ICOM orporated 400900 Wireless 802.11 abgn/ac indoor AP User Manual
ICOM Incorporated Wireless 802.11 abgn/ac indoor AP Users Manual
Contents
- 1. Users Manual (Statement)_rev.pdf
- 2. Users Manual.pdf
Users Manual.pdf
– 4 –
– 1 –
A7493W-2EX Printed in Japan
© 2018 Icom Inc.
1-1-32 Kamiminami, Hirano-ku, Osaka 547-0003, Japan
CONNECTION GUIDE
WIRELESS ACCESS POINT
AP-95M
Thank you for purchasing this Icom product. The AP-
95M wireless access point is designed and built
with Icom’s IP network technology. It complies with the
“IEEE802.11ac Wave 2” standard, and is designed for
dual band communications in the 5 GHz and 2.4 GHz
bands.
Read the “PRECAUTIONS” leaet rst, if you have not done so.
DSupplied Accessories
• Mounting bracket set
• Precautions Guide
• Connection Guide (This guide)
• Power adapter
( The adapter type differs, depending on the access point version)
DOther requirements
• PC
• LAN cable
About this Connection Guide:
This Connection Guide explains the basic operation of the
AP-95M. Access our website to download the instruction
manual.
Icom website http://www.icom.co.jp/world/
NOTE:
• Adobe® Acrobat Reader® is required on your PC in order to
display the downloaded PDF instruction manual.
• If your PC does not have Adobe® Acrobat Reader®, please
download it from the Adobe® website.
1. System Requirements
2. Panel description
DAbout the indicators
*1
When there is no wireless device to communicate with the AP-95M, or no wireless communication is performed while the Wireless Unit is
enabled, the indicator turns OFF. The time when the indicator turns OFF differs, depending on the communication status.
*2 While booting up, the [POWER] indicator lights green → blinks green → lights green.
LAll indicators light while booting.
Indicator 5 GHz 2.4 GHz LAN MODE POWER*2
Green
Lights More than 1 connection/WPS succeeded*1 LAN connected
(1000BASE-T)
[MODE] is held down for
1 second Booting
Blinks Wireless operation is
standing by for DFS —LAN is communicating
(1000BASE-T) WPS is running Booting/
Updating rmware
Orange
Lights — — LAN connected
(10BASE-T/100BASE-TX)
A rmware update is
ready (Online update) —
Blinks — — LAN is communicating
(10BASE-T/100BASE-TX)
WPS failed
(Blinks for 30 seconds) —
OFF Other than the above
Icom, Icom Inc. and the Icom logo are registered trademarks of Icom Incorporated (Japan) in Japan, the United States, the
United Kingdom, Germany, France, Spain, Russia, Australia, New Zealand, and/or other countries.
Microsoft, Windows and Windows Server are registered trademarks of Microsoft Corporation in the United States and/or other
countries.
Adobe and Adobe Reader are registered trademarks of Adobe Systems Incorporated in the United States and/or other countries.
All other products or brands are registered trademarks or trademarks of their respective holders.
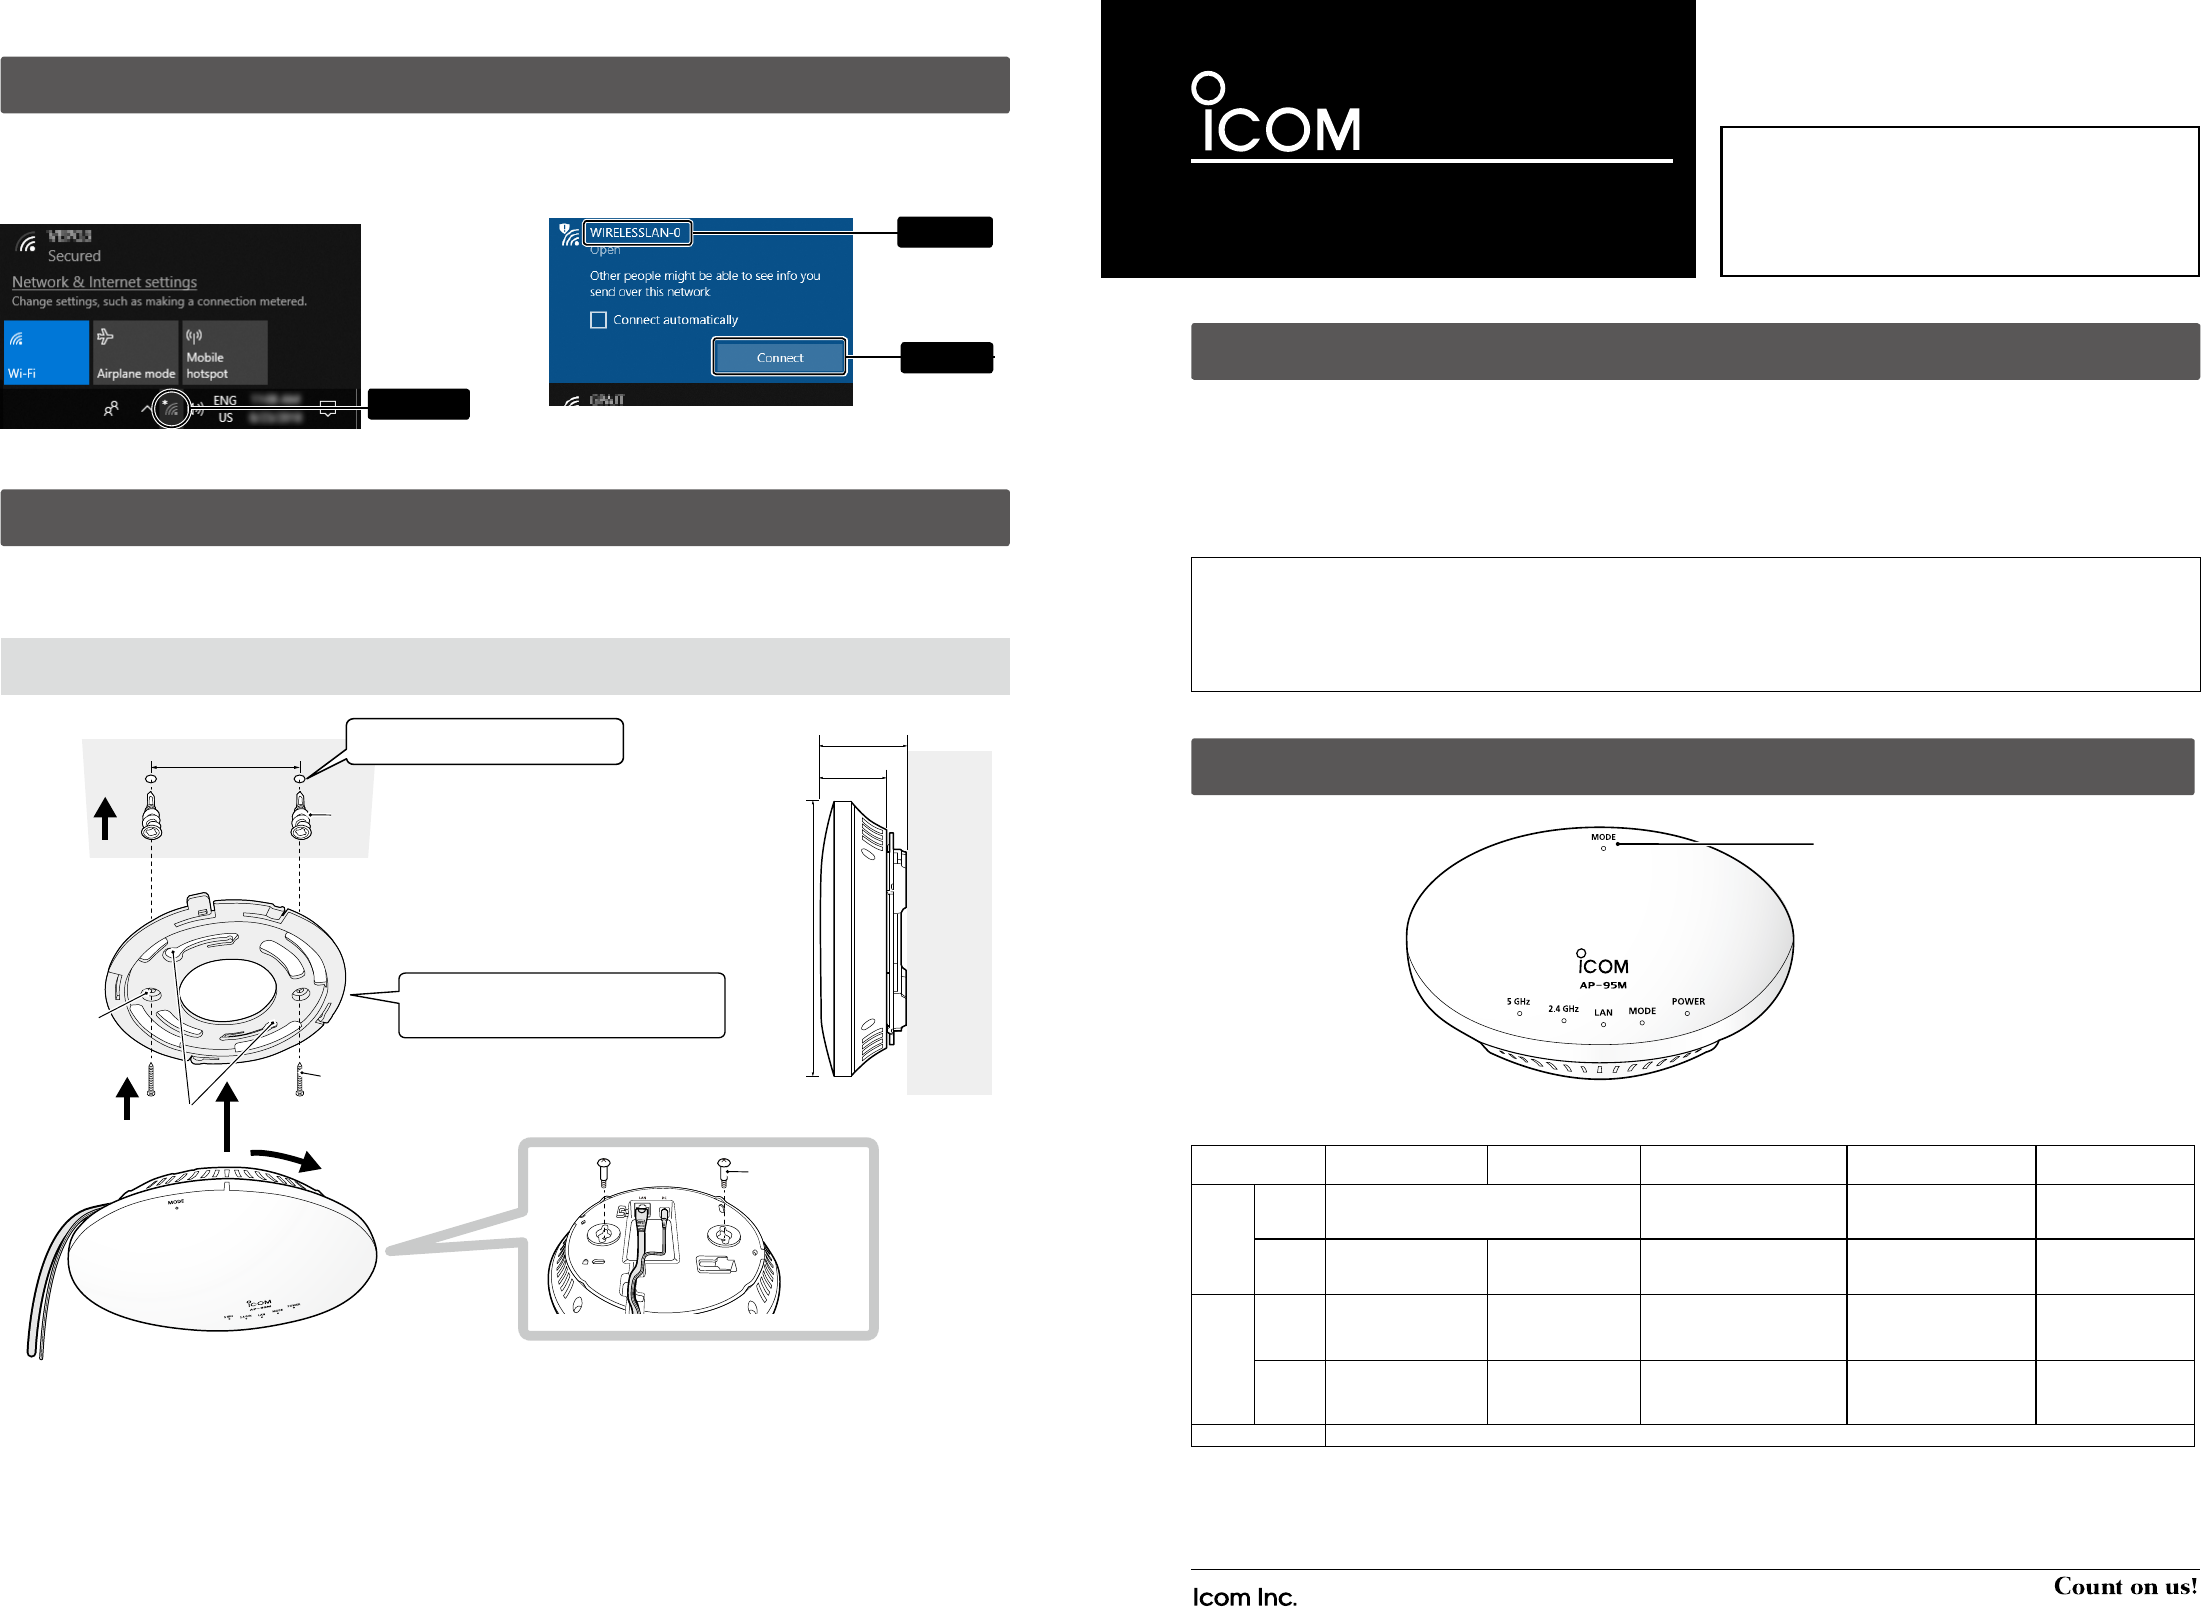
7. About installation
[MODE]
Refer to “RESETTING THE AP-95M” in the
Precautions Guide, for details.
This product radiates or receives radio wave from its top surface, so we recommend mounting on a wall or ceiling.
You can mount on the wall or ceiling using the supplied bracket, by following procedure ➊ to ➎ below.
LTo use the security wire, refer to the instruction manual on our website.
q
w
rt
e
80 mm (3.1 in)
Hooking screws
(Supplied)
Screw hole
Use the supplied anchor if mounting on drywall.
Hook slots
Tapping screw (Supplied)
Ceiling or wall
3.5 × 32 mm (0.1 × 1.3 in)
13 × 43 mm (0.5 × 1.7 in)
Mark the screw positions using the
bracket as the template.
162 mm (6.4 in)
42 mm (1.7 in)
52 mm (2 in)
Dimensions
Wall or
ceiling
Mount the unit to the bracket by hooking the
screws (e) to the hook slots (r) and twisting
the unit until it makes a click sound (t).
2.6 × 12 mm
(0.1 × 0.5 in)
6. Connecting with wireless LAN
The following procedures describe how to connect to the AP-95M through a wireless LAN, based on Microsoft® Windows® 10.
LThe procedure differs, depending on the connected devices, so follow their instructions when using the other devices.
q Start the AP-95M, and then turn ON the PC.
w Click the Wireless Network Connection icon.
e Select the SSID set to the AP-95M and click [Connect].
Then follow the instructions.
• The SSID is set to “WIRELESSLAN-0” by default.
Click
q Select
w Click
IEEE802.11ac Wave 2 standard
Dec. 2018
RDANGER!
Mount the unit securely to a thick surface that can support more than 600 g (1.3 lb).
– 2 – – 3 –
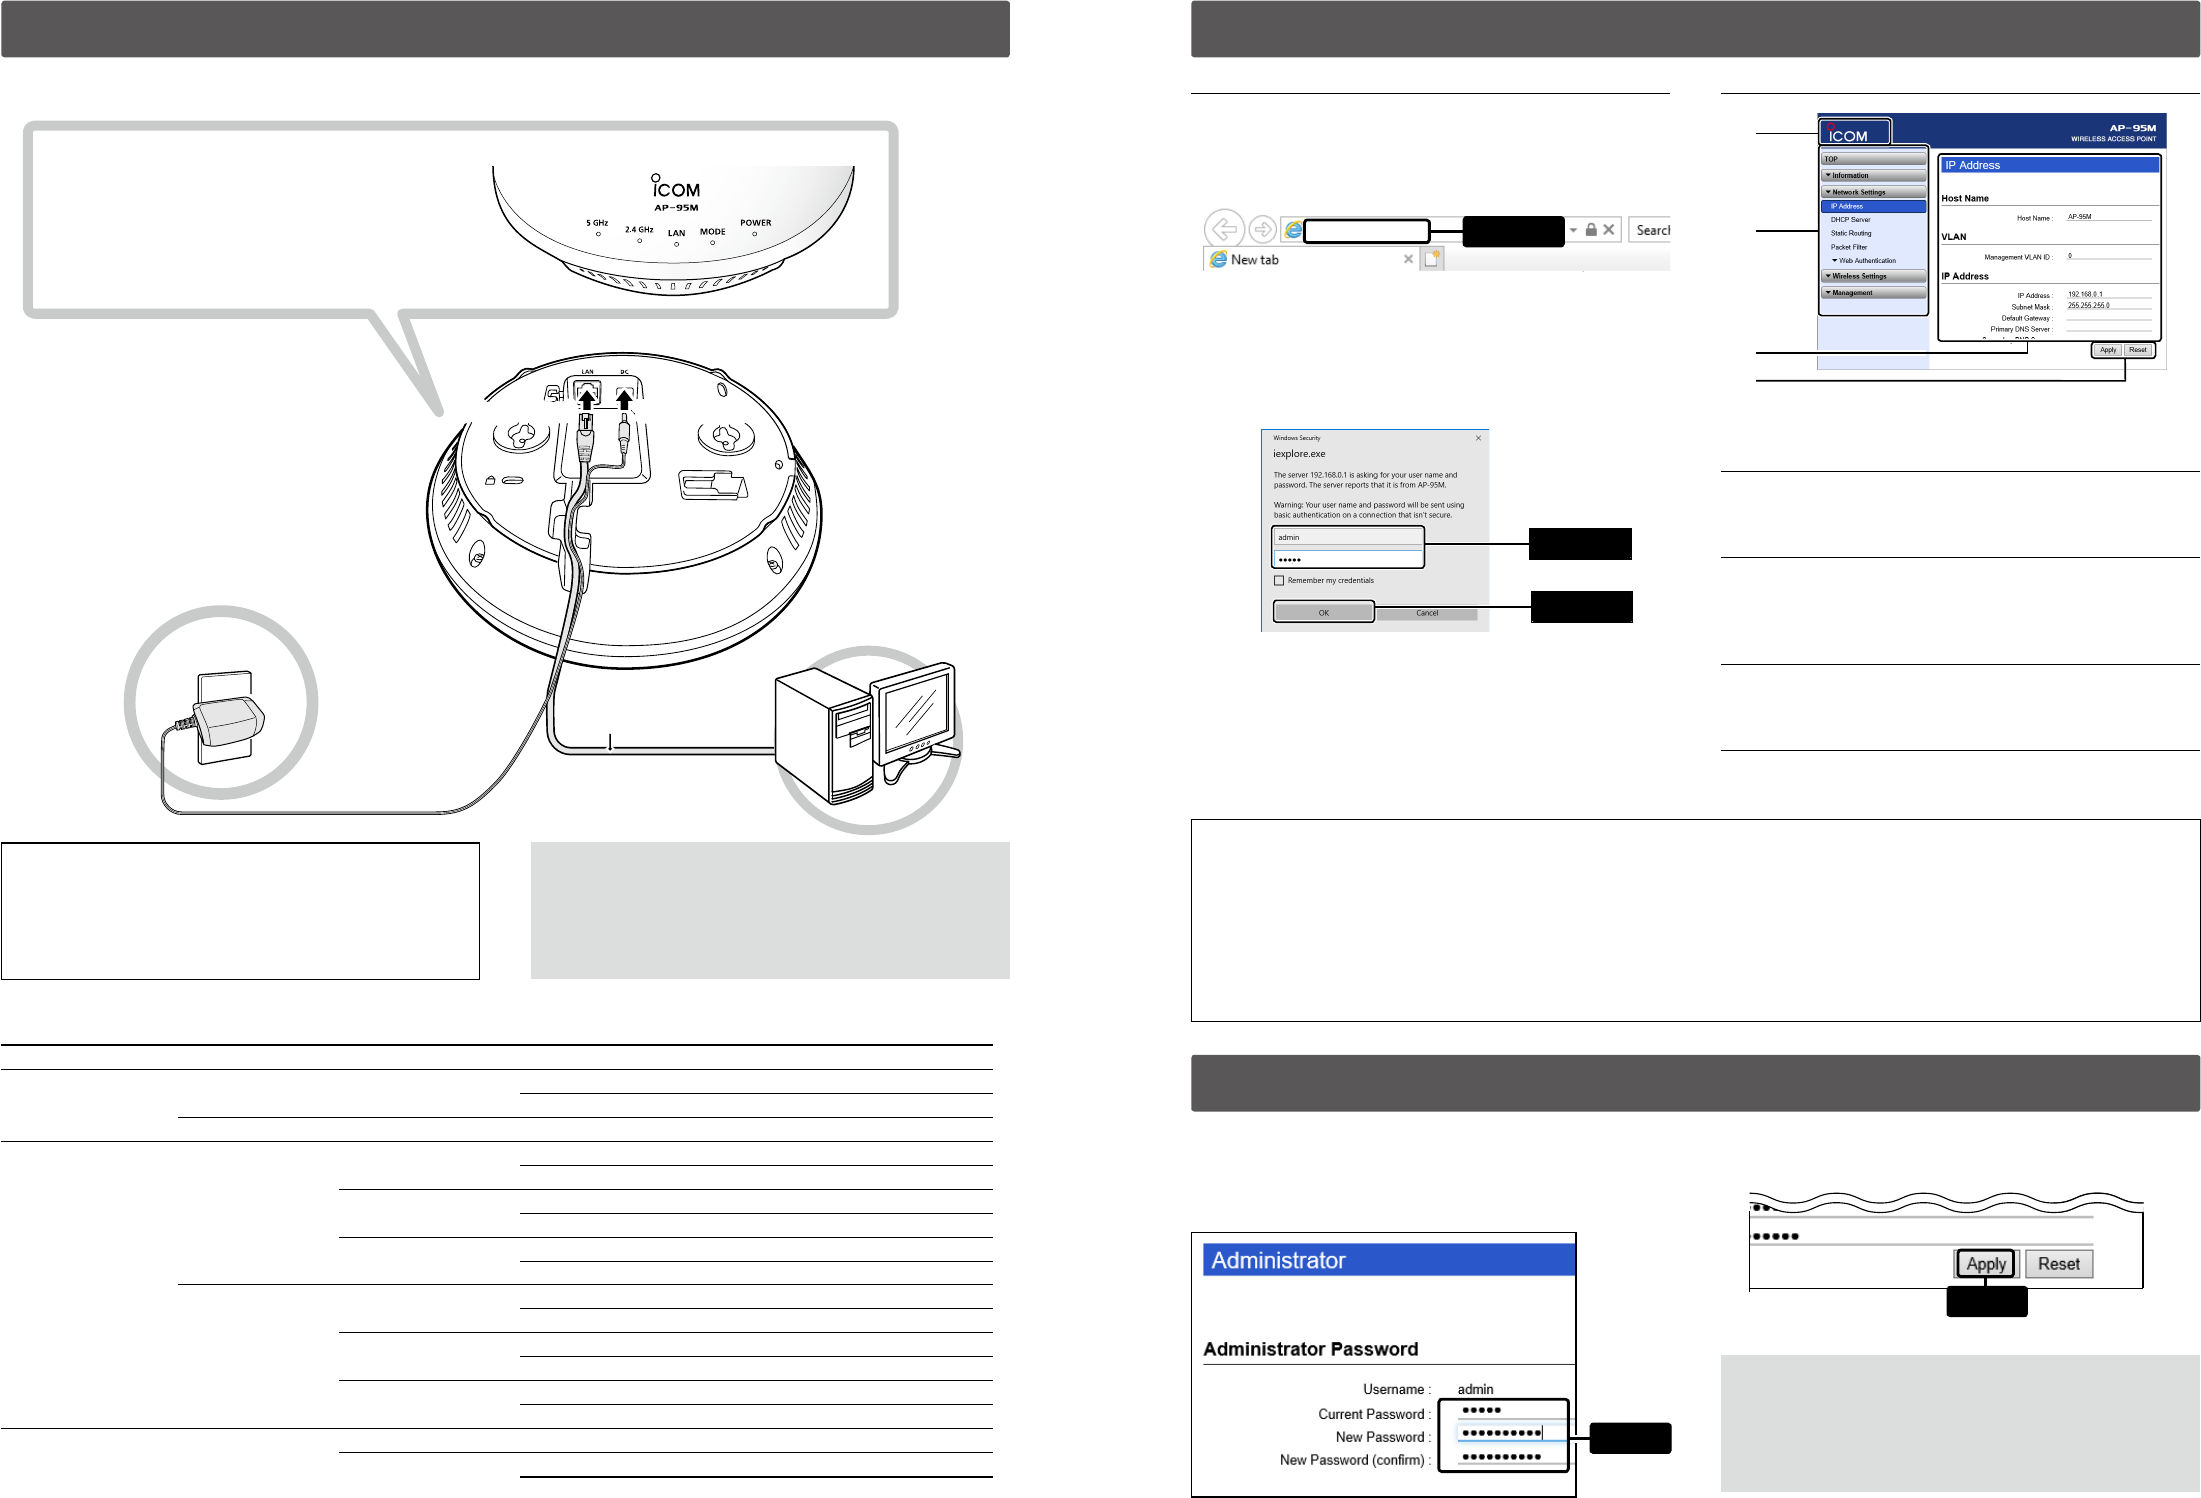
AC outlet
q
w
r
e
Connect Cables
Connect the power adaptor
Start the PC
[POWER] lights green when the
AP-95M has completed its boot up.
Check the [LAN] indication
If [LAN] does not light, check the LAN cable connection.
AP-95M
(Default: 192.168.0.1)
To the [LAN] portTo the [LAN] port To the DC jack
To the DC jack
Lights:
Blinks:
Green:
Orange:
LAN connected
LAN is communicating
1000BASE-T
10BASE-T/100BASE-TX
LAN cable
(User supplied:
Category 5e or higher)
PC
(Example: 192.168.0.100)
4. About the setting screen
q Open your web browser, then enter the IP address* of
the AP-95M into the address bar.
*The default IP address is “192.168.0.1.”
w Push the [ENTER] key.
• The Login Authentication screen will appear.
e Enter “admin” (fixed username) and “admin” (default
password) in their respective input fields in the Login
Authentication window, and then click [OK].
To prevent unauthorized access
You must carefully choose your password, and change it occasionally.
• Choose one that is not easy to guess.
• Use numbers, characters and letters (both lower and upper case).
About web browsers
We recommend using Microsoft Internet Explorer 11 or later with the AP-95M.
Enable JavaScript® and set to allow Cookies on your web browser to correctly display the setting screen.
If other browsers are used, the screen may not be correctly displayed.
About the setting screen
q Link to the Icom web site
If your PC is connected to the Internet, click the Icom logo
to open the Icom web site.
w Setting menu
Displays the screen name list on a menu line. When you
click each menu title, a list of items drops down which you
can use to select the desired setting item.
e Setting screen
Displays the settings and values when you click the screen
name.
r Setting buttons
Save or cancel the setting values.
• Items and buttons may differ, depending on the setting.
q
w
r
e
3. Connecting and turning ON the power
RWARNING!
To prevent electrical shock, television interference (TVI),
broadcast interference (BCI) and other problems, ground the
AP-95M through the ground terminal.
NEVER connect the ground terminal to a gas or electric pipe.
This may result in an electrical shock or cause a fire.
NOTE: If you have forgotten your password, you cannot access
the AP-95M’s setting screen.
When you forgot your password
Reset the AP-95M by following the instructions described in
the precautions guide. The AP-95M will have to be reset as its
default.
IP address for PC
The AP-95M’s IP address is set to “192.168.0.1,” and DHCP
server to “Disable” as the default. Set the PC's IP address in
the 192.168.0.x (Example: “192.168.0.100”).
See the PC’s instruction manual for the IP address setting
details.
Menu Setting screen Setting item Default setting
Network Settings IP Address IP Address IP Address 192.168.0.1
Subnet Mask 255.255.255.0
DHCP Server DHCP Server DHCP Server Disable
Wireless Settings Wireless 1 Wireless LAN Channel 001 CH (2412 MHz)
Bandwidth 20 MHz
Virtual AP Interface ath0
SSID WIRELESSLAN-0
Security Authentication Open System/Shared Key
Encryption None
Wireless 2 Wireless LAN Channel 036 CH (5180 MHz)
Bandwidth 20 MHz
Virtual AP Interface ath1
SSID WIRELESSLAN-0
Security Authentication Open System/Shared Key
Encryption None
Management Administrator Password Username admin (Fixed)
Current Password admin (Lower case letters)
DAbout default settings
LProduct specications, appearance, or functions are subject to change without notice and may differ from this manual.
Accessing the setting screen
Following procedures describe how to use the AP-95M
setting screen using a web browser.
Follow the procedure (➊ to ❹) to connect with the AP-95M, and check the indications as described below.
• If you are connecting the AP-95M with its default settings, disconnect the networks from your PC.
Enter
http://192.168.0.1/
q Enter
w Click
• When accessing the web browser for the rst time, setting the
time zone is required. See the
“Setting the interface language
and the Time Zone” leaet for details.
qClick [Management], then [Administrator].
• The Administrator screen will appear.
wFill out each box to change the password.
eClick [Apply.]
LEnter the new administrator’s password from now on.
5. Changing the administrator password
To prevent unauthorized access, you must change the password.
Enter
Click