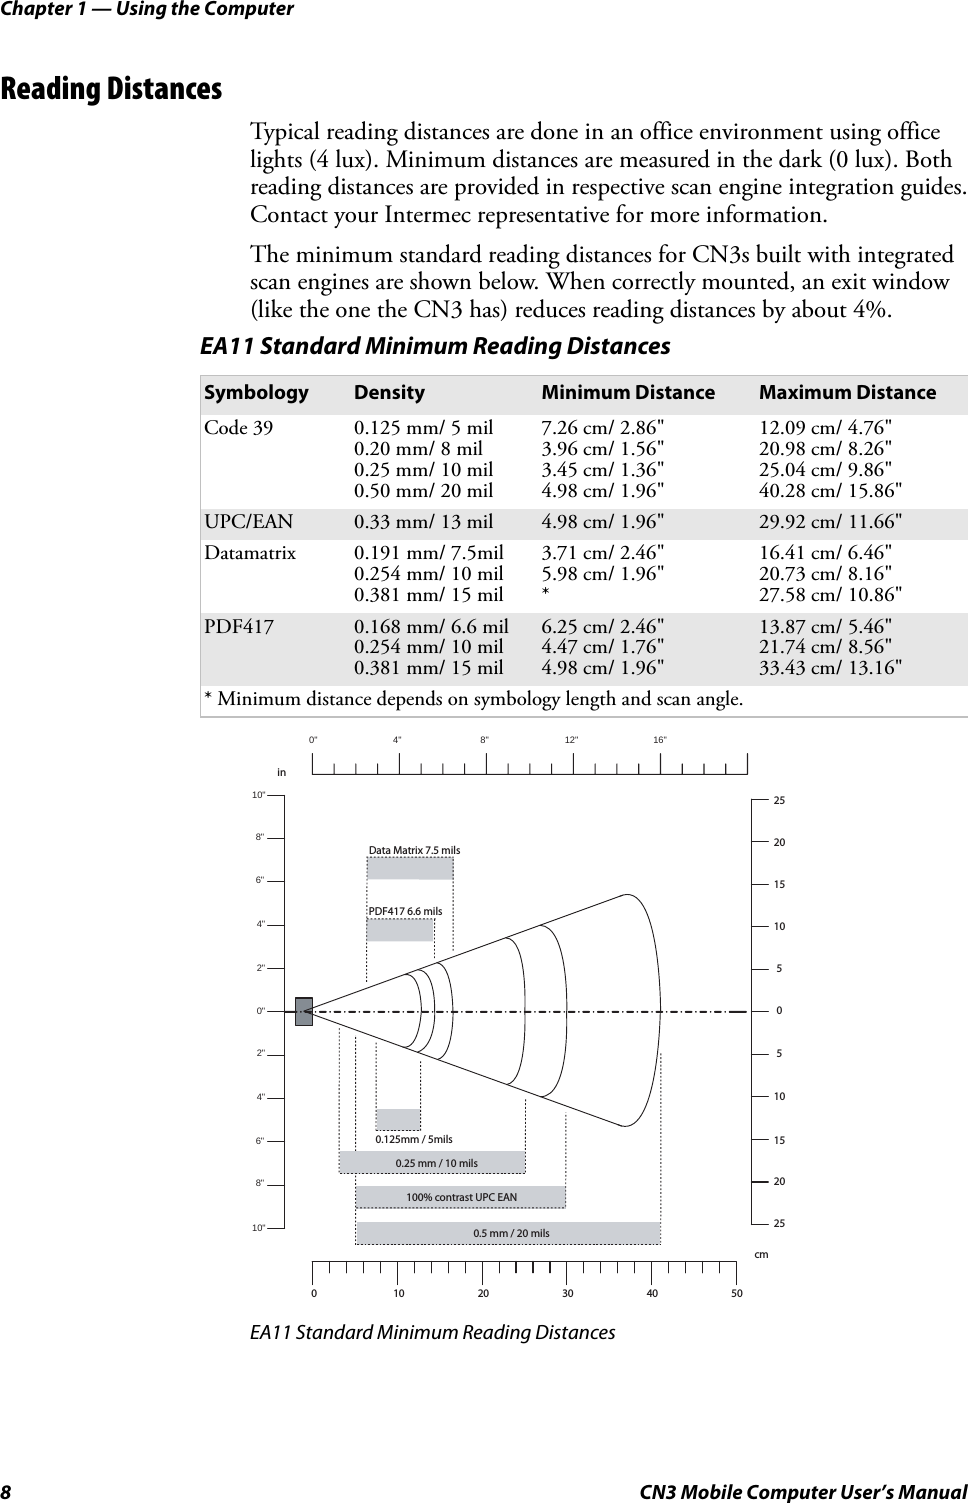
Intermec Technologies 07CN3 CN3 User Manual CN3UserManual
Intermec Technologies Corporation CN3 CN3UserManual
Contents
- 1. Compliance Insert
- 2. User Manual part 1 of 6
- 3. User Manual part 2 of 6
- 4. User Manual part 3 of 6
- 5. User Manual part 4 of 6
- 6. User Manual part 5 of 6
- 7. User Manual part 6 of 6
- 8. User Manual 1 of 6
- 9. User Manual 2 of 6
- 10. User Manual 3 of 6
- 11. User Manual 4 of 6
- 12. User Manual 5 of 6
- 13. User Manual 6 of 6
- 14. Manual
- 15. Radio Info
- 16. User Manual part 1
- 17. User Manual part 2
- 18. User Manual part 3
- 19. User Manual part 4
- 20. User Manual 1
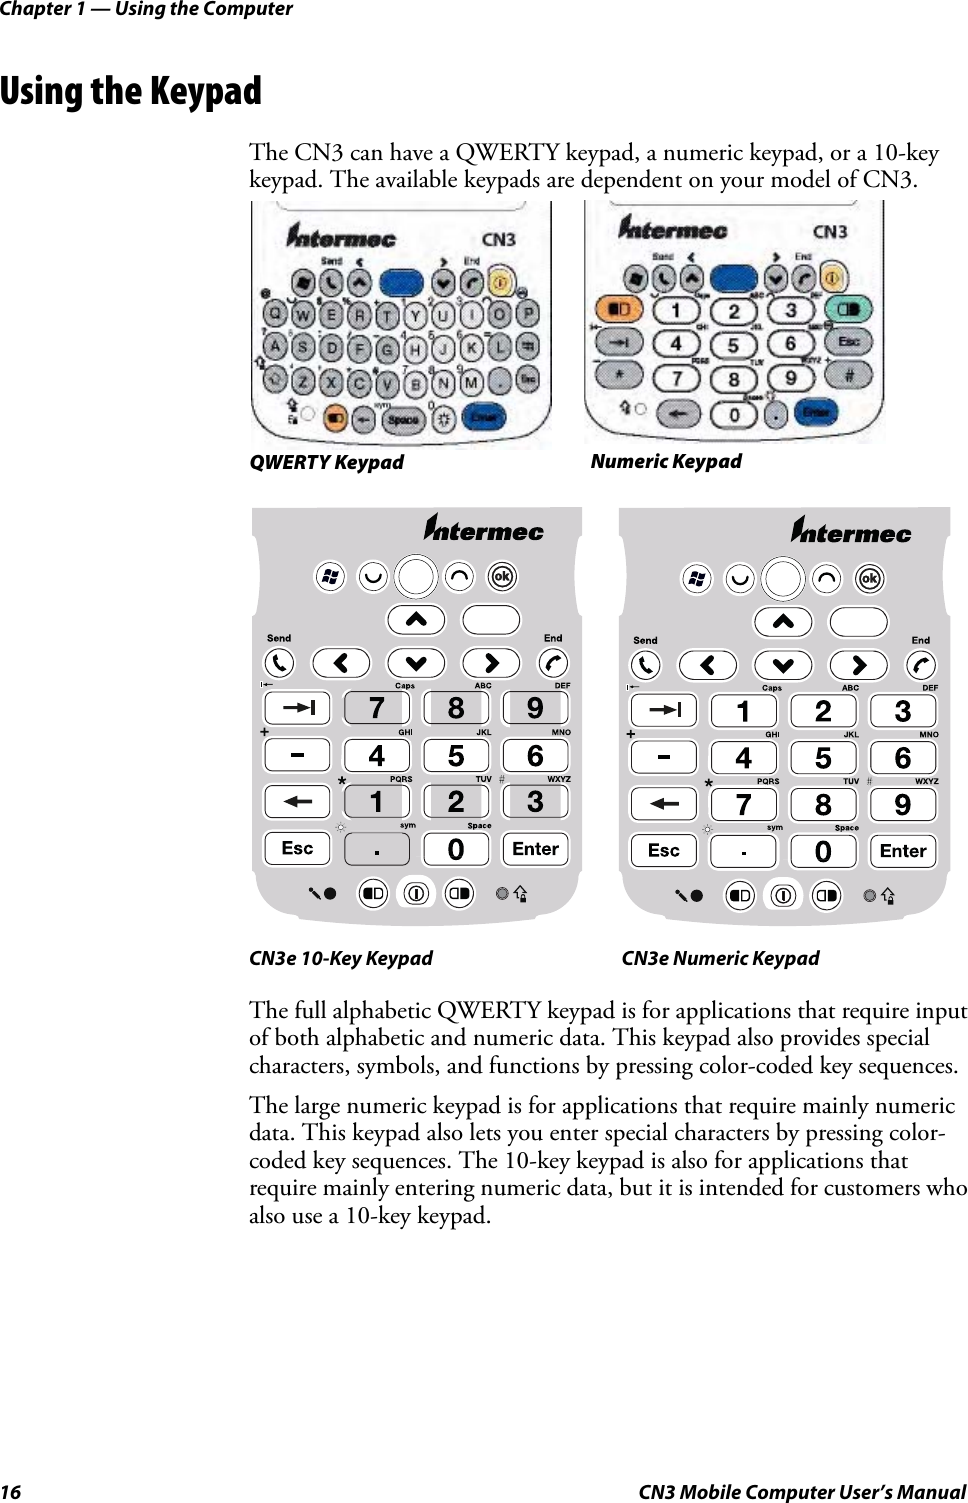
User Manual 2 of 6
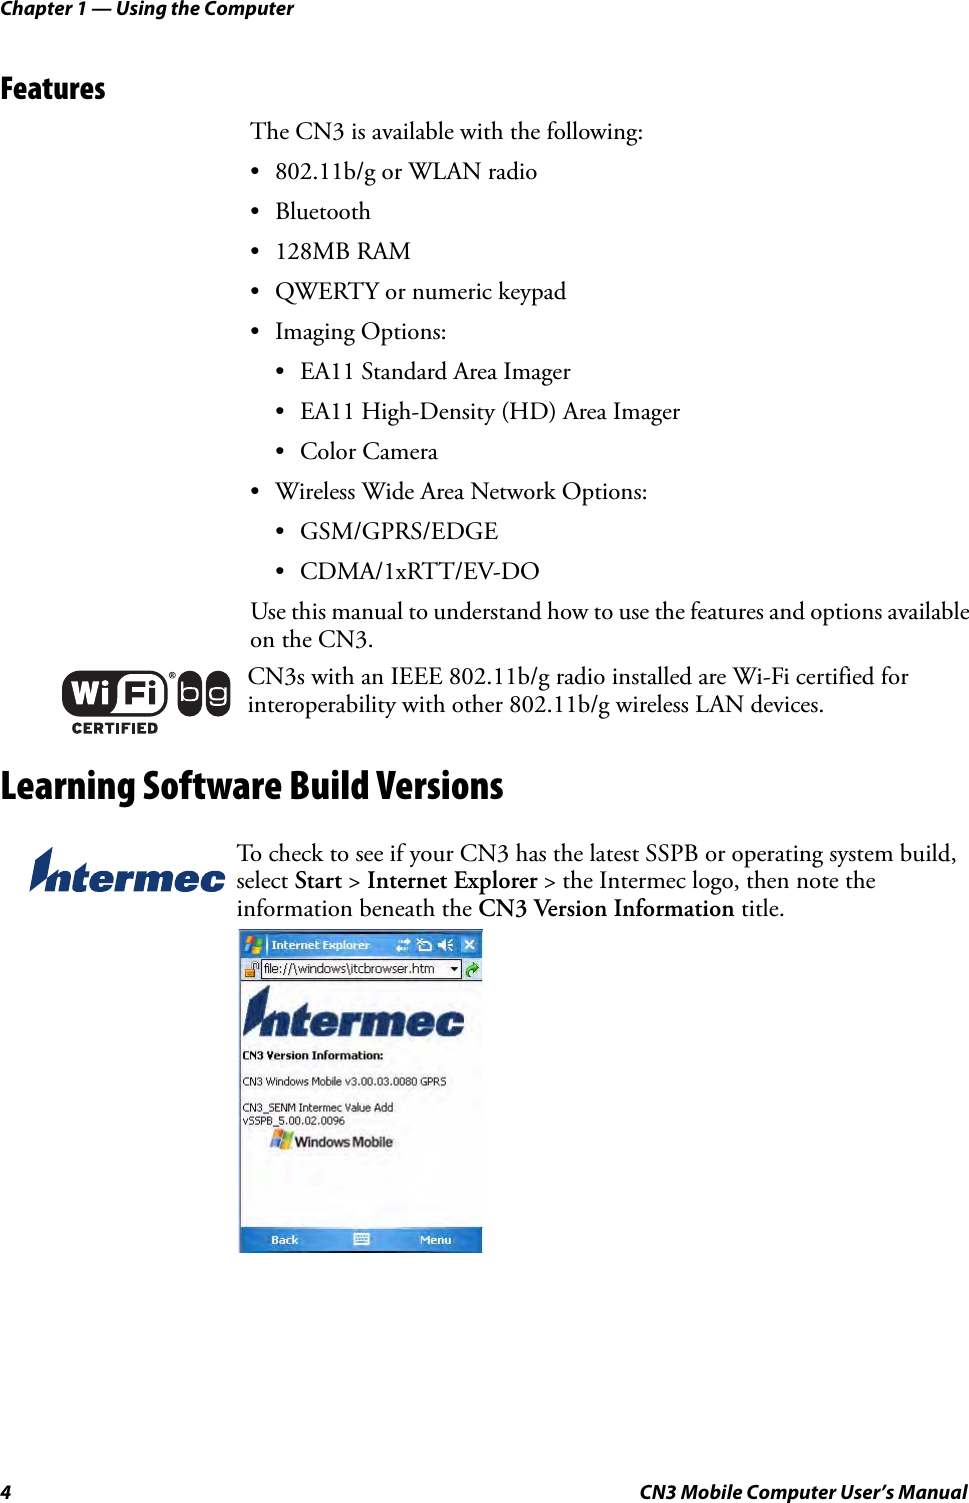
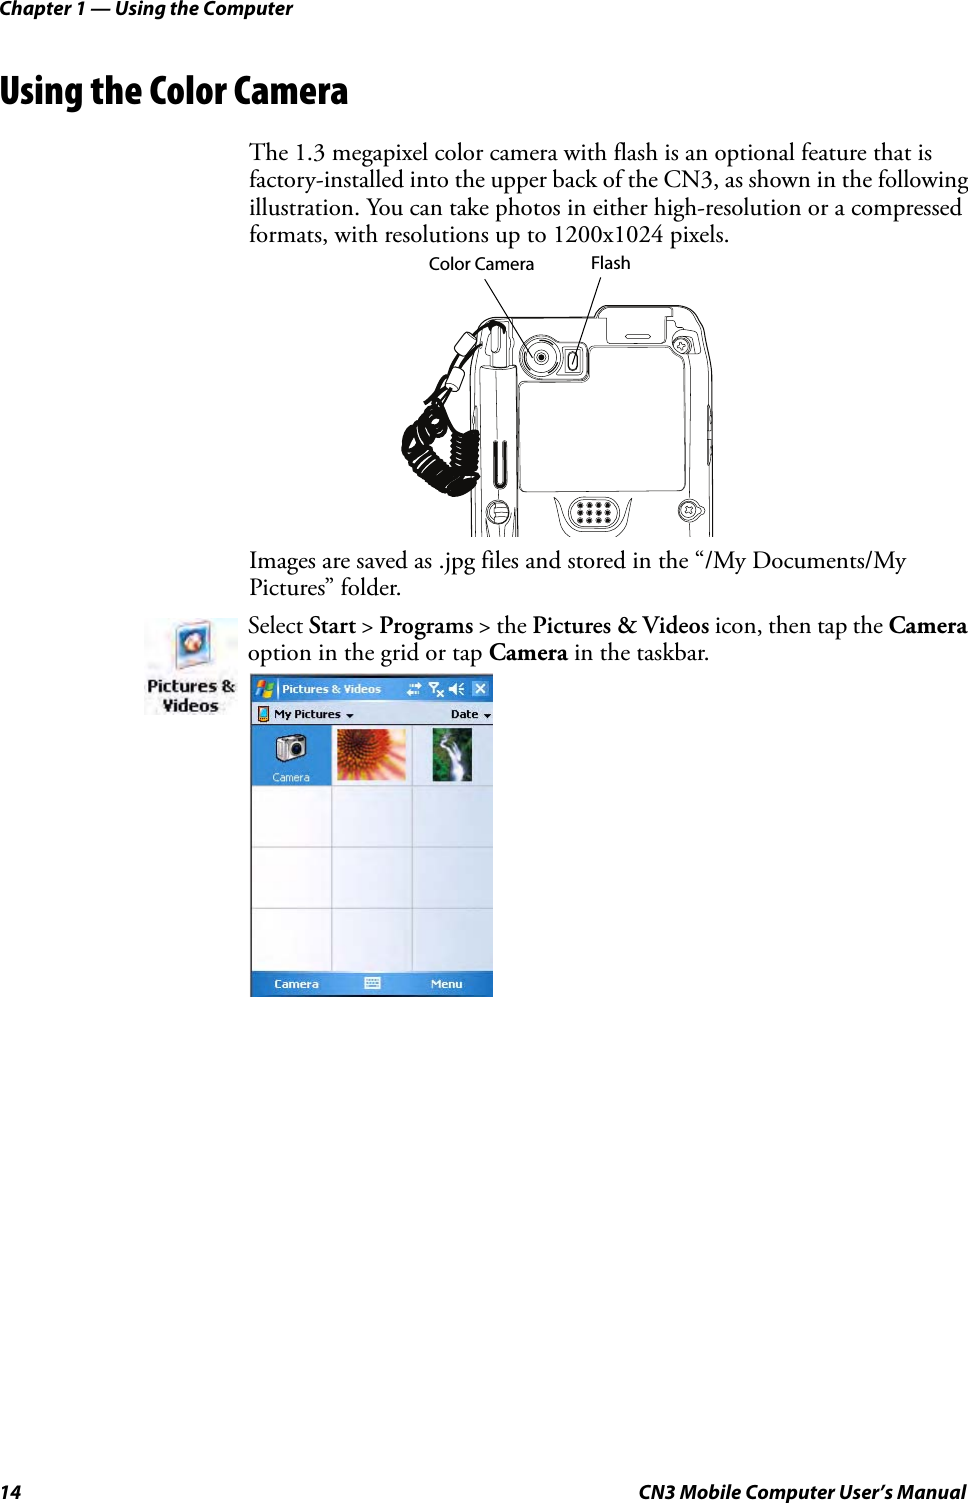
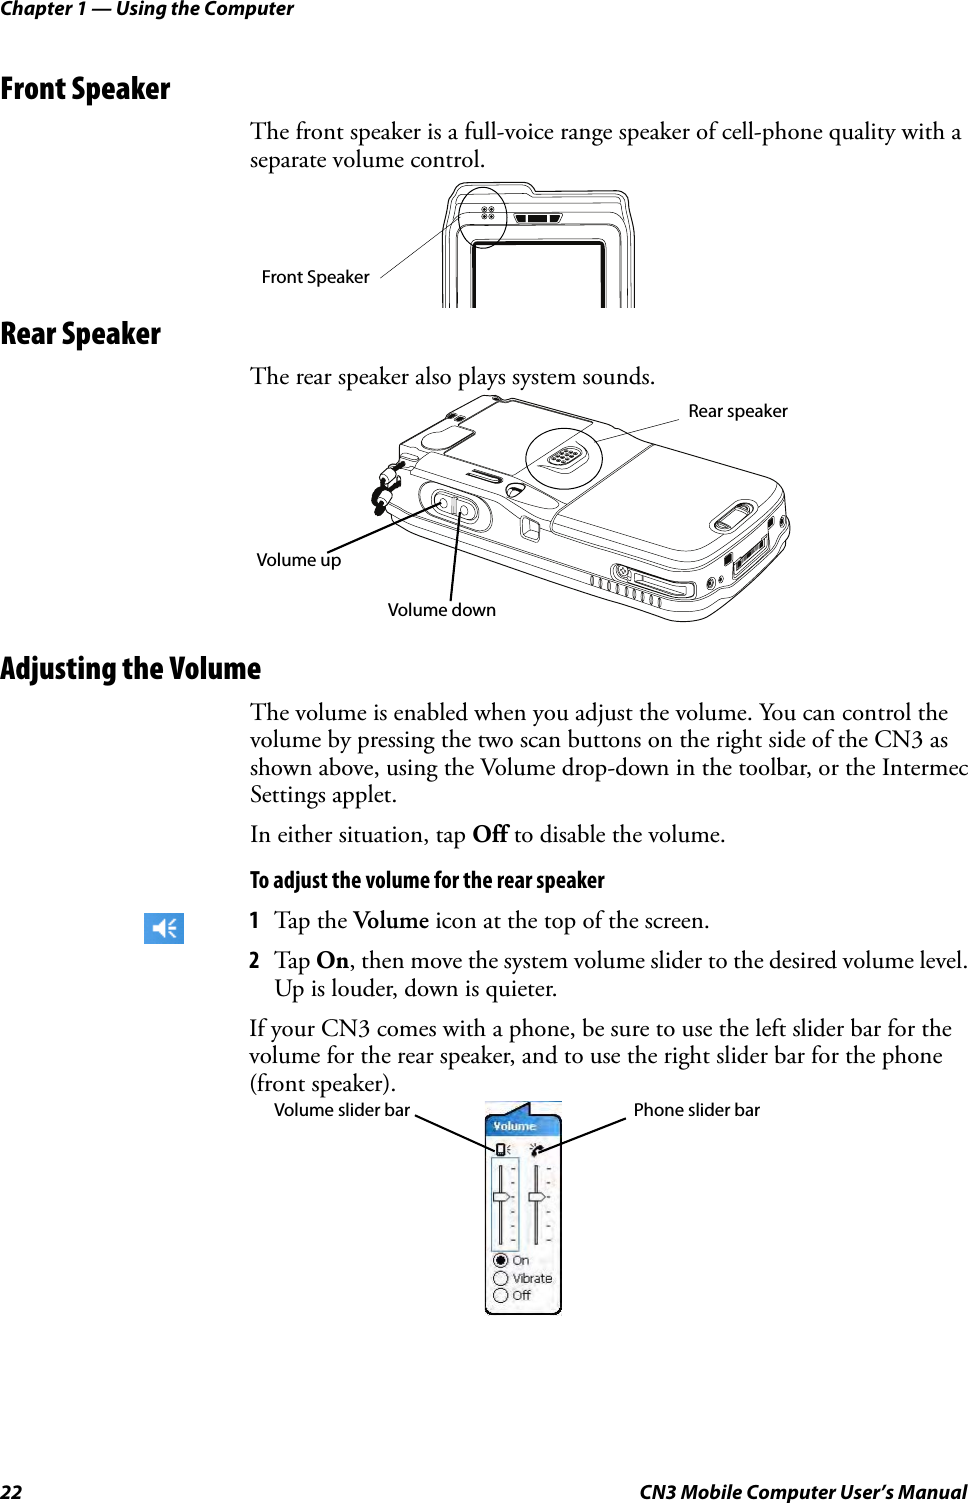
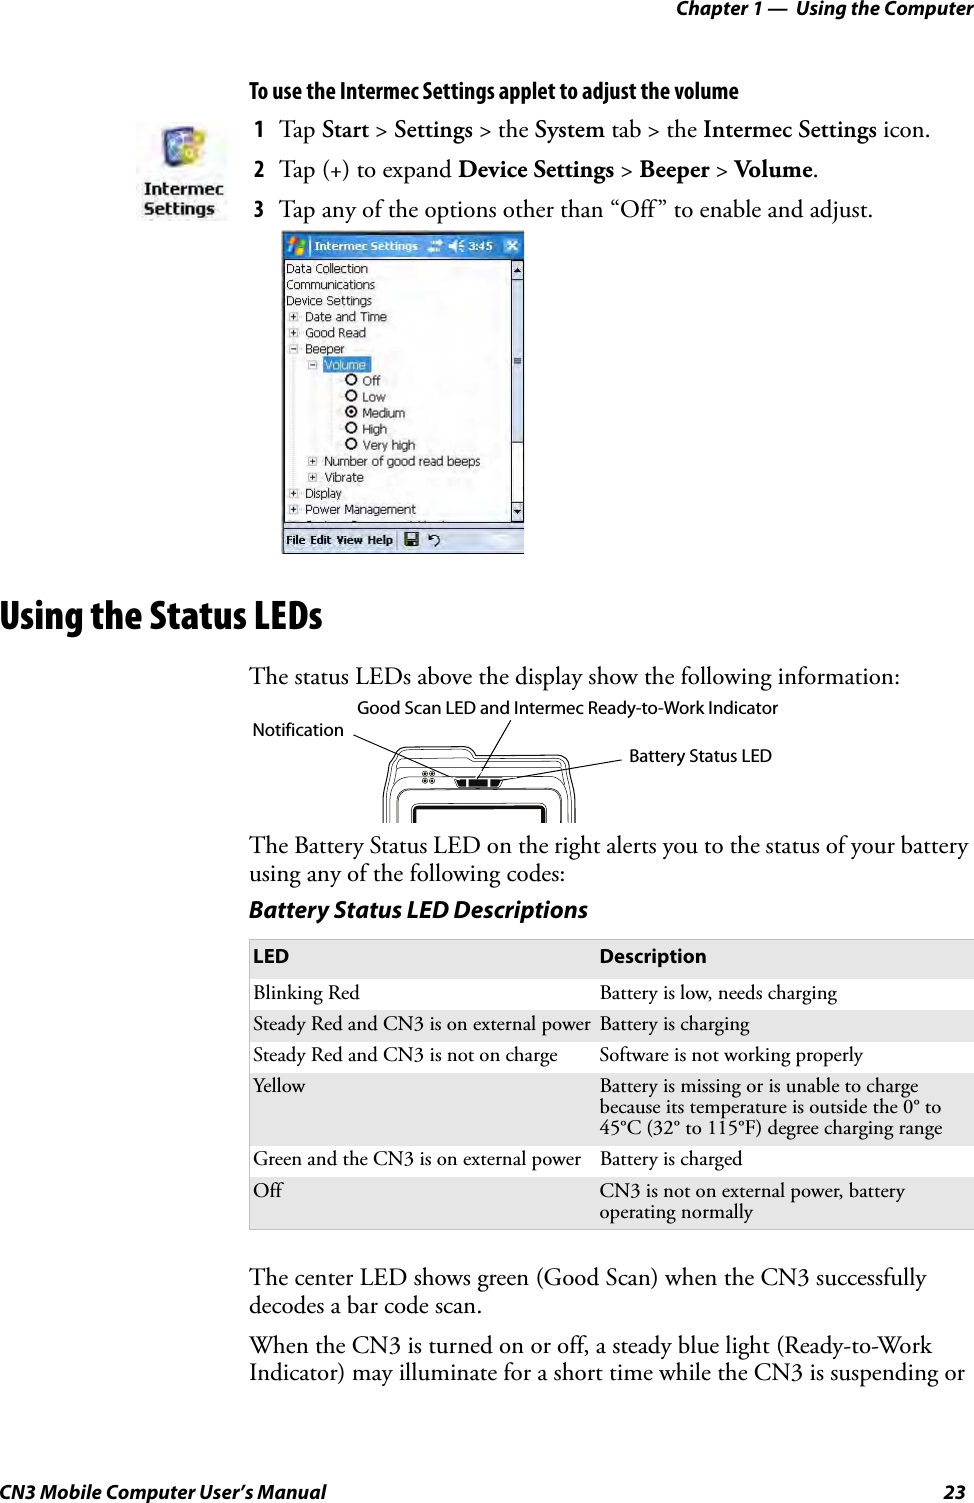
![Chapter 1 — Using the ComputerCN3 Mobile Computer User’s Manual 17Using the Color-Coded KeysEach keypad available for the CN3 provides color-coded keys to let you access additional characters, symbols, and functions printed on the keypad overlay. Once you understand how to use the color-coded keys and key sequences, you can access all of the additional features printed on the keypad overlay. There are two color-coded modifier keys on the numeric keypad: the orange B key and the green C key. The alphanumeric keypad just has the orange B color-coded modifier key.To enter a single character from the orange plane, press the B (orange LED illuminates) then press the desired key (orange LED turns off). To enter multiple characters from the orange plane, press B twice (orange LED on) then enter the desired characters. Pressing B again turns the LED off and returns to the unshifted plane.Capitalizing CharactersTo capitalize a single character on QWERTY keypads, press the shift key, then the character. To type all alphanumeric characters as uppercase letters, you can enable the Caps Lock feature on the CN3 keypad. To enable Caps Lock• On the QWERTY keypad, press B, then the Shift key. Press the same key sequence to disable the Caps Lock.• On the numeric keypad, press C, then the [1] key.The Caps Lock LED lights up green to show that the CN3 is in the Caps Lock mode. The keypad stays in this mode until you press a color key again.Entering Characters on the QWERTY KeypadOn the QWERTY keypad, to type the number “2,” press B [U]. Press B twice to enter characters until you press B again.QWERTY CharactersTo Enter Press the Keys To Enter Press the Keys@B [Q] 1B [Y]?B [A] 2B [U]CapsLock B [Shift] 3B [I]smiley B [W] 4B [H]&B [S] 5B [J]‘ (left quote) B [Z] 6B [K]’ (right quote) B [X] 7B [B]%B [R] 8B [N]/B [F] 9B [M]*B [C] 0B [backlight]](https://usermanual.wiki/Intermec-Technologies/07CN3.User-Manual-2-of-6/User-Guide-841946-Page-17.png)
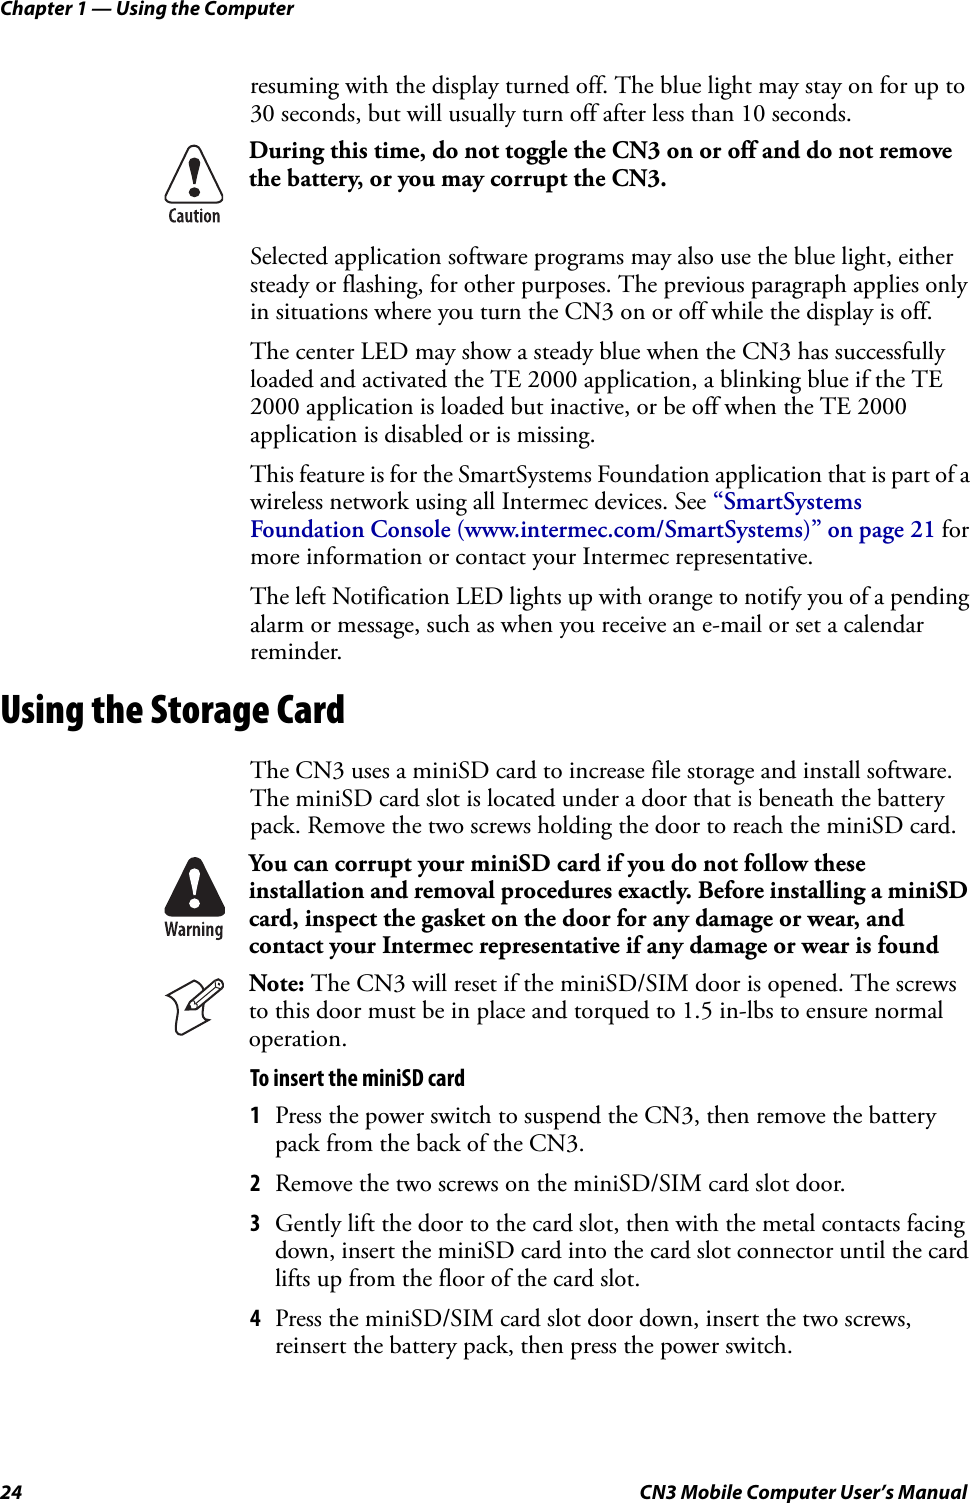
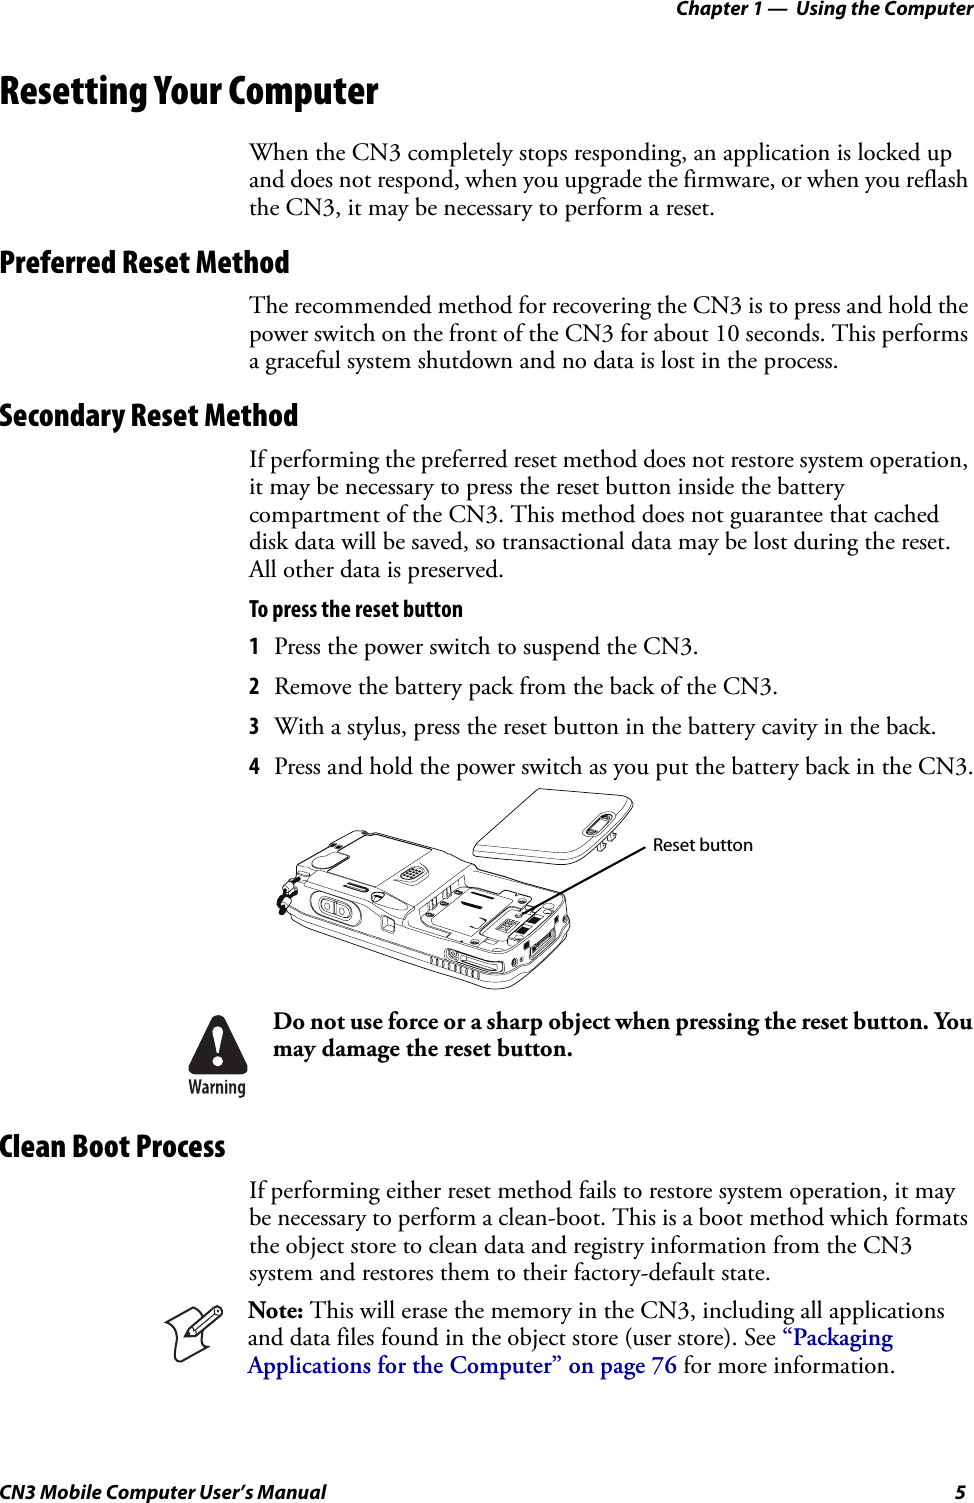
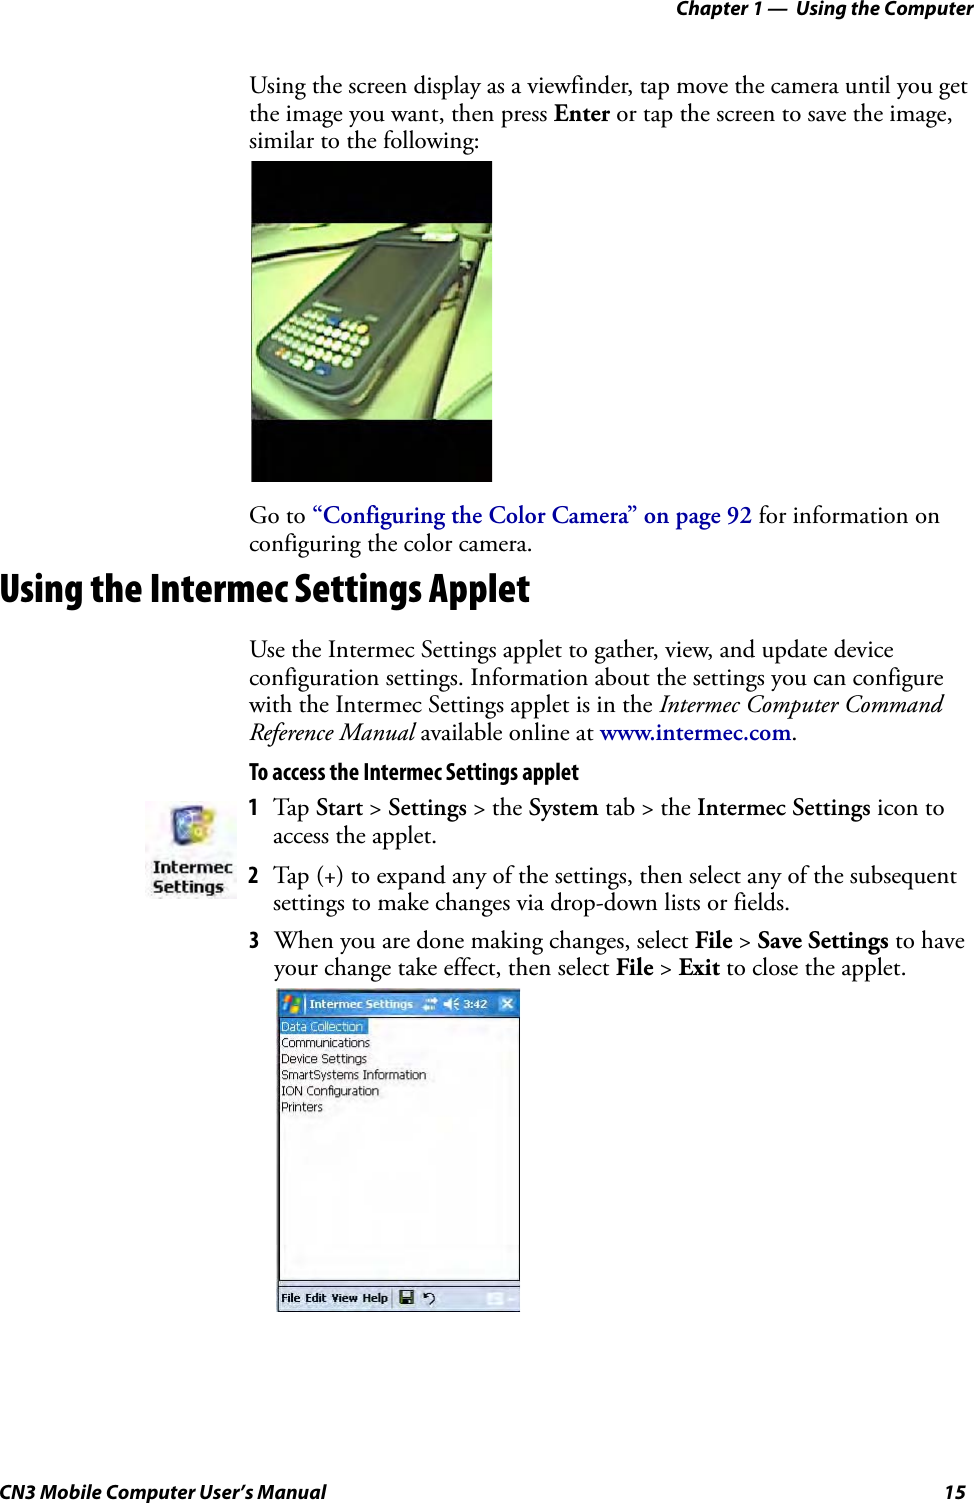
![Chapter 1 — Using the Computer18 CN3 Mobile Computer User’s ManualEntering Characters on the Numeric KeypadOn the numeric keypad, to type a lowercase “c,” press C [2] [2] [2]. To type a letter on the same key as the last letter entered, wait two seconds, then enter the correct series of keystrokes to create the next letter.While in the Alpha mode and you press [1] to initiate the CAPS mode, you will render a Caps Lock until you press [1] again. Once you are in CAPS mode, you stay in CAPS until it is pressed again. Press [0] to enter a space.+B [T] frown B [O]-B [G] =B [L]#B [V] ok B [P]Numeric CharactersTo Enter Press the Keys To Enter Press the Keysa C [2] AC [1] [2]bC [2] [2] BC [1] [2] [2]cC [2] [2] [2] CC [1] [2] [2] [2]dC [3] DC [1] [3]eC [3] [3] EC [1] [3] [3]fC [3] [3] [3] FC [1] [3] [3] [3]gC [4] GC [1] [4]hC [4] [4] HC [1] [4] [4]iC [4] [4] [4] IC [1] [4] [4] [4]jC [5] JC [1] [5]kC [5] [5] KC [1] [5] [5]lC [5] [5] [5] LC [1] [5] [5] [5]mC [6] MC [1] [6]nC [6] [6] NC [1] [6] [6]oC [6] [6] [6] OC [1] [6] [6] [6]pC [7] PC [1] [7]qC [7] [7] QC [1] [7] [7]rC [7] [7] [7] RC [1] [7] [7] [7]sC [7] [7] [7] [7] SC [1] [7] [7] [7] [7]tC [8] TC [1] [8]uC [8] [8] UC [1] [8] [8]vC [8] [8] [8] VC [1] [8] [8] [8]wC [9] WC [1] [9]xC [9] [9] XC [1] [9] [9]yC [9] [9] [9] YC [1] [9] [9] [9]zC [9] [9] [9] [9] ZC [1] [9] [9] [9] [9]QWERTY Characters (continued)To Enter Press the Keys To Enter Press the Keys](https://usermanual.wiki/Intermec-Technologies/07CN3.User-Manual-2-of-6/User-Guide-841946-Page-18.png)