Intermec Technologies 1000CP01SX1 1000CP01S, 1000CP02S, 1001CP01S User Manual 70 Series Mobile Computer DRAFT
Intermec Technologies Corporation 1000CP01S, 1000CP02S, 1001CP01S 70 Series Mobile Computer DRAFT
Contents
User Manual part 2 of 2

93
7
Managing the Computer
Use this chapter to learn how to remotely update, configure,
and monitor your Intermec mobile computers. You will also
find information on installing and developing software
applications as well as how to upgrade the system software.
DRAFT
Chapter 7 — Managing the Computer
94 70 Series Mobile Computer User Manual
Managing the Computer in Your Network
When you have multiple mobile computers and peripherals in your
network, it is essential to have an easy way to manage updates,
configure all of the devices, and remotely troubleshoot problems.
Intermec provides a free device management software platform called
SmartSystems™ Foundation to help you manage your devices. You
can also purchase third-party device management software through a
vendor.
Managing the Computer Using SmartSystems
Intermec's SmartSystems Foundation is a software platform that lets
you manage all of your SmartSystems-enabled devices simultaneously
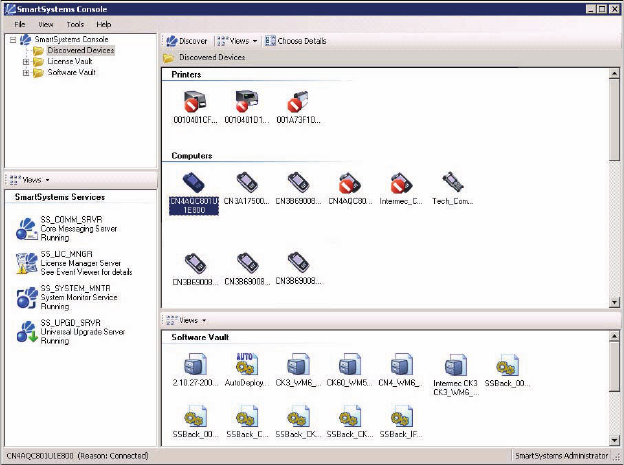
from a central server. The SmartSystems Foundation console displays
all SmartSystems-enabled computers and peripherals in your network.
Intermec SmartSystems Foundation Console
Through the Console, you can:
•drag-and-drop configuration bundles, operating system updates,
and firmware upgrades to multiple computers.
DRAFT
Chapter 7 — Managing the Computer
70 Series Mobile Computer User Manual 95
•save configuration settings from a single device and deploy those
settings to many devices simultaneously.
•remotely change settings on SmartSystems-enabled computers and
peripherals.
The SmartSystems Foundation console can report on asset locations
and battery status, making it easier to manage your mobile devices.
With a Provisioning license, SmartSystems Foundation can
automatically push software, configuration settings, and other files to
connected mobile computers. The license also enables ScanNGo,
which makes connecting additional mobile computers to your wireless
network as easy as reading bar codes. You can download SmartSystems
Foundation from the Intermec web site at no charge. For more
information, visit www.intermec.com/SmartSystems. To purchase a
Provisioning license, contact your local Intermec sales representative.
Managing the Computer Using Third-Party Software
You can use third-party software such as Wavelink Avalanche to
centrally manage your Intermec devices. Device management software
enables you to update software, increase security, track your assets,
and troubleshoot devices remotely. You can download the Wavelink
Enabler for the mobile computer from the Wavelink web site. For more
information, visit the Intermec web site and search for Wavelink
Avalanche or visit www.wavelink.com to download the enabler.
Developing and Installing Applications
Use the Intermec Resource Kits to develop applications to run on the
mobile computer. The Resource Kits are a library of C++, .NET, Java,
and web components grouped by functionality that you can use to
create applications for the computer. The Resource Kits are part of the
Intermec Developer Library (IDL), and can be downloaded from the
Intermec web site at www.intermec.com/idl.
For more information, see the Intermec Developer Library Resource Kit
Developer Guide.
DRAFT

Chapter 7 — Managing the Computer
96 70 Series Mobile Computer User Manual
Packaging Your Application
For very simple applications, the executable file may be the only file
you need to deploy. More typically, you will have a set of files to install.
Intermec recommends using .cab files to install your applications. The
computer uses standard Windows Mobile .cab files and will install
third-party .cab files.
Choosing a Target Location
You can have your .cab file place your application in any of these
memory locations on the mobile computer:
•The ObjectStore.
•The optional microSD card. Depending on available disk space,
you may want to consider installing your application files on the
microSD card. Using a card creates the Storage Card folder on the
computer.
•The non-volatile Flash File Store. Applications and data in the
Flash File Store will persist through a clean boot.
Files copied to any of these locations are safe when you cold boot the
computer as long as the AutoRun system is installed in the appropriate
location. When AutoRun is installed on the computer, all .cab files in
the CabFiles folder are automatically extracted after a cold boot. For
more information about AutoRun, see the Intermec Developer Library
Resource Kit Developer Guide.
Installing Applications Using SmartSystems Foundation
Console
You can use the SmartSystems console to drag-and-drop Intermec
applications onto your mobile computer. The console is part of
SmartSystems Foundation.
To install applications using SmartSystems Foundation Console:
1Download your application file from the Intermec web site and
unzip it on your desktop PC.
Note: The Flash File Store is erased if you reflash the operating system
image.
DRAFT
Chapter 7 — Managing the Computer
70 Series Mobile Computer User Manual 97
2Double-click the application file to install it. The application file
should appear in the Software Vault.
3From the SmartSystems console in the Software Vault,
drag-and-drop the application onto each mobile computer in your
network, or drop the application on a group of computers
contained in a folder.
Installing Applications Using Microsoft ActiveSync
When you only have a few computers to update with applications, you
can copy files using Microsoft ActiveSync. This procedure assumes
that Microsoft ActiveSync is installed on your PC and is up and
running.
1Connect to the mobile computer via ActiveSync.
2Copy the .cab files from your development PC to the computer.
3Reboot or cold boot the computer.
4After the boot process is finished, browse to the .cab files and tap
the files to install them.
Installing Applications Using a Storage Card
Use a storage card to install applications on one computer at a time or
if you have no network connection.
To install applications using a storage card:
1Copy your application file to the storage card.
2Install the storage card in the mobile computer.
3On the mobile computer, browse to the Storage Card folder and
run your application.
Launching Applications Automatically
There are two ways to launch an application automatically on a cold
boot:
•Set up your .cab file to place a shortcut to the application in the
\Windows\StartUp directory at install time.
DRAFT
Chapter 7 — Managing the Computer
98 70 Series Mobile Computer User Manual
•Use AutoRun.exe to start your application at boot time. AutoRun
ships on the computer and automates other operations.
At boot time, AutoRun executes any commands found in its data file,
Autouser.dat. For more information on how to use the AutoRun.exe
feature, view the Readme.txt file located in the My Device\Flash File
Store\2577 directory on your computer.
Updating the System Software
The mobile computer uses Image Update to update the operating
system (OS) and the system software. Image Update uses incremental
packages to allow for smaller and faster updates because the contents
are stored in flash ROM.
Update packages persist through a cold or clean boot and cannot be
removed by the end user. The Image Update process also provides
strengthened security because all packages are signed. Image Update
packages (.pkg or .pks files) may contain elements such as .dll,
executable (.exe), and .cab files.
You can use either of these methods to update your mobile computer:
•You can update multiple computers at the same time using the
SmartSystems Console. For help, see the next section, “Updating
Multiple Computers Using SmartSystems Console”.
•You can update individual computers by transferring the packages
to the mobile computer and then installing them from the mobile
computer.
If you are using SmartSystems Foundation to update the computer,
you can purchase a Provisioning License to send the Image Update
silently. For more information, see “Sending the Image Updates
Silently” on page 100.
DRAFT
Chapter 7 — Managing the Computer
70 Series Mobile Computer User Manual 99
Updating Multiple Computers Using SmartSystems Console
You can use the SmartSystems console to update the operating system
or system software on your mobile computer. The console is part of
SmartSystems Foundation and is available from the Intermec web site
through the Intermec Developer Library (IDL). Before you can update
your mobile computer, you need:
•SmartSystems Foundation. To download SmartSystems
Foundation, go to www.intermec.com/SmartSystems and click
the Downloads tab.
•the SmartSystems bundles you want to install. The SmartSystems
bundle contains the Image Update package file. These
SmartSystems bundles are available from the Intermec web site at
www.intermec.com. Go to Support > Downloads.
•a Provisioning license.
To update the mobile computer using SmartSystems Foundation:
1Open the SmartSystems console.
2Make sure the SmartSystems console and the mobile computer are
on the same subnet and they are connected wirelessly or through
Ethernet.
3Make sure the mobile computer is in a powered dock or that power
management is disabled.
4Download the SmartSystems bundle to your PC.
5Double-click the SmartSystems bundle on your PC to extract the
update files to the software vault.
6From the SmartSystems console, locate the bundles to install and
drag them to each mobile computer (or group in a folder) you want
to update. The SmartSystems console installs the update on your
mobile computers.
After the download is complete, your mobile computer begins the
update process and automatically performs a cold boot. The
computer then boots into a special Update Loader mode where the
computer has no network connections and is completely unusable.
DRAFT

Chapter 7 — Managing the Computer
100 70 Series Mobile Computer User Manual
This process can take anywhere from 30 seconds to 15 minutes
depending on the update.
After the update is complete, the computer boots again.
7When a confirmation dialog box appears requesting user input,
dismiss it.
Sending the Image Updates Silently
If you want to automatically download and send update packages to
your mobile computers, you can purchase a Provisioning license. The
silent updates do not require any user intervention and begin when
you choose to have the update process start. SmartSystem Foundation
users are notified when update packages are released so that they can
download them and update their Intermec computers. For more
information, see the SmartSystems Foundation Help.
Updating Individual Mobile Computers
You can download update packages from your PC to the mobile
computer using Microsoft ActiveSync or any other file transfer
method you choose. If you need to download ActiveSync or the
Windows Mobile Device Center, go to
www.windowsmobile.com/getstarted.
To update an individual mobile computer:
1Download the Image Update packages you want to install from the
Intermec web site at www.intermec.com. Go to Support >
Downloads.
2Transfer the Image Update package from your PC to the mobile
computer.
3On your mobile computer, tap Start > Programs > File Explorer
and navigate to the location of the Image Update package.
Note: The SmartSystems console indicates that your mobile
computer is offline, by displaying a red stop symbol, until the
computer reboots and reconnects to the system.
DRAFT
Chapter 7 — Managing the Computer
70 Series Mobile Computer User Manual 101
4Double-tap the package to start the installation. Your mobile
computer begins the update process and automatically performs a
cold boot.
The computer then boots into a special Update Loader mode where
the computer has no network connections and is completely
unusable. This process can take anywhere from 30 seconds to 15
minutes depending on the update. After the update is complete,
the mobile computer boots again.
5When a confirmation dialog box appears requesting user input,
dismiss it.
DRAFT
Chapter 7 — Managing the Computer
102 70 Series Mobile Computer User Manual
DRAFT

103
8
Troubleshooting and Maintaining the
Computer
If you encounter any problems while using the 70 Series
computer, look in this chapter to find a possible solution. You
will also find information on routine maintenance.
DRAFT
Chapter 8 — Troubleshooting and Maintaining the Computer
104 70 Series Mobile Computer User Manual
About the Intermec Dashboard
The Intermec Dashboard is designed to provide proactive monitoring
of your mobile computers to prevent downtime. You can easily see the
health of the device and can help pinpoint the source of a problem to
determine if it is hardware or software related.
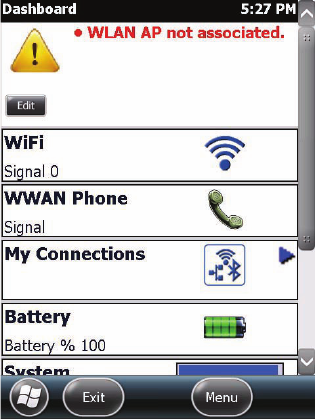
Intermec Dashboard displays information such as the status of
network connections, battery usage, storage space, and internal
devices. It also provides system information such as the operating
system, firmware, and hardware configuration.
To launch the Intermec Dashboard:
•Press the Intermec Dashboard button (m) on the computer keypad.
Intermec Dashboard Main Screen
Intermec Dashboard is highly integrated with SmartSystems
Foundation. You can use SmartSystems Foundation to remotely
monitor the health of your computers. For more information, refer to
the SmartSystems online help.
DRAFT

Chapter 8 — Troubleshooting and Maintaining the Computer
70 Series Mobile Computer User Manual 105
Troubleshooting Your Mobile Computer
Use the troubleshooting tables in this section to fix problems with the
Wi-Fi connection, 802.1x security, the imager, or general problems
with operating the mobile computer.
If you send the computer in for service, it is your responsibility to save
the computer data and configuration. Intermec is responsible only for
ensuring that the hardware matches the original configuration when
repairing or replacing the computer.
Troubleshooting the Wi-Fi Connection
Use this troubleshooting table to help solve problems with your
802.11 radio connection.
Problems With the Wi-Fi Connection
Problem Solution
When you turn on the computer after it
was suspended for a while (10 to 15
minutes or longer), it can no longer send
or receive messages over the network.
Host may have deactivated or lost current terminal
emulation session. In a TCP/IP direct connect network,
turn off the “Keep Alive” message from host to
maintain the TCP session while the computer is
suspended.
The computer is connected to the network
and you move to a new site to collect data.
Your computer now shows you are not
connected to the network.
Move closer to an access point or to a different location
to reestablish communications until you reconnect
with the network.
The computer appears to be connected to
the network, but you cannot establish a
terminal emulation session with the host
computer.
There may be a problem with the host computer, or
with the connection between the access point and the
host computer. Check with the network administrator
to make sure the host is running and allowing users to
log in to the system.
The computer appears to be connected to
the network, but the host computer is not
receiving any information from the 70
Series computer.
There may be a problem with the connection between
the access point and the host computer. Check with the
network administrator or use your access point user’s
manual.
DRAFT

Chapter 8 — Troubleshooting and Maintaining the Computer
106 70 Series Mobile Computer User Manual
Troubleshooting 802.1x Security
Use the following table to troubleshoot problems with your 802.1x
security that will prevent you from connecting to your network, such
as an incorrect password.
Problems With 802.1x Security
A network connection icon appears in the
toolbar, but then disappears.
The computer may not be communicating with the
intended access point. Make sure the network name
matches the access point network name. Default
network name is “INTERMEC.”
The access point may not be communicating with the
server. Ensure the access point is turned on, properly
configured, and has 802.1x security enabled.
Problem Solution
Problem Solution
The computer indicates it is not
authenticated.
Make sure that:
•the User Name and Password parameters on the computer
must match the user name and password on authentication
server. You may need to reenter the password on both the
computer and authentication server.
•on your authentication server, the user and group are
allowed and the group policy is allowed to log into the
server. For help, see the documentation that shipped with
your authentication server software.
•the IP address and secret key for access point must match the
IP address and secret key on the authentication server. You
may need to reenter the IP address and secret key on both
your access point and authentication server.
•the authentication server software is running on the server
PC.
You receive a message saying “The
server certificate has expired or
your system date is incorrect”
after you perform a clean boot on
the computer.
Date and time are not saved when you perform a clean boot.
Reenter the date and time, and then save your changes.
DRAFT
Chapter 8 — Troubleshooting and Maintaining the Computer
70 Series Mobile Computer User Manual 107
Checking 802.11 Network Status
If you have trouble connecting to your 802.11 wireless network:
•Make sure you have correctly set network parameters on the
computer.
•Check your wireless security settings.
Follow the next procedure to verify available access points and
networks, check signal strength, and view other diagnostics. If you
need to contact Intermec Product Support, this information can be
helpful in troubleshooting wireless network connection issues.
To verify the network status:
1Tap Start > iSpyWiFi. The ISpyWiFi application launches.
The ISpyWiFi tab shows:
•MAC address and IP address of the 802.11 radio.
•network association status, including the SSID and MAC
address of the access point.
•security configuration.
•radio transmit power and signal strength information.
2Tap the Scan tab to view a list of available 802.11 networks. The list
includes the signal strength, channel, and MAC address for each
network.
•Tap Scan to refresh the screen.
3Tap the Supp tab to view radio supplicant information, including
a list of supplicant events and authentication status.
•To verify the settings for the currently active security profile, tap
Configure Profile. Intermec Settings launches for you to
configure 802.11 Radio settings.
•To try reconnecting to the network, tap Reconnect.
•To delete the events in the list, tap Clear Events.
DRAFT
Chapter 8 — Troubleshooting and Maintaining the Computer
108 70 Series Mobile Computer User Manual
4Tap the Ping tab to run a ping test to the host.
To run a ping test:
aIn the Host field, enter the IP address of the host.
bFrom the Repetitions list, choose the number of times the
computer will ping the host.
cTap Ping. The graph shows the amount of time it takes for the
host to return the ping. Tap List to see this information in a list
format.
5Tap the RSSI tab to view the received signal strength of the host
signal.
The information box includes the current signal strength, host
SSID name, MAC address, data rate, and transmit power.
•Tap Mark to place an arrow marker above the graph.
6Tap the Conf tab to set up a log file that lists RSSI history.
This screen includes the 802.11 radio driver version and available
radio modes.
To create a log file:
aCheck the Log to File check box.
b(Optional) Change the sample period and number of samples
displayed.
cTap Log File. The Save As screen appears.
d(Optional) Change the name of the saved log file, the folder to
which the file will be saved, the content type (log or text), and
the location.
eTap OK.
DRAFT

Chapter 8 — Troubleshooting and Maintaining the Computer
70 Series Mobile Computer User Manual 109
Troubleshooting Reading Bar Codes
Use this section to troubleshoot problems that may prevent you from
being able to read a bar code, such as the symbology not being enabled.
Problems Reading Bar Codes
Problem Solution
You cannot see the illumination
beam or frame from the imager
when you press the Scan button
and aim the imager at a bar code
label.
•You may be too far away from the bar code label. Try moving
closer to the bar code label and scan it again.
•You may be reading the bar code label “straight on.” Change
the reading angle and try again.
•The imager hardware trigger might be disabled in Intermec
Settings. To check the setting go to Start > Settings >
Systems > Data Collection > Scanner Settings. Hardware
trigger should be checked.
When you release a Scan button
or handle trigger, the Good Read
light does not turn off.
The Good Read light will remain on if you configure the
computer to use continuous/edge triggering. If you configure
the computer for level triggering and the Good Read light
remains on, there may be a problem. Press one of the Scan
buttons or pull the trigger again without scanning a bar code
label. If the light is still on, contact your local Intermec
representative.
The scanner will not read the bar
code label.
•Aim the scanner beam to cross the entire bar code label in
one pass. Vary the scanning angle.
•Check the quality of the bar code label. Scan a bar code label
that you know will scan. Compare the two bar code labels to
see if the bar code quality is too low. You may need to replace
the label that you cannot scan.
•Make sure the bar code symbology is enabled and
configured correctly. Use Intermec Settings to check the
symbologies. Expand Data Collection > Symbologies
beneath devices listed (scanner, virtual wedge) to check and
enable symbologies, then scan the bar code label again.
•Make sure the computer application is expecting input from
a bar code. You may need to type this information instead.
•The scanner may not be turned on or the scanner may be
unable to scan a specific bar code. Run the ScanDiagnostic
application to help you troubleshoot the problem. For more
information, see
DRAFT

Chapter 8 — Troubleshooting and Maintaining the Computer
110 70 Series Mobile Computer User Manual
Using ScanDiagnostic to Troubleshoot the Scanner
Use the ScanDiagnostic application to troubleshoot problems such as
the inability to read a bar code or a scanner that does not turn on.
To run the ScanDiagnostic application:
1From the Home menu, tap Start > ScanDiagnostic.
2From the Scan Health screen, select the scanner you want to
troubleshoot and then tap Diagnose.
The application checks to make sure the scanner is enabled and
checks settings to make sure they are optimized.
3From the Scan Test screen, press and hold the Press to Scan
button while aiming at the bar code you want to read.
After the computer scans the bar code, it beeps and the label data,
data length, and symbology appear on the screen.
4Press the right arrow button to view any recommended settings.
5To accept the recommended settings, tap Apply.
6Tap OK to exit.
The scanner does not read the bar
code labels quickly, or the
scanning beam seems to be faint
or obscured.
The scanner window may be dirty. Clean the window with a
solution of ammonia and water. Wipe dry. Do not allow
abrasive material to touch the window.
You scan a valid bar code label to
enter data for your application.
The data decoded by the scan
module does not match the data
encoded in the bar code label.
The computer may have decoded the bar code label in a
symbology other than the label’s actual symbology. Try
scanning the bar code label again. Make sure you scan the
entire label.
The input device attached to the
computer does not work well or
read bar code labels very quickly.
Set the Scanner Model command to the specific attached input
device. Check enabled bar code symbologies and enable only
the symbologies being used.
Problem Solution
DRAFT

Chapter 8 — Troubleshooting and Maintaining the Computer
70 Series Mobile Computer User Manual 111
Troubleshooting Operating the Computer
Use this section to troubleshoot problems that may prevent you from
being able to operate the computer.
Problems Operating the Computer
Problem Solution
You press the Power button and
nothing happens.
Try the following solutions:
•Replace or charge the battery. The battery may be completely
drained.
•Remove the battery and press the Reset button to perform a
cold boot. For help, see “Cold Booting the Computer” on
page 113.
The computer appears to be
locked up and you cannot enter
data.
•Press the Power button and select Suspend from the Power
Options menu. Press the Power button to turn the screen
back on.
•Press the Power button and select Reboot from the Power
Options menu.
•Remove the battery and press the Reset button to perform a
cold boot. For help, see “Cold Booting the Computer” on
page 113.
•Try reloading the firmware. For help, see “Updating the
System Software” on page 98.
•If the computer does not boot or reset, contact your
Intermec representative for help.
You tap the screen and nothing
happens.
Align your screen. For help, see “Aligning the Screen” on page
43.
You cannot type a character on
the keypad or you can only type
uppercase or lowercase letters.
You may have locked a modifier key on the keypad. Press the
necessary key sequence to unlock the key. For help, see “About
the Keypad” on page 16.
DRAFT
Chapter 8 — Troubleshooting and Maintaining the Computer
112 70 Series Mobile Computer User Manual
Calling Product Support
If you cannot find the answer to your problem in the
“Troubleshooting the Computer” section, you can visit the Intermec
technical knowledge base (Knowledge Central) at
intermec.custhelp.com to review technical information or to request
technical support. If you still need help after visiting Knowledge
Central, you may need to call Product Support.
To talk to an Intermec Product Support representative, call:
1-800-755-5505
Before you can call Intermec Product Support, make sure you have the
following information ready:
•Configuration number
•Serial number
•Operating system version
•SmartSystems Platform Bundle (SSPB) version
•If you are using security, know the type (Funk or Microsoft) and the
full set of parameters
•Power management settings
•If you are using Intermec terminal emulation (ITE), know the
version and protocol. If you are not using ITE, know the language
your custom application was written in and the tools you used to
create it.
You can find most of the information listed above in Intermec
Settings. Consult your application developer for information on your
custom application.
Finding Your Configuration Number
Use the following procedure to help you find the configuration
number of your computer.
•Look at the label on the back of the computer.
DRAFT
Chapter 8 — Troubleshooting and Maintaining the Computer
70 Series Mobile Computer User Manual 113
Finding Your Operating System Version
Use the following procedure to find the OS version of your mobile
computer.
1Press the Intermec Dashboard (m) button to launch the
Dashboard.
2Tap the Information bar. The Information Details page appears
and displays information such as the firmware version and the OS
version.
Resetting the Computer
If the computer does not resume after pressing the Power button, or if
the computer or an application locks up, you may need to reset the
computer. The computer uses the configuration currently saved in
flash memory during the boot process. There are three ways to reset the
computer:
•Reboot
•Cold boot
•Clean boot
Rebooting the Computer
You may need to reboot the computer to correct conditions where an
application stops responding to the system.
To reboot the computer:
•Press the Power button and select Reboot from the menu.
The computer systematically shuts down, restarts, and goes
through the initialization process.
Cold Booting the Computer
In some cases where the computer completely stops responding, it may
be necessary to perform a cold boot or hard reset. Because cold booting
may result in data loss, use this method only if all other recovery
methods have failed.
DRAFT
Chapter 8 — Troubleshooting and Maintaining the Computer
114 70 Series Mobile Computer User Manual
To cold boot the mobile computer:
1Press the Power button to suspend the computer.
2Remove the handstrap and the battery pack.
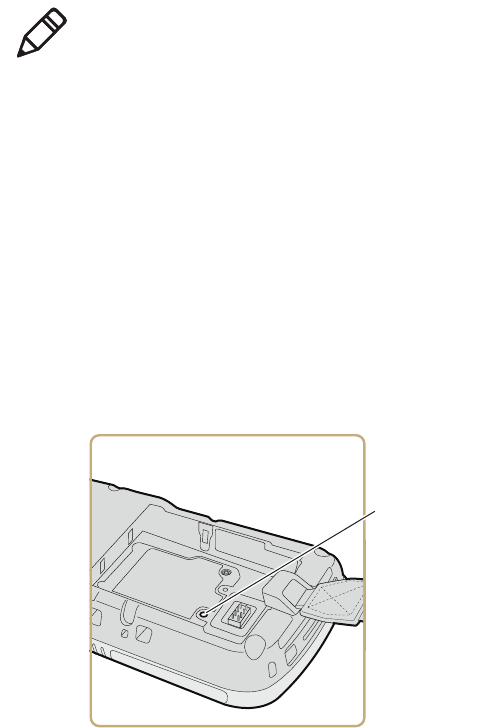
3Press the Reset button in the battery compartment on the back of
the computer.
4Replace the battery and the handstrap.
5Press Power and wait while the mobile computer boots. When the
cold boot is complete, the Home screen appears.
Location of CN70/CN70e Reset Button
Note: Cold booting the computer does not guarantee that cached disk
data will be saved, so transactional data may be lost during the reset.
All other data, such as configuration and network settings, is
preserved.
Reset button
DRAFT
Chapter 8 — Troubleshooting and Maintaining the Computer
70 Series Mobile Computer User Manual 115
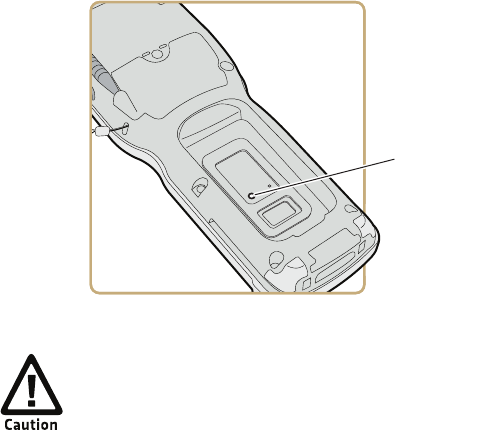
Location of CK70/CK71 Reset Button
Clean Booting the Computer
If the computer seems to be locked up, try cold booting it. If this
process does not work, use a clean boot to get the computer up and
running for further troubleshooting. You can clean boot using the
mobile computer, or you can clean boot using the SmartSystems
Console:
To perform a clean boot using the mobile computer:
1Remove the battery pack from the back of the computer.
2With a stylus, press the Reset button in the battery cavity.
3Insert the battery back into the computer, and immediately press
and hold the Power button and Volume Down button (the lower
button on the right side).
4Continue to hold the Power button and the Volume Down
button down until you are prompted to release them.
5Press the Volume Up button on the right side to start the clean
boot.
6Wait for the computer to load files from its ROM.
Reset button
A clean boot erases the memory in the mobile computer,
including all applications and data files, with the exception of
those found in the Flash File Store, or any removeable storage.
DRAFT

Chapter 8 — Troubleshooting and Maintaining the Computer
116 70 Series Mobile Computer User Manual
To clean boot the computer using the SmartSystems Console:
•Right-click the 70 Series computer and select Intermec Power
Tools > Clean Boot Device.
Cleaning the Computer
To keep the computer in good working order, you may need to clean
the imager window, color camera window, and the touch screen. Clean
the windows and the touch screen as often as needed for the
environment in which you are using the computer. To clean the
computer, use a solution of ammonia and water.
To clean the image window, camera window, and touch screen:
1Press the Power button and choose to suspend the computer.
2Dip a clean cloth towel in the ammonia solution and wring out the
excess.
3Wipe off the imager window, camera lens, and flash area. Do not
allow any abrasive material to touch these surfaces.
4Wipe dry.
There are no user-serviceable parts inside the 70 Series computer.
Opening the computer will void the warranty and may cause
damage to the internal components.
DRAFT

117
A
Specifications and Default Settings
DRAFT

Appendix A — Specifications and Default Settings
118 70 Series Mobile Computer User Manual
Physical and Environmental Specifications
CN70 Physical Dimensions
CN70e Physical Dimensions
CK70 Physical Dimensions
CK71 Physical Dimensions
Environmental Specifications
Dimensions 16.9 x 8.0 x 3.4 cm (6.66 x 3.14 x 1.35 in)
Weight 450 g (15.2 oz) with battery
Dimensions 19.5 x 8.0 x 3.4 cm (7.66 x 3.14 x 1.35 in)
Weight 491 g (16.6 oz) with battery
Dimensions 23.7 x 8.0 x 4.3 cm (9.33 x 3.16 x 1.69 in)
Weight 562 g (19 oz) with battery
Dimensions 23.7 x 8.0 x 5.0 cm (9.33 x 3.16 x 1.98 in)
Weight 584 g (19.75 oz) with battery
Operating temperature -20°C to 60°C (-4°F to 140°F)
Storage temperature -30°C to 70°C (-22°F to 158°F)
Charging temperature 0°C to 45°C (32°F to 113°F)
Relative humidity (operating) 5% to 95% non-condensing
Environmental rating IP67 compliant
Drop Specifications All corners and sides from 1.8 m (6 ft) per
MIL-STD 810F
DRAFT

Appendix A — Specifications and Default Settings
70 Series Mobile Computer User Manual 119
Power and Electrical Specifications
70 Series Non-Incendive Computer Specifications
The 70 Series mobile computers with non-incendive (NI) certification
comply with the following specifications for North America and
Canada regions only.
Operating System
Microsoft Windows Embedded Handheld.
Hardware
Battery type Rechargeable Lithium-ion (Li-ion) battery
Battery capacity
CN70/CN70e: 3.7 V, 4000 mAh (14.8 Wh)
CK70/CK71: 3.7 V, 5200 mAh (19.2 Wh)
Electrical rating x 4.37/4.8 V; 2/1,5 A
Location Suitable for use in Division 2 locations
Safety cULus Listing - ISA/ANSI 12.12.01
Gases Class I - Groups A, B, C, D
Dusts Class II - Groups F, G
Fibers and Flyings Class III
Maximum Ambient Temperature T6 rating with a maximum temperature
of 50°C
Main processor options TI OMAP3, 1 GHz
TI OMAP3, 600 MHz
Memory 512 MB RAM
Persistent storage 1 GB Flash
Removable storage up to 32 GB user-accessible microSD card slot
Keypad CN70: QWERTY, Numeric
CN70e: QWERTY Numeric, Numeric
CK70: Large Alpha, Alphanumeric
CK71: Numeric Function, Alphanumeric
DRAFT

Appendix A — Specifications and Default Settings
120 70 Series Mobile Computer User Manual
Back Accessory Interface Pin-outs
The back accessory interface provides power for peripheral devices out
the back of the CK70 and CK71 computers.
Touch Screen Specifications
Transmissive VGA display with high-durability touch screen; 480 x
640 pixels; 8.9 cm (3.5 in) diagonal active area; LED backlight and
ambient light sensor.
Standard Communications
•UMTS (not available on CK71)
•CDMA (not available on CK71)
•GPS (not available on CK71)
•802.11a/b/g/n
•Bluetooth
•USB high speed 2.0 OTG©
Wireless LAN
Imaging options 5 megapixel color camera and EA30 area imager
(all), EV12 (CK71 only), or EX25 (CK71 only)
Pin Pin Name I/O Description
1 OTB_PWR Output Power supply for peripheral
2GND
3 OTB_RX Input DTE Data Receive
4 OTB_TX Output DTE Data Transmit
5 OTB_I/O_Voltage Input I/O Voltage Level
6 OTB_ID BiDir One Wire Bus for ID
7 OTB_RTS Output DTE Ready do Send
8 OTB_CTS Input DTE Clear to Send
Standards compliant IEEE 802.11a/b/g/n (2.4 GHz and 5 GHz), Single
Stream
Data rates up to 72Mbps
DRAFT

Appendix A — Specifications and Default Settings
70 Series Mobile Computer User Manual 121
Regulatory Approvals
FCC, CE, cULus Listed, DEMKO
Bar Code Symbologies
The imagers support all of the bar code symbologies listed in the next table.
Supported Bar Code Symbologies
* These symbologies are not supported with the EV12 imager in the
CK71.
Security 802.11i, WPA, WPA2, 802.1x (EAP-TLS, TTLS, LEAP,
PEAP, EAP-FAST), WEP
Certifications WPA2™ (Enterprise, Personal), WPA™ (Enterprise,
Personal), Wi-Fi, WMM®, WMM Power Save, Cisco
Compatible Extensions (CCX 4.0)
AustraliaPost* GS1 DataBar Omni-Directional
Aztec* Infomail*
BPO* Interleaved 2 of 5
Canada Post* Japan Post*
China Post* KoreanPost*
Codabar Matrix 2 of 5
Codablock A* Maxicode*
Codablock F* Micro PDF417*
Code 11 MSI
Code 39 PDF417*
Code 93 Planet*
Code 128/GS1-128 Plessey
DataMatrix* Postnet*
Dutch Post* QR Code*
EAN/UPC Standard 2 of 5
GS1 Composite SwedenPost*
GS1 DataBar Expanded Telepen
GS1 DataBar Limited TLC 39*
DRAFT
Appendix A — Specifications and Default Settings
122 70 Series Mobile Computer User Manual
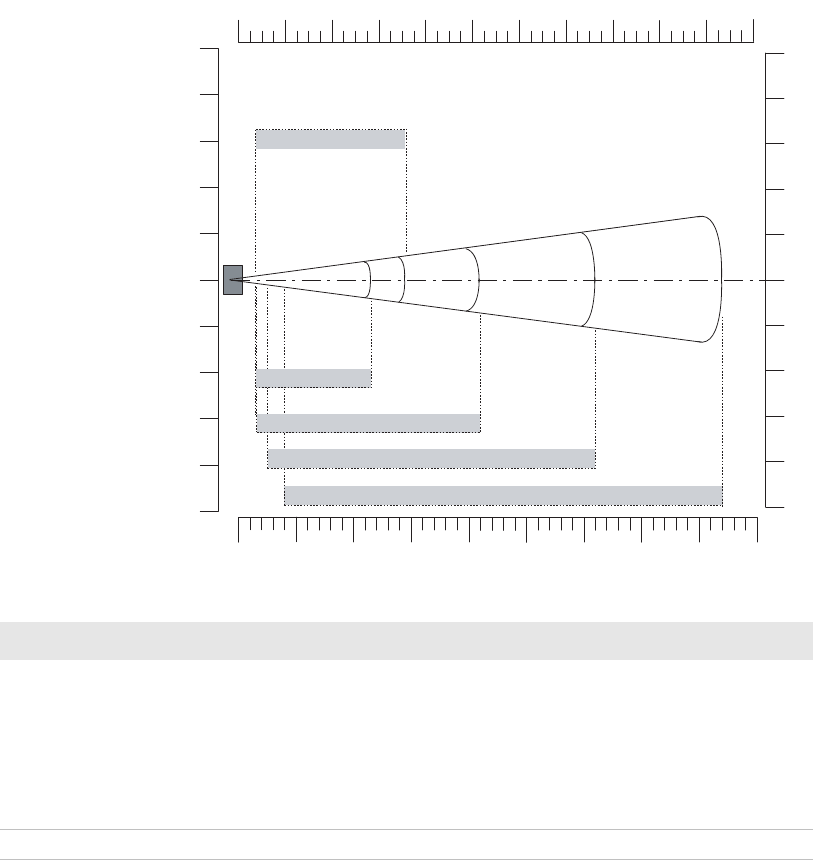
Imager Reading Distances
Typical reading distances are done in an office environment using
office lights (4 lux). Minimum distances are measured in the dark (0
lux). Both reading distances are provided in respective scan engine
integration guides. Contact your local Intermec representative for
more information.
Below are the typical and minimum standard reading distances for the
70 Series computer built with an EA30 imager. Also included are
typical and minimum standard reading distances for the CK71 with an
EV12 or EX25 imager.
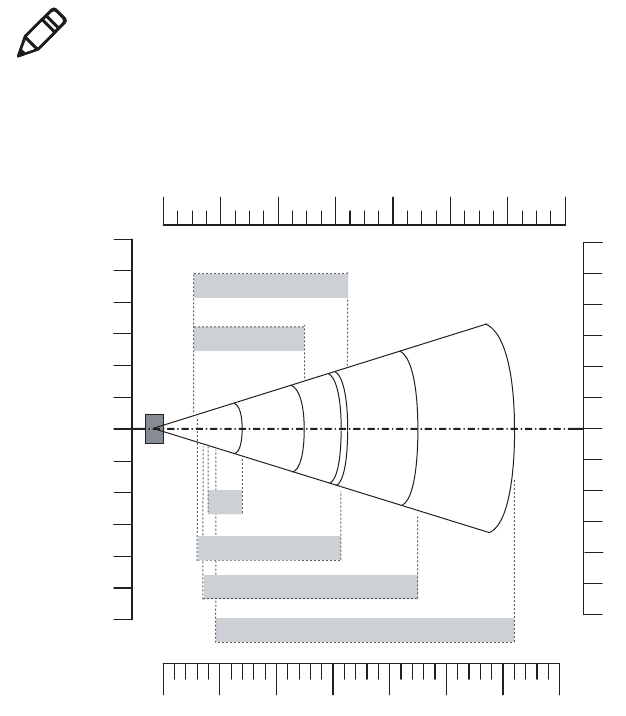
EA30 Area Imager Minimum Reading Distances
Minimum distances are measured in the dark (0 lux).
Note: Minimum distances depend on the length of the bar code.
cm
PDF417 10 mils
0.5 mm / 20 mils
1 mm / 40 mils
Data Matrix 10 mils
in
0" 28"24"20"16"12"8"4"
070605040302010
EAN/UPC
0.125mm/5 mils
4"
8"
0"
4"
8"
12"
12"
10
0
10
20
20
30
30
DRAFT
Appendix A — Specifications and Default Settings
70 Series Mobile Computer User Manual 123
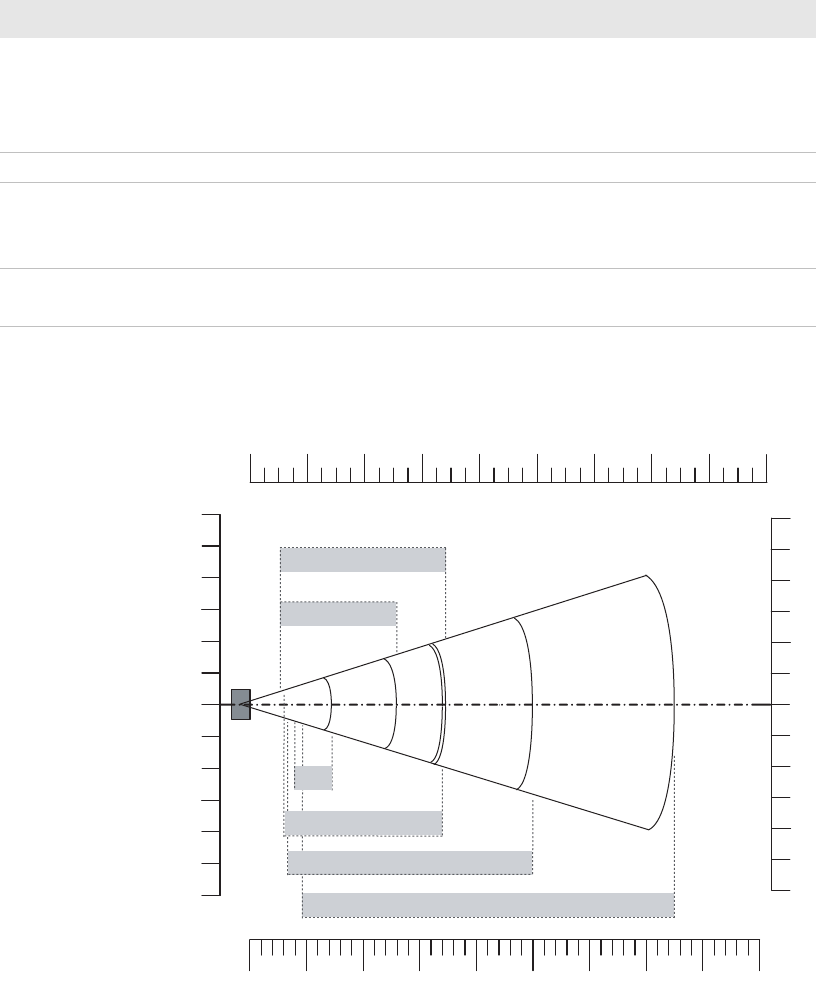
EA30 Minimum Reading Distances
EA30 Area Imager Typical Reading Distances
Typical distances are measured in an office environment (250 lux).
Symbology Density Minimum Distance Maximum Distance
Code 39 0.1 mm (4 mils)
0.1250 mm (5 mils)
0.5 mm (20 mils)
1 mm (40 mils)
9.5 cm (3.74 in)
8 cm (3.15 in)
7 cm (2.76 in)
9.5 cm (3.74 in)
10.5 cm (4.13 in)
14 cm (5.51 in)
45 cm (17.72 in)
62 cm (24.41 in)
UPC/EAN 100% 0.33 mm (13.0 mils) 6 cm (2.36 in) 31.5 cm (12.4 in)
Data Matrix 0.18 mm (7 mils)
0.25 mm (10 mils)
0.38 mm (15 mils)
8 cm (3.15 in)
6.5 cm (2.56 in)
5.5 cm (2.17 in)
15.5 cm (6.1 in)
21.5 cm (8.46 in)
31.5 cm (12.4 in)
PDF417 0.25 mm (10 mils)
038 mm (15 mils)
5.5 cm (2.17 in)
7 cm (2.76 in)
25 cm (9.84 in)
34 cm (13.39 in)
4"
8"
0"
4"
8"
12"
12"
cm
PDF417 10 mils
0.5 mm / 20 mils
1 mm / 40 mils
Data Matrix 10 mils
in
0" 36"32"28"24"20"16"12"8"4"
0908070605040302010
EAN/UPC
0.125mm/5 mils
10
0
10
20
20
30
30
DRAFT

Appendix A — Specifications and Default Settings
124 70 Series Mobile Computer User Manual
EA30 Typical Reading Distances
Symbology Density Minimum Distance Maximum Distance
Code 39 0.1 mm (4 mils)
0.125 mm (5 mils)
0.5 mm (20 mils)
1 mm (40 mils)
9.5 cm (3.74 in)
8 cm (3.15 in)
6.5 cm (2.56 in)
9.5 cm (3.74 in)
11.5 cm (4.53 in)
14.5 cm (5.71 in)
50 cm (19.69 in)
75 cm (29.53 in)
UPC/EAN 100% 0.33 mm (13.0 mils) 6 cm (2.36 in) 34 cm (13.39 in)
Data Matrix 0.18 mm (7 mils)
0.25 mm (10 mils)
0.38 mm (15 mils)
7.5 cm (2.95 in)
6 cm (2.36 in)
5.5 cm (2.17 in)
16.5 cm (6.5 in)
23 cm (9.06 in)
34.5 cm (13.58 in)
PDF417 0.25 mm (10 mils)
0.38 mm (15 mils)
5.5 cm (2.17 in)
6.5 cm (2.56 in)
26 cm (10.24 in)
37 cm (14.57 in)
DRAFT
Appendix A — Specifications and Default Settings
70 Series Mobile Computer User Manual 125
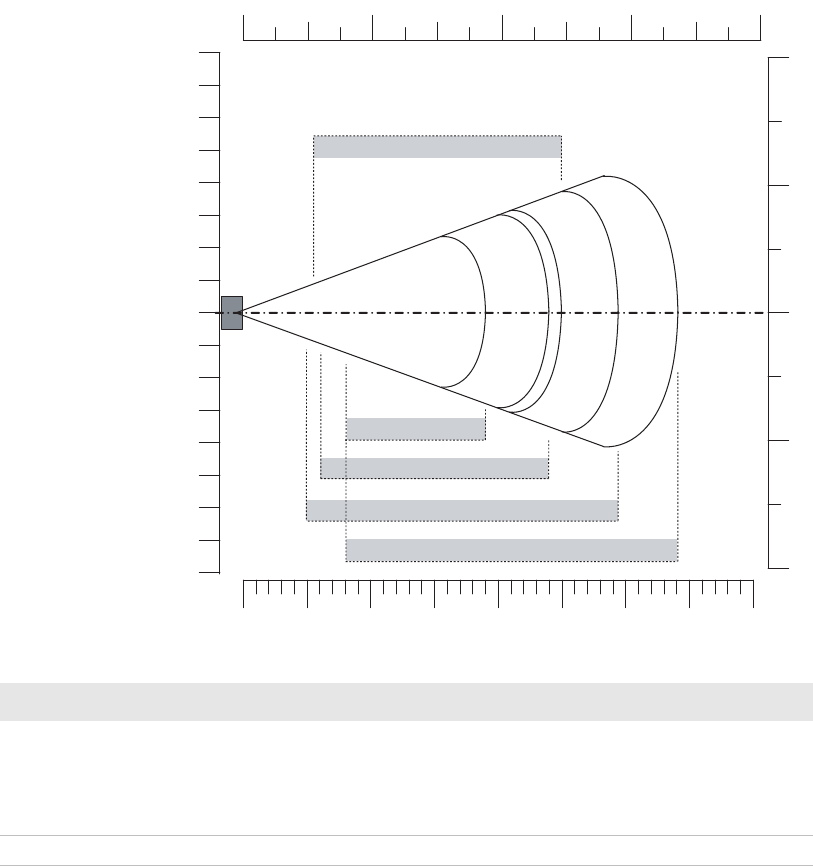
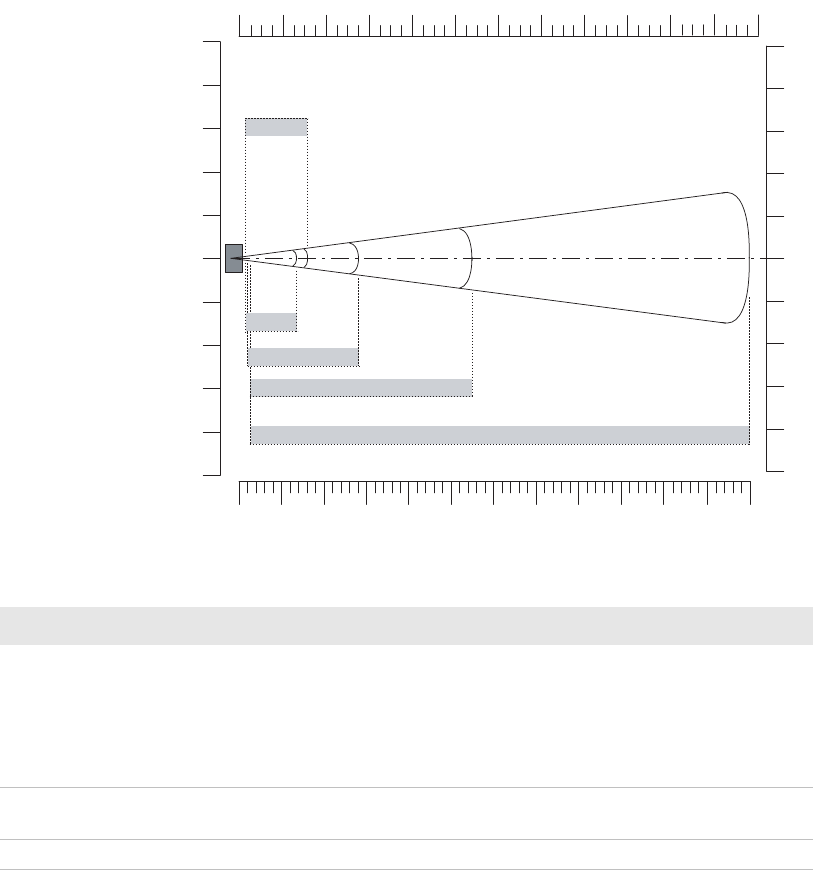
EV12 Linear Imager Minimum Reading Distances
The illustration below does not include the 0.12 cm (0.05 in) setback
for the CK71. Minimum reading distances are measured in the dark (0
lux).
EV12 Miniumum Reading Distances With 0.12 cm (0.05 in) Setback
0"
2"
8"
in
cm
0
10
20
0" 16" 12" 8" 4"
0 40 30 20 10
0.125 mm / 5 mils
0.25 mm / 10 mils
0.5 mm / 20 mils
1 mm / 40 mils
EAN/UPC 100%
5
15
10
20
5
15
6"
4"
5 15 25 35
2" 6" 10" 14"
1"
3"
5"
7"
2"
8"
6"
4"
1"
3"
5"
7"
Symbology Density Minimum Distance Maximum Distance
Code 39 0.15 mm (6 mils)
0.25 mm (10 mils)
0.5 mm (20 mils)
1 mm (40 mils)
9.6 cm (3.8 in)
7.1 cm (2.9 in)
6.1 cm (2.5 in)
8.1 cm (3.2 in)
17.9 cm (7.1 in)
20.9 cm (8.3 in)
26.9 cm (10.6 in)
33.9 cm (13.4 in)
EAN/UPC 0.33 mm (13 mils) 6.1 cm (2.5 in) 22.9 cm (9.1 in)
DRAFT
Appendix A — Specifications and Default Settings
126 70 Series Mobile Computer User Manual
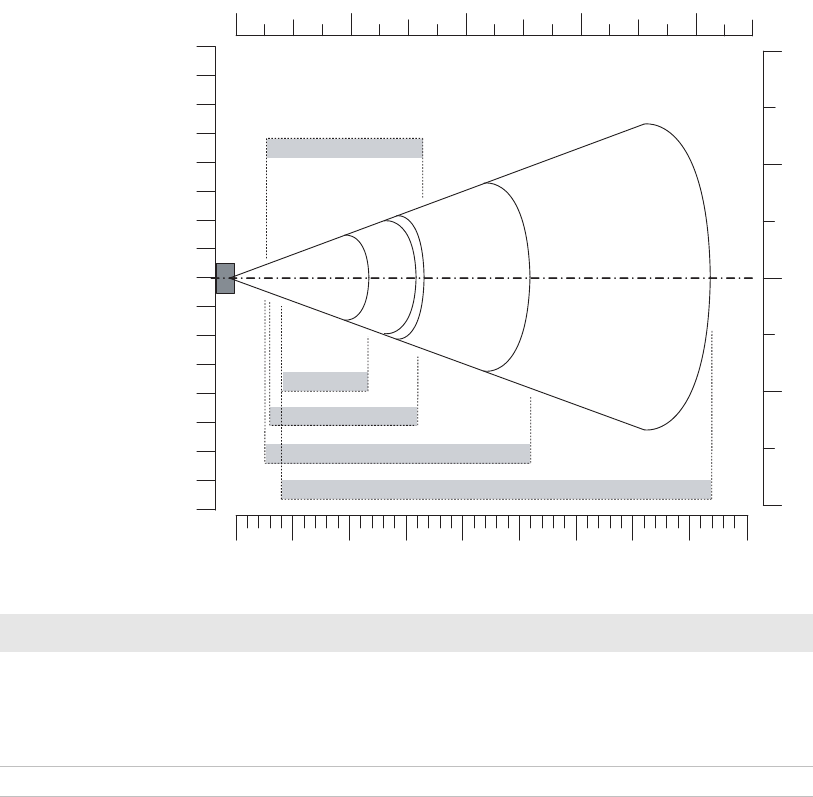
EV12 LInear Imager Typical Reading Distances
The illustration below does not include the 0.12 cm (0.05 in) setback
for the CK71. Typical reading distances are measured in an office
environment (200 lux).
EV12 Typical Reading Distances With 0.12 cm (0.05 in) Setback
** Minimum distance depends on bar code width and scan angle.
0"
4"
16"
in
cm
0
20
40
0" 32" 24" 16" 8"
0 80 60 40 20
0.125 mm / 5 mils
0.25 mm / 10 mils
0.5 mm / 20 mils
1 mm / 40 mils
EAN/UPC 100%
10
30
20
40
10
30
12"
8"
10 30 50 70
4" 12" 20" 28"
2"
6"
10"
14"
4"
16"
12"
8"
2"
6"
10"
14"
90
36"
Symbology Density Minimum Distance Maximum Distance
Code 39 0.15 mm (6 mils)
0.25 mm (10 ils)
0.5 mm (20 mils)
1 mm (40 mils)
9.6 cm (3.8 in)
6.1 cm (2.5 in)
5.1 cm (2.1 in)
7.1 cm (2.9 in)**
19.9 cm (7.9 in)
24.9 cm (9.8 in)
34.9 cm (13.8 in)
50.9 cm (20.1 in)
EAN/UPC 0.33 mm (13 mils) 5.1 cm (2.1 in) 27.9 cm (11.0 in)
DRAFT
Appendix A — Specifications and Default Settings
70 Series Mobile Computer User Manual 127
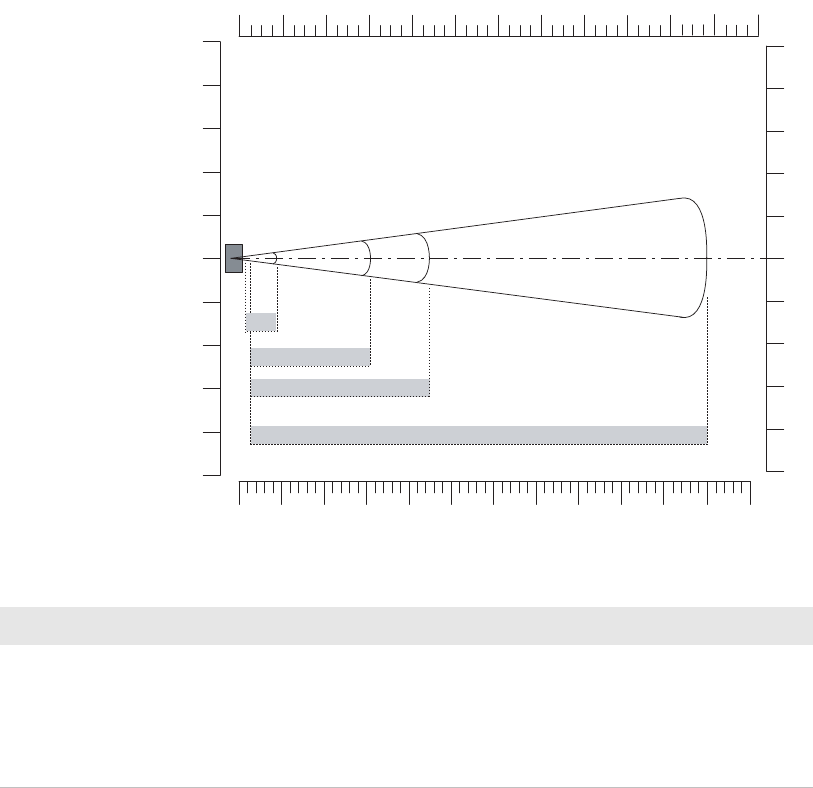
EX25 Near-Far Range Imager Minimum Reading
Distance
Minimum reading distances are measured in the dark (0 lux). The
following graphic does not include the 0.24 cm (0.09 in) setback for
the CK71.
EX25 Minimum Reading Distances With 0.24 cm (0.09 in) Setback
in
050
cm
0” 32” 64” 80”16”
100% EAN contrast UPC
0.5 mm/20 mils
1 mm/40 mils
100 150 200 250 300 350 400 450
48” 96” 112” 128” 144” 160” 176”
1.4 mm/55 mils
32”
16”
48”
64”
16”
0”
80”
32”
48”
64”
80”
80
40
0
40
80
120
160
160
120
200
200
0.25 mm/10 mils
Symbology Density Minimum Distance Maximum Distance
Code 39 0.08 mm (3 mils)
0.1 mm (2.8 mils)
0.25 mm (10 mils)
0.5 mm (20 mils)
1 mm (40 mils)
1.3 mm (51 mils)
15 cm (5.91 in)
15 cm (5.91 in)
15 cm (5.91 in)
16 cm (6.30 in)
25 cm (9.84 in)
40 cm (15.75 in)
35 cm (13.78 in)
45 cm (17.72 in)
115 cm (45.28 in)
210 cm (82.68 in)
310 cm (122.05 in)
310 cm (122.05 in)
EAN 100% 0.33 mm (13 mils) 15 cm (5.91 in) 145 cm (57.09 in)
DRAFT
Appendix A — Specifications and Default Settings
128 70 Series Mobile Computer User Manual
EX25 Near-Far Range Imager Typical Reading Distance
Typical reading distances are measured in an office environment (200
lux). The following graphics do not include the 0.24 cm (0.09 in)
setback for the CK71.
EX25 Near-Far Range Imager 1D Typical Reading Distances
EX25 1D Symbologies Typical Reading Distances With 0.24 cm (0.09
in) Setback
32”
in
0 100
cm
160
80
0
80
160
240
320
320
240
400
400
0” 40” 80”
0.25 mm
10 mils
0.5 mm/20 mils
1 mm/40 mils
200 300 600400 700500 1100
120” 160” 200”
64”
0”
32”
64”
800 900 1000
240” 280” 320” 360” 400” 440”
96”
128”
160”
96”
128”
160”
100% EAN
contrast UPC
480”
1200
2.5 mm/100 mils
Symbology Density Minimum Distance Maximum Distance
Code 39 0.25 mm (10 mils)
0.5 mm (20 mils)
1 mm (40 mils)
1.4 mm (55 mils)
2.5 mm (100 mils)
15 cm (5.91 in)
16 cm (6.30 in)
25 cm (9.84 in)
40 cm (15.75 in)
**
135 cm (53.15 in)
280 cm (110.24 in)
550 cm (216.54 in)
720 cm (283.46 in)
1200 cm (472.44 in)
Code 128
retro-reflective
2.5 mm (100 mils) ** 1300 cm (511.81 in)
EAN 100% 0.33 mm (13 mils) 15 cm (5.91 in) 160 cm (62.99 in)
DRAFT
Appendix A — Specifications and Default Settings
70 Series Mobile Computer User Manual 129
** Minimum distance depends on bar code width and scan angle.
EX25 Near-Far Range Imager 2D Typical Reading Distances
EX25 2D Symbologies Typical Reading Distances With 0.24 cm (0.09
in) Setback
** Minimum distance depends on bar code width and scan angle.
32”
in
0 100
cm
160
80
0
80
160
240
320
320
240
400
400
0” 40” 80”
0.25 mm
10 mils
0.76 mm/30 mils
1.4 mm/55 mils
200 300 600400 700500 1100
120” 160” 200”
64”
0”
32”
64”
800 900 1000
240” 280” 320” 360” 400” 440”
96”
128”
160”
96”
128”
160”
480”
1200
2.5 mm/100 mils
Symbology Density Minimum Distance Maximum Distance
DataMatrix 0.25 mm (10 mils)
0.76 mm (30 mils)
1.4 mm (55 mils)
2.5 mm (100 mils)
7.5 mm (300 mils)
15 cm (5.91 in)
25 cm (9.84 in)
**
**
20 cm (7.87 in)
90 cm (35.43 in)
310 cm (122.05 in)
450 cm (177.17 in)
1100 cm (433.07 in)
1524 cm (600 in)
DRAFT

Appendix A — Specifications and Default Settings
130 70 Series Mobile Computer User Manual
Default Configuration
The following tables list the default values of the configuration
settings supported on the mobile computer. If you restore the mobile
computer to factory default settings, the mobile computer uses these
values.
The settings are grouped by function and reflect the organization of
Intermec Settings. Not all of the configuration settings are listed in
this appendix. For detailed information on most of the settings, see the
Intermec Settings Command Reference Manual.
Data Collection Settings
Use data collection settings to configure the imager and to configure
the bar codes that you want the imager to be able to read.
Data Collection Settings
Symbology Settings
Data Collection Setting Default Value
Enable Scanner/Camera Port On
BT-Configure On Connect Overwrite with computer
settings
Enable Magstripe Reader Disable
Symbology Default Value
AustraliaPost Disable
Aztec Disable
BPO Disable
CanadaPost Disable
Codabar Disable
Codablock A Disable
Codablock F Disable
Code 11 Disable
Code 39 Enable
Code 93 Disable
Code 128/GS1-128 Enable
DRAFT

Appendix A — Specifications and Default Settings
70 Series Mobile Computer User Manual 131
Symbology Option Settings
DataMatrix Enable
DutchPost Disable
EAN/UPC Enable UPC A, UPC E, EAN
8, EAN 13
GS1 Composite Disable
GS1 DataBar Expanded Disable
GS1 DataBar Limited Disable
GS1 DataBar Omni-Directional Disable
Infomail Disable
Intelligent Mail Disable
Interleaved 2 of 5 Disable
JapanPost Disable
Matrix 2 of 5 Disable
Maxicode Disable
Micro PDF417 Disable
MSI Disable
PDF417 Enable
Planet Disable
Plessey Disable
Postnet Disable
QR Code Disable
Standard 2 of 5 Disable
SwedenPost Disable
Telepen Disable
TLC 39 Disable
Symbology Option Settings Default Value
Preamble None (Disabled)
Postamble None (Disabled)
Symbology Identifier Disable
Multicode Disable
Symbology Default Value
DRAFT

Appendix A — Specifications and Default Settings
132 70 Series Mobile Computer User Manual
Scanner Settings
Imager Settings
Decode Security Settings
Scanner Settings Default Value
Trigger Predefined Modes Level
Trigger Mode Level
Aimer Mode Typical aimer
Hardware Trigger Enable
Trigger Timeout (sec) 2
Aiming Duration (msec) 500
Turn Off After Good Read Enable/One-shot
Imager Settings Default Value
Predefined Modes 1D and 2D Standard
Image File Location \My Documents\MDI
Signature Image Capture Disable
Document Imaging Disable
Image Capture
Output Compression
Output Compression Quality
Edge Enhancement
Noise Reduction
Subsampling
Image Rotation
Image Lighting Correction
Bitmap
0
None
0
None
None
Disable
Decode Security Settings Default Value
Consecutive Data Validation 0
Identical Consecutive Timeout 300 ms
Different Consecutive Timeout 0
Center Decoding Disable
Center Decoding Tolerance 0
DRAFT

Appendix A — Specifications and Default Settings
70 Series Mobile Computer User Manual 133
Communications
Use communications settings to configure how the mobile computer
communicates with the network.
Communications Settings
802.11 Radio Settings
Ethernet Adapter Settings
Bluetooth Settings
WWAN Radio Settings
Communications Setting Default Value
Device Name IntermecCXXX (where XXX
indicates the model of
mobile compuer)
802.11 Radio Setting Default Value
Security Choice Funk
Allow Security Changes Enabled
Active Profile Profile 1
DHCP Enabled
Import Root Certificates False
Import User Certificates False
Import Pac Files False
Radio Bands b/g (2.4 GHz)
Radio Enabled Off
Ethernet Adapter Setting Default Value
DHCP Enabled
Bluetooth Setting Default Value
Bluetooth Power Off
WWAN Radio Setting Default Value
WWAN Radio Enabled Disable
DRAFT

Appendix A — Specifications and Default Settings
134 70 Series Mobile Computer User Manual
Serial Port Switch
Device Settings
Use device settings to configure settings on the mobile computer.
Device Settings
Good Read Settings
Backlight Settings
Screen Settings
Serial Port Switch Setting Default Value
Serial Port Switch Standard Docking and IrDA
Device Setting Default Value
Date N/A
Time N/A
Beeper and Voice Medium
Headset Beeper Very Low
Vibrate Mode Intensity 1 Strong Pulse
Good Read Setting Default Value
Internal Scanner Good Read Beep One Beep
Dock Tethered Scanner One Beep
Bluetooth Scanner Good Read Beep One Beep
Backlight Setting Default Value
Display Backlight Adjustment Normal
Keypad Backlight On Based on Light Level
Light Level Low
Screen Setting Default Value
Screen Rotations Portrait 0 Degrees
DRAFT

Appendix A — Specifications and Default Settings
70 Series Mobile Computer User Manual 135
Keypad Settings
Power Management Settings
Sensors Settings
Profiles Settings Application
Keypad Setting Default Value
Scan Button Remapping Scanner
Power Management Setting Default Value
Enable Power Button Screen On
Screen Options Displayed Hibernate, Suspend, Reboot
Screen Timeout (Seconds) 5
Power Button Behavior Suspend
Device Turns Off After (Battery Power) 5 minutes
Screen Turns Off After (Battery Power) Disabled
Device Turns Off After (External Power) Disabled
Screen Turns Off After (External Power) Disabled
Sensors Setting Default Value
Screen Rotation Disabled
Device Off Disabled
Profiles Settings Default Value
Camera
Disable Camera Scan
Enable Camera Scan
Show Option in Profile Settings
Show Option in Profile Settings
Power
Always On
Maximize Battery Life
Normal
Show Option in Profile Settings
Show Option in Profile Settings
Show Option in Profile Settings
Scanning
1D Bar Codes Optimized
Bright Sunlight
Reflective Labels
Standard
Show Option in Profile Settings
Show Option in Profile Settings
Show Option in Profile Settings
Show Option in Profile Settings
DRAFT

Appendix A — Specifications and Default Settings
136 70 Series Mobile Computer User Manual
GPS Settings
Use GPS settings to configure how the mobile computer
communicates with the GPS network.
GPS
Core Messaging Service Settings
Use core messaging service settings to configure the message routers
between client and server software applications.
Core Messaging Service
Device Monitor Settings
Use device monitor settings to configure how the mobile computer
monitors the network.
Device Health Controls
GPS Setting Default Value
Enable Bread Crumbing Disable
Core Messaging Service Setting Default Value
Associated Server IP Null
Broadcast Name INTERMEC
Port 62241
Keep Alive Ping Interval 30 Seconds
Device Health Setting Default Value
Enable Health Data Collection On
Enable Device Health Application On
Enable Blue Light Off for Ready-to-Work
Set Rule File Location \SmartSystems\HealthRules.txt
System Device Health Refresh (seconds) 90
Network Device Health Refresh (seconds) 45
DRAFT

Appendix A — Specifications and Default Settings
70 Series Mobile Computer User Manual 137
Device Health Screen Captures
Device Wipe
Virtual Wedge Settings
Use virtual wedge settings to configure the virtual wedge.
Virtual Wedge Setting
Device Health Screen Captures Setting Default Value
Directory \SmartSystems\ScreenCapture
Screen Captures Allowed 3
Device Wipe Setting Default Value
Enable Wipe Disabled
Interval (in days) Null
Setting Default Value
Virtual Wedge Enable
Bar Code Scanner Grid Null
Label Encoding (Code Page) 1252
Magstripe Reader Grid Null
DRAFT
Appendix A — Specifications and Default Settings
138 70 Series Mobile Computer User Manual
DRAFT

139
B
Keypads and Keystrokes
DRAFT

Appendix B — Keypads and Keystrokes
140 70 Series Mobile Computer User Manual
Standard Characters
Use the following tables to learn how to enter standard and other
available characters and functions with the keypad. If there is no
sequence of keystrokes for a particular character or function, it is only
available through the soft input panel (SIP), which you can access by
tapping the keyboard icon on the touch screen.
CN70 Keypads and Keystrokes
CN70 Alphanumeric Characters
Character Numeric Keypad QWERTY Keypad
ac 2 A
bc 2 2 B
cc 2 2 2 C
dc 3 D
ec 3 3 E
fc 3 3 3 F
gc 4 G
hc 4 4 H
ic 4 4 4 I
jc 5 J
kc 5 5 K
lc 5 5 5 L
mc 6 M
nc 6 6 N
oc 6 6 6 O
DRAFT

Appendix B — Keypads and Keystrokes
70 Series Mobile Computer User Manual 141
pc 7 P
qc 7 7 Q
rc 7 7 7 R
sc 7 7 7 7 S
tc 8 T
uc 8 8 U
vc 8 8 8 V
wc 9 W
xc 9 9 X
yc 9 9 9 Y
zc 9 9 9 9 Z
Ac 1 2 y A
Bc 1 2 2 y B
Cc 1 2 2 2 y C
Dc 1 3 y D
Ec 1 3 3 y E
Fc 1 3 3 3 y F
Gc 1 4 y G
Hc 1 4 4 y H
Ic 1 4 4 4 y I
Jc 1 5 y J
Character Numeric Keypad QWERTY Keypad
DRAFT

Appendix B — Keypads and Keystrokes
142 70 Series Mobile Computer User Manual
Kc 1 5 5 y K
Lc 1 5 5 5 y L
Mc 1 6 y M
Nc 1 6 6 y N
Oc 1 6 6 6 y O
Pc 1 7 y P
Qc 1 7 7 y Q
Rc 1 7 7 7 y R
Sc 1 7 7 7 7 y S
Tc 1 8 y T
Uc 1 8 8 y U
Vc 1 8 8 8 y V
Wc 1 9 y W
Xc 1 9 9 y X
Yc 1 9 9 9 y Y
Zc 1 9 9 9 9 y Z
00b ,
11b Y
22b U
33b I
44b H
Character Numeric Keypad QWERTY Keypad
DRAFT

Appendix B — Keypads and Keystrokes
70 Series Mobile Computer User Manual 143
CN70 Characters and Functions
55b J
66b K
77b B
88b N
99b M
To Enter Numeric Keypad QWERTY Keypad
@ (at symbol) N/A b Q
& (ampersand) N/A b S
* (asterisk) *b C
: (colon) N/A b D
, (comma) N/A b X
$ (dollar) N/A b E
! (exclamation) N/A b O
- (hyphen) -b G
% (percent) N/A b R
. (period) ..
+ (plus) b - b T
# (pound) #b V
? (question mark) N/A b A
‘ (apostrophe) N/A b Z
Character Numeric Keypad QWERTY Keypad
DRAFT

Appendix B — Keypads and Keystrokes
144 70 Series Mobile Computer User Manual
Forward Tab jj
Backspace { {
Up Arrow uu
Down Arrow dd
Left Arrow ll
Right Arrow rr
CapsLock c 1 y y
Enter ee
ok b | b P
Shift b or cb or y
Space c 0 s
Start (Windows) b m or c m b m
Esc ||
Talk pp
End Call ww
Intermec Dashboard mm
To Enter Numeric Keypad QWERTY Keypad
DRAFT

Appendix B — Keypads and Keystrokes
70 Series Mobile Computer User Manual 145
CN70e Keypads and Keystrokes
CN70e Alphanumeric Characters
Character Numeric Keypad QWERTY Numeric Keypad
ac 2 A
bc 2 2 B
cc 2 2 2 C
dc 3 D
ec 3 3 E
fc 3 3 3 F
gc 4 G
hc 4 4 H
ic 4 4 4 I
jc 5 J
kc 5 5 K
lc 5 5 5 L
mc 6 M
nc 6 6 N
oc 6 6 6 O
pc 7 P
qc 7 7 Q
rc 7 7 7 R
sc 7 7 7 7 S
DRAFT

Appendix B — Keypads and Keystrokes
146 70 Series Mobile Computer User Manual
tc 8 T
uc 8 8 U
vc 8 8 8 V
wc 9 W
xc 9 9 X
yc 9 9 9 Y
zc 9 9 9 9 Z
Ac 1 2 y A
Bc 1 2 2 y B
Cc 1 2 2 2 y C
Dc 1 3 y D
Ec 1 3 3 y E
Fc 1 3 3 3 y F
Gc 1 4 y G
Hc 1 4 4 y H
Ic 1 4 4 4 y I
Jc 1 5 y J
Kc 1 5 5 y K
Lc 1 5 5 5 y L
Mc 1 6 y M
Nc 1 6 6 y N
Character Numeric Keypad QWERTY Numeric Keypad
DRAFT

Appendix B — Keypads and Keystrokes
70 Series Mobile Computer User Manual 147
Oc 1 6 6 6 y O
Pc 1 7 y P
Qc 1 7 7 y Q
Rc 1 7 7 7 y R
Sc 1 7 7 7 7 y S
Tc 1 8 y T
Uc 1 8 8 y U
Vc 1 8 8 8 y V
Wc 1 9 y W
Xc 1 9 9 y X
Yc 1 9 9 9 y Y
Zc 1 9 9 9 9 y Z
000
111
222
333
444
555
666
777
888
Character Numeric Keypad QWERTY Numeric Keypad
DRAFT

Appendix B — Keypads and Keystrokes
148 70 Series Mobile Computer User Manual
CN70e Characters and Functions
999
To Enter Numeric Keypad QWERTY Numeric Keypad
@ (at symbol) N/A b Q
& (ampersand) N/A b U
* (asterisk) **
: (colon) N/A b I
, (comma) N/A ,
$ (dollar) N/A b E
! (exclamation) N/A b O
- (hyphen) --
% (percent) N/A b R
. (period) ..
+ (plus) b - b -
# (pound) ##
? (question mark) N/A b Y
‘ (apostrophe) N/A b W
Forward Tab jj
Backspace { {
Up Arrow uu
Down Arrow dd
Character Numeric Keypad QWERTY Numeric Keypad
DRAFT

Appendix B — Keypads and Keystrokes
70 Series Mobile Computer User Manual 149
CK70 Keypads and Keystrokes
CK70 Alphanumeric Characters
Left Arrow ll
Right Arrow rr
CapsLock c 1 y y
Enter ee
ok b | b |
Shift b or cb or y
Space c 0 s
Start (Windows) b m or c m b m
Esc ||
Talk pp
End Call ww
Intermec Dashboard mm
Character Large Alpha Keypad Alphanumeric Keypad
aAA
bBB
cCC
dDD
eEE
fFF
To Enter Numeric Keypad QWERTY Numeric Keypad
DRAFT

Appendix B — Keypads and Keystrokes
150 70 Series Mobile Computer User Manual
gGG
hHH
iII
jJJ
kKK
lLL
mMM
nNN
oOO
pPP
qQQ
rRR
sSS
tTT
uUU
vVV
wWW
xXX
yYY
zZZ
Ay A y A
Character Large Alpha Keypad Alphanumeric Keypad
DRAFT

Appendix B — Keypads and Keystrokes
70 Series Mobile Computer User Manual 151
By B y B
Cy C y C
Dy D y D
Ey E y E
Fy F y F
Gy G y G
Hy H y H
Iy I y I
Jy J y J
Ky K y K
Ly L y L
My M y M
Ny N y N
Oy O y O
Py P y P
Qy Q y Q
Ry R y R
Sy S y S
Ty T y T
Uy U y U
Vy V y V
Character Large Alpha Keypad Alphanumeric Keypad
DRAFT

Appendix B — Keypads and Keystrokes
152 70 Series Mobile Computer User Manual
CK70 Characters and Functions
Wy W y W
Xy X y X
Yy Y y Y
Zy Z y Z
0bP 0
1bD 1
2bE 2
3bF 3
4bG 4
5bH 5
6bI 6
7bK 7
8bL 8
9bM 9
To Enter Large Alpha Keypad Alphanumeric Keypad
@ (at symbol) b S N/A
& (ampersand) b W b U
* (asterisk) b O b 0
: (colon) b J b 2
; (semicolon) c J b 5
Character Large Alpha Keypad Alphanumeric Keypad
DRAFT

Appendix B — Keypads and Keystrokes
70 Series Mobile Computer User Manual 153
, (comma) b T c X
$ (dollar) c S N/A
! (exclamation) c W N/A
- (hyphen or minus) c X c s
% (percent) c O N/A
. (period) ..
+ (plus) b X b s
# (pound) b Q c 0
? (question mark) c Q c Y
‘ (apostrophe) c T b Y
= (equals) b Y b S
_ (underscore) c Y c X
> (greater than) c N c V
< (less than) b N b V
[ (left square bracket) b V b T
] (right square bracket) c V c T
{ (left curly brace) N/A b U
} (right curly brace) N/A c U
~ (tilde) N/A b W
\ (backslash) c U c 8
/ (forward slash) b U b 8
To Enter Large Alpha Keypad Alphanumeric Keypad
DRAFT

Appendix B — Keypads and Keystrokes
154 70 Series Mobile Computer User Manual
“ (quotes) N/A b Z
( (left parenthesis) b R N/A
) (right parenthesis) c R N/A
Insert b Z b 4
Delete c Z b 6
Sym b s N/A
¦ (broken vertical bar) N/A c S
̀ (grave) N/A c W
Forward Tab jj
Backspace { {
Up Arrow uu
Down Arrow dd
Left Arrow ll
Right Arrow rr
CapsLock y y y y
Enter ee
ok c m c m
Shift yy
Space ss
Start (Windows) b m or c m b m or c m
Esc ||
To Enter Large Alpha Keypad Alphanumeric Keypad
DRAFT

Appendix B — Keypads and Keystrokes
70 Series Mobile Computer User Manual 155
CK70 Function Keys
Alt N/A Alt
Ctrl Ctrl Ctrl
Send Call b A c 1
End Call b C c 3
Intermec Dashboard mm
To Enter Large Alpha Keypad Alphanumeric Keypad
F1 c D ¡
F2 c E ¢
F3 c F £
F4 c G ¤
F5 c H ¥
F6 c I b ¡
F7 c K b ¢
F8 c L b £
F9 c M b ¤
F10 c P b ¥
F11 N/A b A
F12 N/A b B
F13 N/A b C
F14 N/A b D
F15 N/A b E
To Enter Large Alpha Keypad Alphanumeric Keypad
DRAFT

Appendix B — Keypads and Keystrokes
156 70 Series Mobile Computer User Manual
CK71 Keypads and Keystrokes
CK71 Alphanumeric Characters
F16 N/A b F
F17 N/A b G
F18 N/A b H
F19 N/A b I
F20 N/A b J
F21 N/A b K
F22 N/A b L
F23 N/A b M
F24 N/A b N
Character Numeric With Function Keys Keypad Alphanumeric Keypad
ab 7 A
bb 8 B
cb 9 C
db 4 D
eb 5 E
fb 6 F
gb 1 G
hb 2 H
ib 3 I
To Enter Large Alpha Keypad Alphanumeric Keypad
DRAFT

Appendix B — Keypads and Keystrokes
70 Series Mobile Computer User Manual 157
jb 0 J
kb - K
lb ¡ L
mb ¢ M
nb £ N
ob ¤ O
pb ¥ P
qb ¦ Q
rb § R
sb ¨ S
tb © T
ub ª U
vb « V
wb ¬ W
xb m X
yb Ctrl Y
zb Alt Z
Ab y 7 y A
Bb y 8 y B
Cb y 9 y C
Db y 4 y D
Character Numeric With Function Keys Keypad Alphanumeric Keypad
DRAFT

Appendix B — Keypads and Keystrokes
158 70 Series Mobile Computer User Manual
Eb y 5 y E
Fb y 6 y F
Gb y 1 y G
Hb y 2 y H
Ib y 3 y I
Jb y 0 y J
Kb y - y K
Lb y ¡ y L
Mb y ¢ y M
Nb y £ y N
Ob y ¤ y O
Pb y ¥ y P
Qb y ¦ y Q
Rb y § y R
Sb y ¨ y S
Tb y © y T
Ub y ª y U
Vb y « y V
Wb y ¬ y W
Xby m y X
Yb y Ctrl y Y
Character Numeric With Function Keys Keypad Alphanumeric Keypad
DRAFT

Appendix B — Keypads and Keystrokes
70 Series Mobile Computer User Manual 159
CK71 Characters and Functions
Zb y Alt y Z
000
111
222
333
444
555
666
777
888
999
To Enter Numeric With Function Keys Keypad Alphanumeric Keypad
: (colon) c s b 8
; (semicolon) N/A b 5
, (comma) N/A c X
$ (dollar) c S N/A
! (exclamation) c W N/A
- (hyphen or minus) -c s
. (period) ..
+ (plus) N/A b s
Character Numeric With Function Keys Keypad Alphanumeric Keypad
DRAFT

Appendix B — Keypads and Keystrokes
160 70 Series Mobile Computer User Manual
‘ (apostrophe) N/A b Y
= (equals) N/A b S
_ (underscore) c - c X
> (greater than) N/A c V
< (less than) N/A b V
[ (left square bracket) N/A b T
] (right square bracket) N/A c T
{ (left curly brace) N/A b U
} (right curly brace) N/A c U
~ (tilde) N/A b W
\ (backslash) c Alt c 2
/ (forward slash) c Ctrl b 2
“ (quotes) N/A b Z
Insert b l b 4
Delete c 4 b 6
¦ (broken vertical bar) N/A c S
̀ (grave) N/A c W
Forward Tab jj
Backspace { {
Up Arrow uu
Down Arrow dd
To Enter Numeric With Function Keys Keypad Alphanumeric Keypad
DRAFT

Appendix B — Keypads and Keystrokes
70 Series Mobile Computer User Manual 161
CK71 Function Keys
Left Arrow ll
Right Arrow rr
CapsLock y y y y
Enter ee
ok c m c m
Shift yy
Space ss
Start (Windows) b m or c m b m or c m
Esc ||
Alt Alt b |
Ctrl Ctrl Ctrl
Intermec Dashboard mm
To Enter Numeric With Function Keys Keypad Alphanumeric Keypad
F1 ¡¡
F2 ¢¢
F3 ££
F4 ¤¤
F5 ¥¥
F6 ¦b ¡
F7 §b ¢
To Enter Numeric With Function Keys Keypad Alphanumeric Keypad
DRAFT

Appendix B — Keypads and Keystrokes
162 70 Series Mobile Computer User Manual
F8 ¨b £
F9 ©b ¤
F10 ªb ¥
F11 «b A
F12 ¬b B
F13 c ¡ b C
F14 c ¢ b D
F15 c £ b E
F16 c ¤ b F
F17 c ¥ b G
F18 c ¦ b H
F19 c § b I
F20 c ¨ b J
F21 c © b K
F22 c ª b L
F23 c « b M
F24 c ¬ b N
To Enter Numeric With Function Keys Keypad Alphanumeric Keypad
DRAFT

Appendix B — Keypads and Keystrokes
70 Series Mobile Computer User Manual 163
CK71 Intermec Terminal Emulation (ITE) Keys
To Enter Numeric With Function Keys Keypad Alphanumeric Keypad
Attention c 0 c A
Autolog N/A c ¤
Clear b 6 c 6
Duplicate N/A c D
EEOF N/A c ¥
Erase N/A c E
Find N/A c F
Field + c x c 1
Field - b x c 1
Fieldmark N/A c G
Help N/A b 3
Hex N/A c I
Home c . c H
Keypad N/A c K
Menu N/A c M
Mode N/A c O
New Line N/A c N
Next Screen c 9 b 9
PA1 c 1 c ¡
PA2 c 2 c ¢
DRAFT

Appendix B — Keypads and Keystrokes
164 70 Series Mobile Computer User Manual
PA3 c 3 c £
Page c d c d
Print N/A c P
Previous Screen c 7 c 7
Remove N/A c R
Reset c | c |
Return c e c e
Roll Down c 5 c 5
Roll Up c 8 c 8
System Request b r c Q
View N/A b d
View Down b d N/A
View Up b u N/A
To Enter Numeric With Function Keys Keypad Alphanumeric Keypad
DRAFT

165
C
ScanNGo Wi-Fi Configuration Bar Codes
You can use the ScanNGo Wi-Fi configuration bar codes to
quickly configure the 802.11 radio in your computer.
DRAFT
Appendix C — ScanNGo Wi-Fi Configuration Bar Codes
166 70 Series Mobile Computer User Manual
Radio Configuration Bar Codes
Use the following ScanNGo bar codes to enable the 802.11 radio and
set the defaults for either Funk or Microsoft Wireless Zero
Configuration security. After you scan the bar codes, you will still need
to use Intermec Settings or another configuration program to set
network-specific settings on your computer and to configure the
wireless security.
The CN70, CN70e, and CK70 are available with the EA30 imager only.
The CK71 has three imager options: the EA30, EX25, or EV12 imager.
If your CK71 has an EA30 or EX25 imager, use the 2D configuration
bar codes to configure the radio. If your CK71 has an EV12 imager, use
the 1D configuration bar codes to configure the radio. You can find
out what imager is in your CK71 by opening Intermec Settings and
tapping Data Collection > Internal Scanner > Scanner Settings.
The following ScanNGo bar codes were created using SmartSystems
Foundation. For more information on SmartSystems Foundation, see
“Managing the Computer Using SmartSystems” on page 94.
2D Configuration Bar Codes
Follow these directions to configure the computer with a 2D imager
(EA30 or EX25):
1Scan the appropriate bar code from the table and wait for the
program to start.
2Follow any instructions on the device.
DRAFT

Appendix C — ScanNGo Wi-Fi Configuration Bar Codes
70 Series Mobile Computer User Manual 167
2D Imager Radio Configuration Bar Codes
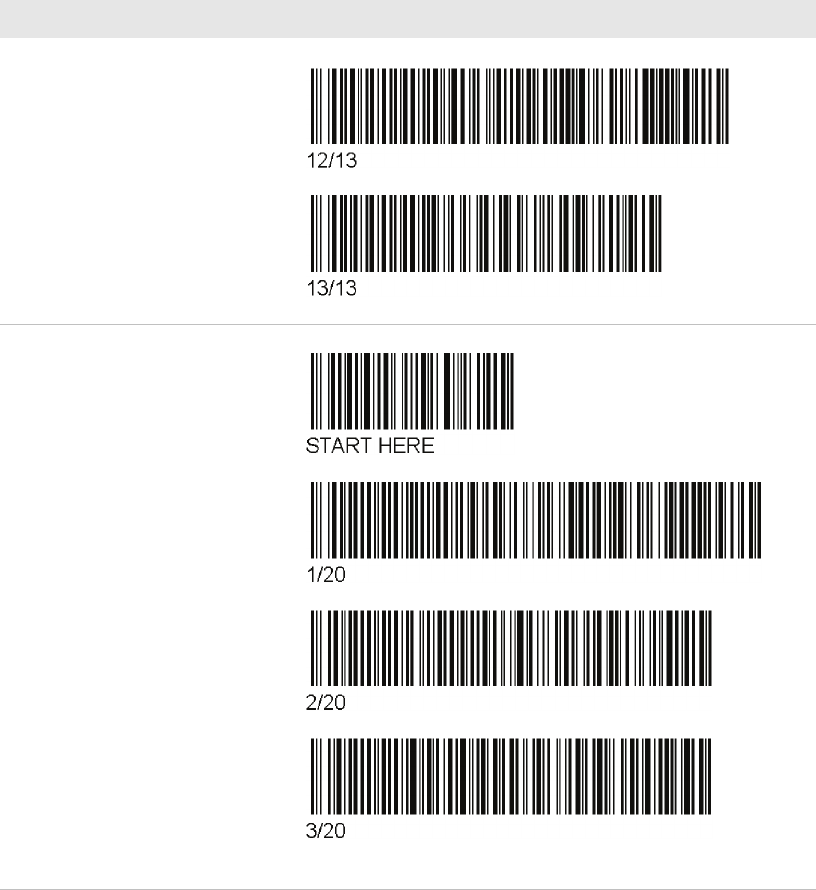
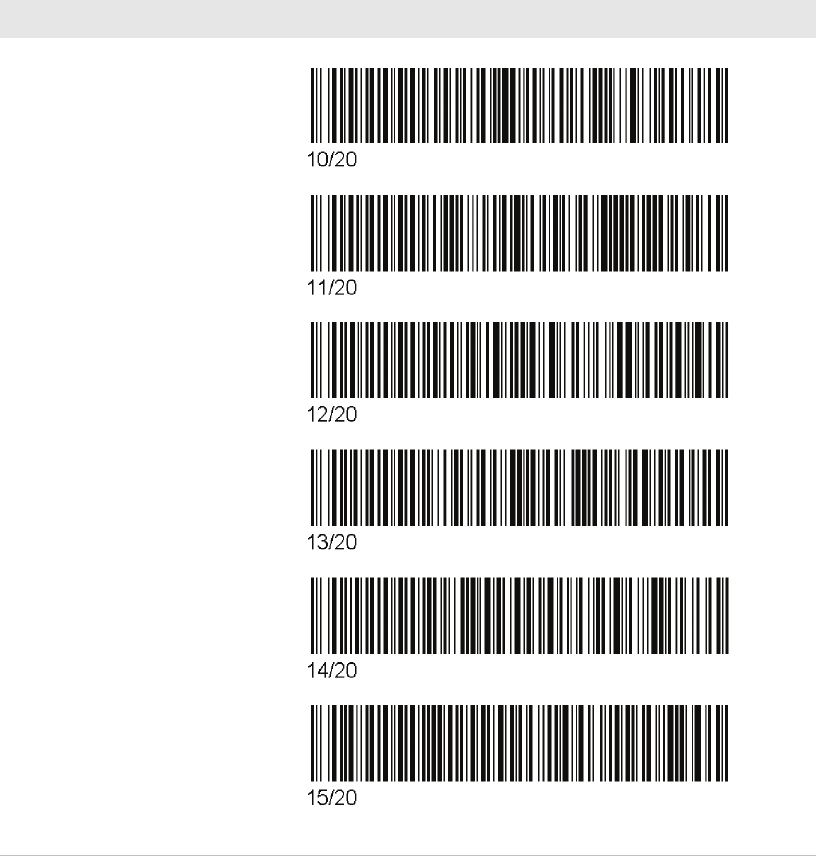
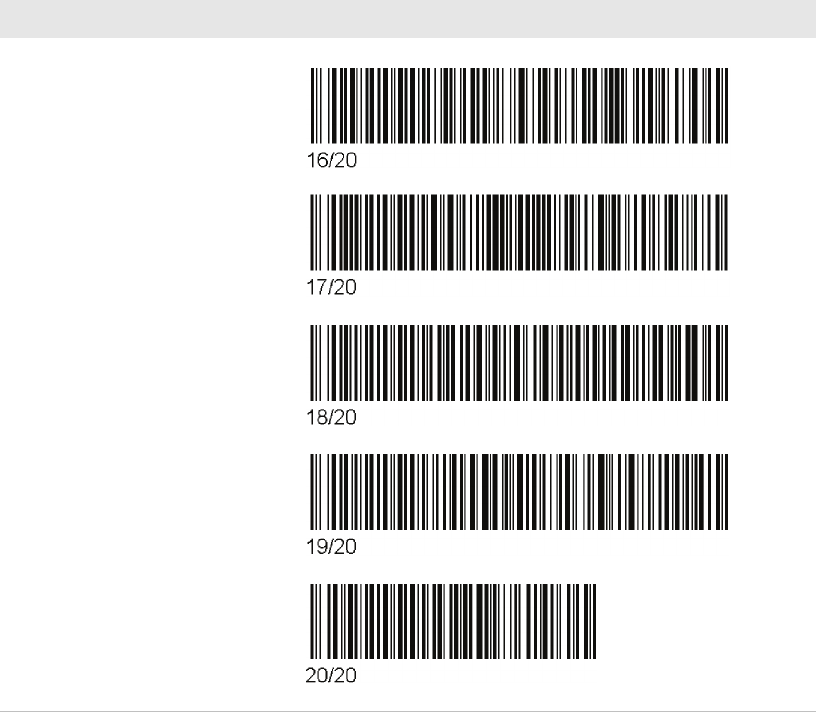
1D Configuration Bar Codes
Follow these directions to configure the computer with a 1D imager
(EV12):
1Scan the START HERE bar code from the table and wait for the
program to start.
2Scan the bar code labeled 1/13 or 1/20 depending of the wireless
security you want to use.
3Scan the rest of the bar codes in any order.
4Follow any instructions on the device.
To Configure These Settings: Scan This Bar Code
Enable Wi-Fi - set Funk defaults
Enable Wi-Fi radio - set Microsoft WZC defaults
DRAFT

Appendix C — ScanNGo Wi-Fi Configuration Bar Codes
168 70 Series Mobile Computer User Manual
1D Imager Radio Configuration Bar Codes
To Configure These Settings: Scan This Bar Code
Enable Wi-Fi - set Funk defaults
DRAFT

Appendix C — ScanNGo Wi-Fi Configuration Bar Codes
70 Series Mobile Computer User Manual 169
Enable Wi-Fi - set Funk defaults
(continued)
To Configure These Settings: Scan This Bar Code
DRAFT
Appendix C — ScanNGo Wi-Fi Configuration Bar Codes
170 70 Series Mobile Computer User Manual
Enable Wi-Fi - set Funk defaults
(continued)
Enable Wi-Fi radio - set Microsoft
WZC defaults
To Configure These Settings: Scan This Bar Code
DRAFT

Appendix C — ScanNGo Wi-Fi Configuration Bar Codes
70 Series Mobile Computer User Manual 171
Enable Wi-Fi radio - set Microsoft
WZC defaults (continued)
To Configure These Settings: Scan This Bar Code
DRAFT
Appendix C — ScanNGo Wi-Fi Configuration Bar Codes
172 70 Series Mobile Computer User Manual
Enable Wi-Fi radio - set Microsoft
WZC defaults (continued)
To Configure These Settings: Scan This Bar Code
DRAFT
Appendix C — ScanNGo Wi-Fi Configuration Bar Codes
70 Series Mobile Computer User Manual 173
Enable Wi-Fi radio - set Microsoft
WZC defaults (continued)
To Configure These Settings: Scan This Bar Code
DRAFT
Appendix C — ScanNGo Wi-Fi Configuration Bar Codes
174 70 Series Mobile Computer User Manual
DRAFT

175
I
Index
DRAFT
Index
176 70 Series Mobile Computer User Manual
Symbols
.cab files, using to install
applications 96
Numerics
70 Series
computer models 2
features 5
802.11 communications,
configuring 73
802.11 network status
troubleshooting 107
802.11 radio, default settings 133
802.1x security
configuring with Funk 84
configuring with Microsoft 88
troubleshooting 106
with Funk 84
A
accessories, described 8
activation wizard, starting 53
ActiveSync
downloading 100
establishing a partnership 34
using to install applications 97
aligning the screen 43
alpha with numeric keypad
illustrated 18
keypresses, listed 149–156
alphanumeric keypad
illustrated 18
keypresses, listed 149–164
applications
developing with Intermec
Resource Kits 95
installing with a storage card 97
installing with ActiveSync 97
installing with computer as mass
storage device 35
installing with Console 96
Intermec 44
Intermec, available for download
45
Intermec, available on computer
44
launching automatically 97
packaging 96
troubleshooting 113
ASCII scanner, connecting 78
audio device, connecting with
Bluetooth 77
audio snap-on adapter, described 8
AutoRun, description 96
AutoRun.exe, using to start
application 97
B
back accessory interface
description 8
pin-outs 120
backlight
configuring screen 26
keypad behavior 18
bar code
default symbology settings 130
radio configuration 166
reading 27
reading, troubleshooting 109
symbologies 121
battery
about 10
battery icons, described 13
changing 10
charging 10
charging accessories 10
checking the status 13
conserving battery life 15
descriptions 8
status LED 14
Bluetooth
Audio application description
44
audio device, connecting to 77
communications, configuring
74–77
printer, connecting to 76
scanner, connecting to 74
C
calling product support 112
camera, description 56
Carrier Selection, described 44
carriers, switching 54
CDMA phone
activating 52
carriers 52
certificate, loading 90
changing the battery 10
characters
entering on CK70/CK71 keypad
23
DRAFT
Index
70 Series Mobile Computer User Manual 177
entering on numeric keypad 22
entering on QWERTY keypad 21
entering with keystrokes
140–164
charging accessories, battery 10
charging the battery 10
CK70
keypads, illustrated 18
status LEDs 6, 7
CK70/CK71
battery, described 8
entering characters on keypad
23
magstripe reader adapter,
described 8
CK71
keypads, illustrated 18
status LEDs 7
clean boot, performing 115
cleaning computer 116
CN70
keypads, illustrated 16
status LEDs 6
CN70/CN70e
battery, described 8
vehicle dock, described 9
vehicle holder, described 9
cold boot, performing 113
communications
802.11, configuring 73
Bluetooth, configuring 74–77
default settings 133
Ethernet, configuring 73
serial 77
USB 77
configuration number, finding 112
configuring parameters 64
conserving battery life 15
Console
using to install applications 96
contact information, Intermec ii
D
Dashboard
about the button 25
button, using 104
description 104
illustration 104
launching 25
default settings
bar code symbologies 130
communications 133
imager 132
listed 130–137
restoring Intermec Settings 71
scanner 132
desktop stand, described 8
DX1 desktop dock, described 8
DX2 dual dock, described 8
DX4 quad dock, described 8
E
EA30 area imager, reading
distances 122
electrial specifications 119
eMDI, description 45
emergency phone call, making with
computer 54
Enhanced Mobile Document
Imaging (eMDI) application,
description 45
environmental specifications 118
Ethernet
communications, configuring
73
snap-on adapter, described 9
EV12 linear imager, reading
distances 125
EX25 imager, reading distances 127
F
Features Demo, description 46
features of 70 Series 5
files, transferring to and from PC
34
fix interval, configuring with iGPS
62
flash file store, using computer as
35
flick, screen gesture described 40
Funk security
802.1x 84
configuring 802.1x 84
configuring static WEP 85
configuring WPA Enterprise
(802.1x) 82
configuring WPA Personal (PSK)
83
configuring WPA2 Enterprise
(802.1x) 82
configuring WPA2 Personal
(PSK) 83
profile, choosing 82
DRAFT
Index
178 70 Series Mobile Computer User Manual
using open (no security)
associations 85
G
gestures, supported 39
Good Read LED
description 7
troubleshooting 109
GPS
configuring 60
GPSID, overview 60
improving performance 61
GPSID (GPS Intermediate Driver)
overview 60
gpsOneXTRA, description 61
H
handstrap replacement kit,
described 9
hard reset, performing 113
health, monitoring computer 104
Hibernate (battery swap),
description 24
holster, described 9
Home screen, understanding 38
horizontal scroll bar
description 38
illustration 38
I
IDL (Intermec Developer Library)
95
iGPS application description 44
iGPS, using to improve
performance 61
Image Capture, description 46
Image Update
silently updating system
software 100
using to update system software
98
imager
default settings 132
reading distances 122–129
Intermec Browser, description 46
Intermec Connection Manager,
description 46
Intermec Dashboard, about 104
Intermec Developer Library (IDL)
95
Intermec Launcher, description 47
Intermec Resource Kits
described 95
downloading 95
Intermec Settings
command reference manual link
69, 72
described 64
description 44, 64
hiding menu items 71
main menu illustration 65
menu options 65–69
navigating in 70
restoring default settings 71
restoring menu items 71
starting 65
understanding structure 65
using remotely with
SmartSystems 72
using to configure Profile
Settings 70
Intermec, contact information ii
Internet Service Provider (ISP)
connection, creating 78
ISpyWiFi
application description 44
diagnosing Wi-Fi status 107
K
Key status LED, description 7
keypad
backlight behavior 16, 18
keystrokes for entering
characters 140–164
keypads
illustrated 16
troubleshooting keys 111
Knowledge Central web site 112
L
language provisioning 9
launching applications
automatically 97
LEDs
battery status, described 14
status descriptions 7
Location of the CK70 Status LEDs
7
locked computer, troubleshooting
111
M
magstripe reader adapter, described
8
DRAFT
Index
70 Series Mobile Computer User Manual 179
magstripe reader snap-on adapter,
description 8
mass storage device, using
computer as 35
memory, computer 119
microSD card
about 28
installing in a CK70/CK71 31
installing in a CN70/CN70e 28
Microsoft security
choosing 86
configuring 802.1x 88
configuring static WEP 89
configuring WPA Enterprise
(802.1x) 86
configuring WPA Personal (PSK)
87
configuring WPA2 Enterprise
(802.1x) 86
configuring WPA2 Personal
(PSK) 87
using open (no security)
associations 90
models of 70 Series computers 2
MS Assisted mode, description 61
N
network
carriers, switching 54
connection,troubleshooting 105
non-incendive (NI) specifications
119
Notification LED, description 7
numeric function keypad,
illustrated 18
numeric keypad
entering characters on 22
illustrated 16
keypresses, listed 140–??
numeric with function keys keypad
keypresses, listed 156–164
O
open associations
configuring with Funk 85
configuring with Microsoft
WZC 90
operating system
finding version 113
version 2
P
pan, screen gesture described 40
phone
CDMA, activating 52
features 50
making a call 54
making an emergency call 54
turning on and off 53
UMTS, activating 50
physical specifications 118
picture
saving to an SD card 57
storage location 56
taking with camera 56
pin-outs, back accessory interface
120
Power button, description of
behavior 23
power options
customizing 25
setting 23
power specifications 119
predefined imager mode, choosing
27
printer, connecting with Bluetooth
76
processor, computer 119
product support
calling 112
Knowledge Central web site 112
product support, calling 112
Profile Settings
configuring with Intermec
Settings 70
Profile Settings application
description 44
profile, choosing Funk security 82
Q
QWERTY keypad
entering characters on 21
illustrated 16
keypresses, listed 140
R
reading bar codes 27
reading distances
EA30 area imager 122
EV12 linear imager 125
EX25 imager 127
Ready-to-Work LED
DRAFT
Index
180 70 Series Mobile Computer User Manual
description 7
reboot
performing 113
power option description 25
recording a video 57
regulatory approvals 121
Reset button, location 114
reset, performing 113
RS-232 snap-on adapter, described
9
S
scan handle, described 9
ScanDiagnostic
Intermec application
description 45
using to troubleshoot 110
scanner
Bluetooth, connecting to 74
default settings 132
tethered scanner, connecting 78
troubleshooting 109
scanners
supported tethered and cordless
27
ScanNGo
radio configuration bar codes
166
screen
aligning 43
backlight, configuring 26
brightness, configuring 26
gestures 39
no response, troubleshooting
111
specifications 120
Screen Off
power option description 25
SD card, using to save pictures and
videos 57
security, wireless
802.1x with Funk 84
choosing Funk or WZC 81
serial communications, about 77
settings
default, listed 130–137
Shift status LED, description 7
Shutdown
power option description 25
silently updating system software
100
SIM card, installing 50
SmartSystems Foundation
console, illustration 94
Console, using to install
applications 96
description 47
downloading 47, 95
monitoring computer health
104
ScanNGo description 95
updating system software 99
using the Console to install
applications 96
using to manage computer 94
using with remote Intermec
Settings 72
specifications
non-incendive (NI) 119
physical and environmental 118
status icons, Title bar 40
status LEDs
CK70 6
CN70 6
descriptions 7
storage card, using to install
applications 97
storage, computer 119
Suspend, power option description
25
symbologies, supported 121
system software
updating with SmartSystems
Foundation 99
system software, updating 98
T
terminal emulation,
troubleshooting 105
tethered scanner, connecting 78
tethered stylus replacement kit,
described 9
Tile bar
description 38
illustration 38
Title bar
description 38
illustration 38
status icon descriptions 40
transferring files, to and from PC
34
troubleshooting 105–110
DRAFT
Index
70 Series Mobile Computer User Manual 181
802.11 network status 107
802.1x security 106
operation 111
reading bar codes 109
Wi-Fi connection 105
turning on or off phone 53, 54
U
UMTS phone, activating 50
update packages, installing
individual 100
USB communictions, about 77
USB snap-on adapter, described 9
V
vehicle dock accessories, described
9
video
recording 57
saving to an SD card 57
Virtual Private Network (VPN)
connection, creating 80
volume, adjusting 26
W
Wavelink Avalanche, downloading
the enabler 95
WEP
static, configuring with Funk 85
static, configuring with
Microsoft 89
WiFi communications
supported 5
Wi-Fi radio, enabling 73
Wi-Fi, troubleshooting 105
Windows Embedded Handheld,
user interface 38
Windows Mobile Device Center
downloading 100
wireless
connectivity, troubleshooting
105
Wireless Center application
description 45
Wireless Printing application
description 45
Wireless Scanning application
description 45
wireless security 81–91
802.1x with Funk 84
certificate, loading 90
choosing Funk or WZC 81
configuration bar codes 166
Wireless Zero Configuration
(WZC), selecting security
choice 86
WPA
Enterprise (802.1x) security,
configuring with Funk 82
Enterprise (802.1x) security,
configuring with
Microsoft 86
Personal (PSK) security,
configuring with Funk 83
Personal (PSK) security,
configuring with
Microsoft 87
WPA2
Enterprise (802.1x) security,
configuring with Funk 82
Enterprise (802.1x) security,
configuring with
Microsoft 86
Personal (PSK) security,
configuring with Funk 83
Personal (PSK) security,
configuring with
Microsoft 87
www.intermec.com
Knowledge Central 112
manuals, downloading xi, xiii
Product Support 112
warranty information xi
DRAFT
Index
182 70 Series Mobile Computer User Manual
DRAFT
DRAFT

Worldwide Headquarters
6001 36th Avenue West
Everett, Washington 98203
U.S.A.
tel 425.348.2600
fax 425.355.9551
www.intermec.com
© 2011 Intermec Technologies
Corporation. All rights reserved.
70 Series Mobile Computer User Manual
*935-038-002*
P/N 935-038-002
DRAFT