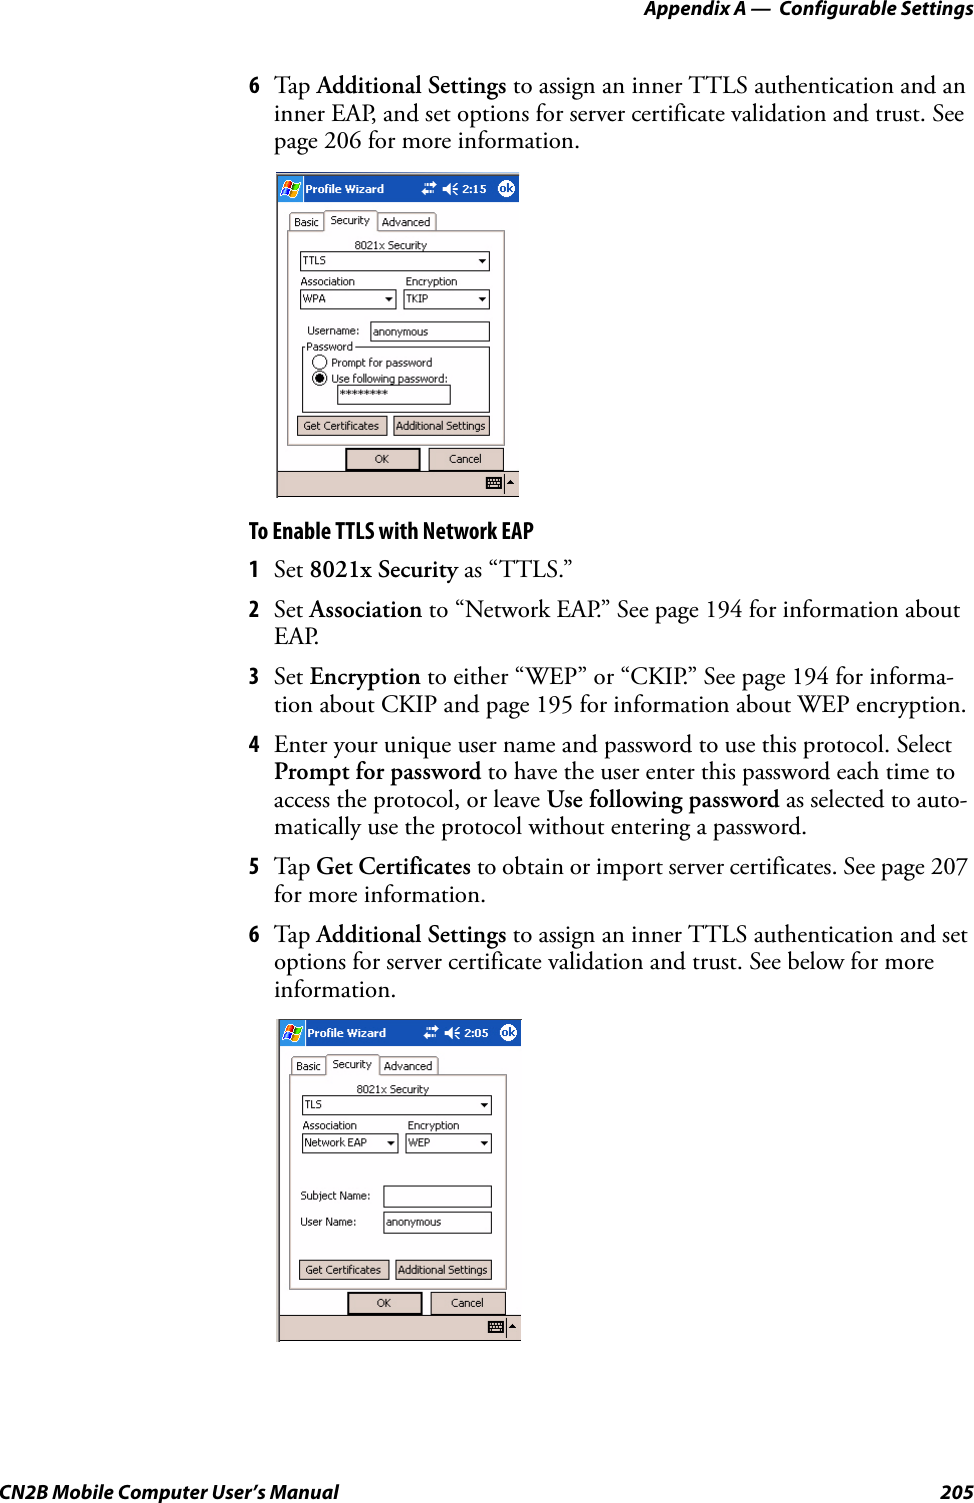
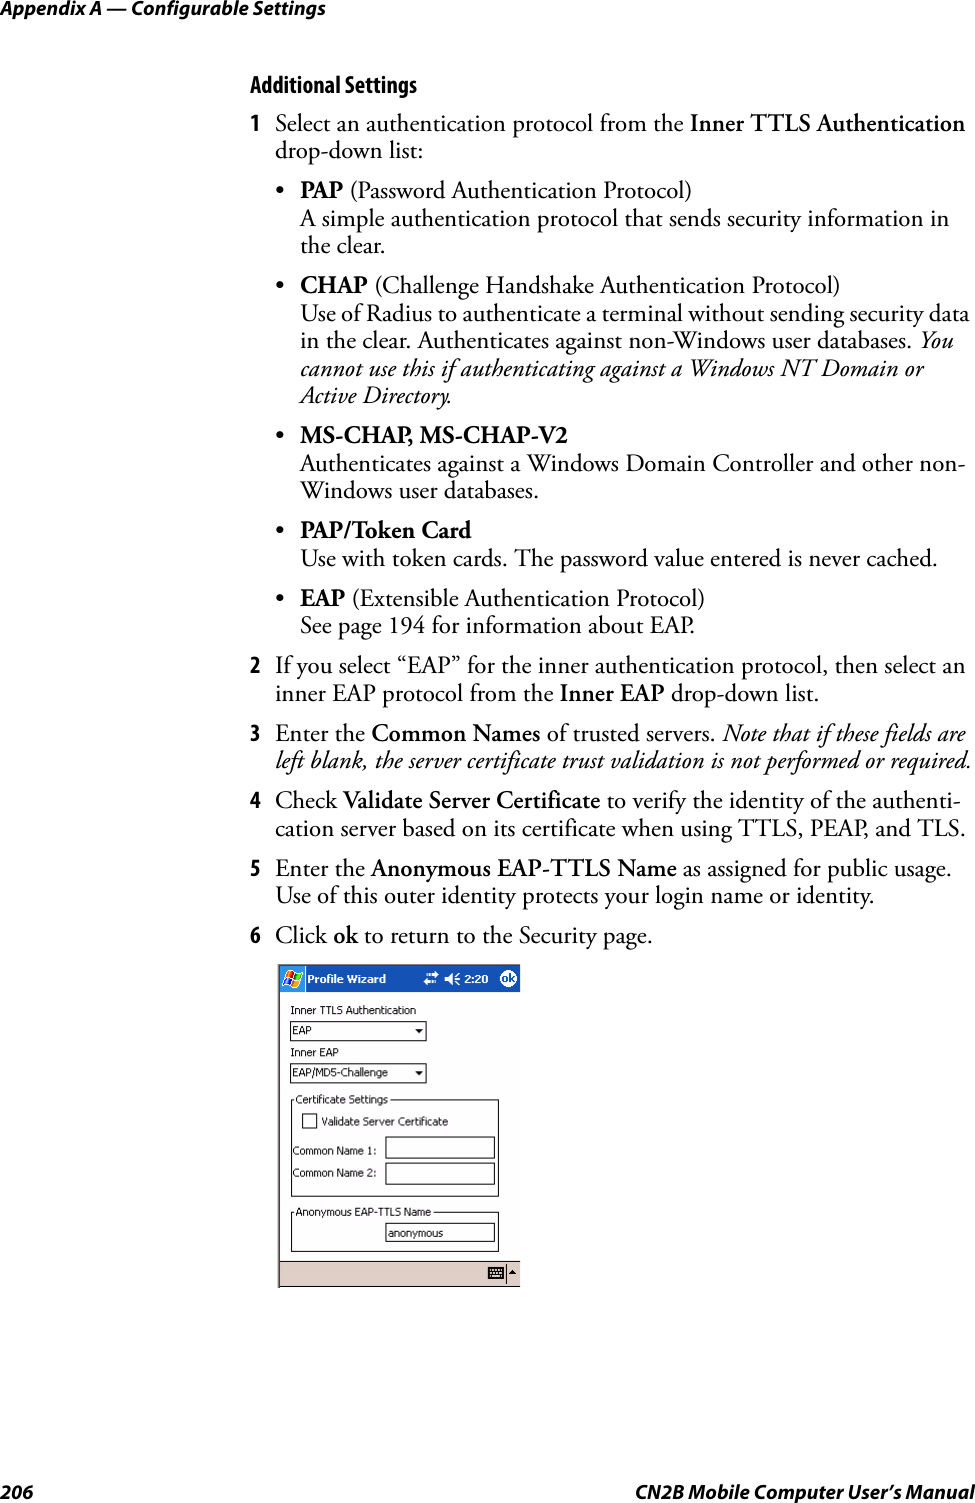
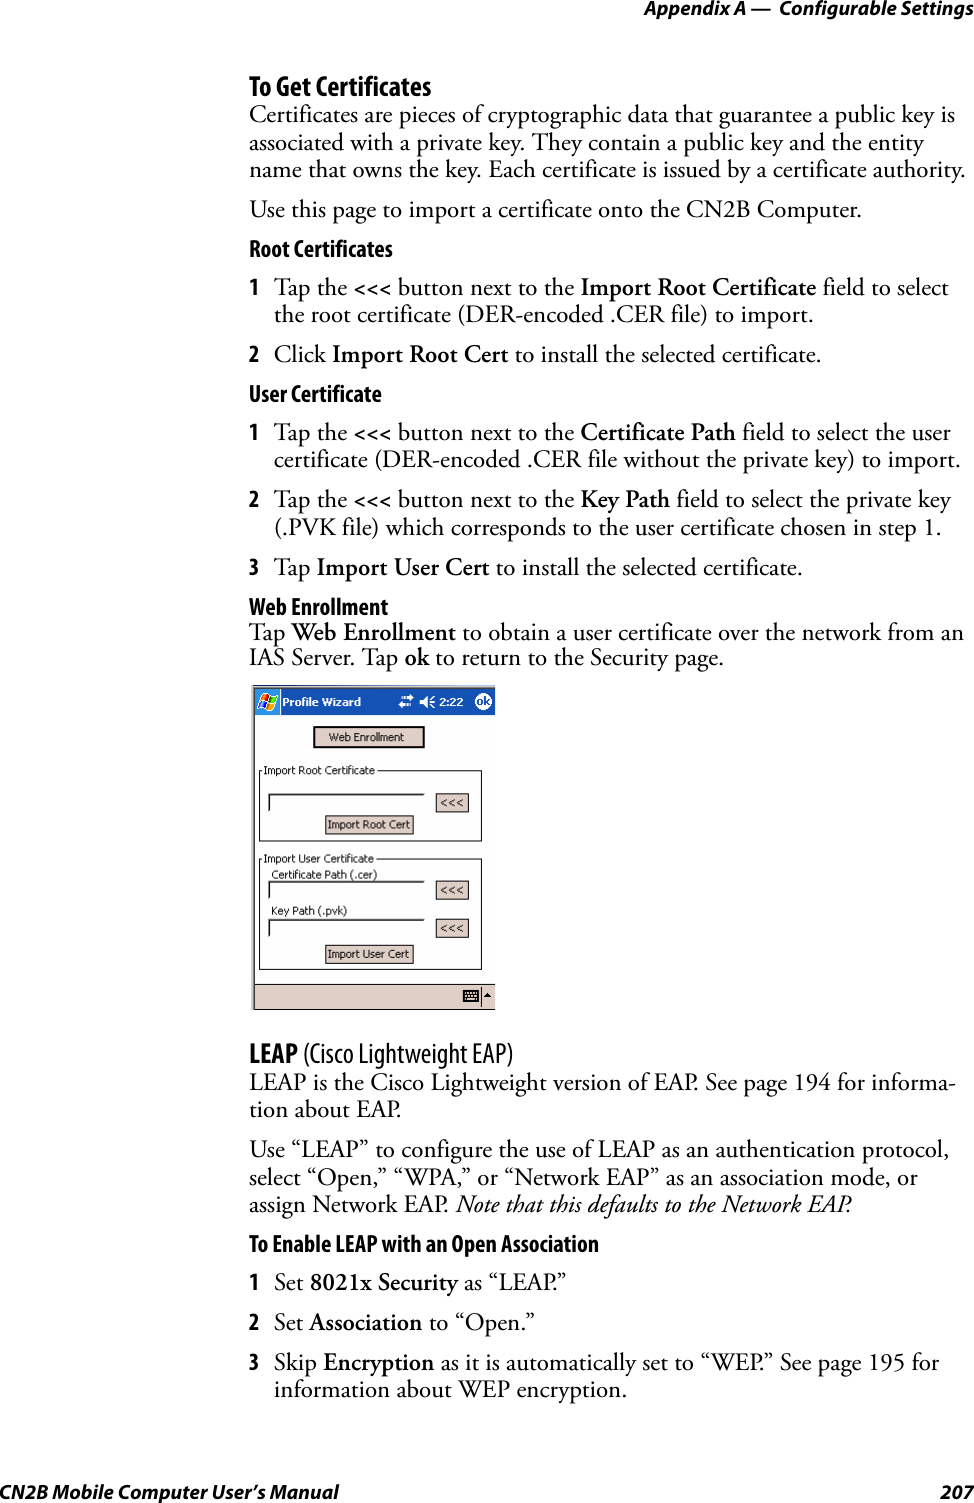
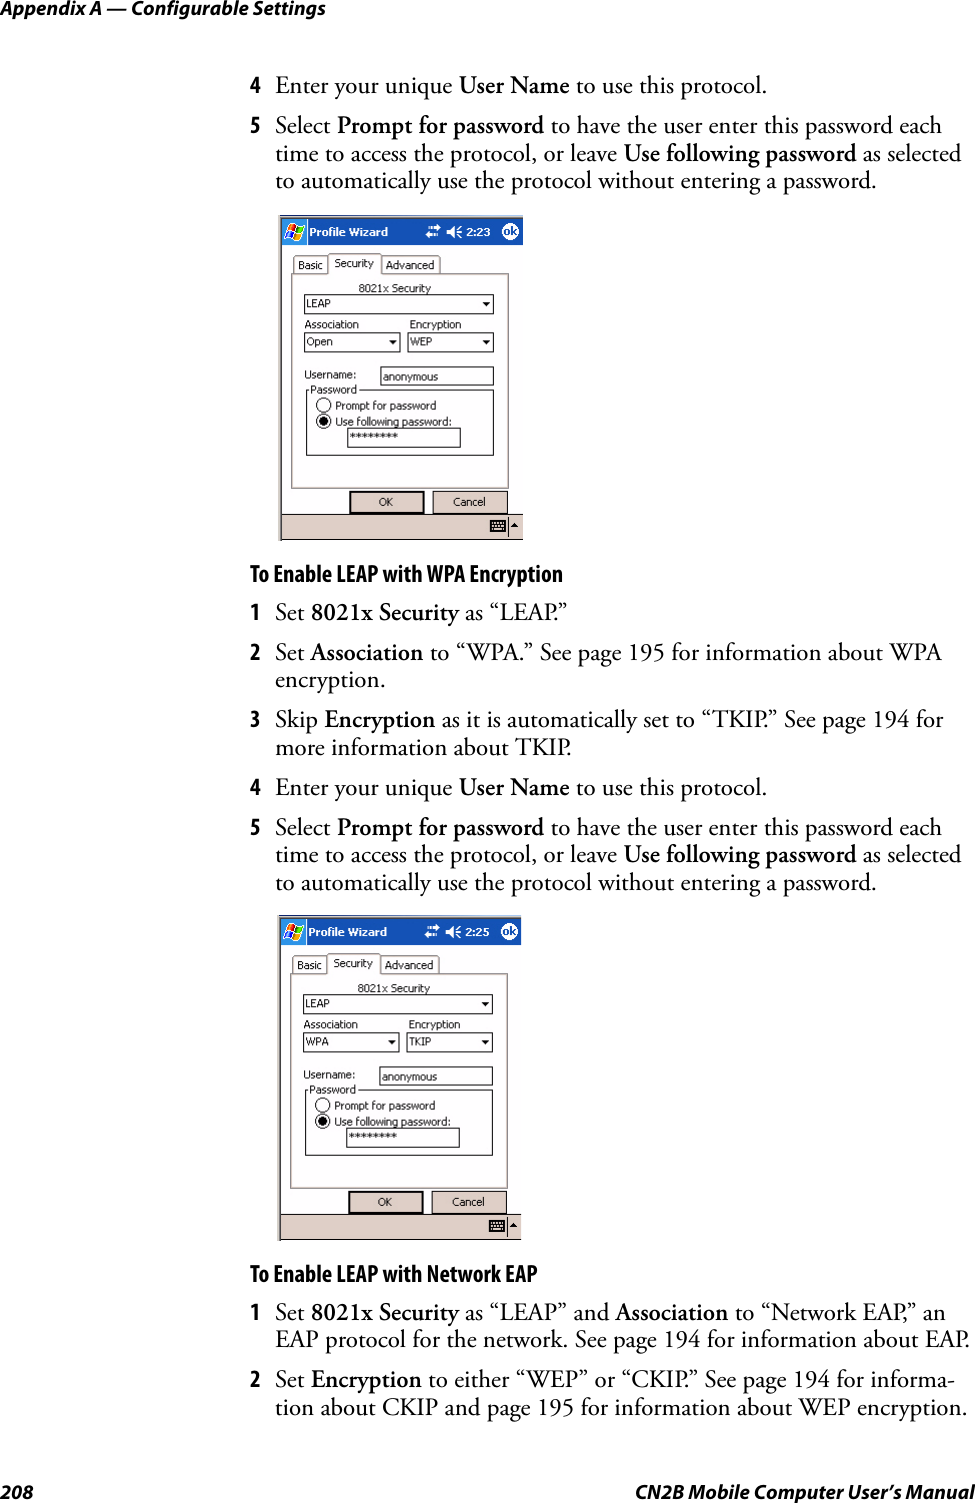
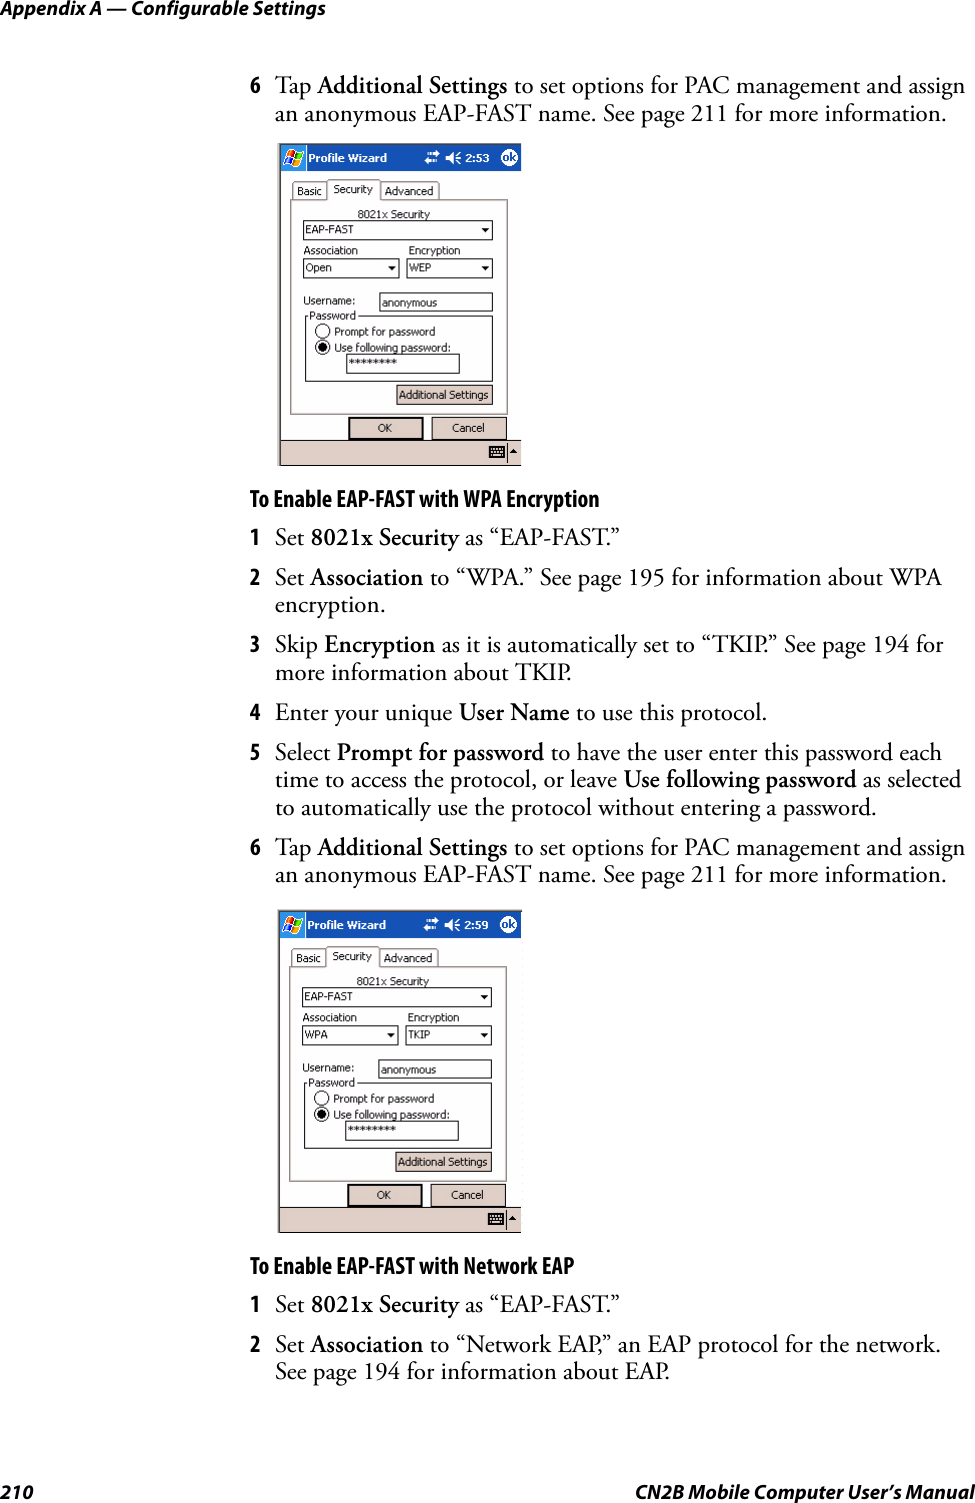
Intermec Technologies 2610CF 2610CF User Manual CN2Busermanual
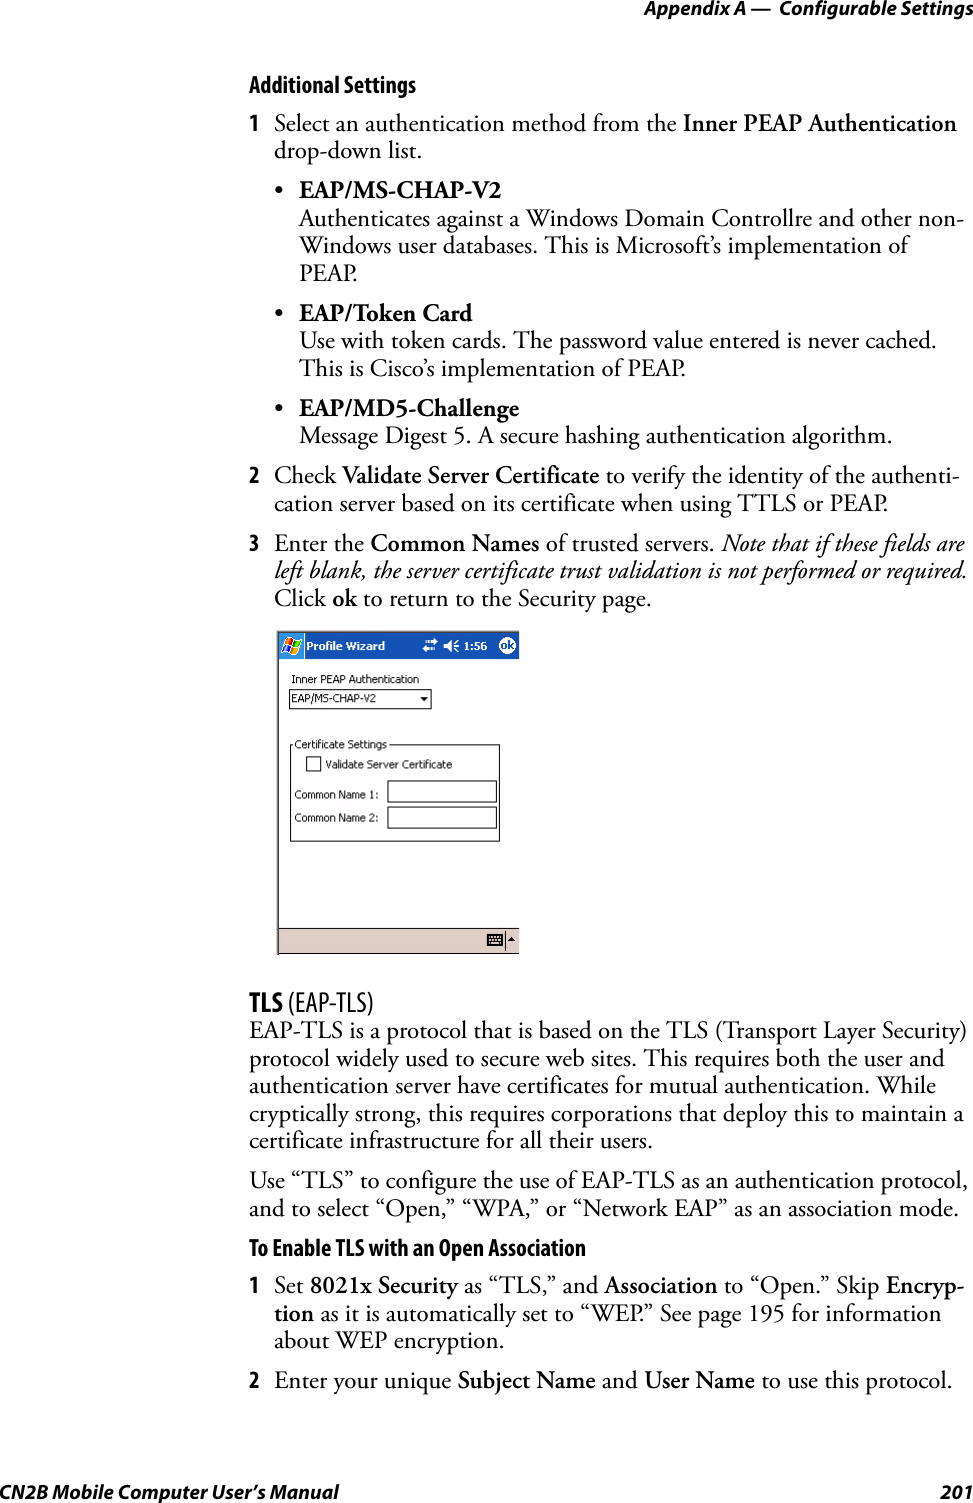
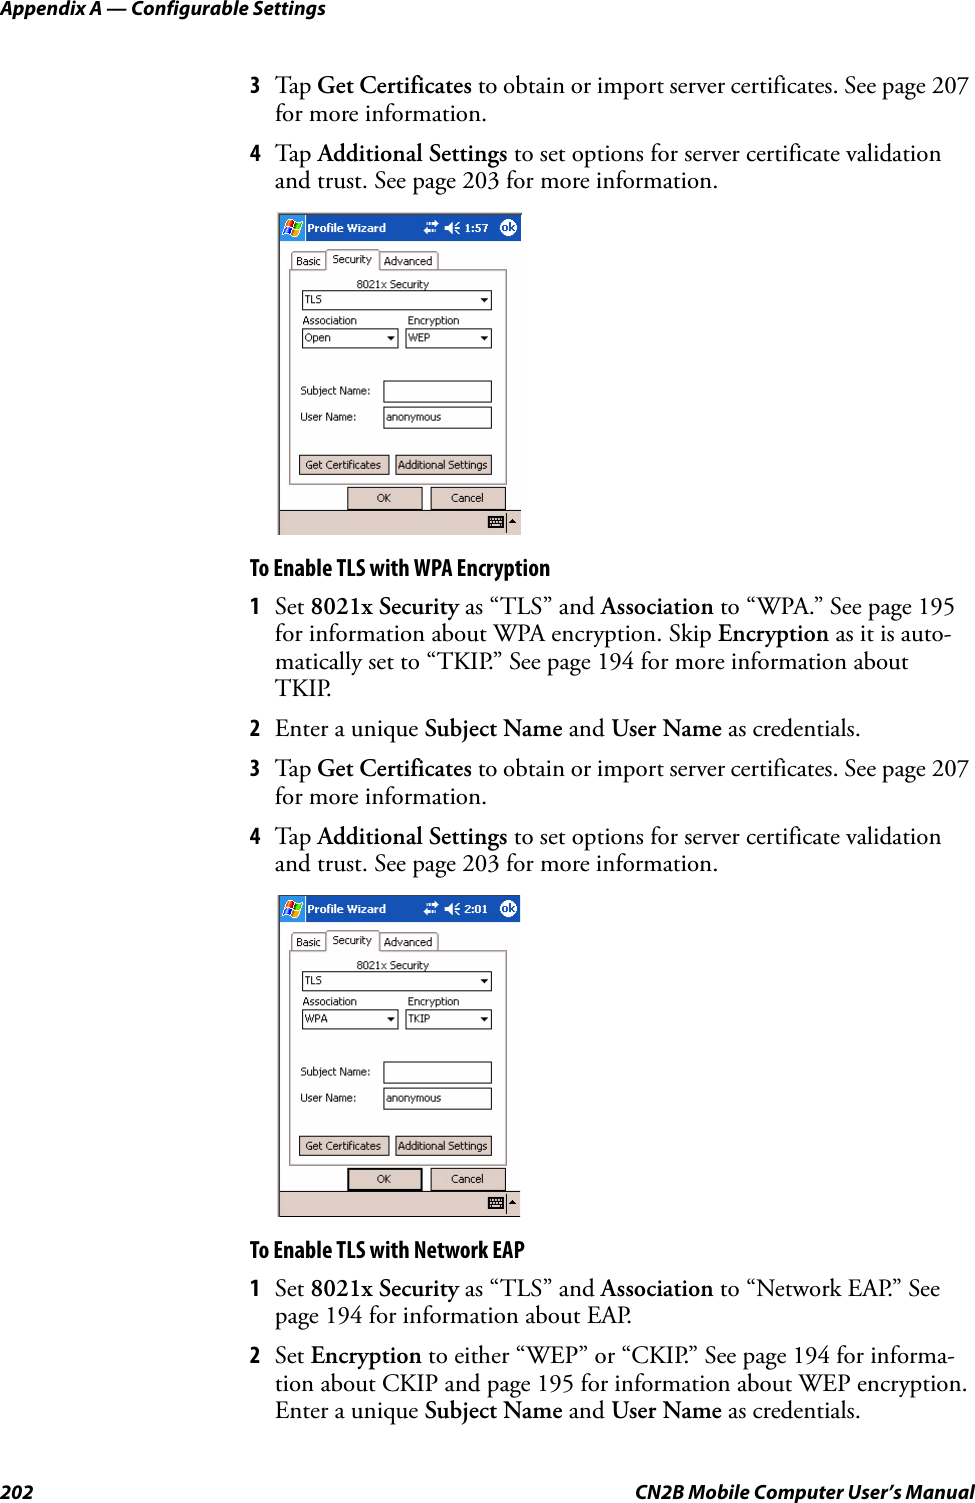
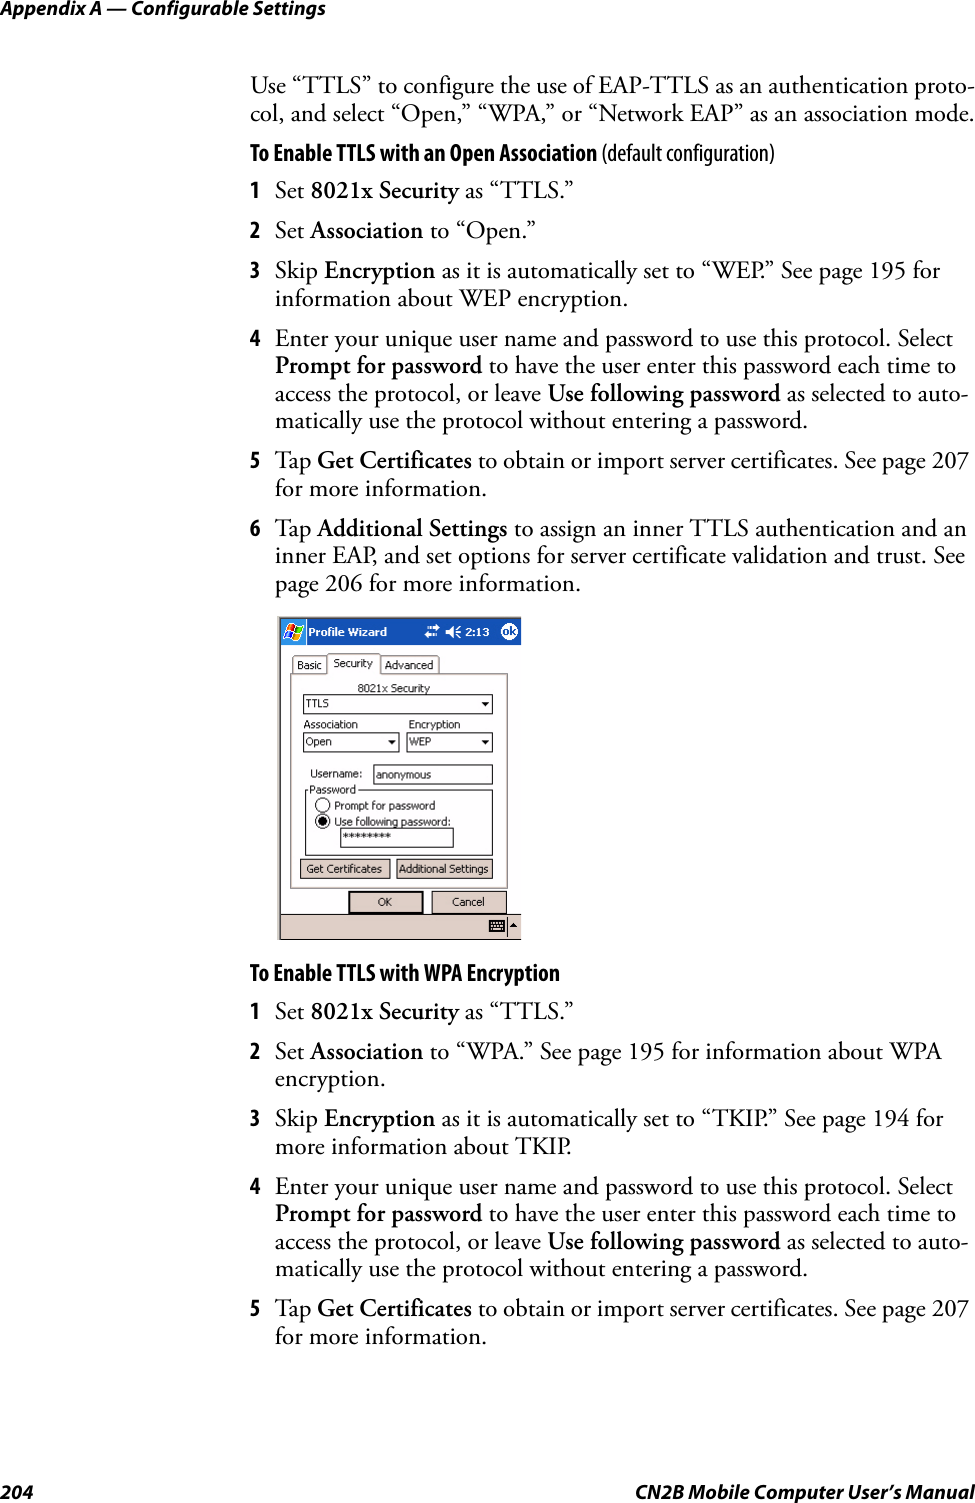
Intermec Technologies Corporation 2610CF CN2Busermanual
UserManual.wiki
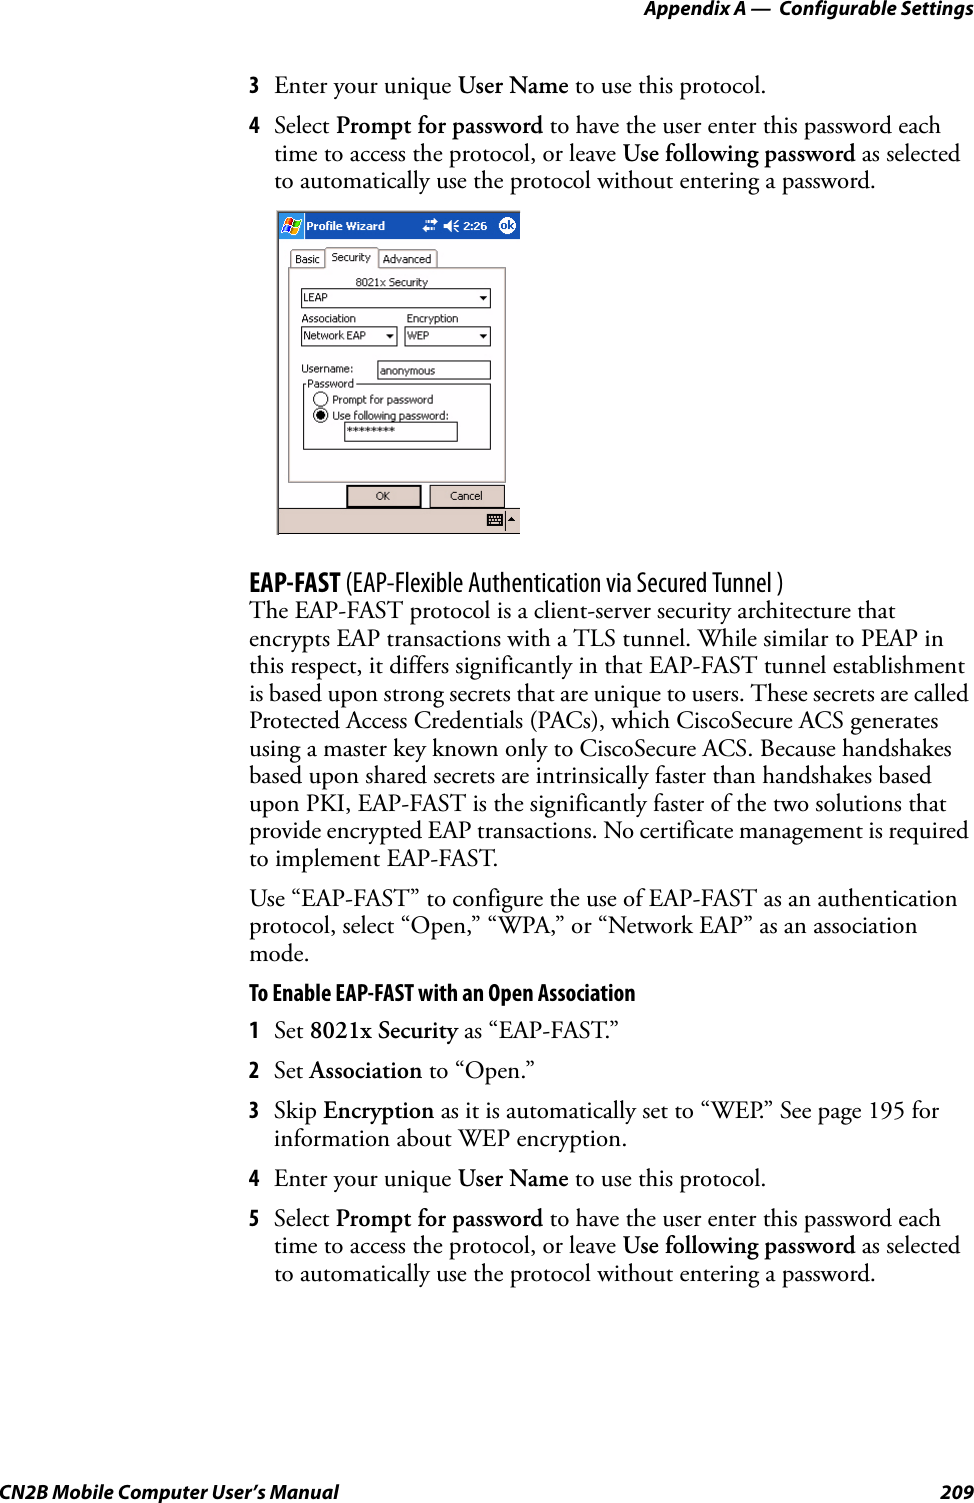
>
Intermec Technologies
>
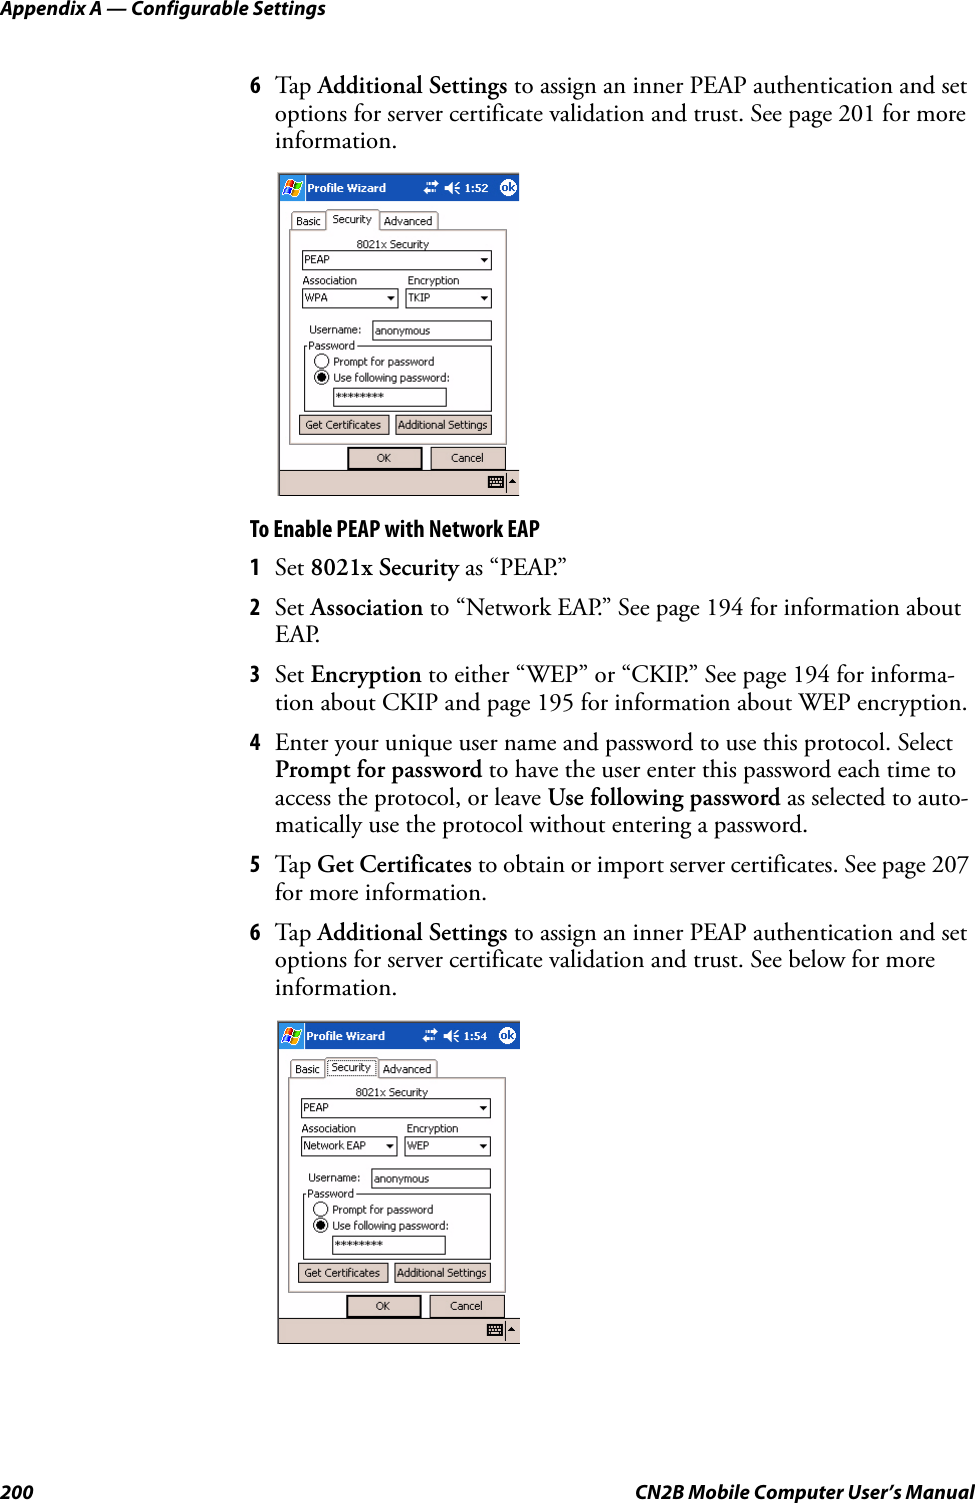
2610CF User Manual
>
User Manual 3 of 3
Contents
1.
700C User Manual 1 of 3
2.
700C User Manual 2 of 3
3.
700C User Manual 3 of 3
4.
CN2 Users Manual 1 of 2
5.
CN2 Users Manual 2 of 2
6.
Compliance Statement Insert
7.
Users Manual
8.
User Manual 1 of 3
9.
User Manual 2 of 3
10.
User Manual 3 of 3
11.
Compliance Insert
User Manual 3 of 3
Navigation menu
Upload a User Manual
Namespaces
Wiki Guide
HTML
PDF
Info
Views
User Manual
Discussion / Help
Navigation
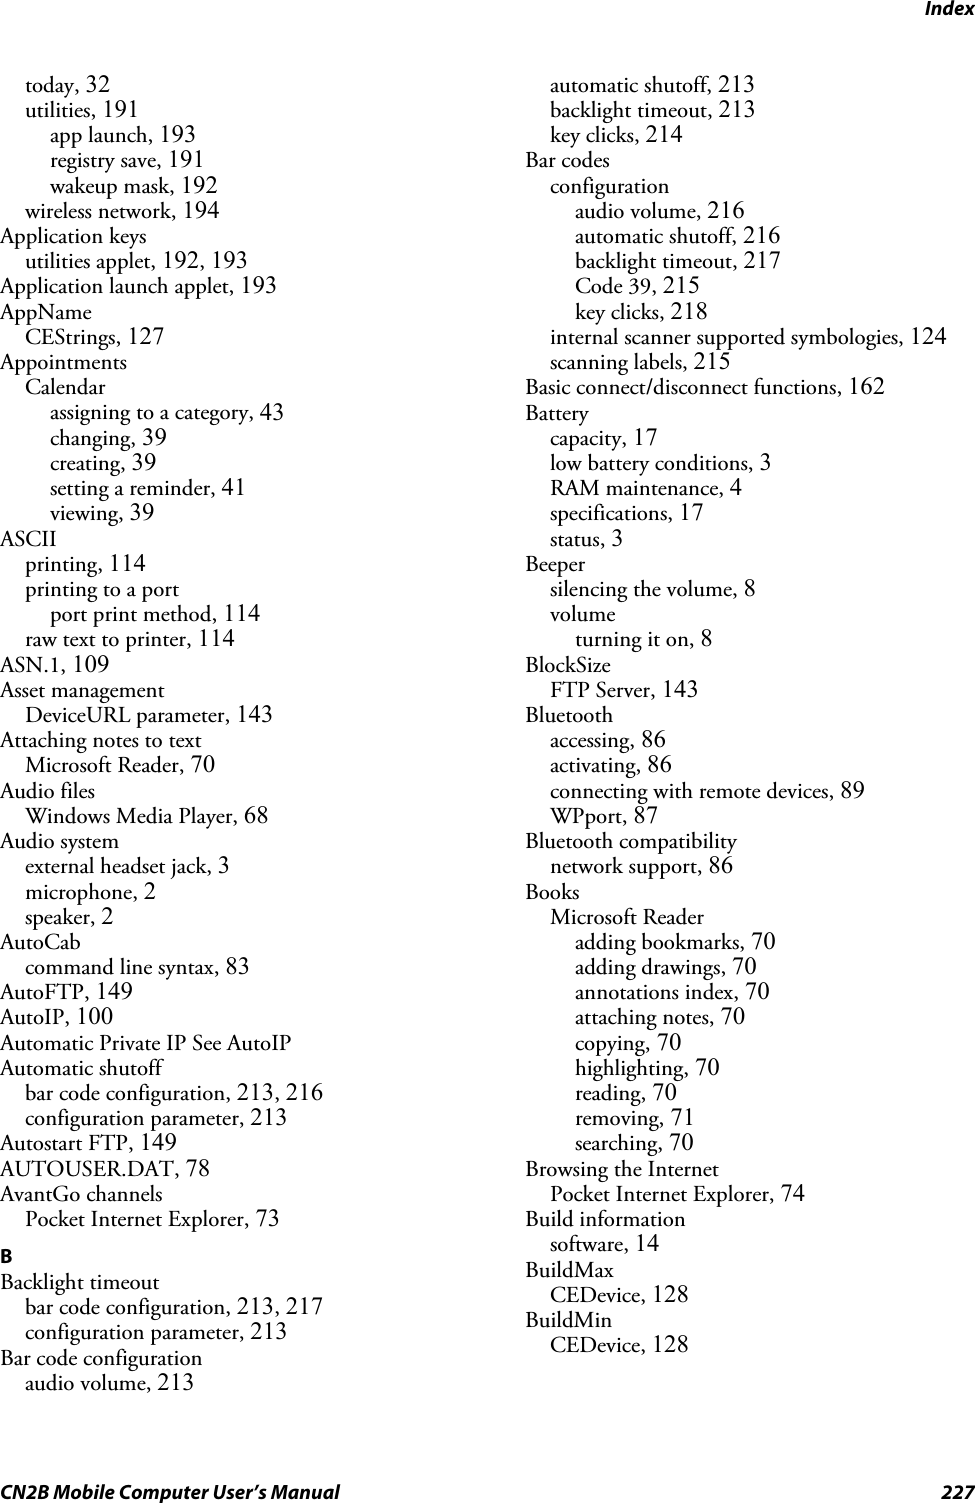
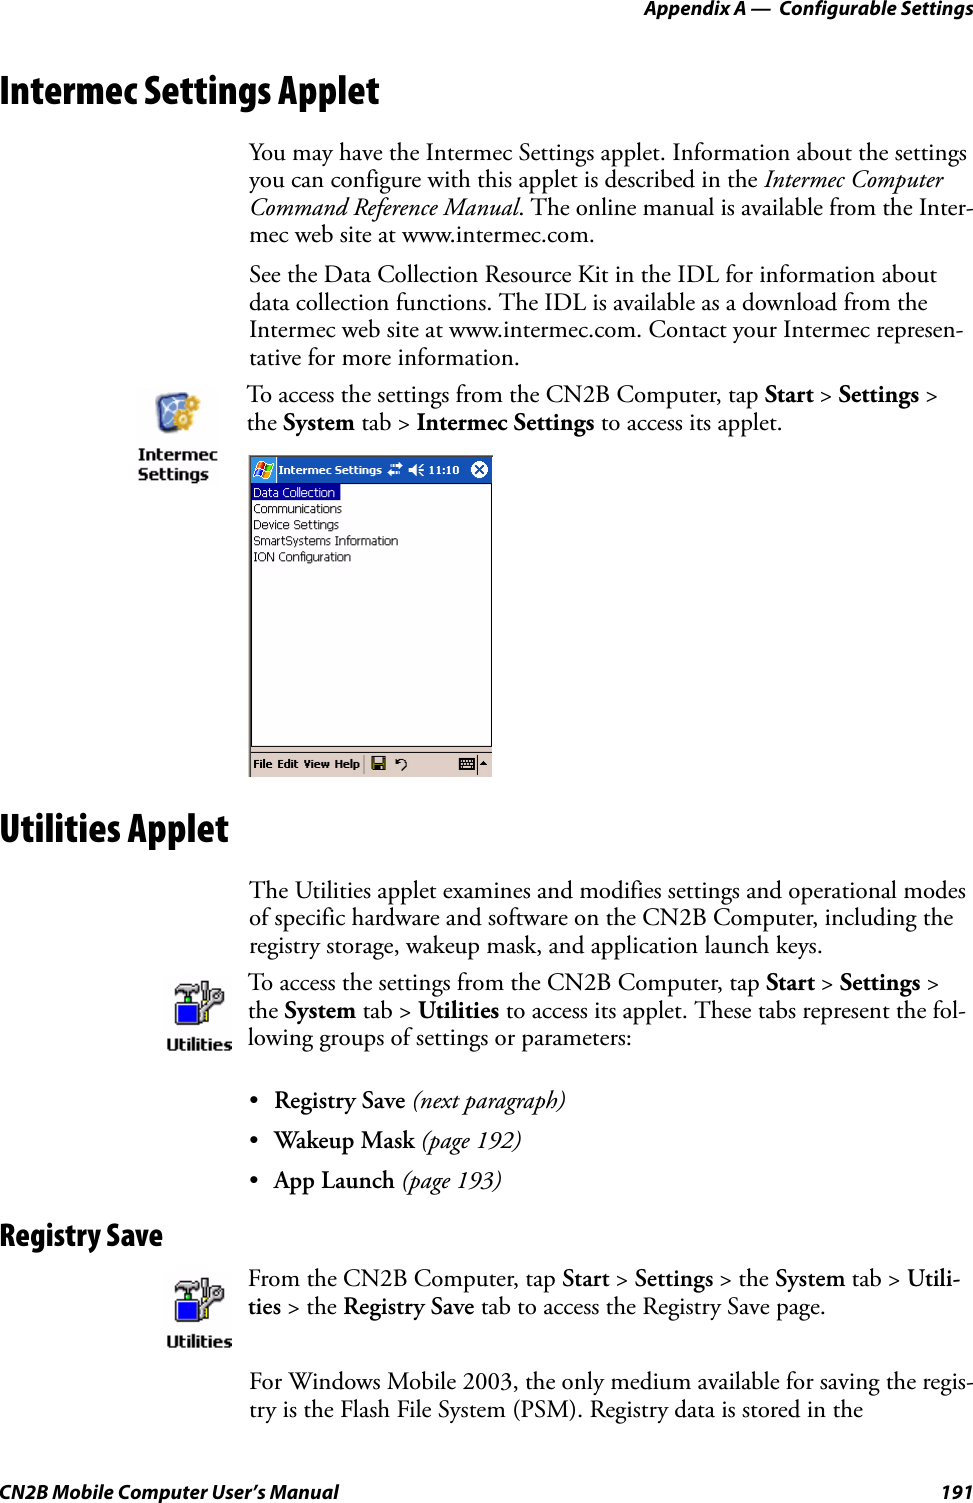
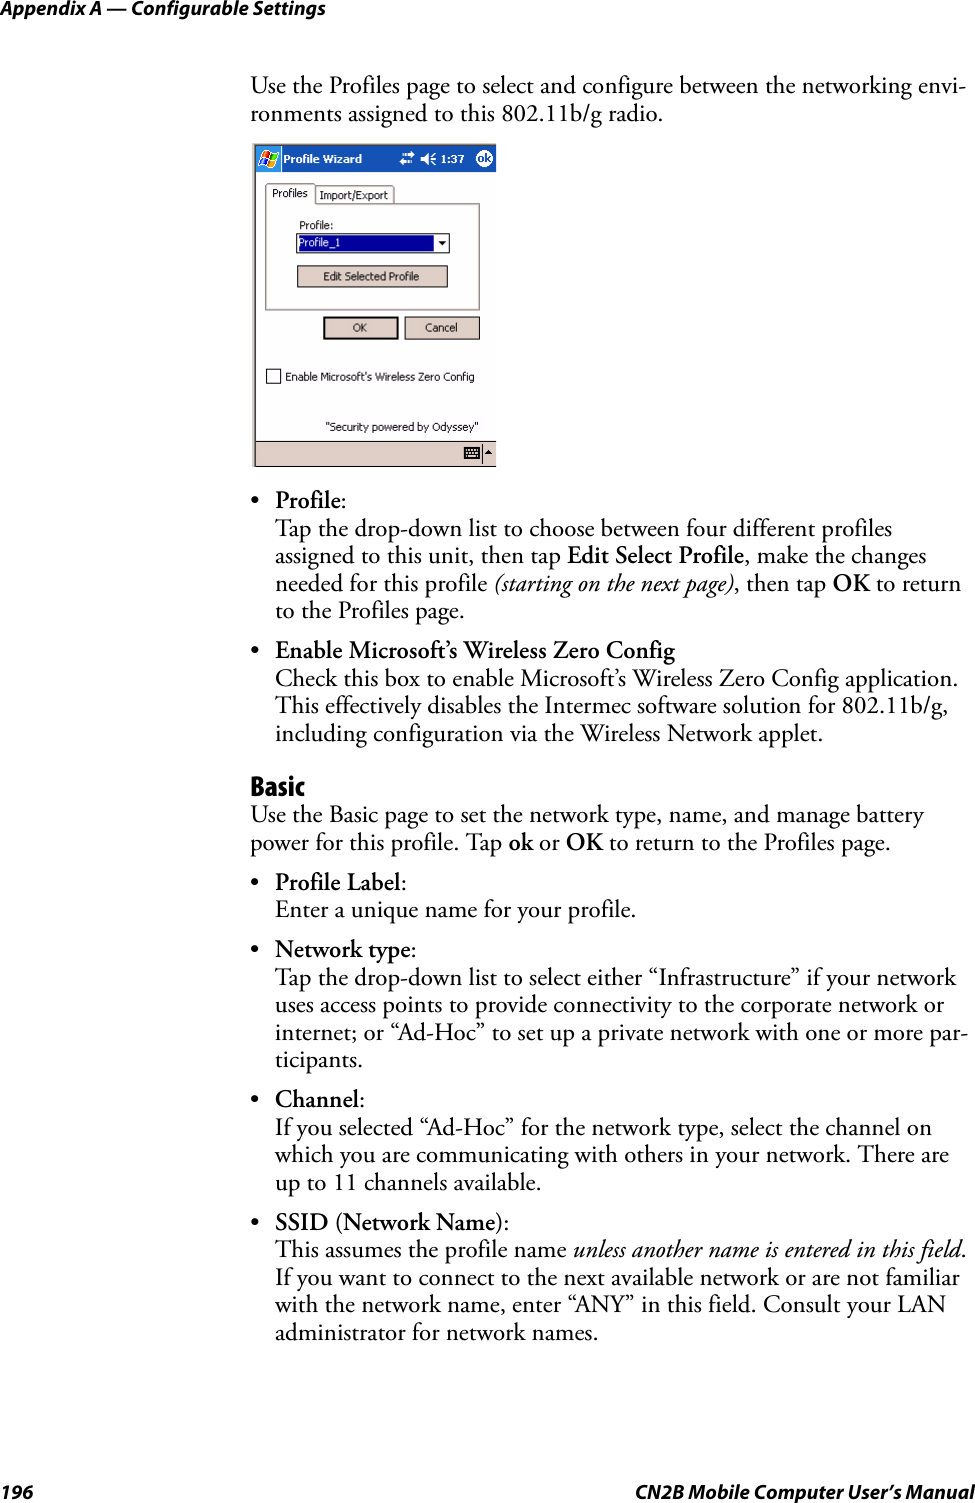
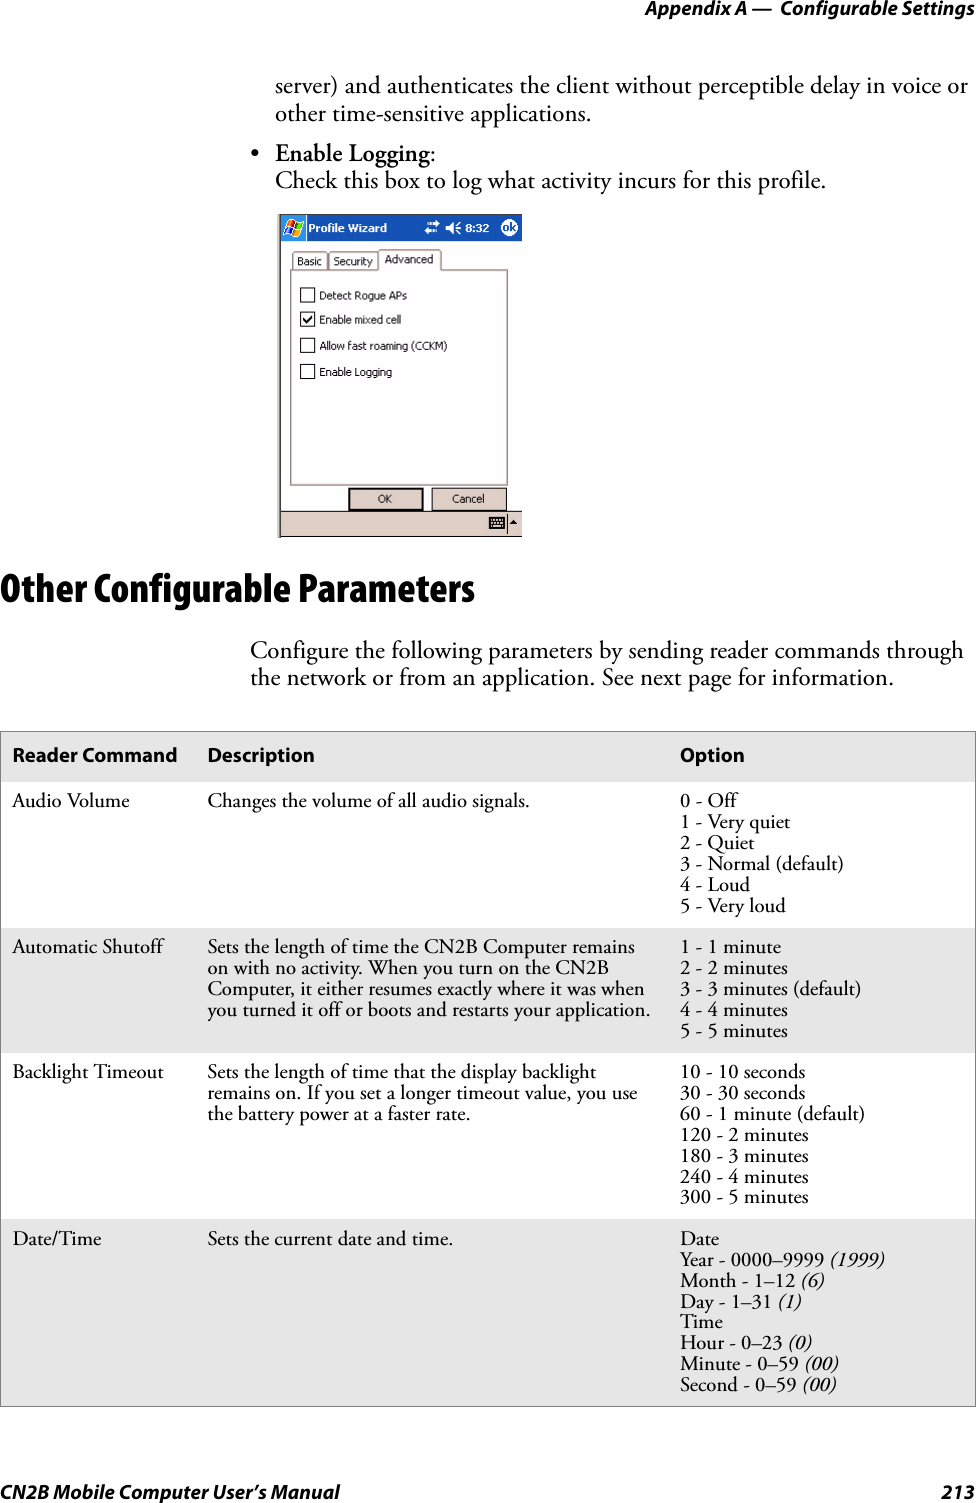
![Chapter 7 — Programming126 CN2B Mobile Computer User’s ManualCreating CAB FilesThe Windows CE operating system uses a .CAB file to install an applica-tion on a Windows CE-based device. A .CAB file is composed of multiple files that are compressed into one file. Compressing multiple files into one file provides the following benefits:• All application files are present.• A partial installation is prevented.• The application can be installed from several sources, such as a desktop computer or a Web site.Use the CAB Wizard application (CABWIZ.EXE) to generate a .CAB file for your application.Creating Device-Specific CAB FilesDo the following to create a device-specific .CAB file for an application, in the order provided:1Create an .INF file with Windows CE-specific modifications (see below).2Optional Create a SETUP.DLL file to provide custom control of the installation process (page 136).3Use the CAB Wizard to create the .CAB file, using the .INF file, the optional SETUP.DLL file, and the device-specific application files as parameters (page 139).Creating an .INF FileAn .INF file specifies information about an application for the CAB Wiz-ard. Below are the sections of an .INF file:[Version]This specifies the file creator, version, and other relevant information.•Signature:“signature_name”“$Windows NT$”•Provider:“INF_creator”The company name of the application, such as “Microsoft.”•CESignature“$Windows CE$”Example[Version]Signature = “$Windows NT$”Provider = “Intermec”CESignature = “$Windows CE$”Required? Yes](https://usermanual.wiki/Intermec-Technologies/2610CF.User-Manual-3-of-3/User-Guide-616313-Page-2.png)
![Chapter 7 — ProgrammingCN2B Mobile Computer User’s Manual 127[CEStrings]This specifies string substitutions for the application name and the default installation directory.•AppName:app_nameName of the application. Other instances of %AppName% in the .INF file are replaced with this string value, such as RP32.•InstallDir:default_install_dirDefault installation directory on the device. Other instances of %Install-Dir% in the .INF file are replaced with this string value. Example: \SDMMC_Disk\%AppName%Example[CEStrings]AppName=“Game Pack”InstallDir=%CE1%\%AppName%[Strings]This section is optional and defines one or more string keys. A string key represents a string of printable characters.•string_key:valueString of letters, digits, or other printable characters. Enclose value in double quotation marks ““”” if the corresponding string key is used in an item that requires double quotation marks. No string_keys is okay.Example[Strings]reg_path = Software\Intermec\My Test App[CEDevice]Describes the targeted application platform. All keys are optional. If a key is nonexistent or has no data, Windows CE does not perform any checking with the exception being UnsupportedPlatforms. If the UnsupportedPlatforms key exists but no data, the previous value is not overridden.•ProcessorType:processor_typeThe value that is returned by SYSTEMINFO.dwProcessorType.For example, the value for the ARM CPU is 2577•UnsupportedPlatforms:platform_family_nameThis lists known unsupported platform family names. If the name speci-fied in the [CEDevice.xxx] section is different from [CEDevice], both platform_family_name values are unsupported for the microprocessor specified by xxx. The unsupported platform family names list is appended to the previous list. Application Manager does not display the Required? YesRequired? NoRequired? Yes](https://usermanual.wiki/Intermec-Technologies/2610CF.User-Manual-3-of-3/User-Guide-616313-Page-3.png)
![Chapter 7 — Programming128 CN2B Mobile Computer User’s Manualapplication for an unsupported platform. Also, a user is warned during the setup process if the .CAB file is copied to an unsupported device.Example[CEDevice]UnsupportedPlatforms = pltfrm1 ; pltfrm1 is unsupported[CEDevice.SH3]UnsupportedPlatforms = ; pltfrm1 is still unsupported•VersionMin:minor_versionNumeric value returned by OSVERSIONINFO.dwVersionMinor. The .CAB file is valid for the currently connected device if the version of this device is greater than or equal to VersionMin.•VersionMax:major_versionNumeric value returned by OSVERSIONINFO.dwVersionMajor. The .CAB file is valid for the currently connected device if the version of this device is less than or equal to VersionMax.•BuildMin:build_numberNumeric value returned by OSVERSIONINFO.dwBuildNumber. The .CAB file is valid for the currently connected device if the version of this device is greater than or equal to BuildMin.•BuildMax:build_numberNumeric value returned by OSVERSIONINFO.dwBuildNumber. The .CAB file is valid for the currently connected device if the version of this device is less than or equal to BuildMax.ExampleThis shows three [CEDevice] sections: one giving basic information for any CPU and two specific to the SH3 and the MIPS microprocessors.[CEDevice] ; A “template” for all platformsUnsupportedPlatforms = pltfrm1; Does not support pltfrm1; The following specifies version 1.0 devices only.VersionMin = 1.0VersionMax = 1.0[CEDevice.ARM]; Inherits all [CEDevice] settings; This will create a .CAB file specific to ARM devices.ProcessorType = 2577; ARM .cab file is valid for ARM microprocessors.UnsupportedPlatforms = ; pltfrm1 is still unsupported; The following overrides the version settings so that no version checking is performed.VersionMin =VersionMax =[CEDevice.MIPS] ; Inherits all [CEDevice] settings; This will create a .CAB file specific to “MIPS” devices.ProcessorType = 4000; MIPS .CAB file is valid for MIPS microprocessor.UnsupportedPlatforms =pltfrm2; pltfrm1, pltfrm2 unsupported for MIPs .CAB file.](https://usermanual.wiki/Intermec-Technologies/2610CF.User-Manual-3-of-3/User-Guide-616313-Page-4.png)
![Chapter 7 — ProgrammingCN2B Mobile Computer User’s Manual 129[DefaultInstall]This describes the default installation of your application. Note that under this section, you will list items expanded upon later in this description.•Copyfiles:copyfile_list_sectionMaps to files defined later in the .INF file, such as Files.App, Files.Font, and Files.Bitmaps.•AddReg:add_registry_sectionExample: RegSettings.All•CEShortcuts:shortcut_list_sectionString that identifies one more section that defines shortcuts to a file, as defined in the [CEShortcuts] section.•CESetupDLL:setup_DLLOptimal string that specifies a SETUP.DLL file. It is written by the Independent Software Vendor (ISV) and contains customized functions for operations during installation and removal of the application. The file must be specified in the [SourceDisksFiles] section.•CESelfRegister:self_reg_DLL_filenameString that identifies files that self-register by exporting the DllRegis-terServer and DllUnregisterServer Component Object Model (COM) functions. Specify these files in the [SourceDiskFiles] section. During installation, if installation on the device fails to call the file’s exported DllRegisterServer function, the file’s exported DllUnregisterServer function is not called during removal.Example[DefaultInstall]AddReg = RegSettings.AllCEShortcuts = Shortcuts.All[SourceDiskNames]This section describes the name and path of the disk on which your appli-cation resides.•disk_ordinal:disk_label,,path1=,“App files” , C:\Appsoft\RP32\...2=,“Font files”,,C:\RpTools\...3=,“CE Tools” ,,C:\windows ce tools...•CESignature: “$Windows CE$”Note: To create the two CPU-specific .CAB files for the SETUP.INF file in the previous example, run the CAB Wizard with the “/cpu arm mips” parameter.Required? YesRequired? Yes](https://usermanual.wiki/Intermec-Technologies/2610CF.User-Manual-3-of-3/User-Guide-616313-Page-5.png)
![Chapter 7 — Programming130 CN2B Mobile Computer User’s ManualExample[SourceDisksNames]; Required section 1 = ,“Common files”,,C:\app\common; Using an absolute path[SourceDisksNames.SH3]2 = ,“SH3 files”,,sh3; Using a relative path[SourceDisksNames.MIPS]2 = ,“MIPS files”,,mips; Using a relative path[SourceDiskFiles]This describes the name and path of the files in which your application resides.•filename:disk_number[,subdir]RPM.EXE = 1,c:\appsoft\...WCESTART.INI = 1RPMCE212.INI = 1TAHOMA.TTF = 2Example[SourceDisksFiles]; Required sectionbegin.wav = 1 end.wav = 1 sample.hlp = 1 [SourceDisksFiles.SH3] sample.exe = 2; Uses the SourceDisksNames.SH3 identification of 2.[SourceDisksFiles.MIPS] sample.exe = 2; Uses the SourceDisksNames.MIPS identification of 2.[DestinationDirs]This describes the names and paths of the destination directories for the application on the target device. Note Windows CE does not support directory identifiers.•file_list_section:0,subdirString that identifies the destination directory. The following list shows the string substitutions supported by Windows CE. Use these only for the beginning of the path. \%CE1% \Program Files%CE2% \Windows%CE3% \My Documents%CE4% \Windows\Startup%CE5% \My Documents%CE6% \Program Files\Accessories%CE7% \Program Files\Communication%CE8% \Program Files\GamesRequired? YesNote: [,subdir] is relative to the location of the INF file.Required? Yes](https://usermanual.wiki/Intermec-Technologies/2610CF.User-Manual-3-of-3/User-Guide-616313-Page-6.png)
![Chapter 7 — ProgrammingCN2B Mobile Computer User’s Manual 131%CE9% \Program Files\Pocket Outlook%CE10% \Program Files\Office%CE11% \Windows\Start Menu\Programs%CE12% \Windows\Start Menu\Programs\Accessories%CE13% \Windows\Start Menu\Programs\Communications%CE14% \Windows\Start Menu\Programs\Games%CE15% \Windows\Fonts%CE16% \Windows\Recent%CE17% \Windows\Start Menu%InstallDir%Contains the path to the target directory selected during installation. It is declared in the [CEStrings] section%AppName%Contains the application name defined in the [CEStrings] section.Example[DestinationDirs] Files.Common = 0,%CE1%\My Subdir; \Program Files\My Subdir Files.Shared = 0,%CE2%; \Windows[CopyFiles]This section, under the [DefaultInstall] section, describes the default files to copy to the target device. Within the [DefaultInstall] section, files were listed that must be defined elsewhere in the INF file. This section identifies that mapping and may contain flags.•copyfile_list_section:destination_filename,[source_filename]The source_filename parameter is optional if it is the same as destination_filename.•copyfile_list_section:flagsThe numeric value that specifies an action to do while copying files. The following table shows values supported by Windows CE.Required? YesFlag Value DescriptionCOPYFLG_WARN_IF_SKIP 0x00000001 Warn user if skipping a file is attempted after error.COPYFLG_NOSKIP 0x00000002 Do not allow a user to skip copying a file.COPYFLG_NO_OVERWRITE 0x00000010 Do not overwrite files in destination directory.COPYFLG_REPLACEONLY 0x00000400 Copy the source file to the destination directory only if the file is already in the destination directory.CE_COPYFLG_NO_DATE_DIALOG 0x20000000 Do not copy files if the target file is newer.CE_COPYFLG_NODATECHECK 0x40000000 Ignore date while overwriting the target file.CE_COPYFLG_SHARED 0x80000000 Create a reference when a shared DLL is counted.](https://usermanual.wiki/Intermec-Technologies/2610CF.User-Manual-3-of-3/User-Guide-616313-Page-7.png)
![Chapter 7 — Programming132 CN2B Mobile Computer User’s ManualExample[DefaultInstall.SH3] CopyFiles = Files.Common, Files.SH3 [DefaultInstall.MIPS] CopyFiles = Files.Common, Files.MIPS[AddReg]This section, under the [DefaultInstall] section, is optional and describes the keys and values that the .CAB file adds to the device registry. Within the [DefaultInstall] section, a reference may have been made to this sec-tion, such as “AddReg=RegSettings.All”. This section defines the options for that setting.•add_registry_section:registry_root_stringString that specifies the registry root location. The following list shows the values supported by Windows CE.• HKCR Same as HKEY_CLASSES_ROOT• HKCU Same as HKEY_CURRENT_USER• HKLM Same as HKEY_LOCAL_MACHINE•add_registry_section:value_nameRegistry value name. If empty, the “default” registry value name is used.•add_registry_section:flagsNumeric value that specifies information about the registry key. The fol-lowing table shows the values that are supported by Window CE.ExampleAddReg = RegSettings.All [RegSettings.All] HKLM,%reg_path%,,0x00000000,alpha; <default> = “alpha” HKLM,%reg_path%,test,0x00010001,3; Test = 3 HKLM,%reg_path%\new,another,0x00010001,6; New\another = 6Required? NoFlag Value DescriptionFLG_ADDREG_NOCLOBBER 0x00000002 If the registry key exists, do not overwrite it. Can be used with any of the other flags in this table.FLG_ADDREG_TYPE_SZ 0x00000000 REG_SZ registry data type.FLG_ADDREG_TYPE_MULTI_SZ 0x00010000 REG_MULTI_SZ registry data type. Value field that follows can be a list of strings separated by commas.FLG_ADDREG_TYPE_BINARY 0x00000001 REG_BINARY registry data type. Value field that fol-lows must be a list of numeric values separated by com-mas, one byte per field, and must not use the 0x hexadecimal prefix.FLG_ADDREG_TYPE_DWORD 0x00010001 REG_DWORD data type. The noncompatible format in the Win32 Setup .INF documentation is supported.](https://usermanual.wiki/Intermec-Technologies/2610CF.User-Manual-3-of-3/User-Guide-616313-Page-8.png)
![Chapter 7 — ProgrammingCN2B Mobile Computer User’s Manual 133[CEShortCuts]This section, a Windows CE-specific section under the [DefaultInstall] section, is optional and describes the shortcuts that the installation applica-tion creates on the device. Within the [DefaultInstall] section, a reference may have been made to this section, such as “ShortCuts.All”. This section defines the options for that setting.•shortcut_list_section:shortcut_filenameString that identifies the shortcut name. It does not require the .LNK extension.•shortcut_list_section:shortcut_type_flagNumeric value. Zero or empty represents a shortcut to a file; any non-zero numeric value represents a shortcut to a folder.•shortcut_list_section:target_file_pathString value that specifies the destination location. Use the target file name for a file, such as MyApp.exe, that must be defined in a file copy list. For a path, use a file_list_section name defined in the [Destination-Dirs] section, such as DefaultDestDir, or the %InstallDir% string.•shortcut_list_section:standard_destination_pathOptional string value. A standard %CEx% path or %InstallDir%. If no value is specified, the shortcut_list_section name of the current section or the DefaultDestDir value from the [DestinationDirs] section is used.ExampleCEShortcuts = Shortcuts.All [Shortcuts.All] Sample App,0,sample.exe; Uses the path in DestinationDirs. Sample App,0,sam-ple.exe,%InstallDir%; The path is explicitly specified.Sample .INF File[Version]; Required section Signature = “$Windows NT$” Provider = “Intermec Technologies Corporation” CESignature = “$Windows CE$”;[CEDevice];ProcessorType = [DefaultInstall]; Required section CopyFiles = Files.App, Files.Fonts, Files.BitMaps, Files.Intl, Files.Tele-comNcsCE, Files.Windows, Files.Import, Files.Export, Files.Work, Files.Data-base, Files.WinCE AddReg = RegSettings.All ;CEShortcuts = Shortcuts.All[SourceDisksNames]; Required section 1 = ,“App files” ,,c:\appsoft\... 2 = ,”Font files” ,,c:\WinNT\Fonts 3 = ,”CE Tools” ,,c:\windows ce tools\wce400\700ie\mfc\lib\x86 [SourceDisksFiles]; Required section rpm.exe = 1,C:\Appsoft\program\wce400\WCEX86Rel700 Required? No](https://usermanual.wiki/Intermec-Technologies/2610CF.User-Manual-3-of-3/User-Guide-616313-Page-9.png)
![Chapter 7 — Programming134 CN2B Mobile Computer User’s Manualwcestart.ini = 1 rpmce212.ini = 1 intermec.bmp = 1 rpmlogo.bmp = 1 rpmname.bmp = 1 import.bmp = 1 export.bmp = 1 clock.bmp = 1 printer.bmp = 1 filecopy.bmp = 1 readme.txt = 1 lang_eng.bin = 1 rpmdata.dbd = 1,database\wce1 tahoma.ttf = 2 mfcce212.dll = 3 olece212.dll = 3 olece211.dll = 1,c:\windows ce tools\wce400\NMSD61102.11\mfc\lib\x86rdm45wce.dll = 1,c:\rptools\rdm45wce\4_50\lib\wce400\wcex86rel picfmt.dll = 1,c:\rptools\picfmt\1_00\wce400\wcex86rel6110 fmtctrl.dll = 1,c:\rptools\fmtctrl\1_00\wce400\wcex86rel6110 ugrid.dll = 1,c:\rptools\ugrid\1_00\wce400\wcex86rel6110 simple.dll = 1,c:\rptools\pspbm0c\1_00\wce400\wcex86rel psink.dll = 1,c:\rptools\psink\1_00\wce400\WCEX86RelMinDependency pslpwce.dll =1,c:\rptools\pslpm0c\1_00\wce400\WCEX86RelMinDependency npcpport.dll = 1,c:\rptools\cedk\212_03\installable drivers\printer\npcp ;dexcom.dll = 1,c:\rptools\psdxm0c\1_00\x86 ncsce.exe = 1,c:\rptools\ncsce\1_04 nrinet.dll = 1,c:\rptools\ncsce\1_04 [DestinationDirs];Required section ;Shortcuts.All = 0,%CE3% ; \Windows\Desktop Files.App= 0,%InstallDir% Files.DataBase= 0,%InstallDir%\DataBase Files.BitMaps= 0,%InstallDir%\Bitmaps Files.Fonts= 0,%InstallDir%\Fonts Files.Intl= 0,%InstallDir%\Intl Files.TelecomNcsCE= 0,%InstallDir%\Telecom\NcsCE Files.Windows= 0,%InstallDir%\Windows Files.Import= 0,%InstallDir%\Import Files.Export= 0,%InstallDir%\Export Files.Work= 0,%InstallDir%\WorkFiles.WinCE= 0,\storage_card\wince[CEStrings]; Required section AppName = Rp32 InstallDir = \storage_card\%AppName% [Strings]; Optional section ;[Shortcuts.All] ;Sample App,0,sample.exe; Uses the path in DestinationDirs. ;Sample App,0,sample.exe,%InstallDir%; The path is explicitly specified.[Files.App] rpm.exe,,,0 rpm.ini,rpmce212.ini,,0 mfcce212.dll,,,0 olece212.dll,,,0 olece211.dll,,,0 rdm45wce.dll,,,0](https://usermanual.wiki/Intermec-Technologies/2610CF.User-Manual-3-of-3/User-Guide-616313-Page-10.png)
![Chapter 7 — ProgrammingCN2B Mobile Computer User’s Manual 135picfmt.dll,,,0 fmtctrl.dll,,,0 ugrid.dll,,,0 simple.dll,,,0 psink.dll,,,0 pslpwce.dll,,,0 npcpport.dll,,,0 ;dexcom.dll,,,0[Files.DataBase]rpmdata.dbd,,,0[Files.Fonts] tahoma.ttf,,,0[Files.BitMaps] intermec.bmp,,,0 rpmlogo.bmp,,,0 rpmname.bmp,,,0 import.bmp,,,0 export.bmp,,,0 clock.bmp,,,0 printer.bmp,,,0 filecopy.bmp,,,0[Files.Intl] lang_eng.bin,,,0[Files.TelecomNcsCE] ncsce.exe,,,0 nrinet.dll,,,0 [Files.Windows]readme.txt,,,0[Files.Import]readme.txt,,,0[Files.Export]readme.txt,,,0[Files.Work]readme.txt,,,0[Files.WinCE]wcestart.ini,,,0[RegSettings.All] HKLM,”SOFTWARE\Microsoft\Shell\AutoHide”,,0x00010001,1; Autohide the taskbar HKLM,”SOFTWARE\Microsoft\Shell\OnTop”,,0x00010001,0; Shell is not on top HKLM,”SOFTWARE\Microsoft\Clock”,SHOW_CLOCK,0x00010001,0; Clock is not on taskbar](https://usermanual.wiki/Intermec-Technologies/2610CF.User-Manual-3-of-3/User-Guide-616313-Page-11.png)
![Chapter 7 — Programming136 CN2B Mobile Computer User’s ManualUsing Installation Functions in SETUP.DLLSETUP.DLL is an optional file that enables you to perform custom opera-tions during installation and removal of your application. The following list shows the functions that are exported by SETUP.DLL.After the CAB File ExtractionCab files that need to cause a warm reset after cab extraction need to create the __RESETMEPLEASE__.TXT file in the “\Windows” directory. The preferred method to create this file is within the DllMain portion of the SETUP.DLL file. It looks like this:#include <windows.h>#include <Tlhelp32.h>#include <winioctl.h>#include <ce_setup.h> // in the public SDK dir#define IOCTL_TERMINAL_RESET CTL_CODE (FILE_DEVICE_UNKNOWN,FILE_ANY_ACCESS, 2050, METHOD_NEITHER)BOOL APIENTRY DllMain( HANDLE h, DWORD reason, LPVOID lpReserved ){return TRUE;} // DllMain//************************************************************************// $DOCBEGIN$// BOOL IsProcessRunning( TCHAR * pname );//// Description: Get process table snapshot, look for pname running.//// Arguments: pname - pointer to name of program to look for.// for example, app.exe.//// Returns: TRUE - process is running.// FALSE - process is not running.// $DOCEND$//************************************************************************Install_Init Called before installation begins. Use this function to check the application version when reinstall-ing an application and to determine if a dependent application is present.Install_Exit Called after installation is complete. Use this function to handle errors that occur during applica-tion installation.Uninstall_Init Called before the removal process begins. Use this function to close the application, if the applica-tion is running.Uninstall_Exit Called after the removal process is complete. Use this function to save database information to a file and delete the database and to tell the user where the user data files are stored and how to reinstall the application.Note: Use [DefaultInstall] > CESelfRegister (page 129) in the .INF file to point to SETUP.DLL.](https://usermanual.wiki/Intermec-Technologies/2610CF.User-Manual-3-of-3/User-Guide-616313-Page-12.png)
![Chapter 7 — ProgrammingCN2B Mobile Computer User’s Manual 137BOOL IsProcessRunning( TCHAR * pname ) {HANDLE hProcList;PROCESSENTRY32 peProcess;DWORD thDeviceProcessID;TCHAR lpname[MAX_PATH];if ( !pname || !*pname ) return FALSE;_tcscpy( lpname, pname );_tcslwr( lpname );hProcList = CreateToolhelp32Snapshot( TH32CS_SNAPPROCESS, 0 );if ( hProcList == INVALID_HANDLE_VALUE ) {return FALSE;} // end ifmemset( &peProcess, 0, sizeof(peProcess) );peProcess.dwSize = sizeof(peProcess);if ( !Process32First( hProcList, &peProcess ) ) {CloseToolhelp32Snapshot( hProcList );return FALSE;} // end ifthDeviceProcessID = 0;do {_tcslwr( peProcess.szExeFile );if ( _tcsstr( peProcess.szExeFile, lpname ) ) {thDeviceProcessID = peProcess.th32ProcessID;break;} // end if} while ( Process32Next( hProcList, &peProcess ) );if ( ( GetLastError() == ERROR_NO_MORE_FILES ) && ( thDeviceProcessID == 0 ) ) {CloseToolhelp32Snapshot( hProcList );return FALSE;} // end ifCloseToolhelp32Snapshot( hProcList );return TRUE;} // IsProcessRunningcodeINSTALL_INIT Install_Init(HWND hwndParent,BOOL fFirstCall, BOOL fPreviouslyInstalled, LPCTSTR pszInstallDir ) {return codeINSTALL_INIT_CONTINUE;}codeINSTALL_EXIT Install_Exit (HWND hwndParent, LPCTSTR pszInstallDir,](https://usermanual.wiki/Intermec-Technologies/2610CF.User-Manual-3-of-3/User-Guide-616313-Page-13.png)
![Chapter 7 — Programming138 CN2B Mobile Computer User’s ManualWORD cFailedDirs, WORD cFailedFiles, WORD cFailedRegKeys, WORD cFailedRegVals, WORD cFailedShortcuts ) {HANDLE h;TCHAR srcfile[MAX_PATH];TCHAR dstfile[MAX_PATH];if (cFailedDirs || cFailedFiles || cFailedRegKeys || cFailedRegVals || cFailedShortcuts)return codeINSTALL_EXIT_UNINSTALL;if ( IsProcessRunning( L”autocab.exe” ) ){h = CreateFile( L”\\Windows\\__resetmeplease__.txt”,(GENERIC_READ | GENERIC_WRITE), 0, NULL, CREATE_ALWAYS,FILE_ATTRIBUTE_HIDDEN, NULL );if ( h != INVALID_HANDLE_VALUE )CloseHandle( h );else{// Couldn’t create the file. If it failed because the file already exists, it is not fatal. // Otherwise, notify user of the inability to reset the device and they will have to// perform it manually after all of the installations are complete.} // end if}else{DWORD dret;h = CreateFile( L”SYI1:”, (GENERIC_WRITE | GENERIC_READ), 0, NULL, OPEN_EXISTING,FILE_ATTRIBUTE_NORMAL, NULL );// Force a warm start NOW.if ( h != INVALID_HANDLE_VALUE ){DeviceIoControl( h, IOCTL_TERMINAL_RESET, NULL, 0, NULL, 0, &dret, NULL);// Won’t return, but we’ll show clean up anywayCloseHandle( h );}else{// Couldn’t access SYSIO. Notify user.} // end if} // end ifreturn codeINSTALL_EXIT_DONE;}codeUNINSTALL_INIT Uninstall_Init(HWND hwndParent,](https://usermanual.wiki/Intermec-Technologies/2610CF.User-Manual-3-of-3/User-Guide-616313-Page-14.png)
![Chapter 7 — ProgrammingCN2B Mobile Computer User’s Manual 139LPCTSTR pszInstallDir ) {// TODO: Perform the reverse of INSTALL_INIT herereturn codeUNINSTALL_INIT_CONTINUE;}codeUNINSTALL_EXIT Uninstall_Exit(HWND hwndParent) {// TODO: Perform the reverse of INSTALL_EXIT herereturn codeUNINSTALL_EXIT_DONE;}The system software looks for the following directory structure and files on the installed media card whether it be a Secure Digital card or embedded flash file system. No other folders need exist.\2577\autorun.exe\2577\autorun.dat\2577\autocab.exe\2577\autocab.dat\cabfiles\*.cabCreating CAB Files with CAB WizardAfter you create the .INF file and the optional SETUP.DLL file, use the CAB Wizard to create the .CAB file. The command-line syntax for the CAB Wizard is as follows:cabwiz.exe “inf_file” [/dest dest_directory] [/err error_file] [/cpu cpu_type [cpu_type]]A batch file, located in <program> directory, with the following com-mands, works well:cabwiz.exe c:\appsoft\<program>\<inf_file_name>cd \appsoft\<program>“inf_file” The SETUP.INF file path.dest_directory The destination directory for the .CAB files. If no directory is specified, the .CAB files are created in the “inf_file” directory.error_file The file name for a log file that contains all warnings and errors that are encountered when the .CAB files are compiled. If no file name is specified, errors are displayed in message boxes. If a file name is used, the CAB Wizard runs without the user interface (UI); this is useful for automated builds.cpu_type Creates a .CAB file for each specified microprocessor tag, which is a label used in the Win32 SETUP.INF file to differentiate between different microprocessor types. The /cpu parameter, fol-lowed by multiple cpu_type values, must be the last qualifier in the command line.](https://usermanual.wiki/Intermec-Technologies/2610CF.User-Manual-3-of-3/User-Guide-616313-Page-15.png)
![Chapter 7 — Programming140 CN2B Mobile Computer User’s ManualExampleThis example creates .CAB files for the ARM and MIPS microprocessors, assuming the Win32 SETUP.INF file contains the ARM and MIPS tags:cabwiz.exe “c:\myfile.inf” /err myfile.err /cpu arm mipsTroubleshooting the CAB WizardTo identify and avoid problems that might occur when using the CAB Wizard, follow these guidelines:•Use %% for a percent sign (%) character when using this character in an .INF file string, as specified in Win32 documentation. This does not work under the [Strings] section.• Do not use .INF or .CAB files created for Windows CE to install appli-cations on Windows-based desktop platforms.• Ensure the MAKECAB.EXE and CABWIZ.DDF files, included with Windows CE, are in the same directory as CABWIZ.EXE.• Use the full path to call CABWIZ.EXE.• Do not create a .CAB file with the MAKECAB.EXE file included with Windows CE. You must use CABWIZ.EXE, which uses MAKE-CAB.EXE to generate the .CAB files for Windows CE.•Do not set the read-only attribute for .CAB files.Customization and LockdownPocket PC (Windows Mobile) is a hardware specification created by Microsoft Corporation. Devices that wish to carry the Pocket PC logo must meet the minimum hardware requirements set in the Pocket PC specifica-tion. Manufacturers are free to add extra hardware functionality.Pocket PC devices also use a specialized version of the CE operating system. This operating system is built from Windows CE 4.2 but contains custom-izations, most notably the lack of a desktop and the addition of the Today Screen.To carry the Pocket PC logo, all devices must be tested at an Independent Test Laboratory. The ITL testing is done based on Microsoft requirements. The test lab then reports the findings back to Microsoft Corporation and Intermec Technologies. If the CN2B Computer passed all tests, Intermec is allowed to ship the device with the Pocket PC logo. Each time the operat-ing system is modified, Intermec must resubmit to ITL testing.Note: CABWIZ.EXE, MAKECAB.EXE, and CABWIZ.DDF (Windows CE files available on the Windows CE Toolkit) must be installed in the same directory on the desktop computer. Call CABWIZ.EXE using its full path for the CAB Wizard application to run correctly.](https://usermanual.wiki/Intermec-Technologies/2610CF.User-Manual-3-of-3/User-Guide-616313-Page-16.png)
![Chapter 7 — Programming142 CN2B Mobile Computer User’s ManualDo the following to send commands:1Start an FTP client and connect to the device FTP server.2Log in with “intermec” as the user name and “cr52401” for the pass-word.3From the FTP client, send the command.4Wait for a response.Synopsisftpdce [ options ]OptionsNote: You should consult the RFC959 specification for proper use of some of these commands at the following URL:• www.ietf.org/rfc/rfc959.txt for the text version, or• www.w3.org/Protocols/rfc959/ for an html version.–Aaddr (where addr is in the form of a.b.c.d) Sets the single target address to which to send the network announcement. Default is broadcast.–Bbyte Sets the FTP data block size. Smaller sizes may be useful over slower links. Default is 65536.–Cname Sets the device name. Used by Intermec management software.–Fvalue Disables the default Intermec account. A value of “0” disables the account. Default is “1”. Note that disabling the default account without providing a working access control list on the server will result in a device that will not accept any FTP connections.–Hsec Sets the interval between network announcements in seconds.“0” turns the network announce-ment off. Default is 30 seconds.–Iaddr (where addr is in the form of a.b.c.d) Sets the preferred 6920 Communications Server (optional).–Llog (where log is either “0” or “1”) Sets the state of logging. Default is 0 (disabled).–Nsec Specifies the number of seconds to wait before initially starting FTP server services.–Pport Sets the UDP port on which the network announcement are sent. Default port is 52401.–Qport Sets the port on which the FTP Server will listen for connections. Default port is 21.–Rdir Sets the FTP mount point to this directory. Default is the root folder of the object store.–Tscrip Sets the script name for the 6920 Communications Server to process.–Uurl Sets the default URL for this device.–Z“parms” Sets extended parameters to be included in the network announcement.](https://usermanual.wiki/Intermec-Technologies/2610CF.User-Manual-3-of-3/User-Guide-616313-Page-18.png)


![Chapter 7 — Programming146 CN2B Mobile Computer User’s ManualSITE The following extended OEM commands are supported by the SITE request. For Microsoft FTP clients, you can send site commands by preceding the command with “quote” such as “quote site status.”ATTRIB Gets or sets the attributes of a given file. (SITE ATTRIB)Usage: QUOTE SITE ATTRIB [+R | -R] [+A | -A ] [+S | -S] [+H | -H] [[path] filename]+ Sets an attribute.– Clears an attribute.R Read-only file attribute.A Archive file attribute.S System file attribute.H Hidden file attribute.To retrieve the attributes of a file, only specify the file. The server response will be: 200-AD SHRCEIX filenameTo retrieve the attributes of a file, only specify the file. The server response will be: 200-AD SHRCEIX filenameIf the flag exists in its position shown above, it is set. Also, in addition to the values defined above, there is also defined:C Compressed file attribute.E Encrypted file attribute.I INROM file attribute.X XIP file attribute (execute in ROM, not shadowed in RAM).BOOT Reboots the server OS. This will cause the system on which the server is executing to reboot. The FTP Server will shut down cleanly before reboot. All client connections will be terminated. Cold boot is default except for the PocketPC build in which the default is warm boot. (SITE BOOT)Usage: QUOTE SITE BOOT [WARM | COLD]COPY Copies a file from one location to another. (SITE COPY)Usage: QUOTE SITE COPY [source] [destination]Example: QUOTE SITE COPY ‘\Storage Card\one.dat’ ‘\Storage Card\two.dat’EXIT Exits the FTP Server. This command will shut down the FTP Server thus terminating all client connections. (SITE EXIT)Usage: QUOTE SITE EXITHELP Gives site command help information. (SITE HELP)Usage: QUOTE SITE HELP [command]KILL Terminates a running program. (SITE KILL)Usage: QUOTE SITE KILL [program | pid]](https://usermanual.wiki/Intermec-Technologies/2610CF.User-Manual-3-of-3/User-Guide-616313-Page-22.png)
![Chapter 7 — ProgrammingCN2B Mobile Computer User’s Manual 147The remaining FTP requests specified in RFC 959 are recognized, but not implemented.The banner returned in the parenthetical portion of its greeting shows the version number of the FTP Server as well as the MAC address, serial num-ber and operating system of the machine hosting the server.The FTP Server supports browsing from the latest Netscape and Microsoft web browsers. Drag-and-drop capability is available using this environ-ment.LOG Opens or closes the program log. (SITE LOG)Usage: QUOTE SITE LOG [open [filename]| close]PLIST Lists the running processes (SITE PLIST)Usage: QUOTE SITE PLISTRUN Starts a program running. If the program to run has spaces in path or filename, wrapping the name with single quotes is required.Usage: QUOTE SITE RUN [program]Example: QUOTE SITE RUN ‘\Storage Card\app.exe’STATUS Returns the current settings of the FTP Server. MAC, serial number, model, IP address, network announcement information as well as OS memory usage are returned. (SITE STATUS)Usage: QUOTE SITE STATUSTIMEOUT Toggles idle timeout between 120 to 1200 seconds (2 to 20 minutes). If this timer expires with no activity between the client and the server, the client connection will be disconnected. If the optional seconds argument is supplied, the server will set the con-nection timeout to the number of seconds specified. Default is 120 seconds or 2 minutes. (SITE TIMEOUT)Usage: QUOTE SITE TIMEOUT [seconds]EKEY Gives site command electronic key information. (SITE HELP)Usage: QUOTE SITE EKEY [command]EVAL Gives site command electronic value information. (SITE HELP)Usage: QUOTE SITE EVAL [command]GVAL Gives site command general value information. (SITE HELP)Usage: QUOTE SITE GVAL [command]PVAL Gives site command value information. (SITE HELP)Usage: QUOTE SITE PVAL [command]](https://usermanual.wiki/Intermec-Technologies/2610CF.User-Manual-3-of-3/User-Guide-616313-Page-23.png)

![Chapter 7 — ProgrammingCN2B Mobile Computer User’s Manual 155IOCTL_HAL_GET_OAL_VERINFOReturns the HAL version information of the Pocket PC image.Usage#include “oemioctl.h”SyntaxBOOL KernelIoControl( IOCTL_HAL_GET_OAL_VERINFO,LPVOID lpInBuf,DWORD nInBufSize,LPVOID lpOutBuf,DWORD nOutBufSize,LPDWORD lpBytesReturned );ParametersReturn ValuesReturns TRUE if function succeeds. Returns FALSE if the function fails. GetLastError() may be used to get the extended error value.IOCTL_HAL_GET_BOOTLOADER_VERINFOReturns the HAL version information of the Pocket PC image.Usage#include “oemioctl.h”SyntaxBOOL KernelIoControl( IOCTL_HAL_GET_OAL_VERINFO,LPVOID lpInBuf, DWORD nInBufSize,LPVOID lpOutBuf,DWORD nOutBufSize,LPDWORD lpBytesReturned );lpInBuf Should be set to NULL.lpInBufSize Should be set to zero.lpBytesReturned Returns sizeof(PVERSIONINFO).lpOutBuf Must point to a VERSIONINFO structure as defined by OEMIOCTL.H. The fields should have these values:• cboemverinfo sizeof (tagOemVerInfo);• verinfover 1• sig; “ITC\0”• id; ‘ N’• tgtcustomer “”• tgtplat SeaRay• tgtplatversion Current build version number• tgtcputype[8]; “Intel\0”• tgtcpu “PXA255\0”;• tgtcoreversion “”• date Build time• time Build datenOutBufSize The size of VERSIONINFO in bytes.](https://usermanual.wiki/Intermec-Technologies/2610CF.User-Manual-3-of-3/User-Guide-616313-Page-31.png)
![Chapter 7 — Programming156 CN2B Mobile Computer User’s ManualParametersReturn ValuesReturns TRUE if function succeeds. Returns FALSE if the function fails. GetLastError() may be used to get the extended error value.IOCTL_HAL_WARMBOOTCauses the system to perform a warm-boot. The object store is retained.Usage#include “oemioctl.h”SyntaxBOOL KernelIoControl( IOCTL_HAL_WARMBOOT,LPVOID lpInBuf,DWORD nInBufSize,LPVOID lpOutBuf,DWORD nOutBufSize,LPDWORD lpBytesReturned );ParametersReturn ValuesNone.lpInBuf Should be set to NULL.nInBufSize Should be set to zero.lpOutBuf Must point to a VERSIONINFO structure as defined by OEMIOCTL.H. The fields should have these values: • cboemverinfo Sizeof (tagOemVerInfo);• verinfover 1• sig; “ITC\0”• id; ‘B’• tgtcustomer “”• tgtplat SeaRay• tgtplatversion Current build version number of the bootstrap loader• tgtcputype[8]; “Intel\0”;• tgtcpu “PXA255\0”• tgtcoreversion “”• date Build time• time Build datenOutBufSize The size of VERSIONINFO in bytes.lpBytesReturned The number of bytes returned to lpOutBuf.lpInBuf Should be set to NULL.lpInBufSize Should be set to zero.lpOutBuf Should be NULL.nOutBufSize Should be zero.](https://usermanual.wiki/Intermec-Technologies/2610CF.User-Manual-3-of-3/User-Guide-616313-Page-32.png)
![Chapter 7 — Programming160 CN2B Mobile Computer User’s ManualParametersReturn ValuesReturns TRUE if function succeeds. Returns FALSE if the function fails. May use GetLastError() to get the extended error value.IOCTL_GET_CPU_IDReturns Xscale processor ID.Usage#include “oemioctl.h”SyntaxBOOL KernelIoControl( IOCTL_GET_CPU_ID,LPVOID lpInBuf, DWORD nInBufSize,LPVOID lpOutBuf,DWORD nOutBufSize,LPDWORD lpBytesReturned );ParametersReturn ValuesReturns TRUE if function succeeds. Returns FALSE if the function fails. May use GetLastError() to get the extended error value.lpInBuf Should be set to NULL.nInBufSize Should be set to zero.lpOutBuf Should be a pointer to the PROCESSOR_INFO structure. The PROCESSOR_INFO structure stores information that describes the CPU more descriptively.typedef __PROCESSOR_INFO {WORD wVersion; // Set to value 1WCHAR szProcessorCore[40]; // “ARM\0”WORD wCoreRevision; // 4WCHAR szProcessorName[40]; // “PXA255\0”WORD wProcessorRevision; // 0WCHAR szCatalogNumber[100]; // 0WCHAR szVendor[100]; // “Intel Corporation\0”DWORD dwInstructionSet; // 0DWORD dwClockSpeed; // 400}nOutBufSize Should be set to sizeof(PROCESSOR_INFO) in bytes.lpBytesReturned Returns sizeof(PROCESSOR_INFO);lpInBuf Should point to a CPUIdInfo structure defined in OEMIO-CTL.H.lpInBufSize Should be sizeof(CPUIdInfo).lpOutBuf Should be NULL.nOutBufSize Should be set to 0.lpBytesReturned Returns sizeof(PROCESSOR_INFO);](https://usermanual.wiki/Intermec-Technologies/2610CF.User-Manual-3-of-3/User-Guide-616313-Page-36.png)
![Chapter 7 — ProgrammingCN2B Mobile Computer User’s Manual 161Network Selection APIsThe Network Selection APIs change the network adapter configuration programmatically. Both drivers support the same IOCTL function num-bers for loading and unloading the drivers. Loading and unloading of the 802.11b/g driver is performed by the FWL1: device in the system by per-forming DeviceIOControl() calls to the driver. Loading and unloading of the driver for the built-in Ethernet adapter is performed by the SYI1: device in the system by performing DeviceIOControl() calls to the driver. • For loading an NDIS driver associated with an adapter, the IOCTL is IOCTL_LOAD_NDIS_MINIPORT.• For unloading NDIS drivers associated with an adapter the IOCTL is IOCTL_UNLOAD_NDIS_MINIPORT.Example#include <winioctl.h>#include “sysio.h”void DoLoad(int nDevice) { LPTSTR devs[] = { _T(“SYI1:”), _T(“FWL1:”) };HANDLE hLoaderDev;DWORD bytesReturned;hLoaderDev = CreateFile(devs[nDevice], GENERIC_READ|GENERIC_WRITE, 0,NULL, OPEN_EXISTING, 0, NULL);if (hLoaderDev != INVALID_HANDLE_VALUE) {if (!DeviceIoControl( hLoaderDev, IOCTL_LOAD_NDIS_MINIPORT, NULL, -1, NULL, 0, &bytesReturned, NULL)){MessageBox(NULL, TEXT(“SYSIO IoControl Failed”), TEXT(“Network loader”),MB_ICONHAND);if (hLoaderDev!=INVALID_HANDLE_VALUE) CloseHandle(hLoaderDev);hLoaderDev = INVALID_HANDLE_VALUE; // bad handle}else {CloseHandle(hLoaderDev);}}}void DoUnload(int nDevice) {LPTSTR devs[] = { _T(“SYI1:”), _T(“FWL1:”) };HANDLE hLoaderDev;DWORD bytesReturned;hLoaderDev = CreateFile(devs[nDevice], GENERIC_READ|GENERIC_WRITE, 0,NULL, OPEN_EXISTING, 0, NULL);if (hLoaderDev != INVALID_HANDLE_VALUE) {if (!DeviceIoControl( hLoaderDev, IOCTL_UNLOAD_NDIS_MINIPORT, NULL, -1, NULL, 0, &bytesReturned, NULL)){MessageBox(NULL, TEXT(“SYSIO IoControl Failed”),TEXT(“Network loader”),MB_ICONHAND);if (hLoaderDev!=INVALID_HANDLE_VALUE) CloseHandle(hLoaderDev);hLoaderDev = INVALID_HANDLE_VALUE; // bad handle}else {CloseHandle(hLoaderDev);}}}The API provided by Intermec Technologies exposes a limited set of rou-tines for a programmer to access and affect the 802.11b/g network interface](https://usermanual.wiki/Intermec-Technologies/2610CF.User-Manual-3-of-3/User-Guide-616313-Page-37.png)

![Chapter 7 — Programming182 CN2B Mobile Computer User’s ManualNLEDSetDeviceUsage#include “nled.h”SyntaxBOOL NLEDSetDevice ( UINT nDeviceId, void *pInput );ParametersReboot FunctionsThere are several methods, via Kernel I/O Control functions, that an appli-cation program can use to force the CN2B Computer to reboot.IOCTL_HAL_REBOOTIOCTL_HAL_REBOOT performs a warm-boot. See page 159.IOCTL_HAL_COLDBOOTInvoking with this forces a cold reboot, resets the CN2B Computer, reloads Windows CE as if a power-up was performed, and discards the contents of the Windows CE RAM-based object. See page 157.IOCTL_HAL_WARMBOOTThis function is supported on CN2B Computers. It performs a warm boot of the system, preserving the object store. See page 156.Remapping the KeypadApplications have the ability to remap keys on the CN2B keypad. This allows applications to enable keys that would otherwise not be available, such as the [F1] function key. Also, to disable keys that should not be avail-able, such as the alpha key because no alpha entry is required. Use caution when attempting to remap the keypad because improper remapping may cause the keypad to become unusable. This can be corrected by performing a cold-boot on the device that reloads the default keymap.nDeviceId Integer specifying the device identification. The following is defined:NLED_SETTINGS_INFO_ID Contains information about the desired LED settings.pInput Pointer to the buffer that contains the NLED_SETTINGS_INFO structure.Note: Use caution when remapping the keypad. Improper remapping may render the keypad unusable. Data within the CN2B Computer could also be lost, should any problems occur.](https://usermanual.wiki/Intermec-Technologies/2610CF.User-Manual-3-of-3/User-Guide-616313-Page-58.png)
![Chapter 7 — ProgrammingCN2B Mobile Computer User’s Manual 183Note that remapping the keys in this way affects the key mapping for the entire system, not just for the application that does the remapping.There are three “planes” supported for the CN2B keypad. Keys used in more than one shift plane must be described in each plane.Unshifted PlaneThe unshifted plane contains values from the keypad when not pressed with other keys, such as the following:Orange PlaneThe orange plane contains values from the keypad when a key is simulta-neously pressed with the orange key, such as the following:Alpha (Green) PlaneThe alpha plane contains values from the keypad when the keypad has been placed in alpha mode by pressing the green [Alpha] key, such as:Key ValuesKey values for each plane are stored in the registry. All units ship with a default key mapping loaded in the registry. Applications that change the default mapping need to read the appropriate key from the registry into an array of words, modify the values required and then write the updated val-ues back into the registry. The registry access can be done with standard Press the Key To Enter This[1] 1[5] 5[9] 9Press the Keys To Enter Thisorange [0] Start menuorange [6] A4orange [9] PgDnPress the Keys To Enter This[Alpha] [1] Caps[Alpha] [5] j[Alpha] [9] w](https://usermanual.wiki/Intermec-Technologies/2610CF.User-Manual-3-of-3/User-Guide-616313-Page-59.png)
![Chapter 7 — Programming184 CN2B Mobile Computer User’s ManualMicrosoft API calls, such as RegOpenKeyEx(), RegQueryValueEx(), and RegSetValueEx(). These registry keys contain the plane mappings:• The unshifted plane mapping can be found in the registry at:HKEY_LOCAL_MACHINE\HARDWARE\DEVICEMAP\KEYBD\Vkey• The orange plane mapping can be found in the registry at:HKEY_LOCAL_MACHINE\HARDWARE\DEVICEMAP\KEYBD\VkeyGold• The alpha plane mapping can be found in the registry at:HKEY_LOCAL_MACHINE\HARDWARE\DEVICEMAP\KEYBD\VkeyAlphaHow Key Values Are Stored in RegistryTo know which fields to update in the registry, you must know what Scan Codes are assigned to each physical key (see page 185). The Scan Code is used at the lowest level of the system to let the keypad driver know which physical key is pressed. The keypad driver takes that scan code and looks it up in a table (a copy of the table in the registry) to determine the values to pass to the operating system.Each registry key is just an array that describes to the keypad driver what value needs to be passed for each physical key. The key values are indexed by the scan code, this is a zero-based index. For example in the unshifted plane, the [4] key has a scan code of 0x06. This means that the seventh word under the “Vkey” registry key has the value for the [4] key. Taking a sample of the “Vkey” registry key shows the following values:00,00,0B,05,02,03,C1,07,04,03,BE,00,34,00,00,00,. . .The value is 34,00. The values are in reverse byte order because that is the way the processor handles data. When writing an application, nothing needs to be done to swap the bytes, as this will happen automatically when the data is read into a byte value. This is something you just need to be aware of when looking at the registry. Knowing this, we can see that the value that the keypad driver will pass to the system is a hex 34. Looking that up on an UNICODE character chart, we see that it maps to a “4”. If you wanted the key, labeled “4”, to output the letter “A” instead, you would need to change the seventh word to “41” (the hexadecimal representation of “A” from the UNICODE chart), then put the key back into the registry.If you wish to disable a certain key, remap its scan code to 0x00.Change NotificationJust changing the registry keys do not immediately change the key map-pings. Signal the “ITC_KEYBOARD_CHANGE” named event using the CreateEvent() API to notify the keypad driver the registry was updated.Note: Do not remap scan codes 0x01, 0x41, 0x42, 0x43, or 0x44, or the CN2B Computer becomes unit unusuable until a cold-boot is performed.](https://usermanual.wiki/Intermec-Technologies/2610CF.User-Manual-3-of-3/User-Guide-616313-Page-60.png)
![Chapter 7 — ProgrammingCN2B Mobile Computer User’s Manual 185Advanced Keypad RemappingIt is also possible to map multiple key presses to one button and to map named system events to a button. The multiple key press option could be useful to cut down on the number of keys needed to press in a given situa-tion or to remap which key behaves like the action key. Mapping events to a button could be useful to change which buttons will fire the scanner, con-trol volume, and allow for suspending and resuming the device. If you need help performing one of these advanced topics please contact Intermec Technical Support.Scan CodesAt the lowest driver level, the CN2B keypad identifies keys as scan codes. These scan codes are sent via the keypad microcontroller, and cannot be changed without modifying the keypad firmware.Keypad Scan Codes and MeaningsPress this Key Meaning Scan CodeReserved 0x00[I/O] I/O button 0x01Scanner Handle Trigger 0x02Scanner Left 0x03Scanner Right 0x04[4] 4/GHI/A2 0x06None 0x07Left arrow/Back Tab 0x08None 0x09[BkSp] BkSp// (forward slash) 0x0Aorange orange key 0x0BNone 0x0C[Esc] Esc/– (minus sign) 0x0D[v] Down arrow 0x0E[1] 1/Caps 0x0F[7] 7/PQRS/PgUp 0x10[Alpha] [Alpha] key 0x11None 0x12](https://usermanual.wiki/Intermec-Technologies/2610CF.User-Manual-3-of-3/User-Guide-616313-Page-61.png)
![Chapter 7 — Programming186 CN2B Mobile Computer User’s Manual[^] Up arrow/Volume increase 0x13Right arrow/Tab 0x14[2] 2/ABC 0x15[8] 8/TUV/* (asterisk) 0x16[0] 0/Win 0x17[5] 5/JKL/A3 0x18None 0x19[Action] Action/+ (plus symbol) 0x1A[3] 3/DEF/backlight 0x1B[9] 9/WXYZ/PgDn 0x1C[ENTER] Enter/@ (at symbol) 0x1D[6] 6/MNO/A4 0x1ENone 0x1F-0x40Charge Detect 0x41LCD frontlight 0x42Ambient light 0x42Threshold crossed 0x42Headset detected 0x43Keypad Backlight 0x44Ambient Light 0x44Threshold Crossed 0x44Keypad Scan Codes and Meanings (continued)Press this Key Meaning Scan Code](https://usermanual.wiki/Intermec-Technologies/2610CF.User-Manual-3-of-3/User-Guide-616313-Page-62.png)
![Chapter 7 — ProgrammingCN2B Mobile Computer User’s Manual 187Sample View of Registry KeysThe following is a sample view of the current default key mapping for the CN2B keypad. See the registry on your device for the latest key mappings.[HKEY_LOCAL_MACHINE\HARDWARE\DEVICEMAP\KEYBD]”ResumeMask”=dword:7”Vkey”=hex: 00,00,0B,05,02,03,C1,07,04,03,BE,00,34,00,00,00,\25,00,00,00,08,00,03,02,00,00,1B,00,28,00,31,00,\37,00,01,02,00,00,26,00,27,00,32,00,38,00,30,00,\35,00,00,00,01,03,33,00,39,00,0D,00,36,00,00,00,\00,00,00,00,00,00,00,00,00,00,00,00,00,00,00,00,\00,00,00,00,00,00,00,00,00,00,00,00,00,00,00,00,\00,00,00,00,00,00,00,00,00,00,00,00,00,00,00,00,\00,00,00,00,00,00,00,00,00,00,00,00,00,00,00,00,\00,00,07,05,01,05,03,05,02,05”VkeyGold”=hex:00,00,0B,05,02,03,C1,07,04,03,BE,00,34,00,00,00,\09,01,00,00,BF,00,03,02,00,00,BD,00,75,00,72,00,\21,00,01,02,00,00,76,00,09,00,73,00,38,01,5B,00,\35,00,00,00,BB,01,09,05,22,00,32,01,36,00,00,00,\00,00,00,00,00,00,00,00,00,00,00,00,00,00,00,00,\00,00,00,00,00,00,00,00,00,00,00,00,00,00,00,00,\00,00,00,00,00,00,00,00,00,00,00,00,00,00,00,00,\00,00,00,00,00,00,00,00,00,00,00,00,00,00,00,00,\00,00,07,05,01,05,03,05,02,05”VkeyAlpha”=hex:00,00,0B,05,02,03,C1,07,04,03,BE,00,47,00,00,00,\25,00,00,00,08,00,03,02,00,00,1B,00,28,00,02,02,\50,00,01,02,00,00,26,00,27,00,41,00,54,00,20,00,\4A,00,00,00,01,03,44,00,57,00,0D,00,4D,00,00,00,\00,00,00,00,00,00,00,00,00,00,00,00,00,00,00,00,\00,00,00,00,00,00,00,00,00,00,00,00,00,00,00,00,\00,00,00,00,00,00,00,00,00,00,00,00,00,00,00,00,\00,00,00,00,00,00,00,00,00,00,00,00,00,00,00,00,\00,00,07,05,01,05,03,05,02,05](https://usermanual.wiki/Intermec-Technologies/2610CF.User-Manual-3-of-3/User-Guide-616313-Page-63.png)


![Appendix A — Configurable Settings192 CN2B Mobile Computer User’s Manual“\Flash_File_Store\Registry” path. Check Enable Registry Storage to enable this function.Wakeup MaskThis page programs three scanner buttons and the A1 and A2 application keys to be “wakeup” or resume keys. That is, to prompt the CN2B Com-puter to “wake up” or resume activity after going to “sleep” as a result of being inactive after a length of time. This information remains between warm and cold boots. Check the appropriate box, then tap ok to apply.Based on the setting, do the following to “wake up” the CN2B Computer.From the CN2B Computer, tap Start > Settings > the System tab > Utili-ties > the Wakeup Mask tab to access the Wakeup Mask page.Middle Scanner Button Squeeze the button on the Scan HandleLeft Scanner Button Squeeze the left scanner buttonRight Scanner Button Squeeze the right scanner buttonGOLD + A1 (Application 1) Press orange [period]GOLD + A2 (Application 2) Press orange [4]](https://usermanual.wiki/Intermec-Technologies/2610CF.User-Manual-3-of-3/User-Guide-616313-Page-68.png)


![Appendix A — Configurable Settings214 CN2B Mobile Computer User’s ManualUsing Reader CommandsAfter the CN2B Computer is connected to your network, you can send the CN2B Computer a reader command from an application to perform a task, such as changing the time and date. Some reader commands temporarily override configuration settings and some change the configuration settings.Change ConfigurationThe Change Configuration command must precede any configuration command. If you enter a valid string, the CN2B Computer configuration is modified and the computer emits a high beep. To send the Change Config-uration command through the network, use the $+ [command] syntax where command is the two-letter command syntax for the configuration command followed by the value to be set for that command.You can also make changes to several different commands by using the $+ [command]...[command n] syntax. There are seven configuration command settings that you can change in this way. See each command for information on respective acceptable “data” values.Example 1To change the Beep Volume to Off, you can send this string to the CN2B Computer through the network: $+BV0where:$+ Indicates Change Configuration.BV Specifies the Audio Volume parameter.0Specifies a value of Off.Key Clicks Enables or disables the keypad clicks. The CN2B Com-puter emits a click each time you press a key or decode a row of a two-dimensional symbology.0 - Disable clicks1 - Enable soft key clicks2 - Enable loud key clicks (default)Command SyntaxAudio Volume BVdataAutomatic Shutoff EZdataBacklight Timeout DFdataKey Clicks KCdataVirtual Wedge Grid AFdataVirtual Wedge Postamble AEdataVirtual Wedge Preamble ADdataReader Command Description Option](https://usermanual.wiki/Intermec-Technologies/2610CF.User-Manual-3-of-3/User-Guide-616313-Page-90.png)