Itron 100GDLA utility meter transceiver User Manual 100G Installation Guide draft 102808
Itron, Inc. utility meter transceiver 100G Installation Guide draft 102808
Itron >
Contents
- 1. Users Manual p1
- 2. Users Manual p2
- 3. Users Manual p3
- 4. Users Manual p4
Users Manual p4
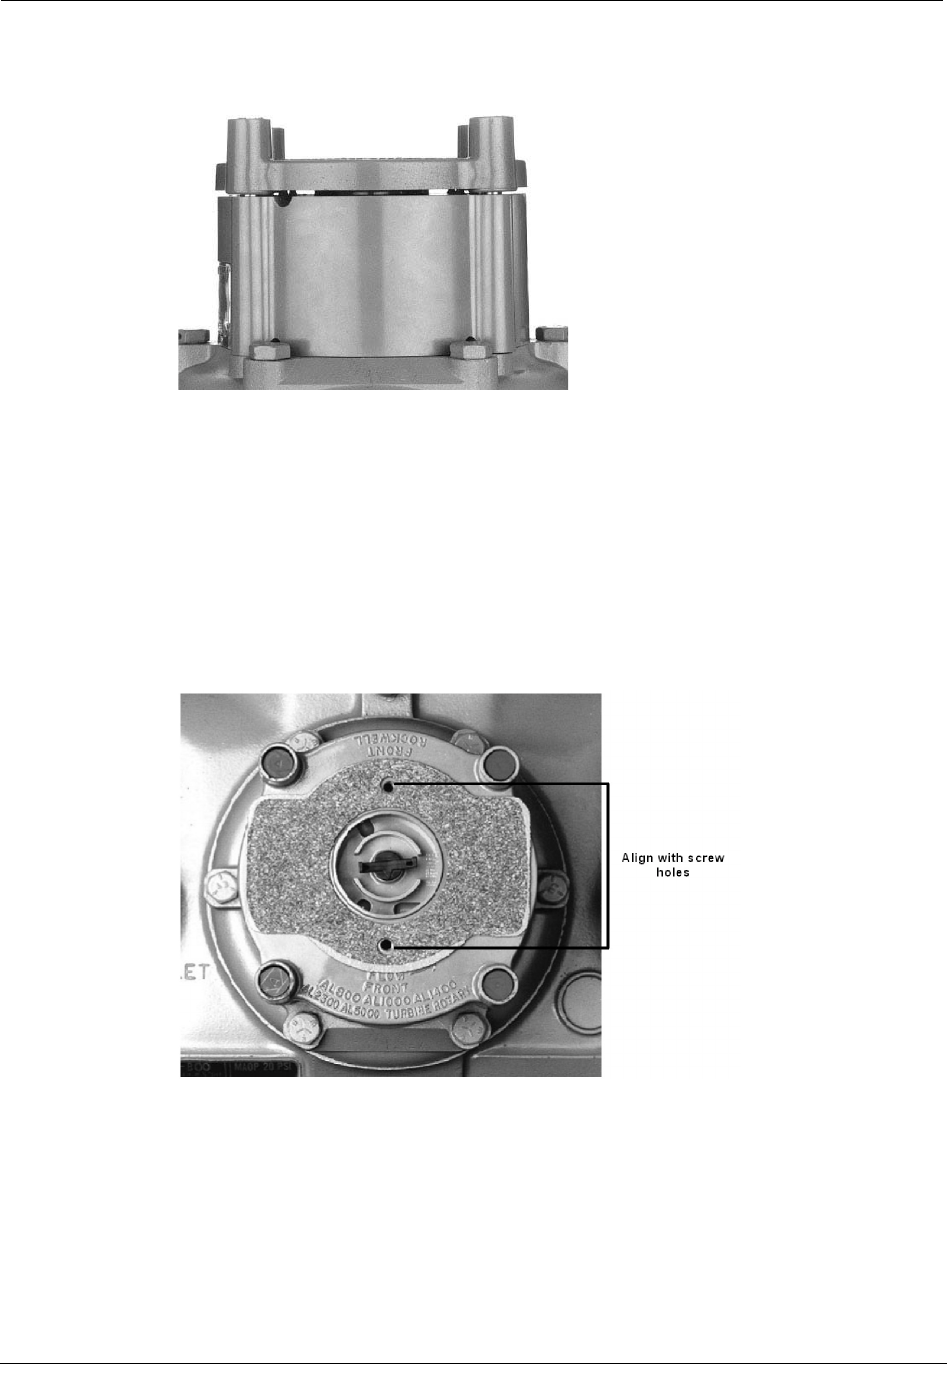
Installing the 100G ERT Module
Natural Gas Solutions 100G Installation Guide for Direct Mounting on Meters 71
A gap at the screw locations is normal both before and after the index cover
mounting-plate screws are tightened.
7. Install the four ERT module mounting screws and tighten them, in a diagonal
sequence. Turn each screw 1/4 to 1/2 turn after it contacts the mounting plate. If you
are using a torque wrench, tighten to 72 inch-pounds.
8. Place new tamper seals over screws and press the seals into place with an 11/32 inch
nut driver, or other blunt tool.
To attach the index and cover
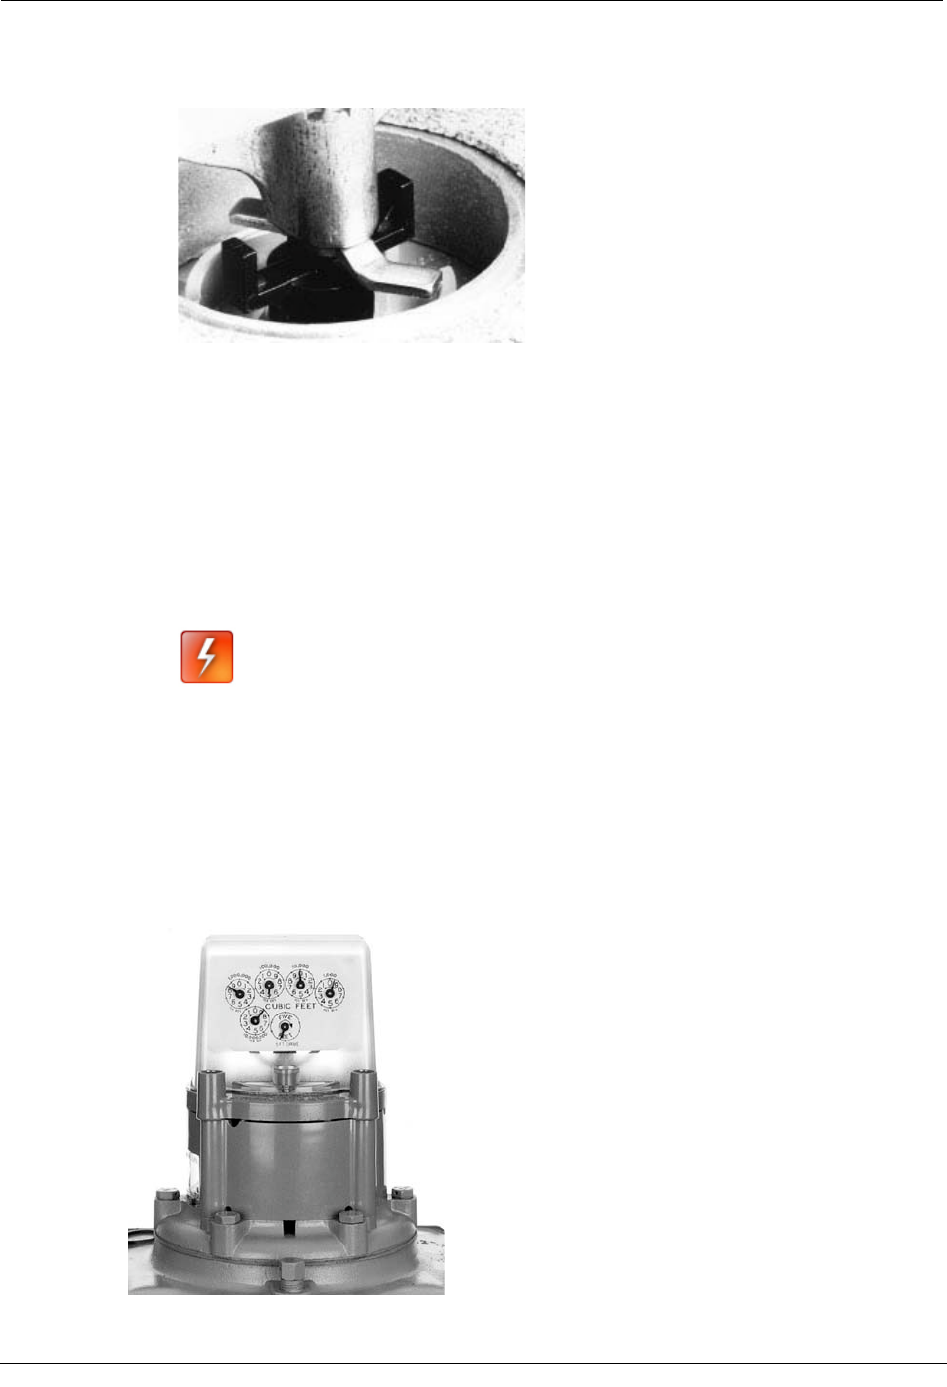
1. Locate the gasket previously removed and place it on the index cover mounting plate.
2. Align the gasket screw holes with the mounting plate's screw holes.
Chapter 6 American/Actaris Commercial Meter Installation
72 Natural Gas Solutions 100G Installation Guide for Direct Mounting on Meters
3. Turn the index wriggler so it will go across the ERT module wriggler when you put
the index onto the mounting plate.
4. Carefully lower the index and cover onto the mounting plate. Place the index facing
the same direction it was before you removed it.
5. Align the index cover screw holes with the screw holes in the gasket and index cover
mounting plate.
6. Verify there is no gap between the bottom of the index cover and the top of the gasket.
If there is a gap, it may be the index wriggler is riding on top of the ERT module's
upper wriggler. To eliminate a gap, repeat steps 2, 3, and 4 until the cover fits
properly.
WARNING! Do not press down on the index cover if there is a gap. If
you do, you can damage the index wriggler or ERT module wriggler.
7. Turn each screw 1/4 to 1/2 turn after it contacts the cover.
8. Place new tamper or wire seals over or through the screw heads.
9. Press tamper seals into place with an 11/32 nut driver, or other blunt tool, or crimp the
seal if you are using wire seals.
100G ERT Module installation on the American Commercial Meter is complete.
Installing 100G ERT Module on Actaris
Natural Gas Solutions 100G Installation Guide for Direct Mounting on Meters 73
Installing 100G ERT Module on Actaris
The information in this section guides you through the installation of the 100G ERT Module
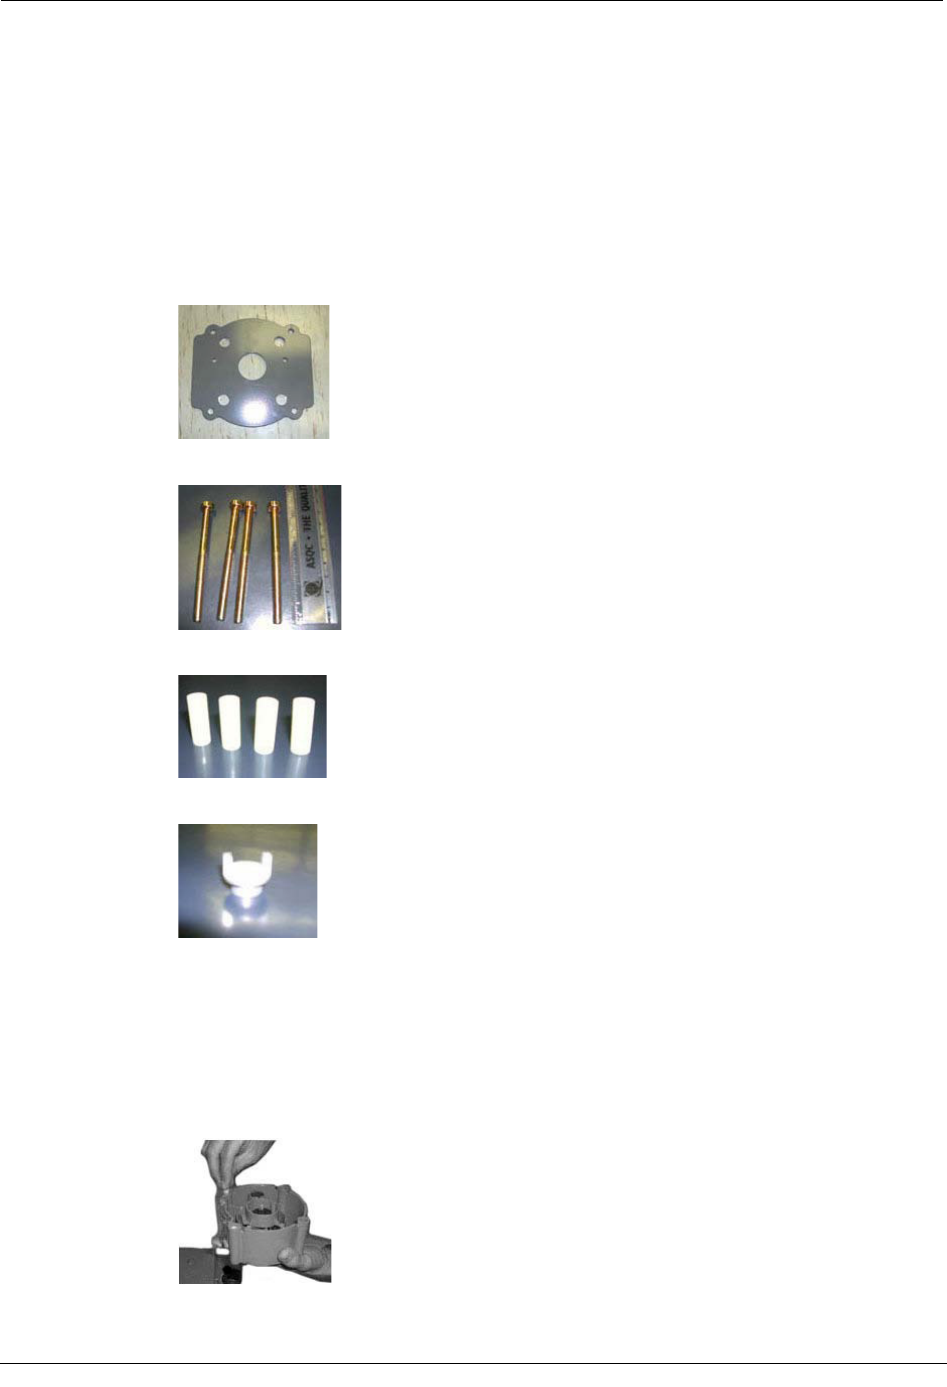
on Actaris 675A, 800A and 1000A meters. Installation requires an adapter kit (Actaris part
number 80005901 which must be ordered from Actaris) that contains:
xOne adapter plate
xFour ERT mounting screws
xFour screw bushings
xOne extension driver
To mount the index assembly to the adapter plate
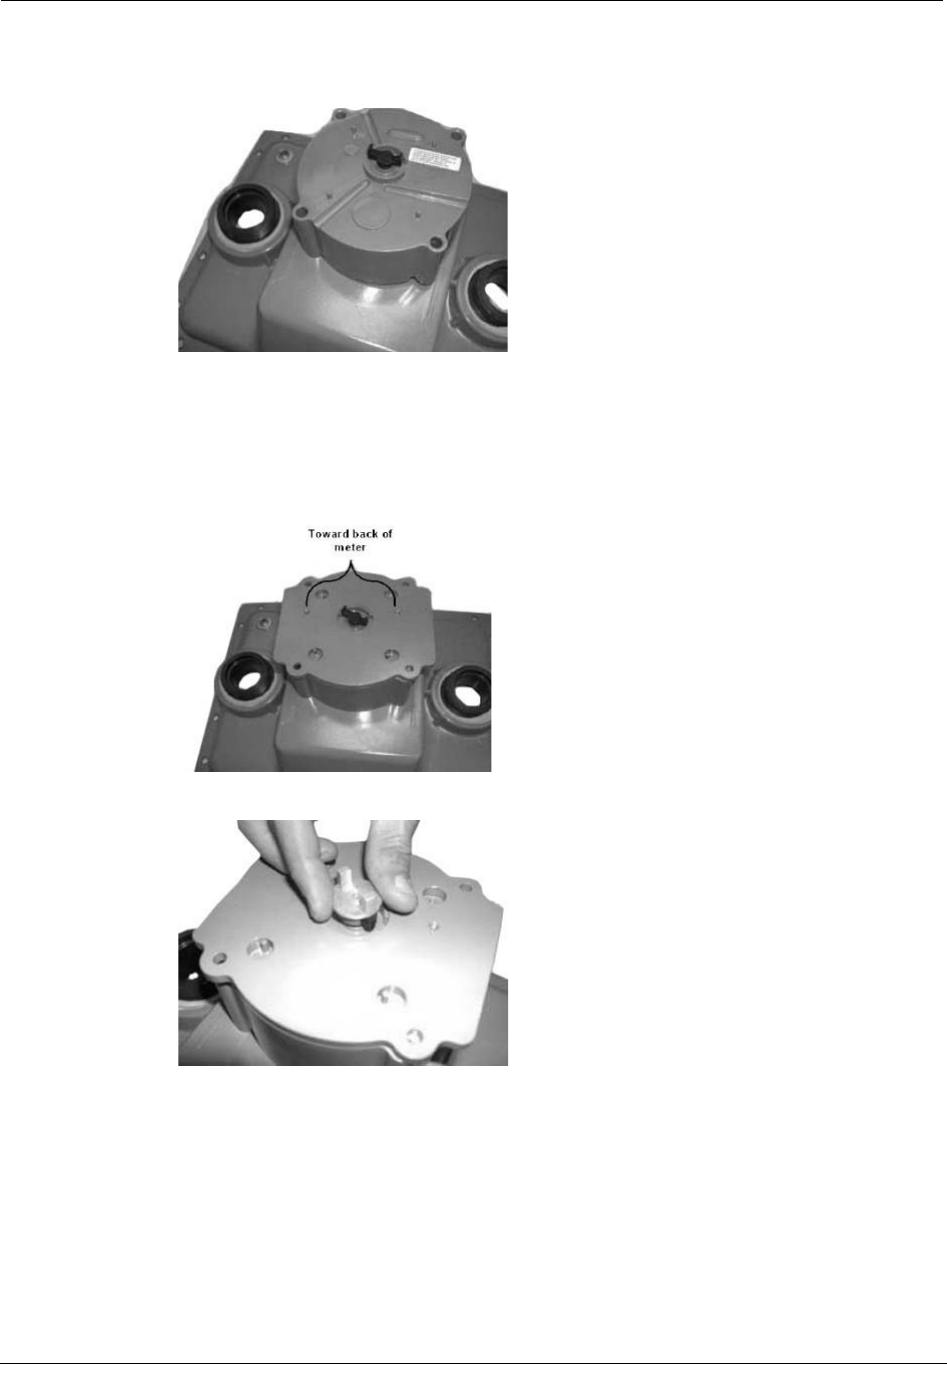
1. Turn the 100G ERT Module upside down in your hand.
2. Use the other hand to place the four screw bushings into the 100G ERT Module's
screw holes. If the screw bushings become dislodged before final assembly, replace
them and repeat process.
Chapter 6 American/Actaris Commercial Meter Installation
74 Natural Gas Solutions 100G Installation Guide for Direct Mounting on Meters
3. Turn the 100G ERT Module right side up and place it on the top of the commercial
meter.
4. Verify both the 100G ERT Module and meter drive dogs are lined correctly to
eliminate binding.
5. INLET lettering must be on the inlet side of the meter.
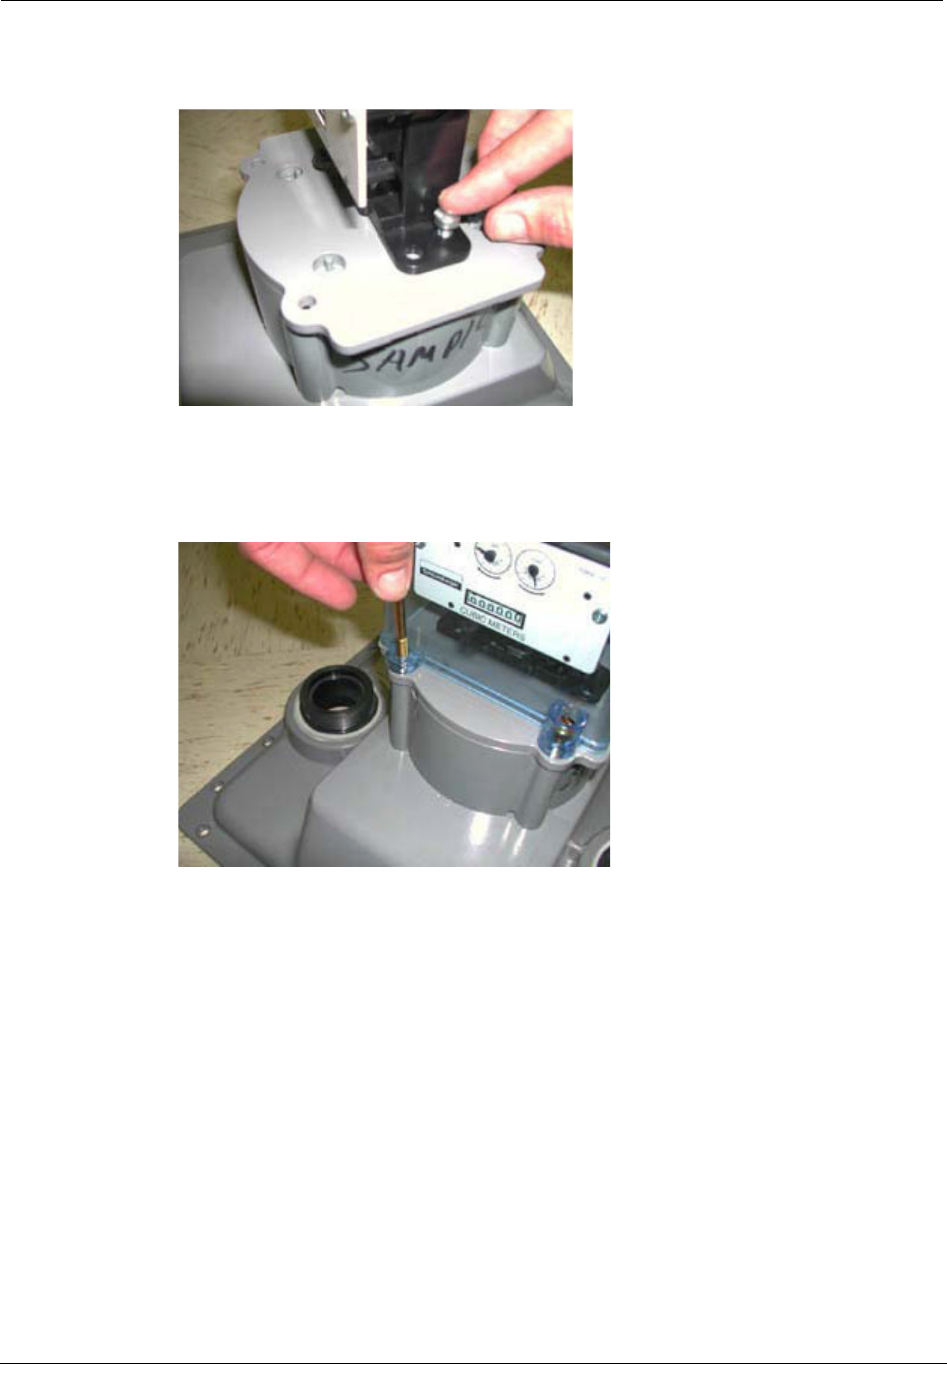
6. Place the adapter plate on top of the 100G ERT Module. The two small screw holes in
the adaptor plate must face the back of the meter.
7. Place the extension driver onto the 100G ERT Module wriggler.
Installing 100G ERT Module on Actaris
Natural Gas Solutions 100G Installation Guide for Direct Mounting on Meters 75
8. Gently place the index assembly onto the adapter plate and install the two index
mounting screws.
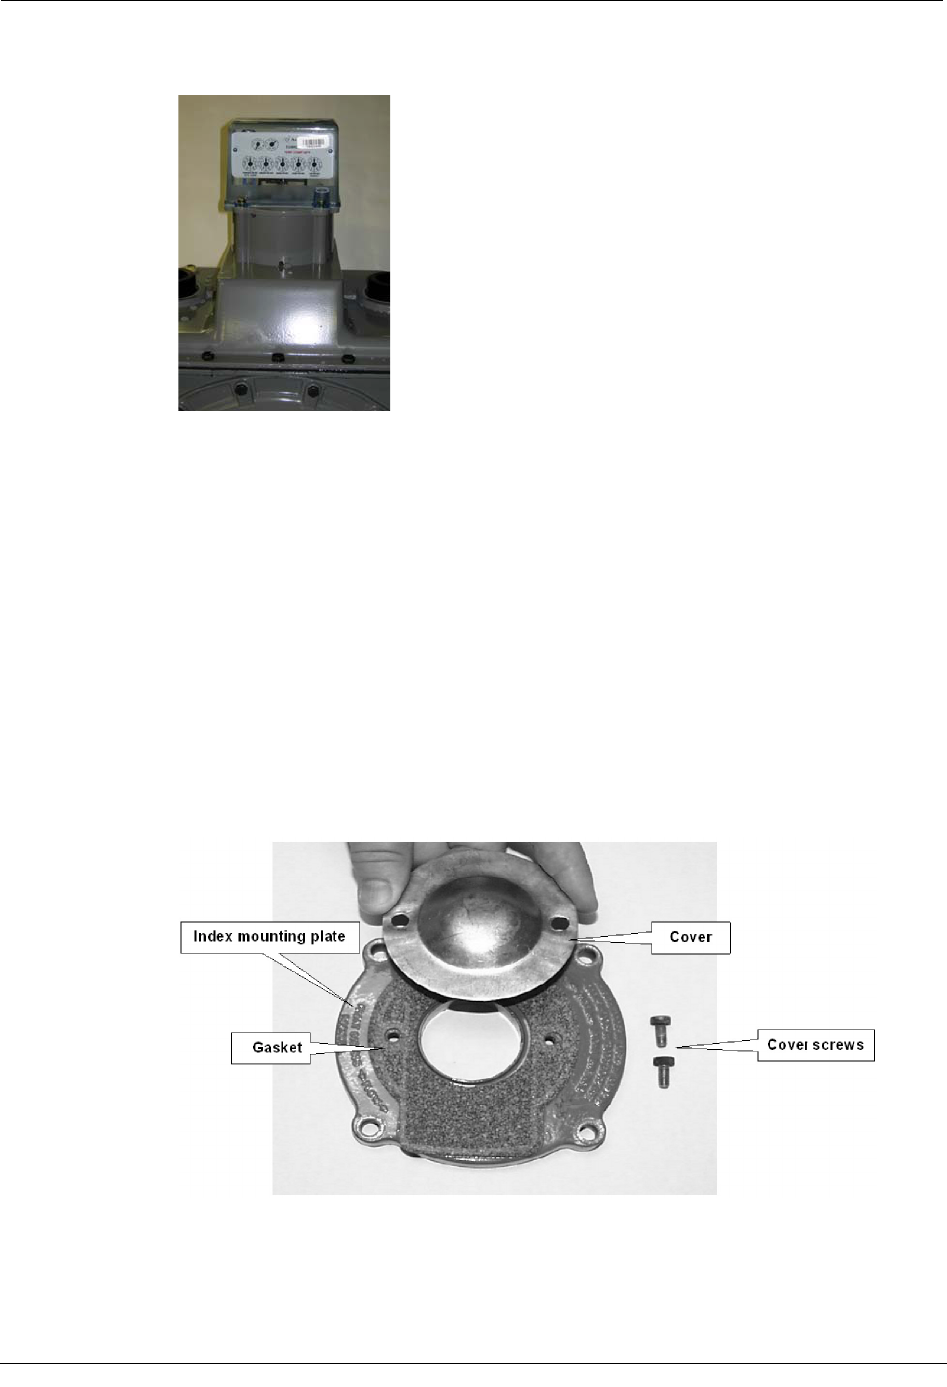
9. Place the index cover over the index assembly. The transparent section of the cover
must be on the same side as the index dials so the meter dials can be easily read.
10. Align the four holes in the index cover with the holes located in each corner of the
adapter plate and install the long cover screws.
11. Turn each screw 1/4 to 1/2 turn after it contacts the cover.
12. Place the tamper seals into the front right and back left screw holes of the index cover.
13. Install tamper seals over the screws and press them into place with an 11/32 nut
driver, or some other blunt tool. The tamper seals should not protrude above the index
cover screw holes.
14. Complete necessary paperwork and properly dispose excess installation and scrap
materials.
Chapter 6 American/Actaris Commercial Meter Installation
76 Natural Gas Solutions 100G Installation Guide for Direct Mounting on Meters
100G ERT Module installation on the Actaris Commercial Meter is complete.
Installing 100G ERT Module on ROOTS Rotary
The information in this section guides you through the installation of the 100G ERT Module
Commercial on ROOTS rotary meters. Installation requires the following items:
xOne index mounting plate
xGasket and drive cover kit
x100G ERT Module
xA flat screwdriver
To attach the Commercial 100G ERT Module to the meter
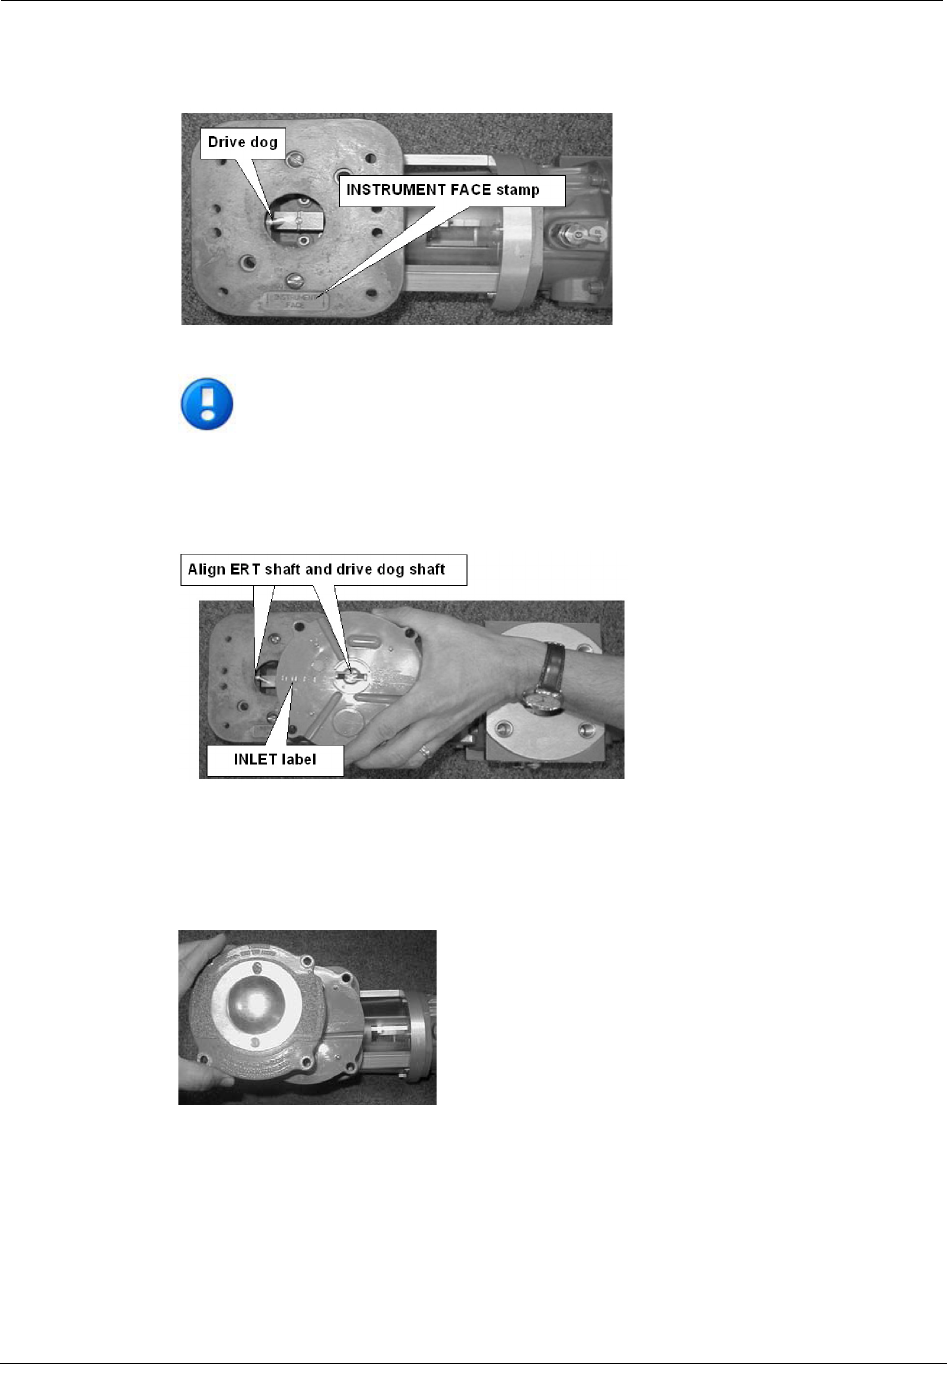
1. Install the gasket and cover on the index mounting plate (as shown) using the two
screws included with the kit.
Installing 100G ERT Module on ROOTS Rotary
Natural Gas Solutions 100G Installation Guide for Direct Mounting on Meters 77
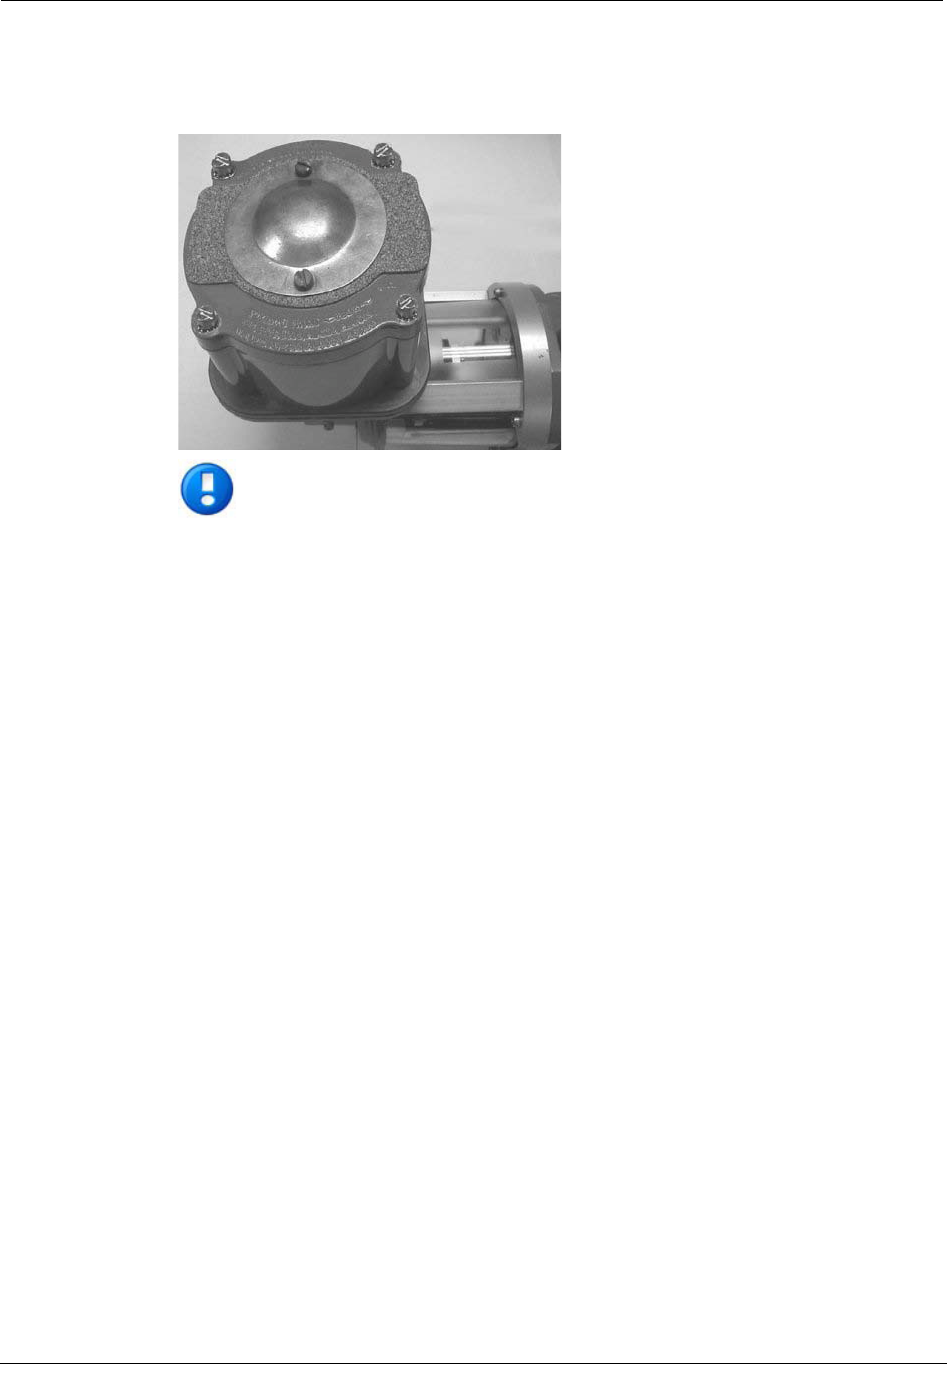
2. Locate the INSTRUMENT FACE stamp and position the meter with the drive dog
aligned (as shown).
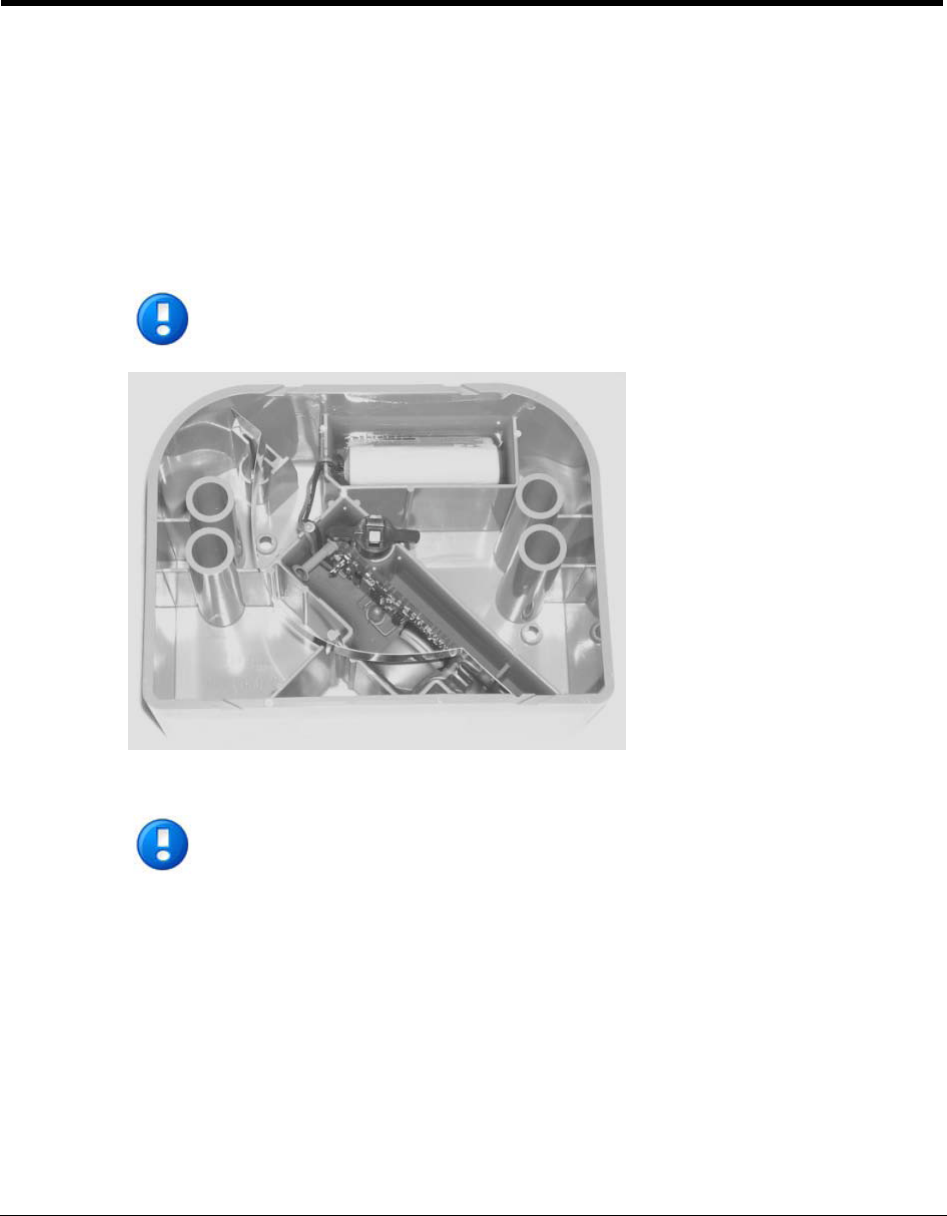
IMPORTANT Handle the 100G ERT Module carefully so the metal passive
radiator antenna is not damaged.
3. Locate the INLET label and position the ERT module as shown. Verify the two shafts
are aligned.
4. Verify the shafts are engaged by turning the ERT shaft. You should feel resistance.
5. Place the index mounting plate on the module and install the four bolts. Do not disturb
the shaft alignment.
Chapter 6 American/Actaris Commercial Meter Installation
78 Natural Gas Solutions 100G Installation Guide for Direct Mounting on Meters
6. Install the four ERT module mounting screws and tighten them, in a diagonal
sequence. Turn each screw 1/4 to 1/2 turn after it contacts the mounting plate. If you
are using a torque wrench, tighten to 72 inch-pounds.
NOTE
To mount an index and index cover on the rotary meter, remove the domed
cover and reference "To attach the index and cover" in the previous section.
Natural Gas Solutions 100G Installation Guide for Direct Mounting on Meters 79
This chapter shows you how to install a 100G ERT Module on a Sensus Commercial meter.
Before installing the 100G ERT Module, verify you have:
xA compatible meter shown in the Meter Compatibility List.
xA compatible index. Itron 100G ERT Module can be used with standard dial and
direct read (odometer) indexes.
xThe list of materials defined under Installation Prerequisites in this chapter.
IMPORTANT Handle the 100G ERT Module carefully so the metal passive
radiator antenna is not damaged.
Sensus meters are also known as: Invensys, Equimeter, and Rockwell. For
consistency, these meter types will be referred to as Sensus meters for this
installation procedure.
Installation Prerequisites
The following items are required to install the Itron 100G ERT Module.
C
H A P T E R
7
Sensus Commercial Meter Installation

Chapter 7 Sensus Commercial Meter Installation
80 Natural Gas Solutions 100G Installation Guide for Direct Mounting on Meters
Materials Supplied by Itron
The following items are supplied by Itron:
x100G ERT Module
xNew tamper seals
xFour screws for securing the 100G ERT Module assembly to the meter. These screws
may have holes drilled into the heads to accept wire tamper seals.
xTwo internal-tooth star washers for the mounting screws when using metal index
plates.
xTwo cork washers and two flat washers for the mounting screws when using plastic
index covers.
Materials Supplied By You
You must supply the following items to install, initialize, and check the 100G ERT Module
on the meter.
xSmall and medium flat-blade or Phillips screwdrivers Used to remove and tighten
index and index-cover screws.
xSide-cutting plier/wire snips Used for cutting wire seals, if necessary.
xMeter seals, wire seals, and seal press Used to secure the meter from tampering, if
necessary.
x11/32-inch nut driver or other blunt tool Used to securely seat new tamper plugs
over screw holes.
xFC200SR with EndPoint-Link or EndPoint-Link Pro software Used to program
and check ERT assembly.
Replacement Screws
Use 12 - 24 x 1/2-inch slotted, Fillister head machine screws (drilled to accept wire seals)
for replacement screws to mount the index cover.
Pre-installation Preparations
Before installing the 100G ERT Module on a meter, verify:
xAll Itron 100G ERT Module gas modules are compatible with your brand of gas
meter. See the Meter Compatibility List for compatible meter model numbers for
the 100G ERT Module.
Installing the 100G ERT Module
Natural Gas Solutions 100G Installation Guide for Direct Mounting on Meters 81
Installing the 100G ERT Module
There are three major steps to installing the 100G ERT Module on a meter:
xRemove the index
xProgram the 100G ERT Module
xAttach the 100G ERT Module to the meter.
NOTE Properly dispose of all unused screws, old index covers, gaskets, tamper
seals, and other left over materials. Do not leave any materials on customer
premises.
To remove the index
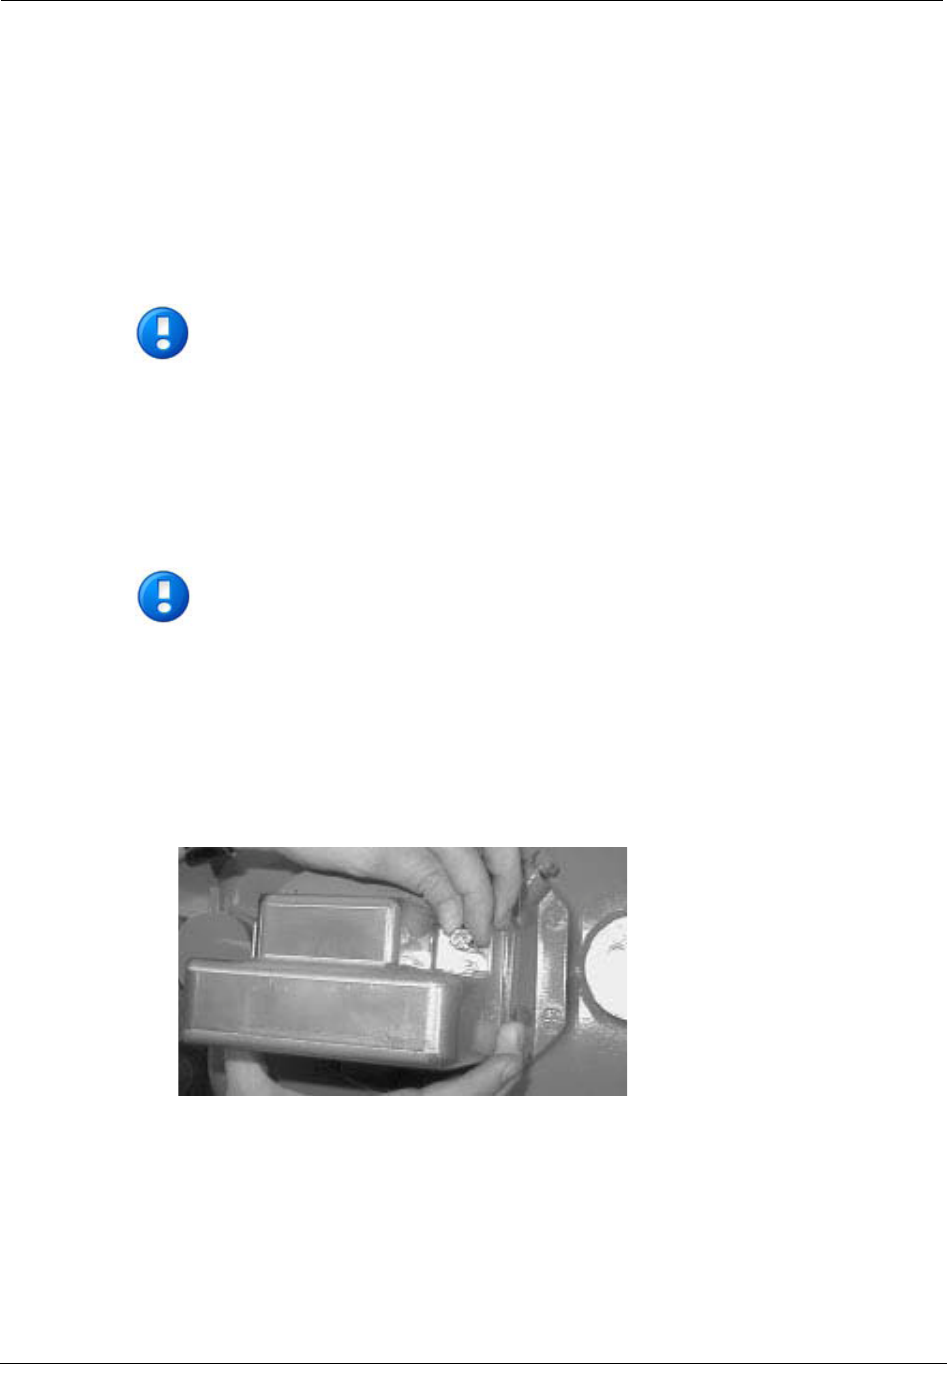
1. Note the orientation of the index. Remove the tamper seals or wire seals from the
index cover.
For illustrative purposes in the procedure, a plastic index cover with tamper
seal cups was used.
2. Remove the index cover screws from the meter. Verify screws are 1/2-inch long and
not corroded.
xIf the screws are the correct length and not corroded, keep them for later use.
xIf the screws are an incorrect length or are corroded, dispose of them properly.
Use the screws listed in Replacement Screws.
Chapter 7 Sensus Commercial Meter Installation
82 Natural Gas Solutions 100G Installation Guide for Direct Mounting on Meters
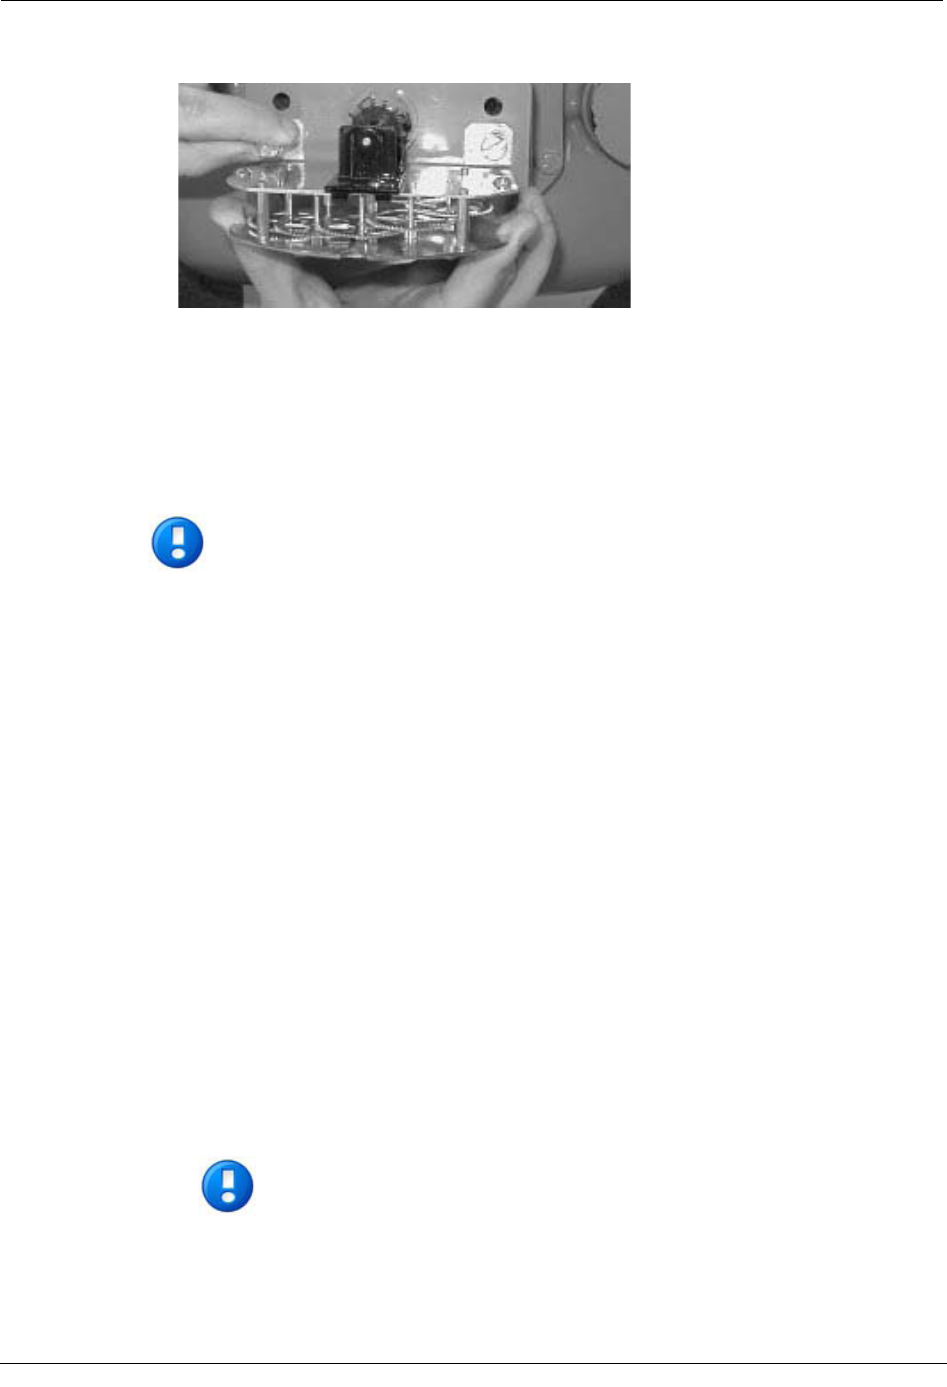
3. Remove the index mounting screws and discard them.
Program the ERT
The ERT must be programmed using the FC200SR with EndPoint-Link software. See the
Endpoint-Link ERT Programming Guide (TDC-0411) for more information.
IMPORTANT You must perform the following programming procedure for
the ERT module to function properly.
To program the ERT module
1. Using the FC200SR, program the reading of the index that was on the meter into the
ERT module assembly.
xFor initial programming, hold the FC200SR approximately 1 foot away from
the 100G.
xFor reprogramming (30 days or more past initial programming), hold the
FC200SR approximately 4 to 5 feet away from the 100G.
Be sure to program the 100G to the correct mode for the reading technology that will
be used (for example, Fixed Network Mode, Mobile/Handheld Mode, or Hard to Read
Mobile/Handheld Mode). In Endpoint-Link Pro v5.0, you will have access to the one
mode that was defined by your system administrator.
During programming, the 100G ERT module is programmed to the nearest 100 cubic
feet; the last two digits (the tens and units) are programmed as zeros (0). Once
programming is complete, however, the ERT module assembly can be read to the
nearest cubic foot.
2. Slowly turn the ERT module drive wriggler two turns in the direction indicated on the
index drive rate. This lets you verify the ERT module is counting properly after
assembly.
IMPORTANT Do not turn the drive wriggler faster than one turn per second.
Installing the 100G ERT Module
Natural Gas Solutions 100G Installation Guide for Direct Mounting on Meters 83
3. Read the ERT module assembly using the FC200SR. Consult the EndPoint-Link ERT
Programming Guide (TDC-0411) or other applicable instructions for details on how to
read an ERT.
xIf this reading is higher than the one you programmed in step 1 above, the ERT
module assembly is counting correctly.
xIf the ERT module assembly reading is not higher than what was programmed
in step 1, replace the ERT module with a new one.
To attach the 100G ERT Module to the meter
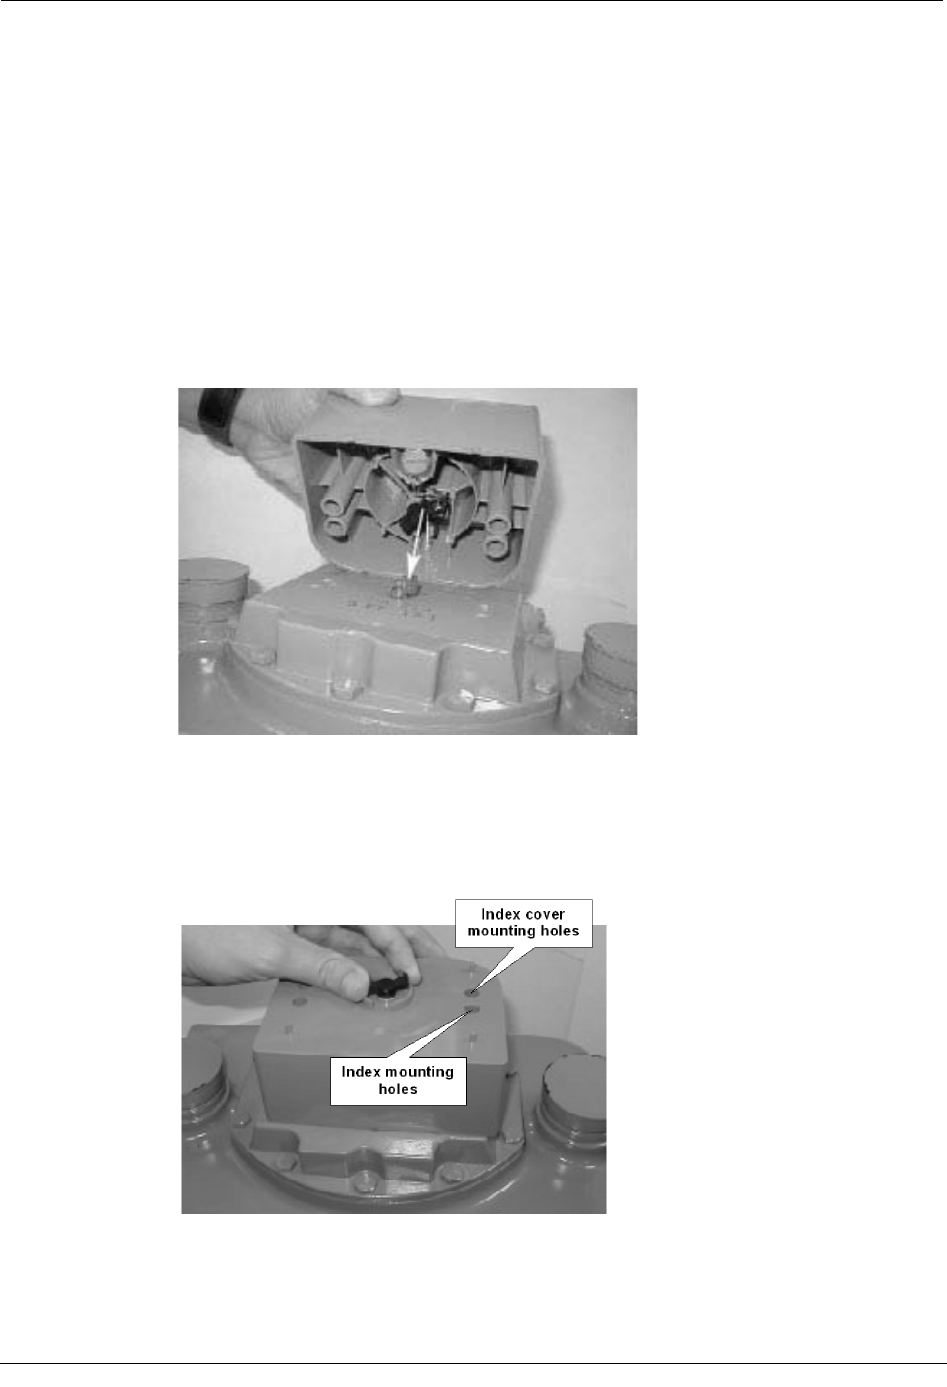
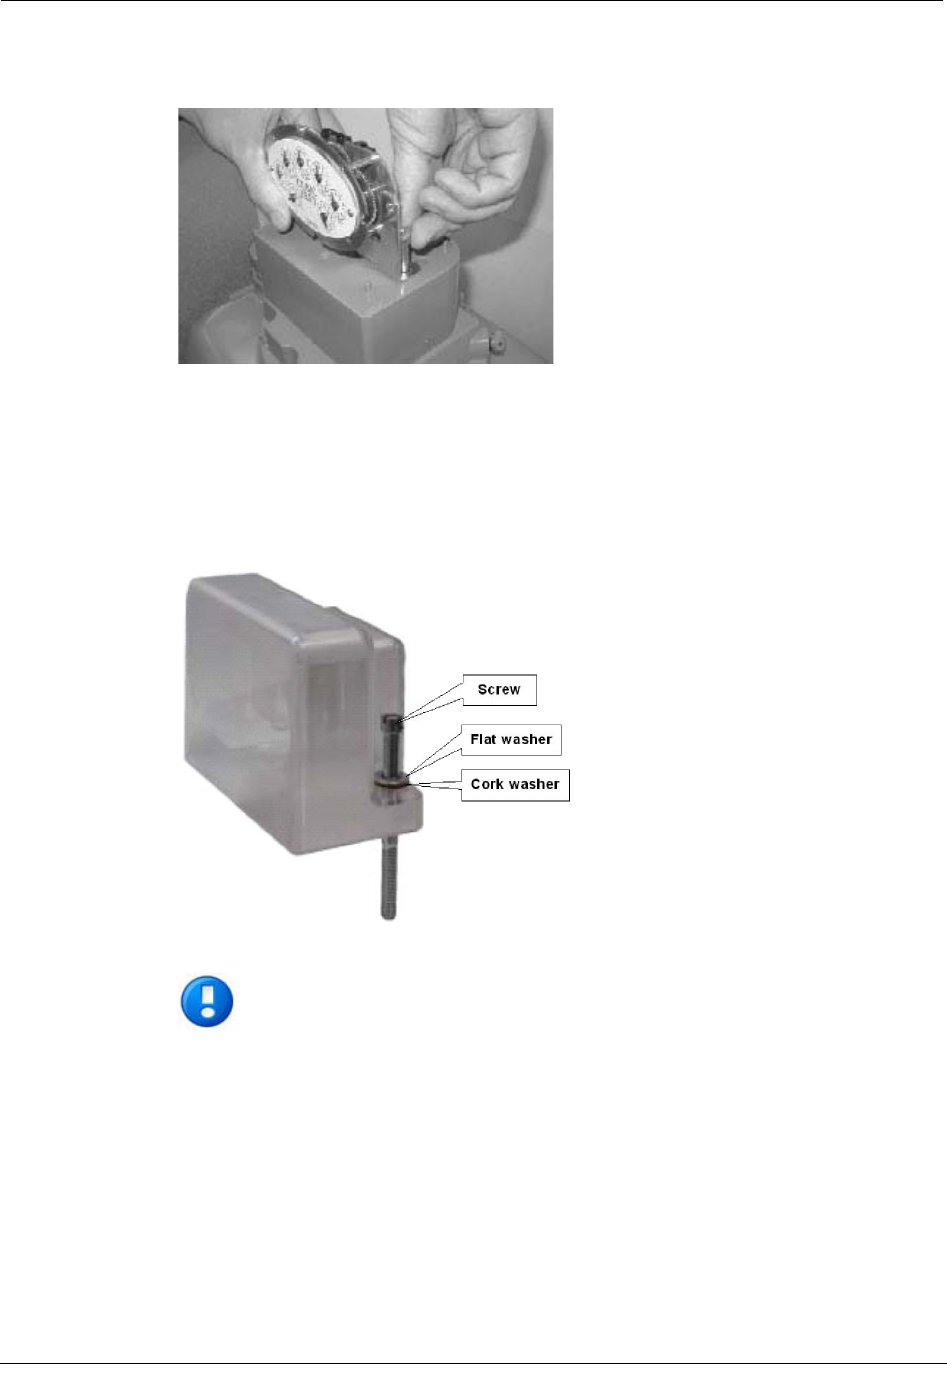
1. Carefully lower the 100G ERT Module onto the meter top so the wriggler aligns with
the meter drive dog.
2. Verify there is no gap between the bottom of the ERT module and the top of the
meter. If there is a gap, it may be the drive notches of the ERT module's lower
wriggler are not properly aligned with the meter wriggler's drive teeth.
3. Position the ERT module so its screw holes line up with the screw holes in the top of
the meter.
4. Rotate the 100G ERT Module drive to make sure it engages with the meter drive.
Chapter 7 Sensus Commercial Meter Installation
84 Natural Gas Solutions 100G Installation Guide for Direct Mounting on Meters
5. Place the index on top of the 100G ERT Module and line up the mounting holes.
Install the ERT module mounting screws (Itron part number SCR-0062-003).
6. Turn each screw 1/4 to 1/2 turn after it contacts the mounting plate. If you are using a
torque wrench, tighten to 72 inch-pounds.
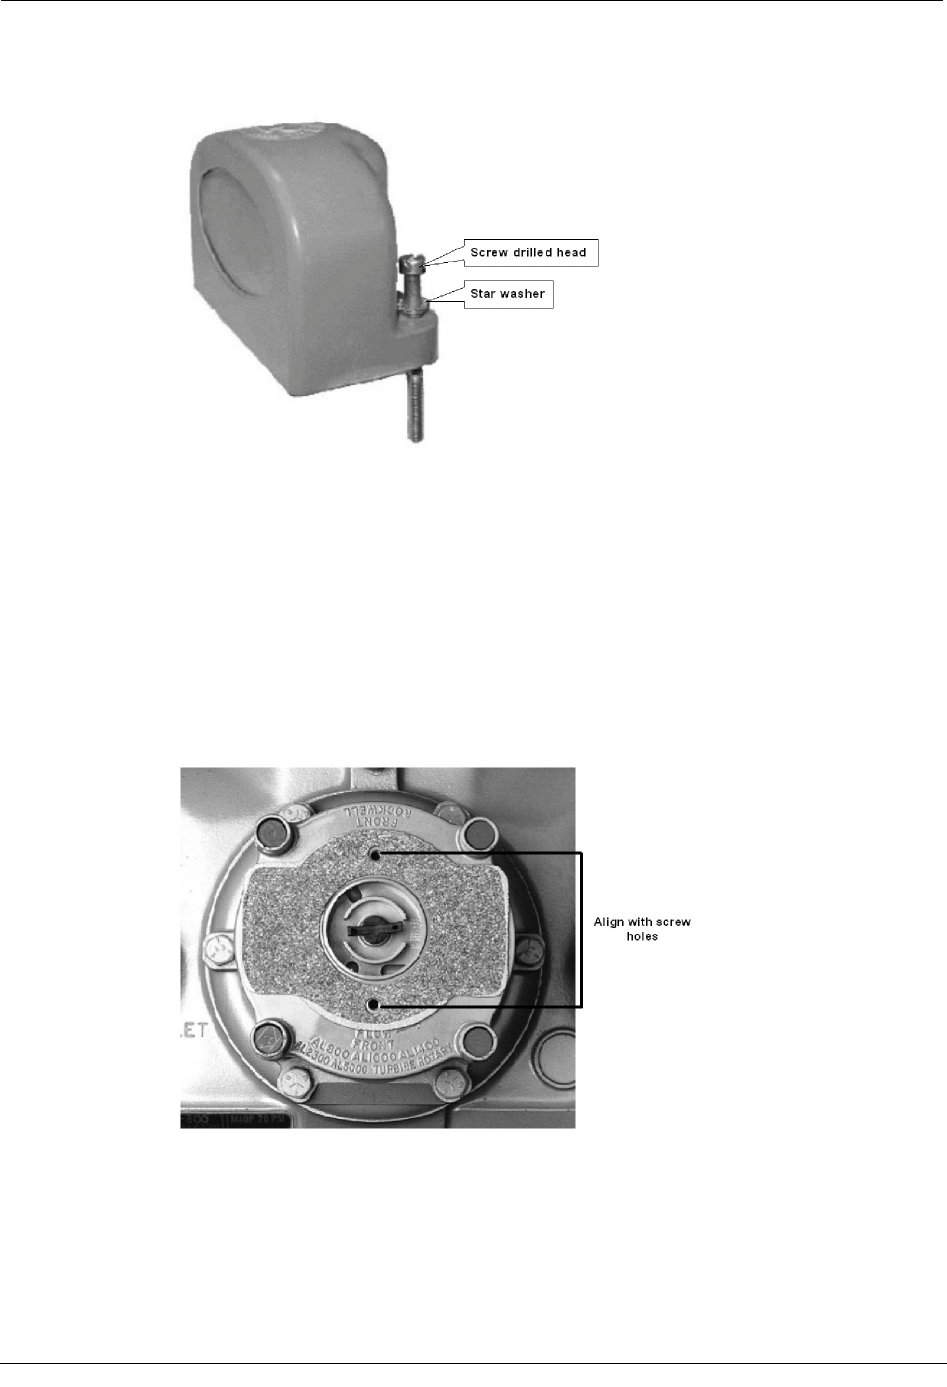
7. Install the index cover:
xFor plastic covers with a flat surface for screw holes: use screws (Itron part
number SCR-0062-002), flat washers (Itron part number WSH-0020-005), and
cork washers (Itron part number WSH-0032-001).
NOTE Some plastic covers have a raised boss area for screw placement. In
this case, use screws and red tamper seals. Press the tamper seals into place
with an 11/32 nut driver or other blunt tool.
Installing the 100G ERT Module
Natural Gas Solutions 100G Installation Guide for Direct Mounting on Meters 85
xFor metal index covers: use screws with the heads drilled to accept wire seals
and star washers (Itron part number WSH-0003-006).
8. Place new tamper seals
xFor plastic covers over screws: Press the seals into place with an 11/32 inch nut
driver or other blunt tool. For metal covers: pass wires through the holes in the
screw heads and crimp the seal.
To attach the index and cover
1. Locate the gasket previously removed and place it on the index cover mounting plate.
2. Align the gasket screw holes with the mounting plate's screw holes.
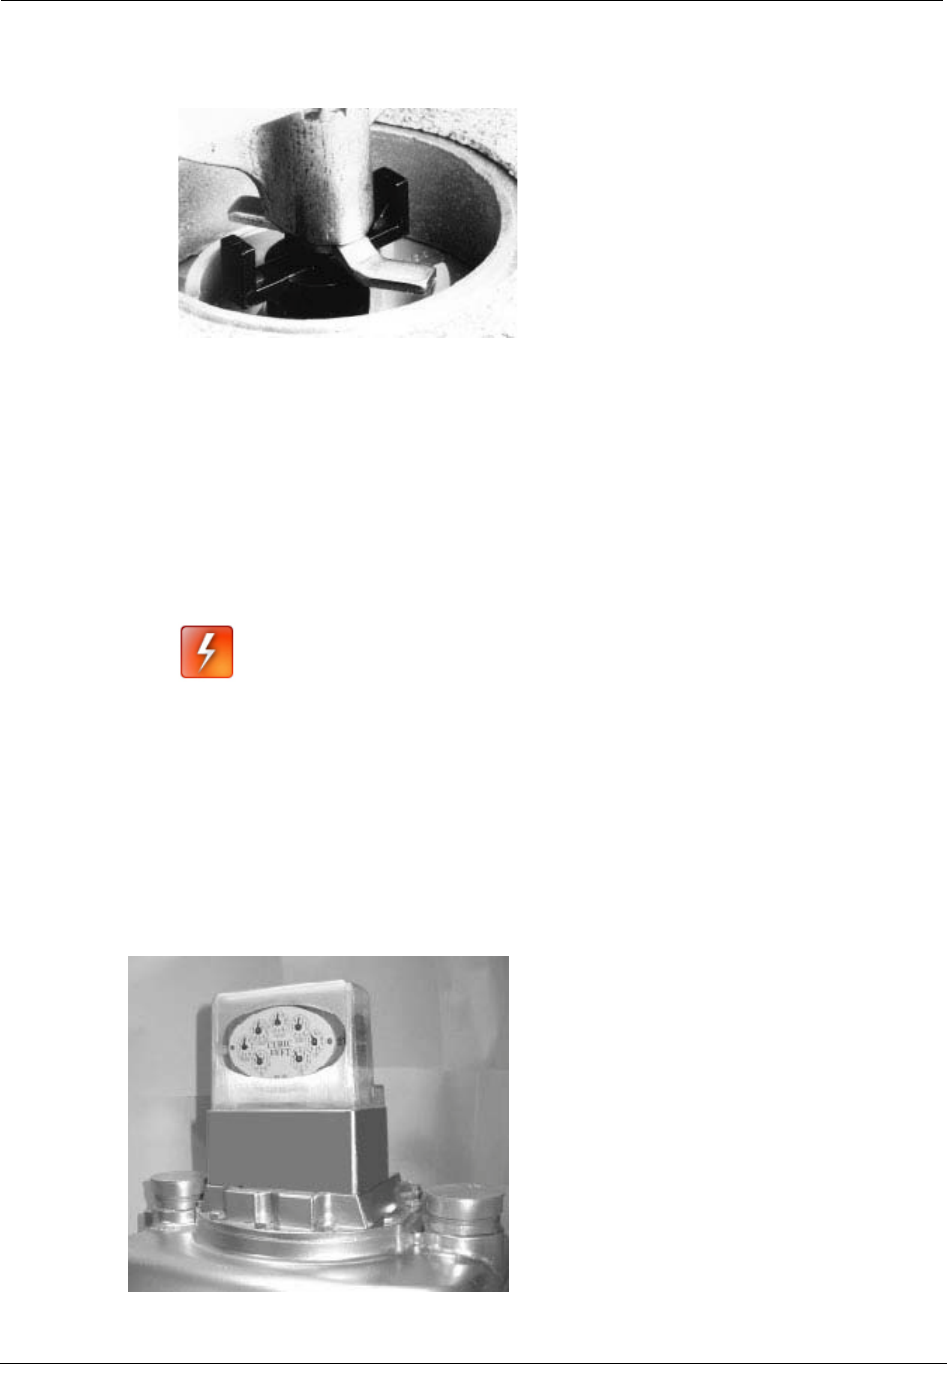
Chapter 7 Sensus Commercial Meter Installation
86 Natural Gas Solutions 100G Installation Guide for Direct Mounting on Meters
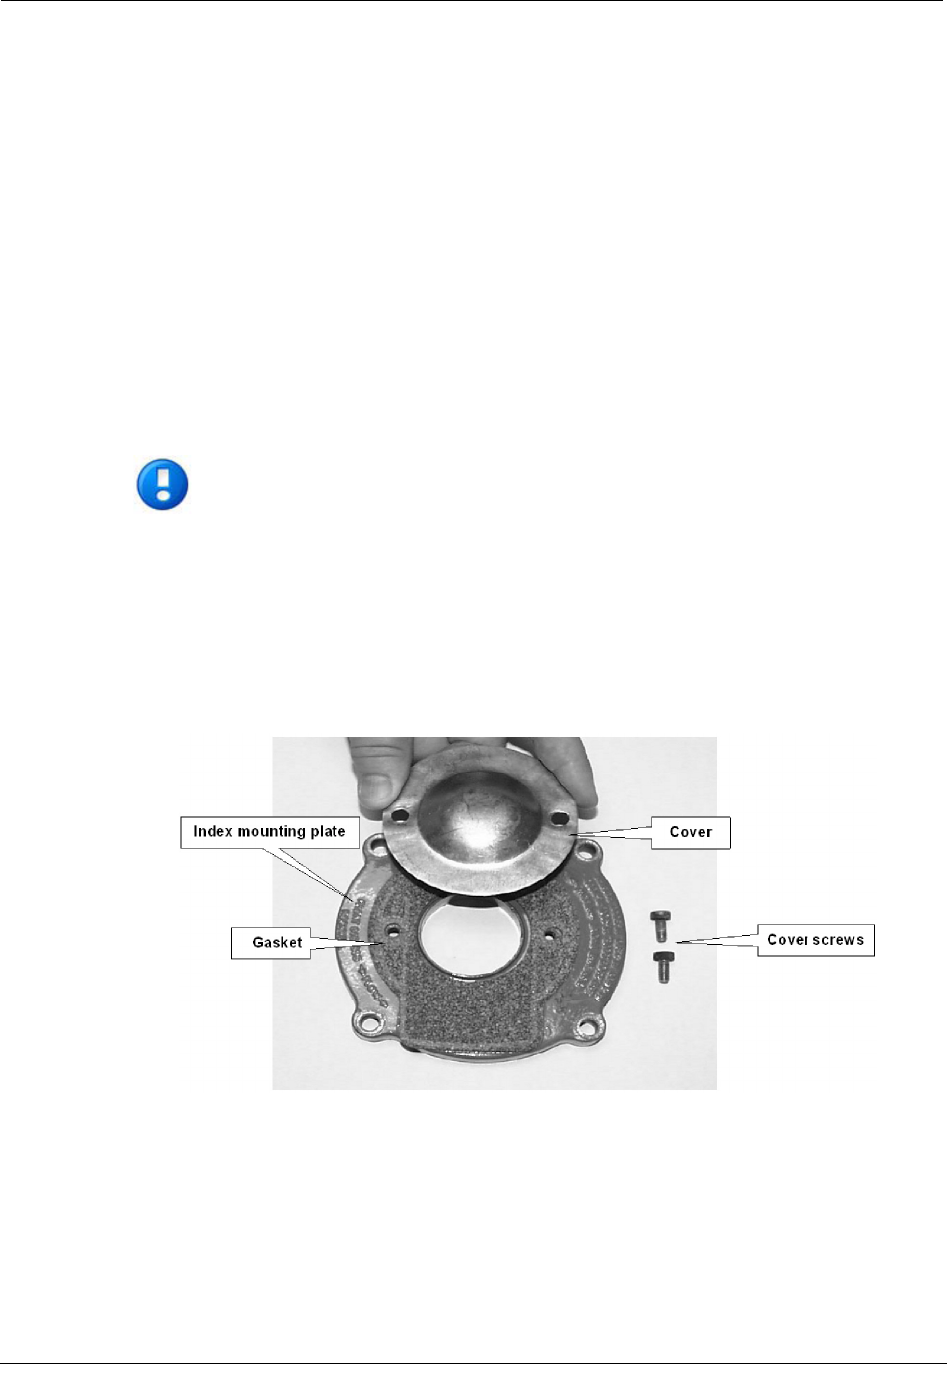
3. Turn the index wriggler so it will go across the ERT module wriggler when you put
the index onto the mounting plate.
4. Carefully lower the index and cover onto the mounting plate. Place the index facing
the same direction it was before you removed it.
5. Align the index cover screw holes with the screw holes in the gasket and index cover
mounting plate.
6. Verify there is no gap between the bottom of the index cover and the top of the gasket.
If there is a gap, it may be the index wriggler is riding on top of the ERT module's
upper wriggler. To eliminate a gap, repeat steps 2, 3, and 4 until the cover fits
properly.
WARNING! Do not press down on the index cover if there is a gap. If
you do, you can damage the index wriggler or ERT module wriggler.
7. Turn each screw 1/4 to 1/2 turn after it contacts the cover.
8. Place new tamper or wire seals over or through the screw heads.
9. Press tamper seals into place with an 11/32 nut driver, or other blunt tool, or crimp the
seal if you are using wire seals.
100G ERT Module installation on the Sensus Commercial meter is complete.
Installing 100G ERT Module on ROOTS Rotary
Natural Gas Solutions 100G Installation Guide for Direct Mounting on Meters 87
Installing 100G ERT Module on ROOTS Rotary
The information in this section guides you through the installation of the 100G ERT Module
Commercial on ROOTS rotary meters.
Installation Prerequisites
Installation requires the following items:
xOne index mounting plate
xGasket and drive cover kit
x100G ERT Module
xA flat screwdriver
NOTE For illustrative purposes, an American/Actaris ERT is used in this
procedure. The procedure for installing a Sensus Rockwell commercial ERT is
exactly the same.
To attach the Commercial 100G ERT Module to the meter
1. Install the gasket and cover on the index mounting plate (as shown) using the two
screws included with the kit.
Chapter 7 Sensus Commercial Meter Installation
88 Natural Gas Solutions 100G Installation Guide for Direct Mounting on Meters
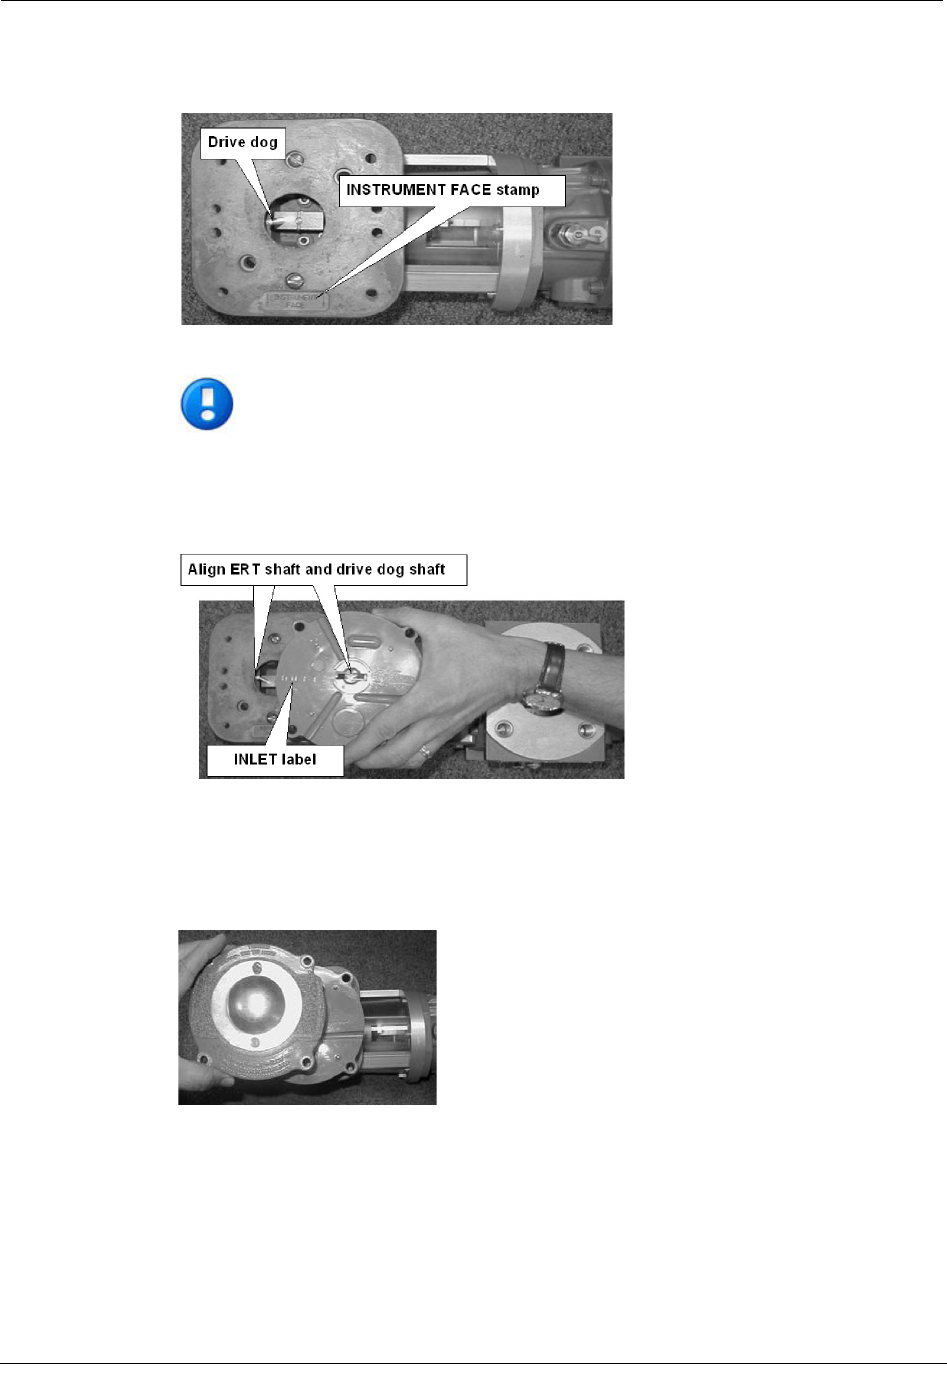
2. Locate the INSTRUMENT FACE stamp and position the meter with the drive dog
aligned (as shown).
IMPORTANT Handle the 100G ERT Module carefully so the metal passive
radiator antenna is not damaged.
3. Locate the INLET label and position the ERT module as shown. Verify the two shafts
are aligned.
4. Verify the shafts are engaged by turning the ERT shaft. You should feel resistance.
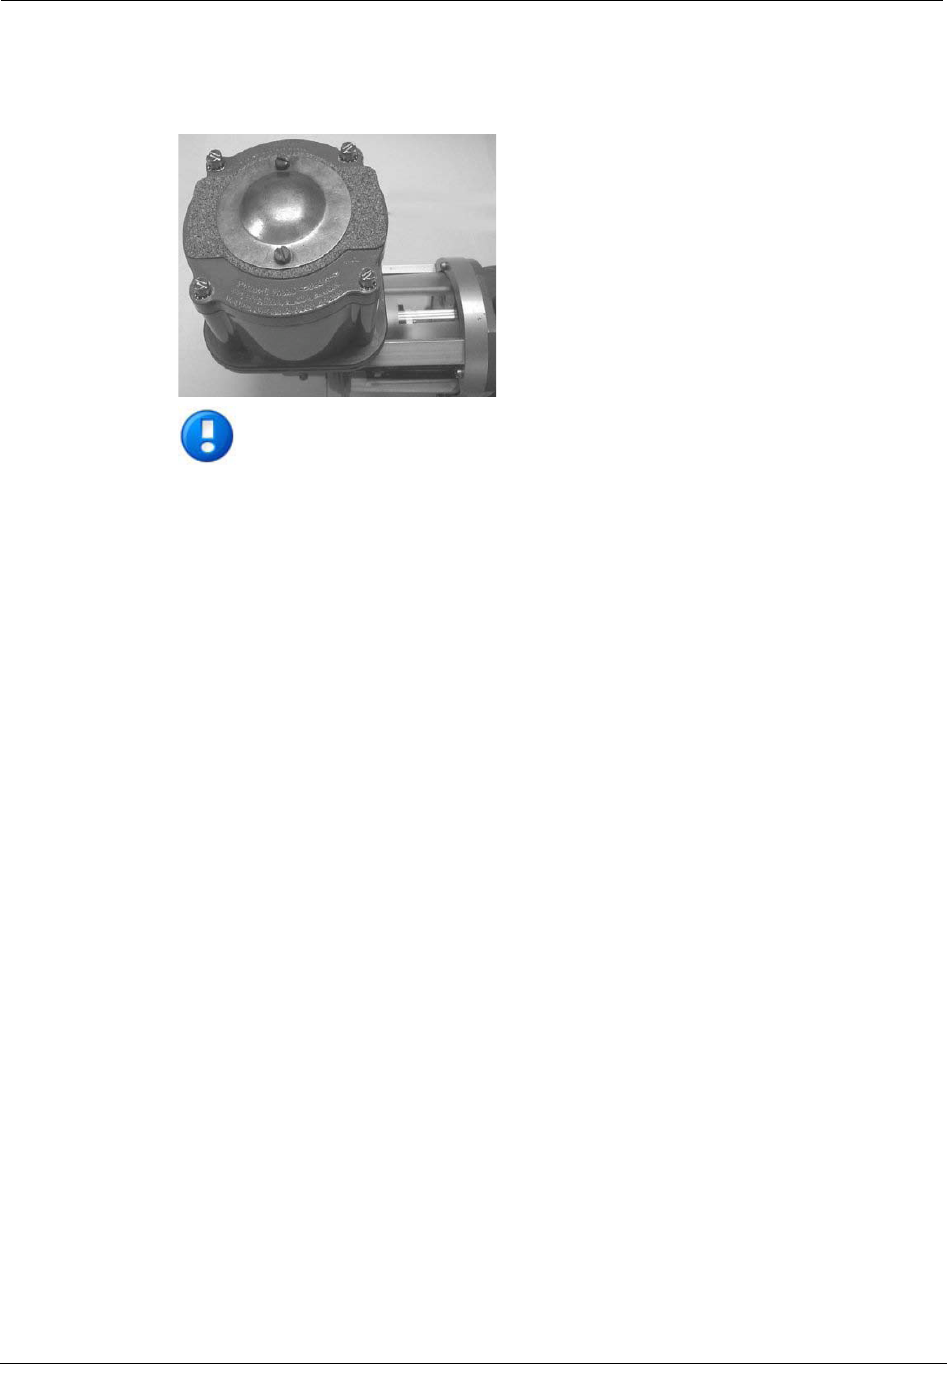
5. Place the index mounting plate on the module and install the four bolts. Do not disturb
the shaft alignment.
Installation Prerequisites
Natural Gas Solutions 100G Installation Guide for Direct Mounting on Meters 89
6. Install the four ERT module mounting screws and tighten them, in a diagonal
sequence. Turn each screw 1/4 to 1/2 turn after it contacts the mounting plate. If you
are using a torque wrench, tighten to 72 inch-pounds.
NOTE
To mount an index and index cover on the rotary meter, remove the domed
cover and reference "To attach the index and cover" in the previous section.

Chapter 7 Sensus Commercial Meter Installation
90 Natural Gas Solutions 100G Installation Guide for Direct Mounting on Meters