JADAK a business unit of Novanta MERCURY6E-M RFID Module User Manual 2
Trimble Navigation Limited RFID Module 2
Contents
User Manual 2
DAP Technologies 1-17Getting Started
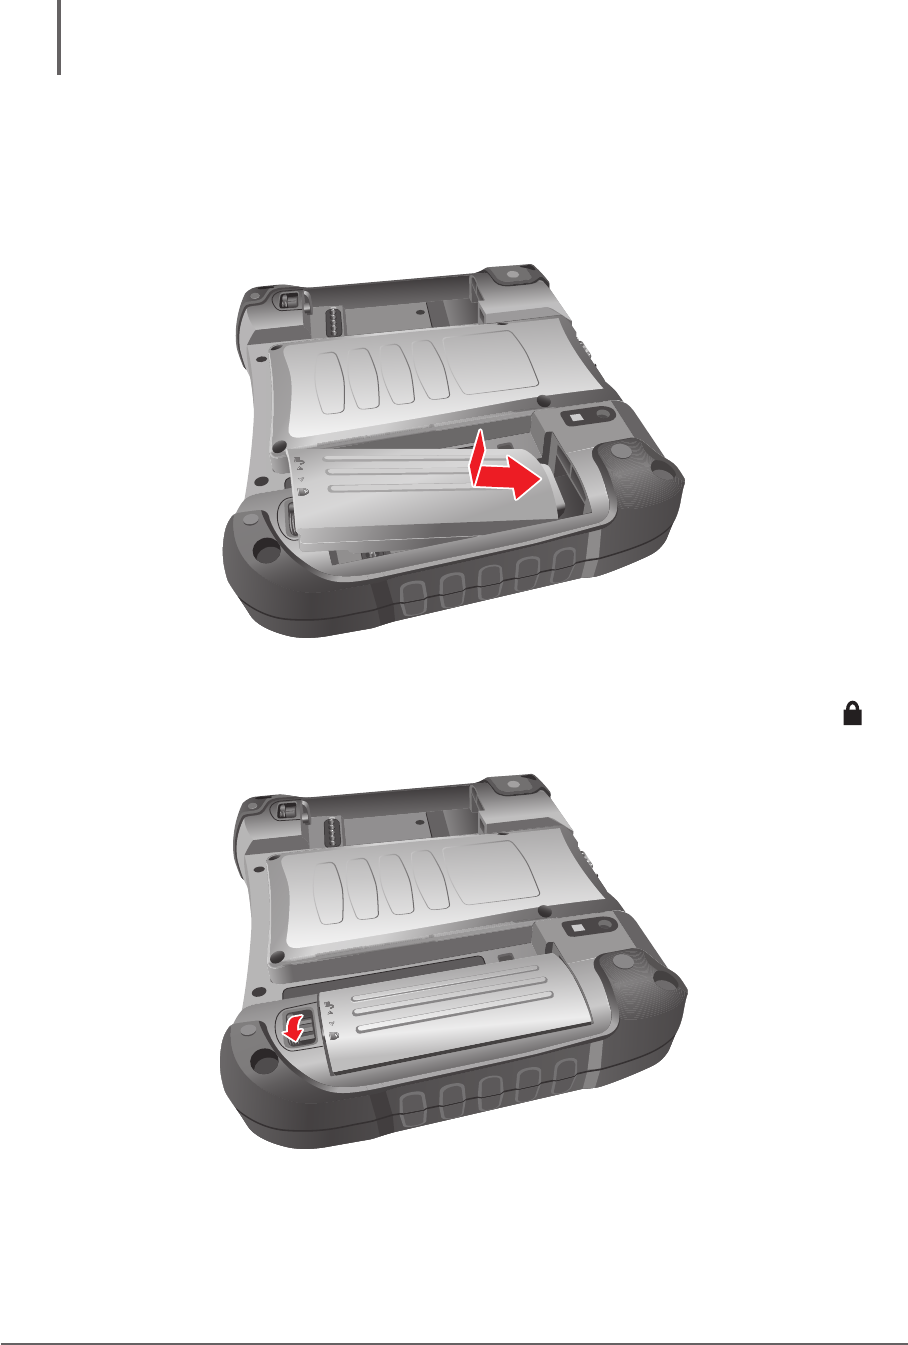
Installing the Battery Pack
NOTE:
• The battery pack(s) are hot-swappable.
Perform the following to install the battery pack to M9020:
1. From the top side of the battery pack, align and place the battery on its
bay.
2. Press down on the battery pack.
3. Press down on the battery pack and rotate the lock latch to the lock ( )
direction, until the battery pack is xed.
1-18 DAP Technologies Getting Started
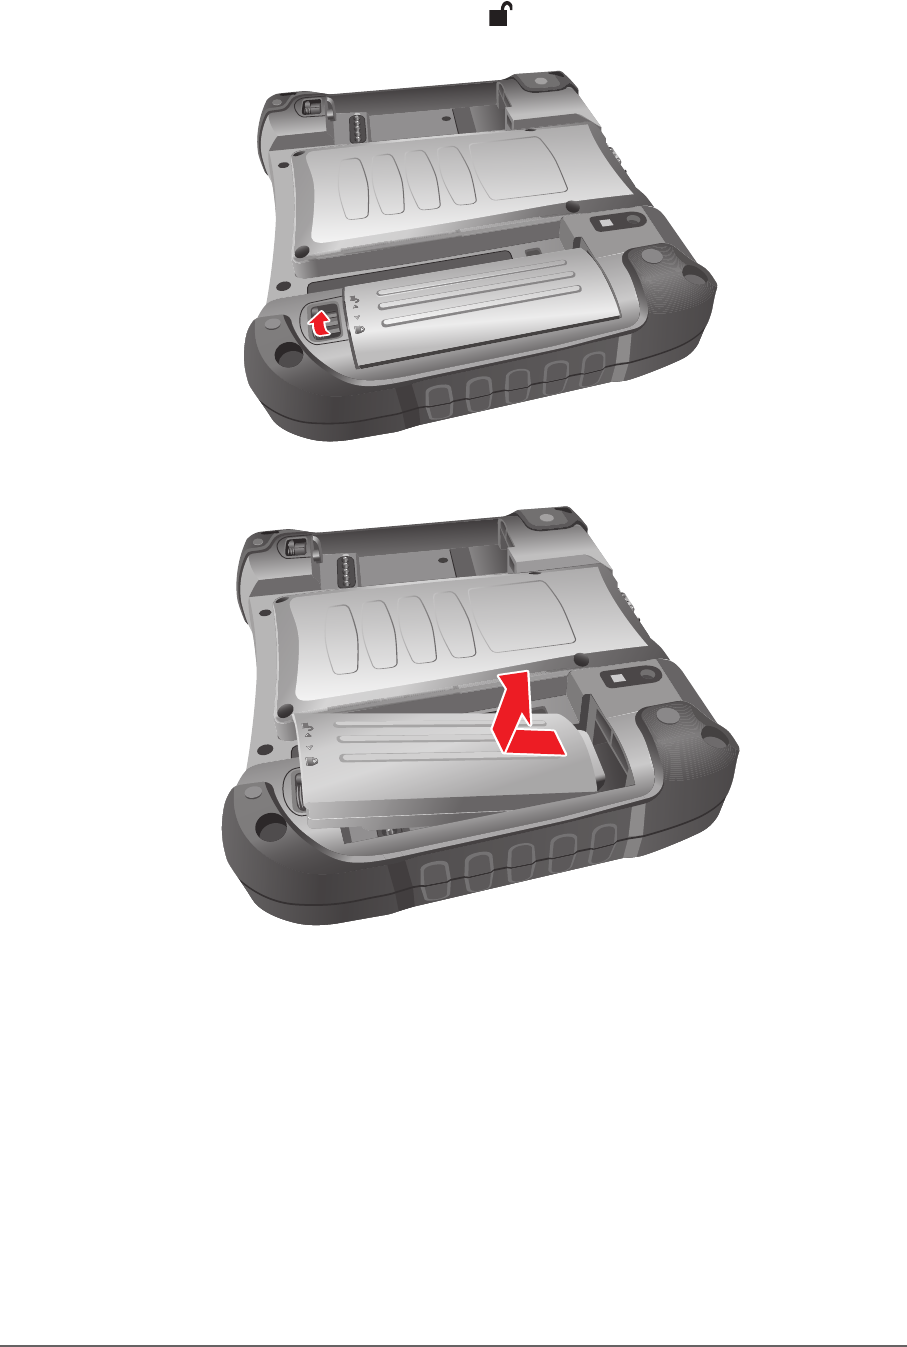
Removing the Battery Pack
Perform the following to remove the battery pack from M9020:
1. Rotate the lock latch to the unlock ( ) direction, until the battery pack is
released from the socket.
2. Release the battery pack from the bay, and remove.
DAP Technologies 1-19Getting Started
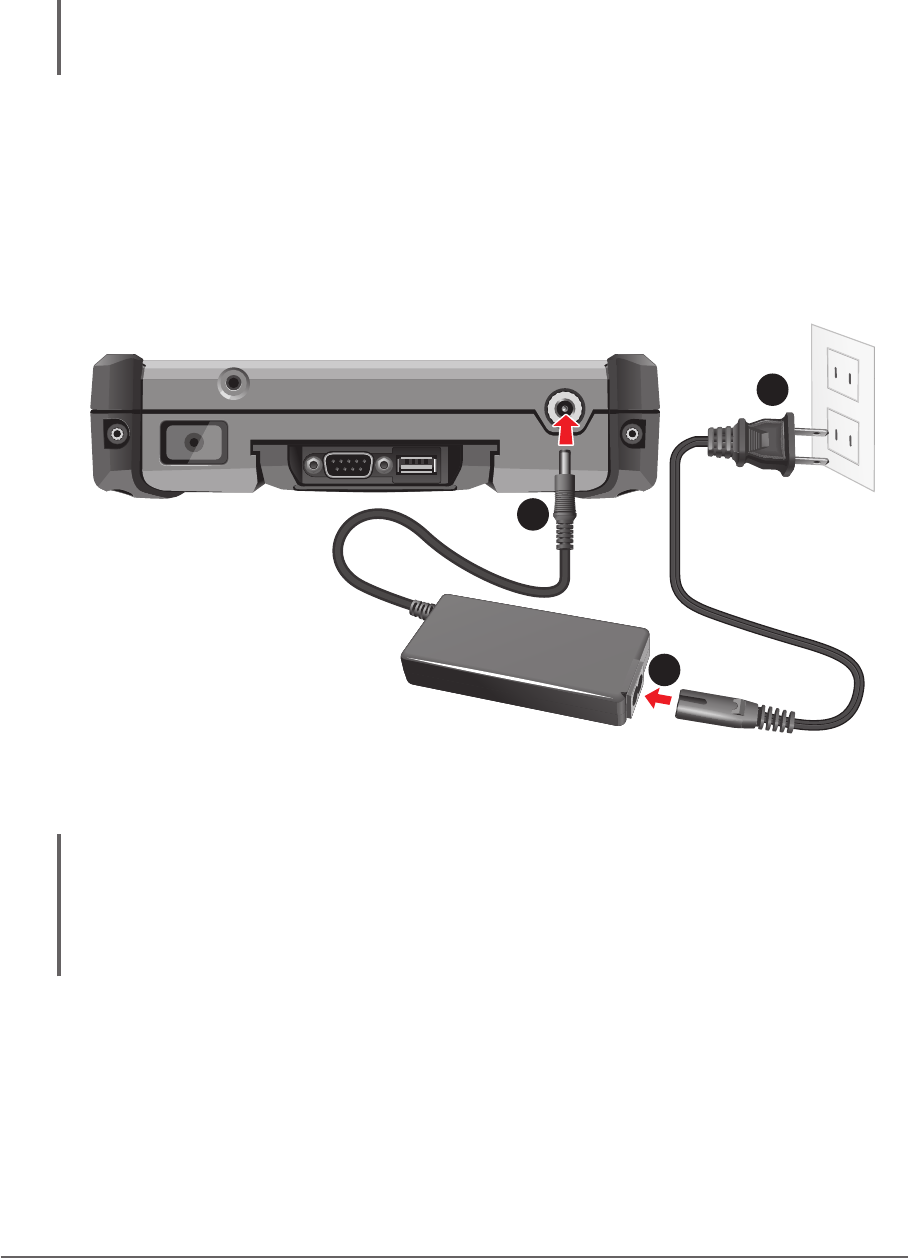
Connecting to AC Power
The M9020 operates either on external AC power or internal battery power. It is
recommended to use AC power when you start up the device for the rst time.
CAUTION: Use only the AC adapter included with your M9020. Using other AC adapters may
damage M9020.
Perform the following to connect the M9020 to AC power:
1. Plug the DC cord of the AC adapter into the power connector of the
M9020.
2. Plug the female end of the AC power cord into the AC adapter.
3. Then plug the male end of the AC power cord into an electrical outlet.
1
2
3
When the AC adapter is connected, the battery pack is charging.
CAUTION:
• When you disconnect the AC adapter, disconnect from the electrical outlet rst and
then from M9020. A reverse procedure may damage the AC adapter or M9020.
• When unplugging the connector, always hold the plug head. Never pull on the cord.
1-20 DAP Technologies Getting Started
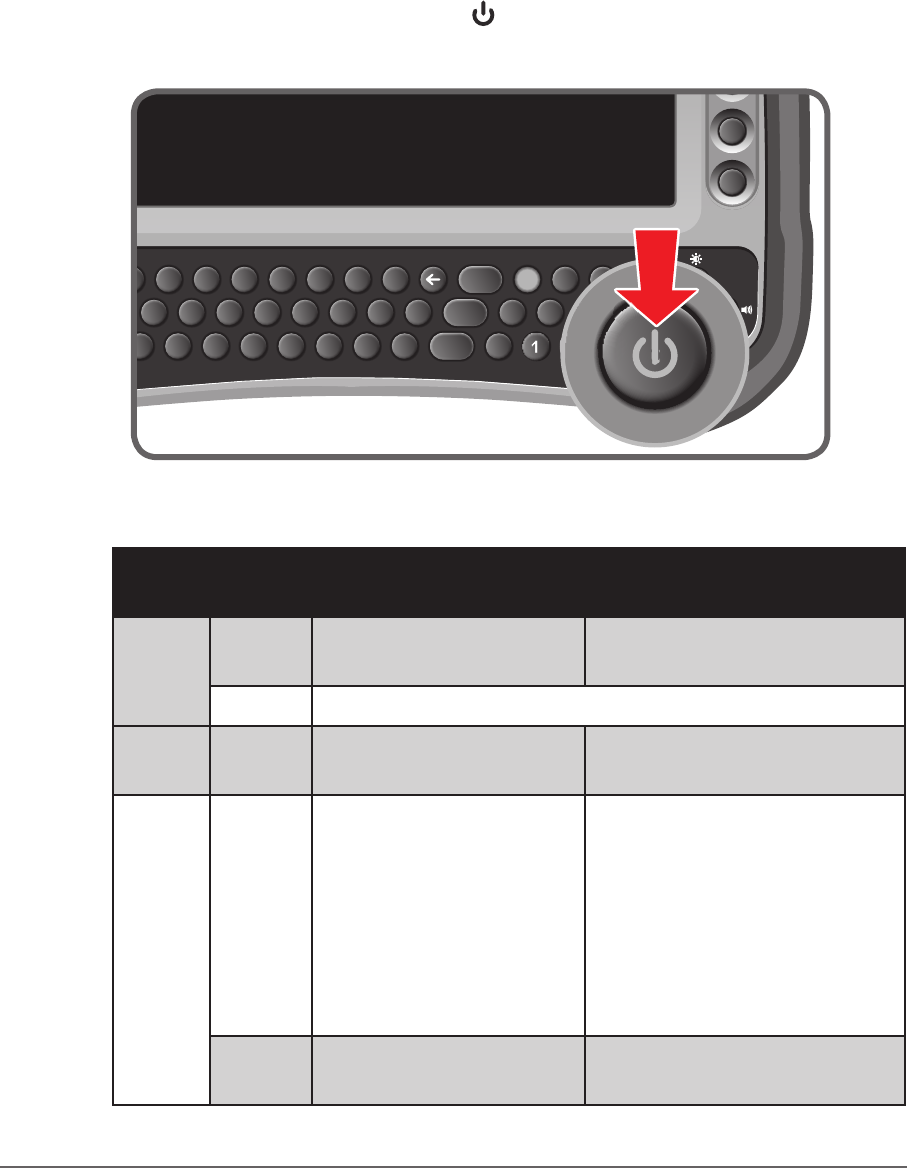
Turning the M9020 On and Off
Turning On
1. Make sure that the M9020 is either connected to AC power or that the
battery pack is charged.
2. Press and hold the power button ( ) for about 5 seconds, until the power
LED lights up.
Esc
Tab
Ctrl
Q
A
ZXCVBNM012
45
789
Alt
Shift
SDFGHJKL
Enter
Space
Del Fn
,.
WERTYUIOP
!@
-=
#$%^& *(
?>][}{
)
|
;
\:“‘ ~`
F1
F2
F4
F3
F5
See the following table for the power LED indicator states:
LED
Color Status Battery Mode
(On Battery Power) AC Mode
(On External Power)
Green Solid Power on. Fully charged: Both
batteries are fully charged.
Blinking Suspend: Every 3 seconds.
Blue Solid N/A Either battery is being
charged.
Red
Blinking
(The average of two
batteries)
• <= 20%: every 5s.
• <= 15%: every 3s.
• <= 10%: every 1s.
• 5%: Hibernate.
(Depends on OS
setting).
N/A
Solid Either Battery #1 or
Battery #2 is missing. N/A
DAP Technologies 1-21Getting Started
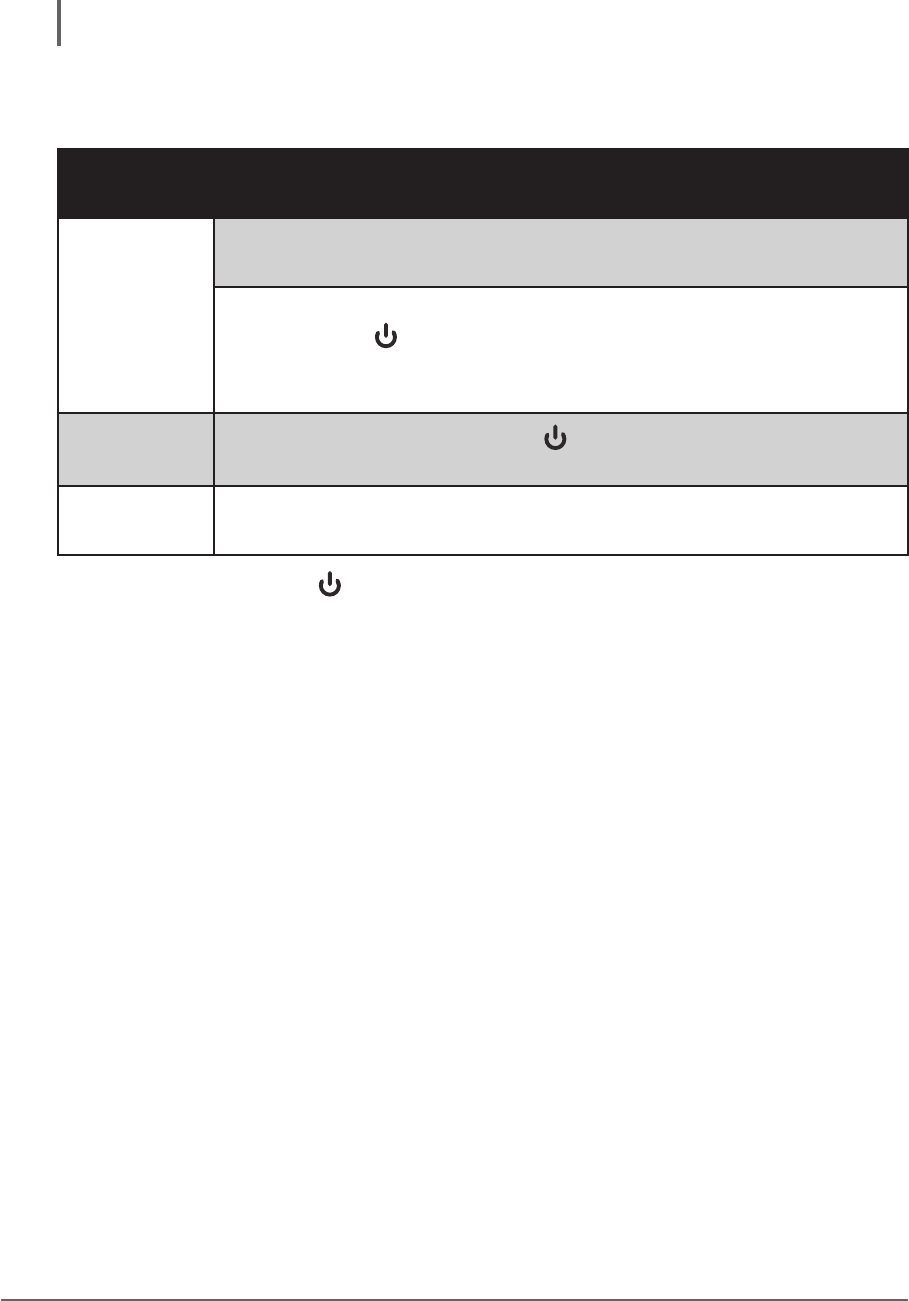
Turning Off
To turn off the M9020, use the “Shut Down” command of your operating
system.
CAUTION: Wait for at least ve seconds after turning off the M9020 before turning it back on.
When you nish a working session, you can stop the device by shutting it down
or by leaving it in Sleep or Hibernation mode:
To stop in
this mode... Do this...
Off Use the Windows Start Menu and follow the shut down
procedure.
You can force M9020 to turn off by pressing and holding the
power button ( ) for more than 6 seconds. This is not the
recommended method, but may be necessary if the system is
locked up.
Hybrid Sleep Short press the power button ( ) or use the Windows Start
Menu to put M9020 in Hybrid Sleep mode.
Hibernation Use the Windows Start Menu to put M9020 in hibernation
mode.
Press the power button ( ) to resume or turn on the M9020 from any of these
modes. See “Power Management” on page 4-6 for more information.

DAP Technologies 2-1Operating Your Tablet Computer
CHAPTER 2
This chapter provides information about the use of the M9020 and
describes the operating basics of the following components and
features:
• Touch Screen
• Keyboard
• Panel Keys
• Wireless LAN Features
• Bluetooth Features
• Wireless WAN Features
• GPS Features
• Camera
• DAP Control Center
• Barcode Reader
Operating Your Tablet
Computer
2-2 DAP Technologies Operating Your Tablet Computer
Using the Touch Screen
The touch screen is a touch-sensitive device that allows you to control and
make selections on the device by controlling the location of the pointer on the
screen.
CAUTION: Do not use sharp or pointed objects on the touch screen. These objects may
scratch the screen. Use only the stylus pen or the tip of your nger.
Esc
Tab
Ctrl
Q
A
ZXCVBNM0123
456
789
Alt
Shift
SDFGHJKL
Enter
Space
Del Fn
,.
WERTYUIOP
!@
-=
#$%^& *(
?>][}{
)
|
;
\:“‘ ~`
F1
F2
F4
F3
F5
Here are some common terms that you should know when using the touch
screen.
Term Action
Tap Tap gently on the touch screen to select or open an item.
Tapping is the same as clicking the left mouse button of a
PC.
Double-tap Rapidly tap twice on the touch screen. This action is
similar to double-clicking the left mouse button of a PC.
Tap and hold Tap and hold the stylus lightly on the display. A big circle
appears to indicate that a pop-up menu will soon appear.
Lift up the stylus and a pop-up menu appears. Select the
desired function. This action is similar to a right mouse
click on a PC.
Drag Hold the stylus on the screen and drag across the screen
to select text and images or move icons to a new location.
For more customized stylus settings, use the HIDeGalaxTouch available on the
desktop of the device.
DAP Technologies 2-3Operating Your Tablet Computer
Calibrating the Screen
When there is a noticeable discrepancy in the placement of the stylus on
the screen and the indicated position of the onscreen pointer, recalibrate the
screen.
For calibration you can use the HIDeGalax Touch tool.
HIDeGalax Touch Calibration Tool
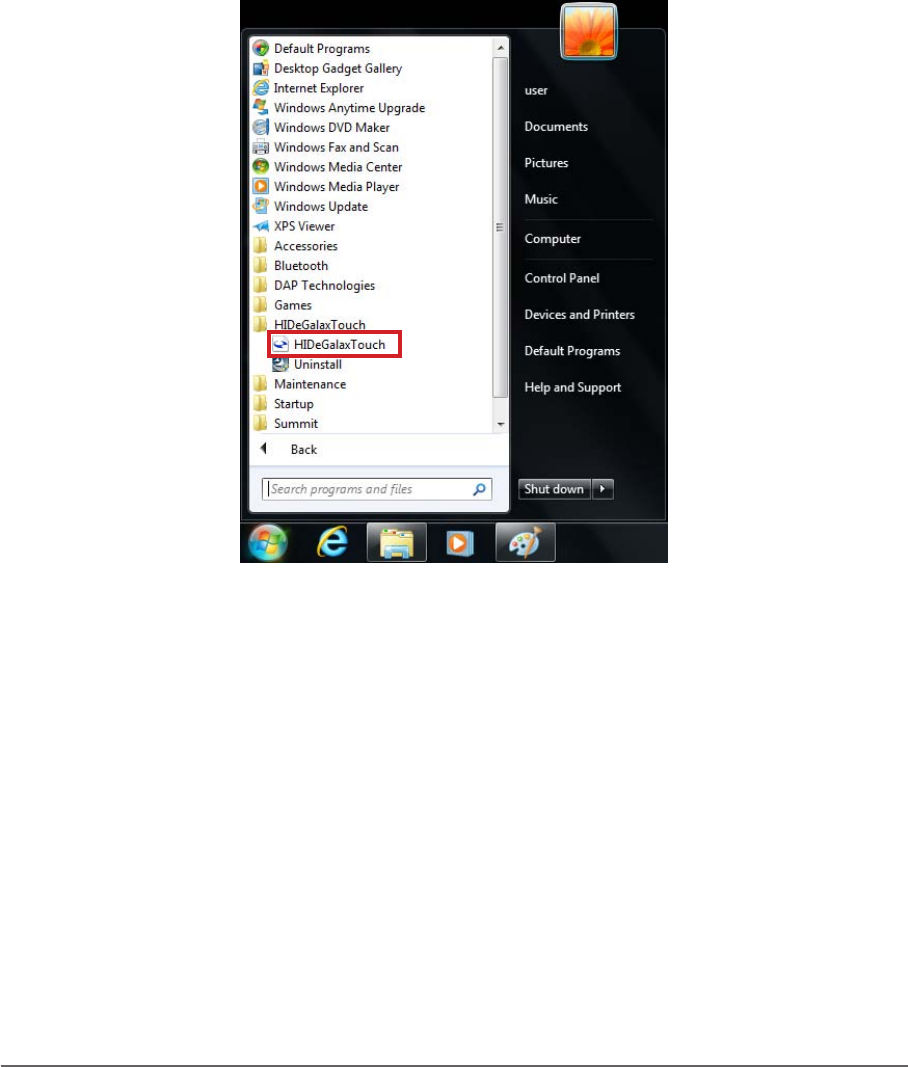
Perform the following to calibrate the screen:
1. Tap Start > All Programs > HIDeGalaxTouch > HIDeGalaxTouch. The
following screen opens.
2-4 DAP Technologies Operating Your Tablet Computer
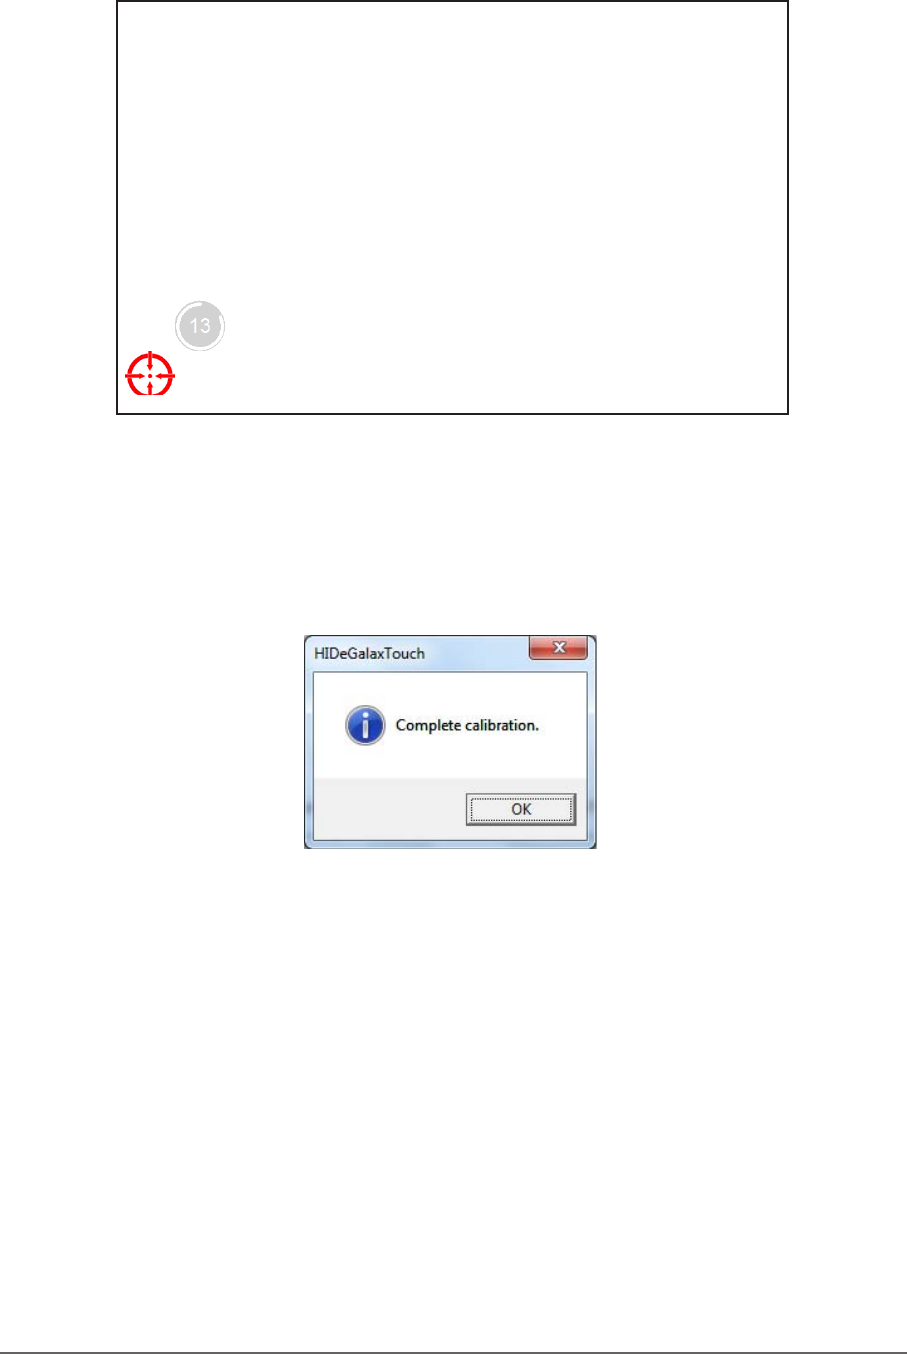
2. For a basic test, tap 4 Points Calibration, for more detailed one, tap 9
Points Linearization or 25 Points Linearization. The following example
shows 4 Points Calibration.
3. Use the supplied stylus to tap and hold the dot inside the red circle, until it
turns into a blue circle. Repeat this process as the dot moves around the
screen.
4. When calibration is complete, tap OK button and close the calibration
utility screen.
DAP Technologies 2-5Operating Your Tablet Computer
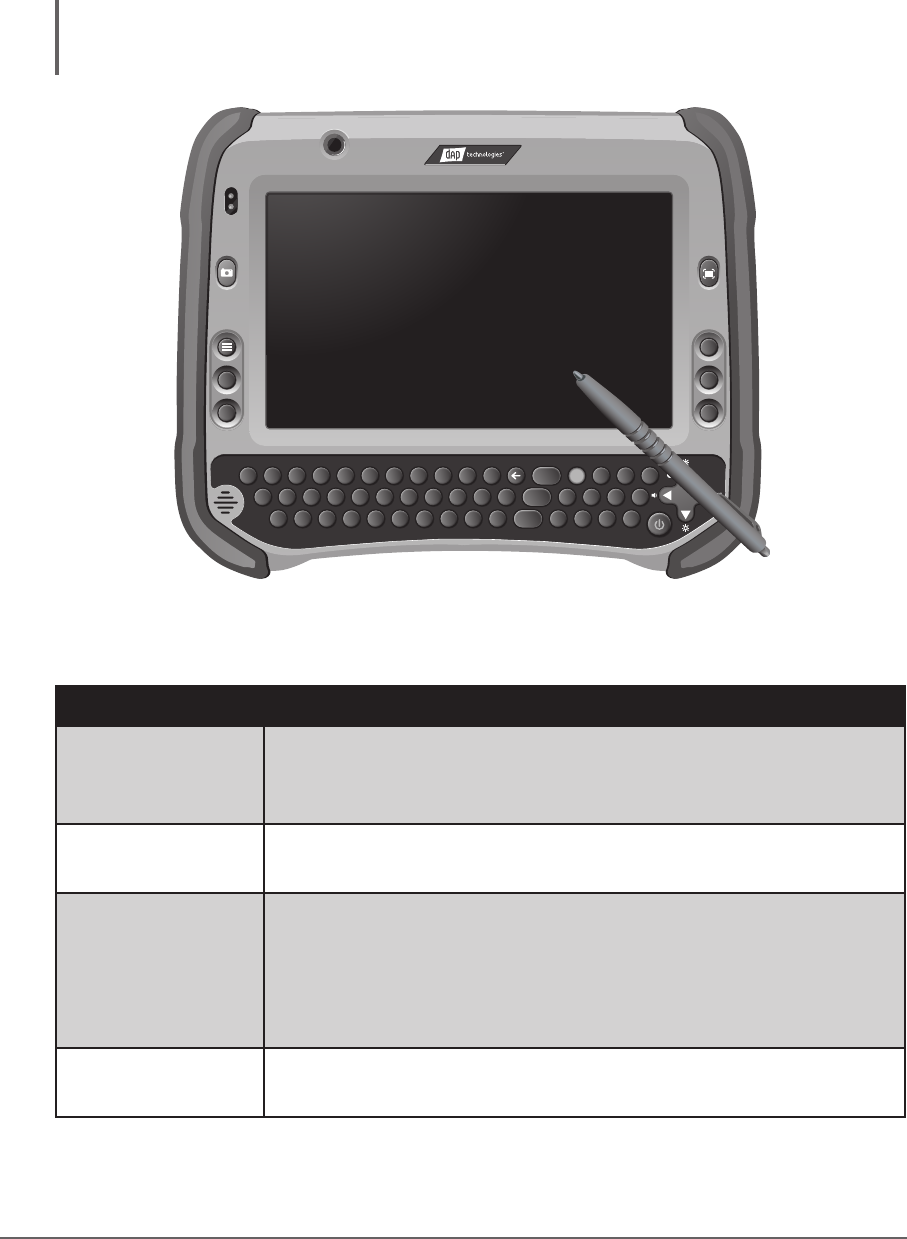
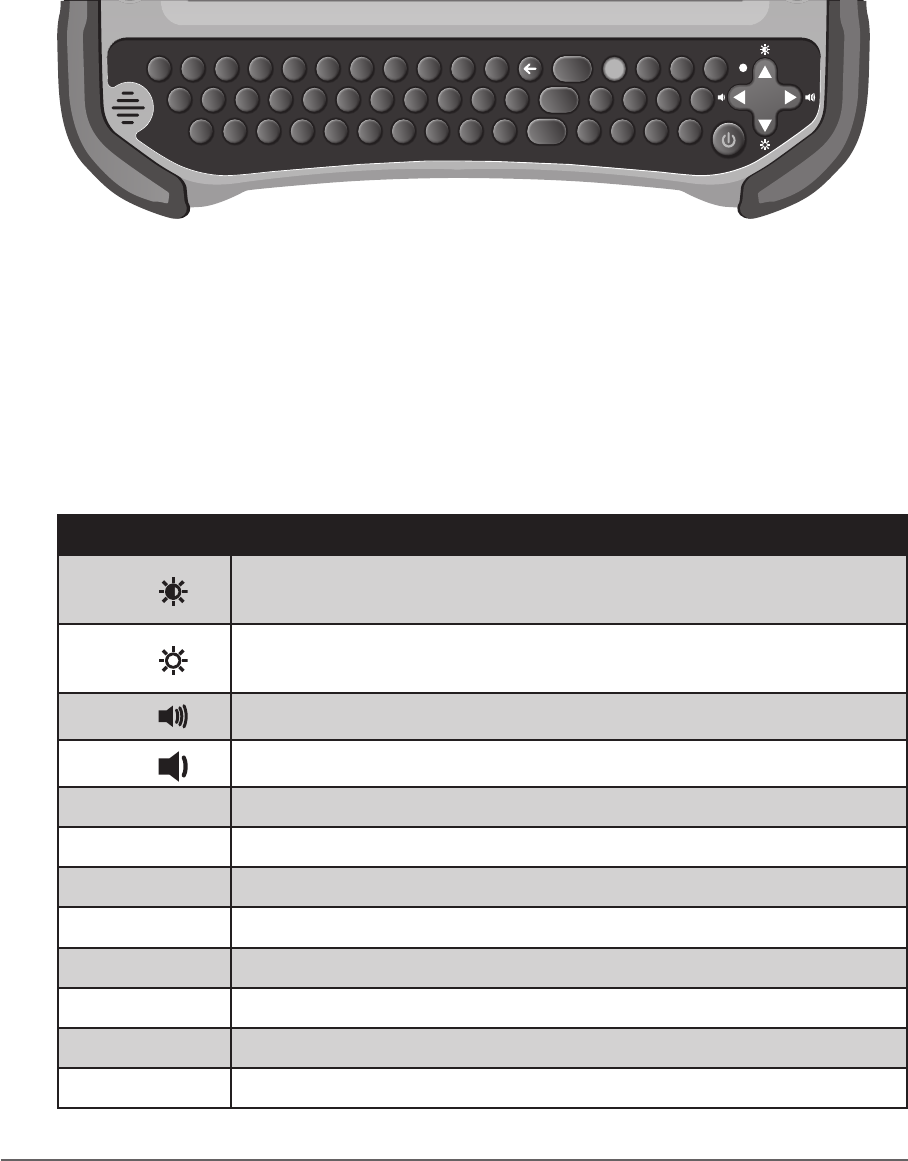
Using the Integrated Keyboard
Your M9020 includes an integrated keyboard that allows you to enter text and
perform various keyboard functions.
Keyboard Overview
Esc
Tab
Ctrl
Q
A
ZXCVBNM0123
456
789
Alt
Shift
SDFGHJKL
Enter
Space
Del Fn
,.
WERTYU IOP
!@
-=
#$%^& *(
?>][}{
)
|
;
\:“‘ ~`
F1
F2
F4
F3
F5
Use the keyboard to type in text and numbers. If you need to use special
symbols and functions, marked in yellow on the keyboard, press and hold the
Fn key, and then press the corresponding symbol or function key. For example,
to enter “%”, press and hold Fn key and then press the corresponding letter “T”.
Special Function Keys
The following is a list of special functions, accessible via keyboard.
Function Description
Fn + Hold down Fn and press ▲ repeatedly to increase screen
brightness.
Fn + Hold down Fn and press ▼ repeatedly to decrease screen
brightness.
Fn + Hold down Fn and press ► repeatedly to increases volume.
Fn + Hold down Fn and press ◄ repeatedly to decreases volume.
Fn + 1Function key F11.
Fn + 2Function key F12.
Fn + 3Function key F13.
Fn + 4Function key F14.
Fn + 5Function key F15.
Fn + 6Function key F6.
Fn + 7Function key F7.
Fn + 8Function key F8.
2-6 DAP Technologies Operating Your Tablet Computer
Function Description
Fn + 9Function key F9.
Fn + 0Function key F10.
NOTE: To access the function keys F1 ~ F5, see “Using the Panel Keys” on
page 2-6.
Navigation Keys
Use the navigations keys (◄ / ► / ▲ / ▼) to move the cursor or selection one
space or line in the direction of the arrow, or scroll a webpage in the direction of
the arrow.
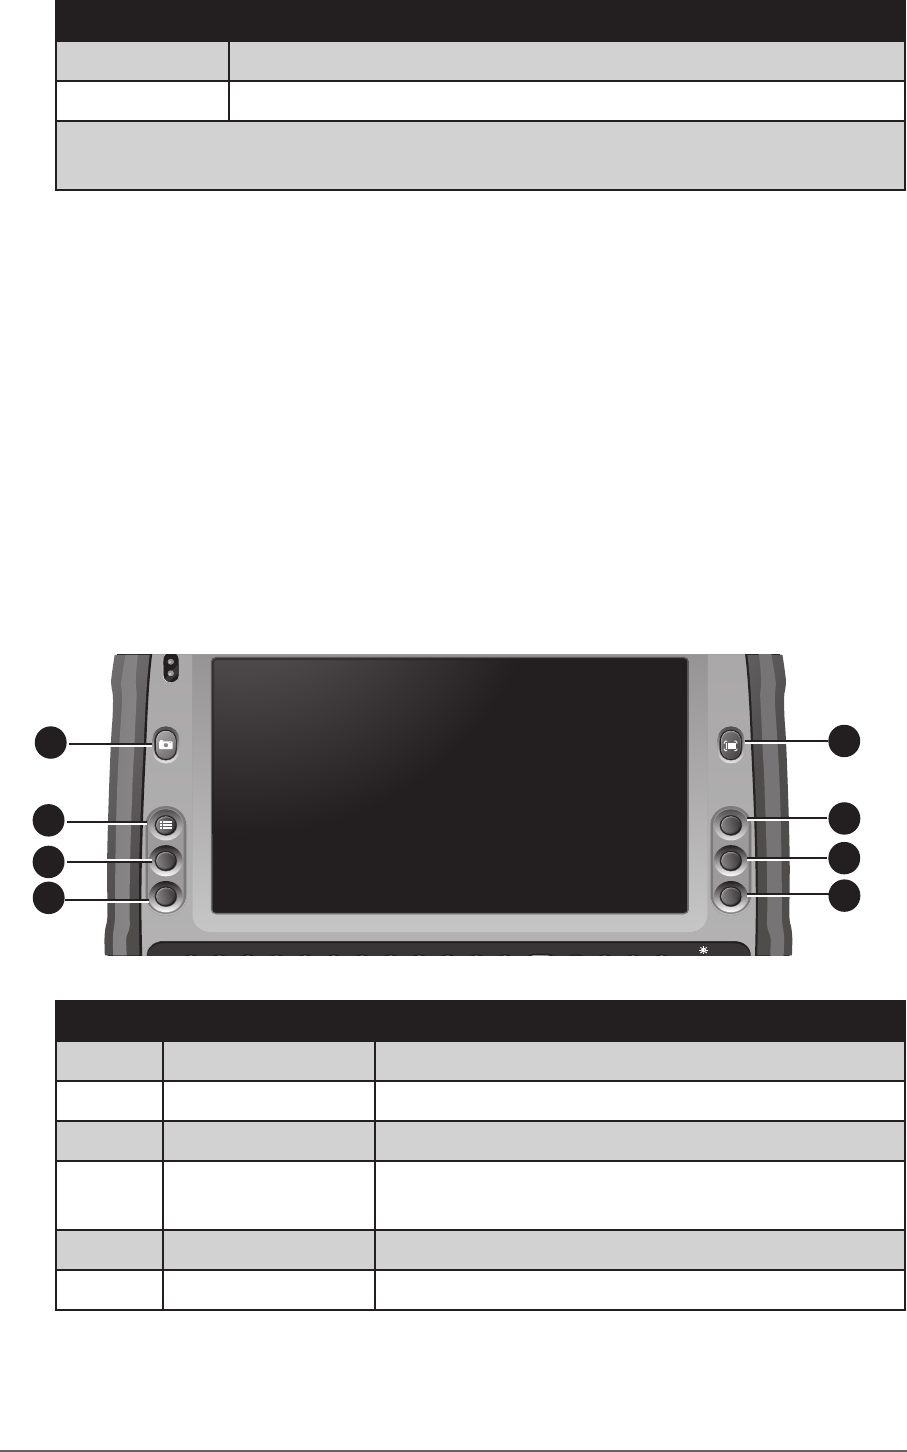
Using the Panel Keys
The Panel Keys provide shortcuts for you to utilize the common functions of
your M9020, such as opening the camera, activating the bar code reader, and
more.
Esc
Tab
Ctrl
Q
A
ZXCVBNM0123
456
789
Alt
Shift
SDFGHJKL
Enter
Space
Del Fn
,.
WERTYUIOP
!@
-=
#$%^& *(
?>][}{
)
|
;
\:“‘ ~`
F1
F2
F4
F3
F5
2
6
7
81
5
3
4
No. Button Description
1 Barcode Scanner Press and hold, to scan the barcode.
2F3 Programmable funciton key.
3F4 Programmable funciton key.
4F5 Tap to refresh the active window in Internet
Explorer.
5F2 Programmable funciton key.
6F1 Programmable funciton key.
DAP Technologies 2-7Operating Your Tablet Computer
No. Button Description
7 Menu Tap to open the Start menu.
8Camera Press to open the camera application. How to
use the camera, see “Using the Camera” on
page 2-26.
Using Wireless LAN
Your M9020 has a built-in wireless radio which automatically detects wireless
networks that are within range.
Turning the Wireless Radio On and Off
By default, the Wi-Fi is turned on. In case you need to turn it on or off, perform
the following:
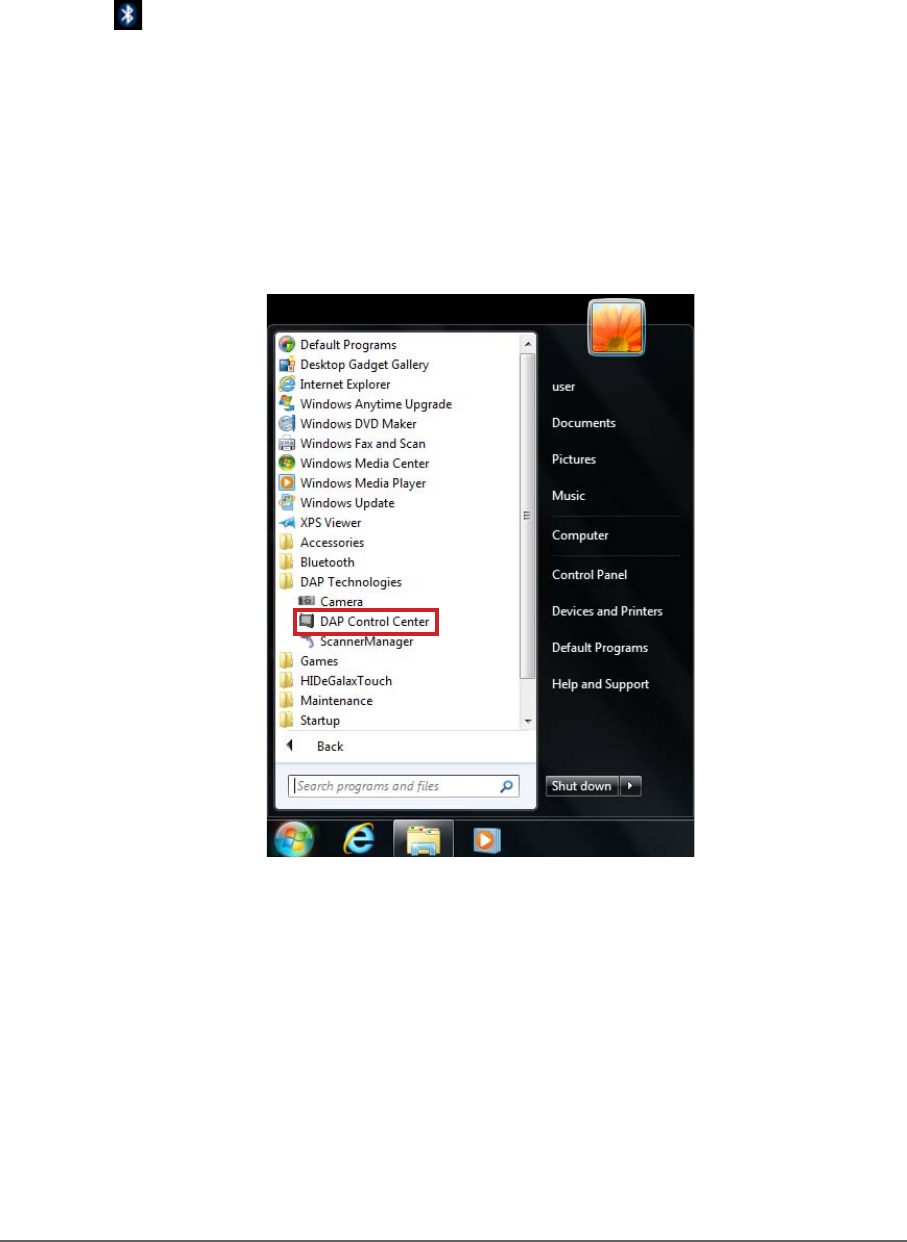
1. Tap Start > All Programs > DAP Technologies > DAP Control Center.
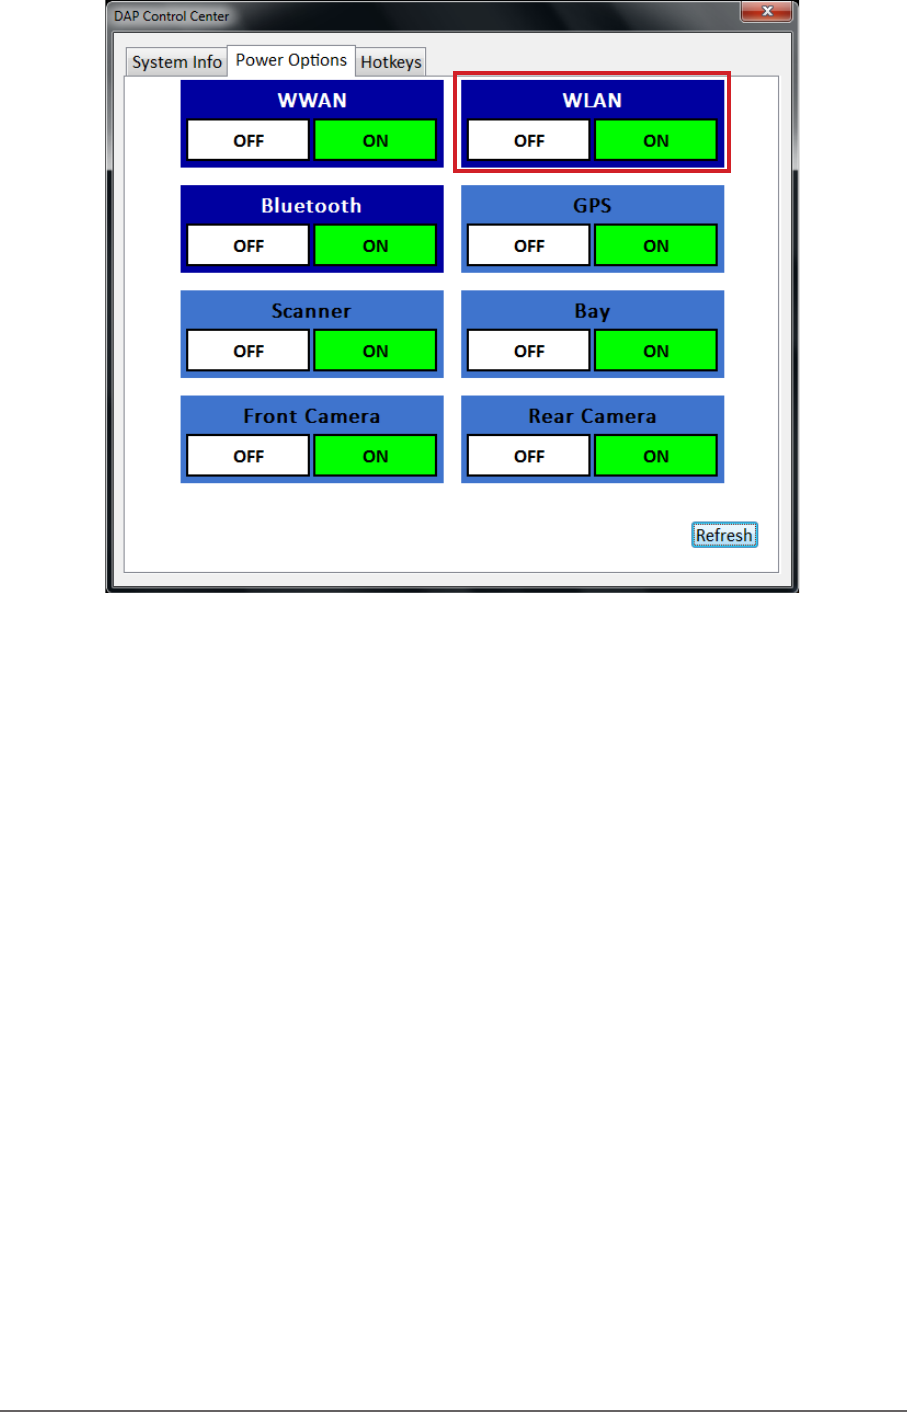
2-8 DAP Technologies Operating Your Tablet Computer
2. Select the Power Options tab.
3. To turn the Wi-Fi on or off, tap ON or OFF in the corresponding box.
DAP Technologies 2-9Operating Your Tablet Computer
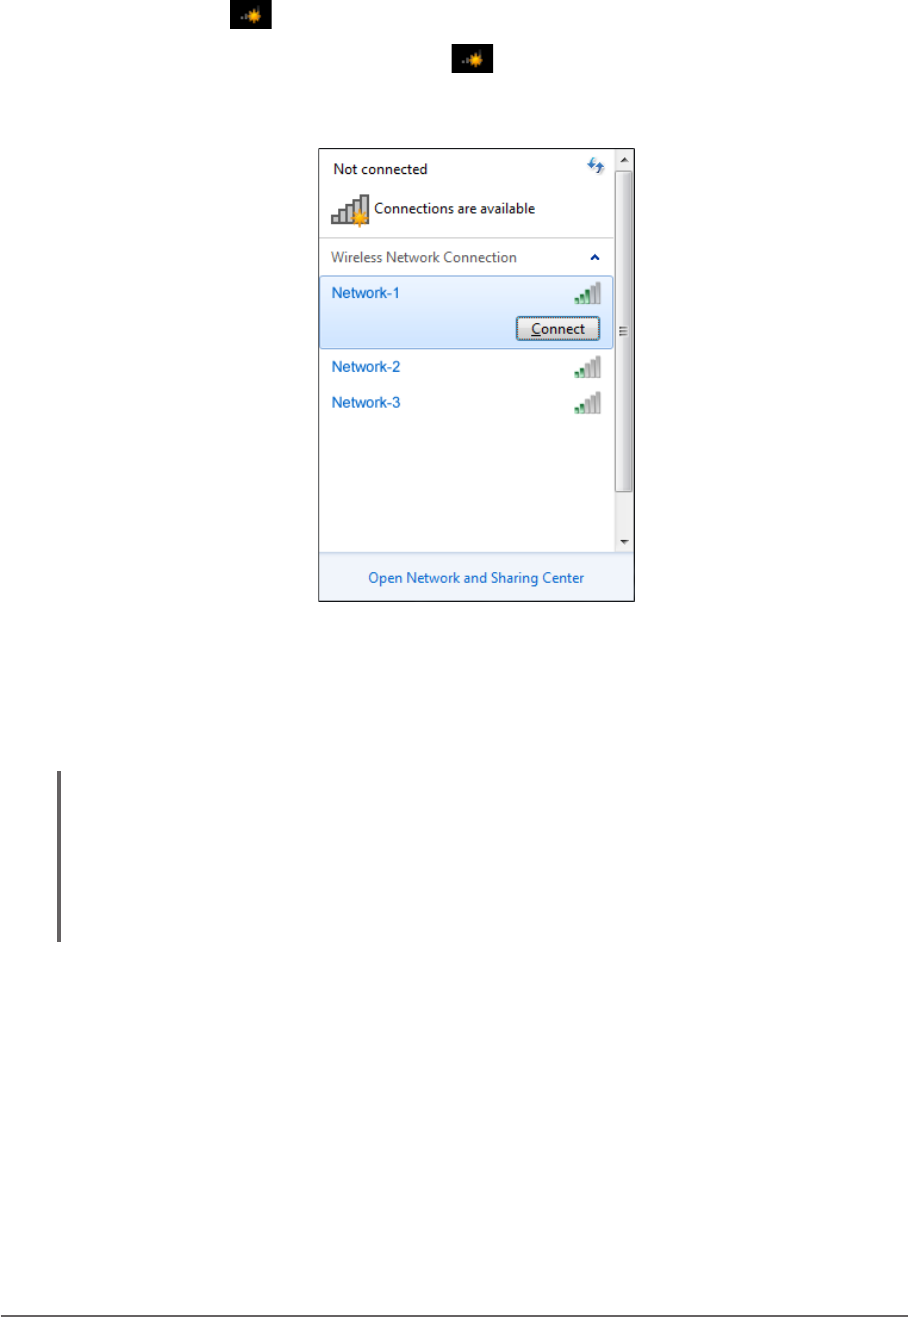
Connecting to a Wireless Network
Perform the following to connect to a wireless network:
1. Make sure that the WLAN is ON (The Wireless network icon on the task
bar shows ).
2. Tap the Wireless Network icon ( ) on the taskbar.
3. From the list of available networks, select a network.
4. Tap Connect.
5. If the network requires authentication, enter the security key or
passphrase.
NOTE:
• Once you are connected to a wireless network, Windows saves the network prole and
will automatically connect to that network when it is in range.
• For more information on connecting to your wireless network, contact your network
administrator.
2-10 DAP Technologies Operating Your Tablet Computer
Using Bluetooth
Your M9020 has integrated Bluetooth capability for short-range wireless
communication between Bluetooth-enabled devices.
By default, the Bluetooth feature is enabled as indicated by the Bluetooth
icon ( ) on the taskbar; but your M9020 is not visible to other devices. To
make your M9020 visible, check the Discovery box in Bluetooth settings (see
“Conguring Bluetooth Settings” on page 2-15).
Turning the Bluetooth On and Off
In case you need to turn the Bluetooth on or off, perform the following:
1. Tap Start > All Programs > DAP Technlogies > DAP Control Center.
DAP Technologies 2-11Operating Your Tablet Computer
2. Select the Power Options tab.
3. To turn the Bluetooth on or off, tap ON or OFF in the corresponding box.
Turning the Bluetooth Adapter On and Off
In case you need to turn the Bluetooth adapter on or off, perform the following:
1. Tap the Bluetooth On ( ) or Bluetooth off ( ) icon on the taskbar.
2. A pop up menu appears. Tap Turn adapter on or Turn adapter off.
NOTE: If the Bluetooth icon is not shown on the task bar, check that the Blue-
tooth is activated on DAP Control Center.
2-12 DAP Technologies Operating Your Tablet Computer
Pairing with Bluetooth Devices
Before you can pair with Bluetooth devices for the rst time, you need to add
and save the device prole to your M9020.
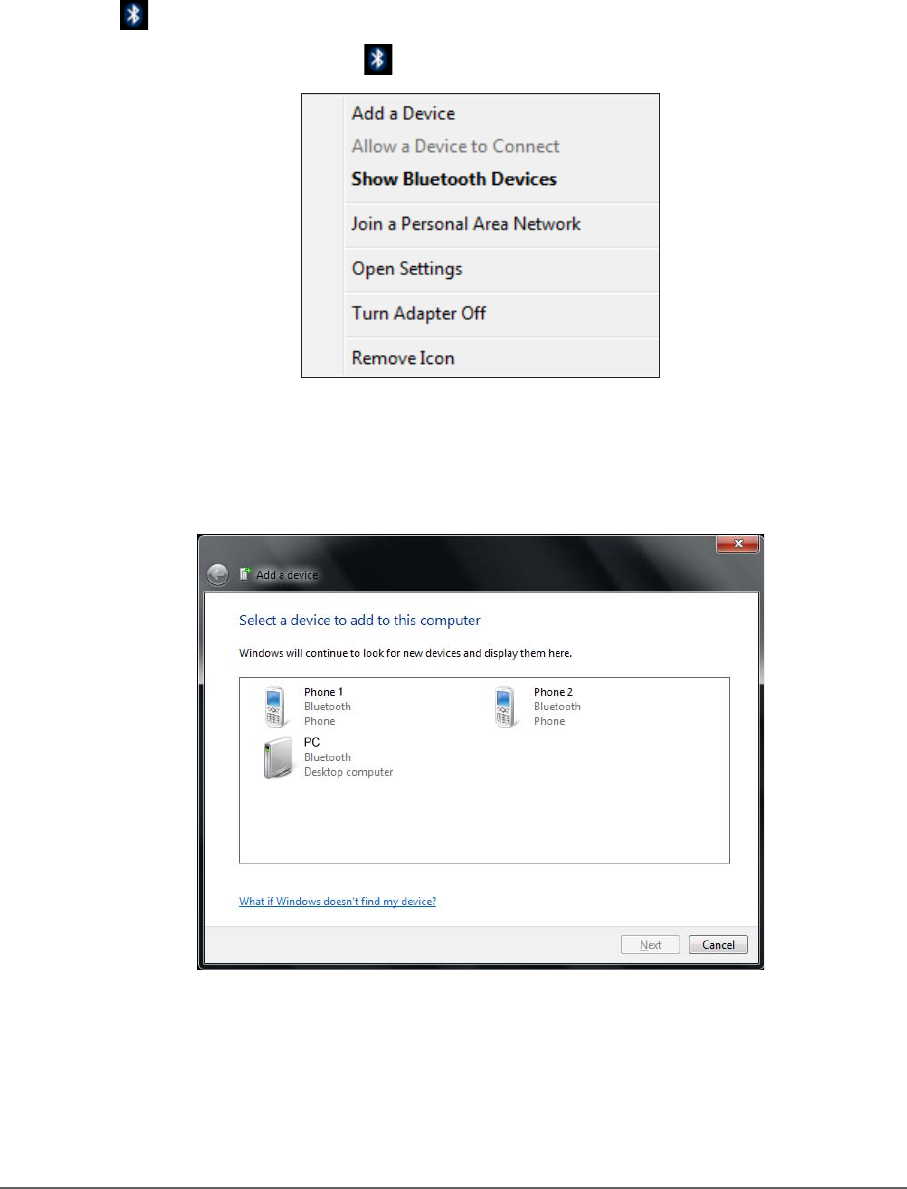
To add and pair a Bluetooth device
Perform the following to pair your M9020 with Bluetooth devices:
1. Make sure the Bluetooth adapter is on as indicated by the Bluetooth icon
( ) on the taskbar.
2. Tap the Bluetooth icon ( ) to display a pop up menu.
3. Tap Add a Device. The M9020 will scan for Bluetooth devices within
range.
4. Select the device you want to pair with, then tap Next.
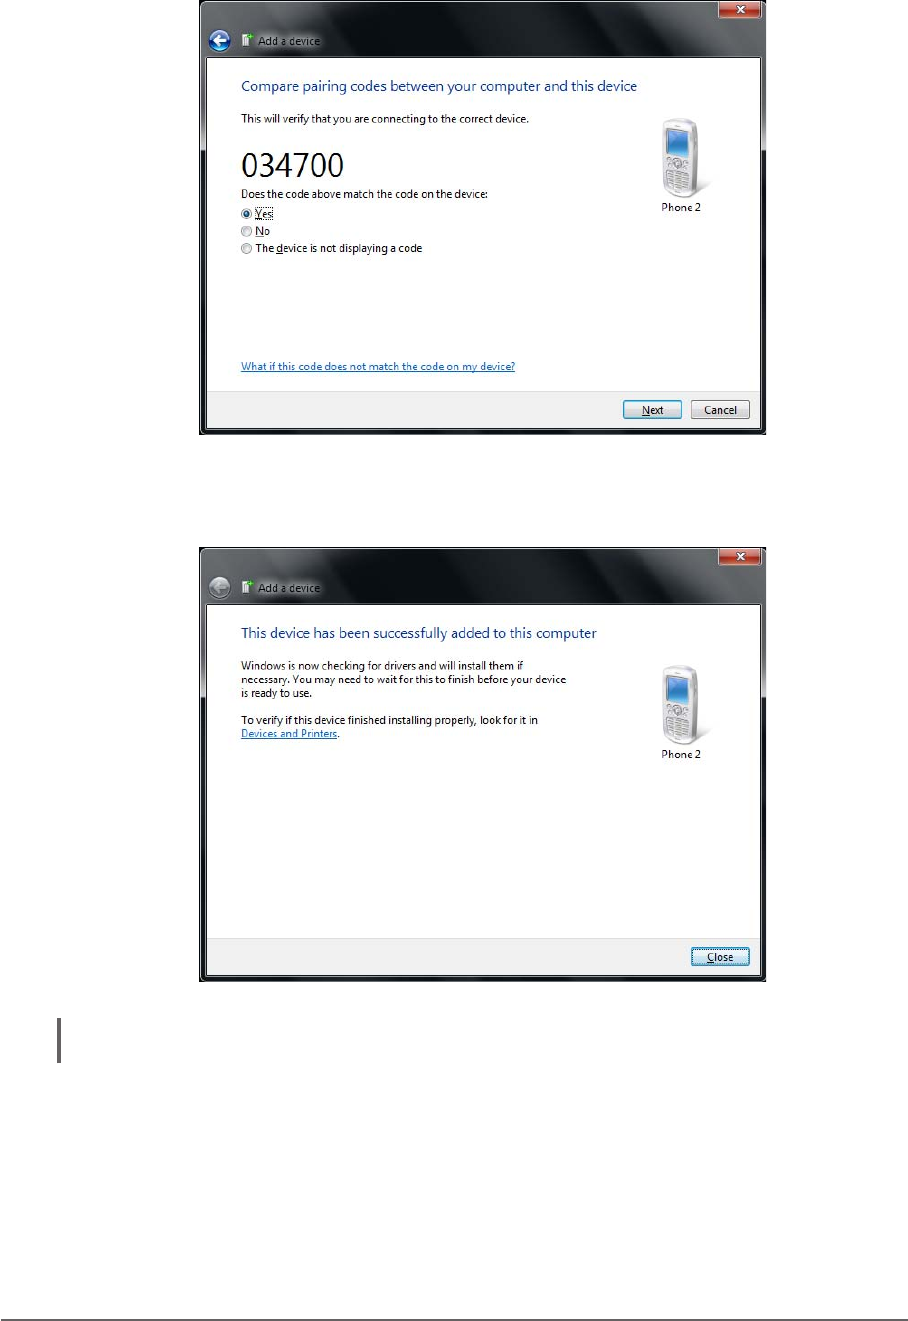
DAP Technologies 2-13Operating Your Tablet Computer
5. Depending on the device you are pairing with, you may be prompted to
enter or verify a pairing code. The pairing code entered or shown on your
M9020 must be the same as the one on the Bluetooth device. Click Next
to continue.
6. Windows will check for the device driver and install it, if necessary. Tap
Close to close the screen.
NOTE: For more information on using Bluetooth features, see Windows online help.
2-14 DAP Technologies Operating Your Tablet Computer
To reconnect to a Bluetooth device
Once a Bluetooth device has been paired with your M9020, you do not need to
enter or verify the pairing code as you did the rst time.
To reconnect to a Bluetooth device, perform the following:
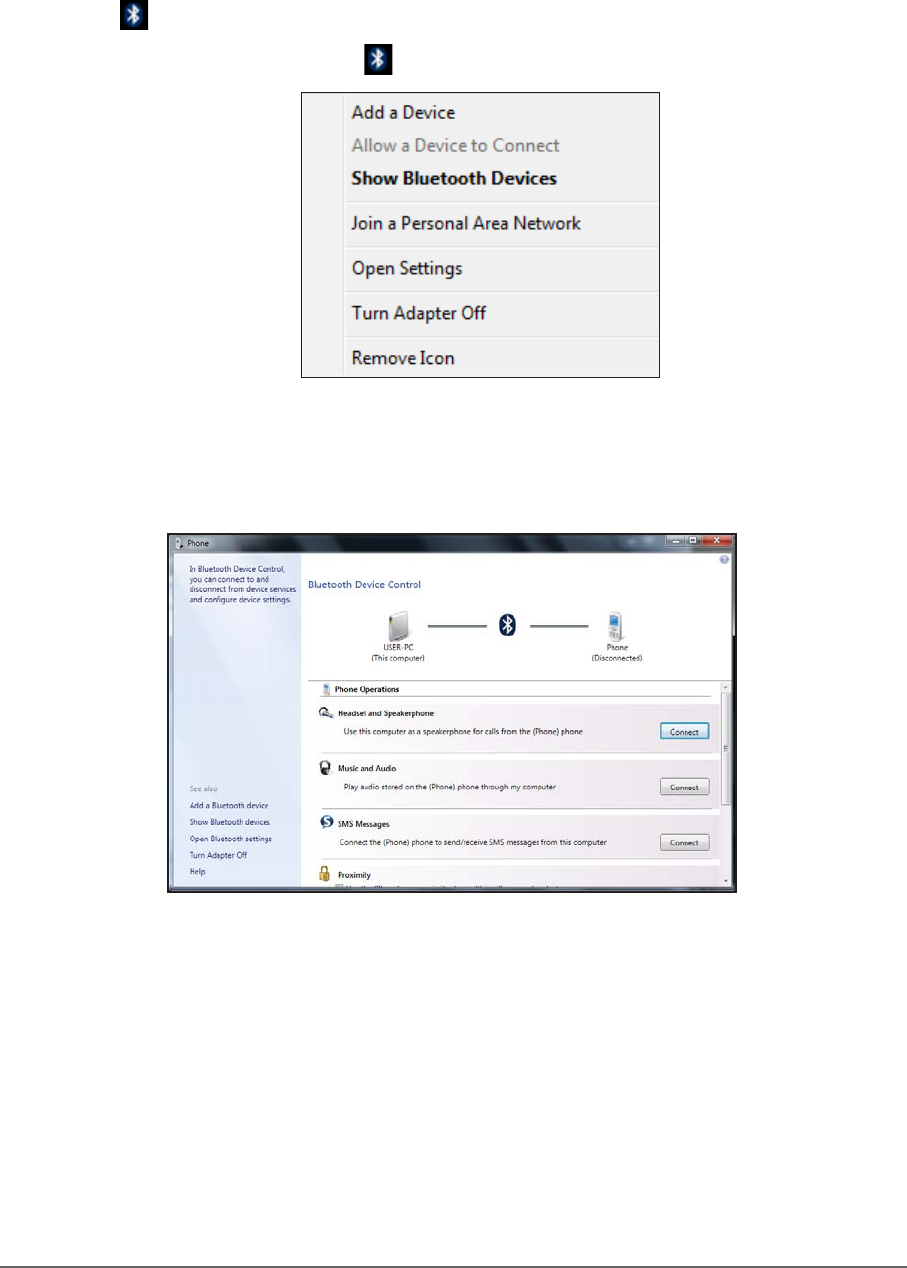
1. Make sure the Bluetooth adapter is on as indicated by the Bluetooth icon
() on the taskbar.
2. Tap the Bluetooth icon ( ) to display a pop up menu.
3. Tap Show Bluetooth Devices.
4. Double-tap the icon of the desired Bluetooth device. The Bluetooth Device
Control screen opens.
DAP Technologies 2-15Operating Your Tablet Computer
5. Tap the applicable connection operation (for example, Headset and
Speakerphone).
When the connection is established, a “green” check mark appears next to
the Bluetooth logo.
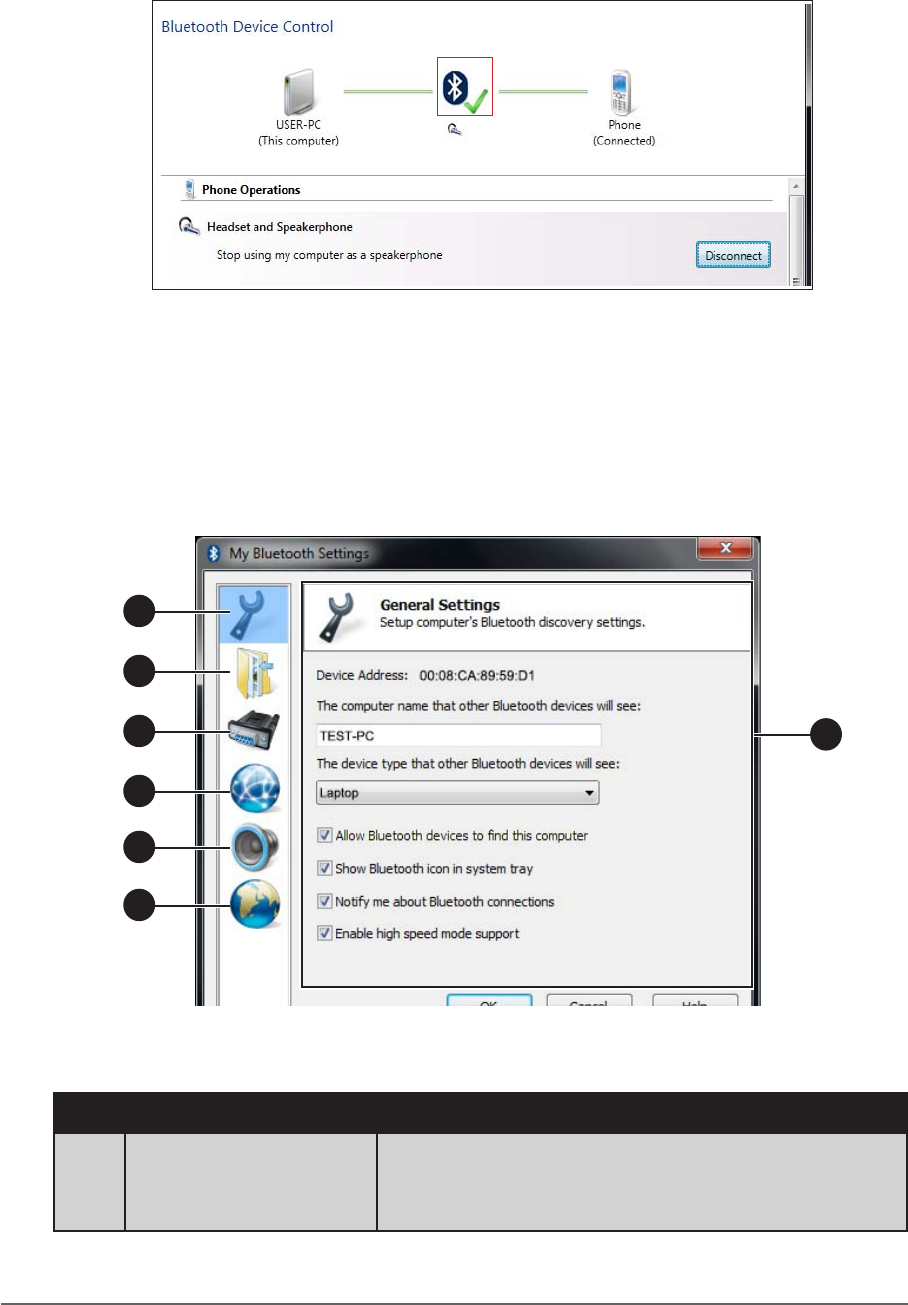
Conguring Bluetooth Settings
The Bluetooth Settings allows you to congure how you want to connect to
Bluetooth devices, sync data, and other options. To access the settings, open
My Bluetooth, and then tap My Bluetooth Settings.
1
2
3
4
5
6
7
Tap a menu from the left panel to display the relevant settings on the right.
Menu Description
1 General Settings Congures M9020 name and type, enable
visibility, notication options, and enable high
speed mode support.

2-16 DAP Technologies Operating Your Tablet Computer
Menu Description
2File Transfer Settings Congures the folder location of incoming les
and enable sharing of les with connected
Bluetooth devices.
3 Serial Port Settings Congures virtual serial ports to be used by
M9020.
4 Network Settings Enables networking via Bluetooth connection.
5 Audio Settings Selects how you want to play audio les through
M9020 and enable Skype switching.
6 Language Settings Selects the Bluetooth interface language.
7 Settings page Displays the relevant settings to congure. Tap
OK to apply changes and close the screen.
DAP Technologies 2-17Operating Your Tablet Computer
Using the WWAN Network
The M9020 has optional WWAN network capabilities that provide wireless
connection to the Internet using a SIM card with data subscription.
Connecting to a WWAN Network
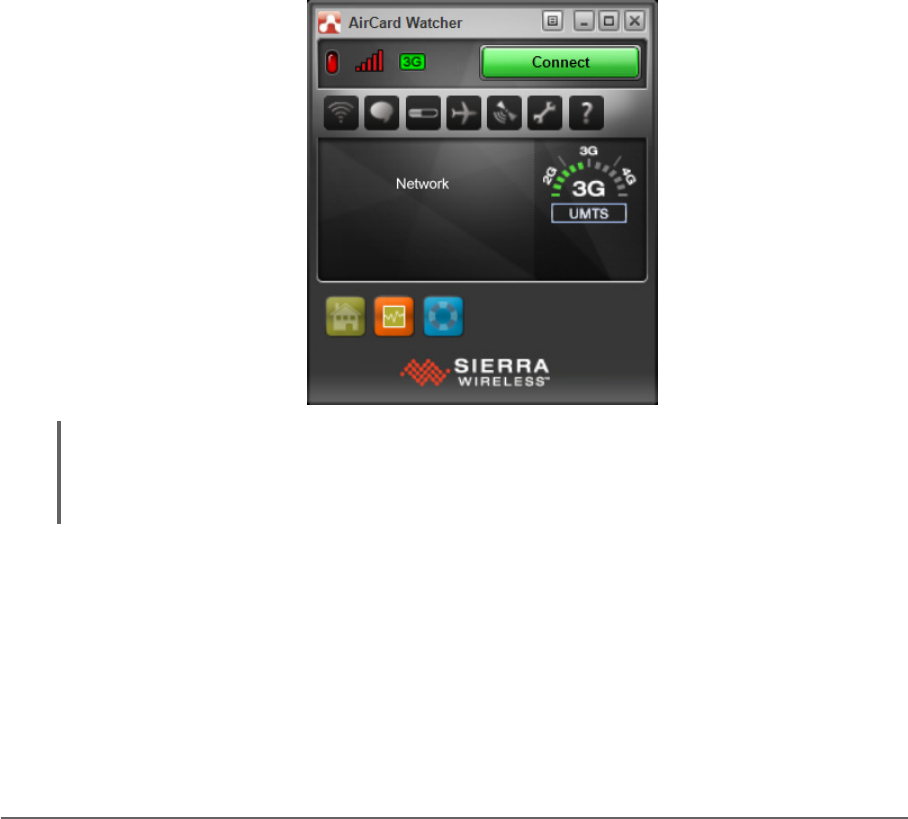
Your M9020 comes with Sierra Wireless AirCard® Watcher, an application
that allows you to connect to the Internet using your SIM card and keeps you
informed of your wireless connection status. Perform the following to connect to
your WWAN network:
1. Install a SIM card on your M9020 (see “Installing the SIM Card” on page
1-15).
2. Open the AirCard® Watcher application (tap Start > All Programs > Sierra
Wireless > AirCard Watcher).
The application detects the SIM card and displays network information on
the AirCard® Watcher main screen.
TIP: To open AirCard® Watcher faster, create a desktop shortcut icon. Alternatively, you can
set AirCard® Watcher to open and connect automatically with your WWAN network (see
“To congure WWAN network proles” on page 2-21).
3. Tap Connect to connect to the WWAN network.
Once connected, the AirCard® Watcher main screen displays the network
connection information, such as signal strength, connection speed, and
bitrate transfer. For more information on using the application, see “Using
AirCard® Watcher” on page 2-18.
2-18 DAP Technologies Operating Your Tablet Computer
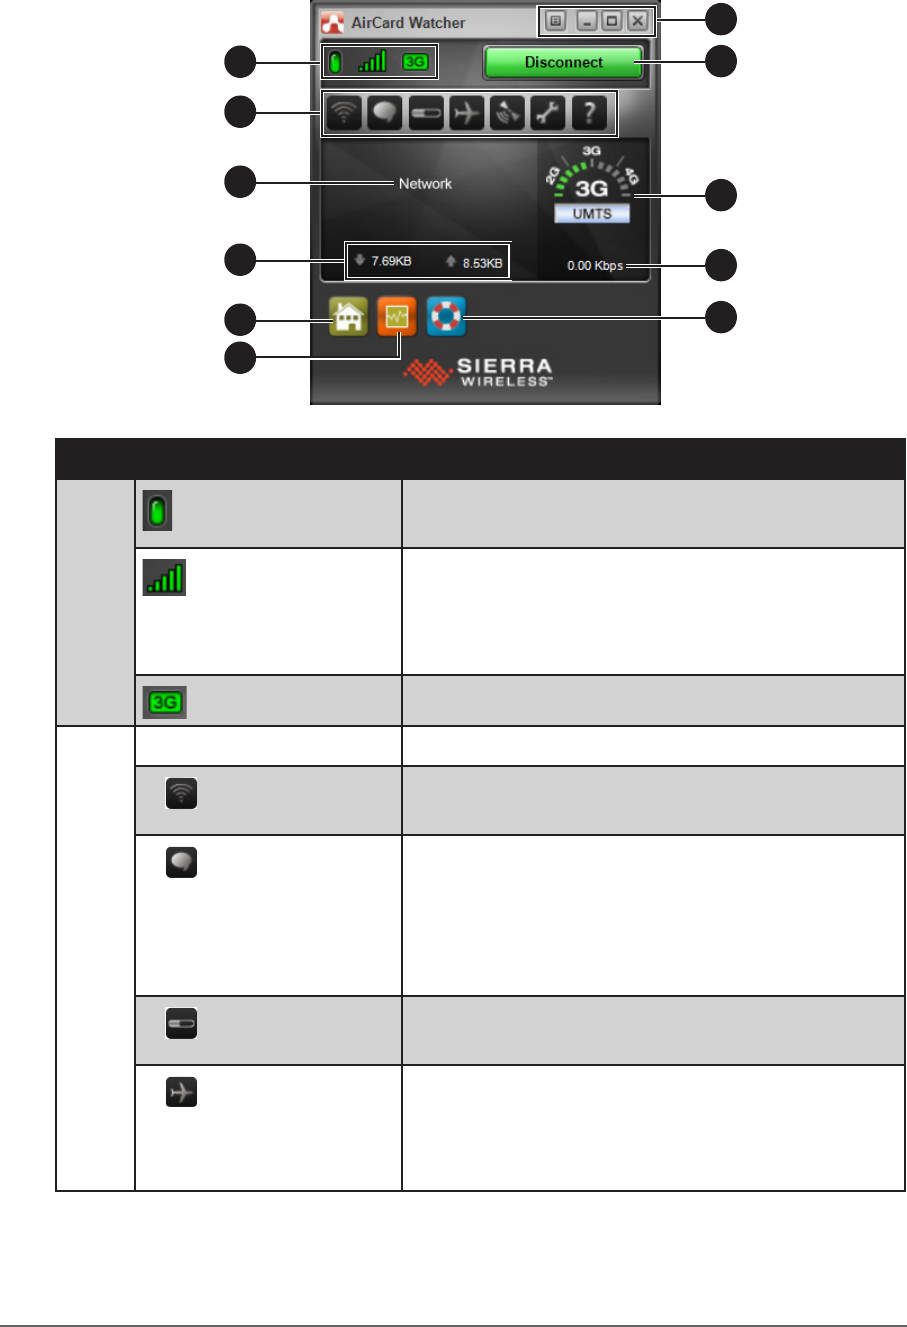
Using AirCard® Watcher
The AirCard® Watcher main screen
1
2
8
9
3
410
5
6
11
7
No. Item Description
1 WWAN Connection • Green: WWAN network is connected.
• Red: WWAN network is disconnected.
Signal Strength • Green: Indicate the network signal
strength. More lit bars indicate stronger
signal.
• Red: No signal.
Network Type Indicates the network connection type.
2 Toolbar Tap an icon to access the function.
Wireless Prole Tap to view and modify wireless network
prole.
SMS Tap to open SMS Express to send and
receive SMS messages on your M9020.
NOTE: Your data plan subscription must support this
feature to be able to send and receive SMS messages
on your M9020.
History Tap to view the usage history and clear the
bitrate counters.
Airplane Mode Tap to enable airplane mode. When this
feature is enabled, the icon turns red. Tap the
icon again or tap Turn Radio On to disable
airplane mode.
DAP Technologies 2-19Operating Your Tablet Computer
No. Item Description
2 AirCard GPS Tap to open AirCard GPS Monitor.
Settings Tap to access the AirCard® Watcher settings.
See “Conguring AirCard® Watcher Settings”
on page 2-20.
Help Tap to view the help le.
3 Network Name Displays the name of the SIM card network
provider.
4Data Transfer Rate Displays the upstream and downstream
transfer information.
5 Home Tap to open the Sierra Wireless website.
6 Speed Graph Tap to show a graphical display of the data
transfer speed.
7 Menu Tap to access the application menu.
Minimize Tap to minimize the application to the system
tray.
Restore Tap to toggle the display between full view
and compact view.
Close Shuts down the application.
8 Connect / Disconnect
Button Tap to connect or disconnect from the
WWAN.
9Network Info A graphical display of the network connection
type.
10 Speed Indicates the network connection speed.
11 Customer Support Tap to open Sierra Wireless support website.

2-20 DAP Technologies Operating Your Tablet Computer
Conguring AirCard® Watcher Settings
On the AirCard® Watcher main screen, tap the Settings ( ) icon to display the
screen below.
Tap a menu item on the left panel to display the corresponding settings on the
right. The following menus are available:
Menu Description
General Congures startup/shutdown settings, warning
messages, display properties, and others.
Messaging Congures message settings such as service center
number, default storage, and message notication.
Network Congures network mode and radio technology.
SIM Settings Enables SIM security settings.
Sounds Enables sound alert when network is connected,
disconnected or when a new message is received.
Proles Congures network proles and auto-connect
functions. See “To congure WWAN network proles”
on page 2-21.
Data Usage Tracking Enables data usage tracking and congures data
subscription rate plan settings. This feature helps
manage and control internet usage when you have a
subscription plan with a limited data rate
Firmware Displays rmware information.
DAP Technologies 2-21Operating Your Tablet Computer
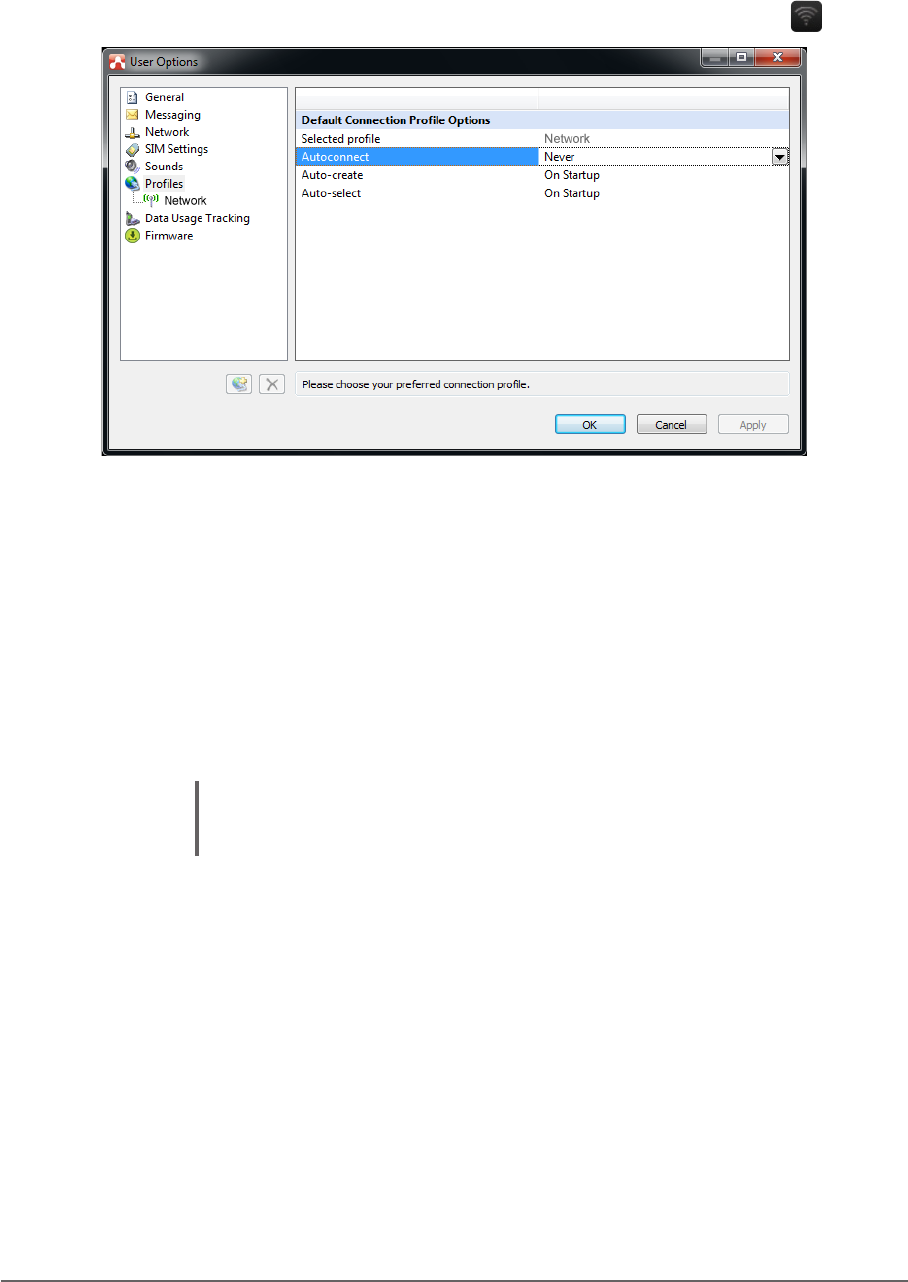
To congure WWAN network proles
Once a SIM card is used in your M9020, its network prole is created. You can
view network information, such as prole name, access point name (APN),
TCP/IP settings, and more. You can also set AirCard® Watcher to automatically
connect to the WWAN at startup.
1. On the AirCard® Watcher main screen, tap the Wireless Prole ( ) icon.
2. On the Proles menu, the following items are displayed:
• Selected prole: Displays the name of your WWAN network.
• Autoconnect: Tap the eld and then select one of the following:
• Never: Do not auto-connect to network.
• While not roaming: Automatically connects to network while within
the local network coverage.
• Always (even when roaming): Automatically connects to network
even when roaming outside the local network coverage.
NOTE: Connecting to your network while roaming may incur additional
charges. Check with your service provider for details.
• Auto-create: Tap to automatically create a connection prole when
using a new SIM card.
• Auto-select: Tap to automatically select the best connection prole for
the current SIM.
3. Tap Apply to save the settings.
4. To congure specic parameters related to your connection, tap the
network name on the left panel.
5. Tap OK to close the screen.
2-22 DAP Technologies Operating Your Tablet Computer
Using GPS
Your M9020 is equipped with GPS (Global Positioning System) capabilities
to determine your location and aid in the presentation and analysis of GPS
information.
Before using the GPS, make sure the GPS radio is enabled on ‘DAP Control
Center’ and on ‘Location and Other Sensors’. See more information below.
Turning the GPS On and Off
In case you need to turn the GPS on or off, perform the following:
1. Tap Start > All Programs > DAP Technologies > DAP Control Center.
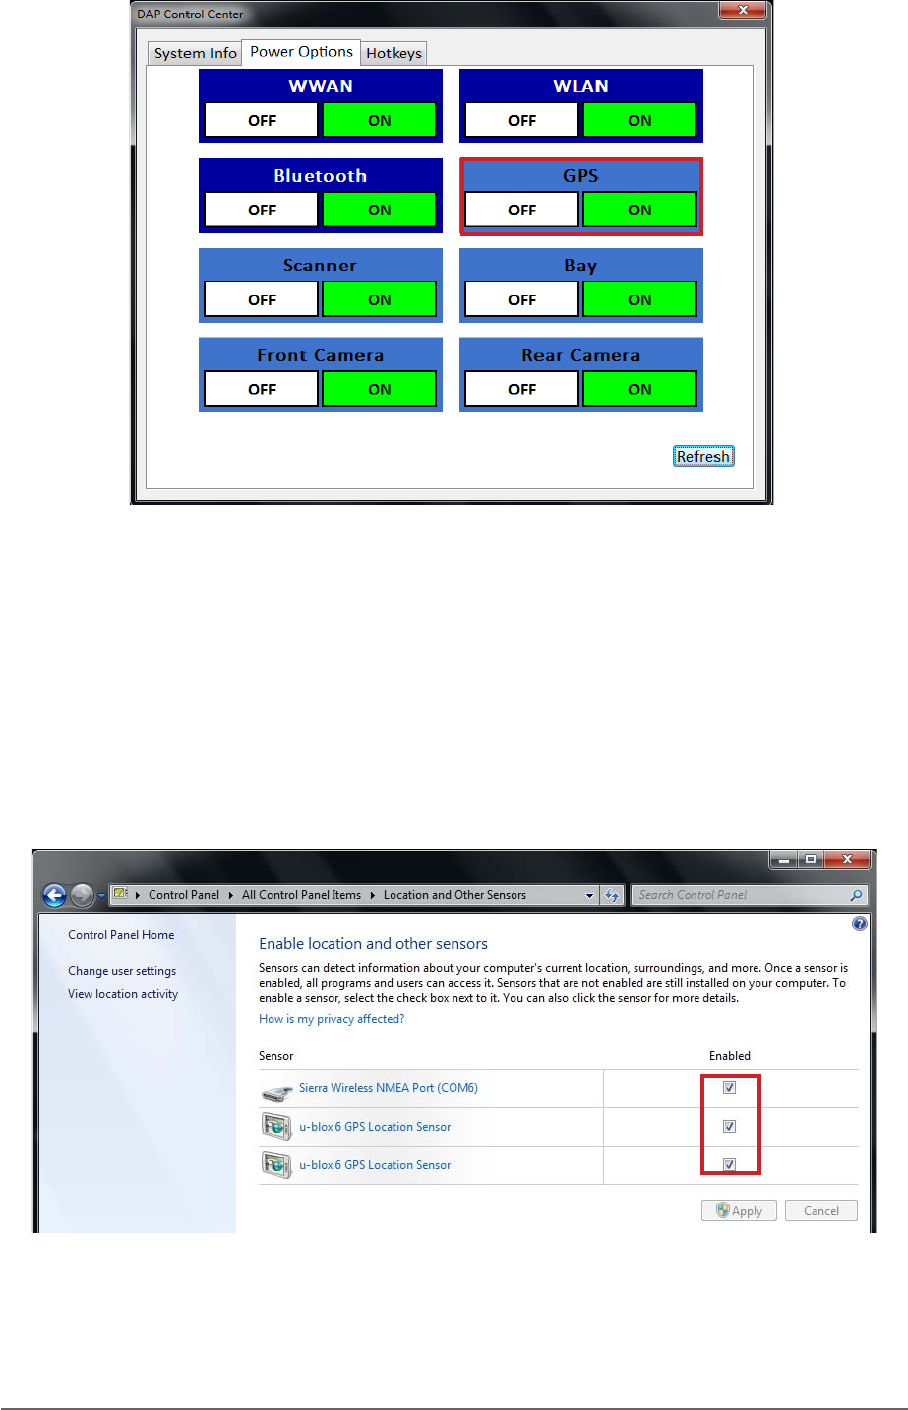
DAP Technologies 2-23Operating Your Tablet Computer
2. Tap Power Options tab.
3. To turn the GPS on or off, tap ON or OFF.
Enabling the Location Sensors
The M9020 is equipped with the u-blox 6 GPS Location Sensor. By default,
this location sensor is enabled.
Perform the following to enable the location sensors:
1. On Windows desktop, tap Start > Control Panel > Hardware and
Sound > Location and Other Sensors.
2. To enable/disable the sensors, use the check boxes.
3. Tap Apply to save and apply the changes.
2-24 DAP Technologies Operating Your Tablet Computer
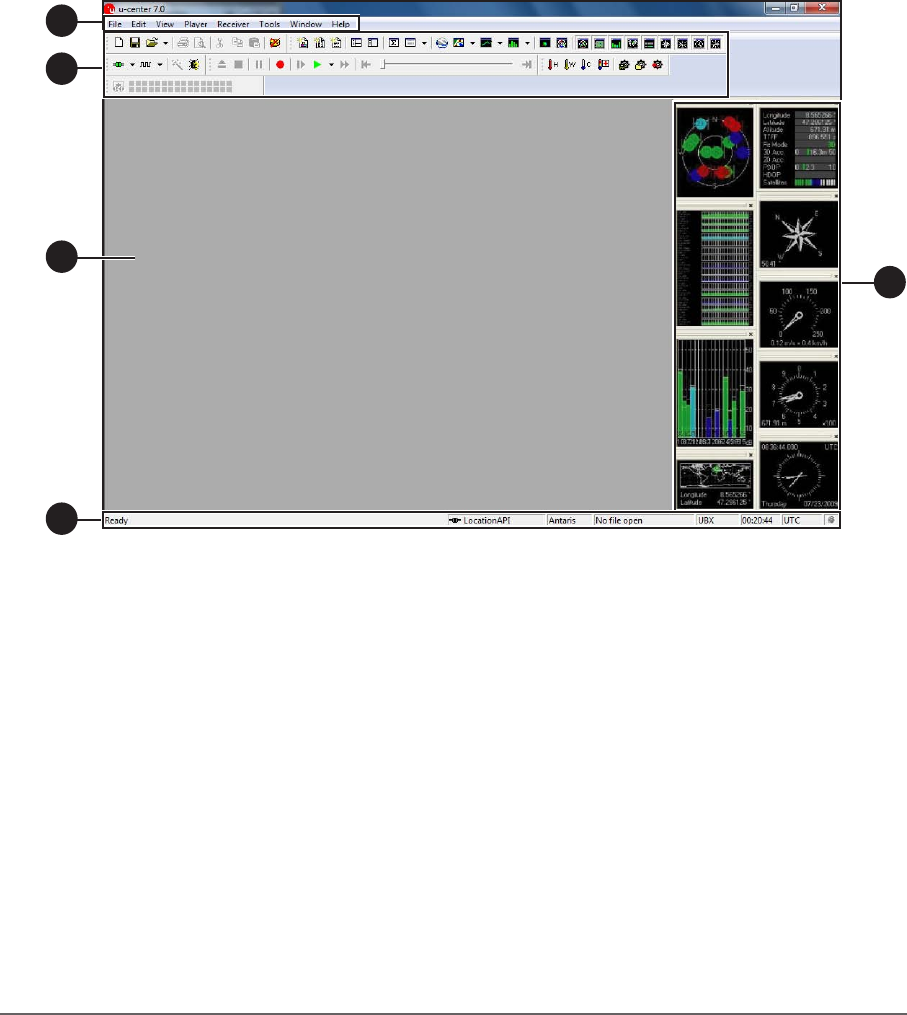
Using u-center
u-center is an application that displays position accuracy, road test position and
trajectory, satellite tracking, time to rst x, etc. All processed data can be saved
in ASCII format and opened using popular spreadsheet applications.
To open u-center, perform one of the following:
• Double-tap the u-center desktop shortcut icon.
• Tap Start > All Programs > u-blox > u-center > u-center.
The u-center Main Screen
If the GPS receiver is working correctly, the main screen displays the satellite
position and level, data, altitude, compass, speed meter, etc.
1
2
3
4
5

DAP Technologies 2-25Operating Your Tablet Computer
No. Item Description
1 Menu Bar Consists of eight menu items:
• File: Allows you to create, save, open,
close a log le or clear a database.
• Edit: Allows you to copy, paste, delete or
select text or set of information.
• View: Allows you to open console
windows, view maps, charts, camera,
and select toolbars to display on the main
screen.
• Player: Allows you to record and play a log
le.
• Receiver: Allows you to congure the
receiver settings, such as port, baudrate,
sensor, network connection settings, etc.
• Tools: Allows you to update the rmware
and set application preferences.
• Window: Allows you to select the layout of
your workspace.
• Help: Allows you to view help les.
2 Toolbars Provides shortcuts to common tasks by
tapping on the icon.
TIP: If using a USB mouse, hold the mouse cursor over
the button for a few seconds to view the button name. A
brief description is also displayed on the status display
area.
3Window Area Displays maps, console windows, charts and
the camera view.
4Status Display Area Displays a brief description of the button
function, communication information, GPS
mode, le in use, operating and UTC time,
protocol information, and GPS status.
5 Docking Window Displays graphical GPS information, such as
the satellite position, satellite level, satellite
level history, world position, data, altitude
meter, compass, speed meter, and watch.
NOTE: For more information on using u-center, see the u-center User Guide in Start > All
Programs > u-blox > u-center > u-center User Guide.
2-26 DAP Technologies Operating Your Tablet Computer
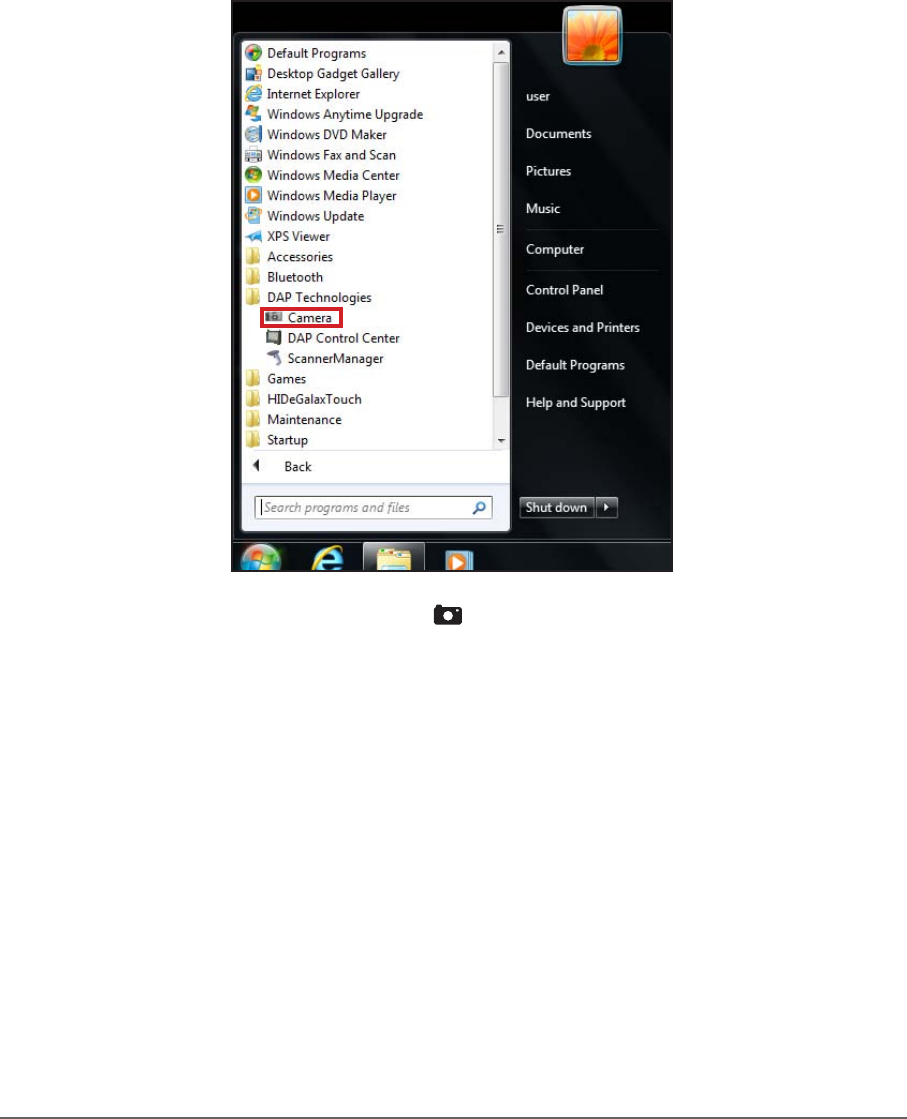
Using the Camera
Your M9020 has integrated front and rear cameras for taking photos.
Opening the Camera
Perform one of the following to open the camera:
• Tap Start > All Programs > DAP Technologies > Camera.
• Press the camera shortcut key ( ).
DAP Technologies 2-27Operating Your Tablet Computer
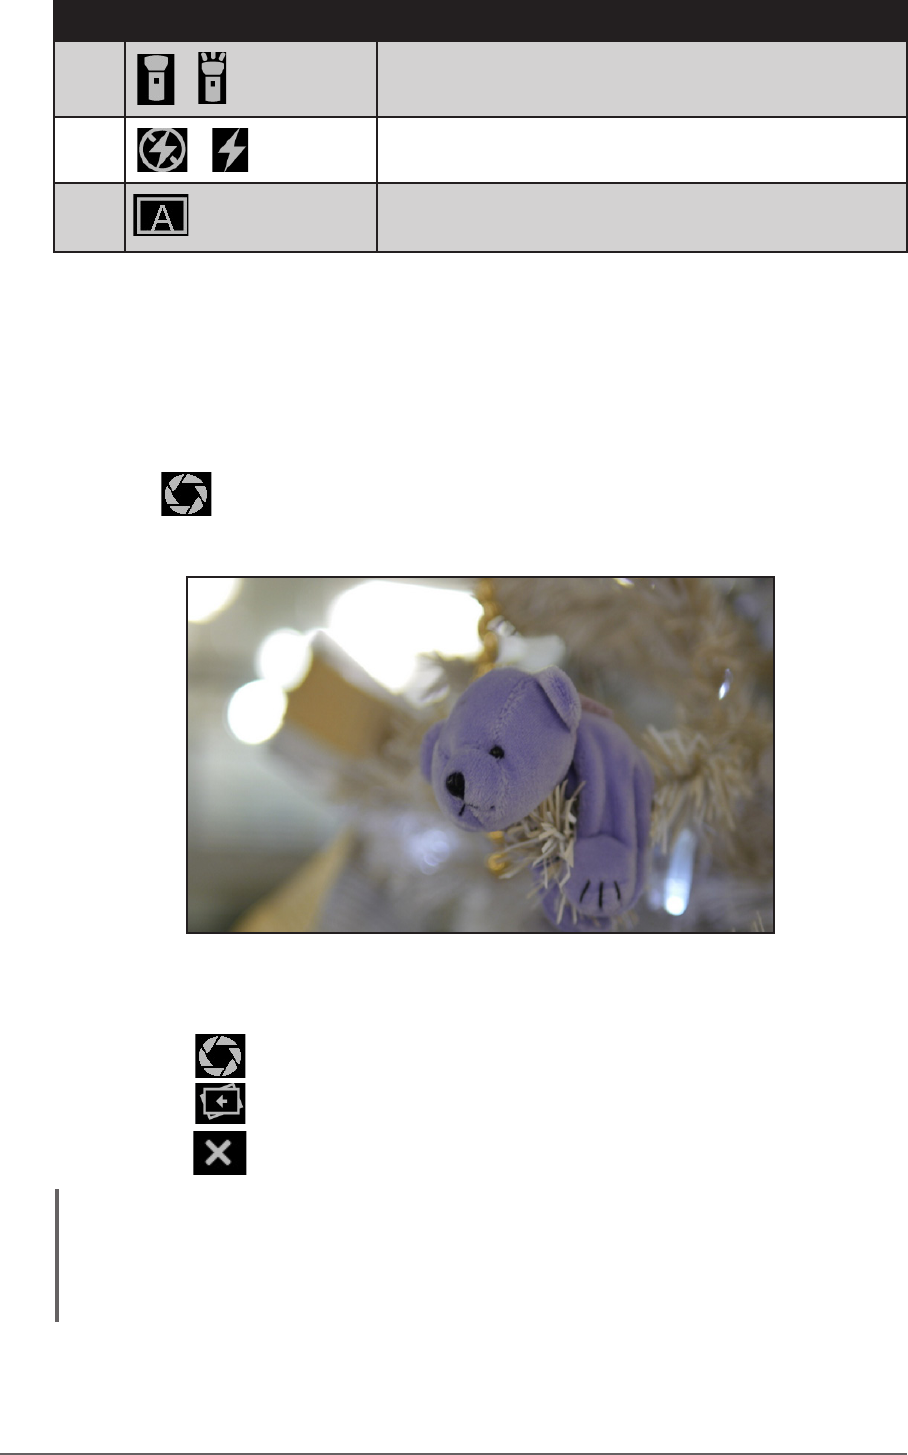
The Camera Screen
3
7
8
9
10
4
5
6
2
1
11
No. Item Description
1 Shooting Mode Shows the shooting mode (by default it is Auto).
2 Settings Tap to view the camera settings. See “Camera
Settings” on page 2-29.
3 Exit Tap to close the camera screen.
4 Minimize Tap to minimize the camera screen.
5 Shutter Tap to capture a photo.
6 Open the Photo Tap to open the captured photo.
7
/
Positioning
Tap to add/remove the GPS-based location
information on the photo (disabled by default).
8 Switch Tap to switch between front camera and rear
camera.
2-28 DAP Technologies Operating Your Tablet Computer
No. Item Description
9
/ Flashlight
Tap to activate/deactivate the ashlight function
(deactivated by default).
10 / Flash Tap to enable/disable ash (disabled by default).
11 Shooting Mode The only shooting mode available on the M9020
is automatic.
Shooting Photos
1. Open the camera (see “Opening the Camera” on page 2-26).
2. Focus on your subject.
3. Tap to capture the photo.
4. By default, the photo preview is briey shown on the screen.
The preview screen automatically closes after 3 seconds. Do one of the
following:
• Tap to capture the next image.
• Tap to see the image in Windows Photo Viewer.
• Tap to close the camera screen.
NOTE:
By default the system automatically creates a folder with the current date to the logged in
user’s Pictures folder, and saves the images into that folder. For example, C:\Users\My
Name-PC\Pictures\2013-12-16.
DAP Technologies 2-29Operating Your Tablet Computer
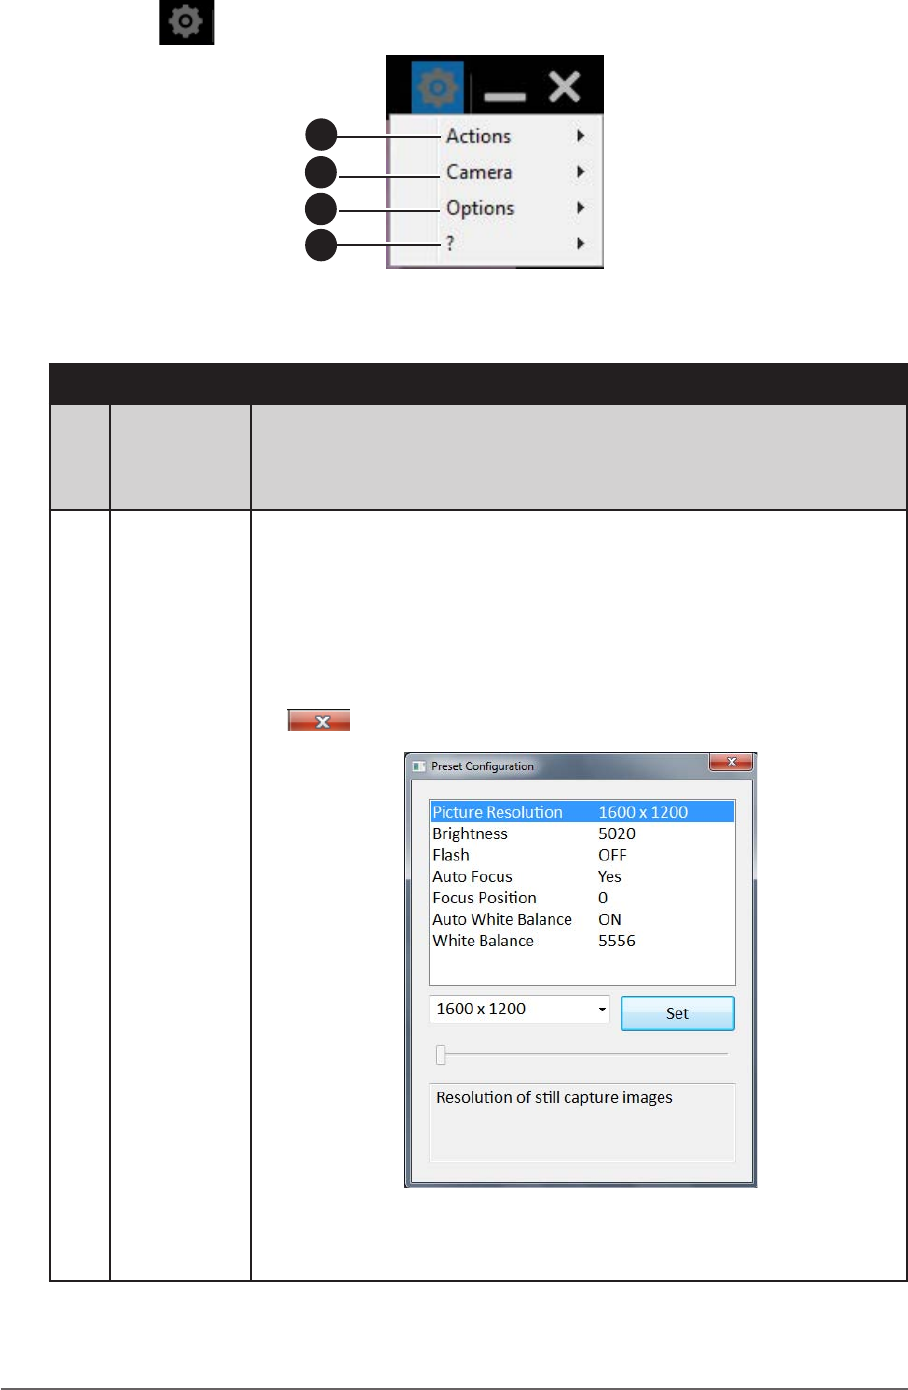
Camera Settings
1. Tap to open the settings pop-up menu.
1
2
3
4
2. Modify the necessary settings.
No. Item Description
1 Actions • Capture: Tap to capture an image.
• Show Image Folder: Tap to open the image folder.
2 Camera
• Advanced Settings...: Tap to open the Preset
Conguration page. On this page you can modify
parameters such as the default picture resolution,
brightness, ash and white balance of the camera. Tap
on the parameter and select the desired value. After all
modications are done, tap Set to save changes. Tap
to close the page.
2-30 DAP Technologies Operating Your Tablet Computer
No. Item Description
2 Camera
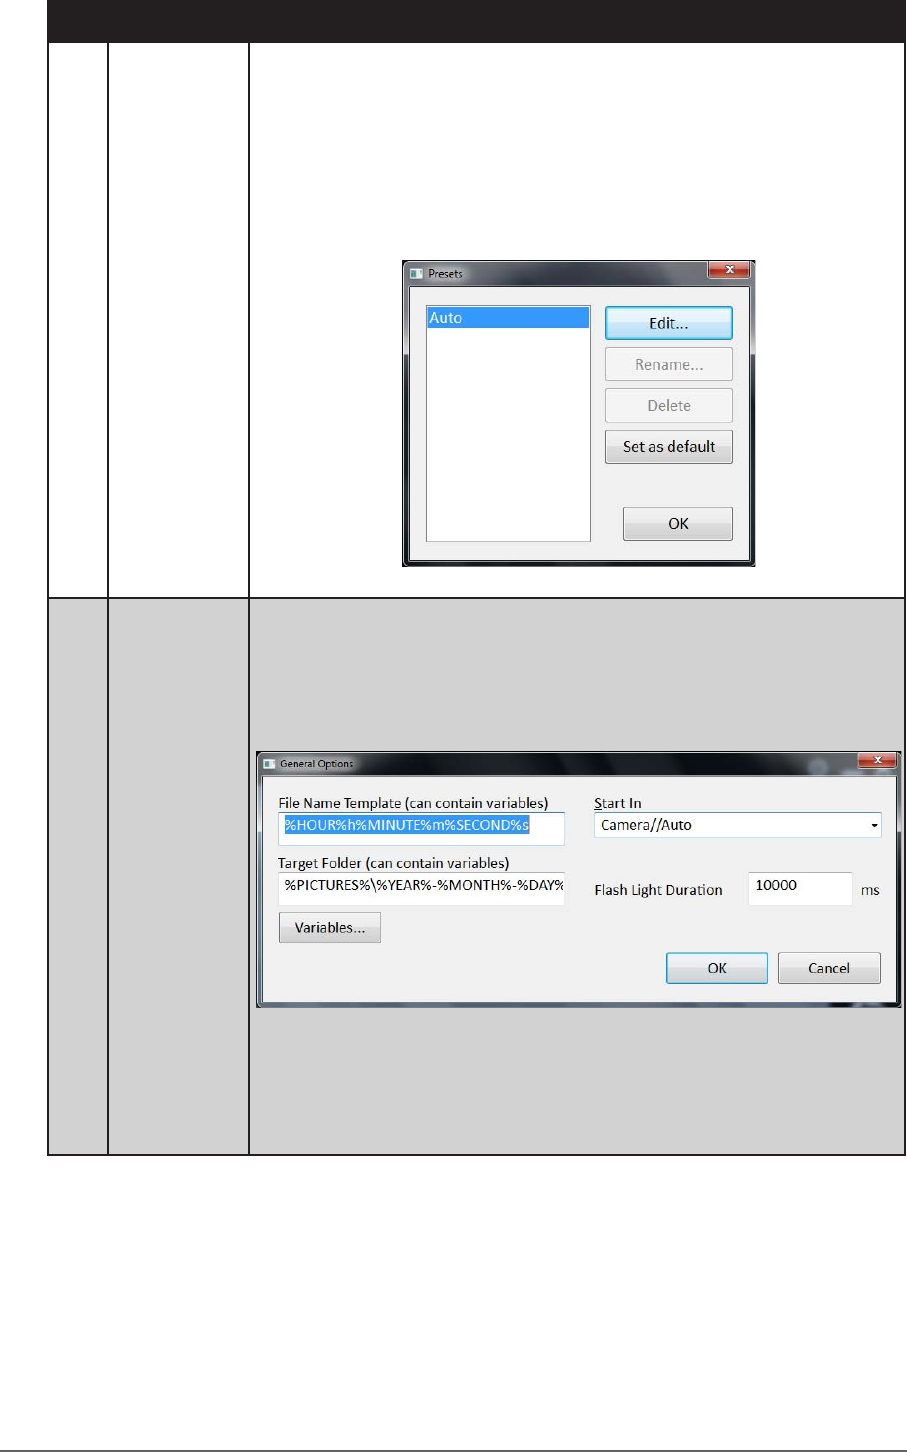
• Edit Presets...: Tap to open the Presets page. On
this page you can congure the default parameters of
Auto shooting mode. Tap on the mode and then tap
Edit.... You can also set the mode as a default mode, by
selecting a mode and clicking on Set as Default. Tap OK
to save changes and exit the page.
3 Options
• General...: Tap to open the General Options page. On
this page you can dene the le name template, target
image folder location, start in mode and ash light
duration. When all modications are done, tap OK.
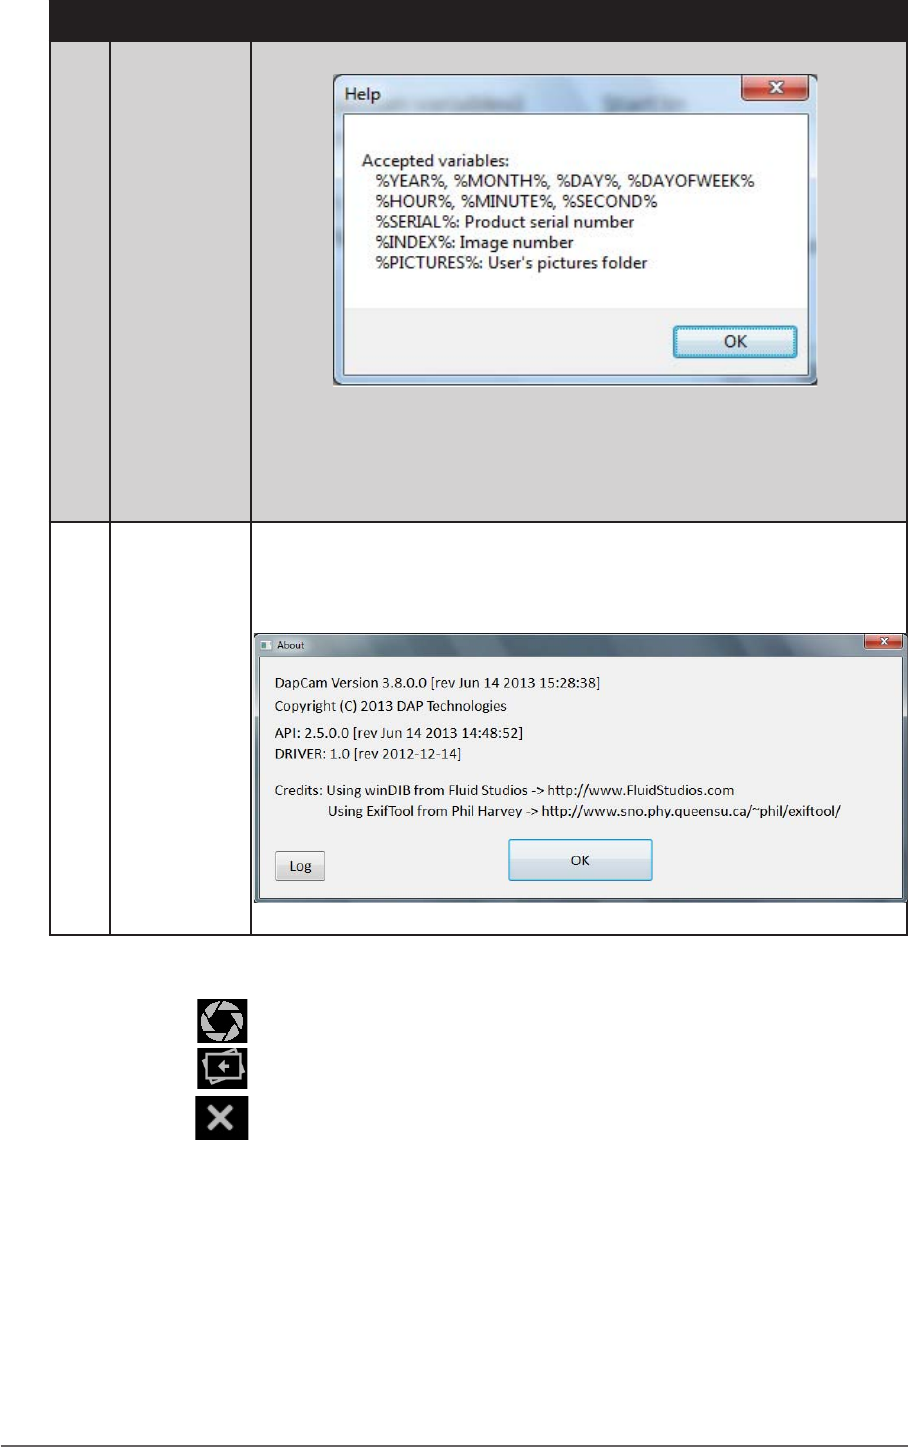
Please note that you can use variables, to automate
the image naming and image folder location and naming.
Click the Variables... button for more details on variable
names.
DAP Technologies 2-31Operating Your Tablet Computer
No. Item Description
3 Options
Tap OK to return General Options page.
• Export Conguration...: Tap to select the location
where you want to save the conguration parameters.
The parameters are saved in XML format.
4 ?
• About: Tap to see the camera application information
page. Tap OK, to return to the
• camera screen.
3. When settings are complete, do one of the following:
• Tap to capture an image.
• Tap to see the image in Windows Photo Viewer.
• Tap to close the camera screen.
2-32 DAP Technologies Operating Your Tablet Computer
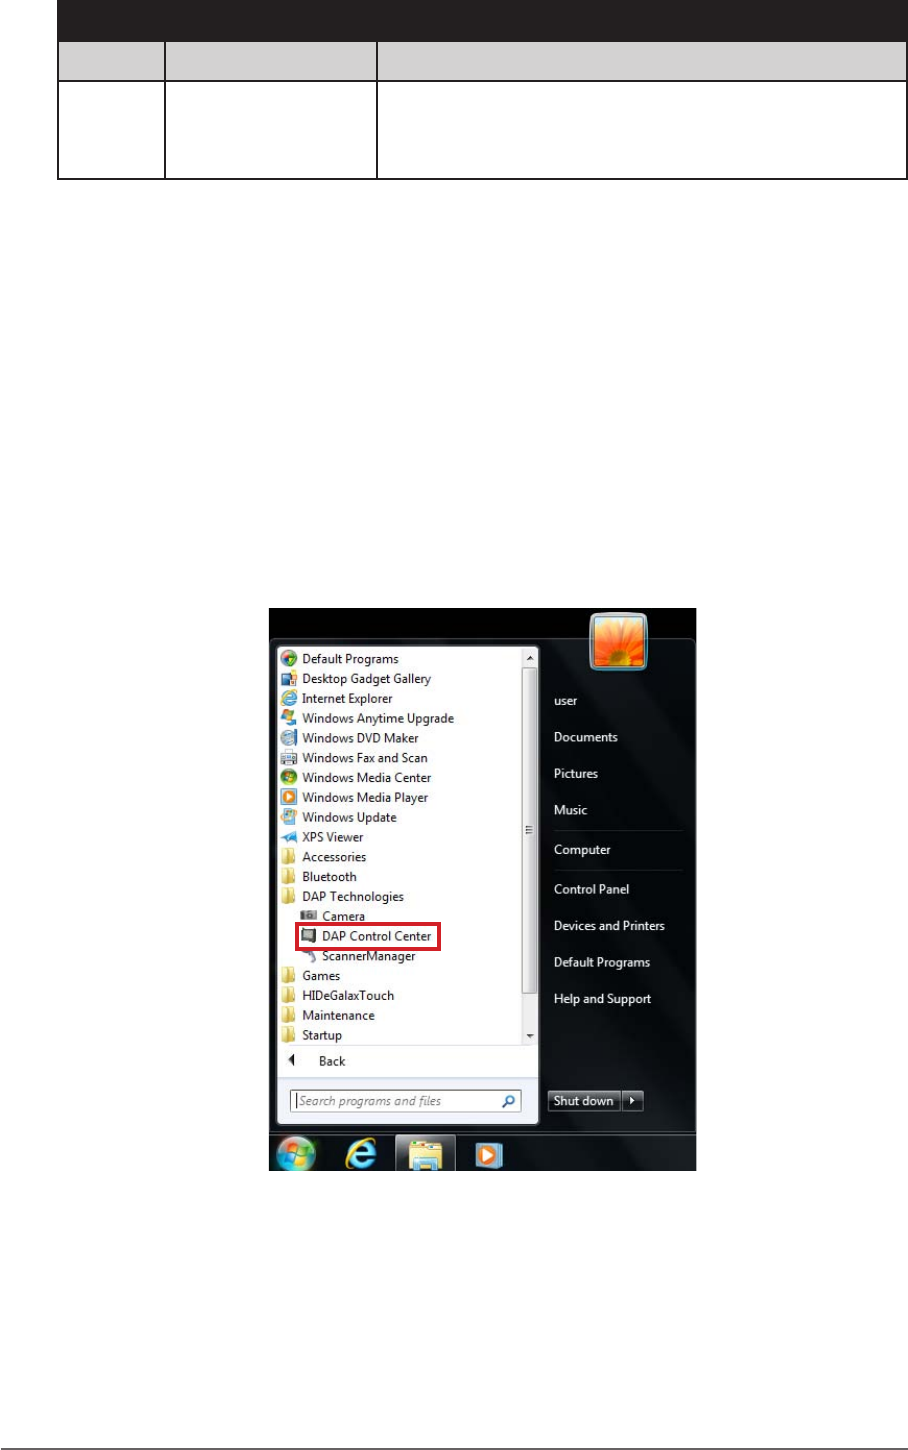
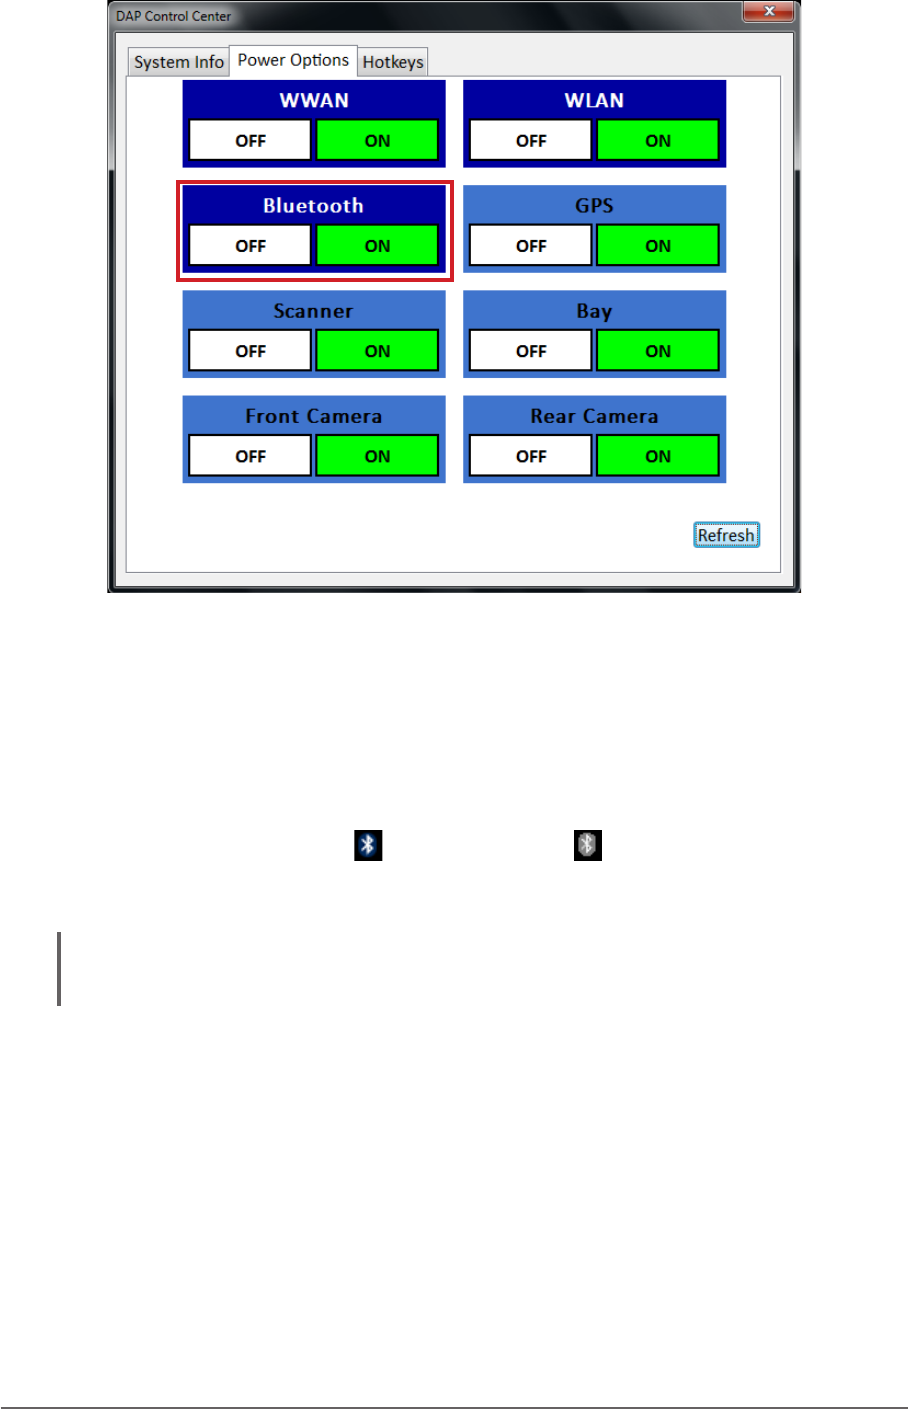
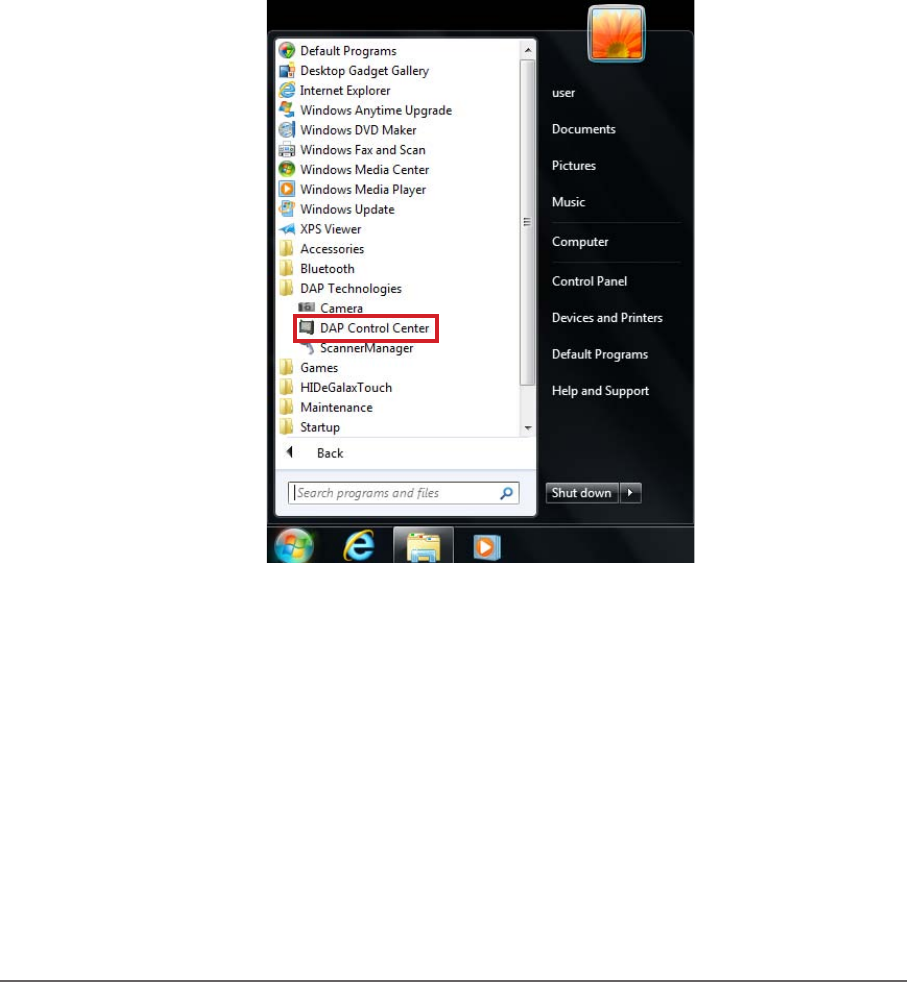
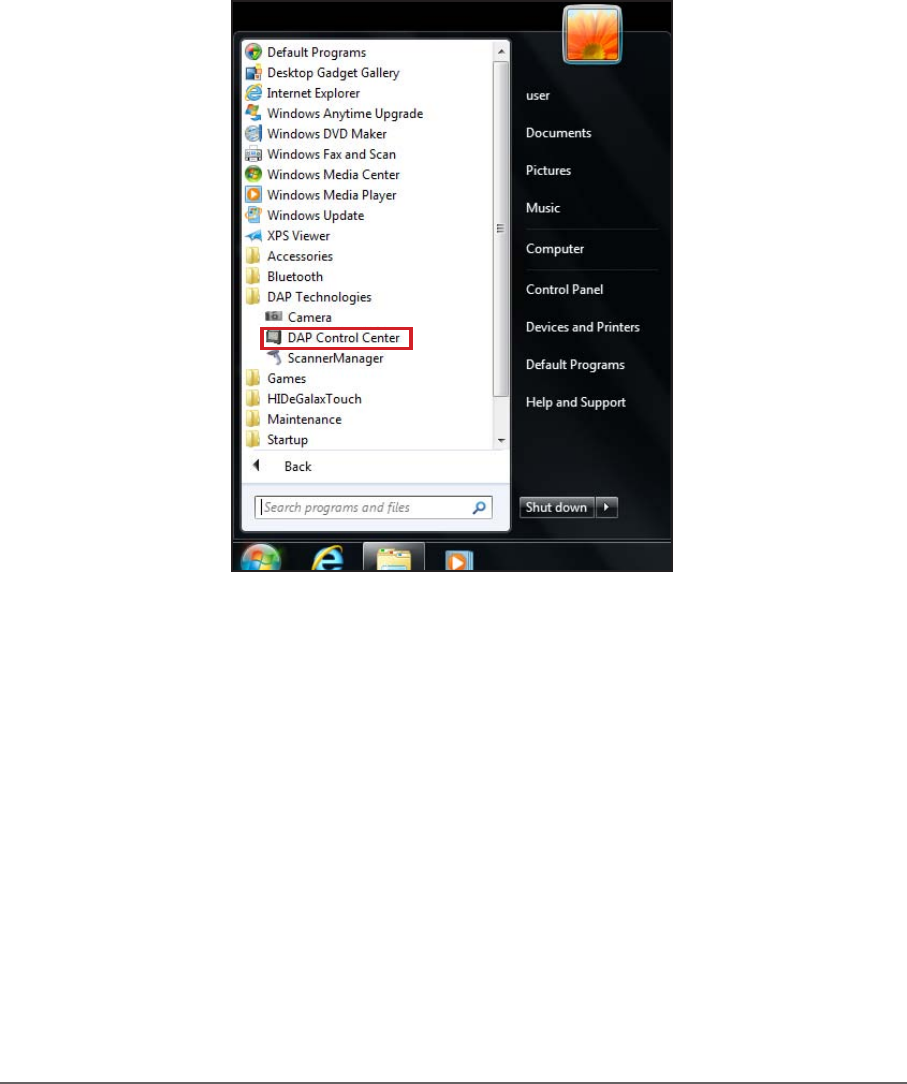
Using the DAP Control Center
Your M9020 has a control center for viewing system information, setting power
options and dening hotkeys.
Opening the DAP Control Center
Perform the following to open the DAP Control Center:
• Tap Start > All Programs > DAP Technologies > DAP Control Center.
DAP Technologies 2-33Operating Your Tablet Computer
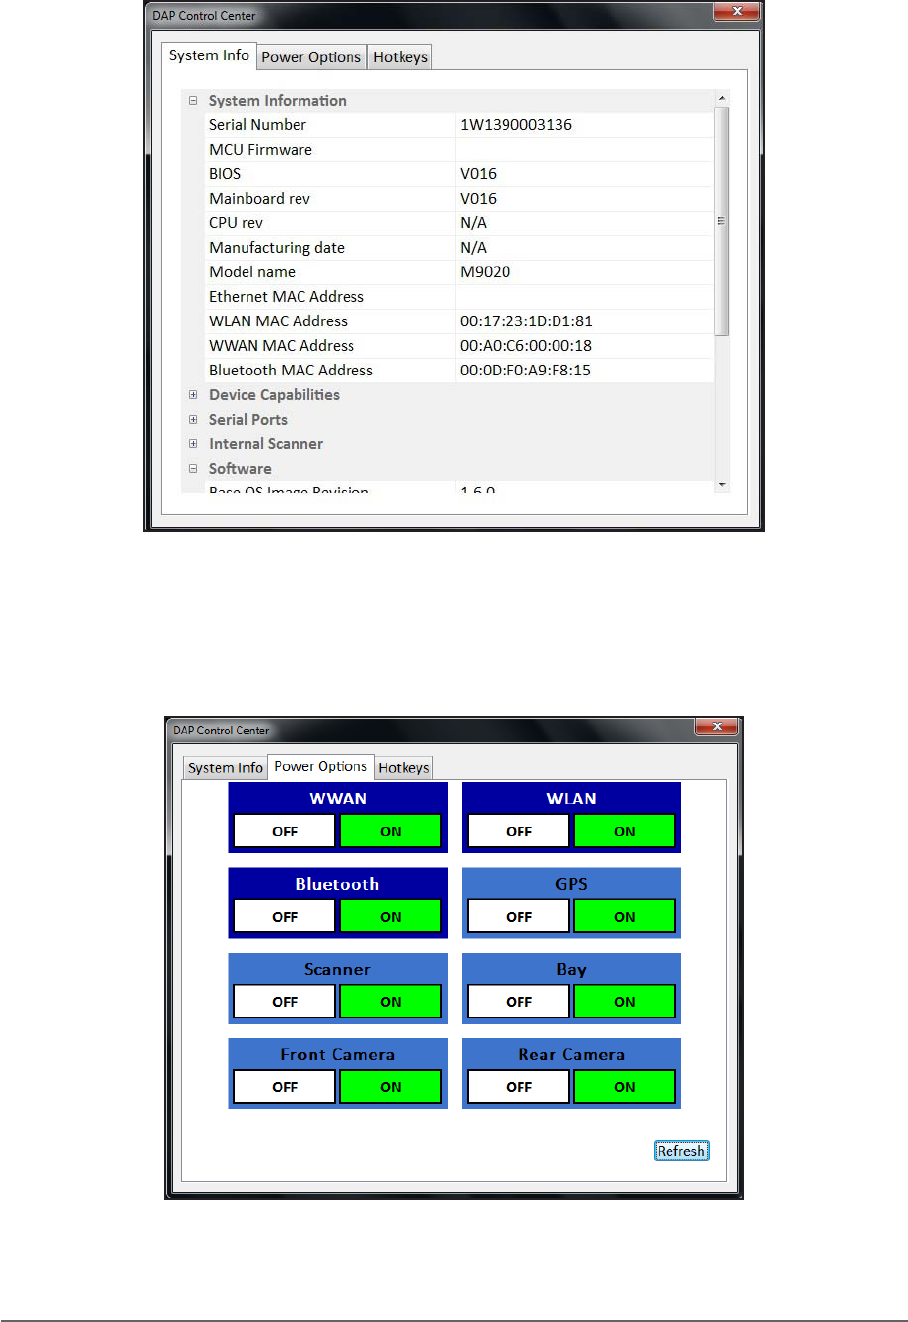
Viewing System Information
General system information is displayed in the System Info tab on DAP Control
Center.
Setting Power Options
Tap the Power Options tab to control the power state of features such as the
WWAN, WLAN, Bluetooth, GPS, Scanner and Cameras.
2-34 DAP Technologies Operating Your Tablet Computer
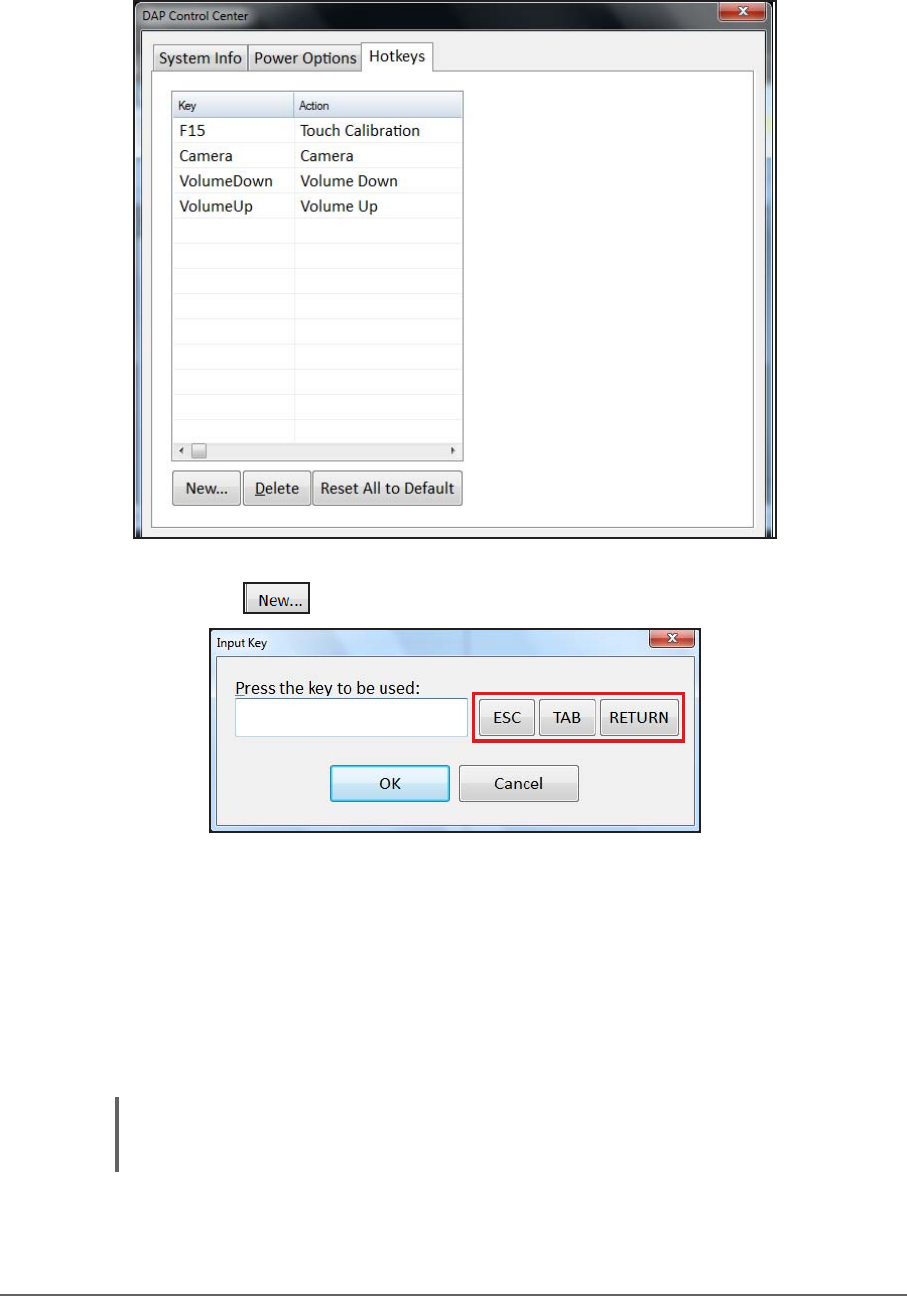
Dening Hotkeys
To dene hotkeys, do the following:
1. Tap on Hotkeys tab. The Hotkeys page opens.
2. Tap New... ( ). The Input Key window opens.
3. Type the key or key combination that will be dened as a hotkey. To assign
a hotkey to the ESC (Escape), TAB (Tabular) or RETURN (Enter) keys,
use the corresponding buttons. Tap OK to conrm.
The selected hotkey appears in the table on the Hotkeys page.
4. To assign an action to a hot key, select it on the list and then tap the Action
eld. A list of actions is displayed on the screen. Select the desired action
from the list.
NOTE:
To activate the hotkey, make sure the Enabled checkbox is checked.
DAP Technologies 2-35Operating Your Tablet Computer
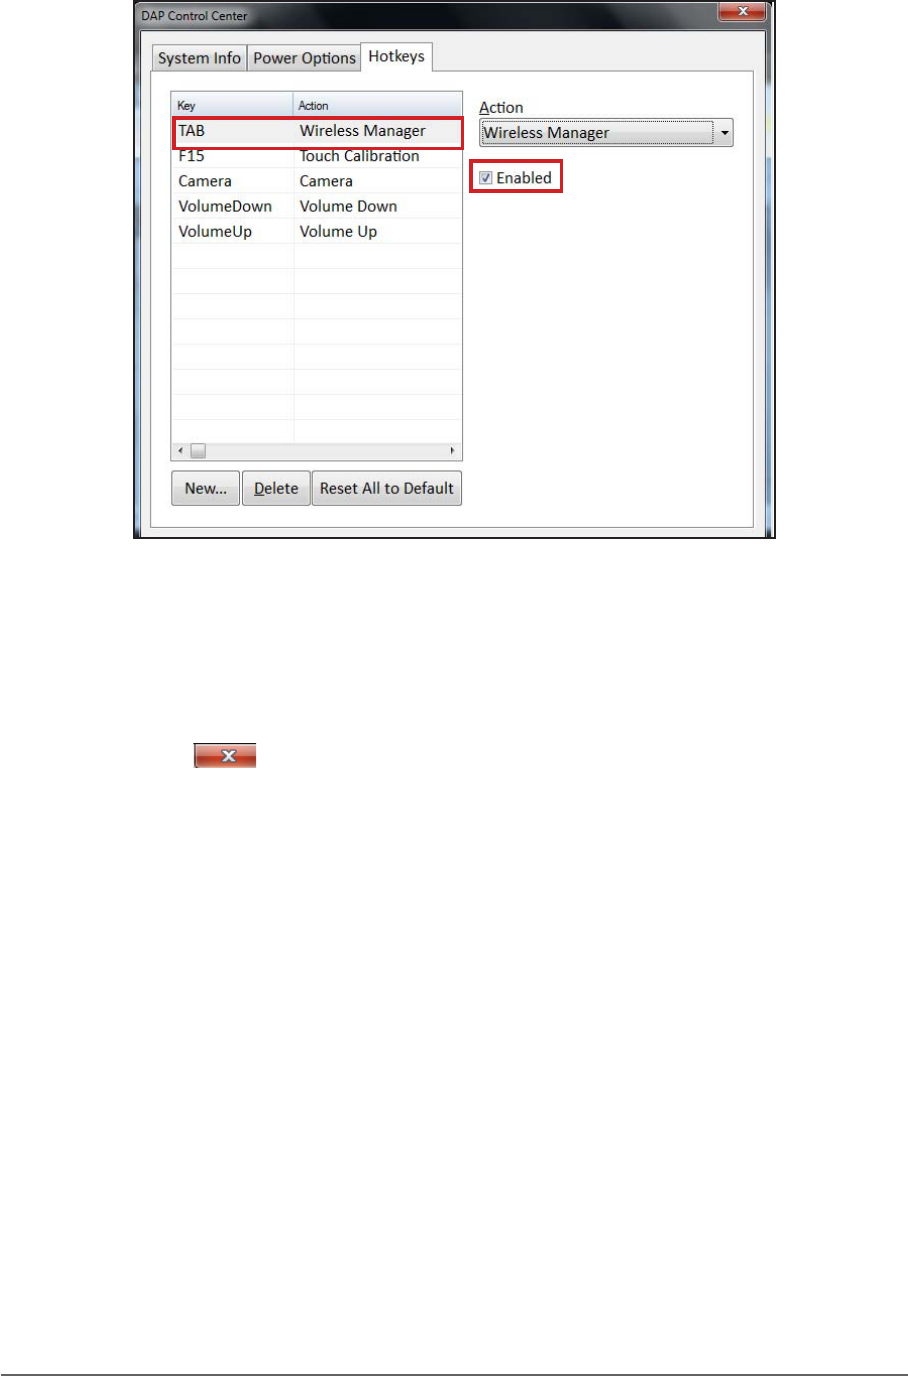
In the following illustration, the TAB key is assigned to open the Wireless
Manager.
5. After the hotkey is assigned, do one of the following:
• Tap New, to assign the next hotkey. Repeat steps from 1 to 4.
• Select the key and tap Delete, to delete the hotkey assignment.
• Tap Reset All to Default, to restore the default conguration.
• Tap to close the Hotkeys page.
2-36 DAP Technologies Operating Your Tablet Computer
Using the Barcode Reader
Your M9020 has a built-in barcode reader which is a 2D imager that you can
use to scan barcodes.
NOTE:
• The built-in barcode reader is an optional accessory.
• Alternatively, you can also use a Bluetooth scanner or connect an external barcode
scanner to the USB or RS-232 ports.
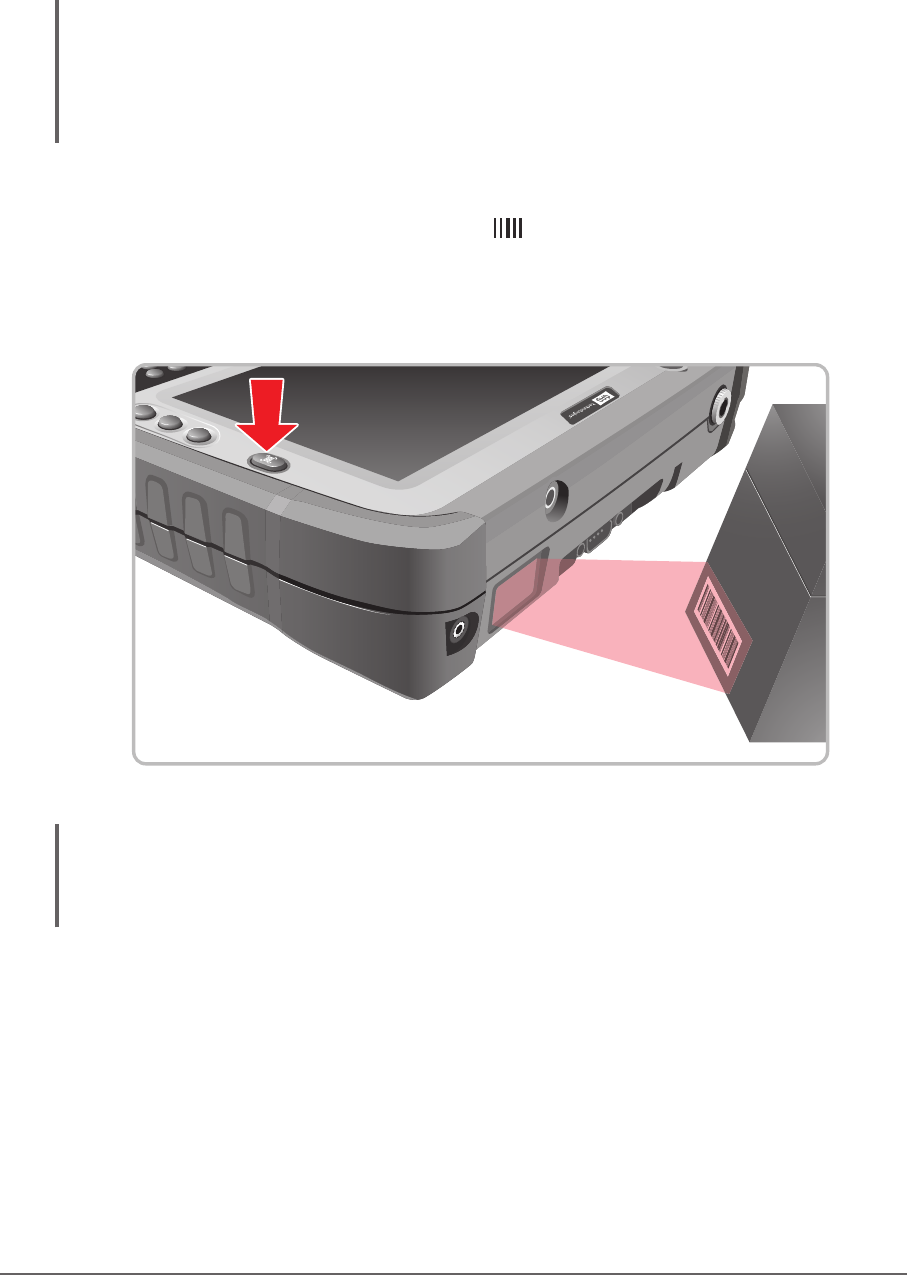
Perform the following to scan barcodes using the built-in barcode reader:
1. Press and hold the barcode button ( ) to active the barcode reader. The
barcode reader lights red.
2. Point the beam to the barcode label. The device emits a beep sound when
the barcode is read properly.
CAUTION:
• DO NOT aim the barcode scanner into the eyes. It may severely damage the eyes or
may cause blindness if pointed directly into eyes.
DAP Technologies 2-37Operating Your Tablet Computer
Using ScannerManager
The ScannerManager allows you to see the status and congure the settings of
the Internal Scanner, Tethered Scanner, and Bluetooth Scanner.
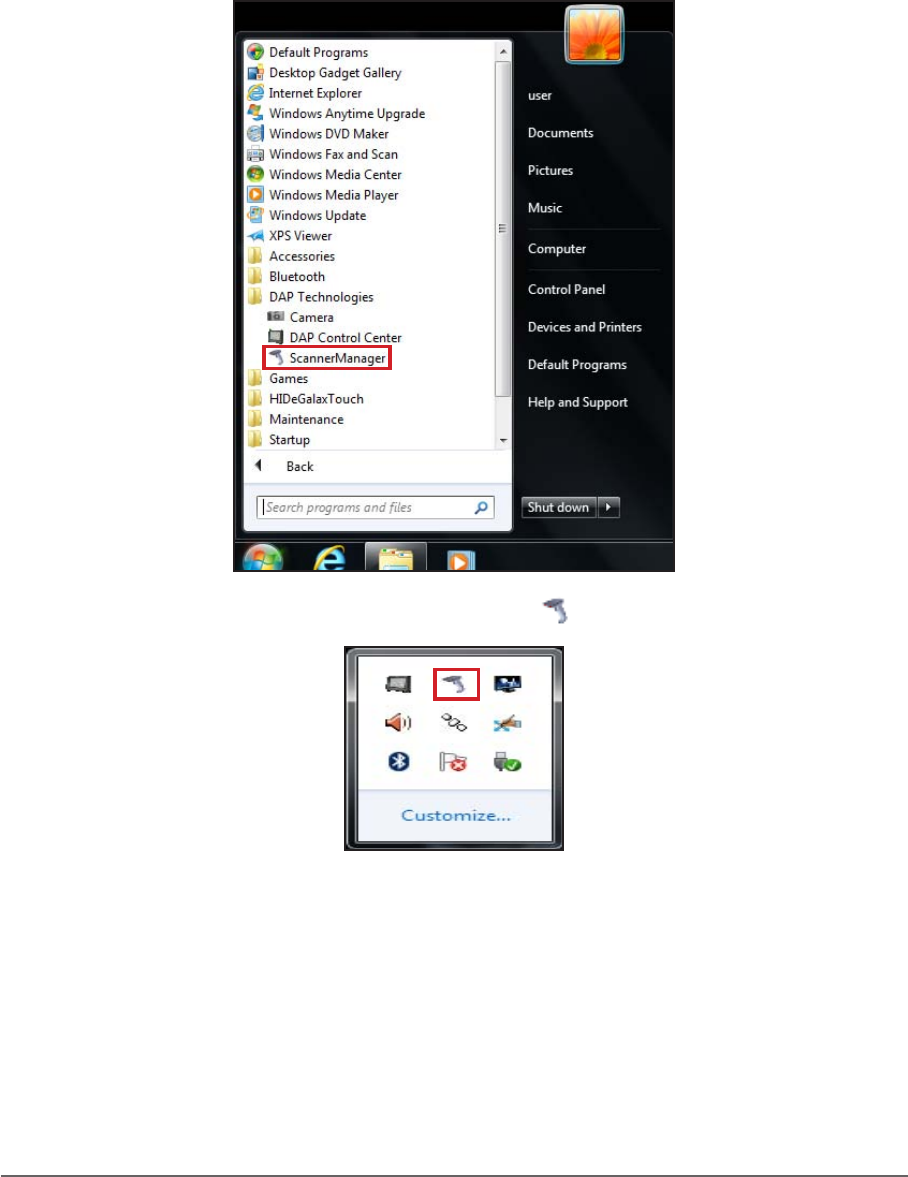
Opening the ScannerManager
Perform one of the following to open the ScannerManager application::
• Tap Start > All Programs > DAP Technologies > ScannerManager.
• Press the ScannerManager shortcut key ( ) icon on the taskbar.

2-38 DAP Technologies Operating Your Tablet Computer
Using the ScannerManager
1. Open the ScannerManager, see “Opening the ScannerManager” on page
2-37. The settings main page opens on the screen.
2
1
3
4
5
No. Item Description
1 Internal Scanner By default the inner scanner is enabled and
connected. Tap Settings, to modify the de-
coder properties, import/export parameters,
or disable the internal scanner.
Tap OK to return to the ScannerManager
main page.
2 Tethered Scanner By default the tethered scanner is disabled.
Tap Settings to enable this scanner and do
modications to the serial link connection
parameters.
Tap OK to return to the ScannerManager
main page.
3 Bluetooth Scanner Tap Settings to congure the Bluetooth
scanner connection parameters. See
“Working With Bluetooth Scanners” on page
2-40.
Tap OK to return to the ScannerManager
main page.
DAP Technologies 2-39Operating Your Tablet Computer
No. Item Description
4 Trigger Options By default, when you press the barcode
button ( ), the barcode scanner activates.
Tap Trigger Options if you want to remove
or assign the barcode scanner a different
shortcut key.
Tap OK to return to the ScannerManager
main page.
No. Item Description
5 Output to a) Select where to direct the barcode
scanning output. The available options are
as follows:
- Keyboard Wedge
- Link*One
- SDK.
b) Tap Settings to modify the selected output
conguration.
2. When the modications are done, tap to close the ScannerManager
page.
2-40 DAP Technologies Operating Your Tablet Computer
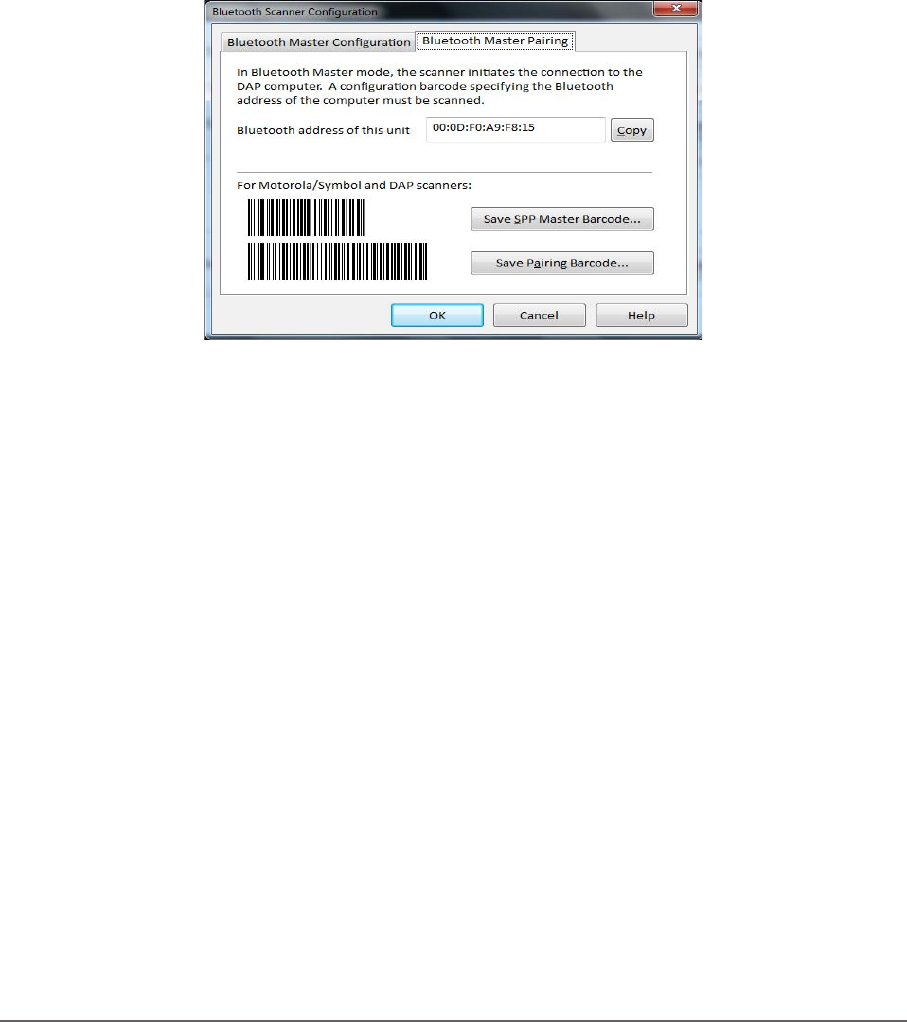
Working With Bluetooth Scanners
Scanner Manager recognizes Bluetooth scanners that are in master mode. This
means that the scanner initiates the connection. In order to do that, it must have
a way to know which unit to connect to.
Scanner manufacturers explain how to proceed to congure and pair their
devices in their documentation. Usually, the user must create a special barcode
based on the Bluetooth MAC address of the computer. Once that barcode has
been generated, it does not change. It can be placed on the M9020, and the
next time any scanner has to be associated with the unit, an operator simply
needs to scan the code and wait the connection to be established automatically.
For DAP and Symbol/Motorola scanners, you can use the Bluetooth Master
Pairing tab in the ScannerManager Bluetooth settings as follows:
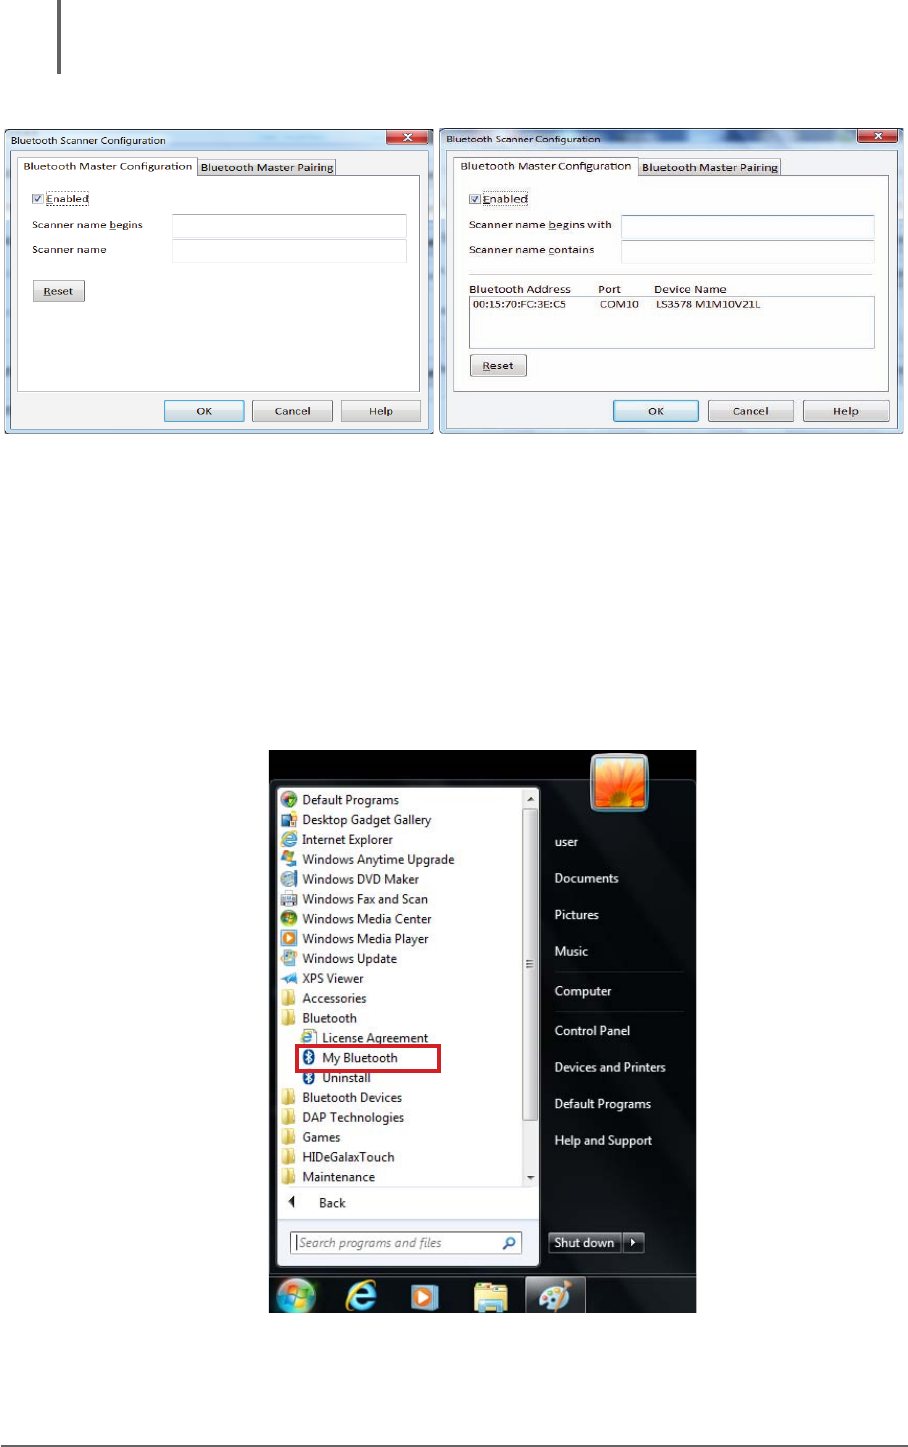
Bluetooth Master Conguration When Using BlueSoleil or the Microsoft BT Stack
The Bluetooth Master Conguration dialog box allows the ltering of which
Bluetooth scanner to accept a connection from. With the default values (empty),
the rst detected device using the Serial Port Prole (SPP) will be selected. In
most cases, this is correct. If you are using more than one SPP devices, change
the values to select, for example, only scanners from a given model.
DAP Technologies 2-41Operating Your Tablet Computer
NOTE: The bottom list on “BlueSoleil Installed” illustration presents all the devices using the
Serial Port Prole, that are currently connected.
BlueSoleil Installed
Microsoft Bluetooth Stack
Bluetooth Master Conguration When Using an Incompatible Bluetooth Stack
In this situation, the Bluetooth Master Conguration page allows selecting the
COM port to use to connect to the scanner. A virtual COM port must be created.
When using Motorola Bluetooth, perform the following, to create a Bluetooth
virtual COM port:
1. Tap Start > All Programs > Bluetooth > My Bluetooth. My Bluetooth
page opens.
2-42 DAP Technologies Operating Your Tablet Computer
2. Tap My Bluetooth. My Bluetooth settings page opens.
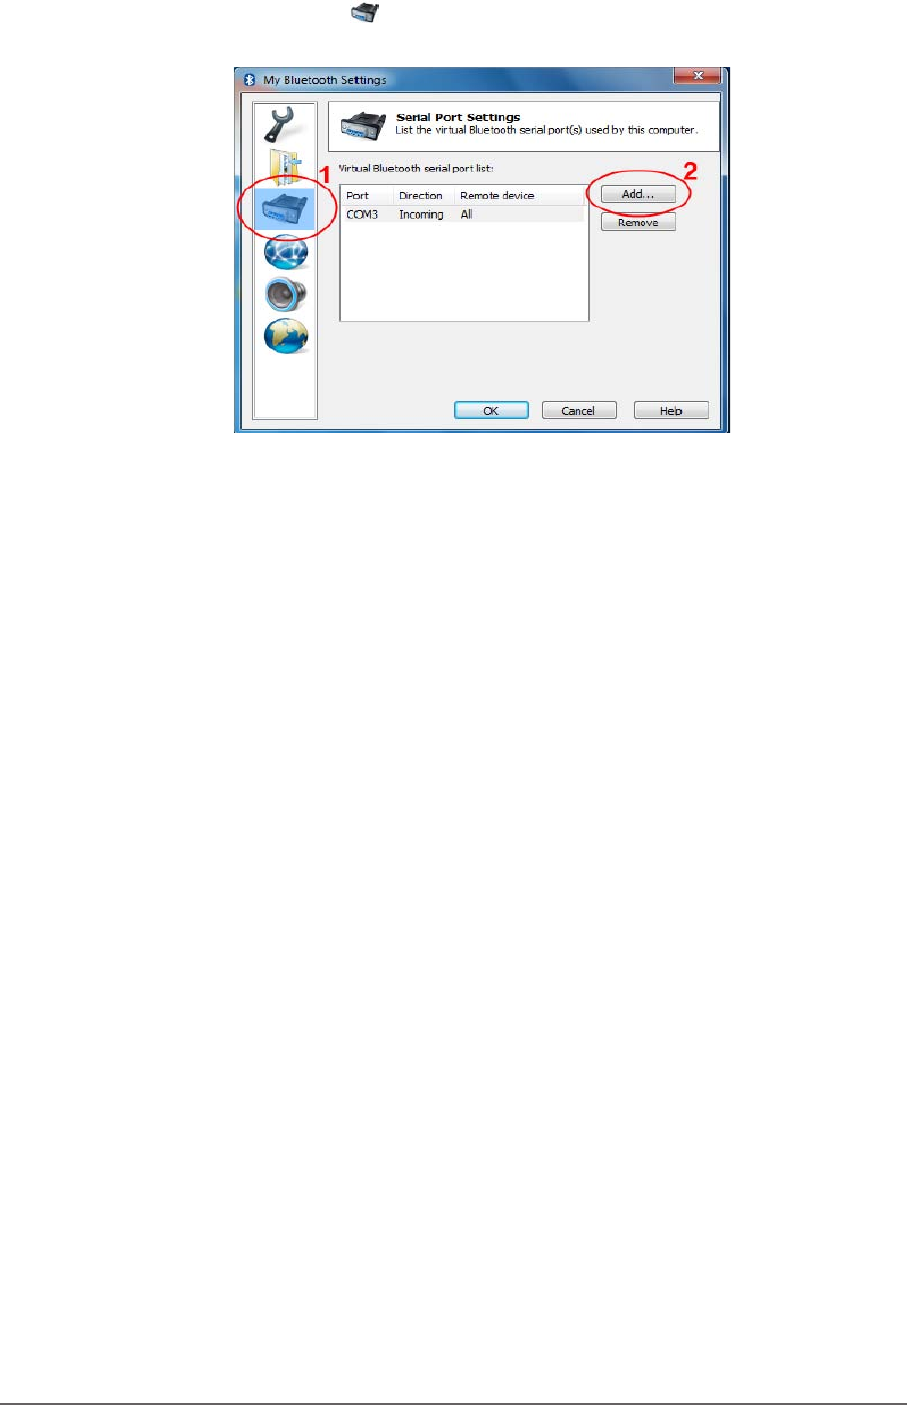
3. Tap on the connector ( ) icon (1). If no virtual COM port is shown, tap
Add button and create a virtual port (2).
Creating a virtual COM port is complete.
4. Return to the ScannerManager Bluetooth Master Conguration to
complete the scanner connection. See “Using ScannerManager” on page
2-37.