JVC KENWOOD K2T001 Card Printer w/Built-in RFID Tag User Manual CX 120U cover p65
JVC KENWOOD Corporation Card Printer w/Built-in RFID Tag CX 120U cover p65
Contents
- 1. Users Manual 1 of 2
- 2. Users Manual 2 of 2
- 3. Startup Guide 1 of 3
- 4. Startup Guide 2 of 3
- 5. Startup Guide 3 of 3
Startup Guide 2 of 3
16
Setup (continued)
Replacement of Card
Replacement of card can be performed when the
READY LED on the control panel, or when the CARD
LED is illuminated.
Replacement of card is also possible when the power
is off.
Replace card carefully to avoid interruptions during
printing and printing errors caused by vibrations while
opening and closing the card cassette.
Replacement of card can be performed during
printing, but we advise it to be done when printing is
not in progress as feeding without cover may result
in jammed cards.
Adjusting Card Thickness
This printer can print cards with thickness between
0.25 mm to 1.00 mm. Default thickness is adjusted to
0.76mm.
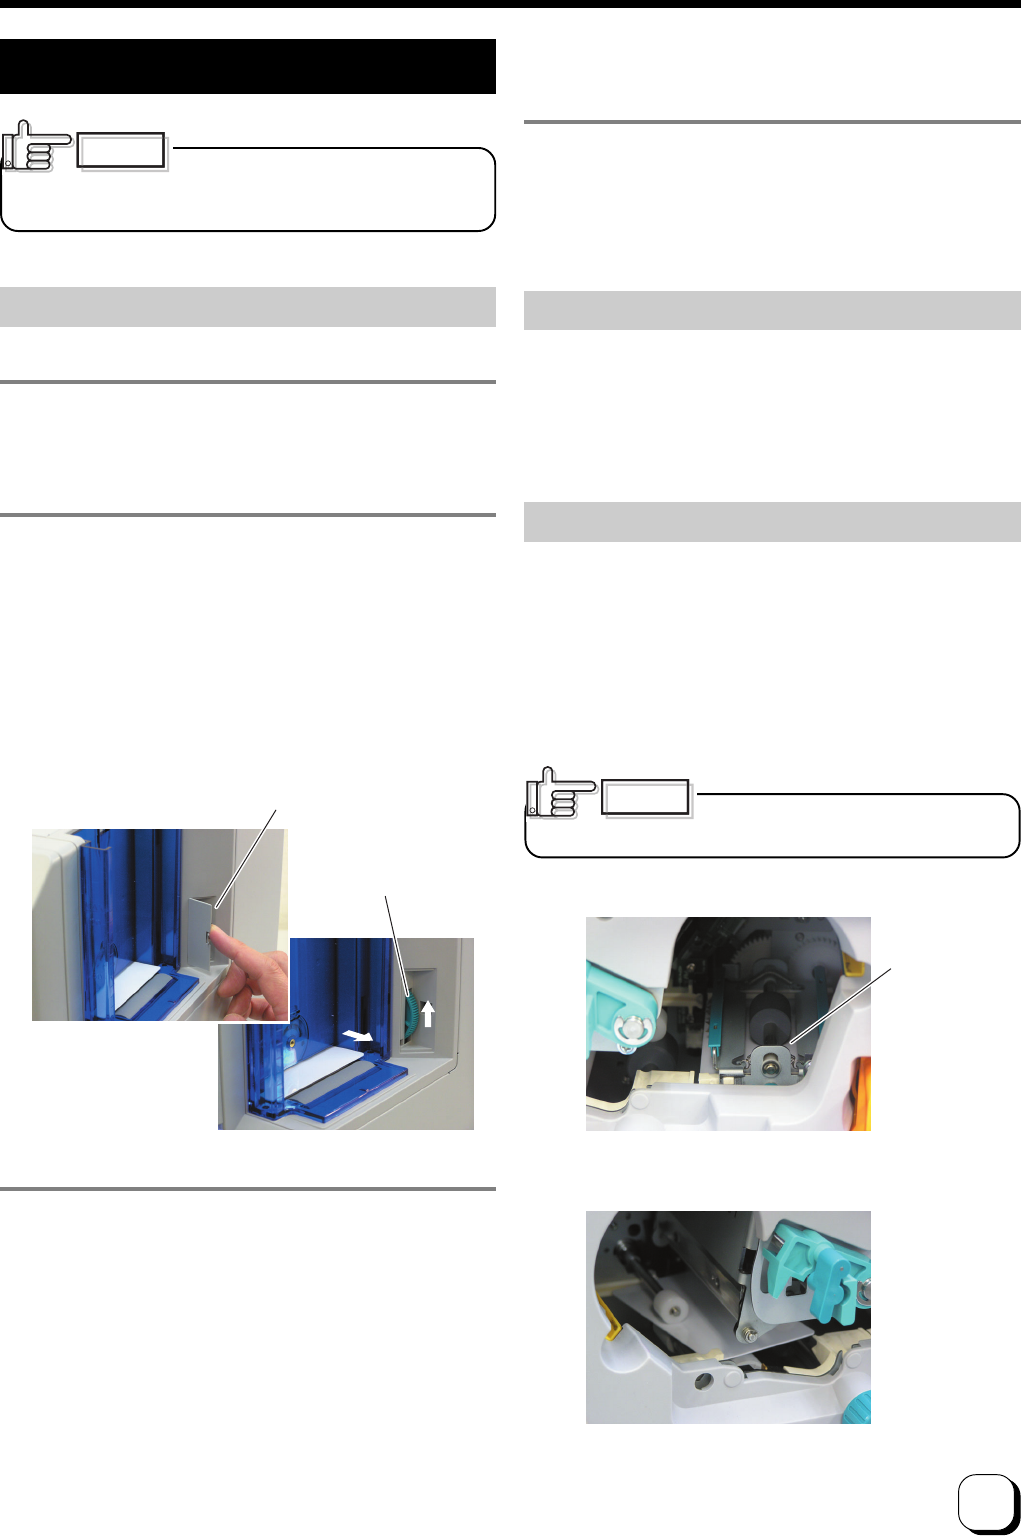
1.
Remove card cassette
Lock the card cassette cover by moving the slider on the
top of the card cassette to LOCK.
Lift the card cassette up by about 1cm and slide to the
right to remove the cassette.
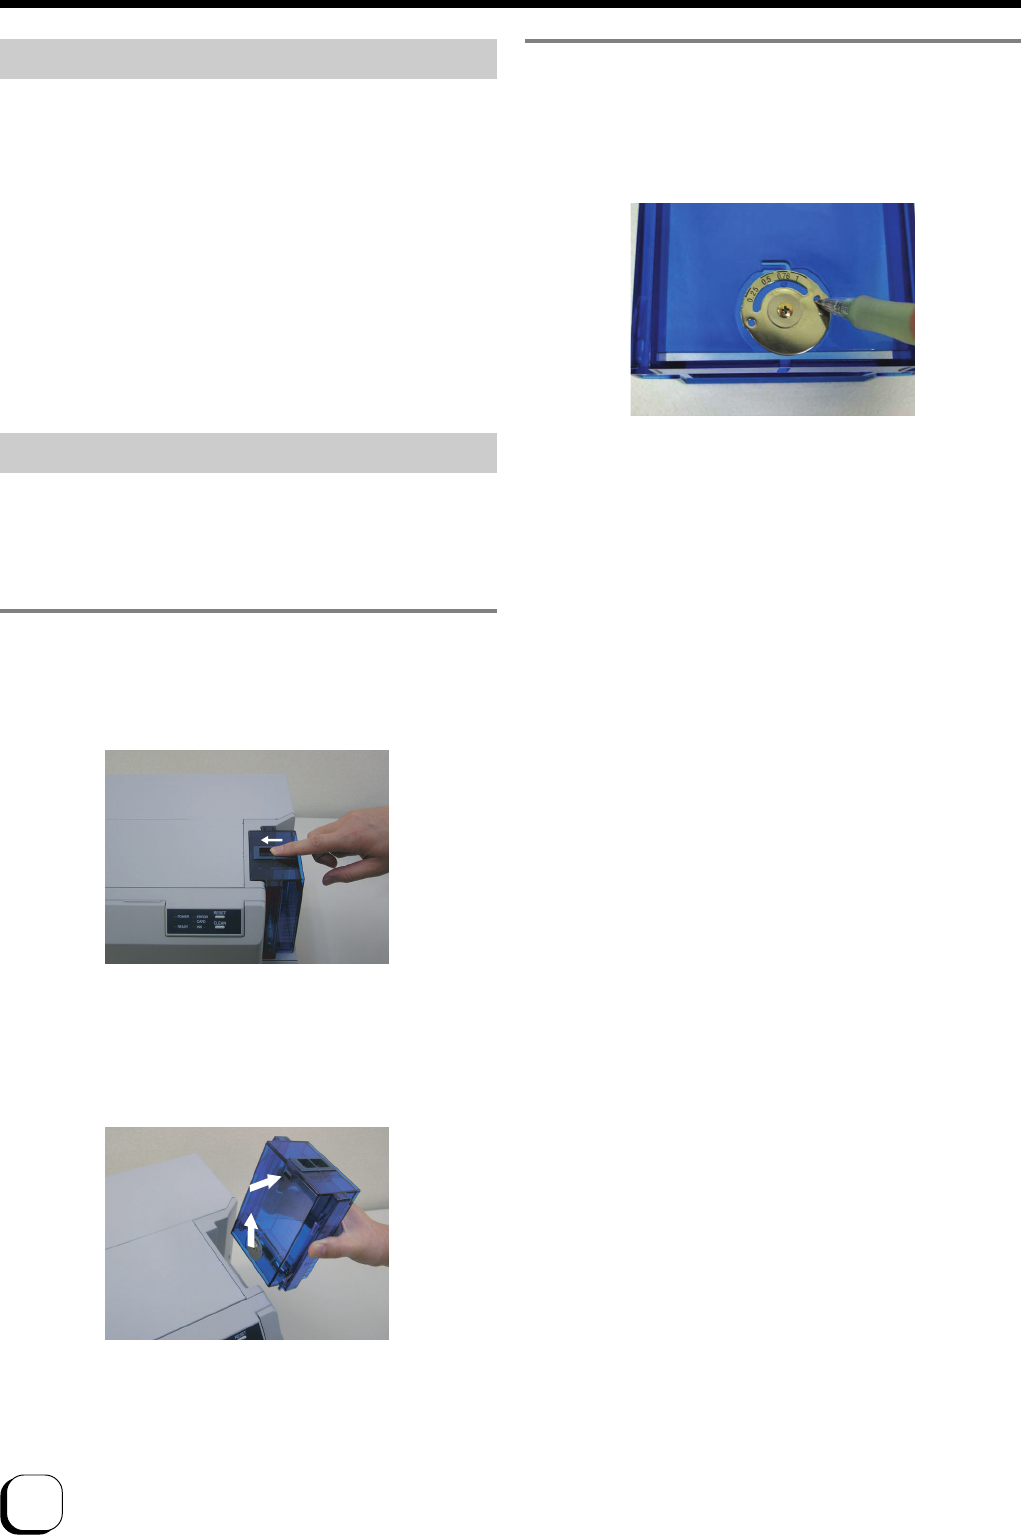
2.
Adjust the gate
Insert the tip of a ball pen into the hole on the card cassette
gate and turn the gate slowly to adjust to the thickness of
your card.
During printing, when the card is not discharged from
the card cassette, adjust the gate adjustment position
clockwise, one scale at a time. If 2 cards are
discharged, adjust the gate adjustment position anti-
clockwise.
When cards of different thickness are used frequently,
it is recommended that you purchase an additional
card cassette based on the thickness of the card.
Refer to Optional Items (see p.35) regarding purchase
of card cassettes.
1
2
17
(to the next page)
Preparing and Connecting the USB Cable
USB cable is not supplied with this printer. Be sure to
use the USB-IF certified Hi-Speed USB cable.
CAUTION
Insert the USB cable all the way in.
1.
Check to ensure that the power of both the printer
and host computer are switched off.
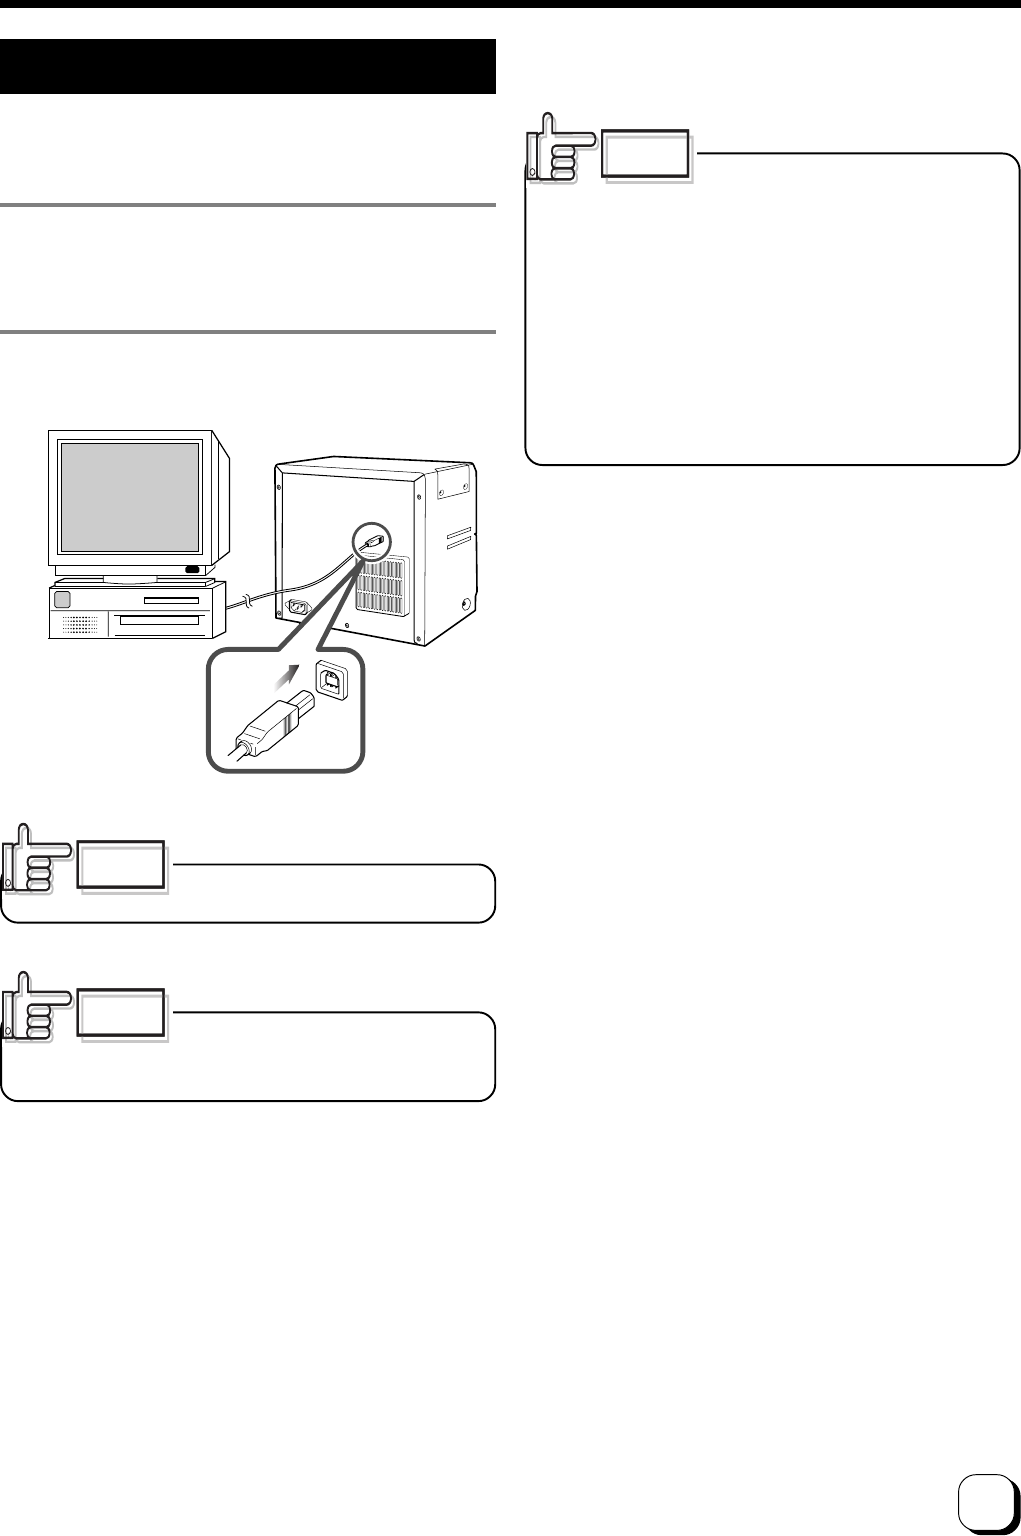
2.
Connect the printer and host computer with the
USB cable.
CAUTION
Consult your dealer on the cable
connection if there are USB or serial cable slots on the
printer’s optional port.
CAUTION
sThe location of terminals varies with the host
computer. Please refer to the instruction manual of
the host computer.
sWhen there are multiple USB cable slots on the host
computer, either one can be used.
sThe USB cable terminal has a front and a rear side.
Insert cable according to the shape of the slot.
sDo not connect to the USB terminal slot on the host
computer’s monitor or keyboard. It may not be
recognized correctly.
sWhen using a USB hub, connect to the hub that is
directly linked to the host computer.
18
CAUTION
Do not switch off the power of the
host computer or use the suspend function on the host
computer during printing.
If the power of the host computer is switched off during
printing, or if the suspend function of the host computer
is activated, cards printed halfway may remain in the
printer. When this occurs, open the printer door and
close it again. Cards remained in the printer will be
ejected from the Rejected card exit.
Installation of Software
About software
The following softwares are required in order to use CX-
120. These are kept in the attached CD-ROM.
1USB Driver
USB driver for Windows. First install into the host
computer that is connected to CX-120. Method of
installation is different between Windows 2000 and
Windows XP. Refer to the respective chapters when
installing.
2CX-120 Status Monitor
Software that carries out various settings and indicates
the status of CX-120. Install into the host computer
that connects to CX-120.
3CX-120 Printer Driver
Install the printer driver from the CD-ROM when using
standard printer drivers. Refer to the electronic file in
the CD-ROM “XXXXX”for method to install. Refer to
the respective guide books on the use of other printer
drivers.
Operation Environment
Software in the attached CD-ROM operates in the
following environment.
sWindows XP Professional and Home Edition
sWindows 2000 Professional
Connecting to the Host Computer
19
(to the next page)
Installation of USB Driver - WindowsXP
1.
Start Windows and install attached CD-ROM into
host computer.
2.
Check that the connection between host
computer and printer is on.
3.
Switch on the printer.
Search wizard for new hardware begins.
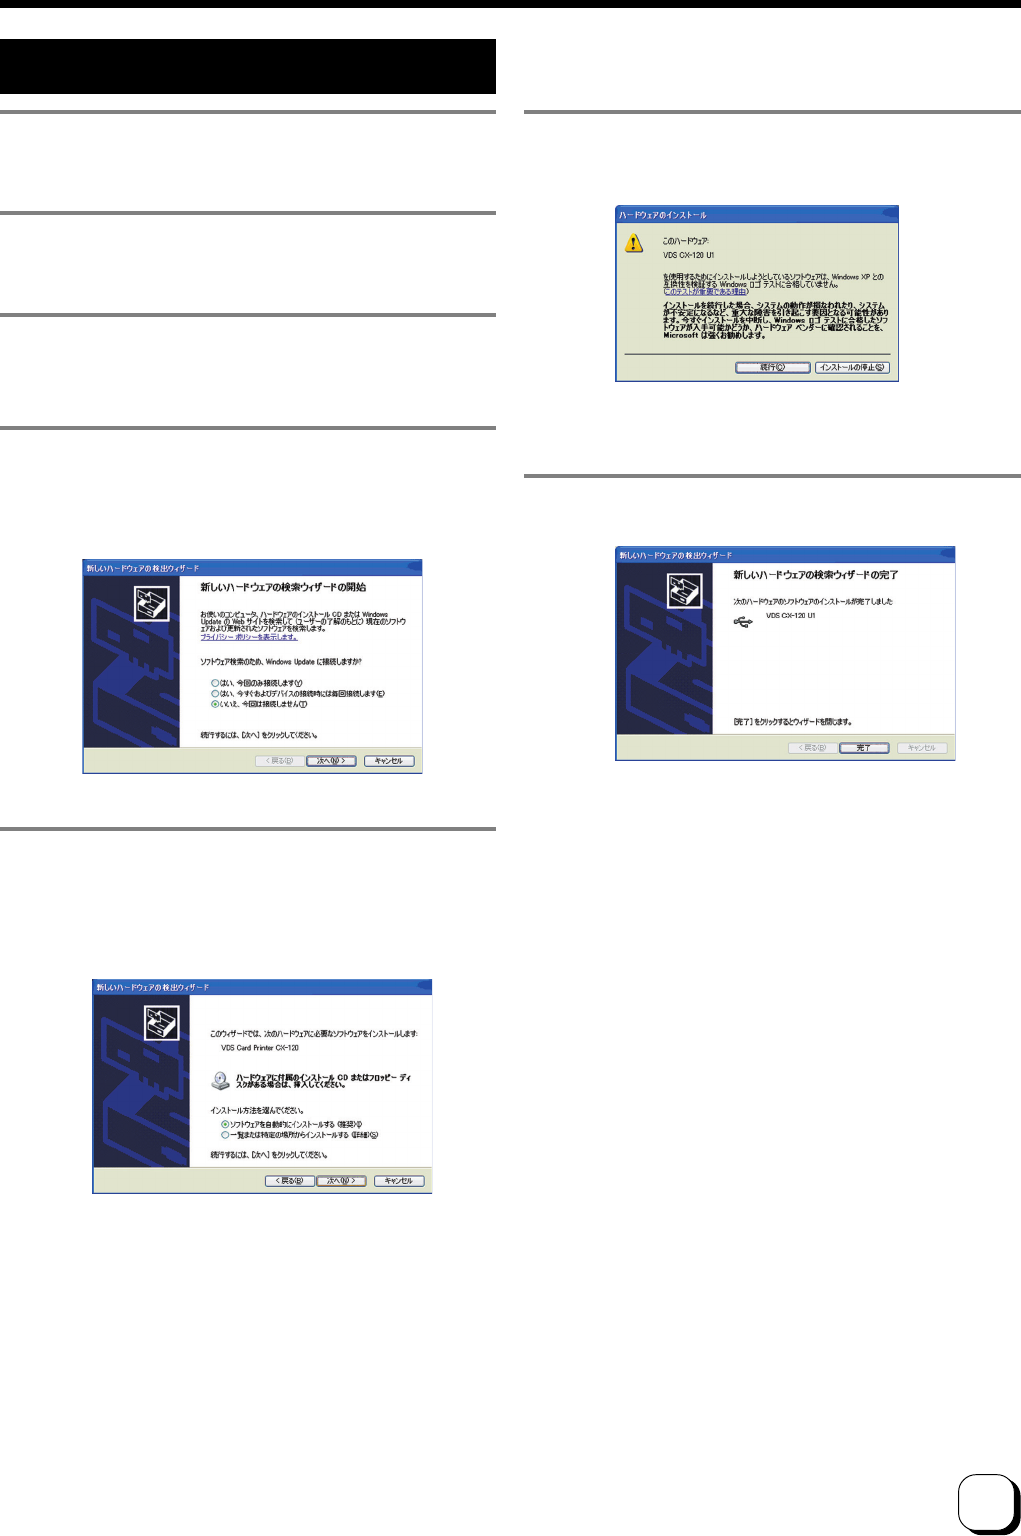
4.
When the following screen appears,
1Select “No, I do not wish to connect this time” and
2 click on the “next” button
6.
When the following screen appears, click on the
“continue” button.
5.
When the following screen appears,
1Select “Automatic installation of Software (recommended)”
and
2 click on the “next” button
7.
Open the card tray.
Installation of USB driver begins.
Installation of USB driver is now complete.
20
Installation of USB Driver - Windows2000
1.
Start Windows and install attached CD-ROM into
host computer.
2.
Check that the connection between host
computer and card printer is on.
3.
Switch on the printer. Search wizard for new
hardware begins.
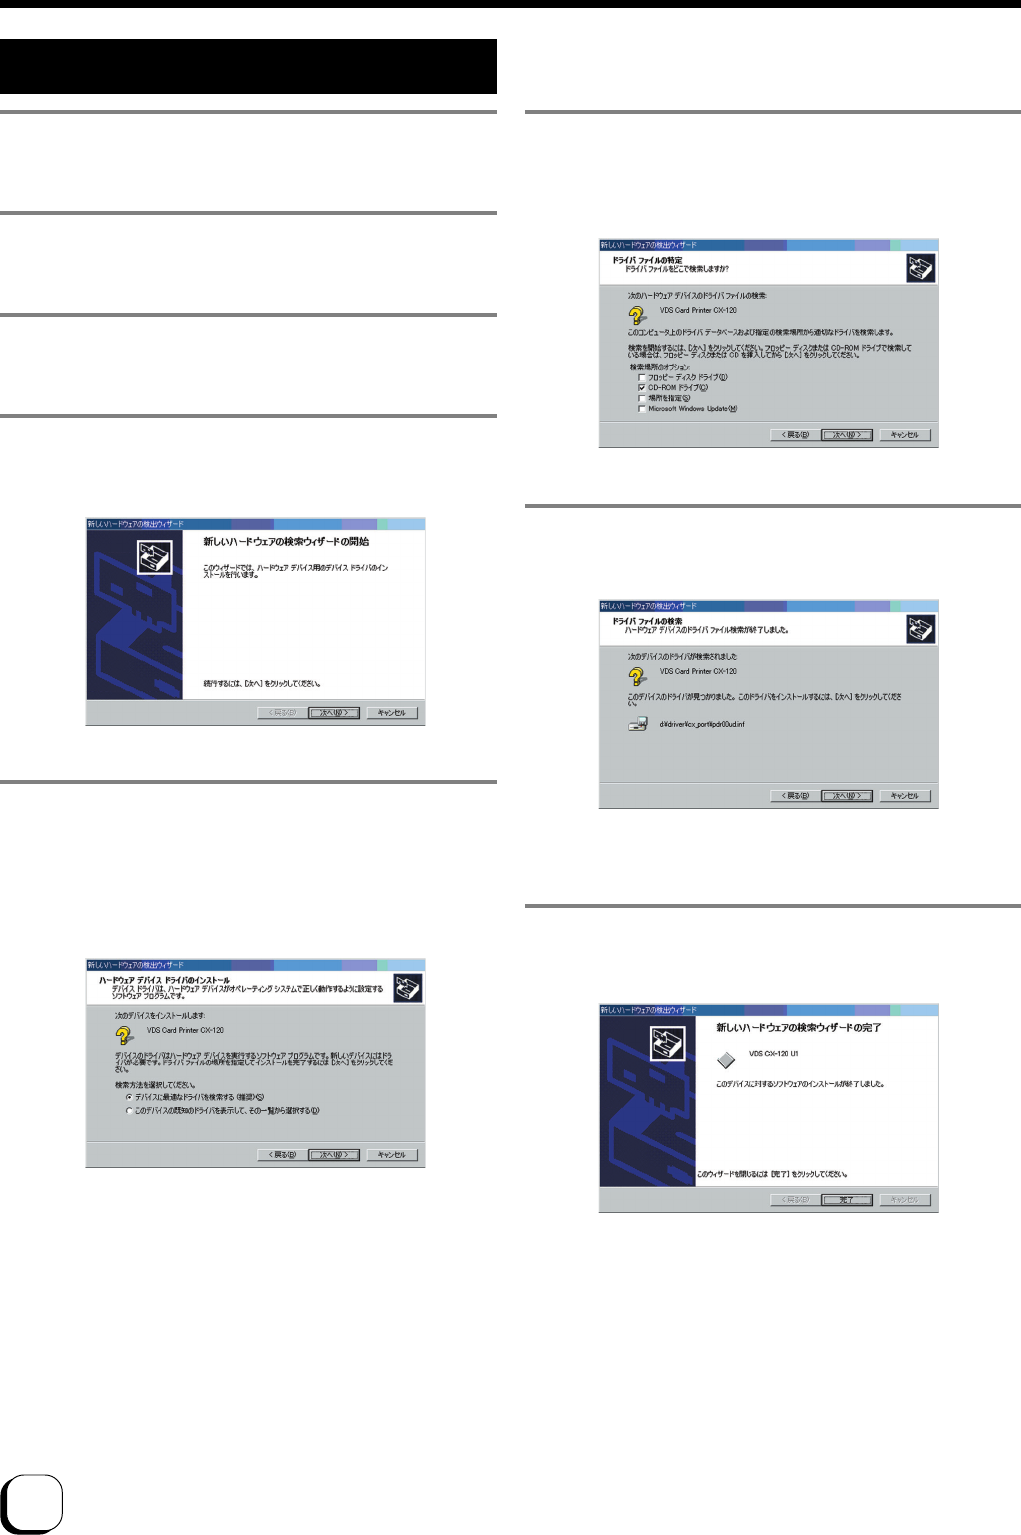
4.
When the following screen appears, click on the
“next” button.
6.
When the following screen appears,
1Select “CD-ROM Drive” and
2click on the “next” button
5.
When the following screen appears,
1Select “Search for the most suitable driver for the device
(recommended)” and
2 click on the “next” button
7.
When the following screen appears, click on the
“next” button
Installation of USB driver begins.
8.
When the following screen appears, click on the
“Finish” button.
Installation of USB driver is now complete.
Installation of Software (continued)
21
(to the next page)
Installation of Status Monitor
1.
Start Windows and place the “CX-120 Card
Printer CD-ROM” into the computer.
2.
Double-click “XXXXXXX” on the CD-ROM to
launch the status monitor installer.
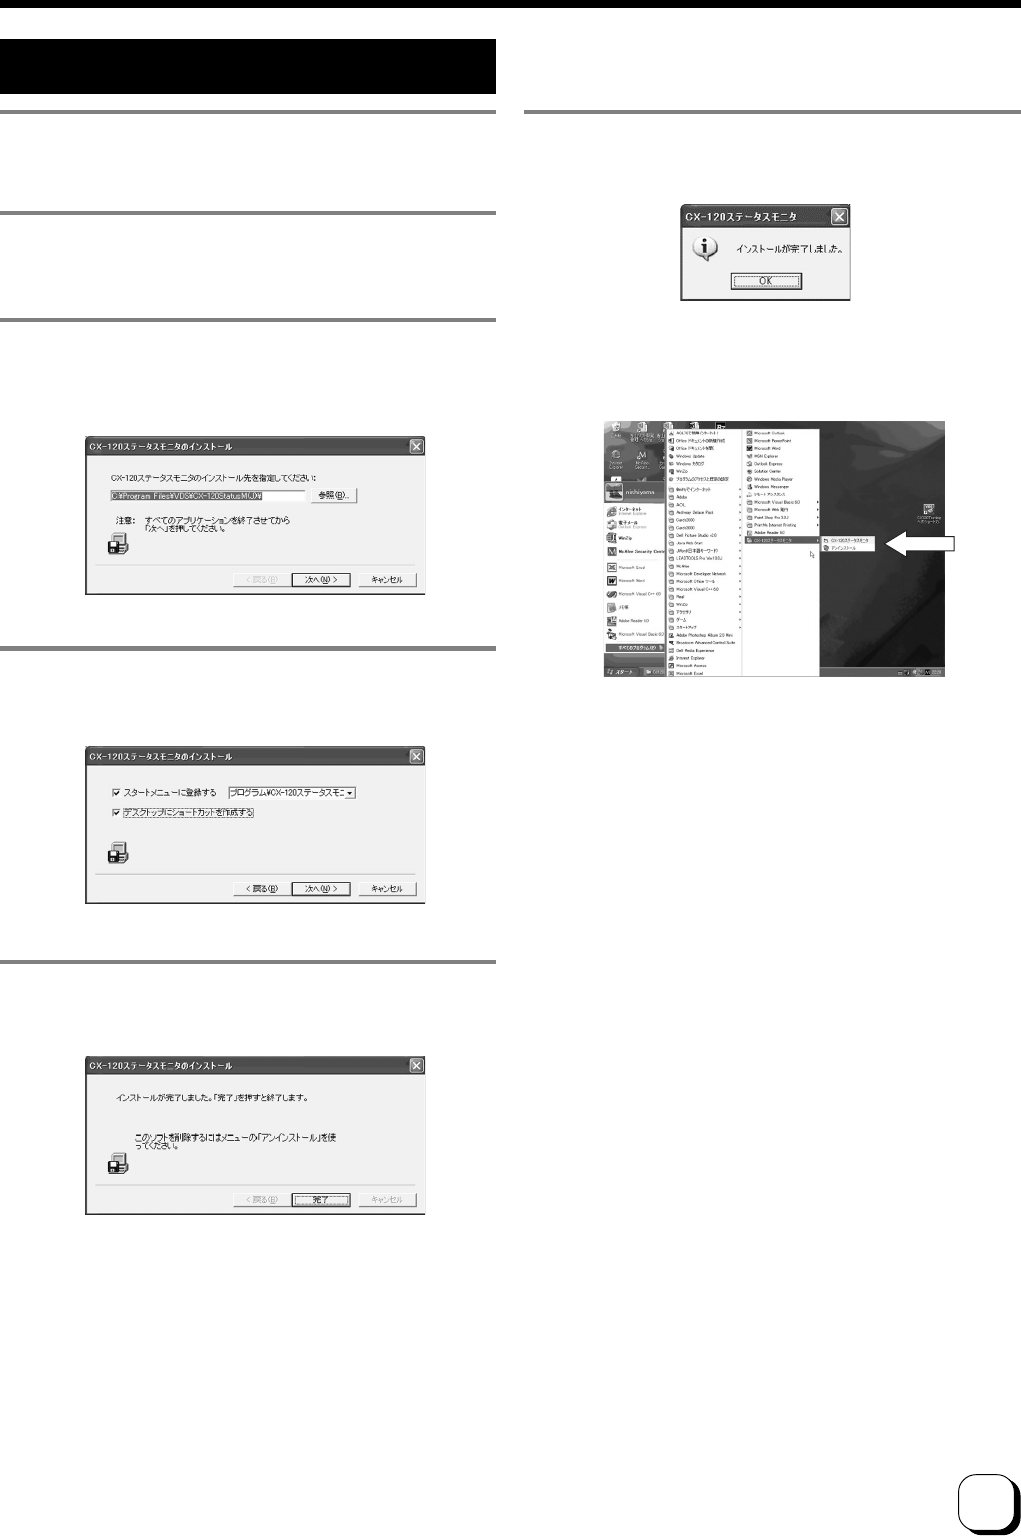
3.
An Installer screen will be displayed. Confirm the
directory for installation and click on the “Next”
button.
6.
Click the “OK” button. Installation is now
complete.
5.
5. A confirmation screen will be displayed
upon completion. Click on the “Finish” button.
Once installation is completed, the Status Monitor can be
launched from the Start menu.
4.
Confirm setting and click on the “Next” button.
Installation begins.
22
Checking Connection with the Host Computer
Check the printer and software operation after installing the USB driver and status monitor.
1.
Check to ensure that the printer is connected to
the host computer.
2.
Switch on the power for the printer and host
computer.
3.
Start up the status monitor once the host
computer is booted up.
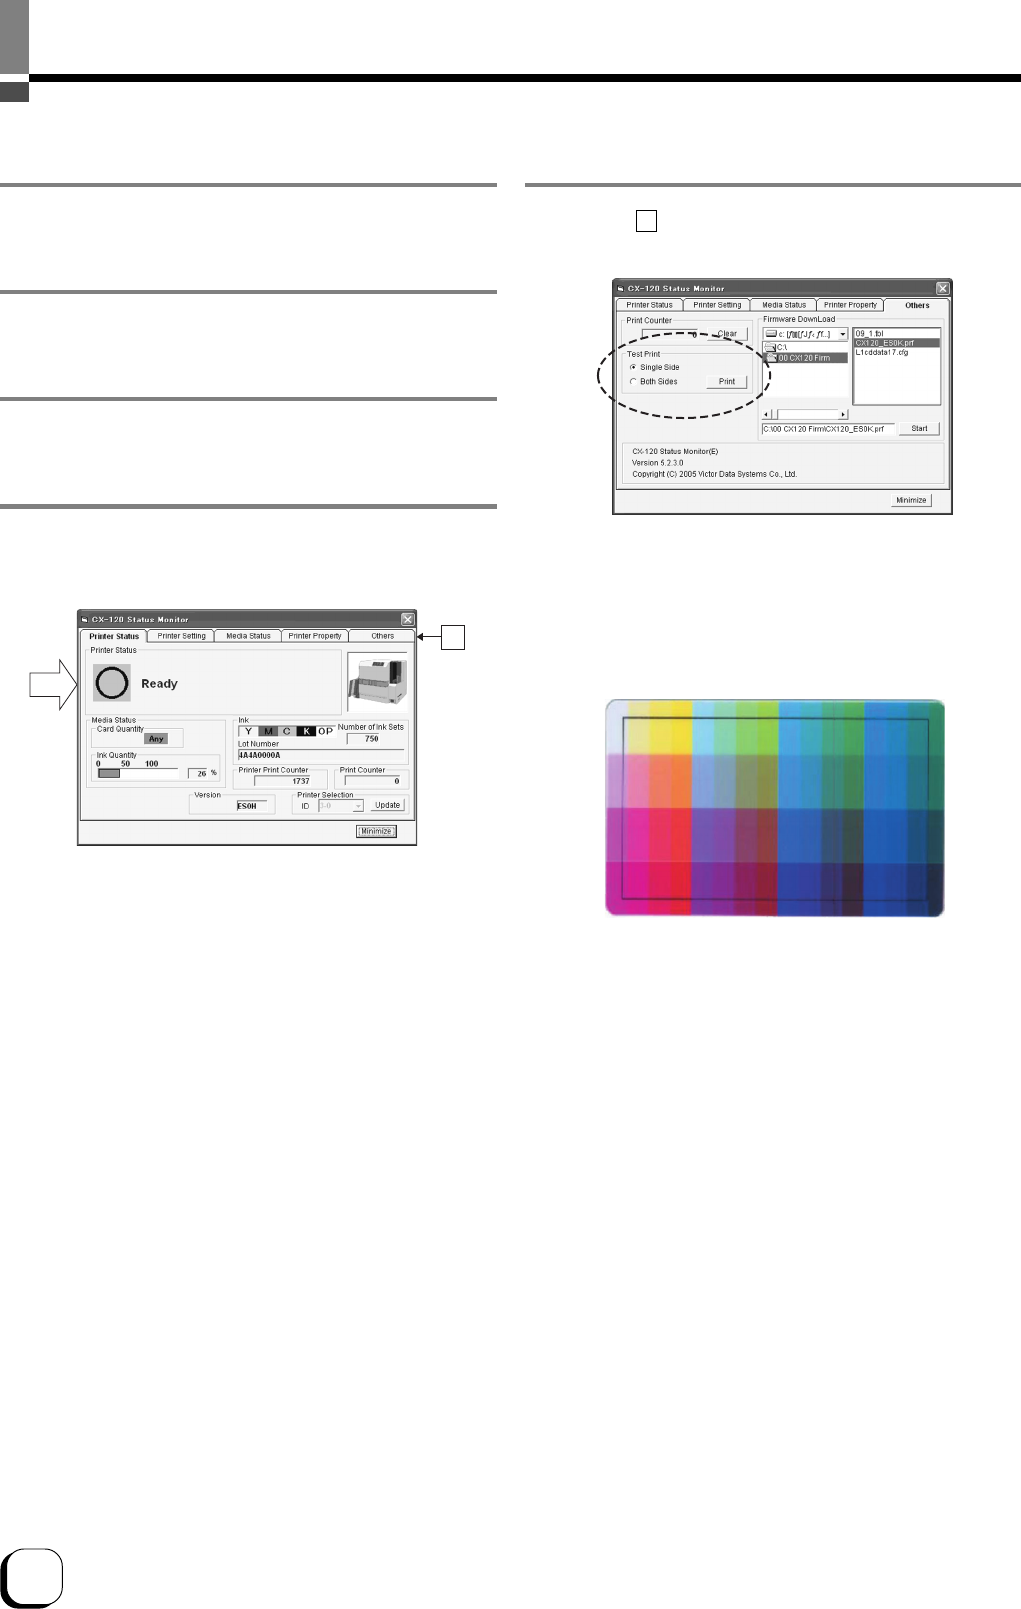
4.
Check that the printer is ready from the printer
status display (Diagram A) on the status monitor.
5.
Press B to display other screens and carry out
test printing.
1Check the connection between the printer and host
computer when the “Printer is not connected”
message is displayed.
2If “Initializing mechanism” is displayed, wait till the
“Ready” message appears.
3Display of other messages indicates an abnormal
status. Refer to “Cause and Action for Error Code” on
page 28 of this manual.
Status Display Screen
Other Screens
1Select “2-sided” for test printing and click on the enter
button.
2Print a card with the picture below on both sides.
Operation check for the printer and installed software is
now complete. For actual printing of cards, refer to the
manual of the card issuance software or printer driver in
use.
B
A

23
How to read the electronic manual
An instruction manual (electronic manual) is included in the attached CD-ROM. To view
the manual, you need to install Adobe Reader (Ver6.0 and above) on the host computer.
Adobe Reader can be downloaded free-of-charge from Adobe’s website.
You can either open the instruction manual directly from the CD-ROM or copy it to the
hard disc of the host computer.
Content of the Instruction Manual (electronic manual)
•Printer operation and display
Names of each part on the control panel
Button operation
LED display
Printer initialization
Running of test print
•Differences between printing modes
•How to use the status monitor (printer setting tool)
•Updating and uninstalling software
•Troubleshooting (detailed version)
Layout of internal mechanism
Error code list
When ink ribbon is torn
Problems related to printing
Misalignment of printing position
Problems related to color printing
Dirt
Uneven color, alignment
Color shift (color bleeding)
Decolorization
Problems related to text printing
Blurred / crushed
Problems related to protective layer (OP)
Actions to take when startup fails
•Version upgrade
•Specifications
Main specifications
Dimensional outline drawing
24
Maintenance
Ensure that maintenance is carried out when power switch of the printer is off.
(Clean the card transport roller and magnetic head when power is ON.)
To keep this unit in its best condition at all times, be sure to check each part before use and clean it
whenever there is any dirt or dust.
In particular, dirt and dust on the thermal head, roller parts and cleaning roller will result in uneven print
density or color shift.
Cleaning the Cleaning Roller
The cleaning roller is used to remove dust and dirt
adhered to the card. It is recommended that you clean it
after every use if you use it daily. In addition, it may be
difficult to clean in some cases due to the large amount
of dust and dirt depending on cards. In this case, clean
them after every 100 ~ 200 pieces.
Do not clean when printer is running.
1.
Place your fingers on top of the printer and
open it towards you.
Open slowly while supporting with your hands
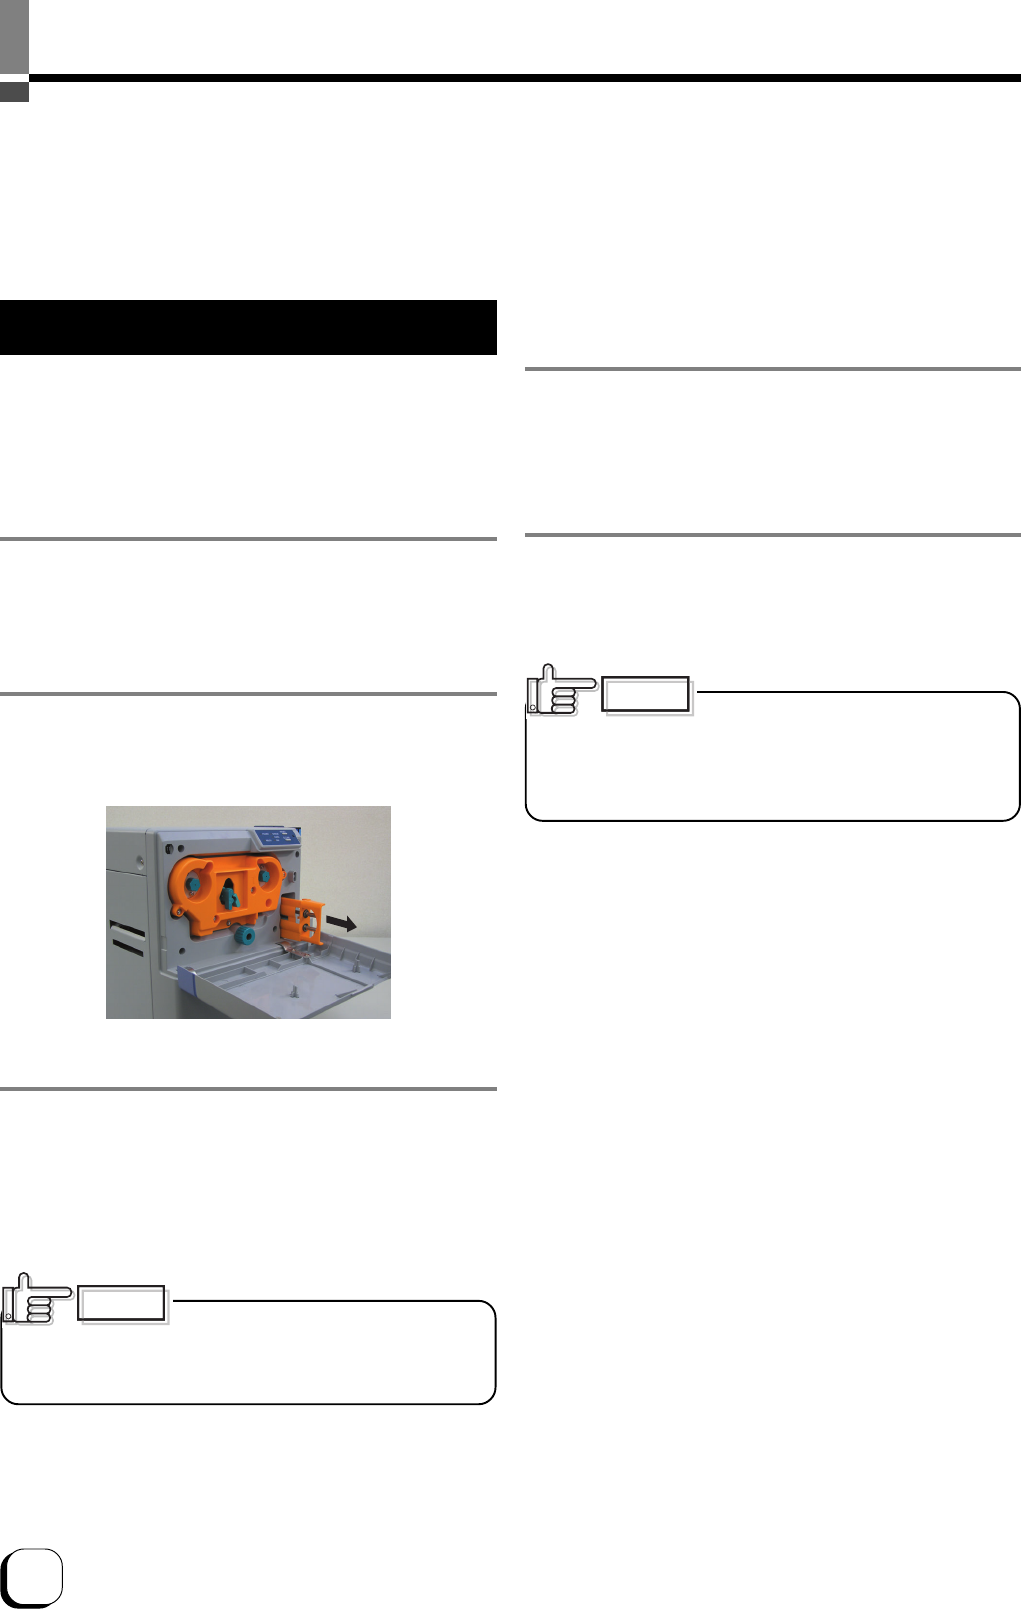
2.
Remove the cleaning unit.
Pull it open as shown in picture below.
Moisture remaining in the gap
between rollers or behind a roller may result in printing
errors. Do not set up the cleaning unit after washing
until it is fully dry.
CAUTION
The decline in cleaning unit’s
removal capability may result in defects in the printed
card. In such a case, replace the cleaning unit with a
new one.
(Estimated interval for exchange is about 1 year)
CAUTION
5.
Close the printer door.
4.
Set the cleaning unit to the printer.
With the roller on the right side, push it all the way in.
3.
Wash the roller of cleaning unit with water.
Remove dirt on the roller surface with your fingers while
pouring water on the roller. Allow it to dry naturally after
washing.
25
(to the next page)
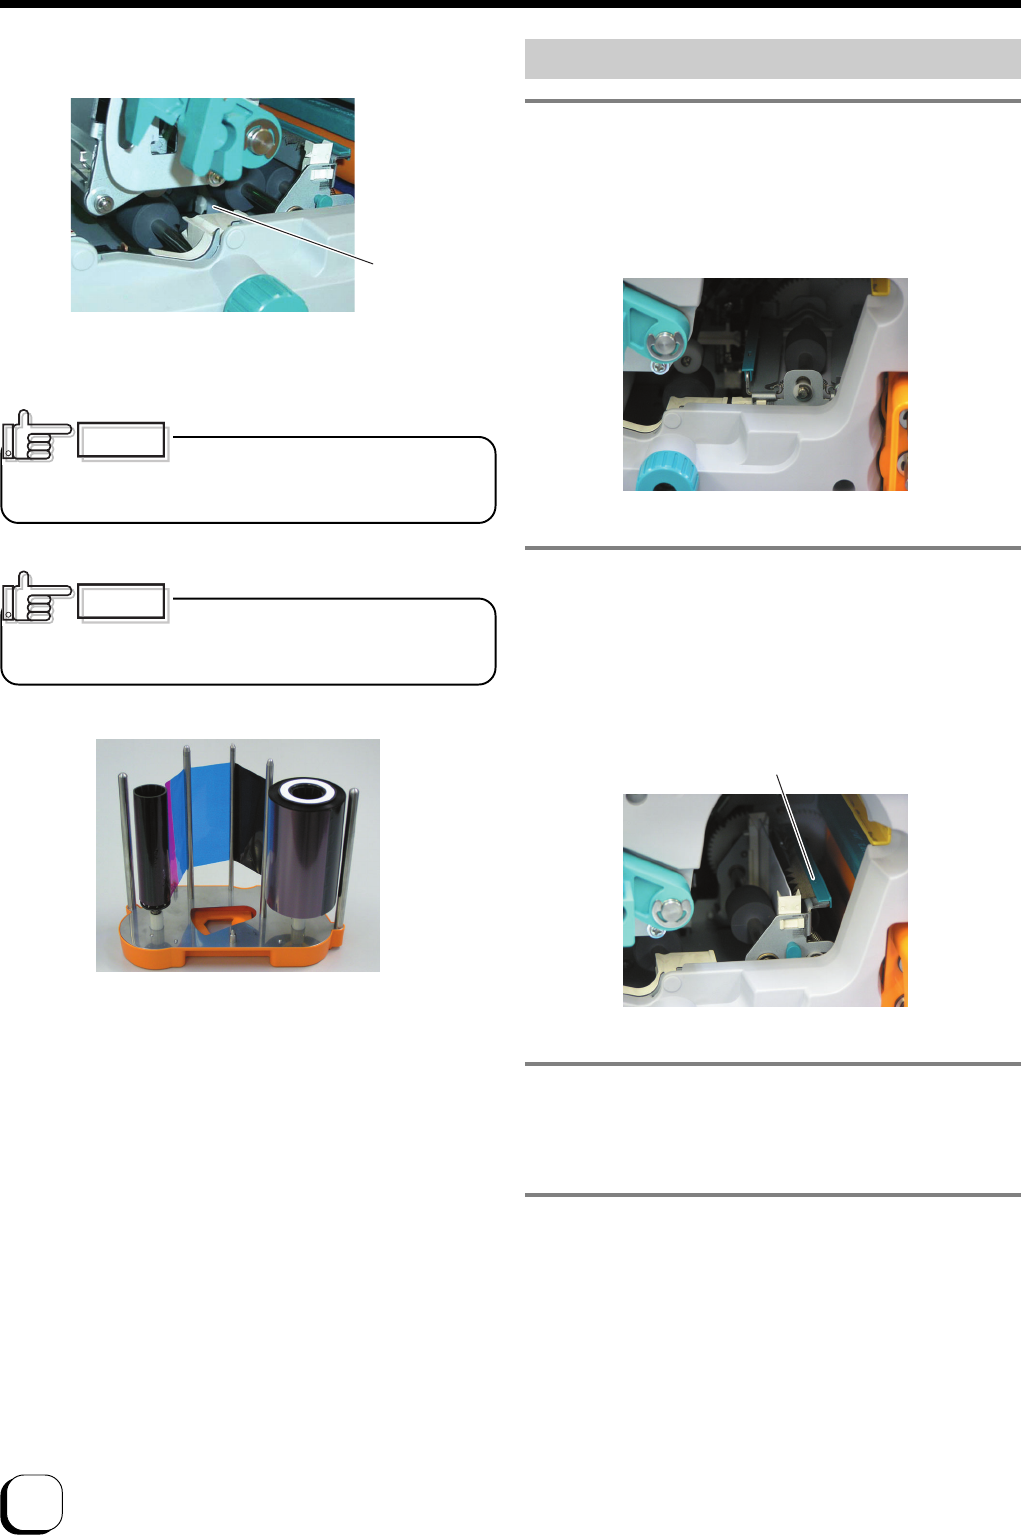
3.
Insert ink ribbon cassette and close the printer
door. Refer to pages 13 to 14 of this manual.
2.
Dip the cotton swab (sold separately) with
alcohol (sold separately) and wipe the thermal
head.
Wipe the part indicated as carefully in a horizontal
direction.
1.
Open printer door and remove the ink ribbon
cassette. Refer to page 12 of this manual.
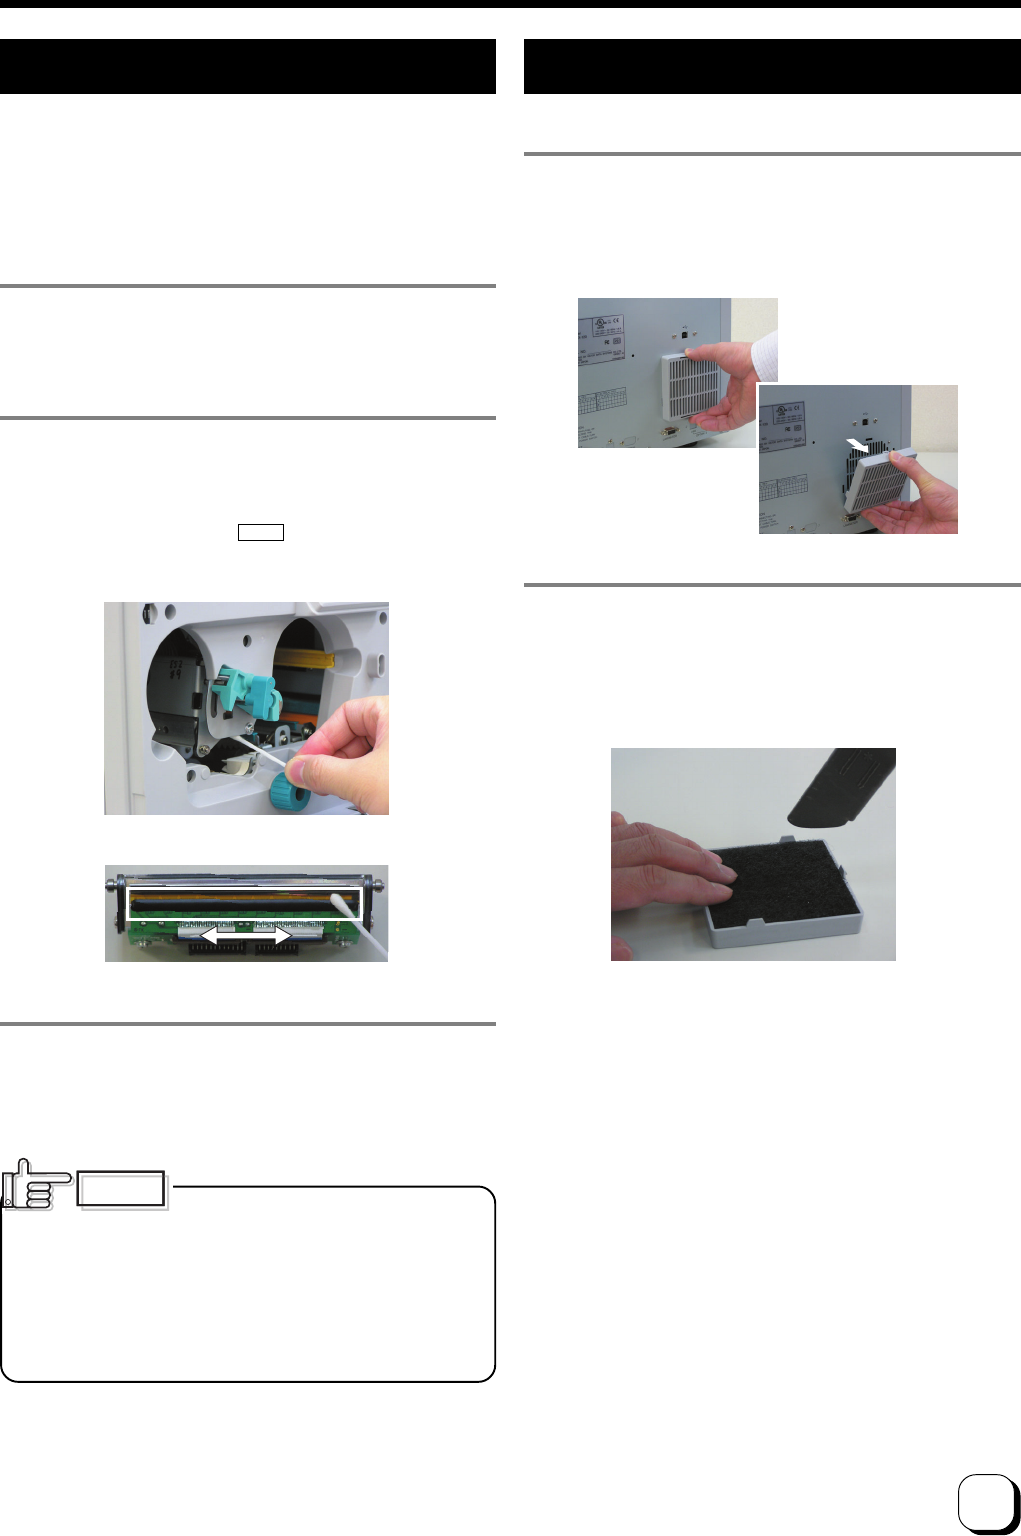
2.
Clean the filter
Remove dirt attached to the filter with a vacuum
cleaner. While cleaning, press down the filter to
prevent it from being sucked into the vacuum cleaner.
1.
Remove the filter cover
Hold the upper and lower ends of the filter cover and
pull one of these ends forward to remove the filter
cover.
• The thermal head may be damaged upon contact with
human bodies that carry static electricity.
Be sure to touch the printer’s frame (metal portion)
before cleaning.
• Soak with absolute ethanol when cleaning. Be careful
not to damage the thermal head by knocking against
hard objects such as metal when cleaning.
WARNING
Cleaning the Thermal Head
Defects will occur such as lines appearing on the printed
card if the thermal head is dirty. We recommend cleaning
to be carried out after every 10,000 screen pages. The
thermal head is a consumable item and has a limited life
span.
Cleaning the Fan Filter
26
2.
Close printer door and switch on power of the
printer.
The unit will initialize and the INK LED will start blinking.
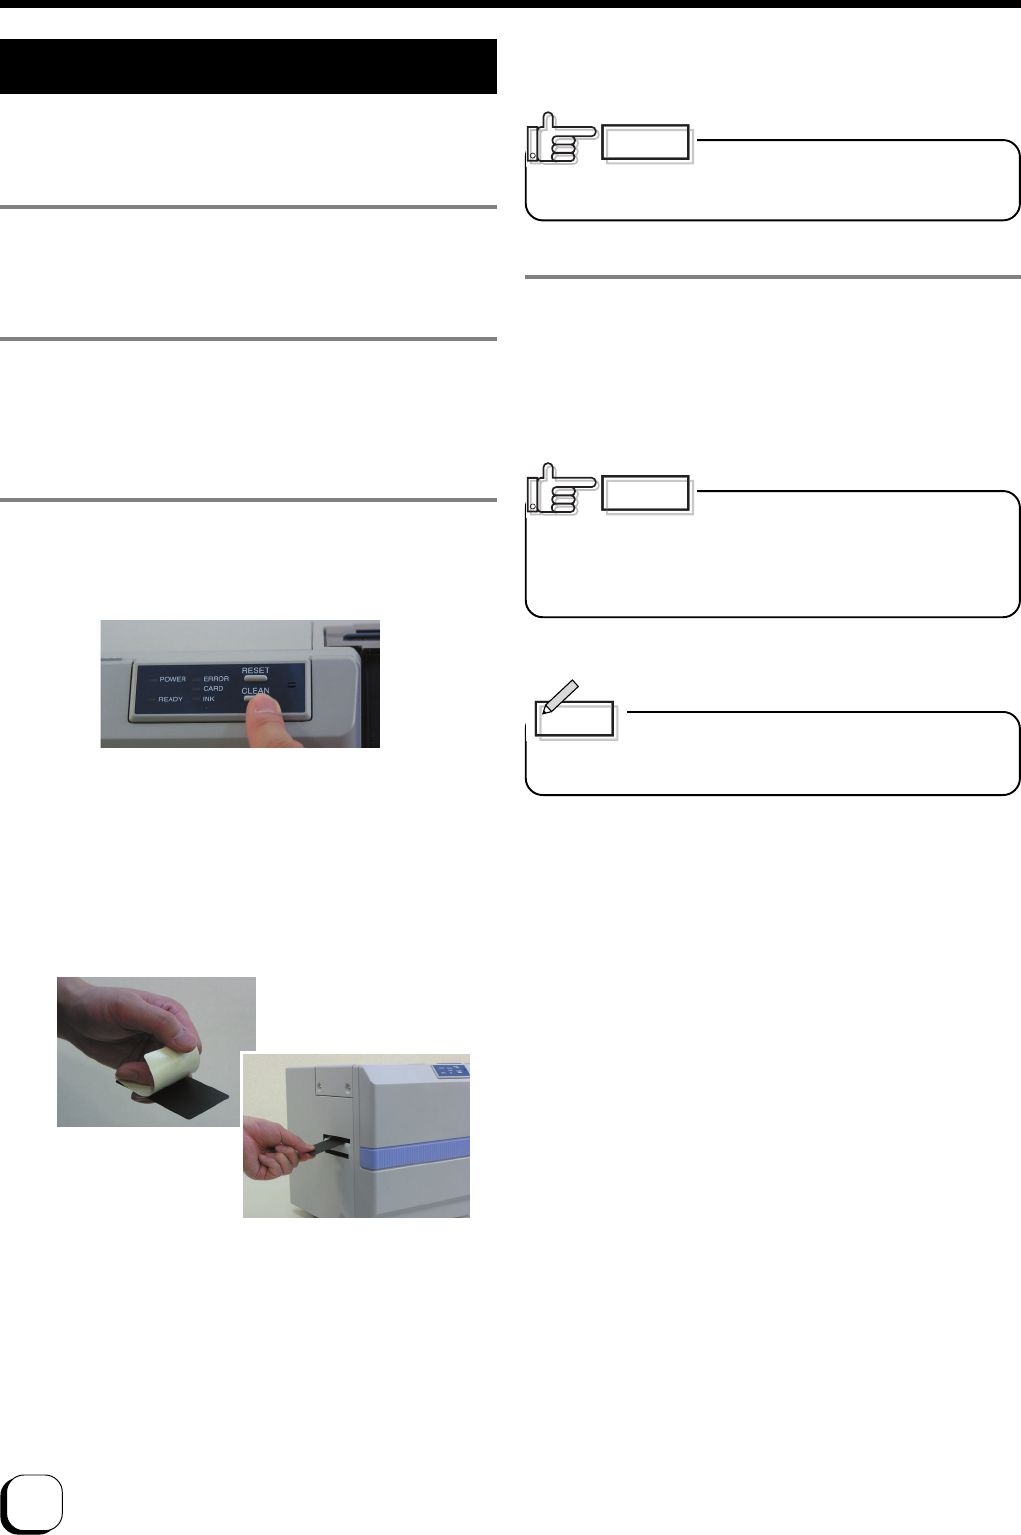
3.
Start cleaning
Press the CLEAN button on the control panel for more
than 1 second.
Roller of the card exit will rotate for about 20 seconds
before cards can be drawn in.
Peel off the separator on the cleaning card supplied and
insert card into the card exit.
Roller will draw the card in and cleaning will be performed
automatically.
4.
Switch off the power after cleaning card is being
ejected.
Wait for 10 seconds if you wish to switch on the power
again.
Each cleaning card can only be used
once. Using a dirty card over and over again will dirty
the roller and result in breakdown.
Consult your dealer for any queries regarding the
cleaning card.
CAUTION
Roller at the card exit will stop if the cleaning card is not
inserted within about 20 seconds.
In this case, press the CLEAN button again for over 1
second to start cleaning and roller will rotate for about 20
seconds before cards can be drawn in.
The cleaning card cannot be inserted
through the Rejected Card exit on the right.
CAUTION
1.
1. Open printer door and remove the ink ribbon
cassette. Refer to page 12 of this manual.
Cleaning the Card Transport Roller
In most cases, card jams are caused by dirty rollers. It is
recommended that you clean it after every 1,000 pieces.
If the laminator unit is connected, cleaning
can be done together by inserting the
cleaning card into the card exit of the laminator unit.
Memo
Maintenance (continued)
27
2.
Close printer door and switch on the power.
Proceed to the next procedure when the READY LED
lights up.
3.
Removing card cassette
Refer to Page 16 of this manual. When CARD LED is lit,
proceed to the next step.
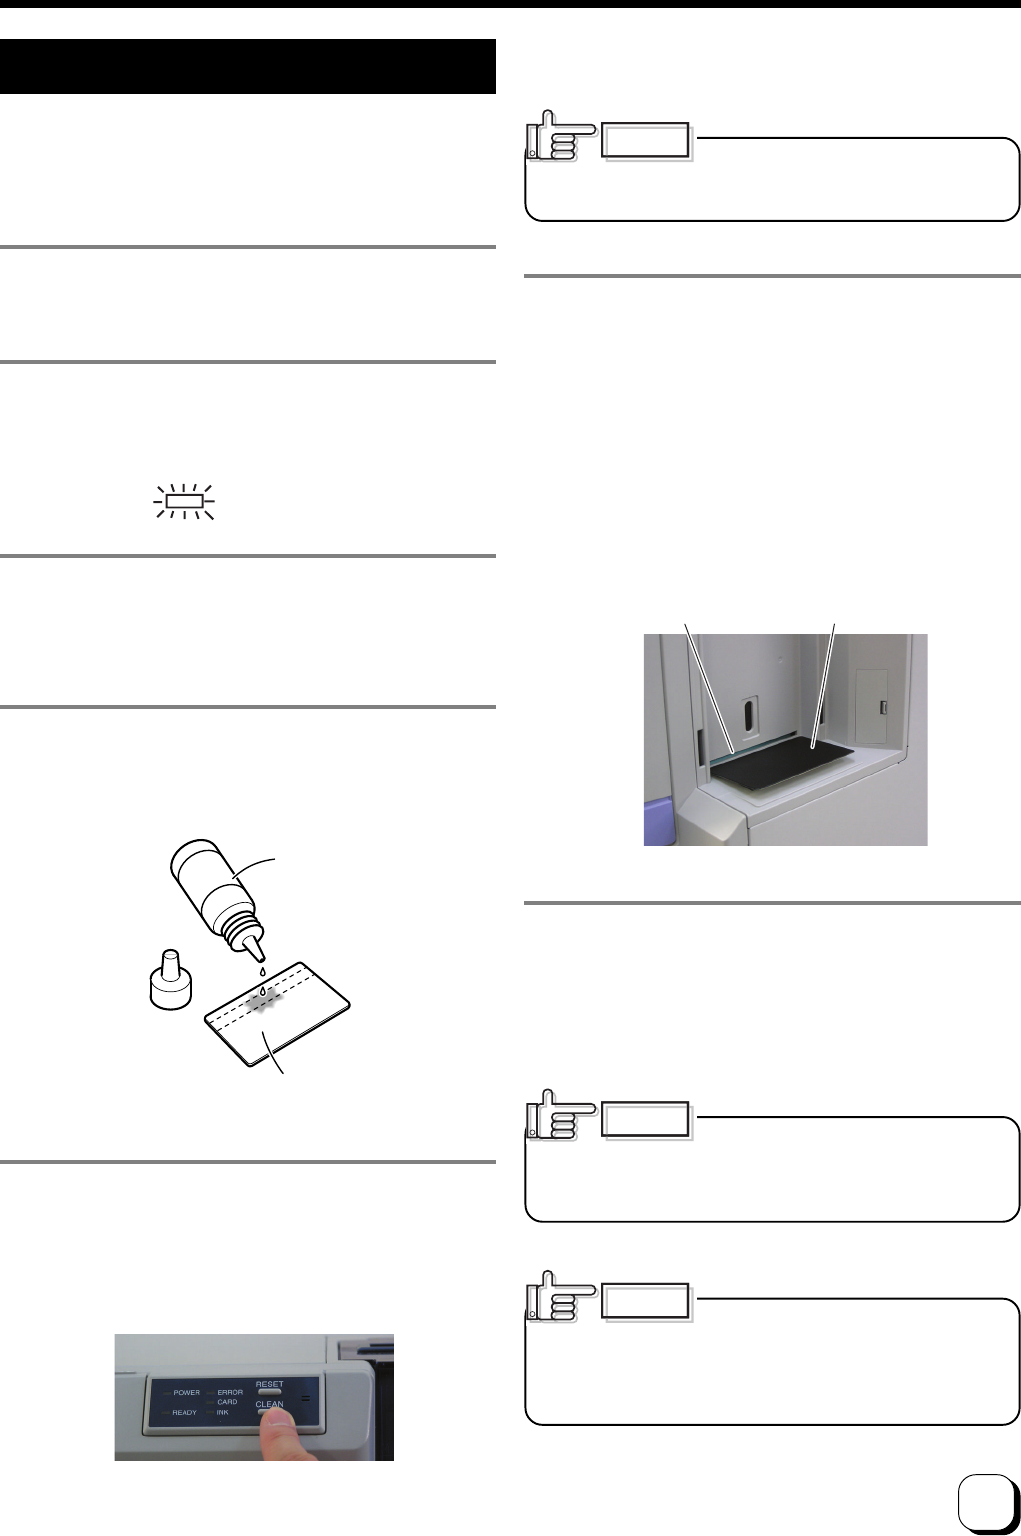
4.
Apply alcohol on the magnetic head cleaning
card
Apply 3~4 drops of alcohol to where the magnetic stripe
is located.
When cleaning the magnetic head,
do not use the black adhesive card used for cleaning
the roller. The adhesive card may stick to the head and
cause the printer to malfunction.
CAUTION
6.
Set the cleaning card into card-loading slot as
shown in the picture below.
Be careful not to set in the wrong direction.
Cleaning card will be fed and cleaning will start
automatically.
Push gently with your fingers if the card is not drawn in.
The card feed roller will stop moving if the cleaning card
is not inserted within about 10 seconds.
In this case, press the CLEAN button again for 1 second
or longer to start cleaning. The roller will rotate for about
10 seconds before the card can be drawn in.
7.
Switch off the power after cleaning card is ejected
from the Rejected Card exit.
Wait for about 10 seconds if you wish to switch on the
power again.
1.
Set aside an ink ribbon cassette. Refer to pages
12 and 13 of this manual.
Cleaning Card
(optional)
Alcohol
(optional)
Cleaning the Magnetic Head
IDirty magnetic heads will result in writing / reading error. It
is recommended that cleaning be performed after every
1,000 cards.
This is not required if you do not use magnetic stripe cards.
5.
Start cleaning
Press the CLEAN button on the control panel for 1 second
or longer.
The paper feed roller will rotate and the cleaning card is
ready to be fed.
Light on
Cleaning cannot begin if the
magnetic head cleaning card is first placed at the card-
loading slot.
CAUTION
Change the magnetic head cleaning
card when it is dirty. Using dirty cards may dirty the
head and cause malfunctions.
Consult your dealer for any queries regarding the
alcohol and cleaning card.
CAUTION
Card-loading slot Cleaning card
28
Troubleshooting (Simplified Version)
Procedures for dealing with problems related to print quality and various problems not mentioned in this
manual are described in the instruction manual recorded in the CD-ROM (electronic manual). Please read
through the manual before making inquiries.
When removing jammed cards, do not insert any metallic items such as tweezers into the into the
printer body while the power is on. Doing so may cause it to breakdown.
CAUTION
There is a protruding part inside the printer body. Wear items such as hand gloves before inserting
your hand during maintenance and be careful so as not to injure yourself.
CAUTION
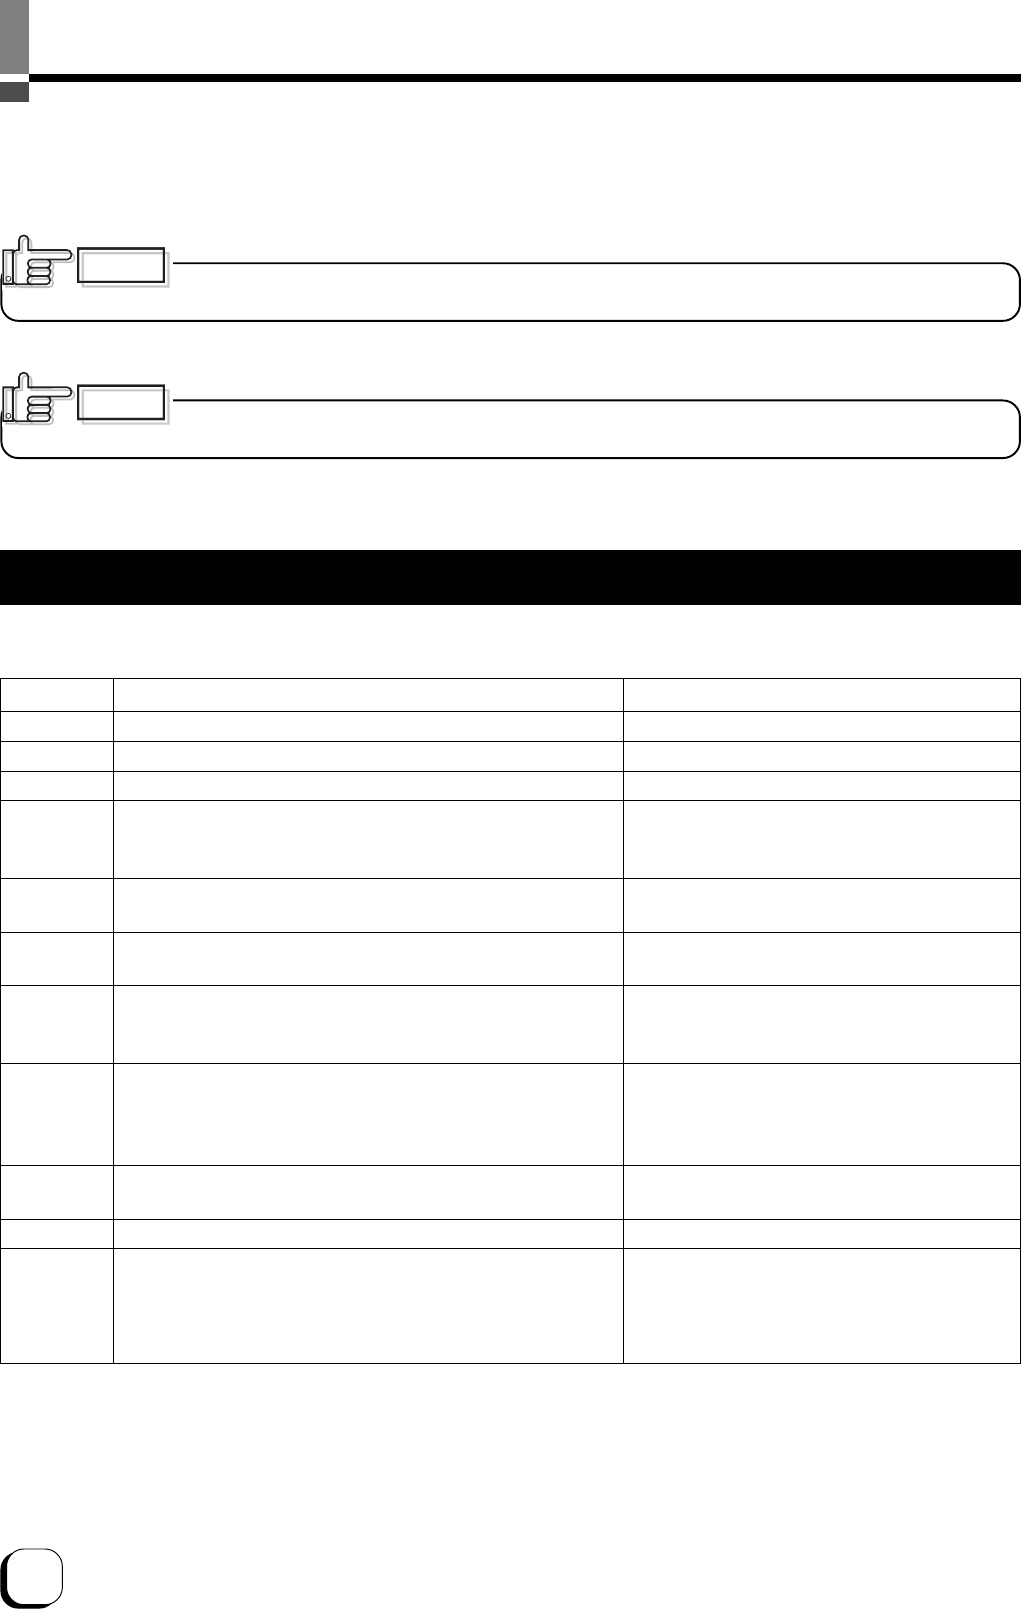
Cause and Action for Error Code
Below errors are the representative error messages and actions in the printer or laminating unit (laminator). Refer to
Troubleshooting (detailed version) of the Setup Guide (electronic manual) for error messages that are not mentioned here.
Error Code Message on the Status MonitorAction
01020480 Printer door is open. Close printer door.
01020481 Cleaning roller not attached. Attach cleaning roller.
01023A00 Out of card. Replenish card in the card cassette.
01023A80 Problem occurred in the laminator. Printed card cannot be
laminated. Remove laminator problem. Laminating will start
automatically once laminator is in the Ready mode.
01033600 Unable to control ink. Open printer door and check the ink
installation.
01033B81 Feed jam. Take out the card cassette and remove jammed
card.
01033B82 – Card jam in the printer. Open printer and remove card.
01033B85
01033B88
01033B86 Problem occurred in the laminator. Remove laminator problem
and initialize printer.
01043681 Cannot find ink mark. Open printer door to check the installation
of ink.
01420081 Out of ink. Open printer door and change into new ink.
01420082 Laminator is out of film. Printed cards cannot be laminated.
Open the front door and replace with a new film.
Laminating will start automatically when the laminator switches
to the Ready mode.
Close printer door.
Attach cleaning roller.
Replenish card in the card cassette.
Refer to instruction manual of the laminator unit
and remove the laminator problem.
Check if ink ribbon is attached correctly.
Remove jammed card by referring to
Troubleshooting (Feed Jam) in this book.
Remove jammed card by referring to Troubleshooting
(Jam inside printer) in this book.
Refer to instruction manual of the laminator unit and
remove the laminator problem. When the laminator
switches to the Ready mode, open and close
the printer door to initialize the printer.
Check if there is any problem with the ink ribbon.
Change into new ink ribbon.
Change into new laminating film.
29
(to the next page)
1.
Remove the card cassette cover.
Refer to page 14 of this manual for setting of cards.
Removing Jammed Card
Stains such as fingerprints on the
printed surface will result in printing errors. Use lint-
free gloves when handling the card.
CAUTION
Feed Jam
2.
Remove the jammed card.
Remove the cards in the cassette and remove the
jammed card at the bottom.
If the card is jammed inside the printer and difficult to
be removed, open the jog cover behind the card
cassette. Turn the jog dial anti-clockwise (upward) and
the card will come out. The jog cover can be removed
by pulling the lock at the center right towards you while
pushing it leftwards.
4.
Open and close the printer door
Printer will start to initialize and return to the Ready
mode.
When there are frequent feed jams
There is possibility that adjustment of the card
cassette does not fit the card that is being used. Refer
to page 16 of this manual for adjustment of card
thickness and gate adjustment of the card cassette.
Jam inside the printer
Open the printer door and remove the ink cassette.
Refer to page 12 of this manual for setting of ink
ribbon.
Check the inside visually to find out where the jammed
card is.
Use the corresponding method to remove the card
according to the condition of the jam.
Do not touch inked surface with your hand.
CAUTION
3.
Return unused cards to the cassette and put on
the card cassette cover. Refer to pages 14 and
15 of this manual for setting of cards.
A. When card is at the right (near inverter)
B. When card is at the left (near printing unit)
Jog Cover
Jog Dial
Inverter
30
Troubleshooting (continued)
1.
Open the jog cover behind the card cassette, turn
the JOG dial to move card to the center of the
inverter. Refer to Feed Jam (page 29 of this
manual) on how to open the jog cover.
Push with your hand if the card does not move.
A. When card is at the right (near inverter)
C. When card can barely be seen from the encoding unit
Be careful not to drop the ink ribbon
into the interior of the printer when removing the ink
cassette.
CAUTION
Stand the ink cassette after removing
it. Allowing the inked surface to touch the ground will
dirty the cassette and cause it to malfunction.
CAUTION
2.
With the guard component (green color) on your
right, turn the inverter vertical with your hand.
Turning the inverter will move the card away from
its center. As such, turn the jog dial to return
card to the center of the inverter while you are
turning the inverter.
3.
Turn the jog dial to move card to the top and
remove with hand.
4.
Install the ink cassette and close the printer
door. Refer to pages 13 and 14 of this manual.
Printer will start to initialize and return to the Ready
mode.
Card
Guard Component