JVC KENWOOD K2T001 Card Printer w/Built-in RFID Tag User Manual CX 120 pm65e2
JVC KENWOOD Corporation Card Printer w/Built-in RFID Tag CX 120 pm65e2
Contents
Users Manual 2 of 2
17
Softwqre Upgrade
6.
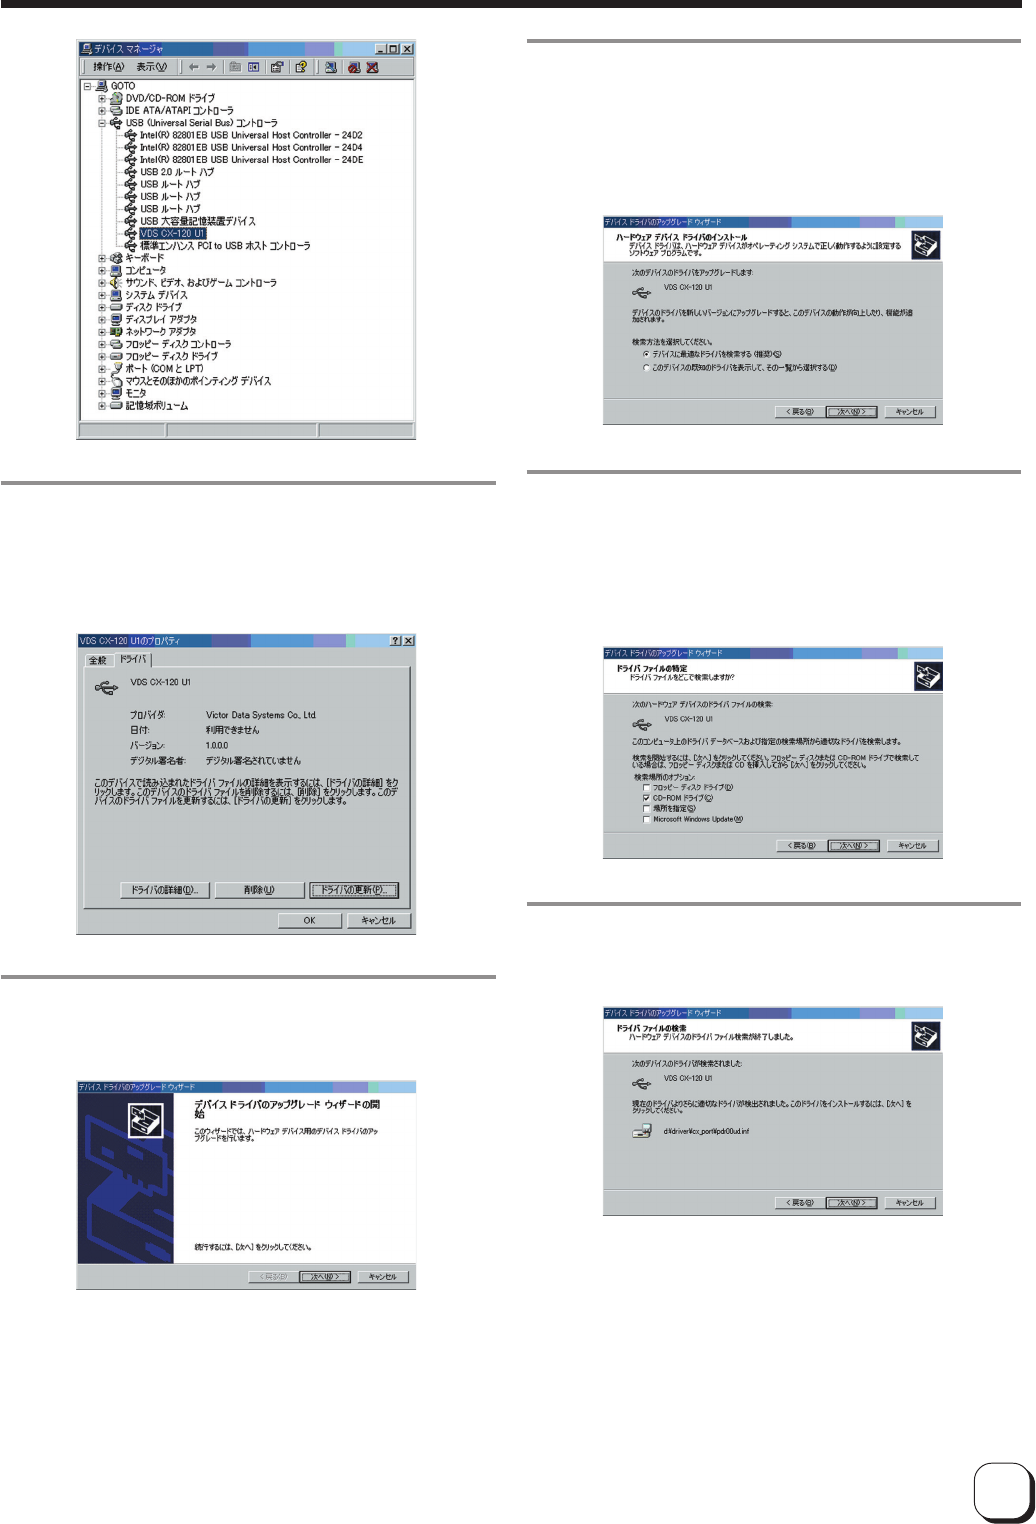
When the following screen appears,
1Select "Driver" tab and
2click on the "Update Driver" button
7.
When the following screen appears, click on
the "next" button.
10.
When the following screen appears, click
on the "next" button.
Update of USB driver begins.
1Set where to save the latest USB Driver File from
"Optional Search Locations" and
2click on the "next" button
9.
When the following screen appears,
8.
When the following screen appears,
1Select "Search for a suitable driver for my device
(recommended)" and
2click on the "next" button
18
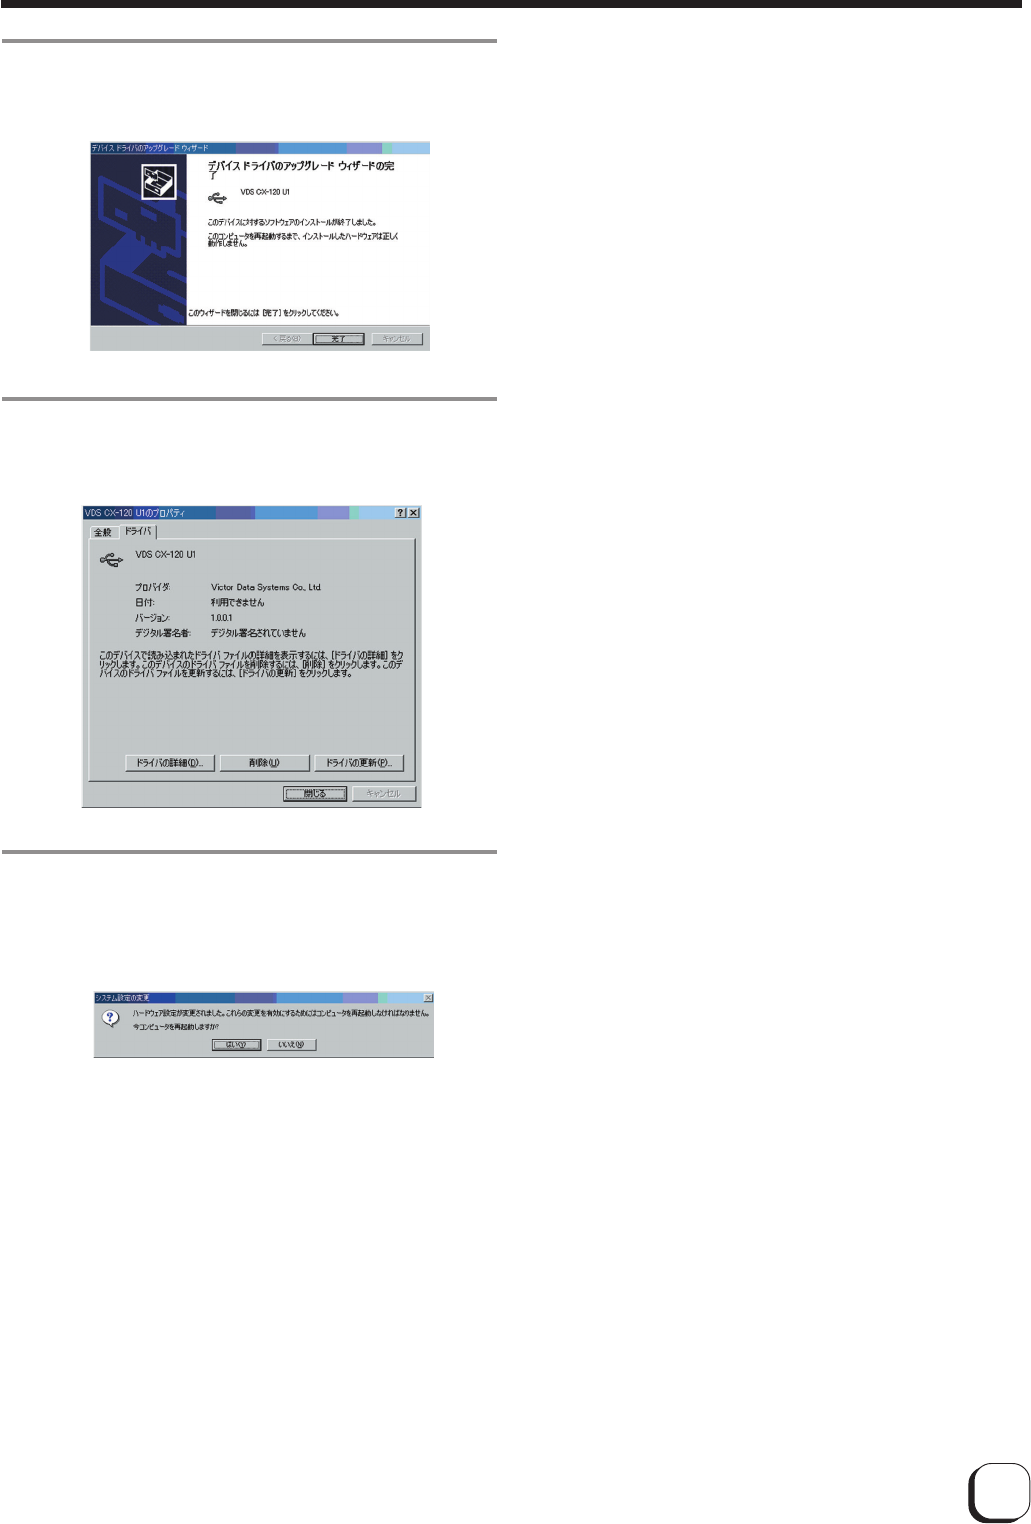
11.
When the following screen appears, click
on the "Finish" button.
12.
When the following screen appears, click
on the "Close" button.
13.
When the following screen appears, click
on the "Yes" button. Windows will restart
automatically.
Update of USB driver is now complete.
Softwqre Upgrade
19
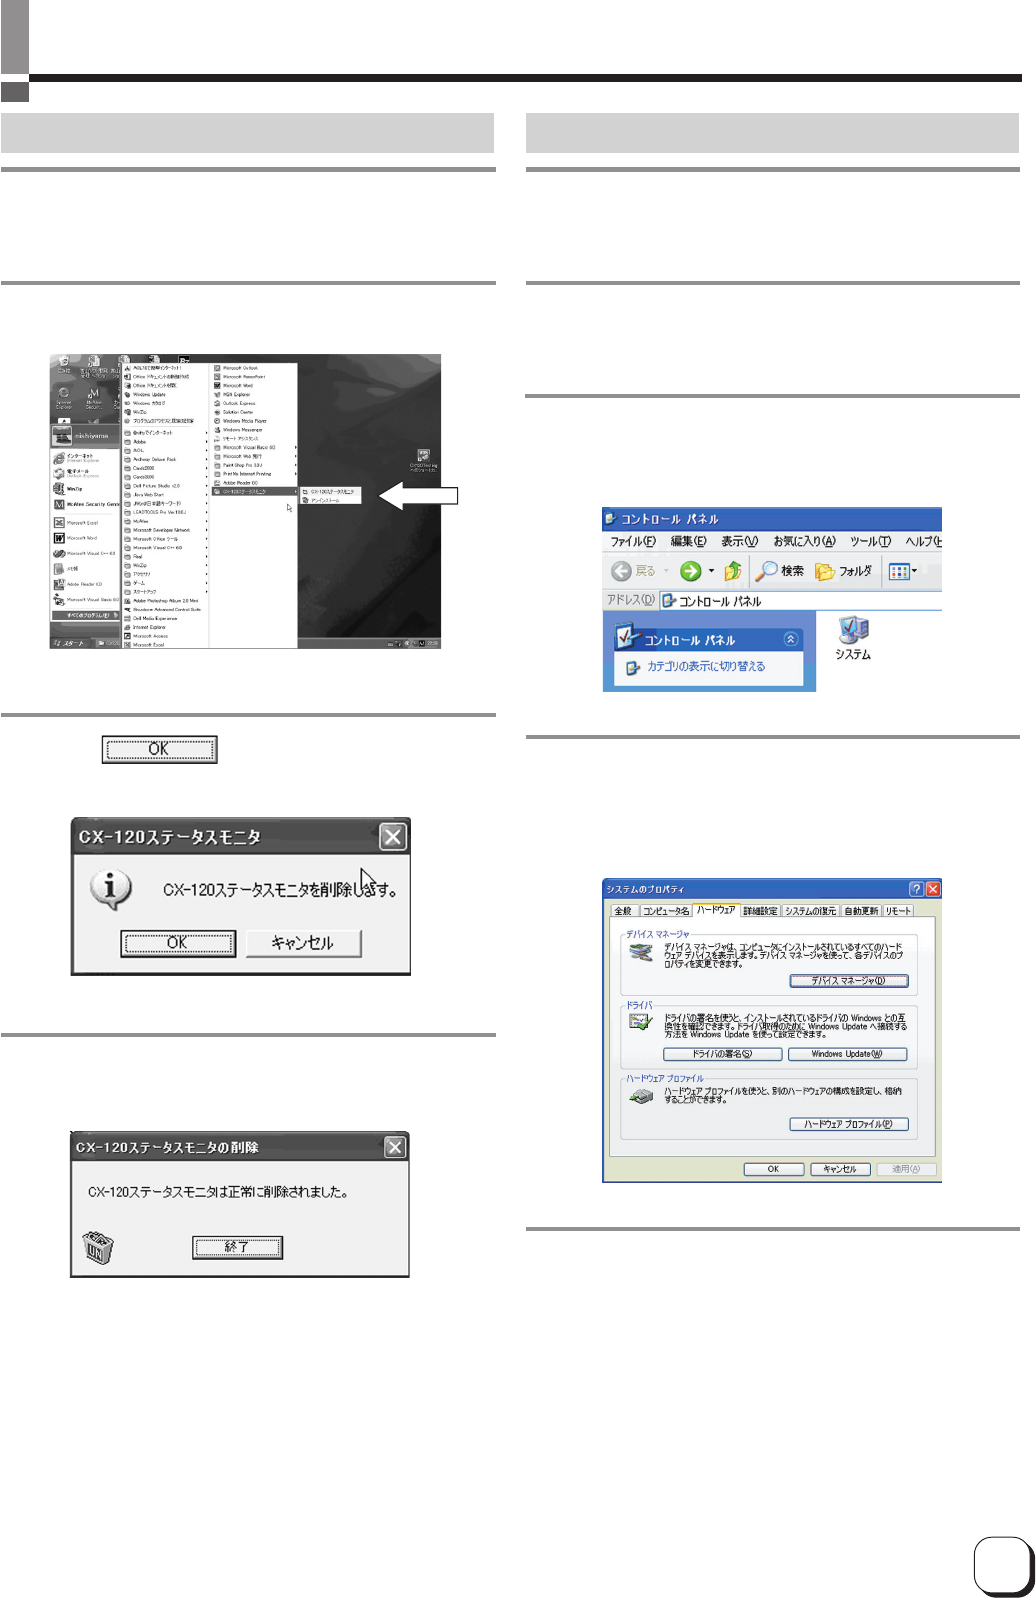
Uninstalling Software
Deletion of USB Driver - WindowsXP
1.
Check that the connection between com-
puter and card printer is on.
2.
Switch on the card printer.
3.
Open "Control Panel" from "My Computer"
and double-click on "System".
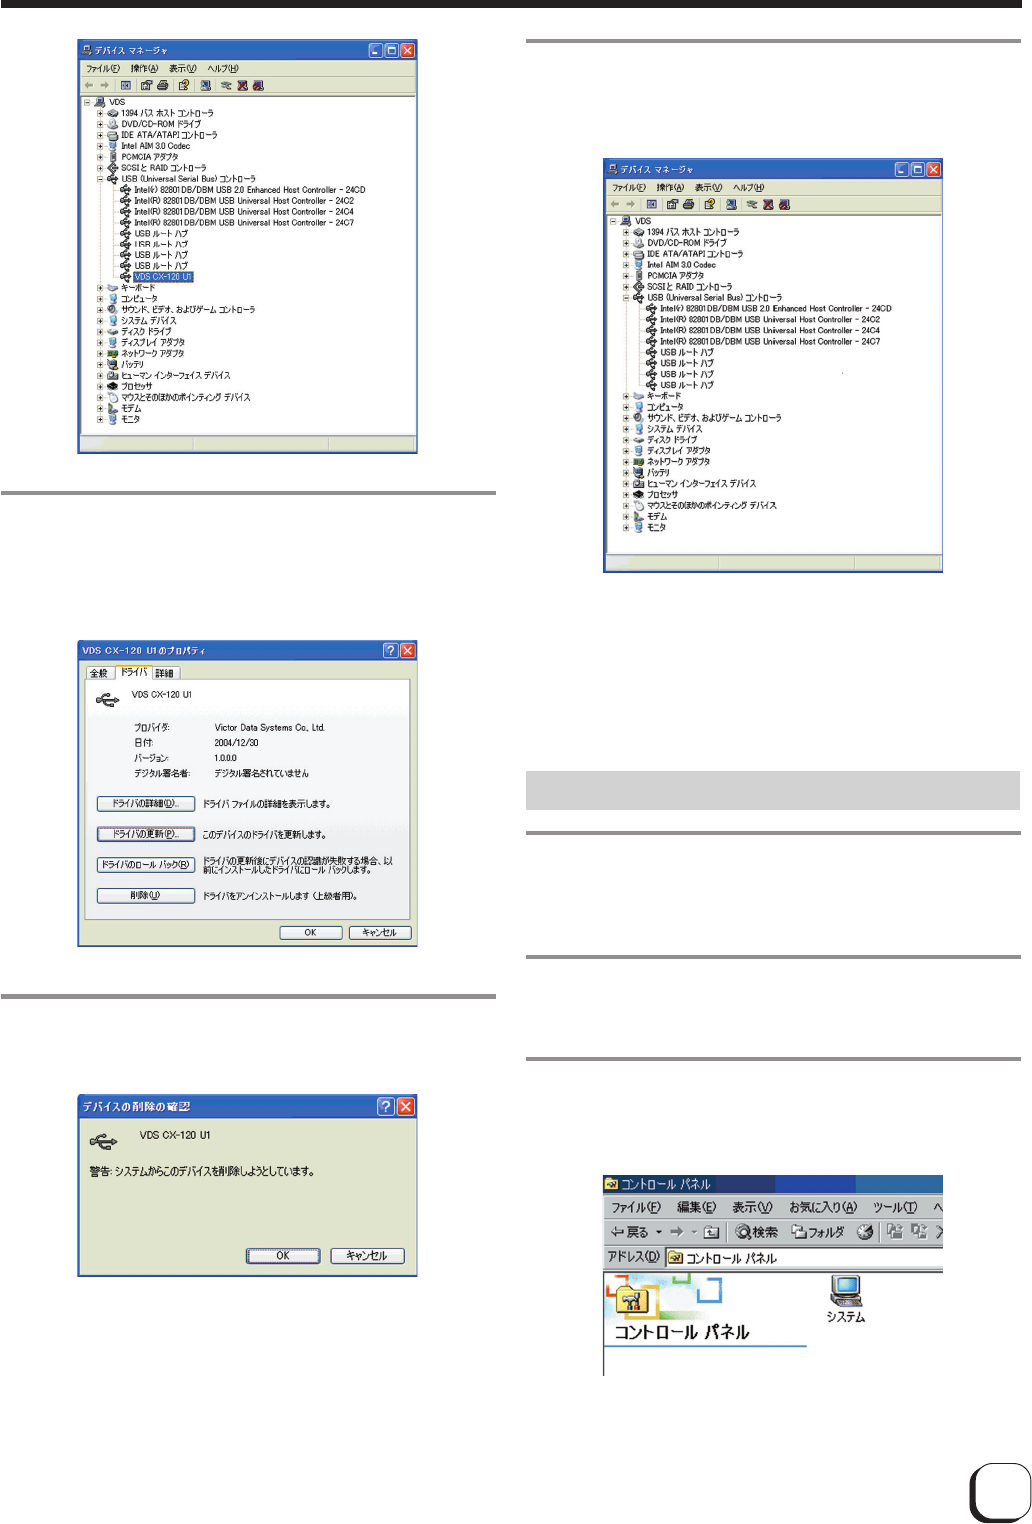
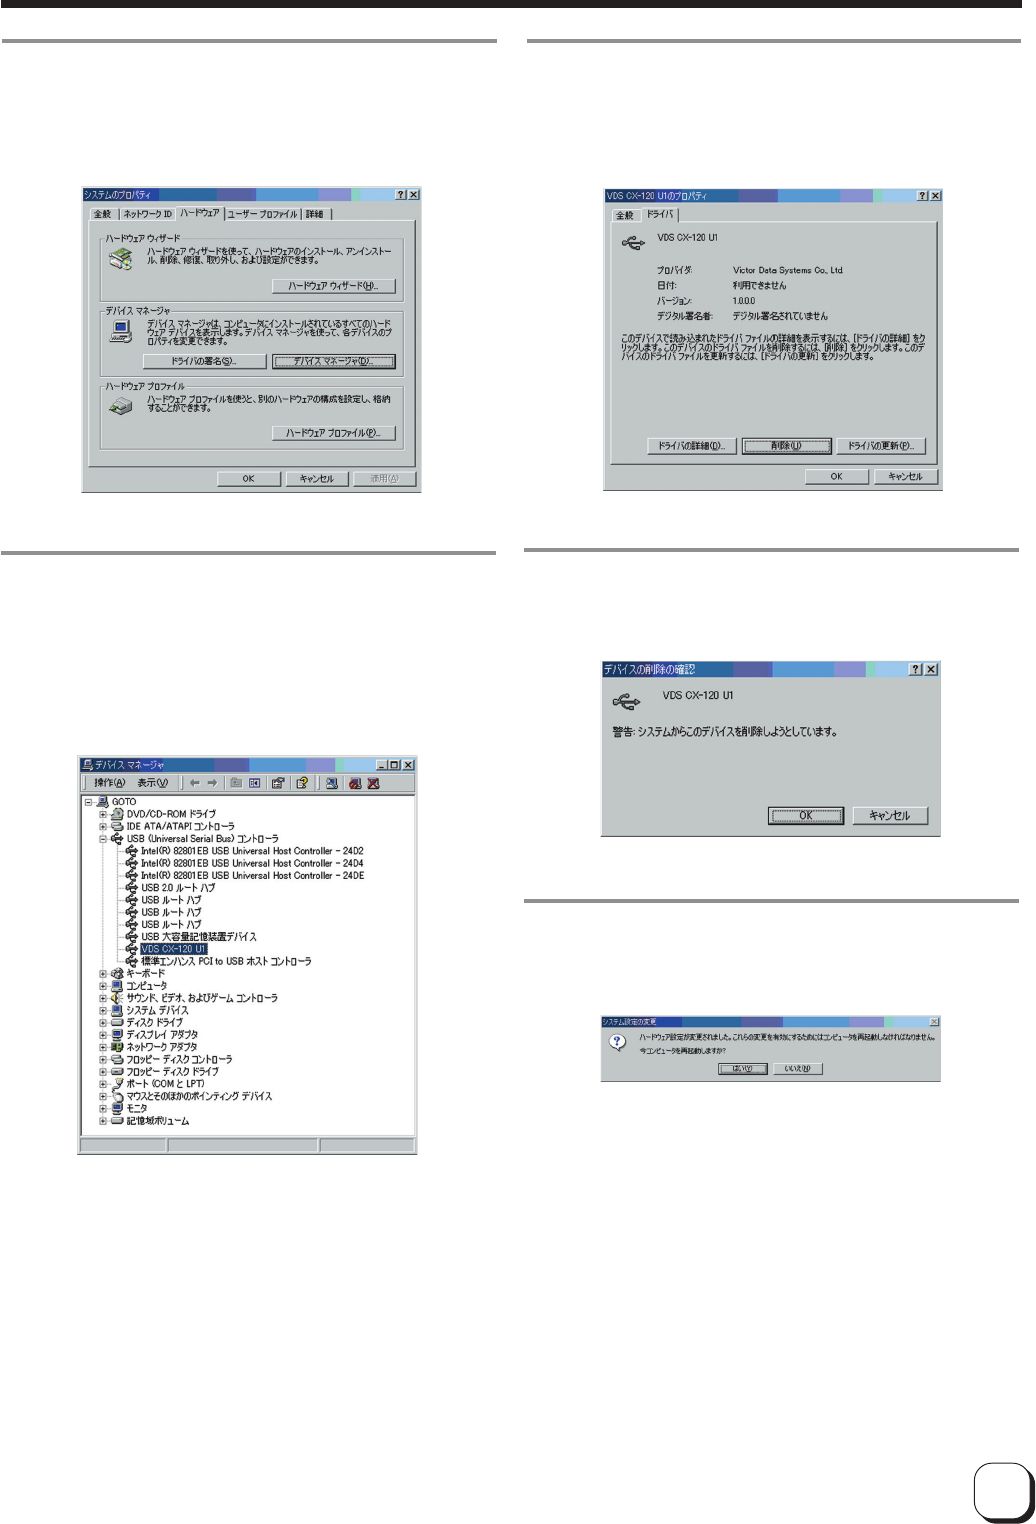
5.
When the following screen appears,
1Select "USB (Universal Serial Bus) Controller" and
2double-click to delete [VDS CX-120 Un](n : 1 to 7)
4.
When the following screen appears,
1Select "Hardware" tab and
2click on the "Device Manager" button
Deletion of Status Monitor
1.
Check that the Status Monitor is not in op-
eration.
2.
Perform uninstallation from the Start menu.
3.
Click button to start uninstalling.
4.
Click on the "Finish" button. Uninstallation
is now complete.
20
Deleting USB Driver - Windows2000
1.
Check that the connection between com-
puter and card printer is on.
2.
Switch on the card printer.
3.
Open "Control Panel" from "My Computer"
and double-click on "System".
7.
When the following screen appears, click on
the "OK" button.
6.
When the following screen appears,
1Select "Driver" tab and
2click on the "Delete" button
Deletion of USB driver is now complete.
8.
When the following screen appears, check
to ensure that [VDS CX-120 Un] item has
been deleted.
Uninstalling Software
21
7.
When the following screen appears, click on
the "OK" button.
Deletion of USB driver is now complete.
6.
When the following screen appears,
1Select "Driver" tab and
2click on the "Delete" button
8.
When the following screen appears, click on
the "Yes" button. Windows will restart auto-
matically.
5.
When the following screen appears,
1Select "USB (Universal Serial Bus) Controller" and
2double-click to delete [VDS CX-120 Un](n : 1 to 7)
4.
When the following screen appears,
1Select "Hardware" tab and
2click on the "Device Manager" button
Uninstalling Software
22
Troubleshooting (Detailed Version)
This chapter describes detailed error displays and their
solutions, as well as solutions to problems related to print
quality that are not mentioned in the Startup Guide. For
the removal of jammed cards, please refer to the Startup
Guide (separate manual).
Caution
When removing jammed cards,
do not insert any metallic items such as tweezers
into the printer unit while the power is on as this
may cause it to breakdown.
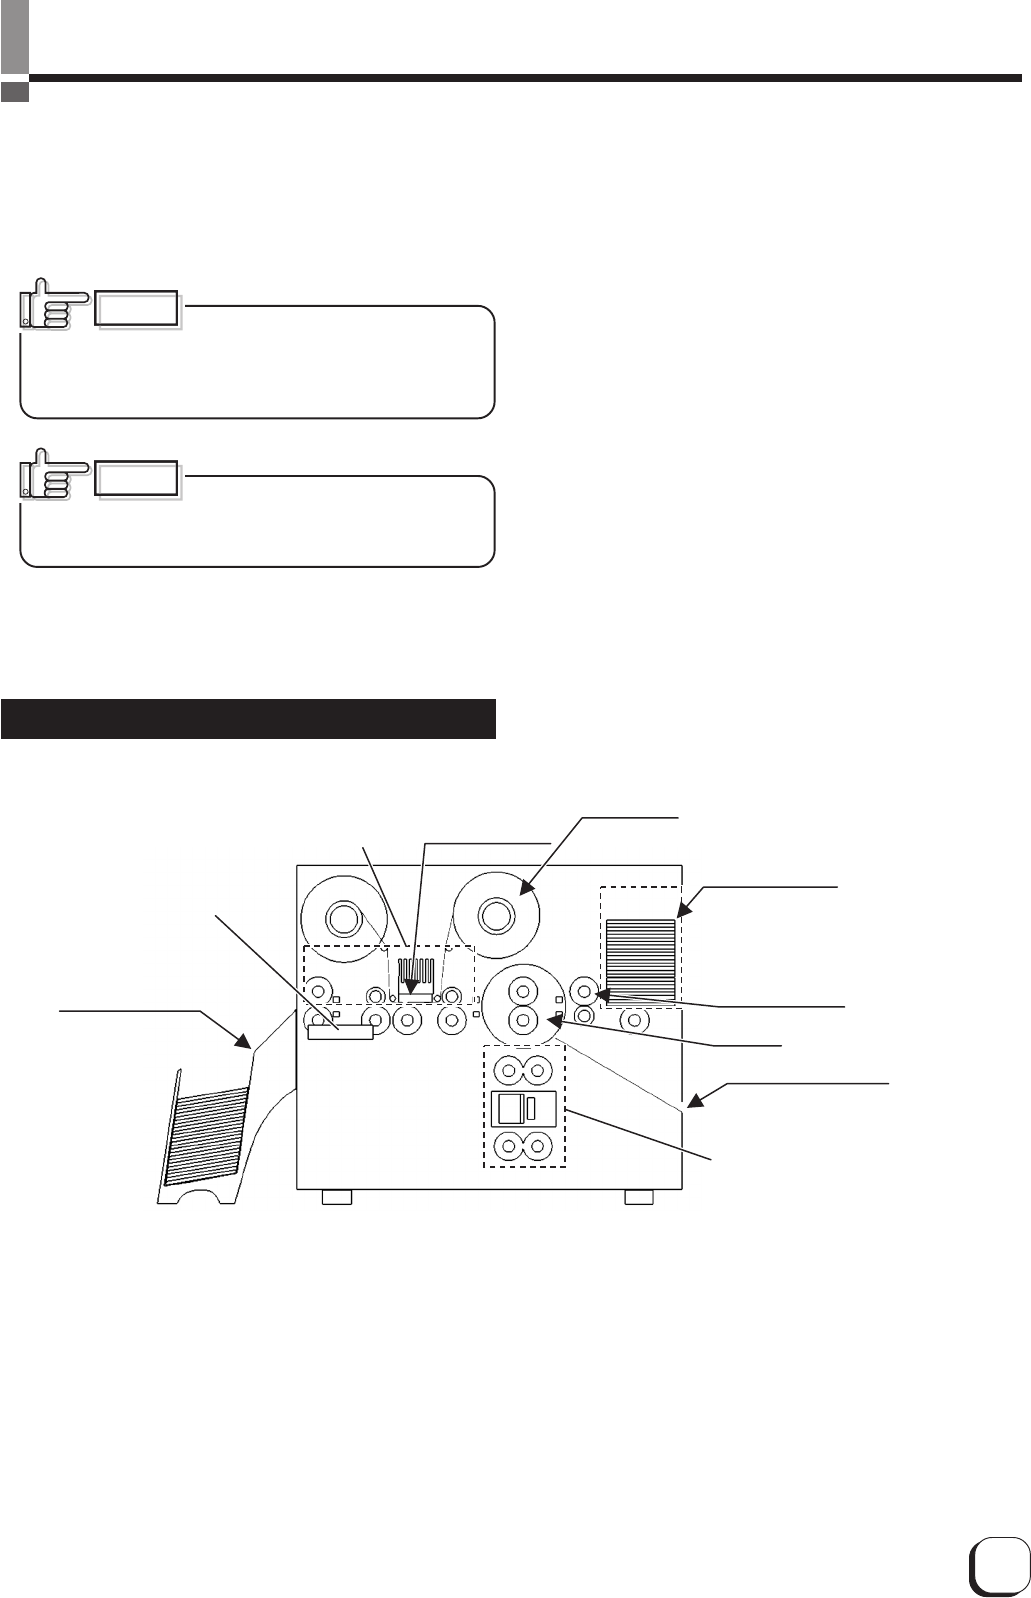
Internal Configuration
Card Cassette
Printing Unit
Card Stacker
Contact IC/Magnetic Card
Encoder Unit (Optional)
Non-Contact IC Antenna
(Optional) Mounting Unit
Rejected Card Exit
Thermal Head
Cleaning Roller
Inverter
Ink Ribbon
Caution
There is a protruding part inside
the printer unit. Put on hand gloves and insert your
hand carefully so as not to injure yourself.
23
Troubleshooting (Detailed Version)
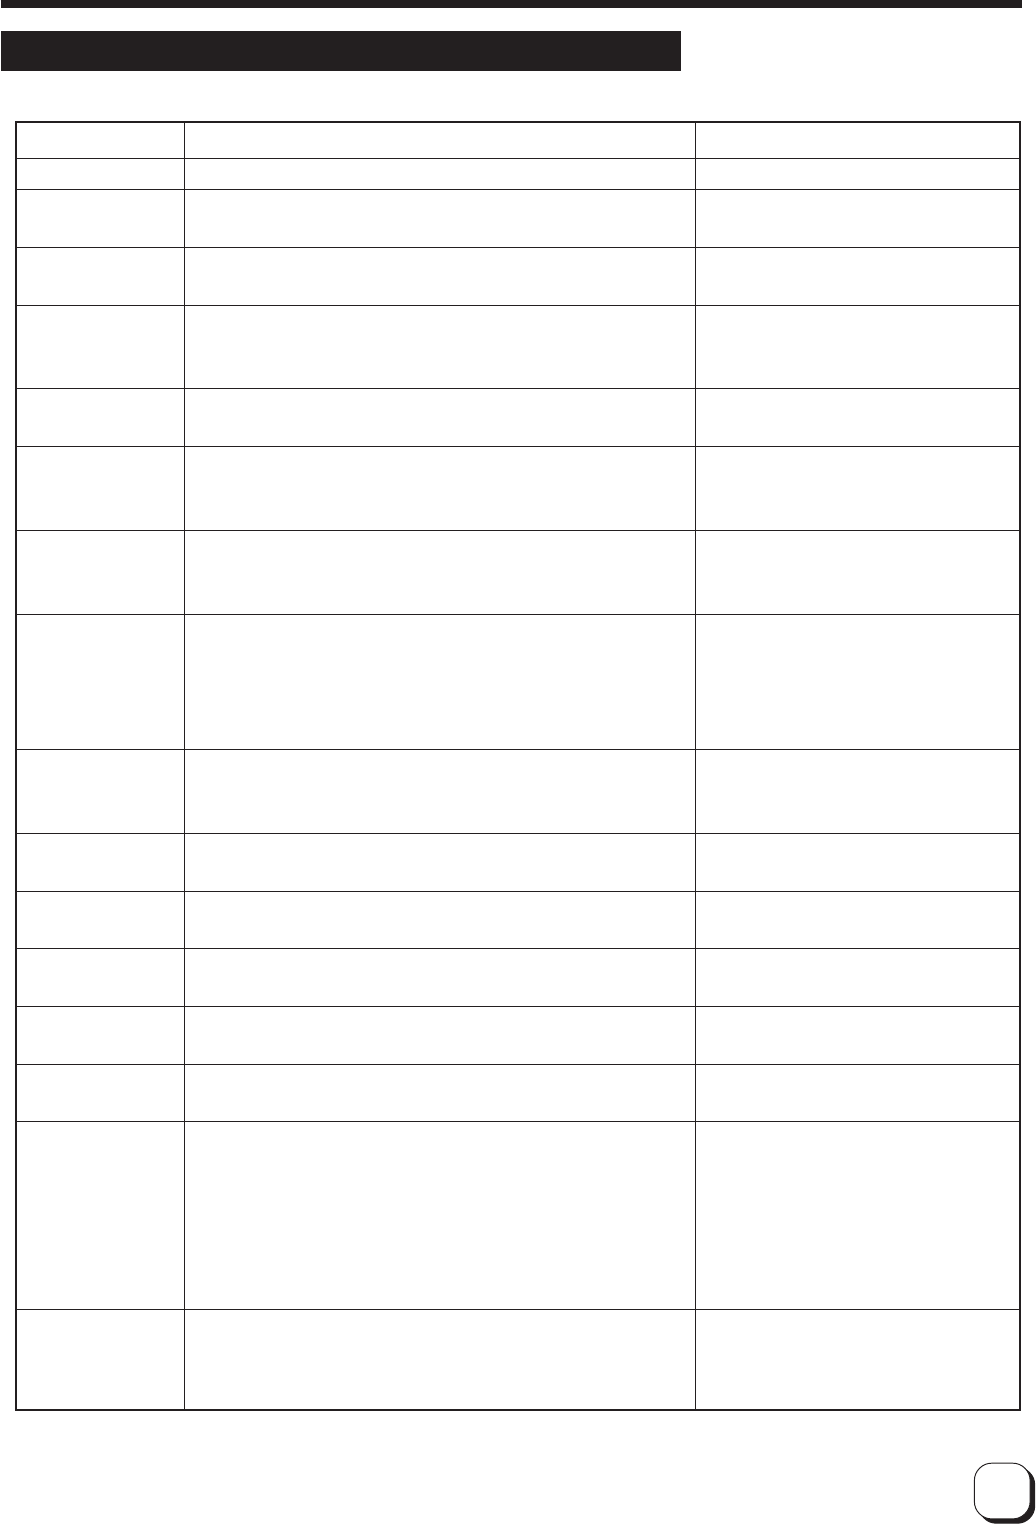
List of Error Codes and Corresponding Actions
1. Errors and corresponding actions related to the printer or laminator unit.
Close printer door.
Attach cleaning roller.
Replenish card in the card cassette.
Remove laminator problem by referring to
instruction manual of the laminator unit.
Check if ink ribbon is inserted properly.
Refer to Troubleshooting (Feed Jam) of this
book and remove the jammed cards.
Refer to Troubleshooting (Jam within
Printer) of this book to remove the jammed
cards.
Refer to the instruction manual of the lami-
nator unit and remove the laminator prob-
lem. When laminator switches to the Ready
mode, open and close printer door to ini-
tialize the printer.
Check to ensure that laminator unit is in the
Ready mode and the connection cable be-
tween units are correctly installed.
Check if there is any ink ribbon defect.
Unrecoverable error. Call for servicing if it
recurs after restoring power.
Unrecoverable error. Call for servicing if it
recurs after restoring power.
Unrecoverable error. Call for servicing if it
recurs after restoring power.
Unrecoverable error. Call for servicing if it
recurs after restoring power.
Unrecoverable error.
Refer to Troubleshooting (Jam within
printer) of this book and remove jammed
card when there is card in the inverter
mechanism.
Call for servicing if it recurs after restoring
power.
Unrecoverable error. Call for servicing if it
recurs after restoring power.
Printer door is open. Close printer door.
Cleaning roller not attached. Attach cleaning roller.
No card inside. Replenish card in the card cassette.
Problem in the laminator. Printed cards cannot be laminated. Re-
move laminator problem. Laminating will start automatically when
laminator is in the Ready mode.
Unable to control ink ribbon. Open printer door and check the ink
ribbon installation.
Feed jam. Dismount the card cassette and remove the jammed
cards.
Card jam in the printer. Open the printer door and remove the card.
Problem in the laminator. Remove laminator problem and initialize
printer.
Printer fails to initialize. Laminator is either not in the Ready mode or
not connected correctly.
Cannot find ink mark. Open printer door and check the ink ribbon
installation.
Fail to access to printer's EEPROM. Restore printer power and ini-
tialize the printer.
Problem in the hardware. Restore printer power and initialize the
printer.
Problem in the firmware. Restore printer power and initialize the
printer.
Problem in the magnetic unit mechanism. Restore printer power
and initialize the printer.
Problem in the inverter mechanism. Restore printer power and ini-
tialize the printer.
Problem in the thermal head mechanism. Restore printer power
and initialize the printer.
Error Code Message Display on Status monitor Action
01020480
01020481
01023A00
01023A80
01033600
01033B81
01033B82 to
01033B85,
01033B88
01033B86
01040882
01043681
01044001ÅA
01044002
01044400
01044480
0104AB00
0104C000
0104C100
24
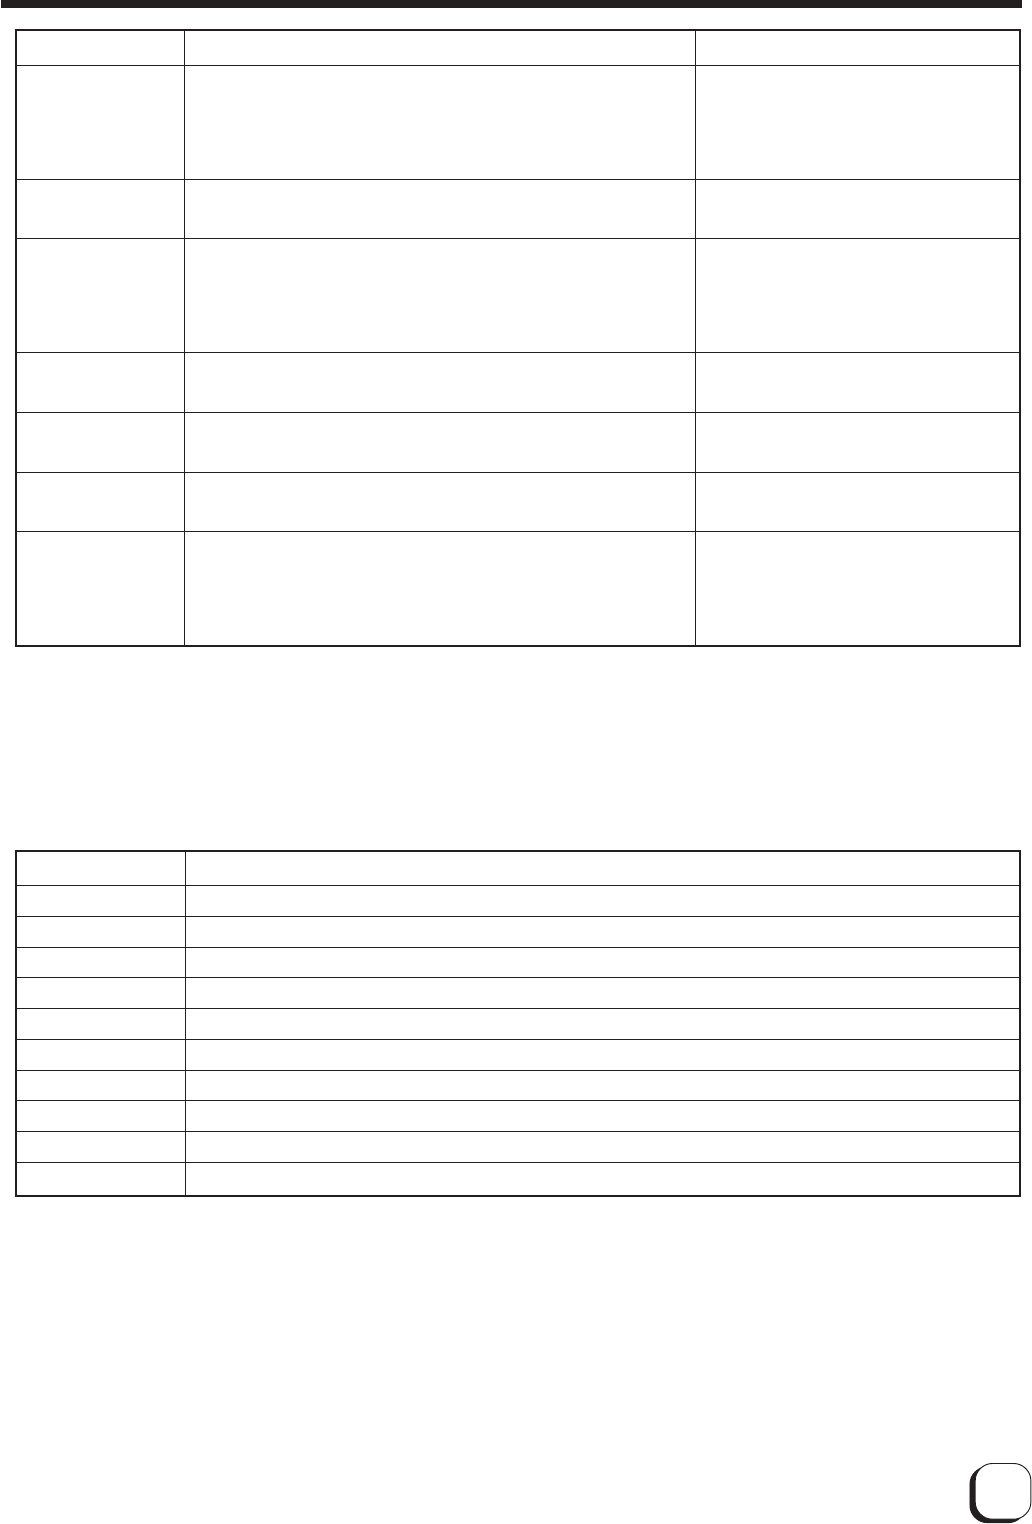
2. Software or System Errors and Corresponding Actions
The following errors are failures in the software or system of the host computer. Restore power of the host computer
and printer. Consult your dealer if the problem cannot be resolved.
Troubleshooting (Detailed Version)
Error Code Message Display on Status monitor Action
0104F600
0104F601
0104F800
0104F801
01052681
01420081
01420082
Check to ensure that temperature of the
environment is not too high. Clean the fan
filter. Check if the air inlet behind the printer
is blocked.
Raise the temperature of the environment.
Check to ensure that temperature of the
environment is not too high. Clean the fan
filter. Check if the air inlet behind the printer
is blocked.
Raise the temperature of the environment
Downloaded data is incorrect. Check the
file.
Replace with a new ink ribbon.
Replace with a new laminator film.
Temperature in the printer is too high. Turn off the power to cool
down the printer.
Temperature in the printer is too low. Turn off the power and switch
on again when it becomes warmer.
Temperature of the thermal head is too high. Turn off the power to
cool down the printer.
Temperature surrounding the thermal head is too low. Turn off
the power and switch on again when it becomes warmer.
Downloaded data is incorrect. Check the file.
No ink ribbon. Open printer door and replace with a new ink ribbon.
No laminator film. Unable to laminate printed cards. Open front door
and replace with a new film. Lamination will start once laminator
becomes Ready.
Error Code Message Display on Status Monitor
02000001
02000002
02000003
02000005
02010000
02020000
02030000
09000002
09000003
09000004
CX Port Manager failure. Insufficient memory.
CX Port Manager failure. CX Port Manager unable to receive commands.
CX Port Manager failure. Command ended abnormally.
CX Port Manager failure. Unable to find printer port.
CX Port Manager failure. Abnormal SRB status.
CX Port Manager failure. Abnormal HA status.
CX Port Manager failure. Abnormal target status.
Unable to locate printer. Check connection.
DLL failure. Insufficient memory.
DLL failure. Failure to read file.
25
Troubleshooting (Detailed Version)
Problems Related to Printing
Causes and actions to take when printing position on the
card is constantly out of alignment.
1.
Adjustment position is out of alignment
Refer to the "Checking after Replacement of Ther-
mal Head" in the Startup Guide (separate book) on
procedures to adjust the printing position.
2.
Card size is different from the compatible
dimensions (54.0 mm x 85.6 mm).
When the card size is different, the top and bottom
or left and right margins will not be equal. Check
with your card dealer.
Causes and actions to take when printing position on the
card varies from card to card.
1.
Card transport roller is dirty
Refer to "Cleaning of Card Transport Roller" in "Main-
tenance" of the Startup Guide (separate book) on
procedures to clean the roller.
2.
When using pre-printed cards
The printing position of pre-printed cards may vary
from card to card. Consult your dealer on pre-printed
designs for which the deviance is not easily notice-
able after printing.
Printing Position Out of Alignment
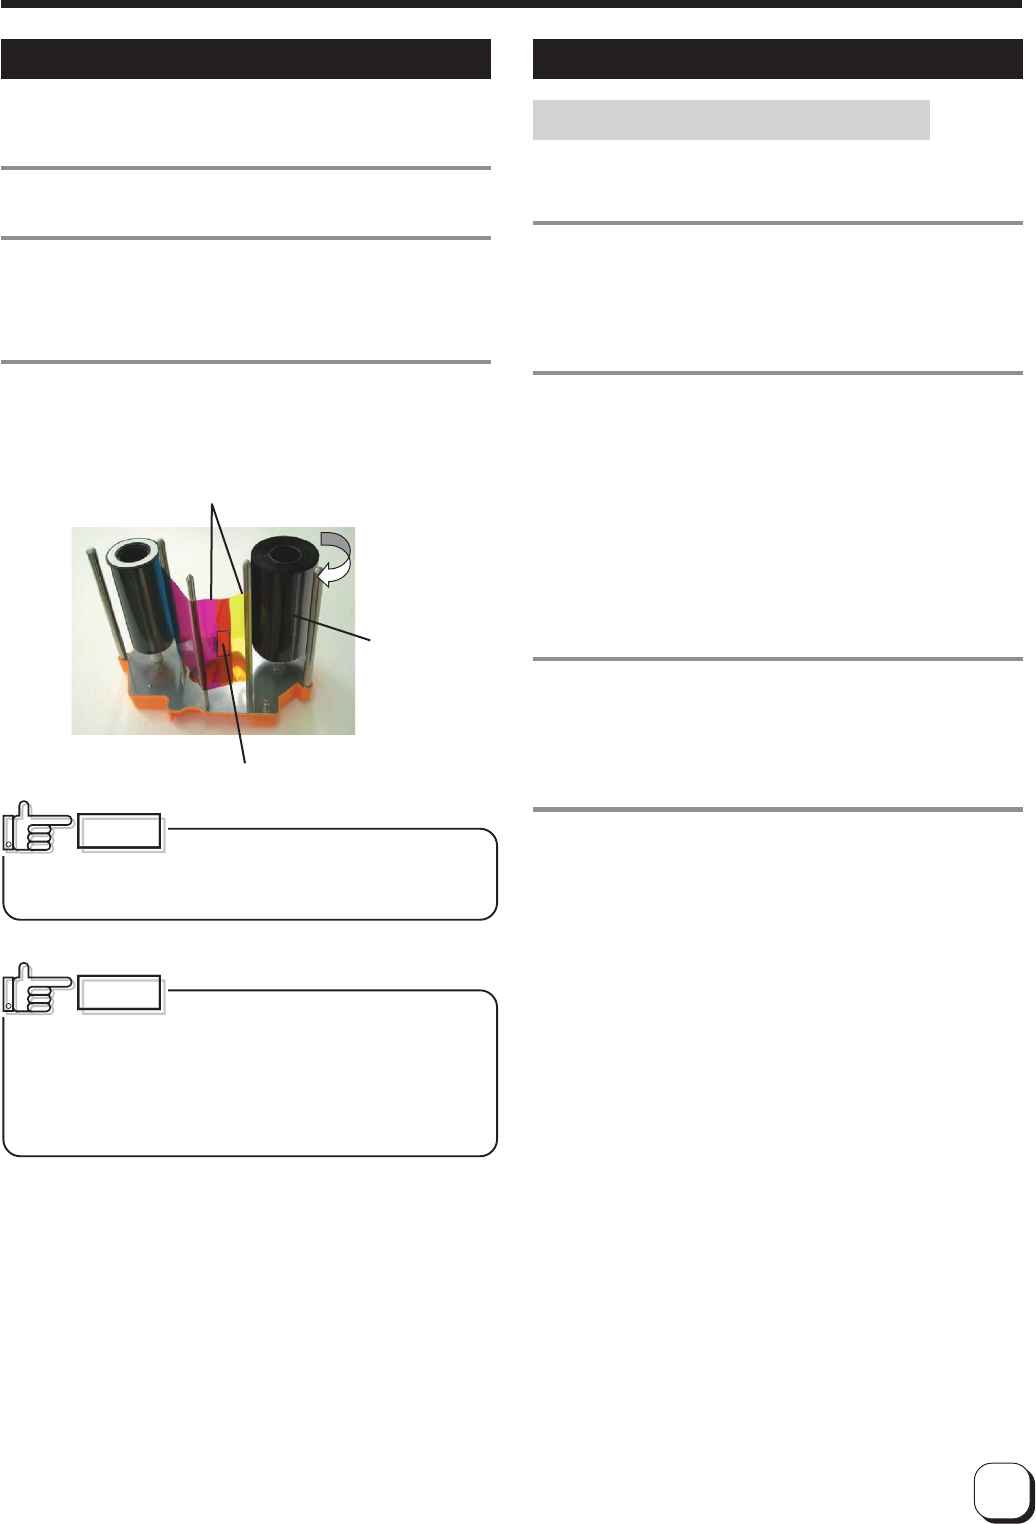
When ink ribbon is torn
Repair in the following ways when the ink ribbon is torn
due to some reasons.
1.
Cut off the torn portion with scissors neatly.
2.
Adhere cellophane tape close to the center
of the ribbon.
Do not discard any used ink or film on the reel.
3.
Wind the ink ribbon on the reel with hand
until the torn portion cannot be seen.
Ensure evenness
Reel
Cellophane Tape
Caution
Refer to the "Installation of Ink Rib-
bon" in the Startup Guide (separate book) and pay
attention to the ink ribbon installation procedures.
Caution
When the surface material of the card
in use does not suit the printing mode of this printer,
the card and ink ribbon may stick together during print-
ing, causing the ink ribbon to tear. Consult your card
dealer when the ribbon is torn due to its adhesion to
the card.

26
Uneven Print Density and Crease
1.
Card transport roller is dirty
Refer to the "Cleaning of the Card Transport Roller"
in "Maintenance" of the Startup Guide (separate
book) on procedures to clean the roller.
2.
Thermal head is dirty
Refer to the "Cleaning of the Thermal Head" in
"Maintenance" of the Startup Guide (separate book)
on procedures to clean the thermal head.
3.
Try printing in Fine mode
Fine mode produces a more stable print quality as
printing is carried out more slowly when compared
to the Standard mode. Therefore, uneven print den-
sity and crease may not be so visible.
4.
When white crease frequently appear
Replace the thermal head as it is damaged when
there are frequent vertical white crease as shown
in the diagram below even after cleaning the ther-
mal head, or when the color lightens to the extent
that crease are visible. Refer to the "Procedures to
Replace Thermal Head" in the Startup Guide on pro-
cedures to replace the thermal head.
White or Light-colored crease
Problems related to Color Printing
Cause and actions to take when there is dirt on the card's
printed surface.
1.
Cleaning roller is dirty
Refer to the "Cleaning of the Cleaning Roller" in
"Maintenance" of the Startup Guide (separate book)
on procedures to clean the roller.
2.
Card transport roller is dirty
Refer to the "Cleaning of the Card Transport Roller"
in "Maintenance" of the Startup Guide (separate
book) on procedures to clean the roller.
3.
Card is stained by fingerprints, etc
Put on lint-free hand gloves so that the card surface
will not be stained with fingerprints when handling
the cards.
Dirt
Troubleshooting (Detailed Version)

27
Discoloration
1.
When there is discoloration at random spots
Printing error will occur when there is dirt on the
card during printing. Refer to the "Cleaning of the
Cleaning Roller" in "Maintenance" of the Startup
Guide (separate book) on procedures to clean the
roller.
2.
When discoloration appears in a crescent
shape at print areas with high print density.
Please note that the ink ribbon may be creased and
discoloration may occur when printing broad areas
such as backgrounds in high print density. Consult
your dealer on the card designs to use to prevent
such problems.
Problems Related to Text Printing
1.
When text is blurred
Refer to "How to Use the Status Monitor" of this
book on procedures to increase the K Resin print
density setting (+ direction).
2.
When text is distorted
Refer to "How to Use the Status Monitor" of this
book on procedures to decrease the K Resin print
density setting (– direction).
As a feature of the K Resin ink, the text printed on a
white background appears relatively darker when
text printing is performed on top of YMC print. Re-
duce the K Resin print density (– direction) when
the text on YMC print appears unclear.
3.
When unable to bring a balance between
blurred/ distorted text
The maximum resolution for text printing with K resin
ink or fine line printing in the "Standard mode" is 2
dots. Printing fine lines and text containing 1-dot lines
may result in blurred print. Choose the "Fine mode"
when you use such fonts.
Blurred / Distorted
Problems Related to Protective Layer (OP)
Card surface lacks gloss or becomes matte on areas for
which the transparent protective layer (OP) is printed.
1.
When there is an area for which transfer of
protective layer is poor
Refer to the "How to Use the Status Monitor" of this
book on procedures to increase the OP transfer level
(+ direction).
2.
When a crescent-shaped gap appears in the
area where the protective layer (OP) is printed
OP transfer level is too high. Refer to "How to Use
the Status Monitor" of this book on procedures lower
the OP transfer level (– direction).
3.
When the ink ribbon tears while printing the
protective layer
OP transfer level is too high. Refer to "How to Use
the Status Monitor" of this book on procedures to
lower the OP transfer level (– direction).
Color Shift (Color Bleed)
1.
Card Transport Roller is dirty
Refer to the "Cleaning of the Card Transport Roller"
in "Maintenance" of the Startup Guide (separate
book) on procedures to clean the roller.
2.
When Using Thin Cards
This printer is able to print cards with a thickness of
0.25 mm or above. Cards may not be transported
properly when thinner cards are used and color shift
may occur.
3.
Printing error at periphery of the card
Printing error may occur when the ink ribbon and
card are not in close contact due to burrs around
the card. Consult your card dealer when there are
burrs on the card.
Troubleshooting (Detailed Version)
28
Actions to Take When Printer Fails to Start Up
Printer will fail to start up during reboot when download-
ing of printer's firmware fails. In such a case, follow pro-
cedures below to switch to the Download mode and down-
load the printer's firmware again.
1.
Switch off the power of the printer.
2.
Switch on the power while pressing on the
RESET button on the control panel.
Printer switches to the Download mode and all 5
LEDs on the control panel are lit.
3.
Download the printer's firmware using the
firmware download function of the status
monitor.
Caution
Laminator firmware and configura-
tion information cannot be downloaded when in the
Download mode. To download these files, turn on the
power again and switch to the Standard mode.
Troubleshooting (Detailed Version)
29
Version Upgrade
Versions of the firmware, USB driver and Status Monitor
for this printer may be upgraded to add new functions or
improve performance without prior notice. Consult your
dealer on details of and ways to obtain the latest version,
as well as on their operability with the application soft-
ware in use.
ⅷHow to Upgrade Firmware Version
Refer to the "Firmware Upgrade" feature in "How to
use the Status Monitor" of the instruction manual (this
book).
ⅷHow to Upgrade USB Driver
Refer to the "USB Driver Upgrade" in "Software Up-
grade" of the instruction manual (this book).
ⅷHow to Upgrade Status Monitor
Refer to the "Status Monitor Upgrade" in "Software Up-
grade" of the instruction manual (this book).
Caution
Be sure to retain a copy of the cur-
rent version when performing version upgrade. We are
not liable for any damage such as defective cards or
interruptions during printing as a result of the version
upgrade. Reinstall the version prior to upgrading im-
mediately if these problems occur.
30
Specifications
Main Specifications
Recording Mode : Dye sublimation
Paper Feed Mode : Automatic feeding
Recording Density : 300 dpi
Printing Time : Approx. 20 seconds (Single-sided print-
ing in standard mode for all of YMC, K
Resin and OP, encoding time excluded)
Interface : USB 2.0 Hi-Speed (USB-IF certified prod-
uct)
Usage Environment : Temperature 15˚C ~ 30˚C
Humidity 35% ~ 70% (without condensa-
tion)
Storage Environment: Temperature –15˚C ~ 55˚C
Humidity 20% ~ 80%
Power Supply : AC 100 - 120 V / 220 - 240 V (tolerance
(10%)
Power Consumption : 1.6 A (100 V) / 0.8 A (200 V)
Mass : 12kg and below (excluding MG/IC en-
coder)
15kg and below (including MG/IC en-
coder)
Accessories and optional items are described in the Startup
Guide.
The specifications and appearance of the printer, accesso-
ries and optional items may be changed for the purpose of
product improvement without prior notice.
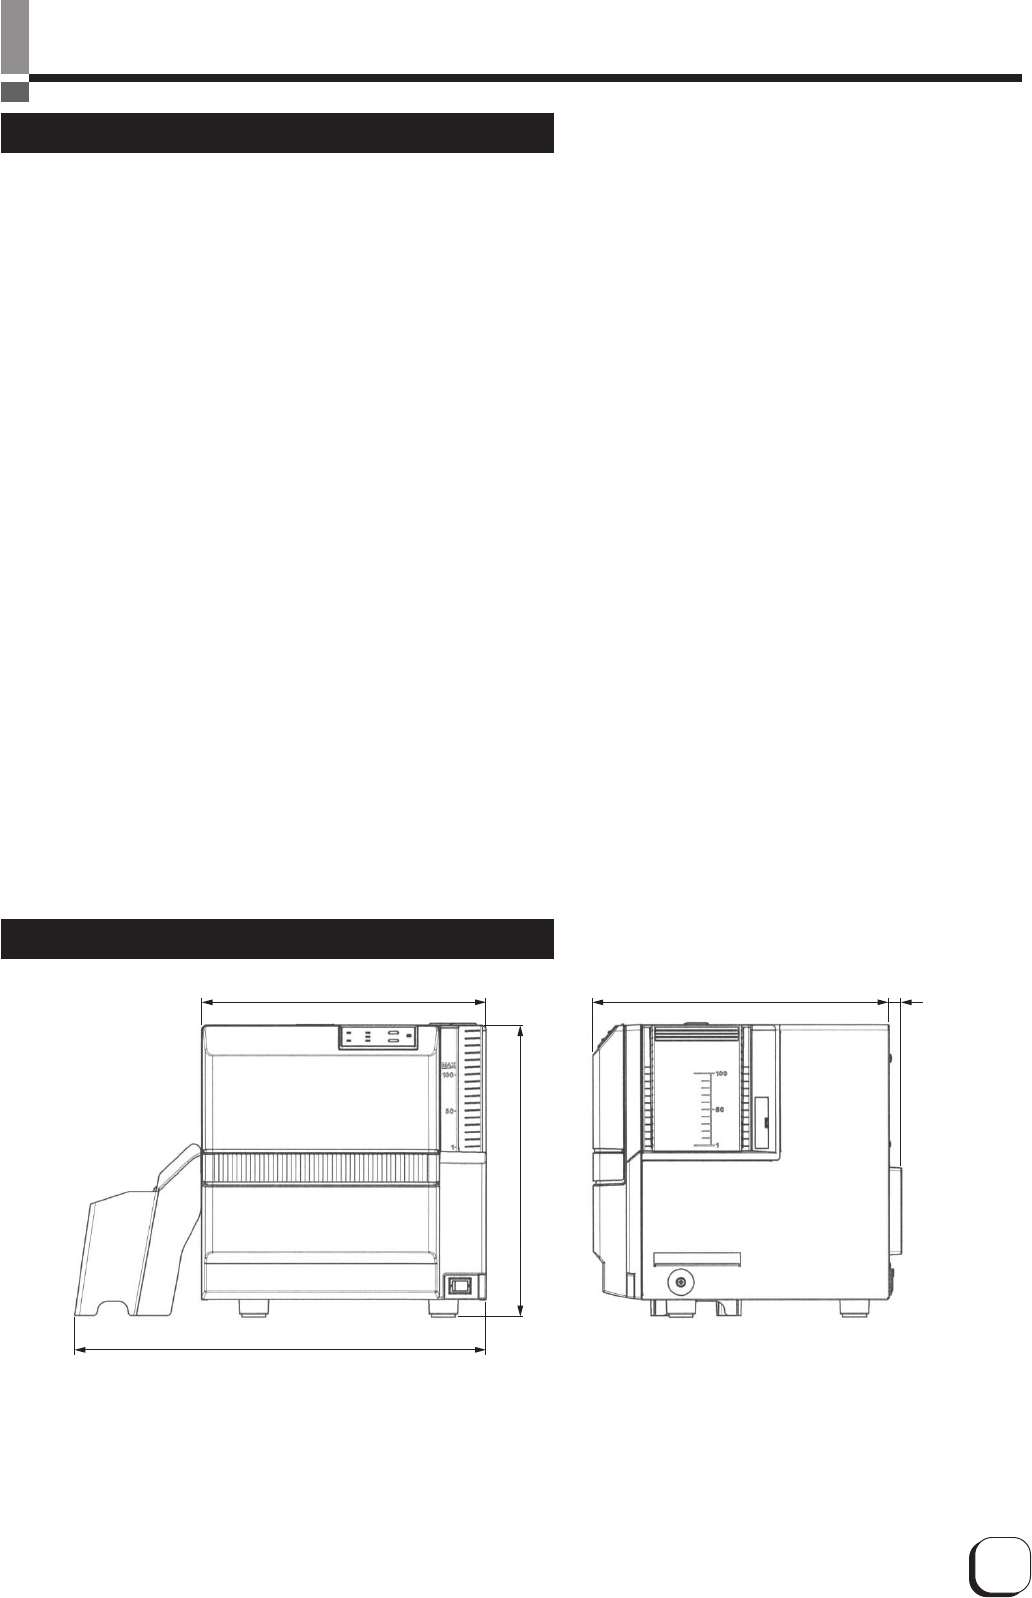
External Dimension
299
308
432
311 13
Unit: mm

KAT-
Direct Dye Sublimation Printer CX-120 Instructions
C
2005 Victor Company of Japan, Limited