LINKSYS WPC54GSV2 Wireless-G Notebook Adapter User Manual WPC54GS UG 40220NC
LINKSYS LLC Wireless-G Notebook Adapter WPC54GS UG 40220NC
LINKSYS >
Contents
- 1. Users Manual 1
- 2. Users Manual 2
- 3. Users Manual 3
- 4. Users Manual 4
- 5. Users Manual 5
Users Manual 2

5
Chapter 2: Planning your Wireless Network
Network Layout
Wireless-G Notebook Adapter with SpeedBooster
Network Layout
Linksys wireless access points and wireless routers have been designed for use with 802.11a, 802.11b, and
802.11g products. With 802.11g products communicating with the 802.11b standard and some products
incorporating both “a” and “g”, products using these standards can communicate with each other.
Access points and wireless routers are compatible with 802.11a, 802.11b and 802.11g adapters, such at the PC
Cards for your laptop computers, PCI Card for your desktop PC, and USB Adapters for when you want to enjoy
USB connectivity. Wireless products will also communicate with the wireless PrintServer.
When you wish to connect your wired network with your wireless network, network ports on access points and
wireless routers can be connected to any of Linksys's switches or routers.
With these, and many other, Linksys products, your networking options are limitless. Go to the Linksys website at
www.linksys.com for more information about wireless products.
6
Chapter 3: Getting to Know the Wireless-G Notebook Adapter
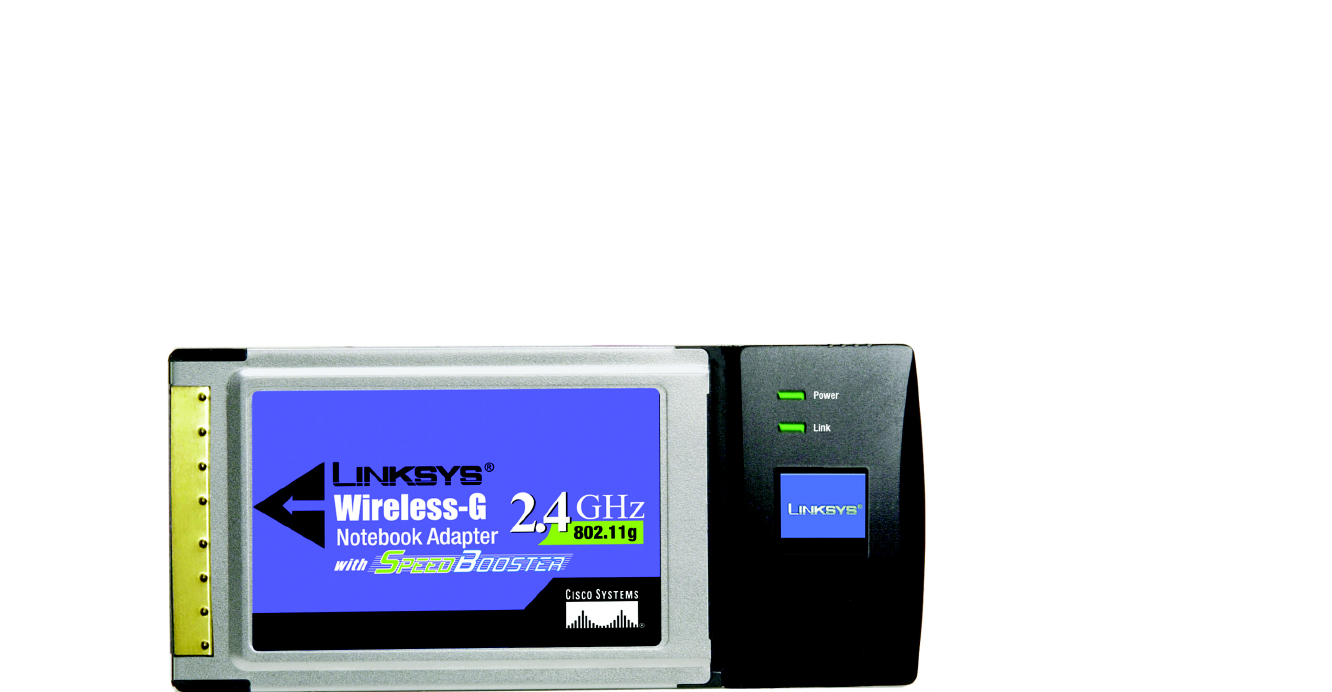
The LED Indicators
Wireless-G Notebook Adapter with SpeedBooster
Chapter 3: Getting to Know the Wireless-G Notebook
Adapter
The LED Indicators
The Network Adapter's LEDs display information about network activity.
Power Green. The Power LED lights up when the Adapter is powered on.
Link Green. The Link LED lights up when the Adapter has an active connection.
Figure 3-1: Front Panel
7
Chapter 4: Software Installation and Configuration
Wireless-G Notebook Adapter with SpeedBooster
Chapter 4: Software Installation and Configuration
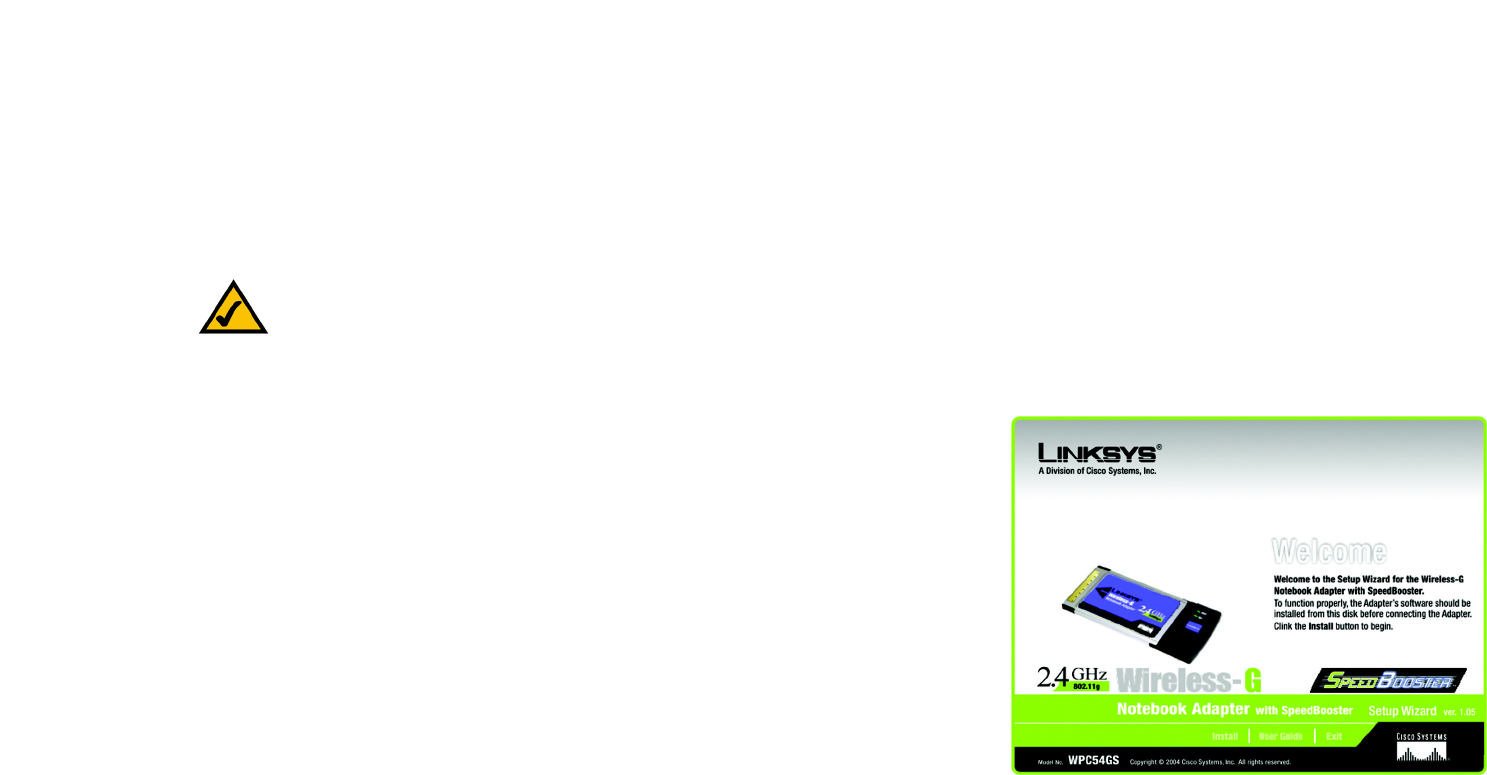
The Wireless Wireless-G Notebook Adapter Setup Wizard will guide you through the installation procedure. The
Setup Wizard will install the WLAN Monitor and driver, as well as configure the Adapter.
Insert the Setup Wizard CD-ROM into your CD-ROM drive. The Setup Wizard should run automatically, and the
Welcome screen should appear. If it does not, click the Start button and choose Run. In the field that appears,
enter D:\setup.exe (if “D” is the letter of your CD-ROM drive).
On the Welcome screen, you have the following choices:
Install - Click the Install button to begin the software installation process.
User Guide - Click the User Guide button to open the PDF file of this User Guide.
Exit - Click the Exit button to exit the Setup Wizard.
NOTE: You must run the Setup Wizard to install the software before installing
the hardware.
Figure 4-1: The Setup Wizard’s Welcome Screen
8
Chapter 4: Software Installation and Configuration
The Installation Procedure
Wireless-G Notebook Adapter with SpeedBooster
The Installation Procedure
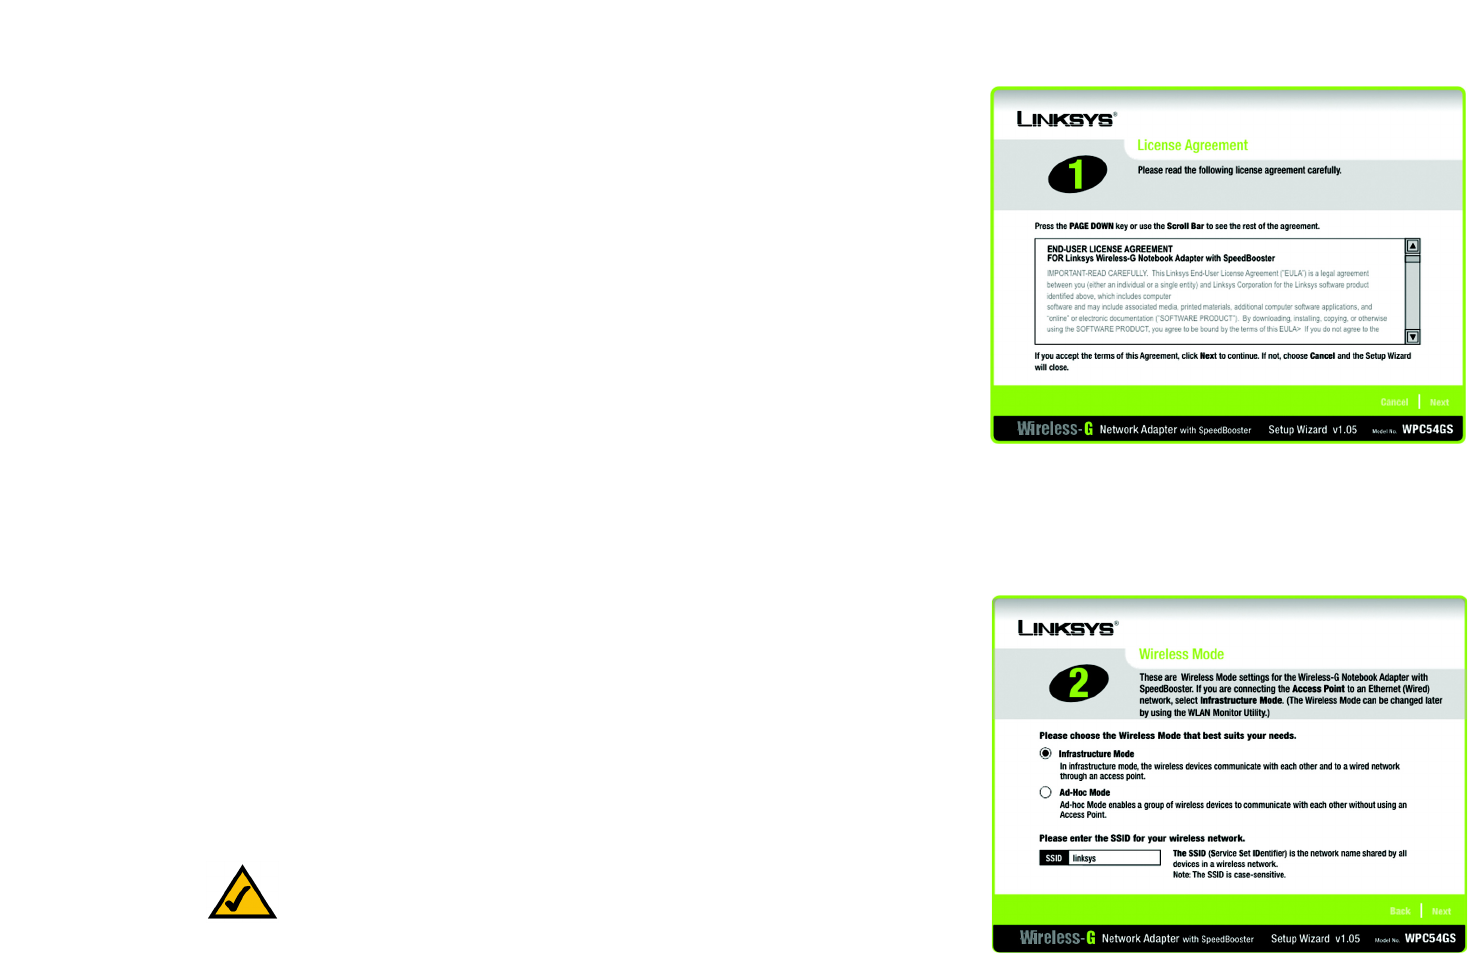
1. To install the Adapter, click the Install button on the Welcome screen.
2. After reading the License Agreement, click the Next button if you agree, or click the Cancel button to end the
installation.
3. The Setup Wizard will ask you to choose a network mode. Click the Infrastructure Mode radio button if you
want your wireless computers to network with computers on your wired network using a wireless access
point. Click the Ad-Hoc Mode radio button if you want multiple wireless computers to network directly with
each other.
In the SSID field, enter the SSID of your wireless network. The SSID must be identical for all devices in the
network. The default setting is linksys (all lowercase). Click the Next button.
Figure 4-2: The Setup Wizard’s License Agreement
Figure 4-3: The Setup Wizard’s Wireless Mode Screen
NOTE: Network SSIDs should be unique to your network and identical for all
devices within the network.

9
Chapter 4: Software Installation and Configuration
The Installation Procedure
Wireless-G Notebook Adapter with SpeedBooster
4. If you chose Infrastructure Mode, go to Step 5 now. If you chose Ad-Hoc Mode, select the correct operating
channel for your network. Then, select the Network Mode from the drop-down menu. Click the Next button,
and go to Step 5. Click the Back button to change any settings.
Channel - The channel you choose should match the channel set on the other devices in your wireless
network. If you are unsure about which channel to use, select the default channel (Channel 6).
Network Mode - Select Mixed Mode, and both Wireless-G and Wireless-B computers will be allowed on the
network, but the speed will be reduced. Select G-Only Mode for maximum speed, but no Wireless-B users
will be allowed on the network.
5. Select the type of security you want to use: 64-bit WEP, 128-bit WEP, or WPA-PSK. All devices in a network
must use the same type.
WEP
WEP - To use WEP encryption, select 64-bits or 128-bit characters from the drop-down menu, and enter a
passphrase or WEP key.
Passphrase - Instead of manually entering a WEP key, you can enter a passphrase in the Passphrase field, so
a WEP key is automatically generated. It is case-sensitive and should not be longer than 16 alphanumeric
characters. This passphrase must match the passphrase of your other wireless network devices and is
compatible with Linksys wireless products only. (If you have any non-Linksys wireless products, enter the
WEP key manually on those products.)
WEP Key - The WEP key you enter must match the WEP key of your wireless network. If you are using 64-bit
WEP encryption, then the key must consist of exactly 10 hexadecimal characters. If you are using 128-bit
WEP encryption, then the key must consist of exactly 26 hexadecimal characters. Valid hexadecimal
characters are “0” to “9” and “A” to “F”.
Transmit Key - The default transmit key number is 1. If your network’s access point or wireless router uses
transmit key number 2, 3, or 4, select the appropriate number from the Transmit Key drop-down box.
Authentication -The default is set to Auto, where it auto-detects for Shared Key or Open system. Shared
Key is when both the sender and the recipient share a WEP key for authentication. Open key is when the
sender and the recipient do not share a WEP key for authentication. All points on your network must use the
same authentication type.
Figure 4-4: The Setup Wizard’s Ad-Hoc Mode Screen
Figure 4-5: The Setup Wizard’s WEP Screen

10
Chapter 4: Software Installation and Configuration
The Installation Procedure
Wireless-G Notebook Adapter with SpeedBooster
Click the Next button to continue.s. Click the Back button to return to the previous screen. Click the Help
button for more information.
WPA-PSK
WPA-PSK offers two encryption methods, TKIP and AES, with dynamic encryption keys.
Select the type of algorithm, TKIP or AES, for the Encryption Type. Enter a WPA Shared Key of 8-63 characters
in the Passphrase field..
Click the Next button to continue.s. Click the Back button to return to the previous screen. Click the Help
button for more information.
6. The Setup Wizard will ask you to review your settings before it starts to install files. Click Next if you are
satisfied with your settings, or click Back to change any settings.
Figure 4-6: The Setup Wizard’s WPA-PSK Screen
Figure 4-7: The Setup Wizard’s Check Settings Screen

11
Chapter 4: Software Installation and Configuration
The Installation Procedure
Wireless-G Notebook Adapter with SpeedBooster
7. After the software has been successfully installed, the Congratulations screen will appear. Click the Exit
button.
Proceed to “Chapter 5: Hardware Installation.”
Figure 4-8: The Setup Wizard’s Congratulations Screen

12
Chapter 5: Hardware Installation
Connecting the Adapter
Wireless-G Notebook Adapter with SpeedBooster
Chapter 5: Hardware Installation
Connecting the Adapter
1. Turn off your notebook PC.
2. Locate an available CardBus slot on your notebook PC.
3. With the connector pin end facing the CardBus slot and the label facing up, as shown in Figure 5-1, slide the
Adapter into the CardBus slot until it locks in place.
4. Restart your notebook PC. The Power LED should light up when the Adapter is installed correctly.
5. Windows will begin copying the driver files to your computer. If Windows asks you for the original Windows
CD-ROM, insert the CD-ROM, and direct Windows to its correct location (e.g., D:\).
The installation of the Wireless-G Notebook Adapter is complete.
If you want to check the link information, search for available wireless networks, or make additional
configuration changes, go to “Chapter 6: Using the Wireless Network Monitor.”
Figure 5-1: How the Adapter installs into your notebook
NOTE: You must run the Setup Wizard to install the software before installing
the hardware.

13
Chapter 6: Using the Wireless Network Monitor
Accessing the WLAN Monitor
Wireless-G Notebook Adapter with SpeedBooster
Chapter 6: Using the Wireless Network Monitor
Use the WLAN Monitor to check the link information, search for available wireless networks, or create profiles
that hold different configuration settings.
Accessing the WLAN Monitor
After installing the Adapter, the Wireless-G Notebook Adapter WLAN Monitor icon will appear in your system tray.
Double-click the icon.
The Link Information screen will appear. From this screen, you can find out how strong the current wireless signal
is and how good the connection’s quality is. You can also click the More Information button to view additional
status information about the current wireless connection. To search for available wireless networks, click the
Site Survey tab. To perform configuration changes, click the Profiles tab.
Link Information
The Link Information screen displays network mode, signal strength, and link quality information about the
current connection. It also provides a button to click for additional status information.
Ad-Hoc Mode or Infrastructure Mode - The screen indicates whether the Adapter is currently working in ad-
hoc or infrastructure mode.
Signal Strength - The Signal Strength bar indicates signal strength.
Link Quality - The Link Quality bar indicates the quality of the wireless network connection.
Click the More Information button to view additional information about the wireless network connection.
Figure 6-1: Link Information