LINKSYS WPC54GSV2 Wireless-G Notebook Adapter User Manual WPC54GS UG 40220NC
LINKSYS LLC Wireless-G Notebook Adapter WPC54GS UG 40220NC
LINKSYS >
Contents
- 1. Users Manual 1
- 2. Users Manual 2
- 3. Users Manual 3
- 4. Users Manual 4
- 5. Users Manual 5
Users Manual 3

14
Chapter 6: Using the Wireless Network Monitor
Link Information
Wireless-G Notebook Adapter with SpeedBooster
Clicking the More Information button displays more information about the Adapter’s connection, as shown
below:
Wireless Network Status
The Networks Settings screen provides information on your current network settings.
Wireless Network Status
Status - The status of the wireless network connection.
SSID - This is the unique name of the wireless network.
Wireless Mode - The mode of the wireless network currently in use is displayed here.
Transfer Rate - The data transfer rate of the current connection is shown here.
Channel - The channel to which the wireless network devices are set.
Encryption- The status of the security feature.
Authentication - This is your wireless network’s authentication method.
Network Mode - The wireless mode currently in use.
IP Address - The IP Address of the Adapter.
Subnet Mask - The Subnet Mask of the Adapter.
Default Gateway - The Default Gateway address of the Adapter.
DNS - The DNS address of the Adapter.
DHCP Client- This displays the status of the DHCP client.
MAC - The MAC address of the wireless network’s access point.
Signal Strength - The Signal Strength bar indicates the signal strength.
Link Quality - The Link Quality bar indicates the quality of the wireless network connection.
Figure 6-2: More Information-Network Settings

15
Chapter 6: Using the Wireless Network Monitor
Link Information
Wireless-G Notebook Adapter with SpeedBooster
Click the Statistics button to go to the Network Statistics screen. Click the Back button to return to the initial
Link Information screen. Click the Save to Profile button to save the currently active connection to a profile.
Wireless Network Statistics
The Networks Statistics screen provides statistics on your current network settings.
Transmit Rate - The data transfer rate of the current connection.(In Auto mode, the Adapter dynamically shifts to
the fastest data transfer rate possible at any given time.)
Receive Rate - The rate that data is received.
Packets Received - This shows the packets received by the Adapter, in real time, since connecting to the
Wireless Network or since the Refresh button was last pressed.
Packets Transmitted - This shows the packets transmitted from the Adapter, in real time, since connecting to
the Wireless Network or since the Refresh button was last pressed.
Bytes Received - This shows the bytes received by the Adapter, in real time, since connecting to the Wireless
Network or since the Refresh button was last pressed.
Bytes Transmitted - This shows the bytes transmitted from the Adapter, in real time, since connecting to the
Wireless Network or since the Refresh button was last pressed.
Noise Level - This is your wireless network’s authentication method.
Signal Strength - This shows the Adapter’s IP Address.
Driver Version - This shows the version of the Adapter’s driver.
Signal Strength - The Signal Strength bar indicates the signal strength.
Link Quality - The Link Quality bar indicates the quality of the wireless network connection.
Click the Back button to return to the initial Link Information screen. Click the Status button to go to the
Network Status screen. Click the Save to Profile button to save the currently active connection to a profile. Click
the Refresh Stats button to refresh the screen.
Figure 6-3: More Information-Network Statistics

16
Chapter 6: Using the Wireless Network Monitor
Site Survey
Wireless-G Notebook Adapter with SpeedBooster
Site Survey
The Site Survey screen displays a list of infrastructure and ad-hoc networks available for connection in the table
on the right. This table shows the network’s SSID, Channel, and the quality of the wireless signal the Adapter is
receiving. You may click SSID, CH (Channel), or Signal, to sort by that field.
SSID - The SSID or unique name of the wireless network.
CH - The channel upon which the network broadcasts.
Signal - The percentage of signal strength, from 0 to 100%.
Site Information
For each network selected, the following settings are listed:
SSID - The SSID or unique name of the wireless network.
Wireless Mode - The mode of the wireless network currently in use.
Channel - The channel to which the wireless network devices are set.
Encryption- The status of the encryption security feature.
MAC - The MAC address of the wireless network’s access point.
Refresh - Click the Refresh button to perform a new search for wireless devices.
Connect - To connect to one of the networks on the list, select the wireless network, and click the Connect
button.
Figure 6-4: Site Survey

17
Chapter 6: Using the Wireless Network Monitor
Profiles
Wireless-G Notebook Adapter with SpeedBooster
Profiles
The Profiles screen lets you save different configuration profiles for different network setups. The table on the
right displays a list of infrastructure and ad-hoc networks available for connection This table shows the network’s
profile name and the wireless network’s SSID, as set in the connection profile.
Profile Information
For each profile selected, the following are listed:
Wireless Mode - The mode of the wireless network currently in use.
Transfer Rate - The Adapter is set to Auto mode, so it will dynamically shift to the fastest data transfer rate
possible at any given time.
Channel - The channel to which the wireless network devices are set.
Encryption- The status of the encryption security feature.
Authentication - The authentication setting for the network.
Connect - To connect to a wireless network using a specific profile, select the profile, and click the Connect
button.
New - Click the New button to create a new profile. See the next section, “Creating a New Profile,” for detailed
instructions.
Edit - Select a profile, and click the Edit button to change an existing profile.
Import - Click the Import button to import a profile that has been saved in another location. Select the
appropriate file, and click the Open button.
Export - Select the profile you want to save in a different location, and click the Export button. Direct Windows to
the appropriate folder, and click the OK button.
Delete - Click the Delete button to delete a profile.
Figure 6-5: Profiles
Figure 6-6: Importing a Profile
Figure 6-7: Exporting a Profile
NOTE: If you want to export more than one profile, you have to export them one at a time.

18
Chapter 6: Using the Wireless Network Monitor
Creating a New Profile
Wireless-G Notebook Adapter with SpeedBooster
Creating a New Profile
1. On the Profiles screen, click the New button to create a new profile.
2. Enter a name for the new profile, and click the OK button. Click the Cancel button to return to the Profiles
screen without entering a name.
Figure 6-8: Creating a New Profile
Figure 6-9: Enter Profile Name
19
Chapter 6: Using the Wireless Network Monitor
Creating a New Profile
Wireless-G Notebook Adapter with SpeedBooster
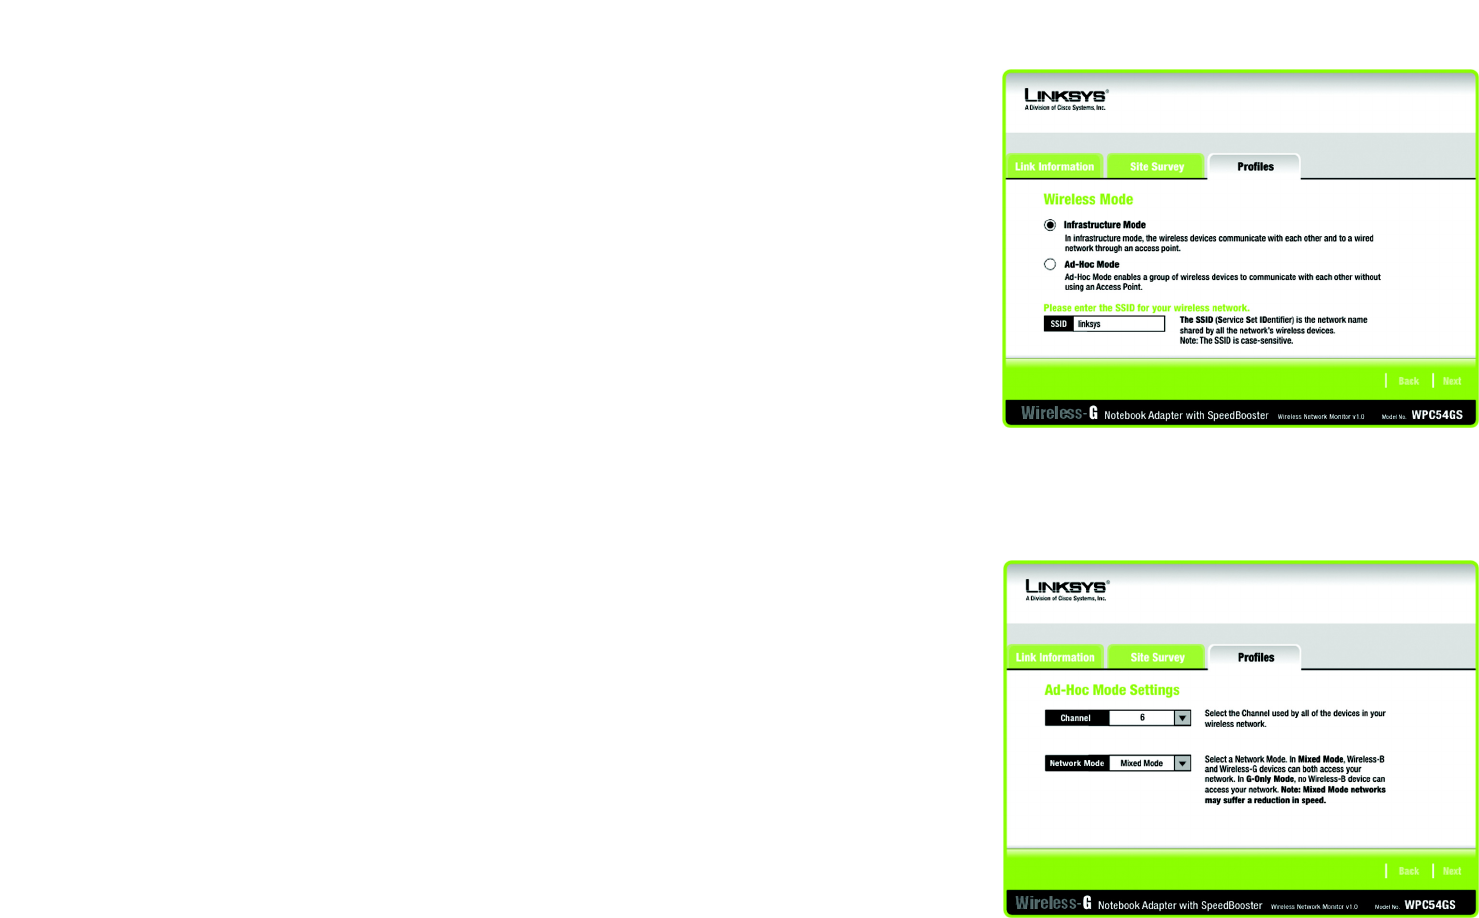
3. The Wireless Mode screen shows a choice of two wireless modes. Click the Infrastructure Mode radio
button if you want your wireless computers to communicate with computers on your wired network via a
wireless access point. Click the Ad-Hoc Mode radio button if you want multiple wireless computers to
communicate directly with each other. Enter the SSID for your network.
Click the Next button to continue or the Back button to return to the previous screen.
Infrastructure Mode - This mode allows wireless and wired networks to communicate through an access
point.
Ad-Hoc Mode - This mode allows wireless-equipped computers to communicate directly with each other. No
access point is used.
SSID - The network name. It must be used for all the devices in your wireless network. It is case sensitive. It
should be a unique name to help prevent others from entering your network.
4. The Ad-Hoc Mode Settings screen will appear. If you chose Infrastructure Mode, go to Step 5 now. If you
chose Ad-Hoc Mode, select the correct operating channel for your network from the Channel drop-down
menu. Then, select the Network Mode from the drop-down menu. Click the Next button, and go to Step 5.
Click the Back button to change any settings.
Channel - The channel you choose should match the channel set on the other devices in your wireless
network. If you are unsure about which channel to use, select the default channel (Channel 6).
Network Mode - Select Mixed Mode, and both Wireless-G and Wireless-B computers will be allowed on the
network, but the speed may be reduced. Select G-Only Mode for maximum speed, but no Wireless-B users
will be allowed on the network. Select B-Only Mode for Wireless-B users only.
Figure 6-11: Ad-Hoc Mode Settings
Figure 6-10: Wireless Mode for New Profile
20
Chapter 6: Using the Wireless Network Monitor
Creating a New Profile
Wireless-G Notebook Adapter with SpeedBooster
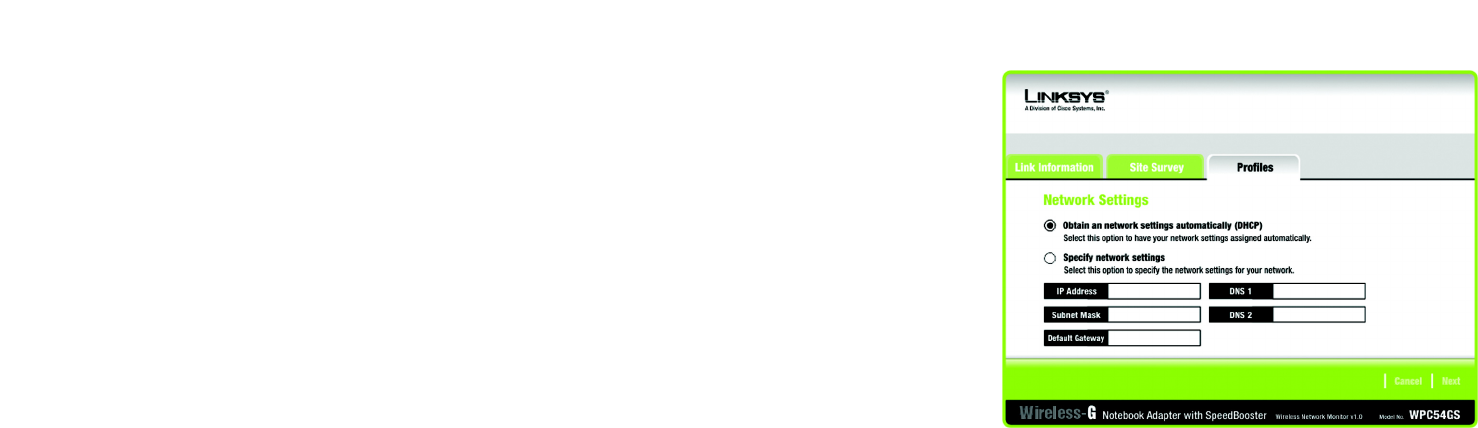
5. The Network Settings screen will appear next. If your network has a DHCP server, click the radio button next
to Obtain an IP address automatically (DHCP). Click the Next button to continue, or click the Cancel button
to return to the Profiles screen.
If your network does not have a DHCP server, click the radio button next to Specify the IP Setting. Enter an IP
Address, Subnet Mask, Default Gateway, and DNS appropriate for your network. You must specify the IP
Address and Subnet Mask on this screen. If you are unsure about the Default Gateway and DNS address,
leave these fields empty. Click the Next button to continue, or click the Cancel button to return to the Profiles
screen.
IP Address - This IP Address must be unique to your network.
Subnet Mask - The Adapter’s Subnet Mask must be the same as your wired network’s Subnet Mask.
Default Gateway - Enter the IP address of your network’s Gateway here.
DNS 1 and DNS 2 - Enter the DNS address of your (wired) Ethernet network here
Figure 6-12: Netowork Settings

21
Chapter 6: Using the Wireless Network Monitor
Creating a New Profile
Wireless-G Notebook Adapter with SpeedBooster
6. The Wireless Security screen will appear. Select WEP, WPA-PSK, WPA Radius, or Radius for the Encryption
Method. WEP stands for Wired Equivalent Privacy, WPA-PSK stands for Wi-Fi Protected Access Pre-Shared
Key, which is a security standard stronger than WEP encryption, and RADIUS stands for Remote
Authentication Dial-In User Service. If you don’t want to use encryption, select Disabled. Then, click the Next
button to continue or the Back button to return to the previous screen.
WEP
WEP - To use WEP encryption, select 64-bits or 128-bit characters from the drop-down menu, and enter a
passphrase or key.
Authentication -The default is set to Auto, where it auto-detects for Shared Key or Open system. Shared
Key is when both the sender and the recipient share a WEP key for authentication. Open key is when the
sender and the recipient do not share a WEP key for authentication. All points on your network must use the
same authentication type.
Passphrase - Instead of manually entering a WEP key, you can enter a passphrase in the Passphrase field,
so a WEP key is automatically generated. It is case-sensitive and should not be longer than 16 alphanumeric
characters. This passphrase must match the passphrase of your other wireless network devices and is
compatible with Linksys wireless products only. (If you have any non-Linksys wireless products, enter the
WEP key manually on those products.)
Transmit Key - The default transmit key number is 1. If your network’s access point or wireless router uses
transmit key number 2, 3, or 4, select the appropriate number from the Transmit Key drop-down box.
Key 1- The WEP key you enter must match the WEP key of your wireless network. If you are using 64-bit WEP
encryption, then the key must consist of exactly 10 hexadecimal characters. If you are using 128-bit WEP
encryption, then the key must consist of exactly 26 hexadecimal characters. Valid hexadecimal characters
are “0” to “9” and “A” to “F”.
Figure 6-14: WEP Setting for New Profile
Figure 6-13: Wireless Security for New Profile

22
Chapter 6: Using the Wireless Network Monitor
Creating a New Profile
Wireless-G Notebook Adapter with SpeedBooster
WPA-PSK
WPA-PSK offers two encryption methods, TKIP and AES, with dynamic encryption keys. Click the Next button
to continue and the screen in Figure 6-17 appears. Click the Back button to return to the previous screen.
Select the type of algorithm, TKIP or AES, for the Encryption Type. Enter a WPA Shared Key of 8-63 characters
in the Passphrase field.
WPA RADIUS.
Figure 6-15: WPA-PSK Settings
Figure 6-16: TKIP Settings