Medtronic MiniMed 2007C Implantable Insulin Pump User Manual Dmp9196021 011 c
Medtronic MiniMed, Inc. Implantable Insulin Pump Dmp9196021 011 c
Contents
physician part4

145
APPENDIX D Precautions and General
Procedures
Special note and precautions
Before beginning the implant, refill, stroke volume measurement, rinse/
flush, or pressure measurement procedure, carefully read this Appendix
and keep the information in mind as you perform each procedure.
1. All procedures should be performed using ASEPTIC TECHNIQUE.
2. Air in the Pump System has been shown to be a significant contribut-
ing factor to aggregation of insulin. Proper degassing of all solutions
that enter the Pump is essential. Read the insert in the syringe packag-
ing about the degassing procedure.
3. When using the refill kit, never release the syringe-locking ring while
there is a vacuum within the refill syringe. The plunger of the syringe
will snap back forcefully and may rupture the syringe and eject the
contents.
4. It is important that the syringe needle is perpendicular to the fill port
to prevent binding when entering or exiting.
5. The Side Port Catheter attachment site contains up to 20 units of
INSULIN. The distal portion of the Catheter and the tubing can con-
tain up to 13 units of INSULIN. However, the INSULIN in the Pump
fluid pathway and the side port receptacle can be cleared by following
the procedure to pull RINSE BUFFER through the side port. During
Dmp9196021-011_c.book Page 145 Wednesday, April 3, 2002 5:07 PM

146
a flush procedure to push out a catheter tip blockage, the 13 units in
the distal catheter will be delivered to the patient. The 13 units can be
managed by programming cautions bolus amounts prior to the proce-
dure, or with the use of oral or IV glucose as needed during the proce-
dure. Individual patient response to INSULIN bolus amounts must be
considered.
6. Patient blood glucose monitoring must be performed during, and up to
one hour after the procedure. Oral and intravenous glucose should be
available for glycemic management.
7. After the flush procedure, at least 13 units of RINSE BUFFER will
remain in the distal portion of the catheter. Programmed bolus
amounts to remove the RINSE BUFFER may be completed before
the patient leaves the clinic. A prescribed INSULIN basal rate should
be programmed when the system is clear of RINSE BUFFER.
8. Never push down on the plunger to fill the Pump. When the MiniMed
refill needle is properly seated in the fill port, the vacuum in the reser-
voir will draw the fluid from the syringe.
9. Each step of the procedure will list the syringes and appropriate fluids
needed for that step. It is suggested that the syringes be prepared and
labeled prior to the start of the procedure.
10. The Side Port Catheter is intended to be accessed only during the
implant procedure, the combined rinse/flush procedure, the catheter
flush procedure, and for diagnostic procedures. The catheter is not
intended to provide access to the peritoneum for bolus injections of
fluids or for withdrawal of body fluids.
General procedures
Before beginning any of the procedures, be sure you are familiar with the
general techniques for locating the Pump fill port and the Side Port Cath-
eter, accessing the Pump inlet, venting the refill syringe, and preparing the
syringes.
Dmp9196021-011_c.book Page 146 Wednesday, April 3, 2002 5:07 PM
Special note and precautions 147
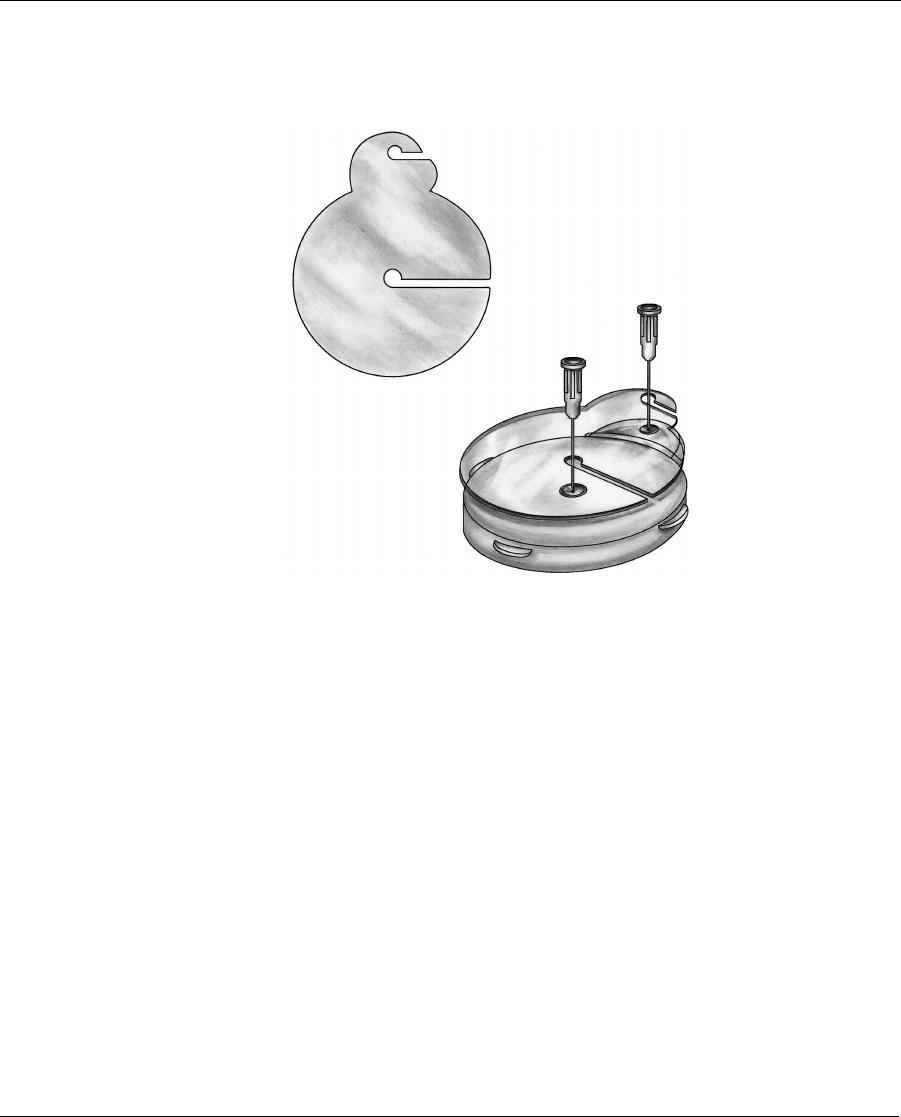
Locating the pump fill port and the side port
Figure 16: Template and Placement on Skin with Guide Needles in
Position
1. Locate the Pump, then aseptically prep and drape the Pump area. Use
topical or local anesthetic if desired.
2. To locate the Pump fill port, located in the center of the Pump, align
the sterile template (MMT-4106) over the Pump by palpating the
Pump circumference. Then insert an 18 gauge needle into the central
Pump fill port as shown in below:
3. To locate the side port, palpate around the circumference of the Pump.
It is helpful to grasp the side port between the thumb and index finger
when aligning the template.
4. Using the template as a guide, insert the second 18 gauge needle into
the side port as shown. The side port can be accessed by inserting the
guide needle just inside the outer edge of the side port connection.
Dmp9196021-011_c.book Page 147 Wednesday, April 3, 2002 5:07 PM
148
This outer edge is raised around the outer aspect of the side port, in
order to help guide the needle into the port.
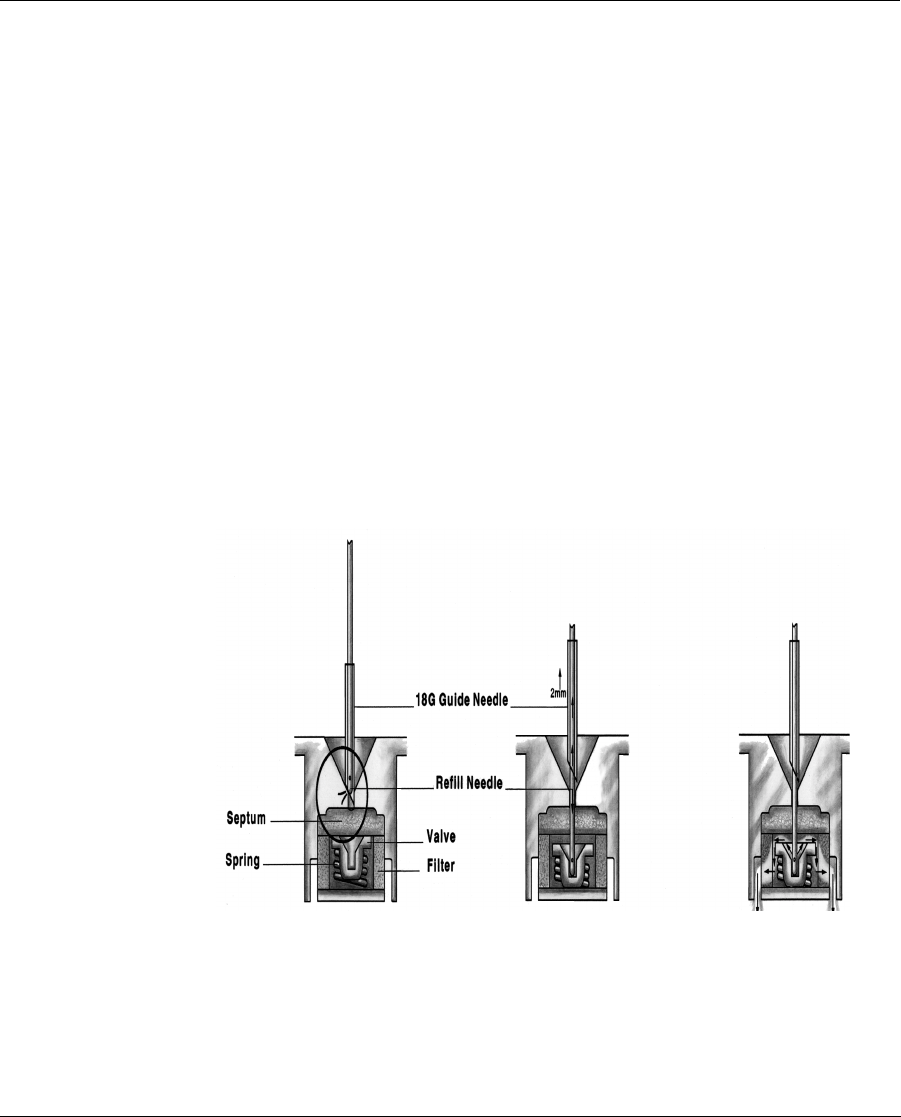
Accessing the pump inlet
To enter the Pump fill port or the side port, make sure the refill syringe
stopcock is closed, then pass the MiniMed refill needle (MMT- 4102)
through the 18 gauge guide needle. Pull back slightly (approximately 2
mm) on the guide needle to allow the MiniMed refill needle to enter the
Pump fill port or the side port. The refill needle entry opens the inlet
valve of the Pump fill port.
After passing through the septum and seating in the valve, you can feel
the increased force, about 0.5 pounds, required to move the valve 0.5 mil-
limeter to open. Maintain this downward pressure in the pump fill port to
ensure that the inlet valve remains open.
In the case of the side port, a downward pressure is not required after the
needle is completely inserted.
Figure 17: Inlet Valve
Dmp9196021-011_c.book Page 148 Wednesday, April 3, 2002 5:07 PM
Special note and precautions 149
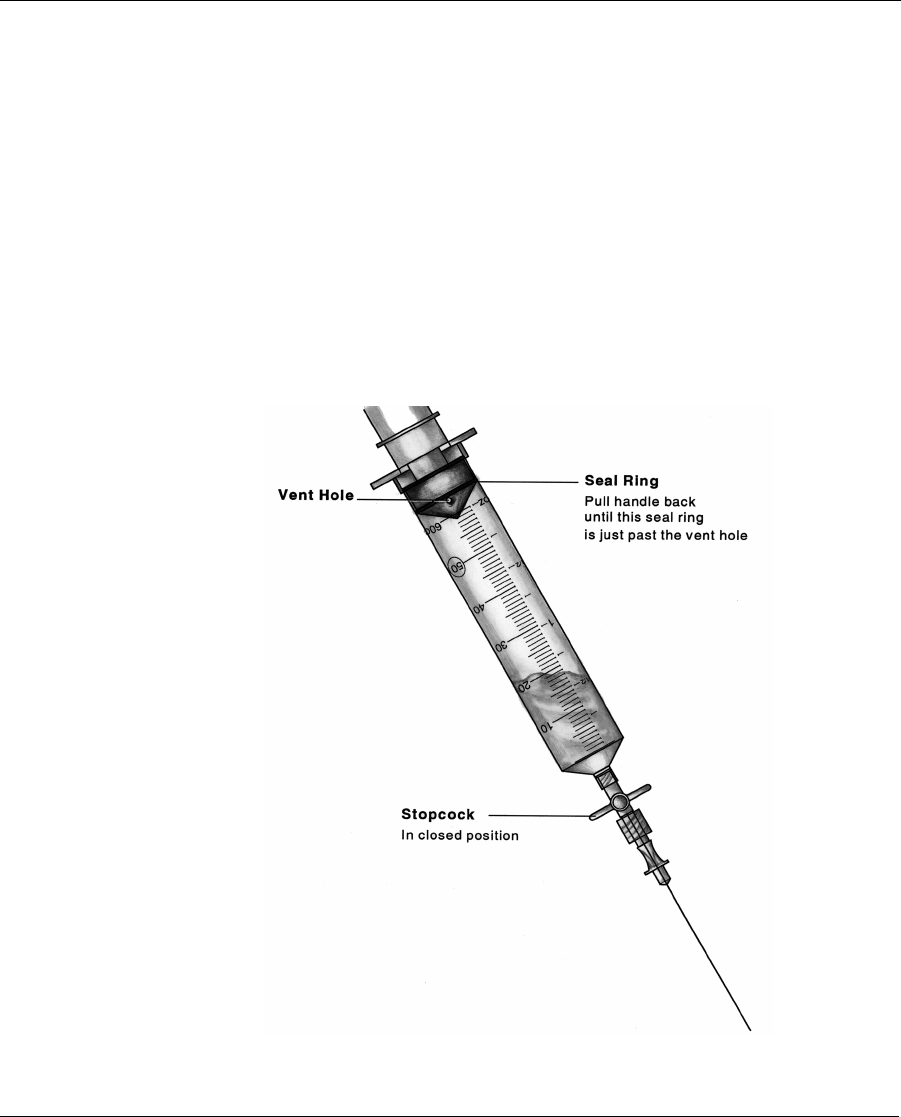
Venting the Minimed refill syringe (optional)
In order to fill the Pump, it may be necessary to vent the headspace in the
MiniMed refill syringe. Refill syringes do not have lubricant on the
syringe housing or on the plunger tip. Some syringes may be “sticky” and
require the venting procedure described below to assist the vacuum in the
Pump to overcome this condition.
To vent, hold the syringe with the refill needle pointing down. Vent the
syringe headspace by pulling back firmly on the plunger until the second
sealing ring on the rubber cap passes beyond the vent hole as shown in
Figure 18.
Figure 18: Venting the Refill Syringe
Dmp9196021-011_c.book Page 149 Wednesday, April 3, 2002 5:07 PM

150
NOTE: Be sure that the plunger is retracted far enough
that the vent hole is exposed. The syringe must be
held with the needle facing down and used within
10 minutes once it is vented. If this time limit is
exceeded, repeat the degassing procedure.
Dmp9196021-011_c.book Page 150 Wednesday, April 3, 2002 5:07 PM

151
APPENDIX E Pump Rinse Procedure
The purpose of this procedure is to dissolve insulin deposits within the
Pump reservoir, pumping mechanism, and the Side Port Catheter “port.”
Supplies and solutions
Prior to performing this procedure, assemble the necessary supplies and
solutions as outlined below:
Supplies
• Steri-Strips® and markers
• Local anesthesia (if necessary)
• Sharps container
• Safety glasses
• PPC
• Oral or IV glucose
• Glucose monitoring equipment
•Drapes
• One (1) scale - 0.01 gram resolution
• One (1) 250 ml sterile beaker
• One (1) sterile bag for PPC (intestinal or cassette bags work well)
• One (1) Side port locating template, MMT-4106
• Seven (7) Refill kits, MMT-4105
Dmp9196021-011_c.book Page 151 Wednesday, April 3, 2002 5:07 PM

152
• Seven (7) MiniMed MMT-4102 refill needles. (Extra needles
should be available to use as needed)
• Eight (8) sharp 18 gauge regular bevel needles
Solutions
• 50 mL’s sterile 0.1 M NaOH (0.4 grams NaOH per 100 ml of
Sterile water for injection)
• Seven (7) 10 ml vials, Aventis rinse buffer solution
• Five (5) 10 ml vials, Aventis HOE 21 PH, U-400 Insulin
The 0.1 M of NaOH used in this proce-
dure can cause permanent eye dam-
age. Safety glasses must be worn
during this procedure.
!
WARNING
Dmp9196021-011_c.book Page 152 Wednesday, April 3, 2002 5:07 PM

153
Preparing for the procedure
NOTE: Before beginning any refill, flush, stroke volume
measurement, carefully read Appendix D, Precau-
tions and General Procedures, and keep this
in mind as you perform each procedure.
In order to prepare for the Side Port Catheter rinse and flush procedure, a
total of seven syringes will need to be labeled and then prepared with dif-
ferent solutions. Table 1 defines the syringe numbers and corresponding
solutions:
Prepare syringes for emptying the Pump
Syringe 1 is used for emptying the Pump. Label and prepare syringe 1 per
Table 1.
Prepare syringes for filling the Pump
During the Catheter rinse/flush procedure, syringes 2, 3, 4, 5, 6, and 7 are
used for filling the Pump. Each of these syringes needs to be labeled with
its solution and syringe number, and then filled and degassed per Table 1.
Program minimal basal rate
Place the PPC in a sterile bag and program the Pump to “SUSPEND”
mode, the basal rate will be 0.2 U/h.
Syringe # Syringe Type Volume Solution
Refill 5 ml RINSE BUFFER
Refill 20 ml NaOH
Refill 30 ml NaOH
Refill 20 ml RINSE BUFFER
Refill 30 ml RINSE BUFFER
Refill 20 ml INSULIN
Refill 30 ml INSULIN
Dmp9196021-011_c.book Page 153 Wednesday, April 3, 2002 5:07 PM

154
Remove insulin from the Pump and fill with NaOH
INSULIN is removed from the Pump and then the Pump is filled with
NaOH. The following volumes are used:
• Syringe 1 - 5 ml RINSE BUFFER
• Syringe 2 - 20 ml Naoh
• Syringe 3 - 30 ml NaOH
Follow the steps below to perform this procedure:
Syringe 1: Rinse Buffer
1. Prime the needle. Weigh the syringe and record the weight on the
refill form (Line A).
2. Close the stopcock. Obtain a vacuum by pulling back on the plunger
until it locks. Press the lock into the plunger groove to be sure it is
firmly secured.
3. Enter the Pump with the refill needle.
4. Open the stopcock; withdraw the INSULIN. After the INSULIN
appears to have stopped rising in the syringe, wait an additional 30
seconds to make sure all of the INSULIN and air is removed.
NOTE: Air in the Pump System has been shown to be a
significant contributing factor to aggregation of
INSULIN. Proper degassing of all solutions that
enter the Pump is essential.
5. When the 30 second time has elapsed, close the stopcock, remove the
syringe. Weigh the syringe and record the weight on the refill form.
Discard the INSULIN in the syringe except for a 5 ml barrier. This
syringe will be used to pull NaOH through the side port. Attach and
prime a new refill needle.
Dmp9196021-011_c.book Page 154 Wednesday, April 3, 2002 5:07 PM

155
The 0.1 M NaOH used in this procedure
can cause permanent eye damage. Safety
glasses must be worn during this proce-
dure.
Syringe 2: NaOH
6. Prime the needle. Close the stopcock
7. Enter the Pump with the refill needle.
8. Open the stopcock and allow the Pump to fill completely with NaOH.
When the fluid level stops moving, the Pump is filled.
9. Close the stopcock. Remove the syringe.
10. Prepare syringe 2 for aspiration. Remove the air from the syringe.
Close stopcock and obtain a vacuum by pulling back on the plunger
until it locks. Press the lock into the plunger groove to be sure it is
firmly secured.
11. Re-enter the Pump.
12. Open the stopcock and remove the NaOH. After the fluid level stops
moving, wait an additional 30 seconds for all the NaOH to be
removed.
13. When the time has elapsed, close the stopcock and remove the
syringe. Discard syringe 2.
!
WARNING
Dmp9196021-011_c.book Page 155 Wednesday, April 3, 2002 5:07 PM

156
Syringe 3:NaOH (degassed)
14. Prime the needle. Close the stopcock.
15. Enter the Pump fill port with the refill needle.
16. Open the stopcock and allow the Pump to fill completely with NaOH.
When the Pump is filled, approximately 10 ml will remain in the
syringe. Leave this NaOH in the syringe, and leave this syringe in
place for the next step.
Equilibrate and pull NaOH through system
The reservoir pressure in the Pump is equilibrated with outside ambient
pressure and NaOH is pulled through the pumping mechanism. This pro-
cedure uses the following volumes in syringes 3 and 1:
• Syringe 3 with residual NaOH from the previous section.
• Syringe 1 with 5 ml insulin/buffer mixture from previous section.
Syringe 3: NaOH (residual)
1. Verify that the stopcock on syringe 3 is open .
2. Prime the needle. Close the stopcock .
3. Obtain a vacuum by pulling back on the plunger until it locks. Press
the lock into the plunger groove to be sure it is firmly secured.
4. Enter the side port with the stopcock closed.
5. Open the stopcock.
6. Program and deliver a 4 unit bolus to open the valve in the Pump
mechanism.
7. Observe syringe 3. When the level of the NaOH approaches 2 ml,
close the stopcock to prevent air from entering the Pump. Observe
syringe 1. At least 1 ml of NaOH must pass into syringe 1 in order to
thoroughly clean the Pump mechanism. If less than 1 ml enters, repeat
Dmp9196021-011_c.book Page 156 Wednesday, April 3, 2002 5:07 PM

157
the bolus from Step 6, some pumps may require 3 successive bolus to
obtain 1 ml.
NOTE: In order to completely dissolve deposits in the
Pump mechanism, it is important to maintain a
vacuum with syringe 1 and deliver the entire
bolus.
8. After the bolus, close the stopcock on syringe 1. Remove both
syringes. Set aside syringe 3 for use in removing the NaOH from the
Pump fill port in the next step. Discard syringe 1.
Remove NaOH and fill with rinse buffer
The NaOH is removed from the Pump and the system is filled with
RINSE BUFFER. This procedure uses the following volumes in syringes
3, 4, and 5:
• Syringe 3 with residual of at least 5 ml NaOH from the previous
step
• Syringe 4 with 20 ml RINSE BUFFER
• Syringe 5 with 30 ml RINSE BUFFER
Syringe 3: NaOH (residual)
1. Prepare syringe for aspiration.
2. Close the stopcock and obtain a vacuum by pulling back on the
plunger until it locks. Press the lock into the plunger groove to be
sure it is firmly secured.
3. Enter the Pump with the refill needle.
4. Open the stopcock and withdraw all the NaOH. After the NaOH
appears to have stopped rising in the syringe, wait an additional 30
seconds to make sure all the NaOH and air is removed.
5. When the time has elapsed, close the stopcock, remove the syringe,
and discard.
Dmp9196021-011_c.book Page 157 Wednesday, April 3, 2002 5:07 PM

158
Syringe 4: Rinse Buffer degassed)
6. Prime the needle. Close the stopcock.
7. Enter the Pump with the refill needle and syringe.
8. Open the stopcock and allow the Pump to fill completely with RINSE
BUFFER. When the fluid level stops moving, the Pump is filled.
9. Close the stopcock. Remove the syringe.
10. Prepare syringe 4 for aspiration. Obtain a vacuum by pulling back on
the plunger until it locks. Press the lock into the plunger groove to be
sure it is firmly secured.
11. Re-enter the Pump.
12. Open the stopcock and remove the RINSE BUFFER. After the fluid
level stops moving, wait an additional 30 seconds for all the RINSE
BUFFER and air to be removed.
13. When the time has elapsed, close the stopcock and remove the syringe
and set aside.
Syringe 5: Rinse Buffer (degassed)
14. Prime the needle. Close the stopcock.
15. Enter the Pump fill port with the refill needle.
16. Open the stopcock and allow the Pump to fill completely with RINSE
BUFFER. When the fluid level stops moving, the Pump is filled.
When the pump is filled, approximately 10 ml of RINSE BUFFER
will remain in the syringe. Leave the RINSE BUFFER in the syringe
and leave the syringe in place for the next step.
Dmp9196021-011_c.book Page 158 Wednesday, April 3, 2002 5:07 PM

159
Equilibrate and pull rinse buffer through system
The reservoir pressure in the Pump is equilibrated with outside ambient
pressure and RINSE BUFFER is pulled through the fluid system. This
procedure uses the following volumes in syringes 4 and 5:
• Syringe 4 with RINSE BUFFER. Expel all RINSE BUFFER
except 5 ml. Change refill needle if desired.
• Syringe 5 with residual RINSE BUFFER from previous step
Syringe 5: Rinse Buffer
1. Verify that the stopcock on syringe 5 is open.
2. Prime the needle of syringe 4. Close the stopcock.
3. Obtain a vacuum by pulling back on the plunger until it locks. Press
the lock into the plunger groove to be sure it is firmly secured.
4. Enter the side port with the stopcock closed.
5. Open the stopcock.
6. To open the valve in the Pump mechanism, program and deliver a 4
unit bolus using the PPC.
7. Observe syringe 4. When at least 1 ml of RINSE BUFFER has
entered syringe 4, close both stopcocks and remove the syringes. If
less than 1 ml enters, repeat the bolus from Step 6. Some Pumps may
require 3 successive boluses to obtain 1 ml. Discard syringe 4 and set
aside syringe 5 to be used later to remove RINSE BUFFER.
Remove rinse buffer and fill with insulin
The RINSE BUFFER is removed from the Pump fluid system and the
system is filled with INSULIN. This procedure uses the following vol-
umes in syringes 5, 7, and 8:
• Syringe 5 with residual RINSE BUFFER from the previous steps
• Syringe 6 with 20 ml INSULIN
Dmp9196021-011_c.book Page 159 Wednesday, April 3, 2002 5:07 PM

160
• Syringe 7 with 30 ml INSULIN
Syringe 5: Rinse Buffer (residual)
1. Prime the needle. Close the stopcock.
2. Obtain a vacuum by pulling back on the plunger until it locks. Press
the lock into the plunger groove to be sure it is firmly secured.
3. Enter the Pump with the refill needle and syringe.
4. Open the stopcock and remove the RINSE BUFFER. After the fluid
level stops moving, wait an additional 30 seconds to make sure all the
RINSE BUFFER and air is removed.
5. When the time has elapsed, close the stopcock, remove the syringe,
and discard.
Syringe 6: Insulin (degassed)
6. Prime the needle. Close the stopcock .
7. Enter the Pump fill port with the refill needle and syringe.
8. Open the stopcock and allow the Pump to fill completely with INSU-
LIN. When the fluid level stops moving, the Pump is filled.
9. Close the stopcock and remove the syringe.
10. Prepare syringe 6 for aspiration. Prime needle and close stopcock.
Obtain a vacuum by pulling back on the plunger until it locks. Press
the lock into the plunger groove to be sure it is firmly secured.
11. Re-enter the Pump.
12. Open the stopcock, remove the INSULIN. After the fluid level stops
moving, wait an additional 30 seconds for all the INSULIN and air to
be removed.
13. When the time has elapsed, close the stopcock and remove the
syringe. Discard all but 5 ml of solution. Remove any air, prime nee-
Dmp9196021-011_c.book Page 160 Wednesday, April 3, 2002 5:07 PM

161
dle and close stopcock. Set aside the syringe.
Syringe 7: Insulin (degassed)
14. Prime the needle on syringe 7. Weigh and record the combined weight
of syringes 6 and 7 on the Refill Form.
15. Close the stopcock. Enter the Pump fill port with the refill needle.
16. Open the stopcock and allow the Pump to fill completely with INSU-
LIN. When the fluid level stops moving, the pump is filled. When the
Pump is filled, approximately 10 ml of INSULIN will remain in the
syringe. Leave the syringe in place for the next step.
Equilibrate and pull insulin through system
The reservoir pressure in the Pump is equilibrated with outside ambient
pressure and INSULIN is pulled through the fluid system. This procedure
uses the following volumes in syringes 6 and 7:
• Syringe 7 with residual INSULIN from previous step
• Syringe 6 with 5 ml solution. To perform this procedure with
syringes 6 and 7, follow the steps below:
Syringe 6: Insulin (residual)
Syringe 7: Insulin (residual)
1. Maintain syringe 7 with approximately 10 ml of residual INSULIN in
the Pump fill port. Verify that the stopcock on syringe 7 is open.
2. Prime the syringe 6 needle. Close the stopcock.
3. Obtain a vacuum in syringe 6 by pulling back on the plunger until it
locks. Press the lock into the plunger groove to be sure it is firmly
secured.
4. Enter the side port with syringe 6 - stopcock closed.
5. Open the stopcock on syringe 6.
Dmp9196021-011_c.book Page 161 Wednesday, April 3, 2002 5:07 PM

162
6. Using the PPC, program and deliver a 4 unit bolus.
7. Observe syringe 7. If the level of INSULIN approaches 2 ml, close
the stopcock to prevent air from entering the Pump. Observe syringe
6. At least 1 ml of INSULIN must pass into syringe 6 to assure
removal of all the RINSE BUFFER from the side port. If less than 1
ml enters, repeat the bolus from Step 6, some Pumps may require 3
successive boluses to obtain 1 ml.
8. Close both stopcocks. Remove syringe 7 from the Pump. Set aside
the syringe to be weighed.
9. With the stopcock closed, remove syringe 6 from the side port.
Syringe 6 will have a vacuum from the previous step. Enter the Pump
fill port with syringe 6 and open the stopcock to remove 2 ml. This
will restore the negative pressure safety feature of the Pump.
10. Close the stopcock, remove syringe 6 from the Pump, and set it aside
to be weighed.
Remove guide needles and record fill amount
At this point, the 18 gauge guide needles should be removed and the refill
amount should be calculated and recorded. Follow the steps below:
1. Remove the 18 gauge guide needles. Apply pressure to the needle
insertion sites.
2. Weigh syringes 6 and 7 and record on the refill form. Subtract the
combined weight from the weights obtained in step 14 of the section,
“Remove RINSE BUFFER and Fill with Insulin.” The result is the
new refill amount.
3. Record the extracted and new refill amounts in the PPC.
Program new basal rate
Using the patient’s PPC, cancel the SUSPEND mode, to return to the nor-
mal patient’s basal rate and modify if needed.
Dmp9196021-011_c.book Page 162 Wednesday, April 3, 2002 5:07 PM

163
APPENDIX F Side Port Catheter
Flush Procedure
When delivery of insulin is impaired due to catheter tip obstruction, the
Catheter may be flushed using 5 - 10 mL of RINSE BUFFER.
Supplies and solutions
Prior to performing this procedure, assemble the necessary supplies and
solutions as outlined below:
Supplies
• Steri-Strips® and markers
• Local anesthesia
• Sharps container
• PPC
• Oral or IV glucose
• Glucose monitoring equipment
•Drapes
• One (1) scale - 0.01 gram resolution
• One (1) 250 mL sterile beaker
• One (1) sterile bag for PPC (intestinal or cassette bags work well)
• One (1) Side port locating template, MMT-4106
• Five (5) Refill kits, MMT-4105
• Six (6) MiniMed MMT-4102 refill needles. (Extra needles
Dmp9196021-011_c.book Page 163 Wednesday, April 3, 2002 5:07 PM

164
should be available to use as needed)
• Eight (8) sharp 18 gauge regular bevel needles
• One (1) 10 or 20 mL Luer Lock® syringe
• One (1) stopcock - 2 way
Solutions
• Seven (7) 10 mL vials, Aventis rinse buffer solution
• Five (5) 10 mL vials, aventis HOE 21 PH, U-400 Insulin
NOTE: One-handed flush with a 10-20 mL syringe only.
Preparing for the procedure
NOTE: Before beginning any refill, flush, stroke volume
measurement, carefully read Appendix D, Precau-
tions and General Procedures, and keep this in
mind as you perform each procedure.
In order to prepare for the Side Port Catheter rinse and flush procedure, a
total of five different refill syringes and one 10 or 20 ml syringe will need
to be labeled and prepared with different solutions. Table 2 defines the
syringe numbers and corresponding solutions.
Dmp9196021-011_c.book Page 164 Wednesday, April 3, 2002 5:07 PM

165
Table 2: Preparation and Labeling of Syringes
Record patient’s blood glucose
Record the patient’s blood glucose value at the start of the procedure.
Monitor blood glucose every 30 minutes, or as needed.
Prepare syringes for emptying the Pump
Syringe 1 is used for emptying the Pump. Label and prepare syringe 1 per
Table 2. Special attention should be observed regarding the Precautions
and General Procedures section in Appendix D of this manual.
After the syringe is prepared, weigh the syringe and enter the weight on
the Refill Form.
Prepare syringes for filling the Pump
During the Catheter rinse/flush procedure, syringes 2, 3, 5, and 6 are used
for filling the Pump. Each syringe should be labeled with its solution and
syringe number, then filled and degassed per Table 2 and the General Pro-
cedures section in Appendix D of this manual.
Syringe # Syringe Type Volume Solution
#1 Refill 5 mL RINSE
BUFFER
#2 Refill 20 mL RINSE
BUFFER
#3 Refill 30 mL RINSE
BUFFER
#4 10ml or 20 ml 5-10 mL RINSE
BUFFER
#5 Refill 20 mL INSULIN
#6 Refill 30 mL INSULIN
Dmp9196021-011_c.book Page 165 Wednesday, April 3, 2002 5:07 PM

166
Prepare syringe for flushing the Side Port Catheter
During the Catheter flush procedure, syringe 4 is used for flushing the
Side Port Catheter. This syringe needs to be labeled and then prepared by
following the steps below:
1. Firmly attach a stopcock to the 10 or 20 ml Luer Lock connector of a
10 or 20 ml syringe. Then attach an 18 gauge needle to the stopcock.
NOTE: Use only a 10-20 ml Luer Lock syringe for this
procedure. Smaller syringes will damage the
Catheter or Pump.
2. Draw 5-10 mL of RINSE BUFFER into the syringe.
3. Expel all air from the syringe.
4. Close the stopcock and remove the 18 gauge needle from the syringe.
5. Fill the hub of the MiniMed refill needle with RINSE BUFFER from
the syringe and attach it to the syringe.
6. Prime the MiniMed refill needle completely.
7. Close the stopcock.
8. Set the syringe aside.
Dmp9196021-011_c.book Page 166 Wednesday, April 3, 2002 5:07 PM

167
Flushing the Side Port Catheter
Program minimal basal rate
Place the PPC in a sterile bag and program the pump to “SUSPEND”
mode, the basal rate will be 0.2 U/h.
Remove insulin and fill with rinse buffer
The INSULIN is removed from the Pump and the system is filled with
RINSE BUFFER. This procedure uses the following volumes in syringes
1, 2, and 3:
• Syringe 1 with 5 mL RINSE BUFFER
• Syringe 2 with 20 mL RINSE BUFFER
• Syringe 3 with 30 mL RINSE BUFFER
Syringe 3: Rinse Buffer (residual)
1. Prime the needle and close the stopcock. Weigh the syringe.
2. Obtain a vacuum by pulling back on the plunger until it locks. Press
the lock into the plunger groove and be sure it is firmly secured.
3. Enter the Pump with the refill needle.
4. Open the stopcock and withdraw the INSULIN. After the INSULIN
appears to have stopped rising in the syringe, wait an additional 30
seconds to make sure all of the INSULIN and air are removed.
NOTE: Air in the Pump System has been shown to be a
significant agonist to aggregation of INSULIN.
Proper degassing of all solutions that enter the
Pump is essential.
5. When the time has elapsed, close the stopcock, remove the syringe.
Weigh the syringe and record the weight on the Refill Form.
Dmp9196021-011_c.book Page 167 Wednesday, April 3, 2002 5:07 PM

168
Syringe 5: Insulin
6. Prime the needle and close the stopcock.
7. Enter the Pump with the refill needle.
8. Open the stopcock and allow the Pump to fill completely with RINSE
BUFFER. When the fluid level stops moving, the Pump is filled.
9. Close the stopcock and remove the syringe.
10. Prepare syringe 2 for aspiration. Obtain a vacuum by pulling back on
the plunger until it locks. Press the lock into the plunger groove and
be sure it is firmly secured.
11. Re-enter the Pump.
12. Open the stopcock and remove the RINSE BUFFER. After the fluid
level stops moving, wait an additional 30 seconds for all the RINSE
BUFFER and air to be removed.
13. When the time has elapsed, close the stopcock and remove the
syringe.
Syringe 3: Rinse Buffer
14. Prime the needle and close the stopcock .
15. Enter the Pump fill port with the refill needle.
16. Open the stopcock and allow the Pump to fill complete with RINSE
BUFFER. When the fluid level stops moving, the Pump is filled.
When the Pump is filled, approximately 10 mL of RINSE BUFFER
will remain in the syringe. Leave the RINSE BUFFER in the syringe,
and leave the syringe in place for the next step.
Dmp9196021-011_c.book Page 168 Wednesday, April 3, 2002 5:07 PM

169
Equilibrate and pull rinse buffer through system
The reservoir pressure in the Pump is equilibrated with outside ambient
pressure and RINSE BUFFER is pulled through the fluid system. This
procedure uses syringes 2 and 3:
• Syringe 2 with RINSE BUFFER. Expel all RINSE BUFFER
except 5 mL. Change the refill needle if desired.
• Syringe 3 with residual RINSE BUFFER from the previous sec-
tion.
Syringe 3: Rinse Buffer
1. Maintain syringe 3 with approximately 10 mL of RINSE BUFFER in
the Pump fill port. Verify that the stopcock on syringe 3 is open.
Syringe 2: Rinse Buffer (residual)
2. Prime the needle. Close the stopcock.
3. Obtain a vacuum by pulling back on the plunger until it locks. Press
the lock into the plunger groove to be sure it is firmly secured.
4. Enter the side port with the stopcock closed.
5. Open the stopcock.
6. Program and deliver a 4 unit bolus to open the valve in the Pump
mechanism.
7. Observe syringe 3. When the level of the RINSE BUFFER
approaches 2 mL, close the stopcock to prevent air from entering the
Pump. Observe syringe 2. When at least 1 mL of RINSE BUFFER
has entered syringe 2 close both stopcocks and remove the syringes.
If less than 1 ml enters, repeat the bolus from Step 6, some Pumps
may require 3 successive boluses to obtain 1 ml. Discard syringe 2
and set aside syringe 3 to be used later to remove the RINSE
BUFFER.
Dmp9196021-011_c.book Page 169 Wednesday, April 3, 2002 5:07 PM

170
Flush side port catheter
The Side Port Catheter is flushed using syringe 4 which is completely
filled with RINSE BUFFER.
NOTE: Approximately 13 units of INSULIN remain in the
distal Side Port Catheter. This INSULIN will be
delivered to the patient rapidly in the next three
steps. Alternatively, the INSULIN may be removed
prior to flushing by programming cautious bolus
amounts. Closely monitor blood glucose during
INSULIN delivery, and administer intravenous
glucose, or glucagon as needed.
10-20 ml Syringe 4: Rinse Buffer
1. Prime the needle. Close the stopcock.
2. Enter the side port with the needle.
3. When the needle is firmly positioned in the side port, open the stop-
cock and quickly push the plunger all the way down. This should
take no longer than one to two minutes.
4. After flushing, close the stopcock, remove and discard the syringe.
NOTE: This is the only time a plunger should be manually
pushed down.
Remove rinse buffer and fill with insulin
The RINSE BUFFER is removed form the Pump fluid system and the
system is filled with insulin. This procedure uses the following volumes
in syringes 3, 5, and 6:
• Syringe 3 with residual RINSE BUFFER from the previous step
• Syringe 5 with 20 mL INSULIN
• Syringe 6 with 30 mL INSULIN
Dmp9196021-011_c.book Page 170 Wednesday, April 3, 2002 5:07 PM

171
Syringe 3: Rinse Buffer (residual)
1. Prime the needle. Close the stopcock.
2. Obtain a vacuum by pulling back on the plunger until it locks. Press
the lock into the plunger groove and be sure it is firmly secured.
3. Enter the Pump with the refill needle and syringe.
4. Open the stopcock and remove the rinse buffer. After the fluid level
stops moving, wait an additional 30 seconds to make sure all of the
RINSE BUFFER and air is removed.
5. When the time has elapsed, close the stopcock, remove the syringe,
and discard it.
Syringe 5: Insulin
6. Prime the needle and close the stopcock.
7. Enter the Pump fill port with the refill needle.
8. Open the stopcock and allow the Pump to fill completely with INSU-
LIN. When the fluid level stops moving, the Pump is filled.
9. Close the stopcock and remove the syringe.
10. Prepare syringe 6 for aspiration. Obtain a vacuum by pulling back on
the plunger until it locks. Press the lock into the plunger groove to be
sure it is firmly secured.
11. Re-enter the Pump.
12. Open the stopcock and remove the INSULIN. After the fluid level
stops moving, wait an additional 30 seconds for all INSULIN and air
to be removed.
13. When the time has elapsed, close the stopcock and remove the
syringe. Discard all but 5 mL of the solution. Remove the air and set
aside the syringe.
Dmp9196021-011_c.book Page 171 Wednesday, April 3, 2002 5:07 PM

172
Syringe 6: Insulin
14. Weigh and record the combined weight of syringes 5 and 6 on the
Refill Form. Prime the needles.
15. Close the stopcock. Enter the Pump fill port with the refill needle.
16. Open the stopcock and allow the Pump to fill completely with INSU-
LIN. When the fluid level stops moving, the Pump is filled. Approx-
imately 10 mL of INSULIN will remain in the syringe. Leave the
syringe in place for the next step.
Equilibrate and pull insulin through system
The reservoir pressure in the Pump is equilibrated with outside ambient
pressure and INSULIN is pulled through the fluid system. This procedure
uses the following volumes in syringes 5 and 6:
• Syringe 6 with residual INSULIN from the previous step
• Syringe 5 with 5 mL solution
Syringe 6: Insulin (residual)
Syringe 5: Solution
1. Maintain syringe 6 with approximately 10 mL of residual insulin in
the Pump fill port. Verify that the stopcock on syringe 6 is open.
2. Prime the syringe 5 needle and close the stopcock.
3. Obtain a vacuum in syringe 5 by pulling back on the plunger until it
locks. Press the lock into the plunger groove and be sure it is firmly
secured.
4. Enter the side port with syringe 5 - stopcock closed.
5. Open the stopcock on syringe 5.
6. Press SEL. When the PPC screen is flashing “PUMP SUSPEND”
press ACT. The system is now in normal mode.
Dmp9196021-011_c.book Page 172 Wednesday, April 3, 2002 5:07 PM

173
7. Using the PPC, program and deliver a 4 unit bolus.
8. Observe syringe 6. If the level of INSULIN approaches 2 mL, close
the stopcock to prevent air from entering the Pump. Observe syringe
5. At least 1 mL of INSULIN must pass into syringe 5 to be sure that
all of the RINSE BUFFER is removed from the side port. If less than
1 ml enters, repeat the bolus from Step 6, some Pumps may require 3
successive boluses to obtain 1 ml.
9. Close both stopcocks. Remove syringe 6 from the Pump. Set the
syringe aside to be weighed.
10. With the stopcock closed, remove syringe 5 from the side port. It will
have a vacuum inside from the previous step. Enter the Pump fill port
with syringe 5 and open the stopcock and remove 2 ml. This will
restore the negative pressure safety feature of the Pump.
11. Close the stopcock, remove syringe 5 from the Pump, and set it aside
to be weighed.
12. Press SEL until the “SUSPEND PUMP” screen is displayed. Then
Press ACT.
Remove guide needles and record refill amount
At this point, the 18 gauge guide needles should be removed, and the refill
amount should be calculated and recorded.
1. Remove the 18 gauge guide needles and discard them. Apply pressure
to the insertion sites.
2. Weigh syringes 5 and 6 and record the combined weight on the Refill
Form. Subtract the combined weight from the weight obtained in step
14 of this section, Remove Rinse Buffer and Fill with Insulin. The
result is the new refill amount.
3. Record the new and extracted refill amount in the PPC.
Dmp9196021-011_c.book Page 173 Wednesday, April 3, 2002 5:07 PM

174
Program new basal rate
Using the patient’s PPC, cancel the “SUSPEND” mode and allow the
Pump to return to the patient’s original basal rate.
Remove rinse buffer from catheter
Approximately 13 units of RINSE BUFFER remain in the distal Side Port
Catheter. Depending on blood glucose values, program the appropriate
bolus amount to remove the RINSE BUFFER from the Catheter. Release
the patient when blood glucose levels are stable.
Dmp9196021-011_c.book Page 174 Wednesday, April 3, 2002 5:07 PM

175
APPENDIX G Stroke Volume Measurement
If under-delivery of insulin is noted in a refill procedure or suspected due
to blood glucose control, it may be useful to verify the proper stroke vol-
ume of the Pump by accessing the side port.
In this procedure, a pipette is attached to a stopcock and refill needle.
This system is inserted into the side port. The insulin pulses in the pipette
are measured to calculate the pump stroke volume.
Supplies and Solutions
Prior to performing this procedure, assemble the necessary supplies and
solutions as outlined below:
Supplies
• Local anesthesia
• Sharps container
• PPC
• Oral or IV glucose
• Glucose monitoring equipment
•Drapes
• 5 mL or 3 mL syringe
• One (1) sterile bag for PPC (intestinal or cassette bags work well)
• One (1) Side port locating template, MMT-4106
• One (1) sterile 100 microliter pipette
Dmp9196021-011_c.book Page 175 Wednesday, April 3, 2002 5:07 PM

176
• One (1) MiniMed MMT-4102 refill needle. (Extra needles should
be available to use as needed)
• One (1) sterile stopcock - 3 way
Solutions
• One (1) 10 mL vial, Aventis rinse buffer solution
Preparing for the Procedure
NOTE: Before beginning any refill, flush, stroke volume
measurement, carefully read Appendix D, Precau-
tions and General Procedures, and keep this in
mind as you perform each procedure.
Record Patient’s Blood Glucose
Record the patient’s blood glucose value at the start of the procedure.
Monitor blood glucose every 30 minutes, or as needed.
Dmp9196021-011_c.book Page 176 Wednesday, April 3, 2002 5:07 PM
177
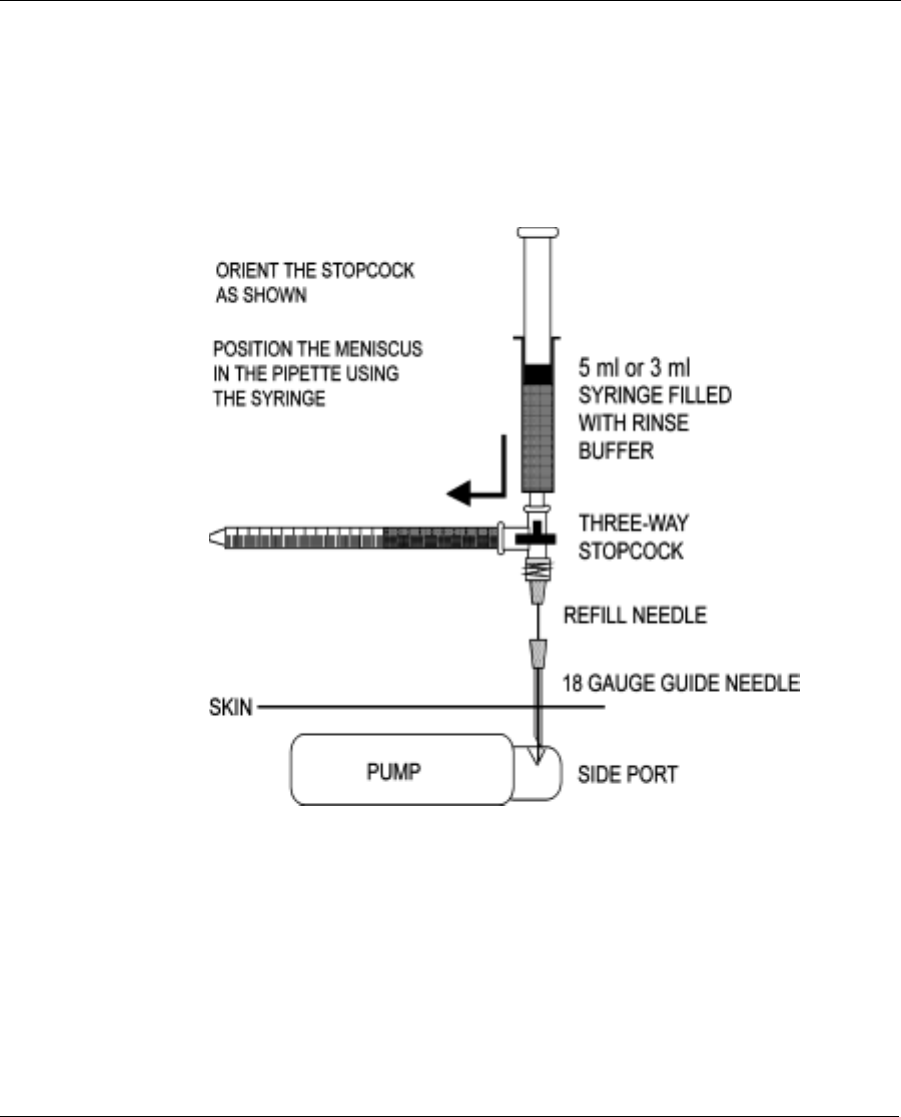
Measuring Stroke Volume
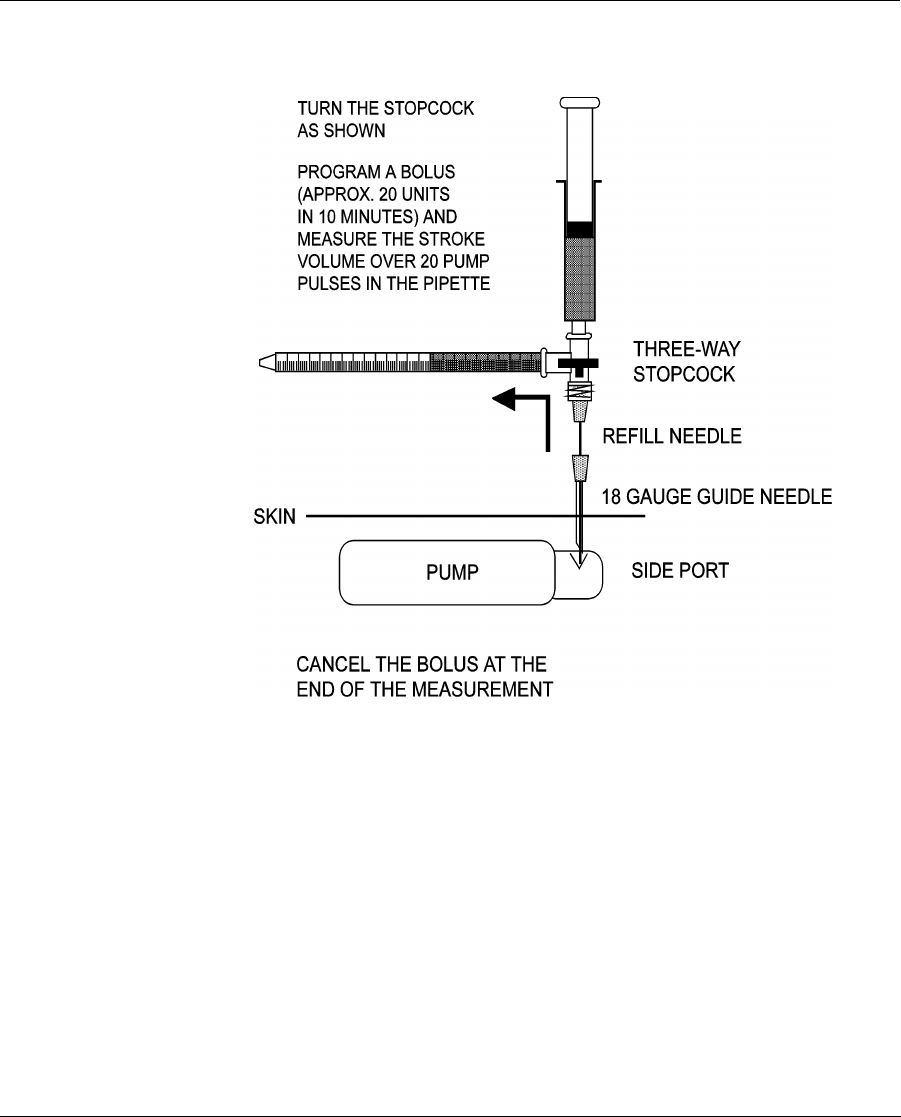
1. In a sterile field immediately before the procedure; prepare the appa-
ratus. Prime the stopcock, pipette, and needle.
Figure 19: Measuring the Stroke Volume
2. Turn the stopcock to close off the needle.
3. Insert the needle into the side port.
4. Turn the stopcock. as shown in Figure 19.
Dmp9196021-011_c.book Page 177 Wednesday, April 3, 2002 5:07 PM
178
Figure 20: Closed Stopcock
5. Program a high rate bolus (approximately 20 units) and measure the
stroke volume over 20 pulses in the pipette.
6. Cancel the bolus at the end of the measurement.
7. Turn the stopcock back to the position shown in Figure 20 to close.
Remove the apparatus.
Dmp9196021-011_c.book Page 178 Wednesday, April 3, 2002 5:07 PM

179
Record Patient’s Blood Glucose
It is likely that some insulin is pumped out of the Catheter and into
the patient in this procedure. Monitor the patient’s blood glucose
and release the patient only after blood glucose values are stable.
Dmp9196021-011_c.book Page 179 Wednesday, April 3, 2002 5:07 PM

180
Dmp9196021-011_c.book Page 180 Wednesday, April 3, 2002 5:07 PM

181
APPENDIX H Pressure Measurement
Using The Side Port Catheter
If under-delivery of insulin is noted by increased insulin needs or by
lower than expected actual usage at refills, you may suspect one of two
causes:
Insulin deposits have led to under-delivery from the Pump.
Catheter blockage has led to under-delivery from the Catheter
Pressure measurement in the side port can detect pressure build-up due to
Catheter tip obstruction. This test, along with the Stroke Volume test,
helps to differentiate Pump problems from Catheter problems.
NOTE: During this procedure, a 5 unit bolus is pro-
grammed. You need to monitor carefully the blood
sugar pre/per/post procedure.
Dmp9196021-011_c.book Page 181 Wednesday, April 3, 2002 5:07 PM

182
Supplies and solutions
Prior to performing this procedure, assemble the necessary supplies and
solutions as outlined below:
Supplies
• Steri-Strips® and markers
• Local anesthesia
• Sharps container
• Safety glasses
• PPC
• Oral or IV glucose
• Glucose monitoring equipment
•Drapes
• One (1) scale - 0.01 gram resolution
• One (1) 250 ml sterile beaker
• One (1) sterile bag for PPC (intestinal or cassette bags work well)
• One (1) Side port locating template, MMT-4106
• Five (5) Refill kits, MMT-4105
• Nine (9) MiniMed MMT-4102 refill needles. (Extra needles
should be available to use as needed)
• Two (2) 10 or 20 ml Luer Lock® syringe
• One (1) stopcock - 2 way
• One (1) stopcock - 3 way
• Syringe filter with luer lock, 0.2 micro (long configuration - not
disk configuration)
• Chart recorder
• Pressure monitor
• Pressure transducer
Dmp9196021-011_c.book Page 182 Wednesday, April 3, 2002 5:07 PM

183
Solutions
• Seven (7) 10 ml vials, Aventis rinse buffer solution
• Five (5) 10 ml vials, Aventis HOE 21 PH, U-400 Insulin
Preparing for the procedure
NOTE: Before beginning any refill, flush, stroke volume
measurement, or pressure measurement proce-
dure, carefully read Appendix D, Precautions and
General Procedures, and keep this in mind as you
perform each procedure.
In order to prepare for the Side Port Catheter flush procedure, a total of
five different refill syringes and one 10 - 20 ml syringe will need to be
labeled and then prepared with different solutions. Table 3 defines the
syringe numbers and corresponding solutions.
Table 3: Preparation and Labeling of Syringes
Syringe Labeling Solution
#1 60 ml RINSE BUFFER
#2 60 ml RINSE BUFFER
#3 60 ml RINSE BUFFER
#4
10-20 ml
5 - 10 ml RINSE BUFFER
#5 60 ml INSULIN
#6 60 ml INSULIN
Dmp9196021-011_c.book Page 183 Wednesday, April 3, 2002 5:07 PM

184
Record patient’s blood glucose
Record the patient’s blood glucose value at the start of the procedure.
Monitor blood glucose every 30 minutes, or as needed.
Prepare syringes for emptying the pump
Syringe 1 is used for emptying the Pump. Label and prepare syringe 1 per
the Precautions and General Procedures section in Appendix D of this
manual. After the syringe is prepared, weigh it and record the weight on
the Refill Form.
Prepare syringes for filling the pump
During the pressure test procedure, syringes 2, 3, 5, and 6 are used for fill-
ing the Pump. Each of these syringes need to be labeled with its solution
and syringe number, and then filled and degassed per the General Proce-
dures in Appendix D of this manual.
Prepare syringe for priming the test setup
During the pressure test procedure, syringe 4 is used to prime the needle,
filter, and the 3-way stopcock. This syringe needs to be labeled and then
prepared by following the steps below:
1. Attach an 18 gauge needle to the syringe. Draw 5 - 10 ml of RINSE
BUFFER into the syringe.
2. Expel all air from the syringe.
3. Attach a 3-way stopcock to the syringe.
4. Turn the stopcock to close off the syringe.
Dmp9196021-011_c.book Page 184 Wednesday, April 3, 2002 5:07 PM

185
Measuring pressure in the side port
Program minimal basal rate
Place the PPC in a sterile bag and program the Pump in SUSPEND mode,
the basal rate will be 0.2 U/h.
Remove insulin and fill with rinse buffer
The INSULIN is removed from the Pump and the system is filled with
RINSE BUFFER. This procedure uses the following volumes in syringes
1, 2, and 3:
• Syringe 1 with 5 ml RINSE BUFFER
• Syringe 2 with 20 ml RINSE BUFFER
• Syringe 3 with 30 ml RINSE BUFFER
Syringe 1: Rinse Buffer
1. Prime the needle and close the stopcock.
2. Obtain a vacuum by pulling back on the plunger until it locks. Press
the lock into the plunger groove to be sure it is firmly secured.
3. Enter the Pump with the refill needle.
4. Open the stopcock and withdraw the INSULIN. After the INSULIN
appears to have stopped rising in the syringe, wait an additional 30
seconds to make sure all of the INSULIN and air is removed.
5. When the time has elapsed, close the stopcock, remove the syringe.
Weigh the syringe and record the weight on the Refill Form.
Syringe 2: Rinse Buffer
6. Prime the needle and close the stopcock.
7. Enter the Pump with the refill needle.
8. Open the stopcock and allow the Pump to fill completely with RINSE
BUFFER. When the fluid level stops moving, the Pump is filled.
Dmp9196021-011_c.book Page 185 Wednesday, April 3, 2002 5:07 PM

186
9. Close the stopcock and remove the syringe.
10. Prepare syringe 2 for aspiration. Obtain a vacuum by pulling back on
the plunger until it locks. Press the lock into the plunger groove to be
sure it is firmly secured.
11. Re-enter the Pump.
12. Open the stopcock and remove the RINSE BUFFER. After the fluid
level stops moving, wait an additional 30 seconds for all the RINSE
BUFFER and air to be removed.
13. When the time has elapsed, close the stopcock and remove the
syringe.
Syringe 3: Rinse Buffer
14. Prime the needle and close the stopcock.
15. Enter the Pump fill port with the refill needle.
16. Open the stopcock and allow the Pump to fill complete with RINSE
BUFFER. When the fluid level stops moving, the Pump is filled.
When the Pump is filled, approximately 10 ml of RINSE BUFFER
will remain in the syringe. Leave the RINSE BUFFER in the syringe,
and leave the syringe in place for the next step.
Equilibrate and pull rinse buffer through system
The reservoir pressure in the Pump is equilibrated with outside ambient
pressure and RINSE BUFFER is pulled through the fluid system. This
procedure uses the following volumes in syringes 2 and 3:
• Syringe 2 with RINSE BUFFER. Expel all RINSE BUFFER
except 10 ml. Change the refill needle if desired.
• Syringe 3 with residual RINSE BUFFER from the previous sec-
tion.
Dmp9196021-011_c.book Page 186 Wednesday, April 3, 2002 5:07 PM

187
Syringe 3: Rinse Buffer (residual)
1. Verify that the stopcock on syringe 3 is open.
2. Prime the needle. Close the stopcock.
3. Obtain a vacuum by pulling back on the plunger until it locks. Press
the lock into the plunger groove to be sure it is firmly secured.
4. Enter the side port with the stopcock closed.
5. Open the stopcock.
6. Press SEL key. When “PUMP SUSPENDED” is flashing on the
screen press ACT. This will place the system in normal mode.
7. Program and deliver a 4 unit bolus to open the valve in the Pump
mechanism.
8. Observe syringe 3. When the level of the RINSE BUFFER
approaches 2 ml, close the stopcock to prevent air from entering the
Pump. Observe syringe 2. When at least 1 ml of RINSE BUFFER
has entered syringe 2. If less than 1 ml enters, repeat the bolus from
Step 6, some Pumps may require 3 successive boluses to obtain 1 ml.
Close both stopcocks and remove the syringes. Discard syringe 2 and
set aside syringe 3 to be used later to remove the RINSE BUFFER.
Perform pressure test
Syringe 4: Rinse Buffer
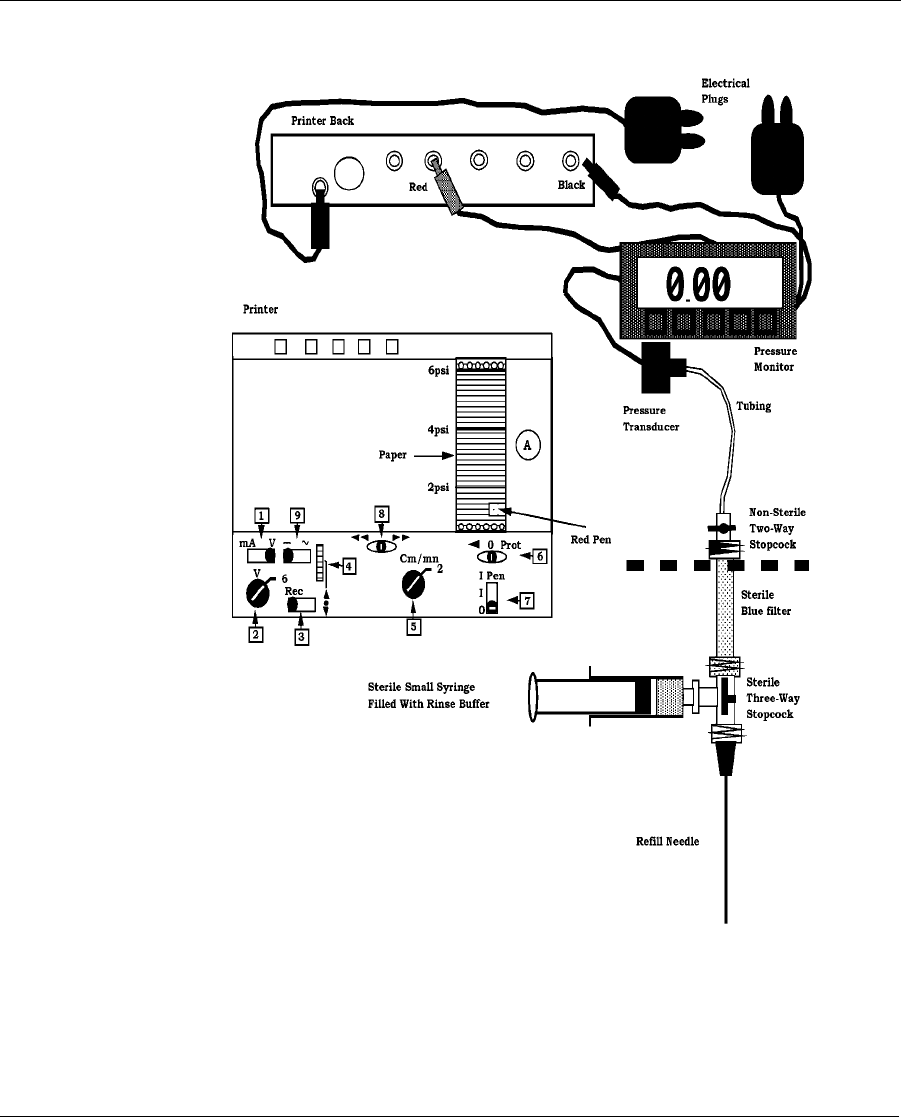
1. Plug in the chart recorder and the monitor. Attach the monitor cables.
The pressure gauge is set to 1 volt = 1 psi. When knob 2 is set to 6
volts, then the full scale reading on the paper chart is 6 psi.
2. Set the switches and knobs of the chart recorder as follows: Switch 1
to “V” position, Knob 2 to “6” volts full scale, Knob 5 t “6” cm/
minute setting, Switch 9 to “_ _ _” icon (Direct Current)
Dmp9196021-011_c.book Page 187 Wednesday, April 3, 2002 5:07 PM

188
3. Open the chart recorder cover at “A.” Remove the pen cap. Retain the
pen cap as it must be replaced after the procedure to prevent the pen
from drying out.
4. Inspect the tubing and the stopcock coming from the pressure trans-
ducer. It must be completely free of bubbles. Inject sterile water with
a very long needle to displace any bubbles present. Use a syringe to
add water to the stopcock to form a positive meniscus.
5. Assemble the following sterile components in a sterile field per :
Syringe, Filter, 3-way Stopcock, MiniMed refill needle (MMT-4102)
Prime the stopcock, filter and needle using the RINSE BUFFER from
the syringe. Form a positive meniscus on the end of the filter.
6. Carefully join the 2-way stopcock to the filter. A sterile person must
hold the filter assembly and a non-sterile person must hold the stop-
cock. From this point, the sterile person will manipulate the needle
and stopcock to perform the measurements.
7. Push switch 7 to “I Pen.” This puts the pen in contact with the paper.
8. Set the “0” adjustment. Maintain switch 3 to the right position and
adjust the thumbwheel 4, until the pen is at “0.”
9. Initialize the chart by pushing switch 6 to the right “Prot” momen-
tarily. The pen will write the chart settings.
10. Tape the transducer securely to a table or any stable surface roughly at
the level of the implanted Pump. Hold the refill needle at the level of
the patient’s pump and open both the 2-way and the 3-way stopcocks.
(The 3-way stopcock is opened to allow flow between the filter and
needle but not to the syringe.) The monitor should display 0 (zero) or
a very low number. Close both stopcocks. (The 3-way stopcock is
opened between the syringe and the filter; the needle is closed.)
Dmp9196021-011_c.book Page 188 Wednesday, April 3, 2002 5:07 PM
189
Figure 21: Attaching the Monitor Cables to the Chart Recorder
Dmp9196021-011_c.book Page 189 Wednesday, April 3, 2002 5:07 PM
190
11. Slide switch 6 to its left position to start the paper. Fast forward the
paper as necessary using switch 8.
12. Place the refill needle in the side port.
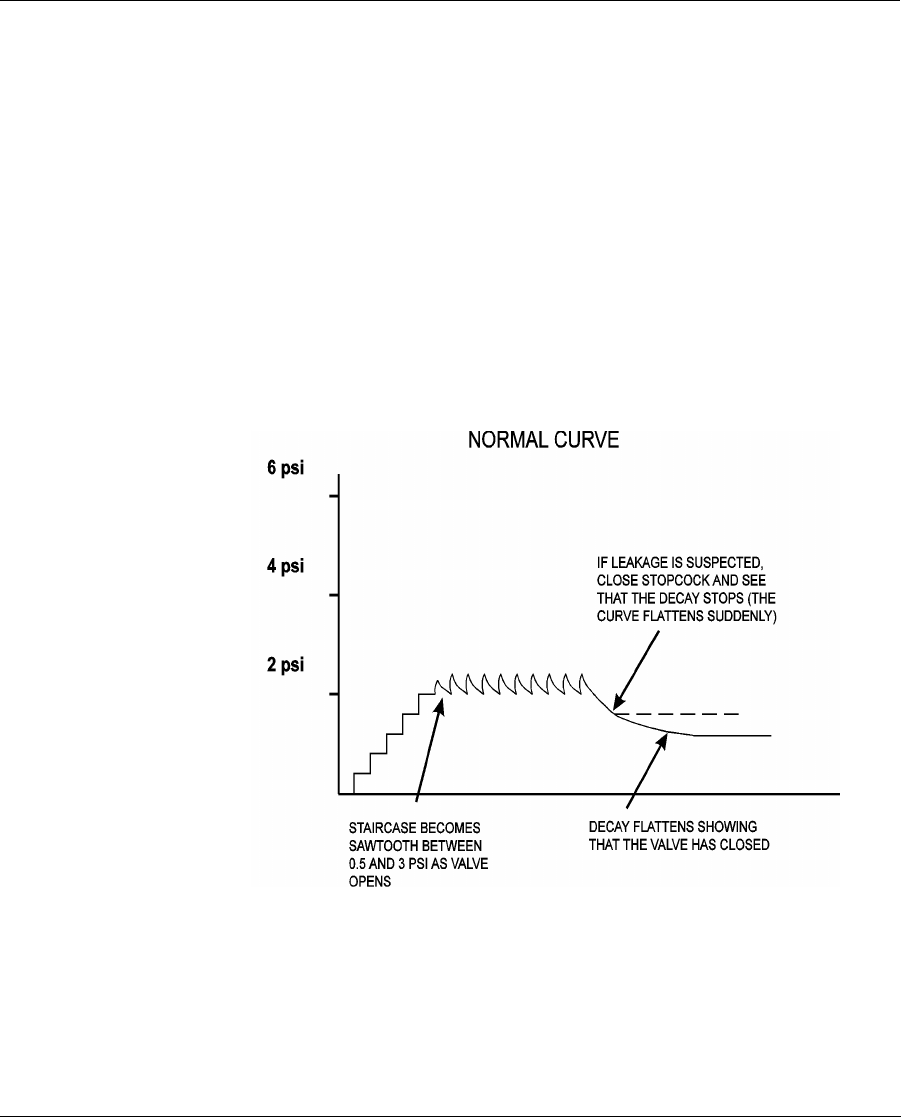
13. Program a bolus (5 units) and open both stopcocks. (The 3-way stop-
cock is opened between the filter and needle and the syringe is
closed.) Maintain the needle in the side port without movement dur-
ing the entire bolus and observe the curve for the duration of the bolus
and for 10 minutes after the bolus. If leakage is suspected, the 3-way
stopcock may be turned so that the filter is off. If the pressure curve
flattens, all of the connections between the transducer and the stop-
cock are leak tight.
Figure 22: Normal Pressure Curve Example
A flush of the Catheter tip can be performed at this time. (See Appendix
F, Side Port Catheter Rinse Procedure). A repeat pressure tracing should
be made subsequent to the flush. Place system in Suspend Mode by press-
Dmp9196021-011_c.book Page 190 Wednesday, April 3, 2002 5:07 PM

191
ing ACT on the “SUSPEND” screen.
Remove rinse buffer and fill with insulin
The RINSE BUFFER is removed from the Pump fluid system and the
system is filled with INSULIN. This procedure uses the following vol-
umes in syringes 3, 5, and 6:
• Syringe 3 with residual RINSE BUFFER from the previous steps
• Syringe 5 with 20 ml INSULIN
• Syringe 6 with 30 ml INSULIN
Syringe 3: Rinse Buffer (residual)
1. Expel all air from the syringe and prime the needle.
2. Close the stopcock. Obtain a vacuum by pulling back on the plunger
until it locks. Press the lock into the plunger groove to be sure it is
firmly secured.
3. Enter the Pump with the refill needle and syringe.
4. Open the stopcock and remove the RINSE BUFFER. After the fluid
level stops moving, wait an additional 30 seconds to make sure all of
the RINSE BUFFER and air is removed.
5. When the time has elapsed, close the stopcock, remove the syringe,
and discard.
Syringe 5: Insulin
6. Prime the needle and close the stopcock.
7. Enter the Pump fill port with the refill needle.
8. Open the stopcock and allow the pump to fill completely with INSU-
LIN. When the fluid level stops moving, the Pump is filled.
9. Close the stopcock and remove the syringe.
10. Prepare syringe 6 for aspiration. Obtain a vacuum by pulling back on
Dmp9196021-011_c.book Page 191 Wednesday, April 3, 2002 5:07 PM

192
the plunger until it locks. Press the lock into the plunger groove to be
sure it is firmly secured.
11. Re-enter the Pump.
12. Open the stopcock and remove the INSULIN. After the fluid level
stops moving, wait an additional 30 seconds for all the INSULIN and
air to be removed.
13. When the time has elapsed, close the stopcock and remove the
syringe. Discard all but 5 ml of the solution. Remove the air and set
aside the syringe.
Syringe 6: Insulin
14. Weigh and record the combined weight of syringes 5 and 6 on the
refill form. Prime the needles.
15. Close the stopcock. Enter the Pump fill port with the refill needle.
16. Open the stopcock and allow the Pump to fill completely with INSU-
LIN. When the fluid level stops moving, the Pump is filled. Approxi-
mately 10 ml of INSULIN will remain in the syringe. Leave the
INSULIN in the syringe, and leave the syringe in place for the next
step.
Equilibrate and pull insulin through system
The reservoir pressure in the Pump is equilibrated with outside ambient
pressure and INSULIN is pulled through the fluid system. This procedure
uses the following volumes in syringes 5 and 6:
• Syringe 6 with residual INSULIN from the previous step
• Syringe 5 with 5 ml solution
Syringe 5: Solution
Syringe 6: Insulin (residual)
Dmp9196021-011_c.book Page 192 Wednesday, April 3, 2002 5:07 PM

193
1. Maintain syringe 6 with approximately 10 ml of residual INSULIN in
the Pump fill port. Verify that the stopcock on syringe 6 is open.
2. Prime the syringe 5 needle. Close the stopcock.
3. Obtain a vacuum in syringe 5 by pulling back on the plunger until it
locks. Press the lock into the plunger groove to be sure it is firmly
secured.
4. Enter the side port with syringe 5 - stopcock closed.
5. Open the stopcock on syringe 5.
6. Program and deliver a 4 unit bolus to open the valve in the Pump
mechanism.
7. Observe syringe 6. If the level of INSULIN approaches 2 ml, close
the stopcock to prevent air from entering the Pump. Observe syringe
5. At least 1 ml of INSULIN must pass into syringe 5 to be sure that
all of the RINSE BUFFER is removed from the side port. If less than
1 ml enters, repeat the bolus from Step 6, some Pumps may require 3
successive boluses to obtain 1 ml.
8. Close both stopcocks. Remove syringe 6 from the Pump. Set aside
the syringe to be weighed.
9. With the stopcock closed, remove syringe 5 from the side port.
Syringe 5 will have a vacuum inside from the previous step. Enter the
Pump fill port with syringe 5 and open the stopcock to remove 2 ml.
This will restore the negative pressure safety feature of the Pump.
10. Close the stopcock, remove syringe 5 from the Pump, and set it aside
to be weighed.
Dmp9196021-011_c.book Page 193 Wednesday, April 3, 2002 5:07 PM

194
Remove guide needles and record refill amount
At this point, the 18 gauge guide needles should be removed, and the refill
amount should be calculated and recorded.
1. Remove the 18 gauge guide needles and discard them. Apply pressure
to the insertion sites.
2. Weigh syringes 5 and 6 and record their combined weight on the
Refill Form. Subtract the combined weight from the weight obtained
in step 14 of this section, Remove Rinse Buffer and fill with
INSULIN. The result is the new refill amount.
3. Record the extracted and new refill amounts in the PPC.
Using the patient’s PPC, cancel the SUSPEND mode, to return to the nor-
mal patient’s basal rate.
D9196021-011 12/00
Dmp9196021-011_c.book Page 194 Wednesday, April 3, 2002 5:07 PM