Meneghetti RUEI Induction Cooking Range with Oven User Manual User and Care Manual
Meneghetti SpA Induction Cooking Range with Oven User and Care Manual
UserManual.wiki
>
Meneghetti
>
RUEI User Manual
>
User and Care Manual
Contents
1.
Installation Manual
2.
User and Care Manual
User and Care Manual
Navigation menu
Upload a User Manual
Namespaces
Wiki Guide
HTML
PDF
Info
Views
User Manual
Discussion / Help
Navigation

![ENGLISHUse & Care Manual8 The Control Panels The user interface has the following features: display, preheat light indicators, keys for commands, cooking mode and temperature selectors. SINGLE OVEN DOUBLE OVEN Command Keys - [INC] key to increase the value. - [DEC] key to decrease the value. [FAST PREHEAT] When a cooking function has been selected, touch this key to enable the fast preheat mode. The fast preheat is not available for all functions. [OPTIONS] Touch this key to enable special functions, low temperature modes or to enter special menu. [LIGHT]: Touch to switch the oven lights status. Display Central Display for time and miscellaneous functions: for time of day, minute minder, automatic cooking. AM/PM indication is also present. Miscellaneous indications are also available to show which cavity is currently selected and whether any door has been locked, automatically for self-clean or manually by the user. Display for Temperature indications: Degree unit (°C or °F) indication is present. It shows the temperature set-point for the current cooking mode, in the selected cavity. Display with writings for Cooking Modes indication to indicate which function has been selected. Knobs Cooking mode selector (multifunction), with eight cooking modes + OFF position. Cooking mode selector (thermal), with three cooking modes + OFF position. Temperature selector with PRESET and CLEAN positions + continuous range between MIN and MAX values. [TIME]: touch this key until “SET TIME” appears to set or change the time of day. Touch this key until “TIMER” appears to set, modify or clear the minute minder value. Once a cooking function has been selected, touch this key until “TIME” appears in order to set, modify or cancel the cooking time. Touch this key until “STOP TIME” appears in order to set, modify or cancel the end of cooking time. Whenever one of the former modes has been enabled and its digits flash, touch or hold:](https://usermanual.wiki/Meneghetti/RUEI.User-and-Care-Manual/User-Guide-2967492-Page-9.png)
![ENGLISHUse & Care Manual10 General Oven Information Before using your oven for the first time remove all packing and foreign materials from the oven(s). Any material of this sort left inside may melt or burn when the appliance is used. Flashing Symbols or Numbers Signals an incomplete action that is in progress (locking the door, preheat, etc.) or an incomplete setting that calls for another input. Beeps Signals that more information must be entered or confirms the receipt of an entry. Beeps also signal the end of a function or an oven fault. It’s displayed steadily when the door is locked. The symbol flashes when the latch is moving in order to lock or unlock the door. Do not attempt to open the door at this time. Door can be opened when the symbol no longer appears. “AUTO LOCK” appears when the door has been locked automatically due to self-clean mode. “USER LOCK” is displayed when the door has been locked manually by the user, for example to prevent children from having free access to the oven cavity. Hold both the [INC] and [DEC] keys for 3 seconds. The latch will lock the door. Repeat the same operation to unlock. Locking the keyboard Hold both the keys indicated by “KEYBD. LOCK” legend for 3 seconds. Commands are now locked and “SENS LOCK” will be displayed every time you touch any keys. Repeat the same operation for 3 seconds to unlock the keyboard. Power Failure After the power returns to the oven, the clock displays the time 12.00AM. Default Settings The cooking modes automatically select a suitable temperature when the selector is in the preset position. These can be changed when a different one is needed. It’s also possible to set a user option in order to save the last used temperature per every cooking mode. F Failure Number Codes These codes are displayed when the electronic control detects a problem in the oven or in the electronics. Convection Fan The convection fan operates during any convection mode. When the oven is operating in the convection mode, the fan will turn off automatically when the door is opened. The convection fan always runs during the preheat time. Preheat and Fast Preheat Whenever a cooking mode is set and the oven is heating, the “PREHEAT” writing appears in the temperature display: the vertical bar indicates, in four steps, when the oven reaches the 25%, 50%, 75%, 100% of the set-point temperature. As soon as the 100% is reached, the control sounds an “end of preheat” tone and the “PREHEAT” writing disappears. When it’s necessary to heat up the oven rapidly, a Fast Preheat mode is available: it uses the heating elements and the convection fan in a special way, in order to reduce the heating time as long as possible. After having set one of the cooking functions for which the fast preheat is available, touch the [FAST PREHEAT] key, the “FAST” writing is shown in addition to the “PREHEAT” one. As soon as the set-point temperature is reached, the control sounds an “end of preheat” tone and both “FAST” and “PREHEAT” writings disappear. The oven switches automatically to the desired cooking mode that was previously set: put the food inside now.](https://usermanual.wiki/Meneghetti/RUEI.User-and-Care-Manual/User-Guide-2967492-Page-11.png)
![ENGLISHUse & Care Manual13 Setting the Clock and Timer The time of day is displayed in hours and minutes. Always set the clock immediately after installation or after a power failure. Once power returns to the oven, the clock displays the time 12:00AM. The clock time will appear during all oven operations except when there is the timer or any timed cooking operations running. The oven is preset to a 12-hour clock and indicates AM and PM. To Set the Time of Day 1. Touch [TIME] until the display shows the “SET TIME” writing. 2. Touch [INC] or [DEC] to set the desired time, the hours will begin flashing: continue until the correct hour value and AM or PM indication is selected. 3. Touch [TIME] again to confirm the hour and minutes will start flashing. 4. Touch [INC] or [DEC] to set the desired minutes value or hold the key to change by 10 minute steps. 5. Touch [TIME] again or wait for 5 seconds in order to confirm the time. NOTE: The Time of Day can never be set if any time function is already set: first delete all the active time functions. To Set the Timer 1. Touch [TIME] until the display shows the “TIMER” writing. 2. Touch [INC] or [DEC] to set the desired timer value, the hours will begin flashing: continue until the desired value is set. 3. Touch [TIME] again to confirm the hour and minutes will start flashing. 4. Touch [INC] or [DEC] to set the desired minutes value or hold the key to change by 10 minute steps. 5. Touch [TIME] again or wait for 5 seconds in order to confirm the time. 6. “TIMER” will be steadily displayed. 7. When the time ends, reminder beeps will sound for 15 minutes or until the [TIME] key is pressed. 8. Timer format is usually HR:MIN, switching into MIN:SEC during the last minute. 9. The displayed value is always rounded to the lower minute.](https://usermanual.wiki/Meneghetti/RUEI.User-and-Care-Manual/User-Guide-2967492-Page-14.png)
![ENGLISHUse & Care Manual14 Selecting the Oven Mode Setting Cooking Mode and Temperature x The following modes can be selected by moving the cooking mode knob to the desired position. To select Clean, the temperature knob must be moved into the appropriate Clean position too. OFF CONVECTION BAKE (CONV BAKE) CONVECTION BROIL (CONV BROIL) CONVECTION ROAST (CONV ROAST) PIZZA (MULTI PIZZA) BAKE (BAKE) BROIL (BROIL) DEHYDRATE(CONV DEHY) PROOF (WARM) DEFROST (CONV) WARMING (WARM PLUS) CLEAN x Select the desired temperature by moving the selector or leave it in the PRESET position if the proposed value is fine. The temperature can be changed by 5°F or 5°C steps. x Cavity will begin to heat, the “ON” writing is displayed when the selected oven is active, oven lights will turn on. x “PREHEAT” writing will turn on. Once the oven has preheated, it will beep and switch the writing off. x To change the temperature while cooking, simply turn the temperature knob until the display shows the desired value. x Move the cooking mode selector to OFF if you intend to stop cooking. x The triangles in the upper right corner of the display are active when a cavity is running, even if it is not selected on the display. Using [OPTIONS] key to select low temperature functions DEHYDRATE (CONV DEHY) PROOF (WARM) DEFROST (CONV) WARMING (WARM PLUS) x Touch [OPTIONS] key to toggle between these four modes. x The last used is kept in memory for the next selection. Using Oven Lights x A single light key activates the lights.x Oven lights turn on and off automatically when the door is opened and closed. x When an oven is in use, oven lights turn on automatically when a mode is started. Oven lights will turn off automatically when the oven mode is cancelled. x The lights do not operate in the Self-Clean mode.](https://usermanual.wiki/Meneghetti/RUEI.User-and-Care-Manual/User-Guide-2967492-Page-15.png)
![ENGLISHUse & Care Manual15 Time Oven Mode Operation x Be sure that the time-of-day clock is displaying the correct time. x The timed mode turns off the oven at the end of the cook time. To Set a Timed Mode 1. 2. Select the cooking mode and the temperature by means of the knobs. The “ON” writing will appear in the display. 3. Touch [TIME] key until the “TIME” writings will appear in the display. 4. Touch [INC] or [DEC], the hour digits will begin flashing. Continue to set the desired cooking time. Keep in mind that the time required for the oven to reach the temperature must be included in the set cooking time. 5. Touch [TIME] again, the hours will be confirmed and the minute digits will begin flashing. 6. Touch [INC] or [DEC] to change the minutes. Hold the key to change by 10 minutes steps. Continue to set the desired cooking time. Touch [TIME] once again or wait for a few seconds to confirm the cooking time value. To Delay the Start of a Timed Mode Follow steps 1 through 6 or 7 above. x Touch [TIME] key until “STOP TIME” will appear in the display. x The control automatically calculates and displays the initial value, adding the cooking time already set to the time of day. x Touch [INC] or [DEC], the hour digits will begin flashing. Continue to set the desired stop time. x Touch [TIME] again, the hours will be confirmed and the minute digits will begin flashing. x Touch [INC] or [DEC] to change the minutes. Hold the key to change by 10 minutes steps. Continue to set the desired stop time. x Touch [TIME] once again or wait for a few seconds to confirm the stop time value. x The clock automatically calculates the time of day at which the mode starts and stops. The “DELAY” writing is displayed until the starting time is reached. When a Timed Mode is running x As soon as the oven actually starts cooking, the display shows the cooking time and counts down by one minute steps. The oven will cook for the programmed time. x When the time expires, the oven automatically turns off, the writings “ON” and “TIME” start flashing and an “end of activity” beep sequence sounds. Reminder beeps will sound for up to fifteen minutes until any key is touched in order to recall the user attention. How to check a time value x Whenever it’s necessary to check a time value that is not displayed, touch the [TIME] key until the proper writing is displayed to view the desired value for 5 seconds. x Example: if the timer value is displayed and you want to check the cooking time, touch the [TIME] key until “TIME” is displayed to view the cooking time for 5 seconds.](https://usermanual.wiki/Meneghetti/RUEI.User-and-Care-Manual/User-Guide-2967492-Page-16.png)
![ENGLISHUse & Care Manual16 Setting the meat probe options This oven is optionally provided with the meat probe feature to sense the temperature inside meat and stop cooking as soon as the set value is reached. The following modes can be selected to work with the meat probe: CONVECTION BAKE CONVECTION ROAST BAKE Other modes are not allowed to start if the probe is inserted. Once the probe has been inserted in its receptacle and detected by the control, turn the cooking mode knob into a valid position, the PROBE writing appears on the cooking mode display with the selected function. The meat probe standard temperature (170°F) flashes on the clock module for 5 seconds. Using the [INC]/[DEC] keys, it’s possible to change the probe set. The standard probe temperature set-point is 170°F. The allowed range is between 130°F and 210°F. The maximum cavity temperature during cooking with meat probe is 475°F. The resolution must be 5°F or 2.5°C both for set and actual temperature. After 5 seconds the value on the display is accepted and the control starts cooking. The actual probe temperature is now displayed. Touch [INC] or [DEC] once to check the probe set temperature. When it’s flashing touch it further or hold to modify the value. As soon as the set probe temperature is reached, the control sounds an end of cooking tone and stops the oven. Always turn the cooking mode in the OFF position before re-using the oven. The PROBE writing flashes when the mode is not valid for cooking with probe. If the probe is removed during cooking, or in case of a short or open circuit, a fault message will be displayed. Automatic time functions are disabled when using the meat probe, only the timer can work.](https://usermanual.wiki/Meneghetti/RUEI.User-and-Care-Manual/User-Guide-2967492-Page-17.png)
![ENGLISHUse & Care Manual26 Special Features The Special Features function can be used to select the following special oven features: 1. SAB => SABBATH MODE (for religious faiths with “no work” requirements on the Sabbath). 2. OFS => OVEN OFFSET (used to calibrate the oven temperature). 3. dEG => °UNIT (used to select Farhenheit or Celsius). 4. Hr => CLOCK FORMAT (used to set the time of day format as 12:00 AM/PM or 24:00). 5. Set => PRESET TEMPERATURE (it’s possible to save the standard preset temperature per every cooking mode or to keep in memory the last used temperature). To select special features, follow the steps below: x Touch and hold [OPTIONS] and [TIME] keys for at least 3 seconds. Clock time disappears and the following display is shown: x Touch the [INC] or the [DEC] key to scroll all available options described above, until the desired one is found. x Touch [OPTIONS] key to edit the selected options. x Change the value by means of [INC] or [DEC] keys. x Touch the [OPTIONS] key to confirm the option and go back to the selection menu or hold the key for 3 second to quit the User Option Menu and go back to the clock original screen.](https://usermanual.wiki/Meneghetti/RUEI.User-and-Care-Manual/User-Guide-2967492-Page-27.png)
![ENGLISHUse & Care Manual27 Sabbath Mode Instruction x Enter the user option menu holding [OPTIONS] and [TIME] keys for 3 seconds. Scroll the option list (dEG, OFS, Hr, Sab), shown by the red temperature module, by pressing [INC]/[DEC], until Sabbath item is found. x Touch [OPTIONS] to enter edit mode: the selected item switches to the green digits on the left and its status in the red digits field starts blinking. x Touch again [INC]/[DEC] keys to set Sabbath mode ON or OFF (Default=OFF). Touch [OPTIONS] to confirm and come back to the option list. Hold [OPTIONS] key for 3 seconds to quit the selection menu and go back to normal operations. x Once Sabbath mode is set, only BAKE and OFF positions are available in the cooking mode selector. Move the selector to BAKE then set the temperature to the desired value within 5 minutes. x After 5 minutes, the temperature cannot be shown any more and the display appears as below: Sabbath mode is active. x Oven lights status cannot be changed during Sabbath time. x Oven temperature can only be lowered but no information can be displayed. x The cooling fan must run in Sabbath mode. x Preheat lights are inhibited during Sabbath mode. x The buzzer must always be silent, regardless of any fault, end of activity, etc. x The meat probe can never be used in Sabbath mode. x Maximum allowed cooking time must be 72 hours. x The user is allowed to stop the oven manually, also during Sabbath, moving the cooking mode selector to OFF position. x Heating elements cycling must not depend on the door switch status. Opening or closing the door must not switch the relays directly.](https://usermanual.wiki/Meneghetti/RUEI.User-and-Care-Manual/User-Guide-2967492-Page-28.png)
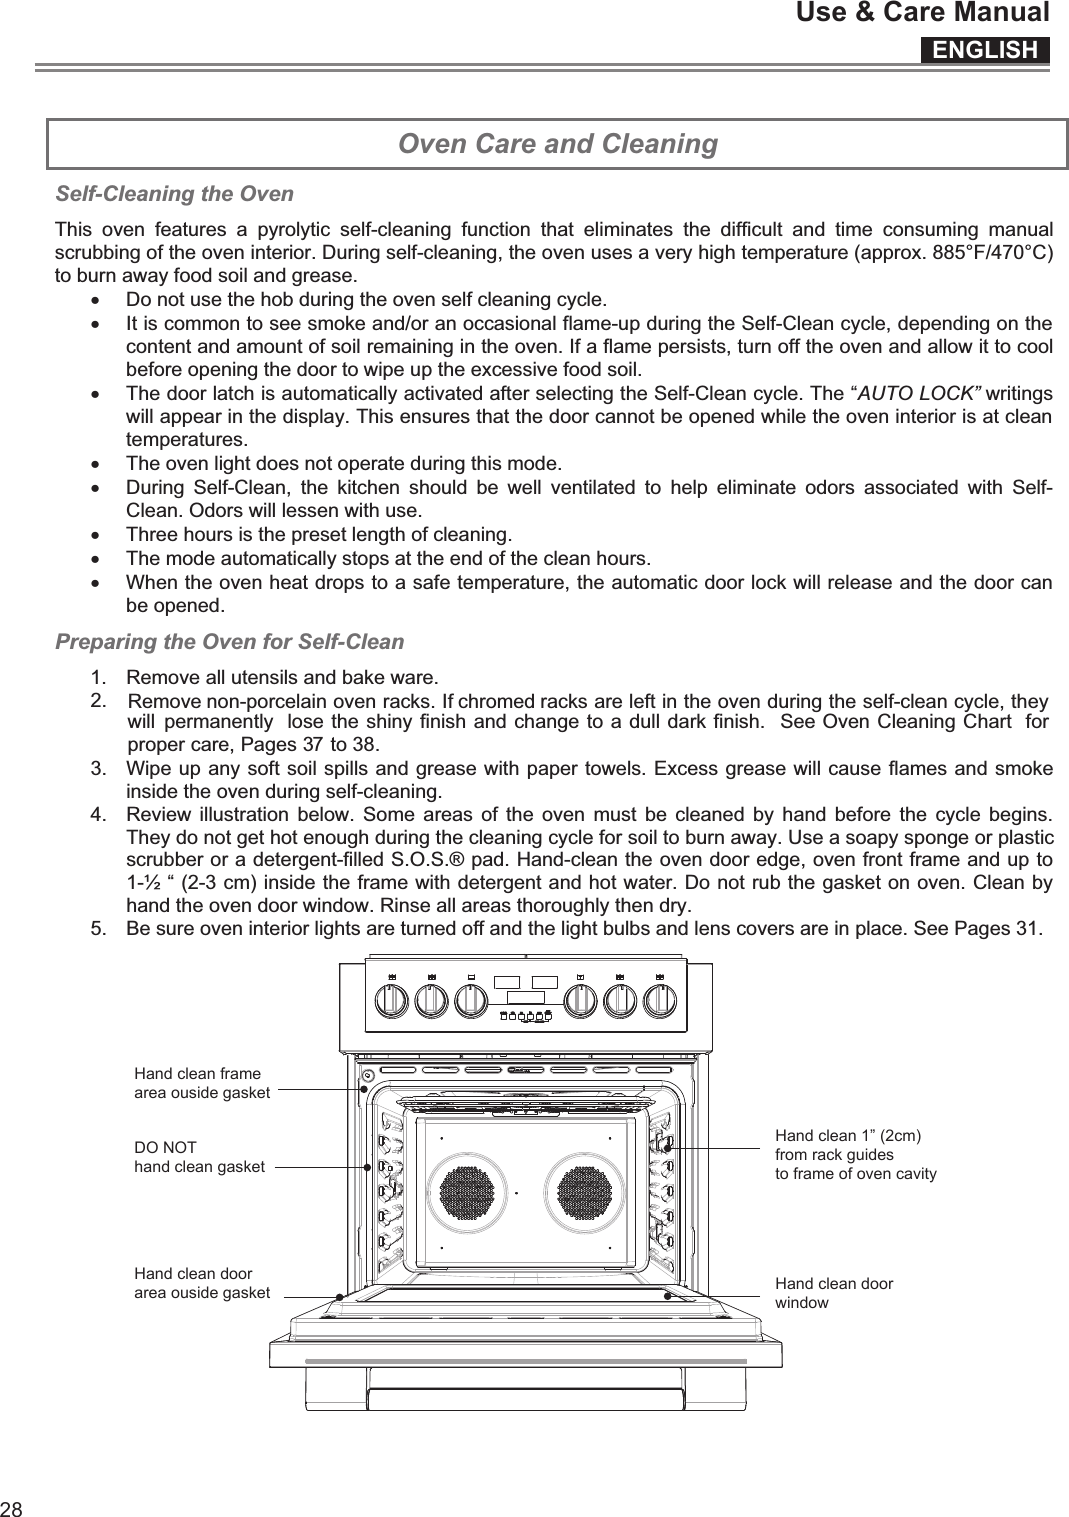
![ENGLISHUse & Care Manual29 Setting the Self-Clean Mode To Set the Self-Clean Mode standard value is 3 hours. the oven will automatically turn off. move one of the two knobs from the cleaning position. Do not attempt to open the door while the door is locked. The “AUTO LOCK” writings will flash until the motor stops. When they are displayed, the door cannot be opened. Check that the door has been locked and will not open before starting the Self-Clean mode. If door does not lock, rotate the cooking mode knob into the OFF position and do not start self-clean; phone for service. If the door is in the open position when this mode is selected, the “AUTO LOCK” writings will flash until the door is closed. The latch doesn’t move. To Change the Cleaning Time 1. To change the setting from 3 hours, select either 2 hours for light soil or 4 hours for heavy soil immediately before starting. 2. To change the hours, touch the [TIME] key. 3. The hours will flash. 4. Use [INC] or [DEC] keys to change the value. 5. To change the minutes, touch the [TIME] key again. 6. The minutes will flash. 7. Use [INC] or [DEC] keys to change the value. Hold the key to change by 10 minutes steps. 8. Touch [TIME] or wait a few seconds to confirm the new value. To Delay the Start of Cleaning 1. Follow steps 1 through 7 above. 2. Touch the [TIME] key and verify that “STOP TIME” appears on the display. The hours will begin flashing. 3. Use [INC] or [DEC] keys to change the stop time value. 4. To change the minutes, touch the [TIME] key, the minutes will flash. 5. Use [INC] or [DEC] keys to change the value. Hold the key to change by 10 minutes steps. 6. Touch [TIME] or wait a few seconds to confirm the new value. 7. The latch starts moving to lock the oven door, the display shows “DELAY”. 8. When the delay time expires, self-cleaning will start. 9. At the end of the programmed cleaning time, the oven will automatically turn off. 10. “End” will appear on the temperature display, “CLEAN” on the mode display and “TIME” on the clock display will start flashing until the [TIME] key is touched or the knob is moved to the OFF position. In order to check the cleaning or the stop time during a delayed clean, simply touch the [TIME] key until “TIME” or “STOP TIME” writings are displayed. 1. Rotate both knobs into the clean position. 2. CLEAN & TIME appear. 3. The clean time is displayed automatically, its 4. At the end of the programmed cleaning time, 5. To stop the cleaning mode at any moment,](https://usermanual.wiki/Meneghetti/RUEI.User-and-Care-Manual/User-Guide-2967492-Page-30.png)