Mitel Deutschland 68635RFP36U-01 DECT base station User Manual SIP DECT OM System Manual
Mitel Deutschland GmbH DECT base station SIP DECT OM System Manual
Contents
- 1. UserManual_part1
- 2. UserManual_part2
- 3. UserManual.pdf
UserManual_part2
SIP–DECT OM System Manual Release 3.0 7 OMM Web Service
The following tasks can be performed on the Directory page:
creating and changing LDAP entries (see chapter 7.9.1.1), •
• deleting LDAP entries(see chapter 7.9.2.2).
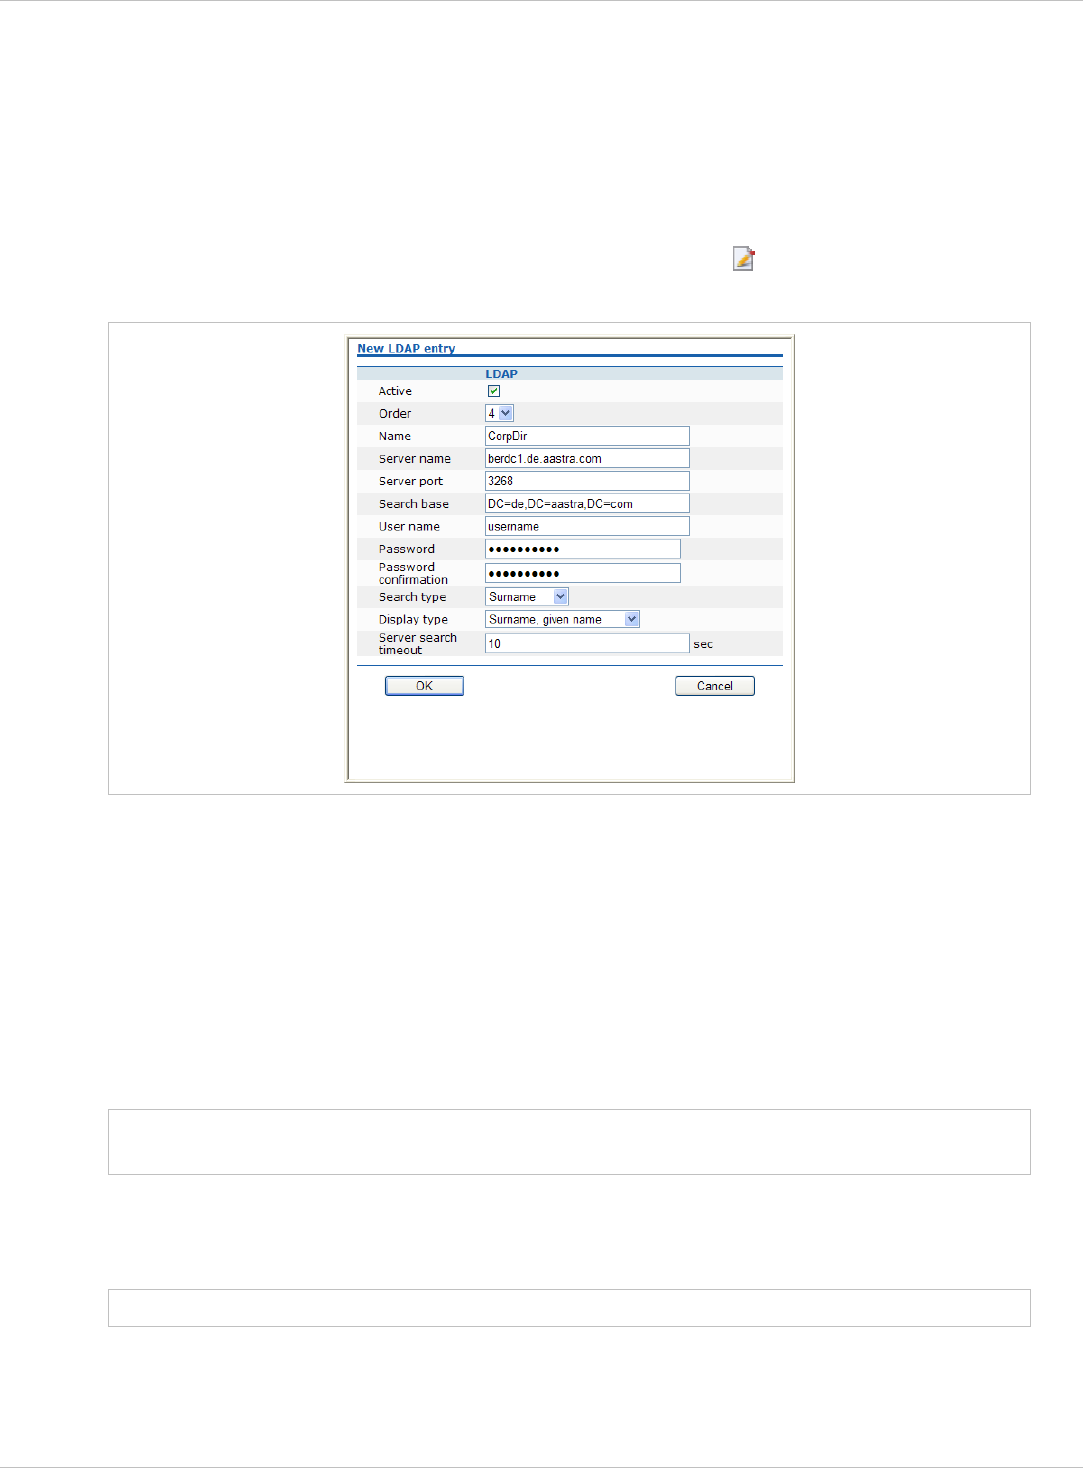
7.9.2.1 Creating and Changing LDAP Servers
1 To configure a new LDAP entry press the New button on the Directory page.
To change the configuration of an existing entry click on the icon left behind the entry.
The New LDAP entry resp. the Configure LDAP entry dialog opens.
1 On the LDAP entry page enter the parameters for the LDAP access, see parameter
description below.
2 Press the OK button to create or change an LDAP directory entry.
The following parameters can be set per LDAP directory entry:
•
•
•
•
Note:
Active flag: allows to enable/disable a specific entry.
Order: determines the position in the handset menu (1 – top; 5 – bottom).
Server name (mandatory): Enter the name or IP address of the LDAP server.
Server port (mandatory): Enter the server port number (default: 389)
SSL (default port 689) is not supported.
Windows® Active Directory Server uses port 3268.
•
•
Note:
Search base: The search base has to be edited (e.g. “ou=people,o=my com”).
User name, Password: User name (a distinguished name) and password may be filled, if
requested by the LDAP Server. Otherwise an anonymous bind takes place.
The DECT IP OMM supports LDAP simple bind.
• Search type: Searches will be done for one of the following attributes:
– Name (sn) // Surname (default)
– First name (Given name)
depl-1230/0.2 Page: 90 (238)

SIP–DECT OM System Manual Release 3.0 7 OMM Web Service
•
•
•
•
•
Note:
Display type: Selection between the following two alternatives is possible:
– Surname (sn), first name (given name) (default)
– first name (Given name) and Surname (sn)
Server search timeout: The search results will be accepted within the entered search
time (value range: 1 - 99 sec).
The configuration is valid for all PP handsets which support the LDAP directory feature. To
make search requests unique for different users the search base configuration can include
space holders which are replaced by user specific values when submitting the LDAP request
to a server.
The following placeholders are defined:
“<TEL>” which is replaced by the specific telephone number of the user,
“<DESC1>” which is replaced by the “Description 1” attribute value of the user
“<DESC2>” which is replaced by the “Description 2” attribute value of the user
The telephone number in SIP–DECT is not limited to numeric character.
7.9.2.2 Deleting LDAP Entries
To delete an existing LDAP directory entry:
1 On the Directory page click on the icon left behind the entry.
The Delete LDAP entry dialog opens showing the current configuration of this entry.
2 Press the Delete button.
7.9.3 “Feature access codes” Menu
Features access codes (FAC) allow to perform specific actions on the OMM from any
subscribed DECT handset.
To configure the FAC feature:
1 FAC number: Enter a unique FAC number.
depl-1230/0.2 Page: 91 (238)
SIP–DECT OM System Manual Release 3.0 7 OMM Web Service
2 Activate the appropriate checkbox(es) to enable the corresponding FAC feature(s). For
each enabled FAC feature enter an assigned access code.
3 Press the OK button.
Afterwards the appropriate action can be performed by dialing the “FAC number” followed by
the “FAC access code” en bloc from any subscribed DECT handset.
In the example above a subscribed user can activate the OMM DECT subscription by dialing
“9999*4701#” en bloc.
Please note: Overlap sending is not supported for FAC. “FAC number” and “FAC action
code” must be entered en bloc.
FAC functions will be confirmed by an audible indication to the user (in-band tone signals).
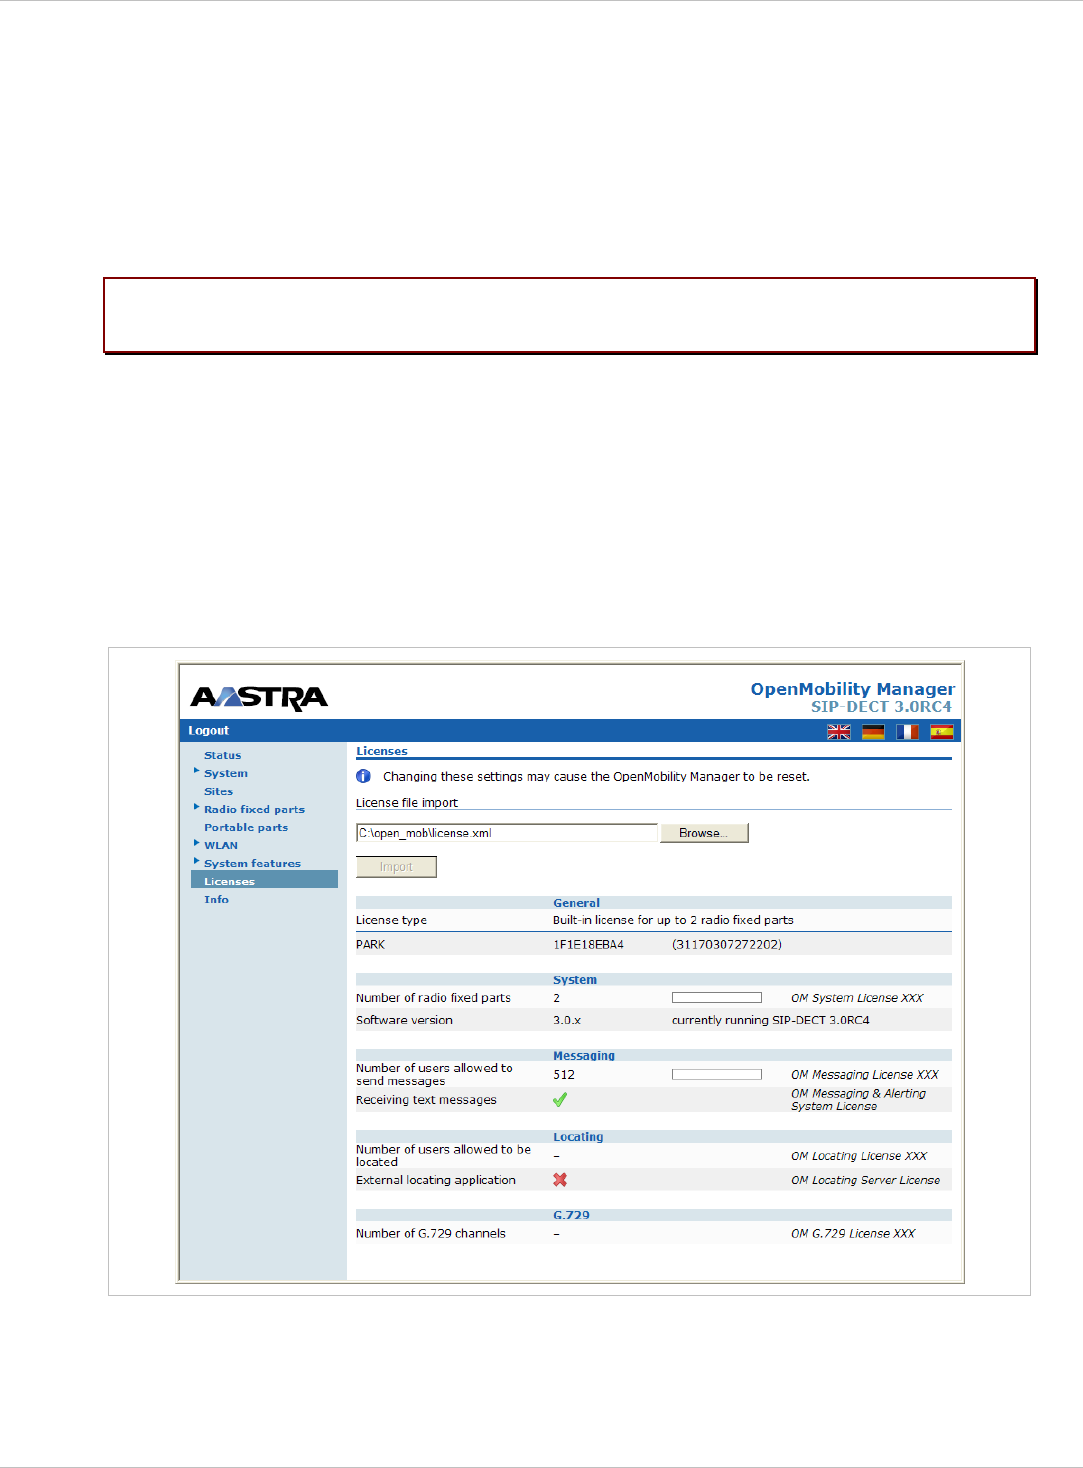
7.10 “Licenses” Menu
The Licenses page provides an overview on the currently used license. On this page you
can also import an activation or license file:
1 Select the path and file name where the activation or license key is stored.
2 Afterwards press the Import button.
For a detailed description on the OMM licensing model see chapter 4.
depl-1230/0.2 Page: 92 (238)

SIP–DECT OM System Manual Release 3.0 7 OMM Web Service
7.11 “Info” Menu
On the Info page, the End User License Agreement (EULA) is displayed.
With the first login into a new SIP–DECT SW version, this page is displayed automatically
and the user has to accept the EULA by pressing the Accept button.
depl-1230/0.2 Page: 93 (238)
SIP–DECT OM System Manual Release 3.0 8 OM Management Portal (OMP)
8 OM Management Portal (OMP)
The OM Management Portal (OMP) is a Java tool to manage the SIP–DECT solution. It can
be used to view and configure OMM system data in the same way as the OM Web service.
This section lists all parameters which can be configured and viewed using OMP. All
parameters which are also accessible by the OM Web service are described in the
appropriate OM Web service section (section 7). New parameters which are only accessible
via OMP are described in this section.
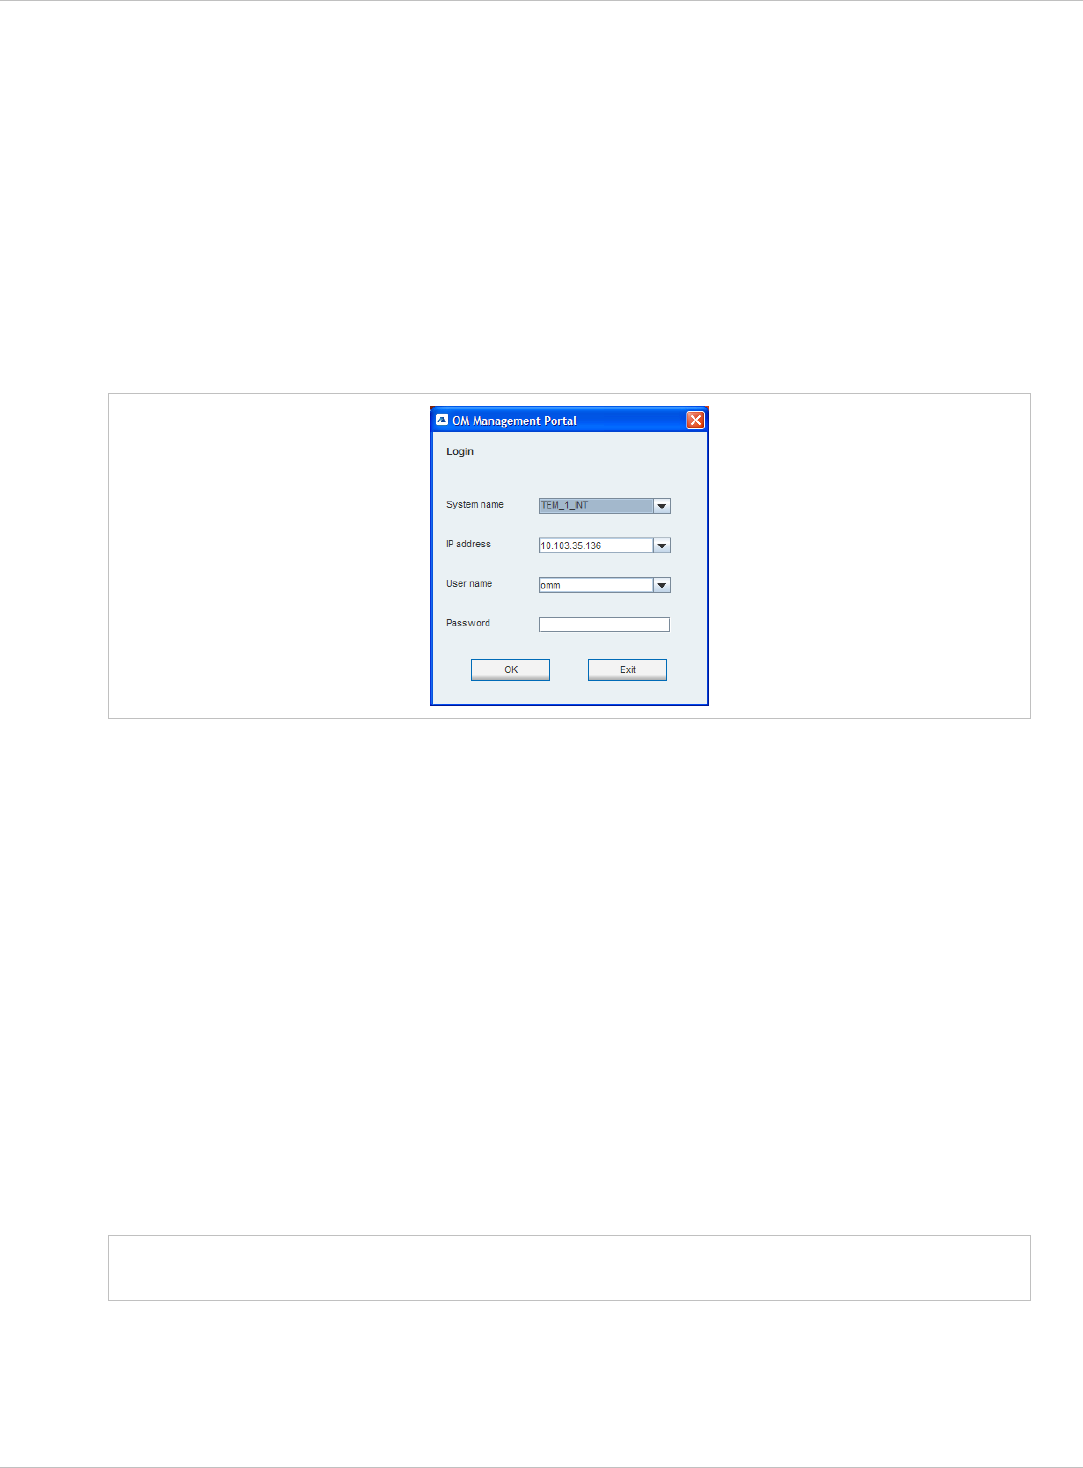
8.1 Login
The OMM allows only one user at a time to configure the system.
To log in to the system enter the following data:
•
•
•
•
Note:
IP address of the OMM.
User name, Password: Enter a user name and a password. Both strings are checked
case sensitive.
With initial installation or after removing the configuration file, the OMM Web service is
accessible via a default built-in user account with user “omm” and password “omm”.
The System name is set by the system administrator after first successful login to the OMM,
see chapter 8.5.1.
The system name and the IP address of successful logins are stored in the local OMP
preferences and can be reselected for further logins. Up to 10 different login datasets can be
stored in the preferences.
On a Linux system, preferences are stored in the users home directory
“~/.java/.userPrefs/…”.
On a windows system in the registry node
“HKEY_CURRENT_USER/Software/JavaSoft/Prefs/…”.
The OMM password can not be changed using OMP, please use the OM Web
service instead (see chapter 7.4.3).
After login the OMP is set to the configuration mode page showing the system status page
which contains health state information of the connected OMM (see chapter 8.4).
depl-1230/0.2 Page: 94 (238)
SIP–DECT OM System Manual Release 3.0 8 OM Management Portal (OMP)
8.2 Logout
There is no automatically logout for the OMP. The user has to log out manually.
To log out from the system:
click on the closing icon on the upper left in the upper right corner of the OMP window
•
•
Note:
or select the Exit entry from the General menu.
If the OMM link is broken, the OMP asks if you want to reconnect to the OMM. In
that case you have to enter the login data again.
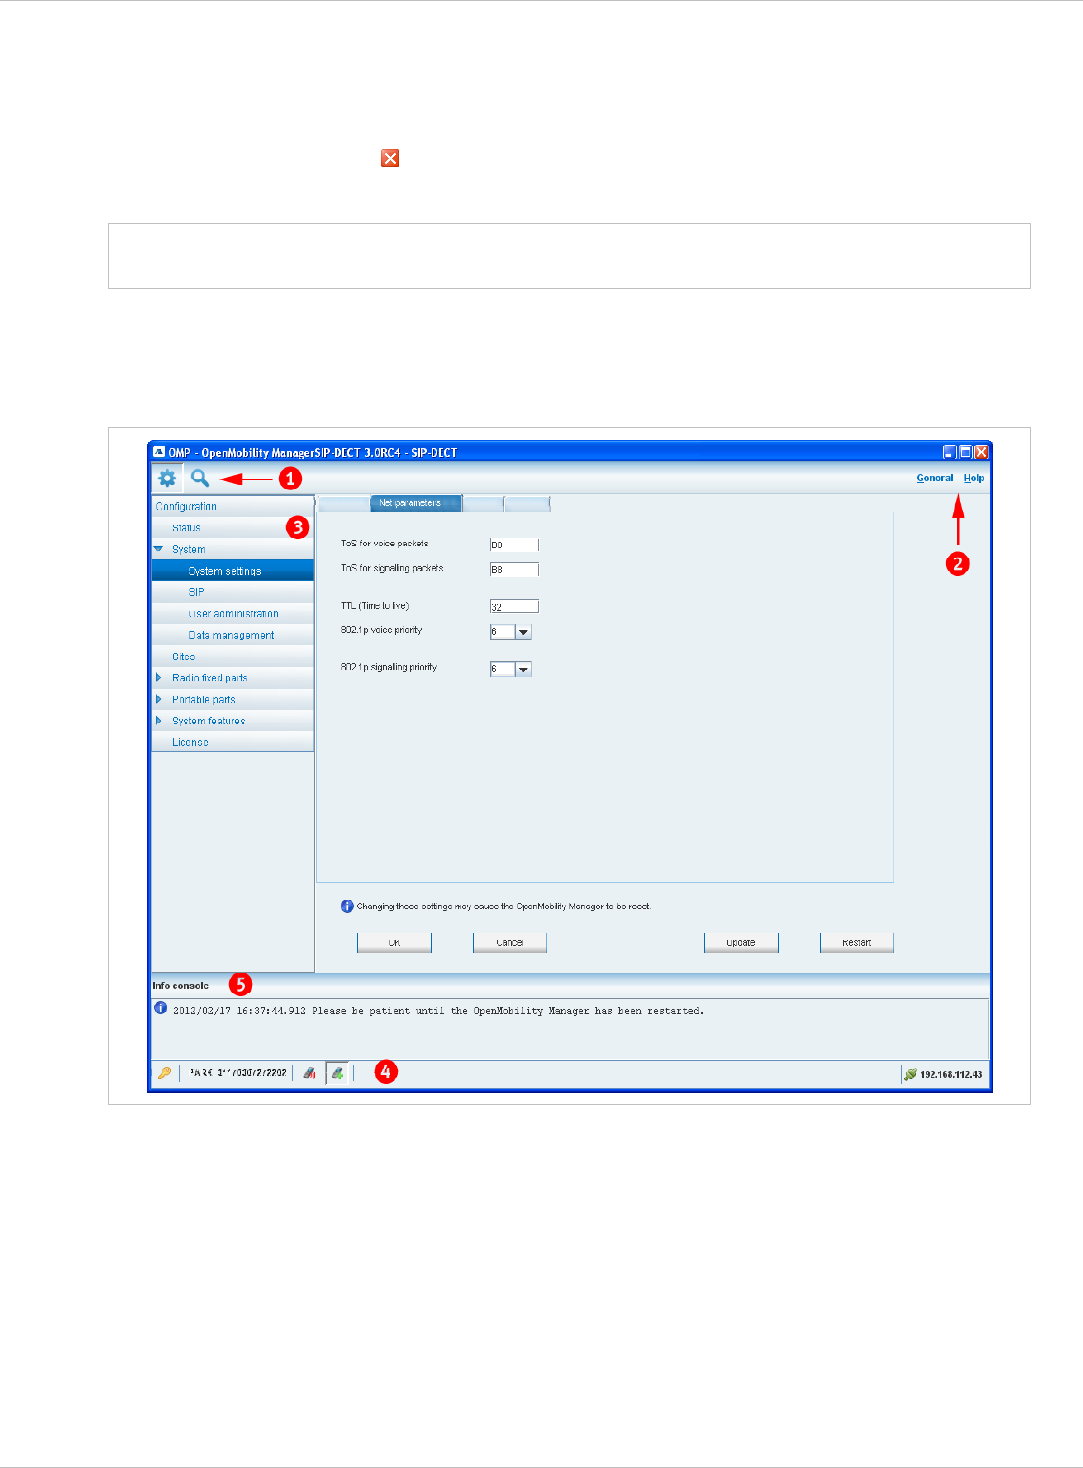
8.3 OMP Main Window
The header of the OMP window shows version info of the connected OMM.
1 – “OMP mode” toolbar buttons
The OMP provides two different modes: the configuration mode and the monitor mode.
The configuration mode allows changing of parameters. In monitor mode parameters are
only displayed, they are not changeable. The monitor mode provides additional features, e.g.
system and RFP statistics and RFP synchronization monitoring.
To select the desired mode, press the appropriate toolbar button in the upper left corner of
the OMP window:
depl-1230/0.2 Page: 95 (238)

SIP–DECT OM System Manual Release 3.0 8 OM Management Portal (OMP)
configuration mode, •
monitor mode. •
2 – Main menus
The OMP provides two main menus which are available in all program situations:
General menu, see chapter 8.11. •
•
•
Help menu, see chapter 8.12.
3 – Navigation panel
Both configuration and monitor mode contain a navigation panel. This panel contains the
mode-dependant menu.
4 – Status bar
The status bar is located at the bottom of the main window. It shows the following items:
Encryption state:
The icon indicates that encryption is enabled.
The icon indicates that encryption is disabled.
This setting can be configured in the DECT tab of the System settings menu (see also
chapter 8.5.1).
PARK, •
• Subscription state: Clicking on one of the following icons enables / disables subscription.
The icon indicates that subscription is enabled.
The icon indicates that subscription is disabled.
Subscription can also be enabled / disabled in the Portable parts menu (see also chapter
8.8).
Auto-create on subscription state: Clicking on one of the following icons enables / disables
Auto-create on subscription.
•
The icon indicates that Auto-create on subscription is enabled.
The icon indicates that Auto-create on subscription is disabled.
This setting can also be configured in the DECT tab of the System settings menu (see
also chapter 8.5.1).
Connection status to the OMM: •
If connected to the OMM, the IP address of the OMM is displayed.
OMP is disconnected from the OMM.
5 – Info console
Since SIP–DECT release 3.0, general OMP events are displayed the Info console.
depl-1230/0.2 Page: 96 (238)
SIP–DECT OM System Manual Release 3.0 8 OM Management Portal (OMP)
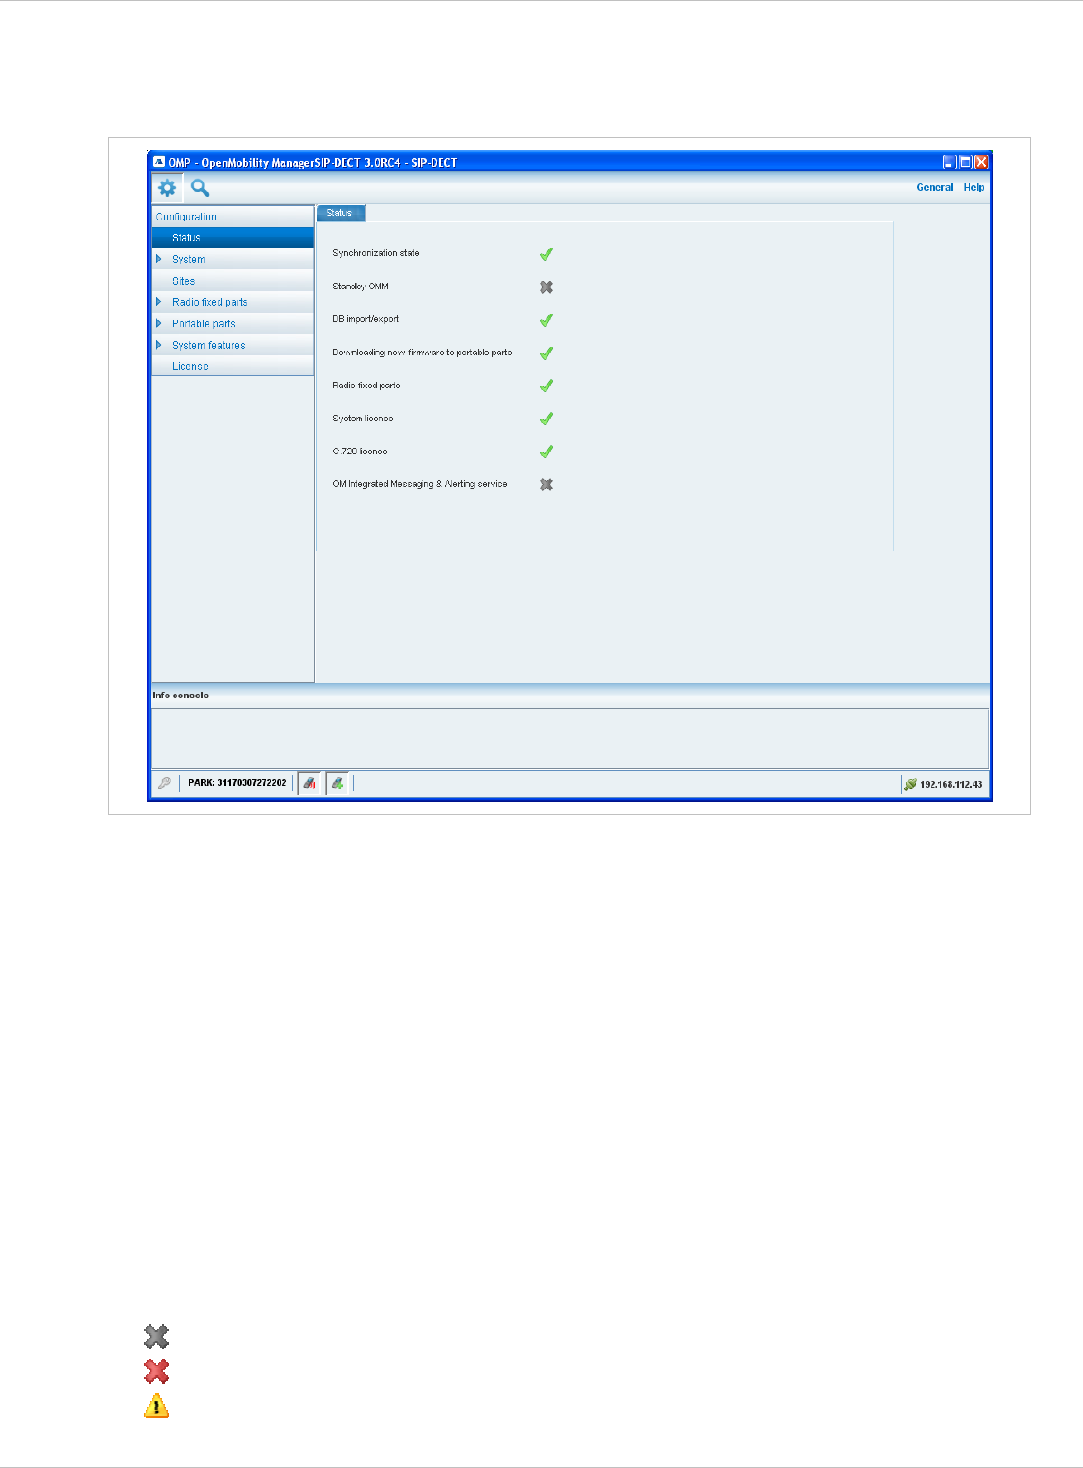
8.4 “Status” Menu
The system status is displayed after startup of OMP. The Status panel provides information
about the system health state.
The following health state items are displayed:
Synchronization state: indicates the current synchronization state for all RFPs (see
chapter 8.7.5).
•
•
•
•
•
•
•
•
•
Standby OMM: indicates if the status of the standby OMM (see chapter 9.13).
DB import/export: indicates the status of a current database import/export (see chapter
8.5.4).
Downloading new firmware to portable parts: indicates the status of the “Download
over Air” service (see chapter 9.17).
Radio fixed parts: indicates the status of all RFPs. The status of an individual RFP can
be viewed in the RFP detail panel (see chapter 8.7.1.1).
System license: indicates the status of the current system license (see chapter 4).
G.729 license: indicates the status of the G.729 codec license (see chapter 4).
OM Integrated Messaging and Alerting service: indicates the status of the integrated
message and alarm server (see chapter 8.5.1).
Health states can be set to these values:
– inactive or unknown; no G.729 channels are licensed
– error •
– warning; all G.729 channels are consumed •
depl-1230/0.2 Page: 97 (238)
SIP–DECT OM System Manual Release 3.0 8 OM Management Portal (OMP)
– OK; G.729 licenses are available •
8.5 “System” Menu
The System menu allows to configure/view the global settings of the OMM. The systems
settings are changeable in configuration mode. Change of some parameters can cause the
OMM to be reset. In this case a new login is required.
The System menu provides the following entries:
Configuration mode Monitor mode See chapter
System settings System settings 8.5.1
Statistics 8.5.2
SIP SIP 8.5.3
Data management Data management 8.5.4
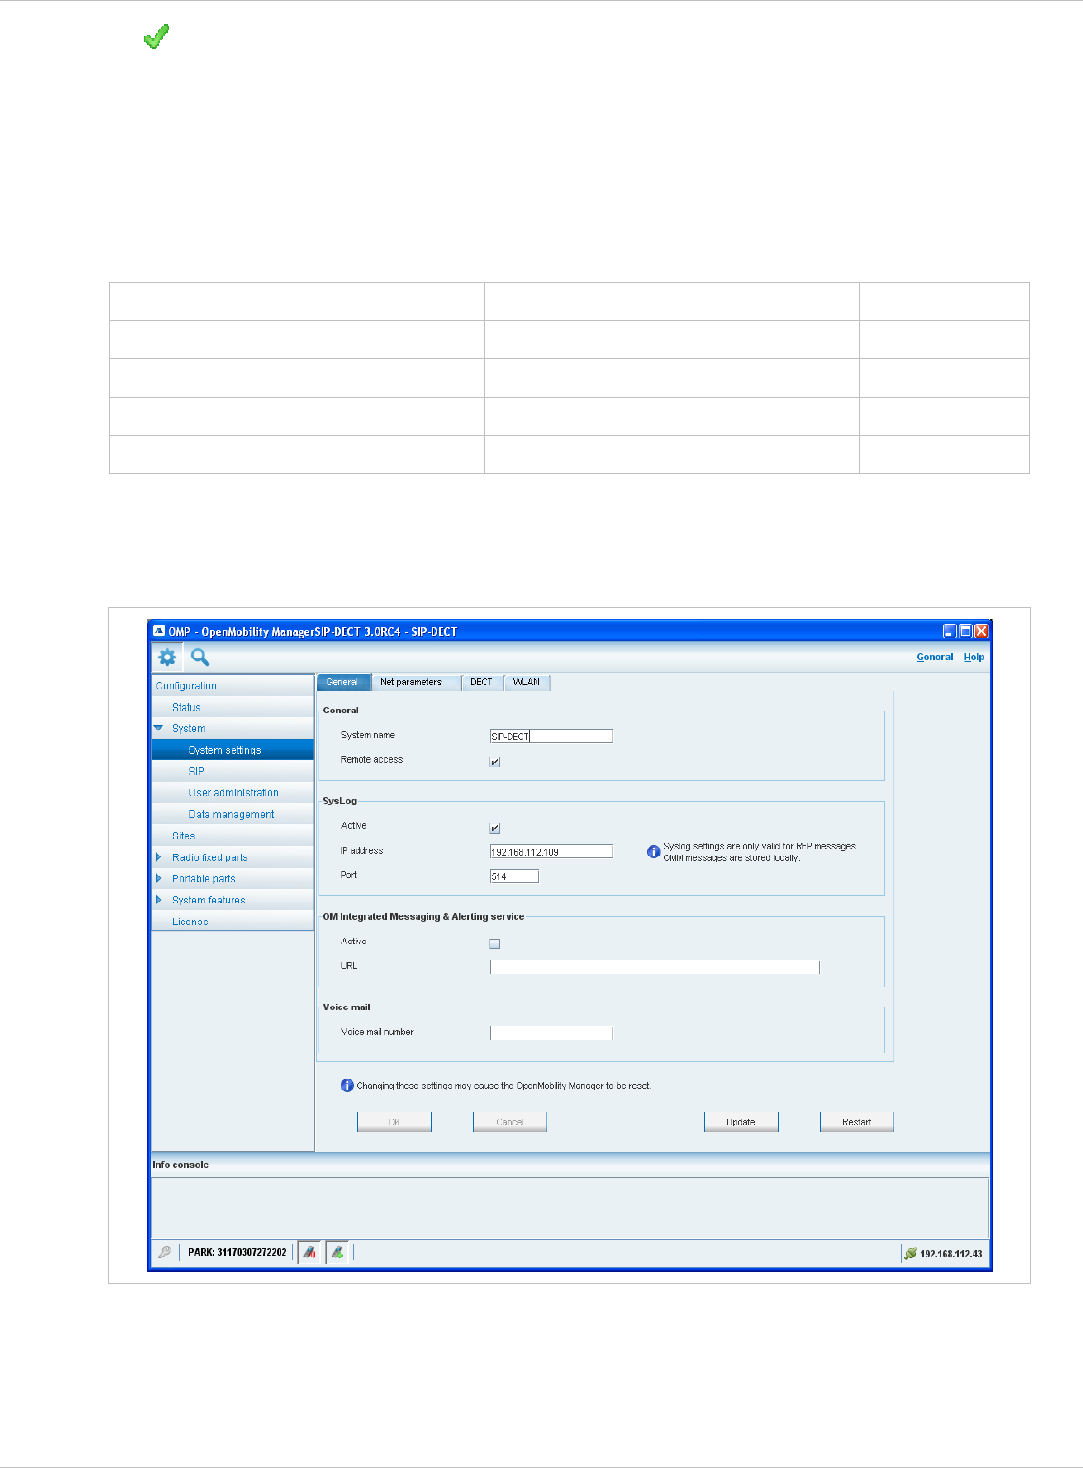
8.5.1 “System settings” Menu
The System settings menu contains general settings of the OpenMobility Manager.
The menu provides the settings in several tabs:
depl-1230/0.2 Page: 98 (238)

SIP–DECT OM System Manual Release 3.0 8 OM Management Portal (OMP)
General
For a description of the parameters which can be set in the General tab, please refer to the
description of the System settings page of the OMM Web service (see chapter 7.4.1). The
corresponding parameters can be found there in the General settings, Syslog, OM
Integrated Messaging and Alerting service and Voice mail page sections.
Net parameters
For a description of the parameters which can be set in the Net parameters tab, please refer
to the description of the System settings page of the OMM Web service (see chapter 7.4.1).
The corresponding parameters can be found there in the IP parameters page section.
Notes:
The 802.1p signalling priority parameter (OMP) corresponds to the VLAN priority Call
control parameter (OMM Web service).
•
•
•
•
The 802.1p voice priority parameter (OMP) corresponds to the VLAN priority Audio
parameter (OMM Web service).
DECT
For a description of the parameters which can be set in the DECT tab, please refer to the
description of the System settings page of the OMM Web service (see chapter 7.4.1). The
corresponding parameters can be found there in the DECT settings and Downloading new
firmware to portable parts page sections.
The following settings are only available in the OMP.
Paging area size: Select the number of paging areas for the SIP–DECT system. A paging
area can consist of up to 16 RFPs. The configuration of the paging areas is done in the
Paging areas menu of the OMP (see chapter 8.7.2).
Auto-create on subscription: Activate this option if an unbound subscription of portable
parts should be allowed. Please see the SIP–DECT; OM Handset Sharing & Provisioning;
User Guide /27/ for details.
WLAN
For a description of the parameters which can be set in the WLAN tab, please refer to the
description of the System settings page of the OMM Web service (see chapter 7.4.1). The
corresponding parameters can be found there in the WLAN settings page section.
Restarting or Updating the OMM
For a restart of the OMM, press the Restart button in the System settings menu. For more
information see chapter 7.4.1.1.
To update the OMM software, press the Update button in the System settings menu. For
more information see the chapters 7.4.1.2 and chapter 9.12.
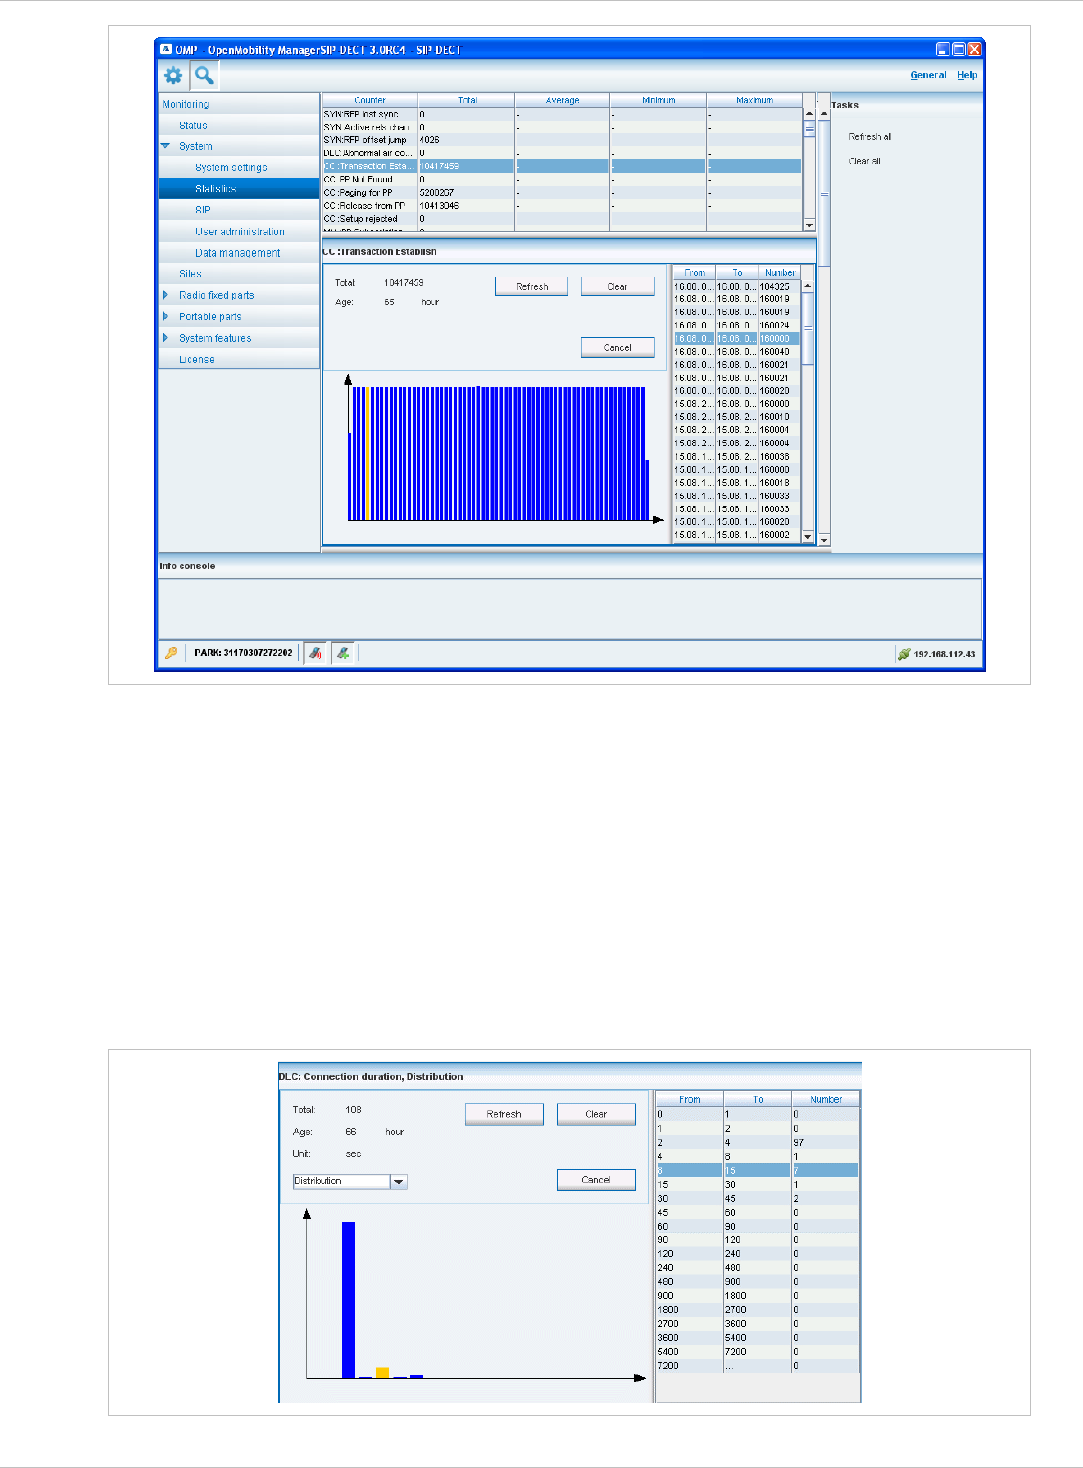
8.5.2 “Statistics” Menu
The Statistics menu provides system statistics information. It contains a table with
numerous system statistics counters which can be used to check the system behavior. The
menu is only available in monitor mode.
depl-1230/0.2 Page: 99 (238)
SIP–DECT OM System Manual Release 3.0 8 OM Management Portal (OMP)
Statistic counters beginning with “+” are counters which are taken over by standby OMM in
case of a failover. All other counters will be reset to the defaults in case of a failover. For
more details about the standby feature, see section 9.13.
The following tasks can be performed:
Refresh all: request OMM update for all statistics counters. •
•
•
•
Clear all: reset all statistics counters in OMM.
If a statistics counter is selected in the table, it is shown in a detail panel. This detail panel
provides all available information for this statistics counter. You can:
update this single statistics counter by pressing the Refresh button or
reset this single statistics counter by pressing the Clear button.
depl-1230/0.2 Page: 100 (238)
SIP–DECT OM System Manual Release 3.0 8 OM Management Portal (OMP)
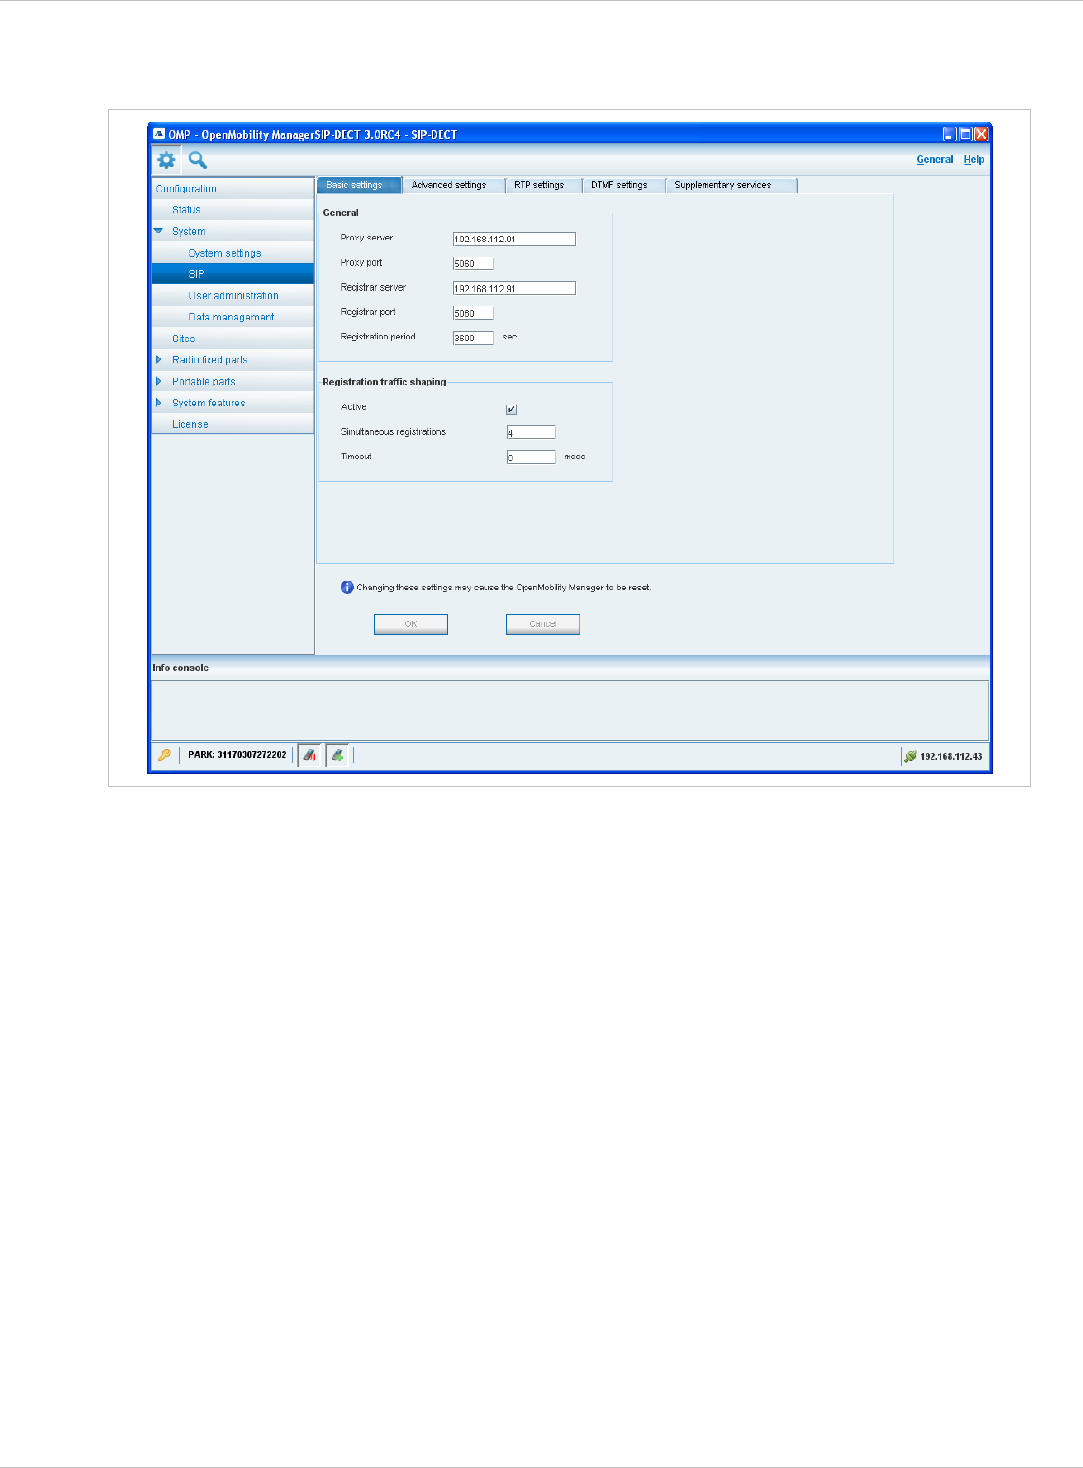
8.5.3 “SIP” Menu
The SIP menu covers global settings for SIP signaling and RTP voice streams.
The menu provides the settings in several tabs:
Basic settings
For a description of the parameters which can be set in the Basic settings tab, please refer
to the description of the SIP page of the OMM Web service (see chapter 7.4.2). The
corresponding parameters can be found there in the Basic settings and Registration traffic
shaping page sections.
Note that the Registration traffic Shaping – Timeout parameter (OMP) corresponds to the
Waiting time parameter (OMM Web service).
Advanced settings
For a description of the parameters which can be set in the Advanced settings tab, please
refer to the description of the SIP page of the OMM Web service (see chapter 7.4.2). The
corresponding parameters can be found there in the Advanced settings page section.
RTP settings
For a description of the parameters which can be set in the RTP settings tab, please refer to
the description of the SIP page of the OMM Web service (see chapter 7.4.2). The
corresponding parameters can be found there in the RTP settings page section.
depl-1230/0.2 Page: 101 (238)

SIP–DECT OM System Manual Release 3.0 8 OM Management Portal (OMP)
DTMF settings
For a description of the parameters which can be set in the DTMF settings tab, please refer
to the description of the SIP page of the OMM Web service (see chapter 7.4.2). The
corresponding parameters can be found there in the DTMF settings page section.
Supplementary services
For a description of the parameters which can be set in the Supplementary services tab,
please refer to the description of the SIP page of the OMM Web service (see chapter 7.4.2).
The corresponding parameters can be found there in the Supplementary Services page
section.
depl-1230/0.2 Page: 102 (238)
SIP–DECT OM System Manual Release 3.0 8 OM Management Portal (OMP)
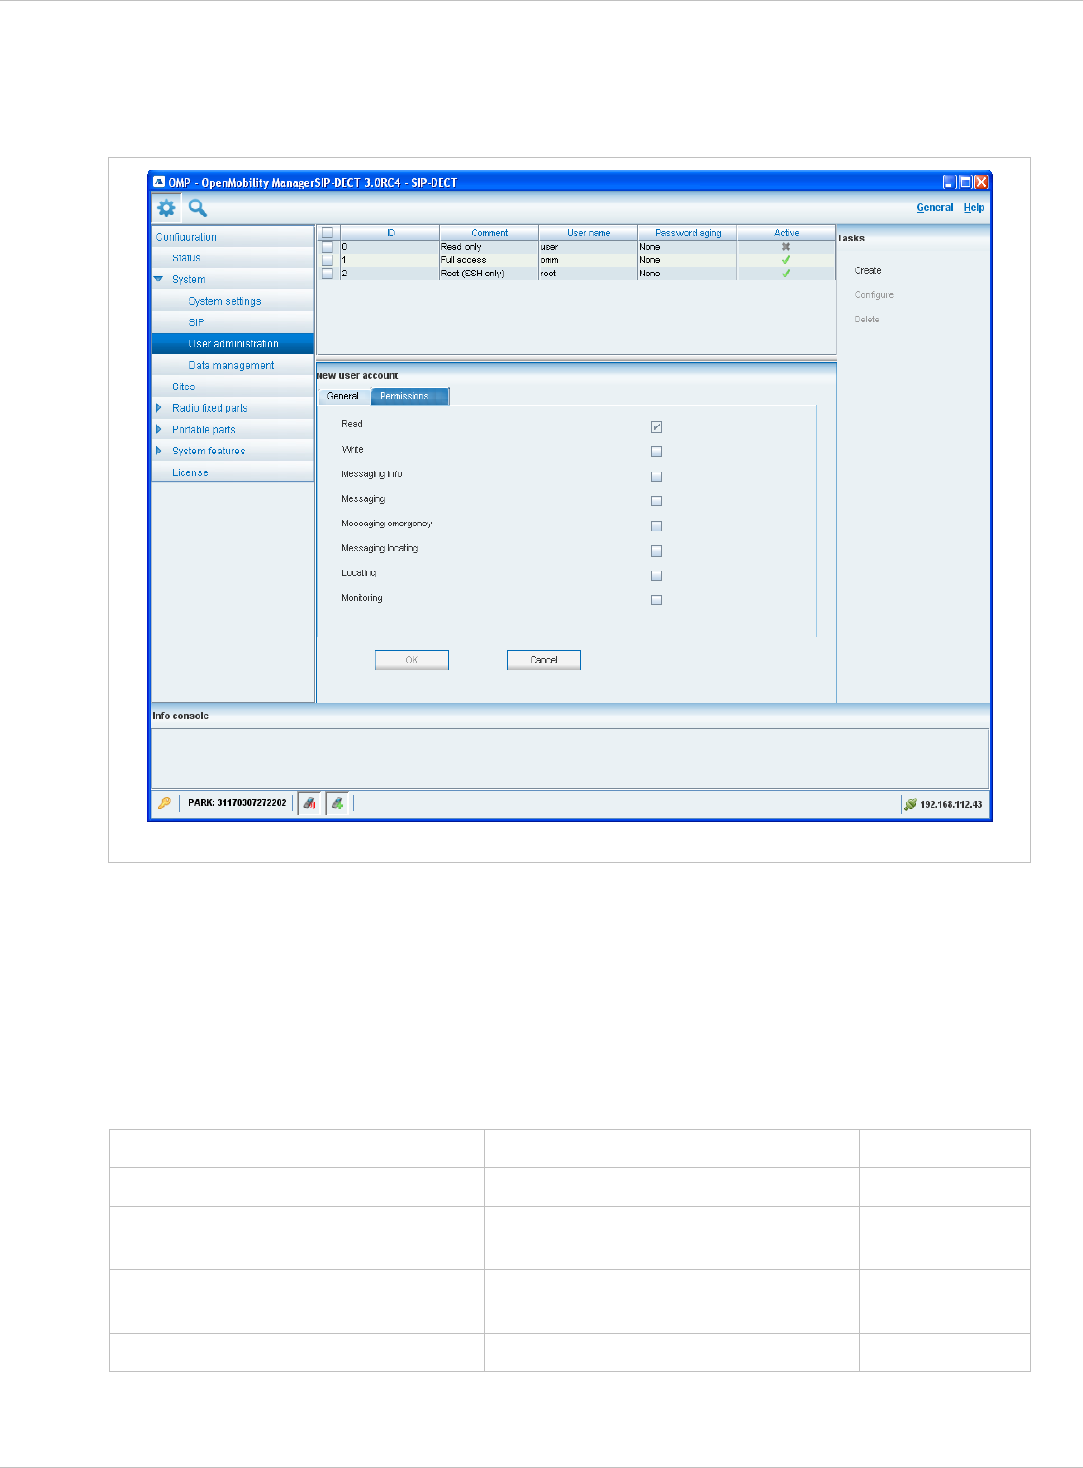
8.5.4 “User administration” Menu
In the User administration menu you configure the OMM user accounts.
User administration menu in configuration mode
The 3 user accounts “Full access”, “Read-only” and “Root (ssh only)” available via the User
administration page of the OMM Web service (see chapter 7.4.3) can also be configured in
the OMP. These are 3 predefined user accounts, which cannot be removed or renamed.
Only the “Root (ssh only)” account can be deactivated. The permissions are fixed. This is
consistent with the OMM WEB service. The meaning of the different account types is
described in section 9.14.1. In addition, the OMP allows to create additional user accounts
(login and password) and to assign specific permissions.
The tasks which can be performed are mode-dependant.
Configuration mode Monitor mode See chapter
Create: create new user account 8.5.4.1
Configure: configure selected user
account in detail panel
8.5.4.2
Show details: shows selected user
account in detail panel
8.5.4.3
Delete: delete selected user account 8.5.4.4
depl-1230/0.2 Page: 103 (238)
SIP–DECT OM System Manual Release 3.0 8 OM Management Portal (OMP)
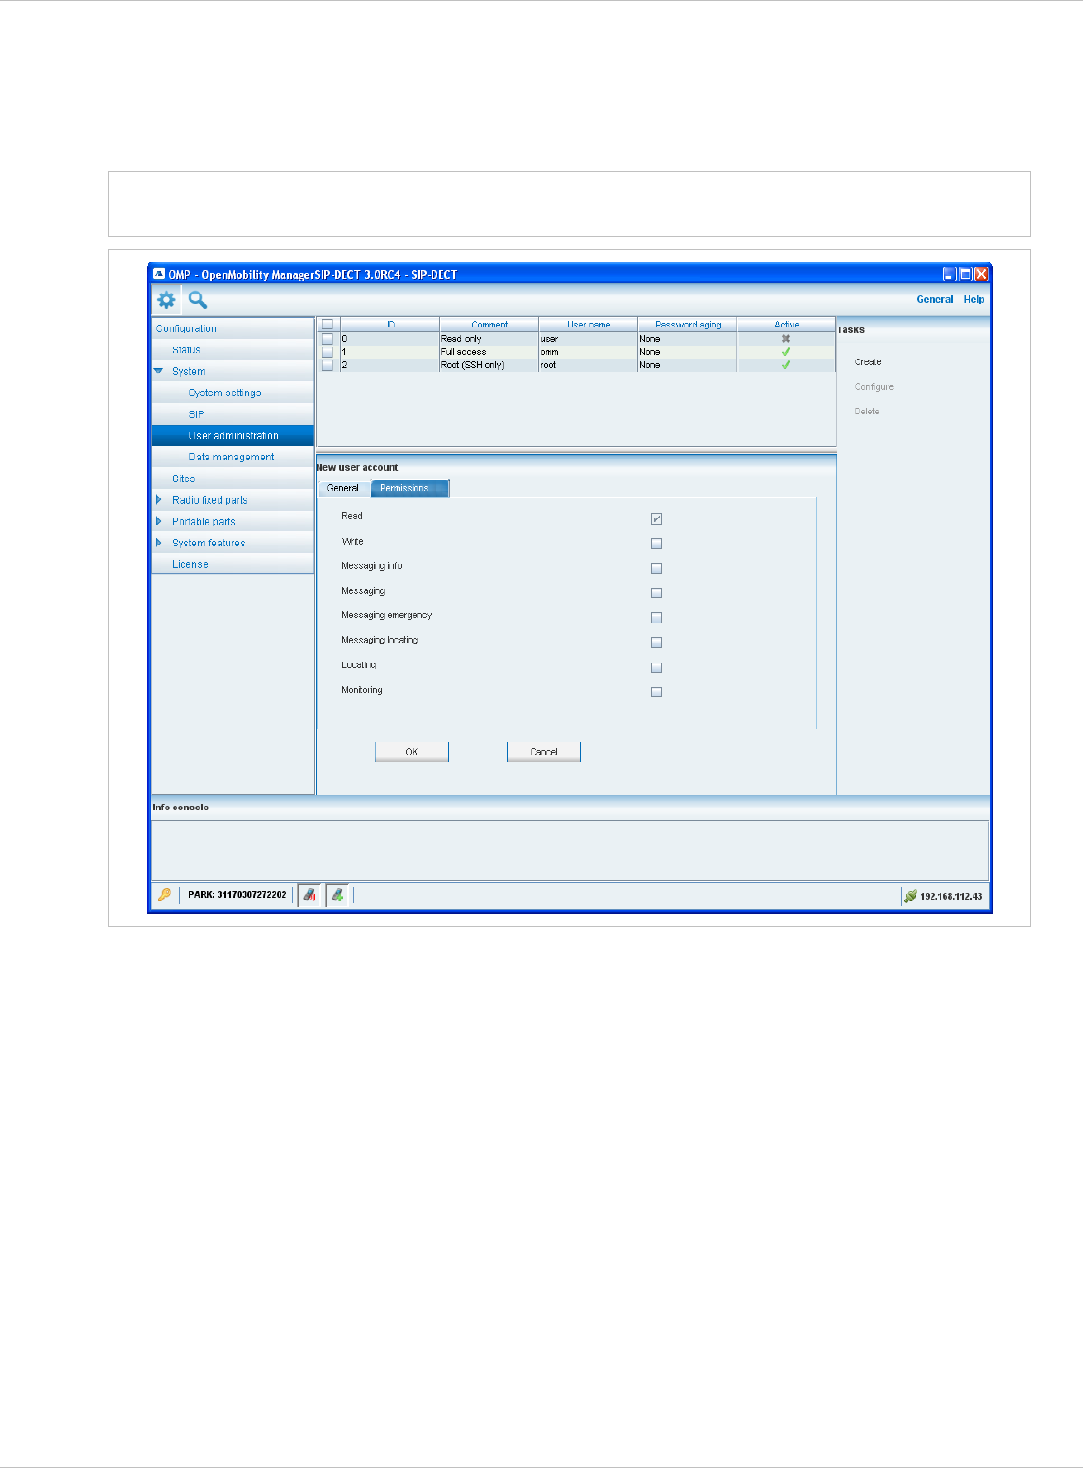
8.5.4.1 Creating New User Accounts
It is possible to create additional user accounts (login and password) and to assign specific
permissions. These accounts are mainly designed to have specific login data and
permissions for applications which are using OM AXI to connect with the OMM.
Note: Individual user accounts cannot be used for a login to the OMM Web service nor
SSH.
Adding individual user accounts is only possible in configuration mode. To add a user
account proceed as follows:
1 In the Tasks bar click on the Create command.
The New user account panel opens. It provides various tabs where the account data has
to be entered.
2 Configure the user account, see parameter description below.
3 Press the OK button.
The following parameters can be set in the tabs of the New user account panel:
General
For a description of the parameters which can be set in the General tab, please refer to the
description of the User administration page of the OMM Web service (see chapter 7.4.3).
depl-1230/0.2 Page: 104 (238)

SIP–DECT OM System Manual Release 3.0 8 OM Management Portal (OMP)
Permissions
The permissions for an individual user account can be set independent from any license
status even if some of the permissions can only been used with an appropriate license.
If an application connects with the OMM via OM AXI, then the permissions been sent from
the OMM to the application is the result of the configured permissions for this account and
the actual license status. For more information please see the OM Application XML Interface
(OM AXI) specification /28/.
The permissions have the following meaning:
Permission Description
Read Read OMM data (OM AXI get requests)
Write Read OMM data (OM AXI set requests)
Messaging info Sent messages with prio “Info”
Messaging Sent messages with prio “Low”, “Normal” and
“High”
Messaging emergency Sent messages with prio “Emergency”
Messaging locating Sent messages with prio “LocatingAlert”
Locating Permission to query the position of PPs and
to track PP positions
Monitoring Permission to monitor various technical
aspects of the mobility system
8.5.4.2 Changing a User Account
Changing user accounts is only possible in configuration mode. To change the
configuration of an existing user account proceed as follows:
1 Select the appropriate user account in the account table.
2 In the Tasks bar click on the Configure command.
3 Change the user account parameters, see parameter description in chapter 8.5.4.1.
4 Press the OK button.
Please note: The predefined user accounts “Full access”, “Read-only” and “Root (ssh only)”
user accounts cannot be renamed. Also their permissions are fixed and
cannot be changed.
8.5.4.3 Viewing User Account Details
You can view the configuration of a user account in monitor mode. Proceed as follows:
1 Select the appropriate user account in the table.
2 In the Tasks bar click on the Show details command.
The user account data is displayed in the user account detail panel.
3 To close the user account detail panel press the Cancel button.
depl-1230/0.2 Page: 105 (238)

SIP–DECT OM System Manual Release 3.0 8 OM Management Portal (OMP)
8.5.4.4 Deleting User Accounts
Deleting user accounts is only possible in configuration mode. To delete one or more
existing user accounts proceed as follows:
1 Select the appropriate account(s) in the user account table by activating the
corresponding checkbox(es).
2 In the Tasks bar click on the Delete command.
3 Confirm the displayed prompt with OK.
Please note:
Please note:
The predefined user accounts “Full access”, “Read-only” and “Root (ssh only)”
user accounts cannot be removed.
8.5.5 “Data management” Menu
The Data management menu provides access to data related to import and export features.
The menu provides the settings in several tabs:
Automatic DB import (see chapter 8.5.5.1), •
•
•
•
•
•
Automatic DB export (see chapter 8.5.5.2),
User data import (see chapter 8.5.5.3),
Manual DB import (see chapter 8.5.5.4),
Manual DB export (see chapter 8.5.5.5),
Maintenance (see chapter 8.5.5.6).
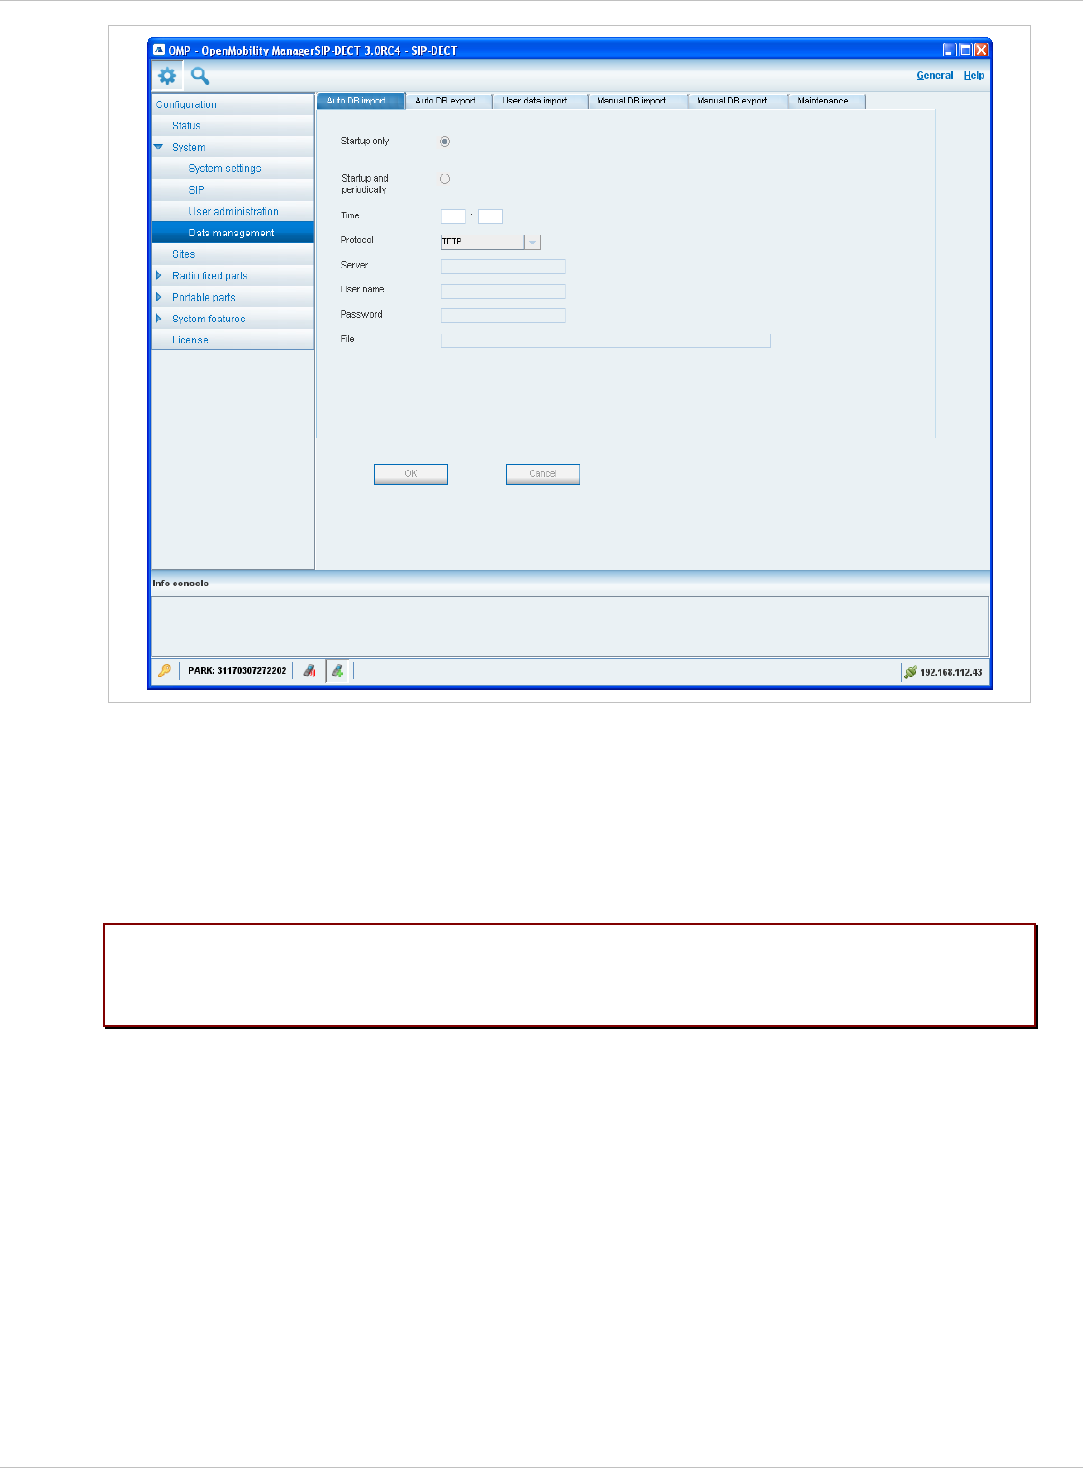
8.5.5.1 “Automatic DB import” Tab
The automatic database (DB) import feature makes it easier to restore a prepared OMM
database into an OMM for an initial configuration or for update reasons.
An automatic import of a database leads to a reset of the OMM to take effect.
depl-1230/0.2 Page: 106 (238)
SIP–DECT OM System Manual Release 3.0 8 OM Management Portal (OMP)
In the Automatic DB import panel enter the following:
1 Startup only: Activate this option if the import should be started for an initial configuration.
2 Startup and periodically: If this option is activated, the OMM tries to import the
configured database file during startup and at the configured time of day.
3 Time: Enter the time, the import should be started.
Please note: An automatic database import at a configured time recommends the time
synchronization with an NTP server. For NTP server configuration see chapter
9.5.4 and chapter 9.6.
4 Protocol: To import a database from an external server select the preferred protocol. The
following protocols are supported: FTP, FTPS, HTTP, HTTPS, TFTP.
5 Server: Enter the IP address or the name of the external server.
6 User name, Password: If necessary, enter the account data of the server.
7 File: Enter the path and file name which include the OMM database.
The database file for an automatic import has to be configured in an URL format like
{ftp|ftps|http|https}://[[user:password@]server]/[directory/]file
or
tftp://[server]/[directory/]file.To be available at OMM startup time and to allow an initial
configuration via automatic import, this URL has to be specified via DHCP (option 24, see
chapter 9.5.4) or the OM Configurator (see chapter 9.6). If such a URL is given by DHCP
depl-1230/0.2 Page: 107 (238)
SIP–DECT OM System Manual Release 3.0 8 OM Management Portal (OMP)
or the OM Configurator, the OMM tries to import a configured database file automatically
during the OMM startup.
8 Click OK to confirm the settings for the automatic import.
For further information on the automatic database import process please refer to the chapter
7.4.6.2.
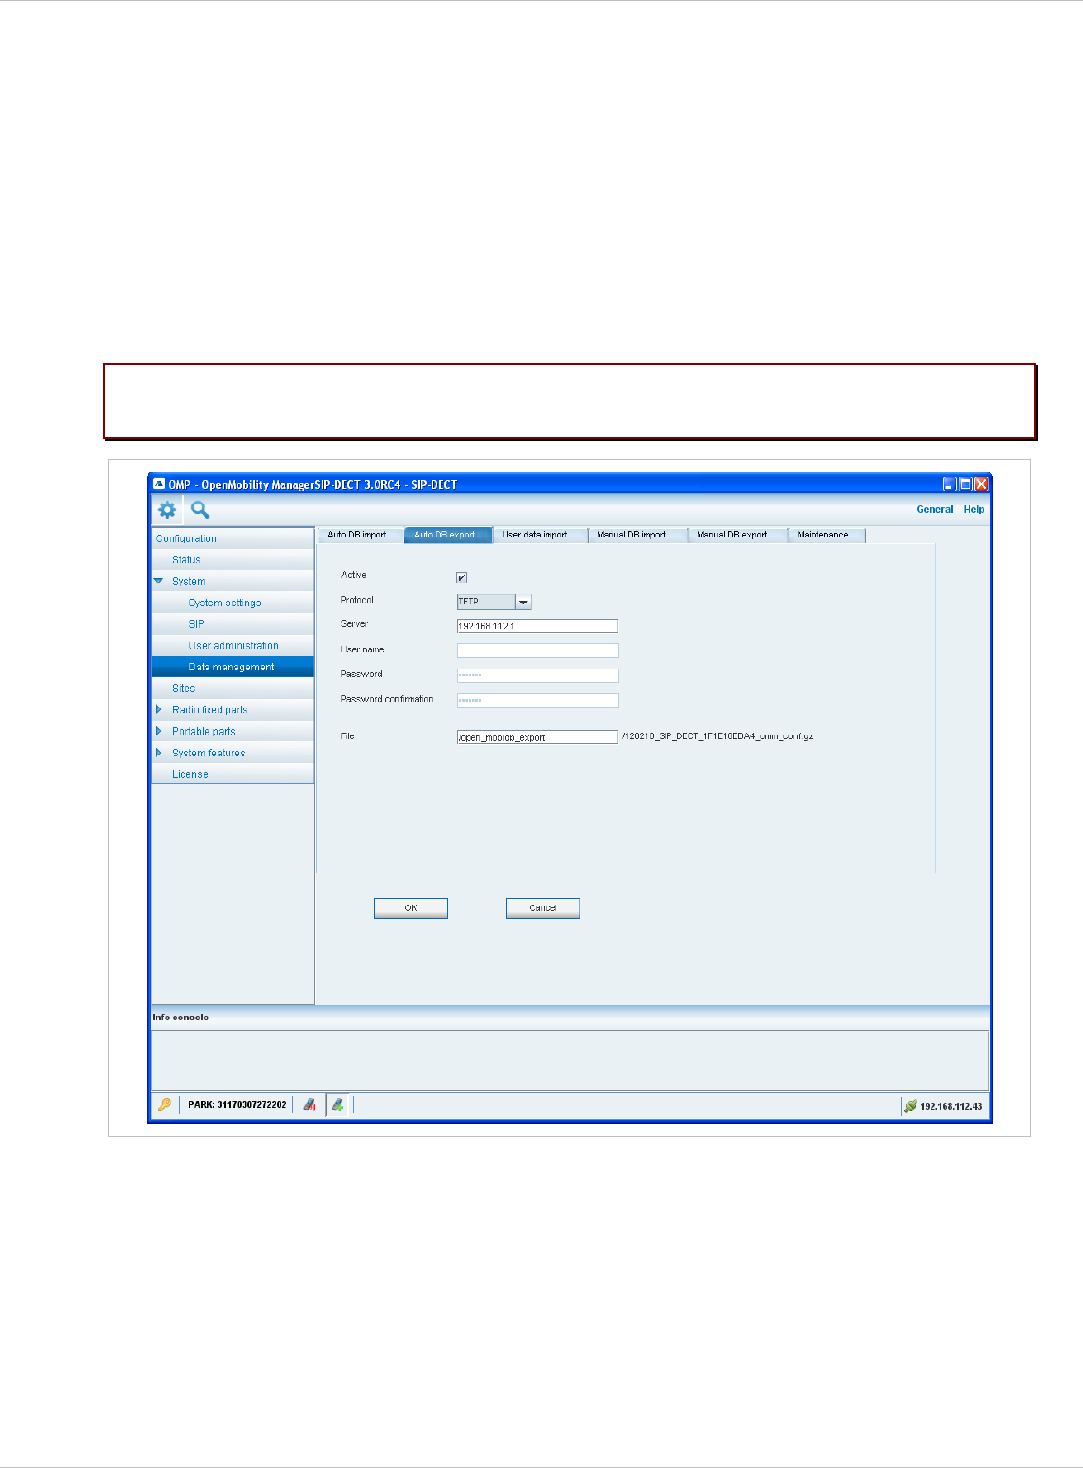
8.5.5.2 “Automatic DB export” Tab
The automatic database export feature allows an automatic database backup to an external
server for each configuration modification.
Please note: For an automatic database export a time synchronization with an NTP server
is mandatory. For NTP server configuration see chapter 9.5.4 and chapter 9.6.
For a description of the parameters which can be set in the Automatic DB export tab,
please refer to the corresponding description in the chapter 7.4.6.4.
depl-1230/0.2 Page: 108 (238)
SIP–DECT OM System Manual Release 3.0 8 OM Management Portal (OMP)
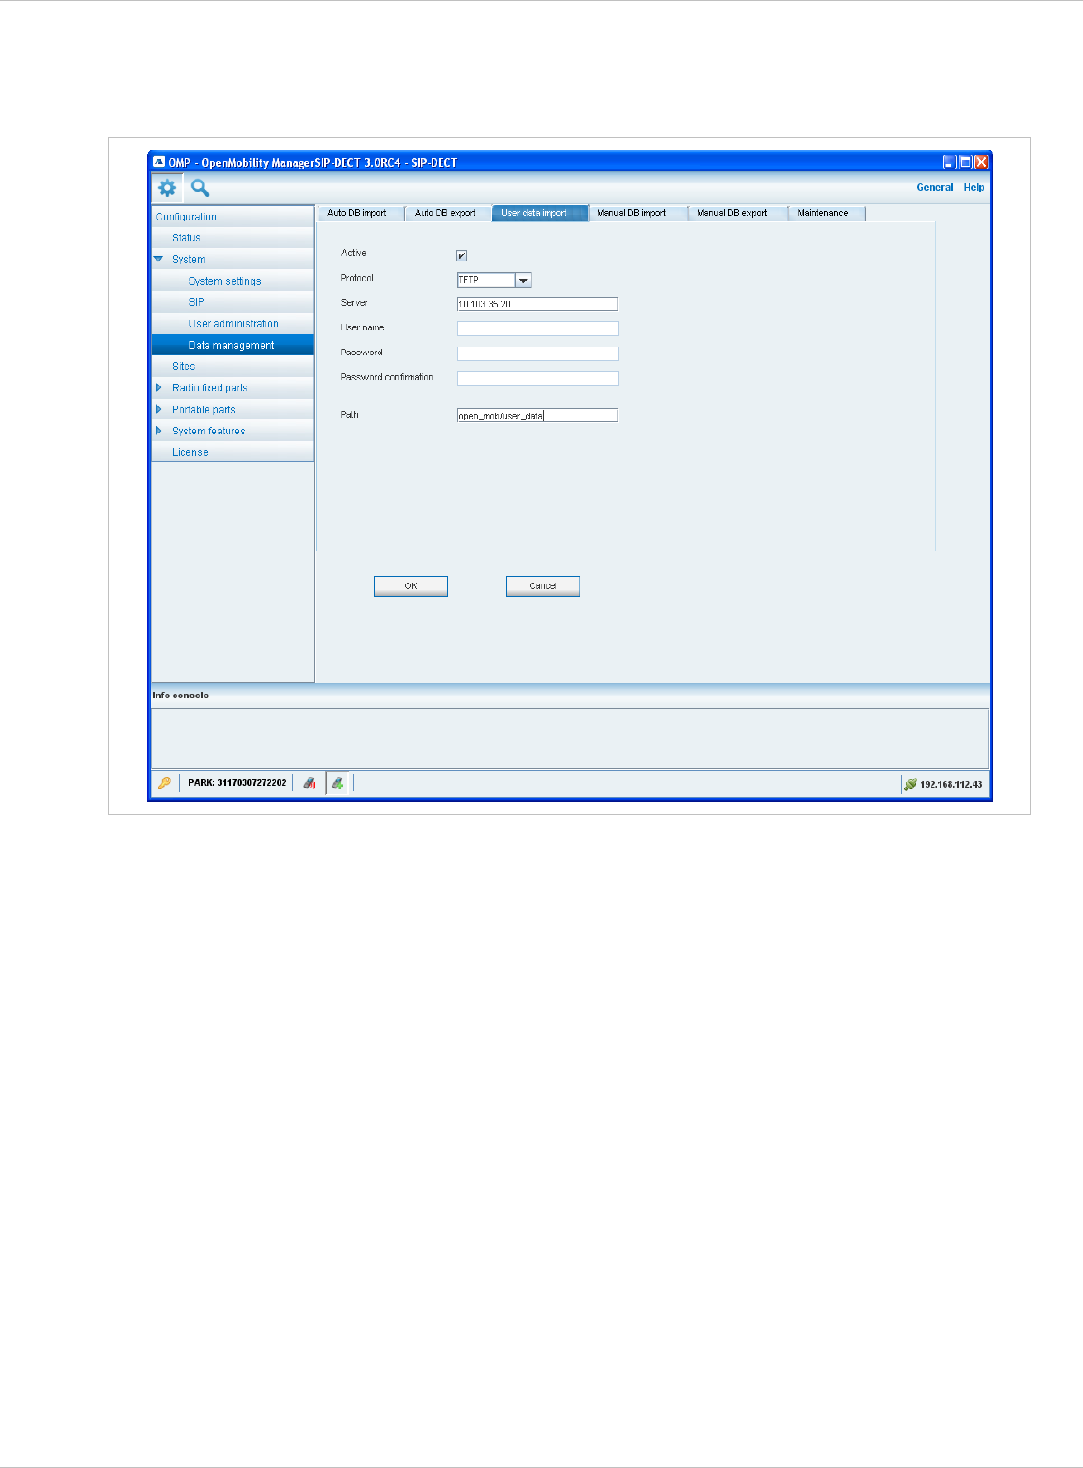
8.5.5.3 “User data import” Tab
The user data import feature allows the import of user data from an external provisioning
server.
1 Active: Activate this option to enable the user data import feature.
2 Protocol: Select the preferred protocol.
3 Server: Enter the IP address or the name of the server.
4 User name, Password: If necessary, enter the account data of the server.
5 Path: Enter the path which includes the user data.
6 Click OK to confirm the settings for the user data import.
For further information on the user data import please refer to the “OpenMobility
Provisioning” user guide for details see /27/.
depl-1230/0.2 Page: 109 (238)
SIP–DECT OM System Manual Release 3.0 8 OM Management Portal (OMP)
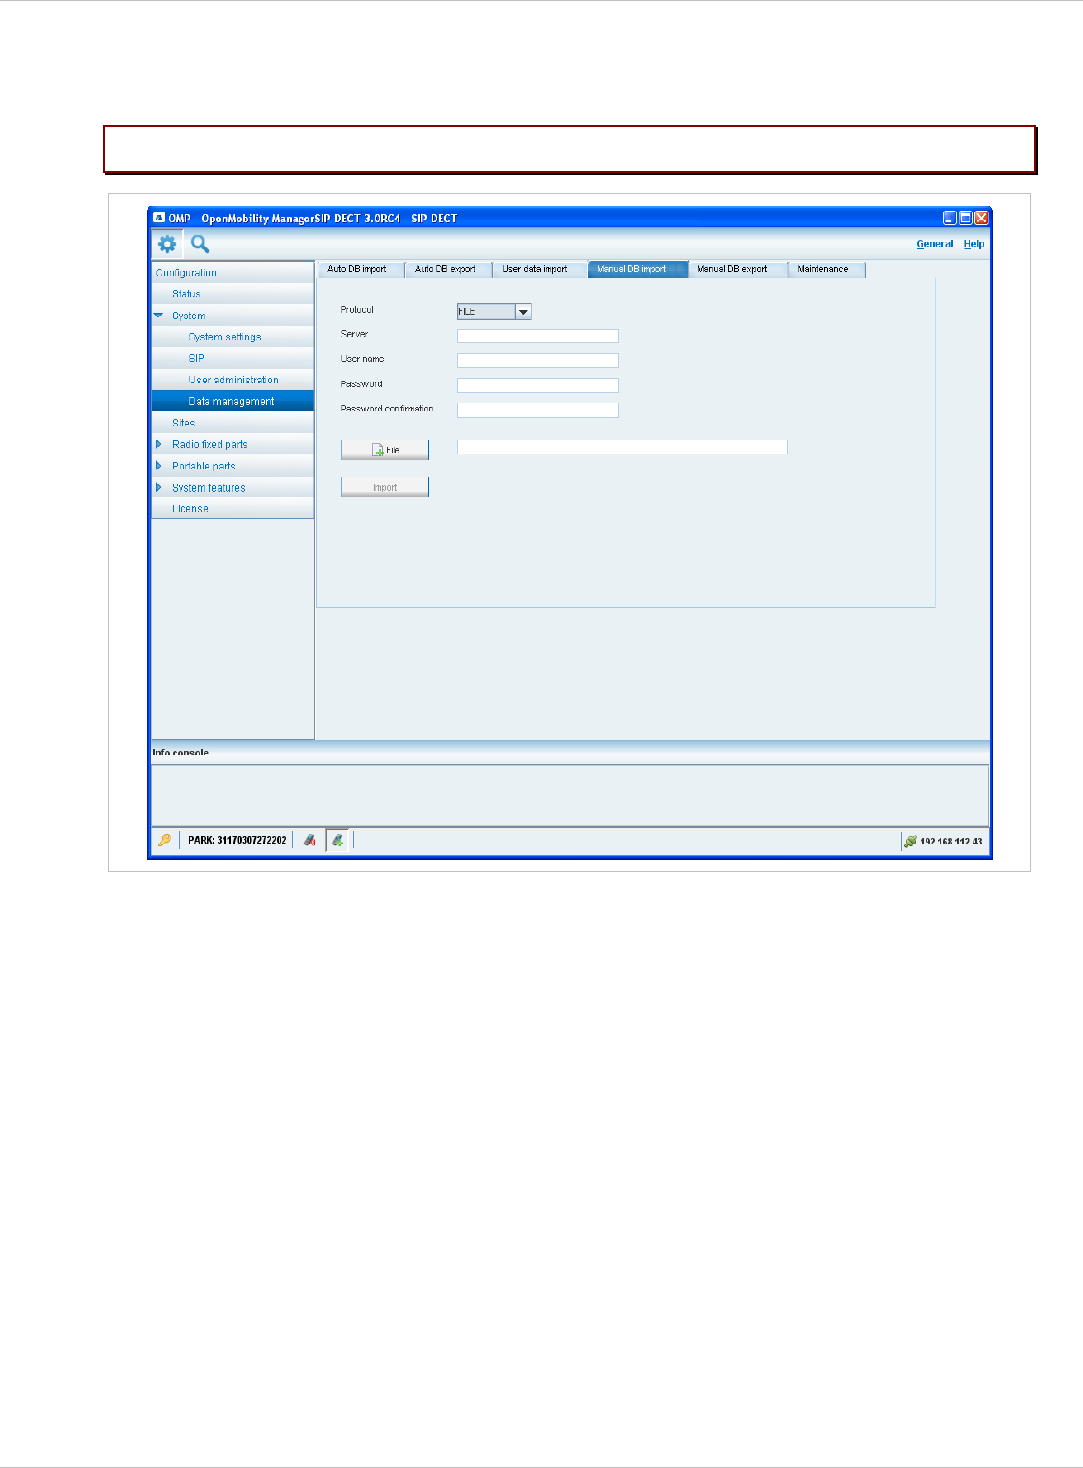
8.5.5.4 “Manual DB import” Tab
Please note: A manual import of a database leads to a reset of the OMM to take effect.
1 Protocol:
– To import a database from the file system the protocol FILE has to be selected.
– To import a database from an external server select the preferred protocol (e.g. HTTP).
2 Server: Enter the IP address or the name of the external server.
3 User name, Password, Password confirmation (in case of import from an external
server): If necessary, enter the account data of the server.
4 File (only if you have selected the FILE protocol): Enter the path and file name which
include the OMM database or select a file by pressing the File button.
5 Press the Import button.
depl-1230/0.2 Page: 110 (238)

SIP–DECT OM System Manual Release 3.0 8 OM Management Portal (OMP)
8.5.5.5 “Manual DB export” Tab
1 Protocol: Select the preferred protocol. If you want to export the database to the file
system, select the FILE setting.
2 Server: Enter the IP address or the name of the server.
3 User name, Password, Password confirmation: If necessary, enter the account data of
the server.
4 Directory (only if you have selected the FILE protocol): Select a directory by pressing the
Directory button.
5 Press the Export button.
depl-1230/0.2 Page: 111 (238)
SIP–DECT OM System Manual Release 3.0 8 OM Management Portal (OMP)
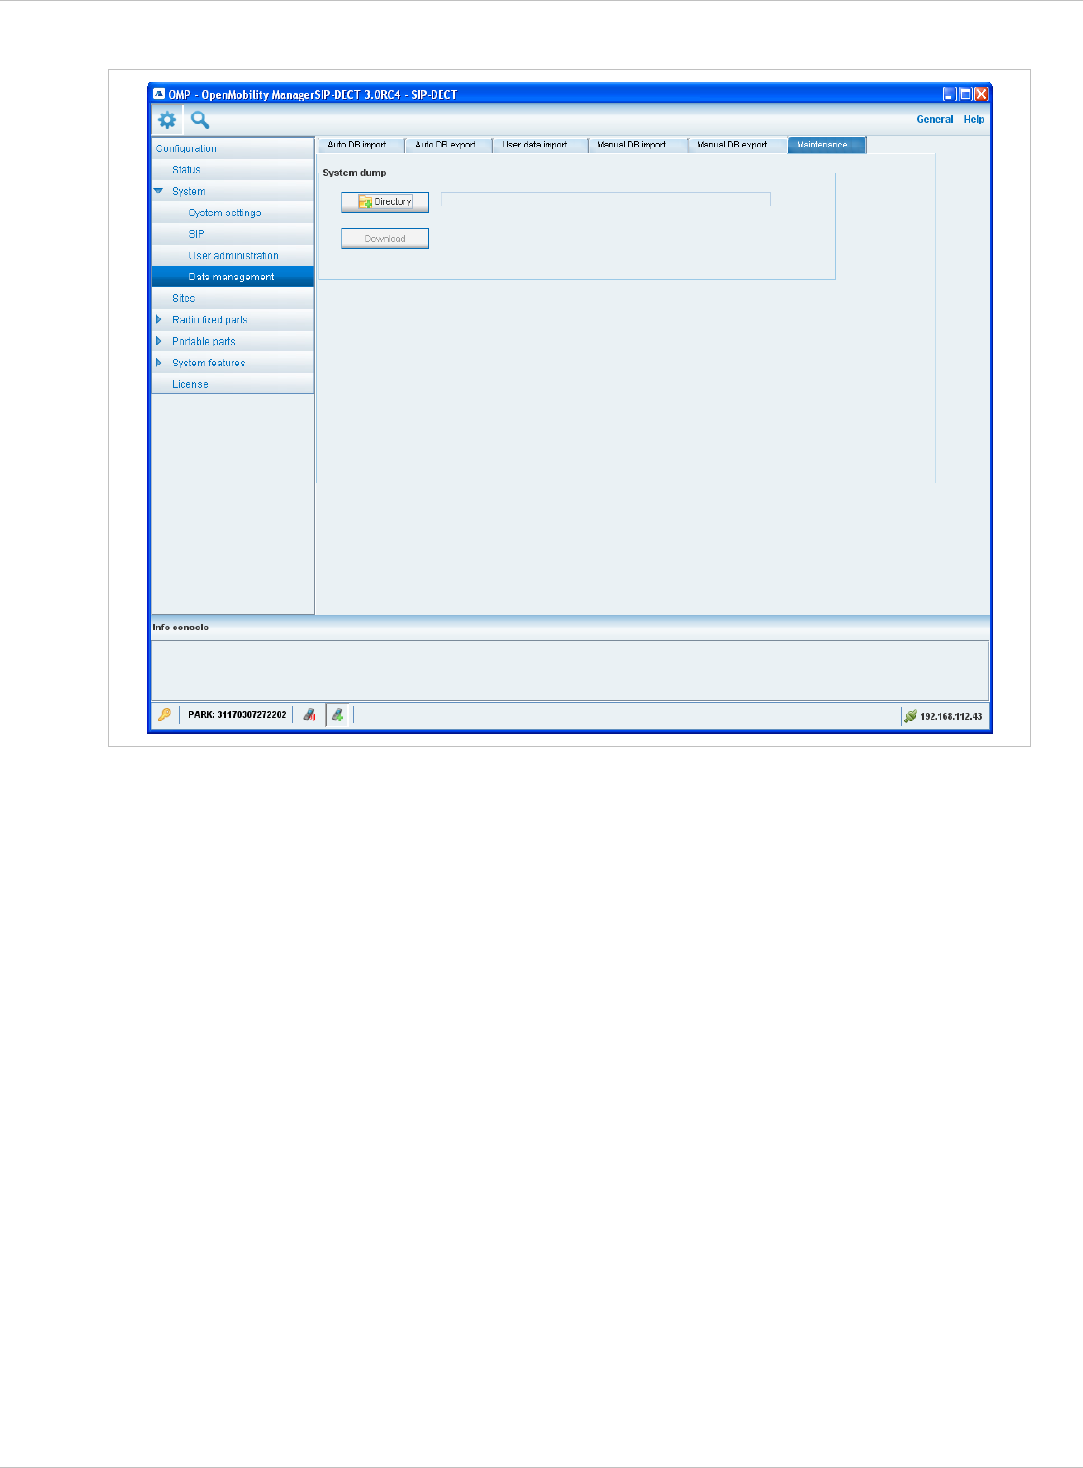
8.5.5.6 “Maintenance” Tab
In the Maintenance panel you can configure and start a system dump. A file “sysdump.txt” is
created in the selected directory. Press the Directory button to select the directory. Then
press the Download button to start the system dump.
depl-1230/0.2 Page: 112 (238)
SIP–DECT OM System Manual Release 3.0 8 OM Management Portal (OMP)
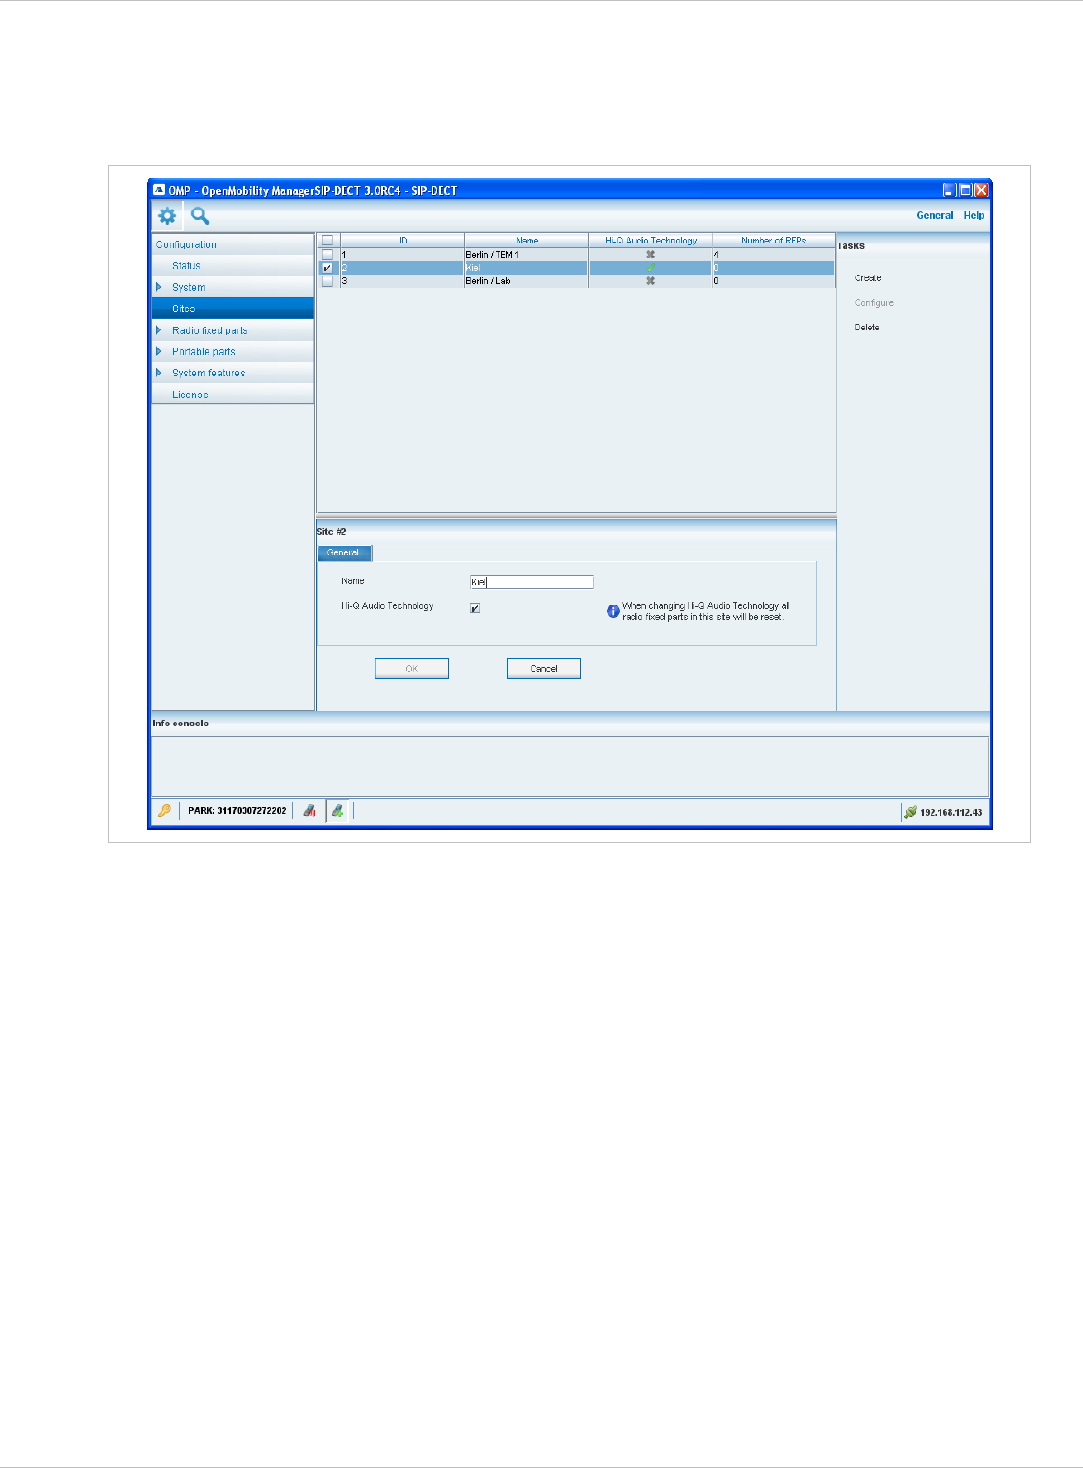
8.6 “Sites” Menu
RFPs can be grouped into different sites. The Sites menu allows to configure/view the
configured sites. An empty system has one predefined site (ID: 1) named “default”. Minimum
one site is required by the system.
A site consists of the following parameters:
ID: Identification number of the site. A value between 1 and 250 is possible. If no value is
given, the OMM selects the next free ID.
•
•
•
•
•
•
•
•
Name: The name of the site.
Hi-Q Audio Technology: The capability Hi-Q TM audio technology must be enabled or
disabled specific for every site.
– In sites, which are configured to provide this functionality, exclusively RFP 35 / 36 / 37
and RFP 43 WLAN are applicable.
– In sites without this capability, it is allowed to mix these new RFP-types with RFP 32 / 34
and RFP 42 WLAN.
Number of RFPs: The number of RFPs which are assigned to this site.
The following tasks can be performed:
Create: create a new site in the General tab.
Configure: configure an existing site in the General tab.
Delete: delete selected sites.
Show details (only in monitor mode): shows configuration of a selected site in the
General tab.
depl-1230/0.2 Page: 113 (238)
SIP–DECT OM System Manual Release 3.0 8 OM Management Portal (OMP)
Note: Only sites without assigned RFPs can be deleted.
8.7 “Radio fixed parts” Menu
RFPs can be configured and viewed in the Radio fixed parts menu. The Radio fixed parts
menu provides the following entries:
Configuration mode Monitor mode See chapter
Device list Device list 8.7.1
Paging areas 8.7.2
Enrolment 8.7.3
Export 8.7.4
Sync view 8.7.5
Statistics 8.7.6
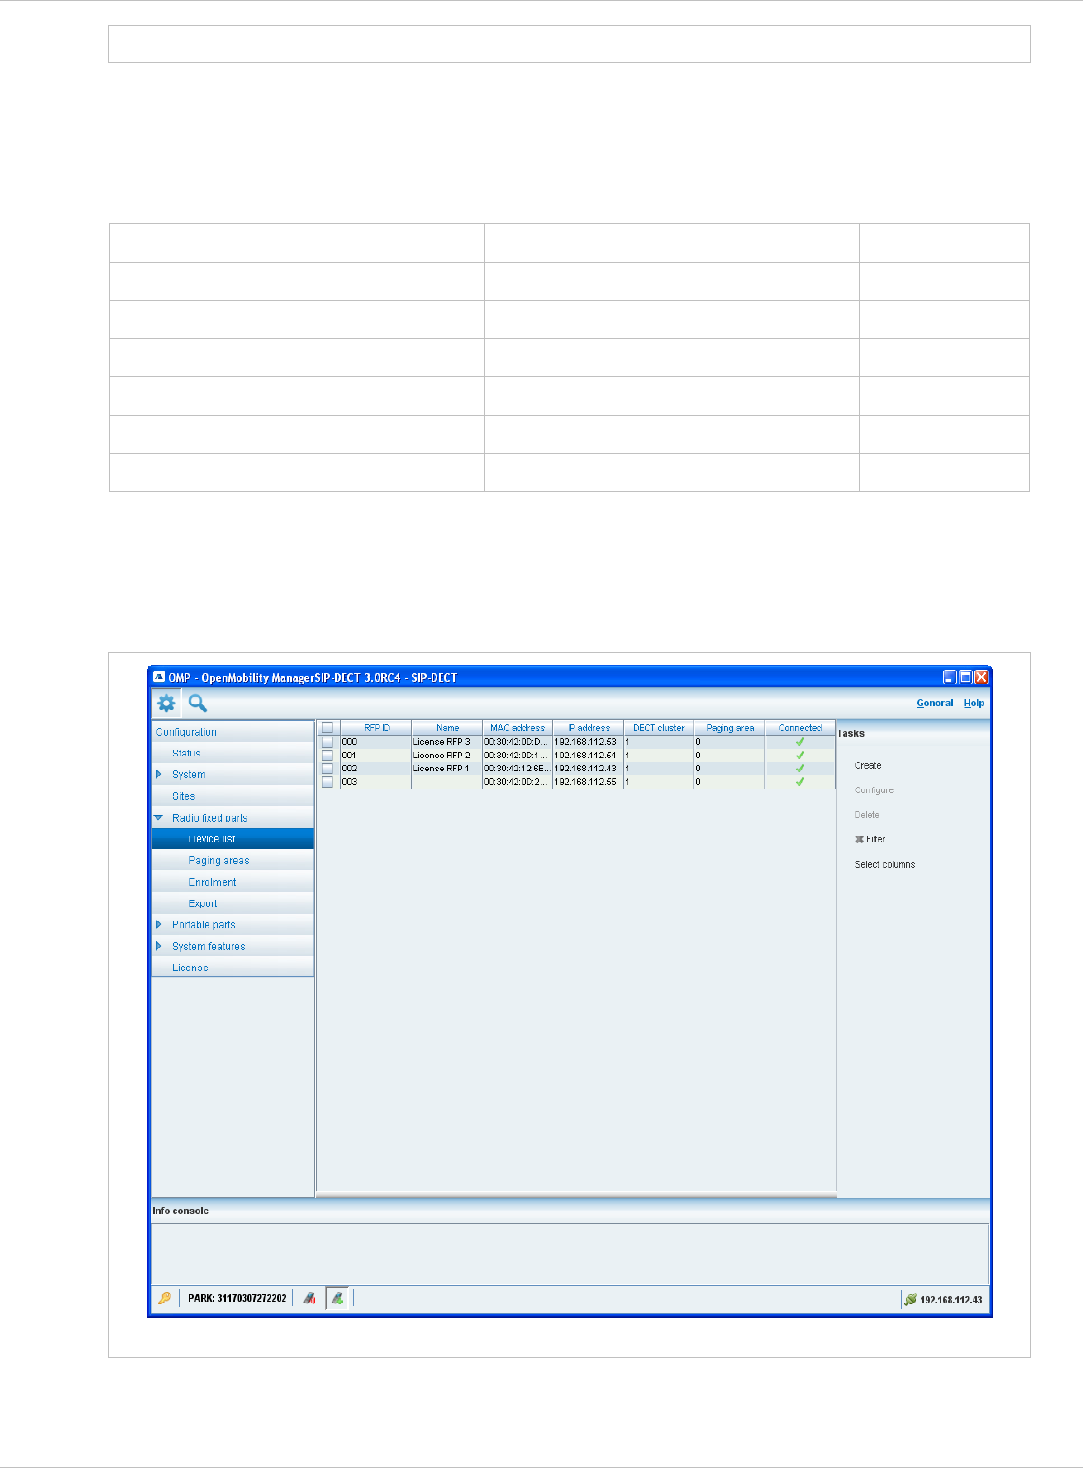
8.7.1 “Device list” Menu
In the Device list panel, all configured RFPs are listed in a table. The device list is available
in configuration mode as well as in monitor mode.
Device list in configuration mode
The Active column shows the following states:
depl-1230/0.2 Page: 114 (238)
SIP–DECT OM System Manual Release 3.0 8 OM Management Portal (OMP)
– DECT is not enabled and/or RFP not connected. •
– DECT is enabled and RFP connected, but DECT has not been activated yet. •
– DECT is enabled and RFP is connected, but RFP is not synchronized and searches
for other synchronized RFPs.
•
– DECT is enabled and RFP is connected and synchronized. •
Note: If the Active column is not displayed, you can activate it in the Select columns
dialog, see chapter 8.7.1.7.
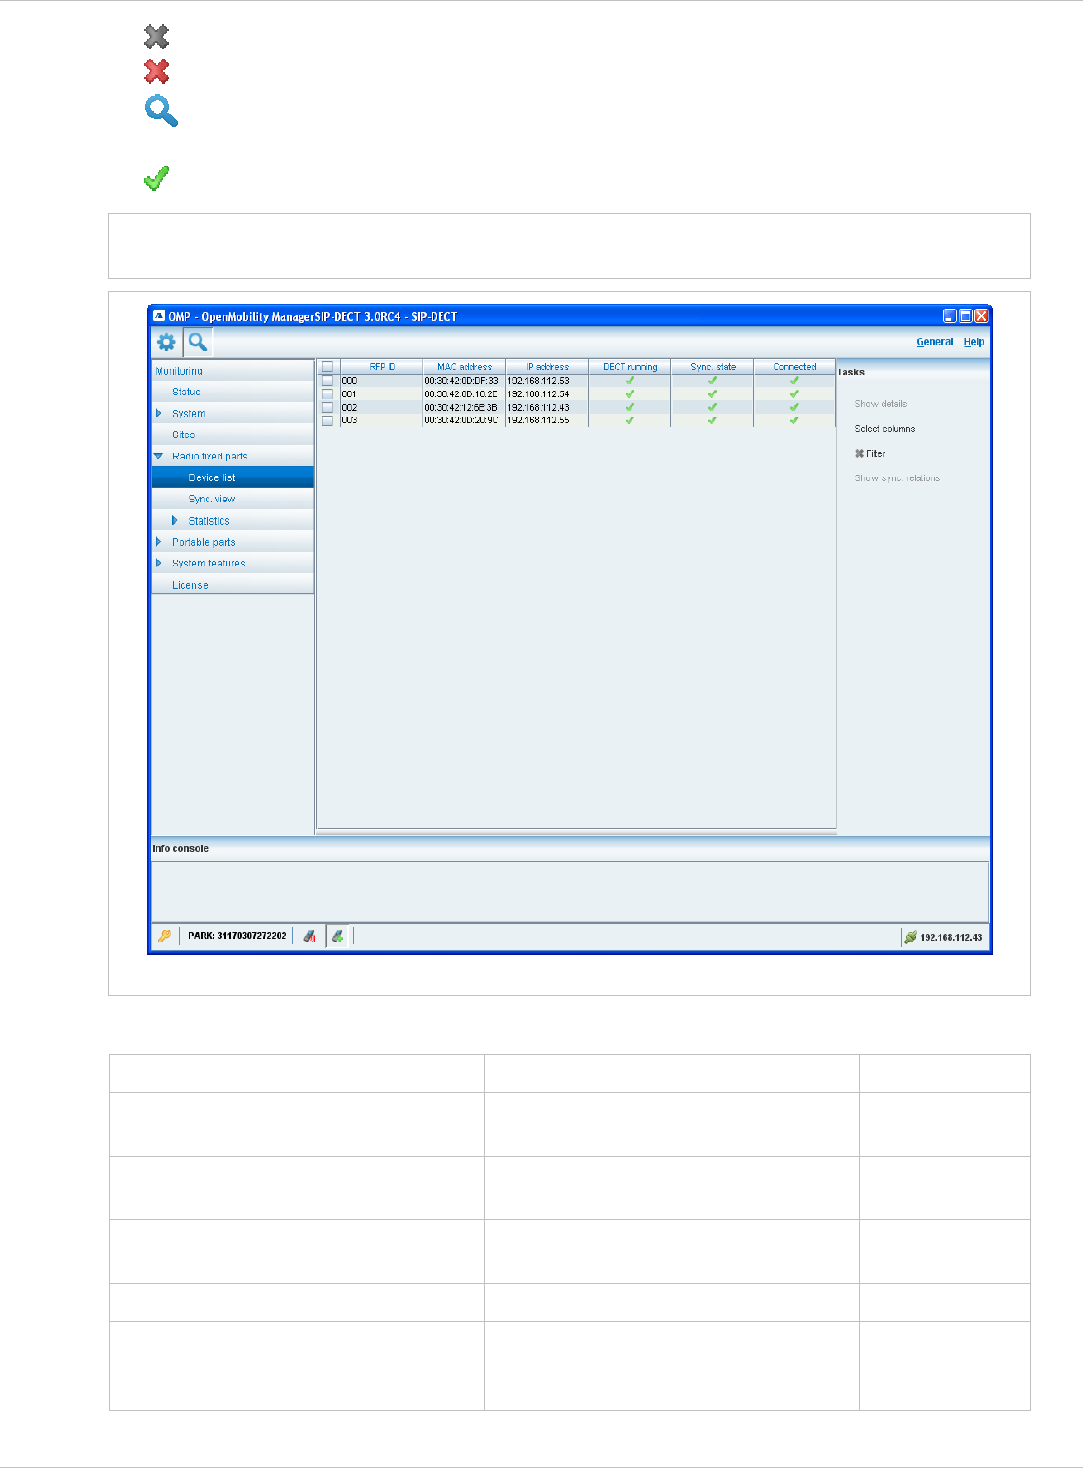
Device list in monitor mode
The tasks which can be performed are mode-dependant.
Configuration mode Monitor mode See chapter
Create: create new RFP in detail
panel
8.7.1.2
Configure: configure selected RFP
in detail panel
0
Show details: show selected RFP in
detail panel
8.7.1.4
Delete: delete selected RFP 8.7.1.5
Show sync. relations: show
synchronization relation for selected
RFPs
8.7.1.6
depl-1230/0.2 Page: 115 (238)
SIP–DECT OM System Manual Release 3.0 8 OM Management Portal (OMP)
Select columns: select
columns/parameters to be shown in
RFP table
Select columns: select
columns/parameters to be shown in
RFP table
8.7.1.7
Filter: show only RFP datasets in
table which contain a special search
string
Filter: show only RFP datasets in
table which contain a special search
string
8.7.1.8
8.7.1.1 RFP Detail Panel
The RFP detail panel is used for configuration/showing of RFP settings and creation of new
RFP datasets.
To call up the RFP detail panel
choose one of the commands in the task bar on the right of the Radio fixed parts panel
(Create, Configure, or Show details)
•
•
or
select the appropriate RFP in the RFP table and double-click the entry.
The RFP detail panel contains the following parameter groups sorted in different tabs.
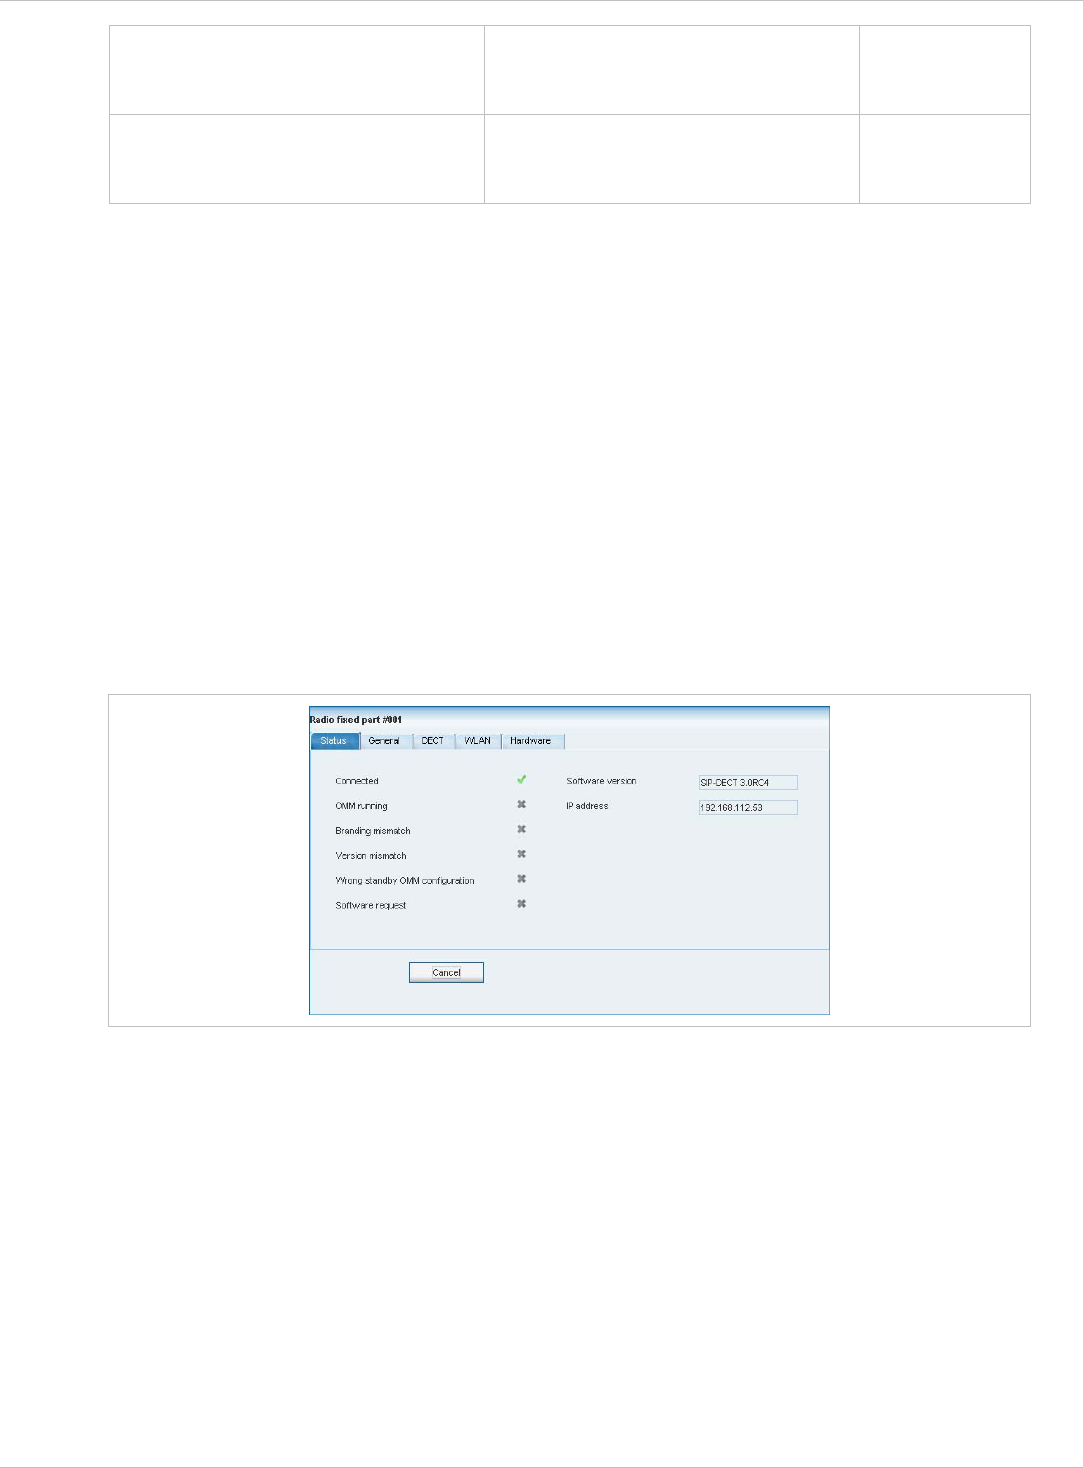
“Status” tab
This tab is only available in monitor mode. It shows system status information relating to the
selected RFP.
“General” tab
This tab contains the general RFP parameters.
depl-1230/0.2 Page: 116 (238)

SIP–DECT OM System Manual Release 3.0 8 OM Management Portal (OMP)
“DECT” tab
This tab contains the RFP's DECT parameters.
“WLAN” tab
This tab contains the RFP WLAN parameters. Settings in the WLAN tab apply to RFPs of the
type “RFP (L) 42 WLAN” and “RFP (L) 43 WLAN” only.
“Hardware” tab
In monitor mode this tab shows hardware information of the selected RFP.
depl-1230/0.2 Page: 117 (238)
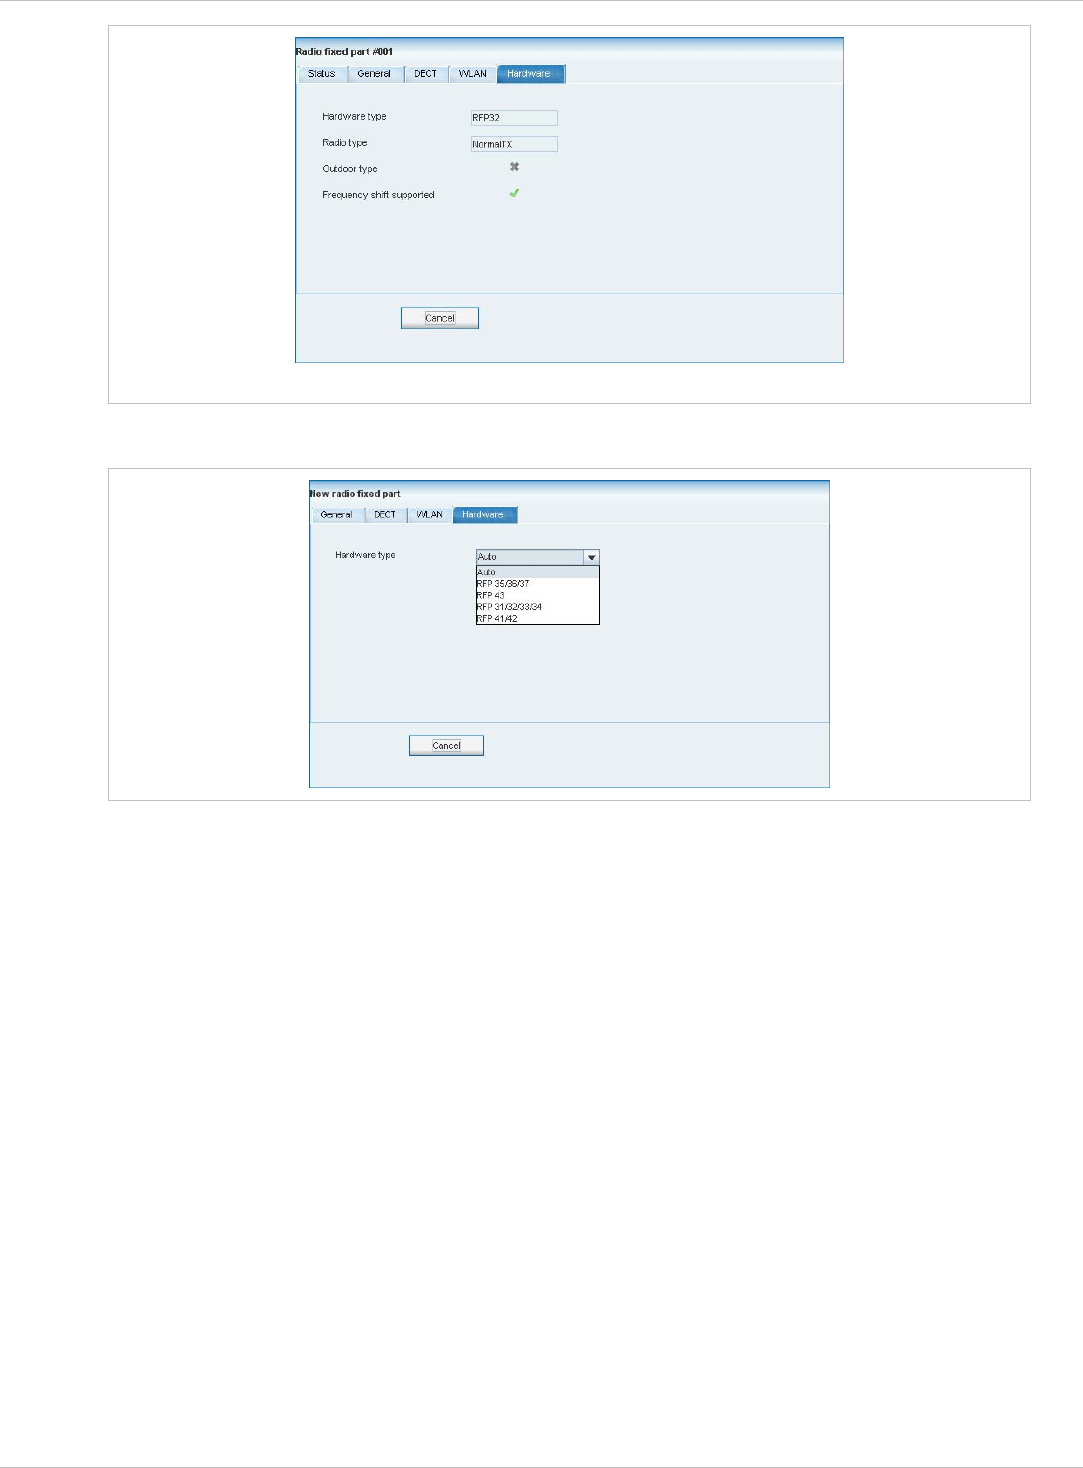
SIP–DECT OM System Manual Release 3.0 8 OM Management Portal (OMP)
RFP Hardware tab in monitor mode
In configuration mode, the RFP hardware type can be set.
8.7.1.2 Adding New RFPs
Adding new RFPs is only possible in configuration mode. To add an RFP to the list of
known RFP proceed as follows:
1 In the task bar on the right of the Radio fixed parts panel click on the Create command.
The New radio fixed part panel opens. It provides various tabs where the RFP data has
to be entered, see chapter 8.7.1.1.
2 Configure the RFP, see parameter description below.
3 Press the OK button.
The following parameters can be set in the tabs of the New radio fixed part panel:
“General” tab
Name: The a name for the RFP. •
•
•
•
MAC address: Each RFP is identified by its unique MAC address (6 bytes hex format,
colon separated). Enter the MAC address, it can be found on the back of the chassis.
Site: If several sites exist (see chapter 0), select the site the RFP is assigned to.
Building, Floor, Room: For easier localization of the RFP you can enter data in these
fields.
depl-1230/0.2 Page: 118 (238)

SIP–DECT OM System Manual Release 3.0 8 OM Management Portal (OMP)
“DECT” tab
•
•
•
Note:
DECT activated: The DECT functionality for each RFP can be switched on/off.
DECT cluster: If DECT is active the RFP can be assigned to a cluster.
Paging area: Enter the paging area, the RFP is assigned to.
The Paging area size is set in the DECT tab of the System settings menu (see
chapter 8.5.1). The assignment between RFPs and paging areas can be changed in
the Paging areas menu (see chapter 8.7.1.8).
•
•
Preferred synchronization source: Activate this checkbox if the RFP should be used as
synchronization source for the other RFPs in the cluster. For background information on
RFP synchronization please refer to chapter 9.2.
Reflective environment: Within areas containing lot of reflective surfaces (e.g. metal or
metal coated glass) in an open space environment the voice quality of a DECT call can be
disturbed because of signal reflections which arrive on the handset or RFP using
multipath propagation. Calls may have permanent drop outs while moving and high error
rates on the RFPs and handsets.
For such environment Aastra has developed the DECT XQ enhancement into base
stations (RFP 32 / 34 / 42 WLAN and RFP 35 / 36 / 37 / 43 WLAN) and the Aastra 600d /
Aastra 650c handsets family. Using this enhancement by switching the Reflective
environment flag on might reduce drop outs and cracking noise.
As soon as Reflective environment is switched on, the number of calls on an
RFP 32 / 34 / 42 WLAN or RFP 35 / 36 / 37 / 43 WLAN is reduced to 4 calls at the same
time.
Please note:
Please note:
The RFPs and handsets use more bandwidth on the Air Interfaces if the
“Reflective environment“ is switched on. Therefore this shall only be used
when problems sourced by metal reflections are detected.
“WLAN” tab
Settings in the WLAN tab apply to RFPs of the type “RFP (L) 42 WLAN” and
“RFP (L) 43 WLAN” only. For details about WLAN configurations please see chapter 9.15.
WLAN properties can only be set if the correct hardware type is configured in
the Hardware tab.
For a description of the parameters which can be set in the WLAN tab, please refer to the
description of the Radio fixed parts page of the OMM Web service (see chapter 7.6.3). The
corresponding parameters can be found there in the WLAN settings section.
Note: Configuration of WLAN profiles is only possible with the OM Web service, see
chapter 7.8.1.
“Hardware” tab
WLAN properties can only be set if the correct hardware type is configured. This can be done
manually before an RFP connects with the OMM and an automatic detection is possible.
depl-1230/0.2 Page: 119 (238)

SIP–DECT OM System Manual Release 3.0 8 OM Management Portal (OMP)
8.7.1.3 Changing RFPs
Changing RFPs is only possible in configuration mode. To change the configuration of an
existing RFP proceed as follows:
1 Select the appropriate RFP in the RFP table.
2 In the task bar on the right of the Radio fixed parts panel click on the Configure
command.
The RFP detail panel opens, see chapter 8.7.1.1.
3 Change RFP parameters, see parameter description in chapter 8.7.1.2.
4 Press the OK button.
8.7.1.4 Viewing RFP Details
You can view the configuration of an RFP in monitor mode. Proceed as follows:
1 Select the appropriate RFP in the RFP table.
2 In the task bar on the right of the Radio fixed parts panel click on the Show details
command.
The RFP detail panel opens, see chapter 8.7.1.1.
3 To close the RFP detail panel press the Cancel button.
8.7.1.5 Deleting RFPs
Deleting RFPs is only possible in configuration mode. To delete one or more existing RFPs
proceed as follows:
1 Select the appropriate RFP(s) in the RFP table by activating the corresponding
checkbox(es).
2 In the task bar on the right of the Radio fixed parts panel click on the Delete command.
The Delete selected radio fixed part(s) dialog opens showing a confirmation prompt.
3 Confirm the displayed prompt with OK.
Please note: License RFPs cannot be deleted.
8.7.1.6 Showing Synchronization Relations
You can view the synchronization relations of an RFP in monitor mode. Proceed as follows:
1 Select the appropriate RFP in the RFP table.
2 In the task bar on the right of the Radio fixed parts panel click on the Show sync.
relations command.
The view switches to the Sync view menu . For further information see chapter 8.7.5.
Note: At least two RFPs must be selected for showing their synchronization relations.
depl-1230/0.2 Page: 120 (238)
SIP–DECT OM System Manual Release 3.0 8 OM Management Portal (OMP)
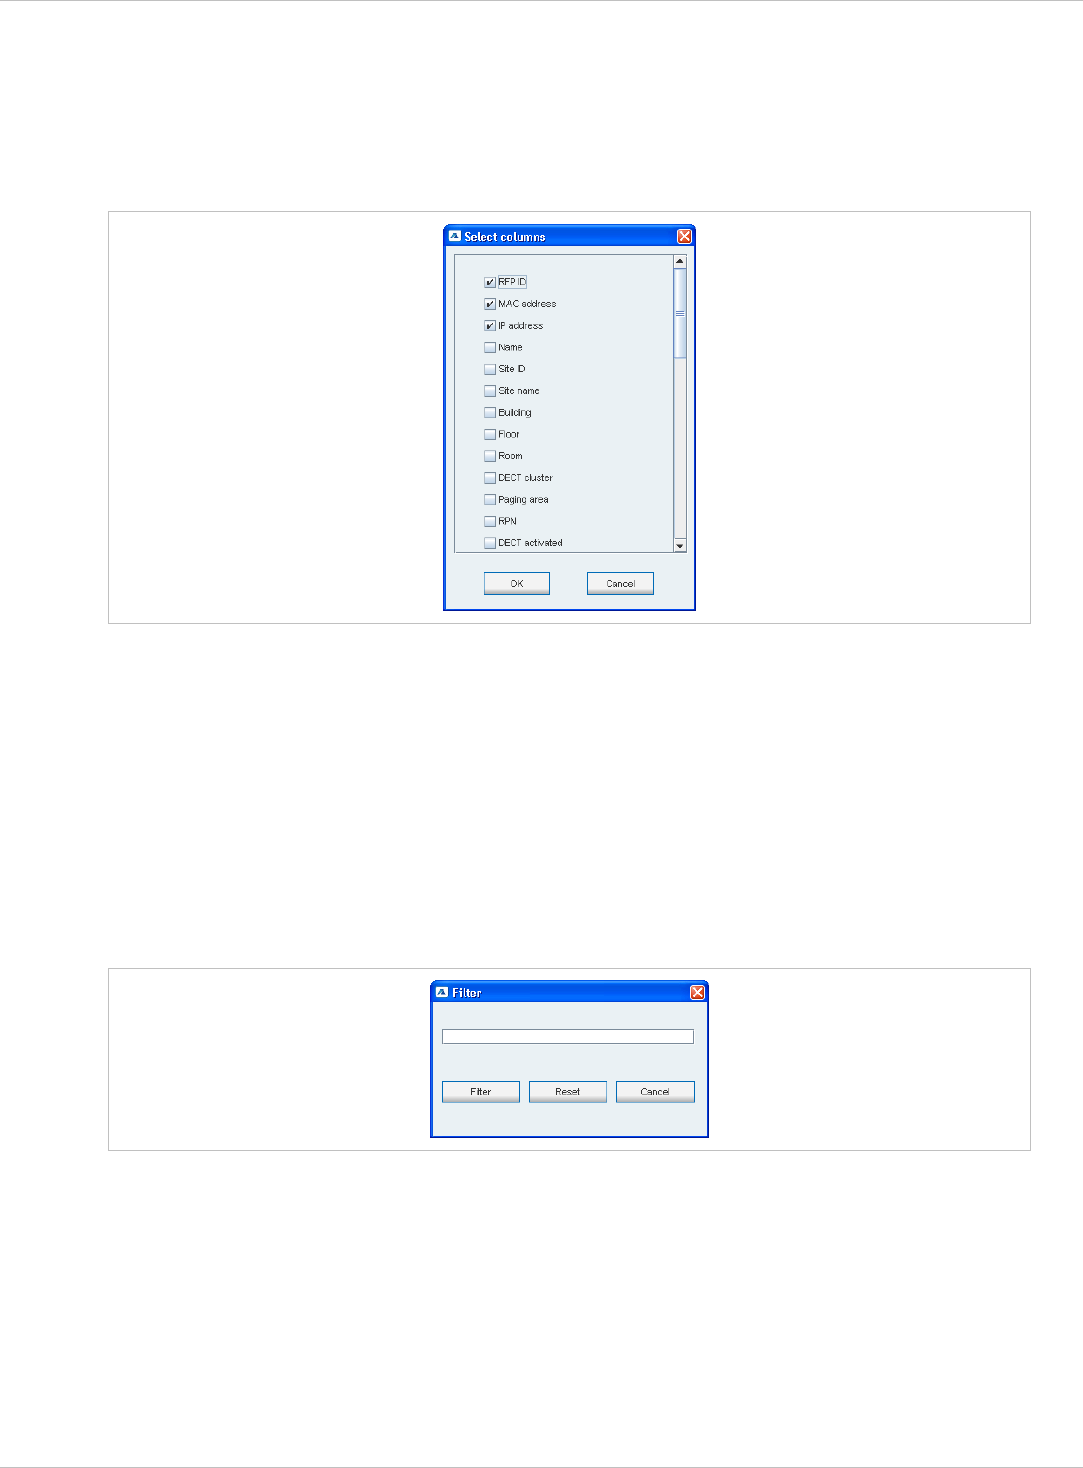
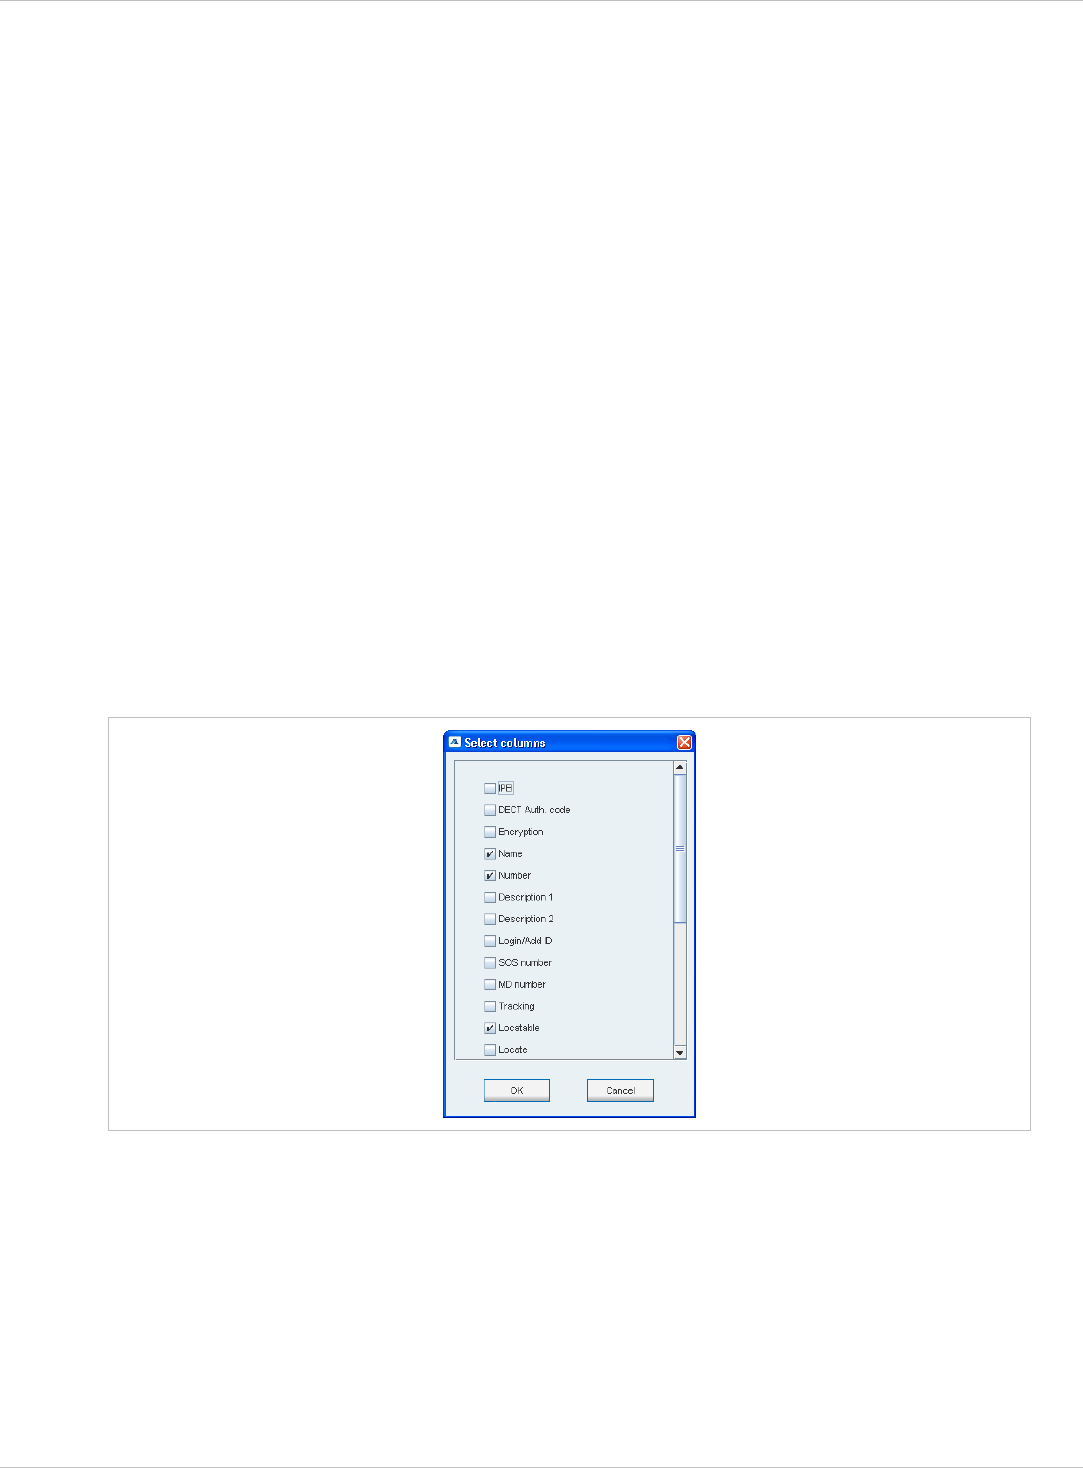
8.7.1.7 Selecting Columns
You can adapt the parameters shown in the RFP table to your needs:
1 In the task bar on the right of the Radio fixed parts panel click on the Select columns
command.
The Select columns dialog opens.
2 Select the columns that shall be shown by activating the appropriate checkboxes.
3 Click the OK button.
The RFP table will be adapted accordingly.
8.7.1.8 Filtering RFP Table
You can filter the list of RFP datasets shown in the RFP table by using a filter.
1 In the task bar on the right of the Radio fixed parts panel click on the Filter command.
The Filter dialog opens.
2 Enter the search string that serves as filter criterion. You can enter digits and characters.
The search is case sensitive.
3 Click on the Filter button.
The Filter dialog is closed and the RFP table will be adapted accordingly.
4 To reset the filter, click on the Filter command in the task bar on the right of the Radio
fixed parts panel.
5 In the Filter dialog click on the Reset button.
depl-1230/0.2 Page: 121 (238)
SIP–DECT OM System Manual Release 3.0 8 OM Management Portal (OMP)
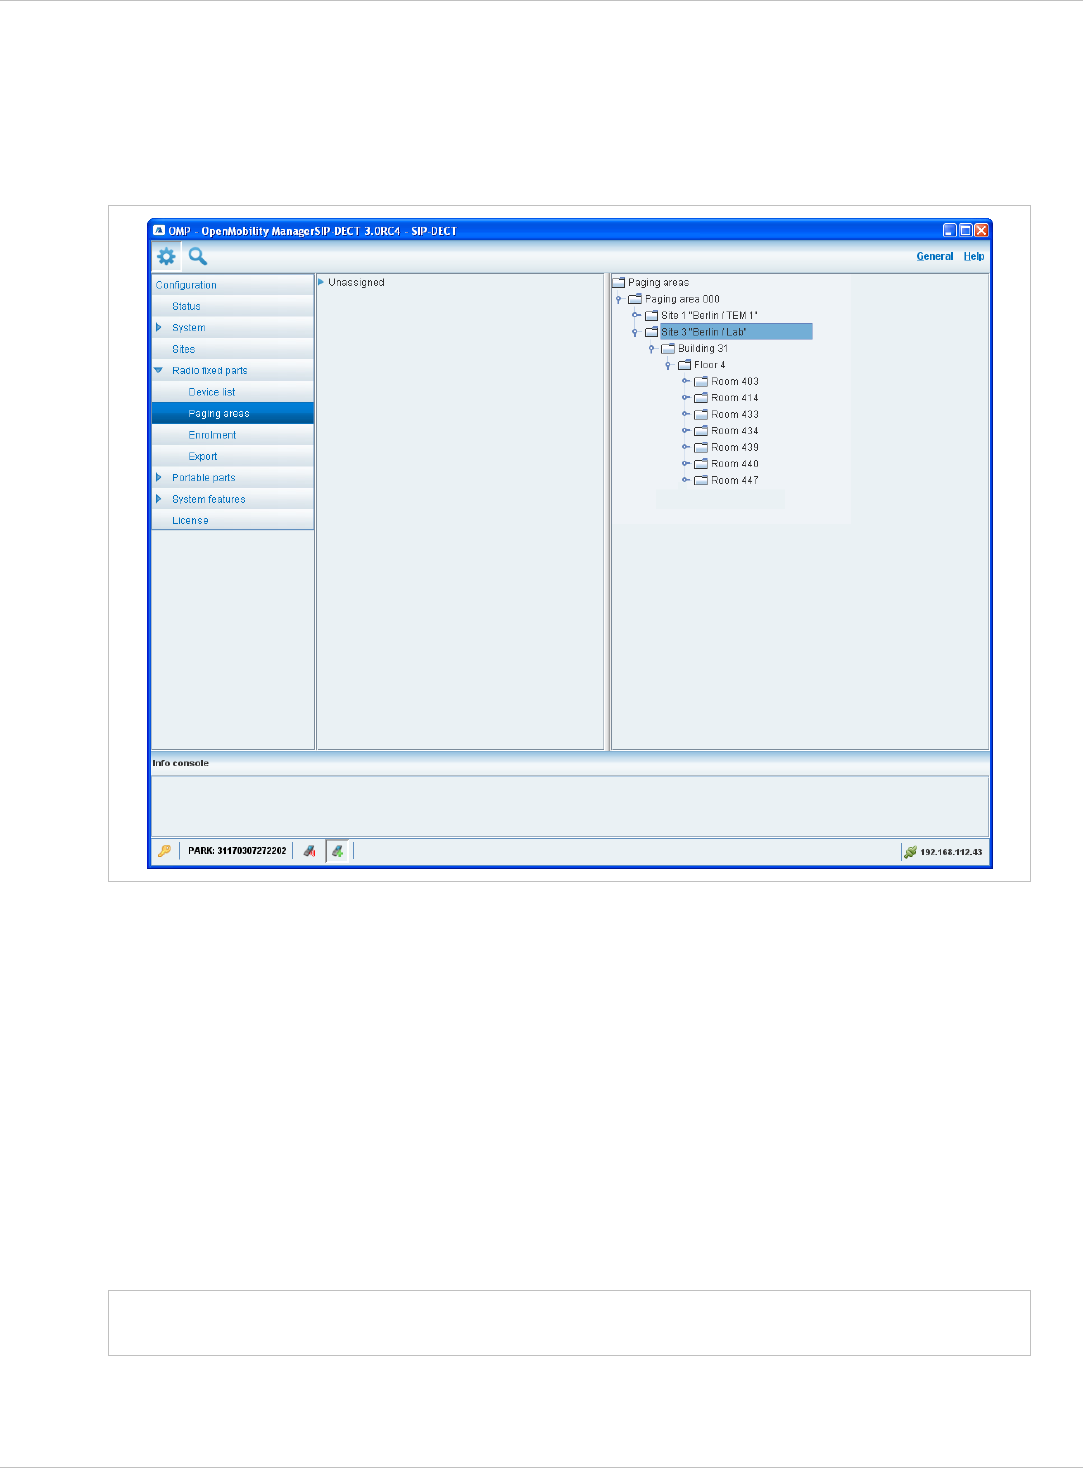
8.7.2 “Paging areas” Menu
The Paging area menu shows all configured RFPs in a tree structure consisting of two trees:
The left Unassigned RFPs tree contains all RFPs without an assigned paging area. •
• The right Paging areas tree shows all configured paging areas with RFPs assigned to
these paging areas.
All RFPs are shown including their site and optional hierarchy (building, floor, and room)
settings.
•
•
•
•
•
Note:
RFPs can be moved by drag and drop from unassigned tree to paging area tree and vice
versa, as well as between different paging areas inside the paging area tree.
Only one RFP node can be moved at once.
If a site or a hierarchy node is selected, all RFPs which are children of this node will be
moved.
If a paging area is completely filled with RFPs, moving additional RFPs in that paging area
is prevented.
If not all RFPs (selected by a site or hierarchy node) can be moved into a paging area,
you will be asked if you want to move as much as possible RFPs or if the operation shall
be cancelled.
The Paging area size is set in the DECT tab of the System settings menu (see
chapter 8.5.1).
depl-1230/0.2 Page: 122 (238)
SIP–DECT OM System Manual Release 3.0 8 OM Management Portal (OMP)
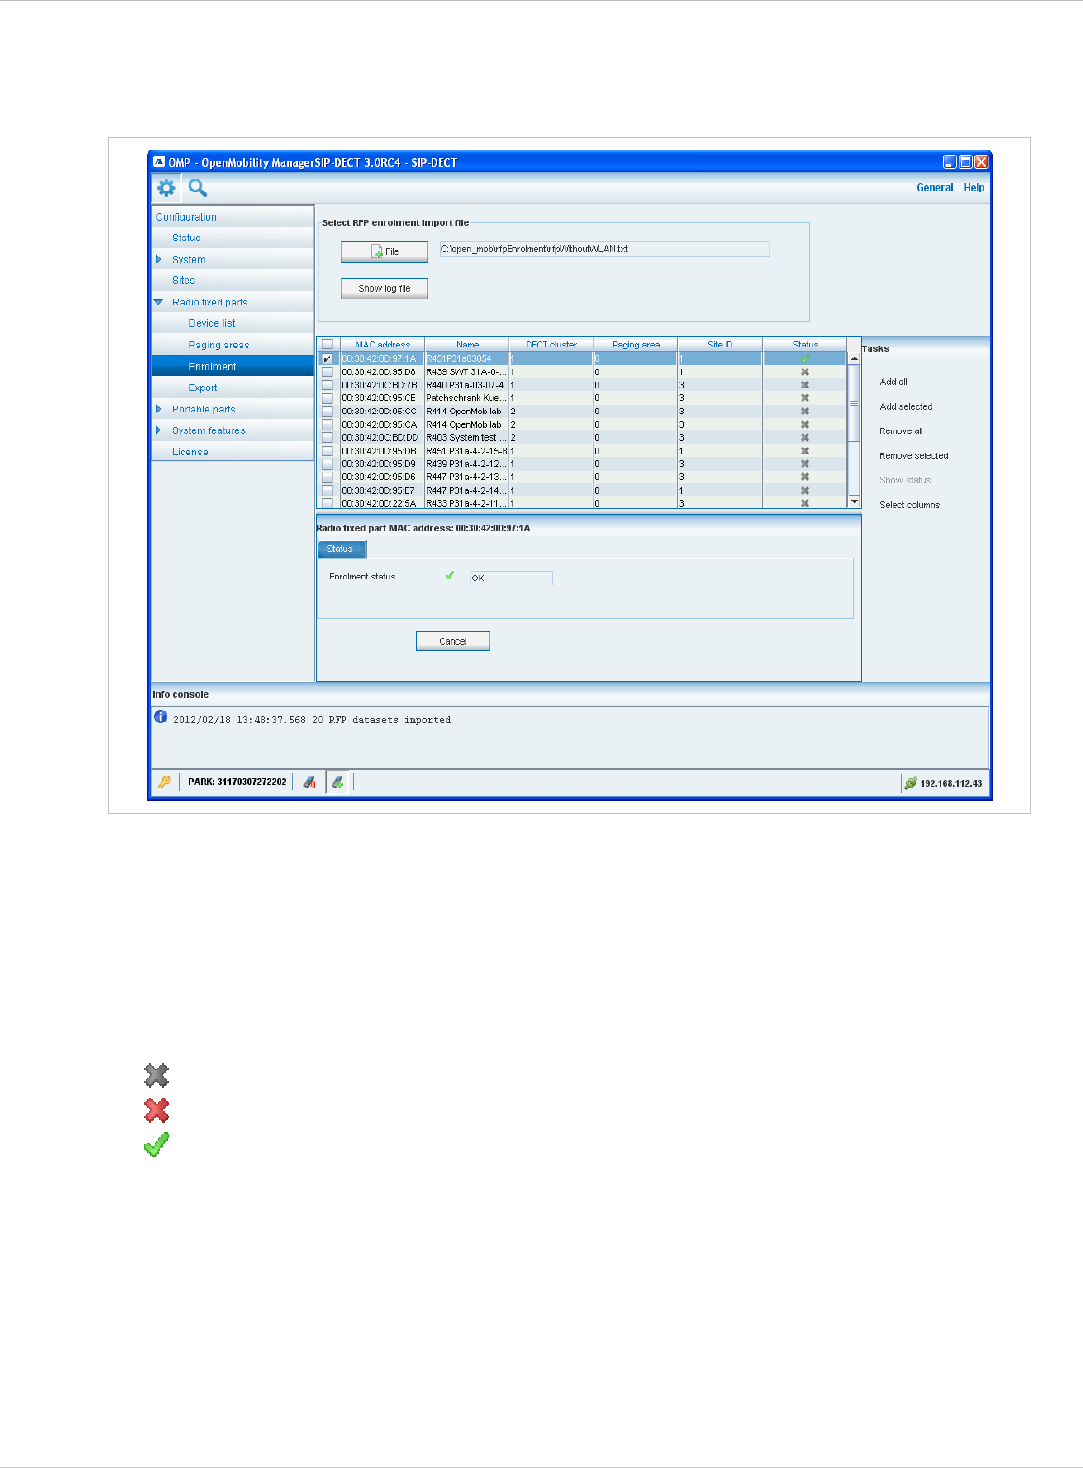
8.7.3 “Enrolment” Menu
The Enrolment menu allows import of RFP datasets using a configuration file. For
information about required configuration file format see chapter 11.7.2.
1 Press the File button.
A file system dialog opens in which you can select the configuration file.
2 To check the results from reading the configuration file press the Show log file button. In
case of file format errors these errors are listed here.
If reading of configuration file is successful, all RFP datasets read are shown in a newly
created table. This table contains, apart from some RFP parameters, the Status column
which shows the current import status for every RFP dataset:
– Not enrolled yet
– Enrolment failed
– OK (Enrolment successful)
3 Start the import by selecting one of the following commands:
Add all: import all RFP datasets into the OMM.
Add selected: import selected RFP datasets to the OMM. For selection activate the
corresponding checkboxes in the RFP table.
Remove all: remove all RFP datasets from table. The table will be hidden.
Remove selected: remove selected RFP datasets from table. If the table is empty after
removing of datasets, the table will be hidden. For selection activate the corresponding
checkboxes in the RFP table.
depl-1230/0.2 Page: 123 (238)
SIP–DECT OM System Manual Release 3.0 8 OM Management Portal (OMP)
Show status: show import status of a selected RFP dataset. If enrolment failed for this
RFP, a message describing the enrolment error is shown.
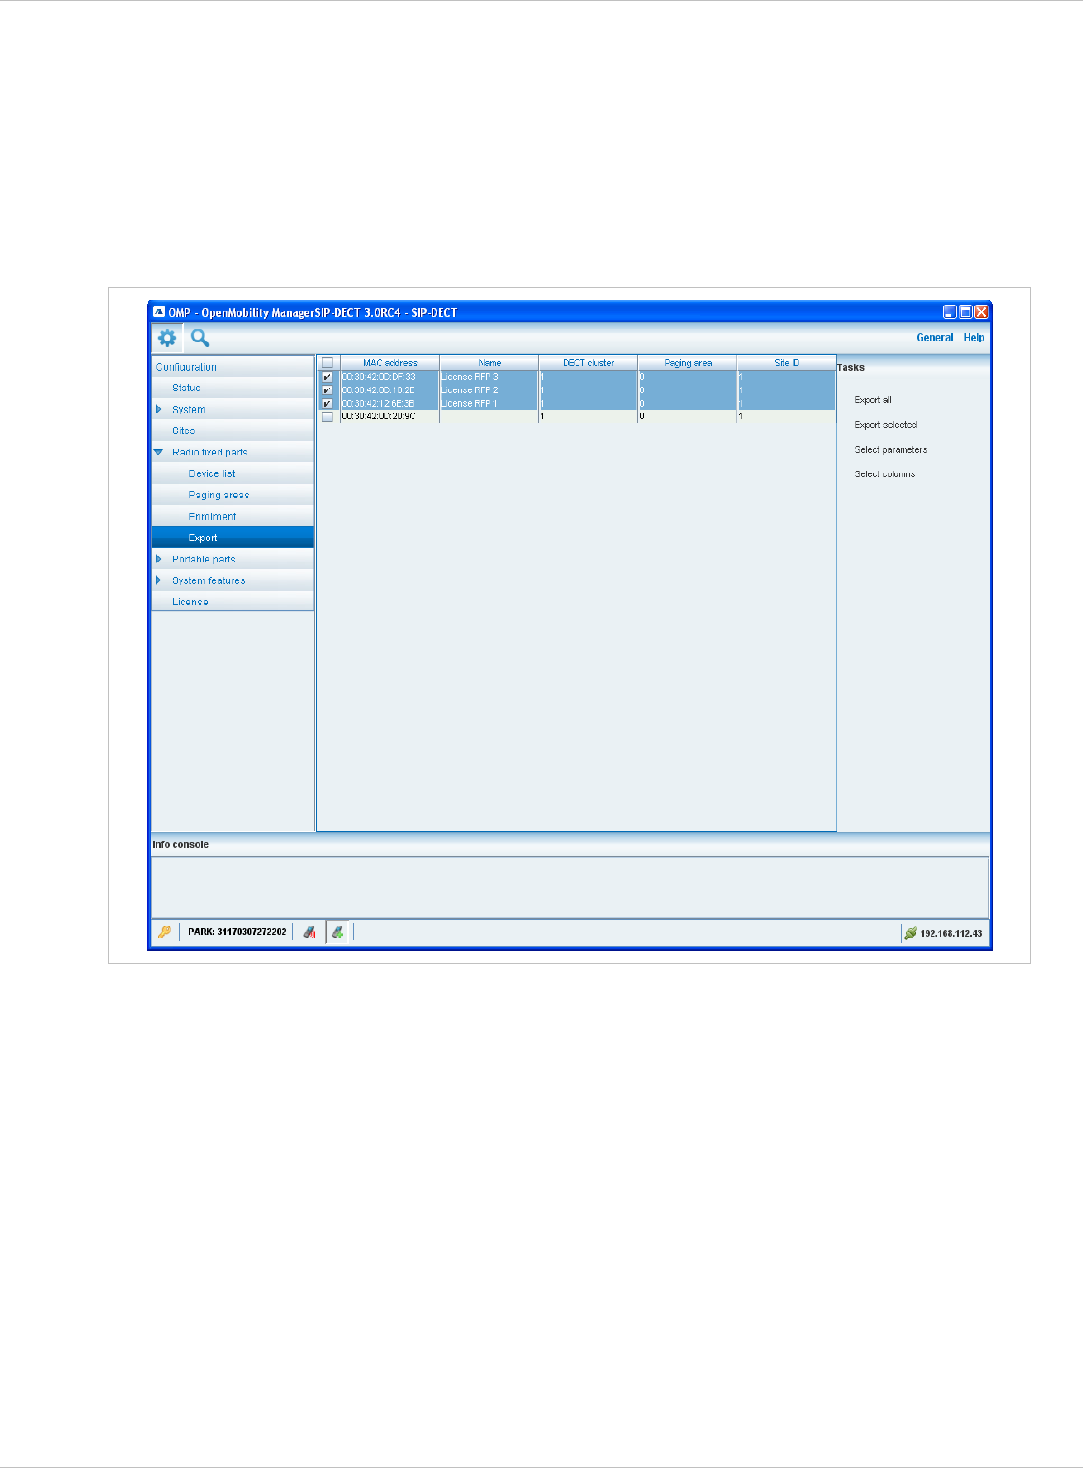
8.7.4 “Export” Menu
The Export menu allows export of all RFPs enrolled to the OMM into an file using “*.csv” file
format. The created file can be viewed externally with a standard spreadsheet application.
All enrolled RFPs are shown in a table.
The following tasks can be performed:
Export all: export all RFP datasets. •
•
•
•
Export selected: export selected RFP datasets.
Select parameters: select RFP parameters which shall be written to csv file (select all
RFP parameters or a subset of these parameters).
Select columns: select the columns thst shall be written to the csv file.
When the export is started, a file system dialog will be opened and the export file name can
be selected. If all parameters are selected for export, the export file can be re-imported using
Enrolment (see chapter 8.7.3). For information about RFP export file format see Appendix,
chapter 11.8).
depl-1230/0.2 Page: 124 (238)
SIP–DECT OM System Manual Release 3.0 8 OM Management Portal (OMP)
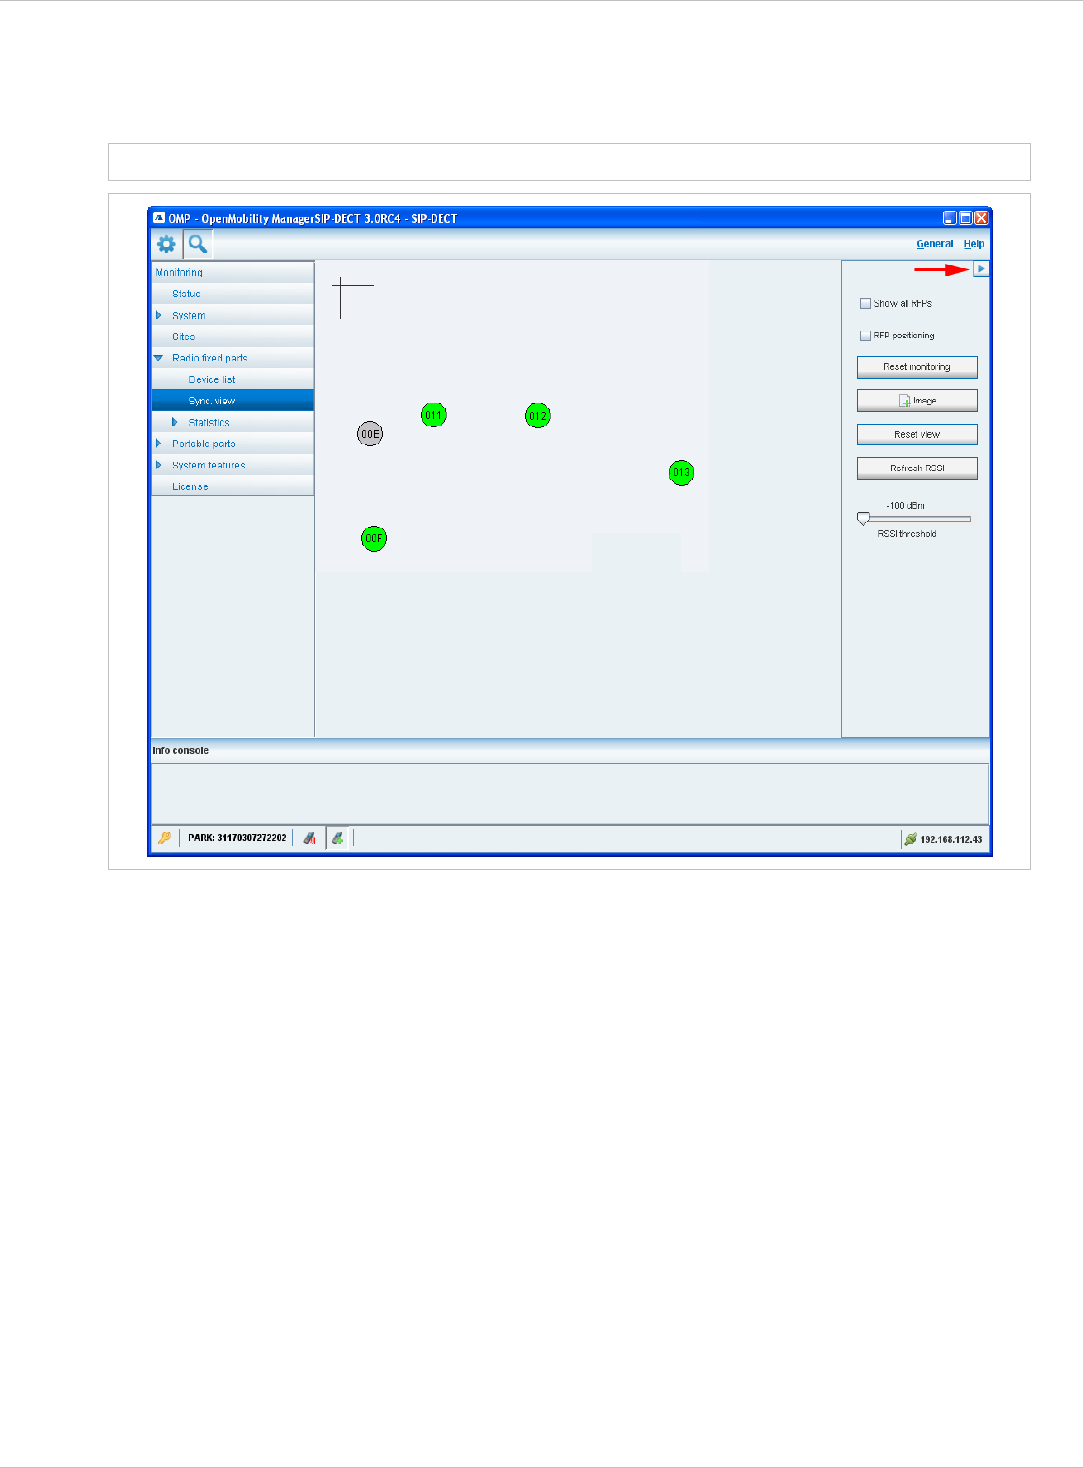
8.7.5 “Sync view” Menu
The Sync view menu allows to check the synchronization relations between RFPs in a
graphical manner.
Note: For background information on RFP synchronization please refer to chapter 9.2.
To open the task panel for sync view press the arrow icon in the upper right corner of the
sync view panel.
The task panel is displayed on the right. The following tasks can be performed:
Show all RFPs: If this checkbox is activated, all configured RFPs are shown in the sync
panel; else only selected RFPs are shown.
•
•
•
•
•
•
•
RFP positioning: If this checkbox is activated, RFP positions can be changed; else RFP
positions are fixed.
Reset monitoring: reset all active sync view monitoring relations.
Image: select background image for sync panel.
Reset view: reset selected view (zero coordinates are reset to the left upper corner of the
sync view panel).
Refresh RSSI: request new RSSI values from OMM for active sync relations.
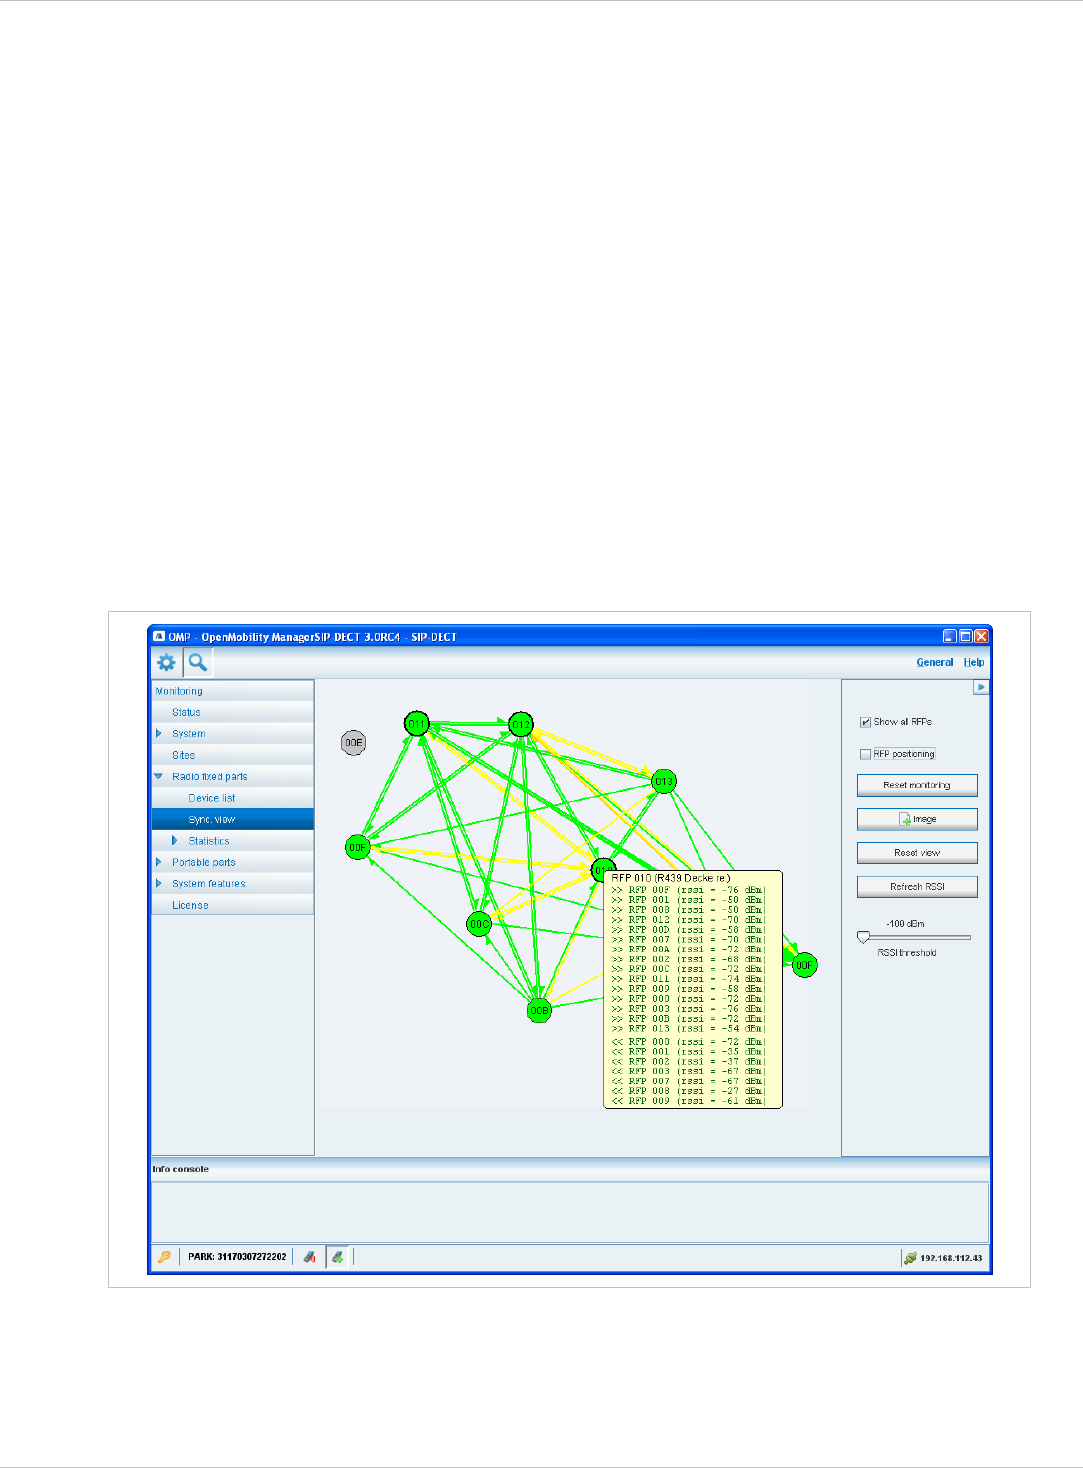
Viewing sync relations
RFPs for which sync relations shall be shown, can be selected as follows:
Select (more than one) RFP in device list table (see chapter 8.7.1)
or
depl-1230/0.2 Page: 125 (238)
SIP–DECT OM System Manual Release 3.0 8 OM Management Portal (OMP)
Activate RFP mouse menu in sync view: Press the right mouse button while mouse cursor
is on an RFP icon and select the Activate Monitoring command from the context menu.
•
•
•
•
•
•
•
•
The color of the RFP icon indicates synchronization state of that RFP:
Grey: inactive
Red: not synchronized
Yellow: searching
Green: synchronized
Sync relations between RFPs are represented by arrows.
Viewing RSSI values
The color of the arrows between RFPs is an indication of the RSSI value of the link:
Red: RSSI < -90 dBm
Orange: -90 dBm <= RSSI <= -70 dBm
Green: RSSI > -70 dBm
If the mouse is moved over an RFP with monitoring activated, a tool tip with RSSI values will
be opened.
You can use the RSSI threshold slider to limit the display of values in the tool tip.
depl-1230/0.2 Page: 126 (238)
SIP–DECT OM System Manual Release 3.0 8 OM Management Portal (OMP)
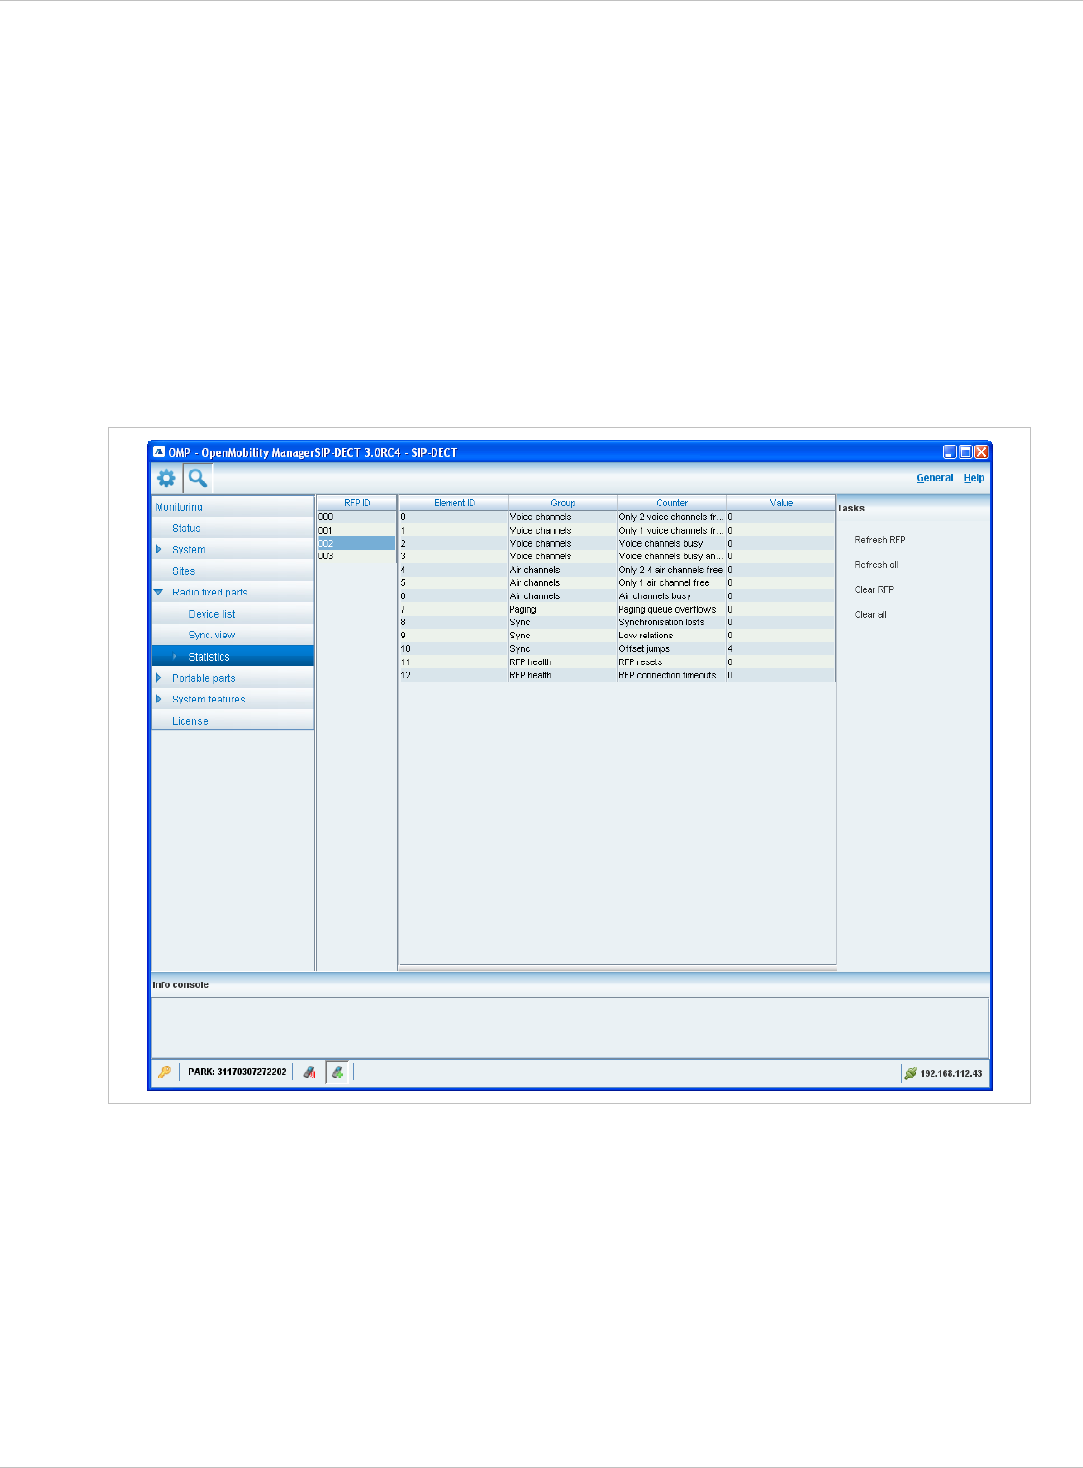
8.7.6 “Statistics” Menu
The Radio fixed parts > Statistics menu provides information about RFP statistics
counters. It contains:
an overview panel with all statistics counters (see chapter 8.7.6.1) and •
• several statistics group panels. In these groups statistics counter types which are related
are pooled together (see chapter 8.7.6.2).
The menu is only available in monitor mode.
8.7.6.1 RFP Statistics Overview
The RFP statistics overview consists of two tables, left RFP ID table and right an overview of
all RFP statistics counters.
The following tasks can be performed:
Refresh RFP: request counter update by OMM for selected RFPs statistics counters. •
•
•
•
Refresh all: request counter update by OMM for all RFP statistics counters.
Clear RFP: clear all RFP statistics counters on selected RFP.
Clear all: clear all RFP statistics counters.
If an RFP is selected (left RFP ID table), the statistics counter table shows counter values of
that RFP (right table). By selecting a statistics counter entry, a detail panel is opened which
shows more detailed information of that counter.
depl-1230/0.2 Page: 127 (238)
SIP–DECT OM System Manual Release 3.0 8 OM Management Portal (OMP)
The detail panel for selected statistics counter shows values for total occurrence and
occurrence in current and last week. You can clear the selected statistics counter on the
selected RFP by pressing the Clear button.
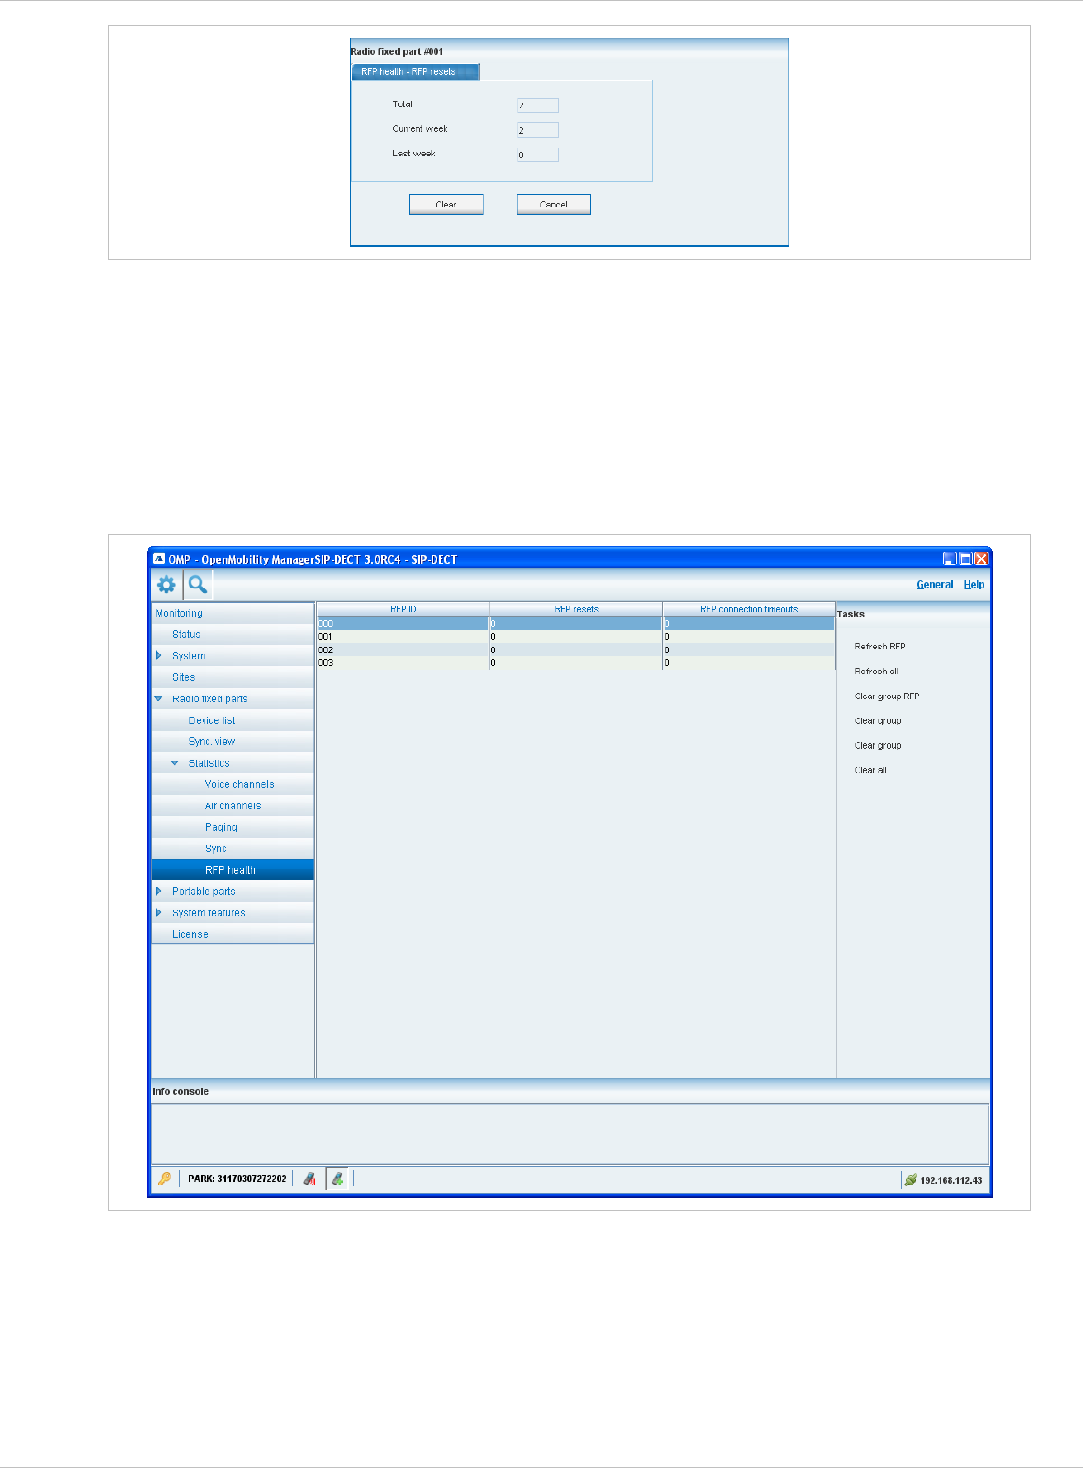
8.7.6.2 RFP Statistics Group Panels
The RFP statistics group panels divide RFP statistics counters into logical groups. This
allows to view all statistics counters of a special group of all RFPs in one table.
The following tasks can be performed:
Refresh RFP: request counter update by OMM for selected RFP. •
•
•
•
Refresh all: request counter update by OMM for all counters.
Clear group RFP: clear counter group of selected RFP.
Clear group: clear counter group of all RFPs.
depl-1230/0.2 Page: 128 (238)

SIP–DECT OM System Manual Release 3.0 8 OM Management Portal (OMP)
Clear RFP: clear all counters of selected RFP.<Anmerkung von Commando an Aastra: In
der SW-Version 3.0RC4 ist dieser String offenbar fälschlich (?) geändert worden zu Clear
group, String wäre dann doppelt, siehe Screenshot Æ Bug?
•
• Clear all: clear all counters of all RFPs.
8.8 “Portable parts” Menu
Portable parts datasets can be configured and viewed in the Portable parts menu. The
Portable parts menu provides the different submenus. Each submenu displays an own table
of PP datasets.
Configuration mode Monitor mode See chapter
Overview:
displays the table of all PP data,
user and device related
Overview:
displays the table of all PP data,
user and device related
8.8.1
Users:
displays the table of all PP user data
8.8.2
Devices:
displays the table of all PP device
data
8.8.3
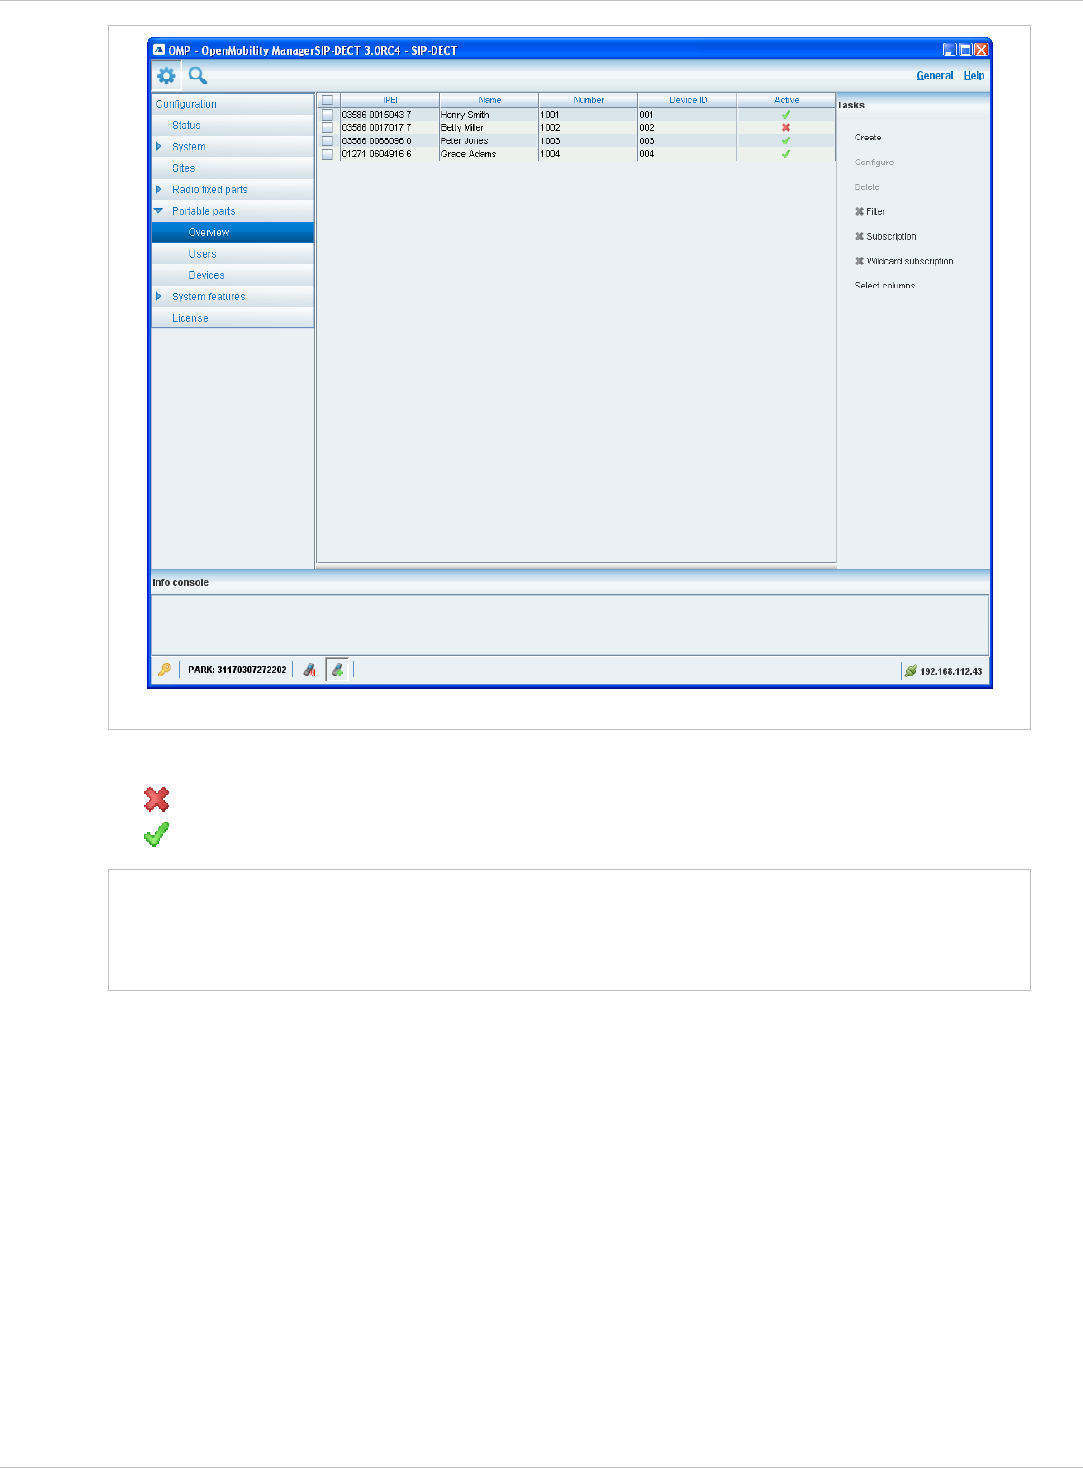
8.8.1 Overview” Menu
In the Overview panel, all PPs data are listed in a table, user related as well as device
related. The overview is available in configuration mode as well as in monitor mode.
In configuration mode, the Overview panel allows to create fixed PPs (user and device are
permanently associated).
depl-1230/0.2 Page: 129 (238)
SIP–DECT OM System Manual Release 3.0 8 OM Management Portal (OMP)
PP overview in configuration mode
The Active column shows the following states:
- PP is not subscribed to the system. •
- PP is subscribed to the system. •
Note: If the Active column is not displayed, you can activate it in the Select columns
dialog, see chapter 8.8.9.
To view the user-device-relation, ensure that the User ID and Device ID columns
are also activated.
depl-1230/0.2 Page: 130 (238)
SIP–DECT OM System Manual Release 3.0 8 OM Management Portal (OMP)
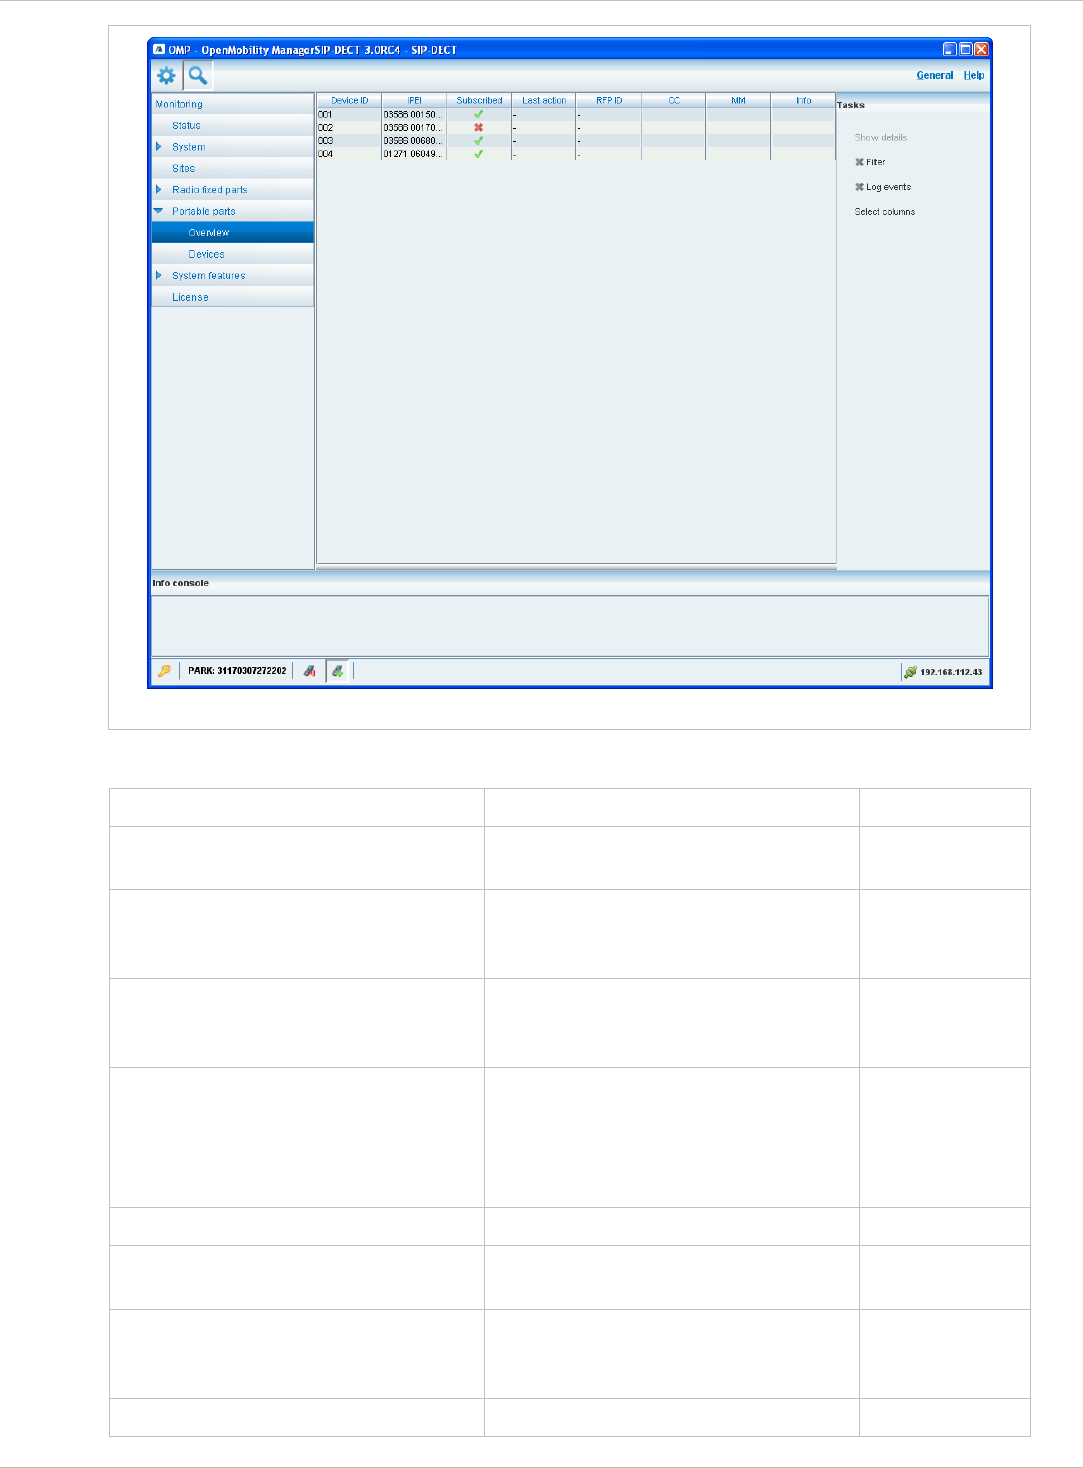
PP overview in monitor mode
The tasks which can be performed are mode-dependant.
Monitor mode Configuration mode See chapter
Create: create new fixed PP dataset
in detail panel
8.8.5
Configure: configure selected PP
user and device dataset in detail
panel
8.8.6
Show details: show selected PP
user and device dataset in detail
panel
8.8.4
Delete: delete selected PP user and
device dataset (in case of fixed
relation) or delete PP user and set
device to unbound status (in case of
dynamic relation)
8.8.8
Subscription: start PP subscription 8.8.7
Wildcard subscription: start PP
wildcard subscription
8.8.7
Select columns: select
columns/parameters to be shown in
PP table
Select columns: select
columns/parameters to be shown in
PP table
8.8.9
Filter: show only PP datasets in
tbl hih ti il h
8.8.10 Filter: show only PP datasets in
tbl hih ti il h
depl-1230/0.2 Page: 131 (238)
SIP–DECT OM System Manual Release 3.0 8 OM Management Portal (OMP)
table which contain a special search
string
table which contain a special search
string
Log events: enable/disable PP
event log
8.8.11
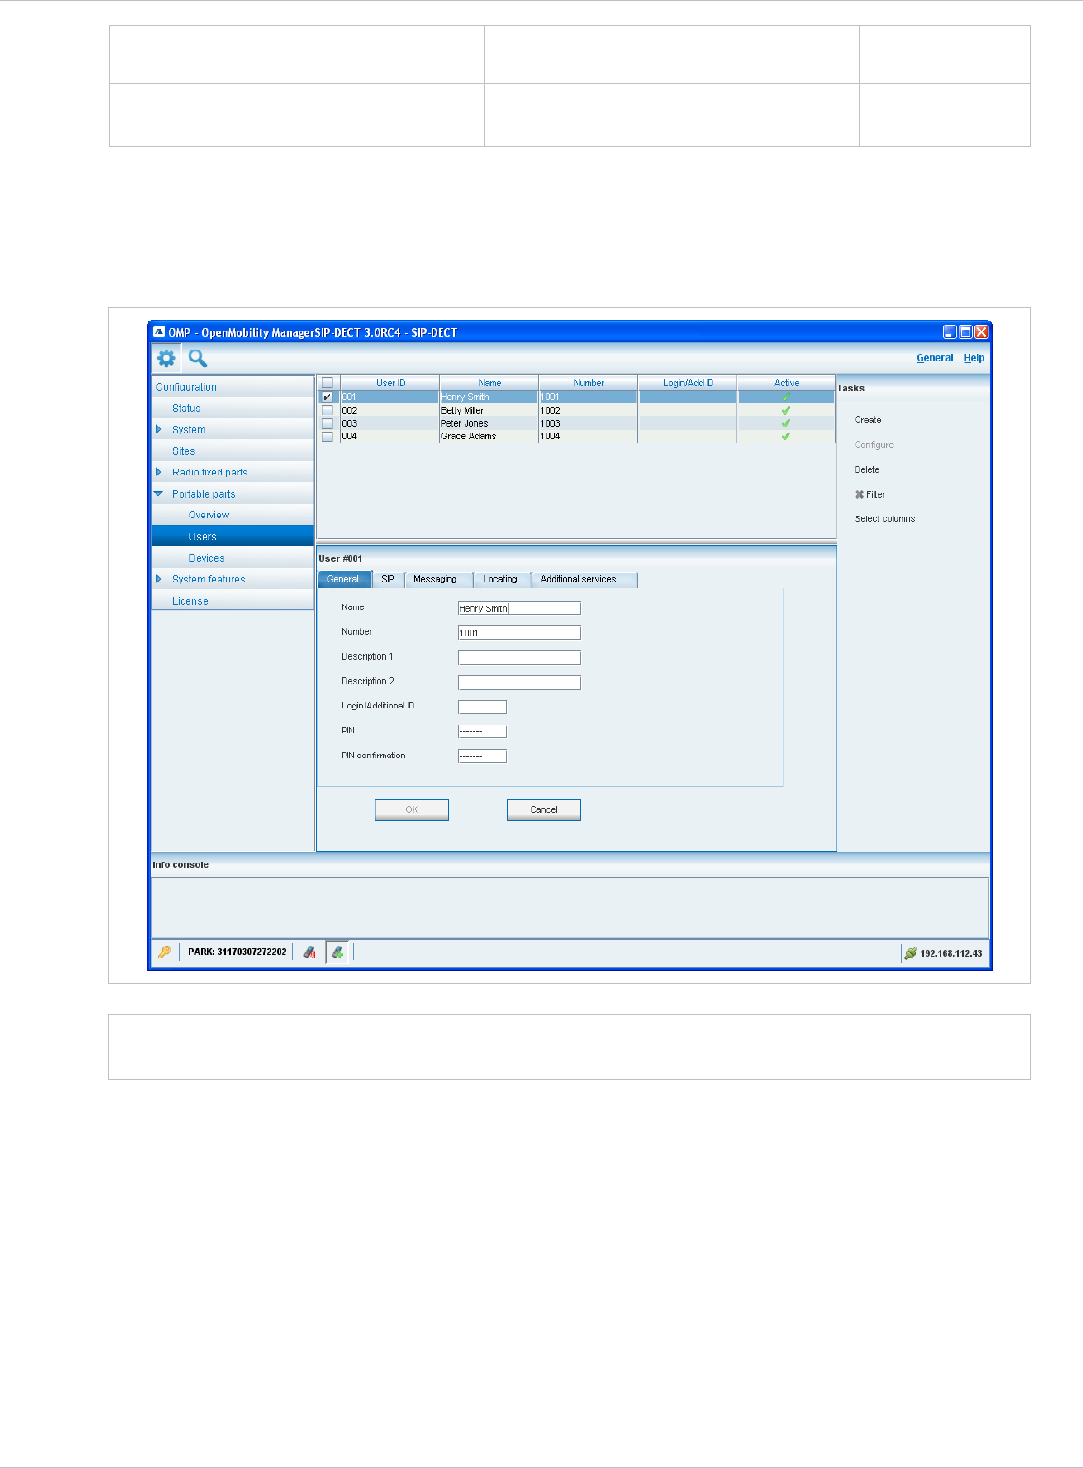
8.8.2 “Users” Menu
In the Users panel, all PP user data are listed in a table. The Users panel allows to create
(unbound) users (which should be able to login and logout at a device).
Note: Use the Select columns dialog (see chapter 8.8.9) to display the desired PP user
data.
The following tasks can be performed:
Create: create new unbound PP user dataset (see chapter 8.8.5). •
•
•
•
•
Configure: configure selected PP user dataset (see chapter 8.8.6).
Delete: delete selected PP user dataset and user data in case of fixed relation (see
chapter 8.8.8).
Select columns: select parameter columns to be shown in table (see chapter 8.8.9).
Filter: filter PP datasets shown in table for string set in filter mask (see chapter 8.8.10).
depl-1230/0.2 Page: 132 (238)
SIP–DECT OM System Manual Release 3.0 8 OM Management Portal (OMP)
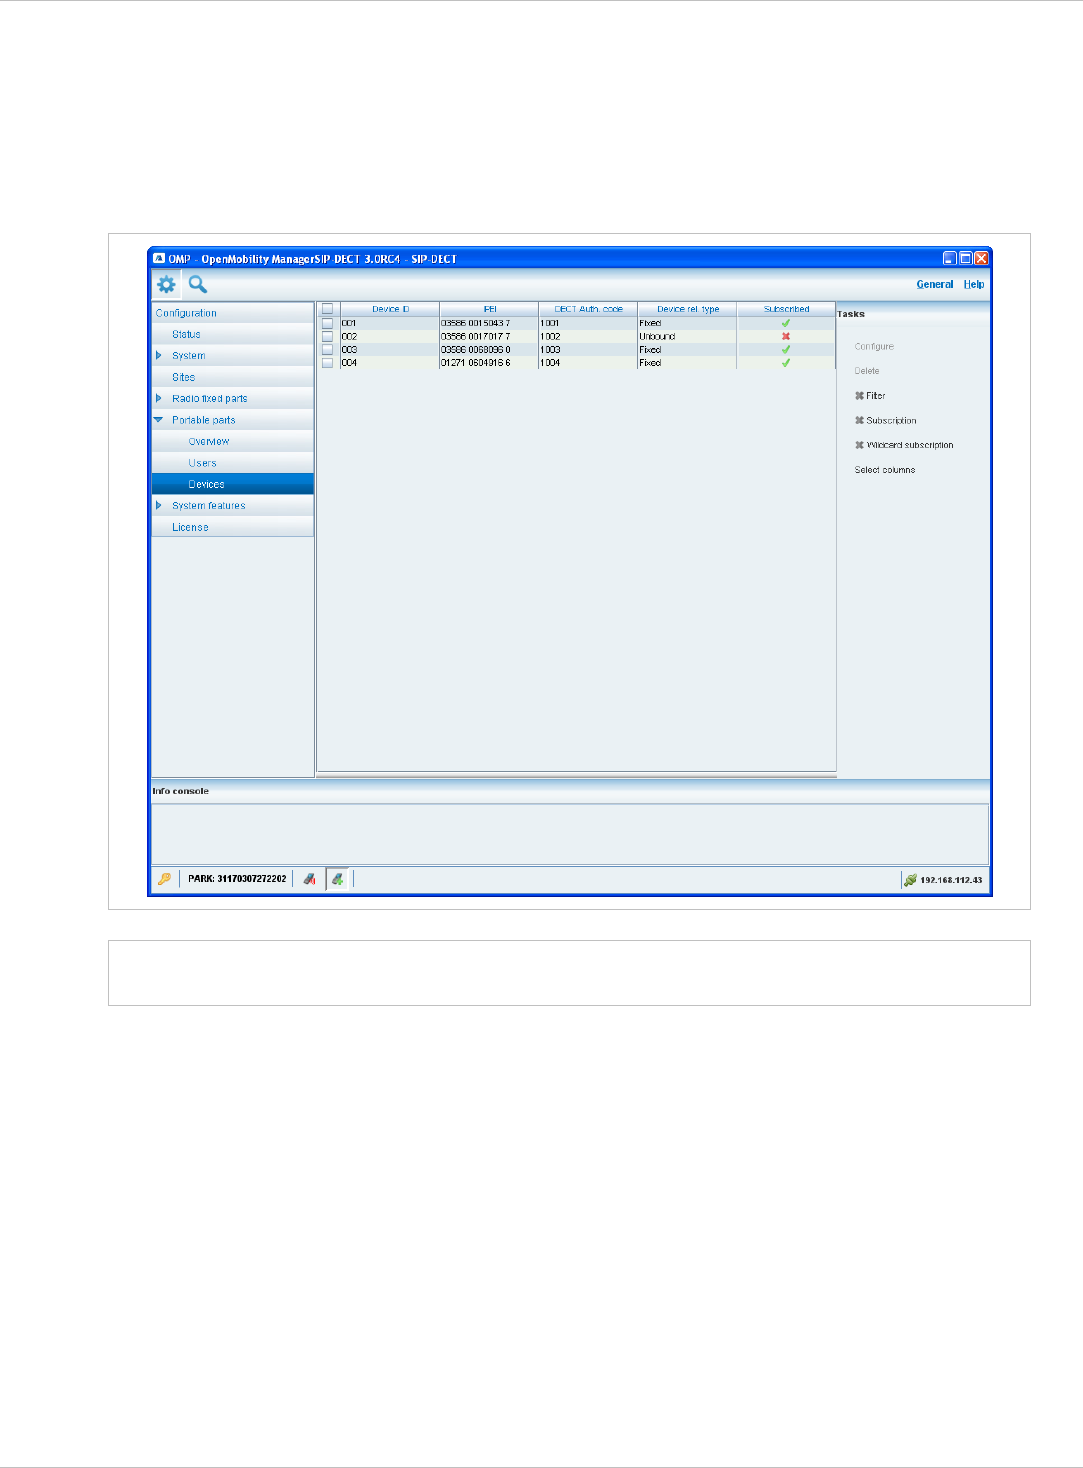
8.8.3 “Devices” Menu
In the Devices panel, all PP device data are listed in a table. The Device panel allows to
configure the DECT part of a PP device dataset.
Devices can not be created separately. They will be automatically created during
subscription (unbound) or they will be created fixed bound to a user when a user is created in
the Overview submenu (see chapter 8.8.1).
Note: Use the Select columns dialog (see chapter 8.8.9) to display the desired PP device
data.
The following tasks can be performed:
Configure: configure selected PP device dataset (see chapter 8.8.6). •
•
•
•
•
•
Delete: delete selected PP device dataset (see chapter 8.8.8).
Subscription: start PP subscription (see chapter 8.8.7).
Wildcard subscription: start PP wildcard subscription (see chapter 8.8.7).
Select columns: select parameter columns to be shown in table (see chapter 8.8.9).
Filter: filter PP datasets shown in table for string set in filter mask (see chapter 8.8.10).
depl-1230/0.2 Page: 133 (238)
SIP–DECT OM System Manual Release 3.0 8 OM Management Portal (OMP)
8.8.4 PP Detail Panel
The PP detail panel is used for configuration/showing of PP settings and creation of new PP
datasets.
To call up the PP detail panel
choose one of the commands in the task bar on the right of the Portable parts panel
(Create, Configure, or Show details)
•
•
•
•
•
or
select the appropriate PP in the PP table and double-click the entry.
The PP detail panel contains the different parameter groups sorted in tabs. Which tabs are
displayed depends on the current mode and from which panel the PP detail panel was called
up:
Overview panel (configuration and monitor mode): The PP detail panel contains all tabs
listed below.
User panel (configuration mode): The PP detail panel contains all tabs but not DECT.
Device panel (configuration mode): The PP detail panel contains only DECT.
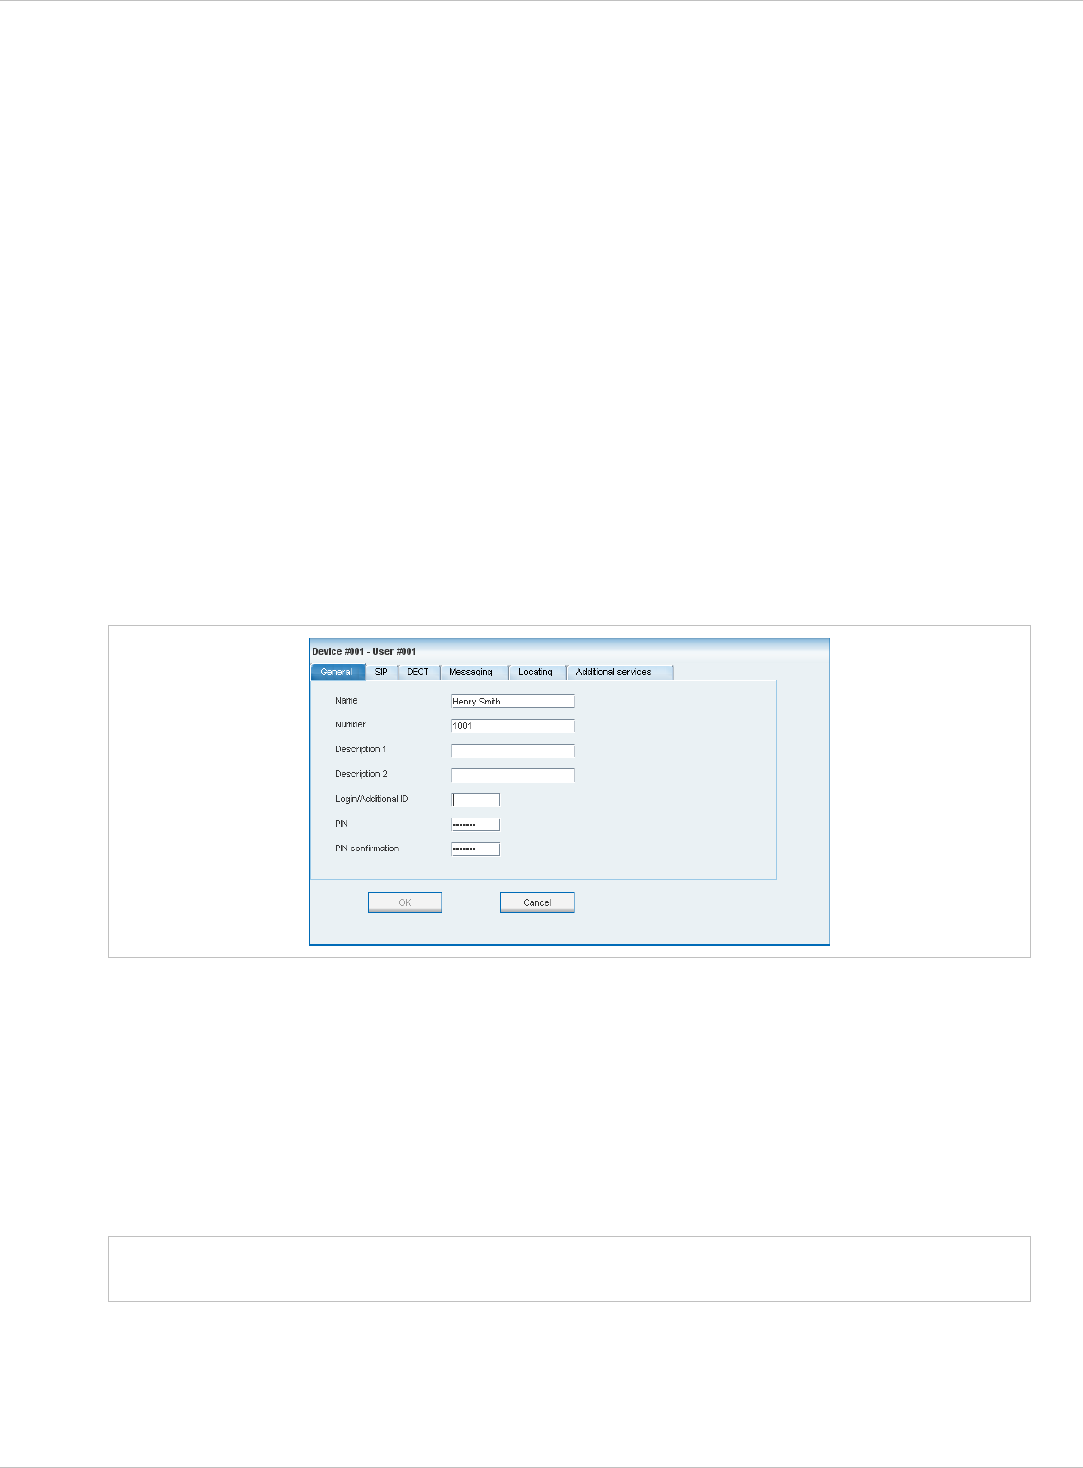
“General” tab
This tab enables to configure the general settings for the PP dataset.
•
•
•
•
Note:
Name: represents the handset user name with up to 20 characters
Number: the handset telephone number with up to 31 characters (1234567890*#azAz+-
_.!$%&/()=?$&). Please be aware that only “*”,”#” and “0” to “9” can be dialled with a
handset.
Description 1 and Description 2: free text comments with up to16 characters each.
Login/Additional ID: The additional ID can be used as a mean for data search within
wildcard subscription (because of the IPEI is not configured which selects the data
otherwise).
The authentication code and additional ID can only be changed if the PP is not
subscribed.
• PIN, PIN confirmation: a user PIN to be entered during user login.
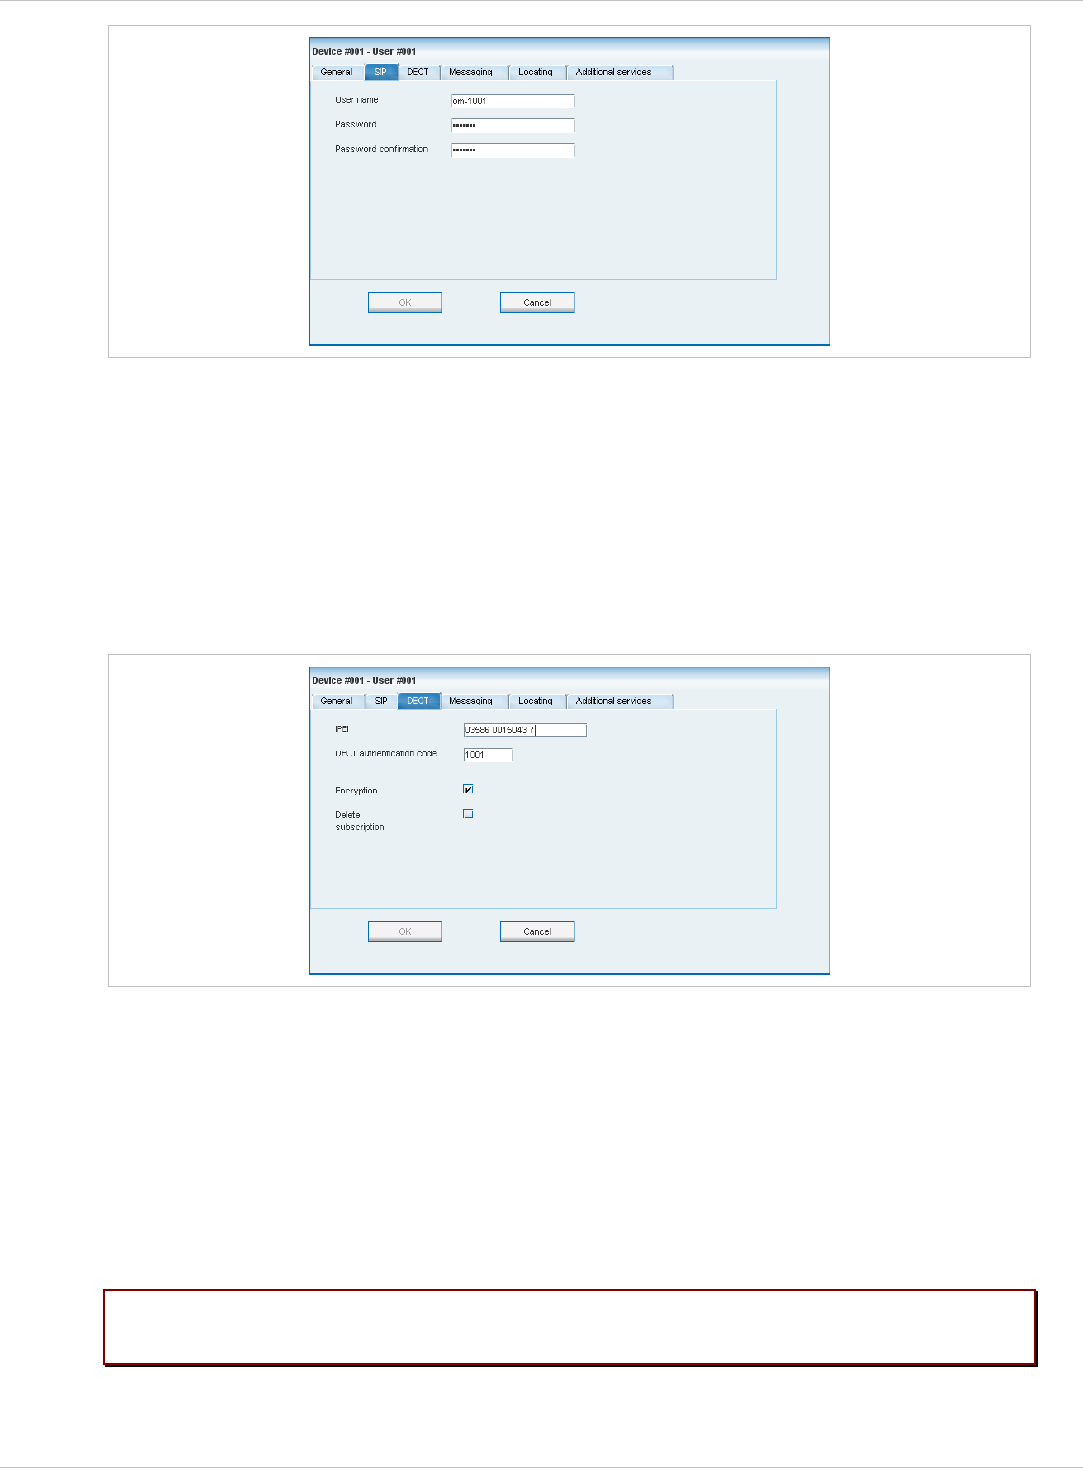
“SIP” tab
This tab enables to configure the SIP authentication for the PP dataset.
depl-1230/0.2 Page: 134 (238)
SIP–DECT OM System Manual Release 3.0 8 OM Management Portal (OMP)
•
•
User name: The SIP Authentication user name is optional but recommended. It
represents the name which will be used during SIP registration and authentication. If no
name is given the number will be used by default.
Password, Password confirmation: The password will be used during SIP registration
and authentication. Enter the appropriate data in these fields.
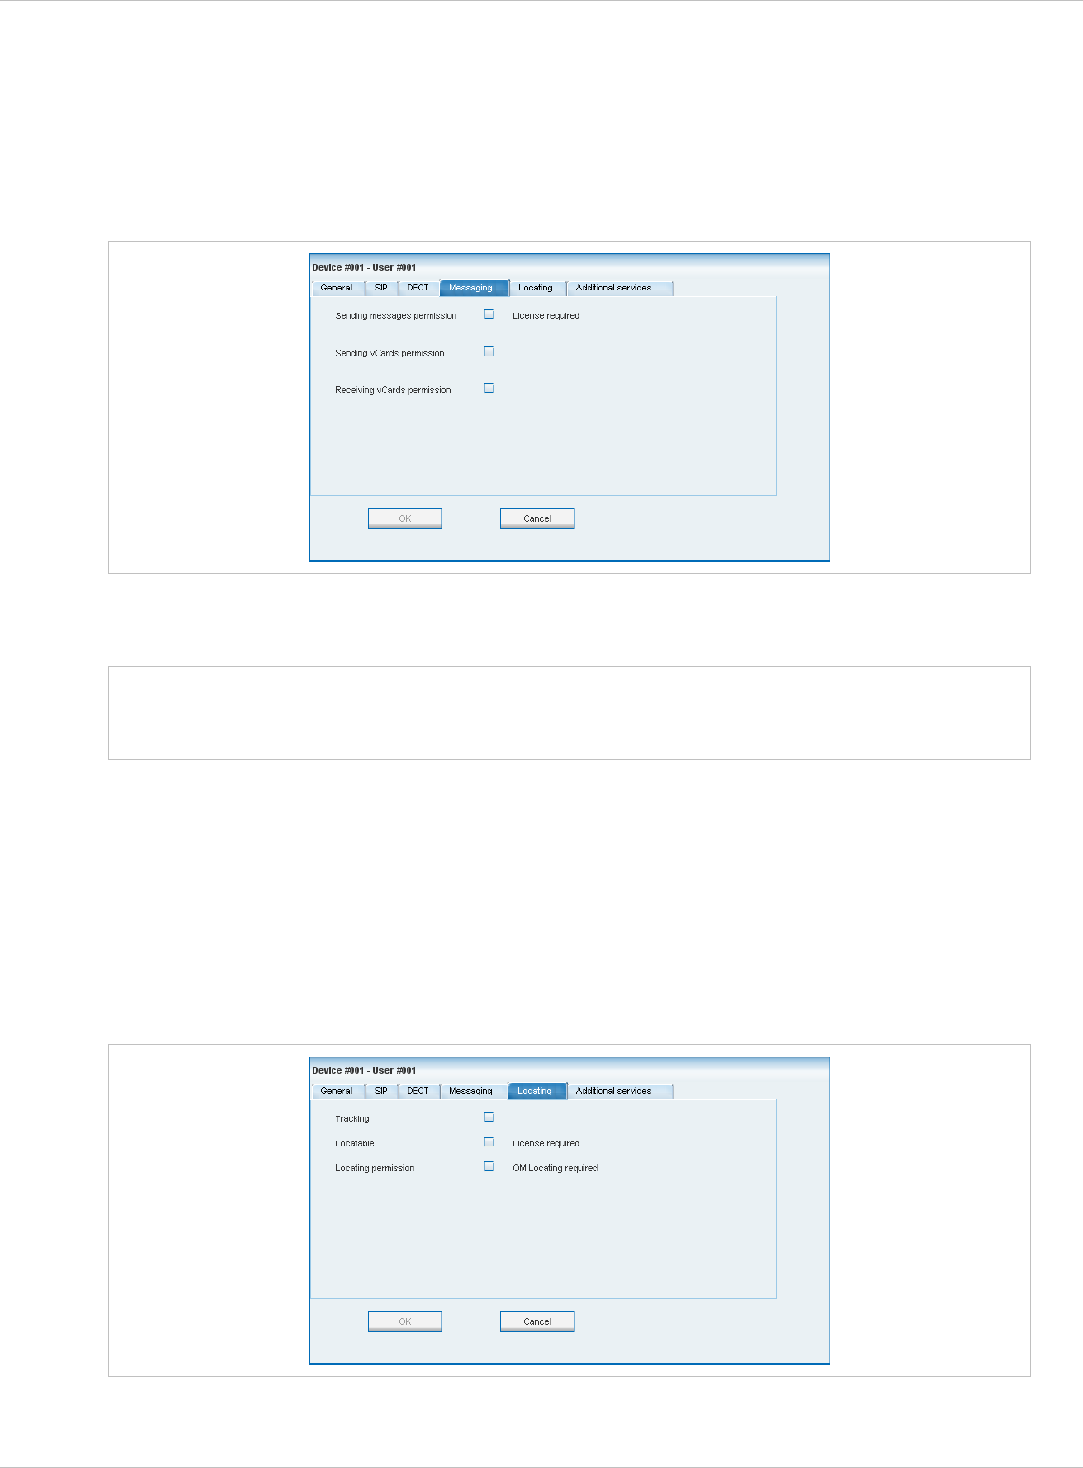
“DECT” tab
This tab enables to configure the DECT part for the PP dataset. When configuring a device
(see 8.8.3), only the DECT tab is shown in the PP detail panel.
•
•
•
IPEI: The IPEI is the DECT 142 / 600d / 650c handset IPEI number which can be found in
the System Options menu of the DECT 142 / 600d / 650c handset.
DECT authentication code: The DECT authentication code is used during initial DECT
subscription as an security option and can be set here for each PP device separately. If a
global DECT authentication code is given on the System settings page (see chapter
8.5.1), this value is filled in here as default. This parameter is optional.
Encryption: If the encryption feature is enabled for the whole system (in the System
settings menu, see chapter 8.5.1), you can de-activate the DECT encryption for this
device.
Please note: The PP device has to support DECT encryption which is not a mandatory
feature.
depl-1230/0.2 Page: 135 (238)
SIP–DECT OM System Manual Release 3.0 8 OM Management Portal (OMP)
Delete subscription: This option is only available when configuring an existing PP. If this
option is activated, the subscription data will be deleted which also requires a re-
subscription of the handset device.
•
“Messaging” tab
This tab enables to configure the OM Integrated Messaging and Alerting service for the
PP dataset.
•
Note:
Sending messages permission: If this option is enabled, the PP can send messages (if
this function is supported by the device).
For further information please refer to the separate document SIP–DECT; OM
Integrated Messaging & Alerting Application; Installation, Administration & User
Guide.
•
•
Sending vCards permission: Allows the user to send personal directory entries as a
vCard message from the handset to other users (if this function is supported by the
device).
Receiving vCards permission: If this option is enabled, all received vCard messages are
automatically processed and written into the personal directory of the handset (if this
function is supported by the device).
“Locating” tab
This tab enables to configure the OM Locating Application for the PP dataset.
depl-1230/0.2 Page: 136 (238)
SIP–DECT OM System Manual Release 3.0 8 OM Management Portal (OMP)
•
•
•
Note:
Tracking: If this option is enabled, the operator of the OM Locating application is able to
use the constant tracking feature for the portable part. Note, that this feature consumes
more of the portable part’s battery power, because it activates an RFP update information
if the device roams and is not in communication. You also cannot enable this feature, if
the Locatable option is disabled.
Locatable: If this option is enabled, the portable part is locatable. Either with the OM
Locating application or by querying it’s location from other portable parts.
Locating permission: This option applies to Aastra 610d/620d/630d/650c handsets only.
If this option is enabled, the portable part is able to determine the location of other
portable parts. The main menu of the Aastra 610d/620d/630d/650c phones provides an
extra menu entry Locating for this.
For further information please refer to the separate document SIP–DECT;
OM Locating Application; Installation, Administration & User Guide.
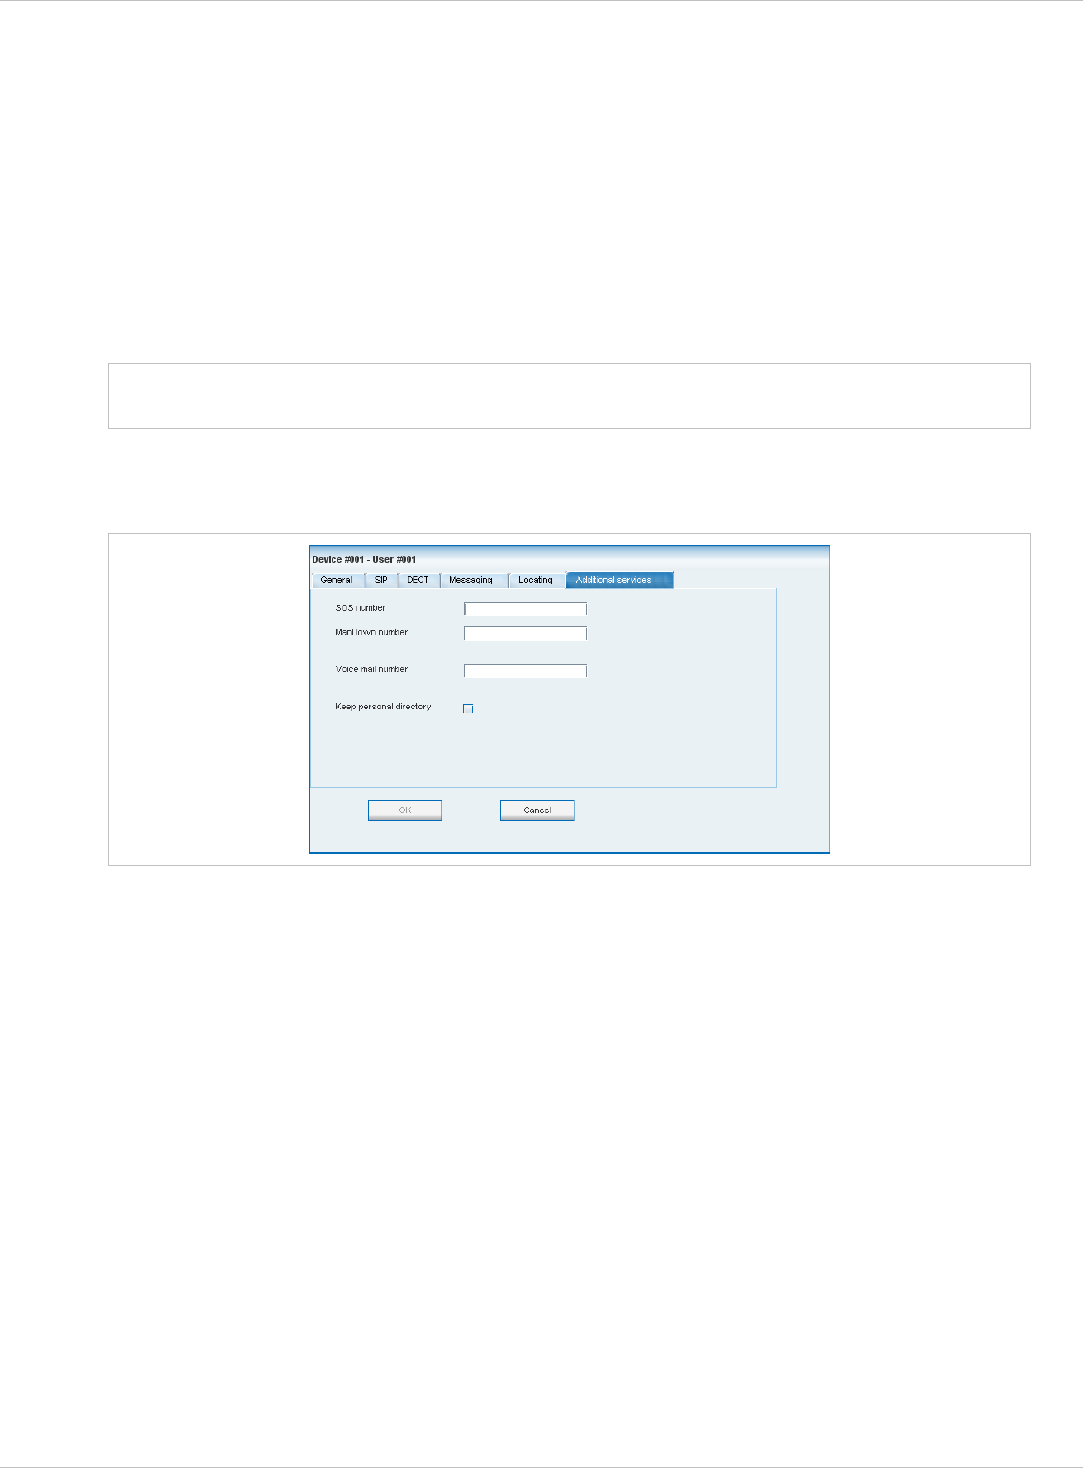
“Additional services” tab
This tab enables to configure extra configuration items for the PP dataset.
•
•
•
•
SOS number: User specific SOS number that is dialled automatically if the SOS key on
the handset is pressed.
ManDown number: User specific “Man down” number that is dialed automatically if a
Man down event happens. This event is triggered by the sensor of an Aastra630d
handset.
If no individual SOS or Man down number is configured for a handset, the number of the
appropriate alarm trigger will be used as calling number in case of a SOS or Man down
event. Please see chapter 8.9.3 and /28/ for details.
Voice mail number: The voice mail number is the number which will be automatically
called as soon as a voice mail call is initiated on the Aastra 600d / Aastra 650c handset. If
there is no individual voice mail number configured in this field, then the system wide
voice mail number is used (see also the System setting menu, chapter 8.5.1). If there is
no voice mail number configured (neither the individual nor the system wide) or another
handset type is used, then the voice mail number must be configured locally in the
handset.
Keep personal directory: Activate this option, to keep the personal directory data in the
handset if the user logs out.
depl-1230/0.2 Page: 137 (238)

SIP–DECT OM System Manual Release 3.0 8 OM Management Portal (OMP)
8.8.5 Creating PP Datasets
Creating PP datasets is only possible in configuration mode. You can create the fixed
PP dataset or only the PP user data.
To create a PP dataset proceed as follows:
1 In the task bar on the right of the Portable parts panel click on the Create command.
– In the Overview submenu you can now create a fixed PP dataset (with combined user
and device data).
– In the Users submenu you can create an unbound user. This user can login and logout
at any prepared device.
The PP detail panel opens. It provides various tabs where the PP data has to be entered.
2 Configure the PP, see parameter description in chapter 8.8.4.
3 Press the OK button.
8.8.6 Configuring PP Datasets
Configuring PP datasets is only possible in configuration mode. To configure an existing
PP dataset proceed as follows:
1 In the task bar on the right of the Portable parts panel click on the Configure command.
– In the Overview submenu you can configure the whole PP dataset (user and device
data).
– In the Users submenu you can configure the PP user data.
– In the Device submenu you can configure the PP device data.
The PP detail panel opens.
2 Change the PP dataset as desired, see parameter description in chapter 8.8.4.
3 Press the OK button.
8.8.7 Subscribing PP Datasets
After adding a PP dataset to the OMM, the PP must be subscribed. The OMM must first be
enabled to allow subscriptions to be take place from PP handsets. Subscribing PP datasets
is possible in the Overview panel and in the Device panel. To start subscription, press one
of the following commands in the Portable parts menu:
Subscription: start PP subscription with configured IPEI. For more information on this
see chapter 7.7.3.1.
•
• Wildcard subscription: start PP wildcard subscription (without configured IPEI). In the
Wildcard subscription dialog, which is now opened, enter the Timeout for this
subscription method. Press the Start button. For more information on this see chapter
7.7.3.2.
depl-1230/0.2 Page: 138 (238)
SIP–DECT OM System Manual Release 3.0 8 OM Management Portal (OMP)
8.8.8 Deleting PP Datasets
Deleting PP datasets is only possible in configuration mode. You can delete the fixed
PP dataset (in case of fixed relation) or only the PP user data resp. the PP device data (in
case of dynamic relation).
To delete one or more existing PP datasets proceed as follows:
1 Select the appropriate PP dataset(s) in the PP table by activating the corresponding
checkbox(es).
2 In the task bar on the right of the Portable parts panel click on the Delete command.
– In the Overview submenu the whole PP dataset will be deleted.
– In the Users submenu only the PP user data will be deleted.
– In the Devices submenu only the PP device data will be deleted.
The Delete [xxx] dialog opens showing a confirmation prompt.
3 Confirm the displayed prompt with OK.
8.8.9 Selecting Columns
You can adapt the parameters shown in the PP table to your needs:
1 In the task bar on the right of the Portable parts panel click on the Select columns
command.
The Select columns dialog opens.
2 Select the columns that shall be shown by activating the appropriate checkboxes.
3 Click the OK button.
The PP table will be adapted accordingly.
8.8.10 Filtering PP Table
You can filter the list of PP datasets shown in the PP table by using a filter.
1 In the task bar on the right of the Portable parts panel click on the Filter command.
depl-1230/0.2 Page: 139 (238)

SIP–DECT OM System Manual Release 3.0 8 OM Management Portal (OMP)
The Filter dialog opens.
2 Enter the search string that serves as filter criterion. You can enter digits and characters.
The search is case sensitive.
3 Click on the Filter button.
The Filter dialog is closed and the PP table will be adapted accordingly.
4 To reset the filter, click on the Filter command in the task bar on the right of the Portable
parts panel.
5 In the Filter dialog click on the Reset button.
8.8.11 Enabling / Disabling PP Event Log
You can store an PP event log file in monitor mode. Proceed as follows:
1 To enable/disable the PP event log, click on the Log events command in the task bar on
the right of the Portable parts panel:
- PP event log is enabled.
- PP event log is disabled.
2 Repeat step 1 to disable/enable the PP event log.
The PP event log will be stored in a file called “pp_event.log“. This file can be found in the
users home directory:
on a Linux it is located under ‘~/.oamp’, •
• on a windows system under ‘c:/Users/<user>/MyDocuments/.Oamp’.
8.9 “System features” Menu
The System features menu provides the following entries:
Configuration mode Monitor mode See chapter
General settings General settings 8.9.1
Feature access codes (FAC) Feature access codes (FAC) 8.9.2
Alarm triggers Alarm triggers 8.9.3
Digit treatment Digit treatment 8.9.4
Directory Directory 8.9.5
XML applications XML applications 8.9.6
depl-1230/0.2 Page: 140 (238)
SIP–DECT OM System Manual Release 3.0 8 OM Management Portal (OMP)
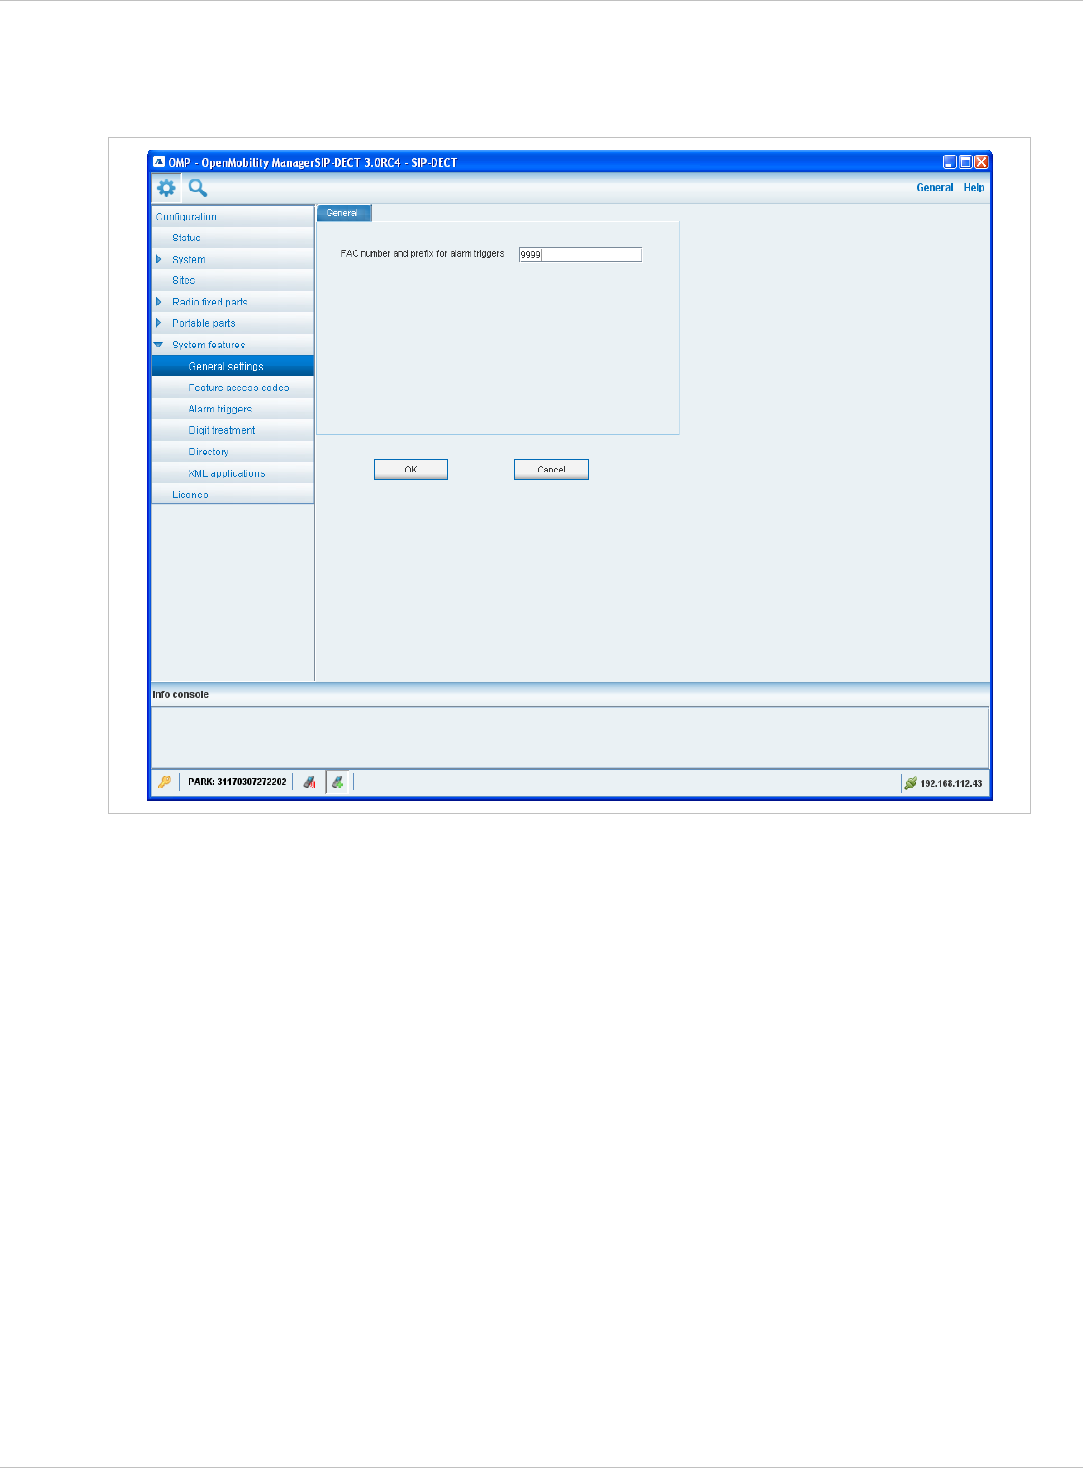
8.9.1 “General settings” Menu
The General settings menu allows to configure/view the FAC number prefix used for feature
access codes and alarm triggers.
1 FAC number and prefix for alarm triggers: Enter a unique FAC number.
2 Press the OK button.
8.9.2 “Feature access codes” Menu
The Feature access codes menu is used to configure/view the feature access codes
parameters.
depl-1230/0.2 Page: 141 (238)
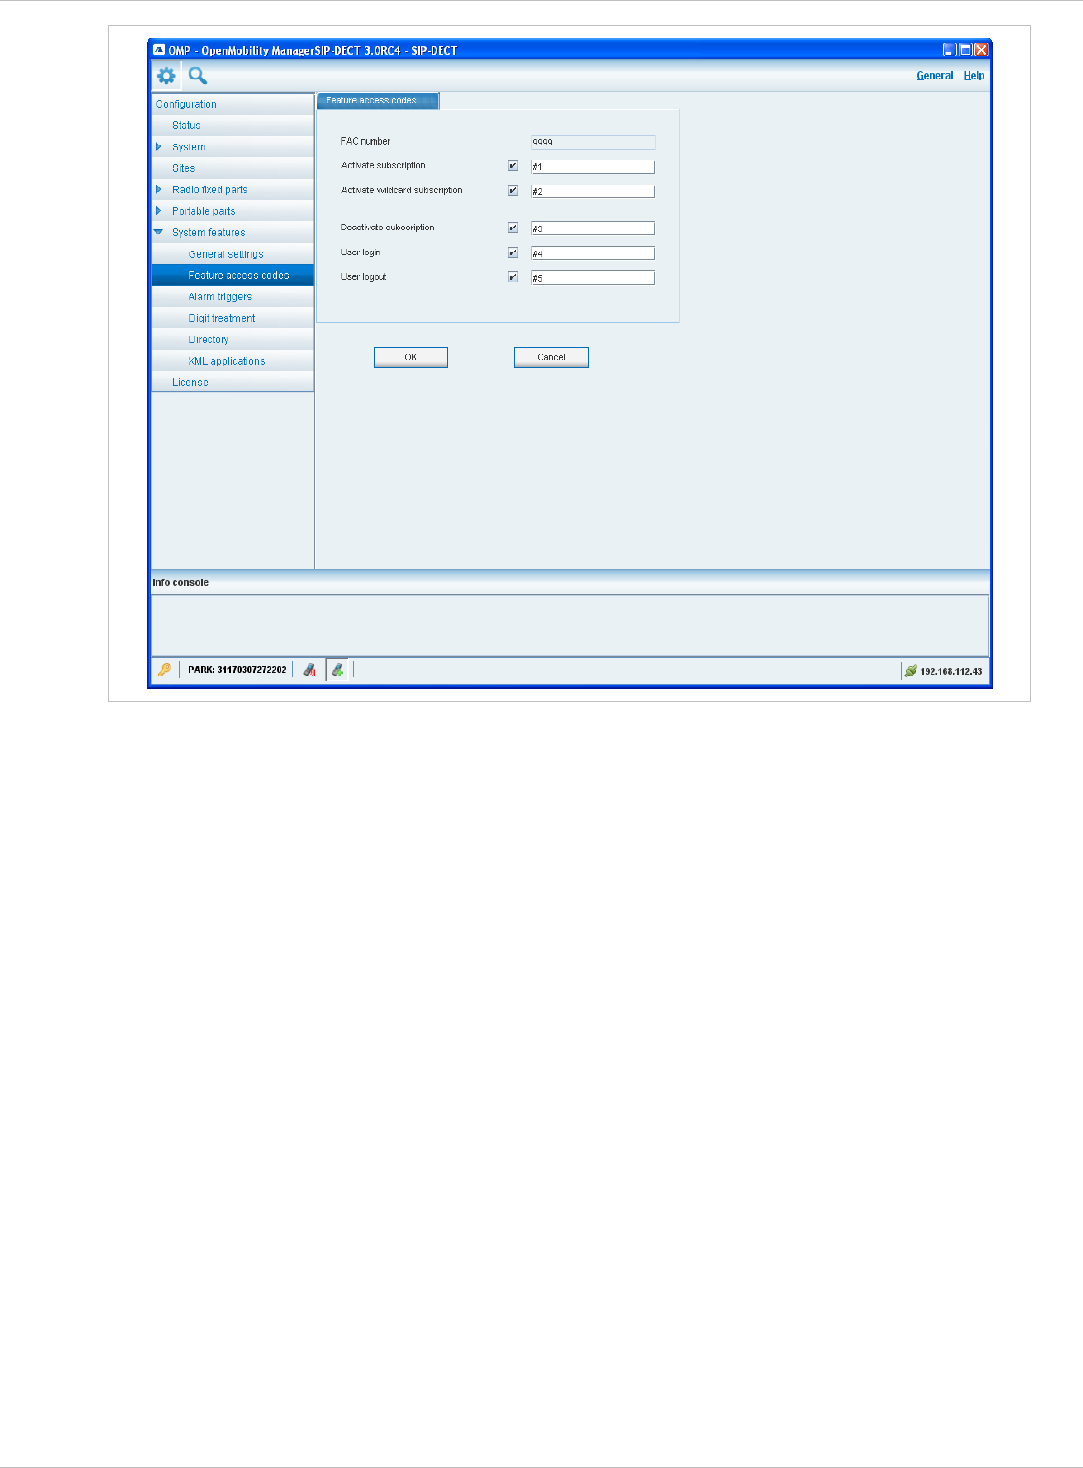
SIP–DECT OM System Manual Release 3.0 8 OM Management Portal (OMP)
The FAC number which introduces the feature access code (see also chapter 8.9.1) is
displayed. For a description of the parameters which can be set in this menu see chapter
7.9.3.
8.9.3 “Alarm triggers” Menu
The Alarm triggers menu allows to configure/view numerous alarm trigger datasets. There
are two predefined alarm triggers (‘SOS and ’Man down‘) which can not be deleted.
depl-1230/0.2 Page: 142 (238)
SIP–DECT OM System Manual Release 3.0 8 OM Management Portal (OMP)
The following tasks can be performed:
Create: create alarm trigger (see chapter 8.9.3.1). •
•
•
•
Configure: configure a selected alarm trigger (see chapter 8.9.3.2).
Delete: delete selected alarm triggers (see chapter 8.9.3.3).
Show details: shows parameters of a selected alarm trigger (see chapter 8.9.3.4).
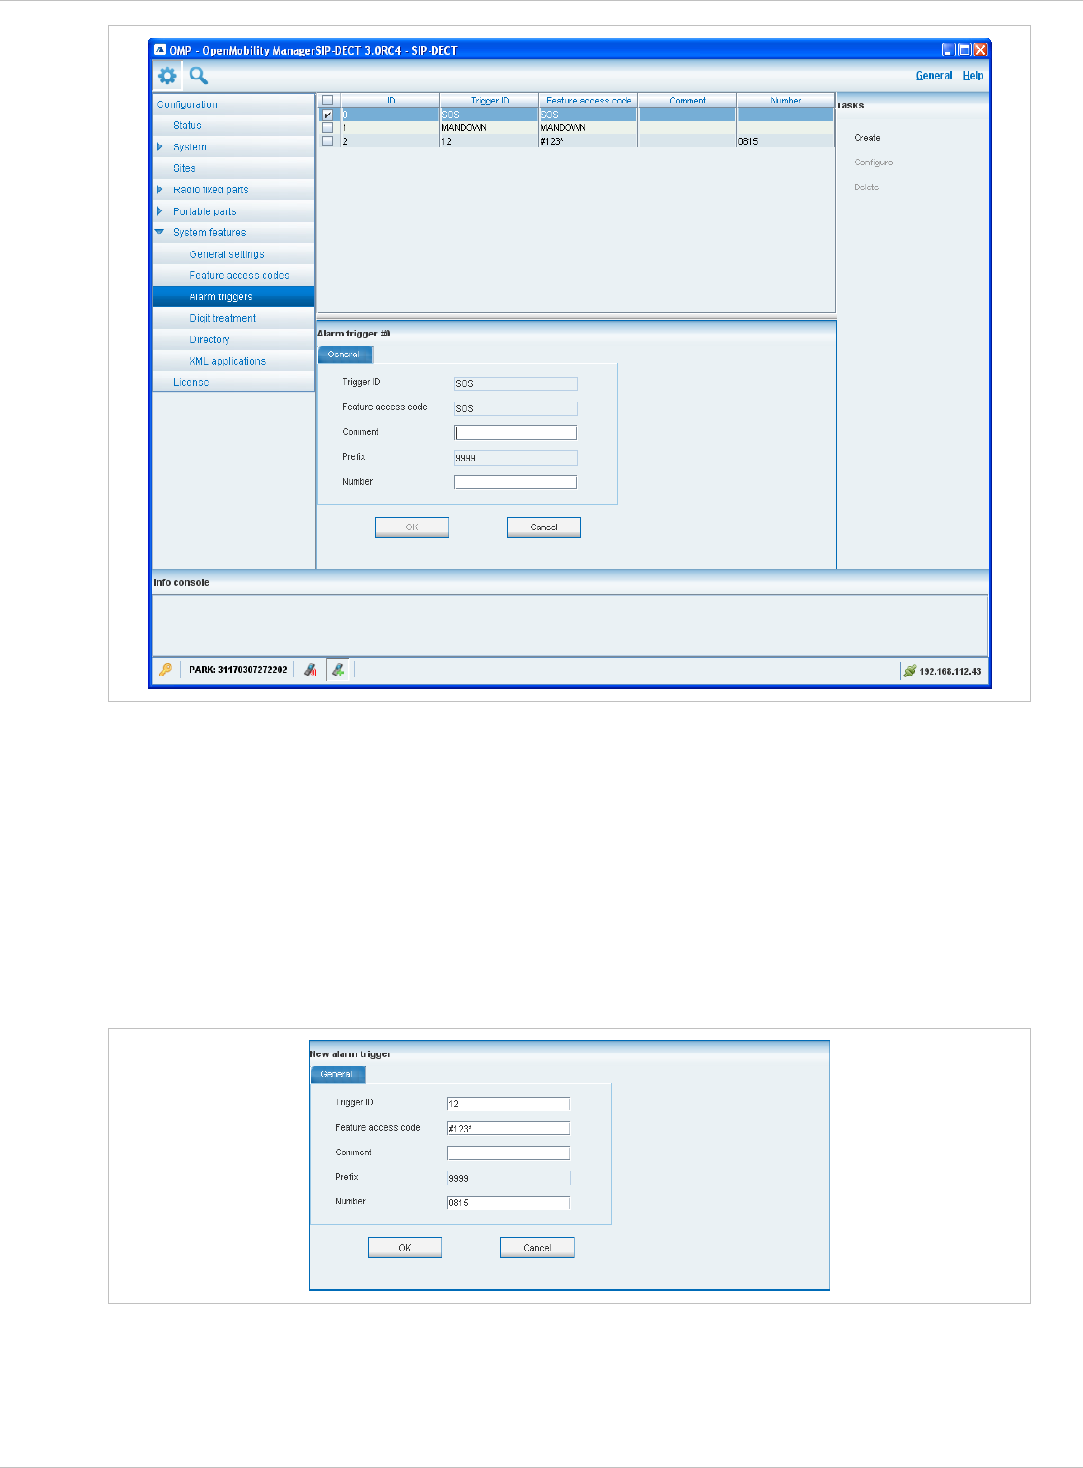
8.9.3.1 Creating “Alarm triggers”
In configuration mode you can create new alarm triggers.
1 Click Create. In the General tab enter the alarm trigger parameters.
2 Trigger ID: Enter the Trigger ID. The Trigger ID identifies the alarm scenario and also
selects the source which triggers the alarm.
depl-1230/0.2 Page: 143 (238)

SIP–DECT OM System Manual Release 3.0 8 OM Management Portal (OMP)
3 Feature access code: Enter the access code which should be assigned to the alarm
trigger.
4 Comment: Enter a comment for the new trigger.
5 Prefix: This field displays the FAC number which introduces the feature access code
(see also chapter 8.9.1).
6 Number: Enter the number to be called in case of this alarm trigger.
7 Press the OK button.
8.9.3.2 Configuring “Alarm triggers”
In configuration mode you can configure an existing alarm trigger.
1 In the alarm trigger table click on the appropriate trigger entry.
2 Click Configure.
The General tab is displayed showing the current trigger configuration.
3 Change the trigger parameters, see chapter 8.9.3.1.
4 Press the OK button.
8.9.3.3 Deleting “Alarm triggers”
In configuration mode you can delete alarm triggers. The predefined alarm triggers (‘SOS
and ’Man down‘) can not be deleted.
1 In the alarm trigger table click on one or more trigger entries.
2 Click Delete.
3 Confirm the displayed prompt with OK.
8.9.3.4 View “Alarm trigger” Details
In monitor mode you can view the details of an alarm trigger.
1 In the alarm trigger table click on the appropriate trigger entry.
2 Click Show details.
The General tab is displayed showing the trigger configuration.
3 Click Cancel to close the tab.
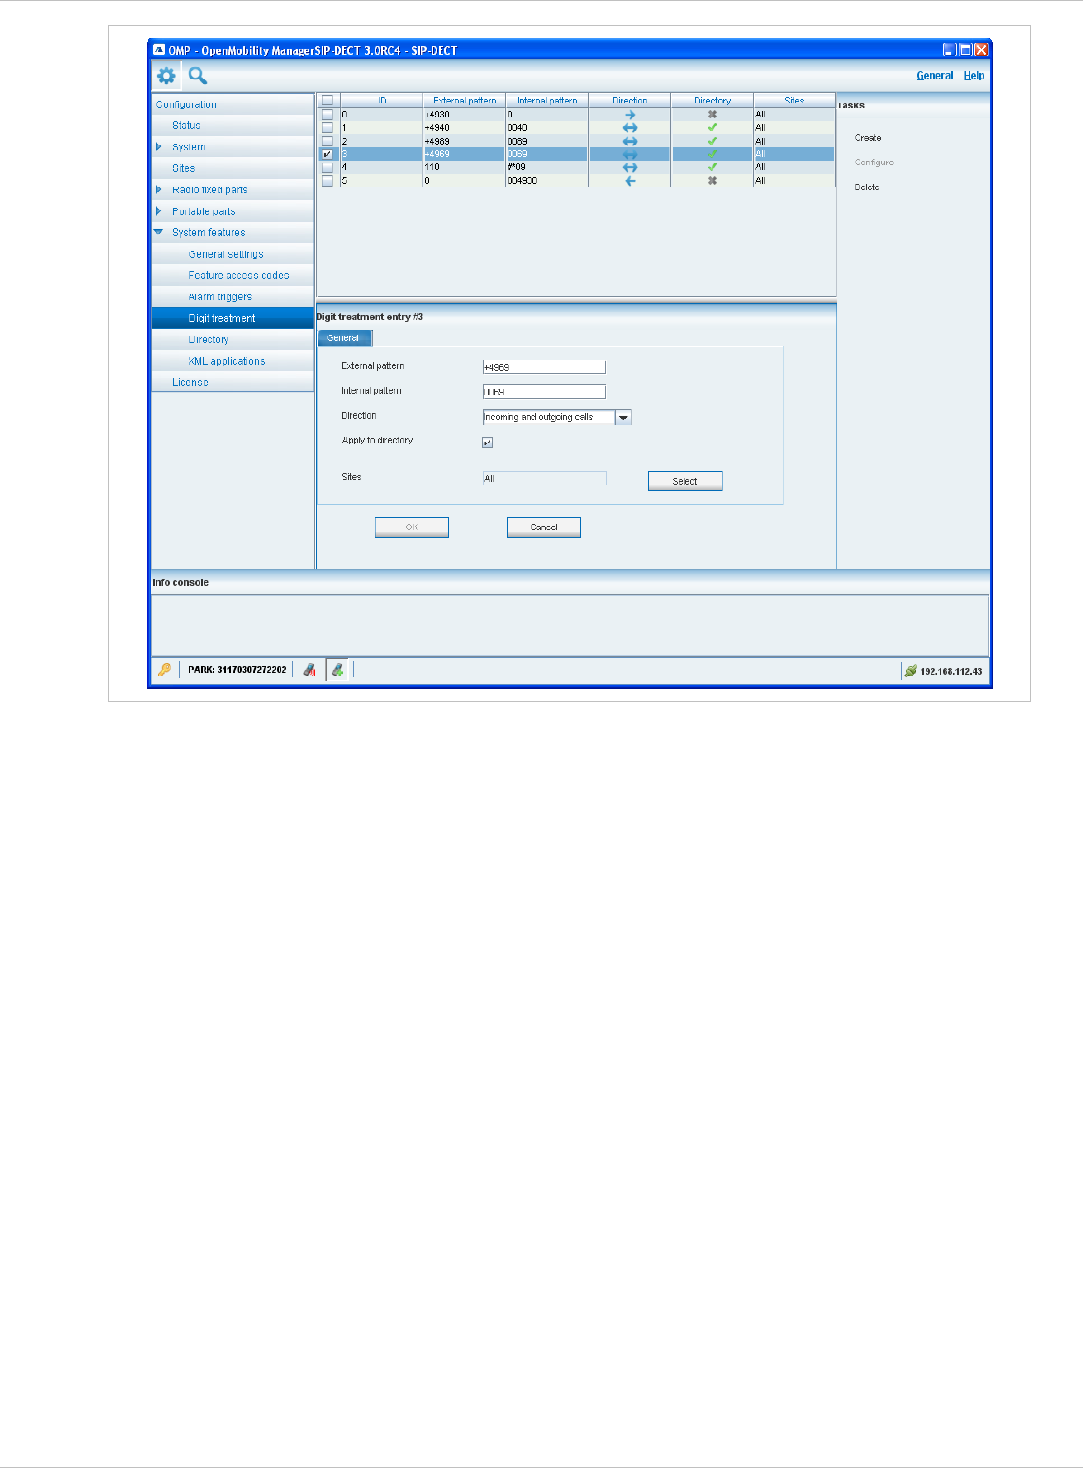
8.9.4 “Digit treatment” Menu
The Digit treatment menu allows to configure the number manipulation that is provided by
the digit treatment feature for LDAP corporate directories.
depl-1230/0.2 Page: 144 (238)
SIP–DECT OM System Manual Release 3.0 8 OM Management Portal (OMP)
For a description of tasks and parameters available in this menu, refer to chapter 7.9.1.
depl-1230/0.2 Page: 145 (238)
SIP–DECT OM System Manual Release 3.0 8 OM Management Portal (OMP)
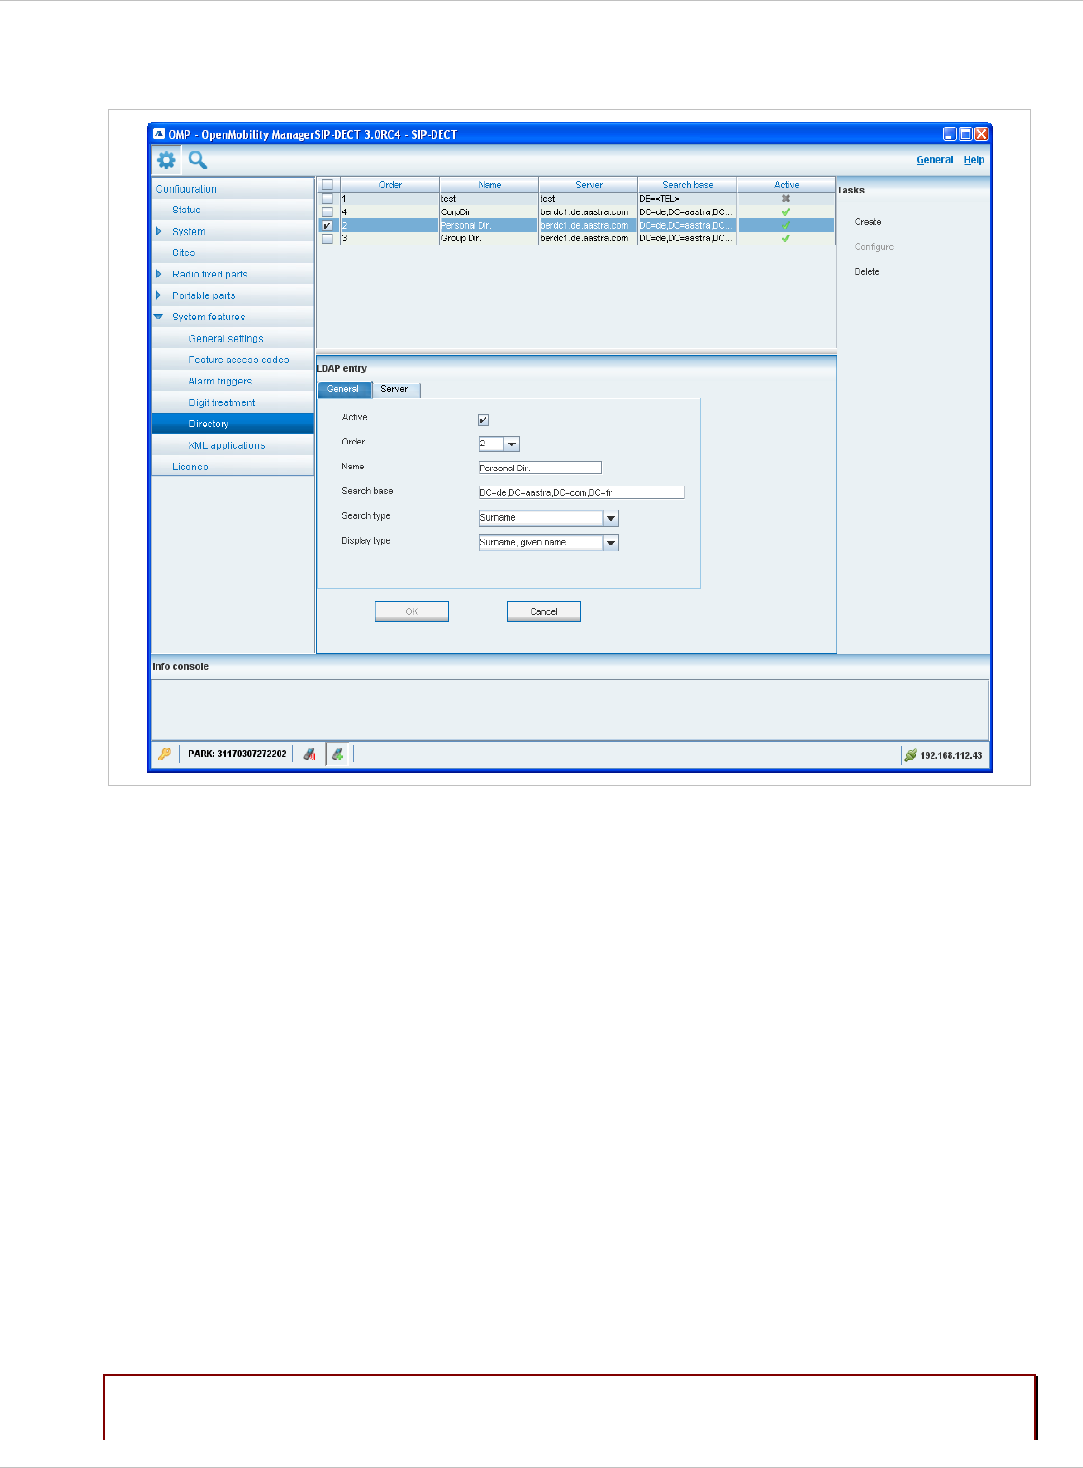
8.9.5 “Directory” Menu
The Directory menu allows to configure the LDAP corporate directory services.
For a description of tasks and parameters available in this menu, refer to chapter 7.9.2.
8.9.6 “XML applications” Menu
The SIP–DECT XML terminal interface allows external applications to provide content for the
user on the DECT handsets Aastra 600d / Aastra 650c display and much more. To make the
XML terminal interface applications available for the handset user, the relevant hooks must
be configured in the XML applications menu.
There are 5 predefined hooks and 10 hooks which can be freely defined. The 5 predefined
hooks are:
Call log: to replace the local call log •
•
•
•
•
Redial list: to replace the local redial list
Presence: hook to reach a presence application
Server Menu: hook to reach a server menu
Action URIs: URI to be called in case of user/device events
These hooks can be activated or deactivated but not deleted. Up to 10 additional hooks can
be created dynamically.
Please note: “Call log” and “Redial list” are replacing the local call log and redial list of the
Aastra 600d / Aastra 650c if activated. Additionally the list access must be set
depl-1230/0.2 Page: 146 (238)

SIP–DECT OM System Manual Release 3.0 8 OM Management Portal (OMP)
to “automatic” or “PBX” on the handset in the settings / list access menu. If the
list access is is set to “local”, the local list are used by the handset.
An activated hook becomes available on a handset (incl. the cooresponding menu entry)
after the next DECT location registration of the handset. This can be foreced by switching the
handset off and on. The same applies if a hook shall be deactivated.
The tasks which can be performed in the XML applications menu are mode-dependant.
Configuration mode Monitor mode See chapter
Create: create new XML hooks 8.9.6.1
Configure: configure selected XML
hook in detail panel
8.9.6.2
Show details: shows selected XML
hook in detail panel
8.9.6.3
Delete: delete selected XML hook 8.9.6.4
depl-1230/0.2 Page: 147 (238)
SIP–DECT OM System Manual Release 3.0 8 OM Management Portal (OMP)
8.9.6.1 Creating a New XML Hook
Besides the 5 predefined XML hooks you can create up to 10 additional XML hooks.
Adding individual XML hooks is only possible in configuration mode. To add an XML hook
proceed as follows:
1 In the Tasks bar click on the Create command.
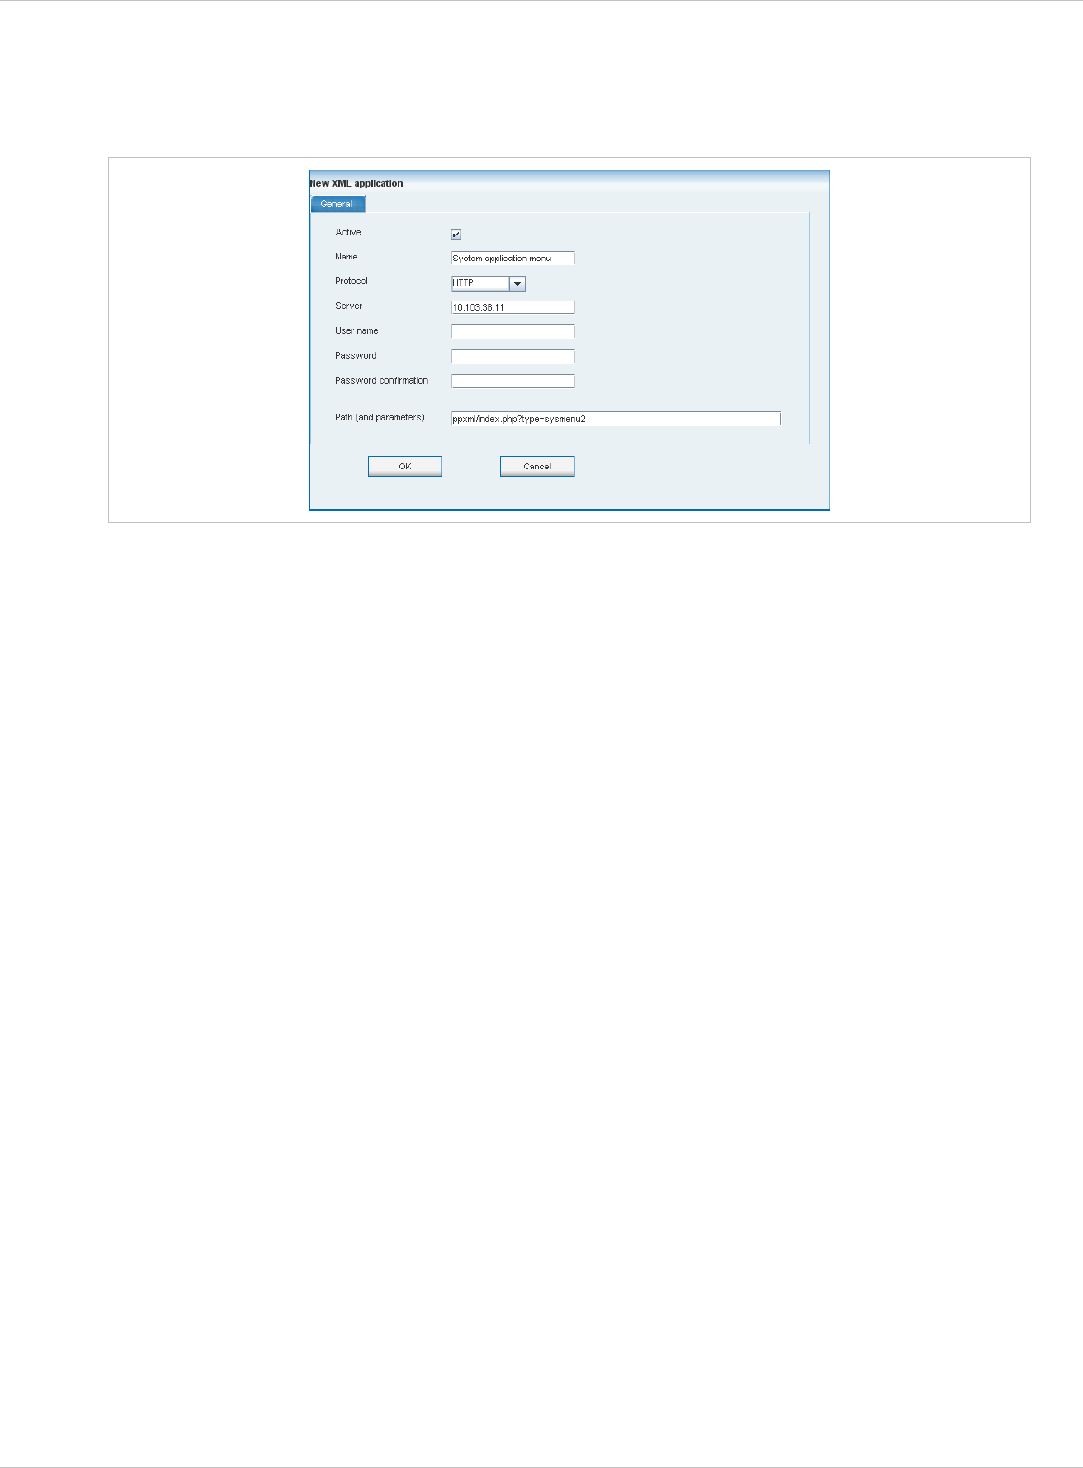
The New XML application panel opens.
2 Configure the XML hook, see parameter description below.
3 Press the OK button.
The following parameters can be set in the tabs of the New XML application panel:
Active: This setting activates or deactivated a configured XML application entry. •
•
•
•
•
•
•
Name: The predefined hooks have fixed predefined names. A name has to be configured
for the free defined hooks.
The following parameters specify the URI:
Protocol: Select the protocol HTTP or HTTPS.
Server: Enter the IP address or the name of the server which provides the XML content.
User name: Enter the login user name if an authentication is required by the server.
Password, Password confirmation: Enter the password if the authentication is required
by the server.
Path (and parameter): Enter the path and query of the URI.
8.9.6.2 Changing an XML Hook
Changing XML hooks is only possible in configuration mode. To change the configuration
of an existing XML hook proceed as follows:
1 Select the appropriate XML hook in the account table.
2 In the Tasks bar click on the Configure command.
3 Change the XML hook parameters, see parameter description in chapter 8.9.6.1.
4 Press the OK button.
depl-1230/0.2 Page: 148 (238)

SIP–DECT OM System Manual Release 3.0 8 OM Management Portal (OMP)
Please note:
Please note:
The 5 predefined XML hooks cannot be renamed.
8.9.6.3 Viewing XML Hook Details
You can view the configuration of an XML hook in monitor mode. Proceed as follows:
1 Select the appropriate XML hook in the table.
2 In the Tasks bar click on the Show details command.
The user account data is displayed in the user account detail panel.
3 To close the XML hook detail panel press the Cancel button.
8.9.6.4 Deleting XML Hooks
Deleting XML hooks is only possible in configuration mode. To delete one or more existing
XML hook proceed as follows:
1 Select the appropriate XML hook(s) in the table by activating the corresponding
checkbox(es).
2 In the Tasks bar click on the Delete command.
3 Confirm the displayed prompt with OK.
The 5 predefined XML hooks cannot be removed.
depl-1230/0.2 Page: 149 (238)
SIP–DECT OM System Manual Release 3.0 8 OM Management Portal (OMP)
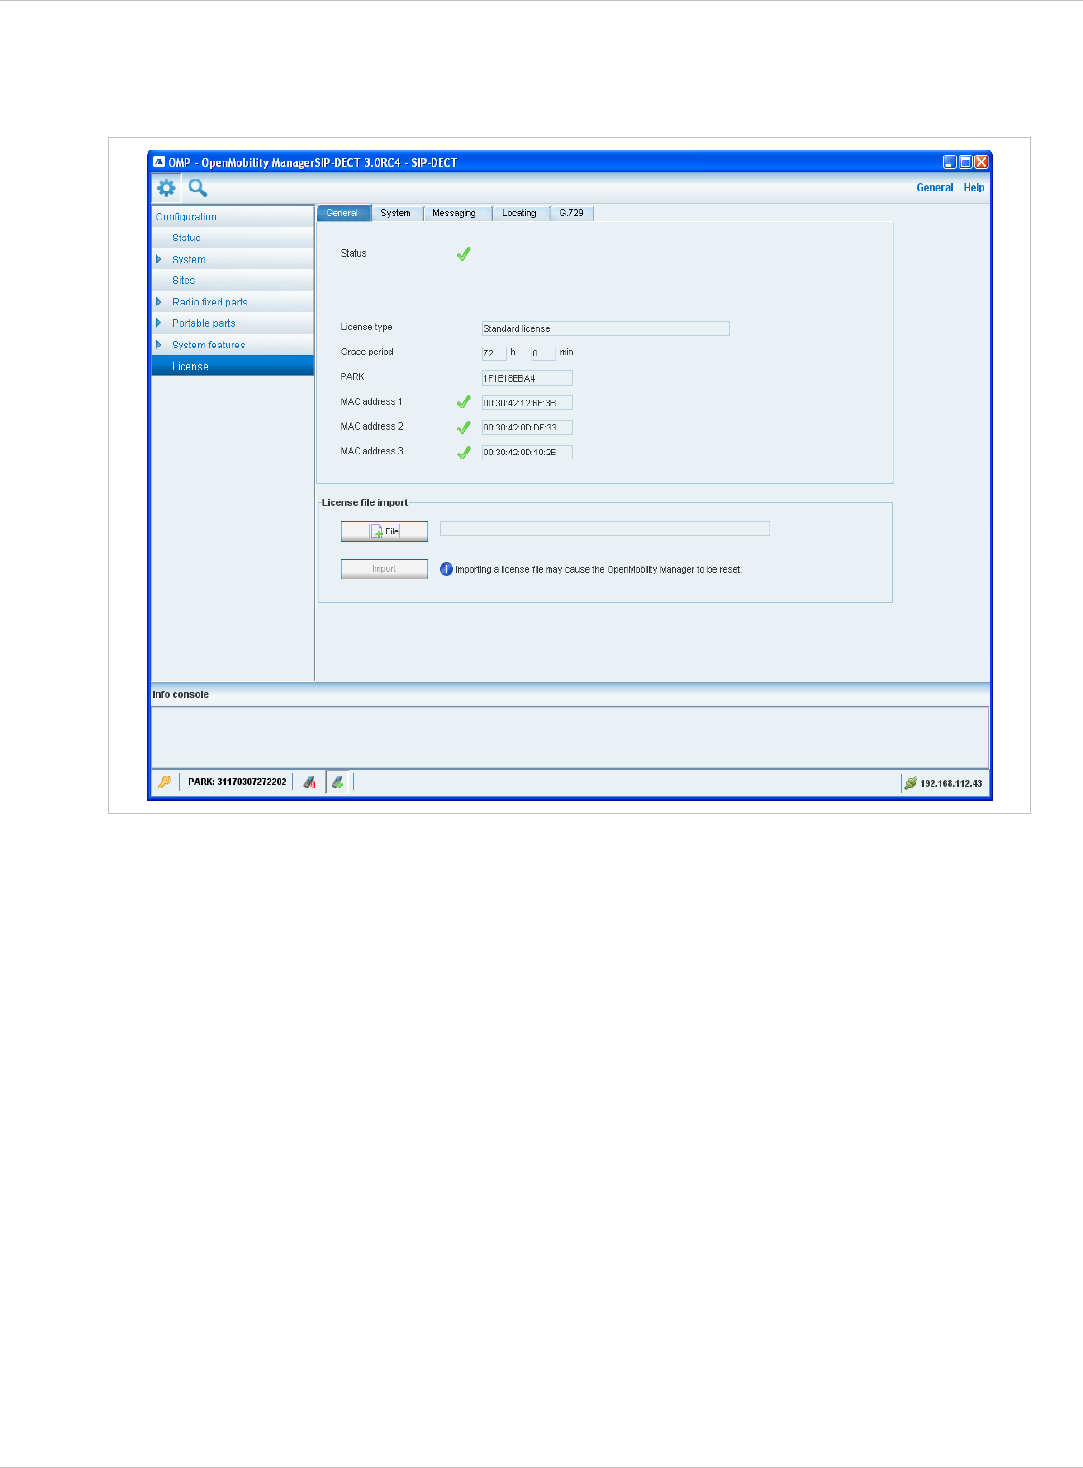
8.10 “License” Menu
The License panel provides an overview on the currently used licenses. In configurator
mode you can also import an activation or a license file:
The license information is displayed in the following tabs:
General: shows general license status. •
•
•
•
•
•
System: shows system license status.
Messaging: shows Integrated Messaging and Alerting Service (IMA) license status.
Locating: shows Locating license status.
G.729: provides information about how many G.729 channels are licensed and how many
licenses are temporarily in use.
To import an activation or a license file (only possible in configuration mode):
1 Press the File button to select the path and file name where the activation or license key
is stored.
2 Afterwards press the Import button.
For a detailed description on the OMM licensing model see chapter 4.
8.11 “General” Menu
The General menu is available in all program situations. It contains following submenus:
Exit: Selecting this menu entry opens the exit dialog to close the OMP.
depl-1230/0.2 Page: 150 (238)
SIP–DECT OM System Manual Release 3.0 8 OM Management Portal (OMP)
Options: Selecting this menu entry opens the Options dialog (see below). •
“Options” dialog, “General” tab
Language: You can select the OMP language. After changing the language, the OMP is
automatically closed and has to be started again.
The field User directory shows the path where the following files are saved if necessary:
System dump file “sys_dump.txt” •
•
•
Expert console log file “spy.log” when the application terminates
Exception log file “exception.log” in case of a Java exception
In the Warnings section you can activate/deactivate the display of warning messages in the
OMP.
“Options” dialog, “Expert console” tab
In the Expert console tab you can enable several trace levels. The trace messages will be
shown in the expert console which can be called up via the Help menu (see chapter 8.12).
Moreover Additional class info can be enabled to show in which Java class the message
has been generated.
depl-1230/0.2 Page: 151 (238)
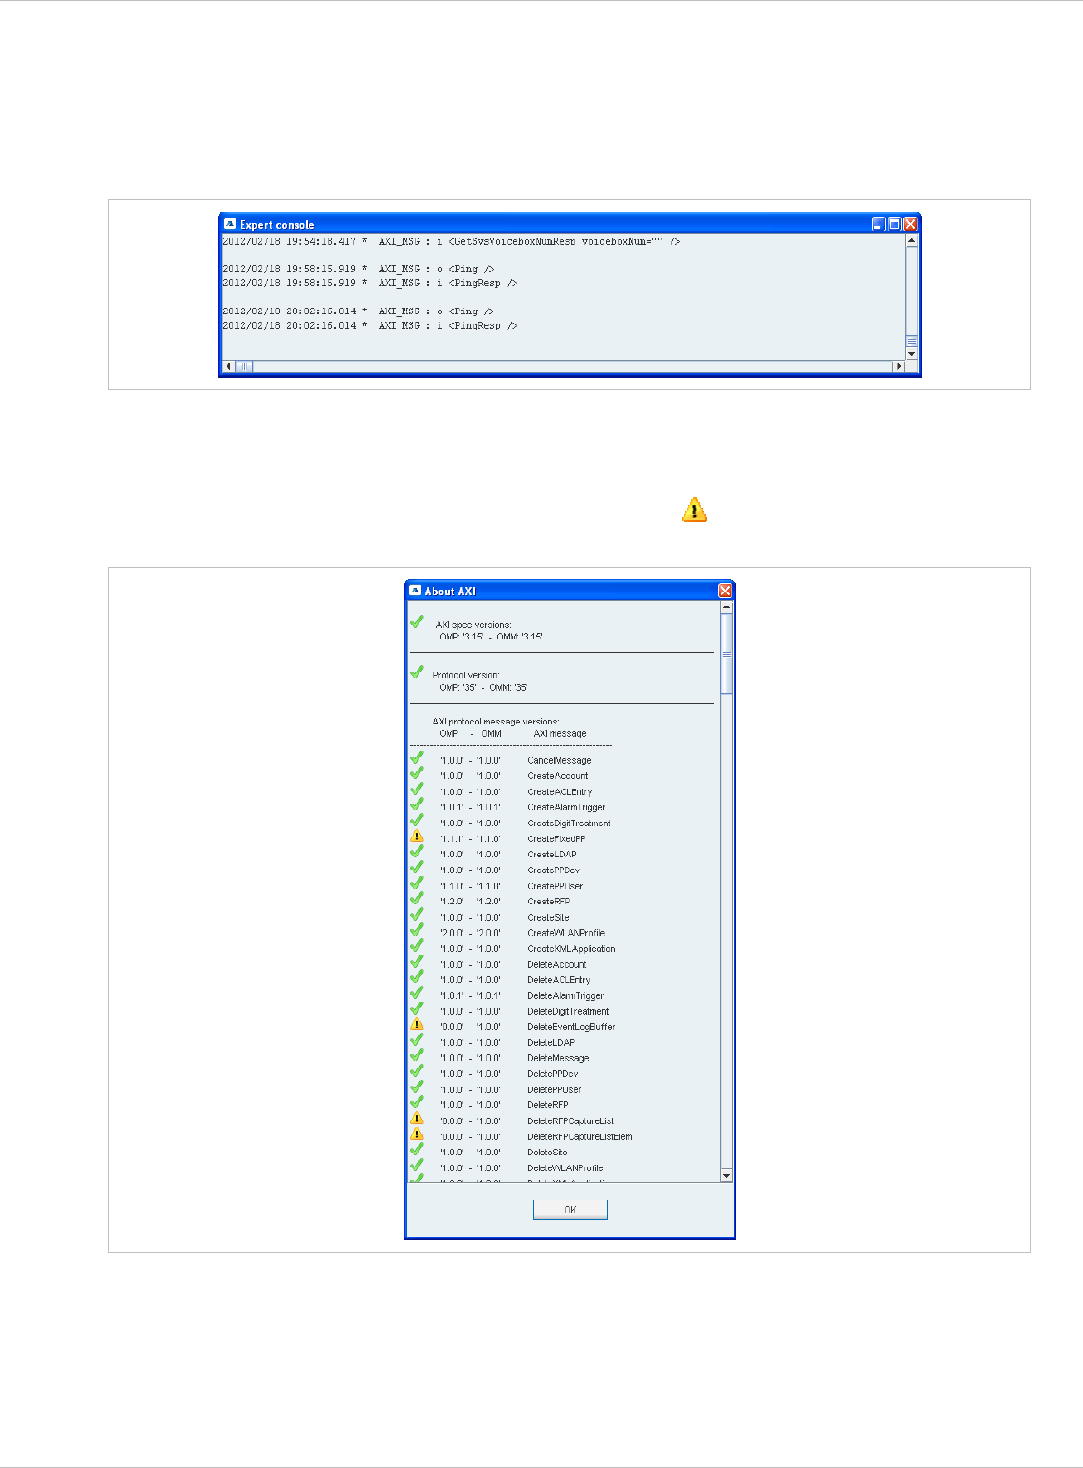
SIP–DECT OM System Manual Release 3.0 8 OM Management Portal (OMP)
8.12 “Help” Menu
The Help menu is available in all program situations. It contains following submenus:
Expert console: Selecting this menu entry enable/disables the expert console. The
expert console allows to trace OMP messages and to check the messages sent and
received from the OMM. The expert console will be opened in a secondary window.
•
•
•
Info: Selecting this menu entry displays the End User License Agreement (EULA).
About AXI: Selecting this menu entry displays the About AXI dialog. This dialog
compares the protocol version numbers which are provided by the OMM with the protocol
version numbers supported by OMP. The warning icon shows a version mismatch. A
version number “0.0.0” means the protocol element is not used by OMP.
• About OMP: Selecting this menu entry displays the OMP version info and copyright.
depl-1230/0.2 Page: 152 (238)
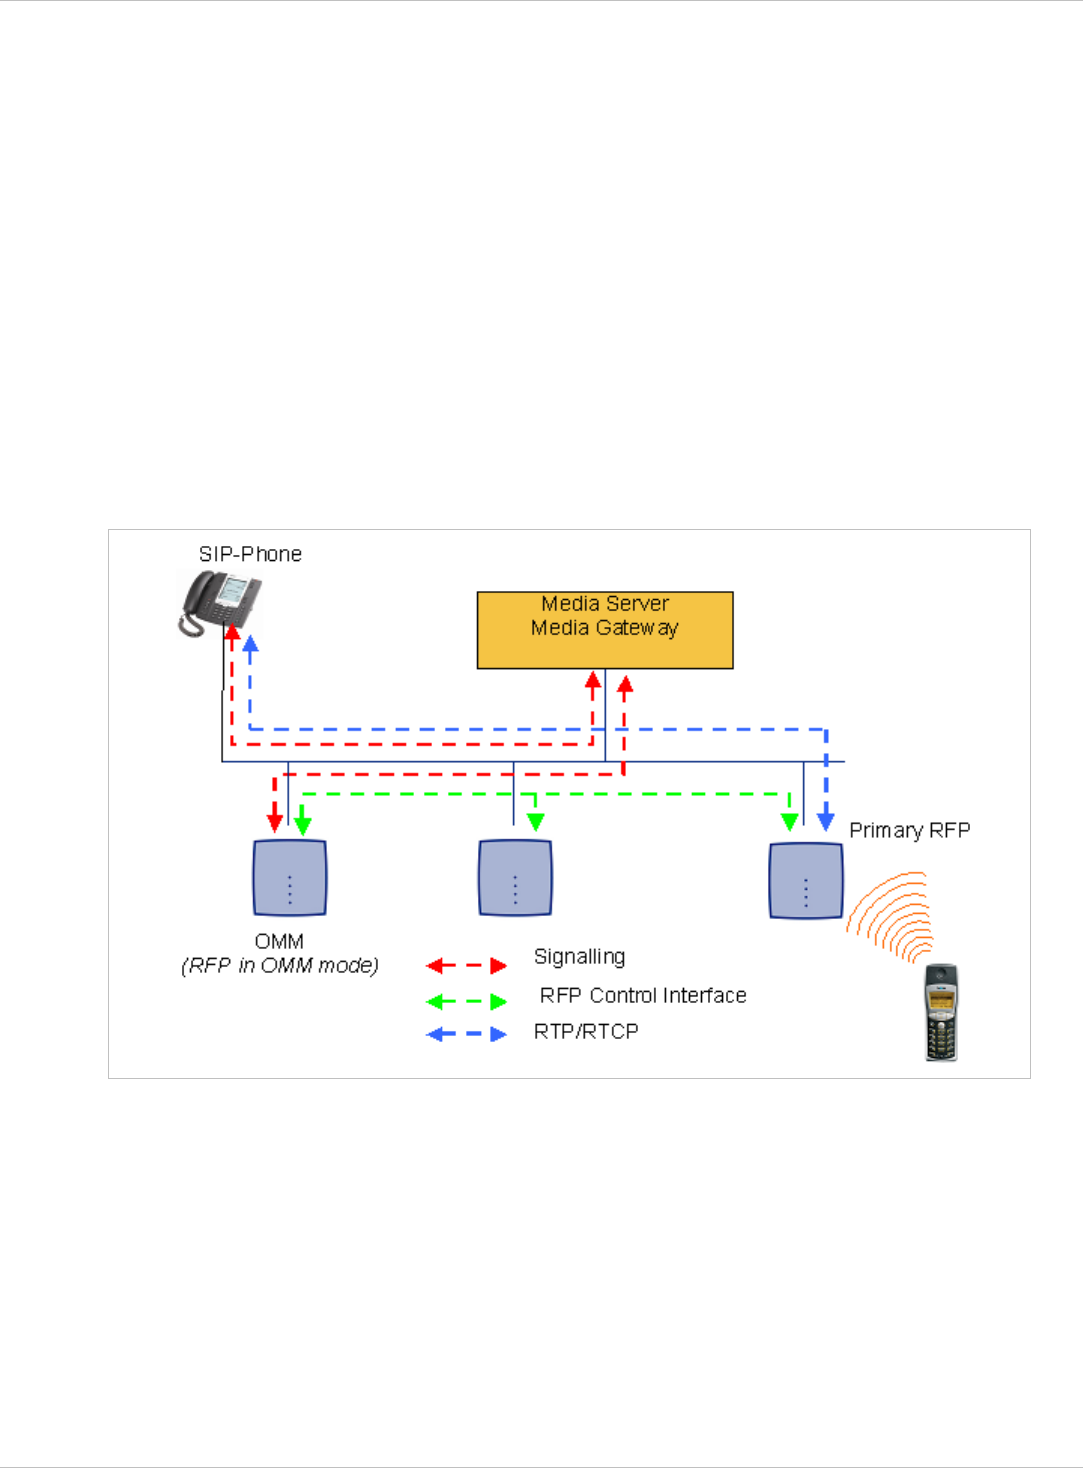
SIP–DECT OM System Manual Release 3.0 9 Configuration und Administration Aspects
9 Configuration und Administration Aspects
This chapter provides detailed information on various configuration and administration
aspects regarding the SIP–DECT solution.
9.1 IP Signaling and Media Stream
To establish a call between an IP Phone and a PP (e.g. Aastra 620d), the following IP
streams must be established:
A signaling channel to and from the SIP phone. •
•
•
•
A signaling channel to and from the OMM.
A control interface between the OMM and the RFP that has a connection to the PP
(known as the primary RFP).
A Real Time Protocol (RTP) / Real Time Control Protocol (RTCP) connection between the
SIP phone and the primary RFP.
The following figure illustrates this scenario.
To establish a call between two PPs, the same IP streams must be established like in the
scenario before, except the IP phone is not involved. The following figure illustrates this
scenario.
depl-1230/0.2 Page: 153 (238)
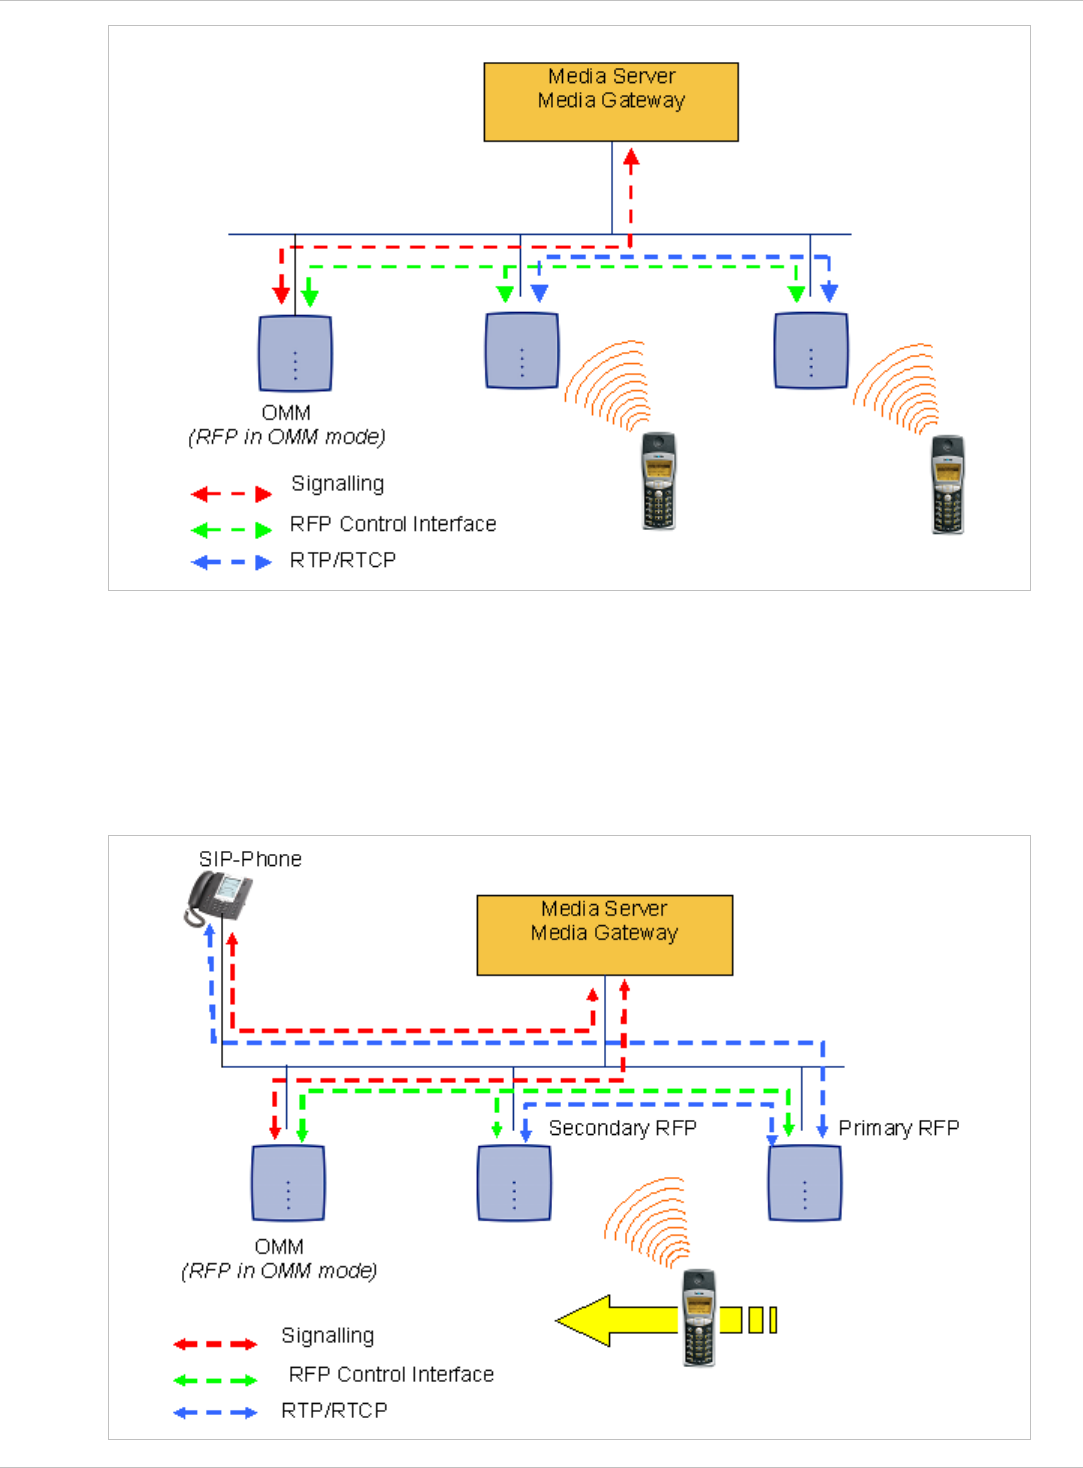
SIP–DECT OM System Manual Release 3.0 9 Configuration und Administration Aspects
A call from one PP to another that resides on the same RFP will loop back within the RFP if
no media gateway is involved. So the call will not pass through to the Local Area Network
(LAN). Although the voice packets will not impact LAN traffic, signal packets will.
If the PP user is moving, the PP detects that another RFP has a better signal strength and,
therefore, it starts the handover process. The media stream from the IP phone cannot move
to the secondary RFP, so the primary RFP uses the LAN to direct the voice to the secondary
RFP, as shown in the following figure.
depl-1230/0.2 Page: 154 (238)
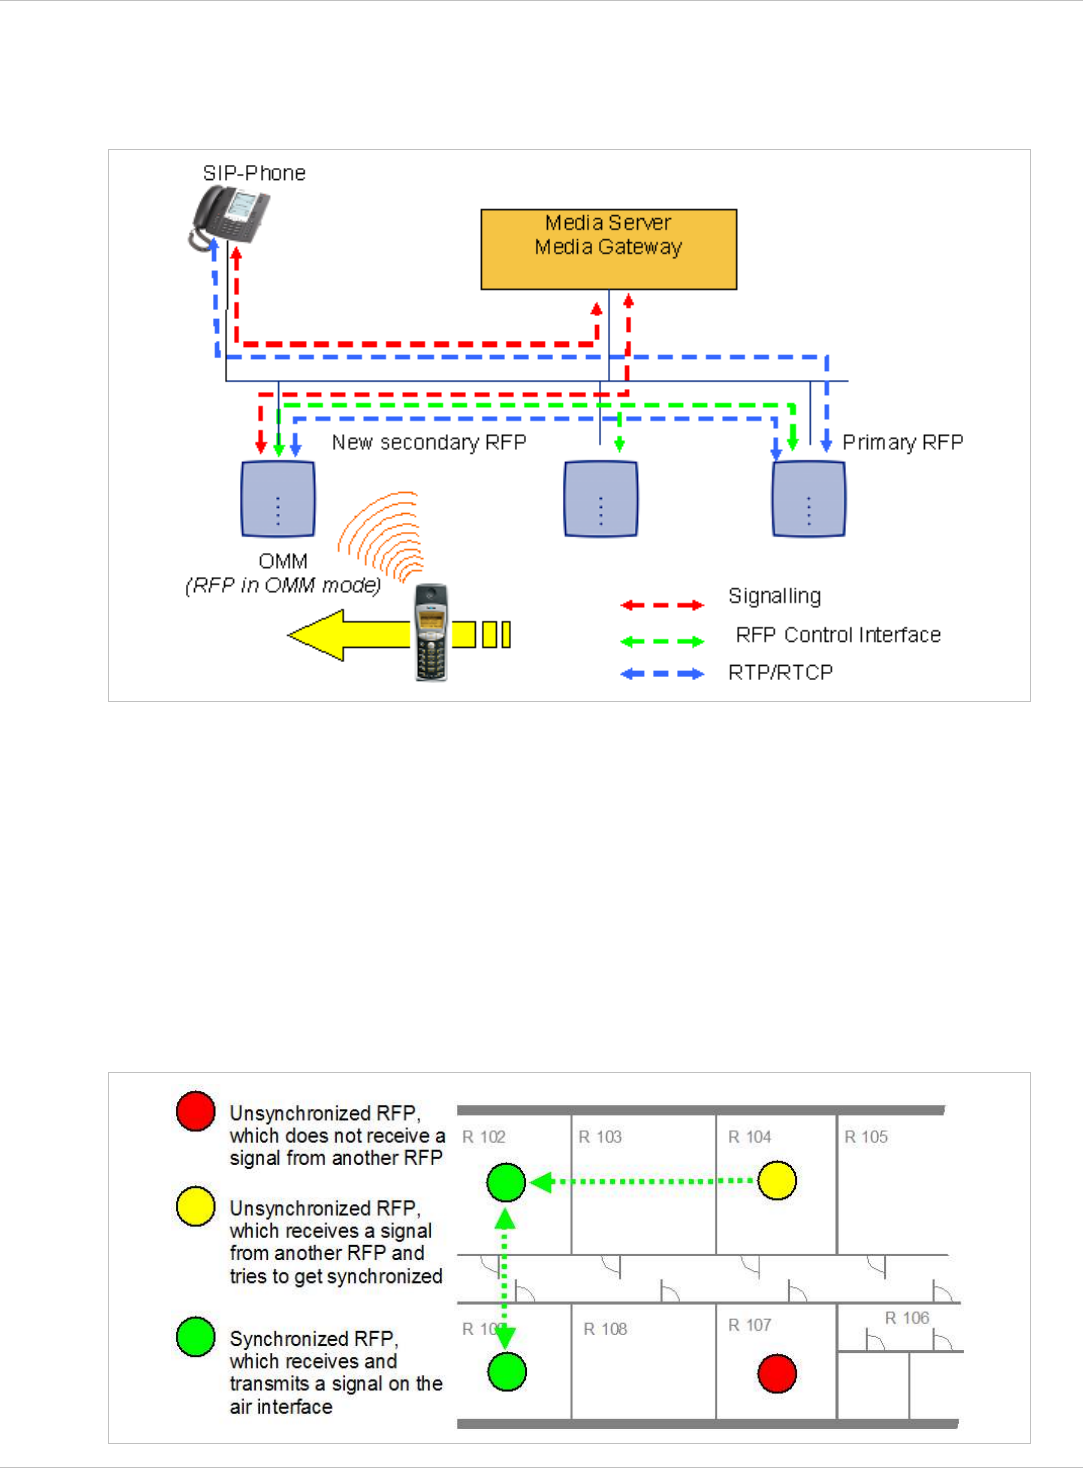
SIP–DECT OM System Manual Release 3.0 9 Configuration und Administration Aspects
As the PP user moves into the next RFP zone of coverage, the PP detects that the RFP has
a better signal strength. Again the media stream from the SIP phone cannot move to the
secondary RFP, so the primary RFP uses the LAN to direct the voice to the new secondary
RFP.
9.2 RFP Synchronization
To guarantee a seamless handover if a caller moves from one RFP zone of coverage to
another RFP zone of coverage, an accurate synchronization of the RFPs is necessary.
The RFPs are synchronized over the air interface. The first RFP to complete startup will
transmit a signal on the air for the other RFPs to synchronize from. If an RFP gets in sync,
then it will transmit a signal on the air and will be the sync source for the next RFP. Only
RFPs which can receive a synchronization signal will become synchronized.
For the RFP to sync to another RFP the signal strength cannot drop below -70 dBm. You
must consider this requirement during the site survey.
depl-1230/0.2 Page: 155 (238)
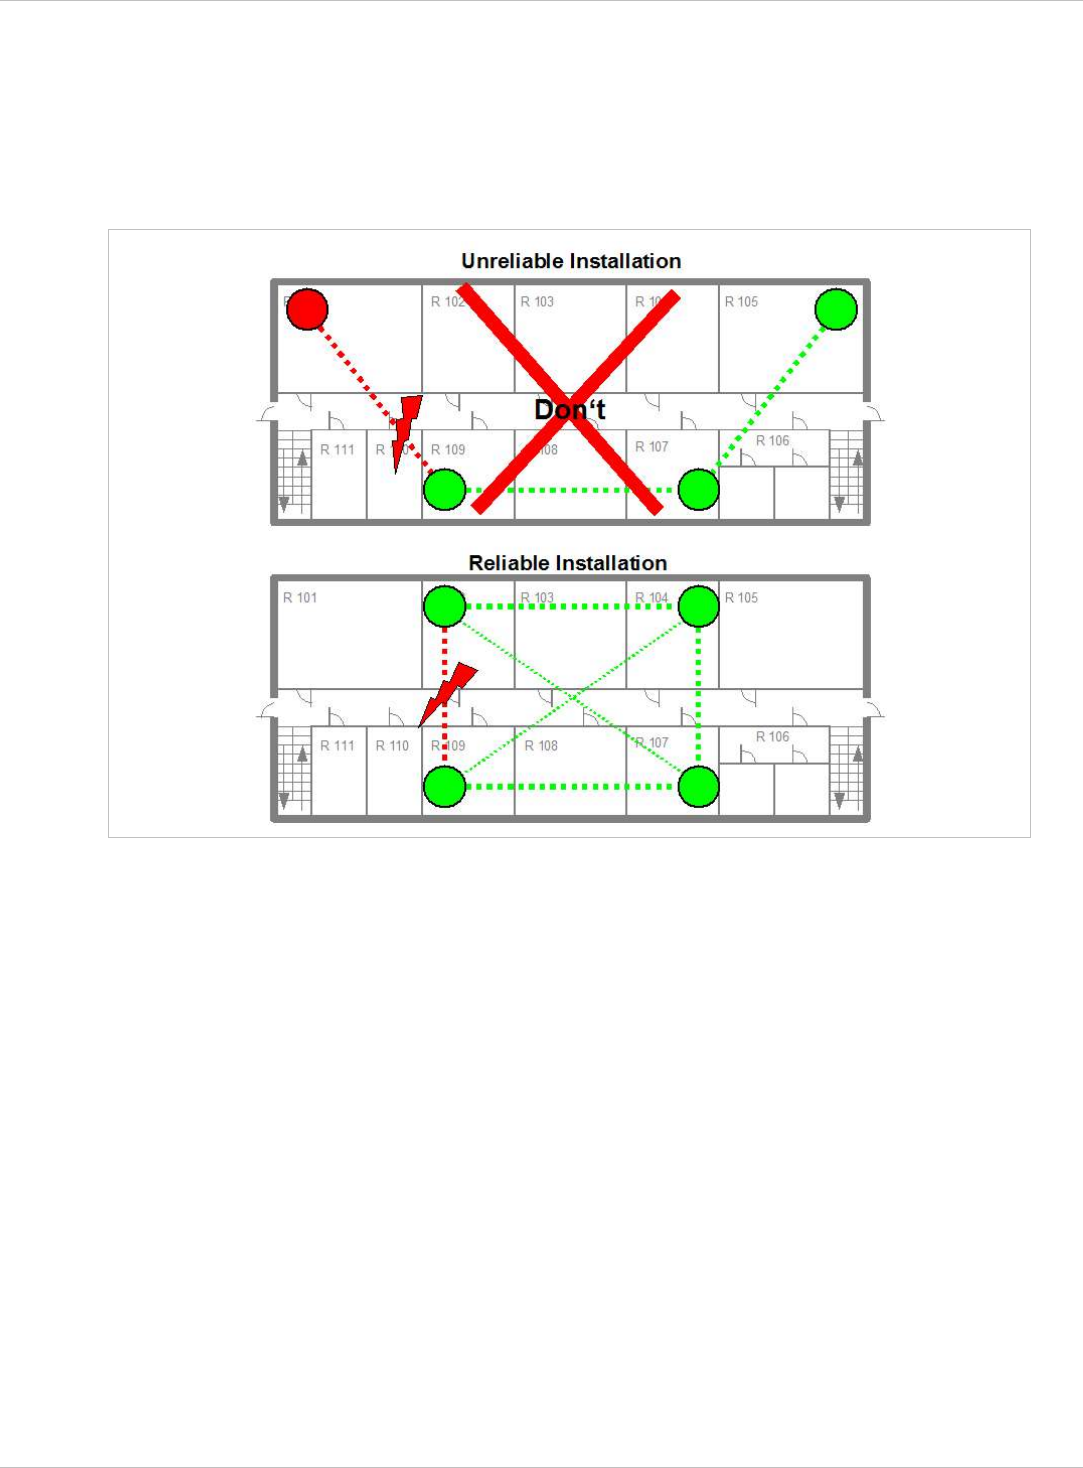
SIP–DECT OM System Manual Release 3.0 9 Configuration und Administration Aspects
As long as an RFP is not in sync, no calls can be established using this RFP.
If an RFP loses the synchronization, the RFP does not accept new calls (“busy bit”). There is
a delay of maximum 3 minutes until the active calls on this RFP are finished. Then it tries to
get synchronized again.
A SIP–DECT installation is more reliable if an RFP can receive the signal from more than
only one RFP because the other signals are also used for synchronization.
The sync-over-air solution is very reliable because all existing redundant paths are used for
synchronization. Thus, hardware tolerances have only very little influence. No RFP has a key
position.
Only unfavorable setups without redundant synchronization paths can cause problems.
Sometimes RFPs do not need to be synchronized, e.g. if they are in different buildings.
These RFPs can be put into different clusters. RFPs in different clusters will not be
synchronized with each other. Different clusters start up at the same time independently.
9.2.1 Initial Synchronization Procedure
To avoid synchronization problems and to speed up the synchronization on system startup,
an initial synchronization procedure will be used. For every cluster the following
synchronization stages are defined.
Synchronization stage 0 •
- If at least one preferred RFP was configured, the synchronization process will wait up to
30 seconds for an incoming startup message of such a preferred RFP. Receiving a
message will finishing stage 0 and the synchronization process jumps to stage 1.
depl-1230/0.2 Page: 156 (238)

SIP–DECT OM System Manual Release 3.0 9 Configuration und Administration Aspects
- If no message was received within the 30 seconds this stage will be terminated and the
next stage will be started.
- If no preferred RFP was configured, this stage will be ignored.
Synchronization stage 1 •
•
•
•
- If a preferred RFP was determined in stage 0, this one will be the synchronization
source for the next upcoming RFPs. Otherwise the first RFP which sends a startup
message will be the synchronization source for the next upcoming RFPs.
- In this stage only RFPs reporting an RSSI value better than -65 dBm will be permitted
to do a synchronization.
- If an RFP has done its synchronization, this RFP will be also a synchronization source
for other upcoming RFPs.
- The initial timeout for this stage is 30 seconds. Whenever an RFP has finished its
synchronization in this stage a new stage timeout value will be calculated.
- If no RFP comes up within the timeout time or if all the upcoming RFPs do not fit the
RSSI threshold, this stage will be terminated and the next stage will be started.
Synchronization stage 2
- The behavior of this stage is identical to stage 1, but an RSSI threshold value of
-70 dBm is significant.
Synchronization stage 3
- The behavior of this stage is identical to stage 1, but an RSSI threshold value of
-75 dBm is significant.
Synchronization finished
- No more RSSI threshold value is significant. All the RFPs which failed the stage
conditions above, are now permitted to do a synchronization.
The last level “synchronization finished” will be achieved either all registered RFPs of this
cluster are synchronized or the timer of stage 3 expires.
9.2.2 Checking the Synchronization of a Network
For every cluster a periodically check of the synchronization of the network is done. If the
network is split into at least two subnets, all the RFPs of the lesser subnet(s) will be
resynchronized. While doing initial synchronization procedure this check is deactivated. You
can check the RFP synchronization using the Sync view menu of the OM Management
Portal (OMP), see chapter 8.7.5.
9.3 RFP Channel Capacity
On air the RFP has 12 available time slots, 8 can have associated DSP resources for media
streams. All DECT time slots are used for control signaling, SW download over air,
messaging and bearer handover independent of associated DSP resources.
If all 8 media stream channels are used the RFP announces a “busy bit”. In that case the
PPs determine whether another RFP has an appropriate signal strength. If so, the PP will
handover to that RFP. Once the handover has been completed, the RFP will then lower its
“busy bit”.
depl-1230/0.2 Page: 157 (238)

SIP–DECT OM System Manual Release 3.0 9 Configuration und Administration Aspects
Whenever the busy state is announced a log entry is made to the system logs. If the
announcement of busy raises in a specific area, a further RFP should be installed to double
the number of media streams available for calls.
Notes on Hi-Q connections
Each Hi-Q connection uses, compared to conventional narrowband, the double capacity on
the DECT air interface. Due to this fact, four Hi-Q connections (instead of eight) can be
established via one RFP.
It is not possible to have DECT XQ audio combined with Hi-Q audio within the same
connection.
9.4 Network Infrastructure Prerequisites
To establish and maintain an SIP–DECT installation, a network infrastructure is assumed,
which comprises at least the following components:
RFPs •
•
•
•
•
•
•
•
•
•
•
•
•
PPs
IP PBX/media server (e.g. Asterisk)
TFTP server
Depending on the operational modes the following services should be provided:
DHCP
TFTP
SNTP
DNS
LDAP
Syslog daemon
Notes on network infrastructure prerequisites
In NA outdoor RFPs may only be installed with the antennas shipped with the units. No
other antennas or cabling are permitted. In EMEA the outdoor RFPs are shipped without
antennas and you may use the units with one of the optional antennas (separate order
no.).
A TFTP server is no longer required for boot of an RFP (L) 35/36/37 IP or
RFP (L) 43WLAN.
TFTP, FTP(S), HTTP(S) are supported for RFP (L) 35/36/37 IP or RFP (L) 43WLAN
software update.
9.5 SIP–DECT Startup
This chapter contains detailed information on the startup (booting) process of the SIP–DECT
solution.
For booting an RFP (L) 32/34 IP or RFP (L) 42 WLAN, there must be at least one TFTP
server on the attached network to load the OMM/RFP application software.
depl-1230/0.2 Page: 158 (238)

SIP–DECT OM System Manual Release 3.0 9 Configuration und Administration Aspects
RFP (L) 35/36/37 IP or RFP (L) 43 WLAN uses the internal flash to start the boot image. A
fileserver is only needed for software update over the network, please see chapter 9.11.5.
The essential network settings can be alternatively:
•
•
•
•
•
Note:
Communicated by a DHCP server at startup time.
Configured on the RFP with the OM Configurator tool (see chapter 9.6). The settings
made by the OM Configurator will be saved permanently in the internal flash memory of
each OMM/RFP.
9.5.1 TFTP and DHCP Server Requirements
TFTP server requirements
The RFP gets the boot image file from a TFTP server. The requirement list for the used
TFTP server is defined as follows:
The support of RFC 1350 /1/ is mandatory.
To accelerate the download of a boot image file, it is possible to increase the packet size
of the transmitted TFTP packets from 512 bytes per packet to 1468 bytes per packet. To
use this optional feature, the TFTP server has to support RFC 2347 /3/ and RFC 2348 /4/.
To reduce the overall download time of the RFPs in a system, it is possible to use TFTP
multicast download. To use this optional feature, the TFTP server has to support RFC
2090 /2/ and RFC 2349 /5/.
To use the TFTP multicast option, the attached network has to support multicast too.
Furthermore a support of IGMP, RFC 2236 /6/ is required.
If many RFPs loading the boot image simultaneously, the network load could
increase significant. To balance the network load or for backup reasons, it is
possible to configure more than one TFTP server in a network.
DHCP server requirements
A DHCP server needs to support RFC 2131 /9/. The TFTP and DHCP server need not to
reside on the same host.
9.5.2 Booting Steps
Booting is performed in two steps:
1 Starting the boot process.
6 Starting the application.
Booter startup
The RFP has only a little standalone application built into the flash. This software realizes the
so called net boot process. On startup each RFP tries to determine its own IP address and
other settings of the IP interface from the configuration settings in the internal flash memory.
If no settings are available or these settings are disabled, the RFP tries to determine these
settings via DHCP. The RFP gets the application image file from the TFTP server.
depl-1230/0.2 Page: 159 (238)

SIP–DECT OM System Manual Release 3.0 9 Configuration und Administration Aspects
Application startup
After starting the application image the RFP checks the local network settings in its internal
flash memory once again. If no settings are available or if they are disabled, it starts a DHCP
client to determine the IP address of the OMM and other application startup settings.
Depending on the given settings the following service applications will be started in these
phase: OMM (OpenMobility Manager), SNTP, SNMP.
There is no difference in booting that RFP which is chosen to be running in OMM mode from
those which are in the RFP only mode. The decision is driven by the OMM IP address, which
is read
within the local network settings, if active; •
•
•
•
•
•
•
•
•
•
•
•
•
•
via DHCP request;
RFP configuration file (see 9.8).
The RFP which has the same IP address as the dedicated OMM IP address will be the RFP
which the OMM application runs on.
9.5.3 Booter Startup
The SIP–DECT Release 2.0 (and higher) includes a booter version 3.4 with the following
new features:
VLAN can be configured via the OM Configurator without a static IP configuration. This
means that the first DHCP request will be done by using VLAN.
To balance the network load, up to three TFTP servers can be configured. This can be
done using the OM Configurator (local setting) or using the DHCP option 150. Before
starting the download, the TFTP server will be selected randomly by the booter. But, if the
option “Preferred TFTP server” was set by the OM Configurator, the option “TFTP server
address” will specify the TFTP server to use. No randomly selection will be done in this
case.
To reduce the number of TFTP packets sent by the TFTP server, the packet size can be
increased. This will be done by using a TFTP option (see 9.5.1 “TFTP server
requirements”).
Multicast TFTP download is possible if the TFTP server and the connected network
support this.
To indicate the actual state of the booter, the four LEDs of the RFP will be used (see
9.5.5).
9.5.3.1 DHCP Client
Within the initial boot process the DHCP client supports the following parameters:
IP address mandatory
Net mask mandatory
Gateway mandatory
Boot file name mandatory
TFTP server mandatory
Public option 224: “OpenMobility” mandatory
depl-1230/0.2 Page: 160 (238)

SIP–DECT OM System Manual Release 3.0 9 Configuration und Administration Aspects
VLAN-ID optional •
•
•
•
•
•
•
•
•
•
•
•
•
•
•
•
TFTP server list optional
9.5.3.1.1 DHCP Request
The DHCP client sends the vendor class identifier (code 60) “OpenMobility” and requests the
following options in the parameter request list (code 55):
Subnet mask option (code 1)
Router option (code 3)
VLAN ID option (code 132)
TFTP server list (code 150)
Public option 224 (code 224) (string “OpenMobility”)
Public option 225 (code 225) (VLAN ID, not relevant for SIP–DECT)
Public option 226 (code 226) (not relevant for SIP–DECT)
9.5.3.1.2 DHCP Offer
The DHCP client selects the DHCP server according to the following rules:
The public options (code 224) has a value equal to the string “OpenMobility”,
or
the file field in the DHCP message has a sub string equal to “ip_rfp.cnt”.
If none of the two rules above match, the DHCP offer is ignored.
Information retrieved from the DHCP offer:
The IP address to use is taken from the yiaddr field in the DHCP message.
The IP net mask is taken from the subnet mask option (code 1).
The default gateway is taken from the router option (code 3).
The TFTP server IP address is taken from the siaddr field in the DHCP message and
additionally DHCP option 150, if available.
The boot image filename is taken from the file field in the DHCP message, if this field is
empty the default filename “iprfp.bin” is used.
9.5.3.1.3 Retries
If the DHCP client does not get an appropriate DHCP offer, a new DHCP request is send
after 1 second. After 3 DHCP requests are sent the DHCP client will sleep for 60 seconds.
During this time the booter will accept a local configuration with the OM Configurator.
This cycle will repeat every 3 minutes until either all the required DHCP options are provided
or the system is manually configured using the OM Configurator tool.
9.5.3.2 TFTP Client
The TFTP client will download the application image from the TFTP server. Both TFTP
server and the name of the application image are supplied via the DHCP client. The
application image is checksum protected.
depl-1230/0.2 Page: 161 (238)

SIP–DECT OM System Manual Release 3.0 9 Configuration und Administration Aspects
9.5.3.3 Booter Update
Each application SW comes with the latest released booter SW. The application SW will
update the booter automatically.
Please note: After an upgrade from an older OpenMobility Release (< 2.0) to an
OpenMobility Release 2.x the booter of the RFPs will be updated to Version
3.4.x. The OpenMobility Configurator 2.x is required to configure RFPs with
this new booter version. If you downgrade the RFP to an older release, the
booter will not downgrade automatically.
9.5.4 Application Startup
After successfully downloading and starting the application the RFP checks the local network
settings in its internal flash memory once again. If no settings are available or if they are
disabled, it starts a DHCP client to determine the IP address of the OMM and other
application startup settings.
9.5.4.1 DHCP Client
The DHCP client is capable of receiving broadcast and unicast DHCP replies. Therefore the
flags field is 0x0000. The DHCP request contains the well-known magic cookie
(0x63825363) and the end option (0xFF).
Parameters
The following parameters will be supported within this step:
Option / Field Meaning Mandatory
yiaddr IP address of the IP-RFP yes
siaddr Parameter named “Boot Server Host Name” with value
as the IP address of the TFTP server
yes
File Parameter named “Bootfile Name” with value of the
path (optional) and name of the application image. For
exampleiprfp2g.tftp.
yes
code 1 Subnet mask yes
code 3 Default Gateway yes
code 6 Domain Name Server no
code 15 Domain Name no
code 42 IP address of a NTP server no
code 43 Vendor Specific Options yes
code 66 URL specifies the protocol, server and path to access
the RFP configuration files (see 9.8).
no
public option 224 Parameter named magic_str must be set to value
"OpenMobility".
yes
depl-1230/0.2 Page: 162 (238)

SIP–DECT OM System Manual Release 3.0 9 Configuration und Administration Aspects
Vendor specific options
The Vendor Specific Options consist of:
Vendor Specific
Option
Meaning Length Mandatory
option 10 ommip1: Used to select the IP-RFP who
should reside the Open Mobility Manager
(OMM).
4 yes
option 14 syslogip: IP address of a Syslog Daemon 4 no
option 15 syslogport: Port of a Syslog Daemon 2 no
option 17 Country: Used to select the country in which
the OMM resides. This enables country
specific tones (busy tone, dial tone, …).
2 no
option 18 ntpservname: Name of a NTP Server x no
option 19 ommip2: Used to select a secondary IP-RFP
who should reside the standby Open Mobility
Manager (OMM). This option must be given if
the OMM Standby feature should be used
(see chapter 9.13).
4 no
option 24 rsturl: Restore URL
URL for an automatic OMM Database import
(see chapter 7.4.6.2 and chapter 8.5.5.1)
x no
Example
An example of the minimal contents for the Option 43 parameter value would be:
0a 04 C0 A8 00 01 where “C0 A8 00 01” represents “192.168.0.1” for the OMM IP.
The option 43 contains a string of codes in hex the format is “option number” “length”
“value” in this example
0a = option 10 (ommip1)
04 = following value is 4 blocks long
C0 A8 00 01 = 192.168.0.1
If there is more than one option, add the next option at the end of the previous one.
Depending of the DHCP server you need to end the option 43 with FF.
Country specific tones
Tones for the following countries are supported:
Country code Country
1 Germany
2 Great Britain
3 Switzerland
4 Spain
6 Italy
7 Russia
8 Belgium
depl-1230/0.2 Page: 163 (238)

SIP–DECT OM System Manual Release 3.0 9 Configuration und Administration Aspects
9 Netherlands
10 Czechoslovakia
11 Austria
12 Denmark
13 Slovakia
14 Finland
15 Hungary
16 Poland
17 Belarus
18 Estonia
19 Latvia
20 Lithuania
21 Ukraine
22 Norway
24 Sweden
25 Taiwan
100 North America
101 France
102 Australia
9.5.4.2 Configuration using DHCP
The DHCP client of the RFP familiy requests serveral parameters that are used to configure
the RFP. The DHCP client vendor class identifier (option 60) is different for the different RFP
generations:
The second generation Hardware RFP (L) 32/34 IP / RFP (L) 42 WLAN use
“OpenMobility”.
•
• The third generation RFP (L) 35/36/37 IP / RFP (L) 43 WLAN use “OpenMobility3G”.
Please note: The first lot of RFP (L) 35/36/37 IP / RFP (L) 43 WLAN comes with a
prefieldtrial software on board which uses “OpenMobility” as DHCP client
vendor class identifier. After update to SIP-DECT 3.0RC3 or later the DHCP
client vendor class identifier is “OpenMobility3G”.
BOOTP/DHCP
Option
Meaning Type Remarks
siaddr IP address of the
TFTP server
4 octets Only mandatory for
RFP (L) 32/34 IP /
RFP (L) 42 WLAN
because of the
NETBOOT process;
optional for
RFP
(
L
)
35/36/37 IP/
depl-1230/0.2 Page: 164 (238)

SIP–DECT OM System Manual Release 3.0 9 Configuration und Administration Aspects
RFP (L) 43 WLAN
SW update
File Path to the boot
image server by the
TFTP server
N octets Only mandatory for
RFP (L) 32/34 IP /
RFP (L) 42 WLAN
because of the
NETBOOT process;
optional for
RFP (L) 35/36/37 IP/
RFP (L) 43 WLAN
SW update
150 TFTP server list N * 4 octets Only used by the
NETBOOT process of
the RFP (L) 32/34 IP /
RFP (L) 42 WLAN,
optional
224 Magic String “OpenMobilitySIP-
DECT” *
The client uses this
option to select the
server, mandatory
* The magic string “OpenMobilitySIP-DECT” instead of “OpenMobility” (as defined in
SIPDECT 2.x) makes sure that a SIP-DECT software is loaded into the RFP (L) 35/36/37 IP/
RFP (L) 43 WLAN even an different, non-SIP-DECT SW is previously installed and running.
9.5.4.3 Selecting the Right DHCP Server
The DHCP client requests its own IP address using code 50. The DHCP client will select the
DHCP server that offers the currently used IP address. Additionally the mandatory options
must be offered otherwise the DHCP offer is ignored by the DHCP client.
If no matching reply was received, the DHCP client resends the request 2 times after
1 second. Then the DHCP client will wait for 1 minute before resending 3 requests again.
If the DHCP client cannot accept an DHCP offer within 3 minutes the RFP is rebooted.
9.5.5 RFP LED Status
RFP (L) 32/34 IP
RFP 32/34 NA
RFP (L) 35/36 IP
RFP (L) 42 WLAN
RFP (L) 43 WLAN
depl-1230/0.2 Page: 165 (238)

SIP–DECT OM System Manual Release 3.0 9 Configuration und Administration Aspects
LED 1 Info / Booter; LED 2 System;
LED 3 DECT; LED 4 (unused)
LED 1 Info / Booter; LED 2 System
LED 3 DECT; LED 4 WLAN
The following tables show the LED status of an RFP according to the different states.
A red respectively orange colored field in the table means that the LED glows permanently in
red or orange. A split field with e.g. the specification 1s/1s means that the LED is flashing
with a frequency of one second LED red on and one second LED off. Grey means that the
LED is off.
9.5.5.1 Booter LED Status
RFP (L) 35/36/37 IP, RFP (L) 43 WLAN
The RFP (L) 35/36/37 IP and RFP (L) 43 WLAN booter uses LED1 for signaling its activity.
After power up the LED 1 (INFO) is turned on red continuously. The successful start of the
boot image is signaled by turning on LED 1 orange.
Frage von Commando an Aastra: Wo sind die LED am Outdoor RFP 37 IP? Auf den
bisher uns bekannten Fotos sind keine LED zu sehen…
RFP (L) 32/34 IP, RFP 32/34 NA, RFP (L) 42 WLAN
depl-1230/0.2 Page: 166 (238)
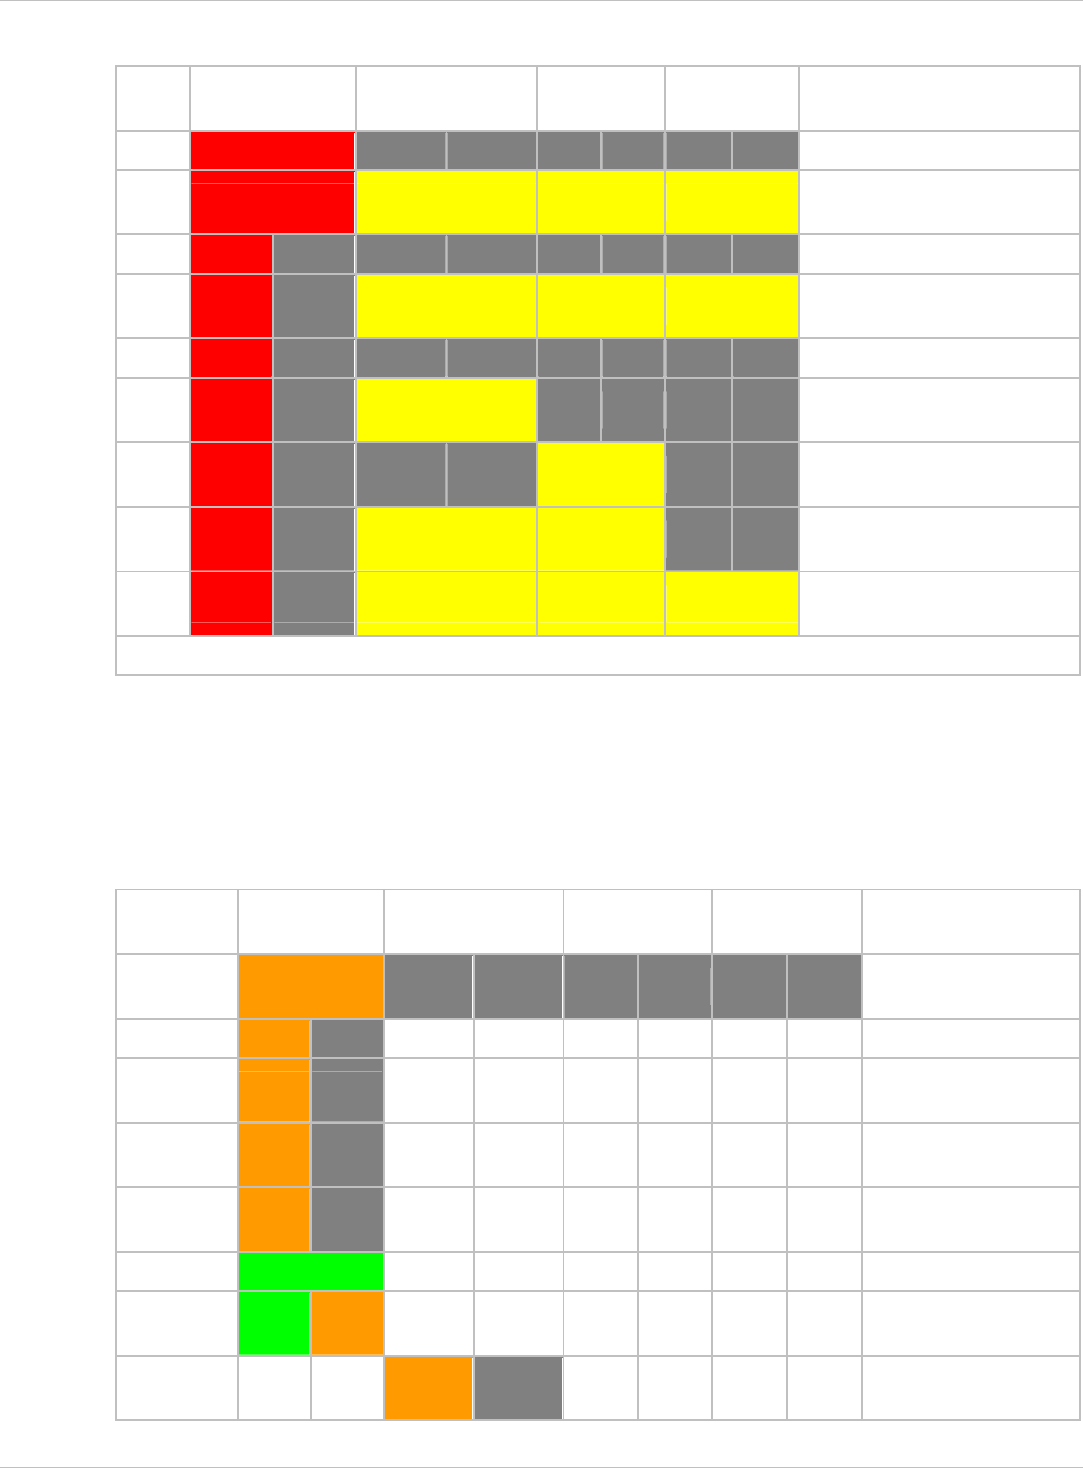
SIP–DECT OM System Manual Release 3.0 9 Configuration und Administration Aspects
The following table illustrates the different meaning of the LEDs while the booter is active.
LED1 (INFO) LED2 (OMM /
SYSTEM)
LED3
(DECT)
LED4
(WLAN)
Booter cont. Power connected
cont. cont. cont. cont. Wait for OMM Configurator
Input
1s 1s DHCP
1,9s 0,1s cont. cont. cont. DHCP failed, wait for OMM
Configurator Input
0,25s 0,25s TFTP download after DHCP
0,25s 0,25s cont. TFTP download after local
configuration
0,25s 0,25s cont. TFTP download after DHCP
Multicast
0,25s 0,25s cont. cont. TFTP download after local
configuration and multicast
3,9s 0,1s cont. cont. cont. TFTP failed, wait for OMM
Configurator Input
Now, the kernel / application is running: LED1 will never be RED
9.5.5.2 Application LED Status
The following tables illustrate the different meaning of the LEDs while the application is
starting or active.
RFP (L) 35/36/37 IP, RFP (L) 43 WLAN
LED1 (INFO) LED2 (OMM /
SYSTEM)
LED3 (DECT) LED4 (WLAN)
Kernel cont. kernel boot phase
(inflator, …)
RFPM 1s 1s DHCP phase
1,85s 0,1s
DHCP failure (idle
loop)
0,5s 0,5s
obtaining external
configuration
0,85s 0,1s
external configuration
failure
cont. Ready
1,85s 0,15s
Up&Running + RFP
houses OMM
RFP
general
1s 1s OMM connect phase
depl-1230/0.2 Page: 167 (238)
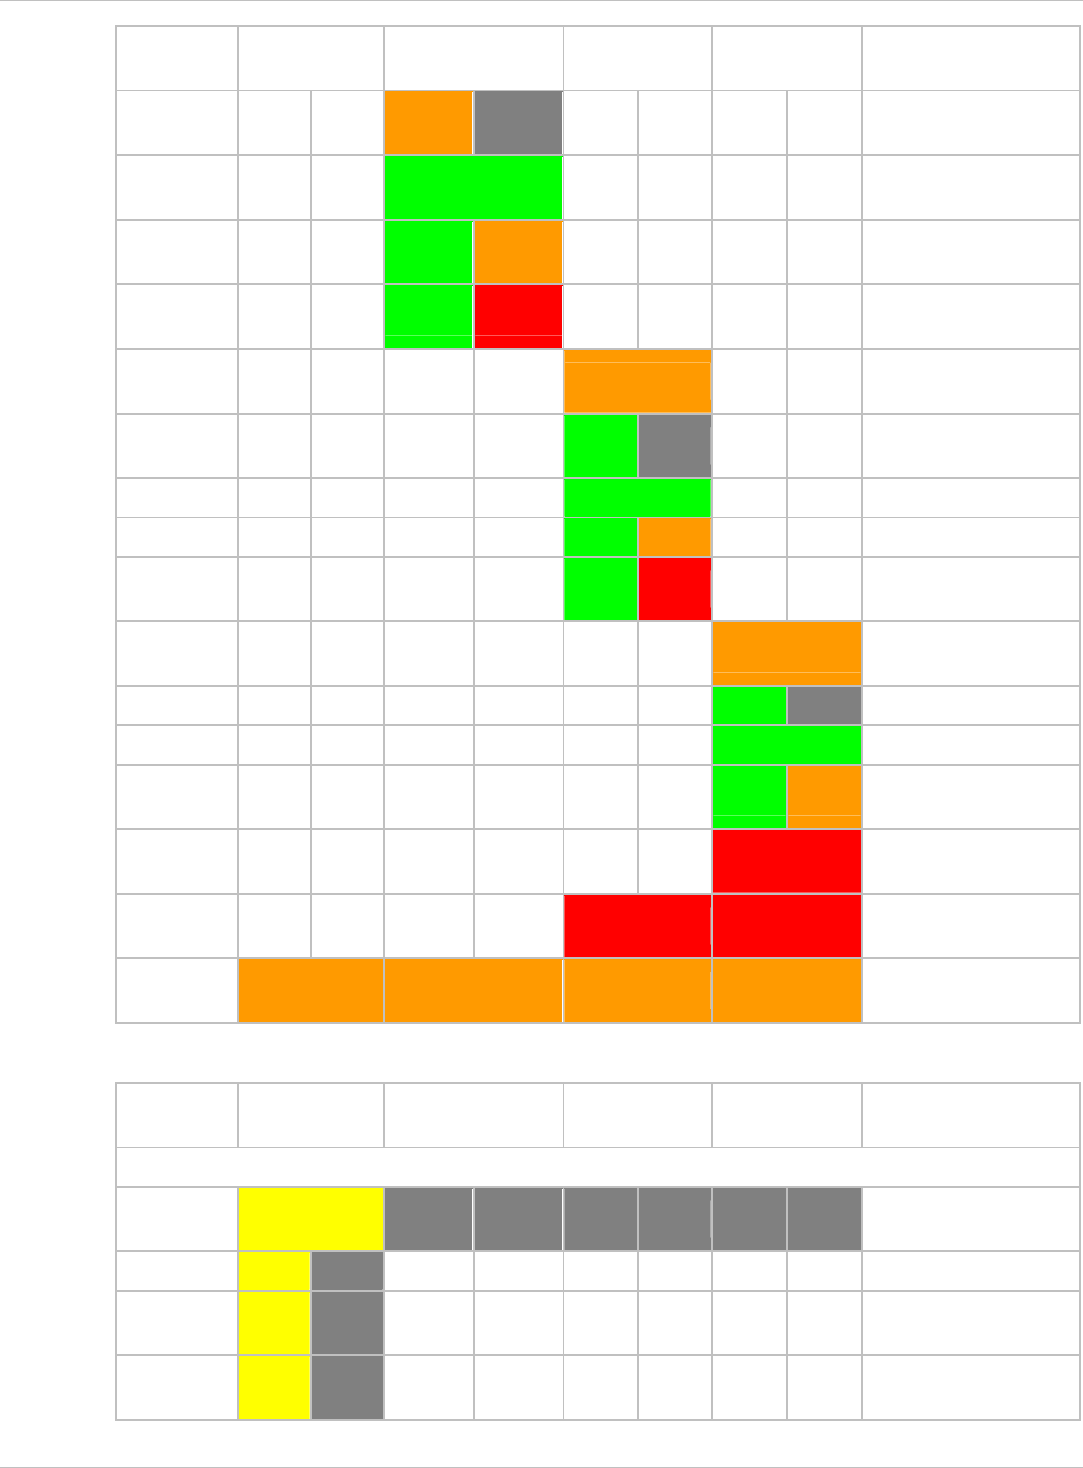
SIP–DECT OM System Manual Release 3.0 9 Configuration und Administration Aspects
LED1 (INFO) LED2 (OMM /
SYSTEM)
LED3 (DECT) LED4 (WLAN)
1,85s 0,15s
OMM connection
failure (idle loop)
cont.
Up&Running (OMM
connected)
1,85s 0,15s
Up&Running + OMM
warning
1,85s 0,15s
Up&Running + OMM
failure
RFP DECT cont.
DECT not configured
on this RFP
1,85s 0,15s
DECT inactive (not
synced yet)
cont DECT 'on air'
1,85s 0,15s DECT + call active
1,85s 0,15s
DECT + call active
+busy bit
RFP WLAN cont. WLAN not configured
on this RFP
1,85s 0,15s WLAN inactive yet
cont. WLAN 'on air'
1,85s 0,15s WLAN + assoc.
clients
cont. WLAN failure (e.g. 10
Mbit uplink)
License cont. cont. Branding mismatch
(RFP not functional)
Reboot
request cont. cont. cont. cont. RFP will reboot
RFP (L) 32/34 IP, RFP 32/34 NA, RFP (L) 42 WLAN
LED1 (INFO) LED2 (OMM /
SYSTEM)
LED3 (DECT) LED4 (WLAN)
Now, the kernel / application is running: LED1 will never be RED
Kernel cont. kernel boot phase
(inflator, …)
RFPM 1s 1s DHCP phase
1,9s 0,1s
DHCP failure (idle
loop)
0,5s 0,5s
obtaining external
configuration
depl-1230/0.2 Page: 168 (238)
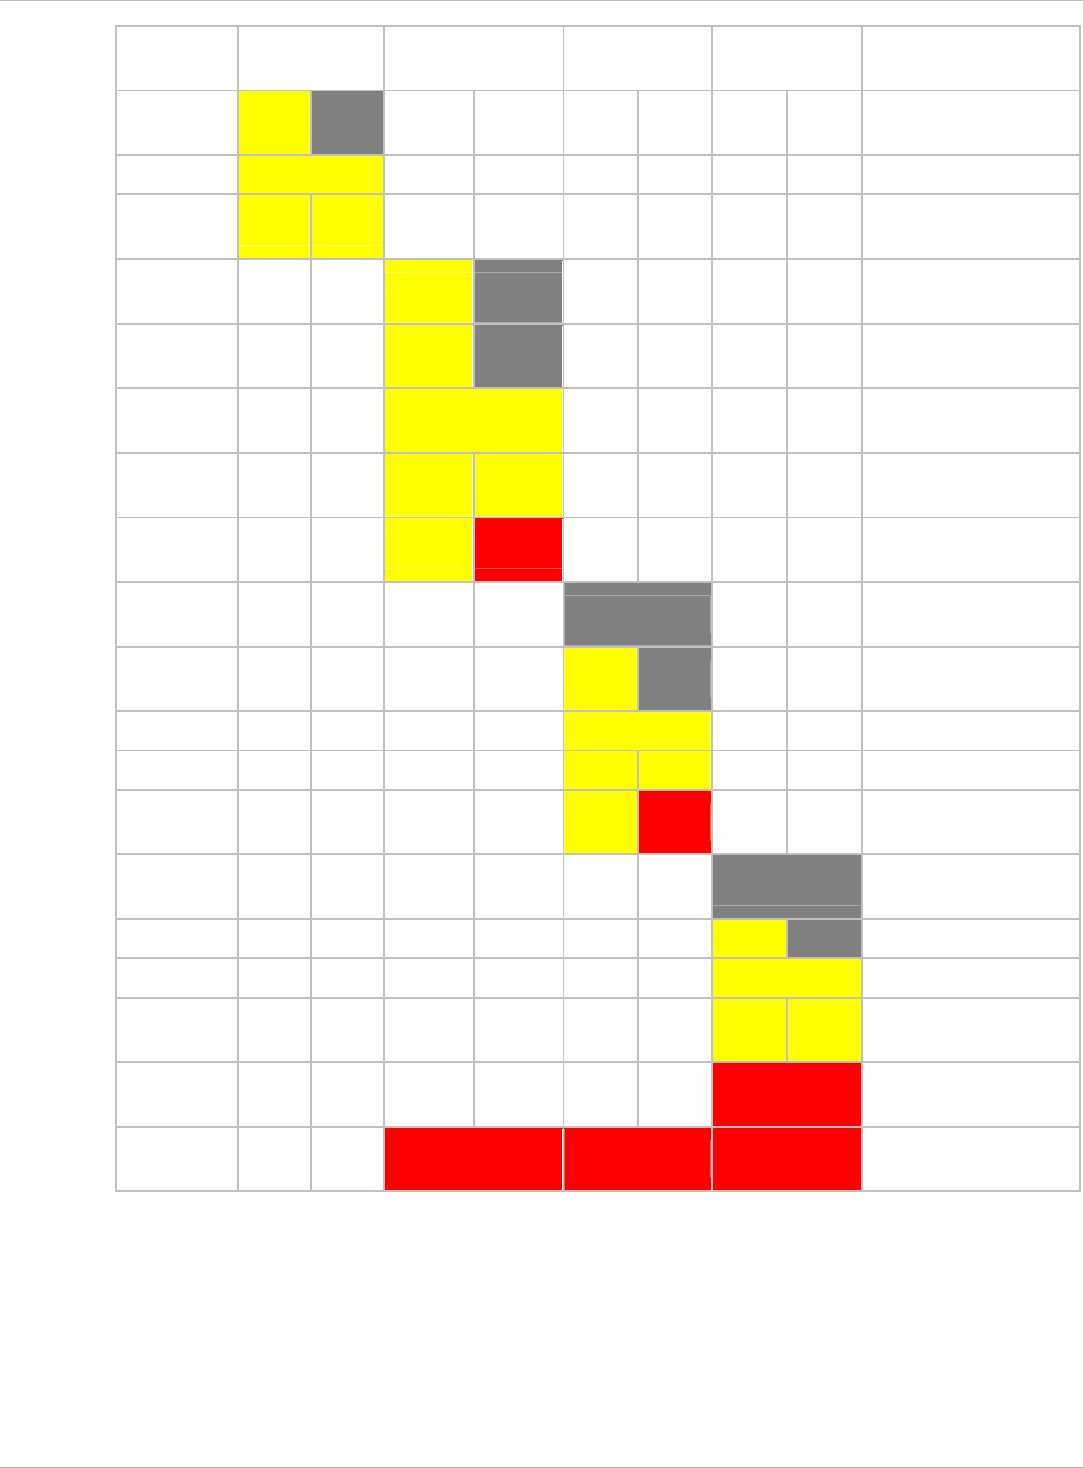
SIP–DECT OM System Manual Release 3.0 9 Configuration und Administration Aspects
LED1 (INFO) LED2 (OMM /
SYSTEM)
LED3 (DECT) LED4 (WLAN)
0,9s 0,1s
external configuration
failure
cont. Ready
1,9s 0,1s
Ready + OMM reside
on this RFP
RFP
general
1s 1s OMM connect phase
1,9s 0,1s
OMM connection
failure (idle loop)
cont.
Ready (OMM
connected)
1,9s 0,1s
Ready + OMM has a
warning
1,9s 0,1s
Ready + OMM has an
error
RFP DECT cont.
DECT not configured
on this RFP
1,9s 0,1s
DECT inactive (not
synced yet)
cont DECT 'on air'
1,9s 0,1s DECT + call active
1,9s 0,1s
DECT + call active
+busy bit
RFP WLAN cont. WLAN not configured
on this RFP
1,9s 0,1s WLAN inactive yet
cont. WLAN 'on air'
1,9s 0,1s WLAN + assoc.
clients
cont. WLAN failure (e.g. 10
Mbit uplink)
License cont. cont. cont. Branding mismatch
(RFP not functional)
depl-1230/0.2 Page: 169 (238)
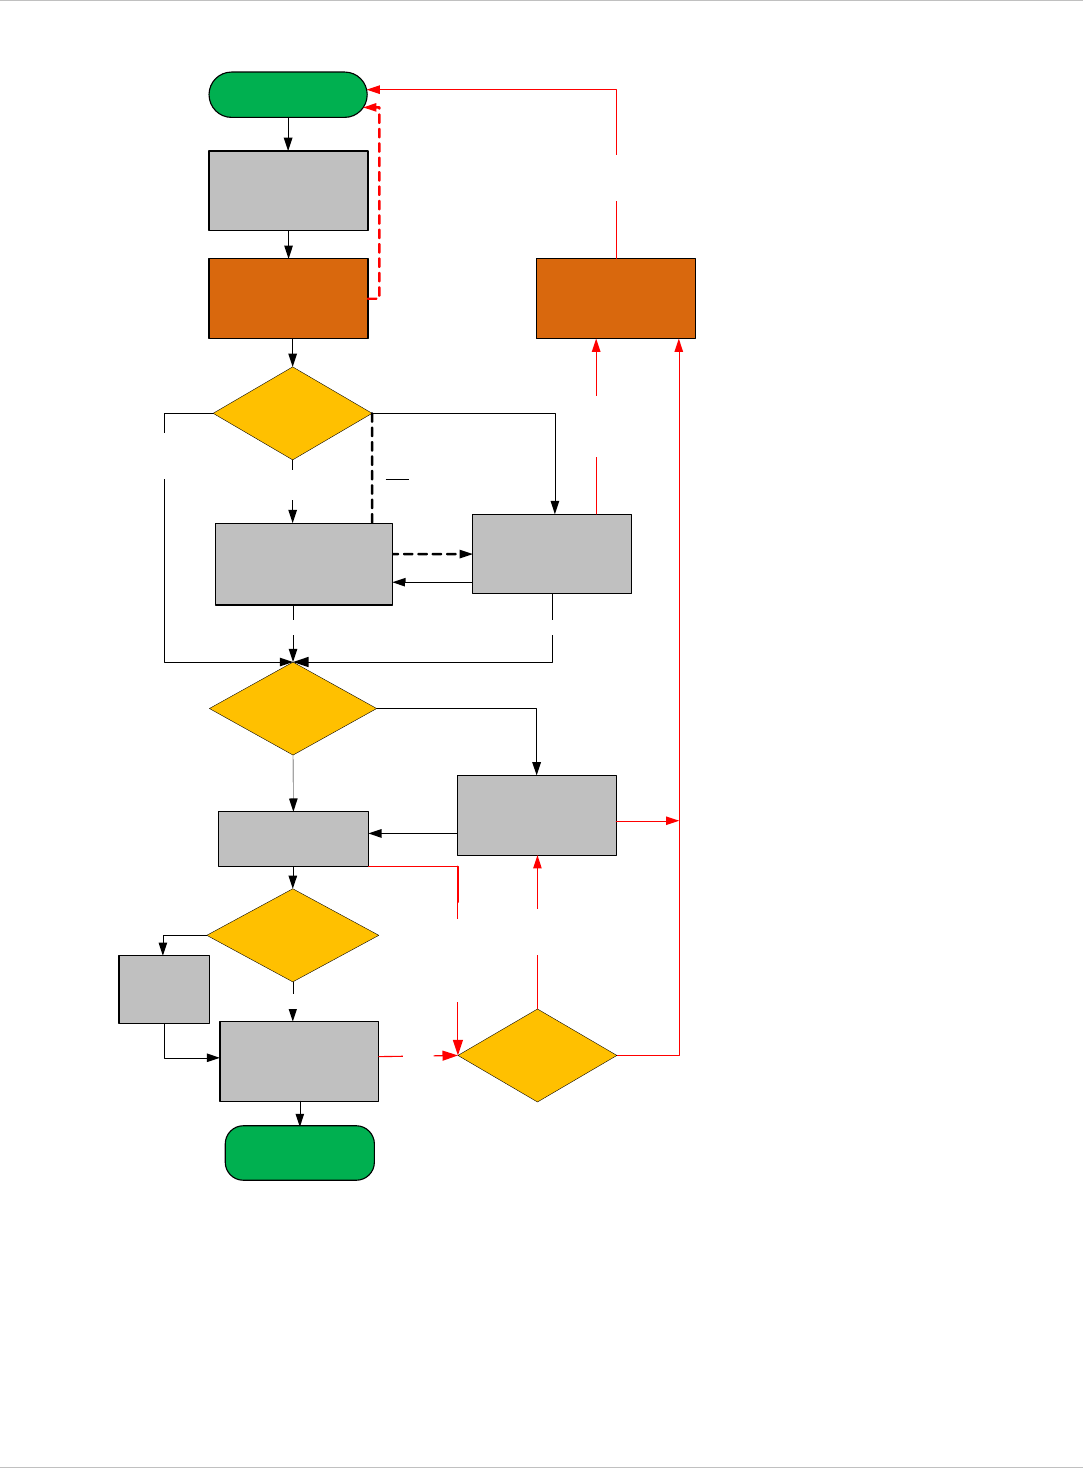
SIP–DECT OM System Manual Release 3.0 9 Configuration und Administration Aspects
9.6 State Graph of the Start-up Phases
wait until
Ethernet link is up
DHCP
Check for Local
Configuration Inactive
active and
VLAN configured
If DHCP
offer with
VLAN code
received Offer is validVLAN ID is in use
wait 6 seconds for
OMM Configurator
input
No OMM Configurator input
wait 60 seconds for
OMM Configurator
input
no offer
or offer
not ok.
after retry.
Timeout or OMM
Configurator
input received
TFTP Download
contact Servers
from List
Server offer
Multicast TFTP
TFTP Server
list
failed
no
IGMP
join group
yes
No other
Server
available
other TFTP
Server
configured
Download failed.
retry other
configured servers
active but
no VLAN
configured
multiple Servers
are configured
Only one server
is configured
contact this server
Power ON
Start
Application Phase
base station reboot
if new configuration
is received by
OMM Configurator
TFTP Download
send read request
failed / timeout
Download failed
only one Server
configured
If only VLAN
is configured
enable
configured
VLAN ID
depl-1230/0.2 Page: 170 (238)

SIP–DECT OM System Manual Release 3.0 9 Configuration und Administration Aspects
DHCP
Check for Local
Configuration
Start Application
Phase
enable configured
parameter
Check for RFP
config file
download and
apply RFP
config files
Application
init
connect to OMM
SNMP
start OMM
application
Check for
OMM IP
WLAN
active
inactive
valid offer received
config file server
is set
failed if no valid config
is available on this RFP
not set apply config files
(overwrite local parameter)
this RFP is OMM
failed
apply config from OMM
syslog
DECT
failed
failed
major config change of local configuration
Failure e.g. connection to OMM lost
up & running
DHCP no answer
or offer not okay
(try 3 minutes)
init configured
applications
*
any time
RFP application
connect to OMM
9.7 Static Local Configuration of an RFP (OM Configurator)
As an alternative to DHCP configuration, the RFPs/OMM may be individually statically
configured using the OM Configurator tool.
Note: The OM Configurator requires the Java Runtime Environment version 1.6 or higher.
The settings, which are configured on the RFP with the tool OM Configurator, will be saved
permanently in the internal flash memory of the RFP.
depl-1230/0.2 Page: 171 (238)
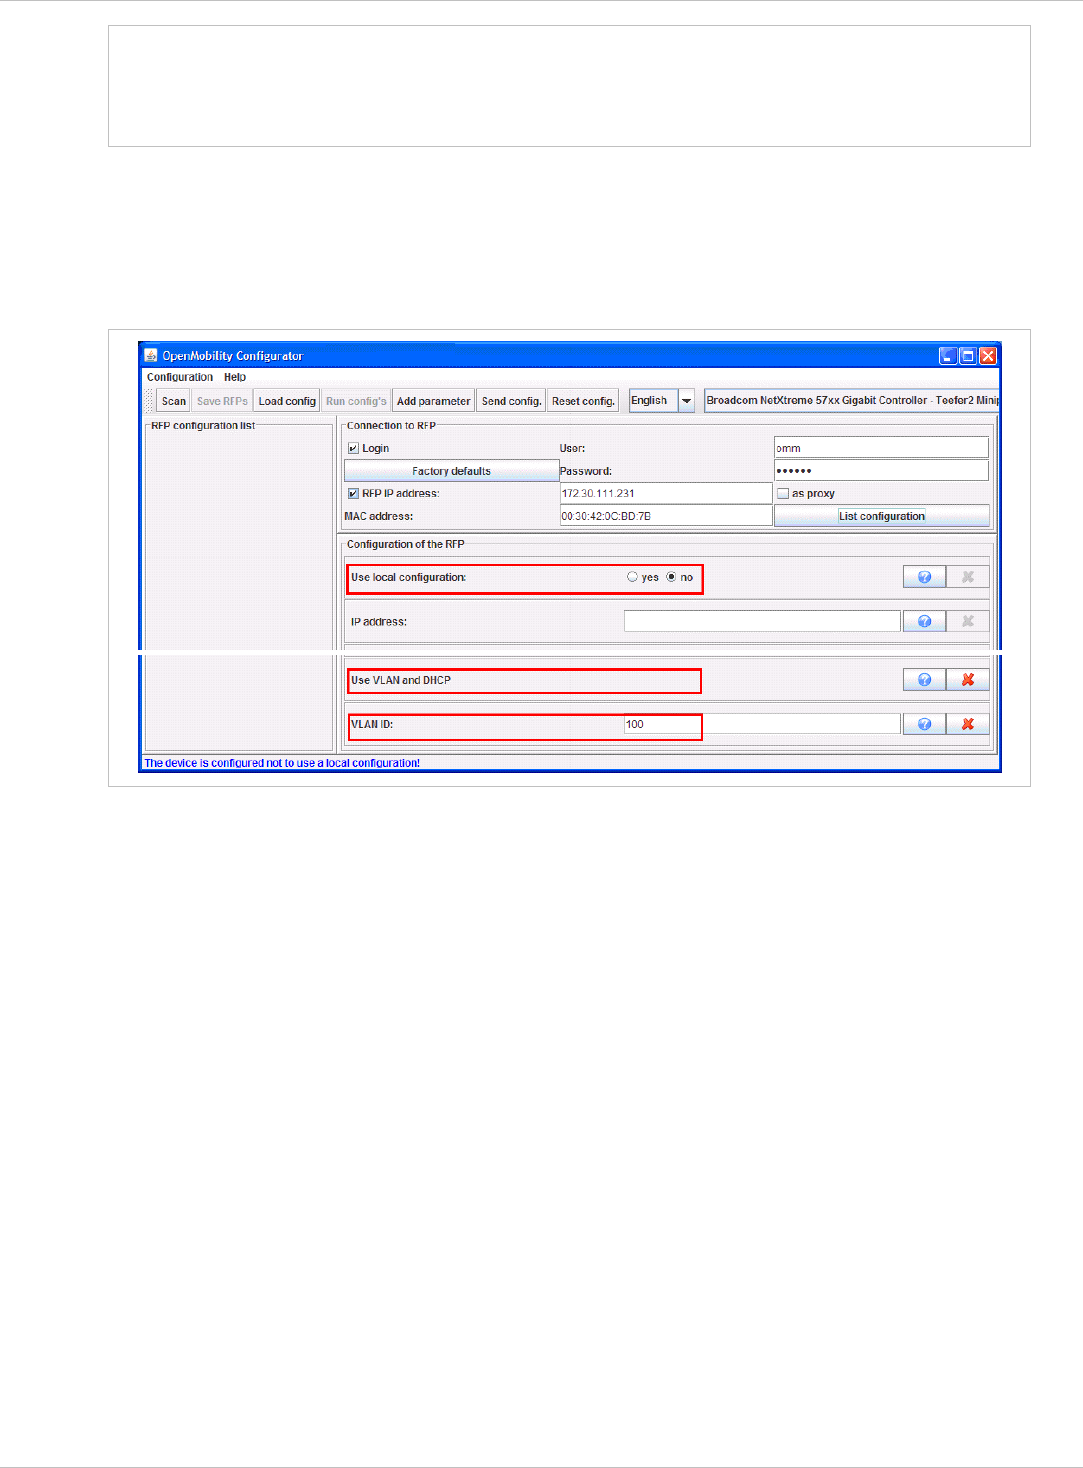
SIP–DECT OM System Manual Release 3.0 9 Configuration und Administration Aspects
Note: An initial configuration of the RFPs (L) 35/36/37 IP / RFP (L) 43 WLAN via the OM
Configurator tool requires a login and password. The default login and password is
“omm” and “omm”. No login is required for the initial configuration of the previous
RFP family (RFPs (L) 32/34 IP / RFP (L) 42 WLAN.
With the launch of SIP–DECT 3.0 the appropriate OM Configurator especially for the stream
‘SIP-DECT’ must be used for the local configuration of RFPs.
There are two modes of operation.
The OM Configurator is used to set a VLAN ID but other parameters are still requested via
DHCP.
•
OR
All parameters are set via the OM Configurator and DHCP is not used anymore.
The parameters configurable via the OM Configurator comply with the DHCP option,
please see chapter 9.5.4 for details.
•
depl-1230/0.2 Page: 172 (238)

SIP–DECT OM System Manual Release 3.0 9 Configuration und Administration Aspects
On systems with multiple Ethernet adapters select the interface to use for the configuration of
the RFPs. To configure an RFP, at least the MAC address and all mandatory options (see
table below) have to be set. The MAC address must be entered in a format such as xx-xx-xx-
xx-xx-xx.
If the RFP has already an IP address, enter this address in the IP address field. In this case
you can reach the RFP from outside the local LAN segment. This setting is optional.
To set additional parameters, press the Add parameter button and choose the desired
parameter.
Please note: Select the yes checkbox for the RFP to Use local configuration otherwise
DHCP will be used.
Press the Send configuration button to transmit the parameters to an RFP.
Boot parameters (comply with DCHP options)
Parameter Type Meaning
Use local configuration mandatory The parameter defines whether the
local configuration settings should be
used when booting or not.
IP Address mandatory IP address of the RFP
Net mask mandatory Subnet mask of the IP network
depl-1230/0.2 Page: 173 (238)

SIP–DECT OM System Manual Release 3.0 9 Configuration und Administration Aspects
IP address of the TFTP server, set to
0.0.0.0 is not used
TFTP Server Address Only mandatory for
RFP (L) 32/34 IP /
RFP (L) 42 WLAN
because of the
NETBOOT process;
Optional for
RFP (L) 35/36/37 IP /
RFP (L) 42 WLAN SW
update
The boot file be read from the TFTP
server.
TFTP File Name Only mandatory for
RFP (L) 32/34 IP /
RFP (L) 42 WLAN
because of the
NETBOOT process;
Optional for
RFP (L) 35/36/37 IP /
RFP (L) 42 WLAN SW
update
TFTP server list Only used by the
RFP (L) 32/34 IP /
RFP (L) 42 WLAN,
optional
List of additional TFTP servers to load
the boot file
Preferred TFTP server Only used by the
RFP (L) 32/34 IP /
RFP (L) 42 WLAN,
optional
Try to load the boot file from ‘TFTP
Server Address’ as first.
OMM IP Address mandatory IP address of the OpenMobility
Manager
Router addresses optional IP address of Default gateway
DNS Addresses optional IP address of DNS server
DNS Domain optional Domain name of the network
Broadcast Address optional The broadcast address for that network
2nd OMM IP Address optional IP address of the standby OMM
Country optional Defines the country in which the OMM
resides to handle country specific call
progress tones.
NTP Server Address optional IP address of an NTP Server
NTP Server Name optional Name of an NTP Server
VLAN ID optional VLAN identifier
Use VLAN and DHCP optional The parameter defines whether only
the local VLAN configuration settings
should be used when booting or not.
Syslog IP Address optional Destination IP address for the syslog
Syslog Port optional Destination port for the syslog
Restore URL optional URL for an automatic OMM Database
im
p
ort
(
see cha
p
ter 7.4.6.2 and
depl-1230/0.2 Page: 174 (238)

SIP–DECT OM System Manual Release 3.0 9 Configuration und Administration Aspects
chapter 8.5.5.1)
Configuration file server optional URL of a server with configuration files
(ipdect.cfg|<mac>.cfg) alternatively/in
addition to OM Configurator settings.
Syntax:
{ftp|ftps|http|https}://[user:password@]
server/[directory/]
or
tftp://server/[directory/]
Core dump* optional In case of an system error the RFP
creates core dump files and transfers
them using TFTP to the folder
configured in the TFTP file name.
* can not be set via
DHCP
The configuration can only be set after powering up or at the retry phase (LED flashing 0.25
Hz) or in kernel mode, please see chapter 9.5 for details. The OM Configurator tool waits
2 seconds and retries transmitting the data 3 times.
If you want to read the configuration parameters from an RFP, set the MAC address and the
IP address additionally and press the List configuration button. All parameters will be listed
in the OM Configurator tool.
Press the Reset configuration button to clean all input fields and additional parameters.
Since the OpenMobility version 1.5, login data can be used to prevent against unauthorized
configuration changes. If authorization is used, mark the Login checkbox and enter the user
name and the password into the fields User and Password. This OM Configurator is
backward compatible to previous OpenMobility versions without login support.
A forgotten password could not be recovered but deleted using the Factory defaults button.
Send the displayed cookie to the OpenMobility manufacturer support. After receiving the
password reset key from the support, enter it into the Enter reset key dialog. This will delete
the complete local configurations from the internal flash memory of the RFP, too!
Please note: With the password reset all local configurations inclusively possible existing
OpenMobility configurations will be deleted.
An RFP outside the local LAN segment could also work as proxy. Mark the as proxy
checkbox to enable this functionality. Then the MAC address will be used to address an RFP
in the LAN segment of the proxy RFP. Scanning for available RFPs and configuration of
multiple RFPs via a configuration file could be used also with the proxy mechanism.
depl-1230/0.2 Page: 175 (238)
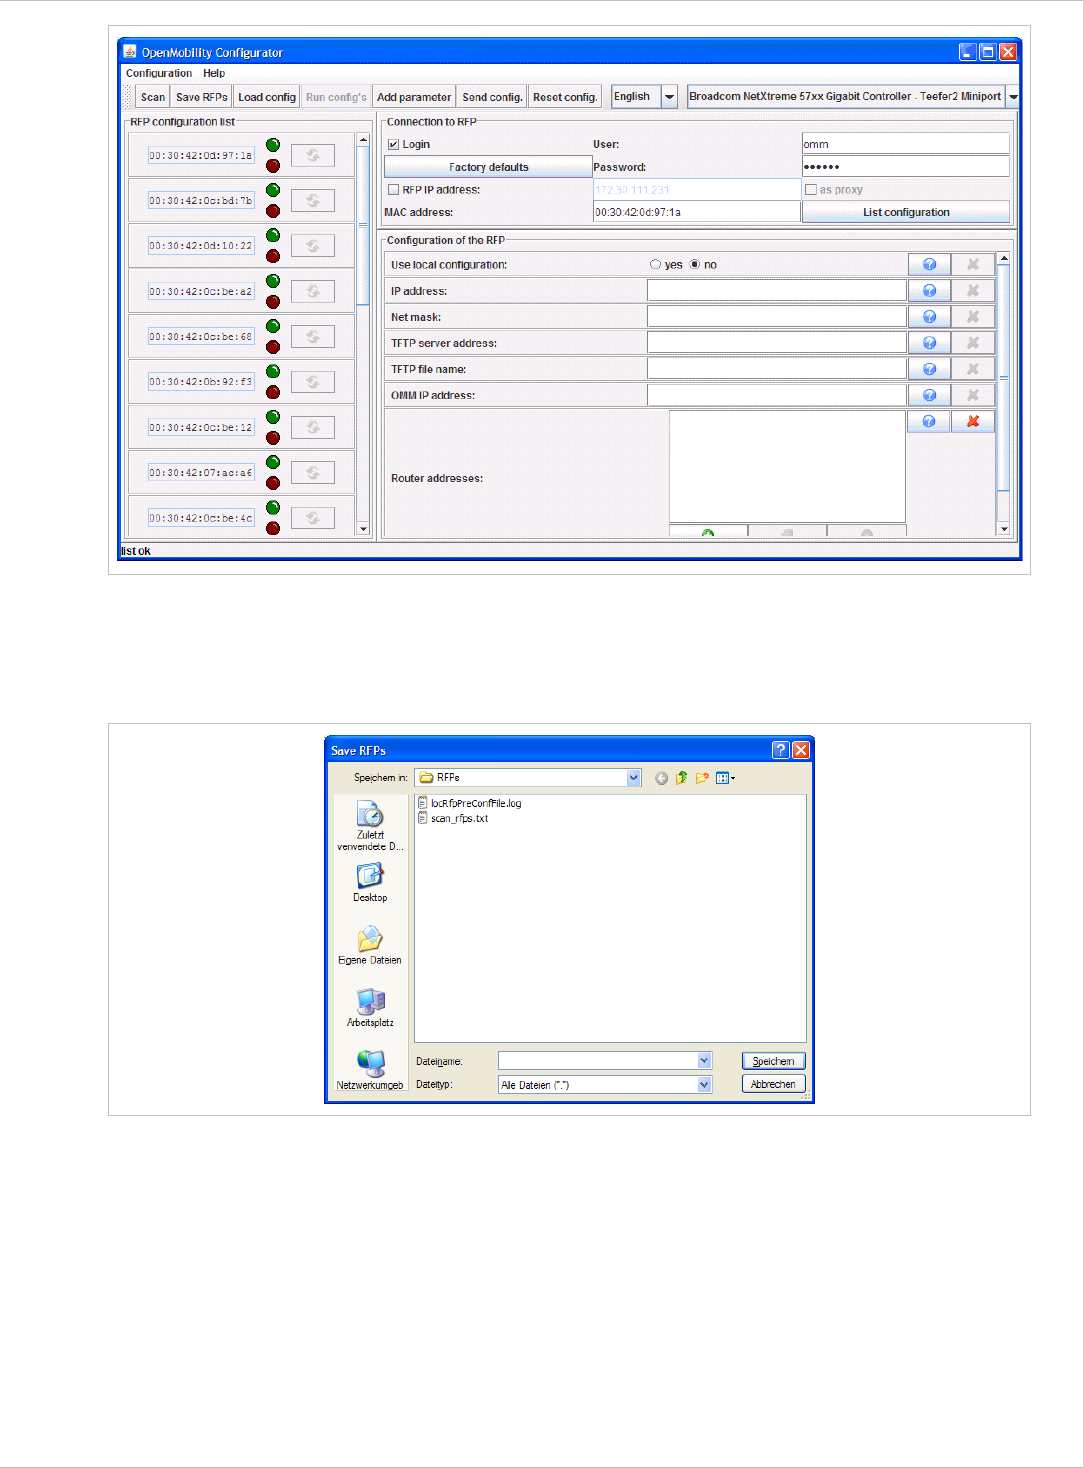
SIP–DECT OM System Manual Release 3.0 9 Configuration und Administration Aspects
Use the Scan button to search for available RFPs in the local LAN segment or via the proxy
mechanism in outside LAN segments. All MAC addresses of the found RFPs will be
displayed in the left RFP list. The status LEDs and the update button are disabled after
scanning for RFPs.
The list of RFPs could be saved by using the Save RFPs button. This enables an
administrator to edit the configuration data of multiple RFPs via a text editor or a spread
sheet application like described in section 11.7.3.
depl-1230/0.2 Page: 176 (238)
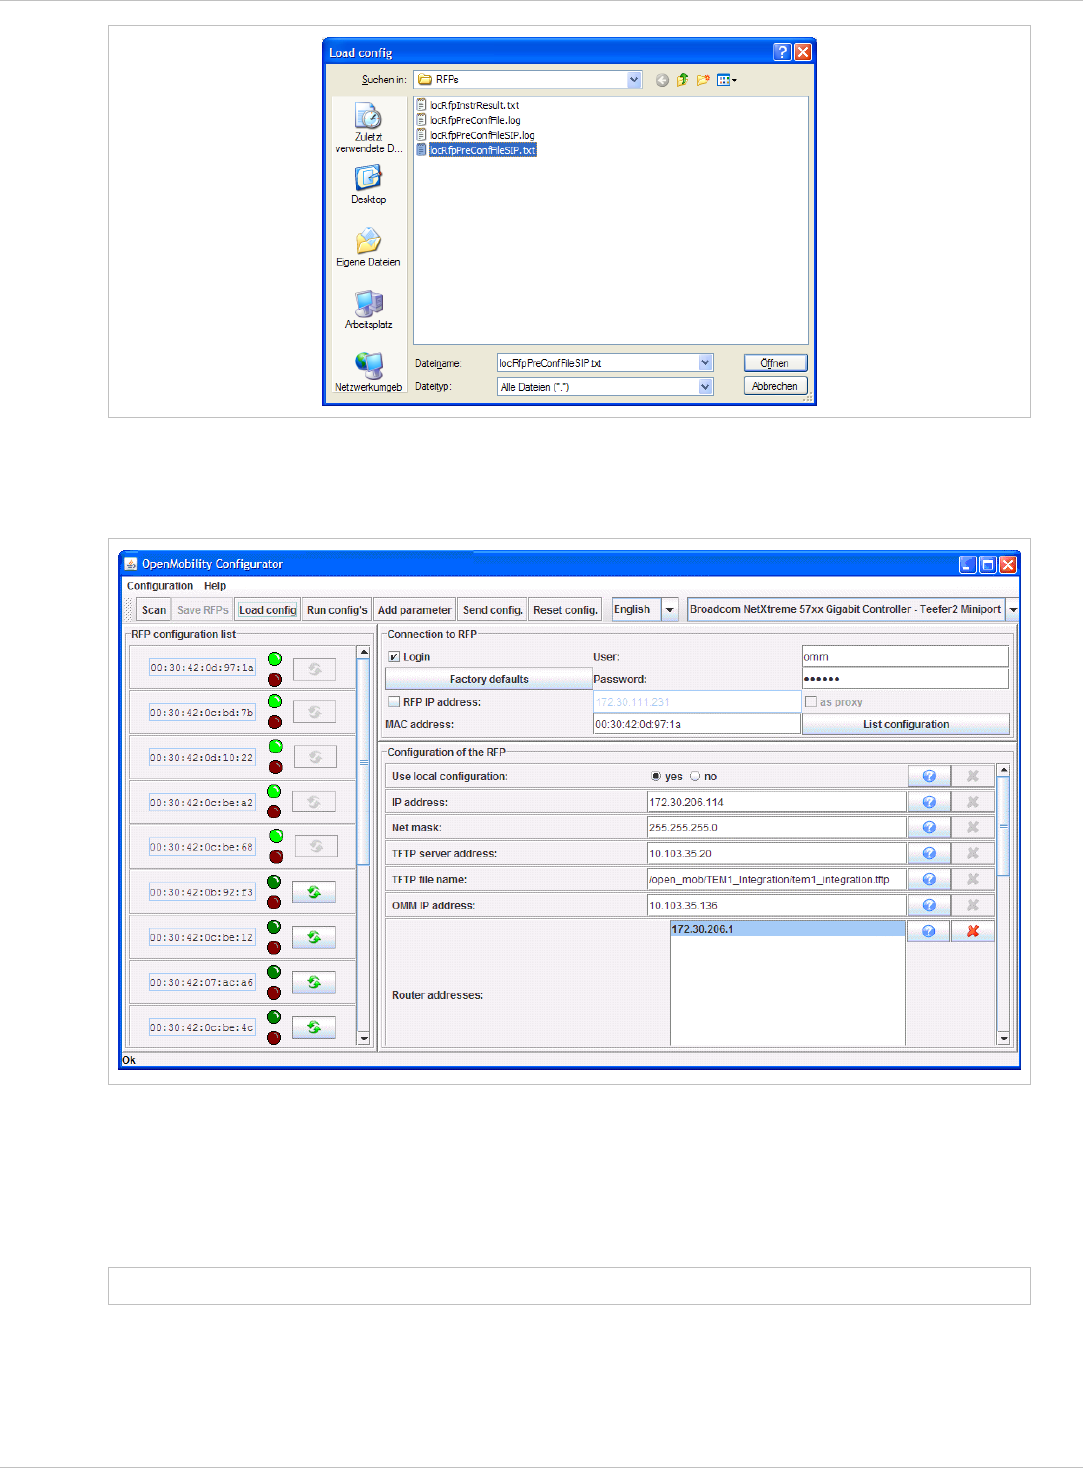
SIP–DECT OM System Manual Release 3.0 9 Configuration und Administration Aspects
The prepared configuration file can be loaded using the Load config. button. Log files with
status information about parsing and executing the configuration file and data are stored into
the same directory.
Use the Run configs button to start the iterative configuration of multiple RFPs using the
prepared and loaded configuration file. The LEDs will display whether the configuration has
succeeded or failed. See the log file content for further information. If the configuration has
failed for an RFP, the configuration could be repeated using the update button beside the
LEDs.
Note: Note that the login and proxy data will be used for the whole configuration file!
depl-1230/0.2 Page: 177 (238)

SIP–DECT OM System Manual Release 3.0 9 Configuration und Administration Aspects
9.8 RFP Configuration Files
RFP (L) 35/36/37 IP / RFP (L) 43 WLAN configuration files
A new configuration parameter specifies the location of the software that will be installed into
the flash of an RFP (L) 35/36/37 IP / RFP (L) 43 WLAN and activated by the OpenMobility
Manager.
OM_SwImageUrl=ftp://172.30.207.21/openmobility/SIP-DECT_3.0.dnld
TFTP, FTP(S), HTTP(S) are supported for an RFP (L) 35/36/37 IP / RFP (L) 43 WLAN
software update, please see section 9.11.5.
RFP (L) 32/34 IP / RFP (L) 42 WLAN configuration files
IP-RFPs support two RFP configuration files which are downloaded from a server to get
configuration settings. There is one common file “ipdect.cfg” for all RFPs and there is one file
specific file “<MAC>.cfg” for every single IP-RFP. The RFP requests the “ipdect.cfg” file if an
URL is given. The RFP specific <MAC>.cfg is requested if this is indicated in the common
“ipdect.cfg” file. It is possible that all RFPs request “ipdect.cfg” and only selected RFPs
request the <MAC>.cfg to have a specific configuration on some RFPs.
Standard IP settings
Standard IP settings which are necessary to have access to the RFP configuration files are
configured via DHCP (see chapter 9.5) or OM Configurator (see chapter 9.6). These are:
IP address •
•
•
•
•
•
•
•
•
•
Net mask
Gateway (i.e. router)
Boot file name
TFTP server
Public option 224: “OpenMobility” (to identify the relevant DHCP offer)
Domain Name Server (optional)
Domain Name (optional)
URL to the RFP configuration files
All other parameters can be set by using an RFP configuration file even if standard DHCP
options or OM Configurator parameters exist.
Configuration file source
A TFTP / FTP(S) / HTTP(S) URL specifies the protocol, server and path to access the RFP
configuration files. The URL can include account data if appropriate.
Syntax:
{ftp|ftps|http|https}://[user:password@]server/[directory/]
or
tftp://server/[directory/]
The URL configuration is done via DHCP option code 66 or the OM Configurator.
“ipdect.cfg” is mandatory if an URL is given by DHCP option code 66 or local static
configuration via the OM Configurator.
depl-1230/0.2 Page: 178 (238)
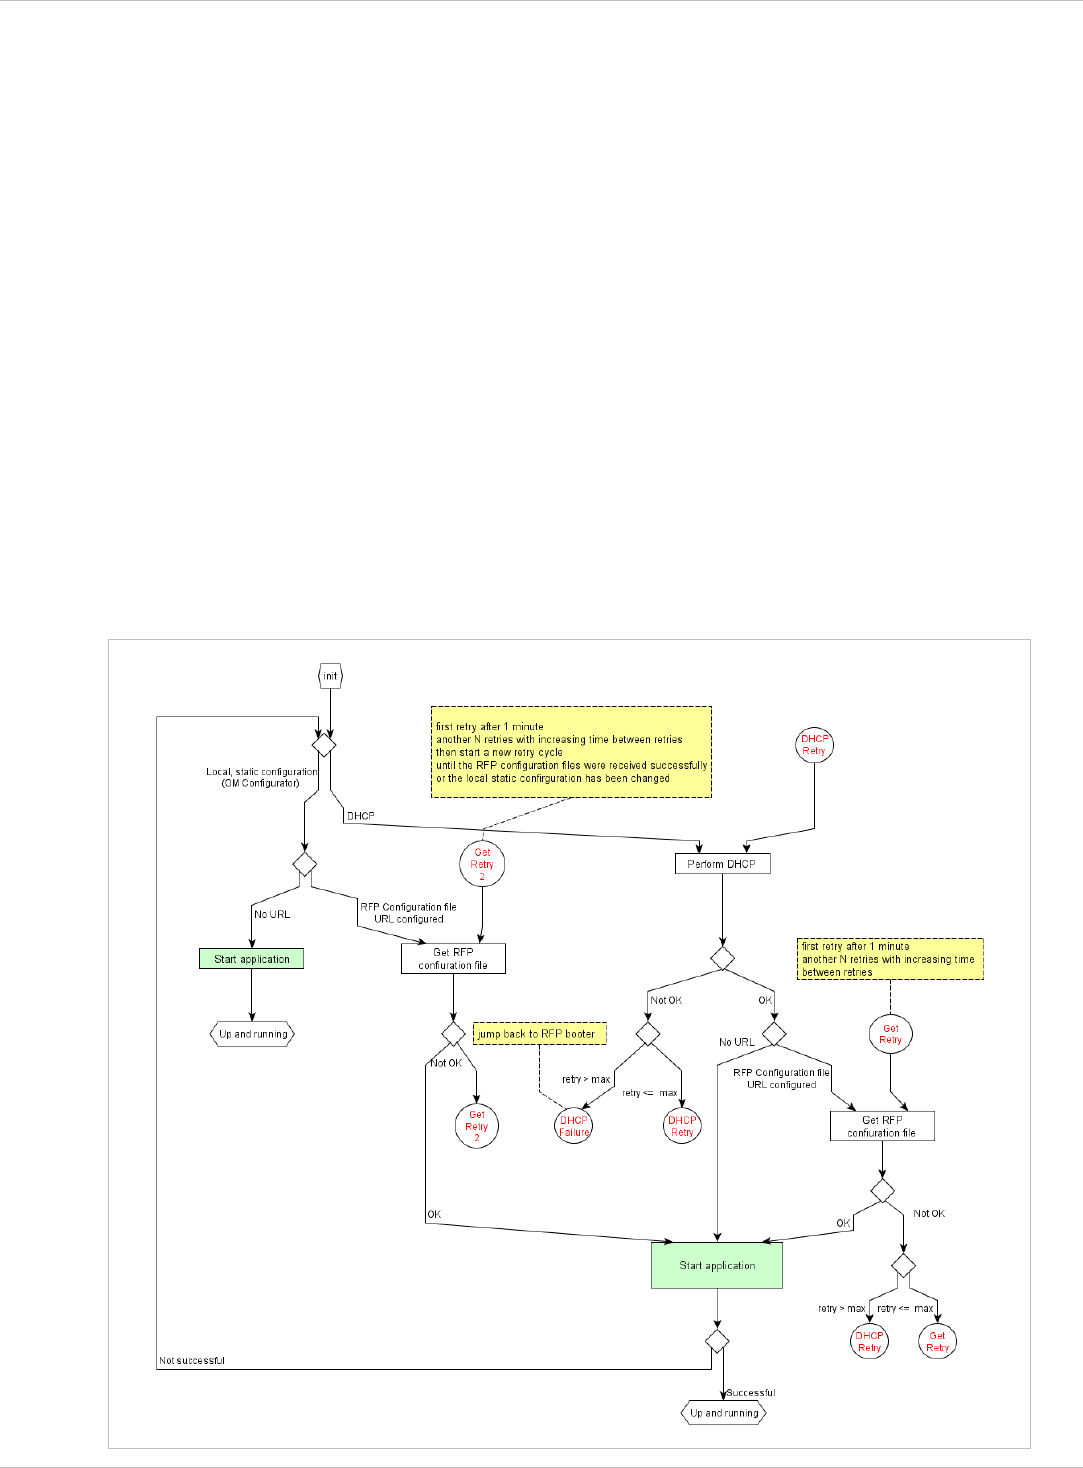
SIP–DECT OM System Manual Release 3.0 9 Configuration und Administration Aspects
“<MAC>.cfg” is mandatory if it is indicated in the “ipdect.cfg” that a “<MAC>.cfg” exists for
the RFP. (There is a key word to indicated that a “<MAC>.cfg” exists for every RFP.)
•
•
•
•
•
•
Mandatory means: if a file can not be loaded then the RFP will not start. This is relevant for
the following scenarios:
RFP boot / startup (after power on, SW update, …),
a change of the URL.
Parameter settings priority
Some parameters can be set via DHCP / OM Configurator or by using the files “ipdect.cfg” or
“<MAC>.cfg”. If a parameter is provided by more than one of the possible ways, the last
setting has priority. There is the following order:
DHCP / OM Configurator
ipdect.cfg
<MAC>.cfg
It is also possible to remove settings.
Times when RFP configuration times are read
The configuration files are read by the RFP application e.g. during startup as shown by the
following figure.
depl-1230/0.2 Page: 179 (238)

SIP–DECT OM System Manual Release 3.0 9 Configuration und Administration Aspects
Configuration files are read by the RFP application at the following times:
RFP reboot, •
•
•
•
•
•
•
•
•
•
•
•
•
•
Restart of an application e.g. OMM,
DHCP renew and DHCP bound,
Configuration changes via OM Configurator,
RFP configuration file update check.
RFP configuration file update check
RFP configuration file update check has the following characteristics:
The interval is configurable in the RFP configuration files (minimum interval: 5 minutes;
maximum interval: 7 days).
Default interval: 24 hours.
Both RFP configuration files are checked if relevant.
What if the configuration file(s) cannot be retrieved
The RFP continues operation with the last successfully retrieved configuration file(s).
The RFP will retry to get the configuration files, starting with an interval of 1 minute and
doubling this interval with each retry, not exceeding the update check interval (either
default or configured).
If the RFP is using DHCP, a renew of the lease is scheduled so that possible changes in
DHCP configuration will be detected.
Failures in getting the configuration files is reported via Syslog.
Handling of parameter changes
A change of a parameter (DHCP / OM Configurator, RFP config files) does not necessarily
mean a change of the RFP configuration because the parameter could be covered up or
previously set by using an alternative way.
Example 1:
IP address of a Syslog Daemon has been changed in “ipdect.cfg” but is covered up by
“<MAC>.cfg” in which this parameter has not been changed.
Example 2:
A parameter is new in “<MAC>.cfg” but has been set previously in “ipdect.cfg” with the
same parameter value.
Only if a parameter change causes a change of RFP configuration as a sum of e.g. DHCP /
OM Configurator, “ipdect.cfg” and “<MAC>.cfg” then the RFP will perform an configuration
update procedure.
Depending on the changed parameter an RFP configuration update is done:
On the fly without any service interruption e.g. IP address of a Syslog Daemon has been
changed.
With an application restart e.g. OMM IP address has been changed.
depl-1230/0.2 Page: 180 (238)

SIP–DECT OM System Manual Release 3.0 9 Configuration und Administration Aspects
Configuration file syntax
##############################################################################
# sample configuration file for the OpenMobility system
# retrieved via the net using file transfer protocols
# like tftp, ftp or http
#
##############################################################################
# comments are starting with the hash sign: "#"
#
##############################################################################
##
# BOOL variables support the following values
# YES Y 1 TRUE (case does not matter)
# NO N 0 FALSE (case does not matter)
# other values are interpreted as false
#
##############################################################################
# configuration files check interval
# time interval for checking the remote cfg files in seconds
# minimum value is 300 (5 minutes)
# maximum value is 604800 (7 days)
OM_ConfigCheckInterval=500
##############################################################################
# personal configuration files
# personal configuration files have the following name
# <OWN-MAC>.cfg, where <OWN-MAC>.cfg is of the form
# e.g. 003042ABCDEF.cfg
# all RFPs will also load the <OWN-MAC>.cfg file
OM_PersonalConfigAll=1 # BOOL
# DO load the individual file for the RFP with mac 003042FFF0D0
# no matter what OM_PersonalConfigAll says
OM_PersonalConfig_003042FFF0D0=y
# DO NOT load the individual file for the RFP with mac 003042ABCDEF
# no matter what OM_PersonalConfigAll says
OM_PersonalConfig_003042ABCDEF=n # BOOL
##############################################################################
# OpenMobility system
# the OpenMobilityManager IP addresses
OM_ManagerIpAddress1=172.30.205.17
OM_ManagerIpAddress2=172.30.205.18
OM_ManagerRestoreDbUrl=ftp://172.30.207.21/pub/backup.txt
OM_ManagerCountry=2
##############################################################################
# SYSLOG
OM_SyslogIpAddress=172.30.207.20
OM_SyslogPort=10115
##############################################################################
# NTP
OM_NtpServerName=de.pool.ntp.org
OM_NtpServerIPAddress=131.188.3.220 130.149.17.21
##############################################################################
# MISC
# transfer core files to the following url location
OM_CoreFileTransfer=ftp://172.30.206.21/pub # currently not
implemented
##############################################################################
9.9 RFP (L) 35/36/37 IP / RFP (L) 43 WLAN Software Update
The software checks several locations for a software update (software different from the
currently active software). If found then the software is copied to the flash leaving the running
depl-1230/0.2 Page: 181 (238)

SIP–DECT OM System Manual Release 3.0 9 Configuration und Administration Aspects
software intact. After successful installation the OMM is informed about the different
software. Activation of the software is then managed by the active OMM. RFPs that do not
have a connection to the OMM activate and start the software immediately.
Locations for SW update are:
Attached USB mass storage device with a software image iprfp3g.dnld in its root. The
USB mass storage device must be formatted using the vfat32 file system.
•
•
•
•
•
•
•
•
•
•
•
•
If ipdect.cfg supplies the OM_SwImageUrl variable then the URI is used to get the boot
image. Please see chapter 9.8.
TFTP server, path and file configured using the OM Configurator or via DHCP.
9.10 802.1Q Support
The IP RFPs support VLANs according to IEEE 802.1Q. VLAN can be administered
on a per port basis of the LAN switch assuming that the IP RFPs are connected to a
single port of a switched Ethernet environment, or
by advising a VLAN ID to the IP RFP matching the VLAN they should operate in.
VLAN tagging has only to be set to IP RFPs’ in the last case. The whole section refers to that
case. With this, also 802.1p priority within Ethernet frames is enabled.
The scope of the following description is only the VLAN tagging and obtaining the VLAN ID.
Quality of Service mechanisms like 802.1p priority and DiffServ are not in the scope of this
section.
VLAN implementation notes referring to IP RFPs:
IP RFPs are not able to support VLAN ID 0 as described later in this section. Any other
valid VLAN ID can be configured.
If a VLAN ID is configured all traffic from an IP RFP will be tagged with this VLAN ID.
The VLAN ID configured for a IP RFP is also used for the OMM running on this IP RFP.
Once a VLAN ID is set to the IP RFP, incoming frames are only accepted if they are
tagged as well. Therefore the switch port has to be configured as a tagged trunk for this
VLAN.
The VLAN configurations can be done using DHCP or the interface for the local static
configuration, the OM Configurator.
The usage of VLAN does influence the boot up process of the IP RFP because the VLAN
configuration takes place during the boot up phase.
The default setting is not to tag the traffic. 802.1Q tagging is enabled if the VLAN ID is set.
If no VLAN ID is set 802.1Q is disabled.
Why not VLAN ID 0 ?
VLAN ID 0 means that the IP RFP’s traffic belongs to the port/native VLAN. The Ethernet
switch port to which the IP RFP is connected must be configured to accept 802.1Q tagging
for this to work and the switch must interpret VLAN ID 0 as the port/native VLAN ID per the
IEEE 802.1Q standard.
The packets from the IP RFP are tagged with VLAN ID 0 and the packets send to the IP RFP
are tagged with the port/native VLAN ID. This scenario does not work, because the IP RFP
depl-1230/0.2 Page: 182 (238)

SIP–DECT OM System Manual Release 3.0 9 Configuration und Administration Aspects
supports only one VLAN ID in both directions. That means the VLAN ID in receive direction
has to be the same as in send direction.
9.10.1 Boot Phase of IP RFPs (DHCP)
Because the IP RFP does not know about VLAN during the beginning of the start up, two
DHCP scopes are required. This applies regardless of the Ethernet switch being used. The
following scenario with arbitrary VLAN Ids’ details the steps an IP RFP would go through in a
typical dual-VLAN implementation.
Step A. DHCP scope within the native VLAN:
1 IP RFP boots up and obtains an address on the native VLAN.
2 The data VLAN DHCP option 132 directs the IP RFP to go to voice VLAN.
Step B. DHCP scope within the voice VLAN:
1 IP RFP releases the data VLAN address and obtains an address on the voice VLAN and
all other parameters.
The voice VLAN does not have the DHCP option 132, because a IP RFP already on the
voice VLAN does not need to be directed to go there.
2 IP RFP is operational on the voice VLAN.
If a reboot or power cycle occurs, the IP RFP returns to step A.
If an IP RFP cannot obtain an address on the voice VLAN, due to network or DHCP
problems then the IP RFP falls back automatically to untagged frames (native VLAN).
To avoid the DHCP scope within the native VLAN the VLAN ID to be used can be set
permanently via OMC without losing the ability to provide other parameter via DHCP, please
see section 0 Static Local Configuration Of An RFP.
9.10.2 Boot Phase of IP RFPs (Local Configuration)
The PC running the OM Configurator has to be a member of the native VLAN for the 1st
configuration, later on within the voice VLAN set.
If a wrong or unknown VLAN ID is set, you can overwrite or read the configuration using no
VLAN tag on the switch port in the first 6 seconds after the RFP is connected to a power
supply / PoE. After 6 seconds the RFP apply the local configurations and start using the
parameters.
9.11 Installing OMM in Host Mode
In this case the OMM software has to be installed on a PC running with Red Hat Linux. The
network parameters with which the OMM works in this mode depend on this PC’s network
configuration.
Once started, OMM works permanently on the PC. In case of fatal error or PC restart, OMM
will restart automatically.
depl-1230/0.2 Page: 183 (238)

SIP–DECT OM System Manual Release 3.0 9 Configuration und Administration Aspects
Please note:
IMPORTANT :
Check that the versions of the OMM and RFP software on your SIP–DECT
installation are the same. Note that the OMM in host mode is not supported on
virtual machines.
9.11.1 System Requirements
The Linux PC OMM requires the following configuration:
Red Hat© Enterprise Linux 6 for x86 server •
•
•
•
Server HW minimum:
- Processor : Dual Core Intel® Xeon® 3065, 2.33GHz, 4MB cache
- Bus 1333 MHz
- Memory : 2GB DDR2 SDRAM 667 MHz
- Hard disk: 80 GB SATA 7200 rpm
- 1 Gbit/s Ethernet interface
9.11.2 Installing the OMM Software
The OMM software for Linux Redhat x86 server is provided in form of a self-extracting
executable file e.g. “SIP-DECT_3.0.bin”. This binary file comprises two Red Hat© packages:
SIP-DECT-OMM-<SIP-DECT-version>.i586.rpm
OpenMobility Manager software.
SIP-DECT -HANDSET-<handset-version>.i586.rpm
Software for Aastra 610d/620d/630d and Aastra 650c handsets
The Aastra 610d/620d/630d and Aastra 650c handset software can be updated via the Air
interface, see chapter 9.17. A separate software package can also be provided for specific
updates of the handset software.
Log on as user root to install and/or update OMM. If you do not login as
root to open the OMM console, the path to ommconsole is not set and
you have to enter the whole path “/usr/sbin/ommconsole” to start the
OMM console.
Command syntax
For extraction and automatic standard installation
SIP-DECT_3.0.bin
For extraction and automatic standard installation
SIP-DECT_3.0.bin -f
For extraction of RFP packages only
SIP-DECT_3.0.bin –x
RPM packages can also be installed manually.
For a first OMM type installation
rpm –i SIP-DECT-OMM-<version>.i586.rpm
depl-1230/0.2 Page: 184 (238)

SIP–DECT OM System Manual Release 3.0 9 Configuration und Administration Aspects
For an OMM software update (see chapter 9.12)
rpm –U SIP-DECT-OMM-<version>.i586.rpm
For Aastra 610d/620d/630d and Aastra 650c handset software installation
rpm –i SIP-DECT-HANDSET-<version>.i586.rpm
To delete a software release
rpm –e SIP-DECT-HANDSET and
rpm –e SIP-DECT-OMM
After the installation phase, start OMM by running the command
“/etc/init.d/sip-dect-omm start”
To check an installed release
rpm –qi SIP-DECT-OMM
or
rpm –qi SIP-DECT- HANDSET
depl-1230/0.2 Page: 185 (238)

SIP–DECT OM System Manual Release 3.0 9 Configuration und Administration Aspects
9.11.3 Configuring the Start Parameters
The basic data for initializing OMM is stored in the file “/etc/sysconfig//SIP-DECT”. It can be
edited to modify the OMM interface.
##############################################
# OMM configuration file
##############################################
# if you use a different interface for omm activate/correct parameter below
#OMM_IF="eth0"
#
OMM_CONFIG_FILE=/opt/SIP-DECT/tmp/omm_conf.txt
#
#if you use OMM resiliency for OMM activate parameter below with OMMs IP
adresses
#OMM_RESILIENCY="192.168.0.1:192.168.0.2"
#
# Automatic OMM database import:
# TFTP / FTP / HTTP(S) URL specifies the import server and file
#RST_URL=ftp://download-url.com/directory/file.dat
# country tones:
# VS_COUNTRY_DEU = 1, VS_COUNTRY_GBR = 2, VS_COUNTRY_CHE = 3,
VS_COUNTRY_ESP = 4, VS_COUNTRY_FRA = 5, VS_COUNTRY_ITA = 6,
# VS_COUNTRY_RUS = 7, VS_COUNTRY_BEL = 8, VS_COUNTRY_NLD = 9,
VS_COUNTRY_CZE = 10, VS_COUNTRY_AUT = 11, VS_COUNTRY_DNK = 12,
# VS_COUNTRY_SVK = 13, VS_COUNTRY_FIN = 14, VS_COUNTRY_HUN = 15,
VS_COUNTRY_POL = 16, VS_COUNTRY_BLR = 17, VS_COUNTRY_EST = 18,
# VS_COUNTRY_LVA = 19, VS_COUNTRY_LTU = 20, VS_COUNTRY_UKR = 21,
VS_COUNTRY_NOR = 22, VS_COUNTRY_EUN = 23, VS_COUNTRY_SWE = 24,
# VS_COUNTRY_TWN = 25
COUNTRY="2"
Parameters Description
OMM_IF Interface for communicating with the RFPs
(by default: eth0)
OMM_CONFIG_FILE Directory containing the OMM configuration
file (by default: /etc/omm_conf.txt)
OMM_RESILIENCY In case of OMM redundancy, enter the two IP
addresses of the OMMs. See also
section 9.13.
Restore URL Restore URL for an automatic OMM
database import (see chapter 7.4.6.2)
Country tone schema
9.11.4 Specific Commands – Troubleshooting
/etc/init.d/sip-dect [start|stop|restart].
The command line interface for OMM is accessible via telnet on port 8107.
Malfunction
COUNTRY
The OMM software has been installed but does not work automatically when the PC starts.
The command below stops or starts OMM manually (User root):
To check whether OMM is working, see the list of procedures for the “SIP-DECT” process. If
OMM does not start, delete the lock file “/var/lock/subsys/SIP-DECT”.
depl-1230/0.2 Page: 186 (238)

SIP–DECT OM System Manual Release 3.0 9 Configuration und Administration Aspects
To delete the OMM configuration remove the OMM configuration file “/opt/SIP-
DECT/tmp/omm_conf.txt” (by default).
9.11.5 Upgrade from OMM Version 2.x to 3.x in Host Mode
To update a OMM system from version 2.x to 3.x, you must delete the old OMM software
package rpm –e omm_ffsip-OMM omm_ffsip-HANDSET and install the SIP-DECT_3.0.bin
software.
9.12 Updating the OMM
To prevent a full breakdown of the DECT network for large systems during an update, a new
mechanism has been introduced.
The procedures for updating an existing DECT installation with a new software depend on
In this case the installation routine copies automaticly the OMM database.
If there are changes in start parameters you can copy the old saved config file from
/etc/sysconfig/omm_ffsip.rpmsave to /etc/sysconfig/SIP-DECT.
is a single OMM or standby OMM installation used and •
•
•
•
•
•
is the OMM running on an RFP or PC.
The OMM “standby” feature is described in section 9.13.
Especially for installations using a standby OMM this new update mechanism allows an
update of the RFPs with a minimum impact to the DECT services.
All RFPs check the availability of new boot image file automatically when:
the DHCP lease is refreshed,
the RFP lost the connection to the OMM,
one of the service applications running on the RFP must be restarted, and
an RFP configuration file update check is done (see chapter 9.8).
As soon as an RFP detects a new boot image file on the TFTP server it notifies this to the
OMM. The OMM keeps track when it is save to restart an RFP in order to leave the DECT
service synchronal.
RFPs scheduled for restart are marked with a yellow sign within the Web service (see
chapter 7.6.1) or in a separate column within the OM Management Portal (OMP), see
chapter 8.7.1.1.
9.12.1 Updating a Single OMM Installation
In case of a single OMM installation, a breakdown of the DECT network during the update
procedure is unavoidable.
Please note: Updating a single OMM installation will cause a breakdown of the DECT
network during the update procedure.
For the update replace the boot image file on the TFTP server(s) with the new one.
depl-1230/0.2 Page: 187 (238)

SIP–DECT OM System Manual Release 3.0 9 Configuration und Administration Aspects
OMM in RFP mode
If the OMM is running on an RFP force the update of this RFP by pressing the Update button
on the System settings web page (see chapter 7.4.1.2). The RFP checks the boot image
file on the TFTP server and reboots if a new one is found.
OMM in host mode (on Linux PC)
If the OMM is running on a dedicated Linux PC, install the new software as described in
section 9.11.2 on that PC with the command “SIP-DECT_3.0.bin”. This stops automatically
the running OMM and installs the new software. After the installation phase, restart the OMM
by running the command “/etc/init.d/sip-dect-omm start”.
As soon as the RFPs lost the connection to the OMM (because of the update), the RFPs
detects that a new image file is on the TFTP server and reboots with the new image file.
9.12.2 Updating a Standby OMM Installation
Please note:
Please note:
Updating a standby OMM installation will cause a switch over between both
OMMs. All active calls will be dropped.
For the update replace the boot image file on the TFTP server(s) with the new one.
OMM in RFP mode
Force the update by pressing the Update button on the System settings web page (see
chapter 7.4.1.2). The OMM-RFP checks the boot image file on the TFTP server and initiates
an update procedure, if a new image file has been found. The automated update procedure
performs the following steps:
1 Reboot the RFP residing the standby OMM.
2 Reboot the RFP residing the active OMM which causes a failover to the standby OMM.
3 Reboot all other RFPs that are able to find the new boot image file one by one. This is
managed by the new active OMM.
This procedure reduces the downtime of the SIP–DECT system to a minimum due to the
optimized failover.
Please be aware that a minimum downtime of the system can only be reached
if the system was in a stable working state when initiating the update and the
IP infrastruckture guarantees a fast update of the OMM RFPs e.g. no 64kbit/s
line to donload the SW into the RFP. A RFP typically laods the SW from a
server within 12 seconds in a LAN environment.
OMM in host mode (on Linux PC)
For an update with a minimum impact to the DECT service do the following:
1 Replace the boot image file on the TFTP server(s).
2 Manually update the standby OMM.
a) Stop the OMM service.
b) Install the new SW.
depl-1230/0.2 Page: 188 (238)

SIP–DECT OM System Manual Release 3.0 9 Configuration und Administration Aspects
c) Start the OMM service.
d) Wait at least 30 seconds before you go on with updating the active OMM.
3 Manually update the active OMM.
a) Stop the OMM service.
b) Install the new SW.
c) Wait at least 30 seconds.
d) Start the OMM service.
Please note: A one by one update of RFPs is not possible if the signaling interface between
the OMM and the RFP has been changed. Please see the release notes
delivered with the software.
To enforce an update of the whole DECT system at once, deactivate / update both OMMs
simultaneously. The RFPs will lost the connection to both OMMs and will automatically
restart with the new boot image file.
9.13 OMM Standby
To perform OMM standby, two OpenMobility Managers have to be provided in an OMM
network. One is working as the active OMM, and the other one is working as the standby
OMM.
In the event that the RFP designated as the OMM fails, the other RFP, designated as the
secondary OMM automatically assumes the role of the OpenMobility Manager.
How OMM Standby Works
During system start-up, each IP-RFP retrieves either one (if no standby OMM is configured)
or two (if OMM Standby is configured) OMM IP addresses and both try to connect to each
other. The active OMM will serve all connections from RFPs or handsets.
During normal operations, both the active and the standby OMM are in contact and monitor
each other’s operational state. They continually exchange their current standby states and
the standby OMM receives a copy of any configuration changes on the active OMM.
Provided that both OMMs are in contact with each other, their databases are synchronized
automatically.
If the primary OMM fails, the OMM responsibilities are taken over by the standby OMM to
maintain operation. A “No Standby” warning is displayed on the OMM web interface,
indicating that there are no longer two functioning OMMs in the network or cluster.
Configuration changes are done unsafe in this situation.
If the active OMM fails, the inactive OMM recognizes this and begins to act as the active
OMM, and the web service is started.
If the connection between the two OMMs fails, the network or cluster essentially breaks into
two operational parts. The standby OMM now becomes the active OMM. At this point, the
two OMMs cannot detect one another and, therefore, cannot synchronize. When the
connection between the two OMMs is re-established, the synchronization of the OMMs
forces one OMM to become the standby OMM again. Once the recently failed OMM returns
to service and becomes the inactive OMM, it does not resume the role of active OMM.
depl-1230/0.2 Page: 189 (238)

SIP–DECT OM System Manual Release 3.0 9 Configuration und Administration Aspects
9.13.1 Configuring OMM Standby
Each RFP of the DECT system have to be configured with two OMM IP addresses. This both
OMM addresses can be either configured via DHCP (see chapter 9.5.1) or with the OM
Configurator (see chapter 9.6).
9.13.2 Fail Over Situations
Fail over occurs under following circumstances:
An OMM error occurs on the active OMM. •
•
•
•
•
•
•
The RFP acting as the active OMM is shut down or rebooted at the SSH console.
The OMM is rebooted in the web browser menu.
The active OMM is unreachable.
The standby OMM becomes the active OMM under following circumstances:
The configured SIP Proxy/Registrar is reachable.
The other OMM has a larger IP Address while no OMM is active and both OMMs are in
contact with each other (normally at system startup).
When the OMMs get in contact again:
Both OMMs check which one ran for a longer period. That one will become the active
OMM. The other one falls back to the standby one.
9.13.3 Fail Over Failure Situations
Fail over failure occurs under following circumstances: The IP connection between OMMs
fails and the configured SIP Proxy/Registrar is unreachable. In this case the active OMM
shall wait until the SIP Proxy/Registrar is reachable.
The following state diagram shows the OMM Standby states:
depl-1230/0.2 Page: 190 (238)
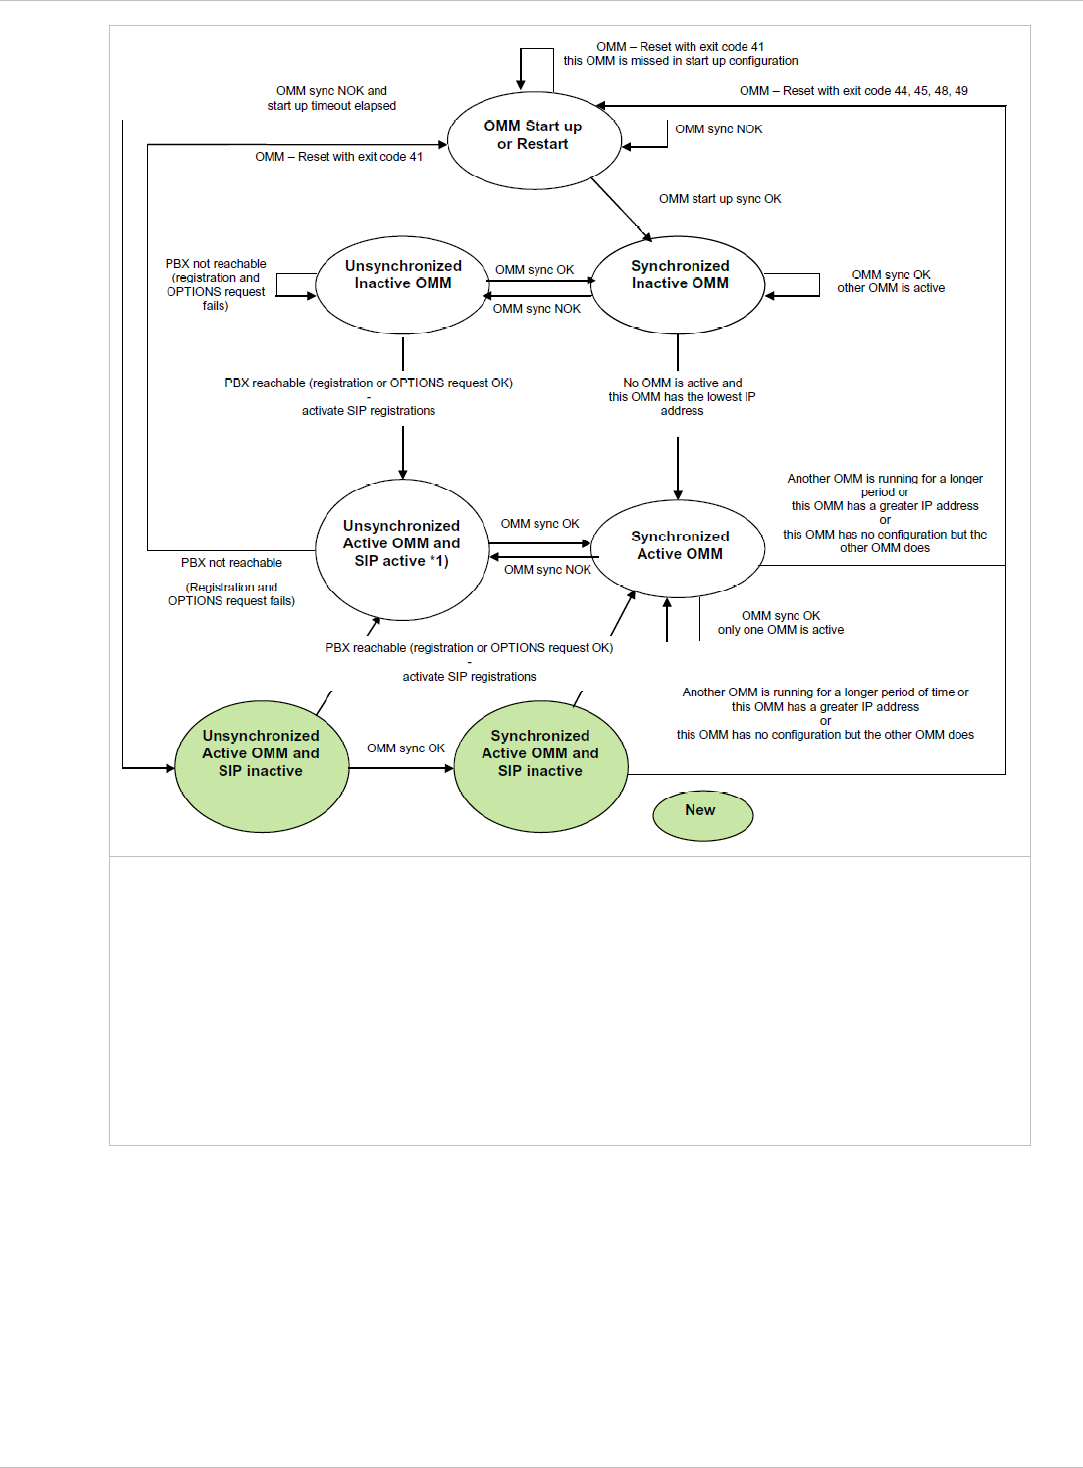
SIP–DECT OM System Manual Release 3.0 9 Configuration und Administration Aspects
“OMM sync OK” means: OMMs are synchronized with each other and are able to exchange their operational
states
“OMM sync NOK” means: OMMs are not synchronized with each other and are not able to exchange their
operational states
*1) In this state the DECT air interface might not be in a definite state as both OMMs are active but cannot
connect with each other! This is caused by IP network failures and cannot be handled by the SIP-DECT system in
a proper automatic way. In such a scenario it is not predetermined which RFP connects with which of the 2
OMMs. The DECT network can split-up into two unsynchronized DECT sub-networks. This can cause voice
quality and handover problems.
With these new states (“… SIP inactive”) the OMM standby mechanism takes care in the
start up phase that all SIP users does not become active if the PBX is not reachable. This
avoids a possible double SIP registration when the PBX and the other OMM is reachable
again before both OMMs negotiate with each other which OMM becomes the active one.
The double SIP registrations might cause a user not to be reachable when his latest SIP
registration came from that OMM that was negotiated to be the inactive one and the SIP
registrar cannot handle 2 or more simultaneous registrations (non-forking proxy).
depl-1230/0.2 Page: 191 (238)

SIP–DECT OM System Manual Release 3.0 9 Configuration und Administration Aspects
9.13.4 Specific Standby Situations
Some aspects have to looked at in case of OMM state changes when they are
unsynchronized.
9.13.4.1 How A Standby OMM Becomes Active
As the above figure shows in case of an unsynchronized OMM state the standby OMM has
to decide whether to become active or not.
For this purpose the OMM tries to contact the configured SIP proxy and registrar. The OMM
starts a SIP registration for the handset with the lowest phone number and sends an
OPTIONS request to the configured proxy. If there is an answer the SIP proxy/registrar will
be considered as reachable and the OMM becomes active.
9.13.4.2 Handling When Both OMMs Are Not Synchronized
In an unsynchronized OMM Standby state the connection between the OMMs is broken. In
case of a network problem both OMMs might be in this state. During this time an inconsistent
OpenMobility system is working with some constraints.
The Web service will warn with the warning “No Standby” for both OMMs in this situation and
possible made configuration changes are not save.
In any case, when both OMMs get in contact again with each other, the longer running one
becomes the active one and that will overwrite the database file in the standby OMM.
Configurations made in this becoming standby OMM would be lost!
9.13.4.3 Two DECT Air Interfaces
In case of both OMMs are in an unsynchronized and active state they are fully working.
RFPs which lose connection to the OMM because of the network break down might connect
to the other OMM. Two DECT air interfaces will be present but are working parallel.
Note: Both air interfaces are using the same PARK. So it can not determined to which
OMM a location registration succeeds.
For PPs different situations are possible:
They do not notice this situation: •
•
- active calls stay established, depending on network conditions;
- PPs can make and receive new calls, depending on an available PBX connection;
- PPs can do handover to RFPs connected to the same OMM;
- PPs can call PPs that are registered to the other OMM
They lose their RFP base station and perform a new location registration:
- active calls are broken;
- PPs can make and receive new calls, depending on an available PBX connection;
- PPs can do handover to RFPs connected to the same OMM;
- PPs can call PPs that are registered to the other OMM;
depl-1230/0.2 Page: 192 (238)

SIP–DECT OM System Manual Release 3.0 9 Configuration und Administration Aspects
•
Note:
They lose their RFP base station and search the DECT network without finding another
one:
- active calls are broken;
- PPs stay in searching for network until an air interface is available again.
Handover between PPs located to RFPs which are controlled by different OMMs is
not possible.
When the OMMs get in contact again with each other this inconsistent OpenMobility system
situation will end.
9.14 Managing Account Data for System Access
Each RFP provides different independent access types:
the OMM Web service/HTTPS interface (see chapter 7); •
•
•
•
•
•
•
•
the OMP (see chapter 8);
The OMM Web service and the OMP are mainly used for configuration and administration.
the OM Configurator (see chapter 9.6);
The OM Configurator is mainly used for static local configuration of an RFP.
the SSH user shell (see chapter 10.3.5).
The SSH user shell is mainly used from experts for diagnosis.
Each of this these access types uses the same account data.
The account data can be altered at the User account page of the OMM Web service (see
chapter 7.4.3).
The OMM delivers all the necessary account data to all connected RFPs. The RFPs save the
account data inside their permanent memory. This has some implications:
An RFP out of the box uses the default account data as long as this RFP is not connected
to the OMM.
An RFP which was connected for at least one time with the OMM uses the account data
from the OMM.
When the account data are changed on the OMM, any not connected RFPs will continue
to use the older passwords.
9.14.1 Account Types
There are three different account types:
Full access: This access type is the “normal” access for all the configuration. Using this
access it is allowed to configure the OMM and each RFP. On the SSH interface of an RFP
this access type allows login for debug information e. g. 'pinging an other RFP to check
visibility.
The factory setting for this account is
Name: 'omm'
Password: 'omm'
Active: 'n/a'
depl-1230/0.2 Page: 193 (238)

SIP–DECT OM System Manual Release 3.0 9 Configuration und Administration Aspects
Read-only access: As the name suggests this access type is not allowed to configure
any item of the OMM installation. This access type can only be used on the OM Web
service. The account can be deactivated.
•
•
The factory setting for this account is
Name: 'user'
Password: 'user'
Active: 'yes
Root (SSH only) access: This access type is only applicable on the SSH interface of an
RFP. Its purpose is to get detailed information e. g. parameters from the kernel. The
access using this account type is not reachable from other hosts hence a login using the
full access type is necessary.
The factory setting for this account is
Name: 'root'
Password: '22222'
Active: 'n/a'
Please note: It is highly recommended not to use the “Root (SSH only) access” account
type. It is meant for technical support only.
9.14.2 Potential Pitfalls
When an RFP is configured via the OM Configurator and is taken out of an installation, the
RFP may become unusable:
When this RFP comes up, it finds a valid configuration in its permanent memory. It will
hence skip DHCP for booting.
•
•
•
But when this configuration is not valid anymore (e.g. the TFTP server has a new IP
address meanwhile), the RFP isn't able to complete the boot and is hence not able to
connect to the OMM.
The RFP will not get newer passwords from the OMM.
It is therefore recommended to switch of the OM Configurator before taking an RFP out of an
installation. But nevertheless the OM Configurator allows to reset the permanent memory of
an RFP (the Aastra support must be connected).
9.15 WLAN Configuration (RFP (L) 42 WLAN / RFP (L) 43 WLAN only)
9.15.1 WLAN configuration steps
The correct configuration of an RFP with a WLAN interface requires the correct configuration
of the DECT part. The second step is to specify the regulatory domain of the WLAN network
at the System settings page of the OMM web service (see chapter 7.4.1).
Regulatory Domain Country
0x10: FCC USA, Australia
0x20: IC Canada
0x30: ETSI Europe (excluding Spain, France)
depl-1230/0.2 Page: 194 (238)
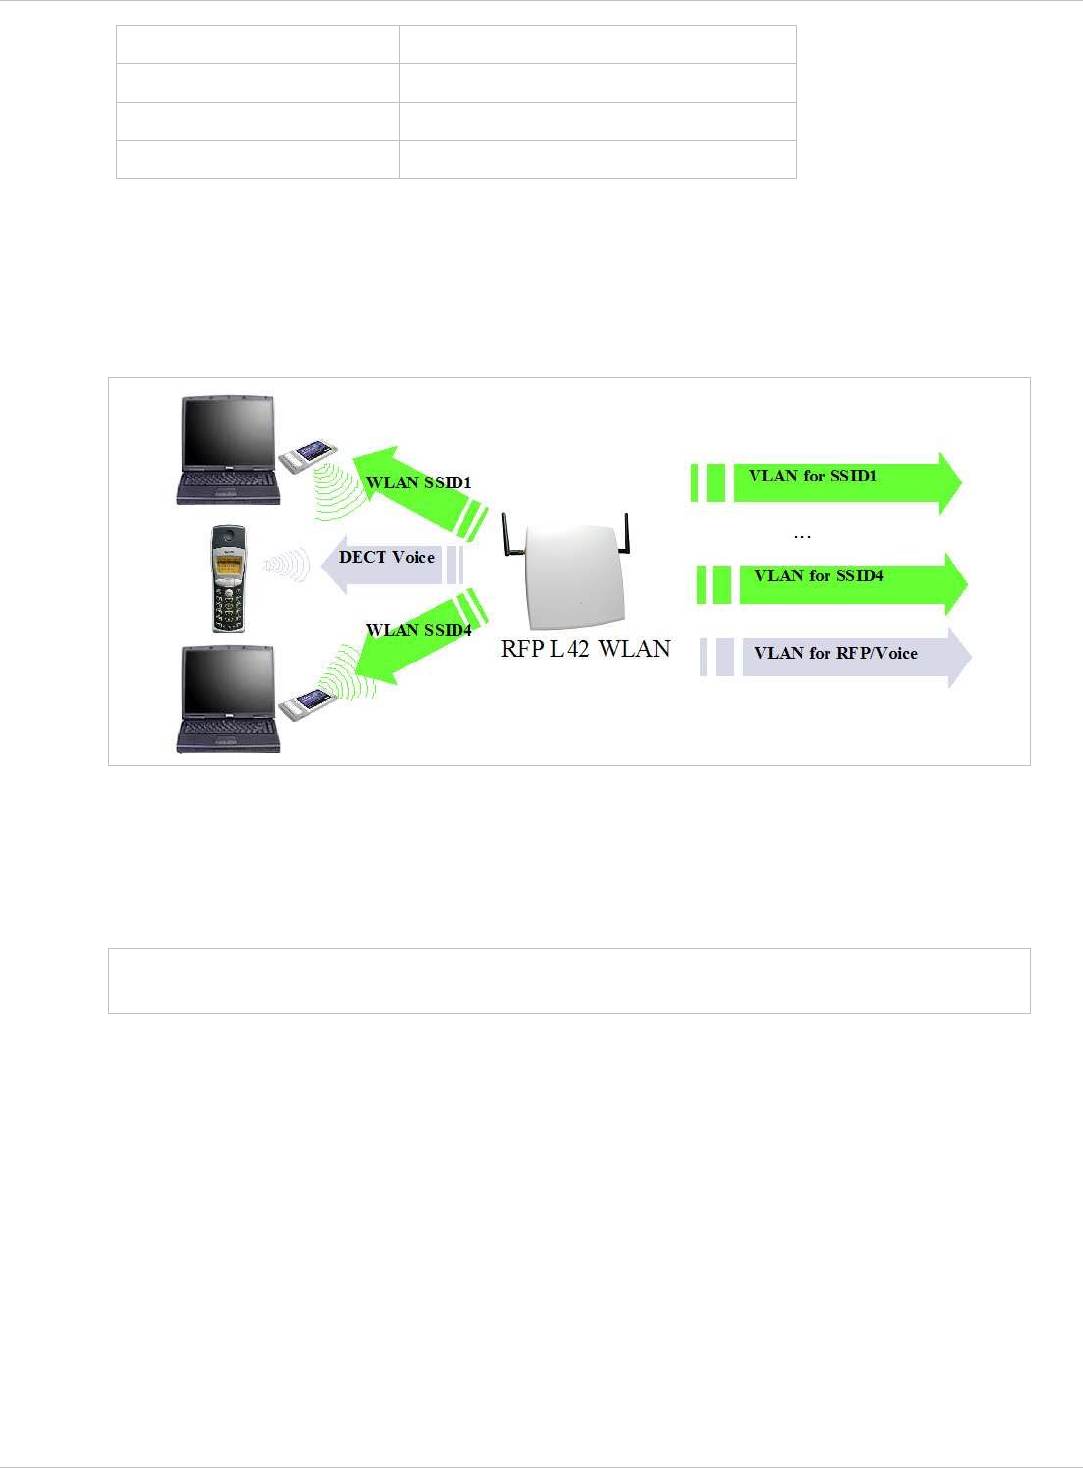
SIP–DECT OM System Manual Release 3.0 9 Configuration und Administration Aspects
0x31: SPAIN Spain
0x32: FRANCE France
0x40: MKK Japan
0x41: MKK1 Japan (MKK1)
This setting depends on the country and is prescribed by the laws of that country. Only the
setting prescribed for that country must be used.
The third step is to specify the WLAN parameters in a profile (see chapter 7.8.1). The WLAN
profile determines the name (SSID) of the WLAN network and other parameters. The
encryption and authentication procedures are especially important and must be planned
carefully beforehand.
The access point can be assigned to a VLAN that conforms to 802.1q. All the data that is
received from and that is to be forwarded to the WLAN clients is then carried by the
configured VLAN. All other data, such as VoIP packets, configuration data or authentication
data (Radius), is given the VLAN tag configured for the RFP. The switch port of the network
component to which the access point is connected must be configured as a trunk port.
Note: The RFP (L) 42 WLAN and RFP (L) 43 WLAN must be connected at least via a
100BaseT Ethernet link in order to activate the RFP’s WLAN function.
9.15.2 Optimizing the WLAN
Beacon Interval
Transmitting beacons requires transmission channel capacity. A shorted beacon interval
increases the WLAN network's ability to detect signals, thus improving its availability. At the
same time, it increases the network's ability to adjust the mutually negotiated signal strength.
A longer beacon interval saves WLAN air time and also reduces the power consumption of
mobile WLAN clients.
RTS Threshold
If the network throughput is low or if many retransmissions occur, the RTS/CTS handshake
can be activated by reducing the RTS threshold value below 1500 byte. This can improve
depl-1230/0.2 Page: 195 (238)
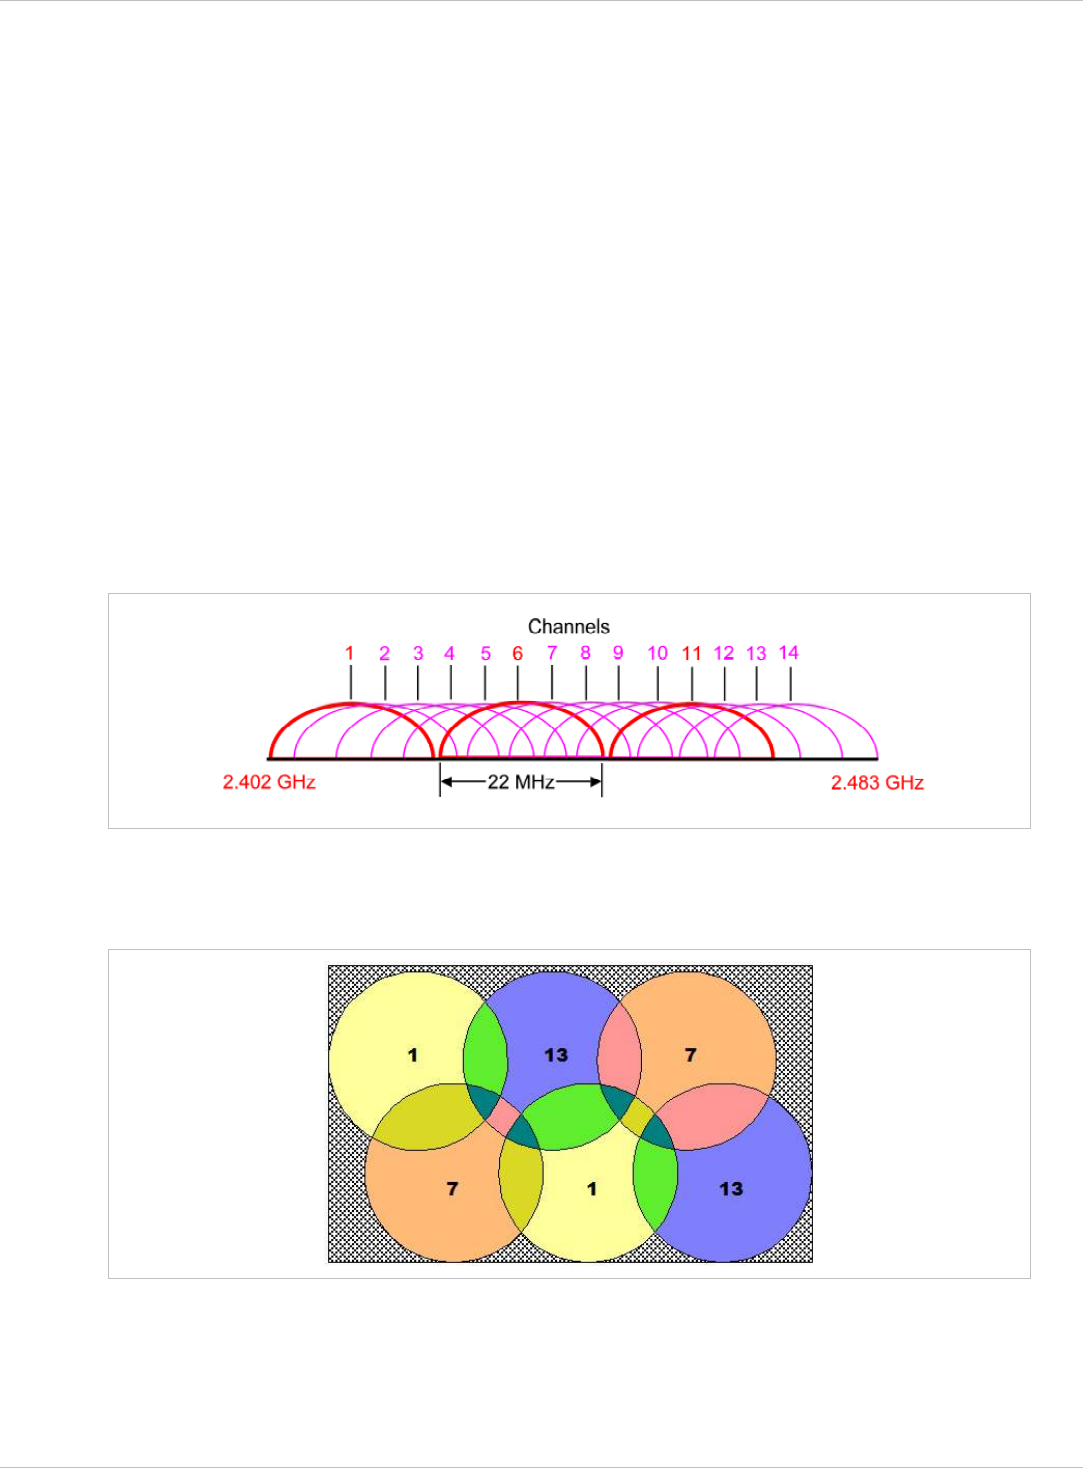
SIP–DECT OM System Manual Release 3.0 9 Configuration und Administration Aspects
throughput, especially in environments where reflection and attenuation cause problems for
HF.
Fragmentation Threshold
In environments where there is lot of interference and poor radio quality, reducing the
fragment size below 1500 bytes can improve the effective throughput. However, transmitted
data frames have to be fragmented, which means a higher load on the RFP’s processor.
DTIM Period
The DTIM period specifies the interval between transmissions of the broadcast and multicast
packets. All WLAN clients must be active during this interval. Increasing the DTIM period
lowers the clients power consumption slightly. Not all programs can manage the increase in
response times, however.
Channel Allocation
Every WLAN RFP must be configured to a channel. You should ensure that the channel
settings do not overlap. WLAN RFPs within range of each other should be configured at least
five channels apart. When the radio field is planned, the WLAN RFPs of foreign WLANs that
may be operating in the vicinity must be taken into account.
When planning the radio coverage for a two-dimensional area, please bear in mind that the
distance between any two base stations operating on the same frequency must be at least
twice their range. The range can be adjusted by lowering the output power level.
depl-1230/0.2 Page: 196 (238)

SIP–DECT OM System Manual Release 3.0 9 Configuration und Administration Aspects
9.15.3 Securing the WLAN
In order to ensure that communication in the WLAN network is secure, several measures
need to be taken. Firstly, data packets transmitted via the openly visible radio interface must
be encrypted, and secondly, all WLAN components that provide services should have to
authenticate themselves.
There are different encryption methods available which you configure within the WLAN
profile (see chapter 7.8.1). However, only the recent WiFi protected access (WPA)
encryption offers sufficient security against possible intruders. You should not use the (older)
WEP encryption for your company LAN.
Especially with larger WLAN installations, the single shared secret offered by WPA-personal
may not be sufficient for your security requirements, because any person that connects to
the WLAN needs to know the same shared secret. For this reason, you should also setup
RADIUS authentication that is supported by all RFP 42/L42 devices.
A Radius Server (Remote Authentication Dial In User Service) handles 802.1x
Authentication, thus authorize different WLAN clients with an individual username / password
combination to log in. We recommend to use a Radius Server with EAP-TLS (e.g.
FreeRadius or MS Windows 2003 IAS Server) and a Certificate Authority (CA).
The RADIUS authentication takes place between the RADIUS server and the RADIUS client,
with the WLAN RFP to pass-through this communication. You should refer to the
documentation that comes with your RADIUS product for details on how to setup, maintain
and operate the RADIUS system.
9.16 SNMP Configuration
To manage a larger RFP network, an SNMP agent is provided for each RFP. This will give
alarm information and allow an SNMP management system (such as HP Open View) to
manage this network. The SNMP agents can be configured in the SNMP menu of the OM
Web service, see chapter 7.4.5.
All SNMP agents are configured by the OMM. Additional parameters, that are valid for the
individual RFP (e.g. “sysLocation” and “sysName”) are generated. The “sysLocation”
parameter corresponds to the location configured via the OMM web interface. The
“sysName” parameter is generated using the MAC address and the RFP device type (e.g.
RFP (L) 43 WLAN). The RFP uptime can be requested by reading the “sysUpTime”
parameter. This value indicates how long the RFP application software is running. It does not
indicate the uptime of the operating system which does not correspond to the operational
RFP state.
The SNMP agent responds to SNMPv1-read and SNMPv2c-reads requests for the standard
MIB-II objects. The Management Information Base (MIB-II) contains 11 object groups. The
agent receives both SNMPv1 and SNMPv2c traps. It sends a “coldStart” trap when it first
starts up. It also sends an enterprise-specific trap “nsNotifyShutdown” when it stops. When
the SNMP agent receives an SNMP request using an unknown community name, it sends an
“authenticationFailure” trap. The SNMP agent also generates an enterprise-specific trap
“nsNotifyRestart” (rather than the standard “coldStart” or “warmStart” traps) after being re-
configured.
depl-1230/0.2 Page: 197 (238)

SIP–DECT OM System Manual Release 3.0 9 Configuration und Administration Aspects
9.17 Download Over Air
The “Download Over Air” feature allows updating the handset firmware without any user
interaction or interruption of the telephony services over the existing DECT air interface. This
features is currently available for the handset types Aastra 600d and Aastra 650c.
The PP firmware is part of each OpenMobility software package which is delivered by Aastra.
The PP firmware is delivered in the package file “aafon6xxd.dnld”. This package file must be
put on the same tftp server and path where the OMM-RFP gets his boot image file (e.g.
iprfp3g.dnld).
9.17.1 How “Download Over Air” Works
If the “Download over Air” feature is activated, the OMM acts as a download server which
provides the firmware for downloads.
The PP sends its actual firmware version within the DECT attachment procedure. If the
firmware version does not match the version provided by the OMM, the PP will be queued
into the update-queue. Later on the queued PPs will be paged to establish a download
connection. After the connection is established, the OMM sends its actual PP firmware
version and the PP will request a handset description file. After receiving the handset
description file, the PP decides which files are missing or need to be updated. If files are
missing or need to be updated the PP initiates the download procedure.
The OMM takes care of the following download scenarios automatically:
If a handsets becomes unreachable e.g. when the handset is switched off, the OMM will
update the handset when the PP becomes available again.
•
•
•
•
•
The OMM will take care of the software download while the user is moving between base
stations (roaming) and location areas.
The OMM has the capability of resuming a download from the point where it was last
disrupted. e.g. the user goes out of coverage area during download or the handset runs
out of battery power.
The OMM updates new handsets subscribed to the system.
While the handset is barred (e.g. low battery or “Download over Air“ is disabled at the
local menu), the download will be postponed.
The download happens without any user intervention. During the download, the telephony
services, the roaming- and handover procedures are still available. The download stops
automatically when e. g. the PP leaves the coverage area or the RFP gets busy. The
download resumes automatically when the stop cause is solved.
The Aastra 610d/620d/630d/650c handsets have two partitions in the internal flash memory
to hold 2 different software versions. During the download the new firmware is written to one
partition and the PP is running from the other partition.
After the download is successfully completed, the new firmware will be activated when the
handset is in the idle state.
The download of a single PP with a firmware of 1 MB lasts approximately 90 minutes. The
number of PPs which can be downloaded depends on the available system resources.
The “Download over Air” service is delayed after a system startup for a while to become the
whole DECT system active. This may last several minutes.
depl-1230/0.2 Page: 198 (238)

SIP–DECT OM System Manual Release 3.0 9 Configuration und Administration Aspects
9.17.2 How to configure “Download Over Air”
In the following, the configuration of the “Download Over Air” feature is described by using
the OM Web service. The feature can also be configured using the OM Management Portal
(OMP). Therefore, links to the corresponding OMP settings are also given, but without
screenshots.
The “Download over Air” feature can be activated or deactivated on the System Settings”
web page.
In the OMP, the “Download over Air” feature is activated/deactivated in the Miscellaneous
tab of the Data management menu (see chapter 8.5.5.6).
Please note: Before a new handset firmware package is put on a tftp server, the “Download
over Air” feature must be deactivated. After the copy or installation the
“Download over Air” feature can be activated again.
If the “Download over Air feature” is activated, the status of the “Download over Air” service
together with some statistics is presented in the Portable parts section on the Status web
page.
depl-1230/0.2 Page: 199 (238)

SIP–DECT OM System Manual Release 3.0 9 Configuration und Administration Aspects
The handset firmware container for handset firmware update over the air includes
packages for the Aastra 600d and Aastra 650c handsets. The available versions are
also displayed on the Status web page.
Please note: The entry of “Loading firmware from” on the OpenMobility Manager Status
web page is only updated on restart of the OpenMobility Manager. Changing
the location while the OpenMobility Manager is running has no effect.
The individual download status of each PP is presented on the Portable part web page.
The different icons and texts of the Download column have the following meaning:
Icon Meaning
depl-1230/0.2 Page: 200 (238)

SIP–DECT OM System Manual Release 3.0 9 Configuration und Administration Aspects
- Impossible to download the firmware to that handset (e.g.
noAastra 610d/620d/630d/650c)
The PP is paged to establish a download connection. In case of a successful
connection establishment the PP calculates the number of bytes to
download. This may last several seconds.
xx kbytes left The download is ongoing and xx kbytes are left.
The firmware of this PP is up to date.
Warning.
The download is barred because of one of the following reasons:
– The battery power is lower than 50% and the PP is not connected to the
docking station or the USB-Interface.
– This is not the master download system. A PP can be enrolled on several
OpenMobility systems. The first system to which the handset will be
enrolled is the “master system”. The PP downloads only from the “master
system”. A different “master system” can be chosen inside the local menu
of the handset.
– The download is disabled in the local menu of the handset.
Error
The download failed because of one of the following reasons:
The specific reason is shown as a tooltip.
The PP is queued in the update-queue for updating (pending).
– The PP is busy (temporary status).
The specific reason is shown as a tooltip.
– checksum error,
– file system error,
– error while writing firmware to flash,
– version mismatch,
– error while expanding firmware container.
Info
The download is not possible because of:
– the handset is not reachable,
– the handset is detached.
The specific reason is shown as a tooltip.
In the OMP, the “Download over Air” service status is displayed in the Status menu (see
chapter 8.4).
depl-1230/0.2 Page: 201 (238)

SIP–DECT OM System Manual Release 3.0 10 Maintenance
10 Maintenance
10.1 Site Survey Measurement Equipment
If a SIP–DECT installation has to be planned, a sufficient distribution of the RFPs is
necessary which fulfills the requirements for reliable synchronization and connectivity to the
Portable Parts. The site survey kit may help you. It comprises:
One measuring RFP with its own power supply. •
•
•
•
•
A tripod and a battery for the RFP.
Two reference PPs with chargers.
Battery chargers.
Optional a measuring handset which can monitor other makers DECT radio sources.
10.2 Checking the Aastra DECT 142 / Aastra 142d Handset
Firmware Version
You can display the version information of the Aastra DECT 142 / Aastra 142d handset with
a few keystrokes. Check the firmware version to determine whether an update is required to
overcome any user issues.
1 Press the Menu soft key.
7 Select System (only to highlight).
8 Press OK.
9 Select Version Number.
10 Press OK.
The display will show the software and the hardware version of the Aastra DECT 142 /
Aastra 142d handset.
10.3 Diagnostic
10.3.1 Aastra DECT 142 / Aastra 142d Site Survey Mode
You can set the Aastra DECT 142 / Aastra 142d handset in “site survey mode” with a few
keystrokes. In this mode the phone will display the RFPs and the actual field strength of the
receiving signal in dBm.
1 Press the Menu soft key.
11 Enter the following key sequence “R***76#”.
12 Select Site Survey.
13 Press OK.
14 To leave the site survey mode switch the phone off and on again.
The following display is shown on the Aastra DECT 142 / Aastra 142d handset:
depl-1230/0.2 Page: 202 (238)

SIP–DECT OM System Manual Release 3.0 10 Maintenance
Menu Phonebook
RFPI 10FFF21 02
FE PP: FP:
-dBm 50 57 50
RPN 02 01 00
PARK: 1F-10-FF-F0-21 RFP ID: 02*
RFP ID: 02*
*The ID of RFP to which the PP is currently associated to.
Frame error
Field strength
RFP ID
In this example the PP is currently connected to the RFP with the number 02. The RFPs 01
and 00 are also visible. The number “10FFF221 02” on the upper right side refers to the
PARK (Example 1F-10-F2-21) of the SIP–DECT system and to the RFP to which the phone
is currently connected to.
10.3.2 Aastra DECT 142 / Aastra 142d Auto Call Test Mode
You can set the Aastra DECT 142 / Aastra 142d handset to “auto call test mode” with a few
keystrokes. In this mode the phone will call a specified number cyclically. You can use this
feature to generate traffic for test purposes. This mode is also active if the phone is on the
charger.
1 Press the Menu soft key.
15 Enter the following key sequence “R***76#”.
16 Select Auto Call Test.
17 Press OK.
18 Enter the phone number to call.
19 Press OK.
20 Enter a number of seconds between two calls.
21 Press OK.
22 Enter a number of seconds a call shall be active.
23 Press OK. The test will be started automatically.
24 To stop the test, switch the phone off and on again.
10.3.3 Aastra DECT 142 / Aastra 142d Auto Answer Test Mode
You can set the Aastra DECT 142 / Aastra 142d handset to “auto answer test mode” with a
few keystrokes. In this mode the phone will answer incoming calls automatically. You can
use this feature together with phones in the “auto call test mode” (see chapter 10.3.2) for test
purposes. This mode is also active if the phone is on the charger.
depl-1230/0.2 Page: 203 (238)
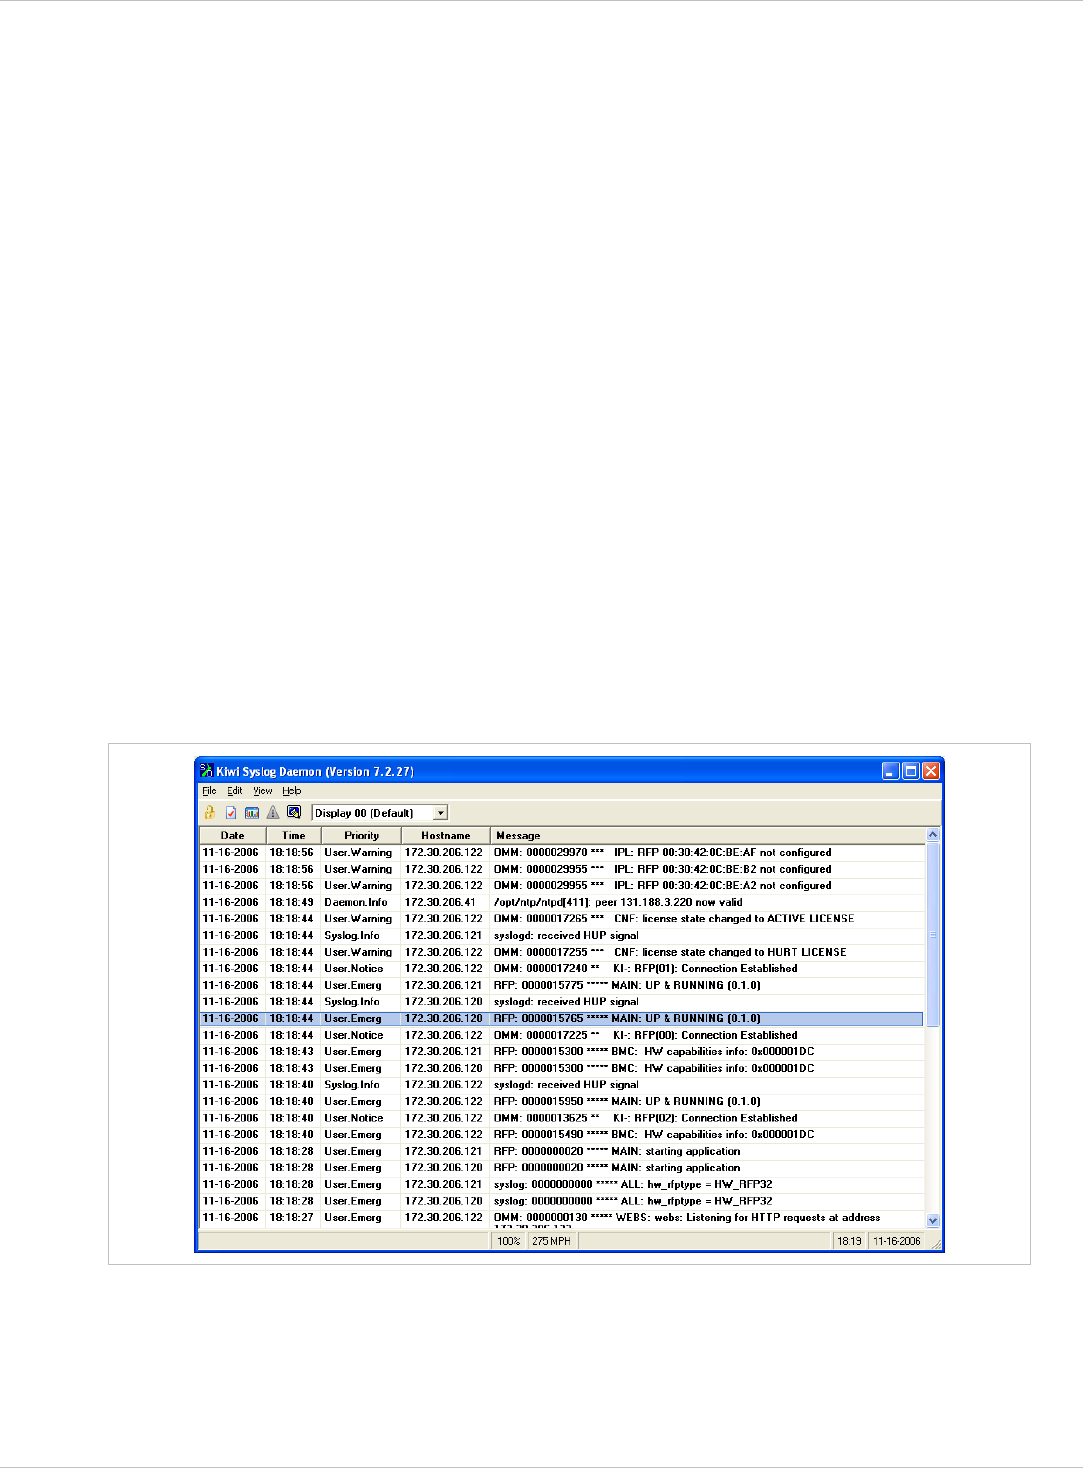
SIP–DECT OM System Manual Release 3.0 10 Maintenance
1 Press the Menu soft key.
25 Enter the following key sequence “R***76#”.
26 Select Auto Answer.
27 Press OK.
28 Enter a number of seconds the phone shall ring before it will answer the call.
29 Press OK.
30 Enter a number of seconds a call shall be active.
31 Press OK. The test will be started automatically.
32 To stop the test switch the phone off and on again.
•
•
10.3.4 Syslog
The OpenMobility Manager and the RFPs are capable of propagating Syslog messages
conforming to RFC 3164 (see /13/). This feature together with the IP address of a host
collecting these messages can be configured.
Syslog has to be enabled by:
DHCP using the public options 227 and 228.
To set up the syslog via DHCP or the OM Configurator has the advantage that syslogs are
available in earlier states of the RFP startup.
The level of syslog messages in the default state allows the user to have control over the
general system state and major failures.
Setting the syslog daemon server and port via the web interface.
depl-1230/0.2 Page: 204 (238)

SIP–DECT OM System Manual Release 3.0 10 Maintenance
10.3.5 SSH user shell
Each RFP offers a lot of commands within the SSH shell. Most of them are useful for
diagnostic and may help experts to resolve failures.
Note: Some commands can harm the system operation.
The SSH access of an RFP is open if
the RFP is not connected to an OMM.
To activate the SSH access of an RFP which has a connection to an OMM, activate the
Remote access checkbox on the OMM System settings web page (see also chapter 7.4.1).
the RFP is connected to an OMM and the “Remote Access” is switched on or •
•
Æ In the OMP, the SSH access is activated/deactivated in the General tab of the System
settings menu (see chapter 8.5.1).
10.3.5.1 Login
To log in to the SSH user shell:
1 Open SSH session to the IP DECT base station with the “Full access” user name.
33 Enter the password for the “Full access” account (see also 9.14.1).
The output should look like:
Welcome to IP RFP OpenMobility SIP Only Version 2.1.x
last reset cause: hardware reset (Power-on reset)
omm@172.30.206.94's password:
omm@172.30.206.94 >
depl-1230/0.2 Page: 205 (238)

SIP–DECT OM System Manual Release 3.0 10 Maintenance
10.3.5.2 Command Overview
Type help to get a command overview:
Command Description
exit,quit,bye Leave session
ommconsole OMM console
ip_rfpconsole RFP console
rfpmconsole RFP manager console
wlanconsole WLAN console
wpaconsole WPA console
flash Shows information from flash
link Shows status of ethernet interface
ldb View / set local configuration (OmConfigurator)
setconsole Duplicate messages to console
noconsole Do not duplicate messages to console
dmesg Messages from last boot
logread Last messages
su Switch to user root
ping Well known ping
traceroute Well known traceroute
free Well known free
ps Well known ps
top Well known top
ifconfig Well known ifconfig
uptime Well known uptime
reboot Well known reboot
date Well known date (time in UTC)
rfpm_console RFP manager console
wlan_console WLAN console
10.3.5.3 OMM Console On Linux Server
You can call the OMM console on the Linux server which runs the OMM using the
“ommconsole” command. Log on as user root as it is necessary to install and/or update
OMM.
IMPORTANT : If you not login as root to open the OMM console then the path to
ommconsole is not set and you have to enter the whole path
“/usr/sbin/ommconsole” to start the OMM console.
depl-1230/0.2 Page: 206 (238)

SIP–DECT OM System Manual Release 3.0 10 Maintenance
10.3.5.4 RFP Console Commands
If you type ip_rfpconsole you are able to use the following commands on each RFP:
Command Description
? Displays Command Help Table
help Displays Command Help Table
logger Send a string to the syslog daemon
deftrc Resets all trace settings to default
dsp Shows channel config
dump Creates system state dump file /tmp/sys_dump.txt.gz
mem Show memory and heap
exit Leave this console
heap Shows heap buffer statistics
lec Adjust linear echo canceler parameters
media Display state of media channels
mutex Lists all created MXP mutexes
omms Shows connection status to OMM(s)
queues Lists all created MXP queues
reset Resets the IPRFP application
resume Resume bmc activity
rsx Allows RSX connection to BMC via TCP
Lists all created MXP semaphores
spy
suspend Suspend bmc activity
tasks Lists all running MXP tasks
Displays the state of voice handling
wlan
runtime Report the process runtime
sem
Set/display spy levels: [ <key #> <level #> ]
voice
Configure wlan card on cmdline
lu10 Lu10 SDU <-> PDU converter (RFP (L) 35/36/37 IP and
RFP (L) 43 WLAN only)
mroute Display media routes
Please note: The “spy” command enables you to increase the level of syslog messages.
This should be only used by instructions of the support organization because it
can harm the system operation.
depl-1230/0.2 Page: 207 (238)

SIP–DECT OM System Manual Release 3.0 10 Maintenance
10.3.5.5 OMM Console Commands
If you have opened the session on the OMM RFP and you type “ommconsole”, you are able
to use the following OpenMobility Manager (OMM) related commands:
Command Description
? Displays Command Help Table
adb Automatic DB export and import (ADB) console
CMI commands
cnf
cron Display pending cron jobs
help Displays Command Help Table
Send a string to the syslog daemon
deftrc
dlc DECT Data Link Control
dm Download Over Air Manager
cmi
Show configuration parameters
logger
Resets all trace settings to default
dsip DSIP commands
epr External provisioning task (EPR) console
mem Show memory and heap
exit Leave this console
fts Requesting FTS to download file
gmi DECTnet2 Inter Working Unit
heartbeat Configure heartbeat mechanism for IP-RFPs
ima IMA commands
ipc Displays socket communication
ipl Displays connected RFPs
iplfilter Configures for which RFPs spy messages shall be generated
mon Toggle monitor functionality
msm Display states within MediaStreamManagement
mutex Lists all created MXP mutexes
nwk DECT network layer
omi OMI commands
queues Lists all created MXP queues
rfp Radio Fixed Part Control
rfpd Radio Fixed Part Debug
rfps Radio Fixed Part Statistic
rping Requests one or more RFPs to ping a host
rspy Remote configure spy levels on IP-RFPs
rsx Toggles RSX debug port on RFPs
depl-1230/0.2 Page: 208 (238)

SIP–DECT OM System Manual Release 3.0 10 Maintenance
rtt Set event flag for high RTT values / clears values
sem Lists all created MXP semaphores
spy Set/display spy levels: [ <key #> <level #> ]
standby Displays redundant OMMs
stat Statistic
sync Commands for RFP synchronisation
tasks Lists all running MXP tasks
tzone Time zone commands
uptime Displays system uptime
ver Version information
wlan Display states within Wireless LAN Management
axi AXI commands
runtime Report the process runtime
upd Displays update status of RFPs
xml XML browser task (XML) console
Please note:
Please note:
The “spy” command enables you to increase the level of syslog messages
especially for subsystems of the OMM. This should be only used by
instructions of the support organization because it can harm the system
operation.
10.3.6 Core File Capturing
If there some fatal error on the OMM and the software is breaking down, the OMM is able to
generate memory dump. If you send these generated core files to the support, you help them
to resolve this failures. The OMM is able to store these core files on a TFTP server in your
local network.
To enabling core file creation write on the OMM command line:
ldb core=yes
ldb core_srv=server-ip – TFTP server IP address
ldb core_path=path – file path on TFTP server (must be writeable)
If no ldb_core_srv and ldb_core_path is given, the OMM tries to write the core files to the
TFTP server and path where the OMM/RFP application was downloaded.
After restarting the OMM, the core files are automatically transferred to the TFTP server.
The TFTP server must allow writing new files, this is usually not standard.
To disable core file capturing writer on command line: ldb core=.
depl-1230/0.2 Page: 209 (238)
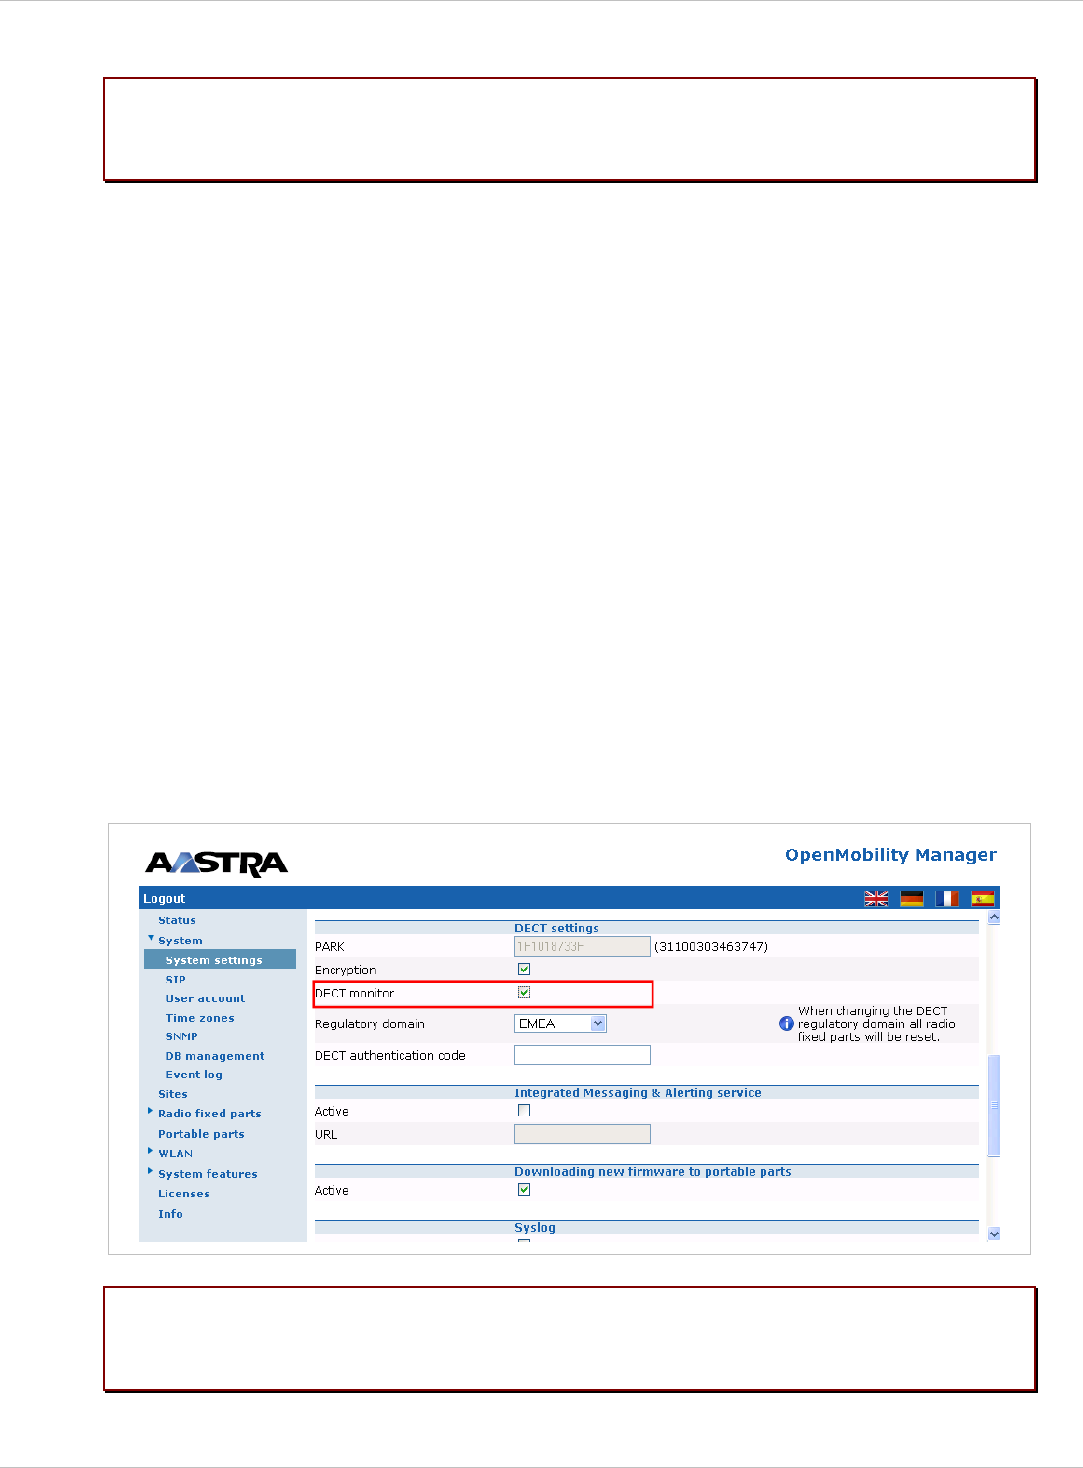
SIP–DECT OM System Manual Release 3.0 10 Maintenance
10.3.7 DECT Monitor
Please note:
Please note:
The DECT Monitor has been replaced by OMP but the DECT Monitor can still
be used without warrenty for SIP–DECT installations with a standard PARK
and up to 256 RFPs’ all within paging area 0.
For a better error detection in the SIP–DECT system the DECT Monitor can be used. The
DECT Monitor is an MS Windows based stand alone program. It provides the possibility to
give a real time overview of the current IP DECT base station and telephone states in the
SIP–DECT system.
The following features are provided by the DECT Monitor:
Reading out of the DECT configuration of an SIP–DECT system. •
•
•
•
•
•
•
•
•
Configuration can be stored in an ASCII file.
Display of DECT transactions IP DECT base station <–> telephone in clear tabular form
with highlighting of handover situations. Real-time display.
Display of further events concerning the status or actions of IP DECT base stations and
telephones of the SIP–DECT system.
All events can also be recorded in a log file.
Display of the synchronization relations between the RFPs.
Monitoring of systems with up to 256 IP DECT base stations and 512 PPs.
Reading out and display of IP DECT RFP statistics data, either for a single IP DECT RFP
or for all IP DECT RFPs.
Display of DECT central data of the SIP–DECT system.
The DECT Monitor program can only be used when the DECT monitor checkbox is
activated on the flag in the OMM System settings web page (see also chapter 7.4.1).
Because of security, the DECT monitor flag is not stored permanently in the
internal flash memory of the OMM/RFP. After a reset the DECT monitor flag is
disabled.
depl-1230/0.2 Page: 210 (238)
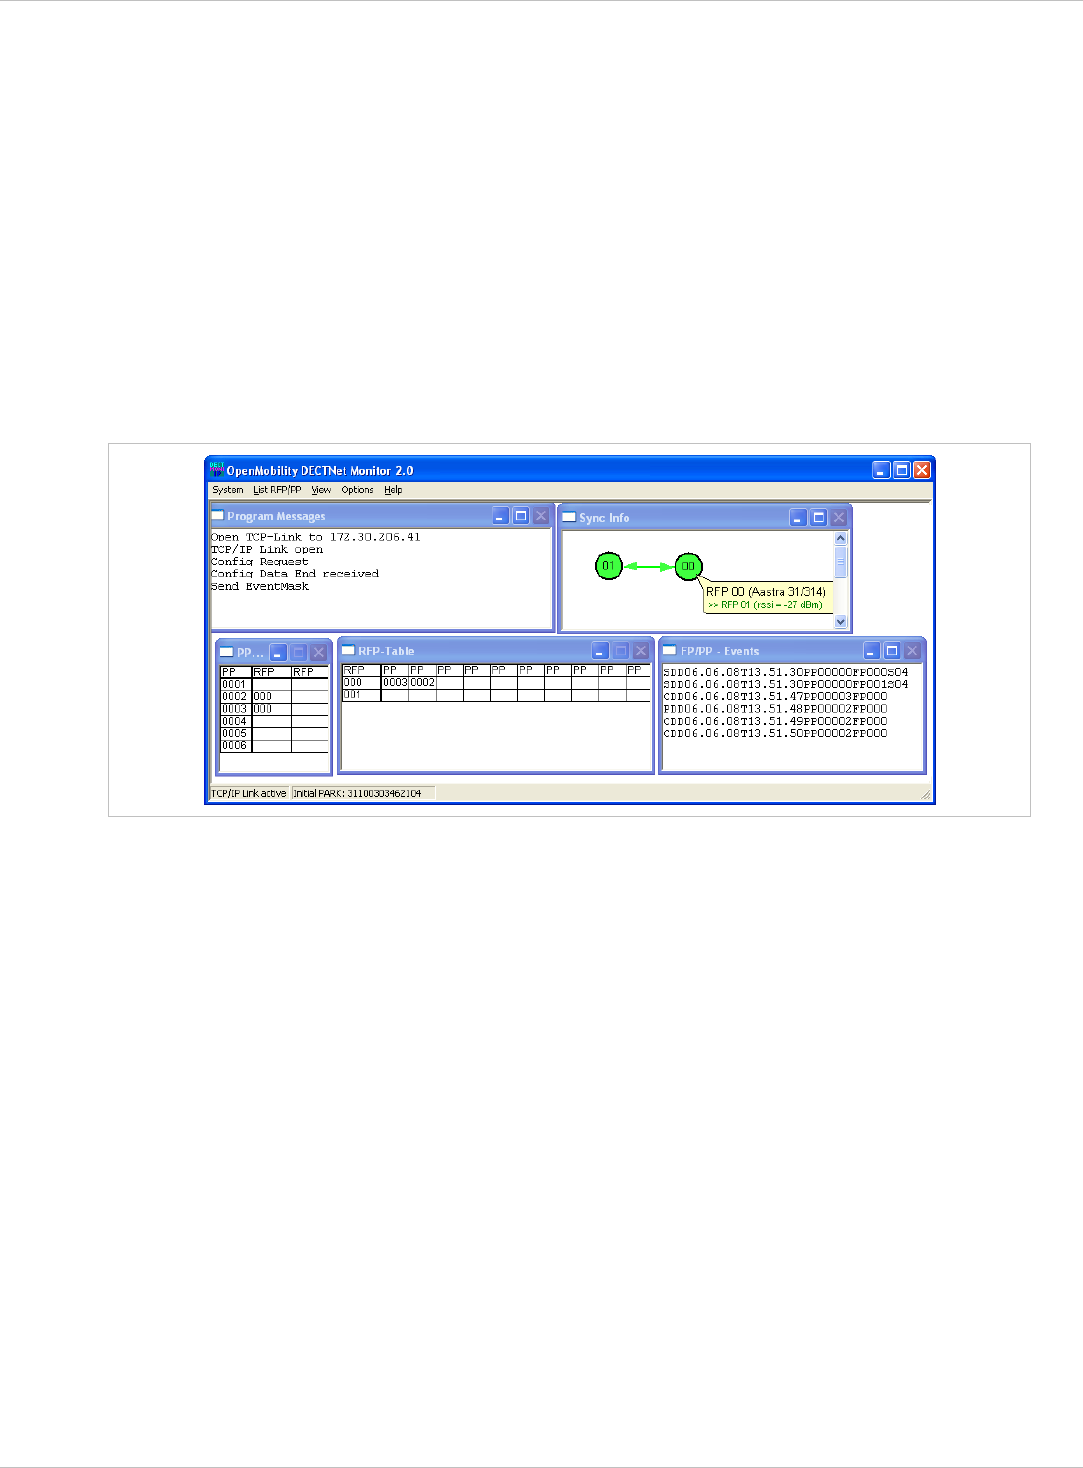
SIP–DECT OM System Manual Release 3.0 10 Maintenance
The DECT monitor program is used together with the SIP–DECT system. When the program
is started, the user is requested to enter the IP address of the IP DECT RFP or the server
running the OpenMobility Manager (OMM) software.
There can be several reasons for an unsuccessful link establishment:
Operation of DECT monitor is not enabled inside the OMM. Use the OMM web service to
enable DECT monitor operation.
•
•
•
IP address is not correct. It has to be the address of the RFP the OMM is running on.
A link routed to the RFP is not supported.
The program displays the IP address which was used last time. When the program is started,
a link to the OMM is automatically established and the program window shows all user
configured child windows and tables. When all links have been established, the DECT data
of the system are automatically read out and entered in the tables “RFP-Table” and “PP-
Table”. This procedure is called “Config Request”.
Next, the defined trace options (Event Mask) are sent to the OMM. The options which are
sent to the OMM are always those which were active the last time the program was exited.
If the trace option “Transaction establish/release” is activated, the OMM will deliver all
existing transactions.
Following this, the OMM system delivers the desired trace data. The user can either
communicate with the program interactively (see below) or he can simply activate a log file in
which to record the data.
Following this initialization, the user can carry out the following modifications:
The trace settings can be modified using the menu item Options-Event Mask.
Transmission to the OMM takes place after confirmation of the settings with OK.
•
•
•
•
•
A Config Request can be sent again to the OMM.
A log file can be activated.
By means of various dialogs, the configuration data of the telephones, RFPs and control
modules can be displayed and stored in ASCII files.
The following information is displayed dynamically in the tables:
Transactions between telephone and DECT system. These are displayed in both tables.
Simple transactions are displayed in black on a white background; during handover, both
transactions involved are displayed in white on a red background.
depl-1230/0.2 Page: 211 (238)
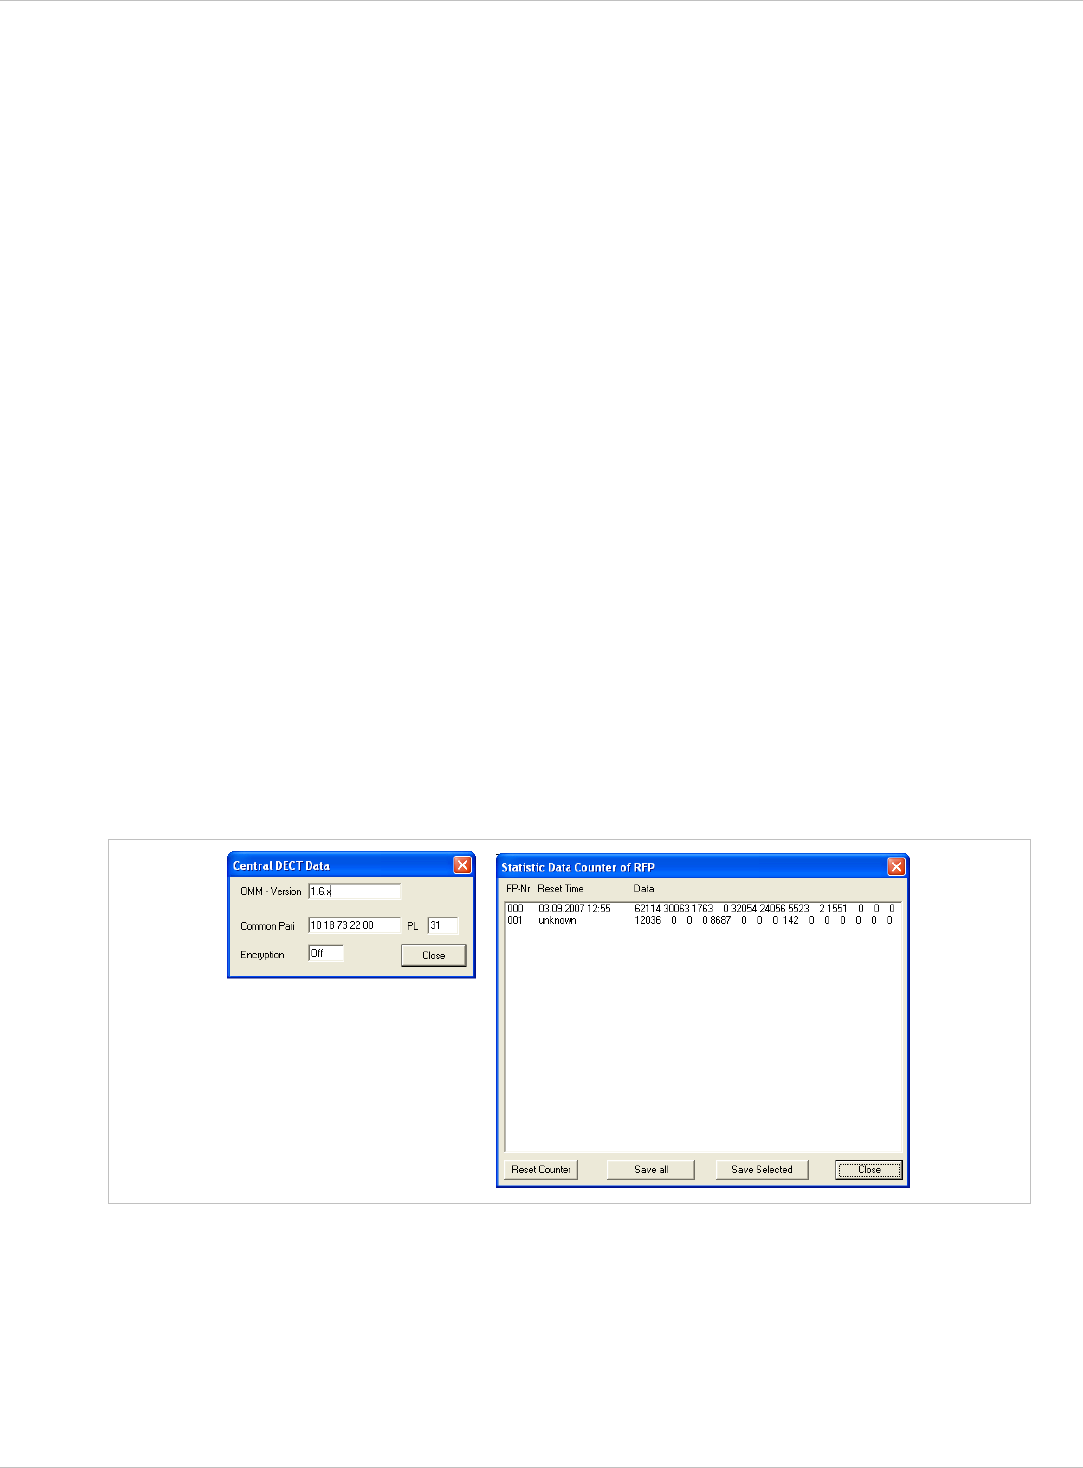
SIP–DECT OM System Manual Release 3.0 10 Maintenance
The Location Registration and Detach events are displayed in the tables for approx. 1-2s
after their occurrence (light green background), if possible. There is no display in the FP
table if there is no column free for display. If the event has already been displayed, it can
be overwritten at any time. The events are not displayed if they occur during an on-going
transaction. Irrelevant of whether the events are displayed in the tables, they are always
entered in the FP/PP-Events window and in the log file (provided that this is open).
•
•
•
•
•
•
The following color scheme is used for display of the RFPs in the RFP table:
RFP gray-blue: IP DECT base station is not active (not connected or disturbance).
RFP black: IP DECT base station is active.
The data of an RFP are displayed in a dialogue box after clicking on the respective RFP field
in the RFP table. The statistics data of the RFP can be called up from this dialogue box.
The following color scheme is used for display of the telephone in the PP table:
PP black: Handset is enrolled. It is assumed that the telephone can be reached.
PP blue: Handset can presumably not be reached. Detach was received, or when an
attempt was made to reach a telephone, the handset did not answer.
PP gray blue: Handset not enrolled.
The data of a telephone are displayed in a dialog box after clicking on the respective
telephone field in the FP table.
The Sync Info child window contains all IP DECT base stations and shows their
synchronization and relation states to each other. Selecting the IP DECT base stations with
the right mouse button, the user can change visibility views and can even force a
resynchronization of an IP DECT base station.
There are several optional child windows selectable. They are all listed below and give some
more information about the SIP–DECT systems. Mostly they are statistics and for internal
use only.
depl-1230/0.2 Page: 212 (238)
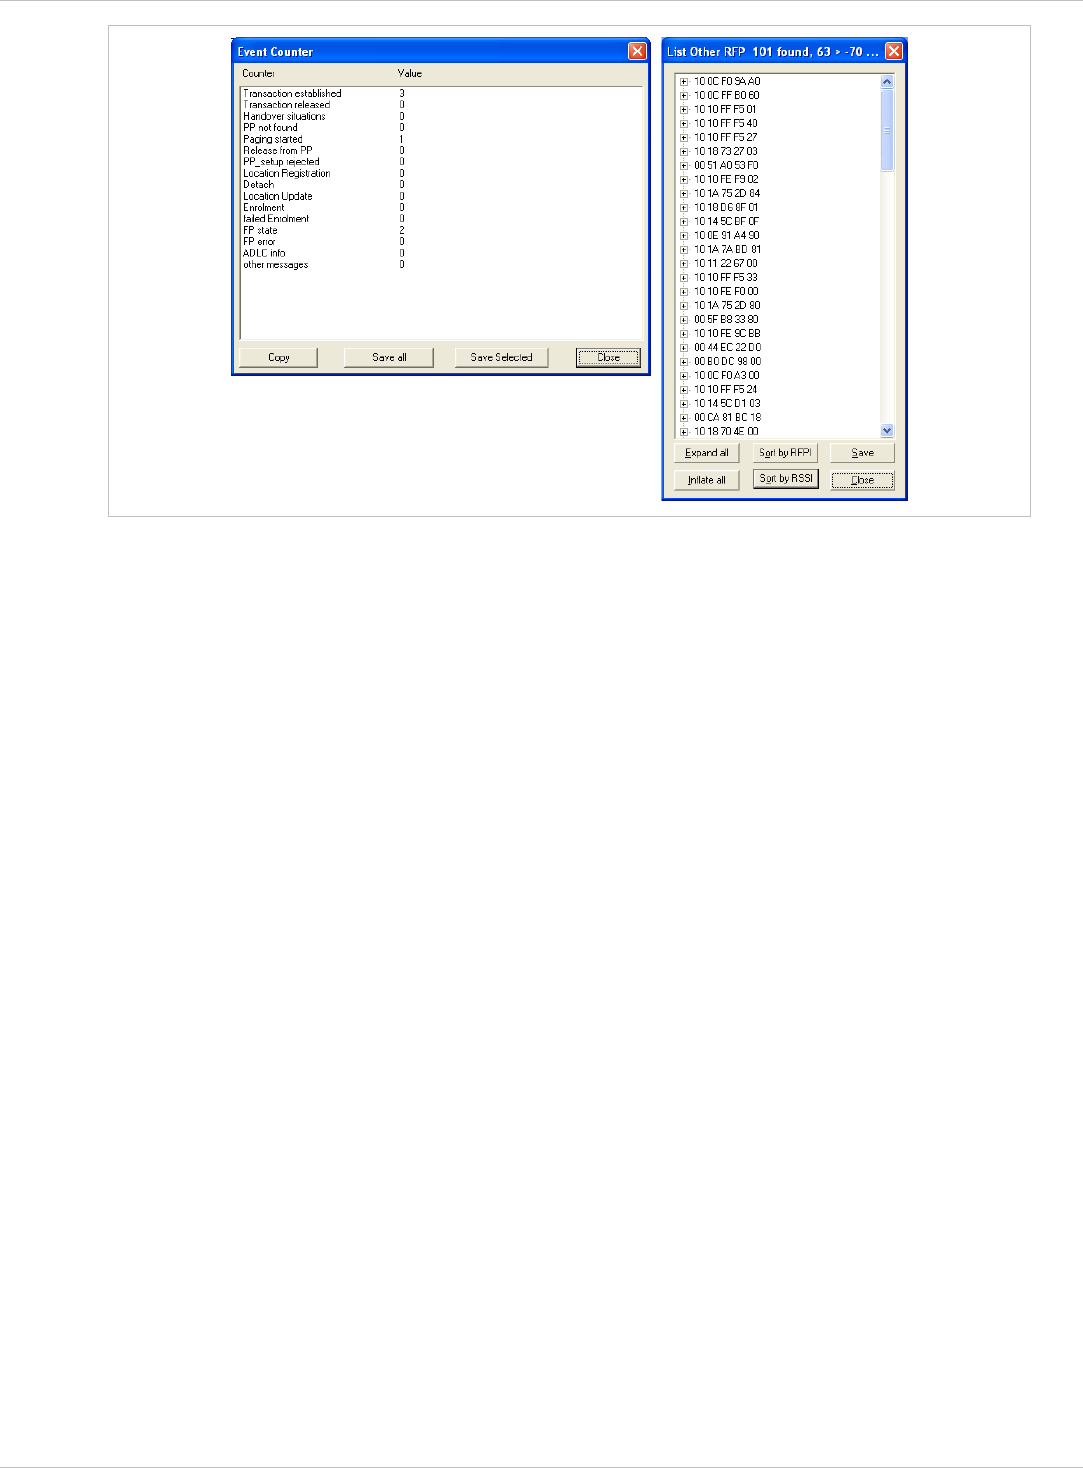
SIP–DECT OM System Manual Release 3.0 10 Maintenance
depl-1230/0.2 Page: 213 (238)

SIP–DECT OM System Manual Release 3.0 11 Appendix
11 Appendix
11.1 Declaration of Conformity
The CE mark on the product certifies its conformity with the technical guidelines for user
safety and electromagnetic compatibility, valid from the date of issue of the relevant
Declaration of Conformity pursuant to European Directive 99/5/EC.
The Declaration of Conformity can be viewed on the Aastra homepage.
11.2 Communications Regulation Information for Aastra 142d,
Aastra 600d
11.2.1 FCC Notices (U.S. Only)
This device complies with part 15 of the FCC Rules. Operation is subject to the following two
conditions: (1) This device may not cause harmful interference, and (2) this device must
accept any interference received, including interference that may cause undesired operation.
Modifications not expressly approved by this company could void the user's authority to
operate the equipment.
NOTE: This equipment has been tested and found to comply with the limits for a Class B
digital device, pursuant to Part 15 of the FCC Rules. These limits are designed to provide
reasonable protection against harmful interference in a residential installation. This
equipment generates, uses and can radiate radio frequency energy and, if not installed and
used in accordance with the instructions, may cause harmful interference to radio
communications. However, there is no guarantee that interference will not occur in a
particular installation. If this equipment does cause harmful interference to radio or television
reception, which can be determined by turning the equipment off and on, the user is
encouraged to try to correct the interference by one or more of the following measures:
Reorient or relocate the receiving antenna. •
•
•
•
Increase the separation between the equipment and receiver.
Connect the equipment into an outlet on a circuit different from that
to which the receiver is connected.
Consult the dealer or an experienced radio/TV technician for help.
Health and Safety Information
Exposure to Radio Frequency (RF) Signals:
The wireless phone is a radio transmitter and receiver. It is designed and manufactured not
to exceed the emission limits for exposure to radio frequency (RF) energy set by the Federal
Communications Commission (FCC) of the U.S. Government. These limits are part of
comprehensive guidelines and establish permitted levels of RF energy for the general
population. The guidelines are based on the safety standards previously set by both U.S. and
international standards bodies. These standards include a substantial safety margin
designed to assure the safety of all persons, regardless of age and health.
depl-1230/0.2 Page: 214 (238)

SIP–DECT OM System Manual Release 3.0 11 Appendix
This device and its antenna must not be co-located or operating in conjunction with any other
antenna or transmitter.
This EUT has been shown to be capable of compliance for localized specific absorption rate
(SAR) for uncontrolled environment/general population exposure limits specified in
ANSI/IEEE Std. C95.1-1992 and had been tested in accordance with the measurement
procedures specified in FCC/OET Bulletin 65 Supplement C (2001) and IEEE 1528-2003.
11.2.2 Industry Canada (Canada only, not for Aastra 600d)
Operation of this device is subject to the following two conditions: (1) this device may not
cause interference, and (2) this device must accept any interference, including interference
that may cause undesired operation of the device.
Privacy of communications may not be ensured when using this telephone.
Exposure to Radio Frequency (RF) Signals:
The wireless phone is a radio transmitter and receiver. It is designed and manufactured not
to exceed the emission limit for exposure to radio frequency (RF) energy set by the Ministry
of Health (Canada), Safety Code 6. These limits are part of comprehensive guidelines and
established permitted levels of RF energy for the general population. These guidelines are
based on the safety standards previously set by international standard bodies. These
standards include a substantial safety margin designed to assure the safety of all persons,
regardless of age and health.
This device and its antenna must not be co-located or operating in conjunction with any other
antenna or transmitter.
This device has been shown to be capable of compliance for localized specific absorption
rate (SAR) for uncontrolled environment / general public exposure limits specific in
ANSI/IEEE C95.1-1992 and had been tested in accordance with the measurement
procedures specified in IEEE 1528-2003.
11.3 Communications Regulation Information for RFP 32, RFP 34,
RFP 35 and RFP 36
11.3.1 FCC Notices (U.S. Only)
This device complies with part 15 of the FCC Rules. Operation is subject to the following two
conditions: (1) This device may not cause harmful interference, and (2) this device must
accept any interference received, including interference that may cause undesired operation.
NOTE: This equipment has been tested and found to comply with the limits for a Class B
digital device, pursuant to Part 15 of the FCC Rules. These limits are designed to provide
reasonable protection against harmful interference in a residential installation. This
equipment generates, uses and can radiate radio frequency energy and, if not installed and
used in accordance with the instructions, may cause harmful interference to radio
communications. However, there is no guarantee that interference will not occur in a
Modifications not expressly approved by this company could void the user's authority to
operate the equipment.
depl-1230/0.2 Page: 215 (238)

SIP–DECT OM System Manual Release 3.0 11 Appendix
particular installation. If this equipment does cause harmful interference to radio or television
reception, which can be determined by turning the equipment off and on, the user is
encouraged to try to correct the interference by one or more of the following measures:
•
•
•
•
Reorient or relocate the receiving antenna.
Increase the separation between the equipment and receiver.
Consult the dealer or an experienced radio/TV technician for help.
Exposure to Radio Frequency (RF) Signals:
The wireless phone is a radio transmitter and receiver. It is designed and manufactured not
to exceed the emission limits for exposure to radio frequency (RF) energy set by the Federal
Communications Commission (FCC) of the U.S. Government. These limits are part of
comprehensive guidelines and establish permitted levels of RF energy for the general
population. The guidelines are based on the safety standards previously set by both U.S. and
international standards bodies. These standards include a substantial safety margin
designed to assure the safety of all persons, regardless of age and health.
The radiating element of the RFP should be installed during operating at a separation
distance greater than 20 cm between user and device. The device comply with the
requirements for routine evaluation limits.
11.3.2 Industry Canada (Canada only)
Operation of this device is subject to the following two conditions: (1) this device may not
cause interference, and (2) this device must accept any interference, including interference
that may cause undesired operation of the device.
Connect the equipment into an outlet on a circuit different from that to which the receiver
is connected.
This device and its antenna must not be co-located or operating in conjunction with any other
antenna or transmitter.
Privacy of communications may not be ensured when using this telephone.
Exposure to Radio Frequency (RF) Signals:
The wireless phone is a radio transmitter and receiver. It is designed and manufactured not
to exceed the emission limit for exposure to radio frequency (RF) energy set by the Ministry
of Health (Canada), Safety Code 6. These limits are part of comprehensive guidelines and
established permitted levels of RF energy for the general population. These guidelines are
based on the safety standards previously set by international standard bodies. These
standards include a substantial safety margin designed to assure the safety of all persons,
regardless of age and health.
This device and its antenna must not be co-located or operating in conjunction with any other
antenna or transmitter.
The radiating element of the RFP should be installed during operating at a separation
distance greater than 20 cm between user and device. This device comply with the
requirements for routine evaluation limits.
depl-1230/0.2 Page: 216 (238)

SIP–DECT OM System Manual Release 3.0 11 Appendix
11.4 Abbreviations
AC Authentication Code
ADPCM Adaptive Differential Pulse Code Modulation
DECT Digital Enhanced Cordless Telecommunication
DHCP Dynamic Host Configuration Protocol
DSP Digital Signal Processor
FCC Federal Communications Commission
GAP Generic Access Profile
OM IMA Integrated Messaging and Alerting Service
IPEI International Portable Equipment Identity
HTTP Hyper Text Transfer Protocol
OAM&P Operation, Administration, Maintenance & Provisioning
OM OpenMobility
OM AXI OM Application XML Interface
OMC OM Configurator
OML OM Locating
OMM OpenMobility Manager
OMP OM Management Portal
PARK Portable Access Rights Key
PP Portable Part (DECT handset or device)
SNMP Simple Network Management Protocol
TFTP Trivial File Transfer Protocol
RFP DECT Radio Fixed Part (DECT base station)
RTCP Real Time Control Protocol
RTP Real Time Protocol
11.5 Definitions
Aastra DECT 142 /
Aastra 142d Handset
In the context of the SIP–DECT solution, an Aastra DECT 142
Handset, Aastra 142d and Portable Part (PP) are interchangeable.
In consideration of differences in regulatory requirements between
North America and all other areas of the world exist two different PP
variants which use specific frequency bands and field strengths:
- Aastra DECT 142: For use in North America and Canada only.
- Aastra 142d: For global use.
depl-1230/0.2 Page: 217 (238)

SIP–DECT OM System Manual Release 3.0 11 Appendix
Asterisk Asterisk is a complete Open Source PBX in software. It runs on
Linux, BSD and MacOSX and provides many features. Asterisk
supports voice over IP in many protocols, and can interoperate with
almost all standards-based telephony equipment.
Base station Please see: RFP or Radio Fixed Part
DECT Digital Enhanced Cordless Telecommunication
The standard (ETS 300 175) essentially specifies the air interface,
known as the radio interface. Voice and data can both be transmitted
via this interface.
Its technical key characteristics for Europe are:
- Frequency range: approx. 1880 – 1900 MHz (approximately
20 MHz bandwidth)
- carrier frequencies (1728 kHz spacing) with 12 time slots each
- Doubling the number of time slots (to 24) using the TDMA
process
- Net data rate per channel of 32 kbps
(for voice transmission using ADPCM)
- Voice coding using the ADPCM method
Its technical key characteristics for North American are:
- Frequency range: approx. 1920 – 1930 MHz (approximately
10 MHz bandwidth)
- 5 carrier frequencies (1728 kHz spacing) with 12 time slots
each)
- Doubling the number of time slots (to 24) using the TDMA
process
- Net data rate per channel of 32 kbps
(for voice transmission using ADPCM)
- Voice coding using the ADPCM method
GAP Generic Access Profile
- The GAP standard (ETS 300 444) is based on the same
technology as DECT, but is limited to the most important basic
features. This standard was created in order to allow telephones
of different vendors to be used on any type of DECT system. It
thus represents the smallest common denominator of all
manufacturer-specific variants of the DECT standard.
- An important limitation in the GAP standard is that external
handover is not possible. For this reason connection handover
is used, which is supported by GAP terminals.
- The operation of GAP-capable telephones is comparable to
that of analogue terminals. For example, features can be called
up via ‘*’ and ‘#’ procedures.
Handover A handover is similar to roaming, but occurs during an ongoing call.
A handover normally takes place “in the background”, without
disrupting the call (seamless handover).
depl-1230/0.2 Page: 218 (238)

SIP–DECT OM System Manual Release 3.0 11 Appendix
IPEI International Portable Equipment Identity
- 13-digit identification code for PPs
- Example: 00019 0592015 3
(the final digit is the checksum).
- The code is represented in decimal form.
- This code is globally unique.
PARK Portable Access Rights Key
Access code for the Portable Part. This code determines whether a
PP can access a particular DECT system. Used for unique selection
of a dedicated the system from a handset at enrolment/subscription
time. Labeled on the OpenMobility CD and unique to each SIP–
DECT deployment.
Radio Fixed Part
(RFP)
An RFP provides a DECT radio cell and terminates the radio link
from the portable DECT device. One or more RFPs build the area of
radio coverage.
Roaming While in motion, the PP performs ongoing measurements to
determine which RFP is best received. The one that can be best
received is defined as the active RFP. To prevent the PP from
rapidly switching back and forth between two RFPs that have similar
signal strength, certain threshold values are in effect.
11.6 References
/1/ RFC 1350, The TFTP Protocol, Revision 2, July 1992
/2/ RFC 2090, TFTP Multicast Option, February 1997
/3/ RFC 2347, TFTP Option Extension, May 1998
/4/ RFC 2348, TFTP Block size Option, May 1998
/5/ RFC 2349, TFTP Timeout Interval and Transfer Size Options, May 1998
/6/ RFC 2236, Internet Group Management Protocol, Version 2, November 1997
/7/ RFC 1889, RTP: A Transport Protocol for Real-Time Applications, January 1996
/8/ RFC 2030, Simple Network Time Protocol (SNTP) Version 4 for IPv4, IPv6 and OSI,
October 1996
/9/ RFC 2131, Dynamic Host Configuration Protocol, March 1997
/10/ RFC 2327, SDP: Session Description Protocol, April 1998
/11/ RFC 2474, Definition of the Differentiated Service Field (DS Field) in the IPv4 and
IPv6 Headers, December 1998
/12/ RFC 2617, HTTP Authentication: Basic and Digest Access Authentication, June 1999
/13/ RFC 3164, The BSD Sys Log Protocol, August 2001
/14/ RFC 2833, RTP Payload for DTMF Digits, Telephony Tones and Telephony Signals,
May 2000
/15/ RFC 3261, Session Initiation Protocol (SIP), June 2002
depl-1230/0.2 Page: 219 (238)

SIP–DECT OM System Manual Release 3.0 11 Appendix
/16/ RFC 3264, An Offer/Answer Model with Session Description Protocol (SDP),
June 2002
/17/ RFC 3420, Internet Media Type message/sipfrag, November 2002
/18/ RFC 3515, The Session Initiation Protocol (SIP) Refer method, April 2003
/19/ RFC 3665, The Session Initiation Protocol (SIP) Basic Call Flow Examples,
December 2003
/20/ RFC 3842, A Message Summary and Message Waiting Indication Event Package for
the Session Initiation Protocol (SIP), August 2004
/21/ RFC 3891, The Session Initiation Protocol (SIP) “Replaces” Header, September 2004
/22/ RFC 3892, The Session Initiation Protocol (SIP) Referred-By Mechanism, September
2004
/23/ RFC 4566, SDP: Session Description Protocol
/24/ Compendium “OpenMobility SIP–DECT 3.0 Solution; Installation & Administration”
/25/ SIP–DECT; OM Locating Application; Installation, Administration & User Guide
/26/ SIP–DECT; OM Integrated Messaging & Alerting Application; Installation,
Administration & User Guide
/27/ SIP–DECT; OM Handset Sharing & Provisioning; User Guide
/28/ SIP–DECT; Aastra 610d, 620d, 630d; Messaging & Alerting Applications; User Guide
Issue 4
/29/ Aastra 610d, 620d, 630d SIP–DECT User’s Guide Issue 4
/30/ aad-0384 OM Application XML Interface specification (OM AXI)
/31/ RFC 2782, A DNS RR for specifying the location of services (DNS SRV)
/32/ RFC 3262, Reliability of Provisional Responses in the Session Initiation Protocol
(SIP)
/33/ RFC 3311, The Session Initiation Protocol (SIP) UPDATE Method
/34/ SIP–DECT XML terminal interface specification
11.7 Pre-Configuration File Rules
The following file format description can be used to administrate the RFP and PP
configuration with external applications, e.g. an external configuration management tool or a
PBX communications system.
The framework of the text file follows strictly defined rules. The main framework is divided in
two parts:
1 An instruction section is used to drive a generic data creation for those fields not filled
within data sequence section.
2 A data sequence section defines data record fields. Each of them are explicitly set.
Layout rules in detail are:
Comments start with “#”. •
• Each record is terminated by the regular expressions “\r” or “\n”.
depl-1230/0.2 Page: 220 (238)

SIP–DECT OM System Manual Release 3.0 11 Appendix
Instruction settings are made like: <tag> = <value>. •
•
•
•
•
•
Data sequence sections starts with the key word “data_sequence”. This key word is
always mandatory to proceed the file. All instructions have to be written before this row.
Data sequence record fields are separated by colon “;”. Colons have also to be set for
empty fields if at least one follows which is not empty. Otherwise a position mismatch of
fields will occur.
If fields have several values assigned (that may be true for a few local RFP configuration
fields like “ntp_address”), they must be separated by comma “,”.
Notes:
Because of data sequence fields are separated by colon the content of that section can
possibly be generated by a *.csv export of Excel Sheet and copied into the configuration
file.
Instructions are only proceeded on those fields which are left empty within the data
sequence section.
11.7.1 PP Configuration File (OMM Database)
11.7.1.1 Supported Instructions
Instruction Explanation
start_number Numbers can be generated automatically.
This instruction defines the start value.
no_of_number If “start_number” is given, this instruction
defines the maximum of numbers which are
generated.
ac (authentication code)
additional_pin
sip_user
sip_pw
If set to “number”, “ac” will be equal to
number.
If a value is advised, it will be taken as a start
number which will be increased for each new
record.
sos_number
mandown_number
locatable
localization
tracking
If these instructions are set, the value will be
taken as default value for the empty
corresponding field within the data sequence
section records.
SOS/Mandown denote the user specific
numbers. The Locatable, Localization, and
Tracking flags are ignored by Web import.
11.7.1.2 Data Section Fields
The data section contains the following field order:
1 Number
2 Name
3 AC
depl-1230/0.2 Page: 221 (238)

SIP–DECT OM System Manual Release 3.0 11 Appendix
4 IPEI
5 Additional ID
6 Sip user name
7 Sip password
8 SOS number
9 Mandown number
10 Locatable (ignored by Web import and always set to “inactive”)
11 Localization (ignored by Web import and always set to “inactive”)
12 Tracking (ignored by Web import and always set to “inactive”)
13 Description1 (ignored by Web import and always set to “”)
14 Description2 (ignored by Web import and always set to “”)
11.7.1.3 Example
The following screen shot shows a PP configuration. This corresponds to the given
configuration file.
PP configuration file:
# -----------------------#
# instruction section:
# -----------------------#
# -- start_number = {<start value for numbers to be generated>}
# -- no_of_number = {<maximum of generated numbers>}
# -- ac = {<""number"">, <start value for ac's to be generated>}
# -- additional_pin = {<""number"">, <start value for id's >}
# -- sip_user = {<""number"">, <start value for id's >}
# -- SIP password = {<""number"">, <start value for id's >}
# -- SOS number = {<common default>)
# -- Mandown number
# -- Locatable (ignored by Web import and always set to inactive)
# -- Localization (ignored by Web import and always set to inactive)
# -- Tracking (ignored by Web import and always set to inactive)
depl-1230/0.2 Page: 222 (238)

SIP–DECT OM System Manual Release 3.0 11 Appendix
start_number = 5401
no_of_number = 10
ac = 1001
additional_pin = number
sip_user = number
sip_pw = number
sos_number=5002
mandown_number=5002
# ---------------------#
# data sequence:
# ---------------------#
# 1. number
# 2. name
# 3. AC
# 4. IPEI
# 5. additionalId
# 6. SIP user
# 7. SIP password
# 8. sos no
# 9. mandown no
# 10. locatable (ignored by Web import and always set to inactive)
# 11. localization (ignored by Web import and always set to inactive)
# 12. tracking (ignored by Web import and always set to inactive)
# 13. descr1 (ignored by Web import and always set to "")
# 14. descr2 (ignored by Web import and always set to "")
data_sequence;;;;;;;;;;;;;
# 1. number;2. name;3. AC;4. IPEI ;5. additionalId;6. SIP user;7. SIP
password;8. sos no;9. mandown no;10. locatable;11. localization;12.
tracking;13. descr1;14. descr2
101;PP 1;;0081008625768;;;;;;;;;;
104;PP 4;;0007701154842;;;;;;;;;;
;Kiel Phone1;;0127105395099;5401;5401;5401;30;30;;;;;
;Karl May;;;;;;;;;;;;
;Karl Valentin;;;;;;;;;;;;
;Karl Heinz;;;;;;;;;;;;
;Radi Radenkowicz;;;;;;;;;;;;
;Radi Rettich;;;;;;;;;;;;
;Wadi Wade;;;;;;;;;;;;
Parse log about import / instruction processing
OK: start_number = 5401
OK: ac = 1001
OK: additional_pin = number
OK: sip_user = number
OK: sip_pw = number
OK: sos_number = 5002
OK: mandown_number = 5002
OK: no_of_number = 10
Section processing:
[…]
11.7.2 RFP Configuration File / Central (OMM Database)
Import of RFP configurations using files is possible with Web Service or OMM Management
portal.
depl-1230/0.2 Page: 223 (238)

SIP–DECT OM System Manual Release 3.0 11 Appendix
11.7.2.1 Supported Instructions
All instructions are taken as common value which are set to all records of data sequence
section of that file if the corresponding field is empty.
Instruction Explanation
active Activation of DECT: {‘0’ or ‘false ’= inactive, ‘1’ or ‘true’ = active }
cluster Cluster, the RFP is referred to - RFP-OMM: {1..256}, PC-OMM: {1..2048}
paging_area Paging area, the RFP is referred to: {‘unassigned, ’0’..’127’}
Ignored by WEB import and always set to ‘0’ (Paging area 0)
sync_source Synchronization source: {‘0’ or ‘false ’= inactive, ‘1’ or ‘true’ = active }
refl_env Reflective environment: {‘0’ or ‘false ’= no, ‘1’ or ‘true’ = yes }
site Site Id: {1..250}
wlan_profile Reference key to an existing WLAN profile
wlan_antenna Antenna settings: {0=diversity, 1, 2}
wlan_channel_bg WLAN channel: {0..14 (size depends on regulatory domain) }
wlan_power WLAN power: {6, 12, 25, 50,100 (in percent)}
wlan_act Activation of WLAN: {‘0’ or ‘false ’= inactive, ‘1’ or ‘true’ = active }
Note: Web import allows currently only ‘0’ or ‘1’ for Boolean parameters.
11.7.2.2 Data Section Fields
The data section contains the following field order:
1 MAC address
2 Name
3 DECT activated
4 DECT cluster
5 Paging area (ignored by Web import and always set to “0”, PA0)
6 Preferred sync.
7 Reflective env.
8 Site ID (if left empty then set to the lowest Site ID)
9 Building (ignored by Web import and always set to “”)
10 Floor (ignored by Web import and always set to “”)
11 Room (ignored by Web import and always set to “”)
12 WLAN profile
13 WLAN antenna
14 WLAN channel
15 WLAN power
16 WLAN activated
depl-1230/0.2 Page: 224 (238)
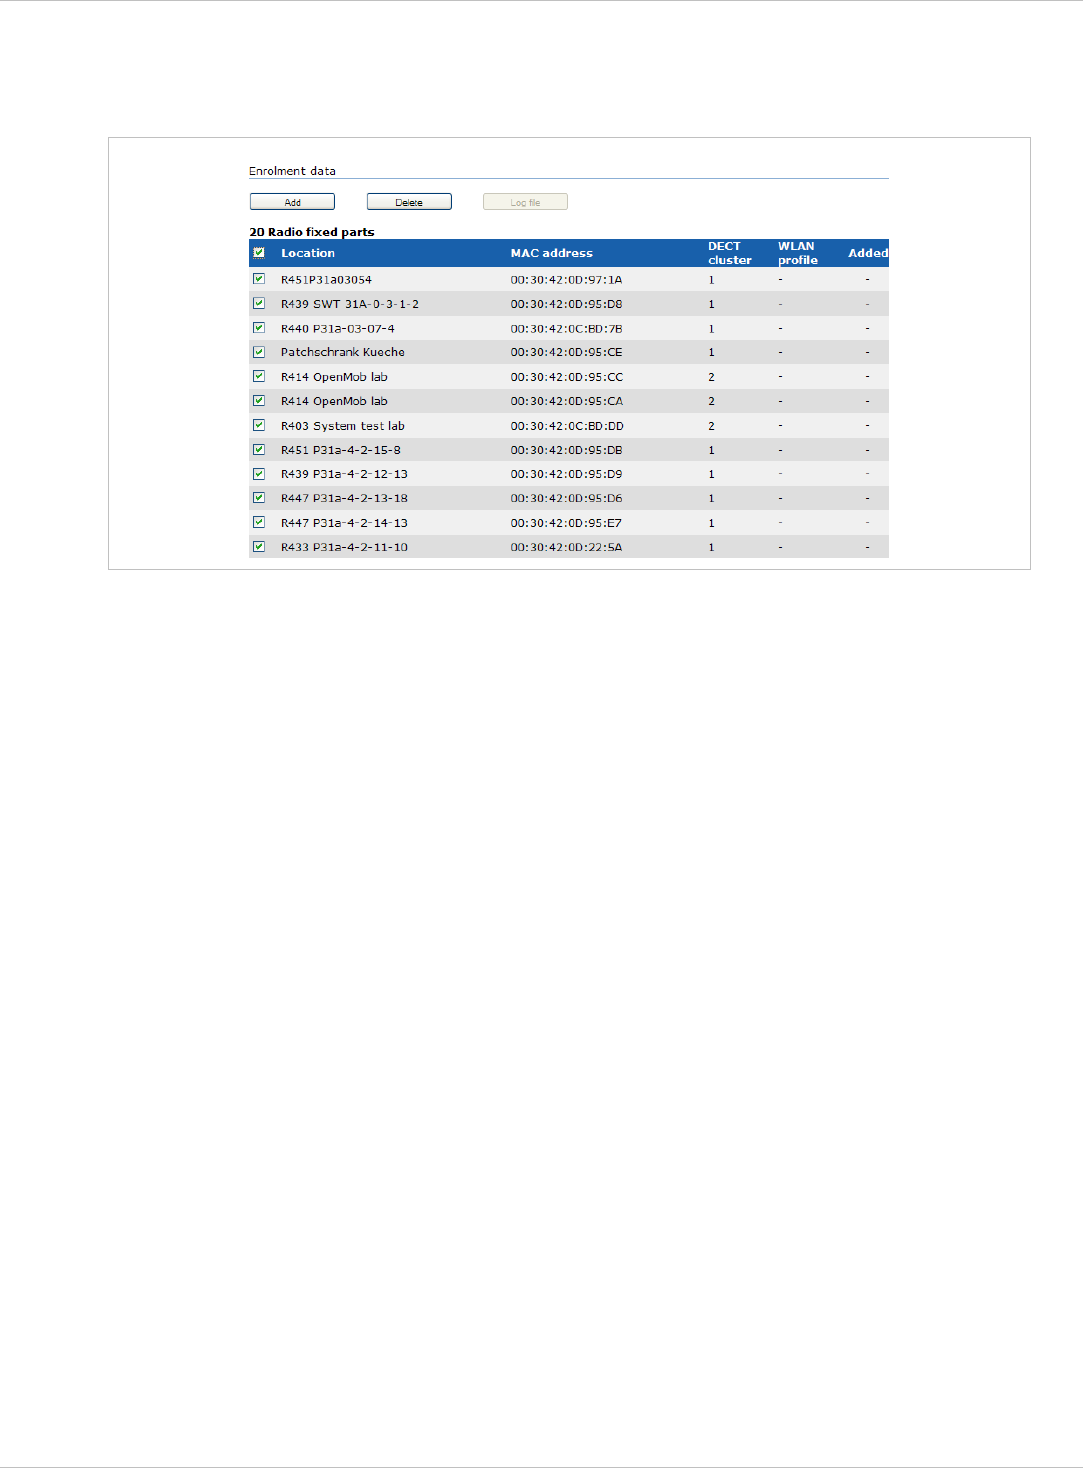
SIP–DECT OM System Manual Release 3.0 11 Appendix
11.7.2.3 Example
The following screenshot shows an RFP enrolment data import dialog that is shown if the
corresponding configuration file is imported.
RFP configuration file/central:
##############################################################################
# instruction section:
##############################################################################
#active
# Activation of DECT:
# {'0' or 'false '= inactive, '1' or 'true' = active}
#cluster
# Cluster, the RFP is referred to:
# {1..256} (RFP OMM) or {1..2048} (PC OMM)
#paging_area
# Ignored by Web import and always set to "0" (PA0)
# Paging area, the RFP is referred to: {'unassigned, '0'..'127'}
#sync_source
# Synchronisation source:
# '0' or 'false '= inactive, '1' or 'true' = active}
#refl_env
# Reflective environment:
# '0' or 'false '= no, '1' or 'true' = yes}
#site
# Site Id: {1..250}
#wlan_profile
# Reference key to an existing WLAN profile
#wlan_antenna
# Antenna settings: {0=diversity, 1, 2}
#wlan_channel_bg
# WLAN channel: {0..14 (size depends on regulatory domain) }
#wlan_power
# WLAN power = { 6, 12, 25, 50,100 (in percent)}
#wlan_act
# Activation of WLAN:
# '0' or 'false '= inactive, '1' or 'true' = active}
#Note: Web import allows only "0" or "1" for Boolean
##############################################################################
active=1
cluster=100
refl_evc=1
site=1
depl-1230/0.2 Page: 225 (238)
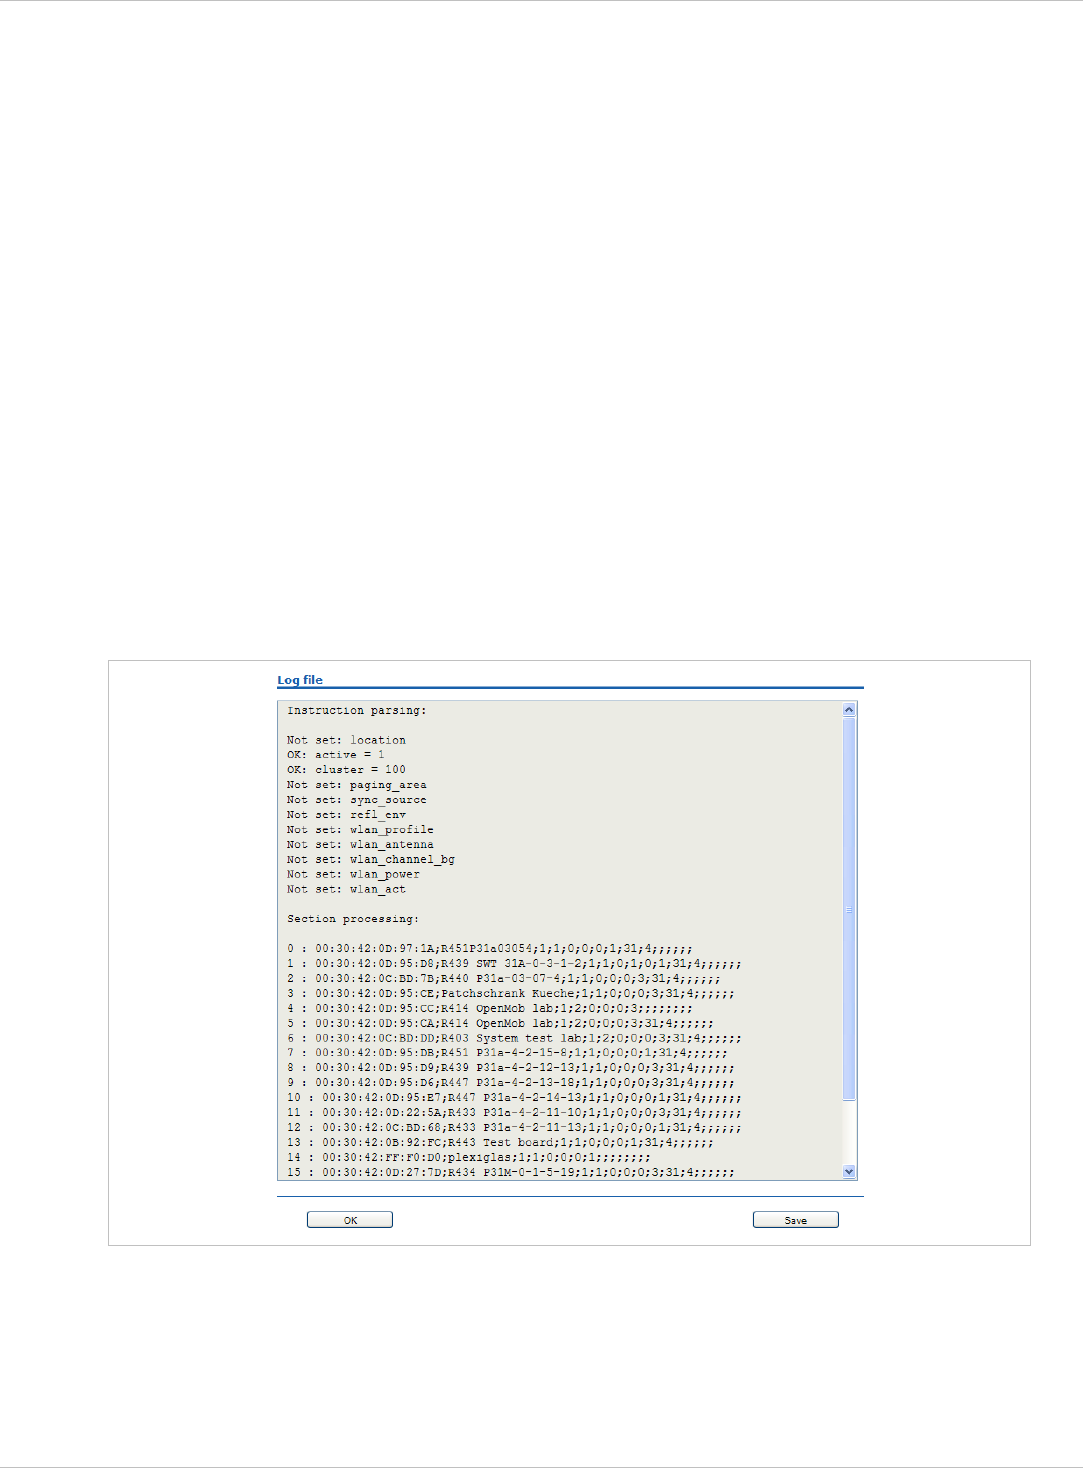
SIP–DECT OM System Manual Release 3.0 11 Appendix
##############################################################################
data_sequence
##############################################################################
#MAC address;Name;DECT activated;DECT cluster;Paging area;Preferred sync.;
#Reflective env.;Site ID;Building;Floor;Room;WLAN profile;WLAN antenna;
#WLAN channel;WLAN power;WLAN activated
00:30:42:0D:97:1A;R451P31a03054;1;1;0;0;0;1;31;4;;;;;;
00:30:42:0D:95:D8;R439 SWT 31A-0-3-1-2;1;1;0;1;0;1;31;4;;;;;;
00:30:42:0C:BD:7B;R440 P31a-03-07-4;1;1;0;0;0;3;31;4
00:30:42:0D:95:CE;Patchschrank Kueche;1;1;0;0;0;3;31;4
00:30:42:0D:95:CC;R414 OpenMob lab;1;2;0;0;0;3;;
00:30:42:0D:95:CA;R414 OpenMob lab;1;2;0;0;0;3;31;4
00:30:42:0C:BD:DD;R403 System test lab;1;2;0;0;0;3;31;4
00:30:42:0D:95:DB;R451 P31a-4-2-15-8;1;1;0;0;0;1;31;4
00:30:42:0D:95:D9;R439 P31a-4-2-12-13;1;1;0;0;0;3;31;4
00:30:42:0D:95:D6;R447 P31a-4-2-13-18;1;1;0;0;0;3;31;4
00:30:42:0D:95:E7;R447 P31a-4-2-14-13;1;1;0;0;0;1;31;4
00:30:42:0D:22:5A;R433 P31a-4-2-11-10;1;1;0;0;0;3;31;4
00:30:42:0C:BD:68;R433 P31a-4-2-11-13;1;1;0;0;0;1;31;4
00:30:42:0B:92:FC;R443 Test board;1;1;0;0;0;1;31;4
00:30:42:FF:F0:D0;plexiglas;1;1;0;0;0;1;;
00:30:42:0D:27:7D;R434 P31M-0-1-5-19;1;1;0;0;0;3;31;4
00:30:42:0A:C9:62;R439 Decke re.;1;1;0;0;0;1;;
00:30:42:0D:E3:F6;R436 Wand oben ln;1;1;0;0;0;1;;
00:30:42:08:31:5F;R434 Decke ln. Tür;1;1;0;0;0;1
00:30:42:08:31:64;R440 Decke re Fnstr;1;1;0;0;0;1
Parse log about import / instruction processing
depl-1230/0.2 Page: 226 (238)

SIP–DECT OM System Manual Release 3.0 11 Appendix
11.7.3 RFP Configuration File / Local (OM Configurator)
11.7.3.1 Supported Instructions
All instructions are taken as common value which are set to all records of data sequence
section of that file if the corresponding field is empty.
Instruction Explanation
active Local configuration active: {0=inactive(use
DHCP instead), 1=active}
net_mask Net mask
tftp_server IP address of TFTP server
tftp_file Path and name of boot file
omm_1 OMM IP address
omm_2 IP address of backup OMM
gateway Default gateway
dns_server Up to two DNS server IP addresses
dns_domain local DNS domain
ntp_address Up to two NTP server IP addresses
ntp_name Up to two NTP server names
syslog_addr IP address of syslog daemon
syslog_port Listen port of syslog daemon
core Flag to enable core dumps
use_vlan VLAN is enabled
srvlst List of further tftp server
broadcast_addr local broadcast address
vlan_id VLAN Id
country Country code
preferred_tftp tftp_server is preferred
import_url URL
config_file_server configuration server
11.7.3.2 Data Section Fields
The data section contains the following field order:
1 MAC address of RFP
34 Local configuration active flag
35 IP address of RFP
36 Net mask
depl-1230/0.2 Page: 227 (238)

SIP–DECT OM System Manual Release 3.0 11 Appendix
37 TFTP server
38 TFTP_FILE
39 OMM IP address
40 IP address of backup OMM
41 Default gateway
42 DNS server
43 DNS domain
44 NTP server IP address
45 NTP server name
46 Syslog daemon IP address
47 Syslog listen port
48 Core
49 Use VLAN
50 Server list
51 Broadcast address
52 VLAN Id
53 Country code
54 Preferred TFTP server
55 Import URL
56 Configuration file server
11.7.3.3 Example
RFP configuration file/local (OM Configurator):
# --------------------#
# instruction section #
# --------------------#
active = 1
net_mask = 255.255.0.0
tftp_server= 172.30.200.92
tftp_file = iprfp2g.tftp
syslog_addr= 172.30.200.92
omm_1 = 172.30.111.188
omm_2 = 172.30.11.181
gateway = 172.30.0.2
dns_server = 172.30.0.4,172.30.0.21
dns_domain = aastra.de
ntp_addr = 192.53.103.108,192.53.103.104
ntp_name = ptbtime1.ptb.de,ptbtime2.ptb.de
core = 0
use_vlan = 1
srvlist = 172.30.0.4,172.30.0.21
broadcast_addr = 172.30.255.255
vlan_id = 4
country = 1
preferred_tftp = 1
depl-1230/0.2 Page: 228 (238)

SIP–DECT OM System Manual Release 3.0 11 Appendix
import_url = https://server/importfiles/ommxy_conf.gz
# 2. ACTIVE_FLAG
#18. SRVLIST
config_file_server = https://server/configfiles/
# --------------#
# data sequence #
# --------------#
# 1. MAC_ADDR ! no instruction supported !
# 3. RFPADDR ! no instruction supported !
# 4. NET_MASK
# 5. TFTP_SERVER
# 6. TFTP_FILE
# 7. OMM1
# 8. OMM2
# 9. GATEWAY
#10. DNS_SERVER
#11. DNS_DOMAIN
#12. NTP_ADDR
#13. NTP_NAME
#14. SYSLOG_ADDR
#15. SYSLOG_PORT
#16. CORE
#17. USE_VLAN
#19. BROADCAST_ADDR
#20. VLAN_ID
#21. COUNTRY
#22. PREFERRED_TFTP
#23. IMPORT_URL
#24. CONFIG_FILE_SERVER
data_sequence
00-30-42-01-01-01;;172.30.111.1
00-30-42-02-02-02;;172.30.111.2
Parse log about import / instruction processing
ok: active = 1
ok: net_mask = 255.255.0.0
ok: tftp_server = 172.30.200.92
ok: tftp_file = iprfp2g.tftp
ok: omm_1 = 172.30.111.188
ok: omm_2 = 172.30.11.181
ok: gateway = 172.30.0.2
ok: dns_server = 172.30.0.4,172.30.0.21
ok: dns_domain = Aastra.com
ok: ntp_addr = 192.53.103.108,192.53.103.104
ok: ntp_name = ptbtime1.ptb.de,ptbtime2.ptb.de
ok: syslog_addr = 172.30.200.92
not set: syslog_port
ok: core = 0
ok: use_vlan = 1
ok: srvlist = 172.30.0.4,172.30.0.21
ok: broadcast_addr = 172.30.255.255
ok: vlan_id = 4
ok: country = 1
ok: preferred_tftp = 1
ok: import_url = https://server/importfiles/ommxyz_conf.gz
ok: config_file_server = https://server/configfiles/
:parsing ok:
processing of section: data_sequence
[…]
create data:
depl-1230/0.2 Page: 229 (238)

SIP–DECT OM System Manual Release 3.0 11 Appendix
[…]
RFP configuration:
[…]
11.8 RFP Export File Format
General
RFP export files are created by OMM Management Portal in ‘csv’-file format which can be
easily viewed by a spreadsheet application. Export file contains all or a part of the following
parameters:
MAC address •
•
•
•
•
•
•
•
•
•
•
•
•
•
•
•
Location name
DECT active
Cluster
Paging area
Synchronisation source
Reflective environment
Site
Building
Floor
Room
WLAN profile reference
WLAN antenna
WLAN Channel_bg
WLAN power
WLAN active
Example
Following example RFP export file contains all exportable RFP parameters and is re-
importable by OMM Management Portal.
##################################################
# RFP data export file: '/home/user/example.csv'
# Date: 24.09.10 Time: 15:58:19
##################################################
#
# Exported parameters:
#
# MAC address
# Name
# DECT activated
# DECT cluster
# Paging area
# Preferred sync.
# Reflective env.
# Site ID
# Building
# Floor
# Room
# WLAN profile
# WLAN antenna
depl-1230/0.2 Page: 230 (238)

SIP–DECT OM System Manual Release 3.0 11 Appendix
# WLAN channel
# WLAN power
# WLAN activated
#
##################################################
MAC address;Name;DECT activated;DECT cluster;Paging area;Preferred
sync.;Reflective env.;Site ID;Building;Floor;Room;WLAN profile;WLAN
antenna;WLAN channel;WLAN power;WLAN activated
data_sequence
00:30:42:0E:71:41;License RFP 1;
true;1;0;false;true;1;B1;F1;R1;1;0;;100;false
00:30:42:0E:26:F1;License RFP 2;
true;1;0;false;false;1;B1;F2;R1;1;0;;100;false
00:30:42:0E:75:59;License RFP 3;
true;1;0;true;false;1;B1;F2;R2;1;0;;100;false
depl-1230/0.2 Page: 231 (238)

SIP–DECT OM System Manual Release 3.0 11 Appendix
11.9 Protocols and Ports
OpenMobility Manager Protocol
Server port Client port
HTTPS server tcp server 443 or as configured any
HTTP server (redirect
to https)
tcp server 80 or as configured any
HTTP/HTTPS client
for the SIP–DECT
XML terminal
interface
tcp 80/443 > 1024
RFP control protocol tcp server 16321 any
OMM Standby tcp server 16322 any
OM AXI tcp server 12622 any
DECTnet monitor tcp server 8106 any
LDAP tcp client 389 or as configured >=1024 (see note)
TFTP client udp 69 / given by server >=1024 (see note)
HTTP client tcp 80 or as configured >=1024 (see note)
HTTPS client tcp 443 or as configured >=1024 (see note)
explicit FTPS client tcp 21 or as configured >=1024 (see note)
implicit FTPS client tcp 990 or as configured >=1024 (see note)
OM AXI server TCP tcp server 12621 any
OM AXI server TLS tcp server 12622 any
SIP udp 5060 as configured
Telnet (OMM
console, Linux PC
based OMM only)
tcp server localhost 8107 localhost any
Note: Unbound ports start at port 1024.
depl-1230/0.2 Page: 232 (238)

SIP–DECT OM System Manual Release 3.0 11 Appendix
IP-RFP Protocol
Server port Client port
HTTP/HTTPS client
for the SIP–DECT
XML terminal
interface
tcp 80/443 > 1024
RFP control protocol tcp client 16321 >=1024 (see note)
HTTP server (redirect
to OMM web server
(http))
tcp server 80 or as configured any
SSH server tcp server 22 any
DHCP client udp 67 68
TFTP client udp 69 / given by server >=1024 (see note)
OMCFG server udp 64000 64000
NTP client udp 123 123
Syslog client udp 514 or as configured 514
DNS client udp 53 >=1024 (see note)
SNMP agent (server) udp 161 any
SNMP trap agent
(client)
udp >=1024 (see note) 162
RSXport (debug only) tcp server 38477 any
RTP/RTCP (server) udp Range of [RTP port
base + 71] even ports
for RTP, odd ports for
RTCP. Port base is
16320 or as
configured.
any
RTP/RTCP (client) udp any Range of [RTP port
base + 71] even ports
for RTP, odd ports for
RTCP. Port base is
16320 or as
configured.
Note: Unbound ports start at port 1024.
depl-1230/0.2 Page: 233 (238)

SIP–DECT OM System Manual Release 3.0 12 Index
12 Index
Configuration tools................................. 30
802.1Q support.................................... 182
OM Configurator .............................. 171
Aastra 142d ........................................... 15
OM Management Portal (OMP) ......... 94
Auto answer test mode .................... 203
OMM Web service ............................. 41
Auto call test mode .......................... 203
Checking firmware ........................... 202
Site survey mode ............................. 202
Aastra 600d ........................................... 15
Software........................................... 184
Aastra 650c............................................ 15
Software........................................... 184
Account Data ....................................... 193
Account Types..................................... 193
Alphanumeric dialing ............................. 28
Auto answer test mode........................ 203
Auto call test mode .............................. 203
Auto-create on subscription
Enabling (OMP) ................................. 99
Status indication (OMM Web service) 75
Status indication (OMP)..................... 96
Beacon interval.................................... 195
Capacities
OMM .................................................. 14
Capacities
SIP–DECT ......................................... 13
CAT-iq.................................................... 26
Channel allocation ............................... 196
Cluster ................................................... 11
Overview............................................ 29
Setting (OMM Web service)............... 66
RFP (pre-configuration file rules).... 223,
227
Country specific tones ......................... 163
DECT Monitor................................ 45, 210
Boot phase (IP RFPs)...................... 183
Server requirements ........................ 159
Entries................................................ 88
RFP files (OMP)............................... 123
DECT authentication code..................... 24
dSetting (OMM Web service)............. 71
Setting (OMM Web service)............... 45
Setting (OMP) .................................. 135
DECT XQ............................................... 27
Setting (OMM Web service)............... 66
Setting (OMP) .................................. 119
DHCP
Client................................................ 162
Country specific tones ..................... 163
Parameters ...................................... 162
RPF Configuration ........................... 164
Server selection ............................... 165
Setup ................................................. 17
Vendor specific options.................... 163
Digit treatment ....................................... 87
LDAP ................................................. 87
Download over air.......................... 26, 198
Activating (OMM Web service) .......... 45
Activating (OMP)........................ 99, 112
DTIM period......................................... 196
Setting (OMP) .................................. 119
Encryption
Configuration files
PP .................................................... 135
Import PP files ................................... 72
RFP.............................................. 45, 99
Import RFP files (OMM Web concole 67
WLAN settings ................................... 83
Import RFP files (OMP) ................... 123
Enrolment
Import user data files ....................... 109
PP files (OMM Web service).............. 72
PP (pre-configuration file rules) ....... 221
RFP files (OMM Web service) ........... 67
RFP (description)............................. 178
RFP (file syntax) .............................. 181
User data files (OMP) ...................... 109
EULA ............................................. 93, 152
depl-1230/0.2 Page: 234 (238)

SIP–DECT OM System Manual Release 3.0 12 Index
Fragmentation threshold...................... 196
G.729 codec .......................................... 34
IPEI (subscription) ................................. 76
License
EULA (OMP).................................... 152
Standard license (small system)........ 38
Uploading license file......................... 37
Account types .................................. 193
Alarm triggers .................................. 142
OM Configurator .................................. 171
OMM
DECT settings (OMP) ........................ 99
Protocols and ports.......................... 232
Time zone .......................................... 46
OMM Upgrade ..................................... 187
Enabling (OMM Web service)............ 46
Enabling (OMP) ................................. 99
GAP phones .......................................... 16
PP settings (OMP) ........................... 136
Hi-Q™ audio technology........................ 26
Host mode ..................................... 29, 183
Boot parameters .............................. 173
Indoor RFPs....................................... 8, 10
Boot phase (IP RFPs)...................... 183
IPEI
OM Management Portal (OMP) ............. 94
Setting (OMM Web service)............... 71
Setting (OMP) .................................. 135
Console command (host mode)....... 206
Console commands ......................... 208
Isolated sites.......................................... 29
DECT settings (OMM Web service)... 45
LDAP ..................................................... 87
Server ................................................ 90
General settings (OMM Web service) 44
General settings (OMP) ..................... 99
Built-in license (medium system) ....... 38
Host mode ............................... 183, 188
Built-in license (small system) ........... 38
Net parameters (OMM Web service) . 44
EULA (OMM Web service) ................ 93
Net parameters (OMP) ...................... 99
Overview............................................ 11
G. 729 violations ................................ 36
General violations .............................. 36
Restart ............................................... 46
Menu (OMM Web service)................. 92
RFP mode.................................. 11, 188
Menu (OMP) .................................... 150
RFP-based......................................... 11
Model ................................................. 34
Selection ............................................ 22
Restrictions ........................................ 36
Software........................................... 184
Standard license (large system) ........ 39
Start parameters .............................. 186
Syslog ................................................ 46
Status (OMM Web service)................ 42
System requirements....................... 184
Status (OMP) ..................................... 97
Tasks ................................................. 12
Update License.................................. 35
Update ....................................... 47, 187
Locating application........................... 8, 29
WLAN settings (OMM Web service) .. 46
PP settings (OMP) ........................... 136
WLAN settings (OMP) ....................... 99
Login
OMM database
Export (OMM Web service) ............... 58
OMM Web service ............................. 41
Export (OMP)........................... 108, 111
OMP................................................... 94
Import (OMM Web service)................ 56
SSH user shell ................................. 205
Import (OMP) ........................... 106, 110
Logout
OMM standby ...............see Standby OMM
OMM Web service ............................. 42
OMP................................................... 95
OMM Web service ................................. 41
Messaging ......................................... 8, 29
depl-1230/0.2 Page: 235 (238)

SIP–DECT OM System Manual Release 3.0 12 Index
SIP authentication (OMM Web service)
....................................................... 72
OMP
Modes ................................................ 95
SIP authentication (OMP) ................ 134
Options ............................................ 151
SOS number (OMM Web service) ..... 72
OpenMobility Manager................see OMM
PARK
PP
DECT authentication code (OMM Web
service) .......................................... 71
Download over air (OMM Web service)
....................................................... 45
Messaging settings .......................... 136
SOS number (OMP) ........................ 137
Outdoor RFPs.................................... 8, 10
Subscription with configured IPEI (OMM
Web service).................................. 76
Paging areas
Configuration ................................... 122
Subscription with configured IPEI (OMP)
..................................................... 138
Overview............................................ 29
Size.................................................... 99 Voice mail number ..................... 72, 137
Wildcard subscription (OMM Web
service) .......................................... 76
Indication (OMM Web service) .......... 45
Indication (OMP).......................... 96, 99 Wildcard subscription (OMP) ........... 138
Portable Part...................................see PP Provisioning ....................................... 8, 29
Portable part user login type.................. 45 Creating (unbound) devices (OMP) . 133
Creating (unbound) users (OMP) .... 132
Additional ID (OMM Web service) ..... 71 User data import (OMP)................... 109
Additional ID (OMP)......................... 134 Viewing unbound PP data (OMM Web
service) .......................................... 70
Additional settings............................ 137
Configuration file.............................. 221 Radio coverage.. see RFP synchronization
Radio Fixed Part.......................... see RFP
Reflective environment ........see DECT XQ
DECT authentication code (OMP) ... 135 RFP
DECT settings (OMP) ...................... 135 Channel Capacity ............................ 157
Delete subscription (OMM Web service)
....................................................... 71 Console commands ......................... 207
DECT settings (OMM Web service)... 66
Delete subscription (OMP)............... 136 DECT settings (OMP) .............. 117, 119
Export file format.............................. 230
General settings (OMM Web service) 65
Download over air (OMP) .......... 99, 112
General settings (OMP) ........... 116, 118
Encryption........................................ 136
Hardware information (OMP)........... 117
General settings (OMM Web service) 71
Hardware settings (OMP) ................ 119
General settings (OMP) ................... 134
LED Status....................................... 165
Import configuration files.................... 72
RSSI values ..................................... 126
Import user data files ....................... 109
Status indication (OMM Web service) 63
IPEI (OMM Web service) ................... 71
Status indication (OMP)........... 114, 116
IPEI (OMP) ...................................... 135
Viewing sync relations ..................... 125
Locating settings.............................. 136
WLAN settings (OMM Web service) .. 66
ManDown number (OMM Web service)
....................................................... 72 WLAN settings (OMP) ............. 117, 119
RFP 32 IP / RFP L32 IP........................... 8
ManDown number (OMP)................ 137
RFP 34 IP / RFP L34 IP........................... 8
RFP 35 IP / RFP L35 IP......................... 10
depl-1230/0.2 Page: 236 (238)

SIP–DECT OM System Manual Release 3.0 12 Index
Standby OMM........................................ 28
RFP 36 IP / RFP L36 IP......................... 10
Configuration ................................... 190
RFP 37 IP / RFP L37 IP......................... 10
Installation update............................ 188
RFP 42 WLAN / RFP L42 WLAN............. 8
OMM Console Commands .............. 209
RFP 43 WLAN / RFP L43 WLAN........... 10
Overview.......................................... 189
RFP software update........................... 181
Protocol and Port ............................. 232
RFP synchronization...................... 28, 155
Status indication (OMM Web service) 42
Preferred synchronization source (OMM
Web service).................................. 66 Status indication (OMP)..................... 97
Preferred synchronization source (OMP)
..................................................... 119
Startup
Application ....................................... 160
Sync view (OMP) ............................. 125 Booter .............................................. 159
RSSI values......................................... 126 Statistics ................................................ 99
RTS threshold...................................... 195 Subscription........................................... 74
Seamless handover..................... see RFP
Synchronisation Wildcard subscription (OMM Web
service) .......................................... 76
SIP Wildcard subscription (OMP) ........... 138
Advanced settings (OMM Web service)
....................................................... 49 With IPEI (OMM Web service)........... 76
With IPEI (OMP) .............................. 138
Advanced settings (OMP)................ 101 Sync relations ...................................... 125
Basic settings (OMM Web service).... 48 Syslog messages................................. 204
Basic settings (OMP) ....................... 101 System Requirements ......................... 184
DTMF settings (OMM Web service) .. 50 TFTP
DTMF settings (OMP)...................... 102 Server requirements ........................ 159
General settings (OMM Web service) 47 Setup ................................................. 17
General settings (OMP) ................... 101 Troubleshooting ........... 186, 190, 194, 209
PP Authentication (OMM Web service)
....................................................... 72 User administration
OMM Web service ............................. 51
PP authentication (OMP) ................. 134
OMP................................................. 103
Registration traffic shaping ................ 51
UTF-8............................................... 27, 28
RTP settings (OMM Web service) ..... 50
Voice mail number................................. 28
RTP settings (OMP)......................... 101
System wide (OMM Web service) ..... 46
Supplementary services (OMP)....... 102
Wildcard subscription............................. 76
SIP-DECT XML terminal interface . 30, 146
WLAN .................................................... 29
Site survey mode ................................. 202
Clients................................................ 86
SNMP .................................................... 30
Configuration ................................... 194
Configuration ................................... 197
Menu.................................................. 78
General settings................................. 55
Profiles............................................... 78
Menu.................................................. 54
Securing........................................... 197
Trap handling..................................... 55
WLAN profile
SSH user shell..................................... 205
General settings................................. 82
Commands ...................................... 206
Key settings ....................................... 84
Login ................................................ 205
Multiple SSID (SSID2 – SSID4)......... 84
depl-1230/0.2 Page: 237 (238)

SIP–DECT OM System Manual Release 3.0 12 Index
QoS settings ...................................... 84
Radius settings .................................. 84
Security settings ................................ 83
XML applications ........................... 30, 146
depl-1230/0.2 Page: 238 (238)