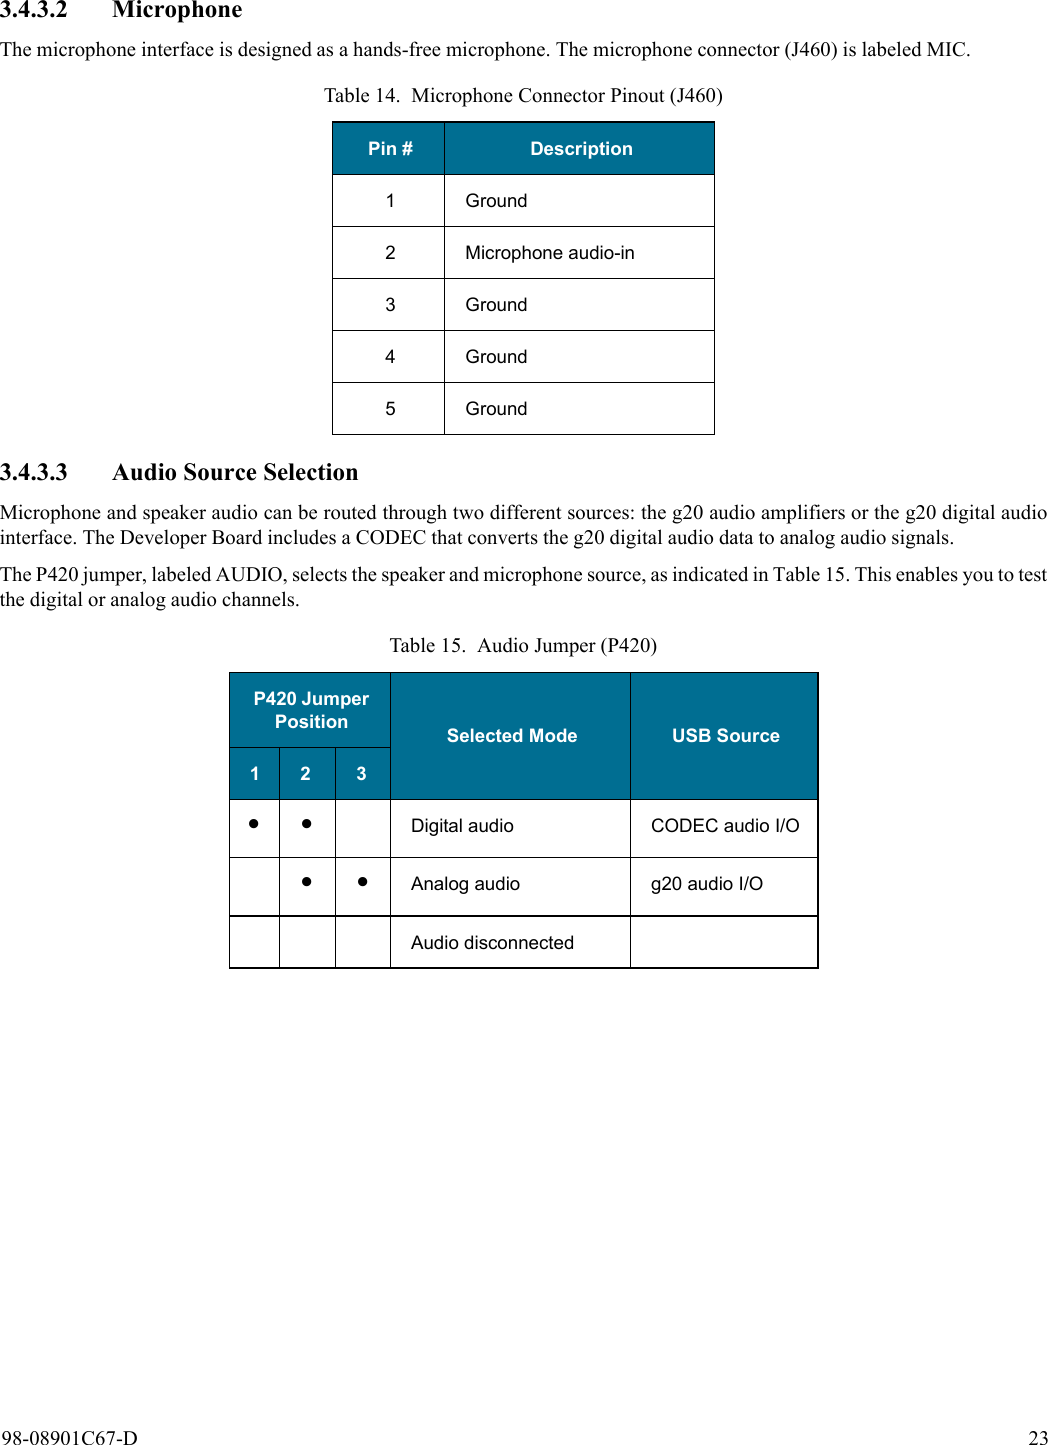
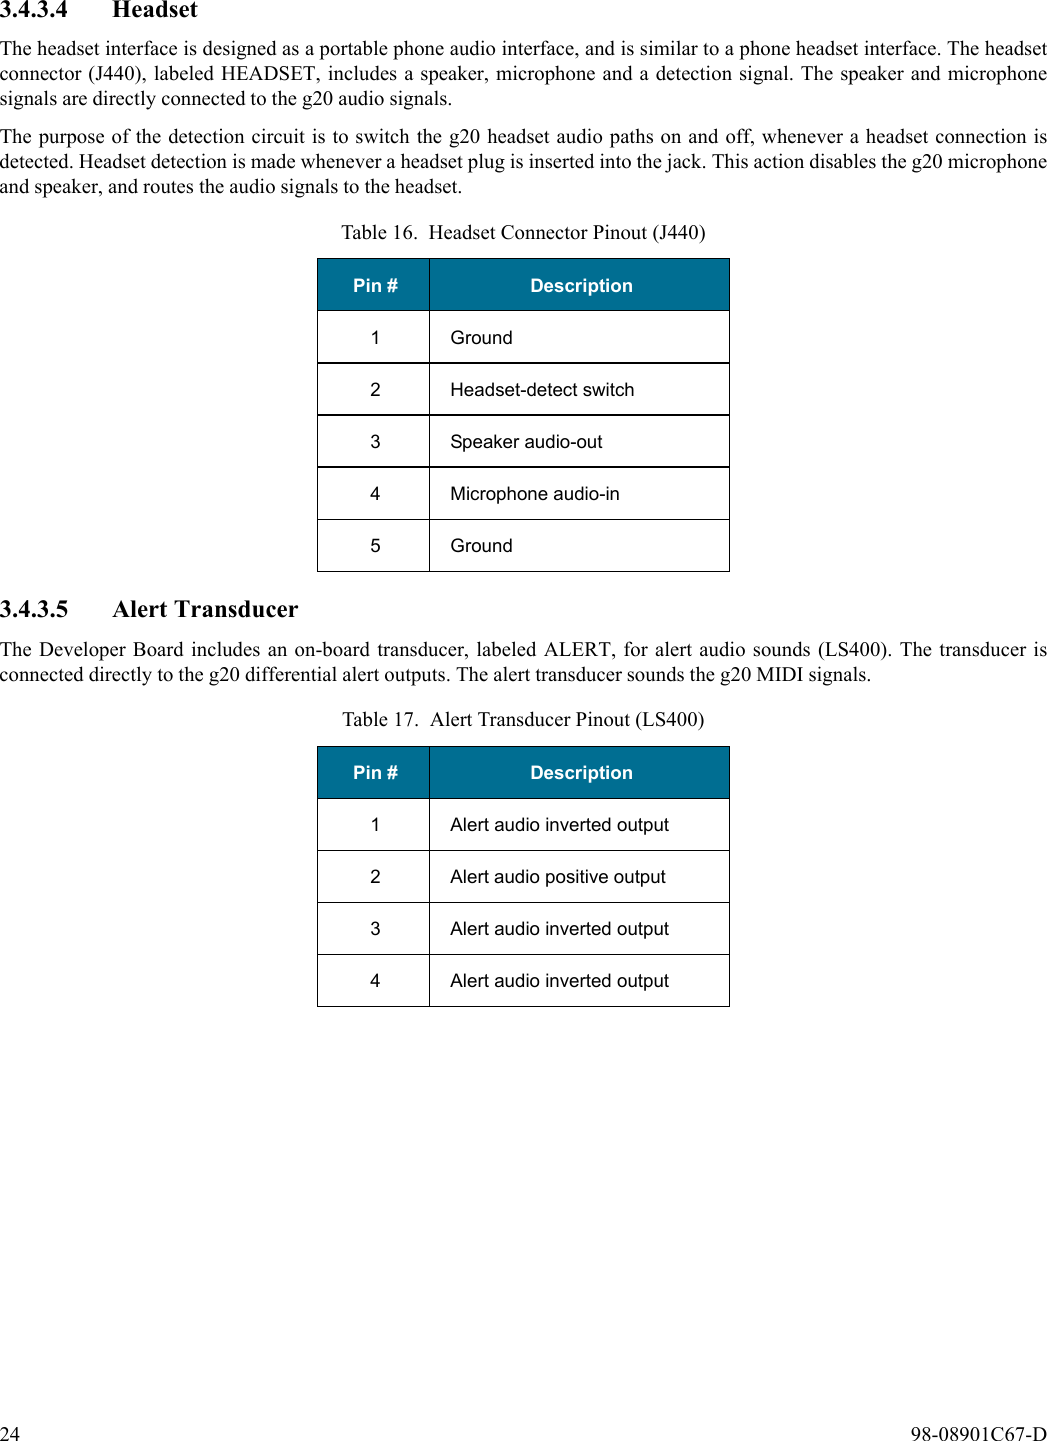
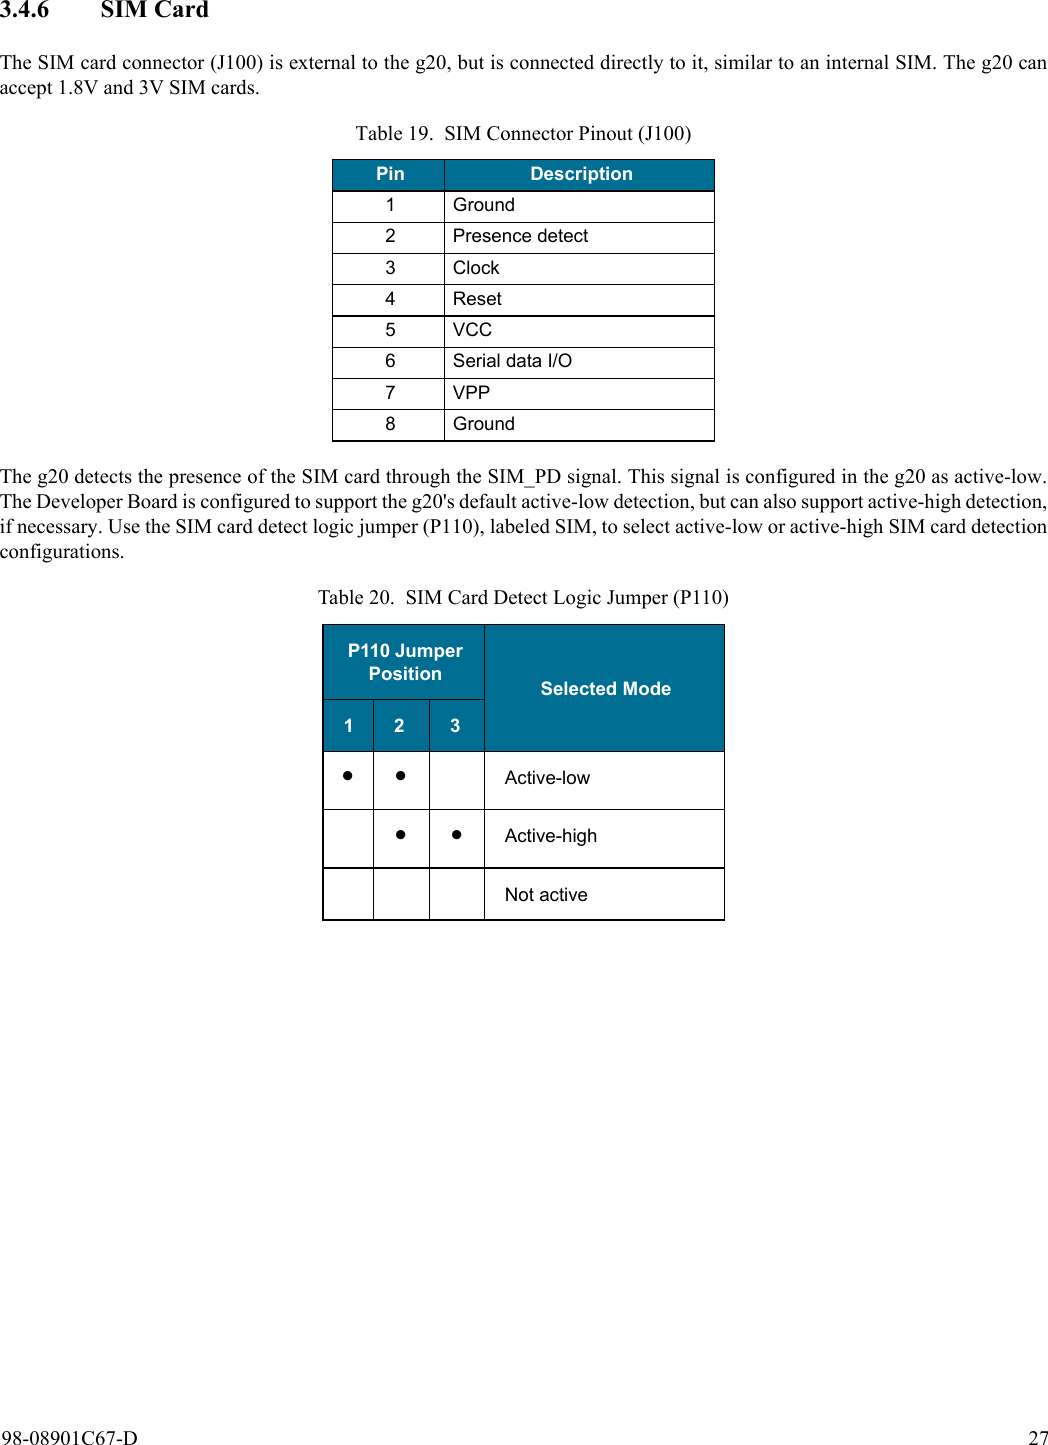
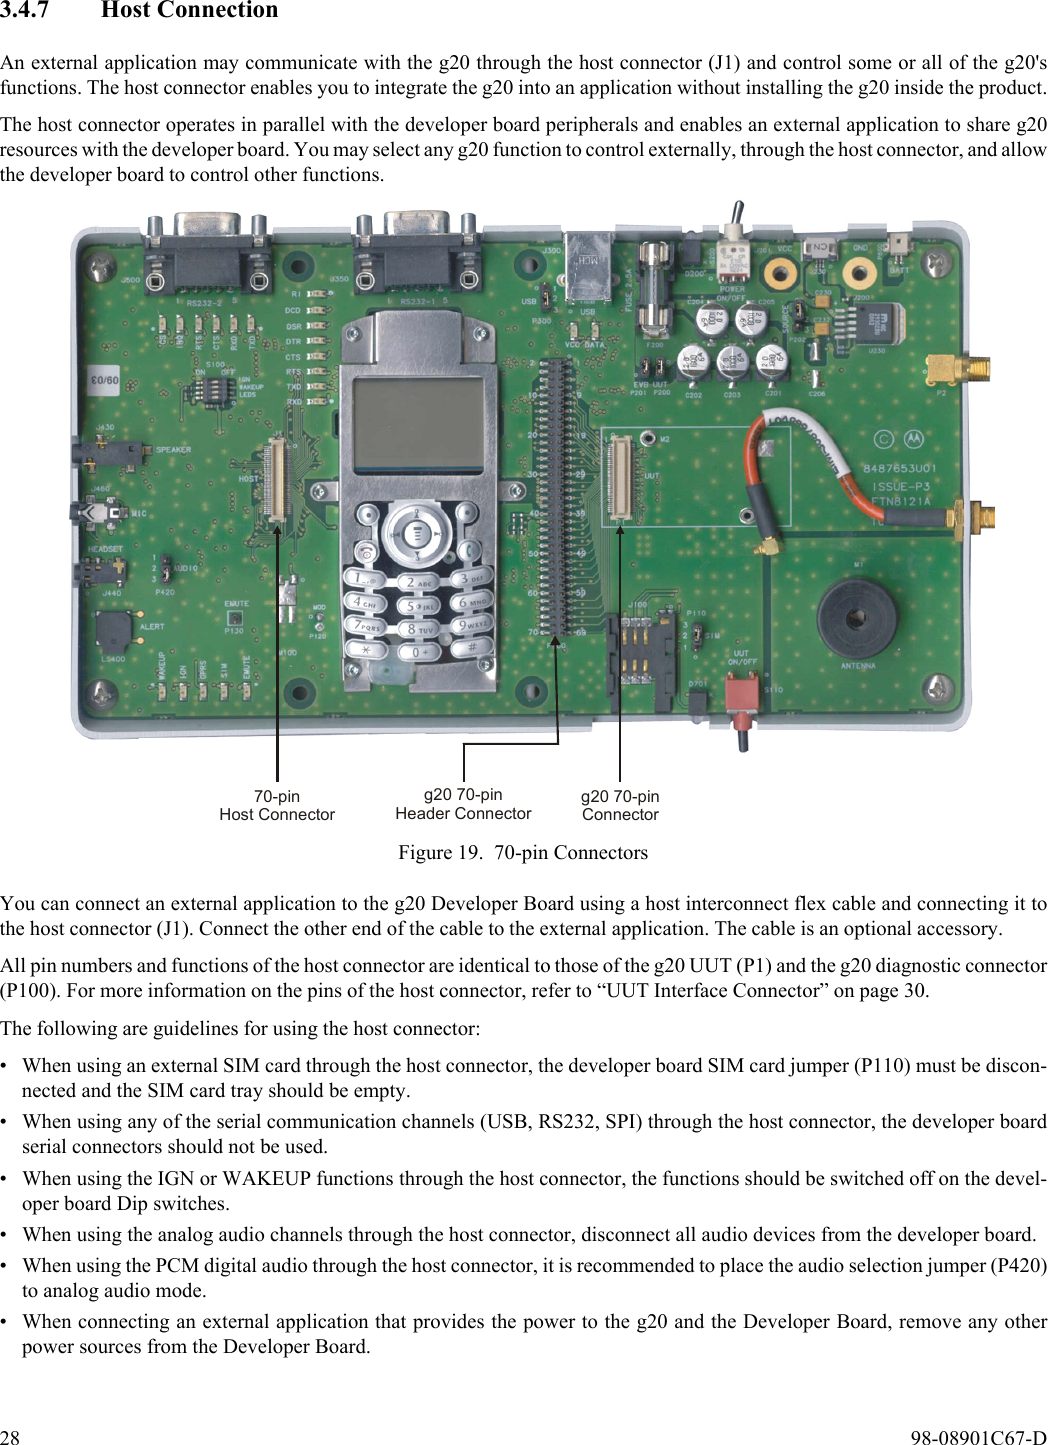
Motorola Mobility T56DB2 Dual Band GSM Development Module User Manual g20 Developer s Kit

Motorola Mobility LLC Dual Band GSM Development Module g20 Developer s Kit

Contents

Exhibit 8 b1 Users Manual per CRN22341

Developer's GuideMotorola g20Developer’s Kit98-08901C67-D
SPECIFICATIONS SUBJECT TO CHANGE WITHOUT NOTICENoticeWhile reasonable efforts have been made to assure the accuracy of this document, Motorola, Inc. assumes no liability resulting from any  inaccuracies or omissions in this document, or from use of the information obtained herein. The information in this document has been carefully checked and is believed to be entirely reliable. However, no responsibility is assumed for inaccuracies or omissions. Motorola, Inc. reserves the right to make changes to any products described herein and reserves the right to revise this document and to make changes from time to time in content hereof with no obligation to notify any person of revisions or changes. Motorola, Inc. does not assume any liability arising out of the application or use of any product, software, or circuit described herein; neither does it convey license under its patent rights or the rights of others.It is possible that this publication may contain references to, or information about Motorola products (machines and programs), programming, or services that are not announced in your country. Such references or information must not be construed to mean that Motorola intends to announce such Motorola products, programming, or services in your country.CopyrightsThis instruction manual, and the Motorola products described in this instruction manual may be, include or describe copyrighted Motorola material, such as computer programs stored in semiconductor memories or other media. Laws in the United States and other countries preserve for Motorola and its licensors certain exclusive rights for copyrighted material, including the exclusive right to copy, reproduce in any form, distribute and make derivative works of the copyrighted material. Accordingly, any copyrighted material of Motorola and its licensors contained herein or in the Motorola products described in this instruction manual may not be copied, reproduced, distributed, merged or modified in any manner without the express written permission of Motorola. Furthermore, the purchase of Motorola products shall not be deemed to grant either directly or by implication, estoppel, or otherwise, any license under the copyrights, patents or patent applications of Motorola, as arises by operation of law in the sale of a product.Computer Software CopyrightsThe Motorola and 3rd Party supplied Software (SW) products described in this instruction manual may include copyrighted Motorola and other 3rd Party supplied computer programs stored in semiconductor memories or other media. Laws in the United States and other countries preserve for Motorola and other 3rd Party supplied SW certain exclusive rights for copyrighted computer programs, including the exclusive right to copy or reproduce in any form the copyrighted computer program. Accordingly, any copyrighted Motorola or other 3rd Party supplied SW computer programs contained in the Motorola products described in this instruction manual may not be copied (reverse engineered) or reproduced in any manner without the express written permission of Motorola or the 3rd Party SW supplier. Furthermore, the purchase of Motorola products shall not be deemed to grant either directly or by implication, estoppel, or otherwise, any license under the copyrights, patents or patent applications of Motorola or other 3rd Party supplied SW, except for the normal non-exclusive, royalty free license to use that arises by operation of law in the sale of a product.  VENDOR COPYRIGHTApache Software Foundation Copyright 2002-2003  All Rights ReservedArtesyn Copyright 2002-2003  All Rights ReservedCMU  * Copyright 2002-2003  All Rights ReservedFreeware Tools / Utilities  * Copyright 2002-2003  All Rights ReservedPerformance Technologies Copyright 2002-2003  All Rights ReservedTelelogic Copyright 2002-2003  All Rights ReservedQNX  * Copyright 2002-2003  All Rights Reserved*= Freeware
Usage and Disclosure RestrictionsLicense AgreementsThe software described in this document is the property of Motorola, Inc. and its licensors. It is furnished by express license agreement only and may be used only in accordance with the terms of such an agreement.Copyrighted MaterialsSoftware and documentation are copyrighted materials. Making unauthorized copies is prohibited by law. No part of the software or documentation may be reproduced, transmitted, transcribed, stored in a retrieval system, or translated into any language or computer language, in any form or by any means, without prior written permission of Motorola, Inc.High Risk MaterialsComponents, units, or third-party products used in the product described herein are NOT fault-tolerant and are NOT designed, manufactured, or intended for use as on-line control equipment in the following hazardous environments requiring fail-safe controls: the operation of Nuclear Facilities, Aircraft Navigation or Aircraft Communication Systems, Air Traffic Control, Life Support, or Weapons Systems (High Risk Activities"). Motorola and its supplier(s) specifically disclaim any expressed or implied warranty of fitness for such High Risk Activities.Trademarks MOTOROLA and the Stylized M Logo are registered in the US Patent & Trademark Office. All other product or service names are the property of their respective owners. ©Copyright 2005 Motorola, Inc.  Java™ Technology and/or J2ME™: Java and all other Java-based marks are trademarks or registered trademarks of Sun Microsystems, Inc. in the U.S. and other countries.UNIX®: UNIX is a registered trademark of The Open Group in the United States and other countries. REV052604
Developer’s Guide98-08901C67-D© Motorola Communications Ltd., 2005A subsidiary of Motorola Inc.All rights reserved.g20 Developer’s Kit
v  98-08901C67-DREVISION HISTORYRevision Date PurposeO 30 June 2003 Initial releaseA 15 February 2004 Removed 2 g20 modelsChanges in para. 3.4.2.2 regarding USB driverB 1 March 2004 Updated Table 22 - g20 Connectors PinoutC 4 July 2004 Updated section 2.2, Package ContentsUpdated section 3.4.5.1, WakeupUpdated section 3.5.2, Switches and JumpersUpdated section 3.5.3, LED IndicatorsUpdated section 5.1, Developer Board Parts ListD April 2005 New sections: “LIMITATION OF LIABILITY” on page 3 and “WARRANTY NOTIFICATION” on page 4Updated section 3.5.4, MMI
July 2004© Motorola Inc., 2004 98-08901C67-Dg20 Developer’s KitCONTENTS REVISION HISTORY ................................................................................................................................................................vPREFACE1.1 SCOPE OF THIS MANUAL .................................................................................................................................................11.2 WHO SHOULD USE THIS MANUAL.................................................................................................................................11.3 DISCLAIMER........................................................................................................................................................................11.4 SAFETY .................................................................................................................................................................................11.4.1 Precautions ..................................................................................................................................................................11.4.2 User Operation ............................................................................................................................................................21.4.3 Antenna Installation ....................................................................................................................................................21.5 APPLICABLE DOCUMENTS ..............................................................................................................................................21.6 TRADEMARKS.....................................................................................................................................................................21.7 TERMS AND ABBREVIATIONS ........................................................................................................................................31.8 HOW THIS MANUAL IS ORGANIZED..............................................................................................................................31.9 LIMITATION OF LIABILITY..............................................................................................................................................31.10 WARRANTY NOTIFICATION ..........................................................................................................................................41.10.1 HOW TO GET WARRANTY SERVICE?...............................................................................................................41.10.2 CLAIMING...............................................................................................................................................................51.10.3 CONDITIONS ..........................................................................................................................................................51.10.4 WHAT IS NOT COVERED BY THE WARRANTY..............................................................................................51.10.5 INSTALLED DATA.................................................................................................................................................61.10.6 OUT OF WARRANTY REPAIRS...........................................................................................................................6INTRODUCTION2.1 GENERAL DESCRIPTION...................................................................................................................................................72.2 PACKAGE CONTENTS........................................................................................................................................................92.3 ACCESSORIES....................................................................................................................................................................10DEVELOPER BOARD AND INTERFACES DESCRIPTION3.1 HOW THIS CHAPTER IS ORGANIZED...........................................................................................................................113.2 OVERVIEW .........................................................................................................................................................................113.2.1 Developer Board Features.........................................................................................................................................11
vii  98-08901C67-D3.2.2 Developer Board Components.................................................................................................................................. 123.3 INITIAL SETUP.................................................................................................................................................................. 133.3.1 g20 ............................................................................................................................................................................ 133.3.2 External Connectors ................................................................................................................................................. 143.4 CONFIGURATION............................................................................................................................................................. 163.4.1 Alternate Power Sources .......................................................................................................................................... 163.4.2 Communication Interfaces........................................................................................................................................ 193.4.3 Audio Interface......................................................................................................................................................... 223.4.4 Antenna..................................................................................................................................................................... 253.4.5 Option Switches........................................................................................................................................................ 263.4.6 SIM Card .................................................................................................................................................................. 273.4.7 Host Connection ....................................................................................................................................................... 283.5 COMPONENTS AND SPECIFICATIONS ........................................................................................................................ 293.5.1 Connectors Description ............................................................................................................................................ 293.5.2 Switches and Jumpers............................................................................................................................................... 323.5.3 LED Indicators ......................................................................................................................................................... 343.5.4 MMI.......................................................................................................................................................................... 363.5.5 AC Adapter Detection Circuit .................................................................................................................................. 363.5.6 Electrical Specifications ........................................................................................................................................... 36SERVICE SUPPORT4.1 CUSTOMER ASSISTANCE............................................................................................................................................... 374.1.1 Motorola Workflow.................................................................................................................................................. 384.1.2 Service Centers......................................................................................................................................................... 384.2 TROUBLESHOOTING....................................................................................................................................................... 40PARTS LIST5.1 DEVELOPER BOARD PARTS LIST................................................................................................................................. 435.2 DEVELOPER BOARD UNPLACED PARTS LIST .......................................................................................................... 49INDEXSCHEMATICS AND PLACEMENT DIAGRAMS
98-08901C67-D viiiLIST OF FIGURESFigure 1. g20 Developer’s Kit (top view, with cover) ................................................................................................................. 7Figure 2. g20 Developer’s Kit (front, with cover) ....................................................................................................................... 8Figure 3. g20 Developer’s Kit (left side, with cover) .................................................................................................................. 8Figure 4. g20 Developer’s Kit (rear, with cover)......................................................................................................................... 8Figure 5. g20 Developer’s Kit (right side, with cover) ................................................................................................................ 8Figure 6. g20 Developer’s Kit with Accessories and the g20.................................................................................................... 10Figure 7. Developer Board Components.................................................................................................................................... 12Figure 8. Connecting the g20..................................................................................................................................................... 13Figure 9. Developer Board Power Switch and Adapter Connector ........................................................................................... 14Figure 10. Audio Connectors ..................................................................................................................................................... 15Figure 11. SIM Tray................................................................................................................................................................... 15Figure 12. Power Supply Connectors, Jumpers and Switches ................................................................................................... 16Figure 13. DC Power Connectors .............................................................................................................................................. 17Figure 14. USB, RS232 and Diagnostics Connectors................................................................................................................ 19Figure 15. Audio Connectors and Jumper.................................................................................................................................. 22Figure 16. Antenna Connectors (external) ................................................................................................................................. 25Figure 17. Antenna Connectors (internal).................................................................................................................................. 25Figure 18. Option Switches........................................................................................................................................................ 26Figure 19. 70-pin Connectors..................................................................................................................................................... 28Figure 20. Jumpers and Switches on Developer Board ............................................................................................................. 32Figure 21. LEDs on Developer Board........................................................................................................................................ 34
98-08901C67-D xLIST OF TABLESTable 1. Terms and Abbreviations ............................................................................................................................................... 3Table 2. g20 Developer’s Kit Package Contents.......................................................................................................................... 9Table 3. Accessories Sold Separately ........................................................................................................................................ 10Table 4. Power Adapter Connector Pinout (J230) ..................................................................................................................... 17Table 5. Battery Connector Pinout (P600)................................................................................................................................. 18Table 6. Power Source Jumper (P202)....................................................................................................................................... 18Table 7. Developer Board Power Jumper (P201) ...................................................................................................................... 18Table 8. g20 Power Jumper (P201)............................................................................................................................................ 19Table 9. RS232-1 Connector Pinout (J350) ............................................................................................................................... 20Table 10. USB Connector Pinout (J300).................................................................................................................................... 20Table 11. USB Jumper (P300) ................................................................................................................................................... 21Table 12. Diagnostics Connector Pinout (J500)......................................................................................................................... 21Table 13. Speaker Connector Pinout (J430)............................................................................................................................... 22Table 14. Microphone Connector Pinout (J460)........................................................................................................................ 23Table 15. Audio Jumper (P420) ................................................................................................................................................. 23Table 16. Headset Connector Pinout (J440)............................................................................................................................... 24Table 17. Alert Transducer Pinout (LS400)............................................................................................................................... 24Table 18. Option Switches ......................................................................................................................................................... 26Table 19. SIM Connector Pinout (J100) .................................................................................................................................... 27Table 20. SIM Card Detect Logic Jumper (P110) ..................................................................................................................... 27Table 21. Connectors.................................................................................................................................................................. 29Table 22. g20 Connectors Pinout ............................................................................................................................................... 30Table 23. Switches and Jumpers ................................................................................................................................................ 32Table 24. LEDs .......................................................................................................................................................................... 34Table 25. Electrical Specifications............................................................................................................................................. 36Table 26. Troubleshooting ......................................................................................................................................................... 40Table 27. Developer Board Parts List ........................................................................................................................................ 43Table 28. Developer Board Unplaced Parts List........................................................................................................................ 49
98-08901C67-D  11. PREFACE1.1 SCOPE OF THIS MANUALThis manual introduces the g20 Developer's Kit, and describes the technical details required by the user to successfully integratethe Motorola g20 cellular engine into an original equipment manufacturer (OEM) wireless host device. With the help of thismanual, the user can utilize the Developer's Kit to conduct a full series of test and evaluation procedures on the g20, as well asperform application development.We at Motorola want to make this guide as helpful as possible. Keep us informed of your comments and suggestions forimprovements. You can reach us by email: n2cshd@motorola.com.1.2 WHO SHOULD USE THIS MANUALThis manual is intended for all members of the integration team who are responsible for integrating the g20 into the host appli-cation, including representatives from hardware, software and RF engineering disciplines.1.3 DISCLAIMERThis guide provides advice and guidelines to developers. Responsibility regarding how the information is used lies entirely withthe user. Statements indicating support provided by, or offered by, Motorola are subject to change at any time.Motorola reserves the right to make any changes to this manual.1.4 SAFETY1.4.1 PrecautionsMost Developer Board circuits are not shielded. Be sure to take appropriate precautionary measures in order to avoid ESD whilehandling the kit. ESD can damage the Developer Board and/or the g20 module attached to it.
2  98-08901C67-D1.4.2 User OperationDo not operate your unit when a person is within eight inches (20 centimeters) of the antenna. A person or object within eightinches (20 centimeters) of the antenna could impair call quality and may cause the unit to operate at a higher power level thannecessary, as well as expose that person to RF energy in excess of that established by the FCC RF Exposure Guidelines.IMPORTANT: The unit must be installed in a manner that provides a minimum separation distance of eight inches (20 centi-meters) or more between the antenna and persons in order to satisfy FCC RF exposure requirements for mobile transmittingdevices.IMPORTANT: To comply with the FCC RF exposure limits and to satisfy the categorical exclusion requirements for mobiletransmitters, the requirements described in the following section must be met.1.4.3 Antenna Installation• A minimum separation distance of eight inches (20 centimeters) must be maintained between the antenna and all persons.• The effective radiated power of the transmitter must be less than 3.0 Watts ERP (4.9 Watts or 36.9 dBm EIRP). This requiresthat the combination of antenna gain and feed line loss should not exceed 9.9 dBi.1.5 APPLICABLE DOCUMENTS• g20 Cellular Engine Module Description: 9808901C66-G• g20 AT Commands: 9808901C68-F1.6 TRADEMARKSMOTOROLA and the Stylized M Logo are registered in the U.S. Patent and Trademark Office. All other product and servicenames are the property of their respective owners.© Motorola, Inc. 2005
98-08901C67-D 31.7 TERMS AND ABBREVIATIONSThis section provides definitions for terms and abbreviations used in this document. 1.8 HOW THIS MANUAL IS ORGANIZEDThis manual contains the following chapters:•Chapter 1 contains this preface.•Chapter 2 introduces the g20 Developer’s Kit.•Chapter 3 describes the Developer Board and its components in detail, including connectors, jumpers, Dip switches andLED indicators. It also includes a set of setup procedures for first-time use.•Chapter 4 provides contact information for Motorola Service Support and Customer Assistance.•Chapter 5 provides a parts list for the g20 Developer’s Kit.1.9 LIMITATION OF LIABILITY The Products are not designed, intended, or authorized for use as components in systems intended for surgical implant into thebody; in other applications intended to support or sustain life; for the planning, construction, maintenance, operation or use ofany nuclear facility; for the flight, navigation, communication of aircraft or ground support equipment; or in any other applica-tion in which the failure of the Product could create a situation where personal injury or death may occur. If CUSTOMER shouldTable 1. Terms and AbbreviationsAcronym/Term Definition/DescriptionADC Analog to Digital ConverterCMOS Complementary Metal Oxide SemiconductorCODEC Coder-DecoderDIAG DiagnosticsDTE Data Terminal Equipment (such as terminals, PCs and so on)EME Electromagnetic EmissionESD Electro-Static DischargeEVB Evaluation BoardGPRS General Packet Radio ServiceGSM Global System for Mobile CommunicationsIRQ Interrupt RequestLED Light-Emitting DiodeMIDI Musical Instrument Digital InterfaceMMCX Mini Micro CoaxMMI Man-Machine InterfaceOEM Original Equipment ManufacturerPCM Pulse Code ModulationRF Radio FrequencySIM Subscriber Identity ModuleSPI Serial Peripheral InterfaceUART Universal Asynchronous Receiver TransmitterUSB Universal Serial BusUUT Unit Under Test
4  98-08901C67-Duse any Product or provide any Product to a third party for any such use, CUSTOMER hereby agrees that MOTOROLA is notliable, in whole or in part, for any claims or damages arising from such use, and further agrees to indemnify and hold MOTOR-OLA harmless from any claim, loss, cost or damage arising from such use.  EXCEPT AS SPECIFICALLY STATED ABOVE, THE PRODUCTS ARE PROVIDED "AS IS" AND MOTOROLAMAKES NO OTHER WARRANTIES EXPRESS, IMPLIED, STATUTORY, OR OTHERWISE REGARDING THE PROD-UCTS. MOTOROLA SPECIFICALLY DISCLAIMS ANY IMPLIED WARRANTIES OF MERCHANTABILITY ANDFITNESS FOR A PARTICULAR PURPOSE, OR ARISING FROM A COURSE OF DEALING OR USAGE OF TRADE.Under no circumstances shall MOTOROLA be liable to CUSTOMER or any other party for any costs, lost revenue or profitsor for any other special, incidental or consequential damages, even if MOTOROLA has been informed of such potential loss ordamage. And in no event shall MOTOROLA's liability to CUSTOMER for damages of any nature exceed the total purchaseprice CUSTOMER paid for the Product at issue in the dispute, except direct damages resulting from patent and/or copyrightinfringement, which shall be governed by the "INDEMNITY" Section of this Agreement.  The preceding states MOTOROLA's entire liability for MOTOROLA's breach or failure to perform under any provision of thisAgreement.1.10 WARRANTY NOTIFICATIONMotorola guarantees to you, the original purchaser, the Personal Communicator and accessories which you have purchased froman authorised Motorola dealer (the "Products"), to be in conformance with the applicable Motorola specifications current at thetime of manufacture for a term of [1] year from date of purchase of the Product(s) (Warranty Term).You must inform Motorola of the lack of conformity to the applicable specifications of any of the Products within a period oftwo (2) months from the date on which you detect a defect in material, workmanship or lack of conformity and in any eventwithin a term not to exceed the Warranty Term, and must immediately submit the Product for service to Motorola's AuthorisedRepair or Service Center. Motorola shall not be bound by Product related statements not directly made by Motorola nor anywarranty obligations applicable to the seller.A list of the Motorola Call Center numbers is enclosed with this Product.During the Warranty term, Motorola will, at its discretion and without extra charge, as your exclusive remedy, repair or replaceyour Product which does not comply with this warranty; or failing this, to reimburse the price of the Product but reduced to takeinto account the use you have had of the Product since it was delivered. This warranty will expire at the end of the WarrantyTerm.This is the complete and exclusive warranty for a Motorola Personal Communicator and accessories and in lieu of all otherwarranties, terms and conditions, whether express or implied.Where you purchase the product other than as a consumer, Motorola disclaims all other warranties, terms and conditions expressor implied, such as fitness for purpose and satisfactory quality.In no event shall Motorola be liable for damages nor loss of data in excess of the purchase price nor for any incidental specialor consequential damages* arising out of the use or inability to use the Product, to the full extent such may be disclaimed by law.This Warranty does not affect any statutory rights that you may have if you are a consumer, such as a warranty of satisfactoryquality and fit for the purpose for which products of the same type are normally used under normal use and service, nor anyrights against the seller of the Products arising from your purchase and sales contract.(*)including without limitation loss of use, loss of time, loss of data, inconvenience, commercial loss, lost profits or savings.1.10.1 HOW TO GET WARRANTY SERVICE?In most cases the authorised Motorola dealer which sold and/or installed your Motorola Personal Communicator and originalaccessories will honour a warranty claim and/or provide warranty service. Alternatively, for further information on how to getwarranty service please contact either the customer service department of your service provider or Motorola's call Center at thetelephone numbers below for your country.
98-08901C67-D 51.10.2 CLAIMINGIn order to claim the warranty service you must return the Personal Communicator and/or accessories in question to Motorola'sAuthorised Repair or Service Center in the original configuration and packaging as supplied by Motorola .Please avoid leavingany supplementary items like SIM cards. The Product should also be accompanied by a label with your name, address, andtelephone number; name of operator and a description of the problem. In the case of vehicular installation, the vehicle in whichthe Personal Communicator is installed should be driven to the Authorised Repair or Service Center, as analysis of any problemmay require inspection of the entire vehicular installation.In order to be eligible to receive warranty service, you must present your receipt of purchase or a comparable substitute proofof purchase bearing the date of purchase. The phone should also clearly display the original compatible electronic serial number(IMEI) and mechanic serial number [MSN]. Such information is contained with the Product.You must ensure that all and any repairs or servicing is handled at all times by a Motorola Authorised Service Center in accor-dance with the Motorola Service requirementsIn some cases, you may be requested to provide additional information concerning the maintenance of the Products by MotorolaAuthorised Service Centers only, therefore it is important to keep a record of any previous repairs, and make them available ifquestions arise concerning maintenance1.10.3 CONDITIONSThis warranty will not apply if the type or serial numbers on the Product has been altered, deleted, duplicated, removed, or madeillegible. Motorola reserves the right to refuse free-of-charge warranty service if the requested documentation can not bepresented or if the information is incomplete, illegible or incompatible with the factory records.Repair, at Motorola's option, may include reflashing of software, the replacement of parts or boards with functionally equivalent,reconditioned or new parts or boards. Replaced parts, accessories, batteries, or boards are warranted for the balance of the orig-inal warranty time period. The Warranty Term will not be extended. All original accessories, batteries, parts, and PersonalCommunicator equipment that have been replaced shall become the property of Motorola. Motorola does not warrant the instal-lation, maintenance or service of the products, accessories, batteries or parts.Motorola will not be responsible in any way for problems or damage caused by any ancillary equipment not furnished by Motor-ola which is attached to or used in connection with the Products, or for operation of Motorola equipment with any ancillaryequipment and all such equipment is expressly excluded from this warranty.When the Product is used in conjunction with ancillary or peripheral equipment not supplied by Motorola, Motorola does notwarrant the operation of the Product/peripheral combination and Motorola will not honour any warranty claim where the Prod-uct is used in such a combination and it is determined by Motorola that there is no fault with the Product. Motorola specificallydisclaims any responsibility for any damage, whether or not to Motorola equipment, caused in any way by the use of the PersonalCommunicator, accessories, software applications and peripherals (specific examples include, but are not limited to: batteries,chargers, adapters, and power supplies) when such accessories ,software applications and peripherals are not manufactured andsupplied by Motorola.1.10.4 WHAT IS NOT COVERED BY THE WARRANTYThis warranty is not valid if the defects are due to damage, misuse, tampering, neglect or lack of care and in case of alterationsor repair carried out by unauthorised persons.The following are examples of defects or damage not covered by this product warranty1. Defects or damage resulting from use of the Product in other than its normal and customary manner.2. Defects or damage from misuse, access to incompatible sources, accident or neglect.3. Defects or damage from improper testing, operation, maintenance, installation, adjustment, unauthorised software appli-cations or any alteration or modification of any kind.
6  98-08901C67-D4. Breakage or damage to antennas unless caused directly by defects in material or workmanship.5. Products disassembled or repaired other than by Motorola in such a manner as to adversely affect performance or preventadequate inspection and testing to verify any warranty claim.6. Defects or damage due to range, coverage, availability, grade of service, or operation of the cellular system by the cellularoperator.7. Defects or damage due to moist, liquid or spills of food.8. Control unit coil cords in the Product that are stretched or have the modular tab broken.9. All plastic surfaces and all other externally exposed parts that are scratched or damaged due to customer normal use.10. Leather cases (which are covered under separate manufacturer's warranties).11. Products rented on a temporary basis.12. Periodic maintenance and repair or replacement of parts due to normal wear and tear.The warranty for Motorola rechargeable batteries becomes void if (i) the batteries are charged other than by Motorola approvedbattery chargers specified for the charging of the battery, (ii) any of the seals on the battery are broken or show evidence oftampering, (iii) the battery is used in equipment or service other than the cellular telephone equipment for which it is specified.Depending on operating conditions and your usage habits, wear and tear might take place of components including mechanicalproblems related to Product housing, paint, assembly, sub-assemblies, displays and keyboards and any accessories which arenot part of the Product's in-box configuration. The rectification of faults generated through wear and tear and the use of consum-able items like batteries beyond their Optimum Performance Time as indicated in the product manual is considered to be yourresponsibility and therefore Motorola will not provide the free Warranty repair service for these items1.10.5 INSTALLED DATAPlease make and retain a note of all data you have inserted into your Product for example names, addresses, phone numbers,user and access codes, notes etc before submitting your Product for a Warranty service as such data may be deleted or erased aspart of the repair or service process.Please note if you have downloaded material onto your Product, for example ring tones, ring tunes, screensavers, wallpaper,games etc these may be deleted or erased as part of the repair process or testing process. Motorola shall not be responsible forsuch matters. The repair or testing process should not affect any such material that was installed by Motorola on your Productas a standard feature.1.10.6 OUT OF WARRANTY REPAIRSIf you request Motorola to repair your Product any time after the Warranty term or where this warranty does not apply due tothe nature of the defect or fault, then Motorola may in its discretion carry out such repairs subject to you paying Motorola itsfees for such a repair or it may refer you to an authorised third party to carry out such repairs.NoteThe talk-time, stand-by time and total life cycle of a Motorola rechargeable battery for your PersonalCommunicator will depend on usage conditions and network configurations. As a consumable product, thespecifications indicate that you should be able to obtain optimum performance for your Motorola PersonalCommunicator within the first six months from date of purchase and up-to (200) charges(Optimum Perfor-mance Time).
98-08901C67-D  72. INTRODUCTION2.1 GENERAL DESCRIPTIONThe g20 Developer’s Kit is intended for evaluating the g20 module, as well as for developing and testing software applicationsfor it. The main component of the g20 Developer’s Kit is the Developer Board, which is mounted in a chassis. The kit includes a coverfor the Developer Board. The cover has openings on the top and sides for the Developer Board’s external connectors.Figure 1. g20 Developer’s Kit (top view, with cover)On-board AntennaSIM TrayKeypadDisplay
8  98-08901C67-DFigure 2. g20 Developer’s Kit (front, with cover)Figure 3. g20 Developer’s Kit (left side, with cover)Figure 4. g20 Developer’s Kit (rear, with cover)Figure 5. g20 Developer’s Kit (right side, with cover)SIM Trayg20 On/OffPushbuttong20 PowerIndicator LEDSpeakerConnectorMicrophoneConnectorHeadsetConnectorPower AdapterConnectorPowerOn/Off SwitchUSBConnectorRS232-1ConnectorDiagnostics (RS232-2)ConnectorBattery ConnectorPowerIndicator LEDExternalAntenna InputInternalAntenna Input
98-08901C67-D 92.2 PACKAGE CONTENTSThe g20 Developer’s Kit includes the Developer Board, chassis and cover, as well as accessories that enable you to better utilizethe board. The kit contains the following components: Kit Number: F3030BTable 2. g20 Developer’s Kit Package ContentsPart No. Description QuantityFTN8121C Developer Board 1NNTN4250B Wall Mount Power Adapter 1SYN7456A European Plug for Adapter 18102316T02 Test SIM Card 1SYN6962A Mono Headset w/Detect 13087563V12 USB Cable 13087563V13 RS232 Cable 12987604U01 DC Power Input Mount — VCC 12987604U02 DC Power Input Mount — GND 10310907A03 M2/6mm Screw (for g20 fastening) 28509397T03 Antenna Stub 11587867V01 Developer Board Chassis 11587867V02 Developer Board Cover 13087568V01 RF cable between internal antenna and external connectors13087568V02 RF cable with MMCX connector between g20 and external antenna connector1FVN5245A Documentation CD 1SVN4651A Software CD 1
10  98-08901C67-DFigure 6 shows the g20 Developer’s Kit, including the Developer Board (without cover) and the g20 and some accessoriesattached.Figure 6. g20 Developer’s Kit with Accessories and the g20The Developer’s Kit does not include a g20 device. A g20 must be obtained separately.2.3 ACCESSORIESTable 3 provides a list of additional accessories for the Developer’s Kit, which are sold separately.Table 3. Accessories Sold SeparatelyPart No.  Description0189727L01 3.6V Lithium-Ion Battery0187506V08 Host Interconnect Flex CableFSN5527A Audio Speaker 8SYN5708A Audio Microphone (Passive)SYN7455A UK Plug for Adapterg20 Developer BoardHeadsetRS232 CableUSB CableMicrophonePower AdapterRFCablesBatterySpeakerAdapter PlugΩ
98-08901C67-D  113. DEVELOPER BOARD ANDINTERFACES DESCRIPTION3.1 HOW THIS CHAPTER IS ORGANIZEDThis chapter contains the following sections:•Overview provides an overview of the Developer Board.•Initial Setup describes how to set up and prepare the Developer Board for first-time use.•Configuration describes how to modify the default settings to control the operation of the Developer Board.•Components and Specifications lists each connector, switch, jumper, Dip switch and LED and provides other details andspecifications for the Developer Board.3.2 OVERVIEWThe g20 Developer Board is designed to support the hardware and software development and validation of the g20 GSM/GPRSdata module. The Developer Board provides a peripheral platform to operate the g20 as a standalone product, and to easilyaccess the g20’s 70-pin interface connector signals.The Developer Board has the following functions:• Serves as a mounting platform for the g20 module• Supplies the g20 module with power• Provides standard communication interfaces (USB and RS232) to the g203.2.1 Developer Board FeaturesThe Developer Board provides the following features to facilitate software and hardware development:• Easy access to the g20’s 70-pin interface connector signals, through a large header connector and an external host connector• AC, battery and DC power supplies for board operation• LED indicators for critical signals• Display and keypad for phone operation• USB and RS232 serial interfaces• Diagnostics interface for g20 debugging (RS232-2)• Digital audio interface• Analog audio interface for speaker, alert transducer, microphone and headset• SIM card connector• Switches and jumpers for controlling board operation
12  98-08901C67-D3.2.2 Developer Board ComponentsFigure 7 shows the Developer Board and its components:Figure 7. Developer Board ComponentsDiagnostics (RS232-2)ConnectorSPI andRS232-2LEDsDipSwitchesSpeakerConnectorMicrophoneConnectorHeadsetConnectorAlertTransducerGPIOLEDsg20 On/OffPushbuttong20 PowerIndicator LEDInternalAntennaInternalAntennaInputExternalAntennaInputg20 UUTConnectorPower JumpersUSBLEDsHostConnectorPower SourceJumperSIM CardDetect LogicJumperg20 HeaderConnectorMMI Keypad& DisplaySIM CardTrayEntertainment MuteInput JumperAudioJumperRS232-1ConnectorRS232-1LEDsBatteryConnectorPowerAdapterConnectorDC PowerConnectorsPowerIndicator LEDUSBConnectorFuse2.5AUSBJumperPower On/OffSwitchOff          On
98-08901C67-D 133.3 INITIAL SETUPThis section describes the initial procedure for setting up the g20 Developer Board for testing and evaluating of the g20. Thetasks in this section need to be performed only once, before the first time you use the g20 Developer’s Kit. After performing theinitial setup, you can modify the default settings or use different peripheral devices, as described in “Configuration” on page 16.Perform the steps in this section in sequence.Before starting, remove the cover of the Developer Board. The cover simply slides up off the board, and does not require theremoval of any screws or clips. After setting up the Developer Board, you can place the cover back on the Developer Board bysimply pushing it gently back into place. Make sure the cover is aligned properly with the external connectors on the side of theboard.3.3.1 g20The Developer Board works with all versions of the g20. There are four versions of the g20:• European version• European version with USB driver• North American version• North American version with USB driverConnect the g20 to the Developer Board by performing the following steps:• Place the g20 into the area on the Developer Board marked by a white rectangle, and push the g20 70-pin connector downinto the UUT 70-pin connector (P1). The two screw holes on the g20 should be aligned with the g20 spacers (M2 and M3).• Fasten the g20 to the Developer Board using the two M2 screws provided with the kit.Figure 8. Connecting the g20External AntennaConnectorRFCableMMCXConnectorg20ScrewsInternal AntennaConnectorRF Cableg20
14  98-08901C67-D• An RF cable with an MMCX connector is connected to the external antenna connector. Connect the RF cable’s MMCXconnector to the MMCX connector of the g20 by pushing it in until it clicks. This connects the g20 to the antenna.3.3.2 External ConnectorsPlace the cover back on the Developer Board and connect the following external connectors.3.3.2.1 Power SupplyMake sure the Developer Board power switch is off before connecting the power supply.Figure 9. Developer Board Power Switch and Adapter ConnectorConnect the supplied power adapter to the Developer Board adapter connector (J230), which is labeled Power on the cover ofthe Developer Board. Plug the adapter into a wall outlet.3.3.2.2 PC ConnectionUSB and RS232 serial interfaces are available for PC communications. If a PC connection is required, connect either a RS232cable with a male D-type connector to the RS232 connector (J350), or a USB cable with a B-type connector to the USBconnector (J300).The g20 Developer’s Kit includes the necessary RS232 and USB cables.NoteThe g20 Developer Board can also be powered by an external DC power supply or battery cell. These options aredescribed in “Configuration” on page 16.Power AdapterConnectorDeveloper BoardOn/Off SwitchPower IndicatorLED
98-08901C67-D 153.3.2.3 Audio DevicesIf you wish to use the audio capabilities of the g20, you may connect the supplied headset, which includes a speaker andmicrophone. The headset connector is labeled HEADSET and is located on the left side of the Developer Board, along withconnectors for additional audio devices.Figure 10. Audio Connectors3.3.2.4 SIM CardInsert a SIM card into the SIM tray (J100) with the contacts down and the cut-off corner to the front and right. A diagram on thecover indicates how to insert the SIM.Figure 11. SIM TrayA test SIM card is provided with the g20 Developer’s Kit.3.3.2.5 AntennaAttach the supplied antenna stub by screwing it in to its base, on top of the Developer's Kit.The Developer's Kit arrives configured to operate with its on-board internal antenna. The EXT ANT and INT ANT antennaconnectors are connected together through an external RF cable, on the board's right side.3.3.2.6 Power UpYou must turn on the Developer Board power and then turn on the g20.• Turn on the Developer Board power by switching on the power switch (S200). The Developer Board power indicator LEDis lit.• Turn on the g20 by pushing in the g20 on/off switch (S110), holding it in for about a second and then releasing it. You canalso turn on the g20 by pressing and holding the red function button on the keypad. (The red button also functions as the end-call button.) The g20 on/off LED is lit and the display above the keypad shows text.The Developer Board is now ready for use. SpeakerConnectorMicrophoneConnectorHeadsetConnectorSIM Tray
16  98-08901C67-D3.4 CONFIGURATIONAfter performing the initial setup in the previous chapter, you can use the Developer Board with the default setup. This sectiondescribes how to change this setup in order to use different peripherals or to change the way the board operates.3.4.1 Alternate Power SourcesDeveloper Board power can be supplied from an AC power adapter, external DC power source or battery. The same powersource is used for the g20 and the board peripherals.You must connect the Developer Board to a power source, and then set the power source jumper (P202), if necessary.There are two other jumpers that help control the power supply in the Developer Board:•P201: Connects/disconnects the power from the Developer Board peripherals•P200: Connects/disconnects the power from the g20Figure 12. Power Supply Connectors, Jumpers and SwitchesEach power supply option is described in the sections that follow.Battery ConnectorPower AdapterConnectorP202(Power SourceJumper)DC PowerConnectorsP200(g20 PowerJumper)P201(Developer BoardPower Jumper)
98-08901C67-D 173.4.1.1 AC Adapter OperationWhen using an AC adapter, the adapter is connected to the power adapter connector (J230). The adapter supplies a constant 4.5 V, which is regulated to a nominal 4.1 V on the Developer Board.3.4.1.2 DC Power Source OperationYou can use an external DC power supply by connecting it to the VCC (J201) and GND (J200) connectors.Figure 13. DC Power ConnectorsThe supplied DC input connectors must be attached to the Developer Board in order to use an external DC power source. Usethe red connector for VCC and the black one for GND. Connect the DC power source to these connectors using banana plugs,alligator clips or wire.The DC voltage applied through this connection should not exceed the recommended operational limits of 3 V to 4.2 V. In allcases, the DC source input is protected from over voltage and reverse polarity, and includes a 2.5A protective fuse.When using the DC power input connectors, the Developer Board cover must be removed.Table 4. Power Adapter Connector Pinout (J230)Pin # Pin Name1GND2 Detection circuit 3VCC!CautionIt is recommended to remove jumper P202 when using the DC power source. The DC power source should not beused when other sources are connected.VCC GNDDC Power Connectors
18  98-08901C67-D3.4.1.3 Battery OperationThe Developer Board supports a battery power supply. The battery used must be a 3.6V lithium-ion cell, corresponding toMotorola part number 0189727L01. The battery is an optional accessory.When using a battery as the main power source, the AC adapter input operates as a battery charger, which connects to anon-board battery charging circuit.3.4.1.4 Power Source SelectionThe Developer Board AC adapter and battery power inputs include a selection jumper (P202) that diverts either the regulatedAC adapter power or the battery power to the board.Jumpers are provided for disconnecting the power from the Developer Board and for disconnecting the power from the g20.You may wish to remove the Developer Board power jumper and shut off the power to the board in order to diagnose a problemthat may be caused by the board. The g20 will continue to receive power..Table 5. Battery Connector Pinout (P600)Pin # Pin Name1VCC2GNDTable 6. Power Source Jumper (P202)P202 Jumper Position Selected Mode Power Source1 2 3•• Adapter AC Adapter••Battery Li-Ion BatteryAdapter and battery disconnected DC power onlyTable 7. Developer Board Power Jumper (P201)P201 Jumper Position Selected Mode1 2••Developer Board connected to power sourceDeveloper Board disconnected from power source
98-08901C67-D 19You may also want to remove the g20 power jumper and then connect an amperometer to the jumper’s two pins to measure thecurrent through the g20.  3.4.2 Communication InterfacesThe g20 Developer Board includes three serial interfaces: • RS232•USB• DiagnosticsThe RS232 and USB ports are multiplexed within the g20, and therefore cannot be operated simultaneously. The defaultconnection is RS232. The USB and RS232 is not detected dynamically. The selected serial connection is determined by the USB cable connection atpower up. If the USB cable is connected (and the PC is on), then USB is selected. Otherwise, RS232 is selected.The Diagnostics RS232 interface is used for debugging.Figure 14. USB, RS232 and Diagnostics ConnectorsEach of these serial interfaces is described in the sections that follow.Table 8. g20 Power Jumper (P201)P200 Jumper Position Selected Mode1 2••g20 connected to power sourceg20 disconnected from power sourceUSBConnectorRS232-1ConnectorDiagnostics (RS232-2)Connector
20  98-08901C67-D3.4.2.1 RS232The 9-pin, D-type RS232-1 serial port (J350) is the primary interface to the g20 UUT. The UUT RS232 signals are active-lowCMOS-level signals (0-2.7 V), which are converted by the Developer Board to standard RS232 levels for PC communications.3.4.2.2 USBThe USB interface connector (J300) is a standard B-type USB device interface. The g20 USB signals are routed directly to thisconnector. The Developer Board includes a USB driver circuit, similar to the g20’s internal USB circuit, for reference andtesting purposes only. For proper USB communications, the Developer Board’s USB driver should not be used.Table 9. RS232-1 Connector Pinout (J350)Pin # Description DTE I/O1 DCD In2RXD In3TXD Out4DTR Out5 Ground6DSR In7RTS Out8CTS In9RI InNoteThe RS232-1 connector pin names are DTE-oriented.Table 10. USB Connector Pinout (J300)Pin # Description1VCC2D-3D+4 Ground
98-08901C67-D 213.4.2.3 DiagnosticsThe 9-pin D-type Diagnostics serial port (J500) is connected to the g20 internal SPI bus. This interface is used to debug appli-cations. On the Developer Board, the g20 SPI interface is converted to standard RS232 signals for PC communications. The conversionprocess uses the RS232 interface as a second slave on the internal g20 SPI bus, and communicates with it as such. SPI read andwrite operations are performed normally, using the CS and IRQ signals provided by the conversion circuit. The IRQ signal isconnected to a g20 IRQ pin.Table 11. USB Jumper (P300)P300 Jumper Position Selected Mode USB Source1 2 3•• g20 g20 driverUSB disconnectedNoteThe RS232-2 connector pin names are DTE-oriented.Table 12. Diagnostics Connector Pinout (J500)Pin # Description DTE I/O1 Unused2RXD In3TXD Out4 Unused5 Ground6 Unused7RTS Out8CTS In9 Unused
22  98-08901C67-D3.4.3 Audio InterfaceThe Developer Board includes analog and digital audio interfaces. The audio interface contains a hands-free speaker andmicrophone, a headset, and an alert transducer.Figure 15. Audio Connectors and Jumper3.4.3.1 SpeakerThe differential speaker interface is designed as a hands-free speaker. The Developer Board uses an audio amplifier to amplifythe speaker audio output to desired levels. The speaker connector (J430) is labeled SPEAKER. The speaker output is 8 ohmsmatched.Table 13. Speaker Connector Pinout (J430)Pin # Description1 Not connected2 Speaker positive output3 Speaker negative output4 Not connectedAudio JumperSpeakerAlert TransducerMicrophoneHeadset
98-08901C67-D 233.4.3.2 MicrophoneThe microphone interface is designed as a hands-free microphone. The microphone connector (J460) is labeled MIC.3.4.3.3 Audio Source SelectionMicrophone and speaker audio can be routed through two different sources: the g20 audio amplifiers or the g20 digital audiointerface. The Developer Board includes a CODEC that converts the g20 digital audio data to analog audio signals.The P420 jumper, labeled AUDIO, selects the speaker and microphone source, as indicated in Table 15. This enables you to testthe digital or analog audio channels.Table 14. Microphone Connector Pinout (J460)Pin # Description1 Ground2 Microphone audio-in3 Ground4 Ground5 GroundTable 15. Audio Jumper (P420)P420 Jumper Position Selected Mode USB Source1 2 3•• Digital audio CODEC audio I/O••Analog audio g20 audio I/OAudio disconnected
24  98-08901C67-D3.4.3.4 HeadsetThe headset interface is designed as a portable phone audio interface, and is similar to a phone headset interface. The headsetconnector (J440), labeled HEADSET, includes a speaker, microphone and a detection signal. The speaker and microphonesignals are directly connected to the g20 audio signals.The purpose of the detection circuit is to switch the g20 headset audio paths on and off, whenever a headset connection isdetected. Headset detection is made whenever a headset plug is inserted into the jack. This action disables the g20 microphoneand speaker, and routes the audio signals to the headset.3.4.3.5 Alert TransducerThe Developer Board includes an on-board transducer, labeled ALERT, for alert audio sounds (LS400). The transducer isconnected directly to the g20 differential alert outputs. The alert transducer sounds the g20 MIDI signals.Table 16. Headset Connector Pinout (J440)Pin # Description1 Ground2 Headset-detect switch3 Speaker audio-out4 Microphone audio-in5 GroundTable 17. Alert Transducer Pinout (LS400)Pin # Description1 Alert audio inverted output2 Alert audio positive output3 Alert audio inverted output4 Alert audio inverted output
98-08901C67-D 253.4.4 AntennaAn antenna (internal or external) must be connected to the Developer Board for adequate GSM reception. You can connect theg20 to either the on-board internal antenna or to an external antenna. Two RF connectors on the side of Developer Board, labeled INT ANT and EXT ANT on the cover, are used for setting up theantenna.Figure 16. Antenna Connectors (external)On the inside of the Developer Board, the EXT ANT connector is connected to the g20 and the INT ANT is connected to theon-board internal antenna.You must perform one of the following:• To use the internal antenna, connect the EXT ANT and INT ANT connectors with the additional RF cable supplied in theDeveloper’s Kit. This is the Developer Board’s default configuration. It arrives with the EXT ANT and INT ANT alreadyconnected. Figure 17. Antenna Connectors (internal)• To use an external antenna, connect an external antenna or antenna application to the EXT ANT connector. (The connectioncable is not included.) You must first disconnect the external RF cable from the EXT ANT connector.ExternalAntenna InputInternalAntenna InputOn-boardInternal Antennag20 RF CableAdditionalRF CableEXT ANTINT ANT
26  98-08901C67-D3.4.5 Option SwitchesFigure 18 shows the Dip switches provided on the Developer Board, which are located on the S100 component.Figure 18. Option SwitchesThe following Dip switches are provided:3.4.5.1 WakeupThe WAKEUP switch is connected to the g20’s internal wakeup interrupt module through the WAKEUP_IN_N signal. Thisline should be in the off position to enter Sleep mode and in the on position to wake up.Generally, your application wakes up the g20. In cases where the application is not ready for integration, you can force wakeupof the g20 by turning on this Dip switch.3.4.5.2 IgnitionThe IGN switch activates the g20 ignition circuits through the IGN signal. You can use this switch to turn the g20 on and off.3.4.5.3 LEDs ControlThe Developer Board includes LED indicators for critical signals. The LED switch enables you to turn off all the LEDs on the Developer Board, for example, to reduce power consumption. TheDeveloper Board power on/off LED and the g20 on/off LED are always active and cannot be disabled.Table 18. Option SwitchesReference DescriptionWAKEUP g20 wakeup signalIGN g20 ignition circuitLEDS on/off switch for LEDs
98-08901C67-D 273.4.6 SIM CardThe SIM card connector (J100) is external to the g20, but is connected directly to it, similar to an internal SIM. The g20 canaccept 1.8V and 3V SIM cards.The g20 detects the presence of the SIM card through the SIM_PD signal. This signal is configured in the g20 as active-low.The Developer Board is configured to support the g20's default active-low detection, but can also support active-high detection,if necessary. Use the SIM card detect logic jumper (P110), labeled SIM, to select active-low or active-high SIM card detectionconfigurations.Table 19. SIM Connector Pinout (J100)Pin Description1 Ground2 Presence detect3Clock4Reset5VCC6 Serial data I/O7 VPP8 GroundTable 20. SIM Card Detect Logic Jumper (P110)P110 Jumper Position Selected Mode1 2 3•• Active-low••Active-highNot active
28  98-08901C67-D3.4.7 Host ConnectionAn external application may communicate with the g20 through the host connector (J1) and control some or all of the g20'sfunctions. The host connector enables you to integrate the g20 into an application without installing the g20 inside the product.The host connector operates in parallel with the developer board peripherals and enables an external application to share g20resources with the developer board. You may select any g20 function to control externally, through the host connector, and allowthe developer board to control other functions.Figure 19. 70-pin ConnectorsYou can connect an external application to the g20 Developer Board using a host interconnect flex cable and connecting it tothe host connector (J1). Connect the other end of the cable to the external application. The cable is an optional accessory.All pin numbers and functions of the host connector are identical to those of the g20 UUT (P1) and the g20 diagnostic connector(P100). For more information on the pins of the host connector, refer to “UUT Interface Connector” on page 30.The following are guidelines for using the host connector:• When using an external SIM card through the host connector, the developer board SIM card jumper (P110) must be discon-nected and the SIM card tray should be empty.• When using any of the serial communication channels (USB, RS232, SPI) through the host connector, the developer boardserial connectors should not be used.• When using the IGN or WAKEUP functions through the host connector, the functions should be switched off on the devel-oper board Dip switches.• When using the analog audio channels through the host connector, disconnect all audio devices from the developer board.• When using the PCM digital audio through the host connector, it is recommended to place the audio selection jumper (P420)to analog audio mode.• When connecting an external application that provides the power to the g20 and the Developer Board, remove any otherpower sources from the Developer Board.g20 70-pinConnector70-pinHost Connectorg20 70-pinHeader Connector
98-08901C67-D 293.5 COMPONENTS AND SPECIFICATIONS3.5.1 Connectors DescriptionAll the Developer Board connectors are marked by their reference number and by a pin-1 indicator. Table 21 describes the avail-able connectors on the Developer Board. Table 21. ConnectorsReference Connector DescriptionInternal Connectors (not visible when cover is on)P1 g20 UUT g20 UUT (unit under test) connectorJ1 Host Emulates the g20 connector for host systemsP100 Header Debug header connector (70-pin)J201 VCC Developer Board DC power supplyJ200 GND Developer Board common groundExternal Connectors (visible when cover is on)J300 USB USB B-type connectorJ350 RS232-1 Primary RS232 to PCJ500 RS232-2 Secondary RS232 for debugging (Diagnostics)J430 Speaker  Hands-free system speaker jackJ460 Microphone Hands-free system microphone jackJ440 Headset Headset jackP600 Battery Battery connectorJ230 AC adapter/charger Wall-mount adapter connectorJ100 SIM card SIM card socket with detectionP2 Antenna connector SMA connector for internal antennaM1 RF Antenna Internal antenna
30  98-08901C67-D3.5.1.1 UUT Interface ConnectorTable 22 lists the pin names and functions available for the g20 interface connectors. All pin numbers and functions are identicalto the g20 UUT (P1), host (J1) and g20 Diagnostic (P100) connectors on the Developer Board.Table 22. g20 Connectors PinoutPin # Pin Name Pin # Pin Name1GND 2GND3GND 4GND5VCC 6VCC7VCC 8VCC9 RTS_N 10 USB_VBUS11 RXD_N 12 USB_D+13 DSR_N 14 USB_D-15 CTS_N 16 WAKEUP_IN_N17 DCD_N 18 PCM_DIN19 DTR_N 20 PCM_DOUT21 TXD_N 22 PCM_CLK23 RI_N 24 PCM_FS25 RESET_N 26 WAKEUP_OUT_N27 BL_SINK 28 KBC1_N29 CHRG_DIS 30 KBC0_N31 CHRG_SW 32 KBR0_N33 CHRG_STATE 34 KBR1_N35 CHRG_DET_N 36 KBR2_N37 Not connected 38 KBR3_N39 TX_EN_N 40 KBR4_N41 ANT_DET 42 KBR5_N43 VIB_OUT 44 SIM_RST_N
98-08901C67-D 3145 CHRG_TYP 46 SIM_CLK47 THERM 48 SIM_VCC49 GPRS_DET_N 50 SIM_PD51 IGN 52 SIM_DIO53 ON_OFF_N 54 LCD_CS55 HDST_INT_N 56 LCD_DATA57 HDST_MIC 58 LCD_CLK59 MIC_GND 60 LCD_RS61 MIC 62 SPI_IRQ_N63 ALRT_N 64 SPI_DIN65 ALRT_P 66 SPI_CLK67 SPKR_N 68 SPI_DOUT69 SPKR_P 70 SPI_CSTable 22. g20 Connectors Pinout (Continued)Pin # Pin Name Pin # Pin Name
32  98-08901C67-D3.5.2 Switches and JumpersFigure 20 shows the jumpers and switches on the Developer Board.Figure 20. Jumpers and Switches on Developer BoardTable 23 describes the available switches and jumpers on the Developer Board.Table 23. Switches and JumpersReference Switch/Jumper DescriptionSwitchesS200 Board on/off Developer Board on/off switchS110 g20 on/off  g20 on/off pushbutton switchDip SwitchesS100 Option switches Four switches for Developer Board optionsP420(Audio)P130(EMUTE)P110(SIM)S110(g20 On/OffPushbutton)HostConnectorP200(g20 Power)S200(Power On/OffSwitch)P202(Power Source)S100(Option Switches)P201(DeveloperBoard Power)P300(USB)
98-08901C67-D 33JumpersP420 Audio Analog/digital audio-selection jumperP201 EVB Peripheral power input jumperP200 UUT g20 UUT power input jumperP202 Source Power source selection jumperP110 SIM SIM card detect logic selection jumperP300 USB USB driver jumper (not used)Table 23. Switches and Jumpers (Continued)Reference Switch/Jumper Description
34  98-08901C67-D3.5.3 LED IndicatorsFigure 21 shows the LEDs on the Developer Board.Figure 21. LEDs on Developer BoardTable 24 describes the LED indicators on the Developer Board. Each LED is marked on the board by the function it represents.Table 24. LEDsGroup LED Reference DescriptionGPIOWAKEUP D704 Wake-up in/outIGN D702 Ignition inputGPRS D710 GPRS coverage indicationSIM D703 SIM card reset indicationEMUTE D708 Not usedPowerUUT D701 g20 on/offPWR D200 PowerGPIOLEDsg20 On-OffHostConnectorSPILEDsRS232-2LEDs RS232-1USBLEDsDeveloperBoard Power
98-08901C67-D 35SPICS D741 SPI chip-select outputIRQ D744 SPI IRQ inputUSBVCC D760 USB VBUSDATA D761 USB D+RS232-1RXD D722 DTE receive dataTXD D721 DTE transmit dataRTS D724 Request to sendCTS D723 Clear to sendDTR D725 Data terminal readyDSR D726 Data set readyDCD D727 Carrier detectRI D728 Ring indicatorRS232-2RXD D743 DTE receive dataTXD D742 DTE transmit dataCTS D744 Clear to sendRTS D745 Request to sendTable 24. LEDsGroup LED Reference Description
36  98-08901C67-D3.5.4 MMIThe Developer Board includes a man-machine interface (MMI), complete with display and keypad. The MMI is intended forinitial operation and evaluation of the g20.The keypad does not function on generic g20 sales models, a special flex should be requested in order to have the keypad func-tioning.For more information on MMI connections, refer to the schematics in “Schematics and Placement Diagrams” on page 55.3.5.5 AC Adapter Detection CircuitThe g20 charger module includes a detection logic circuit for detecting charger presence and type. The detection circuit is inter-nal to the g20 module. However, the Developer Board does contain the necessary routing from the g20 UUT to the AC adapterconnector.Two g20 signals are used for this detection:•CHRG_TYP: ADC signal for charger type detection•CHRG_SW: Charger rate controlThese detection signals are present to provide compatibility with the phone. They may be removed in future versions.3.5.6 Electrical SpecificationsTable 25 describes the electrical specifications of the Developer Board.* When using DC power supply only.** Depends on the active peripherals (LEDs, UART, USB, and so on) in use.Table 25. Electrical SpecificationsParameter Units Min Typ MaxDC power supply V 3.0 3.6 4.2Adapter power supply V 4.4 4.6 12Battery power supply V 3.0 3.6 4.2Off current*uA 3.6 42.6On current mA 8.0 8.25 8.45Active current, peripherals off mA 12.3 12.4 ---Active current, peripherals on** mA 12.6 --- ---
98-08901C67-D  374. SERVICE SUPPORT4.1 CUSTOMER ASSISTANCEThis section provides contact information for any possible queries that may arise, such as the following:• Have questions?• Having trouble getting the Developer Board set up?• Technical questions?• Configuration questions/problems?• Technical operating problems?• Need documentation?The GSM/CDMA Data Module Customer Support Center is ready to assist you on integration issues.A direct customer should use the following email address to contact customer assistance: n2cshd@motorola.com.An indirect customer should send his requests to his distributor and not to Motorola help desk.Every new call/problem report should be directed to the help desk email address noted above. It is recommended to report eachindividual issue in a separate email. The following information is required when reporting a problem:• Customer name and address• Customer contact information for this request, including:•Name• Telephone• Fax number• Mobile number• Email address• Product name (g20)• Software version of the unit (ATI3 command) or model number• PCB version. This information is located on the PCB near the RF connector.• Severity of the problem • Problem description, including:• Operator name• Type of SIM card (for example, Test, Pre-paid, or 5v/3v/1.8v)• Configuration of the setup (such as Developer Board, handset, host, connections, and so on)• Detailed scenario from startup• Log of all the commands and the responses, beginning from startupNoteThe support services provided by Motorola are subject to the agreement between the customer and Motorola andmay be at an additional charge to the customer. Motorola will inform the customer in advance of any such charge.
38  98-08901C67-D• Answers to the following questions:• Was the same scenario tested on the Developer Board and the PC to reproduce the problem?• How many units do you have, and how many of them have this problem?• How often does the problem recur?In addition to the information requested above, send the following AT commands and the HyperTerminal log with theresponses:AT+CMEE=2         //   To get textual error messageAT+CPIN?            //   To get SIM card statusAT+CREG?          //   To see if the TXVR is registered to the networkAT+CSQ             //   To get the signal strength (RX level)AT+CGSN            //   To read the IMEI number of the unitATI3 //   To get the software version of the TXVRAT\S //   To get the setting of basic AT commandsAT+CMER=0,0,1,1 //   To get messages and indicators from the handset display to the DTE4.1.1 Motorola Workflow The help desk uses the following workflow when responding to new calls:1. Each new call is registered in the help desk data base. 2. The help desk immediately notifies the customer with the help desk system record number for each issue.3. A champion is assigned to be responsible for the new call, from arrival to closing.4. During this time, the champion updates the help desk system with the progress of the resolution process. 5. The champion is the contact to the customer and the engineering team, and coordinates activities that are required to solvethe problem.4.1.2 Service CentersMotorola Electronics Taiwan PCS11F, No, 296, Sec. 4, Jen-Ai RoadTaipei, 106, Taiwan, R.O.CMotorola GmbHAm Sophienhof 10D-24941 FlensburgGermany
98-08901C67-D 39Motorola Communications ISRAEL Ltd.Service Operation Attention: Shukrun Ofer3 Krementsky StreetTel Aviv, Israel 67899Telephone: (972) 3 5658829JNB Electronics Pty Ltd.347 Settlement Road, ThomastownVIC 3074AustraliaField service should be coordinated with the Service Manager in Motorola using the following email address:N2CSFS01@motorola.com
40  98-08901C67-D4.2 TROUBLESHOOTINGThe following table lists problems that may occur during board operation, and describes how to resolve them. If the problempersists, please contact your Motorola representative.Table 26. TroubleshootingProblem Indication ActionPowerDeveloper board does not power upPower LED does not light Check the power source connection.If using an external DC power source, verify that the supply is within the limits of 3.0 V to 4.2 V.Verify that the board power switch (S200) is on.Check the source jumper (P202) position.Verify that the EVB jumper (P201) is present.Verify that the protective fuse is not burned out.The g20 does notpower upThe g20 on/off LED doesn’t light or lights for a short periodCheck the g20 connection to the Developer Board.Verify that the UUT jumper (P200) is present.Depress the g20 on/off pushbutton for a longer period.The g20 on/off LED lights up automatically when power is appliedVerify that the IGN option switch is off.The g20 on/off LED blinks Contact your Motorola representative.Image freezes on the display at start upContact your Motorola representative.High current consumptionThe protective fuse burns outCheck the polarity of the DC power inputs.Verify that only one optional power source is connected.GSM ReceptionNo GSM reception availableThe g20 unit searches unsuccessfully for networkVerify that the g20 supports the GSM bands in your area.If using an external DC power source, verify that the supply is within the limits of 3.0 V to 4.2 V.Fasten the g20 to the board with the supplied screws.Check the MMCX RF cable connection to the g20.Fasten the RF cable connections between the EXT ANT and INT ANT connectors.Fasten the onboard antenna stub into its base.SIM cardThe SIM card does not operateInsert SIM is displayed on the board displayVerify that the SIM card operates at 3 V or 1.8 V.Verify that the SIM card is inserted properly into its tray.Check the SIM detect jumper (P110) setting.
98-08901C67-D 41Serial CommunicationsThe USB port does not work with the PCThe PC does not recognize connectionCheck the USB jumper (P300) position.Check the USB cable connection to the PC.The RS232 port does not work with the PCThe PC does not communicateVerify that the USB cable is not plugged into the board.Check the serial cable connection to the PC.Verify that the PC port settings comply with the g20 defaults.Incorrect RS232 LEDsare litContact your Motorola representative.Data logger does not operateNo activity in the application windowCheck the serial cable connection to the PC.Verify that the PC port settings comply with the g20 defaults.MMIThe display does not operateBlank screen, image flickering, corrupt imagesContact your Motorola representative.The display freezes Image freezes on the displayContact your Motorola representative.The keypad does not respondNo audio or visual response to key pressContact your Motorola representative, ask for a flex file (configuration file), which enables the keypad.AudioThe headset does not workNo sound in the headset earpieceVerify that the headset is inserted correctly into the headset (J440) audio connector.Use only the supplied headset.Check the g20 volume level.No sound output from the headset microphoneVerify that the headset is inserted correctly into the headset (J440) audio connector.Use only the supplied headset.Digital audio does not workNo sound from the speaker or microphoneVerify that the g20 supports this feature.Check the audio jumper (P420) position.GeneralThe LEDs do not lightThe LEDs are not lit Verify that the LEDs option switch is on.The g20 does not enter sleep modeThe g20 always active Verify that the WAKEUP option switch is off.
42  98-08901C67-D*The additional accessories are not included in the Developer’s Kit. They are sold separately.Additional Accessories*The speaker does not workNo sound from the speaker Verify that the speaker plug is inserted correctly into the speaker (J430) audio connector.Check the audio jumper (P420) position.Verify that the headset is not plugged in and active.Check the g20 volume level.Use only the recommended accessory speaker.The microphone does not workNo sound from the microphoneVerify that the microphone plug is inserted correctly into the microphone (J460) audio connector.Check the audio jumper (P420) position.Verify that the headset is not plugged in and active.Use only the recommended accessory microphone.The Developer Board does not power up with a batteryThe power LED doesn’t lightCheck the battery connection.Verify that the battery is not empty.Verify that the board power switch (S200) is on.Check the source jumper (P202) position.Verify that the EVB jumper (P201) is present.Verify that the protective fuse is not burned out.Battery charging does not workNo charging Verify that the g20 supports this feature.Check the power adapter connection.Check the source jumper (P202) position.Some options do not work with host flex cableSelective operation Verify that the proper jumper settings are implemented for host flex operation.
98-08901C67-D  435. PARTS LIST5.1 DEVELOPER BOARD PARTS LISTThe following table is a parts list for the g20 Developer’s Kit. Schematic diagrams for the kit are provided at the end of thisguide.Table 27. Developer Board Parts ListREFERENCESYMBOL DESCRIPTIONResistorsR321 47K  1%R440 68  5%R600, R905 75  5%R330 100  5%R723, R725, R745, R747 180  5%R703 270  5%R705, R707, R709, R718, R727, R729, R731, R733, R735,R737, R743, R749, R751, R753, R763, R764300  5%R203 390  5%R603 820  5%R202, R604, R781, R9071000  5%R602 1200  5%R416 1500  5%R412 2200  5%R201 4700  5%R179, R197, R200, R333, R441, R525, R601, R60710K  5%R230, R231, R232 12K  5%R332, R411, R418 20K  5%R196, R320, R331, R370, R504, R608, R609, R780, R90647K  5%ΩΩΩΩΩΩΩΩΩΩΩΩΩΩΩΩΩΩ
44  98-08901C67-DR10, R107, R11, R116, R117, R118, R119, R120, R121, R122, R123, R124, R125, R126, R127, R128, R129, R130, R131, R132, R133, R134, R135, R136, R137, R138, R139, R140, R141, R142, R143, R144, R146, R148, R149, R15, R151, R152, R153, R155, R157, R159, R16, R170, R172, R173, R174, R175, R176, R181, R182, R183, R184, R189, R190, R302, R350, R402, R407, R408, R409, R410, R413, R414, R417, R419, R423, R427, R460, R503, R511, R512, R513, R514, R515, R516, R517, R518, R519, R520, R521, R522, R523, R524, R606, R612, R615, R616, R617, R700, R702, R704, R706, R708, R711, R716, R720, R722, R724, R726, R728, R730, R732, R734, R736, R740, R742, R744, R746, R748, R750, R752, R760, R761, R801, R802, R803, R804, R8050R322 12.1K  1%R430, R431, R433, R434 20.0K  1%R221 100.0K  1%R234 130.0K  1%R211, R220, R241 150.0K  1%R210, R240 200.0K  1%R233 301K  1%CapacitorsC4 1pFC208 3.3pFC207, C215, C217, C234 8.2pFC442, C444, C447, C450, C462, C472, C47310pFTable 27. Developer Board Parts ListREFERENCESYMBOL DESCRIPTIONΩΩΩΩΩΩΩΩ
98-08901C67-D 45C148, C150, C151, C153, C155, C157, C159, C191, C192, C211, C221, C241, C312, C401, C402, C403, C404, C416, C417, C418, C421, C422, C423, C424, C425, C426, C427, C428, C435, C436, C437, C438, C439, C443, C445, C446, C448, C449, C451, C452, C461, C463, C464, C470, C471, C474, C475, C502, C781, C810, C811, C812, C813, C814, C815, C816, C817, C81833pFC125, C128, C131, C134, C216, C218, C231, C511, C51239pFC5 330uFC414 10nFC101, C107, C117, C119, C120, C121, C122, C123, C124, C126, C127, C129, C132, C133, C136, C138, C139, C140, C142, C144, C146, C6000.10uFC430, C431, C433, C434 0.22uFC361, C362, C363, C364, C521, C522, C523, C5240 .33uFC310, C313 4.7uFC440, C441 10.0uFC172, C173, C180, C190, C233, C300, C311, C350, C360, C400, C410, C413, C420, C432, C453, C500, C513, C520, C700, C720, C774, C780, C8001.0uFC230, C232 10uFC210, C212, C220, C222, C240, C24210uFC201, C202, C203, C204, C2051000uFTable 27. Developer Board Parts ListREFERENCESYMBOL DESCRIPTION
46  98-08901C67-DInductorsC3 3.9nHC1 12nHR1 18nHL440 33nHConnectorsJ430 HosidenHSJ1501-019010J460 SMK LGK2009-0301J350, J500 AMP 788797-1P2 Huber-Suhner85-SMA-50-0-1J1 (Host) Molex 53748-0704J300 Molex 67068-0001J440 HosidenHSJ1805-019070J230 Motorola P2K Power ConnectorP200, P201 Jumper 2pinP110, P202, P300, P420 Jumper 3pinP600 HiroseDF13-2P-1.25HP100 SamtecTMMH-135-04-S-DV-TRP1 (UUT) Molex 52991-0708M1 Motorola Antenna ContactSwitchesS200 C&K ET01S110 C&K EP11J100 FCI 7111S1615A02S100 Augat GDH04SLEDsD702, D703, D704, D710, D721, D722, D723, D724, D725, D726, D727, D728, D741, D742, D743, D744, D745, D746, D760, D761Stanley BR1102WD200, D701 Dialight 591-2001Table 27. Developer Board Parts ListREFERENCESYMBOL DESCRIPTION
98-08901C67-D 47TransistorsQ330 Siliconix  SI1905DYQ200, Q780 Siliconix SI4463DYQ1000, Q720, Q740 Rohm UMC5NTLQ110, Q310, Q320, Q370, Q500, Q701, Q702, Q703, Q760, Q761Rohm DTC114YEQ705, Q707, Q711, Q721, Q722, Q723, Q724, Q725, Q726, Q727, Q728, Q741, Q742, Q743, Q744, Q745, Q746Rohm DTA114TEQ610, Q620, U771 OnSemi MMBT3904Q201 OnSemi MMBT3906Q600 OnSemi MMJT9435DiodesVR200 OnSemi 1SMB5918BD320, D600, D700 OnSemi MMBD6100VR100, VR101, VR103, VR104, VR105Rohm UMZ6.8ENIntegrated CircuitsU510 Maxim MAX3100EU210, U220, U240 Maxim MAX604U230 Micrel MIC29302BUU540 Toshiba TC7SZ126FUU440 Toshiba TC7SH08FUU370 Toshiba TC7SH32FUU520 Maxim MAX3223U340, U380, U530 Toshiba TC7S00FUU330 Fairchild NC7SZ125PU360 Maxim MAX3238EU320 Microchip TC54VN2902EU420 Motorola MC74HC4053U410 Motorola MC145483U300, U350, U400, U500 OnSemi MC74LCX244U430 Texas Instruments TPA6203A1U600 National Semi. LM3652U310 Philips ISP1104WFusesF200 Schurter OGN-0031.8221F600 AVX F0603C2R50FWTable 27. Developer Board Parts ListREFERENCESYMBOL DESCRIPTION
48  98-08901C67-DGeneralSH400 Motorola ShieldM2, M3, M4, M5, M6, M7, M8, M9Mac8 2SSA-3.0Y510 NDKCP12A-3.6864 MHzLS400 Motorola TransducerJ200, J201 Motorola Hex NutTable 27. Developer Board Parts ListREFERENCESYMBOL DESCRIPTION
98-08901C67-D 495.2 DEVELOPER BOARD UNPLACED PARTS LISTTable 28. Developer Board Unplaced Parts ListREFERENCE SYMBOLResistorsR185, R186, R187, R188, R191, R192, R198, R300, R301, R310, R311, R312, R351, R352, R400, R401, R415, R424, R425, R426, R465, R466, R480, R481, R482, R483, R484, R485, R500, R501, R502, R510, R594, R595, R596, R597, R611, R613, R614, R618, R712, R713, R770, R771, R772, R773, R774, R790, R800CapacitorsC100, C102, C103, C104, C105, C106, C108, C109, C110, C111, C112, C113, C114, C115, C116, C118, C130, C135, C137, C141, C143, C145, C147, C149, C152, C154, C156, C158, C160, C170, C171, C2, C200, C206, C411, C412, C415, C460, C465, C466, C503, C504, C505, C506, C507, C508, C509, C510, C770, C771, C772, C773, C801ConnectorsP120, P130DiodesVR310, VR102Integrated CircuitsU770LEDsD708, D770, D771TransistorsQ190, Q708GeneralDS800, M100
98-08901C67-D  516. INDEXNumerics70-pin Connectors 11, 13, 28AAbbreviations 3AC Adapter 18Adapter Detection Circuit 36Connector Pins 17Electrical Specifications 36Voltage 17, 36Accessories 10Battery 18Adapter Detection Circuit 36Alert Transducer 11, 22, 24Antenna 2, 14, 15External 25Internal 25Audio 11, 15, 22Amplifier 22Analog 23Digital 23Headset 15, 22, 24Jumpers 23Microphone 15, 22, 23Source Selection 23Speaker 22BBattery 14, 18Connector Pins 18Electrical Specifications 36Voltage 18, 36Battery Charger 18CCommunications 14, 19, 20Configuration 16ConnectorsDescription 29Customer Assistance 37DDC External Power. See External DC PowerDebugging 11, 19Developer Board 7Board Number 9Components 12Configuration 16Connectors Description 29Electrical Specifications 36ESD 1, 10External Connectors 14Features 11Initial Setup 13Overview 11Power Jumpers 18Power LED 26Power Up 15Safety 1, 10Diagnostics 19Connector 28Dip Switches 26Ignition 26LEDs 26Wakeup 26Display and Keypad 11, 36Display. See Display and KeypadEElectrical Specifications 36External Connectors 14External DC Power 14, 16, 17Electrical Specifications 36Voltage 17, 36External Power SourceJumpers 17
52 98-08901C67-DGg20Connecting 13Connecting to Antenna 14Header Connection 11, 28, 29On/Off LED 26Power Jumpers 16, 18, 19Power Switch 14Versions 13GND 17GSMReception 25HHeadset 15, 22, 24Connector Pins 24Host Connector 28Flex Cable 28IIgnition 26Initial Setup 13IRQ Signals 21JJumpers 11, 32Audio 23g20 Power 19Power Source 16, 17, 18, 28SIM Card 27KKeypad. See Display and KeypadKit Number 9LLEDs 11, 34Dip Switch 26g20 On/Off 15g20 on/off 26Power 15, 26MMicrophone 15, 22Connector Pins 23MMCX Connector 14OOEM 1Option Switches. See Dip SwitchesOverview 7PParts List 9, 43Power Adapter 14Power Supply 11, 14AC Adapter 14, 16, 18, 36Alternate Power Sources 16Battery 14, 18Battery Charger 18, 36Developer Board Power Jumper 18Electrical Specifications 36External DC Power 14, 17g20 Power Jumper 18Jumpers 16, 17, 18, 28Power Switch 26VCC 17Voltage 17Power Switch 14g20 14Power Up 15RRF Cable 14, 15, 25RS232 11, 14, 19, 20Connector Pins 20Voltage 20SSafety 1, 2, 10Service Centers 38SIM Card 11, 15, 27Active-High 27Active-Low 27Connector Pins 27Jumpers 27Voltage 27Spacers 13Speaker 22Connector Pins 22Output 22SPI 21, 28, 35Support Center 37Switches 11, 32
98-08901C67-D 53UUSB 11, 14, 19, 20Connector Pins 20Jumpers 21UUT 13, 20, 26, 27, 28Connector Pins 30VVCC 17VoltageAC Adapter 17, 36Battery 18, 36External DC Power 17, 36RS232 20SIM Card 27WWakeup 26
98-08901C67-D  557. SCHEMATICS ANDPLACEMENT DIAGRAMSThe following schematics and placement diagrams are provided on the pages that follow:• Developer Board Top-Level Design• Diagnostics•Power• Serial Interface• Audio Interface• Debug Interface•Battery Charger• LEDs• Keypad and Display• Developer Board Top Layout• Developer Board Bottom Layout
*98-08901C67-D*98-08901C67-DMOTOROLA and the Stylized M Logo are registered in the US Patent & Trademark Office. All other product or service names are the property of their respective owners.©Copyright 2004 Motorola, Inc.Java™ Technology and/or J2ME™ : Java and all other Java–based marks are trademarks or registered trademarks of Sun Microsystems, Inc. in the U.S. and other countries.UNIX® : UNIX is a registered trademark of The Open Group in the United States and other countries.

Navigation menu