Motorola Solutions 99FT3039 GP150/GP200/PR400 VHF 5W Portable Radio User Manual 96C27 O cvr

Motorola Solutions, Inc. GP150/GP200/PR400 VHF 5W Portable Radio 96C27 O cvr

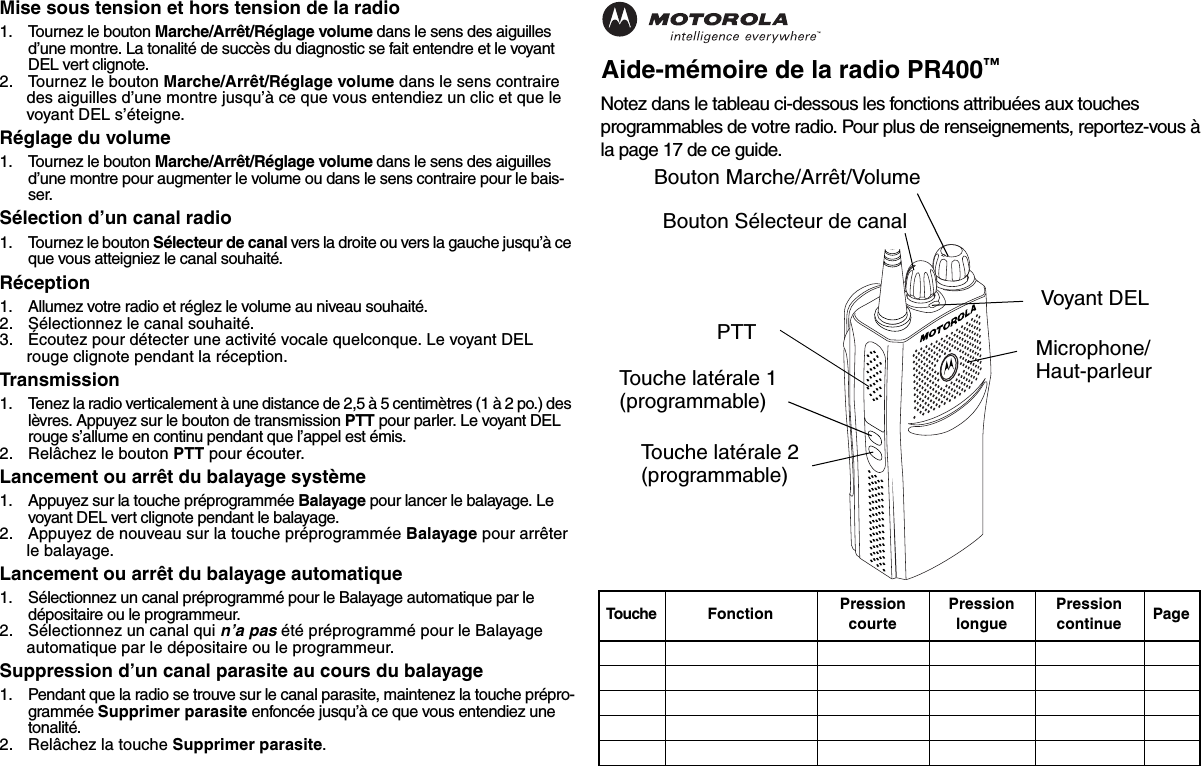
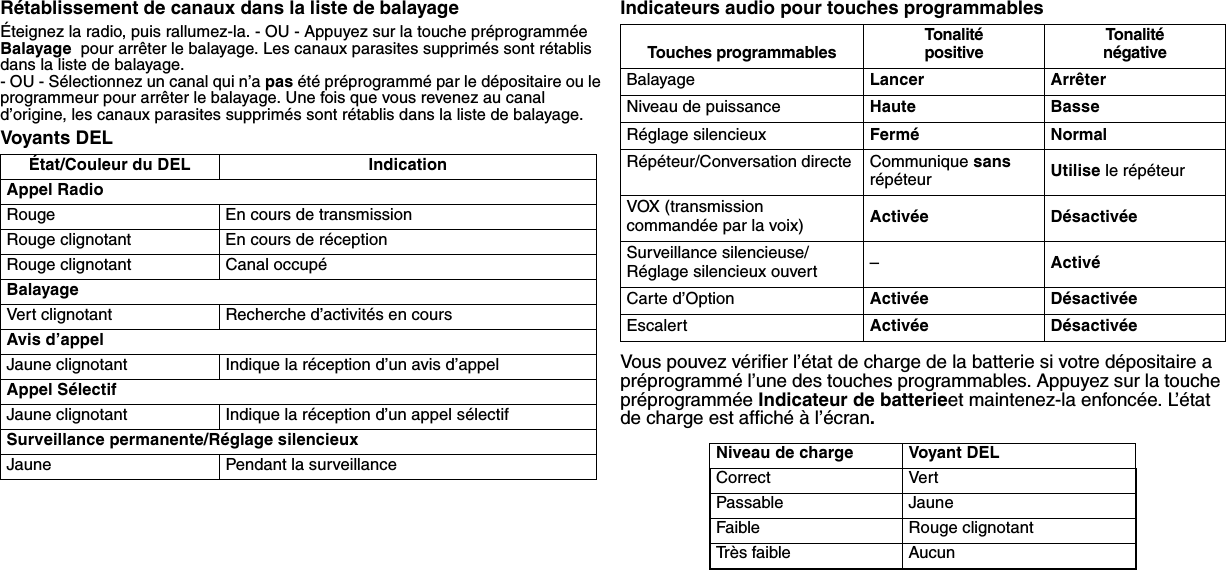
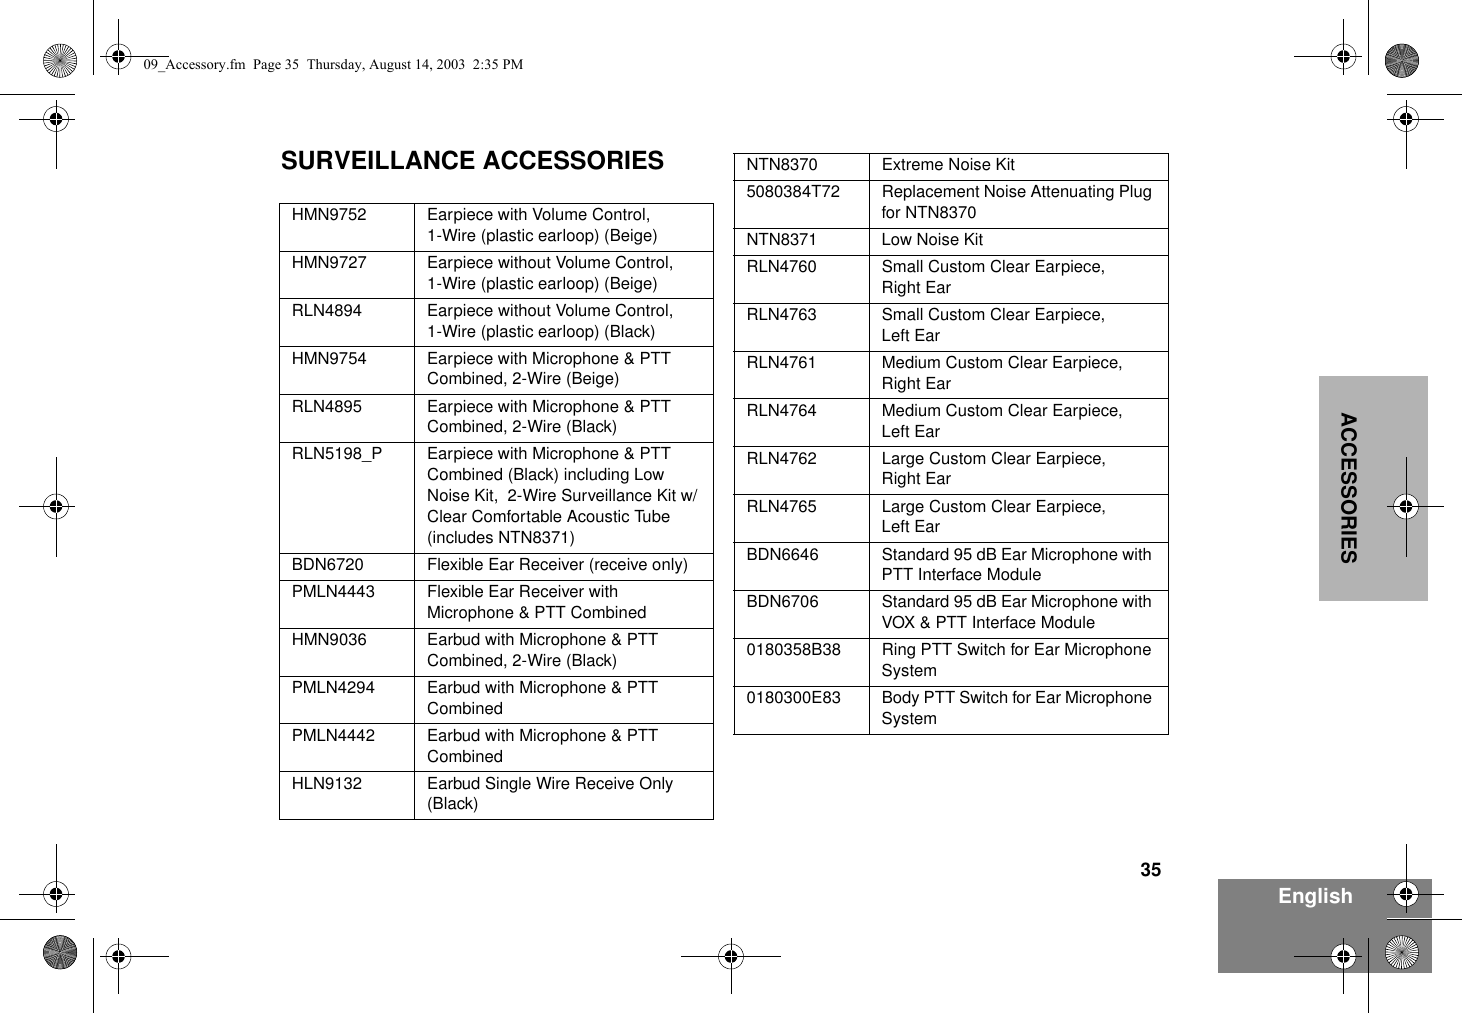
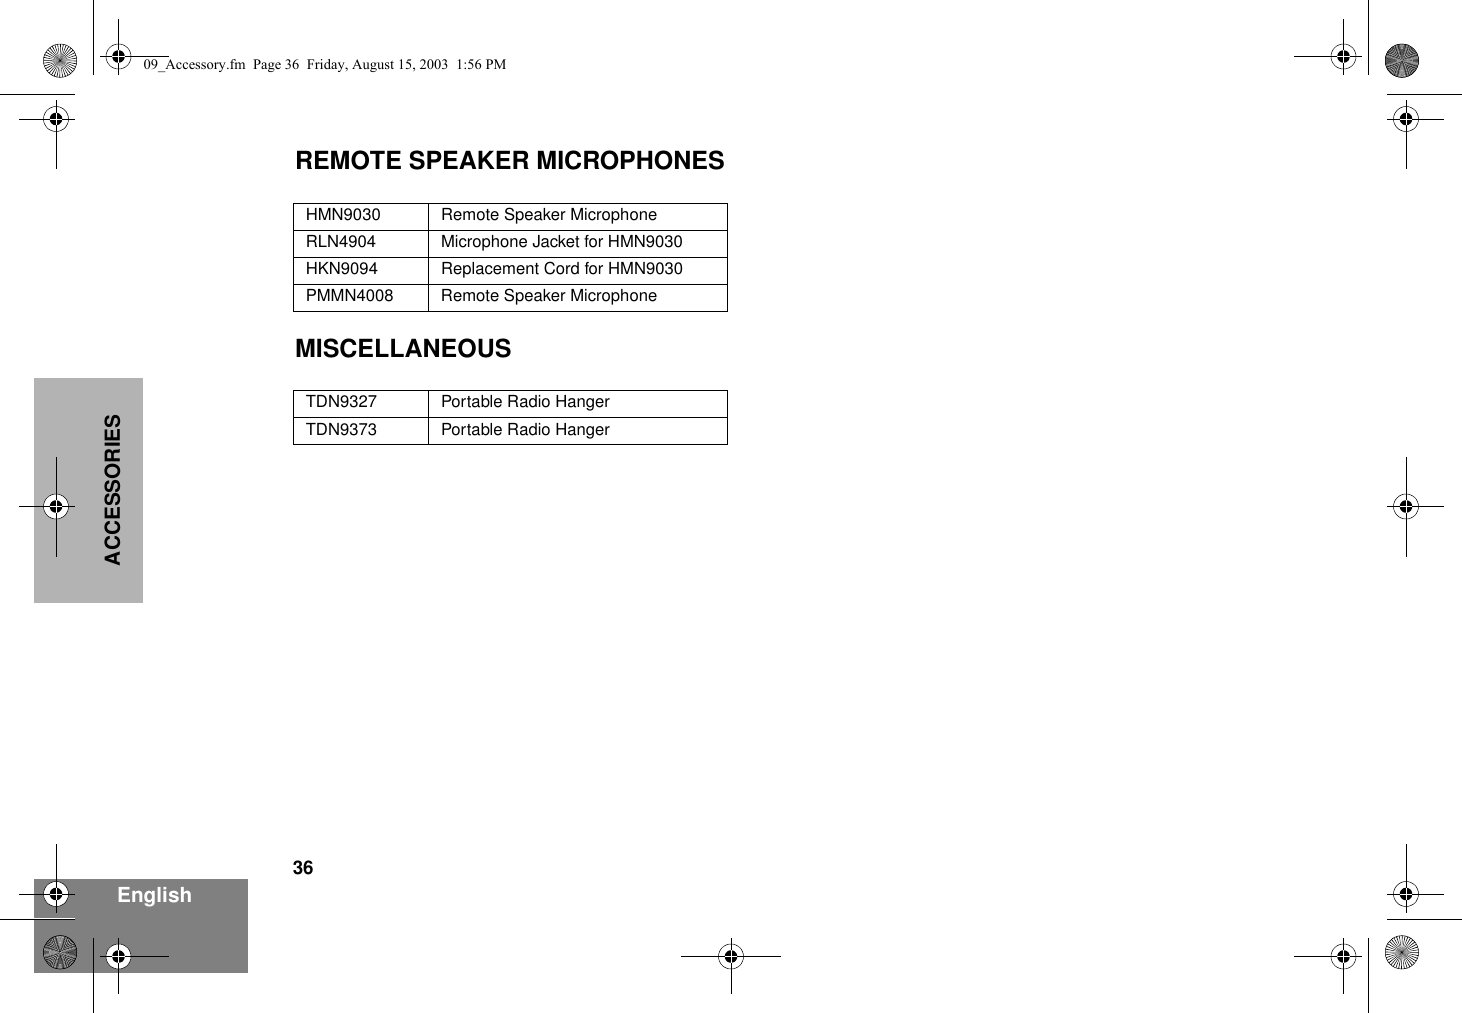
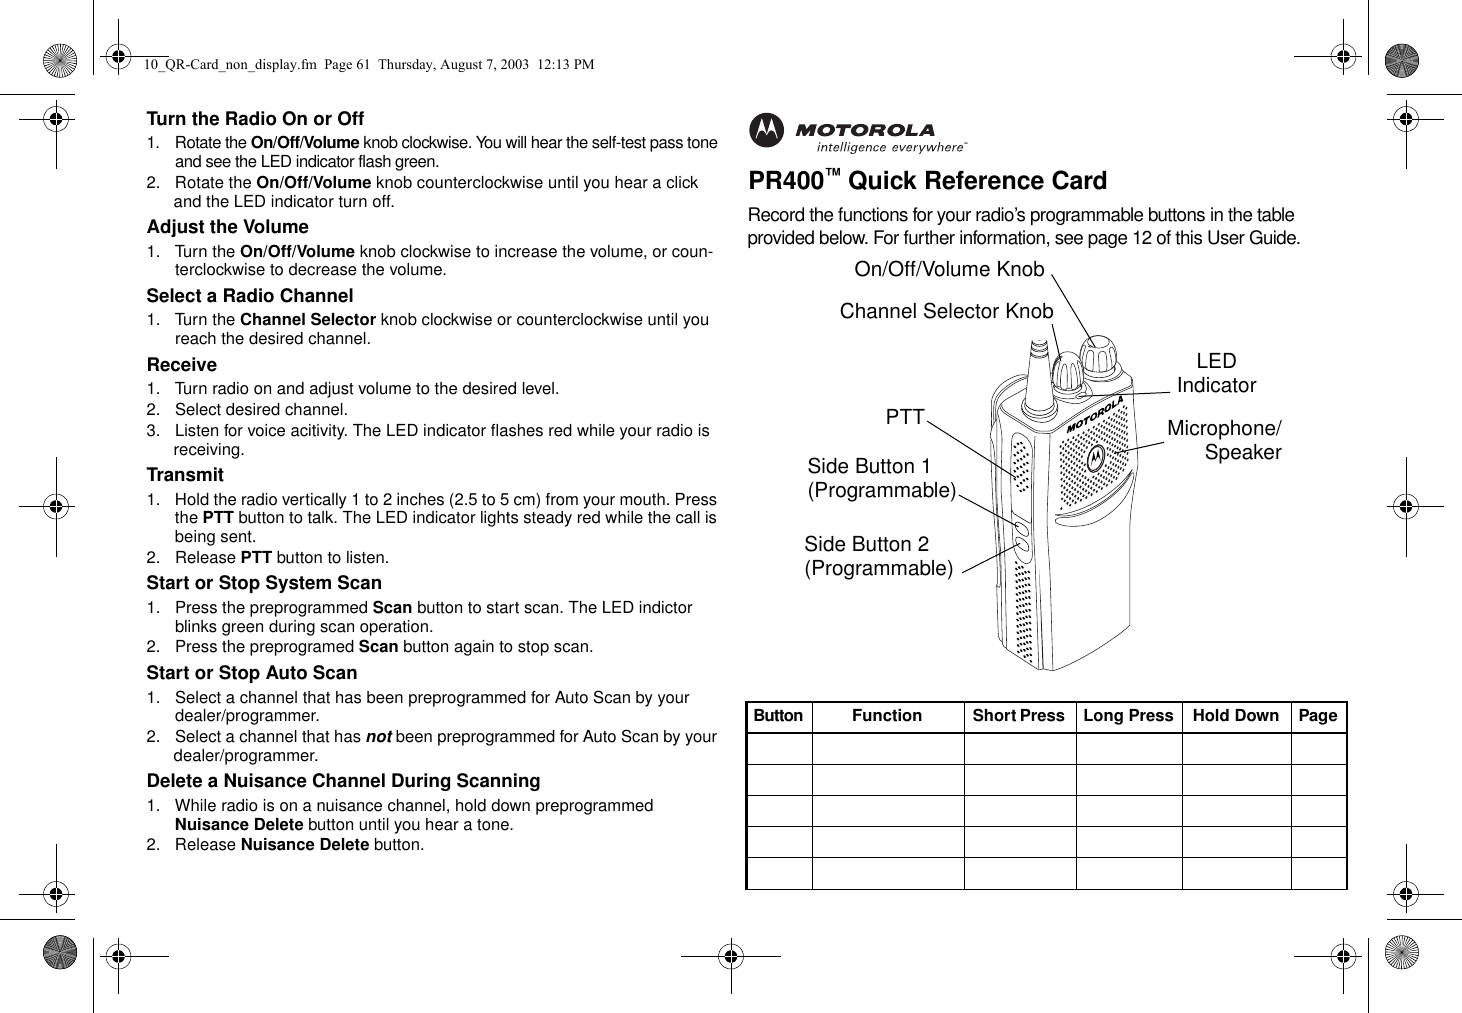
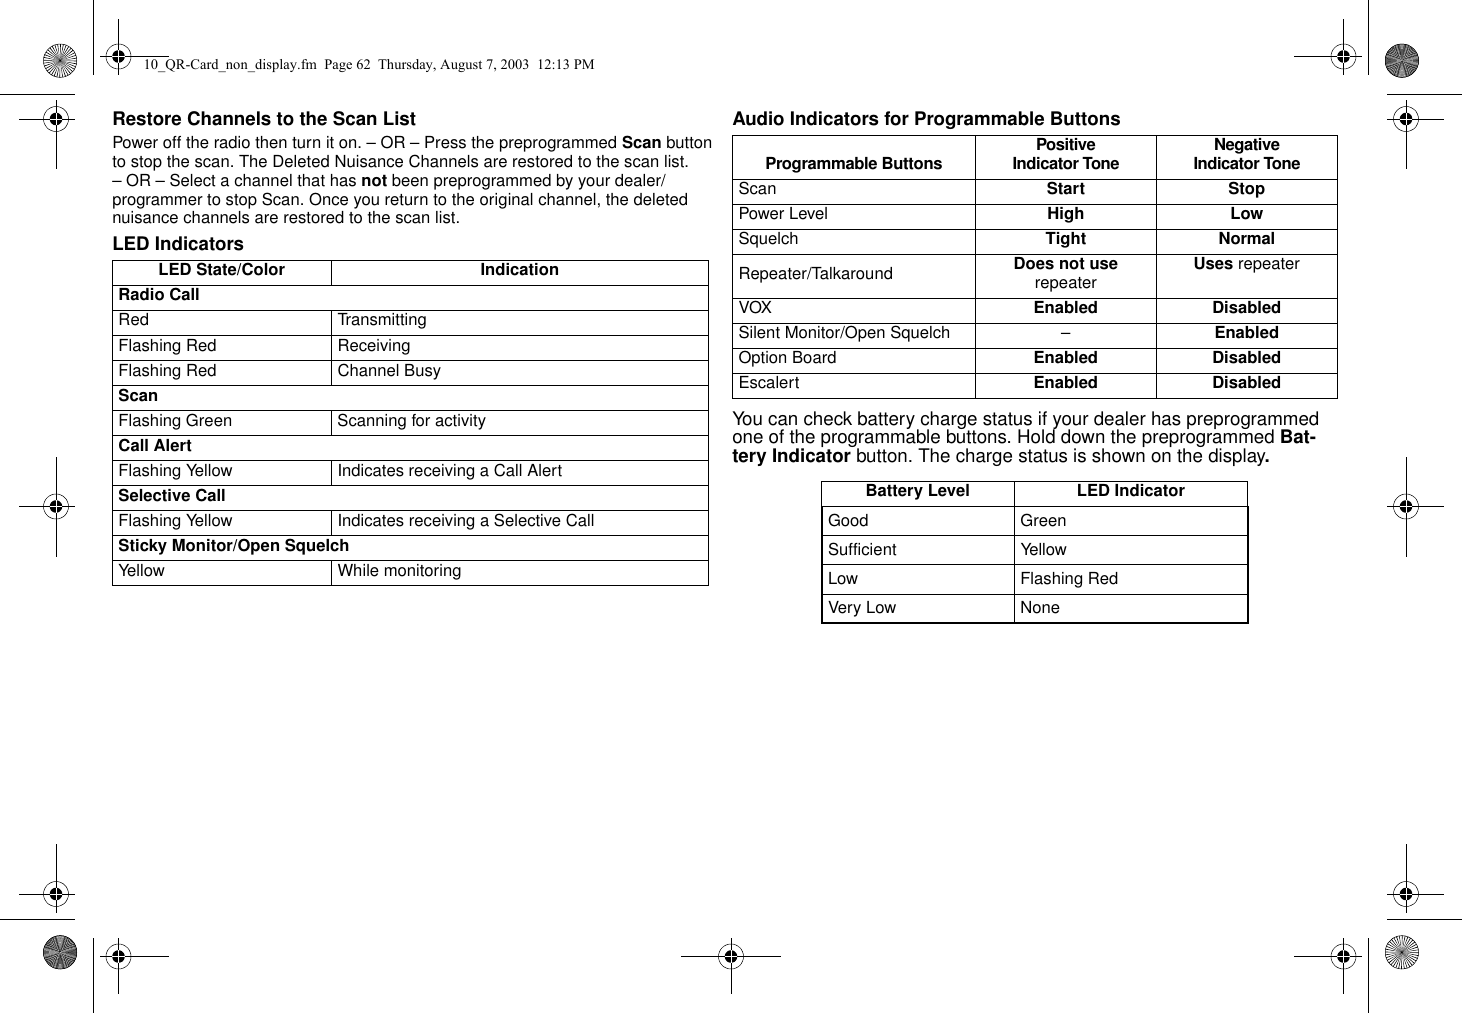
exhibit 08b users manual pr400 non display
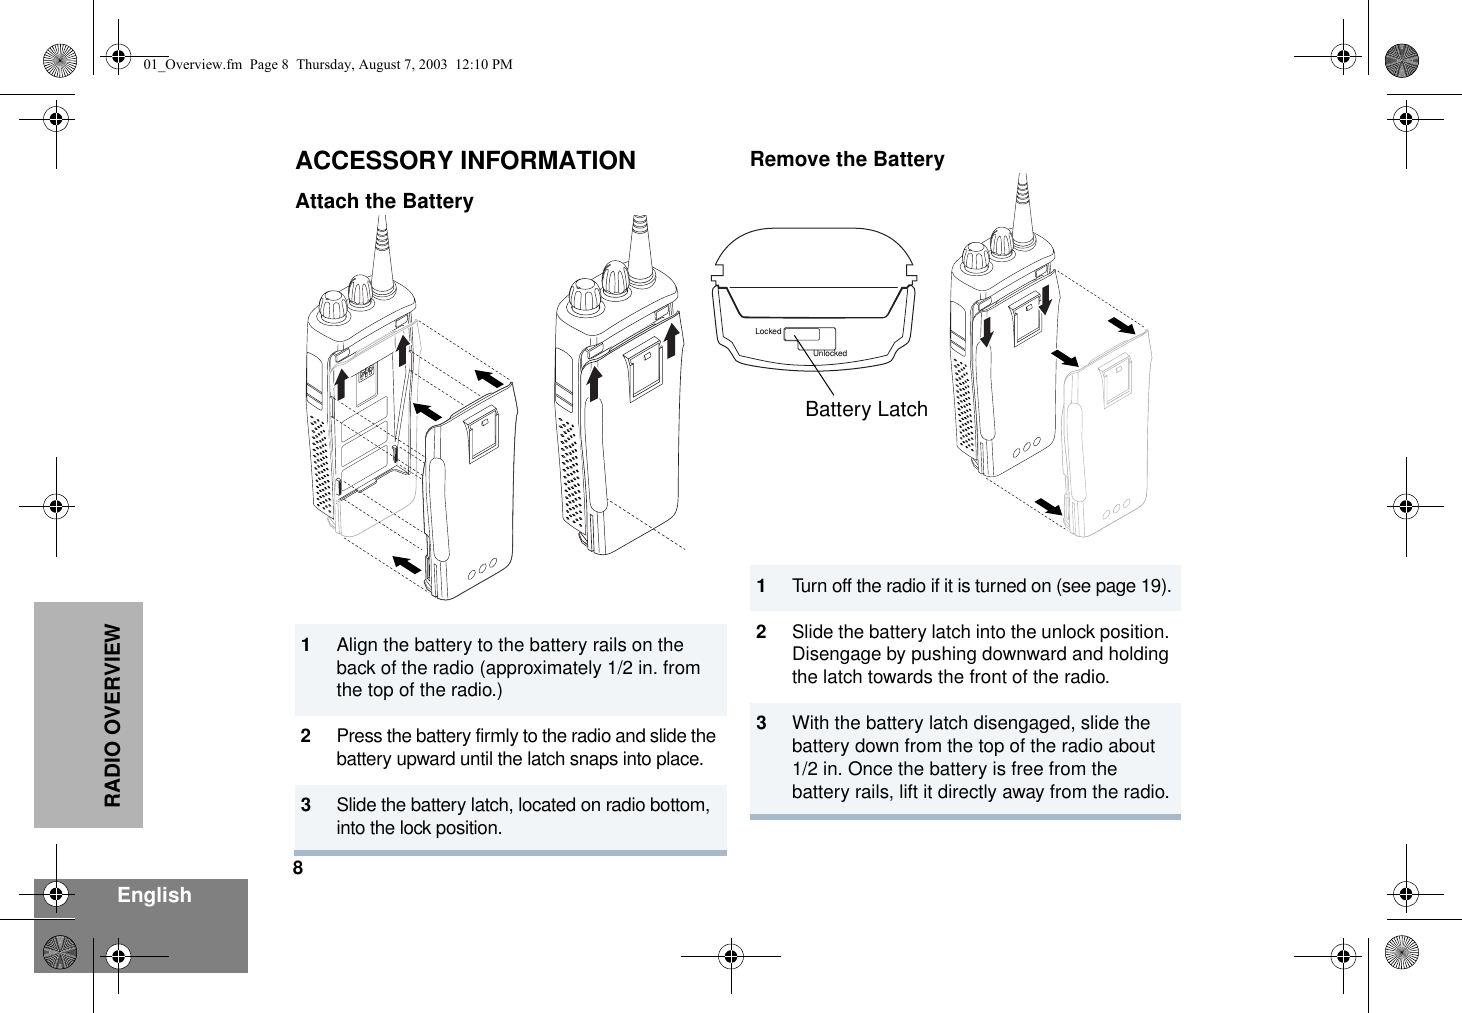
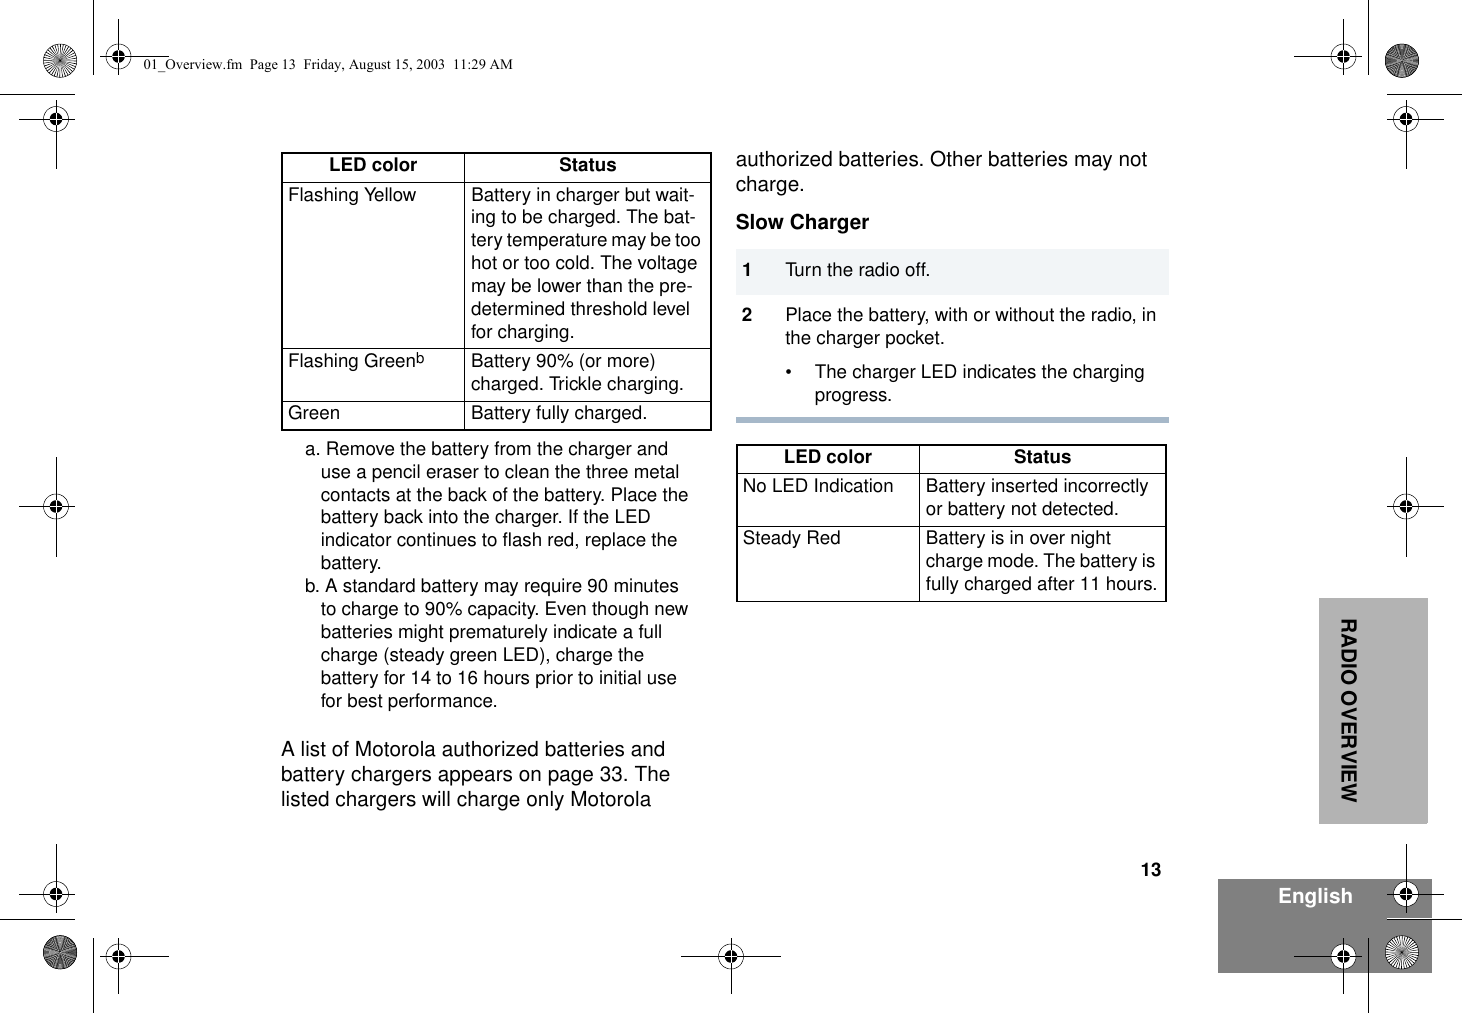
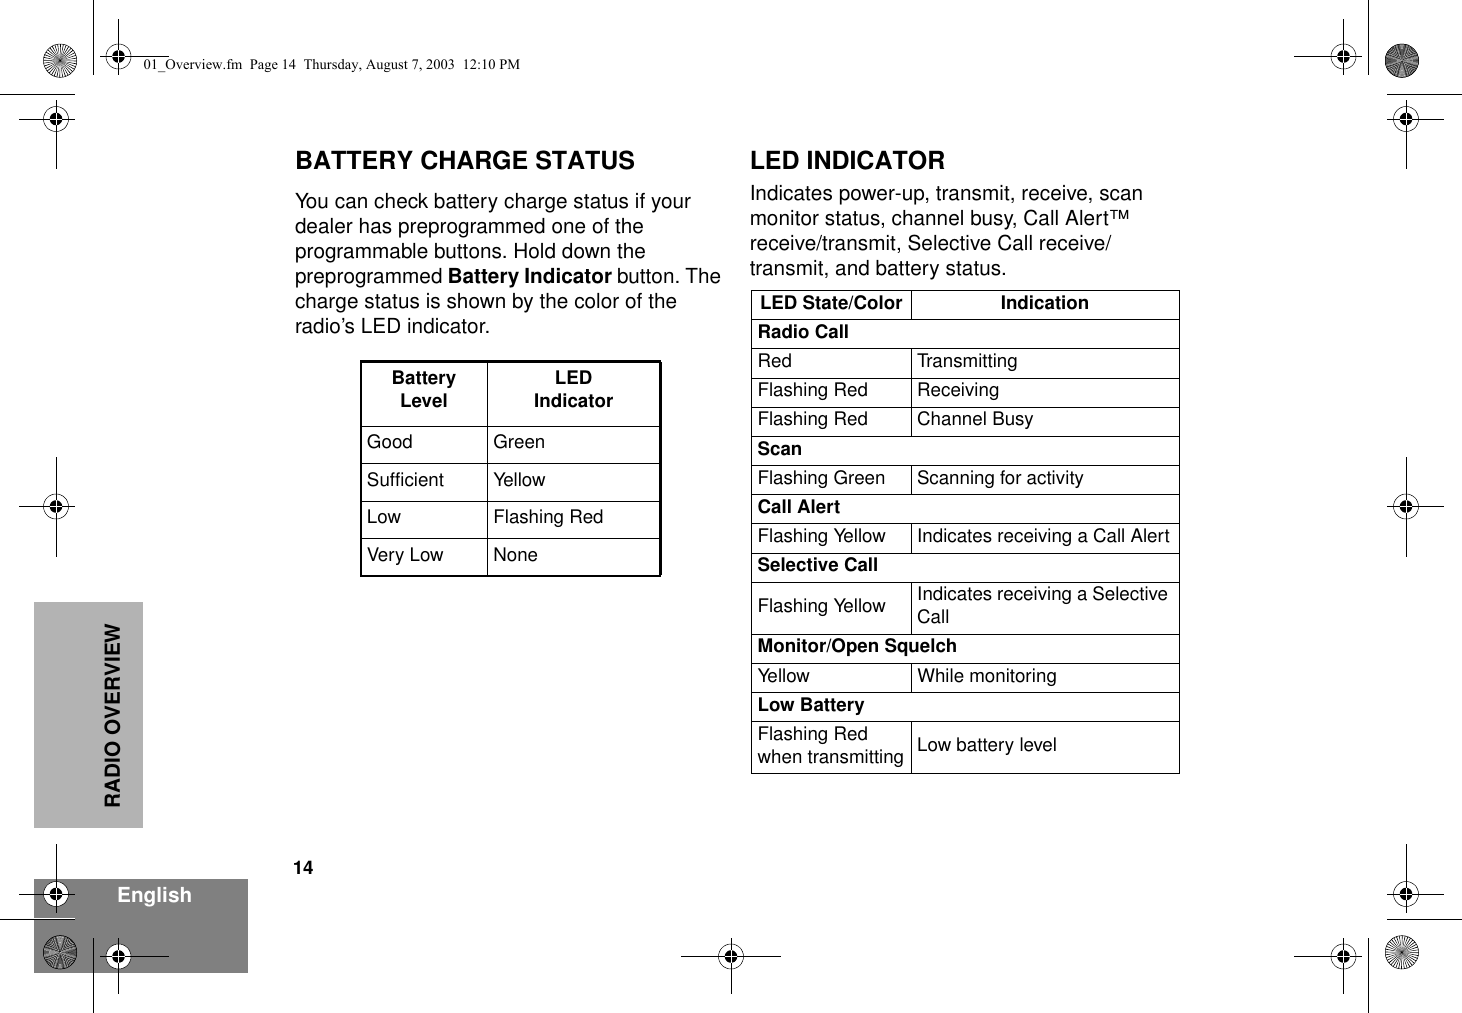
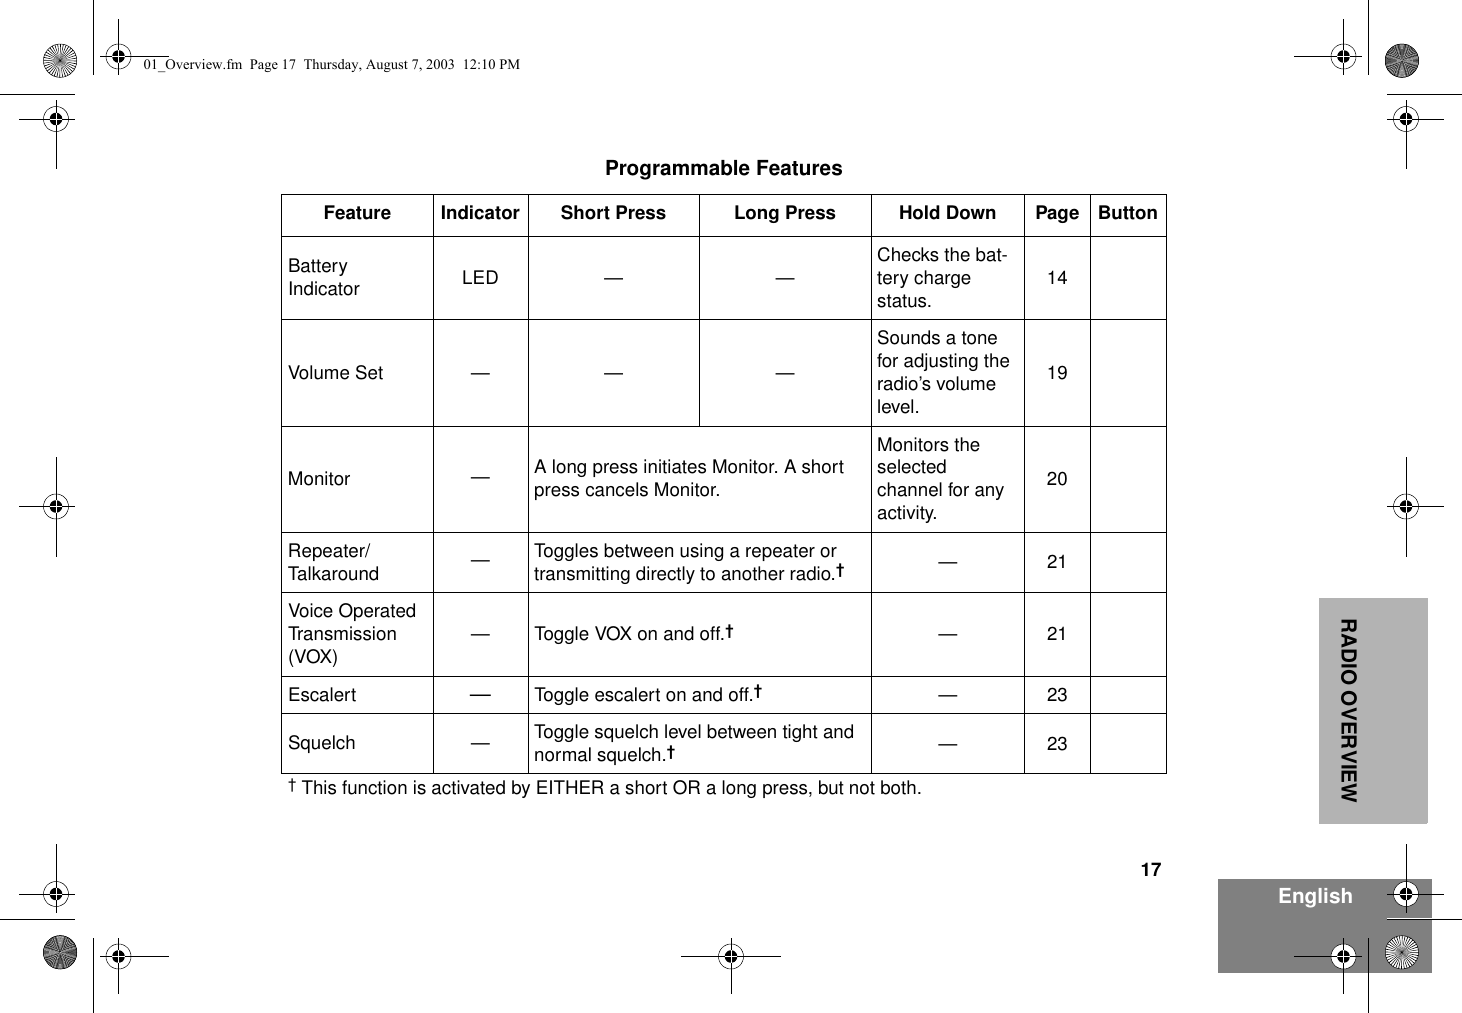
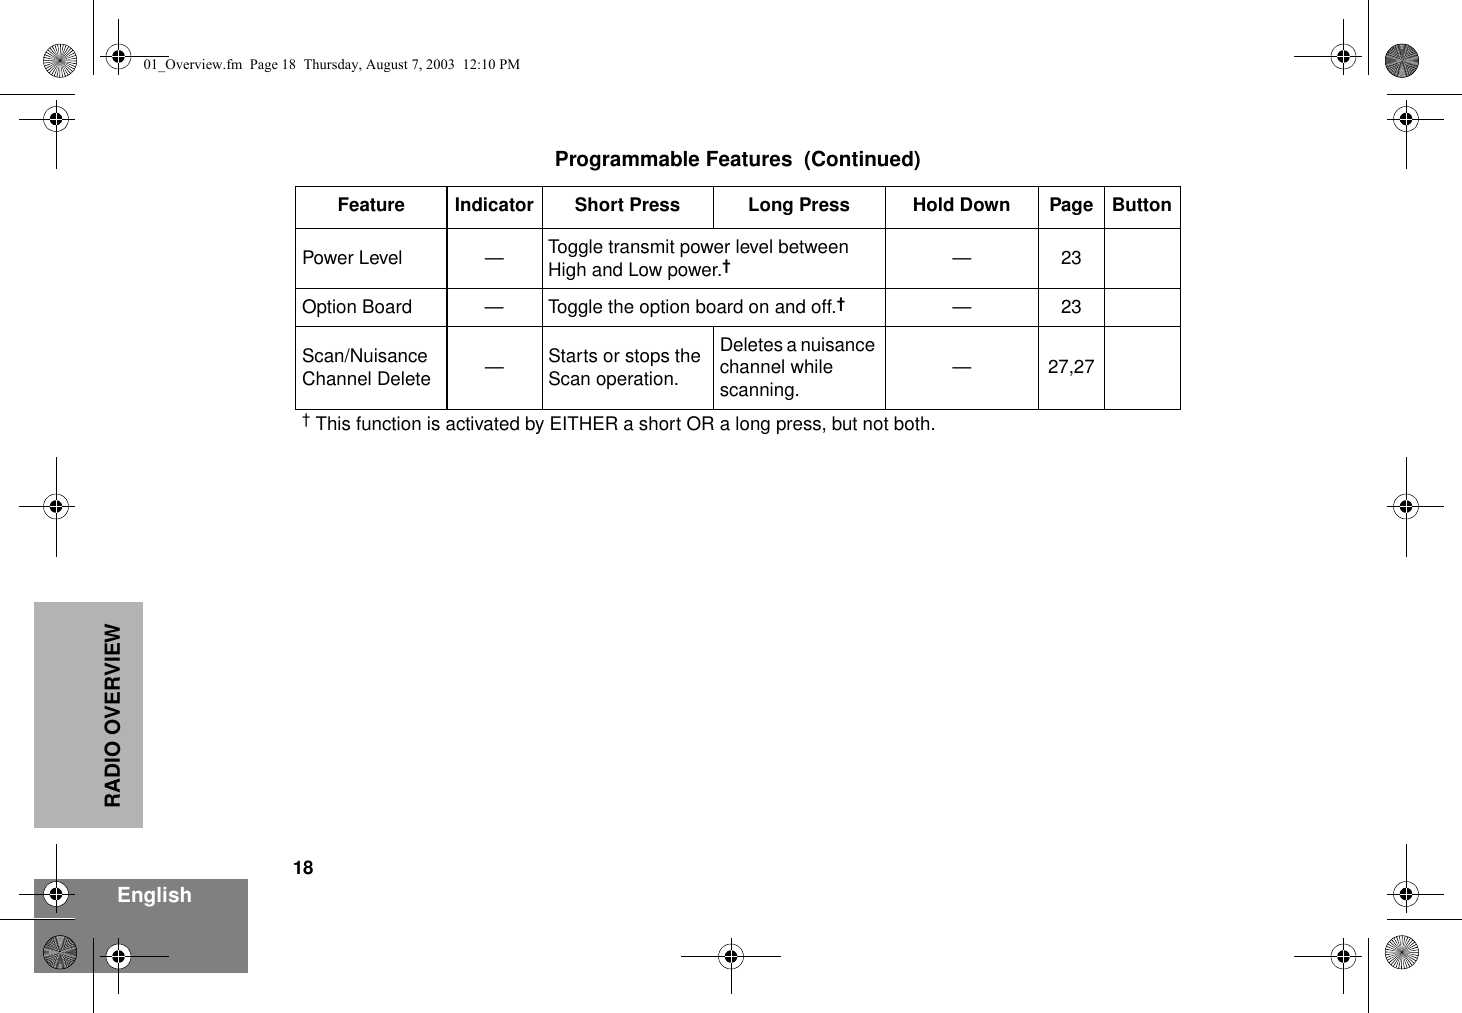
MOTOROLA, the Stylized M Logo, and Radius are registered in the US Patent & Trademark Office.All other product or service names are the property of their respective owners. © Motorola, Inc. 2003. All rights reserved. Printed in U.S.A.MOTOROLA, le logotype au M stylisé et Radius sont enregistrés auprès du Bureau des marques et brevets des États-Unis.Tous les autres noms de produits et de services sont la propriété de leurs titulaires respectifs.© Motorola, Inc. 2003. Tous droits réservés. Imprimé aux États-Unis.*6881096C27*6881096C27-OPR400™Commercial SeriesTwo-Way Radio User GuideManuel de l'utilisateurde la radio bidirectionnelle96C27-O_cvr.qxd  9/23/2003  4:21 PM  Page 1
COMPUTER SOFTWARE COPYRIGHTSThe Motorola products described in this manual may include copyrighted Motorola computer programs stored in semiconductor memories or other media. Laws in the United States and other countries preserve for Motorola certain exclusive rights for copyrighted computer programs including, but not limited to, the exclusive right to copy or reproduce in any form the copyrighted computer program. Accordingly, any copyrighted Motorola computer programs contained in the Motorola products described in this manual may not be copied, reproduced, modified, reverse-engineered, or distributed in any manner without the express written permission of Motorola. Furthermore, the purchase of Motorola products shall not be deemed to grant either directly or by implication, estoppel, or otherwise, any license under the copyrights, patents or patent applications of Motorola, except for the normal non-exclusive license to use that arises by operation of law in the sale of a product.EnglishTOC.fm  Page 0  Tuesday, August 12, 2003  10:51 AM
1EnglishCONTENTSCONTENTSComputer Software Copyrights. . . inside coverSafety . . . . . . . . . . . . . . . . . . . . . . . . . . . . . .  3Product Safety and RF ExposureCompliance . . . . . . . . . . . . . . . . . . . . . . . . .  3Introduction . . . . . . . . . . . . . . . . . . . . . . . . .  5Conventional Radio Systems . . . . . . . . . . . .  5PR400™ Radio Features . . . . . . . . . . . . . . .  5Radio Wide Features . . . . . . . . . . . . . . . .  5Signaling Features . . . . . . . . . . . . . . . . . .  5Radio Overview . . . . . . . . . . . . . . . . . . . . . .  7Accessory Information. . . . . . . . . . . . . . . . . .  8Attach the Battery  . . . . . . . . . . . . . . . . . .  8Remove the Battery . . . . . . . . . . . . . . . . .  8Attach the Antenna  . . . . . . . . . . . . . . . . .  9Remove the Antenna . . . . . . . . . . . . . . . .  9Attach the Belt Clip  . . . . . . . . . . . . . . . .  10Remove the Belt Clip . . . . . . . . . . . . . . .  10Battery Information . . . . . . . . . . . . . . . . . . .  11Charging Your Battery . . . . . . . . . . . . . .  11Wall Charger . . . . . . . . . . . . . . . . . . . . . . . .  12Desktop Chargers . . . . . . . . . . . . . . . . . . . .  12Rapid Charger . . . . . . . . . . . . . . . . . . . .  12Slow Charger. . . . . . . . . . . . . . . . . . . . . .13Battery Charge Status  . . . . . . . . . . . . . . . . .14LED Indicator . . . . . . . . . . . . . . . . . . . . . . . .14Indicator Tones. . . . . . . . . . . . . . . . . . . . . . .15Programmable Buttons. . . . . . . . . . . . . . . . .16Getting Started . . . . . . . . . . . . . . . . . . . . . .19Turn the Radio On or Off . . . . . . . . . . . . . . .19Adjust the Volume  . . . . . . . . . . . . . . . . . . . .19Select a Radio Channel . . . . . . . . . . . . . . . .19Receive. . . . . . . . . . . . . . . . . . . . . . . . . . . . .20Monitor . . . . . . . . . . . . . . . . . . . . . . . . . . . . .20Permanent Monitor . . . . . . . . . . . . . . . . .20Transmit . . . . . . . . . . . . . . . . . . . . . . . . . . . .21Repeater or Talkaround  Mode. . . . . . . . . . .21VOX Operation . . . . . . . . . . . . . . . . . . . . . . .21Connecting a VOX Headset  . . . . . . . . . .21Enable or Disable VOX . . . . . . . . . . . . . .21Enable/Disable Headset Sidetone . . . . . . . .22VOX Headset  . . . . . . . . . . . . . . . . . . . . .22Non-VOX Headset with In-Line PTT . . . .22Escalert. . . . . . . . . . . . . . . . . . . . . . . . . . . . .23Set Squelch Level. . . . . . . . . . . . . . . . . . . . .23Set Power Level . . . . . . . . . . . . . . . . . . . . . .23Option Board On/Off. . . . . . . . . . . . . . . . . . .23EnglishTOC.fm  Page 1  Friday, August 15, 2003  11:30 AM
2EnglishCONTENTSRadio Calls  . . . . . . . . . . . . . . . . . . . . . . . . .25Selective Radio Inhibit  . . . . . . . . . . . . . . . . .25Receive a Selective Call. . . . . . . . . . . . . . . .25Receive a Call Alert™ Page . . . . . . . . . . . . .25Scan . . . . . . . . . . . . . . . . . . . . . . . . . . . . . . .27Talkback . . . . . . . . . . . . . . . . . . . . . . . . . . . .27Start  System Scan. . . . . . . . . . . . . . . . . . . .27Stop System Scan  . . . . . . . . . . . . . . . . . . . .27Start Auto Scan  . . . . . . . . . . . . . . . . . . . . . .27Stop Auto Scan. . . . . . . . . . . . . . . . . . . . . . .28Delete a Nuisance Channel . . . . . . . . . . . . .28Restore Channels to the Scan List . . . . .28Warranty  . . . . . . . . . . . . . . . . . . . . . . . . . . .29Limited Warranty. . . . . . . . . . . . . . . . . . . . . .29Accessories  . . . . . . . . . . . . . . . . . . . . . . . .33Antennas  . . . . . . . . . . . . . . . . . . . . . . . . . . .33Audio Accessory. . . . . . . . . . . . . . . . . . . . . .33Batteries . . . . . . . . . . . . . . . . . . . . . . . . . . . .33Carry Accessories. . . . . . . . . . . . . . . . . . . . .33Chargers. . . . . . . . . . . . . . . . . . . . . . . . . . . .34Headsets  . . . . . . . . . . . . . . . . . . . . . . . . . . .34Surveillance Accessories . . . . . . . . . . . . . . .35Remote Speaker Microphones . . . . . . . . . . .36Miscellaneous. . . . . . . . . . . . . . . . . . . . . . . .36EnglishTOC.fm  Page 2  Thursday, August 14, 2003  2:37 PM
3EnglishSAFETYSAFETYPRODUCT SAFETY AND RF EXPOSURE COMPLIANCEATTENTION!  This radio is restricted to occupational use only to satisfy FCC RF energy exposure requirements. Before using this product, read the RF energy awareness information and operating instructions in the Product Safety and RF Exposure booklet enclosed with your radio (Motorola Publication part number 68P81095C98) to ensure compliance with RF energy exposure limits.  For a list of Motorola-approved antennas, batteries, and other accessories, visit the following web site which lists approved accessories: http://www.motorola.com/cgiss/index.shtml.Before using this product, read the operating instructions for safe usage contained in the Product Safety and RF Exposure booklet enclosed with your radio.!C a u t i o n00_SafetyNA.fm  Page 3  Thursday, August 7, 2003  12:08 PM
4EnglishSAFETYNotes:00_SafetyNA.fm  Page 4  Thursday, August 7, 2003  12:08 PM
5EnglishINTRODUCTIONINTRODUCTIONCONVENTIONAL RADIO SYSTEMS Conventional radio systems typically refer to unit-to-unit communications through a single channel. Conventional systems also allow radio users to extend communication coverage by relaying their messages through a repeater. To ensure coordinated use by multiple users, each radio user must monitor the channel or repeater before transmitting to verify that the system is not currently busy. PR400™ RADIO FEATURESRadio Wide Features• 16 Channels• 2 Programmable Feature Buttons• Option Board Expandability• Busy Channel Lockout• High/Low Power Settings• Transmit Time-Out Timer• Monitor and Sticky Permanent Monitor• System Scan with 2 Priority Levels and Revert ScanSignaling Features• MDC 1200 Signaling• Quik-Call II Signaling• DTMF Signaling- Selective Radio Inhibit Decode - PTT ID Decode- Call Alert Decode - Selective Call Decode- DTMF PTT ID Encode00_Introduction.fm  Page 5  Tuesday, September 16, 2003  10:47 AM
6EnglishINTRODUCTIONNotes:00_Introduction.fm  Page 6  Tuesday, September 16, 2003  10:47 AM
7EnglishRADIO OVERVIEWRADIO OVERVIEW(programmable)Side Button 1Push-to-Talk(PTT) Button(programmable)Side Button 2 Accessory Connectorwith a Dust CoverLED IndicatorOn/Off/VolumeKnobChannel SelectorKnobMicrophone/Antenna BeltClipSpeaker01_Overview.fm  Page 7  Thursday, August 7, 2003  12:10 PM
8EnglishRADIO OVERVIEWACCESSORY INFORMATIONAttach the BatteryRemove the Battery1Align the battery to the battery rails on the back of the radio (approximately 1/2 in. from the top of the radio.)2Press the battery firmly to the radio and slide the battery upward until the latch snaps into place.3Slide the battery latch, located on radio bottom,  into the lock position.1Turn off the radio if it is turned on (see page 19).2Slide the battery latch into the unlock position. Disengage by pushing downward and holding the latch towards the front of the radio.3With the battery latch disengaged, slide the battery down from the top of the radio about 1/2 in. Once the battery is free from the battery rails, lift it directly away from the radio.Battery LatchLockedUnlocked01_Overview.fm  Page 8  Thursday, August 7, 2003  12:10 PM
9EnglishRADIO OVERVIEWAttach the Antenna Remove the AntennaTurn the antenna clockwise to attach it. Turn the antenna counter-clockwise to remove it.01_Overview.fm  Page 9  Thursday, August 7, 2003  12:10 PM
10EnglishRADIO OVERVIEWAttach the Belt Clip Remove the Belt Clip1Align the grooves of the belt clip with those of the battery.2Press the belt clip downward until you hear a click.1Use a key to press the belt clip tab away from the battery to unlock the belt clip.2Slide the belt clip upward to remove it.Belt Clip Tab01_Overview.fm  Page 10  Thursday, August 7, 2003  12:10 PM
11EnglishRADIO OVERVIEWBATTERY INFORMATIONCharging Your BatteryThis radio is powered by a nickel-cadmium (NICd), a nickel-metal hydride (NiMH), or a lithium-ion (Li-lon) rechargeable battery. Charge the battery before use to ensure optimum capacity and performance. The battery was designed specifically to be used with a Motorola charger. Charging in non-Motorola equipment may lead to battery damage and void the battery warranty.Note: When charging a battery attached to a radio, turn the radio off to ensure a full charge.The battery should be at about 77°F (25°C) (room temperature), whenever possible. Charging a cold battery (below 50° F [10°C]) may result in leakage of electrolyte and ultimately in failure of the battery. Charging a hot battery (above 95°F [35°C]) results in reduced discharge capacity, affecting the performance of the radio. Motorola rapid-rate battery chargers contain a temperature-sensing circuit to ensure that batteries are charged within the temperature limits stated above.If a battery is new, or its charge level is very low, you will need to charge it before you can use it. When the battery level is low and the radio is in transmit mode you will see the LED indicator flash red. Upon release of the PTT button, you will hear an alert tone.Note: Batteries are shipped uncharged from the factory. Always charge a new battery 14 to 16 hours before initial use, regardless of the status indicated by the charger.Note: Do not use the wall charger and desktop charger at the same time when charging.01_Overview.fm  Page 11  Thursday, August 7, 2003  12:10 PM
12EnglishRADIO OVERVIEWWALL CHARGERNote: Do not use the wall charger if using  lithium-ion (Li-Ion) or nickel-metal hydride (NiMH) batteries. The wall charger is for a nickel-cadmium (NiCd)  battery only.To Charge the Battery: DESKTOP CHARGERSRapid Charger1Turn the radio off.2Lift the dust cover to expose the audio accessory connector.3Insert the charging adapter into the accessory connector.4Plug the charging adapter into an electrical outlet.• The LED on the charging adapter lights Red while the charger is plugged into an electrical outlet.Note: Do not leave the charger connected to the radio when it is not connected to the electrical outlet.5Unplug the charger from the electrical outlet and radio after 10 hours.Note: After the initial charge of 14 to 16 hours, do not charge the battery more than 10 hours. 1Turn the radio off.2Place the battery, with or without the radio, in the charger pocket. • The charger LED indicates the charging progress.LED color StatusNo LED Indication Battery inserted incorrectly or battery not detected.Single Green Flash  Successful charger power-up.Flashing RedaBattery unchargeable or not making proper contact.Steady Red Battery is in Rapid charge mode.01_Overview.fm  Page 12  Friday, August 15, 2003  11:29 AM
13EnglishRADIO OVERVIEWA list of Motorola authorized batteries and battery chargers appears on page 33. The listed chargers will charge only Motorola authorized batteries. Other batteries may not charge.Slow ChargerFlashing Yellow Battery in charger but wait-ing to be charged. The bat-tery temperature may be too hot or too cold. The voltage may be lower than the pre-determined threshold level for charging.Flashing GreenbBattery 90% (or more) charged. Trickle charging.Green Battery fully charged.a. Remove the battery from the charger and use a pencil eraser to clean the three metal contacts at the back of the battery. Place the battery back into the charger. If the LED indicator continues to flash red, replace the battery.b. A standard battery may require 90 minutes to charge to 90% capacity. Even though new batteries might prematurely indicate a full charge (steady green LED), charge the battery for 14 to 16 hours prior to initial use for best performance.LED color Status1Turn the radio off.2Place the battery, with or without the radio, in the charger pocket. • The charger LED indicates the charging progress.LED color StatusNo LED Indication Battery inserted incorrectly or battery not detected.Steady Red Battery is in over night charge mode. The battery is fully charged after 11 hours.01_Overview.fm  Page 13  Friday, August 15, 2003  11:29 AM
14EnglishRADIO OVERVIEWBATTERY CHARGE STATUSYou can check battery charge status if your dealer has preprogrammed one of the programmable buttons. Hold down the preprogrammed Battery Indicator button. The charge status is shown by the color of the radio’s LED indicator.  LED INDICATORIndicates power-up, transmit, receive, scan monitor status, channel busy, Call Alert™ receive/transmit, Selective Call receive/transmit, and battery status.BatteryLevel LEDIndicatorGood GreenSufficient YellowLow Flashing RedVery Low NoneLED State/Color IndicationRadio CallRed TransmittingFlashing Red ReceivingFlashing Red Channel BusyScanFlashing Green Scanning for activityCall AlertFlashing Yellow Indicates receiving a Call AlertSelective CallFlashing Yellow Indicates receiving a Selective CallMonitor/Open SquelchYellow While monitoringLow BatteryFlashing Red when transmitting Low battery level01_Overview.fm  Page 14  Thursday, August 7, 2003  12:10 PM
15EnglishRADIO OVERVIEWINDICATOR TONESHigh pitched tone   Low pitched tone Some programmable buttons use tones to indicate one of two modes:Self Test Pass ToneSelf Test Fail TonePositive Indicator ToneNegative Indicator ToneGood Key ToneBad Key Tone ProgrammableButtonsPositive Indicator Tone Negative Indicator ToneScan Start StopPower Level High LowSquelch Tight NormalRepeater/Talkaround Does not use repeater Uses repeaterVOX  Enabled DisabledSilent Monitor/Open Squelch  —EnabledOption Board Enabled DisabledEscalert Enabled Disabled01_Overview.fm  Page 15  Thursday, August 7, 2003  12:10 PM
16EnglishRADIO OVERVIEWPROGRAMMABLE BUTTONSYour radio has two programmable buttons. Your dealer can program these buttons as shortcuts to various radio features.Check with your dealer for a complete list of functions your radio supports.Programmable buttons include:• The two side buttons (S1 and S2)Some buttons can access up to two features, depending on the type of button press:•Short Press — quickly pressing and releasing the programmable buttons.•Long Press — pressing and holding the programmable buttons for a minimum of  2.5 seconds.•Hold Down — pressing and holding down the programmable buttons while checking status or making adjustments.The table on page 17 summarizes the programmable features available and shows the page number where the feature is explained.In the “Button” column, have your dealer record the name of the programmable button next to the feature that has been programmed to it. The dealer can use the abbreviations (S1, S2,) shown in the radio illustration on page 7.Also, where appropriate, have your dealer indicate whether the button press requires a short press, a long press, or needs to be held down.01_Overview.fm  Page 16  Thursday, August 7, 2003  12:10 PM
17EnglishRADIO OVERVIEWProgrammable Features Feature Indicator Short Press Long Press Hold Down Page ButtonBatteryIndicator LED — — Checks the bat-tery chargestatus. 14Volume Set — — —Sounds a tone for adjusting the radio’s volume level.19Monitor —A long press initiates Monitor. A short press cancels Monitor.Monitors the selected channel for any activity.20Repeater/Talkaround —Toggles between using a repeater or  transmitting directly to another radio.†—21Voice Operated Transmission (VOX) — Toggle VOX on and off.†—21Escalert —Toggle escalert on and off.†—23Squelch — Toggle squelch level between tight and normal squelch.†—23† This function is activated by EITHER a short OR a long press, but not both.01_Overview.fm  Page 17  Thursday, August 7, 2003  12:10 PM
18EnglishRADIO OVERVIEWPower Level — Toggle transmit power level between High and Low power.†—23Option Board — Toggle the option board on and off.†—23Scan/Nuisance Channel Delete —Starts or stops the Scan operation.Deletes a nuisance channel while scanning. —27,27† This function is activated by EITHER a short OR a long press, but not both.Programmable Features  (Continued)Feature Indicator Short Press Long Press Hold Down Page Button01_Overview.fm  Page 18  Thursday, August 7, 2003  12:10 PM
19EnglishGETTING STARTEDGETTING STARTEDTURN THE RADIO ON OR OFFADJUST THE VOLUMETurn the On/Off/Volume Control knob clockwise to increase the volume, or counterclockwise to decrease the volume. –or– Note: Your dealer can preprogram one of the programmable buttons to Volume Set.SELECT A RADIO CHANNELYour radio offers 16 channels.To select a channel, turn the Channel Selector knob clockwise or counterclockwise until you reach the desired channel.ON OFFRotate the On/Off/Volume knob clockwise. If power-up is successful, you will hear the Self-Test Pass Tone ( ) and see the LED flash green. If the radio fails to power up, you will hear the Self Test Fail Tone ( ). The radio will need to be returned for re-programming.Rotate the On/Off/Volume knob counter-clockwise until you hear a click and the LED indicator turn off.1Hold down the Volume Set button (see page 13). • You will hear a continuous tone.2Turn the On/Off/Volume knob to the desired volume level.3Release the Volume Set button.02_GetStarted.fm  Page 19  Thursday, August 7, 2003  12:10 PM
20EnglishGETTING STARTEDRECEIVEMONITORIt is important to monitor for traffic before transmitting to ensure that you do not “talk over” someone who is already transmitting.Permanent Monitor1Turn your radio on.2Adjust the radio’s volume (see page 19).3Switch to the desired channel. • Make sure the PTT button is released.4Listen for voice activity.• The LED indicator flashes red while your radio is receiving.5To respond, hold the radio vertically 1 to 2 inches (2.5 to 5cm)  from your mouth. Press the PTT button to talk; release it to listen.1Press and hold the preprogrammed Monitor button to access channel traffic.• If no activity is present, you will hear “white noise.”2Once channel traffic has cleared, proceed with your call by pressing the PTT button.1A long press of the preprogrammed Monitor button places the radio in Permanent Monitor mode.• You hear a good key tone.2A short press of the Monitor button cancels Permanent Monitor mode and returns the radio to normal operation.02_GetStarted.fm  Page 20  Thursday, August 7, 2003  12:10 PM
21EnglishGETTING STARTEDTRANSMITREPEATER OR TALKAROUND  MODETalkaround Mode enables you to communicate with another radio when either:• The repeater is not operating.–or–• Your radio is out of the repeater’s range but within communicating distance of another radio.To Select either Repeater Mode or Talkaround ModePress the preprogrammed Repeater/Talkaround button (see page 13) to toggle between Repeater Mode and Talkaround Mode.VOX OPERATIONWhen hands-free operation is desired, your radio can transmit by voice alone using the VOX feature when you speak through an accessory that is connected to your radio.Connecting a VOX HeadsetEnable or Disable VOXTo enable or disable VOX operation, press the preprogrammed VOX button (see page 17).Note: Pressing the PTT button disables VOX.– or –1Turn your radio on.2Use the Channel Selector knob to select the desired channel.Note: Monitor for traffic before transmitting to ensure that you do not “talk over” someone who is already transmitting3Hold the radio vertically 1 to 2 inches (2.5 to 5cm)  from your mouth. Press the PTT button to talk.• The LED indicator lights steady red while the call is being sent.4Release the PTT to listen.1Turn off your radio.2Connect the VOX accessory to your radio and turn the radio on.02_GetStarted.fm  Page 21  Thursday, August 7, 2003  12:10 PM
22EnglishGETTING STARTEDYou can select channels to enable or disable VOX as preprogrammed by your dealer/programmer. ENABLE/DISABLE HEADSET SIDETONEYour dealer can program your radio so you can hear your voice through a headset while you speak.VOX HeadsetNon-VOX Headset with In-Line PTT 1Select a channel that has been preprogrammed by your dealer to enable VOX.Note: Pressing the PTT button disables VOX. 2Select a channel that has not been preprogrammed by your dealer to disable VOX.1To enable the headset sidetone, turn off your radio.2Connect the VOX headset accessory to your radio.3Turn the radio on. During transmit,  you will hear your voice through the headset while you speak.4To disable the headset sidetone, turn off your radio and turn the radio on again.1To enable the headset sidetone, turn off your radio.2Connect the non-VOX accessory to your radio.3Press and hold the In-line PTT on your headset.4Turn the radio on and release the PTT once the radio has completed start-up. During transmit,  you will hear your voice through the headset while you speak.5To disable the headset sidetone, turn off your radio and turn the radio on again.02_GetStarted.fm  Page 22  Thursday, August 7, 2003  12:10 PM
23EnglishGETTING STARTEDESCALERTYou can program your radio to increase the volume of the alarm tones when a radio call is not answered.Press the preprogrammed Escalert button (see page 17).SET SQUELCH LEVELUse this feature to filter out (unwanted) calls and/or background noise. However, tightening squelch could cause calls from remote locations to be filtered out as well. In this case, normal squelch may be more desirable.Press the preprogrammed Squelch button (see page 14) to toggle between tight and normal squelch.SET POWER LEVELEach channel in your radio has a predefined transmit power level that can be changed.To set the power level, press the preprogrammed Power Level button (see page 14) to toggle between low and high power.OPTION BOARD ON/OFFUse this feature to enable or disable an option board.Press the preprogrammed Option Board button (see page 14) to toggle the option board 02_GetStarted.fm  Page 23  Thursday, August 7, 2003  12:10 PM
24EnglishGETTING STARTEDNotes:02_GetStarted.fm  Page 24  Thursday, August 7, 2003  12:10 PM
25EnglishRADIO CALLSRADIO CALLSSELECTIVE RADIO INHIBITYour radio is equipped with a security feature that can temporarily render the unit inoperative when an inhibit signal is sent from the base station.This feature is commonly used to disable radios:• In case of theft• For system control reasonsWhen your radio has been rendered inoperative by the base station,all controls will be inoperative except for the On/Off button and the display shows INHIBIT.RECEIVE A SELECTIVE CALLWhen you receive a selective call:• The LED indicator flashes yellow, if pro-grammed by your dealer/programmer. • You hear two high-pitched tones.RECEIVE A CALL ALERT™ PAGEWhen you receive a Call Alert page:• The LED indicator flashes yellow, if pro-grammed by your dealer/programmer. • You hear four high-pitched tones.To acknowledge the page, press and release the PTT button; to cancel the page, press any other key.1To acknowledge the call, press and release the PTT button.2Press and hold the PTT button to talk; release to listen.03_RadioCall.fm  Page 25  Thursday, August 7, 2003  12:11 PM
26EnglishRADIO CALLSNotes:03_RadioCall.fm  Page 26  Thursday, August 7, 2003  12:11 PM
27EnglishSCANSCANYour radio is equipped with the Scan feature, which allows you to monitor multiple channels for voice activity. The radio will stop on a channel when it detects activity on it.Your radio automatically switches to a channel, within the scan list, when it detects activity.• The LED indicator blinks green during scan mode; it stops blinking when the radio switches to an active  channel.There are two types of Scan available in your radio:•System Scan• Auto ScanTALKBACKThe Talkback feature allows you to respond to a transmission while scanning. If transmission is detected on a channel while scanning, the radio will stop on that channel for a default  period of time after activity has ceased. This is referred to as “hangtime”. During this hangtime you may respond by pressing the PTT button. Note: The LED scan indicator stops blinking while the radio is in hangtime. If the PTT button is not pressed after the  preprogrammed hangtime, the radio returns to scanning channels.START  SYSTEM SCANPress the preprogrammed Scan button to start scan (see page 18).STOP SYSTEM SCANPress the preprogrammed Scan button to stop  System Scan (see page 14).Note: Your dealer/programmer can prepro-gram your radio when exiting System Scan to automatically revert to the last scan channel that had activity on it or to automatically revert to the channel where scan was initiated.START AUTO SCANAuto Scan automatically starts scanning once a channel with Auto Scan enabled is selected.Select a channel that has been preprogrammed for Auto Scan by your dealer/programmer.04_Scan.fm  Page 27  Thursday, August 7, 2003  12:11 PM
28EnglishSCANSTOP AUTO SCAN Select a channel that has not been preprogrammed for Auto Scan by your dealer/programmer.DELETE A NUISANCE CHANNELNote: Your dealer/programmer must prepro-gram a button to access this feature (see page 18).If a channel continually generates unwanted calls or noise (a “nuisance” channel), you can temporarily remove it from the scan list:Restore Channels to the Scan List1While the radio is on the Nuisance Channel, press the preprogrammed Nuisance Channel Delete button until you hear a tone.2Release the Nuisance Channel Delete button. The nuisance channel is deleted.Note: You cannot temporarily delete the channel that has been prepro-grammed by your dealer/program-mer as your designated scan channel, a priority channel, or the last remaining channel in the scan list.1Power off the radio. Once the radio is powered on again, the deleted nuisance channels are restored to the scan list.– or – 1Press the preprogrammed Scan button to stop the scan.2Press the preprogrammed Scan button again to start scanning again. The Deleted Nuisance Channels are restored to the scan list.– or – 1Select a channel that has not been preprogrammed for scan by your dealer /programmer to stop Scan. Once you return to the original channel, the deleted nuisance channels are restored to the scan list.04_Scan.fm  Page 28  Wednesday, August 20, 2003  4:52 PM
29EnglishWARRANTYWARRANTYLIMITED WARRANTYMOTOROLA COMMUNICATION PRODUCTSI. WHAT THIS WARRANTY COVERS AND FOR HOW LONG:MOTOROLA INC. (“MOTOROLA”) warrants the MOTOROLA manufactured Communication Products listed below (“Product”) against defects in material and workmanship under normal use and service for a period of time from the date of purchase as scheduled below:PR400 Portable Units Two (2) YearsProduct Accessories One (1) YearMotorola, at its option, will at no charge either repair the Product (with new or reconditioned parts), replace it (with a new or reconditioned Product), or refund the purchase price of the Product during the warranty period provided it is returned in accordance with the terms of this warranty. Replaced parts or boards are warranted for the balance of the original applicable warranty period. All replaced parts of Product shall become the property of MOTOROLA.This express limited warranty is extended by MOTOROLA to the original end user purchaser only and is not assignable or transferable to any other party. This is the complete warranty for the Product manufactured by MOTOROLA. MOTOROLA assumes no obligations or liability for additions or modifications to this warranty unless made in writing and signed by an officer of MOTOROLA. Unless made in a separate agreement between MOTOROLA and the original end user purchaser, MOTOROLA does not warrant the installation, maintenance or service of the Product.MOTOROLA cannot be responsible in any way for any ancillary equipment not furnished by MOTOROLA which is attached to or used in connection with the Product, or for operation of the Product with any ancillary equipment, and all such equipment is expressly excluded from this warranty. Because each system which may use the Product is unique, MOTOROLA disclaims liability for range, coverage, or operation of the system as a whole under this warranty.08_Warranty.fm  Page 29  Thursday, August 7, 2003  12:11 PM
30EnglishWARRANTYII. GENERAL PROVISIONS:This warranty sets forth the full extent of MOTOROLA'S responsibilities regarding the Product. Repair, replacement or refund of the purchase price, at MOTOROLA’s option, is the exclusive remedy. THIS WARRANTY IS GIVEN IN LIEU OF ALL OTHER EXPRESS WARRANTIES. IMPLIED WARRANTIES, INCLUDING WITHOUT LIMITATION, IMPLIED WARRANTIES OF MERCHANTABILITY AND FITNESS FOR A PARTICULAR PURPOSE, ARE LIMITED TO THE DURATION OF THIS LIMITED WARRANTY. IN NO EVENT SHALL MOTOROLA BE LIABLE FOR DAMAGES IN EXCESS OF THE PURCHASE PRICE OF THE PRODUCT, FOR ANY LOSS OF USE, LOSS OF TIME, INCONVENIENCE, COMMERCIAL LOSS, LOST PROFITS OR SAVINGS OR OTHER INCIDENTAL, SPECIAL OR CONSEQUENTIAL DAMAGES ARISING OUT OF THE USE OR INABILITY TO USE SUCH PRODUCT, TO THE FULL EXTENT SUCH MAY BE DISCLAIMED BY LAW.III. STATE LAW RIGHTS:SOME STATES DO NOT ALLOW THE EXCLUSION OR LIMITATION OF INCIDENTAL OR CONSEQUENTIAL DAMAGES OR LIMITATION ON HOW LONG AN IMPLIED WARRANTY LASTS, SO THE ABOVE LIMITATION OR EXCLUSIONS MAY NOT APPLY. This warranty gives specific legal rights, and there may be other rights which may vary from state to state.IV. HOW TO GET WARRANTY SERVICE:You must provide proof of purchase (bearing the date of purchase and Product item serial number) in order to receive warranty service and, also, deliver or send the Product item, transportation and insurance prepaid, to an authorized warranty service location. Warranty service will be provided by Motorola through one of its authorized warranty service locations. If you first contact the company which sold you the Product (e.g., dealer or communication service provider), it can facilitate your obtaining warranty service. You can also call Motorola at 1-800-927-2744 US/Canada.08_Warranty.fm  Page 30  Thursday, August 7, 2003  12:11 PM
31EnglishWARRANTYV. WHAT THIS WARRANTY DOES NOT COVER:A) Defects or damage resulting from use of the Product in other than its normal and customary manner.B) Defects or damage from misuse, accident, water, or neglect.C) Defects or damage from improper testing, operation, maintenance, installation, alteration, modification, or adjustment.D) Breakage or damage to antennas unless caused directly by defects in material workmanship.E) A Product subjected to unauthorized Product modifications, disassembles or repairs (including, without limitation, the addition to the Product of non-Motorola supplied equipment) which adversely affect performance of the Product or interfere with Motorola's normal warranty inspection and testing of the Product to verify any warranty claim.F) Product which has had the serial number removed or made illegible.G) Rechargeable batteries if:1) any of the seals on the battery enclosure of cells are broken or show evidence of tampering.2) the damage or defect is caused by charging or using the battery in equipment or service other than the Product for which it is specified.H) Freight costs to the repair depot.I) A Product which, due to illegal or unauthorized alteration of the software/firmware in the Product, does not function in accordance with MOTOROLA’s published specifications or the FCC type acceptance labeling in effect for the Product at the time the Product was initially distributed from MOTOROLA.J) Scratches or other cosmetic damage to Product surfaces that does not affect the operation of the Product.K) Normal and customary wear and tear.VI. PATENT AND SOFTWARE PROVISIONS:MOTOROLA will defend, at its own expense, any suit brought against the end user purchaser to the extent that it is based on a claim that the Product or parts infringe a United States patent, and MOTOROLA will pay those costs and damages finally awarded against the end user purchaser in any such suit which are attributable to any such claim, but such defense and payments are conditioned on the following:08_Warranty.fm  Page 31  Thursday, August 7, 2003  12:11 PM
32EnglishWARRANTYA) that MOTOROLA will be notified promptly in writing by such purchaser of any notice of such claim;B) that MOTOROLA will have sole control of the defense of such suit and all negotiations for its settlement or compromise; andC) should the Product or parts become, or in MOTOROLA’s opinion be likely to become, the subject of a claim of infringement of a United States patent, that such purchaser will permit MOTOROLA, at its option and expense, either to procure for such purchaser the right to continue using the Product or parts or to replace or modify the same so that it becomes non-infringing or to grant such purchaser a credit for the Product or parts as depreciated and accept its return. The depreciation will be an equal amount per year over the lifetime of the Product or parts as established by MOTOROLA.MOTOROLA will have no liability with respect to any claim of patent infringement which is based upon the combination of the Product or parts furnished hereunder with software, apparatus or devices not furnished by MOTOROLA, nor will MOTOROLA have any liability for the use of ancillary equipment or software not furnished by MOTOROLA which is attached to or used in connection with the Product. The foregoing states the entire liability of MOTOROLA with respect to infringement of patents by the Product or any parts thereof.Laws in the United States and other countries preserve for MOTOROLA certain exclusive rights for copyrighted MOTOROLA software such as the exclusive rights to reproduce in copies and distribute copies of such Motorola software. MOTOROLA software may be used in only the Product in which the software was originally embodied and such software in such Product may not be replaced, copied, distributed, modified in any way, or used to produce any derivative thereof. No other use including, without limitation, alteration, modification, reproduction, distribution, or reverse engineering of such MOTOROLA software or exercise of rights in such MOTOROLA software is permitted. No license is granted by implication, estoppel or otherwise under MOTOROLA patent rights or copyrights.VII. GOVERNING LAW:This Warranty is governed by the laws of the State of Illinois, USA.08_Warranty.fm  Page 32  Thursday, August 7, 2003  12:11 PM
33EnglishACCESSORIESACCESSORIESMotorola offers a number of accessories to enhance the productivity of your two-way radio. Many of the available accessories are listed below.ANTENNASMISCELLANEOUS ACCESSORIESBATTERIESCARRY ACCESSORIESNAD6502 VHF Heliflex Antenna 14cm, 146-174 MHzHAD9742 VHF Stubby Antenna, 9cm,146-162 MHzHAD9743 VHF Stubby Antenna, 9cm,162-174 MHzNAE6522 UHF Heliflex Stubby Antenna 9cm, 438-470 MHzNAE6483 Flexible Whip Antenna, 403-520 MHz8505816K26 UHF Heliflex Stubby, 470-520 MHz5886627Z01 Antenna AdapterRLN5500 Accessory Retainer KitNNTN4496_R NiCd, 1100 mAhNNTN4497_R Li-lon, 1800 mAhNNTN4851_R NiMH, 1400 mAhNNTN4852_R NiMH FM, 1300 mAhNNTN4970_R Slim Li-Ion, 1600 mAhRLN5498 Hard Leather Case with Belt LoopRLN5496 Hard Leather Case, Full DTMF 2-1/2 with 2-1/2 inch Swivel Belt LoopRLN5497 Hard Leather Case, Full DTMF with3 inch Swivel Belt LoopHLN8255 3 inch Spring Action Belt ClipNTN5243 Shoulder Strap for Hard Leather Cases (attaches to D-Shaped Rings on case)HLN6602 Universal Chest PackRLN4570 Break-A-Way Chest Pack1505596Z02 Replacement Strap for HLN6602 Universal Chest Pack09_Accessory.fm  Page 33  Tuesday, September 30, 2003  4:29 PM
34EnglishACCESSORIESCHARGERSHEADSETSWPLN4138 Rapid Desktop Charger w/US NA PlugWPLN4155 Slow Desktop Charger w/US NA PlugWPLN4161 Multi-Unit Rapid Charger w/US NA CordRLN5411 Ultra-Lite Breeze Behind the Head HeadsetPMMN4001 Earset with Flexible Boom MicrophoneHMN9013 Lightweight Headset w/o In-line PTTRMN4016 Lightweight Headset with In-line PTTRLN5238 Lightweight Headset with In-line PTT, NFL StyleHMN9021 Medium Weight Over the Head Dual Muff HeadsetHMN9022 Medium Weight Behind the Head Dual Muff HeadsetBDN6647 Medium Weight Single Speaker HeadsetBDN6648 Heavy Duty Dual Muff Headset with Noise Canceling Microphone5080371E66 Replacement Ear Pad for BDN6647RMN5015 Heavy Duty Dual Muff Racing Headset (requires RKN4090 Headset Adapter Cable)REX4648 Ear Pad and Windscreen KitRKN4090 Adapter Cable for use with RMN5015 Racing HeadsetRMN4051 2-Way Hard Hat Mount, Black, Noise Reduction Rating (22db) (requires RKN4094 Adapter Cable)RMN4054 Receive-Only Hard Hat Mount Headset with 3.5mm Right Angle PlugRMN4055 Receive-Only Headband Style Headset with 3.5mm Right Angle PlugHLN9133 VOX Adapter Kit (for use with Headsets only)RKN4094 In-Line PTT Adapter for use with headsets RMN4051, RMN4052, and RMN4053 only)PMLN4445 Ultra-Light Heaset with Boom Microphone09_Accessory.fm  Page 34  Thursday, August 14, 2003  2:35 PM
35EnglishACCESSORIESSURVEILLANCE ACCESSORIESHMN9752 Earpiece with Volume Control, 1-Wire (plastic earloop) (Beige)HMN9727 Earpiece without Volume Control, 1-Wire (plastic earloop) (Beige)RLN4894 Earpiece without Volume Control, 1-Wire (plastic earloop) (Black)HMN9754 Earpiece with Microphone & PTT Combined, 2-Wire (Beige)RLN4895 Earpiece with Microphone & PTT Combined, 2-Wire (Black)RLN5198_P Earpiece with Microphone & PTT Combined (Black) including Low Noise Kit,  2-Wire Surveillance Kit w/Clear Comfortable Acoustic Tube (includes NTN8371)BDN6720 Flexible Ear Receiver (receive only)PMLN4443 Flexible Ear Receiver with Microphone & PTT CombinedHMN9036 Earbud with Microphone & PTT Combined, 2-Wire (Black)PMLN4294 Earbud with Microphone & PTT CombinedPMLN4442 Earbud with Microphone & PTT CombinedHLN9132 Earbud Single Wire Receive Only (Black)NTN8370 Extreme Noise Kit5080384T72 Replacement Noise Attenuating Plug for NTN8370NTN8371 Low Noise KitRLN4760 Small Custom Clear Earpiece,Right EarRLN4763 Small Custom Clear Earpiece,Left EarRLN4761 Medium Custom Clear Earpiece, Right EarRLN4764 Medium Custom Clear Earpiece,Left EarRLN4762 Large Custom Clear Earpiece,Right EarRLN4765 Large Custom Clear Earpiece,Left EarBDN6646 Standard 95 dB Ear Microphone with PTT Interface ModuleBDN6706 Standard 95 dB Ear Microphone with VOX & PTT Interface Module0180358B38 Ring PTT Switch for Ear Microphone System0180300E83 Body PTT Switch for Ear Microphone System09_Accessory.fm  Page 35  Thursday, August 14, 2003  2:35 PM
36EnglishACCESSORIESREMOTE SPEAKER MICROPHONESMISCELLANEOUSHMN9030 Remote Speaker MicrophoneRLN4904 Microphone Jacket for HMN9030HKN9094 Replacement Cord for HMN9030PMMN4008 Remote Speaker MicrophoneTDN9327 Portable Radio HangerTDN9373 Portable Radio Hanger09_Accessory.fm  Page 36  Friday, August 15, 2003  1:56 PM
Turn the Radio On or Off1. Rotate the On/Off/Volume knob clockwise. You will hear the self-test pass tone and see the LED indicator flash green.2. Rotate the On/Off/Volume knob counterclockwise until you hear a click and the LED indicator turn off.Adjust the Volume1. Turn the On/Off/Volume knob clockwise to increase the volume, or coun-terclockwise to decrease the volume.Select a Radio Channel1. Turn the Channel Selector knob clockwise or counterclockwise until you reach the desired channel.Receive1. Turn radio on and adjust volume to the desired level.2. Select desired channel.3. Listen for voice acitivity. The LED indicator flashes red while your radio is receiving.Transmit1. Hold the radio vertically 1 to 2 inches (2.5 to 5 cm) from your mouth. Press the PTT button to talk. The LED indicator lights steady red while the call is being sent.2. Release PTT button to listen.Start or Stop System Scan1. Press the preprogrammed Scan button to start scan. The LED indictor blinks green during scan operation.2. Press the preprogramed Scan button again to stop scan. Start or Stop Auto Scan1. Select a channel that has been preprogrammed for Auto Scan by your dealer/programmer.2. Select a channel that has not been preprogrammed for Auto Scan by your dealer/programmer.Delete a Nuisance Channel During Scanning1. While radio is on a nuisance channel, hold down preprogrammedNuisance Delete button until you hear a tone.2. Release Nuisance Delete button.PR400™ Quick Reference CardRecord the functions for your radio’s programmable buttons in the table provided below. For further information, see page 12 of this User Guide.Microphone/PTTLEDIndicatorChannel Selector KnobOn/Off/Volume KnobSide Button 1(Programmable)Side Button 2(Programmable)SpeakerButton Function Short Press  Long Press Hold Down Page10_QR-Card_non_display.fm  Page 61  Thursday, August 7, 2003  12:13 PM
Restore Channels to the Scan ListPower off the radio then turn it on. – OR – Press the preprogrammed Scan button to stop the scan. The Deleted Nuisance Channels are restored to the scan list. – OR – Select a channel that has not been preprogrammed by your dealer/programmer to stop Scan. Once you return to the original channel, the deleted nuisance channels are restored to the scan list.LED IndicatorsAudio Indicators for Programmable ButtonsYou can check battery charge status if your dealer has preprogrammed one of the programmable buttons. Hold down the preprogrammed Bat-tery Indicator button. The charge status is shown on the display.LED State/Color IndicationRadio CallRed Transmitting Flashing Red Receiving Flashing Red Channel BusyScanFlashing Green Scanning for activityCall AlertFlashing Yellow Indicates receiving a Call AlertSelective CallFlashing Yellow Indicates receiving a Selective CallSticky Monitor/Open SquelchYellow While monitoringProgrammable Buttons PositiveIndicator Tone NegativeIndicator ToneScan Start StopPower Level High LowSquelch Tight Normal Repeater/Talkaround Does not use repeater Uses repeaterVOX Enabled DisabledSilent Monitor/Open Squelch  – EnabledOption Board Enabled DisabledEscalert Enabled DisabledBattery Level LED IndicatorGood GreenSufficient YellowLow Flashing RedVery Low None10_QR-Card_non_display.fm  Page 62  Thursday, August 7, 2003  12:13 PM
DROITS D’AUTEUR DU LOGICIEL INFORMATIQUELes produits Motorola décrits dans ce manuel peuvent inclure des programmes informatiques Motorola protégés par les droits d’auteurs et stockés dans les mémoires des semi-conducteurs ou autres supports. La législation des États-Unis et celle d’autres pays confère à Motorola certains droits exclusifs pour les programmes informatiques protégés par les droits d’auteur y compris, mais sans en exclure d’autres, le droit exclusif de copier ou de reproduire, sous quelque forme que ce soit, le programme informatique protégé par les droits d’auteur. En conséquence, aucun programme informatique Motorola protégé par les droits d’auteurs et contenu dans les produits Motorola décrits dans ce manuel ne peut être copié, reproduit, modifié, décompilé ni distribué sous quelque forme que ce soit sans la permission écrite expresse de Motorola. De plus, l’achat de produits Motorola ne confère, de façon directe ou par inférence, préclusion ou autre, aucune licence dans le cadre des droits d’auteur, ni aucun brevet ou demande de brevet de Motorola, excepté pour la licence d’utilisation normale non-exclusive qui découle de l’effet de la loi dans la vente d’un produit.
1TABLE DES MATIÈRESFrançaisTABLE DES MATIÈRESDroits d’auteur du logiciel informatique  . . . . . . . . . . . . . . face intérieureSécurité . . . . . . . . . . . . . . . . . . . . . . . . . . . .  3Sécurité du produit et conformité aux normes d’exposition à l’énergie de radiofréquence (RF). . . . . . . . . . . . . . . . . . . . . . . . . . . . . . .  3Introduction . . . . . . . . . . . . . . . . . . . . . . . . .  5Systèmes de radio conventionnels . . . . . . . .  5Fonctions de la radio PR400™ . . . . . . . . . . .  5Fonctions générales de la radio. . . . . . . .  5Fonctions de signalisation . . . . . . . . . . . .  5Schéma de la radio . . . . . . . . . . . . . . . . . . .  7Accessoires. . . . . . . . . . . . . . . . . . . . . . . . . .  8Installation de la batterie  . . . . . . . . . . . . .  8Retrait de la batterie. . . . . . . . . . . . . . . . .  8Installation de l’antenne . . . . . . . . . . . . . .  9Retrait de l’antenne . . . . . . . . . . . . . . . . .  9Installation de la pince de ceinture. . . . .  10Retrait de la pince de ceinture . . . . . . . .  10Batterie . . . . . . . . . . . . . . . . . . . . . . . . . . . .  11Chargement de la batterie . . . . . . . . . . .  11Chargeur mural . . . . . . . . . . . . . . . . . . . . . .  12Chargeurs de table . . . . . . . . . . . . . . . . . . . .12Chargeur rapide  . . . . . . . . . . . . . . . . . . .12Chargeur lent. . . . . . . . . . . . . . . . . . . . . .13État de charge de la batterie  . . . . . . . . . . . .14Voyant DEL  . . . . . . . . . . . . . . . . . . . . . . . . .14Tonalités . . . . . . . . . . . . . . . . . . . . . . . . . . . .15Touches programmables . . . . . . . . . . . . . . .16Mise en route  . . . . . . . . . . . . . . . . . . . . . . .19Mise sous tension et hors tension de la radio . . . . . . . . . . . . . . . . . . . . . . . . . . . . . .19Réglage du volume. . . . . . . . . . . . . . . . . . . .20Sélection d’un canal radio  . . . . . . . . . . . . . .20Réception . . . . . . . . . . . . . . . . . . . . . . . . . . .20Surveillance . . . . . . . . . . . . . . . . . . . . . . . . .20Surveillance permanente. . . . . . . . . . . . .21Transmission  . . . . . . . . . . . . . . . . . . . . . . . .21Mode Répéteur ou Conversation directe . . .22Fonctionnement en mode VOX  . . . . . . . . . .22Connexion d’un casque VOX. . . . . . . . . .22Activation ou désactivation de la fonction  VOX . . . . . . . . . . . . . . . . . . . .22Activation/Désactivation de l’effet local du casque . . . . . . . . . . . . . . . . . . . . . . . . . . . .23Casque VOX . . . . . . . . . . . . . . . . . . . . . .23Casque autre que VOX avec PTT en ligne . . . . . . . . . . . . . . . . . . . . . . . . . . .23
2FrançaisTABLE DES MATIÈRESEscalert. . . . . . . . . . . . . . . . . . . . . . . . . . . . .23Sélection du niveau de réglage silencieux . .24Réglage du niveau de puissance . . . . . . . . .24Activation et désactivation de la carte d’option . . . . . . . . . . . . . . . . . . . . . . . . . . . .24Appels radio . . . . . . . . . . . . . . . . . . . . . . . .25Blocage sélectif de la radio. . . . . . . . . . . . . .25Réception d’un appel sélectif . . . . . . . . . . . .25Réception d’un signal Call Alert™  . . . . . . . .25Balayage . . . . . . . . . . . . . . . . . . . . . . . . . . .27Réponse . . . . . . . . . . . . . . . . . . . . . . . . . . . .27Lancement du balayage système. . . . . . . . .27Arrêt du balayage système. . . . . . . . . . . . . .27Lancement du balayage automatique. . . . . .28Arrêt du balayage automatique. . . . . . . . . . .28Suppression d’un canal parasite. . . . . . . . . .28Rétablissement de canaux dans la liste de balayage . . . . . . . . . . . . . . . . . . . . .28Garantie . . . . . . . . . . . . . . . . . . . . . . . . . . . .31Garantie limitée. . . . . . . . . . . . . . . . . . . . . . .31Accessoires  . . . . . . . . . . . . . . . . . . . . . . . .37Antennes  . . . . . . . . . . . . . . . . . . . . . . . . . . .37Adaptateur audio  . . . . . . . . . . . . . . . . . . . . .37Batteries . . . . . . . . . . . . . . . . . . . . . . . . . . . .37Accessoires de transport . . . . . . . . . . . . . . . 37Chargeurs  . . . . . . . . . . . . . . . . . . . . . . . . . . 38Casques . . . . . . . . . . . . . . . . . . . . . . . . . . . . 38Accessoires de surveillance. . . . . . . . . . . . . 39Microphones-haut-parleur à distance. . . . . . 40Divers. . . . . . . . . . . . . . . . . . . . . . . . . . . . . . 40
3SÉCURITÉFrançaisSÉCURITÉSÉCURITÉ DU PRODUIT ET CONFORMITÉ AUX NORMES D’EXPOSITION À L’ÉNERGIE DE RADIOFRÉQUENCE (RF)ATTENTION!  L’usage de cette radio doit être exclusivement professionnel, conformément au règlement du FCC (Conseil fédéral américain des communications) relatif à l’exposition à l’énergie de radiofréquence. Avant d’utiliser ce produit, lisez les informations relatives à l’exposition aux RF, ainsi que le mode d’emploi contenus dans la brochure Normes de sécurité et exposition à l’énergie de RF  fournie avec la radio (référence de publication Motorola 68P81095C98) afin d’assurer sa conformité aux limites d’exposition à l’énergie de radiofréquence.  Pour obtenir une liste des antennes, batteries et autres accessoires agréés Motorola, visitez le site Web suivant sur lequel sont répertoriés les accessoires agréés : http://www.motorola.com/cgiss/index.shtmlAvant d’utiliser ce produit, lisez les instructions d’utilisation sécuritaire dans la brochure Normes de sécurité et exposition à l’énergie de RF fournie avec votre radio.!Précaution
4FrançaisSÉCURITÉNotes :
5INTRODUCTIONFrançaisINTRODUCTIONSYSTÈMES DE RADIO CONVENTIONNELS L’expression « Systèmes de radio conventionnels » fait généralement référence aux communications d’unité à unité à travers un canal unique. Les systèmes conventionnels permettent également aux utilisateurs de radio d’étendre la couverture de communication en passant leurs messages par un répéteur servant de relais. Pour assurer une utilisation coordonnée entre plusieurs utilisateurs, chacun d’eux doit surveiller le canal ou le répéteur avant de transmettre, afin de vérifier que le système n’est pas occupé. FONCTIONS DE LA RADIO PR400™Fonctions générales de la radio• 16 canaux• 2 touches de fonction programmables•Capacité d'extension au moyen de cartes d'optins• Verrouillage d’un canal occupé• Paramètres de puissance Haute/Basse• Temporisateur de délai de transmission• Surveillance et surveillance permanente• Balayage du système avec 2 niveaux de priorité et balayage inverséFonctions de signalisation• Signalisation MDC 1200• Signalisation Quik-Call II• Signalisation DTMF- Décodage du blocage sélectif de la radio- Décodage de l’ID de transmission- Décodage d’un avis d’appel - Décodage d’un appel sélectif- Encodage de l’ID de transmission DTMF00_Introduction.fm  Page 5  Wednesday, September 24, 2003  5:21 PM
6FrançaisINTRODUCTIONNotes :
7SCHÉMA DE LA RADIOFrançaisSCHÉMA DE LA RADIOAntenneBouton de transmission (PTT)Touche latérale 1 (programmable)Touche latérale 2 (programmable)Connecteur d’accessoires avec capot antipoussièreMicrophone/Haut-parleurVoyant DELBouton Sélecteur de canalBouton Marche/Arrêt/Volume Pince de ceinture
8FrançaisSCHÉMA DE LA RADIOACCESSOIRESInstallation de la batterieRetrait de la batterie1Disposez la batterie dans l’axe des rails situés au dos de la radio (à environ 13 mm de la partie supérieure de la radio).2Appuyez fermement la batterie contre la radio et faites coulisser la batterie vers le haut jusqu’au déclic du loquet.3Faites glisser le loquet de la batterie situé au bas de la radio en position de verrouillage.1Si la radio est allumée, éteignez-la (voir page 19).2Faites glisser le loquet de la batterie en position de déverrouillage. Dégagez le loquet en le poussant vers le bas tout en le maintenant vers la partie avant de la radio.3Une fois le loquet de la batterie déverrouillé, faites coulisser la batterie du haut vers le bas de la radio d’environ 13 mm. Une fois que vous avez dégagé la batterie des rails, soulevez-la afin de l’enlever directement de la radio.Loquet de la batterieVerrouilléDéverrouillé
9SCHÉMA DE LA RADIOFrançaisInstallation de l’antenne Retrait de l’antenneTournez l’antenne dans le sens des aiguilles d’une montre pour la fixer.Tournez l’antenne dans le sens inverse des aiguilles d’une montre pour l’enlever.
10FrançaisSCHÉMA DE LA RADIOInstallation de la pince de ceinture Retrait de la pince de ceinture1Alignez les rainures de la pince de ceinture sur celles de la batterie.2Poussez sur la pince jusqu’à ce que vous entendiez un clic.1À l’aide d’une clé, appuyez sur le taquet de dégagement de la pince en direction opposée de la batterie pour libérer la pince de ceinture.2Faites coulisser la pince vers le haut pour l’enlever.Taquet de dégagement de la pince de ceinture
11SCHÉMA DE LA RADIOFrançaisBATTERIEChargement de la batterieCette radio fonctionne avec une batterie rechargeable au nickel-cadmium (NICd), au nickel-hydrure métallique (NiMH), ou au lithium-ion (Li-Ion). Pour une capacité et une performance optimales de la batterie, chargez-la avant chaque utilisation. La batterie a été spécialement conçue pour être utilisée avec un chargeur Motorola. Le fait de charger la batterie dans un appareil autre que Motorola peut endommager la batterie et en annuler la garantie.Remarque : Lors de la charge d’une batterie fixée à une radio, éteignez la radio pour assurer une charge complète.Dans la mesure du possible, la batterie doit être conservée à environ 25 °C (77 °F) (température de la pièce). Charger une batterie froide (en dessous de 10 °C [50 °F]) peut provoquer une fuite d’électrolyte et finalement entraîner une panne de la batterie. Charger une batterie chaude (au-dessus de 35 °C [95 °F]) réduit la capacité de décharge de la batterie, ce qui affecte les performances de la radio. Les chargeurs de batterie rapides Motorola sont dotés d’un circuit de détection de température permettant d’assurer  que les batteries sont bien chargées dans les limites de température ci-haut mentionnées.Si la batterie est neuve ou que son niveau de charge est très faible, vous devez la charger avant de pouvoir l’utiliser. Lorsque le niveau de charge de la batterie est bas et que la radio est en mode de transmission, le voyant DEL rouge clignote. Dès que vous relâchez le bouton PTT, une tonalité d’alerte se fait entendre.Remarque : Les batteries sont expédiées non-chargées depuis l’usine. Quel que soit l’état de la batterie indiqué par le chargeur, il est toujours préférable de charger une nouvelle batterie pendant 14 à 16 heures, avant sa première utilisation.Remarque : N’utilisez pas le chargeur mural en même temps que le chargeur de table.
12FrançaisSCHÉMA DE LA RADIOCHARGEUR MURALRemarque : N’utilisez pas le chargeur mural si vous utilisez des batteries au lithium-ion (Li-Ion) ou au nickel-hydrure métallique (NiMH). Le chargeur mural est exclusivement réservé aux batteries au nickel-cadmium (NiCd).Pour charger la batterie :CHARGEURS DE TABLEChargeur rapide1Éteignez la radio.2Soulevez le capot antipoussière afin d’exposer le connecteur d’accessoire audio.3Insérez l’adaptateur de charge dans le connecteur d’accessoire.4Branchez l’adaptateur de charge dans une prise électrique.• Le voyant DEL rouge de l’adaptateur de charge rest allumé tant que le chargeur est branché dans une prise électrique.Remarque : Ne laissez pas le chargeur connecté à la radio s’il n’est pas branché dans une prise électrique.5Débranchez le chargeur de la prise électrique et de la radio au bout de 10 heures.Remarque : Après la charge initiale de 14 à 16 heures, ne chargez pas la batterie plus de 10 heures. 1Éteignez la radio.2Placez la batterie, avec ou sans la radio, dans le logement du chargeur. • Le voyant DEL du chargeur indique la progression de la charge.Couleur du voyant DEL ÉtatAucune indication du voyant DELBatterie mal insérée ou batterie non détectée.Clignotement vert unique Mise sous tension duchargeur réussie.Rouge clignotantaLa batterie ne se charge pas ou il y a un mauvais contact.
13SCHÉMA DE LA RADIOFrançaisUne liste des batteries et des chargeurs de batterie agréés Motorola figure à la page 38. Les chargeurs répertoriés dans cette liste ne chargent que les batteries agréées Motorola. Il est possible que d’autres types de batteries ne puissent pas être chargés.Chargeur lentRouge fixe La batterie est en mode de charge rapide.Jaune clignotant La batterie est dans le chargeur mais en attente d’être chargée. La température de la batterie est trop élevée ou trop basse. Il se peut que la tension électrique soit inférieure au niveau-seuil prédéterminé pour la charge.Vert clignotantbBatterie chargée à 90 % (ou plus). Chargement en régime d’entretien.Vert Batterie complètement chargée.a. Sortez la batterie du chargeur et utilisez la gomme d’un crayon pour nettoyer les trois contacts métalliques situés derrière la batterie. Replacez la batterie dans le chargeur. Si le voyant DEL rouge continue à clignoter, remplacez la batterie.Couleur du voyant DEL État b. Une batterie standard peut mettre 90 minutes à charger à 90 % de sa capacité. Même si les batteries neuves indiquent prématurément une pleine charge (voyant DEL vert fixe), chargez la batterie pendant 14 à 16 heures avant une première utilisation afin d’en optimiser les performances.1Éteignez la radio.2Placez la batterie, avec ou sans la radio, dans le logement du chargeur. • Le voyant DEL du chargeur indique la progression de la charge.Couleur du voyant DEL ÉtatAucune indication du voyant DELBatterie mal insérée ou batterie non détectée.
14FrançaisSCHÉMA DE LA RADIOÉTAT DE CHARGE DE LA BATTERIEVous pouvez vérifier l’état de charge de la batterie si votre dépositaire a préprogrammé l’une des touches programmables. Appuyez sur la touche préprogrammée Indicateur de batterie et maintenez-la enfoncée. L’état de charge est indiqué par la couleur du voyant DEL de la radio.  VOYANT DELIndique l’état de mise sous tension, de transmission, de réception, l’état du balayage de surveillance, l’activité des canaux, la réception et la transmission d’avis d’appel Call Alert™, la réception et la transmission d’appels sélectifs et l’état de la batterie.Rouge fixe La batterie est en mode de charge nocturne. La batterie est complètement chargée au bout de 11 heures.Niveau de chargeVoyant DELCorrect VertPassable JauneFaible Rouge clignotantTrès faibl e Aucu nCouleur du voyant DEL ÉtatÉtat/Couleur du DEL IndicationAppel radioRouge En cours de transmissionRouge clignotant En cours de réceptionRouge clignotant Canal occupéBalayageVert clignotant Recherche d’activités en coursAvis d’appelJaune clignotantIndique la réception d’un avis d’appelAppel sélectifJaune clignotant Indique la réception d’un appel sélectifSurveillance/Réglage silencieux ouvertJaune Pendant la surveillance
15SCHÉMA DE LA RADIOFrançaisTONALITÉSTonalité aiguë   Tonalité grave Certaines touches programmables utilisent des tonalités pour indiquer l’un des deux modes :Batterie faibleRouge clignotant pendant la transmissionNiveau de batterie faibleTonalité de succès du diagnosticTonalité d’échec du diagnosticTonalité positiveTonalité négativeTonalité de touche correcteTonalité de touche incorrecteÉtat/Couleur du DEL Indication Touches programmablesTonalité positiveTonalité négativeBalayage Lancer ArrêterNiveau de puissance Haute BasseRéglage silencieux Fermé NormalRépéteur/Conversation directeCommunique sans  répéteurUtilise le répéteurVOX (transmission commandée par la voix) Activée DésactivéSurveillance silencieuse/Réglage silencieux ouvert —ActivéCarte d'option Activée DésactivéeEscalert Activée Désactivée
16FrançaisSCHÉMA DE LA RADIOTOUCHES PROGRAMMABLESVotre radio possède deux touches programmables. Votre dépositaire peut programmer ces touches pour activer directement plusieurs fonctions de la radio.Contactez votre dépositaire pour obtenir une liste complète des fonctions qu’offre votre radio.Les touches programmables comprennent :• les deux touches latérales (S1 et S2).Certaines touches peuvent commander jusqu’à deux fonctions, selon le mode de pression utilisé :•Pression courte : les touches programmables sont brièvement enfoncées puis relâchées.•Pression longue : la pression sur les touches programmables est maintenue pendant au moins 2,5 secondes.•Pression continue : les touches programmables sont maintenues enfoncées pendant la vérification d’un état ou l’exécution de réglages.Le tableau de la page 17 résume les fonctions programmables disponibles et indique le numéro de page correspondant à l’explication de la fonction.Demandez à votre dépositaire d’inscrire dans la colonne « Touche » le nom de la touche programmable à côté de la fonction qui lui est assignée. Le dépositaire peut utiliser les abréviations (S1, S2) indiquées dans le schéma de la radio page 7.S’il y a lieu, demandez-lui d’inscrire également le mode de pression requis sur la touche (pression courte, pression longue, pression continue).
17SCHÉMA DE LA RADIOFrançaisTouches programmables Fonction Voyant Pression courte Pression longue Pression continue Page ToucheIndicateur dede batterie DEL — — Vérifie la charge de la batterie. 14Réglage Volume — — —Émet une tonalité pour le réglage du volume de la radio.20Surveillance —Une pression longue lance la surveillance. Une pression courte annule la surveillance.Surveille le canal sélectionné à la recherche d’une activité quelconque.20Répéteur/Conversation directe—Alterne entre l’utilisation d’un répéteur et la transmission directe vers une autre radio.†—22Transmission commandée par la voix (VOX)— Active et désactive la fonction VOX.†—22† Cette fonction est activée SOIT par une pression courte, SOIT par une pression longue, mais pas les deux en même temps.
18FrançaisSCHÉMA DE LA RADIOEscalert —Active et désactive la fonction Escalert.†—23Réglage silencieux —Alterne entre le niveau de réglage silencieux Fermé et Normal.†—24Niveau de puissance —Alterne entre puissance d’émission Haute et Basse.†—24Carte d’Option — Active ou désactive la carte d’option.†—24Balayage/Suppression d’un canal parasite—Lance ou arrête le processus de balayage.Supprime un canal parasite au cours du balayage.— 27,28† Cette fonction est activée SOIT par une pression courte, SOIT par une pression longue, mais pas les deux en même temps.Touches programmables  (Suite)Fonction Voyant Pression courte Pression longue Pression continue Page Touche
19MISE EN ROUTEFrançaisMISE EN ROUTEMISE SOUS TENSION ET HORS TENSION DE LA RADIOMARCHE ARRÊTTournez le bouton Marche/Arrêt/Réglage volume dans le sens des aiguilles d’une montre. Si la mise sous tension s'effectue normalement, la tonalité de succès du diagnostic () se fait entendre et le voyant DEL vert clignote. Si la mise sous tension de la radio échoue, la tonalité d’échec du diagnostic se fait entendre ( ). La radio devra alors être retournée pour être reprogrammée.Tournez le bouton Marche/Arrêt/Réglage volume dans le sens contraire des aiguilles d’une montre  jusqu’à ce que vous entendiez un clic et que le voyant DEL s’éteigne.
20FrançaisMISE EN ROUTERÉGLAGE DU VOLUMETournez le bouton Marche/Arrêt/Réglage volume dans le sens des aiguilles d’une montre pour augmenter le volume ou dans le sens contraire pour le baisser. –ou– Remarque : Votre dépositaire peut préprogrammer l’une des touches programmables sur Réglage volume.SÉLECTION D’UN CANAL RADIOLa radio offre 16 canaux.Pour sélectionner un canal, tournez le bouton Sélecteur de canal dans le sens des aiguilles d’une montre ou en sens inverse jusqu’à ce que vous atteigniez le canal souhaité.RÉCEPTIONSURVEILLANCEIl est important de surveiller le trafic avant de transmettre afin de vérifier que vous ne « couvrez » pas la voix d’une transmission déjà en cours.1Maintenez la touche Réglage volume enfoncée (voir page  7). • Une tonalité continue se fait entendre.2Tournez le bouton Marche/Arrêt/Volume jusqu’au niveau de volume souhaité.3Relâchez la touche Réglage volume.1Allumez la radio.2Réglez le volume de la radio (voir page 20).3Trouvez le canal souhaité. • Vérifiez que le bouton de transmission PTT n’est pas enfoncé.4Écoutez pour détecter une activité vocale quelconque. • Le voyant DEL rouge clignote pendant la réception.5Pour répondre, tenez la radio verticalement à une distance de 2,5 à 5 centimètres (1 à 2 po) des lèvres. Appuyez sur le bouton de transmission PTT pour parler, relâchez-le pour écouter.
21MISE EN ROUTEFrançaisSurveillance permanenteTRANSMISSION1Appuyez sur la touche préprogrammée Surveillance en la maintenant enfoncée pour accéder au trafic de canaux.• Si aucune activité n’est détectée, vous entendrez du « bruit blanc ».2Une fois que le trafic est dégagé sur les canaux, transmettez votre appel en appuyant sur le bouton de transmission PTT.1Une pression longue de la touche préprogrammée Surveillance place la radio en mode de surveillance permanente.• Vous entendez une  tonalité de touche correcte.2Une pression courte sur la touche prépro-grammée Surveillance annule le mode de surveillance permanente et la radio revient en mode de fonctionnement normal.1Allumez la radio.2Utilisez le bouton Sélecteur de canal pour sélectionner le canal souhaité.Remarque : Il est important de surveiller le trafic avant de transmettre afin de vérifier que vous ne « couvrez » pas la voix d’une transmission déjà en cours.3Tenez la radio verticalement à une distance de 2,5 à 5 centimètres (1 à 2 po.) des lèvres. Appuyez sur le bouton de transmission PTT pour parler.• Le voyant DEL rouge s’allume en continu pendant que l’appel est émis.4Relâchez le bouton de transmission PTT pour écouter.
22FrançaisMISE EN ROUTEMODE RÉPÉTEUR OU CONVERSATION DIRECTELe mode Conversation directe vous permet de communiquer avec une autre radio :• Lorsque le mode Répéteur ne fonctionne pas. –ou–• Lorsque votre radio est hors de portée d’un répéteur, mais à une distance permettant de communiquer avec une autre radio.Pour sélectionner le mode Répéteur ou Conversation directe :Appuyez sur la touche préprogrammée Répéteur/Conversation directe (voir page 17) pour alterner entre les modes Répéteur et Conversation directe.FONCTIONNEMENT EN MODE VOX Lorsque vous souhaitez opérer en mode mains libres, la radio peut être activée pour transmission uniquement par la voix à l’aide de la fonction VOX lorsque vous parlez en utilisant un accessoire connecté à la radio.Connexion d’un casque VOX.Activation ou désactivation de la fonction  VOXPour activer ou désactiver cette fonction, appuyez sur la touche préprogrammée VOX (voir page 17).Remarque : La fonction VOX peut être désactivée par une pression sur le bouton de transmission PTT.– ou –Vous pouvez sélectionner des canaux pour activer ou désactiver VOX, selon ce qui a été préprogrammé par le dépositaire ou le programmeur. 1Éteignez la radio.2Connectez l’accessoire VOX à votre radio et allumez la radio.1Vous pouvez aussi activer VOX en sélectionnant un canal préprogrammé par votre dépositaire.Remarque : La fonction VOX peut être désactivée par une pression sur le bouton de transmission PTT.
23MISE EN ROUTEFrançaisACTIVATION/DÉSACTIVATION DE L’EFFET LOCAL DU CASQUELe dépositaire peut programmer la radio afin que vous puissiez entendre votre voix dans le casque lorsque vous parlez.Casque VOXCasque autre que VOX avec PTT en ligne ESCALERTVous pouvez programmer votre radio pour augmenter le volume des tonalités d’alarme lorsqu’un appel radio reste sans réponse.Appuyez sur la touche préprogrammée Escalert (voir page  18).2Vous pouvez aussi désactiver VOX en sélectionnant un canal qui n’a pas été préprogrammé par votre dépositaire.1Pour activer l’effet local du casque, éteignez la radio.2Connectez le casque VOX (accessoire) à la radio.3Allumez la radio. Au cours de la transmission, vous entendrez votre voix dans le casque pendant que vous parlez.4Pour désactiver l’effet local du casque, éteignez la radio et rallumez-la.1Pour activer l’effet local du casque, éteignez la radio.2Connectez l’accessoire autre que VOX à votre radio.3Appuyez sur le bouton PTT en ligne de votre casque et maintenez-le enfoncé.4Allumez la radio et relâchez le bouton PTT une fois la mise en route de la radio effectuée. Au cours de la transmission, vous entendrez votre voix dans le casque pendant que vous parlez.5Pour désactiver l’effet local du casque, éteignez la radio et rallumez-la.
24FrançaisMISE EN ROUTESÉLECTION DU NIVEAU DE RÉGLAGE SILENCIEUXUtilisez cette fonction pour filtrer les appels parasites (importuns) ou les bruits de fond. Notez toutefois que la fermeture du réglage silencieux risque aussi de filtrer des appels distants. Dans ce cas, il est sans doute préférable d’opter pour un réglage silencieux normal.Appuyez sur la touche préprogrammée Réglage silencieux (voir page 18) (SQUELCH) pour alterner entre fermé et normal.RÉGLAGE DU NIVEAU DE PUISSANCEChaque canal de votre radio possède un niveau prédéfini de puissance d’émission pouvant être modifié.Pour régler le niveau de puissance, appuyez sur la touche préprogrammée Niv. Puissance (voir page 18) pour alterner entre basse et haute.ACTIVATION ET DÉSACTIVATION DE LA CARTE D’OPTIONCette fonction sert à activer ou à désactiver une carte d’option.Appuyez sur la touche préprogrammée Carte d’option (voir page 18) pour activer ou désactiver la carte d’option.
25APPELS RADIOFrançaisAPPELS RADIOBLOCAGE SÉLECTIF DE LA RADIOVotre radio est équipée d’un dispositif de sécurité pouvant la désactiver temporairement lorsqu’un signal de blocage est émis par la station de base.Cette fonction est généralement utilisée pour désactiver les radios :• en cas de vol;• pour des raisons de vérification du système.Lorsque la radio est rendue inopérante par la station de base, toutes les commandes deviennent inopérantes à l’exception du bouton Marche/Arrêt et de l’écran qui affiche BLOCAGE.RÉCEPTION D’UN APPEL SÉLECTIFLorsque vous recevez un appel sélectif :• Le voyant DEL jaune clignote s’il a été programmé par le dépositaire ou le programmeur. • Deux tonalités aiguës se font entendre.RÉCEPTION D’UN SIGNAL CALL ALERT™Lorsque vous recevez un signal d’avis d’appel :• Le voyant DEL jaune clignote s’il a été programmé par le dépositaire ou le programmeur. • Quatre tonalités aiguës se font entendre.Pour répondre au signal, appuyez sur le bouton de transmission PTT, puis relâchez-le; pour annuler le signal, appuyez sur une touche quelconque.1Pour répondre à l’appel, enfoncez et relâchez le bouton de transmission PTT.2Maintenez le bouton de transmission PTT enfoncé pour parler, relâchez-le pour écouter.
26FrançaisAPPELS RADIONotes :
27BALAYAGEFrançaisBALAYAGEVotre radio est équipée de la fonction Balayage, qui vous permet de surveiller l’activité vocale sur plusieurs canaux. La radio s’arrête sur un canal lorsqu’elle y détecte une activité quelconque.La radio passe automatiquement sur un canal de la liste de balayage lorsqu’elle y détecte une activité quelconque.• Le voyant DEL vert clignote lorsque vous êtes en mode Balayage; il s’arrête de clignoter lorsque la radio passe sur un canal actif.Votre radio dispose de deux types de balayage :• Balayage Système• Balayage automatiqueRÉPONSELa fonction Réponse permet de répondre à une transmission pendant le balayage. Si au cours du balayage la radio détecte une transmission sur un canal, elle s’y arrête pendant une durée préprogrammée une fois que l’activité a cessé. On parle alors de « période d’attente ». Cette période d’attente vous permet de répondre en appuyant sur le bouton de  transmission PTT. Remarque : Le voyant DEL de balayage cesse de clignoter pendant la période d’attente. Si vous n’appuyez pas sur le bouton PTT une fois que le délai d’attente préprogrammé s’est écoulé, la radio reprend le balayage des canaux.LANCEMENT DU BALAYAGE SYSTÈMEAppuyez sur la touche préprogrammée Balayage pour lancer le balayage (voir page  18).ARRÊT DU BALAYAGE SYSTÈMEAppuyez sur la touche préprogrammée Balayage pour arrêter le Balayage système (voir page 18).Remarque : Le dépositaire ou le programmeur peut préprogrammer votre radio de façon à ce que, lorsque vous quittez le Balayage système, elle revienne automatiquement au dernier canal de
28FrançaisBALAYAGEbalayage ayant une activité quelconque ou pour qu’elle revienne automatiquement au canal sur lequel le balayage a été lancé.LANCEMENT DU BALAYAGE AUTOMATIQUELe balayage automatique commence automatiquement la recherche une fois sélectionné un canal sur lequel la fonction Balayage automatique a été activée.Sélectionnez un canal préprogrammé pour le Balayage automatique par le dépositaire ou le programmeur.ARRÊT DU BALAYAGE AUTOMATIQUE Sélectionnez un canal qui n’a pas été préprogrammé pour le Balayage automatique par le dépositaire ou le programmeur.SUPPRESSION D’UN CANAL PARASITERemarque : Pour accéder à cette fonction, le dépositaire ou le programmeur doit préprogrammer cette touche (voir page  18).Si un canal émet continuellement des appels importuns ou du bruit (canal « parasite »), vous pouvez éliminer temporairement ce canal de la liste de balayage :Rétablissement de canaux dans la liste de balayage1Pendant que la radio est sur le canal parasite, maintenez la touche Supprimer canal parasite enfoncée jusqu’à ce que vous entendiez une tonalité.2Relâchez la touche  Supprimer canal parasite. Le canal importun est supprimé.Remarque : Vous ne pouvez pas supprimer temporairement le canal qui a été préprogrammé par le dépositaire ou le programmeur comme canal de balayage attitré ou canal prioritaire, ni le dernier canal restant dans la liste de balayage.1Éteignez la radio. Une fois la radio rallumée, les canaux parasites supprimés sont rétablis dans la liste de balayage.– ou –
29BALAYAGEFrançais1Appuyez sur la touche préprogrammée Balayage pour arrêter le balayage.2Appuyez de nouveau sur la touche préprogrammée Balayage pour relancer le balayage. Les canaux parasites supprimés sont rétablis dans la liste de balayage.– ou – 1Sélectionnez un canal qui n’a pas été préprogrammé par le dépositaire ou le programmeur pour arrêter le balayage. Une fois que vous revenez au canal d’origine, les canaux parasites supprimés sont rétablis dans la liste de balayage.
30FrançaisBALAYAGENotes :
31GARANTIEFrançaisGARANTIEGARANTIE LIMITÉEPRODUITS DE COMMUNICATION MOTOROLAI. PORTÉE ET DURÉE DE LA GARANTIEMOTOROLA INC. (« MOTOROLA ») garantit les produits de communication fabriqués par MOTOROLA listés ci-dessous (« Produit ») contre tout défaut de matériel ou de main-d’oeuvre dans des conditions normales d’utilisation et d’entretien, pendant les périodes suivantes comptées à partir de la date d’achat :Unités portatives PR400 Deux (2) ansAccessoires du produit Un (1) anMotorola, à sa discrétion et sans frais réparera le Produit (avec des pièces neuves ou remises à neuf), le remplacera (par un Produit neuf ou remis à neuf) ou remboursera le prix d’achat du Produit au cours de la période de garantie à condition que celui-ci lui soit retourné conformément aux termes de cette garantie. Les pièces ou cartes remplacées sont garanties pour le reste de la période de garantie d’origine applicable. Toute pièce du Produit remplacée devient la propriété de MOTOROLA.Cette garantie limitée expresse n’est accordée par MOTOROLA qu’à l’acheteur final d’origine et n’est donc ni transférable, ni cessible à un tiers. La présente garantie constitue l’intégralité de la garantie du Produit fabriqué par MOTOROLA. MOTOROLA n’assume aucune obligation ni responsabilité pour les ajouts ou modifications apportées à la présente garantie, à moins qu’elles aient été consignées par écrit et signées par un responsable qualifié de MOTOROLA. Sauf dans le cadre d’une entente distincte conclue entre MOTOROLA et l’acheteur final d’origine, MOTOROLA ne garantit pas l’installation, l’entretien ou la réparation du Produit.MOTOROLA décline toute responsabilité quelle qu’elle soit à l’égard de tout accessoire non fourni par MOTOROLA, branché sur le Produit ou utilisé conjointement, ou à l’égard du fonctionnement du Produit utilisé avec un quelconque accessoire. Tous les appareils de cette nature sont expressément exclus de cette garantie. Compte tenu du caractère unique de chaque système pouvant utiliser le Produit,
32FrançaisGARANTIEMOTOROLA décline toute responsabilité à l’égard de la portée, de la diffusion ou du fonctionnement de l’ensemble du système tombant sous cette garantie.II. CLAUSES GÉNÉRALESLa présente garantie établit l’entière responsabilité de MOTOROLA à l’égard du Produit. Le seul recours possible, à la discrétion de MOTOROLA, est la réparation, le remplacement ou le remboursement du prix d’achat. CETTE GARANTIE REMPLACE TOUTE AUTRE GARANTIE EXPRESSE. LES GARANTIES IMPLICITES, Y COMPRIS MAIS SANS S’Y LIMITER, LES GARANTIES IMPLICITES DE COMMERCIALISATION ET D’APTITUDE À UN USAGE PARTICULIER, SONT LIMITÉES À LA DURÉE DE CETTE GARANTIE LIMITÉE. MOTOROLA NE POURRA EN AUCUN CAS ÊTRE TENUE RESPONSABLE DE DOMMAGES DONT LA VALEUR EXCÈDE LE PRIX D’ACHAT DU PRODUIT NI POUR LES PERTES D’UTILISATION, LES PERTES DE TEMPS, LES INCONVÉNIENTS, LES PERTES COMMERCIALES, LES PERTES DE PROFITS OU D’ÉCONOMIES, NI POUR TOUT AUTRE DOMMAGE INDIRECT, PARTICULIER OU CONSÉCUTIF RÉSULTANT DE L’UTILISATION OU DE L’IMPOSSIBILITÉ D’UTILISER CE PRODUIT, DANS LES LIMITES DE DÉGAGEMENT DE RESPONSABILITÉ PERMISES PAR LA LOI.III. DROITS PRÉVUS PAR LES LOIS PROVINCIALESCERTAINES PROVINCES NE PERMETTENT AUCUNE EXCLUSION NI LIMITE QUANT AUX DOMMAGES CONSÉCUTIFS OU INDIRECTS, NI AUCUNE LIMITE SUR LA DURÉE D’UNE GARANTIE IMPLICITE, DE SORTE QUE LES LIMITES OU EXCLUSIONS MENTIONNÉES PLUS HAUT PEUVENT NE PAS S’APPLIQUER. Cette garantie confère des droits juridiques précis et il est possible que vous jouissiez d’autres droits, qui pourront varier d’une province à l’autre.IV. SERVICE AU TITRE DE LA GARANTIEPour que le service soit couvert par la garantie, vous devez fournir une preuve d’achat (portant la date d’achat et le numéro de série du Produit). De plus, vous devez livrer ou expédier le Produit, en payant d’avance les frais de transport et d’assurance, à un centre agréé de services sous garantie. Le service sous garantie sera effectué
33GARANTIEFrançaispar MOTOROLA dans l’un de ses centres agréés de services. Si vous contactez d’abord l’entreprise qui vous a vendu le Produit (par ex. le dépositaire ou le fournisseur de service de communication), cela peut faciliter l’obtention du service lié à la garantie. Vous pouvez également appeler Motorola en composant le 1-800-927-2744 depuis les États-Unis ou le Canada.V. CE QUI N’EST PAS COUVERT PAR CETTE GARANTIEA) Les défauts ou dommages résultant d’une utilisation du Produit autre que l’utilisation normale et habituelle.B) Les défauts ou dommages résultant d’une utilisation incorrecte, d’un accident, de l’eau, ou de négligence.C) Les défauts ou dommages résultant d’essais, d’une utilisation, d’un entretien, d’une installation, d’une modification ou d’un réglage incorrect.D) Les bris ou dommages causés aux antennes, sauf s’ils sont la conséquence directe d’un défaut de matériel ou de main-d’œoeuvre.E) Un Produit ayant subi des modifications, des réparations ou un démontage non autorisé (y compris, sans s’y limiter, l’ajout au Produit d’un appareil non fourni par Motorola), ayant un effet négatif sur les performances du Produit ou qui empêchent de vérifier le bien-fondé d’une réclamation par le processus normal d’inspection ou d’essais prévus par la garantie Motorola.F) Tout Produit dont le numéro de série a été enlevé ou rendu illisible.G) Les batteries rechargeables, si :1) L’un des sceaux situés sur l’enveloppe de  protection de la batterie a été brisé ou montre des traces évidentes d’altération.2) Le dommage ou défaut est provoqué par le chargement ou l’utilisation de la batterie dans un appareil ou pour un service autre que le Produit pour lequel elle est spécifiée.H) Les frais d’expédition au centre de réparation.I) Tout Produit qui, à cause de modifications illégales ou interdites apportées au logiciel ou au micrologiciel du Produit, ne fonctionne pas conformément aux spécifications énoncées par MOTOROLA ou à celles figurant sur l’étiquette de conformité FCC en vigueur pour ce Produit, au moment où le Produit a initialement été distribué par MOTOROLA.
34FrançaisGARANTIEJ) Les égratignures et autres dommages superficiels qui ne nuisent pas au fonctionnement du Produit.K) L’usure normale et habituelle.VI. DISPOSITIONS RELATIVES AUX BREVETS ET AUX LOGICIELSMOTOROLA défendra à ses frais toute poursuite menée en justice contre l’acheteur final dans la mesure où la poursuite revendique que le Produit ou certaines de ses pièces enfreignent un brevet des États-Unis, et MOTOROLA paiera ces frais et dommages finalement accordés au détriment de l’acheteur dans toute poursuite judiciaire attribuable à une quelconque revendication de cette nature, mais une telle défense et de tels paiements sont soumis aux conditions suivantes :A)  MOTOROLA doit être promptement avertie par écrit par ledit acheteur de tout avis se rapportant à une telle plainte;B)  MOTOROLA mènera comme elle l’entend sa défense contre une telle poursuite, de même que toute négociation en vue de son règlement ou d’un compromis; etC)  si le Produit ou les pièces devaient faire l’objet, ou de l’avis de MOTOROLA, pouvaient vraisemblablement faire l’objet d’une poursuite pour contrefaçon d’un brevet des États-Unis, l’acheteur accordera le droit à MOTOROLA, à la discrétion et aux frais de cette dernière, soit de procurer à l’acheteur le droit de continuer à utiliser le Produit ou les pièces, soit de remplacer ou de modifier ces dernières de manière à ce qu’elles n’enfreignent plus le brevet, soit d’accorder à l’acheteur un crédit équivalent à la valeur dépréciée du Produit ou des pièces et d’accepter de reprendre celles-ci. La dépréciation représentera un montant égal pour chaque année de durée de vie utile du Produit ou des pièces, tel que déterminé par MOTOROLA.MOTOROLA décline toute responsabilité à l’égard de toute poursuite pour contrefaçon de brevet lorsque le Produit ou les pièces livrées avec celui-ci sont adaptées à un logiciel, un appareil ou des équipements non fournis par MOTOROLA. MOTOROLA décline également toute responsabilité à l’égard de tout accessoire ou logiciel non fourni par MOTOROLA et branché sur le Produit ou utilisé conjointement. Ce qui précède énonce l’entière responsabilité de MOTOROLA à l’égard de la contrefaçon de brevets relatifs au Produit ou à toute pièce de ce dernier.La législation aux États-Unis et dans d’autres
35GARANTIEFrançaispays confère à MOTOROLA certains droits exclusifs pour le logiciel protégé par les droits d’auteur MOTOROLA, tels que les droits exclusifs de reproduire et de distribuer des copies d’un tel logiciel Motorola. Le logiciel MOTOROLA ne peut être utilisé qu’avec le Produit à l’intérieur duquel il était installé à l’origine. Il est interdit de remplacer, de copier, de distribuer, de modifier de quelque façon que ce soit ou d’utiliser un tel logiciel dans un tel Produit pour produire un quelconque produit dérivé. Aucune autre utilisation, y compris, mais sans s’y limiter, le changement, la modification, la reproduction, la distribution ou l’ingénierie inverse dudit logiciel MOTOROLA ou l’exercice de droits dans un tel logiciel MOTOROLA n’est permis. Aucune licence n’est accordée par inférence, préclusion ou autre en vertu des droits de brevets ou des droits d’auteur de MOTOROLA.VII.  LOI APPLICABLECette garantie est régie par les lois de l’État d’Illinois, aux États-Unis.
36FrançaisGARANTIENotes :
37ACCESSOIRESFrançaisACCESSOIRESMotorola offre toute une gamme d’accessoires afin d’améliorer la productivité de votre radio bidirectionnelle. La plupart des accessoires offerts sont répertoriés ci-dessous.ANTENNESACCESSOIRES DIVERSBATTERIESACCESSOIRES DE TRANSPORTNAD6502 Antenne Heliflex VHF, 14 cm, 146-174 MHzHAD9742 Antenne VHF courte, 9 cm,146-162 MHzHAD9743 Antenne VHF courte, 9 cm,162-174 MHzNAE6522 Antenne Heliflex UHF courte, 9 cm, 438-470 MHzNAE6483 Antenne fouet à tige souple, 403-520 MHz8505816K26 Antenne Heliflex UHF courte, 470-520 MHz5886627Z01 Adaptateur d’antenneRLN5500 Trousse de fixation pour accessoireNNTN4496_R NiCd, 1100 mAhNNTN4497_R Lithium-ion, 1800 mAhNNTN4851_R NiMH, 1400 mAhNNTN4852_R NiMH FM, 1300 mAhNNTN4970_R Lithium-ion mince, 1600 mAhRLN5498 Étui rigide en cuir avec boucle de ceintureRLN5496 Étui rigide en cuir, DTMF complet avec boucle de ceinture pivotante de 6,4 cm (2,5 po)RLN5497 Étui rigide en cuir,  DTMF complet avec boucle de ceinture pivotante de 7,6 cm (3 po)HLN8255 Pince à ceinture à ressort, de 7,6 cm (3 po)NTN5243 Bandoulière pour étuis rigides en cuir (s’attache aux anneaux en D sur l’étui)HLN9985 Sac imperméableHLN6602 Sac-plastron universelRLN4570 Sac-plastron facile à dégager1505596Z02 Courroie de rechange pour sac-plastron universel HLN660209_Accessory.fm  Page 37  Tuesday, September 30, 2003  4:32 PM
38FrançaisACCESSOIRESCHARGEURSCASQUESWPLN4138 Chargeur rapide de table avec prise nord-américaineWPLN4155 Chargeur lent de table avec prise nord-américaineWPLN4161 Chargeur rapide multiple avec cordon électrique nord-américainRLN5411 Casque ultra-léger Breeze pour port derrière la têtePMMN4001 Écouteur avec micro solidaire à tige flexibleHMN9013 Casque léger sans PTT en ligneRMN4016 Casque léger avec PTT en ligneRLN5238 Casque léger avec PTT en ligne, de style NFL (No Flash Allowed, Interdiction d’appel par touche signal)HMN9021 Casque-diadème de poids moyen à double écouteur avec coquilles anti-bruitHMN9022 Casque de poids moyen à double écouteur avec coquilles anti-bruit, pour port derrière la têteBDN6647 Casque de poids moyen à haut-parleur uniqueBDN6648 Casque renforcé à double écouteur avec coquilles anti-bruit et microphone anti-bruit5080371E66 Coussinet d’écouteur de rechange pour BDN6647RMN5015 Casque de course renforcé à double écouteur avec coquilles anti-bruit (câble adaptateur pour casque RKN4090 requis)REX4648 Trousse avec coussinet d’écouteur et écran anti-ventRKN4090 Câble adaptateur pour casque de course RMN5015RMN4051 Casque de communication bidirectionnelle pour casque de sécurité, noir, indice d’atténuation de bruit : 22 db (nécessite le câble adaptateur RKN4094)RMN4054 Casque de communication  pour casque de sécurité, pour réception seule avec prise à angle droit de 3,5 mmRMN4055 Casque de style serre-tête pour réception seule, avec prise à angle droit de 3,5 mmHLN9133 Trousse d’adaptateur pour VOX (à usage exclusif avec les casques)
39ACCESSOIRESFrançaisACCESSOIRES DE SURVEILLANCERKN4094 Adaptateur de PTT en ligne à usage exclusif avec les casques RMN4051, RMN4052 et RMN4053PMLN4445 Casque ultra-léger avec microphone solidaireHMN9752 Oreillette avec commande de volume, 1 brin (contour d’oreille en plastique) (Beige)HMN9727 Oreillette sans commande de volume, 1 brin (contour d’oreille en plastique) (Beige)RLN4894 Oreillette sans commande de volume, 1 brin (contour d’oreille en plastique) (Noire)HMN9754 Oreillette avec microphone et PTT combinés, 2 brins (Beige)RLN4895 Oreillette avec microphone et PTT combinés, 2 brins (Noire)RLN5198_P Oreillette avec combinaison microphone et PTT (Noir), comprenant une trousse faible bruit, une trousse de surveillance 2 brins avec un tube acoustique transparent tout confort (NTN8371 compris)BDN6720 Récepteur-écouteur flexible (réception seule)PMLN4443 Récepteur-écouteur flexible avec microphone et PTT combinésHMN9036 Insert d’oreille avec microphone et PTT combinés, 2 brins (Noir)PMLN4294 Insert d’oreille avec microphone et PTT combinésPMLN4442 Insert d’oreille avec microphone et PTT combinésHLN9132 Insert d’oreille à brin unique, réception seule (Noir)NTN8370 Trousse bruit extrême5080384T72 Bouchon d'atténuation du bruit de rechange pour NTN8370NTN8371 Trousse faible bruitRLN4760 Oreillette transparente spéciale, petite taille, oreille droiteRLN4763 Oreillette transparente spéciale, petite taille, oreille gaucheRLN4761 Oreillette transparente spéciale, taille moyenne, oreille droiteRLN4764 Oreillette transparente spéciale, taille moyenne, oreille gaucheRLN4762 Oreillette transparente spéciale, grande taille, oreille droiteRLN4765 Oreillette transparente spéciale, grande taille, oreille gaucheBDN6646 Microphone-écouteur standard 95 db avec module d’interface PTT
40FrançaisACCESSOIRESMICROPHONES-HAUT-PARLEUR À DISTANCEDIVERSBDN6706 Microphone-écouteur standard 95 db avec VOX et module d’interface PTT0180358B38 Commutateur PTT en anneau pour système de microphone-écouteur0180300E83 Commutateur PTT à activation corporelle pour système de microphone-écouteurHMN9030 Microphone-haut-parleur à distanceRLN4904 Gaine de microphone pour HMN9030HKN9094 Câble de rechange pour HMN9030PMMN4008 Microphone-haut-parleur à distanceTDN9327 Support pour radio portativeTDN9373 Support pour radio portative
Mise sous tension et hors tension de la radio1. Tournez le bouton Marche/Arrêt/Réglage volume dans le sens des aiguilles d’une montre. La tonalité de succès du diagnostic se fait entendre et le voyant DEL vert clignote.2. Tournez le bouton Marche/Arrêt/Réglage volume dans le sens contraire des aiguilles d’une montre jusqu’à ce que vous entendiez un clic et que le voyant DEL s’éteigne.Réglage du volume1. Tournez le bouton Marche/Arrêt/Réglage volume dans le sens des aiguilles d’une montre pour augmenter le volume ou dans le sens contraire pour le bais-ser.Sélection d’un canal radio1. Tournez le bouton Sélecteur de canal vers la droite ou vers la gauche jusqu’à ce que vous atteigniez le canal souhaité.Réception1. Allumez votre radio et réglez le volume au niveau souhaité.2. Sélectionnez le canal souhaité.3. Écoutez pour détecter une activité vocale quelconque. Le voyant DEL rouge clignote pendant la réception.Transmission1. Tenez la radio verticalement à une distance de 2,5 à 5 centimètres (1 à 2 po.) des lèvres. Appuyez sur le bouton de transmission PTT pour parler. Le voyant DEL rouge s’allume en continu pendant que l’appel est émis.2. Relâchez le bouton PTT pour écouter.Lancement ou arrêt du balayage système1. Appuyez sur la touche préprogrammée Balayage pour lancer le balayage. Le voyant DEL vert clignote pendant le balayage.2. Appuyez de nouveau sur la touche préprogrammée Balayage pour arrêter le balayage. Lancement ou arrêt du balayage automatique1. Sélectionnez un canal préprogrammé pour le Balayage automatique par le dépositaire ou le programmeur.2. Sélectionnez un canal qui n’a pas été préprogrammé pour le Balayage automatique par le dépositaire ou le programmeur.Suppression d’un canal parasite au cours du balayage1. Pendant que la radio se trouve sur le canal parasite, maintenez la touche prépro-grammée Supprimer parasite enfoncée jusqu’à ce que vous entendiez une tonalité.2. Relâchez la touche Supprimer parasite.Aide-mémoire de la radio PR400™Notez dans le tableau ci-dessous les fonctions attribuées aux touches programmables de votre radio. Pour plus de renseignements, reportez-vous à la page 17 de ce guide.PTT Microphone/Haut-parleurVoyant DELBouton Marche/Arrêt/VolumeBouton Sélecteur de canalTouche latérale 1 (programmable)Touche latérale 2 (programmable)Touche Fonction Pression courte Pression longuePression continue Page
Rétablissement de canaux dans la liste de balayageÉteignez la radio, puis rallumez-la. - OU - Appuyez sur la touche préprogrammée Balayage  pour arrêter le balayage. Les canaux parasites supprimés sont rétablis dans la liste de balayage. - OU - Sélectionnez un canal qui n’a pas été préprogrammé par le dépositaire ou le programmeur pour arrêter le balayage. Une fois que vous revenez au canal d’origine, les canaux parasites supprimés sont rétablis dans la liste de balayage.Voyants DELIndicateurs audio pour touches programmablesVous pouvez vérifier l’état de charge de la batterie si votre dépositaire a préprogrammé l’une des touches programmables. Appuyez sur la touche préprogrammée Indicateur de batterieet maintenez-la enfoncée. L’état de charge est affiché à l’écran.État/Couleur du DEL IndicationAppel RadioRouge En cours de transmission Rouge clignotant En cours de réception Rouge clignotant Canal occupéBalayageVert clignotant Recherche d’activités en coursAvis d’appelJaune clignotant Indique la réception d’un avis d’appelAppel SélectifJaune clignotant Indique la réception d’un appel sélectifSurveillance permanente/Réglage silencieuxJaune Pendant la surveillanceTouches programmables Tonalité positive TonaliténégativeBalayage Lancer ArrêterNiveau de puissance Haute BasseRéglage silencieux Fermé Normal Répéteur/Conversation directe Communique sans  répéteur Utilise le répéteurVOX (transmission commandée par la voix) Activée DésactivéeSurveillance silencieuse/Réglage silencieux ouvert  –ActivéCarte d’Option Activée DésactivéeEscalert Activée DésactivéeNiveau de charge Voyant DELCorrect VertPassable JauneFaible Rouge clignotantTrès faible Aucun
MOTOROLA, the Stylized M Logo, and Radius are registered in the US Patent & Trademark Office.All other product or service names are the property of their respective owners. © Motorola, Inc. 2003. All rights reserved. Printed in U.S.A.MOTOROLA, le logotype au M stylisé et Radius sont enregistrés auprès du Bureau des marques et brevets des États-Unis.Tous les autres noms de produits et de services sont la propriété de leurs titulaires respectifs.© Motorola, Inc. 2003. Tous droits réservés. Imprimé aux États-Unis.*6881096C27*6881096C27-OPR400™Commercial SeriesTwo-Way Radio User GuideManuel de l'utilisateurde la radio bidirectionnellePlace holder of photo ONLY96C27-O_cvr.qxd  7/23/2003  4:30 PM  Page 1

Navigation menu