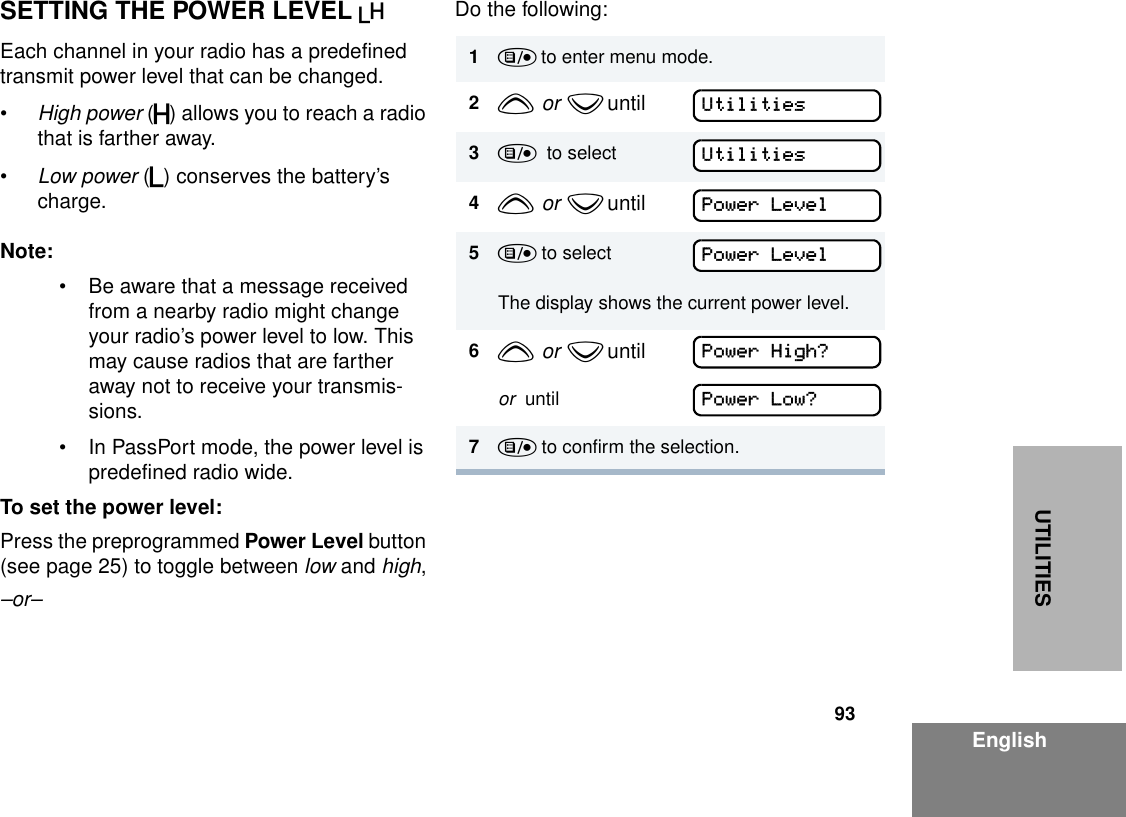
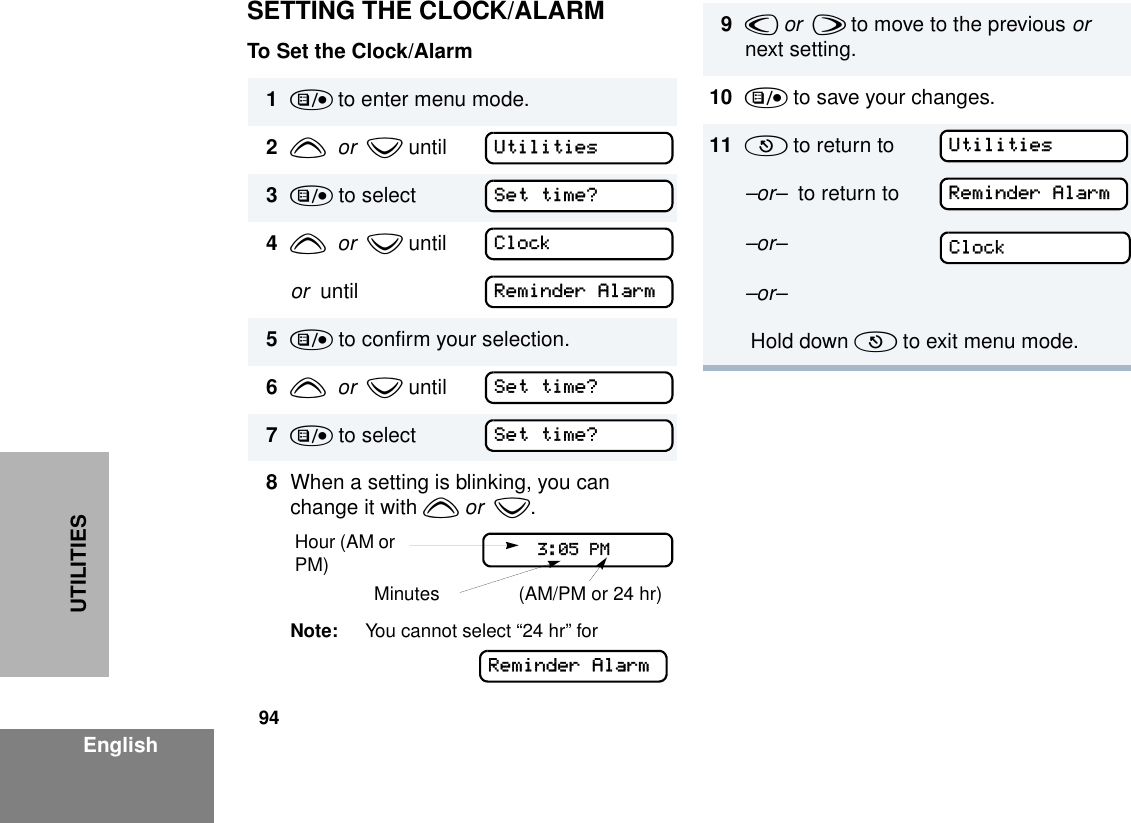
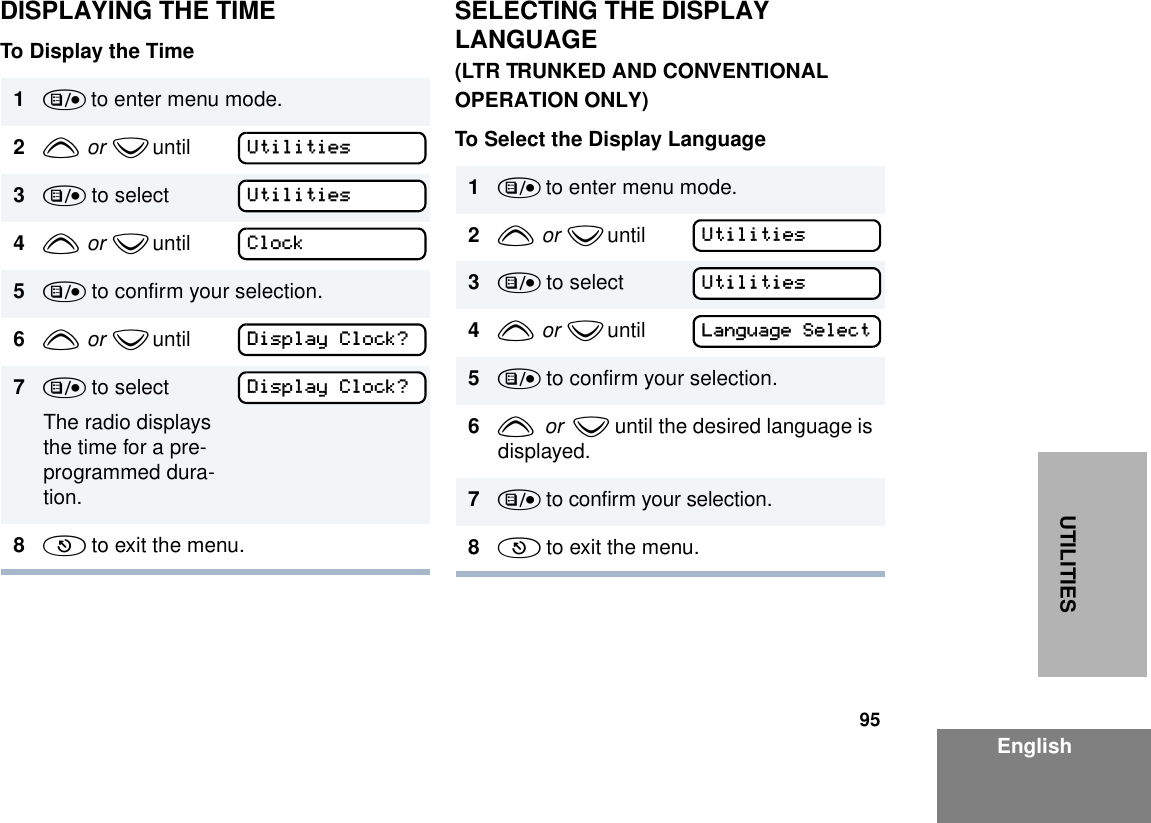
Motorola Solutions 99FT5001 CDM1550LS+ Mobile Radio User Manual 6864110R13 O cvr

Motorola Solutions, Inc. CDM1550LS+ Mobile Radio 6864110R13 O cvr
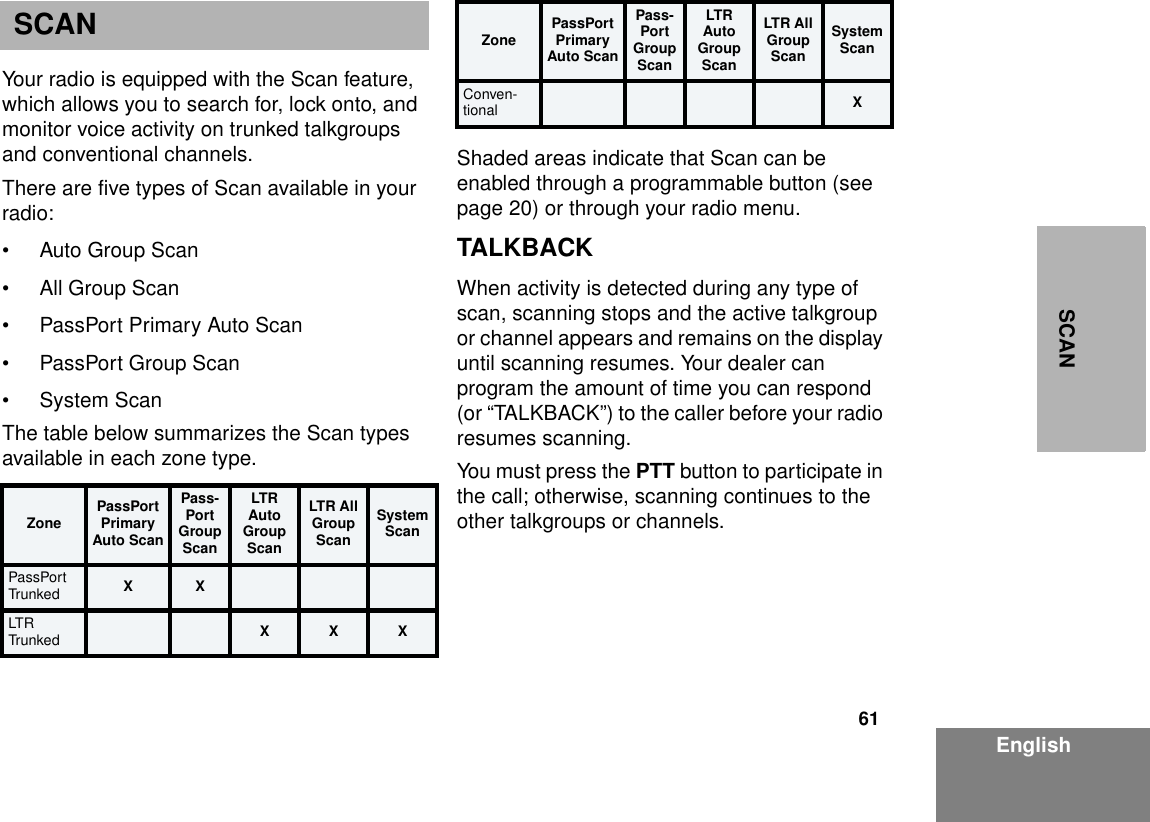
Contents

Ex 8b Users Manual Part 2

61EnglishSCANSCANYour radio is equipped with the Scan feature, which allows you to search for, lock onto, and monitor voice activity on trunked talkgroups and conventional channels.There are five types of Scan available in your radio: • Auto Group Scan• All Group Scan• PassPort Primary Auto Scan• PassPort Group Scan• System Scan The table below summarizes the Scan types available in each zone type.Shaded areas indicate that Scan can be enabled through a programmable button (see page 20) or through your radio menu.TALKBACKWhen activity is detected during any type of scan, scanning stops and the active talkgroup or channel appears and remains on the display until scanning resumes. Your dealer can program the amount of time you can respond (or “TALKBACK”) to the caller before your radio resumes scanning.You must press the PTT button to participate in the call; otherwise, scanning continues to the other talkgroups or channels.Zone PassPort Primary Auto ScanPass-Port Group ScanLTR Auto Group ScanLTR All Group ScanSystem ScanPassPort Trun ked X XLTR  Trun ked XXXConven-tional XZone PassPort Primary Auto ScanPass-Port Group ScanLTR Auto Group ScanLTR All Group ScanSystem Scan
62EnglishSCANPASSPORT PRIMARY AUTO GROUP SCAN(PASSPORT TRUNKED OPERATION ONLY)PassPort Primary Auto Group Scan automatically scans the primary (first) talkgroup within the selected PassPort zone. Any time you are positioned on a PassPort talkgroup other than the first one, your radio automatically scans activity on the first talkgroup within that zone.Note: This feature is enabled AUTOMATICALLY with your radio. It is not enabled through the radio menu or through a prepro-grammed scan button.PASSPORT GROUP SCAN G(PASSPORT TRUNKED OPERATION ONLY)PassPort Group Scan scans talkgroups within the selected PassPort trunked zone, as programmed by your dealer. Up to 16 different talkgroups can be programmed into each Scan list, with one Scan list assigned to each position on the Zone Selector. You can edit these Scan lists through your radio’s menu (see page 66).When PassPort Group Scan is Enabled•The G symbol appears on the display.• The LED indicator blinks green during PassPort Group Scan operation; it stops blinking when the radio switches to an active talkgroup or channel.Note:• PassPort Group Scan is not available when registered on a non-home site.• If you switch to another PassPort zone, LTR, or conventional zone while the radio is scan-ning, scanning resumes upon return to the PassPort zone where PassPort Group Scan was enabled.• If the radio is turned off while scanning, the radio resumes scanning when you turn it back on. If the radio registers on a non-home site, scanning is not enabled until the radio regis-ters at its home site.
63EnglishSCANTo Start or Stop PassPort Group Scan Operation through a Preprogrammed Button (see page 20)• Press the preprogrammed Scan button to start PassPort Group Scan.• Press the preprogrammed Scan button again to stop the PassPort Group Scan.–or–To Start or Stop PassPort Group Scan Operation through the MenuAUTO GROUP SCAN (LTR TRUNKED OPERATION ONLY)Auto Group Scan automatically scans talkgroups within an LTR zone as programmed by your dealer. Auto Group Scan can be either non-prioritized or prioritized. • Non-prioritized Auto Group Scan automatically scans all talkgroups programmed with Auto Group Scan. • Prioritized Auto Group Scan automatically scans the selected talkgroup and all lower 4-numbered talkgroups. For example, if talkgroups 1, 3, and 4 have been programmed by your dealer with Auto Group Scan and talkgroup 4 is selected, the radio automatically scans talkgroups 1, 3, and 4, and skips talkgroup 2.To Start Auto Group ScanSelect a talkgroup that has been programmed for Auto Group Scan by your dealer.Note: You do not need to press a preprogrammed Scan button.1) to enter menu mode.2y  or  z until        3) to selectYou see the current scan status.4y  or  z until        –or– 5) to confirm your selection.Pass Grp ScanPass Grp ScanPpGp Scan Off?PpGp Scan On?
64EnglishSCAN•The G symbol appears on the display when non-prioritized Auto Group Scan has been activated.•The H  symbol appears on the display when prioritized Auto Group Scan has been activated.• There is no LED indicator during Auto Group Scan.To Stop Auto Group Scan Select a talkgroup that has not been programmed for Auto Group Scan by your dealer.ALL GROUP SCAN (LTR TRUNKED OPERATION ONLY)All Group Scan scans all talkgroups within the selected LTR trunked zone. When All Group Scan is enabled:•The G symbol appears on the display.• The LED indicator blinks green during All Group Scan operation; it stops blinking when the radio switches to an active talk-group.Note: If you enter menu mode while the radio is scanning, scanning stops. It resumes when you exit menu mode.To Start or Stop All Group Scan Operation through a Preprogrammed Button  (see page 20)• Press the preprogrammed All Group Scan button once to start All Group Scan.• Press the preprogrammed All Group Scan button again to stop All Group Scan.–or–To Start or Stop All Group Scan Operation Through the Menu1) to enter menu mode.2y  or  z until3) to selectYou see the current scan status.4y  or  z until –or– 5) to confirm your selection.All Group ScanAll Group ScanAll Group On?All Group Off?
65EnglishSCANSYSTEM SCAN G(LTR TRUNKED AND CONVENTIONAL  OPERATION ONLY)System Scan scans trunked talkgroups and conventional channels between LTR and conventional zones, as programmed by your dealer. Up to 16 different talkgroups or conventional channels can be programmed into each Scan list. You can edit these lists through your radio’s menu (see page 66).When System Scan is Enabled• The G symbol appears on the display.• The LED indicator blinks green during Sys-tem Scan operation; it stops blinking when the radio switches to an active talkgroup or channel.Note: If you enter menu mode while the radio is scanning, scanning stops. It resumes when you exit menu mode.To Start or Stop a System Scan OperationPress the preprogrammed Scan button (see page 20) to start or stop scanning,  –or–Do the following:1) to enter menu mode.2y  or  z until3) to select You see the current scan status.4y  or  z until–or–5) to confirm your selection.Note: In conventional zones only, if there is activity on a non-priority channel, the radio disconnects the user from the current conversation and automati-cally switches to an active priority channel. This is indicated with a short alert tone.System ScanSystem ScanSys Scan On?Sys Scan Off?
66EnglishSCANDELETING A NUISANCE CHANNEL/TALKGROUP(PASSPORT GROUP SCAN OR SYSTEM SCAN OPERATION ONLY)If a talkgroup or channel continually generates unwanted calls (a “nuisance” channel), use the preprogrammed Scan button to temporarily delete the talkgroup or channel from the Scan list.To Temporarily Delete the Channel/TalkgroupRestoring a Channel/Talkgroup Back to the Scan ListTo restore a previously deleted talkgroup or channel back to the Scan list, restart the scan operation or turn your radio off and on again.Note: In PassPort mode, the talkgroup can also be restored by scrolling through the list, or switching the current selected talkgroup or zoneEDITING A SCAN LIST(PASSPORT GROUP SCAN OR SYSTEM SCAN OPERATION ONLY)One Scan list is assigned to each of the 16 positions on the Zone Selector. Each Scan list can contain up to 16 talkgroups and/or channels. The same talkgroup or channel can be included in several Scan lists, and the same Scan list can be assigned to several Zone Selector positions.When you edit a Scan list, you can either add, delete, or prioritize talkgroups or channels.1                  While the radio’s receiving activity is on the nuisance channel, press and hold the Scan button until you hear a high-pitched tone (valid key press).2Release the Scan button. The nuisance channel has been temporarily deleted from your Scan list.Note: In PassPort mode, you cannot delete a priority channel/talkgroup (see page 68), or the currently selected talkgroup in a Scan list.
67EnglishSCANNote: In PassPort mode, talkgroups cannot be pri-oritized. Your radio cannot receive any calls while you are editing a Scan list. The K symbol is displayed while you are in edit mode.Note: In Conventional operation only, even if there is activity on a non-priority channel, your radio automatically switches to an active priority channel and indicates the activity with a short tone.ADDING OR DELETING TALKGROUPS OR CHANNELSIN A SCAN LIST 1) to enter menu mode.2y  or  z until 3) to select4y  or  z untilNote: One Scan list per mode of operationis available.Program ListsProgram ListsScan List5) to select6y  or  z until or until7) to confirm your selection.8y  or  z until you see the talkgroup or channel you want to add or delete.Note: You cannot delete the Primary talk-group or your selected talkgroup off a Scan List in PassPort mode.9) to confirm your selection.10 If you added a talkgroup or channel,you see:–or– If you delete a talkgroup or channel,you see:) to confirm the deletion,Scan ListAdd Entry?Delete Entry?Entry SavedDelete?
68EnglishSCANPRIORITIZING A TALKGROUP OR CHANNEL IN A SCAN LIST(SYSTEM SCAN OPERATION ONLY)You may want to check the activity on one or two talkgroups or channels more frequently than others. You can do this by prioritizing them:Note: In Conventional operation only, even if there is activity on a non-priority channel, your radio automatically switches to an active priority channel and indicates the activity with a short tone.you see:11 ( to return to to return to–or– Hold down t to exit menu mode.Priority Channel Scanning SequenceNone specified Ch1➠Ch2➠Ch3➠Ch4➠…Ch1Channel 2(Priority 1) Ch2➠Ch1➠Ch2➠Ch3➠Ch2➠Ch4➠Ch2➠…Ch1Entry DeletedAdd Entry?Delete Entry?Channel 2(Priority 1) and Channel 8(Priority 2)Ch2➠Ch1➠Ch8➠Ch3➠Ch2➠Ch4➠Ch8➠…Ch1Priority Channel Scanning Sequence
69EnglishSCANSetting Priority Talkgroups or Channels1) to enter menu mode.2y  or  z until3) to select4y  or  z until5) to select6y  or  z until7) to select8y  or  z untilor  until You see the current priority talkgroup or channel.9) to select the desired priority level.10 y  or  z until you see the talkgroup or channel you want to prioritize.Program ListsProgram ListsScan ListScan ListEdit Priority?Edit Priority?Priority #1?Priority #2?11 ) to prioritize that talkgroup or channel.12 ( to return to–or–Hold down ( to exit menu mode.Note: You cannot reprioritize a priority 1 talk-group or channel to priority 2.Edit Priority?
70EnglishSCAN Notes
69EnglishPHONEPHONEYour radio allows you to place and receive telephone calls through trunked and conventional systems (depending on phone line availability). Telephone calls through a repeater allow only one person to speak at a time. MAKING A PHONE CALL D  THROUGH A TRUNKED SYSTEMNote: The following instructions assume yourradio has been programmed as follows byyour dealer using CPS (Customer Program-ming Software).• Dial type:  Live• Access/Deaccess type: Immediate Auto• Tone Span: Timed - 100 ms tone durationTo Initiate a Phone CallDo the following:1Select a trunked zone and talkgroup that have been programmed for telephone.2) to enter menu mode.–or– Press the preprogrammed radio or DTMF microphone Phone button, and skip to step 5.–or– a. Press and release the Speed Dial button to use the speed dial feature. b. Press the (1 to 9) key corresponding to the number you want to call on the Phone list. Or press 0 if you want to call the last number dialed. c. Press the PTT button. A dial tone sounds. d. Press the PTT button again to send the phone number.–or– For  LTR trunked systems, press and hold the PTT button while dialing a number.3y  or  z until        4 ) to confirmPhonePhone
70EnglishPHONEMAKING A PHONE CALL D THROUGH A CONVENTIONAL SYSTEMTo Initiate a Phone CallPress the preprogrammed Phone button, and skip to step 5.  –or– Press the PTT button, and if the Hot keypad feature has been programmed by your dealer, do the following:D appears on the display when you are in Phone mode.5Press and Release the PTT button. • If phone access is successful, a dial tone sounds.• If phone access is unsuccessful, a low-pitched alternating tone sounds. Disconnect the call (see step 8) and try again.6Enter the phone number with the DTMF microphone. The number is automatically sent without pressing the PTT button again.–or– y  or  z to select a number from the phone list.Press and release the PTT button again to send the number.XXX-XXX-XXXX7Hold the radio in a vertical position with the microphone 1 to 2 inches (2.5 to 5 cm) away from your mouth. Press the PTT button to talk; release it to listen.8To disconnect the phone call:Press and hold ( to exit Phone.D no longer appears on the display.1Select a conventional zone and channel that have been programmed for tele-phone.
71EnglishPHONE2) to enter menu mode.3y  or  z until        4) to select             D appears on the display when you are in Phone Mode.5(For conventional operation with auto access only). You hear a series of tones, indicating that an access code is being sent automatically, and see your access code: –or– Enter your access code using the DTMF microphone keypad.6When you hear a dial tone:Enter the phone number using the  DTMF microphone keypad.–or– PhonePhoneXXX-XXX-XXXXy  or  z to select a number from the phone list. –or– (see step 7)7a. Press and release the prepro-grammed Speed Dial button (see step  6) to use the Speed Dial fea-ture.b. Press the key (1 to 9) corresponding to the number you want to call, or press 0 if you want to call the last number dialed.Note: To redial the last number dialed (if not using Speed Dial), press and release the PTT button immediately after the access code is sent. The radio sends the last number dialed.–or– If you entered your access code using the keypad, press z once to access the last number dialed; then press and release the PTT but-ton.XXX-XXX-XXXX
72EnglishPHONERECEIVING A PHONE CALL D  THROUGH A TRUNKED OR CONVENTIONAL SYSTEMTo Receive a Phone Call8Press and release the PTT button, if required for your radio.9Hold the radio in a vertical position with the microphone 1 to 2 inches (2.5 to 5 cm) away from your mouth. Press the PTT button to talk; release it to listen.10 To disconnect a phone call, do one of the following:Enter the deaccess code using the DTMF microphone keypad. –or–If your radio has the deaccess code programmed, go to step 9.11 To exit Phone Mode:Press and hold # to disconnect the call.  D disappears from the display.1y o r  z to select a LTR talkgroup or conventional channel that has been programmed for telephone. –or– Activate any scan type containing a tele-phone talkgroup or channel (see page 59). Note: No PassPort talkgroup or zone selection is needed in PassPort mode.• When a phone call is received, a ring-ing tone sounds, alerting you to answer the phone call.Note: The D also appears on the display inPassPort mode.
73EnglishPHONEMODIFYING THE PHONE LIST KYour radio contains a Phone list that holds up to 25 phone numbers. The Phone list is shared between trunked and conventional Phone operation. You can modify the Phone list in three ways through your radio’s menu:• Add an entry• Delete an entry• Edit an existing entryThe K symbol appears on the display when you are modifying the phone list.To Add an Entry2Press the PTT button to answer the phone call. Press the PTT button to talk; release it to listen.3To disconnect the phone call and exit Phone and menu mode: Press and hold to disconnect the call. Note:  D no longer appears on the display in PassPort mode.1) to enter menu mode.2y  or  z until        3) to select4y  or  z until        5) to select6y  or  z until        7) to select,you see:8Use the DTMF microphone keypad to enter the name (see page 23 and page 24).9) to store the name,you see: Program ListsProgram ListsPhone ListPhone ListAdd Entry?Add Entry?Entry NameEnter Phone #
74EnglishPHONETo Delete an Entry10 Use the DTMF microphone keypad to enter the phone number. You can also add a dash (press w) and a Pause Indicator (hold down # until the # character on the dis-play changes to a “P”).11 ) to store the phone number.12 y  or  z until you see the location in the list where you want to store the phone number.13 ) to store the phone number,you see: 14 ) to return to Hold down (  to exit menu mode.1) to enter menu mode.2y  or  z until Entry SavedAdd Entry?Program Lists3) to select   4y  or  z  until        5) to select            6y  or  z  until        7) to select 8y  or  z  until you see the entry you want to delete.9) to select the entry,you see:10 ) again to confirm the deletion,you see:11 ( to return to–or– Hold down ( to exit menu mode.Program ListsPhone ListPhone ListDelete Entry?Delete Entry?Delete?Entry DeletedDelete Entry?
75EnglishPHONETo Edit an Entry1) to enter menu mode.2y  or  z  until        3) to select     4y  or  z  until        5) to select            6y  or  z  until        7) to select        8y  or  z  until you see the entry you want to edit.9) to select the entry.Program ListsProgram ListsPhone ListPhone ListEdit Entry?Edit Entry?10 y  or  z  until                                       (to edit the name), or until                     (to edit the phone number),or until                     (to edit the location in the phone list).11 ) to confirm your selection.12 Use the DTMF microphone keypad to edit the entry (see page 19), –or– y  or  z  until you see the location where you want to store the phone num-ber.13 ) to store the information.14 ( to return to–or–  Hold down (  to exit menu mode.Edit Name?Edit Number?Edit Location?Edit Entry?
76EnglishPHONENotes
79EnglishVOICE STORAGE VOICE STORAGEThe CDM1550•LS+ radio’s voice storage feature enables your radio to perform seven types of voice related functions:• Incoming Call Recording• Voice Memo Recording• Recorded Message Playback• Recorded Message Delete• Recorded Message Transmission• Automatic Message Reply (“When Available”)• Message Time StampingThere is a total of 120 seconds recording time available for all voice storage activity. Your dealer can divide the 120 seconds into a defined number of equal length time slots. The following table summarizes the slot length options available with the CDM1550•LS+ radio:When recording calls, keep in mind these time slot guidelines:Number of Equal Length Slots Slot Length (Seconds)112026052410 1220 6• As a time slot becomes close to full, you see a timer count down the final 5        seconds. When a time slot is completely full, an alert tone sounds The display shows:Recording Stops.• When all message slots have at least one message stored, an alert tone sounds.Msg Slot Full
80EnglishVOICE STORAGEINCOMING CALL RECORDINGThe CDM1550•LS+ radio allows you to record incoming calls in either of two ways:• Selective Incoming Call Recording• All Incoming Call RecordingNote: Only the audio transmissions of your caller is recorded.Selective Incoming Call RecordingThis feature enables you to record incoming calls selectively, or on a call-by-call basis.To Selectively Record an Incoming CallAll Incoming Call RecordingThis feature enables you to automatically record all incoming trunked and conventional dispatch calls, trunked and conventional telephone interconnect calls, and MDC selective calls. This feature is useful when you need to keep informed of channel activity while away from your radio.Note: This feature does not work while in scan mode.If a voice storage record function is requested, the dis-play shows:1Press and hold the preprogrammed Record/Playback button (see page 26) while receiving the call. The display showsMemory FullRecordingA confirmation tone sounds, indicating that the radio begins recording.2The radio records the call until the mes-sage slot is full or until you release the preprogrammed Record/Playback but-ton.3Release the Record/Playback button to stop recording.
81EnglishVOICE STORAGETo Record All Incoming Calls1)  to enter menu mode.2y  or  z until  3)  to select    4y  or  z until 5)  to select   6y  or  z until     7) to select 8The display contin-uously flashes, except while a call is being recorded.Voice StorageVoice StorageRecordRecordAll IncomingAll IncomingAll Incoming9The display shows while your radio is recording.The radio also records the time stamp and the channel alias to the message slot.10 Press ( to stop recording.–or–Go to step 1 again to continue recording in the next available slot.Note:  Five seconds before the message      slot ends, the radio display shows (where XX = remaining seconds).The “voice storage full” alert sounds when the message slot is full, and recording stops.The display shows:      RecordingTime Left XXMsg Slot Full
82EnglishVOICE STORAGEVOICE MEMO RECORDINGIn addition to recording calls received, the CDM1550•LS+ radio offers you the ability to record voice memos (or personal reminders) into the radio. The voice memo recording feature is useful for quickly saving phone numbers, names, or any other brief voice information. You can record voice memos using the preprogrammed Record/Playback button (see page 26) or your radio’s menu.Important Note:To record properly, incoming calls cannot be received while a voice memo is being recorded.To Record a Voice Memo using the Preprogrammed Record/Playback ButtonTo Record a Voice Memo using the Menu1Press and hold the preprogrammed Record/Playback button. • The display shows: • A confirmation tone sounds, indicating that the radio begins recording.Recording2Without pressing the PTT button, speak clearly into the microphone to record your memo. The radio records your memo until the message slot is full or until you release the preprogrammed Record/Playback button.3Release the Record/Playback button to stop recording.1) to enter menu mode.2y  or  z until3) to select   4y  or  z until 5) to select 6y  or  z until7) t o s el ec t                   Voice StorageVoice StorageRecordRecordVoice MemoRecording
83EnglishVOICE STORAGERECORDED MESSAGE PLAYBACKThe CDM1550•LS+ allows you to list, select, and Playback previously recorded incoming call or voice memo messages. You can play back a message by using the preprogrammed Record/Playback button (see page 26) or your radio’s menu.Note: Recorded message Playback cannot be initiated while your radio is receiving. Also, you don’t receive any incoming calls while you play back messages.To Playback a Message using the Preprogrammed Record/Playback Button8Without pressing the PTT button, speak clearly into the microphone to record your memo. The radio records your memo until the message slot is full or until you press (.Note: To stop recording at any time, press (.9Press ( to stop recording.–or–Repeat steps 7 and 8 to store additional messages.Playing Msg XXX1Press and release the preprogrammed Record/Playback button.• The first mes-sage plays, and the display shows (XXX = the mes-sage number)2To advance to the next message at any time during Play back, press and release the Record/Playback button again.3To exit/cancel Playback mode:Press and release the preprogrammed Playback Exit button (see page 26). –or–Press ( to stop Play Back.Playing Msg XXX
84EnglishVOICE STORAGETo Playback a Message using the Menu RECORDED MESSAGE DELETEThe CDM1550•LS+ radio allows you to delete previously recorded incoming call or voice memo messages. You can delete a message using either the preprogrammed Delete Playback button (see page 26) or your radio’s menu.Note: Messages must be deleted one at a time.To Delete a Message using the Preprogrammed Delete Playback Button (see page 26)1) to enter menu mode.2y  or  z until3) to select4y  or  z until5) to select6y  or  z until7) to select8y  or  z to select the desired mes-sage.9Press ) to play the selected message.10 y  or  z anytime during playback to advance to the next message.Voice StorageVoice StoragePlaybackPlayback001 12:00A  005001 12:00A  0051Press and release the preprogrammed Record/Playback button.2y  or  z to select the desired mes-sage. 3Press and hold the preprogrammed Delete Playback button to delete current message.4( to stop deleting messages.Time StampMessage # Duration (in seconds)
85EnglishVOICE STORAGETo Delete a Message using the Menu RECORDED MESSAGE  TRANSMISSIONThis feature allows you to transmit a recorded message to another radio user.To Transmit a Recorded Message1) to enter menu mode.2y  or  z until3)  to select4y  or  z until5) to select6y  or  z  to select the desired mes-sage.7Press  ) to delete the selected mes-sage.8y  or  z to select the another mes-sage to be deleted, then go to step 7.–or–Press ( to stop deleting messages.Voice StorageVoice StorageDeleteDelete1Press and hold the PTT button to initiate the message transmission.2While holding down the PTT button, press the preprogrammed Record/Play-back button to select and play back the desired recorded call or memo.3When finished transmitting your mes-sage, press the Record/Playback but-ton again to stop transmitting.
86EnglishVOICE STORAGEANSWER MODEThe Answer Mode feature allows radio callers to leave recorded audio messages on your radio.Note: This feature is available via the radio’s menu and/or the radio or the DTMF micro-phone programmable button.To Enable the Answer Mode FeatureTo Record a Message1) to enter menu mode.2y  or  z until3) to select Voice Storage4y  or  z until5) to select1y  or  z until     2)  to select          Voice StorageVoice StorageAns Mode On?Ans Mode OnRecord MsgGreeting Msg?3y  or  z until   4) to selectThe LCD shows       5Without pressing the PTT button, speak clearly into the microphone to record your memo. The radio records your greeting until the message slot is full or until you press (.6To exit or cancel recording, press (.With this feature enabled, the recorded message is automatically transmitted whenever your radio receives a call.Alternate Msg?Greeting Msg?Recording
87EnglishVOICE STORAGETo Disable the Answer Mode Feature1) to enter menu mode.2y  or  z until3) to select4y  or  z until5) to selectVoice StorageVoice StorageAns Mode Off?Ans Mode Off
88EnglishVOICE STORAGENotes
87EnglishAUDIO/TONE SETTINGSAUDIO/TONE SETTINGSYou can customize the audio and tone feature settings on your radio by:1) to enter menu mode.2y  or  z until        3)  to select4y  or  z until you see the feature you want to change (see the table on the next page).5) to select the feature. You see the feature’s current setting.6y  or  z for available settings. (For Name and Call Tone Tagging, see page 56.)7) to set the desired setting.Audio/TonesAudio/Tones
88EnglishAUDIO/TONE SETTINGSAudio/Tone SettingsFeature What it Does SettingsAlert Vol Lvl Makes the volume level of the audio and alert tones inde-pendent. If turned on, it makes the alert tones follow the settings in the CPS; if turned off, the alert tones follow the setting of the volume knob.Ind Alert OffInd Alert OnTone Disable Turns all alert and audio tones on or off. Tones OnTones OffName and Call Tone Tagging ‡Assigns a specific ring tone when receiving a call from a specific user (see page 56 for details). StandardAlert #1 – #7Call Tone Tag ‡Assigns a specific tone when receiving a specific type of radio call (see page 56 for details).Standard Alert #1 – #7Escalert ‡ Increases the volume of the alarm tones when a radio call is not answered.Escalert OnEscalert OffCompanding Provides the same audio quality for 12.5kHz and for 25kHz channels. Compand OnCompand Off‡ LTR trunking operation only.
91EnglishUTILITIESUTILITIESYou can customize some of your radio’s feature by:1) to enter menu mode.2y  or  z until        3) to select4y  or  z until you see the feature you want to change (see table on the next page).5) to select the feature. You see the feature’s current setting.6y  or  z for available settings.7) to select the desired setting.UtilitiesUtilities
92EnglishUTILITIESUtilities FeaturesFeature What it Does SettingsPower Level Changes the power level of the radio to high, low (see page 93).Power HighPower LowClock Sets the time, or turns the clock on or off (see page 94). Clock OnClock OffSet TimeReminder Alarm Sets the alarm, or turns it on or off (see page 94). Alarm OnAlarm OffSet TimeLanguageSelection § ‡Selects the language to be shown on your radio’s dis-plays.EnglishSpanishPortugueseFrenchSoftware Ver #  In LTR trunked and conventional operation, displays the radio’s software version number when you press ).In PassPort operation, displays the PassPort software version number when you press ).Note: The LTR and conventional software version number may be different than the PassPort software version number.——§ Conventional Operation only.‡ LTR Trunked Operation only.
93EnglishUTILITIESSETTING THE POWER LEVEL BEach channel in your radio has a predefined transmit power level that can be changed.•High power (S) allows you to reach a radio that is farther away. •Low power (R) conserves the battery’s charge.Note:• Be aware that a message received from a nearby radio might change your radio’s power level to low. This may cause radios that are farther away not to receive your transmis-sions.• In PassPort mode, the power level is predefined radio wide.To set the power level:Press the preprogrammed Power Level button (see page 25) to toggle between low and high,–or– Do the following: 1) to enter menu mode.2y  or  z until        3)  to select          4y  or  z until        5) to select      The display shows the current power level.6y  or  z until        or  until7) to confirm the selection.UtilitiesUtilitiesPower LevelPower LevelPower High?Power Low?
94EnglishUTILITIESSETTING THE CLOCK/ALARMTo Set the Clock/Alarm1) to enter menu mode.2y  or  z until3) to select4y  or  z until or  until5) to confirm your selection.6y  or  z until7) to select8When a setting is blinking, you can change it with y or  z.Note: You cannot select “24 hr” for UtilitiesSet time?ClockReminder AlarmSet time?Set time?Hour (AM or PM) (AM/PM or 24 hr) Minutes    3:05 PMReminder Alarm9v or  w to move to the previous or  next setting.10 ) to save your changes.11 ( to return to–or–  to return to–or––or– Hold down ( to exit menu mode.UtilitiesReminder AlarmClock
95EnglishUTILITIESDISPLAYING THE TIMETo Display the TimeSELECTING THE DISPLAY LANGUAGE(LTR TRUNKED AND CONVENTIONAL OPERATION ONLY)To Select the Display Language1) to enter menu mode.2y  or  z until        3) to select4y  or  z until        5) to confirm your selection.6y  or  z until        7) to selectThe radio displays the time for a pre-programmed dura-tion.8( to exit the menu.UtilitiesUtilitiesClockDisplay Clock?Display Clock?1) to enter menu mode.2y  or  z until        3) to select4y  or  z until        5) to confirm your selection.6y  or  z until the desired language is displayed.7) to confirm your selection.8( to exit the menu.UtilitiesUtilitiesLanguage Select
96EnglishUTILITIESNotes
95EnglishWARRANTYWARRANTYLIMITED WARRANTYMOTOROLA COMMUNICATION PRODUCTSI. WHAT THIS WARRANTY COVERS AND FOR HOW LONG:MOTOROLA INC. (“MOTOROLA”) warrants the MOTOROLA manufactured Communication Products listed below (“Product”) against defects in material and workmanship under normal use and service for a period of time from the date of purchase as scheduled below:CDM1550•LS+ Mobile Units Two (2) YearsProduct Accessories One (1) YearMotorola, at its option, will at no charge either repair the Product (with new or reconditioned parts), replace it (with a new or reconditioned Product), or refund the purchase price of the Product during the warranty period provided it is returned in accordance with the terms of this warranty. Replaced parts or boards are warranted for the balance of the original applicable warranty period. All replaced parts of Product shall become the property of MOTOROLA.This express limited warranty is extended by MOTOROLA to the original end user purchaser only and is not assignable or transferable to any other party. This is the complete warranty for the Product manufactured by MOTOROLA. MOTOROLA assumes no obligations or liability for additions or modifications to this warranty unless made in writing and signed by an officer of MOTOROLA. Unless made in a separate agreement between MOTOROLA and the original end user purchaser, MOTOROLA does not warrant the installation, maintenance or service of the Product.MOTOROLA cannot be responsible in any way for any ancillary equipment not furnished by MOTOROLA which is attached to or used in connection with the Product, or for operation of the Product with any ancillary equipment, and all such equipment is expressly excluded from this warranty. Because each system which may use the Product is unique, MOTOROLA disclaims liability for range, coverage, or operation of the system as a whole under this warranty.12_Warranty.fm  Page 95  Thursday, April 4, 2002  4:39 PM
96EnglishWARRANTYII. GENERAL PROVISIONS:This warranty sets forth the full extent of MOTOROLA'S responsibilities regarding the Product. Repair, replacement or refund of the purchase price, at MOTOROLA’s option, is the exclusive remedy. THIS WARRANTY IS GIVEN IN LIEU OF ALL OTHER EXPRESS WARRANTIES. IMPLIED WARRANTIES, INCLUDING WITHOUT LIMITATION, IMPLIED WARRANTIES OF MERCHANTABILITY AND FITNESS FOR A PARTICULAR PURPOSE, ARE LIMITED TO THE DURATION OF THIS LIMITED WARRANTY. IN NO EVENT SHALL MOTOROLA BE LIABLE FOR DAMAGES IN EXCESS OF THE PURCHASE PRICE OF THE PRODUCT, FOR ANY LOSS OF USE, LOSS OF TIME, INCONVENIENCE, COMMERCIAL LOSS, LOST PROFITS OR SAVINGS OR OTHER INCIDENTAL, SPECIAL OR CONSEQUENTIAL DAMAGES ARISING OUT OF THE USE OR INABILITY TO USE SUCH PRODUCT, TO THE FULL EXTENT SUCH MAY BE DISCLAIMED BY LAW.III. STATE LAW RIGHTS:SOME STATES DO NOT ALLOW THE EXCLUSION OR LIMITATION OF INCIDENTAL OR CONSEQUENTIAL DAMAGES OR LIMITATION ON HOW LONG AN IMPLIED WARRANTY LASTS, SO THE ABOVE LIMITATION OR EXCLUSIONS MAY NOT APPLY. This warranty gives specific legal rights, and there may be other rights which may vary from state to state.IV. HOW TO GET WARRANTY SERVICE:You must provide proof of purchase (bearing the date of purchase and Product item serial number) in order to receive warranty service and, also, deliver or send the Product item, transportation and insurance prepaid, to an authorized warranty service location. Warranty service will be provided by Motorola through one of its authorized warranty service locations. If you first contact the company which sold you the Product (e.g., dealer or communication service provider), it can facilitate your obtaining warranty service. You can also call Motorola at 1-800-927-2744 US/Canada.12_Warranty.fm  Page 96  Thursday, April 4, 2002  4:39 PM
97EnglishWARRANTYV. WHAT THIS WARRANTY DOES NOT COVER:A) Defects or damage resulting from use of the Product in other than its normal and customary manner.B) Defects or damage from misuse, accident, water, or neglect.C) Defects or damage from improper testing, operation, maintenance, installation, alteration, modification, or adjustment.D) Breakage or damage to antennas unless caused directly by defects in material workmanship.E) A Product subjected to unauthorized Product modifications, disassembles or repairs (including, without limitation, the addition to the Product of non-Motorola supplied equipment) which adversely affect performance of the Product or interfere with Motorola's normal warranty inspection and testing of the Product to verify any warranty claim.F) Product which has had the serial number removed or made illegible.G) Rechargeable batteries if:1) any of the seals on the battery enclosure of cells are broken or show evidence of tampering.2) the damage or defect is caused by charging or using the battery in equipment or service other than the Product for which it is specified.H) Freight costs to the repair depot.I) A Product which, due to illegal or unauthorized alteration of the software/firmware in the Product, does not function in accordance with MOTOROLA’s published specifications or the FCC type acceptance labeling in effect for the Product at the time the Product was initially distributed from MOTOROLA.J) Scratches or other cosmetic damage to Product surfaces that does not affect the operation of the Product.K) Normal and customary wear and tear.VI. PATENT AND SOFTWARE PROVISIONS:MOTOROLA will defend, at its own expense, any suit brought against the end user purchaser to the extent that it is based on a claim that the Product or parts infringe a United States patent, and MOTOROLA will pay those costs and damages finally awarded against the end user purchaser in any such suit which are attributable to any such claim, but such defense and payments are conditioned on the following:12_Warranty.fm  Page 97  Thursday, April 4, 2002  4:39 PM
98EnglishWARRANTYA) that MOTOROLA will be notified promptly in writing by such purchaser of any notice of such claim;B) that MOTOROLA will have sole control of the defense of such suit and all negotiations for its settlement or compromise; andC) should the Product or parts become, or in MOTOROLA’s opinion be likely to become, the subject of a claim of infringement of a United States patent, that such purchaser will permit MOTOROLA, at its option and expense, either to procure for such purchaser the right to continue using the Product or parts or to replace or modify the same so that it becomes non-infringing or to grant such purchaser a credit for the Product or parts as depreciated and accept its return. The depreciation will be an equal amount per year over the lifetime of the Product or parts as established by MOTOROLA.MOTOROLA will have no liability with respect to any claim of patent infringement which is based upon the combination of the Product or parts furnished hereunder with software, apparatus or devices not furnished by MOTOROLA, nor will MOTOROLA have any liability for the use of ancillary equipment or software not furnished by MOTOROLA which is attached to or used in connection with the Product. The foregoing states the entire liability of MOTOROLA with respect to infringement of patents by the Product or any parts thereof.Laws in the United States and other countries preserve for MOTOROLA certain exclusive rights for copyrighted MOTOROLA software such as the exclusive rights to reproduce in copies and distribute copies of such Motorola software. MOTOROLA software may be used in only the Product in which the software was originally embodied and such software in such Product may not be replaced, copied, distributed, modified in any way, or used to produce any derivative thereof. No other use including, without limitation, alteration, modification, reproduction, distribution, or reverse engineering of such MOTOROLA software or exercise of rights in such MOTOROLA software is permitted. No license is granted by implication, estoppel or otherwise under MOTOROLA patent rights or copyrights.VII. GOVERNING LAW:This Warranty is governed by the laws of the State of Illinois, USA.12_Warranty.fm  Page 98  Thursday, April 4, 2002  4:39 PM
99EnglishACCESSORIESACCESSORIESMotorola offers a number of accessories to enhance the productivity of your two-way radio. Many of the available accessories are listed below. For a complete list, see your Motorola dealer.MICROPHONESHANDSFREE KITSEXCHANGEABLE BUTTON KITSNote: Other individual exchangeable buttons are available through AAD. Please see Basic Service Manual for button numbers.MOUNTING KITSAARMN4025_ Standard Compact MicrophoneAARMN4026_ Enhanced DTMF Keypad MicrophoneAARMN4038_ Heavy Duty MicrophoneAAREX4617_ Telephone Style Handset with Hang-Up CupHLN9073_R Microphone Hang-Up Clip (all microphones)AARMN4027_ Visor Mounted MicrophoneRLN4856_ Footswitch PTTRLN4857_ Pushbutton PTTRLN4858_ Gooseneck PTTRLN4831_ Standard Button Kit: MON, SCAN, CALL, HOME, PHONERLN5324_ Standard Button Kit: MON, SCAN, CALL, HOME, PHONE, ROAM, SITEGLN7324_R Standard Low Profile Bracket (VHF/UHF)GLN7317_ High Profile Mounting Bracket (VHF/UHF)RLN4779_ Key Lock Mounting Bracket (VHF/UHF)RLN4781_ Direct in Dashboard Mounting Kit (VHF/UHF)HLN8097_ Removable Slide Mount Tray Package (VHF/UHF - A maximum of two external accessory wires can be attached to the slide tray)13_Accessory.fm  Page 99  Thursday, April 4, 2002  4:40 PM
100EnglishACCESSORIESREMOTE MOUNTSEXTERNAL SPEAKERSINSTALLATION AND ALARM KITSANTENNASSERVICE AIDS AND PROGRAMMING EQUIPMENTRLN4802_ Remote Mount Kit - CDM1250 and CDM1550 models (requires HKN4192 power cable)RKN4077_ Remote Mount Cable, 3 meter lengthRKN4078_ Remote Mount Cable, 5 meter lengthRKN4079_ Remote Mount Cable, 7 meter lengthRSN4001_ 13 Watt External LoudspeakerHSN8145_ 7.5 Watt External Speaker - for Receiver AudioHKN4137_ Standard 12V 10” Power Cable to Battery (VHF/UHF)HKN4192_ 12V 20  Ft. Power Cable to Battery (VHF/UHF)GKN6272_ External Alarm Relay and CableRLN4836_ Emergency FootswitchHKN9327_ Ignition Switch CableHKN9557_R PL259/Mini-U Antenna Adapter - 8” CableHLN9457_R Hardware Kit for use with the Expanded Accessory Connector (includes 16 connector pins, (five) 8” wires with pins attached and an extra housing)HKAD4001_ 220 MHz, 1/4-Wave Roof MountHAF4012_ Mini-U 746-794 MHz, 1/4-Wave Roof MountH5177 Portable/Mobile Programming Software (CPS) 3 Year Subscription Package - Includes CPS CD ROM Software: HVN9025 for the HT/EX500/CDM/MTX.LS Series and HVN9067 for MTX Series Privacy Plus. Includes HT/MTX Series Programming/Test Cable (AARKN4074). Also is compatible with RLN4460 used for radio testing. (HVN9025 is compatible with Windows® 95/98/2000/Millennium (ME)/Windows NT®. HVN9067 is compatible with Windows® 95/98/Windows NT®).Note: Software requires a license agreement and is not intended for resale.13_Accessory.fm  Page 100  Thursday, April 4, 2002  4:40 PM
101EnglishACCESSORIESMANUALSCONTROL STATION KITSMOBILE DATA UNITS SECTIONTer minals:AARKN4081_ Programming Cable with Internal RIB (direct connection from computer to radio microphone connector)AARKN4083_ Programming Cable (allows radio programming via rear accessory connector)3080070N01 Programming Cable (connection from RIB to radio)3080369B72 9 Pin PC to Radio Interface Box Cable (IBM AT or compatible)RLN4460_ Test Box for Portables and MobilesRLN4008_ Radio Interface Box (RIB)0180357A57 Wall Mounted Power Supply, 120V - used with RLN4008RLN4853_ 10 to 20 Pin Adapter6864110R14 CDM1550•LS+ 220/700 MHz Detailed Service Manual6864110R16 CDM1550•LS+ 200/700 MHz Basic Service Manual6881092C58 Installation Manual (English)HMN3000_ Desk Microphone (Black)GLN7326_ Desktop Tray with SpeakerGLN7318_ Desktop Tray without SpeakerHKN9088_ Mobile Mini-U Antenna Adapter - 8 Ft. CableHPN4002_R Power Supply and Cable (1-25 Watt Models)HPN4001_R Power Supply and Cable (25-60 Watt Models)RDN7365_ Mobile Status Terminal - Mobile messaging device equipped with a data modem. This will allow a mobile user to report “status messaging” back to the dispatcher by activating one of the status keys.RDN7366_ Mobile Status Terminal with GPS - Mobile status terminal equipped with an Automatic Vehicle Location (AVL) device compatible with Global Positioning System (GPS).13_Accessory.fm  Page 101  Thursday, April 4, 2002  4:40 PM
102EnglishACCESSORIESRadio Interface Cables: One radio interface cable is required with purchase of each hardware devicePeripherals:Global Positioning System (GPS) Antennas: Antenna is required with purchase of any GPS unitSoftware:RDN7367_ Mobile Display Terminal with GPS - Mobile display terminal equipped with an Automatic Vehicle Location (AVL) device compatible with Global Positioning system (GPS).RDN7368_ Mobile Display Terminal - Mobile messaging device equipped with a data modem. This unit features a 4x40 backlit LCD display and the keypad allows users to send information to the dispatcher in response to base instructions.RDN7369_ Standalone Modem/GPS - Cost efficient Automatic Vehicle Location (AVL) device compatible with Global Positioning System (GPS).RDN7738_ Serial Breakout Unit (used in multiple applications that allow up to eight base modems to be connected).RDN7370_ 3 Ft. Interface Cable with 16 Pin ConnectorRDN7376_ 15 Ft. Interface Cable with 16 Pin ConnectorRDN7739_ 3 Ft. Flying Cable (same as regular interface cable, but omits connectors).RDN7740_ 15 Ft. Flying Cable (same as regular interface cable, but omits connectors).RDN7371_ Credit Card Reader - Card reader is used to perform automatic online credit card authorization transaction. Used with RDN7379 (credit card software).RDN7373_ Mobile Printer - The mobile printer provides users with a hard copy of the information transmitted from the base dispatch location.RDN7372_ Fixed Mount GPS Active AntennaRDN7375_ Magnetic Mount GPS Active AntennaRDN7374_ Programming Software - Used for mobile data units.RDN7377_ Regional Map Software - Will allow up to 10 selected US counties.13_Accessory.fm  Page 102  Thursday, April 4, 2002  4:40 PM
103EnglishACCESSORIESMiscellaneous:PUBLIC ADDRESSRETROFIT KITRDN7378_ AVL Messaging Status Software - Mapping software that provides the user with Automatic Vehicle Location to track vehicles along with message dispatch and status tracking capability.RDN7379_ Credit Card Software - Used with RDN7371 (credit card reader).RDN7364_ Radio Channel Card - A radio channel controller and modem that interface with the base radio. Required with every radio channel or wireless circuit used within the system.RDN7380_ Mobile Programming HardwareRLN5288_ Public Address Kit (includes interface cableHKN9323_ 8 Ft. Public Address Speaker CableHKN9324_ 15 Ft. Public Address Speaker Cable (one cable per speaker)HSN1000_R 6 Watt Amplified External Speaker6686119B01 Dismantling Tool13_Accessory.fm  Page 103  Thursday, April 4, 2002  4:40 PM
104EnglishACCESSORIESNotes:13_Accessory.fm  Page 104  Thursday, April 4, 2002  4:40 PM
Selecting a Trunked Zone and Talkgroup1. v or   w   to select desired trunked zone.2. y or  z   until you see desired preprogrammed talkgroup on the display.Sending a Trunked Call1. Press PTT button. If trunked system access was successful — Red LED = steady;if unsuccessful —LED = flashing; red-low pitched tone sounds.2. Speak clearly into microphone. Release PTT button to listen.Initial PassPort System RegistrationSelecting a Conventional Zone and Channel1. v or  w   to select desired conventional zone.2. y   or  z   until you see desired conventional channel on the display.Sending a Conventional Call• Press PTT button and speak clearly into microphone. LED = steady while call is being sent. Release PTT button to listen.Receiving a Trunked or Conventional Call•v or  w, then  y or  z to desired talkgroup or channel. Make sure PTT button is released. When a call is received, the LED flashes.Making a Selective Call (LTR Trunked and Conventional Operation only)1. From Selective Call menu, select or enter desired radio ID number.2. Press PTT button to send the call. The radio sounds a continuous tone.3. Press PTT button and talk; release PTT button to listen.Receiving a Selective Call (LTR Trunked and Conventional Operation only)• When a Selective Call is received, the radio displays F symbol and name or ID of calling radio; the yellow LED flashes. Press PTT button to answer.Upon power up, PassPort alias appears on the LCD.The selected talkgroup alias appears on the LCD.May appear if a PassPort site cannot be quickly located.Appears indicating successful PassPort registration (XXX = PassPort site on which you are registered).Selected talkgroup alias appears and remains on the display upon successful registration.PASSPORTTLKGRP ALIASSEARCHINGREG SITE XXXTLKGRP ALIASCDM1550•LS+ Quick Reference CardRecord the functions for your radio’s programmable buttons in the table provided below. For further information, see pages 24 and  25 in this User Guide.Button Feature Short Press  Long Press Hold Down PageZone Selector/Editing ButtonsMenu Enter/SelectButton(Interchangeable)ProgrammableButton 2 (P2) (Interchangeable)ProgrammableButton 4 (P4)(Interchangeable)ProgrammableButton 3 (P3)LCD ScreenRed/Yellow/Green   LED Indicators Menu Exit/EscapeButton(Interchangeable)ProgrammableButton 1 (P1)(Left/Right)MicrophoneJackControl KnobOn/Off/VolumeTalkgroup/Channel Selector/Menu Navigation Buttons          (Up/Down)
yzMenu Navigation)on/offScan List(p. 66)Phone List(p. 75)add/delete entryeditpriority(‡ and §)SelectiveCall‡§Call Alert‡§Radio Check‡§Alert Vol LvlToneDisableEscalert‡§add/delete/edit entryedit entryon/offselect/enter IDyzyzyzyzselect/enter IDrepeater mode/talkarnd modeyzselect/enter IDyzon/offon/offCompandingon/offCall‡§Tone Tagstandard/alert #1 - #7Power Levelhigh/low/auto (‡ and §)Clockon/off/set time)  to enter menu modey or  z to scroll through the list) to select menu item( to return to previous menu level —or—Hold down  ( to exit menu modey or z to scroll through sub-list) to select sub-menu itemRadioCall List(p. 57)Phone(p. 71)Program Lists(LTR) All Group Scan‡(p. 64)Audio/Tones(p. 89) Utilities(p. 91)Rptr/Talkarnd§(p. 34)Menu Navigation Chart(Refer to Menu Navigation guidelines—lower, left-hand corner of this page)*   —  Available in PassPort trunked zones only‡   —  Available in LTR trunked zones only§—  Available in conventional zones onlyon/offyzLTR /Con System Scanon/offyzPP Group Scan*(p. 62)Software Ver#Record(page 80)Delete(p. 84)all incomingvoicememoyzVoice StoragePlayback(p. 83)Language Selection‡§English/French/Portuguese/SpanishRadio CallReminder Alarmon/off/set time
Motorola, The Stylized M logo, Intelligence Everywhere, Professional Radio - As Dedicated As You Are, CDM Series,CDM1550•LS+, and Call Alert are trademarks of Motorola, Inc.LTR is a mark of E.F. Johnson Company.PassPort is a mark of Trident Micro Systems. © 2002 Motorola, Inc. All rights reserved. Printed in U.S.A.*6864110R13-O*6864110R13-OCDM1550••LS++™User GuideProfessional Radio - As Dedicated As You Are™6864110R13-O_cvr.qxd  2/21/02  12:39 PM  Page 1

Navigation menu