New Centurion Solutions NCS04010910 HANDHELD SECURITY DEVICE User Manual Project 623
New Centurion Solutions, Inc. HANDHELD SECURITY DEVICE Project 623
Contents
- 1. Users Manual
- 2. Installation Manual
- 3. Assembly Manual
Installation Manual
THE INFORMATION CONTAINED HEREIN IS PROPRIETARY TO NEW CENTURION SOLUTIONS, INC. AND SHALL NOT BE REPRODUCED OR
DISCLOSED IN WHOLE OR IN PART FOR ANY DESIGN OR MANUFACTURE EXCEPT WHEN SUCH USER POSSESSES DIRECT, WRITTEN
AUTHORIZATION FROM NEW CENTURION SOLUTIONS, INC.
1
Elliott Tech, LLC
OREP Installation Manual
OREP
New Centurion Solutions
Project Number: 776
Reference: 776-91-07-REV-OREP_INSTALLATION_MANUAL.docx
Original Document: March 1, 2011
Revision A: March 16, 2011
Prepared for:
Prepared by:
New Centurion Solutions, Inc.
Greg Williams
3011 Spring Garden St.
Suite E
Greensboro, NC 27403
(336) 617-5410
GWilliams@newcenturionsolutions.com
Elliott Tech, LLC
346 Raleigh Street
Holly Springs, NC 27540
(919) 342-6899
(888) 631-1795 Fax
s.elliott@elliotttech.com

OREP Installation Manual 776-91-07-REV-A_OREP_INSTALLATION_MANUAL.docx
THE INFORMATION CONTAINED HEREIN IS PROPRIETARY TO NEW CENTURION SOLUTIONS, INC. AND SHALL NOT BE REPRODUCED OR
DISCLOSED IN WHOLE OR IN PART FOR ANY DESIGN OR MANUFACTURE EXCEPT WHEN SUCH USER POSSESSES DIRECT, WRITTEN
AUTHORIZATION FROM NEW CENTURION SOLUTIONS, INC.
2
Revision Page
Rev
Description
Section
A
FCC Notification
3

OREP Installation Manual 776-91-07-REV-A_OREP_INSTALLATION_MANUAL.docx
THE INFORMATION CONTAINED HEREIN IS PROPRIETARY TO NEW CENTURION SOLUTIONS, INC. AND SHALL NOT BE REPRODUCED OR
DISCLOSED IN WHOLE OR IN PART FOR ANY DESIGN OR MANUFACTURE EXCEPT WHEN SUCH USER POSSESSES DIRECT, WRITTEN
AUTHORIZATION FROM NEW CENTURION SOLUTIONS, INC.
3
Contents
1. Equipment List ................................................................................................................................. 4
2. Installation Instructions .................................................................................................................. 6
3. FCC Notification ............................................................................................................................ 11
OREP Installation Manual 776-91-07-REV-A_OREP_INSTALLATION_MANUAL.docx
THE INFORMATION CONTAINED HEREIN IS PROPRIETARY TO NEW CENTURION SOLUTIONS, INC. AND SHALL NOT BE REPRODUCED OR
DISCLOSED IN WHOLE OR IN PART FOR ANY DESIGN OR MANUFACTURE EXCEPT WHEN SUCH USER POSSESSES DIRECT, WRITTEN
AUTHORIZATION FROM NEW CENTURION SOLUTIONS, INC.
4
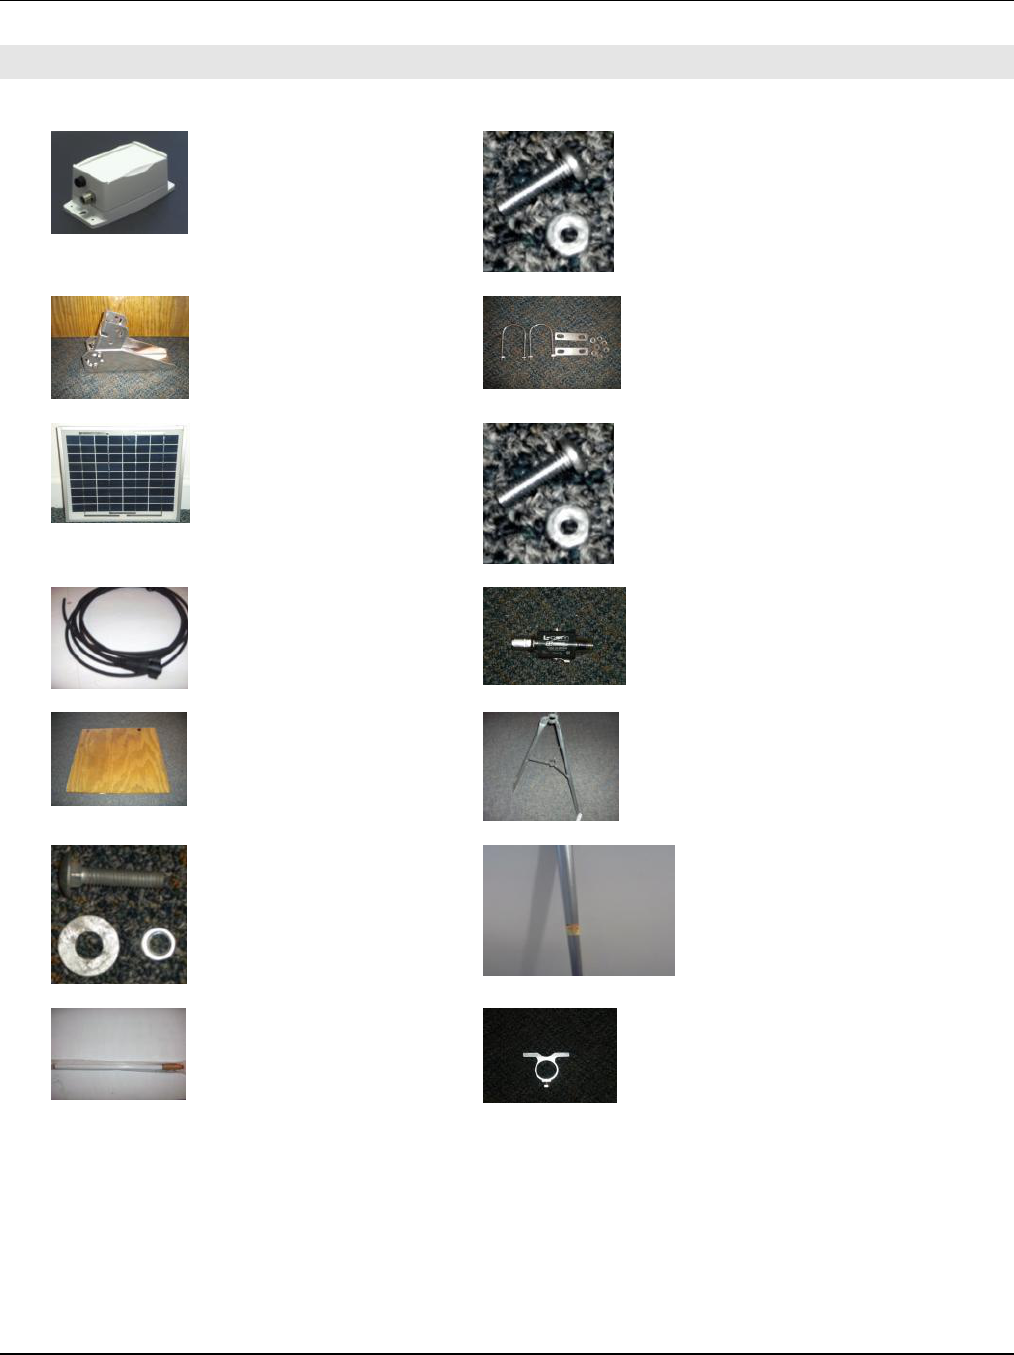
1. EQUIPMENT LIST
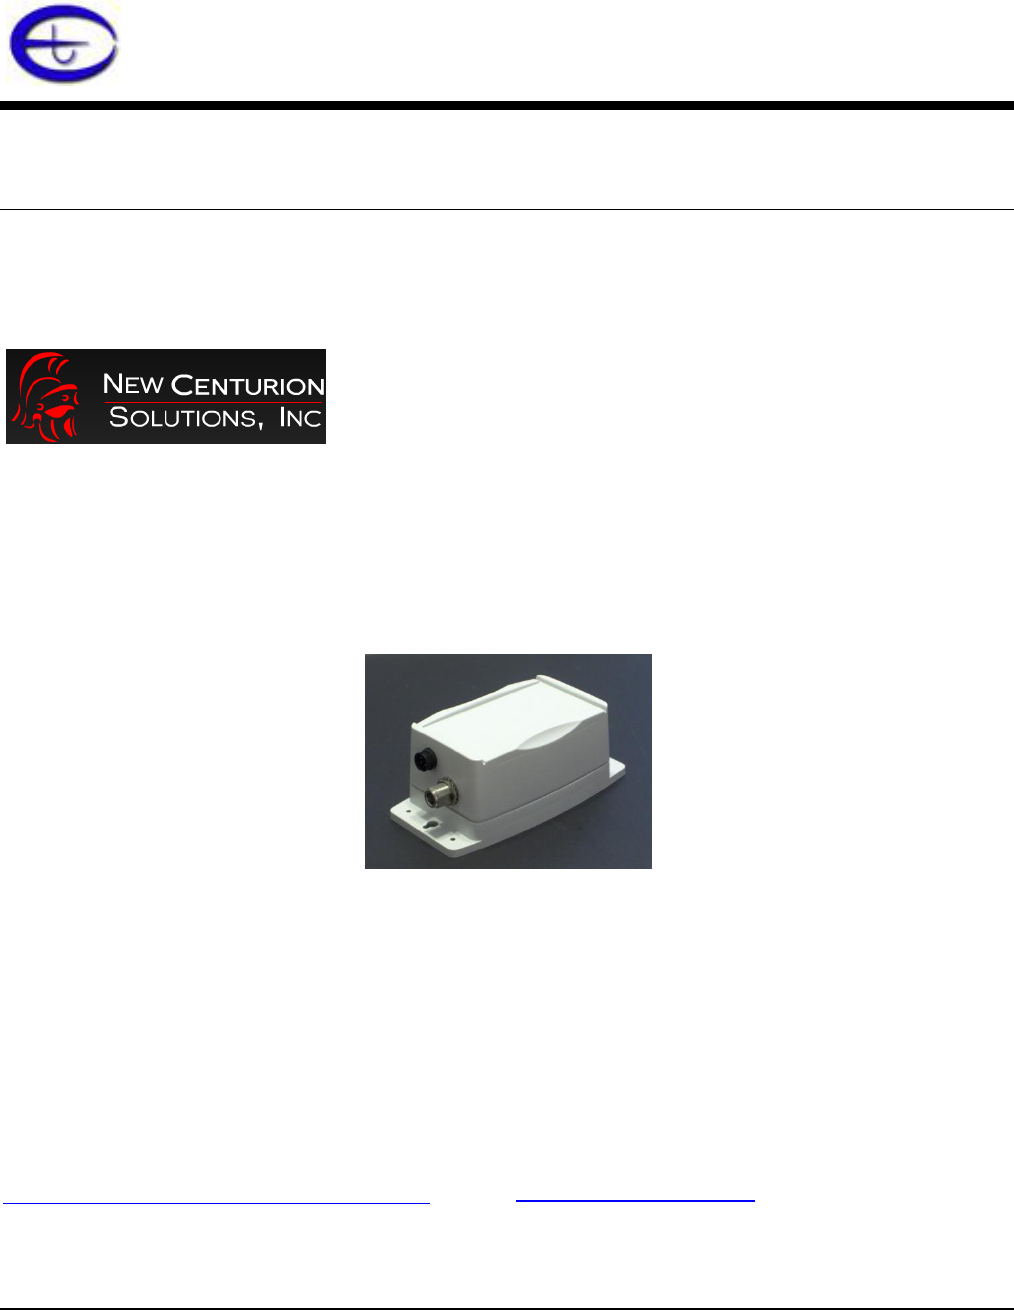
A. OREP assembly (1)
B. Hardware to attach to OREP Bracket (4)
C. Solar Bracket & Hardware (1)
D. Bracket Hardware (2)
E. Solar Panel (1)
F. Panel Hardware (2)
G. TN-Male to N-Male Pigtail 2 ft (2)
H. Lightning Surge Protector (1)
I. Mounting Base-Treated Plywood (1)
J. Tripod Base (1)
K. Hardware to attach tripod to base (3)
L. Mast (1)
M. Antenna 3db (1)
N. Antenna Bracket (1)
OREP Installation Manual 776-91-07-REV-A_OREP_INSTALLATION_MANUAL.docx
THE INFORMATION CONTAINED HEREIN IS PROPRIETARY TO NEW CENTURION SOLUTIONS, INC. AND SHALL NOT BE REPRODUCED OR
DISCLOSED IN WHOLE OR IN PART FOR ANY DESIGN OR MANUFACTURE EXCEPT WHEN SUCH USER POSSESSES DIRECT, WRITTEN
AUTHORIZATION FROM NEW CENTURION SOLUTIONS, INC.
5
O. U-Bolt and mast attachment hardware (1)
P. OREP Bracket (1)
Q. U-Bolts, nuts, washers (2 sets)
R. TN-Male to N-Male Pigtail 2 ft (2)
S. Battery Box (1)
T. 12V Battery (1)
U. Battery Restraining Strap (2)
OREP Installation Manual 776-91-07-REV-A_OREP_INSTALLATION_MANUAL.docx
THE INFORMATION CONTAINED HEREIN IS PROPRIETARY TO NEW CENTURION SOLUTIONS, INC. AND SHALL NOT BE REPRODUCED OR
DISCLOSED IN WHOLE OR IN PART FOR ANY DESIGN OR MANUFACTURE EXCEPT WHEN SUCH USER POSSESSES DIRECT, WRITTEN
AUTHORIZATION FROM NEW CENTURION SOLUTIONS, INC.
6
2. INSTALLATION INSTRUCTIONS
To begin, check the parts available against the equipment list, identifying any missing parts. If all
parts are accounted for, proceed to the instructions below to begin installing the OREP.
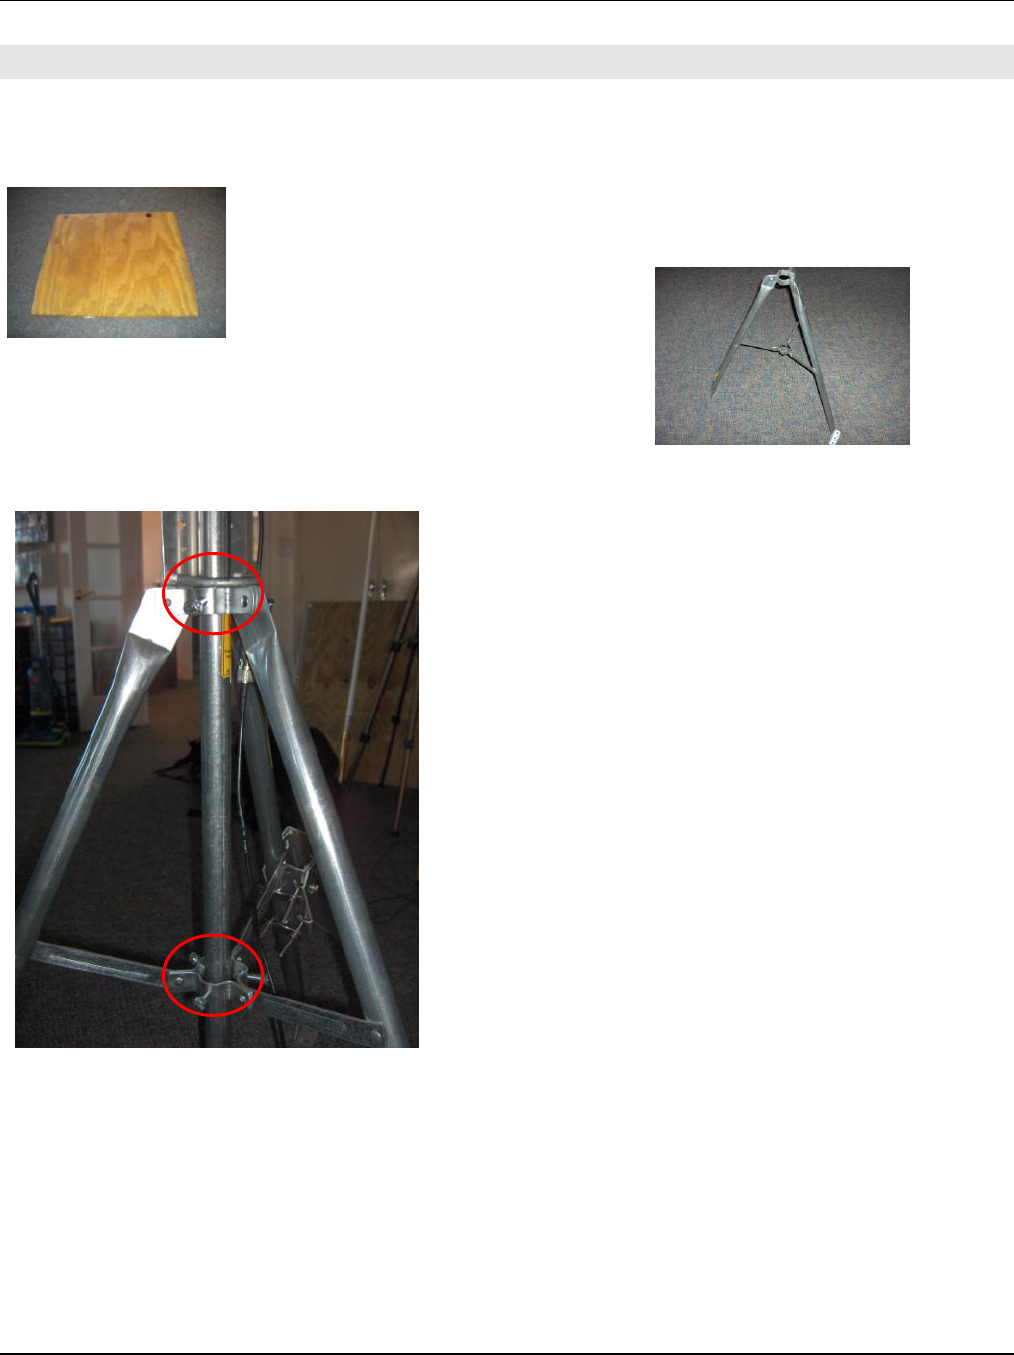
Step 1: Identify the Mounting Base-Treated Plywood (I). Place the
plywood on the ground laying flat. Identify the Tripod Base (J), open its
legs until fully extended, and center it on the plywood. Mark the points for
the drill holes with a pencil and set aside
the base. Drill 1/8” holes where they are
marked on the plywood. Identify the
Hardware to attach to OREP Bracket (B).
Push the screws up through the drilled holes from the bottom of the
plywood, and align the tripod base with the screws. Push the screws
through the holes in the tripod base and secure with a washer and nut
(from Hardware to attach to OREP Bracket (B)) on each screw.
Make sure hardware is secure before proceeding to the next step.
Step 2: Place Mast (L) down through the center of the
Tripod Base (J). Tighten screws at the top and center of
the Tripod Base (J) to secure the Mast (L).
OREP Installation Manual 776-91-07-REV-A_OREP_INSTALLATION_MANUAL.docx
THE INFORMATION CONTAINED HEREIN IS PROPRIETARY TO NEW CENTURION SOLUTIONS, INC. AND SHALL NOT BE REPRODUCED OR
DISCLOSED IN WHOLE OR IN PART FOR ANY DESIGN OR MANUFACTURE EXCEPT WHEN SUCH USER POSSESSES DIRECT, WRITTEN
AUTHORIZATION FROM NEW CENTURION SOLUTIONS, INC.
7
Step 3: Place Antenna 3db (M) through hole in Antenna Bracket (N) and
secure at base of antenna.
Step 4: Identify the U-Bolt and mast attachment hardware (O). Secure
the antenna-bracket assembly to the mast by sliding a u-bolt through each
hole in the bracket (from previous step) and around the mast. Secure the
u-bolt on the mast with two nuts (included with u-bolt).
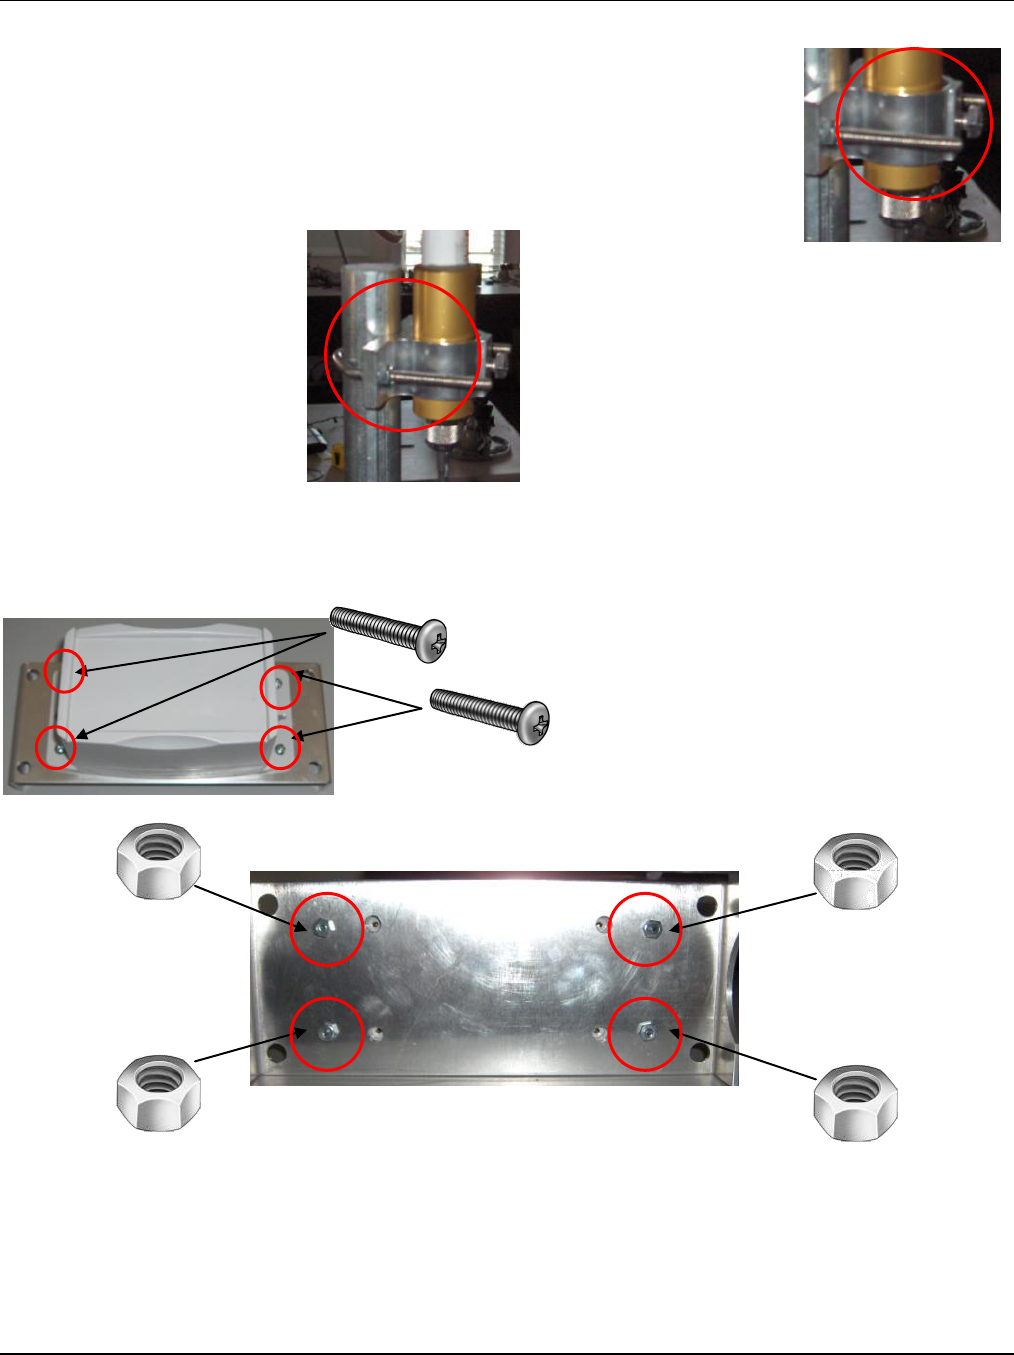
Step 5: Place the OREP assembly (A) on the OREP Bracket (P) with the legs facing away. Identify
the Hardware to attach to OREP Bracket (B). Insert four screws into the OREP enclosure holes and
push through the holes in the bracket. Secure the OREP to the bracket by attaching four nuts to
the screws on the backside of the bracket.
Type-A
Type-A
OREP Installation Manual 776-91-07-REV-A_OREP_INSTALLATION_MANUAL.docx
THE INFORMATION CONTAINED HEREIN IS PROPRIETARY TO NEW CENTURION SOLUTIONS, INC. AND SHALL NOT BE REPRODUCED OR
DISCLOSED IN WHOLE OR IN PART FOR ANY DESIGN OR MANUFACTURE EXCEPT WHEN SUCH USER POSSESSES DIRECT, WRITTEN
AUTHORIZATION FROM NEW CENTURION SOLUTIONS, INC.
8
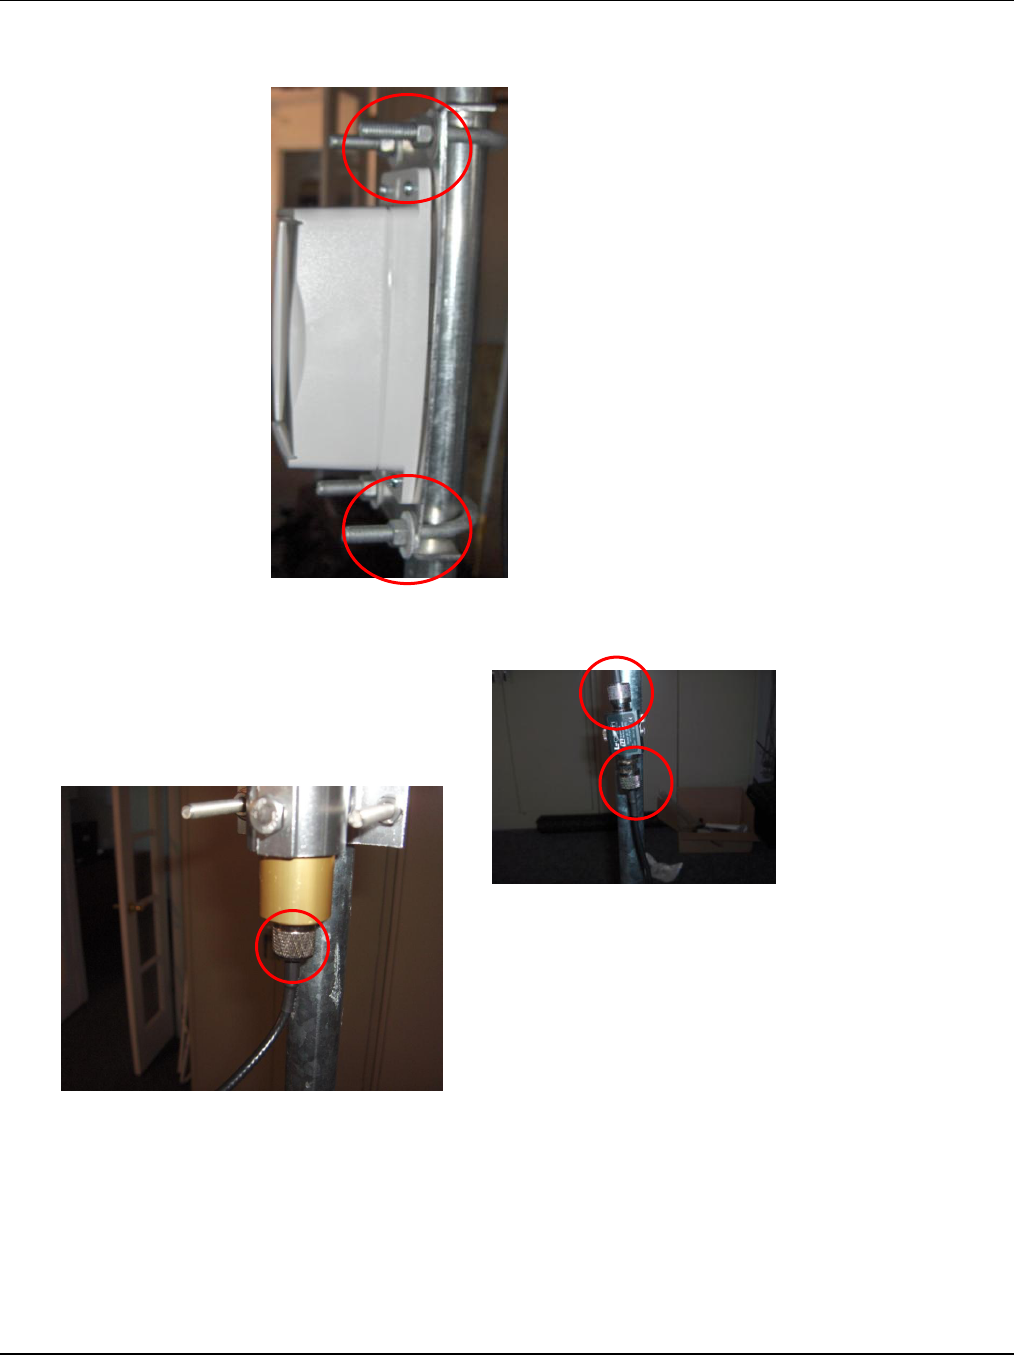
Step 6: Note the OREP bracket has two curved half-moon shaped areas on the back of it. These
areas allow the bracket to seat flushly on the mast. Identify the U-
Bolts, nuts, washers (Q), and while holding the OREP-bracket
assembly on the mast, place one u-bolt around the mast and feed
through the matching holes in the OREP bracket. Secure this u-bolt
with two nuts and two washers. Repeat the process for the other u-
bolt. Ensure both u- bolts are tightened snugly.
Step 7: Take TN-Male to N-Male Pigtail cable (U) and attach to OREP (A) and secure. Take open
end and attach to Light Surge (H) and secure. Take open end Light
Surge (H) and 2nd cable (U) and secure together. Take open
end Light Surge (U) and secure to bottom of antenna (M).
OREP Installation Manual 776-91-07-REV-A_OREP_INSTALLATION_MANUAL.docx
THE INFORMATION CONTAINED HEREIN IS PROPRIETARY TO NEW CENTURION SOLUTIONS, INC. AND SHALL NOT BE REPRODUCED OR
DISCLOSED IN WHOLE OR IN PART FOR ANY DESIGN OR MANUFACTURE EXCEPT WHEN SUCH USER POSSESSES DIRECT, WRITTEN
AUTHORIZATION FROM NEW CENTURION SOLUTIONS, INC.
9
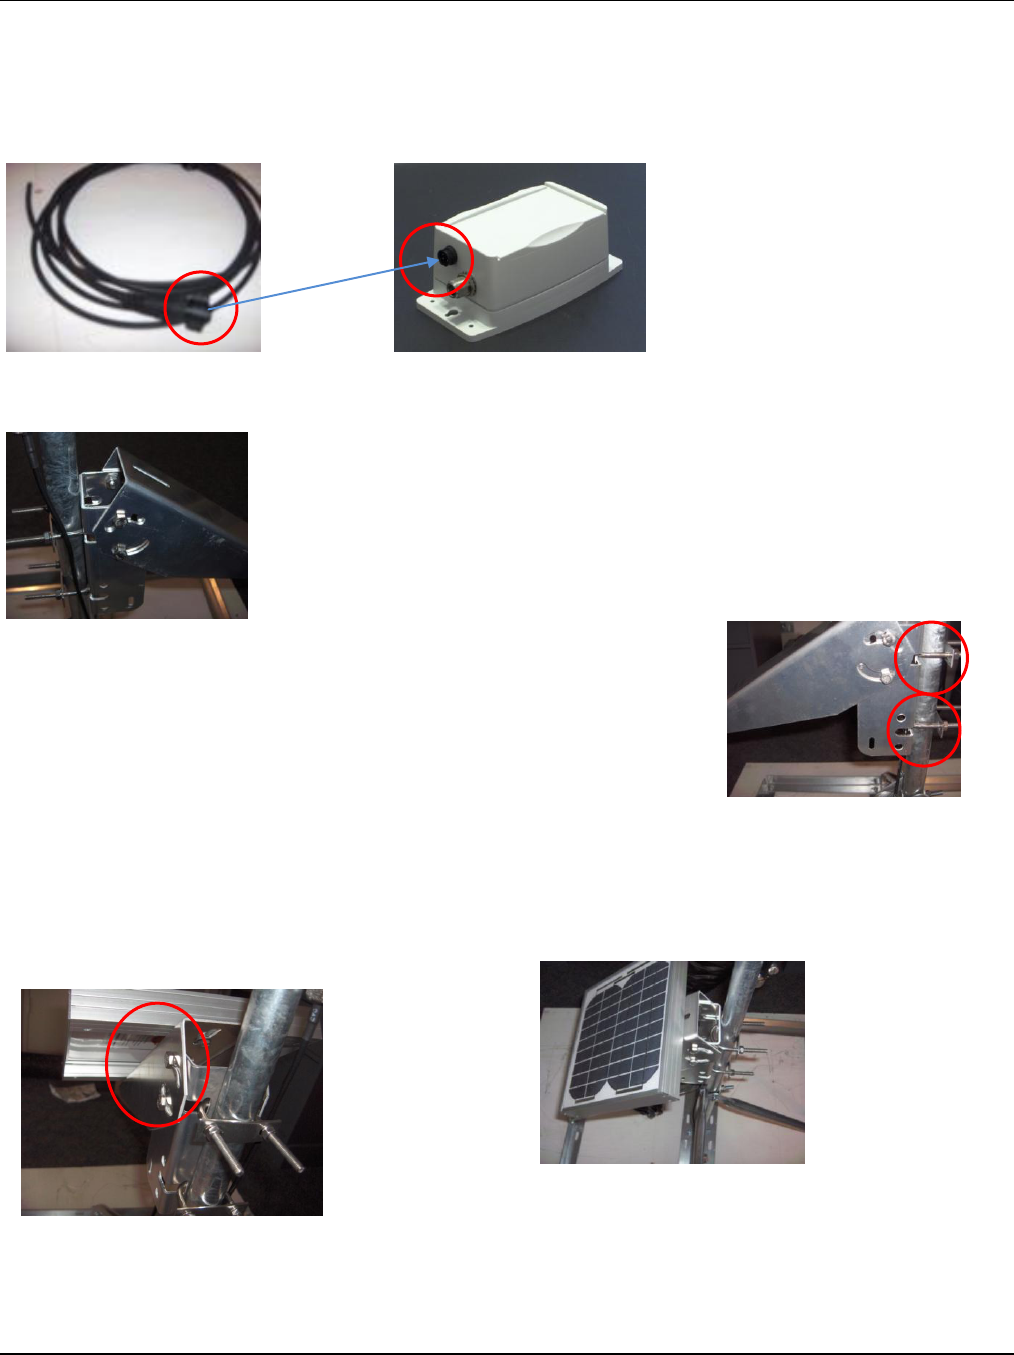
Step 8: Take Inmate 23 4#20 Female Panel Receptacle (G) and secure to OREP as shown.
Step 9: Next, place the Solar Bracket (C) approx. 8-10” below the
Repeater Bracket. Make sure the bracket is securely attached with two
U Bolts (D).
Step 10: Now attach the accompanying part of the Solar Bracket
to the part already attached to the mast. Angle it at a 45 degree
angle and secure tightly. Use the pictures above to confirm proper
placement.
Step 11: Now attach the Solar Panel to the bracket. Confirm that the panel is angled properly
and securely fastened. Use the pictures above for reference.
OREP Installation Manual 776-91-07-REV-A_OREP_INSTALLATION_MANUAL.docx
THE INFORMATION CONTAINED HEREIN IS PROPRIETARY TO NEW CENTURION SOLUTIONS, INC. AND SHALL NOT BE REPRODUCED OR
DISCLOSED IN WHOLE OR IN PART FOR ANY DESIGN OR MANUFACTURE EXCEPT WHEN SUCH USER POSSESSES DIRECT, WRITTEN
AUTHORIZATION FROM NEW CENTURION SOLUTIONS, INC.
10
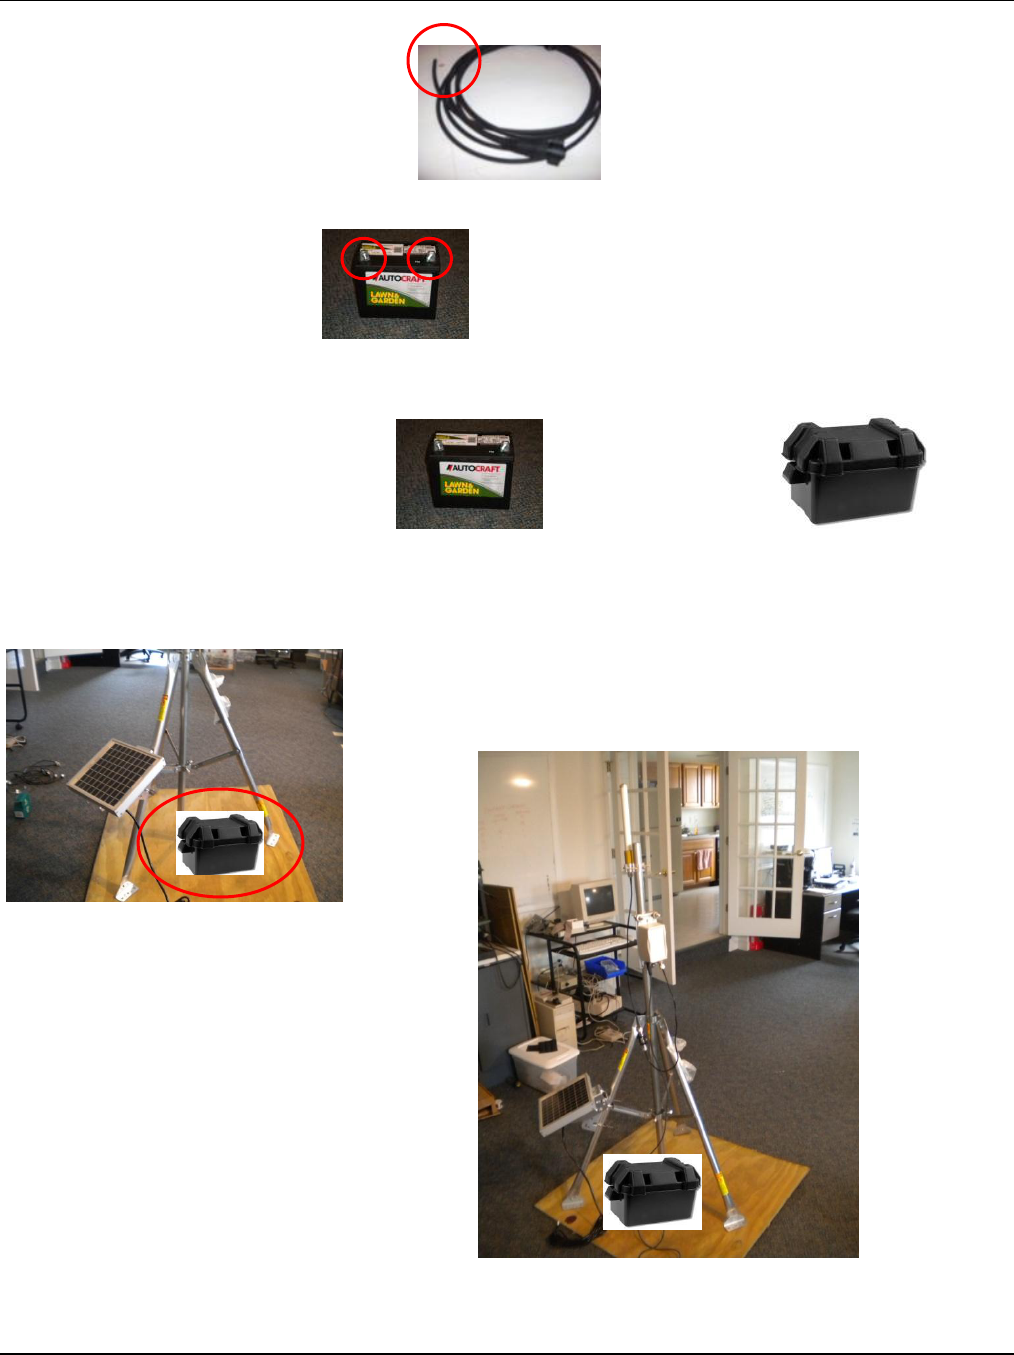
Step 12: Take open end Receptacle (G) and strip wire cover to show bare wire.
Attach bare wire to battery (T) White wire to positive side and black wire to
negative side.
Step 13: Place assembled battery (T) inside battery box (S)
Step 14: Set under middle of tripod (J) on mounting base (I)
Complete OREP Assembly

OREP Installation Manual 776-91-07-REV-A_OREP_INSTALLATION_MANUAL.docx
THE INFORMATION CONTAINED HEREIN IS PROPRIETARY TO NEW CENTURION SOLUTIONS, INC. AND SHALL NOT BE REPRODUCED OR
DISCLOSED IN WHOLE OR IN PART FOR ANY DESIGN OR MANUFACTURE EXCEPT WHEN SUCH USER POSSESSES DIRECT, WRITTEN
AUTHORIZATION FROM NEW CENTURION SOLUTIONS, INC.
11
3. FCC NOTIFICATION
NOTE: THE MANUFACTURER IS NOT RESPONSIBLE FOR ANY RADIO OR TV INTERFERENCE
CAUSED BY UNAUTHORIZED MODIFICATIONS TO THIS EQUIPMENT. SUCH MODIFICATIONS
COULD VOID THE USER’S AUTHORITY TO OPERATE THE EQUIPMENT.
THIS DEVICE COMPLIES WITH PART 15 OF THE FCC RULES. OPERATION IS SUBJECT TO THE
FOLLOWING TWO CONDITIONS: (1) THIS DEVICE MAY NOT CAUSE HARMFUL INTERFERENCE, AND
(2) THIS DEVICE MUST ACCEPT ANY INTERFERENCE RECEIVED, INCLUDING INTERFERENCE THAT
MAY CAUSE UNDESIRED OPERATION.