Nikon 3143EB Wireless LAN Module User Manual Q7115 25 UM EN
Nikon Corporation Wireless LAN Module Q7115 25 UM EN
UserManual.wiki
>
Nikon
>
3143EB User Manual
>
User Manual 3 fo 4
Contents
1.
Installation Manual
2.
User Manual Part 1 of 2
3.
User Manual Part 2 of 2
4.
User Manual 1 fo 4
5.
User Manual 2 fo 4
6.
User Manual 3 fo 4
7.
User Manual 4 fo 4
User Manual 3 fo 4
Navigation menu
Upload a User Manual
Namespaces
Wiki Guide
HTML
PDF
Info
Views
User Manual
Discussion / Help
Navigation
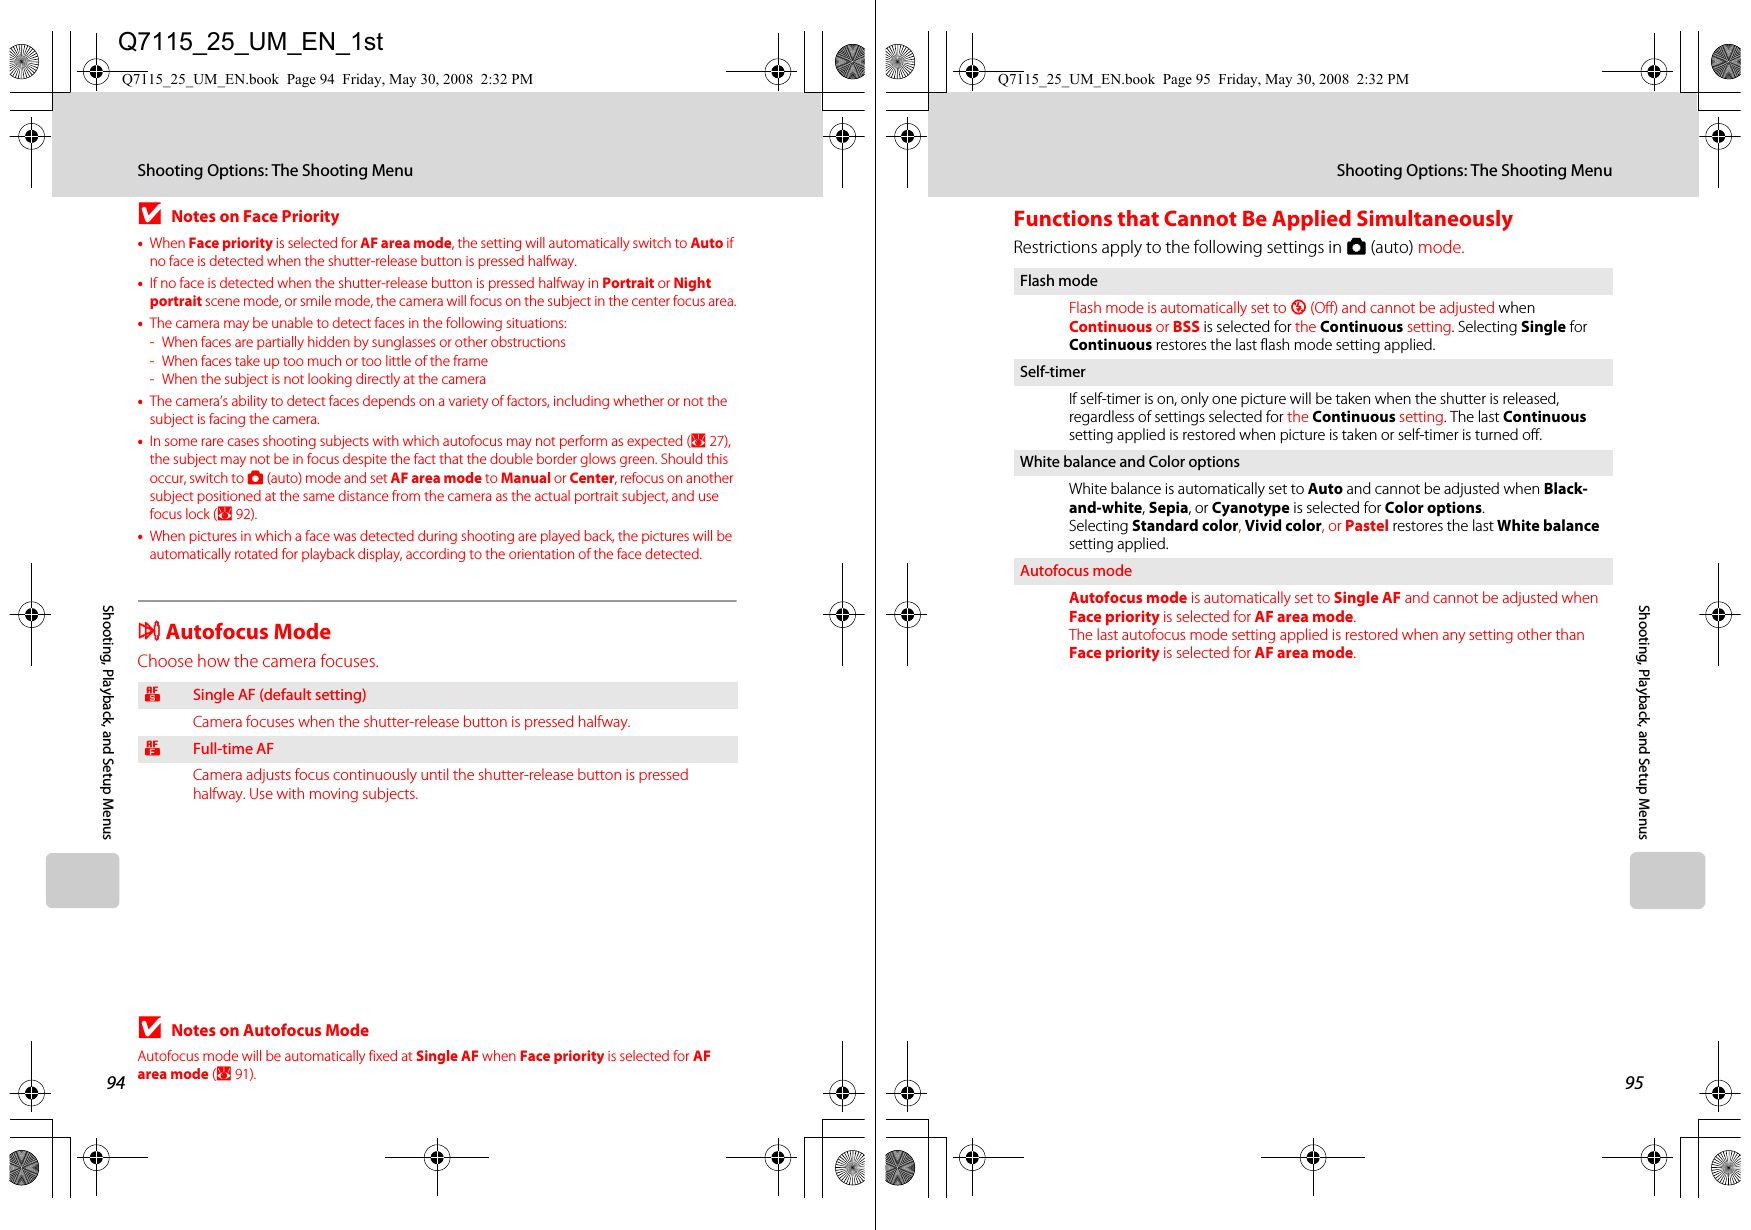
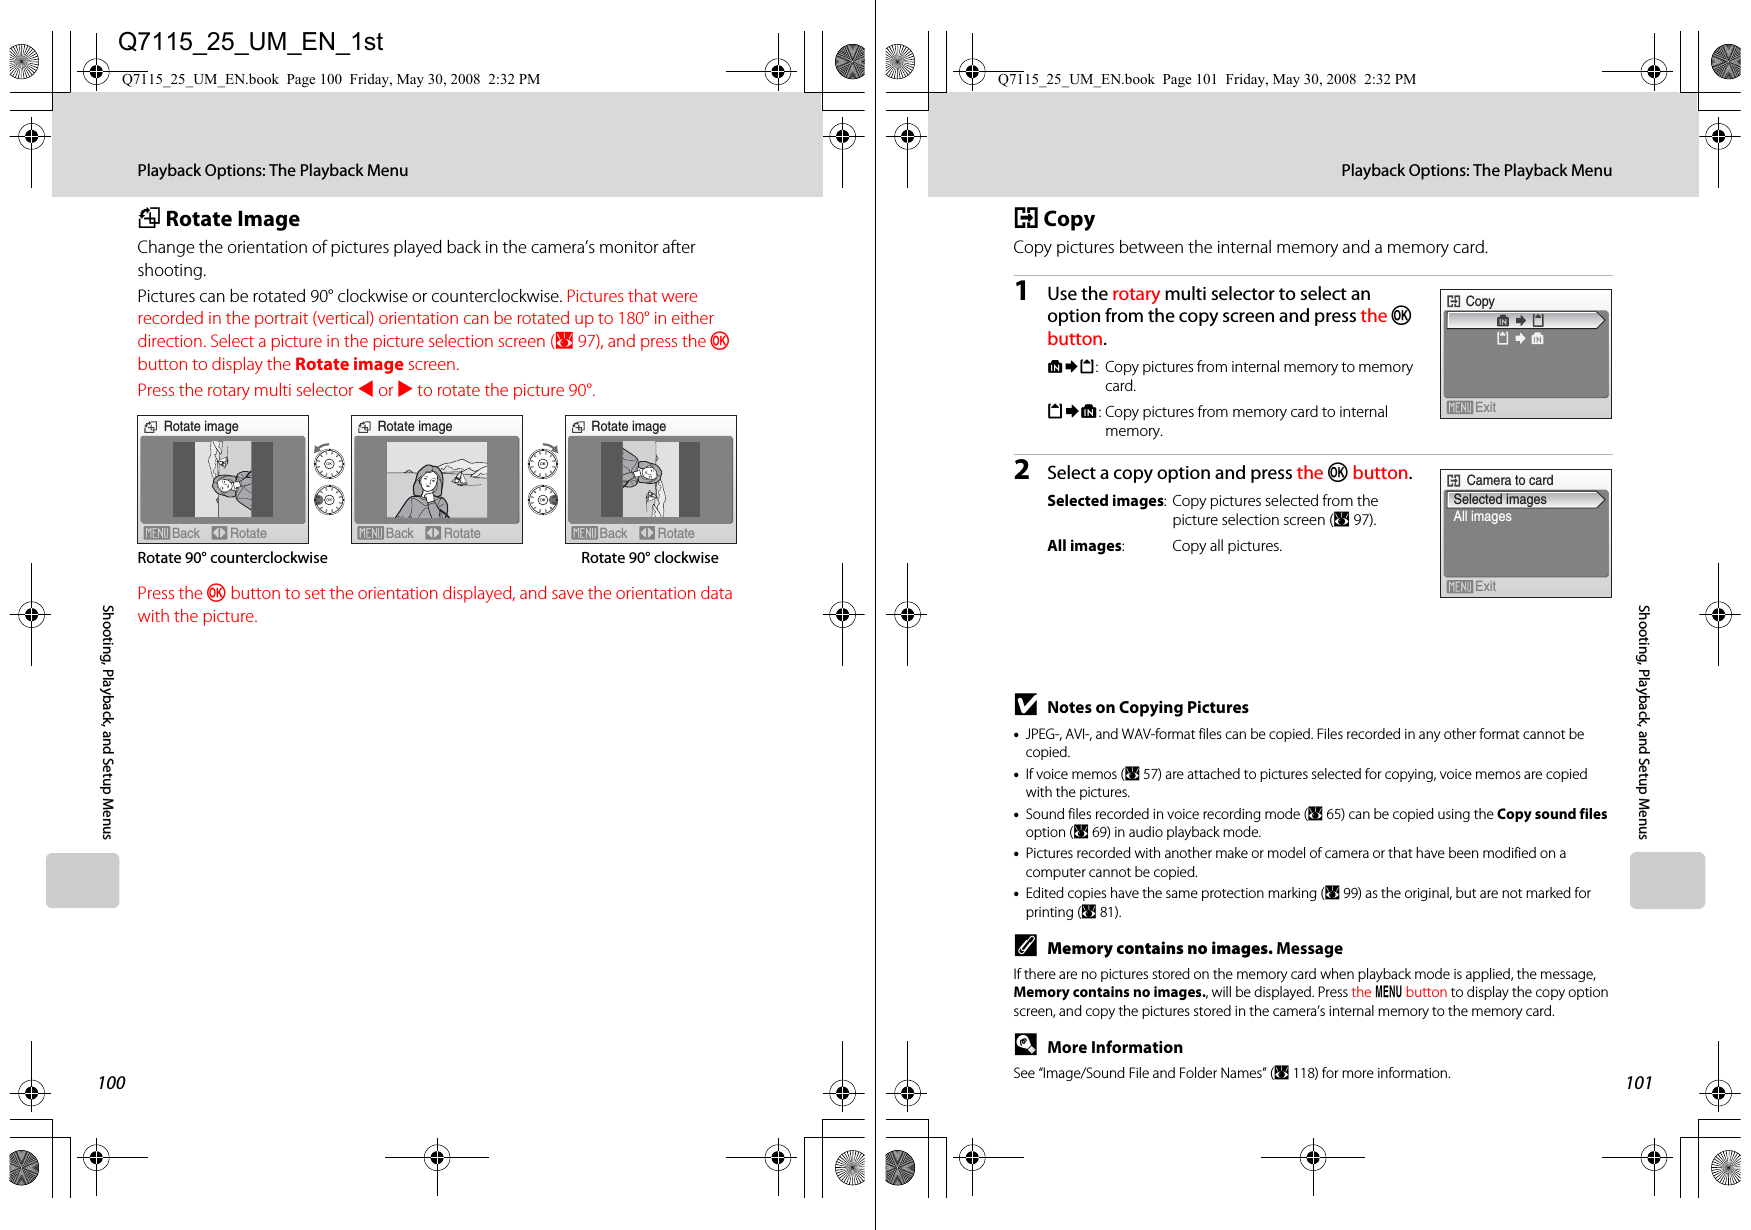
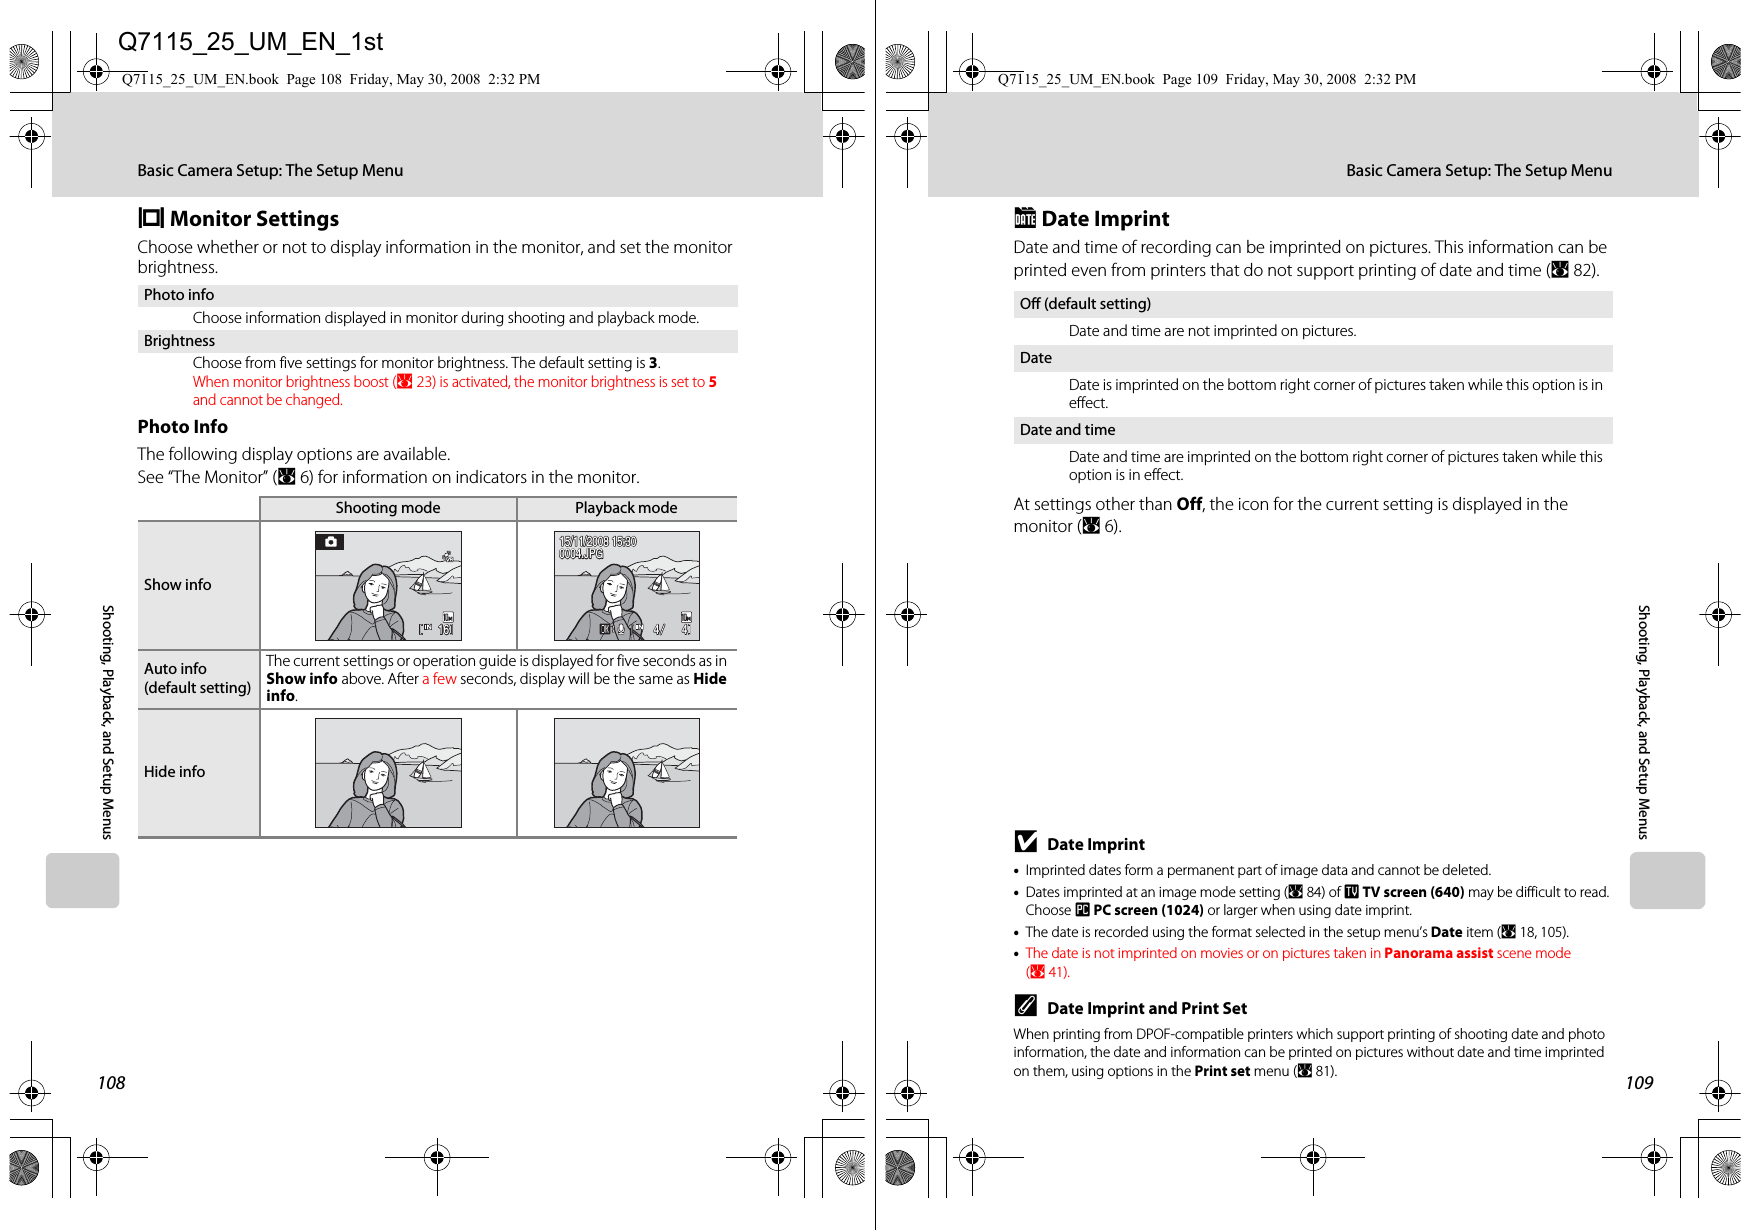
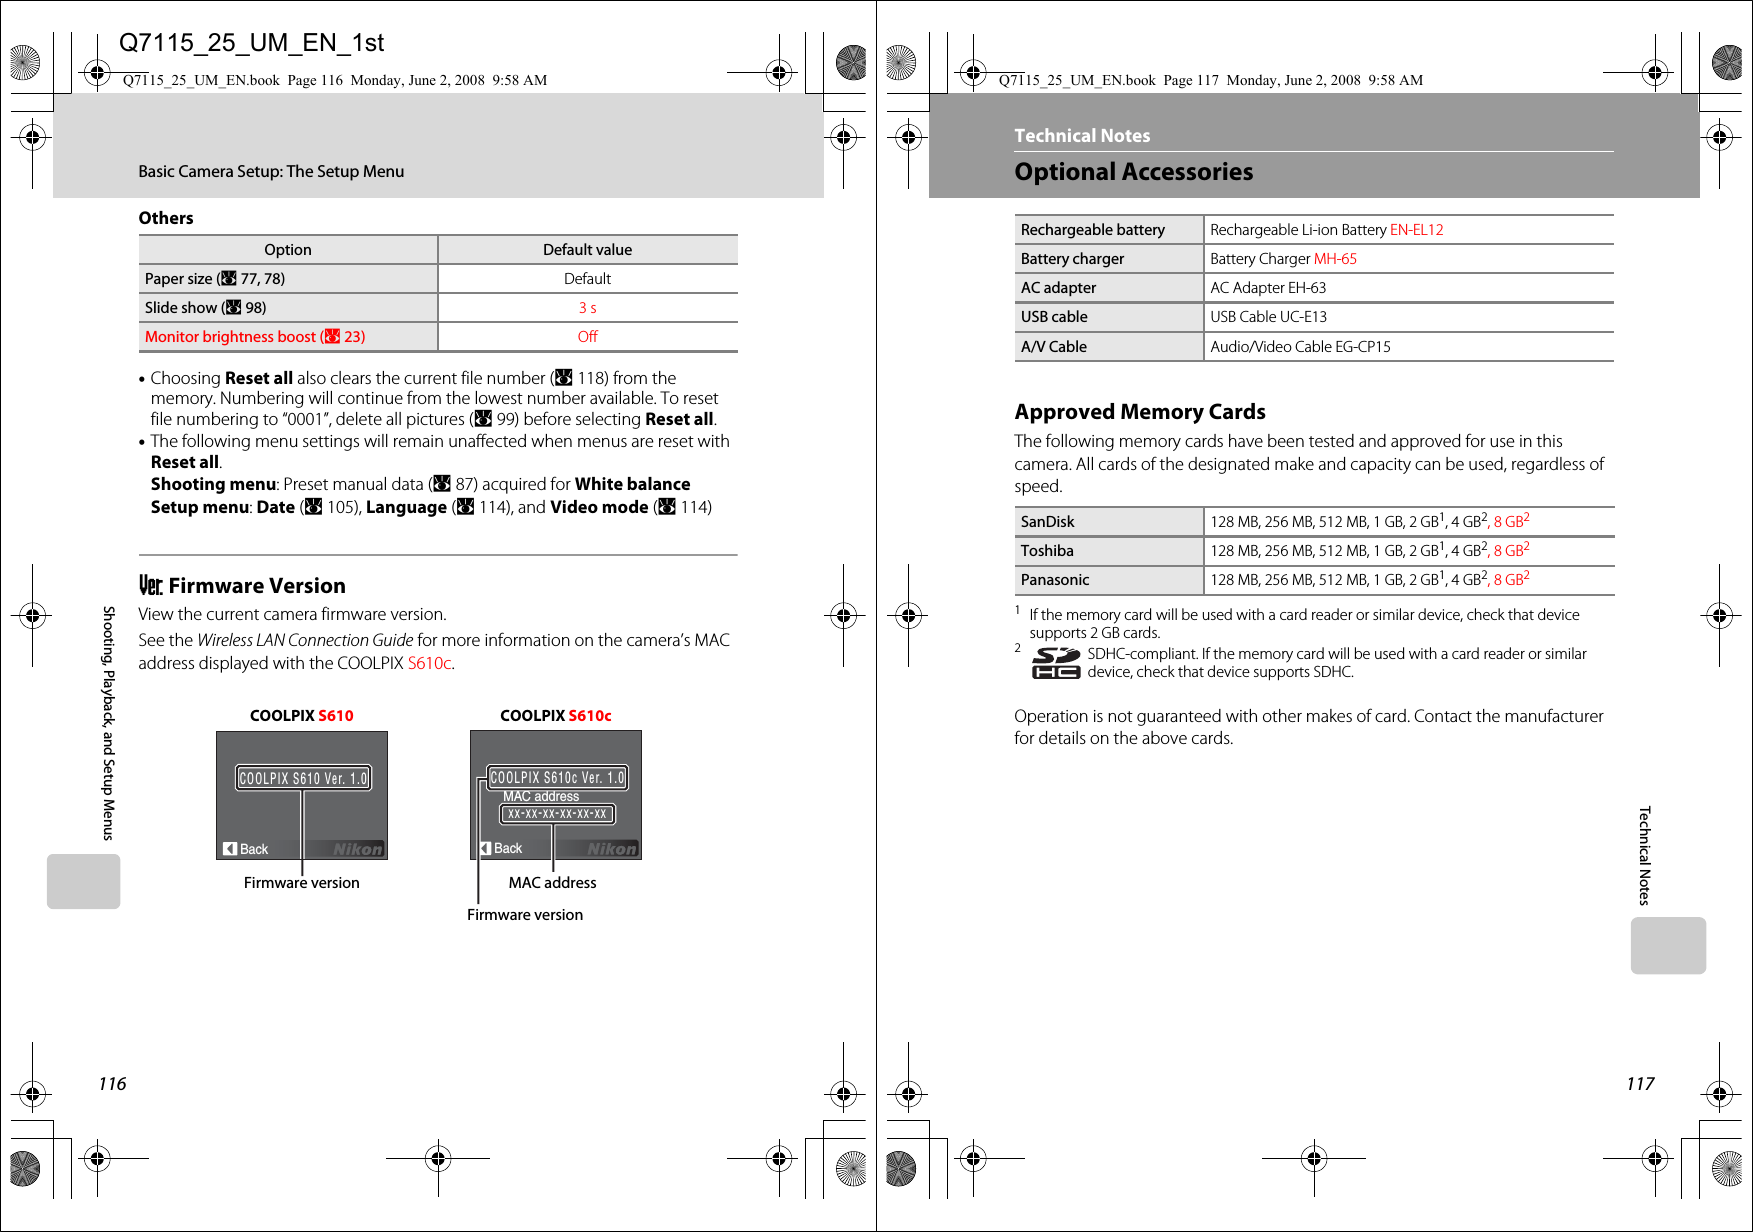
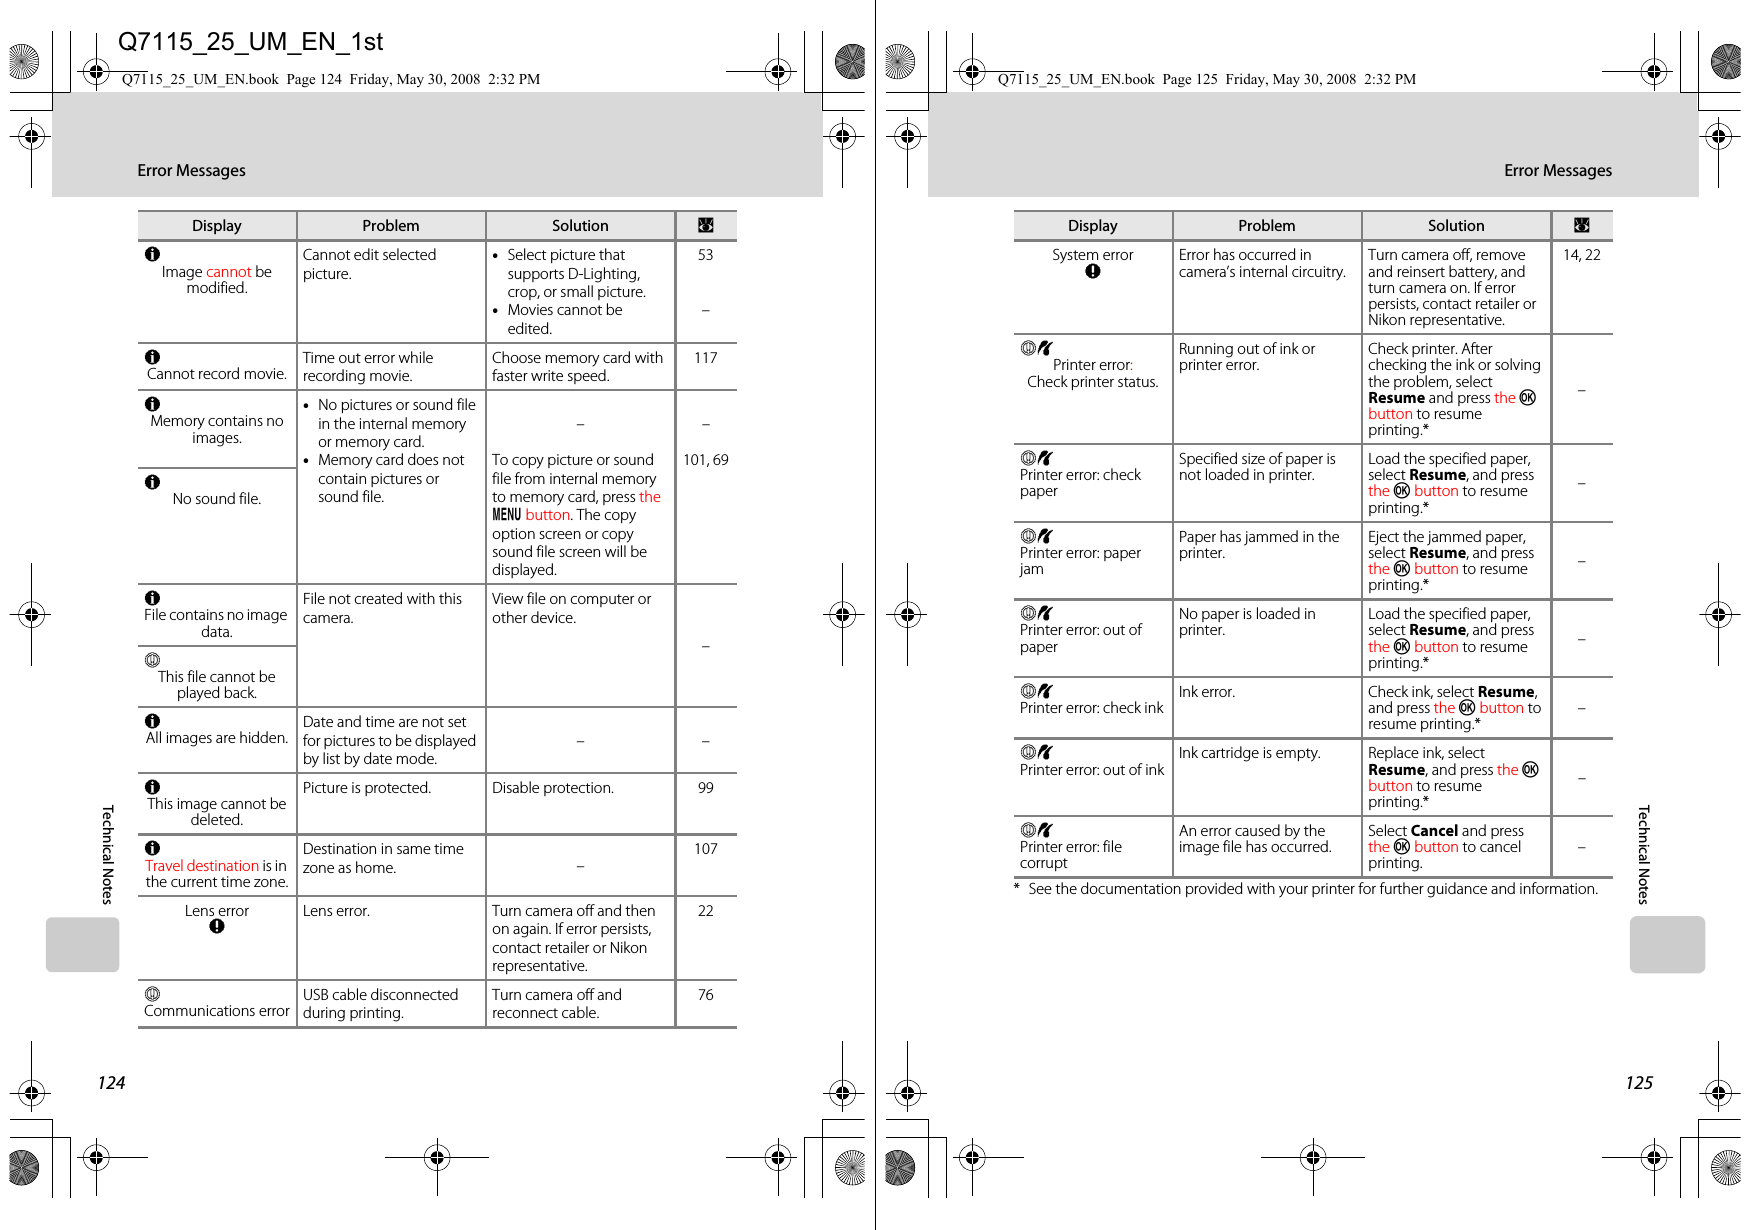
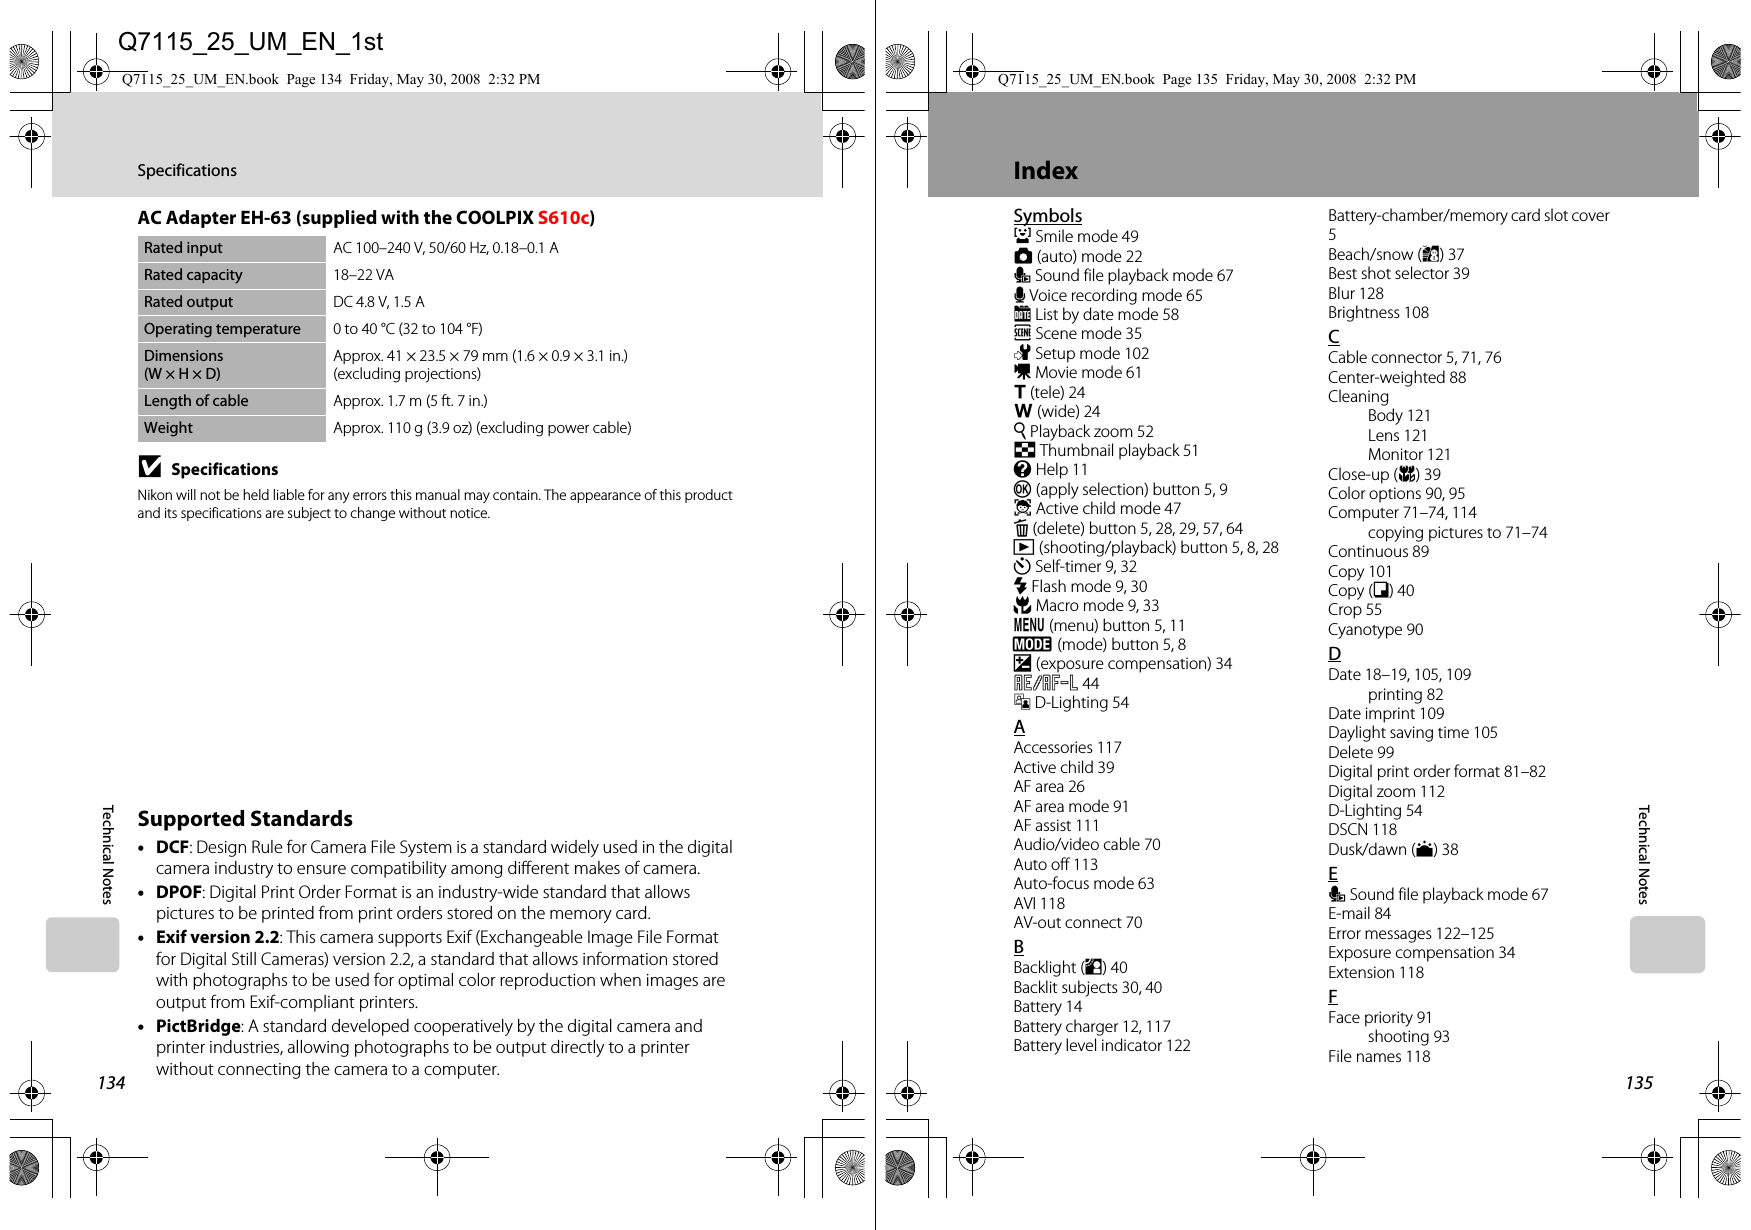
![130TroubleshootingTechnical NotesCannot use D-Lighting, crop, or small picture options•These options cannot be used with movies.•Choose a picture taken at any image mode setting other than l 16:9 (3584) and m 16:9 (1920).•Select picture that supports D-Lighting, crop, or small picture.•Pictures taken with another make or model of camera cannot be edited.•Other cameras may be unable to play back, or transfer to a computer, pictures edited with this camera.6484535353Pictures not displayed on television•Choose correct video mode.•Memory card contains no pictures. Replace memory card. Remove memory card to play back pictures from internal memory.11420Nikon Transfer does not start when camera is connected•Camera is off.•Battery is exhausted.•USB cable is not correctly connected.•If your computer is running Windows 2000 Professional, camera cannot be connected to the computer.•Camera is not recognized by the computer.•Computer is not set to launch Nikon Transfer automatically.For more information on Nikon Transfer, refer to help information contained in Nikon Transfer.22227171––Pictures to be printed are not displayedMemory card contains no pictures. Replace memory card. Remove memory card to print pictures from internal memory.20Cannot select paper size with cameraPaper size cannot be selected from the camera if the printer does not support the page sizes used by the camera or the printer automatically selects the page size. Use the printer to select page size.77, 78Problem Cause/Solution AQ7115_25_UM_EN.book Page 130 Friday, May 30, 2008 2:32 PM131Technical NotesSpecificationsNikon COOLPIX S610/S610c Digital CameraType Compact digital cameraEffective pixels 10.0 millionImage sensor 1/2.33-in. CCD; total pixels: approx. 10.34 millionLens 4× Zoom-Nikkor lensFocal length 5-20mm (equivalent with 35mm [135] format picture angle: 28-112mm)f/-number f/2.7–5.8Construction 7 elements in 6 groupsDigital zoom Up to 4× (equivalent with 35mm [135] format picture angle: approx. 448mm)Vibration reduction Lens shiftAutofocus (AF) Contrast-detect AFFocus range (from lens)•[W]: 50 cm (1 ft. 7.6 in.) to ∞, [T]: 60 cm (1 ft. 11.6 in.) to ∞•Macro mode: 3 cm (1.1 in.) to ∞ (when the zoom indicator is before G)Focus-area selection Auto (9-area automatic selection), face priority, manual with 99 focus areas, centerMonitor 3.0 in., Approx. 230k-dot, TFT LCD with anti-reflection coating and 5-level brightness adjustment (equipped with monitor brightness boost function)Frame coverage (shooting mode)Approx. 100 % horizontal and 100 % verticalFrame coverage (playback mode)Approx. 100 % horizontal and 100 % verticalStorageMedia •Internal memory (approx. ## MB)•SD (Secure Digital) memory cardsFile system DCF, Exif 2.2, and DPOF compliantFile formats Compressed: JPEG-Baseline compliantMovies: AVI Sound files: WAVImage size (pixels) •3,648 × 2,736 High (3648P)/Normal (3648)•3,072 × 2,304 Normal (3072)•2,592 × 1,944 Normal (2592)•2,048 × 1,536 Normal (2048)•1,024 × 768 PC screen (1024)•640 × 480 TV screen (640)•3,584 × 2,016 16:9 (3584)•1,920 × 1,080 16:9 (1920)ISO sensitivity (Standard output sensitivity)ISO 100, 200, 400, 800, 1600, 3200#Auto (auto gain from ISO 100 to 1600#)Q7115_25_UM_EN.book Page 131 Friday, May 30, 2008 2:32 PMQ7115_25_UM_EN_1st](https://usermanual.wiki/Nikon/3143EB.User-Manual-3-fo-4/User-Guide-979164-Page-22.png)
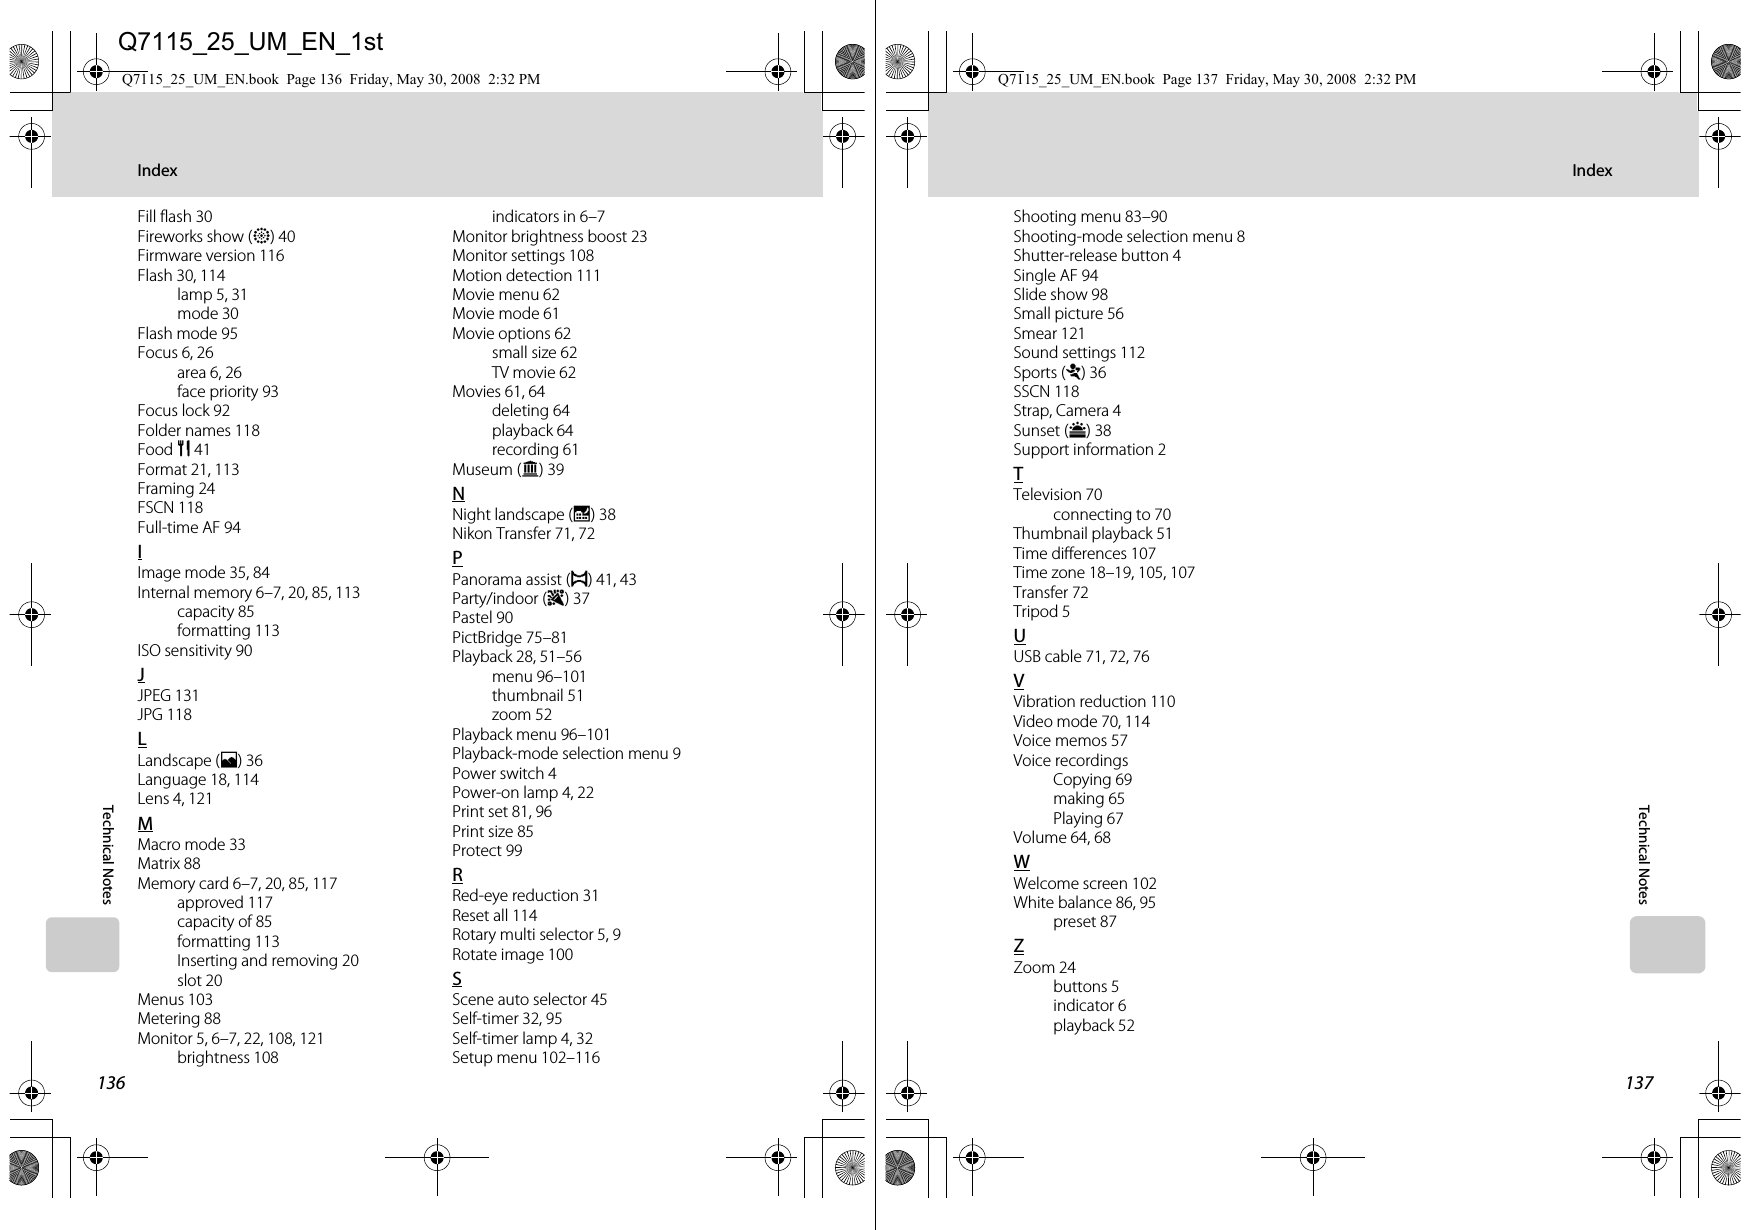
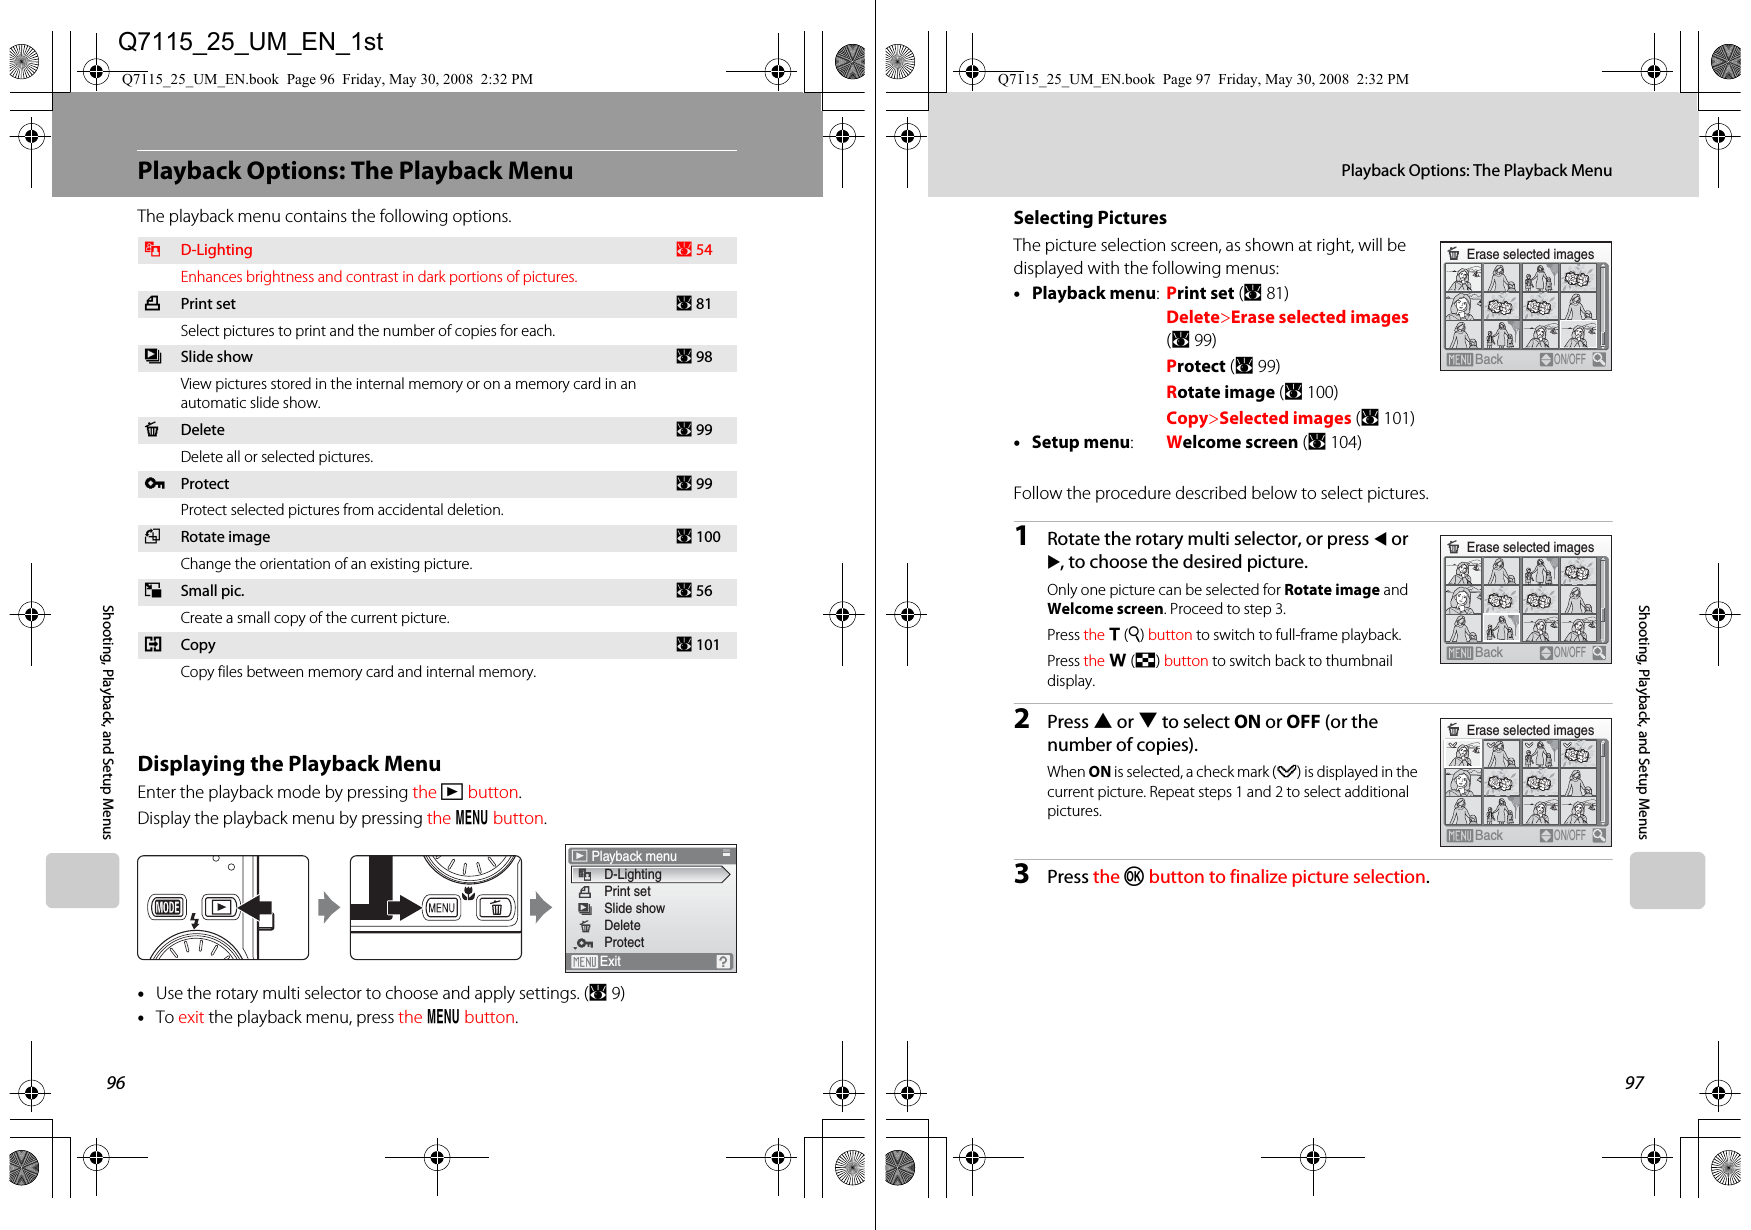
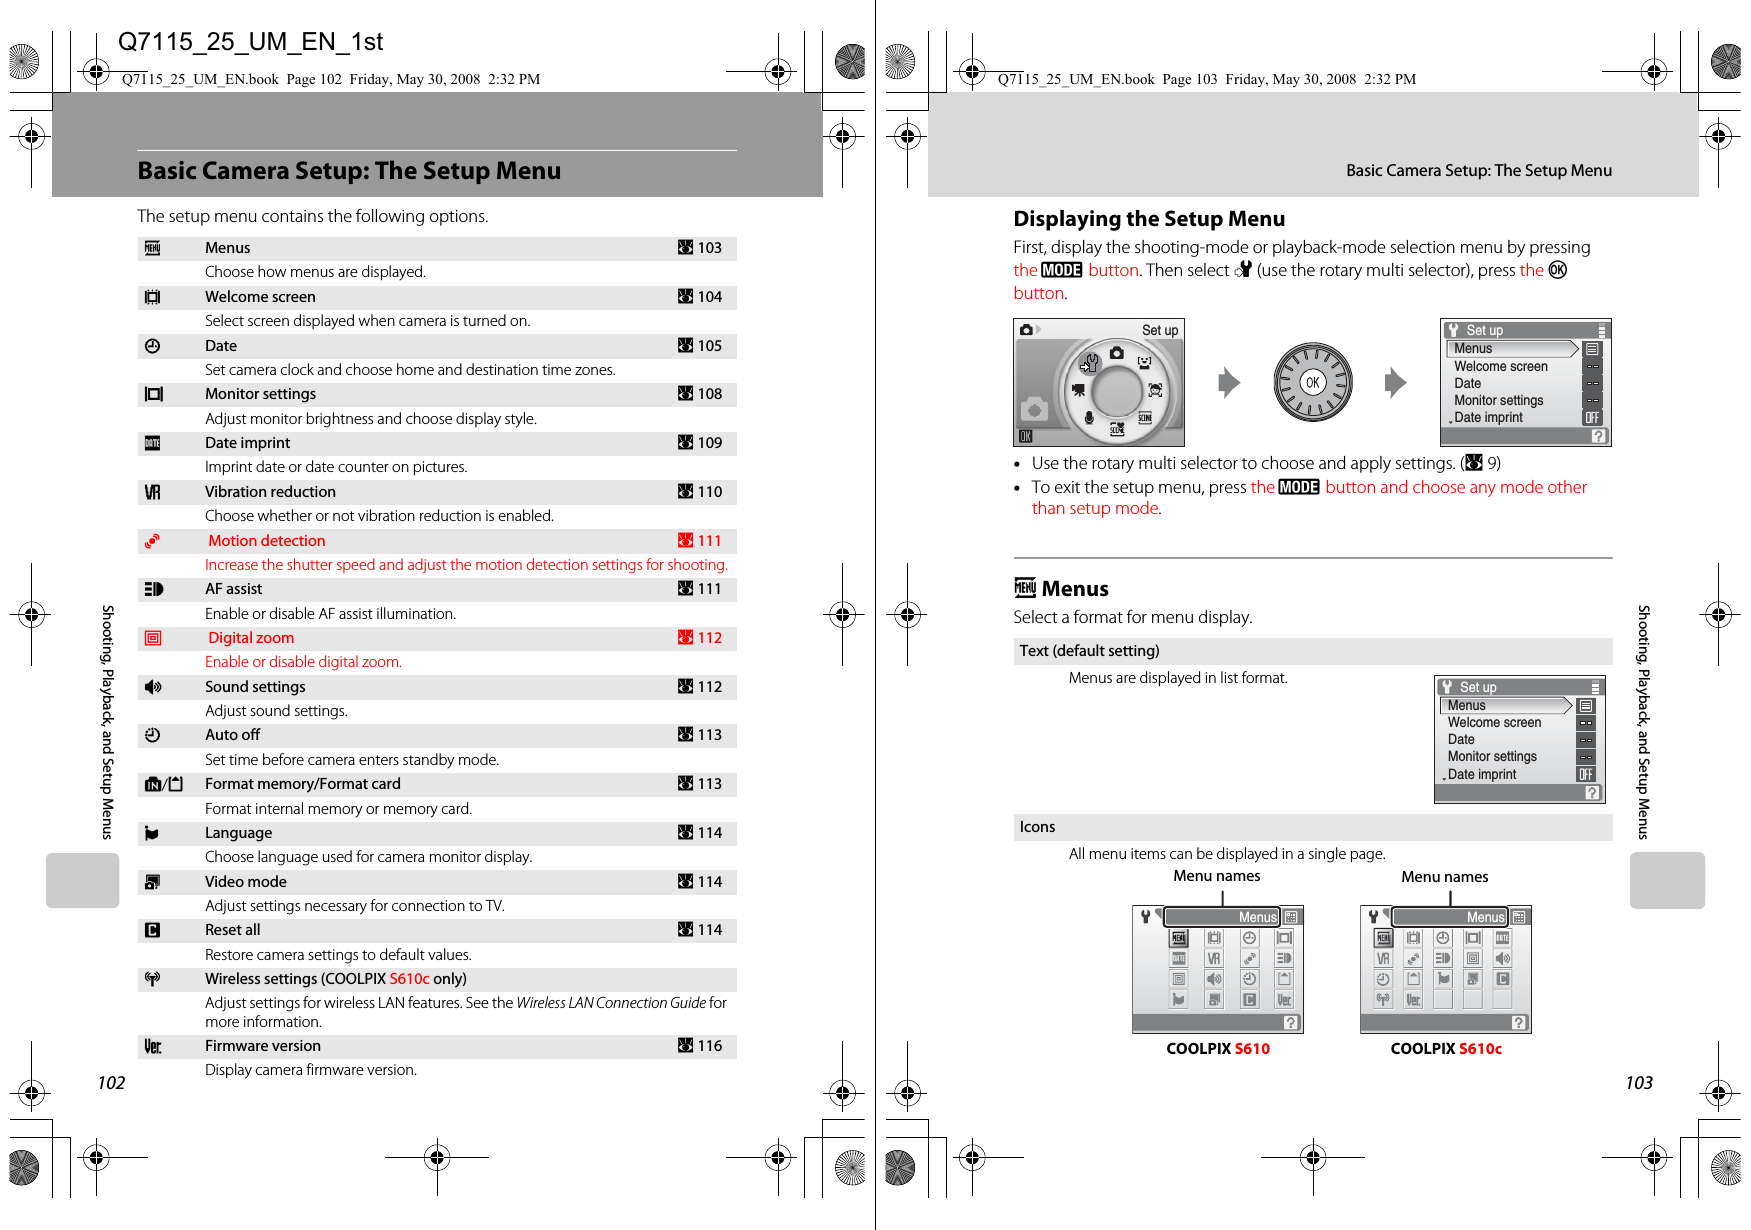
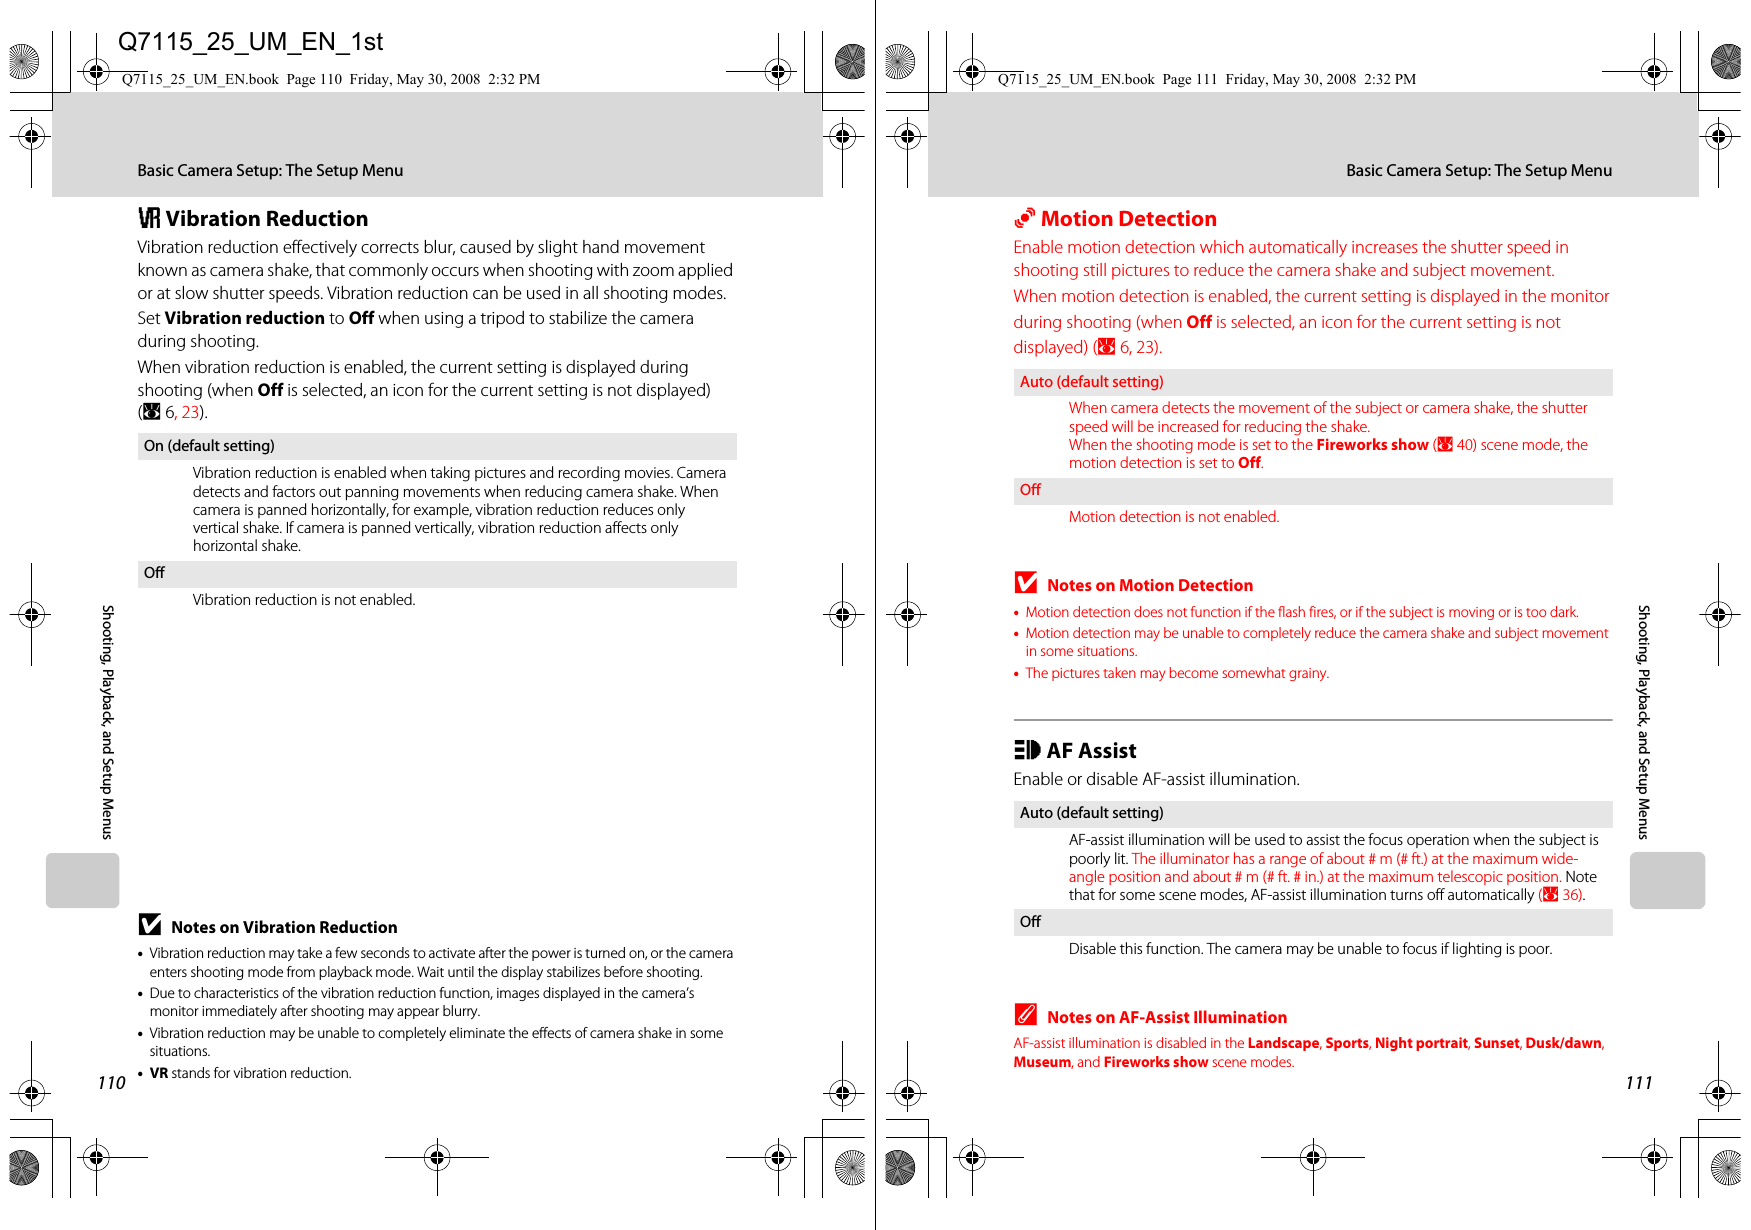
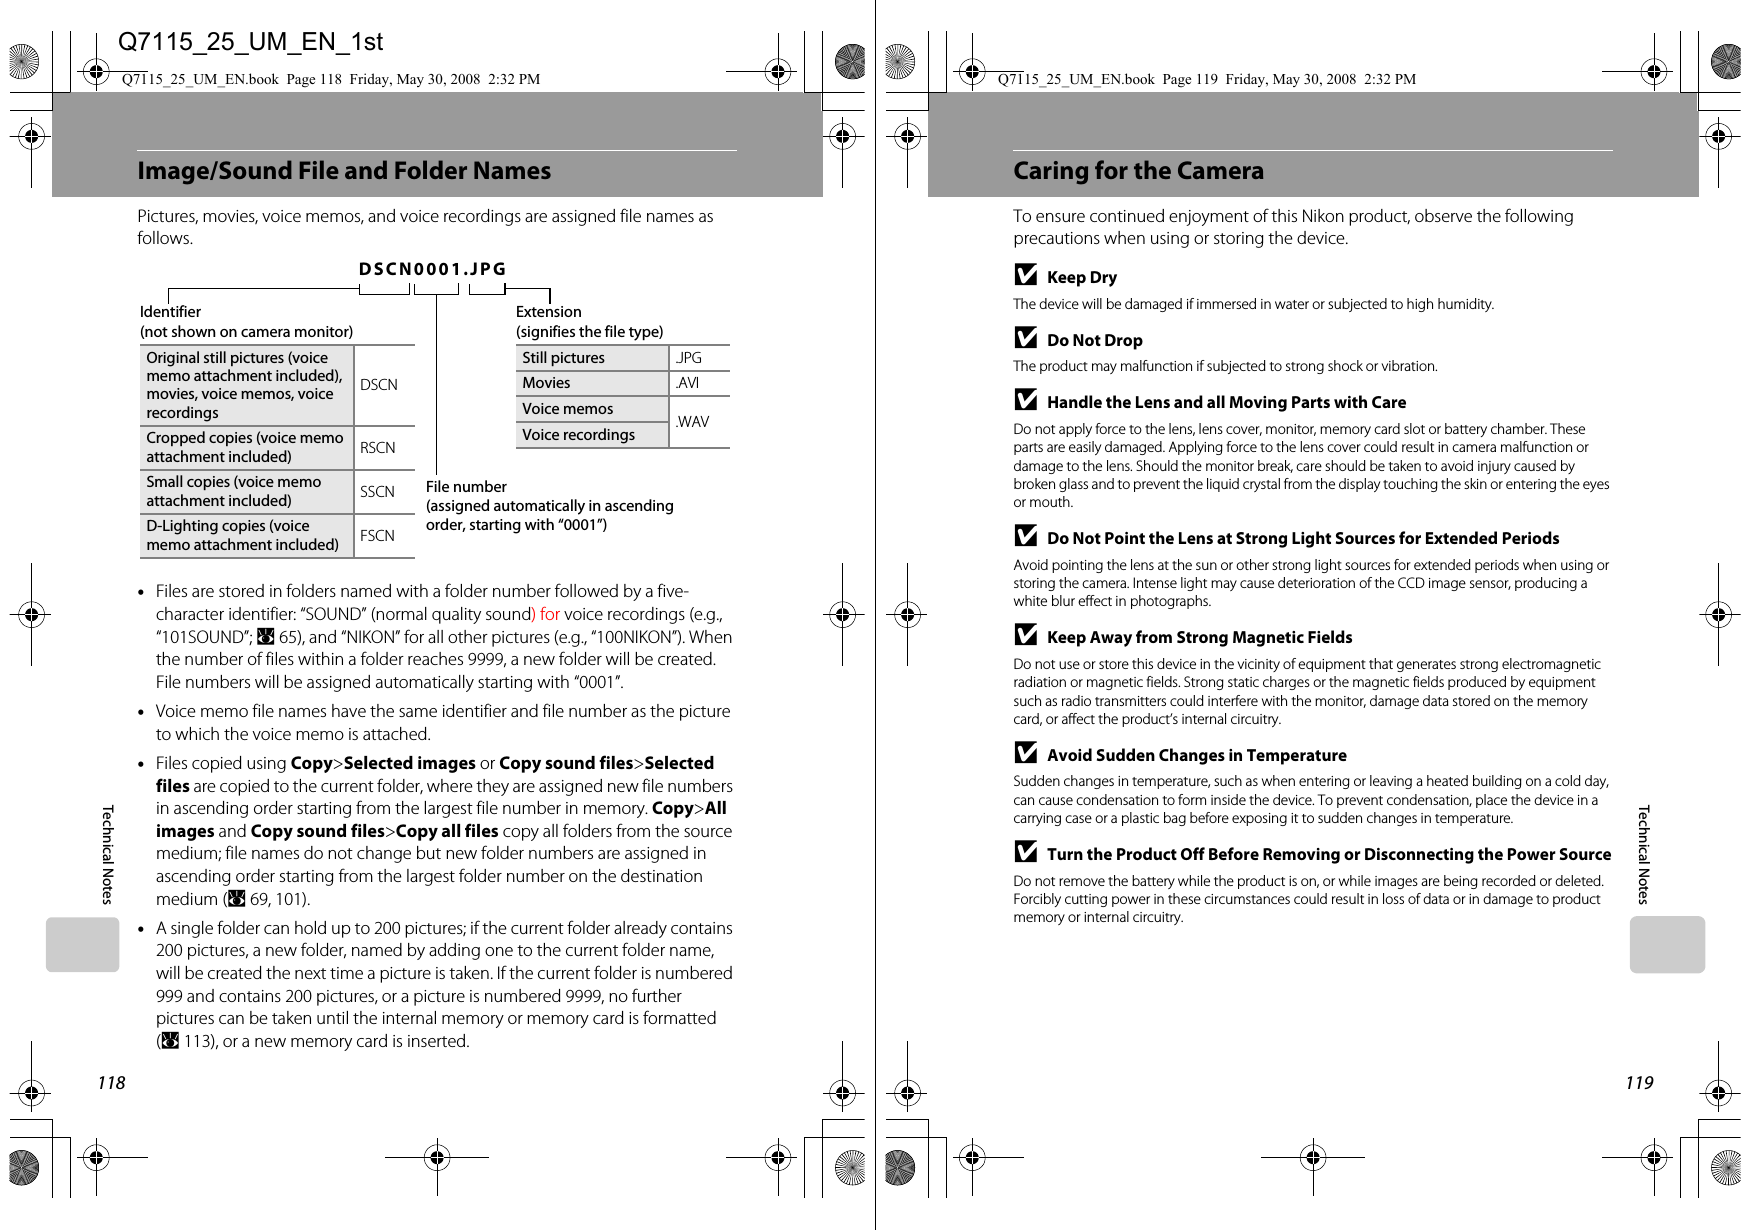
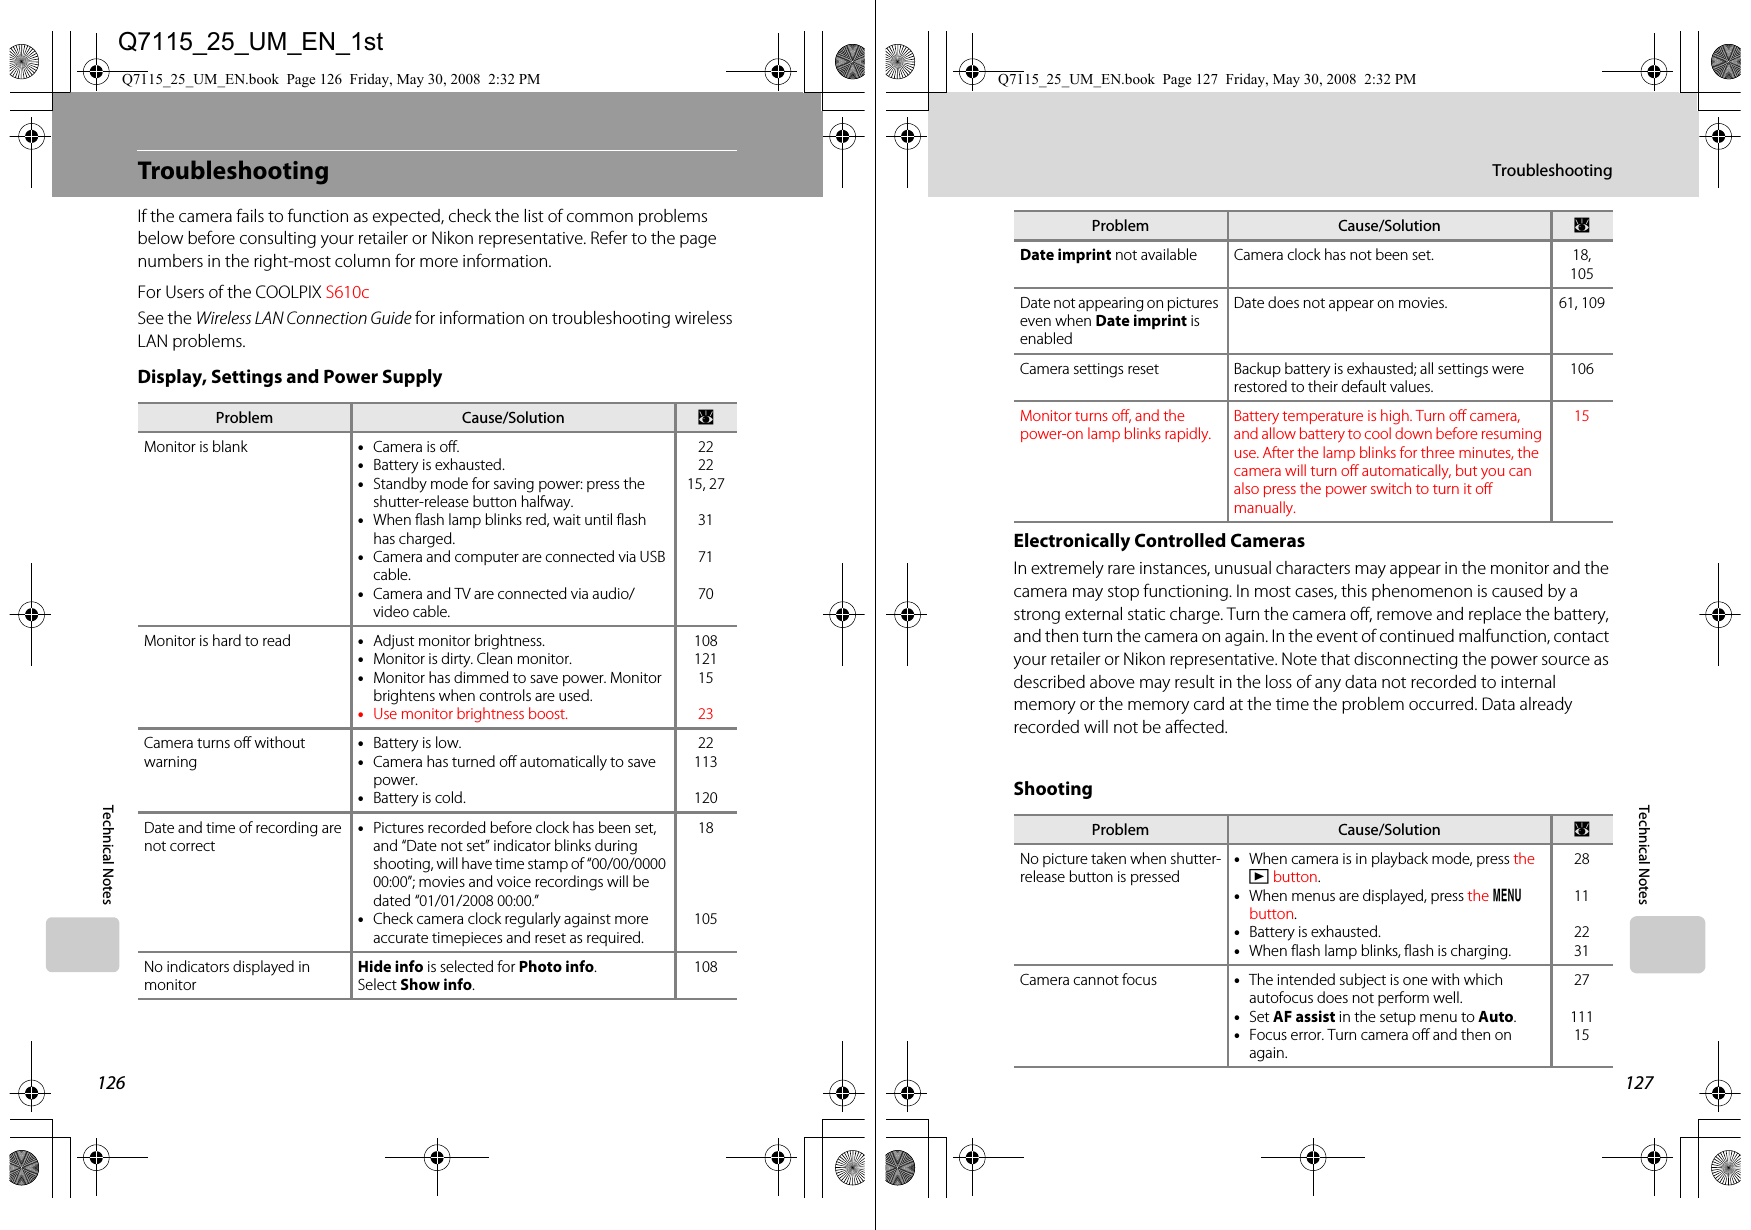
![132SpecificationsTechnical NotesExposureMetering 224-segment matrix, center-weightedExposure control Programmed auto exposure with motion detection and exposure compensation (–2.0 to +2.0 EV in steps of 1/3 EV)Range(ISO 100)[W]: 1.0 to 15.5 EV[T]: 1.2 to 17.7 EVShutter Mechanical and charge-coupled electronic shutterSpeed 1/1500–1 s, 4 s (Fireworks show scene mode)Aperture Electronically-controlled ND filter (-2 AV) selectionRange 2 steps (f/2.7 and f/5.8 [W])Self-timer Can be selected from 10 and 2 seconds durationBuilt-in flashRange (approx.)(ISO sensitivity: Auto)[W]: ## to ## m (## in. to ## ft.)[T]: ## to ## m (## in. to ## ft.)Flash control TTL auto flash with monitor preflashesInterface Hi-Speed USBData transfer protocol MTP, PTPVideo output Can be selected from NTSC and PALI/O terminal Multi connectorSupported languagesArabic, Chinese (Simplified and Traditional), Czech, Danish, Dutch, English, Finnish, French, German, Greek, Hungarian, Indonesian, Italian, Japanese, Korean, Norwegian, Polish, Portuguese, Russian, Spanish, Swedish, Thai, TurkishPower sources •One EN-EL12 Rechargeable Li-ion Battery (supplied)•AC Adapter EH-63Battery life*Approx. ## shots (EN-EL12)Dimensions(W × H × D)COOLPIX S610: Approx. ## × ## × ## mm (## × ## × ## in.) (excluding projections)COOLPIX S610c: Approx. ## × ## × ## mm (## × ## × ## in.) (excluding projections)Weight Approx. ## g (## oz) (without battery and SD memory card)Operating environmentTemperature 0 to 40 °C (32 to 104 °F)Humidity Less than 85 % (no condensation)Q7115_25_UM_EN.book Page 132 Friday, May 30, 2008 2:32 PM133SpecificationsTechnical Notes•Unless otherwise stated, all figures are for a camera with a fully-charged Rechargeable Li-ion Battery EN-EL12 operated at an ambient temperature of 25 °C (77 °F).* Based on Camera and Imaging Products Association (CIPA) standards for measuring the life of camera batteries. Measured at 23 °C (73 °F); zoom adjusted with each shot, flash fired with every other shot, image mode set to i Normal (3648). Battery life may vary depending on shooting interval and length of time menus and images are displayed.Rechargeable Li-ion Battery EN-EL12Battery Charger MH-65 (supplied with the COOLPIX S610)Wireless (COOLPIX S610c only)Standards IEEE 802.11b/g (standard wireless LAN protocol), ARIB STD-T66 (standard for low power data communications systems)Communications protocolsIEEE 802.11g: OFDMIEEE 802.11b: DSSSRange (line of sight) Approx. 50 m (98 ft.) (varies with location and weather)Operating frequency 2412–2462 MHz (11 channels)Data rates IEEE 802.11g: 6, 9, 12, 18, 24, 36, 48, and 54 MbpsIEEE 802.11b: 1, 2, 5.5, and 11 MbpsSecurity TKIP, 128/64-bit (104/40-bit) WEP, AESAccess protocols InfrastructureType Rechargeable lithium-ion batteryRated capacity DC 3.7 V, 1050 mAhOperating temperature 0 to 40 °C (32 to 104 °F)Dimensions (W × H × D) Approx. 32 × 43.8 × 7.9 mm (1.3 × 1.7 × 0.3 in.)Weight Approx. 22.5 g (0.8 oz) (excluding terminal cover)Rated input AC 100-240 V, 50/60 Hz, 0.08-0.05 ARated capacity 8–12 VARated output DC 4.2 V, 0.7 ASupported batteries Nikon Rechargeable Li-ion Battery EN-EL12Charging time Approx. 150 minutes when battery is fully dischargedOperating temperature 0 to 40 °C (32 to 104 °F)Dimensions(W × H × D)Approx. 58 × 27.5 × 80 mm (2.3 × 1.1 × 3.1 in.)(excluding projections)Weight Approx. 65 g (2.3 oz) (excluding power cable)Q7115_25_UM_EN.book Page 133 Friday, May 30, 2008 2:32 PMQ7115_25_UM_EN_1st](https://usermanual.wiki/Nikon/3143EB.User-Manual-3-fo-4/User-Guide-979164-Page-23.png)