Nikon 3143EB 802.11b/g Transmitter Module User Manual Part 1 of 2
Nikon Corporation 802.11b/g Transmitter Module Part 1 of 2
UserManual.wiki
>
Nikon
>
3143EB User Manual
>
User Manual Part 1 of 2
Contents
1.
Installation Manual
2.
User Manual Part 1 of 2
3.
User Manual Part 2 of 2
4.
User Manual 1 fo 4
5.
User Manual 2 fo 4
6.
User Manual 3 fo 4
7.
User Manual 4 fo 4
User Manual Part 1 of 2
Navigation menu
Upload a User Manual
Namespaces
Wiki Guide
HTML
PDF
Info
Views
User Manual
Discussion / Help
Navigation
![xiiTable of ContentsIntroductionTechnical Notes ............................................................................................164Optional Accessories .....................................................................................164Approved Memory Cards ..........................................................................164Image File and Folder Names .......................................................................165Caring for the Camera ..................................................................................167Cleaning ...................................................................................................169Storage .....................................................................................................169Error Messages...............................................................................................170Troubleshooting ............................................................................................ 176Supported Standards.....................................................................................182Specifications ................................................................................................. 183Index...............................................................................................................187Q5155_IM_EN.book Page xii Tuesday, October 31, 2006 7:07 PM1IntroductionAbout This ManualThank you for your purchase of a Nikon COOLPIX S50c digital camera. Thismanual has been written to help you enjoy taking pictures with your Nikondigital camera. Read this manual thoroughly before use, and keep it whereall those who use the product will read it.Symbols and ConventionsTo make it easier to find the information you need, the following symbolsand conventions are used:Notations• A Secure Digital (SD) memory card is referred to as a “memory card.”• The setting at the time of purchase is referred to as the “default setting.”• Menu items, options, and messages displayed in the camera monitor areshown in brackets ([ ]).Screen SamplesIn this manual, images are sometimes omitted from monitor display samplesso that monitor indicators can be more clearly shown.Illustrations and Screen DisplayIllustrations and text displays shown in this manual may differ from actualdisplay. kMemory CardsPictures taken with this camera can be stored in the camera’s internal memory or on remov-able memory cards. If a memory card is inserted, all new pictures will be stored on the mem-ory card and delete, playback, and format operations will apply only to the pictures on thememory card. The memory card must be removed before the internal memory can be format-ted or used to store, delete, or view pictures.This icon marks cautions, infor-mation that should be read before use to prevent damage to the camera.This icon marks tips, additional information that may be helpful when using the camera.This icon marks notes, informa-tion that should be read before using the camera.This icon indicates that more information is available else-where in this manual or in the Quick Start Guide.cljkQ5155_IM_EN.book Page 1 Tuesday, October 31, 2006 7:07 PM](https://usermanual.wiki/Nikon/3143EB.User-Manual-Part-1-of-2/User-Guide-729963-Page-8.png)
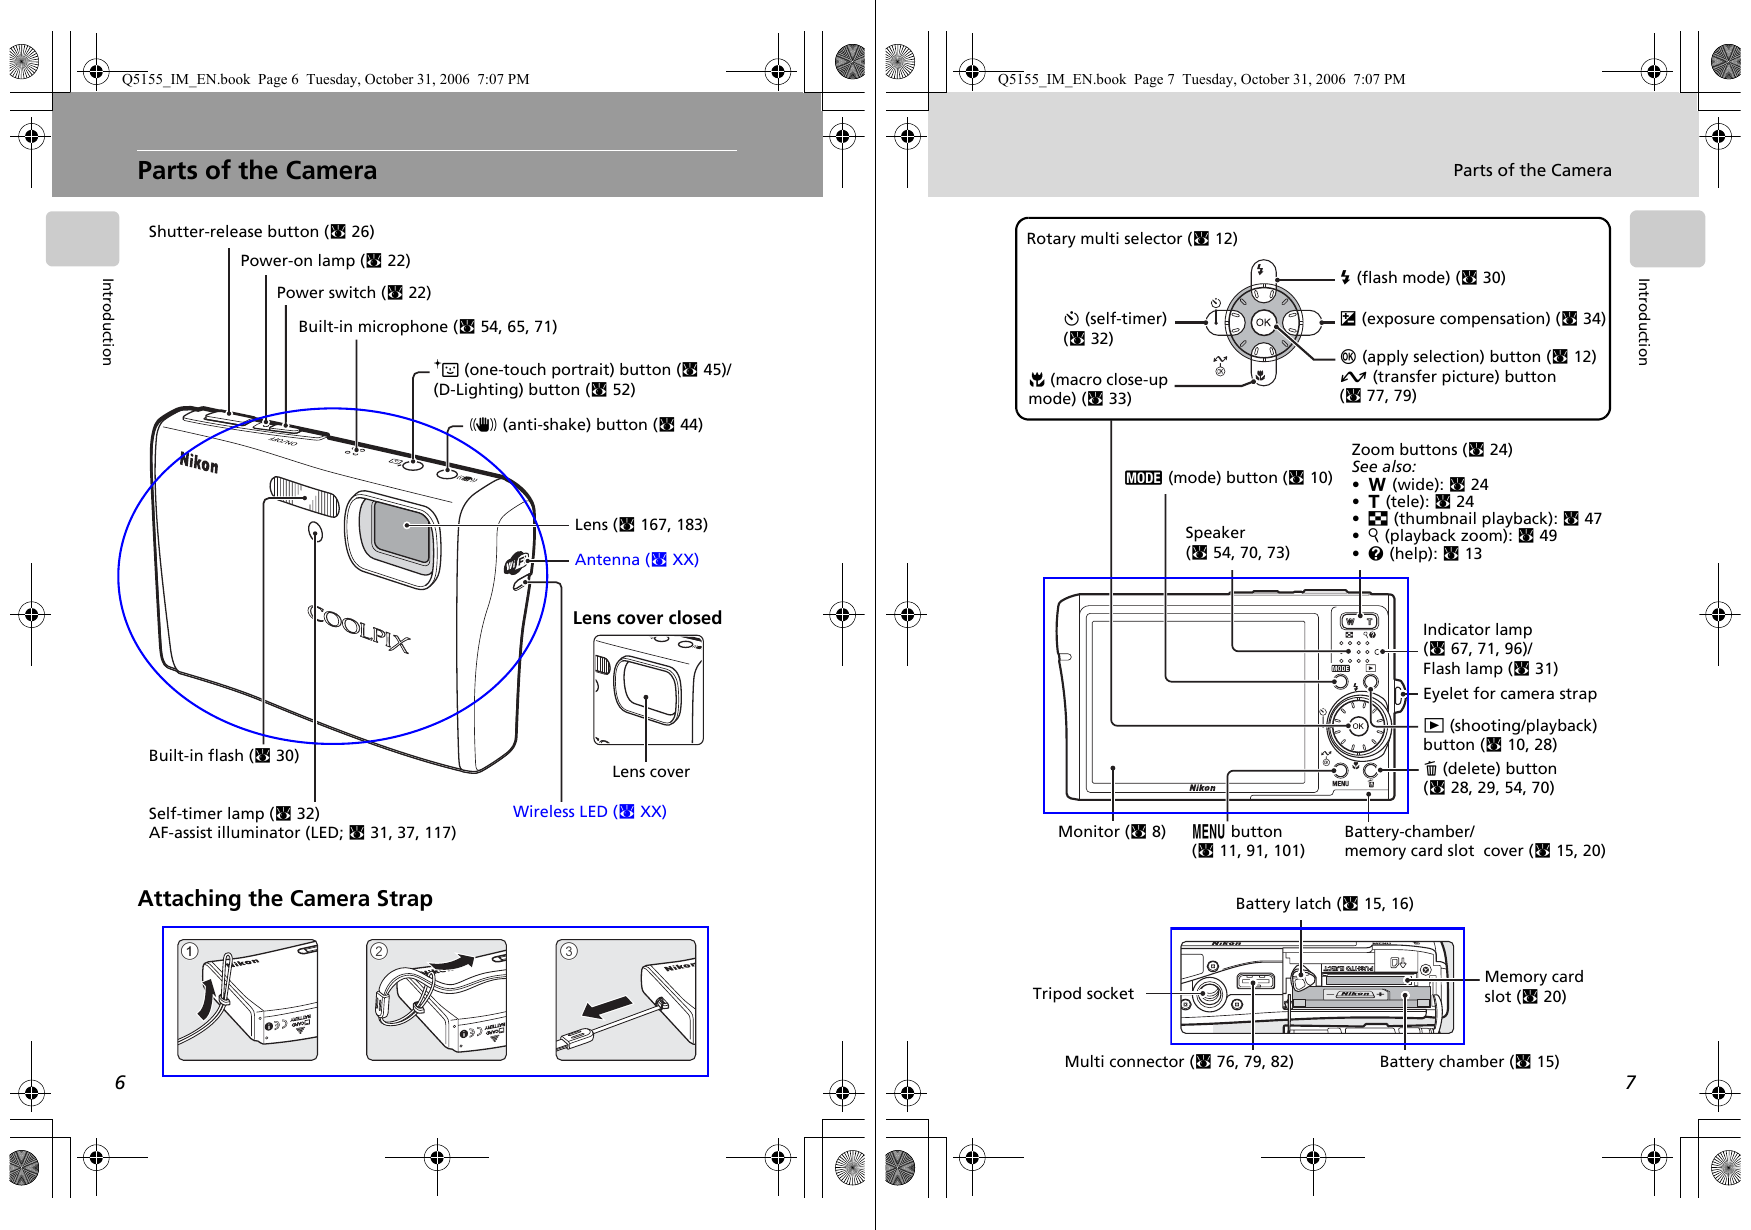
![8IntroductionThe MonitorThe following indicators may appear in the monitor during shooting andplayback (actual display varies with current camera settings).Shooting1Differs according to the current shooting mode. Refer to the sections on each modefor details.2When the shutter-release button is pressed halfway at the default [AF area mode]setting of [Auto], the active focus area is displayed. The focus area can be selectedfrom 99 focus areas in the frame or locked at the center focus area.99999999MMwwWWHHs9999+1.0+1.0+1.0101010EIICCggqqLBBFFWWAAqwzqwzqwzfghijlfghijlfghijlCDBACDBACDBAFEdehiWYYzABCDABCDzABCDppGGB891011141516171819134526720 2112131Shooting mode1.................... 22, 35, 36, 44, 45, 652Exposure lock............................. 433Macro close-up mode................. 334Zoom indicator..................... 24, 335Focus indicator........................... 266Flash mode ................................ 307Internal memory indicator .......... 238Battery level indicator................. 229ISO sensitivity (ISO equivalent)............................................ 31, 9810 Vibration reduction icon........... 11611 Self-timer indicator..................... 3212 “Date not set” indicator ........... 170Time zone indicator .................. 11013 Date imprint ............................. 11414Number of exposures remaining (still pictures).............. 22Movie length ..............................6515 Focus area2.......................... 26, 9916 Exposure compensation value..... 3417 Image mode ............................... 9118 Color options .............................9819 White balance mode .................. 9320 Best shot selector (BSS)............... 9721 Continuous shooting mode ........ 95Q5155_IM_EN.book Page 8 Tuesday, October 31, 2006 7:07 PM9The MonitorIntroductionPlayback01/04/2007 12:0001/04/2007 12:009999.JPG9999.JPG9999.JPG9999999999999999OMMww99999999DDwwEEOEhhPPT01/04/2007 12:00OOPPOKIJKIJKIJK i4631271085911131415161718121Date of recording....................... 182Time of recording....................... 183Internal memory indicator .......... 234Battery level indicator................. 225File number and type................ 1656Volume indicator.................. 54, 707Voice memo recording guide...... 548Voice memo playback guide....... 549Current frame number/total number of frames ...................... 28Movie length.............................. 7010 Movie playback indicator ............ 7011 D-Lighting icon........................... 5212 Voice memo icon........................ 5413 Image mode ............................... 9114 Small picture ..............................5315 Protect icon .............................. 10416 Print-order icon ..........................8717 Transfer icon ......................80, 10518 Movie indicator ..........................70Q5155_IM_EN.book Page 9 Tuesday, October 31, 2006 7:07 PM](https://usermanual.wiki/Nikon/3143EB.User-Manual-Part-1-of-2/User-Guide-729963-Page-12.png)
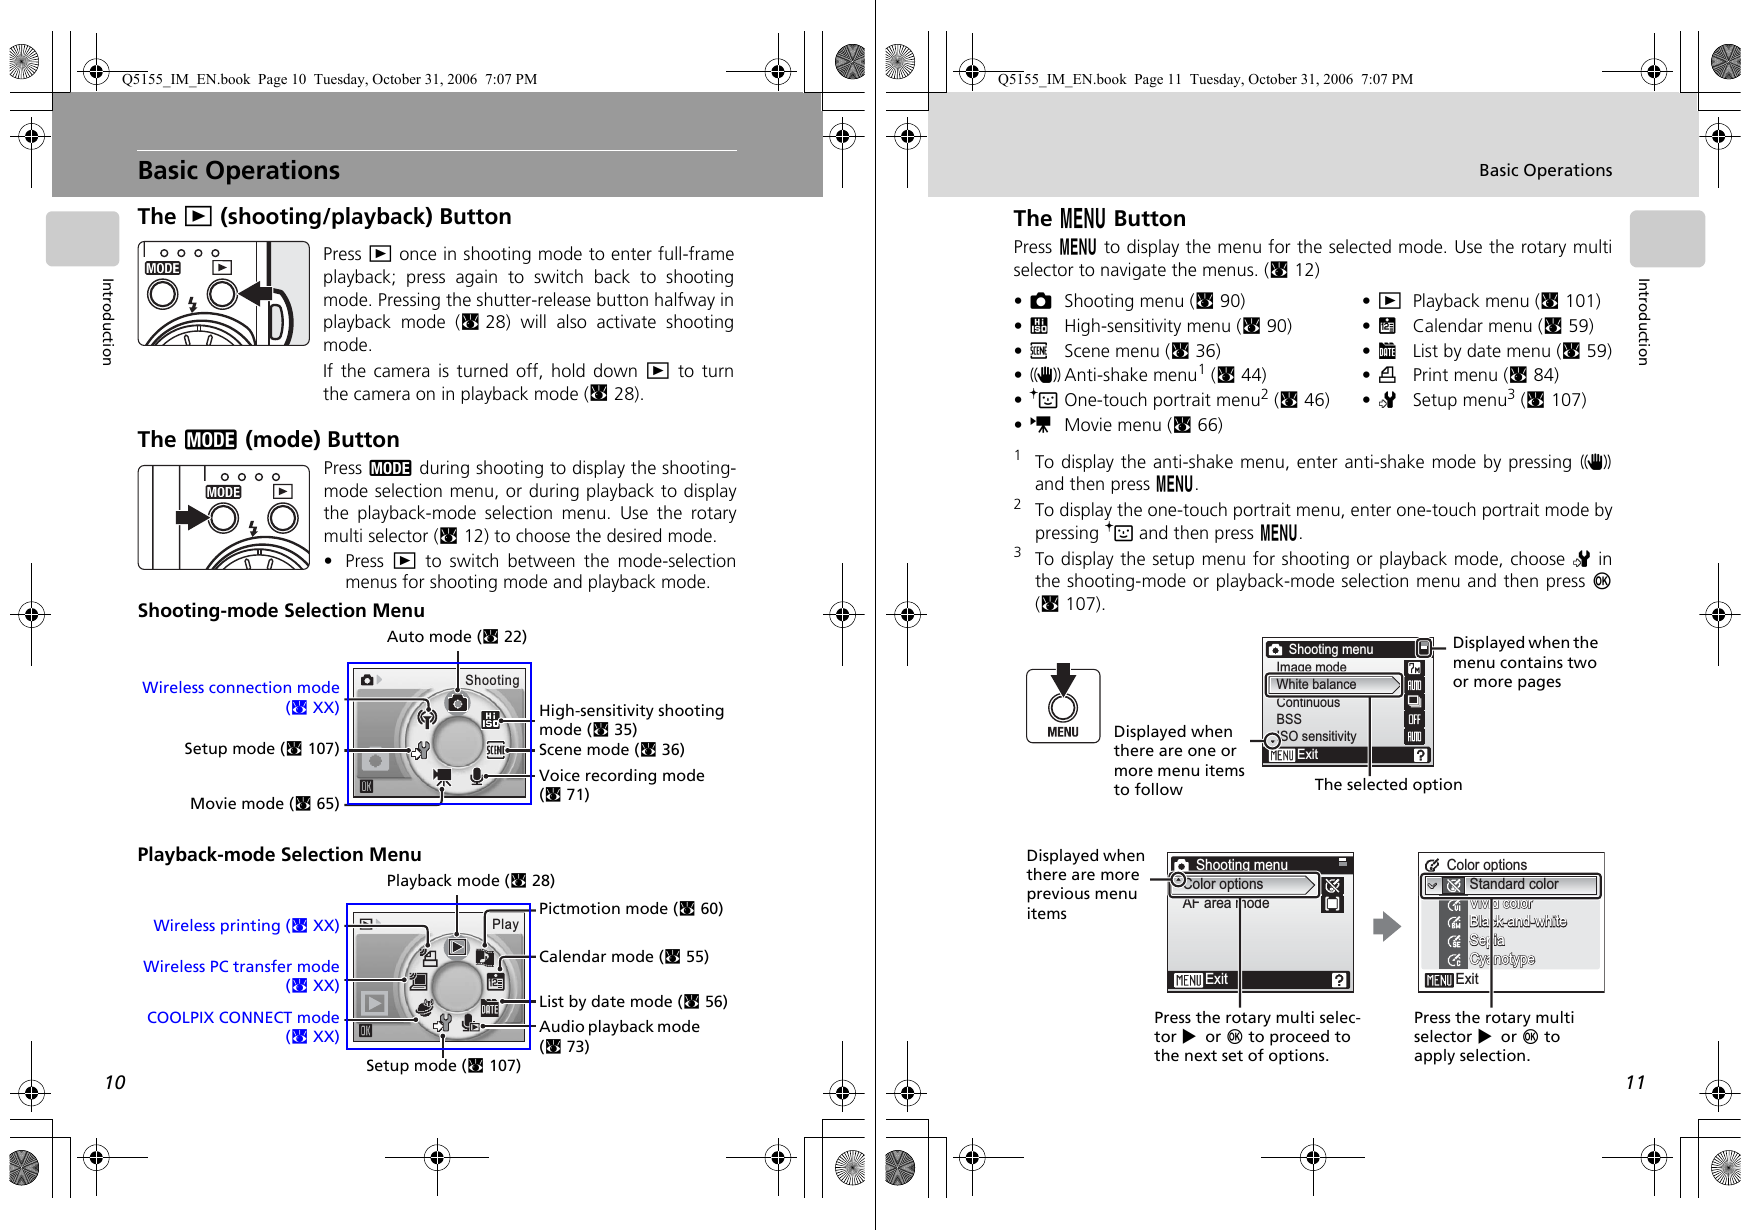
![106Playback Options: The Playback MenuShooting, Playback, and Setup MenusL CopyCopy pictures between the internal memory and amemory card. First, select from the following options.Then, select the desired copy option.Choose [Selected images] (c102) to copy specificpictures in the internal memory or memory card. Tocopy all pictures, choose [All images].jNotes on Copying Pictures• If there is not enough space in the memory or on the memory card to receive the copy, anerror message will be displayed. Delete unwanted pictures or insert a new memory card (ifusing a memory card) before trying again.• The file format of images that can be copied is JPEG, MOV, or WAV.• Pictures taken with another make of camera or that have been modified on a computercannot be copied.kFile Names of Copied Pictures • When pictures are copied using the [Selected images] option, the newly copied pictures arenumbered consecutively from the largest number existing between the two memory sources.Ex: when the last number in the source memory is 32 (DSCN0032.JPG) and the last num-ber in the destination memory is 18 (DSCN0018.JPG), the copied pictures are assignednumbers starting from DSCN0033.• When pictures are copied using the [All images] option, all the pictures in the folder arecopied with the same file numbers. New folder numbers are assigned in ascending orderstarting from the largest folder number available. If a new folder cannot be created, thefolder is not copied and an error message will be displayed.kCopiesEdited copies have the same protection marking (c104) as the original but are not markedfor printing (c87) or transfer (c105).MNOCopy pictures from internal memory to memory card.ONMCopy pictures from memory card to internal memory.CopyExitCamera to cardAll imagesExitSelected imagesQ5155_IM_EN.book Page 106 Tuesday, October 31, 2006 7:07 PM107Shooting, Playback, and Setup MenusBasic Camera Setup: The Setup MenuThe setup menu contains the following options.RMenus c108Choose how menus are displayed.HQuick startup c109Enable or disable welcome screen and start-up sound.VWelcome screen c109Select screen displayed when camera is turned on.WDate c110Set camera clock and choose home and destination time zones.ZMonitor settings c113Adjust monitor brightness and choose display style.fDate imprint c114Imprint date or date counter on pictures.bVibration reduction c116Choose whether or not vibration reduction is enabled during shooting.uAF assist c117Enable or disable AF assist illumination.hSound settings c117Adjust sound and volume settings.IRecord orientation c118Choose whether or not to record the orientation of a picture taken.iAuto off c118Set time before camera enters standby mode to save power.M/OFormat memory/Format card c119Format internal memory or memory card.jLanguage c120Choose language for camera menus and messages.kInterface c120Adjust settings for connection to television or computer.nReset all c121Restore camera settings to default values.nWireless settings c XXXAdjust settings for wireless LAN connection.BFirmware version c123Display camera firmware version.Q5155_IM_EN.book Page 107 Tuesday, October 31, 2006 7:07 PM](https://usermanual.wiki/Nikon/3143EB.User-Manual-Part-1-of-2/User-Guide-729963-Page-17.png)
![108Basic Camera Setup: The Setup MenuShooting, Playback, and Setup MenusDisplaying the Setup MenuFirst, display the playback-mode or shooting-mode selection menu by press-ing C. Then select Z (use the rotary multi selector), press d.• Use the rotary multi selector to choose and apply settings. (c12)• To exit the setup menu, press m.R MenusChoose whether the initial menus displayed for theshooting menu (c90), high-sensitivity menu(c91), scene menu (c36), movie menu (c66),one-touch portrait menu (c46), anti-shake menu(c44), playback menu (c101), and setup menu(displayed when m is pressed) (c107) use[Text] (default setting) or [Icons].When [Icons] is selected, all menu items can be displayed in a single pageand the highlighted menu name appears at the top of the monitor.Set upMenusQuick startupWelcome screenDateMonitor settingsExitSet upMenusExitTex tIconsRHVWZfbuhIiO kjnBnExitMenusSet upMenusQuick startupWelcome screenDateMonitor settingsExit[Text] [Icons]Menu namesQ5155_IM_EN.book Page 108 Tuesday, October 31, 2006 7:07 PM109Basic Camera Setup: The Setup MenuShooting, Playback, and Setup MenusH Quick StartupChoose [On] (default setting) to disable the wel-come screen and start-up sound. The camera willbe ready for shooting as soon as it is turned on.Set to [Off] when enabling the welcome screen.V Welcome ScreenYou can select the welcome screen to be displayedwhen the camera is turned on.To set the welcome screen, [Quick startup] must beset to [Off].lWhen [Select an image] is SelectedIf you have already selected a welcome screen picture, you canselect a new one by following the confirmation dialog.NikonDisplays a welcome screen when the camera is turned on.Animation (default)Displays a short animation when the camera is turned on.Select an imageSelect a picture in the internal memory or on the memory card for the wel-come screen. Choose a picture in the picture selection screen (c102), and press d. The image used in the welcome screen is a copy of the selected picture and, therefore, is not affected if the original picture is deleted or the memory card is removed.Quick startupOnOffExitWelcome screenExitNikonAnimationSelect an imageWelcome screenExitYesNoReplace currentimage?Q5155_IM_EN.book Page 109 Tuesday, October 31, 2006 7:07 PM](https://usermanual.wiki/Nikon/3143EB.User-Manual-Part-1-of-2/User-Guide-729963-Page-18.png)
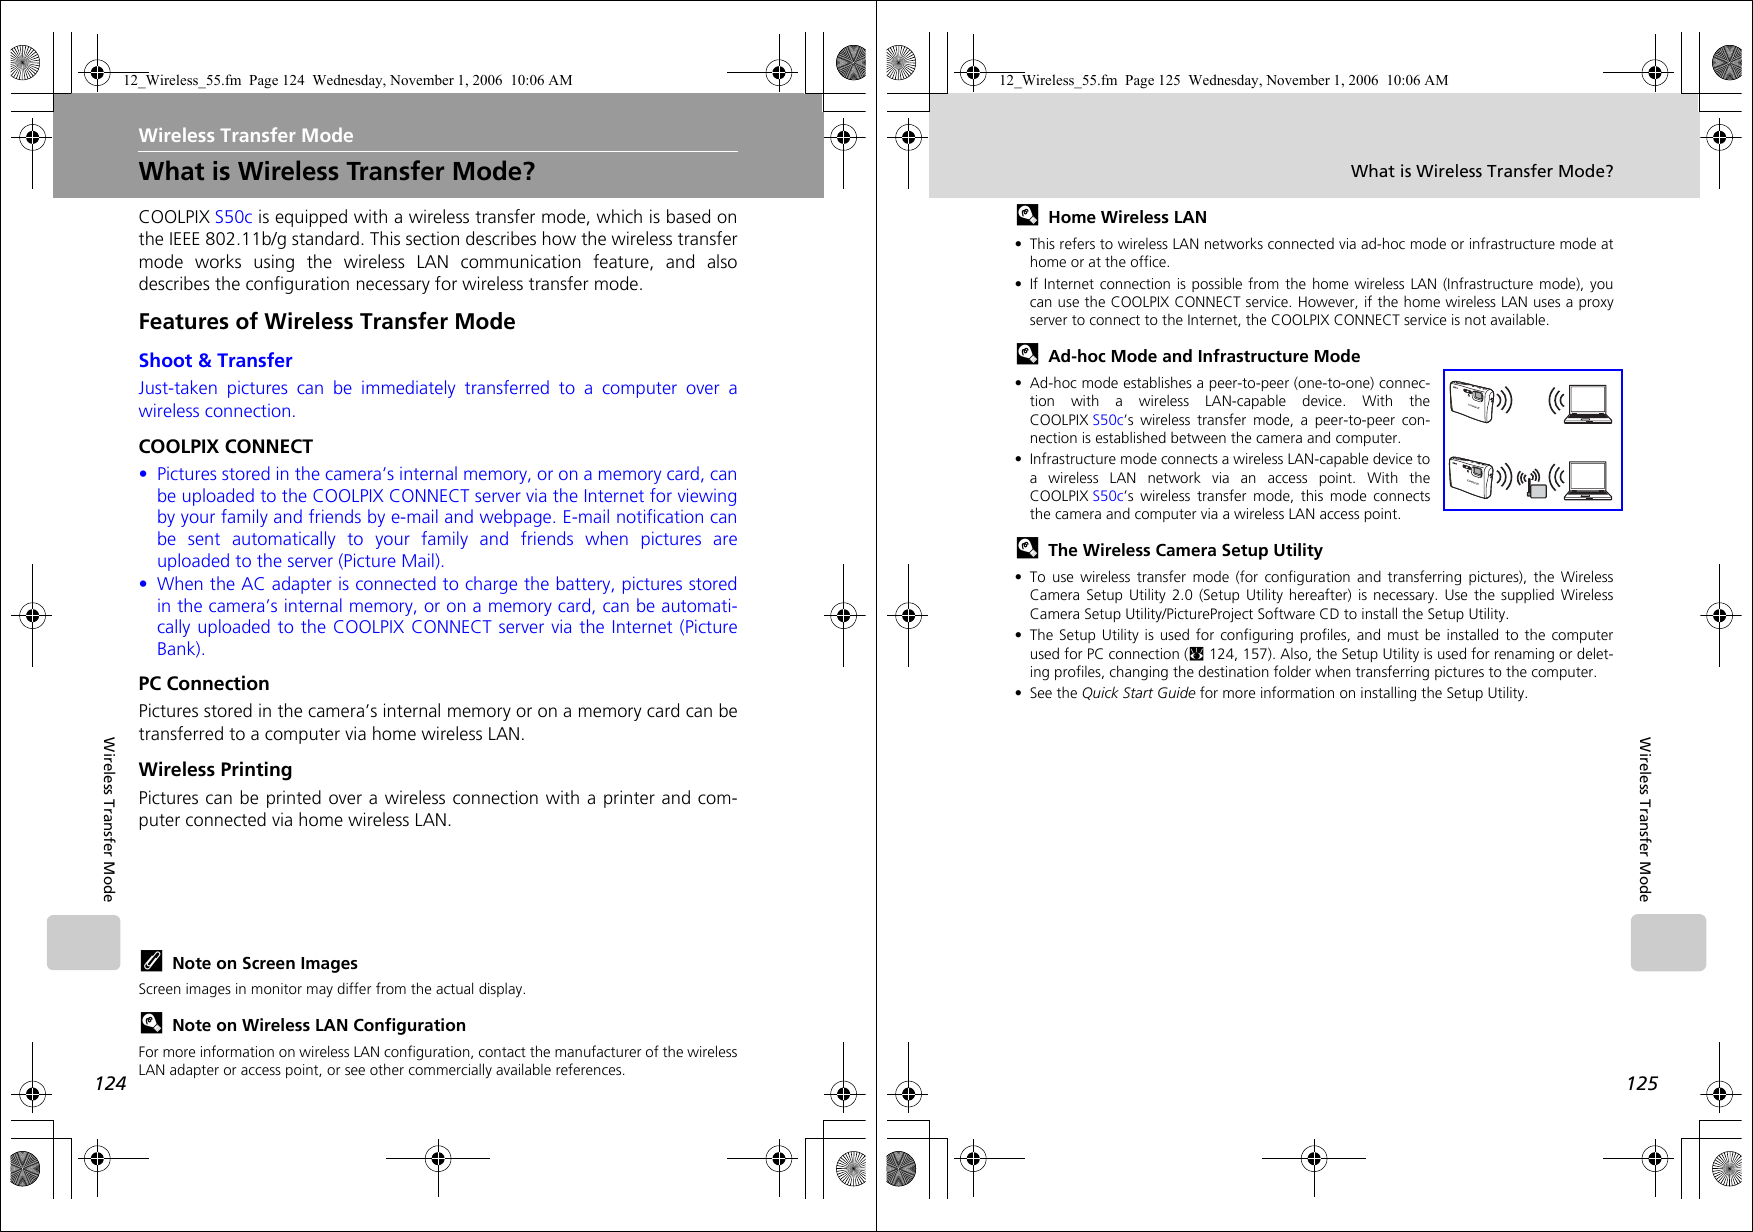
![126Wireless Transfer ModeThe Features Available in the Wireless Transfer ModeThe features below are available in the COOLPIX S50c’s wireless transfermode. After applying the necessary settings for wireless transfer mode, choose thedesired feature from the shooting-mode or playback-mode selection menu.Shoot & TransferImmediately transfer pictures taken.COOLPIX CONNECT (via home wireless LAN)Picture Mail and Picture Bank can be used by connecting the camera directly to theInternet via home wireless LAN.Easy Transfer (including Pictmotion movies)Transfer pictures and Pictmotion movies not yet saved in the computer.Easy Transfer (excluding Pictmotion movies)Transfer pictures not yet saved in the computer (excluding Pictmotion movies).Shooting DateTransfer all pictures taken on a specific recording date.Selected ImagesTransfer only selected pictures.Marked ImagesTransfer pictures with the transfer icon (E). PC ModeAfter connecting the camera and the computer over a wireless connection, trans-fer pictures by operating the computer.Wireless PrintingPrint pictures over a wireless connection from the camera via a computer.FeaturesShoot & TransfernCOOLPIX CONNECTMPC ConnectionNWireless PrintingO12_Wireless_55.fm Page 126 Wednesday, November 1, 2006 10:30 AM127The Features Available in the Wireless Transfer ModeWireless Transfer ModennShooting Play• Home wireless LAN (Ad-hoc mode or Infrastructure mode)• Wireless LAN-capable computer with the Setup Utility. c128 c151• Internet-capable wireless LAN (c128)• Wireless LAN-capable computer with the Setup Utility. Use the Setup Utility, or the [Wireless settings] option in the cam-era’s setup menu, to create the profiles necessary for theCOOLPIX CONNECT service.c128c XXX c151• Home wireless LAN (Ad-hoc mode or Infrastructure mode)• Wireless LAN-capable computer with the Setup Utility. c128c157c157c158c159c160c161• Printer connected with computer is needed in addition to therequirements for PC connection above. c XX c XXRequirementsConfiguring Operating12_Wireless_55.fm Page 127 Wednesday, November 1, 2006 10:30 AM](https://usermanual.wiki/Nikon/3143EB.User-Manual-Part-1-of-2/User-Guide-729963-Page-20.png)
![128Wireless Transfer ModeWireless LAN ConnectionConnection via Home Wireless LAN n M N O Connect to a home wireless LAN and make necessary configurations forshoot and transfer, connecting to COOLPIX CONNECT, and connecting to acomputer over a wireless connection.Configuration ProcedureThis section gives a brief description about the procedure for creating a wire-less connection. See “Configuring the Camera” (c130) for details. 1Prepare a wireless LAN-capable computer.3Check that the USB setting is correctly selected in the cameraand the battery is not exhausted, and turn off the camera.4Connect the computer and camera using the AV/USB cable.5Start the Setup Utility. 7Choose the profile type [Add Profile at Home WirelessLAN]. 2Install the Setup Utility to the computer.6Choose the action [Add profiles].12_Wireless_55.fm Page 128 Wednesday, November 1, 2006 10:06 AM129Wireless LAN ConnectionWireless Transfer Mode12 Configure wireless printing.9Configure wireless LAN settings between the cam-era and computer.11 Set profile name and icon.13 Configure COOLPIX CONNECT.14 Configuration completed.Configure TCP/IP.Configure wireless LAN set-tings between the cameraand computer.8Choose the connection method.Create an Infra-structure (Access Point) network profileCreate an Ad-hoc (Camera to Computer) net-work profileCreate Infra-structure (Access Point) and Ad-hoc (Camera to Computer) net-work profilesCreate Profile manually:•Fixed IP addressing•Operating sys-tem other than Windows•Windows XP SP1•Macintosh1015 Disconnect the computer and camera.12_Wireless_55.fm Page 129 Wednesday, November 1, 2006 10:06 AM](https://usermanual.wiki/Nikon/3143EB.User-Manual-Part-1-of-2/User-Guide-729963-Page-21.png)
![130Wireless LAN ConnectionWireless Transfer ModeConfiguring the CameraThis section describes the “Configuration Procedure” (c128) in detail. • To display more information on each step, click [Help]. To cancel configur-ing a profile device, click [Cancel].1Prepare a wireless LAN-capable computer.2Install the Setup Utility to the computer. Check whether the Setup Utility (c125) is installed on the computer used forconfiguring. For more information on installing the Setup Utility, see the QuickStart Guide.3Check that the USB setting is correctly selected in the cameraand the battery is not exhausted, and turn off the camera. Check the following before starting the Setup Utility on the computer. Afterchecking is complete, turn off the camera.• [Interface] > [USB] (c XX) is set to [PTP].• The battery is fully charged. If the battery runs outwhile configuring a profile, settings will not beentered correctly.4Connect the computer and camera using the supplied AV/USBcable.USBExitPTPMass storage12_Wireless_55.fm Page 130 Wednesday, November 1, 2006 10:06 AM131Wireless LAN ConnectionWireless Transfer Mode5Start the Setup Utility.For the initial installation run, the Setup Utility will launch automatically wheninstallation is complete.From the second time, start the Setup Utility by following the procedure below:Windows: Start the computer and select [Start] > [All programs] > [WirelessCamera Setup Utility] > [Wireless Camera Setup Utility].Macintosh: Start the computer and open [Applications] > [Nikon Software] >[Wireless Camera Setup Utility] folder. Then double-click the [NkWire-lessSetup] icon.• Click [Next] after checking the contents shown inthe screen at right.6Choose the action [Add profiles].7Choose the profile type [Add Profile atHome Wireless LAN]. You can start configuration of infrastructure mode orad-hoc mode for the computer connected to the wire-less LAN.Set up for Public Wireless LAN is available only forT-Mobile HotSpot in United States.12_Wireless_55.fm Page 131 Wednesday, November 1, 2006 10:06 AM](https://usermanual.wiki/Nikon/3143EB.User-Manual-Part-1-of-2/User-Guide-729963-Page-22.png)