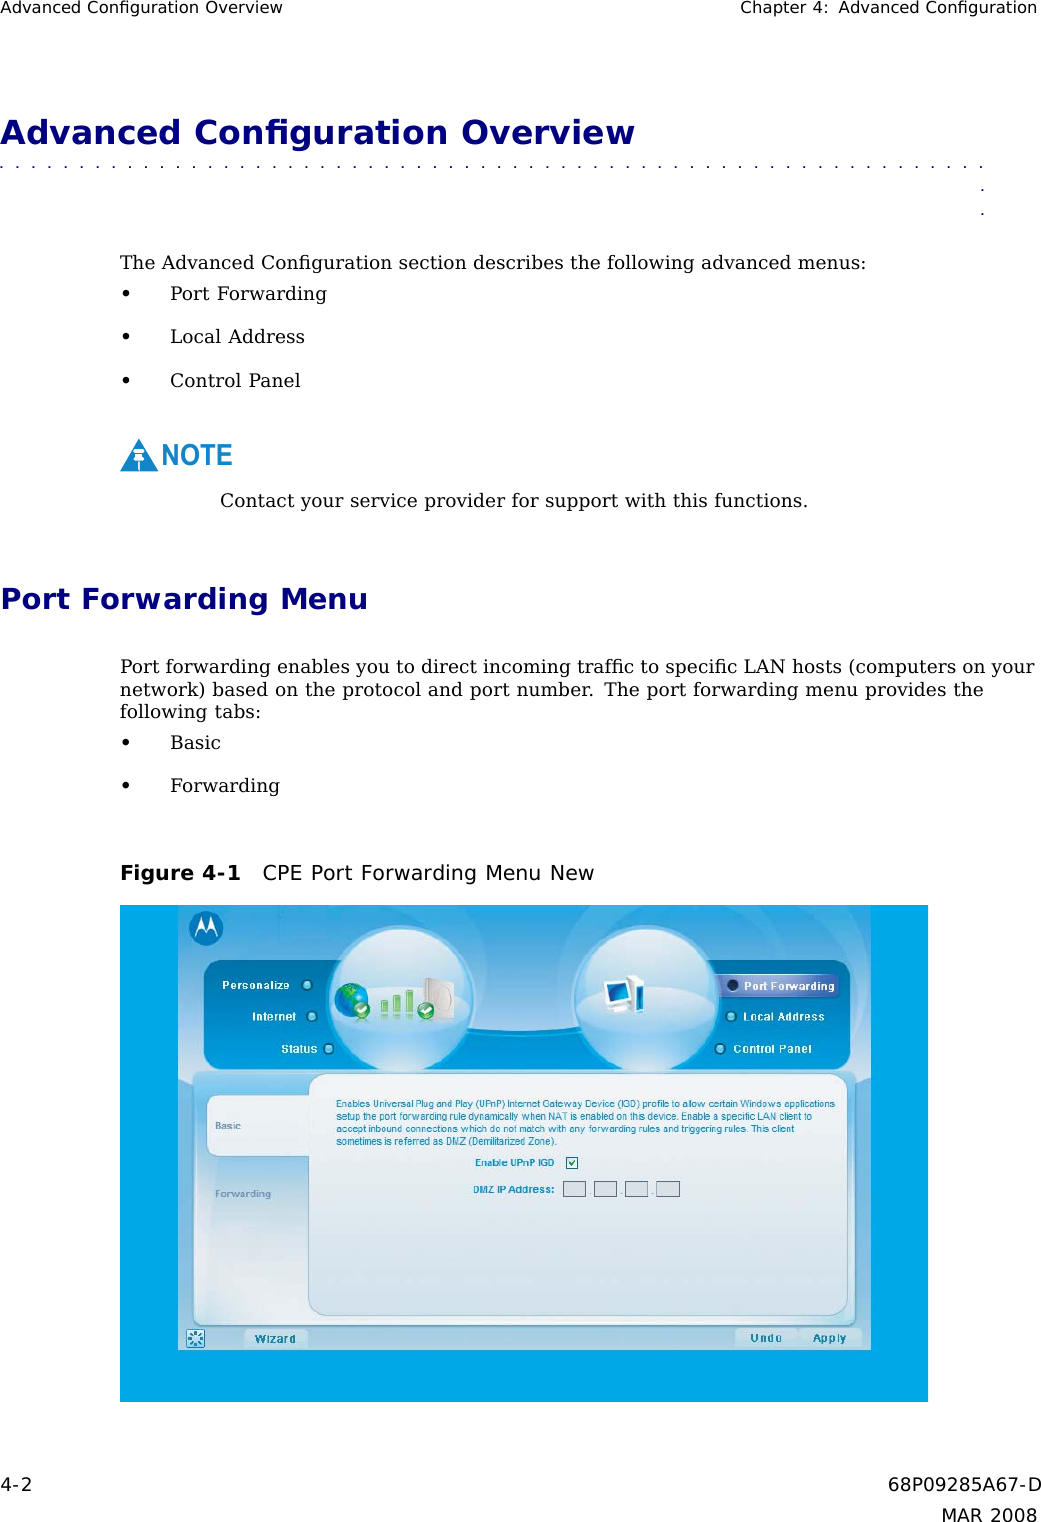
Nokia Solutions and Networks CPE25400 Non-Line-of-Sight Fixed Wireless Data Link User Manual 5A USER GUIDE 68P09285A67 D
Nokia Solutions and Networks Non-Line-of-Sight Fixed Wireless Data Link 5A USER GUIDE 68P09285A67 D
Contents
- 1. 5A USER GUIDE 68P09285A67 D
- 2. 5B Hardware Installation 68P09287A82 B
5A USER GUIDE 68P09285A67 D
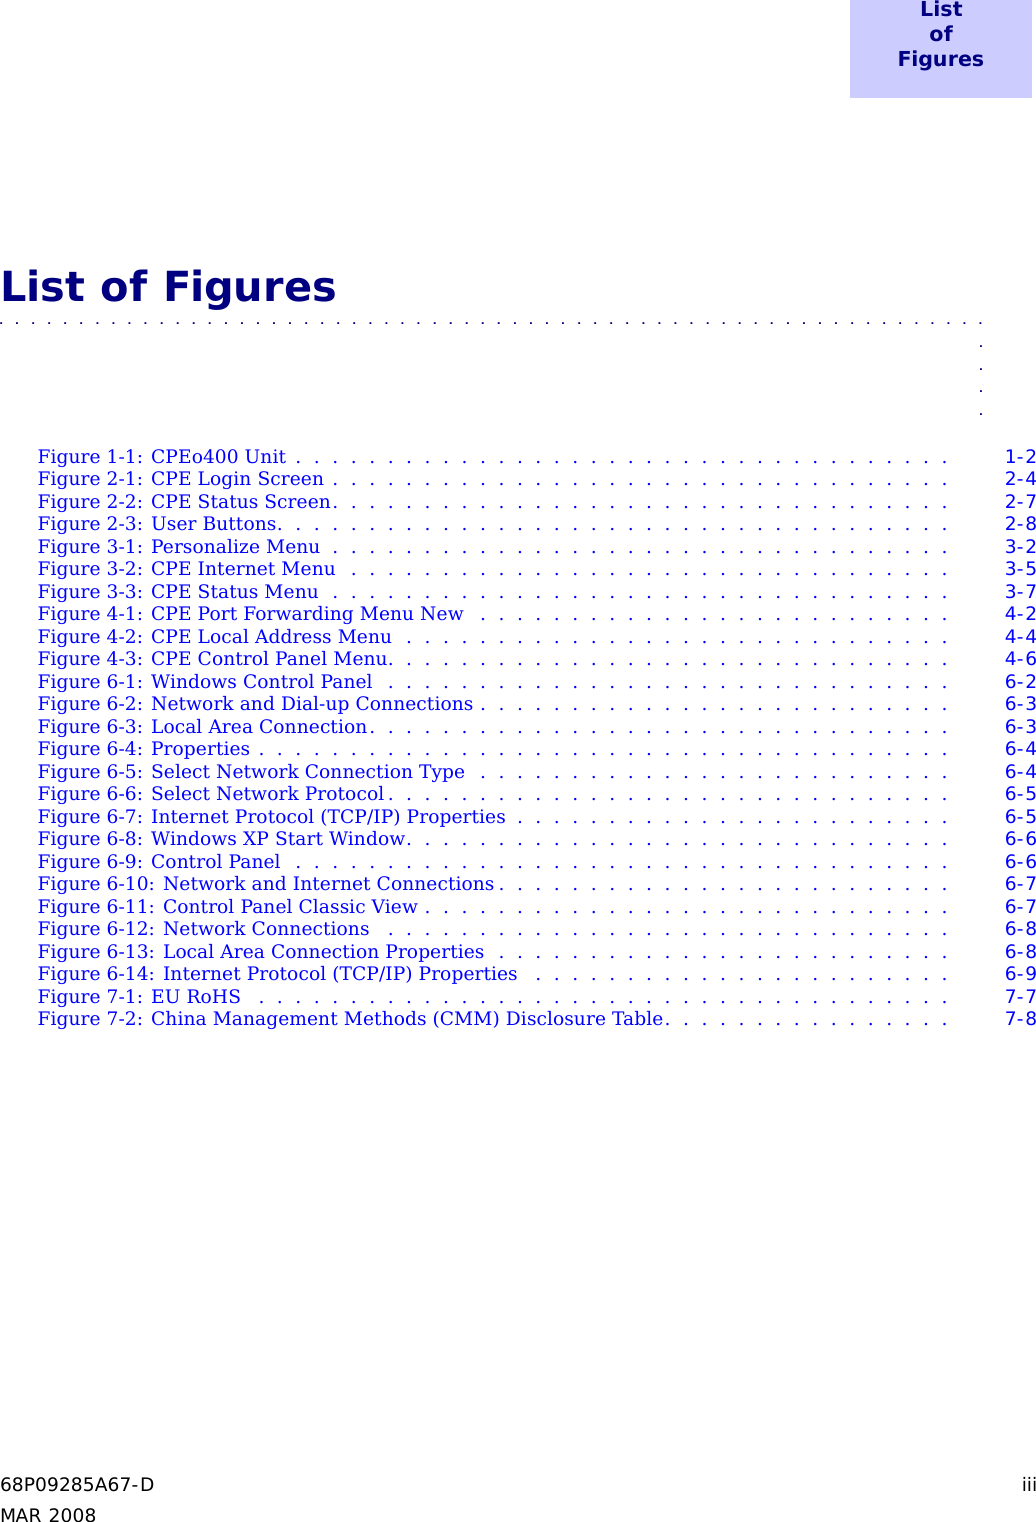


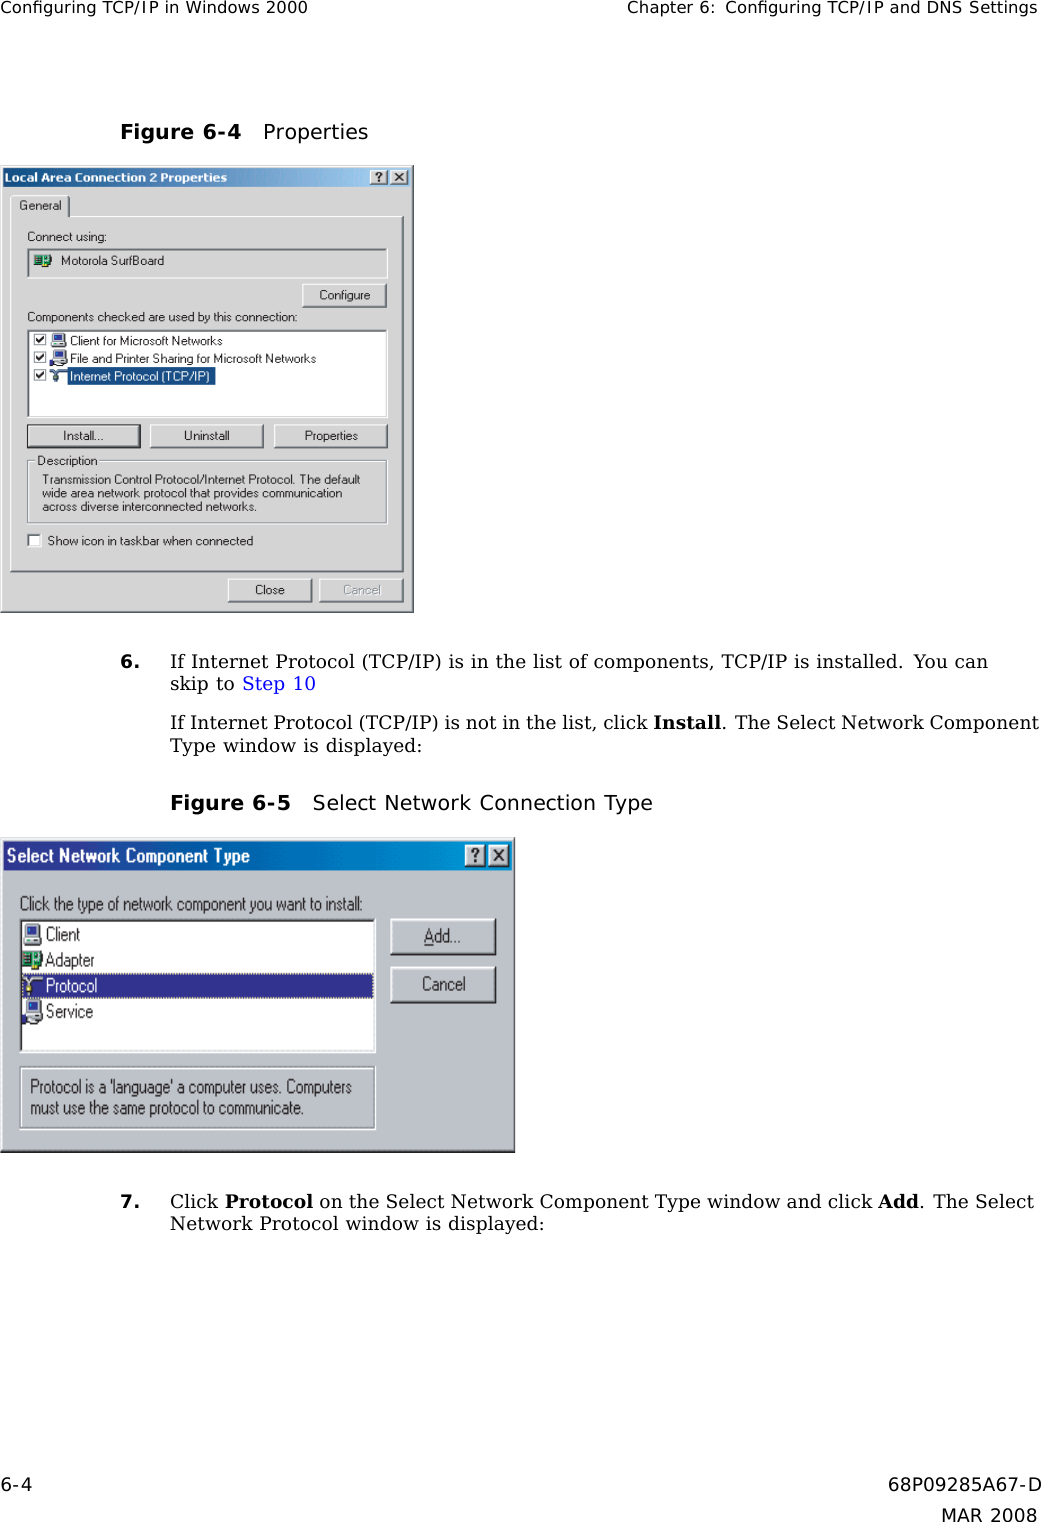
![WiMAX CPEo400 Series User Guide This Product complies with the following RF energy exposure standards and guidelines:EU Declaration of ConformityThis device complies with the essential requirements of the R&TTE Directive 1999/5/EC. Thefollowing test methods have been applied in order to prove presumption of conformity with theessential requirements of the R&TTE Directive 1999/5/ECIEC 60950-1: 2001 ( 1st Edition )Safety of Information Technology EquipmentEN50385 : (2002-08)Product standard to demonstrate the compliance of radio base stations and fixed terminalstations for wireless telecommunication systems with the basic restrictions or the referencelevels related to human exposure to radio frequency electromagnetic fields (110MHz - 40 GHz) -General publicEN 301 489-1 V1.6.1: (2005-09)Electromagnetic compatibility and Radio Spectrum Matters (ERM); ElectroMagneticCompatibility (EMC) standard for radio equipment and services; Part 1: Common technicalrequirementsEN 301 489-4 V1.3.1: (2002-08)Electromagnetic compatibility and radio spectrum matters (ERM); Electromagnetic compatibility(EMC) standard for radio equipment and services; Part 4: Specific conditions for fixed radiolinks and ancillary equipment and servicesEN 302 326-2 V1.1.1(2006-03)Fixed Radio Systems; Multipoint Equipment and Antennas; Part 2: Harmonized EN coveringthe essential requirements of article 3.2 of the R&TTE Directive for Digital Multipoint RadioEquipmentEN 302 326-3 V1.1.1(2006-03)Fixed Radio Systems; Multipoint Equipment and Antennas; Part 3: Harmonized EN covering theessential requirements of article 3.2 of the R&TTE Directive for Multipoint Radio AntennasTable 7-1 Compliance StatementLanguage StatementČesky [Czech] [Jméno výrobce] tímto prohlašuje, žetento [typ zaˇrízení] je ve shodˇesezákladními požadavky a dalšími pˇríslušnýmiustanoveními smˇernice 1999/5/ES.Continued68P09285A67-D 7-3MAR 2008](https://usermanual.wiki/Nokia-Solutions-and-Networks/CPE25400.5A-USER-GUIDE-68P09285A67-D/User-Guide-924291-Page-55.png)
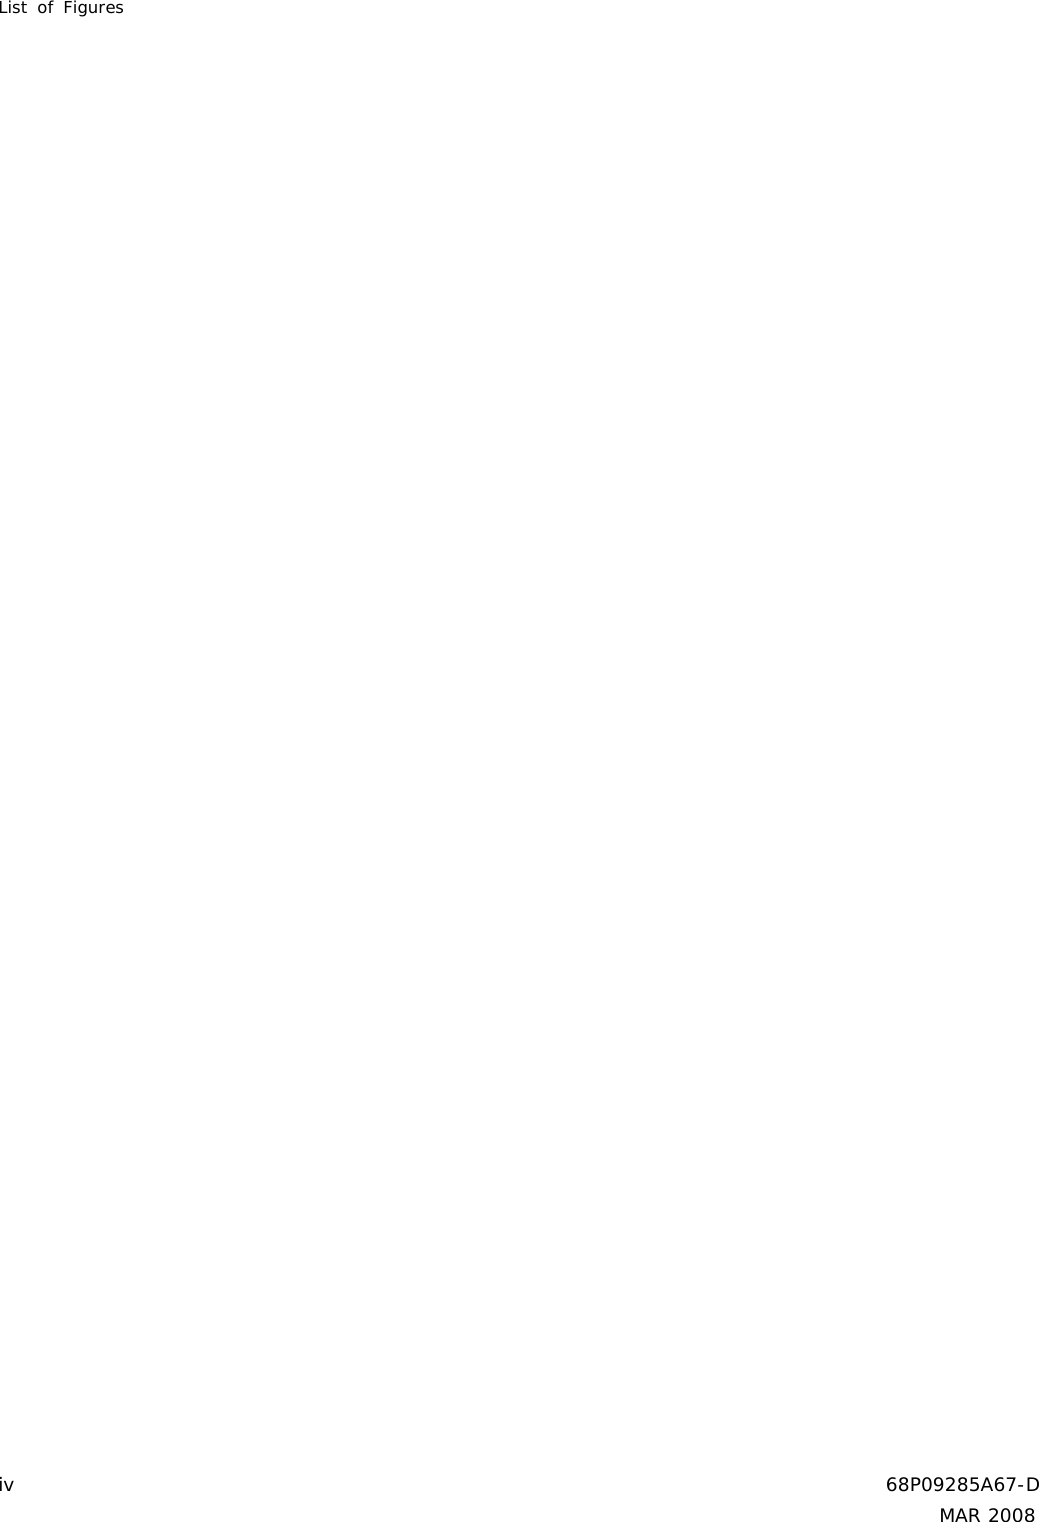
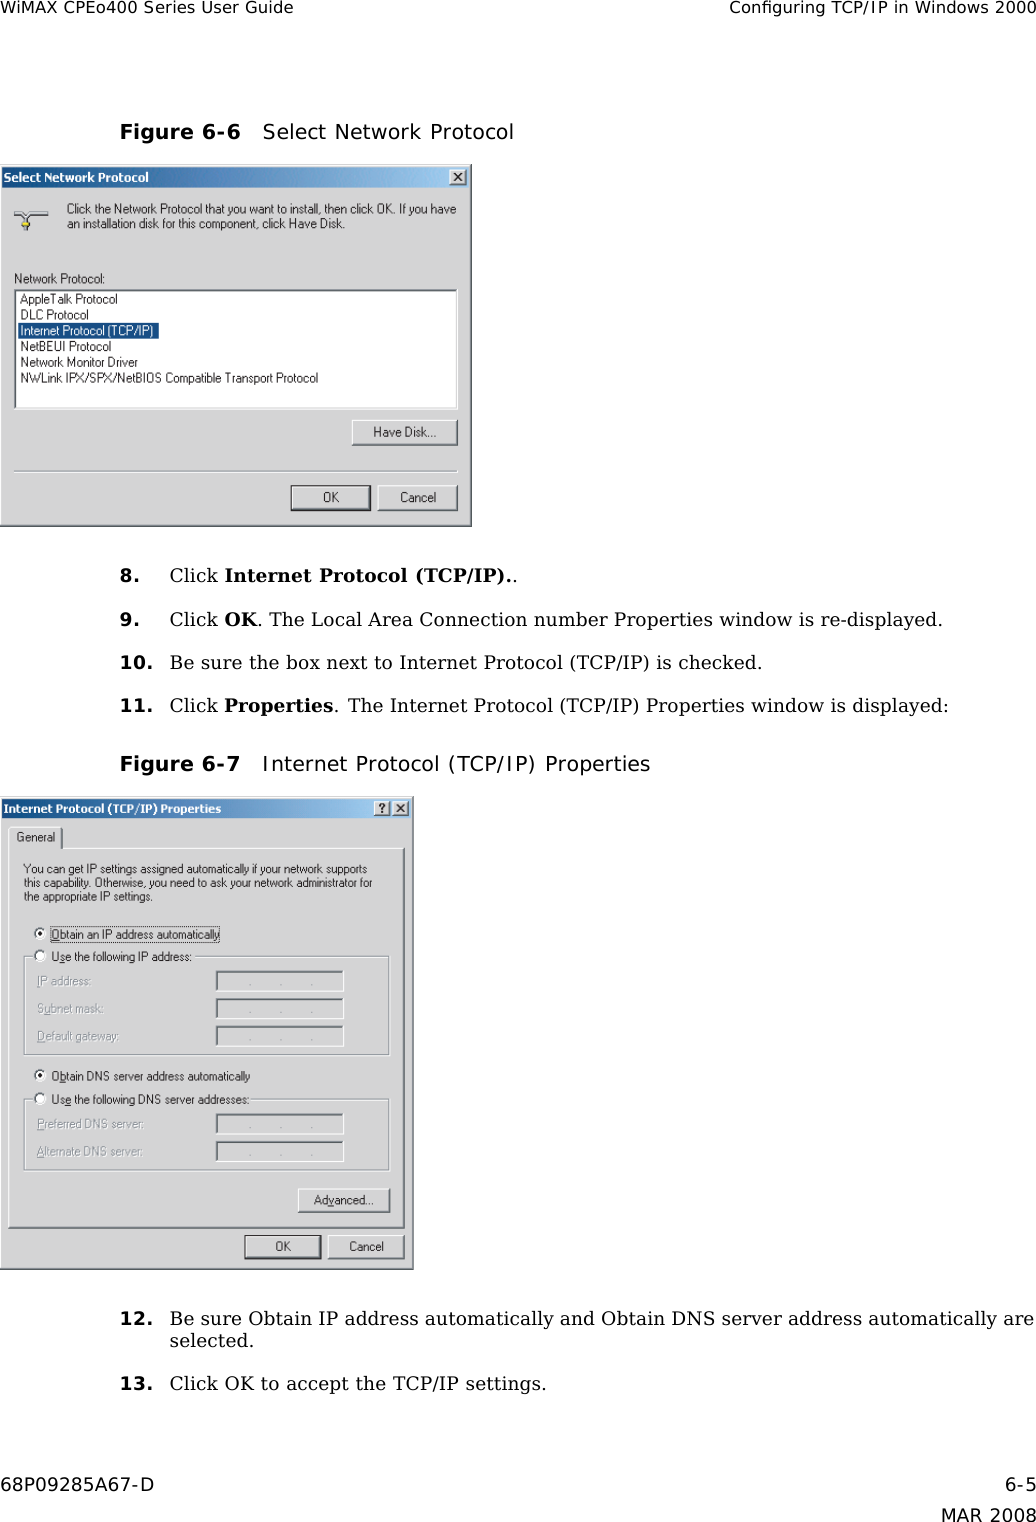
![This Product complies with the following RF energy exposure standards and guidelines: Chapter7: Important Safety and Legal InformationTable 7-1 Compliance Statement (Continued)Language StatementDansk [Danish] Undertegnede [fabrikantens navn] erklærerherved, at følgende udstyr [udstyretstypebetegnelse] overholder de væsentligekrav og øvrige relevante krav i direktiv1999/5/EF.Deutsch [German] Hiermit erklärt [Name des Herstellers],dass sich das Gerät [Gerätetyp] inÜbereinstimmung mit den grundlegendenAnforderungen und den übrigeneinschlägigen Bestimmungen der Richtlinie1999/5/EG befindet.Eesti [Estonian] Käesolevaga kinnitab [tootja nimi =name of manufacturer] seadme [seadmetüüp = type of equipment] vastavustdirektiivi 1999/5/EÜ põhinõuetele janimetatud direktiivist tulenevatele teisteleasjakohastele sätetele.English Hereby, [name of manufacturer], declaresthat this [type of equipment] is in compliancewith the essential requirements and otherrelevant provisions of Directive 1999/5/EC.Español [Spanish] Por medio de la presente [nombre delfabricante] declara que el [clase de equipo]cumple con los requisitos esenciales ycualesquiera otras disposiciones aplicableso exigibles de la Directiva 1999/5/CE.λληνικ [Greek] [name of manufacturer]Ω[type of equipment]Ω Ω1999/5/ .Français [French] Par la présente [nom du fabricant] déclareque l’appareil [type d’appareil] est conformeaux exigences essentielles et aux autresdispositions pertinentes de la directive1999/5/CE.Italiano [Italian] Con la presente [nome del costruttore]dichiara che questo [tipo di apparecchio]è conforme ai requisiti essenziali ed allealtre disposizioni pertinenti stabilite dalladirettiva 1999/5/CE.Latviski [Latvian] Ar šo [name of manufacturer / izgatavotajanosaukums] deklare, ka [type of equipment/ iekartas tips] atbilst Direktivas 1999/5/EKbutiskajam prasibam un citiem ar tosaistitajiem noteikumiem.Continued7-4 68P09285A67-DMAR 2008](https://usermanual.wiki/Nokia-Solutions-and-Networks/CPE25400.5A-USER-GUIDE-68P09285A67-D/User-Guide-924291-Page-56.png)
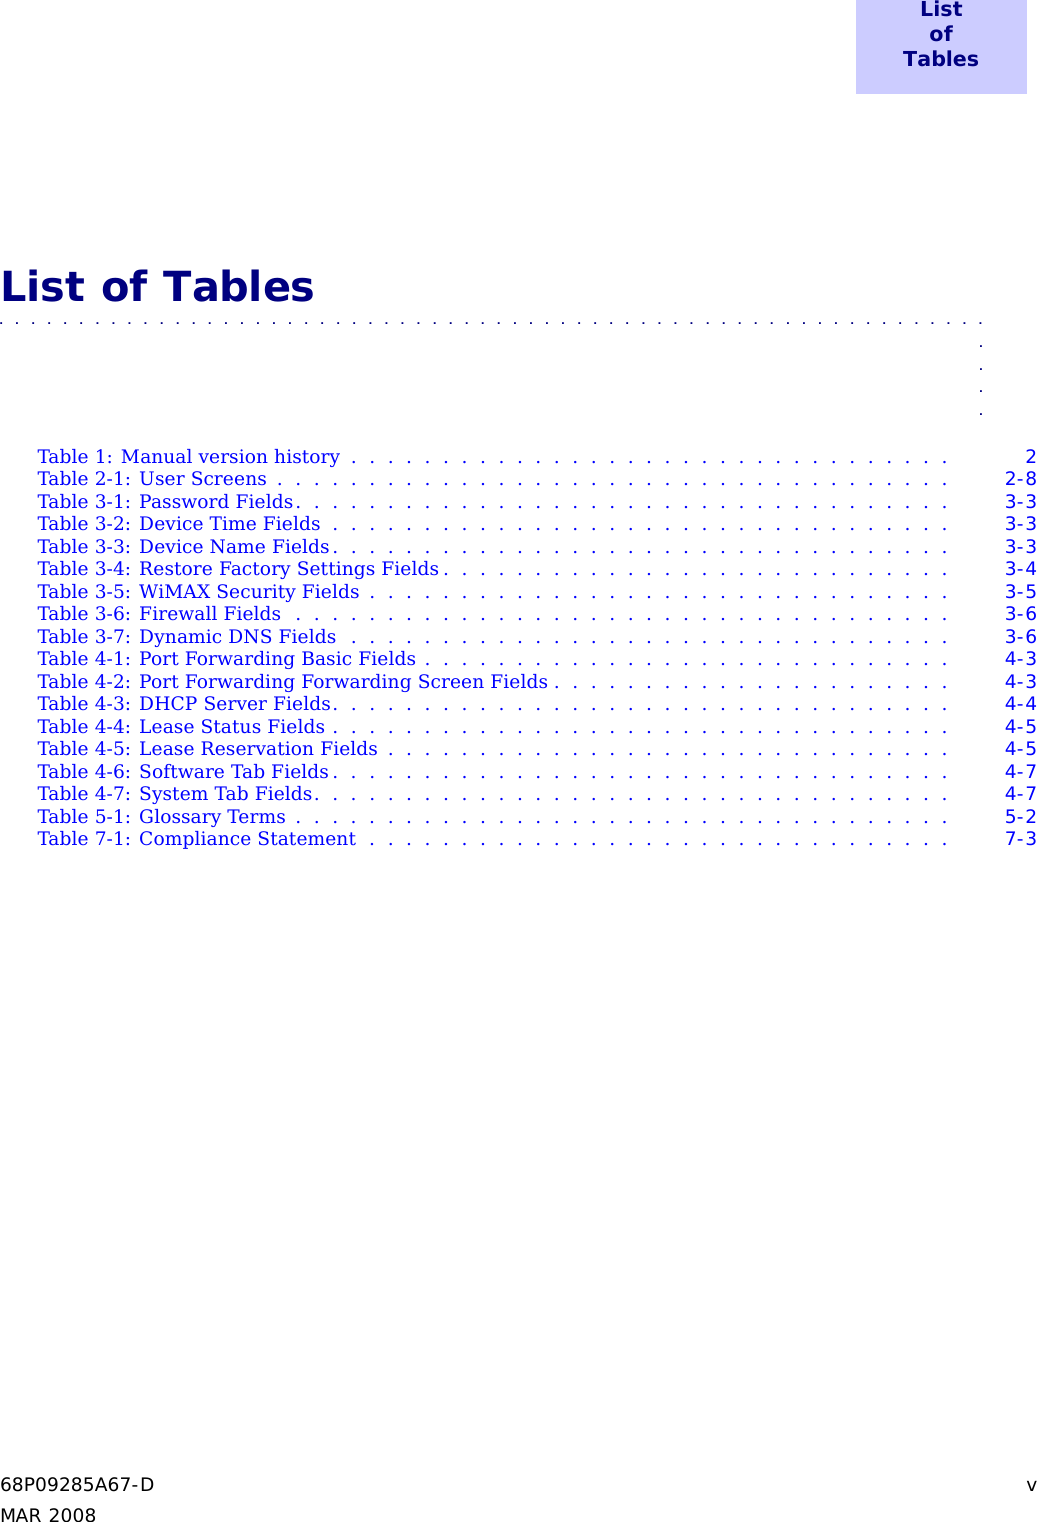
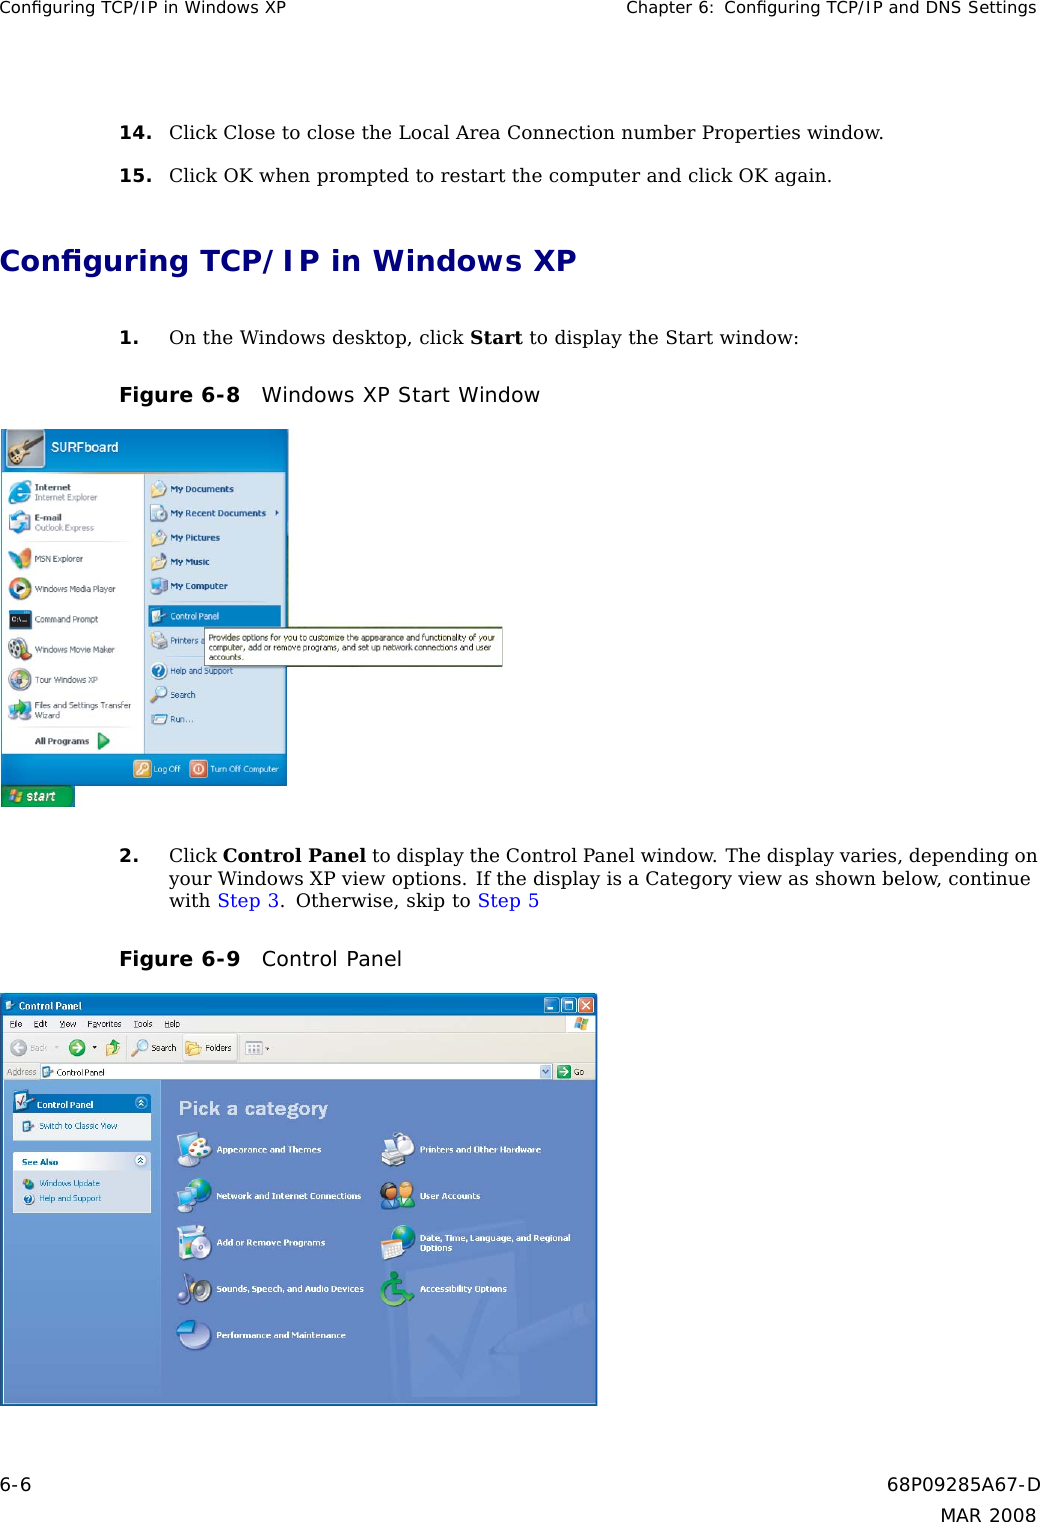
![WiMAX CPEo400 Series User Guide This Product complies with the following RF energy exposure standards and guidelines:Table 7-1 Compliance Statement (Continued)Language StatementLietuvi˛u [Lithuanian] Šiuo [manufacturer name] deklaruoja, kadšis [equipment type] atitinka esminiusreikalavimus ir kitas 1999/5/EB Direktyvosnuostatas.Nederlands [Dutch] Hierbij verklaart [naam van de fabrikant]dat het toestel [type van toestel] inovereenstemming is met de essentiële eisenen de andere relevante bepalingen vanrichtlijn 1999/5/EG.Malti [Maltese] Hawnhekk, [isem tal-manifattur], jiddikjarali dan [il-mudel tal-prodott] jikkonformamal--hti˙gijiet essenzjali u ma provvedimentio-hrajn relevanti li hemm fid-Dirrettiva1999/5/EC.Magyar [Hungarian] Alulírott, [gyártó neve] nyilatkozom, hogya [... típus] megfelel a vonatkozó alapvetõkövetelményeknek és az 1999/5/EC irányelvegyéb elõírásainak.Polski [Polish] Niniejszym [nazwa producenta] o´swiadcza,˙ze [nazwa wyrobu] jest zgodny zzasadniczymi wymogami oraz pozostałymistosownymi postanowieniami Dyrektywy1999/5/EC.Português [Portuguese] [Nome do fabricante] declara que este [tipode equipamento] está conforme com osrequisitos essenciais e outras disposições daDirectiva 1999/5/CE.Slovensko [Slovenian] [Ime proizvajalca] izjavlja, da je ta [tipopreme] v skladu z bistvenimi zahtevamiin ostalimi relevantnimi določili direktive1999/5/ES.Slovensky [Slovak] [Meno výrobcu] týmto vyhlasuje, že [typzariadenia] sp´lˇna základné požiadavky avšetky príslušné ustanovenia Smernice1999/5/ES.Suomi [Finnish] [Valmistaja = manufacturer] vakuuttaatäten että [type of equipment = laitteentyyppimerkintä] tyyppinen laite ondirektiivin 1999/5/EY oleellisten vaatimustenja sitä koskevien direktiivin muiden ehtojenmukainen.Svenska [Swedish] Härmed intygar [företag] att denna[utrustningstyp] står I överensstämmelsemed de väsentliga egenskapskrav och övrigarelevanta bestämmelser som framgår avdirektiv 1999/5/EG.68P09285A67-D 7-5MAR 2008](https://usermanual.wiki/Nokia-Solutions-and-Networks/CPE25400.5A-USER-GUIDE-68P09285A67-D/User-Guide-924291-Page-57.png)