Nokia Solutions and Networks T7HN1 2.5 GHz Diversity Access Point User Manual users manual 2
Nokia Solutions and Networks 2.5 GHz Diversity Access Point users manual 2
Contents
- 1. users manual 1
- 2. users manual 2
- 3. users manual 3
- 4. users manual 4
- 5. users manual 5
users manual 2
Access P oint Hardw are Installation Access P oint Equipment Identication
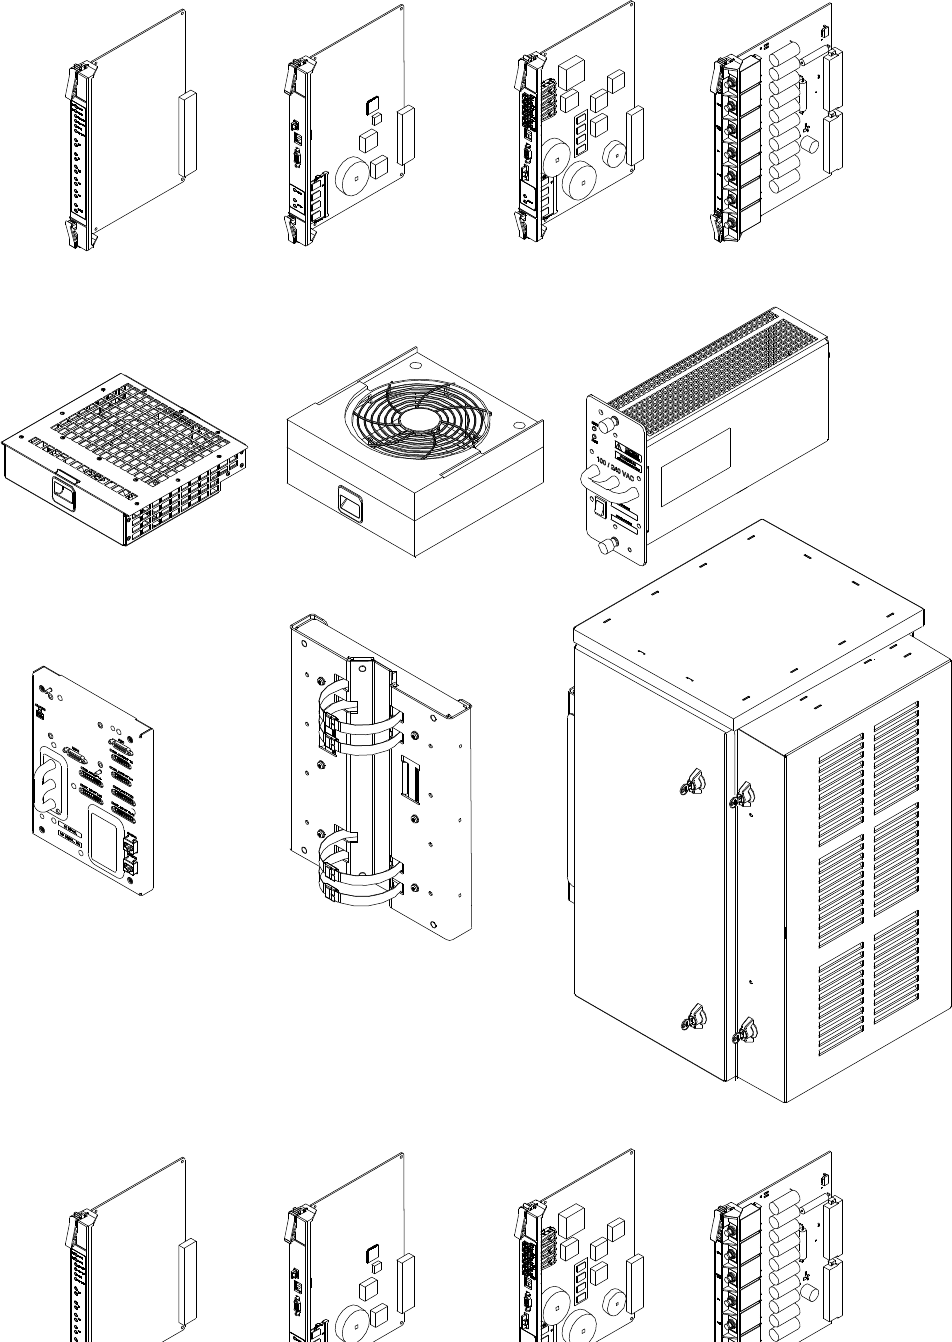
Figure 1 -3 BCU Hardw are
ti-cdma-04197.eps
Alarm Card
Fan Tray
BCU Chassis
I/O Panel
Wall/Pole Mount Bracket
Heater
Circuit Breaker CardModem Card CardController Card
PSU
ti-cdma-04197.eps
Alarm Card
Fan Tray
BCU Chassis
I/O Panel
Wall/Pole Mount Bracket
Heater
Circuit Breaker CardModem Card CardController Card
PSU
68P09277A59 -8 1 -9
PRELIMINARY - UNDER DEVELOPMENT MA Y 2007
Access P oint Equipment Identication Chapter 1: Introduction
RF Head Hardware Identication
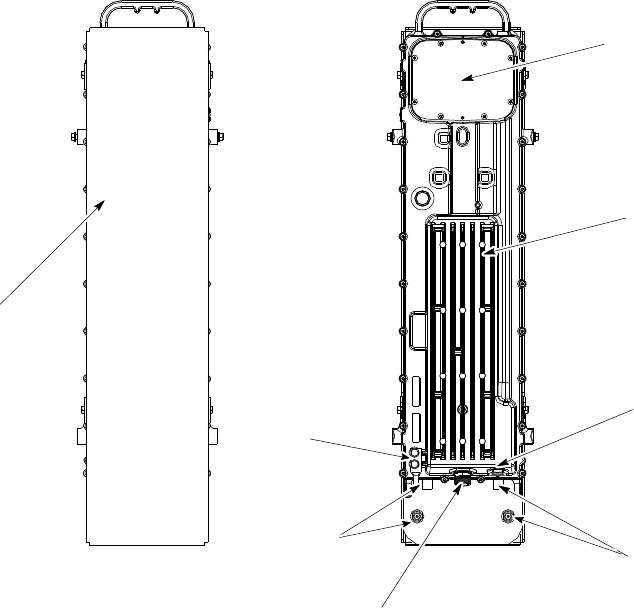
The Diversity Access P oint (DAP) RF Head Assembly consists of a two antenna element using a
single radome and a (one Transmit/Receive RF Module (RF Head)).
Figure 1 -4 DAP RF Head Hardw are
ti-cdma-04168.eps
RF Head
DC Power
Fiber Optic
RF Connector
Ground
Radome
RF Connector
Access
Panel
Connector
Connector
Location
1 -10 68P09277A59 -8
PRELIMINARY - UNDER DEVELOPMENT MA Y 2007

C h a p t e r
2
Site Preparation
■■■■■■■■■■■■■■■■■■■■■■■■■■■■■■■■■■■■■■■■■■■■■■■■■■■■■■■■■■■■■■
■
■
■
■
68P09277A59 -8 2 -1
MA Y 2007 PRELIMINARY - UNDER DEVELOPMENT

Site Prepar ation Ov erview Chapter 2: Site Prepar ation
Site Preparation Overview■■■■■■■■■■■■■■■■■■■■■■■■■■■■■■■■■■■■■■■■■■■■■■■■■■■■■■■■■■■■■■
■
■
Overview
This chapter provides the procedures and information to verify that the site is ready for
equipment installation. It also provides procedures to ensure the safety of the installation
personnel, protect the equipment from damage, and verify the site layout parameters.
Ev ery effort should be made to pro vide a safe working en vironment for all installation
and service personnel.
Installation
This Base Control Unit (B CU) may be installed indoors or outdoors. The RF Head is installed
outdoors. The site preparation depends on the type of installation and the site characteristics.
Site Manager
The site manager is the person in charge of and responsible for the full site.
Verication and Procedures
V erifications typically have the installer check with the site manager that a condition has been
previously checked or procedure previously performed and meets a stated specification.
Inspections typically have the installer personally checking that a condition or item meets
stated specifications.
The verifications and procedures provided in this chapter are:
•Internal site inspections
•Preparing site for the arrival of equipment
•Site layout verification
2 -2 68P09277A59 -8
PRELIMINARY - UNDER DEVELOPMENT MA Y 2007

Access P oint Hardw are Installation Prepare Site for Equipment Arriv al
Prepare Site for Equipment Arrival■■■■■■■■■■■■■■■■■■■■■■■■■■■■■■■■■■■■■■■■■■■■■■■■■■■■■■■■■■■■■■
■
■
Description
This information covers various topics not all of which are needed at every site. Based on the
site characteristics execute the steps that apply to your site. Before installing the equipment, do
the following to ensure the safety of installation personnel and to protect the equipment.
Equipment Arrival
Before the equipment arrives, indicate to the transport company an area at the site where the
equipment can be unloaded and, if necessary , unpacked. The equipment should be carefully
delivered to the site, along with all equipment dollies and padding required to safely move the
equipment from the unloading area to the cell site. The following should also be provided,
outdoor weather protection, temporary lighting and power for lighting and power tools.
Procedure to Prepare the Site for the Equipment
Procedure 2 -1 Procedure to Prepare the Site for the B T S
1
Consult with site manager .
2
Locate the demarcation blocks for external utilities.
V erify that they are shown on the Site Engineering documents, and
determine the required cable routing back to the equipment frames.
3
V erify the following:
•AC power is available and meets the site documentation specifications
•P ole and/or wall mounting structures are adequate
•Outdoor cable runs are installed and meet local building codes
•Customer input termination tie points are available
•There is clear access to move the equipment to the desired mounting
area
•There is sufficient space for installation and service access to the
equipment
•Customer supplied shelters are installed
68P09277A59 -8 2 -3
PRELIMINARY - UNDER DEVELOPMENT MA Y 2007
Shipping and Handling Chapter 2: Site Prepar ation
Shipping and Handling■■■■■■■■■■■■■■■■■■■■■■■■■■■■■■■■■■■■■■■■■■■■■■■■■■■■■■■■■■■■■■
■
■
Overview
The purpose of this chapter is to describe how the Base Control Unit (B CU) and RF Head are
packaged for shipping and how to correctly unpack the units in preparation for installation.
How Equipment is Shipped
The B CU and RF Head will be shipped in separate containers or separate pallets. The
containers, if used will either be wood or card board, with packing material to protect the units.
If pallets are used, the units will be wrapped in packing material and strapped to the pallet.
Plastic wrapping will be used to encase the units and provide protection as well as securing the
units to the pallets.
The B CU is shipped with all cards/modules and internal cabling installed.
The RF Head is shipped fully assembled.
How Equipment Arrives
Before the equipment arrives, indicate to the transport company an area at the site where the
equipment can be unloaded and, if necessary , unpacked. The equipment should be carefully
delivered to the site, along with all equipment dollies and padding required to safely move the
equipment from the unloading area to the cell site. The site should also have the following items
available: outdoor weather protection and power for temporary lighting and power tools.
Unpacking
The unpacking process requires that the following procedures be completed in the order shown:
1. Unpack the shipping container
2. Inventory the shipping container
3. Inspect equipment for damage
Recommended Tools
The tools in T able 2 -1 are recommended to assist in opening the containers housing the
equipment. Tin snips Knife, box cutter , or scissors
2 -4 68P09277A59 -8
PRELIMINARY - UNDER DEVELOPMENT MA Y 2007
Access P oint Hardw are Installation Shipping and Handling
Table 2 -1 R ecommended Unpacking T ools
Qty
Description
1 Tin snips
1
Knife, box cutter , scissors
Unpacking Diagrams
The following diagrams show how to unpack the equipment.
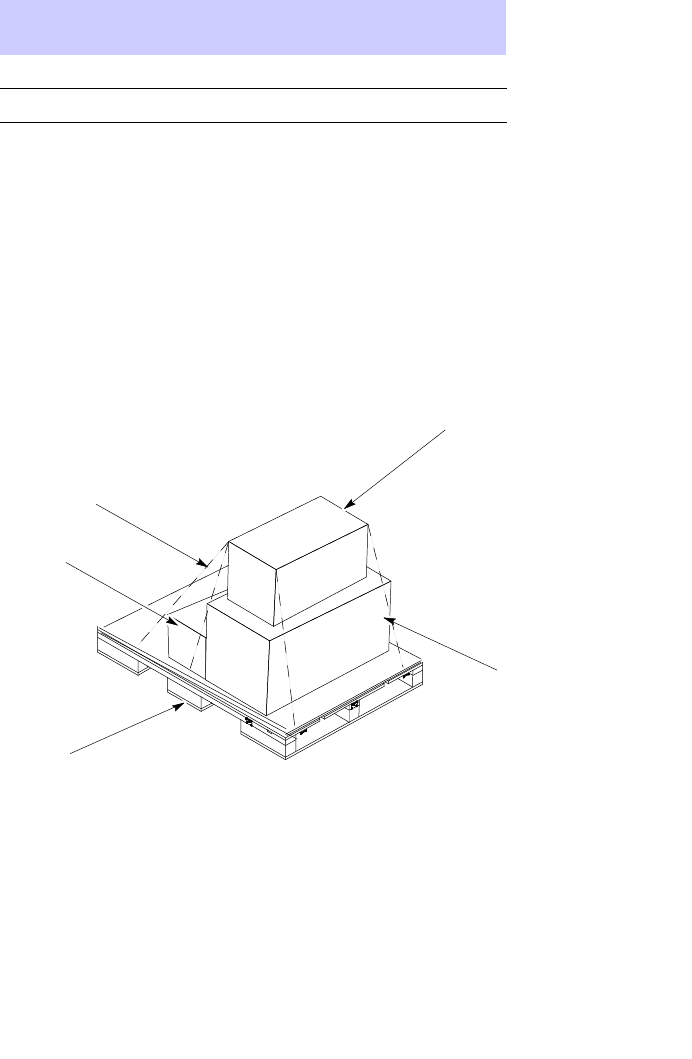
Figure 2 -1 Shrink W r apped Shipment
ti-cdma-04922.eps
ti--cdma--05734.eps
Pallet Container
DAP Container
Boxes are shrinkwrapped to pallet
Pole Mount Bracket Container
BCU Container
68P09277A59 -8 2 -5
PRELIMINARY - UNDER DEVELOPMENT MA Y 2007
Shipping and Handling Chapter 2: Site Prepar ation
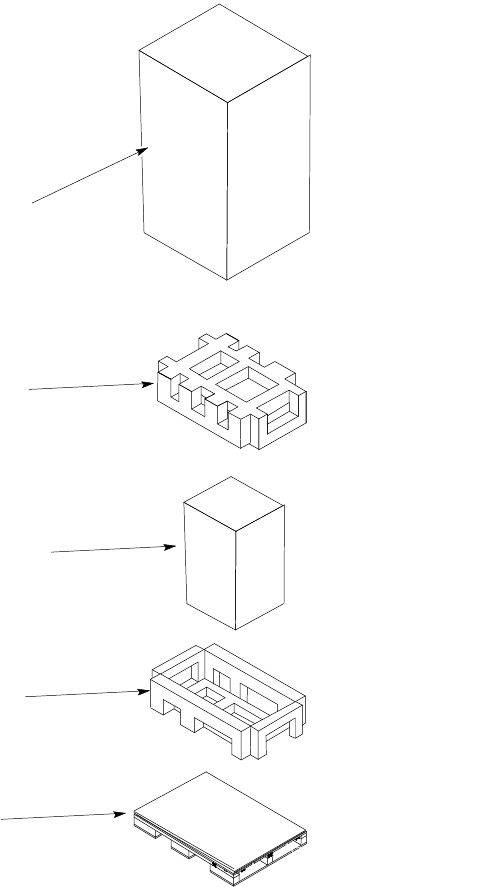
Figure 2 -2 Cardboard Shipping Container
ti-cdma-04922.eps
ti--cdma--04169.eps
Wood Crate
Styrofoam Packing
(See note 1)
Styrofoam Packing
Cardboard Box
BCU
NOTE:
1. Normally this styrofoam
packing is attached to the
pallet. it is shown exploded
for clarity
2. This example shows the BCU
shipping container.
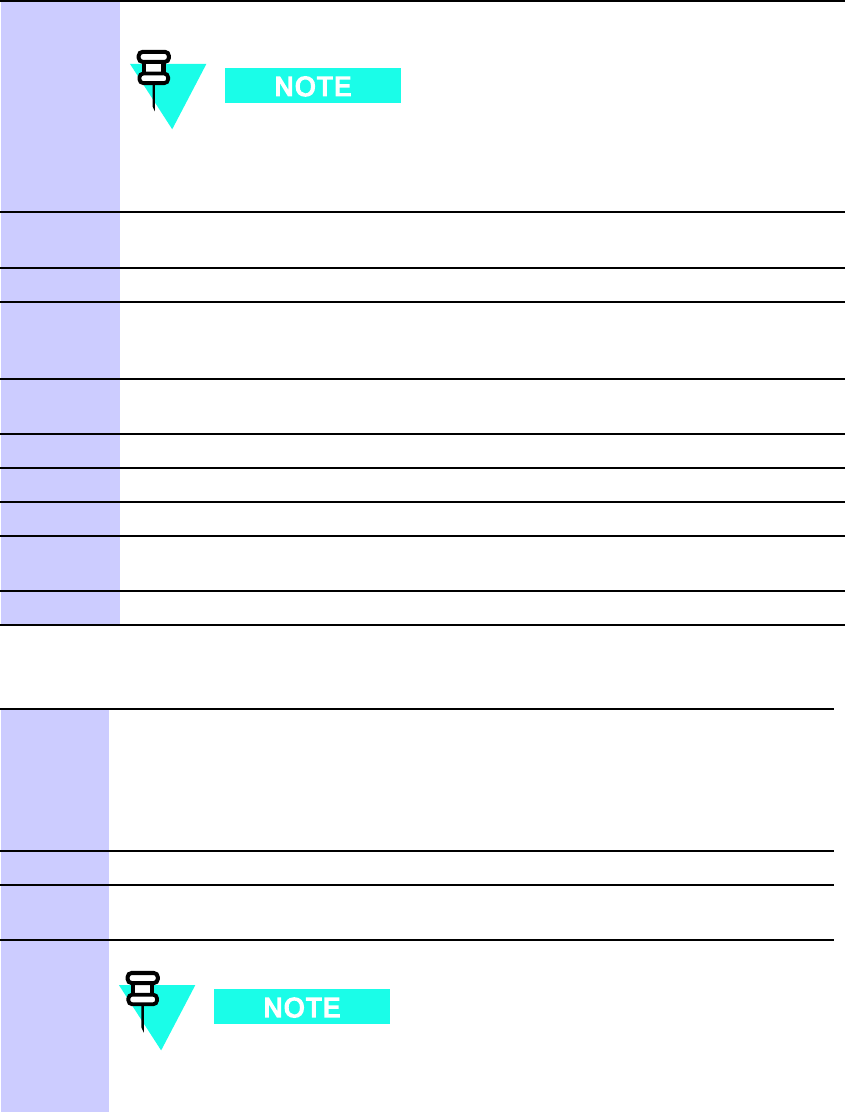
Unpacking a Cardboard Container or Shrink Wrapped Shipment
F ollow the procedure in Procedure 2 -2 to unpack equipment from a container or shrink wrap.
Continued
2 -6 68P09277A59 -8
PRELIMINARY - UNDER DEVELOPMENT MA Y 2007
Access P oint Hardw are Installation Shipping and Handling
Procedure 2 -2 Unpacking Equipment from a Cardboard Container or Shrink W r ap
1
Inspect for damage.
Components may or may not be delivered on one pallet. Procedure
assumes components are delivered in separate containers on one
pallet.
2
If container is made of cardboard, proceed to step 3 .
3
Open container using tin snips to cut each outer steel band.
4
Cut bands securing pole/wall mounting
bracket container to top of B CU container .
Remove pole/wall mounting bracket container , and place to one side.
5
Cut bands securing RF Head container and RF Head mounting bracket
container to pallet.
6
Cut bands securing RGPS container to pallet.
7
Proceed to Procedure 2-3 .
8
Using a knife or equivalent, carefully cut shrink wrap.
9
Carefully separate individual shipping containers.
Check for damage to containers.
10
Proceed to Procedure 2-3 .
Procedure 2 -3 Procedure to R emo v e Outdoor Equipment from Container
1
Lift cardboard container off of the B CU .
Find and remove equipment door key .
Open the shipping container holding the B CU mounting bracket.
Open the shipping container holding the RF Head.
Open shipping container holding RF Head mounting bracket assembly .
Open shipping container holding the GPS equipment.
2
Remove packing material from all containers.
3
Upon opening containers, if components are enclosed in plastic, use a knife
or equivalent to carefully cut plastic away .
4
The B CU weighs a maximum of 68 kg (150 lbs). Recommend that
a minimum of two people be present to move the B CU .
Continued
68P09277A59 -8 2 -7
PRELIMINARY - UNDER DEVELOPMENT MA Y 2007

Shipping and Handling Chapter 2: Site Prepar ation
Procedure 2 -3 Procedure to R emo v e Outdoor Equipment from Container (Continued)
Locate B CU door key . Remove B CU .
5
Use the key to open the door . V erify that cards and modules are installed.
6
If B CU is to be pole mounted, check that B CU has part of the mounting
bracket already attached. Remove B CU pole/wall mounting bracket
assembly from its container .
7
The RF Head for the Diversity Access P oint (DAP) weighs 15.9
kg (35.0 lbs).
Remove the DAP RF Head from its container .
8
Remove DAP RF Head mounting bracket assembly from its container .
9
Remove GPS equipment from its container .
10
T ake inventory of equipment received.
Report the extent of any equipment damage to the
transport company and to appropriate management personnel.
2 -8 68P09277A59 -8
PRELIMINARY - UNDER DEVELOPMENT MA Y 2007

C h a p t e r
3
Cable Descriptions
■■■■■■■■■■■■■■■■■■■■■■■■■■■■■■■■■■■■■■■■■■■■■■■■■■■■■■■■■■■■■■
■
■
■
■
68P09277A59 -8 3 -1
MA Y 2007 PRELIMINARY - UNDER DEVELOPMENT

Cable Descriptions Chapter 3: Cable Descriptions
Cable Descriptions
■■■■■■■■■■■■■■■■■■■■■■■■■■■■■■■■■■■■■■■■■■■■■■■■■■■■■■■■■■■■■■
■
■
Overview
This chapter provides the descriptions of the site cabling.
Procedures for routing cables (through metallic or conductive conduit) to the outdoor equipment
are found in Chapter 4 Access P oint Hardware Installation .
Cabling is one of the most noticeable aspects of workmanship. Straight runs and
proper turns are critical for a positive evaluation of the work.
Congurations Supported
This chapter supports cable installation for 3 and 4 sector configurations.
Cable Installation Order
1. Ground Cabling
2. P ower Cabling
3. Antenna Cabling
4. RGPS or Local GPS Cabling
5. Ethernet Cabling
6. Fiber Optic Cabling
7. Customer Defined Input/Output Cabling
Cable Labels
Refer to T able 3 -1 for the labels used to identify the cables that will be shown in illustrations
throughout this chapter .
3 -2 68P09277A59 -8
PRELIMINARY - UNDER DEVELOPMENT MA Y 2007

Access P oint Hardw are Installation Cable Descriptions
Cable Descriptions and Part Numbers
T able 3 -1 gives the cable descriptions and part numbers of the various cables that will connect
to the Base Control Unit (B CU) and RF head.
Table 3 -1 Cable Description and P art Numbers
Cable Qty
Part Number Description
A
2
Customer Supplied Ground cable, 6 A WG or larger , insulated copper wire.
B
2–8 3089492T02
Antenna Cable, 300 mm (1 ft.)
C 1 T472AA
RGPS cable, 15 m (50 ft.)
T472AB
RGPS cable, 38 m (125 ft.)
T472AC
RGPS cable, 76 m (250 ft.)
T472AD
RGPS cable, 152 m (500 ft.)
T472AE
RGPS cable, 304 m (1000 ft.)
T472AF
RGPS cable, 608 m (2000 ft.)
C1 1
P art of Motorola Kit.
D
1 SGRG4030A
CGDSGPSKITF4NM50
Assembly , Receiver , GPS , RF Module
Antenna, GPS , with mounting and 50 ft.
cable.
E
2
Customer Supplied AC P ower Cable, 10 A WG , copper
DC P ower Cable,
F
1 SGLN6414A
Assembly , Installation, Installation HDW Pkg B CU
G 1–4 3089298C01
RF Head DC P ower Cable, 20 m (65.6 ft)
3089298C02
RF Head DC P ower Cable, 40 m (131.2 ft)
3089298C03
RF Head DC P ower Cable, 60 m (196.8 ft)
3089298C04
RF Head DC P ower Cable, 80 m (262.4 ft)
3089298C05
RF Head DC P ower Cable, 100 m (328.0 ft)
H
1–4 3089843T01
Fiber Optic Cable, 20 m (65.6 ft)
3089843T02
Fiber Optic Cable, 40 m (131.2 ft)
3089843T03
Fiber Optic Cable, 60 m (196.8 ft)
3089843T04
Fiber Optic Cable, 80 m (262.4 ft)
3089843T05
Fiber Optic Cable, 100 m (328.0 ft)
Continued
68P09277A59 -8 3 -3
PRELIMINARY - UNDER DEVELOPMENT MA Y 2007

Cable Descriptions Chapter 3: Cable Descriptions
Table 3 -1 Cable Description and P art Numbers (Continued)
Cable Qty
Part Number Description
J
6
Customer Supplied Ethernet cables, RJ-45 connectors, straight
K
1 GCNTM20A3A
CGDSVXL550
FSJ4–50B)
Assembly , Receiver , GPS , RF Module
Antenna, GPS , with mounting and 50 ft. cable.
Antenna cable from Surge Arrestor (Customer
supplied) to B CU
L
1 SGKN4386
Punch block to B CU I/O board, 15–pin D -connector on
one end and loose wires on the other end. Cable is
Motorola P/N 3086433H12
M
1
Customer Supplied DC power cable, 8–10 A WG , 10 m
Cable Lengths
Table 3 -2 Cable Length R equirements
From T o
Cable Designation Cable length
B CU DC Source
RF Head DC
Connector
G
5 lengths, 20 to 100 m in 20 m
increments (65.6 to 328 ft)
B CU RF Connector
RF Head RF
Connector
B
300 mm (1 ft)
AC Source B CU Customer
Interface
Compartment
E
Length as required.
Customer Output
Source
B CU Customer
Interface
Compartment
F
Length as required.
3 -4 68P09277A59 -8
PRELIMINARY - UNDER DEVELOPMENT MA Y 2007
Access P oint Hardw are Installation Earth Ground and P ower Cables
Earth Ground and Power Cables■■■■■■■■■■■■■■■■■■■■■■■■■■■■■■■■■■■■■■■■■■■■■■■■■■■■■■■■■■■■■■
■
■
The objective of this procedure is to install the power and earth ground cabling for the Base
Control Unit (B CU) and RF Head.
The site should have had an external ground ring or bus bar being used. The ground ring and
bus bar should be an integral part of the structures that will hold the equipment. Reference
Hard copy (Motorola P art Number 6881089E50)
.
Grounding Considerations
Above Ground F or ground rings and the interconnection of internal and external ground
rings, #2 to #6 A WG may be used. F or grounding of equipment and miscellaneous metallic
objects, #6 A WG minimum is required.
Exceptions Connection from an isolated ground bar (IGB) to master ground bar (MGB) is
accomplished using #2 to #6 A WG . The external ground bar (EGB) is grounded through a 2 -inch
(50.8 mm) wide, 16 -gauge copper strap, if available; otherwise, 2 -#6 A WG wires can be used. If
the #6 A WG wires are used, then they must be connected at opposite ends of the EGB and have
a minimum separation of 12 -inches between them.
Below Ground All wire must be #2 A WG as a minimum. Ground rods are to be a minimum of
8 feet long and 5/8 -inch in diameter . In the case of a deep basement next to the rod, the rod
must be long enough to extend 3 feet below the basement floor .
BCU Grounding
The B CU should be tied to a single point grounded to the system master ground (ground bus
bar). All interconnect cables should be in metallic sealtight type conduit or solid shield RF
cables. It is recommended that these cables be run in raceways to reduce the loop dimensions
of the cable runs. This minimizes the effect of inducted currents caused by the intense
electromagnetic field of lightning current. A ground stud is provided on the external surface of
the B CU enclosure to attach the ground wire. Refer to requirements for cable A in T able 3 -1 .
RF Head Grounding
All RF cables should be in metallic sealtight type conduit or solid shield RF cables. It is
recommended that these cables be run in raceways to reduce the loop dimensions of the cable
runs. This minimizes the effect of inducted currents caused by the intense electromagnetic field
of lightning current. A ground lug with captive screws is provided on the RF Head to attach
the ground wire.
68P09277A59 -8 3 -5
PRELIMINARY - UNDER DEVELOPMENT MA Y 2007
Earth Ground and P ower Cables Chapter 3: Cable Descriptions
DC Power Grounding
The DC power cables from the B CU to the RF Head are routed through conduit. The conduit
is grounded to the master ground. The ground for the DC cable is attached DC power surge
protect module. See Figure 4 -11
AC Power Grounding
The AC power cables from the B CU to the RF Head are routed through conduit and into the
B CU . The conduit is grounded to the master ground. The ground for the AC cable is attached AC
power surge protect module. See Figure 4 -10 .
Antenna Grounding
The antenna is grounded through the RF Head.
3 -6 68P09277A59 -8
PRELIMINARY - UNDER DEVELOPMENT MA Y 2007
Access P oint Hardw are Installation Earth Ground and P ower Cables
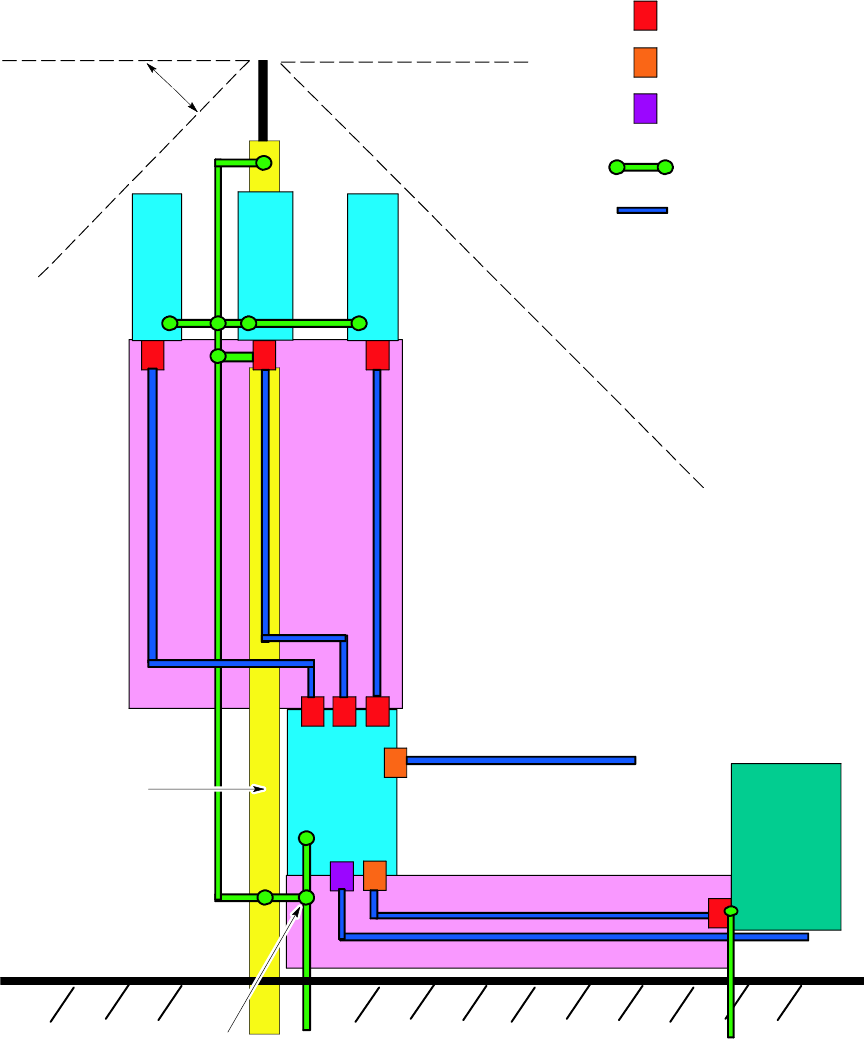
Figure 3 -1 T ypical Outdoor Grounding Diagr am
ti-cdma-04180.eps
DC Primary Surge Arrestors
Backhaul & Customer I/O
Surge Arrestor
AC Primary Surge Protector
Bonded Ground / Earth
Connection
Conduit or
Shielded Cable
LPZ1
LPZ2 Secondary Protected Zone
LPZ0A
LPZ0B
Antenna Tower
45 Degree
IEC Recommended
Direct Strike
Protection Angle
RF
1
RF
2RF
3
BCU
BACKHAUL
CSU
AC Input
Backhaul
MASTER SINGLE
POINT EQUIPMENT
GROUND
LPZ0A-- Possible direct strike zone
LPZ0B-- No direct strike, but
unattenuated electromagnetic field
present
LPZ1 Primary Protected Zone
LPZ1
LPZ2
LPZ
2
LPZ
2
LPZ
2
Customer I/O
68P09277A59 -8 3 -7
PRELIMINARY - UNDER DEVELOPMENT MA Y 2007
Earth Ground and P ower Cables Chapter 3: Cable Descriptions
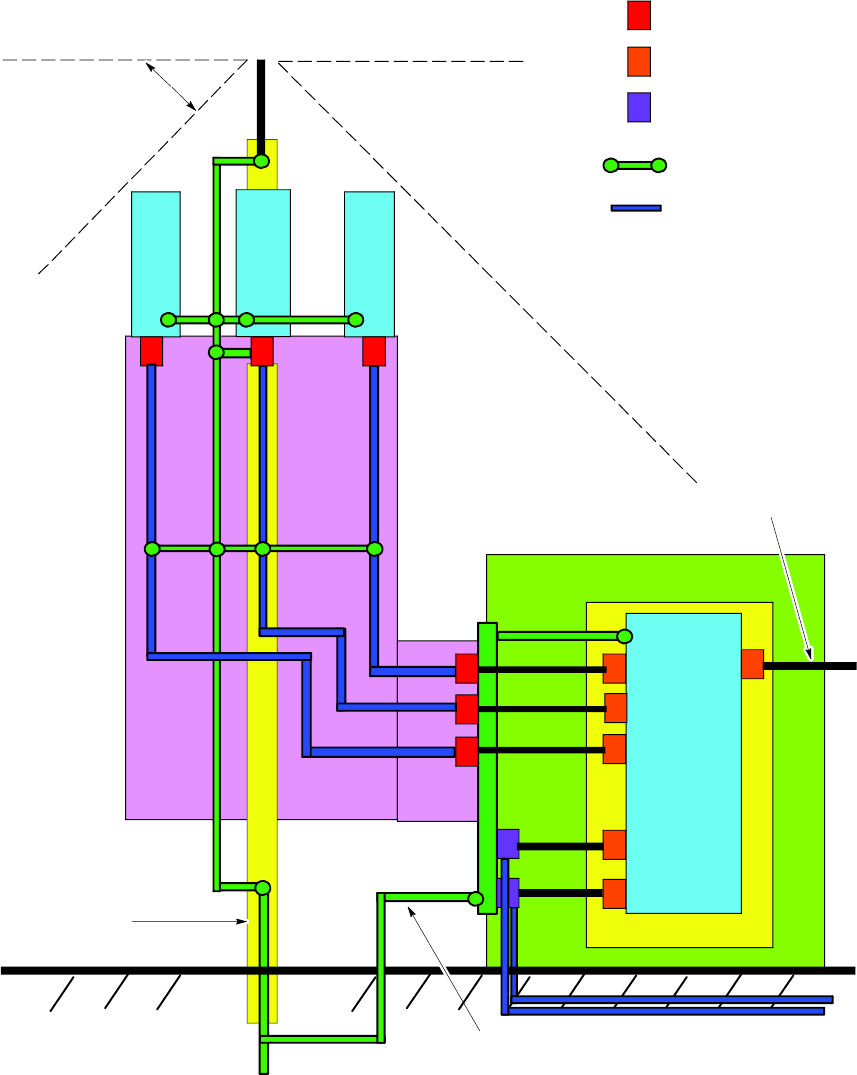
Figure 3 -2 T ypical Indoor Grounding Diagr am
ti-cdma-04181.eps
DCPrimary Surge Arrestors
Secondary Surge Arrestor
AC & Backhaul Primary
Surge Arrestor
Bonded Ground / Earth
Connection
Conduit or
Shielded Cable
LPZ1
LPZ2 Secondary Protected Zone
LPZ0A
LPZ0B
Antenna Tower
45 Degree
IEC Recommended
Direct Strike
Protection Angle
RF
1
RF
2RF
3
BCU
INSULATOR
Customer I/O
MASTER SINGLE
POINT STRUCTURE
GROUND
LPZ0A-- Possible direct strike zone
LPZ0B-- No direct strike, but
unattenuated electromagnetic field
present
LPZ1 Primary Protected Zone
LPZ2
LPZ
2
LPZ
2
LPZ
2
Single Point
Ground
AC Input
Backhaul
STRUCTURE
3 -8 68P09277A59 -8
PRELIMINARY - UNDER DEVELOPMENT MA Y 2007

Access P oint Hardw are Installation Earth Ground and P ower Cables
Power Considerations
The Base Control Unit (B CU) is designed for 100/240 V AC @ 50/60 Hz, 16A max., +20 to +30
VDC , 78A max. or –60 to –39 VDC , 38A max.
The system configuration determines which power cables are installed. The ground cable is
always installed first. Based on the system configuration perform the appropriate procedures
described in Chapter 4 Access P oint Hardware Installation .
DC Power (RF Head)
The DC power cable is orderable in a variety of lengths as indicated in T able 3 -3 below .
Depending on site configuration all of one length or a combination of lengths (up to 4) may be
used.
Table 3 -3 RF Head DC P ower Cable Description and P art Numbers
Cable Qty
Part Number Description
G 1–4 3089298C01
P ower Cable, 20 m (65.6 ft)
1–4 3089298C02
P ower Cable, 40 m (131.2 ft)
1–4 3089298C03
P ower Cable, 60 m (196.8 ft)
1–4 3089298C04
P ower Cable, 80 m (262.4 ft)
1–4 3089298C05
P ower Cable, 100 m (328.0 ft)
68P09277A59 -8 3 -9
PRELIMINARY - UNDER DEVELOPMENT MA Y 2007

Antenna Cable Chapter 3: Cable Descriptions
Antenna Cable■■■■■■■■■■■■■■■■■■■■■■■■■■■■■■■■■■■■■■■■■■■■■■■■■■■■■■■■■■■■■■
■
■
Objective
This section contains general information on the antenna cabling.
Cable Label
Refer to T able 3 -1 for the labels used to identify the cables that will be shown in illustrations
throughout this chapter .
Table 3 -4 Cable Description and P art Numbers
Cable Qty
Part Number Description
B
2 – 4 3089492T02
Antenna Cable, 300 mm (1 ft.)
Antenna Cable Pin and Signal Information
The antenna cabling uses a 50 -Ohm coaxial cable. The inner conductor provides signaling and
the outer conductor provides shielding and ground.
Table 3 -5 Pin and Signal Information for Antenna Cable
Antenna
Inner Conductor Outer Conductor
B TX/RX
Ground
3 -10 68P09277A59 -8
PRELIMINARY - UNDER DEVELOPMENT MA Y 2007

Access P oint Hardw are Installation R emote GPS Cable
Remote GPS Cable■■■■■■■■■■■■■■■■■■■■■■■■■■■■■■■■■■■■■■■■■■■■■■■■■■■■■■■■■■■■■■
■
■
Objective
This section contains general information on the Remote Global P ositioning System (RGPS)
cabling. Installation information is found in Appendix B Alternate RGPS Installation , beginning
with Procedure B -1 .
Cable Label
Refer to T able 3 -1 for the labels used to identify the cables that will be shown in illustrations
throughout this chapter . Cable C is available in different kits covering several lengths.
RGPS Cables
T able 3 -6 provides the quantities and descriptions of the cables.
Table 3 -6 Cables Needed for RGPS Connections
Cable Qty
Part Number Description
C 1 T472AA
RGPS cable, 15 m (50 ft.)
T472AB
RGPS cable, 38 m (125 ft.)
T472AC
RGPS cable, 76 m (250 ft.)
T472AD
RGPS cable, 152 m (500 ft.)
T472AE
RGPS cable, 304 m (1000 ft.)
T472AF
RGPS cable, 608 m (2000 ft.)
L
1 SGKN4386
15 pin D -connector on one end and loose
wires on the other end. Cable is Motorola
P/N 3086433H12.
Mounting Considerations
The RGPS Head requires specific mounting considerations in order to properly observe the
GPS satellites.
68P09277A59 -8 3 -11
PRELIMINARY - UNDER DEVELOPMENT MA Y 2007

R emote GPS Cable Chapter 3: Cable Descriptions
•The mounting pipe for the RGPS head should be mounted vertically with less than five
degrees of tilt.
•It is recommended that the RGPS head be installed using the supplied mounting mast and
mounting hardware. Care should be taken to ensure that the RGPS chassis does not come
into contact with any metal surfaces. F ailure to properly isolate the RGPS chassis from
other conductive surfaces can lead to RGPS head failure. The supplied mounting hardware
has been designed to provide the required RGPS chassis isolation.
•P osition the RGPS head to have an unobstructed view of the sky and to minimize the chance
of debris (leaves, dirt, snow , ice, etc.) accumulating on the radome of the RGPS head.
•The RGPS head must have a clear view of the sky , preferably to within 10 degrees of the
horizon in all directions. The total blockage of the sky (due to buildings, mountains, etc.)
should be less than 50%.
•Place the RGPS head as far away from the transmit antenna as possible to avoid RF
interference issues.
•Place the RGPS head at least 15 m away from lightning rods, towers, or structures that
attract lightning. RGPS head damage is usually not the result of a direct lightning strike,
but of a lightning strike on a nearby structure. Also, since a lightning rod is connected
to an earth ground, it can act as a shield and create a shadow that may block or reduce
the signal from a satellite.
•A fter the Base Control Unit (B CU) is powered up (approximately 15 minutes), check the
RGPS signal strengths with the
gstatus
command on the B CU MMI port.
An optimal installation will have at least one satellite (SV) with an RS SI value 50,
and three (3) satellites with RS SI values 45.
A minimal installation should have at least four (4) satellites with RS SI values 40.
•The RGPS head is rated for ambient air temperatures from –40°C (–40°F) to 75°C (167°F),
and has ratings for humidity , shock, waterproof , UV light resistance, vibrations, salt fog,
ESD , EMI, and altitude.
•The RGPS system used for the Access P oint will support up to 1 km (3280 ft.) of overall
cable length from the RGPS head. If a long cable run needs to be broken into pieces,
minimize the number of breaks in the cable.
3 -12 68P09277A59 -8
PRELIMINARY - UNDER DEVELOPMENT MA Y 2007

Access P oint Hardw are Installation Local GPS (RF GPS) Cable
Local GPS (RF GPS) Cable■■■■■■■■■■■■■■■■■■■■■■■■■■■■■■■■■■■■■■■■■■■■■■■■■■■■■■■■■■■■■■
■
■
Objective
This section contains general information on the R adio Frequency Global P ositioning System
receiver (RF GPS) antenna cabling. More commonly referred to as Local GPS . Refer to
Procedure 4 -10 for installation information.
Cable Label
Refer to T able 3 -1 for the labels used to identify the cables that will be shown in illustrations
throughout this chapter .
Table 3 -7 Local GPS Cable Description and P art Numbers
Cable Qty
Part Number Description
D
1 Receiver SGRG4030
Assembly , GPS , RF Module
1 CGDSGPSKITF4NM50
Assembly , Receiver , RF GPS with 50
ft. cable
Surge Protection
Local GPS antenna requires lightning protection.
Mounting Considerations
Refer to T able 3 -8 for Local GPS mounting considerations.
Table 3 -8 Local GPS Antenna Mounting Consider ations
Description
1
The mounting pipe for the Local GPS Head should be mounted vertically with less
than five (5) degrees of tilt.
2
The Local GPS Head requires a clear view of the sky , preferably to within ten (10)
degrees of the horizon in all directions. The more sky that is observed increases
the number of potential satellites that can be tracked, resulting in better Local
GPS performance.
3
During normal operation, the Local GPS Head continuously tracks a minimum of
four (4) GPS satellites. However , it is theoretically possible to operate the BTS by
Continued
68P09277A59 -8 3 -13
PRELIMINARY - UNDER DEVELOPMENT MA Y 2007

Local GPS (RF GPS) Cable Chapter 3: Cable Descriptions
Table 3 -8 Local GPS Antenna Mounting Consider ations (Continued)
Description
tracking only one (1) GPS satellite. Motorola does not recommend tracking only one
(1) GPS satellite unless there has been an accurate site survey .
4
Place the Local GPS Head where RF obstructions of the sky are minimal. The
sky
includes everything to within ten (10) degrees of the horizon in all directions. RF
obstructions include buildings, towers, natural rock formations, snow , foliage, and
debris.
The mounting of the Local GPS head on antenna towers is not
recommended due to increased risk of damage due to lightning strikes. If
tower mounting is necessary the Local GPS head should mounted at the
lowest point possible and still maintain an unobstructed view of the sky .
5
Separate the Local GPS Head from other radiating sources. Excessive RF energy
can degrade the Local GPS Head’s ability to observe the GPS satellites. The Local
GPS Head receives on the GPS L1 frequency of 1575.42 MHz and incorporates
filters to minimize the effects of potential RF interference, however , strong radiants
can overwhelm the filters, thus degrading the units reception capability .
6
The Local GPS Head is rated for ambient air temperatures in the range -40 to +50
degrees C , and has ratings for humidity , shock, waterproofing, UV light resistance,
vibrations, salt, fog, ESD , EMI, and altitude.
7
An RF gain of between +10 dB and +26 dB should be provided to the Local GPS
receiver antenna input. The GPS antenna supplied in the CGDSGPSKITF4NM50
kit provides a nominal gain of +25 dB. The total signal loss from the
CGDSGPSKITF4NM50 antenna output and Local GPS antenna input must be less
than 15 dB at 1.575 GHz.
3 -14 68P09277A59 -8
PRELIMINARY - UNDER DEVELOPMENT MA Y 2007
Access P oint Hardw are Installation Ethernet Cable
Ethernet Cable■■■■■■■■■■■■■■■■■■■■■■■■■■■■■■■■■■■■■■■■■■■■■■■■■■■■■■■■■■■■■■
■
■
Objective
This section contains general information on the Ethernet Cabling. Refer to Chapter 4 Access
P oint Hardware Installation for ethernet cable installation information.
Cable Label
Refer to T able 3 -1 for the labels used to identify the cables that will be shown in illustrations
throughout this chapter .
Tools and Materials
There are no tools and materials required to install the Ethernet Cables.
68P09277A59 -8 3 -15
PRELIMINARY - UNDER DEVELOPMENT MA Y 2007

Fiber Optic Cable Chapter 3: Cable Descriptions
Fiber Optic Cable■■■■■■■■■■■■■■■■■■■■■■■■■■■■■■■■■■■■■■■■■■■■■■■■■■■■■■■■■■■■■■
■
■
Objective
This section contains general information on the fiber optic cable
Cable Label
Refer to T able 3 -1 for the labels used to identify the cables that will be shown in illustrations
throughout this chapter .
Cable Description and Part Number
The fiber optic cable is orderable in a variety of lengths as indicated in T able 3 -9 below .
Depending on site configuration all of one length or a combination of lengths (up to 4) may be
used.
Table 3 -9 Fiber Optic Cable Description and P art Number
Cable Qty
Part Number Description
H
1–4 3089843T01
Fiber Optic, 20 m (65.6 ft)
1–4 3089843T02
Fiber Optic, 40 m (131.2 ft)
1–4 3089843T03
Fiber Optic, 60 m (196.8 ft)
1–4 3089843T04
Fiber Optic, 80 m (262.4 ft)
1–4 3089843T05
Fiber Optic, 100 m (328.0 ft)
3 -16 68P09277A59 -8
PRELIMINARY - UNDER DEVELOPMENT MA Y 2007

Access P oint Hardw are Installation Customer Dened Input/Output Cables
Customer Dened Input/Output Cables■■■■■■■■■■■■■■■■■■■■■■■■■■■■■■■■■■■■■■■■■■■■■■■■■■■■■■■■■■■■■■
■
■
Objective
This section contains general information on the Customer Defined Input (CDI) and Output
(CDO) cables. Refer to Chapter 4 Access P oint Hardware Installation for installation information.
Cable Label
Refer to T able 3 -1 for the labels used to identify the cables that will be shown in illustrations
throughout this chapter .
Cable Descriptions and Part Numbers
T able 3 -10 gives the cable descriptions and part numbers used to install the Customer I/O
connectors.
Table 3 -10 Customer Dened I/O Cable Description and P art Numbers
Cable Qty
Part Number Description
F
1 SGLN6414A
Assembly , Installation, Installation
Hdw Pkg B CU
68P09277A59 -8 3 -17
PRELIMINARY - UNDER DEVELOPMENT MA Y 2007

Customer Dened Input/Output Cables Chapter 3: Cable Descriptions
Customer Dened Input and Output Connector Pinouts
Input Pins T able 3 -11 lists the pinouts for the Customer Defined Input 1 -4 and 5–8 connectors.
Refer to Figure 4 -16 .
Table 3 -11 Customer Dened Input Connector Pins 1–4 and 5–8
Pin Number Description Pin Number Description
Connector 1–4 Connector 5–8
1
Customer Defined Input 1
1
Customer Defined Input 5
2
Customer Defined Input 1 Return
2
Customer Defined Input 5 Return
3
Customer Defined Input 2
3
Customer Defined Input 6
4
Customer Defined Input 2 Return
4
Customer Defined Input 6 Return
5
Customer Defined Input 3
5
Customer Defined Input 7
6
Customer Defined Input 3 Return
6
Customer Defined Input 7 Return
7
Customer Defined Input 4
7
Customer Defined Input 8
8
Customer Defined Input 4 Return
8
CustomerDefined Input 8 Return
T able 3 -12 lists the pinouts for the Customer Defined Input 9 -12 and 13–16 connectors. Refer
to Figure 4 -16
Table 3 -12 Customer Dened Input Connector Pins 9–12 and 13–16
Pin Number Description Pin Number Description
Connector 9–12 Connector 13–16
1
Customer Defined Input 9
1
Customer Defined Input 13
2
Customer Defined Input 9 Return
2
Customer Defined Input 13 Return
3
Customer Defined Input 10
3
Customer Defined Input 14
4
Customer Defined Input 10 Return
4
Customer Defined Input 14 Return
5
Customer Defined Input 11
5
Customer Defined Input 15
6
Customer Defined Input 11 Return
6
Customer Defined Input 15 Return
7
Customer Defined Input 12
7
Customer Defined Input 16
8
Customer Defined Input 12 Return
8
Customer Defined Input 16 Return
3 -18 68P09277A59 -8
PRELIMINARY - UNDER DEVELOPMENT MA Y 2007