Ohsung Electronics URCMX3000 RF Transmitter Universal Remote Control User Manual OCE 0026A MX3000
Ohsung Electronics Co., Ltd. RF Transmitter Universal Remote Control OCE 0026A MX3000
Contents
- 1. Users Manual
- 2. USERS MANUAL 1
- 3. USERS MANUAL 2
- 4. USER MANUAL
Users Manual
MX-3000
Owners Manual
This remote control was
Custom Programmed for you by:
For questions about your Custom
Programming call:
Custom Programming of a complex home theater
and/or a multi-room system is one of the most
challenging tasks
within an audio/video installation. It involves an
intimate knowledge of how the components interact
and exact details on the proper sequences of control.
Only a Home Theater Master dealer has the requisite
experience and training to quickly and effectively
customize a remote control for true automated operation.
Congratulations on your choice!
MX-3000 Owners Manual © 2004 Universal Remote Control, Inc.
The information in this manual is copyright protected. No part of this manual
may be copied or reproduced in any form without prior written consent from
Universal Remote Control, Inc.
UNIVERSAL REMOTE CONTROL, INC. SHALL NOT BE LIABLE FOR
OPERATIONAL,
TECHNICAL OR EDITORIAL ERRORS/OMISSIONS MADE IN THIS MANUAL.
The information in this manual may be subject to change without prior
notice.
Home Theater Master is a registered trademark of Universal Remote Control,
Inc. Entertainment Made Simple is a trademark of Universal Remote Control,
Inc.
All other brand or product names are trademarks or registered trademarks of
their respective companies or organizations.
500 Mamaroneck Avenue, Harrison, NY 10528
Phone: (914) 835-4484 Fax: (914) 835-4532

Page 3
TABLE OFCONTENTS
Congratulations 1
Connecting the Battery Pack 1
Using the Charging Base 2
Programming the MX-3000 2
No More Pointing! 3
Operating Your System 4
Displaying the Settings Screen 5
Adjusting Backlighting 5
Adjusting Brightness 5
Button Light Settings 5
Sound 6
Setting Time and Date 6
Power Settings 6
System 6
Pickup Settings 7
Calibration 7
Factory Default 7
Exit 7
Maintaining Your MX-3000 8
Warranty 8
Specifications 8
Page 4
MX-3000 COLOR TOUCH SCREEN
Congratulations
You’ve purchased a unique synthesis
of hardware and software engineering,
the Home Theater Master MX-3000.
The twin goals of the design team
were to improve the elegance and
usability of touch screens through the
physical design while providing a new
standard in brightness, clarity and
animation for the touch screen itself.
Easy Operation
By assigning the important home theater operational buttons to the
natural resting place of the end users thumbs, the MX-3000 achieves
a new standard in use and comfort.
Automatic Backlighting
The integral motion sensor detects any movement of the touch
screen and automatically backlights the screen. You do not have to
press any button to display the screen. Any movement of the MX-
3000 renews the
backlighting. To adjust the backlighting, see page 5.
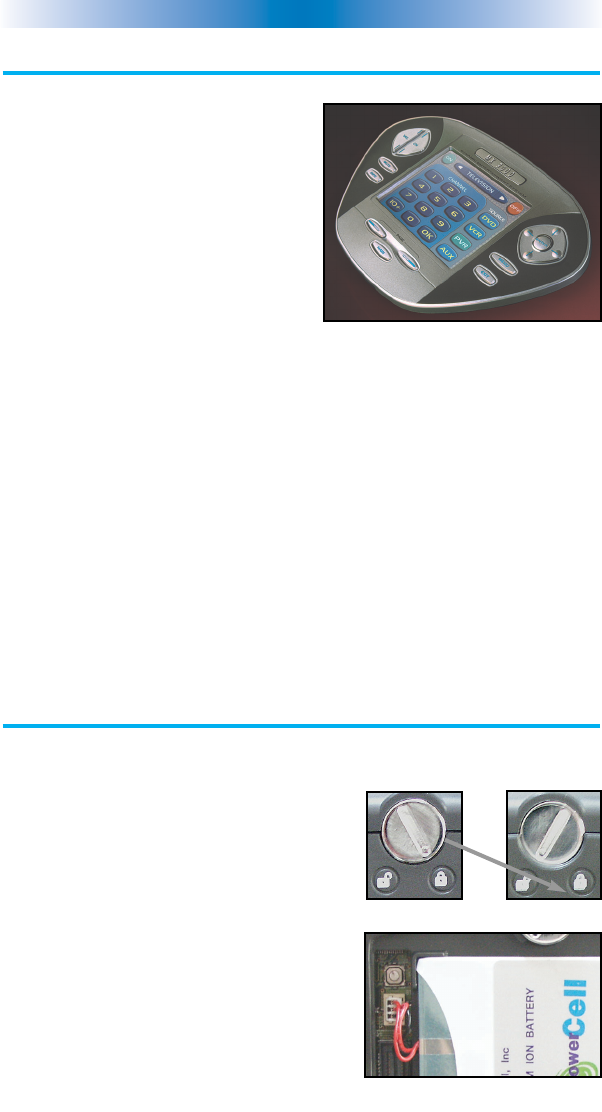
Connecting the Battery Pack
Unlock the rear cover by using a coin to move the locking screw to
the Unlock position.
Remove the cover. For shipment from the
factory, the battery cable is left
unplugged. Plug the cable into the socket
next to the battery. The connector is
slotted to prevent plugging it in the
wrong way, so don’t force it.
Replace the cover and lock it into place
with a coin.
Locked
Battery Cable Plugged In
Un-Locked
Page 5
MX-3000 COLOR TOUCH SCREEN
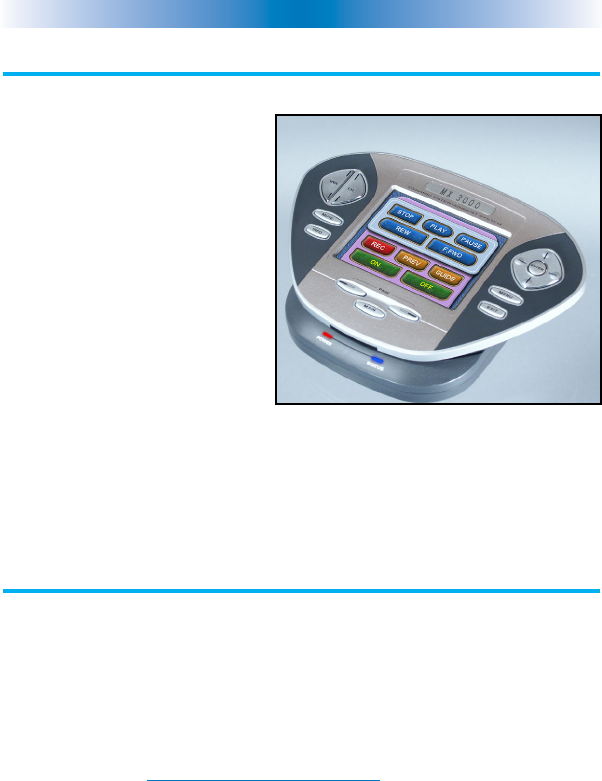
Using the Charging Base
Plug the 5V DC adapter into a
power outlet and into the back
of the charging base.
Gently place the MX-3000 into
the cradle of the charging base.
Push down on the base of the
MX-3000 until you hear and
feel a firm “click”.
The Status light should
immediately light. Red
indicates that it is
charging. Blue shows that it is fully charged. There is no harm in
leaving the MX-3000 on its charging base whenever it is not in use.
Programming the MX-3000
The MX-3000 is programmed via a windows PC equipped with a
USB port (we include a programming cable in the box), using our
proprietary software, MX-3000 Editor. You can download this
software from our
website:
www.universalremote.com
Basic setup takes only a few minutes with this software. However, to
fully automate an audio/video system the user must have a detailed
knowledge of how the system is connected and operated. We highly
recommend that you use a professional audio/video installer to
program your MX-3000 if you would like to enjoy one touch
operation via macros.
The MX-3000 on it’s Charging Base.
Page 6
MX-3000 COLOR TOUCH SCREEN
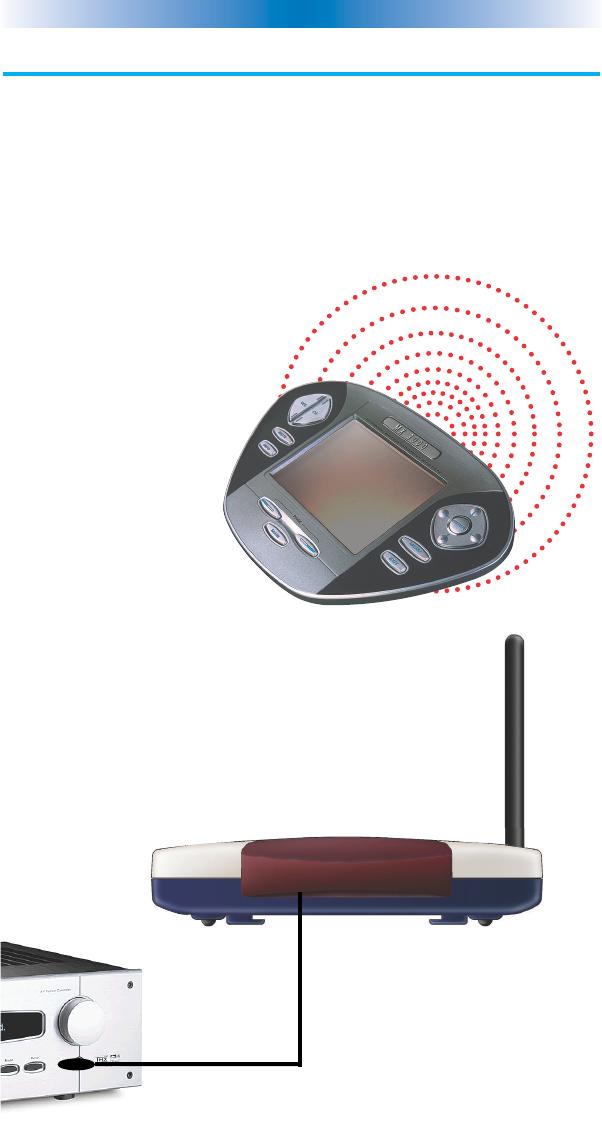
No More Pointing!
The combination of the MX-3000 with it’s companion MRF-250 base
station will enable you to place your audio/video components out of
sight behind closed doors and/or in another room of your house.
The MX-3000 sends radio signals to the MRF-250 throughout your
house (50-100’ away, indoors or outdoors). The MRF-250 converts
your commands to the infrared signals that control your A/V
components.
2. The MRF-250’s built-in Front Blaster sends commands to
components in the same cabinet space as the MRF-250.
1. The MX-3000 remote
control sends radio waves in
every direction, so you don’t
have to point the remote
anymore!
Page 7
MX-3000 COLOR TOUCH SCREEN
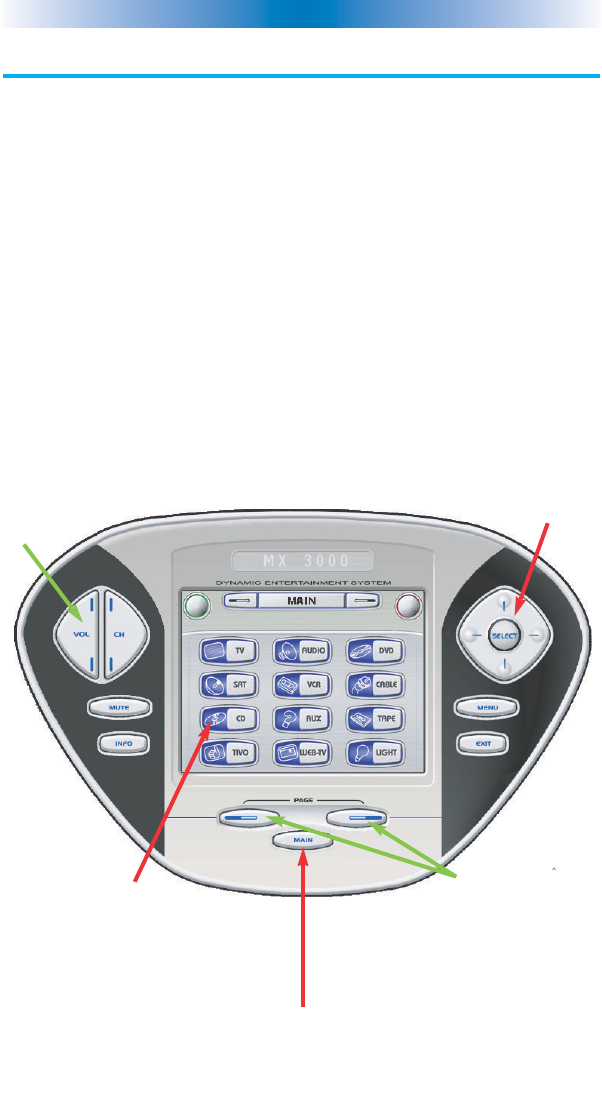
Operating Your System
The MX-3000’s MAIN menu displays the most popular activities and
devices in your system. Press the MAIN button to see the MAIN
menu. Large systems may have more than one page. Press the page
button if you don’t see all your devices.
Gently press any screen button with your finger to select an activity
or a device. The screen will change to a display of the buttons you
need for that activity/device. The PAGE buttons may reveal
additional buttons for some devices and activities.
When you would like to control another device, press the MAIN
button and select a new device from the MAIN menu.
The PAGE buttons
reveal additional
pages of buttons
when they are
available.
The Volume and
Mute buttons are
always available
regardless of what
screen is displayed.
To select a touch
screen button,
touch the screen
with a gentle tap of
your finger.
The 4 way cursor
buttons enable you
to navigate on
screen guides and
menus with ease.
The MAIN Button below the
screen always takes you to the first
page of the MAIN Menu.
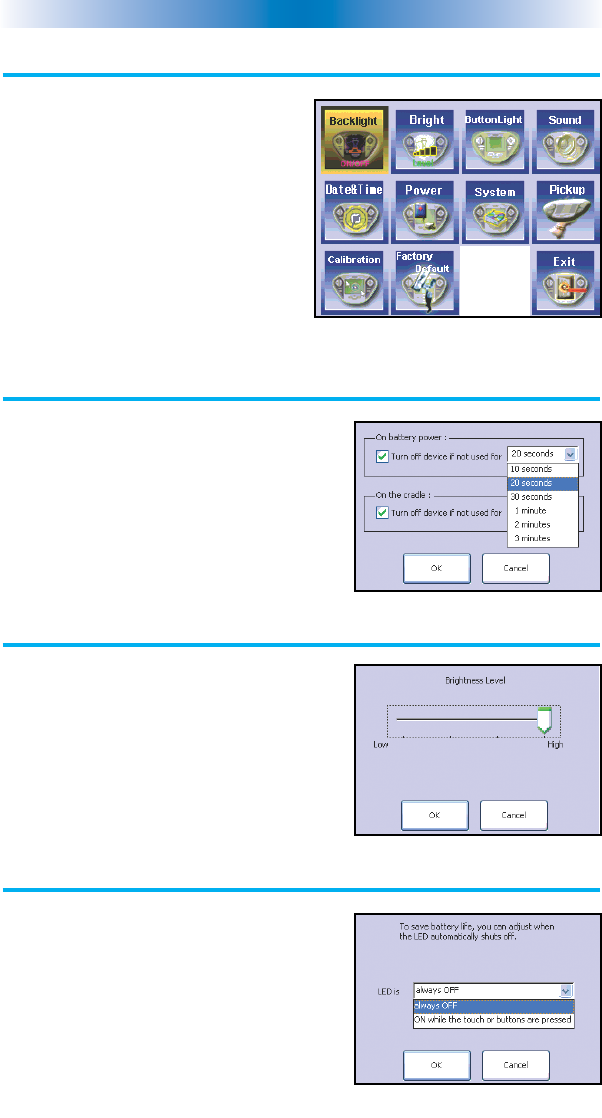
Displaying the Settings Screen
You can adjust the settings of the MX-
3000 whenever you like by pressing
and holding the MAIN button for five
seconds. When you do, the screen
will change to the SETTINGS screen.
If you do not press any button on the
SETTINGS screen within 30 seconds,
the MX-3000 will time out and
automatically return to normal
operation.
Adjusting Backlighting
If you uncheck the check boxes, the MX-
3000 will stay lit until the
battery is exhausted. If you check the
check boxes, you can select from the list of
delays. The amount of delay you select
will be the how long the MX-3000 stays lit.
You can save battery life this way.
Adjusting Brightness
Simply touch and drag the brightness slider
to the desired level. Increased brightness
does affect battery life.
Button Light Settings
You can opt to conserve battery life by
disabling the LED lighting behind the
buttons.
This is done by pulling down the list box
and selecting “always off” from the list.
Page 8
MX-3000 COLOR TOUCH SCREEN
The Settings Screen
The Backlight Screen
The Brightness Screen
The Button Light Screen
Page 9
MX-3000 COLOR TOUCH SCREEN
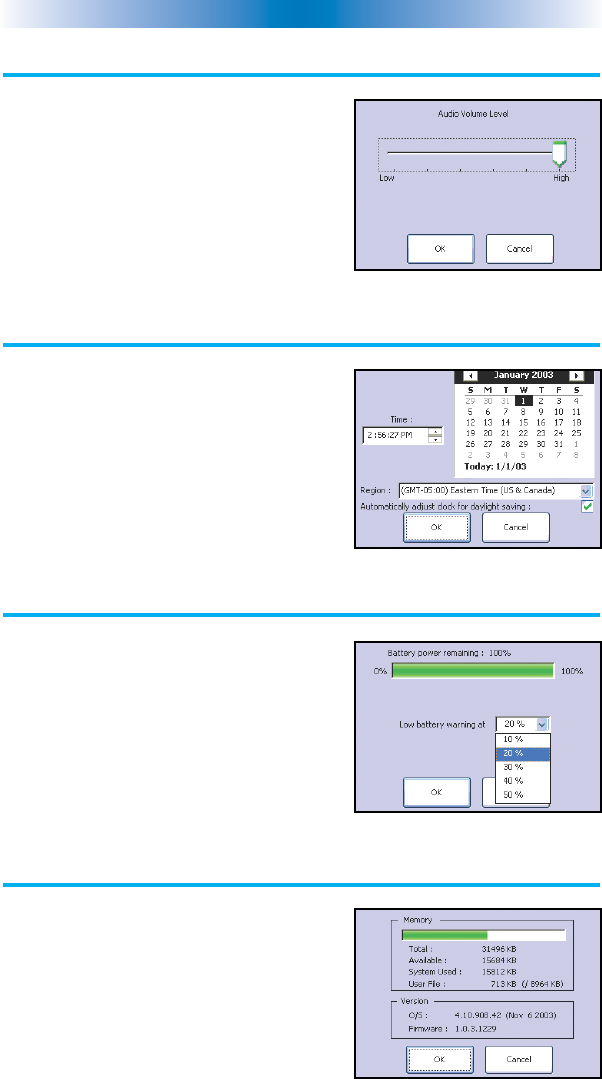
Sound
Your MX-3000 may have been
programmed to make sounds. This is
optional, and some professional
installers may prefer to keep it silent.
However, you can adjust the volume to
any level you like by touching and
dragging the volume control here.
Setting Time and Date
Your MX-3000 may have been
programmed to display the time or date
on a touch screen button. If so, you can
correct the time
displayed by changing the settings on
this screen.
Power Settings
You can display the remaining charge
by selecting Power Settings.
You can also adjust when the low
battery warning screen will appear.
System
The System screen displays data about
your MX-3000’s operating system,
memory etc.
The Sound Screen
The Time and Date Screen
The Power Screen
The System Screen
Page 10
MX-3000 COLOR TOUCH SCREEN
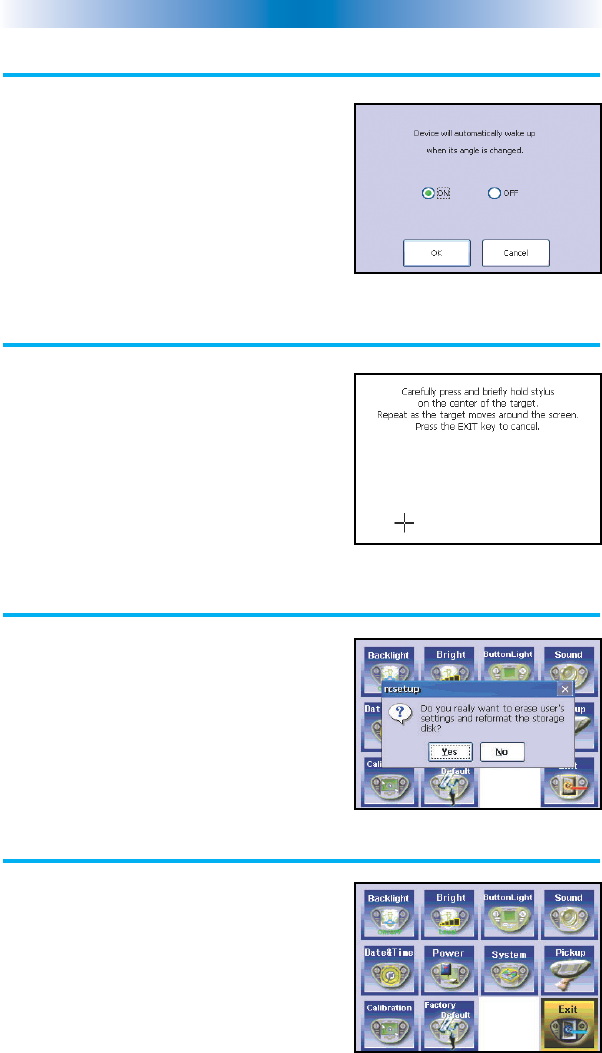
Pickup Settings
You can set your MX-3000 to only turn
on when touched, or every time you
move it.
Calibration
If you like, you can calibrate where you
tap by running the calibration. You will
need a pen top or PDA stylus to do this.
Do not attempt to calibrate using your
fingers.
Factory Default
WARNING! Only use this button when
instructed to by Technical Support. It
resets the memory of the MX-3000 to
the factory condition. All your
programming will be lost!
Exit
When you have finished adjusting
Settings, simply tap the EXIT button to
return to
normal operation.
The Pickup Screen
The Calibration Screen
The Default Screen
The Exit Button

Page 11
MX-3000 COLOR TOUCH SCREEN
Maintaining Your MX-3000
Be careful not to scratch the touch screen, only use your finger to tap the
LCD touch screen or use a plastic pen top or PDA stylus. Never use a real
pen, pencil or any other sharp object on the screen. Keep it away from
extreme cold or heat. The MX-3000 is not waterproof. Do not use it in
any location that is damp or wet.
If you spill water on it, take out the battery pack and let the MX-3000 dry
for 48 hours before you try powering it up again. If you spill coffee or
another beverage on it, clean it with distilled water. Make sure no water
gets inside the MX-3000. The touch screen contains a glass element.
Don’t drop the MX-3000 or impact it against anything.
Use a soft, damp cloth to clean the screen. If the screen still shows finger
prints, clean it with watered down window-cleaner. Do not use anything
abrasive and don’t use too much water, some might leak into the interior.
Warranty
The MX-3000 is covered against any manufacturing defects or faults in
workmanship for a period of one year from the date of purchase when
purchased from an authorized Home Theater Master dealer. Units
purchased from online auction sites or other unauthorized resellers have
no warranty. This warranty does not cover the following items:
s Damage from misuse, neglect, or acts of nature.
sProducts that have been modified or incorporated into other products.
sProducts purchased more than 12 months ago.
sUnits purchased from unauthorized dealers or companies.
Specifications
Microprocessor: 206MHz RISC
Memory - 16 Megabytes of RAM (for User Configuration)
Devices - Supports up to 255 Devices
Pages- Supports up to 255 Pages on each Device
Learning Capability - Standard frequencies (15kHz to 100kHz)
Macro Capability - Up to 255 steps each, however nesting is allowed
IR Range (Line of Sight via Infrared): 30-50 feet, depending on the
environment
RF Range (radio frequency): 50 to 100 feet, depending upon the
environment
RF Frequency: 418MHz
Weight: 10.4 oz. (with batteries)
Size: 7.17” x 4.76” x 1.18”
Batteries: Lithium Ion battery pack included

500 Mamaroneck Avenue, Harrison, NY 10528
Phone: (914) 835-4484 Fax: (914) 835-4532
www.universalremote.com
OCE-0026A Rev 01