Olympus Medical Systems EC-1 Low Power Transmitter User Manual GT1629 FCC MAJ 1467 C1
Olympus Medical Systems Corp. Low Power Transmitter GT1629 FCC MAJ 1467 C1
Contents
- 1. Users manual Part 1
- 2. Users manual Part 2
- 3. Users manual Part 3
- 4. Users manual Part 4
- 5. Users manual part 5
Users manual Part 1

INSTRUCTIONS
OLYMPUS CAPSULE ENDOSCOPE SYSTEM

Contents
i
OLYMPUS CAPSULE ENDOSCOPE SYSTEM
Contents
Labels and Symbols ..................................................................... 1
Symbols ................................................................................................... 1
Labels........................................................................................................ 3
Important Information – Please Read Before Use ..................... 11
Intended use ............................................................................................ 11
Instruction manual .................................................................................... 11
Exclusion criteria ....................................................................................... 13
User qualifications .................................................................................... 13
Instrument compatibility ............................................................................ 14
Repair and modification ........................................................................... 14
FCC warning ............................................................................................ 14
Signal words ............................................................................................. 14
Danger, warnings and cautions................................................................. 15
Danger, warnings and cautions for patients.............................................. 20
Expiration date of the capsule endoscope ................................................ 22
Battery charger.......................................................................................... 23
Battery pack ............................................................................................. 24
EMC (Electromagnetic Compatibility) ....................................................... 27
Chapter 1 Checking the Package Contents............................ 29
1.1 Capsule endoscope system set A (MAJ-1467)............................... 30
1.2 Capsule endoscope set A (MAJ-1469) ........................................... 32
1.3 Workstation (OLYMPUS WS-1) ...................................................... 33
Chapter 2 Nomenclature and functions .................................. 36
2.1 System components ....................................................................... 36
2.2 Capsule endoscope set A (MAJ-1469) ........................................... 38
2.3 Antenna lead set (MAJ-1474) ......................................................... 40
2.4 Recorder unit (OLYMPUS RE-1) .................................................... 41
2.5 Real time viewer (OLYMPUS VE-1) ............................................... 43
2.6 Recorder unit cradle (MAJ-1484).................................................... 45
2.7 Real time viewer cable (MAJ-1485) ................................................ 46
2.8 Recorder unit cradle cable .............................................................. 46
2.9 Battery charger (MAJ-1476)............................................................ 47
2.10 Battery pack (MAJ-1473) ................................................................ 48
2.11 Recorder unit harness (MAJ-1475)................................................. 49
2.12 Workstation (OLYMPUS WS-1) ...................................................... 50

Contents
ii OLYMPUS CAPSULE ENDOSCOPE SYSTEM
Chapter 3 Installation and Connection of the Workstation ... 52
3.1 Installation of workstation and peripherals ...................................... 54
3.2 Connection of equipment ................................................................ 55
3.3 Installation of Endo Capsule software light ..................................... 58
Chapter 4 Workstation Access and Setup .............................. 60
4.1 Login ............................................................................................... 61
4.2 Start-up of Endo Capsule software light.......................................... 66
4.3 Nomenclature and functions of the main screen............................. 68
4.4 User settings ................................................................................... 75
4.5 Language and units settings ........................................................... 83
4.6 Lock function ................................................................................... 87
4.7 Facility logo ..................................................................................... 91
4.8 Log off and exit ............................................................................... 93
Chapter 5 Capsule Endoscope Procedures............................ 96
5.1 Preparation ..................................................................................... 97
5.2 Exterior............................................................................................ 98
5.3 Capsule endoscope ........................................................................ 99
5.4 Preparation on the day before the examination .............................. 100
5.5 Initial setup of the recorder unit....................................................... 102
5.6 Attaching the equipment to the patient ........................................... 116
5.7 Preparing the capsule endoscope .................................................. 129
5.8 Starting the examination ................................................................. 132
5.9 During the examination ................................................................... 133
5.10 Ending the examination .................................................................. 134
Chapter 6 Capsule Endoscope Image Observation ............... 145
6.1 Main screen nomenclature and functions ....................................... 146
6.2 Opening data .................................................................................. 147
6.3 Image observation .......................................................................... 155
6.4 Generating reports .......................................................................... 168
6.5 Examination data management ...................................................... 190
6.6 Exporting image data ...................................................................... 218
6.7 Browsing the image observation operation history ......................... 229
Chapter 7 Care Storage and Disposal ..................................... 230
7.1 Care ................................................................................................ 230
7.2 Storage ........................................................................................... 231
7.3 Disposal .......................................................................................... 232

Contents
iii
OLYMPUS CAPSULE ENDOSCOPE SYSTEM
Chapter 8 Troubleshooting ...................................................... 233
8.1 Troubleshooting .............................................................................. 233
8.2 Returning the system for repair....................................................... 239
Appendix ....................................................................................... 240
Operating/storage environment ................................................................ 240
Specifications ............................................................................................ 244
EMC information ....................................................................................... 256

Contents
iv OLYMPUS CAPSULE ENDOSCOPE SYSTEM
Labels and Symbols
1
OLYMPUS CAPSULE ENDOSCOPE SYSTEM
Labels and Symbols
Safety-related labels and symbols are attached at the locations shown below. If
labels or symbols are missing or illegible, contact Olympus.
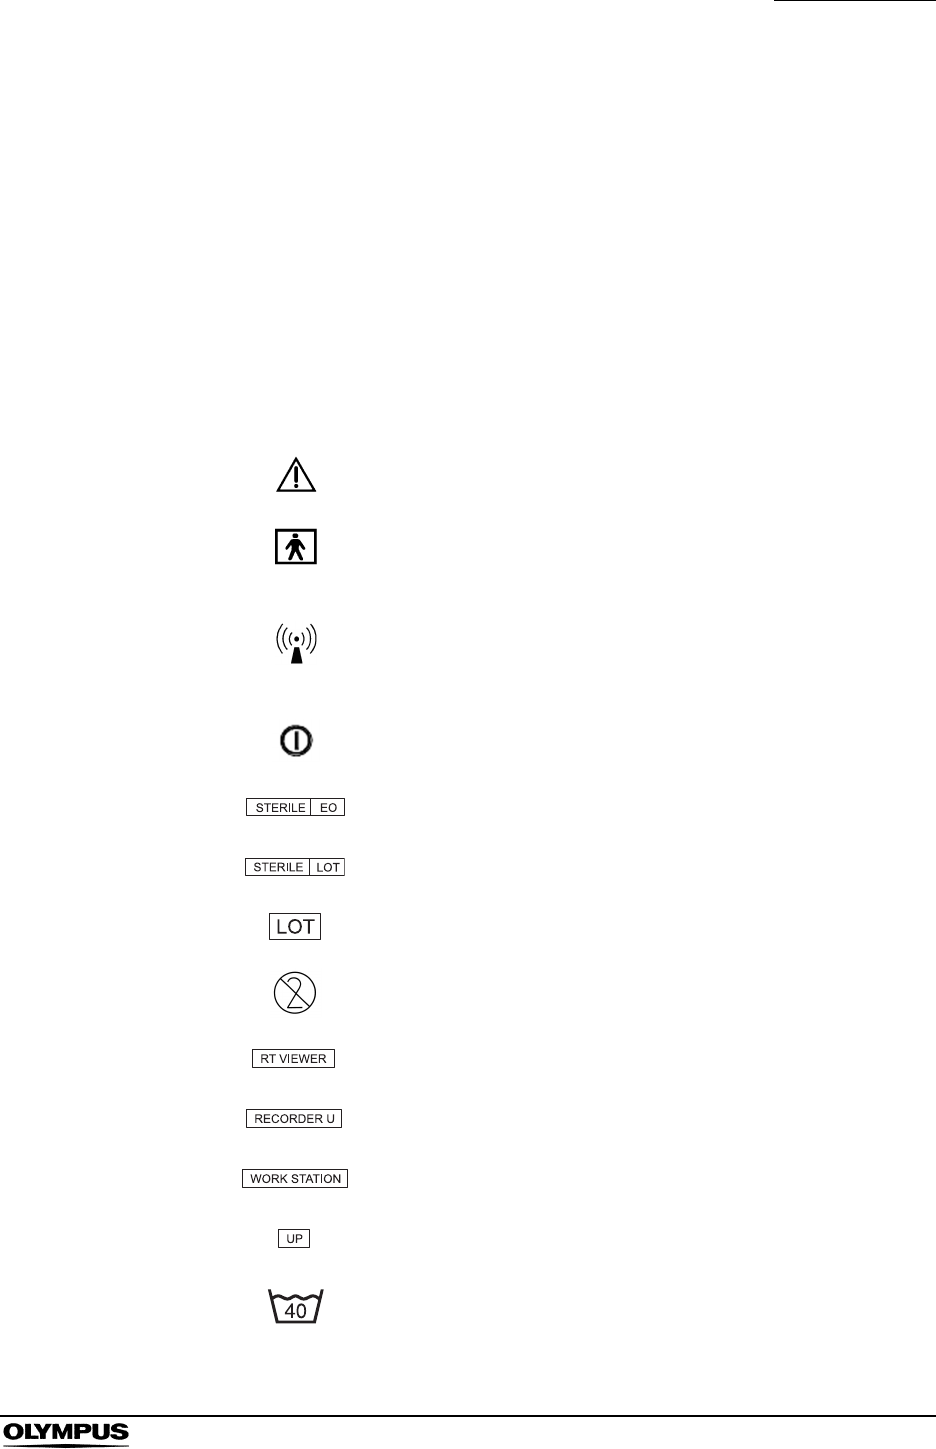
Symbols
The following symbols can be found on the equipment and its packaging.
Refer to instructions.
TYPE BF applied part
When in the proximity of this equipment or portable RF
communication devices, electromagnetic interference may
occur, affecting cardiac pacemakers. Users of cardiac
pacemakers must maintain a sufficient distance from the
equipment.
Power switch (ON/OFF)
Sterilized using ethylene oxide.
Sterilization lot number
Lot number
Do not reuse.
Connector for connecting the viewer cable to the recorder
unit
Connector for connecting the viewer cable to the real time
viewer
Connector for connecting the cradle cable to the recorder
unit cradle
Top side of the viewer cable
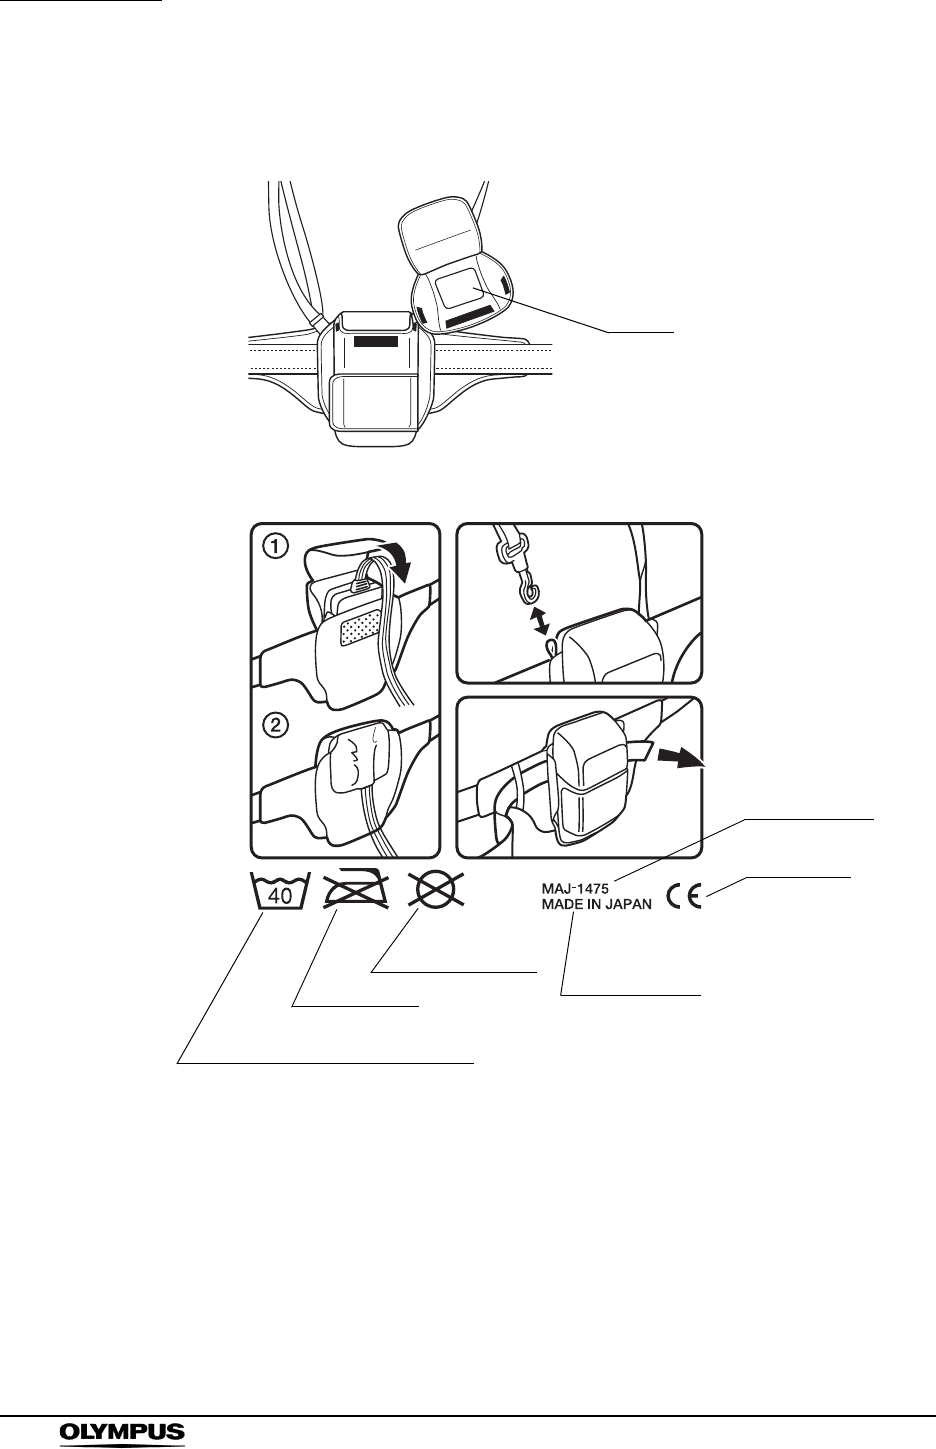
Maximum washing temperature 40°C normal process

2
Labels and Symbols
OLYMPUS CAPSULE ENDOSCOPE SYSTEM
Do not iron.
Do not dry clean.
Labels and Symbols
3
OLYMPUS CAPSULE ENDOSCOPE SYSTEM
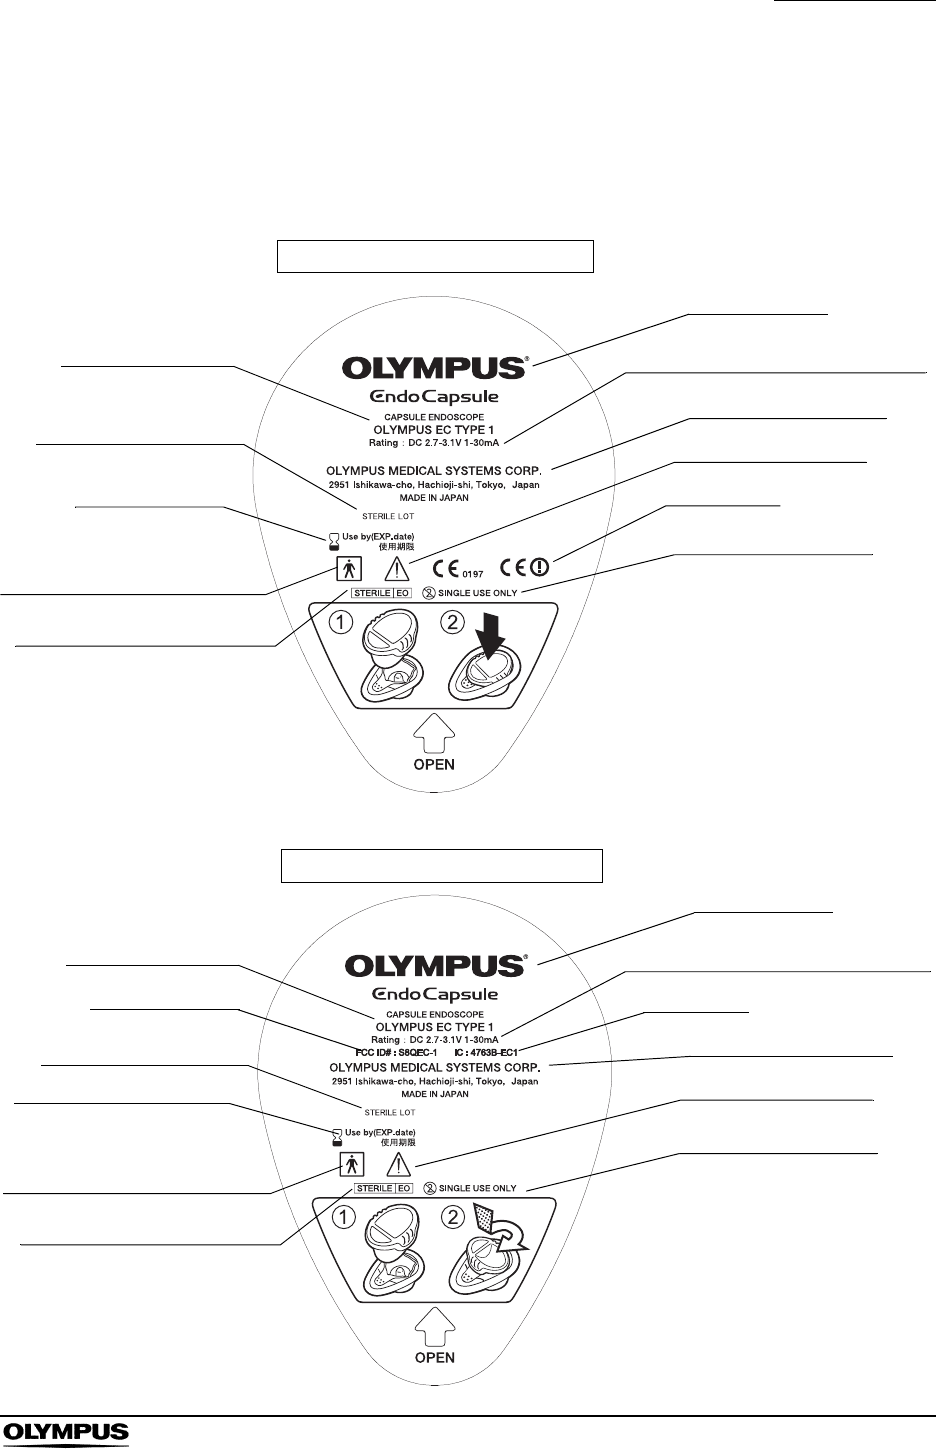
Labels
Capsule endoscope
CE marking
Manufacturer
Refer to instructions
“Single Use” marking
Sterilization lot number
Capsule endoscope storage case
Product name and
model name Electrical rating / Battery capacity
Manufacturer details
Sterilized with ethylene oxide
Expiration date
TYPE BF applied part marking
Manufacturer
Refer to instructions
“Single Use” marking
Sterilization lot number
Capsule endoscope storage case
Product name and
model name Electrical rating / Battery capacity
Manufacturer details
Sterilized with ethylene oxide
TYPE BF applied part marking
For US/Canada
Use by (expiration date)
FCC ID number IC number
Preliminary
4
Labels and Symbols
OLYMPUS CAPSULE ENDOSCOPE SYSTEM
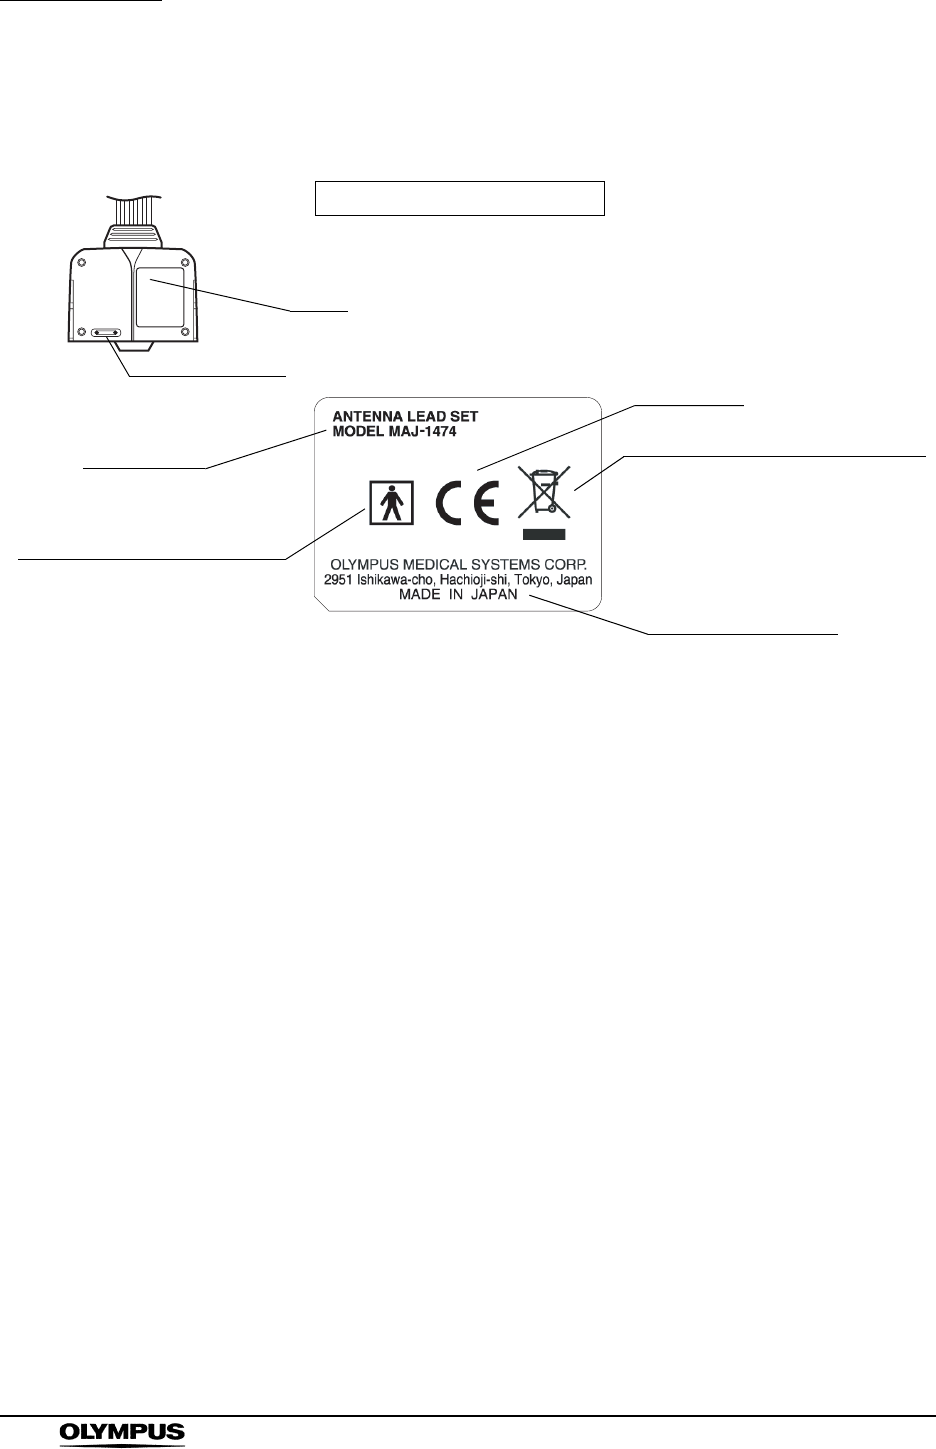
Antenna lead set
Label
CE marking
Antenna lead set back panel
Model name
Manufacturer details
TYPE BF applied part marking
Crossed-out wheeled bin' symbol
Serial number
Labels and Symbols
5
OLYMPUS CAPSULE ENDOSCOPE SYSTEM
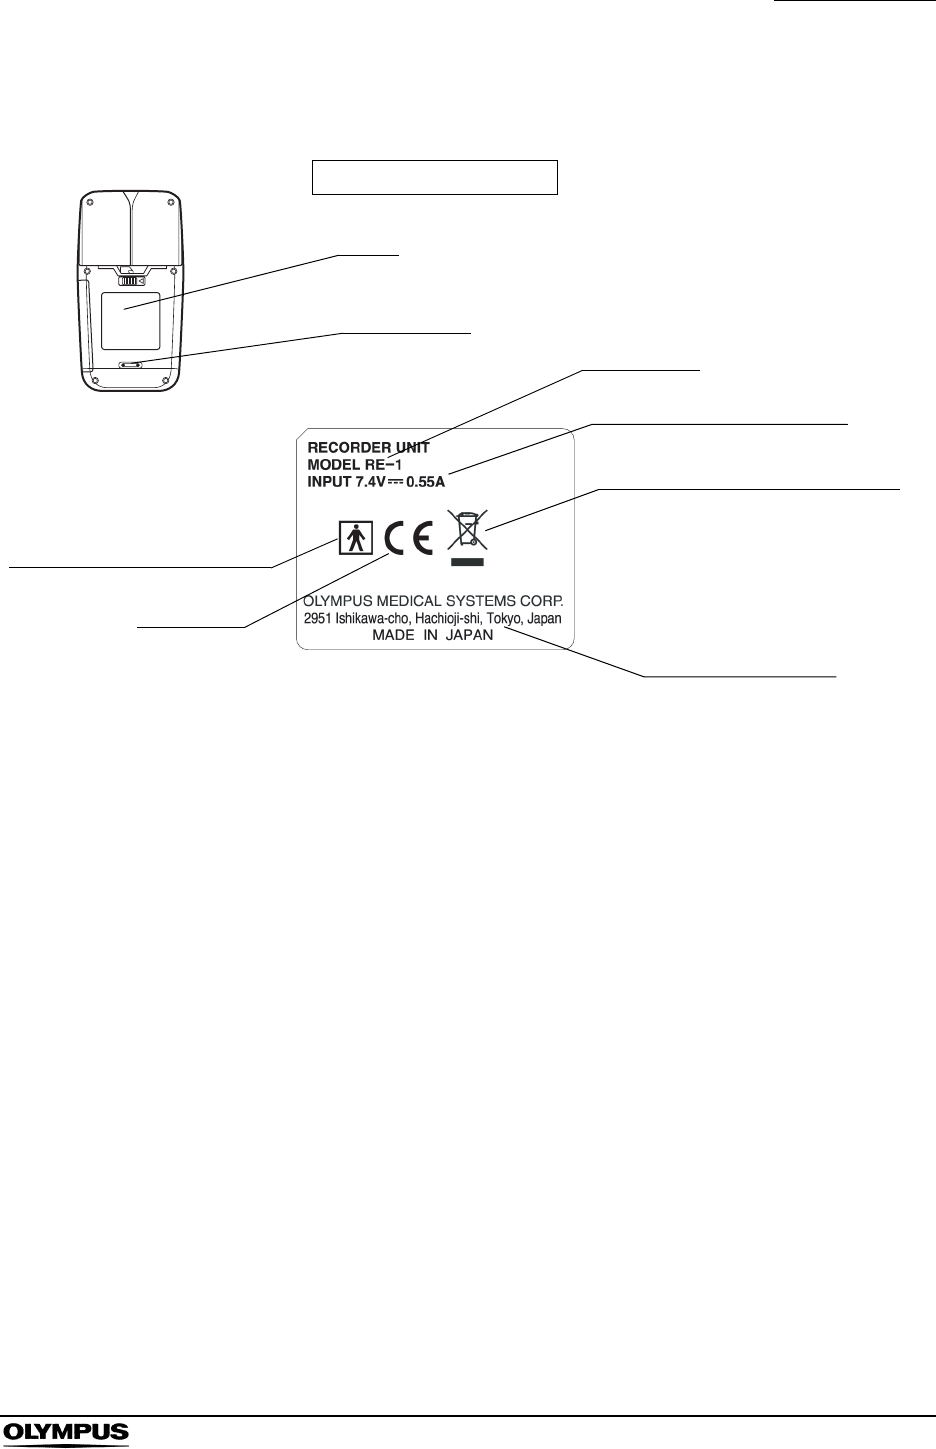
Recorder unit
Electrical rating/Input power
Model name
Label
Recorder unit back panel
Serial number
Manufacturer details
Crossed-out wheeled bin' symbol
CE marking
TYPE BF applied part marking
6
Labels and Symbols
OLYMPUS CAPSULE ENDOSCOPE SYSTEM
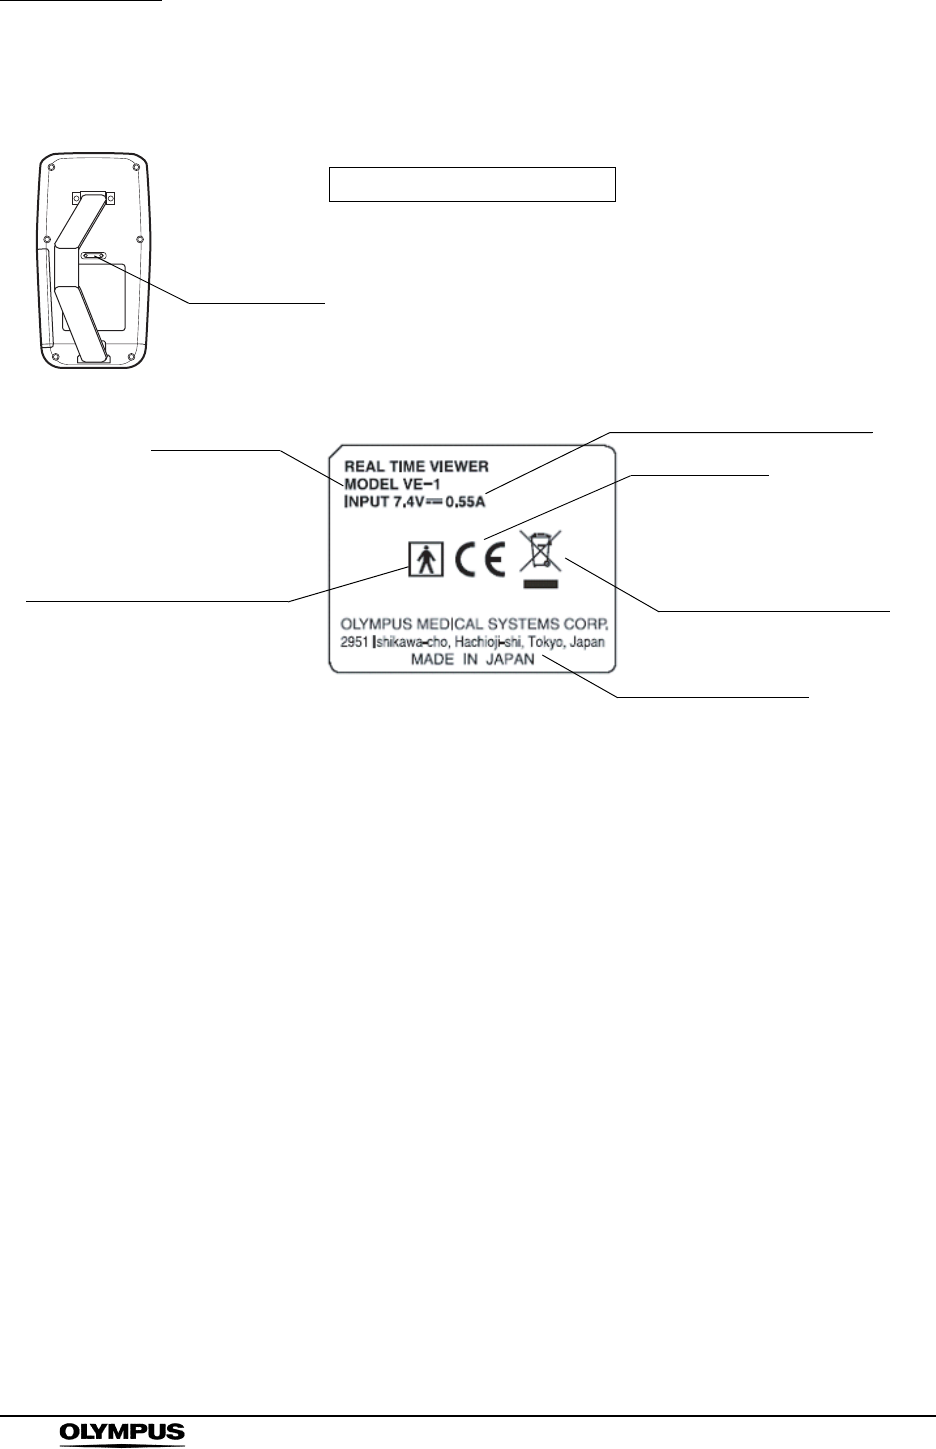
Real time viewer
CE marking
Real time viewer back panel
Manufacturer details
Electrical rating / Input power
TYPE BF applied part marking
Model name
Serial number
Crossed-out wheeled bin'
symbol
Labels and Symbols
7
OLYMPUS CAPSULE ENDOSCOPE SYSTEM
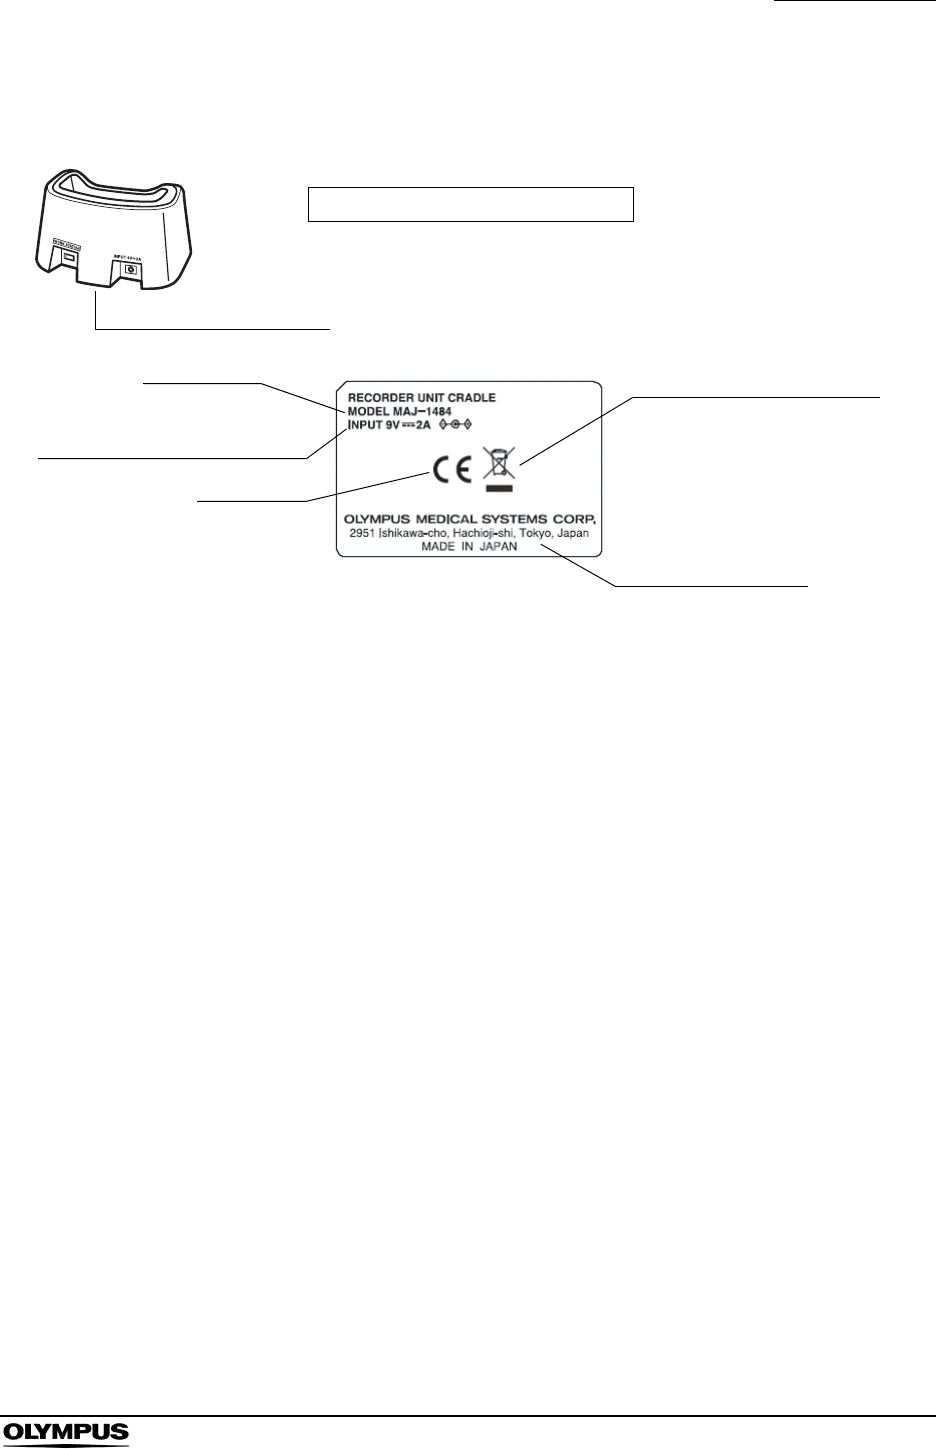
Recorder unit cradle
Recorder unit cradle bottom side
Label
Model name
Electrical rating / Input power
Manufacturer details
CE marking
Crossed-out wheeled bin'
symbol
8
Labels and Symbols
OLYMPUS CAPSULE ENDOSCOPE SYSTEM
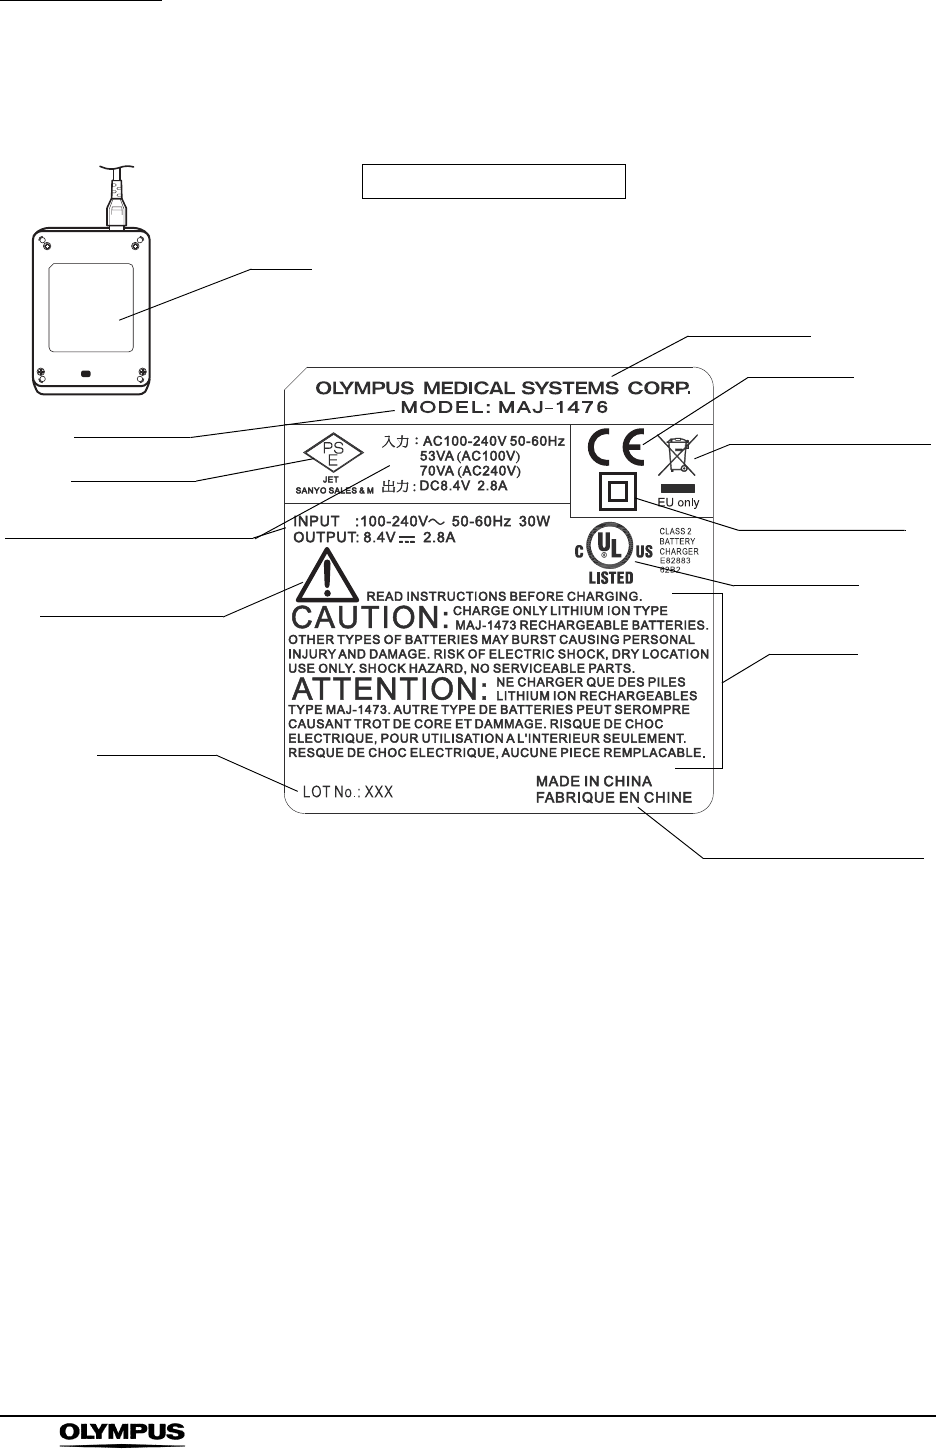
Battery charger
Refer to instructions
CE marking
Seller details
Caution
C-UL marking
Lot number
Electrical rating / Input power
Model name
Label
Battery charger bottom side
Country of manufacture
Double insulation
marking
PSE marking
Crossed-out wheeled
bin' symbol
Labels and Symbols
9
OLYMPUS CAPSULE ENDOSCOPE SYSTEM
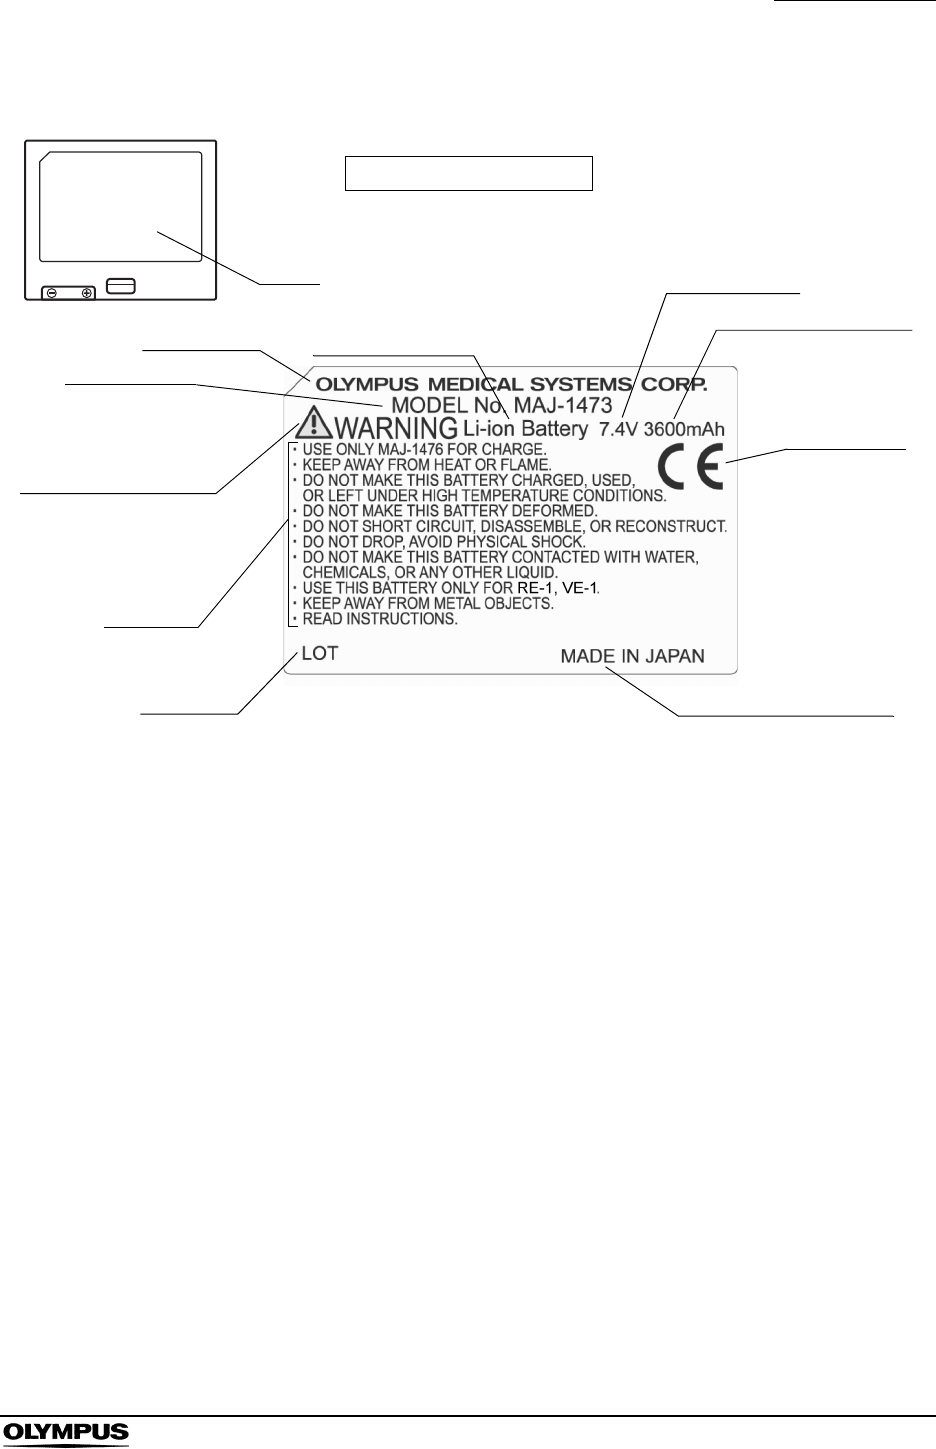
Battery pack
CE marking
Lot number Country of manufacture
Battery pack back plate
Label
Seller details
Model name
Battery pack type
Voltage rating
Battery pack capacity
Refer to instructions
Caution
10
Labels and Symbols
OLYMPUS CAPSULE ENDOSCOPE SYSTEM
Recorder unit harness
Label
Model name
CE marking
Country of
manufacture
Do not dry clean.
Do not iron.
Maximum washing temperature
40°C normal process

Important Information - Please Read Before Use
11
OLYMPUS CAPSULE ENDOSCOPE SYSTEM
Important Information - Please Read Before
Use
Intended use
The capsule endoscope system has been designed to be used for endoscopic
diagnosis of small bowel, consisting of capsule endoscope, recorder unit, real
time viewer, workstation and other accessories. Do not use this system for any
purpose other than its intended use.
Instruction manual
This instruction manual contains essential information on using the system
safely and effectively. Before use, thoroughly review this manual and the
manuals of all equipment which will be used during the procedures, and use the
equipment as instructed.
Keep this and all related instruction manuals in a safe, accessible location.
If you have any questions or comments about any information in this manual,
please contact Olympus.
Terms used in this manual
Patient environment
Places that the patients have direct access to, such as medical wards and
operating rooms.
DC magnetic field
Magnetic field formed by permanent magnets or electromagnets that are
used in health devices and audio speakers.
RTC (Real time clock)
Refers to the recorder unit internal clock.
A drive which contains examination data and thumbnail data.

12
Important Information - Please Read Before Use
OLYMPUS CAPSULE ENDOSCOPE SYSTEM
Examination data
The image data created from the data downloaded from a recorder.
Report
A HTML file created from a thumbnail data.
Check out
The process in which a physician exports examination data from a
workstation for observation on Endo Capsule software light.
Check in
The process in which a physician imports thumbnail data from a workstation
after examination on Endo Capsule software light.
Thumbnail data
The data which contains thumbnails of the selected images and comments
added by a physician.

Important Information - Please Read Before Use
13
OLYMPUS CAPSULE ENDOSCOPE SYSTEM
Exclusion criteria
• Risk of capsule examination:
The capsule endoscope is warranted for remaining within the body for
up to 30 days. If the capsule endoscope is not excreted from the body, it
must be collected using an endoscope or by surgery, within 30 days
from the date of ingestion. To determine the location of the capsule
endoscope within the patient’s body, an X-ray examination may be
required. For this reason, the following exclusion criteria have been set.
Be sure to explain this risk to the patient and obtain his/her consent prior
to the examination.
−Patients who have not given the consent.
−Patients who, as a result of X-ray examinations or past profiling
examinations, have been determined to have a obstruction clear
narrowing, adhesion, and/or diverticula in the gastrointestinal tract
which may interfere with the passing capsule endoscope.
−Patients who have had open abdominal surgery.
−Patient is a non-surgical candidate.
−Pregnant women.
−Patients with serious gastrointestinal transit delay.
• The capsule endoscope may accidentally go down the trachea, if the
patient has difficulties in swallowing.
• Patients using equipment that may be affected by radio transmission (i.e.
cardiac pacemaker and other implanted electrical medical devices). The
capsule endoscope has not been tested with such equipment for safety.
User qualifications
• The operator of this system must be a physician or medical personnel
under the supervision of a physician and must have received sufficient
training in endoscopic procedures. This manual, therefore, does not
explain or discuss endoscopic procedures.
• Analysis of the captured endoscopic images require substantial training.

14
Important Information - Please Read Before Use
OLYMPUS CAPSULE ENDOSCOPE SYSTEM
Instrument compatibility
Refer to the “System chart” in the Appendix to confirm that this instrument is
compatible with the ancillary equipment being used.Using incompatible
equipment can result in patient injury and/or equipment damage.
This instrument complies with the EMC standard for medical electrical
equipment; edition 2 (IEC 60601-1-2:2001).
Repair and modification
This instrument does not contain any user-serviceable parts. Do not
disassemble, modify or attempt to repair it; patient or user injury and/or
equipment damage can result.
Some problems that appear to be malfunctions may be correctable by referring
to Chapter 8, “Troubleshooting” on page 233. If the problem cannot be resolved
using the information in Chapter 8, contact Olympus.
FCC warning
Changes or modifications not expressly approved by the party responsible for
compliance could void the user’s authority to operate the equipment.
Signal words
The following signal words are used throughout this manual.
Indicates an imminently hazardous situation which, if not
avoided, will result in death or serious injury.
Indicates a potentially hazardous situation which, if not
avoided, could result in death or serious injury.
Indicates a potentially hazardous situation which, if not
avoided, may result in minor or moderate injury.
Indicates additional helpful information.

Important Information - Please Read Before Use
15
OLYMPUS CAPSULE ENDOSCOPE SYSTEM
Danger, warnings and cautions
Follow the dangers, warnings and cautions given below when handling the
Olympus capsule endoscope system. This information is to be supplemented by
the dangers, warnings and cautions given in each chapter.
Instruct the patient to stay away from generators of strong
electromagnetic fields (such as MRI equipment), between
ingestion and excretion of the capsule endoscope.
Otherwise, injury within the body cavity may occur.
• The effect of the capsule endoscope on the safety of the
patient’s body has only been tested for a period of 30 days. If
the excretion of the capsule endoscope has not been
confirmed, conduct an X-ray examination in an attempt to
locate the capsule endoscope within the patient’s body. If the
capsule endoscope is located within the body, it must be
collected within 30 days from the date of ingestion.
• Regardless of the positive/negative result, one examination
does not cover all of the small intestine. Continuous checkup
is required.
• Avoid use under combustible environments, such as:
−where the concentration of oxygen is high.
−where oxidizing agents, such as nitrous oxide (N2O), are
contained in the atmosphere.
−nearby a location using combustible anesthetic gases.
The system is not explosion-proof, and may cause an
explosion or a fire.
• The capsule endoscope is a TYPE BF applied part, which
means that application to the heart is prohibited. Do not use it
for the purpose of observing or treating the heart.
• Do not attach the recorder unit to the recorder unit cradle
while the antenna lead set is attached to the patient. Electric
shock and burns may result in the worst case.
• The capsule endoscope is a sterilized single-use product. Do
not reuse it. Doing so may result in an infection of the patient
and/or medical personnel, as well as internal injury to the
patient due to equipment damage.

16
Important Information - Please Read Before Use
OLYMPUS CAPSULE ENDOSCOPE SYSTEM
• Do not use a capsule endoscope that has been dropped,
bitten or subjected to excessive pressure. Using such
endoscopes may result in internal injury to the patient due to
equipment damage.
• Store the capsule endoscope in a safe location and out of the
reach of children.
• The capsule endoscope must be ingested under the
supervision of a physician, or medical personnel authorized
by a physician. Clearly instruct the patient not to use the
capsule endoscope on themselves or others without proper
medical supervision.
• Instruct the patient to immediately consult a physician if
he/she experiences abdominal pain, discomfort, or nausea
after ingesting the capsule endoscope. If treatment is
delayed, it may result in internal injury to the patient.
• When using the capsule endoscope, avoid using other
electronic device simultaneously. The safety of the device in
combination with other equipment cannot be guaranteed.
• Do not place the workstation and its peripherals (including
the recorder unit cradle) in the patient environment. Electric
shocks and burns may result.
• Do not use a capsule endoscope after its expiration date. An
expired capsule endoscope may not perform a proper
examination.
• To prevent the capsule endoscope battery from deteriorating,
store the capsule endoscope under a temperature of 0 to
25°C (39 to 77°F). Do not store in a refrigerator or a freezer,
as condensation may result.
• Keep the capsule endoscope away from magnets. Magnets
can turn the capsule endoscope ON, resulting in the
consumption of battery power.
• Keep the capsule activator away from implant devices, such
as cardiac pacemakers, defibrillators, nerve stimulators, and
other equipment that may be affected by DC magnetic fields.
• Before use, check that the surface of the capsule endoscope
is clear of roughness, sharp edges, and projections. They
may cause internal injury to the patient.

Important Information - Please Read Before Use
17
OLYMPUS CAPSULE ENDOSCOPE SYSTEM
• Keep the recorder unit, antenna lead set, and real time
viewer away from water, alcohol, and any other liquids.
Liquids entering these components may damage them
and/or result in equipment failure.
• Be sure to use only the specified cables for the connection of
system components.
• Before using the recorder unit, check that no error icon is
displayed on the recorder unit’s display panel. If an error icon
is displayed, refer to “Recorder unit error messages” of
Chapter 8, “Troubleshooting” on page 235, to evaluate and
attempt to correct the problem.
• While initializing the recorder unit, do not remove the
recorder unit from the recorder unit cradle or unplug the
recorder unit cradle cable and/or the AC adapter. It may
damage the recorder unit’s internal memory.
• The examination cannot proceed if there is insufficient space
on the recorder unit’s internal memory. Use the workstation to
initialize the recorder unit in advance.
• While initializing the recorder unit, do not turn OFF the
workstation or the recorder unit. The initialization may be
interrupted.
• The examination cannot proceed if the battery pack is not
fully charged. Use the battery charger to fully charge the
battery pack in advance.
• Start the examination immediately after turning the recorder
unit ON. Failure to do so may result in premature termination
of the examination due to an empty or low battery pack. If the
indicator on the battery pack changes from to prior to
the examination, recharge the battery pack, or replace with a
fully-charged battery pack.
• Do not remove the battery pack while the receiver unit’s
power is ON. It may cause the recorder unit to break.
• Avoid prolonged use of the system at or below 0°C/32°F. The
capsule endoscope may not be able to operate for 8 hours,
and you may not be able to recharge the battery packs fully.
• Be sure to use the antenna covers when attaching the
antennas. Failure to do so may prevent the proper reception
of capsule endoscope images.
• Perform the examination with all 8 antenna pads attached to
the patient. The examination may fail with even one antenna
pad not properly attached.

18
Important Information - Please Read Before Use
OLYMPUS CAPSULE ENDOSCOPE SYSTEM
• Do not allow the antenna cable to lay on or near the antenna
pads. It may prevent the proper reception of capsule
endoscope images.
• Do not use an antenna pad that has been completely folded.
Its reception performance may be degraded, causing noise to
appear in the transmitted images.
• The capsule endoscope should only be ingested with water.
Use of other liquids may interfere with the examination.
• Only one capsule endoscope should be ingested per
examination. If the patient ingests more than one capsule
endoscope simultaneously. It may cause the images to lost.
• Do not turn ON a capsule endoscope within 1 m/3.3 ft. of
another patient already undergoing an examination with an
ingested capsule endoscope. It may cause capsule
endoscope images to become distorted.
• During the examination, have the patient stay away from
radio-transmitting devices (i.e. keyless entry, home security,
waitress call system, garage door remote, wireless
headphones, ham radio, etc.).
• While downloading, do not remove the recorder unit from the
recorder unit cradle, unplug the AC adapter, or turn the
workstation or the recorder unit OFF. Doing so will interrupt
the download, and require you to start the download again. In
the worst case, loss of recorded data may result.
• Do not install other software onto the workstation. It may
cause the system to malfunction.
• This system is used to examine the small intestine by the
patient’s ingestion of a capsule endoscope, which
continuously takes pictures as it moves down the
gastrointestinal tract by peristalsis. The captured images are
radio transmitted to the recorder unit, and can be observed
using the workstation. After the examination, the capsule
endoscope is excreted naturally.
• The duration of the capsule endoscope’s presence within the
stomach and the small intestine varies from patient to patient.
There may also be other residual material within the
gastrointestinal tract. For these reasons, it may not be
possible to capture images of some parts of the small
intestine.

Important Information - Please Read Before Use
19
OLYMPUS CAPSULE ENDOSCOPE SYSTEM
• Have a spare capsule endoscope ready for use in case the
primary device is determined to be unusable prior to patient
ingestion.
• The recorder unit cradle cannot be used to recharge the
battery pack. To recharge the battery pack, remove it from
the recorder unit, and use the dedicated battery charger.
• After turning ON the capsule endoscope, bring it near the
antenna lead set on the patient, and confirm that the radio
reception indicator lamp blinks in green. If the indicator does
not blink, the capsule endoscope and/or the recorder unit
may be malfunctioning.
• You can check for proper operation of the equipment by
periodically inspecting the status of the indicator lamp.
• If the real time viewer is displaying images passed via the
recorder unit, an icon ( ) indicating this will be
displayed on the real time viewer’s display panel.
• When the real time viewer is receiving capsule endoscope
images directly, an icon ( ) is displayed on its display
panel.
• The real time viewer is to be used within the hospital only,
and is not to be given to the patient.

20
Important Information - Please Read Before Use
OLYMPUS CAPSULE ENDOSCOPE SYSTEM
Danger, warnings and cautions for patients
Provide the following information to the patients at least one day before the
examination, so that the examination may be performed properly.
Failure to follow these instructions may result in injury and/or may interfere with
the examination. Please provide the patient with the separate “Caution for
Capsule Endoscopy Patients”.
Instruct the patient to stay away from generators of strong
electromagnetic fields (such as MRI equipment), between
ingestion and excretion of the capsule endoscope. Failure to
follow instructions may result in injury to the body cavity.
• Instruct the patient to consult a physician immediately if
abdominal pain, discomfort, or nausea is experienced after
ingesting the capsule endoscope. If treatment for these
symptoms is delayed, it may result in injury to the body
cavity.
• The capsule endoscope is warranted for remaining within the
body for up to 30 days. If the capsule endoscope is not
excreted from the body, it must be collected using an
endoscope or by surgery, within 30 days from the date of
ingestion. To determine the location of the capsule
endoscope within the patient’s body, an X-ray examination
may be required. For this reason, the following exclusion
criteria have been set. Be sure to explain this risk to the
patient and obtain his/her consent prior to the examination.
• Reddening or irritation of the skin may sometimes be caused
by the adhesive on the antenna lead cover. Instruct the
patient to consult a physician immediately if such symptom is
observed on a patient, consult a physician immediately.
• Instruct the patient to abstain from eating, beginning 8 hours
before the examination until 4 hours after ingesting the
capsule endoscope. If necessary, small quantities of water
may be consumed. Failure to follow instructions may
interfere with the examination.
• Instruct the patient to handle the external equipment attached
to his/her body with care, and to avoid sudden movements.
Failure to follow instructions may interfere with the
examination.

Important Information - Please Read Before Use
21
OLYMPUS CAPSULE ENDOSCOPE SYSTEM
• Patients who are currently taking medication must not take
any medication during the period beginning two hours before
and ending two hours after the beginning of the procedure. If
the medication must be taken on a set schedule, instruct the
patient to consult the prescribing physician about shifting the
schedule. Failure to follow instructions may interfere with the
examination.
• Instruct the patient not to turn the recorder unit’s power OFF,
remove the battery pack from the recorder unit, disconnect
the antenna lead set, or remove an antenna pad during the
examination. Failure to follow instructions may interfere with
the examination.
• Antenna cables must be connected from the antenna pads
on the abdomen to the recorder unit worn outside the
clothing. Instruct the patient to avoid wearing one-piece-suit;
a shirt and pants or skirt must be worn to ensure proper
placement of the recorder unit and antenna cables.
• Instruct the patient to stay away from radio-transmitting
devices (i.e. keyless entry, home security, waitress call
system, garage door remote, wireless headphones, ham
radio, etc.) while the capsule endoscope is within his/her
body.
• Instruct the patient to keep the recorder unit, antenna lead
set, and real time viewer away from water, alcohol, and any
other liquids. Liquids entering these components may
damage them and/or result in equipment failure.
• Instruct the patient to avoid using the recorder unit at or
below 0°C/32°F. Failure to follow instructions may cause the
battery pack to deteriorate rapidly, resulting in the
examination ending prematurely.
• Provide your emergency contact number for the patient on
the “Caution for Capsule Endoscopy Patients”, included in
the capsule endoscope set A (MAJ-1469).

22
Important Information - Please Read Before Use
OLYMPUS CAPSULE ENDOSCOPE SYSTEM
Expiration date of the capsule endoscope
The battery inside the capsule endoscope actually consumes gradually during
long term storage. This higher storage environment over 25°C may cause the
battery inside the capsule endoscope consume rapidly. The consumption of the
battery inside the capsule endoscope may shorten the operation time
(continuous record and transmission of the images) of the capsule endoscope.
The capsule endoscope is designed to keep 8 continuous hours by the
expiration date printed on the package of the blister pack of the capsule
endoscope if stored in the normal storage environment (0 to 25°C (39 to 77°F)).
• The storage environment of the capsule endoscope is
restricted between 0 to 25°C (39 to 77°F). The severe
storage environment over 25°C may cause the battery inside
the capsule endoscope consume rapidly, and then the
consumption of the battery inside the capsule endoscope
may shorten the operation time of the capsule endoscope. In
such a case, the capsule endoscope may not operate for
8 continuous hours.
• The rapid temperature change between inside and outside of
the refrigerator or the freezer may cause the condensation
inside the capsule endoscope. And this may cause the
battery inside the capsule endoscope consume rapidly or
severe damage and failure in the image.
• Do not use the expired capsule endoscope. The expired
capsule endoscope may not operate for the assured
operation time (8 hours).
• The peristalsis movement differs among patients. The
capsule endoscope does not pass to the cecum within
8 hours after a patient swallows it in every case. The capsule
endoscope typically operates for 8 continuous hours, and it is
not assured for operation for 8 continuous hours for
observation for whole small bowel in every case.
• Please the capsule endoscope be swallowed by a patient
soon after the capsule endoscope turned on to avoid
consumption of the battery before examination.

Important Information - Please Read Before Use
23
OLYMPUS CAPSULE ENDOSCOPE SYSTEM
Battery charger
• This recorder unit is only to be used with battery pack
MAJ-1473. Do not use the battery charger to charge other
battery packs or batteries. Excessive charging, or recharging
at abnormal current may occur if the battery charger is used
improperly, causing unexpected chemical reactions within the
battery, which may result in excessive heat, release of
smoke, explosion, and/or a fire.
• Be sure to align the battery pack terminals (+ / –) correctly.
• Do not disassemble or modify the battery charger. It may
result in excessive heat, release of smoke, explosion, and/or
a fire while charging the battery pack.
• Do not leave the battery charger plugged in for a prolonged
period. It may result in excessive heat, release of smoke,
explosion, and/or a fire.
• Keep the battery charger away from water, alcohol, and any
other liquids.
• Keep the battery charger away from flames.
• Remove the battery pack from the battery charger before
storage.
• The battery charger will not charge the battery if the
temperature of the battery pack is below 0°C/32°F. In this
case, the charge lamp will blink in yellow at 1.5 second
intervals.
• The battery charger will not charge the battery if the battery
pack or the battery charger is damaged. In this case, the
charge lamp will blink in yellow at 0.5 second intervals.

24
Important Information - Please Read Before Use
OLYMPUS CAPSULE ENDOSCOPE SYSTEM
About the recharger’s power cord
For use in America and Canada
The following Power Cord should be used for this battery charger.
Type SPT-2, 2C/18AWG, UL Listed and CSA Certified cord set with
non-polarized plug, 125V, 10A
For use in Europe
The following Power Cord should be used for this battery charger.
Type H03VVH2-F~0.75mm2, Europe Approved cord set with non-polarized plug,
250V, 2.5A
For use in England
The following Power Cord should be used for this battery charger.
Type H03VVH2-F~0.75mm2, BSI certified cord set with non-polarized plug,
250V, 3A
Battery pack
• Do not disassemble or modify the battery pack. The battery
pack is equipped with a safety circuit and a protective circuit.
Disabling either or both of these circuits may result in
excessive heat, release of smoke, explosion, and/or a fire.
• Do not connect the (+) and (-) terminals of the battery pack
using pieces of metal. In addition, do not store or transport
the battery pack alongside other metallic objects. The battery
pack may be short-circuited, causing an overflow of current,
resulting in excessive heat, release of smoke, explosion,
and/or a fire from the battery, or excessive heating of the
metallic item.
• Do not heat the battery pack or bring it in contact with fire.
The insulating material may melt, gas could be released, the
safety circuit may be damaged, and electrolytic solution may
be ignited, causing excessive heat, release of smoke,
explosion, and/or a fire.
• Do not use or store the battery pack near flames or a source
of high temperature (over 80°C/176°F) such as a stove. If the
plastic separator is damaged by heat, the battery pack will be
short-circuited internally, causing excessive heat, release of
smoke, explosion, and/or a fire.

Important Information - Please Read Before Use
25
OLYMPUS CAPSULE ENDOSCOPE SYSTEM
• Keep the battery pack away from water or any other liquids. If
the internal protective circuit becomes wet and/or damaged,
it may result in excessive heat, release of smoke, explosion,
and/or a fire.
• Do not recharge the battery pack near an open flame, or
under direct sunlight. The protective circuit is activated under
high heat, and may prevent proper recharging. If the
protection circuit fails, recharging may occur at abnormal
current and/or voltage, causing unexpected chemical
reactions within the battery pack, which may result in
excessive heat, release of smoke, explosion, and/or a fire.
• When recharging the battery pack, use only the provided
battery chargers (MAJ-1476) under the specified recharging
conditions. Recharging under conditions other than those
specified (temperature outside the specified range,
excessively high voltage/current, use of modified battery
charger, etc.) may cause abnormalities or overcharging,
causing unexpected chemical reactions within the battery
pack, which may result in excessive heat, release of smoke,
explosion, and/or a fire.
• Do not strike, pierce, drop, or step on the battery pack. A
ruptured or damaged battery pack may be short-circuited
internally, which could cause excessive heat, release of
smoke, explosion, and/or a fire.
• Do not apply strong shocks to the battery pack. They could
cause the battery pack to leak, generate excessive heat,
release smoke, explode, or ignite. If the protection circuit
fails, recharging may occur at abnormal current and/or
voltage, causing unexpected chemical reactions within the
battery pack, which may result in excessive heat, release of
smoke, explosion, and/or a fire.
• Do not use a battery pack that is visibly damaged or
deformed. Excessive heat, release of smoke, explosion,
and/or a fire may result.
• Use the battery pack only for this equipment. Using the
battery pack in other equipment could cause its performance
to deteriorate rapidly, or, depending on the equipment, cause
damage from overcurrent, excessive heat, release of smoke,
explosion, and/or a fire.

26
Important Information - Please Read Before Use
OLYMPUS CAPSULE ENDOSCOPE SYSTEM
• If a battery pack is leaking, take care that the liquid does not
come in contact with your skin or eyes. If liquid enters the
eye, do not rub it; immediately rinse with clean water, then
consult a physician. Failure to take appropriate action may
result in injury.
• If recharging is not completed after the given recharging time,
do not continue recharging. Excessive heat, release of
smoke, explosion, and/or a fire may result.
• Do not place the battery pack in a microwave or a
high-pressure cooker. Rapid heating or breaking of the
battery pack’s seal may result in excessive heat, release of
smoke, explosion, and/or a fire. In this case, the battery pack
may be damaged. Do not use this battery pack and replace it
with a new one.
• If you notice leaking or an abnormal odor from the battery
pack, immediately remove it from any heat source in the
vicinity. The electrolytic solution may ignite, causing release
of smoke, explosion, and/or a fire. Do not use this battery
pack, and replace it with a new one.
• If you notice an abnormal odor, excessive heat, change of
color, deformation, or other abnormalities during use,
recharging, or storage of the battery pack, immediately
remove it from the equipment or battery charger, and do not
use the battery pack. Continued use of the battery pack may
result in excessive heat, release of smoke, explosion, and/or
a fire. Use a new battery pack instead.
Avoid long term use or storage at temperatures exceeding
40°C/104°F. Battery pack performance may deteriorate
rapidly under these conditions.
• When disposing of the battery pack, follow the classification
and recycling guidelines provided by your country, local
government, or the facility.
• The life span of a battery pack is approximately 1 year from
the date of purchase, or 320 recharging cycles, whichever is
first. When the battery pack approaches its end-of-life, the
recorder unit will prompt for replacement. Order a new
battery pack and replace.

Important Information - Please Read Before Use
27
OLYMPUS CAPSULE ENDOSCOPE SYSTEM
EMC (Electromagnetic Compatibility)
• In order to provide the intended functionality, the system
must emit RF energy while in operation. This may affect
electrical devices in the vicinity.
• The system is equipped with a function for device
identification via radio transmission, and is thus subject to
electrostatic interference from other equipment in the vicinity.
Receiver (recorder unit,
real time viewer, antenna
lead set)
Frequency range of possible
interference: 426.8 to 440.8MHz
Frequency range of possible
interference: 306 to 322MHz
(for US/Canada)
Transmitter (capsule
endoscope)
Central frequency: 433.8MHz
Required bandwidth: 7MHz
Modulation method: Minimum shift
keying (MSK)
High frequency output: +37dBµV/m
(when inside body) phantom
Central frequency: 315MHz
Required bandwidth: 7MHz
Modulation method: Minimum shift
keying (MSK)
High frequency output: +37dBµV/m
(when inside body) phantom

28
Important Information - Please Read Before Use
OLYMPUS CAPSULE ENDOSCOPE SYSTEM

Chapter 1 Checking the Package Contents
29
OLYMPUS CAPSULE ENDOSCOPE SYSTEM
Chapter 1 Checking the Package
Contents
Match all items in the package with the components shown in this chapter.
Inspect each item for damage. If the instrument is damaged, a component is
missing or you have any questions, do not use the instrument; immediately
contact Olympus.

30
Chapter 1 Checking the Package Contents
OLYMPUS CAPSULE ENDOSCOPE SYSTEM
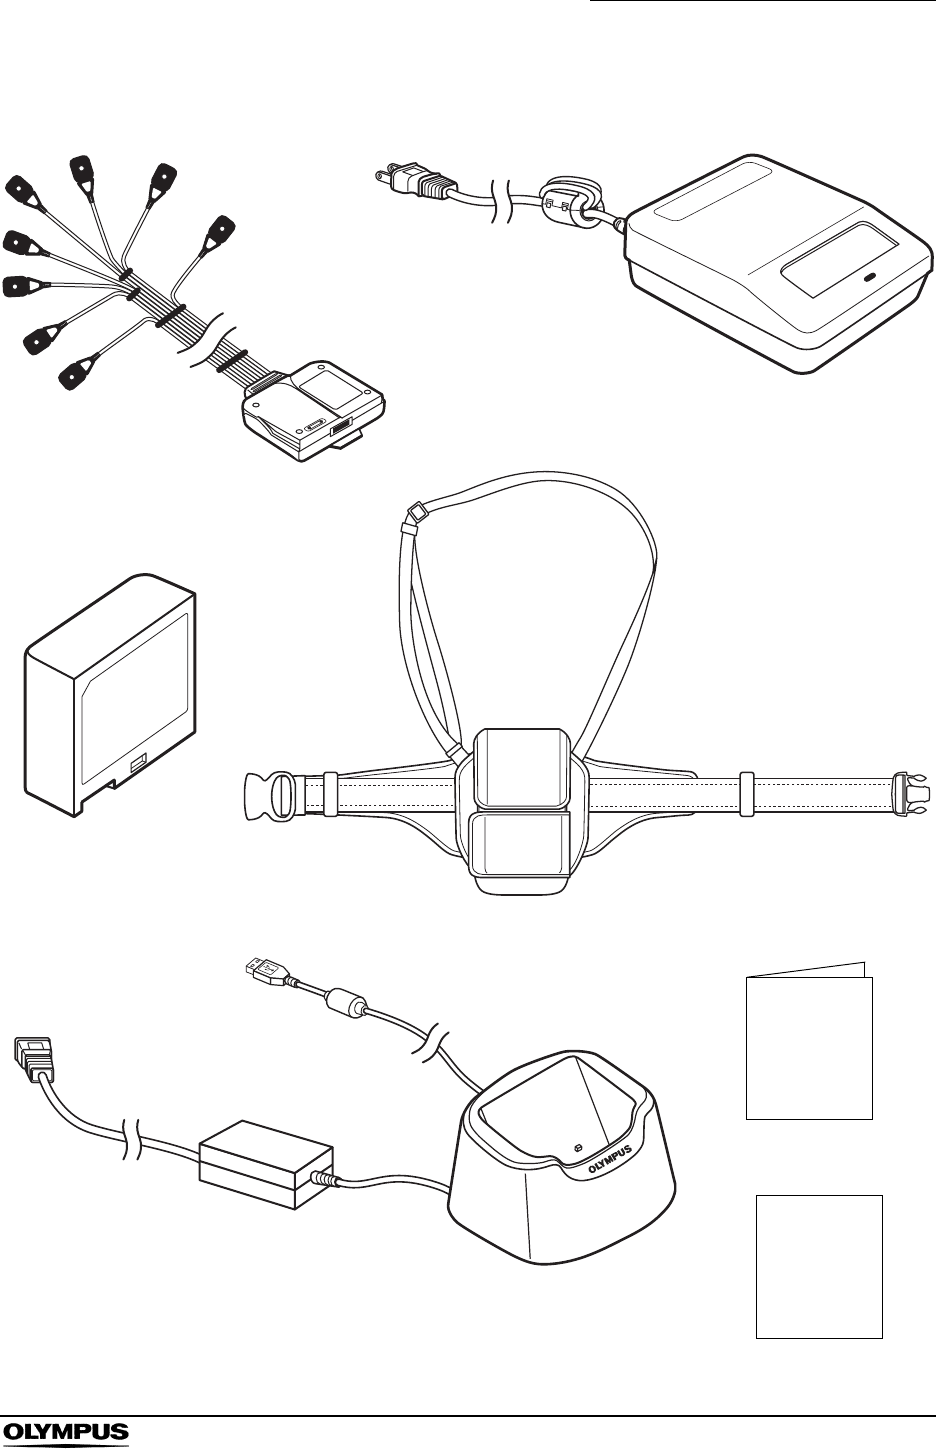
1.1 Capsule endoscope system set A (MAJ-1467)
Antenna lead set
Recorder unit harness
Real time viewer
Battery pack (2 pcs.)
Battery charger
Recorder unit
Recorder unit (OLYMPUS RE-1)
Real time viewer cable (MAJ-1485)
Real time viewer (OLYMPUS VE-1)
Instruction manual,
antenna locations
guide
Real time viewer cable
Recorder unit cradle
Chapter 1 Checking the Package Contents
31
OLYMPUS CAPSULE ENDOSCOPE SYSTEM
Battery pack (MAJ-1473) x 2
Power supply cable
Battery charger (MAJ-1476)
Instruction manual
Antenna locations
guide
Recorder unit harness (MAJ-1475)
Recorder unit cradle (MAJ-1484)
Recorder unit cradle cable
AC adapter
Antenna lead set (MAJ-1474)
Power supply cable

32
Chapter 1 Checking the Package Contents
OLYMPUS CAPSULE ENDOSCOPE SYSTEM
1.2 Capsule endoscope set A (MAJ-1469)
The capsule endoscope set A includes 5 capsule endoscopes, 1 capsule
activator (reusable), and 50 antenna lead cover (disposable). For a single
examination, 1 capsule endoscope, 1 capsule activator, and 10 antenna lead
cover (including 2 spare) are used.
Capsule endoscope (in sterile container)
(OLYMPUS EC TYPE 1) x 5
Capsule activator (reusable)
(MAJ-1478)
Antenna lead cover (set of 50 pcs., disposable)
(MAJ-1470)
Caution for capsule
endoscopy patients x 5
Chapter 1 Checking the Package Contents
33
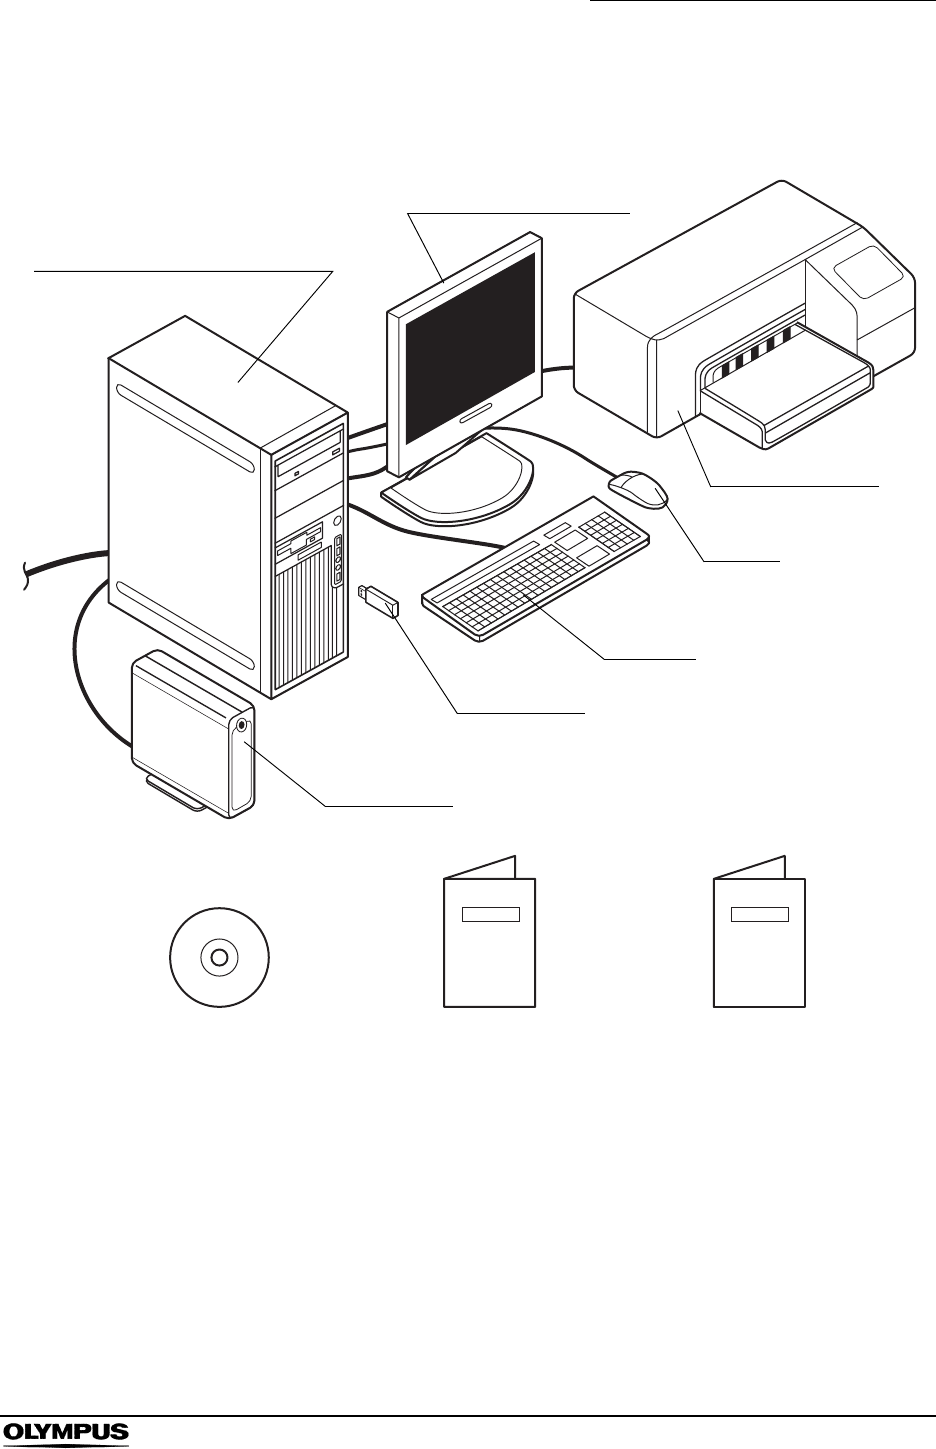
OLYMPUS CAPSULE ENDOSCOPE SYSTEM
1.3 Workstation (OLYMPUS WS-1)
Figure 1.1
LCD monitor (MAJ-1481)
Printer (MAJ-1480)
Mouse
Keyboard
Workstation hardware (MAJ-1479)
USB HDD
USB memory
Instruction manual
(for printer)
Instruction manual (for
LCD monitor)
CD-R (Endo Capsule
software light)

34
Chapter 1 Checking the Package Contents
OLYMPUS CAPSULE ENDOSCOPE SYSTEM
The product model of each item and its content are as
follows:
For the articles of consumption, refer to the instruction
manual for printer.
Product Name Model Contents
Capsule endoscope
system set A
MAJ-1467 Recorder unit, real time viewer,
antenna lead set, 2 battery packs,
battery charger, recorder unit
harness, real time viewer cable,
and recorder unit cradle
Capsule endoscope set A MAJ-1469 Set of 5 pcs., with 50 antenna lead
cover and an capsule activator
Capsule activator MAJ-1478 1 pc.
Recorder unit OLYMPUS RE-1 1 pc., with 1 battery pack
Antenna lead set MAJ-1474 1 pc.
Real time viewer OLYMPUS VE-1 1 pc., with 1 battery pack, real time
viewer cable
Battery pack MAJ-1473 1 pc.
Battery charger MAJ-1476 1 pc., with power supply cable
Recorder unit harness MAJ-1475 1 pc.
Real time viewer cable MAJ-1485 1 pc.
Recorder unit cradle MAJ-1484 1 pc., with AC adapter, recorder
unit cradle cable
Workstation OLYMPUS WS-1 Workstation hardware,
LCD monitor, and printer
Workstation hardware MAJ-1479 Workstation main body, keyboard,
mouse,
USB memory (2GB), conversion
cable, and Endo Capsule software
light CD-R
LCD monitor MAJ-1481 1 pc., power cable, monitor cable
Printer MAJ-1480 1 pc., with printer cable, AC
adapter, power cable, ink
cartridges (black, cyan, magenta,
yellow), print head (black, cyan,
magenta, yellow)
Antenna lead cover MAJ-1470 Set of 50 pcs.

Chapter 1 Checking the Package Contents
35
OLYMPUS CAPSULE ENDOSCOPE SYSTEM
The following items are optional third-party products that may
be purchased separately:
USB HDD: MAXTOR E30G300 (320GB)
For further information, please contact Olympus.
36
Chapter 2 Nomenclature and functions
OLYMPUS CAPSULE ENDOSCOPE SYSTEM
Chapter 2 Nomenclature and functions
2.1 System components
10. Recorder unit (OLYMPUS RE-1)
2. Real time viewer (OLYMPUS VE-1)
9. Recorder unit
cradle (MAJ-1484)
7. Recorder unit cradle cable
8. Real time viewer cable (MAJ-1485)
5. Workstation (OLYMPUS WS-1)
11. Antenna lead set (MAJ-1474)
4. Battery pack (MAJ-1473)
6. Recorder unit harness (MAJ-1475)
1. Capsule endoscope set A (MAJ-1469)
Antenna lead cover
(MAJ-1470) Capsule activator (MAJ-1478)
Capsule endoscope
(OLYMPUS EC TYPE 1)
3. Battery charger
(MAJ-1476)
50 pcs. 1 pc.
5 pcs.

Chapter 2 Nomenclature and functions
37
OLYMPUS CAPSULE ENDOSCOPE SYSTEM
1. Capsule endoscope set A (MAJ-1469)
Takes endoscopic pictures of the gastrointestinal tract, and transmits the
image data by radio transmission.
Consists of:
• Capsule endoscope (OLYMPUS EC TYPE 1) 5 pcs.
• Capsule activator 1 pc.
• Antenna lead cover 50 pcs.
2. Real time viewer (OLYMPUS VE-1)
Monitors the operation of the capsule endoscope before and during the
examination. Also, by using the real time viewer cable to connect the real
time viewer to the recorder unit, the endoscopic images can be viewed in
real-time.
3. Battery charger (MAJ-1476)
Recharges battery packs.
4. Battery pack (MAJ-1473)
The power supply for the recorder unit and the real time viewer.
5. Workstation (OLYMPUS WS-1)
Registers patient information and patient ID onto the recorder unit. Also
used to download the endoscopic images from the recorder unit for
observation, diagnosis, and reporting.
6. Recorder unit harness (MAJ-1475)
Holds the recorder unit during the examination.
7. Recorder unit cradle cable
Connects the recorder unit cradle to the workstation for transmission of
patient ID, image data, etc.
8. Real time viewer cable (MAJ-1485)
Connects the real time viewer to the recorder unit, allowing images from the
recorder unit to be transferred to the real time viewer for real-time viewing.
9. Recorder unit cradle (MAJ-1484)
Holds the recorder unit while connecting to the workstation, for initialization
of the recorder unit, registration of the patient ID, and downloading of image
data.
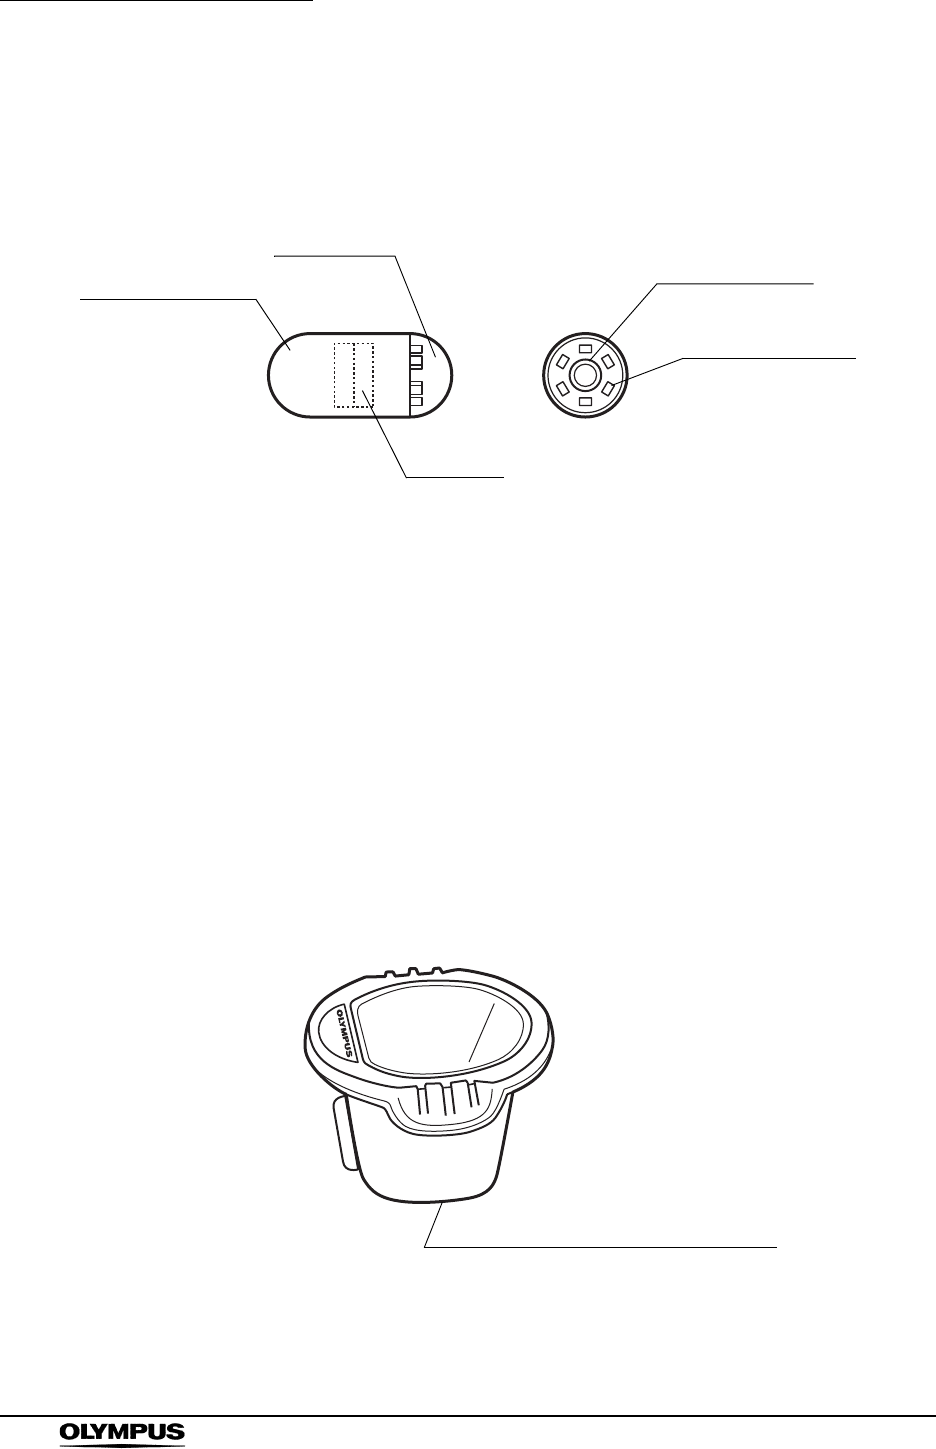
10. Recorder unit (OLYMPUS RE-1)
Records the image data transmitted by the capsule endoscope via the
antenna lead set.
11. Antenna lead set (MAJ-1474)
Receives transmissions from the capsule endoscope, and transfers the
image data to the recorder unit.
38
Chapter 2 Nomenclature and functions
OLYMPUS CAPSULE ENDOSCOPE SYSTEM
2.2 Capsule endoscope set A (MAJ-1469)
Capsule endoscope (OLYMPUS EC TYPE1)
1. Exterior package
Exterior package of the capsule endoscope.
2. Top cover
A transparent observation port covering the objective lens and illumination
LED.
3. Objective lens
Lens for endoscopic observation.
4. Illumination LED
Illuminates the area being observed.
5. Battery
Internal battery for operating the capsule endoscope.
Capsule activator (MAJ-1478)
1. Capsule endoscope insertion hole
To turn ON the capsule endoscope, insert it into this hole.
1. Exterior package
2. Top cover
5. Battery
3. Objective lens
4. Illumination LED
(white LED)
1. Capsule endoscope insertion hole
Chapter 2 Nomenclature and functions
39
OLYMPUS CAPSULE ENDOSCOPE SYSTEM
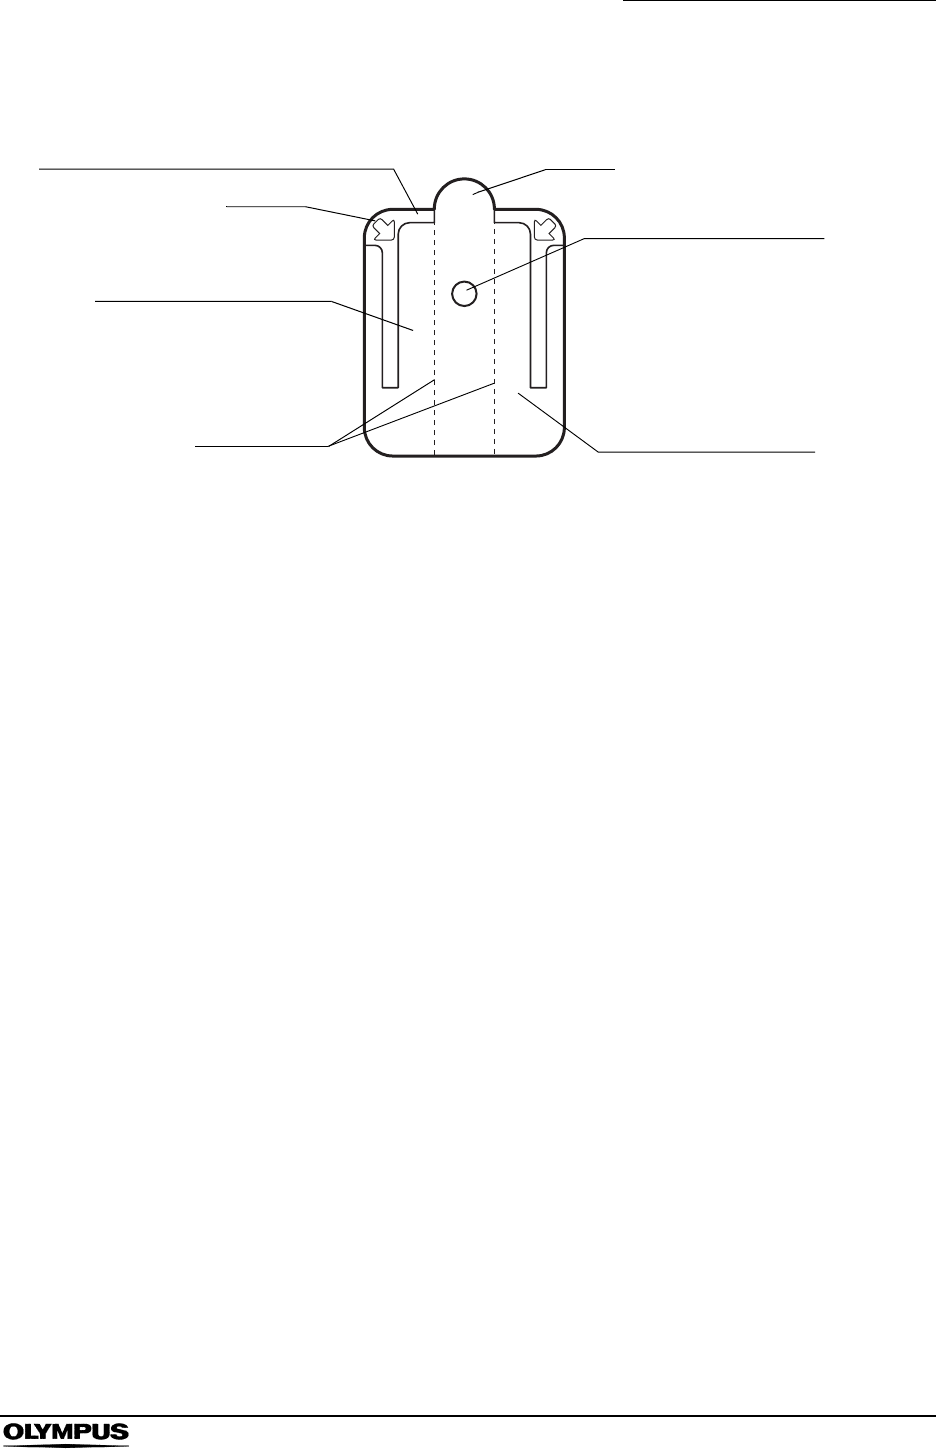
Antenna lead cover (MAJ-1470)
1. Antenna lead cover, top surface (blue)
Insert the antenna so that its color tag is aligned with the blue surface of the
antenna lead cover.
2. Tab
Remove the antenna lead cover by pulling the tab to tear off the perforated
section.
3. Position alignment hole
Use to align the antenna lead cover and the antenna.
4. Lining paper (inside)
Peel off the lining paper to adhere the antenna lead cover onto the antenna
lead set.
5. Perforation
Tear off this perforated section to remove the antenna lead cover from the
antenna.
6. Lining paper (backside)
Peel off the lining paper to attach the antenna pad to the patient.
7. Arrow
When removing the lining paper from the antenna lead cover, or when
removing the antenna lead cover from the patient, start peeling at the
position marked by the arrow.
1. Antenna lead cover, top surface (blue)
6. Lining paper (backside)
2. Tab
5. Perforation 4. Lining paper (inside)
3. Position alignment hole
7. Arrow
40
Chapter 2 Nomenclature and functions
OLYMPUS CAPSULE ENDOSCOPE SYSTEM
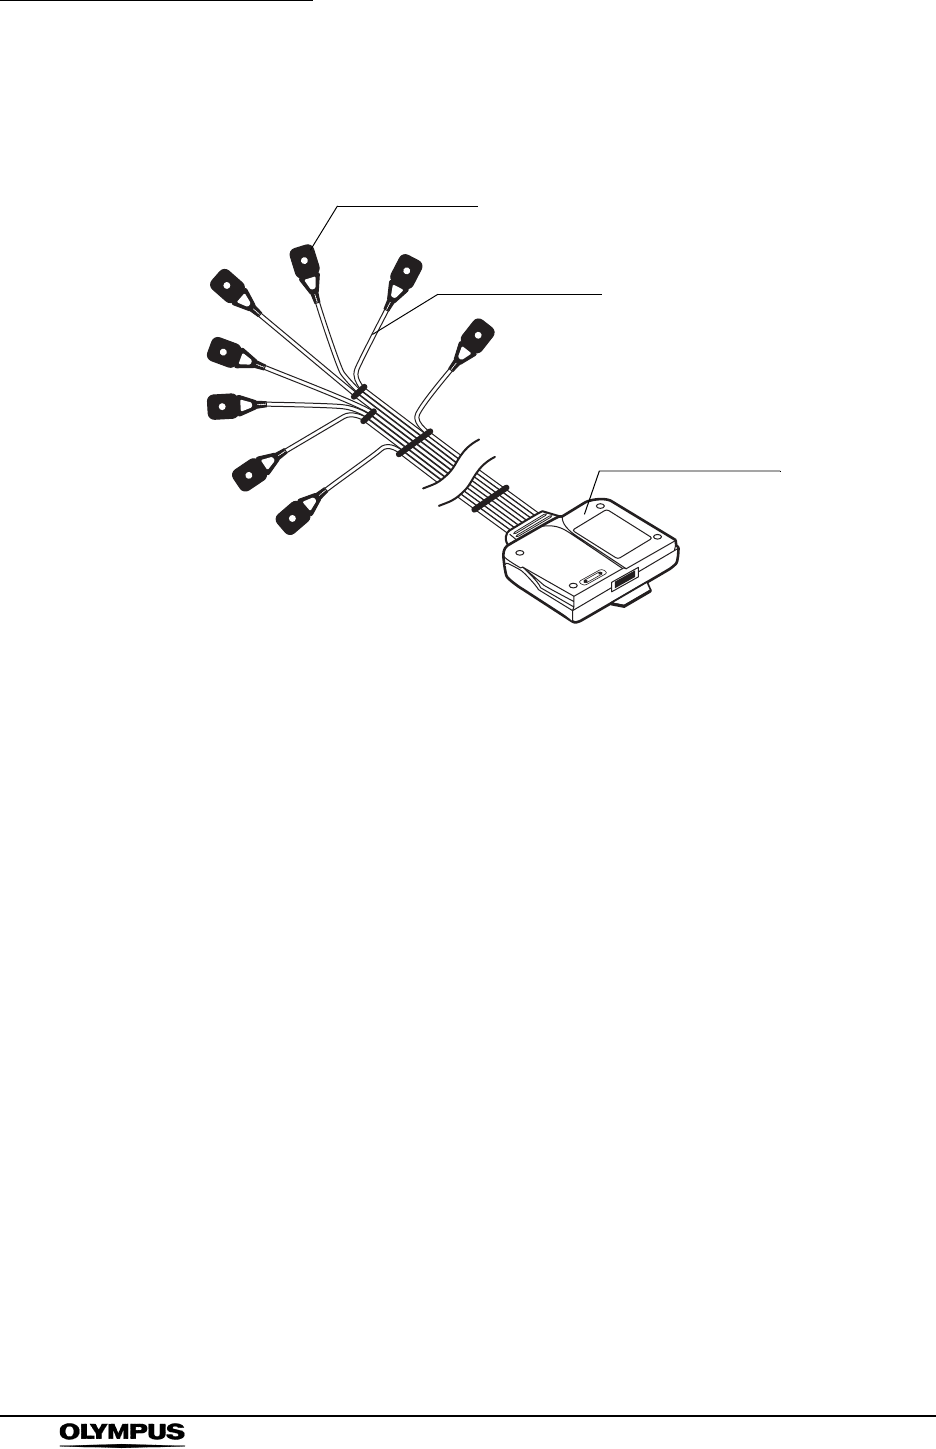
2.3 Antenna lead set (MAJ-1474)
1. Antenna pad
Receives signals from the capsule endoscope.
2. Antenna cable
Transfers the received signals to the connection unit.
3. Connection unit
Connected to the recorder unit.
1. Antenna pad
2. Antenna cable
3. Connection unit

Chapter 2 Nomenclature and functions
41
OLYMPUS CAPSULE ENDOSCOPE SYSTEM
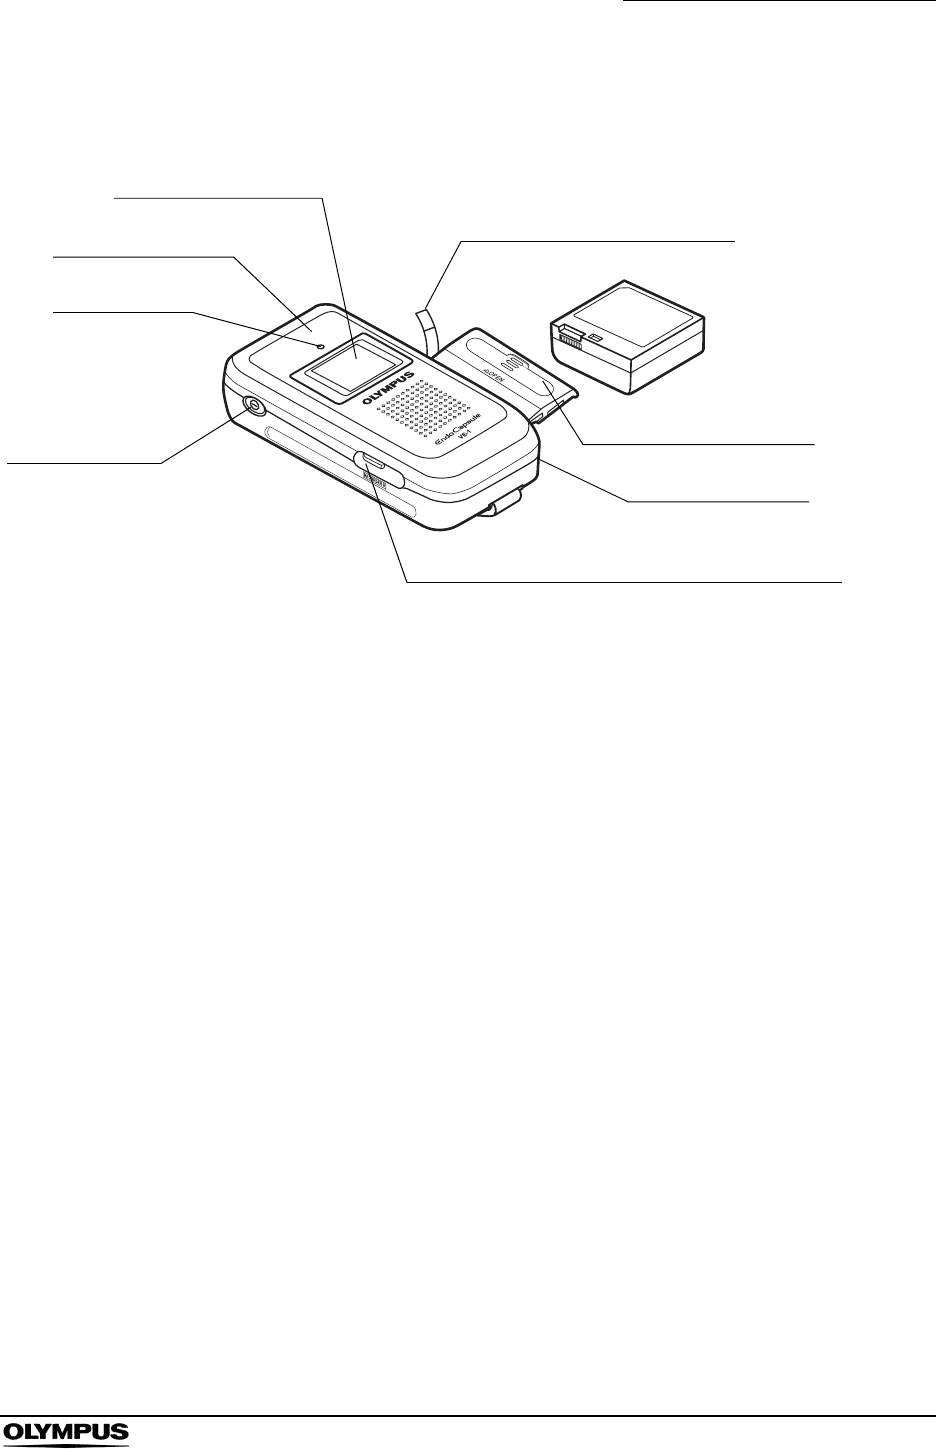
2.4 Recorder unit (OLYMPUS RE-1)
1. Indicator lamp
Indicates the reception/communication status with the capsule endoscope
and the workstation.
2. Power lamp
Illuminates green when the recorder unit is turned ON.
3. Display panel
Displays patient ID, battery pack level, etc.
4. Battery pack removal ribbon
Used for removing the battery pack. With the battery pack removal ribbon
hanging out of the battery pack slot, insert the battery pack into the battery
slot.
5. Battery pack slot cover
Cover for the battery pack slot to hold the battery pack.
6. Battery pack slot
Insert the battery pack here. To remove the battery pack, pull the ribbon
located inside the slot.
7. Recorder unit cradle connector
Inserted into the recorder unit connector on the recorder unit cradle.
10. Antenna lead set connector
3. Display panel
7. Recorder unit cradle connector
6. Battery pack slot
8. Real time viewer cable connector (rubber cap)
9. Antenna lead set eject button
11. Power switch
1. Indicator lamp
(on backside)
(on backside)
2. Power lamp
5. Battery pack slot cover
4. Battery pack removal ribbon

42
Chapter 2 Nomenclature and functions
OLYMPUS CAPSULE ENDOSCOPE SYSTEM
8. Real time viewer cable connector (rubber cap)
Connect the real time viewer cable here.
The rubber cap is provided for the protection of the viewer unit connector.
Attach the rubber cap when the real time viewer cable connector is not in
use.
9. Antenna lead set eject button
Slide the button located on the backside of the recorder unit to disconnect
the antenna lead set.
10. Antenna lead set connector
Attach the antenna lead set here.
11. Power switch
Turn the recorder unit ON by holding down the switch for 1 seconds or
more. Turn the recorder unit OFF by holding down the switch for 2 seconds
or more.
Chapter 2 Nomenclature and functions
43
OLYMPUS CAPSULE ENDOSCOPE SYSTEM
2.5 Real time viewer (OLYMPUS VE-1)
1. Display panel (color)
Displays endoscopic images sent by the capsule endoscope or the recorder
unit, as well as information such as battery pack level.
2. Battery pack removal ribbon
Used for removing the battery pack. With the battery pack removal ribbon
hanging out of the battery pack slot, insert the battery pack into the battery
slot.
3. Battery pack slot cover
Cover for the battery pack slot to hold the battery pack.
4. Battery pack slot
Insert the battery pack here. To remove the battery pack, pull the ribbon
located inside the slot.
5. Real time viewer cable connector (rubber cap)
Connect the real time viewer cable here. By connecting the real time viewer
to the recorder unit, the operation of the recorder unit can be checked, and
the endoscopic images can be viewed in real-time.
The rubber cap is provided for the protection of the viewer unit connector.
Attach the rubber cap when the real time viewer cable connector is not in
use.
6. Power switch
Turn the real time viewer ON by holding down the switch for 1 second or
more. Turn the real time viewer OFF by holding down the switch again for 1
second or more.
7. Power lamp
3. Battery pack slot cover
6. Power switch
4. Battery pack slot
1. Display panel (color)
5. Real time viewer cable connector (rubber cap)
8. Internal antenna
(embedded) 2. Battery pack removal ribbon

44
Chapter 2 Nomenclature and functions
OLYMPUS CAPSULE ENDOSCOPE SYSTEM
7. Power lamp
Illuminates green when the real time viewer is turned ON.
8. Internal antenna (embedded)
Receives signals from the capsule endoscope in proximity.
Chapter 2 Nomenclature and functions
45
OLYMPUS CAPSULE ENDOSCOPE SYSTEM
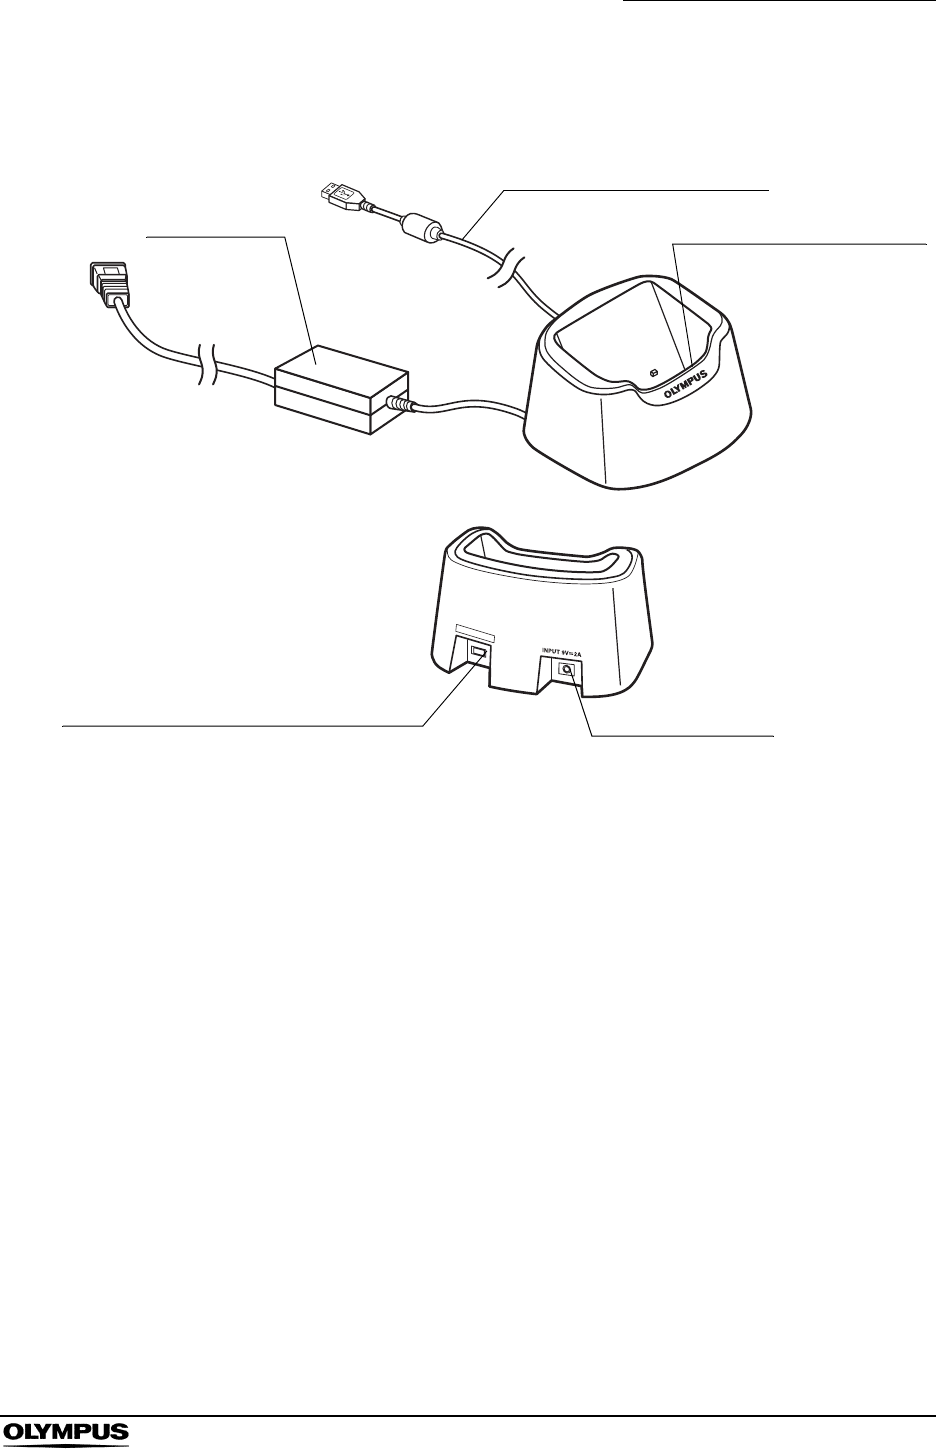
2.6 Recorder unit cradle (MAJ-1484)
1. AC adapter
Connected to an AC power supply.
2. Recorder unit cradle cable
Connected to the recorder unit cradle cable connector. Connects the
recorder unit to the workstation.
3. Recorder unit connector
Connects the recorder unit securely. When the recorder unit is connected to
the recorder unit cradle, the recorder unit’s power is automatically turned
ON. Remove the antenna lead set from the recorder unit before attaching
the recorder unit to the recorder unit cradle.
4. Power connector
Connect the power supply cable here.
5. Recorder unit cradle cable connector
Connect the recorder unit cradle cable here.
WORK STATION
3. Recorder unit connector
1. AC adapter
5. Recorder unit cradle cable connector 4. Power connector
2. Recorder unit cradle cable
46
Chapter 2 Nomenclature and functions
OLYMPUS CAPSULE ENDOSCOPE SYSTEM
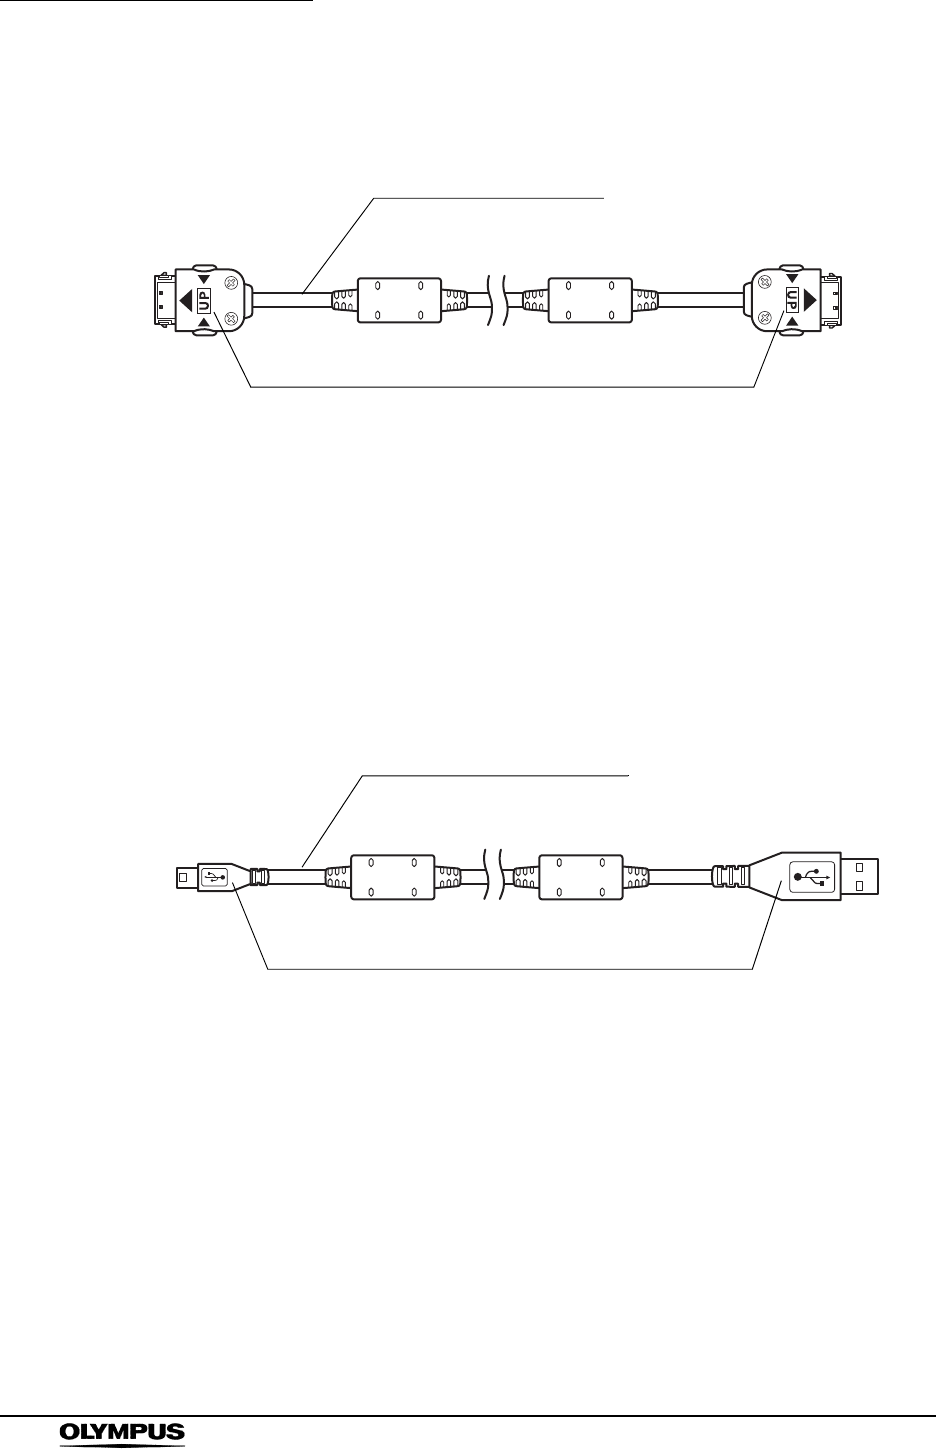
2.7 Real time viewer cable (MAJ-1485)
1. Real time viewer cable
Connects the real time viewer to the recorder unit, and transfers image
signals between them.
2. Connectors
Connect to the real time viewer cable connectors on the recorder unit and
the real time viewer. To disconnect, push in the buttons on the side.
2.8 Recorder unit cradle cable
1. Recorder unit cradle cable
Connects the recorder unit cradle to the workstation, and transfers data
between the recorder unit and the workstation.
2. Connectors
Connect to the USB connector on the workstation, and to the recorder unit
cradle cable connector on the recorder unit cradle.
1. Real time viewer cable
2. Connectors
1. Recorder unit cradle cable
2. Connectors
Chapter 2 Nomenclature and functions
47
OLYMPUS CAPSULE ENDOSCOPE SYSTEM
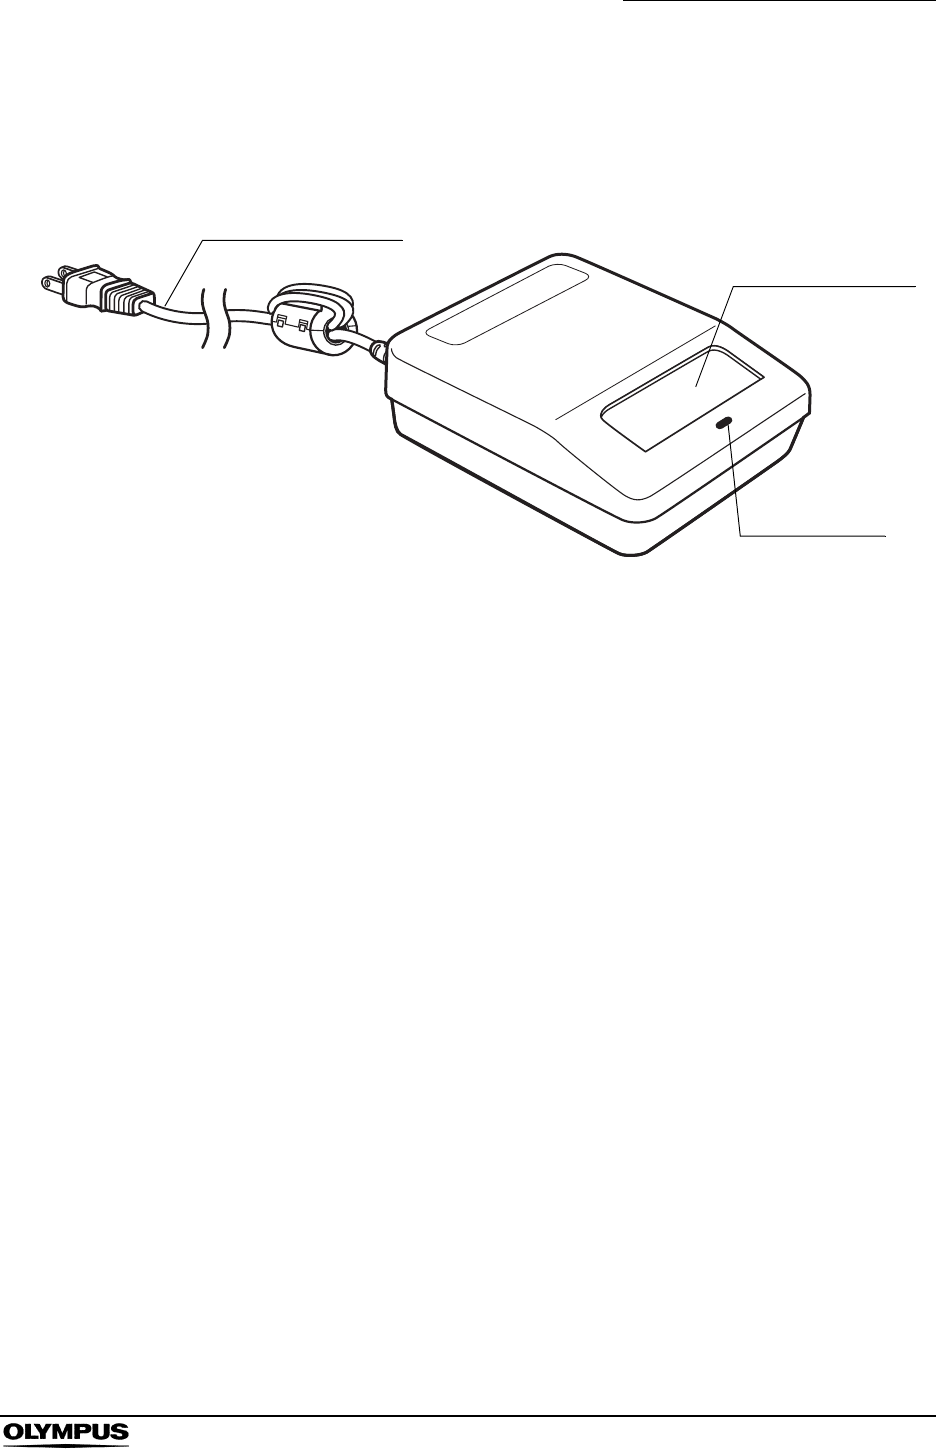
2.9 Battery charger (MAJ-1476)
1. Power supply cable
Connects the battery charger to an AC power source.
2. Battery pack slot
Place the battery pack in this slot.
3. Charge lamp
Illuminates yellow when the battery pack begins charging. Illuminates green
when charging is completed.
1. Power supply cable
2. Battery pack slot
3. Charge lamp
48
Chapter 2 Nomenclature and functions
OLYMPUS CAPSULE ENDOSCOPE SYSTEM
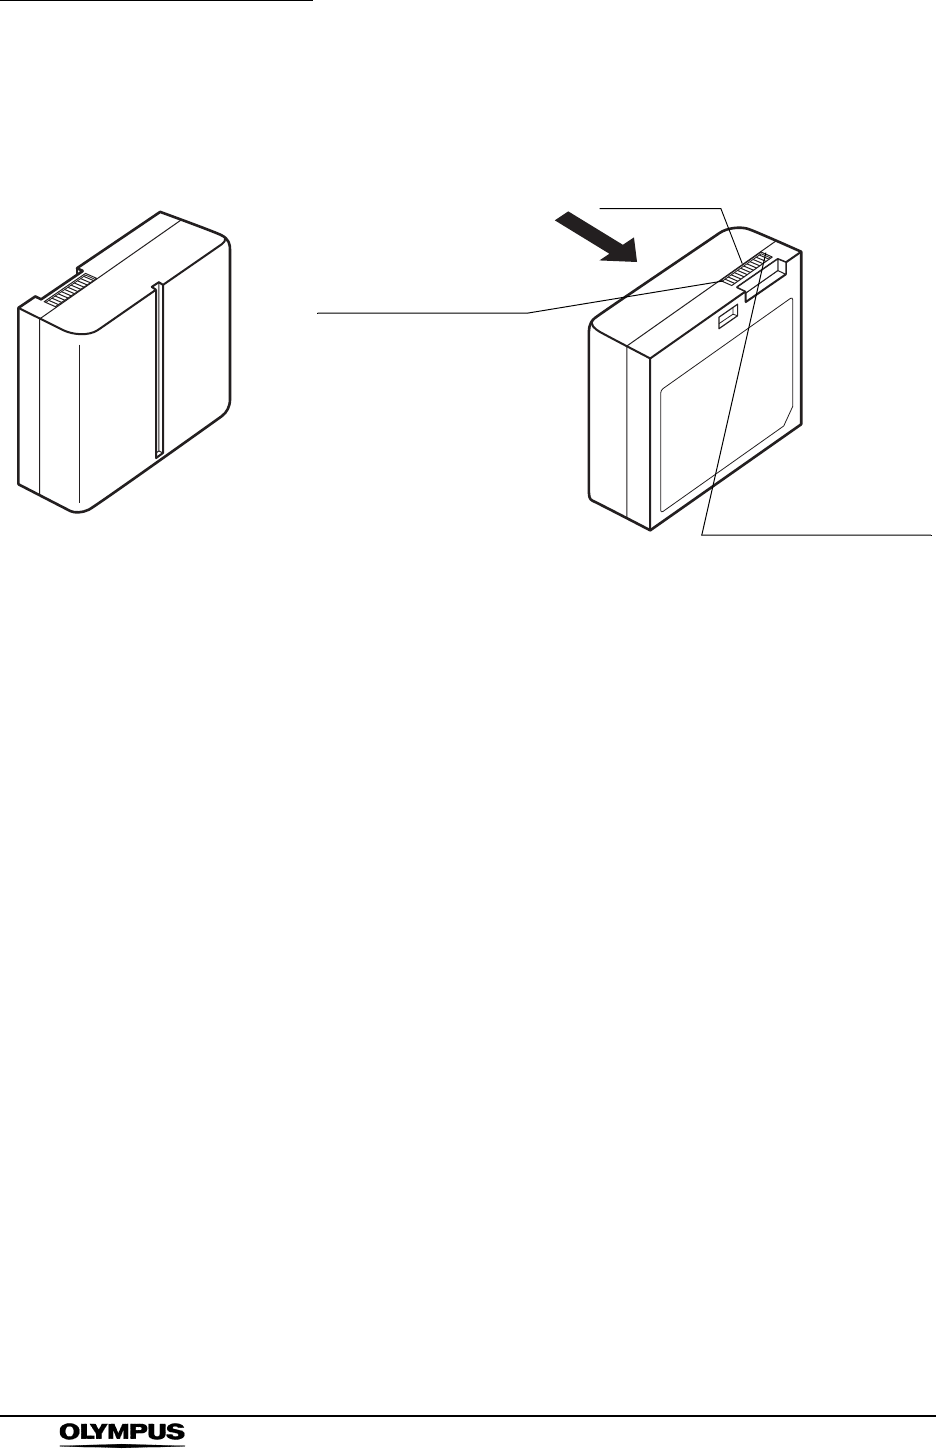
2.10 Battery pack (MAJ-1473)
1. Positive (+) terminal
Outputs positive voltage.
2. Connector
Connects to the connector in the battery pack slot of the receiver/real time
viewer. Also connected to the connector in the battery pack slot of the
recharger.
3. Negative (–) terminal
Outputs negative voltage.
3. Negative (–) terminal
1. Positive (+) terminal
2. Connector
(as seen from “A”)
A
Chapter 2 Nomenclature and functions
49
OLYMPUS CAPSULE ENDOSCOPE SYSTEM
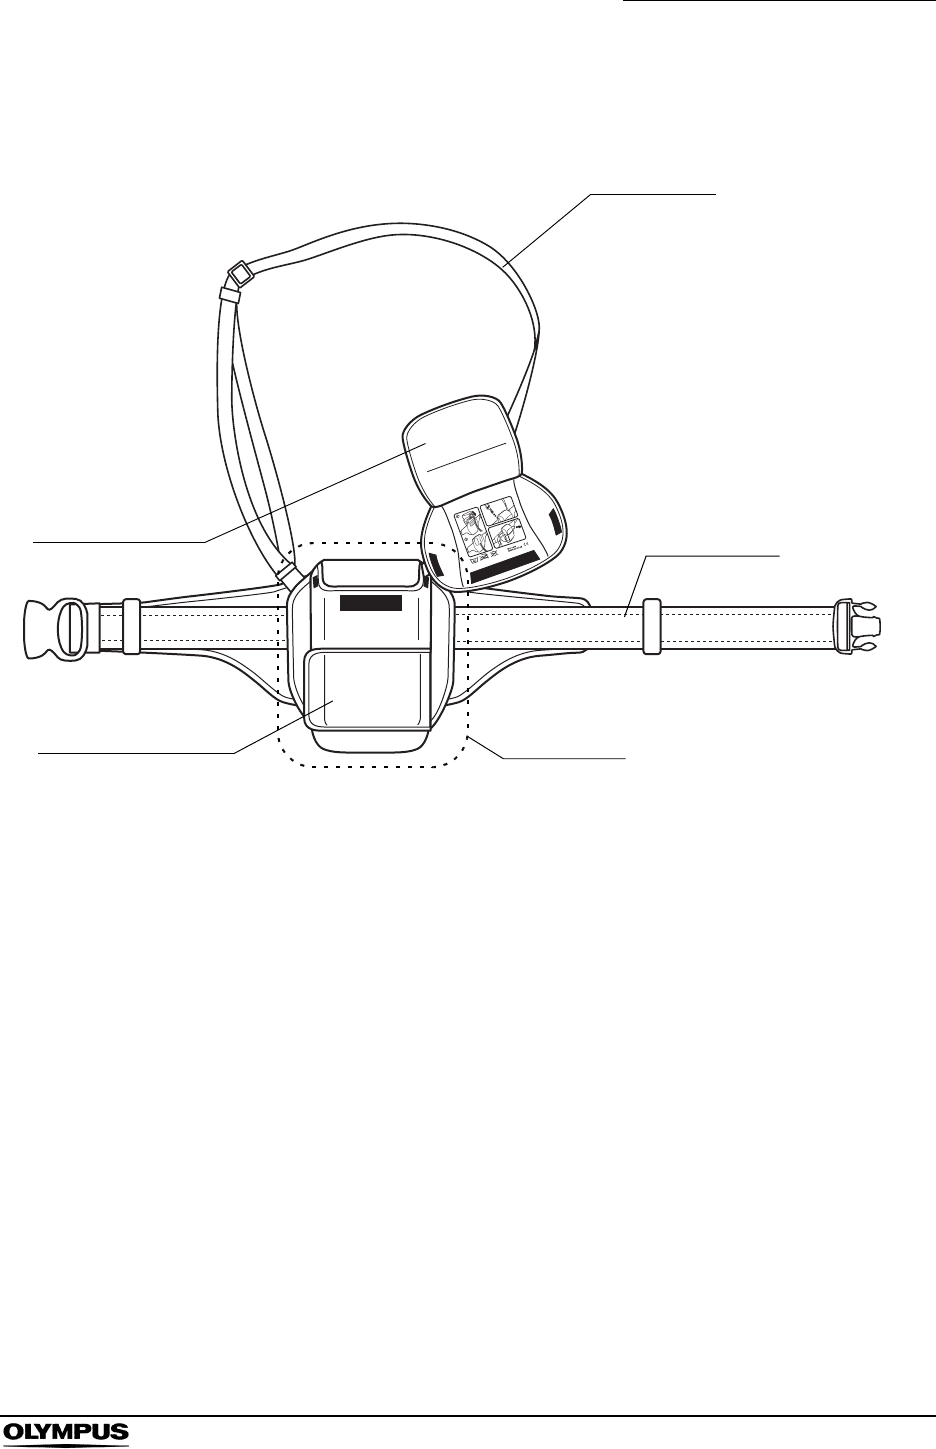
2.11 Recorder unit harness (MAJ-1475)
1. Suspender
Adjust the length according to the patient’s physique.
2. Waist belt
Holds the recorder unit during the examination.
Adjust the length according to the patient’s physique.
3. Pouch
Stores the recorder unit during the examination.
4. Connector cover
Covers the connector on the recorder unit to which the real time viewer
cable is connected.
5. Pouch cover
Secures the recorder unit and the antenna cables to the pouch.
1. Suspender
3. Pouch
2. Waist belt
5. Pouch cover
4. Connector cover
50
Chapter 2 Nomenclature and functions
OLYMPUS CAPSULE ENDOSCOPE SYSTEM
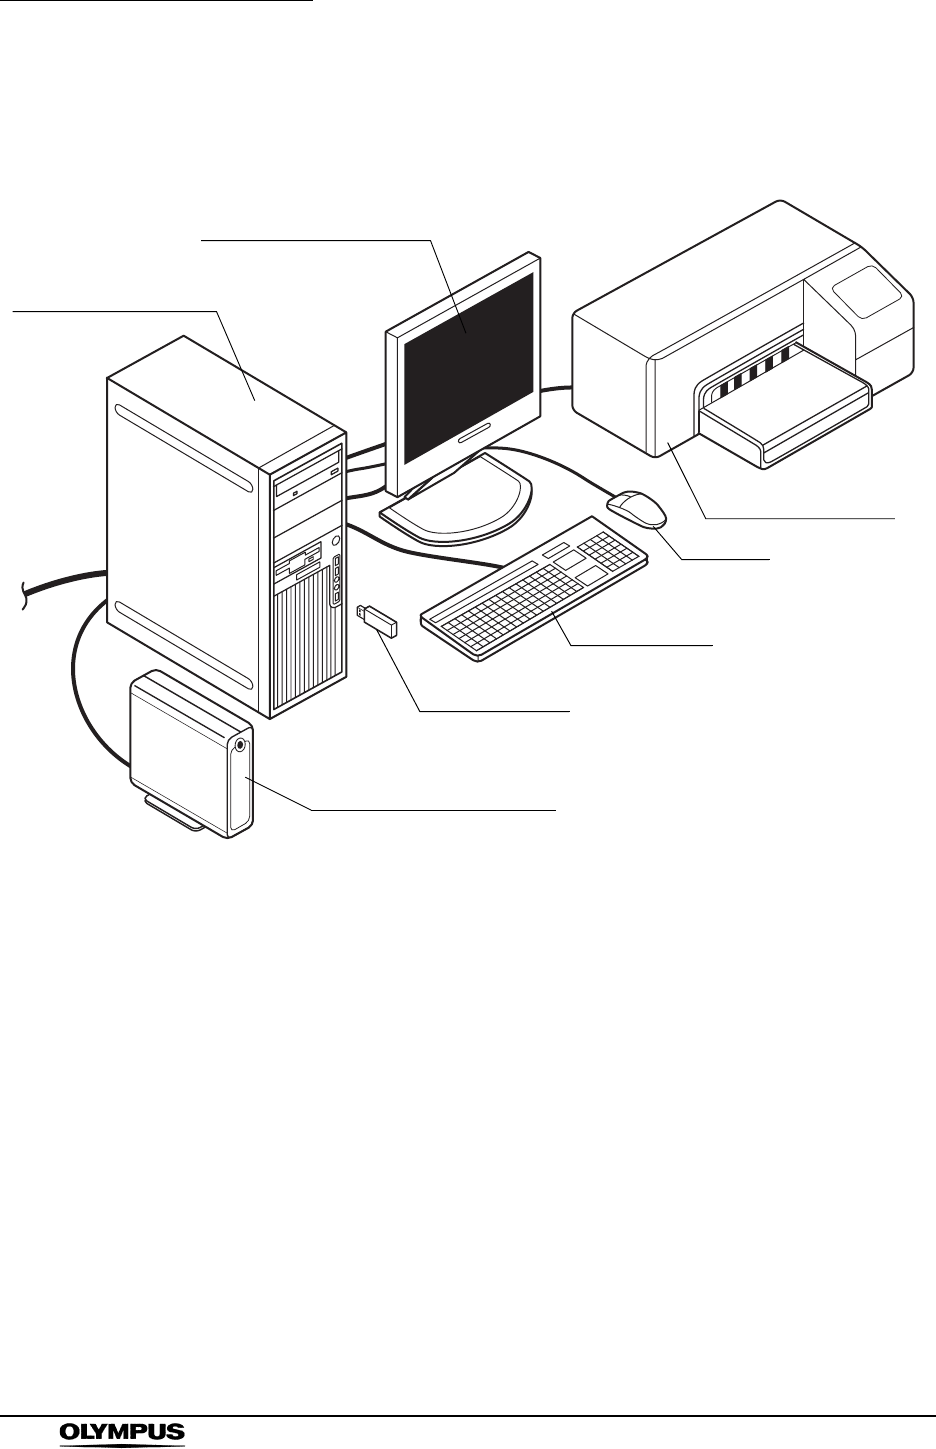
2.12 Workstation (OLYMPUS WS-1)
1. Workstation hardware (MAJ-1479)
Contains the processing unit. Also used to store data onto the CD/DVD for
backup.
2. LCD monitor (MAJ-1481)
Displays images captured by the capsule endoscope.
3. Printer (MAJ-1480)
Used for printing. Refer to the included manual for replacement and
ordering of ink and paper.
4. Mouse
For screen operation.
5. Keyboard
For data input.
6. USB memory
Used for data storage. 2GB capacity.
7. USB HDD (recommended)
Used for data backup. If unavailable, please contact Olympus.
1. Workstation
hardware (MAJ-1479)
5. Keyboard
4. Mouse
3. Printer (MAJ-1480)
2. LCD monitor (MAJ-1481)
6. USB memory
7. USB HDD (recommended)

Chapter 2 Nomenclature and functions
51
OLYMPUS CAPSULE ENDOSCOPE SYSTEM
OLYMPUS WS-1 contains workstation hardware
(MAJ-1479), LCD monitor (MAJ-1481) and printer
(MAJ-1480).

52
Chapter 3 Installation and Connection of the Workstation
OLYMPUS CAPSULE ENDOSCOPE SYSTEM
Chapter 3 Installation and Connection
of the Workstation
• Use the workstation in the configuration shown in the
“System chart” on page 244. Use of a workstation in any
other configuration may cause patient and/or operator injury
or equipment damage, and may impair the functionality of the
system.
• Before use, thoroughly review chapters 3 and 4 of this
instruction manual, as well as the instruction manuals
provided with the peripherals. If the equipment is not properly
prepared before each use, equipment damage, patient and
operator injury, and/or fire may result.
• Do not place the workstation and its peripherals (including
the recorder unit cradle) in the patient environment. Electric
shocks and, burns may result.
• Avoid placing the equipment in locations with the following
conditions. Failure to do so may result in malfunction of
and/or damage to equipment.
−Exposure to water.
−Exposure to rapid changes in temperature.
−Exposure to direct sunlight.
−Proximity to heat sources.
−Proximity to equipment that generates high frequency
waves.
−Exposure to high humidity.
−Exposure to significant vibration, or dust, lampblack, or
smoke.
• Use in a combustible atmosphere is prohibited.
The system is not explosion-proof, and may cause an
explosion or a fire.
• When turning the system OFF, follow the proper shutdown
procedure.
Failure to do so may result in equipment damage.

Chapter 3 Installation and Connection of the Workstation
53
OLYMPUS CAPSULE ENDOSCOPE SYSTEM
• Installing applications not recommended by Olympus on the
workstation, or upgrading the Operating System (OS) are
prohibited.
• Use only the dedicated cables. Use of other cables may
result in malfunction and/or equipment damage.
• The cables should not be sharply bent, pulled, twisted, or
crushed. Doing so may result in damage to the cables.
• Only use the system under the conditions described in the
“Operating / Storage environment” on page 243.
Failure to do so may result in malfunction of and/or
equipment damage.

54
Chapter 3 Installation and Connection of the Workstation
OLYMPUS CAPSULE ENDOSCOPE SYSTEM
3.1 Installation of workstation and peripherals
Place the workstation, keyboard, mouse, monitor, recorder unit cradle, and
printer on a level surface, such as a desk. When doing so, be sure not to tangle
the cables or trap them under any equipment. Also, be sure not to block the
ventilation grills on the workstation and the printer.

Chapter 3 Installation and Connection of the Workstation
55
OLYMPUS CAPSULE ENDOSCOPE SYSTEM
3.2 Connection of equipment
• Never allow the power plug to become wet. It may result in
an electric shock.
• Confirm that the wall power outlet has adequate capacity.
Failure to do so may cause a fire, or a power failure to all
equipment connected to the same power supply.
• Do not bend, pull, or twist the power supply cable. Equipment
damage, including separation of the power plug and
disconnection of the cable wire, fire or electric shock may
result.
• Do not use extension power supply cables. A fire or electric
shock may result. If the extension of power supply cables is
necessary, please contact Olympus.
• Do not place the power strip on the floor.
Exposure to water and/or dust may cause fire or electric
shock.
• Use only the provided cables. Otherwise, equipment
malfunction may result.
• Be sure to connect the power plug securely. Failure to do so
may prevent the equipment from functioning.
• Use of a power supply with insufficient electrical capacity
may cause the equipment to malfunction.
56
Chapter 3 Installation and Connection of the Workstation
OLYMPUS CAPSULE ENDOSCOPE SYSTEM
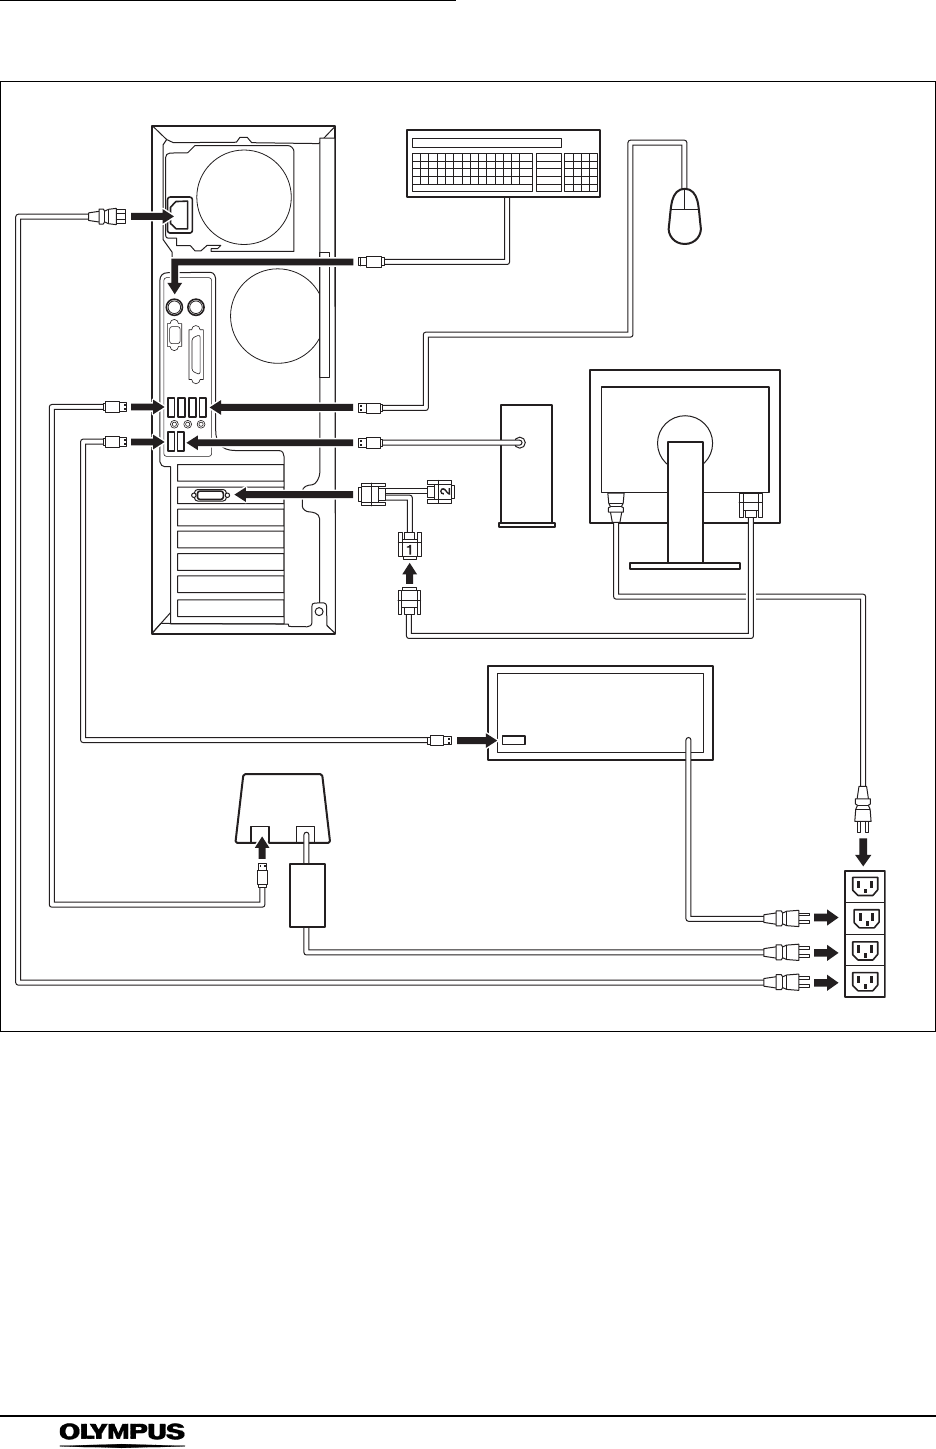
Figure 3.1
1. Connect the LCD monitor to the workstation.
2. Connect the keyboard and the mouse to the corresponding cable connector
on the back panel of the workstation (see Figure 3.1).
3. Connect the printer to the workstation.
4. Prepare the printer according to the instruction manual of the printer.
5. Connect the power supply cables for the workstation, LCD monitor, printer,
USB HDD, and recorder unit cradle.
Workstation (back panel) Keyboard
Printer
LCD monitor
AC Power Outlet
Recorder unit cradle
Mouse
USB HDD
Conversion cable

Chapter 3 Installation and Connection of the Workstation
57
OLYMPUS CAPSULE ENDOSCOPE SYSTEM
6. Connect the recorder unit cradle to the workstation.
Connect the recorder unit cradle cable to the recorder unit cradle’s cable
connector, then connect the other end of the recorder unit cradle cable to
the USB connector on the workstation.
7. Confirm that the workstation, the LCD monitor, and the printer are turned
OFF.
8. Connect the power cables for all equipment to wall power outlets.
The conversion cable is equipped with two connectors on the
monitor end, but only one of them can be used. Connect the
monitor cable to the connector labeled “1”.

58
Chapter 3 Installation and Connection of the Workstation
OLYMPUS CAPSULE ENDOSCOPE SYSTEM
3.3 Installation of Endo Capsule software light
Be sure to back up your data before installing Endo Capsule
software light, as a software conflict may occur, requiring you
to reinstall the OS.
System requirements
Main menu
The following software can be installed from the Main menu:
1. Endo Capsule software light
Used to display the capsule endoscope images and to create reports.
2. WMV CODEC
Used to export the capsule endoscope images as movies.
Installation Endo Capsule software light
1. Insert the installation CD into the CD-ROM drive. The CD will auto-run, and
the Main menu is displayed.
2. On the Main menu, click “Install Endo Capsule Software Light”.
3. The installer will be launched. Follow the instructions on the screen to install
the software.
Product ID: d2Ht-mx9e-weVz-Kr7b
Operating system Windows XP Professional (SP1 or SP2)
Windows XP Home Edition (SP1 or SP2)
Processor 1.3GHz or higher (SSE2 required)
Intel Pentium M family or equivalent processor
RAM 512MB or more
Hard disk 10GB of available hard disk space
Color quality settings Highest (32bit)
Screen resolution Over XGA

Chapter 3 Installation and Connection of the Workstation
59
OLYMPUS CAPSULE ENDOSCOPE SYSTEM
Installation WMV CODEC
1. Insert the installation CD into the CD-ROM drive. The CD will auto-run, and
the Main menu is displayed.
2. On the Main menu, click “Install WMV CODEC”.
3. The installer will be launched. Follow the instructions on the screen to install
the software.
Uninstalling
1. Select [Start] > [Control Panel]. The control panel is displayed.
2. In the control panel, double-click “Add or Remove Programs”. The “Add or
Remove Programs” screen is displayed.
3. In the “Change or Remove Programs” tab, select the Endo Capsule
software light.
4. Click the “Change/Remove” button and follow the instructions on the screen.

60
Chapter 4 Workstation Access and Setup
OLYMPUS CAPSULE ENDOSCOPE SYSTEM
Chapter 4 Workstation Access and
Setup
This section describes the login and logoff processes for the workstation, as well
as the initial workstation setup procedures.
• If you forget your user ID and password, you will lose access
to your workstation. Be sure to manage your user ID and
password well.
• The password should only be given to those who require its
use. Otherwise, it could lead to unauthorized viewing and/or
alteration of data.
• Using a user ID and password that are provided by default or
are easy to guess may allow an unauthorized third person to
use the workstation.
• Turn OFF the workstation when it is not in use.
• Remove the USB devices from the workstation and restart
the workstation when it does not work properly. Then connect
the removed USB devices again.
Chapter 4 Workstation Access and Setup
61
OLYMPUS CAPSULE ENDOSCOPE SYSTEM
4.1 Login
• The “Login” function is not available in Endo Capsule
software light.
• You need to change a language in some languages other
than English when you input alphabets. Please right-click on
the text box and select “Language” and then “English” from
the context menu.
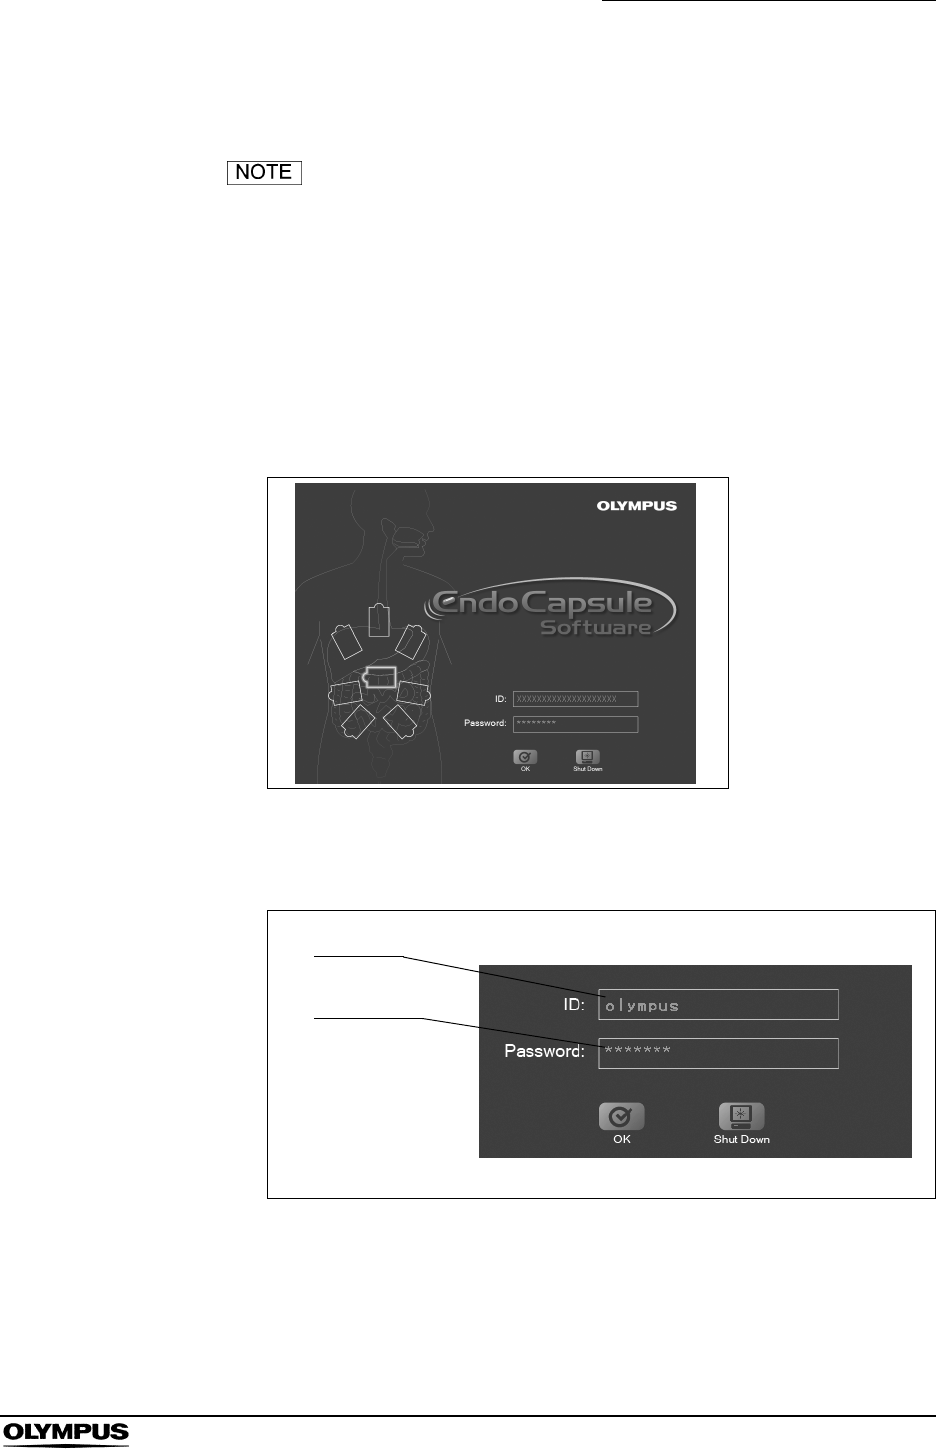
1. Turn ON the monitor and the workstation. The system starts automatically,
and the login screen is displayed (see Figure 4.1).
Figure 4.1
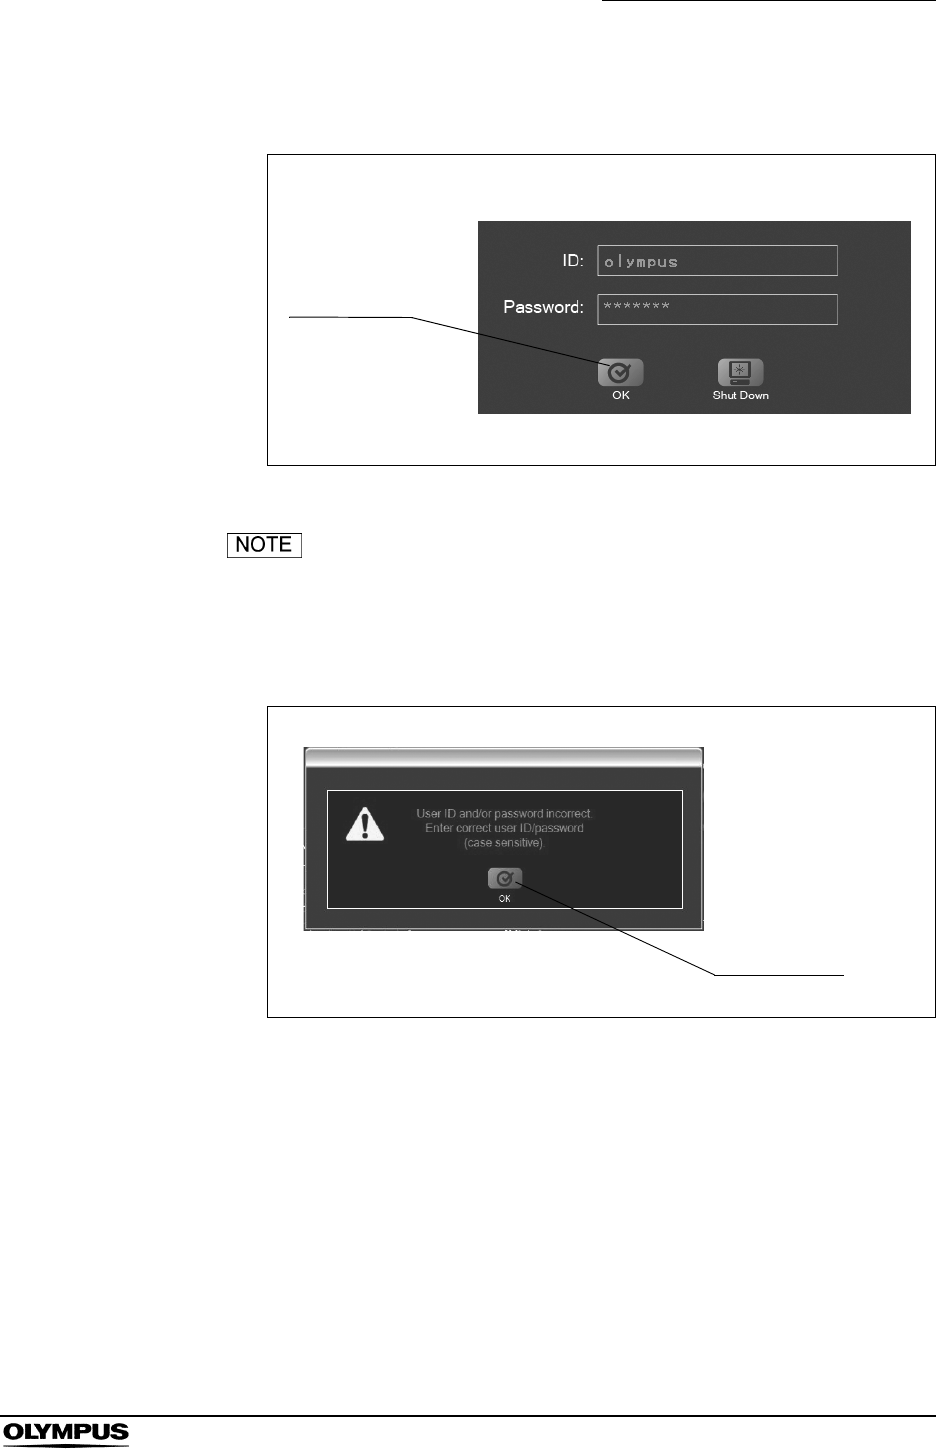
2. Enter your user ID and password (see ).
Figure 4.2
User ID
Password

62
Chapter 4 Workstation Access and Setup
OLYMPUS CAPSULE ENDOSCOPE SYSTEM
• When logging in for the first time, enter “olympus” as the user
ID and password. After you log in, add a user in the user
settings.
• Characters that can be used for user IDs and passwords are
shown in Table 4.1:
Table 4.1
• User IDs and passwords are case sensitive.
• When entering a password, the entered characters will be
displayed as asterisks (∗) for security.
Uppercase A B C D E F G H I J K L M N O P Q R S T U V W X Y Z
Lowercase a b c d e f g h i j k l m n o p q r s t u v w x y z
Numbers 0 1 2 3 4 5 6 7 8 9
Symbols ` ~ ! @ # $ % ^ & * ( ) _ + – = { } | [ ] : " ; ' < > ? , . /
Chapter 4 Workstation Access and Setup
63
OLYMPUS CAPSULE ENDOSCOPE SYSTEM
3. Click the [OK] button (see Figure 4.3).
Figure 4.3
• Click the [Shutdown] button to turn OFF the workstation.
• If the message in Figure 4.4 is displayed, the user ID or
password is incorrect. Click the [OK] button, and then check
and re-enter the user ID and password.
Figure 4.4
OK button
OK button
64
Chapter 4 Workstation Access and Setup
OLYMPUS CAPSULE ENDOSCOPE SYSTEM
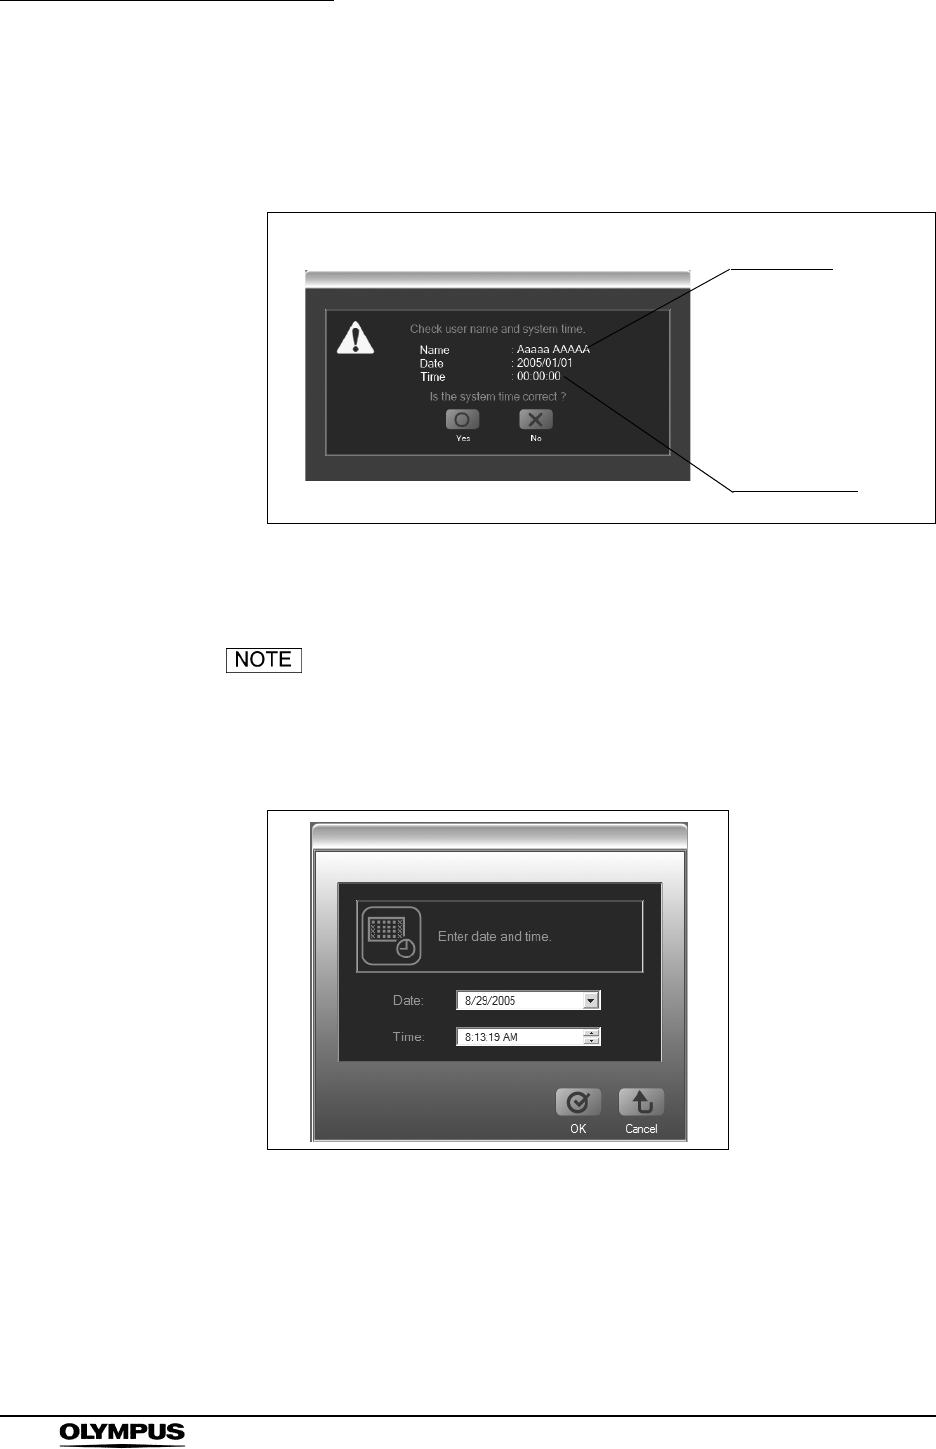
4. If the user ID and password are correct, a confirmation screen for the user
name and system time is displayed. Confirm the user name and system
time (see Figure 4.5).
Figure 4.5
5. To change the system time, click the [No] button.
If you do not need to change the system time, click the [Yes]
button. The main screen is displayed.
6. Set the correct date and time.
Figure 4.6
User name
System time

Chapter 4 Workstation Access and Setup
65
OLYMPUS CAPSULE ENDOSCOPE SYSTEM
7. Click the [OK] button. A confirmation screen for the user name and system
time appears and the system time has changed.
If you wish to cancel changing the system time, click the
[Cancel] button.
8. On the confirmation screen for the user name and system time, click the
[Yes] button. The observation screen is displayed.

66
Chapter 4 Workstation Access and Setup
OLYMPUS CAPSULE ENDOSCOPE SYSTEM
4.2 Start-up of Endo Capsule software light
1. Double-click the icon of Endo Capsule Software Light on the desktop. Endo
Capsule Software Light runs and the user name screen is displayed.
Figure 4.7
2. Enter the user name and click [OK] button.
Figure 4.8
Entering the use name is necessary.

Chapter 4 Workstation Access and Setup
67
OLYMPUS CAPSULE ENDOSCOPE SYSTEM
3. The main screen is displayed.
Figure 4.9
Other software installed on the workstation may cause a
software conflict, and prevent Endo Capsule software light
from functioning properly.
68
Chapter 4 Workstation Access and Setup
OLYMPUS CAPSULE ENDOSCOPE SYSTEM
4.3 Nomenclature and functions of the main screen
The following screen is displayed after login, and is used for observing images
downloaded from the recorder unit.
Figure 4.10
7. Logoff button
5. Menu bar4. Recorder button
3. List button
2. Report button
1. Export button
6. Image display area
8. Image operation buttons
11. Time bar
12. Average color bar
13. Red color detection bar
9. Thumbnail view
10. Time display
14. Antenna display
15. Antenna button

Chapter 4 Workstation Access and Setup
69
OLYMPUS CAPSULE ENDOSCOPE SYSTEM
1. Export button
Displays the export screen.
2. Report button
Displays the report screen.
3. List button
Displays the examination list screen.
4. Recorder button
Displays the recorder management screen.
5. Menu bar
Contains the “File”, “Tools” and “Help”. For more information, refer to
“Menus” on page 72.
6. Image display area
Displays the image data.
7. Logoff button
Quits the application and displays the login screen.
8. Image operation buttons
Plays back image data. For more information, refer to Figure 4.11 on
page 70.
9. Thumbnail view
Displays thumbnails.
10. Time display
Displays the time associated with a thumbnail.
11. Time bar
Indicates the time position of the currently displayed image.
12. Average color bar
Displays the average color of the image data.
13. Red color detection bar
Indicates positions of red-color detected image data.
14. Antenna display
Displays the antenna with the best signal reception.
15. Antenna button
Shows/hides the antenna display.
Image operation buttons
• Red color detection function
Detects red color in images and indicates the position of
red-color detected image data.
• Auto review speed adjustment function
Adjusts the review speed automatically during the playback
or the reverse playback.
70
Chapter 4 Workstation Access and Setup
OLYMPUS CAPSULE ENDOSCOPE SYSTEM
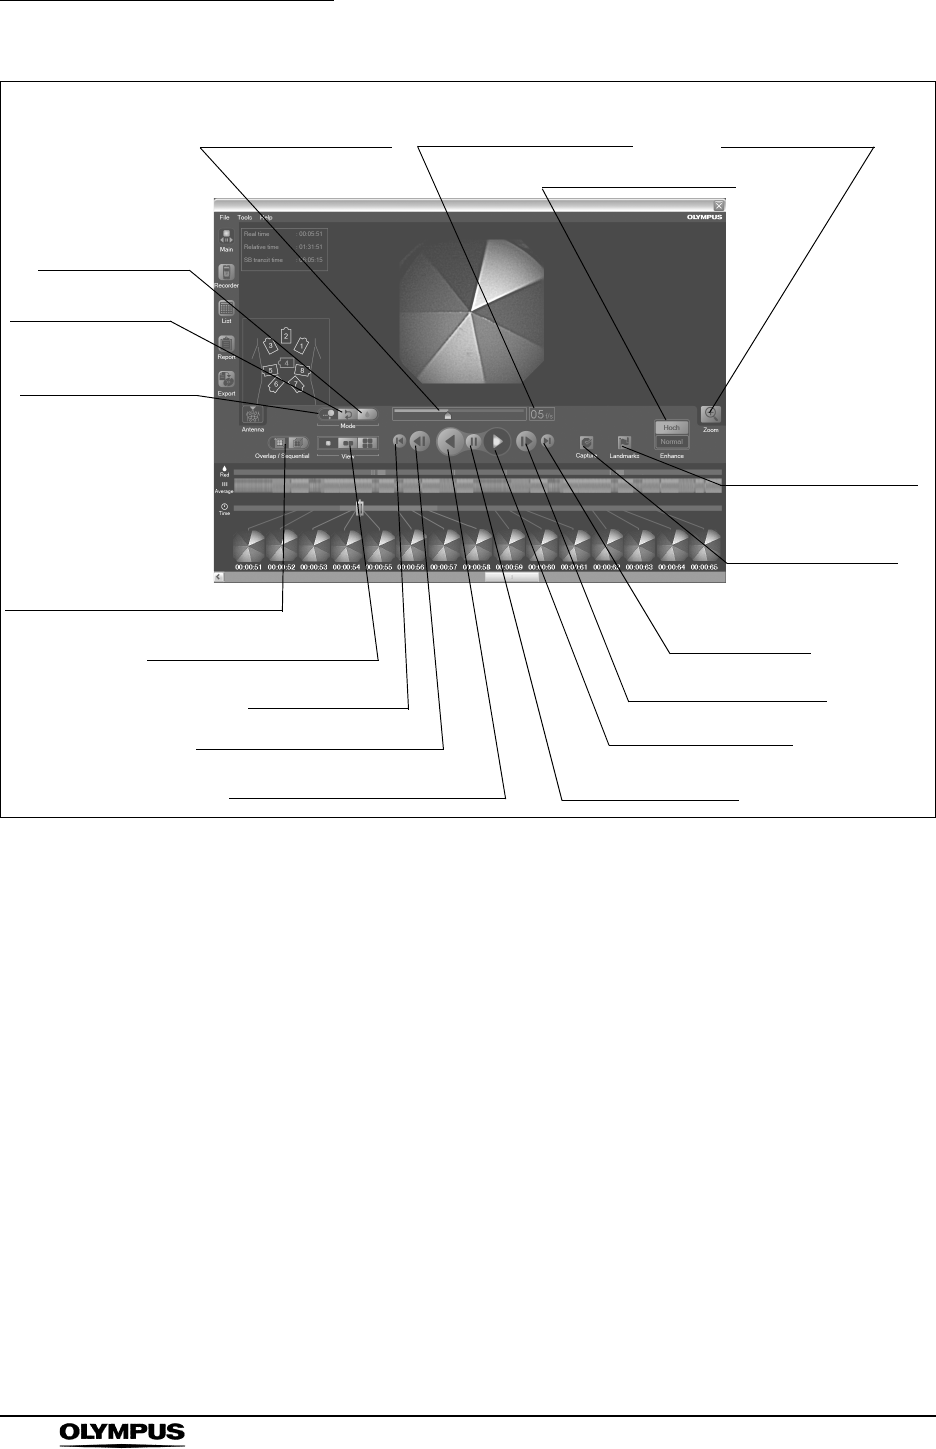
Figure 4.11
1. Speed setting bar
Sets the review speed.
2. Speed setting display
Displays the review speed.
3. Zoom button
Enlarges the image(s) displayed in the image display area.
4. Enhance buttons
Sets the level of structure enhancement.
5. Landmarks button
Displays the feature setting screen for setting the feature for thumbnails.
6. Capture button
Makes a thumbnail in the image display area.
7. Last button
Displays the last image data.
13. First button
12. Previous Image button
11. Reverse Playback button 10. Pause button
9. Playback button
8. Next Image button
7. Last button
1. Speed setting bar 2. Speed setting display
14. Image View buttons
15. Overlap /
Sequential button
3. Zoom button
4. Enhance buttons
16. Normal button
17. Adjust button
18. Red button
6. Capture button
5. Landmarks button

Chapter 4 Workstation Access and Setup
71
OLYMPUS CAPSULE ENDOSCOPE SYSTEM
8. Next Image button
Displays the next image.
9. Playback button
Plays back the image data.
10. Pause button
Pauses the playback or reverse playback of the image data.
11. Reverse Playback button
Plays back the image data in reverse order.
12. Previous Image button
Displays the previous image.
13. First button
Displays the first image data.
14. Image View buttons
Switches the number of images displayed (1, 2, or 4).
15. Overlap / Sequential button
Changes the image update mode how the image data is updated during
playback.
16. Normal button
Plays back images at the speed set by a user.
17. Adjust button
Automatically adjusts the review speed during the playback.
18. Red button
Plays back only the image data detected by the red detection function.
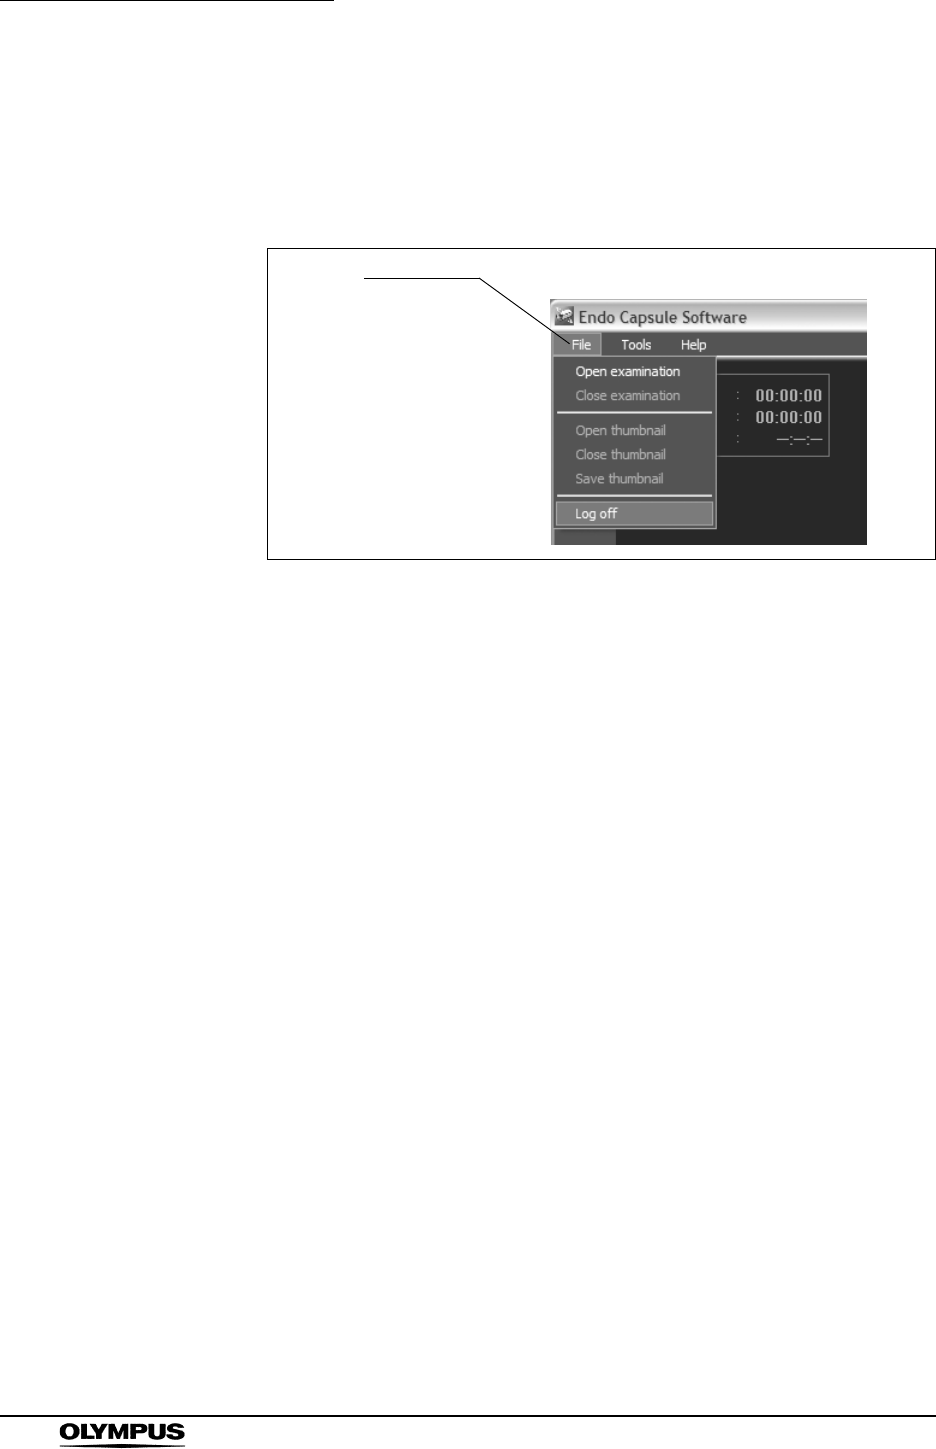
72
Chapter 4 Workstation Access and Setup
OLYMPUS CAPSULE ENDOSCOPE SYSTEM
Menus
File menu
This menu is displayed by clicking “File” on the menu bar (see Figure 4.12).
Figure 4.12
Open examination
Opens examination data.
Close examination
Closes examination data.
Open thumbnail
Opens thumbnail data.
Close thumbnail
Closes thumbnail data.
Save thumbnail
Saves thumbnail data.
Log off
Displays the login screen.
File menu
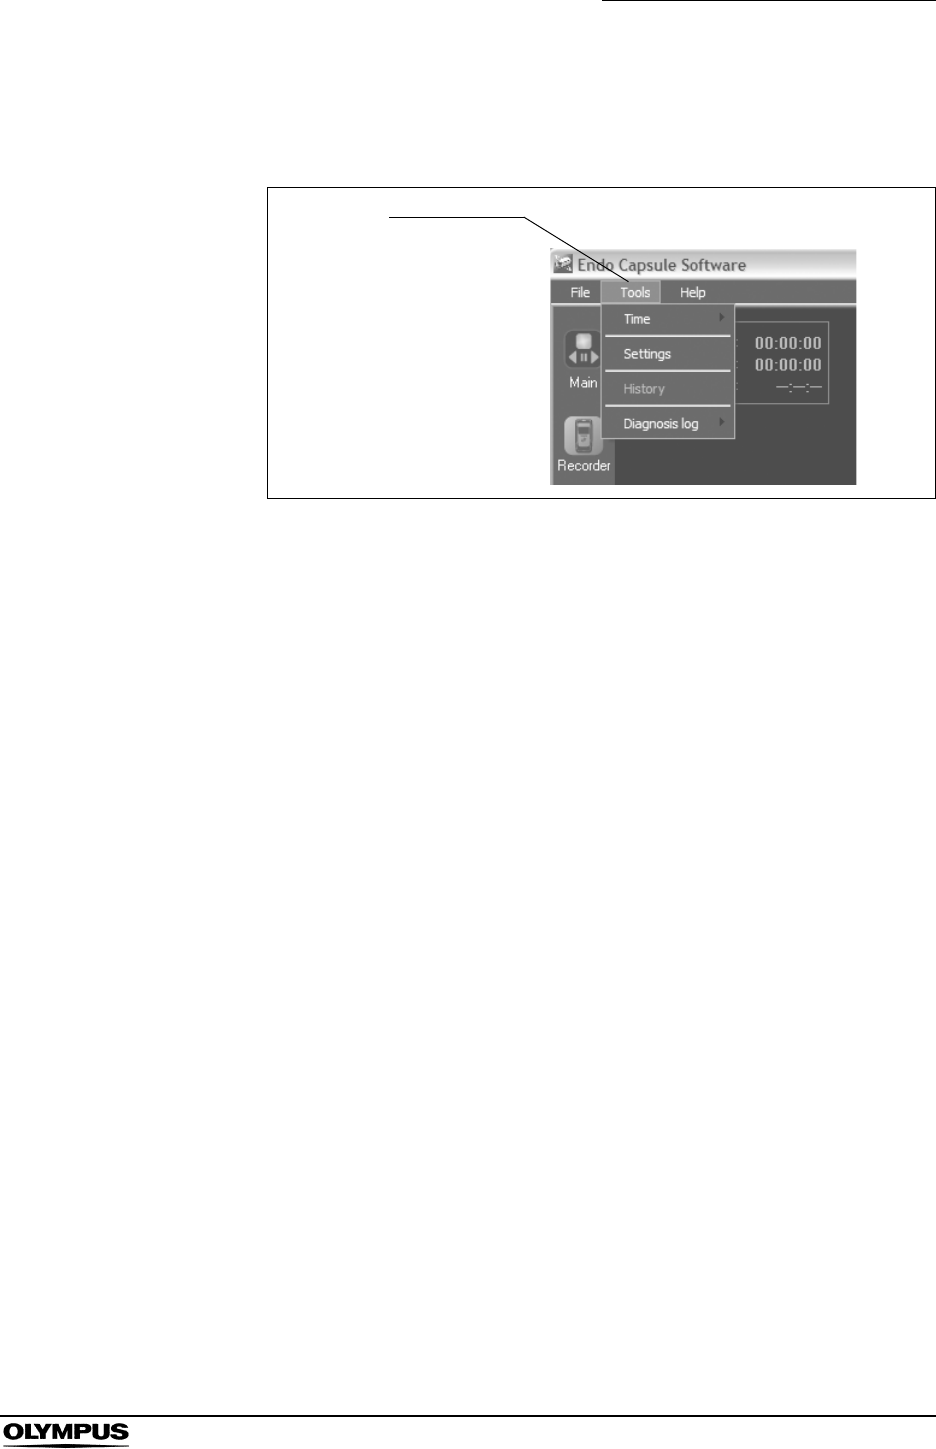
Chapter 4 Workstation Access and Setup
73
OLYMPUS CAPSULE ENDOSCOPE SYSTEM
Tools menu
This menu is displayed by clicking “Tools” on the menu bar (see Figure 4.13).
Figure 4.13
Time
Sets up the time display on the thumbnail. Select from “Real Time” or
“Relative Time”.
Settings
Displays the settings screen.
History
Displays the history display screen.
Diagnosis log
Displays the diagnosis log. Select from “view” or “export”.
Tools menu
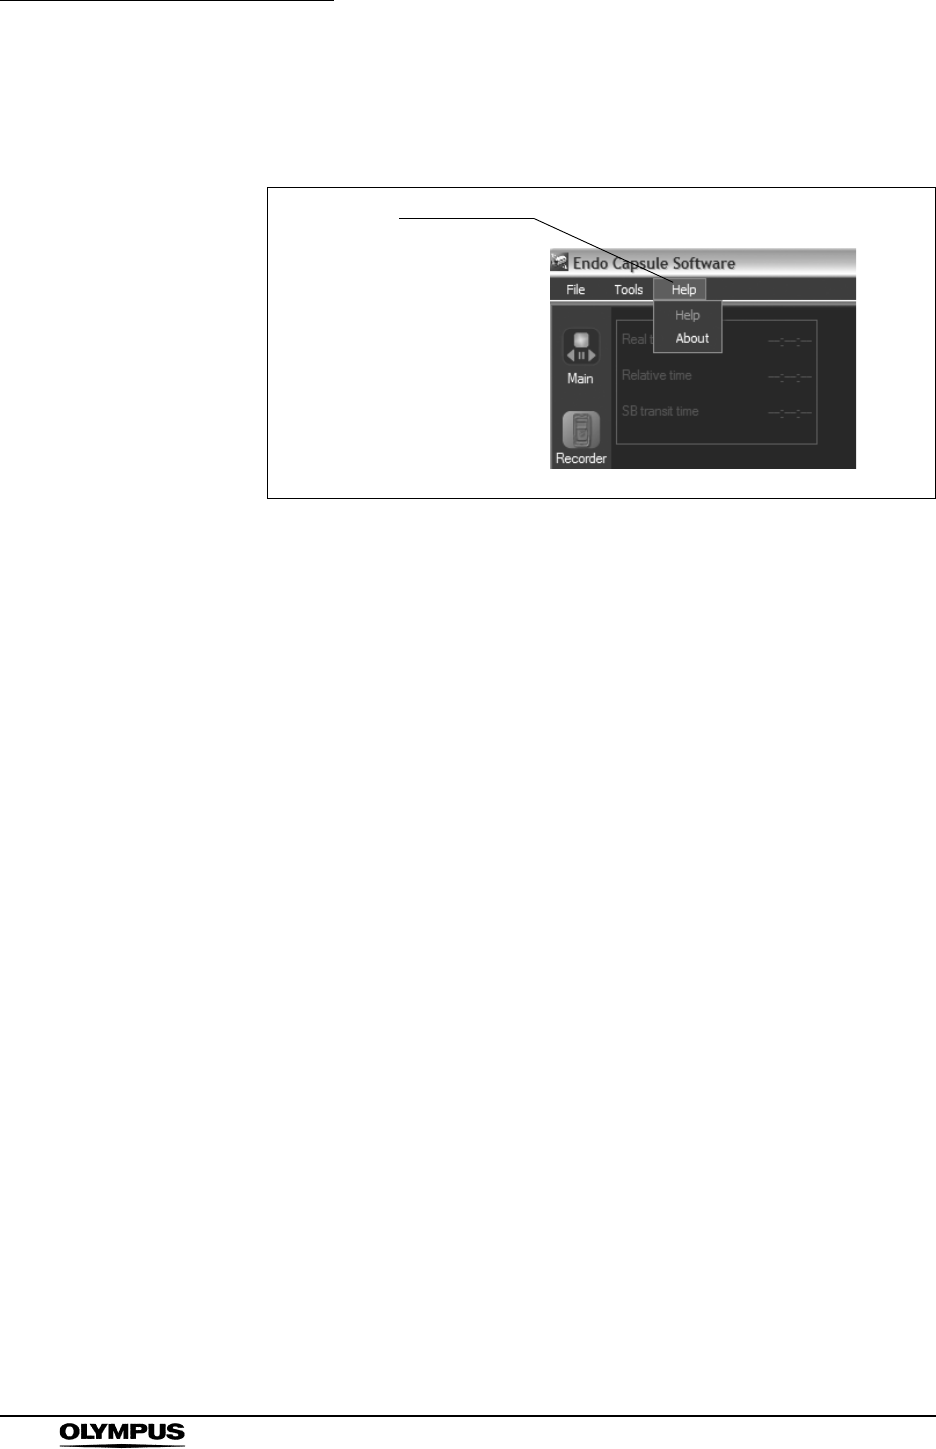
74
Chapter 4 Workstation Access and Setup
OLYMPUS CAPSULE ENDOSCOPE SYSTEM
Help menu
This menu is displayed by clicking “Help” on the menu bar (see Figure 4.14).
Figure 4.14
Help
Displays the help.
About
Displays the version information of the system.
Help menu