Olympus Medical Systems EC-1 Low Power Transmitter User Manual GT1629 FCC MAJ 1467 C1
Olympus Medical Systems Corp. Low Power Transmitter GT1629 FCC MAJ 1467 C1
Contents
- 1. Users manual Part 1
- 2. Users manual Part 2
- 3. Users manual Part 3
- 4. Users manual Part 4
- 5. Users manual part 5
Users manual Part 2
Chapter 4 Workstation Access and Setup
75
OLYMPUS CAPSULE ENDOSCOPE SYSTEM
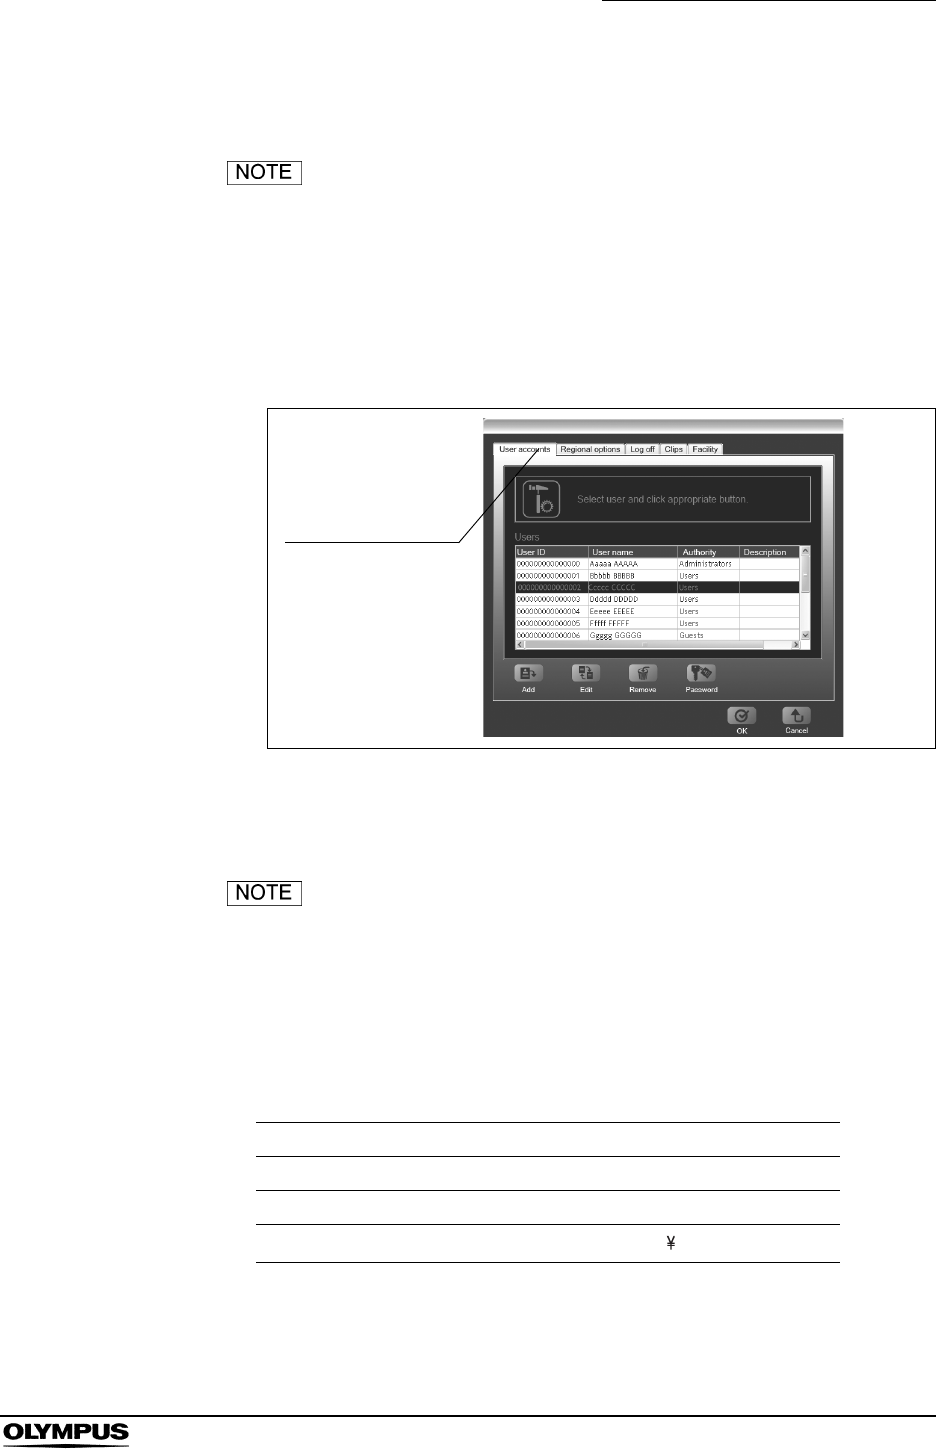
4.4 User settings
The “User Settings” function is not available in Endo Capsule
Software Light.
You can add or remove users, as well as change passwords.
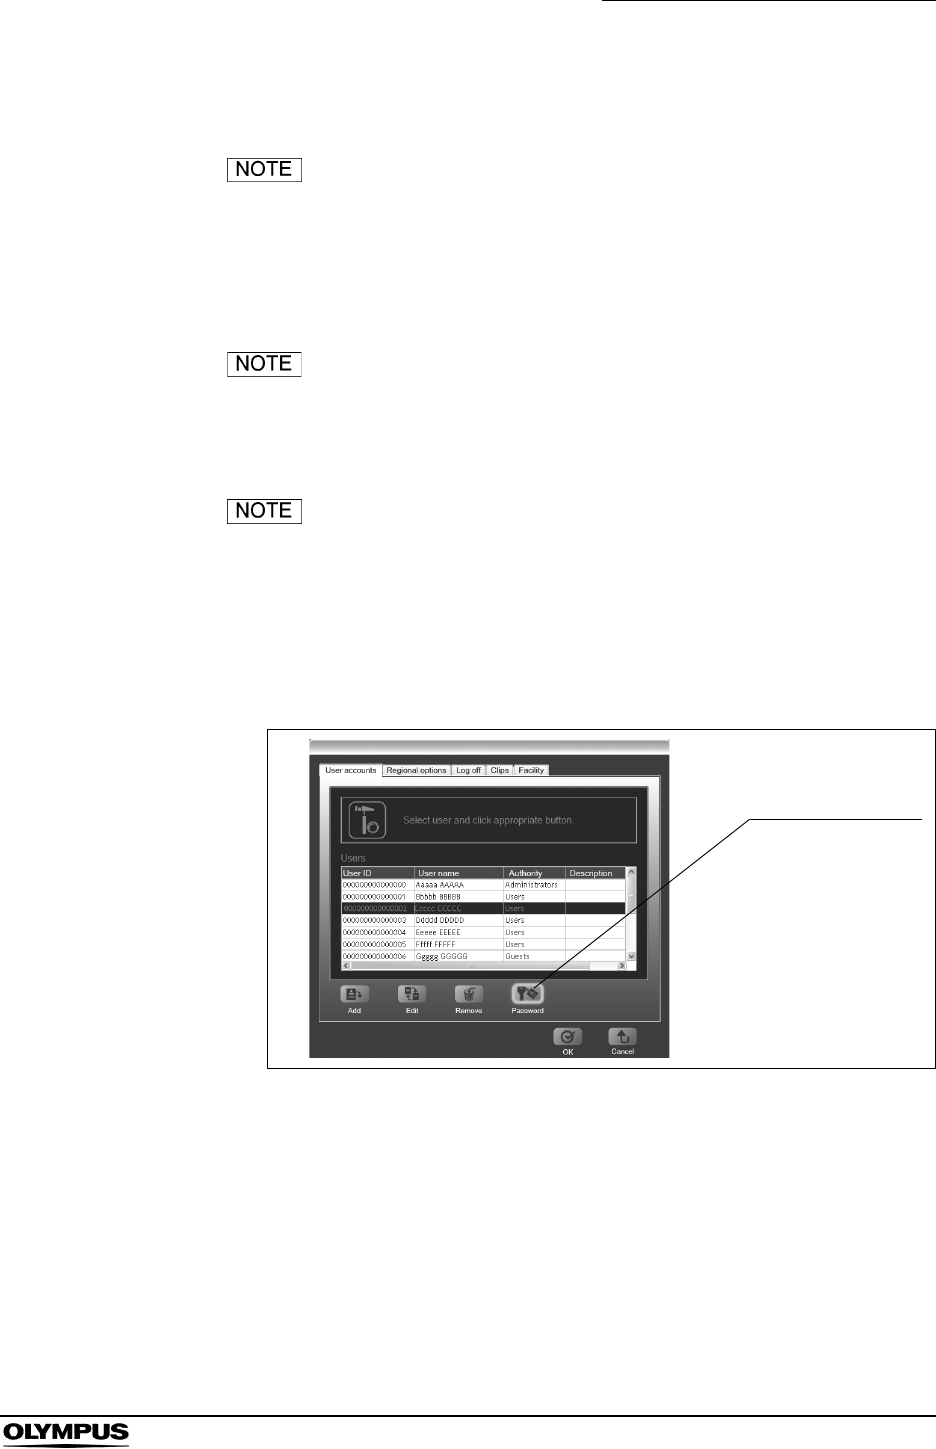
1. Select “Settings” from the “Tools” menu on the main screen.
2. Click the “User accounts” tab. The user settings screen is displayed.
Figure 4.15
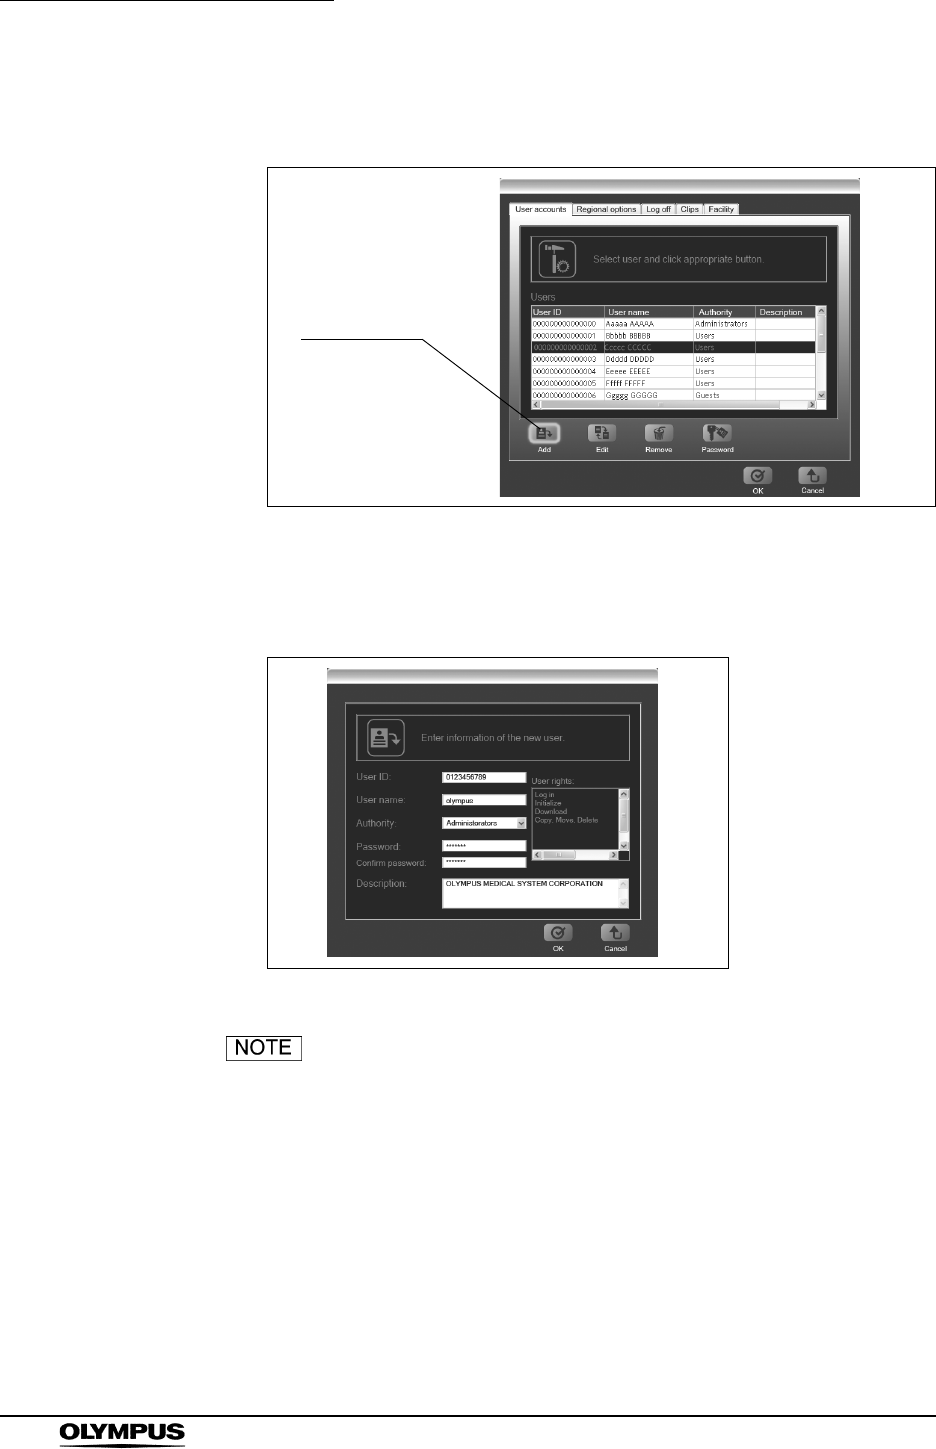
Adding users
• You must log in as an administrator in order to add a user.
• Characters that can be used for user IDs and passwords are
shown in Table 4.2.
• For more information on authority levels, see “Workstation
operation limitations” on page 82.
Table 4.2
Uppercase A B C D E F G H I J K L M N O P Q R S T U V W X Y Z
Lowercase a b c d e f g h i j k l m n o p q r s t u v w x y z
Numbers 0 1 2 3 4 5 6 7 8 9
Symbols ` ~ ! @ # $ % ^ & * ( ) _ + – = { } | [ ] : " ; ' < > ? , . /
User accounts tab
76
Chapter 4 Workstation Access and Setup
OLYMPUS CAPSULE ENDOSCOPE SYSTEM
1. Click the [Add] button on the user settings screen. The adding user screen
is displayed.
Figure 4.16
2. Enter the user ID, user name, authority, and password. Enter additional
information in the “Remarks” field as necessary.
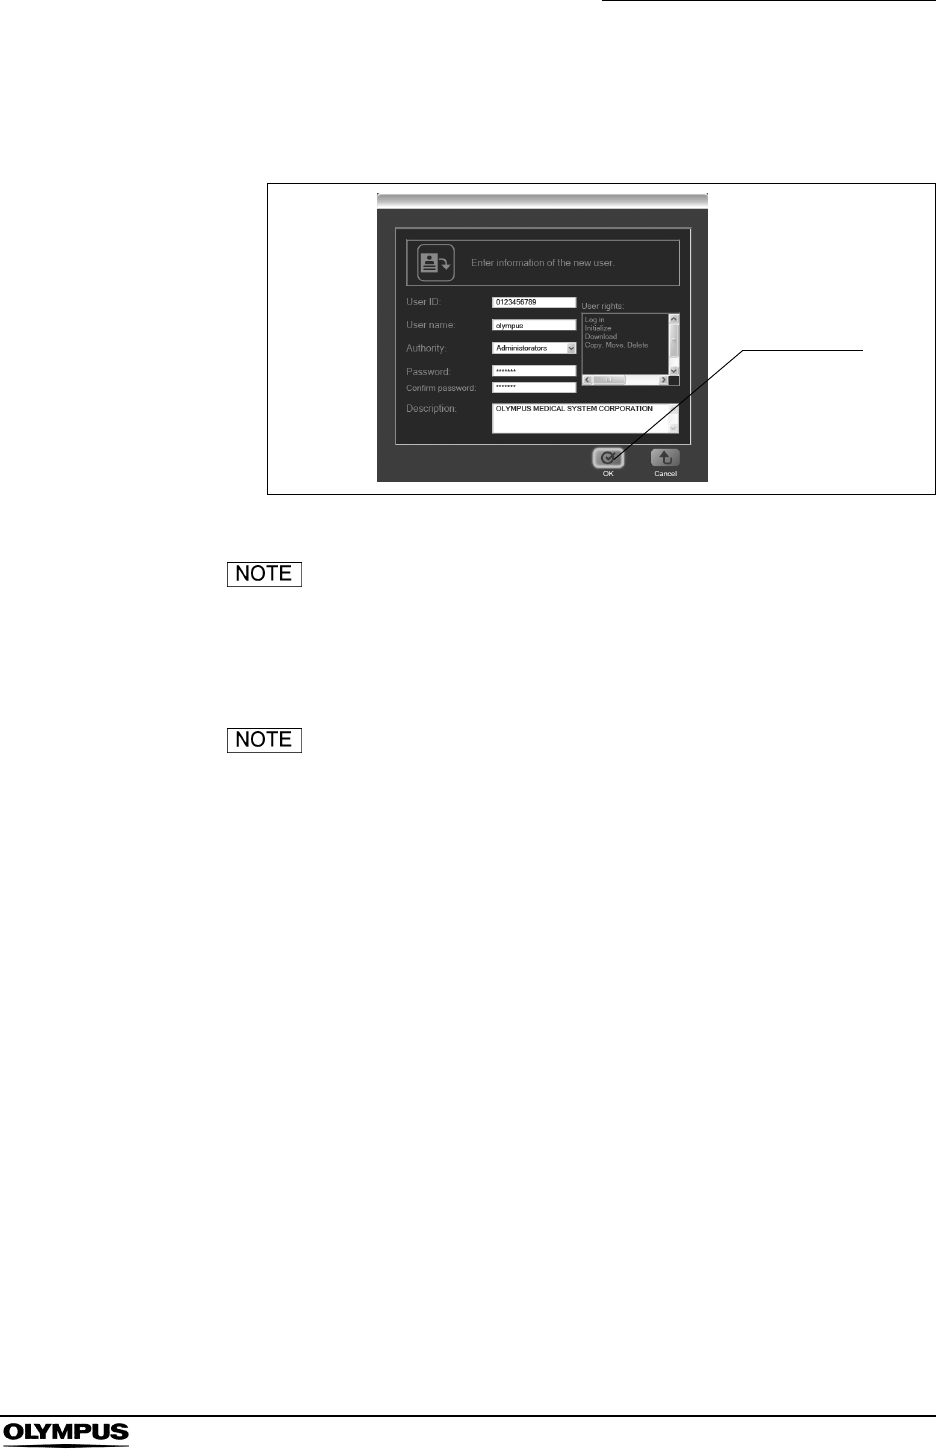
Figure 4.17
• The user ID and password can be up to 32 characters in
length.
• All fields are case sensitive.
• Operation on the workstation will be limited depending on the
user’s authority (see “Workstation operation limitations” on
page 82).
• The password to be set is for initial use.
Add button
Chapter 4 Workstation Access and Setup
77
OLYMPUS CAPSULE ENDOSCOPE SYSTEM
3. Click the [OK] button. The user settings screen is displayed, and the new
user is added to the list on the user settings screen.
Figure 4.18
Click the [Cancel] button to return to the user settings screen
without adding a user.
4. Click the [OK] button on the user settings screen. The new user is added.
Click the [Cancel] button to cancel the addition.
OK button
78
Chapter 4 Workstation Access and Setup
OLYMPUS CAPSULE ENDOSCOPE SYSTEM
Changing user information
You must log in as an administrator in order to change user
information.
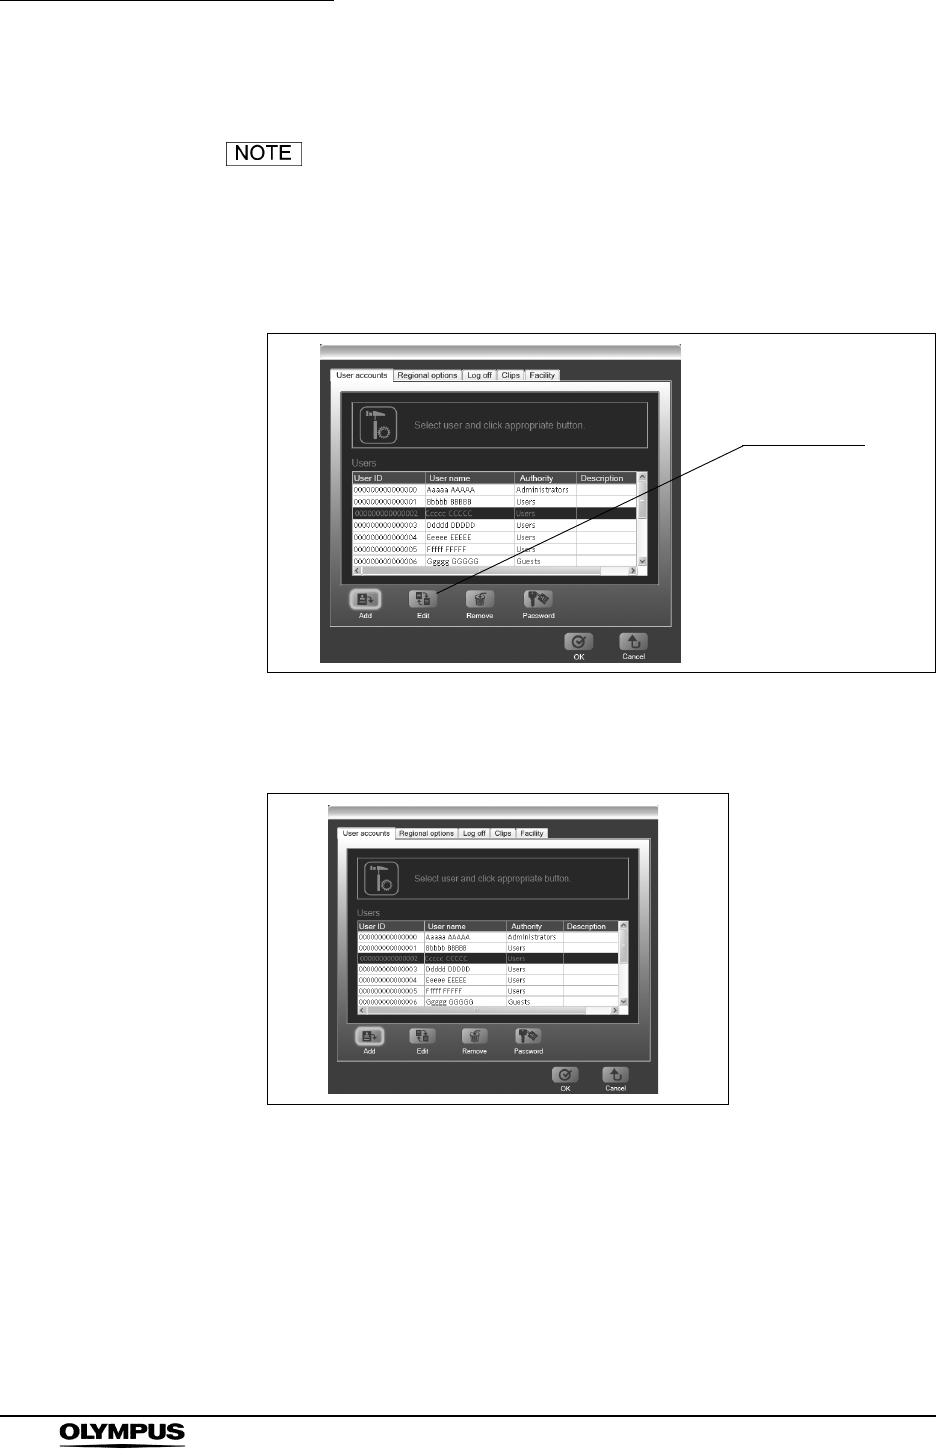
1. Select the user whose information you wish to change, and click the [Edit]
button. The user information update screen is displayed.
Figure 4.19
2. Enter the new information.
Figure 4.20
Edit button
Chapter 4 Workstation Access and Setup
79
OLYMPUS CAPSULE ENDOSCOPE SYSTEM
3. Click the [OK] button. The user settings screen is displayed.
Click the [Cancel] button to return to the user settings screen
without changing the user information.
4. Click the [OK] button on the user settings screen. The user information is
updated.
Click the [Cancel] button to discard the changes.
Changing passwords
• You can only change the password for the user who is
currently logged in.
• If you forget your password, an administrator can change the
user information.
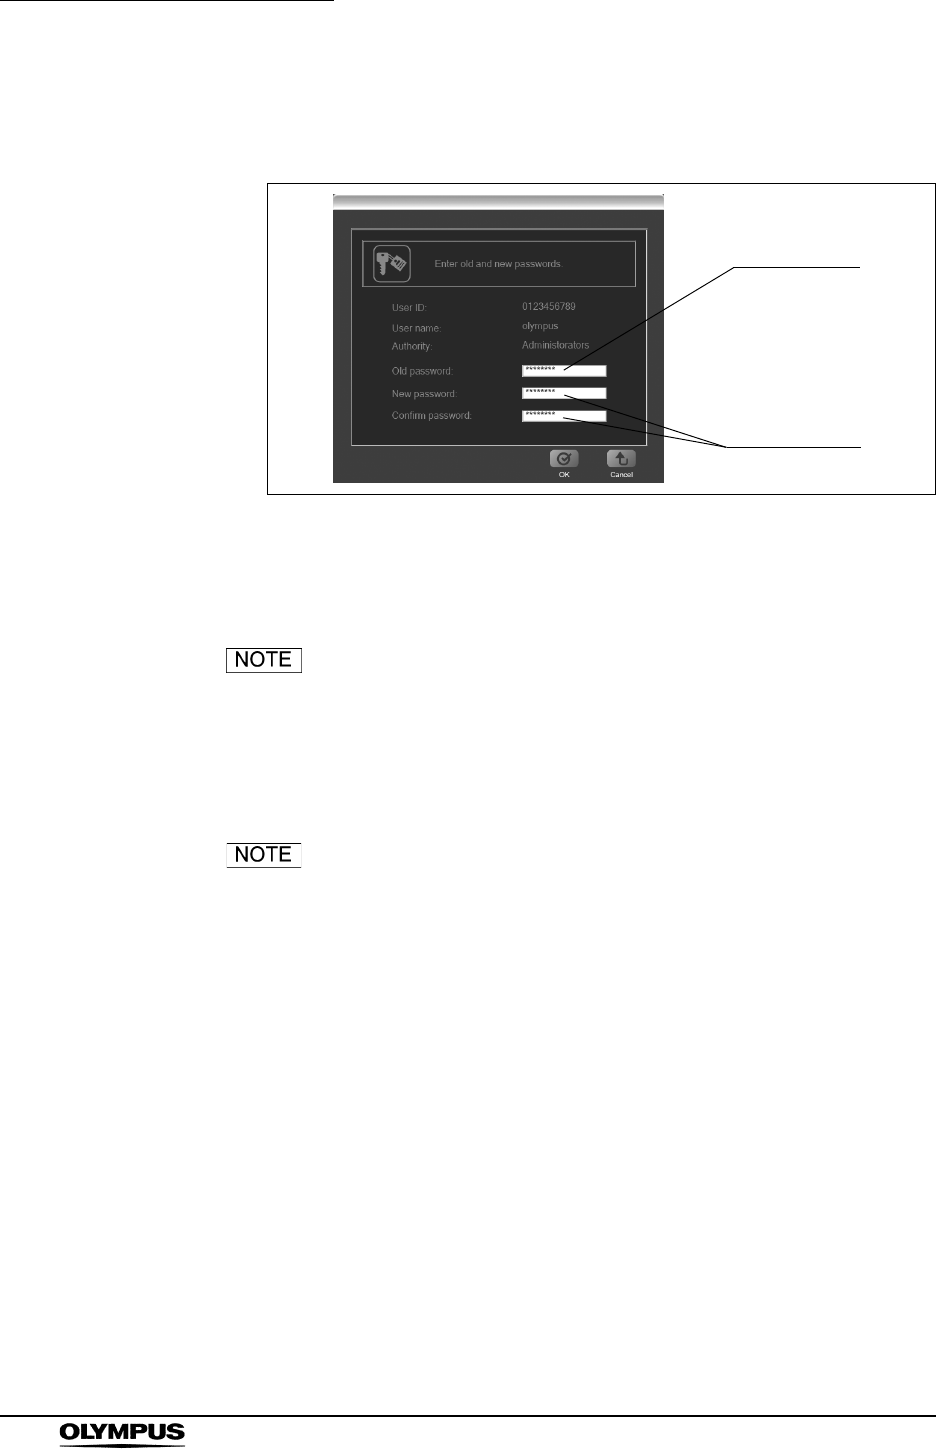
1. Click the [Password] button. The password update screen is displayed.
Figure 4.21
Password button
80
Chapter 4 Workstation Access and Setup
OLYMPUS CAPSULE ENDOSCOPE SYSTEM
2. Enter the old and new passwords. Enter the new password twice to confirm
it.
Figure 4.22
3. Click the [OK] button. The password is changed, and the user settings
screen is displayed.
Click the [Cancel] to return to the user settings screen
without changing the password.
4. Click the [OK] button on the user settings screen. The new password
becomes effective.
Click the [Cancel] button to discard the new password and
keep the old password.
Old password
New password
Chapter 4 Workstation Access and Setup
81
OLYMPUS CAPSULE ENDOSCOPE SYSTEM
Removing users
You must log in as an administrator in order to remove a user.
Once a user is removed, the user can no longer log in to the
workstation.
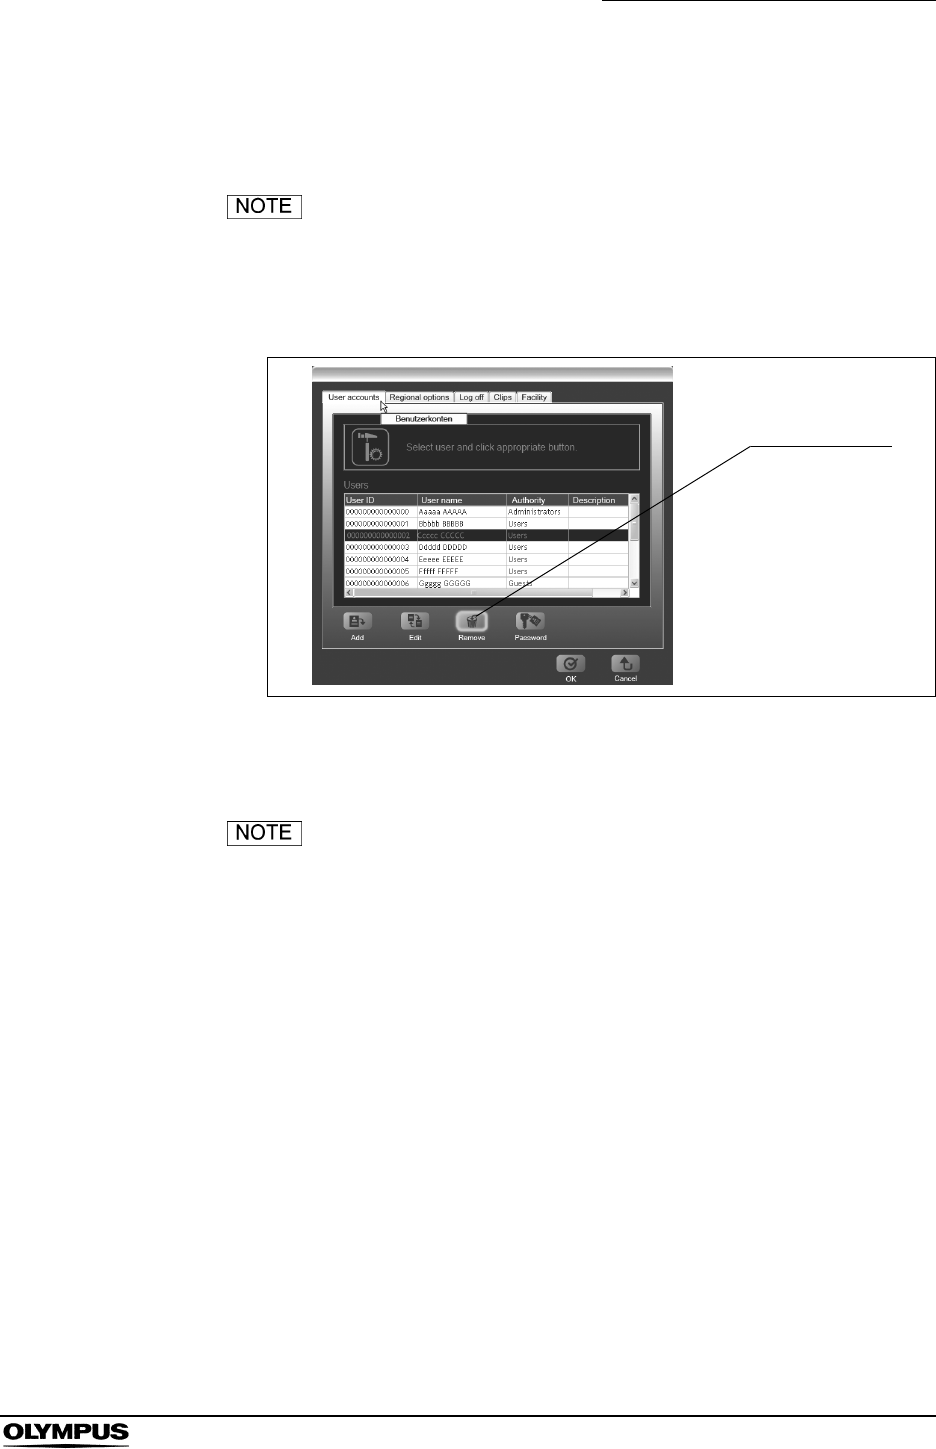
1. Select the user that you wish to remove and then click the [Remove] button.
Figure 4.23
2. The user is removed from the “Users” list.
Click the [Cancel] button to discard the removal.
3. Click the [OK] button on the user settings screen. The removal becomes
effective.
Remove button

82
Chapter 4 Workstation Access and Setup
OLYMPUS CAPSULE ENDOSCOPE SYSTEM
Workstation operation limitations
The following table summarizes the workstation operations permitted for each
authority level.
Table 4.3 {:YES –:NO
Operation Administrator User Guest
Login {{{
Register patient data {{{
Download image data {{{
Observe image data {{–
Select thumbnails {{–
Add comments {{–
Generate reports {{–
Save reports {{–
Export image data {{–
Copy and delete image data {{{
Browse diagnosis log {{–
Change user information {––
Add and remove users {––
Change passwords {{{

Chapter 4 Workstation Access and Setup
83
OLYMPUS CAPSULE ENDOSCOPE SYSTEM
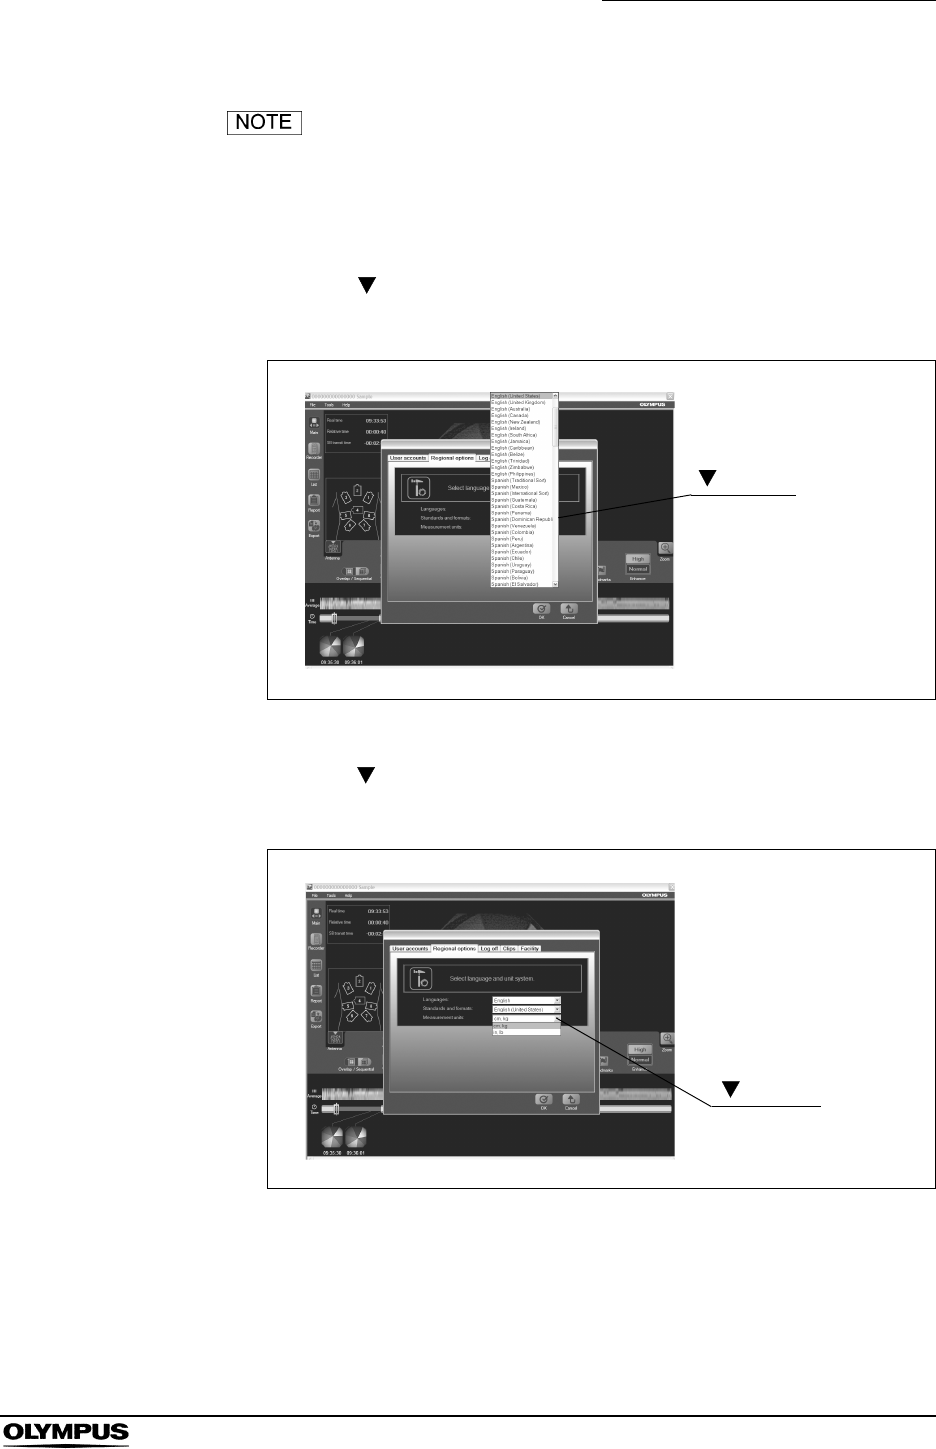
4.5 Language and units settings
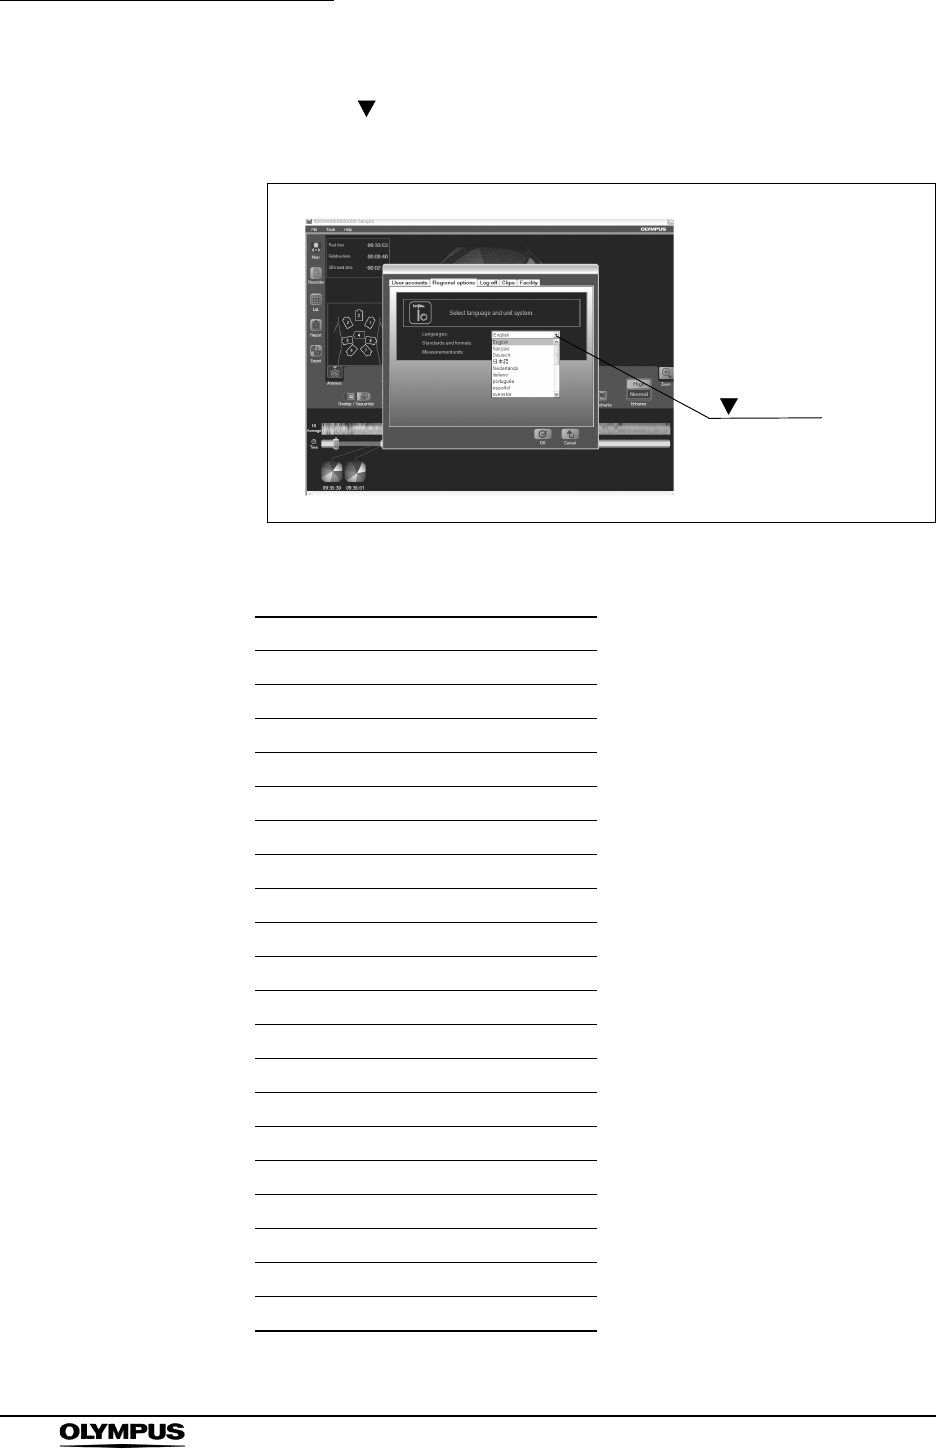
1. Select “Settings” from the “Tools” menu on the main screen.
2. Select the “Regional options” tab. The local information settings screen is
displayed.
Figure 4.24
Regional options tab
84
Chapter 4 Workstation Access and Setup
OLYMPUS CAPSULE ENDOSCOPE SYSTEM
3. Click the “ ” to the right of “Language” to select the language (see Figure
4.25). The available languages are listed in Table 4.4.
Figure 4.25
Table 4.4
Available Languages
English
Italian
Dutch
Greek
Swedish
Spanish
Danish
German
Norwegian
Finnish
French
Portuguese
Estonian
Latvian
Lithuanian
Polish
Slovak
Slovene
Hungarian
Czech
button
Chapter 4 Workstation Access and Setup
85
OLYMPUS CAPSULE ENDOSCOPE SYSTEM
You need to change a language in some languages other
than English when you input alphabets. Please right-click on
the text box and select “Language” and then "English" from
the context menu.
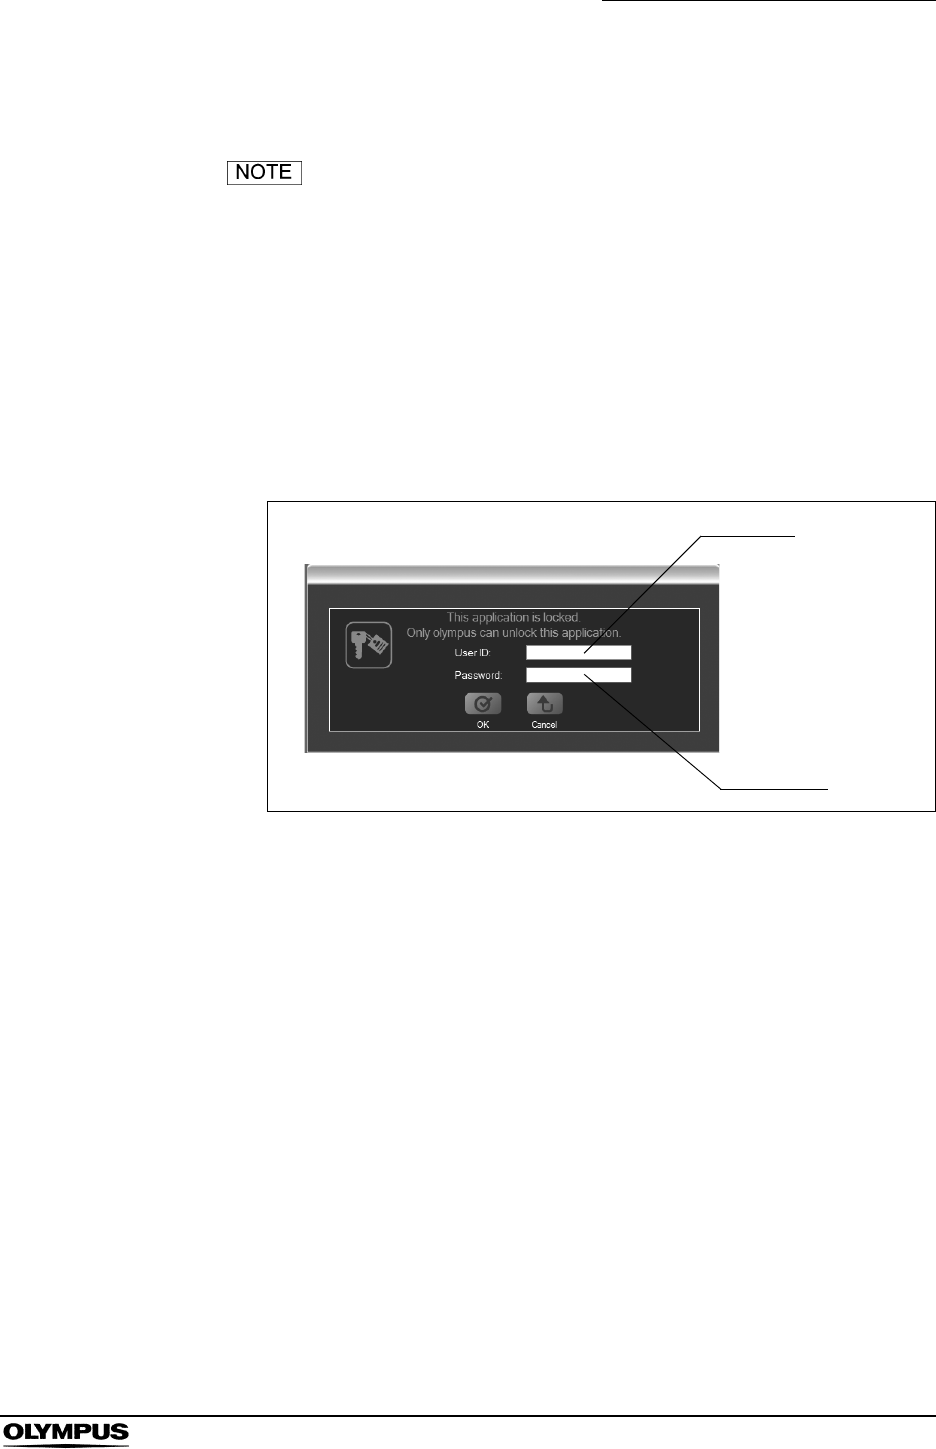
4. Click the “ ” to the right of “Standards and formats” to select the region
(see Figure 4.26). The format of date depends on the selected region.
Figure 4.26
5. Click the “ ” to the right of “Measurement units” to select the measurement
units (see Figure 4.27). The available units are listed in Table 4.5.
Figure 4.27
button
button

86
Chapter 4 Workstation Access and Setup
OLYMPUS CAPSULE ENDOSCOPE SYSTEM
Table 4.5
6. Click the [OK] button on the local information settings screen.
The new language and unit settings will be reflected.
Click the [Cancel] button to discard the changes.
System Units
CGS system Length: cm / Weight: kg
Yard-pound systems Length: inches / Weight: pound
Chapter 4 Workstation Access and Setup
87
OLYMPUS CAPSULE ENDOSCOPE SYSTEM
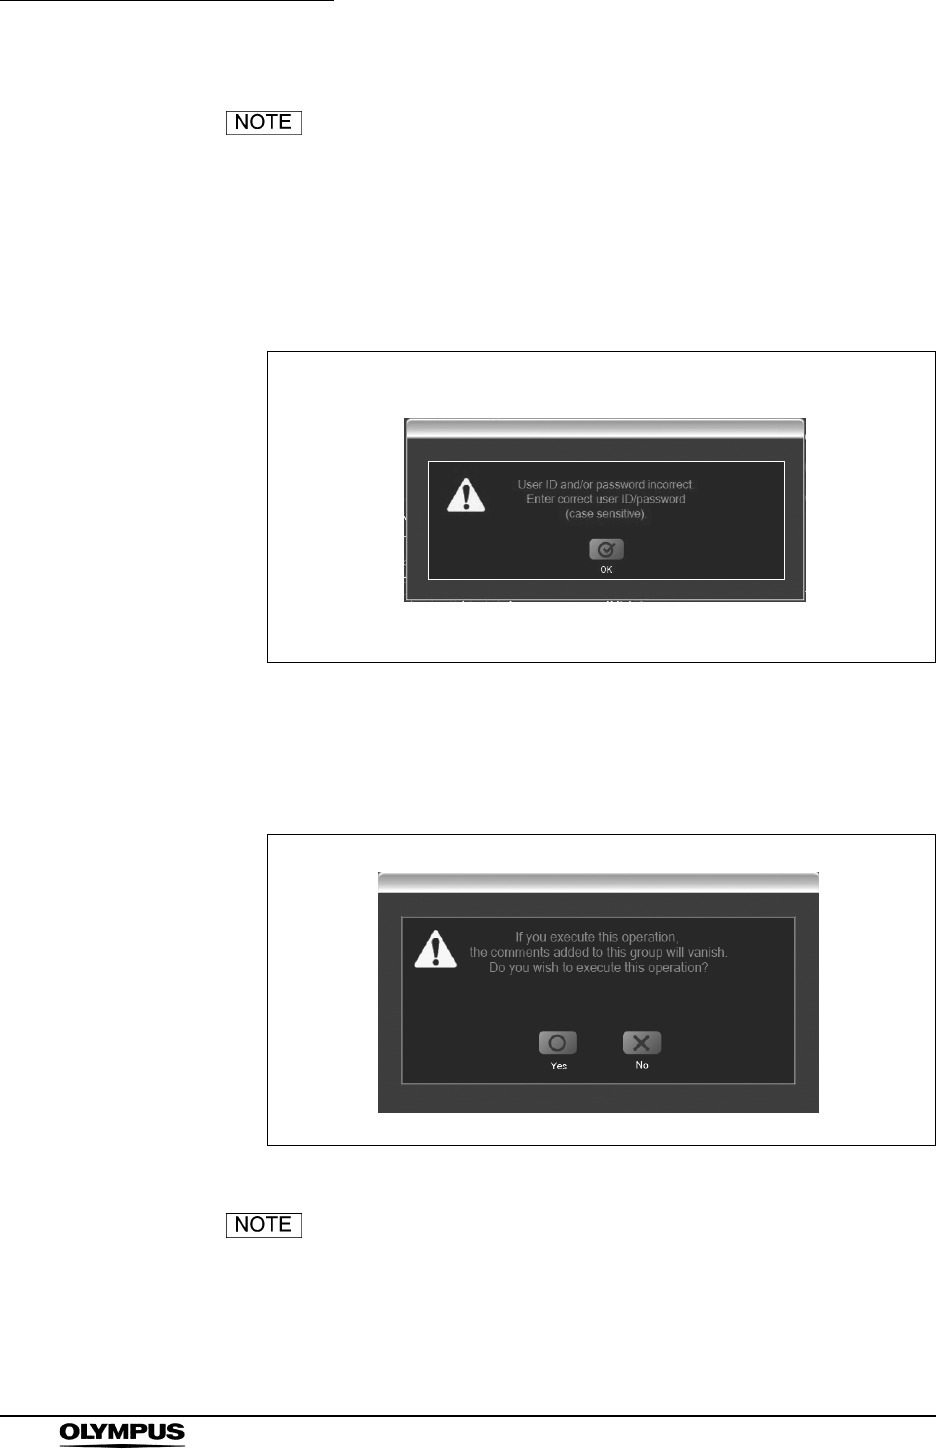
4.6 Lock function
The “Lock” function is not available in Endo Capsule
Software Light.
The application is locked after a period of inactivity, and the lock screen is
displayed. To release the lock, you will need the user ID and password of the
user who was last logged in.
Releasing the lock
1. Enter the user ID and password on the lock screen (see Figure 4.28).
Figure 4.28
2. Click the [OK] button. The screen is restored to the state before the
activation of the lock.
User ID
Password
88
Chapter 4 Workstation Access and Setup
OLYMPUS CAPSULE ENDOSCOPE SYSTEM
• By default, the lock is not activated.
• To set the activation time for the lock, refer to “Setting the
lock function” on page 89.
• Only the user who was most recently logged in can regain
access. If another user attempts to unlock the system, the
error message in Figure 4.29 will be displayed.
Figure 4.29
• If you attempt to shut down the system while it is locked, the
following screen is displayed, allowing you to save the
thumbnail data.
Figure 4.30
Pressing the power button of the workstation shortly enables
to shut down the workstation.
Chapter 4 Workstation Access and Setup
89
OLYMPUS CAPSULE ENDOSCOPE SYSTEM
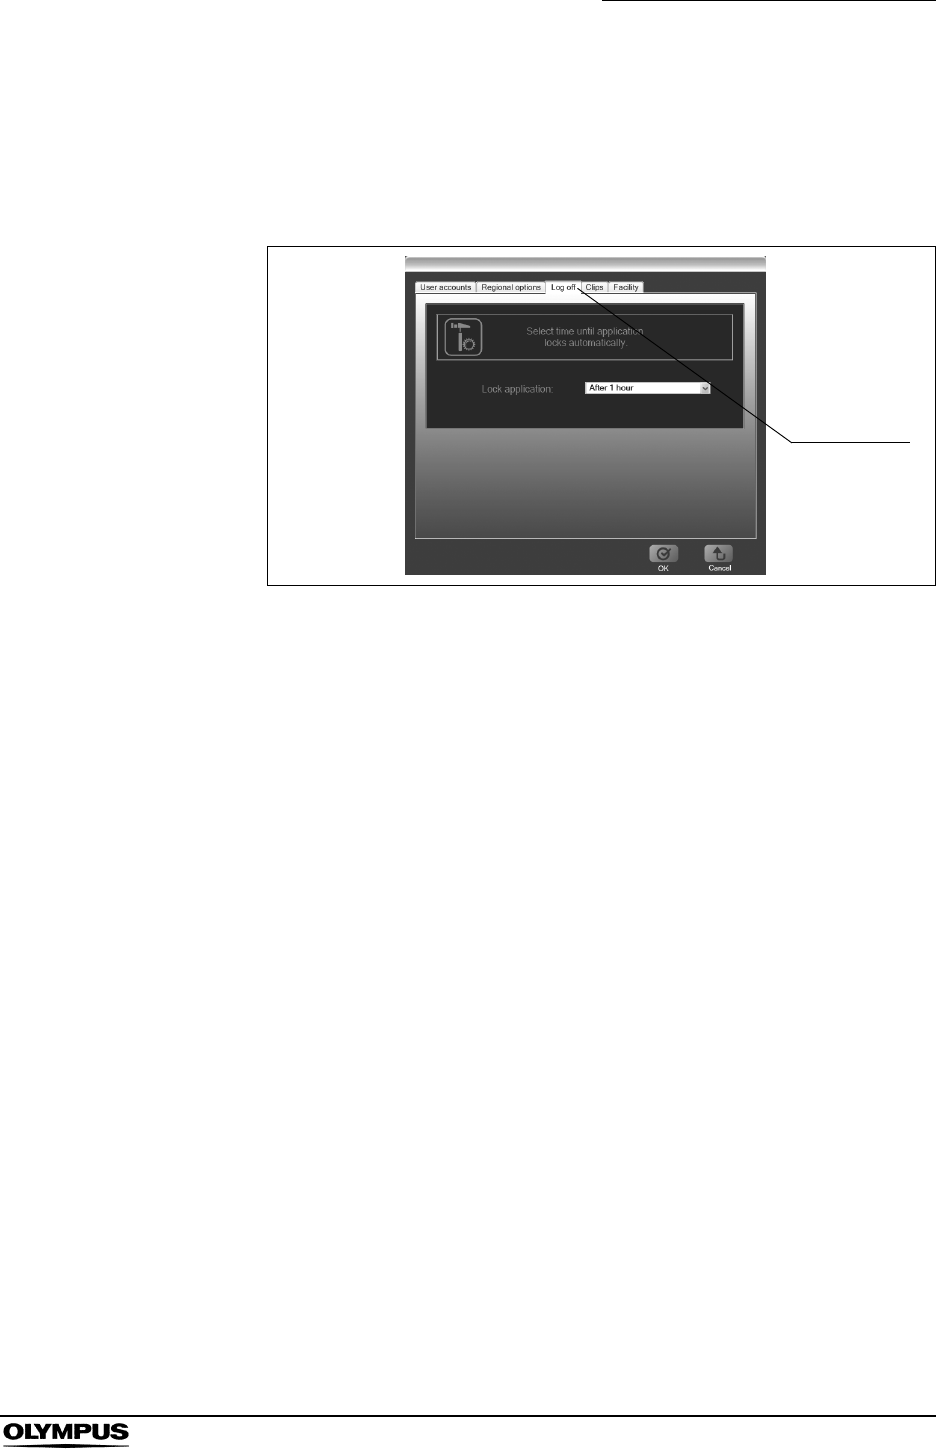
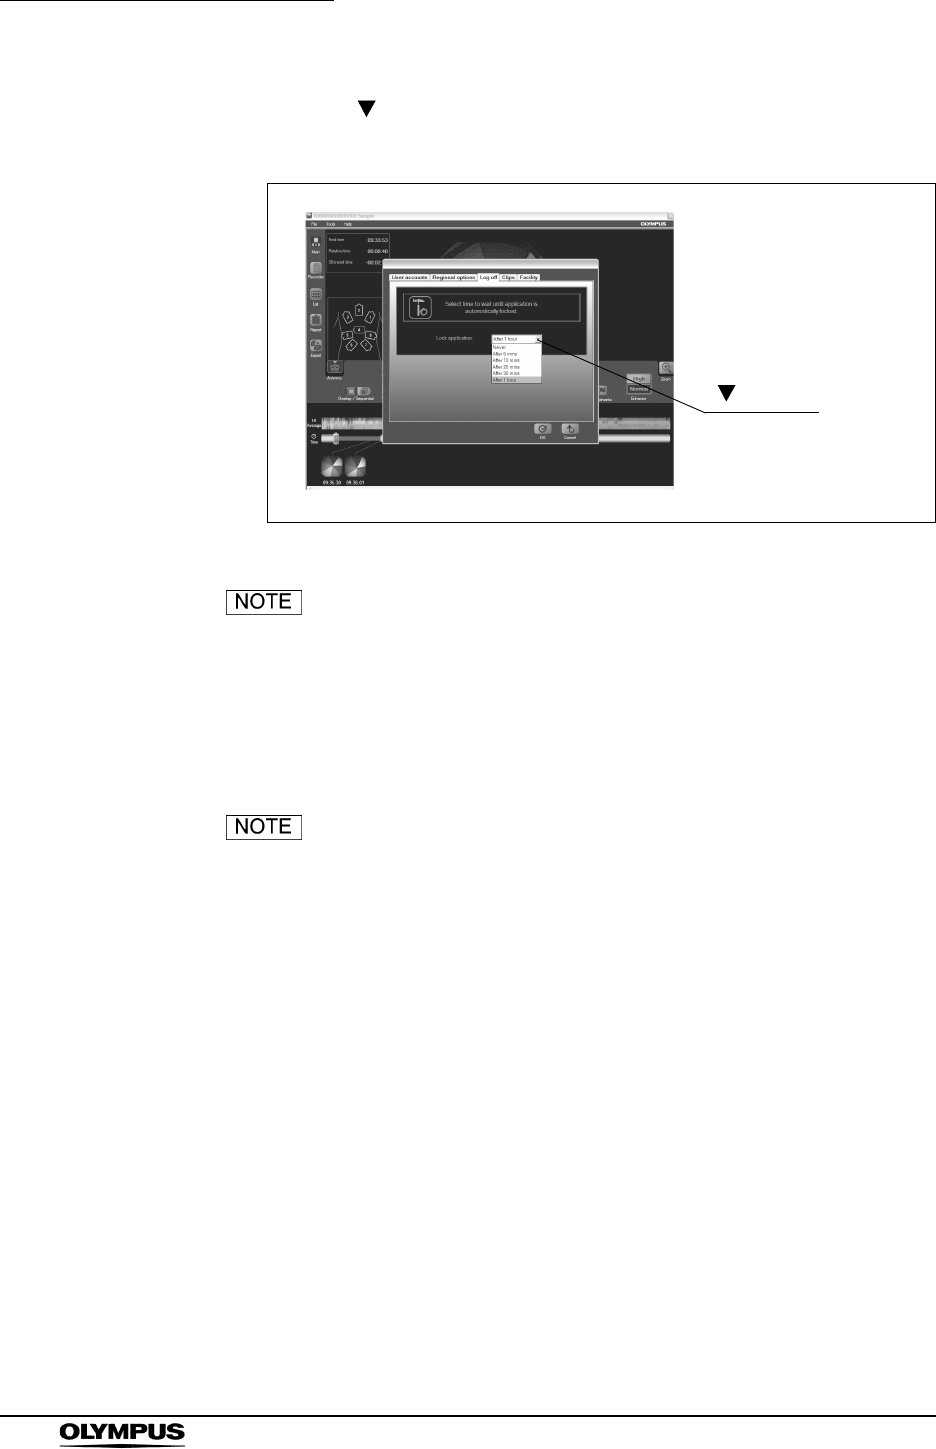
Setting the lock function
1. Select “Settings” from the “Tools” menu on the main screen.
2. Select the “Log off” tab. The log off settings screen is displayed.
Figure 4.31
Log off tab
90
Chapter 4 Workstation Access and Setup
OLYMPUS CAPSULE ENDOSCOPE SYSTEM
3. Click the “ ” to the right of “Lock application” to select the activation time
for the lock screen (see Figure 4.32).
Figure 4.32
The following activation times are available:
4. Click the [OK] button on the log off settings screen.
Click the [Cancel] button to discard the changes.
• Never (defaults) • 5 minutes • 10 minutes
• 20 minutes • 30 minutes • 1 hour
button
Chapter 4 Workstation Access and Setup
91
OLYMPUS CAPSULE ENDOSCOPE SYSTEM
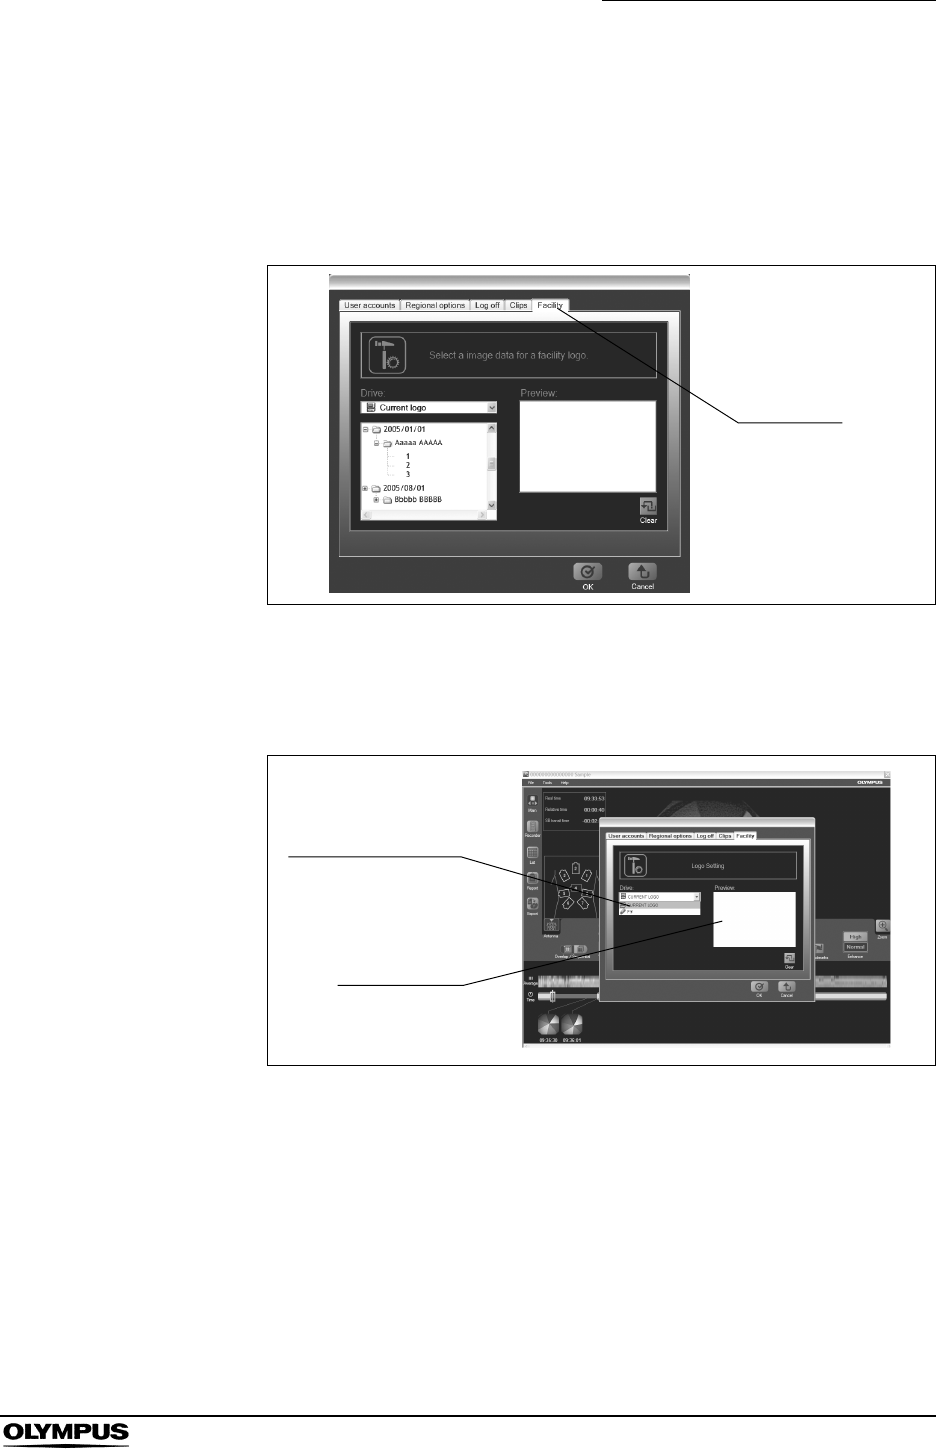
4.7 Facility logo
1. Select “Settings” from the “Tools” menu on the main screen.
2. Select the “Facility” tab. The facility information settings screen is displayed.
Figure 4.33
3. Select “Current logo” from the drive selection box.
The current logo is displayed in the preview area.
Figure 4.34
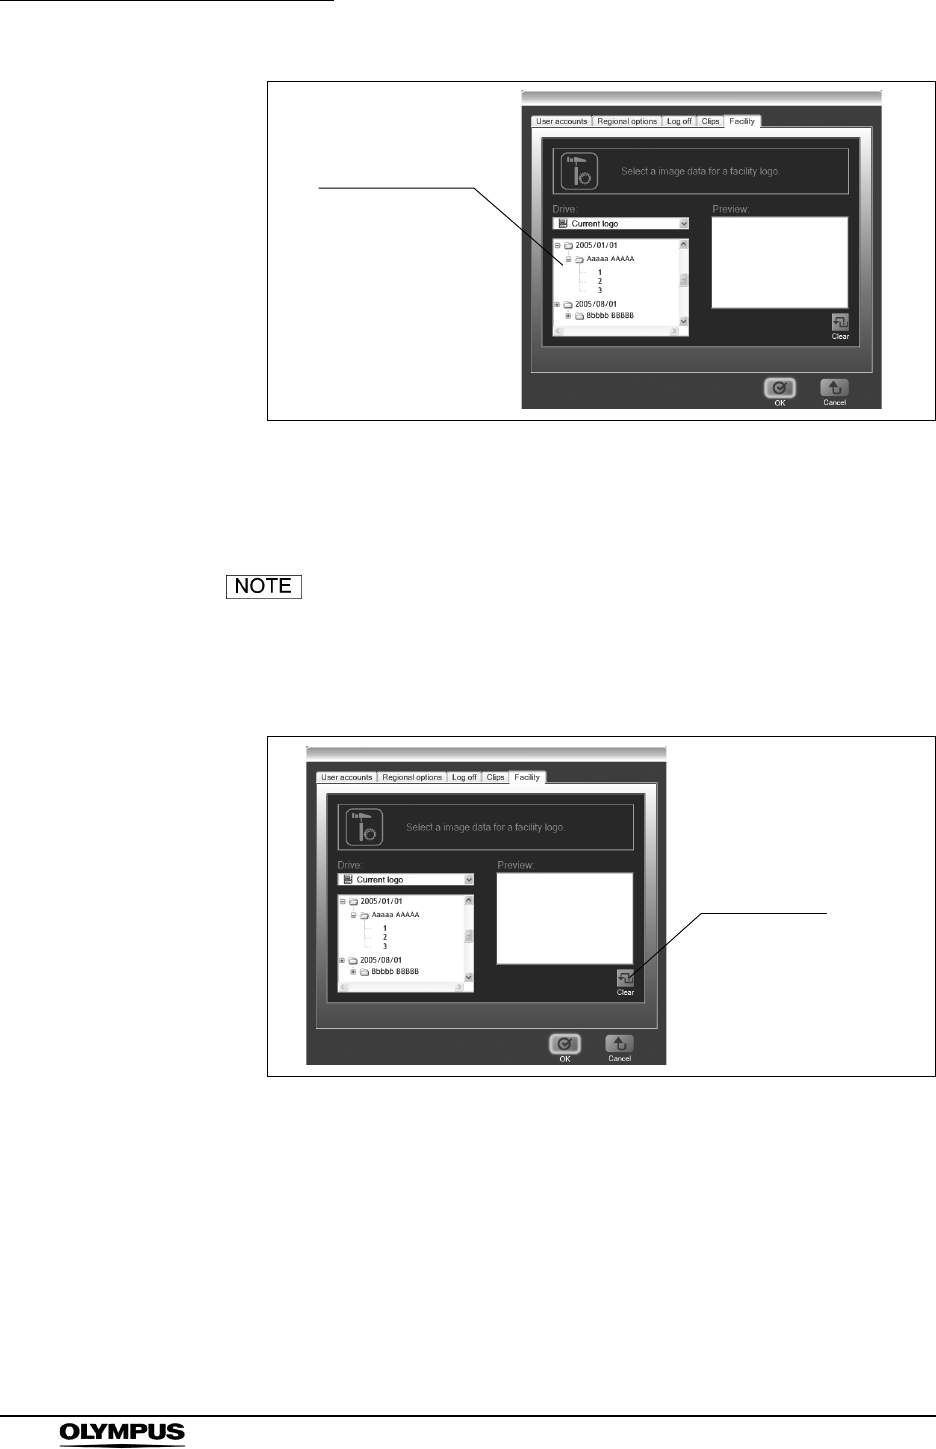
4. Select the logo file (Bitmap file) in the file selection box and click the [OK]
button on the facility information settings screen. The selected logo file is
displayed in the preview area.
Facility tab
Drive selection box
Preview area
92
Chapter 4 Workstation Access and Setup
OLYMPUS CAPSULE ENDOSCOPE SYSTEM
Figure 4.35
5. Click the [OK] button on the facility information settings screen. The
selected logo file is registered.
Click the [Cancel] button to discard the settings.
6. To clear the current facility logo, click the [Clear] button on the facility
information settings screen.
Figure 4.36
File selection box
Clear button
Chapter 4 Workstation Access and Setup
93
OLYMPUS CAPSULE ENDOSCOPE SYSTEM
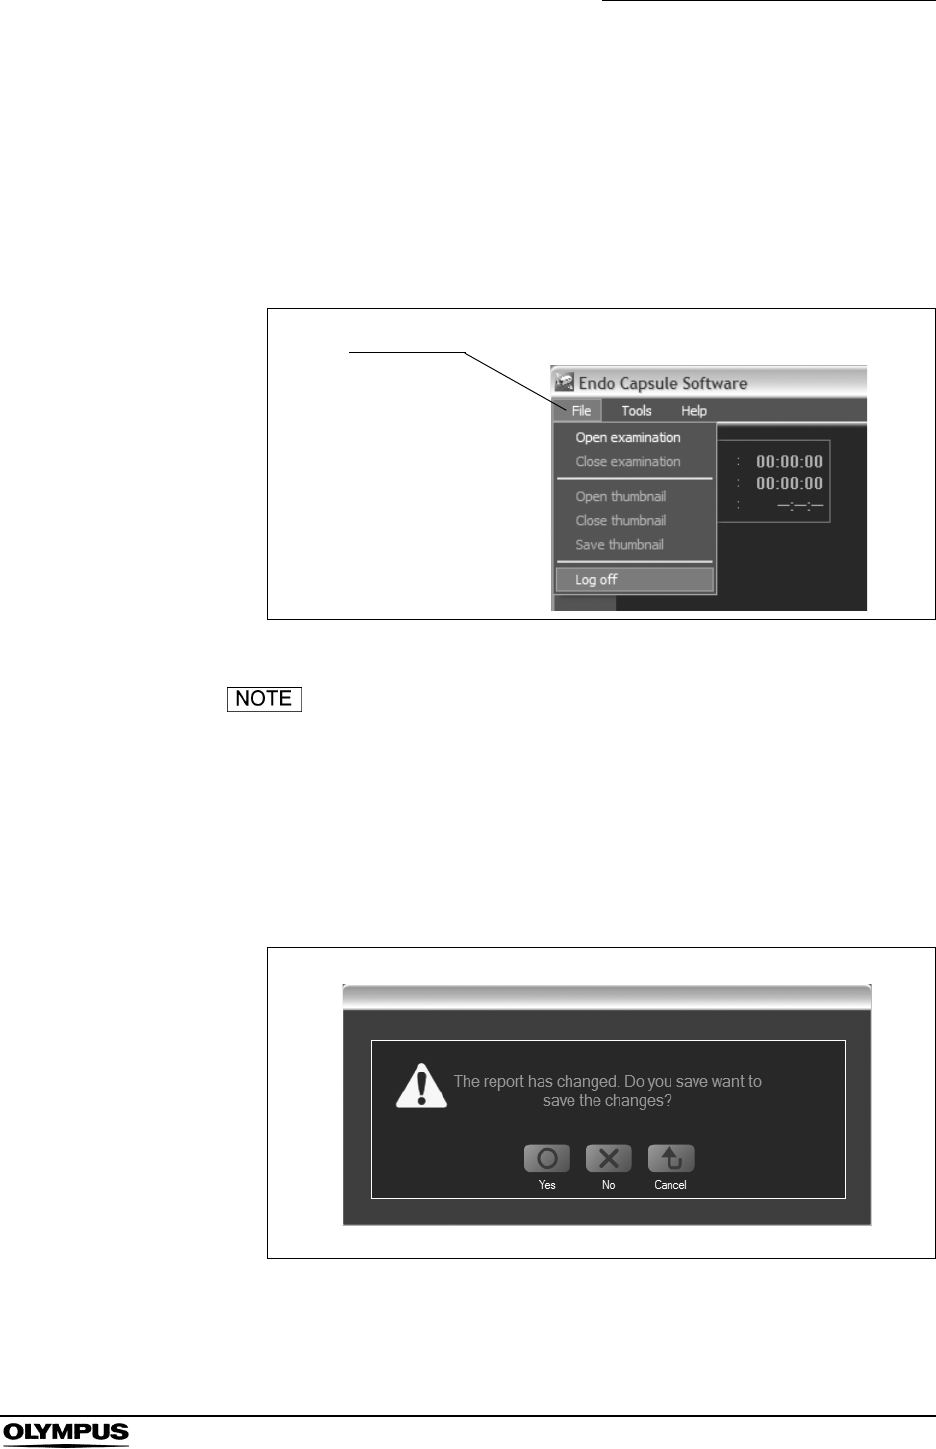
4.8 Log off and exit
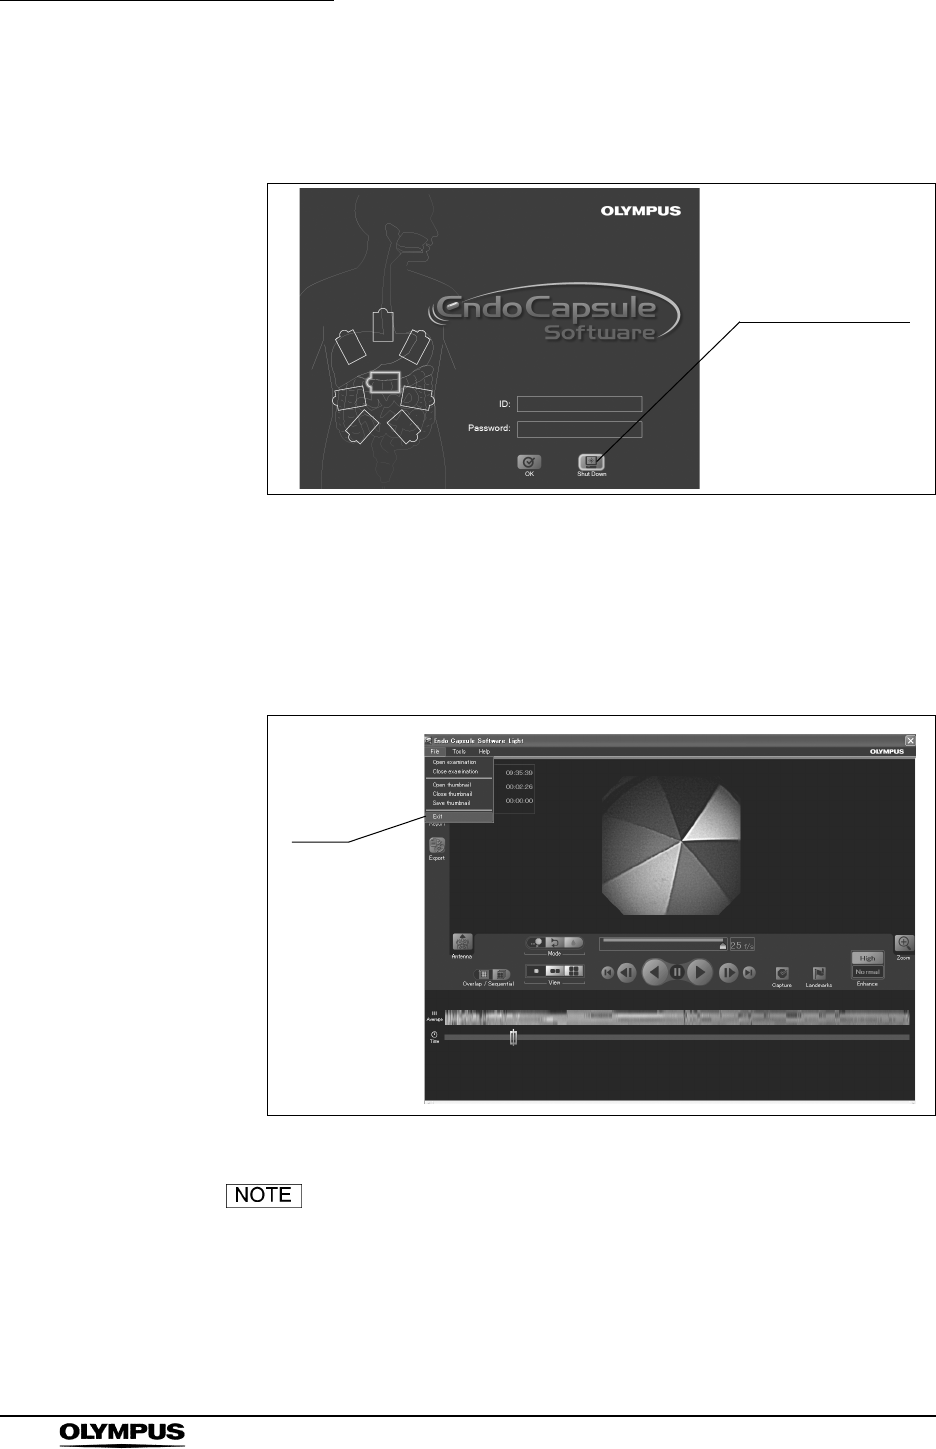
Endo Capsule software
1. Select “Log off” from the “File” menu on the main screen (see Figure 4.37).
The login screen is displayed.
Figure 4.37
• You also can log off by clicking the [X] button at the
upper-right of the main screen.
• If the thumbnail data is not saved, you will be asked if you
wish to save the data (see Figure 4.38). Click the [Yes] button
if you wish to save the thumbnail data, or the [No] button to
discard any work since the last save. Click the [Cancel]
button to cancel the logoff.
Figure 4.38
File menu
94
Chapter 4 Workstation Access and Setup
OLYMPUS CAPSULE ENDOSCOPE SYSTEM
2. Click the [Shut Down] button on the login screen. The workstation will be
turned OFF.
Figure 4.39
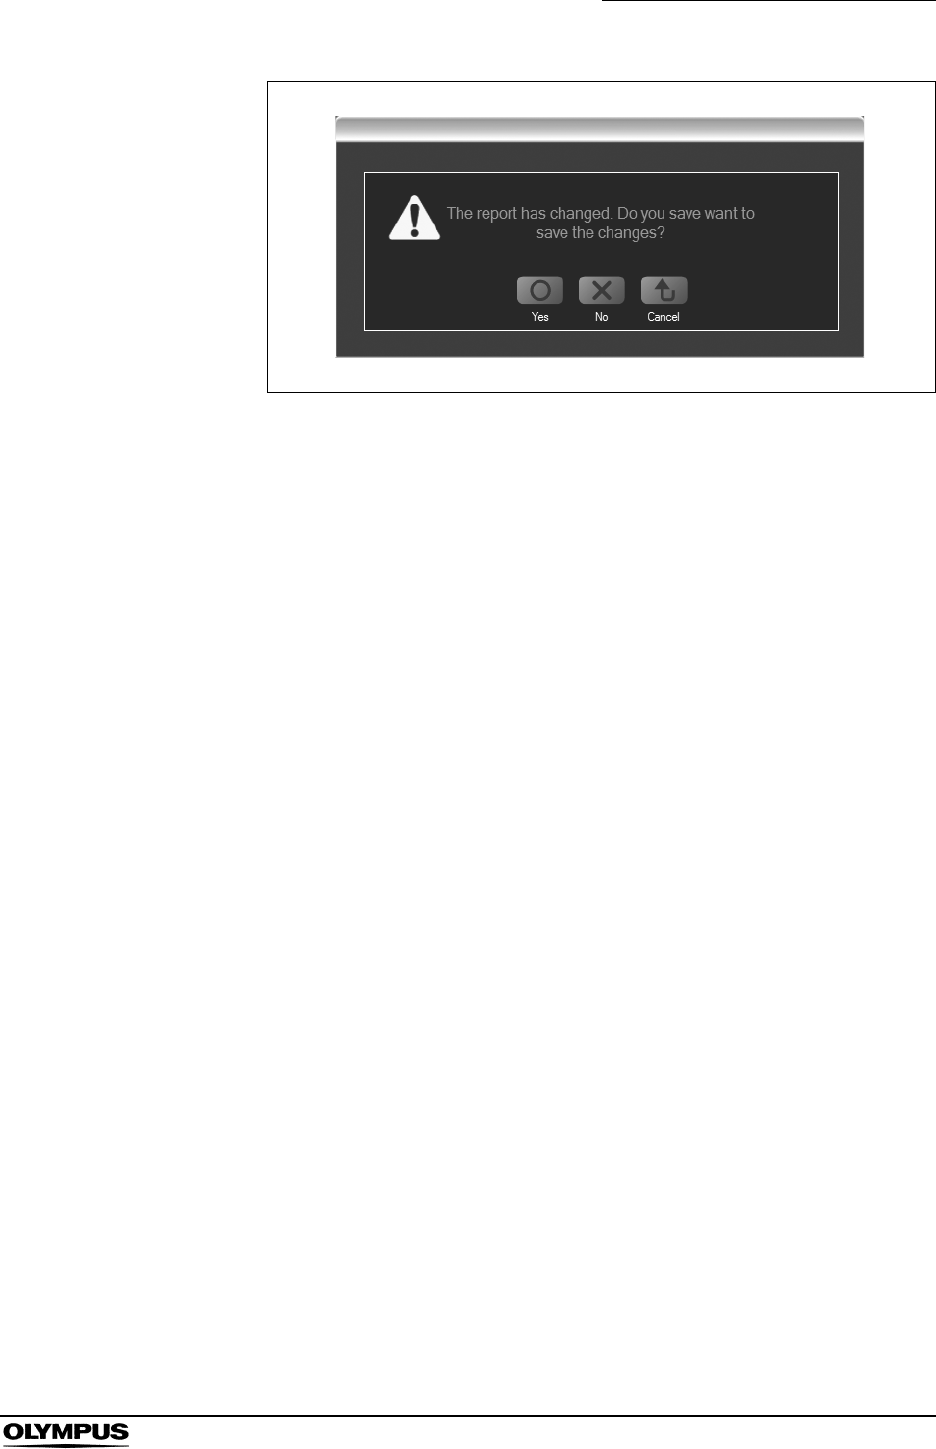
Endo Capsule software light
1. Select “Exit” from the “File” menu or click the [X] button at the upper right on
the main screen (Figure 4.40).
Figure 4.40
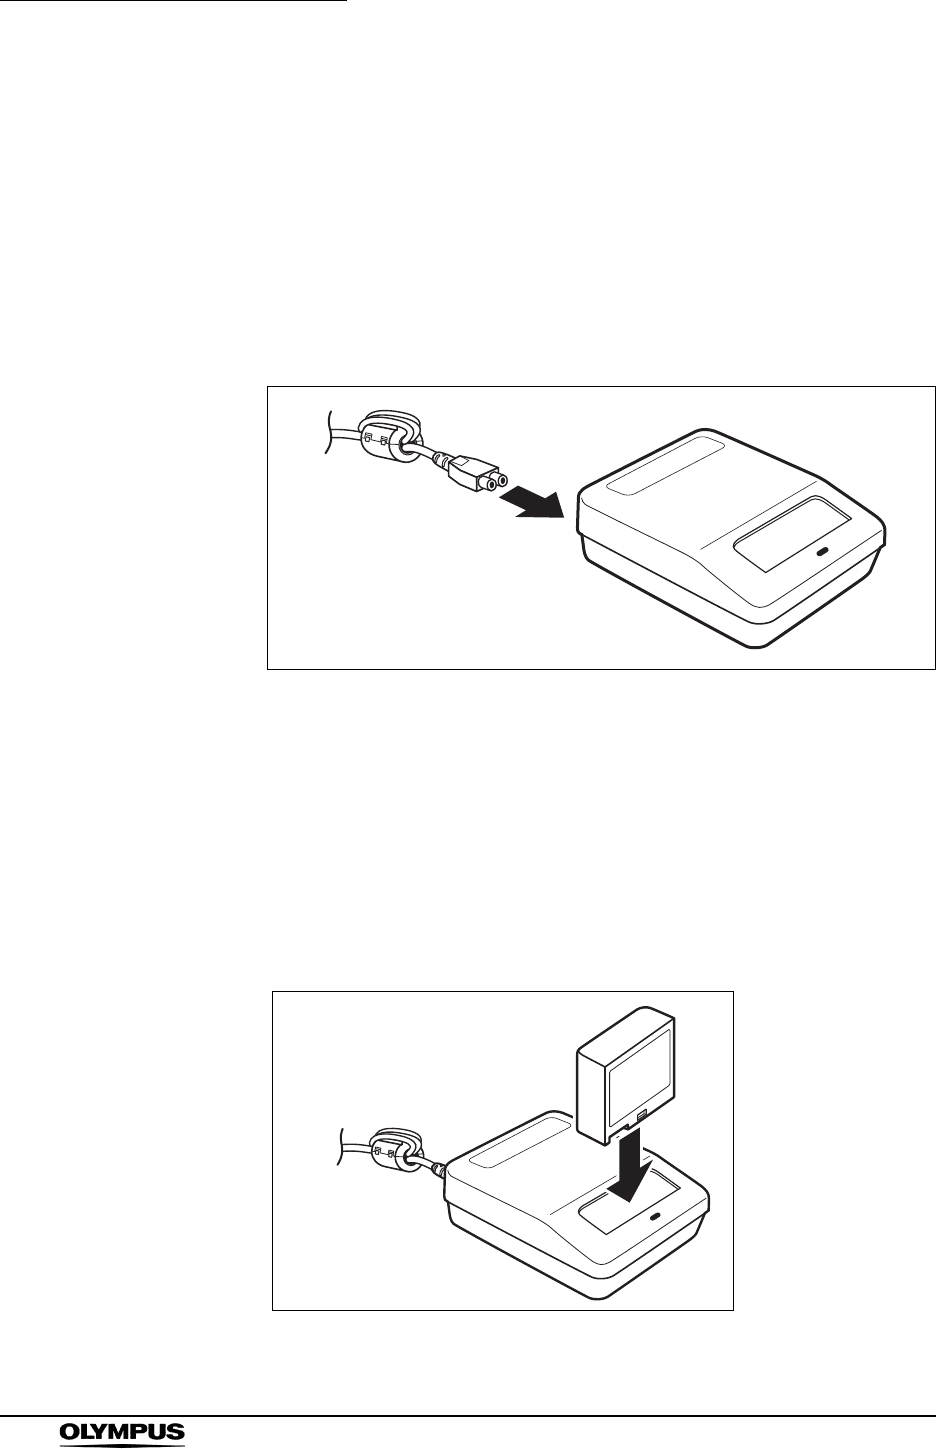
If the thumbnail data is not saved, you will be asked if you
wish to save the data (see Figure 4.41). Click the [Yes] button
if you wish to save the thumbnail data, or the [No] button to
discard any work since the last save. Click the [Cancel]
button to cancel exiting (see Figure 4.41).
Shut Down button
Exit
Chapter 4 Workstation Access and Setup
95
OLYMPUS CAPSULE ENDOSCOPE SYSTEM
Figure 4.41

96
Chapter 5 Capsule Endoscope Procedures
OLYMPUS CAPSULE ENDOSCOPE SYSTEM
Chapter 5 Capsule Endoscope
Procedures
Before starting the examination, be sure to read and clearly understand the
information in this instruction manual.
The patient must stay away from generators of strong
magnetic fields (such as MRI equipment), between ingestion
and excretion of a capsule endoscope. Otherwise, the patient
could suffer injury within the body cavity.
If the patient experiences abdominal pain, discomfort, or
nausea after ingesting a capsule endoscope, have him/her
consult a physician immediately. If treatment is delayed, it
may result in injury to the body cavity.
• Do not remove the antenna lead set or the recorder unit
harness until the examination is completed. Failure to follow
instructions may interfere with the examination.
• Do not turn the recorder unit’s power OFF, remove the
battery pack from the recorder unit, or disconnect the
antenna lead set during the examination. Failure to follow
instructions may interfere with the examination.
• During the examination, avoid pointing radio-transmitting
devices (i.e. keyless entry, home security, waitress call
system, garage door remote, wireless headphones, ham
radio, etc.) at the antenna leads.

Chapter 5 Capsule Endoscope Procedures
97
OLYMPUS CAPSULE ENDOSCOPE SYSTEM
5.1 Preparation
The following items are required for the capsule endoscope examination.
Inspect them the day before the examination as described in this chapter.
Table 5.1
Equipment Quantity Description
Capsule endoscope 2 (1 spare) Ingested to capture endoscopic
images of the gastrointestinal tract.
Image data is transmitted to the
antenna lead set.
Antenna lead set 1 Receives signals from the capsule
endoscope.
Recorder unit 1 Records the endoscopic image data
received via the antenna lead set.
Real time viewer 1 Checks the operation of the capsule
endoscope prior to the examination.
Recorder unit cradle 1 Holds the recorder unit during
initialization, download, etc.
Real time viewer
cable
1 Connects the real time viewer to the
recorder unit.
Recorder unit cradle
cable
1 Connects the recorder unit cradle to
the workstation.
Battery charger 1 Recharges the battery pack.
Battery pack 2 Used as power source for the recorder
unit and the real time viewer.
Recorder unit
harness
1 Holds the recorder unit during the
examination.
Workstation 1 Registers patient information and
patient ID onto the recorder unit.
Capsule activator 1 Turns ON the capsule endoscope.
Antenna lead cover 10
(2 spares)
Attached to each antenna pad. The
adhesive side is attached to the
patient’s body.
Drinking water As
required
Used by the patient to ingest the
capsule endoscope.
Shaver As
required
To remove body hair from the areas of
the patient’s skin where the antenna
lead cover will be attached.
Antenna locations
guide
1 Used as reference in attaching the 8
antennas to the patient.

98
Chapter 5 Capsule Endoscope Procedures
OLYMPUS CAPSULE ENDOSCOPE SYSTEM
5.2 Exterior
Inspect the equipment as described in Table 5.2 below.
Table 5.2
Gauze As
required
Used to remove perspiration, for
temporarily placing the capsule
endoscope, and for cleaning the
equipment.
Ethyl or isopropyl
alcohol
As
required Used for cleaning the equipment.
Equipment Inspection Details
Antenna lead set Check that the antenna lead cover fit the antenna pads, that the
antenna pads are not folded, and that the coating of the
antenna pads and the cables are not damaged. Ensure that no
metal parts are exposed.
Antenna lead
cover
Take out 10 antenna lead covers. Check that they have not
been folded or creased, and that their surfaces are clean.
Recorder unit Check that the unit is free of cracks, deterioration, deformation,
and other damage.
Real time viewer Check that the unit is free of cracks, deterioration, deformation,
and other damage.
Recorder unit
cradle
Check that the unit is free of cracks, deterioration, deformation,
and other damage. Check the power supply cable for scratches
and bends. Check the connectors for cracks, deterioration,
deformation, and other damage.
Real time viewer
cable
Check that the unit is free of cracks, deterioration, deformation,
and other damage.
Recorder unit
cradle cable
Check the cable for scratches and bends. Check the connectors
for cracks, deterioration, deformation, and other damage.
Battery charger Check that the unit is free of cracks, deterioration, deformation,
and other damage.
Battery pack Check that the unit is free of cracks, deterioration, deformation,
and other damage.
Equipment Quantity Description

Chapter 5 Capsule Endoscope Procedures
99
OLYMPUS CAPSULE ENDOSCOPE SYSTEM
5.3 Capsule endoscope
Perform the following inspections before use. Should any
irregularity be observed, do not use the equipment.
Equipment damage or irregularity may cause equipment
malfunction or patient injury.
1. Confirm that the expiration date has not passed.
2. Check the sterile package for ruptures, damage to the seal or water that
might has entered the sterile package.
3. Before removing the capsule endoscope from the sterile package, inspect
the capsule’s surface for cracks, deterioration, deformation, and other
damage.
100
Chapter 5 Capsule Endoscope Procedures
OLYMPUS CAPSULE ENDOSCOPE SYSTEM
5.4 Preparation on the day before the examination
Recharging the battery packs
Fully charge the battery packs to prevent low battery charge, which could cause
the examination to end prematurely. In preparation for the examination, recharge
the battery packs on the previous day.
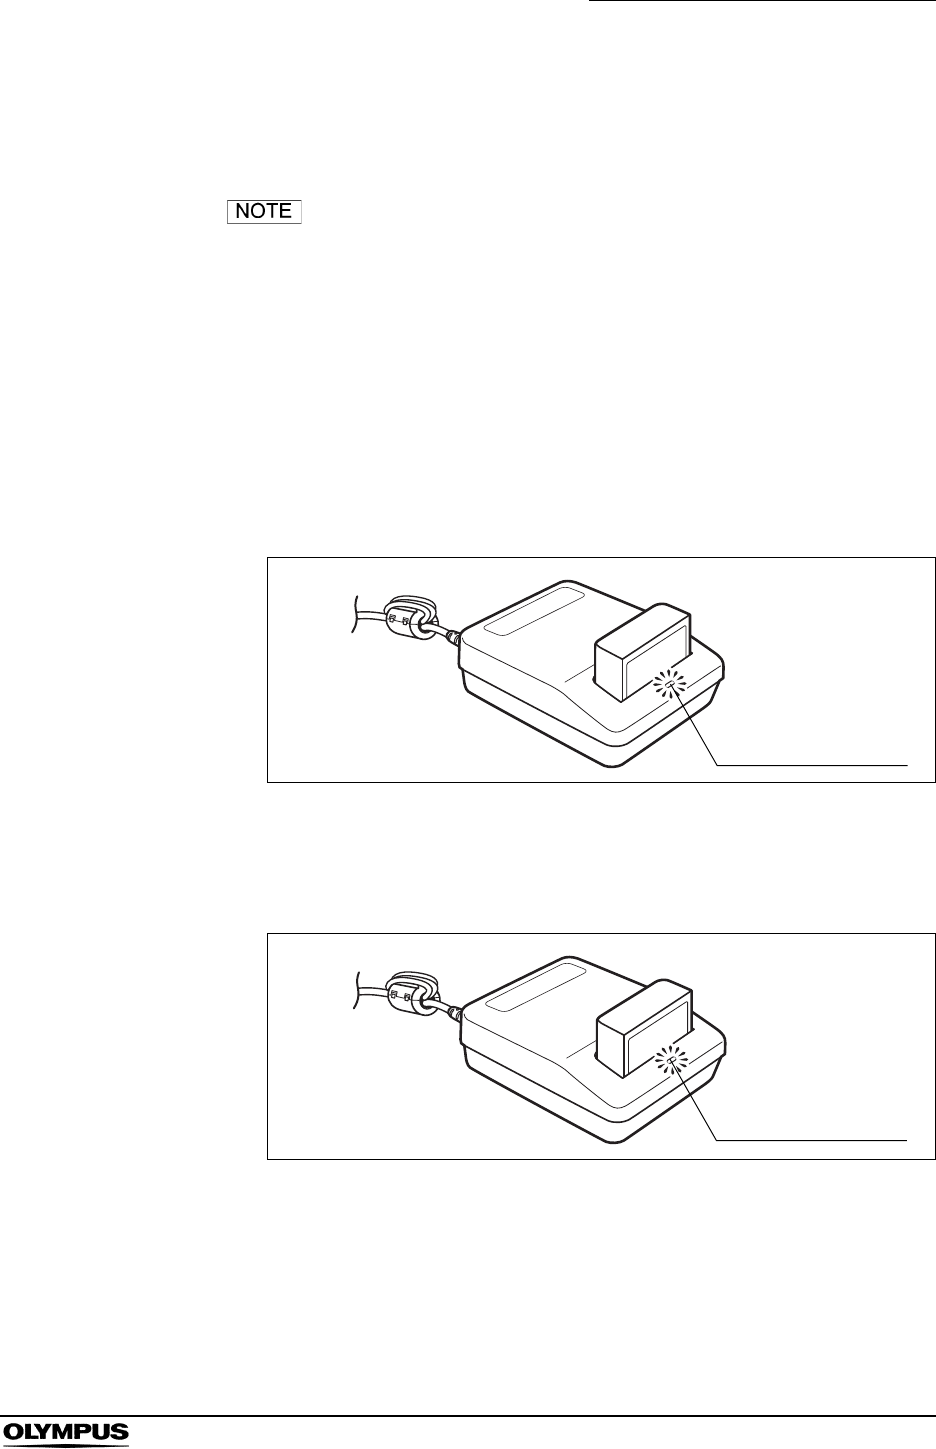
1. Connect the power supply cable to the battery charger.
Figure 5.1
2. Plug in the battery charger’s power supply cable into a power outlet.
3. With the back of the battery pack facing towards you, attach the battery pack
to the battery charger by pushing it down into the battery charger’s battery
slot cover (see Figure 5.2).
The battery pack has a reversal prevention slot to prevent it from being
inserted in the wrong direction.
Figure 5.2
Chapter 5 Capsule Endoscope Procedures
101
OLYMPUS CAPSULE ENDOSCOPE SYSTEM
4. When the battery pack is properly attached, the charge lamp on the battery
charger is illuminated yellow to indicate the start of a recharge (see Figure
5.3). The recharging time is approximately 2 hours.
• The battery charger will not charge the battery if the
temperature of the battery pack is below 0°C/32°F. In this
case, the charge lamp will blink in yellow at about 1.5 second
intervals.
• The battery charger will not charge the battery if the battery
pack or the battery charger is damaged. In this case, the
charge lamp will blink in yellow at about 0.5 second intervals.
• The recorder unit cradle cannot be used to recharge the
battery pack. To recharge the battery pack, remove it from
the recorder unit, and use the dedicated battery charger.
Figure 5.3
5. When recharging is complete, the charge lamp turns from yellow to green
(see Figure 5.4).
Figure 5.4
6. Pull the battery pack upward to remove it from the battery charger. The
battery charger’s charge lamp will go out.
7. Be sure to recharge both battery packs required for the examination (1 for
the recorder unit, 1 for the real time viewer).
Charge lamp - Yellow
Charge lamp - Green

102
Chapter 5 Capsule Endoscope Procedures
OLYMPUS CAPSULE ENDOSCOPE SYSTEM
5.5 Initial setup of the recorder unit
The “Initial Setup of the Recorder Unit” function is not
available in Endo Capsule Software Light.
Connecting the recorder unit
The recorder unit is connected to the workstation via the recorder unit cradle.
If the antenna lead set being worn by a patient is connected
to the recorder unit, do not connect the recorder unit to the
workstation. Doing so may result in electric shock.
While setting up the recorder unit, do not remove the
recorder unit from the cradle or remove the cradle cable.
Doing so may result in loss of image data. If you do so,
connect the recorder to the workstation through the cradle
and the cradle cable and restart the workstation before
setting up the recorder unit again.
• Up to two recorder units can be simultaneously connected to
the workstation.
• If you connect a third recorder unit to the workstation, it will
be turned OFF.
• Restart the workstation when the workstation does not work
properly.
• Remove the USB devices from the workstation and restart
the workstation when it does not work properly. Then connect
the removed USB devices again.
Chapter 5 Capsule Endoscope Procedures
103
OLYMPUS CAPSULE ENDOSCOPE SYSTEM
1. Firmly insert the recorder unit all the way into a cradle that is connected to
the workstation. The recorder unit will be turned ON automatically. The
indicator lamp on the recorder unit is illuminated yellow for 2 seconds, and
then turns to green.
• When the recorder unit is inserted into the recorder unit
cradle, its power turns ON, and the normal startup screen is
displayed on its display panel for approximately 3 seconds.
Figure 5.5
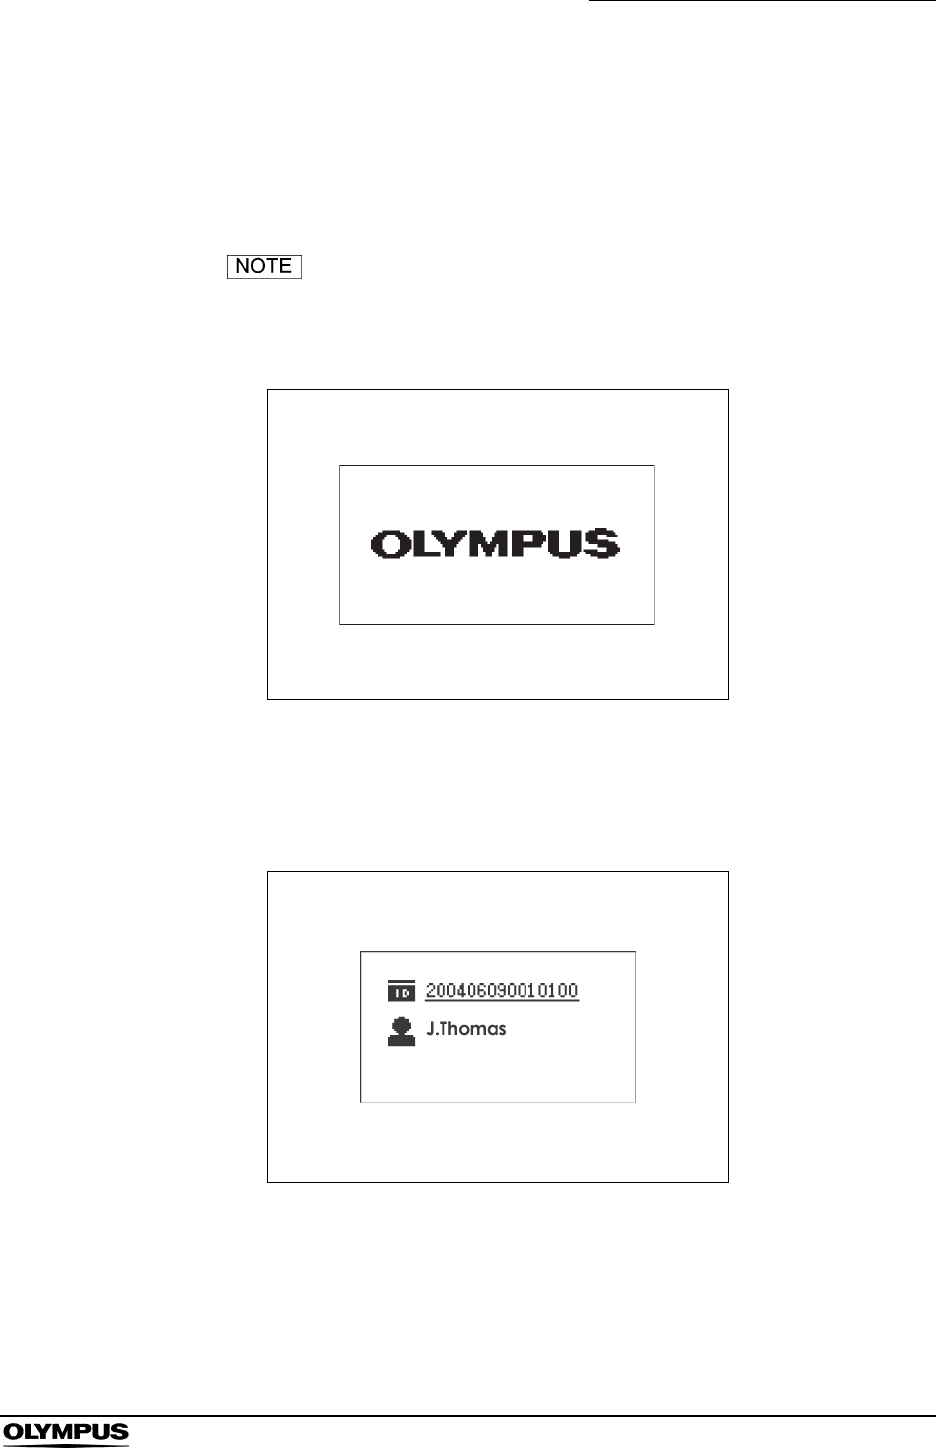
• If the recorder unit contains image data, the patient ID and
patient name are displayed on the recorder unit’s display
panel (see Figure 5.6).
Figure 5.6
• If an error is detected on the recorder unit, the indicator lamp
will blink yellow, and the corresponding error code will be
displayed on the display panel. To troubleshoot, refer to
Chapter 8, “Troubleshooting” on page 233.
104
Chapter 5 Capsule Endoscope Procedures
OLYMPUS CAPSULE ENDOSCOPE SYSTEM
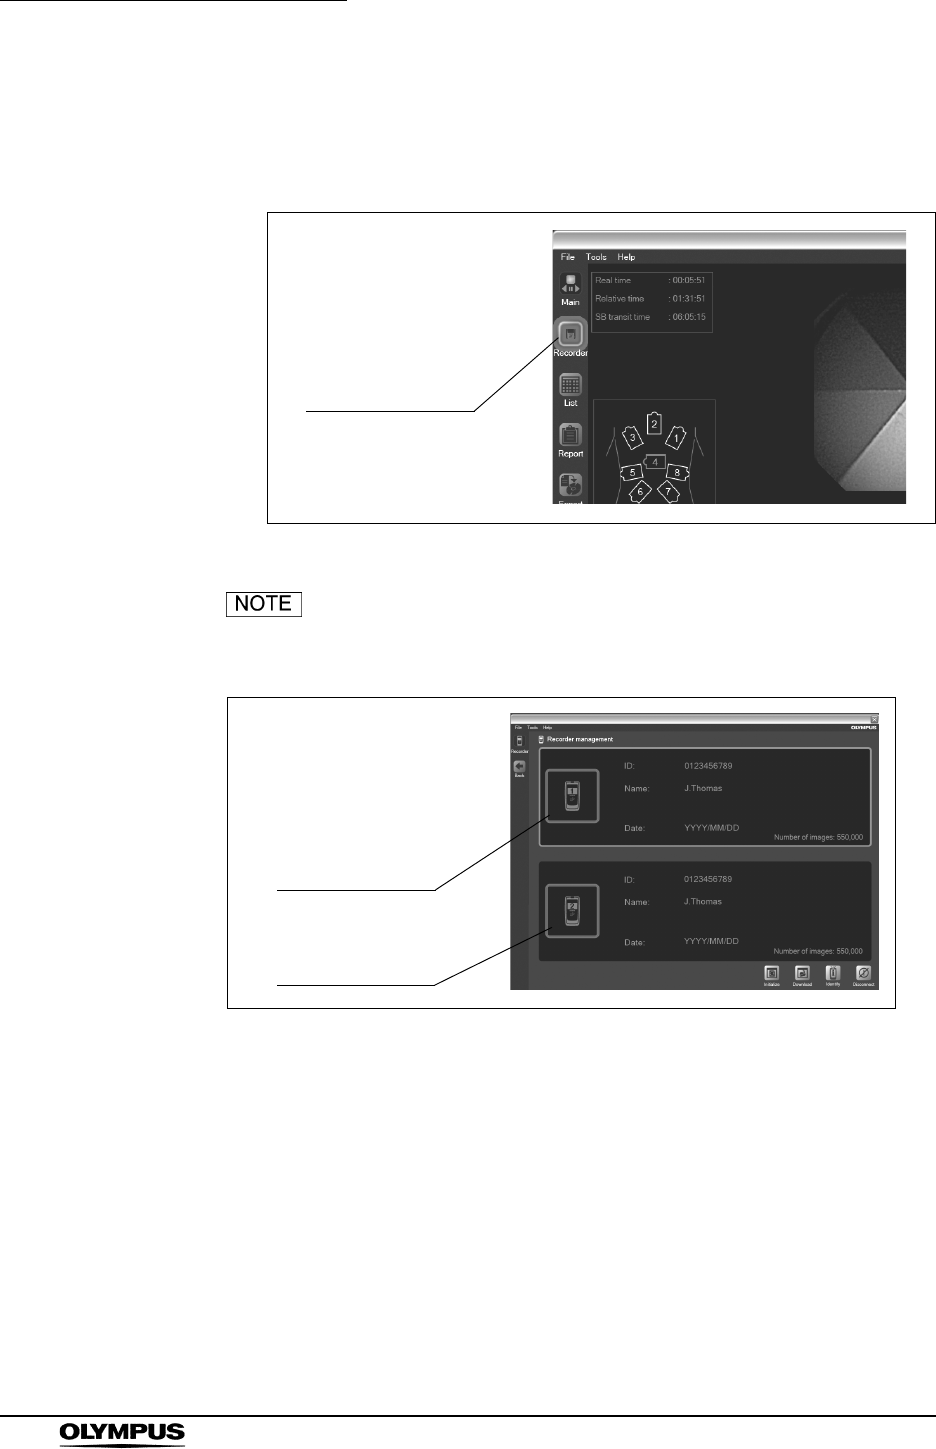
2. Click the [Recorder] button on the main screen (see Figure 5.7). The
recorder management screen is displayed, and the information recorded on
the recorder unit is shown.
Figure 5.7
• If two recorder units are connected to the workstation,
information for both units is displayed (see Figure 5.8).
Figure 5.8
• To identify which recorder unit is selected to display
information onto the recorder management screen, click the
[Identify] button. The selected recorder unit will blink green
three times.
Recorder button
Information for
recorder unit 2
Information for
recorder unit 1

Chapter 5 Capsule Endoscope Procedures
105
OLYMPUS CAPSULE ENDOSCOPE SYSTEM
Figure 5.9
Identify button
106
Chapter 5 Capsule Endoscope Procedures
OLYMPUS CAPSULE ENDOSCOPE SYSTEM
Setting up the recorder unit
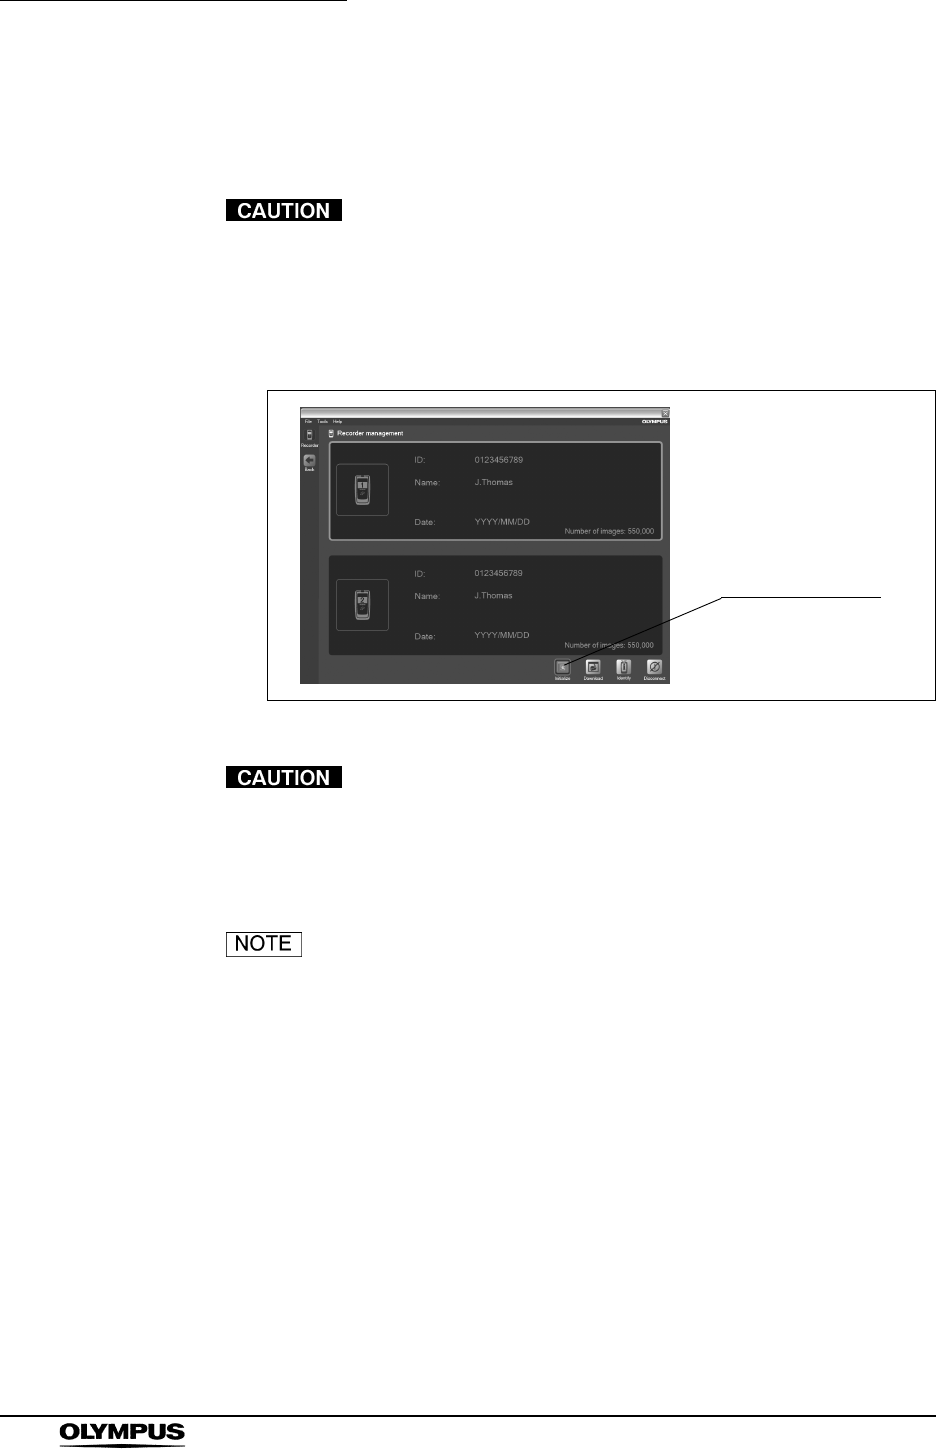
1. Select the recorder unit for which the initial setup is to be performed.
If two recorder units are connected to the workstation, first
identify which recorder unit is being set up.
2. Click the [Initialize] button on the recorder management screen (see Figure
5.10). The initial settings screen is displayed.
Figure 5.10
When you perform the initial setup of the recorder unit, all
data on the recorder unit will be deleted. If you wish to keep
any of the data stored on the recorder unit, be sure to
download it before initializing.
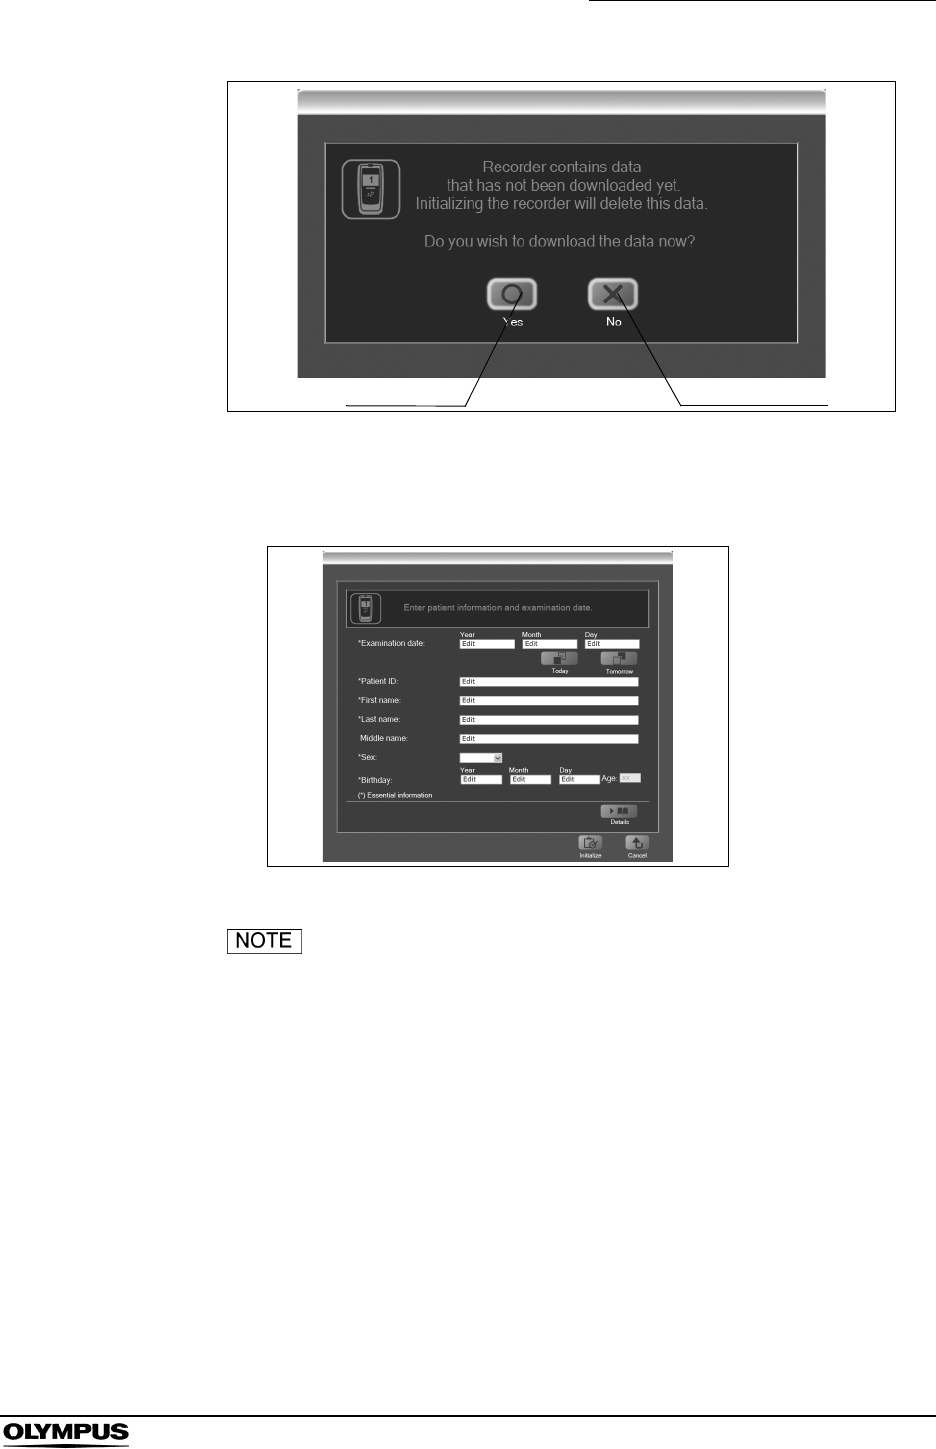
• If there are any image data remaining on the recorder unit, a
confirmation message will be displayed (see Figure 5.11). If
you click the [NO] button, the initial setup screen will be
displayed. Click the [YES] button to display the download
screen.
• If the workstation cannot recogize the connected recorder(s),
please remove the cradle cable from the workstation, restart
the workstation and then connect it again.
• Do not remove the recorder unit from the cradle while
initializing with two recorders connected whether the data is
now set to it or not. Doing so may result in the hangup of the
workstation. If the workstation does not work properly, please
restart the workstation.
Initialize button
Chapter 5 Capsule Endoscope Procedures
107
OLYMPUS CAPSULE ENDOSCOPE SYSTEM
Figure 5.11
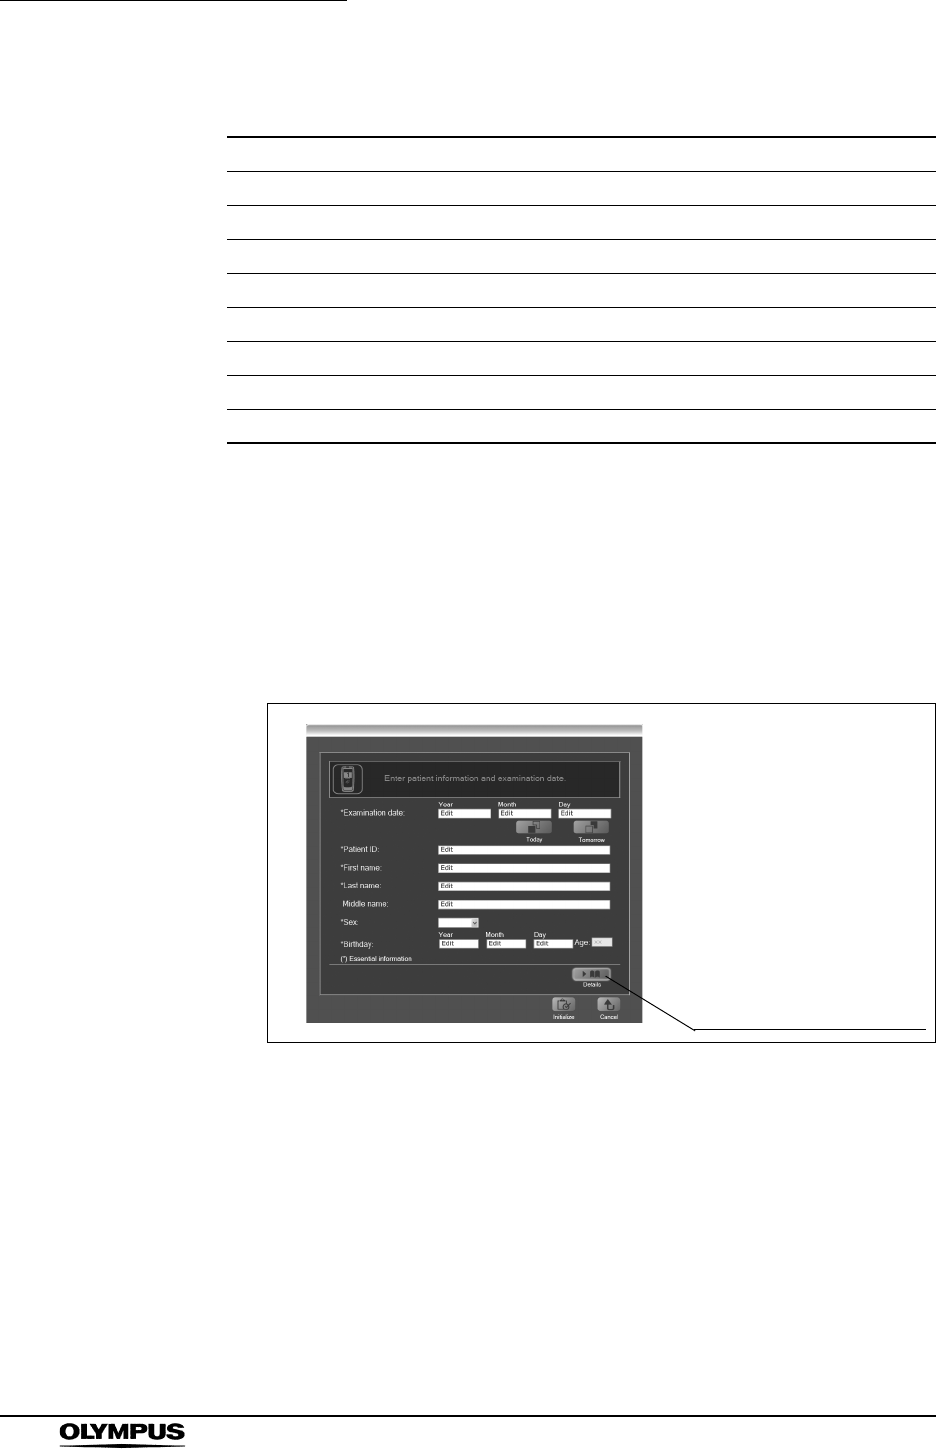
3. Enter the patient information on the initial setup screen.
Figure 5.12
• For details on the patient information to be entered on the
initial setup screen, refer to Table 5.3 below.
Yes button No button
108
Chapter 5 Capsule Endoscope Procedures
OLYMPUS CAPSULE ENDOSCOPE SYSTEM
Table 5.3
* Essential information
• Click the [Today] button to enter today’s date in the
examination date field. Click the [Tomorrow] button to enter
tomorrow’s date in the examination date field.
4. Click the [Show more detail] button to display the panel for entering detailed
patient information, like the patient’s height, weight, and waist size.
Figure 5.13
Item Description
Examination date* Year, Month, and Day (numbers)
Patient ID* Up to 15 alphanumeric characters
First name* Up to 40 characters
Last name* Up to 40 characters
Middle name Up to 20 characters
Sex Select “male” or “female” from the pull-down menu
Birthday Year, Month, and Day (numbers)
Age Automatically displayed after entering the birthday
Show more detail button

Chapter 5 Capsule Endoscope Procedures
109
OLYMPUS CAPSULE ENDOSCOPE SYSTEM
• Click the [Close detail] button to hide the details panel.
Figure 5.14
• The height, weight, and waist must be entered as a number
with 5 or less digits, with up to 3 digits in the integer part, and
up to 2 digits in the decimal part.
5. Click the [Initialize] button. The initial setup confirmation screen is displayed.
Figure 5.15
If you click the [Initialize] button with any essential
information missing, the message “Enter patient information
and examination date.” is displayed. Complete all the
essential information, and then click the [Initialize] button
again.
Close detail button
Initialize button
110
Chapter 5 Capsule Endoscope Procedures
OLYMPUS CAPSULE ENDOSCOPE SYSTEM
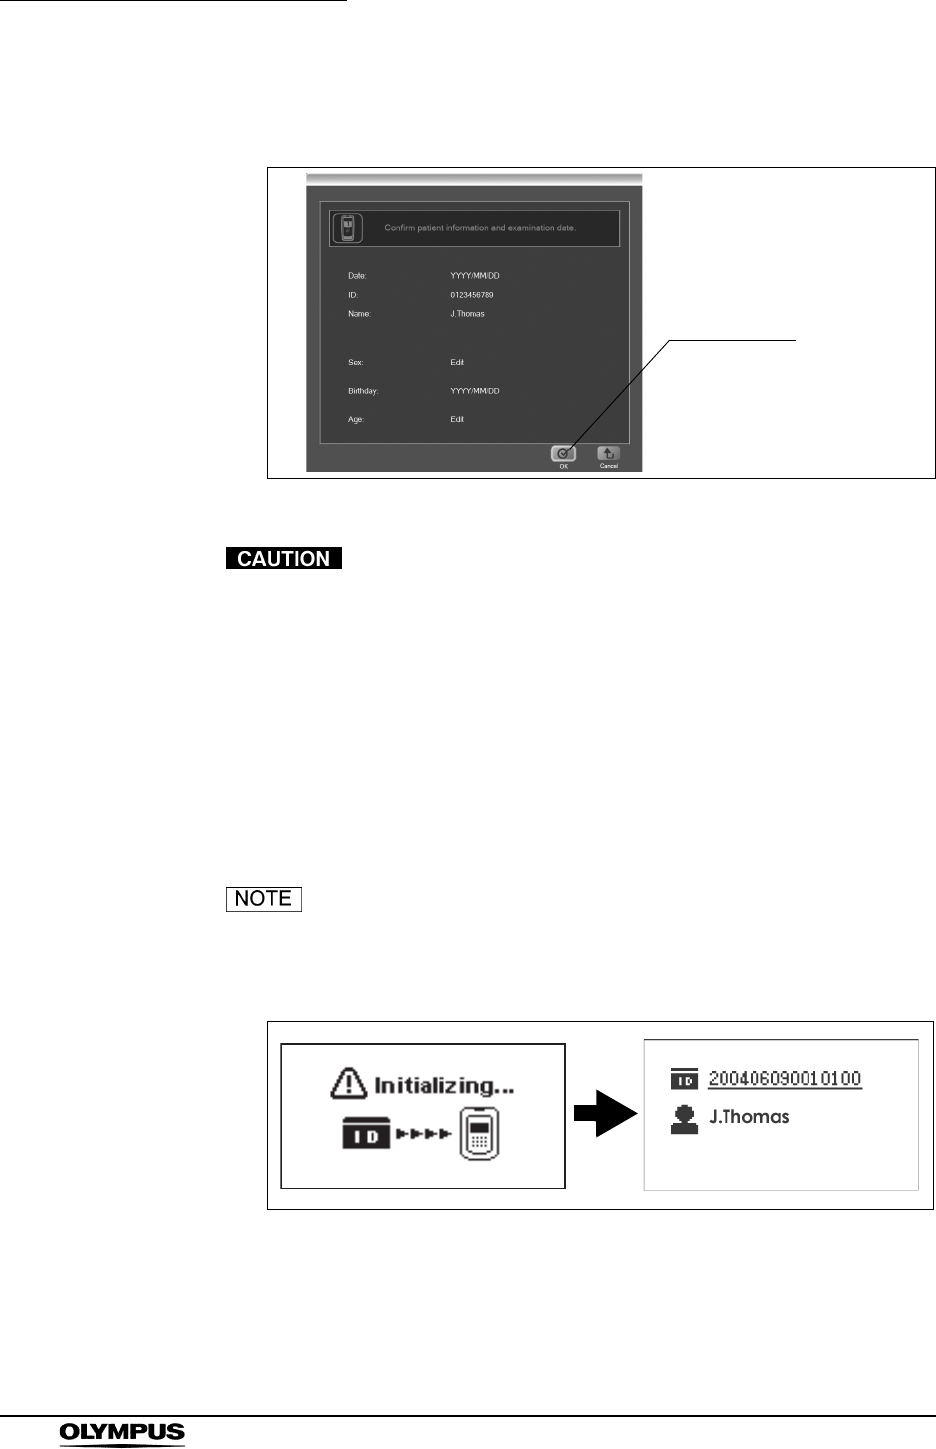
6. Check your input on the initial setup confirmation screen, and then click the
[OK] button.
Figure 5.16
• Check that the information being displayed belongs to the
patient who is being examined.
• Patient information cannot be altered after the completion of
an examination. To change an entry, click the [Cancel] button
and return to the initial setup screen, then re-enter the
information.
7. Patient information is transmitted to the recorder unit. After transmission is
completed, the initial setup completion screen is displayed (see Figure
5.18).
During the initial setup, the icon shown in Figure 5.17 will be
displayed on the recorder unit’s display panel, and the
recorder unit’s indicator lamp will blink yellow.
Figure 5.17
OK button
Chapter 5 Capsule Endoscope Procedures
111
OLYMPUS CAPSULE ENDOSCOPE SYSTEM
Figure 5.18
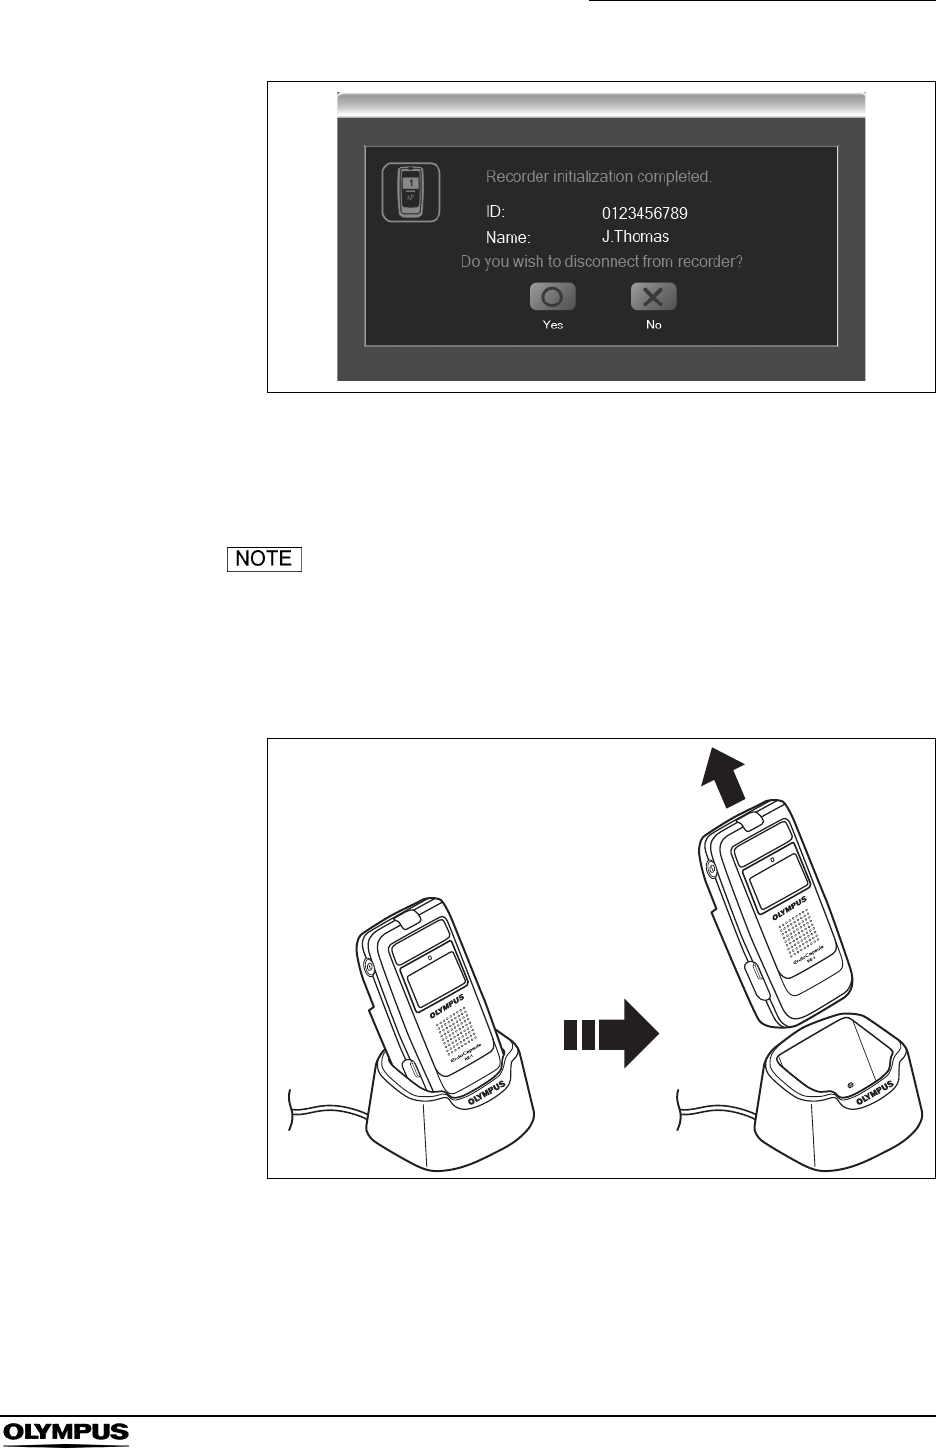
8. Click the [YES] button. The recorder unit is turned OFF and the recorder
management screen is displayed.
If you want to manually turn OFF the recorder unit later, click
the [NO] button.
9. Holding the cradle with one hand, lift the recorder unit upward to remove it
from the cradle.
Figure 5.19
112
Chapter 5 Capsule Endoscope Procedures
OLYMPUS CAPSULE ENDOSCOPE SYSTEM
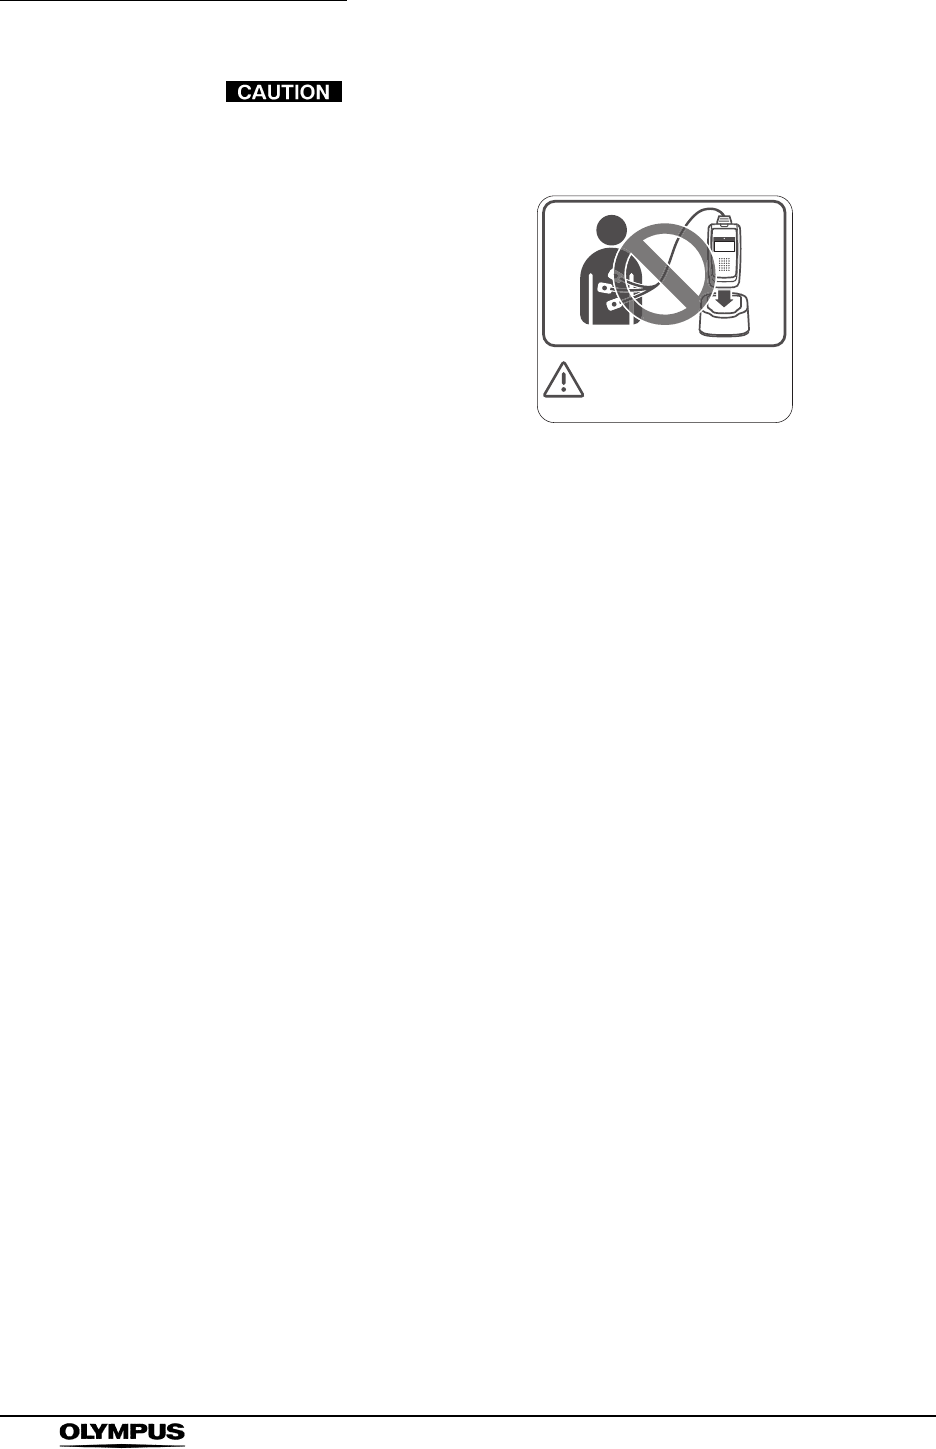
• Do not connect the recorder unit to the cradle while the
antennas are attached to the patient. In the worst case,
electric shock and burns may result.
• If the recorder unit is ON, first turn it OFF by clicking the
[Disconnect] button after selecting the recorder unit on the
recorder management screen. If you remove the recorder
unit from the cradle while it is ON, it may become damaged.
D
o
n
o
t
c
o
nn
ec
t
t
h
e
r
ec
o
r
d
e
r
un
i
t
t
o
t
h
e
c
r
a
d
l
e
w
h
il
e
t
h
e
a
n
t
e
nn
a
s
a
r
e
a
tt
ac
h
e
d
t
o
t
h
e
p
a
t
i
e
n
t
.
Chapter 5 Capsule Endoscope Procedures
113
OLYMPUS CAPSULE ENDOSCOPE SYSTEM
Inserting battery pack into recorder unit
• Use only the specified battery pack (MAJ-1473) for the
receiver/real time viewer. Use of other battery packs may
result in excessive heat, fire, and/or explosion.
• Use a fully charged battery pack for the recorder unit.
Otherwise, the recorder unit will display a warning, and
prevent the examination from continuing.
• The life span of a battery pack is approximately 1 year from
the date of purchase, or 320 recharging cycles, whichever is
first. When the battery pack approaches its end-of-life, the
recorder unit will prompt for replacement. Order a new
battery pack and replace.
1. Open the battery pack slot cover by sliding it in the direction of the arrow
(see Figure 5.20 (b)).
Figure 5.20
2. With the battery pack removal ribbon hanging out of the battery pack slot,
insert a fully charged battery pack into the slot (see Figure 5.21 (b)).
Figure 5.21
Arrow ( )
(a) (b)
Battery pack
114
Chapter 5 Capsule Endoscope Procedures
OLYMPUS CAPSULE ENDOSCOPE SYSTEM
3. Close the battery back slot cover, taking care not to catch the battery pack
removal ribbon, and then slide the cover upward to lock it (see Figure 5.22
(b)).
Figure 5.22
(a) (b)
Arrow ( )