Olympus Medical Systems EC-1 Low Power Transmitter User Manual GT1629 FCC MAJ 1467 C1
Olympus Medical Systems Corp. Low Power Transmitter GT1629 FCC MAJ 1467 C1
Contents
- 1. Users manual Part 1
- 2. Users manual Part 2
- 3. Users manual Part 3
- 4. Users manual Part 4
- 5. Users manual part 5
Users manual Part 3
Chapter 5 Capsule Endoscope Procedures
115
OLYMPUS CAPSULE ENDOSCOPE SYSTEM
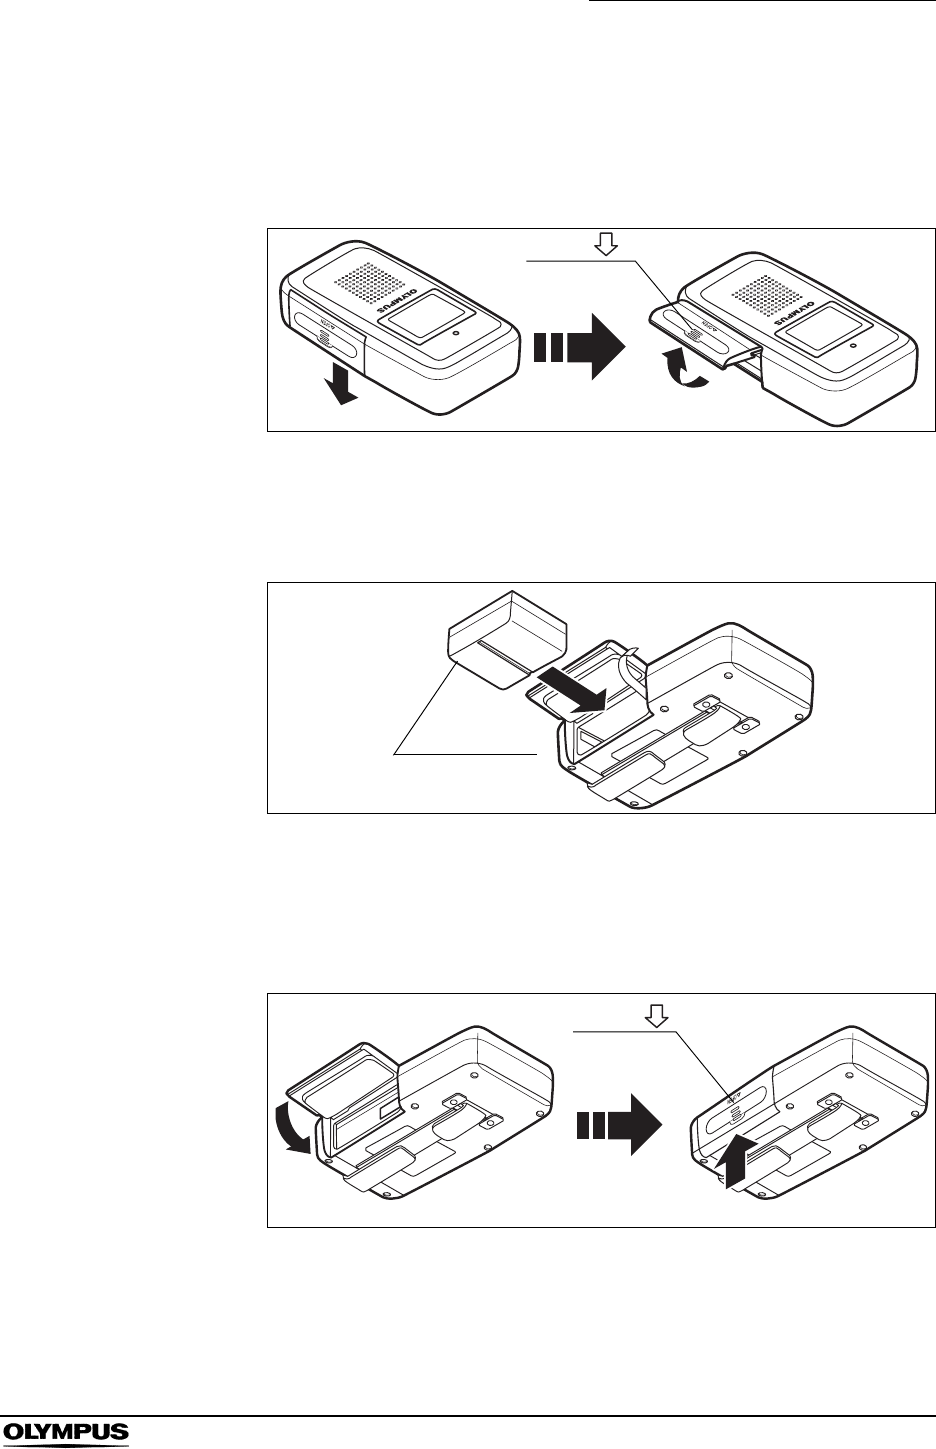
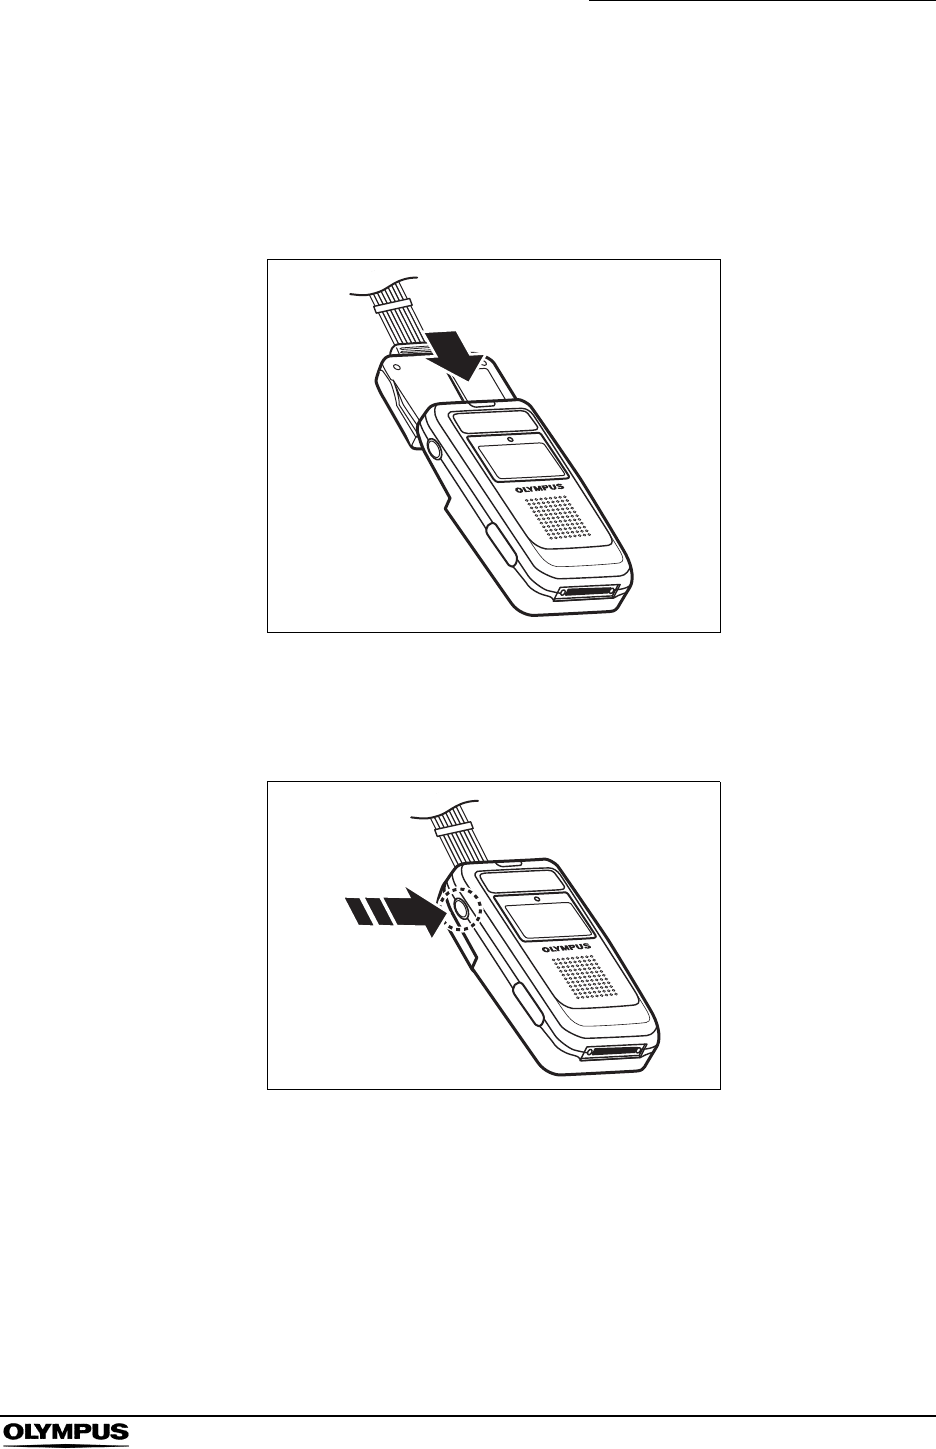
Inserting battery pack into real time viewer
1. Open the battery pack slot cover by sliding it in the direction of the arrow
(see Figure 5.23 (b)).
Figure 5.23
2. With the battery pack removal ribbon hanging out of the battery pack slot,
insert a fully charged battery pack into the slot (see Figure 5.24 (b)).
Figure 5.24
3. Close the battery back slot cover, taking care not to catch the battery pack
removal ribbon, and then slide the cover upward to lock it (see Figure 5.25
(b)).
Figure 5.25
(a) (b)
Arrow ( )
Battery pack
(a) (b)
Arrow ( )
116
Chapter 5 Capsule Endoscope Procedures
OLYMPUS CAPSULE ENDOSCOPE SYSTEM
5.6 Attaching the equipment to the patient
Patient confirmation
Before attaching the antenna lead set to the patient, confirm the patient’s identity.
Also confirm that the patient has not eaten or drunk for at least 8 hours before
the examination.
Confirmation of antenna locations
(and shaving, if necessary)
1. Ask the patient to lie down with his upper body exposed, and to lower his
pants or skirt.
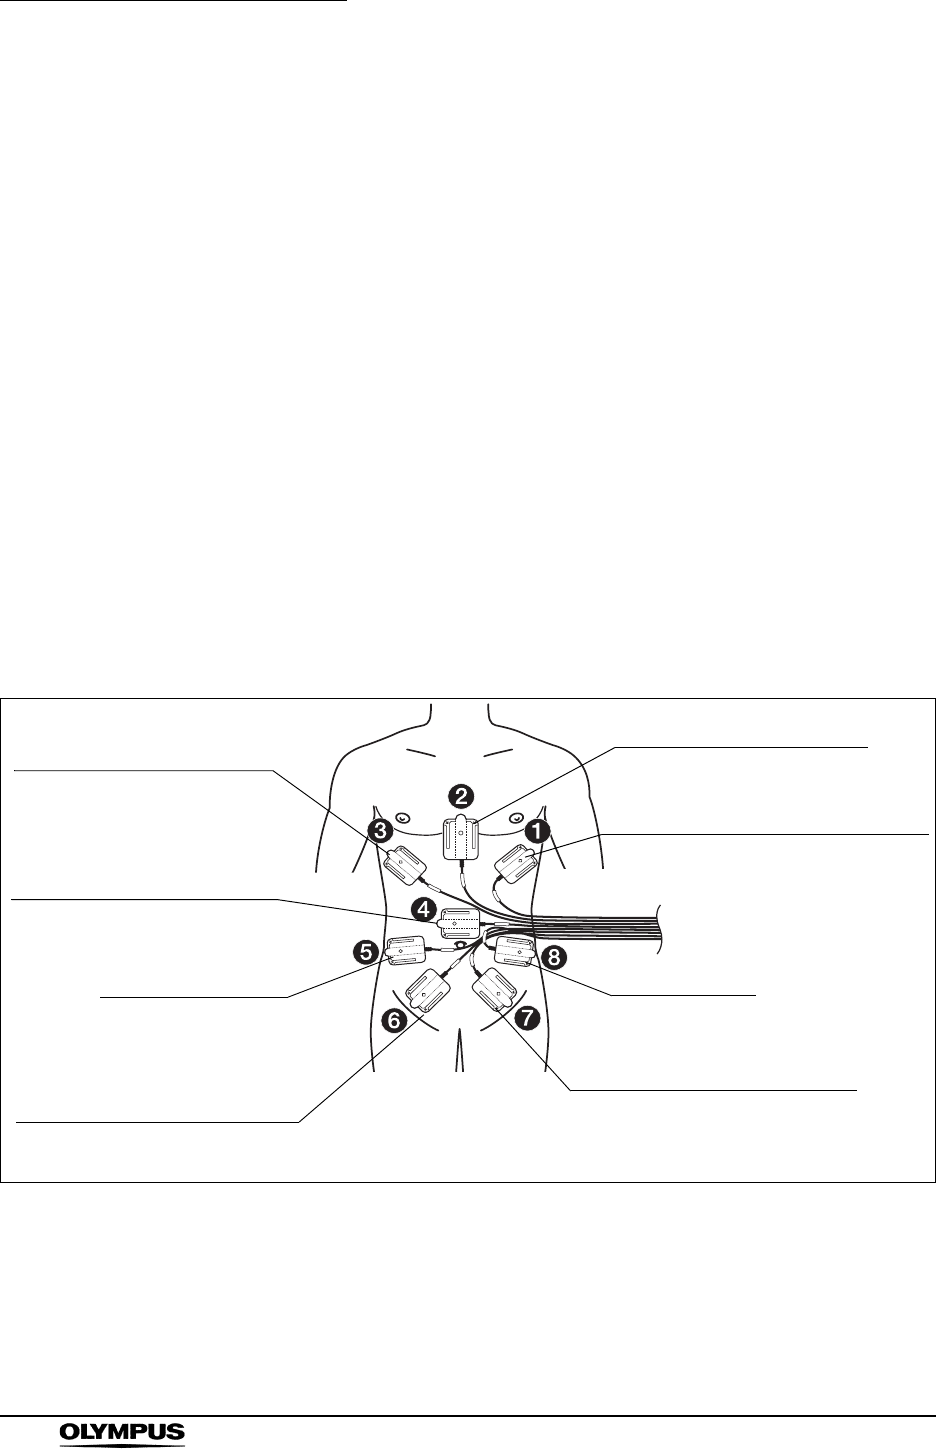
2. Referring to the provided template “Antenna locations guide”, identify the 8
antenna locations on the patient, and determine if the locations require
shaving.
3. If there is too much hair in a particular location to securely adhere the
antenna lead cover, shave as necessary.
Figure 5.26
Red: 7th right rib
(immediately below the chest
bulge)
Green: Right flank
Pink: Around the epigastric
(center of body)
White: Left flank
Blue: Right lower abdomen
(lowest possible position
unaffected by bending of thigh)
Brown: 7th left rib
(immediately below the chest bulge)
Yellow: Above the umbilicus
(not to overlap the umbilicus)
Purple: Left lower abdomen
(lowest possible position
unaffected by bending of thigh)
For patients of normal stature
Chapter 5 Capsule Endoscope Procedures
117
OLYMPUS CAPSULE ENDOSCOPE SYSTEM
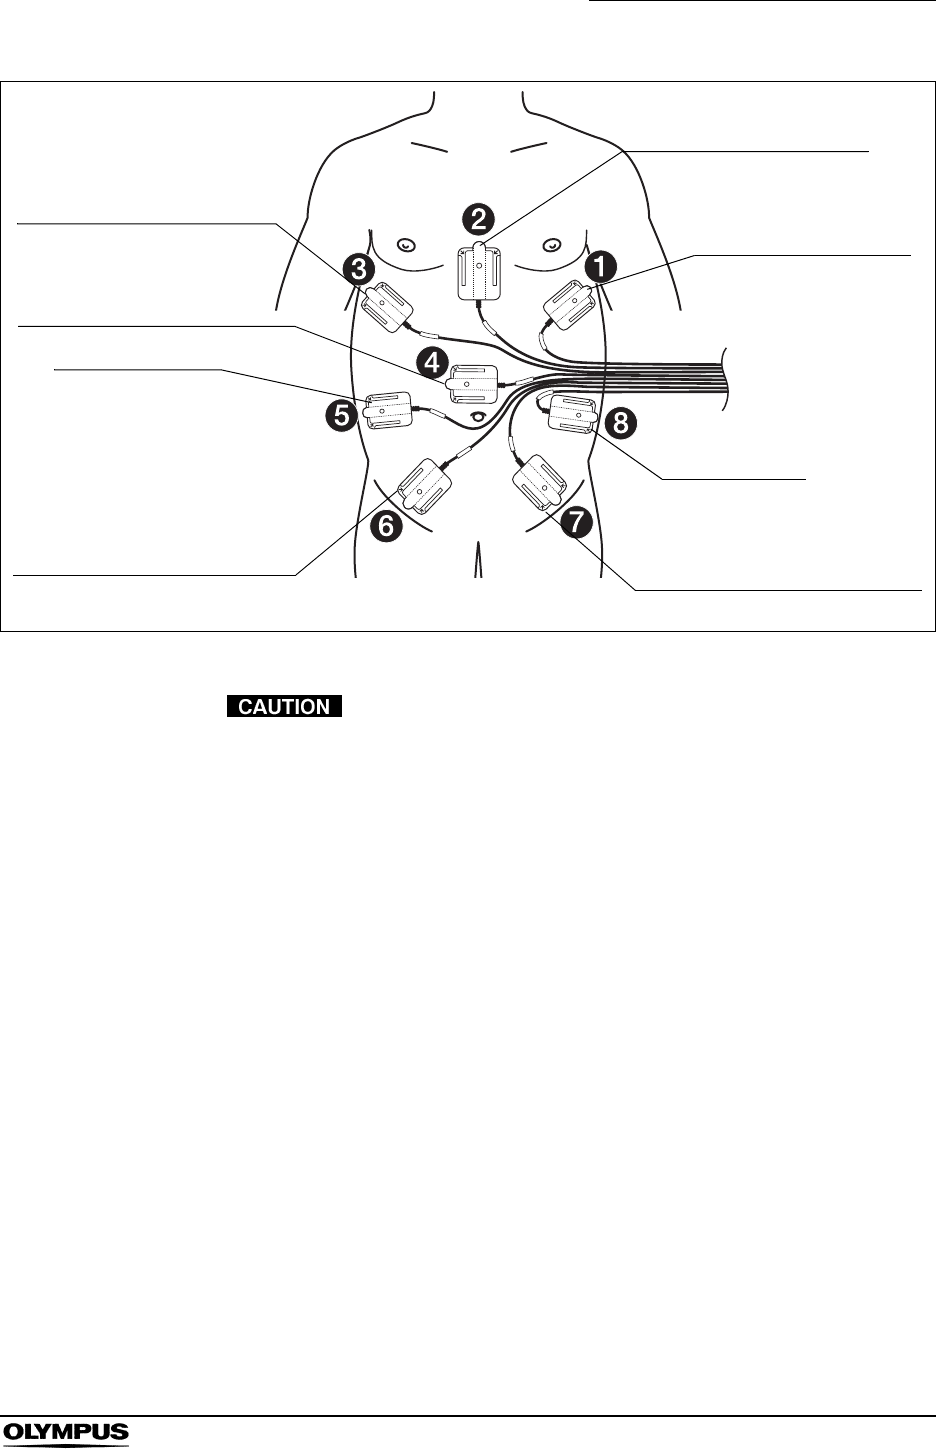
Figure 5.27
When attaching the antenna pads, position the cables so that
they do not overlap with the antenna pads. Otherwise, noise
may appear in the images.
Red: 7th right rib
(immediately below the chest
bulge)
Green: Right flank
Pink: Around the epigastric
(center of body)
White: Left flank
Blue: Right lower abdomen
(lowest possible position
unaffected by bending of thigh)
Brown: 7th left rib
(immediately below the
chest bulge)
Yellow: Above the umbilicus
(not to overlap the umbilicus)
Purple: Left lower abdomen
(lowest possible position
unaffected by bending of thigh)
For patients of large stature
118
Chapter 5 Capsule Endoscope Procedures
OLYMPUS CAPSULE ENDOSCOPE SYSTEM
Attaching the antenna lead cover
Before attaching the antenna lead cover to the antenna pad,
check that the antenna pad has not been folded or creased,
and that the antenna cable is free of significant deformation
or abnormalities.
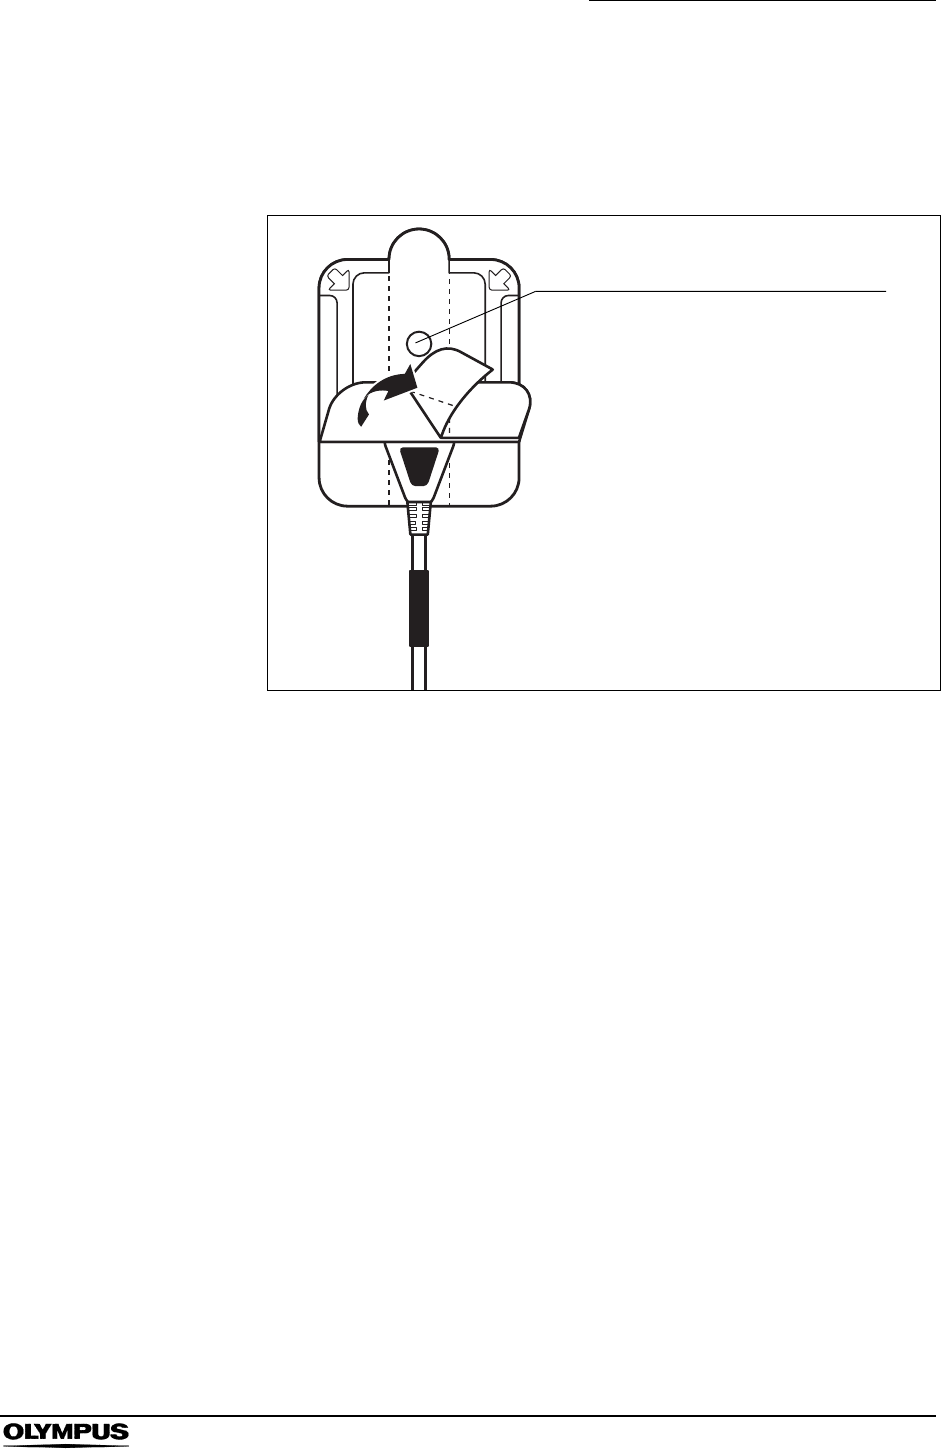
1. Insert the antenna into the antenna lead cover so that its color tag is on the
same side as the blue surface of the antenna lead cover, then align their
holes (see Figure 5.28).
Figure 5.28
Antenna lead cover, top surface (blue)
Lining paper (inside)
Attachment in process
Antenna color tag
Antenna number
Chapter 5 Capsule Endoscope Procedures
119
OLYMPUS CAPSULE ENDOSCOPE SYSTEM
2. Align the hole on the center of the antenna pad to the hole on the center of
the antenna lead cover. Peel off the lining paper from the inside of the
antenna lead cover (on the blue side), and adhere the antenna pad securely
to the antenna lead cover (see Figure 5.29).
Figure 5.29
Attachment complete
Align the hole on the antenna pad
with the hole on the antenna lead cover
120
Chapter 5 Capsule Endoscope Procedures
OLYMPUS CAPSULE ENDOSCOPE SYSTEM
Attaching the antennas to the patient
Make sure that the antenna pads are attached firmly to the
antenna lead cover, and that the antenna lead cover are
attached firmly to the patient. Otherwise, noise may appear in
the images, or the images may not be transmitted properly.
1. Dry the patient’s body by wiping with a dry piece of gauze.
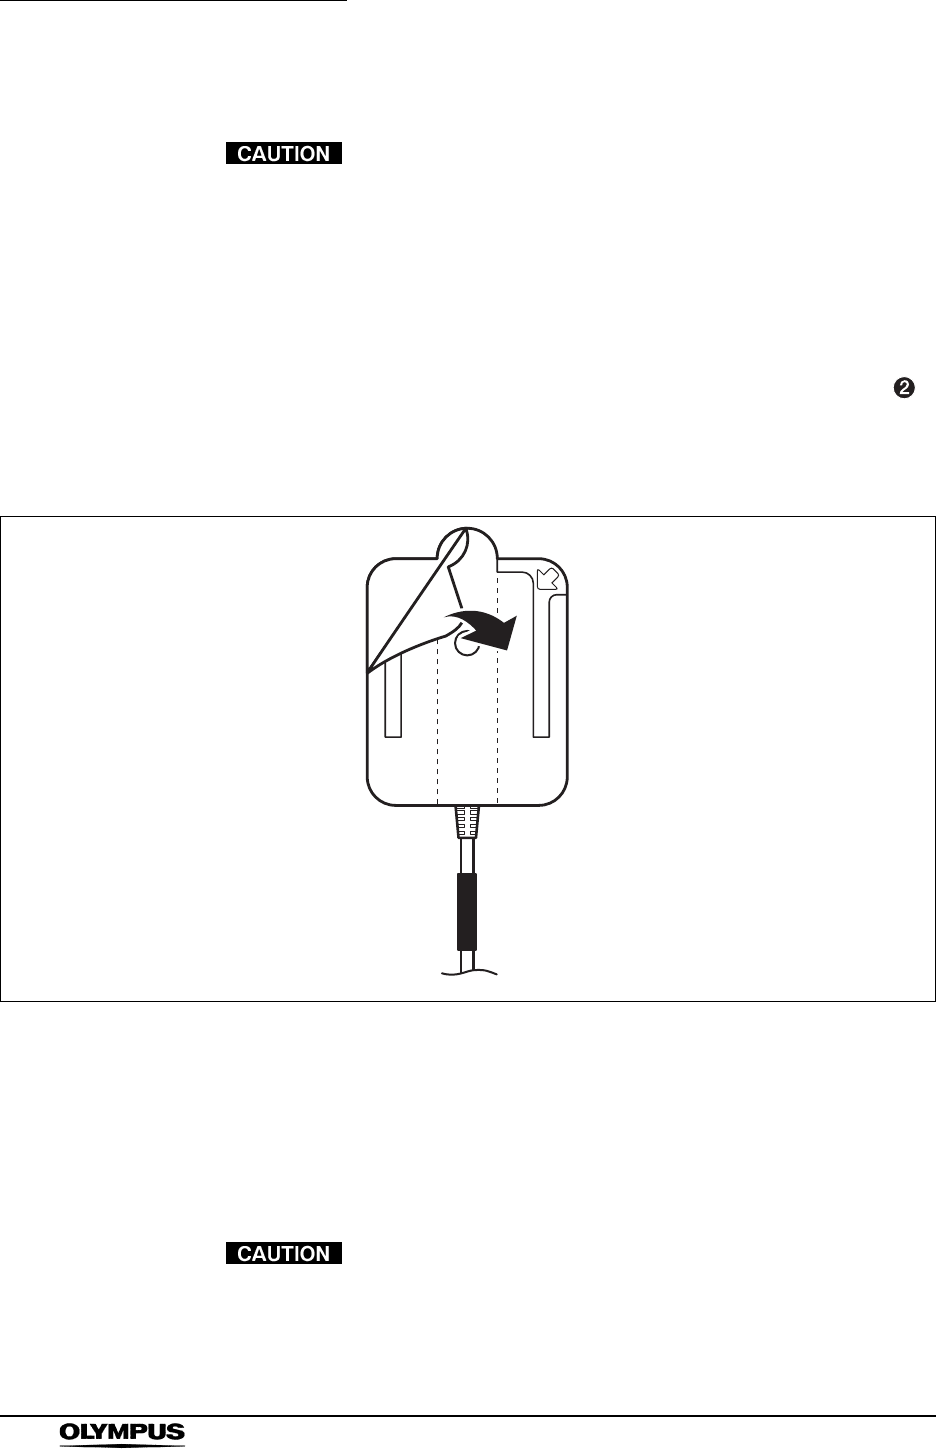
2. Place the antenna pads on the patient so that their numbering matches the
Antenna Locations Guide (see Figure 5.26). Starting with antenna pad ,
remove the lining paper on the back of the antenna lead cover by peeling
from the point indicated by the arrow (see Figure 5.30), and then press
down firmly on the antenna pad to attach it to the patient.
Figure 5.30
3. Ask the patient to get off the bed, to move around slowly, then sit on the bed
again. While making sure that all antennas are securely attached, have the
patient check for any skin discomfort caused by the attached antennas. If
the patient experiences discomfort, replace the antenna lead cover with a
spare, and reattach the antenna.
• Once used, the antenna lead cover loses adhesion. Please
replace the antenna lead cover if reattaching the antenna.
Chapter 5 Capsule Endoscope Procedures
121
OLYMPUS CAPSULE ENDOSCOPE SYSTEM
• Be sure to use the antenna covers when attaching the
antennas. Failure to do so may prevent the proper reception
of small bowel capsule endoscopic images.
• Perform the examination with all 8 antenna pads attached to
the patient. The examination may fail with even one antenna
pad not properly attached.
• Do not allow the antenna cable to lay on or near the antenna
pads. It may prevent the proper reception of capsule
endoscopic images.
• Do not use an antenna pad that has been completely folded.
Its reception performance may be degraded, causing noise to
appear in the transmitted images.
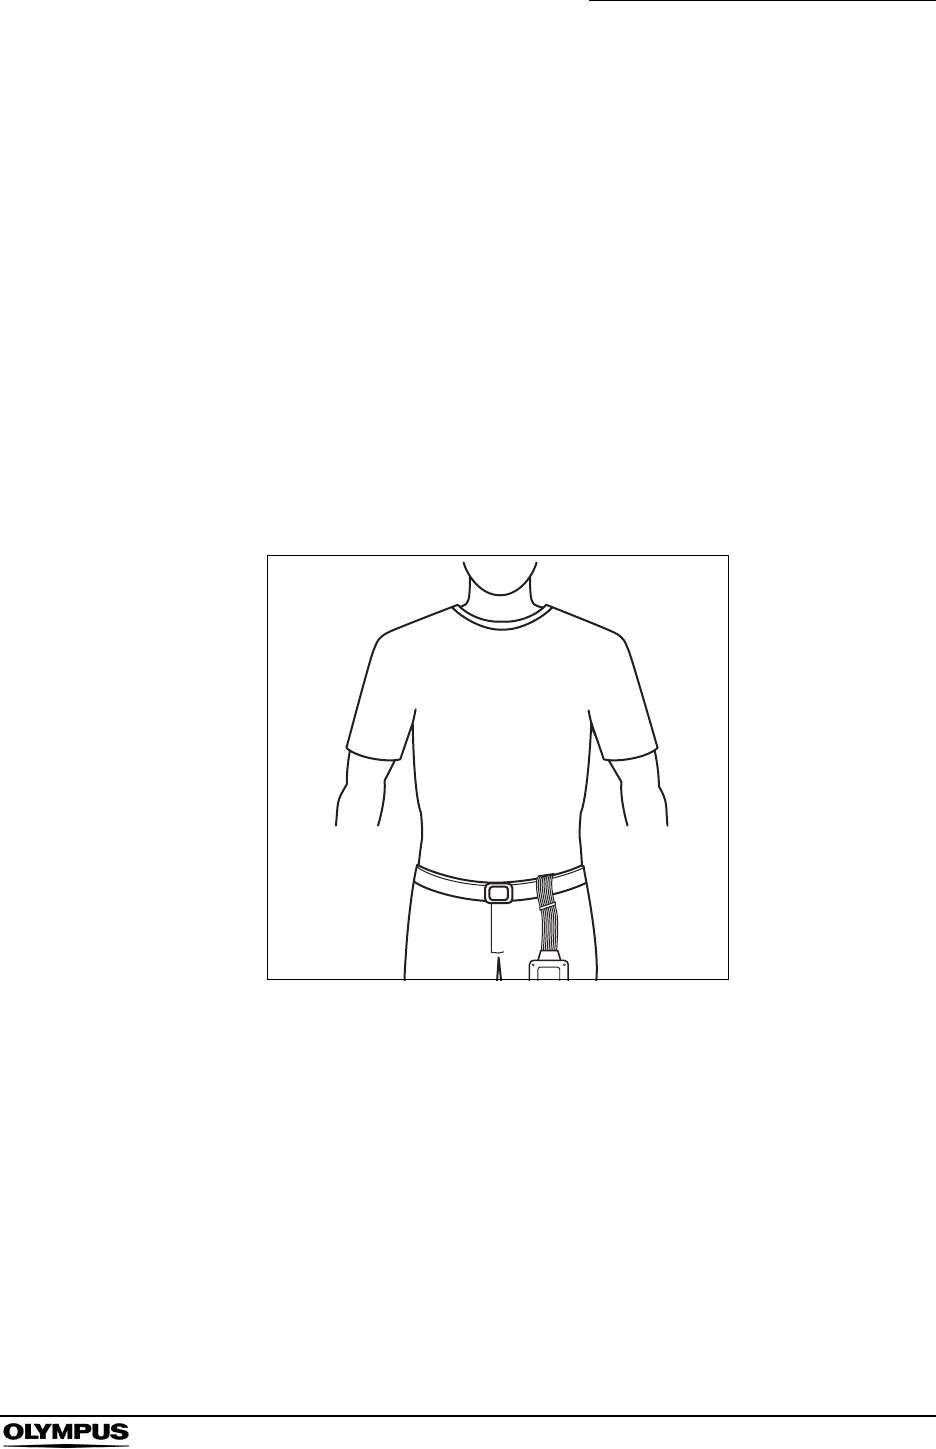
4. Have the patient get dressed, letting the antenna lead set protrude to the left
of his/her abdomen (see Figure 5.31).
Figure 5.31
122
Chapter 5 Capsule Endoscope Procedures
OLYMPUS CAPSULE ENDOSCOPE SYSTEM
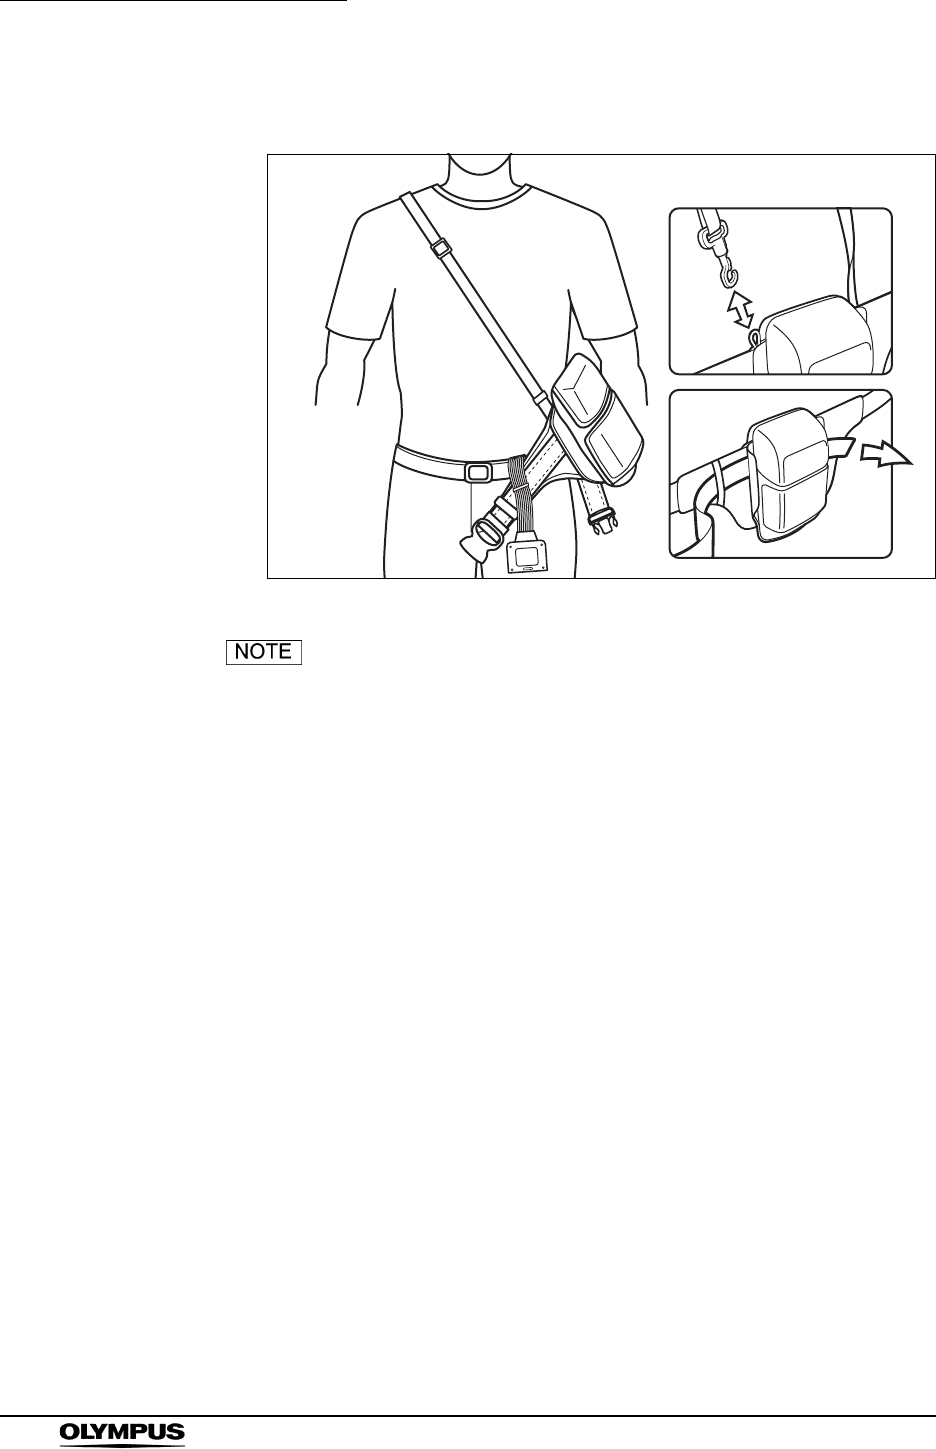
5. Have the patient wear the suspender.
Figure 5.32
• The suspender can be released on one of its ends.
• Pass the loose end of the belt between the belt and the
pouch to keep it out of the way.
Chapter 5 Capsule Endoscope Procedures
123
OLYMPUS CAPSULE ENDOSCOPE SYSTEM
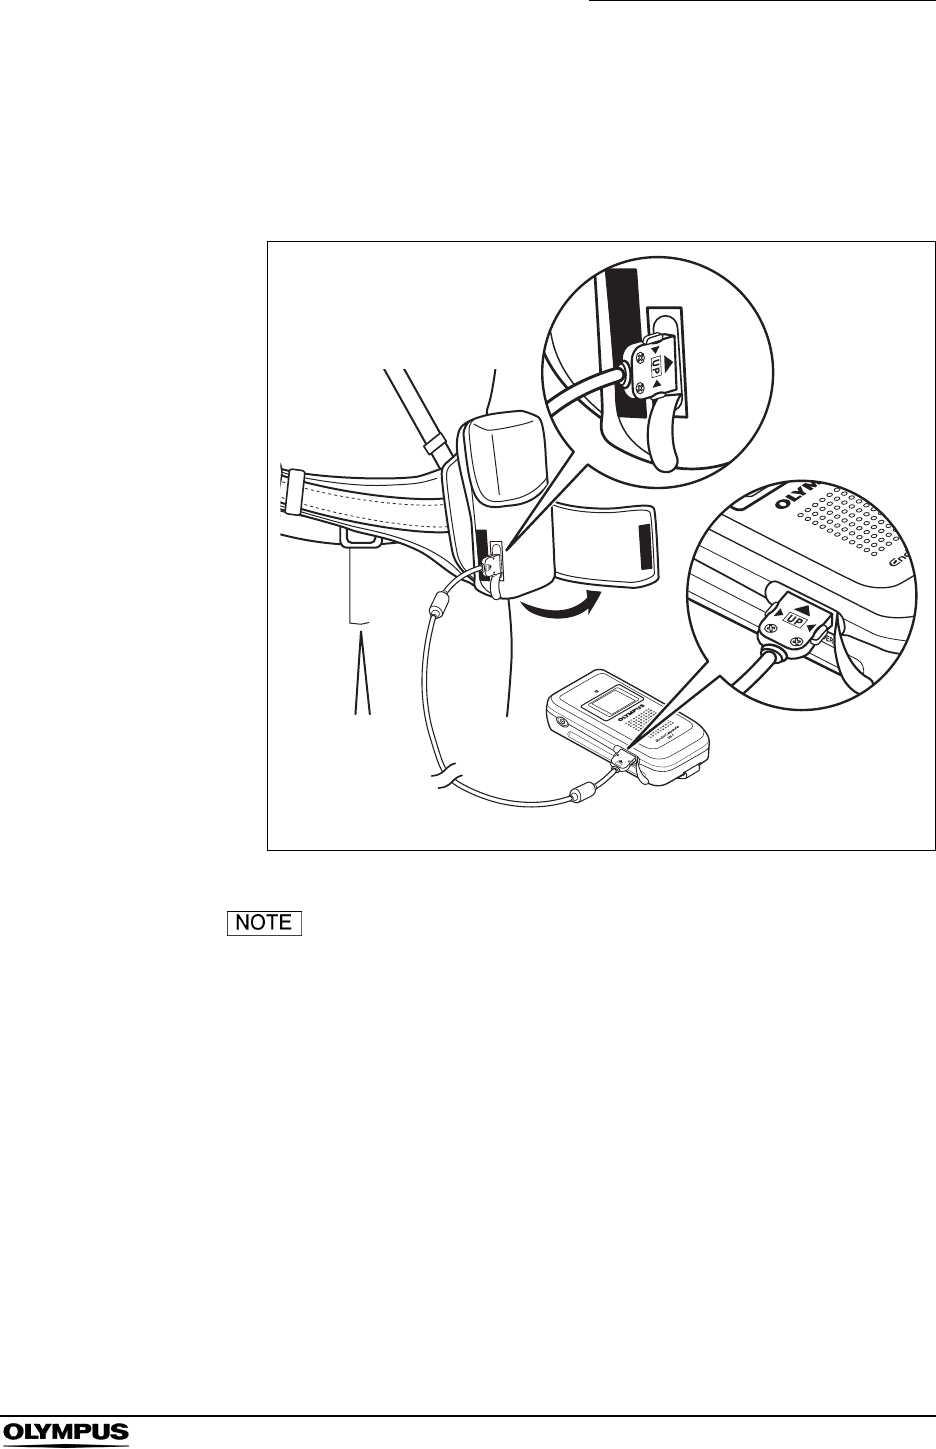
Connecting and testing the recorder unit and the antenna lead
set
1. Connect the antenna lead set to the recorder unit by inserting the
connection unit into the recorder unit until they click (see Figure 5.33).
Figure 5.33
2. Hold down the recorder unit’s power switch for at least 1 seconds to turn ON
the recorder unit.
Figure 5.34
3. The Olympus logo is displayed again, and the indicator lamp illuminates in
yellow for 2 seconds.
124
Chapter 5 Capsule Endoscope Procedures
OLYMPUS CAPSULE ENDOSCOPE SYSTEM
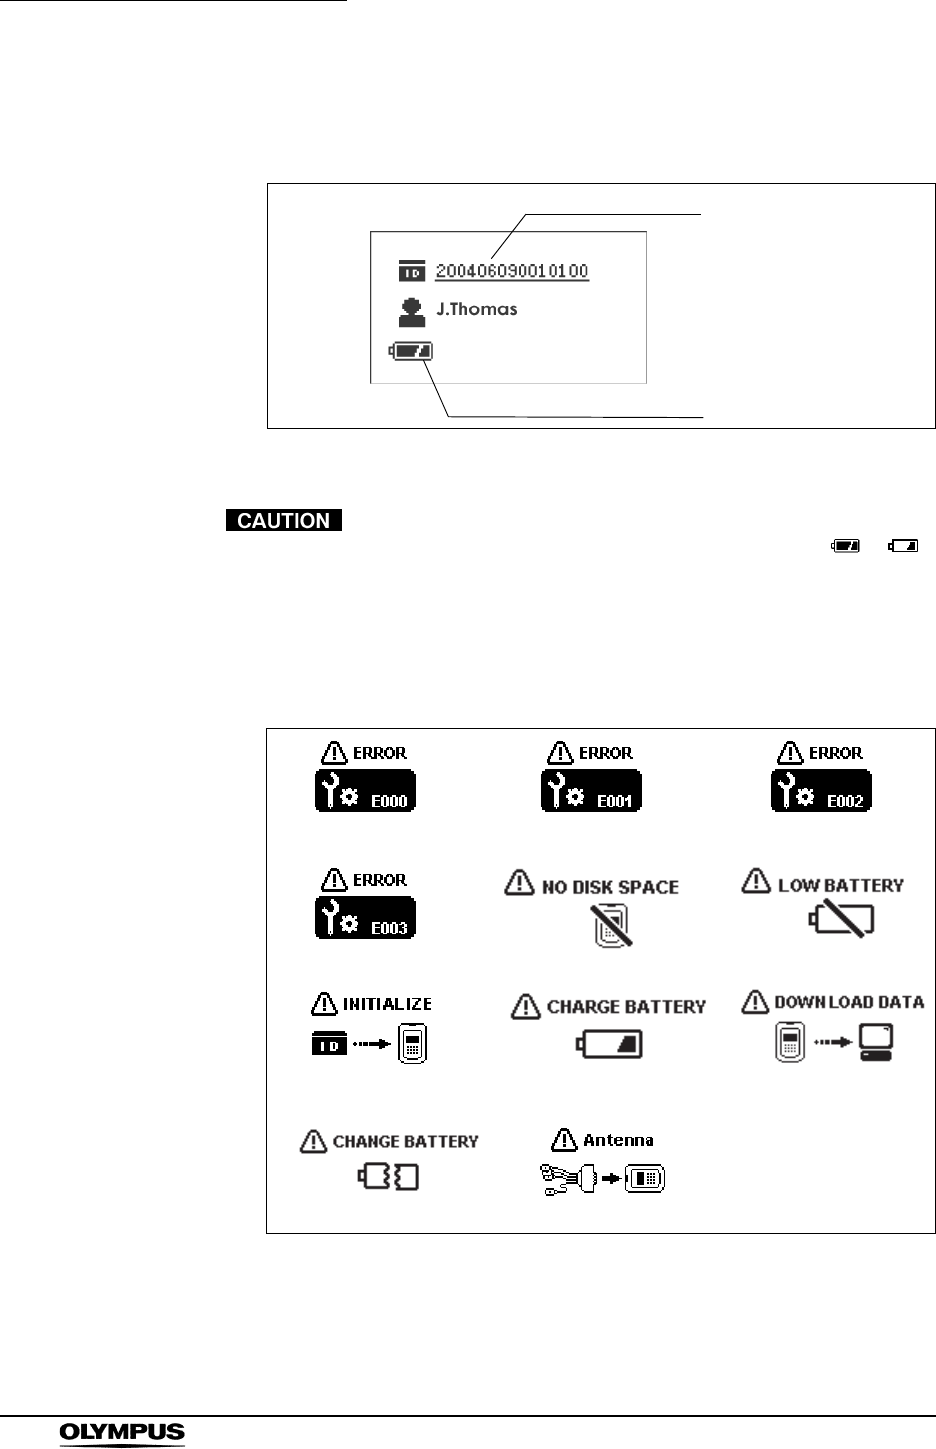
4. The following information display screen (see Figure 5.35) is displayed on
the recorder unit’s display panel, and the indicator lamp illuminates in green.
Figure 5.35
• If the indicator on the battery pack changes from to
prior to the examination, recharge the battery pack, or
replace with a fully-charged battery pack.
• If an error is detected while turning the recorder unit ON, the
recorder unit’s indicator lamp will blink yellow. With the lamp
blinking yellow, the examination cannot start.
Figure 5.36
• If any of the icons shown in Figure 5.36 are displayed, refer
to “Recorder unit error messages” on page 235, to evaluate
and attempt to correct the problem
Patient ID display
Battery pack level indicator
Chapter 5 Capsule Endoscope Procedures
125
OLYMPUS CAPSULE ENDOSCOPE SYSTEM
5. Check that the recorder unit is displaying information for the patient that is
about to be examined.
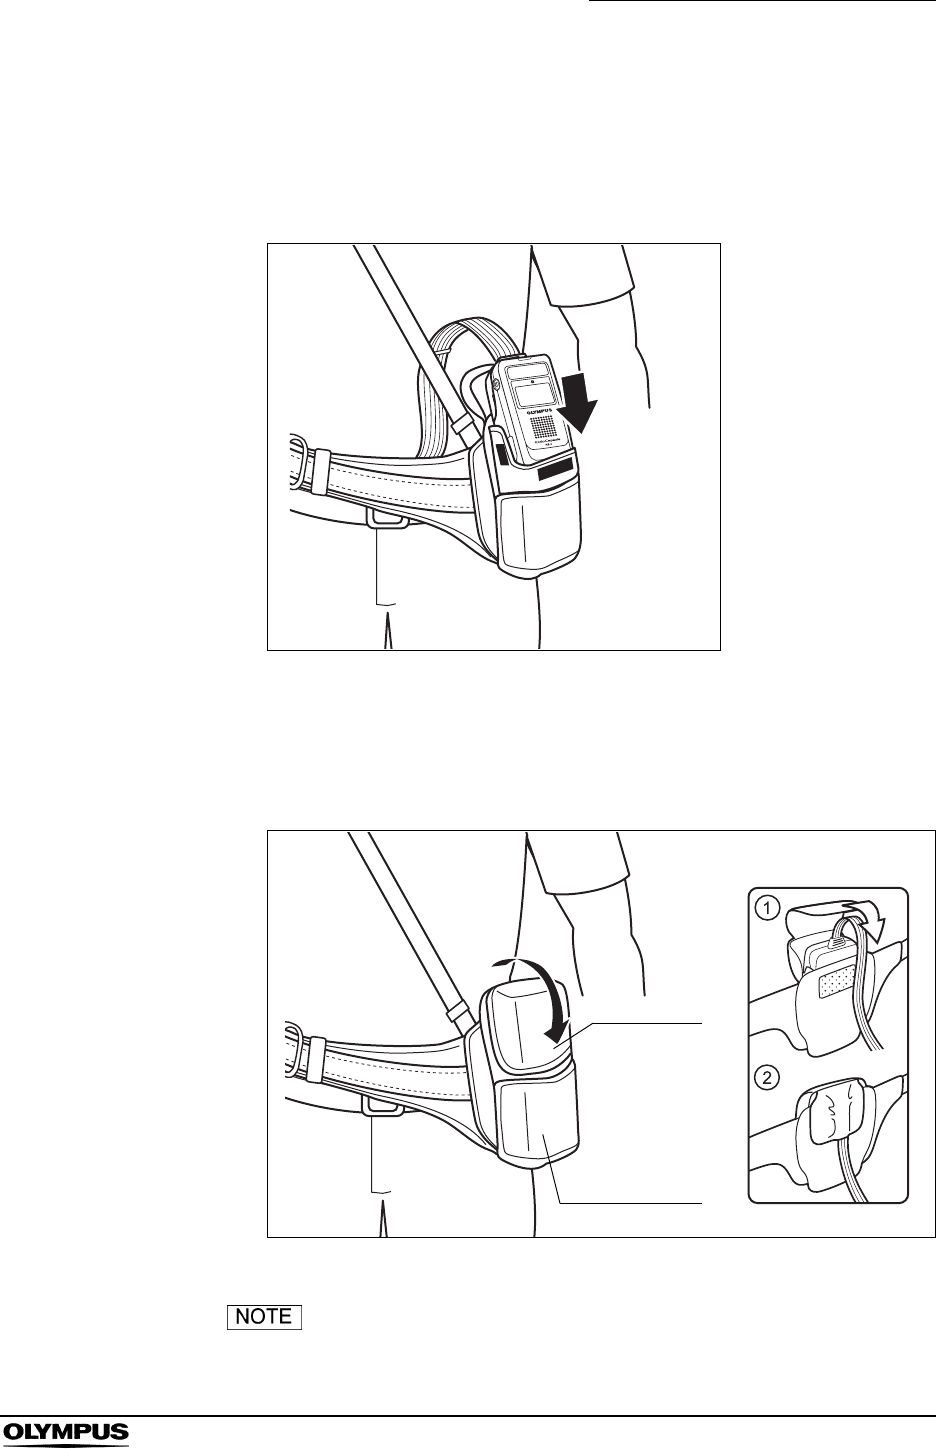
6. Insert the recorder unit into the recorder unit pouch, with its display panel
facing outward (see Figure 5.37).
Figure 5.37
7. To secure the recorder unit to the porch, close the pouch cover with the
antenna cable passed through its side (or its center), then fasten the pouch
cover with the Velcro straps (see Figure 5.38).
Figure 5.38
• Adjust the length of the suspender and the belt to fit the
patient.
Pouch cover
Connector cover
126
Chapter 5 Capsule Endoscope Procedures
OLYMPUS CAPSULE ENDOSCOPE SYSTEM
• Ask the patient to adjust the position of the pouch when
sitting down.
• Show the patient how to loosen the recorder unit harness, for
example, when using the bathroom.
• The procedure for storing the recorder unit into the pouch is
illustrated on the back side of the pouch cover.
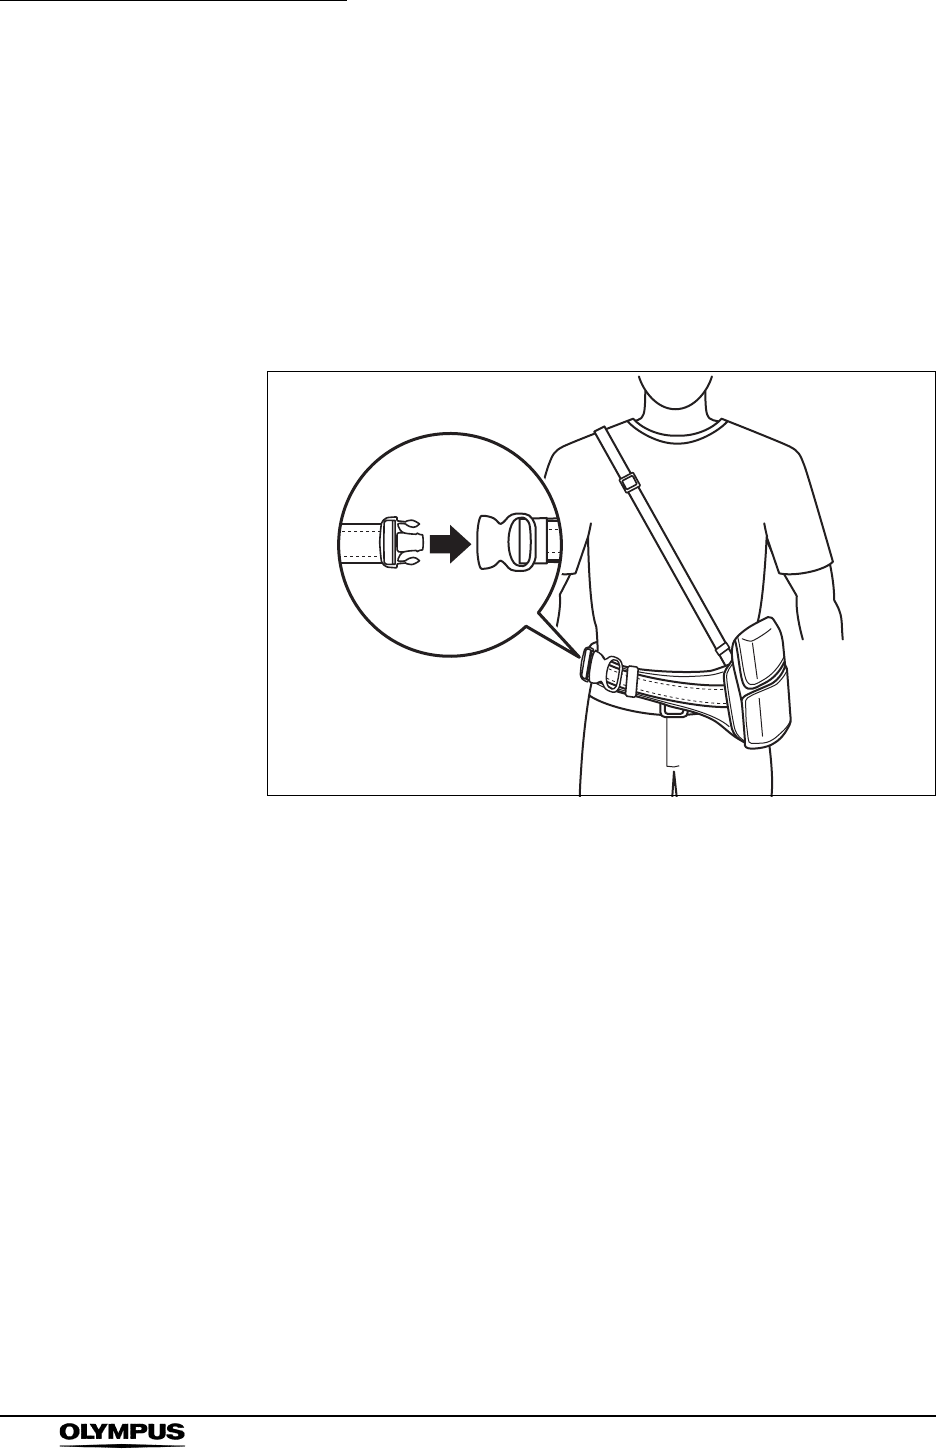
8. Have the patient connect the buckle, and then pass the antenna lead set
through from the inside to the outside of the belt.
Figure 5.39
Chapter 5 Capsule Endoscope Procedures
127
OLYMPUS CAPSULE ENDOSCOPE SYSTEM
9. Remove the rubber caps from the real time viewer cable connectors on the
recorder unit (accessible via the opening on the lower right side of the
netted pocket) and on the real time viewer. Using the real time viewer cable,
connect the real time viewer to the recorder unit, as shown in Figure 5.40.
Figure 5.40
If you have mistakenly inserted the recorder unit with its
display panel facing inward, then the recorder unit’s real time
viewer cable connector can be accessed via the opening on
the lower left side of the connector cover.
10. Hold down the real time viewer’s power switch for at least 1 seconds to turn
ON the real time viewer.
128
Chapter 5 Capsule Endoscope Procedures
OLYMPUS CAPSULE ENDOSCOPE SYSTEM
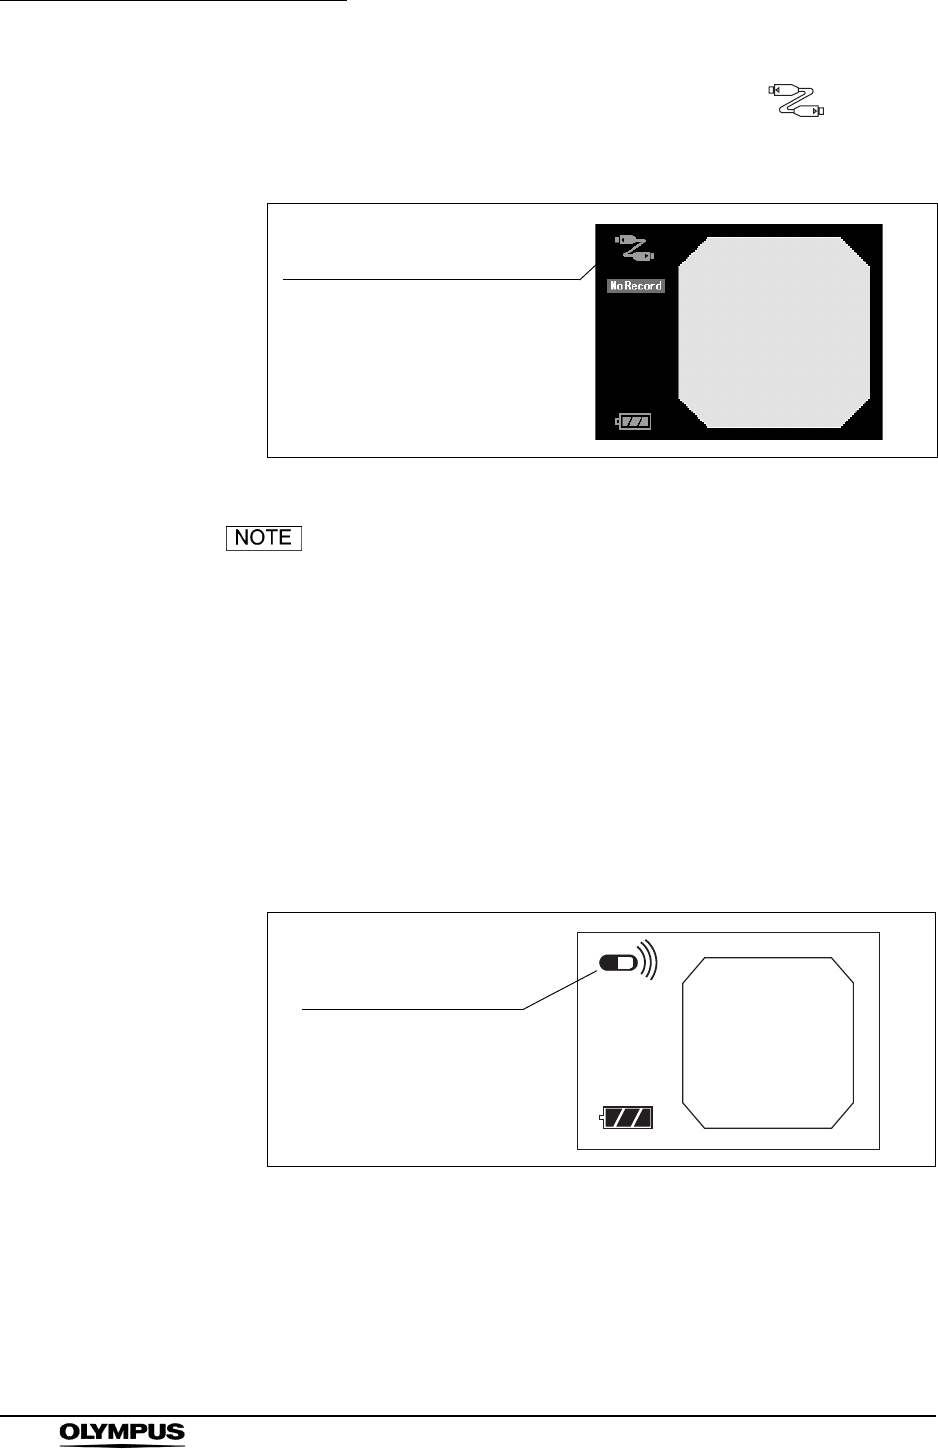
11. The real time viewer’s display panel will display an icon ( ) indicating
the connection to the recorder unit, and the octagonal display will show “No
RECORD”.
Figure 5.41
• When signals from the capsule endoscope are not being
received, or if the reception is poor, “NO RECORD” will be
displayed to the left of the octagonal display, and endoscope
images cannot be recorder by the recorder unit.
• On the upper left of the real time viewer’s display panel, a
receiver connection icon is displayed to indicate that the
image is being transmitted from the recorder unit via the real
time viewer cable (see Figure 5.41).
• When the real time viewer is receiving images directly from
the capsule endoscope, the direct reception icon is displayed
(see Figure 5.42).
Figure 5.42
Recorder unit connection icon
Direct reception icon

Chapter 5 Capsule Endoscope Procedures
129
OLYMPUS CAPSULE ENDOSCOPE SYSTEM
5.7 Preparing the capsule endoscope
Do not use a capsule endoscope that have been dropped,
bitten or been subjected to excessive pressure. Using such a
capsule endoscope may result in infection of patient and/or
medical personnel, as well as internal injury to the patient
due to equipment damage.
• If the sterile container is open or damaged, the sterility of the
capsule endoscope may have been compromised. Use a
new capsule endoscope instead.
• To prevent the capsule endoscope battery from deteriorating,
store the capsule endoscope under a temperature of 0 to
25°C (39 to 77°F). Do not store in a refrigerator or a freezer,
as condensation may result.
Clean the capsule activator with a cotton swab soaked in
70% ethyl or isopropyl alcohol.
130
Chapter 5 Capsule Endoscope Procedures
OLYMPUS CAPSULE ENDOSCOPE SYSTEM
Turning power ON
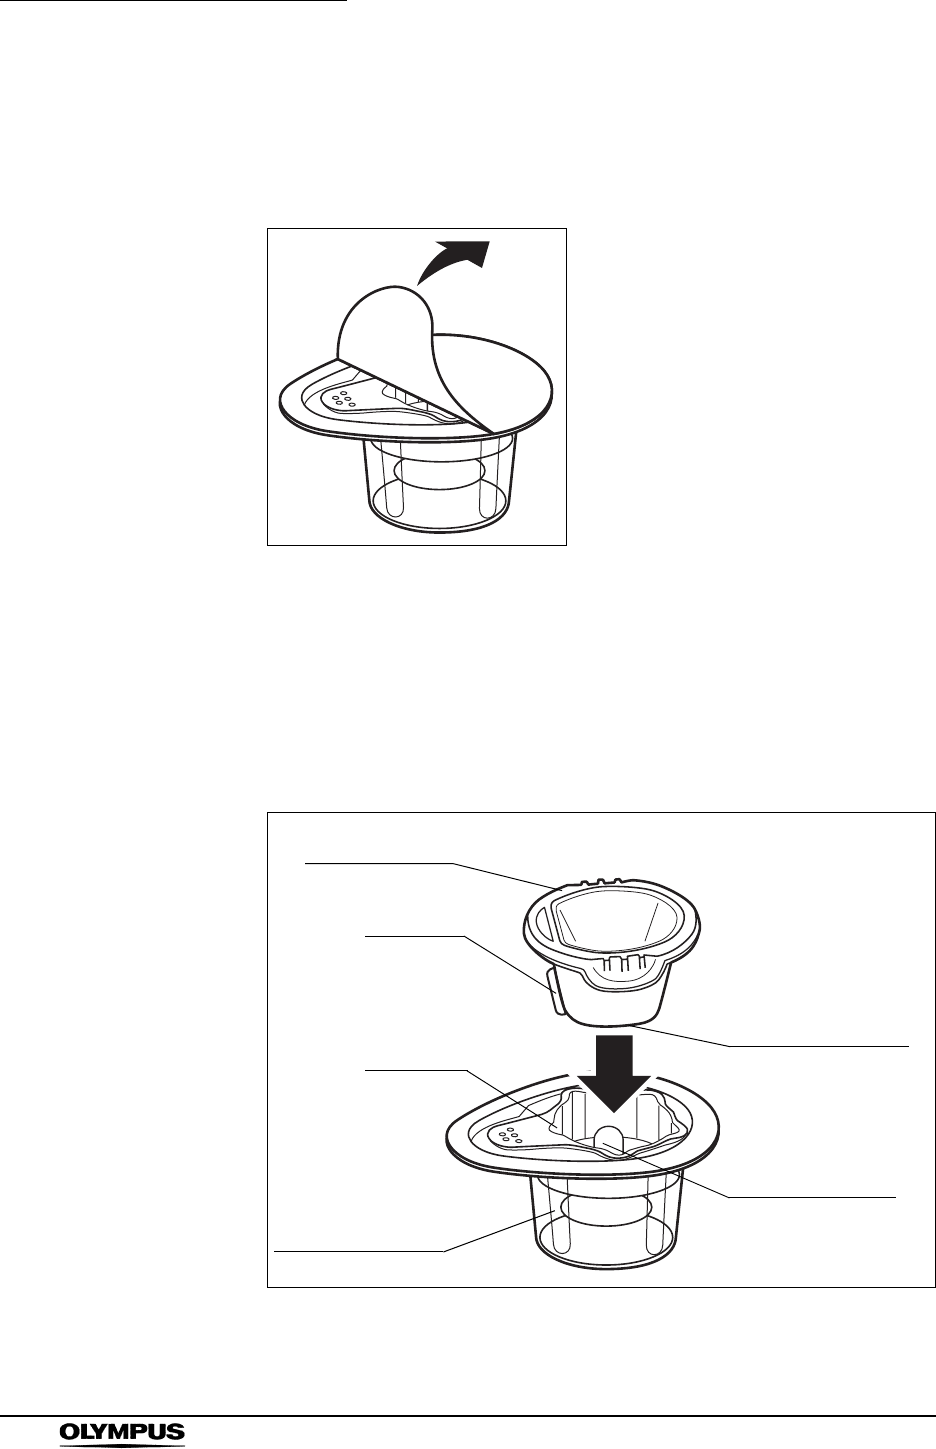
1. Slowly remove the sealing paper and take care that the capsule endoscope
does not fall out of the container.
Figure 5.43
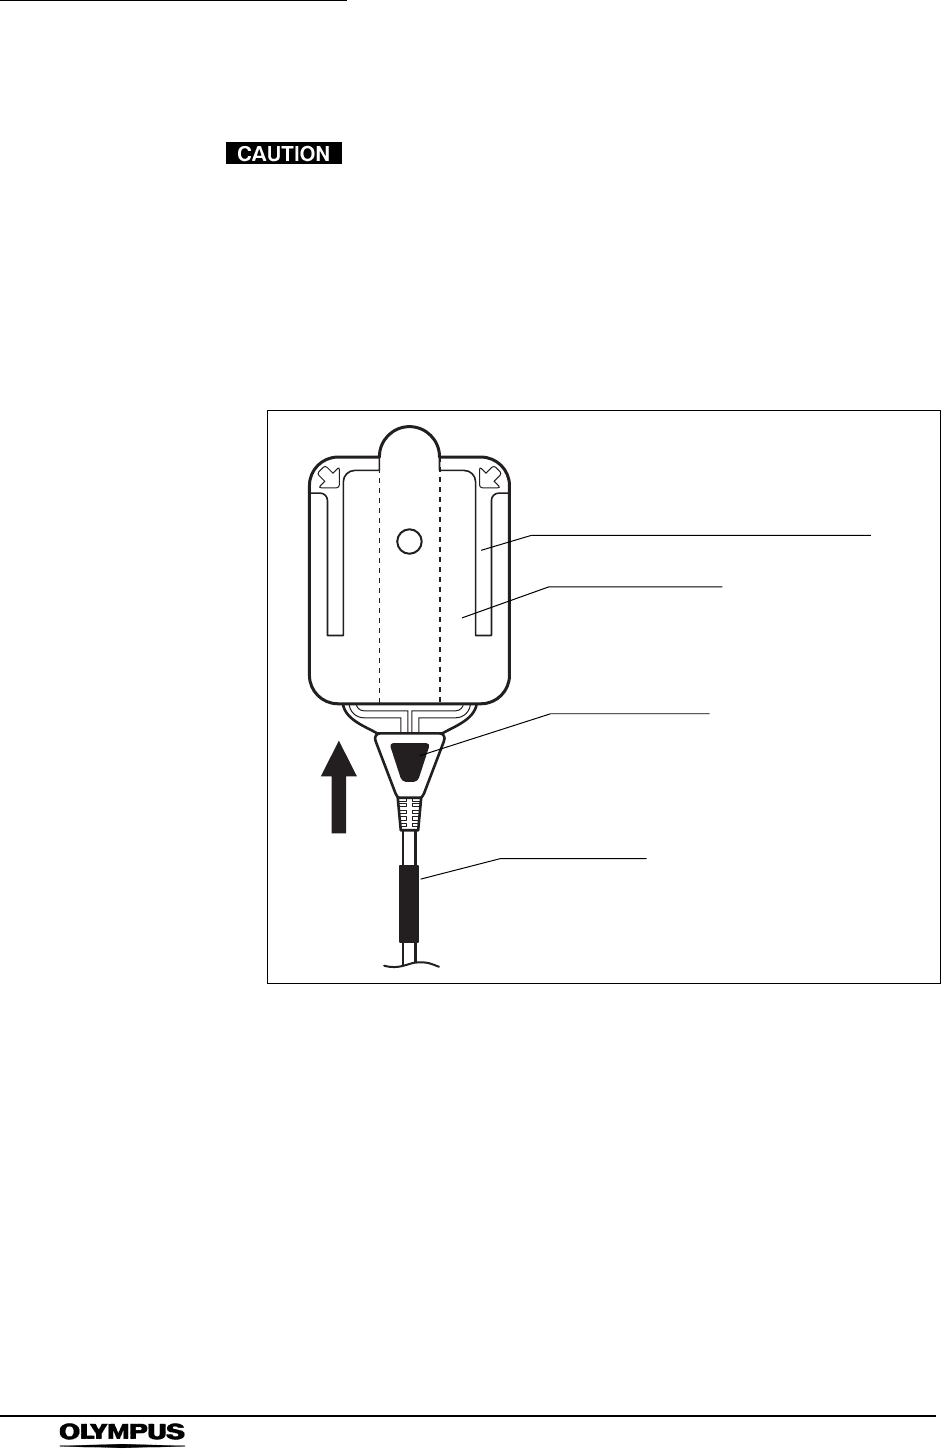
2. Hold the sterile container, taking care not to squeeze it. Adjust the direction
of the boss of the capsule activator to the closest groove to the handle of the
inner lid of sterile container.
Then insert the capsule activator straight along with the groove, the capsule
endoscope turn ON (see Figure 5.44). When the capsule endoscope is
turned ON, the LED illuminates.
Figure 5.44
Inner lid of sterile
container
Outer lid of sterile
container
Capsule activator
Insert
Capsule endoscope
insertion hole
Boss
Groove

Chapter 5 Capsule Endoscope Procedures
131
OLYMPUS CAPSULE ENDOSCOPE SYSTEM
• The capsule activator is not sterilized. Do not allow the
capsule endoscope to touch the activator.
• Keep the capsule endoscope away from magnets.
Magnets can turn the capsule endoscope ON, resulting in the
consumption of battery power.
• Do not look directly at the capsule endoscope’s LED for a
prolonged duration. It may cause an afterimage.
Inserting the capsule activator again will turn the capsule
endoscope OFF.
Confirming image
To avoid unnecessary consumption of battery power, once
the capsule endoscope has been turned ON, perform the
image confirmation quickly.
1. Bring the capsule endoscope in the sterile container close to an antenna of
the antenna lead set and confirm that the images captured by the capsule
endoscope are displayed on the real time viewer’s display panel. Also
confirm that the recorder unit’s display lamp blinks green simultaneously
with the transmission.
• Do not let the patient ingest the capsule endoscope until you
confirm the green blinking of the recorder unit’s indicator
lamp. Failure to do so may interfere with the examination.
• If the capsule endoscope images are not displayed, remove
the viewer cable from the real time viewer, and check if
images can be displayed via direct reception by the real time
viewer. If images are still not displayed, try using a different
capsule endoscope.
You can check for proper operation of the equipment by
periodically inspecting the status of the indicator lamp.
2. Disconnect the real time viewer cable from the recorder unit, close the
rubber cap for the viewer cable connector, and close the connector cover.

132
Chapter 5 Capsule Endoscope Procedures
OLYMPUS CAPSULE ENDOSCOPE SYSTEM
5.8 Starting the examination
Instruct the patient to follow the cautions for Capsule Endoscopy Patients in the
Capsule Endoscope Set A.
Also instruct the patient to return to the hospital 8 hours after the beginning of the
examination.
Dispensing
Do not use a capsule endoscope that has been dropped,
bitten or subjected to excessive pressure. Using such
endoscopes may result in internal injury to the patient due to
equipment damage.
• The capsule endoscope should only be ingested with water.
Use of other liquids may interfere with the examination.
• Avoid touching the top cover (LED side) of the capsule
endoscope. Do not wipe with gauze or other cloths.
1. Prepare a glass of water.
2. Remove the inner case, and hand it to the patient.
3. Confirm that the capsule endoscope’s LED is blinking.
4. Instruct the patient to take the capsule endoscope out of the inner case and
ingest it with a sip of water, and not to bite the capsule.
Confirming passage
Using the real time viewer, confirm that the capsule endoscope has passed the
stomach and entered the duodenum. Prolonged delay of the passage may result
in the examination ending prematurely due to low battery.
• In general, the capsule endoscope reaches the duodenum
about 2 hours after ingesting the capsule endoscope, though
this time may vary from patient to patient.
• The duration of the capsule endoscope’s presence within the
stomach varies from patient to patient. For this reason, you
may not be able to capture images for the entire small
intestine.

Chapter 5 Capsule Endoscope Procedures
133
OLYMPUS CAPSULE ENDOSCOPE SYSTEM
5.9 During the examination
Familiarize the patient with the following dangers, warnings and cautions.
The capsule endoscope contains metal parts. While the
capsule endoscope is in your body, stay away from
equipment (i.e. MRI equipment) for which wearing of metallic
objects is prohibited.
Immediately consult a physician if abdominal pain,
discomfort, or nausea is experienced after the patient ingests
the capsule endoscope. If treatment is delayed, it may result
in injury to the body cavity.
• With allergic patients, reddening or irritation of the skin may
be caused by the adhesive on the antenna lead cover.
• Do not remove the antenna lead set or the recorder unit
harness until the examination is completed. Failure to follow
instructions may interfere with the examination.
• Do not turn the recorder unit OFF, remove the battery pack
from the recorder unit, or disconnect the antenna lead set
during the examination. Failure to follow instructions may
interfere with the examination.
• During the examination, avoid pointing radio-transmitting
devices (i.e. keyless entry, home security, waitress call
system, garage door remote, wireless headphones, ham
radio, etc.) at the antenna leads.
134
Chapter 5 Capsule Endoscope Procedures
OLYMPUS CAPSULE ENDOSCOPE SYSTEM
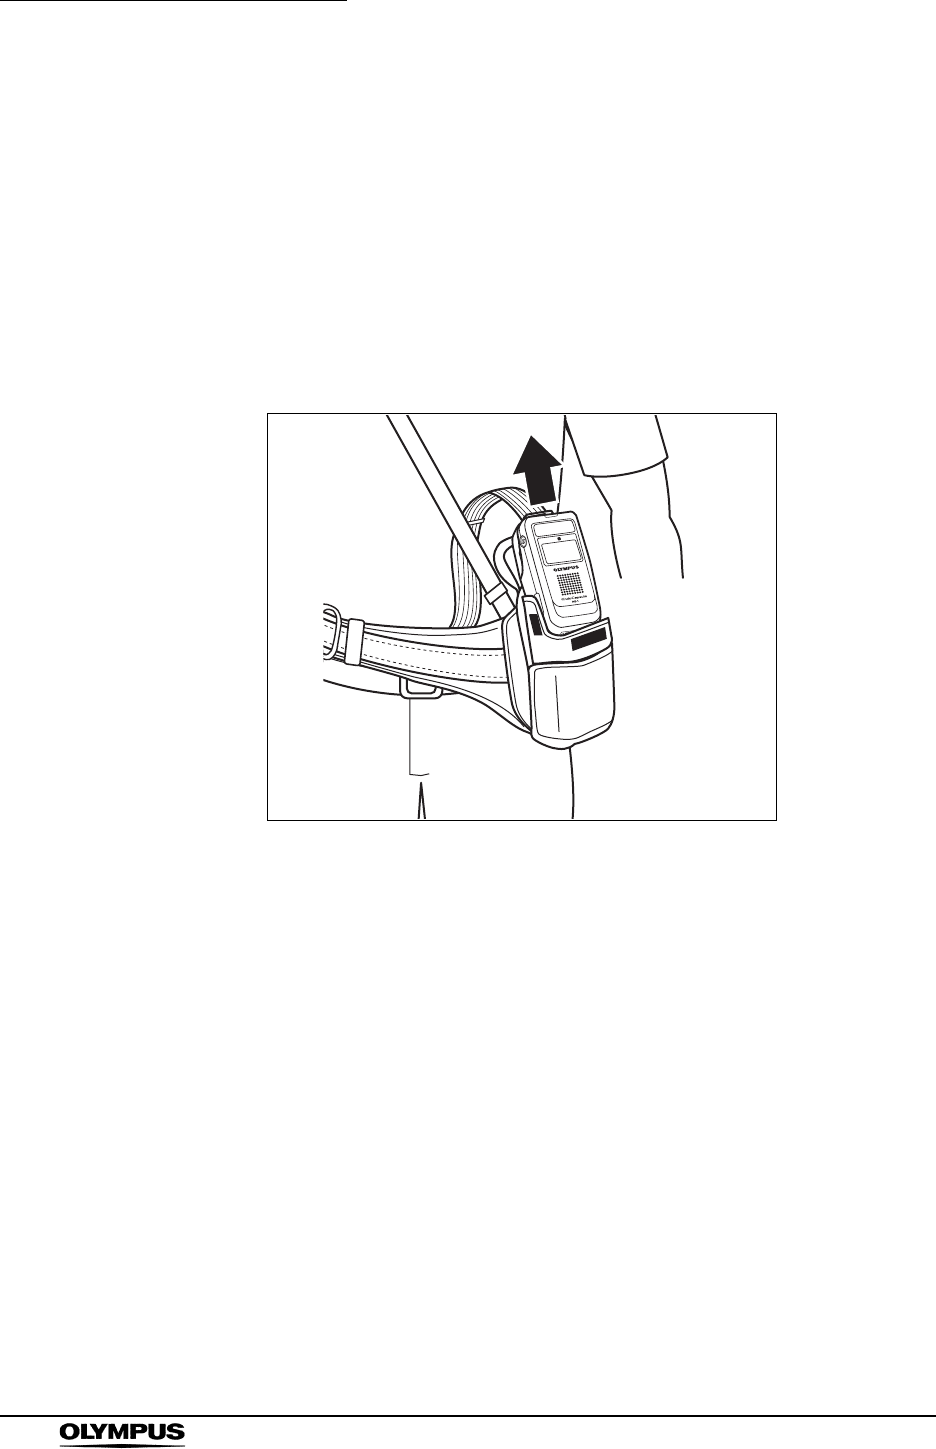
5.10 Ending the examination
Removing equipment
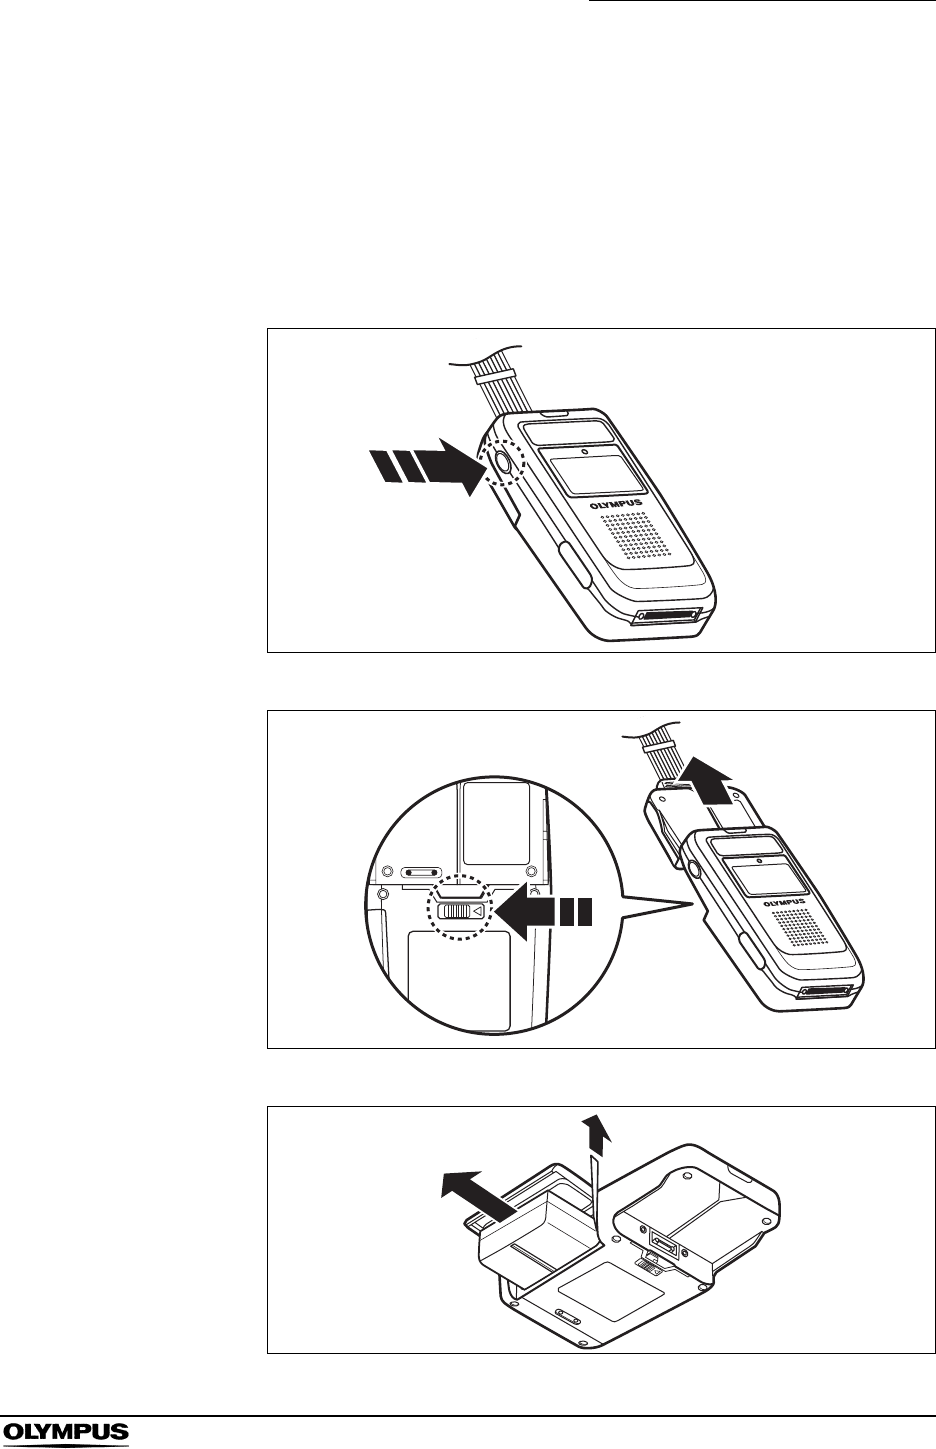
1. 8 hours after the start of the examination, check that the recorder unit’s
indicator lamp has stopped blinking, and end the examination.
If the indicator lamp is blinking, connect the real time viewer and determine
whether to continue or stop the examination.
2. Take the recorder unit out of the storage pouch.
Figure 5.45
Chapter 5 Capsule Endoscope Procedures
135
OLYMPUS CAPSULE ENDOSCOPE SYSTEM
3. Hold down the recorder unit’s power switch for 2 seconds or more to turn
OFF the recorder unit, then disconnect the antenna lead set. Slide the
antenna lead set eject button on the backside of the recorder unit, and
disconnect the connection unit by sliding it in the direction of the arrow (see
Figure 5.47).
Pull the battery pack removal ribbon to remove the battery pack (see Figure
5.48). Recharge the battery.
Figure 5.46
Figure 5.47
Figure 5.48
136
Chapter 5 Capsule Endoscope Procedures
OLYMPUS CAPSULE ENDOSCOPE SYSTEM
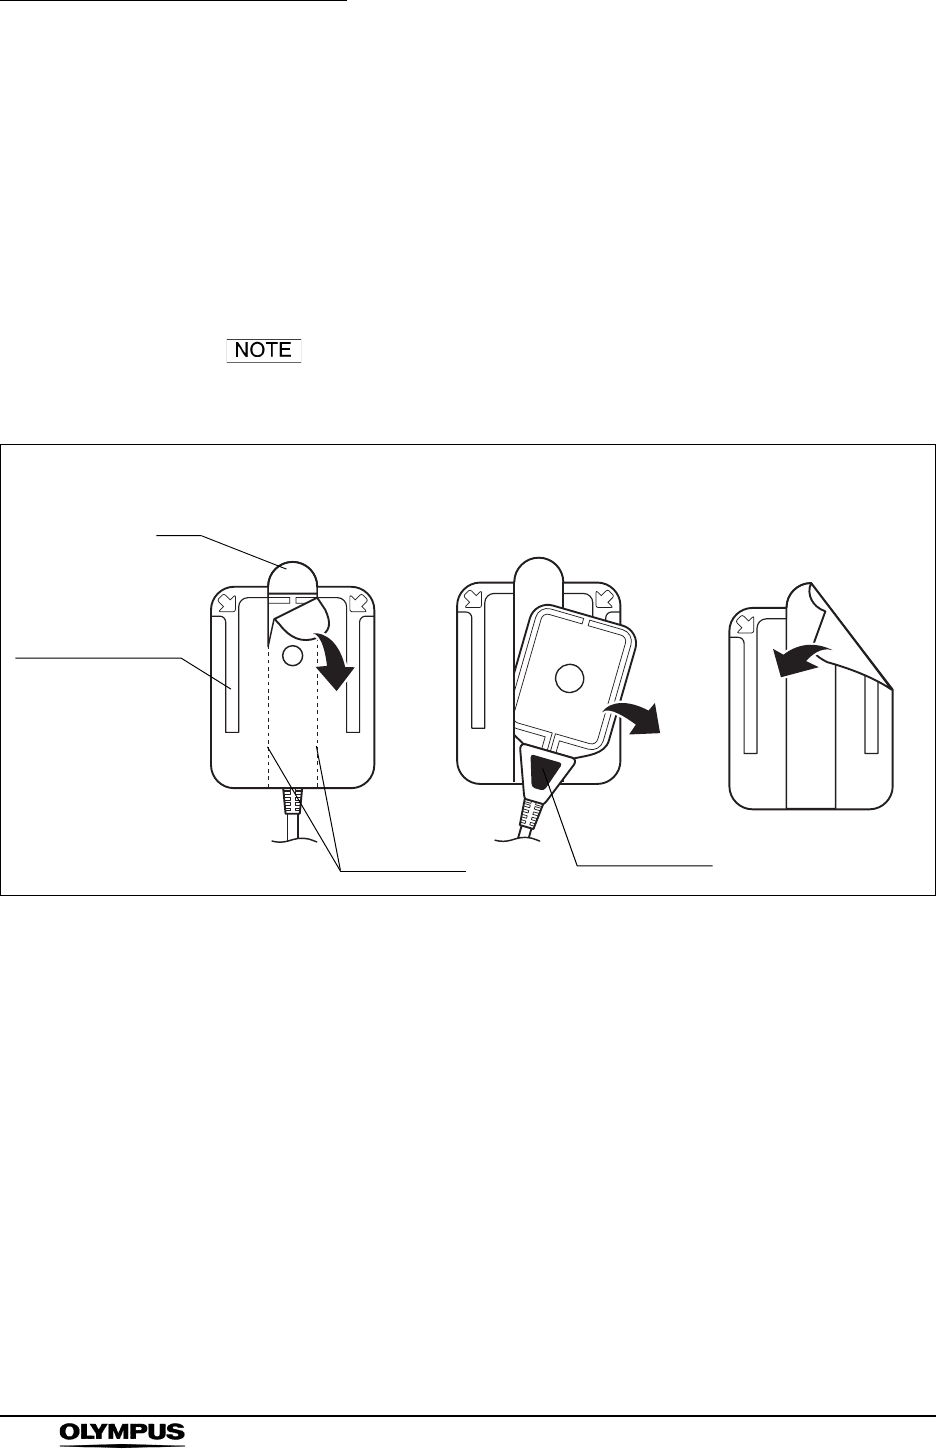
4. Remove the recorder unit harness from the patient.
5. Remove the antenna pads from the antenna lead cover.
The antenna lead cover can be easily removed by holding the tab and
tearing the center section of the blue surface, down along the perforation
(see Figure 5.49).
6. Carefully remove the antenna lead cover from the patient.
The antenna lead cover are single-use only. Do not reuse
them.
Figure 5.49
Antenna pad
Tab
Antenna lead cover
top surface (blue)
Remove
Tear off
Perforation

Chapter 5 Capsule Endoscope Procedures
137
OLYMPUS CAPSULE ENDOSCOPE SYSTEM
Downloading image data
The “Download” function is not available in Endo Capsule
Software Light.
Download the image data from the recorder unit to the workstation according to
the following procedure:
• While downloading, do not remove the recorder unit from the
cradle or turn OFF the workstation. Doing so may result in
loss of image data.
• While downloading, do not unplug the recorder unit cradle’s
power supply cable. Doing so may result in loss of image
data.
• While downloading, do not turn OFF the recorder unit. Doing
so will interrupt the download, and require you to start the
download again from the beginning.
• While downloading, do not remove the recorder unit from the
cradle or remove the cradle cable. Doing so may result in
loss of image data. If you do so, connect the recorder to the
workstation through the cradle and the cradle cable and
restart the workstation before downloading again.
• If the antenna lead set being worn by a patient is connected
to the recorder unit, do not connect the recorder unit to the
cradle. Otherwise, the patient may experience an electric
shock.
• If the workstation cannot recogize the connected recorder(s),
please remove the cradle cable from the workstation, restart
the workstation and then connect it again.
• Do not remove the recorder unit from the cradle while
downloading with two recorders connected whether the data
is now set to it or not. Doing so may result in the hangup of
the workstation. If the workstation does not work properly,
please restart the workstation.
1. Check that the recorder unit cradle is connected to the workstation using the
recorder unit cradle cable.
2. Turn ON the workstation and log in, as described in Chapter 4.
138
Chapter 5 Capsule Endoscope Procedures
OLYMPUS CAPSULE ENDOSCOPE SYSTEM
3. Remove the battery pack from the recorder unit and insert the recorder unit
into the recorder unit cradle. The recorder unit will be turned ON
automatically.
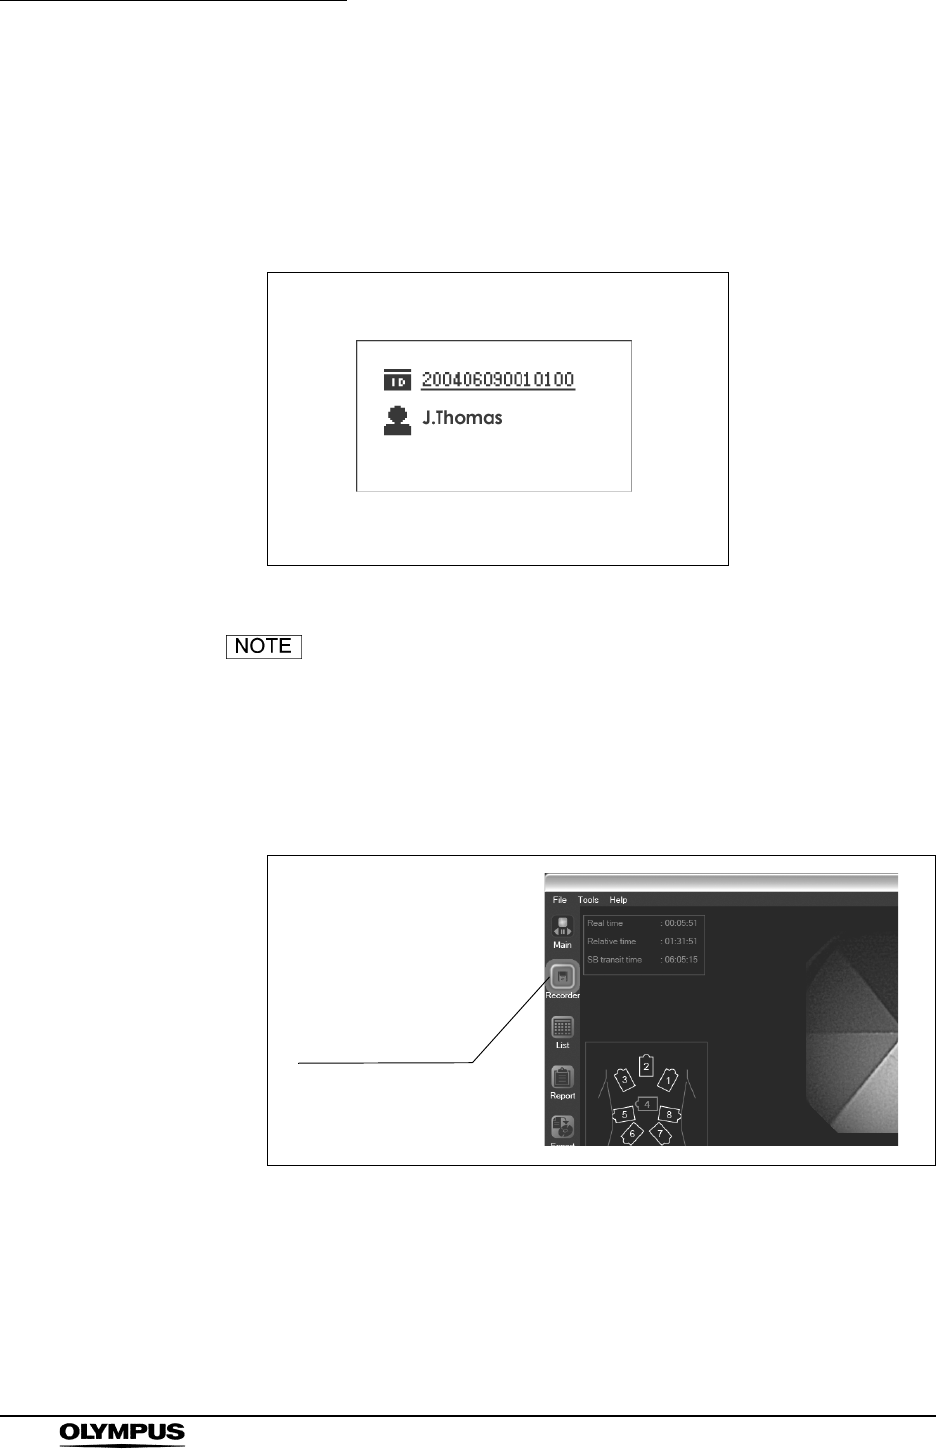
4. The patient’s ID and name are displayed on the recorder unit’s display panel
(see Figure 5.50).
Figure 5.50
If an error is detected on the recorder unit, the indicator lamp
will blink yellow. To troubleshoot, refer to Chapter 8,
“Troubleshooting” on page 233.
5. Click the [Recorder] button on the main screen. The recorder management
screen is displayed (see Figure 5.51).
Figure 5.51
Recorder button
Chapter 5 Capsule Endoscope Procedures
139
OLYMPUS CAPSULE ENDOSCOPE SYSTEM
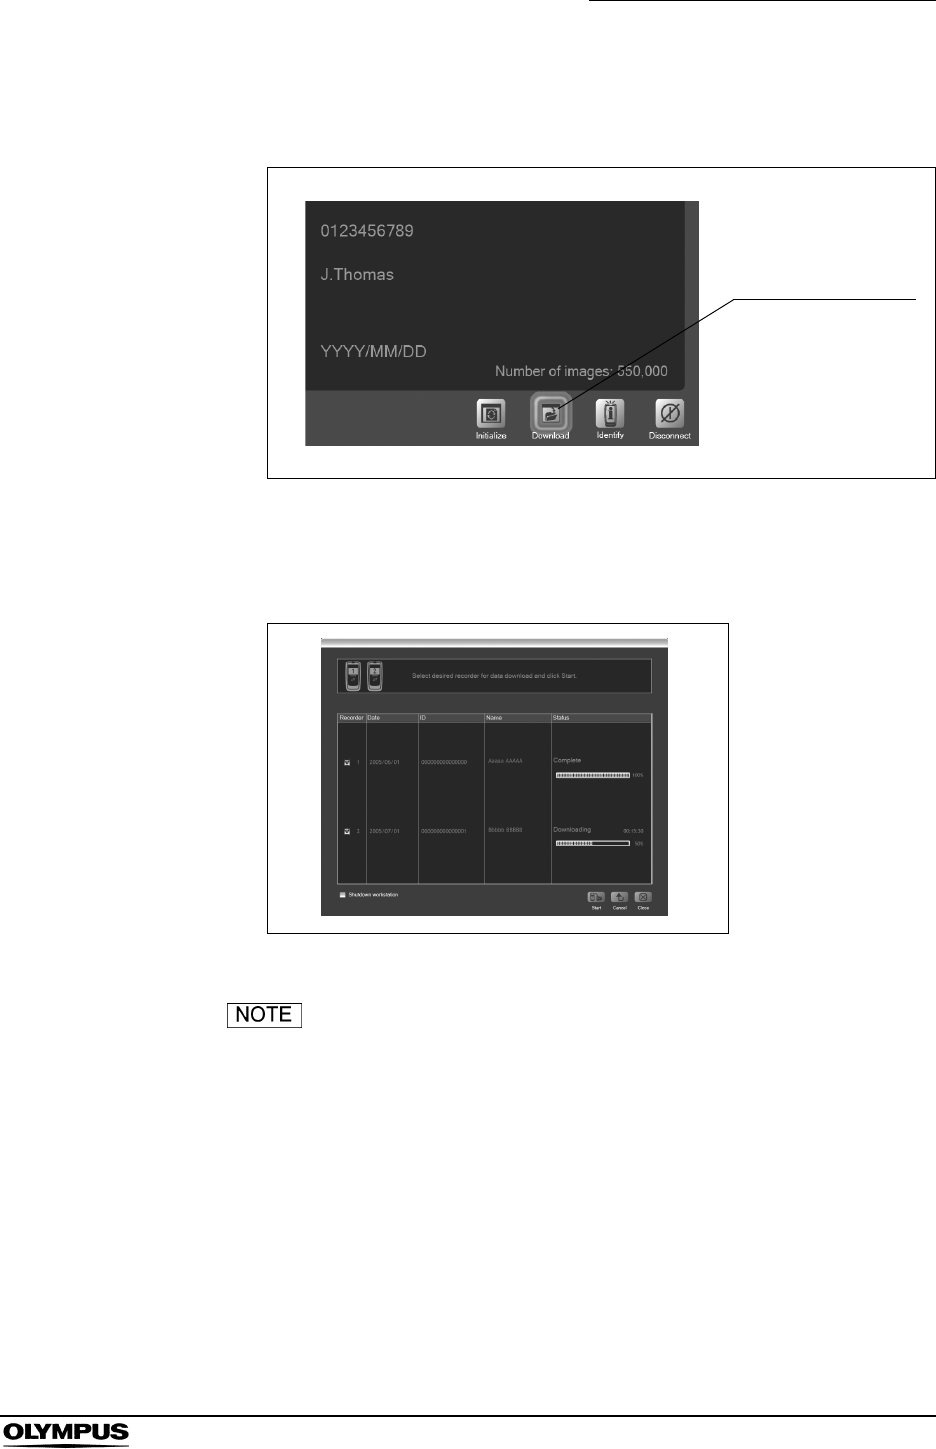
6. Click the [Download] button on the recorder management screen. The
download screen is displayed (see Figure 5.52).
Figure 5.52
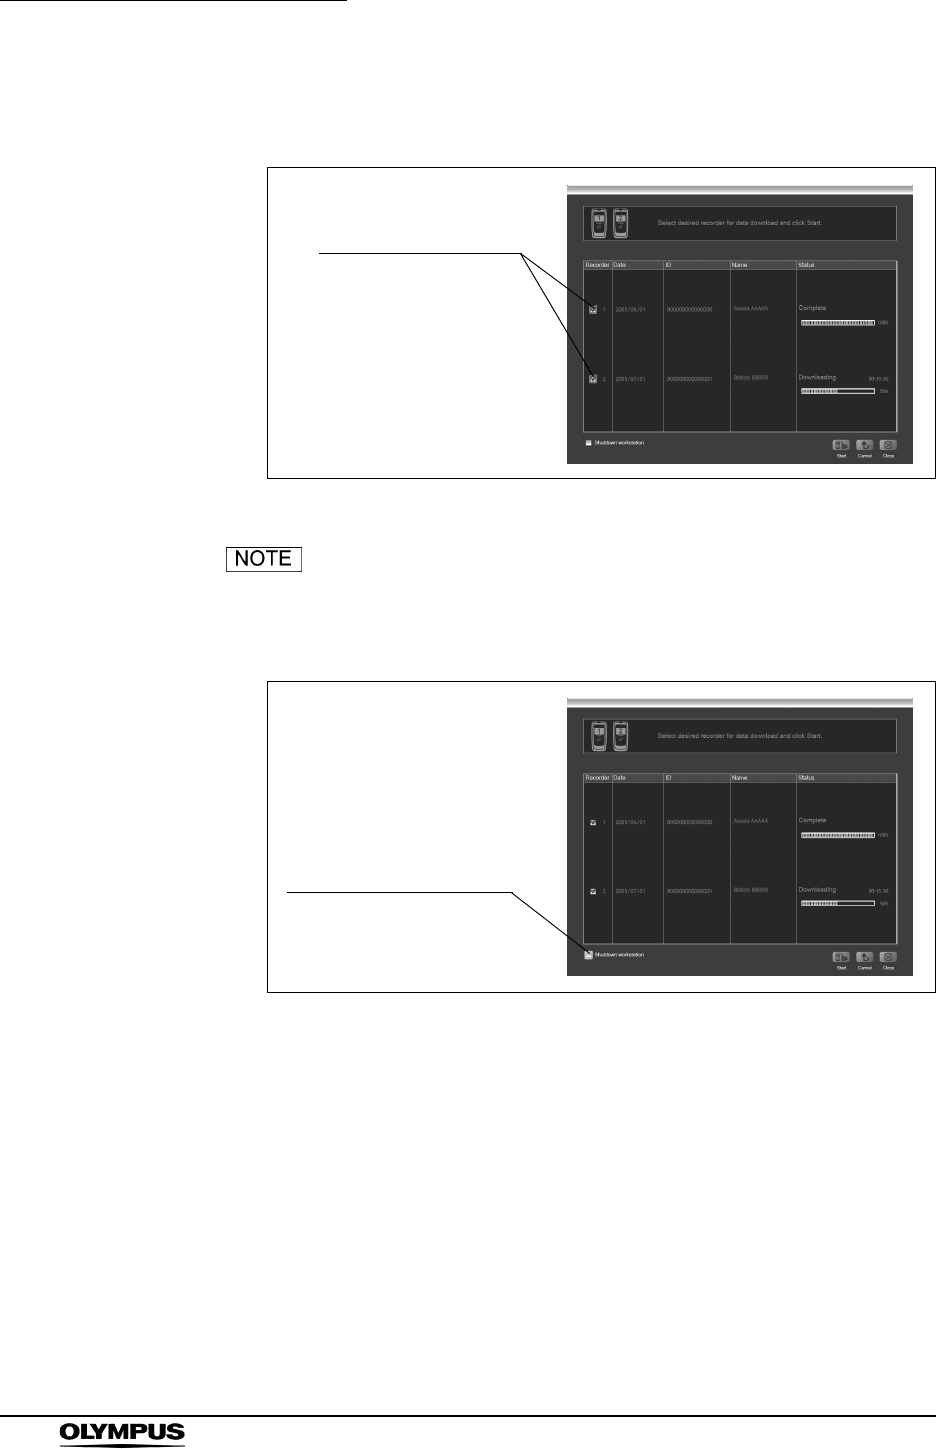
7. Information stored on the recorder unit is displayed on the download screen
(see Figure 5.53).
Figure 5.53
If two recorder units are connected, the information for both
units is displayed.
Download button
140
Chapter 5 Capsule Endoscope Procedures
OLYMPUS CAPSULE ENDOSCOPE SYSTEM
8. Check the checkbox for the recorder unit from which information is to be
downloaded (see Figure 5.54).
Figure 5.54
If the “Shutdown workstation” checkbox is checked, the
workstation will be turned OFF after the download is
completed (see Figure 5.55).
Figure 5.55
Checkbox for
the recorder unit
Checkbox for Shutdown
workstation
Chapter 5 Capsule Endoscope Procedures
141
OLYMPUS CAPSULE ENDOSCOPE SYSTEM
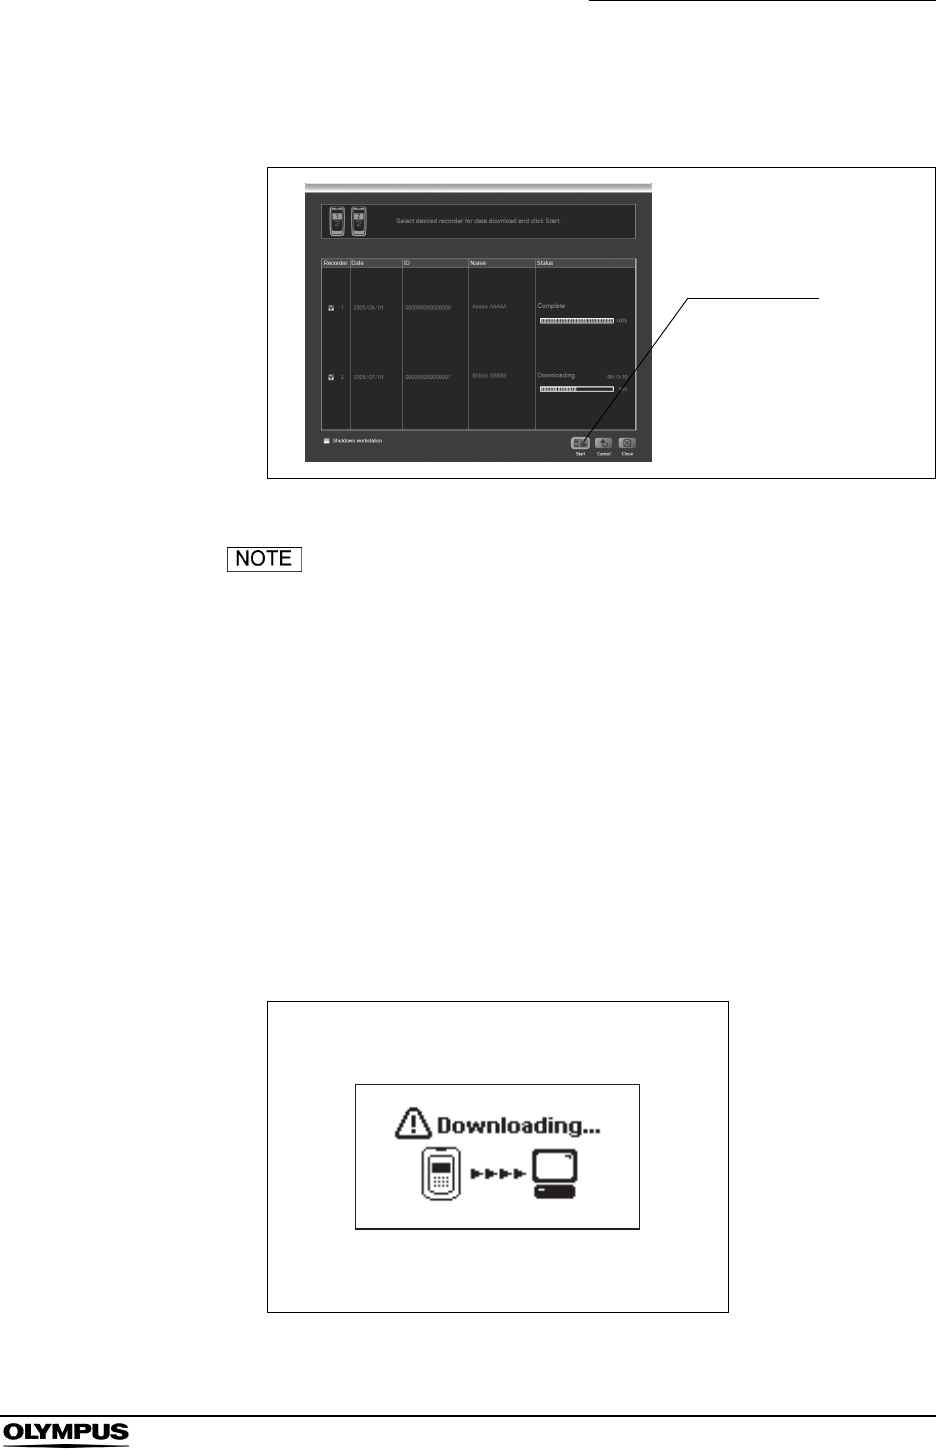
9. Click the [Start] button. The image data download will start (see Figure
5.56). The download status is displayed after starting the download.
Figure 5.56
• If you click the [Cancel] button during the download, the
download will stop immediately. As it is not possible to
continue a stopped download process, you will be required to
start the downloading from the beginning again.
• While downloading the image data, the indicator lamp on the
recorder unit turns from green illumination to yellow blinks
(once every second). The recorder unit will be turned OFF
when the download is completed.
• While downloading the image data, the icon in Figure 5.57 is
displayed on the recorder unit’s display panel.
• Remove the USB devices from the workstation and restart
the workstation when it does not work properly. Then connect
the removed USB devices again.
Figure 5.57
Start button
142
Chapter 5 Capsule Endoscope Procedures
OLYMPUS CAPSULE ENDOSCOPE SYSTEM
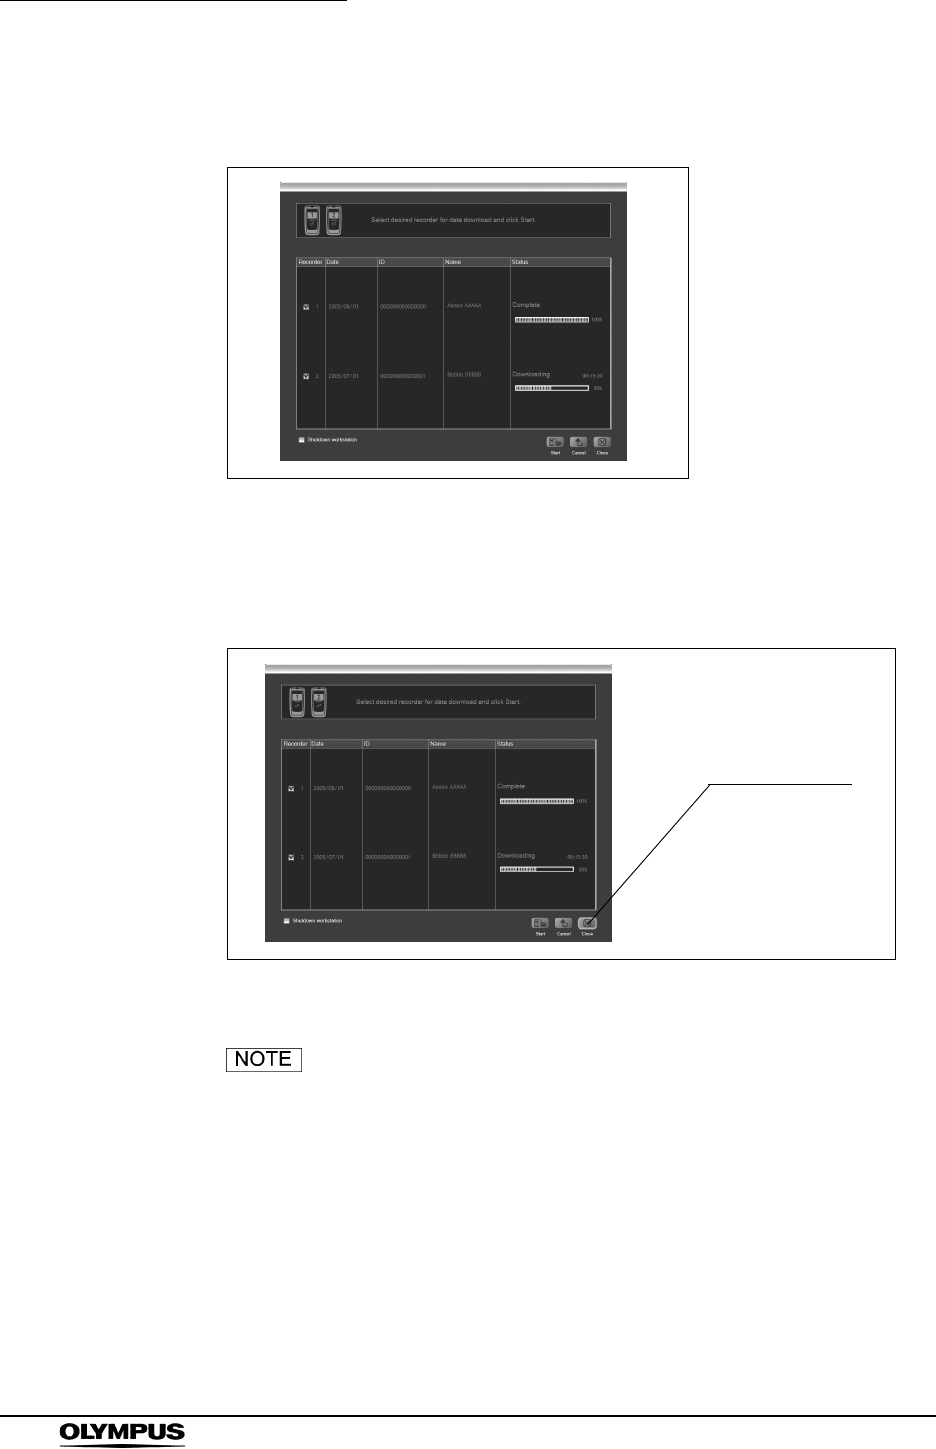
10. When the download has completed successfully, “Complete” is displayed on
the download screen (see Figure 5.58).
Figure 5.58
11. Click the [Close] button to exit the download screen. The recorder
management screen is displayed (see Figure 5.59).
Figure 5.59
The workstation has disk space for about 30 examinations
(Each examination is estimated to be 8 hours long). If you
take many pictures and movies, the number of examination
may decrease.
Close button
Chapter 5 Capsule Endoscope Procedures
143
OLYMPUS CAPSULE ENDOSCOPE SYSTEM
Removing the recorder unit
The “Removing the Recorder Unit” function is not available in
Endo Capsule Software Light.
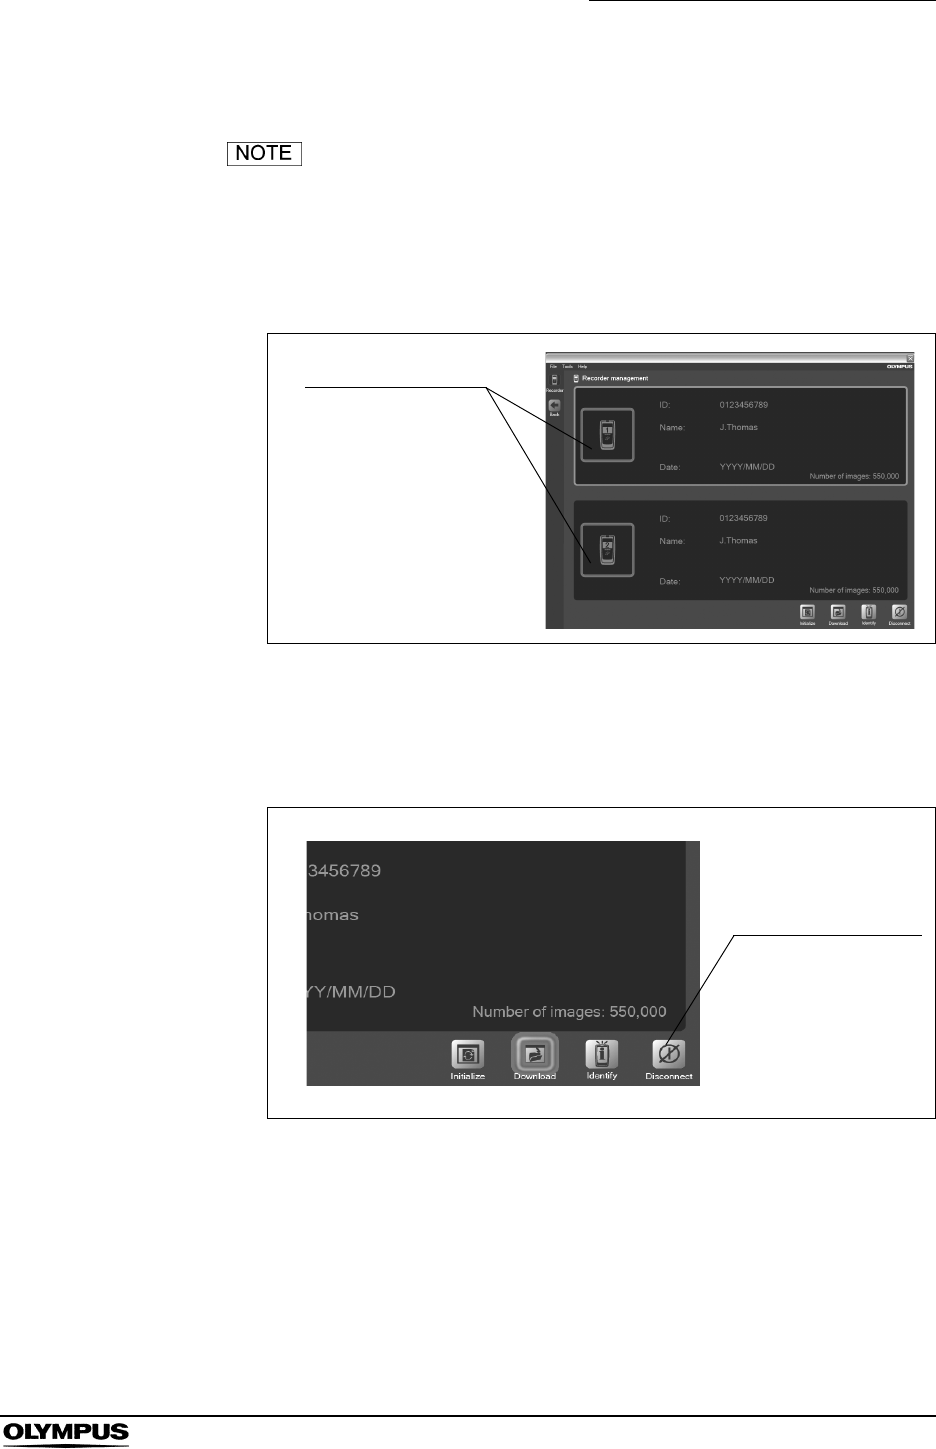
1. On the recorder management screen, select the recorder unit you wish to
remove (see Figure 5.60).
Figure 5.60
2. Click the [Disconnect] button (see Figure 5.61). The selected recorder unit is
turned OFF.
Figure 5.61
3. Remove the recorder unit from the recorder unit cradle.
The recorder unit
Disconnect button

144
Chapter 5 Capsule Endoscope Procedures
OLYMPUS CAPSULE ENDOSCOPE SYSTEM
Confirming excretion of the capsule endoscope
Familiarize the patient with the following “Caution for Capsule Endoscopy
Patients”.
The capsule endoscope contains metal parts. Instruct the
patient to stay away from equipment (i.e. MRI equipment) for
which wearing of metallic objects is prohibited while the
capsule endoscope is in the patient’s body.
If the excretion of the capsule endoscope has not been
confirmed, attempt to locate the capsule endoscope within
the patient’s body by X-ray examination.
1. The capsule endoscope will be excreted with the patient’s feces.
2. Confirm that the capsule endoscope has been excreted.
Cleaning and storing the equipment
For instructions on cleaning and storing the equipment, refer to Chapter 7, “Care
Storage and Disposal” on page 230.

Chapter 6 Capsule Endoscope Image Observation
145
OLYMPUS CAPSULE ENDOSCOPE SYSTEM
Chapter 6 Capsule Endoscope Image
Observation
Images captured by the capsule endoscope are downloaded from the recorder
unit to the workstation for viewing.
• After viewing the images, prepare a back up onto a DVD to
protect them from a hard disk failure.
• Do not change the file structure in the workstation. The files
may become inaccessible.
• The following DVD formats are supported:
• Remove the USB devices from the workstation and restart
the workstation when it does not work properly. Then connect
the removed USB devices again.
DVD : DVD-R, DVD+R
146
Chapter 6 Capsule Endoscope Image Observation
OLYMPUS CAPSULE ENDOSCOPE SYSTEM
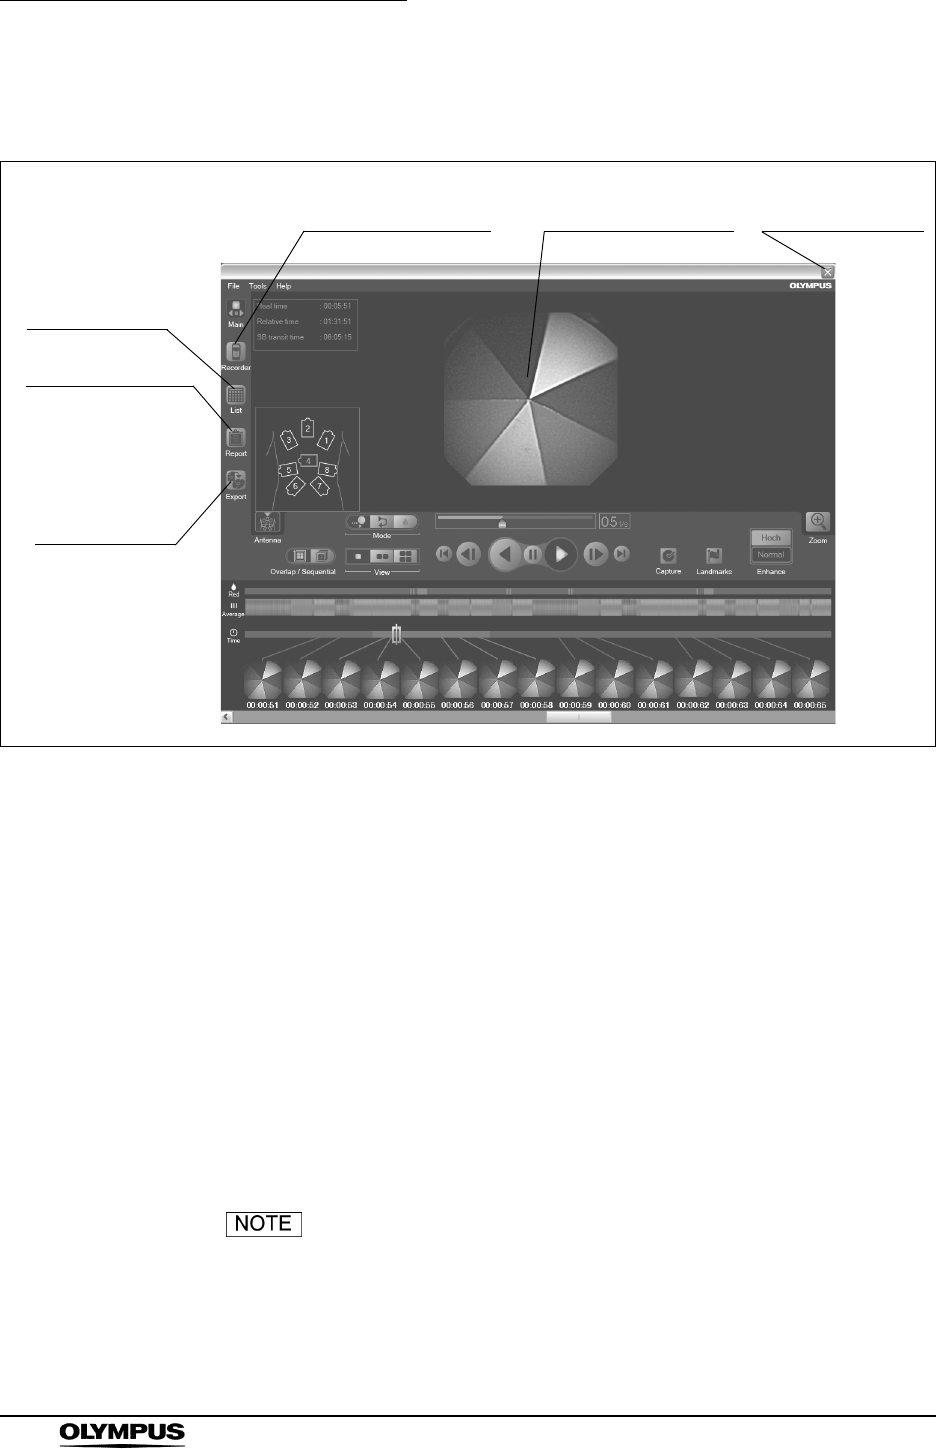
6.1 Main screen nomenclature and functions
Figure 6.1
1. Export button
Displays the data export screen.
2. Report button
Displays the report screen.
3. List button
Displays the examination list screen.
4. Recorder button
Displays the recorder management screen.
5. Image display area
Displays the image data.
6. Log off button
Displays the login screen.
“Report” button is not available when you open the
examination data in the DVD. You can view the finalized
report in the history screen by selecting “History” from the
“Tools” menu on the main screen.
6. Log off button
4. Recorder button
3. List button
2. Report button
1. Export button
5. Image display area
Chapter 6 Capsule Endoscope Image Observation
147
OLYMPUS CAPSULE ENDOSCOPE SYSTEM
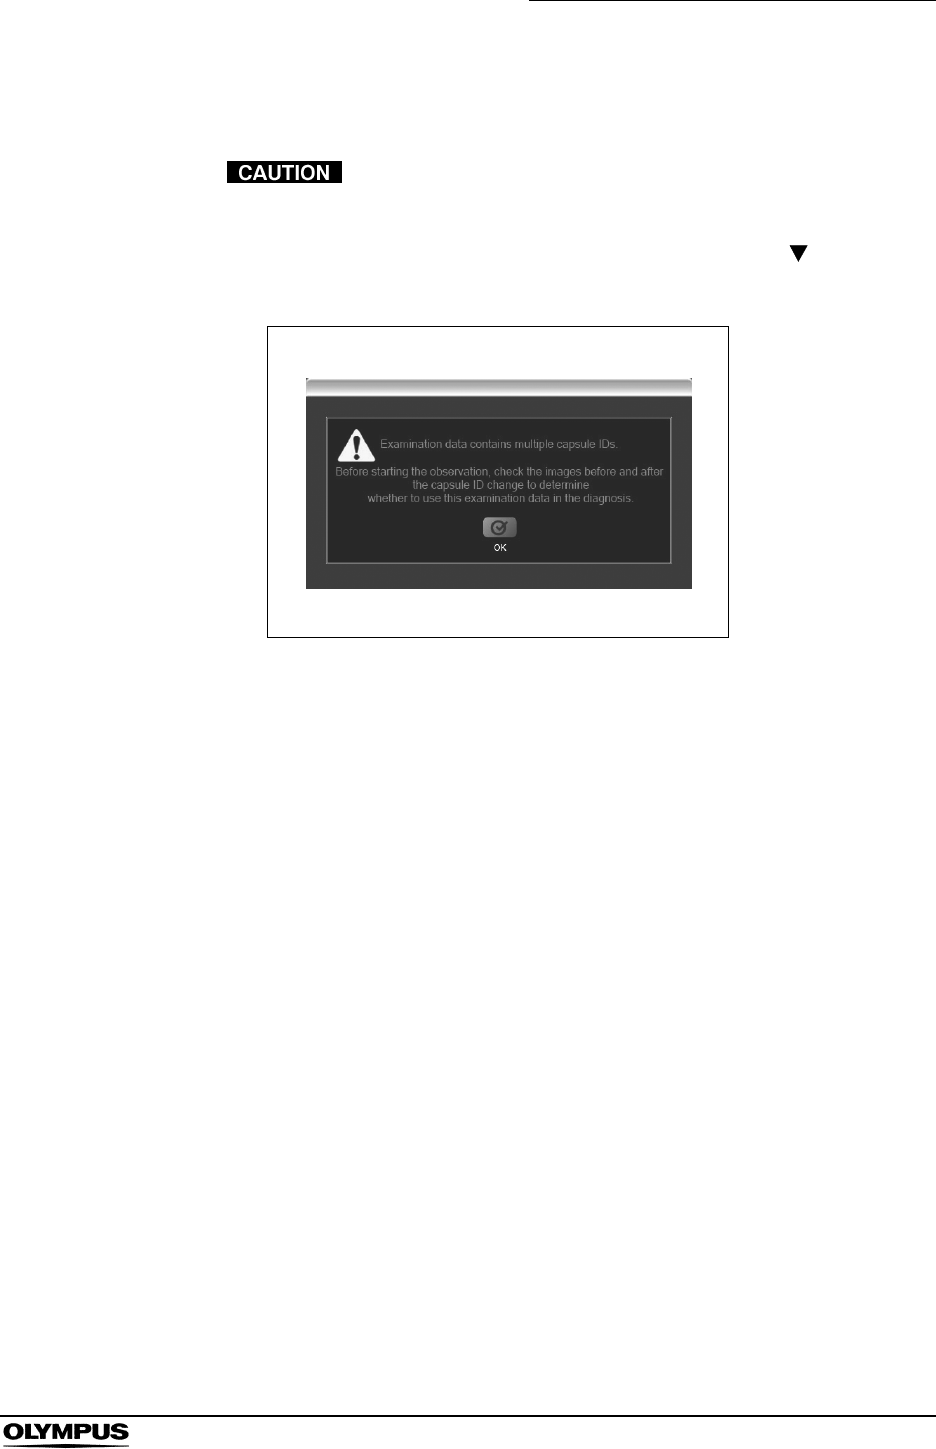
6.2 Opening data
If multiple capsules are included within examination data, the
following warning message is displayed (see Figure 6.2).
Check the previous and next thumbnails of “ ” mark on the
time bar, and select an appropriate image to observe.
Figure 6.2
148
Chapter 6 Capsule Endoscope Image Observation
OLYMPUS CAPSULE ENDOSCOPE SYSTEM
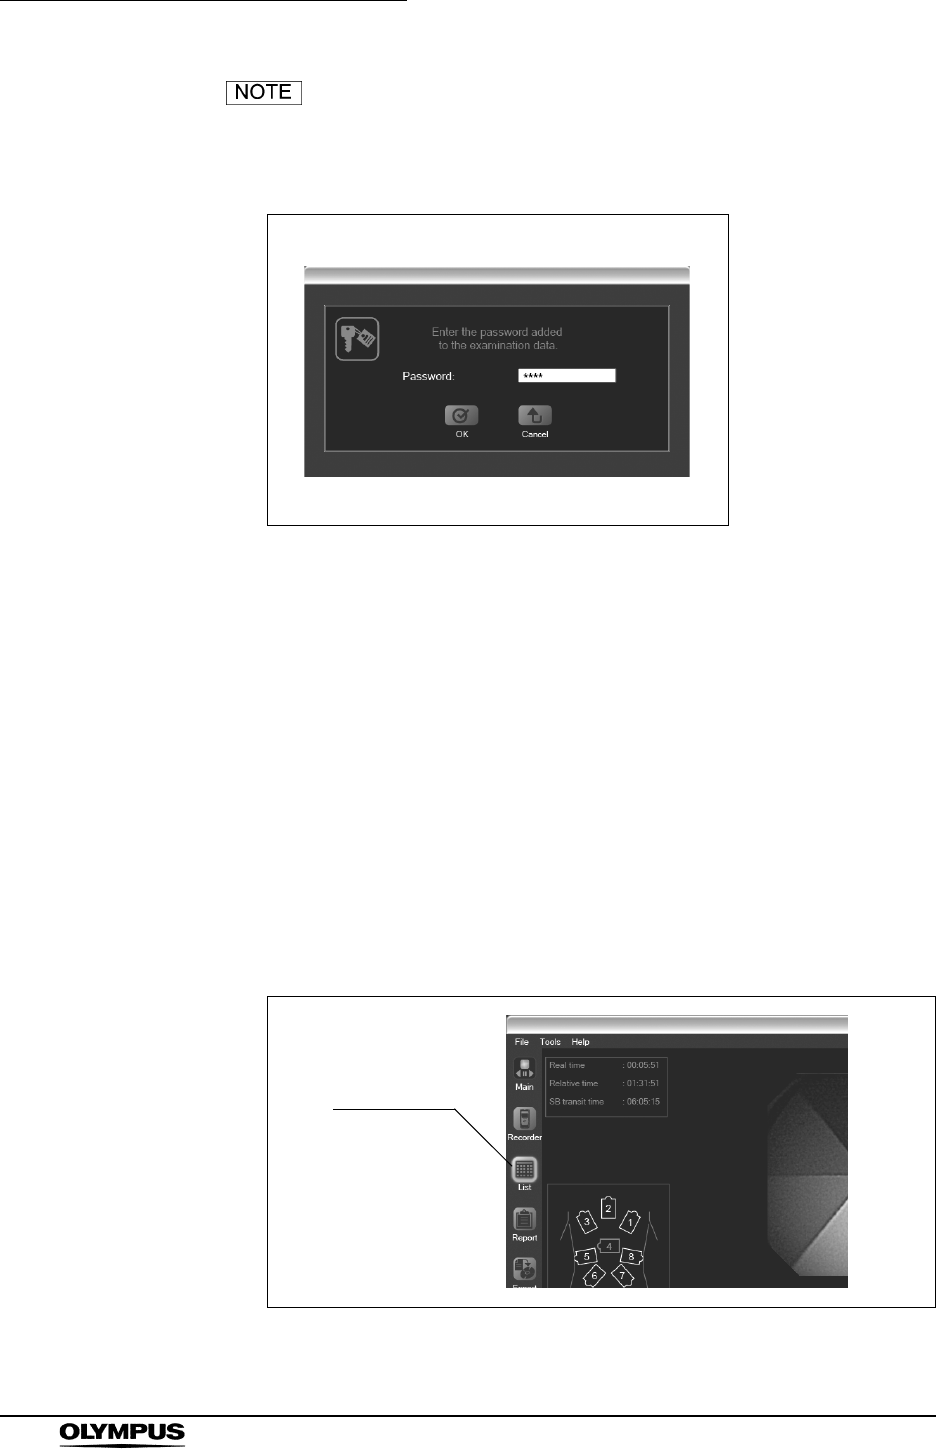
• If the examination data is password-protected, the password
input screen is displayed (see Figure 6.3). Enter the
password for the examination data and click the [OK] button.
Figure 6.3
• When you open new examination data while another
examination data is already open, the previous examination
data is closed to allow the new examination data to open. If
the thumbnail data is not saved, you will be asked if you wish
to save the data.
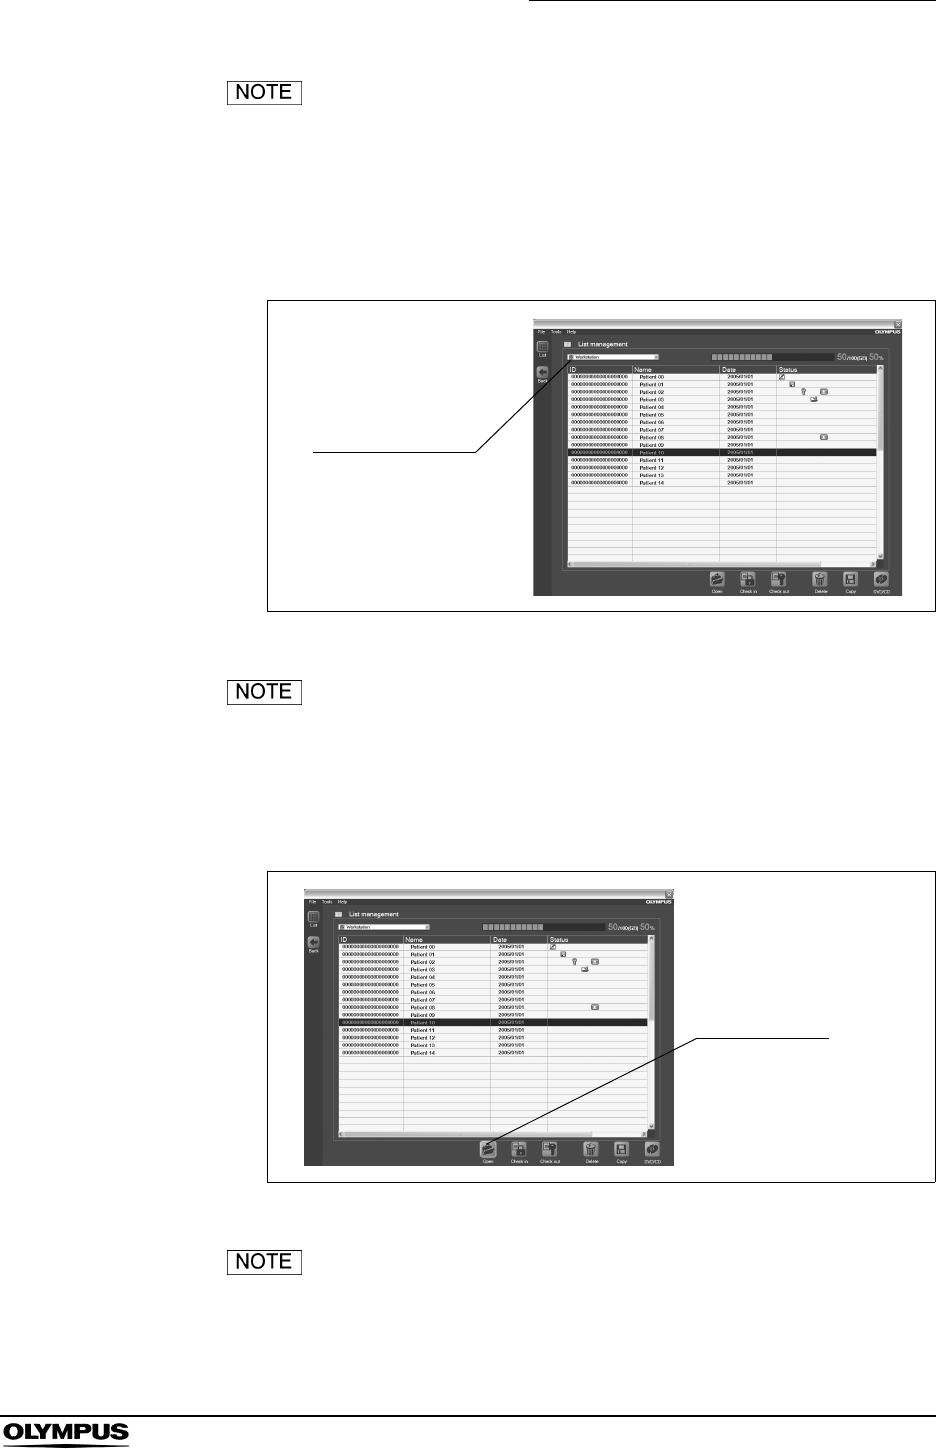
Opening data in Endo Capsule software
Opening examination data and thumbnail data from the
examination list screen
1. Click the [List] button on the main screen (see Figure 6.4). The examination
list screen is displayed.
Figure 6.4
List button
Chapter 6 Capsule Endoscope Image Observation
149
OLYMPUS CAPSULE ENDOSCOPE SYSTEM
Select “Open examination” or “Open thumbnails” from the
“File” menu on the main screen. The examination list screen
is displayed.
2. On the examination list screen, use the drive selection box to select the
drive on which the examination data is stored (see Figure 6.5).
Figure 6.5
To select examinations stored on the workstation, select
workstation in the drive selection box.
3. Select the examination data from the examination list, and click the [Open]
button (see Figure 6.6). The data open screen is displayed.
Figure 6.6
Thumbnail data for the selected examination data is
displayed in the thumbnail data list on the data open screen.
Drive selection
box
Open button
150
Chapter 6 Capsule Endoscope Image Observation
OLYMPUS CAPSULE ENDOSCOPE SYSTEM
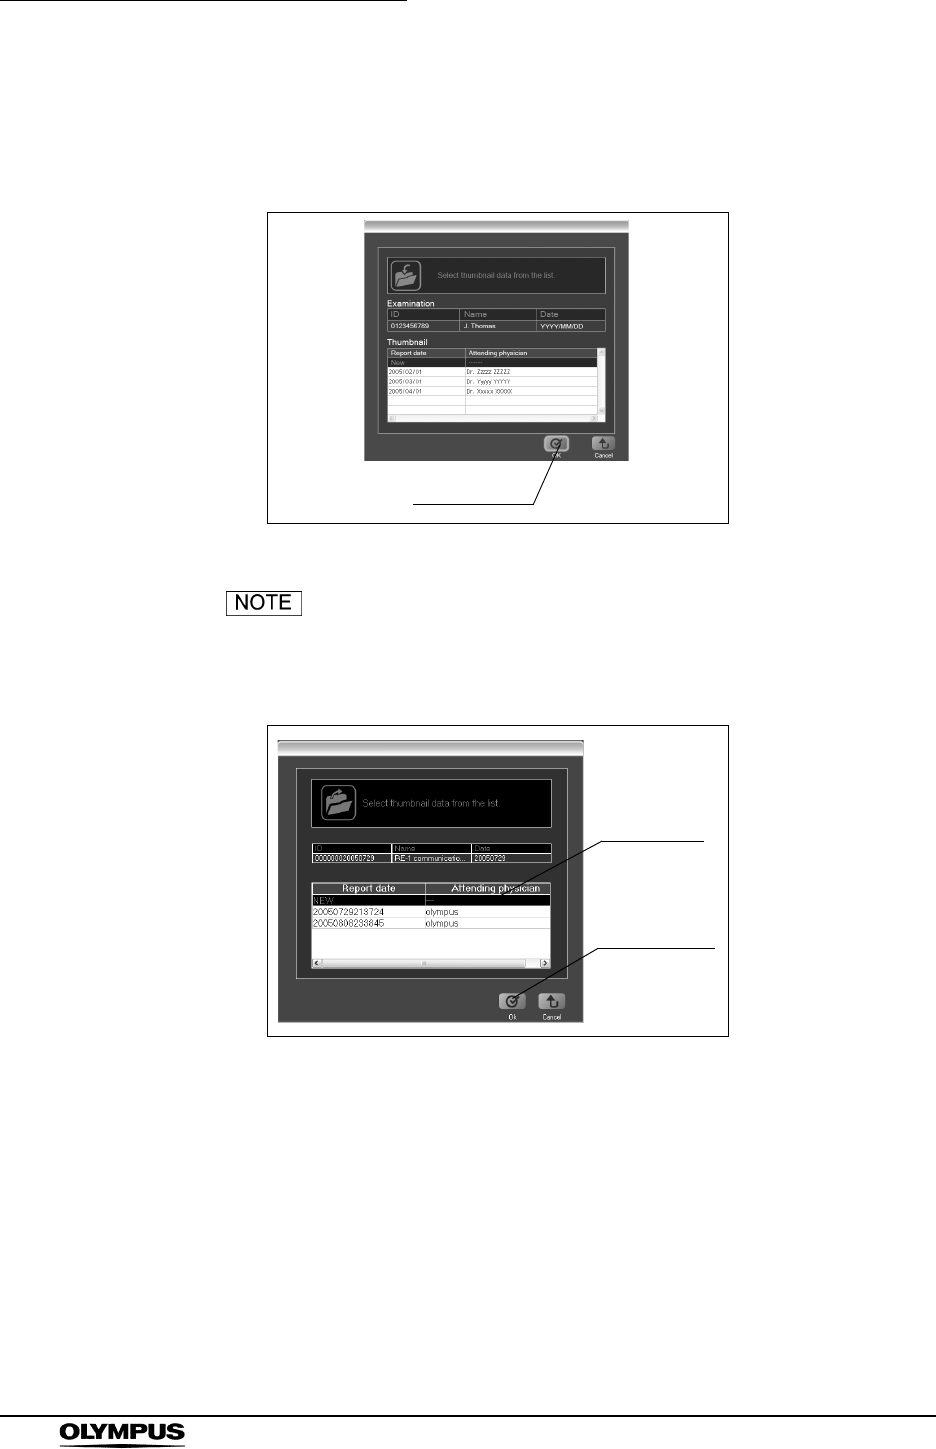
4. Select a thumbnail data, and click the [OK] button (see Figure 6.7). The
main screen is displayed, and the examination data and thumbnail data are
opened.
Figure 6.7
To create a new thumbnail data, select “New” (top row) from
the examination data list, and click the [OK] button (see
Figure 6.8).
Figure 6.8
OK button
“New”
OK button
Chapter 6 Capsule Endoscope Image Observation
151
OLYMPUS CAPSULE ENDOSCOPE SYSTEM
Opening data in Endo Capsule software light
Opening examination data from the menu
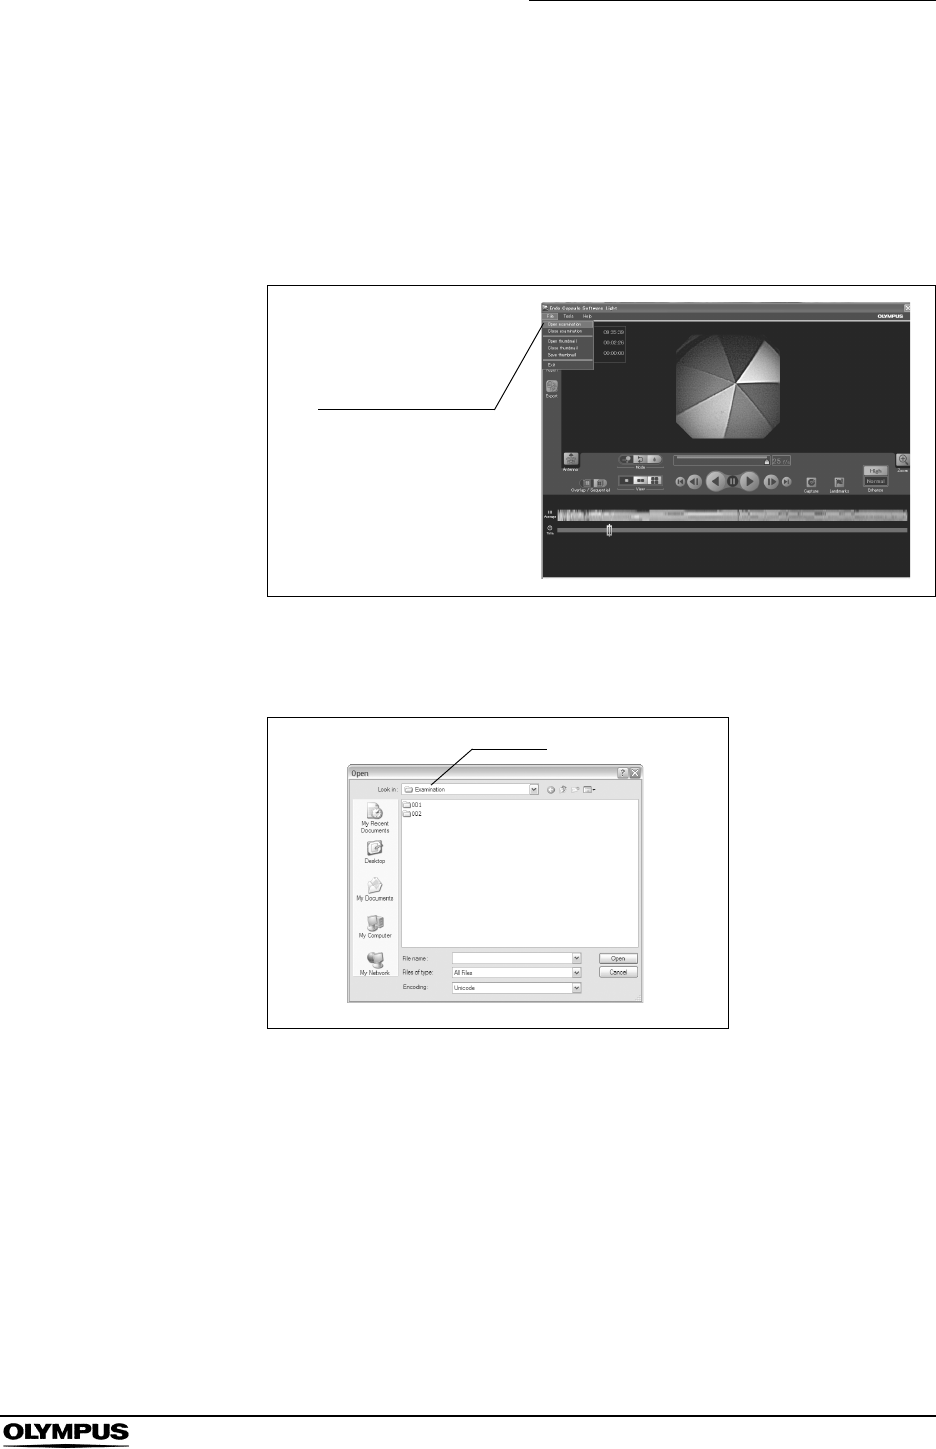
1. Select “Open examination” from the “File” menu on the main screen (see
Figure 6.9). The file open screen is displayed.
Figure 6.9
2. Select the folder in which the examination data is saved (see Figure 6.10).
Figure 6.10
Open examination
Folder
152
Chapter 6 Capsule Endoscope Image Observation
OLYMPUS CAPSULE ENDOSCOPE SYSTEM
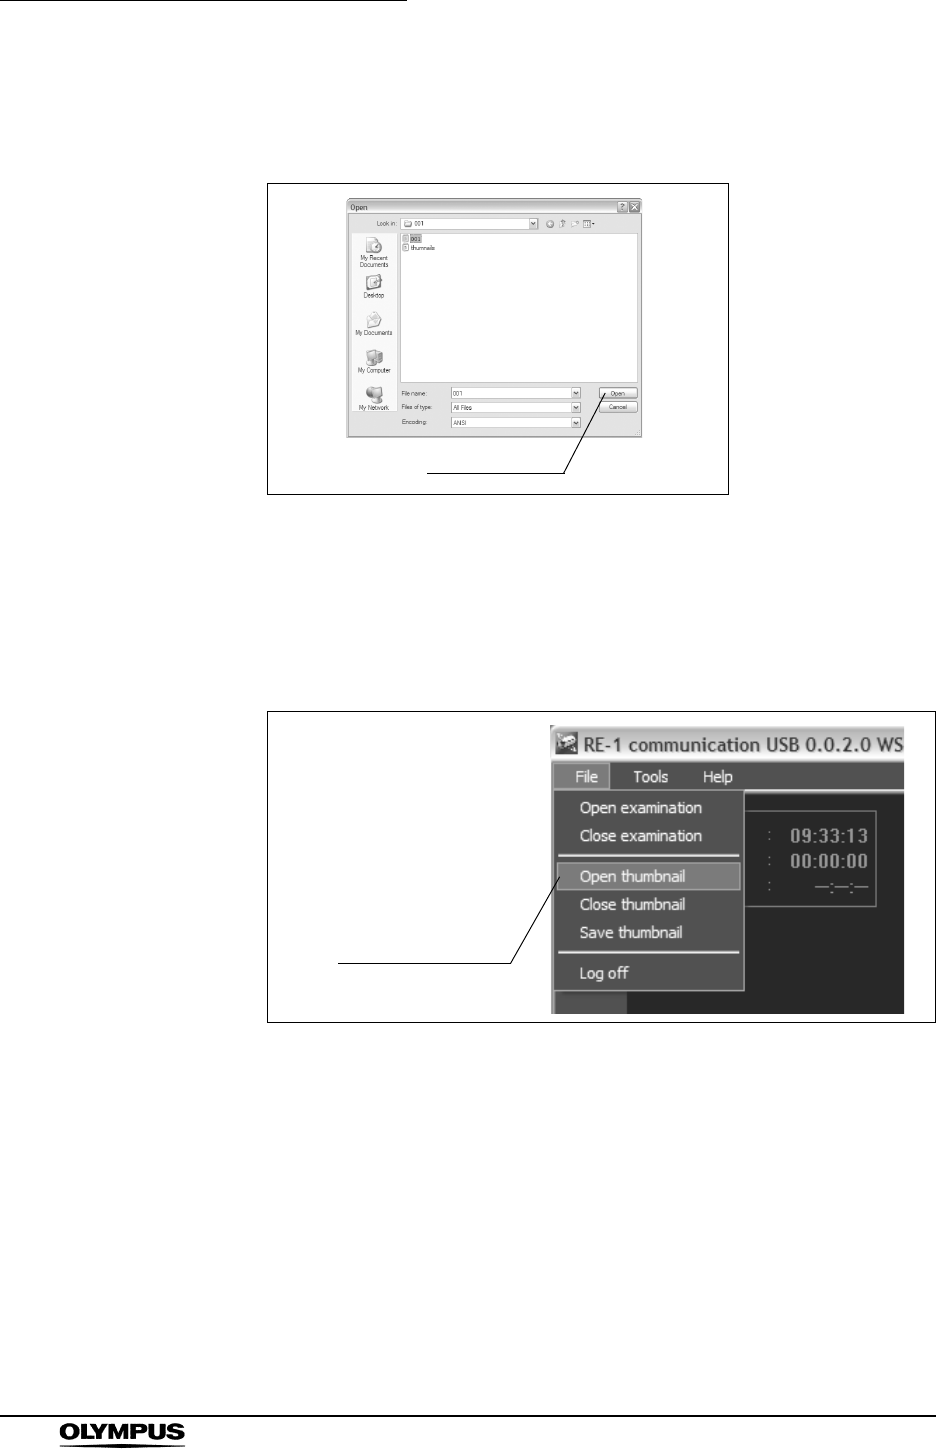
3. Select the examination data (∗∗∗.opg), and click the [Open] button (see
Figure 6.11). The examination data is opened.
Figure 6.11
Opening thumbnail data from the menu
1. Select “Open thumbnails” from the “File” menu on the main screen (see
Figure 6.12). The file open screen is displayed.
Figure 6.12
Open button
Open thumbnails
Chapter 6 Capsule Endoscope Image Observation
153
OLYMPUS CAPSULE ENDOSCOPE SYSTEM
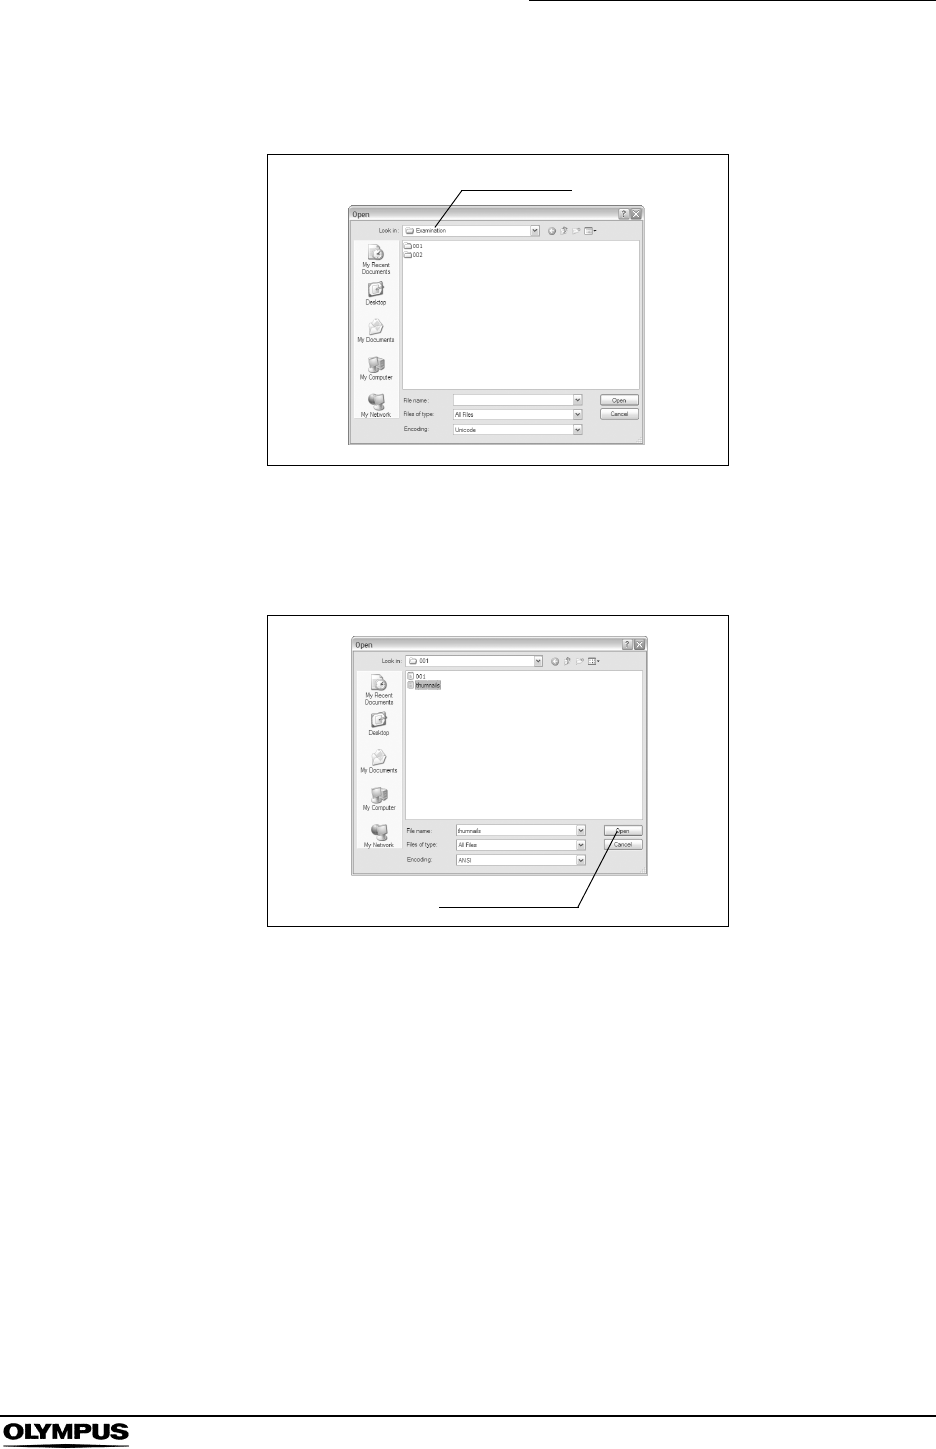
2. Select the folder in which the thumbnail data is saved (see Figure 6.13).
Figure 6.13
3. Select the thumbnail data (∗∗∗.xml), and click the [Open] button (see Figure
6.14). The thumbnail data is opened.
Figure 6.14
Folder
Open button
154
Chapter 6 Capsule Endoscope Image Observation
OLYMPUS CAPSULE ENDOSCOPE SYSTEM
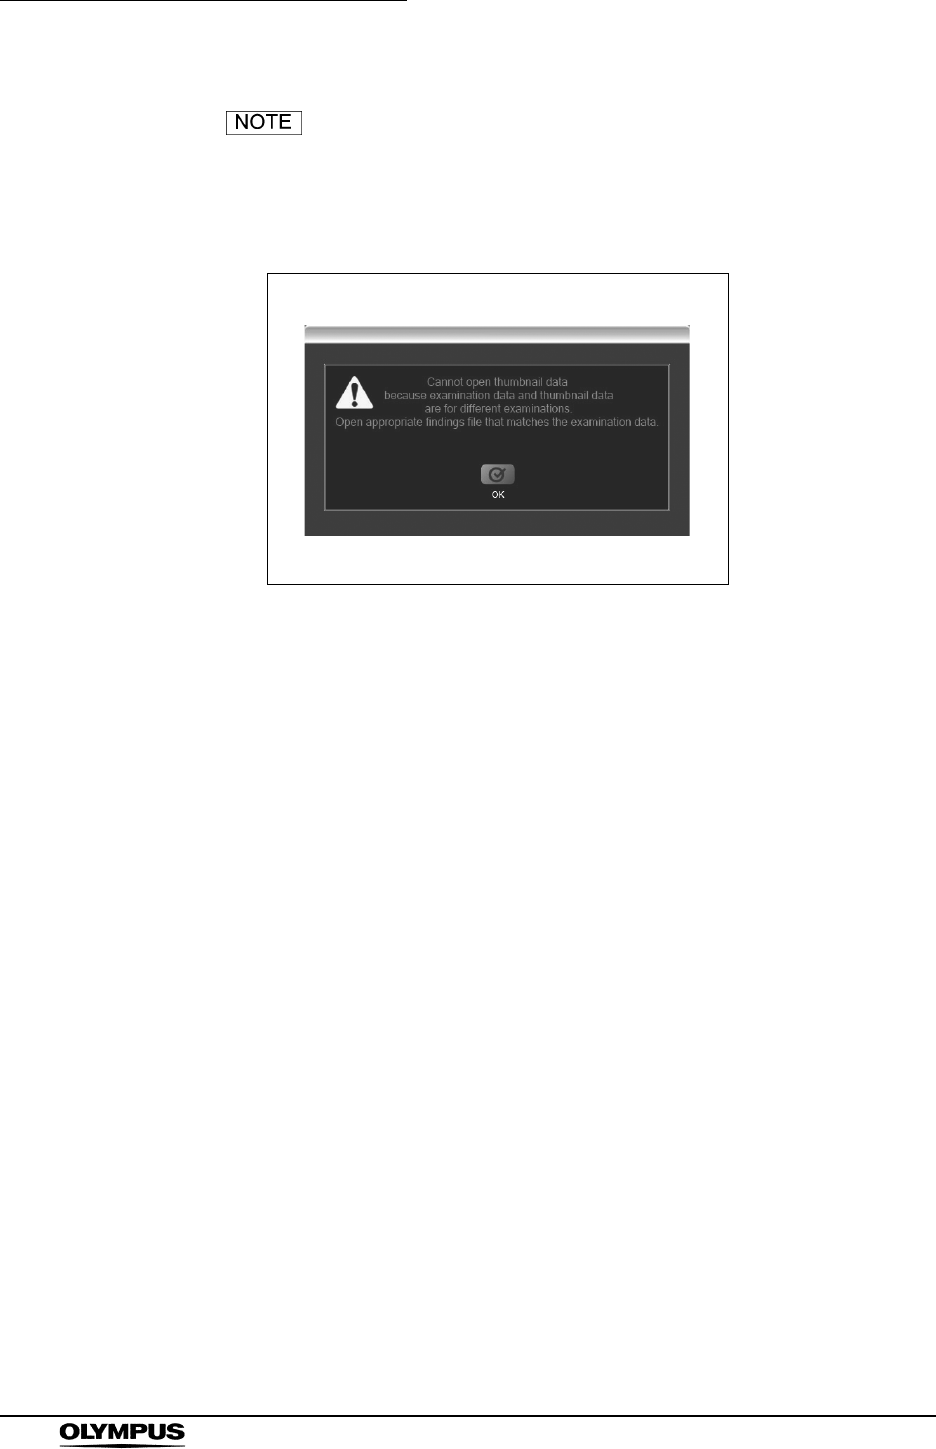
If you open an examination data and a thumbnail data for
different examinations, the following error message will be
displayed. Select the thumbnail data for the same
examination, or create new thumbnail data.
Figure 6.15
Chapter 6 Capsule Endoscope Image Observation
155
OLYMPUS CAPSULE ENDOSCOPE SYSTEM
6.3 Image observation
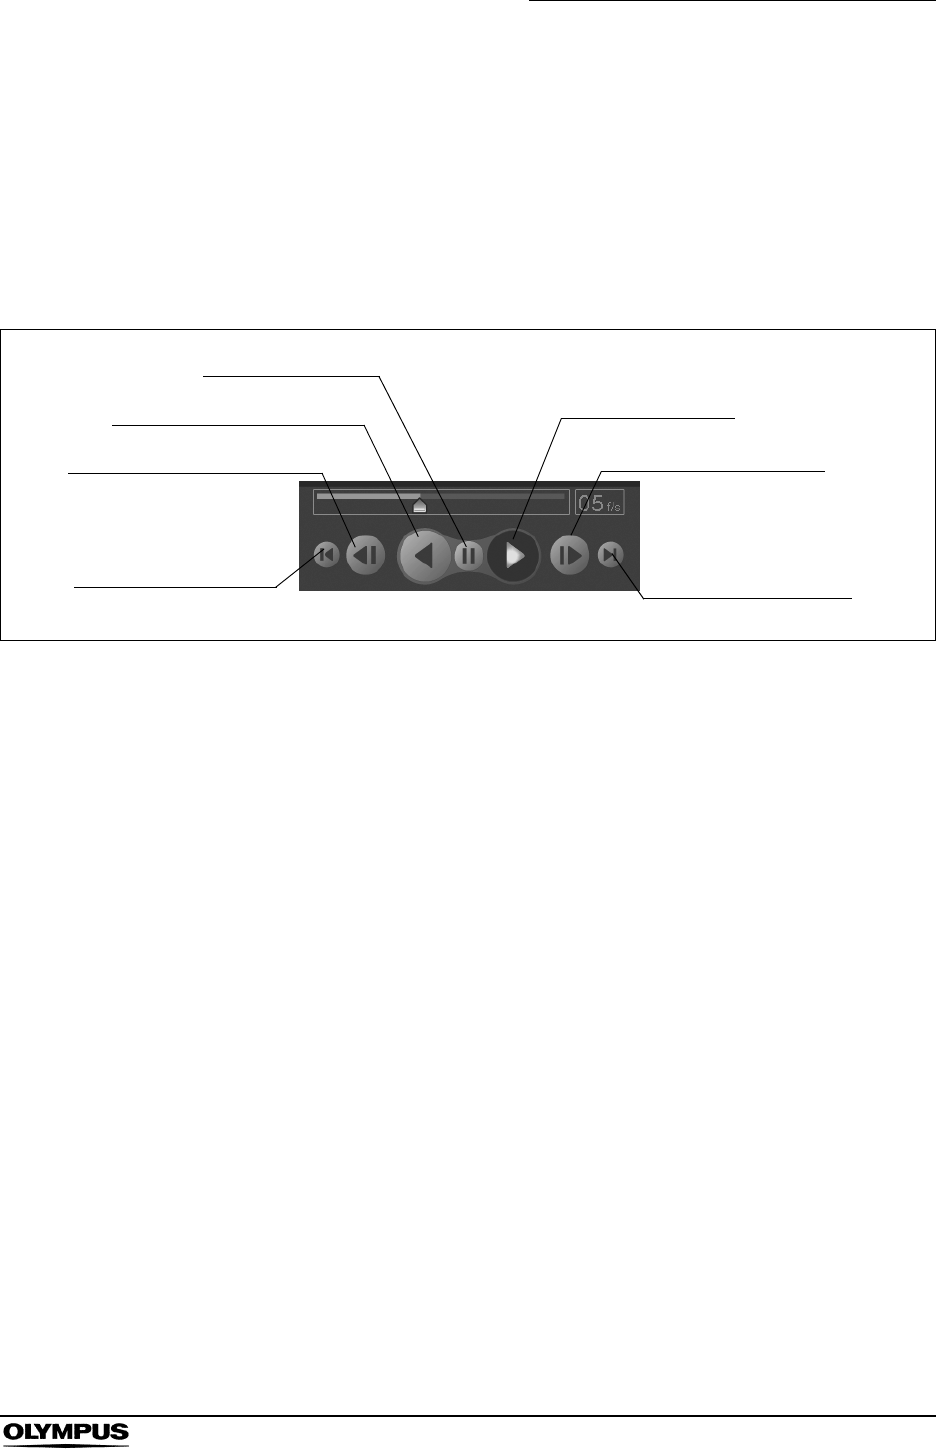
Playing back images
To play back the image data, use the buttons in the image operation area (see
Figure 6.16). The image data being played back is displayed in the image
display area.
Figure 6.16
1. First Image button
Displays the first image.
2. Previous Image button
Displays the image that was captured before the currently displayed image.
3. Reverse Playback button
Plays back the image data in reverse order.
4. Pause button
Pauses the playback or reverse playback of the image data.
5. Playback button
Plays back the image data.
6. Next Image button
Displays the image that was captured after the currently displayed image.
7. Last Image button
Displays the last image data.
2. Previous Image button
7. Last Image button
1. First Image button
6. Next Image button
3. Reverse Playback button
4. Pause button
5. Playback button
156
Chapter 6 Capsule Endoscope Image Observation
OLYMPUS CAPSULE ENDOSCOPE SYSTEM
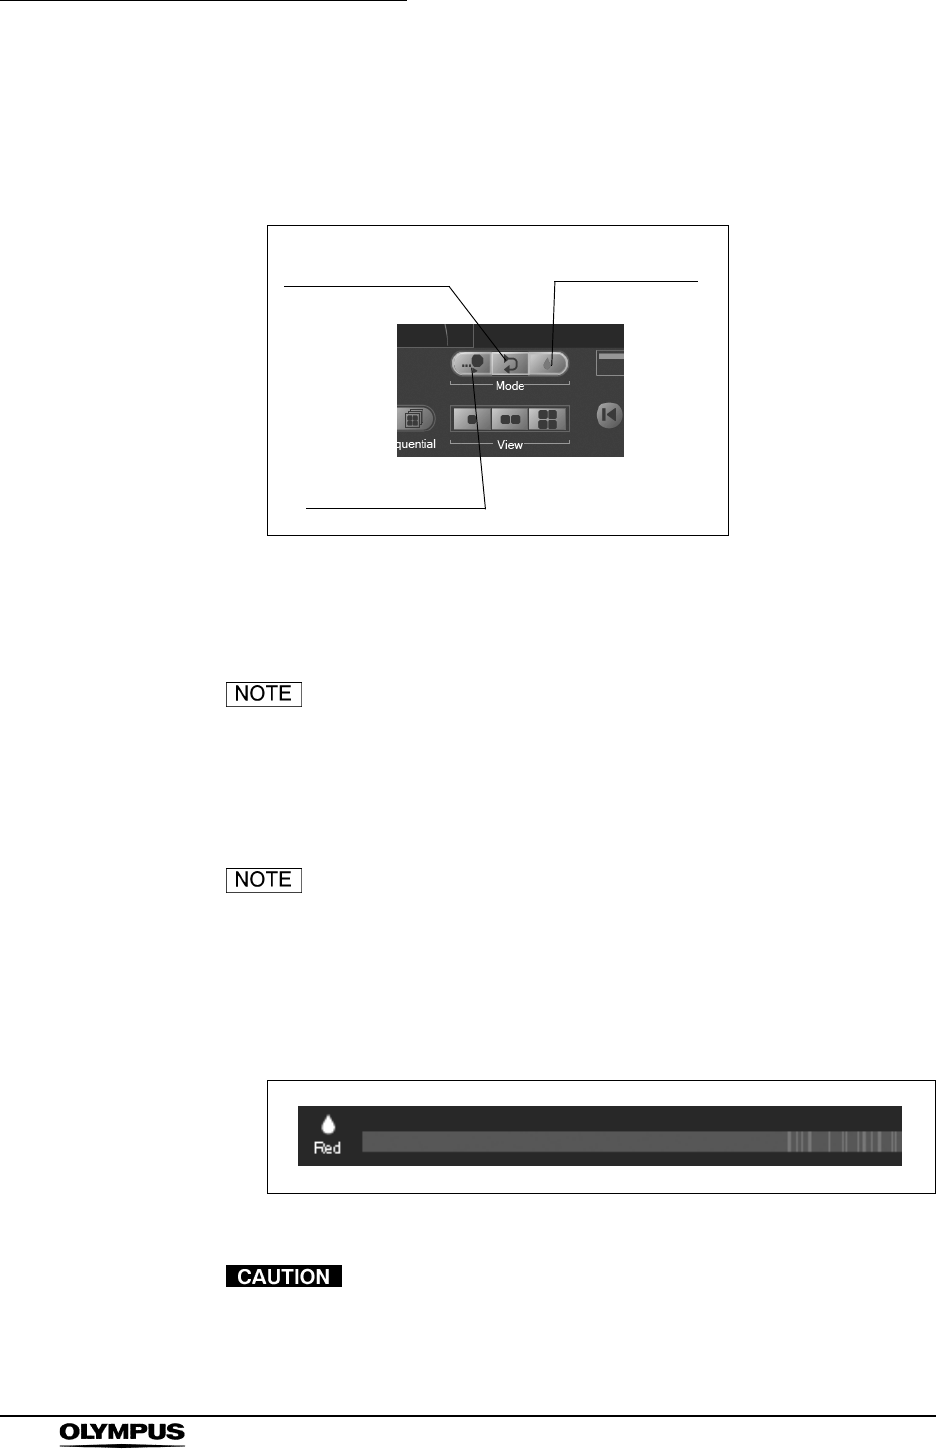
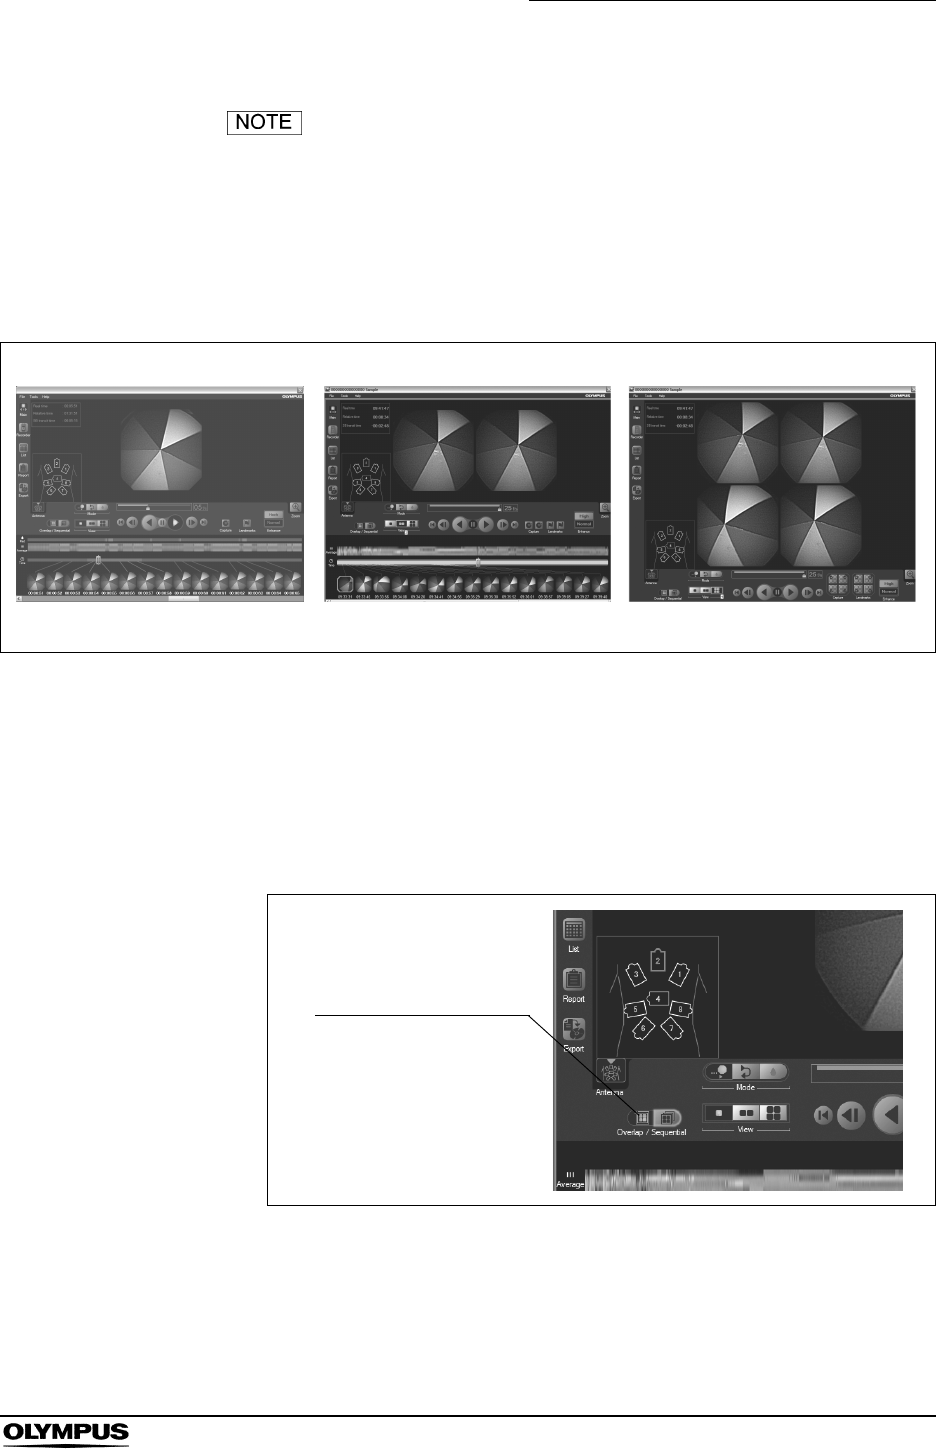
Switching the playback mode
Use the playback mode switching button on the main screen to switch between
playback modes (see Figure 6.17).
Figure 6.17
1. Normal button
Images are played back at the speed set by a user.
The review speed is configurable (see “Changing the review
speed” on page 157).
2. Adjust button
The review speed is automatically adjusted.
Adjustment is automatically made so that the review speed is
increased when there is less motion in the images.
3. Red button
The red color detection bar is displayed. Only the image data detected by
the red color detection function is played back.
Figure 6.18
This function is provided as an aid for the diagnosis.
Detection of lesions by this function alone is not guaranteed.
Do not depend on this function for the diagnosis.
2. Adjust button
1. Normal button
3. Red button
Chapter 6 Capsule Endoscope Image Observation
157
OLYMPUS CAPSULE ENDOSCOPE SYSTEM
• Red color detection is automatically performed while
downloading the image data from the recorder unit.
• To display images before or after the image detected by the
red color detection function, rotate a wheel of a mouse.
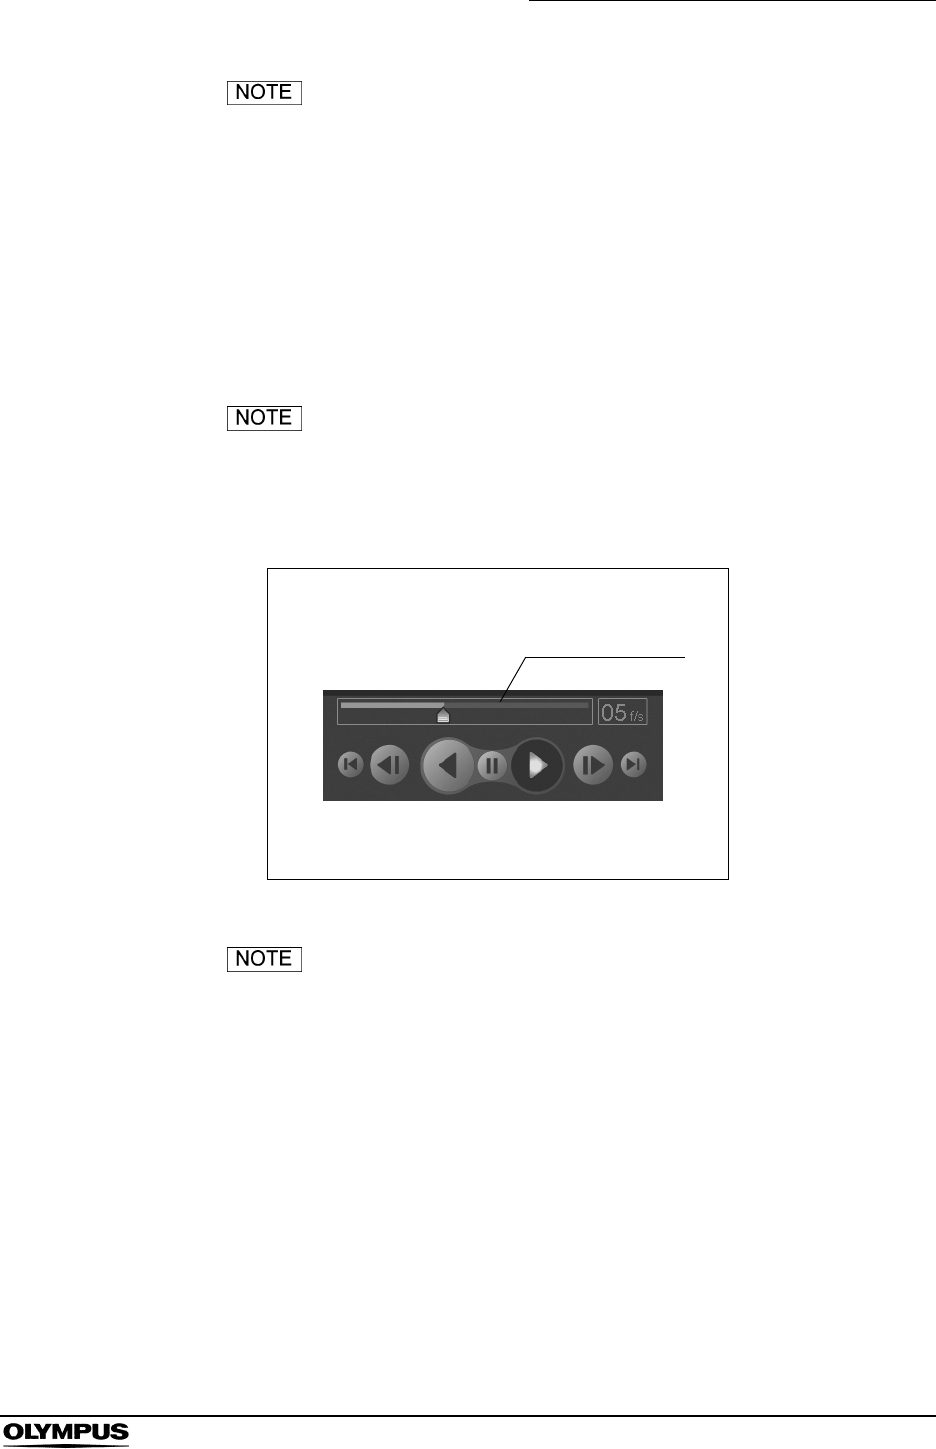
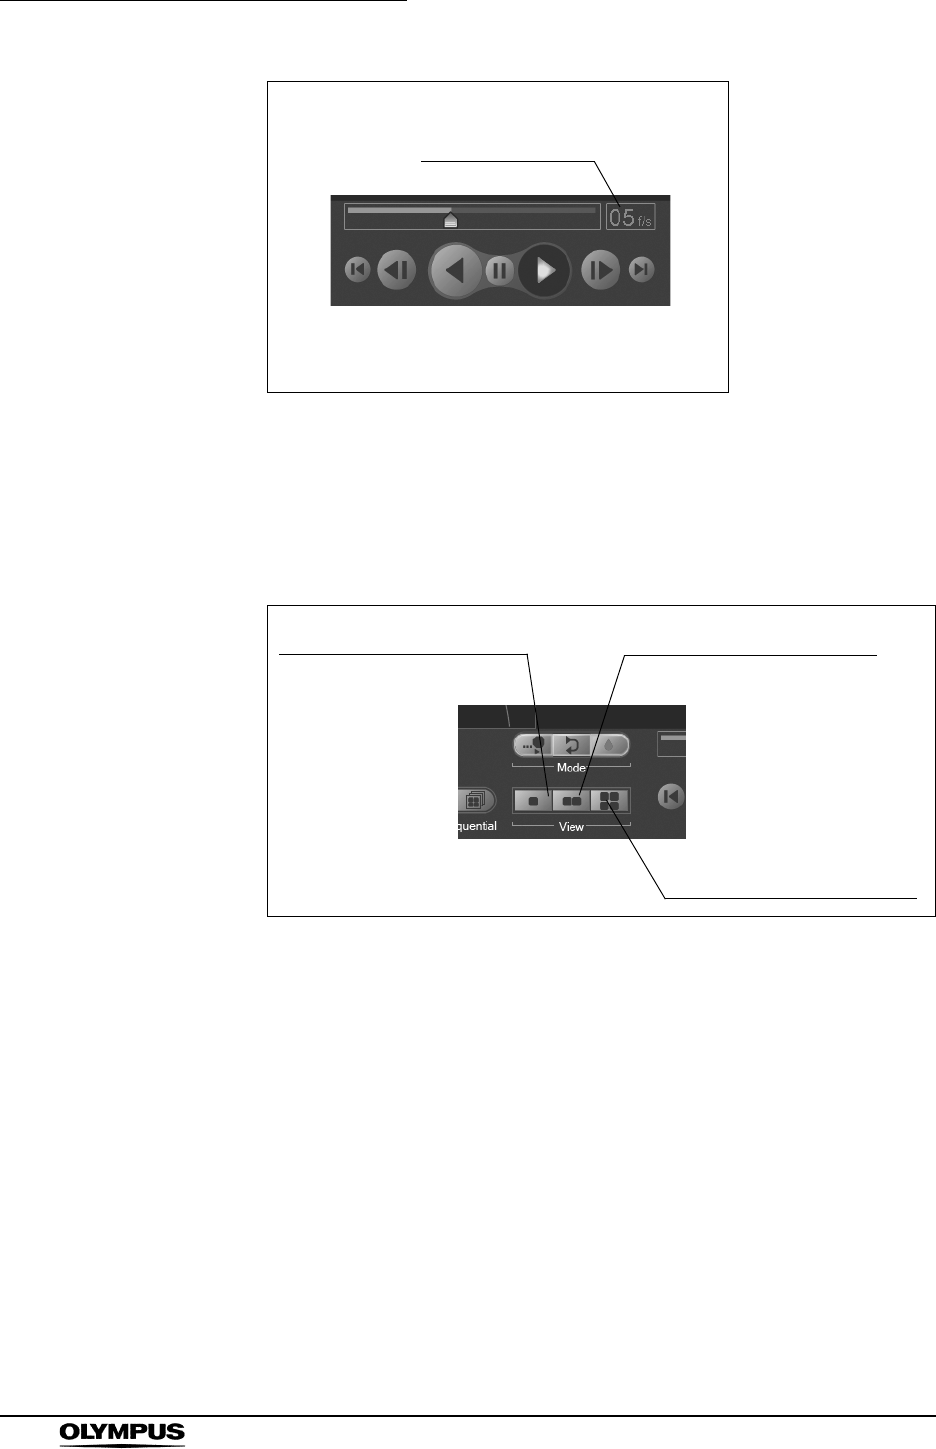
Changing the review speed
You can set the review speed for the image data using the speed setting bar in
the image operation area on the main screen.
The displayed review speed is approximated.
1. To set the review speed, drag the cursor on the speed setting bar with the
mouse (see Figure 6.19).
Figure 6.19
• Move to the cursor towards the right end of the speed setting
bar to increase the review speed. Move the cursor towards
the left end to decrease the review speed.
• The review speed is displayed in the speed setting display as
the number of images displayed per second (see Figure
6.20).
Speed setting bar
158
Chapter 6 Capsule Endoscope Image Observation
OLYMPUS CAPSULE ENDOSCOPE SYSTEM
Figure 6.20
Multi display function
You can display 1, 2, or 4 images simultaneously. Use the image view buttons in
the image display area to change the image view setting (see Figure 6.21).
Figure 6.21
1. 1-Image Display button
Sets the number of images to be displayed in the image display area to 1.
2. 2-Image Display button
Sets the number of images to be displayed in the image display area to 2.
3. 4-Image Display button
Sets the number of images to be displayed in the image display area to 4.
Speed display area
3. 4-Image Display button
2. 2-Image Display button
1. 1-Image Display button
Chapter 6 Capsule Endoscope Image Observation
159
OLYMPUS CAPSULE ENDOSCOPE SYSTEM
• In the “2 Display Mode”, the image on the left side is 0.5
second older than the image on the right (see Figure 6.22).
• In the “4 Display Mode”, the images shown in the upper left,
upper right, and lower right are 1.5, 1.0, and 0.5 second older
than the image on the lower left, respectively (see Figure
6.22).
Figure 6.22
Switching the image update mode
You can select the way in which images on the main screen are refreshed.
1. Click either of the [Overlap / Sequential] buttons (see Figure 6.23).
Figure 6.23
1 Display Mode 4 Display Mode2 Display Mode
Overlap / Sequential
buttons