Olympus Medical Systems EC-1 Low Power Transmitter User Manual GT1629 FCC MAJ 1467 C1
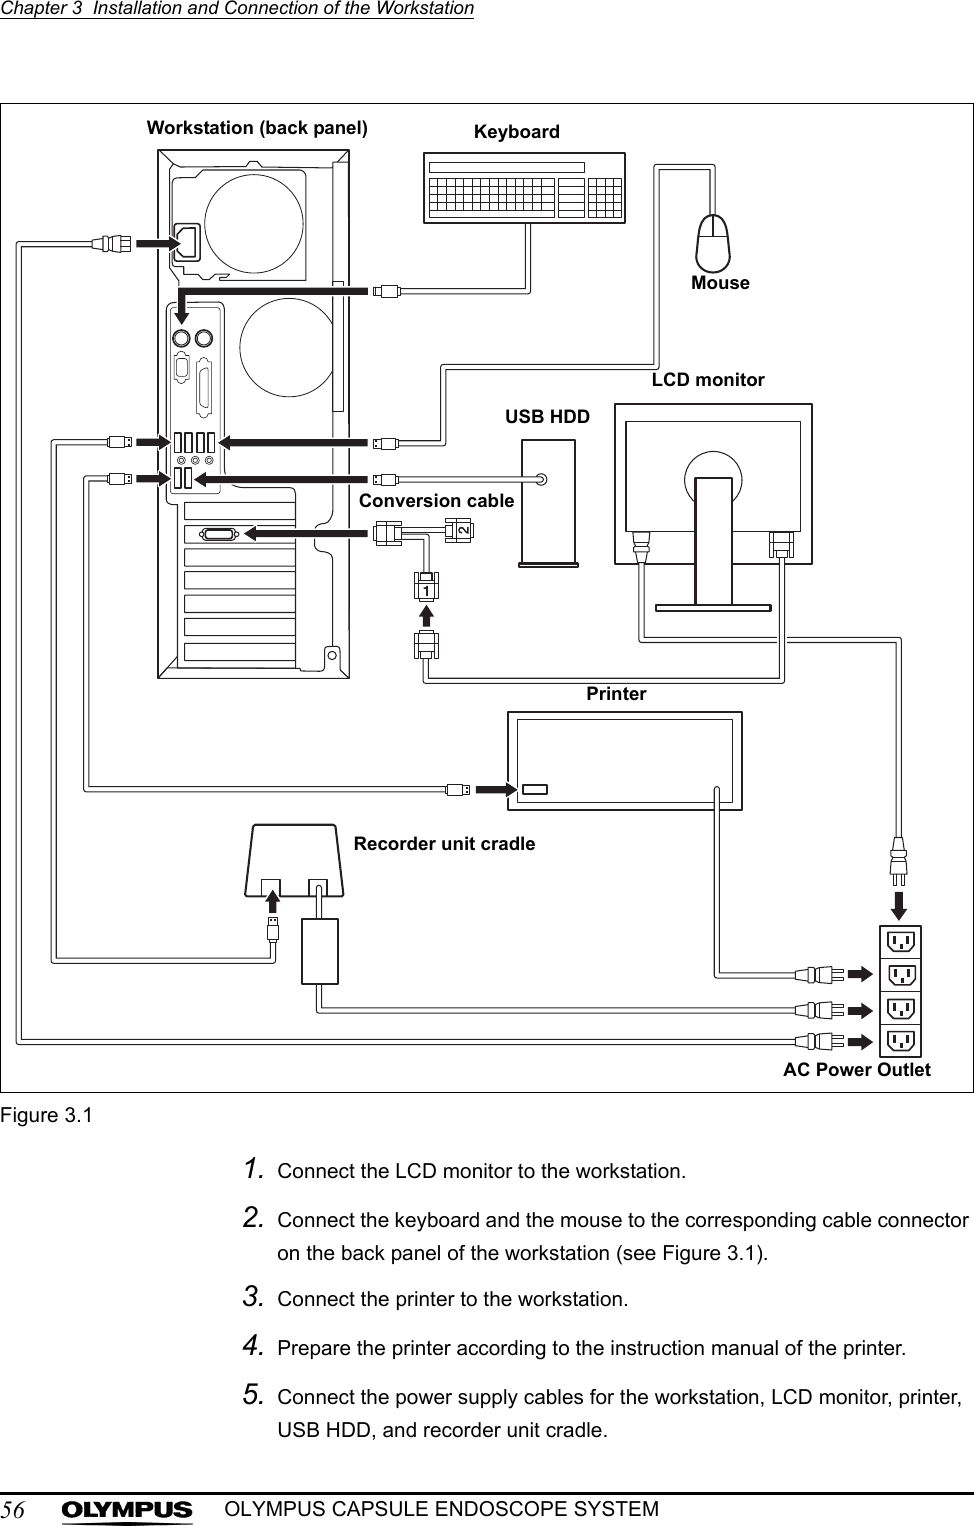
Olympus Medical Systems Corp. Low Power Transmitter GT1629 FCC MAJ 1467 C1
Contents
- 1. Users manual Part 1
- 2. Users manual Part 2
- 3. Users manual Part 3
- 4. Users manual Part 4
- 5. Users manual part 5
Users manual Part 1


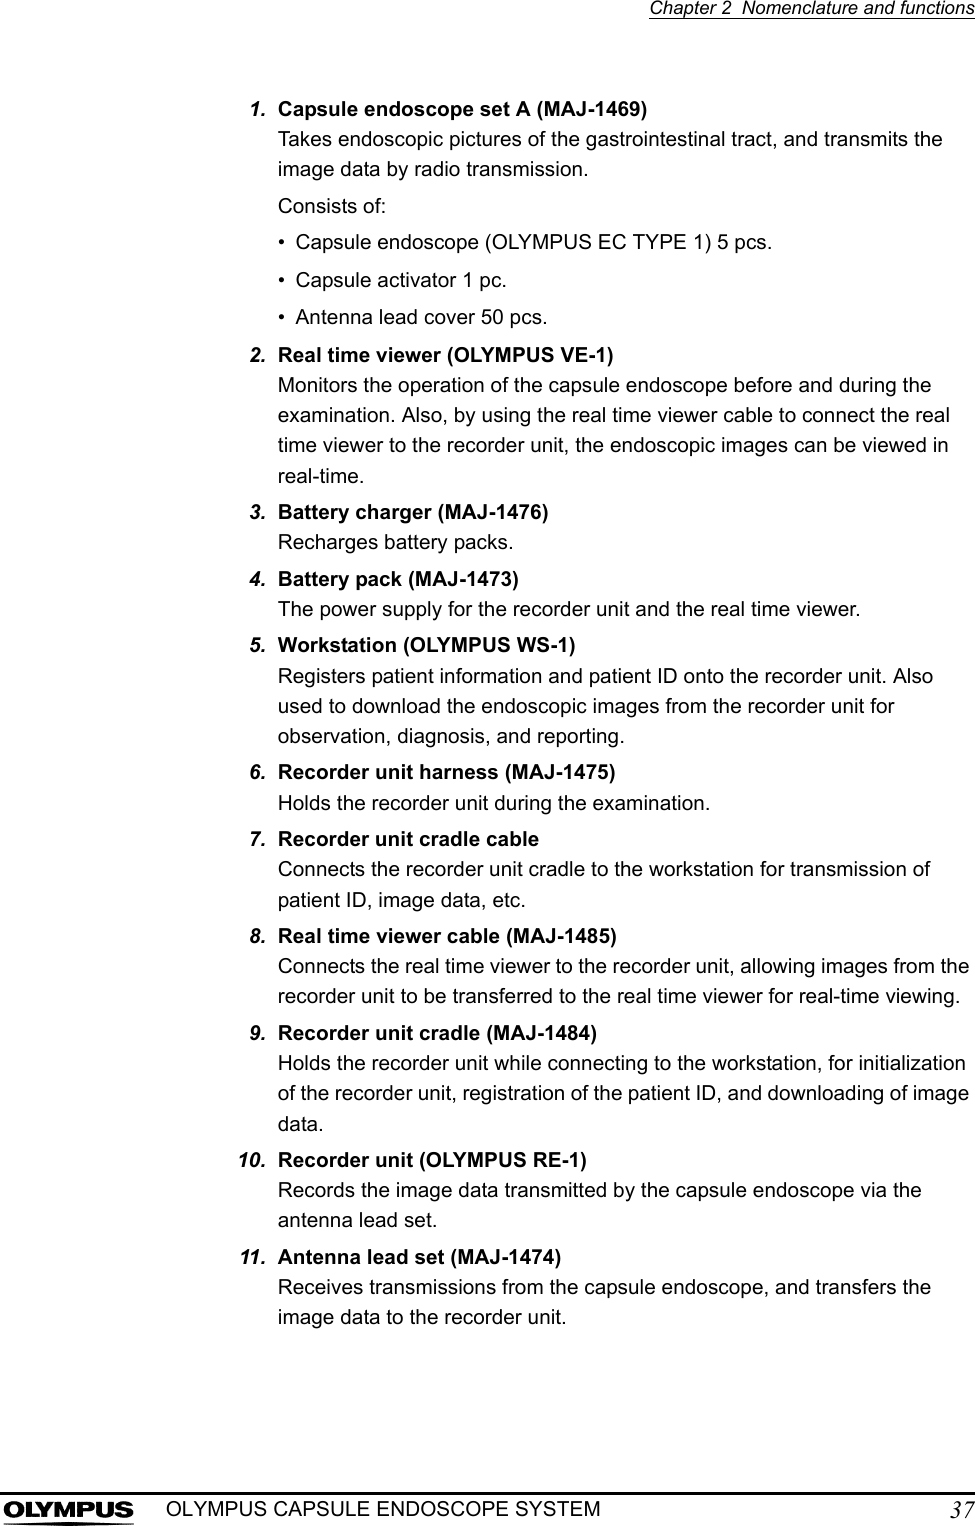

![Chapter 3 Installation and Connection of the Workstation59OLYMPUS CAPSULE ENDOSCOPE SYSTEMInstallation WMV CODEC1. Insert the installation CD into the CD-ROM drive. The CD will auto-run, and the Main menu is displayed. 2. On the Main menu, click “Install WMV CODEC”. 3. The installer will be launched. Follow the instructions on the screen to install the software. Uninstalling 1. Select [Start] > [Control Panel]. The control panel is displayed. 2. In the control panel, double-click “Add or Remove Programs”. The “Add or Remove Programs” screen is displayed. 3. In the “Change or Remove Programs” tab, select the Endo Capsule software light. 4. Click the “Change/Remove” button and follow the instructions on the screen.](https://usermanual.wiki/Olympus-Medical-Systems/EC-1.Users-manual-Part-1/User-Guide-618769-Page-65.png)
![62Chapter 4 Workstation Access and SetupOLYMPUS CAPSULE ENDOSCOPE SYSTEM• When logging in for the first time, enter “olympus” as the user ID and password. After you log in, add a user in the user settings.• Characters that can be used for user IDs and passwords are shown in Table 4.1:Table 4.1• User IDs and passwords are case sensitive.• When entering a password, the entered characters will be displayed as asterisks (∗) for security.Uppercase A B C D E F G H I J K L M N O P Q R S T U V W X Y ZLowercase a b c d e f g h i j k l m n o p q r s t u v w x y zNumbers 0 1 2 3 4 5 6 7 8 9Symbols ` ~ ! @ # $ % ^ & * ( ) _ + – = { } | [ ] : " ; ' < > ? , . /](https://usermanual.wiki/Olympus-Medical-Systems/EC-1.Users-manual-Part-1/User-Guide-618769-Page-68.png)
![Chapter 4 Workstation Access and Setup63OLYMPUS CAPSULE ENDOSCOPE SYSTEM3. Click the [OK] button (see Figure 4.3).Figure 4.3• Click the [Shutdown] button to turn OFF the workstation.• If the message in Figure 4.4 is displayed, the user ID or password is incorrect. Click the [OK] button, and then check and re-enter the user ID and password.Figure 4.4OK buttonOK button](https://usermanual.wiki/Olympus-Medical-Systems/EC-1.Users-manual-Part-1/User-Guide-618769-Page-69.png)
![64Chapter 4 Workstation Access and SetupOLYMPUS CAPSULE ENDOSCOPE SYSTEM4. If the user ID and password are correct, a confirmation screen for the user name and system time is displayed. Confirm the user name and system time (see Figure 4.5).Figure 4.55. To change the system time, click the [No] button.If you do not need to change the system time, click the [Yes] button. The main screen is displayed.6. Set the correct date and time.Figure 4.6User nameSystem time](https://usermanual.wiki/Olympus-Medical-Systems/EC-1.Users-manual-Part-1/User-Guide-618769-Page-70.png)
![Chapter 4 Workstation Access and Setup65OLYMPUS CAPSULE ENDOSCOPE SYSTEM7. Click the [OK] button. A confirmation screen for the user name and system time appears and the system time has changed.If you wish to cancel changing the system time, click the [Cancel] button.8. On the confirmation screen for the user name and system time, click the [Yes] button. The observation screen is displayed.](https://usermanual.wiki/Olympus-Medical-Systems/EC-1.Users-manual-Part-1/User-Guide-618769-Page-71.png)
![66Chapter 4 Workstation Access and SetupOLYMPUS CAPSULE ENDOSCOPE SYSTEM4.2 Start-up of Endo Capsule software light1. Double-click the icon of Endo Capsule Software Light on the desktop. Endo Capsule Software Light runs and the user name screen is displayed.Figure 4.72. Enter the user name and click [OK] button.Figure 4.8Entering the use name is necessary.](https://usermanual.wiki/Olympus-Medical-Systems/EC-1.Users-manual-Part-1/User-Guide-618769-Page-72.png)