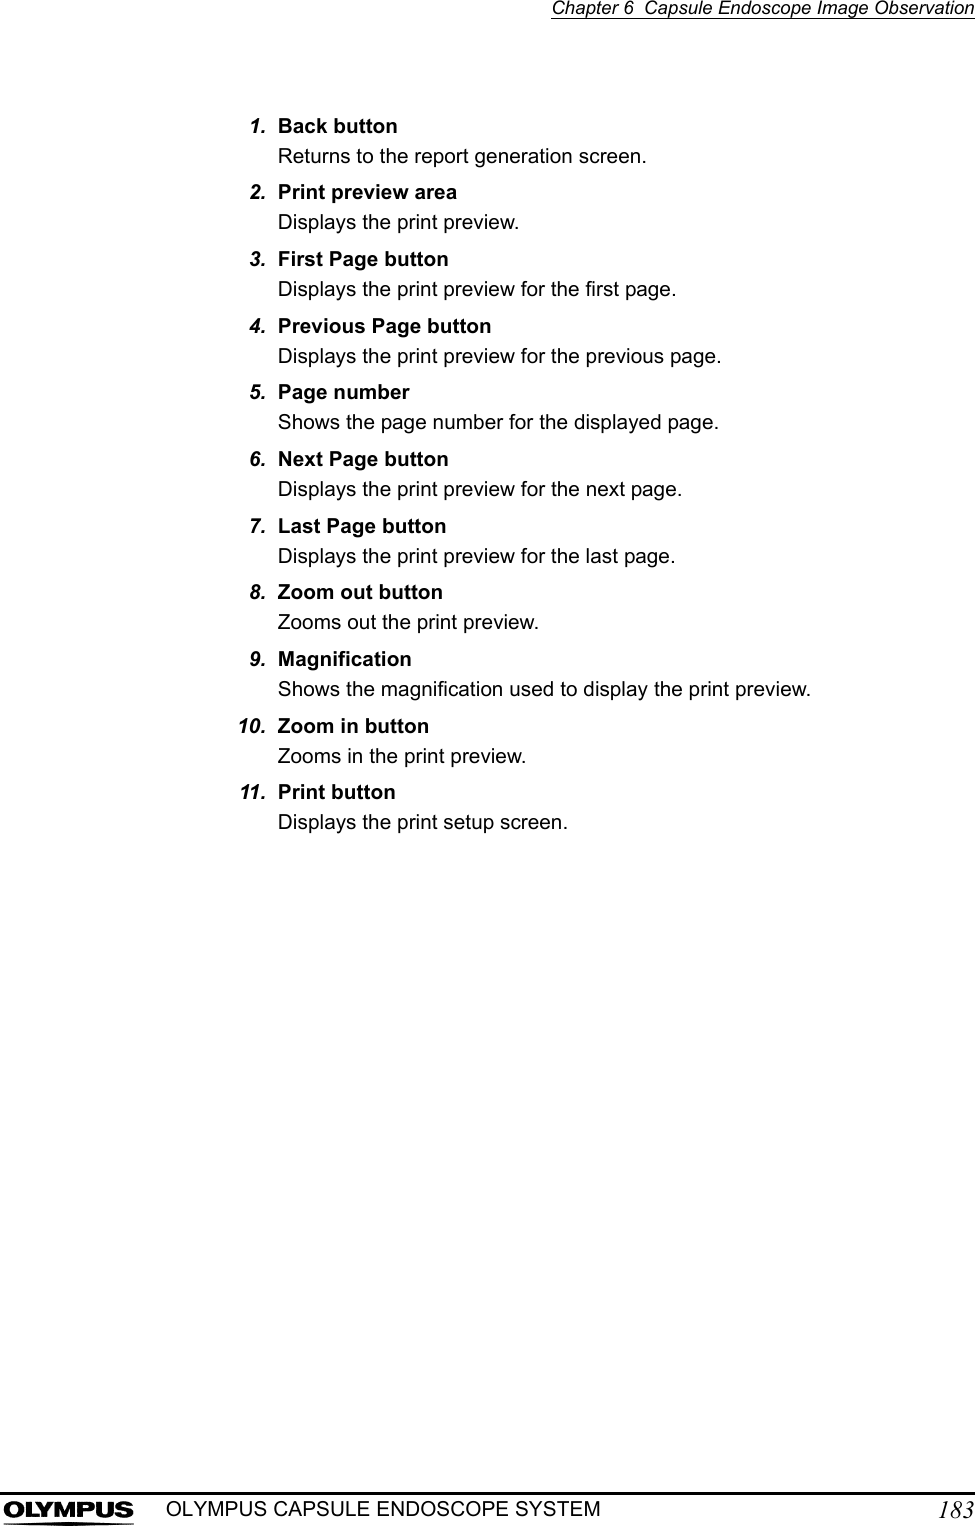
Olympus Medical Systems EC-1 Low Power Transmitter User Manual GT1629 FCC MAJ 1467 C1
Olympus Medical Systems Corp. Low Power Transmitter GT1629 FCC MAJ 1467 C1
Contents
- 1. Users manual Part 1
- 2. Users manual Part 2
- 3. Users manual Part 3
- 4. Users manual Part 4
- 5. Users manual part 5
Users manual Part 4
![160Chapter 6 Capsule Endoscope Image ObservationOLYMPUS CAPSULE ENDOSCOPE SYSTEMTable 6.1Enlarging imagesYou can enlarge the image data displayed in the image display area of the main screen.1. Click the [Zoom] button (see Figure 6.24). The image being displayed in the image display area will be enlarged.Figure 6.24• When you enlarge an image, the [Zoom] button is changed to the original size mode (see Figure 6.25). Click the [Zoom] button again to restore the image to its original size.Figure 6.25• Magnification varies in the image view mode (see Table 6.2).Overlap One image is refreshed.Sequential All images displayed are refreshed.Zoom buttonEnlargement mode Original size mode](https://usermanual.wiki/Olympus-Medical-Systems/EC-1.Users-manual-Part-4/User-Guide-618772-Page-1.png)
![Chapter 6 Capsule Endoscope Image Observation161OLYMPUS CAPSULE ENDOSCOPE SYSTEMTable 6.2Structure enhancementUse the [Enhance] buttons to emphasize the patterns on the surface of the mucosa (see Figure 6.26).Figure 6.26Image view mode Magnification1 Display mode x 22 Display mode x 1.54 Display mode − (not available)Enhance buttons](https://usermanual.wiki/Olympus-Medical-Systems/EC-1.Users-manual-Part-4/User-Guide-618772-Page-2.png)
![162Chapter 6 Capsule Endoscope Image ObservationOLYMPUS CAPSULE ENDOSCOPE SYSTEMThe structure enhancement level can be switched between “Normal” and “High” (see Table 6.3).Table 6.3Antenna displayThe antenna display identifies the antenna with the best signal reception.The antenna information is for reference only. Do not depend on this information to determine the position of the capsule endoscope.1. Click the [Antenna] button in the antenna display section (see Figure 6.27). The antenna display panel is displayed.Figure 6.27Click the [Antenna] button again to hide the antenna display panel.Enhancement level DetailNormal The image is displayed without structure enhancement applied.High The image is displayed with structure enhancement applied.Antenna button](https://usermanual.wiki/Olympus-Medical-Systems/EC-1.Users-manual-Part-4/User-Guide-618772-Page-3.png)
![Chapter 6 Capsule Endoscope Image Observation163OLYMPUS CAPSULE ENDOSCOPE SYSTEMCreating thumbnailsClicking the [Capture] button while the playback of image data is paused will create and display thumbnails of the image data in the thumbnail view area (see Figure 6.28).To create thumbnails, double click on the image display area.Figure 6.28When you click the [Capture] button during the playback of image data, a thumbnail will be created for the image being displayed at that moment, and the playback of image data will be paused.Removing thumbnails1. On the thumbnail view area, select the thumbnail you wish to remove.2. Right-click on the selected thumbnail to display the context menu (see Figure 6.29).Figure 6.29Capture buttonThumbnail view area](https://usermanual.wiki/Olympus-Medical-Systems/EC-1.Users-manual-Part-4/User-Guide-618772-Page-4.png)
![164Chapter 6 Capsule Endoscope Image ObservationOLYMPUS CAPSULE ENDOSCOPE SYSTEM3. Select “Remove” from the context menu to delete the selected thumbnail.• You can also press the “Delete” key on the keyboard to delete the selected thumbnail.• If the thumbnail included in the reporting group is removed, one of the below messages is displayed.−The selected thumbnails are added to a report. If you delete these thumbnails, they will be removed from a report.−If you delete the selected thumbnails, the comments added to the group which contains these thumbnails will be deleted.• If no thumbnail has been created, pressing the land mark will create a new thumbnail.Setting featuresYou can set a featured region on the time bar to identify the range of images (small bowel area) to focus on.1. Click and select a thumbnail to set a feature.2. Click the [Landmarks] button on the thumbnail and select “Landmarks” from the context menu (see Figure 6.30).Figure 6.30Landmarks button](https://usermanual.wiki/Olympus-Medical-Systems/EC-1.Users-manual-Part-4/User-Guide-618772-Page-5.png)
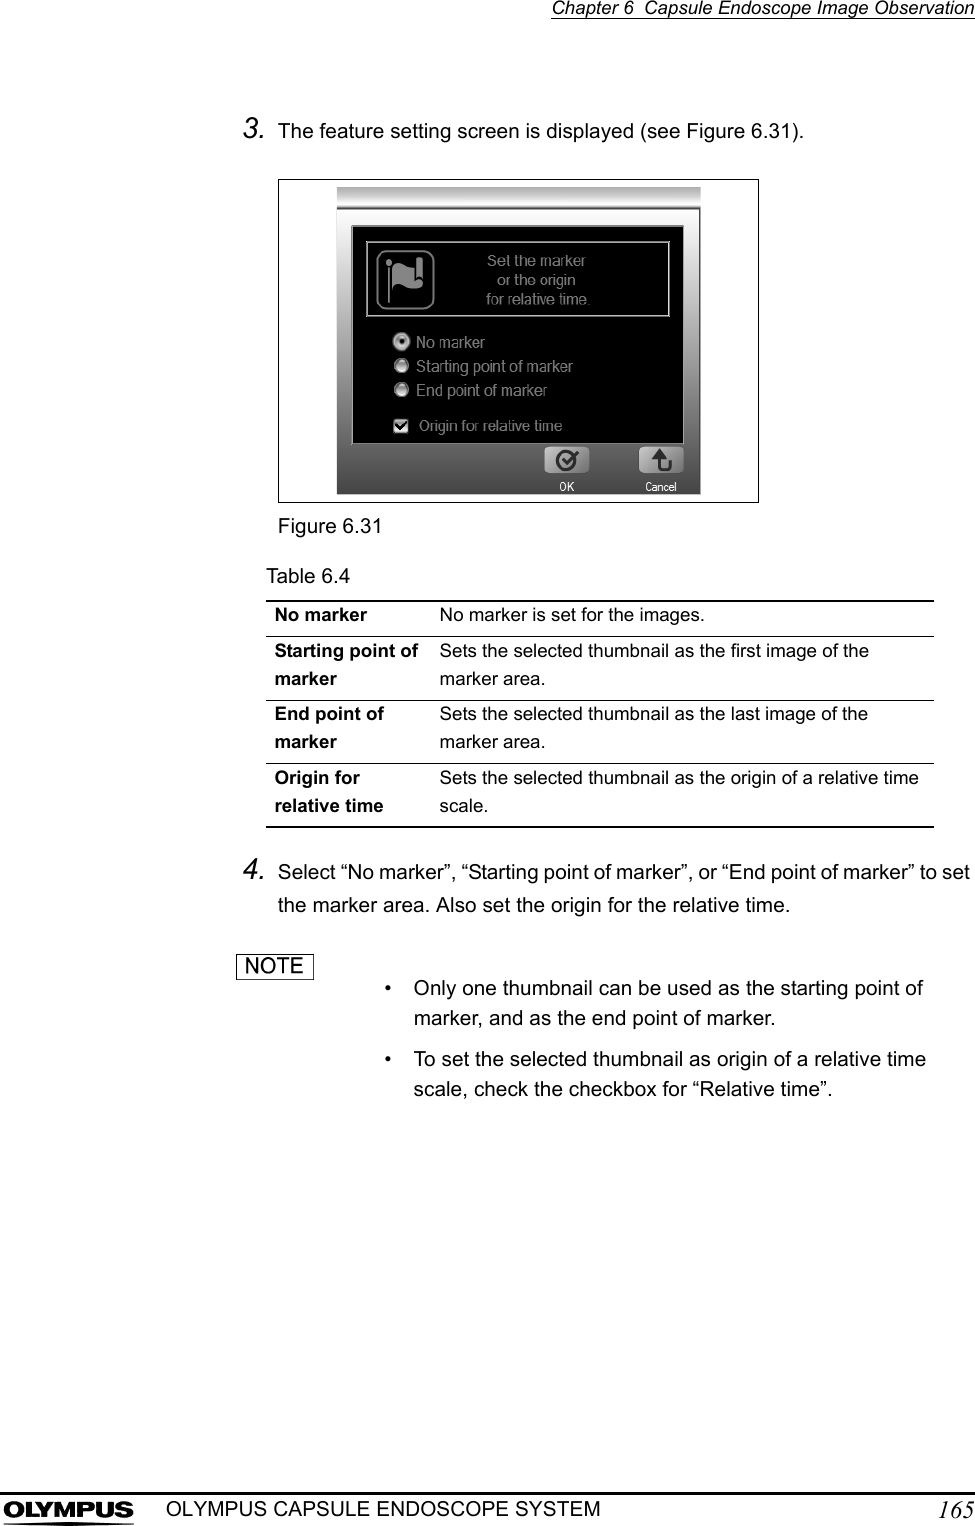
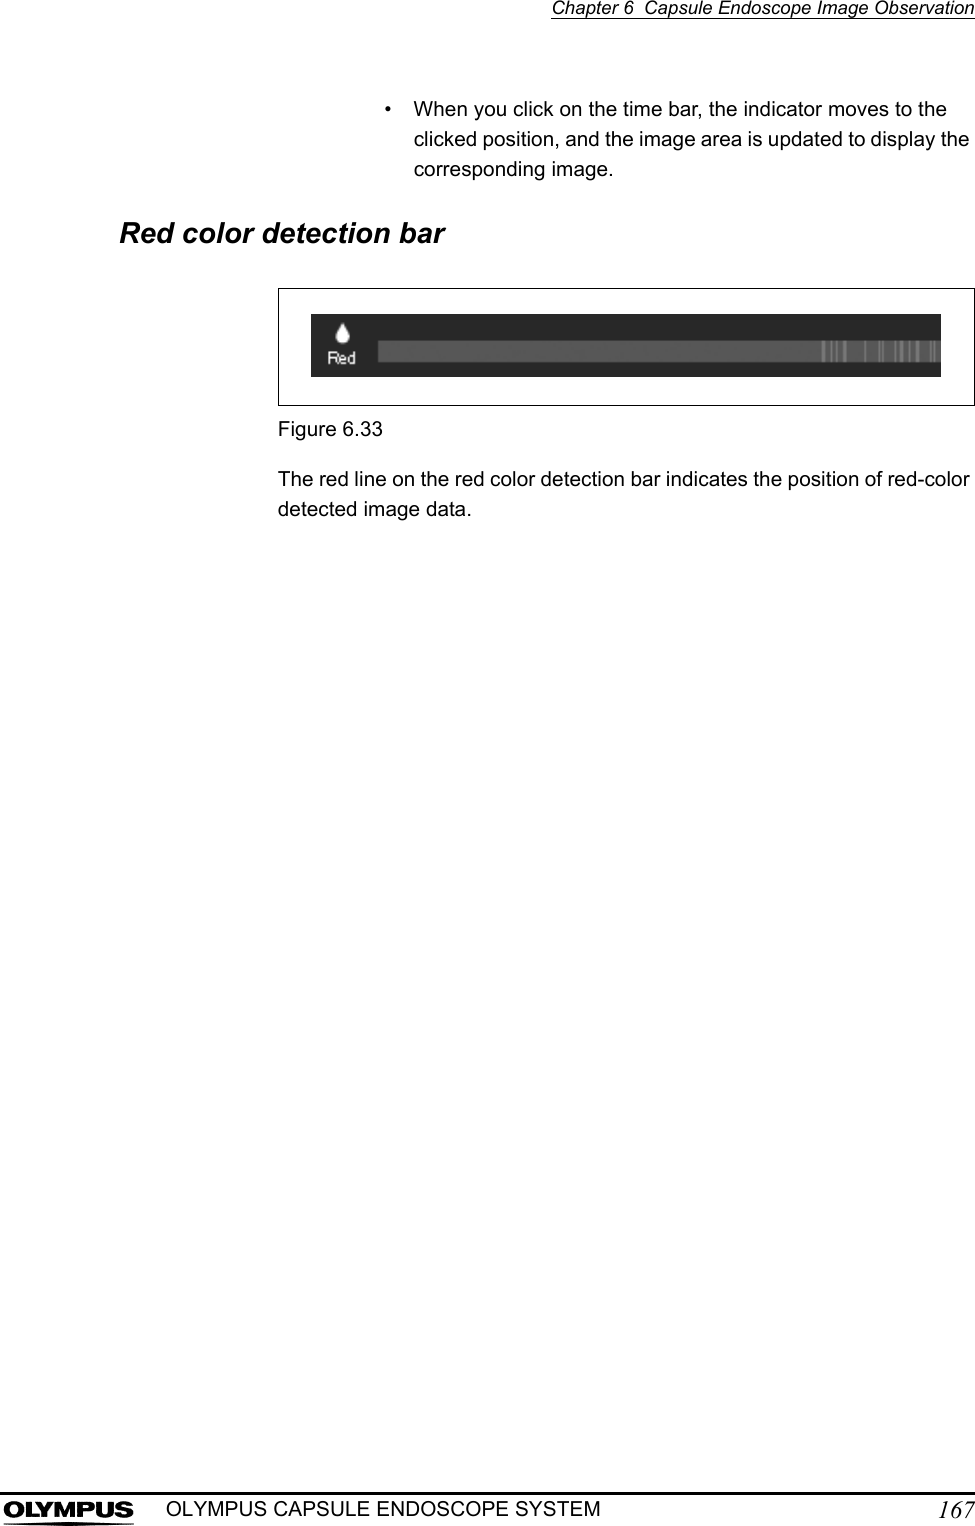
![166Chapter 6 Capsule Endoscope Image ObservationOLYMPUS CAPSULE ENDOSCOPE SYSTEM5. Click the [OK] button. The feature interval is now set.• If you right-click on the thumbnail, the context menu which contains the items in the Table 6.4 appears.You can set features by selecting one of the context menu.• Click [Cancel] to discard the settings and exit the feature setting screen.• The configured feature interval is shown in a different color on the time bar.• When only the “Start of feature interval” is specified, the last image of the data set becomes the “End of feature interval”.• When only the “End of feature interval” is specified, the first image of the data set becomes the “Start of feature interval”.Time barThe time bar indicates the position of the currently displayed image relative to the overall timeframe (see Figure 6.32).Figure 6.32The thumbnails are connected with a line to a position on the time bar that corresponds to the time at which they were captured.• When you drag the indicator on the time bar to the left or the right, the image data being displayed in the image area is updated accordingly.• The time bar becomes interrupted when the recorder unit is turned OFF or when signals are not being received.Time bar](https://usermanual.wiki/Olympus-Medical-Systems/EC-1.Users-manual-Part-4/User-Guide-618772-Page-7.png)
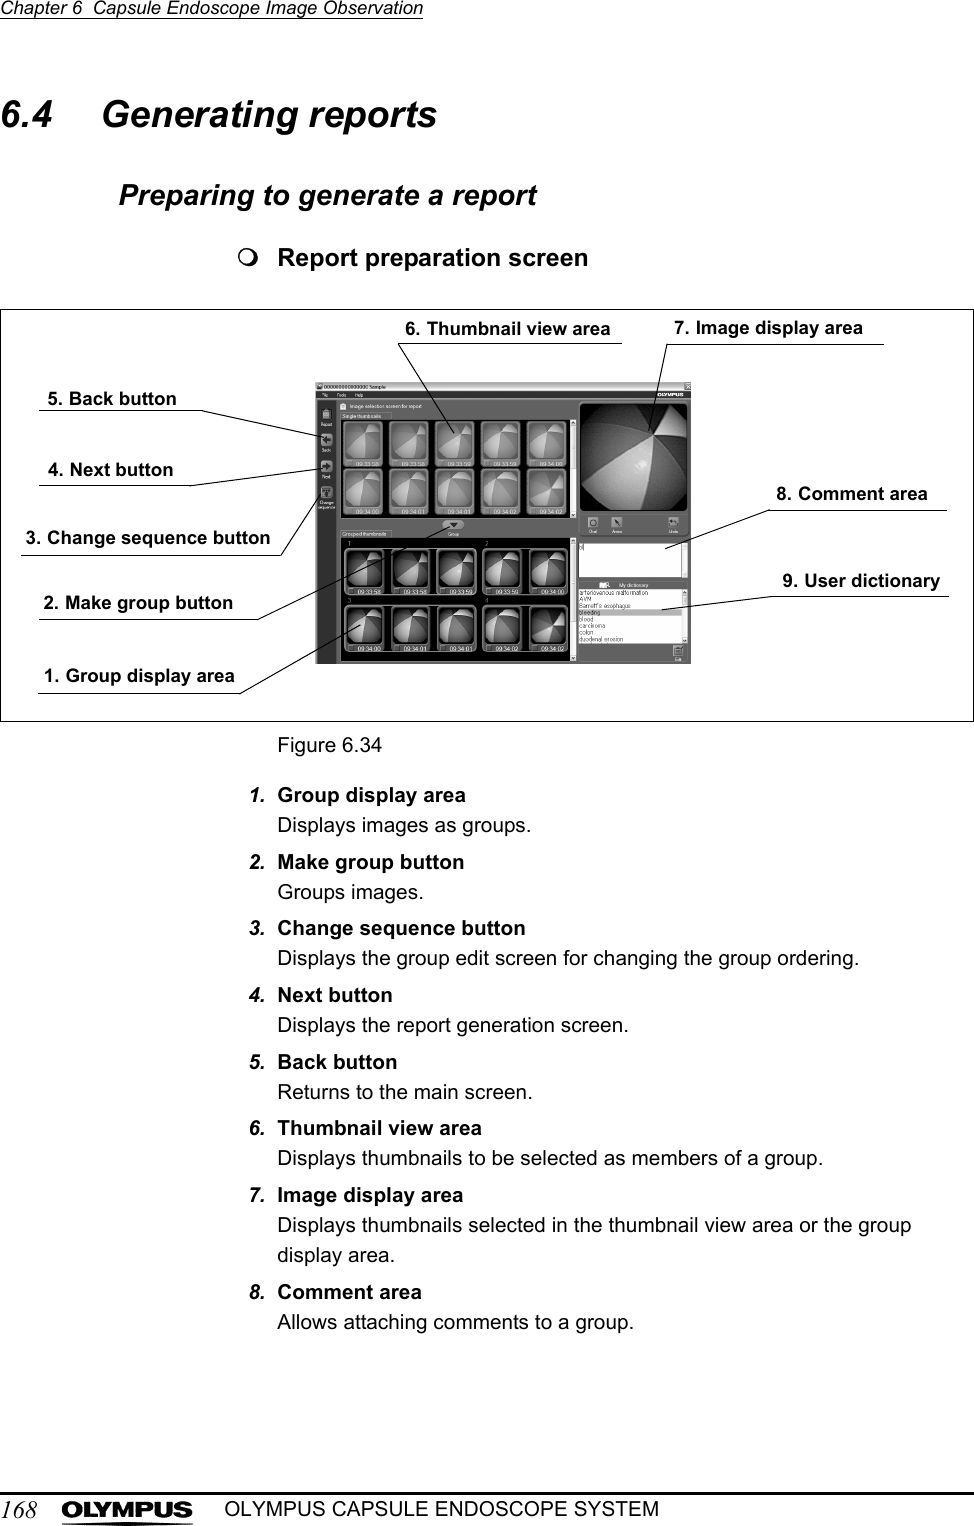
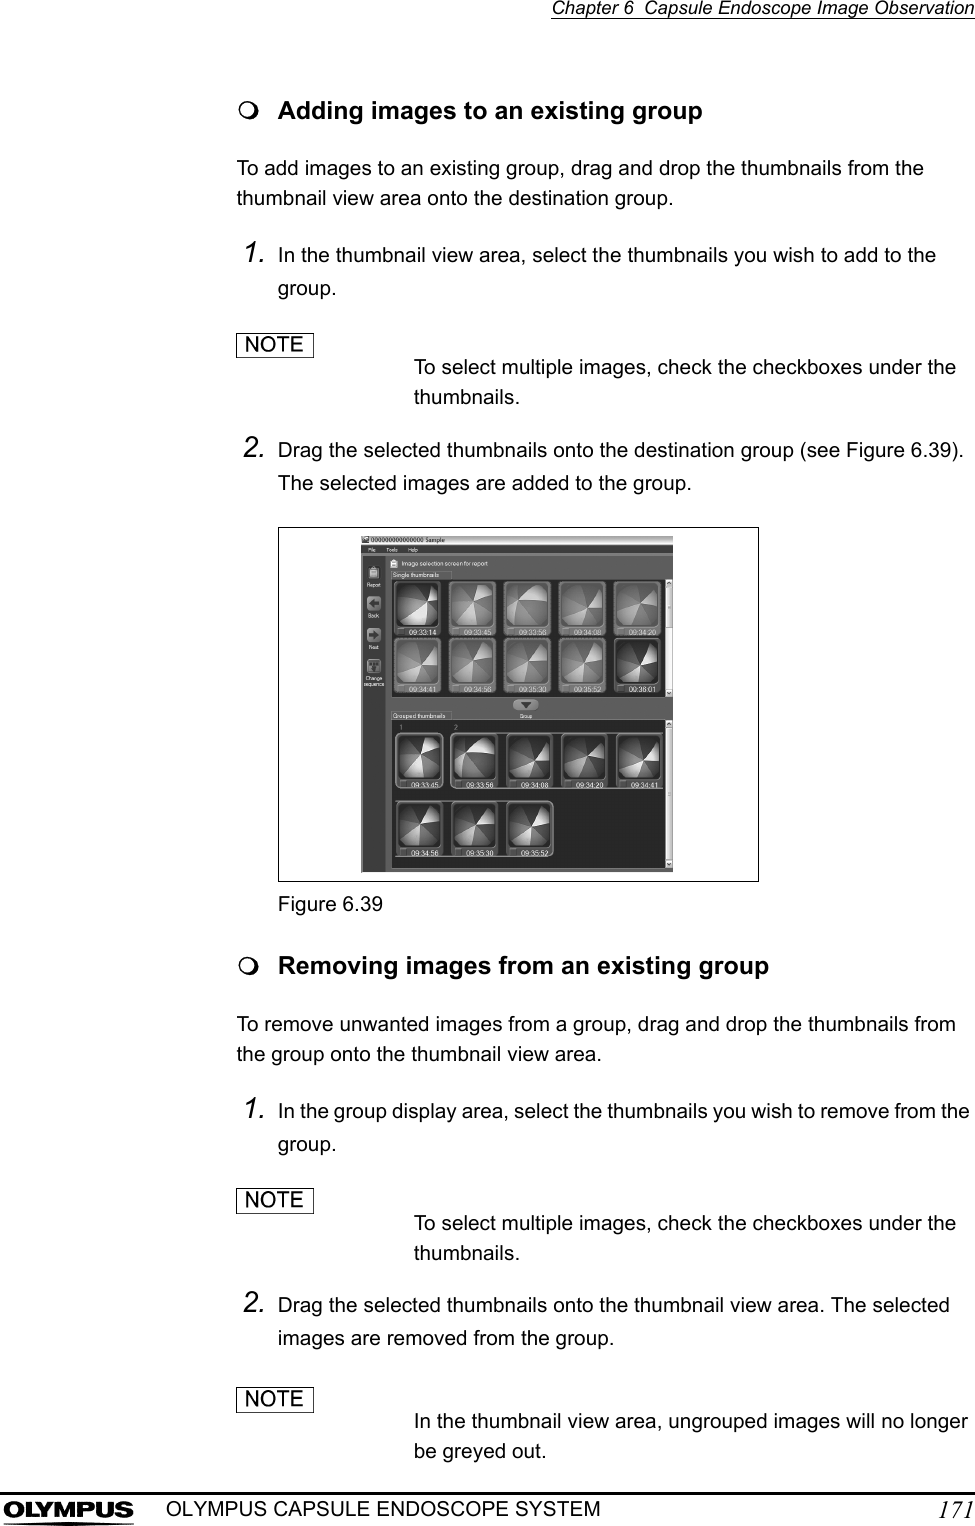
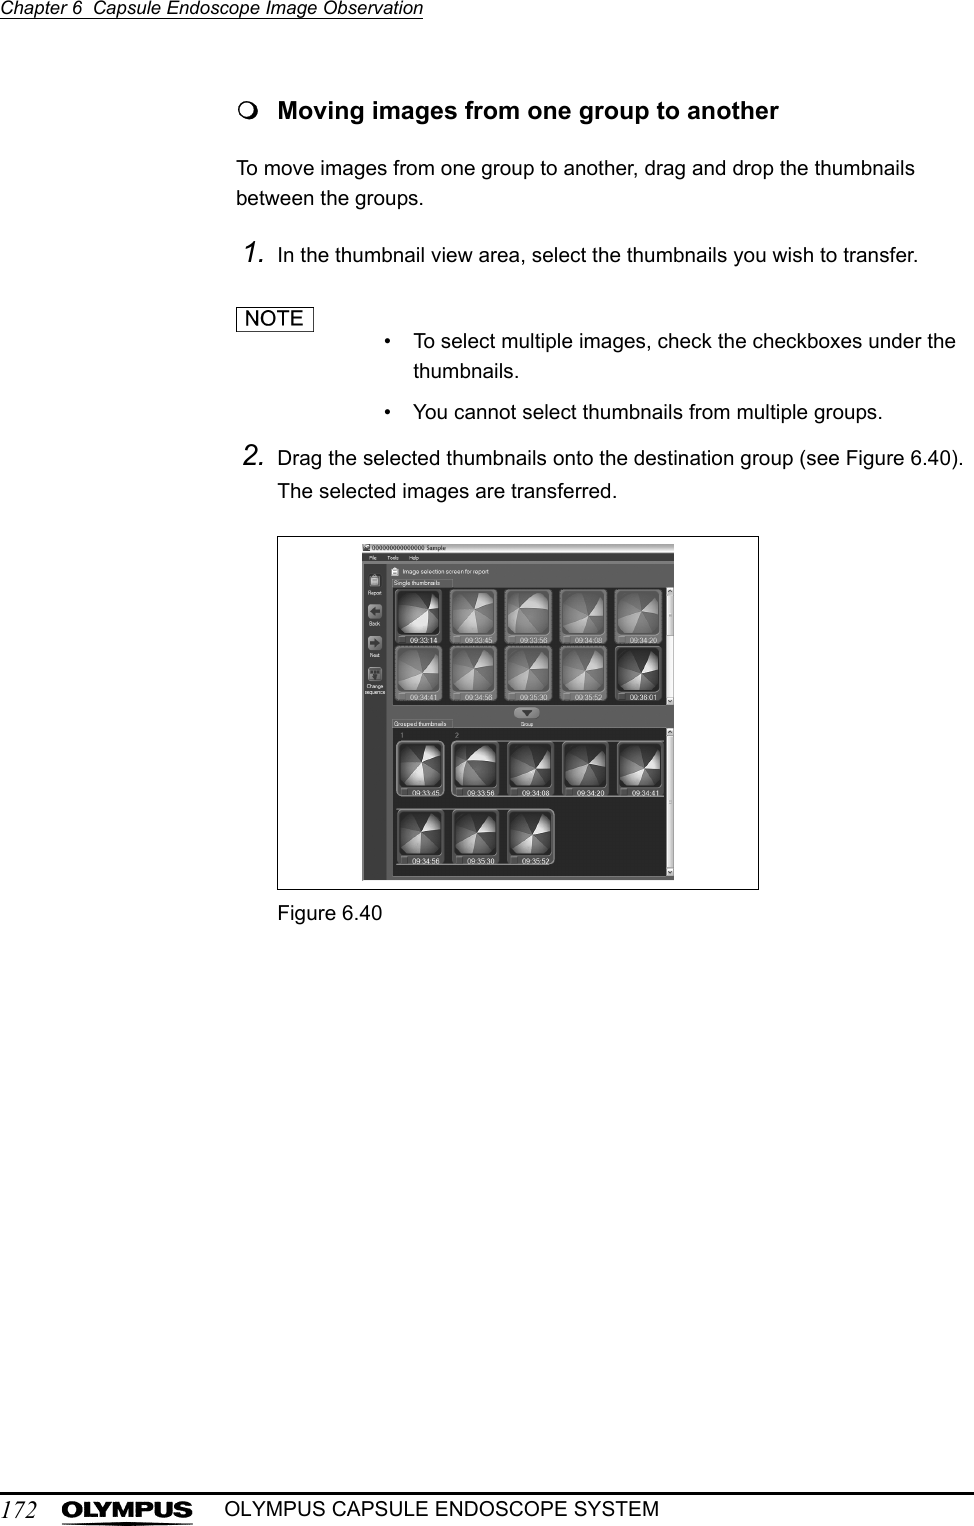
![Chapter 6 Capsule Endoscope Image Observation169OLYMPUS CAPSULE ENDOSCOPE SYSTEM9. User dictionaryUsed when entering comments. As you type into the comment area, terms starting with the characters you have entered will be searched for and displayed.Grouping imagesOnly the images that have been assigned to a group can be included in a report. You can associate a comment to each group.1. Click the [Report] button on the main screen (see Figure 6.35). The report preparation screen is displayed.Figure 6.352. From the thumbnail view area, check the checkbox under the thumbnail you wish to include in the reporting group (see Figure 6.36).Figure 6.36Report buttonThumbnail view area](https://usermanual.wiki/Olympus-Medical-Systems/EC-1.Users-manual-Part-4/User-Guide-618772-Page-10.png)
![170Chapter 6 Capsule Endoscope Image ObservationOLYMPUS CAPSULE ENDOSCOPE SYSTEMTo select multiple images, check the checkboxes under the thumbnails (see Figure 6.37).Figure 6.373. Click the [Make group] button (see Figure 6.38). Selected images are displayed in the group display area and a group is created.Figure 6.38Images that are already grouped will be greyed out in the thumbnail view area.CheckboxMake group button](https://usermanual.wiki/Olympus-Medical-Systems/EC-1.Users-manual-Part-4/User-Guide-618772-Page-11.png)
![Chapter 6 Capsule Endoscope Image Observation173OLYMPUS CAPSULE ENDOSCOPE SYSTEMDrawing ovals on observation imagesYou can draw ovals on images to indicate areas of interest.1. Click the [Oval] button on the image display area (see Figure 6.41).Figure 6.41The image display area displays the image for the thumbnail selected in the thumbnail view area or the group display area.2. Click & drag on the image in the image display area to draw an oval (see Figure 6.42).Figure 6.42• The oval will be centered around the point where the mouse was clicked.• Release the mouse button to complete the oval.Oval button](https://usermanual.wiki/Olympus-Medical-Systems/EC-1.Users-manual-Part-4/User-Guide-618772-Page-14.png)
![174Chapter 6 Capsule Endoscope Image ObservationOLYMPUS CAPSULE ENDOSCOPE SYSTEM• An oval that extends beyond the limits of the image display area will not be shown.3. To undo the oval(s) you have drawn, click the [Undo] button.To delete an oval, select the oval and press the [Delete] key on the keyboard.Drawing arrows on observation imagesYou can draw arrows on images to point out areas of interest.1. Click the [Arrow] button on the image display area (see Figure 6.43).Figure 6.43The image display area displays the image for the thumbnail selected in the thumbnail view area or the group display area.Arrow button](https://usermanual.wiki/Olympus-Medical-Systems/EC-1.Users-manual-Part-4/User-Guide-618772-Page-15.png)
![Chapter 6 Capsule Endoscope Image Observation175OLYMPUS CAPSULE ENDOSCOPE SYSTEM2. Click and drag on the image in the image display area to draw an arrow (see Figure 6.44).Figure 6.44• The arrow will be drawn from the point where the mouse was clicked.• Release the mouse button to complete the arrow.• An arrow that extends beyond the limits of the image display area will not be shown.3. To undo the arrow(s) you have drawn, click the [Undo] button.To delete an arrow, select the arrow and press the [Delete] key on the keyboard.Entering commentsA comment can be attached to each group. Input your comment using the keyboard or the user dictionary.1. On the report preparation screen, type in your comment into the comment area.2. Words that start with the entered character string are displayed in the candidate display area.• A candidate is displayed when a character is entered following a space.](https://usermanual.wiki/Olympus-Medical-Systems/EC-1.Users-manual-Part-4/User-Guide-618772-Page-16.png)
![176Chapter 6 Capsule Endoscope Image ObservationOLYMPUS CAPSULE ENDOSCOPE SYSTEM• As you type into the comment area, terms starting with the characters you have entered will be searched for and displayed in the user dictionary area. To enter a term from the dictionary, select the term and press the [Enter] key on the keyboard.3. Use the up/down arrow keys on the keyboard to select the word you wish to enter from the candidate display area.4. Press the [Enter] key on the keyboard to enter the currently selected word into the comment entry box.• You can also click on a word in the candidate display area to enter it into the comment box.• To change the language when entering comments, right-click on the comment area and select the language.Editing the user dictionaryWords that are frequently used in reports can be registered in the user dictionary.1. Click the [Edit] button on the report preparation screen. The user dictionary edit screen is displayed.2. To add a word or phrase to the user dictionary, type the text into the text box on the user dictionary edit screen, and click the [Add] button.3. To remove a word or phrase from the user dictionary, select a registered word or phrase from the user dictionary, and click the [Remove] button.Figure 6.45](https://usermanual.wiki/Olympus-Medical-Systems/EC-1.Users-manual-Part-4/User-Guide-618772-Page-17.png)
![Chapter 6 Capsule Endoscope Image Observation177OLYMPUS CAPSULE ENDOSCOPE SYSTEMSorting groups1. Click the [Change sequence] button on the report preparation screen (see Figure 6.46). The group edit screen is displayed.Figure 6.462. Select the group you wish to reorder.3. Drag and drop the selected group to achieve the desired ordering of groups (see Figure 6.47). The groups are rearranged.Figure 6.474. Click the [OK] button. The change is applied, and the report preparation screen will be displayed. Click the [Cancel] button to discard the changes and return to the report preparation screen.Change sequence button](https://usermanual.wiki/Olympus-Medical-Systems/EC-1.Users-manual-Part-4/User-Guide-618772-Page-18.png)
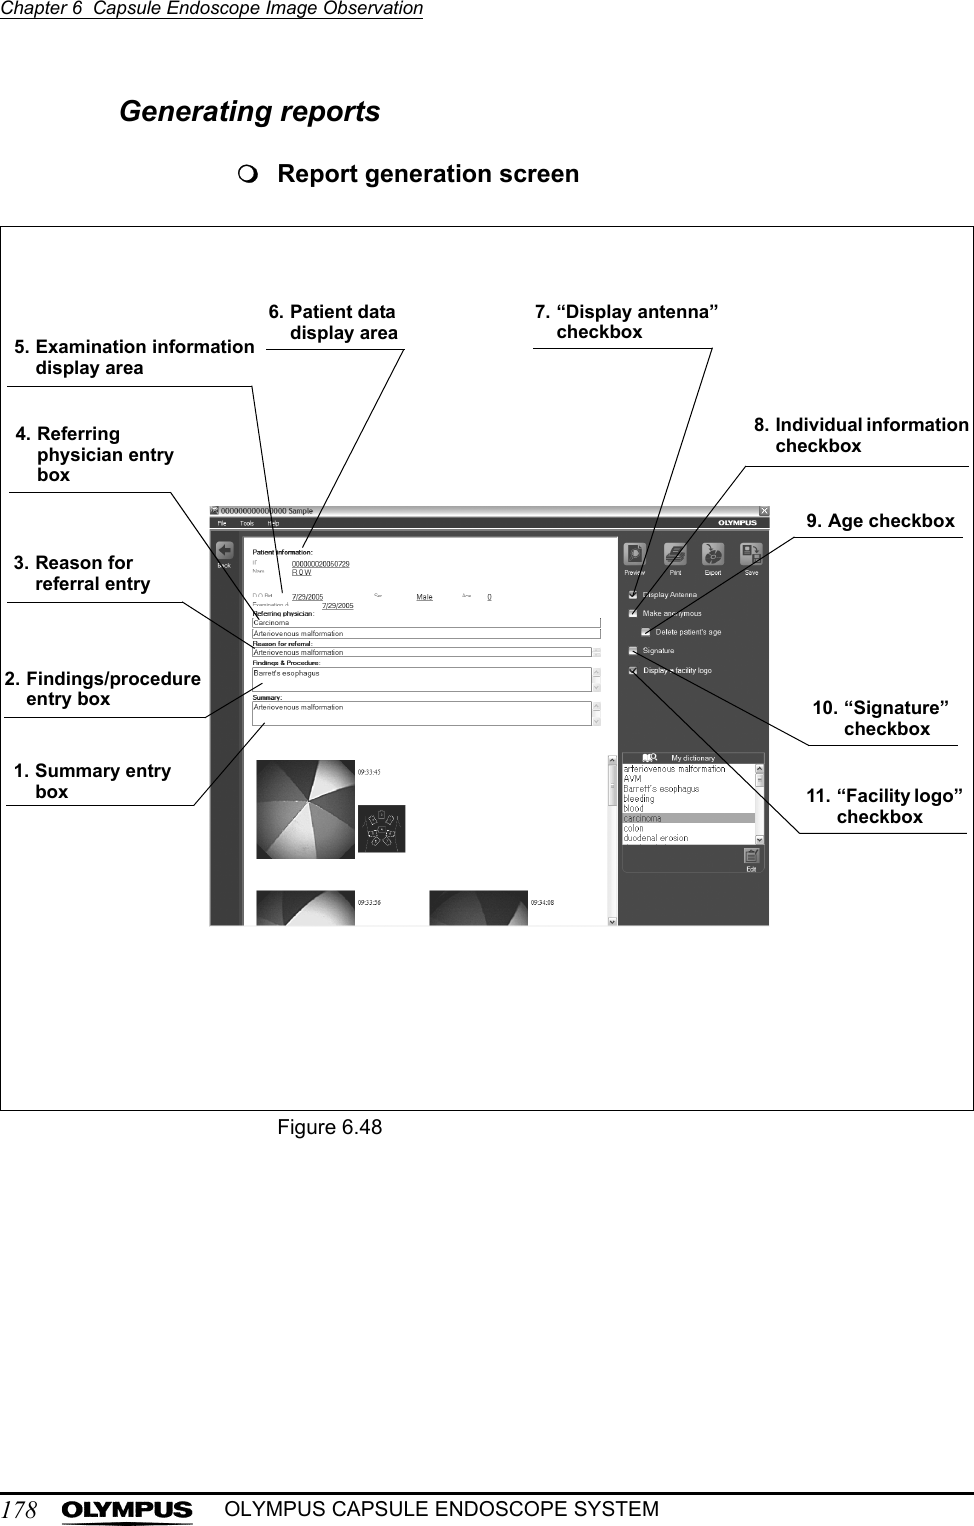
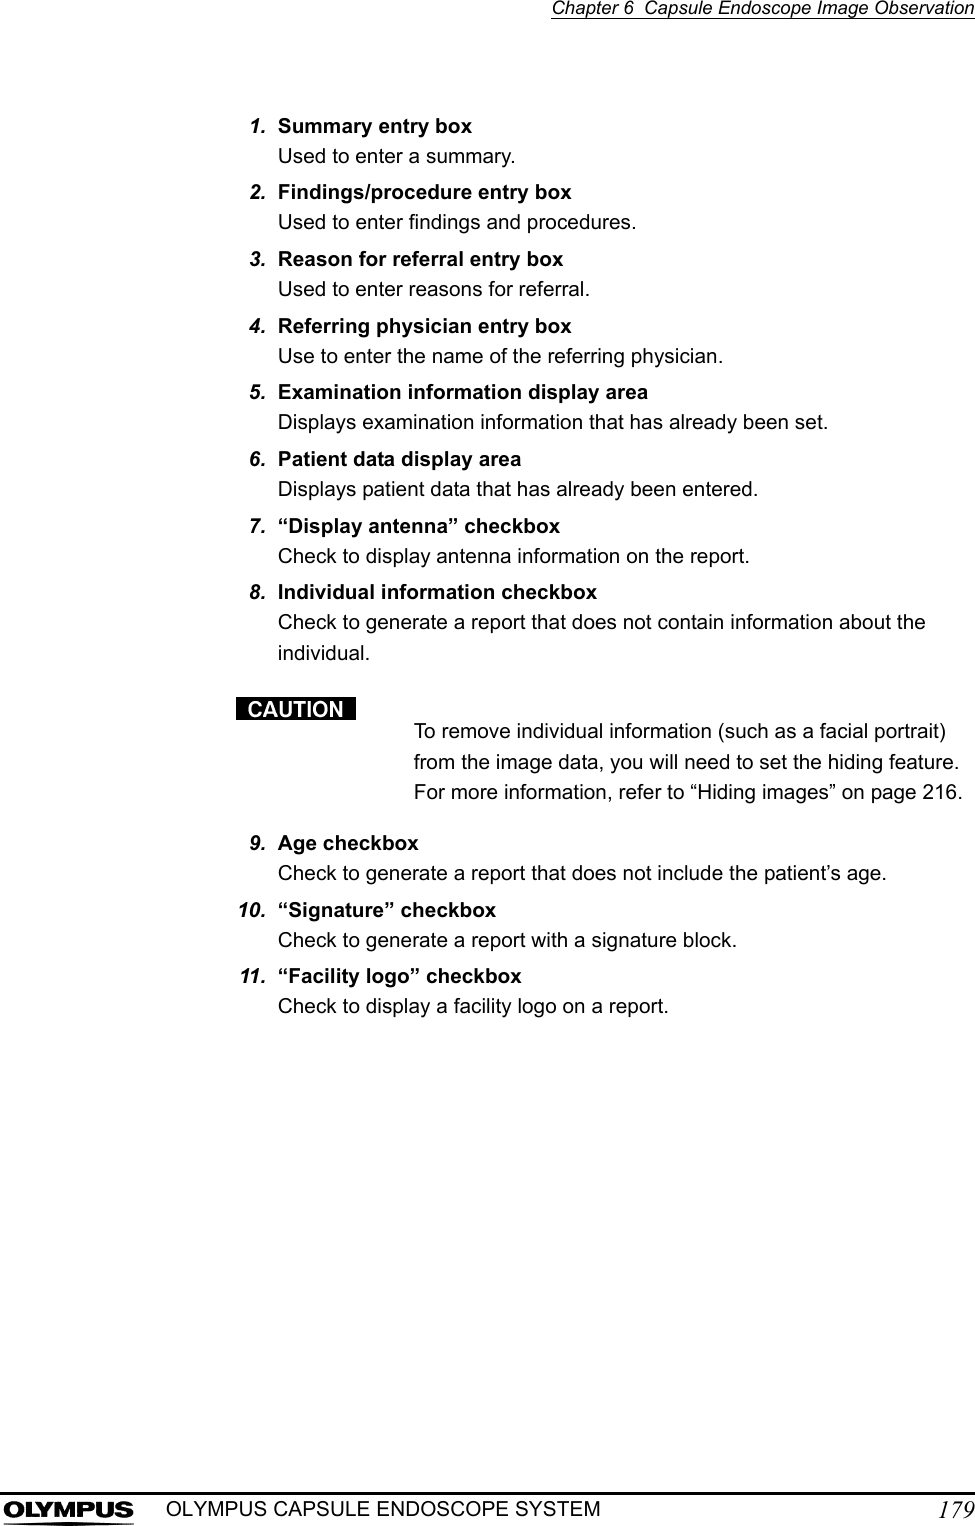
![180Chapter 6 Capsule Endoscope Image ObservationOLYMPUS CAPSULE ENDOSCOPE SYSTEMDisplaying the report generation screen1. Click the [Next] button on the report preparation screen (see Figure 6.49). The report generation screen is displayed.Figure 6.492. Contents specified on the initial setup screen are displayed (see Figure 6.50).Figure 6.50Only grouped images are displayed.3. Images grouped on the report preparation screen are displayed by group.Next button](https://usermanual.wiki/Olympus-Medical-Systems/EC-1.Users-manual-Part-4/User-Guide-618772-Page-21.png)
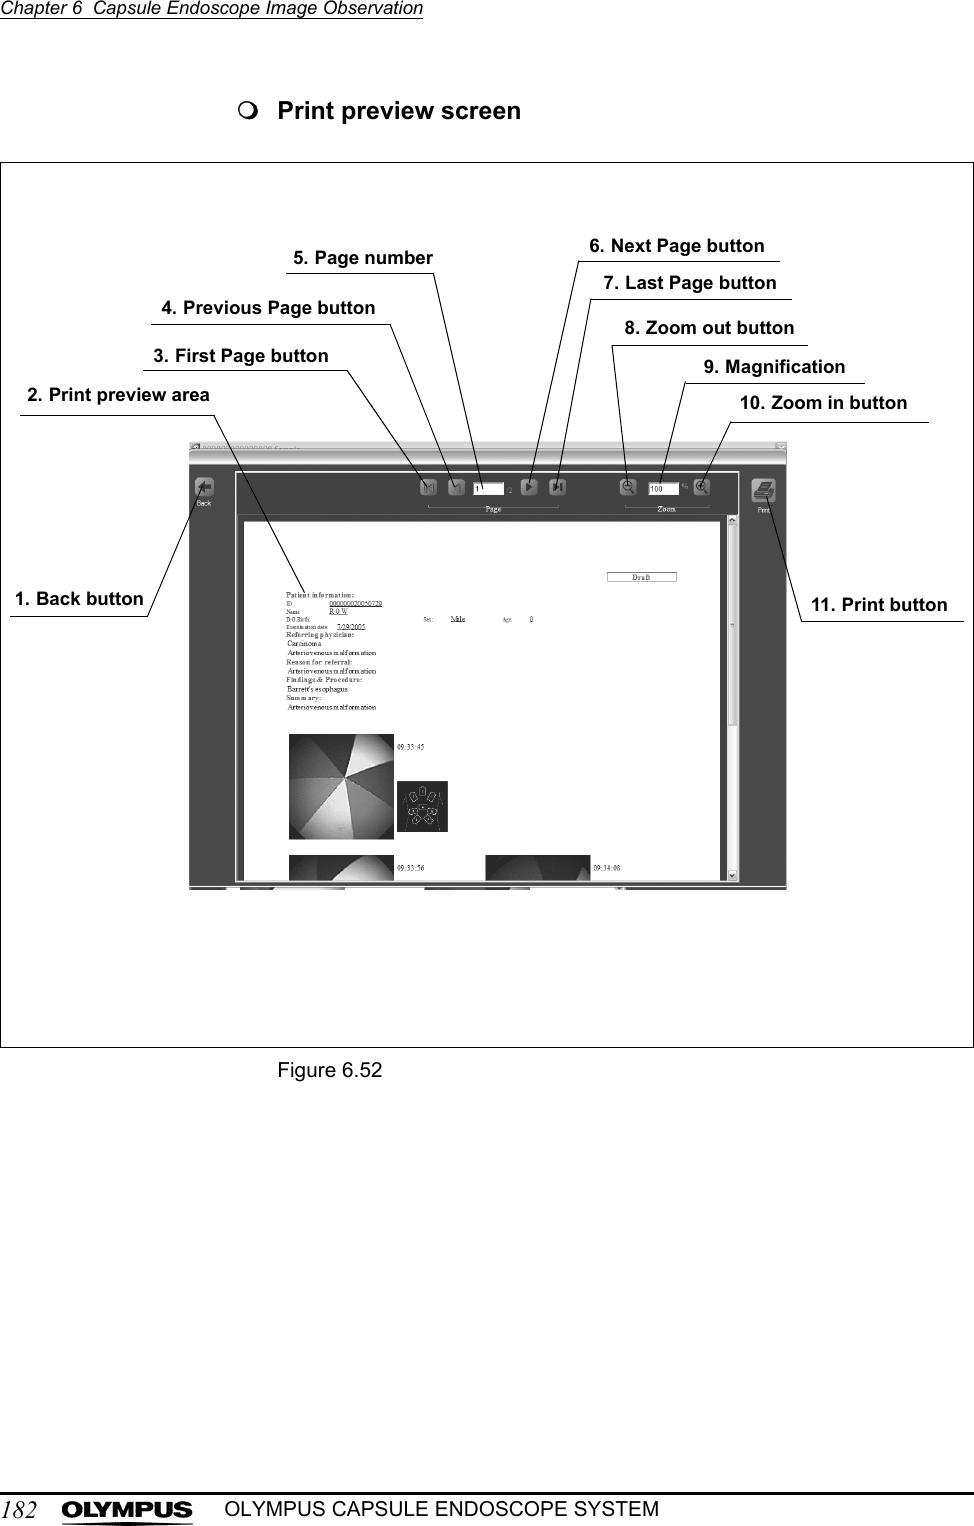
![Chapter 6 Capsule Endoscope Image Observation181OLYMPUS CAPSULE ENDOSCOPE SYSTEMDisplaying print previewsYou can preview how the report will appear when printed.1. Click the [Preview] button on the report generation screen (see Figure 6.51). The print preview of the report is displayed.Figure 6.51Preview button](https://usermanual.wiki/Olympus-Medical-Systems/EC-1.Users-manual-Part-4/User-Guide-618772-Page-22.png)
![184Chapter 6 Capsule Endoscope Image ObservationOLYMPUS CAPSULE ENDOSCOPE SYSTEMPrinting reports1. Click the [Print] button on the report generation screen (see Figure 6.53) or the print preview screen. The print setup screen is displayed.Figure 6.53You can also display the print setup screen by clicking the [Print] button on the print preview screen.2. Click the [Print] button on the print setup screen (see Figure 6.54). The report is printed.Figure 6.54• By default, the reports are adjusted to print to letter size paper.• You can select the paper size from letter the size or A4.• When A4 size is selected, the print size will be automatically scaled to match the paper size.Print buttonPrint button](https://usermanual.wiki/Olympus-Medical-Systems/EC-1.Users-manual-Part-4/User-Guide-618772-Page-25.png)
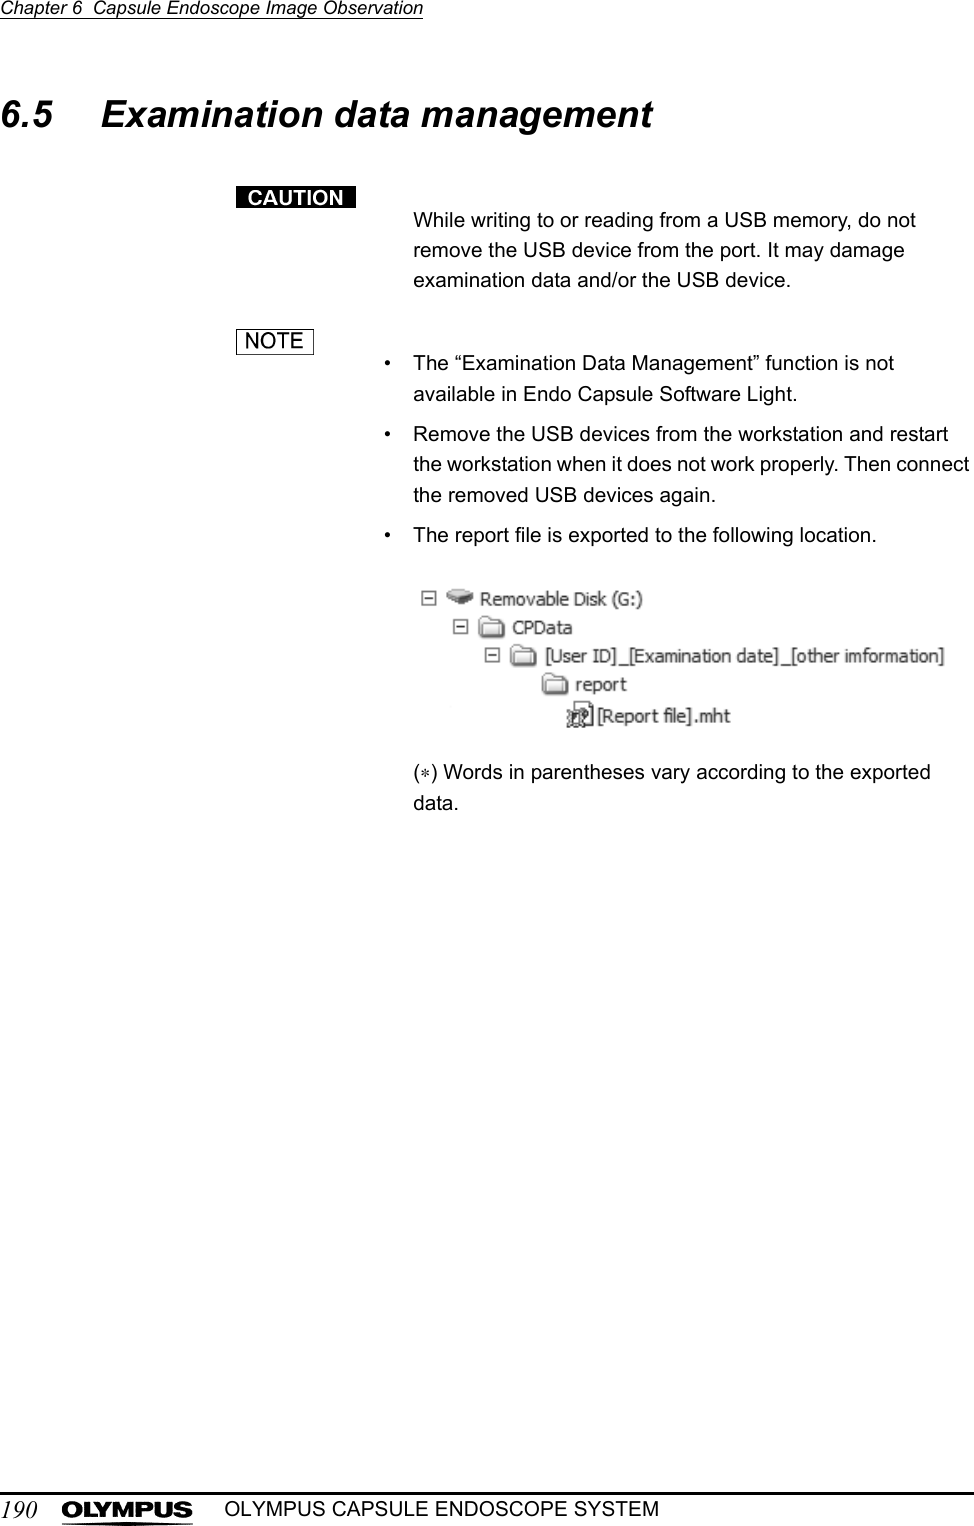
![Chapter 6 Capsule Endoscope Image Observation185OLYMPUS CAPSULE ENDOSCOPE SYSTEMExporting reportsYou can export the generated report in HTML format.1. Click the [Export] button on the report generation screen (see Figure 6.55). The destination setting screen is displayed.Figure 6.552. Select the destination (see Figure 6.56).Figure 6.56• When exporting a report from the workstation, you can only export to external drives.• When exporting a report from the Endo Capsule software light version of the PC, you can export to any drive.Export button](https://usermanual.wiki/Olympus-Medical-Systems/EC-1.Users-manual-Part-4/User-Guide-618772-Page-26.png)
![186Chapter 6 Capsule Endoscope Image ObservationOLYMPUS CAPSULE ENDOSCOPE SYSTEM3. Click the [OK] button (see Figure 6.57). The report is exported to the selected destination.Figure 6.57• The report is exported in HTML format.• The exported report can be viewed by any HTML browser.Saving reportsYou can save the generated report. The report can also be saved as a draft.1. Click the [Save] button on the report generation screen (see Figure 6.58). The save screen is displayed.Figure 6.58OK buttonSave button](https://usermanual.wiki/Olympus-Medical-Systems/EC-1.Users-manual-Part-4/User-Guide-618772-Page-27.png)
![Chapter 6 Capsule Endoscope Image Observation187OLYMPUS CAPSULE ENDOSCOPE SYSTEM2. To finalize the report, click the [Finalize] button (see Figure 6.57). A report file is generated in HTML format.Figure 6.59• To save the report as a draft, click the [Save draft] button (see Figure 6.58). When the report is finalized, an HTML file of the report is created and the report history is recorded. When the report is saved as a draft, an HTML file of the report is not created and the report history is not recorded.Figure 6.60• Save the thumbnail data frequently to prevent possible data loss due to a breakdown.• You can also save the thumbnail data by selecting “Save thumbnail” from the “File” menu. In this case, an HTML file of the report is not created and the report history is not recorded.Finalize the report before you write the report onto the DVD.FinalizeSave draft button](https://usermanual.wiki/Olympus-Medical-Systems/EC-1.Users-manual-Part-4/User-Guide-618772-Page-28.png)
![188Chapter 6 Capsule Endoscope Image ObservationOLYMPUS CAPSULE ENDOSCOPE SYSTEMViewing the report historyYou can view past reports by selecting them from the report history.1. Select “History” from the “Tools” menu on the report generation screen when you open the examination data in the drive other than DVD. The history screen is displayed.Figure 6.61Select ”History“ from the ”Tools“ menu on the main screen when you open the examination data in the DVD (see Figure 6.61). The history screen is displayed.2. From the report history, select the report you wish to view, and click the [Open] button (see Figure 6.62).Figure 6.62ToolsOpen button](https://usermanual.wiki/Olympus-Medical-Systems/EC-1.Users-manual-Part-4/User-Guide-618772-Page-29.png)
![Chapter 6 Capsule Endoscope Image Observation189OLYMPUS CAPSULE ENDOSCOPE SYSTEM3. The selected report is displayed on the report preview screen.Click the [Cancel] button on the history screen to exit the history screen.](https://usermanual.wiki/Olympus-Medical-Systems/EC-1.Users-manual-Part-4/User-Guide-618772-Page-30.png)
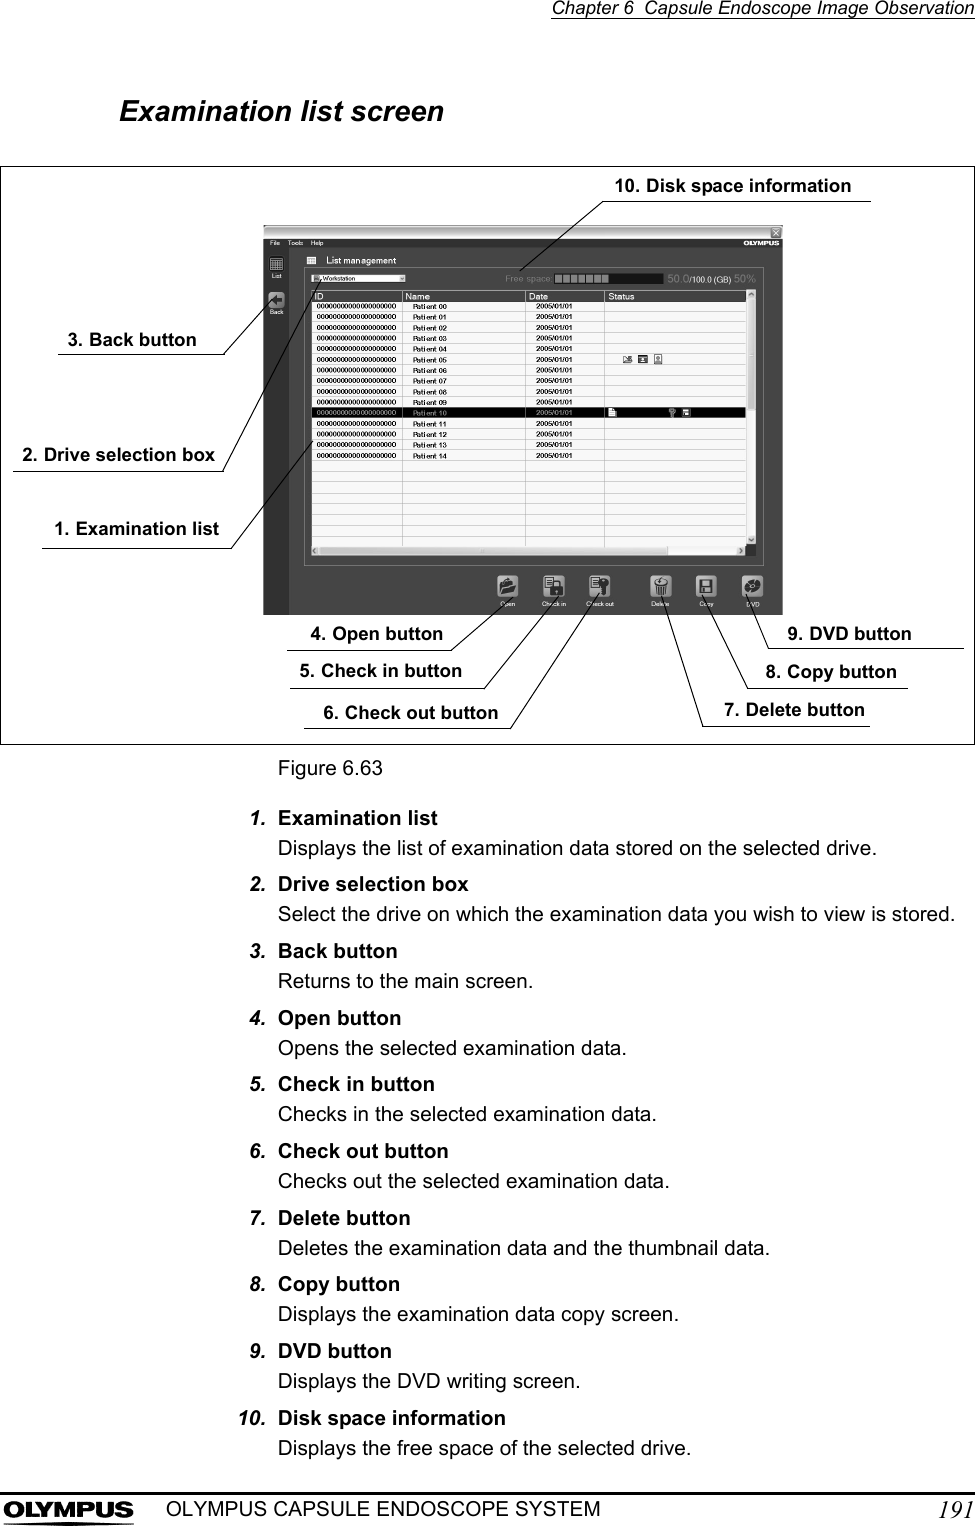
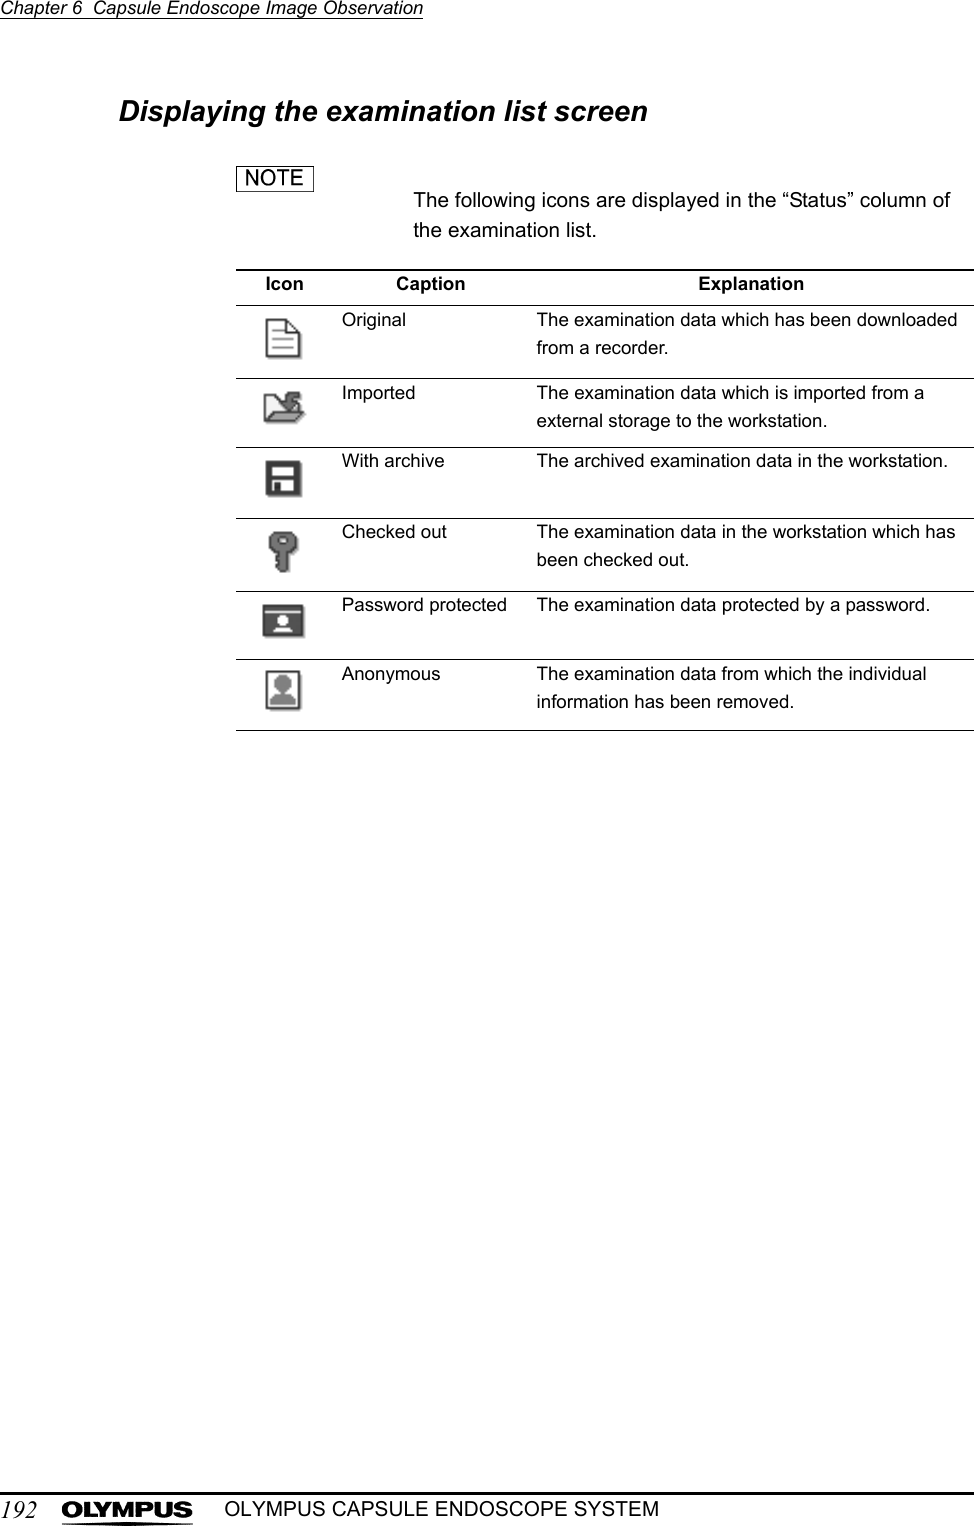
![Chapter 6 Capsule Endoscope Image Observation193OLYMPUS CAPSULE ENDOSCOPE SYSTEM1. Click the [List] button on the main screen (see Figure 6.64). The examination list screen is displayed.Figure 6.642. To exit the examination list screen, click the [Back] button (see Figure 6.65). Figure 6.65List buttonBack button](https://usermanual.wiki/Olympus-Medical-Systems/EC-1.Users-manual-Part-4/User-Guide-618772-Page-34.png)
![194Chapter 6 Capsule Endoscope Image ObservationOLYMPUS CAPSULE ENDOSCOPE SYSTEMChecking out the examination dataYou can copy the examination data and thumbnail data from the workstation onto an external drive, and edit the copied thumbnail data. You cannot edit thumbnail data on the source workstation until the copied data is restored to the workstation. This is referred to as the “check-out” function.1. From the examination list on the examination list screen, select the examination data associated with the thumbnail data you wish to check out.2. Click the [Check Out] button (see Figure 6.66). The thumbnail data selection screen is displayed.Figure 6.663. From the thumbnail data list on the thumbnail data selection screen, select the thumbnail data you want to check out (see Figure 6.67).Figure 6.67To create a new thumbnail data, select “New” (top row) from the examination data list.Check out button](https://usermanual.wiki/Olympus-Medical-Systems/EC-1.Users-manual-Part-4/User-Guide-618772-Page-35.png)
![Chapter 6 Capsule Endoscope Image Observation195OLYMPUS CAPSULE ENDOSCOPE SYSTEM4. Click the [OK] button (see Figure 6.68). The check-out destination selection screen is displayed.Figure 6.685. Use the drive selection box to select the drive to which the data is checked out and click the [OK] button. The examination data and the thumbnail data are copied to the check-out destination (see Figure 6.69).Figure 6.69The internal hard drive of the workstation cannot be selected. Select an external drive.• Check the “Password” checkbox to set a password for the check-out function.• If you specify a password when checking out the data, you will be required to enter the password to open the thumbnail data.• Click the [Cancel] button to exit the check-out destination selection screen.OK buttonDrive selection box](https://usermanual.wiki/Olympus-Medical-Systems/EC-1.Users-manual-Part-4/User-Guide-618772-Page-36.png)
![196Chapter 6 Capsule Endoscope Image ObservationOLYMPUS CAPSULE ENDOSCOPE SYSTEM• If there is insufficient storage space on the selected check-out destination, you can make free space by deleting the unnecessary files.• While copying the data to the check-out destination, a progress screen will be displayed. To stop the copying process, click the [Cancel] button on the progress screen.• The examination data (∗∗∗.opg) and the thumbnail data (∗∗∗.xml) is exported to the following location.(∗) Words in parentheses vary according to the check out data.](https://usermanual.wiki/Olympus-Medical-Systems/EC-1.Users-manual-Part-4/User-Guide-618772-Page-37.png)
![Chapter 6 Capsule Endoscope Image Observation197OLYMPUS CAPSULE ENDOSCOPE SYSTEMChecking In the thumbnail dataOnce you have finished editing the checked out thumbnail data, you must return it to the source workstation. This is referred to as the “check-in” function.1. Select the checked out examination data and click the [Check in] button (see Figure 6.70). The check-in source selection screen is displayed.Figure 6.702. Use the drive selection box to select the drive that contains the checked out thumbnail data which you wish to check in (see Figure 6.71).Figure 6.71Only external drives can be selected.Check in buttonDrive selection box](https://usermanual.wiki/Olympus-Medical-Systems/EC-1.Users-manual-Part-4/User-Guide-618772-Page-38.png)
![198Chapter 6 Capsule Endoscope Image ObservationOLYMPUS CAPSULE ENDOSCOPE SYSTEM3. Click the [OK] button (see Figure 6.72). The thumbnail data selection screen is displayed.Figure 6.724. From the list of thumbnail data, select the thumbnail data you wish to check in (see Figure 6.73).Figure 6.73OK buttonThumbnail data](https://usermanual.wiki/Olympus-Medical-Systems/EC-1.Users-manual-Part-4/User-Guide-618772-Page-39.png)
![Chapter 6 Capsule Endoscope Image Observation199OLYMPUS CAPSULE ENDOSCOPE SYSTEM5. Click the [OK] button (see Figure 6.74). The thumbnail data being checked in is saved, and the check-in process is complete.Figure 6.74If you select “New” from the list of thumbnail data when checking out the data and do not make the thumbnail data on Endo Capsule Software Light, you can not check in the thumbnail data. To release a check-out, see “Releasing the check-out” on page 200.OK button](https://usermanual.wiki/Olympus-Medical-Systems/EC-1.Users-manual-Part-4/User-Guide-618772-Page-40.png)
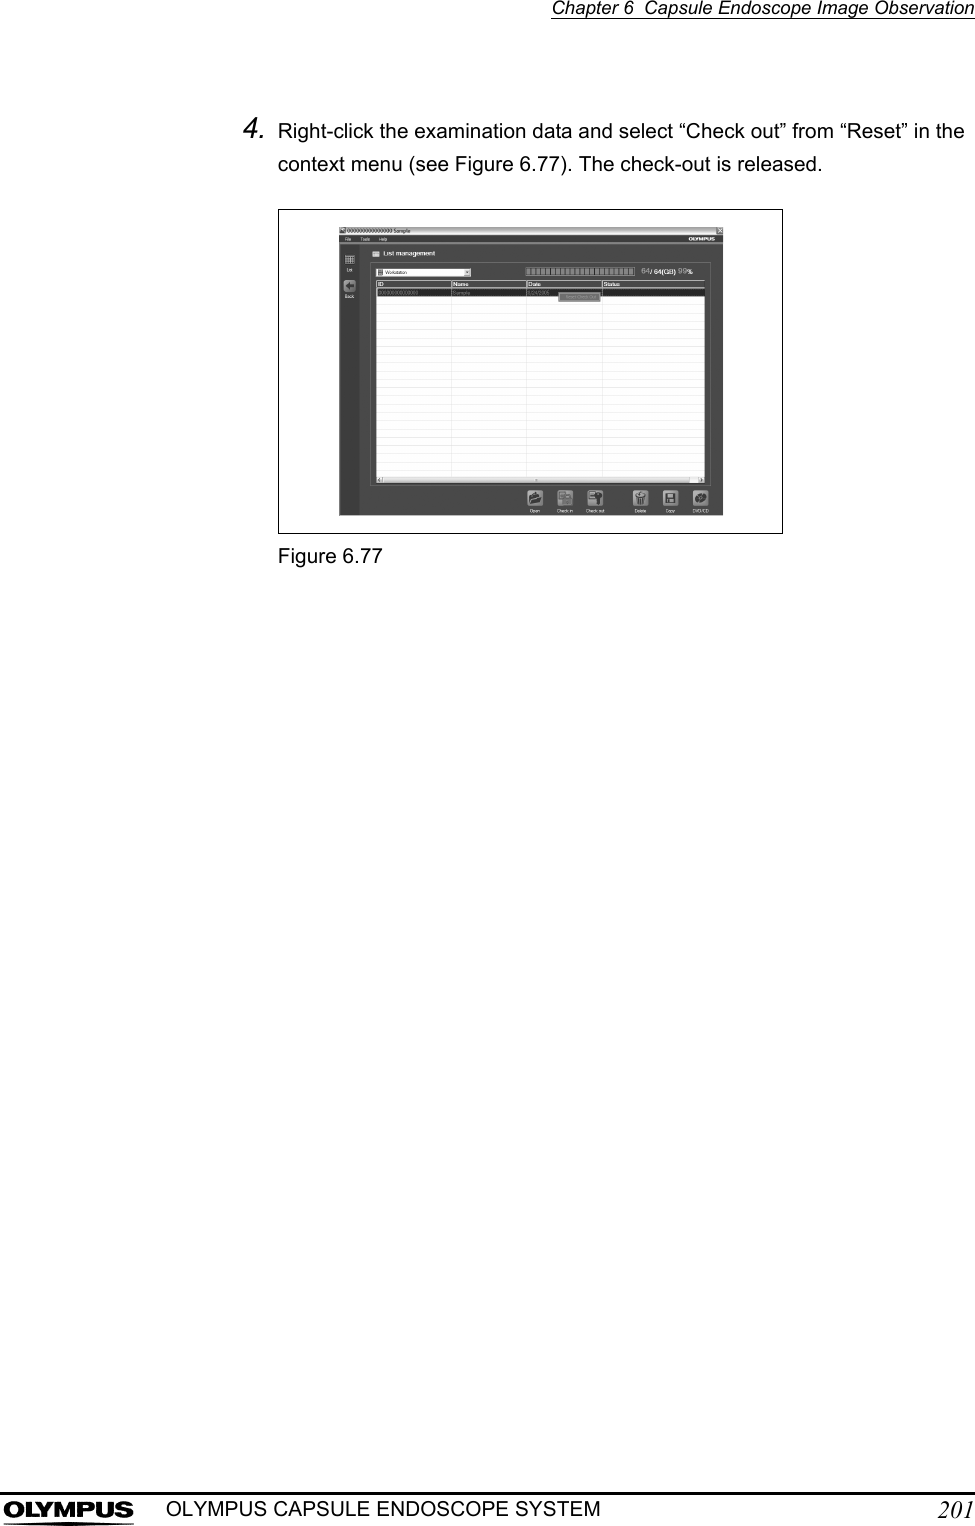
![200Chapter 6 Capsule Endoscope Image ObservationOLYMPUS CAPSULE ENDOSCOPE SYSTEMReleasing the check-outIf the checked out thumbnail data cannot be checked in, perform the following steps to release the check-out.If you release a check-out, the checked out data cannot be saved.1. Log in as an administrator.2. Click the [List] button on the main screen (see Figure 6.75). The examination list screen will appear.Figure 6.753. Select the checked out examination data (see Figure 6.76).Figure 6.76List buttonExamination data](https://usermanual.wiki/Olympus-Medical-Systems/EC-1.Users-manual-Part-4/User-Guide-618772-Page-41.png)
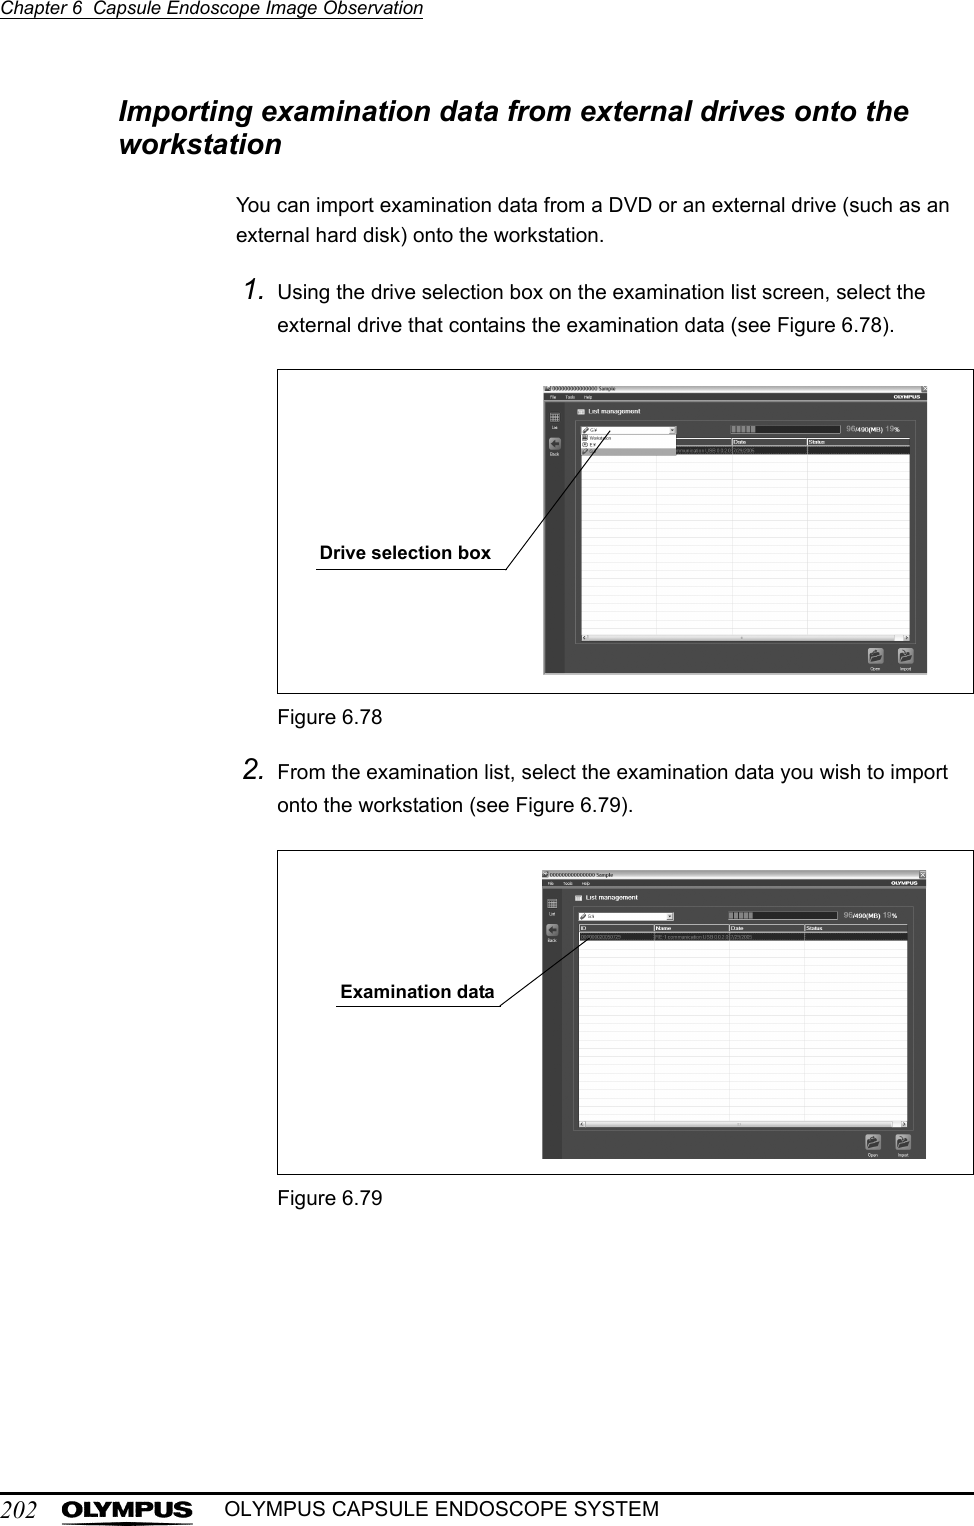
![Chapter 6 Capsule Endoscope Image Observation203OLYMPUS CAPSULE ENDOSCOPE SYSTEM3. Click the [Import] button (see Figure 6.80). The thumbnail data selection screen is displayed.Figure 6.804. From the list of thumbnail data, select the thumbnail data you wish to import.5. Click the [OK] button (see Figure 6.81). The examination data and the selected thumbnail data are imported onto the workstation.Figure 6.81• If there is insufficient storage space on the internal hard drive of the workstation, the error message will be displayed.• “Cannot import data because workstation does not have sufficient disk space” message is displayed. Create enough disk space to import data.Import buttonOK button](https://usermanual.wiki/Olympus-Medical-Systems/EC-1.Users-manual-Part-4/User-Guide-618772-Page-44.png)
![204Chapter 6 Capsule Endoscope Image ObservationOLYMPUS CAPSULE ENDOSCOPE SYSTEMCopying examination and thumbnail data1. Select the examination data you wish to copy and click the [Copy] button on the examination list screen (see Figure 6.82). The copy screen is displayed.Figure 6.82• You can select multiple examination data simultaneously. The thumbnail data associated with the selected examination data will be copied automatically.• To exit the copy screen, click the [Cancel] button.2. Use the drive selection box to select the destination drive on the copy screen (see Figure 6.83). The amount of available disk space on the selected drive is displayed.Figure 6.83The folder for the examination data will be created automatically during the copying process.Copy buttonDrive selection box](https://usermanual.wiki/Olympus-Medical-Systems/EC-1.Users-manual-Part-4/User-Guide-618772-Page-45.png)
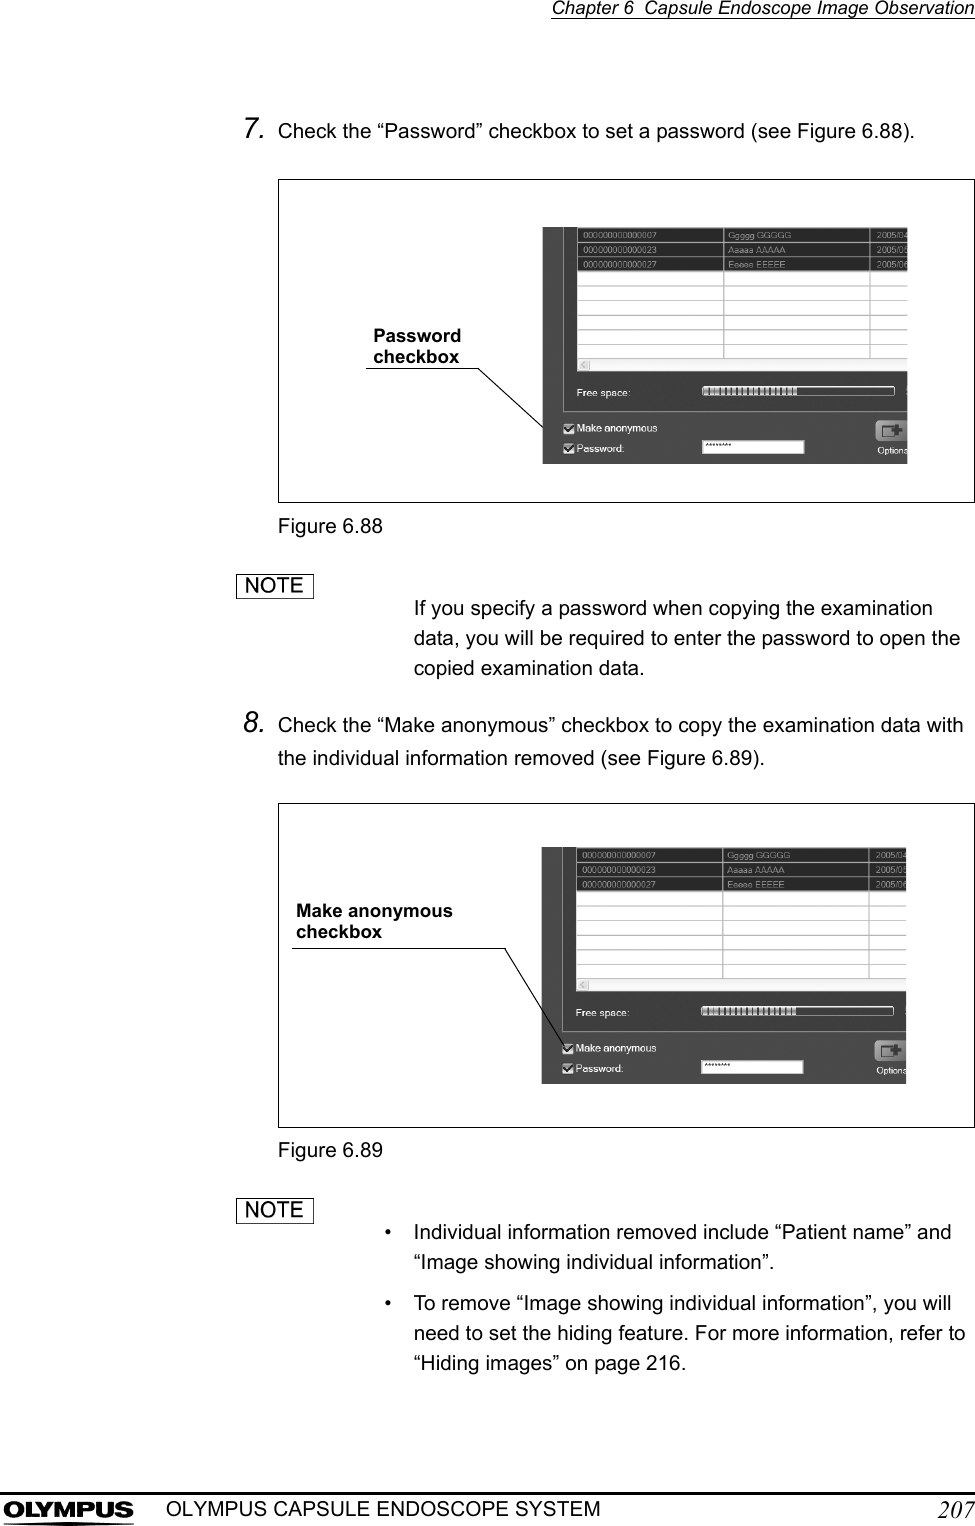
![Chapter 6 Capsule Endoscope Image Observation205OLYMPUS CAPSULE ENDOSCOPE SYSTEM3. The selected examination data which you wish to copy is displayed. (see Figure 6.84).Figure 6.844. Click the [Option] button to display the data copy options screen (see Figure 6.85).Figure 6.855. Select the type of files to be copied together with the examination data. Click the [Picture] button to copy still images, and the [Movie] button to copy video files (see Figure 6.86).Selected examination dataOption button](https://usermanual.wiki/Olympus-Medical-Systems/EC-1.Users-manual-Part-4/User-Guide-618772-Page-46.png)
![206Chapter 6 Capsule Endoscope Image ObservationOLYMPUS CAPSULE ENDOSCOPE SYSTEMFigure 6.86All items are selected by default.6. Click the [OK] button to save the settings and exit the data copy options screen (see Figure 6.87).Figure 6.87Picture buttonMovie buttonOK button](https://usermanual.wiki/Olympus-Medical-Systems/EC-1.Users-manual-Part-4/User-Guide-618772-Page-47.png)
![208Chapter 6 Capsule Endoscope Image ObservationOLYMPUS CAPSULE ENDOSCOPE SYSTEM9. Click the [OK] button on the data copy screen (see Figure 6.90). The selected examination data will be copied. The progress screen is displayed while the examination data is being copied.Figure 6.90• To stop the copying process, click the [Cancel] button on the progress screen.• If there is insufficient storage space on the copy destination, an error message will be displayed. In this case, refer to Chapter 8, “Troubleshooting” on page 233.• Do not remove an external storage device while copying. Copying will fail and if may cause hang-up of the workstation.10. When the copying of examination data is complete, you will be returned to the examination list screen.OK button](https://usermanual.wiki/Olympus-Medical-Systems/EC-1.Users-manual-Part-4/User-Guide-618772-Page-49.png)
![Chapter 6 Capsule Endoscope Image Observation209OLYMPUS CAPSULE ENDOSCOPE SYSTEMDeleting examination and thumbnail dataThe examination data which has not been archived can not be deleted.1. Select the examination data you wish to delete and click the [Delete] button on the examination list screen (see Figure 6.91). The examination data deletion screen is displayed (see Figure 6.91).Figure 6.91• You can select multiple examination data simultaneously.• To exit the screen, click the [Cancel] button.2. The selected examination(s) which you wish to delete is displayed (see Figure 6.92).Figure 6.92Delete buttonSelect examination data](https://usermanual.wiki/Olympus-Medical-Systems/EC-1.Users-manual-Part-4/User-Guide-618772-Page-50.png)