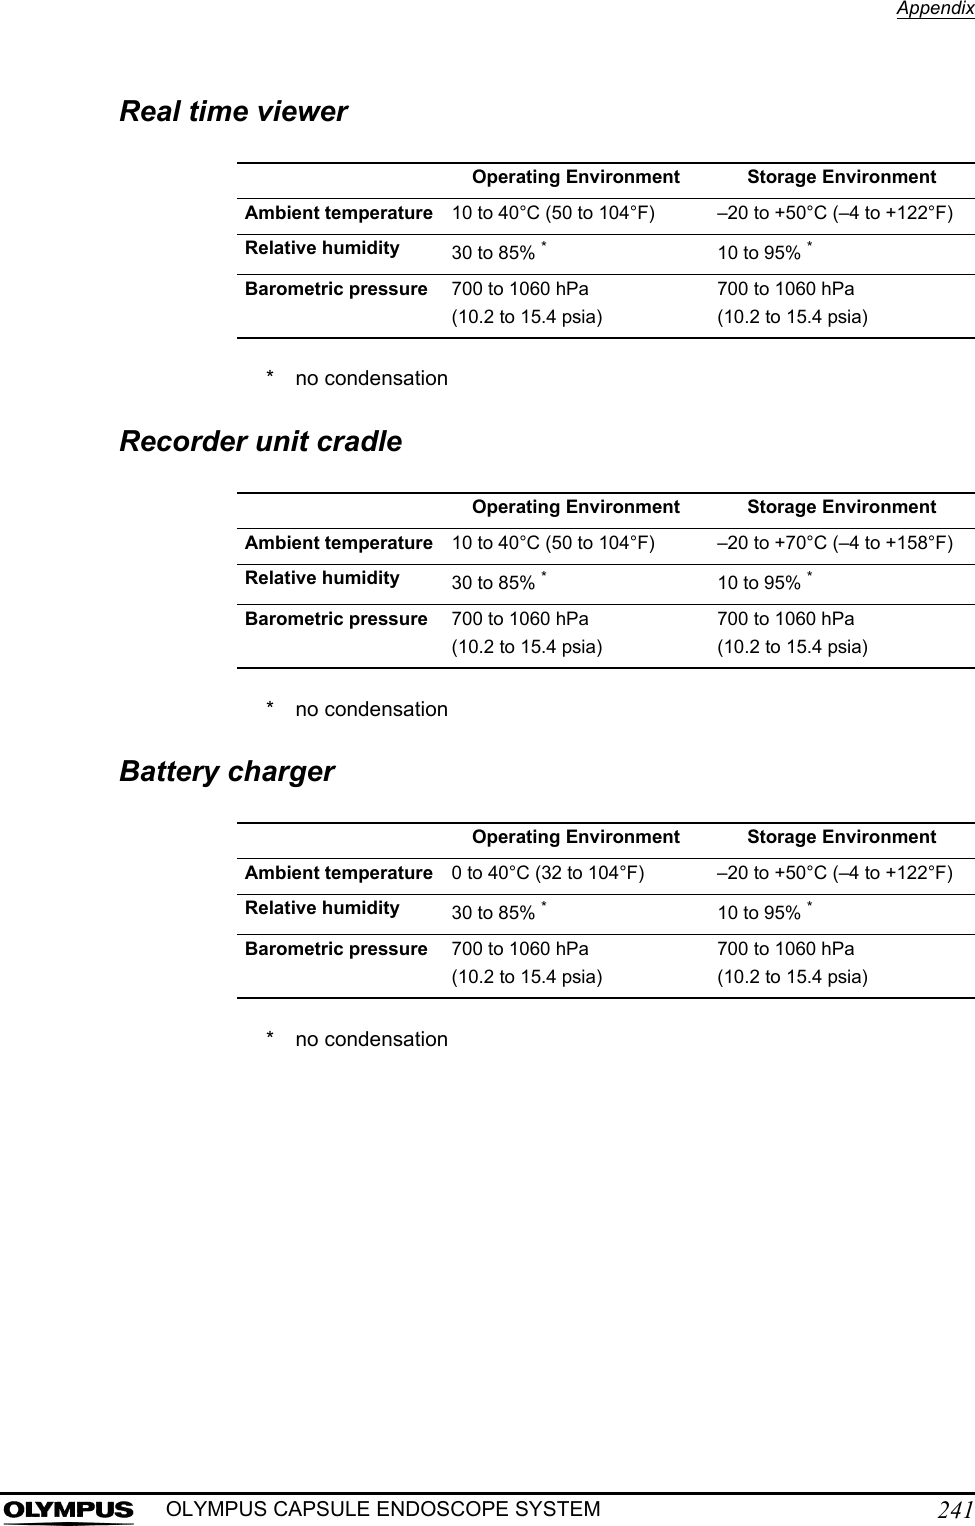
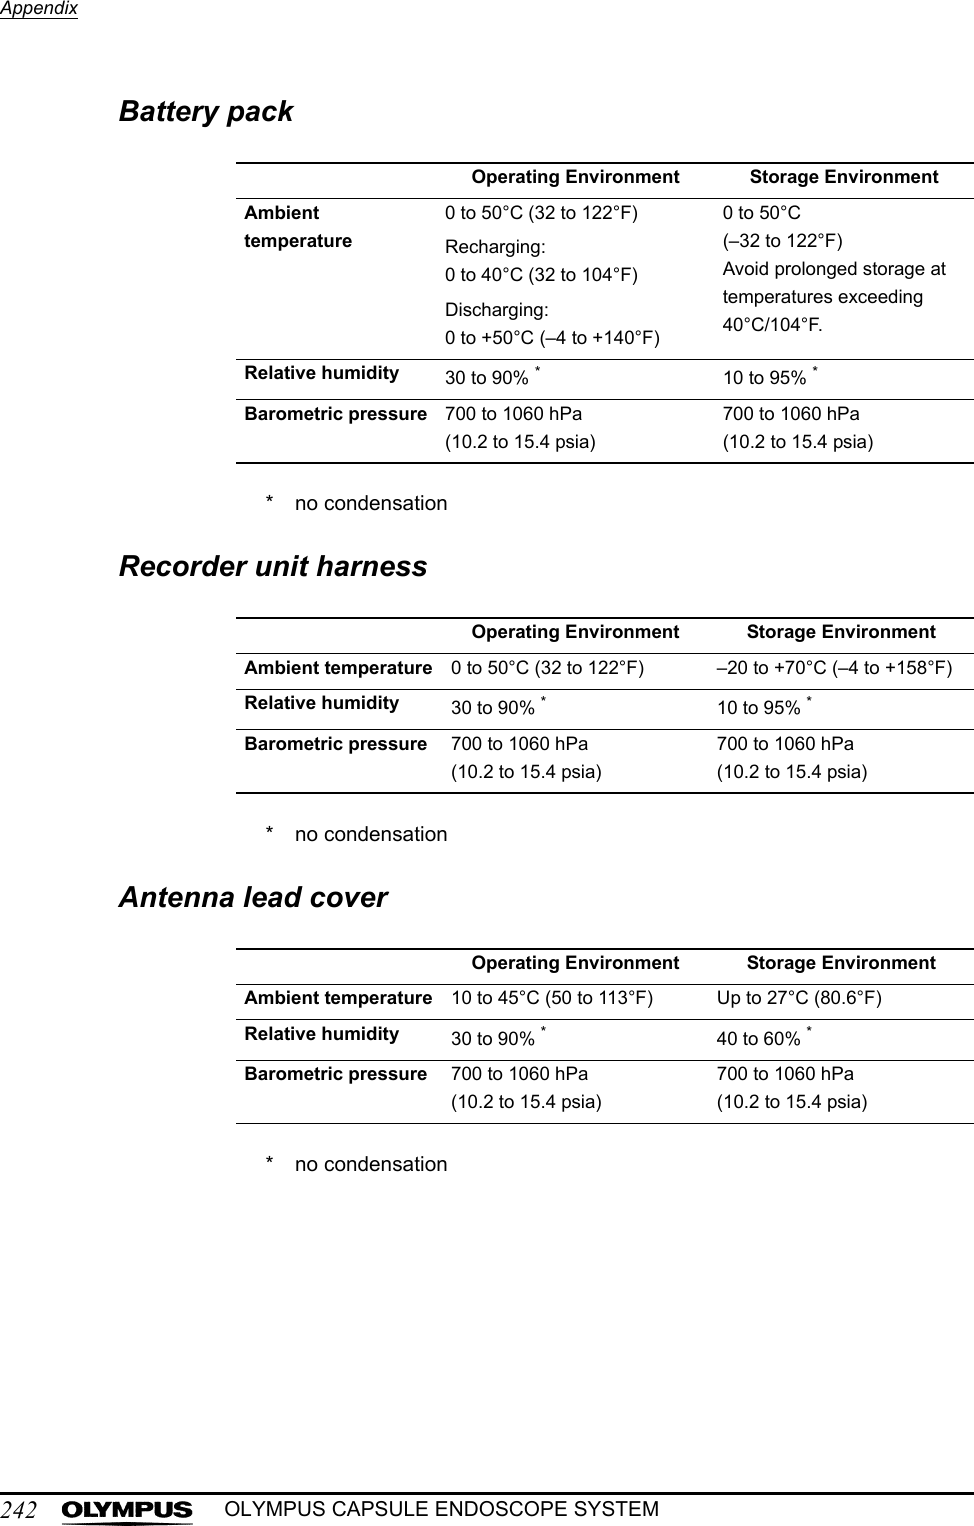
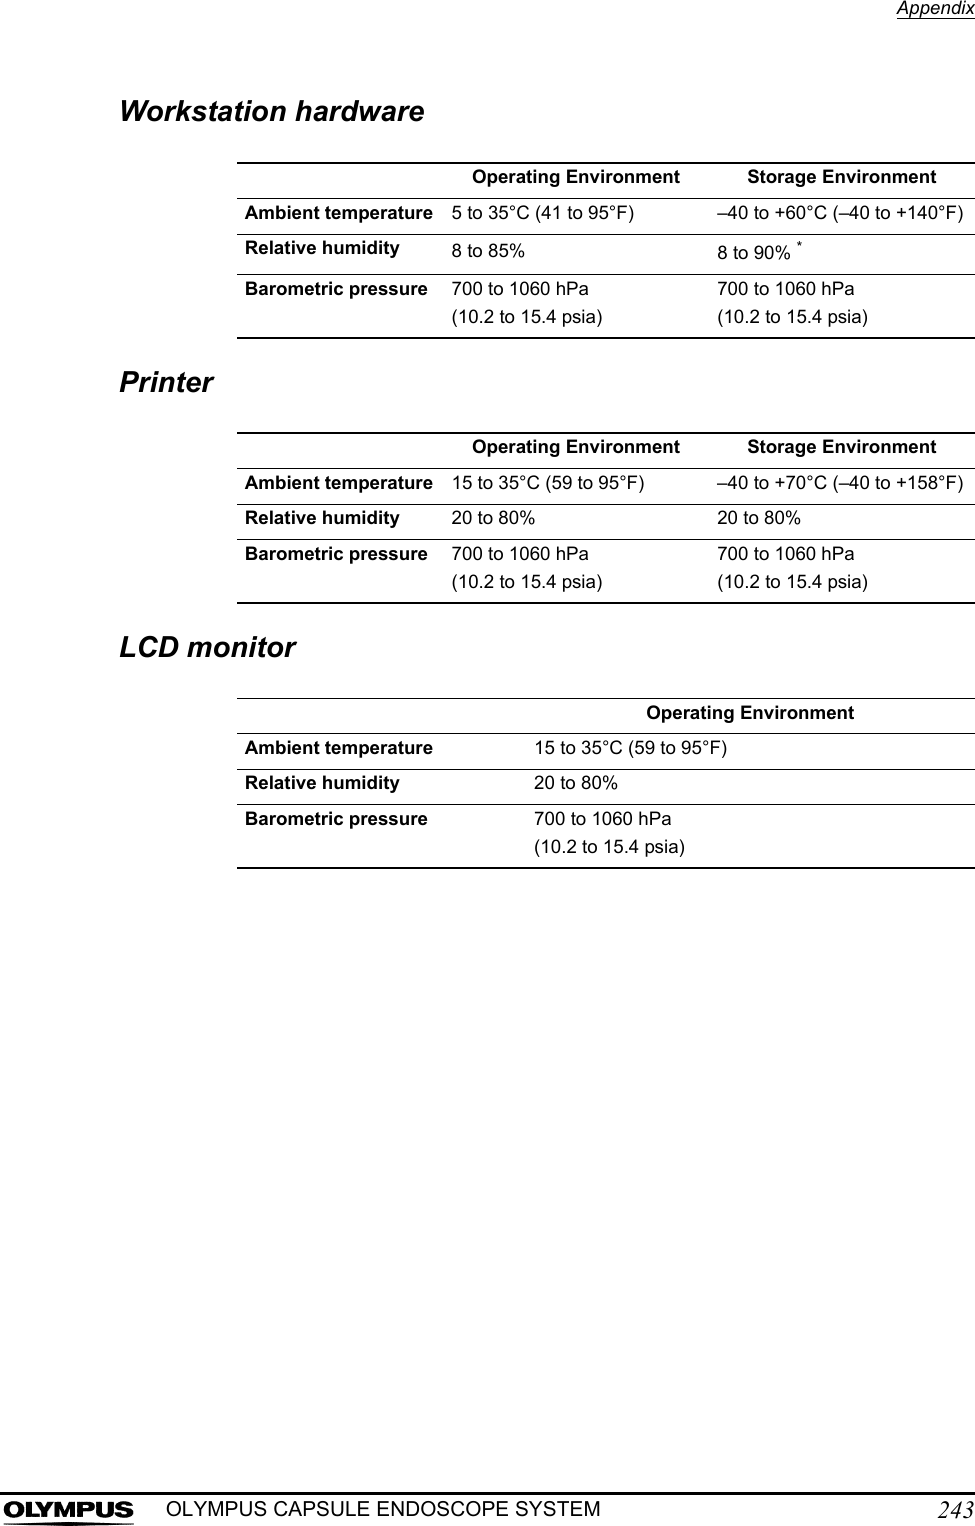
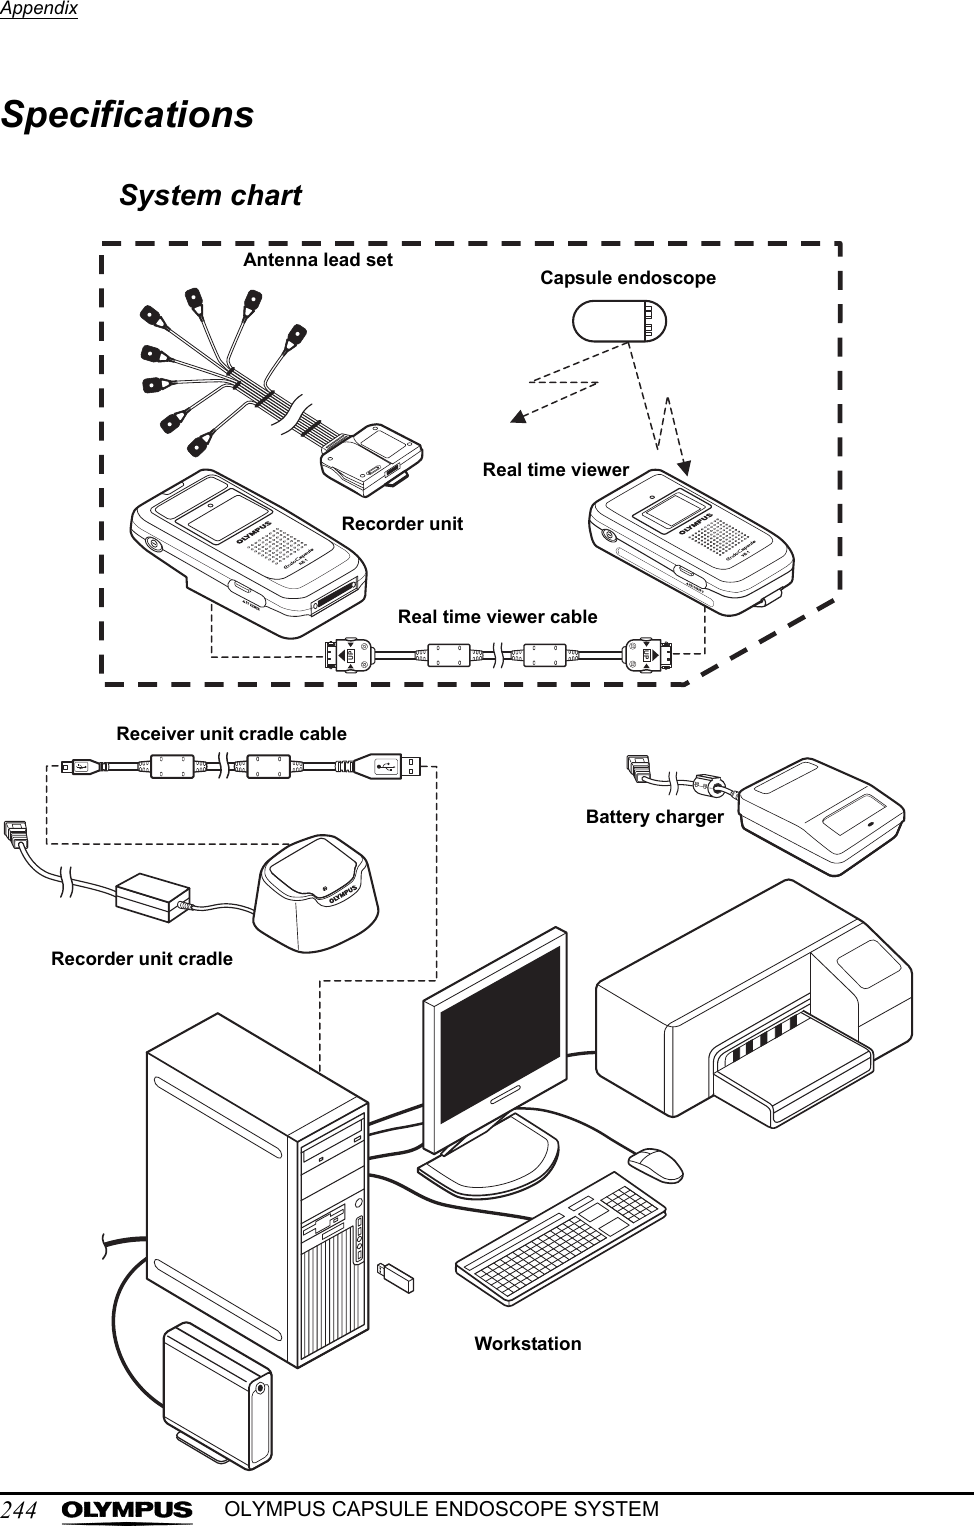
Olympus Medical Systems EC-1 Low Power Transmitter User Manual GT1629 FCC MAJ 1467 C1
Olympus Medical Systems Corp. Low Power Transmitter GT1629 FCC MAJ 1467 C1
Contents
- 1. Users manual Part 1
- 2. Users manual Part 2
- 3. Users manual Part 3
- 4. Users manual Part 4
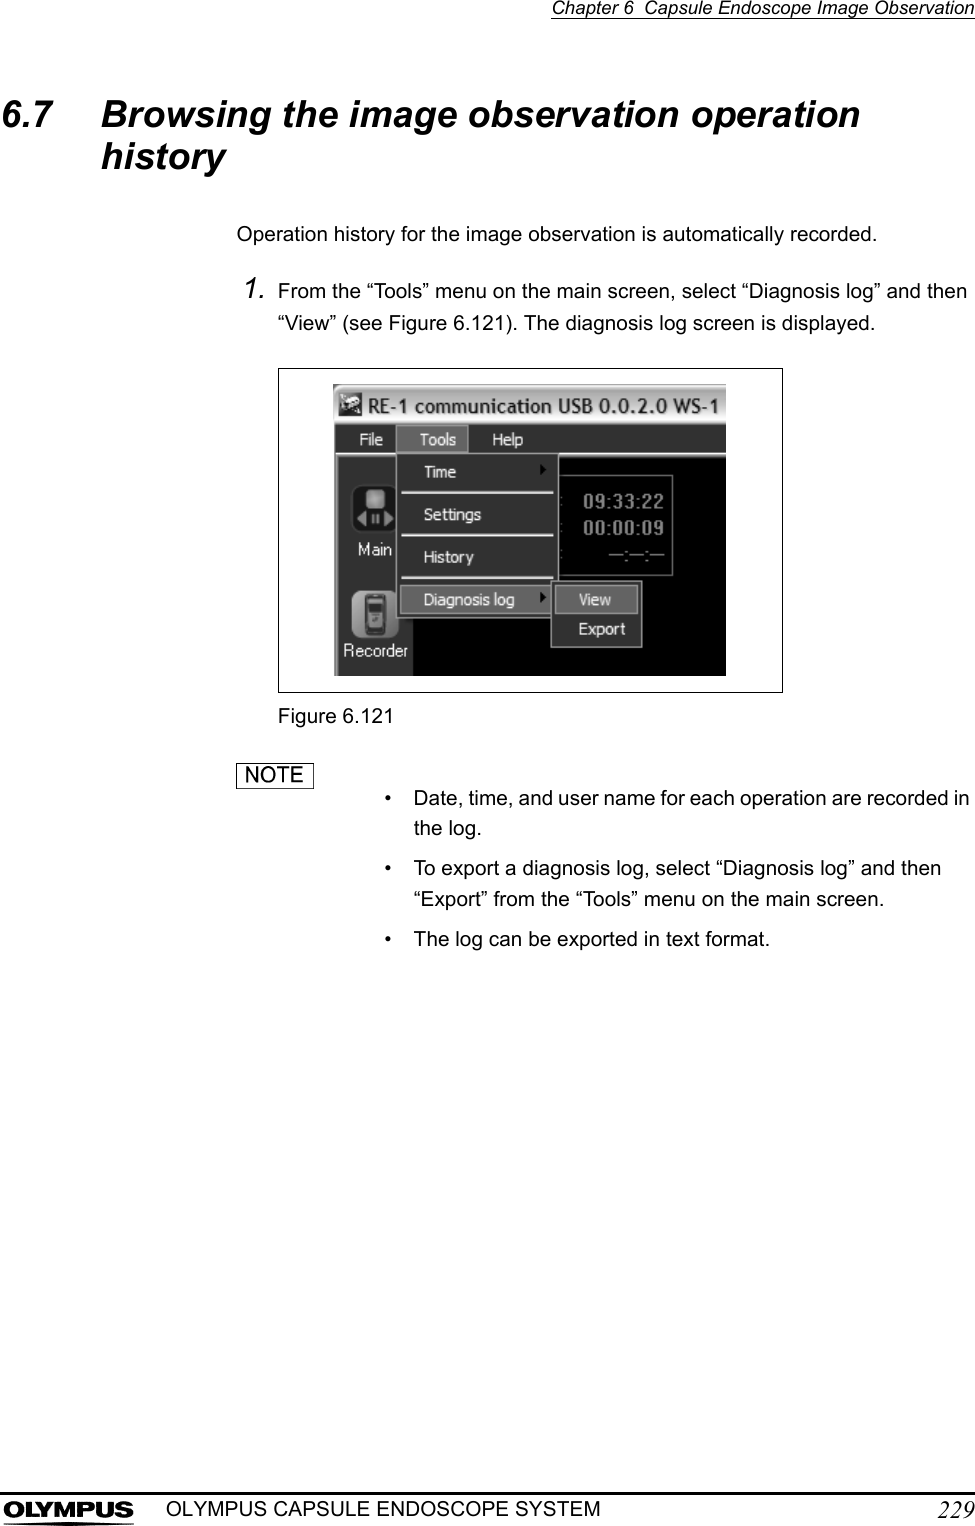
- 5. Users manual part 5
Users manual part 5
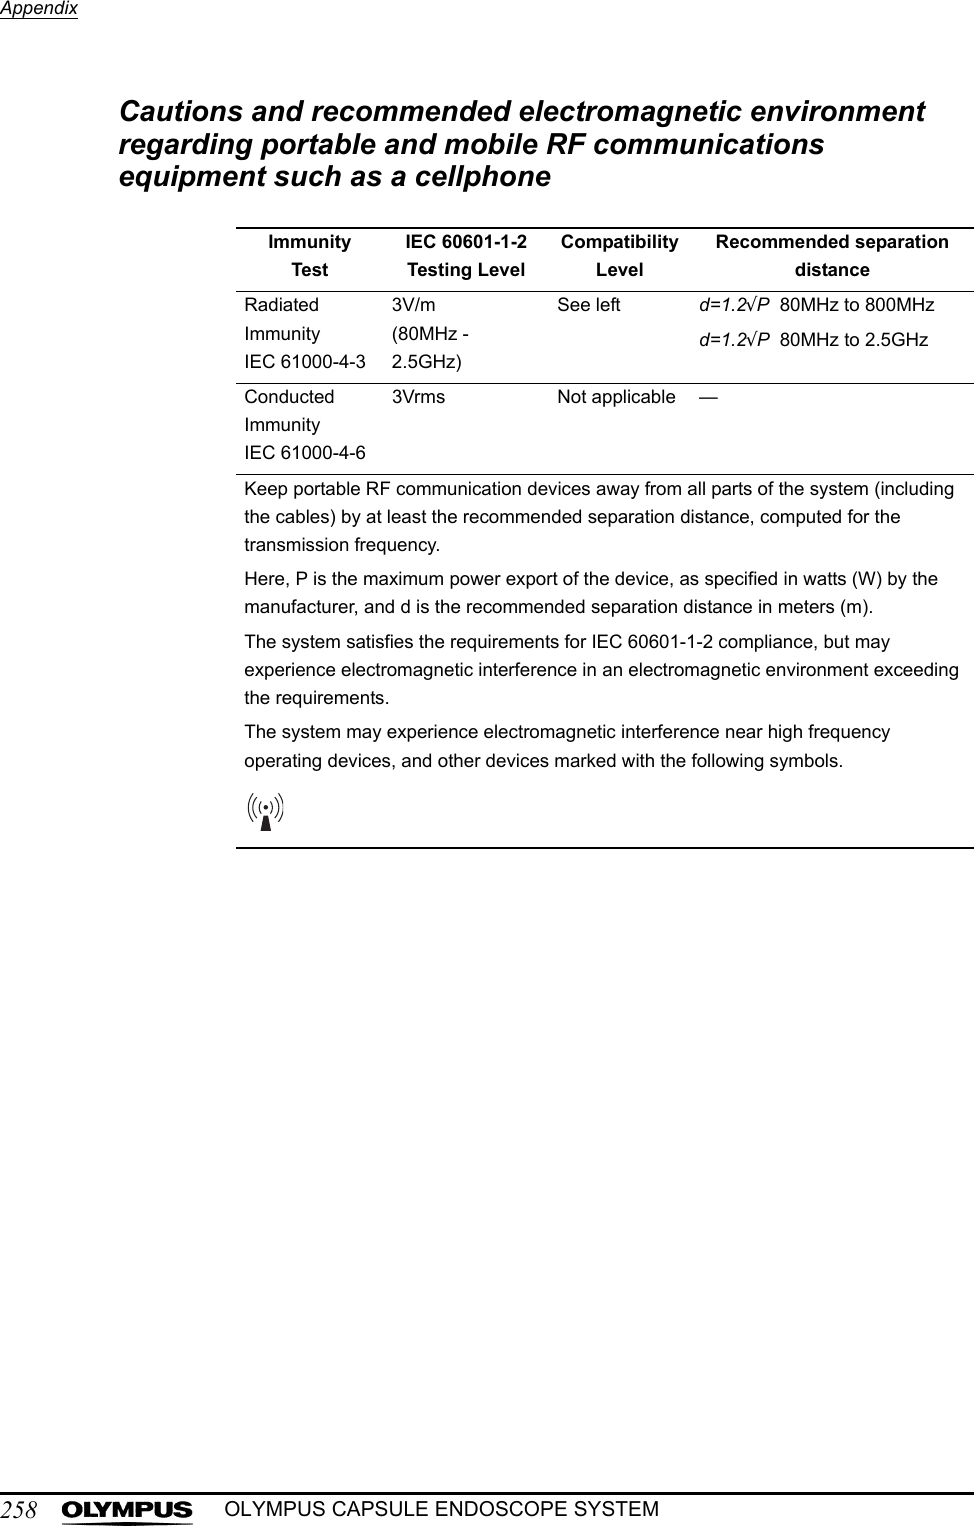
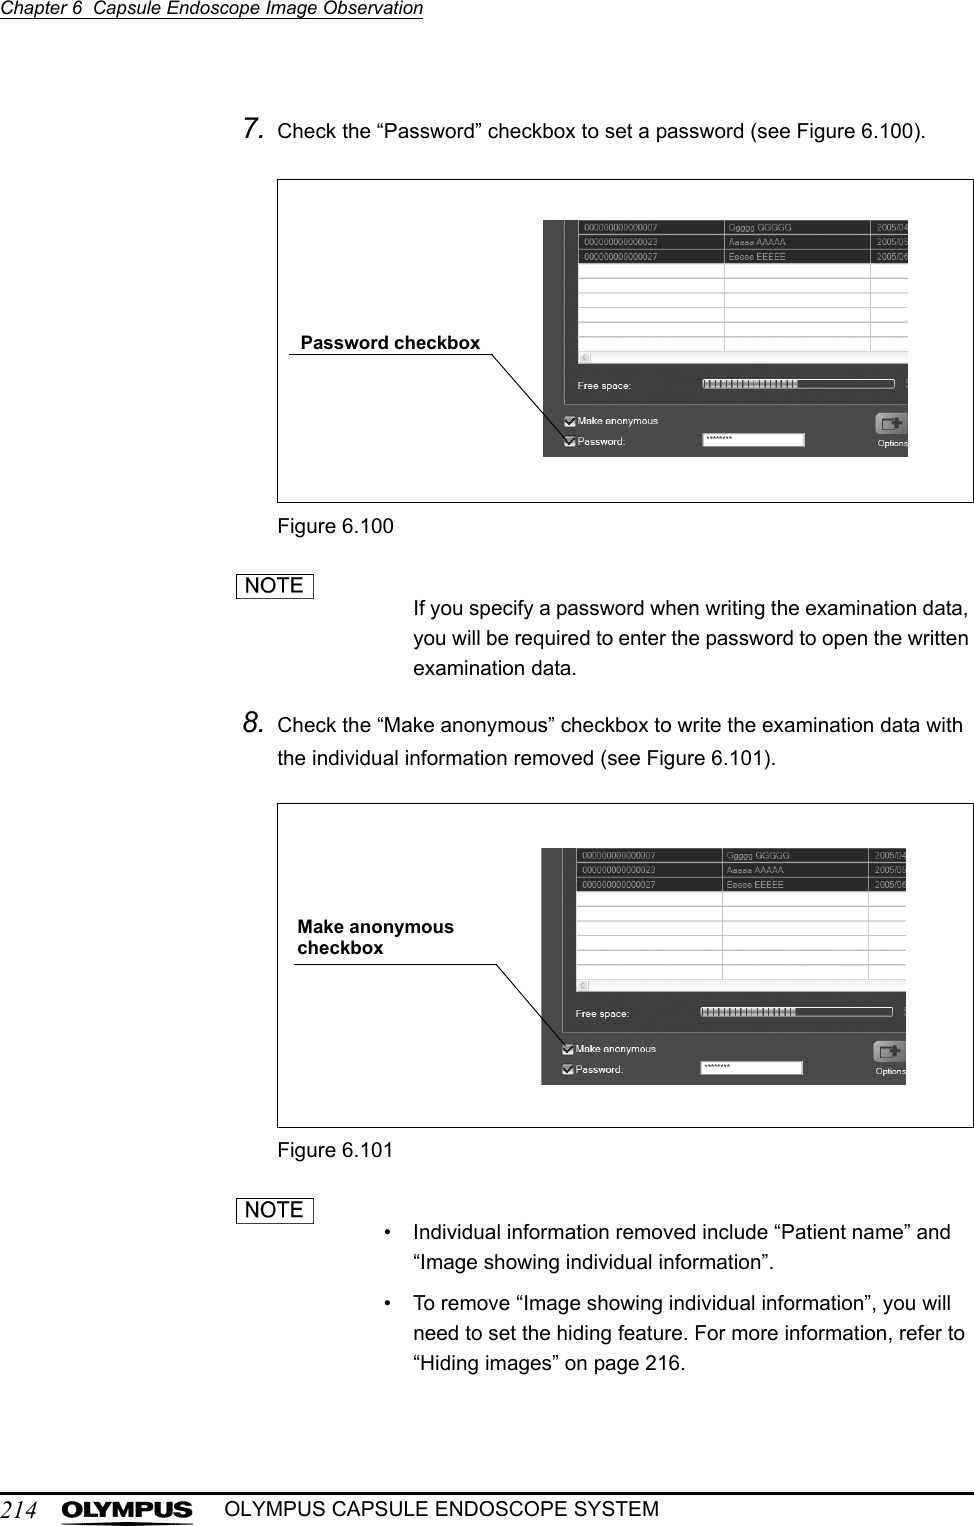
![210Chapter 6 Capsule Endoscope Image ObservationOLYMPUS CAPSULE ENDOSCOPE SYSTEMThe folders and the data associated with the selected examination (image data, case data, and exported images) will be removed during the deletion process.3. Click the [OK] button on the examination data deletion screen (see Figure 6.93). The selected examination data will be deleted. A progress screen is displayed while the examination data is being deleted.Figure 6.934. When the deletion of examination data is complete, you will be returned to the examination list screen.OK button](https://usermanual.wiki/Olympus-Medical-Systems/EC-1.Users-manual-part-5/User-Guide-618773-Page-1.png)
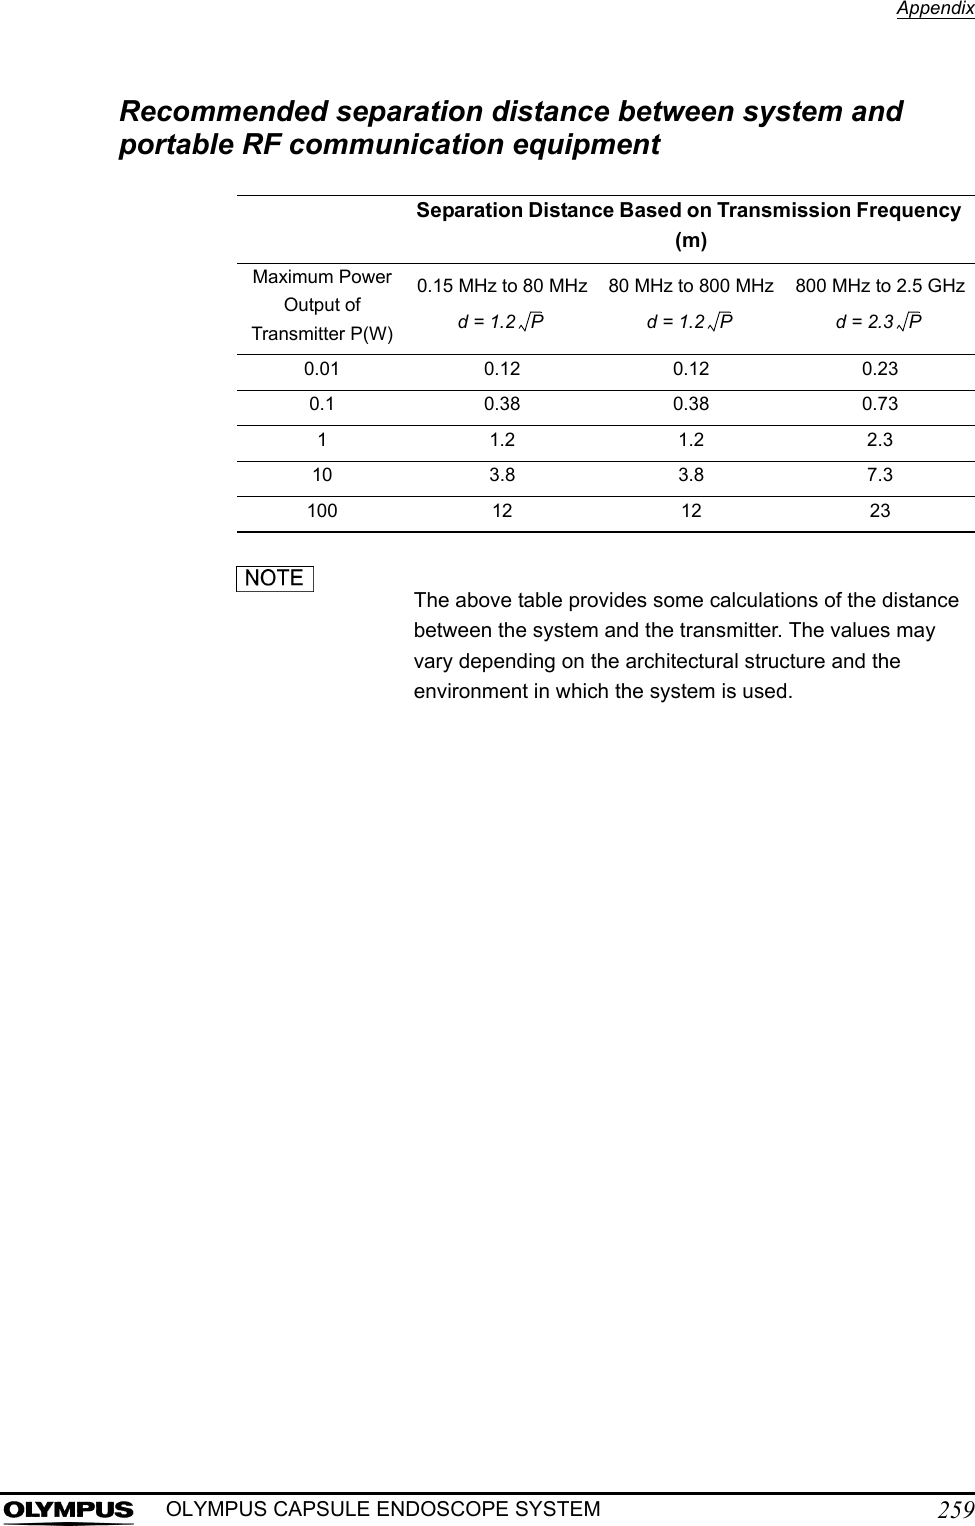
![Chapter 6 Capsule Endoscope Image Observation211OLYMPUS CAPSULE ENDOSCOPE SYSTEMWriting examination and thumbnail data onto a DVD1. Select the examination data you wish to write onto a DVD and click the [DVD] button on the examination list screen (see Figure 6.94). The DVD writing screen is displayed.Figure 6.94You can select multiple examination data simultaneously. The thumbnail data associated with the selected examination data will be written automatically.2. Use the drive selection box to select the destination drive to write the data to (see Figure 6.95). The amount of available disk space on the selected drive is displayed.Figure 6.95• The folder for the examination data will be created automatically during the writing process.DVD buttonDrive selection box](https://usermanual.wiki/Olympus-Medical-Systems/EC-1.Users-manual-part-5/User-Guide-618773-Page-2.png)
![212Chapter 6 Capsule Endoscope Image ObservationOLYMPUS CAPSULE ENDOSCOPE SYSTEM• The following DVD formats are supported:• Though you use DVD-RW or DVD+RV, you cannot rewrite or delete data.• While it is possible to copy the data to an USB HDD, the safety of data on the USB HDD cannot be assured, so it is advised that the user first back up the examination data to a DVD.3. The selected examination data which you wish to write is displayed (see Figure 6.96).Figure 6.964. Click the [Option] button to display the DVD writing options screen (see Figure 6.97).Figure 6.975. Select the type of files to be written together with the examination data. Click the [Picture] button to write still images, and the [Movie] button to write video files (see Figure 6.98).DVD : DVD-R, DVD+RSelect examination dataOption button](https://usermanual.wiki/Olympus-Medical-Systems/EC-1.Users-manual-part-5/User-Guide-618773-Page-3.png)
![Chapter 6 Capsule Endoscope Image Observation213OLYMPUS CAPSULE ENDOSCOPE SYSTEMFigure 6.98All items are selected by default.6. Click the [OK] button to save the settings and exit the DVD writing options screen (see Figure 6.99).Figure 6.99Picture buttonMovie buttonOK button](https://usermanual.wiki/Olympus-Medical-Systems/EC-1.Users-manual-part-5/User-Guide-618773-Page-4.png)
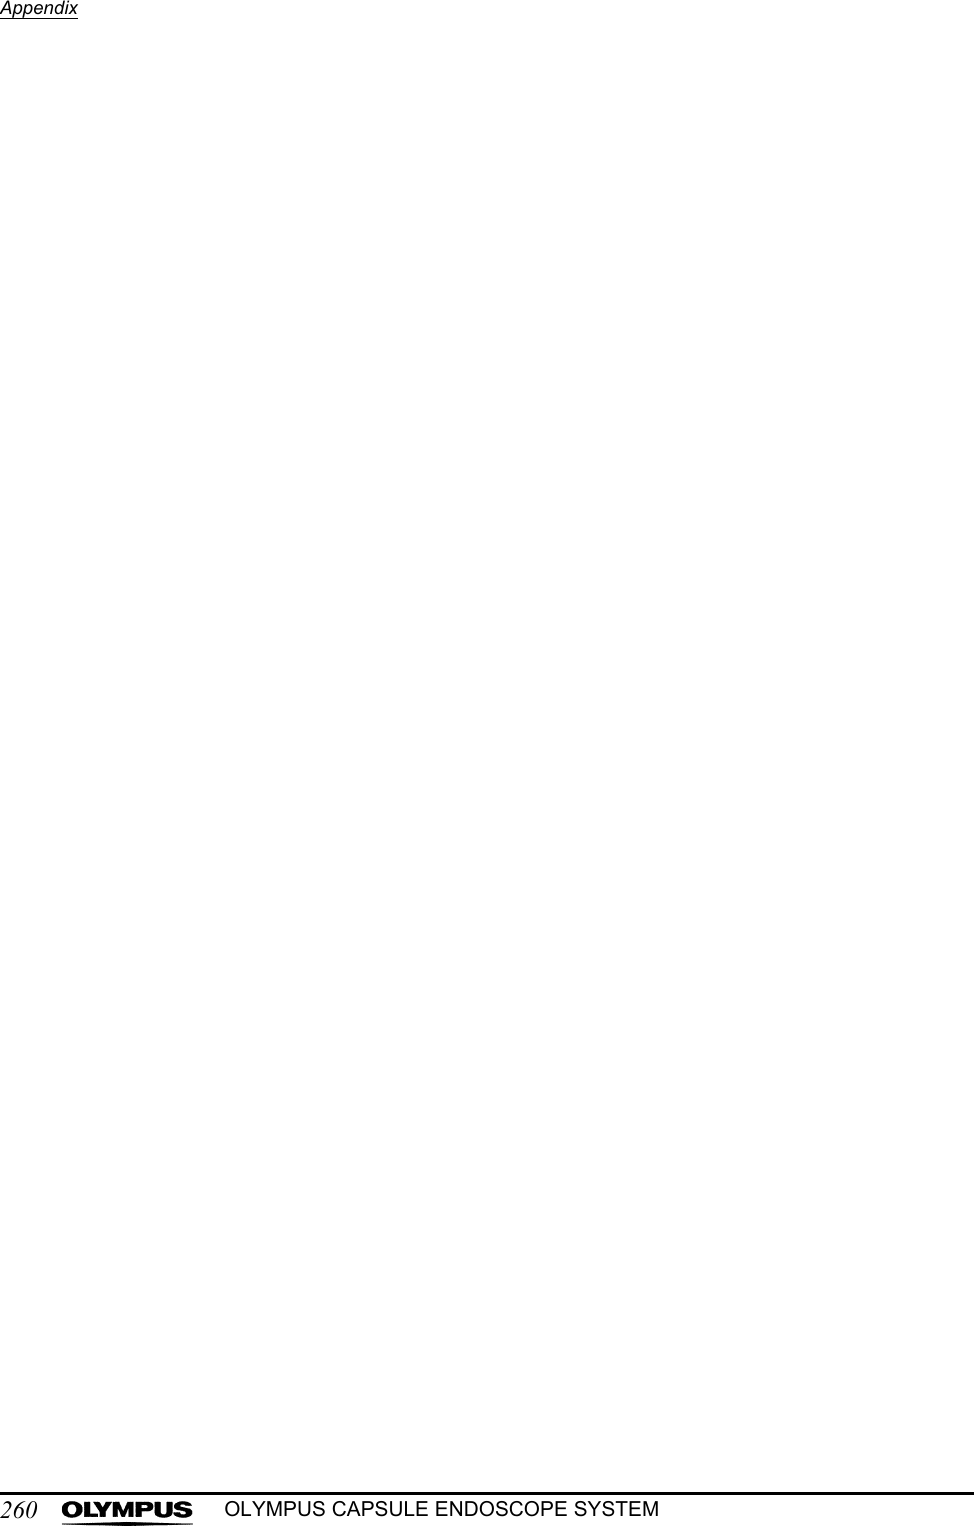
![Chapter 6 Capsule Endoscope Image Observation215OLYMPUS CAPSULE ENDOSCOPE SYSTEM9. Click the [OK] button on the DVD writing screen (see Figure 6.102). The selected examination data will be written. The progress screen is displayed while the examination data is being written.Figure 6.102• To stop the writing process, click the [Cancel] button on the progress screen.• If there is insufficient storage space on the writing destination, an error message will be displayed. In that case, refer to Chapter 8, “Troubleshooting” on page 233.• The DVD drive will open after writing the data and close automatically to verify the written data. Please wait until the verification is completed.10. When writing of examination data is complete, the examination list screen will be displayed.Finalize the report before you write the report onto the DVD.OK button](https://usermanual.wiki/Olympus-Medical-Systems/EC-1.Users-manual-part-5/User-Guide-618773-Page-6.png)
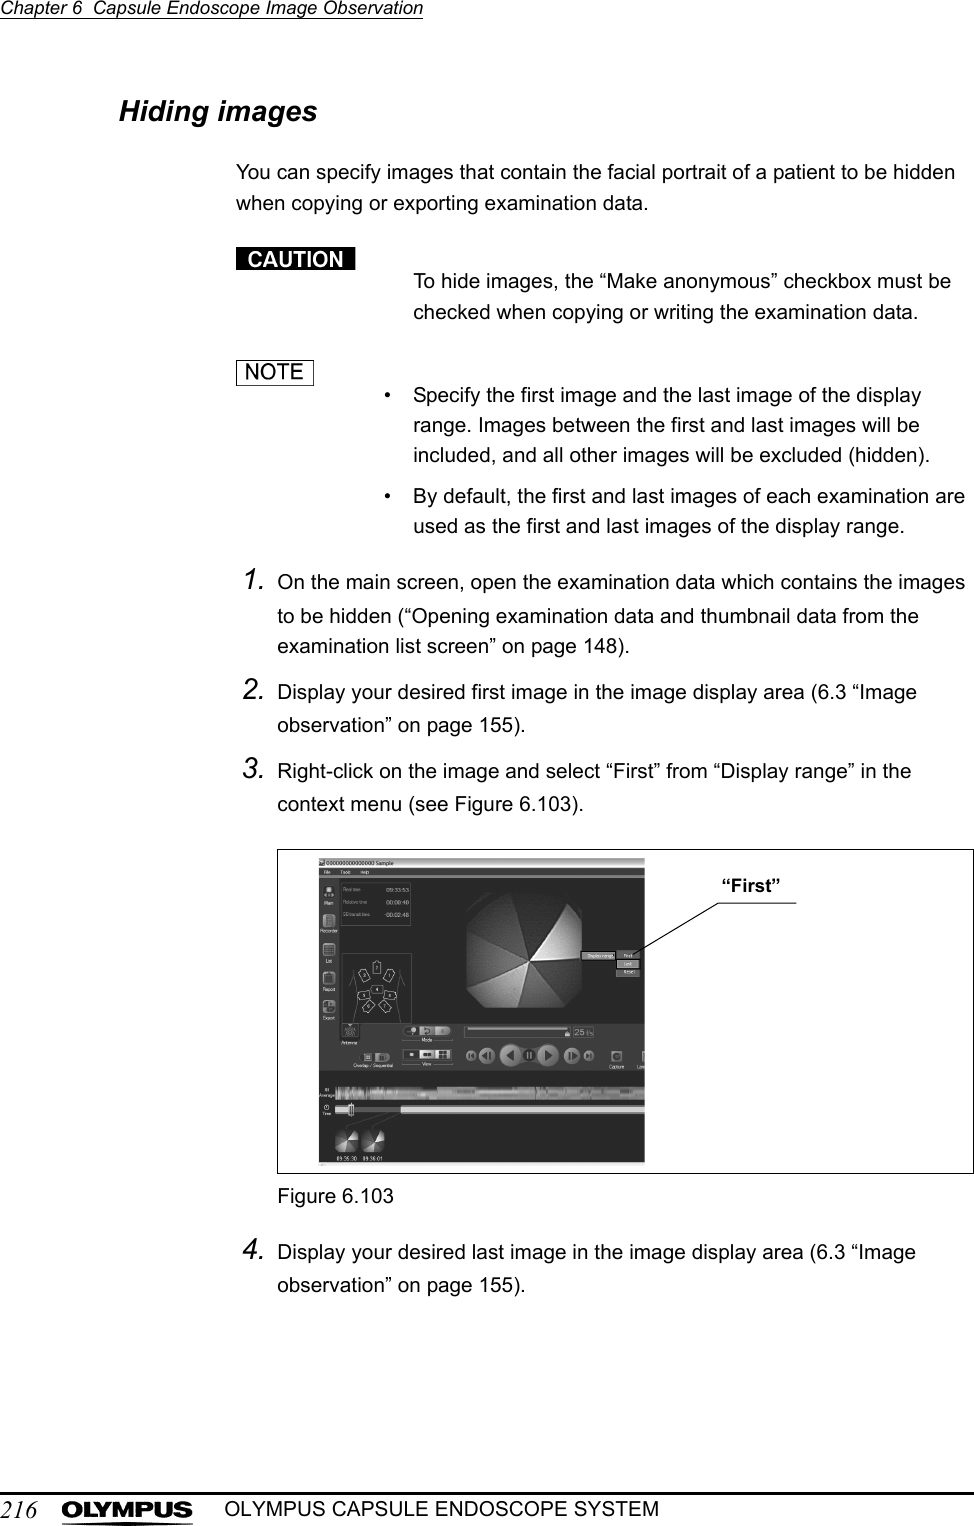
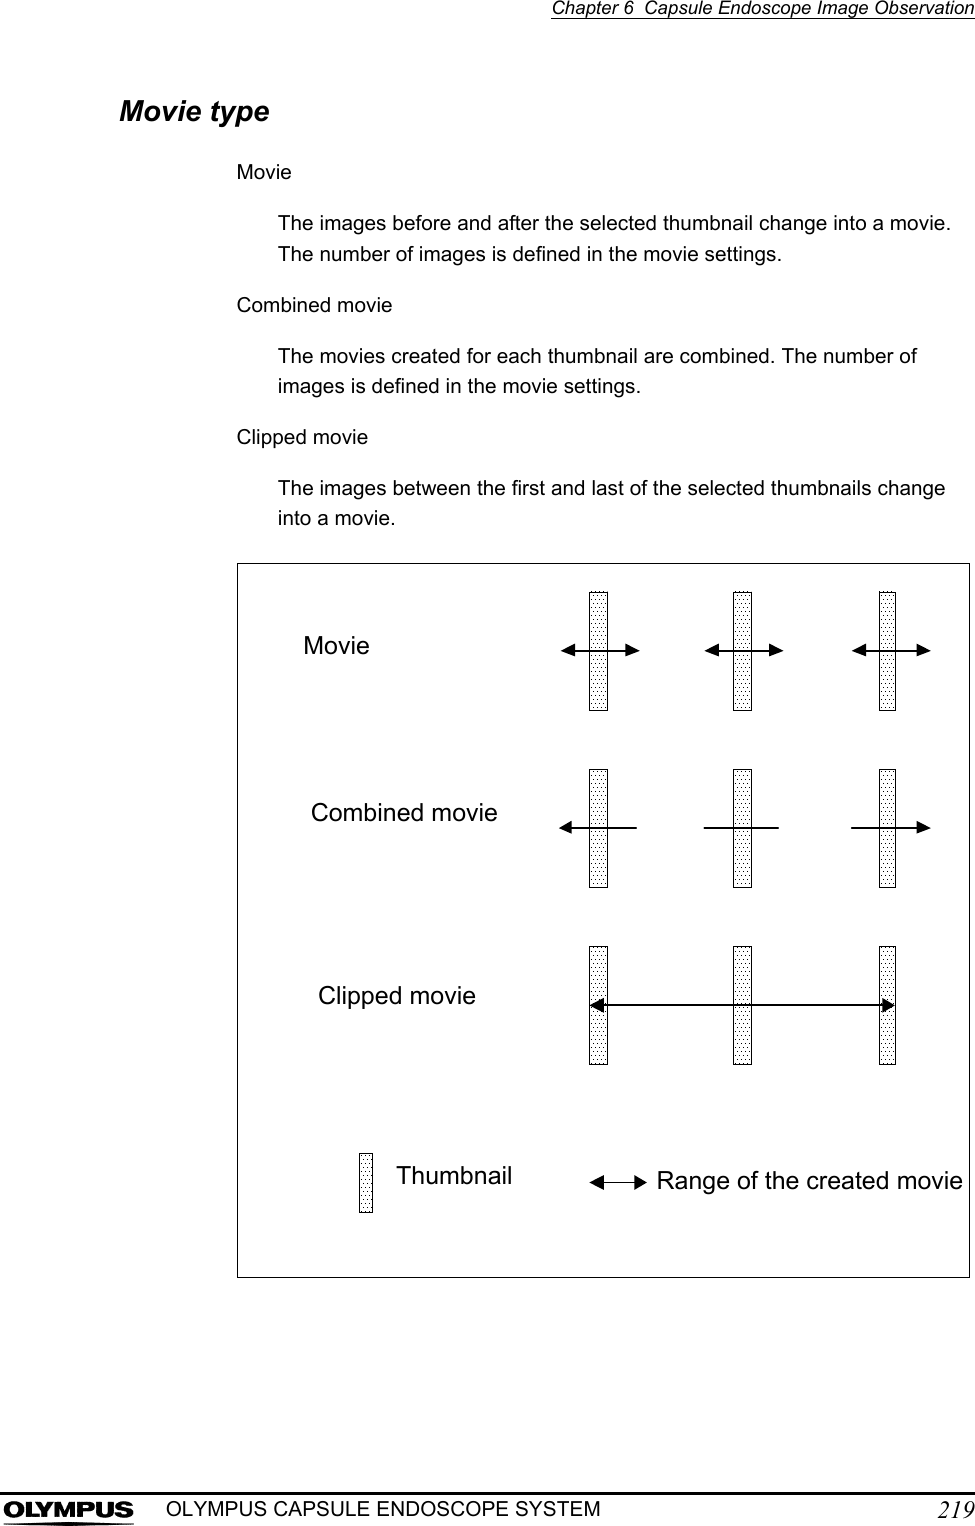
![220Chapter 6 Capsule Endoscope Image ObservationOLYMPUS CAPSULE ENDOSCOPE SYSTEMMovie settingsThe number of images used to form a movie is set on the movie settings screen.1. Select “Settings” from the “Tools” menu on the main screen.2. Click the “Clips” tab. The movie settings screen is displayed (see Figure 6.107).Figure 6.1073. Set the number of images to be added before and after the selected thumbnail (see Figure 6.108).Figure 6.108You can specify a number between 1 and 999.4. Click the [OK] button on the movie settings screen.Clips tab](https://usermanual.wiki/Olympus-Medical-Systems/EC-1.Users-manual-part-5/User-Guide-618773-Page-11.png)
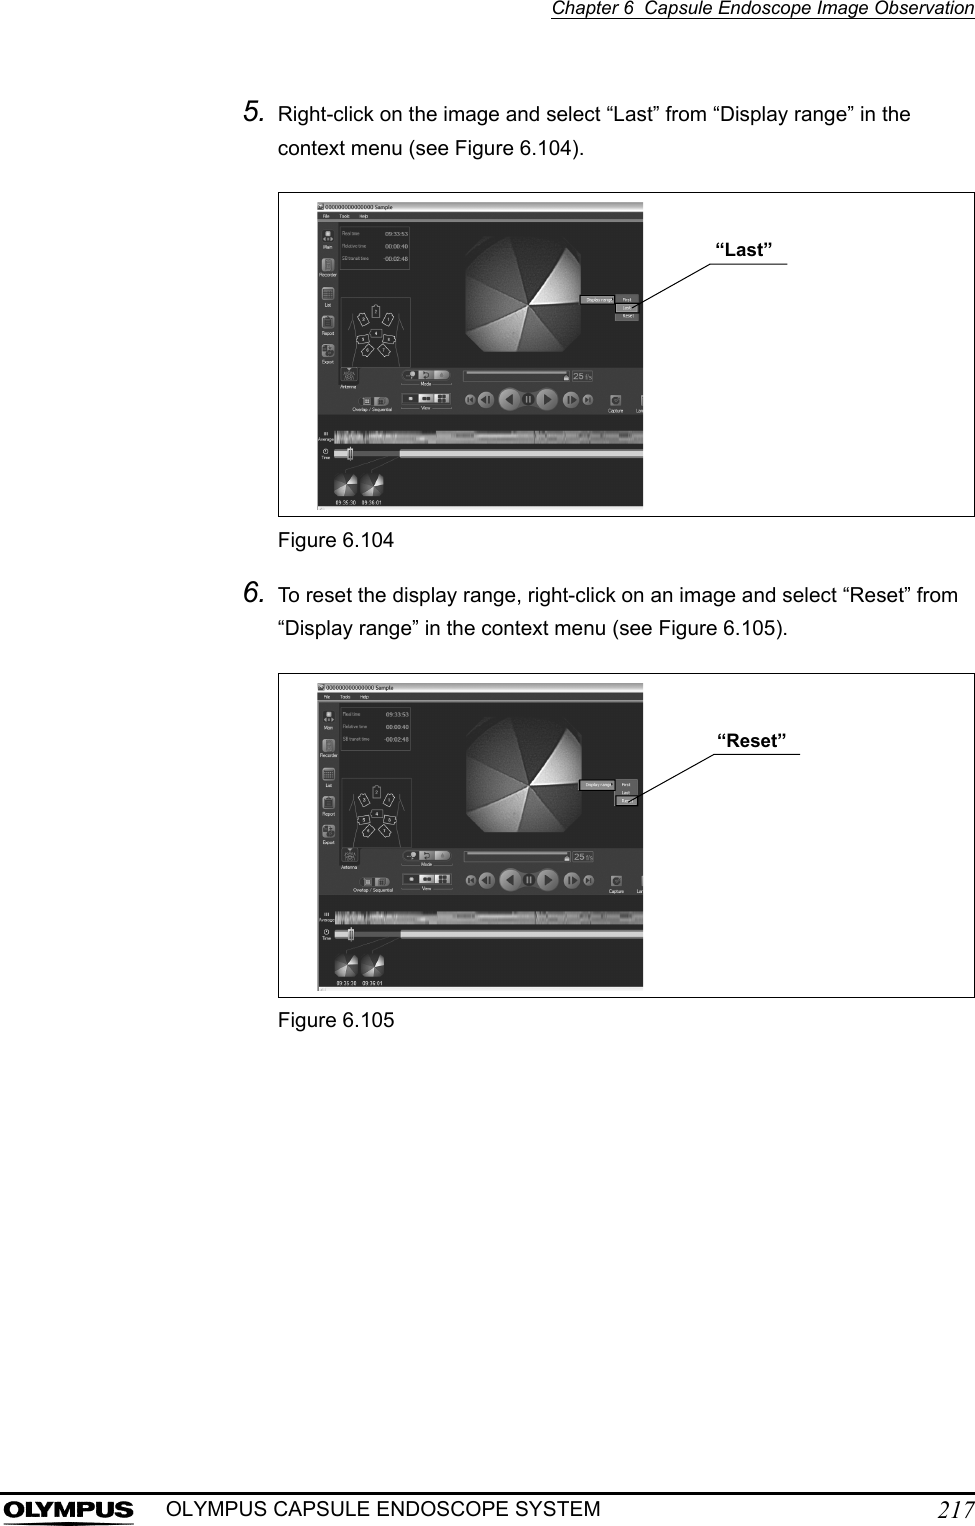
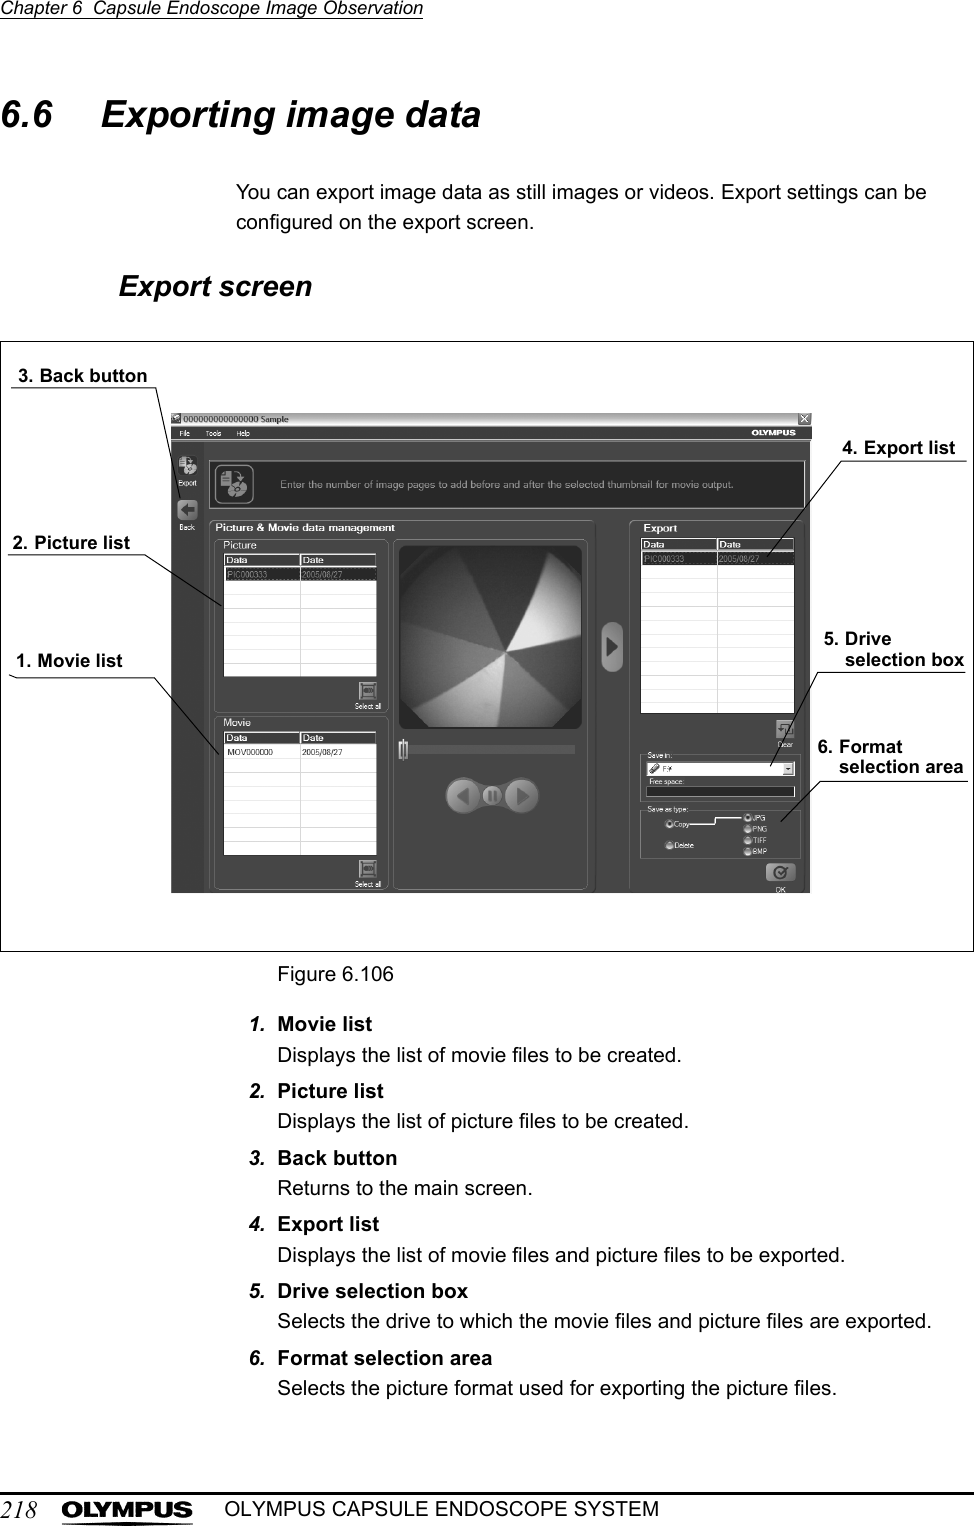
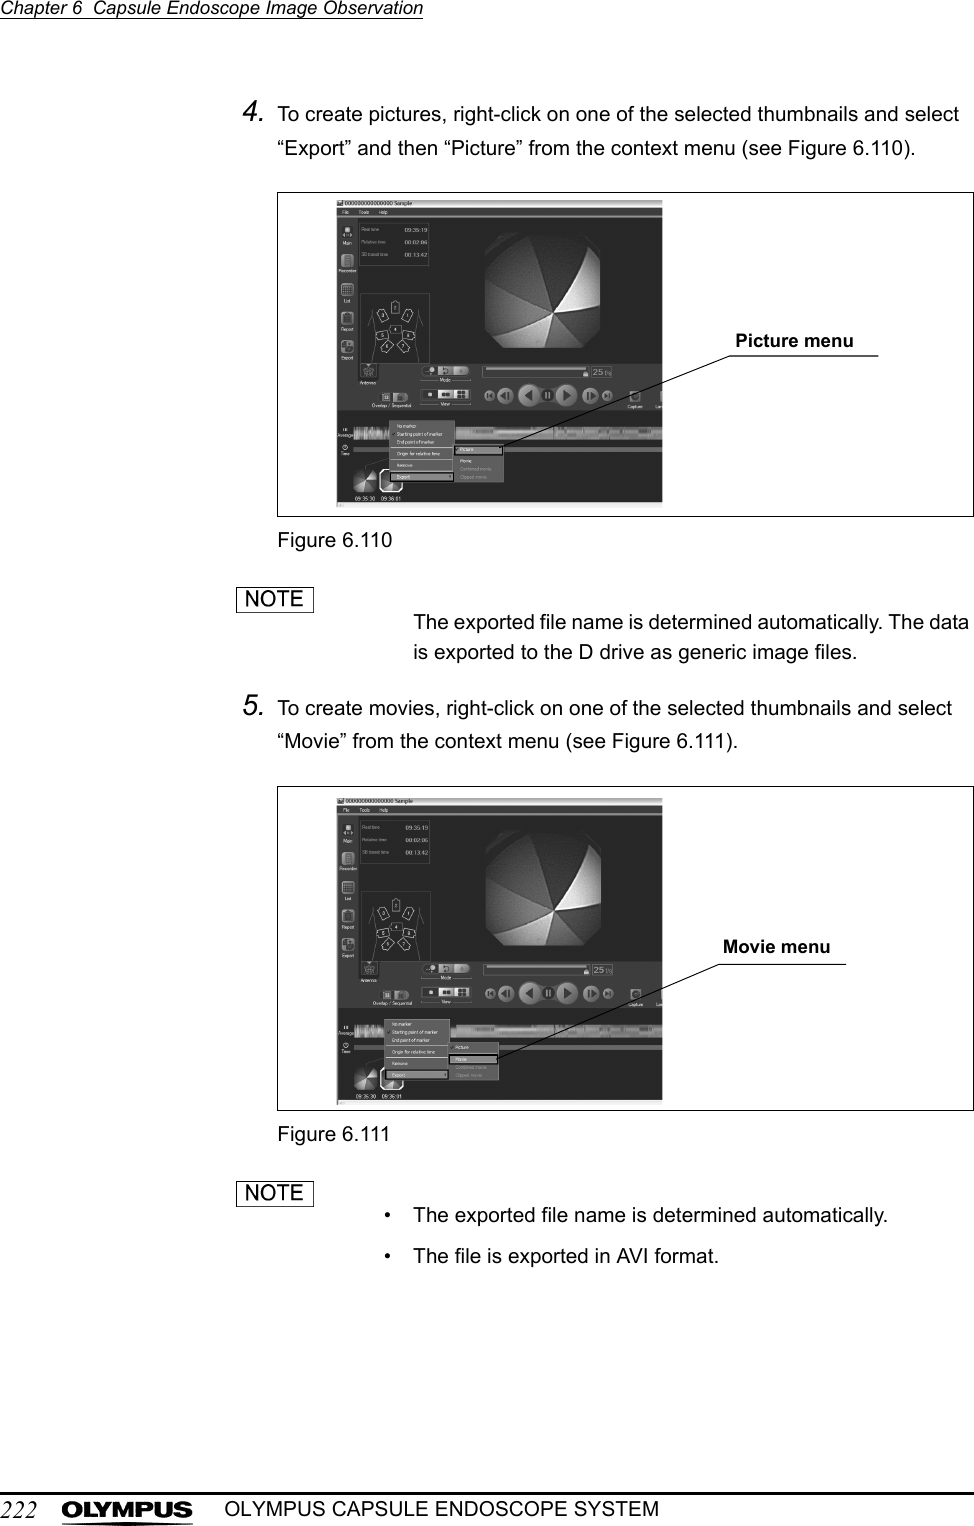
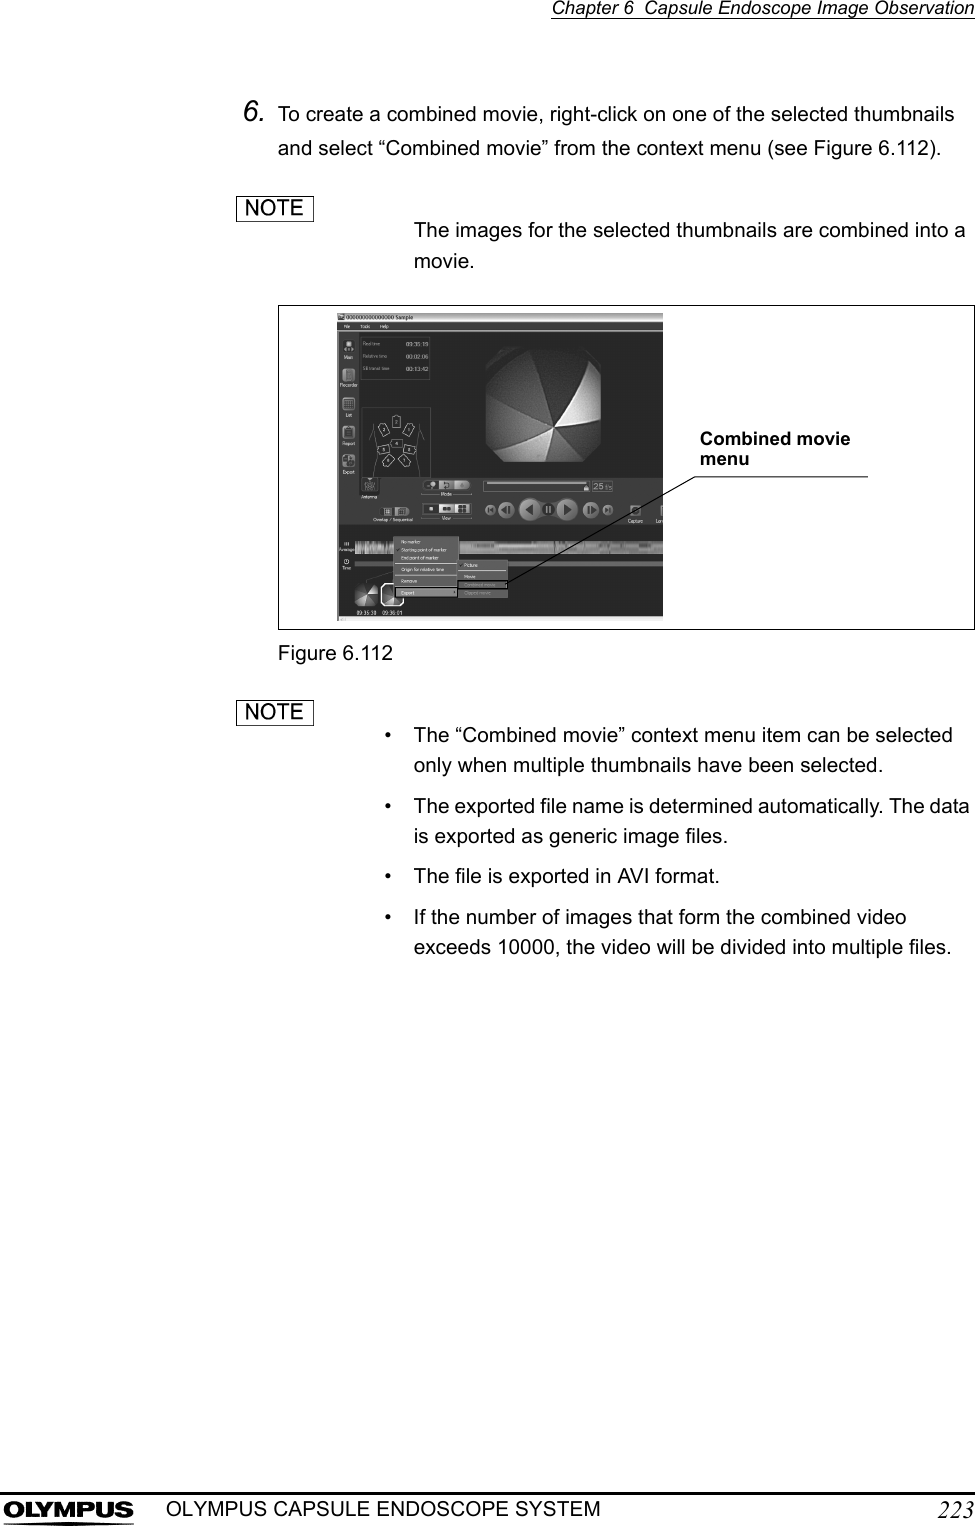
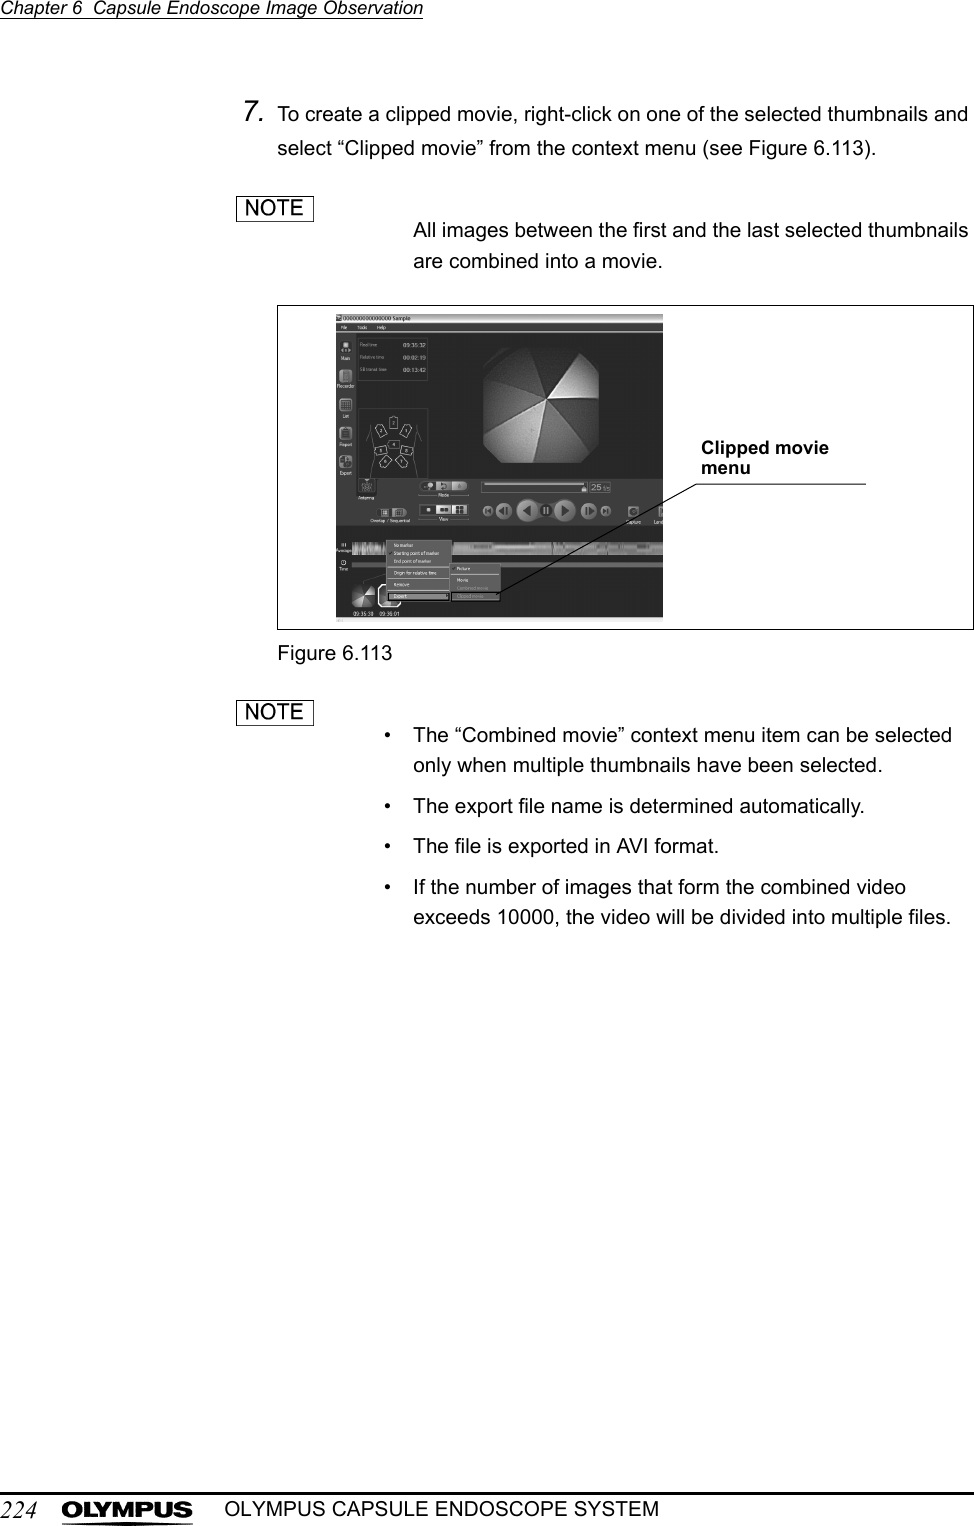
![Chapter 6 Capsule Endoscope Image Observation221OLYMPUS CAPSULE ENDOSCOPE SYSTEMCreating pictures / movies / combined movies / clipped moviesThe created pictures and movies are stored on the workstation. To export a picture or movie file, refer to “Exporting picture / movie files” on page 225.1. On the main screen, open the examination data (see “Opening thumbnail data from the menu” on page 152).2. Create thumbnails you wish to include in your export (see “Creating thumbnails” on page 163).3. Select the thumbnails you wish to include in your export (see Figure 6.109).To select multiple thumbnails, click the thumbnails while holding down the [Shift] key on the keyboard.Figure 6.109](https://usermanual.wiki/Olympus-Medical-Systems/EC-1.Users-manual-part-5/User-Guide-618773-Page-12.png)
![Chapter 6 Capsule Endoscope Image Observation225OLYMPUS CAPSULE ENDOSCOPE SYSTEMExporting picture / movie files1. Click the [Export] button on the main screen (see Figure 6.114). The export screen is displayed.Figure 6.1142. Use the drive selection box to select the destination drive for the export (see Figure 6.115). The amount of available disk space on the selected drive is displayed.Figure 6.115Export button](https://usermanual.wiki/Olympus-Medical-Systems/EC-1.Users-manual-part-5/User-Guide-618773-Page-16.png)
![226Chapter 6 Capsule Endoscope Image ObservationOLYMPUS CAPSULE ENDOSCOPE SYSTEM3. Select the picture and/or movie files you wish to export (see Figure 6.116).Figure 6.1164. Click the [ ] button to add the picture and/or movie files you wish to export to the export list from the picture list or the movie list (see Figure 6.117).Figure 6.117To clear a picture or movie file from the export list select the file you wish to clear and click the [Clear] button. button](https://usermanual.wiki/Olympus-Medical-Systems/EC-1.Users-manual-part-5/User-Guide-618773-Page-17.png)

![228Chapter 6 Capsule Endoscope Image ObservationOLYMPUS CAPSULE ENDOSCOPE SYSTEM7. Click the [OK] button on the export screen (see Figure 6.120). The selected files will be exported. The progress screen is displayed while the files are being exported.Figure 6.120• To stop the export process, click the [Cancel] button on the progress screen.• If there is insufficient storage space on the export destination, an error message will be displayed. In this case, refer to Chapter 8, “Troubleshooting” on page 233.8. When exporting is complete, you will be returned to the export screen.The picture or movie files is exported to the following location.(∗) Words in parentheses vary according to the exported data.OK button](https://usermanual.wiki/Olympus-Medical-Systems/EC-1.Users-manual-part-5/User-Guide-618773-Page-19.png)