Oxford Instruments W2CBW003 802.11 b/g + Bluetooth Module User Manual part 3
Oxford Instruments 802.11 b/g + Bluetooth Module part 3
Contents
User manual part 3
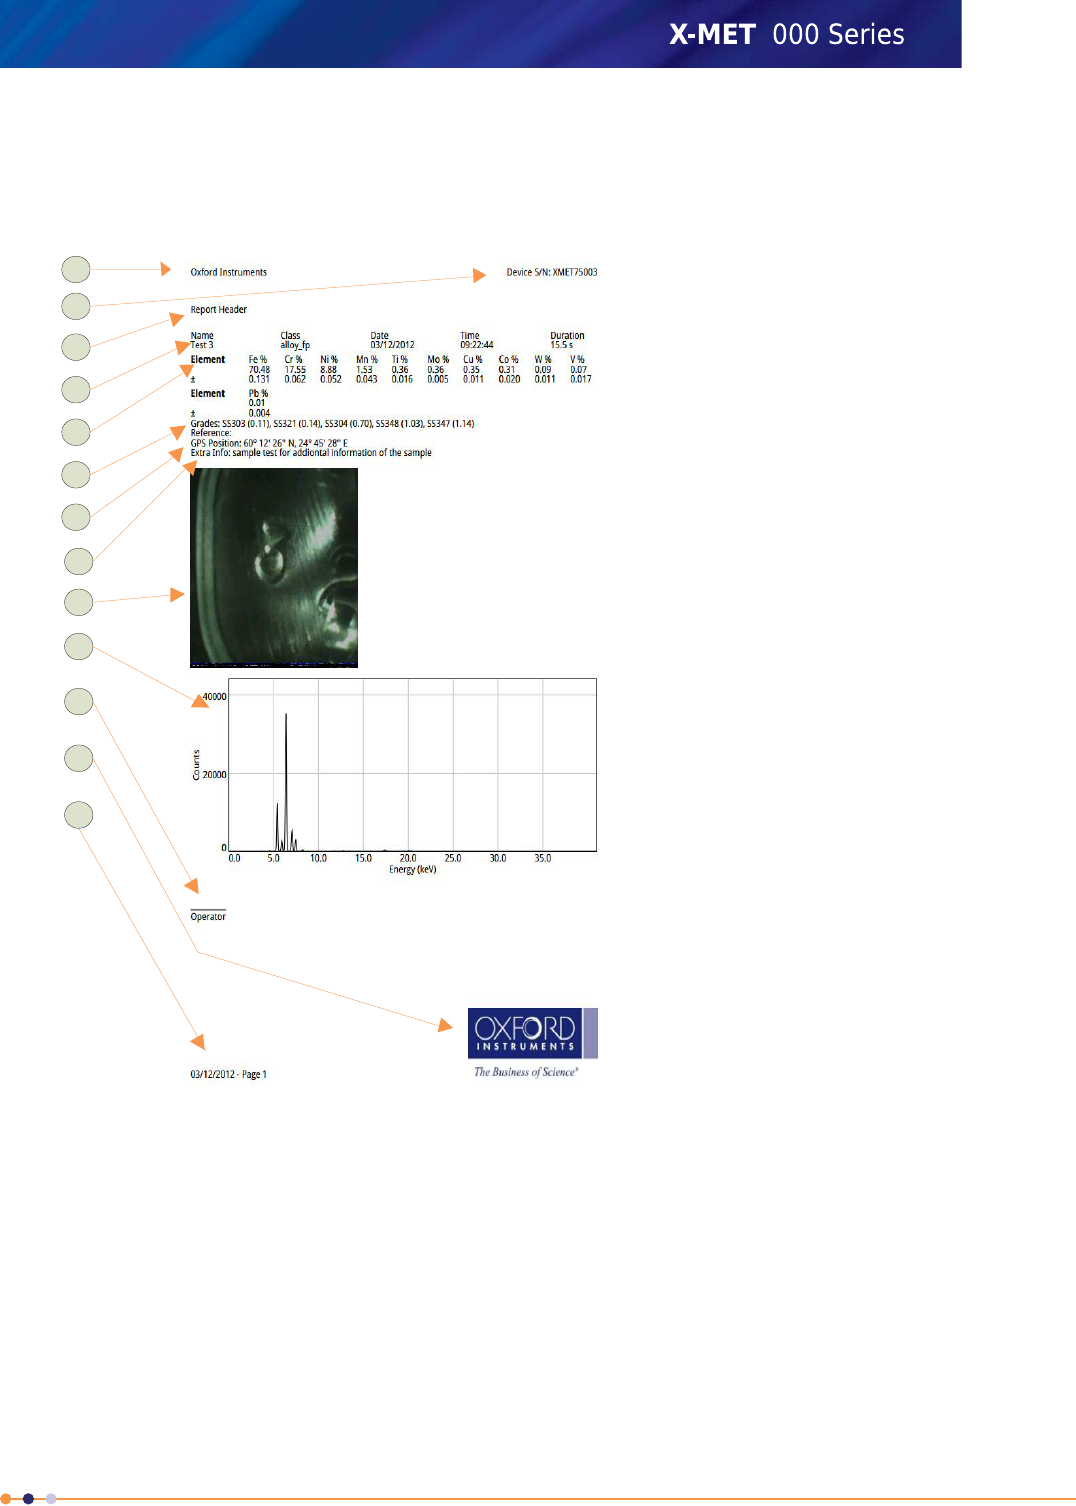
A Custom Report
This is a typical custom report. The report template provides full control of all these aspects of the
report.
1. Margin: company
information
2. Margin: serial number
3. Report header
4. Sample information
5. Element: concentration and
+/-
6. Grade
7. GPS Position
8. Additional Information
9. Camera Image
10. Spectra
11. Operator information
12. Margin: logo
13. Margin: date and page
number
1
12
11
10
9
8
7
6
5
4
3
2
13
The margins can include:Margins
•Company information
•Company logo
•The device serial number
•The date and page number.
It is possible to place these items in any of the four margins.
The report can start with an introduction.Report header
Sample information includes:Sample information
•The sample name
201
X-MET8000 Series User Manual
8
•The mode or method
•The date and time
•The measurement time.
It is necessary to select the elements to appear in the report. Chosen
elements that are not present in the sample donot appear in the report
Element information
unless All The Elements From The Result option is selected .
Element information can include the concentration and +/- value.
The report can include the grade information.Grade
The report can include the GPS information.GPS Position
The report can include the additional information for the sample.Additional Information
The report can include the camera image of the sample.Camera Image
The report can include the spectra for the sample.Spectra
The report can include information about the operator.Operator information
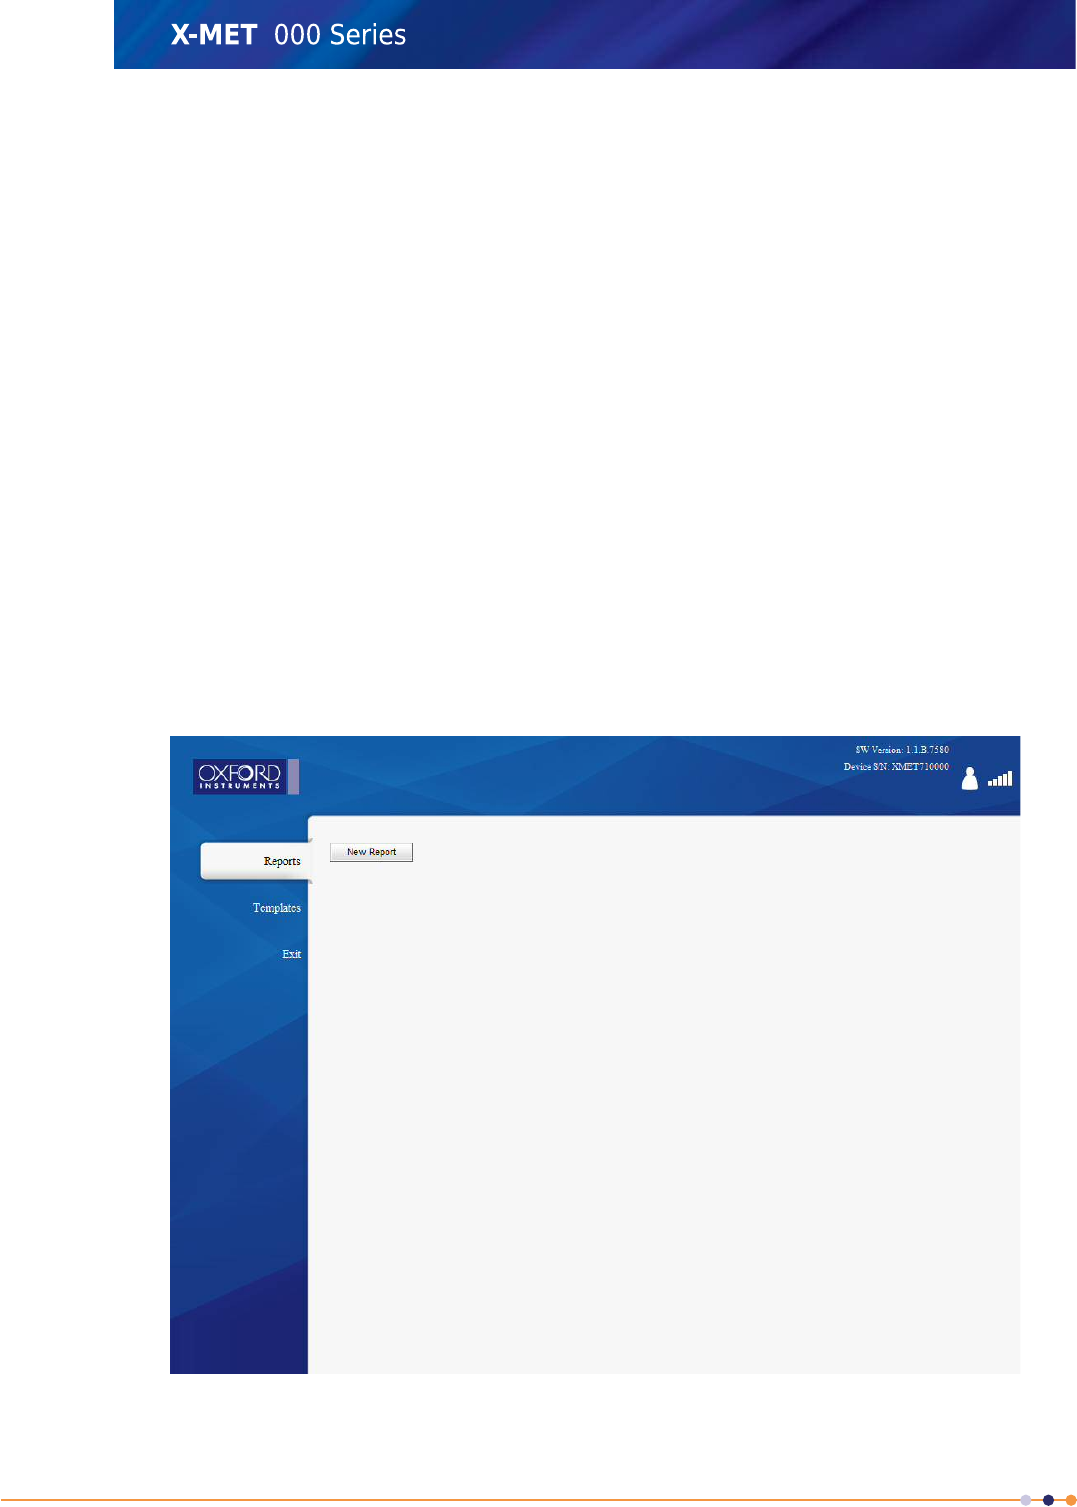
Create A Report
It is necessary to have a report template to create a report. Follow these steps to create a report.
1. From the PC main screen, click Report Generator.
The Reports screen appears.
202
X-MET8000 Series User Manual
8
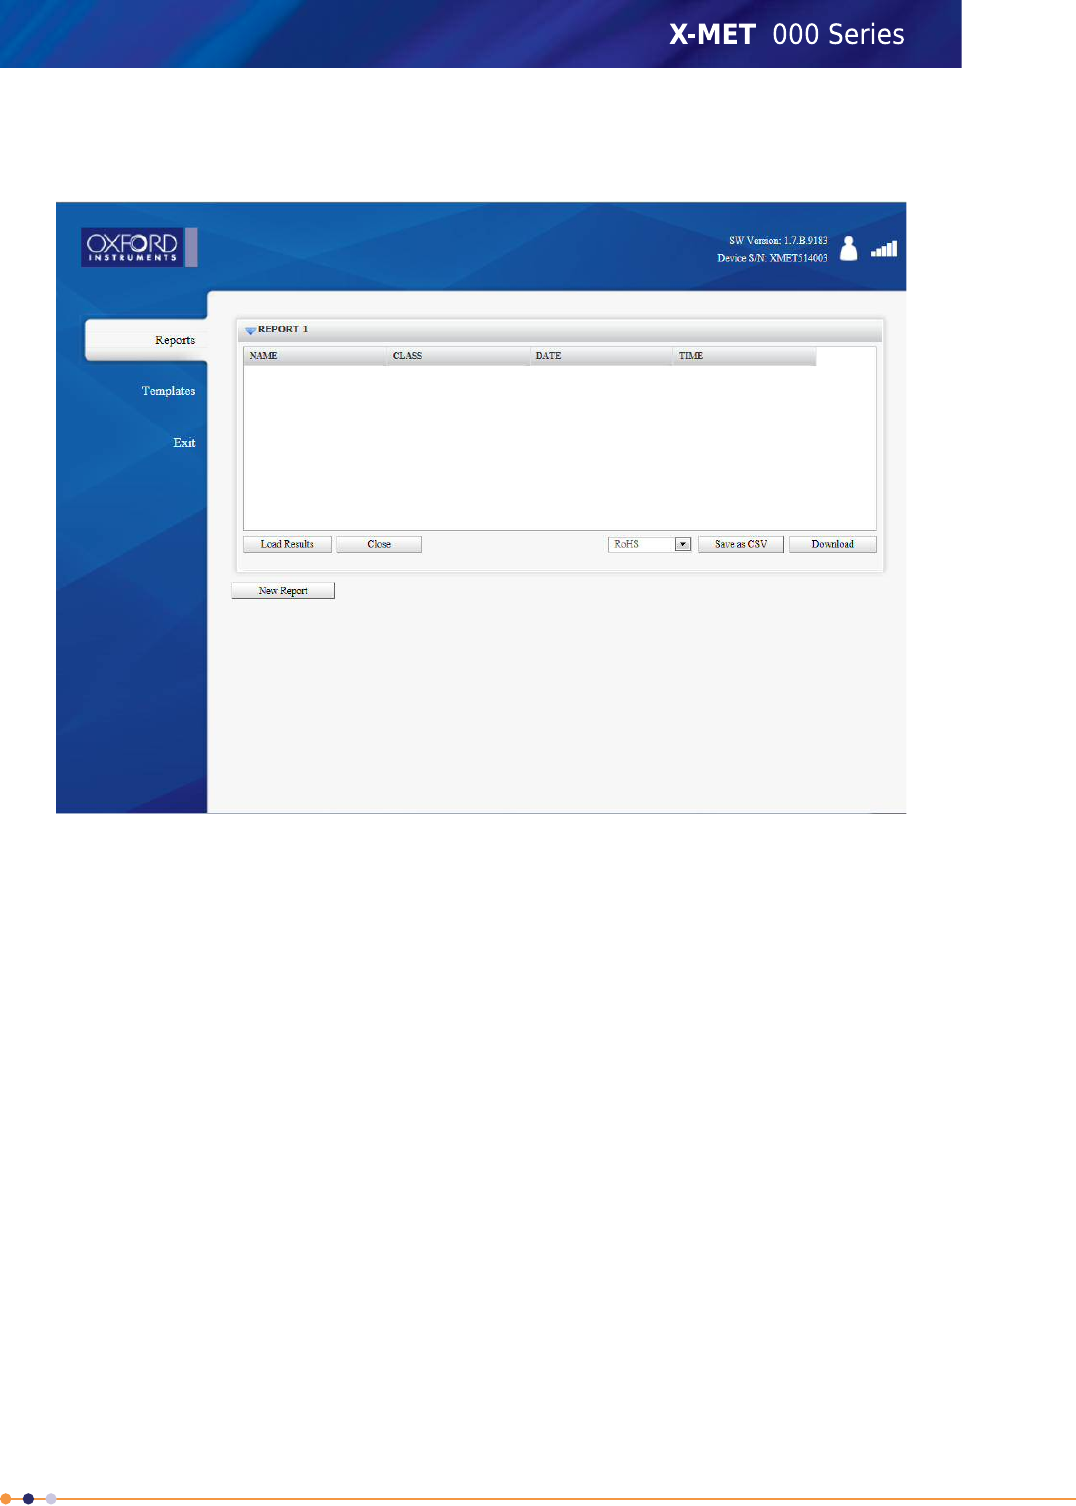
2. Click New Report.
The Reports screen has a new report.
203
X-MET8000 Series User Manual
8
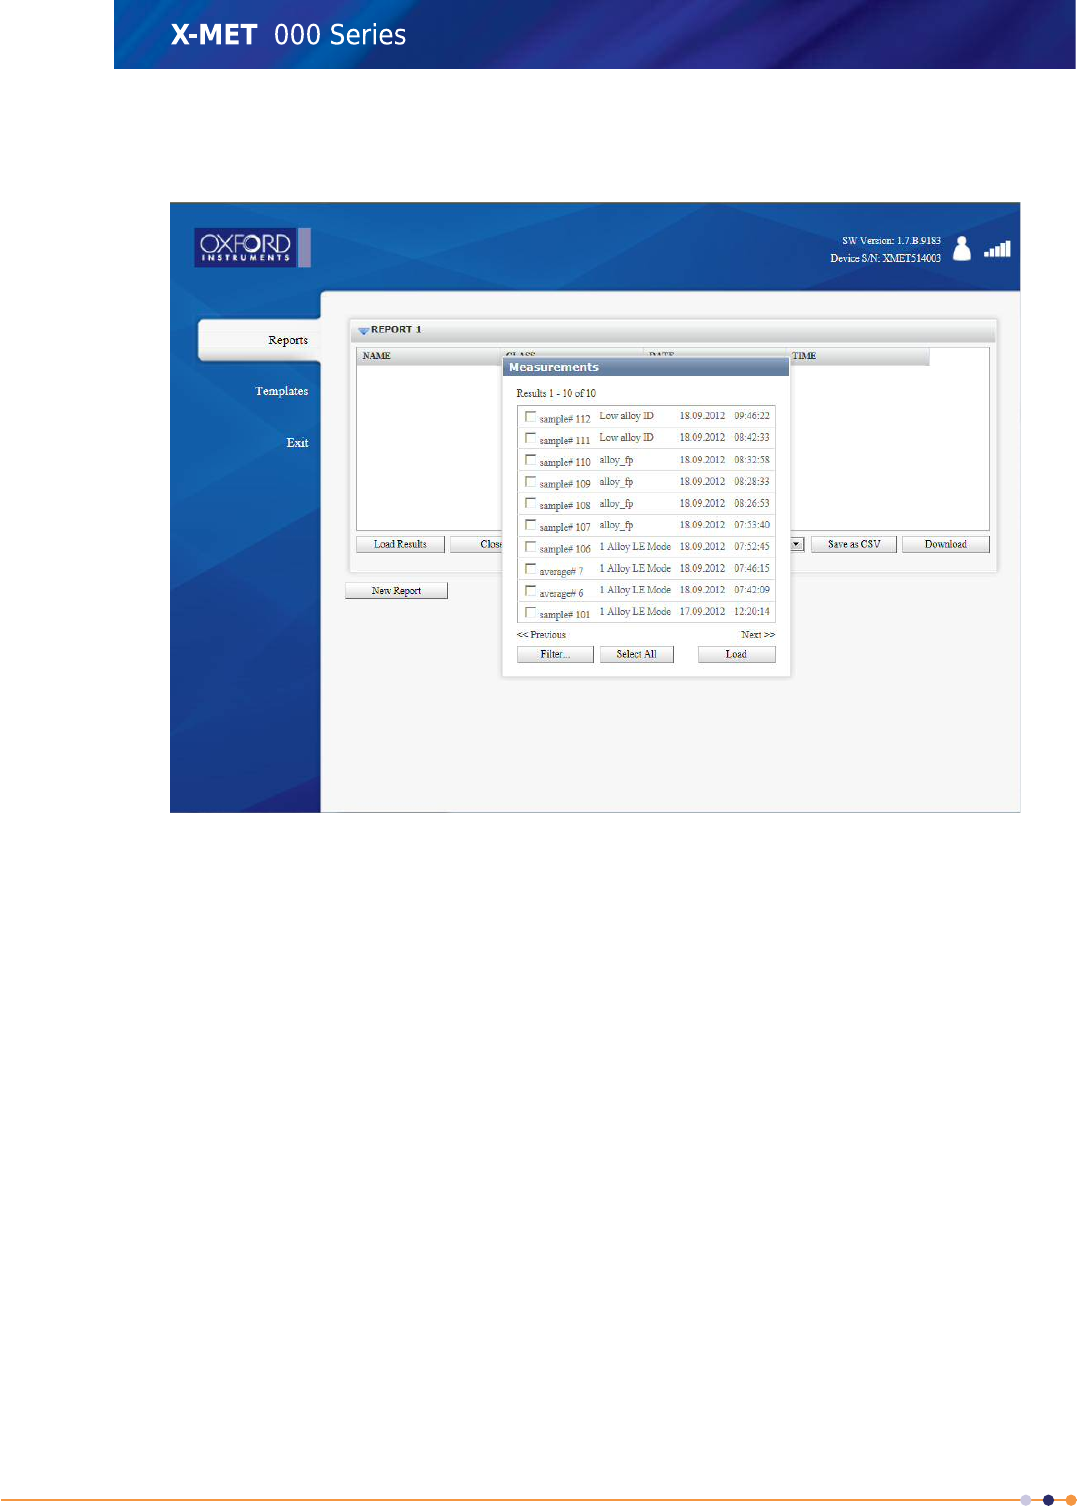
3. Click Load Results.
The Measurements dialog box appears.
204
X-MET8000 Series User Manual
8
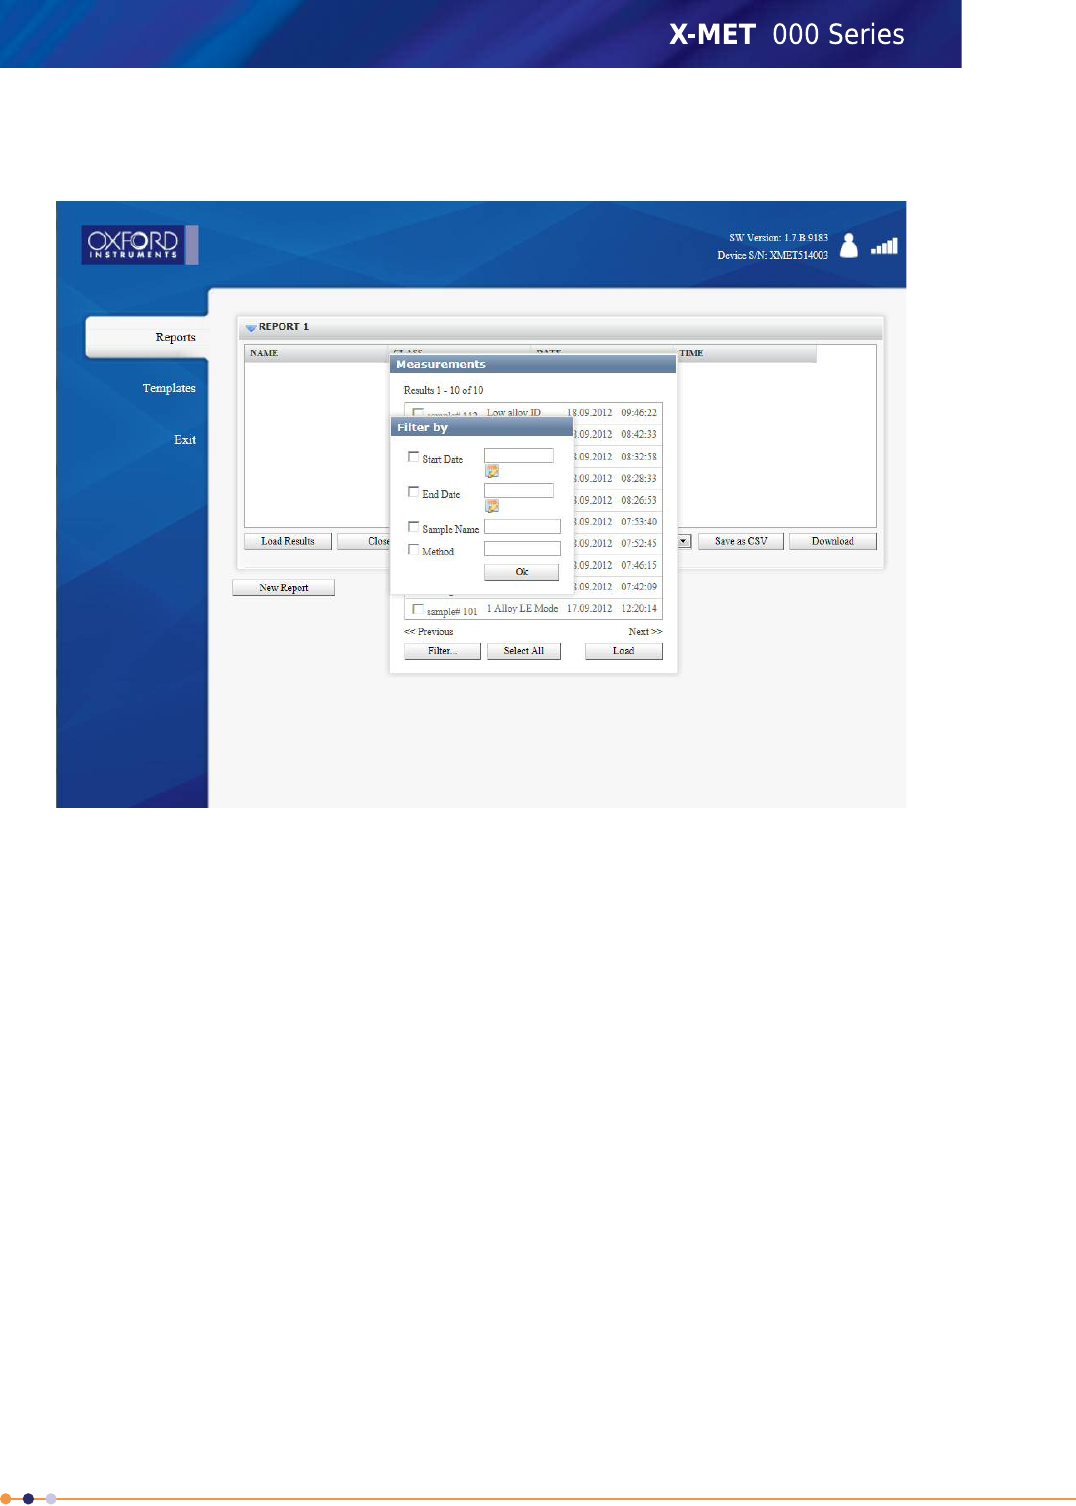
4. If required, click Filter ....
The Filter by dialog box appears.
5. To use the filter, do one or more of the following, as required:
•Click the Start Date tick box, and use the calendar to choose a date.
•Click the End Date tick box, and use the calendar to choose a date.
•Click the Sample Name tick box, and type all or part of the sample name.
•Click the Method tick box, and type all or part of the Method name.
6. Click OK to return to the Measurements dialog box, with filtered results.
205
X-MET8000 Series User Manual
8
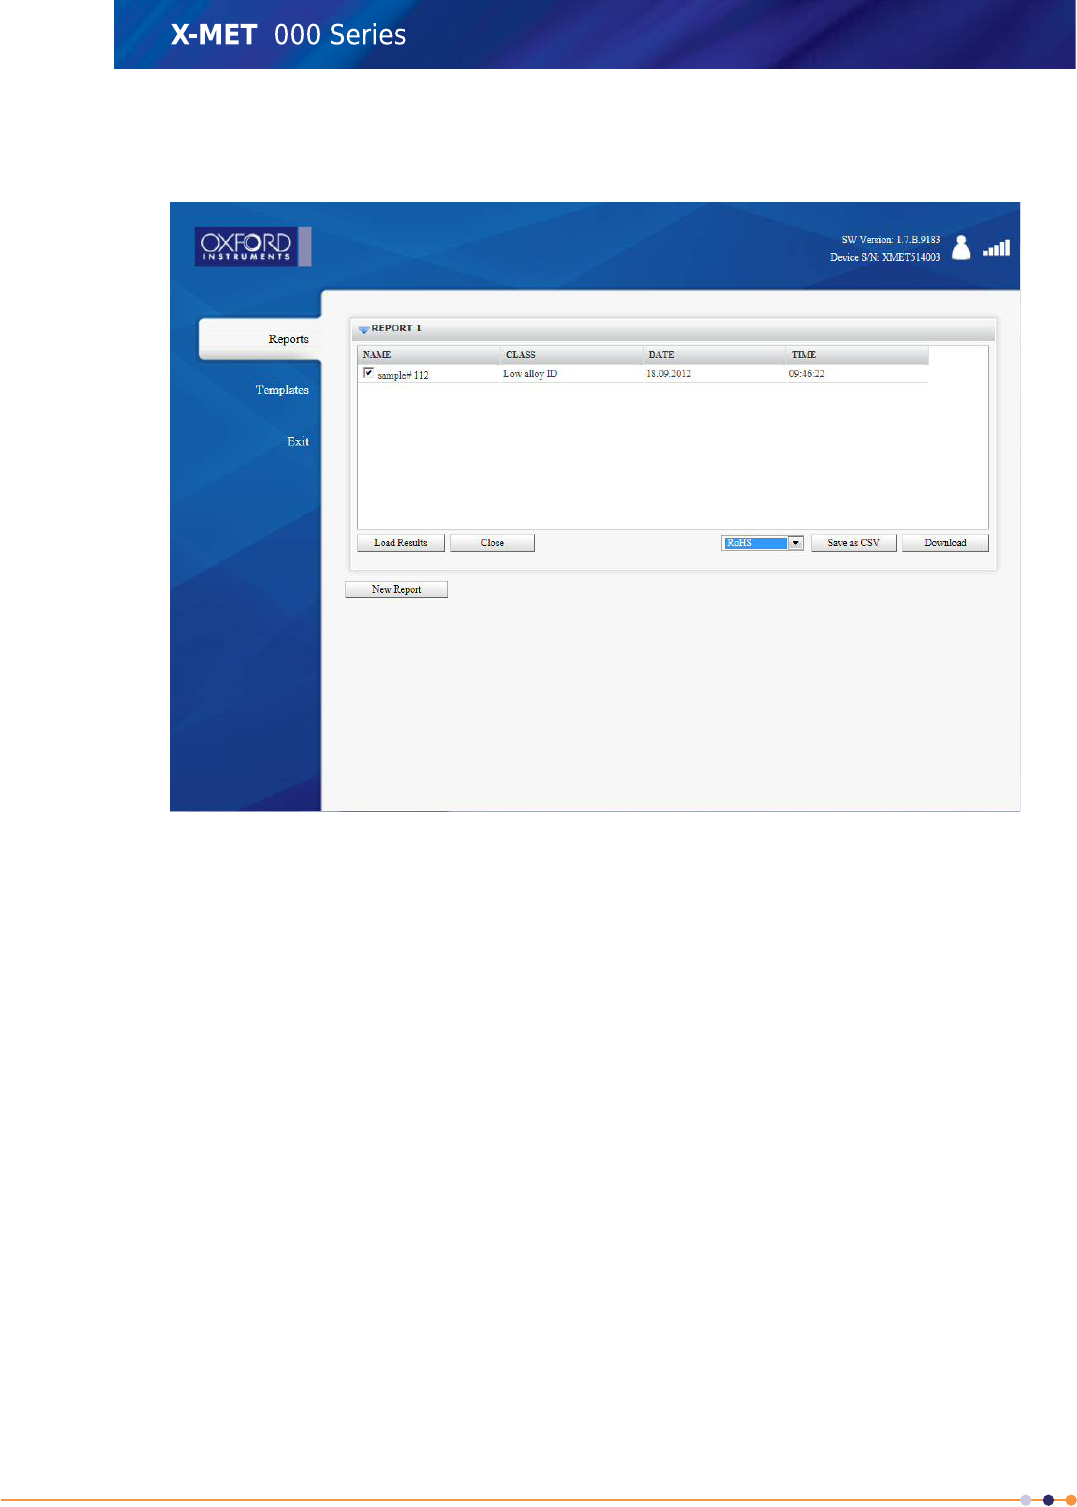
7. If required click Select All to select all the results for the report, and then click Load.
The Reports screen shows the result or results for the report.
8. Select the required template for the report from the Report Template drop down list.
9. Do one of the following
•Click Save As CSV
•Click Download to download a PDF file.
The File Download dialog box appears.
206
X-MET8000 Series User Manual
8

10. Click Save to save the file.
The Zip file contains the report PDF file or the excel file(csv).
Note: In MS excel 2007 or older versions, it may be difficult to open csv files in the readable
format as csv file uses UTF-8 character encoding. In such cases follow the below steps
•Open Microsoft Excel.
•Click the Data tab on menu bar.
•Click the From Text option
•Browse to the saved csv file to be imported, select it and click the import button.
•Follow the 3 steps of Text import Wizard which opens to your screen.
•On Wizard first choose the file type that describes your data best. Usually in case of X-MET
that is Delimited.
•Select the format 65001: Unicode(UTF-8) from the File origin drop down list. When done
click Next.
•On the second Text Import Wizard step check whatever delimiters your data may have.
Data preview shows how the data will appear on spread sheet. When done click Next.
•Continue to last Text Import Wizard step and modify any columns data format, or deselect
the unnecessary columns if any.
•Click Finish and the imported file opens into MS spread sheet.
11. Click Exit to return to the PC main screen.
207
X-MET8000 Series User Manual
8
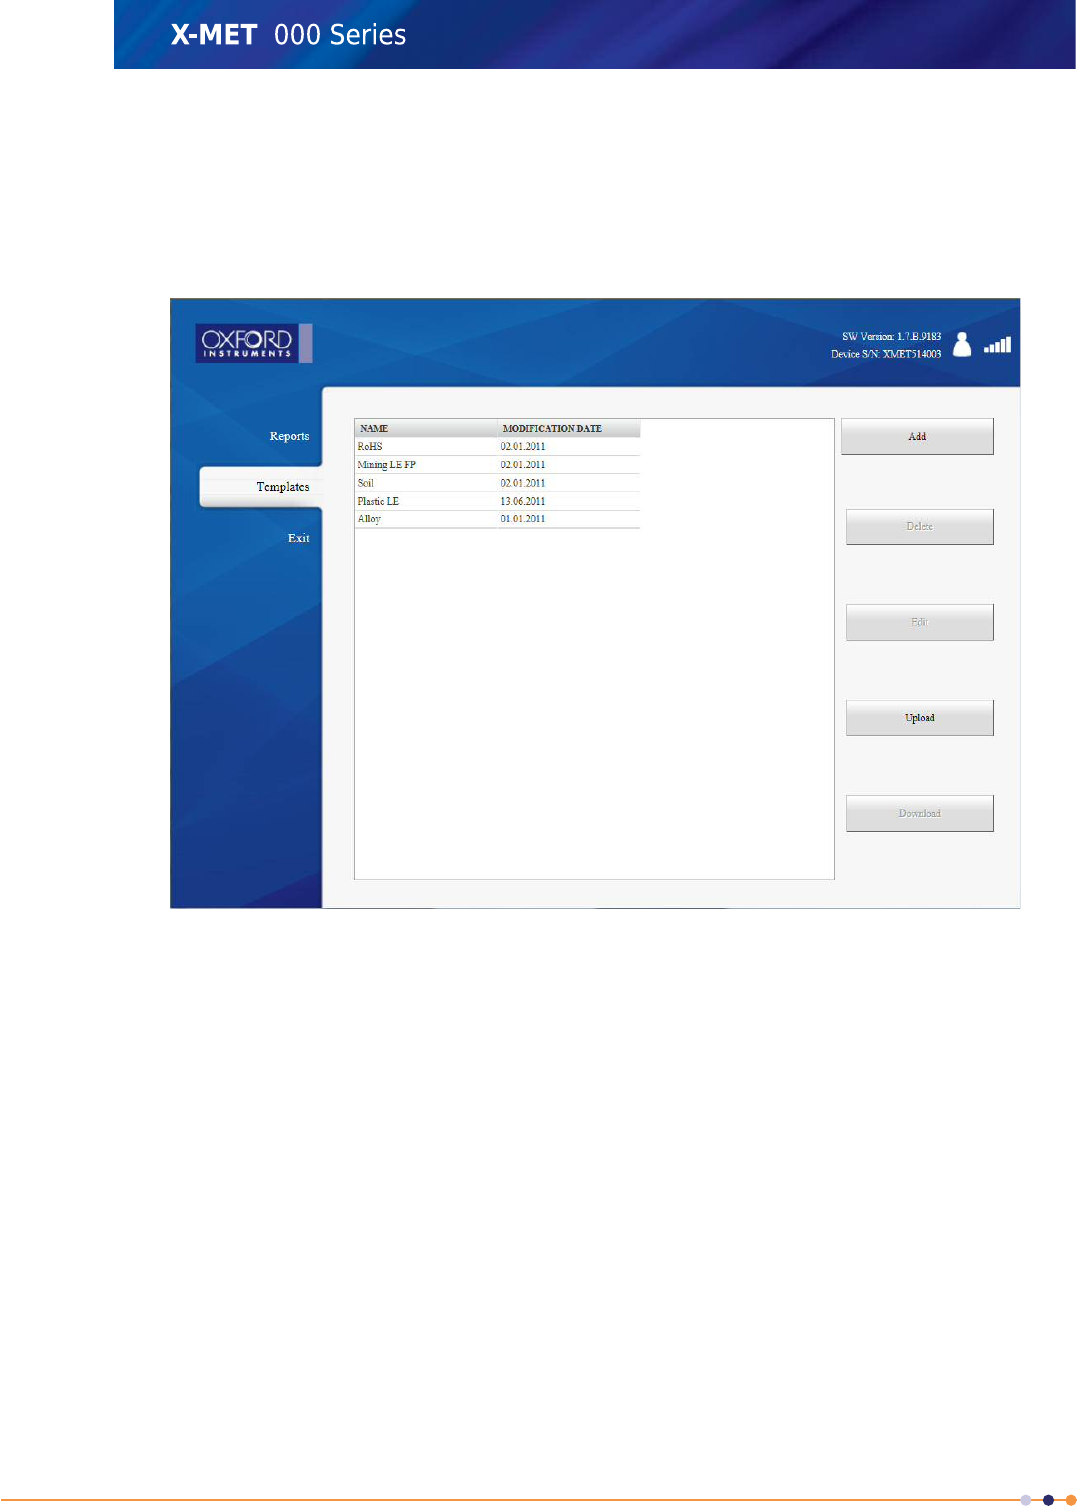
Add A Report Template
Follow these steps to add a report template.
1. From the PC main screen, click Report Generator, and then click Templates.
The Templates screen appears.
208
X-MET8000 Series User Manual
8
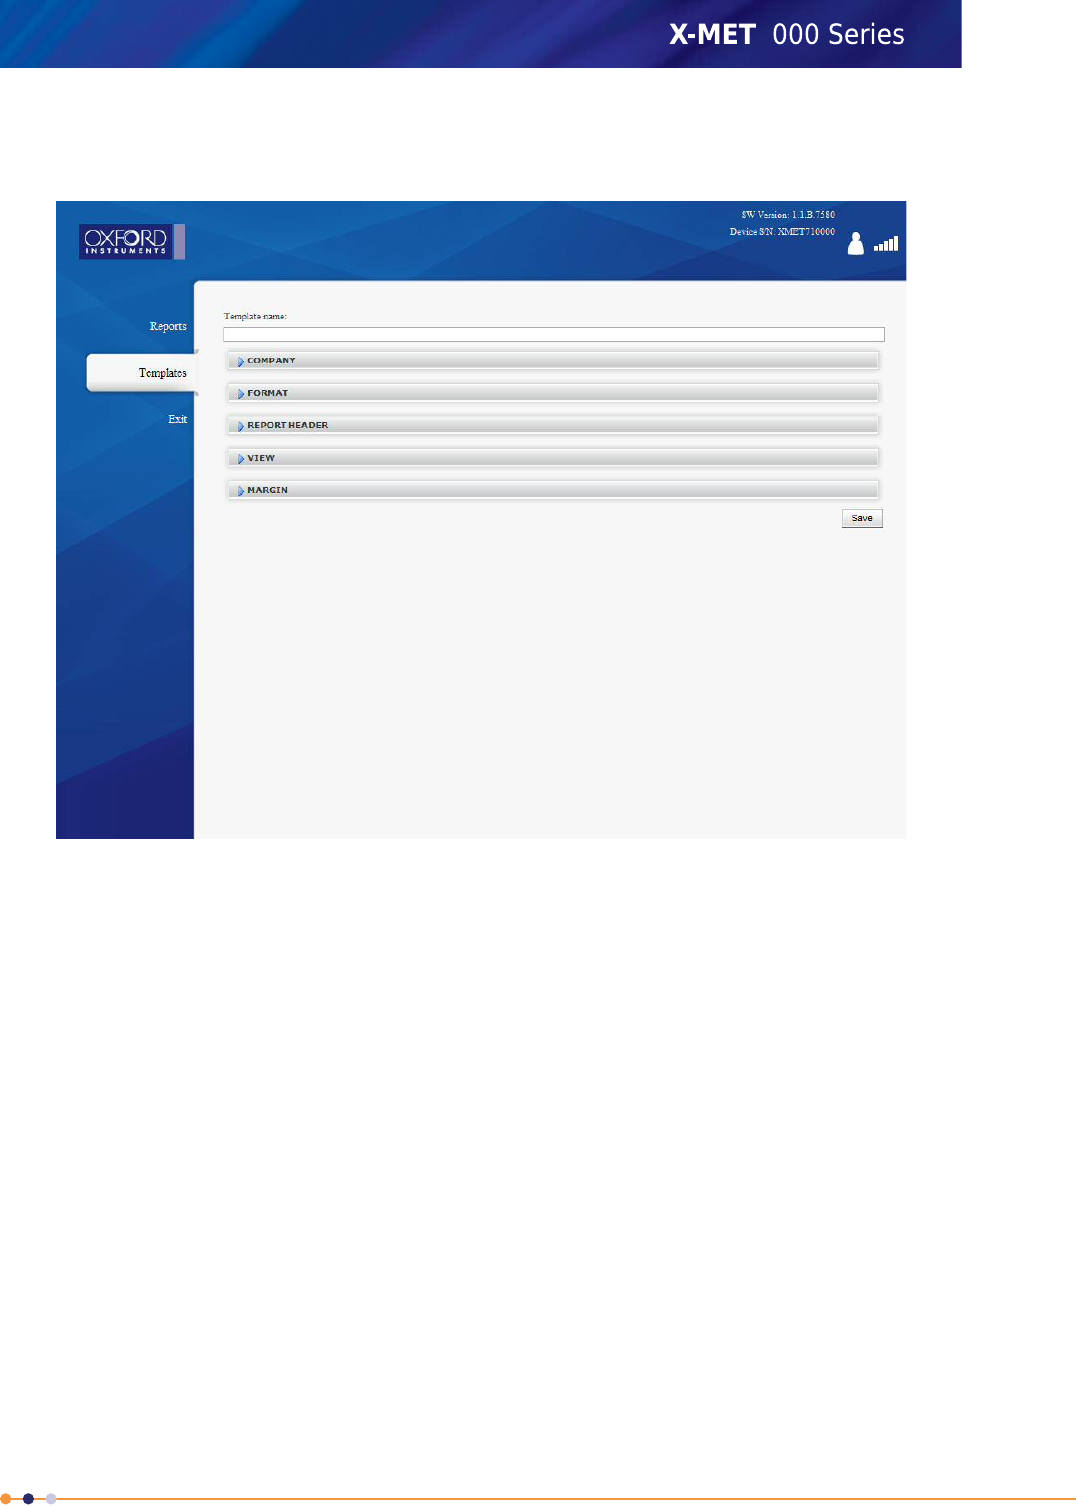
2. Click Add.
The Template Design screen appears.
3. Type a name for the report into the Template Name text box.
209
X-MET8000 Series User Manual
8
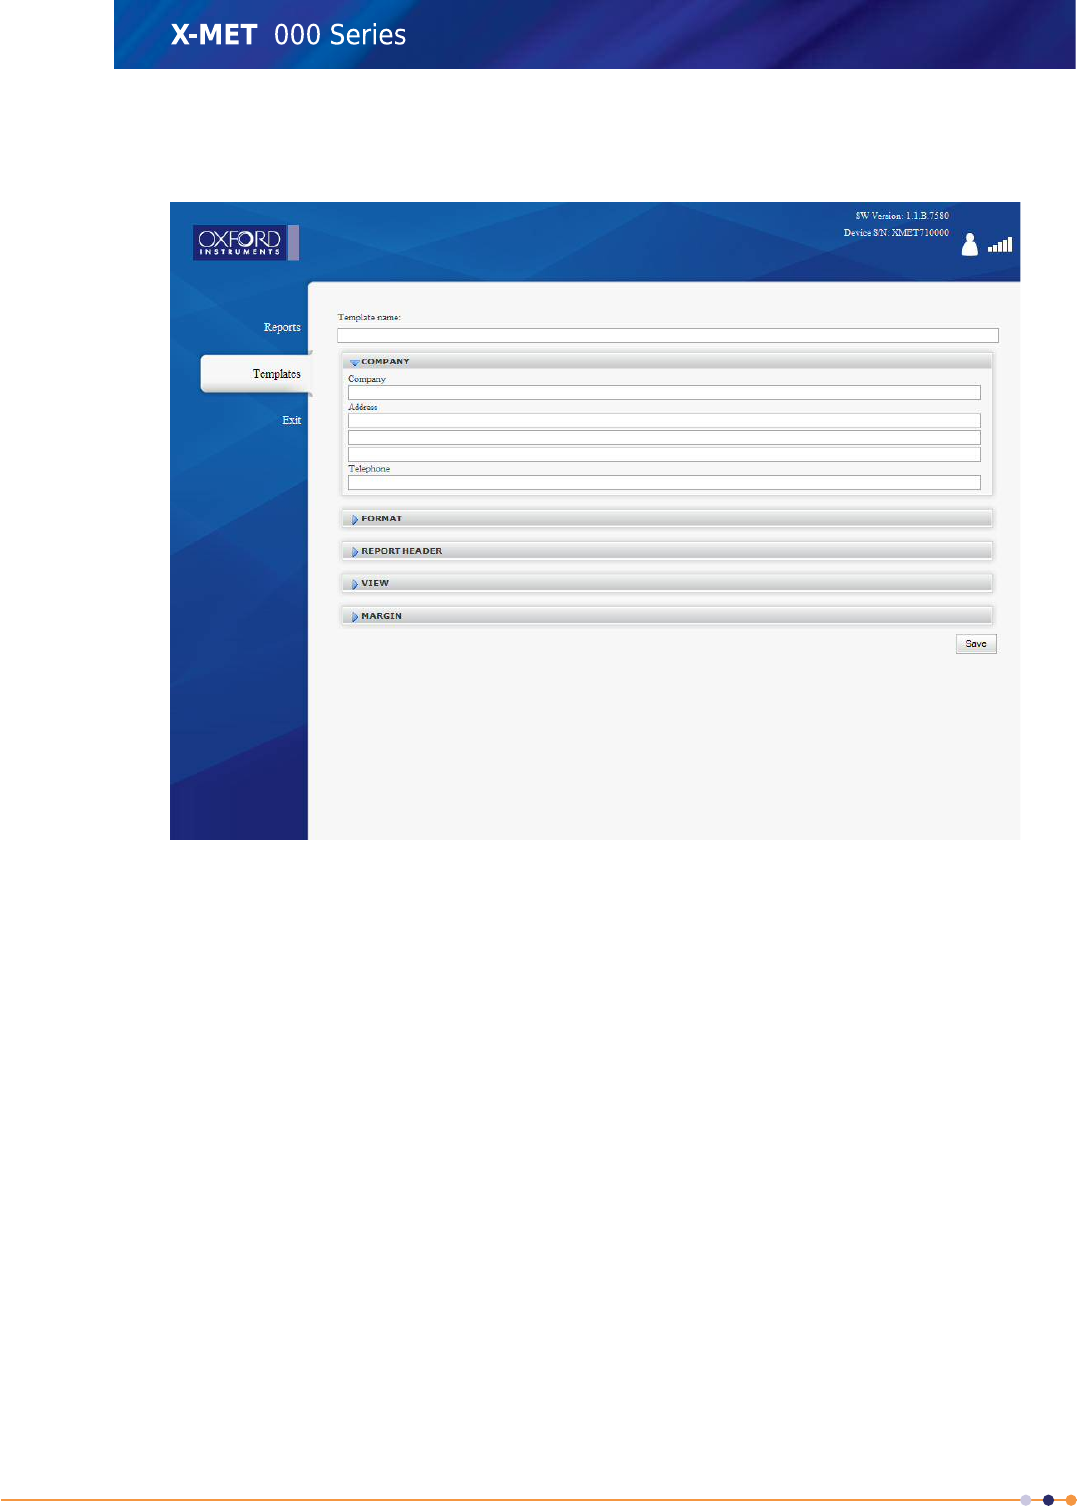
4. Click Company.
The Company pane appears.
5. Enter the company information into the applicable text box.
6. Click Company to close the Company pane.
210
X-MET8000 Series User Manual
8
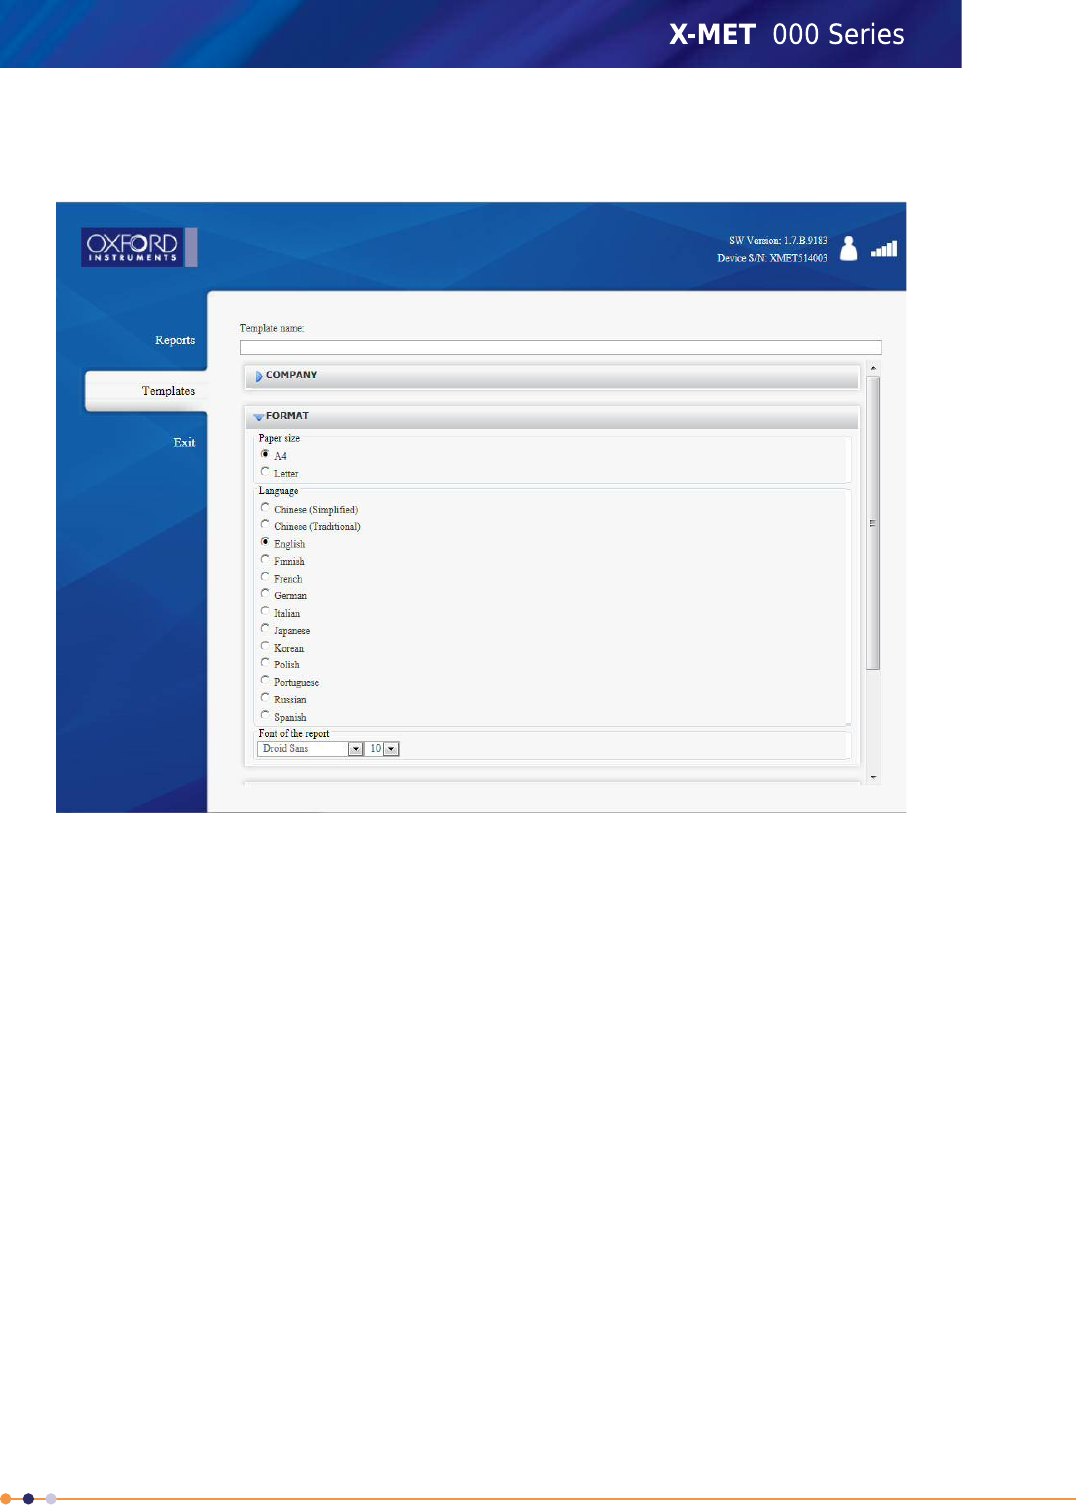
7. Click Format.
The Format pane appears.
8. Click the applicable Page Size, select a Language and choose a Font from the drop down list.
Droid Sans Fallback font should be used for Chinese , Japanese and Korean languages.
9. Click Format to close the Format pane.
211
X-MET8000 Series User Manual
8
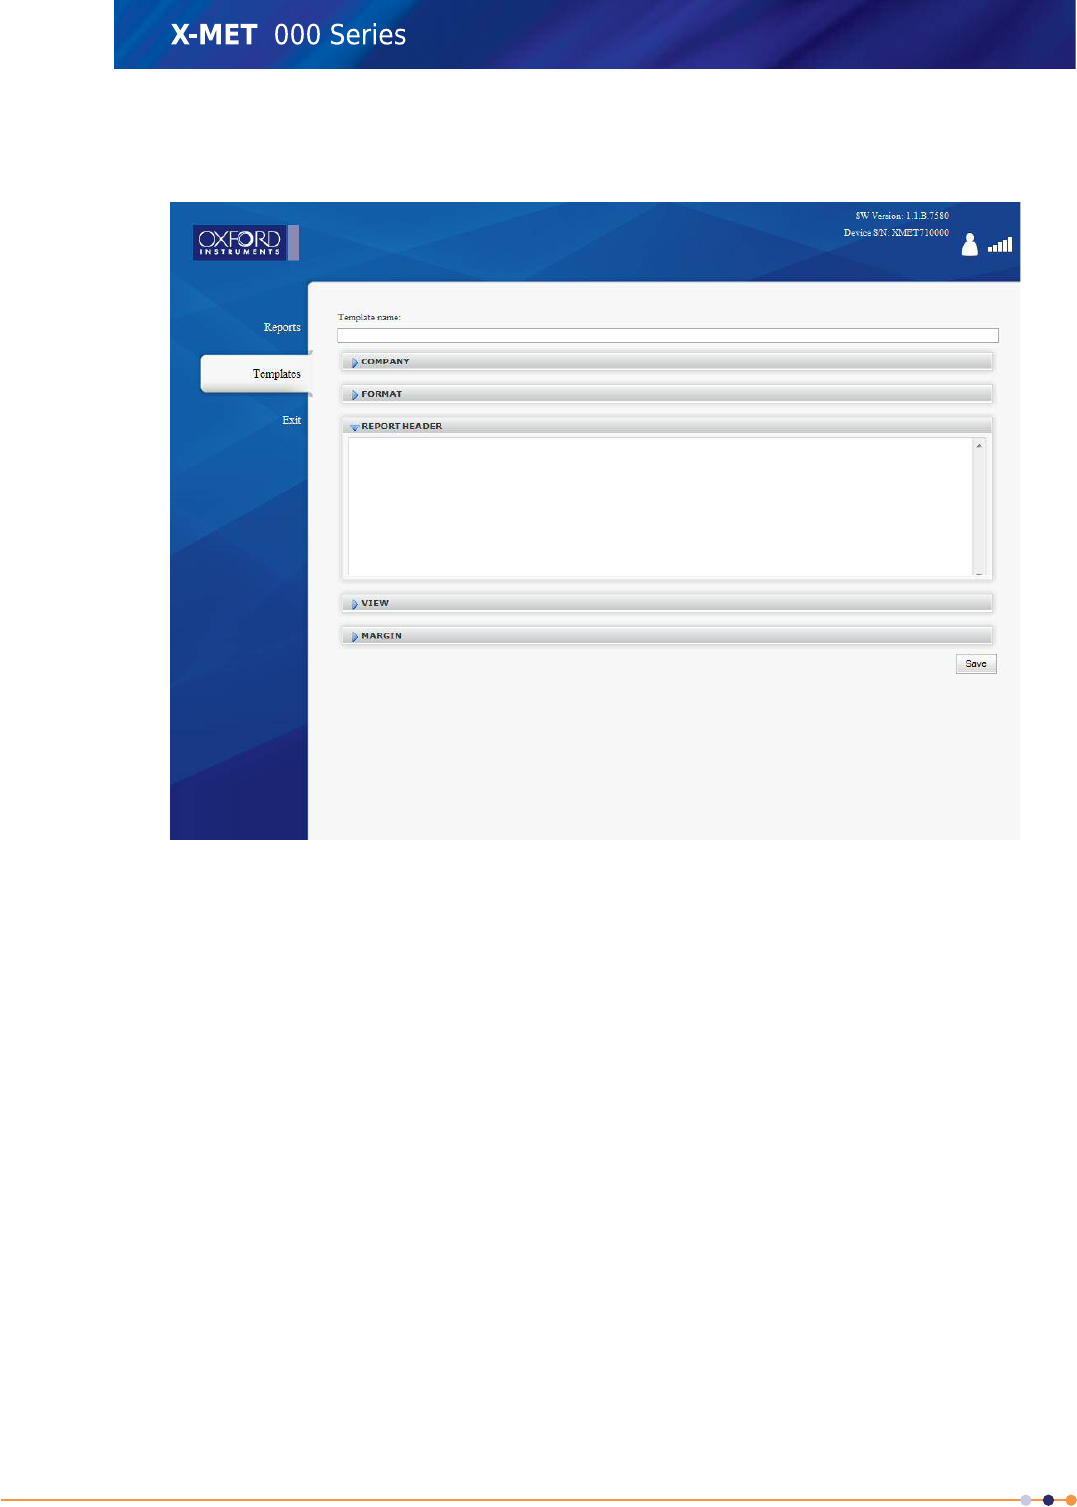
10. Click Report Header.
The Report Header pane appears.
11. Type the report header into the text box.
12. Click Report Header to close the Report Header pane.
212
X-MET8000 Series User Manual
8
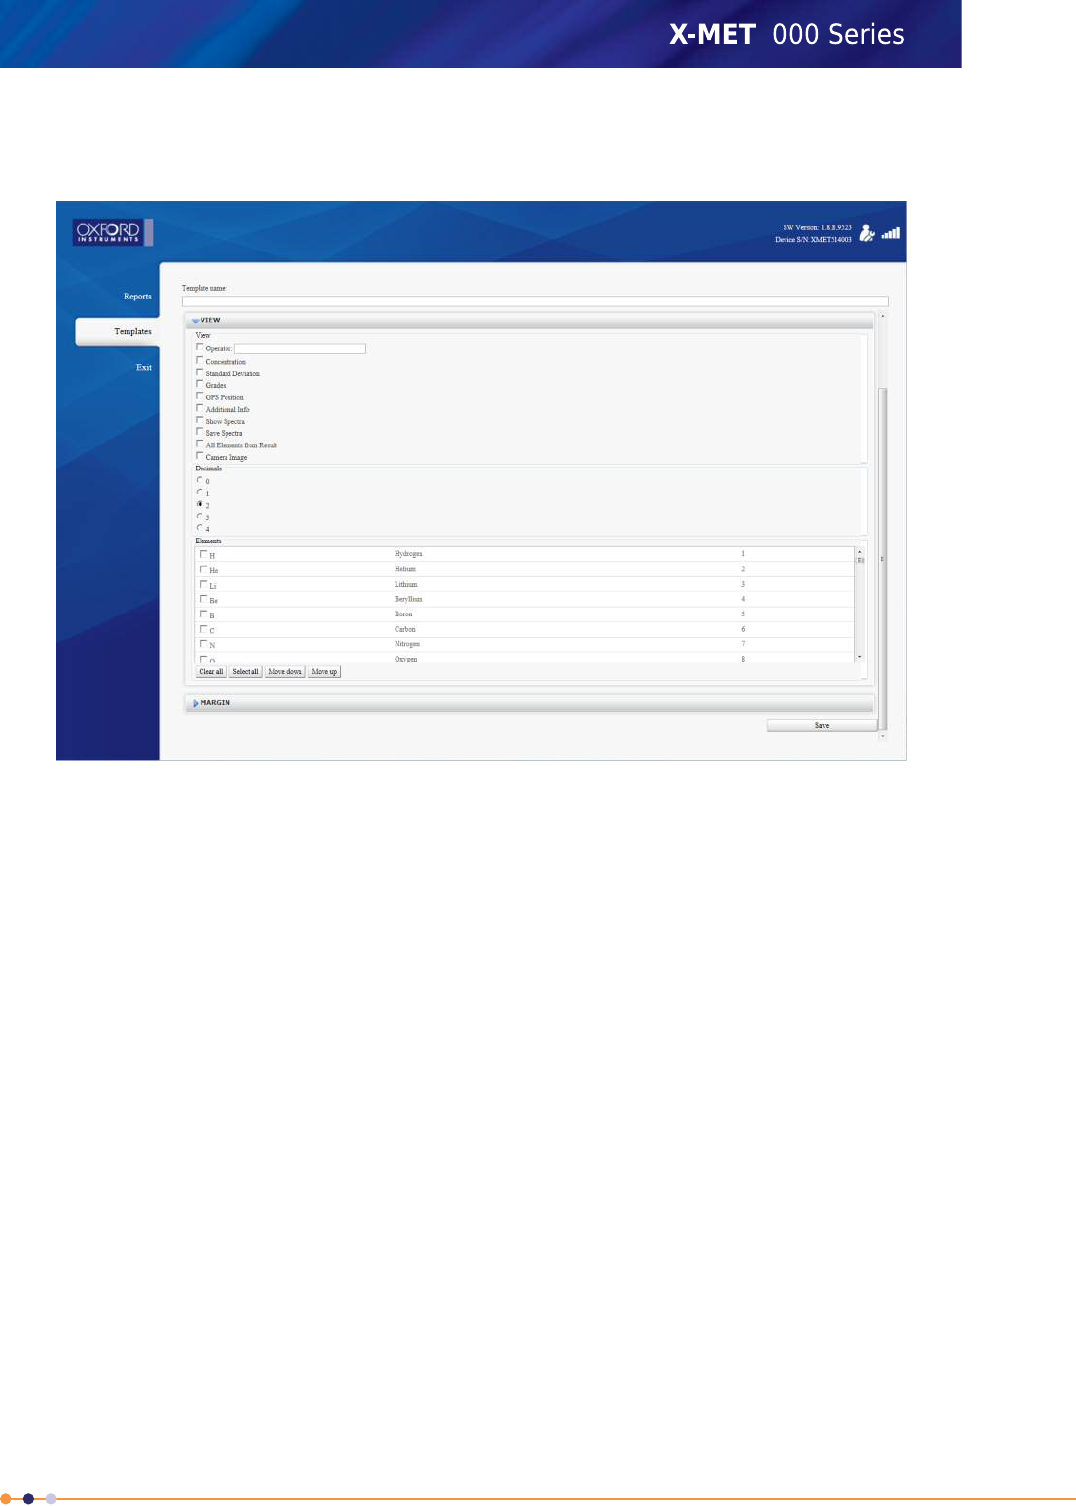
13. Click View.
The View pane appears.
14. Click the applicable tick box to select the items to appear on the report.
15. Type the operator information into the Operator text box.
16. Select the number of decimal places for the element concentrations from Decimals.
17. Click the applicable tick box to select the elements to appear on the report. The order in which the
elements appear in the report can be changed by selecting Move Down and Move Up buttons.
18. Click View to close the View pane.
213
X-MET8000 Series User Manual
8
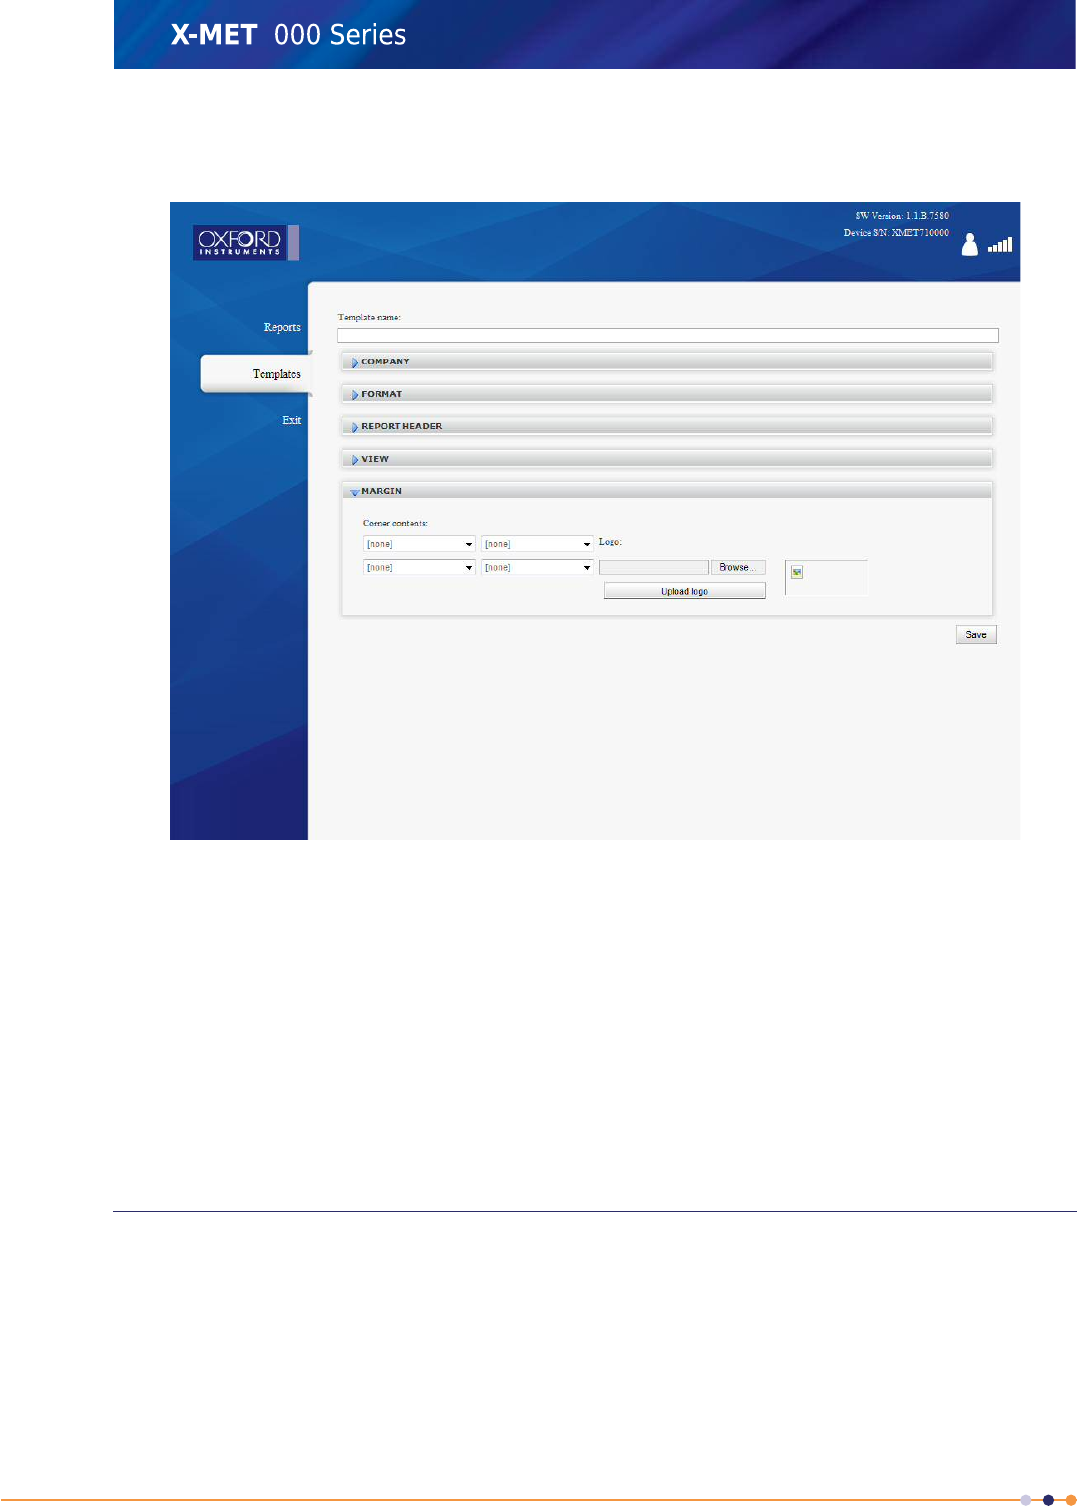
19. Click Margin.
The Margin pane appears.
20. Click the applicable Corner Contents drop down list to choose the item to appear in that corner
of the report.
21. To upload a logo file, do the following:
a) Click Browse to search for the file on the PC.
b) Click Upload Logo to upload the logo.
The logo file appears on the Margin pane.
22. Click Margin to close the Margin pane.
23. When the report template is complete, click Save to save it and return to the Templates screen.
24. Click Exit to return to the PC main screen.
Software Installation
No application specific software is required to use a PC with the X-MET8000 series. An Internet browser
is the only software requirement to control the X-MET8000 series. However, a software driver is
required for a PC operating system to control an application through a USB interface.
Software driver requirements by operating system:
•Windows XP: the USB memory device contains driver software to install, and a Microsoft Hotfix is
available.
214
X-MET8000 Series User Manual
8
•Windows Vista and Windows 7: driver software loads automatically through Plug and Play.
•Linux and Mac OS X: driver software is part of the operating system.
Installation On Windows XP
Driver software does not load automatically. Follow these steps to install the driver software. It is
necessary to have administrator privileges to install driver software.
A Hotfix is available from Microsoft to make sure that the USB interface operates correctly:
http://support.microsoft.com/kb/959765.
1. Plug the USB memory device with the driver software into the PC.
2. Connect the X-MET8000 series to the PC. Refer to Connect To A PC And Login on page 40.
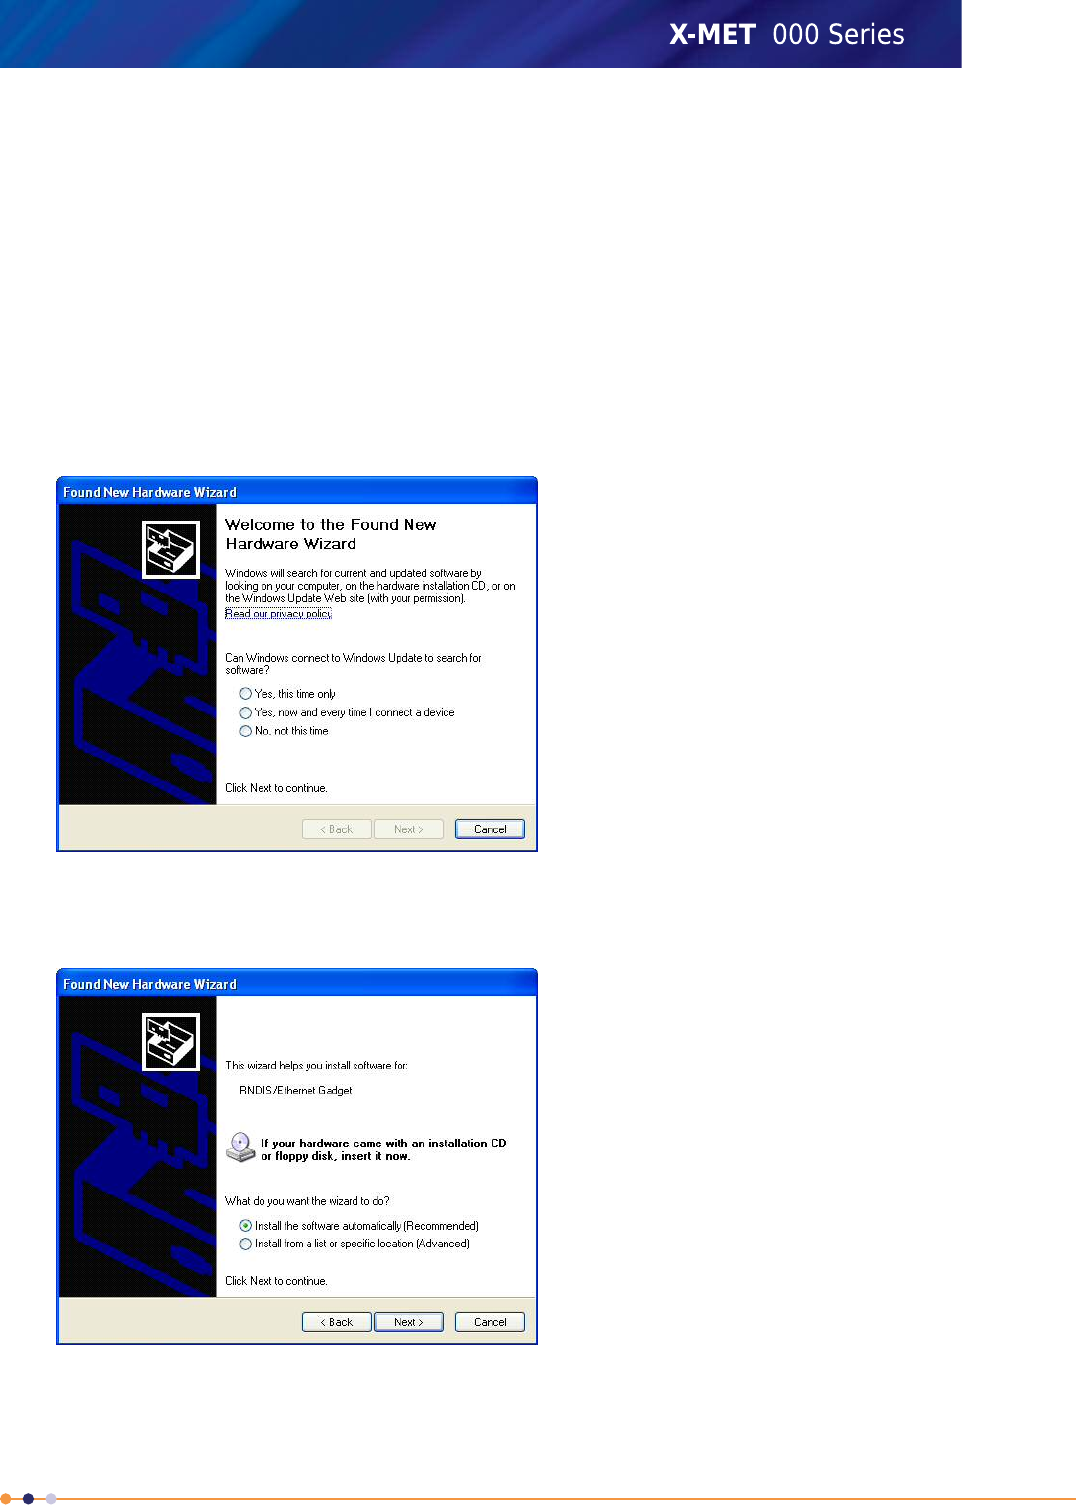
The Found New Hardware Wizard screen appears.
3. Click No, not this time, and then click Next.
The Found New Hardware Wizard screen changes.
215
X-MET8000 Series User Manual
8
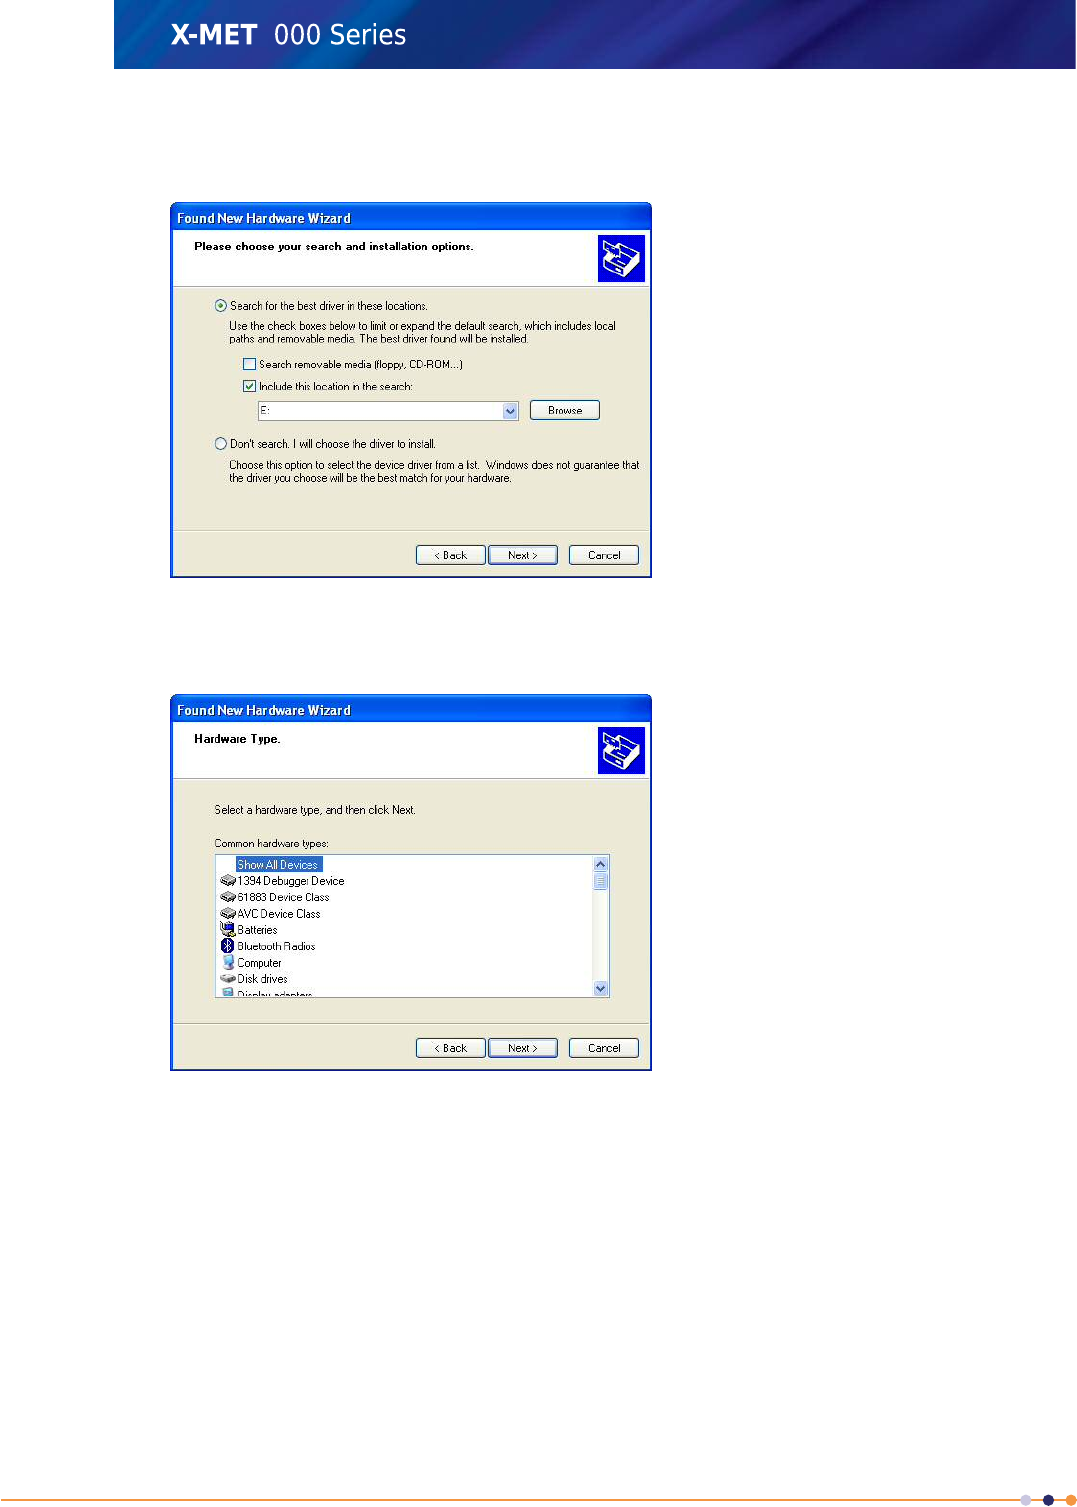
4. Click Install from a list or specific location (Advanced), and then click Next.
The Found New Hardware Wizard screen changes.
5. Click Don’t search. I will choose the driver to install., and then click Next.
The Found New Hardware Wizard screen changes.
216
X-MET8000 Series User Manual
8
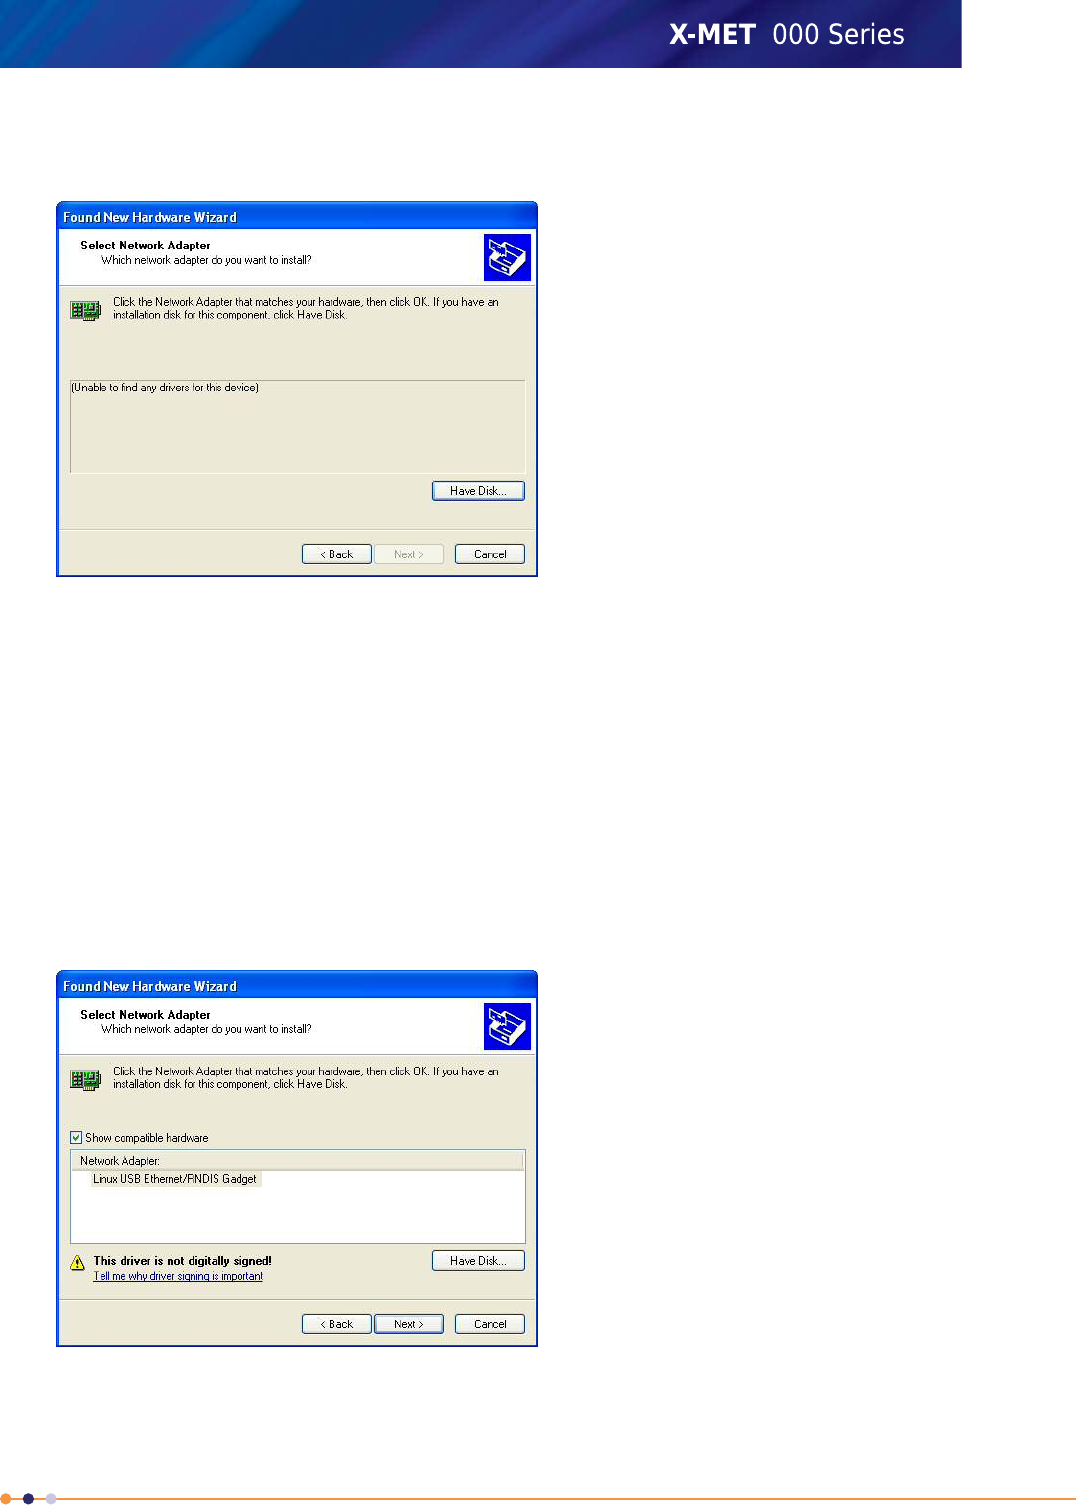
6. Click Network adapters, and then click Next.
The Found New Hardware Wizard screen changes.
7. Click Have Disk..., and then click Next.
An Install From Disk dialog box appears.
8. Click Browse....
An Install From Disk dialog box appears.
9. Select the USB memory device drive from the Locate File dialog box.
10. Select one of the following, as applicable for the operating system:
•Windows XP 32 driver
•Windows XP 64 driver
11. Click Open to return to the Install From Disk dialog box.
12. Click OK to return to the Found New Hardware Wizard screen.
217
X-MET8000 Series User Manual
8
13. Click Next.
A Hardware Installation dialog box appears.
14. Click Continue Anyway to install the driver software.
15. Click Finish to close the Found New Hardware Wizard screen when installation is complete.
Installation On Windows 7 And Windows Vista
Driver software loads automatically. Follow these steps to install the driver software if it fails to install
correctly. It is necessary to have administrator privileges to install driver software. This procedure is
for Windows 7, but Windows Vista is similar.
1. Connect the X-MET8000 series to the PC. Refer to Connect To A PC And Login on page 40.
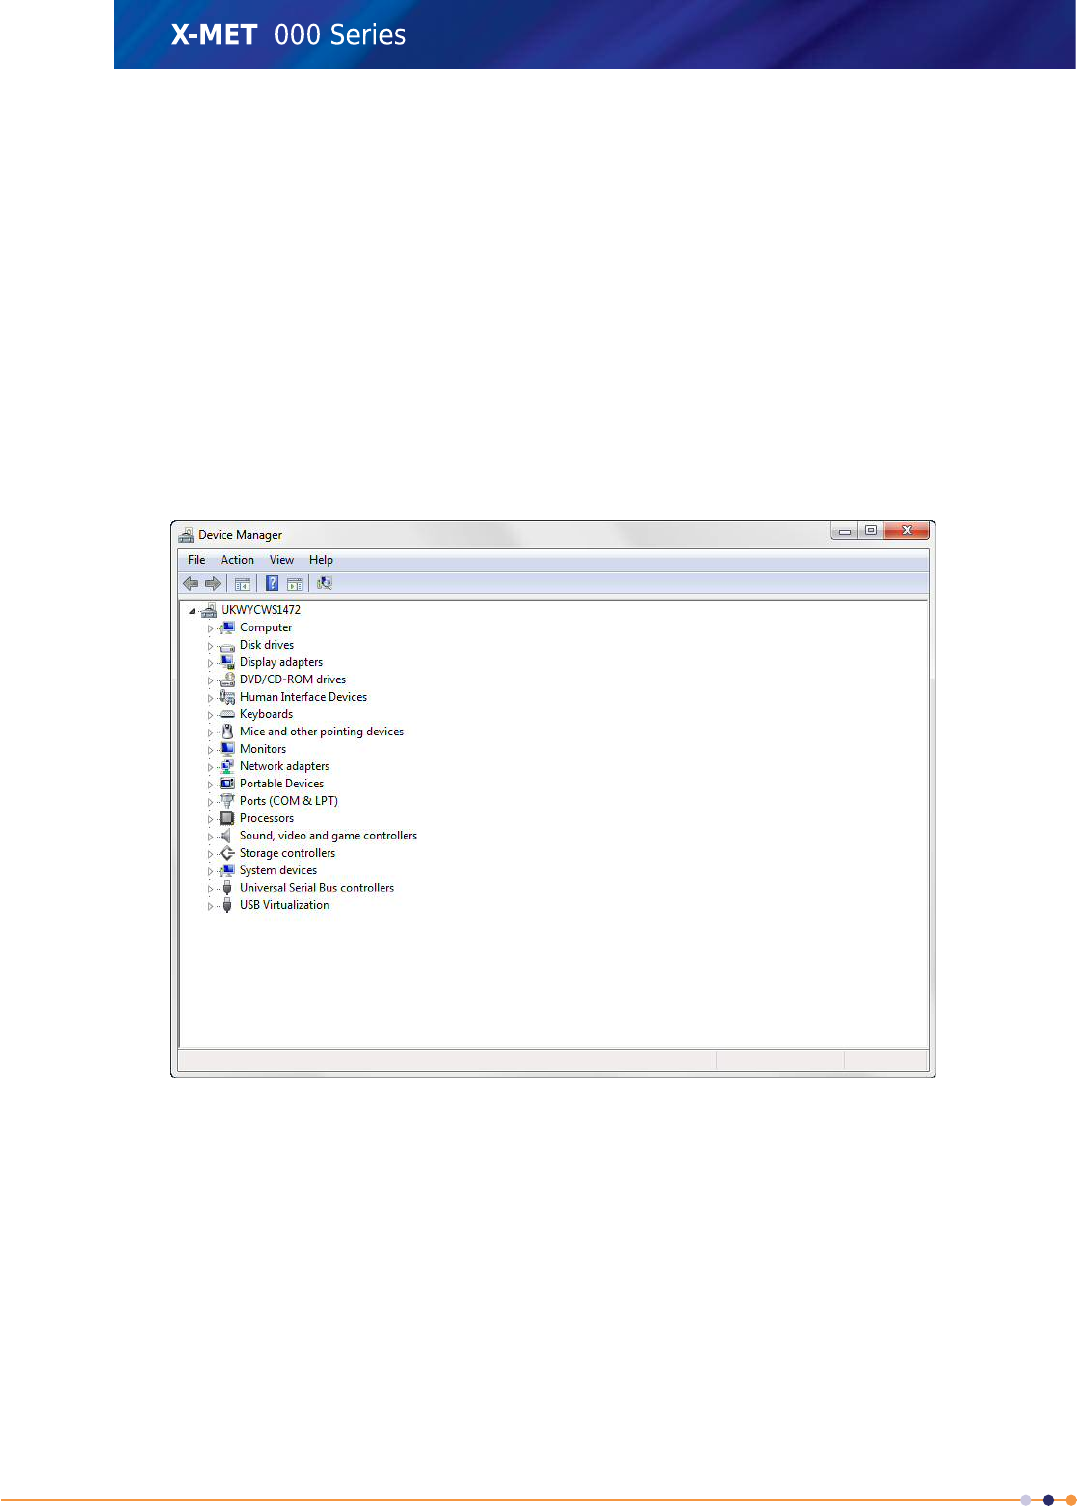
2. Navigate: Start >Control Panel >System and Security >System: Device Manager .
The Device Manager screen appears.
218
X-MET8000 Series User Manual
8
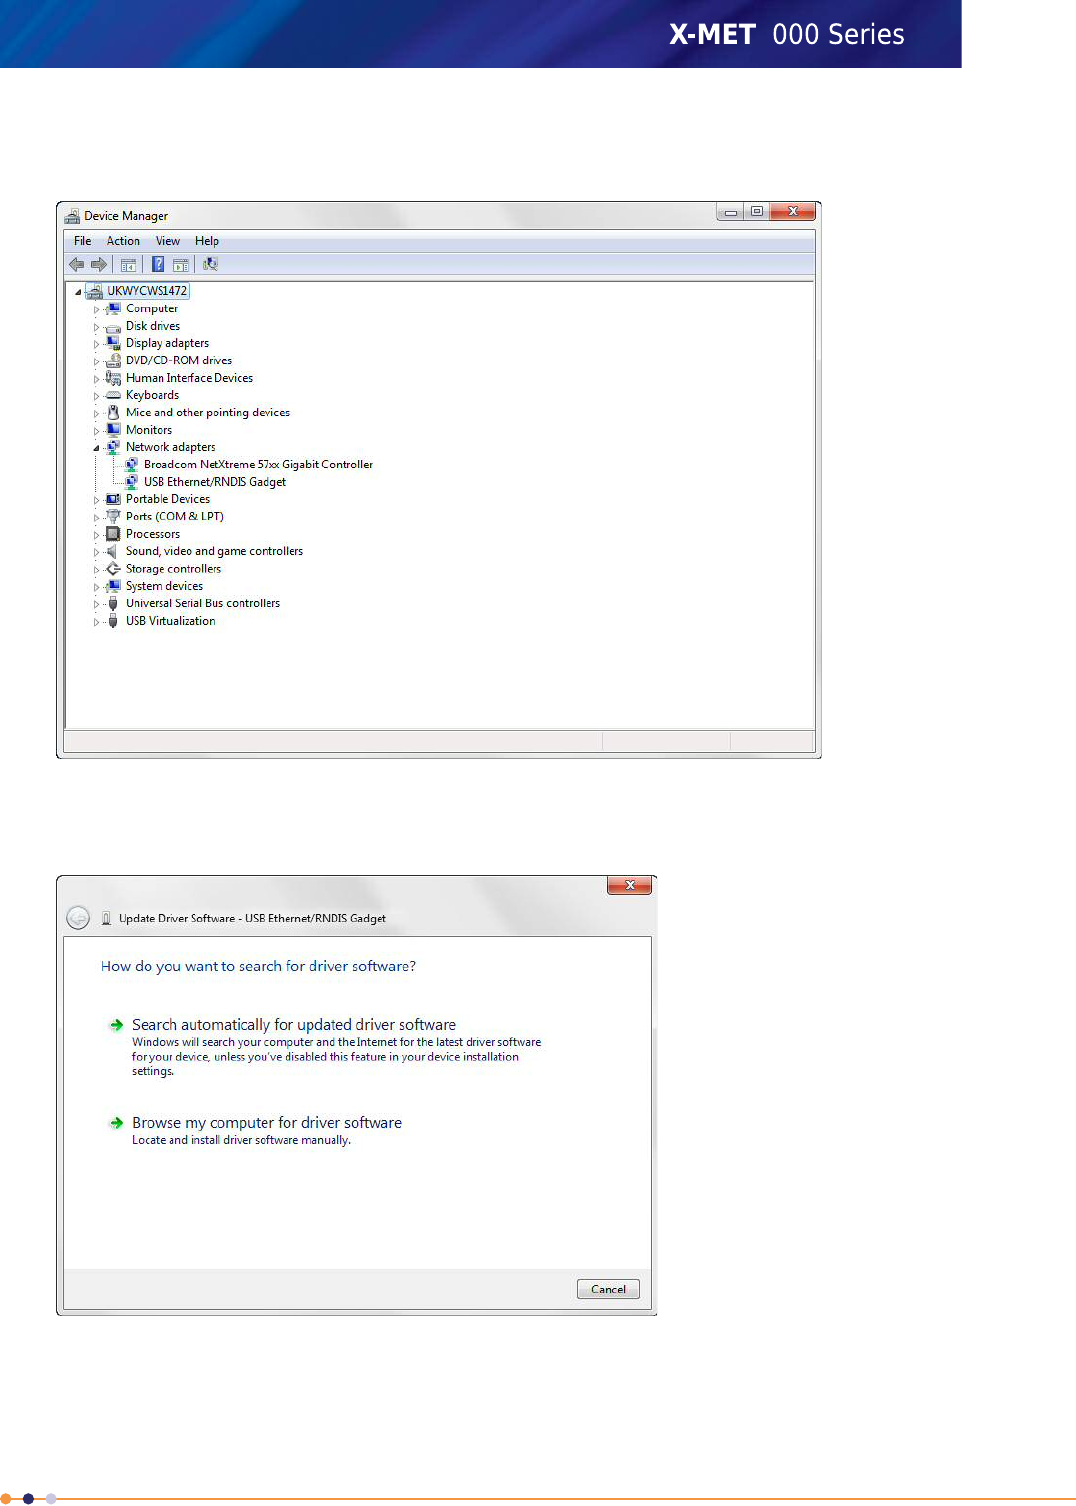
3. Navigate: Network adapters >USB Ethernet/RNDIS Gadget .
The Device Manager screen shows the USB Ethernet/RNDIS Gadget adapter.
4. Navigate: Action >Update Driver Software... .
The Update Driver Software screen appears.
219
X-MET8000 Series User Manual
8
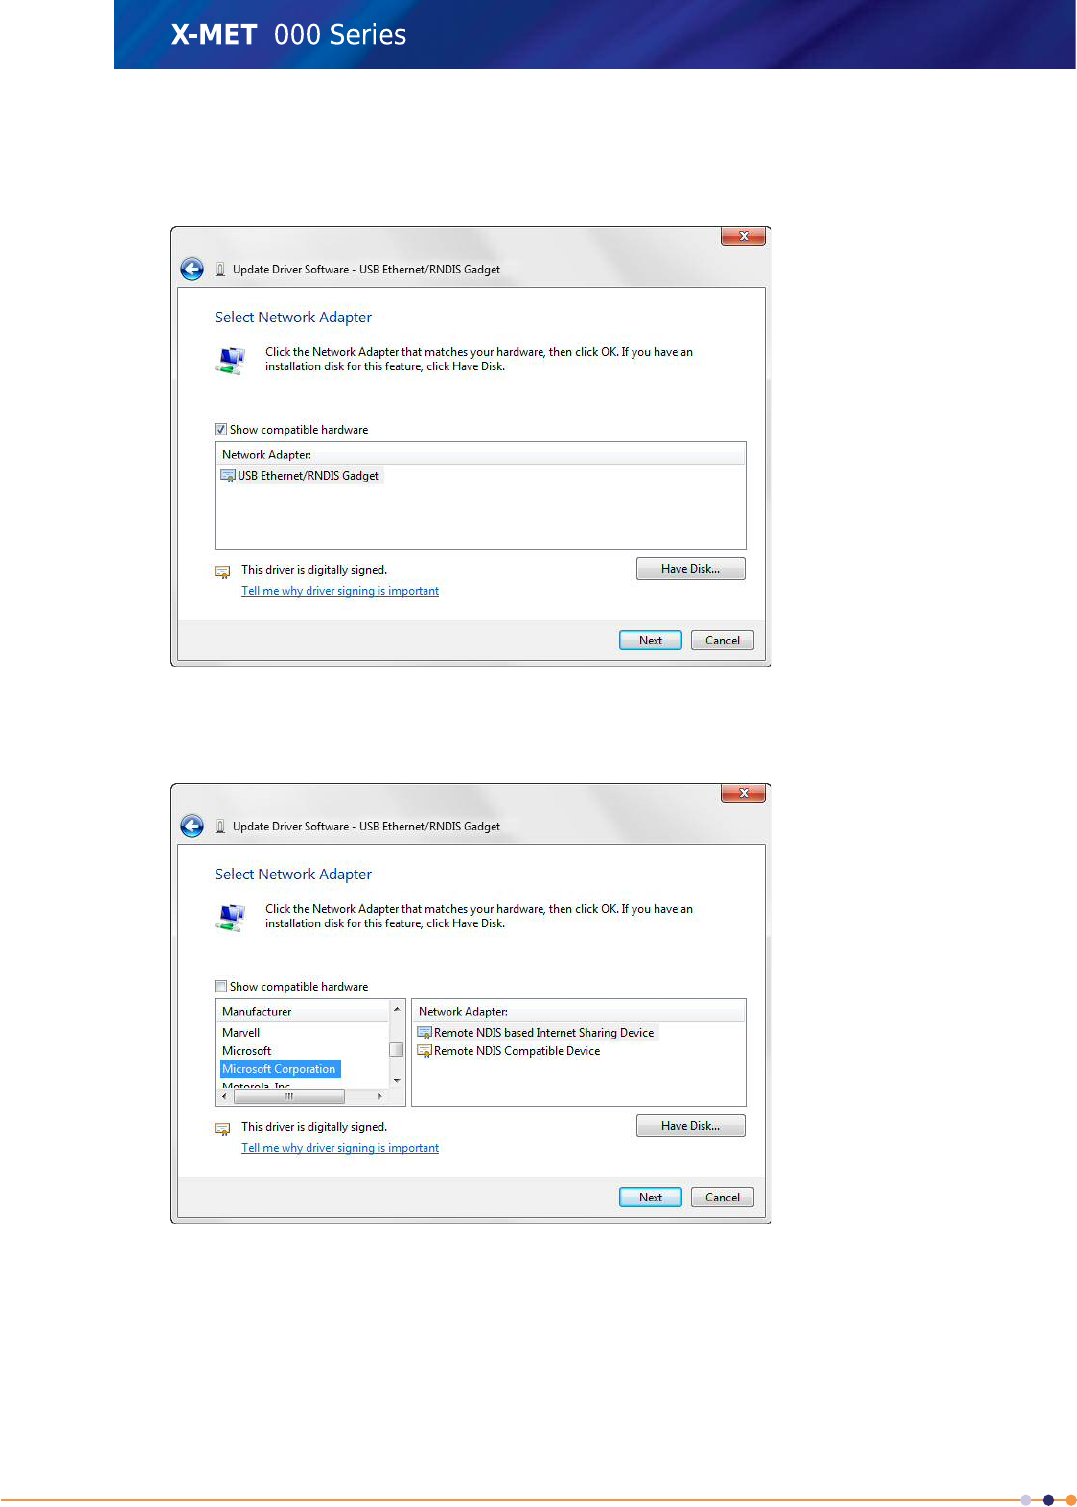
5. Navigate: Browse my computer for driver software >Let me pick from a list of device
drivers on my computer .
The Update Driver Software screen changes.
6. Click Show compatible hardware to deselect it.
The Update Driver Software screen shows the available network adapters.
7. Navigate: Microsoft Corporation >Remote NDIS Compatible Device , and then click Next.
An Update Driver Warning dialog box appears.
8. Click Yes to install the driver software.
9. Click Close to close the Update Driver Software screen when installation is complete.
220
X-MET8000 Series User Manual
8
Operation With A GPS
Using a GPS receiver in combination with the X-MET8000 Series can significantly improve the quality
of the collected data by providing easy to use location information stored with the sample data.
The X-MET8000 Series has an internal GPS receiver that provides location information, optionally a
consumer grade Bluetooth GPS like the Nokia LD-3W can be used to add location information to the
X-MET8000 Series measurement data.
Using a Trimble handheld Trimble Field Computer with GPS and Trimble®TerraSync™software or
equivalent to store geographical features, positions, and attribute data the X-MET8000 Series can be
used for accurate and reliable GIS.
A GPS receiver calculates its position by precisely timing the signals sent by GPS satellites high above
the Earth. Each satellite continually transmits messages that include the time the message was
transmitted and the satellite position at time of message transmission The receiver uses the messages
it receives to determine the transit time of each message and computes the distance to each satellite
this information is then used to compute the location of the GPS receiver. In typical GPS operation,
four or more satellites must be visible to obtain an accurate result.
Bluetooth
Bluetooth is a short-range wireless communication technology. Devices with Bluetooth capabilities
can exchange information over a distance of up to 30 feet (10 meters), without requiring a physical
connection.
X-MET8000 series Internal GPS
The X-MET8000 series is equipped with an internal GPS receiver.
The internal GPS receiver complements the X-MET8000 series measurement data with location
information.
Location accuracy for the internal GPS device is typically 10 meters (30 feet).
The Internal GPS receiver concists of a integrated GPS/GLONAS chip.
Acquisition times are approximately 45s/2s (cold/hot start).
Nokia LD-3W Bluetooth GPS
The Nokia LD-3W Bluetooth GPS receiver complements the X-MET8000 series measurement data with
location information.
The use of an external Bluetooth GPS receiver can be feasible when operating in locations where the
X-MET8000 series might not get reliable satellite reception and the external GPS receiver can be
placed in a more favorable place.
Location accuracy for consumer GPS devices is typically 10 meters (30 feet).
The Nokia LD-3W consists of a Sirf Star III (High Sensitivity GPS microcontroller manufactured by SiRF
Technology), 20 parallel channels
Acquisition times are approximately 45s/2s (cold/hot start).
Minimum operating time for the Nokia LD-3W is 15h with a standby time of up to 7 days depending
on applications used and external conditions.
221
X-MET8000 Series User Manual
8

Trimble Field Computer and GPS
Using the X-MET8000 Series together with a Trimble Field Computer and Trimble®TerraSync™software
for fast and efficient field GIS data collection and maintenance where the X-MET8000 Series
measurements are linked to geographical features, positions, and attribute data.
Achieve decimeter (10 cm / 4 inch) accuracy using real-time or post processed H-Star technology
(dependent on H-Star-capable receiver and antenna combination used).
Can I use an external antenna with my Trimble Nomad 900 series?
The Trimble Nomad 900 series does not have an external antenna option. The device is designed to
achieve 2 to 4 meter (HRMS, Horizontal Root Mean Square) accuracy with the integrated antenna,
with SBAS (Satellite Based Augmentation Systems) corrections. If higher accuracy is required, you
can use the optional Trimble Nomad 900 series Serial Boot accessory to connect an external GPS
receiver via 9-Pin RS-232 Serial data connection. Many newer high-accuracy GPS receivers also offer
a Bluetooth connectivity option.
How do I use the Trimble Nomad 900 series to ensure best GPS performance?
When collecting point features or vertices (corners or intersections of geometric shapes), Trimble
recommends that you log GPS data for at least 30 seconds, using a 1-second logging rate. Collecting
multiple positions for a static feature help to improve accuracy by averaging out the errors in individual
GPS positions. In heavy canopy, or other difficult environments, logging for 1–2 minutes is
recommended. Pausing briefly (5–10seconds) before logging a point feature or vertex also help to get
the best performance from the receiver. This allows you to ensure that the internal GPS receiver is
horizontal and correctly located over the feature you are mapping, and allows the computed position
to settle and not be influenced by the recent movement of the handheld. Turning off A-GPS (Assisted
Global Positioning System) will also increase GPS accuracy, but will increase time-to-fix (see the product
user manual for details).
How does the Trimble Nomad 900 series perform in harsh GPS conditions?
•The Trimble Nomad 900 series can track all available GPS satellites. This allows you to get the best
results when you work in many different environments, without having to adjust the GPS mask
settings. The receiver performs well in harsh GPS environments, such as under heavy canopy and
in urban areas.
•SiRFInstantFixII (satellite prediction technology) is embedded in the firmware of all Trimble Nomad
900 series units. This technology provides satellite orbit prediction info if Signal to Noise Ratio
(SNR) is 28 or lower resulting in more satellites tracked, faster Time to First Fix, and improved
performance in canyons and under canopy.
Major Differences Internal GPS vs. Nokia LD-3W vs. Trimble Field Computer
The internal GPS receiver is compairable to a consumer level GPS receiver and integrated in the
X-MET8000 Series device.
The Nokia LD-3W is a consumer level Bluetooth GPS receiver that complements the X-MET8000 Series
measurement data with location information.
Location accuracy of a consumer GPS is typically 10 meters (30 feet).
For more accurate location data use the X-MET8000 Series in combination with a Trimble Field Computer
and Trimble®TerraSync™software for fast and efficient field GIS data collection and maintenance
where the X-MET8000 Series measurements are linked to geographical features, positions, and attribute
data.
222
X-MET8000 Series User Manual
8
Achieve decimeter (10 cm / 4 inch) accuracy using real-time or post processed H-Star technology
(dependent on H-Star-capable receiver and antenna combination used)
Setup and use the Internal GPS
Setup the X-MET8000 series for use with the internal GPS receiver to add location information to the
measurements.
Enable Internal GPS ***DRAFT***
Follow these steps to enable the internal GPS receiver.
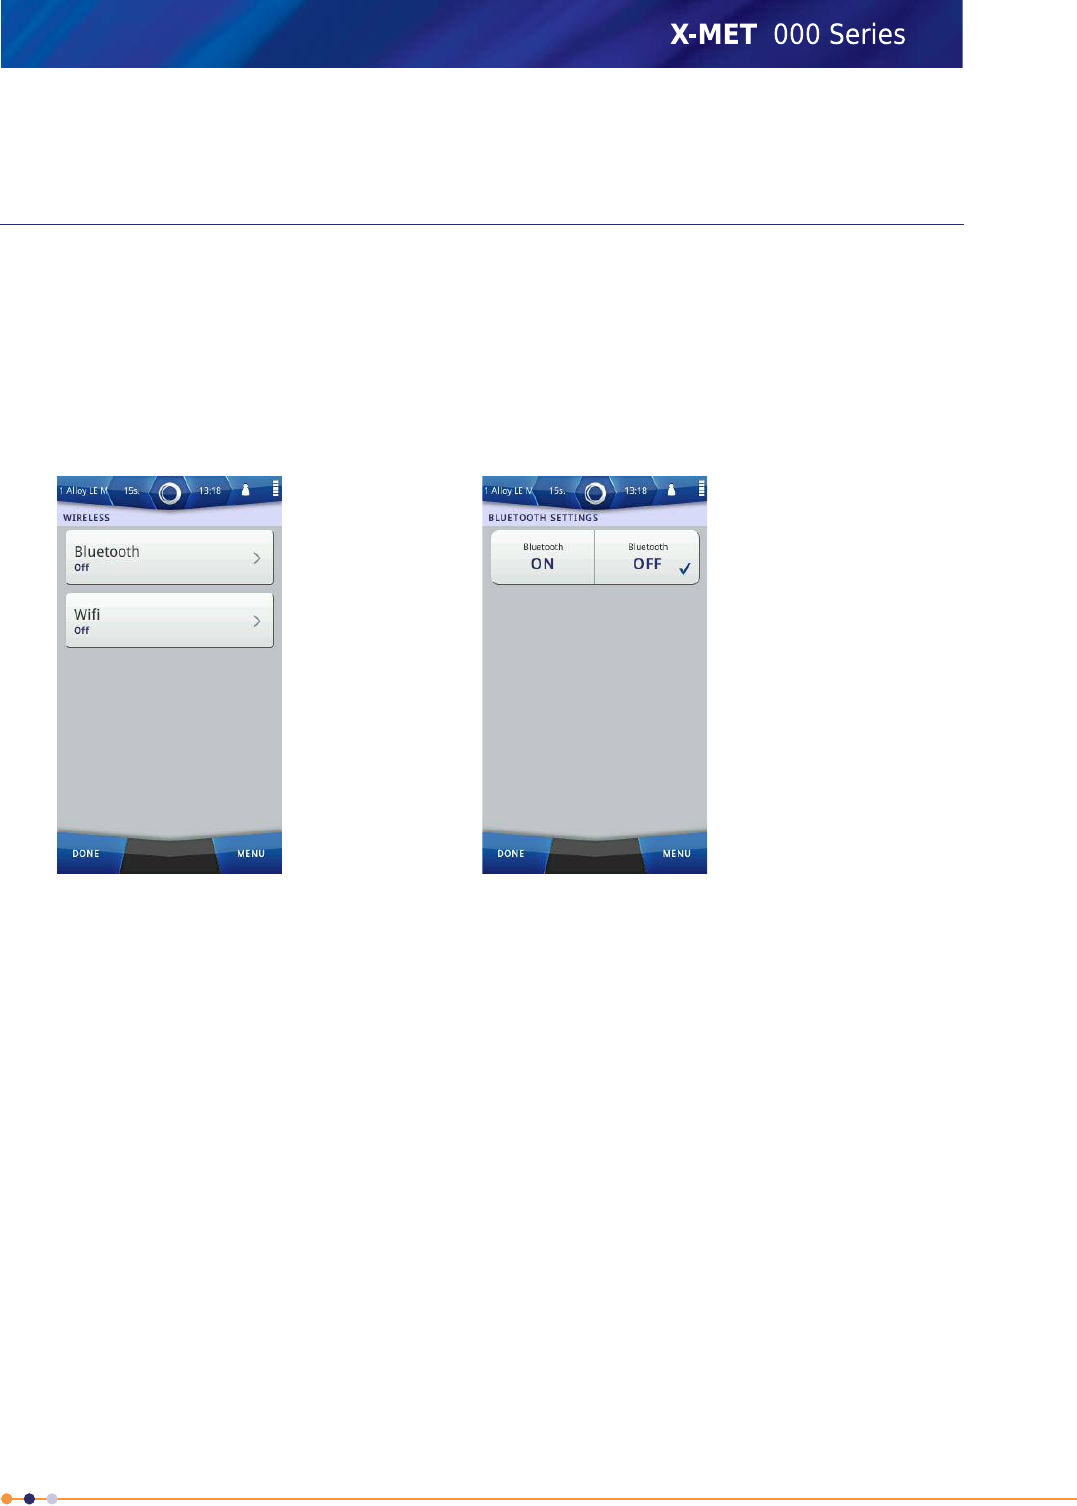
1. Navigate: Status Bar >Wireless .
The Wireless screen appears.
2. Tap GPS.
The GPS screen appears.
223
X-MET8000 Series User Manual
8
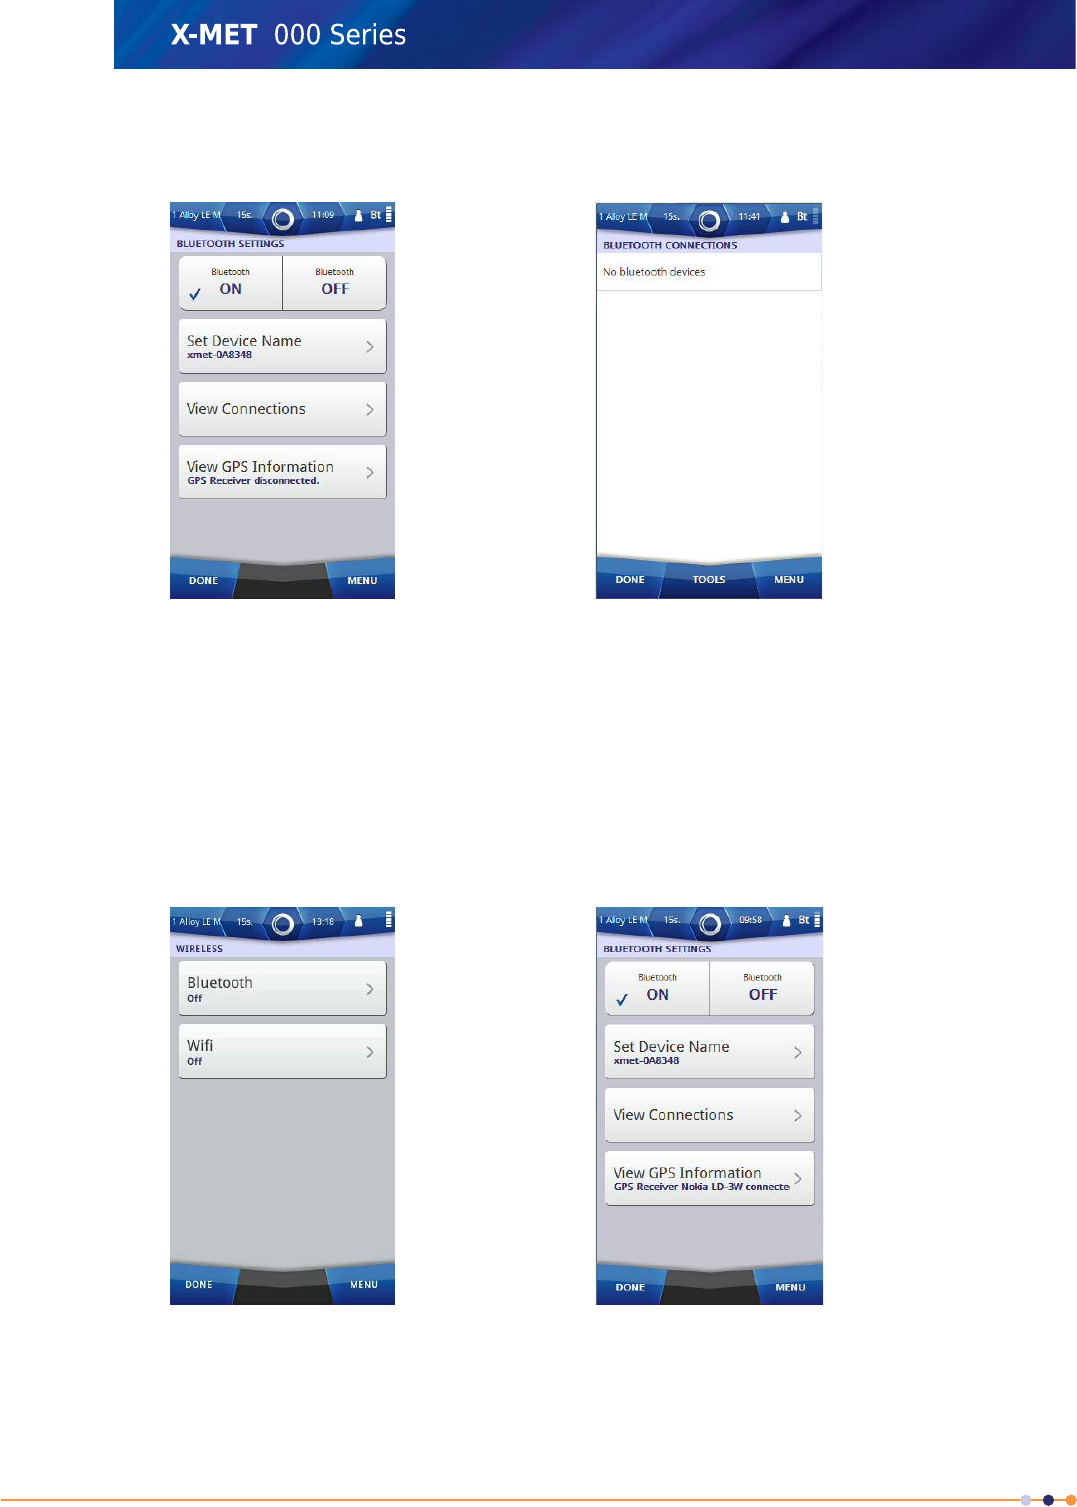
3. Tap the ON tick box.
The screen changes.
4. Tap Done to return to the wireless screen.
5. Tap Done twice again to return to the main screen.
Check GPS Information
Once a Bluetooth connection is made to the GPS receiver, it is possible to check the GPS position data
and satellite information. Follow these steps to check the GPS information.
1. Navigate: Status Bar >Wireless
The Wireless screen appears.
2. Tap Bluetooth.
The Bluetooth Settings screen appears.
224
X-MET8000 Series User Manual
8
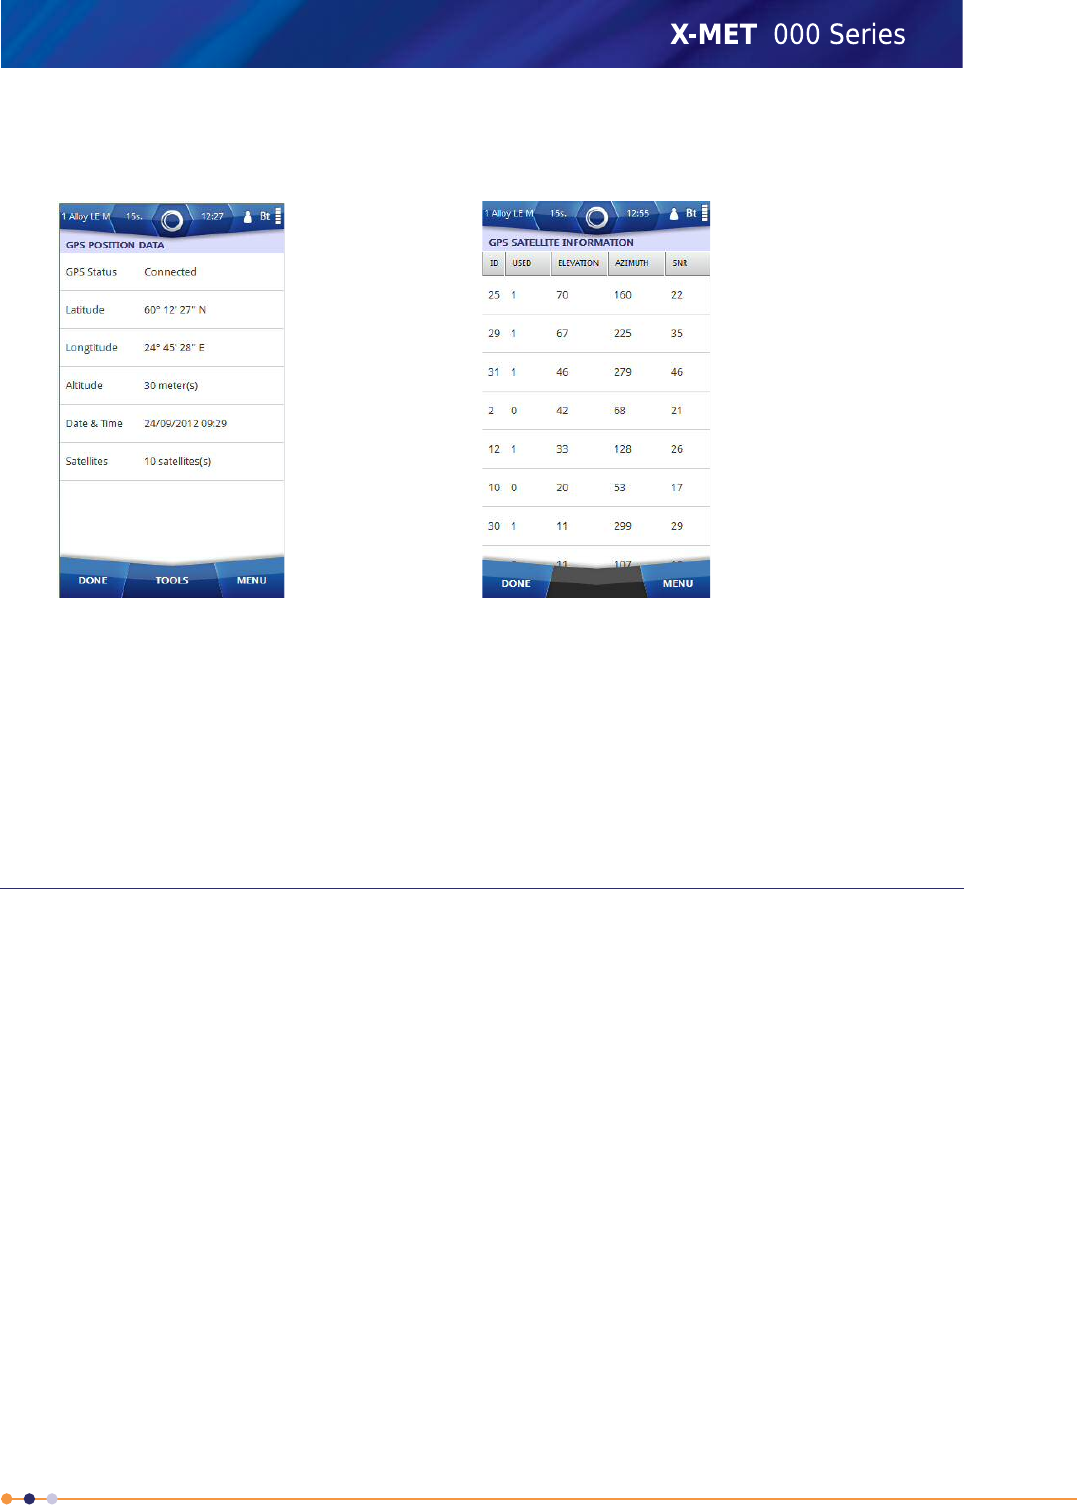
3. Tap View GPS Information.
The GPS Position Data screen appears.
4. Tap: Tools >Refresh Now to refresh the GPS Position Data.
5. Tap: Tools >View Satellites
The GPS Satellite Information screen appears.
6. Tap Done to return to the GPS Position Data screen.
7. Tap Done to return to the Bluetooth Settings screen.
8. Tap Done twice again to return to the main screen.
Setup and use the Nokia LD-3W Bluetooth GPS
Setup the X-MET8000 series for use with the Nokia LD-3W Bluetooth GPS receiver to add location
information to the measurements.
Install battery and charge Nokia LD-3W Bluetooth GPS
When using the Nokia LD-3W Bluetooth GPS receiver for the first time, install the battery in the Nokia
LD-3W and charge it before use.
Please refer to the Nokia LD-3W Bluetooth GPS Module Users Guide for further information.
Switch on the Nokia LD-3W Bluetooth GPS receiver
Switch on the Nokia LD-3W Bluetooth GPS receiver by pressing the power-key on the Nokia LD-3W
Bluetooth receiver for one second.
Please note that a GPS receiver will not get a fix on the location indoors.
225
X-MET8000 Series User Manual
8
Add Nokia LD-3W Bluetooth GPS Connection
Follow these steps to connect to a Nokia LD-3W Bluetooth GPS.
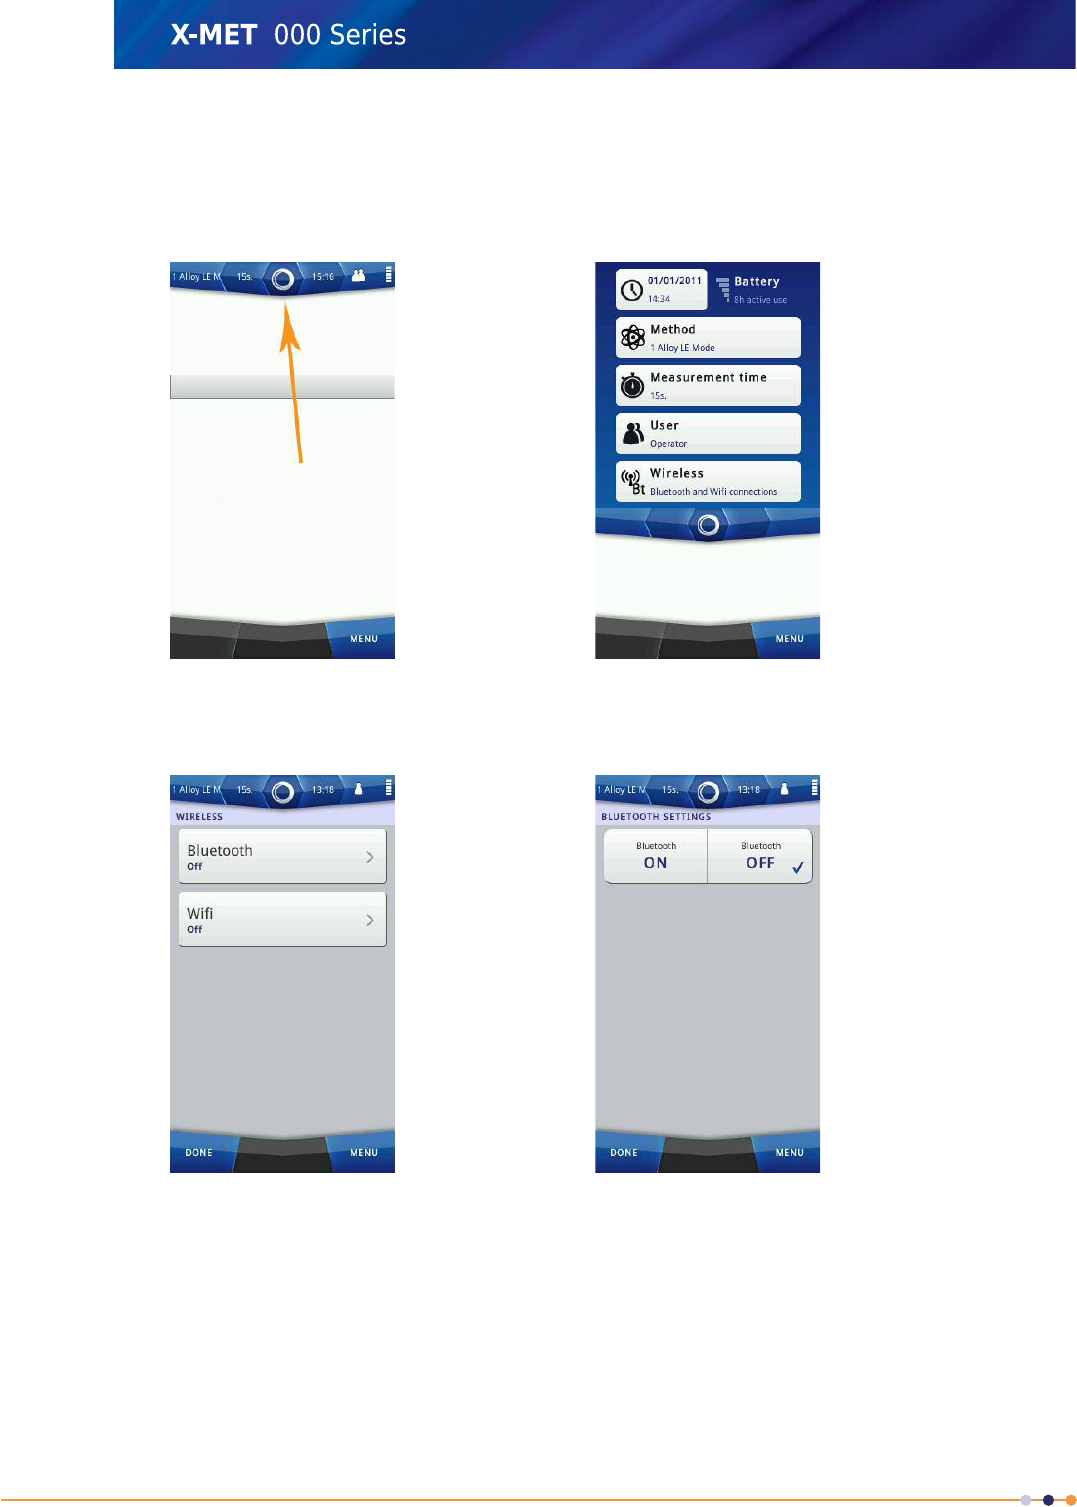
1. Navigate: Status Bar .
2. Navigate: Wireless .
The Wireless screen appears.
3. Tap Bluetooth.
The Bluetooth Settings screen appears.
226
X-MET8000 Series User Manual
8
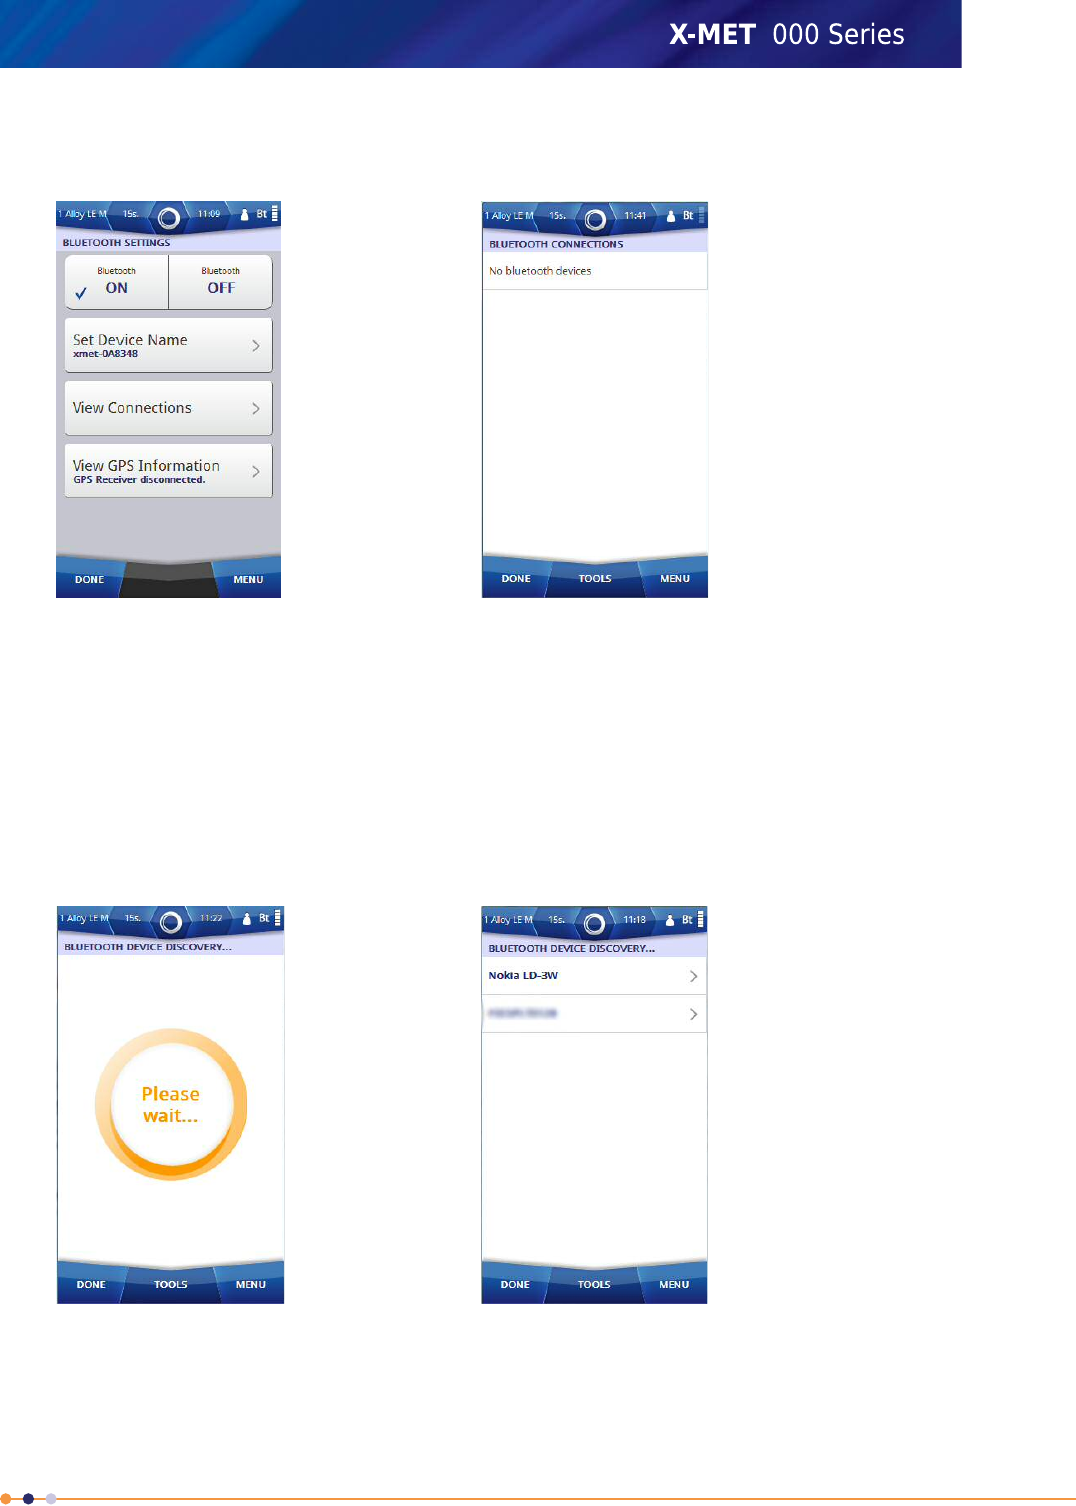
4. Tap the ON tick box.
The Bluetooth Settings screen changes.
5. Tap Set Device Name to give the X-MET8000 series a device name.
6. Use the virtual keyboard to type an applicable name, and then tap Done to return to the Bluetooth
Settings screen.
7. Tap View Connections.
The Bluetooth Connections screen appears.
8. Tap: Tools >Discover New Devices .
The Bluetooth Device Discovery screen appears, and a search for the Bluetooth devices begin.
When the search is complete, the screen shows the available Bluetooth devices.
9. If necessary, tap: Tools >Discover Again .
Another search for the Bluetooth devices begins, and the Bluetooth Device Discovery screen
updates.
227
X-MET8000 Series User Manual
8
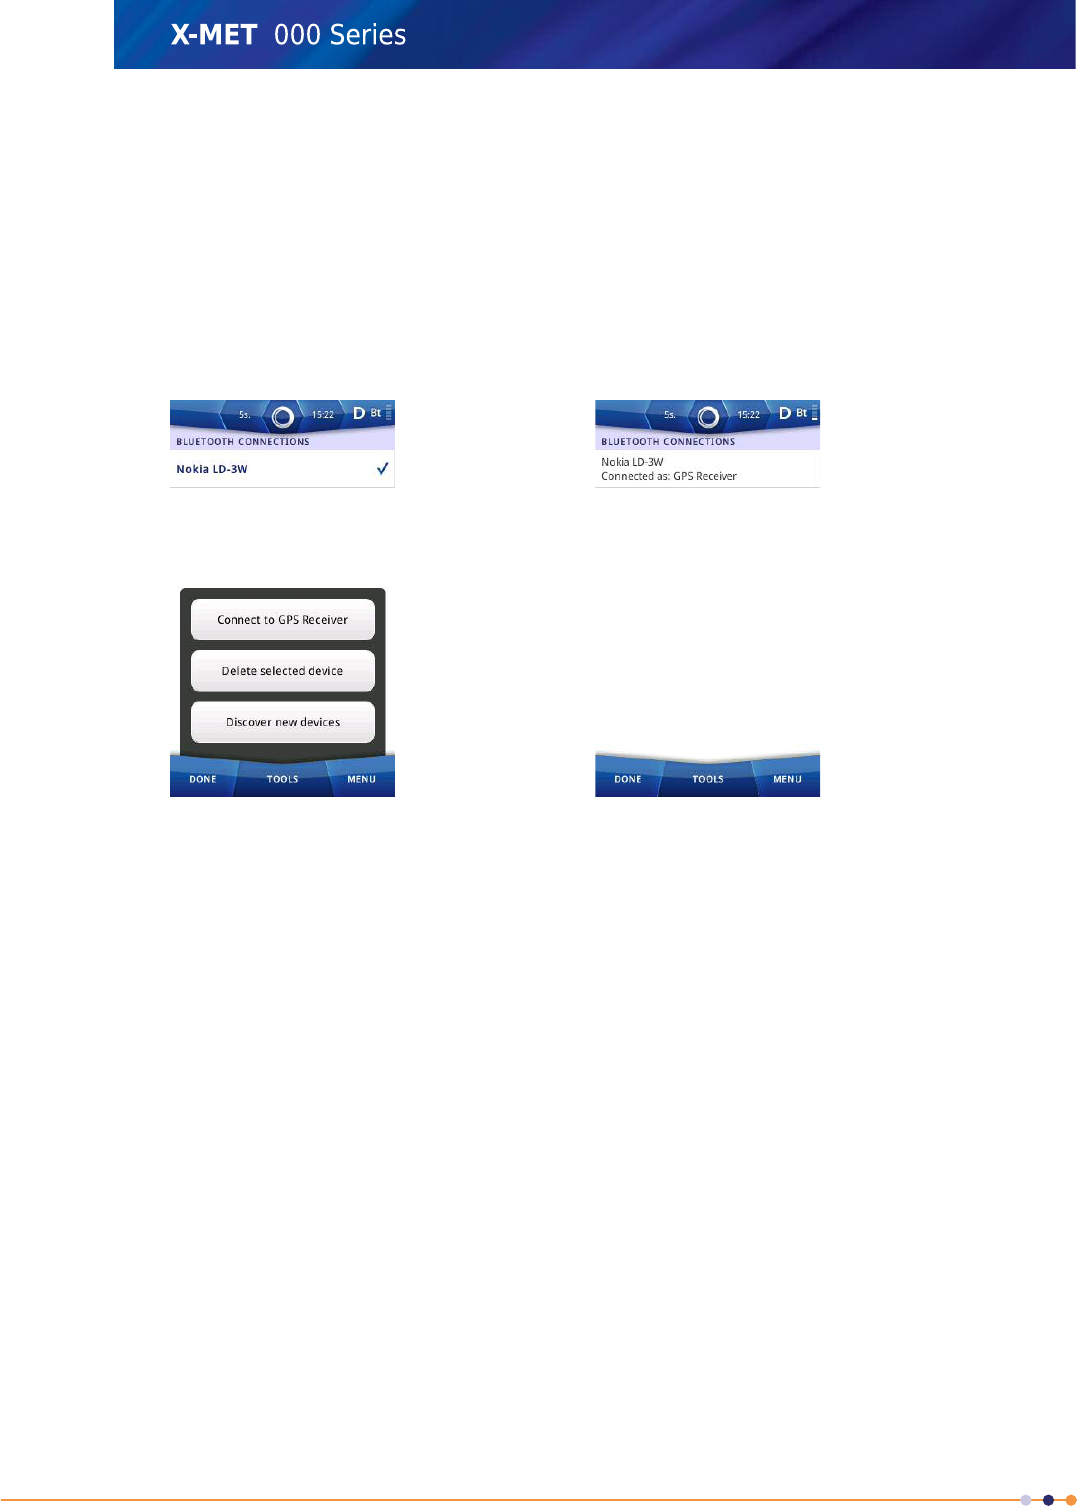
10. Tap on the discovered Nokia LD-3W Bluetooth device.
The Set Pin Code for Bluetooth Device screen appears.
11. Enter the correct Pin Code, for a Nokia LD-3W this is 0000.
12. Tap Done twice to return to the Bluetooth Connections screen.
The Nokia LD-3W Bluetooth device is added to the Bluetooth Connections screen.
13. Tap on the newly added Nokia LD-3W Bluetooth device and select Tools and choose Connect to
GPS Receiver.
The Bluetooth Connections screen updates.
14. Tap Done to return to the Bluetooth Settings screen.
15. Tap Done twice again to return to the main screen.
228
X-MET8000 Series User Manual
8
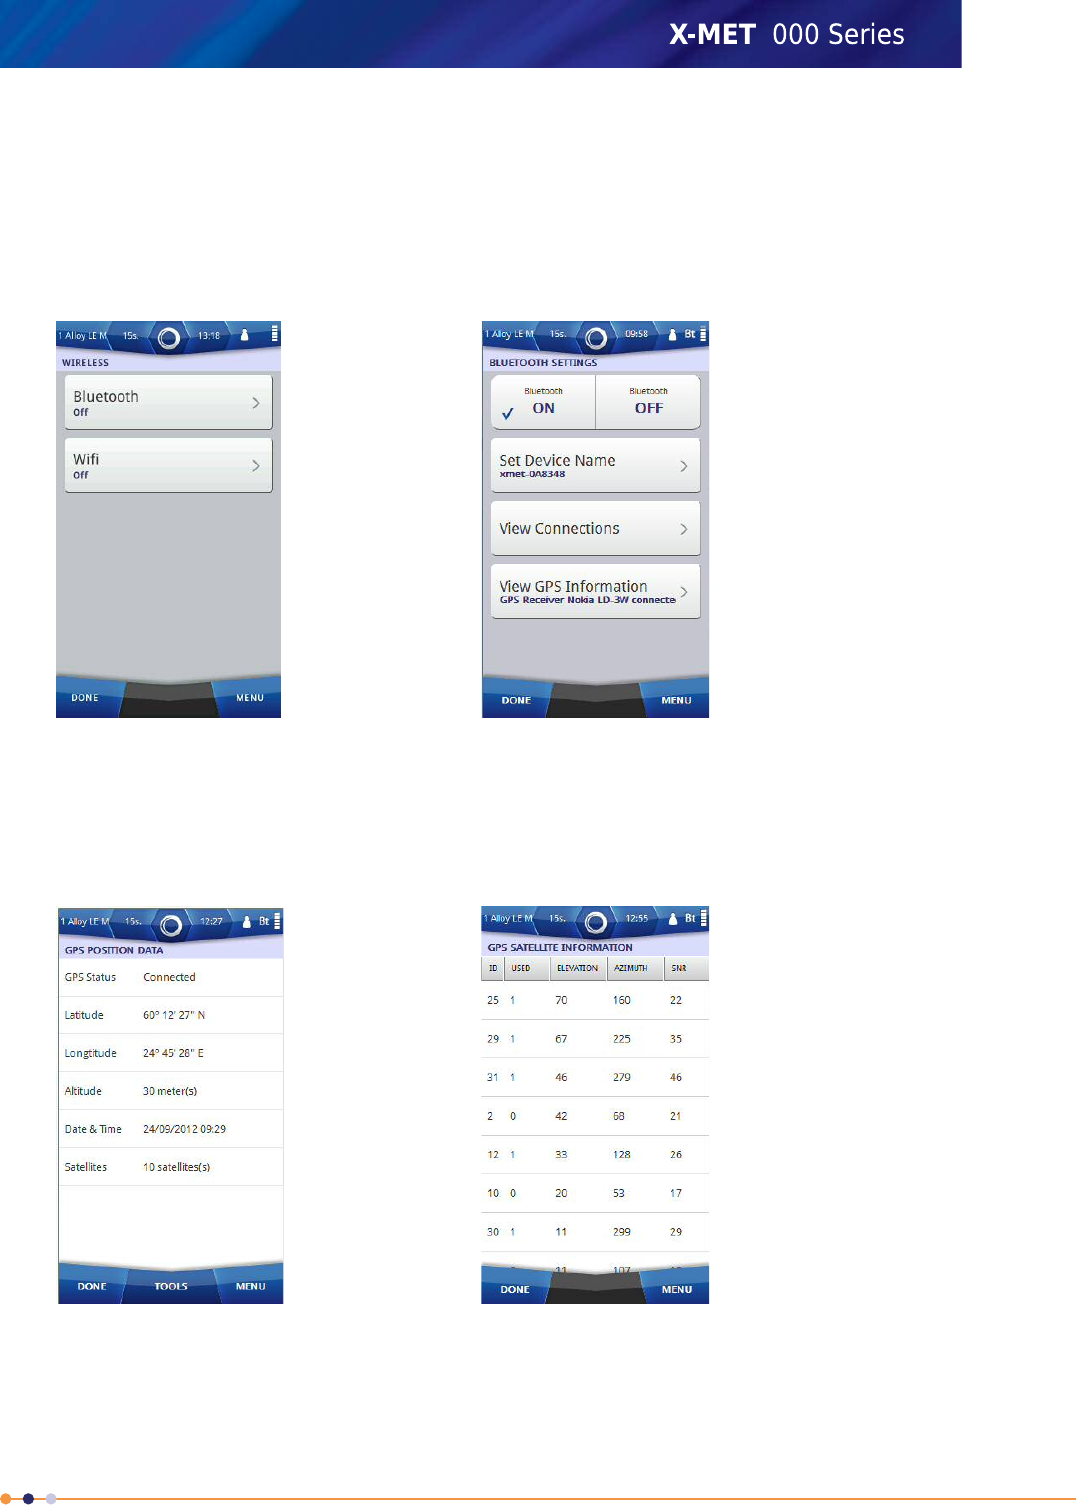
Check GPS Information
Once a Bluetooth connection is made to the GPS receiver, it is possible to check the GPS position data
and satellite information. Follow these steps to check the GPS information.
1. Navigate: Status Bar >Wireless
The Wireless screen appears.
2. Tap Bluetooth.
The Bluetooth Settings screen appears.
3. Tap View GPS Information.
The GPS Position Data screen appears.
4. Tap: Tools >Refresh Now to refresh the GPS Position Data.
229
X-MET8000 Series User Manual
8
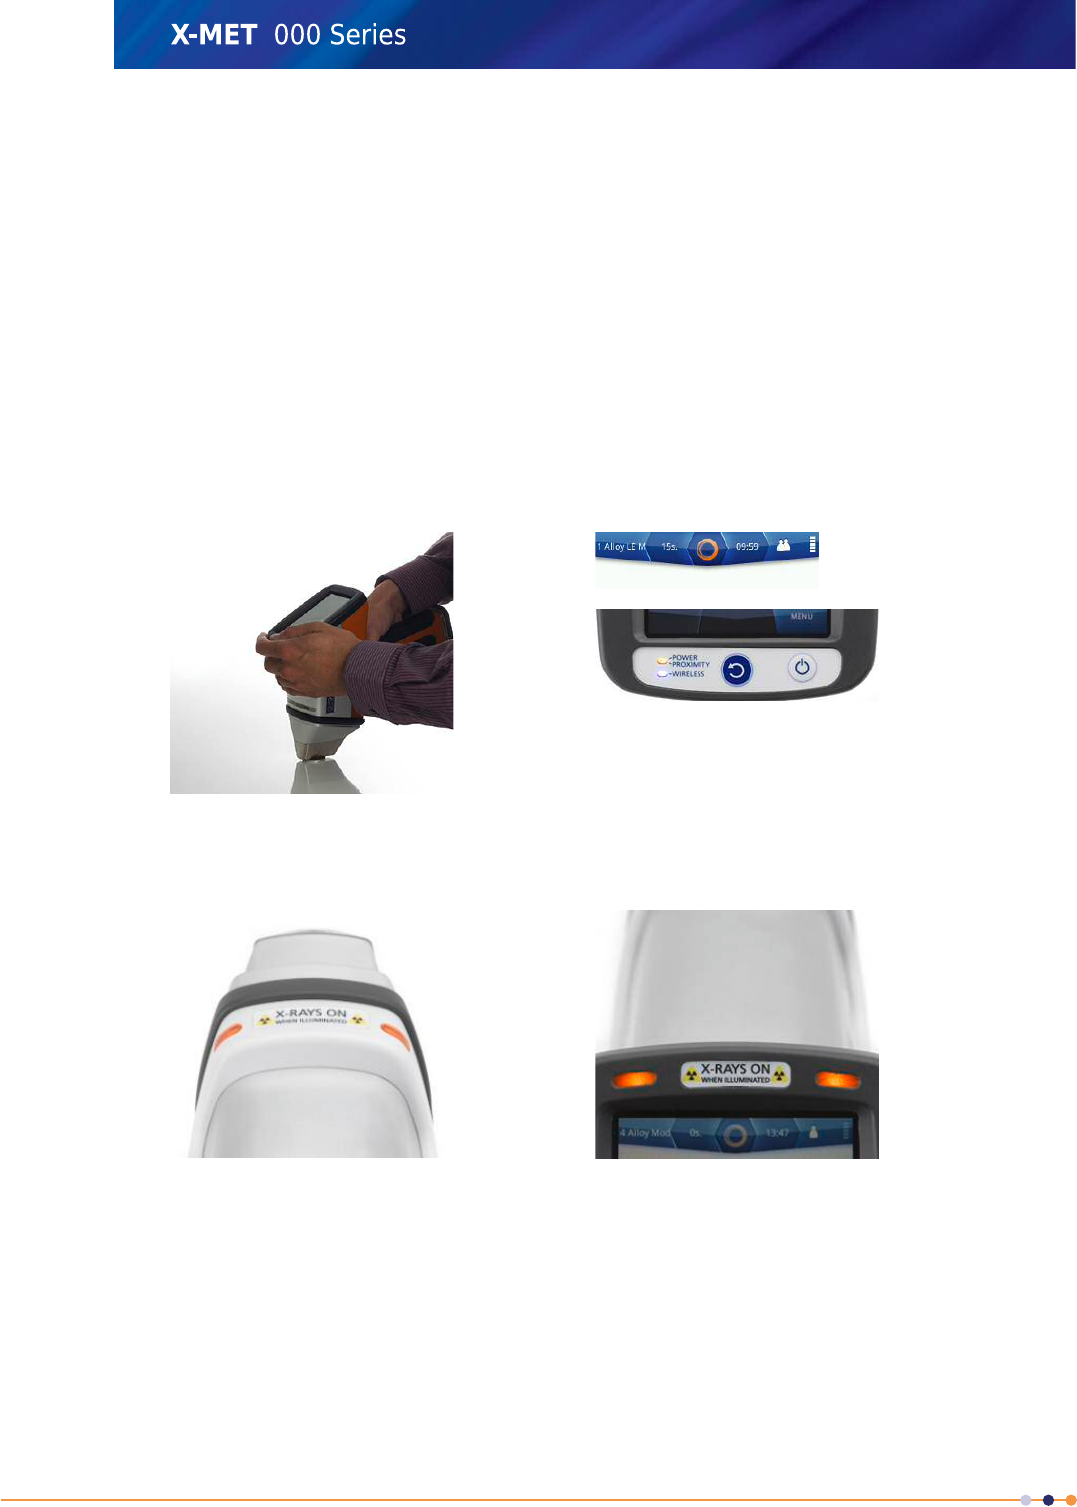
5. Tap: Tools >View Satellites
The GPS Satellite Information screen appears.
6. Tap Done to return to the GPS Position Data screen.
7. Tap Done to return to the Bluetooth Settings screen.
8. Tap Done twice again to return to the main screen.
Take A Measurement
Follow these steps to measure the sample.
1. Carefully hold the X-MET8000 series so that it touches the sample, and that both the proximity
and measurement windows are covered.
Do not press the X-MET8000 series into the sample.
The proximity indicators change to green.
2. Pull and hold the trigger firmly.
The X-ray On indicators blink red.
230
X-MET8000 Series User Manual
8
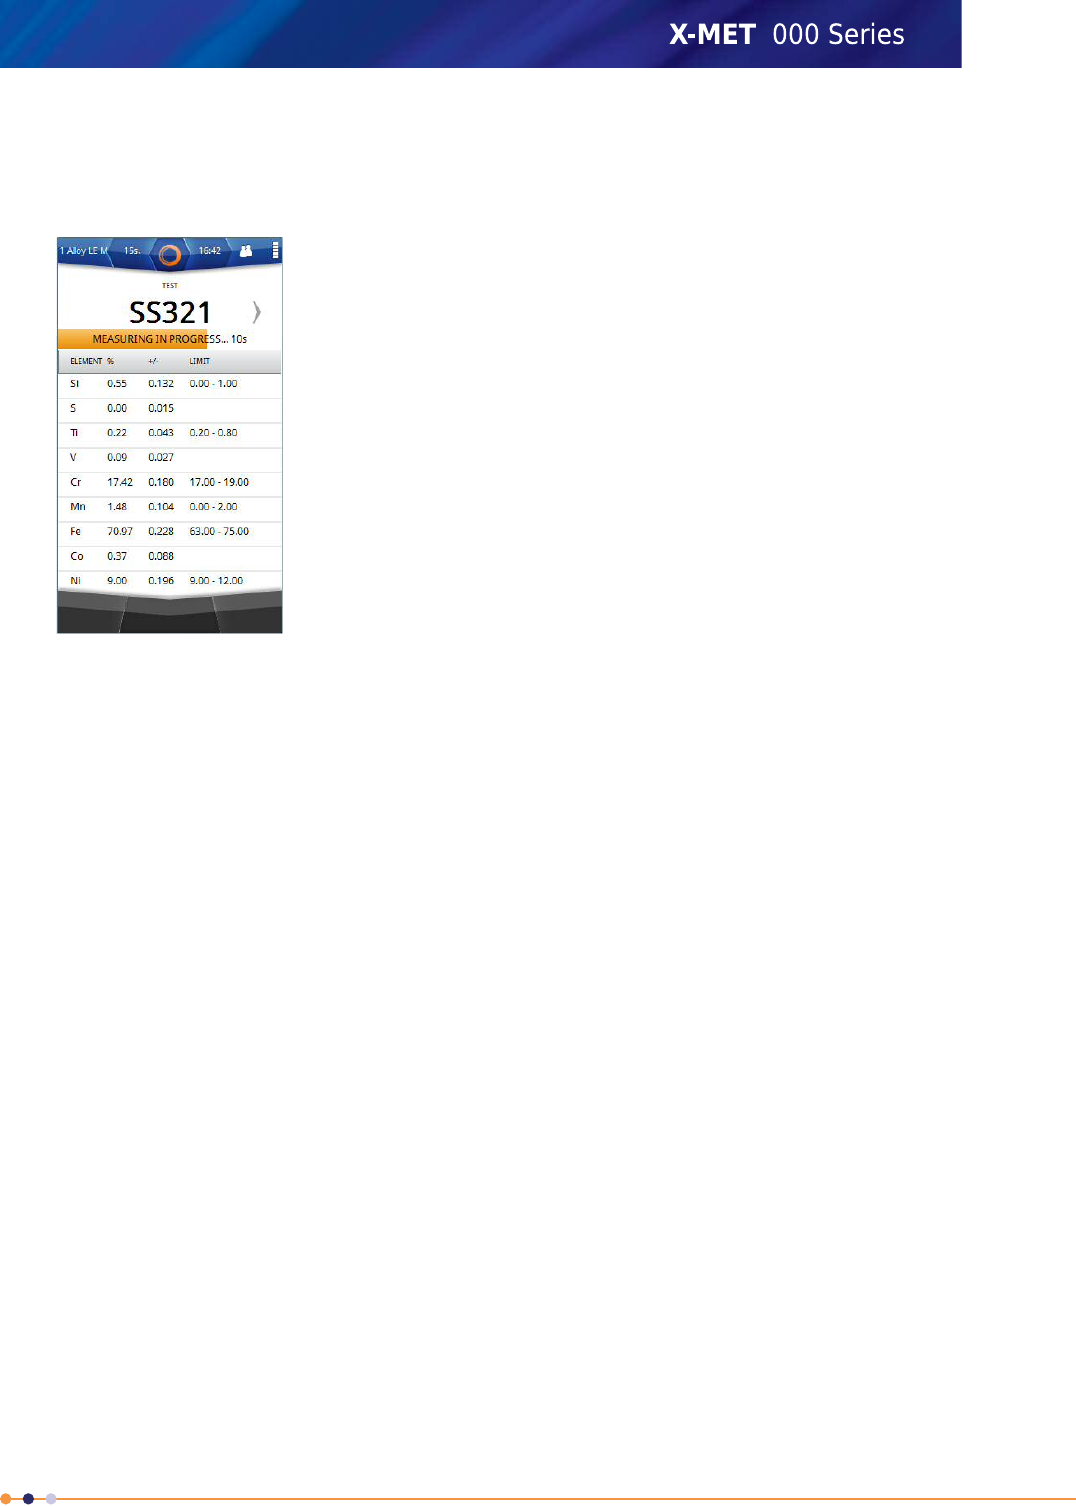
3. Keep the X-MET8000 series upright and steady during the measurement.
Use both hands to hold the X-MET8000 series and keep them away from the sample.
The Results screen refreshes approximately every 2 seconds.
4. At the end of the measurement time, the X-MET8000 series makes a ‘ping’ sound. Release the
trigger to stop the measurement.
The measurement stops, and the X-MET8000 series displays the result.
It is possible to release the trigger and stop the measurement before the ‘ping’ sound.
Follow these steps again to make the next measurement.
Flick the screen to left or right to access other results.
Read stored location information
The location information is stored with the measurement data in the X-MET8000 series.
To view the location information stored with the last measurement, tap Tools,Show Details.
231
X-MET8000 Series User Manual
8
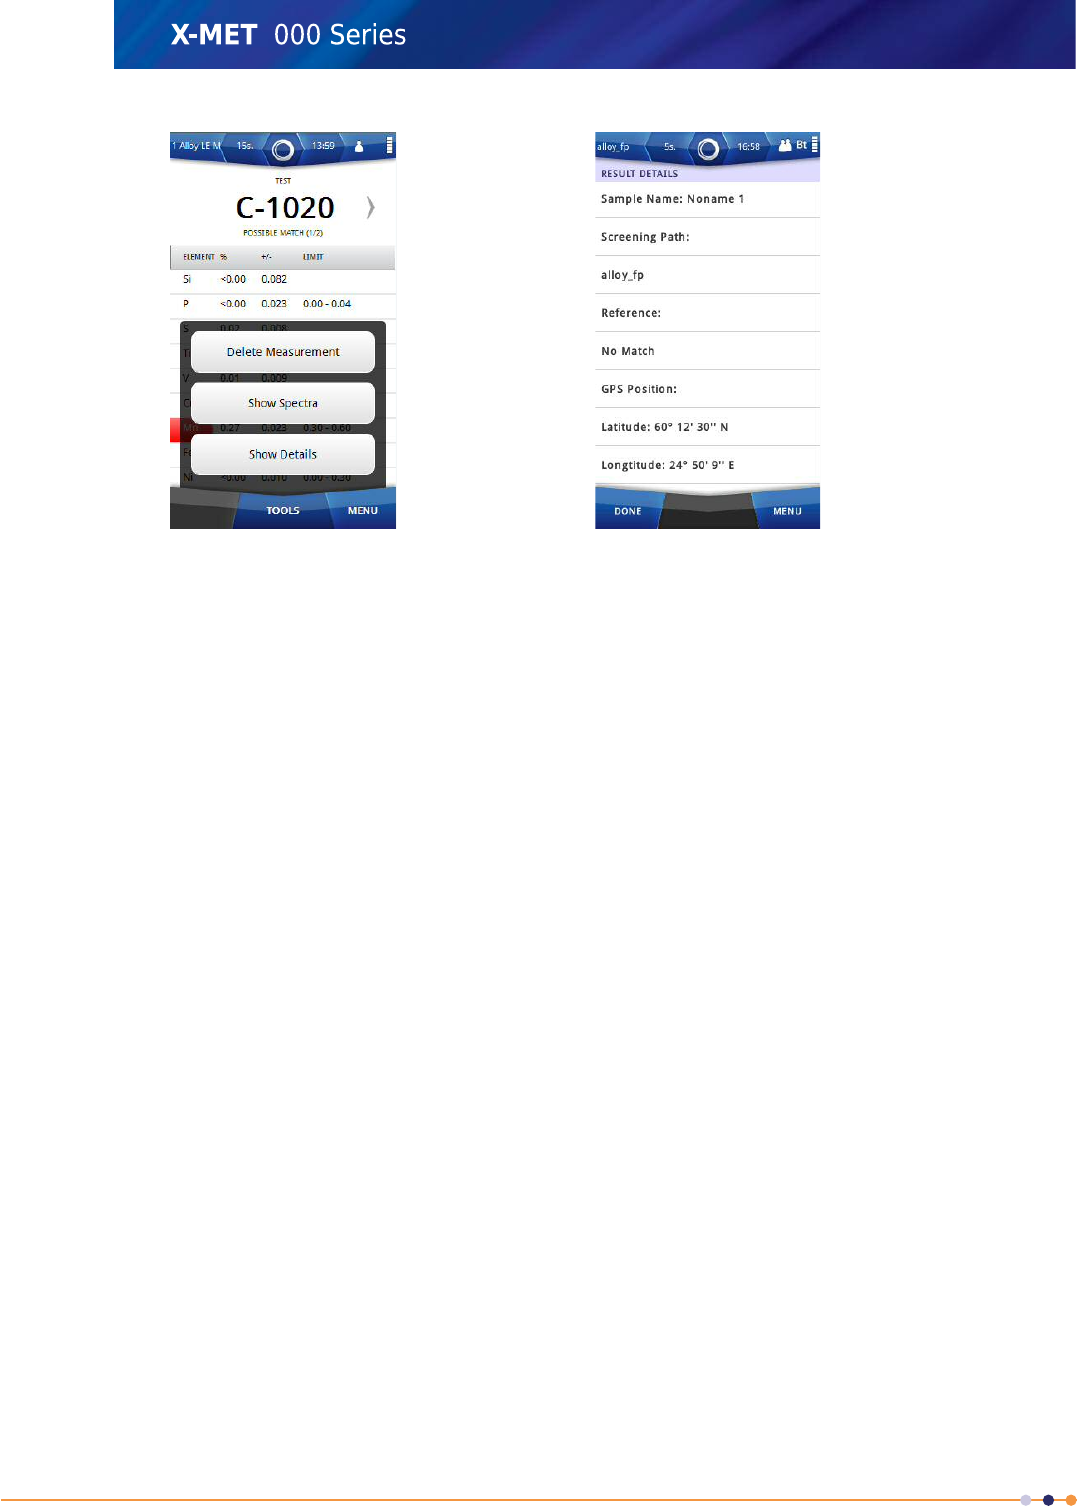
The location information is included in all available report formats.
Please refer to the X-MET8000 series Supervisors Guide for more information on generating reports.
232
X-MET8000 Series User Manual
8
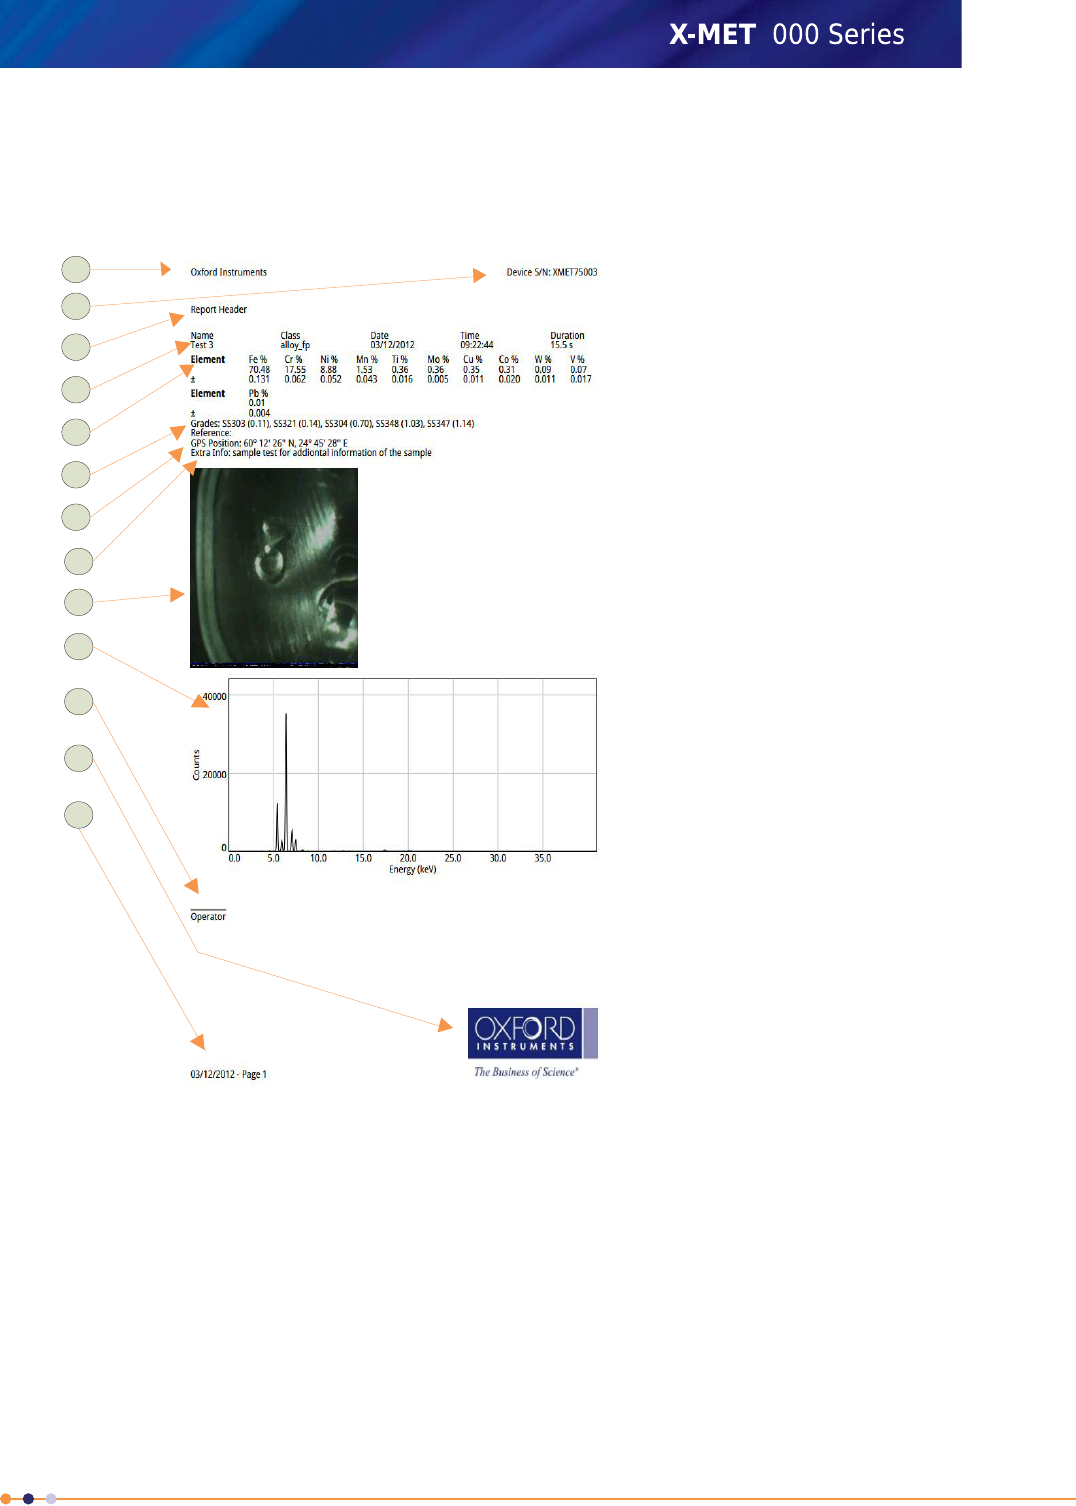
A Custom Report
This is a typical custom report. The report template provides full control of all these aspects of the
report.
1. Margin:
company
information
2. Margin: serial
number
3. Report header
4. Sample
information
5. Element:
concentration
and +/-
6. Grade
7. GPS Position
8. Additional
Information
9. Camera Image
10. Spectra
11. Operator
information
12. Margin: logo
13. Margin: date
and page
number
1
12
11
10
9
8
7
6
5
4
3
2
13
The margins can include:Margins
•Company information
•Company logo
•The device serial number
•The date and page number.
It is possible to place these items in any of the four margins.
The report can start with an introduction.Report header
Sample information includes:Sample information
•The sample name
233
X-MET8000 Series User Manual
8
•The mode or method
•The date and time
•The measurement time.
It is necessary to select the elements to appear in the report. Chosen
elements that are not present in the sample do not appear in the report
Element information
unless All The Elements From The Result option is selected .
Element information can include the concentration and +/- value.
The report can include the grade information.Grade
The report can include the GPS information.GPS Position
The report can include the additional information for the sample.Additional Information
The report can include the camera image of the sample.Camera Image
The report can include the spectra for the sample.Spectra
The report can include information about the operator.Operator information
Setup and use a Trimble Field Computer and GPS
Connecting the X-MET8000 series to a Trimble Field Computer and Trimble®TerraSync™software.
Enable Bluetooth on the Trimble
Follow these steps to enable Bluetooth on the Trimble Nomad 900 series.
1. On the Trimble Nomad 900 series, Navigate: Start >Settings >Connections .
234
X-MET8000 Series User Manual
8
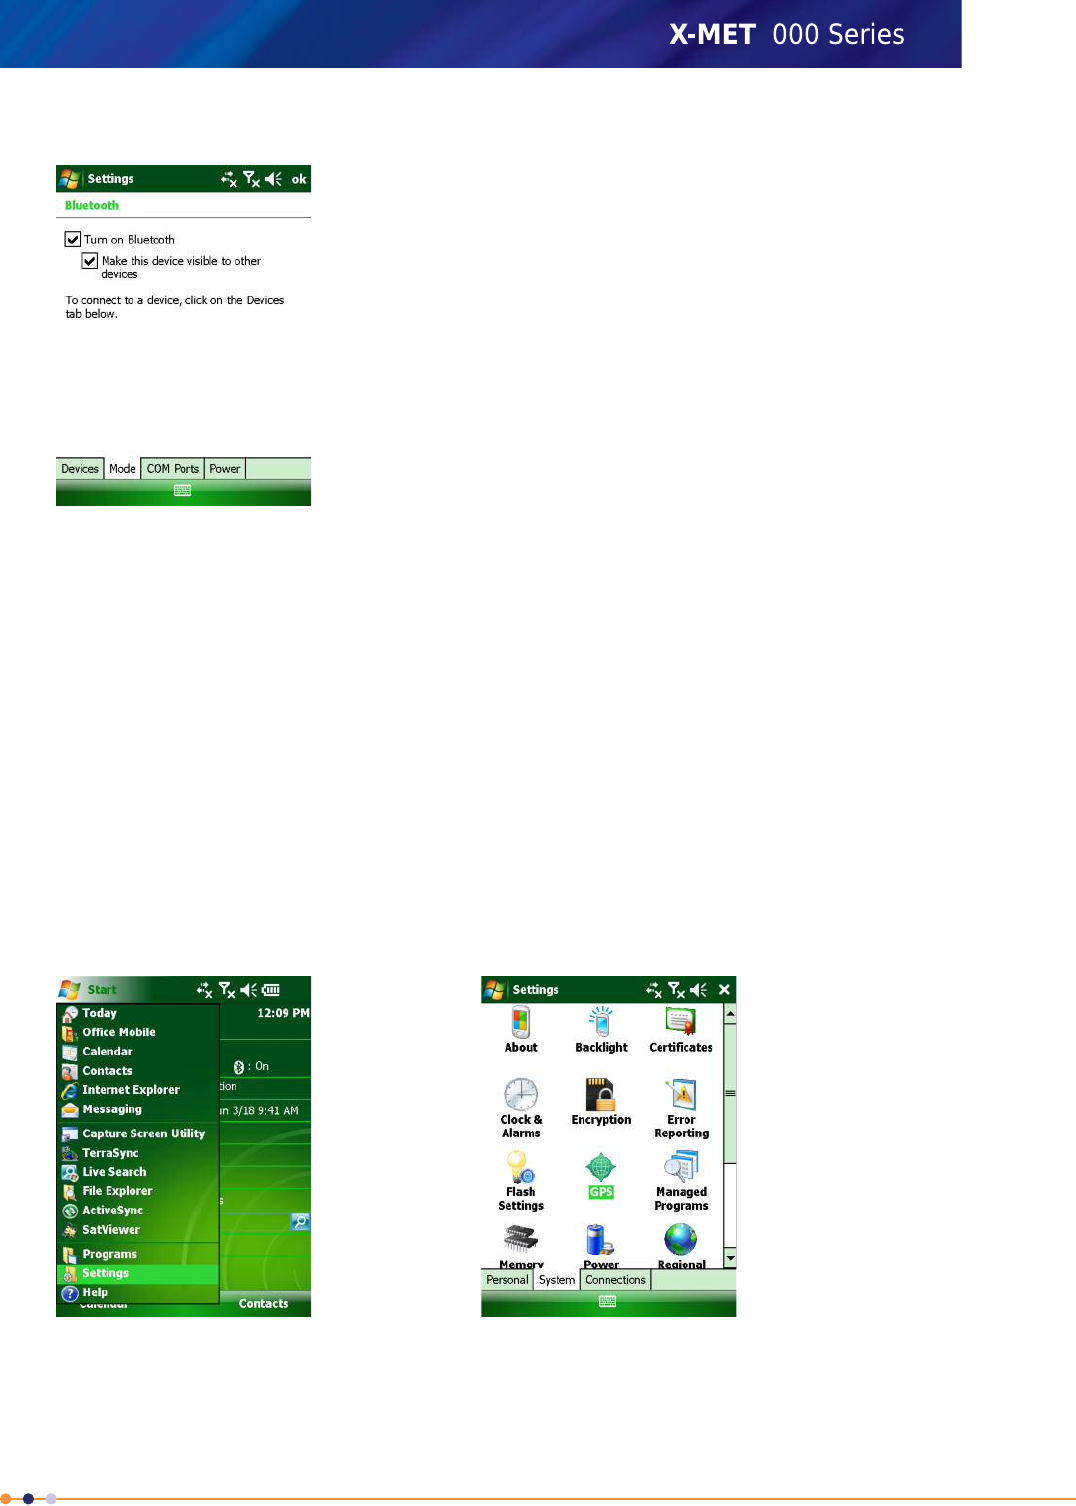
2. Tap: Bluetooth >Mode .
3. Make sure the Enable Bluetooth has a checkmark.
For the Trimble Nomad 900 series to be visible to other devices, also make sure the Make this
device visible to other devices has a checkmark.
Bluetooth is now enabled.
4. Tap OK in the upper right corner to close the Bluetooth settings screen
5. Tap Xin the upper right corner to close settings and return to the default start screen.
Setup a Trimble Field Computer and GPS
Setup a Trimble Nomad 900 series or equivalent Handheld Field Computer to provide GPS connection
for multiple programs using this guide. To use other GPS and/or data collecting devices, please refer
to the user's guides for these. GPS settings:
1. If you are using only one GPS-aware application, for example Trimble®TerraSync™, these settings
do not need to be changed. However, to use multiple GPS-aware applications simultaneously, tap
Start >Settings >System >GPS .
235
X-MET8000 Series User Manual
8
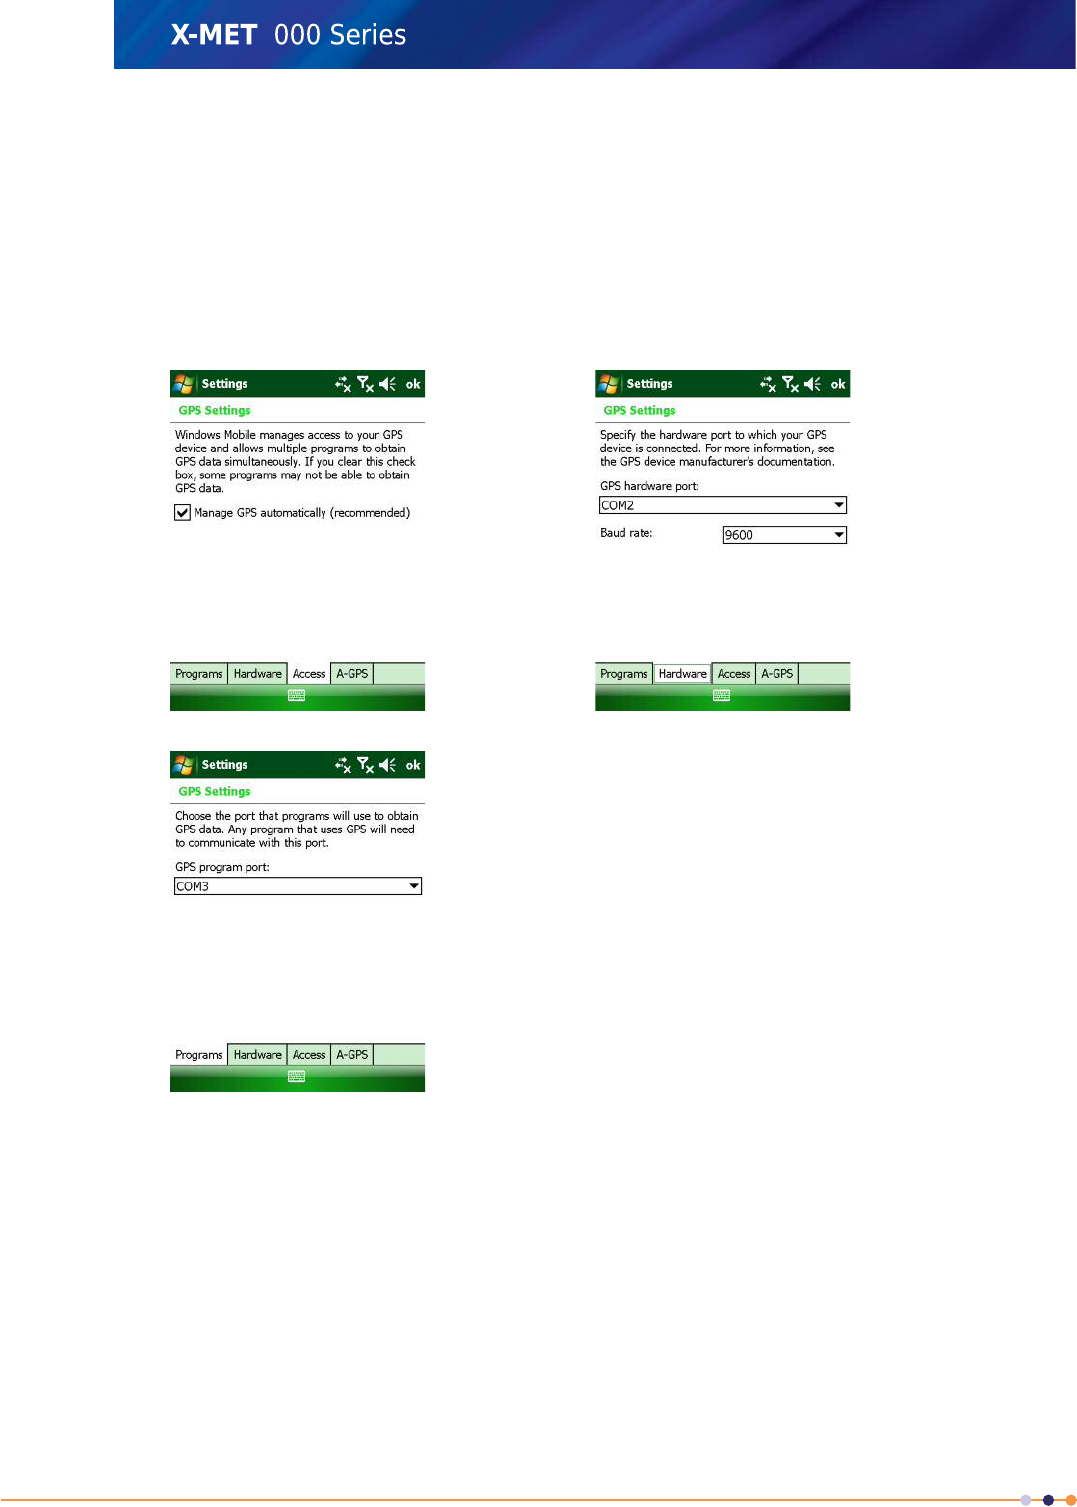
2. Next select the following tabs:
a) Access: The GPS Intermediate Driver allows multiple applications to access the GPS receiver
(disabled by default). To enable the GPS Intermediate Driver, select the check box.
b) Hardware: COM2 is the hardware port dedicated for the built-in GPS. Verify that COM2 is
selected. The internal GPS communicates at 9600 baud by default. If it has been modified by
a third party program, adjust to match the receiver baud rate.
c) Programs: Programs that use GPS need to know which port to use to access GPS data. Ensure
that the COM port on the GPS- aware application is set to the same port as shown in the Programs
tab of the GPS applet. The programs port must be a different port than the hardware port.
3. Tap OK in the upper right corner to close the GPS settings screen
4. Tap Xin the upper right corner to close settings and return to the default start screen.
236
X-MET8000 Series User Manual
8
Add Trimble Bluetooth GPS Connection
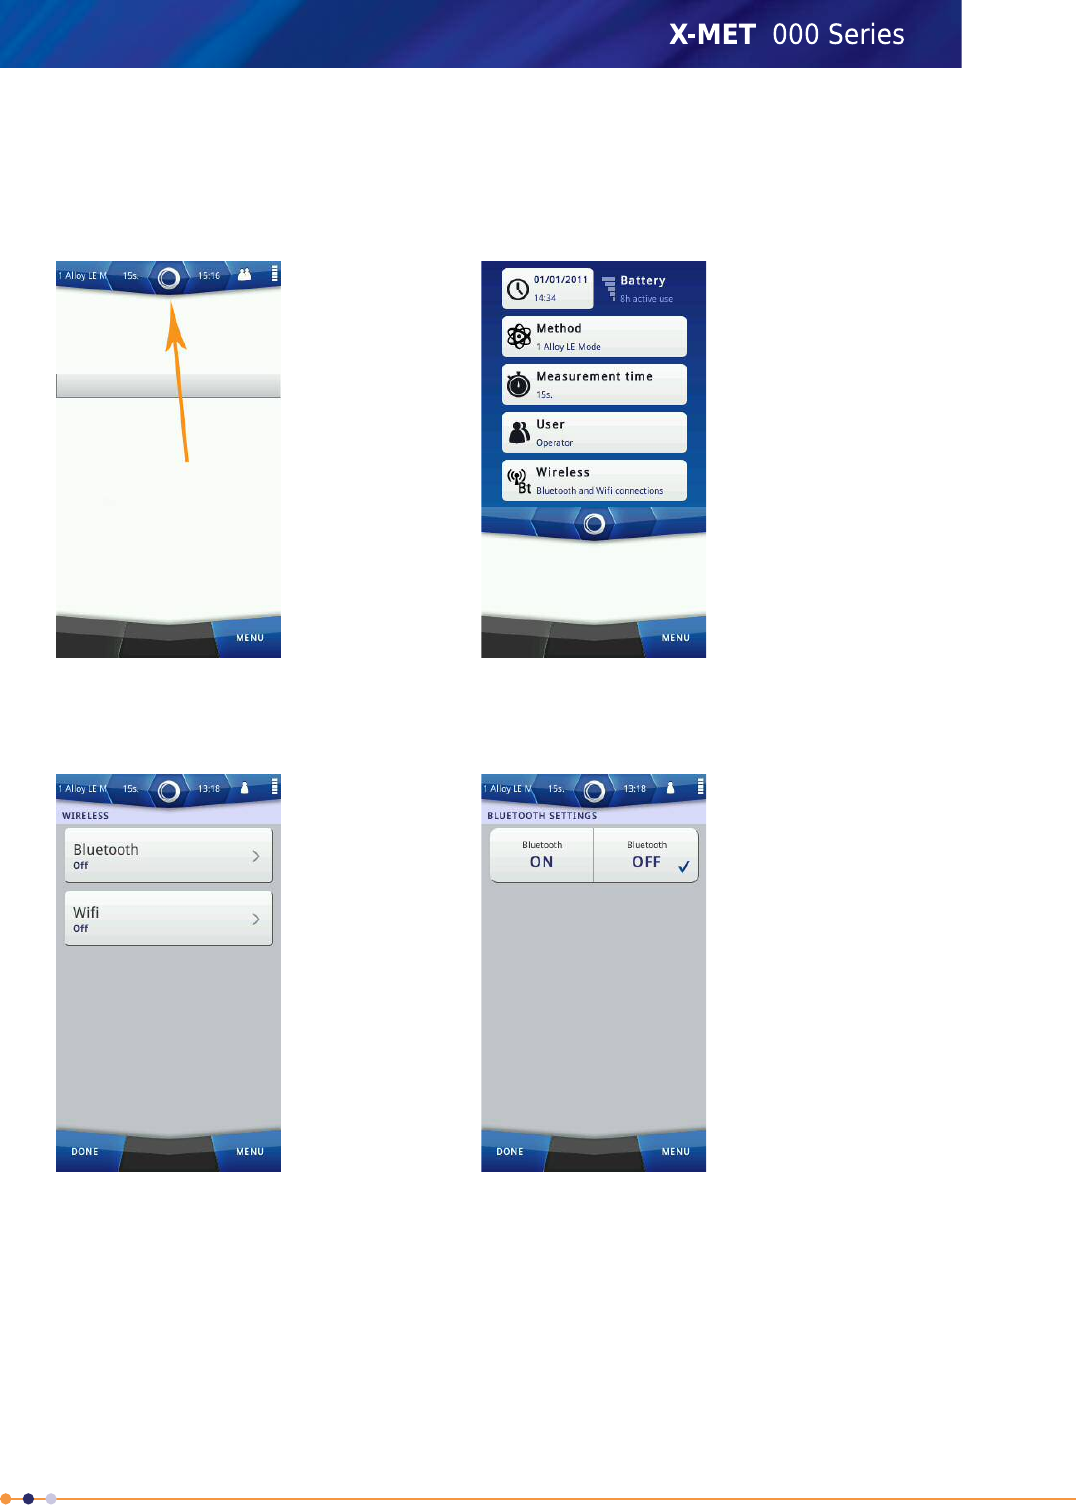
Follow these steps to connect the X-MET8000 Series to a Trimble Nomad 900 series Bluetooth GPS.
1. Navigate: Status Bar .
2. Navigate: Wireless .
The Wireless screen appears.
3. Tap Bluetooth.
The Bluetooth Settings screen appears.
237
X-MET8000 Series User Manual
8
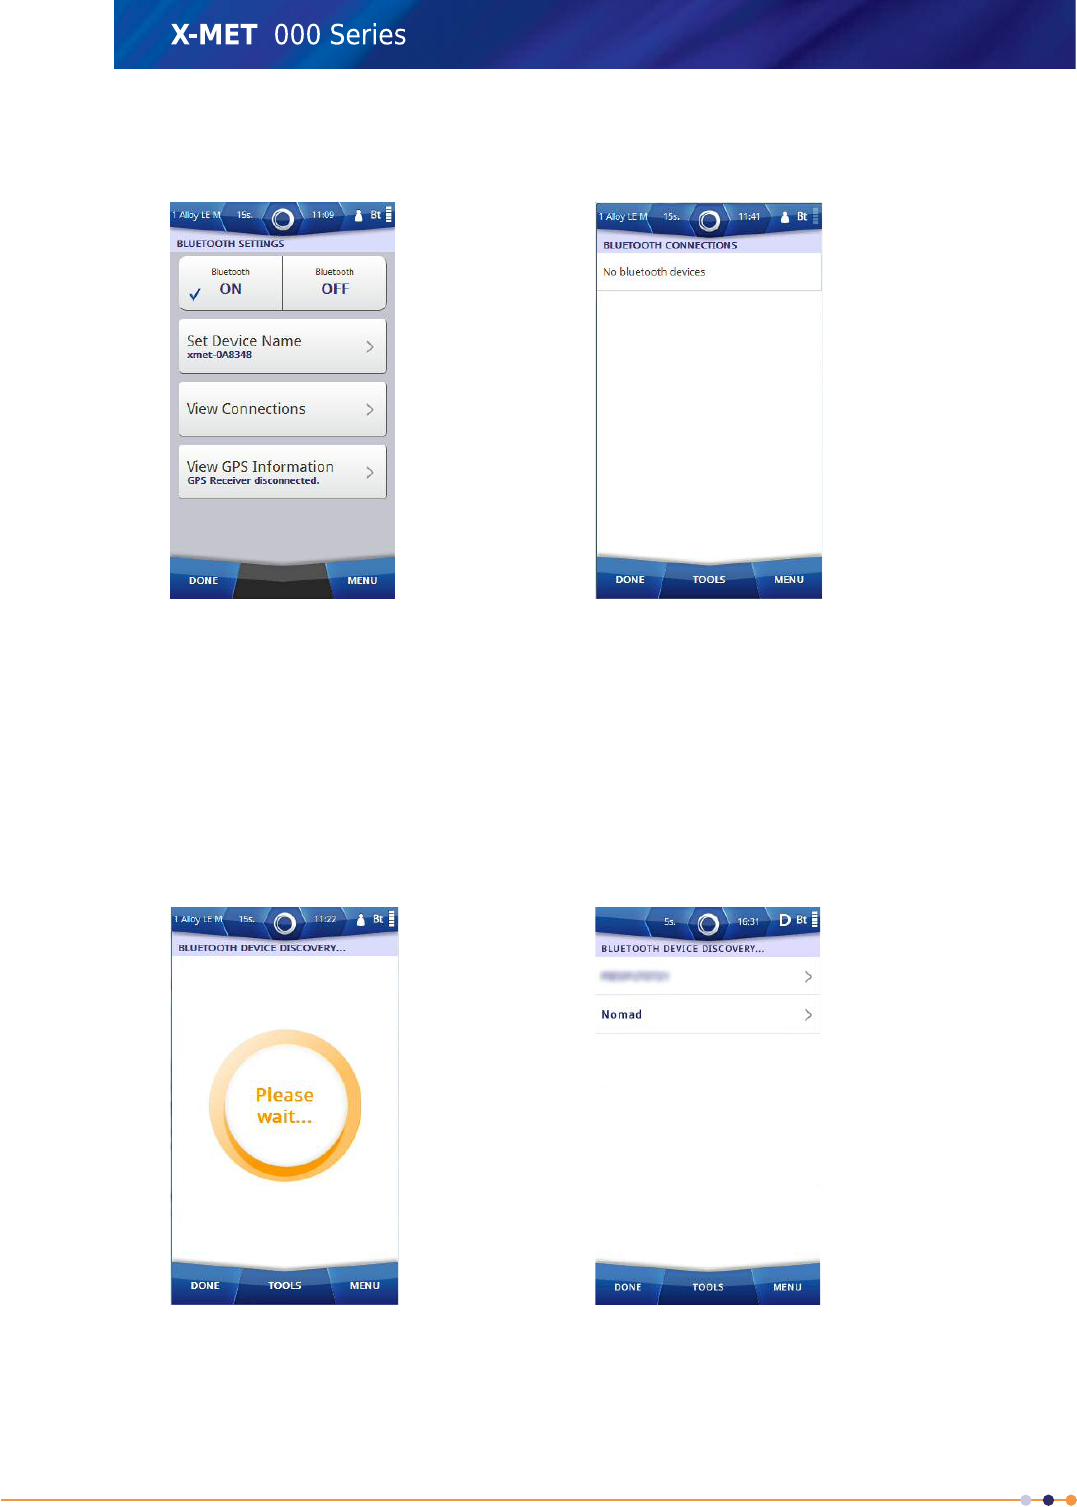
4. Tap the ON tick box.
The Bluetooth Settings screen changes.
5. Tap Set Device Name to give the X-MET8000 series an unique and recognizable device name.
6. Use the virtual keyboard to type an applicable name, and then tap Done to return to the Bluetooth
Settings screen.
7. Tap View Connections.
The Bluetooth Connections screen appears.
8. Tap: Tools >Discover New Devices .
The Bluetooth Device Discovery screen appears, and a search for the Bluetooth devices begin.
When the search is complete, the screen shows the available Bluetooth devices.
9. If necessary, tap: Tools >Discover Again .
Another search for the Bluetooth devices begins, and the Bluetooth Device Discovery screen
updates.
238
X-MET8000 Series User Manual
8
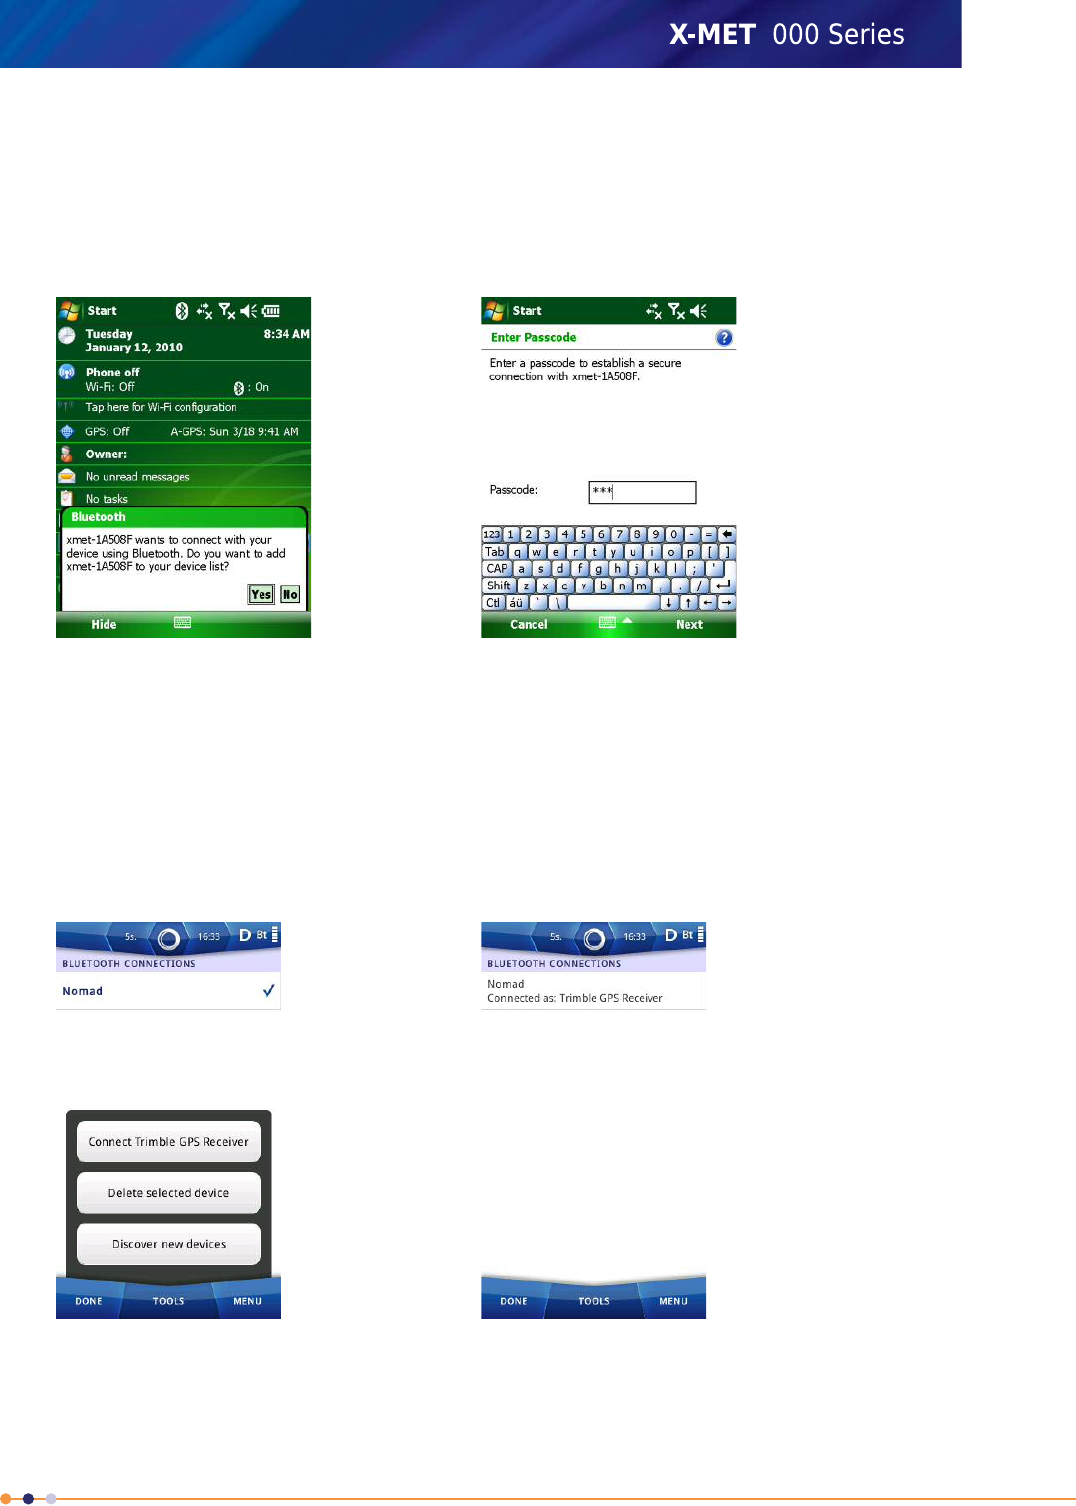
10. Tap on the discovered Trimble GPS Receiver device, this might show up as a blank field if no
identification is given to the Trimble GPS Receiver.
The Set Pin Code for Bluetooth Device screen appears.
11. Enter a Pin Code
A screen appears on the Trimble GPS Receiver verifying that the connection is allowed
12. Tap Yes on the Trimble GPS Receiver to allow the connection.
A screen asking for the pin code will appear on the Trimble GPS Receiver
13. Enter the same pin code that was entered on the X-MET8000 series in step 11 and tap Next.
The Trimble GPS Receiver is added to the Bluetooth Connections screen.
14. On the X-MET8000 series, tap on the newly added Trimble GPS device and select Tools and choose
Connect to GPS Receiver.
The Bluetooth Connections screen updates.
15. Tap Done to return to the Bluetooth Settings screen.
16. Tap Done twice again to return to the main screen.
239
X-MET8000 Series User Manual
8
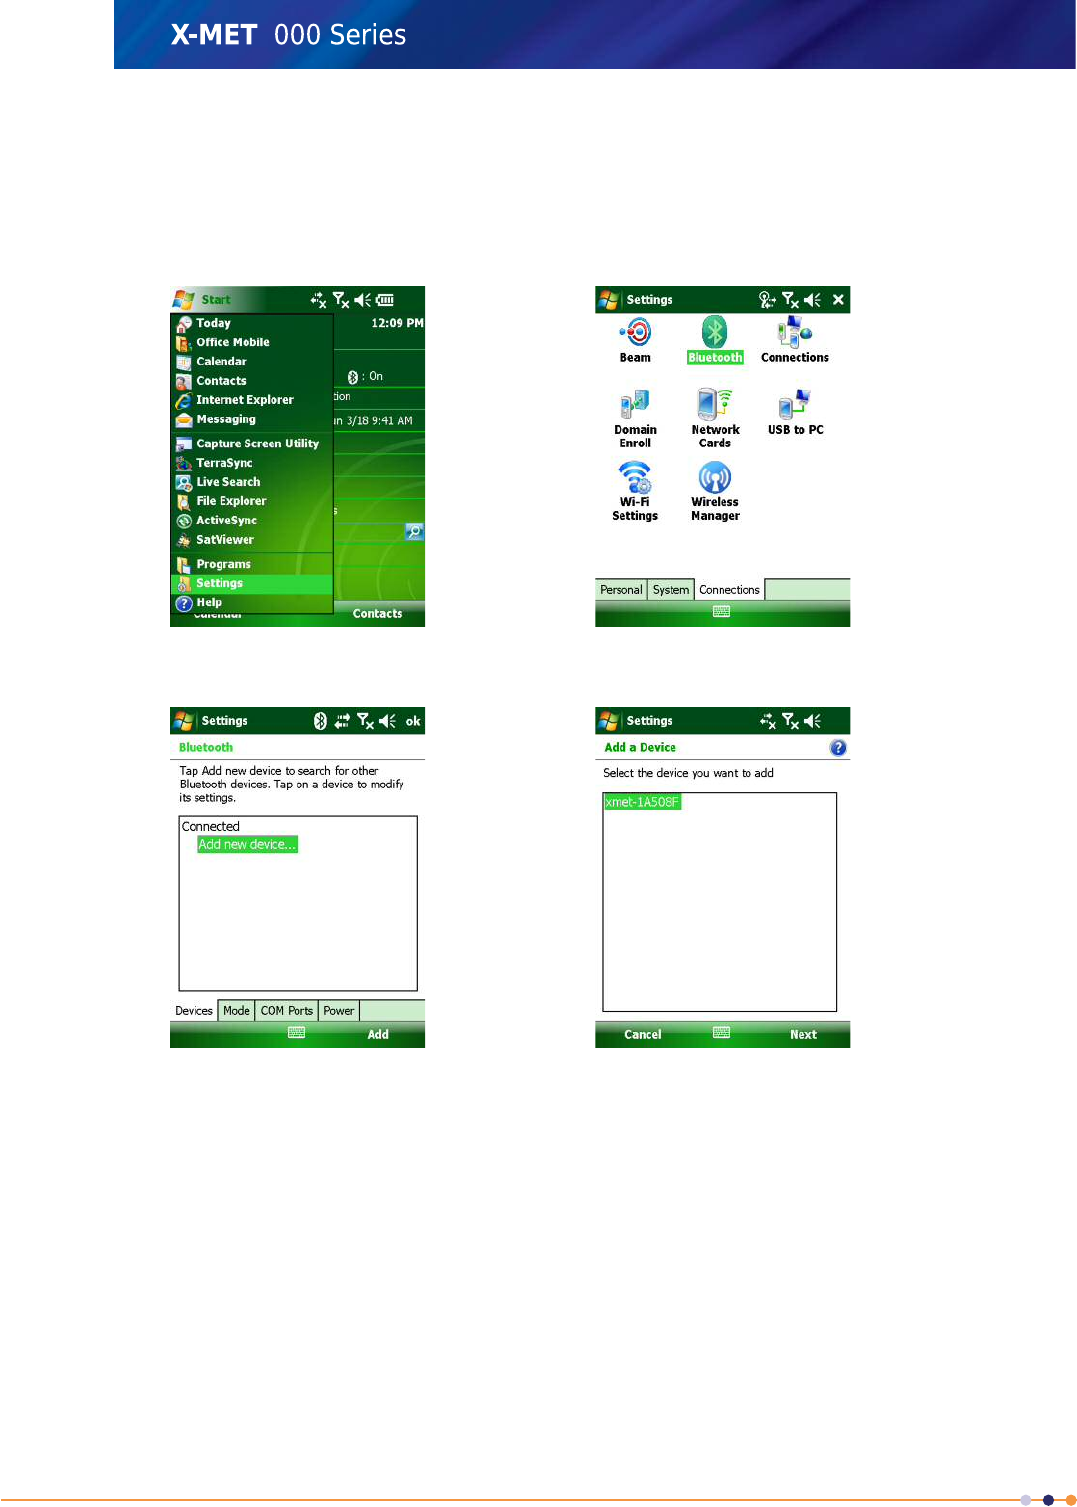
Add Serial Port to the Trimble
Follow these steps to add a serial port for external sensors on the Trimble Nomad 900 series Bluetooth
GPS.
1. On the Trimble Nomad 900 series, Navigate: Start >Settings >Connections .
2. Tap: Bluetooth >Com Ports >New Outgoing Port .
3. Tap Next.
The Port Selection drop down list appears.
240
X-MET8000 Series User Manual
8
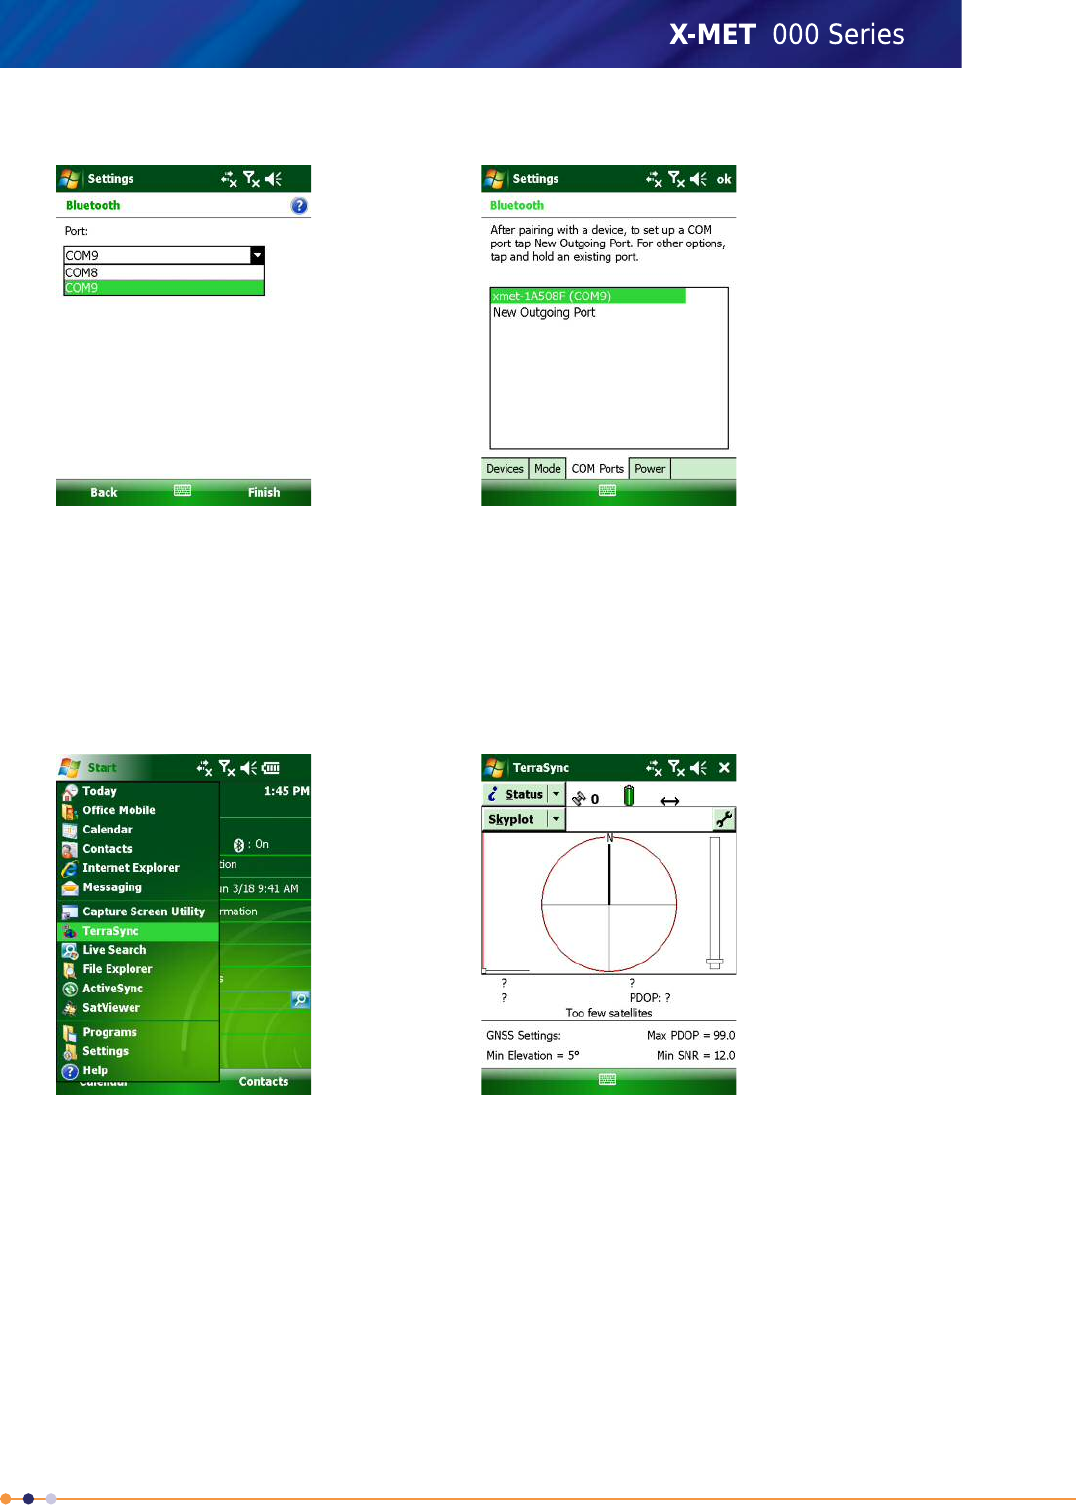
4. Select the next free COM port from the list and tap Finish.
5. Tap OK in the upper right corner to close the Bluetooth settings screen
6. Tap Xin the upper right corner to close settings and return to the default start screen.
Configure Trimble®TerraSync™with X-MET8000 Series as external sensor
Follow these steps to setup Trimble®TerraSync™to use the X-MET8000 Series as external sensor.
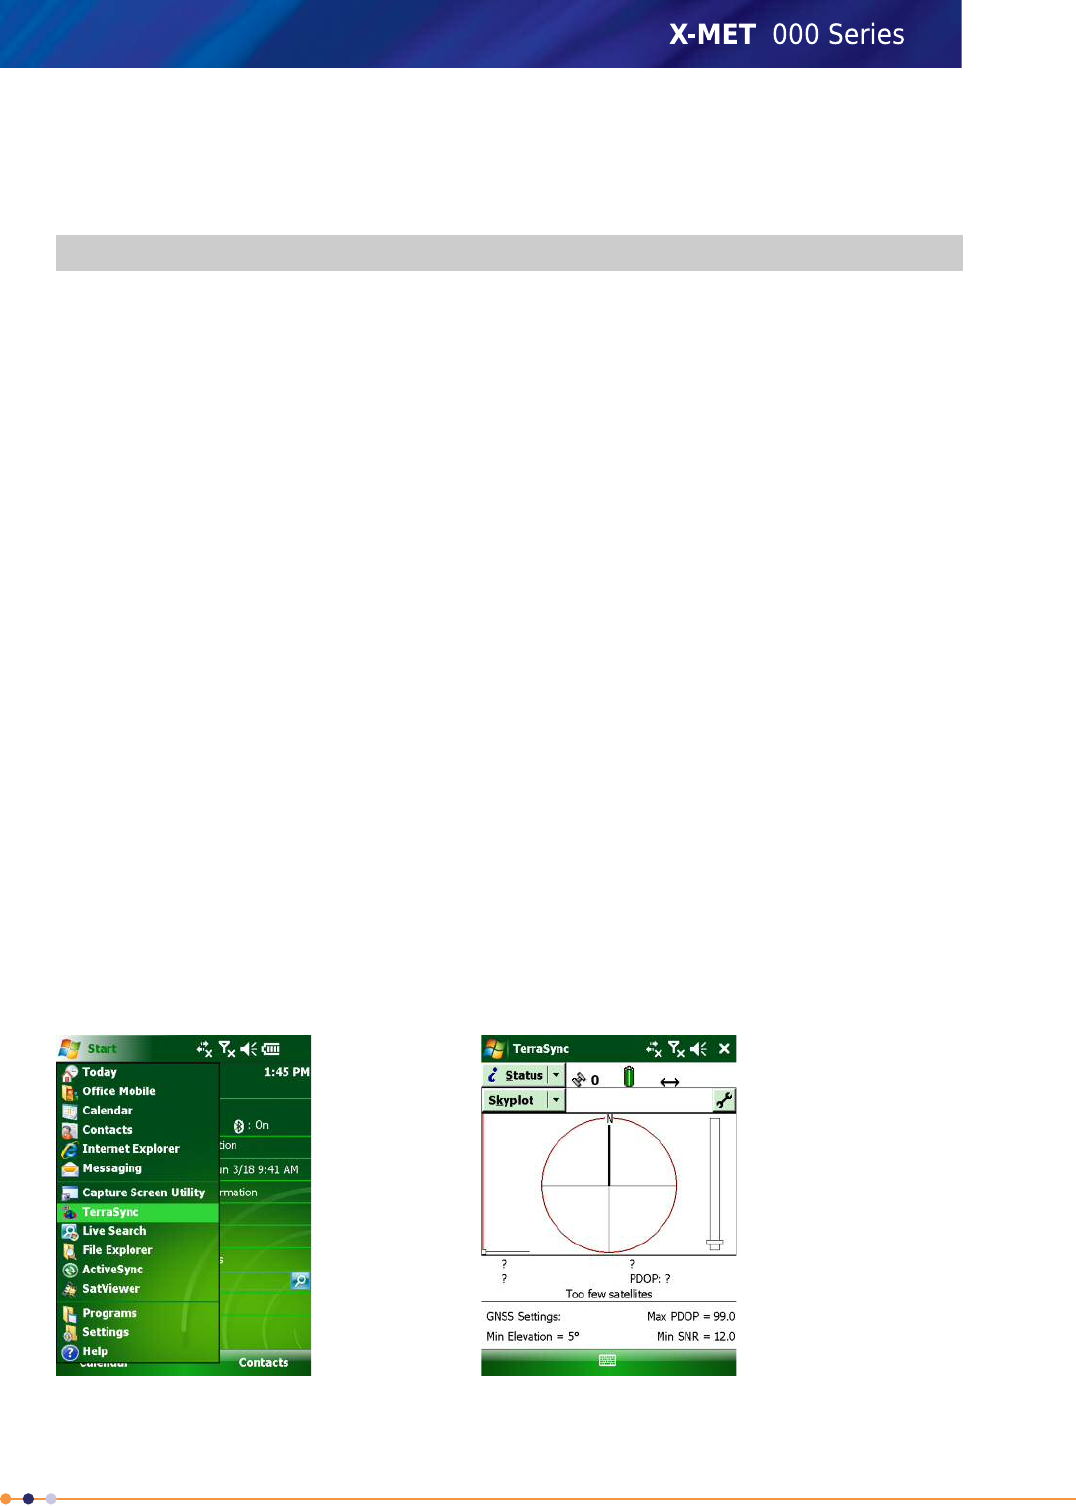
1. On the Trimble Nomad 900 series, Navigate: Start >TerraSync .
241
X-MET8000 Series User Manual
8
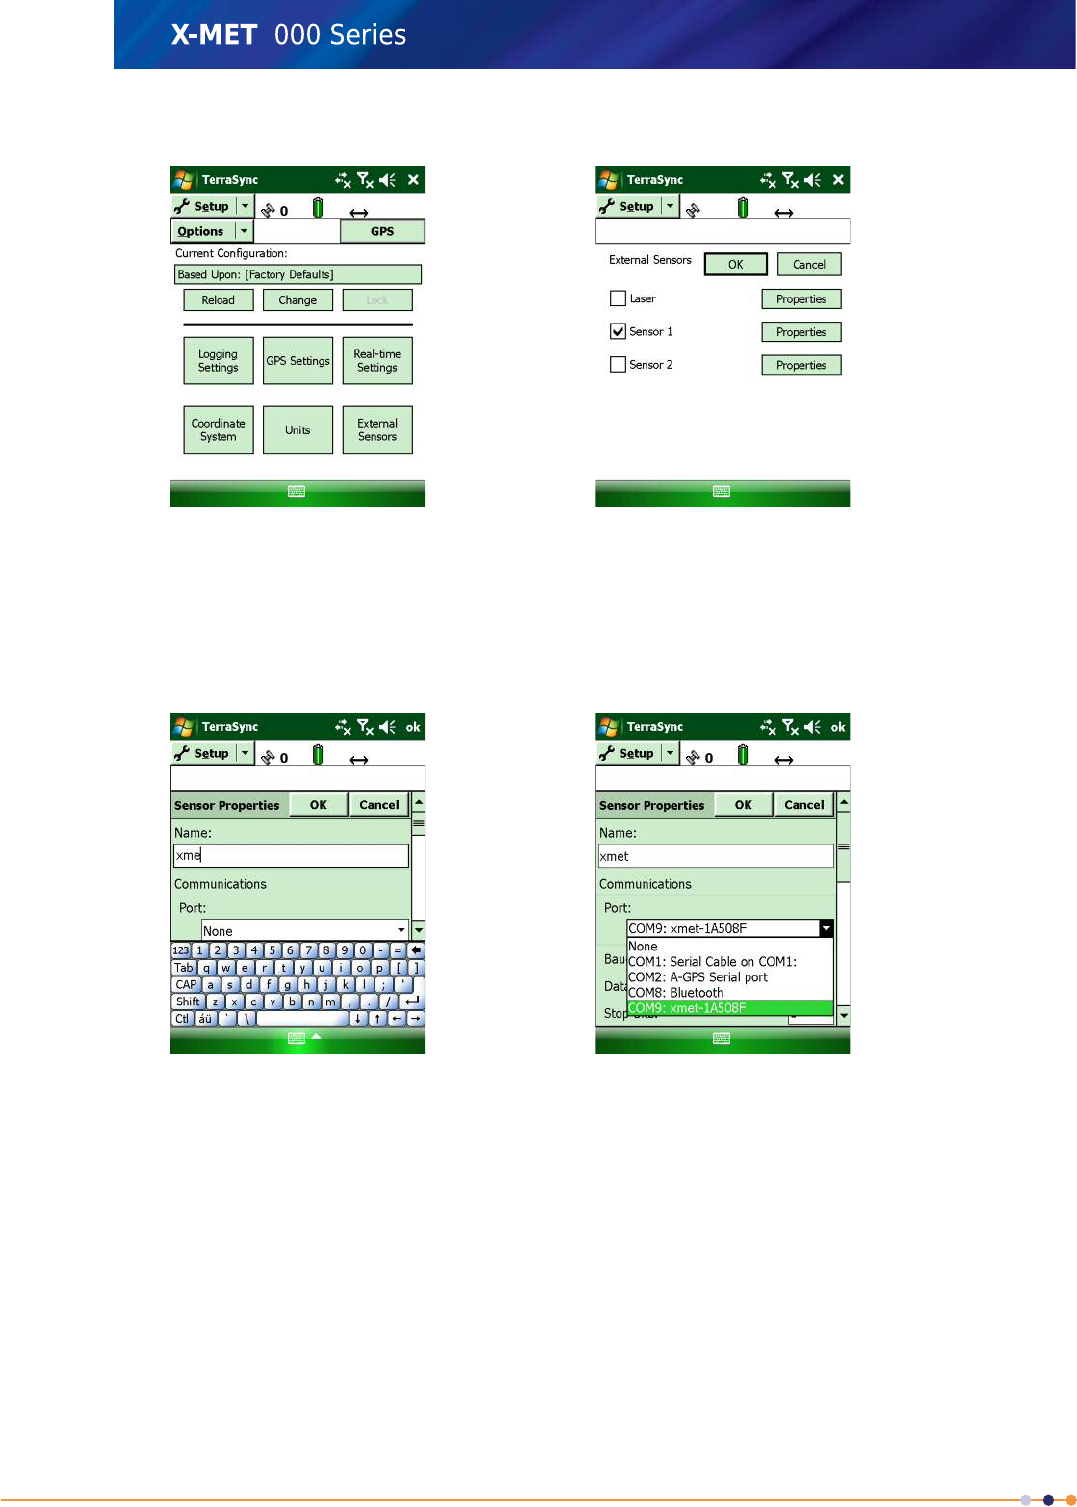
2. Navigate: Status >Setup
3. Tap External Sensors.
The External Sensor configuration screen appears.
4. Verify that the Sensor 1 checkbox is a checked, if not tap on the checkbox to the left of Sensor
1.
5. Tap Properties for Sensor 1 and enter an applicable name.
6. Tap the Port dropdown list and select the COM-port previously assigned to the X-MET8000 Series
242
X-MET8000 Series User Manual
8
7. Enter the configuration data for the sensor as per table 1 depending on the required storage option,
Full Data or Summary.
Table 5: Configuration table
ValueProperty
X-METName
(The COM port configured previously)Port
9600Baud Rate
8Data Bits
1Stop Bits
NoneParity
$PXMTM, (Full Data) OR $PXMTM, BEGIN, (Summary)Prefix String
\0a\0dSuffix String
200Max Bytes
0Time Out
UnsolicitedReceiver Mode
AllLogging Intervals
Uninterpreted (Full Data) OR As Attribute (Summary)Data Destination
8. Tap OK twice to store and exit the sensor configuration.
9. Verify that the information transfers from the X-MET8000 Series by follow the steps in the next
chapter.
Collect Features to Trimble®TerraSync™with X-MET8000 series as external sensor
Follow these steps to verify that the X-MET8000 series information transfers to Trimble®TerraSync™.
The X-MET8000 series and Trimble Field Computer are properly configured and powered on.
1. On the Trimble Nomad 900 series, Navigate: Start >TerraSync .
243
X-MET8000 Series User Manual
8
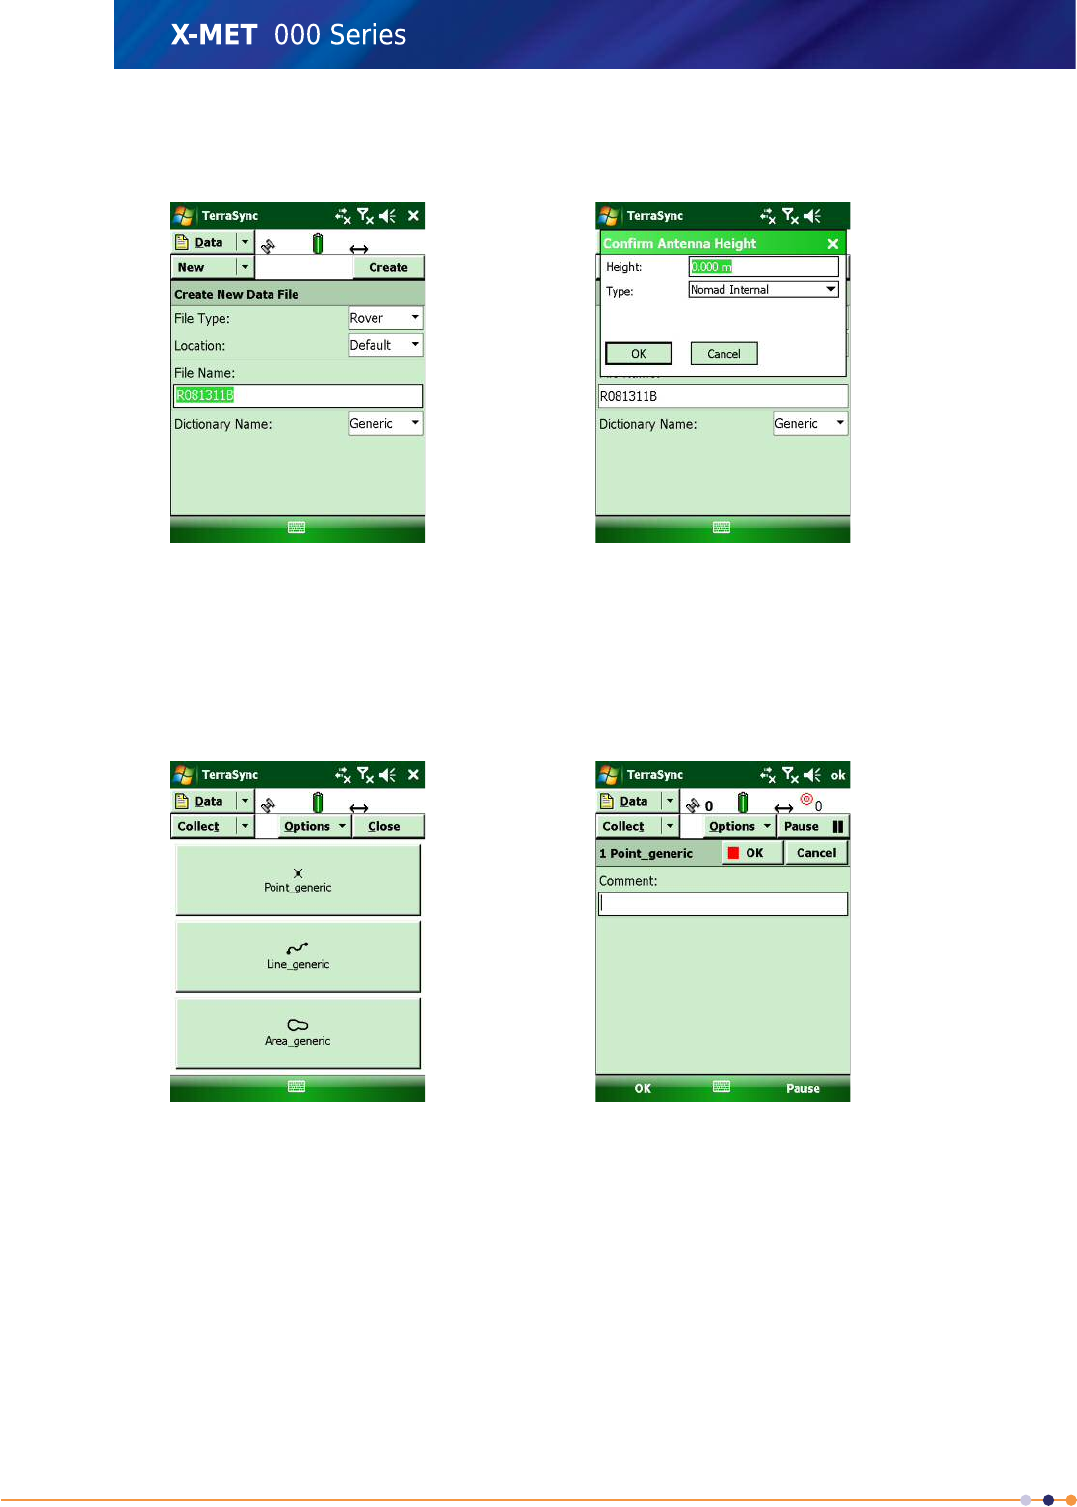
2. Navigate: Status >Data .
Create New Data File-screen appears
3. Enter a File Name if needed.
4. Tap Create
Confirm Antenna Height screen appears
5. Enter correction information if needed and tap OK.
The Method section screen appears
6. Tap on one of the methods to start collecting features. The basic procedure for capturing point,
line, and polygon features is the same, except as described below.
•Point features - Remain on station while contributory positions are captured.
•Line features – Move directly along the feature’s complete alignment as positions are captured.
•Area features – Move directly along the feature’s complete perimeter as positions are captured
244
X-MET8000 Series User Manual
8
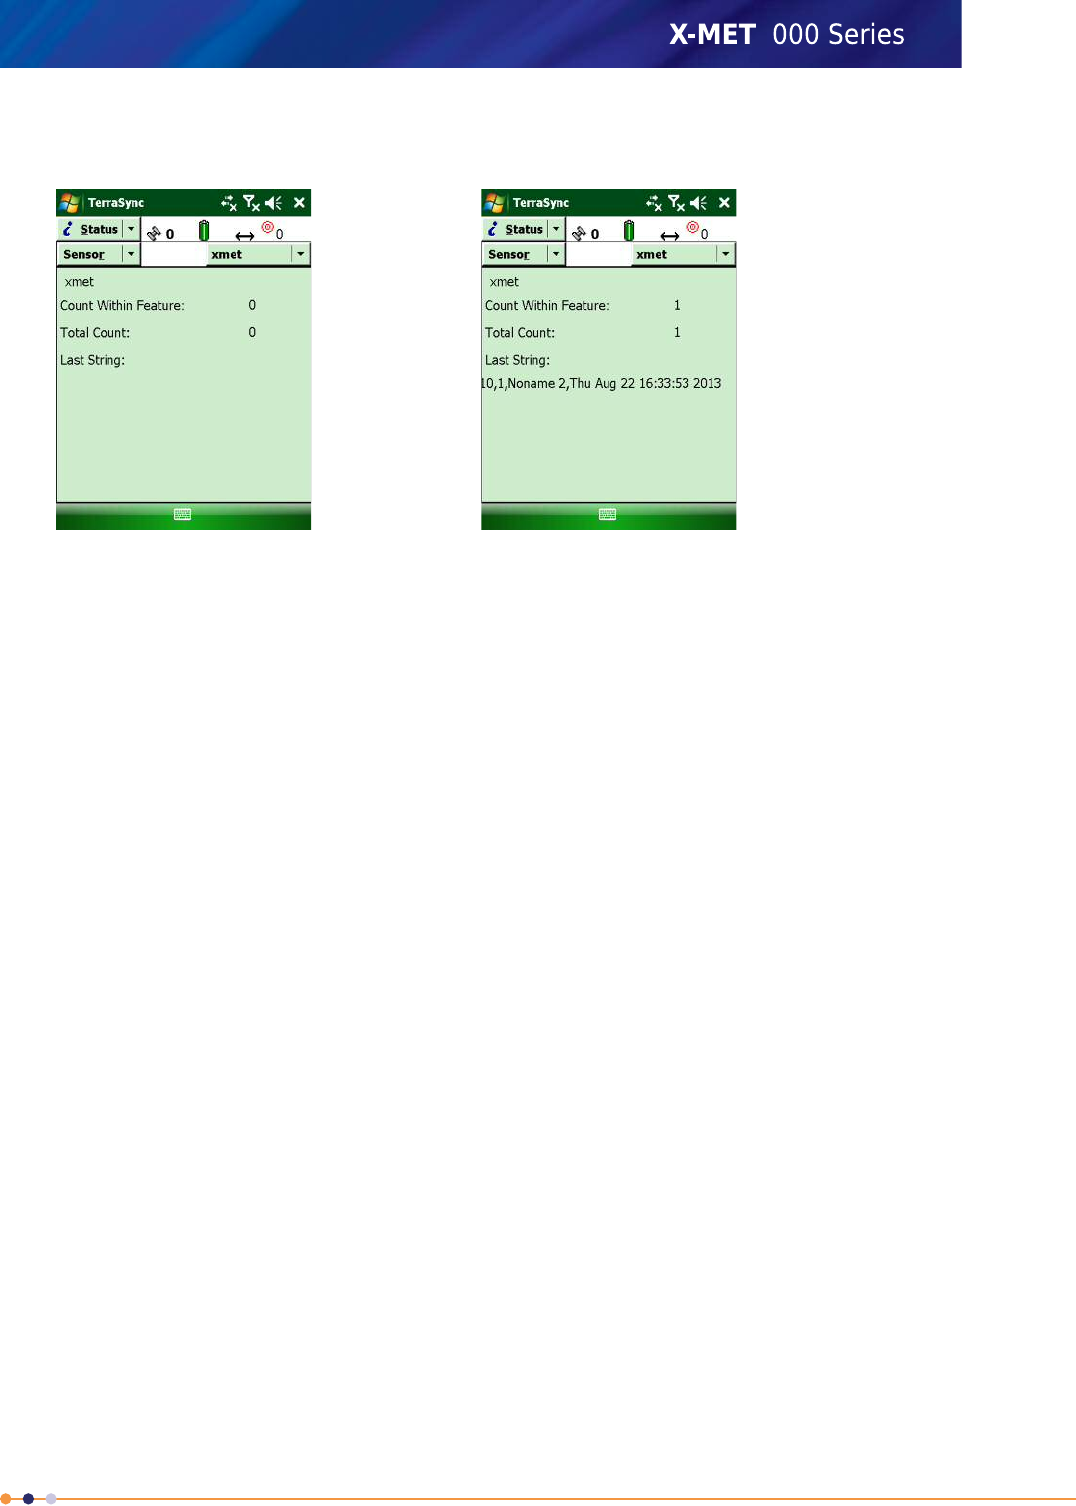
7. To view a summary of the collected sensor data, Navigate: Data >Status then Skyplot >Sensor
.
8. Make a measurement using the X-MET8000 series.
The measurement count for the X-MET8000 series sensor increases in Trimble®TerraSync™for
every measurement made using the X-MET8000 series.
How-To use the Trimble®TerraSync™Data
How to use Trimble®TerraSync™data and the measurements from the X-MET8000 series.
Post processed differential correction in the GPS Pathfinder Office software is the most accurate way
to process GNSS (Global Navigation Satellite System) data. In the field, you collected autonomous
and/or real- time corrected data, while base data was stored at base stations nearby. The data sets
are loaded into the GPS Pathfinder Office software where corrections are applied. Any real-time data
that has been collected can be “recorrected” in the GPS Pathfinder Office software to achieve the best
possible results.
After you display your corrected data file, you can:
• Edit any unwanted positions
• Verify that the feature information is correct, and edit any attributes
• Export your data to a format that integrates with your software requirements.
To install Trimble®TerraSync™/Pathfinder/ArcGIS and similar software please refer to the installation
guides for the software in question.
To transfer the Trimble®TerraSync™software files between a data collector and an office computer,
you need one of the following installed on the office computer:
• Compatible version of the GPS Pathfinder Office software
• The Trimble Data Transfer utility, which is available for free download from the Trimble website at
http://www.trimble.com/datatransfer.html
You also need one of the following installed on the office computer:
• ActiveSync technology, version 4.5 or later, if you are running a Microsoft Windows operating system
other than the Windows Vista operating system.
• Windows Mobile Device Center, if you are running the Windows 7 or Windows Vista operating system.
245
X-MET8000 Series User Manual
8

Transfer the data files from Trimble®TerraSync™using the Data Transfer utility in the Pathfinder
Office Software for post processing.
The X-MET8000 series measurement results are included in the Trimble®TerraSync™data files if the
Full Data option is used and has to be parsed before use as Trimble®TerraSync™limits messages to
256 characters and the measurement results are split over multiple messages. If the Summary option
is used for the X-MET8000 series data, the measurement files must be fetched separately from the
X-MET8000 series device. The Measurement ID contained in the summary can be used to obtain the
full measurement result using the X-MET8000 series Application Programming Interface (XAPI).
Troubleshooting GPS
Use this information to diagnose any problems with the X-MET8000 series and GPS or Location. If this
information does not deal with the problem, refer to the local Oxford Instruments representative.
Troubleshooting GPS
If the X-MET8000 series can't connect to the GPS receiver, follow these steps:
Verify that the GPS receiver is switched On.
Verify that Bluetooth is enabled on X-MET8000 series, if not enable Bluetooth on the X-MET8000 series.
Verify that the GPS device is recognized by the X-MET8000 series and that the GPS device is connected
as a GPS-device on the X-MET8000 series.
Check the satellite information on the X-MET8000 series.
If none of the above resolves the problem, go through the GPS/Bluetooth setup procedure for the
X-MET8000 series.
Troubleshooting unavailable Location
The X-MET8000 series can't determine the location, GPS-device is present.
Make sure the GPS device has a clear view of the sky, please note that GPS-receivers do not work
properly indoors.
Place the GPS receiver in a good location with clear view of the sky to get a fix on the location.
If the GPS receiver is unable to get a fix on the location, restart the GPS receiver.
Check satellite data in the X-MET8000 series to verify that the location information is available on the
X-MET8000 series.
If the problem persists please refer to the GPS receivers manual for more information.
Troubleshooting Trimble®TerraSync™
In case of problems with Trimble devices, Trimble®TerraSync™or other equipment, follow these steps
and for further information refer to the users guides for the equipment in question.
Verify that the Trimble-GPS receiver is switched On.
Verify that Bluetooth is enabled on both the X-MET8000 series and the GPS device, if not then enable
Bluetooth.
Verify that the GPS device is recognized by the X-MET8000 series and that the GPS device is connected
as a GPS-device on the X-MET8000 series.
Verify that the X-MET8000 series is visible as an external sensor in Trimble®TerraSync™, if not please
follow the setup instructions.
246
X-MET8000 Series User Manual
8

X-MET Application Programming Interface
The X-MET8000 series provides software access to measurement data and other information over
USB or WLAN connection.
X-MET Application Programming Interface (XAPI)
XAPI is a RESTful web service accessible via the URL http://10.0.0.1:8080/xapi/ if the X-MET8000 series
is configured to use the default IP address of 10.0.0.1. The data is returned in XML format. This
document contains examples of retuned data and an XML Schema Document "xapi.xsd" is provided
for reference. The X-MET8000 series can also be configured to push new measurement results to a
HTTP server.
Oxford Instruments Analytical Customer Support provides example files for usage of the XAPI on
request.
Resources
The following resources under the XAPI URL can be queried with HTTP GET request.
/A directory of top level resources. The following list is returned in software version 1.2:
<DirectoryListing>
<Entry name ="Measurements" xlink="measurements" />
<Entry name ="Methods" xlink="methods" />
<Entry name ="Report Templates" xlink="reporttemplates" />
<Entry name ="Report PDF" xlink="reportpdf" />
<Entry name ="Push Client Settings"
xlink="pushclientsettings" />
</DirectoryListing>
/measurements A list of all available measurements. The list can be filtered using HTTP GET
parameters startDate,endDate,measurementNamePart and methodNamePart. For example,
the URL /measurements?startDate=2011-02-16 lists measurements with date 16th February 2011 or
later. Entries in the list have the datetime,methodName,id and name attributes:
<Measurements>
<MeasurementRef datetime="2011-01-01T13:01:56.253"
methodName="metal_fp" id="1" xlink="1"
name="Noname 1" />
</Measurements>
Individual measurement resources are located at /measurements/<id> where the <id> is the ID
number of the measurement. Normal Measurements use the Measurement root element, average
measurements have an AverageMeasurement element instead. Depending on the method used
there is at least one FundamentalParametersResult,EmpiricalAssayResult or
EmpiricalIdentificationResult element. An average measurement also have an AverageResult
element.
FP and empirical assay results contain ConcentrationResults and Grades elements while an
identification method result contains an IdentificationResults element instead. The Spectrums,
AdditionalInfo, and Location (GPS position) elements are common to all result types.
<Measurement measurementTime="2011-01-01T13:01:56.253"
id="1" name="Noname 1">
<Result>
<FundamentalParametersResult1
measurementTime="2011-01-01T13:01:56.253"
name="Noname 1" measurementDuration="6">
<ScreeningInfo>
<ScreeningMethod name="metal_fp" />
247
X-MET8000 Series User Manual
8
</ScreeningInfo>
<spectrums>
<Spectrums>
<SpectrumRef xlink="/xapi/spectrums/1" />
</Spectrums>
</spectrums>
<ConcentrationResults>
<ConcentrationResult name="Fe"
standardDeviation="0.259588"
numberOfDecimals="2" concentration="68.6963"
unit="%" />
</ConcentrationResults>
<Grades>
<Grade name="SS316" match="0.612988">
<GradeElement elementShortName="Fe"
highLimit="0.8" result="OK"
lowLimit="0.6" />
</Grade>
</Grades>
</FundamentalParametersResult>
</Result>
</Measurement>
/spectrums The resource /spectrums/<id> contains the mapping from channels to energy (slope>
and intercept units), measurement parameters (current and voltage and the counts for each
channel.
<Spectrum slope="20046" name=""
measurementTime="2011-01-01T13:04:15 current="10"
intercept="0" voltage="40" id="3" accumulationTime="5">
<Counts value="0" channel="0" />
<Counts value="0" channel="1" />
...
</Spectrum>
/methods A list of methods in the device with method ID and name.
<Methods>
<MethodInfo id="1" name="Aluminium" />
<MethodInfo id="2" name="Aluminium ID" />
<MethodInfo id="3" name="alloy_fp" />
</Methods>
/reporttemplates A list of report templates in the device with name, modification date and ID.
The ID is used for generating PDF reports.
<ReportTemplates>
<ReportTemplateInfo
modificationDate="2011-01-01T14:31:10.249"
id="1" name="basic" />
</ReportTemplates>
/reportpdf Generate and return a measurement report in the PDF format used by the report generator
in device GUI and web GUI. Report template and measurements must be selected using the
reportTemplateId and measurementId GET parameters. For example, the URL
/reportpdf?reportTemplateId=1&mesurementId=10&mesurementId=12 would generate report PDF
using template 1 ad containing the two measurements with IDs 10 and 12.
/pushclientsettings returns current settings of the push client. The default values are
<pushclientsettings>
<server-url>http://localhost:5000/measservice</server-url>
<user>user</user>
248
X-MET8000 Series User Manual
8

<password>password</password>
<buffersize>0</buffersize>
<retryinterval>60</retryinterval>
<send-measurements>false</send-measurements>
<send-spectrums>false</send-spectrums>
</pushclientsettings>
The parameters are explained below.
Push API
The X-MET8000 series can be configured to send new measurements and spectra to a specified URL
in HTTP POST requests. The push client is enabled and configured by performing a HTTP PUT request
to the /pushclientsettings resource in the format defined above. If the PUT request was successful,
HTTP Status code 200 OK is returned and the new settings come to effect immediately. In case of an
error, HTTP Status code 400 Bad Request is returned and settings are not modified. Settings are saved
and restored when the X-MET8000 series device is restarted.
The following parameters can be set:
•server-url: Valid server URL to the root directory of the push-server.
•user: Username used in HTTP Basic authentication.
•password: Password used in HTTP basic authentication.
•buffersize: The amount of extra spectra and measurement results that are stored in a queue in
case of a connection error. Buffer size must be an integer in range [0, 100]. No data is sent if
buffer size is set to 0.
•retryinterval: Interval in second between retry attempts in case of a connection error. Value must
be a positive integer.
•send-measurements: Configures if measurements results are sent to the server. Valid values
are "true" and "false".
•send-spectrums: Configures if spectra are sent to the server. Valid values are "true" and "false".
Push Client sends spectra and measurement results to the server whenever a new spectrum or result
is finished. Measurements are sent in a HTTP POST request to the URL
<server-url>/[serial-number]/measurements where [serial-number] is the serial number of the
X-MET7000 series
Measurement results are sent in the same XML format that is used for the /measurements resource,
except that the Spectrums element containing links to spectra is replaced with a SpectrumData
element containing the data directly.
Spectra are sent to the URL <server-url>/[serial-number]/spectrums in the same XML format
used for the /spectrum resource.
Push Client uses HTTP Basic authentication when communicating with the server. In case of an error,
Push Client keeps spectra and measurements in the queue and tries sending again every
<retryinterval> seconds.
249
X-MET8000 Series User Manual
8

Additional Troubleshooting
Additional troubleshooting information applicable to a supervisor. When it is necessary to service the
X-MET8000 series, a supervisor can do a test measurement and save diagnostics information to send
to Oxford Instruments.
A test measurement does not use the methods to define the measurement parameters, but allows a
supervisor to set them directly. The diagnostics information should include a particular test
measurement with the Alloy CRM sample, and is saved to a compressed archive tar file.
Missing Menus Or Methods
Problem
Occasionally, certain menu items and methods are not available.
Solution
This can occur when a supervisor logs in as an operator. A supervisor can access more of the features
and functions of the X-MET8000 series. The features and functions available to an operator are suitable
for someone who takes measurements most of the time.
A supervisor can access all of the methods available within the X-MET8000 series, including the
empirical calibrations. An operator does not need to access empirical calibrations because a mode
will auto select the most applicable calibration.
Do A Test Measurement
Follow these steps to do a test measurement. Use the Alloy CRM sample, or an applicable check sample
or check samples for the measurement.
1. Do one of the following:
•Navigate: Menu >Time
•Navigate: Status Bar >Measurement Time
Make sure that Timed Assay is set correctly.
250
X-MET8000 Series User Manual
8
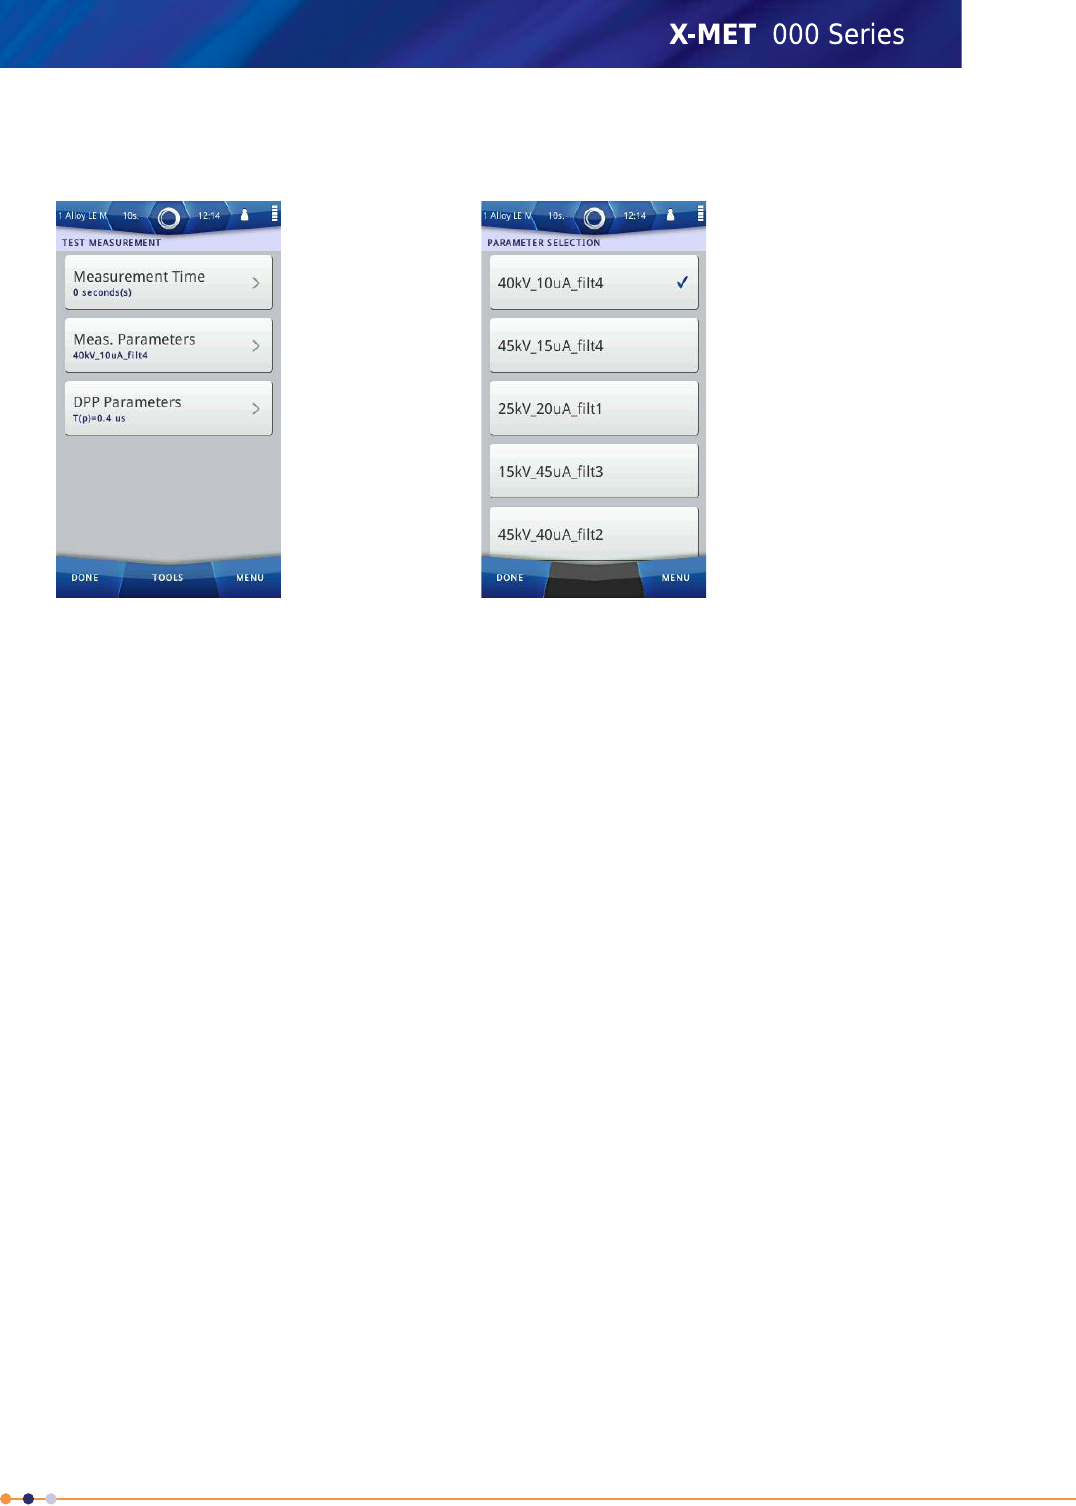
2. Navigate: Menu >Settings >Instrument Configuration >Test Measurement .
The Test Measurement screen appears.
3. Tap Measurement Time.
4. Use the numeric keypad to type the measurement time, and then tap Done to return to the Test
Measurement screen.
5. Tap Measurement Parameters.
The Parameter Selection screen appears.
6. Tap one of the following to select it:
•40 kV 10 µA Filt 1
•45 kV 15 µA Filt 4
•25 kV 20 µA Filt 1
•15 kV 45 µA Filt 3
•45 kV 40 µA Filt 2
•13 kV 45 µA Filt 3
7. Make sure that the correct measurement parameter is selected, and then tap Done to return to
the Test Measurement screen.
251
X-MET8000 Series User Manual
8
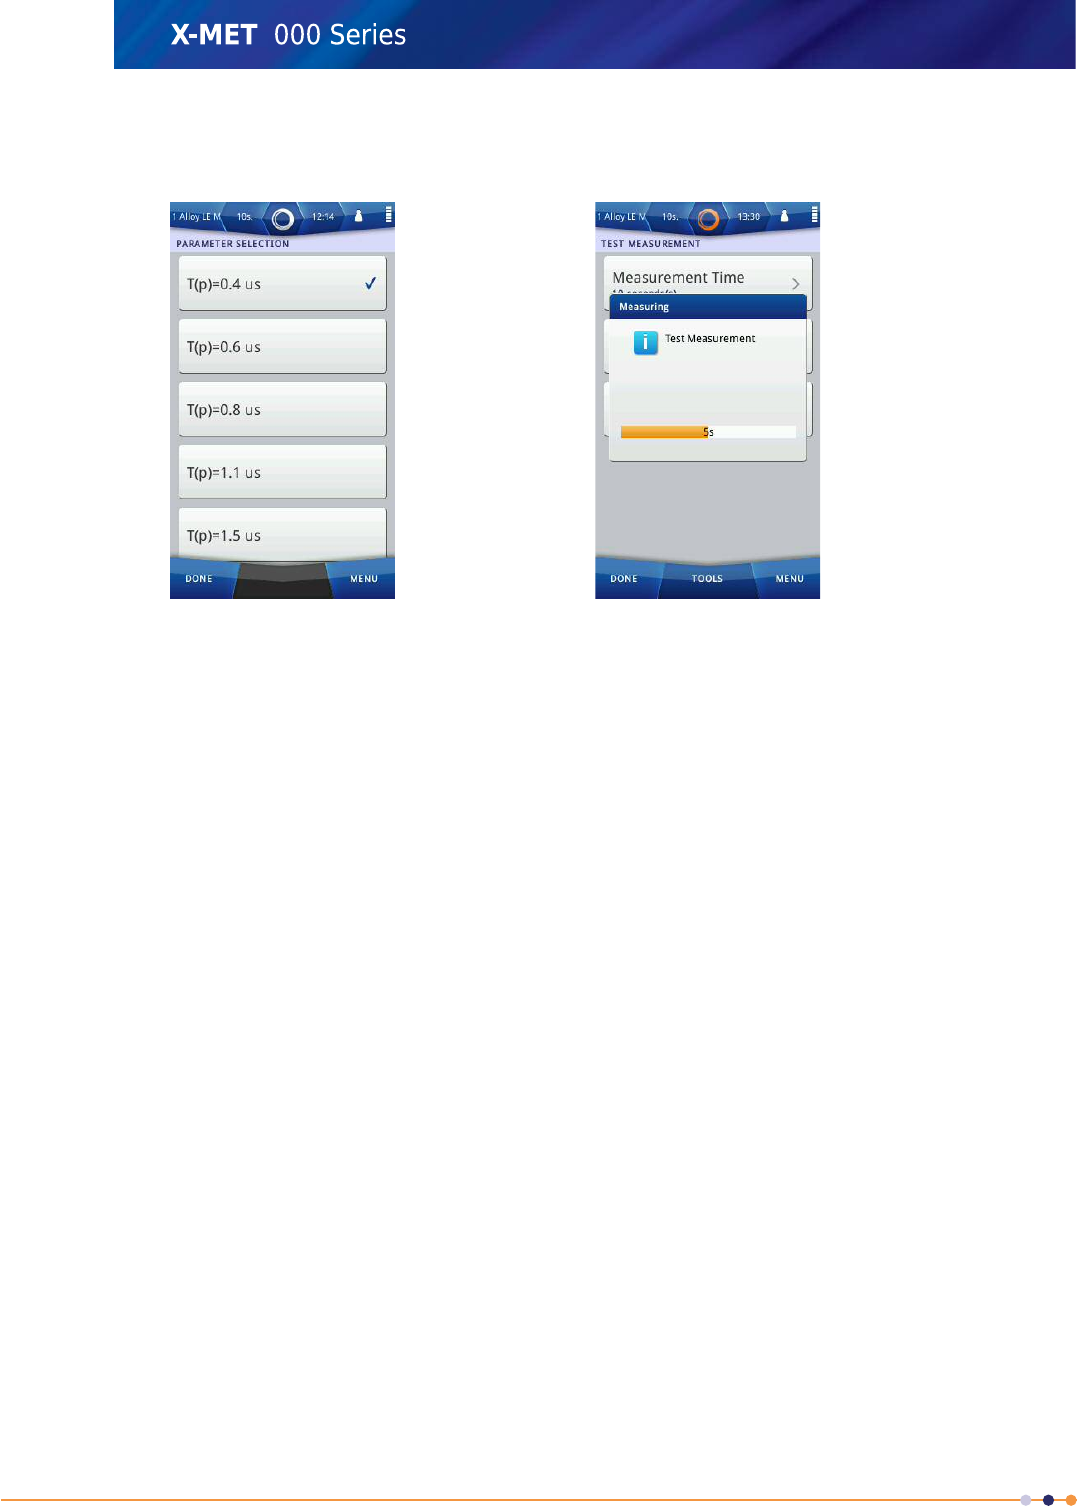
8. Tap DPP Parameters.
The Parameter Selection screen appears.
9. Tap one of the following to select it:
•T(p) = 0.4 µs
•T(p) = 0.6 µs
•T(p) = 0.8 µs
•T(p) = 1.1 µs
•T(p) = 1.5 µs
10. Make sure that the correct measurement parameter is selected, and then tap Done to return to
the Test Measurement screen.
11. Take a measurement in the usual way.
A Measuring dialog box appears.
The Test Measurement screen appears at the end of the measurement.
Refer to: View The Spectra on page 111.
12. Tap Done three times to return to the main screen.
252
X-MET8000 Series User Manual
8
Save Diagnostics Information
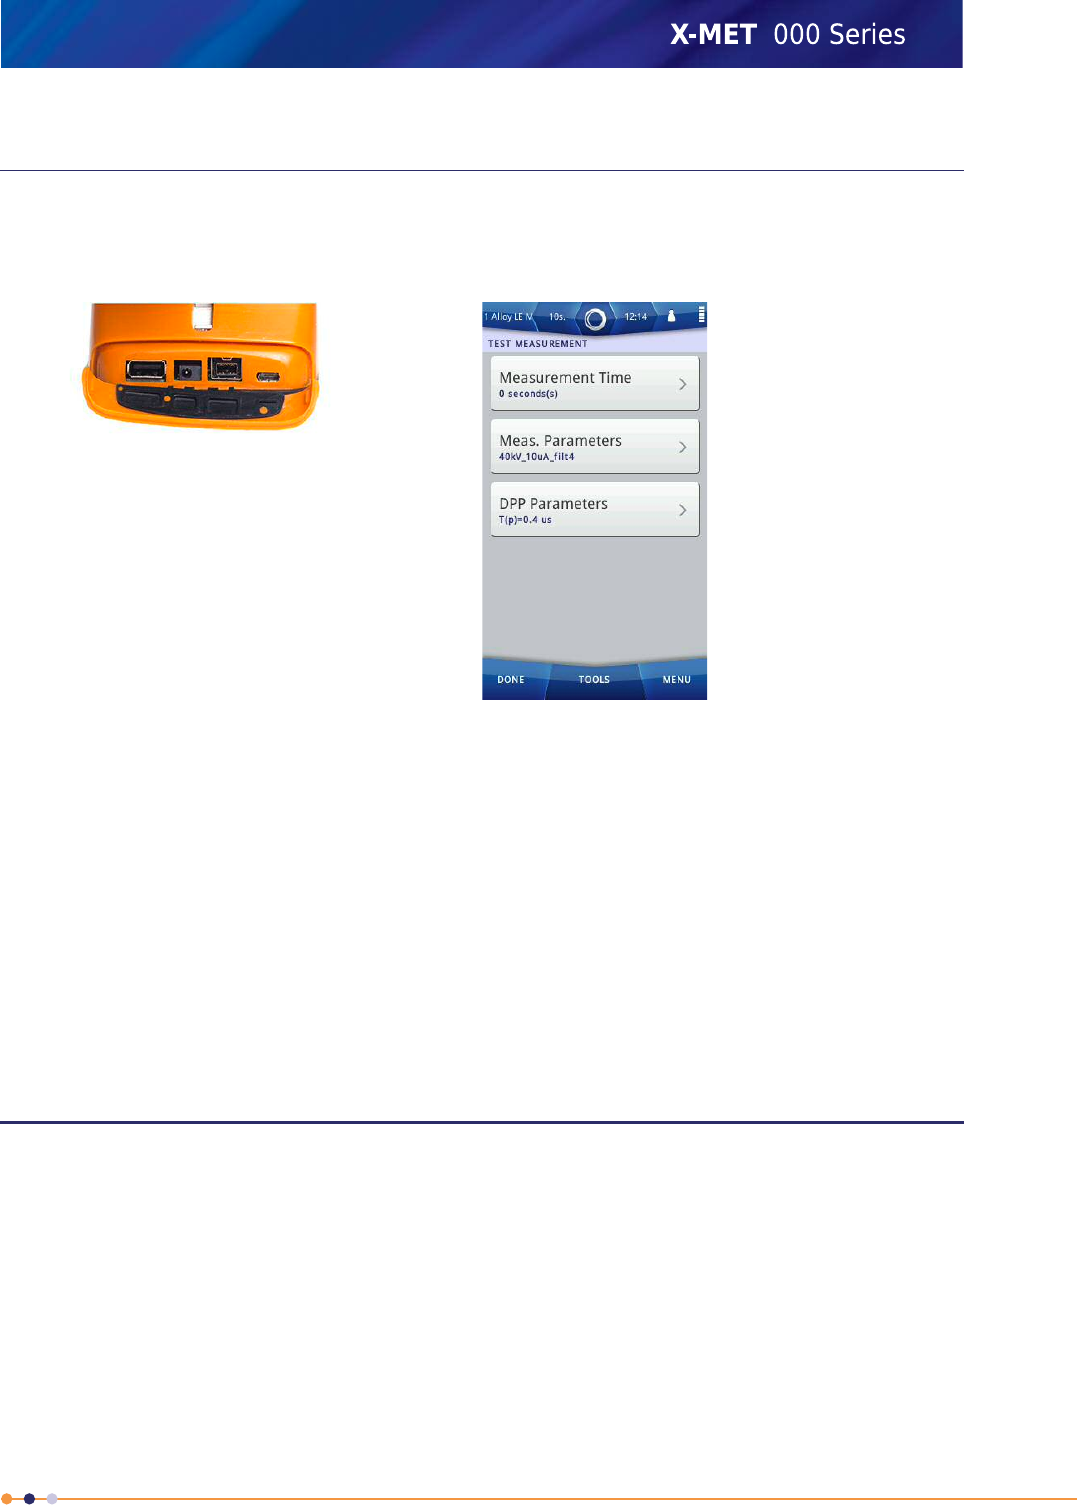
Follow these steps to save the diagnostics information to a compressed archive tar file. This includes
a test measurement with specific parameters and the Alloy CRM sample.
1. Open the connector cover underneath the display to access the external connections.
2. Plug a USB memory device into the USB A connector.
3. Refer to: Do A Test Measurement on page 250 and set these parameters.
•Measurement Time: 60 s
•Measurement Parameters:40 kV 10 µA Filt 4
•DPP Parameters:T(p) = 1.1 µs
4. Take the test measurement with the Alloy CRM sample.
5. Tap: Tools >Save Diagnostics .
The diagnostics information is saved to a tar file on the USB memory device.
6. Tap Done three times to return to the main screen.
Radiation Specifications
The Finnish Radiation and Nuclear Safety Authority, STUK, tested the X-MET8000.
Test Report TR/9/13X-MET8000
253
X-MET8000 Series User Manual
8
Primary Beam Intensity
There are regulatory limits for the permissible radiation dose rate absorbed by hands and eyes during
a year. These limits then define the maximum exposure time for hands and eyes against the sample
window surface of the X-MET8000 series and also at a distance of 100 cm to it.
EyesHands!! XMET7000 VALUES!!
15 mSv/year50 mSv/yearPermissible dose rate
26 s97 sMaximum exposure time, sample window surface
30 h100 hMaximum exposure time, 100 cm distance
•X-ray beam parameters: 50 kV / 50 µA
•Dose rate, sample window surface: 2,061 mSv/h
•Dose rate, 100 cm distance: 0.5 mSv/h
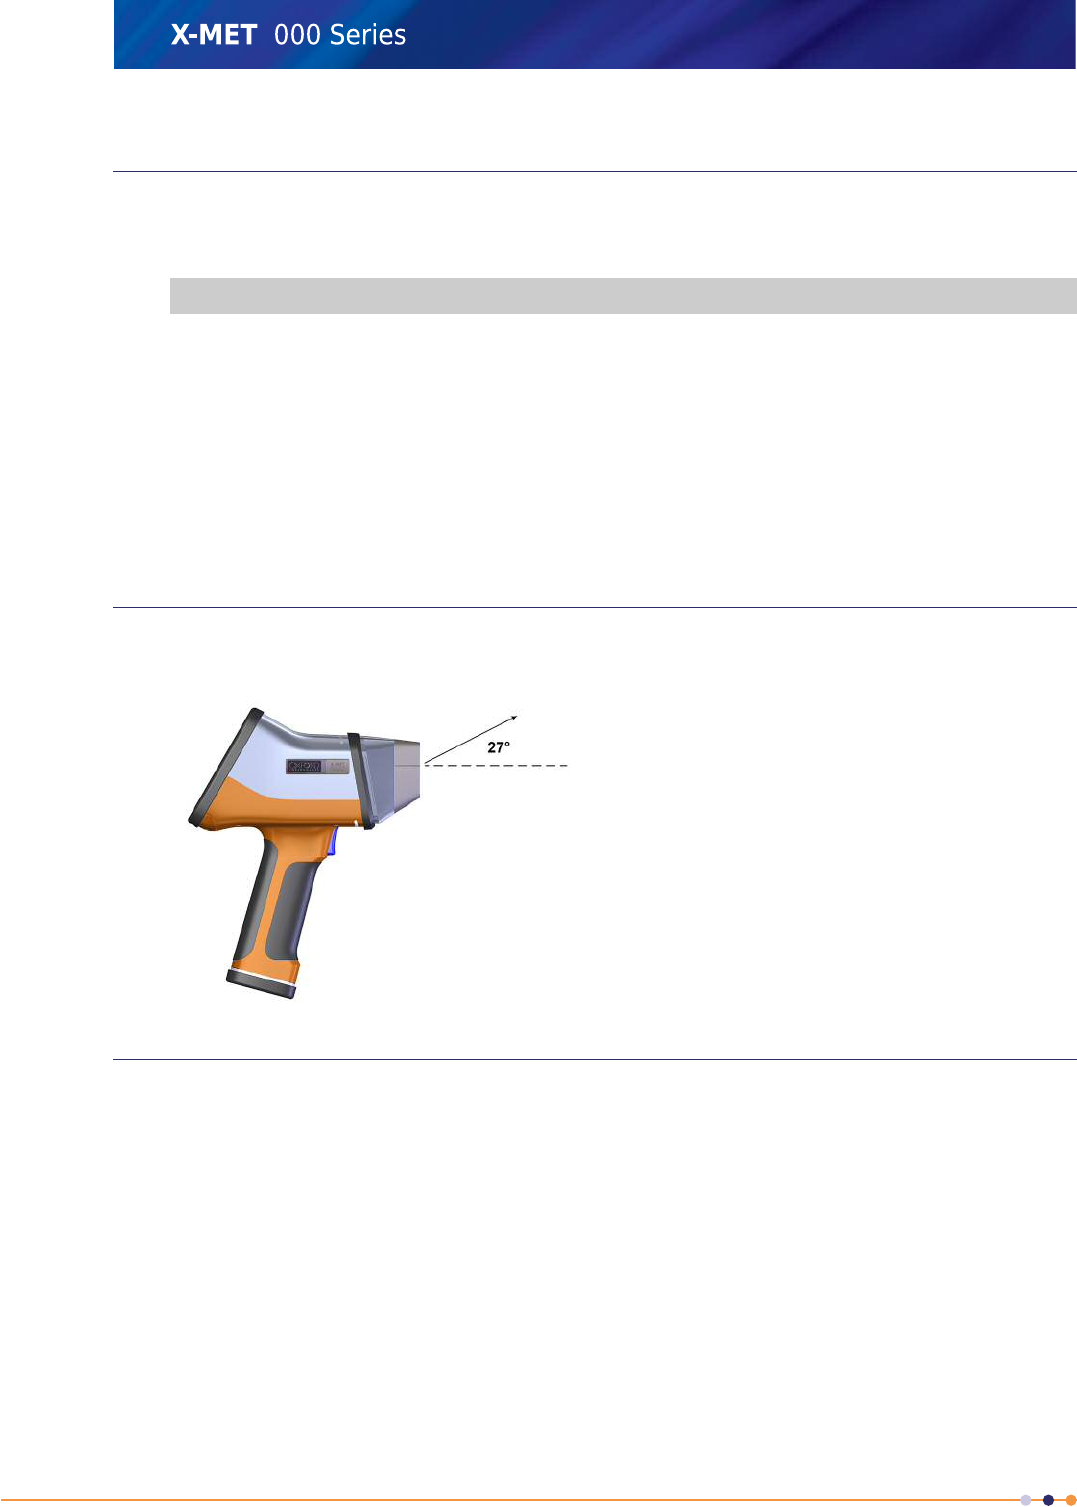
Primary Beam Direction
The safety features prevent the generation of an X-ray beam unless a sample is present. The X-ray
beam is at an angle of approximately 27° upwards.
Scattered Radiation Profile
The Finnish Radiation and Nuclear Safety Authority, STUK, tested the X-MET8000 at 17 positions
around the analyzer with a stainless steel sample. Some measurements were against the body, some
were at a distance of 10 cm.
SS316 plate, 10 mm thickStainless steel sample
254
X-MET8000 Series User Manual
8
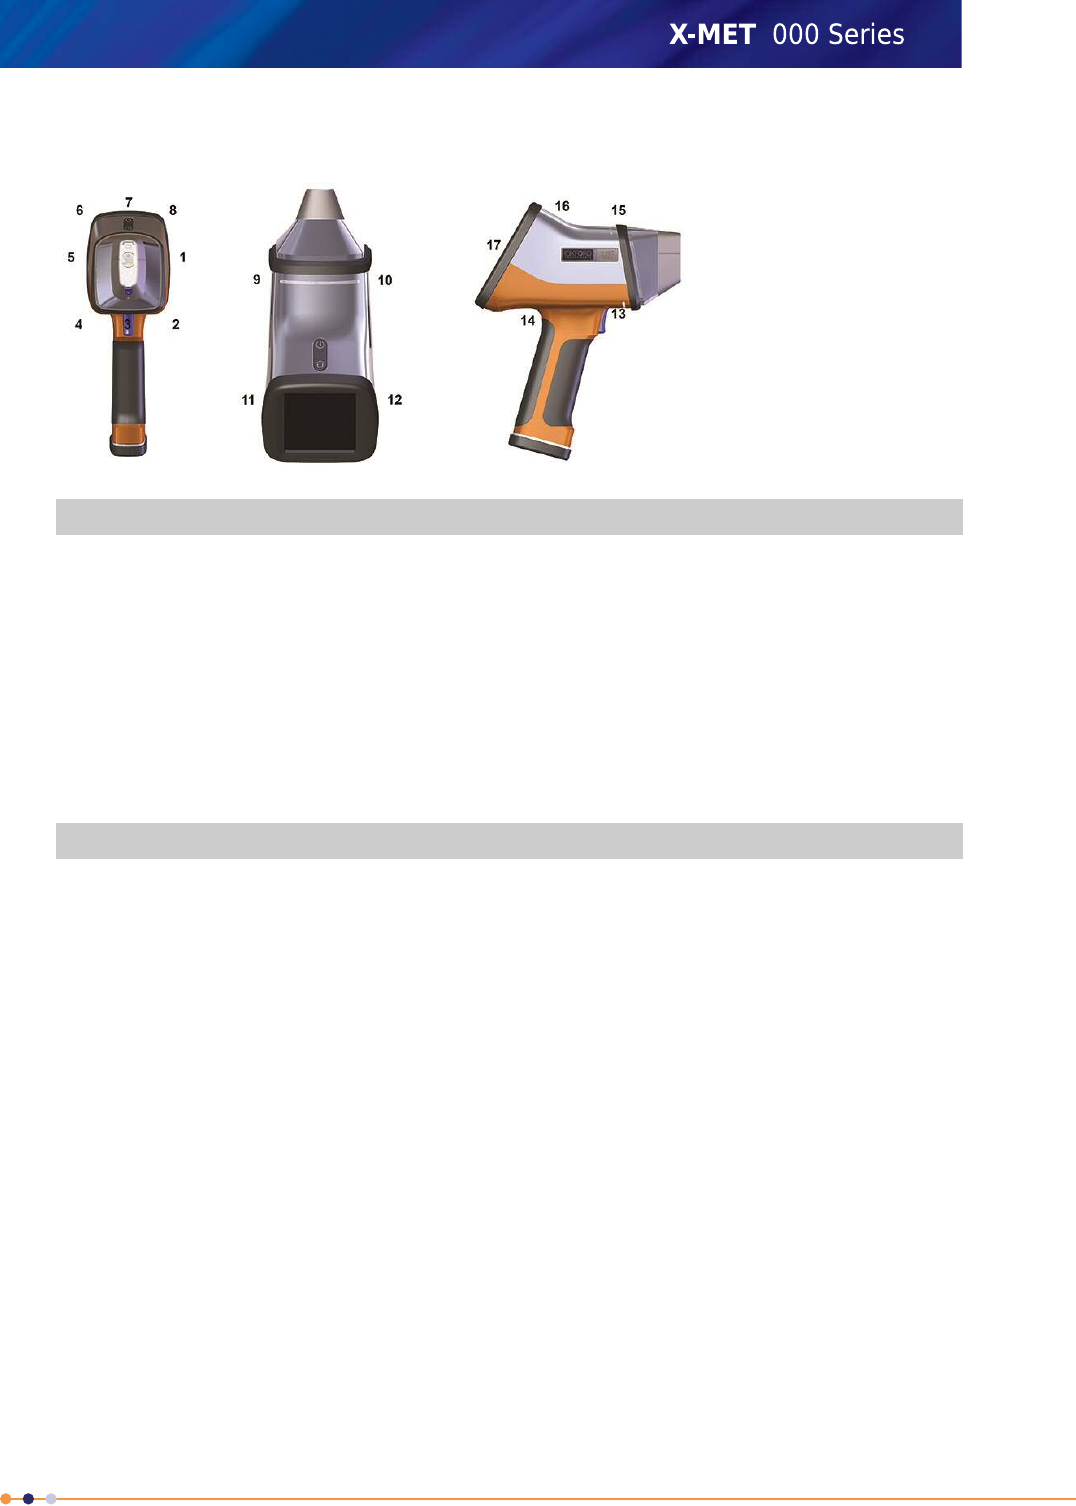
Scattered Radiation Profile Test Points
DistancePositionDistancePositionDistancePosition
0 cm1310 cm710 cm1
0 cm1410 cm810 cm2
0 cm1510 cm910 cm3
0 cm1610 cm1010 cm4
0 cm170 cm1110 cm5
0 cm1210 cm6
Scattered Radiation Profile, X-MET8000, Steel Sample
Dose RatePositionDose RatePositionDose RatePosition
< 1 µSv/h13< 1 µSv/h7< 1 µSv/h1
< 1 µSv/h14< 1 µSv/h8< 1 µSv/h2
< 1 µSv/h15< 1 µSv/h9< 1 µSv/h3
< 1 µSv/h16< 1 µSv/h10< 1 µSv/h4
< 1 µSv/h17< 1 µSv/h11< 1 µSv/h5
< 1 µSv/h12< 1 µSv/h6
255
X-MET8000 Series User Manual
8