PLUS N-31SW COPYBOARD User Manual part 1 of 2
PLUS Corporation COPYBOARD Users Manual part 1 of 2
PLUS >
Contents
- 1. Users Manual - part 1 of 2
- 2. Users Manual - part 2 of 2
Users Manual - part 1 of 2
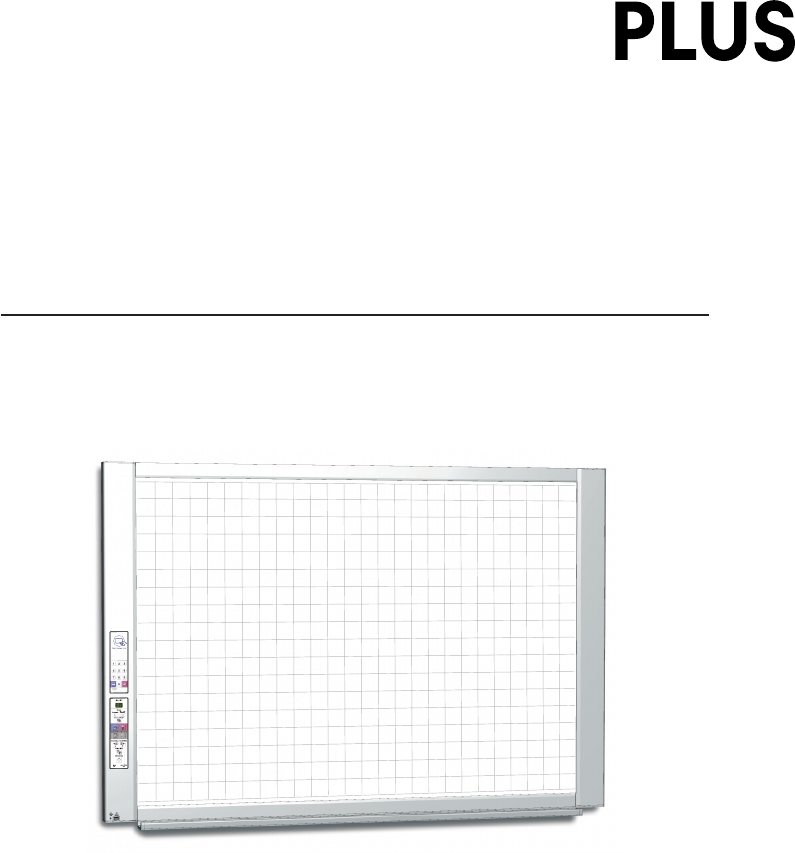
Copyboard
(Network board)
N-31S/N-31W/N-314
User’s Manual
Thank you for your purchase of the PLUS Copyboard.
Please read this User’s Manual carefully before use to take full advan-
tage of the functions of this product. After you have finished reading
the manual, please keep it for future reference.

E-2
Introduction
This manual is for the network board (model name: N-31S/N-31W/N-314).
• Themodelsarecategorizedintodifferenttypes.
Model Type
N-31S Standard size for two screens
N-31W Wide size for two screens
N-314 Standard size for four screens
ThedescriptionsanddiagramsinthismanualrefertothemodelN-31S.
Forusinganetwork,referto“N-31SeriesNetworkManual”.
* Whenfunctionsoroperationsarespecifictoacertainmodelofnetworkboard,themodelnameisspeci-
fied.
NOTE
• UseonlythepowercordandACpoweradaptersuppliedwiththenetworkboard.
ThesuppliedpowercordandACpoweradaptercannotbeusedwithotherproducts.
• Youwillbepunishedformerelyowningillegalcopies.
• Donotuseruledtypetapes.
Donotmovethesheetwithtape,etc.,attachedtoit.Doingsocouldresultinmalfunction.
• Donotattachtemplatesheetsorpapertothesheet.(Supportedmodel:N-314)
Donotcopywhilefilm-typeobjectsorpapersareattachtothesheet.Doingsocouldresultinmalfunction.
Trademarks
• MicrosoftandWindowsareregisteredtrademarksortrademarksintheUnitedStatesandothercountriesoftheMicrosoftCor-
poration.
• AdobeandAdobeAcrobatReaderaretrademarksofAdobeSystemsIncorporated.
• Safari,Apple,MacOSandMacintosharetrademarksorregisteredtrademarkofAppleComputer,Inc.,oftheUnitedStates.
• MifareisaregisteredtrademarkofNXPSemiconductors.
Thetrademarksofthevariouscompaniesandtheproducttrademarks,evenwhennotwrittendown,willbegivenduerespect.
Productnamesandcompanynamesappearinginthismanualareregisteredtrademarksortrademarksoftherespectivecompa-
nies.
(1) Thecontentsofthismanualmaynotbereprintedinpartorwholewithoutpermission.
(2) Thecontentsofthismanualaresubjecttochangewithoutnotice.
(3) Greatcarehasbeentakeninthecreationofthismanual;however,shouldanyquestionablepoints,errors,oromissionsbe
apparent,pleasecontactus.
(4) NotwithstandingSection(3),thiscompanywillnotberesponsibleforanyclaimsoflossorprofitorothermattersdeemedto
betheresultofusingthisunit.
(5) SinceprinterconnectedwiththenetworkboardisbasedontheuseasaperipheraldeviceforthePLUSnetworkboard,we
donotwarrantdirectconnectionwithacomputer.
(6) Manualswithincorrectcollatingormissingpageswillbereplaced.

E-3
TableofContents
MeaningoftheTermsUsedinthisManual
• Mainunit(orset):Thisreferstothenetworkboard.
• USBmemory: referstoUSBflashmemory.
• USBmemorystorage: meansthesavingofsheetsurfacedatausingMEMORY(i.e.,theUSBport)oftheoperationpanel.
• Memoryforcomputerstorage: indicatesatemporarysavinglocationoftheimagethathasbeenread.
• “copy”: Both“print”and“USBmemorysaving”meanto“copy.”
• “Sheetsurface”: refertothedrawingportion.
• “Scroll”or“move”: indicatesfeedingofthesheet
• Memoryfornetworkstorage:Memoryusedfornetworkstorage.
• Network: The communications network on which devices are interconnected in net fashion for communication (exchange of
data)betweenthedevices.Forthisnetworkboard,the“network”indicatestheLANbelow.
• LAN(LocalAreaNetwork):Aclosedcommunicationsnetworkforcommunicatingwithinarestrictedarea,suchaswithinacom-
pany.
• FTP(FileTransferProtocol):Theprotocol(communicationsrules)usedwhentransferringfilesonaTCP/IPnetwork.
Introduction ...............................................................E-2
Package Contents ......................................................E-4
Names of the Parts ....................................................E-5
Front ......................................................................E-5
Input/output terminals ............................................. E-6
Changing the Height of the Unit................................ E-7
Control Panel .......................................................... E-8
Keypad panel .......................................................... E-9
Functions of the Network board .............................E-10
Printing Functions ................................................. E-10
Saving Functions ...................................................E-11
Operation Steps .......................................................E-12
Setting the Time .......................................................E-13
Printing (printer sold separately) ............................E-15
Preparing the Printer .............................................E-15
Preparing the Printer connected to a Network ......... E-15
Basic Printing Operation ........................................ E-16
Moving the sheet surface manually ........................ E-18
Printing Thumbnails............................................... E-18
Consecutive Printing .............................................. E-19
Changing Printing Color ......................................... E-19
Using USB Memory ..................................................E-20
USB Memory Storage Procedure ............................ E-20
Saving Image Files on a Computer/Deleting Image
Files ..................................................................... E-22
Using the network board connected to a
computer ..................................................................E-24
CB Setup (Operating the Network Board’s
Buttons)....................................................................E-26
Basic setting operation ..........................................E-26
Table of Function Numbers and Settings ................. E-27
Meaning of Error Messages ....................................E-29
Troubleshooting .......................................................E-31
Scanning Adjustment (White Calibration) ..............E-33
Specifications ..........................................................E-34
Appendix ..................................................................E-35
Connections and Wiring Diagram ........................... E-35
E-4
The package contents are as described below. Please check before use.
PackageContents
Mainunit[1]
Printer*[1]
Pleaseseetheinstructionmanualoftheprinterforinforma-
tionabouttheprinteraccessories.
* Depending on the type of product you have purchased,
theprintermaybesoldseparately.
Stand[1]
A mobile stand (with casters) for supporting the main unit.
Forthecontentsofthestand’spackageandinstructionson
assembly,seethestand’sinstructionsortheseparateN-31
Series AssemblyandSetupManual.
Pentray[1]
Pen tray fixing screws (M4 × 20) (temporarily fastened on
mainunit)
N-31S/N-314:3screws,N-31W:4screws
(See the N-31 Series Assembly and Setup Manual for
assemblyinstructions.)
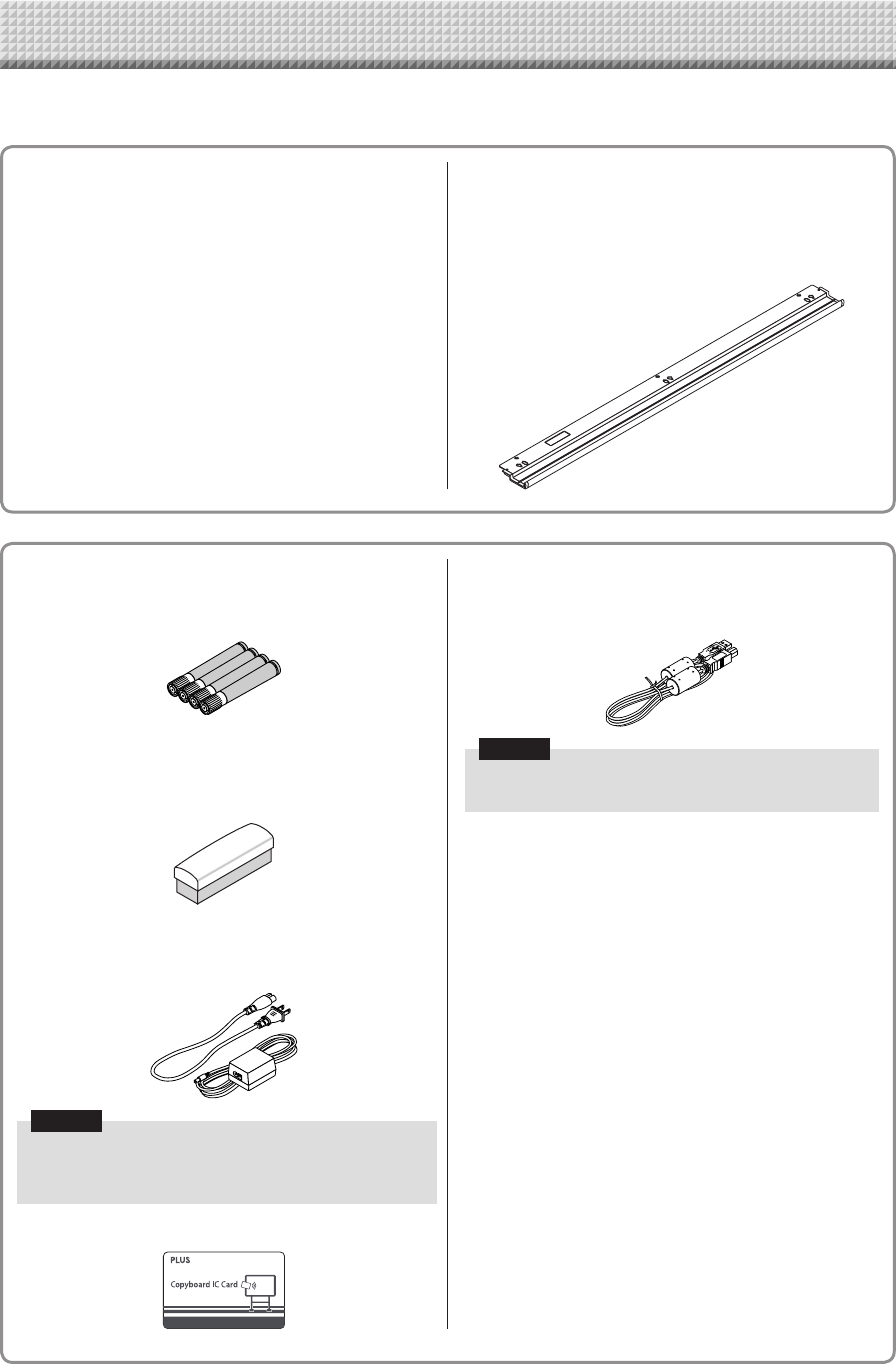
NetworkboardAccessories
Dedicatedmarkers
(Oneeachofblack,red,blue,andgreen)
Usethesemarkerstodrawonthesheetsurface.
Dedicatederaser[1](Replacementsponge[2])
Usethistoerasethedrawing.
Theeraserhasfoursideswhichcanberotatedtorenewthe
eraser.Afterusingupthefoursides,replacetheeraserwith
oneofthesuppliedsponges.
ACpoweradapter(withpowercord2.5m)[1]
This is the power adapter for supplying power to the net-
workboard(SeePageE-35).
(LTE36E-S2-3)
Notice
• The included AC power adapter and AC power cord
areexclusivelyfor usewith thisunit. Neveruse them
withotherproducts.
ICcard[1]
Foruserauthentication
USBcable(typeB↔typeA)[1]
[PLUScode715258900]
Cableforconnectingthemainunittoacomputer.
Usedformakingthedevicesettings.
Notice
• Do not use this cable for connection to the printer
(soldseparately).
Documents
User’smanual(thisdocument)[1]
Safety precautions to observe when using the network
boardanditsusageareprovided.
N-31SeriesNetworkManual[1]
Procedure on setting up network as well as procedure on
saving,printing,anddeliveringofreaddataareprovided.
QuickGuide[1]
Briefexplanationonoperation.
N-31SeriesAssemblyandSetupManual
Includesinstructions on installingthe setand connecting it
withtheprinter(soldseparately).
ImportantSafetyInformation[1]
Includes instructions to be heeded in order to use the set
safely.
E-5
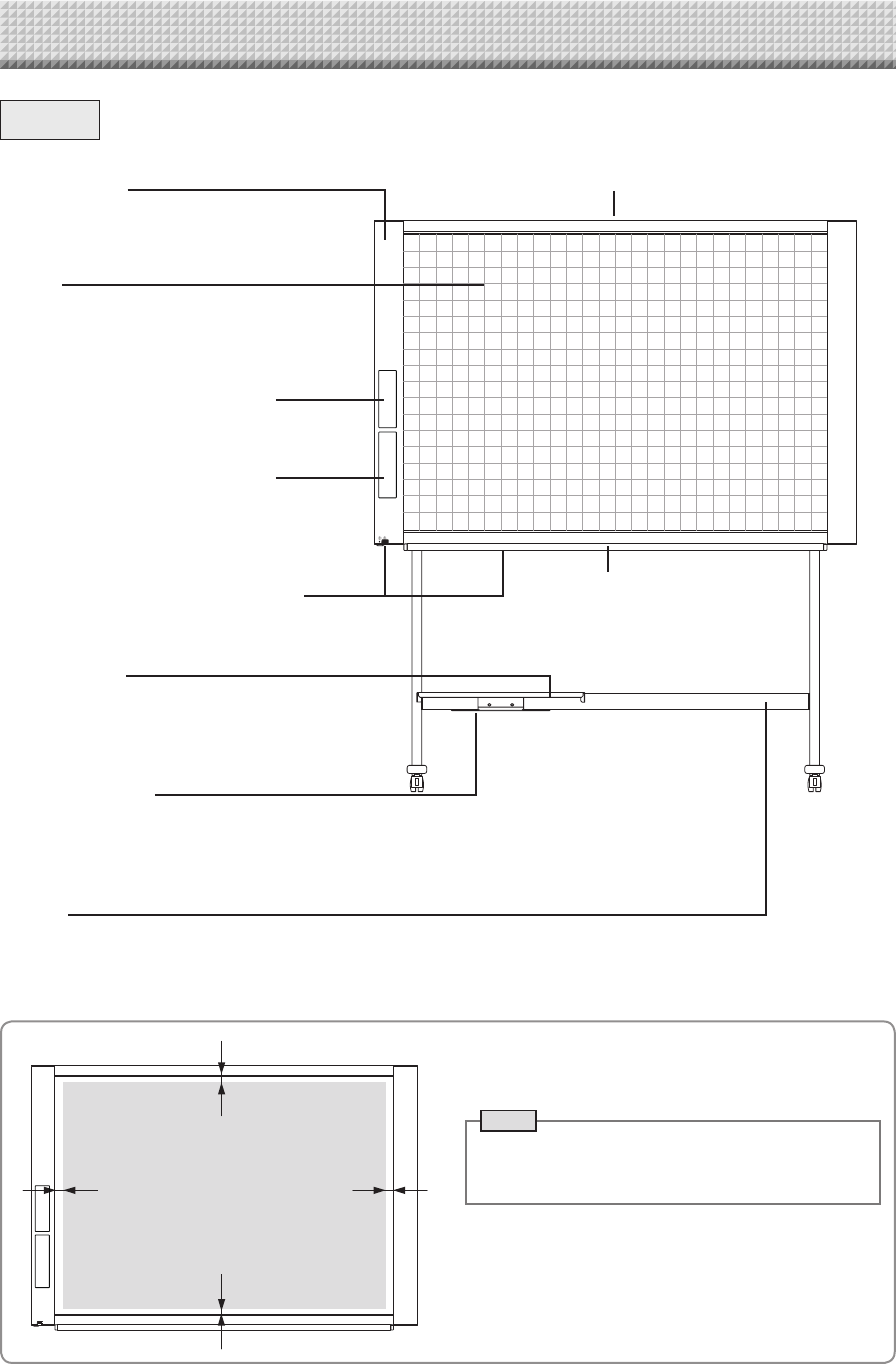
NamesoftheParts
Framecover
Sheet
Dedicatedmarkersareusedonthesheettodraw
diagramsandtowrite.
Controlpanel(SeePageE-8)
Keypadpanel(SeePageE-9)
Input/outputterminals(seenext
page)
*Locatedonthebottomsurface.
Printertable
Theprinter*isplacedhere.(SeetheN-31 Series
AssemblyandSetupManual.)
*Theprinterissoldseparately.
ACadapterbox
Store the AC power adapters of the network
board and printer here. (See the N-31 Series
AssemblyandSetupManual.)
Stand
Thisstandsupportsthenetworkboard.(Seethe
N-31SeriesAssemblyandSetupManual.)
Mainunit
Pentray
* Dependingontheproductyou havepurchased,theprintermaybe
soldseparately.
* Thisillustrationdoesnotshowtheconnectioncords.
EffectiveReadingSize
Theareathatcanbecopiedisthegrayareaofthediagram.
Note
• Itmightnotbepossibletoprintorcopywhenstoring
to USB memory or personal computer any portions
thataredrawnoutsideofthisrange.
approx.5mm
approx.10mm
approx.10mm
approx.5mm
Effectivereadingsize
Front
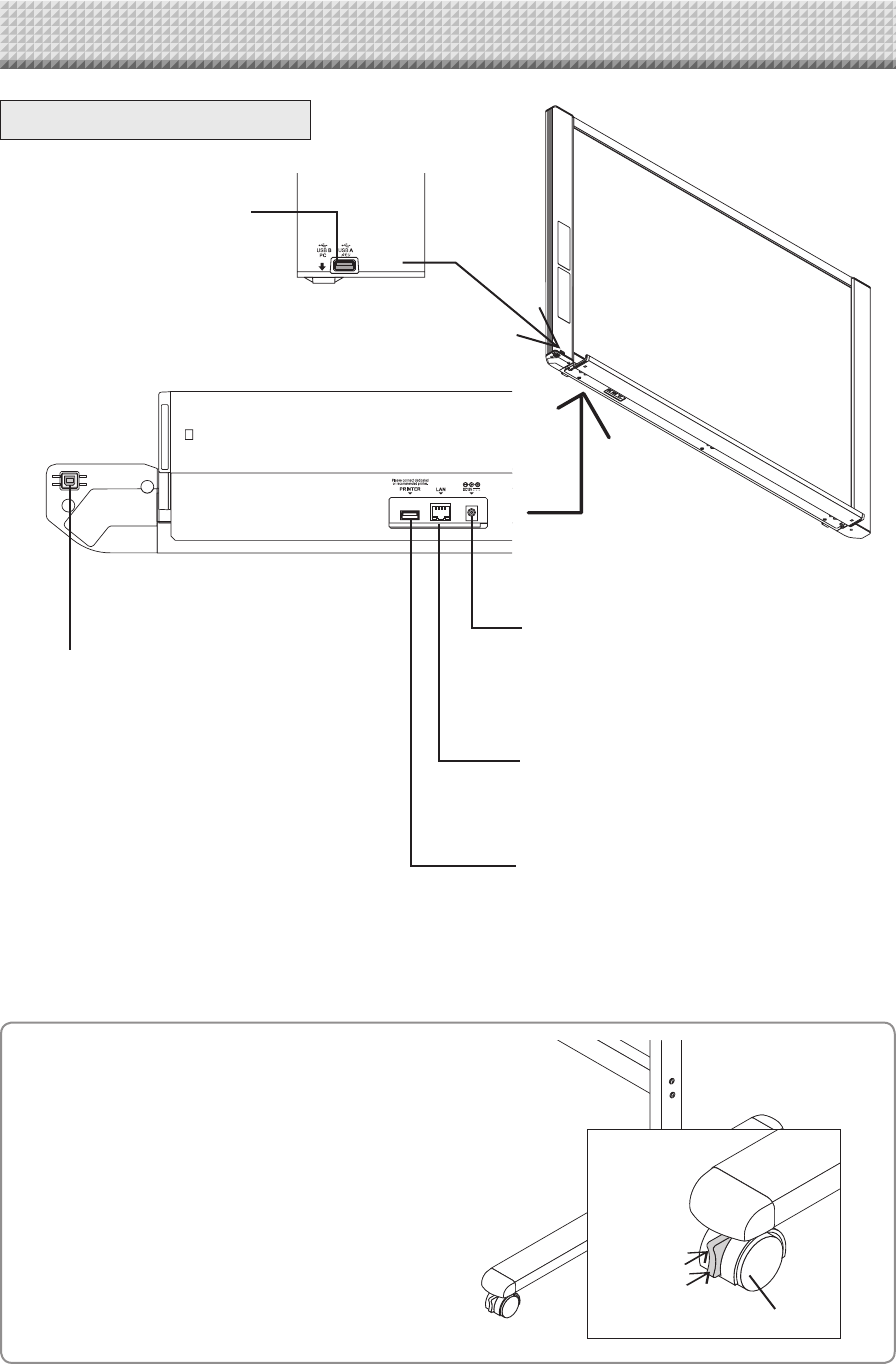
E-6
LANterminal(RJ-45)
ConnectacommerciallyavailableLANcable.
USBmemoryport(typeA)
Connect a commercially available USB
memorydevice.Scannedimagescanbe
saved.(SeepageE-20)
DCinputconnector
ConnectthiswiththeDC plugendoftheACpower
adapter.(SeePageE-35.)(Onlyconnectthesupplied
ACpoweradapter;nothingelse.)
Printerconnector(USBportTypeA)
Connect this with the USB connector of the printer
(SeePageE-35).
(The printer connector is dedicated for use with a
printer;useitonlywithaprinter.)
* This illustration does not show the printer or
connectioncords.
Personalcomputer(PC)dedicatedUSB
port(TypeB)
ConnectthiswiththeUSBport(typeA)ofthePC.
Used to do the Simple Network Settings for this
product.(Refertotheseparate“N-31SeriesNetwork
Manual”.)Canalsobeusedtocopyscannedimages
ontothecomputer.(SeepageE-24.)
Theconnectorislocatedonthebottomsur-
faceofthemainunit.
Thediagramviewisseenfromthebottom.
NamesoftheParts
Unlock
Lock
Caster
Locking/unlockingthestand’scasters
After installation, lock the casters with the stoppers. When
movingthestand,unlockthecaster’sstoppers.
Thestoppersarelockedwhenthebottomispressed.Press
thetoptounlockthem.
Input/outputterminals
E-7
NamesoftheParts
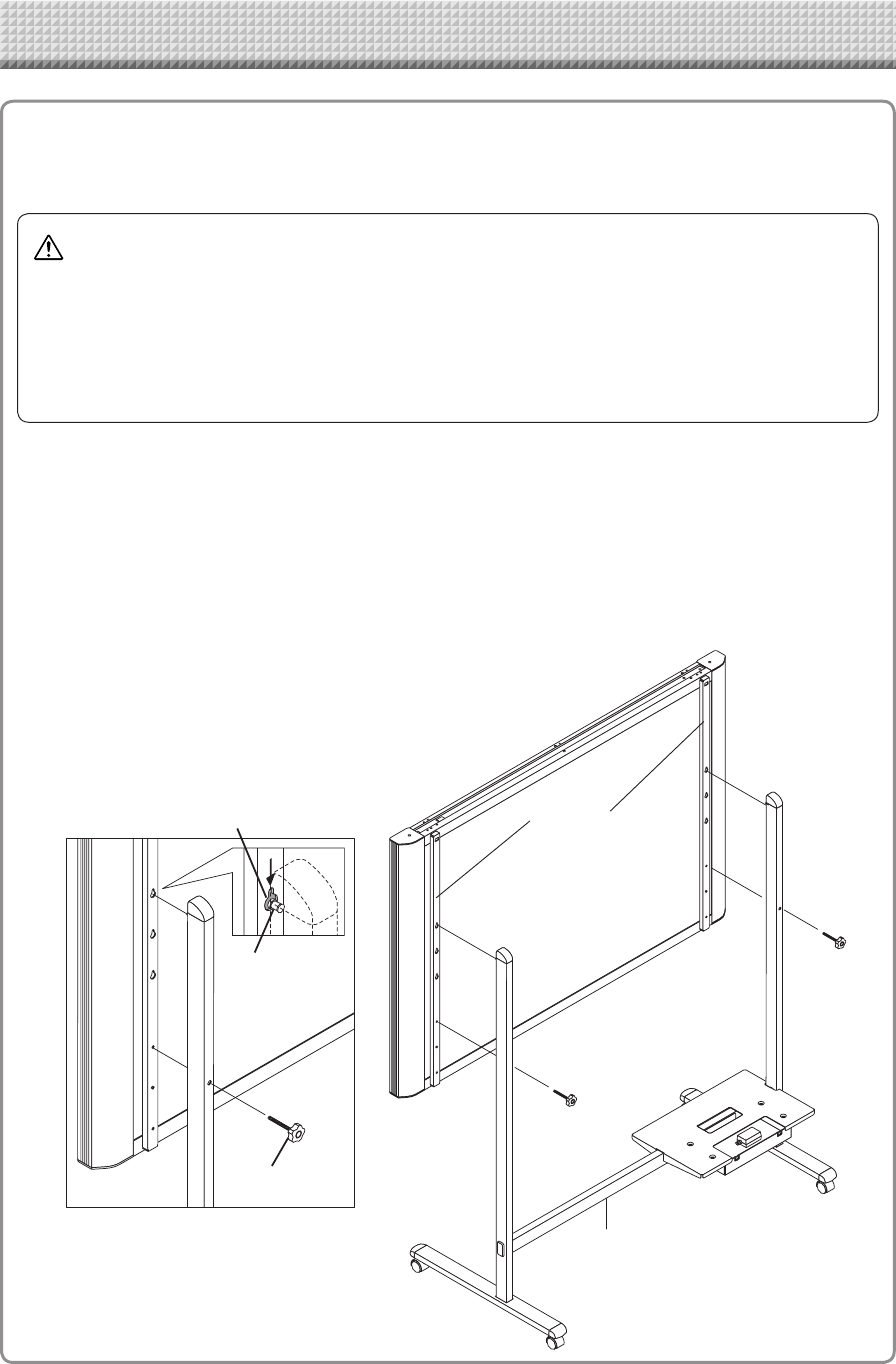
(1) Unplug the power cord from the wall power outlet, then disconnect all the connection cords from
the main unit.
(2) Remove the locking knobs (one on each side).
(3) Change the position of the main unit support pieces.
Lift the main unit about 1 cm to unhook it.
Insert the stand’s hooks securely into in the mounting holes in the main unit’s support pieces (one on
each side).
(4) Fasten the two locking knobs (left and right) to the mount support pieces.
(5) Connect all the connection cables.
ChangingtheHeightoftheUnit
This is the height adjustment when setting up the network board on the optional stand. The stand height
can be adjusted to 3 levels by 100 mm.
* Thisillustrationdoesnotshowtheconnectioncords.
Mountinghole
Hook
lock-screw
Rearframes
lock-screws
Stand
CAUTION
• Atleasttwopersonsshouldholdthemainunit.Ifnot,themainunitcoulddroportip,resultinginaccidentalinjury.
• Lockthestand’scastersbypressingthebottomofthecasterlockbutton.Ifnot,thestandcouldmovewhilethemain
unitisbeingmountedorremoved,resultinginaccidentalinjury.
• Afterunpluggingthepowercordfromthewallpoweroutlet,disconnectalltheconnectioncordsfromtheset’sinput/
outputterminals.Ifthesetisremovedwithoutdisconnectingthecords,itcouldtip,resultinginaccidentalinjury.
• Ifaprinterismountedontheset,removetheprinterbeforestarting.Ifnot,thestandcouldtipwhilethemainunitis
beingmountedorremoved,resultinginaccidentalinjuryduetotheprinterdroppingortippingover.
E-8
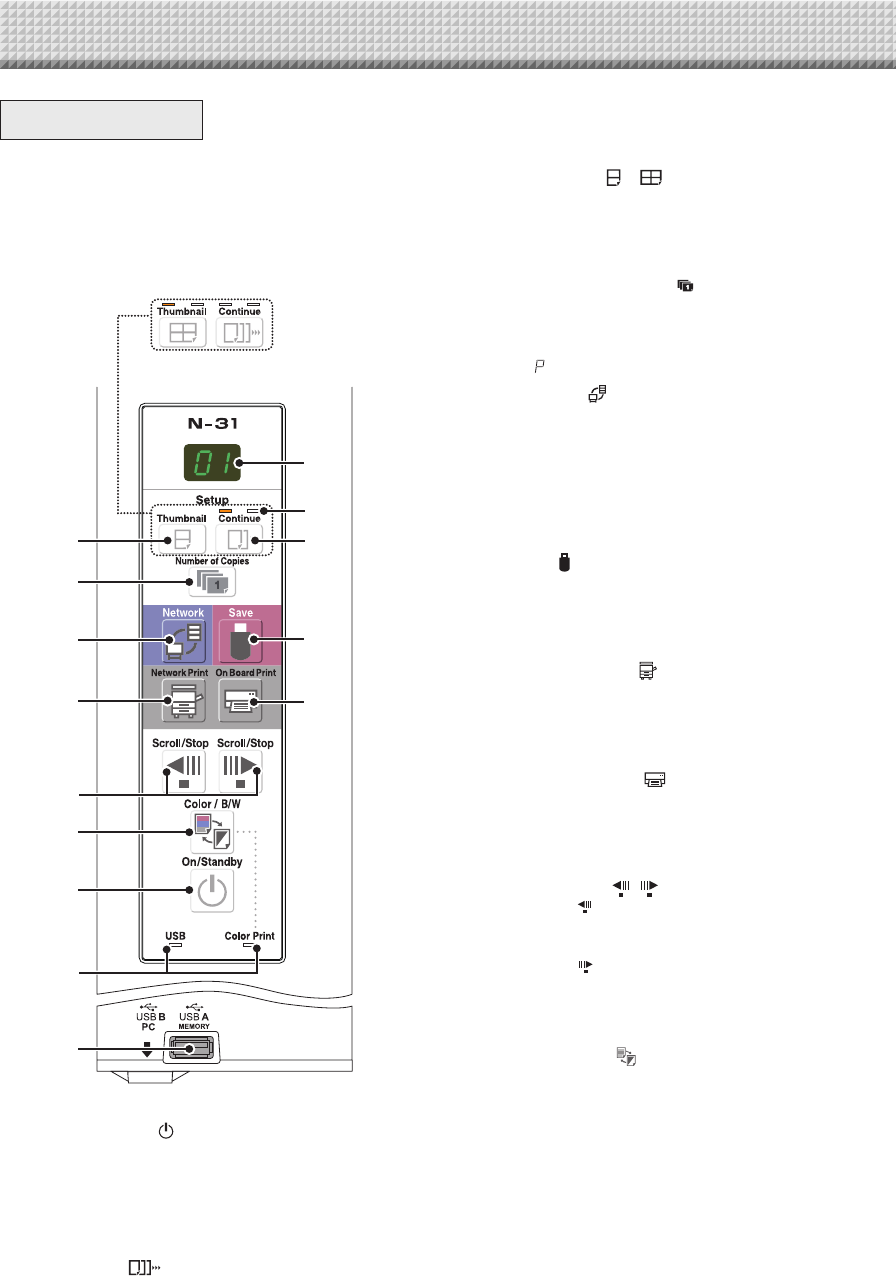
4 Consecutiveprintingnumberindicators
These light yellow to indicate the number of screens
selectedwiththeconsecutivebutton.
5 Thumbnail( )( onN-314)button
Usedto select the layout for printing thumbnailsof mul-
tiplescreensonasinglepage.
The selected layout is indicated on the display window.
(PageE-18,“PrintingThumbnails”)
6 NumberofCopies( )/Testprintbutton
Press this button to set the number of copies to be
printed(max.10).The number of copiesisdisplayedon
thedisplaywindow.
* “ ”isdisplayedduringtestprinting.
7 Network( )button
Scrollsandscansthesheetonescreen’sworthandsaves
thedatainthefolderforsaving.
The data is saved either on the network board or in a
folderontheFTPserver,aspreviouslyset.
• If you have set “Plural Registration”, go on to enter
anotherIDnumberusingthekeypadpanel.Fordetails,
referto“N-31SeriesNetworkManual”.
8 Save( )button(USBmemorystorage)
Thesheetismovedby1screenandread,andtheimage
isstoredontheUSBmemorydevice.
WhenconnectedtoacomputerbyUSBcable,theimage
isstoredinthenetworkboard’sinternalmemory.
9 NetworkPrint( )button
Thesheetismovedby1screenandread,andtheimage
isprintedouttothenetworkprinteronthesamenetwork.
Thenumberofcopiesisdisplayedonthedisplaywindow.
* FTPsupportedprinter
10 OnBoardPrint( )button
Thesheetismovedby1screenandread,andtheimage
is printed out to the printer connected with the network
board.
Thenumberofcopiesisdisplayedonthedisplaywindow.
11 Scroll/Stop( )button
When the button is pressed, the sheet scrolls one
screen’s worth to the left (to the next screen) and stops
automatically.
When the button is pressed, the sheet scrolls one
screen’s worth to the right (to the previous screen) and
stopsautomatically.
Whenpressedduringscrolling,scrollingstops.
12 Color/B/W( )button
Changesprintcolor(Color/Monochrome).
SelectionstatusisshownaccordingtowhethertheColor
Printstatusindicatorislitoroffandhowitlights.
Color:Greensteadylight
Monochrome:Off
13 USBAMemoryport(USBTypeA)
Saves in commercially-available USB memory images
thathavebeenreadbythenetworkboard.
The USB status indicator lights green when the USB
memorydeviceisrecognized.
14 Status
Connectionsettingstatusisshownbyturningon/offthe
indicator.
Fordetails,seepagesE-27 and E-28.
ControlPanel
The control panel of the drawing refers to Model
N-31S/N-31W.
When pressing a button, please press the center area
(the square bulge). The button may not work if it is
pressed on a corner.
DisplayofmodelnameN-314
5
2
4
3
8
10
6
7
9
11
12
1
14
13
1 ON/Standby( )button
Turns the network board’s power on and off (standby
mode).
2 Displaywindow
The number of copies, operating status and error mes-
sagesaredisplayedonthe7-segmentLEDs.
3 Continue( )button
Used to select the number of screens when printing or
storingmultiplescreensconsecutively.
Model:N-31S/N-31W(singleanddoublescreens)
Model:N-314(onetofourscreens)
NamesoftheParts
E-9
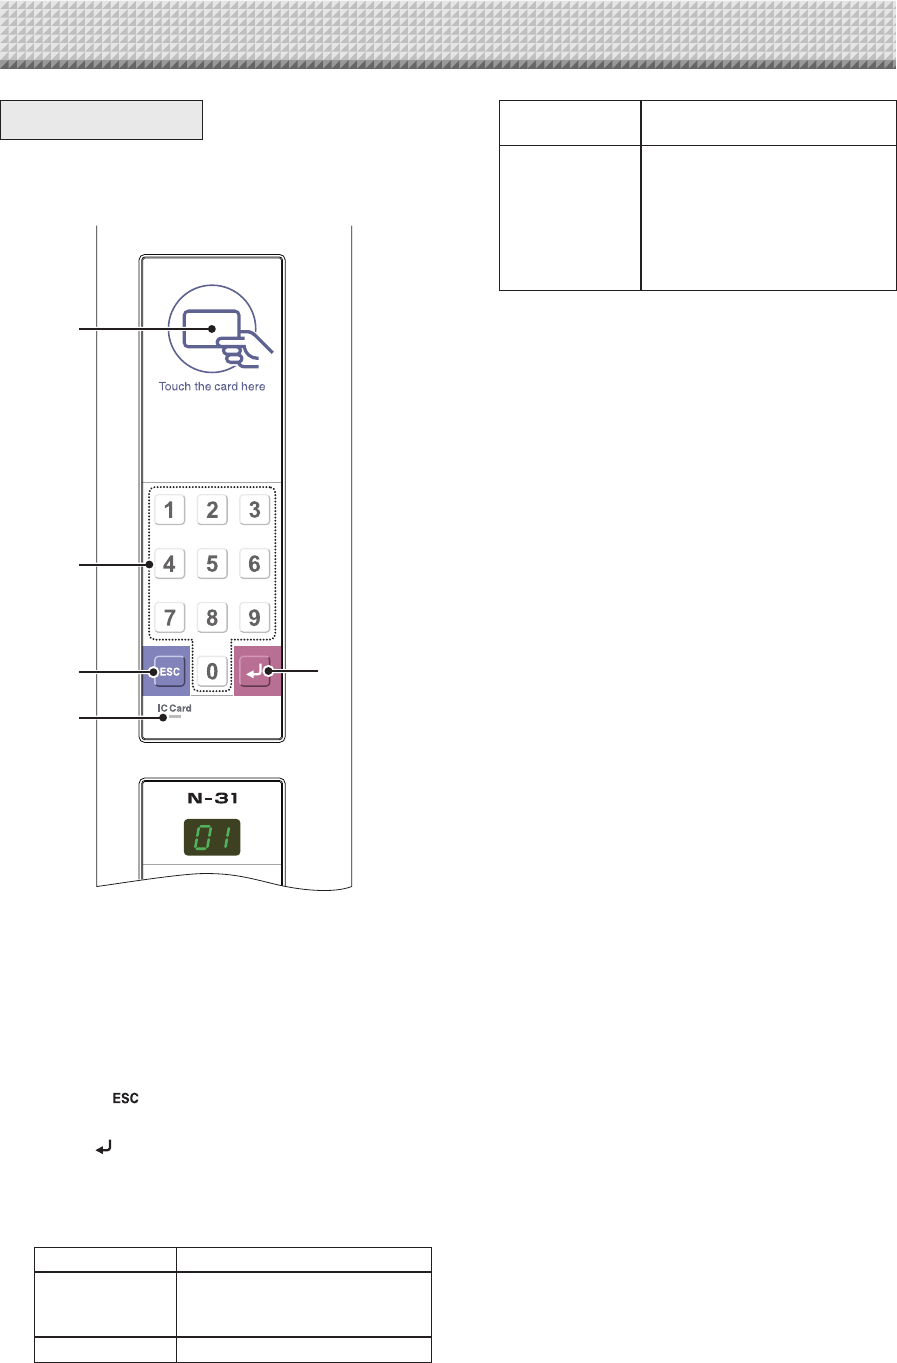
NamesoftheParts
Keypadpanel
When pressing the button, press the center area (the square
bulge).Thebuttonmaynotworkifitispressedonacorner.
1
2
3
5
4
1 ICcardread/writepart
TouchthesuppliedICcardhere.
ReadsorwritesdatatotheICcard.
Touch the touch mark with the IC card. Touching other
placesthanthetouchmarkmaycauseanerror.
2 Numeric(0thru9)button
EntertheIDnumberfornetworkstorage.
3 Escape( )button
Cancelsentriesonthekeypadpanel.
4 Enter( )button
Startsnetworkstorage.
5 ICCardindicator
Shows status of read/write to the IC card according to
whetheritislitoroffandhowitlights.
ICCardindicator StatusofICcard
Litgreen AcceptICcard
• Turning on the power lights
green.
Flashinggreen PreparingforwritingtoICcard
Litred IC card error in read/write (3 sec-
onds)
Off NotacceptICcard
Theindicatorlightsoffinthefollow-
ingcondition:
• “NetworkSetting”isnotdone.
• “Network Storage” in “Security
Setting”issetto“Invalid”.
• Inoperation
E-10
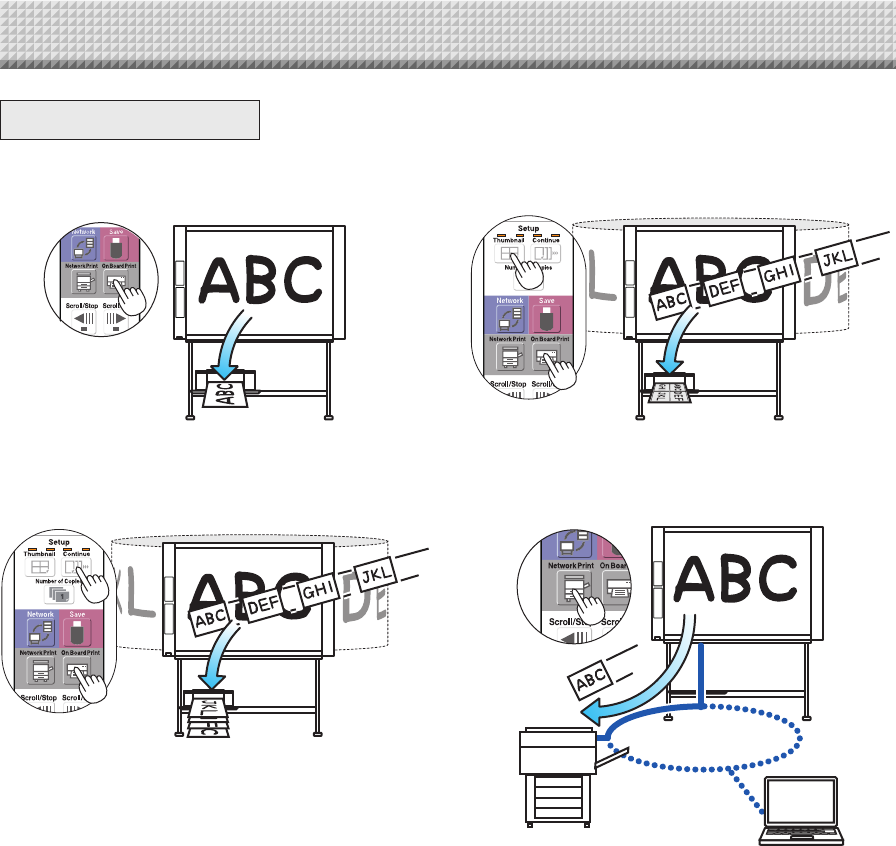
FunctionsoftheNetworkboard
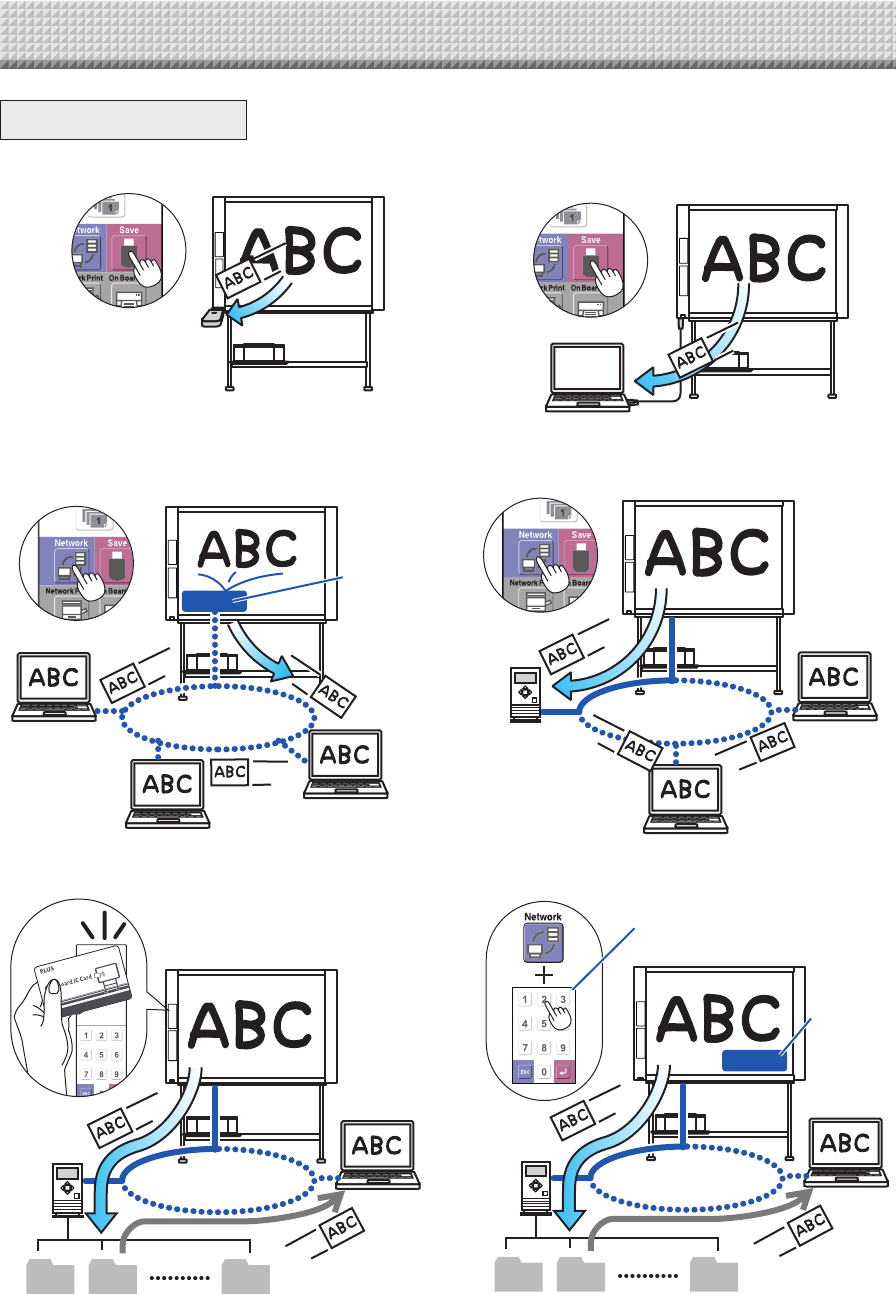
PrintingFunctions
① Printing ② Printingthumbnailsofmultiplescreenson
asinglepage
Outputtopaper Printingofthumbnailsonsinglepage
③ Printingorstoringmultiplescreenscon-
secutively
④ Printtothenetworkprinter.
Consecutiveprintingorstoring,onescreen
atatime
LAN
FTPsupportedprinter
* Printingofthumbnailsof2screensandconsecutiveonModelN-31S/N-31W.
E-11
SavingFunctions
⑤ StoringonUSBmemorydevices ⑥ Capturingimagesonacomputer
StoringonUSB
memorydevice
Storingofimageoncomputer
⑦ Viewingimagesstoredonthenetwork
boardviaanetwork
⑧ StoringimagesonanFTPserverviaanet-
work
LAN
Viewingof
imagesstored
onthenetwork
board
Network
board’s
memory
LAN
Viewingof
imagesstored
onFTPserver
⑨ UsingtheICcardtostoreimagesonaspe-
cificfolderonanFTPserver.
⑩ UsinganIDnumbertostoreimagesonan
FTPserveroronaspecificfolderinthe
networkboard.
LAN
01 02 99
Savelocation
Blip!
FTPserver
Viewing
LAN
01 02 99
Savelocation
EnteringIDnumber
FTPserver
Viewing
Network
board’s
memory
FunctionsoftheNetworkboard
E-12
DrawontheSheetSurface
Please draw with the dedicated markers that have been
supplied.
Ifanythingotherthanthededicatedmarkersoreraserare
used,itmaybeimpossibletoerasethesheetorthesheet
couldgetdirty.
Tomovethesheetmanually,see“Movingthesheetsurface
manually”onpageE-18.
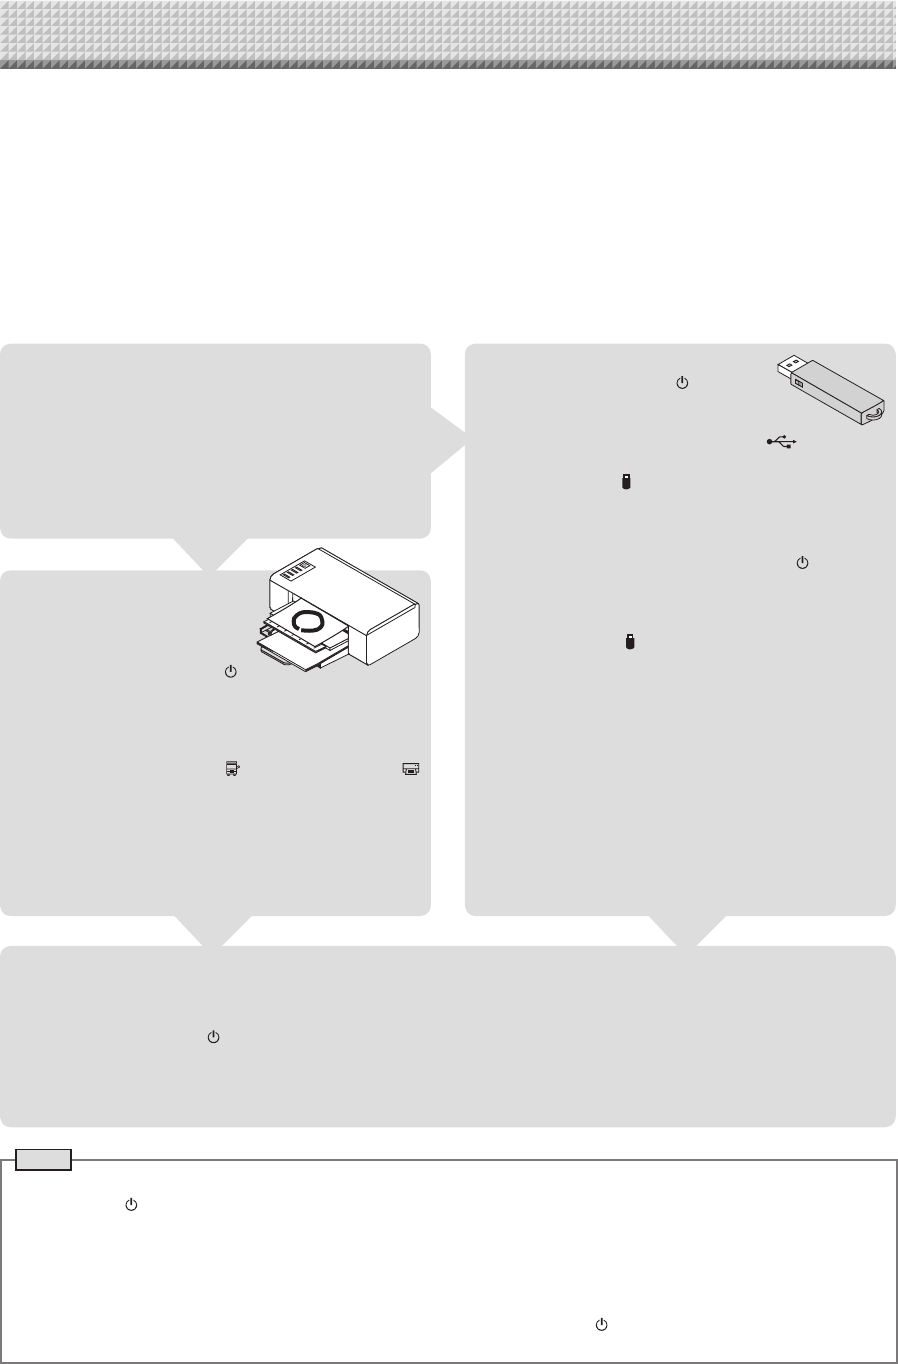
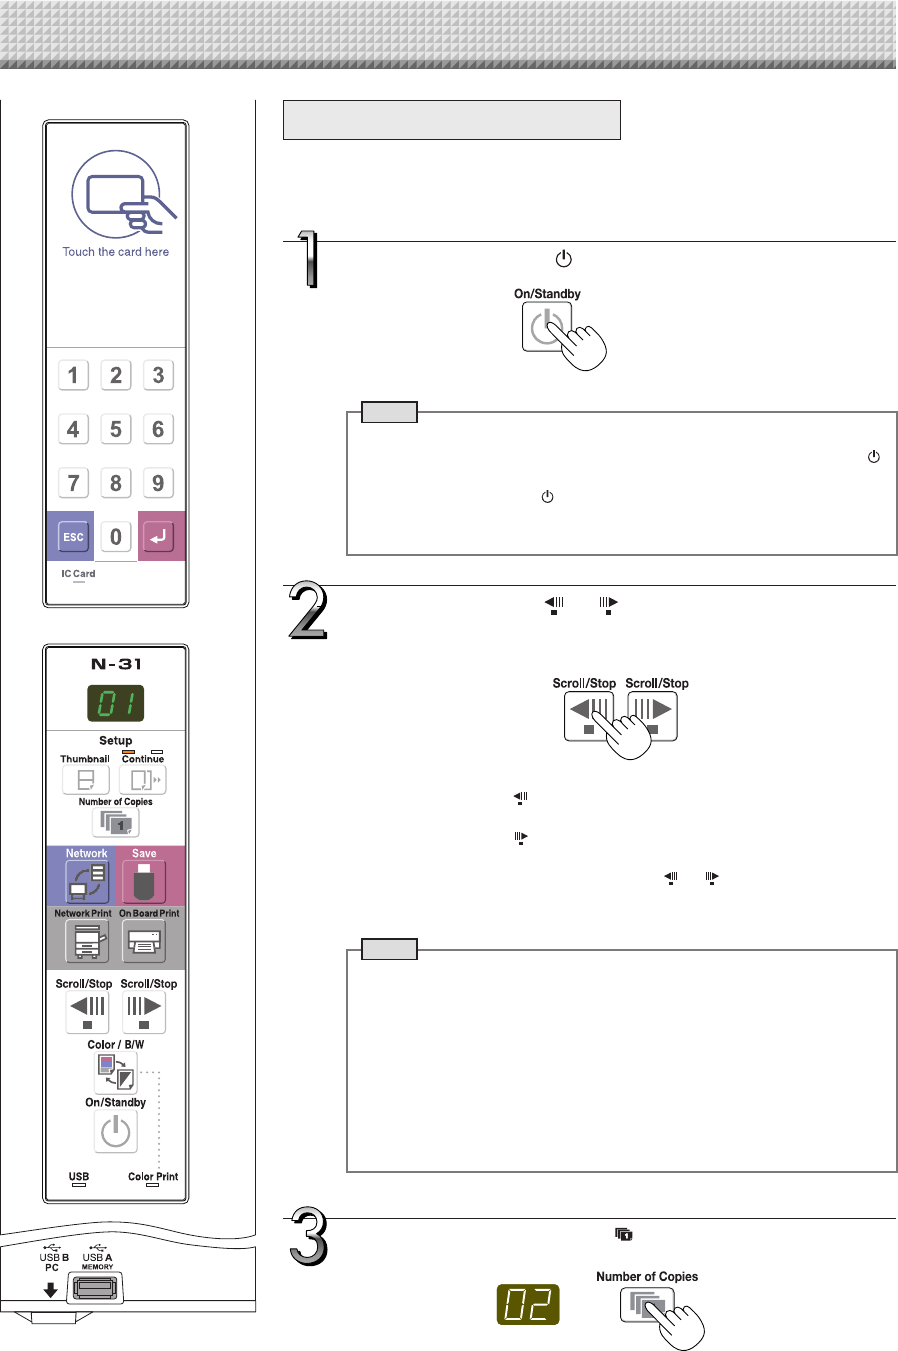
Printing
(1) SetA4orlettersizepaper.
Do not set anything other
thanA4orlettersizepaper.
(2) Press the ON/Standby
buttonofthenetworkboardandswitchonthepower.
(3) Switchontheprinterpower.
For instructions on operating the printer, see the
printer’soperatinginstructions.
(4) PresstheNetworkPrint* ortheOnBoardPrint
button. The network board will move a one-screen
portion of sheet, read the image, and start the copy
operation.See“Printing”onPageE-15.
* To use a network printer, Network Setting is
required.
SavingtoUSBMemory
(1) PresstheON/Standby buttonof
thenetworkboardtoswitchonthe
power.
(2) InsertUSBmemoryintotheMemory port(USBA
port)ofthenetworkboard.
(3) PresstheSave button.
See“UsingUSBMemory”onPageE-20.
Savingonacomputer
(1) Pressthenetworkboard’sON/Standby( )buttonto
turnthepoweron.
(2) Connectthenetworkboardtothecomputerusingthe
PCdedicatedUSBport.
(3) PresstheSave( )button.
(4) Theimageissavedonthecomputer.
OperationSteps
The network board uses an image scanner to scan characters or diagrams drawn using special markers (four
colors). The image can be printed out to the printer and be stored on a USB memory device or a computer.
When network settings are made with a network connected to the network board, the image can be saved on
the network board or a FTP server, or can be printed out to the network printer on the network.
To use a network, refer to the separate “N-31 Series Network Manual”.
Preparation
• Setupthenewlypurchasednetworkboardandconnectaprinter.
Seeaseparatemanualtitled“N-31SeriesAssemblyandSetupManual.”
• PlugtheACpowerplugsofthenetworkboardandprinterintowallpoweroutlets.
• Afterpurchase,besuretosetthenetworkboard’sclock.Ifnot,theproperdateandtimewillnotbedisplayedon
printsorinimagefiles.SeepageE-13.
WhenNotUsingtheNetworkboard
(1) Byallmeans,cleanlyerasethedrawingfromthesheetsurfacewiththededicatederaser.(Leavingthedrawingforalong
periodwillmakeithardertoerase.)
(2) PresstheON/Standby buttonofthenetworkboardandswitchoffthepower(standbymode).
ThepowercannotbeswitchedoffwhiletheUSBmemoryremainsinstalled.(Thisisapreventionfunctionagainstforget-
tingtounplugtheUSBmemory.)
(3) Switchofftheprinterpower.
Note
• Whenturningonthepower,waitabout5secondsormoreafterthepowerplughasbeenconnectedbeforepressingthe
ON/Standby button.
• ThecoloroftheimageswhenprintedincolororwhensavedinUSBmemorywilldiffersomewhatfromthemarkercolors.
• Blurredcharacters,thinlines,overlapping of markersandother factors cancausecolors to differinplacesandcan also
resultinportionsthatcannotbescannedsuccessfully.
• Ifdarkhorizontallinesonaprintedouthardcopyorimageonthescreenaregenerated,performthescanningadjustment
(whitecalibration).SeepageE-33.
• ThedatainthememoryforcomputerstorageisdeletedwhentheON/Standby buttonisturnedoff(standbymode)or
theconnectionwiththecomputeriscut.Thedatainthememoryfornetworkstorageisnotdeleted.
E-13
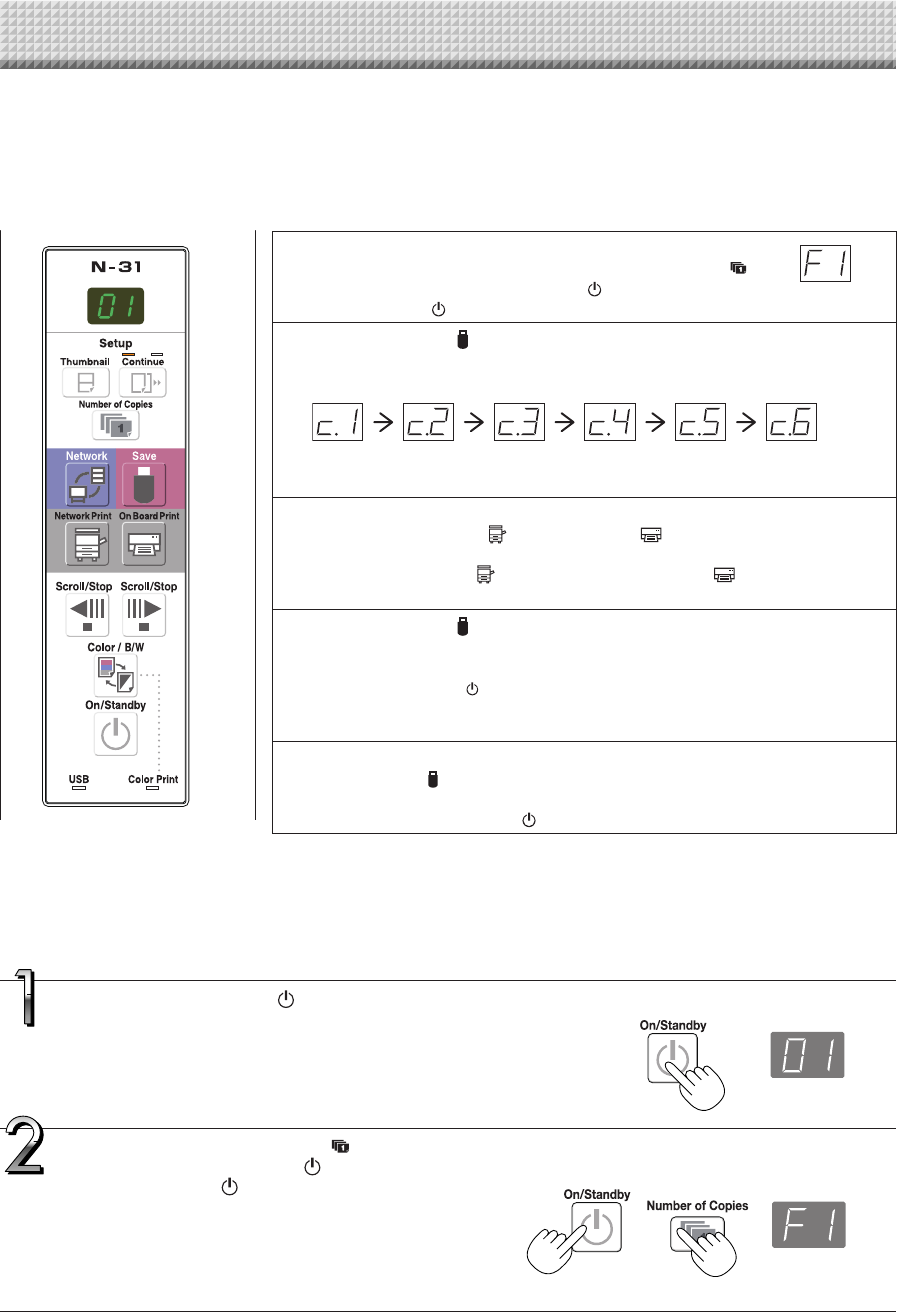
SettingtheTime
The date and time are stamped on the printing paper and recorded in the file information when files are stored
on the network board and FTP server, so set the network board’s time correctly. The time can also be set from
a computer via a network (when connected to a LAN). In this section, operation for setting the time by using
buttons on the network board is provided.
PresstheON/Standby buttontoturnonthepower.
Thedisplaywindow’sLEDslightandthepowerturnson.
PresstheNumberofCopies buttonwhile
pressingtheON/Standby button,thenrelease
theON/Standby button.
Themodeswitchesto“CBSetup”,and“F1”isdisplayedonthe
displaywindow’sLEDs.
The mode returns to the normal mode if no buttons are oper-
atedfor10seconds.
DescriptionofOperations
1 Switchto“CBSetup”.
With the power turned on, press the Number of Copies
buttonwhilepressingtheON/Standby button,thenrelease
theON/Standby button.
2 PresstheSave buttonandswitchto“TimeSetting”.
ThemodeswitcheseachtimetheSavebuttonispressed.
Contentsofsettingmodedisplayedondisplaywindow
(First2digits) (Last2digits)
Christianyear Month Day Hours Minutes
3 Setthesettingmode’sdateandtime.
WhentheNetworkPrint or OnBoardPrint buttonispressedonce,theset-
tingcanbemade.
UsetheNetworkPrint (Increase)andOnBoardPrint (Decrease)buttonsto
set.
4 PresstheSave buttontoenterthesetting.
Thenetworkboardswitchestothenextsettingposition.
Repeatsteps4and5tosetthecurrentdateandtime.
• If the ON/Standby button is pressed during steps 3 to 5, the partially made
settingiscanceledandthedateandtimereturntothevaluessetbeforetheset-
tingwasstarted.
5 Completethesetting.
WhentheSave buttonispressedaftertheminute’ssettingposition(c.6display)
hasbeenset,the“TimeSetting”iscompletedandthe[F1]display(CBSetup)reap-
pears.PresstheON/Standby buttontoreturntothenormalmode.
Normalmode
“CBSetup”mode
Preparations:
Connectthepowerplugtoawallpoweroutlet(AC100–240V).
[Example]:Settingthedateandtimeto2:16pmOctober8,2013
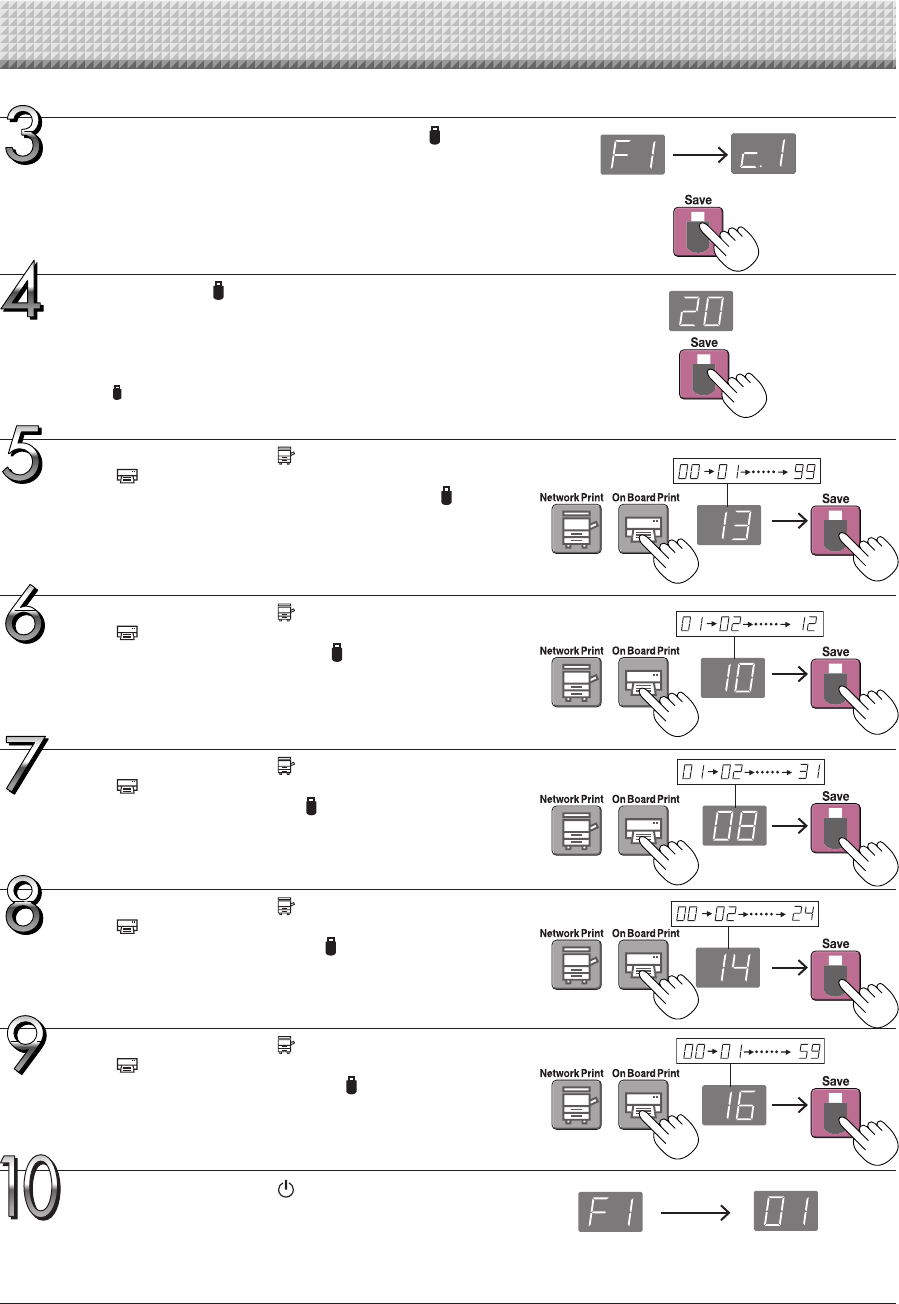
E-14
SettingtheTime
UsetheNetworkPrint (Increase)andOnBoard
Print (Decrease)buttonstoselect“14”(the
hours),thenpresstheSave buttontoenter.
Thedisplayswitchesto“c6”(settingofminutes).
UsetheNetworkPrint (Increase)andOnBoard
Print (Decrease)buttonstoselect“08”(the
day),thenpresstheSave buttontoenter.
Thedisplayswitchesto“c5”(settingofhours).
UsetheNetworkPrint (Increase)andOnBoard
Print (Decrease)buttonstoselect“16”(the
minutes),thenpresstheSave buttontoenter.
Thedisplayswitchesto“F1”(functionsetting).
PresstheON/Standby buttontoreturntothe
normalmode.
• Thenetworkboardalsoreturnstothenormalmodeifyoujust
wait10seconds.
Thiscompletesthetimesetting.
UsetheNetworkPrint (Increase)andOnBoard
Print (Decrease)buttonstoselect“10”(the
month),thenpresstheSave buttontoenter.
Thedisplayswitchesto“c4”(settingofday).
UsetheNetworkPrint (Increase)andOnBoard
Print (Decrease)buttonstoselect“13”(thelast
2digitsoftheyear),thenpresstheSave but-
tontoenter.
Thedisplayswitchesto“c3”(settingofmonth).
PresstheSave buttontomovetothelastdig-
itsoftheyear
Thedisplayswitchesto“c2”(last2digitsofyear).
Notice:
The first two digits of the year (“20”) are fixed. Simply press the
Save button to switch to the last 2 digits of the year setting
position.
While“F1”isdisplayed,presstheSave button
toenter.
Thedisplayswitchesto“c1”(first2digitsofyear).
Ifnobuttonsareoperatedfor10secondswhileinthetimesetting
mode,themodereturnstothe“CBSetup”mode.
“CBSetup”mode Normalmode

E-15
Use a printer to print out the image that has been drawn on the sheet surface. Use a PLUS-designated printer.
Operations and names of parts differ from printer to printer. For details of operations, see your printer’s operat-
ing instructions. The network board can print out to the printer connected to the network board or a network.
PreparingthePrinter
Pleasecheckthatthenetworkboardandtheprinterhavebeenconnected.SeePageE-35.
PreparingthePrinterconnectedtoaNetwork
• PrintersavailablefortheNetworkPrint buttonareFTPsupportednetworkprinters.Someprintersmaynotbesupported.
• Toprintouttotheprinterconnectedtoanetwork,set“FTPPrint”for“Board/PrinterSetting”of“NetworkSetting”.Todoset-
tings,refertotheseparate“N-31SeriesNetworkManual”.
Printing(printersoldseparately)
Setthepaper.
PleaseuseA4orlettersizeprinterpaper.
• Whenusinglettersizepaper,setlettersizepaperinthe
devicesettings.(SeepageE-26.)
1)Arrangethepaperedgessothattheyareeven.
2)Insertpaperatthespecifiedpositionofthepapertray.
3)Pressthepaperguidegentlyuntilittouchesthepaper.
Note
Seeyourprinter’soperatinginstructionsforadescrip-
tionofthepaperthatcanbeused.
Notice
• Depending on the printer’s specifications, some
timemayberequiredforcleaningoftheprinthead.
Switchonthepower.
Pressthepowerswitch.Thepowerindicatorlights.
Thiscompletesthepreparationoftheprinter.
PresstheOnBoardPrint buttononthenetworkboard’scontrolpanel.Onepageworthofdataisreadandtheprinting
operationstarts.
Notice
• Dependingontheprinter,indicators,etc.,mayflashafterthepoweristurneduntiltheprinterispreparedtoprint.
Inthiscase,seetheprinter’soperatinginstructionsandcheckthattheprinterisreadybeforestartingtheprinting
operationonthenetworkboard.
Whenfinishedprinting...
Switchofftheprinterpowerandremovethepaper.
Closethepapertray.
Notice
• Caution:DonotturnoffthepowerordisconnecttheUSBcableduringprinting.
Dischargetray
Paperguide
Paper
Powerswitch
Appearanceofprinterisforillustrationpurposes.
Papertray
E-16
Preparetheprinter.(Seethepreviouspage.)
Note
• When turning on the power, wait about 5 seconds or more after the
power plug has been connected before pressing the ON/Standby
button.
• PresstheON/Standby buttontoswitchonthepower.TheLEDofthe
displaywindowwilllight.
• Turnonthenetworkboard’spowerbeforeturningontheprinter’spower.
PresstheON/Standby buttonandswitchonthepower.
PresstheScroll/Stop or buttonanddisplaythesheet
surfaceyouwanttoprint.
When the Scroll/Stop button is pressed, the sheet surface scrolls one
screen’sworthtotheleft(tothenextscreen)andstopsautomatically.
When the Scroll/Stop button is pressed, the sheet surface scrolls one
screen’sworthtotheright(tothepreviousscreen)andstopsautomatically.
Tostopduringscrolling,presstheScroll/Stop or buttonagain.
• TherearefourscreenonlyonmodelN-314.
Note
• To display the next screen, press the Scroll/Stop button after scrolling
stops. If the button is pressed during scrolling, scrolling stops immedi-
ately.Whenpressedagain,thesheetisscrolledonescreen’sworthfrom
thepointatwhichitstopped.
• Theone-screenthatisvisibleisprintableposition.
• Tofine-adjust the sheet surface position, with the sheet stopped, move
thesheetslowlybyhand.Thesheetcanbemovedeithertotheleftorto
theright.
• Printing of the portion located around the sheet surface might not be
possible.Pleasesee“Effectivereadingsize”onPageE-5.
BasicPrintingOperation
Preparation:
Preparation:CheckthattheACpowerplugsofthenetworkboard and printer are con-
nectedtowallpoweroutlets.
Printing
PresstheNumberofCopies buttonandselectthenum-
berofcopies.
E-17
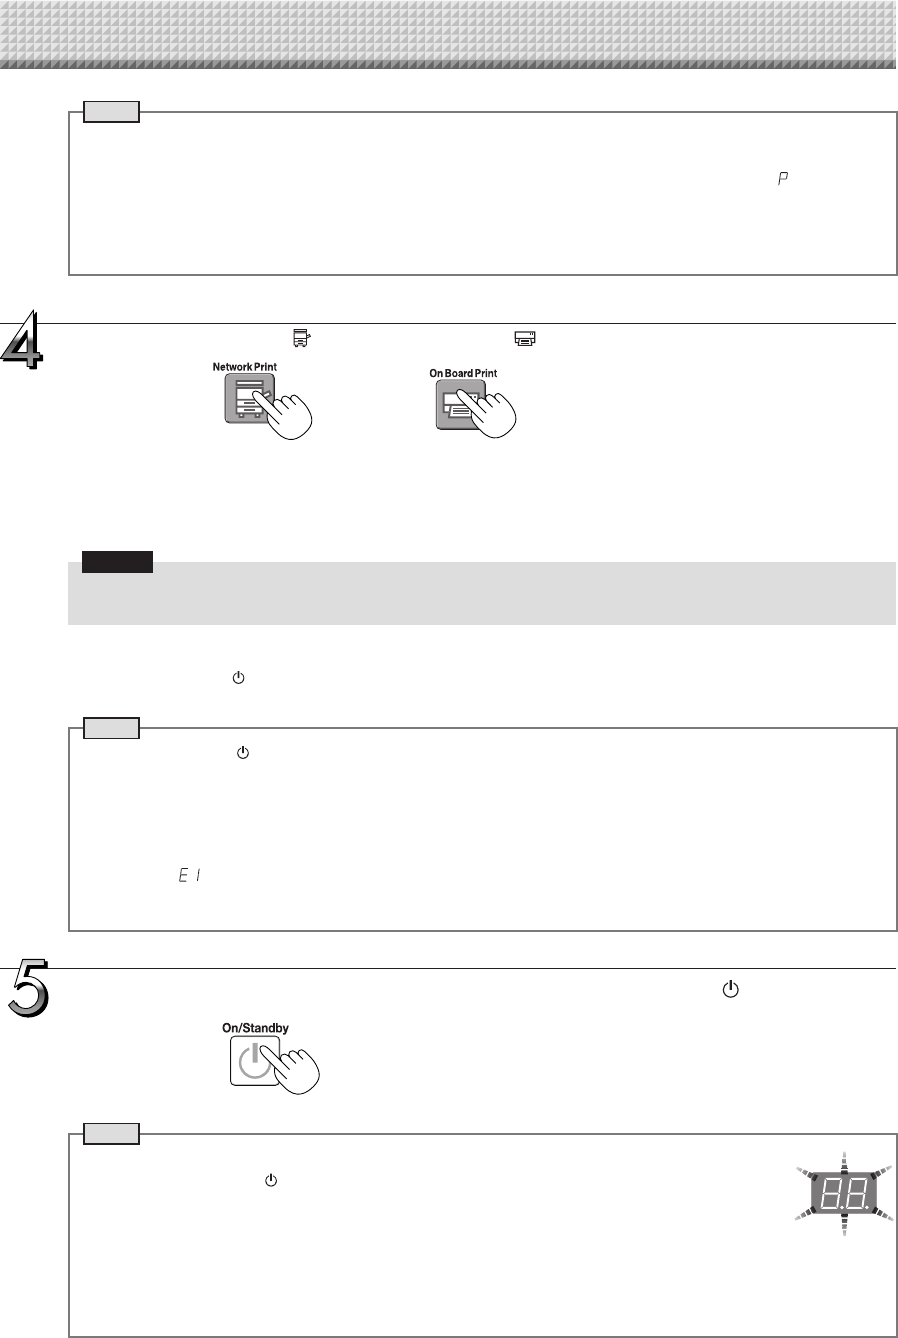
Printing
PresstheNetworkPrint ortheOnBoardPrint buttontoprint.
Note
• “01”isselectedwhenthepoweristurnedon.
• Upto10copiescanbespecifiedanddisplayedonthedisplaywindow.
• Thenumberofcopiesincreasesby1eachtimetheNumberofCopiesbuttonispressed,and“ ”isdisplayed
after“10”(thisisusedfortestprinting:seepageE-32).Whenthebuttonispressedagain,thedisplayswitchesto
“01”.Thenumberswitchescontinuouslyifthebuttonisheldin.
• Aftersettingthenumberofcopies,proceedtostep4within1minute.Thenumberofcopiesisresetto“01”ifno
operationisperformedwithin1minute.
Thereadingoperationisperformedforaone-sheetportion(whilethesheetisscrolled)andtheprintingoperationisper-
formed.
Tochangeprintingcolor(ColororB/W),performthumbnailprintingorcontinuousprinting,makeeachsetting(seenext
page)andpresstheappropriatePrintbutton.
Notice
• Tousethenetworkprintingfunction,connecttheFTPsupportedprintertothesamenetworkwherethenetwork
boardislocated,andmaketheprintersettingsonthenetworkboard.
Cancellationoftheprintoperationinprogress
WhentheON/Standby buttonispressed,thereadingofthesheetstops,andthepartiallyreadimagedataisprinted.
Waituntilthesheetisexpelledfromtheprinter.
Note
• IftheON/Standby buttonispressedwhilethesheetsurfaceisbeingread,printingisinterruptedandonlypart
oftheimagewillbeprinted.
• Theone-screenportionisreducedtoA4papersizeandprinted.
Forwidetypenetworkboards(modelN-31W),theimageiscompressedabout75%inthehorizontaldirection.
To print with the same proportions as the image on the sheet surface, see “CB Setup (Operating the Network
Board’sButtons)”(pageE-26).
• Aflashing“ ”inthedisplaywindowindicatesaprinterror.See“MeaningofErrorMessages”onPageE-29.
• Whenprinting,atimestamp(dateandtime)isprintedatthetoprightofthesheet.See“CBSetup(Operatingthe
NetworkBoard’sButtons)”onpageE-26.
or
• Switchofftheprinterpower.
Note
• WhentheEraseReminderfunctionissetto“Enable”
WhentheON/Standby buttonispressed,thedisplaywindowandalltheindicatorsflashsimul-
taneously,thesheetautomaticallymovestothesurfacethatisnotyeterasedandthepowerturns
off.TosettheEraseReminderfunctionto“Disable”,seepageE-28.
*TheEraseReminderfunctionmaynotworkproperlyduetodirtonthesheet'sadhesivesections
ormarkerresidue.
• Ifnobuttonisoperatedwithin30minutes,thepowerturnsoffautomatically(autopoweroff).
Whenthepoweristurnedoff,scannedimagesstoredintheunit’sinternalmemoryarecleared.
• TheautopowerofffunctioniscanceledwhenthenetworkboardandcomputerareconnectedbyUSBcable.
Whenthenetworkboardisnotgoingtobeused,presstheON/Standby buttonand
switchoffthepower(standbymode).

E-18
Movingthesheetsurfacemanually
Thesheetcanbemovedevenwhenthepowerofthenetworkboardisswitched
off.
Thesheetcanbemovedwithyourhandeitherinleft or right. Please place your
handattheverticalcenterandmovethesheetslowly.
Notice
• Quickmovementcancausedamagetothedrivemechanismofthenetwork
board.
Note
• WhentheEraseReminderfunctionis set to“Enable”,theEraseReminder
functionmaynotoperateproperlyifthesheetsurfaceismovedbyhand.
Printing
PrintingThumbnails
Multiplescreensfromthescreenatthecurrentpositioncanbeprintedonasinglepage.
• Thethumbnailprintingfunctionisforprintingonly.StoringwiththeSave orNetwork buttonisnotpossible.
1. PresstheThumbnail buttonandselectthepagelayout.
Displaywindowstatusandpagelayout
Thumbnail
selection
Movementofdisplaywin-
dowLEDs
Pagelayout
Thumbnailsof2
screens
1
2
Thumbnails
of 4 screens
(arrangedhori-
zontally)
12
34
Thumbnails
of 4 screens
(arrangedverti-
cally)
13
24
Cancel(1
screen) Cancel
(1)
Whenprintingisfinished,thumbnailprintingiscanceled.
Note
• Toprintthumbnailsof3screensonmodelN-314,specifythumbnailsof4screens(arrangedhorizontallyorvertically).
• Ifthereisablankscreeninthespecifiedsequence,thatscreenisprintedasablank.
• If the ON/Standby button is pressed during scanning, scanning is interrupted and only the images that have been
scannedareprintedasthumbnails.
2. PressNetworkPrint orOnBoardPrint buttontoprint.
Whenoneoftheprintbuttonsispressed,thespecifiednumberofscreensiscollectedsequentiallyinthescanningmemory
andthumbnailprocessingisperformed.Printingstartsafterthisprocessingiscompleted.
or
The mode switches in the following order each time the
buttonispressed.
Thumbnailsof2screens→Cancel...
(Thumbnails of 2 screens → Thumbnails of 4 screens
(horizontally) → Thumbnails of 4 screens (vertically) →
Cancel...onmodelN-314)
• Thethumbnailsarearrangedinorderfromthecurrently
visible screen, counted to the right as screen 1 and
screen2(screen1, screen2,screen3, and screen4
onmodelN-314).
Tostartfromaparticularscreen,presstheScroll/Stop
or buttontoscrolltothatscreen.
Notice
• Note that if you have drawn on the sheet after
moving it manually part way or after stopping
scrolling in the middle, the amount of movement
foronescreen’sworthchanges,sothepositionof
thescannedimageswillbesubstantiallyoff.
• Thisproductusesanendlesssheet.Notethatthe
positionofthescannedimagesmaygoslightlyoff
duetostretchingofthesheetorslippage.
(ButtononmodelN-314)