Palm 850 PDA Phone With GSM/GPRS/EDGE and Bluetooth User Manual 2 of 4
Palm Inc PDA Phone With GSM/GPRS/EDGE and Bluetooth 2 of 4
Palm >
Contents
- 1. User Manual 1 of 4
- 2. User Manual 2 of 4
- 3. User Manual 3 of 4
- 4. User Manual 4 of 4
User Manual 2 of 4
YOUR PHONE
75
3
CHAPTER
Your Treo 680 is compatible with select
TTY devices. You can connect a TTY/TDD
machine to your Treo 680 through the
headset jack, but you cannot use your
headset jack with a headset while this
mode is enabled. Please check with the
manufacturer of your TTY device for
connectivity information and to ensure that
the TTY device supports digital wireless
transmission.
To use TTY, you may need to make
additional arrangements with Cingular
Wireless. Please contact Cingular
Wireless’s customer service department
for more information.
1Press Phone .
2Select the Dial Pad tab.
3Enter #*TTY.
4Press Send .
5When a message appears indicating
that TTY is enabled, select OK. To
disable TTY, repeat these steps.
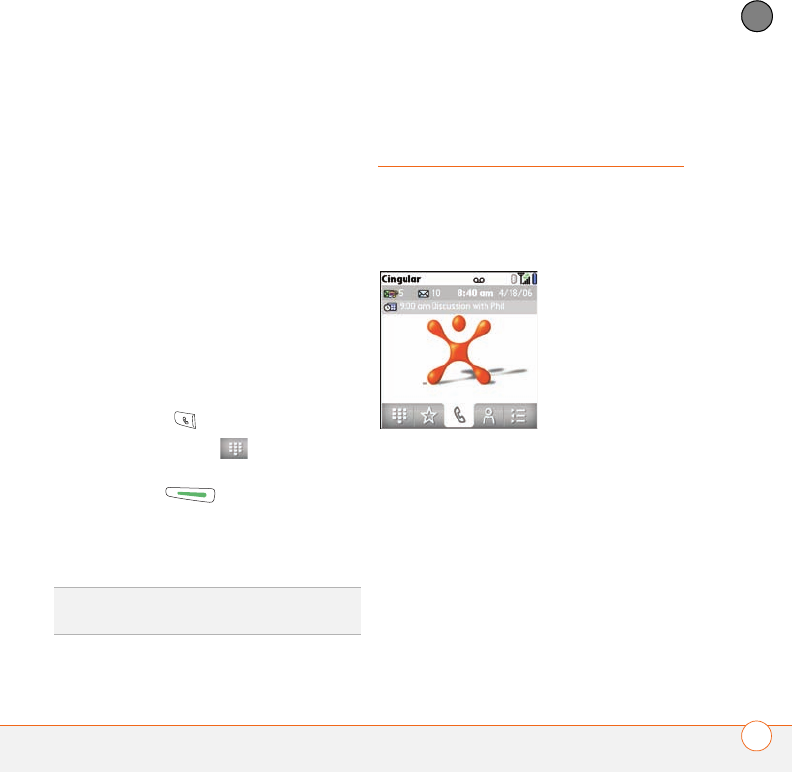
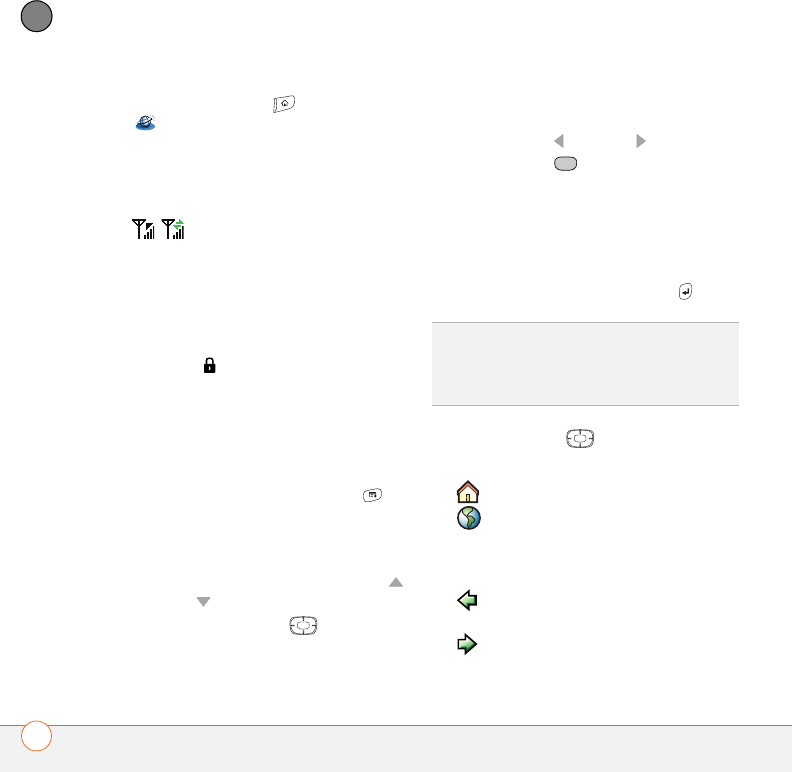
What are all those
icons?
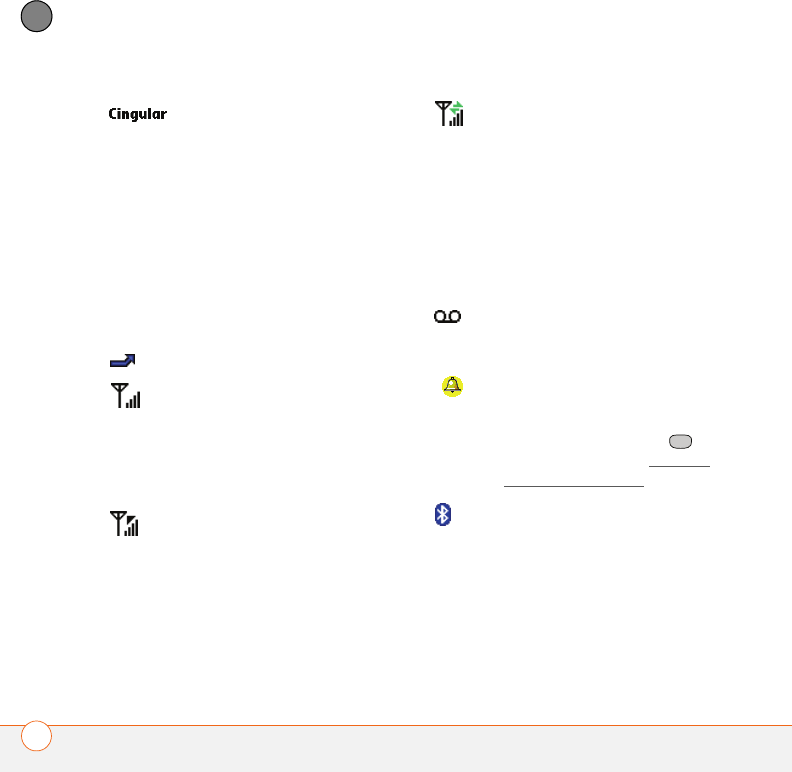
You can monitor the status of several items
using icons in the title bar in the Phone
application:
TIP
A red T appears at the top of the Phone
screen to indicate that TTY is enabled.
YOUR PHONE
76
3
CHAPTER
0
Your phone is on and you are in
a Cingular Wireless coverage
area. If you are outside a
coverage area, No Service or No
Service—SOS Only appears
instead. No Service means that
there is no coverage at all and
No Service—SOS Only means
that you can call only
emergency numbers, such as
911. When you turn off your
phone, Phone Off appears.
Call forwarding is active.
Your phone is on. The bars
display the signal strength. The
stronger the signal, the more
bars that appear. If you are
outside a coverage area, no bars
appear.
Your phone is on and a GPRS or
EDGE network is within range,
but you are not actively
transmitting data. You can still
make and receive calls.
Your phone is on and a GPRS or
EDGE data connection is active.
You may not be able to receive
calls when you are actively
transmitting data. If you make a
call, the data transmission is
automatically interrupted, and
you must manually resume the
data connection when you end
the call.
You have new voicemail
messages. You can select this
icon to retrieve your messages.
You have a new alert, such as a
Calendar alarm or a new text
message. To view the alert,
press and hold Center or
select the icon. See Viewing
and using the alerts.
The Bluetooth wireless
technology icon appears in gray
when this feature is off, in blue
when this feature is on, and in
reverse blue when your Treo
680 is communicating with
another Bluetooth device.
YOUR PHONE
77
3
CHAPTER
This icon replaces the Bluetooth
icon when your Treo 680 is
connected to a Bluetooth
hands-free device. This icon
appears in dark blue when a call
is in progress and in light blue
when a call is not in progress.
This icon replaces the Bluetooth
icon when your Treo 680 is
connected to your computer
using a dial-up networking
(DUN) connection.
Your battery is partially drained.
When the battery drains to 20%
of its capacity, the icon changes
from blue to red. At 10% of its
capacity, you begin to receive
warning messages, and at 5%
of its capacity, the Treo 680
beeps (if the Ringer switch is in
the Sound On position) and the
icon changes from red to clear.
Your battery is being charged.
The lightning bolt turns from red
to green when the battery is
fully charged and your Treo 680
remains connected to the
charger.
Your battery is fully charged and
your Treo 680 is not connected
to the charger.
You have new text or
multimedia messages. The
number next to the icon
indicates the number of unread
messages in your Inbox. You
can select this icon to retrieve
your messages.
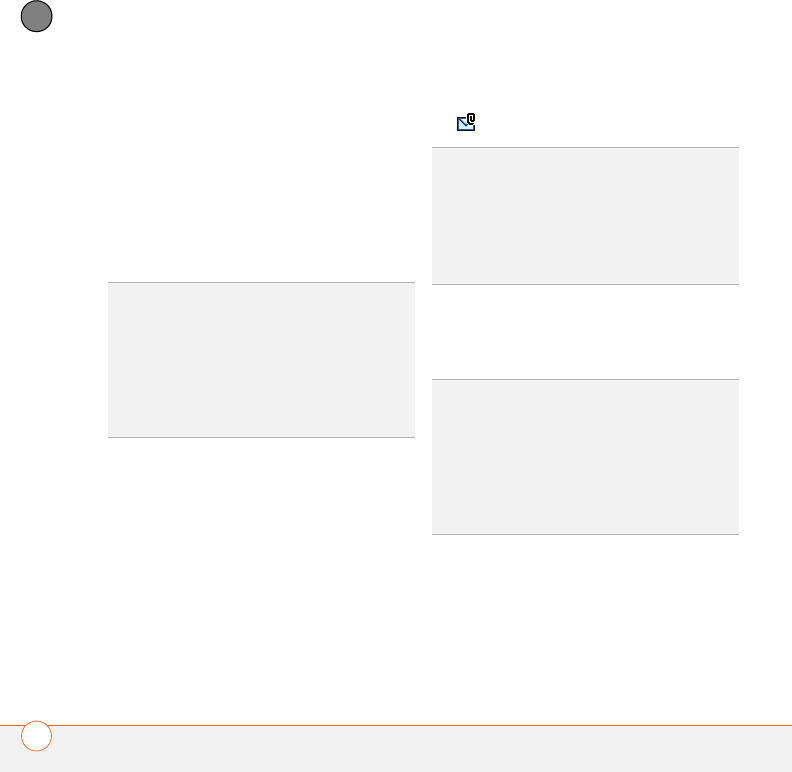
You have new email messages.
The number next to the icon
indicates the number of unread
messages in your Inbox. If you
set up multiple email accounts
on your Treo 680, this number
reflects only the account that
you most recently accessed.
You can select this icon to
retrieve your messages.
YOUR PHONE
78
3
CHAPTER
KEY
TERM
GPRS (General Packet Radio
Service) A mobile connectivity technology
that provides persistent data connections.
(Additional charges may apply.)
KEY
TERM
EDGE (Enhanced Data rate for GSM
Evolution) An enhanced version of GPRS
that delivers data speeds that are up to three
times faster than standard GPRS connections.
(Additional charges may apply.)
DID
YOU
KNOW
?
You can tap the Bluetooth
icon to quickly turn Bluetooth wireless
features on and off.
TIP
To display the remaining battery power,
tap the battery icon at the top of the screen.

CHAPTER
4
Your email and other
messages
You already know how efficient email and messaging are for staying in
touch. Now your Palm®Treo™ 680 smart device brings you a new level
of convenience: email on the go. Enjoy the ease and speed
of communicating with friends, family, and colleagues anywhere you
can access the Cingular Wireless data network.
You can send photos to your friends and family, or create Microsoft
Word or Excel files and send them to your colleagues. You can also
receive attachments to view and edit at your convenience.
Benefits
•Access email on the go
•Send and receive photos, sound files,
Word and Excel files, and more
•Save messages from your computer to
view at a convenient time

In this chapter
Which email application should I use? . . . . . . . . . . . . . . . . . . . . . . . 81
The VersaMail application. . . . . . . . . . . . . . . . . . . . . . . . . . . . . . . . . 83
Xpress Mail . . . . . . . . . . . . . . . . . . . . . . . . . . . . . . . . . . . . . . . . . . . 96
GoodLink . . . . . . . . . . . . . . . . . . . . . . . . . . . . . . . . . . . . . . . . . . . . . 97
Messaging . . . . . . . . . . . . . . . . . . . . . . . . . . . . . . . . . . . . . . . . . . . . 97
YOUR EMAIL AND OTHER MESSAGES
81
4
CHAPTER
Which email
application should I
use?
Your Treo 680 includes three email
applications: the VersaMail® application
(called Email in Applications View), the
Xpress Mail application, and the
GoodLink™ application (GetGood). You can
also access web-based email, like Yahoo!
Mail or Hotmail, from the web browser on
your Treo.
NOTE You must activate data services on
your Cingular Wireless account before you
can use email on your Treo 680.
TIP
An email application is not an email
provider. An email application just transfers
messages from an account that you have
already set up with a provider.
KEY
TERM
Email provider The service you
use to send and receive email. Your email
provider’s name appears between the @
symbol and the dot in your email address.
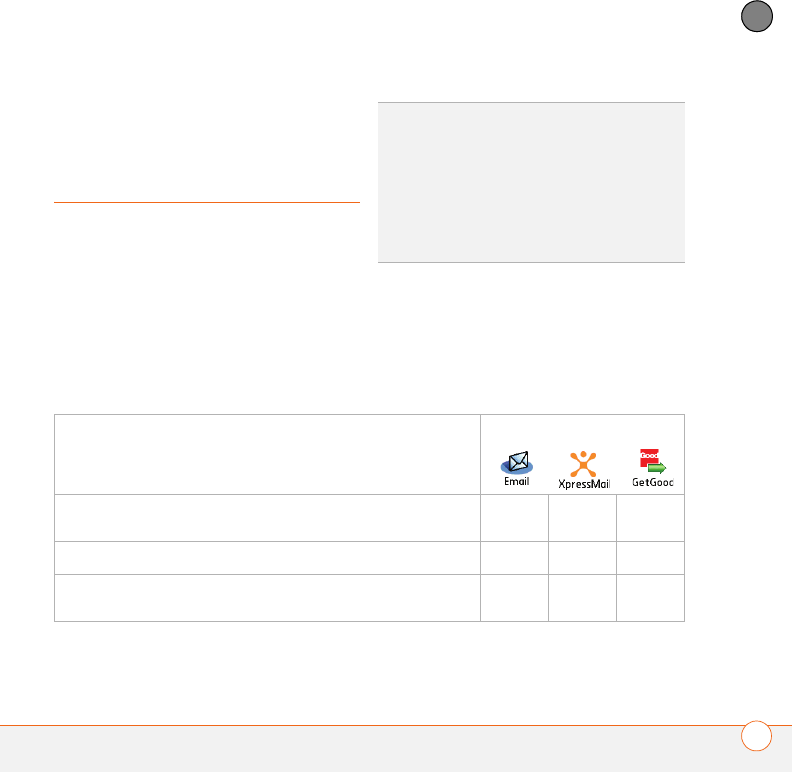
I want to…
Then choose this app…
Access an email account that’s set up on my Mac
computer
✔
Check fee-based Internet mail, such as Yahoo! Mail Plus ✔✔*
Access email from an existing account without extra
software or account sign-up
✔
* You must set up a corporate Xpress Mail account before you enter settings for an
Internet mail account.
YOUR EMAIL AND OTHER MESSAGES
82
4
CHAPTER
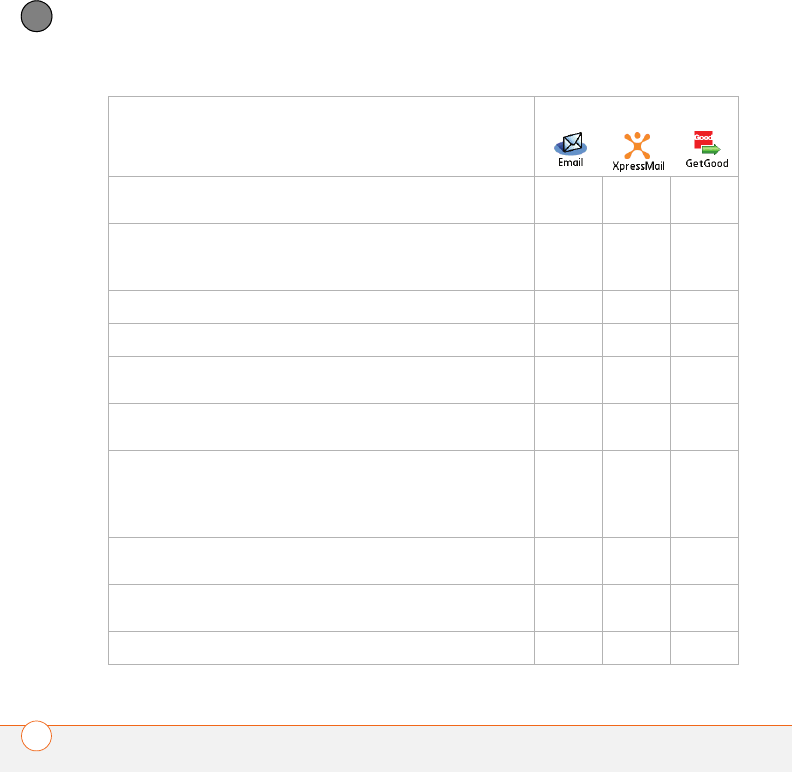
Access Contacts on my device to address email
messages
✔✔
Use the Cingular Xpress Mail website to check email from
multiple email addresses, from any computer connected
to the Internet
✔
Access email from up to three email accounts ✔✔
Access email from up to eight email accounts ✔
Work with email messages when I’m not connected to
the Internet (for example, when I’m on a plane)
✔✔✔
Access my corporate directory to address email
messages
✔✔
Access my corporate email on my desktop computer
instead on the server (requires desktop software
installation and maintaining an always-on connection
between your computer and the Internet)
✔
Access my corporate email using my IT department’s
GoodLink server software
✔
Sync my email and organizer info with my company’s
Exchange Server (using Microsoft Exchange ActiveSync®)
✔✔✔
Sync my email with my company’s Domino server ✔✔
I want to…
Then choose this app…
YOUR EMAIL AND OTHER MESSAGES
83
4
CHAPTER
NOTE To use GoodLink, your company
must have a Good server installed (sold
separately).
The VersaMail
application
Before you can use VersaMail, you need to
enter your email account settings. If you
have multiple email accounts, you must
enter settings for each email account.
After you enter your email account
settings, see the User Guide for the
VersaMail Application on your computer for
info on sending and receiving messages
and customizing your VersaMail settings.
Windows: Start>Programs>Palm
Mac: Insert the Palm Installation CD and
click the link to the User Guide for the
VersaMail Application in the
Documentation folder.
How do I get started?
1If either of the following is true, read the
User Guide for the VersaMail
Application on your computer:
•You used the VersaMail application on
your previous Palm OS® device, and
you want to transfer those settings to
your Treo 680.
•You plan to use VersaMail to access
an email account on a Microsoft
Exchange ActiveSync server, a Lotus
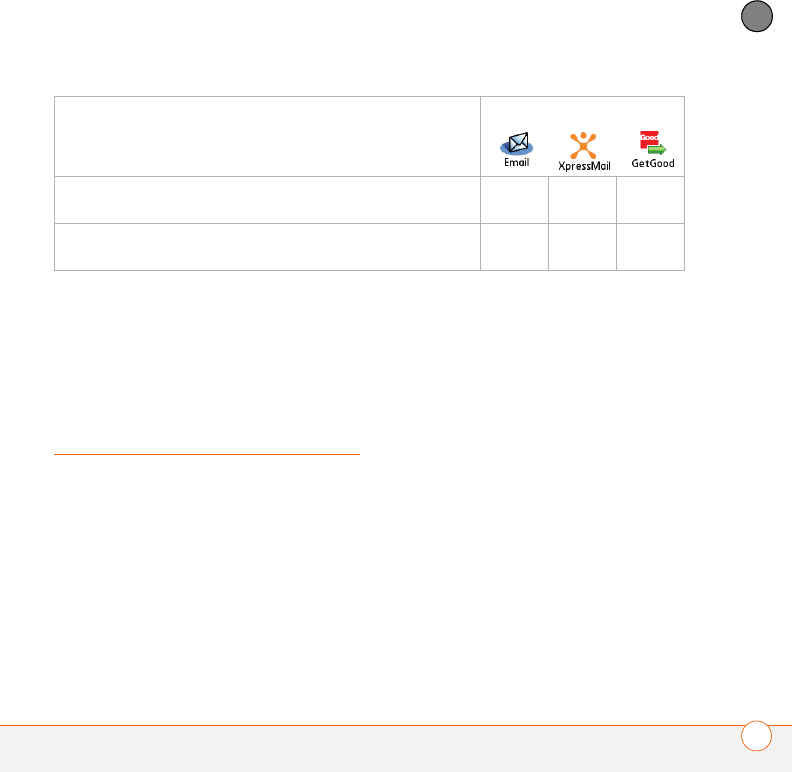
Use the Advanced Encryption Standard (AES) while
sending and receiving email
✔✔
Use Secure Sockets Layer (SSL) while sending and
receiving messages
✔✔✔
I want to…
Then choose this app…
YOUR EMAIL AND OTHER MESSAGES
84
4
CHAPTER
Notes server, or a Microsoft MAPI
server.
2If your email provider is listed in the
following table, then skip to Setting up
VersaMail to work with common
providers.
3If your email provider’s name is not
listed, then you need to obtain the
following info from your system
administrator or ISP, and then skip to
Setting up VersaMail to work with other
providers:
•Mail protocol: POP or IMAP
•Incoming and outgoing mail server
names, such as mail.myisp.com
•Incoming and outgoing mail server
port numbers, such as 110 (incoming
POP), 143 (incoming IMAP), or 25
(outgoing POP or IMAP)
•(If necessary) Security settings: APOP,
ESMTP, SSL
Setting up VersaMail to work with
common providers
1Press Applications and select
Email to open the VersaMail
application.
NOTE If you do not see the Email
icon, then you need to install VersaMail
from the Palm Installation CD. See
Installing bonus software from the CD for
additional info.
•Adelphia •EarthLink
•Airmail.net •Gmail
•AOL •Hughes Direcway
•Apple.Mac •Juno
•AT&T (mMode
& Worldnet)
•Mail.com
•Mediacom
•Bell South •NetZero
•Cablevision •Qwest
(select areas)
•Charter
•Comcast •RCN
•CompuServe •SBC
(select areas)
•Concentric •Speakeasy
•Covad •USA.net
•Cox
(East,Central,
& West)
•Verizon DSL
•Yahoo!
YOUR EMAIL AND OTHER MESSAGES
85
4
CHAPTER
2If prompted to select an initial setup
option, select Continue.
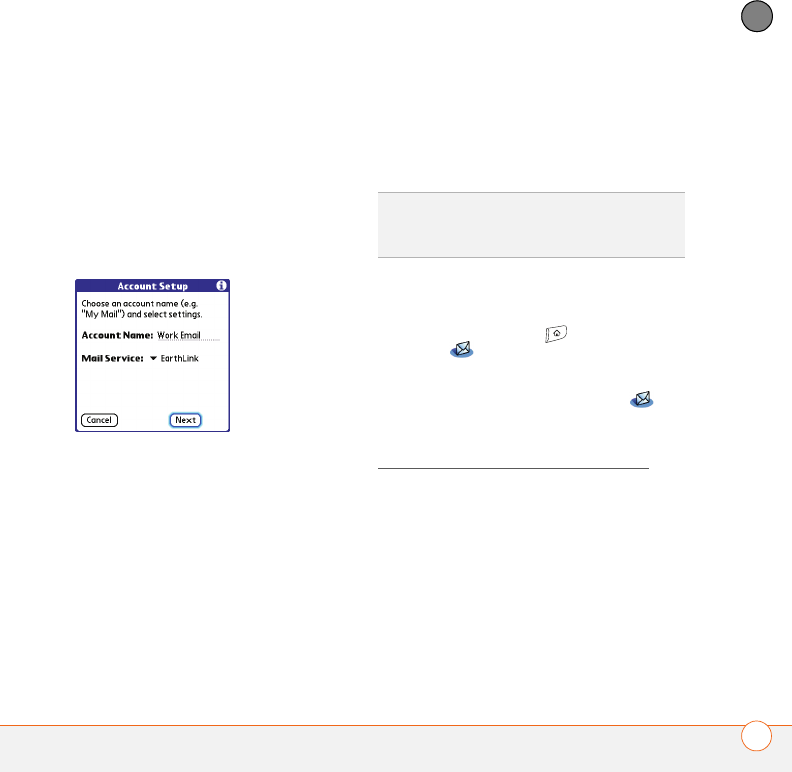
3Make up a name that describes this
account and enter it in the Account
Name field. For example, Work Email.
4Select the Mail Service pick list, and
then select your email provider, such as
EarthLink, and then select Next.
5Enter the username for your email
account. Your username usually appears
before the @ symbol in your email
address.
NOTE For some email providers, such as
Gmail, your username is your entire email
address. Check with your email provider if
you are not sure what to enter as your
username.
6Select the Password box, enter your
email account password, select OK, and
then select Next.
7Select Next, and then select Done.
Setting up VersaMail to work with other
providers
1Press Applications and select
Email to open the VersaMail
application.
NOTE If you do not see the Email
icon, then you need to install VersaMail
from the Palm Installation CD. See
Installing bonus software from the CD for
additional info.
2If prompted to select an initial setup
option, then select Continue.
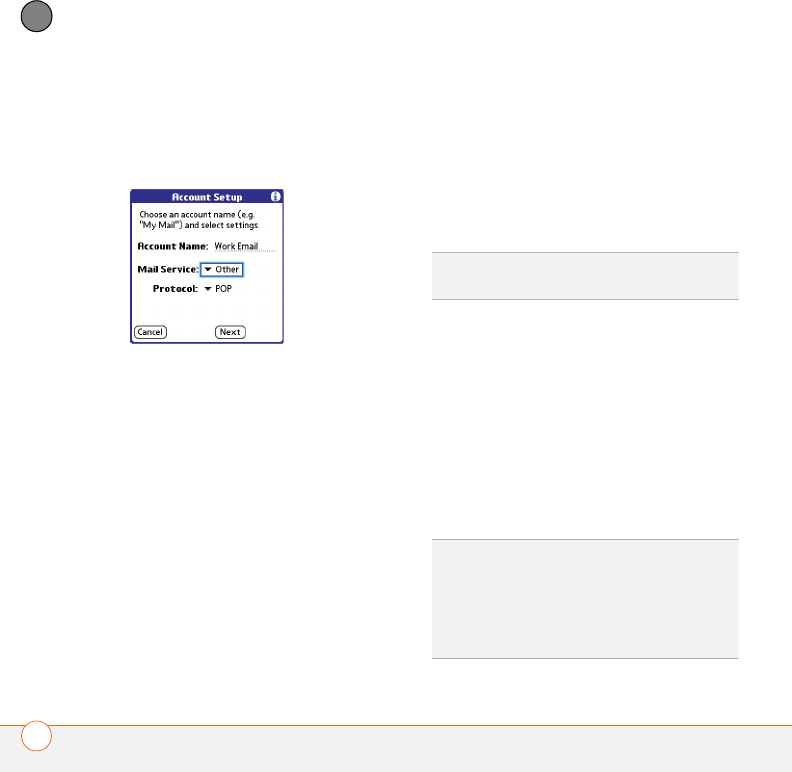
3Make up a name that describes this
account and enter it in the Account
Name field. For example, Work Email.
4Select the Mail Service pick list, and
then select Other.
TIP
To enter settings for another email
account, open the Accounts menu and select
Account Setup.
YOUR EMAIL AND OTHER MESSAGES
86
4
CHAPTER
5Select the Protocol pick list, select POP
or IMAP (based on the info you got from
your system administrator or ISP), and
then select Next.
6Enter the username for your email
account. Your username usually appears
before the @ symbol in your email
address.
NOTE For some email providers, such as
Gmail, your username is your entire email
address. Check with your email provider if
you are not sure what to enter as your
username.
7Select the Password box, enter your
email account password, select OK, and
then select Next.
8Enter your email address and the
names of the incoming and outgoing
mail servers, and then select Next.
9If your system administrator or ISP
provided port numbers or security
settings, select Advanced, and then
enter those settings.
10 Select Done.
Creating and sending messages
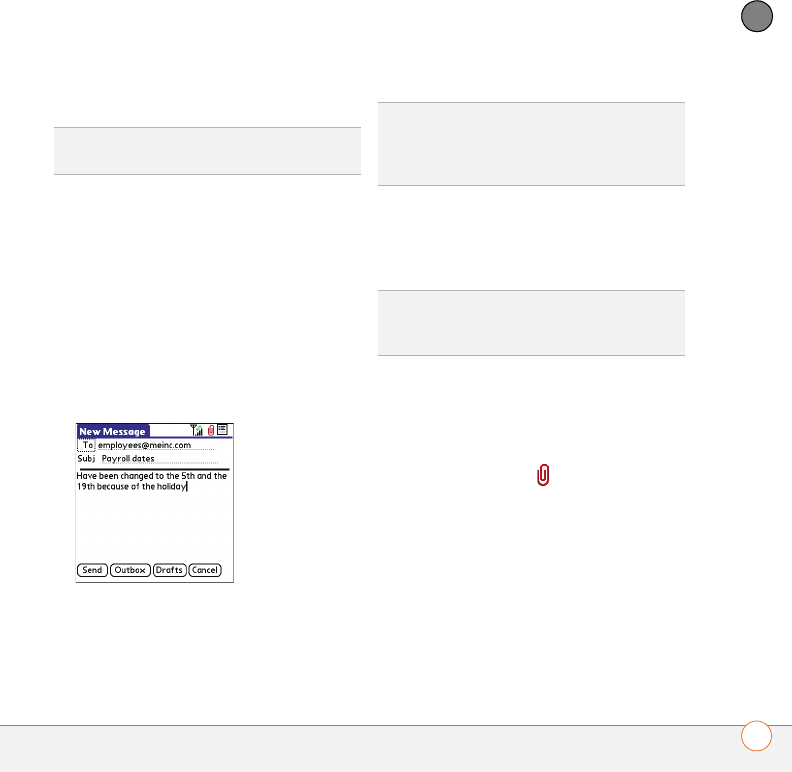
1From the Inbox, select New.
2Begin entering one of the following for
the addressee:
•Email address
•First name
•Last name
TIP
You can also select Advanced to set more
options for incoming and outgoing messages.
TIP
If you enter address info that matches one
or more of your contacts, VersaMail displays
the matching contacts. To accept a
suggestion, select the correct contact. To
send to a different address, keep entering the
email address or name.
YOUR EMAIL AND OTHER MESSAGES
87
4
CHAPTER
3Enter the subject and message text.
4Select one of the following:
Send: Connects and sends all
messages immediately. If the message
cannot be sent for any reason, the
message is stored in your Outbox.
Outbox: Puts the message in the
Outbox to send later.
Drafts: Saves the message so you can
continue working on it at another time.
Adding attachments to your messages
You can attach several types of files to your
email messages.
.
Attaching photos and videos
1Create the message to which you want
to attach the photo or video.
2On the New Message screen, select
the red paper clip icon in the
upper-right corner.
TIP
To move between fields, press Up or
Down on the 5-way.
DID
YOU
KNOW
?
VersaMail makes up to five
attempts to send a message; if it is still not
successful, an alert message appears and you
must try to manually send the message again.
TIP
To remove an attachment, select the file in
the Attachments box, and then select
Delete.

YOUR EMAIL AND OTHER MESSAGES
88
4
CHAPTER
3From the Ty p e pick list, select Photo/
Video.
4On the Select Media screen, select the
Album pick list to go to the album
containing the photo or video you want,
and then check the box to the left of the
photo or video.
5Select Done.
.
Attaching ringtones
1Create the message to which you want
to attach the ringtone.
2On the New Message screen, select
the red paper clip icon in the
upper-right corner.
3From the Ty p e pick list, select Sounds.
4Select the ringtone you want, and then
select Insert.
5Select Done.
Attaching Word, Excel, PowerPoint, and
PDF files
1Create the message to which you want
to attach the file.
2On the New Message screen, select
the red paper clip icon in the
upper-right corner.
3From the Ty p e pick list, select
Documents.
4Select the file you want on the
Documents screen.
5Select Done.
TIP
To attach more than one file to a message,
repeat steps 3 and 4.
TIP
Ringtones that are copy-protected appear
in the Sounds application with a lock icon. You
can use these ringtones on your phone, but
you cannot send them as attachments.
YOUR EMAIL AND OTHER MESSAGES
89
4
CHAPTER
Attaching other types of files
1Create the message to which you want
to attach the item.
2On the New Message screen, select
the red paper clip icon in the
upper-right corner.
3From the Ty p e pick list, select the type
of file to attach—for example, Address,
Appointment, or Memo/Text.
4Select the item you want from the list in
the Ty p e box.
5Select Done.
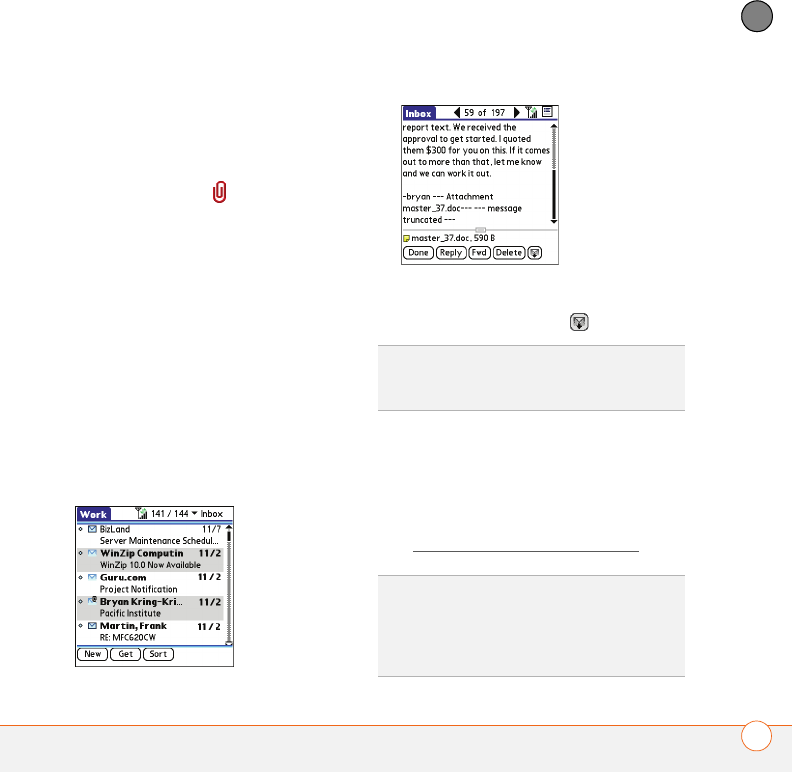
Receiving and viewing messages
1From any mailbox, select Get or Get &
Send.
2From the Inbox, select the message you
want to view.
3If a large incoming message is
truncated, select More .
4Select Done.
Replying to or forwarding messages
When you respond to messages, you can
select whether to include the original text
(see Customizing your email settings).
TIP
When viewing a message, tap the scroll
arrows at the top of the screen to view the
previous or next message.
DID
YOU
KNOW
?
The VersaMail application
sends all messages as plain text only, with all
HTML tags stripped, even if you are
forwarding or replying to a message that was
originally received as HTML.
YOUR EMAIL AND OTHER MESSAGES
90
4
CHAPTER
1From the Inbox or another folder, open
the message you want to respond to.
2In Message View, select Reply. Select
whether to reply to just the sender or to
reply to both the sender and all
addressees on the message.
3Enter your reply.
4Select Send.
Viewing attachments
There are a number of attachment types
you can open with the built-in software
on your Treo 680 (for example, Microsoft
Word, Excel, PowerPoint, and PDF files;
ringtones; and photos).
1From any folder, open the message with
the attachment you want to view.
Messages with downloaded
attachments appear with a paper clip
icon to the left of the message icon.
2Tap the attachment name at the bottom
of the message screen to view it in the
default viewer on your Treo 680.
3When you finish with the attachment,
select Done to return to the
Attachments dialog box.
TIP
You can also tap the folder icon to the left
of the attachment name to open a menu of
tasks you can do with the attachment,
including View, Install, or Unzip, depending on
the attachment file type; Save to card to save
the attachment to an expansion card; or select
Viewer to select the application you want to
use to view the attachment.
TIP
If an attachment is not downloaded
because it is larger than your maximum
message size, the paper clip icon does not
appear, and the attachment does not display
at the bottom of the message screen. Select
More to download and display any
attachments.
TIP
You can also tap the folder icon to the left
of the attachment name to open a menu of
tasks you can do with the attachment,
including View, Install, or Unzip, depending on
the attachment file type; Save to card to save
the attachment to an expansion card; or select
Viewer to select the application you want to
use to view the attachment.
YOUR EMAIL AND OTHER MESSAGES
91
4
CHAPTER
NOTE If there is no Done button, press
Applications and select Email to
return to the account’s Inbox.
Managing your messages
The status icons that appear near the
messages in your Inbox indicate the
following:
0
You can rearrange the message list to
make it easier to find and view messages.
•In the Inbox, select Sort, and then
select one of the following: Sort by
Date, Sort by Name, Sort by Subject.
•To quickly switch between folders in list
view, select the folder pick list at the
top of the screen and select the desired
folder.
Deleting selected messages from the
Inbox
When you delete a message from the
Inbox, it moves to the Trash folder.
1Select the bullet next to the icon of each
message that you want to delete. To
select adjacent messages, drag the
stylus so it touches the bullet to the left
of each message. Lift the stylus and
drag again to select more adjacent
messages.
2Press Menu .
3Select Delete on the Message menu.
4If a confirmation dialog box appears,
select OK to confirm deletion.
Deleting messages by date
You can quickly delete a group of
messages by selecting a range of dates.
1Press Menu .
2Select Delete Old on the Message
menu.
The message is unread when the
subject appears in bold.
The message includes an
attachment.
The message includes a meeting
invitation.
This message has high priority.
TIP
To delete a single message, select the
envelope icon next to the message, and then
select Delete from the list.
YOUR EMAIL AND OTHER MESSAGES
92
4
CHAPTER
3Select the folder and a date range for
the messages you want to delete.
4Select OK.
5If a confirmation dialog box appears,
select OK to confirm deletion.
Switching accounts
If you create more than one email account
in VersaMail, you need to switch from
account to account to get, send, and
otherwise manage the messages in each
account.
1Press Menu .
2Select Accounts, and then select an
account.
Customizing your email settings
You can customize the VersaMail settings
for each individual email account on your
Treo. The preferences you set apply only to
the email account you are currently
viewing. If you have multiple accounts,
configure each account separately.
You can set up a schedule to automatically
retrieve email messages; set preferences
for how and when messages are retrieved;
add a signature to an outgoing message;
and more. For complete information on all
of the email settings you can customize,
see the User Guide for the VersaMail
Application on your computer.
Windows: Start>Programs>Palm
Mac: Insert the Palm Installation CD and
click the link to the User Guide for the
VersaMail Application in the
Documentation folder.
Scheduling Auto Sync
You can set up VersaMail to automatically
download new email messages to your
Treo 680 with the Auto Sync feature.
TIP
To empty (or purge) the Trash folder, open
the Message menu and select Empty Trash.
DID
YOU
KNOW
?
If you assigned VersaMail to a
quick button, you can press that button
repeatedly to switch between your different
email accounts.
TIP
You need to set up a separate Auto Sync
schedule for each email account. This feature
may not work with email accounts that require
VPN connection.

YOUR EMAIL AND OTHER MESSAGES
93
4
CHAPTER
1Press Menu .
2Select Options, and then select
Preferences.
3Select Auto Sync.
4Check the Auto-sync box.
5Select the Every pick list and select the
time interval, from 5 minutes to
12 hours.
NOTE If you set a more frequent interval,
you may need to recharge your Treo battery
more often.
6Select the Start Time and End Time
boxes, and then select the hour, the
minute, and AM or PM to enter the time
for the first and last Auto Sync to take
place. Select OK.
7Select the days you want the schedule
to be active. You can choose any
number of days, but you can set up only
one schedule for each email account.
8Select OK, and then select Get Mail.
Selecting alert tones
When you schedule Auto Sync for a given
account, you can choose a sound—such as
a bird, a phone, or an alarm—to let you
know when new email arrives.
1From any mailbox screen, press
Menu .
2Select Options, and then select
Preferences.
3Select Alerts.
4Check the Alert me of new mail box.
TIP
After you set up a scheduled Auto Sync
and select Get Mail, from then on, only new
messages are retrieved during Auto Sync.
TIP
To receive notifications of successful Auto
Sync retrievals only, uncheck the Alert me of
auto sync failures box. Leave the box
checked if you want to receive notifications of
both successful and failed Auto Sync
retrievals.
YOUR EMAIL AND OTHER MESSAGES
94
4
CHAPTER
5Select the Alert Sound pick list, and
then select a sound. Your Treo plays a
brief demo of the sound.
6Select OK.
Setting preferences for getting messages
1From any mailbox screen, press
Menu .
2Select Options, and then select
Preferences.
3Select Incoming.
4Set any of the following preferences,
and then select OK.
Get: Indicates whether to get message
subjects only or entire messages.
Ask Every Time: Indicates if you want
to see a dialog box for selecting
subjects only or entire messages each
time you retrieve email. If the box is
unchecked, messages are retrieved
according to the option you select in the
Get pick list.
Unread messages (IMAP accounts
only): Downloads only unread mail to
your Treo 680. If you don’t check this
box and you select Get & Send, all the
messages on your mail server are
downloaded to your Inbox, including
messages you’ve read.
Mail from last: Gets messages sent
within the number of days you specify.
TIP
The POP protocol does not support
retrieval of unread mail only from the server. If
you have a POP email account, VersaMail
downloads all messages regardless of
whether you have read them, and regardless
of whether the Unread messages box is
checked.
YOUR EMAIL AND OTHER MESSAGES
95
4
CHAPTER
Download attachments: Automatically
downloads files attached to email,
except for attachments that exceed the
maximum message size.
Maximum message size: Sets the
maximum size of an incoming email
message. Enter the size in kilobytes
(KB). The default is 5KB, but you can
enter any size up to 2048KB
[approximately 2 megabytes (MB)],
including attachments. The maximum
message size that you can retrieve is
60KB for the body text and
approximately 5MB of total data for any
attachments.
Message Format: Sets the format for
messages you retrieve.
•HTML: Displays messages sent in
HTML format with basic formatting
intact and displays other messages as
plain text.
•Text: Displays all messages as plain
text, regardless of the format in which
they were sent.
Attaching a signature to a message
You can attach a personal signature, with
info like your company’s address and
phone numbers, to the bottom of all
messages you send.
1From any mailbox screen, press
Menu .
2Select Options, and then select
Preferences.
3Select Signature.
4Check the Attach Signature box.
5Enter your signature information, and
then select OK.
Working with Microsoft Exchange
ActiveSync
Microsoft Exchange ActiveSync works with
the VersaMail, Calendar, and Contacts apps
on your Treo 680 to directly access
corporate groupware information on a
Microsoft Exchange 2003 server. You can
synchronize business email, calendar, and
contact info with the Exchange 2003
server from your Treo 680 without using a
desktop computer.

YOUR EMAIL AND OTHER MESSAGES
96
4
CHAPTER
When you create a Microsoft Exchange
ActiveSync account in the VersaMail
application, your email, calendar, and
contact info sync directly with the
Exchange Server; information does not
sync with the desktop software application
on your computer, such as Microsoft
Outlook or Palm Desktop software. Other
information that is stored on your
computer, such as tasks and memos,
continues to synchronize with your desktop
software.
For complete info on using a Microsoft
Exchange ActiveSync account, see the
User Guide for the VersaMail Application
on your computer.
Windows: Start > Programs > Palm
Mac: Insert the Palm Installation CD and
click the link to the User Guide for the
VersaMail Application in the
Documentation folder.
Xpress Mail
Xpress Mail works with your existing
corporate and personal email accounts to
transfer messages to your Treo 680. To
access your corporate email, the Xpress
Mail desktop must be running and your
computer must be connected to your mail
server.
To use Xpress Mail to access email on your
Treo 680, you must first do the following:
•Enter your email account info on the
Cingular Xpress Mail website from your
computer.
•Download and install the Xpress Mail
desktop software on the computer
where you access your email.
•Set up the Xpress Mail desktop
software.
•Install the Xpress Mail software on your
Treo.
•Set up Xpress Mail on your Treo to work
with your email account.
For detailed instructions on setting up and
using Xpress Mail, visit: www.palm.com/
mytreo680cingular
YOUR EMAIL AND OTHER MESSAGES
97
4
CHAPTER
GoodLink
You can install the optional GoodLink
application for secure, real-time access to
your Microsoft Outlook email, calendar,
contacts, tasks, and notes. GoodLink offers
real-time push synchronization of email and
personal info; as messages are received on
the server, they are automatically
downloaded to your Treo 680. GoodLink
also offers attachment viewing through the
Documents application on your Treo 680
and integration with your corporate Global
Address List (GAL).
Your corporate email system must use
GoodLink with your Microsoft Exchange
Server in order for you to use GoodLink on
your Treo. Contact your system
administrator for information about setting
up GoodLink and using it. For more
information, visit www.good.com.
1Press Applications and select Get
Good .
2Follow the onscreen instructions to
download and install the software.
Messaging
You can use the Messaging application to
exchange brief text messages (SMS) and
multimedia messages (MMS) with other
devices and email addresses that support
these forms of messaging. Before you use
your Treo to send or receive messages,
refer to your service plan for pricing and
availability of messaging services.
Creating and sending a text message
Each text message can have up to
160 characters. Messages with more than
160 characters are automatically split into
several messages. (If you send a text
message to an email address, the email
address is deducted from the
160-character count.)
DID
YOU
KNOW
?
You can address messages to
multiple recipients by separating the
addresses with a comma. If you address a
single message to three people, you will be
billed for three messages.
YOUR EMAIL AND OTHER MESSAGES
98
4
CHAPTER
1Press Applications and select
Messaging .
2Select New.
3Select the To field to address the
message:
•Press Center . If the recipient’s
name appears in the list of recent
addresses, select it from the list.
•If the recipient is in your Contacts list,
enter the first initial and last name (no
spaces), and then select the
recipient’s phone number or email
address, depending on where you
want to send the message.
•If the recipient’s name isn’t in the list
of recent addresses or your Contacts
list, enter the phone number or email
address.
NOTE Sending text messages to land line
phones may not be supported.
4Enter your message or select
QuickText to insert predefined
phrases. To insert emoticons, select .
NOTE Some symbols can’t be used in text
messages. The Messaging application
automatically replaces invalid characters.
5Select Send.
DID
YOU
KNOW
?
You can page someone to call
you by sending them a blank text message.
TIP
If you see numbers when you expect to
see letters (or the other way around), you
need to turn Option Lock on by pressing
Option twice or turn it off by pressing Option
once.
TIP
To add a new QuickText phrase, select
Edit QuickText from the list.
TIP
Select Save as Draft to save a draft of the
message without sending it. To access the
draft, select the category pick list at the top of
the screen and select Drafts.
YOUR EMAIL AND OTHER MESSAGES
99
4
CHAPTER
Creating and sending a multimedia
message
Multimedia messages consist of text,
photos, videos, and sounds presented as
one or more slides. Even if your Tr e o 6 8 0
does not include a camera, you can still
send, receive, and view photos and videos.
You can include any of the following items:
0
1Press Applications and select
Messaging .
2Select New.
3Select Add Media.
4Select the To field to address the
message with up to 25 addresses:
•Press Center . If the recipient’s
name appears in the list of recent
addresses, select it from the list.
•If the recipient is in your Contacts list,
enter the first initial and last name (no
spaces), and then select the
recipient’s phone number or email
address.
•If the recipient’s name is not in the list
of recent addresses or your Contacts
list, enter the phone number or email
address.
5Enter a subject.
6Select the image placeholder, and then
select one of the following:
Attach image: Insert one photo or
video from your Treo 680 or an
expansion card.
Take new picture: Take a picture with
the built-in camera and add it to the
message (camera model only).
KEY
TERM
Slide A collection of text, pictures,
videos, and sounds that are grouped together
within a multimedia message. During
playback, all the items within a particular slide
appear on the same screen. If a multimedia
message contains multiple slides, each slide
can be viewed separately during playback.
Item Supported File Types
Pictures JPEG, GIF, WBMP
Videos MPEG4, 3GGP, 3GPP2
Ringtones MIDI
Sound clips AMR, QCELP
YOUR EMAIL AND OTHER MESSAGES
100
4
CHAPTER
Take new video: Capture a short video
with the built-in camcorder and add it to
the message (camera model only).
7(Optional) Select Sound , and then
select one of the following:
Record new: Record a sound clip of up
to 1 minute.
Attach voice memo: Select a memo
you recorded in the Voice Memo
application.
Attach ringtone: Select a ringtone.
8Enter a text message or caption.
9Select Add slide to insert additional
slides.
10 (Optional) Select Preview to view the
message as the recipient will see it.
11 (Optional) Press Menu , and then
select High Priority from the Compose
menu to mark the message as urgent.
12 Select Send.
Receiving messages
When your phone is turned on and is in an
area of wireless coverage, you
automatically receive new text messages.
For multimedia messages, you can set
your Treo 680 to automatically download
new messages or to notify you that a
message is ready to be downloaded (see
Customizing your Messaging settings). You
can also configure how your Treo 680
notifies you when a new message arrives
(see Selecting Messaging alert tones).
TIP
When creating a message, you can
preview or delete an item. Highlight the item,
press Center on the 5-way, and then select
Remove, View, or Play.
DID
YOU
KNOW
?
You can send a contact or
calendar entry. Select the entry, open the
Record menu, select Send, and then select
Messaging.
YOUR EMAIL AND OTHER MESSAGES
101
4
CHAPTER
The new message alert may include any of
the following buttons:
•OK: Dismisses the alert and places the
message in your Inbox.
•Reply: Opens Chat View, where you
can reply with a text message. To send
an MMS reply, select Add from Chat
View.
•Call Back: Dials the sender’s phone
number.
•Go To Msg: Opens the message so you
can view its full contents.
•Delete: Moves the message from your
Inbox to the Deleted folder.
Using links in messages
When you receive a text message that
contains a telephone number, email
address, or URL, you can dial the number,
send an email message, or go to the web
page immediately.
1Press Applications and select
Messaging .
2Select the message that contains the
link you want to use.
3Select the phone number, email
address, or URL (appears as underlined
blue text).
Your Treo automatically launches the
appropriate application from the link.
TIP
When you receive a message, you can
also press Send to call the sender.
TIP
If you have multiple alerts, the Alert dialog
box displays all your pending alerts. Select an
item’s description to jump to that item, or
check the box to clear that item. To view all
your pending alerts from any screen on your
Treo 680, press and hold Center on the 5-way.
YOUR EMAIL AND OTHER MESSAGES
102
4
CHAPTER
Viewing/playing a multimedia message
1Press Applications and select
Messaging .
2Select the message you want to view.
3If there are sounds or multiple slides,
playback begins immediately.
4Do any of the following:
•Use the onscreen controls to scroll to
other slides and messages.
•To save a sound, press Menu , and
select Save Sound from the
Message menu. You can access
saved sounds later by pressing
Applications and selecting
Sounds or Voice Memo .
•To save a picture, press Menu ,
and select Save Picture from the
Message menu. You can access
saved pictures later by pressing
Applications and selecting
Pics&Videos .
•To copy the text, use the stylus to
highlight the text, then press Menu
, select Edit, and then select
Copy.
•To stop playback of a message, select
Play/Stop.
•To view message details, press Menu
and select Message Details from
the Message menu.
•To save a calendar or contact entry,
open the message details. You can
access saved entries later by pressing
Applications and selecting
Calendar or Contacts
(depending on the type of entry you
saved).
5Select OK.
Arranging your messages
You can rearrange the messages in any
folder by using the Sort command.
YOUR EMAIL AND OTHER MESSAGES
103
4
CHAPTER
1Press Applications and select
Messaging .
2Select the folder list in the title bar and
select the folder you want to sort.
3Press Menu .
4Select View, and then select Sort by
Name or Sort by Date.
Deleting messages
You can delete several messages at once
from any folder by using the Purge
command.
1Press Applications and select
Messaging .
2Select the folder list in the title bar and
select the folder that contains the
messages you want to delete.
3Press Menu .
4Select Purge from the Message menu.
5Select the Purge pick list, and then
select an option.
6Select OK.
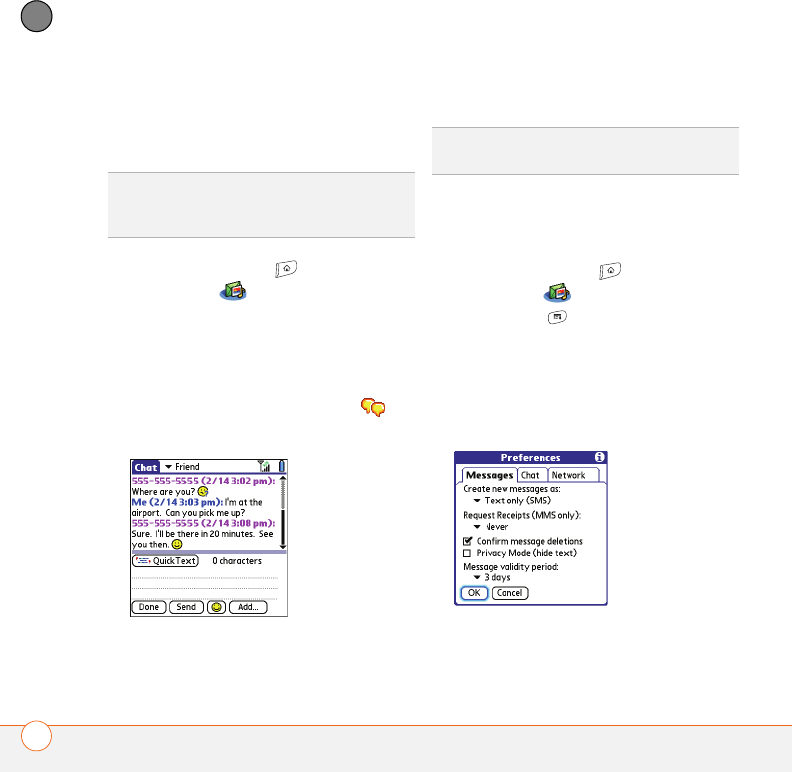
Chatting with Messaging
When you exchange more than one
message with a single contact, the
messages you exchange with that person
are grouped into a chat session. When you
select a chat session from your message
list, the upper part of Chat View displays all
messages you’ve exchanged with this
contact, and the lower part provides an
entry area.
TIP
To delete an individual message, highlight
it in the message list, and then select Delete.
DID
YOU
KNOW
?
You can send and receive text
messages even while you are on a phone call.
This is easiest when using a hands-free device
or the speakerphone.
YOUR EMAIL AND OTHER MESSAGES
104
4
CHAPTER
You can carry on multiple chats at the same
time and easily switch between them,
using the pick list at the top of the screen.
1Press Applications and select
Messaging .
2Do one of the following:
Start a new chat: Select a message
and reply to it.
Continue an existing chat: Select a
message that displays the Chat
icon.
3Enter your message.
4Select Send.
Customizing your Messaging settings
1Press Applications and select
Messaging .
2Press Menu .
3From the Options menu, select
Preferences.
4On the Messages tab, set any of the
following preferences for your individual
messages:
TIP
To find a chat you had with someone, open
your Messaging Inbox and select a chat
session.
TIP
Pale gray text indicates that a message is
pending or enroute.
YOUR EMAIL AND OTHER MESSAGES
105
4
CHAPTER
Create new messages as: Indicates
whether text or multimedia messaging
is the default format for a new
message.
Request Receipts (MMS only):
Indicates whether you want to receive a
confirmation when an outgoing MMS
message is delivered.
Confirm message deletions: Indicates
whether you want deletion confirmation
prompts to appear.
Privacy Mode (hide text): Indicates
whether you want the body text to
appear in the alert when you receive a
new message, or whether you want the
alert to hide the text and prompt you to
go to the message.
Message validity period: Indicates
how long you want an outgoing
message to be valid.
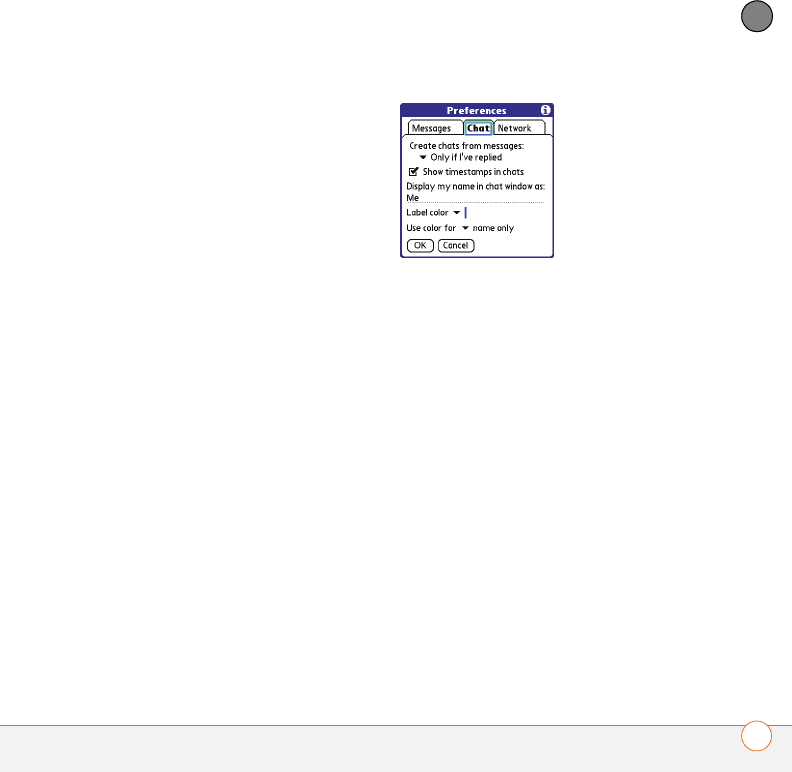
5Select the Chat tab and set any of the
following preferences for chat sessions.
Create chats from messages: Indicate
when you want to group messages
from the same person into a chat.
Show timestamps in chats: Indicate
whether you want to see the local date
and time the message was sent next to
each message.
Display my name in chat window as:
Enter the name you want to use as the
label for your messages in Chat View.
Label color: Select a color to
differentiate your messages from the
sender’s messages while in Chat View.
Use color for: Indicate whether you
want both your name and message text
in the selected label color, or only your
name.

YOUR EMAIL AND OTHER MESSAGES
106
4
CHAPTER
6Select the Network tab and set any of
the following preferences for network
connections.
Automatically collect MMS
messages: Indicate whether you want
to download multimedia messages
automatically.
Even when roaming: Indicate whether
you want to automatically receive
multimedia messages while roaming.
Network Configuration: Indicate if you
want to use Automatic or Manual
message retrieval. If you select Manual,
select Edit and enter Cingular
Wireless’s settings.
NOTE We recommend that you do not
change the Network Configuration
settings.
7Select OK.
Selecting Messaging alert tones
1Press Applications and select
Messaging .
2Press Menu .
3Select Options, and then select Alerts.
4Select the Application pick list and
select Messaging.
DID
YOU
KNOW
?
Your Treo includes a silent alert
that can vibrate even when the Ringer switch
is set to Sound Off.
YOUR EMAIL AND OTHER MESSAGES
107
4
CHAPTER
5Select the Volume pick list and select
the volume level.
6Select the Vibrate pick list and select
when you want your Treo 680 to vibrate.
7Select the Message Tone pick list and
select a tone for incoming message
alerts for a message alert.
8Check the boxes if you want to see
onscreen alerts when a new message
arrives and when a message you sent is
received.
9Select Done.
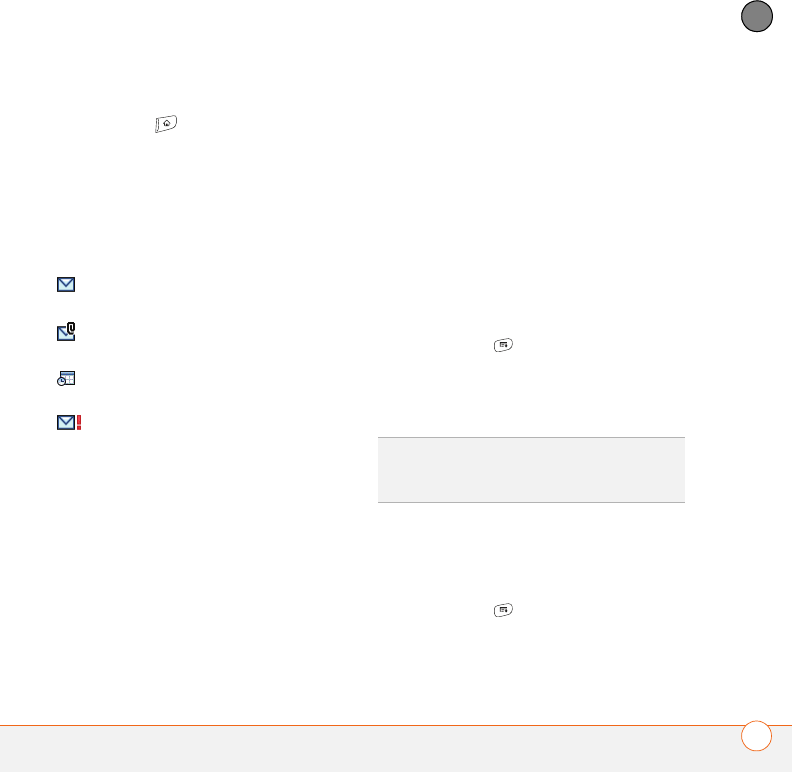
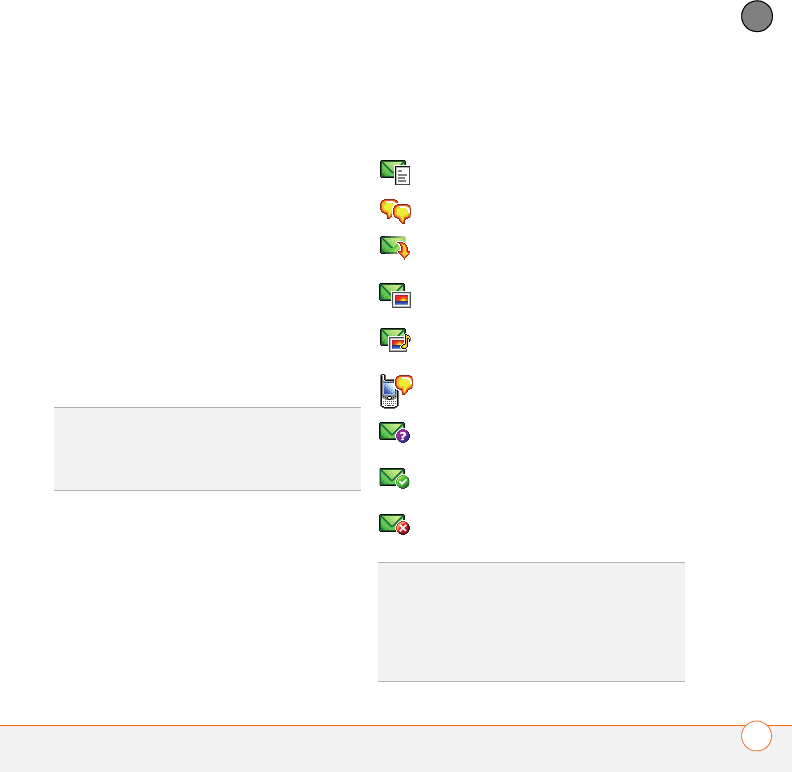
What are all those icons?
The message descriptions in the Inbox,
Outbox, and Sent folders show the
message status:
•Unread messages appear in bold.
•Read messages appear in plain text.
•Urgent messages appear with a red
exclamation point (!).
The following icons show the message
type and additional status info:
TIP
By default, the Messaging app shows the
Inbox folder. To view a different folder, select
the folder list in the title bar and select a
different folder from the list.
A text message
A chat session
A multimedia message that is ready
for you to download
A multimedia message that is fully
downloaded
A multimedia message that is fully
downloaded and contains sound
A voicemail page
A message that is waiting to be
sent
A receipt, which you requested,
confirming delivery of the message
An outgoing message with an error
DID
YOU
KNOW
?
If you are outside a coverage
area or if your phone is turned off, outgoing
messages go into the Outbox. When you
return to a coverage area or turn your phone
on, your pending messages are automatically
sent and transferred to the Sent folder.

YOUR EMAIL AND OTHER MESSAGES
108
4
CHAPTER

CHAPTER
5
Your connections to the web
and wireless devices
You use the web for many things: driving directions, shopping,
news, web-based email. Now, with the Cingular Wireless
network and the built-in web browser, you can take the web
with you almost anywhere.
The built-in Bluetooth® feature of your Palm®Treo™ 680 smart
device helps you easily set up wireless connections to a
number of devices, so you can enjoy the convenience of
cable-free connectivity. You can also use your Treo 680 to
connect your computer to the Internet and to share contacts or
your favorite photos with other people.
Benefits
•Carry the web with you
•Store web pages for offline
viewing
•Connect to Bluetooth headsets
and car kits
•Connect your computer to the
Internet through your Treo 680

In this chapter
Web browser . . . . . . . . . . . . . . . . . . . . . . . . . . . . . . . . . . . . . . . . . . 111
Connecting your computer to the Internet through your Treo . . . . . 119
Connections with Bluetooth devices . . . . . . . . . . . . . . . . . . . . . . . . 122
YOUR CONNECTIONS TO THE WEB AND WIRELESS DEVICES
111
5
CHAPTER
Web browser
The Blazer® web browser on your Treo
provides quick and easy access to web
pages. You can view most sites you use on
your computer, including those with
security and advanced features, such as
JavaScript and frames. To browse the web,
you must activate data services from
Cingular Wireless.
Viewing a web page
To make viewing web pages on your Treo a
better experience, the web browser
reformats web pages into a single column
and resizes images. In this format—called
Optimized Mode—you can see most
content without scrolling left or right. You
can also switch to Wide Page Mode if you
like.
DID
YOU
KNOW
?
The security certificates and
128-bit Secure Sockets Layer (SSL) encryption
let you visit secure websites, like ones for
banking and using email. Some secure sites
also require specific browsers, so those may
not work with your web browser.
DID
YOU
KNOW
?
The web browser supports
JavaScript, SSL strong encryption, and
cookies, but does not support plug-ins (such
as Flash or Shockwave) or Java applets.
DID
YOU
KNOW
?
You can send email from a
web page on your Treo. Email addresses
appear as links on web pages. After you
configure an email application on your Treo,
you can select an email address link to create
a message to the selected address.
Optimized Mode
Wide Page Mode
YOUR CONNECTIONS TO THE WEB AND WIRELESS DEVICES
112
5
CHAPTER
1Press Applications and select Web
to open the Blazer web browser. If
necessary, select Ye s to turn on your
phone, and Ye s to connect to the
Internet.
If you do not see either of these icons
in the title bar, data services are
not available in your current location and
you cannot connect to the Internet.
2Enter a web page address (URL) in the
Address Bar and select Go.
NOTE If you browse to a secure web
page, a lock icon appears in the
Address Bar.
3Do any of the following to navigate
within the web page:
View a page in wide layout format (as
on your computer): Press Menu ,
select Options, and then select Wide
Page Mode.
Scroll through the page: In Optimized
Mode (the default format) press Up
or Down . In Wide Page Mode, use all
buttons on the 5-way to scroll in
any direction.
Follow a link to another web page: In
Optimized Mode, highlight the link by
pressing Left or Right and then
press Center to go to the selected
page. In Wide Page Mode, use the
stylus to select a link.
Submit a form: Enter the info and then
select the onscreen button to submit
the form. If the form doesn’t have an
onscreen button, press Return .
4Use the 5-way to access any of
the following icons in the title bar:
0
TIP
To adjust the font size, open the Options
menu and select Font. To fit more text on the
screen, select Small. To make the text easier
to read, select Large.
Goes to your home page.
Opens a dialog box where you
can enter a web address or view
a list of recently viewed web
pages.
Goes back in order through
pages you viewed.
Goes forward in order through
pages you viewed.
YOUR CONNECTIONS TO THE WEB AND WIRELESS DEVICES
113
5
CHAPTER
Creating a bookmark
With bookmarks, you can instantly access
a web page without entering the address
every time. The web browser can store up
to 100 bookmarks or saved pages, allowing
you to open your favorite web pages
quickly. Note that a bookmark is different
from a saved page and different from a
favorite (see Defining favorite buttons).
1Go to the page you want to bookmark.
2Press Menu .
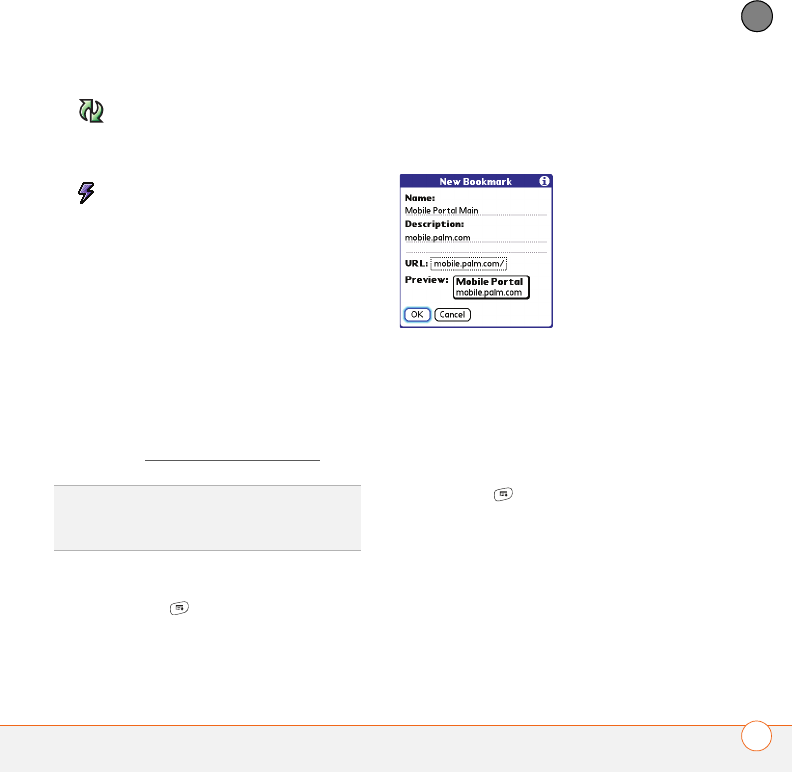
3Select Add Bookmark from the Page
menu.
4Change the entries in the Name and
Description fields.
5Select OK, and then select OK again.
Saving a page
You can use the web browser to save a
page for offline viewing, so you don’t need
a wireless connection to view it later.
1Go to the page you want to save.
2Press Menu .
3Select Save Page from the Page menu.
4Select OK, and then select OK again.
Viewing bookmarks or saved pages
Bookmarks and saved pages both appear in
Bookmarks View. Saved pages are
indicated by a small triangle in the
upper-right corner of the bookmark.
Gets the latest version of the
current web page. This is
sometimes called refreshing the
web page.
Opens a list where you can
select Fast mode (no images or
style sheets) or Normal mode
(with images and style sheets).
DID
YOU
KNOW
?
The predefined bookmarks
take you to pages that are optimized for your
Treo.

YOUR CONNECTIONS TO THE WEB AND WIRELESS DEVICES
114
5
CHAPTER
1Select the Bookmarks View icon.
2Select the bookmark or saved page you
want to view.
Editing or deleting a bookmark or saved
page
1In Bookmarks View, press Menu .
2Select Edit Bookmarks from the
Bookmarks menu.
3Select the bookmark you want to edit or
delete.
4Enter the desired changes or select
Delete.
5Select OK.
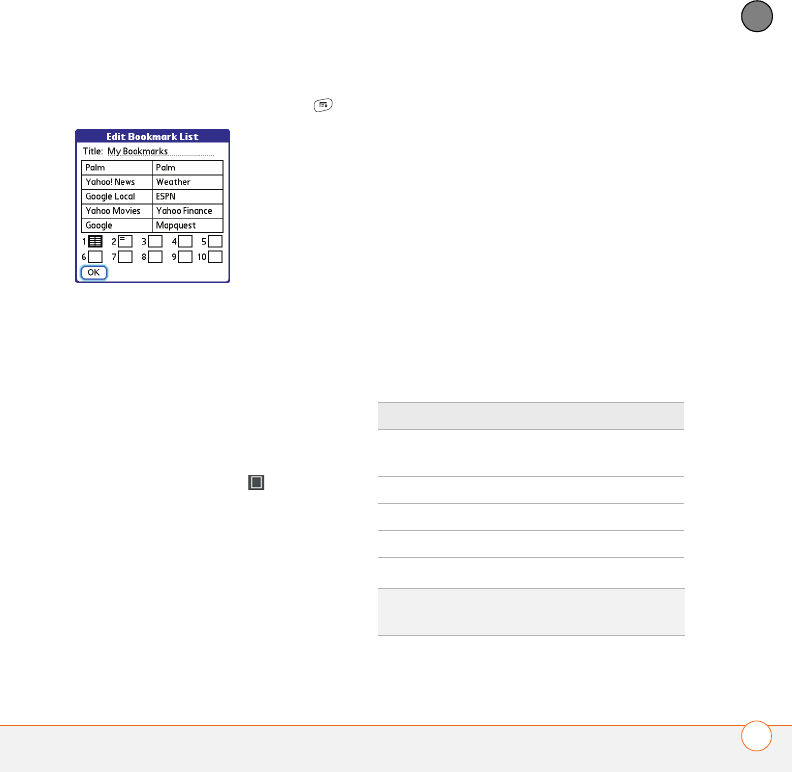
Arranging bookmarks and saved pages
Bookmarks View has ten pages where you
can store and arrange bookmarks and
saved pages in a way that works for you.
For example, you can store travel links on
one bookmark page, stock links on another,
and business links on a third page.
DID
YOU
KNOW
?
You can make Bookmarks
View the default view when you open the
browser. Open the Options menu and select
Preferences. Select the Start With pick list
and select Bookmarks.
TIP
To go back to the last web page you
viewed without selecting a bookmark, select
Page View.
TIP
If you can’t edit, delete, or beam a
bookmark, it is probably locked and these
actions are prohibited.
YOUR CONNECTIONS TO THE WEB AND WIRELESS DEVICES
115
5
CHAPTER
1In Bookmarks View, press Menu .
2Select Edit Bookmarks from the
Bookmarks menu.
3Enter a title for this page of bookmarks.
4Use the stylus to drag and drop a
bookmark into the desired slot. You can
move a bookmark within the current
page or move it to a different bookmark
page by dragging and dropping it on one
of the Bookmark Page icons at the
bottom of the screen.
5Select OK.
Downloading files from a web page
The web browser lets you download files
that are recognized by one of the
applications on your Treo 680. When you
download a file, you can open it in the
application that recognizes the file. For
example, if you download an MP3 file, you
can listen to it later in the Pocket Tunes™
application. If a file is not recognized by any
application on your Treo 680 you cannot
open it on your Treo. You can, however,
download the file to an expansion card,
transfer it to your computer using an
expansion card reader (sold separately),
and view it on your computer.
You can download files such as new
applications and choose to play or save
music and video files in many popular
formats—provided that the website
permits the downloading of files:
Item Supported File Types
Pictures JPEG, WBMP, GIF,
animated GIF
Videos MP4, 3G2, ASF, WMV
Ringtones MIDI, AAC
Music MP3, WMA
TIP
You can also access software and other
downloads using the Downloads bookmark.
YOUR CONNECTIONS TO THE WEB AND WIRELESS DEVICES
116
5
CHAPTER
1Go to the page with the link to the file
you want to download.
2Do one of the following:
•In Optimized Mode, press Left or
Right to highlight the link to the
file, and then press Center .
•In Wide Page Mode, tap the link with
your stylus.
3If prompted, select what you want to do
with the file: Play, Save To Device, or
Save To Card.
4Select Ye s .
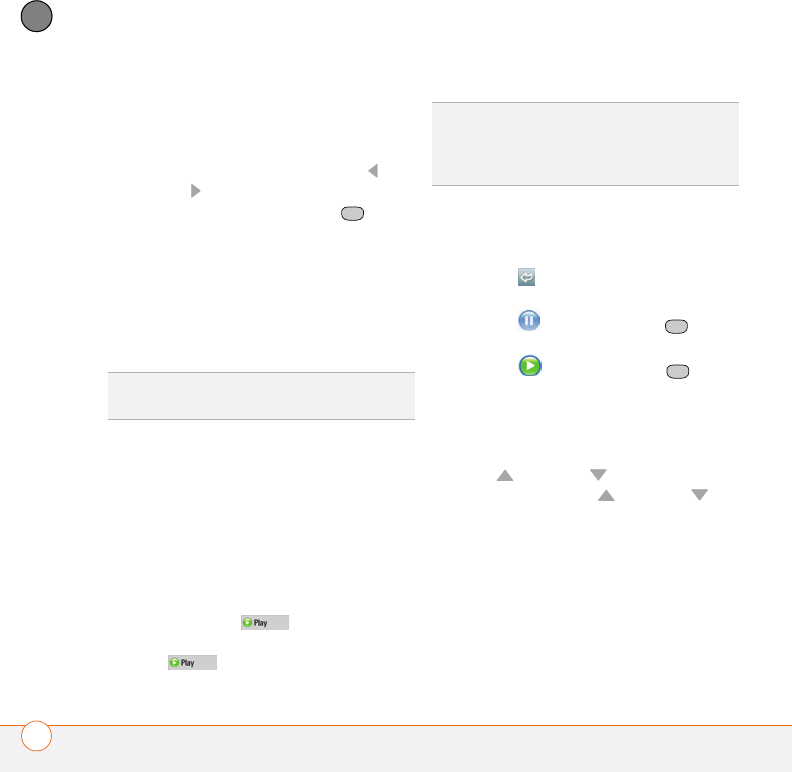
Streaming files from a web page
The web browser lets you stream files that
are recognized by one of the applications
on your Treo 680. For example, you can
choose to play music and video files in
many popular formats (MP3, WMA, WMV).
1When the web browser recognizes
streamed content on a web page, it
displays a Play icon. To view or
listen to the streamed content, select
Play .
2Once streaming begins, playback starts
automatically. Use the following
controls when viewing or listening:
•Select to return to the web page
containing the streamed content.
•Select or press Center to
pause playback.
•Select or press Center to
resume playback after pausing.
•A few seconds after playback begins,
the toolbar is hidden and you can view
the content on the full screen. Press
Up or Down to display the
toolbar; press Up or Down
again to hide the toolbar again.
•Press the Volume button on the side
of your Treo 680 to adjust the volume.
Copying text from a web page
You can copy text from a web page and
paste it into other applications.
TIP
You can also save an image from a web
page by tapping and holding it with the stylus.
TIP
The web browser recognizes streamed
content that is not supported by any of the
applications on your Treo 680, and it displays a
Media type not supported message.
YOUR CONNECTIONS TO THE WEB AND WIRELESS DEVICES
117
5
CHAPTER
1Use the stylus to highlight the text you
want to copy.
2Press Menu .
3Select Edit, and then select Copy.
4Go to the app in which you want to
paste the text and position the cursor
where you want to paste the text.
5Press Menu .
6Select Edit, and then select Paste.
Returning to recently viewed pages
The History list stores the addresses of the
last 100 pages you visited. Items in the
History list are sorted chronologically.
1In Page View, press Menu .
2Select History from the Page menu.
3Select the web page you want to load.
Finding text on a web page
1In Page View, press Menu .
2Select Find Text on Page from the
Page menu.
3Enter the text you want to find.
4Check or uncheck the Wrap Search box
to indicate whether you want the search
to wrap from the end of the page to the
beginning when the end is reached.
5Select Find to start the search.
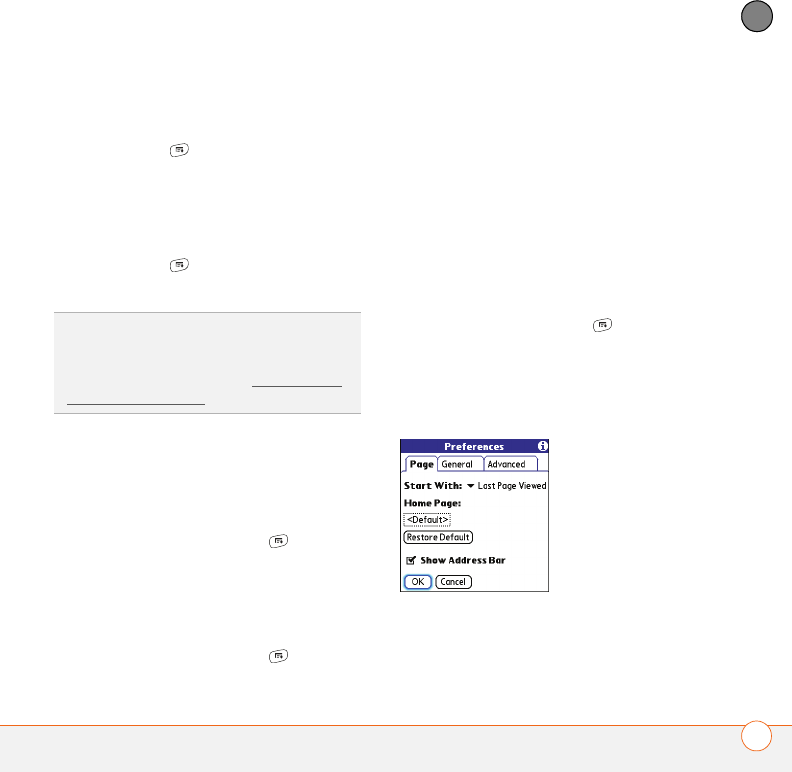
Customizing your web browser settings
1In Page View, press Menu .
2Select Options, and then select
Preferences.
3Select Page and set any of the following
preferences:
Start With: Determines which view
appears when you open the browser.
DID
YOU
KNOW
?
If the web browser does not
recognize a phone number as dialable, you
can copy the phone number (as text) and
paste it into the Dial Pad (see Dialing from a
web page or message).
YOUR CONNECTIONS TO THE WEB AND WIRELESS DEVICES
118
5
CHAPTER
Home Page: Sets the page that appears
when you select .
Restore Default: Selects the original
home page, if you changed it.
Show Address Bar: Sets whether the
web address appears in Page View.
When it is visible, you can select the
pick list to go to a previously viewed
page or enter a URL directly from Page
View.
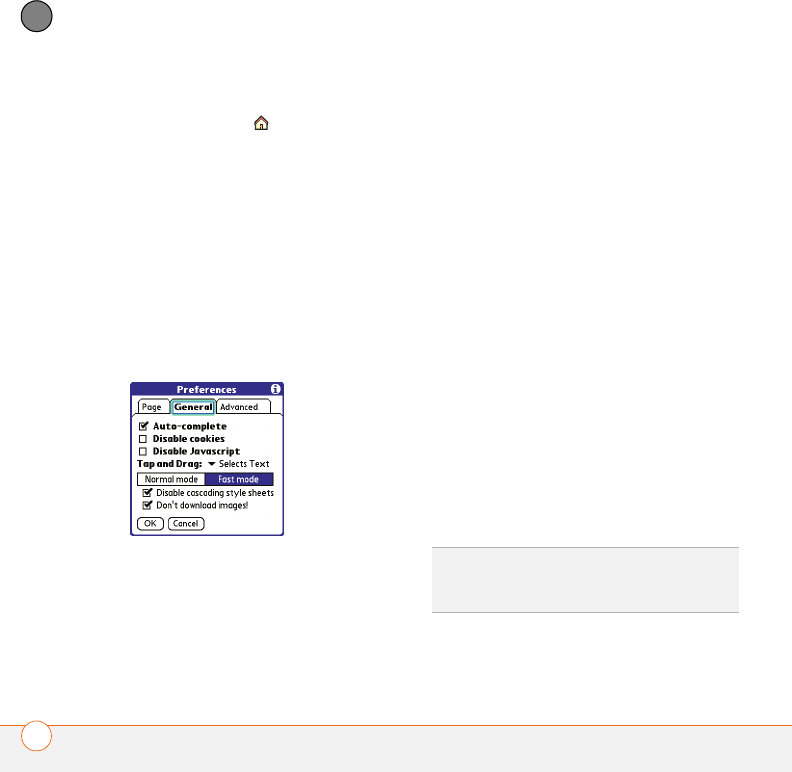
4Select General and set any of the
following preferences:
Auto-complete: Determines whether
the web browser suggests text, based
on your previous entries, when you
begin entering info.
Disable cookies: Determines whether
websites can store personalized info on
your Treo. Some sites do not work
properly if you select this option.
Disable JavaScript: Bypasses
JavaScript elements on the web pages
you view.
Tap and Drag: Determines whether
dragging the stylus selects text or
scrolls through the content of the page.
Normal mode/Fast mode: Determines
whether a web page appears as
designed (Normal mode) or with some
of the items removed for faster display.
Selecting Fast mode gives you the
following options:
•Disable cascading style sheets:
Determines whether style sheets are
applied when you load a web page.
When style sheets are disabled,
pages download faster, but you may
lose some of the formatting.
•Don’t download images!
Determines whether images appear
KEY
TERM
Cascading Style Sheets (CSS) A
file that governs design elements of a web
page, such as its fonts, colors, and layout.
YOUR CONNECTIONS TO THE WEB AND WIRELESS DEVICES
119
5
CHAPTER
when you load a web page. If you
select not to view images, you can
still see any image by selecting the
placeholder box on the web page.
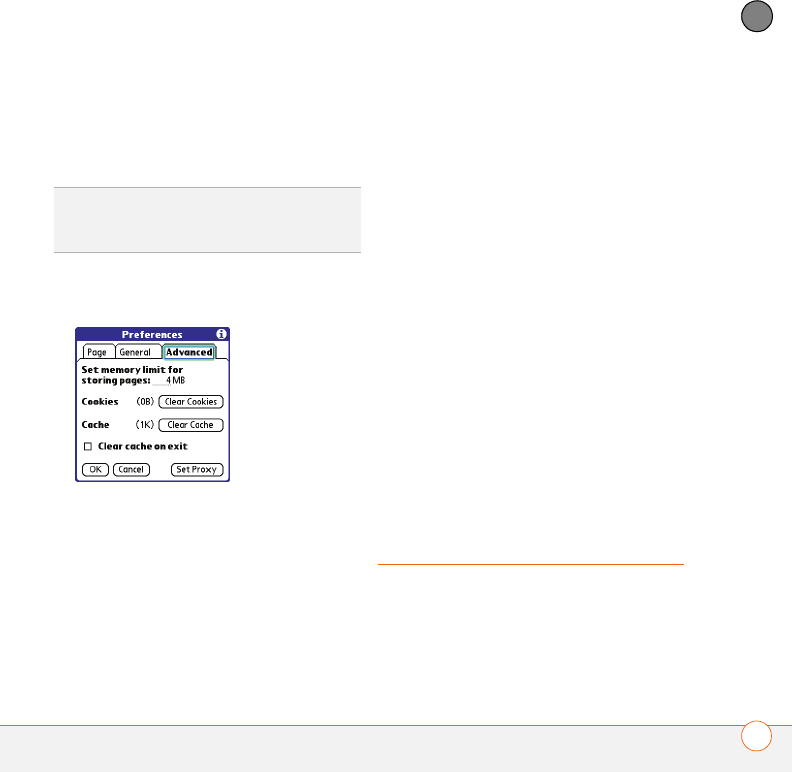
5Select Advanced and set any of the
following preferences:
Set memory limit for storing pages:
Sets the amount of memory used for
your cache. Pages are cached so that
they load faster the next time you view
them.
Cookies: Indicates how much memory
is being used by cookies. To free up this
memory, select Clear Cookies.
Cache: Indicates how much memory is
being used by your cache to store
recent pages and history. To free up this
memory, select Clear Cache.
Clear cache on exit: Determines
whether the cache clears each time you
exit the web browser.
Set Proxy: Sets up a proxy server to
access the Internet. If your connection
requires a proxy server, please contact
your Internet service provider or IT
administrator for this information.
6Select OK.
Connecting your
computer to the
Internet through
your Treo
Dial-up networking (DUN) is the feature
that converts your Treo 680 into a modem
so that you can access the Internet from
your computer. If your computer is enabled
TIP
Lots of pretty graphics slowing you down?
Browse the web faster by enabling the Don’t
download images! option.
YOUR CONNECTIONS TO THE WEB AND WIRELESS DEVICES
120
5
CHAPTER
with Bluetooth wireless technology, you
can set up your Treo 680 as a wireless
modem using the built-in Bluetooth
technology.
The following procedures describe the
process of setting up your Treo 680 as a
wireless modem using the built-in
Bluetooth technology.
Creating a partnership between your Treo
and your computer
1Make sure that your computer’s
Bluetooth setting is on and that your
computer is ready to create a Bluetooth
partnership. Check the documentation
that came with your computer to find
and change these settings.
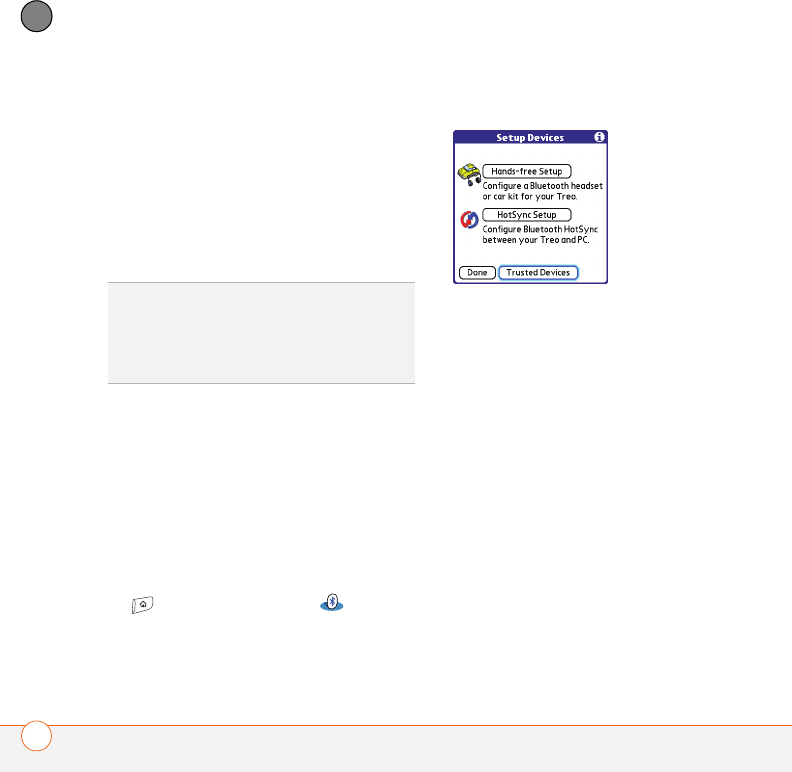
2On your Treo 680, press Applications
and select Bluetooth .
3Select Bluetooth On if it is not already
selected, and then select Setup
Devices.
4Select Tru s t e d D e v i c e s .
5Select Add Device. The discovery icon
appears, indicating that the discovery
process is active.
6Select your computer from the Tr u s t e d
Devices list, and then select OK.
7Make up a passkey, enter it on the
Bluetooth Security screen, and then
select OK. The passkey can be up to 16
numbers.
NOTE You need this passkey in the next
step, so be sure to write it down exactly.
We recommend that you use a passkey of
16 numbers, where possible, to improve
the security of your Treo. The longer the
passkey, the more difficult it is for the
passkey to be deciphered.
TIP
If your computer is not enabled with
Bluetooth wireless technology, you need to
purchase a wireless Bluetooth adapter
accessory for your computer to use this
feature.
YOUR CONNECTIONS TO THE WEB AND WIRELESS DEVICES
121
5
CHAPTER
8Enter the same passkey on your
computer when prompted.
9Select Done, and then select Done
again to return to the Bluetooth screen.
Setting up your computer for a Bluetooth
DUN connection
Follow the instructions from the
manufacturer of your Bluetooth adapter to
enable DUN.
Accessing the Internet using a Bluetooth
DUN connection
The steps for accessing the Internet on
your computer may vary depending on your
operating system and how Bluetooth
wireless technology is set up on your
computer—for example, if it is built-in
versus if you are using a Bluetooth adapter.
If you need additional info, check your
computer’s documentation for how to set
up Bluetooth technology to access the
Internet using a DUN connection.
BEFORE YOU BEGIN Verify that DUN is
enabled on your computer. See the
documentation that came with your
computer for details.
1Open the Bluetooth application on your
computer and let it locate the Treo you
paired it with in the previous procedure.
2Double-click the icon or option
representing your Treo 680. Your
computer connects to your Treo 680
and shows that DUN services are
available.
3Double-click the DUN icon.
4Enter the following settings:
•Dial: *99***1#
•User Name:
WAP@CINGULARGPRS.COM
•Password: CINGULAR1
5Click Dial. Once the connection is
successfully established, you can
browse the Internet on your computer
or download your email.
TIP
You may need to use a virtual private
network (VPN) to access corporate email.
Check with your system administrator for
more information.
YOUR CONNECTIONS TO THE WEB AND WIRELESS DEVICES
122
5
CHAPTER
6Look for a network connection icon in
the taskbar at the bottom of your
computer screen to verify that you are
connected.
NOTE When a DUN connection is active,
you cannot use data services on your Treo
680. For example, you cannot browse the
Web, or send or receive email messages.
Also, any scheduled automatic email
retrievals do not take place. You can,
however, use other wireless features of
your Treo 680, such as making and
receiving phone calls or sending and
receiving text messages.
Terminating a Bluetooth DUN Internet
session
It is important to end a Bluetooth DUN
session after you finish using it. Ending the
DUN session lets you use the wireless
features of your Treo 680 that require a
data connection, it frees up the Bluetooth
feature so that you can connect to other
Bluetooth devices, and it optimizes battery
life, too.
1On your computer, right-click the icon or
option representing your Treo 680.
2Click Disconnect.
Connections with
Bluetooth devices
With the built-in Bluetooth wireless
technology on your Treo, you can connect
to a number of Bluetooth devices,
including a hands-free device such as a
headset or car kit, a printer, or a GPS
receiver, as well as to other Treo 680s and
handhelds that are equipped with
Bluetooth wireless technology. If your
TIP
If you get a message asking whether you
want your computer to remember the dial text
for this connection, we recommend that you
say yes. This avoids errors and the
inconvenience of entering the dial text for
every session.
DID
YOU
KNOW
?
You can check the status of the
connection by right-clicking the Bluetooth
network icon in the taskbar.
YOUR CONNECTIONS TO THE WEB AND WIRELESS DEVICES
123
5
CHAPTER
computer is enabled with Bluetooth
wireless technology, you can also
synchronize wirelessly or use your phone
to connect your computer to the Internet.
You can create a list of Bluetooth devices
that you trust to communicate with your
Treo. When communicating with trusted
devices, your Treo skips the discovery
process and creates a secure link as long
as the device is within range. Bluetooth
range is up to 30 feet depending on
environmental conditions, including
obstacles, radio interference from nearby
electronic equipment, and other factors.
When you configure a hands-free device,
as described previously in Connecting to a
Bluetooth hands-free device, the
hands-free device automatically appears in
your Trusted Devices list. Follow the steps
in this section to add other devices to your
Trusted Devices list, such as a friend’s
handheld.
Requesting a connection with another
Bluetooth device
1Press Applications and select
Bluetooth .
2Select Bluetooth On.
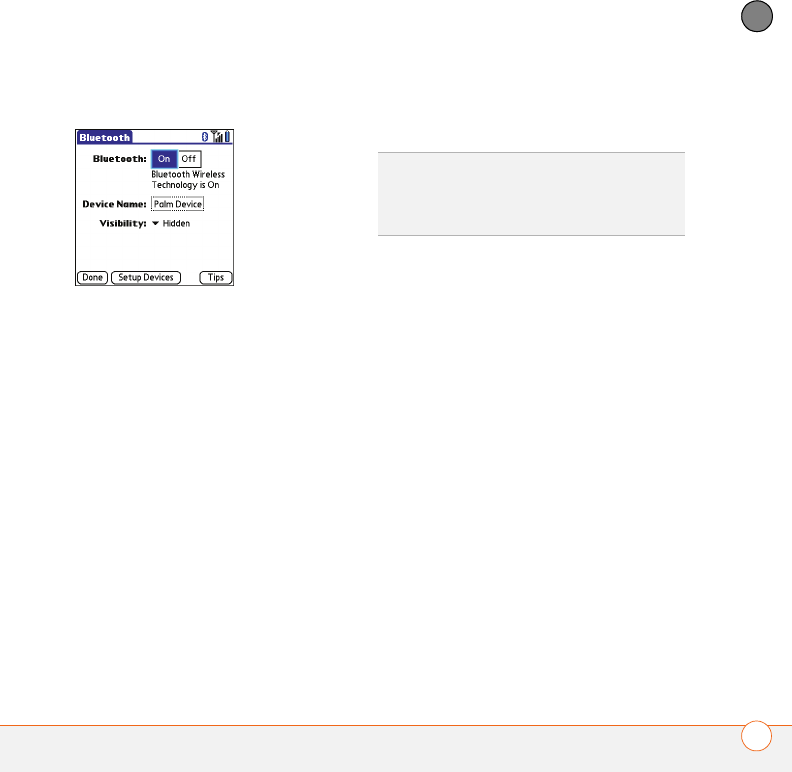
3(Optional) Enter a device name that
identifies your Treo 680 when it is
discovered by other Bluetooth devices.
NOTE Use the same device name for all
your Bluetooth connections. If you change
the device name, you need to recreate any
partnerships you already created.
4Select Setup Devices.
5Select Tru s t e d D e v i c e s .
DID
YOU
KNOW
?
Your Treo does not support
wireless connections to Bluetooth stereo
headphones.
YOUR CONNECTIONS TO THE WEB AND WIRELESS DEVICES
124
5
CHAPTER
6Select Add Device. The Discovery icon
appears, indicating that the discovery
process is active.
7Select the Show pick list and select
Nearby devices.
8If the device you want to add doesn’t
appear on the Discovery Results list,
make sure that the other device is ready
to receive a connection request (see the
device’s documentation), and then
select Find More on your Treo to search
again.
9Enter the same passkey on your Treo
680 and on the Bluetooth device, and
select OK.
IMPORTANT Some Bluetooth devices
have a preset passkey; if so, you can find
the passkey in the documentation for that
device. Other devices provide a screen
where you enter a passkey that you make
up. In either case, you must use the same
passkey on both your Treo 680 and the
other Bluetooth device. We recommend
that where possible, you make up a
passkey of 16 alphanumeric characters
(letters and numerals only) to improve the
security of your Treo. The longer the
passkey, the more difficult it is for the
passkey to be deciphered.
10 Select Done.
Accepting a connection from another
Bluetooth device
1Press Applications and select
Bluetooth .
TIP
For the Treo 680 to be visible to Bluetooth
devices, the Bluetooth setting must be set to
On and visibility must be set to Visible or
Temporary.
YOUR CONNECTIONS TO THE WEB AND WIRELESS DEVICES
125
5
CHAPTER
2Select Bluetooth On.
3(Optional) Enter a device name that
identifies your Treo 680 when it is
discovered by other Bluetooth devices.
NOTE Use the same device name for all
your Bluetooth connections. If you change
the device name, you need to recreate any
partnerships you already created.
4Select the Visibility pick list and select
one of the following:
Visible: Enables Bluetooth devices that
are not on your Trusted Devices list to
request a connection with your Treo
680. Your Treo 680 remains accessible
to other devices until you turn this
option off. After you’re done using this
setting, remember to change it back to
Hidden.
Temporary: Enables Bluetooth devices
that are not on your Trusted Devices list
to request a connection with your Treo
680 during the next two minutes. Your
Treo 680 reverts to the Hidden setting
and becomes inaccessible to other
devices after two minutes.
Hidden: Allows only devices with which
you have previously formed a partnership
to request a connection with your Treo 680.
New devices cannot request a connection.
5Enter the same passkey on your Treo
680 and on the Bluetooth device.
IMPORTANT Some Bluetooth devices,
such as headsets and GPS receivers, have
a preset passkey; if so, you can find the
passkey in the documentation for that
device. Other devices provide a screen
where you enter a passkey that you make
TIP
Use the Visible option only when you need
your Treo 680 to be accessible for an
extended period of time. For short term
accessibility, use the Temporary option.

YOUR CONNECTIONS TO THE WEB AND WIRELESS DEVICES
126
5
CHAPTER
up. In either case, you must use the same
passkey on both your Treo and the other
Bluetooth device. We recommend that
where possible, you make up a passkey of
16 alphanumeric characters (letters and
numerals only) to improve the security of
your Treo. The longer the passkey, the
more difficult it is for the passkey to be
deciphered.
6(Optional) Check the Add to trusted
device list box if you want to form a
partnership with the requesting device.
7Select OK.

CHAPTER
6
Your photos, videos, and
music
Do you have a wallet bulging with photos of friends, family, pets,
and your most recent vacation?
Are you tired of carrying both your MP3 player and your phone?
Your Palm
®
Treo
™
680 smart device solves both problems. You can
keep your favorite photos right on your Treo—videos, too. And
there's no need to carry an expensive MP3 player; you can play
music on your Treo. Simply transfer songs onto your Treo or an
expansion card and then listen through your stereo headphones
(cards and headphones sold separately).
Benefits
•Never be far from your favorite
people, places, and songs
•Arrange your photos, videos, and
songs
•No separate photo viewer, MP3,
CD, or mini-disc player required

In this chapter
Camera. . . . . . . . . . . . . . . . . . . . . . . . . . . . . . . . . . . . . . . . . . . . . . . 129
Pictures & Videos. . . . . . . . . . . . . . . . . . . . . . . . . . . . . . . . . . . . . . . 133
Pocket Tunes . . . . . . . . . . . . . . . . . . . . . . . . . . . . . . . . . . . . . . . . . . 139
YOUR PHOTOS, VIDEOS, AND MUSIC
129
6
CHAPTER
Camera
Your Treo 680 comes with an easy-to-use,
built-in, VGA camera with 2x digital zoom
(camera version only). You can use the
camera to take and view pictures and
videos and send them to your friends and
family. To add a personal touch to your
Treo, use your pictures as your wallpaper
for the Main tab in the Phone application
and as caller ID images.
If your Treo 680 doesn’t have a built-in
camera, the sections in this chapter about
taking pictures and videos don’t apply to
you. But you can still receive and view
pictures and videos, send pictures and
videos to other people as email
attachments or multimedia messages
(MMS), and use pictures to personalize
your Treo 680 (such as wallpaper or picture
caller ID; see Assigning a caller ID photo
for details). You can also move pictures and
videos to a computer by synchronizing your
Treo 680 with your computer.
Taking a picture
You can store pictures on your Treo 680 or
on an expansion card.
1Press Applications and select
Camera .
2By default, the Camera application
stores pictures you take in the PALM
folder on your expansion card (if a card
is inserted). Otherwise, Camera stores
pictures in the PALM album on your
Treo. To store a picture in a different
location, select one of the following:
<Album name>: Stores the picture in
the selected album. The storage
location is based on the location of the
album (Treo 680 or expansion card).
New Albums: Opens a dialog box
where you can enter an album name
and select the storage location
(Treo 680 or expansion card).
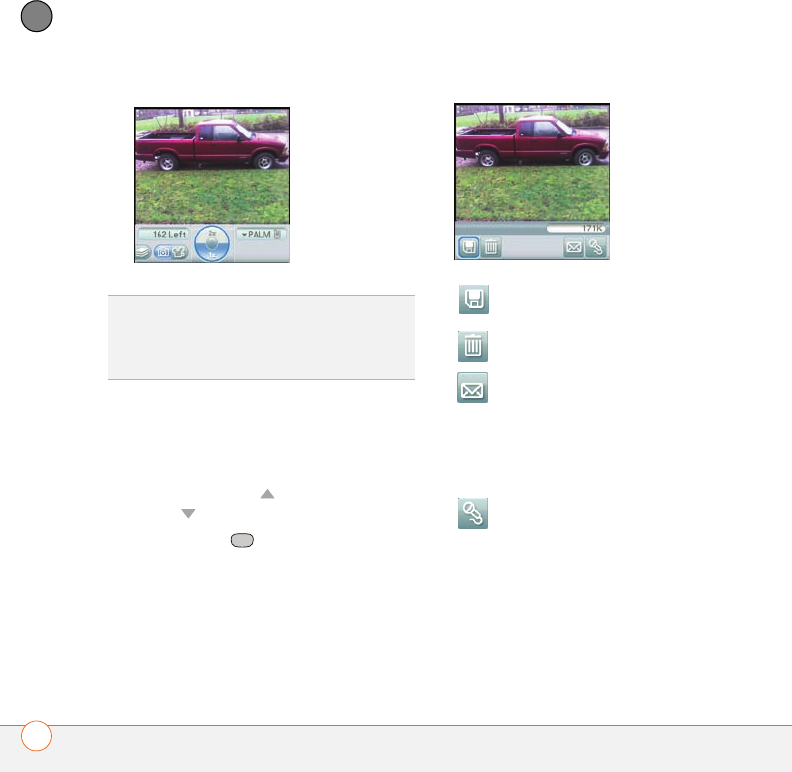
YOUR PHOTOS, VIDEOS, AND MUSIC
130
6
CHAPTER
3Find your subject in the screen on your
Treo (the lens is on the back of your
Treo).
4(Optional) To get a close-up of your
subject, press Up to select 2x. Press
Down to return to 1x.
5Press Center to capture the
picture.
6Do any of the following:
TIP
The default camera resolution is VGA (640
x 480) and it also supports QVGA (320 x 240)
resolution. To view these settings before you
take a picture, press Menu.
Saves the picture in the location
you selected in step 2.
Deletes the picture.
Opens a dialog box where you
can select how you want to send
the picture: Messaging,
Bluetooth, or Email. The receiving
device must support the method
you select.
Lets you add a voice caption.
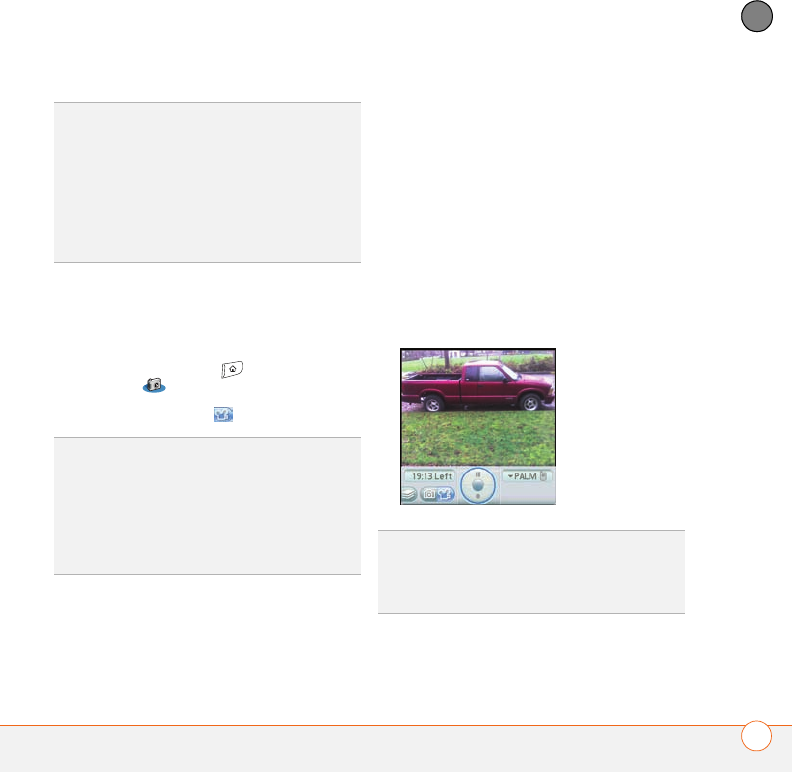
YOUR PHOTOS, VIDEOS, AND MUSIC
131
6
CHAPTER
Recording a video
You can store videos on your Treo 680 or
on an expansion card.
1Press Applications and select
Camera .
2Select Camcorder .
3By default, the Camera application
stores videos you record in the PALM
folder on your expansion card (if a card
is inserted). Otherwise, Camera stores
pictures in the PALM album on your
Treo. To store a video in a different
location, select one of the following:
<Album name>: Stores the video in the
selected album. The storage location is
based on the location of the album
(Treo 680 or expansion card).
New Albums: Opens a dialog box
where you can enter an album name
and select the storage location
(Treo 680 or expansion card).
TIP
To add an audio caption later, open the
picture and then select Audio Caption from
the Photo menu.
DID
YOU
KNOW
?
You can personalize a picture.
Open the Photo menu, select Draw on, and
then use the drawing tools to add your own
personal touch. When you save the picture,
you can replace the original or save a copy.
TIP
The video recording screen displays the
approximate recording time you have left
based on the space available on your Treo 680
or expansion card. Actual recording time may
vary depending on how fast you are moving,
how many colors you are recording, and so
on.
TIP
The default camcorder resolution is CIF
(352 x 288) and it also supports QCIF (176 x
144). To view these settings before you
capture a video, press Menu.
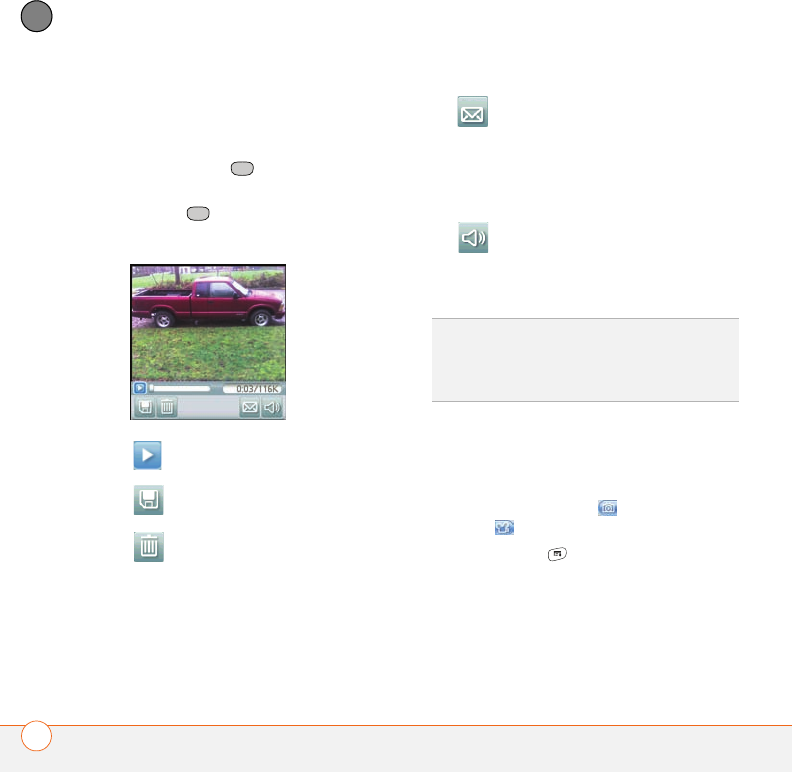
YOUR PHOTOS, VIDEOS, AND MUSIC
132
6
CHAPTER
4Find your subject in the screen on your
Treo (the lens is on the back of your
Treo).
5Press Center to start recording.
6After you finish recording, press
Center again to stop.
7Select any of the following:
Customizing your Camera settings
You can customize the built-in camera’s
settings for your Treo 680.
1Go to Camera View or Camcorder
View .
2Press Menu . If you are in Camera
View, the Photo Settings screen
appears. If you are in Camcorder View,
the Video Settings screen appears.
Plays the video, so you can
review it.
Saves the video in the location
you selected in step 2.
Deletes the video.
Opens a dialog box where you
can select how you want to send
the video: Messaging, Bluetooth,
or Email. The receiving device
must support the method you
select and video messages.
Opens a dialog box where you
can adjust the volume during
playback.
TIP
During playback, tap and drag the
progress indicator bar to jump to a different
section of the video. Select Pause to pause
video playback.
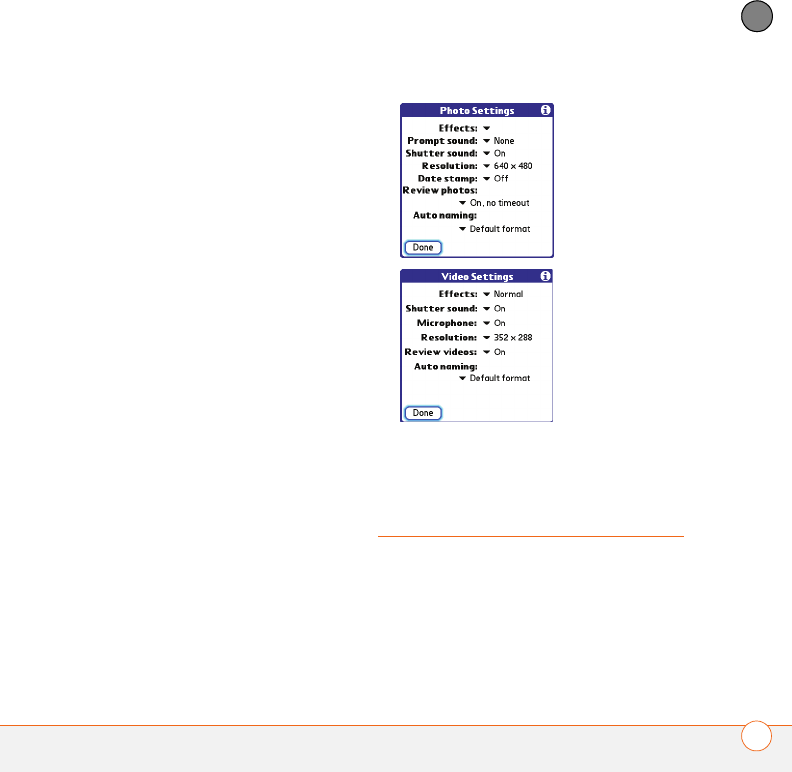
YOUR PHOTOS, VIDEOS, AND MUSIC
133
6
CHAPTER
3Set any of the following preferences:
Effects: Sets the color palette for the
current picture or video. You cannot
change an item’s palette after you take
the picture or video.
Prompt sound: (Pictures only) Sets the
sound that plays before you take
the picture.
Shutter sound: Determines whether a
sound plays when you take a picture.
Microphone: (Videos only) Turns the
microphone on and off so that you can
record videos with or without sound.
Resolution: Sets the default size for
newly captured pictures or videos.
Date stamp: (Pictures only) Determines
whether the date the picture is taken
appears on your pictures.
Review photos/videos: Determines
whether you can review pictures or
videos before saving them and how
quickly they are automatically saved.
Auto naming: Assigns a name to a
series of pictures to be captured, such
as Seattle001, Seattle002, and so on.
4Select Done.
Pictures & Videos
Viewing a picture
In addition to viewing the pictures you
capture with the built-in camera, you can
view pictures captured on many popular
digital cameras or downloaded from the
YOUR PHOTOS, VIDEOS, AND MUSIC
134
6
CHAPTER
Internet. Your Treo 680 supports the
following picture formats:
•JPG
•TIF
•BMP
•GIF
1Press Applications and select
Pics&Videos .
2Select the album that contains the
picture you want to see.
3Select the picture you want to view.
4Press Right or Left to scroll to the
next item in the album.
5If the picture has a voice caption, select
to hear it.
6Tap the picture or press Center to
return to Thumbnail View.
Viewing a video
In addition to viewing the videos you
capture with the built-in camera, you can
view videos captured on many popular
digital cameras. Your Treo 680 supports the
following types of video files:
•3GP (with H.263 video and AMR audio)
•3G2 (with MPEG-4 video and QCELP
audio)
•MP4 (with MPEG-4/H.264 video and
MP3/AAC/AAC+ audio)
•MPG (with MPEG-1 video and MPEG-1
audio)
•M4V (with MPEG-4/H.264 video and
MP3/AAC/AAC+ audio)
TIP
To view an album from an expansion card,
insert the card and select the album from the
Album list. If the items on the card are not
grouped into albums, select the card name
from the list.
DID
YOU
KNOW
?
To see the outer edges of a
picture that may not be visible, use the stylus
to tap and drag the picture in any direction.
TIP
In Thumbnail View, you can group photos
or videos to more easily locate them. Select
one of the grouping options from the View
menu.
YOUR PHOTOS, VIDEOS, AND MUSIC
135
6
CHAPTER
•ASF (with MPEG-4 video and
IMA-ADPCM audio)
•AVI (with MJPEG video and PCM audio)
1Press Applications and select
Pics&Videos .
2Select the album that contains the video
you want to see.
3Select the video you want to view.
Playback begins automatically.
4Hold down Right or Left to seek
within the current video, or press Right
or Left to scroll to the next item in
the album.
5Press Center to return to
Thumbnail View.
Viewing a slide show
1Press Applications and select
Pics&Videos .
2Select the album you want to view.
3Press Menu , select Options, and
then select Auto-hide Toolbar Off if
you want to see the toolbar.
4Press Space to start the slide
show.
5Press Center to return to the
previous view.
Sending pictures or videos
You can send pictures or videos to an
email address or to other devices that
support picture and video messaging.
1From the Album list, select the album
that contains the picture(s) or video(s)
you want to send.
2Select Send .
DID
YOU
KNOW
?
If you pause video playback
and then close the video, the video starts
where you left off the next time you play it.
TIP
To set slide show options such as
background music and transitions, open the
Options menu and select Slideshow
Setting. Keep in mind that background music
overrides audio captions when you’re running
a slide show. Background music for a slide
show also overrides any music that might be
playing using the Pocket Tunes application on
your Treo 680.

YOUR PHOTOS, VIDEOS, AND MUSIC
136
6
CHAPTER
3Select the pictures or videos to send, or
select Select All to send the entire
album. (A + appears next to selected
items.)
4Select Send.
5Select how you want to send the
picture or video: Messaging,
Bluetooth, or Email.
Copying a picture or video
You can copy pictures or videos into
another album. You can also copy pictures
and videos between your Treo 680 and an
expansion card.
1From the Album list, select the album
that contains the picture(s) or video(s)
you want to copy.
2Press Menu .
3Select Copy to from the Photo (or
Video) menu.
4Select the pictures or videos to copy, or
select Select All to copy the entire
album. (A + appears next to selected
items.)
5Select Copy.
6Select the Copy items to pick list and
select whether you want to copy the
selected items to your device or to an
expansion card.
DID
YOU
KNOW
?
You cannot send copyrighted
pictures or videos that appear with a Lock icon
in Thumbnail View or in the Picture list.
+ sign
indicates a
picture is
selected
YOUR PHOTOS, VIDEOS, AND MUSIC
137
6
CHAPTER
7Select the Into album pick list and
select the album you want to copy the
selected items to.
8Select Copy.
Organizing pictures and videos
1Open the album you want to organize.
2Press Menu .
3Select Album, and then select Add to
album or Remove from album.
4Select the pictures or videos to add or
remove, or select Select All to add or
remove the entire album. (A + indicates
that you want to add the item. An X
indicates that you want to remove the
item.)
5Select Add or Remove.
Saving a picture as wallpaper
You can select a picture to use as wallpaper
for the Main tab in the Phone application.
1Display the picture you want to save as
wallpaper.
2Press Menu .
3Select Options, and then select Save
as Wallpaper.
4When the confirmation message
appears, confirm by selecting Ye s , or
decline by selecting No.
TIP
You can also move pictures and videos
between albums. Open the Photo (or Video)
menu and select Move to. The remaining
steps are the same as copying pictures, but
use the Move commands instead of the Copy
commands.
DID
YOU
KNOW
?
You can also open the Album
list from Camera View or Camcorder View by
selecting the icon in the lower-left corner.
TIP
Install the Palm® Files application from the
Palm Software Installation CD to easily
browse and manage files on an expansion
card.
TIP
To change the name, add a caption, or
view other picture or video information,
highlight (or open) the item, open the Photo
(or Video) menu, and select Details.
YOUR PHOTOS, VIDEOS, AND MUSIC
138
6
CHAPTER
Adding a picture to a contact entry
1Display the picture you want to add to a
contact.
2Press Menu .
3Select Options, and then select Save
as Contact.
4Select the contact you want to add this
picture to.
Rotating a picture
1Display the picture you want to rotate.
2Press Menu .
3Select Rotate from the Photo menu.
4Select the orientation.
Deleting a picture or video
1Open the album that contains the
picture(s) or video(s) you want to delete.
2Press Menu .
3Select Delete from the Photo (or
Video) menu.
4Select the pictures or videos that you
want to delete, or select Select All to
delete the entire album. (An X appears
next to selected items.)
5Select Delete.
6Select Delete to confirm the deletion.
Viewing pictures and videos on your
computer
When you synchronize your Treo 680, your
pictures and videos are copied to your
desktop computer. You can view pictures in
JPEG format and videos in MPEG-4 format
(3G2 file extension). You can email them to
friends using your desktop email
application.
BEFORE YOU BEGIN To view and edit
videos you captured on your Treo 680 on
your computer, you must first install
QuickTime from the Palm Software
Installation CD.
On a Windows computer, you can view
and edit synchronized pictures and videos
in the Palm Media desktop application.
Open Palm®Desktop software and click
TIP
You can also highlight a picture or video in
Thumbnail View, and then press Backspace to
delete the highlighted item.
YOUR PHOTOS, VIDEOS, AND MUSIC
139
6
CHAPTER
the Media icon. You can refer to the
Palm Desktop Online Help for information
about using the Palm Media desktop
application.
Pocket Tunes
You can listen to music through the
speaker on the back of your Treo 680 or
through a stereo headset or headphones
(stereo headphone adapter or 2.5mm
stereo headphone or headset required,
sold separately). To listen to music on your
Treo 680, you need to convert the music
files into MP3 format using Windows
Media Player (Windows computers) or
iTunes (Mac computers), and then transfer
the music files to your Treo 680 or an
expansion card. After you transfer the
music files, you can play them using Pocket
Tunes on your Treo 680.
Setting up Windows Media Player for
MP3
On a Windows computer, you need to set
Windows Media Player to save your music
files in MP3 format in order for the files to
be compatible with Pocket Tunes.
1Connect your Treo 680 to your
computer with the sync cable.
2Press Applications and select
pTunes .
3On your computer, open Windows
Media Player, and then click the
full-screen icon in the upper-right
corner to maximize the window.
4Click To o l s , and then click Options.
TIP
You can upgrade Pocket Tunes to a version
that supports more music file formats (such as
WMA); supports subscription music; and
includes additional features. For more info,
visit www.pocket-tunes.com/palm.
DID
YOU
KNOW
?
If a call comes in when you’re
listening to music, you can take the call and
the music pauses automatically. After you
finish the call, the music starts again.
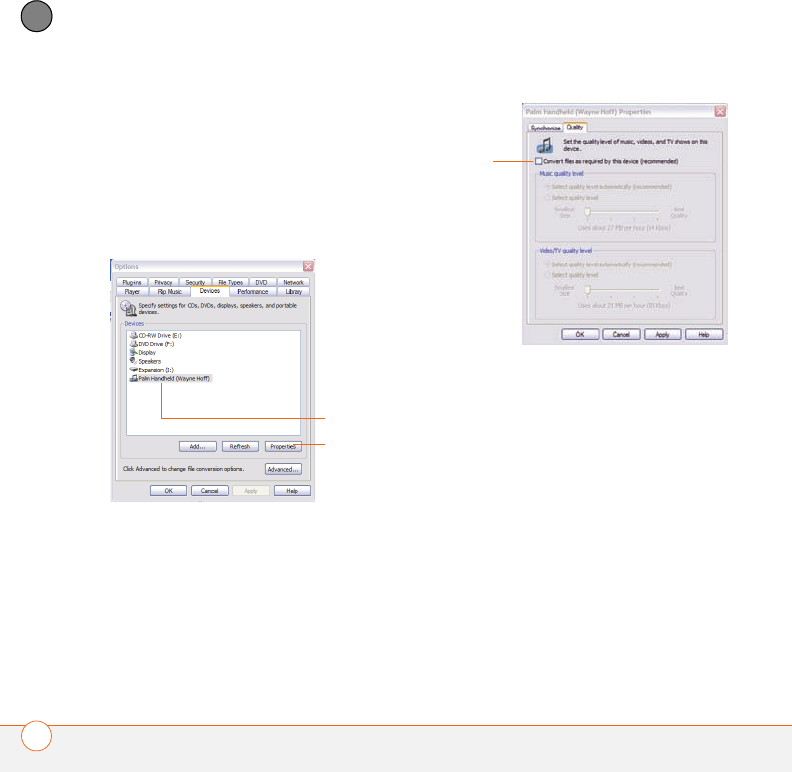
YOUR PHOTOS, VIDEOS, AND MUSIC
140
6
CHAPTER
5Click the Rip Music tab, click the
Format pick list, and then select mp3.
Click OK.
6Click To o l s , and then click Options.
7Click the Devices tab, select Palm
Handheld from the Devices list, and
then click Properties.
8Click the Quality tab, uncheck the
Convert files as required by this
handheld (recommended) box. Click
Apply.
9Click OK, and then click OK again.
You now have set up Windows Media
Player to transfer MP3 files to the Pocket
Tunes application on your Treo 680.
Setting up iTunes for MP3
On a Mac, use iTunes (included with OS X)
to convert music from a CD to MP3 format.
For more information on using the iTunes
software, see the documentation that
came with your Mac.
1On your Mac, open iTunes.
2Select Preferences.
Click
Properties
Select your
Treo 680
Uncheck
box
YOUR PHOTOS, VIDEOS, AND MUSIC
141
6
CHAPTER
3Click the Advanced button at the top of
the window, and then click Importing.
4Click the Import Using pop-up menu
and select MP3 Encoder.
5Click the Setting pop-up menu and
select Good Quality.
Transferring MP3 files from your computer
If your MP3 files are already on your
computer’s hard drive, you just need to
transfer them onto your Treo 680 to listen
to them with Pocket Tunes.
If an expansion card is inserted into the
Treo 680, Windows Media Player copies
the MP3 files to the expansion card. If you
don’t have an expansion card inserted, the
MP3 files are copied to your Treo.
IMPORTANT You must synchronize your
Treo 680 with your computer at least once
before you can transfer MP3 files from
your computer.
BEFORE YOU BEGIN On a Mac, you need
an expansion card (sold separately) to
listen to music on your Treo. You cannot
transfer MP3 files from your Mac directly
onto your Treo.
1Connect your Treo to your computer
with the USB sync cable.
2On your Treo 680, press Applications
and select pTunes .
3If you are transferring MP3 files from a
Mac, insert an expansion card into your
Treo. This step is optional for Windows
users.
4Do one of the following:
Windows: Open Windows Media
Player on your computer. Select the
Sync tab, and then select Palm
Handheld from the drop-down list.
Select Start Sync. The files are
transferred to your Treo 680.
NOTE Do not press the sync button on
your cable. Windows Media Player
transfers the files, so there’s no need to do
anything.
TIP
Mac If you want greater control over the
file size and sound quality of your MP3 files,
select Custom from the Setting pop-up
menu.
YOUR PHOTOS, VIDEOS, AND MUSIC
142
6
CHAPTER
Mac: Drag and drop the MP3 files onto
the Send To Handheld droplet in the
Palm folder. Select your device name,
the file name, and the destination (card).
Click OK. Synchronize your Treo with
your computer. Be patient; transferring
music to an expansion card can take
several minutes.
Transferring music from a CD to your
Tr e o 6 8 0
If your songs are on a CD and you want to
listen to them on your Treo 680, you need
to convert them to MP3 format on your
computer before you transfer the files to
your Treo 680.
WINDOWS ONLY
1On your computer, open Windows
Media Player.
2Insert the music CD into your
computer’s CD drive.
3Select the Rip tab.
4Select the tracks you want to convert to
MP3.
5Select Rip Music.
6Transfer the MP3 files to your Treo 680
as described in Transferring MP3 files
from your computer.
MAC ONLY
1On your Mac, open iTunes.
2Insert the music CD into the CD drive
on your Mac.
3Check the boxes next to the tracks you
want to convert to MP3.
4Click the Import button in the
upper-right corner of the iTunes window.
5When the songs are finished importing,
click the Eject Disk button in the
lower-right corner of the iTunes window.
TIP
You can also use a card reader accessory
(sold separately) to transfer MP3 files from
your computer to your expansion card. Create
a Music_Audio folder in the root directory of
the card, and store your MP3 files in this
folder.
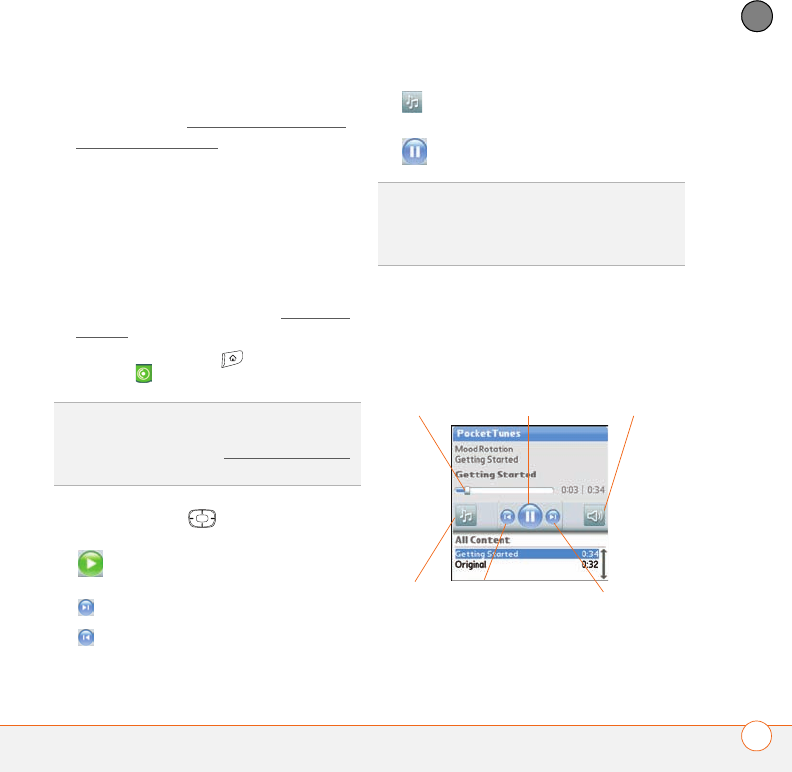
YOUR PHOTOS, VIDEOS, AND MUSIC
143
6
CHAPTER
6Transfer the MP3 files to your Treo 680
as described in Transferring MP3 files
from your computer.
Listening to music on your Treo
CAUTION Protect your hearing. Listening
to this device at full volume for a long
period of time can damage your hearing.
1Make sure the Ringer switch is set to
the Sound On position. See Silencing
sounds for more information.
2Press Applications and select
pTunes .
3Use the 5-way to access any of
the following icons:
Play: Plays or resumes playback of
the current song.
Next song: Plays the next song.
Previous song: Plays the previous
song.
Choose song: Displays a list of
songs to choose from.
Pause: Pauses playback.
NOTE To adjust the volume during
playback, press the Volume button on the
side of your Treo.
TIP
You can change the settings on your Treo
so that pressing and holding the Side button
opens Pocket Tunes. See Reassigning buttons
for details.
DID
YOU
KNOW
?
You can also press Space to
pause and resume playback, as well as use
the 5-way to navigate among songs or pause
and resume playback.
Previous
song Next
song
Volume
Choose
song
Progress
indicator Play/Pause
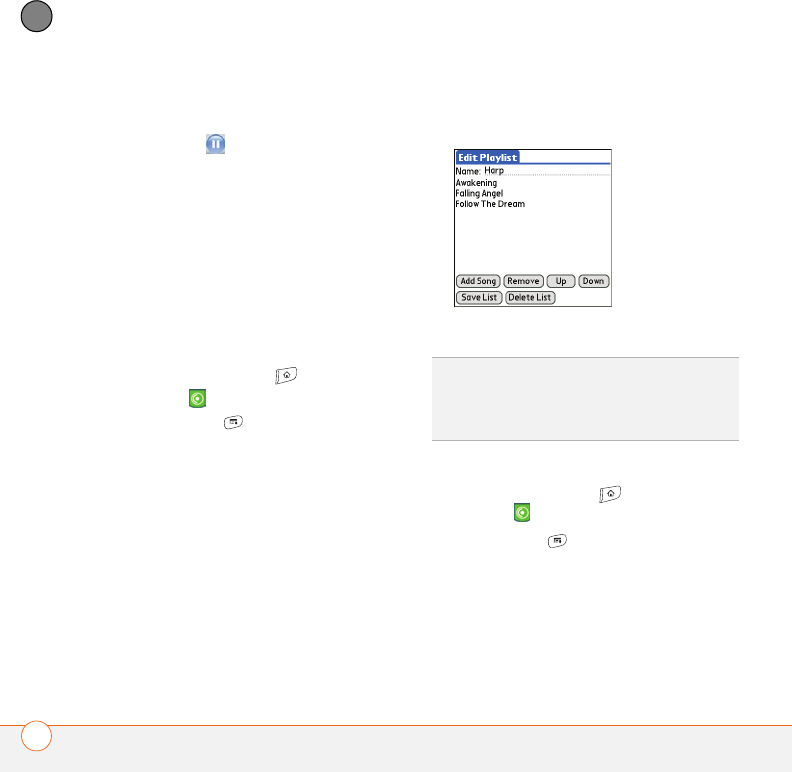
YOUR PHOTOS, VIDEOS, AND MUSIC
144
6
CHAPTER
Pocket Tunes continues playing until it
reaches the end of your list or until you
select Pause . Music continues to play
even if you switch to another application or
turn off your screen. If you want to stop
playing music when you exit Pocket Tunes,
open the Background Prefs menu and
uncheck the Enable background play box,
and then select OK.
Creating a playlist
If you want to play a group of songs in a
particular order, you can create a playlist.
1Press Applications and select
pTunes .
2Press Menu .
3Select Actions, and then select
Manage Playlists.
4Select New, and then enter a name for
the playlist.
5Select Add Song. Select the songs you
want to include on the playlist.
6Select Save List.
Editing a playlist
1Press Applications and select
pTunes .
2Press Menu .
3Select Actions, and then select
Manage Playlists.
4Highlight a playlist, and then select Edit.
TIP
To play songs from a playlist, open Pocket
Tunes, select Choose Songs, and then select
Playlists. Select the playlist you want to play,
and then select All.
YOUR PHOTOS, VIDEOS, AND MUSIC
145
6
CHAPTER
5Do any of the following:
•To delete a song from the playlist,
select the song and then select
Remove.
•To add a song, select Add Song,
check a song’s box, and then
select Done.
•To move a song up or down one slot,
select a song and then select Up or
Down.
6Select Save List.
TIP
To delete a playlist, select Manage
Playlists from the Actions menu, select the
playlist, and then select Delete List. Select
Ye s to confirm the deletion.

YOUR PHOTOS, VIDEOS, AND MUSIC
146
6
CHAPTER

CHAPTER
7
Your personal information
organizer
Say good-bye to paper calendars and throw away those
scribbled to-do lists. Your Palm®Treo™ 680 smart device is all
you need to organize your personal information and keep it with
you wherever you go.
You never lose your information, even if your battery is
completely drained. All of your personal info is backed up each
time you synchronize, and your info is kept private when you
use the security features on your Treo. Also, you can easily
share info with others electronically.
Benefits
•Track current, future, and past
appointments
•Make to-do lists that get done
•Set reminders for appointments,
birthdays, important tasks, and
more
•Before you call your friend in
London, check the time first

In this chapter
Calendar . . . . . . . . . . . . . . . . . . . . . . . . . . . . . . . . . . . . . . . . . . . . . . 149
World Clock . . . . . . . . . . . . . . . . . . . . . . . . . . . . . . . . . . . . . . . . . . . 156
Tasks . . . . . . . . . . . . . . . . . . . . . . . . . . . . . . . . . . . . . . . . . . . . . . . . 158

YOUR PERSONAL INFORMATION ORGANIZER
149
7
CHAPTER
Calendar
Calendar is a powerful organizer application
that helps you manage your schedule. You
can view your calendar by day, week, or
month, or as an agenda list that combines
your Tasks list and email notifications with
your appointments. Schedule repeating
meetings or a block of vacation time by
creating an event that repeats at an interval
you specify. Color-code your appointments
by category and add notes with helpful
information.
Displaying your calendar
Press Calendar repeatedly to cycle
through the various views:
Agenda View: Shows your daily
schedule, the number of unread email
messages, and any items on your Tasks
list that are overdue or due today. If
there’s room, Agenda View also lists
events on future dates.
Day View: Shows your daily schedule
one day at a time.
Week View: Shows your schedule for
an entire week. The time frames are
based on the Start Time and End Time
settings in Calendar Preferences.
Month View: Shows your schedule for
a whole month.
In most Calendar views, you can do the
following:
•Open the Options menu and select
Year View to view a calendar for an
entire year.
•Use the 5-way to go to another
day, week, month, or year —based on
the current view. (Not available in
Agenda View.)
DID
YOU
KNOW
?
If your company uses
Microsoft Exchange Server 2003, you may be
able to wirelessly synchronize Calendar
events directly with the server. See Working
with Microsoft Exchange ActiveSync for
information.
YOUR PERSONAL INFORMATION ORGANIZER
150
7
CHAPTER
•Select Go To, and then select a date
from the calendar. (Not available in
Agenda View.)
Creating an event
1Press Calendar until Day View
appears.
2Select Go To and then select the
desired day.
3Select New.
4Using the keyboard, enter a starting
hour and minute for the event, such as
545 for 5:45.
5Select the End Time box and enter the
ending hour and minute for the event.
6To assign a time zone to the event,
select the Time Zone pick list and
select a city in the time zone you want.
7Select OK.
8Enter a description for the event.
IMPORTANT If you use Palm Desktop
software, do not add time zones to your
events. Palm Desktop does not support
time zones.
If you use Microsoft Outlook, you can use
the time zone feature, but you must install
the conduit that came with your Treo 680
(or a subsequent update) on all the
computers with which you sync your Treo
680. Chapura PocketMirror and other
earlier Microsoft Outlook conduits do not
support time zones.
0
TIP
If you have several appointments to enter,
it’s more efficient to use Palm®Desktop
software or Microsoft Outlook on your
computer and then synchronize your Treo 680
with your computer. For more information,
see Synchronizing information—the basics.
Selected
day
Selected
date
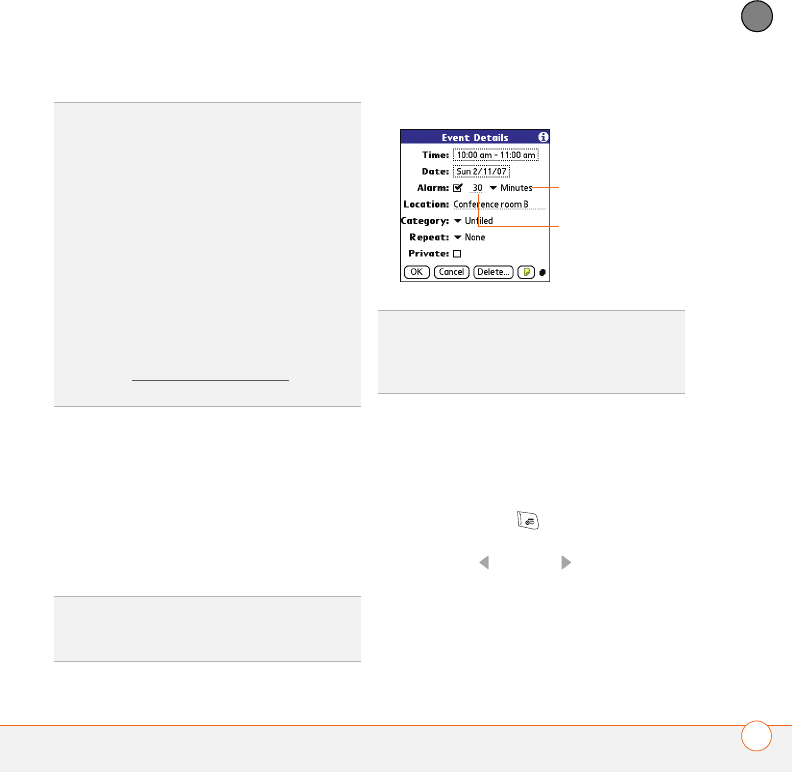
YOUR PERSONAL INFORMATION ORGANIZER
151
7
CHAPTER
Adding an alarm to an event
1In Calendar, select the event.
2Select Details.
3Check the Alarm box and select the
number of minutes, hours, or days
before the event you would like to
receive the alarm.
4Select OK.
Creating an untimed event
An untimed event, such as a holiday or
deadline, does not occur at a particular
time.
1Press Calendar until you are in Day
View.
2Press Left or Right to go to the
date of the event.
3Make sure no times are highlighted.
TIP
To automatically assign a time zone to your
events, open the Options menu, select
Preferences, and check the New events use
time zones box. All your new events will be
assigned to your local time zone (existing
events aren’t affected), and you can change
the time zone setting for individual events.
TIP
If you want your events with time zones to
stay at the same time in Calendar, regardless
of the time zone you are in, go to Date & Time
Preferences, select the Automatically set
pick list, and select Date and time. If you
select Date, time and time zone, the event
time shifts if you travel to a different time
zone. See Setting the date and time for
information.
TIP
The alarm for untimed events is defined by
minutes, days, or hours before midnight of the
date of the event.
DID
YOU
KNOW
?
When an alarm occurs, the
Alert dialog box displays all your pending
alerts. Select an alert description to jump to
that item, or check the box to clear that alert.
Type of time
units
Number of
time units
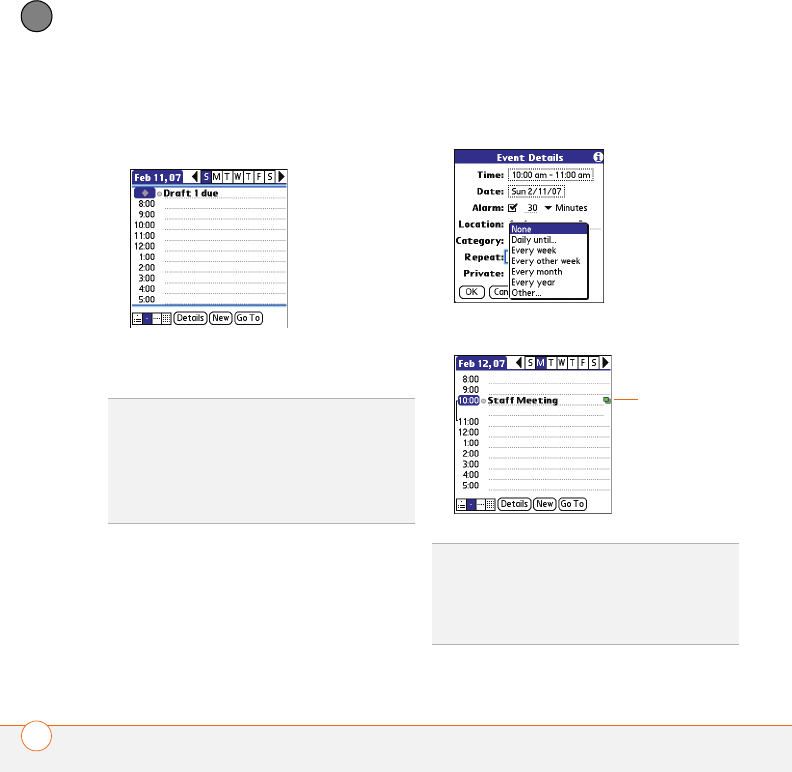
YOUR PERSONAL INFORMATION ORGANIZER
152
7
CHAPTER
4Enter a description for the event.
A diamond appears next to the
description of an untimed event.
Scheduling a repeating event
1Create an event, and then select it.
2Select Details.
3Select the Repeat pick list, and then
select a repeat interval. If the interval
you need doesn’t appear on the list,
select Other to define a custom
interval.
4Select OK.
TIP
To enter a birthday or anniversary, add this
info to the person’s Contacts entry and it
automatically appears in your Calendar.
TIP
To enter a holiday, create an untimed
event. Then, from the Details screen, select
Every year as the repeat interval.
DID
YOU
KNOW
?
If you sync with Microsoft
Outlook and your events include other people,
a With field appears in the Details dialog box
and your attendee info appears in this field
after you sync.
This icon
indicates a
repeating
event.
YOUR PERSONAL INFORMATION ORGANIZER
153
7
CHAPTER
Color-coding your schedule
Use color-coding to quickly spot various
types of events. For example, make
appointments with family green,
coworkers blue, and friends red. Follow
these steps to create a category and
assign it a color code.
1In Day View, select an event description
or select an empty time slot.
2Select Details.
3Select the Category pick list and select
Edit Categories.
4Do one of the following:
•To create a new category, select New
and then enter a category name.
•To add a color to an existing category,
select a category and select Edit.
5Select the color you want to give this
category, and then select OK.
6(Optional) Repeat steps 4 and 5 to add
or edit more categories.
7Select OK two more times.
Now that the categories are set up with
colors, you can assign categories to your
events to color-code them. See the next
section for details.
Changing or deleting an event
1Select the event you want to edit or
delete.
2Select Details.
3In addition to the settings covered
earlier in this chapter, you can also
change any of the following settings:
Date and Time: Displays when the
event takes place. Change these
settings to reschedule the event.
Location: Provides a description of
where the event takes place.
Category: Sets the color-coded
category for this event.
Note : Provides space for you to
enter additional text.
Delete: Removes the event from your
calendar.
4Select OK.
TIP
To save memory, you can purge your old
events. Open the Record menu and select
Purge. Select the Delete events older than
pick list and select a time frame. Select OK.

YOUR PERSONAL INFORMATION ORGANIZER
154
7
CHAPTER
Customizing display options for your
calendar
1Press Menu .
2Select Options, and then select
Display Options.
3Select the Default View pick list and
select the view you want to see when
you open Calendar.
4Select Agenda and set any of the
following options:
Show Due Tasks: The tasks that are
due today and the tasks that are
overdue appear in Agenda View.
Show Messages: The number of read
and unread email messages displays in
Agenda View.
Background: A favorite photo becomes
the Agenda View background. Check
the Background box, select the image
placeholder, and then select a photo.
Adjust the fade setting so that the text
is easy to read against the photo.
5Select Day and set any of the following
options:
Show Category List: The Category pick
list appears in Day View.
Show Time Bars: The time bars appear
in Day View to show the duration of an
event and to illustrate event conflicts.
Compress Day View: When this box is
unchecked, all time slots appear on the
screen. When this box is checked, start
and end times appear for each event,
but blank time slots near the bottom of
the screen disappear to minimize
scrolling.
Show Category Column: The
color-coded category marker appears
between the time and the description to