Palm 850 PDA Phone With GSM/GPRS/EDGE and Bluetooth User Manual 3 of 4
Palm Inc PDA Phone With GSM/GPRS/EDGE and Bluetooth 3 of 4
Palm >
Contents
- 1. User Manual 1 of 4
- 2. User Manual 2 of 4
- 3. User Manual 3 of 4
- 4. User Manual 4 of 4
User Manual 3 of 4
YOUR PERSONAL INFORMATION ORGANIZER
155
7
CHAPTER
indicate under which category the event
is filed.
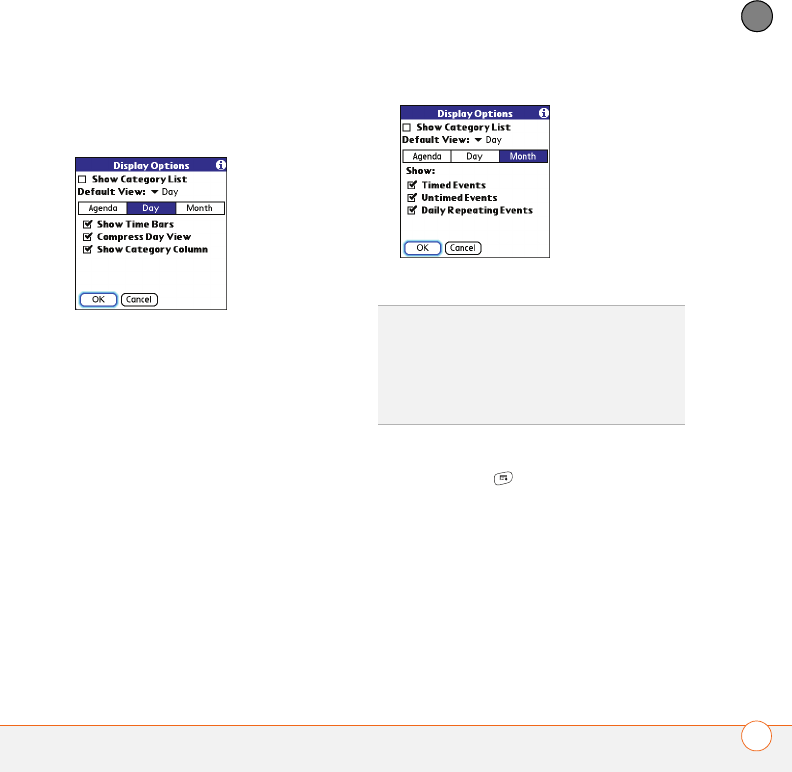
6Select Month and set any of the
following options:
Show Category List: The Category pick
list appears in Month View.
Timed Events: The events that are
scheduled for a specific time appear in
Month View.
Untimed Events: The events that are
scheduled for a specific date but not a
specific time appear in Month View.
Daily Repeating Events: The events
that repeat every day appear in Month
View.
7Select OK.
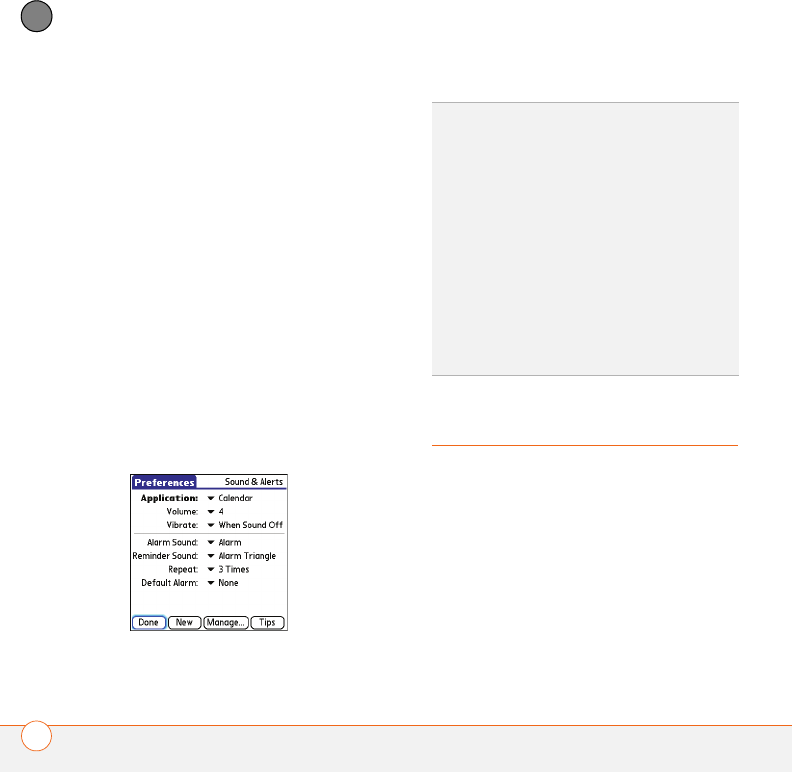
Selecting alarm tones
1Press Menu .
2Select Options, and then select Sound
Preferences.
3Select the Application pick list and
select Calendar.
4Select the Volume pick list and select
the volume level.
TIP
You can customize your Treo 680 to display
the most current Calendar event in the Main
tab in the Phone application. Press Phone,
open the Options menu, and then select
Phone Display Options. Check the Show
Calendar event box.
YOUR PERSONAL INFORMATION ORGANIZER
156
7
CHAPTER
5Select the Vibrate pick list and select
when you want your Treo 680 to vibrate
for an event alarm.
6Select tones from any of the following
pick lists:
Alarm Sound: The tone that plays the
first time your alarm goes off.
Reminder Sound: The tone that plays if
an alarm is not acknowledged and
the alarm repeats itself.
Repeat: The number of times the alarm
repeats itself if the alarm is not
acknowledged.
Default Alarm: A default amount of
time before the event for which the
alarm goes off.
7Select Done.
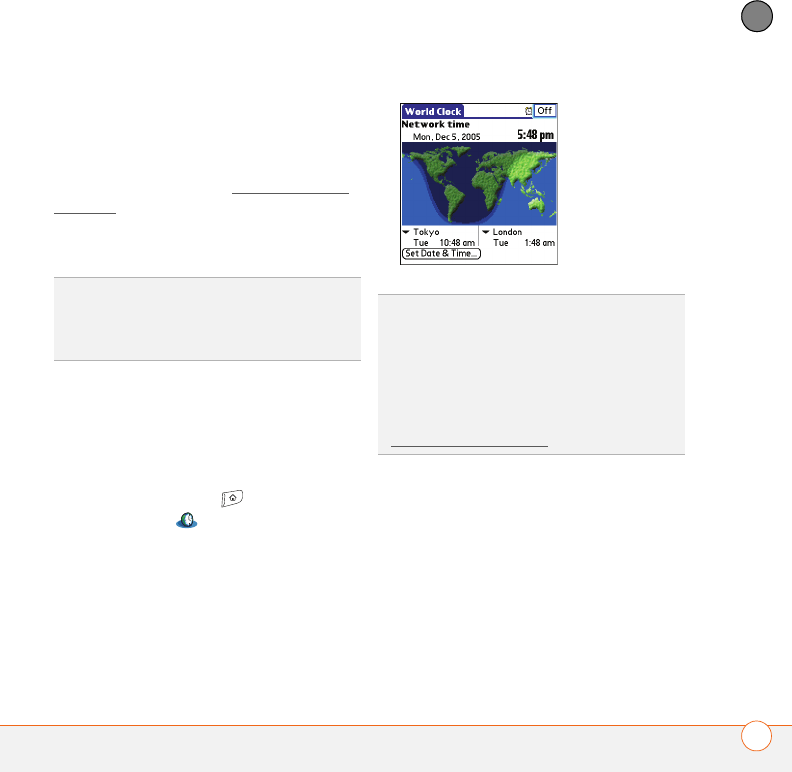
World Clock
World Clock displays the day and time in
three cities anywhere around the globe.
Whether you’re traveling or staying home,
it’s easy to keep track of the best time to
reach your business associates, friends,
and family in faraway places.
TIP
You can also record sounds and use them
as alarms. Select Manage on the Sound &
Alerts Preferences screen.
•To record a sound, select New.
•To play a sound, select it and press Center
on the 5-way.
•To delete a sound, select it and press
Backspace.
•To send a sound, select it and then select
Send.
DID
YOU
KNOW
?
Your Treo includes a silent
alarm that can vibrate even when the Ringer
switch is set to Sound Off.
YOUR PERSONAL INFORMATION ORGANIZER
157
7
CHAPTER
Selecting cities
World Clock shows the system date and
time above the world map. If you selected
the option to get the date and time from
the mobile network (see Setting the date
and time), the Cingular Wireless network
automatically updates the time display to
match the local time when you travel.
Below the world map, you can view the
time in two other cities. If you travel a lot
you may want to select your home city as
one of these two cities, so that you always
know what time it is at home.
1Press Applications and select
World Clock .
2Select a City pick list, and select a city
in the same time zone.
Adding cities
If the city you want to display is not in the
predefined list, you can add it.
1Select a City pick list and select Edit
List.
2Select Add.
3Select a location in the same time zone
as the city you want to add, and then
select OK.
TIP
If you did not select the option to get the
date and time from the mobile network, then
you can set the city at the top of the screen to
a fixed location.
DID
YOU
KNOW
?
You can run your stylus over
the map to see the time in other cities. The
shadow over the map represents nighttime
moving across the globe.
TIP
World Clock does not automatically update
the system time for daylight savings time. To
change the Daylight Savings Time setting, see
Setting the date and time.
YOUR PERSONAL INFORMATION ORGANIZER
158
7
CHAPTER
4Enter the name of the city.
5Select Location, select Map, select the
location of the city, and then select OK.
6If the city is not on Daylight Savings
Time, uncheck this box. If Daylight
Savings Time is observed, enter Start
and End dates.
7Select OK, and then select Done.
Setting an alarm
The next time you travel, don’t rely on a
hotel alarm clock to get you to that
important meeting. Use your Treo 680
instead. World Clock includes a built-in
alarm feature that you can use as a travel
alarm.
1Select Off in the upper-right corner.
2Select the time you want the alarm to
sound.
3Select OK.
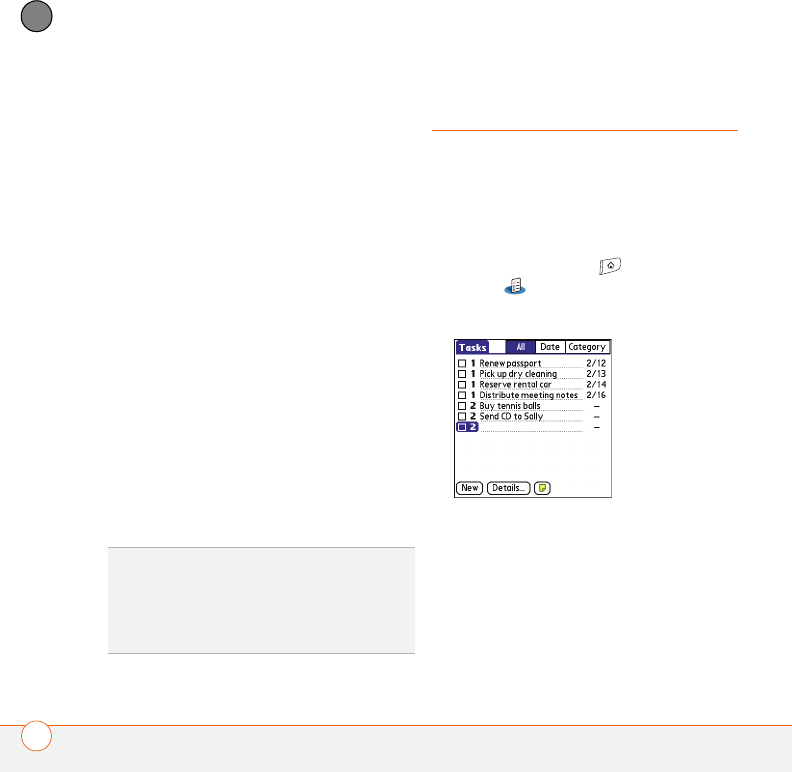
Tasks
You can use Tasks to remind you of tasks
you need to complete and to keep a record
of when you finish tasks.
Adding a task
1Press Applications and select
Ta s k s .
2Select New to create a new task.
3Enter a description of the task. The text
can be longer than one line.
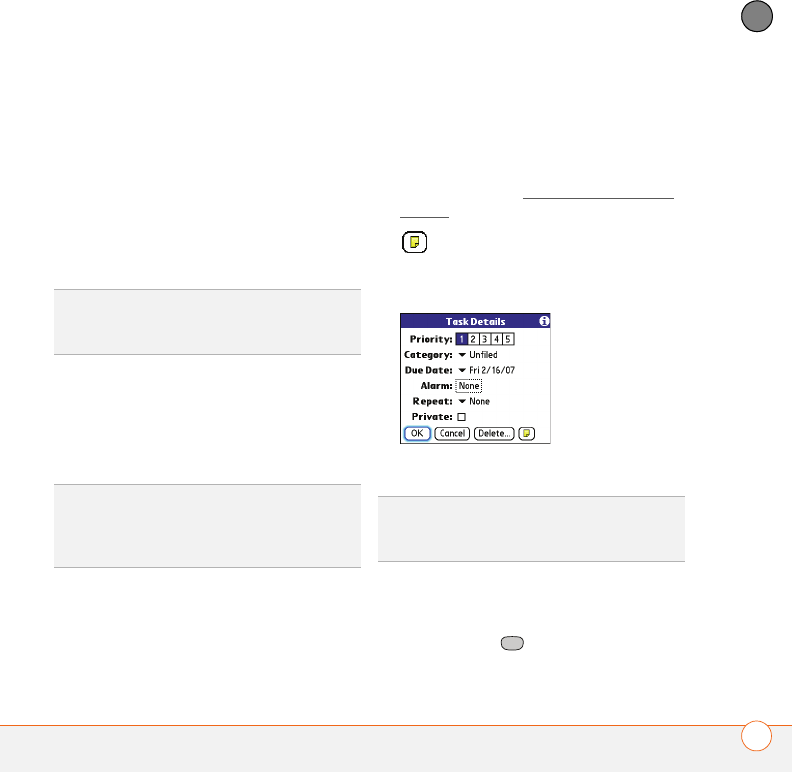
Setting task priority, due date, and other
details
The Details dialog box enables you to
assign a priority level, due date, category,
privacy flag, and other details for each task.
TIP
To customize the alarm sound and volume,
open the Options menu and select Alarm
Preferences.
TIP
Make sure the Ringer switch is set to
Sound On, so that you can hear the alarm.
YOUR PERSONAL INFORMATION ORGANIZER
159
7
CHAPTER
1Select the task to which you want to
assign details.
2Select Details.
3Set any of the following:
Priority: Select the priority number for
this task (1 is most important). Later
you can arrange your tasks based on the
importance of each task.
Category: Assign the task to a specific
category.
Due Date: Select the Due Date pick list
and select a due date for the task.
Alarm: Set an alarm for this task.
Repeat: Indicate whether the task
occurs at regular intervals and how
often it repeats. When you check off a
repeating task, the next instance of this
task automatically appears in your task
list.
Private: Check this box to mark this
task private. See Working with private
entries for additional information.
: Select this button to enter
additional text that you want to
associate with the task.
4Select OK.
Checking off a task
1Select the task you want to check off.
2Press Center or tap in the box to
check off the task.
TIP
You can also select the priority from the
Tasks list by selecting the number next to a
task and then selecting a priority level.
TIP
If you turn on the Show Due Dates option
in the Tasks Preferences screen, you can
select the due date in the Tasks list to set a
new date.
TIP
Press Menu to access other features such
as importing phone numbers into the Tasks
list.
YOUR PERSONAL INFORMATION ORGANIZER
160
7
CHAPTER
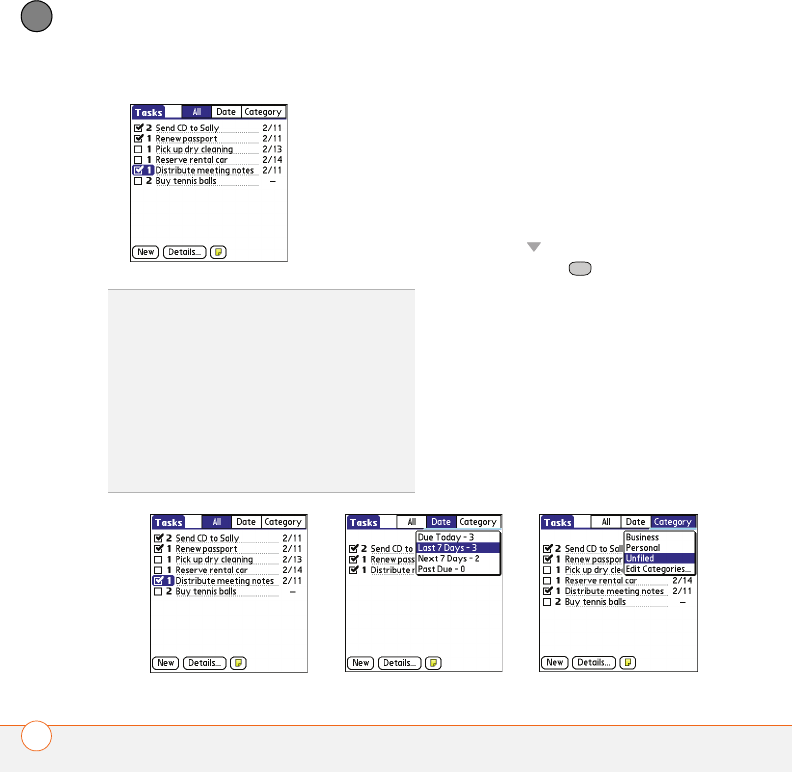
Organizing your tasks
In the Tasks list, select one of these
options:
All: Displays all your tasks.
Date: Displays tasks that are due in a
specific time frame. With Date selected,
press Down to select the pick list, and
then press Center to see the various
options: Due Today, Last 7 Days, Next 7
Days, or Past Due.
Category: Displays tasks that are assigned
to the selected category. Select the
Category pick list to select a different
category.
TIP
If you accidentally check off a task and
need to uncheck it, highlight the task again
and press Center on the 5-way to uncheck it.
TIP
You can set Tasks to record the date that
you completed a task, and you can select to
show or hide completed tasks. Completed
tasks remain in the memory of your Treo 680
until you purge them.
DID
YOU
KNOW
?
Overdue tasks have an
exclamation point (!) next to the due date.
YOUR PERSONAL INFORMATION ORGANIZER
161
7
CHAPTER
Deleting a task
1Select the task you want to delete.
2Press Menu .
3Select Delete Task from the Record
menu.
4Select OK.
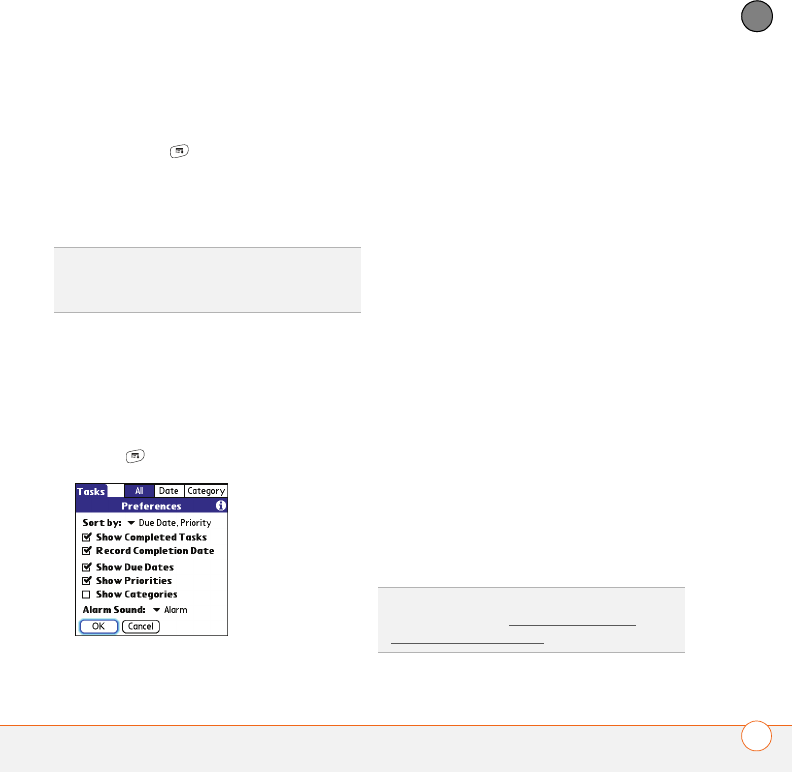
Customizing Tasks
The Tasks Preferences screen enables you
to control the appearance of the Tasks list
screen.
1In the Tasks list screen, press
Menu .
2Select Options, and then select
Preferences.
3Set any of the following preferences:
Sort by: Indicates the order in which
your tasks appear in the list.
Show Completed Tasks: Displays
tasks you’ve checked off.
Record Completion Date: Replaces
due date with the completion date
when you complete (check off) the task.
Show Due Dates: Displays task due
dates and inserts an exclamation point
(!) next to overdue tasks.
Show Priorities: Displays the priority
setting for each task.
Show Categories: Displays the
category for each task.
Alarm Sound: Sets the sound for the
alarms you assign to your tasks.
4Select OK.
TIP
To save memory, you can purge all
completed tasks. Open the Record menu and
select Purge. Select OK.
DID
YOU
KNOW
?
You can display your tasks in
your calendar. See Customizing display
options for your calendar for details.

YOUR PERSONAL INFORMATION ORGANIZER
162
7
CHAPTER

CHAPTER
8
Your memos and documents
With its ability to store large amounts of important information,
your Palm
®
Treo
™
680 smart device lets you take your office with
you—including your Microsoft Office and PDF files. You can keep
updated copies of the files on both your Treo 680 and your
computer so that you can work on them in the most convenient
location any time.
Leave your note pad and voice recorder at home. Use Memos to
type notes. Use Voice Memo to record notes, agenda items, and
other important thoughts, and play them back, right on your Treo
680. You can even send your notes and voice memos to a friend or
colleague by attaching them to an email or multimedia message.
Benefits
•Manage Word, Excel, PowerPoint,
and PDF files on your Treo 680
•Improve productivity by taking
important docs, spreadsheets, and
presentations with you
•Capture thoughts on the fly

In this chapter
Documents To Go Professional . . . . . . . . . . . . . . . . . . . . . . . . . . . . 165
Memos. . . . . . . . . . . . . . . . . . . . . . . . . . . . . . . . . . . . . . . . . . . . . . . 166
Voice Memo. . . . . . . . . . . . . . . . . . . . . . . . . . . . . . . . . . . . . . . . . . . 167
YOUR MEMOS AND DOCUMENTS
165
8
CHAPTER
Documents To Go
Professional
NOTE The Palm Software Installation CD
includes the Documents To Go® desktop
software. On your Treo 680, the companion
for Documents To Go is named Documents
and it’s already installed on your Treo 680.
With the Documents application, you can
take your important office info with you.
You can carry, create, view, and edit
Microsoft Word and Excel files directly on
your Treo 680. You can also view, carry, and
manage PowerPoint and PDF files. For
example, you can open email attachments,
files you download with the web browser,
and files stored on an expansion card—as
long as the files are in a supported format.
If you install the Documents To Go desktop
software (from the Palm Software
Installation CD), you can use Documents
To Go to transfer files from your computer
to your Treo 680 when you synchronize.
Here are a few more examples of what you
can do with Documents:
•Send and receive email attachments in
Word, Excel, PowerPoint, and Acrobat
file formats (DOC, XLS, PPT, and PDF).
•View Word, Excel, PowerPoint, and
Acrobat files (DOC, XLS, PPT, and PDF).
•Create or edit a Word-compatible
document or Excel-compatible
spreadsheet on your Treo 680, and then
save it in the native DOC or XLS format.
•Create a PowerPoint presentation on
your computer, use the Documents To
Go desktop application to optimize the
file for your Treo 680, and then sync the
file onto your Treo 680 to view it on the
go.
NOTE The Documents application does
not support some editing functions, such
as multiple font sizes and spell checking.
YOUR MEMOS AND DOCUMENTS
166
8
CHAPTER
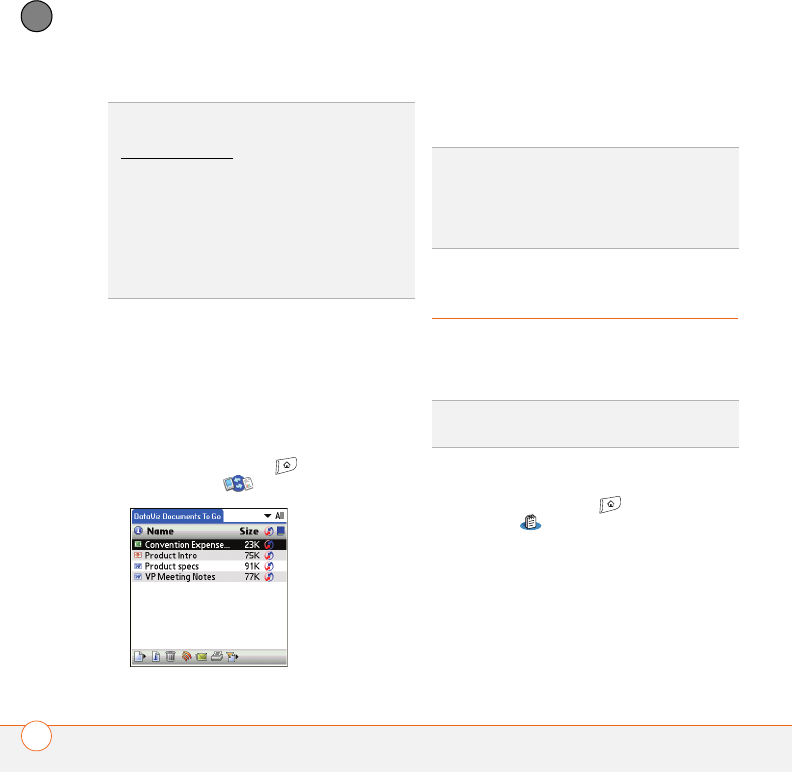
Opening a document
In the Documents application, you can
view and open any Word, Excel,
PowerPoint, or Acrobat (PDF) file on your
Treo 680 or an expansion card that is
inserted in the expansion slot.
1Press Applications and select
Documents .
2Select the document you want from the
list.
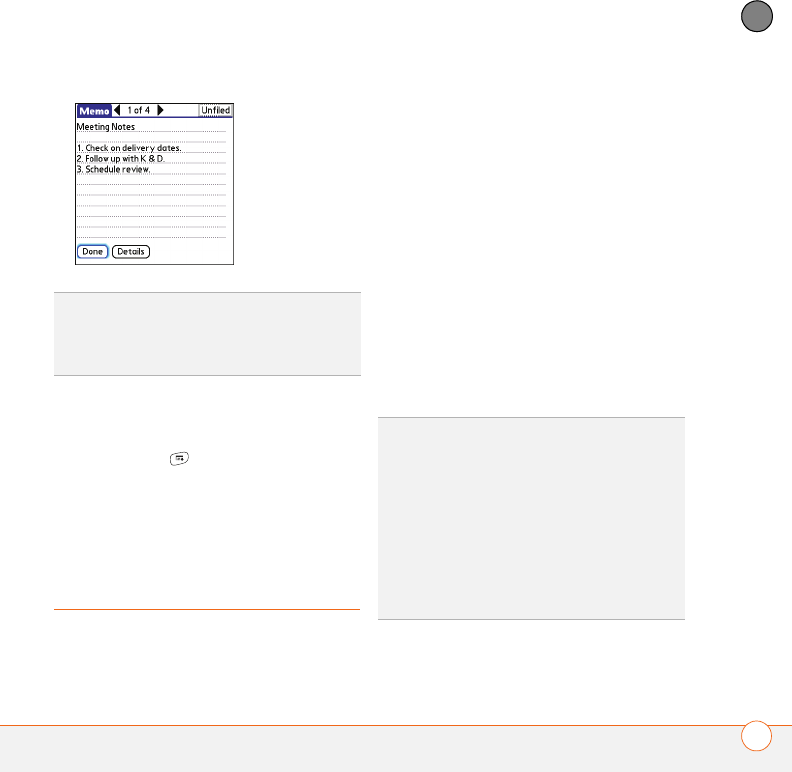
Memos
Memos are a great way to store notes on
your Treo 680.
Creating a memo
1Press Applications and select
Memos .
2Enter the text you want to appear in the
memo.
3Select Done.
TIP
For more info on the Documents To Go
application on your Treo 680, go to
www.dataviz.com. If you installed the desktop
application from the Palm Software
Installation CD, you can also click the
Documents To Go icon on your computer,
and then click Help.
TIP
Install the Files application from the Palm
Software Installation CD to easily browse and
manage files on an expansion card.
TIP
When you work on a file on your Treo 680,
you can save it to your Treo 680 or an
expansion card. Open the File menu, select
Save As, and then select the location where
you want to save the file.
DID
YOU
KNOW
?
Each memo can include 4,096
characters of text.
YOUR MEMOS AND DOCUMENTS
167
8
CHAPTER
Deleting a memo
1Open the memo you want to delete.
2Press Menu .
3Select Delete Memo from the Record
menu.
4Select OK.
Voice Memo
Voice Memo provides a place for you to
record and play back notes and other
important thoughts directly on your Treo
680.
Creating a voice memo
When recording a voice memo, hold your
Treo 680 with the screen facing towards
you while speaking.
1Press and hold the Side button on your
Treo 680 while recording your memo.
After you finish recording, release the
Side button.
The memo is automatically saved to
your Treo 680.
2(Optional) Enter a title for the memo.
TIP
You can assign categories to your memos.
Open the memo you want to change, select
the category pick list at the top of the screen,
and select a category.
TIP
You can also access Voice Memo, by
pressing Applications and selecting Voice
Memo.
TIP
If you need to pause while recording,
press and hold Center on the 5-way. Release
the button to resume recording.
DID
YOU
KNOW
?
You can use a voice memo as
a ringtone. Highlight the voice memo in the
list, open the Voice Memo menu, and then
select Copy to Ringtone.

YOUR MEMOS AND DOCUMENTS
168
8
CHAPTER
Listening to a voice memo
1Press Applications and select
Voice Memo .
2In the Voice Memo list, navigate to the
voice memo title and then press
Center to select it. The voice
memo begins to play.
3Press Center to pause or stop
playback.
TIP
To adjust the volume level, press the
Volume button on the side of your Treo 680.
TIP
To change a voice memo title, open the
Voice Memo menu and select Rename
Memo.
DID
YOU
KNOW
?
You can send a voice memo in
an email or MMS message (see the
documentation for your email application, or
Creating and sending a multimedia message).
You can also use Bluetooth® wireless
technology to send a voice memo to a nearby
Bluetooth device (see Sending info over a
Bluetooth wireless connection).

CHAPTER
9
Your application and
info management tools
Synchronization is a great way to transfer, update, and back up
info on your Palm®Treo™ 680 smart device. Synchronizing
simply means that info you entered or updated in one place
(your Treo or your computer) is automatically updated in the
other. There’s no need to enter info twice.
Expansion cards (sold separately) provide a compact and
limitless storage solution. When one card becomes full, simply
use another card to carry your extra music and video clips and
to install and run cool games and other software, from
dictionaries to travel guides.
Benefits
•Locate info in your applications
with the Find feature
•Install applications, games, and
other software
•Quickly enter, update, and protect
your info on your computer and
your Treo
•Store, carry, and exchange info
In this chapter
Using Find . . . . . . . . . . . . . . . . . . . . . . . . . . . . . . . . . . . . . . . . . . . . 171
Viewing and using the alerts . . . . . . . . . . . . . . . . . . . . . . . . . . . . . . 171
Calculator . . . . . . . . . . . . . . . . . . . . . . . . . . . . . . . . . . . . . . . . . . . . . 172
Installing applications . . . . . . . . . . . . . . . . . . . . . . . . . . . . . . . . . . . . 174
Removing applications . . . . . . . . . . . . . . . . . . . . . . . . . . . . . . . . . . . 176
Viewing application info . . . . . . . . . . . . . . . . . . . . . . . . . . . . . . . . . . 177
Sending information with Bluetooth wireless technology . . . . . . . . 178
Beaming information . . . . . . . . . . . . . . . . . . . . . . . . . . . . . . . . . . . . 180
Synchronizing information—advanced . . . . . . . . . . . . . . . . . . . . . . . 182
Using expansion cards . . . . . . . . . . . . . . . . . . . . . . . . . . . . . . . . . . . 188
YOUR APPLICATION AND INFO MANAGEMENT TOOLS
171
9
CHAPTER
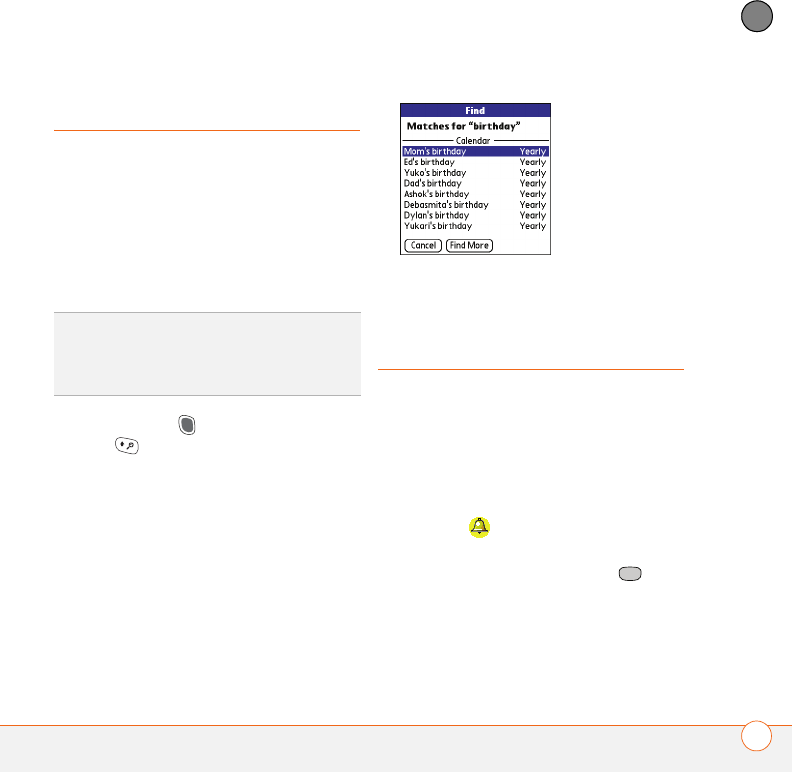
Using Find
The Find feature locates any text in the
built-in applications and databases and
in some third-party applications. The Find
feature searches for the group of
characters you specify, including characters
that are part of a word. Find is not
case-sensitive.
1Press Option , and then press Shift/
Find to open the Find dialog box.
2Enter the text you want to find.
3Select OK to start the search.
4In the search results, select the text you
want to review, or select Find More to
continue the search.
Viewing and using
the alerts
The Alert dialog box on your Treo 680
shows info about incoming items, such as
new email messages and Calendar events.
An alert also notifies you when you miss a
phone call.
To view the Alert dialog box, tap the
blinking bell with your stylus when it
appears in the upper-left corner of any
screen, or press and hold Center
when the blinking bell appears.
DID
YOU
KNOW
?
Find locates any word that
begins with the text you enter. For example,
entering “plane” finds “planet,” but not
“airplane.”
YOUR APPLICATION AND INFO MANAGEMENT TOOLS
172
9
CHAPTER
In the Alert dialog box, you can do any of
the following:
•Check the box next to the alert to
remove it from the list.
•Select the alert to open the
corresponding application and view the
alert item (message, event, missed call,
and so on).
•Select Done to close the Alert dialog
box. The alert remains active and the
bell continues to blink in the upper-left
corner of the screen.
•Select Clear All to delete all alerts in
the Alert dialog box.
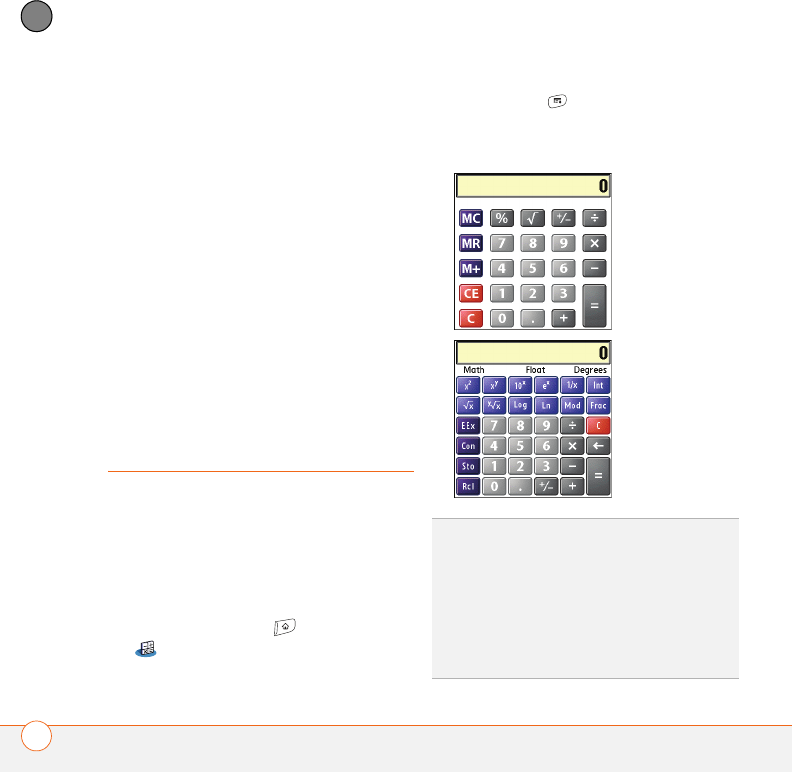
Calculator
Calculator includes a basic calculator, plus
an advanced calculator with scientific,
financial, and conversion functions.
Switching between Basic and Advanced
Calculator Modes
1Press Applications and select Calc
.
2Press Menu .
3Select Options, and then select
Advanced Mode or Basic Mode.
TIP
In Basic Mode, you can also press Right
on the 5-way to switch to Advanced Mode. In
Advanced Mode, press Right on the 5-way to
cycle between functions, and press Left on
the 5-way to return to Basic Mode.
DID
YOU
KNOW
?
You can tap the onscreen
number pad or use the keyboard to input
numbers.
YOUR APPLICATION AND INFO MANAGEMENT TOOLS
173
9
CHAPTER
Selecting functions in Advanced
Calculator Mode
1Switch to Advanced Mode (see the
preceding procedure).
2Press Menu .
3Select Options, and then select the
type of function you want to use:
Math: Advanced mathematical
functions such as exponents, roots, and
logarithms.
Trig: Trigonometric functions such as
sine, cosine, tangent, and variants.
Finance: Financial calculator functions
such as APR and amortization.
Logic: Hexadecimal characters in
keypad, plus logic functions such as
And, Not, Or, and Xor.
Statistics: Statistical functions such as
sum, factorial, and random number
generator.
Weight/Tmp: Weight and temperature
conversions for metric and English
values.
Length: Length conversions for metric
and English values.
Area: Area conversions for metric,
traditional, and English values.
Volume: Volume conversions for metric
and English values.
4Press Menu .
5Select Pref, and then select the decimal
display format: Float, Fixed(x), Sci(x),
or Eng(x).
6Press Menu .
7Select Pref, and then select the number
display format: Degrees, Radians, or
Grads.
TIP
Select Sto to store a number in one of ten
memory slots. Select Rcl to recall a stored
number.
TIP
Select Con to access a list of
mathematical constants such as Avogadro’s
number or the speed of light.

YOUR APPLICATION AND INFO MANAGEMENT TOOLS
174
9
CHAPTER
Installing applications
Your Treo 680 comes with several built-in
and ready-to-use applications. You can also
install additional applications, such as
business software, games, and more. The
Palm Software Installation CD includes
several bonus software apps, and you can
purchase other third-party Palm OS® apps
as well. To learn about applications you can
add to your Treo 680, go to
www.palm.com/mytreo680cingular.
NOTE The instructions in this section tell
you how to install basic PRC (Palm OS
application) and PDB (Palm OS database)
files on your Treo. Some Palm OS software
uses an installer or wizard to guide you
through the process. For details, consult
the documentation that came with the
software.
Installing bonus software from the CD
The Palm Software Installation CD includes
several bonus software applications that
you can install on your Treo 680. You can
install these applications when you install
the desktop software, or you can install
them later.
1Insert the Palm Software Installation CD
into the CD drive on your computer.
2Click Install bonus software.
3Click the name of the application you
want to install.
4Click Install (on the right side of the
screen).
5Repeat steps 3 and 4 to install additional
applications.
6Synchronize your Treo 680 with your
computer to install the application(s) on
your Treo.
Installing applications from the Internet
You can use the web browser on your Treo
to install Palm OS files (PRC or PDB)
directly from the Internet. When you
download a PRC or PDB file, it is
automatically installed on your Treo. If a file
is compressed (ZIP or SIT files), you need
to download it to your computer, expand
the file, and then synchronize to transfer
the expanded file to your Treo.
YOUR APPLICATION AND INFO MANAGEMENT TOOLS
175
9
CHAPTER
1Open the web browser (see Viewing a
web page).
2Go to the page that contains the link to
the application you want to download.
3Press Left or Right to highlight the
link to the file, and then press Center
to initiate the download process.
4Follow the onscreen instructions to
accept and install the application.
Installing applications from a computer
When you download an application to your
computer, it is probably in a compressed
format such as a ZIP or SIT file. If the file is
compressed, you need to use a
decompression utility on your computer,
such as WinZip or Allume Stuffit Expander,
before you install the application on your
Treo.
BEFORE YOU BEGIN To install an app
from your computer to your Treo, you must
first install Palm®Desktop software on
your computer (see Installing the desktop
synchronization software).
1Windows: Drag and drop the file(s)
onto the Palm Quick Install icon on the
Windows desktop.
Mac: Drag and drop the file(s) onto the
Send To Handheld droplet in the Palm
folder.
2Select your device name from the User
list, and then click OK.
3Synchronize your Treo with your
computer to install the application(s) on
your Treo 680.
TIP
Want to install an app to an expansion card
rather than your Treo 680?
Windows: Open Palm® Quick Install and drag
the file to the Expansion Card pane.
Mac: In the menu for Palm Desktop software,
click HotSync, select Install Handheld files,
and select expansion card as the file’s
destination.
TIP
On a Windows computer, you can also
access Palm Quick Install by selecting the
Quick Install icon in Palm Desktop software
or from the Programs folder in the Start
menu.
YOUR APPLICATION AND INFO MANAGEMENT TOOLS
176
9
CHAPTER
Getting help with third-party applications
If you encounter a problem (such as an
error message) with a third-party
application, contact the application’s author
or vendor. For general troubleshooting of
third-party applications, see Third-party
applications.
Removing
applications
If you decide that you no longer need an
application, or you want to free up
memory, you can remove apps from your
Treo or an expansion card (for more on
expansion cards, see Inserting an
expansion card). You can remove only
apps, patches, and extensions that you
install; you cannot remove the built-in apps
that reside in the ROM portion of your Treo.
Applications that you cannot remove
appear with a Lock icon next to them.
1Press Applications .
2If you want to remove an application
from an expansion card, insert the card
into your Treo.
3Press Menu .
4Select Delete on the App menu.
5Select the Delete From pick list and
select the location of the application you
want to remove: Phone or <card
name>.
6Select the application that you want to
remove.
7Select Delete.
8Synchronize to remove the application
from the Backup subfolder on your
computer.
DID
YOU
KNOW
?
Applications deleted from your
Treo 680 are kept on your computer in the
Archive folder of your user folder. If you have
trouble locating your user folder, see I can’t
find my user folder.
YOUR APPLICATION AND INFO MANAGEMENT TOOLS
177
9
CHAPTER
Manually deleting applications
If an app you delete reappears on your Treo
680, you may need to manually delete the
app from your computer.
1Locate your Backup subfolder on your
computer.
Windows: C:\Program
Files\Palm\<device name>.
Mac: Mac
HD\Applications\Palm\Users\<device
name>.
If you upgraded from a previous version
of Palm Desktop, your Backup subfolder
may be located in the palmOne or
Handspring folder.
2If you find a PRC or PDB file for the
application you just removed, delete the
file from the Backup subfolder.
3Delete the file from your device again.
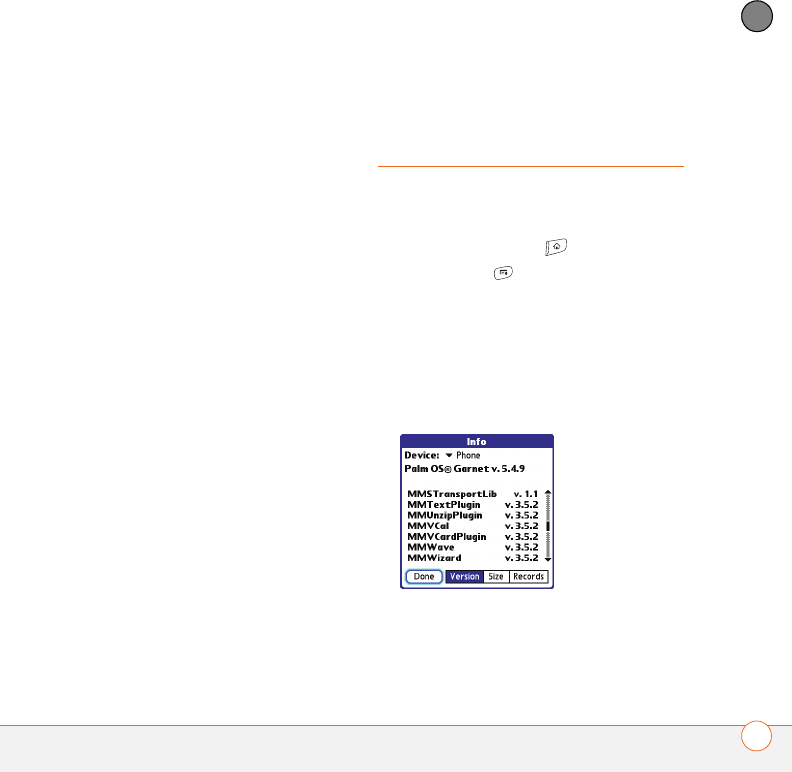
Viewing application
info
The Info screens display basic statistics
about the applications on your Treo.
1Press Applications .
2Press Menu .
3Select Info on the App menu.
4Select the Device pick list and select
the location of the app you want to view
info for: Phone or <card name>.
5At the bottom of the screen, select the
type of information you want to view:
Version: The version numbers of
applications on your Treo 680.
YOUR APPLICATION AND INFO MANAGEMENT TOOLS
178
9
CHAPTER
Size: The size (in kilobytes) of
applications and information on your
Treo 680.
Records: The number of entries in
various applications on your Treo 680.
6Scroll to the application you want to see
info about.
7Select Done.
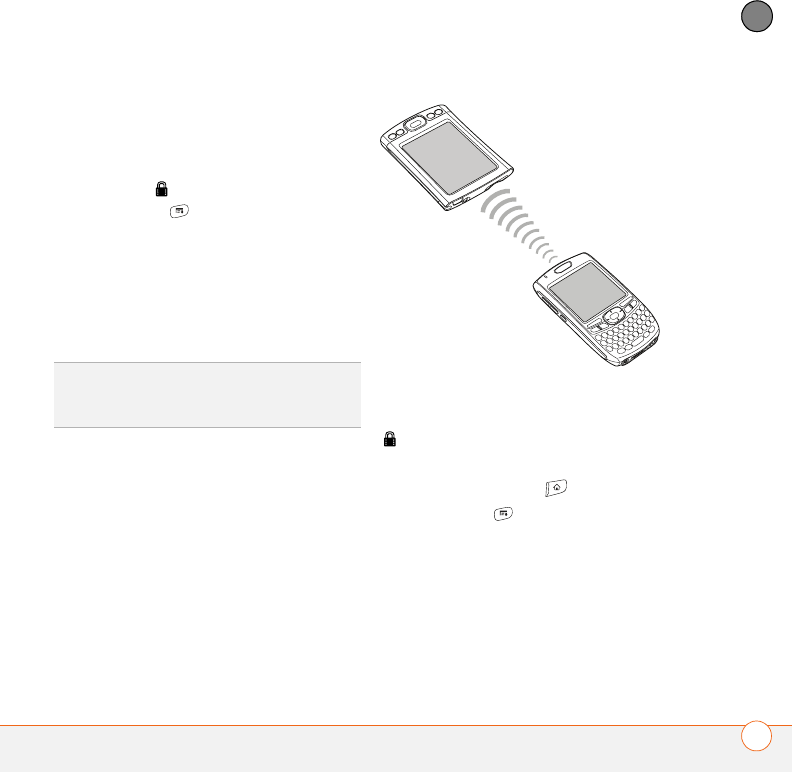
Sending information
with Bluetooth
wireless technology
The range of Bluetooth® wireless
technology is up to 30 feet in optimum
environmental conditions. Performance
and range may be affected by physical
obstacles, radio interference from nearby
electronic equipment, and other factors.
Sending info over a Bluetooth wireless
connection
In most applications, you can send an
individual entry or item such as a contact or
a picture. You can also send all the entries
in a category, such as all contacts in the
Business category.
1Press Applications and select
Bluetooth .
2Select Bluetooth On.
3Open an application.
4Select the entry or category you want to
send. You cannot send an item that has
a lock next to it.
5Press Menu .
6Select Send from the leftmost menu.
7Select Bluetooth, and then select OK.
8Select the receiving device(s) from the
Discovery Results list, and then select
OK.
9Wait for a message to indicate that the
transfer is complete before you
continue using your Treo.
TIP
Check your battery level before
establishing a Bluetooth wireless connection.
If the battery level is very low, you can’t make
a Bluetooth wireless connection.
YOUR APPLICATION AND INFO MANAGEMENT TOOLS
179
9
CHAPTER
Sending an app over a Bluetooth wireless
connection
1Press Applications and select
Bluetooth .
2Select Bluetooth On.
3Press Applications .
4Press Menu .
5Select Send from the App menu.
6Select the Send From pick list and
select the location of the app you want
to send: Phone or <card name>.
7Select the application you want to
transfer. You cannot send an item that
has a lock next to it.
8Select Send.
9Select Bluetooth, and then select OK.
10 Select the receiving device(s) from the
Discovery Results list, and then select
OK.
11 Wait for a message to indicate that the
transfer is complete before you
continue using your Treo.
Receiving info over a Bluetooth wireless
connection
1Press Applications and select
Bluetooth .
2Select Bluetooth On.
3Select the Visibility pick list and select
one of the following:
Visible: Enables Bluetooth devices that
are not on your Trusted Devices list to
request a connection with your Treo
680. Your Treo 680 remains accessible
to other devices until you turn this
option off. After you’re done using this
setting, remember to change it back to
Hidden.
Temporary: Enables Bluetooth devices
that are not on your Trusted Devices list
to request a connection with your Treo
680 during the next two minutes. Your
Treo 680 reverts to the Hidden setting
and becomes inaccessible to other
devices after two minutes.
YOUR APPLICATION AND INFO MANAGEMENT TOOLS
180
9
CHAPTER
4Use the other device to discover your
Treo 680 and send information to it:
•See the other device’s documentation
to learn how to discover and send
information over a Bluetooth wireless
connection.
•If the Ringer switch is set to Sound
On, your Treo beeps to notify you of
the connection and then prompts you
to accept the info. Select a category
or expansion card to file the item(s). If
you don’t select a category, the
item(s) goes into the Unfiled category.
5Select Ye s to receive the information or
No to refuse it.
Beaming information
Your Treo 680 is equipped with an IR
(infrared) port so that you can beam
information to another device with an IR
port—provided the other device supports
IR communications with Palm OS devices.
The IR port is located on the top of your
Treo 680, next to the Ringer switch, behind
the small dark shield.
Beaming an entry
You can beam an individual entry or item
such as a contact or a picture. You can also
beam all the entries in the selected
category, such as all the contacts in the
Business or Family category.
TIP
The Device Name in the Bluetooth app is
the name other devices with Bluetooth
wireless technology see when they connect
to your Treo 680. The default name is the
name you gave your device during setup. You
can change this name if you want to.
DID
YOU
KNOW
?
When you receive an
application over a Bluetooth connection, you
can store the application on your Treo 680 or
send it to an expansion card inserted into the
expansion card slot.
TIP
For best results, the path between the
two devices must be clear of obstacles, and
both devices must be stationary. If you have
difficulty beaming, shorten the distance and
avoid bright sunlight.
TIP
Beam your business card in two key
presses: From the Main tab in the Phone
application, press Menu, and then press M.
YOUR APPLICATION AND INFO MANAGEMENT TOOLS
181
9
CHAPTER
1Open the application that holds the
entry you want to beam.
2Select the entry or category you want to
beam. You cannot beam an item that
has a lock next to it.
3Press Menu .
4Select Record, and then select one of
the following:
Beam: Sends an individual record.
Beam Category: Sends all entries in
the current category.
5When the Beam Status dialog box
appears, point the IR port on your Treo
directly at the IR port of the receiving
device.
6Wait for the Beam Status dialog box to
indicate that the transfer is complete
before you continue using your Treo.
Beaming an application
Not all applications can be beamed. A lock
icon appears on the Beam screen next
to applications that cannot be beamed.
1Press Applications .
2Press Menu .
3Select Beam from the App menu.
4Select the Beam From pick list and
select the location of the application you
want to beam: Phone or <card name>.
5Select the application you want to
transfer.
DID
YOU
KNOW
?
If you beam a bookmark or
saved page from the web browser, it beams
the URL, not the contents of that page.
YOUR APPLICATION AND INFO MANAGEMENT TOOLS
182
9
CHAPTER
6Select Beam.
7When the Beam Status dialog box
appears, point the IR port on your Treo
directly at the IR port of the receiving
device.
8Wait for the Beam Status dialog box to
indicate that the transfer is complete
before you continue using your Treo.
Receiving beamed information
BEFORE YOU BEGIN Make sure that the
Beam Receive option in Power
Preferences is On. See Optimizing power
settings for details.
1Turn on your screen.
2Select the beam command on the
transmitting device.
3Point the IR port on your Treo directly at
the IR port of the transmitting device
to open the Beam Status dialog box.
4When the Beam Status dialog box
appears, select a category for the entry.
5Select Ye s to receive the information or
No to refuse it.
Synchronizing
information—
advanced
Changing which applications sync
By default, information from Calendar,
Contacts, Memos, Pictures & Videos, and
Tasks is updated each time you
synchronize your Treo 680. You can
change which applications synchronize. For
example, if you don’t use the Memos
application and you want to speed up
TIP
If you do not select a category upon
receiving a beamed item, the item is placed in
the Unfiled category.
TIP
If you can’t receive beamed info, make
sure that you are not running a third-party app
that disables beaming. If you still can’t receive
a beam, try a soft reset (see Resetting your
Treo).
DID
YOU
KNOW
?
You can store a beamed app
on your Treo 680 or send it to an expansion
card inserted into the expansion card slot.
YOUR APPLICATION AND INFO MANAGEMENT TOOLS
183
9
CHAPTER
synchronization, you can turn off
synchronization for Memos.
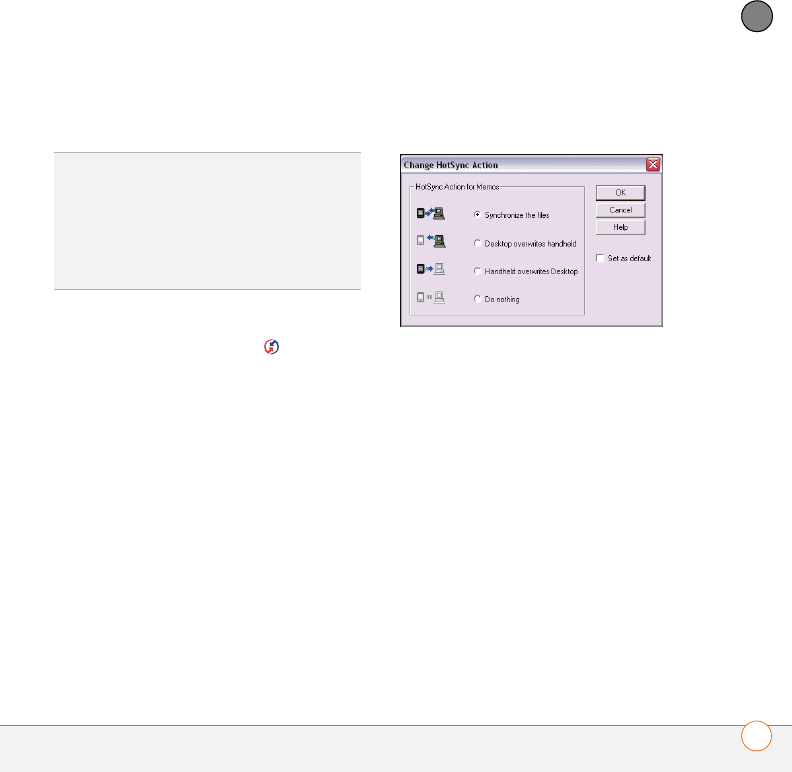
WINDOWS ONLY
1Click HotSync® manager in the
taskbar in the lower-right corner of your
screen.
2Select Custom.
3Select your device name from the User
list at the top of the screen.
4Select the application for which you
want to turn synchronization on or off,
and then click Change.
5Select Synchronize the files to turn on
synchronization for an app.
Select Do nothing to turn off
synchronization for an app that currently
synchronizes (for example, to turn off
synchronization for Memos if you do not
use this app).
NOTE If you want the information in one
location (Treo 680 or computer) to
completely replace the information in the
other location for that app, select one of
the two overwrite options. For example, if
the Calendar info on your Treo 680 is
accurate but the info on your computer has
become corrupted, select Handheld
overwrites Desktop for the Calendar app
to have your Treo 680 info replace your
computer info. Note that “handheld” refers
to your Treo 680 and “desktop” refers to
your computer.
TIP
Windows If you set up your Treo 680 to
sync with Outlook, you can learn how to
change which applications synchronize, by
doing the following: Click the HotSync
manager icon in the taskbar and select
Custom. Select a conduit that syncs with
Outlook, click Change, and then click Help.
YOUR APPLICATION AND INFO MANAGEMENT TOOLS
184
9
CHAPTER
6(Optional) If you want to make this
change permanent, check the Set as
default box. Otherwise, your change
affects only one synchronization (the
next one you do); thereafter, the
synchronization action reverts to what it
was before the change.
7Click OK.
8(Optional) To turn synchronization on or
off for other apps, repeat steps 4, 5, 6,
and 7 for each application you want to
change.
9Click Done.
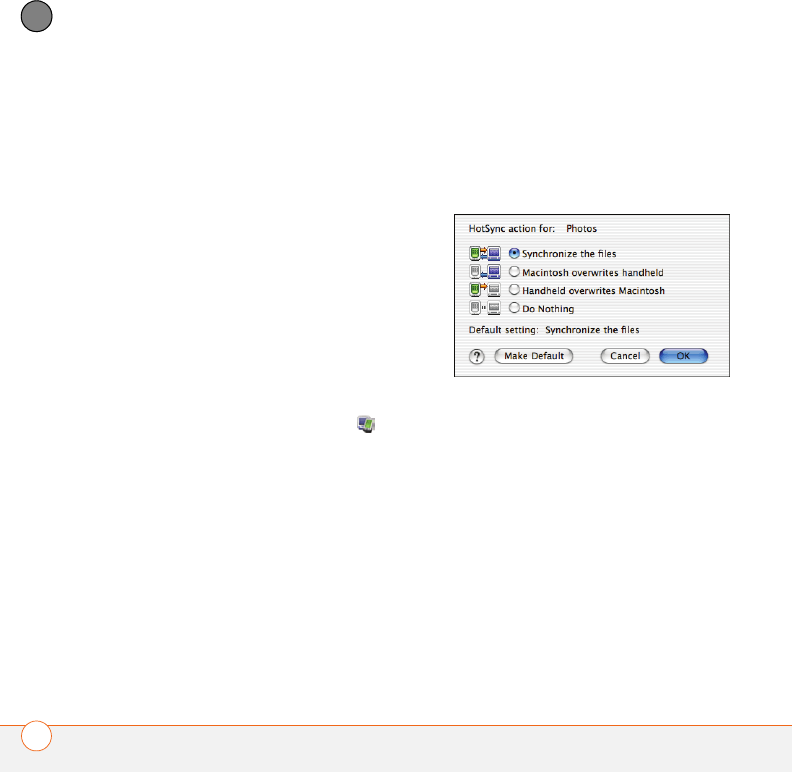
MAC ONLY
1Double-click the Palm Desktop icon
in the Palm folder.
2From the HotSync menu, select
Conduit Settings.
3From the User pop-up menu, select
your device name.
4Select the application for which you
want to turn synchronization on or off,
and then click Conduit Settings.
5Select Synchronize the files to turn on
synchronization for an app.
Select Do nothing to turn off
synchronization for an app that currently
synchronizes (for example, to turn off
synchronization for Memos if you do not
use this app).
NOTE If you want the information in one
location (Treo 680 or computer) to
completely replace the information in the
other location for that app, select one of
the two overwrite options. For example, if
the Calendar info on your Treo 680 is
accurate but the info on your Mac has
become corrupted, select Handheld
overwrites Macintosh for the Calendar
app to have your Treo 680 info replace the
info on your Mac. Note that “handheld”
refers to your Treo 680.
YOUR APPLICATION AND INFO MANAGEMENT TOOLS
185
9
CHAPTER
6(Optional) If you want to make this
change permanent, click Make Default.
Otherwise, your change affects only
one synchronization (the next one you
do); thereafter, the synchronization
action reverts to what it was before the
change.
7Click OK.
8(Optional) To turn synchronization on or
off for other apps, repeat steps 4, 5, 6,
and 7 for each application you want to
change.
9Close the Conduit Settings window.
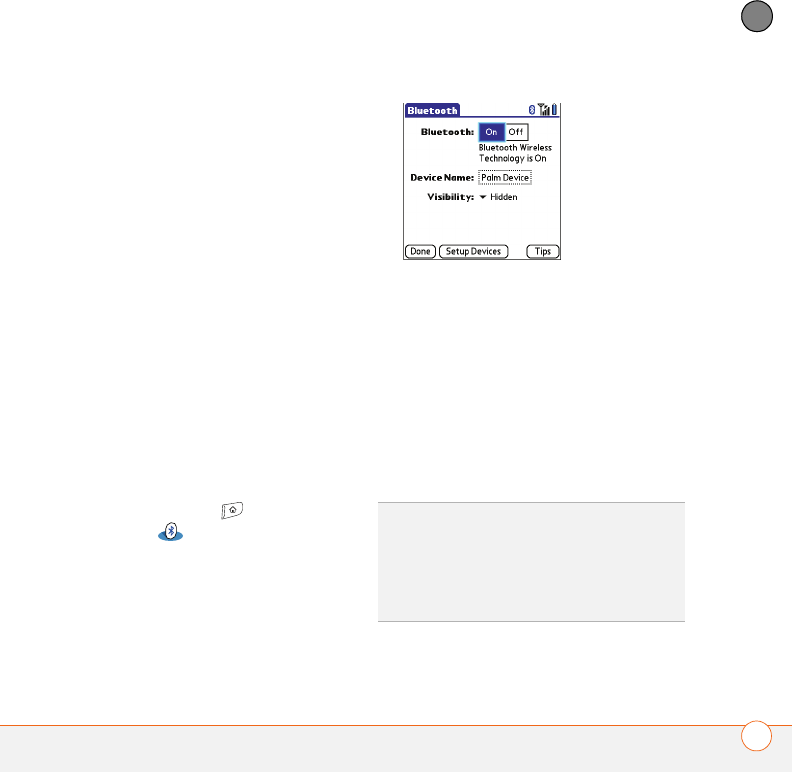
Setting up a Bluetooth connection for
synchronization
If your computer is enabled with Bluetooth
wireless technology, you can synchronize
wirelessly over a Bluetooth connection.
1Press Applications and select
Bluetooth .
2Select Bluetooth On.
3(Optional) Enter a device name that
identifies your Treo 680 when it is
discovered by other Bluetooth devices.
NOTE Use the same device name for all
your Bluetooth connections. If you change
the device name, you need to recreate any
partnerships you already created.
4Select the Visibility pick list and select
Visible or Te m p o r a r y.
5Select Setup Devices.
TIP
After you form a partnership with a device,
you can change the Visibility setting back to
Hidden. That way only devices with which
you’ve already formed a partnership can find
your Treo 680. New devices cannot request a
connection.
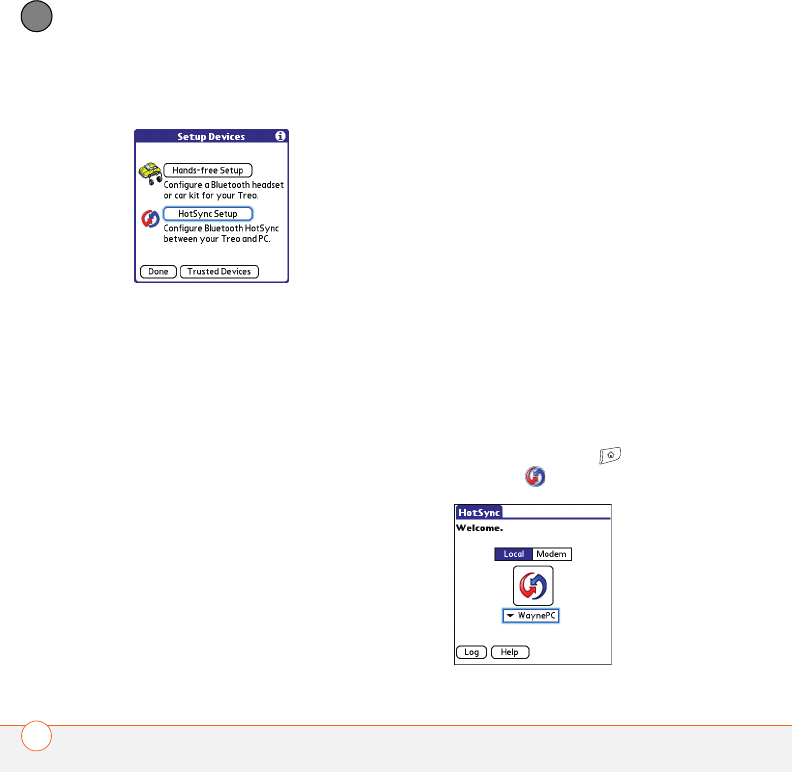
YOUR APPLICATION AND INFO MANAGEMENT TOOLS
186
9
CHAPTER
6Select HotSync Setup.
7Follow the onscreen instructions to
create a partnership between your Treo
680 and your computer. In some cases
you may need to perform setup steps
on your computer before you can
complete this step. Check your
computer’s documentation for specific
setup instructions.
8After you finish the HotSync setup,
select Done to return to Applications
View.
0
You’re now ready to sync your Treo 680
with your Bluetooth computer.
Synchronizing over a Bluetooth
connection
When you synchronize using the Bluetooth
wireless feature on your Treo, you don’t
need your sync cable. This is especially
useful if you travel with a laptop enabled
with Bluetooth wireless technology.
BEFORE YOU BEGIN Verify the following
on your computer:
•It includes built-in Bluetooth wireless
technology or a Bluetooth adapter.
•Bluetooth is turned on.
•HotSync manager is active. On a
Windows computer, you know HotSync
manager is active when its icon appears
in the lower-right corner of your screen.
1Press Applications and select
HotSync .
YOUR APPLICATION AND INFO MANAGEMENT TOOLS
187
9
CHAPTER
2Select Local.
3Select the pick list below the HotSync
icon, and then select the name of the
PC you set up for Bluetooth
synchronization (see Setting up a
Bluetooth connection for
synchronization).
4Select the HotSync icon on your
Treo 680.
When synchronization is complete, a
message appears at the top of your Treo
680 screen. Be patient; synchronization
may take a few minutes.
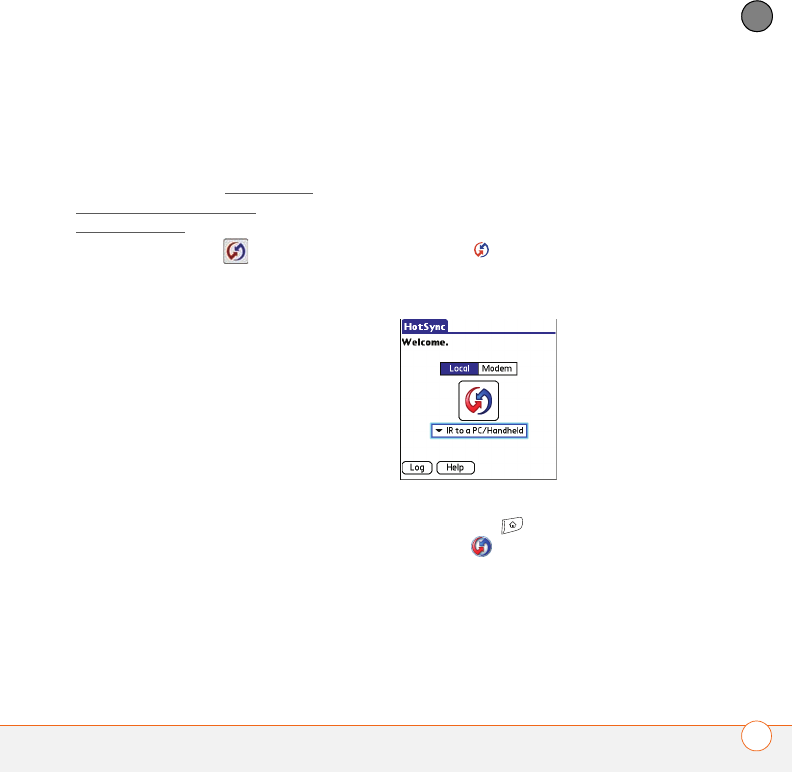
Synchronizing over an infrared
connection
When you synchronize using the IR port on
your Treo, you don’t need your sync cable.
This is especially useful if you travel with
an IR-enabled laptop.
BEFORE YOU BEGIN Your computer must
include the following items:
•An enabled IR port and driver or an IR
device attached to it. Check your
computer’s documentation to see if it
supports IR communication.
•HotSync manager must be active. On a
Windows computer, you know HotSync
manager is active when its icon appears
in the lower-right corner of your screen.
WINDOWS ONLY
1On your computer, click HotSync
manager in the taskbar in the
lower-right corner of your screen. Make
sure that Infrared is selected.
2On your Treo 680, press
Applications and select
HotSync .
3Select Local.
4Select the pick list below the HotSync
icon and select IR to a PC/Handheld.
YOUR APPLICATION AND INFO MANAGEMENT TOOLS
188
9
CHAPTER
5Position the IR port on your Treo within
a few inches of your computer’s IR port.
6Select the HotSync icon on your
Treo 680.
When synchronization is complete, a
message appears at the top of your Treo
680 screen. Be patient; synchronization
may take a few minutes.
MAC ONLY
1Double-click the HotSync manager
icon in the Palm folder.
2Click the HotSync Controls tab, and
then select Enabled.
3Click the Connection Settings tab, and
then check the On box next to IR port.
4Close the HotSync Software Setup
window.
5On your Treo 680, press Applications
and select HotSync .
6Select Local.
7Select the pick list below the HotSync
icon and select IR to a PC/Handheld.
8Position the IR port on your Treo within
a few inches of your Mac’s IR port.
9Select the HotSync icon on your
Treo 680.
When synchronization is complete, a
message appears at the top of your Treo
680 screen. Be patient; synchronization
may take a few minutes.
Using expansion
cards
The expansion card slot on your Treo 680
enables you to add SD cards and
MultiMediaCard cards to extend the
storage capacity of your Treo 680
(expansion cards sold separately). Here are
some examples of what SD and
MultiMediaCard expansion cards can store:
•Photos
•MP3 audio files
•Email attachments
•Games
•eBooks
YOUR APPLICATION AND INFO MANAGEMENT TOOLS
189
9
CHAPTER
•Microsoft Office files
•Adobe Acrobat files
•Applications
•Databases
Your Treo 680 is also compatible with SDIO
cards, which you can use to add
accessories, such as an FM radio module,
to your Treo.
IMPORTANT When using an SDIO card,
the SDIO card may protrude from the side
of your Treo 680 and prevent you from
closing the door of the expansion card slot.
Be careful not to damage the door.
Additionally, some SDIO cards may be too
wide to fit inside the expansion door
opening, so make sure the SDIO card fits
inside the expansion door opening before
making your purchase.
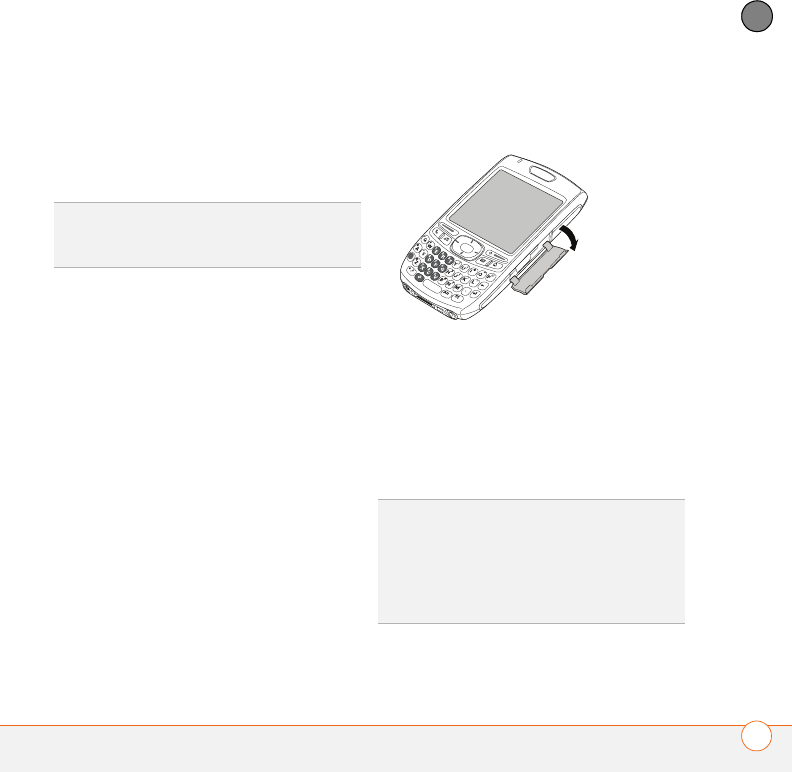
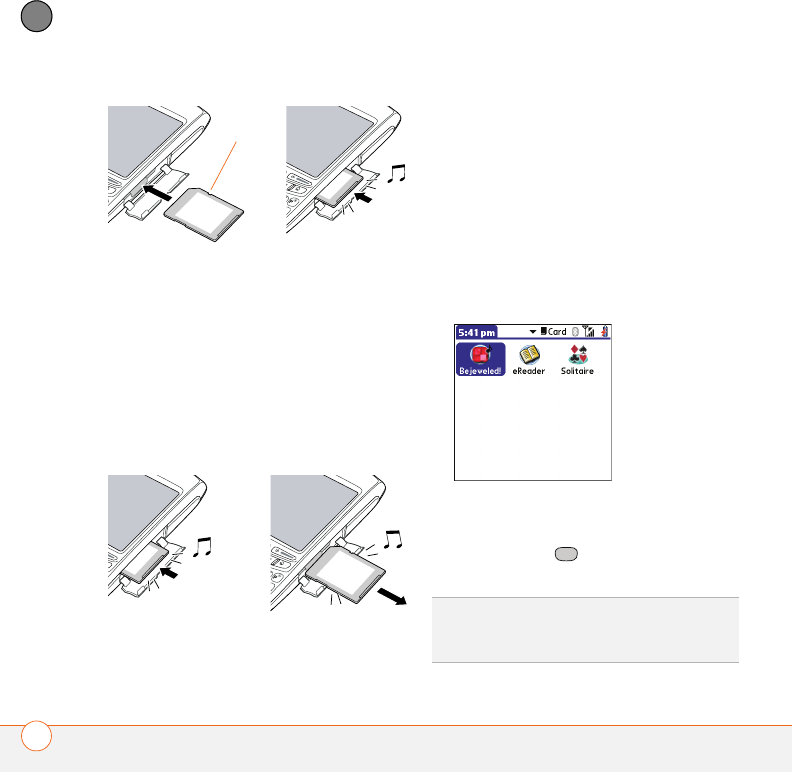
Inserting an expansion card
1Open the expansion slot door.
2Hold your Treo with the screen facing
you, and hold the card with the label
facing you. The notch on the card should
be in the upper corner closest to the
screen.
3Insert the card into the expansion card
slot until you feel it lock into place.
TIP
SD cards are faster than MultiMediaCard
cards for reading and writing information, and
SD cards also offer write-protection.
TIP
The expansion card slot has a push-push
mechanism: push in gently to insert a card;
push in gently to remove it.
TIP
If the Ringer switch is set to Sound On,
you hear a confirmation tone when you insert
or remove an expansion card.
YOUR APPLICATION AND INFO MANAGEMENT TOOLS
190
9
CHAPTER
4Close the expansion slot door.
Removing an expansion card
1Open the expansion slot door.
2Press the card into the expansion slot to
release it from the expansion slot.
3After you feel the expansion card slot
eject the card, remove the card
from the slot.
4Close the expansion slot door.
Opening applications on an expansion
card
After you insert an expansion card into the
expansion card slot, you can open any of
the applications stored on the expansion
card.
1Insert the expansion card into the
expansion card slot. The Card category
of Applications View automatically
appears.
2Select the icon for the application you
want to open.
3Press Center to open the
application.
Notch
TIP
Install the Files application from the Palm
Software Installation CD to easily browse and
manage files on an expansion card.
YOUR APPLICATION AND INFO MANAGEMENT TOOLS
191
9
CHAPTER
Accessing items stored on an expansion
card
When an expansion card contains items
such as pictures or songs, you can’t view
them directly from the Card category in
Applications View. You must open the app
that recognizes the item.
1Insert the expansion card into the
expansion card slot. The Card category
of Applications View automatically
appears.
2Select the category pick list in the title
bar, and select All.
3Select the icon for the application in
which you want to open the item. For
example, to view a picture, select
Pics&Videos.
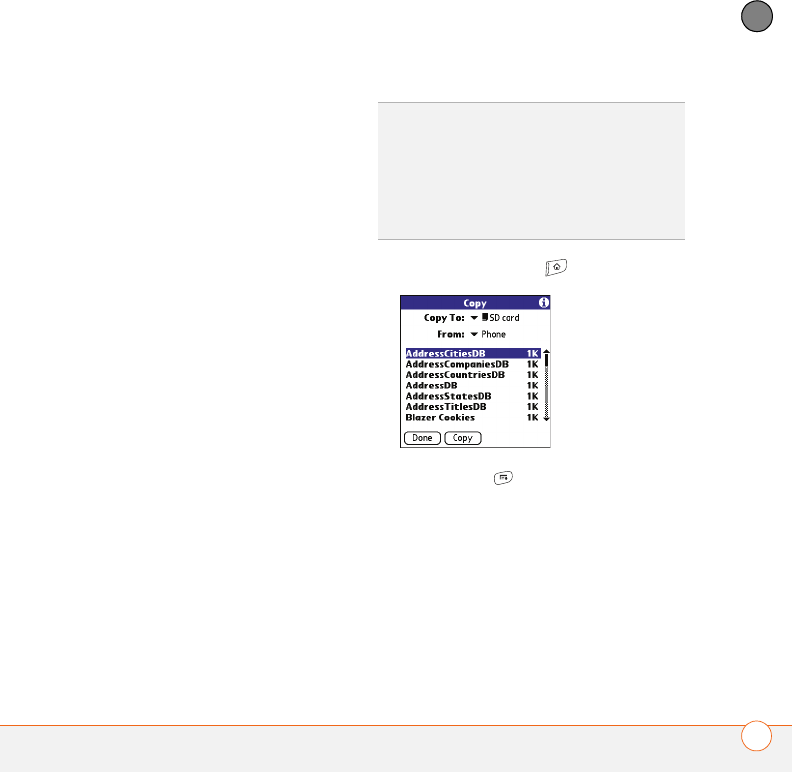
Copying applications between an
expansion card and your Treo
You can copy applications from your Treo to
your expansion card and vice versa.
1Press Applications .
2Press Menu .
3Select Copy from the App menu.
4Select the Copy To pick list and select
the destination: Phone or <card
name>.
5Select the From pick list and select the
location of the application you want to
copy: Phone or <card name>.
TIP
Before you copy an application to an
expansion card, make sure that it is
compatible with Palm OS software version
5.4.5 or later. Some applications do not work
with expansion cards and do not allow you to
store files in a location that is separate from
the application.
YOUR APPLICATION AND INFO MANAGEMENT TOOLS
192
9
CHAPTER
6Highlight the application you want to
copy.
7Select Copy.
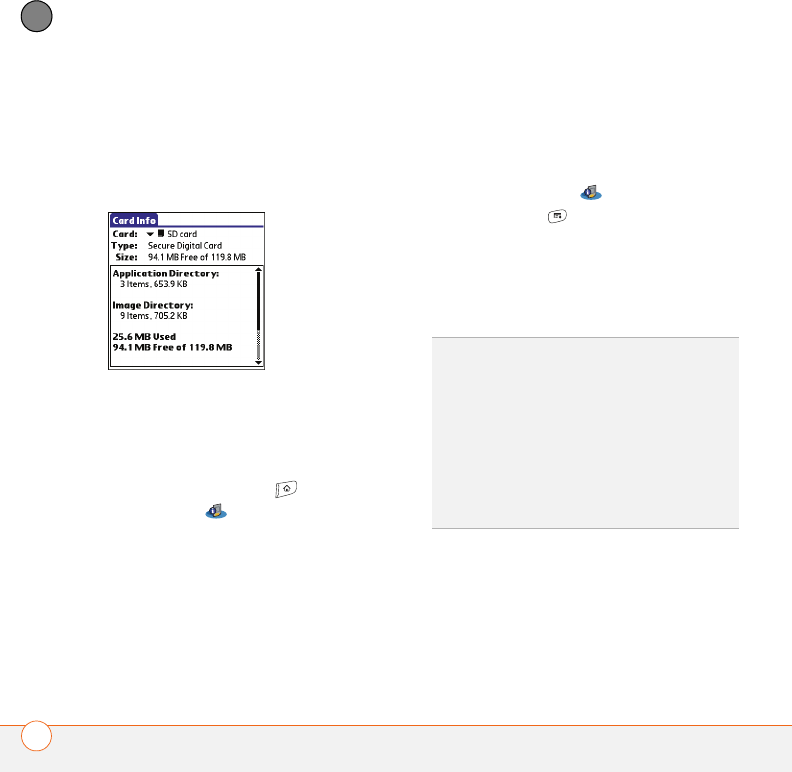
Viewing expansion card information
The Card Info application displays general
information about the expansion card that
is currently in the expansion slot, and it
enables you to rename and format a card.
•Press Applications and select
Card Info .
Renaming an expansion card
If you change the contents of an expansion
card, you may at some point want to
rename the card to better match its
contents.
1Insert the expansion card into the
expansion card slot.
2Select the category pick list at the top
of the screen and select All.
3Select Card Info .
4Press Menu .
5Select Rename Card from the Card
menu.
6Enter a new name for the card.
7Select OK.
Formatting an expansion card
Formatting an expansion card is similar to
formatting a disk on a computer. When
you format an expansion card, you erase all
the information stored on the card.
TIP
If you have trouble copying info to,
renaming, or formatting an expansion card,
make sure the card is not write-protected.
Press Applications and select Card Info. If a
This card is read-only message appears, then
the card is write-protected. If you’re using an
SD card, you can slide the write-protect tab to
the opposite position to write to the card. See
the instructions that came with your card for
additional info.
YOUR APPLICATION AND INFO MANAGEMENT TOOLS
193
9
CHAPTER
1Insert the expansion card into the
expansion card slot.
2Select the category pick list at the top
of the screen and select All.
3Select Card Info .
4Press Menu .
5Select Format Card from the Card
menu.
6Enter a new name for the card.
7Select OK.
TIP
If you format a card, any photos or
documents that were previously stored on the
card are deleted from your desktop software
the next time you sync. You can recover these
files from the backup folder, or you can
prevent the deletion by temporarily changing
your sync settings for the affected application
to Desktop overwrites handheld.

YOUR APPLICATION AND INFO MANAGEMENT TOOLS
194
9
CHAPTER

CHAPTER
10
Your personal settings
Customizing your Palm®Treo™ 680 smart device is great way to
make it match your lifestyle and work even harder for you.
On your Treo, you can easily customize the sounds, fonts,
screen colors, and more. Take advantage of different levels of
security. Prevent making an accidental (and expensive) phone
call by locking the keyboard. Some settings can help extend the
life of your Treo battery. There are lots of ways to make your
Treo work better for you.
Benefits
•Access applications quickly
•Make your screen easy to read
•Conserve power
•Enjoy your Treo 680 more

In this chapter
System sound settings. . . . . . . . . . . . . . . . . . . . . . . . . . . . . . . . . . . 197
Display and appearance settings . . . . . . . . . . . . . . . . . . . . . . . . . . . 198
Applications settings . . . . . . . . . . . . . . . . . . . . . . . . . . . . . . . . . . . . 201
Locking your Treo and info . . . . . . . . . . . . . . . . . . . . . . . . . . . . . . . . 203
System settings . . . . . . . . . . . . . . . . . . . . . . . . . . . . . . . . . . . . . . . . 210
Connecting to a VPN . . . . . . . . . . . . . . . . . . . . . . . . . . . . . . . . . . . . 212
YOUR PERSONAL SETTINGS
197
10
CHAPTER
System sound
settings
Silencing sounds
You can immediately silence all alerts,
ringtones, music that plays through the
built-in speaker, and system sounds by
sliding the Ringer switch to the Sound Off
position. This does not mute the audio
during a phone call.
1Slide the Ringer switch to the Sound
Off position. Your Treo 680 vibrates
once to let you know that you’ve turned
sounds off.
2To hear all sounds again, slide the
Ringer switch to the Sound On
position.
NOTE For info on setting the vibrate option,
see the section on setting alert tones in the
chapters that describe the individual applications.
When you slide the Ringer switch back to
the Sound On position, it restores the
previous sound settings.
Setting system volume levels
You can set the volume level for system
sounds, such as the tone that plays when
you synchronize.
1Press Applications and select
Sounds .
2Select the Application pick list and
select System.
TIP
If the Ringer switch is set to Sound Off,
the ringer setting overrides the sound settings
and all sounds are turned off.
Sound On Sound Off
YOUR PERSONAL SETTINGS
198
10
CHAPTER
3Select the System Volume and Game
Volume pick lists and select the volume
levels.
4Select Done.
Display and
appearance settings
Adjusting the brightness
Depending on the lighting conditions in
which you’re using your Treo, you may
need to adjust the brightness of the screen
and keyboard backlight.
1Press Option , and then press
Backlight .
2Press Left and Right to adjust the
brightness.
3Select Done.
Changing the screen font
You can change the screen font in
Calendar, Contacts, Memos, Messaging,
Tasks, and Web. The font styles may vary
between applications and some
applications may offer fewer choices.
1Open the application in which you want
to change the font.
2Press Menu .
3Select Options, and then select Font.
TIP
To temporarily set the backlight to the
preset low setting, press Option + Menu.
TIP
You can also adjust the backlight and set
the brightness duration during a call in Power
Preferences. See Optimizing power settings.
Backlight
YOUR PERSONAL SETTINGS
199
10
CHAPTER
4Select a font style. (In the web browser,
select the Font size pick list and select
Large or Small.)
5Select OK.
Setting display formats
Formats Preferences enable you to select
number conventions based on geographic
regions. For example, in the United
Kingdom, time often is expressed using a
24-hour clock. In the United States, time is
expressed using a 12-hour clock with an
AM or a PM suffix. Many of the built-in
applications on your Treo 680 use the
Formats Preferences settings.
1Press Applications and select
Prefs .
2Select Formats.
3Set any of the following preferences:
Preset to: The standard number
conventions for your country. When you
select a country, the other Formats
Preferences are automatically set to
that country’s conventions. You can also
edit each option individually.
Time: The time format. Select HH:MM
to display a 24-hour clock.
Date: The date format.
Week starts: The first day of the week
(usually Sunday or Monday).
Numbers: The format for numbers with
decimal points and commas.
4Select Done.
Large fontSmall font
Small bold font
Large bold font
YOUR PERSONAL SETTINGS
200
10
CHAPTER
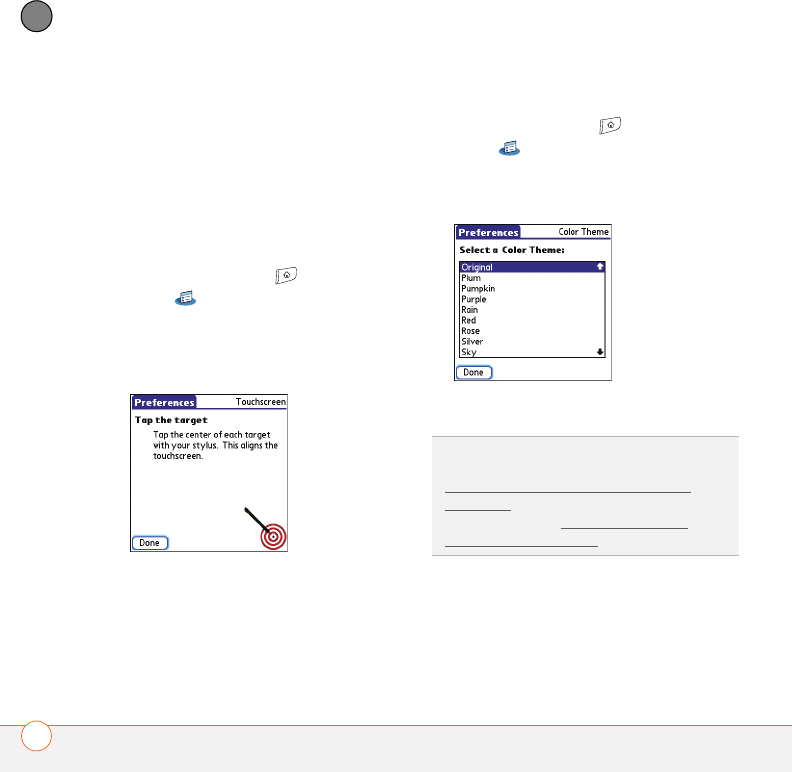
Aligning the screen to correct tapping
problems
Occasionally, your Treo screen may need to
be readjusted. If this problem occurs, you
may see the wrong feature being activated
when you tap the screen. To fix the
problem, you can align the screen at any
time.
1Press Applications and select
Prefs .
2Select Touchscreen.
3Follow the onscreen instructions and
tap the screen where indicated.
4Select Done.
Changing the system color scheme
1Press Applications and select
Prefs .
2Select Color Theme.
3Select a color scheme from the list.
4Select Done.
TIP
You can also set the wallpaper for the
Main tab in the Phone application (see
Customizing the Main tab in the Phone
application) and the background for Calendar
Agenda View (see Customizing display
options for your calendar).

YOUR PERSONAL SETTINGS
201
10
CHAPTER
Applications settings
You can change the Applications settings
on your Treo so that you can easily access
the applications you use most often.
You can arrange and display your
applications by category, reassign
the buttons on your Treo, and select default
applications for specific tasks.
Arranging applications by category
You can assign an application to a category
and then display a specific category of
applications in Applications View.
1Press Applications .
2Press Menu .
3Select Category on the App menu.
4Select the pick list next to each
application and select a category.
5Select Done.
Displaying applications by category
Do one of the following:
•Press Applications repeatedly to
cycle through the categories.
•Select the category pick list at the top
of the screen and select a category.
Select All to display all of your
applications.
Changing Applications View
By default, Applications View displays each
application as an icon. As an alternative,
you can view a list of applications. The list
view is particularly useful when you have
so many applications in a category that the
applications fill up more than one screen.
TIP
To create a new category, select the
category pick list and select Edit Categories.
Select New, and then enter the category
name. Select OK to close the dialog box, and
then select OK.
DID
YOU
KNOW
?
If there is an expansion card in
the expansion slot, the card appears in the
category pick list and is treated as a category
when you press Applications repeatedly.
YOUR PERSONAL SETTINGS
202
10
CHAPTER
1Press Applications .
2Press Menu .
3Select Options, and then select
Preferences.
4Select the View By pick list and select
List.
5Select OK.
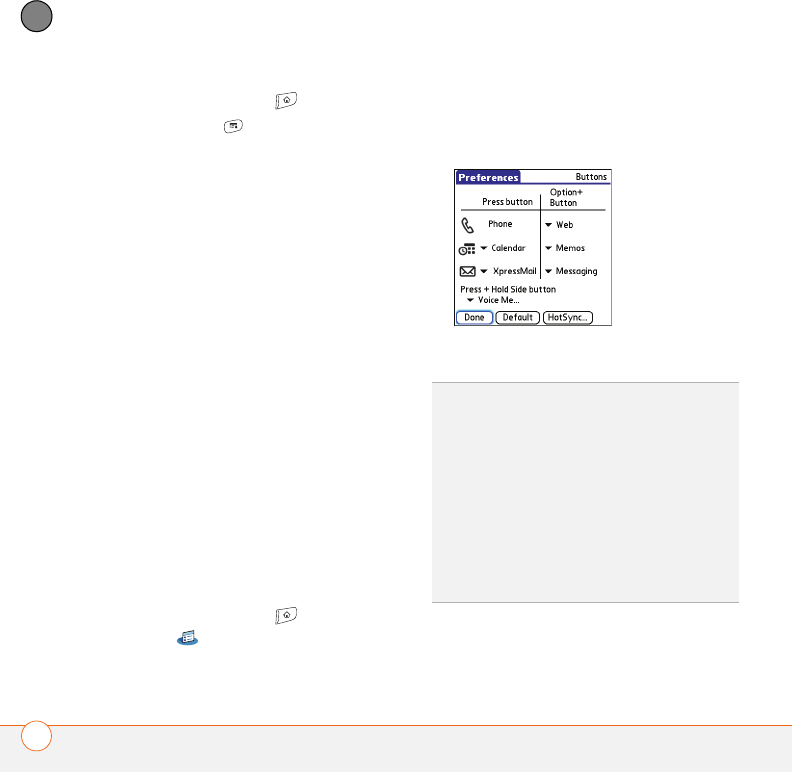
Reassigning buttons
With Buttons Preferences, you can select
which applications are associated with the
quick buttons and the Side button on your
Treo. You can assign a primary and
secondary application to each of the three
quick buttons that open an application.
NOTE We recommend that you keep the
primary button assignments on the factory
settings until you become comfortable with
the features of your Treo 680. If you do
change the primary button assignments,
remember that the instructions in this
guide and in the other help features refer to
the original button settings.
1Press Applications and select
Prefs .
2Select Buttons.
3Select the pick list next to the item you
want to reassign, and then select an
application.
4Select Done.
DID
YOU
KNOW
?
You can also choose an
application to open with the sync button on
the USB sync cable. To change this setting,
select HotSync on the Buttons Preferences
screen.
TIP
To restore all the buttons and key
combinations to their factory settings, select
Default.
DID
YOU
KNOW
?
Some third-party applications
automatically take over a button when you
install the application.
YOUR PERSONAL SETTINGS
203
10
CHAPTER
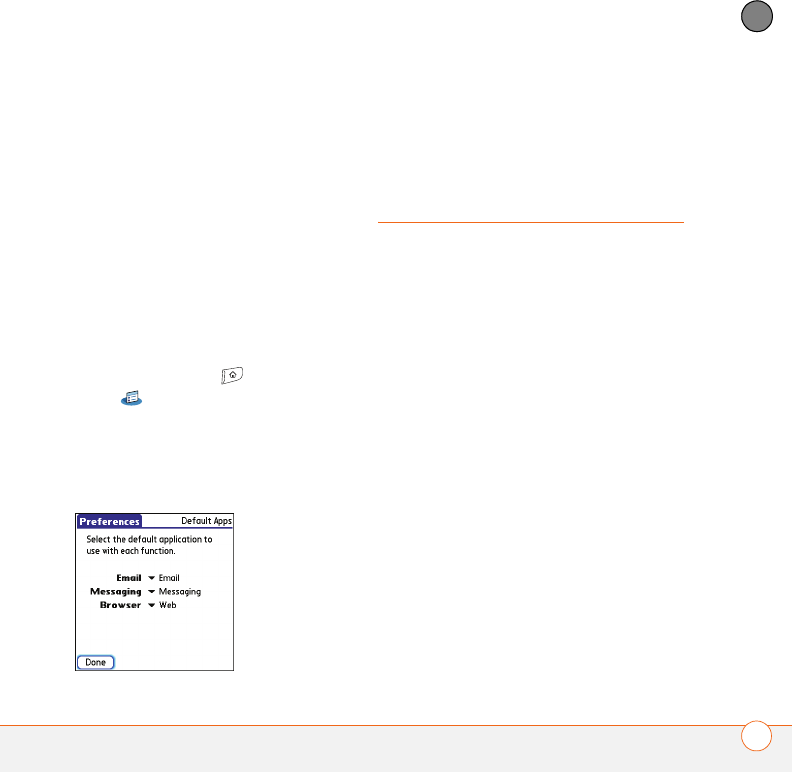
Changing default applications
Sometimes one application looks for
another application to handle information
(for example, a mail application might open
a browser when you select a link in an
email message). Your Treo 680 comes with
a set of predefined applications to handle
email, messaging, and browser requests
from other applications. If you have more
than one application to handle these
requests on your Treo 680, you can specify
which application you want to use for each
function.
1Press Applications and select
Prefs .
2Select Default Apps.
3Select each pick list and select the
application you want to associate with
that function.
4Select Done.
Locking your Treo and
info
Your Treo includes several features to
protect your Treo 680 from inadvertent use
and keep your information private. You can
lock any of the following features on your
Treo 680:
Keyboard (Keyguard): You can use the
Keyguard feature to disable the keyboard
and all buttons to prevent accidental
presses in your bag or pocket.
Screen: You can disable the screen’s
touch-sensitive feature during an active call
or call alert.
Phone (Phone Lock): You can set your
phone to require a password to make calls.
The built-in security software lets you
make emergency calls even if your phone
is locked.
YOUR PERSONAL SETTINGS
204
10
CHAPTER
Tr e o : You can set your Treo to require a
password for you to see any information on
your Treo.
Entries: You can mask or hide entries
marked as private and set your Treo 680 to
require a password for viewing them.
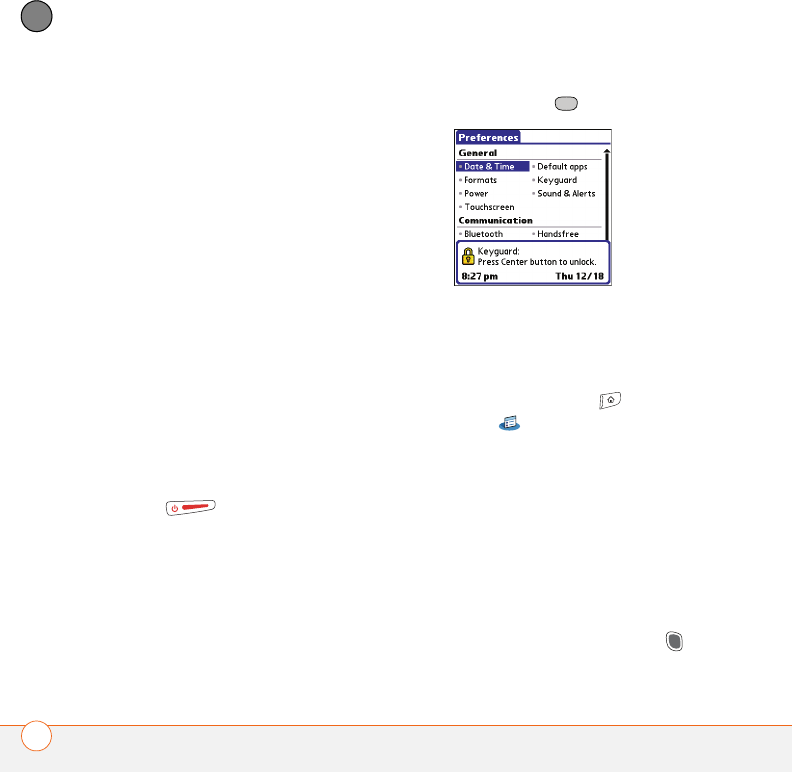
Locking your keyboard (Keyguard)
The Keyguard feature locks the keyboard so
that you don’t accidentally press buttons or
activate items on the screen while your
Treo 680 is in a pocket or bag.
By default, Keyguard turns on whenever
the screen is off. Each time you wake up
the screen, you must turn off Keyguard to
unlock the keyboard and use your Treo 680.
To turn off Keyguard, do the following:
1When the screen is off, press Power/
End to wake up the screen.
2Press Center to turn off Keyguard.
You can change how quickly Keyguard turns
on, or you can disable this feature
altogether. To change the Keyguard
settings, do the following:
1Press Applications and select
Prefs .
2Select Keyguard.
3Select the Auto-Keyguard pick list, and
then do one of the following:
•Select how quickly you want Keyguard
to turn on: When power is turned
off, 5 seconds after power off, or 30
seconds after power off.
•Select Disable to completely disable
the Keyguard feature until you turn it
on again by pressing Option +
YOUR PERSONAL SETTINGS
205
10
CHAPTER
Power/End when the screen is
on.
4Select Done.
Locking your screen
You can set your Treo 680 to automatically
lock the screen’s touch-sensitive features in
certain situations.
1Press Applications and select Prefs
.
2Select Keyguard.
3Check any of the following boxes:
Incoming calls received: Disables the
screen when the phone rings. You must
use the 5-way to select the
onscreen Answer and Ignore buttons, or
press Send to answer the call
or Power/End to ignore the
call.
On a call: Disables the screen after you
answer a call. You must use the 5-way
to select the onscreen buttons
during the call. Use this setting to avoid
accidentally pressing onscreen buttons
while you’re holding your Treo 680 near
your ear to speak.
4Select Done.
Locking your phone (Phone Lock)
You can lock your SIM card to prevent
unauthorized calls and use of other
wireless features. When your SIM card is
locked, you must enter the correct PIN
code to unlock it, even if you move it to a
different phone. You can still make
emergency calls when your phone is
locked, however.
IMPORTANT If your SIM card is locked
and you enter the wrong PIN more than
three times, you must call Cingular
Wireless for your unique PIN unlock key
(PUK) to unlock your SIM card.
DID
YOU
KNOW
?
When you check the boxes to
disable the touchscreen during a call, the
touchscreen is automatically enabled again
after you end the call.
TIP
When Phone Lock is turned on, other
people can still see the info on your Treo 680,
but they cannot make or receive phone calls
or use the other wireless features without
your password.
YOUR PERSONAL SETTINGS
206
10
CHAPTER
1Press Phone .
2Press Menu .
3Select Options, and then select Phone
Lock.
4Check the Lock SIM box.
5When prompted, enter the current PIN
and select OK. (Unless you changed
your PIN, enter the default PIN,
provided with Cingular Wireless’s
account materials.)
6If you want to change the PIN, select
Change PIN, enter a new PIN, and then
select OK. Repeat this step to verify the
new PIN.
7If your SIM card supports fixed number
dialing (FDN), select Advanced and
check the Enable Fixed Number
Dialing box to restrict dialing to the
numbers in your FDN list. When
prompted, enter your PIN2 and then
select OK.
8Turn your phone off to activate the
phone lock feature.
9To turn your phone on again, press and
hold Power/End , enter your
PIN, and then select OK to unlock your
Treo 680.
Your SIM card locks again when you turn
off your Treo 680 and then turn it back on.
To disable the current Phone Lock settings:
1Press Phone .
2Press Menu .
3Select Options, and then select Phone
Lock.
4Uncheck the Lock SIM box.
5Enter your PIN code.
6Select OK.
Locking your Treo
To protect your personal information, you
can lock your Treo 680 so that you need to
enter your password to access any of your
information or use any of the features on
your Treo, including the phone. You can,
however, still make emergency calls when
your Treo is locked.
TIP
To manage your FDN list, press
Applications select SIM Book, press Menu,
and then select Modify FDN from the
Options menu.
YOUR PERSONAL SETTINGS
207
10
CHAPTER
IMPORTANT If you lock your Treo, you
must enter the exact password to unlock it.
If you forget the password, you need to
perform a hard reset to resume using your
Treo. Performing a hard reset deletes all
the entries in your Treo. If you use
password protection in Palm Desktop
software, you must remember your
password to restore your info. However, if
you do not use password protection in
Palm Desktop software, you can restore all
previously synchronized info the next time
you sync (see Synchronizing information—
the basics).
1Press Applications and select
Security .
2Select the Password box.
3Assign a password and a password hint.
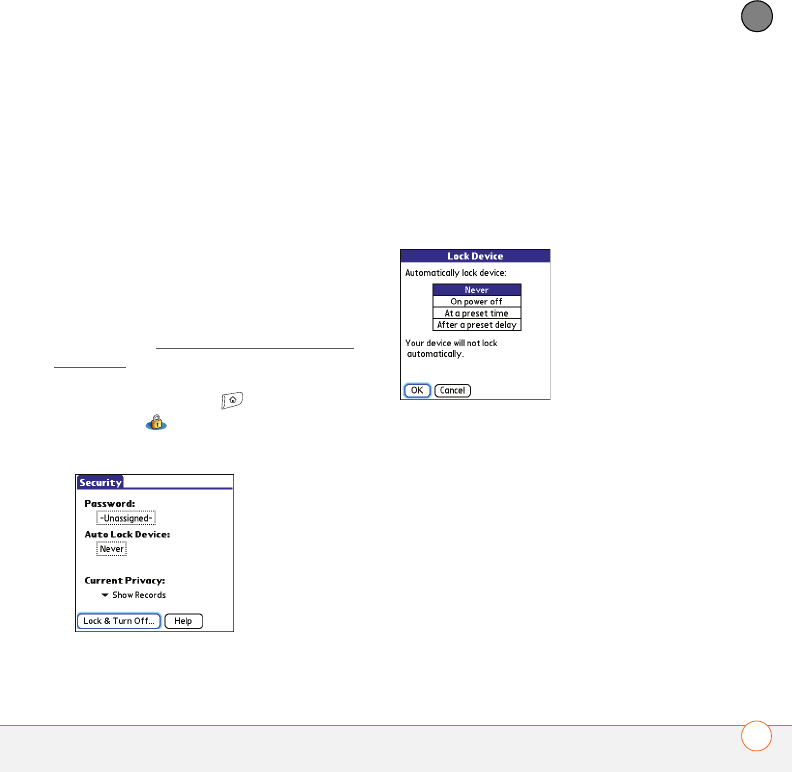
4Select the Auto Lock Device box.
5When prompted, enter your password
and select OK.
6Select one of the following options:
Never: Prevents your Treo from locking
automatically.
On power off: Locks your Treo when
you turn off the screen, or when it
shuts off with the Auto-off feature.
At a preset time: Locks your Treo at a
specific time of day.
After a preset delay: Locks your Treo
after a period of inactivity.
7Select OK.
8Do one of the following:
•Select Lock & Turn Off to lock your
Treo immediately.
YOUR PERSONAL SETTINGS
208
10
CHAPTER
•Press Applications to accept
your settings and continue using your
Treo.
Working with private entries
In most applications, you can mark
individual entries as private. All private
entries remain visible and accessible until
you select the Security setting. You have
three Security setting options:
Show Records: Private records are visible.
Hide Records: Private entries do not
appear anywhere in the application.
Mask Records: Private entries are
replaced with a gray bar that lets you know
the entry is there but keeps it from being
legible.
After you enable the mask or hide setting,
any entries marked as private are
immediately hidden or masked. If you
define a password, you must enter it to
display private entries. If you do not define
a password, you (or anyone else) can reveal
private entries without a password.
1Open the entry that you want to mark
private.
2Select Details.
3Check the Private box.
4Select OK.
Hiding or masking all private entries
Make sure the entries you want to mask or
hide are marked private.
1Press Applications and select
Security .
2Select the Current Privacy pick list and
select either Hide Records or Mask
Records.
3If prompted for your password, enter it
and then select OK.
TIP
After you create a password, you can lock
your system manually. Press Applications
and select Security. Select Lock & Turn Off,
and then select Off & Lock.
TIP
To change your password, select the
Password box, enter your current password,
and then enter the new password. To delete
your password, select the Password box and
then select Unassign.
YOUR PERSONAL SETTINGS
209
10
CHAPTER
Viewing all private records
You can reveal all the entries you’ve hidden
or masked.
1Press Applications and select
Security .
2Select the Current Privacy pick list and
select Show Records.
3If prompted for your password, enter it
and then select OK.
Viewing private entries in a specific
application
1Open the application that contains the
private entries you want to see.
2Press Menu .
3Select Options, and then select
Security.
4Select the Current Privacy pick list and
select Show Records.
5Select OK.
6If prompted for your password, enter it
and then select OK.
Security and Palm Desktop software
(Windows)
You can set the Windows version of
Palm®Desktop software to observe the
security password for your Treo 680. If you
forget your password, you cannot view
your information in Palm Desktop. If your
Treo 680 is unlocked, you can change your
password on your Treo 680, but all entries
marked as private are deleted. You can
restore your private entries the next time
you sync and then create a new password.
Follow these steps to recover from a lost
password:
1Press Applications and select
Security .
2Select the Password box.
3Select Lost Password.
4Select Ye s .
Entering owner information
You can use Owner Preferences to record
information that you want to associate with
TIP
If you want additional security for
Palm Desktop files, you may want to purchase
a third-party solution.
YOUR PERSONAL SETTINGS
210
10
CHAPTER
your Treo 680, such as your name,
company name, and home phone number.
If you lock your Treo (see Locking your
Treo), the Owner Preferences information
appears on the screen that requests your
password to unlock it, and you must also
enter your password to change the Owner
Preferences information.
1Press Applications and select
Prefs .
2Select Owner.
3If you assigned a password with the
Security application, select Unlock,
enter your password, and then select
OK to continue.
4Enter the text that you want to appear in
the Owner Preferences screen.
5Select Done.
System settings
Setting the date and time
By default, your Treo 680 synchronizes the
date, time, and time zone with the Cingular
Wireless network when your phone is on
and you are inside a coverage area. Date &
Time Preferences also enable you to
manually set the date, time, and location
(time zone) setting for your Treo 680.
1Press Applications and select
Prefs .
2Select Date & Time.
3Select the Automatically set pick list
and select one of the following settings:
NOTE The options that appear on the
screen vary based on the setting you select
in step 3.
Date, time and time zone: The date,
time, and time zone are acquired from
the Cingular Wireless network.
Date and time: Lets you set the time
zone manually. The date and time are
acquired from the Cingular Wireless
network.
YOUR PERSONAL SETTINGS
211
10
CHAPTER
Nothing: Lets you set the date, time,
and time zone manually. No info is
acquired from the Cingular Wireless
network.
4If the Location pick list appears, select
it, and then select a city in your time
zone.
5If the Date and Time fields appear,
select the Date field and select the
date, and then select the Time field and
select the time.
6Select Done.
Optimizing power settings
Power Preferences enable you to adjust
settings to maximize the battery’s
performance.
1Press Applications and select
Prefs .
2Select Power.
3Set any of the following preferences:
Brightness: Sets the intensity of the
screen and keyboard backlights. Drag
the slider or press Left and Right
to adjust the brightness level.
Auto-off after: Determines how long
your screen stays on during a period of
TIP
If a city in the same time zone is not on
the list, select Edit List, select Add, select a
city in your time zone, and then select OK. If
necessary, modify any of the settings in the
Edit Location dialog box, and then select OK.
TIP
You can also set time zones for Calendar
events. See Creating an event.
YOUR PERSONAL SETTINGS
212
10
CHAPTER
inactivity. When there is no interaction
with the keyboard or screen for the
specified time period, your Treo 680
turns off automatically.
On a call, dim backlight after:
Determines how long the backlight
stays on at normal intensity during a
phone call. After the specified time
period, the backlight dims to conserve
power during a long phone call.
Beam Receive: Determines whether
your Treo is ready to receive information
over an infrared beam. If you leave this
option turned off, you must return to
this screen to turn on this option the
next time you want to receive a beam.
4Select Done.
Connecting to a VPN
If you want to use your Treo to access your
corporate email account or other files on
your corporate server, you may need to set
up a virtual private network (VPN) on your
Treo. A VPN enables you to log in to your
corporate server through the company’s
firewall (security layer). You need a VPN
client on your Treo 680 if your Treo 680 and
your company’s server are located on
opposite sides of the firewall.
Check with your company’s system
administrator to see if a VPN is required to
access the corporate server. If a VPN is
necessary, you must purchase and install a
third-party VPN client on your Treo 680 to
use this feature.
TIP
You can also access the brightness setting
by pressing Option + P. To temporarily set the
backlight to the preset low setting, press
Option + Menu.
TIP
For information about third-party VPN
client software, see the Palm Software
Installation CD or visit www.palm.com/
mytreo680cingular.

YOUR PERSONAL SETTINGS
213
10
CHAPTER
1Install your third-party VPN client. See
Installing applications for details.
2Press Applications and select
Prefs .
3Select VPN.
4Enter the settings provided by your
corporate system administrator.

YOUR PERSONAL SETTINGS
214
10
CHAPTER

In this chapter
Upgrading. . . . . . . . . . . . . . . . . . . . . . . . . . . . . . . . . . . . . . . . . . . . . 217
Desktop software installation. . . . . . . . . . . . . . . . . . . . . . . . . . . . . . 219
Resetting your Treo . . . . . . . . . . . . . . . . . . . . . . . . . . . . . . . . . . . . . 219
Replacing the battery . . . . . . . . . . . . . . . . . . . . . . . . . . . . . . . . . . . . 221
Screen . . . . . . . . . . . . . . . . . . . . . . . . . . . . . . . . . . . . . . . . . . . . . . . 223
Synchronization . . . . . . . . . . . . . . . . . . . . . . . . . . . . . . . . . . . . . . . . 224
Phone. . . . . . . . . . . . . . . . . . . . . . . . . . . . . . . . . . . . . . . . . . . . . . . . 231
Hands-free devices . . . . . . . . . . . . . . . . . . . . . . . . . . . . . . . . . . . . . 233
Email . . . . . . . . . . . . . . . . . . . . . . . . . . . . . . . . . . . . . . . . . . . . . . . . 234
Messaging . . . . . . . . . . . . . . . . . . . . . . . . . . . . . . . . . . . . . . . . . . . . 234
Web . . . . . . . . . . . . . . . . . . . . . . . . . . . . . . . . . . . . . . . . . . . . . . . . . 236
Camera. . . . . . . . . . . . . . . . . . . . . . . . . . . . . . . . . . . . . . . . . . . . . . . 239
Making room on your Treo . . . . . . . . . . . . . . . . . . . . . . . . . . . . . . . . 240
Third-party applications . . . . . . . . . . . . . . . . . . . . . . . . . . . . . . . . . . 241
Error messages . . . . . . . . . . . . . . . . . . . . . . . . . . . . . . . . . . . . . . . . 242
COMMON QUESTIONS
217
11
CHAPTER
Upgrading
If you experience problems with your
Palm®Treo™ 680 smart device after
performing the upgrade steps in this guide,
you may have incompatible applications or
settings that were not quarantined during
the installation process. These
Incompatible applications or settings can
lead to numerous issues, including system
resets and freezes. If you experience a
problem after upgrading, follow the steps
in this section to remove the incompatible
apps from your Treo 680 and to transfer
your other info to your new Treo 680.
NOTE If you have trouble installing a
third-party application, contact the
developer for assistance.
We recommend that you do not install
apps that do any of the following:
•Modify phone functions, such as
ringtones, dialing, or caller ID
•Replace organizer features, such as
Contacts or Calendar
•Set data connection features, such as
activating or ending data connections
•Provide web clipping features, such as
PQA files
•Provide instant messaging features
If you want to continue using these types
of applications, please contact the
third-party developer for software updates
and info about compatibility with your Treo
680.
WINDOWS ONLY
1On your computer, click
Start>Programs>Palm>Safe HotSync.
2Follow the instructions on the screen.
3Locate the Old_Apps folder on your
computer. This folder is usually located
inside one of the following folders:
C:\Program Files\Palm\
C:\Program Files\palmOne\
C:\Program Files\Handspring\
4To help you identify the app that is
causing the problem, move one app at a
time from the Old_Apps folder to the
Backup folder, and then sync.
COMMON QUESTIONS
218
11
CHAPTER
If the problem recurs, delete the last
app you installed and report the
problem to its developer.
5Repeat step 4 for each of the apps in
the Old_Apps folder.
NOTE If you have trouble moving apps
from the Old_Apps folder to the Backup
folder, or determining which files to move,
try reinstalling the app using the original
third- party developer files.
MAC ONLY
1Locate your user folder on your
computer.
NOTE Your user folder name is the same
as your device name and is usually found in
this location: <Mac hard drive> : Users :
<your Mac username> : Documents :
Palm : Users
2Select your user folder and Option-drag
it to your Mac desktop to make a copy
of that folder.
3Confirm that your copy includes the
Backup subfolder and that all the files in
the original Backup subfolder are also in
the copy of the Backup subfolder.
4Delete all files from the original Backup
subfolder.
5Perform a hard reset on your Treo 680.
See Resetting your Treo for instructions.
6Sync your Treo 680 with your new
desktop software and be sure to select
your existing device name from the
User list.
7To help you identify the app that is
causing the problem, move one
third-party app from the copy of the
Backup subfolder to the original
Backup subfolder, and then sync.
If the problem recurs, delete the last
app you installed and report the
problem to its developer.
8Repeat step 7 for each of the third-party
apps in the copy of the Backup folder.
TIP
Need more info on the Backup folder? See
What is the backup folder?.
COMMON QUESTIONS
219
11
CHAPTER
Desktop software
installation
If you are having trouble installing the
desktop software, you may have the wrong
version of the software or some of your
computer’s resources may be unavailable.
Follow these steps to retry the installation.
1Make sure your computer profile
includes administrator rights to install
software. In large organizations, these
are usually granted by the system
administrator.
2Restart your computer.
3Quit any active applications, including
virus scanners and Internet security
applications.
4Make sure you’re installing the software
from the Palm Software Installation CD
that came with your new Treo 680.
Other versions of the desktop software
may not work with your Treo 680.
5Insert the Palm Software Installation CD
to restart the installation.
IMPORTANT Always use the same
language for your Treo, your computer
operating system, and your desktop
software. Otherwise, you may lose
information or have difficulty with
synchronization. Support is not provided for
mismatched language setups.
Resetting your Treo
Performing a soft reset
A soft reset is similar to restarting a
computer. If your Treo is not responding
or you have trouble synchronizing with your
computer, a soft reset may help. All your
TIP
The Palm Software Installation CD installs
software that lets you synchronize using
Palm®Desktop software or Microsoft Outlook
for Windows. If you want to synchronize using
a different personal information manager
(PIM), you must install a third-party solution.
Contact the PIM’s author or vendor to learn if
software is available for your Treo 680.
COMMON QUESTIONS
220
11
CHAPTER
info is retained when you perform a soft
reset.
1Remove the battery from your Treo 680,
and then reinsert it.
Don’t know how? See Replacing the
battery.
NOTE The reset begins when you reinsert
the battery.
2At the end of the soft reset, Date &
Time Preferences appears. Select
Done.
Performing a system reset
A system reset, also called a safe or warm
reset, tells your Treo to stop what it’s doing
and start over again without loading any
system extras. If your Treo loops or freezes
during or after a soft reset, a system reset
may help. Performing a system reset can
release your Treo from an endless loop so
that you can uninstall a third-party
application that may be causing
the looping.
1Remove the battery from your Treo 680,
and then reinsert it.
Don’t know how? See Replacing the
battery.
2When the Palm logo appears, press and
hold Up until the black status bar at
the bottom of the screen fills and
disappears, and then release Up .
3Delete the third-party application that
you suspect is causing the problem.
4Perform a soft reset. The wireless
features of your Treo 680 are not
available until you complete this step.
Performing a hard reset
A hard reset erases all information and
third-party software on your Treo. Never
perform a hard reset without first trying a
soft reset, a system reset, and trying to
resolve third-party software issues. (See
Third-party applications for suggestions on
diagnosing third-party software issues.)
After a hard reset, you can restore
previously synchronized information the
next time you sync.
IMPORTANT If you set a password on
your Treo 680, performing a hard reset
reformats your Treo 680. This is a more
severe form of a hard reset, which
COMMON QUESTIONS
221
11
CHAPTER
removes all your information, and restores
your formats, preferences, and other
settings to the factory default settings.
1Remove the battery from your Treo 680,
and then reinsert it.
Don’t know how? See Replacing the
battery.
2When the Palm logo appears, press and
hold Power/End until the black
status bar at the bottom of the screen
fills and disappears, and then release
Power/End .
3When the Erase all data? prompt
appears, press Up to confirm the
hard reset.
IMPORTANT If a Reformatting in
progress message appears, do not touch
your Treo 680 until the process is
complete. This may take up to 10 minutes.
4When the language selection screen
appears, select the same language you
selected for your desktop software.
IMPORTANT Always use the same
language for your Treo, your computer
operating system, and your desktop
software. Otherwise, you may lose
information or have difficulty with
synchronization. Support is not provided for
mismatched language setups.
5(Optional) If you want to confirm that
the hard reset was successful, press
Applications and select
HotSync . If you see your device
name in the upper-right corner, the hard
reset was not successful.
Replacing the battery
Your Treo 680 comes with a replaceable
battery. Be sure to use a replacement
battery that is recommended or sold by
Palm and is compatible with the Treo 680.
TIP
Some third-party applications do not
create a backup on your computer when you
synchronize. If you perform a hard reset, you
may lose data in these applications and you
will need to reinstall the application after the
hard reset. Please contact the application’s
developer to find out which data is backed up
during synchronization.
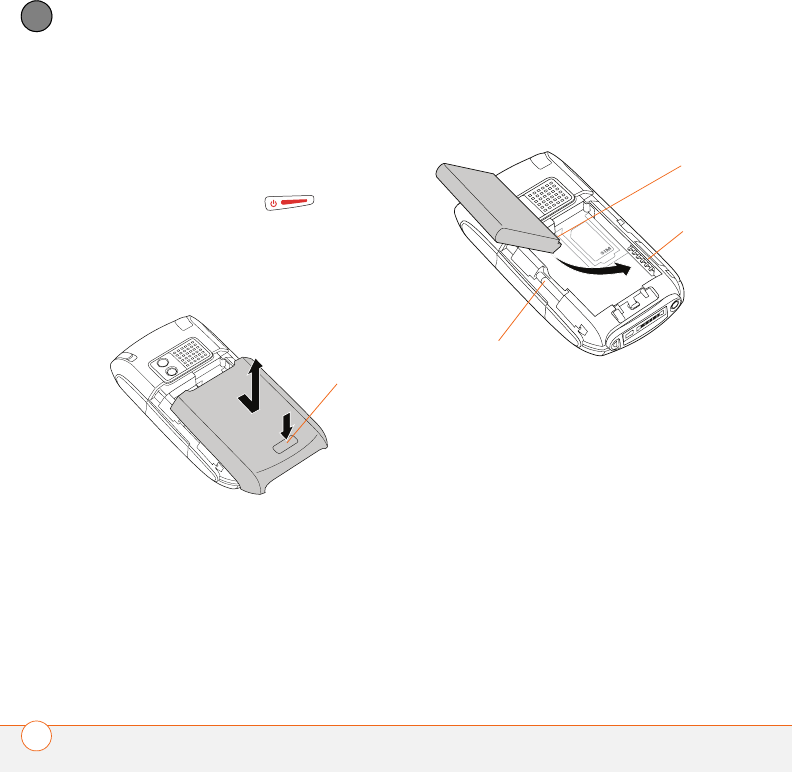
COMMON QUESTIONS
222
11
CHAPTER
CAUTION Failure to use the proper battery
may result in a risk of personal injury or
product damage, and it voids your Treo 680
warranty.
1Press Power/End to turn off
the screen.
2Press the Battery door release button,
and slide the battery door downward
to remove it from your Treo 680.
3Place a finger in the notch next to the
battery, and lift up the old battery at a
45-degree angle to remove it from the
compartment.
4Align the metal contacts on the new
battery with the contacts inside the
battery compartment, insert the new
battery into the compartment at a
45-degree angle, and then press it into
place.
IMPORTANT Use the battery that came
with your Treo 680. Do not use a battery
from another Treo model in your Treo 680.
Similarly, do not use the Treo 680 battery in
another Treo model. Using a battery that is
designed for another Treo model can
damage your Treo 680.
5Slide the battery door onto the back of
the Treo 680 until it clicks into place.
6Connect your Treo to the charger or
sync cable to charge the new battery.
Battery door
release button
Battery contact
s
Treo 680
contacts
Notch
COMMON QUESTIONS
223
11
CHAPTER
Screen
The screen appears blank
1When a call lasts longer than the limit
specified in Power Preferences, the
screen dims automatically. In certain
lighting conditions, the screen may
appear blank when this occurs.
Press any key except Power/End to
restore the screen to normal brightness.
Pressing Power/End hangs up the call.
2When a period of inactivity lasts longer
than the limit specified in Power
Preferences, the screen turns off. Press
and release Power/End to
wake up the screen.
3Look closely at the screen. If you can
see a dim image, try adjusting the
screen brightness (see Adjusting the
brightness).
4If the screen is still blank, perform a soft
reset (see Performing a soft reset).
5If the problem persists, connect your
Treo to the charger (see Charging the
battery) and perform a soft reset again.
6If that doesn’t work, perform a hard
reset (see Performing a hard reset).
The screen doesn’t respond accurately to
taps or it activates wrong features
1Press Applications .
2Use the 5-way to select Prefs .
3Use the 5-way to select
Touchscreen.
4Follow the onscreen instructions to
align the screen.
5Select Done.
6If the problem persists, check for dirt
between the screen and the edge of the
Treo 680.
7If you’re using a screen protector, make
sure that it is properly installed.
TIP
Be sure to dispose of your old battery
properly. In some areas, disposal in household
or business trash is prohibited.
TIP
To find carrying cases that protect the
screen and other useful accessories, visit
www.palm.com/mytreo680cingular.
COMMON QUESTIONS
224
11
CHAPTER
There’s a blinking bell in the upper-left
corner
The blinking bell in the upper-left corner of
the screen is the Alert icon. It appears
when you have alarms or messages that
you haven’t acknowledged.
1Press and hold Center or tap the
blinking bell with your stylus.
2When the list of pending alerts appears,
do any of the following:
•Select the text of the alert to view the
item. The item stays in the list.
•Check the box next to an alert to clear
it from the list, and then select Done.
Synchronization
Synchronization backs up the information
from your Treo onto your computer and
vice versa. If you ever need to perform a
hard reset or otherwise need to erase all
your information on your Treo 680, you can
synchronize your Treo 680 with your
computer to restore the info. Similarly, if
your computer crashes and your Palm
Desktop info is damaged, you can recover
your info by synchronizing with your Treo
680. To make sure you always have an
up-to-date backup of your info, synchronize
frequently.
This section describes synchronization
between your Treo and a desktop
computer running Palm Desktop software.
You can also synchronize the information
on your Treo using third-party applications.
See the documentation for the third-party
application for information on features and
configuration.
Before you attempt to synchronize, make
sure you’ve installed the desktop
synchronization software from the Palm
Software Installation CD.
I can’t find my user folder
Windows: If your device name is one
word, your user folder name is the first six
characters of your device name. If your
device name is two words, your user folder
name consists of the first six characters of
TIP
Every device needs a unique name. Never
synchronize more than one device to the
same device name on your computer.
COMMON QUESTIONS
225
11
CHAPTER
the second word of your device name
followed by the first letter of the first word.
For example, if your device name is John
Smith, your user folder is named SmithJ.
Your user folder is usually located inside
one of the following folders:
C:\Program Files\Palm\
C:\Program Files\palmOne\
C:\Program Files\Handspring\
Mac: Your user folder name is the same as
your device name and is usually found in
this location: <Mac hard drive> : Users :
<your Mac username> : Documents :
Palm : Users
What is the backup folder?
The Backup folder is located inside your
user folder (see I can’t find my user folder).
During synchronization, HotSync® Manager
puts a copy of most of your info and
applications in the Backup folder. (Some
third-party apps do not put a copy in the
Backup folder.) The next time you sync,
HotSync Manager compares the contents
of the Backup folder to the contents of your
Treo 680, and then restores any missing
info or applications.
If an app that you deleted reappears on
your Treo 680, try deleting the app from
your Backup folder.
Palm Desktop does not respond to a sync
attempt
1Make sure that the USB sync cable is
securely connected to the USB port on
your computer and on the bottom of
your Treo 680 (see Synchronizing
information—the basics).
2Make sure that HotSync manager is
running:
Windows: Right-click HotSync
manager in the taskbar in the
lower-right corner of your computer
screen, and make sure that Local USB
is checked. If you don’t see the HotSync
manager icon, click Start, select
Programs, select Palm, and then select
HotSync Manager.
TIP
If you’re having trouble trying to sync
using an IR or Bluetooth® wireless technology
connection, try using the USB sync cable
instead. If this solves the problem, then check
your IR or Bluetooth settings (see
Synchronizing information—advanced).
COMMON QUESTIONS
226
11
CHAPTER
Mac: Find the Palm folder on your Mac
hard drive. Double-click the HotSync
manager icon in the Palm folder. In
the Connection Settings panel, set the
Local Setup port to Palm USB.
3Synchronize. If the synchronization is
successful, you do not need to
complete the remaining steps.
4Perform a soft reset (see Performing a
soft reset).
5Synchronize. If the synchronization is
successful, you do not need to
complete the remaining steps.
6If problems persist and you’re
synchronizing through a USB hub, try
connecting the sync cable to a different
USB port or directly to your computer’s
built-in USB port.
7Synchronize. If the synchronization is
successful, you do not need to
complete the remaining steps.
8Check the multi-connector on the
bottom of your Treo 680 for debris or
discoloration. Carefully clean the
connector by dipping a cotton swab in
some rubbing alcohol and gently wiping
the metal contacts on the connector.
Try to sync again.
9Check the connector on the USB sync
cable for integrity and cleanliness. Make
sure the pins on the connector are
straight, protruding, and not damaged. If
the cable appears to be damaged, stop
here and locate another USB sync
cable.
10 WINDOWS ONLY Uninstall
Palm Desktop software. Click Start,
select Settings, select Control Panel,
select Add or Remove Programs,
select Palm Desktop software, and
then click Change/Remove.
NOTE Mac computers do not provide an
option for uninstalling Palm Desktop
software. Contact Technical Support if the
problem persists after completing step 7.
11 Reboot your computer.
12 Reinstall Palm Desktop software from
the Palm Software Installation CD that
came with your Treo 680.
COMMON QUESTIONS
227
11
CHAPTER
Synchronization starts but stops without
finishing
If you upgraded from a previous Palm OS®
device or received a system error, such as
Sys0505, there may be conflicts with
software on your Treo 680.
1Locate your Backup subfolder and
rename the folder (for example,
BackupOld).
Windows: C:\Program
Files\Palm\<device name>
Mac: <Mac hard drive> : Applications
: Palm : Users : <device name>
NOTE Can’t find a Palm folder in Program
Files? Then look for a palmOne or
Handspring folder instead. For more info,
see I can’t find my user folder.
2Synchronize.
3If the problem is resolved, begin
reinstalling your third-party applications
one at a time by double-clicking a single
file in the original Backup subfolder that
you renamed, and sync after each
application you install. If the problem
recurs, delete the last application you
installed and report the problem to its
developer.
4 WINDOWS ONLY If the Windows
New Hardware Wizard appears, the
synchronization process may be timing
out before the wizard completes its job.
Follow all instructions in the New
Hardware Wizard, and then sync again.
5WINDOWS ONLY Uninstall
Palm Desktop software. Click Start,
select Settings, select Control Panel,
select Add or Remove Programs,
select Palm Desktop software, and
then click Change/Remove.
NOTE Mac computers do not provide an
option for uninstalling Palm Desktop
software. Contact Technical Support if the
problem persists after completing step 3.
6Reboot your computer.
TIP
The HotSync Log can give you information
about your most recent synchronization.
Windows: Right-click the HotSync manager
icon in the taskbar in the lower-right corner of
your computer screen, and then select View
Log.
Mac: Open Palm Desktop software. From the
HotSync menu, select View Log.
COMMON QUESTIONS
228
11
CHAPTER
7Reinstall Palm Desktop software from
the Palm Software Installation CD that
came with your Treo 680.
Synchronization finishes but info doesn’t
appear where it should
1Make sure you’re synchronizing with
the intended desktop personal
information manager (PIM). The Palm
Software Installation CD enables you to
choose whether you want to
synchronize with Palm Desktop
software or Microsoft Outlook for
Windows. Reinsert the installation CD
and select Change your
synchronization method if necessary.
If you use a different PIM, you need to
install third-party software to
synchronize. For more information,
consult the company that makes the
PIM.
2If multiple Palm OS devices are
synchronizing with your computer,
make sure the name of the device you
are synchronizing appears in the User
field on the toolbar of Palm Desktop
software.
3Open HotSync manager on your
computer, and make sure the necessary
conduits are set to Synchronize the
files.
NOTE If you need to change the setting to
Synchronize the files, be sure to check
the Set as default box as well.
4WINDOWS ONLY Uninstall
Palm Desktop software. Click Start,
select Settings, select Control Panel,
select Add or Remove Programs,
select Palm Desktop software, and
then click Change/Remove.
MAC ONLY Mac computers do not
provide an option for uninstalling Palm
Desktop software. Contact Technical
Support if the problem persists after
completing step 3.
5Reboot your computer.
6Reinstall Palm Desktop software from
the Palm Software Installation CD that
came with your Treo 680.
7(Outlook only) If you’re trying to
synchronize offline, set your Outlook
Calendar, Contacts, Notes, and Tasks to
be available offline.
COMMON QUESTIONS
229
11
CHAPTER
I have duplicate entries in Microsoft
Outlook after I sync
1Open Microsoft Outlook and delete the
duplicate entries.
2On your computer, go to the application
with duplicate entries and manually
enter any info you added to your Treo
680 since the last time
you synchronized.
3Right-click HotSync manager in the
taskbar and select Custom.
4Select an application that has duplicate
entries and also has Outlook in its
name.
5Click Change.
6Select Desktop overwrites handheld,
and then click OK.
7If more than one application has
duplicate entries, repeat steps 4
through 6 for each application with
duplicates.
8Click Done.
9Synchronize your Treo 680 and your
computer.
My appointments show up in the wrong
time slot after I sync
If you create an appointment in the wrong
time zone (i.e., your desktop was set to the
wrong time zone), it shows up in the wrong
time zone on your Treo. To be safe, enable
local network time and avoid assigning
time zones to your appointments.
If you’re using Microsoft Outlook:
1Make sure that you installed the
Microsoft Outlook conduit that came
with your Treo 680. If you’re not sure
whether this software is installed,
reinstall Palm Desktop software from
the Palm Software Installation CD that
came with your Treo 680.
TIP
Outlook subfolders and public folders are
not accessible with the included software. You
may wish to use a third-party solution instead.
TIP
(Outlook only) If you want to sync your
info with a global Exchange Address Book,
you must copy the addresses to your local
Contacts list in Outlook (right-click the
addresses and select Add to Personal
Address Book).
TIP
For more info on Outlook conduits,
right-click the HotSync manager icon in the
taskbar, select Custom, select an app with
Outlook in its name, and then select Help.
COMMON QUESTIONS
230
11
CHAPTER
2Open Microsoft Outlook and correct the
wrong entries.
3On your computer, manually enter any
Calendar info you added to your Treo
680 since the last time
you synchronized.
4Click HotSync manager in the
taskbar and select Custom.
5Select an application that has both
Calendar and Outlook in its name.
6Click Change.
7Select Desktop overwrites handheld,
and then click OK.
8Synchronize your Treo 680 and your
computer.
9Repeat steps 4 through 6 to open the
Calendar Change HotSync Action dialog
box again.
10 Make sure Synchronize the files is
selected and Set as default is checked,
and then click OK.
You should now be able to assign time
zones to your events without encountering
this problem.
If you’re using Palm Desktop software:
1On your Treo 680, press Calendar .
2Press Menu .
3Select Options, and then select
Preferences.
4Uncheck the New events use time
zones box (if it’s checked).
5On your computer, open Palm Desktop
software and correct the wrong entries.
6On your computer, manually enter any
Calendar info you added to your Treo
680 since the last time
you synchronized.
7Click HotSync manager in the
taskbar and select Custom.
8Select Calendar.
9Click Change.
10 Select Desktop overwrites handheld,
and then click OK.
11 Synchronize your Treo 680 and your
computer.
12 Repeat steps 7 through 9 to open the
Calendar Change HotSync Action dialog
box again.
13 Make sure Synchronize the files is
selected and Set as default is checked,
and then click OK.
COMMON QUESTIONS
231
11
CHAPTER
You should now be able to assign time
zones to your events without
encountering this problem.
IMPORTANT To avoid this problem in the
future, do not assign time zones to your
events. Palm Desktop software does not
support time zones.
The text of my memos is truncated after I
sync
If you use your desktop software to create
a memo that is longer than 4,096
characters, the excess characters are
truncated when you transfer the memo to
your Treo 680.
Phone
Signal strength is weak
Become familiar with low coverage areas
where you live, commute, work, and play.
Then you will know when to expect signal
strength issues. You can check signal
strength by looking at the Signal Strength
icon in the title bar of the Main tab in
the Phone application. The stronger the
signal, the more bars that appear. If you are
outside a coverage area, no bars appear.
1If you’re standing, move about ten feet
in any direction.
2If you’re in a building, move near a
window. Open any metal blinds.
3If you’re in a building, move outdoors or
to a more open area.
4If you’re outdoors, move away from
large buildings, trees, or electrical wires.
5If you’re in a vehicle, move your Treo so
that it’s close to a window of your
vehicle.
My Treo won’t connect to the mobile
network
1Try the suggestions about signal
strength described in Signal strength is
weak.
2Turn off your phone and turn it on again
(see Turning your phone on and off).
3Remove the SIM card and reinsert it
(see Inserting the SIM card and battery).
4Perform a soft reset (see Performing a
soft reset).

COMMON QUESTIONS
232
11
CHAPTER
The other person hears an echo
•Try decreasing the volume on your Treo
to avoid coupling or feedback on the
other person’s end. This applies to both
the speakerphone and the earpiece.
•Position the earpiece closer to your ear
to prevent sound leaking back to the
microphone. Keep your hand away from
the microphone hole, which is on the
bottom right side of the Treo 680.
•If you’re using the speakerphone
feature with your Treo lying on a flat
surface, try turning the Treo face down
(screen facing the surface).
I hear my own voice echo
Ask the person on the other end of the call
to turn down the volume on his or her
phone or to hold the phone closer to his or
her ear.
My voice is too quiet on the other end
•Be sure to place the bottom of the Treo,
or the hands-free microphone, close to
your mouth.
•Check the Signal Strength icon in
the title bar of the Main tab in the
Phone application. If the signal is weak
(few bars are displayed), try the
suggestions about signal strength
described in Signal strength is weak.
I hear static or interference
Check the Signal Strength icon in the
title bar of the Main tab in the Phone
application. If the signal is weak (few bars
are displayed), try the suggestions about
signal strength described in Signal strength
is weak.
If you’re using a Bluetooth hands-free
device, see I hear static or interference
when using my Bluetooth
hands-free device.
My phone seems to turn off by itself
If a system error and reset occur, the Treo
680 automatically turns the phone on if it
was on before the reset. However, if the
Treo 680 can’t determine if your phone was
on before the reset, the phone does not
automatically turn on (see Turning your
phone on and off). If the problem persists
and you’re using third-party applications,
see Third-party applications for additional
suggestions.
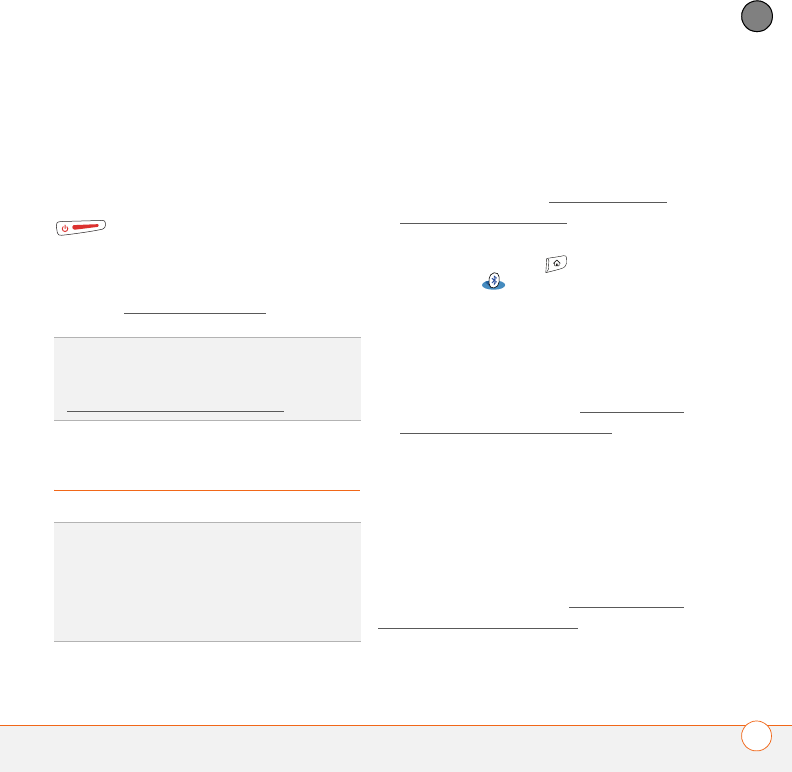
COMMON QUESTIONS
233
11
CHAPTER
My Treo makes or answers calls when it’s
in a bag or pocket
Items in your bag or pocket may be
pressing the onscreen Answer button or
otherwise activating screen items. If this
happens, be sure to press Power/End
to turn off the screen before
placing your Treo in a bag or pocket. You
may also want to disable the screen’s
touch-sensitive feature during incoming
calls (see Locking your screen).
Hands-free devices
I can’t make or receive calls using a
Bluetooth hands-free device
Confirm all the following:
•The Bluetooth device is compatible with
your Treo 680. Go to www.palm.com/
treo680cingular-support for a list of
compatible devices.
•Press Applications and select
Bluetooth . Make sure the
Bluetooth setting is On.
•You have already formed a partnership
between your Treo 680 and your
hands-free device, and that the
hands-free device appears in the
Trusted Devices list. (see Connecting to
a Bluetooth hands-free device).
•Your hands-free device is charged and
turned on.
•Your Treo is within range of the
hands-free device.
If the problem persists, turn the Bluetooth
setting Off and then turn it On again. If it
still persists, create a new partnership with
the hands-free device (see Connecting to a
Bluetooth hands-free device).
TIP
To find carrying cases that can help
prevent your Treo 680 from making calls, as
well as other useful accessories, visit
www.palm.com/mytreo680cingular.
TIP
Bluetooth range is up to 30 feet in
optimum environmental conditions.
Performance and range may be affected by
physical obstacles, radio interference from
nearby electronic equipment, and other
factors.
COMMON QUESTIONS
234
11
CHAPTER
I hear static or interference when using
my Bluetooth hands-free device
•Try moving your Treo closer to the
hands-free device. Audio quality
degrades as the distance between your
Treo and hands-free device increases.
The effective range for a device varies
between manufacturers.
•Confirm that no obstructions, including
your body, are between your Treo and
your hands-free device.
•If the problem persists, turn the
Bluetooth setting Off and then turn it
back on again. If it still persists, create a
new partnership with the hands-free
device (see Connecting to a Bluetooth
hands-free device).
Some features of my Bluetooth
hands-free device don’t work with my
Tr e o
•Check the Palm compatibility list at
www.palm.com/treo680cingular-support
to ensure that your device is compatible.
•Check the documentation that came
with your device or the manufacturer’s
website for information specific to
your device.
Email
•For troubleshooting info on the
VersaMail® application, see the User
Guide for the VersaMail Application on
your computer.
Windows: Start>Programs>Palm
Mac: Insert the Palm Installation CD
and click the link to the User Guide for
the VersaMail Application in the
Documentation folder.
Messaging
I can’t tell if data services are available
When your phone is on, icons appear in the
title bar in the Main tab in the Phone
application to indicate whether data
services are available and whether a data
TIP
For best performance, keep your
Bluetooth hands-free device and your phone
on the same side of your body.