Panasonic Mobile Communications Development of USA 23C002A GSM Cellular Mobile Radio with Bluetooth User Manual VS7 AAA
Panasonic Mobile Communications Development Corporation of USA GSM Cellular Mobile Radio with Bluetooth VS7 AAA
Contents
Users Guide Part 3
111
Settings
Managing paired devices
d Main menu > Settings > Connectivity > Bluetooth > Paired
devices
1. [192] to scroll to the required device 7 [5] (Options)
2. Select the required option
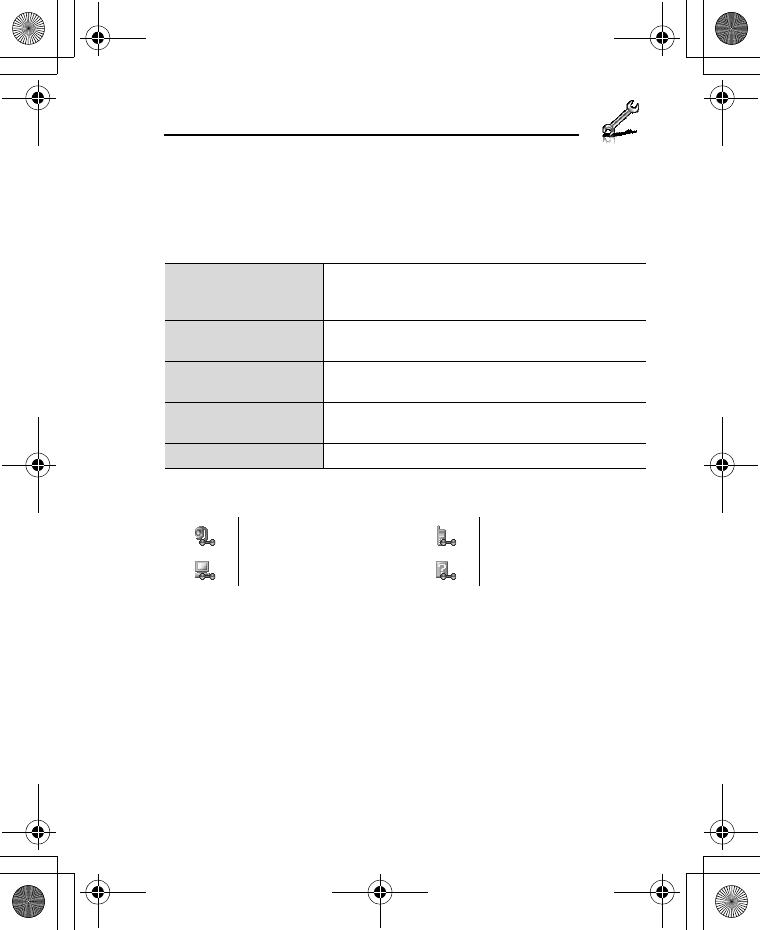
Icons of paired devices
Add new device
View the list of discovered devices. To search for
other devices, press [5] (Options) 7 select
Search while viewing the Discovered devices list.
Make trust/ Make
untrust
Make the required device a trusted/untrusted
device.
Connect/ Disconnect Connect/disconnect to the phone, headset or
handsfree.
Rename Change name of paired device to an easily
recognised name.
Delete Delete the paired device from your list.
audio phone
computer miscellaneous
VS7_AAA.book Page 111 Wednesday, August 3, 2005 5:10 PM
112
Settings
Synchronisation
You can synchronise your Contacts list with your network server. You
may need to do this if you store your Contacts list on the network
server, and you want them all to be the same. You can just send
changes or send all your records to the network server. This function
uses SyncML/OMA Standard technology.
Before you can synchronise your Contacts list, you need to set up a
server profile and select a WAP profile.
Creating/editing a server profile
You can create up to 2 server profiles.
d Main menu > Settings > Connectivity > Synchronisation
1. [5] (Options) 7 Select Sync. settings
2. [192] to scroll to the required profile
3. [5] (Options) 7 Select Edit
4. Select the required setting 7 [0]
5. Enter information 7 [0]
6. [5] (Save)
Selecting a server profile
d Main menu > Settings > Connectivity > Synchronisation
1. Repeat steps 1 and 2 in “Creating/editing a server profile” on
page 112
2. [5] (Options) 7 Select Set
Profile name Enter the profile name.
Server name Enter the web address of the server.
Server database Enter the database name of the server.
Server user ID Enter your user name for the server.
Server password Enter the password.
VS7_AAA.book Page 112 Wednesday, August 3, 2005 5:10 PM
113
Settings
Selecting a WAP profile
d Main menu > Settings > Connectivity > Synchronisation
1. [5] (Options) 7 Select WAP profiles
2. Select the required profile
Synchronising
To send only changes to the network server:
d Main menu > Settings > Connectivity > Synchronisation >
Modified contacts
The phone confirms completion.
To send all your records to the network server:
d Main menu > Settings > Connectivity > Synchronisation > All
contacts
The phone confirms completion.
Server or database authentication
While synchronising, you may be asked for server or database
authentication. Enter the correct information and retry the
synchronisation connection.
In authentication screen:
1. [192] to scroll to the required setting 7 [0]
2. Enter the correct information 7 [0]
3. To retry the synchronisation connection, [5] (Options) 7
Select Ok
Note: If you are synchronising your Contacts list for the first time, or you
need to make a large number of changes, then the synchronisation may take
several minutes or more.
You cannot synchronise the following fields: Birthday, Postal address,
Ringtone, Message alert, Illumination, Picture and Group. There may be
other fields that cannot be synchronised depending on the server.
VS7_AAA.book Page 113 Wednesday, August 3, 2005 5:10 PM
114
Settings
Cell Broadcast
You can receive messages on specified topics, such as weather
information and traffic news, regularly from your service provider.
You can specify the “topic(s)” of information and the language in
which you wish to receive the information.
Activating Cell Broadcast
d Main menu > Settings > Connectivity > Cell Broadcast > On/
Off
1. Select On or Off
Reading a received message
d Main menu > Settings > Connectivity > Cell Broadcast >
Read messages
1. [192] to scroll to the required message 7 [0]
Topics and languages
You can add, edit and delete topics and languages.
d Main menu > Settings > Connectivity > Cell Broadcast >
Options > Topic or Language
1. [192] to scroll to the required topic or language
2. [5] (Options) 7 Select Add, Edit or Delete
VS7_AAA.book Page 114 Wednesday, August 3, 2005 5:10 PM
115
Settings
GSM network
Selecting a network manually
You can manually select a network that is available in your current
location.
d Main menu > Settings > Connectivity > GSM network > New
search
1. Select the required network
Network list
The network list is used when the Search mode is set to Automatic.
The order in the list indicates the search priority. You can edit the list
as required.
d Main menu > Settings > Connectivity > GSM network > Select
network
1. [192] to scroll to the required network
2. [5] (Options) 7 Select Add, Insert, Edit or Delete
Add stores a new network at the end of the list, while Insert stores a
new network above the selected network.
Search mode
You can set your phone to automatically or manually search for the
other networks when roaming. When Automatic is selected, the
phone automatically selects a new network in order to maintain
optimum network availability. When Manual is selected, available
networks are shown on the standby screen.
d Main menu > Settings > Connectivity > GSM network >
Search mode
1. Select Automatic or Manual
Note: National regulations may not permit roaming in your home region.
VS7_AAA.book Page 115 Wednesday, August 3, 2005 5:10 PM
116
Settings
Data connections
GPRS settings and CSD settings are stored in the Data connections
menu.
Data can be sent/received using GPRS or CSD technology.
Editing GPRS/CSD settings
d Main menu > Settings > Connectivity > Data connections
1. [192] to scroll to the required setting you want to edit or
<Empty> to add new setting 7 [0]
2. If <Empty> is selected, select GPRS or CSD
3. Edit the required field 7 [5] (Save)
Deleting GPRS/CSD settings
d Main menu > Settings > Connectivity > Data connections
1. [192] to scroll to the required setting you want to delete
2. [5] (Options) 7 Select Delete
3. [0]9[5] (Yes)
USB
You can backup data stored on your phone to a PC using USB
Cable. Install the Handset Manager software from the CD-ROM
before using USB Cable. (See “CD-ROM” on page 152.)
Note: If your service provider has protected some of your settings, you may
not be able to modify them.
VS7_AAA.book Page 116 Wednesday, August 3, 2005 5:10 PM
117
Settings
Security
PIN code
The PIN protects your SIM card against unauthorised use. If you
enable the PIN, you will be prompted to enter the PIN code every
time the phone is switched on.
The PIN2 controls security for certain service provider services such
as Fixed dial and Service charge.
Enabling/Disabling PIN entry
d Main menu > Settings > Security > PIN entry > Enable/disable
1. Select Enable or Disable
2. Enter the PIN code (4-8 digits) 7 [0]9[5] (Ok)
Changing PIN
You can change the PIN when PIN entry is set to Enable.
d Main menu > Settings > Security > PIN entry > Change PIN
1. Enter the current code 7 [0]9[5] (Ok)
2. Enter the new code 7 [0]9[5] (Ok)
3. Enter the new code again 7 [0]9[5] (Ok)
Note: If PIN is entered incorrectly 3 times the phone will be locked, and you
will need to enter the PUK code. If PIN2 is entered incorrectly 3 times SIM
card will be locked, and you will need to enter PUK2 code. If the PUK code is
entered incorrectly 10 times, the phone will cease to operate permanently.
All information stored in the SIM card will be lost and the SIM card will need
to be replaced. Contact your service provider for further information.
VS7_AAA.book Page 117 Wednesday, August 3, 2005 5:10 PM
118
Settings
Changing PIN2
d Main menu > Settings > Security > Change PIN2
1. Enter the current code 7 [0]9[5] (Ok)
2. Enter the new code 7 [0]9[5] (Ok)
3. Enter the new code again 7 [0]9[5] (Ok)
Fixed dial
When Fixed dial is enabled, only the phone numbers stored in SIM
Contacts can be dialled. Any manually dialled phone numbers must
match the phone numbers in SIM Contacts.
To store, edit or delete phone numbers in SIM Contacts, you need to
enter your PIN2 code.
d Main menu > Settings > Security > Fixed dial
1. Select Enable or Disable
2. Enter the PIN2 code (4-8 digits) 7 [0]9[5] (Ok)
Call barring
Call barring restricts certain calls, using a password supplied by your
service provider.
The following Call bar settings are available:
Bar outgoing calls All outgoing calls are barred.
Bar foreign calls International outgoing calls are barred.
Bar foreign calls
except Home
International outgoing calls except to your home
country are barred.
Bar incoming calls All incoming calls are barred.
Bar incoming if
abroad Roaming is barred if abroad.
VS7_AAA.book Page 118 Wednesday, August 3, 2005 5:10 PM
119
Settings
Call barring setting
d Main menu > Settings > Security > Call barring
1. Select the required setting
2. Enter the password 7 [0]9[5] (Ok)
To cancel setting/check status:
d Main menu > Settings > Security > Call barring
1. [192] to scroll to the required setting
2. [5] (Options) 7 Select Off or Status
3. If Off is selected, enter the password 7 [0]9[5] (Ok)
To cancel all the settings/check all the statuses:
d Main menu > Settings > Security > Call barring
1. Select Cancel all or Status all
2. If Cancel all is selected, enter the password 7 [0]9[5] (Ok)
Changing the password
d Main menu > Settings > Security > Call barring > Password
1. Enter the current password 7 [0]9[5] (Ok)
2. Enter a new password 7 [0]9[5] (Ok)
3. Enter the new password again 7 [0]9[5] (Ok)
VS7_AAA.book Page 119 Wednesday, August 3, 2005 5:10 PM
120
Tools
Tools menu structure
Note: There are several ways to select items from menu lists. See “Menu
selection method” on page 26.
SIM Tool Kit*1................. 121
Alarms............................. 121
Sound recorder .............. 123
Calculator ....................... 124
*1
VS7_AAA.book Page 120 Wednesday, August 3, 2005 5:10 PM
121
Tools
SIM Tool Kit
The SIM Tool Kit allows the applications existing on the SIM card to
interact and operate with your phone. These applications, stored in
the SIM memory, are Value Added Services. Your service provider
can configure your SIM card with the applications that can be seen
on your phone as additional menu items.
For further information, contact your service provider.
Alarms
You can set up to 5 different alarms.
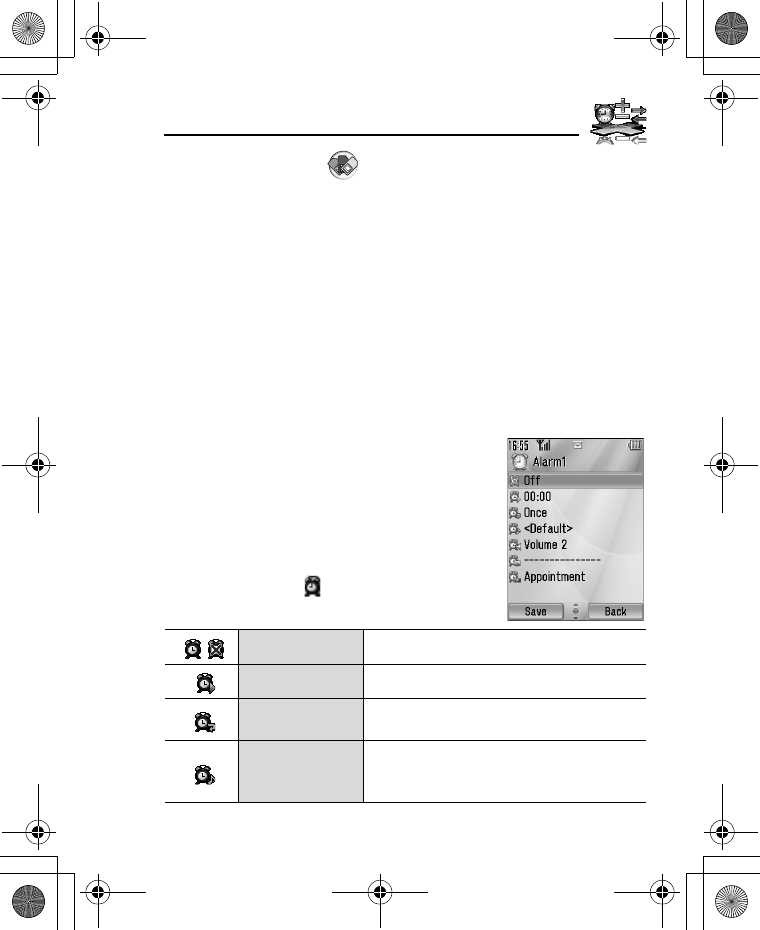
Setting the alarm
d Main menu > Tools > Alarms
1. [192] to scroll to the required setting 7
[0]
2. [192] to scroll to the required field 7
[0]
3. Enter information 7 [0]
4. [5] (Save) to store the entry
The alarm icon () appears on the standby
screen.
Turn on/off Select On or Off.
Time Enter the time.
Repeat type Select Once, Everyday or Weekly for
alarm repeat type.
Alarm tone
Select alarm tone from <Default> or My
Media. To download an alarm tone, select
Download*1.
VS7_AAA.book Page 121 Wednesday, August 3, 2005 5:10 PM
122
Tools
*1
Turning the alarm on/off
d Main menu > Tools > Alarms
1. [192] to scroll to the required setting
2. [5] (Options) 7 Select Turn on or Turn off
Stopping the alarm
When the alarm sounds, you can activate the snooze function to
repeat the alarm 5 times at 5 minute intervals.
1. Press any key except [Y] 7 “Stop snooze?”
2. To stop the snooze function: [0]9[5] (Turn off)
To activate the snooze function: [6] (Snooze)
Alarm volume Adjust alarm volume (Volume 0-4 or Step
tone).
Stored pictures
Select the required picture. The picture
appears on the screen when the alarm
sounds.
Illumination Select the required illumination pattern or
Off.
Note: The alarm sounds at the time you set even if the phone is off.
Shortcut: Stopping the alarm by pressing [Y] activates the snooze
function and returns to standby mode.
VS7_AAA.book Page 122 Wednesday, August 3, 2005 5:10 PM
123
Tools
Sound recorder
You can record sounds, your voice or phone conversation. The
recorded sound clips (except for the phone conversation) can be
attached to MMS messages.
Recording new sound clips
d Main menu > Tools > Sound recorder
1. [0]9[5] (Start) to start recording
The max. recording time is 3 minutes.
2. [0]9[5] (Stop) to stop recording
3. [0] to play back if required
[192] to adjust the volume
4. [5] (Options) 7 Select Save
The sound clip is saved to My Media.
If you select Send as MMS, you can access MMS menu.
Note: When you save the recorded sound clip and receive storage full
message, press [0]9[5] (Yes) to save the recorded sound clip by deleting
unwanted files in My Media.
VS7_AAA.book Page 123 Wednesday, August 3, 2005 5:10 PM
124
Tools
Calculator
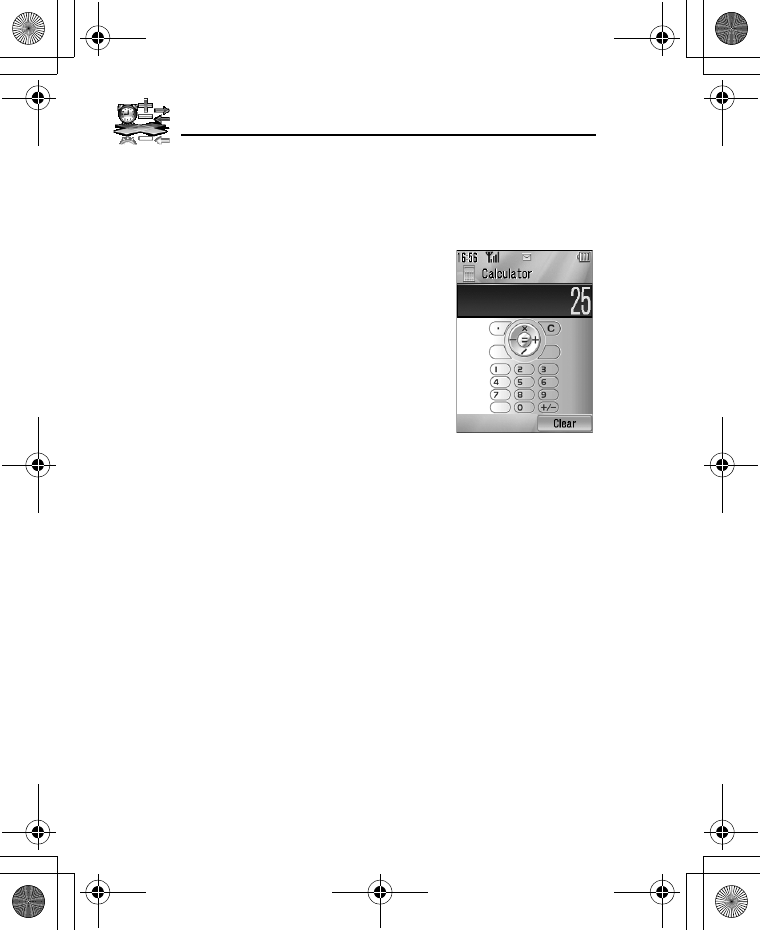
You can use the 4-function calculator (addition, subtraction,
multiplication and division) to make simple arithmetic operations.
d Main menu > Tools > Calculator
1. Enter a number
To enter a decimal point: [5]
To enter a negative sign: [r]
To erase digits: [6] (Clear)
2. [1929394] to select the arithmetic
operation ([1] to multiply, [4] to add, [2]
to divide, [3] to subtract)
3. Enter a number
4. [0] (=) to calculate
VS7_AAA.book Page 124 Wednesday, August 3, 2005 5:10 PM
125
Calendar
Browsing Calendar
You can view the calendar by month, by week or by day.
Browsing operation
d Main menu > Calendar
To move around the calendar: [1929394]
To change the view format (Monthly view/Weekly view): see
View format in “Options”
To view the details of the selected day (Daily view): [0]
Options
From Monthly view or Weekly view, the following options are
available by pressing [5] (Options).
*1Available only when Display language setting is set to Chinese
language. (See “Language” on page 91.)
Note: There are several ways to select items from menu lists. See “Menu
selection method” on page 26.
New entry See “Creating Calendar events” on page 127.
View format Change calendar view format, Monthly or Weekly.
Go to date Go to specified date.
Send via
Send calendar events via infrared or Bluetooth. See
“Infrared” on page 105 or “Bluetooth® wireless
technology” on page 107.
Delete See “Deleting multiple events” on page 129.
Lunar calendar
detail*1
Check Chinese Lunar calendar dates and festivals when
viewing the western calendar.
Memory status Show used memory for calendar.
Settings See “Calendar settings” on page 130.
VS7_AAA.book Page 125 Wednesday, August 3, 2005 5:10 PM
126
Calendar
Calendar view
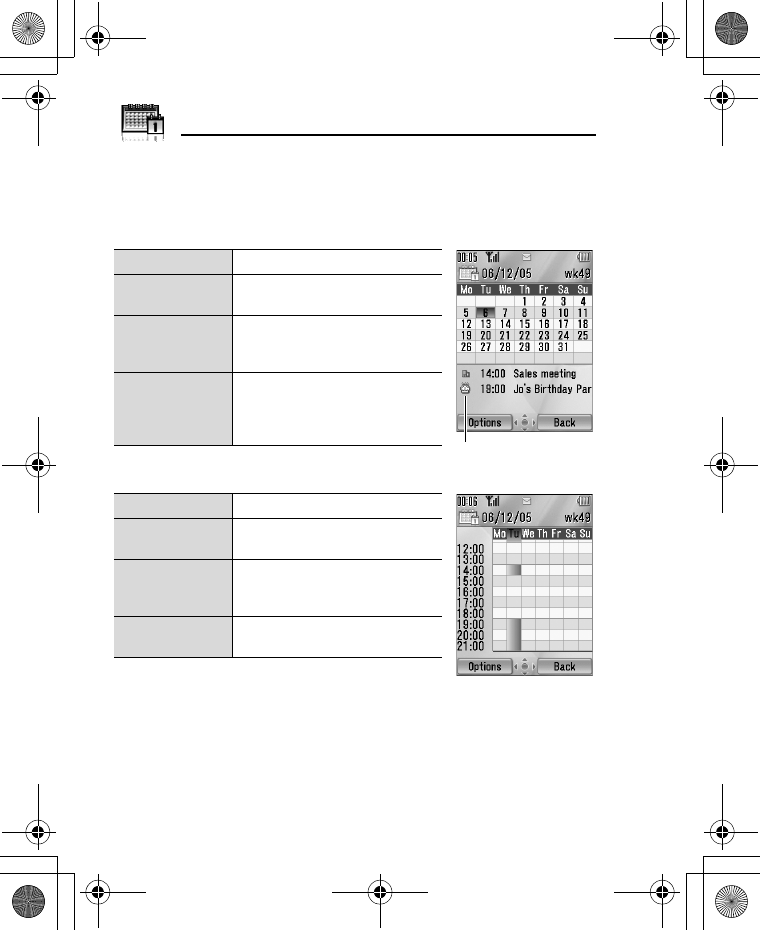
To change the calendar view format, see “Browsing operation” on
page 125.
Monthly view
Weekly view
Current date Red frame
Selected date Coloured - Also displayed in
the upper left of the calendar
Week number
of selected
date
Displayed in the upper right of
the calendar
Scheduled
note
Coloured - Also displayed in
the schedule list with category
icon, start time and note (up to
3 events)
Current date Red line under week
Current week
number
Displayed in the upper right of
the calendar
Selected date
The day of the week is coloured
- Also displayed in the upper
left of the calendar
Scheduled
note
The scheduled time zone is
coloured
Schedule list
VS7_AAA.book Page 126 Wednesday, August 3, 2005 5:10 PM
127
Calendar
Daily view
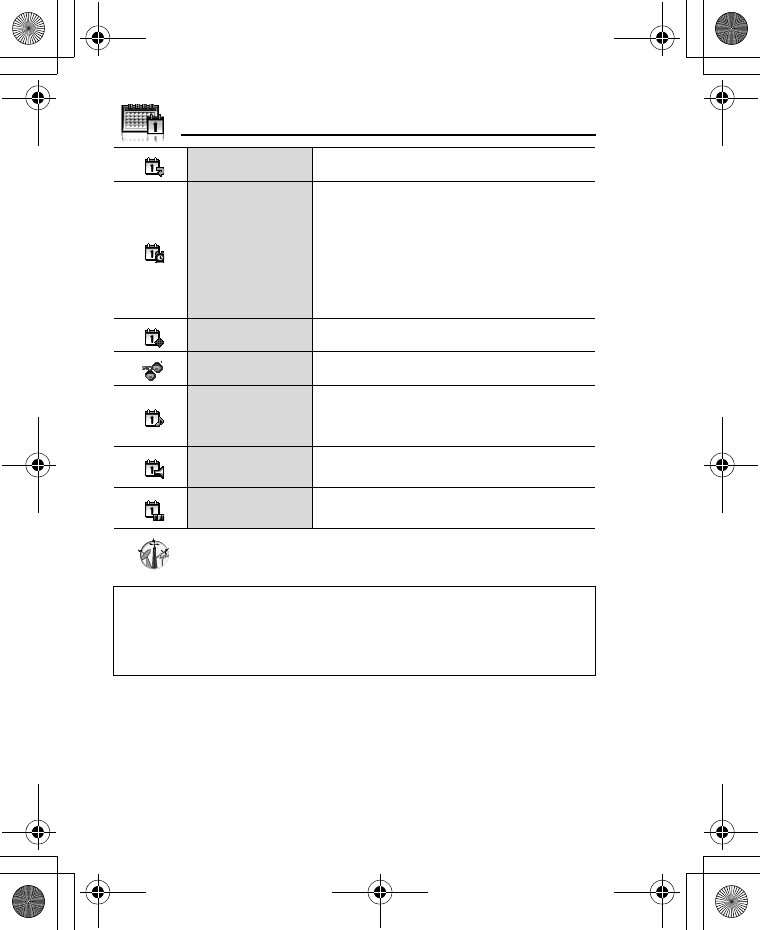
Creating Calendar events
d Main menu > Calendar
1. Select the day of the event you wish to store
2. [5] (Options) 7 Select New entry
3. [192] to scroll to the required field 7
[0]
4. Enter information 7 [0]
To enter characters, see “Text entry” on
page 36.
5. [5] (Save) to store the event
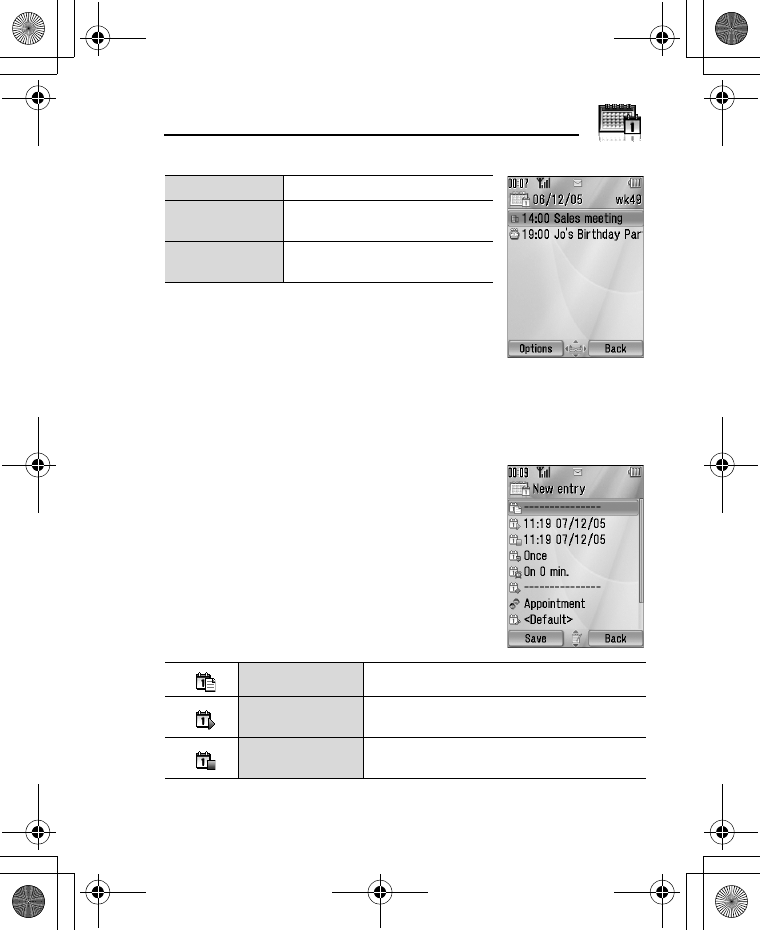
Current date Displayed in the upper left
Current week
number Displayed in the upper right
Scheduled
note
Displayed with category icon,
start time and note
Note Enter note (subject).
Start date/time Enter the start time 7 [2] 7 Enter the start
date (Present time/date is already entered.)
End date/time Enter the end time 7 [2] 7 Enter the end
date (Present time/date is already entered.)
VS7_AAA.book Page 127 Wednesday, August 3, 2005 5:10 PM
128
Calendar
*1
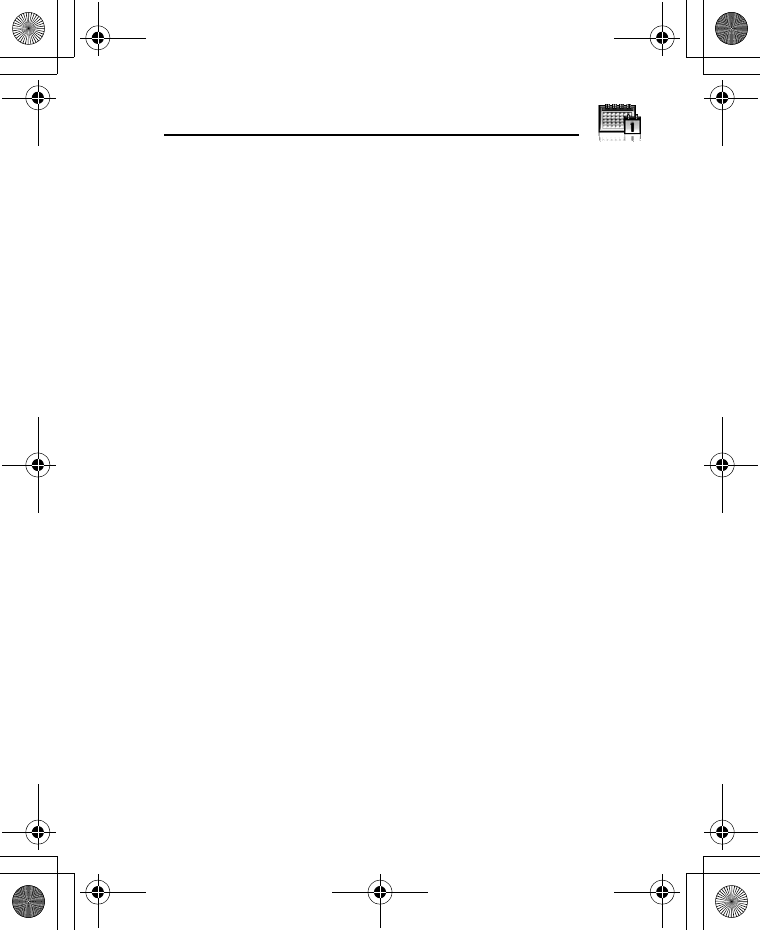
Repeat type Select an event repeat cycle.
Reminder
Set the reminder to sound at the start time
(0 min.) or certain minutes ahead of the
start time.
Select Off, 0 min., or 5, 10, 15, 30, 60, 90
min. ahead.
When the reminder tone sounds, press [5]
(View) to check the schedule or press [6]
(Stop) to return to standby mode.
Location Enter location.
Category Select category.
Calendar tone
Select a reminder tone from <Default> or
My Media. To download a tone, select
Download*1.
Calendar
volume
Adjust the reminder volume (Volume 0 -4 or
Step tone).
Illumination Select a reminder illumination pattern or
Off.
Note: The reminder sounds at the scheduled time even if the phone is off.
The calendar highlights only the start days of scheduled events if the events
are scheduled for over days.
For downloading contents, visit http://box.panasonic.com/
VS7_AAA.book Page 128 Wednesday, August 3, 2005 5:10 PM
129
Calendar
Managing Calendar events
Editing events
d Main menu > Calendar
1. From Daily view, [192] to scroll to the required event
2. [5] (Options) 7 Select Edit
3. Edit the required field 7 [5] (Save) to overwrite
Deleting events
Deleting an event
d Main menu > Calendar
1. From Daily view, [192] to scroll to the required event
2. [5] (Options) 7 Select Delete
3. [0]9[5] (Yes)
Deleting multiple events
To delete the events of the selected day or the past events:
d Main menu > Calendar
1. From Monthly view or Weekly view, [1929394] to scroll to
the required date
2. [5] (Options) 7 Select Delete
3. Select Day or Past
4. [0]9[5] (Yes)
To delete all events:
d Main menu > Calendar
1. From Monthly view or Weekly view, [5] (Options) 7 Select
Delete
2. Select All
3. [5] (Yes)
VS7_AAA.book Page 129 Wednesday, August 3, 2005 5:10 PM
130
Calendar
Calendar settings
Selecting the starting day of the week
d Main menu > Calendar
1. [5] (Options) 7 Select Settings
2. Select Week starts on
3. Select the required day of the week
Setting holidays
You can set holidays to be indicated in red.
d Main menu > Calendar
1. [5] (Options) 7 Select Settings
2. Select Holiday set
3. [192] to scroll to the required day of the week 7 [0]
Repeat this step to select other days of the week.
4. [5] (Ok)
Chinese Lunar calendar
You can check Chinese Lunar calendar dates and festivals when still
viewing western calendar. To display Chinese Lunar calendar, you
need to select Chinese language in Display language setting (see
page 91).
Switching on/off Chinese Lunar calendar
d Main menu > Calendar
1. [5] (Options) 7 Select Settings
2. Select Lunar calendar
3. Select On or Off
Viewing Chinese Lunar calendar detail
d Main menu > Calendar
1. [1929394] to scroll to the day you wish to view the detail
2. [5] (Options) 7 Select Lunar calendar detail
VS7_AAA.book Page 130 Thursday, August 4, 2005 9:45 AM
131
My Media
My Media menu structure
Note: There are several ways to select items from menu lists. See “Menu
selection method” on page 26.
Pictures........................... 132
Stored pictures ..................... 132
Download*1.......................... 136
Take new picture .................. 136
Sounds............................ 136
Stored sounds ...................... 136
Download*1.......................... 138
Record new sound ............... 138
Videos ............................. 139
Stored videos ....................... 139
Download*1.......................... 140
Record new video ................ 140
Games .............................140
Stored applications ...............140
Download*1...........................141
Text templates ................141
Memory status ................142
*1
VS7_AAA.book Page 131 Wednesday, August 3, 2005 5:10 PM
132
My Media
Pictures
Pictures taken by Camera, images downloaded from a WAP site and
received via infrared or Bluetooth are stored in the Pictures folder.
Viewing pictures
d Main menu > My Media > Pictures > Stored pictures
1. [1929394] to scroll to the required thumbnail 7 [0]
You can view the actual size of the selected picture by pressing [0] if
the picture is larger than the display. To continue onto step 2, press [6]
(Back).
2. [4]9[2] to view the next picture or [3]9[1] to view the
previous picture
Managing files
To make a new folder:
1. In the Stored pictures folder, [5] (Options) 7 Select Manage
files
2. Select New folder
3. Enter folder name 7 [0]
To move the selected picture to another folder:
1. When the required thumbnail is highlighted, [5] (Options) 7
Select Manage files
2. Select Move to folder
3. Select the required folder
Note: To use a file downloaded or indicated by the icon ( ), you may need
to purchase the rights. For further information, contact your service provider.
Note: The file size of highlighted picture is displayed under the picture title,
together with the date and time the image was stored. A picture of less than
1 kB is displayed as 1 kB.
VS7_AAA.book Page 132 Wednesday, August 3, 2005 5:10 PM
133
My Media
Options
When viewing the picture list, the following options are available by
pressing [5] (Options).
Send as MMS Attach the selected picture to an MMS message.
See “Creating an MMS message” on page 58.
Use as
Use the selected picture as Wallpaper, External
wallpaper or Contacts picture. See “Using
pictures” on page 134.
Delete Delete the selected picture or folder.
Delete all Delete all the pictures in the folder or all the
folders.
Activate Purchase your rights to view the selected picture.
Rename Rename the selected picture or folder.
Send via
Send the selected picture via infrared or
Bluetooth. See “Infrared” on page 105 or
“Bluetooth® wireless technology” on page 107.
Resize Resize the selected picture.
Edit Edit the selected picture. See “Editing pictures” on
page 134.
Change view Change the picture list to List view or Grid view.
Manage files Make a new folder or move the selected picture to
another folder. See “Managing files” on page 132.
Details Show details of the selected picture.
Note: Sending or editing of a forward locked picture indicated by the icon
( ) is restricted.
VS7_AAA.book Page 133 Wednesday, August 3, 2005 5:10 PM
134
My Media
Using pictures
You can use the stored pictures as wallpapers, external wallpapers
or Contacts pictures.
d Main menu > My Media > Pictures > Stored pictures
1. [1929394] to scroll to the required picture
2. [5] (Options) 7 Select Use as
3. Select Wallpaper, External wallpaper or Contacts picture
(If Contacts picture is selected, go to the next step.)
4. Highlight the required contact 7 [5] (Select)
5. [5] (Save)
Editing pictures
Adding frame
You can add a frame to your picture.
d Main menu > My Media > Pictures > Stored pictures
1. When the required thumbnail is highlighted or the required
picture is displayed on the screen, [5] (Options) 7 Select
Edit
2. Select Add frame
3. Select the required frame
The picture with the selected frame is displayed.
You can change the frame by pressing [394].
4. [0]9[5] (Save)
5. Enter the file name 7 [0]
Note: Adding a frame is available only when the size of the picture to be
edited is Medium 320x240, Small 160x120 or Main display 240x320.
VS7_AAA.book Page 134 Wednesday, August 3, 2005 5:10 PM
135
My Media
Trimming
You can trim your pictures.
d Main menu > My Media > Pictures > Stored pictures
1. When the required thumbnail is highlighted or the required
picture is displayed on the screen, [5] (Options) 7 Select
Edit
2. Select Trimming
3. Select the required trimming size
4. If Free size is selected: [1929394] to determine the starting
point 7 [0]9[5] (Start) 7 [1929394] to determine the
ending point 7 [0]9[5] (Ok)
If a size other than Free size is selected: [1929394] to move
the trimming box 7 [0]9[5] (Start)
5. [0]9[5] (Save)
6. Enter the file name 7 [0]
Clearing shadow
You can make dark pictures clearer.
d Main menu > My Media > Pictures > Stored pictures
1. When the required thumbnail is highlighted or the required
picture is displayed on the screen, [5] (Options) 7 Select
Edit
2. Select Clear shadow
3. [0]9[5] (Save)
4. Enter the file name 7 [0]
VS7_AAA.book Page 135 Wednesday, August 3, 2005 5:10 PM
136
My Media
Downloading picture files
d Main menu > My Media > Pictures > Download
The download site is displayed.
Taking a new picture
d Main menu > My Media > Pictures > Take new picture
The phone switches to Picture mode. See “Taking a picture” on
page 72.
Sounds
Sound clips recorded by Sound recorder, downloaded from a WAP
site and received via infrared or Bluetooth are stored in the Sounds
folder.
Playing sound clips
d Main menu > My Media > Sounds > Stored sounds
1. [192] to scroll to the required sound file 7 [0]
[192] to adjust the volume.
2. To stop: [0]
To restart: [5] (Restart)
Note: Panasonic is not responsible for the performance of downloaded
contents or possible corruption of phone software.
For downloading contents, visit http://box.panasonic.com/
Note: To use a file downloaded or indicated by the icon ( ), you may need
to purchase the rights. For further information, contact your service provider.
Note: The VS7 supports the ISO standard for MP3, nonconforming MP3
formats may not play properly.
VS7_AAA.book Page 136 Wednesday, August 3, 2005 5:10 PM
137
My Media
Managing files
You can make new folders or move the selected sound files to
another folder. See “Managing files” on page 132.
Options
In the sound list, the following options are available by pressing [5]
(Options).
Send as MMS
Attach the selected sound clip to an MMS
message. See “Creating an MMS message” on
page 58.
Use as
Use the selected sound clip as Ringtone,
Message alert or Contacts ringtone. See “Using
sound clips” on page 138.
Play in sequence Select Looped or Random to play all the sound
clips in the selected folder in a loop or at random.
Delete Delete the selected sound file or folder.
Delete all Delete all the sound files in the folder or all the
folders.
Activate Purchase your rights to play the selected sound
file.
Rename Rename the selected sound file or folder.
Send via
Send the selected sound file via infrared or
Bluetooth. See “Infrared” on page 105 or
“Bluetooth® wireless technology” on page 107.
Manage files
Make a new folder or move the selected sound file
to another folder. See “Managing files” on
page 132.
Details Show details of the selected sound file.
VS7_AAA.book Page 137 Wednesday, August 3, 2005 5:10 PM
138
My Media
Using sound clips
You can use the stored sound clips as ringtones, Message alerts or
Contacts ringtones.
d Main menu > My Media > Sounds > Stored sounds
1. [192] to scroll to the required sound clip
2. [5] (Options) 7 Select Use as
3. Select Ringtone, Message alert or Contacts ringtone
(If Contacts ringtone is selected, go to the next step.)
4. Highlight the required contact 7 [5] (Select)
5. Select Ringtone ( ) or Message alert ( )
6. [5] (Save)
Downloading sound clips
d Main menu > My Media > Sounds > Download
The download site is displayed.
Recording new sound clips
d Main menu > My Media > Sounds > Record new sound
The phone switches to the Sound recorder mode. See “Sound
recorder” on page 123.
Note: The file size of highlighted sound is displayed at the top of the list,
together with the date and time the sound file was stored. A sound file of less
than 1 kB is displayed as 1 kB.
Sending or editing of a forward locked sound indicated by the icon ( ) is
restricted.
Note: Panasonic is not responsible for the performance of downloaded
contents or possible corruption of phone software.
For downloading contents, visit http://box.panasonic.com/
VS7_AAA.book Page 138 Wednesday, August 3, 2005 5:10 PM
139
My Media
Videos
Video clips recorded by Video recorder, downloaded from a WAP
site and received via infrared or Bluetooth are stored in the Videos
folder.
Playing video clips
d Main menu > My Media > Videos > Stored videos
1. [192] to scroll to the required video file 7 [0]
[192] to adjust the volume.
2. To stop: [0]
To restart: [5] (Restart)
Managing files
You can make new folders or move the selected video files to
another folder. See “Managing files” on page 132.
Options
In the video list, the same options in the Stored sounds folder are
available. See “Options” on page 137. Note that Use as option is not
available for video files.
Note: To use a file downloaded or indicated by the icon ( ), you may need
to purchase the rights. For further information, contact your service provider.
Note: The file size of highlighted video is displayed at the top of the list,
together with the date and time the video file was stored. A video file of less
than 1 kB is displayed as 1 kB.
VS7_AAA.book Page 139 Wednesday, August 3, 2005 5:10 PM
140
My Media
Downloading video clips
d Main menu > My Media > Videos > Download
The download site is displayed.
Recording a new video
d Main menu > My Media > Videos > Record new video
The phone switches to Video mode. See “Recording a video clip” on
page 78.
Games
Preloaded games and downloaded games are stored in the Games
folder.
Playing games
d Main menu > My Media > Games > Stored applications
1. [192] to scroll to the required game 7 [0]
For further details, see “Games” on page 144.
Note: Panasonic is not responsible for the performance of downloaded
contents or possible corruption of phone software.
For downloading contents, visit http://box.panasonic.com/
Note: To use a file downloaded or indicated by the icon ( ), you may need
to purchase the rights. For further information, contact your service provider.
VS7_AAA.book Page 140 Wednesday, August 3, 2005 5:10 PM
141
My Media
Downloading games
d Main menu > My Media > Games > Download
For further details, see “Download games” on page 146.
Text templates
You can use templates stored in the phone when creating a text
message. You can also save frequently used text as templates.
Editing Text templates
d Main menu > My Media > Text templates
1. [192] to scroll to the required template 7 [0]
2. Edit the template 7 [0]
Options
In the text templates list, the following options are available by
pressing [5] (Options).
Note: Panasonic is not responsible for the performance of downloaded
contents or possible corruption of phone software.
For downloading contents, visit http://box.panasonic.com/
New Create a new template.
Create message Create an SMS or MMS message using the
selected template.
Edit Edit the selected template.
Delete Delete the selected template.
Delete all Delete all the templates.
Details Show details of the selected template file.
VS7_AAA.book Page 141 Wednesday, August 3, 2005 5:10 PM
142
My Media
Memory status
You can see how much data is stored in the individual folders in My
Media.
d Main menu > My Media > Memory status
Note: To decrease the amount of phone memory used, delete unwanted
data or store data on your PC (see “CD-ROM” on page 152).
VS7_AAA.book Page 142 Wednesday, August 3, 2005 5:10 PM
143
Games
Games menu structure
Note: There are several ways to select items from menu lists. See “Menu
selection method” on page 26.
Games............................. 144
Download*1..................... 146
Settings........................... 147
Sound volume ...................... 147
Backlight............................... 147
Vibration ............................... 147
Reset.................................... 147
WAP profiles......................... 147
Information ..................... 147
*1
VS7_AAA.book Page 143 Wednesday, August 3, 2005 5:10 PM
144
Games
Games
Selecting games
Your phone has preinstalled JavaTM applications. The downloaded
JavaTM applications are also listed here.
d Main menu > Games > Games
1. [192] to scroll to the required application
2. [5] (Options) 7 Select the required option
Run Run the selected JavaTM application.
Permission
Select Network access, Messaging or Auto
invocation, then select Always allowed, Ask
first time, Ask every time or Not allowed.
Details Show the application name, version, vendor,
storage size, etc.
Delete Delete the selected JavaTM application (except for
the preinstalled applications).
Activate Purchase your rights to run the selected JavaTM
application.
Note: Your phone supports J2METM JavaTM applications. Other types of
JavaTM applications cannot be installed.
Bluetooth headset cannot be used for listening for sounds during the games.
VS7_AAA.book Page 144 Wednesday, August 3, 2005 5:10 PM
145
Games
SONIC THE HEDGEHOG
This is a mobile version of the high speed action classic, “SONIC
THE HEDGEHOG”, which originally debuted in 1991 on the Mega
Drive (SEGA Genesis).
Save the animals from the evil scientific genius, Dr. Eggman, and
stop him from taking over the world!
Your objective is to get Sonic to the end of the game in one piece!
The game has 6 Zones, and each Zone is divided into 3 Acts. In
Act 3, Dr. Eggman will arrive in his contraption. Beat him to clear the
Zone.
d Main menu > Games > Games > SONIC THE HEDGEHOG
Key operation:
Soccer
This game is a 3D soccer game. Play and win exhibition game with
selected country.
d Main menu > Games > Games > Soccer
Key operation:
Move/Dash right Press [4] or press [H] key.
Move/Dash left Press [3] or press [F] key.
Jump Press [1] or press [S] key.
Look Up Press [0] or press [G] key.
Crouch Press [2] or press [J] key.
Spin Press [2] or press [J] key (during dash).
Move/Dribble Press Navigation key.
Shoot Press [r] key.
Pass Press [0] or press [G] key with a ball.
Slide tackle Press [0] or press [G] key without a ball.
VS7_AAA.book Page 145 Wednesday, August 3, 2005 5:10 PM
146
Games
Suspending/Terminating the game
1. [Y]
2. Select Suspend or Terminate
When you select Suspend, JavaTM icon () appears on the standby
screen.
To resume the game:
d Main menu > Games > Games
1. Select Resume
The JavaTM application starts running.
Download games
You can download games to your phone from WAP sites. For
customer support of downloaded contents, visit the respective
supplier’s web sites.
d Main menu > Games > Download
1. Select the required JavaTM application
When the downloading is over, “Would you like to run application?”
appears.
2. To run the JavaTM application: [0]9[5] (Ok)
To exit: [Y]9[6] (Cancel)
Note: You can also suspend the JavaTM application by closing the flip.
Note: Panasonic is not responsible for the performance of downloaded
contents or possible corruption of phone software.
For downloading contents, visit http://box.panasonic.com/
VS7_AAA.book Page 146 Wednesday, August 3, 2005 5:10 PM
147
Games
Settings
d Main menu > Games > Settings
1. Select the required setting
Information
You can view copyright information about the software used on the
phone.
d Main menu > Games > Information
Sound volume Adjust the sound volume of JavaTM applications.
Backlight Switch the backlight on in Application
preference or System preference, or switch Off.
Vibration Switch the vibration function for JavaTM
applications On or Off.
Reset
Delete all the downloaded JavaTM applications,
reset records of preloaded JavaTM application and
initialise JavaTM settings.
WAP profiles Select the required profile setting.
VS7_AAA.book Page 147 Wednesday, August 3, 2005 5:10 PM
148
Appendix
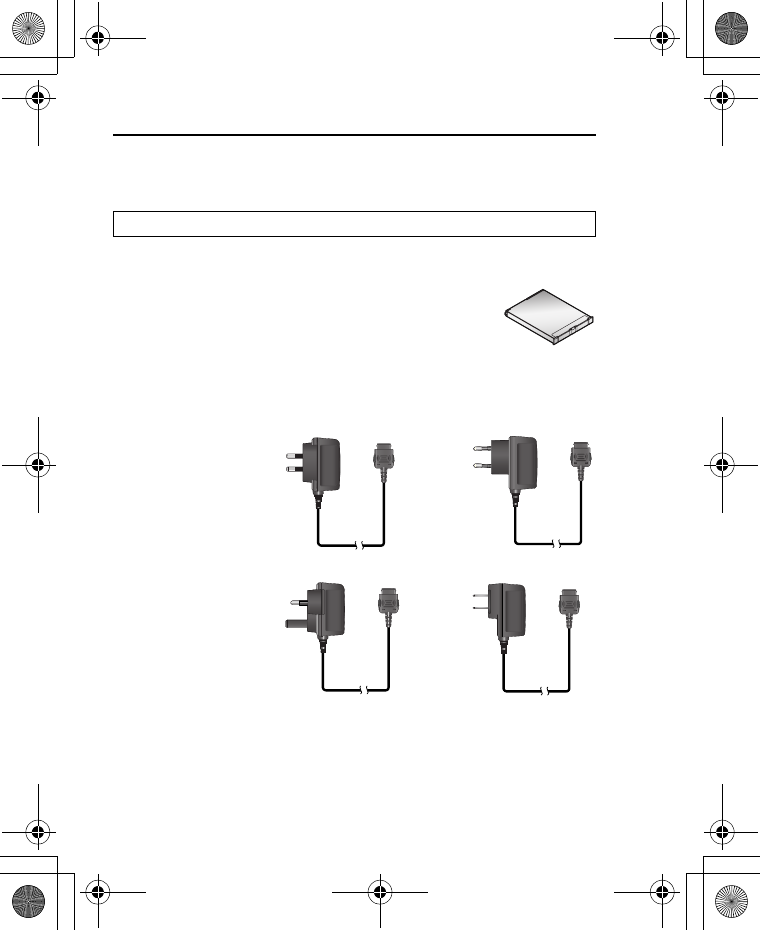
Accessories
The following accessories are available for your Panasonic phone.
Battery (EB-BS001)
Double your talk time by having a spare battery.
Travel Charger
Carry this wherever you go, so you can always recharge your
battery.
Note: Availability depends on your country/region.
(EB-CA001 AU) (EB-CA001 EU)
(EB-CA001 UK) (EB-CA001 US)
VS7_AAA.book Page 148 Wednesday, August 3, 2005 5:10 PM
149
Appendix
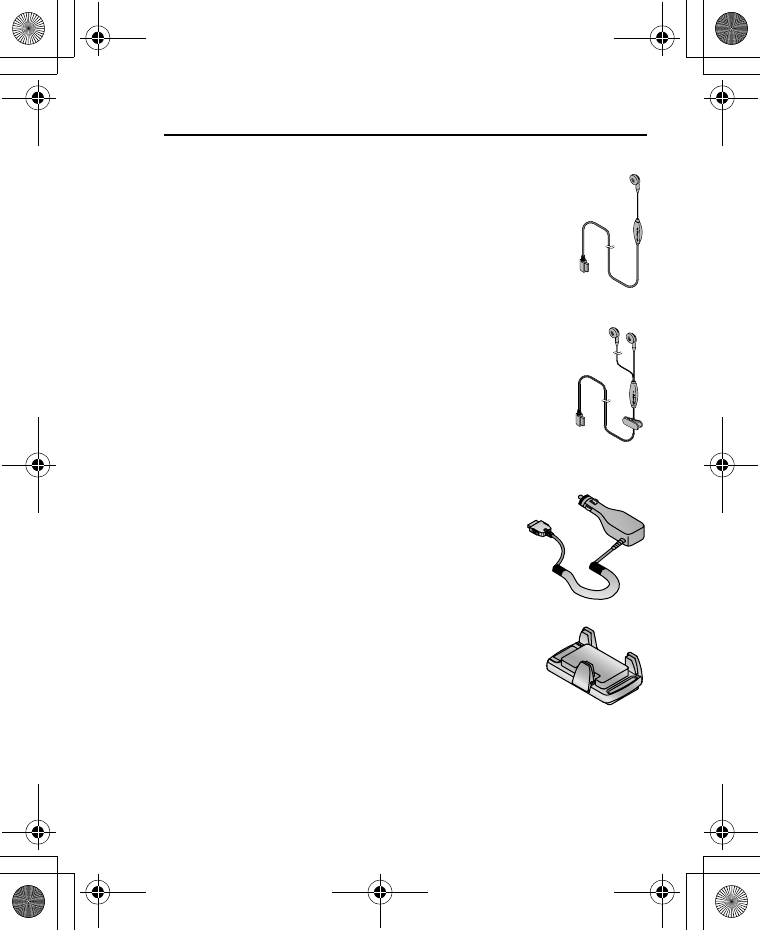
Personal Handsfree (Mono) (EB-EMX800)
Plug into your phone and talk without holding the phone
to your ear.
Personal Handsfree (Stereo) (EB-EM001)
Talk/listen to the music and move while keeping your
hands free, by using a Personal Handsfree. Put the ear
pieces in your ears and the adaptor in the side of the
phone.
In-Car Charger (EB-CD001)
Recharge the battery using your vehicle’s
cigarette lighter socket.
Car Holder (EB-KA001)
This can be mounted in your vehicle to store your
phone.
VS7_AAA.book Page 149 Wednesday, August 3, 2005 5:10 PM
150
Appendix
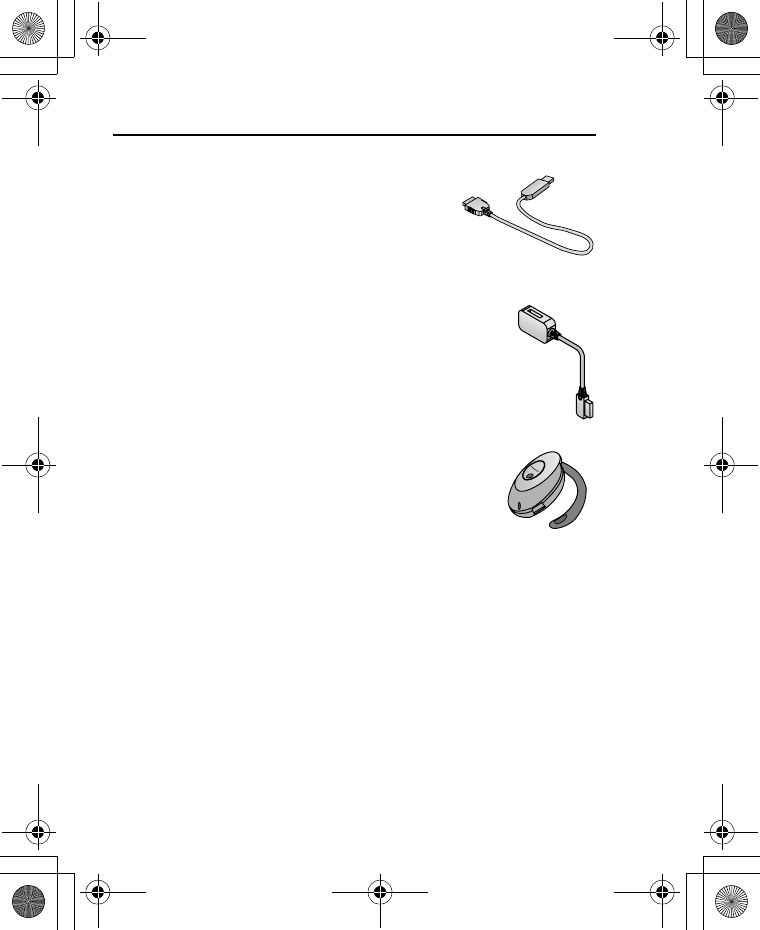
USB Cable (EB-USX800)
Use this to connect your phone to a PC to
transfer data between them. Use in conjunction
with the software provided on the CD-ROM.
Branch Cable (EB-CBX800)
This cable branches the connection to a USB Cable,
Personal Handsfree and Travel Charger so that you
can transfer data OR talk on handsfree while charging.
Bluetooth® headset (EB-BHX70)
Talk handsfree and without wires. Place the headset
on your ear and the phone in your pocket, with no
wires connecting the two.
VS7_AAA.book Page 150 Wednesday, August 3, 2005 5:10 PM
151
Appendix
Contact
(ASIA-PACIFIC)
AUSTRALIA Panasonic Australia 132-600
HONG KONG Shun Hing Technology Co., Ltd. 2313-0888
INDIA Panasonic India Pvt. Ltd. (0120)-256-7045
INDONESIA PT. MET GOBEL (021)-8015666
MALAYSIA Panasonic Malaysia Sdn, Bhd. (03)-55422288
NEW
ZEALAND Panasonic New Zealand Ltd. (09)-272-0100
PHILIPPINES Panasonic Philippines (02)-899-4595 to 98
SINGAPORE Panasonic Singapore 6282-6868
TAIWAN Panasonic Systems Sales Taiwan
Co., Ltd. (02)-2227-6111
THAILAND Panasonic Siew Sales (Thailand)
Co., Ltd.
(02)-731-8888
ex. 2310
VIETNAM
Matsushita Electric Industrial Co.,
Ltd.
Ho Chi Minh Office
(08)-8219160
(LATIN AMERICA)
BRASIL Panasonic do Brasil Ltda. (0800)-704-2019
COLOMBIA Panasonic de Colombia S.A. (1)-623-3383
MEXICO Panasonic de Mexico, S.A. de
C.V. (55)-5-488-1000
PANAMA Panasonic Latin America, S.A. (229)-2955
PERU Panasonic Peruana S.A. (1)-614-0000
VENEZUELA Panasonic de Venezuela, C.A. (212)-945-3022
VS7_AAA.book Page 151 Wednesday, August 3, 2005 5:10 PM
152
Appendix
CD-ROM
PC Software
The CD-ROM supplied with your VS7 phone contains a software
application which allows you to manage the information in your
phone from a Personal Computer (PC). This application includes:
Handset Manager
With Handset Manager you can easily manage your phone
information on a PC and synchronise it back to the phone. This
information includes contacts, calendar, messages and the image,
video and sound data held in your VS7 phone. For further
information please refer to the documentation on the CD-ROM, or to
the Panasonic website
http://panasonic.co.jp/pmc/products/en/support/index.html
Installing the Software
The software is compatible with PCs and laptops running Microsoft
WindowsTM 98 SE, Windows Me, Windows 2000 and Windows XP.
On most PCs the software should auto-install when the CD-ROM is
inserted into the CD drive. If not, then autoplay must be manually
selected in Windows Explorer. Follow the instructions that appear on
the PC screen to install the software.
VS7_AAA.book Page 152 Wednesday, August 3, 2005 5:10 PM
153
Appendix
Changing the X-Changeable CoverTM
Before changing the cover, always switch off the power and
disconnect the phone from the charger or any other device. For your
safety, follow these procedures when removing or attaching the
cover.
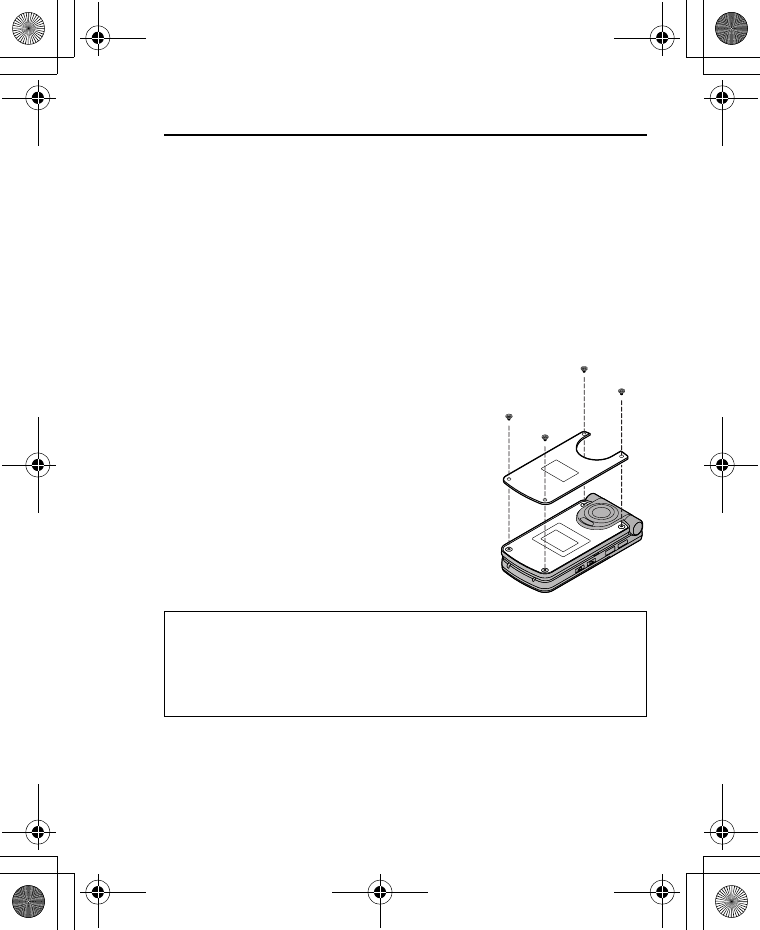
Removing the cover
Loosen and remove the 4 screws with the screw driver included in
this package and then gently remove the cover.
Attaching the cover
Place the cover right in the hollow in the
phone and align the bottom edge of the cover
with that of the hollow. Tighten the 4 screws
firmly.
Ensure that there is no dust caught between
the cover and the hollow.
Note: Do not use the phone without the cover attached.
Do not force the cover when removing or replacing. Before tightening the
screws, ensure the cover is located correctly. Do not force or over tighten the
screws.
Use only covers designed for this model.
VS7_AAA.book Page 153 Wednesday, August 3, 2005 5:10 PM
154
Appendix
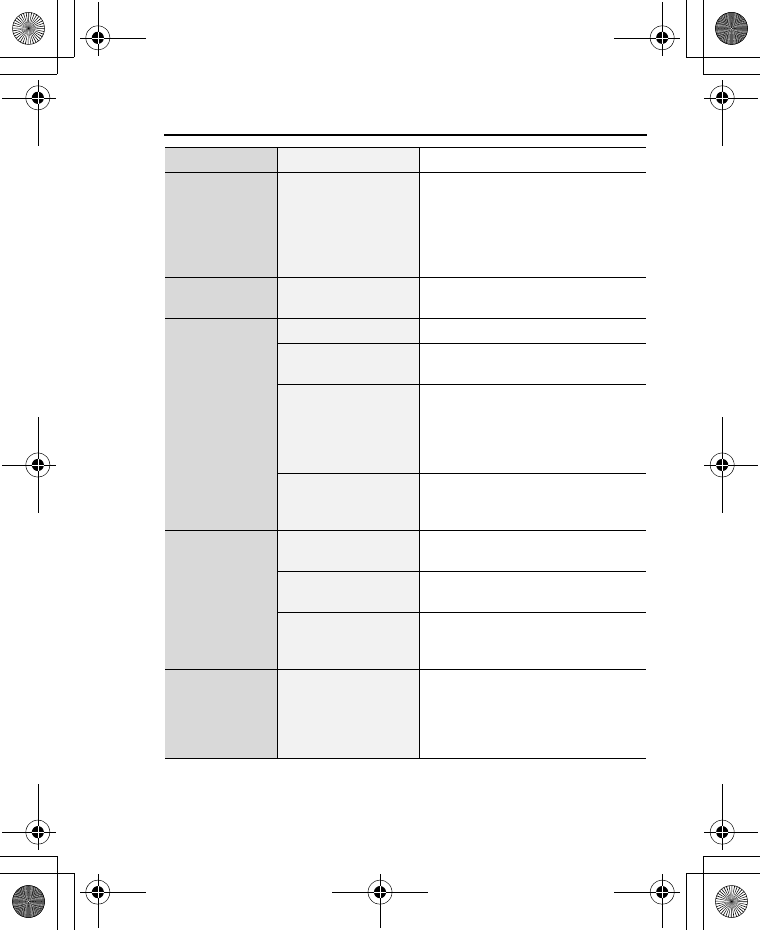
Troubleshooting
Problems
Should any problem persist, contact your dealer.
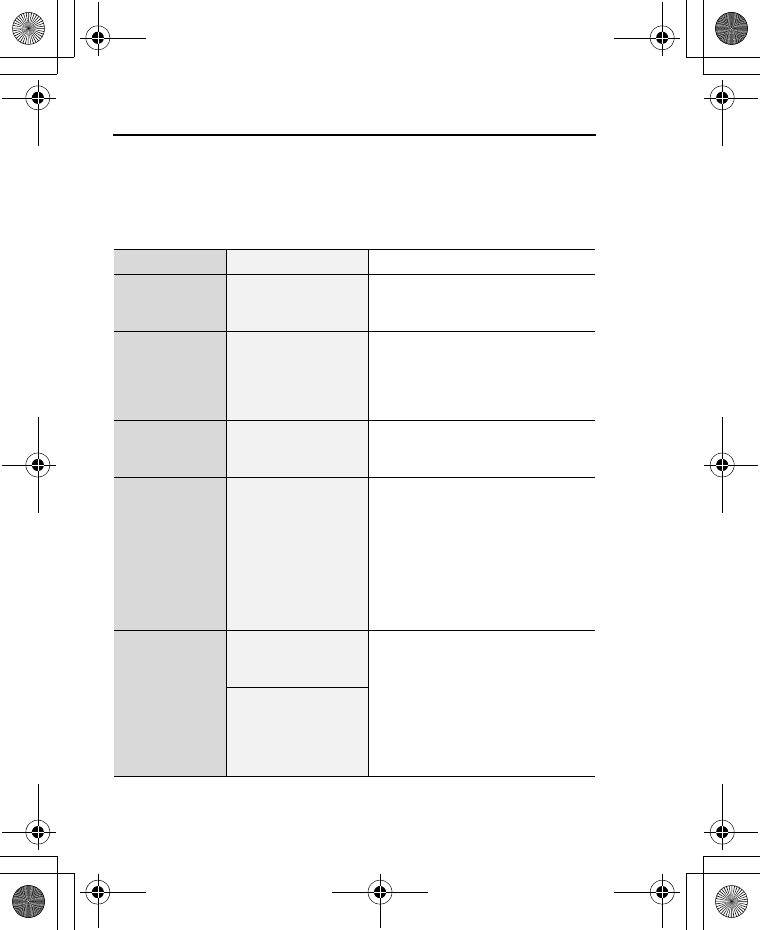
Problem Cause Remedy
Phone will not
switch on.
Check that the battery is fully
charged and correctly connected
to the phone.
Extremely
short battery
life for a new
battery.
The network you
are using and the
condition of the
battery can affect
battery life.
Short battery
life for an old
battery.
The battery has
worn out.
Replace with a new fully charged
battery.
The battery
charge level
indicator does
not appear
and the phone
cannot be
switched on
when
charging.
The battery is not
attached to the
phone or the battery
has been deeply
discharged.
Leave the phone charging the
battery for a few minutes before
the battery charge level indicator
appears and attempt to switch the
phone on.
Battery fails to
charge.
The battery is not
attached to the
phone. Ensure the battery is fitted to the
phone prior to commencing
charging.
The battery was
connected to the
phone after the
charger was
connected.
VS7_AAA.book Page 154 Wednesday, August 3, 2005 5:10 PM
155
Appendix
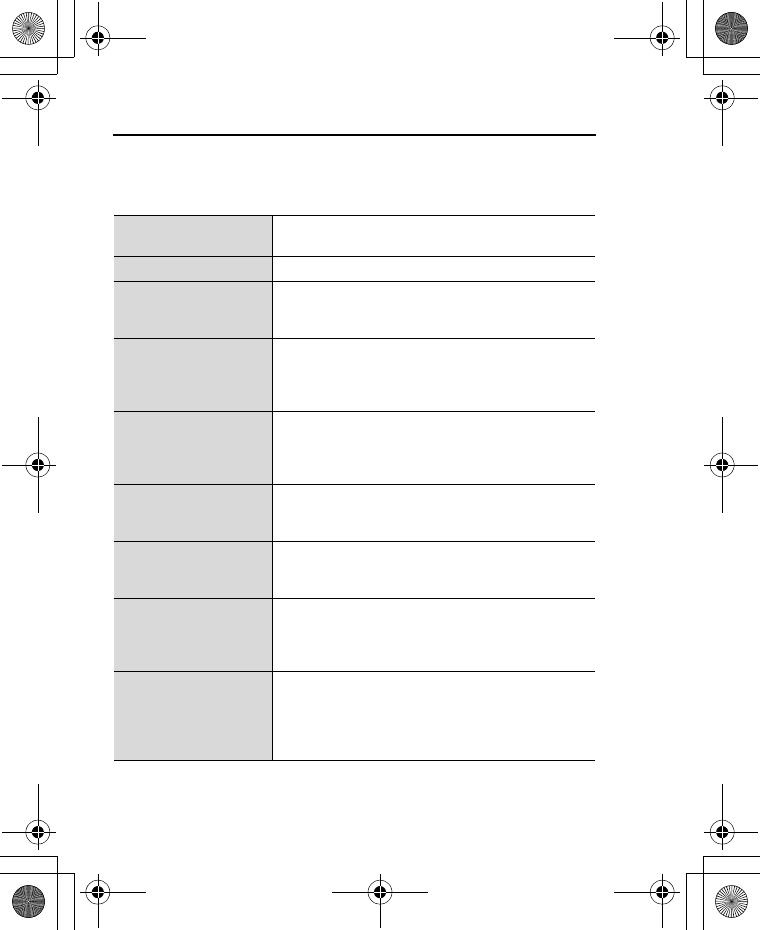
Battery fails to
charge.
The battery
temperature
exceeds the
charging
temperature range
(too hot or too cold).
Use the battery at room
temperature.
Display looks
faded.
The Brightness
level is low.
Check the Brightness setting
(see page 96).
Calls cannot
be made.
Keyguard is on. Disable keyguard.
Outgoing calls are
barred.
Disable outgoing call barring or
barred dialling.
Fixed dialling is
switched on so that
only the numbers
stored in Contacts
can be dialled.
Switch off the Fixed dialling.
The phone is not
registered with a
network.
Move to a coverage area and
operate your phone after it has
registered with a network.
Calls cannot
be received.
The phone is not
switched on. Switch the phone on.
Incoming calls are
barred. Disable incoming call barring.
The phone is not
registered with a
network.
Move to a coverage area and
operate your phone after it has
registered with a network.
Emergency
calls cannot
be made.
You are not in a
GSM coverage
area.
Check that the antenna symbol
(p) is displayed - move to a
coverage area and operate your
phone when the antenna symbol
is displayed.
Problem Cause Remedy
VS7_AAA.book Page 155 Wednesday, August 3, 2005 5:10 PM
156
Appendix
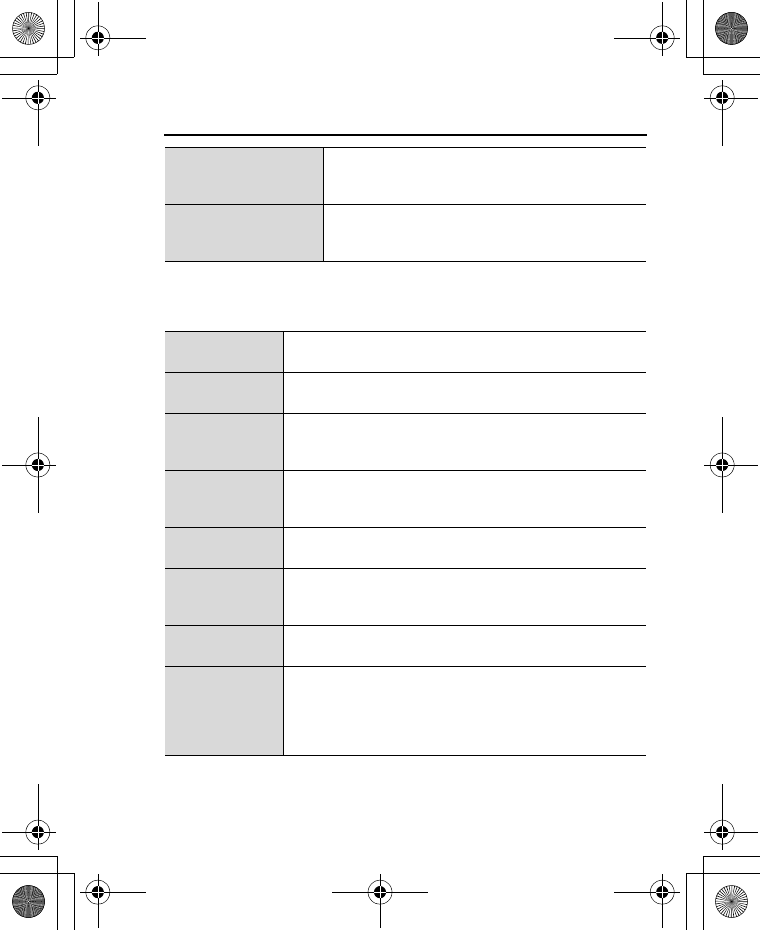
Error messages
These are some of the most important error messages which may
be displayed:
Location area not
allowed! Roaming in the selected area is not allowed.
Network not allowed! Roaming with the selected network is not allowed.
Security failure!
The network has detected an authentication
failure because your SIM card is not registered
with that network - contact your service provider.
SIM blocked
The SIM card is blocked because the PIN
unblocking key (PUK) has been entered
incorrectly 10 times - contact your service
provider.
Restarting SIM.
Please wait
The phone has detected a problem with the SIM
card - switch the phone off and then back on; if the
message is still displayed - contact your service
provider.
Invalid SIM
The SIM card has failed one or more of the SIM
personalisation checks - contact your service
provider.
Function unavailable
The selected feature is either not supported by the
SIM card or is not available with the current
subscription - contact your service provider.
PIN2 invalidated
The PIN2 is blocked permanently because the
wrong PUK2 has been entered 10 times, services
controlled by PIN2 cannot be used - contact your
service provider.
Message rejected.
Storage full
or
Message rejected.
SIM full
A message has been received but the message
store is full - to receive messages, delete some of
the currently stored messages.
VS7_AAA.book Page 156 Wednesday, August 3, 2005 5:10 PM
157
Appendix
Glossary of terms
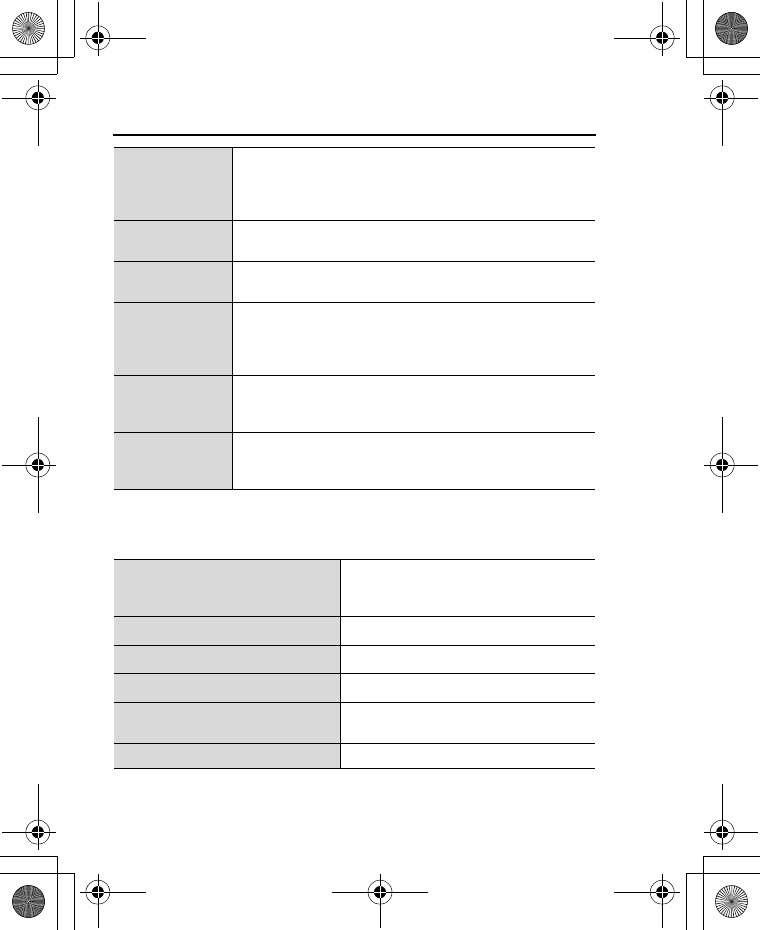
Memory low!
Message may not be
stored
The message area is full. Your messages cannot
be stored until some of the currently stored
messages are deleted.
Verification failure
On changing the PIN/PIN2, verification of the new
code is incorrect - retry changing the PIN/PIN2
with correct verification.
CSD Circuit Switched Data. A communication method used to
transmit data over telephone connections.
DTMF Dual Tone Multi-Frequency allows you to communicate
with computerised phone systems, voice mailboxes, etc.
GPRS
General Packet Radio Service. A GSM transmission
technique that transmits and receives data in packets
rather than setting up a continuous channel.
GSM
Global System for Mobile communications. The name
given to the advanced digital technology that your phone
uses.
Infrared A type of wireless connection that allows data to be
transmitted directly to another device.
JavaTM
A programming language developed by Sun
Microsystems. Programs written in Java do not rely on
an operating system.
Network
Operator
The organisation responsible for operating a GSM
network.
PIN / PIN2
Personal Identification Number. PIN is used for SIM card
security. PIN2 is used for the control of Fixed dialling and
Call charges metering. Supplied by your service
provider. If the PIN or PIN2 is entered incorrectly several
times (basically 3 times), the PIN or PIN2 will be blocked.
VS7_AAA.book Page 157 Wednesday, August 3, 2005 5:10 PM
158
Appendix
Specifications
PUK / PUK2
PIN or PIN2 Unblocking Key. Used to unblock the PIN or
PIN2 code. Supplied by your service provider. If the PUK
or PUK2 is entered incorrectly 10 times, the PUK or
PUK2 will be blocked.
Roaming The ability to use your phone on networks other than
your home network.
Service
provider
The organisation responsible for providing access to the
GSM/GPRS network.
SIM
Subscriber Identity Module. A small smart-card which
stores unique subscriber and user entered information
such as Contacts entries and short messages. Supplied
by your service provider.
URL
Uniform Resource Locator. The URL is an alphanumeric
address that points to homepages and other Internet
locations.
WAP
Wireless Application Protocol. The communication
standard which enables you to download resources from
the Internet to your phone.
Bands supported
GSM 900 Class 4
GSM 1800 Class 1
GSM 1900 Class 1
Standby time*1Up to 240 hours
Talk time*1Up to 300 minutes
Charging time*2Up to 150 minutes
Temperature range Charging: +5°C - +35°C
Storage: -20°C - +60°C
Weight 113 g (including battery)
VS7_AAA.book Page 158 Wednesday, August 3, 2005 5:10 PM
159
Appendix
*1Talk and Standby times will be dependant upon network conditions, SIM
card, backlight usage, battery condition/charging management and the
use of applications such as camera and games where available.
*2Charging time depends on usage and battery condition.
*365 k colours for other image formats
Dimensions
(excluding protrusions)
Height: 102 mm
Width: 50.6 mm
Depth: 18.7 mm
Volume 93 cc
Battery 830 mAh Li-ion
Antenna Internal
SIM type 1.8 V/3 V
Memory storage
MMS: 2 MB
User data (excluding MMS) and
preinstalled applications: 30 MB
Display
Main display: QVGA 240 x 320 pixels
TFT LCD; Approx. 16 million colours
(JPEG and camera/video image*3);
Approx. 300 cd/m2 brightness
Sub display: 96 x 64 pixels STN LCD;
4 k colours
Camera 2 M pixels CMOS
Connectivity
Infrared: SIR (slow infrared)
USB: v2.0
Bluetooth: Serial Port, Object Push,
Generic Object Exchange, Headset
and Handsfree profiles
VS7_AAA.book Page 159 Wednesday, August 3, 2005 5:10 PM
160
Licensing
© 2005 Panasonic Mobile Communications Co., Ltd. All rights reserved.
Information in this document is subject to change without notice. No part of
these instructions may be reproduced or transmitted in any form or by any
means without obtaining written permission from Panasonic Mobile
Communications Co., Ltd.
CP8 Patent
Panasonic VS7 with Bluetooth® Technology
The Bluetooth word mark and logos are owned by the
Bluetooth SIG, Inc. and any use of such marks by Panasonic Mobile
Communications Co., Ltd. is under license. Other trademarks and trade
names are those of their respective owners.
Java and all Java-based trademarks and logos are
trademarks or registered trademarks of Sun Microsystems,
Inc. in the U.S. and other countries.
T9® Text Input is licensed under one or more of the following:
U.S. Pat. Nos. 5,187,480, 5,818,437, 5,945,928, 5,953,541,
6,011,554, 6,286,064, 6,307,548, 6,307,549, and 6,636,162,
6,646,573; Australian Pat. Nos. 727539, 746674, and
747901; Canadian Pat. Nos.1,331,057, 2,302,595, and 2,227,904; Japan
Pat. No. 3532780, 3492981; United Kingdom Pat. No. 2238414B; Hong
Kong Standard Pat. No. HK1010924; Republic of Singapore Pat. No. 51383,
66959, and 71979; European Pat. Nos. 0 842 463 (96927260.8), 1 010 057
(98903671.0), 1 018 069 (98950708.2); Republic of Korea Pat. Nos.
KR201211B1 and KR226206B1. People’s Republic of China Pat.
Application Nos. 98802801.8, 98809472.X and 96196739.0; Mexico Pat.
No. 208141; Russian Federation Pat. No. 2206118; and additional patents
are pending worldwide.
VS7_AAA.book Page 160 Wednesday, August 3, 2005 5:10 PM
161
Licensing
Copyright © 2003 by Bitstream, Inc. All Rights Reserved.
Bitstream Vera is a trademark of Bitstream, Inc.
For further information, please refer to:
http://www.w3.org/2003/08/sera/COPYRIGHT.TXT
Powered by Mascot Capsule®/Micro3D EditionTM Mascot Capsule® is a
registered trademark of HI Corporation© 2005 HI Corporation. All Rights
Reserved.
Aplix, microJBlend and JBlend, and all Aplix-or JBlend-related
trademarks and logos are trademarks or registered
trademarks of Aplix Corporation in the U.S., Japan and other
countries.
This product is licensed under the MPEG-4 patent portfolio license for the
personal and non-commercial use of a consumer to (i) encode video in
compliance with the MPEG-4 Visual Standard (“MPEG-4 Video”) and/or (ii)
decode MPEG-4 Video that was encoded by a consumer engaged in a
personal and non-commercial activity and/or was obtained from a licensed
video provider. No license is granted or implied for any other use. Additional
information may be obtained from MPEG LA,LLC.
MPEG Layer-3 audio coding technology licensed from Fraunhofer IIS and
Thomson.
SONIC THE HEDGEHOGTM
© SEGA Corporation
MUSIC COMPOSED BY MASATO NAKAMURA
Two music (Sonic Zone1.mmf / Sonic Invisible.mmf)
© SEGA Corporation
MUSIC COMPOSED BY MASATO NAKAMURA
SEGA, the SEGA logo and SONIC THE HEDGEHOG are either registered
trademarks or trademarks of SEGA Corporation.
VS7_AAA.book Page 161 Wednesday, August 3, 2005 5:10 PM
162
Licensing
END-USER SOFTWARE LICENSE AGREEMENT
By use of this Panasonic cellular phone, including any embedded
software features or programs ("Embedded Software"), you agree to
the terms and conditions of this End-User Software License
Agreement ("EULA").
1. END-USER RIGHTS: You are granted a limited end-user right to use the
Embedded Software only as part of and together with this Panasonic
cellular phone. You agree to use the Embedded Software in a manner
that complies with all applicable laws, including laws related to copyright
and other intellectual property rights. All other uses are prohibited.
2. LIMITATIONS ON END-USER RIGHTS:
(a) You may not reproduce, copy, or transfer the Embedded Software to
any other device;
(b) You may not create derivative works of any type based on the
Embedded Software (unless and except as expressly permitted as
part of a feature application);
(c) You may not reverse engineer, reverse compile, disassemble, or
otherwise attempt to discover the source code of the Embedded
Software;
(d) You may not transfer this Panasonic cellular phone other than to a
transferee end-user who undertakes to observe the same obligations
as those set out in this EULA;
(e) You may not remove any proprietary notices, such as copyright,
trademark, or otherwise, from the Embedded Software.
3. INTELLECTUAL PROPERTY RIGHTS: The Embedded Software is
protected by copyright, trademark, patent and/or other intellectual
property rights and is owned by Panasonic Mobile Communications Co.,
Ltd. ("PMC") and/or is under license from PMC's licensors.
4. TERMINATION: Your right to use the Embedded Software may be
terminated for failure to comply with any of the terms of this EULA.
VS7_AAA.book Page 162 Wednesday, August 3, 2005 5:10 PM
163
Licensing
5. LIMITATION OF LIABILITY/DISCLAIMER OF WARRANTIES: TO THE
MAXIMUM EXTENT PERMITTED BY APPLICABLE LAW, IN NO EVENT
SHALL PMC, ITS AFFILIATES, AND THEIR LICENSORS BE LIABLE
FOR INCIDENTAL, INDIRECT, SPECIAL OR CONSEQUENTIAL
DAMAGES OR ANY DAMAGES WHATSOEVER RESULTING FROM
LOSS OF USE, DATA OR PROFITS, ARISING OUT OF OR IN
CONNECTION WITH THE USE OR PERFORMANCE OF THE
EMBEDDED SOFTWARE. EXCEPT AS EXPRESSLY STATED IN THE
RELEVANT WARRANTY CARD, PMC, ITS AFFILIATES, AND THEIR
LICENSORS DISCLAIM ALL WARRANTIES, EXPRESS AND IMPLIED,
INCLUDING, WITHOUT LIMITATION, THE IMPLIED WARRANTIES OF
MERCHANTABILITY AND FITNESS FOR A PARTICULAR PURPOSE.
THE REMEDIES PROVIDED TO THE END-USER IN THE RELEVANT
WARRANTY CARD ARE EXCLUSIVE.
6. ADDITIONAL THIRD PARTY TERMS: The Embedded Software may
contain third party software subject to separate third party license terms
and conditions set forth in the user manual or associated product
documentation and/or displayed on the LCD of this Panasonic cellular
phone. You acknowledge and agree that such third party software is
governed by the third party license terms, as applicable, and that such
terms are solely between you and the applicable licensor.
7. EXPORT REGULATIONS/RESTRICTED RIGHTS: The Embedded
Software is subject to U.S. export control laws, including the U.S. Export
Administration Act and its associated regulations, and may be subject to
export or import regulations in other countries. You agree to comply
strictly with all such regulations. You confirm that with respect to the
Embedded Software, you will not export or re-export it, directly or
indirectly, to any countries that are subject to U.S. export restrictions.
Use, duplication or disclosure by the U.S. government is subject to the
restrictions as set forth in the Rights in Technical Data and Computer
Software Clauses in DFARS 252.227-7013(c)(1)(ii) and FAR 52.227-
19(c)(2) as applicable.
VS7_AAA.book Page 163 Wednesday, August 3, 2005 5:10 PM
164
Index
A
Active flip .................................. 103
Alarms ...................................... 121
Alert mute ................................... 30
Answering calls .......................... 29
Any key answer ........................ 102
Archive ....................................... 64
Auto answer ............................. 103
Auto redial .................................. 27
B
Backlight time ............................. 99
Battery
Charging ................................... 21
Inserting ................................... 20
Removing ................................. 20
Bluetooth .................................. 107
Bookmarks ................................. 84
Brightness .................................. 96
Browser ...................................... 81
Browser options
Advanced ................................. 87
Bookmarks ............................... 84
Enter address ........................... 85
Reload page ............................. 86
Save media .............................. 85
Service Inbox ........................... 86
Set as bookmark ...................... 85
Settings .................................... 87
C
Calculator ................................. 124
Calendar ................................... 125
Call
Answering ................................ 29
Duration .................................. 103
Hold .......................................... 32
Making ...................................... 27
Call barring ............................... 118
Call diverts ............................... 101
Call log ........................................ 47
Call waiting ............................... 102
Calls .......................................... 101
Camera ....................................... 70
Cell Broadcast .......................... 114
Chat ............................................ 66
Clock ........................................... 91
Conference ................................. 35
Connectivity settings .................105
Contacts ..................................... 41
Continuous shooting ...................76
Creating a message
MMS ......................................... 58
SMS .......................................... 55
D
Display
Front display ............................. 15
Main display ............................. 15
Settings .................................... 96
Download
Games ............................141, 146
Picture files ............................. 136
Sound clips ............................. 138
Video clips .............................. 140
Drafts folder ................................ 64
DTMF .......................................... 33
E
Emergency call ........................... 29
Emoticon list ............................... 56
Error messages ........................ 156
F
Fixed dial .................................. 118
G
Games ...................................... 144
Games folder ............................ 140
GSM network ............................ 115
VS7_AAA.book Page 164 Wednesday, August 3, 2005 5:10 PM
165
Index
H
Handsfree talking ....................... 33
Hold ............................................ 32
How to read this manual .............. 8
I
Icons ........................................... 16
Main menu icons ...................... 98
Status icons ............................. 16
Illumination message ................. 55
Illuminations ............................... 92
Inbox .......................................... 60
In-call operations ........................ 32
Indicator/Illumination Light ......... 18
Infrared ..................................... 105
Input method .............................. 36
International dialling ................... 28
K
Key
Backlight .................................. 93
Functions ................................. 12
Keyguard .................................. 94
Quick keys ............................... 13
Settings .................................... 93
Shortcut .................................... 94
Tone ......................................... 93
Volume ..................................... 93
L
Language
Cell Broadcast ........................ 114
Display ..................................... 91
Input ................................... 57, 91
M
Main menu
icons ......................................... 98
Structure .................................. 24
Making calls ............................... 27
Master reset ............................... 95
Memory status
Contacts ................................... 51
My Media ................................ 142
SMS/MMS ................................ 69
Menu
Displaying the menu ................. 25
Menu selection method ............ 26
Message alert ............................. 99
Messages settings ...................... 67
Missed call notification ................ 30
MMS ........................................... 54
Multi shot mode .......................... 76
Multiple calls operations ............. 34
My dictionary .............................. 38
My number .................................. 50
O
Operator name ........................... 96
Outbox folder .............................. 64
P
Phone
Opening/closing ........................ 23
Overview .................................. 10
Settings .................................... 90
Switching on/off ........................ 23
Picture ........................................ 71
Pictures folder ........................... 132
PIN/PIN2 code .......................... 117
Problems .................................. 154
Profiles ........................................ 90
Q
Quick keys .................................. 13
R
Recent call dialling ...................... 28
Recording a video clip ................ 78
Ringtone ..................................... 99
VS7_AAA.book Page 165 Wednesday, August 3, 2005 5:10 PM
166
Index
S
Security settings ....................... 117
Self-portrait ................................. 72
Send my number ...................... 103
Sent folder .................................. 64
Service charge ......................... 104
Service numbers ........................ 52
Shortcut keys ............................. 94
Shutdown tone ......................... 100
Silent mode ................................ 31
SIM card
Inserting ................................... 19
Removing ................................. 19
SIM Tool Kit .............................. 121
SMS ........................................... 54
Sound recorder ........................ 123
Sounds & alerts settings ............ 99
Sounds folder ........................... 136
Speed dial .................................. 48
Standby display .......................... 15
Startup tone .............................. 100
Status icons ................................ 16
Symbols used in this manual ........ 7
Synchronisation .................. 49, 112
T
T9® ............................................. 38
Taking a picture .......................... 72
Text entry ................................... 36
Text templates .......................... 141
Themes ...................................... 99
Time and date ............................ 91
U
Unsent folder .............................. 64
USB .......................................... 116
V
Vibration alert ........................... 100
Video, record .............................. 78
Videos folder ............................ 139
Voicemail .................................... 66
Volume control ............................ 33
W
Wallpaper ................................... 96
Warning tone ............................ 100
Web mail ..................................... 65
X
X-Changeable CoverTM ............ 153
VS7_AAA.book Page 166 Wednesday, August 3, 2005 5:10 PM