Panasonic of North America 9TGCF-502 Panasonic ToughBook w/ Intel WLAN User Manual Operating Instructions
Panasonic Corporation of North America Panasonic ToughBook w/ Intel WLAN Operating Instructions
Contents
- 1. Users Manual 1
- 2. Users Manual 2
- 3. Users Manual 3
Users Manual 2
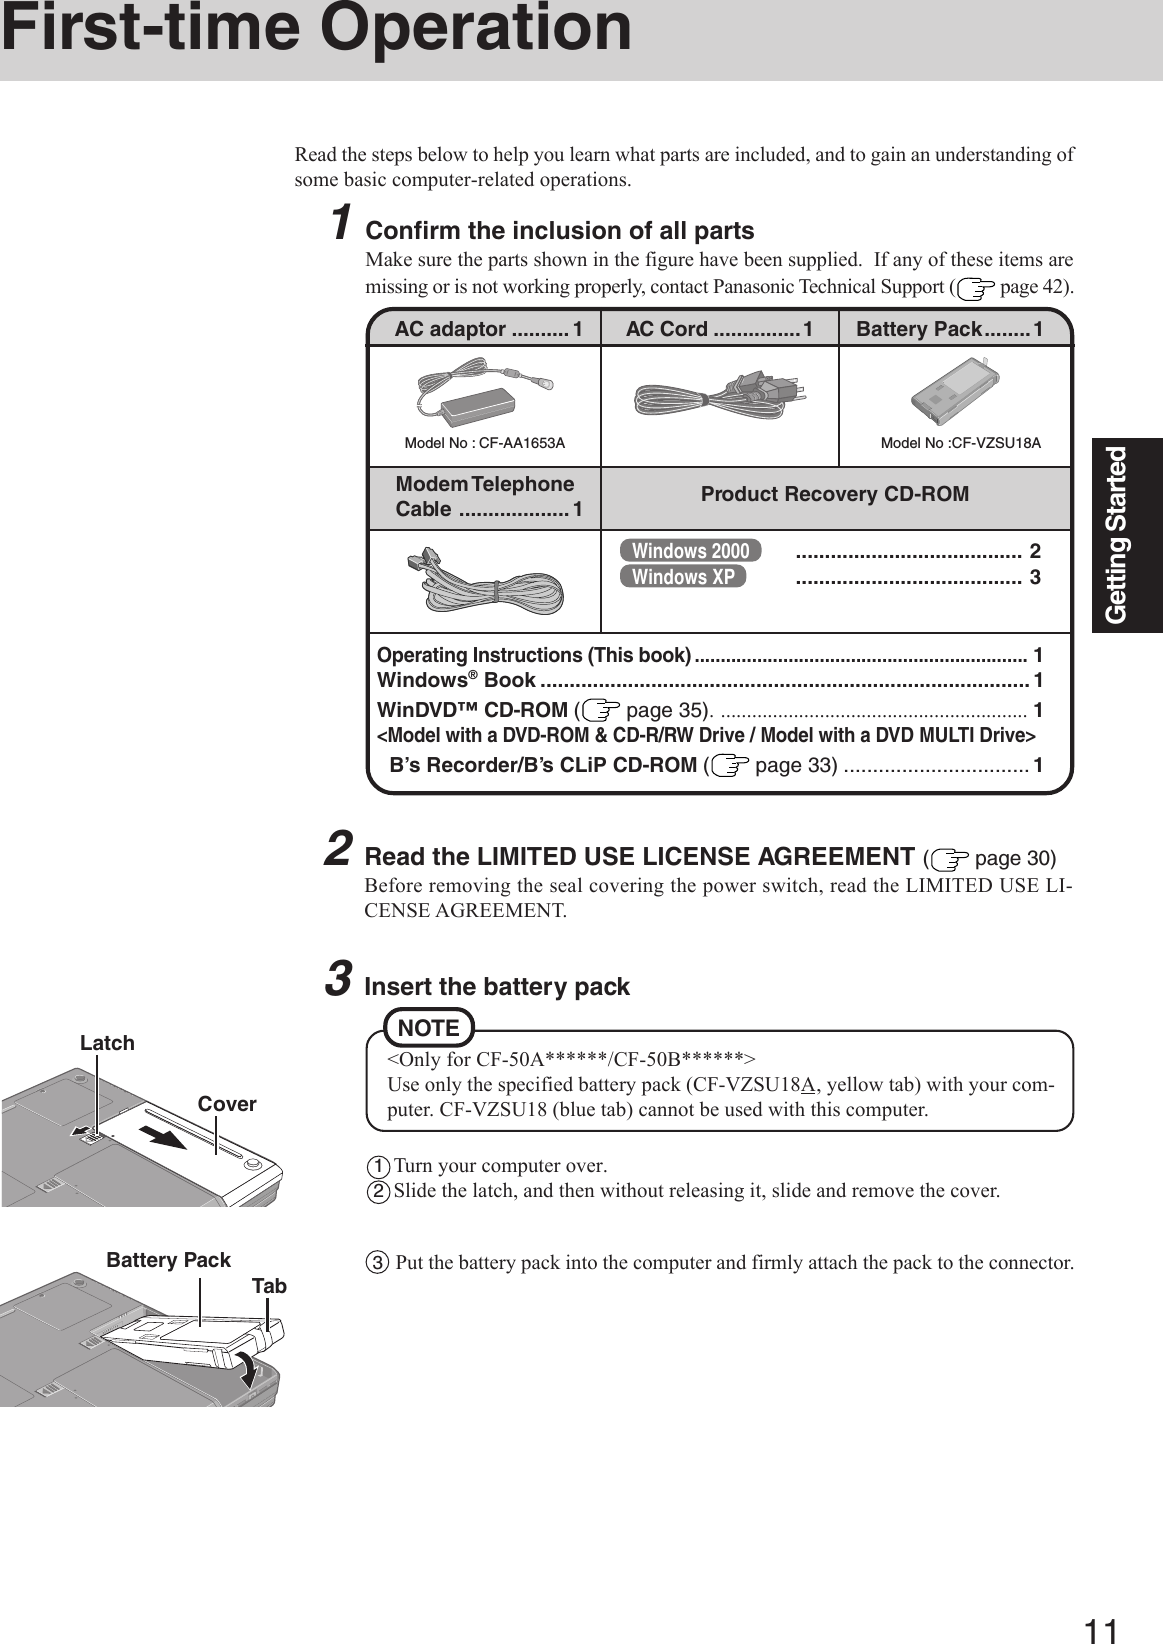
![13Getting Started7Setup WindowsMoving the cursor ( ) or clicking buttons can be performed with the touch pad ( page 19).1At [Welcome to the Windows 2000 Setup Wizard], select [Next].2After reading the agreement, select [I accept this agreement] or [I don’t accept thisagreement], then select [Next].3Select settings for your region, then select [Next].4Enter your name and organization and then select [Next].5Enter your computer name and administrator password and then select [Next].Windows 2000NOTE If [I don’t accept this agreement] is selected, the Windows setup will be aborted.Do not change the Setup Utility settings before executing Windows setup.Do not press any key or move the touch pad until [Windows 2000 ProfessionalSetup] is displayed.CAUTIONCAUTIONRemember this password! If the password is forgotten, Windows 2000 cannot beoperated.6Enter the correct date, time and the time zone, then select [Next].7At [Networking Settings], select [Typical settings], then select [Next].8At [Workgroup or Computer Domain], select [No, this computer is not on a network,or is on a network without a domain], then select [Next].The computer will restart.9At [Welcome to the Network Identification Wizard], select [Next].10At [Users of This Computer], select [Users must enter a user name and password touse this computer], then select [Next].11Select [Finish].12Enter your administrator password and select [OK].NOTEAfter setting up Windows, you can use “Icon Enlarger” to change the size of theicons, etc. as you like. To use this, select on the desktop or [Icon Enlarger] in[Start] - [Programs] - [Panasonic].1At [Welcome to the Windows XP Setup Wizard], select [Next].2After reading the agreement, select [I accept this agreement] or [I don’t accept thisagreement], then select [Next].Windows XPDo not change the Setup Utility settings before executing Windows setup.Do not press any key or move the touch pad until [Windows XP ProfessionalSetup] is displayed.CAUTIONNOTE If [I don’t accept this agreement] is selected, the Windows setup will be aborted.(To next page)](https://usermanual.wiki/Panasonic-of-North-America/9TGCF-502.Users-Manual-2/User-Guide-338206-Page-3.png)
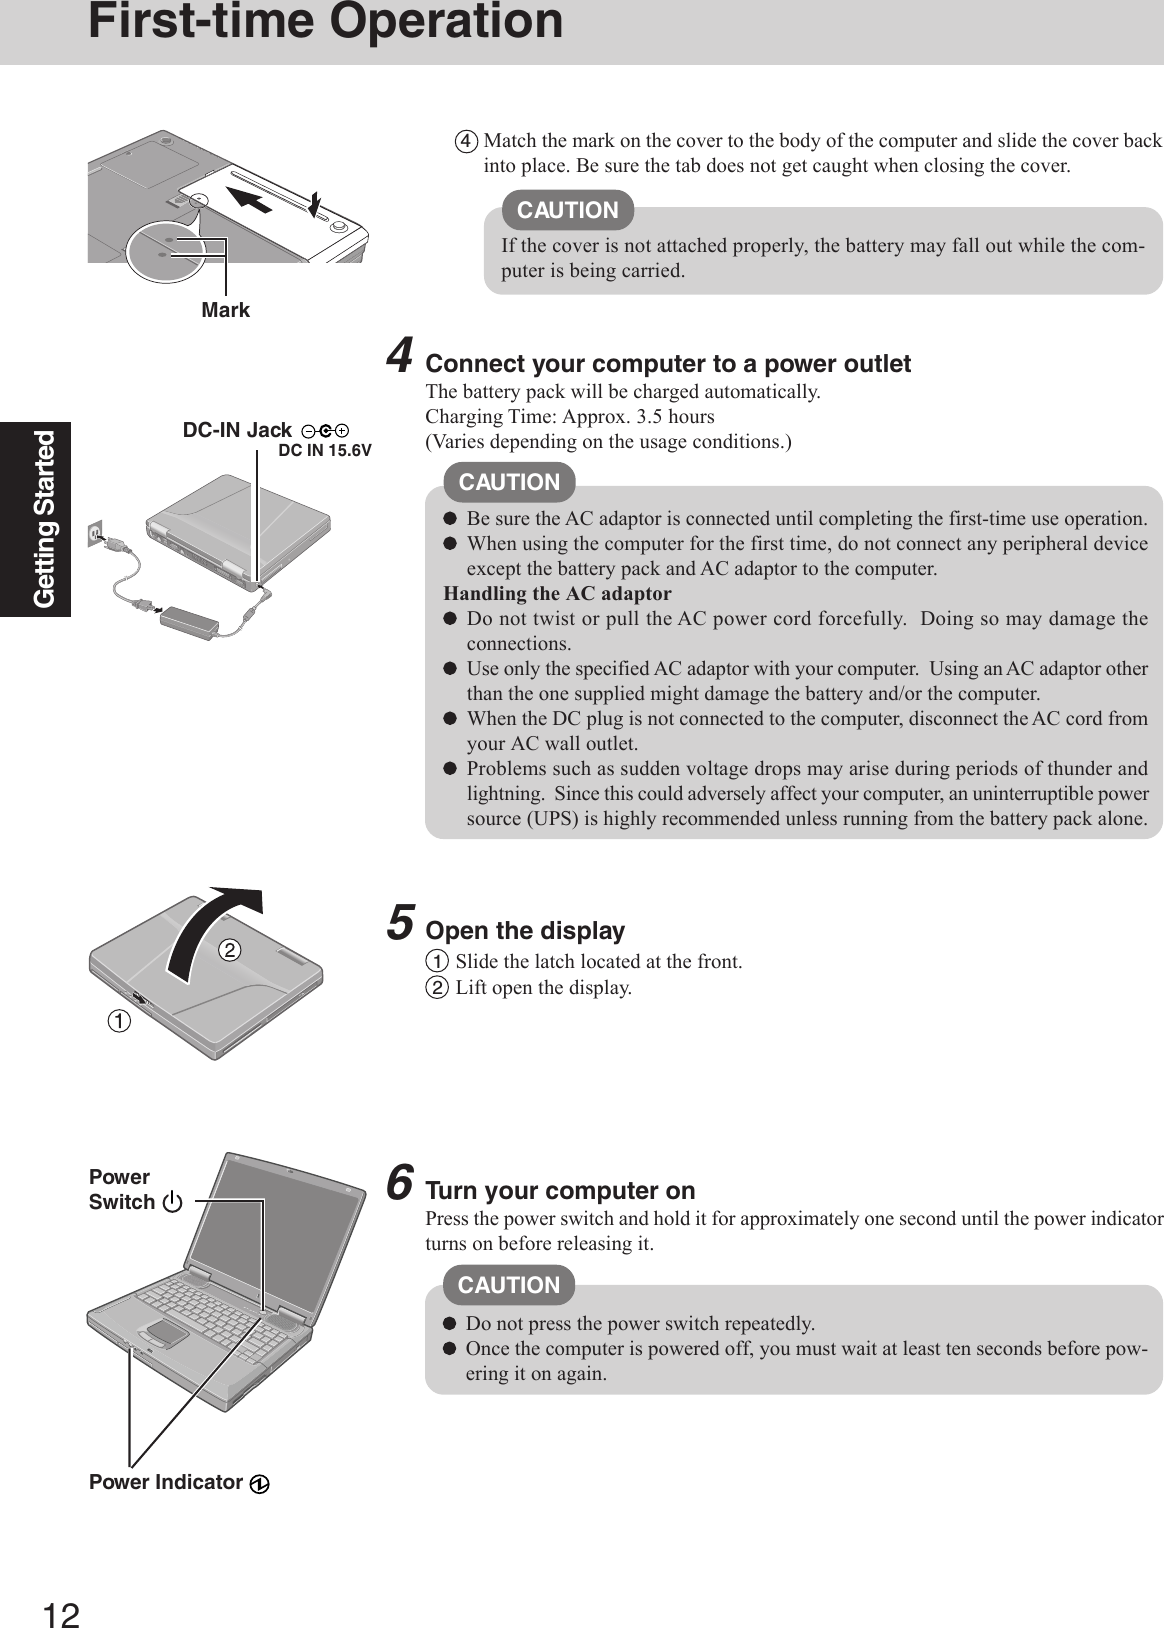
![14Getting StartedFirst-time Operation3Select settings for your region, then select [Next].4Enter your name and organization and then select [Next].5Enter your computer name and administrator password and then select [Next].6Enter the correct date, time and the time zone, then select [Next].7At [Networking Settings], select [Typical settings], then select [Next].8At [Workgroup or Computer Domain], select [No, this computer is not on a network,or is on a network without a domain], then select [Next].The computer will restart.9Enter your administrator password and select .10 Select [start] - [Control Panel] - [User Accounts] - [Create a new account] and followthe instructions on the display to create a user account, then restart the computer.CAUTIONRemember this password! If the password is forgotten, Windows XP cannot beoperated.NOTEIt may take two to three minutes until the next screen is displayed. Wait, and donot press any keys, or touch the touch pad, etc.NOTEAfter setting up Windows, you can use “Icon Enlarger” to change the size of theicons, etc. as you like. To use this, select on the desktop or [Icon Enlarger] in[start] - [All Programs] - [Panasonic].When creating a new user account:If you make mail settings, create password reset disks ( page 15), or conductother related operations before creating the user account, you will be unable touse any previous mail history or settings.When you create the first new account, you can only select [Computer administrator].Once a “Computer Administrator” account has been created, you can create ad-ditional limited user accounts.Note also that only the added user account will be displayed in the Welcome screen.The account for the administrator created during Windows setup will not be dis-played.<Only for CF-50E******/CF-50G******>If [Windows XP is currently configured to manage the Intel(R) PRO/WirelessLAN adaptor.] is displayed, select [Yes].If you use the wireless LAN, be sure to refer to the Reference Manual’s “Wire-less LAN”. If “Yes, make this computer a member of the following domain” is selected, thefollowing message may be displayed: [An invalid domain was specified. Wouldyou like to proceed for now and try joining a domain later?]. In this case, select[Yes]. After selecting [Yes], the computer will restart automatically, but some-times the [Starting Windows] message will remain on the screen, and windowswill not start up. If this happens, hold Alt down while pressing Tab until[Network ID Wizard] is displayed on top, and follow the instructions on thescreen.NOTECAUTIONRemember this password! If the password is forgotten, Windows XP cannot beoperated. You can create a password reset disk beforehand ( page 15).](https://usermanual.wiki/Panasonic-of-North-America/9TGCF-502.Users-Manual-2/User-Guide-338206-Page-4.png)
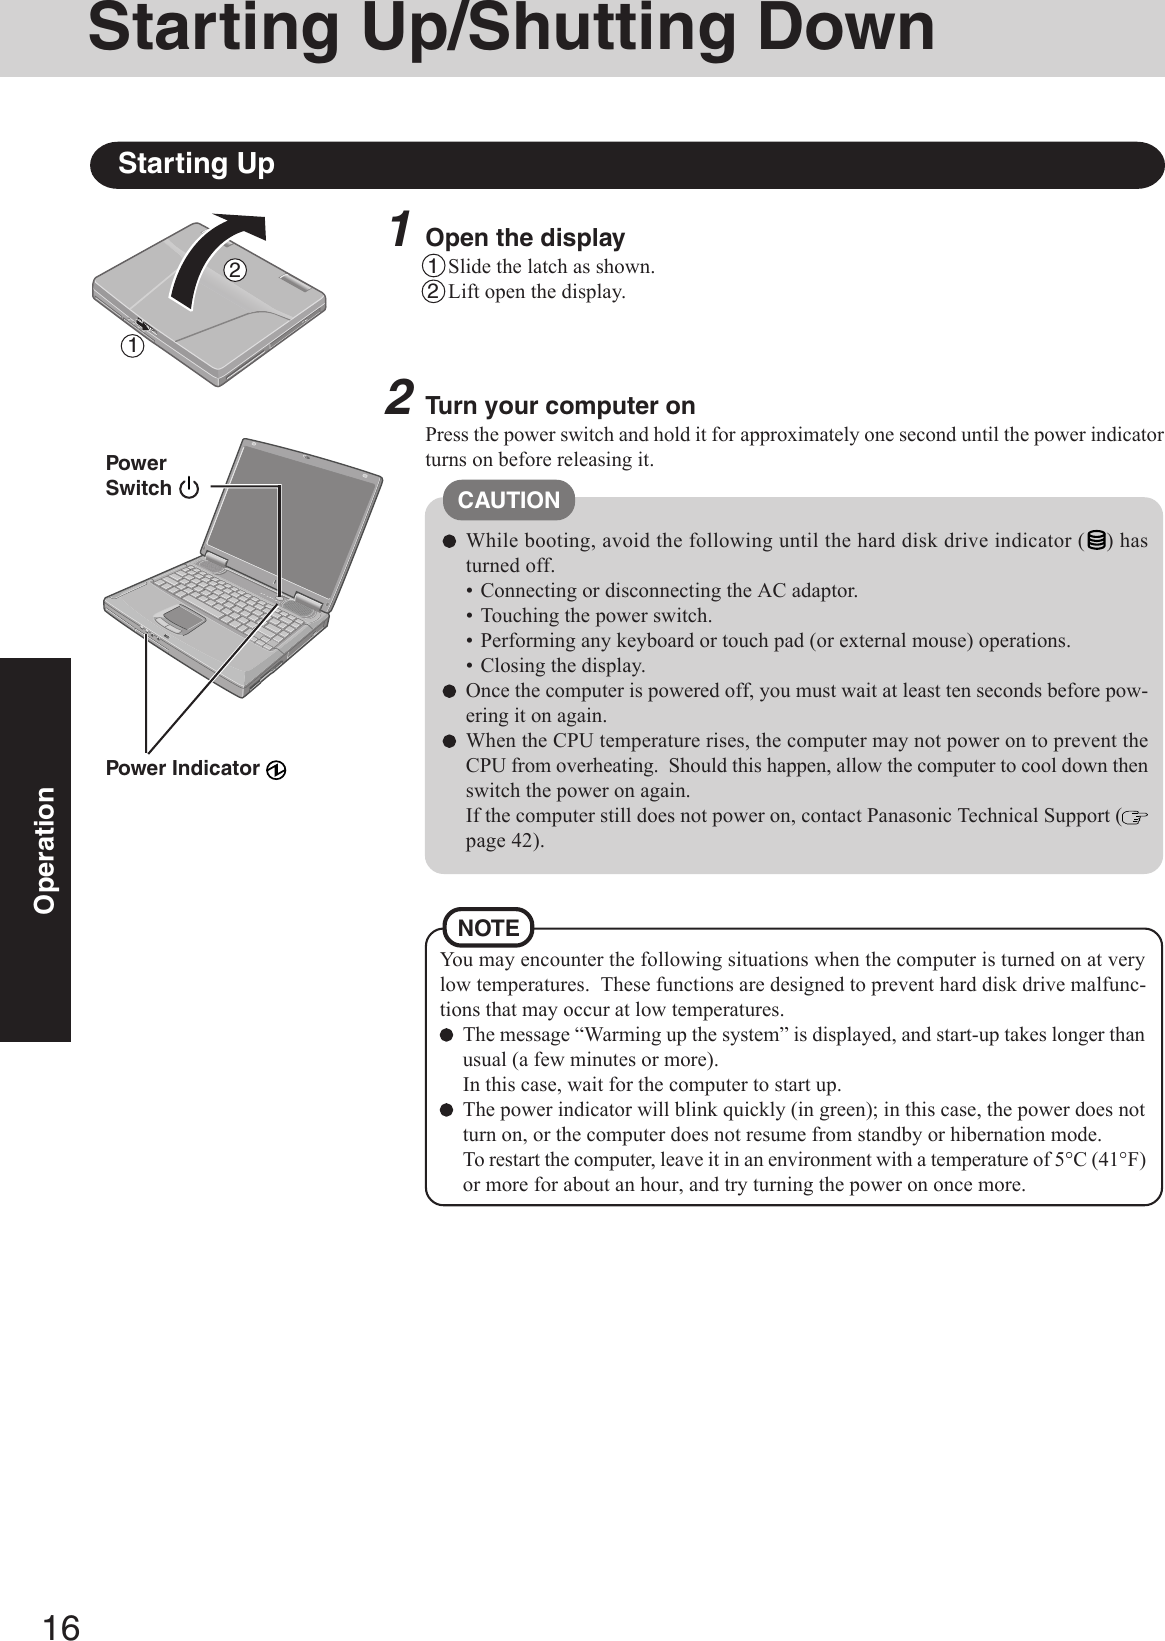
![15Getting StartedDepending on the Windows settings, installed applications, and drivers, menus andother displays may differ, or some functions (such as use of the password reset disk)may be inoperable. Check with your system administrator for details.You can select Classic view for the Control Panel or select the Classic Start menu. Youcan also change the way a user logs on or off.The procedure in this manual uses the method or view of the Windows XP defaultsetting (not Classic view or Classic Start menu etc.).Resetting the passwordWindows XP has a function to reset a forgotten password.To use this function, you need to create a password reset disk beforehand following thesteps below.1Select [start] - [Control Panel] - [User Accounts].2Select [Prevent a forgotten password] from [Related Tasks] menu of the account youused to logon and create a password reset disk following the on-screen instructions.Store the password reset disk in a safe place.· Only the logon password for each account can be reset.The password set in the Setup Utility cannot be reset.Information for Windows XPThis concludes the first-time use operation guidelines.<Information for the DVD-ROM & CD-R/RW drive>Before using the DVD-ROM & CD-R/RW drive for the first time, remove the protectivesheet from the lens area. The protective sheet inside the drive delays the opening of thedrive by about ten seconds. This delay is not a problem.NOTE<Only for CF-50A******/CF-50B******>8Create Backup Disks for reinstallation1Prepare 2HD floppy disks and make sure they are not in the write-protected state, andthen set it.2Windows 2000Select [Start] - [Programs] - [Panasonic] - [Create Backup Disk] and follow the on-screen instructions.Windows XPSelect [start] - [All Programs] - [Panasonic] - [Create Backup Disk] and follow the on-screen instructions.When [You do not need to make “BACKUP DISK”] is displayed, there is no need tocreate a Backup Disk.3Place a label identifying the contents on each disk.Name of created backup diskFIRSTAID FD (When the display for creating the UPDATE FD is shown, create thedisk by following the on-screen instructions.)Label on the top surface, andinsert the shutter-side headfirst.Eject ButtonCAUTIONStore the floppy disks in a safe place. They will enable you to return your com-puter to close to the condition at the time of purchase should any problems occur.When creating backup disks, do not run any other application program.When creating backup disks and the message [Insufficient files to copy] is dis-played, select [OK] and then contact Panasonic Technical Support ( page 42).While the floppy disk drive indicator is on, do not remove the floppy disk, poweroff your computer or use the standby or hibernation function ( “Standby/Hibernation Functions”).Be sure to create the backup disk.If a backup disk is not created, it will be impossible to return the computer to itsoriginal state. In this case, contact Panasonic Technical Support ( page 42).](https://usermanual.wiki/Panasonic-of-North-America/9TGCF-502.Users-Manual-2/User-Guide-338206-Page-5.png)
![17Operation3Log on to WindowsWindows 2000Wait for 10 seconds after confirming that the hard disk drive access has been completed,input the user name and password, then select [OK]. Until the correct user name andpassword are entered, the computer will not operate.Windows XPWait for 10 seconds after confirming that the hard disk access has been completed, selectthe user and input the password, then select . Until the correct password is entered, thecomputer will not operate.4Select your applicationYou are able to start working on your computer.The power saving function is factory set, so if there is no input from a key, the touch pador an external mouse (when one is connected) for a certain interval of time, the power tothe LCD and hard disk may be turned off. The LCD will resume operation when thetouch pad or an external mouse (when one is connected) is used or a key is pressed.The power to the LCD may be turned off even when an application software is beinginstalled. In this case, because it is conceivable that a selection dialog box will beshown, do not press Space or Enter to attempt to resume from this condition asdoing so may trigger a selection, but instead, press a key unrelated to the direct trigger-ing of a selection, like Ctrl .In addition, when the computer is left alone, it automatically enters the standby or hiber-nation mode ( “Standby/Hibernation Functions”). The computer will resumeby pressing the power switch.Windows XPWhen switching to a different user with the Fast User Switching function, it may not bepossible to set the settings of the display. In this case, log off all users, and try theoperation once more. If the problem persists, restart the computer.NOTEWhen an application or file that was previously displayed ap-pears on your screenThe standby or hibernation mode has been set ( “Standby/Hibernation Func-tions”). Enter your password* and press Enter .( “Security Measures”)Will Start Will Not Start(Power off)If [Enter Password] is displayed*Supervisor Password or User Password set in the Setup Utility (notthe Windows password).Three incorrect attemptsorNo password for about a minuteThe correct passwordEnter Password [ ]](https://usermanual.wiki/Panasonic-of-North-America/9TGCF-502.Users-Manual-2/User-Guide-338206-Page-7.png)
![18OperationShutting Down (power off your computer)Restarting your computer (without shutting down)Windows 2000Select [Restart], then select [OK].Windows XPSelect [Restart].To shut down using the keyboard,Windows 2000Press , U , and select [Shut Down] with , then press Enter .Windows XPPress , U , and select [Turn Off] with , then press Enter .To quickly resume computer operation after shutting down,The standby or hibernation function is available ( “Standby/HibernationFunctions”).NOTEThis procedure is for shutting down the computer without using the standby or hibernationfunction.( “Standby/Hibernation Functions”)1Save important data and close each application2Windows 2000Select [Start] - [Shut Down]Windows XPSelect [start] - [Turn Off Computer]3Windows 2000Select [Shut down], then select [OK]Windows XPSelect [Turn Off]Your computer will power off automatically.CAUTIONDo not do the following during the shutdown/restart procedure.• Connecting or disconnecting the AC adaptor.• Touching the power switch.• Performing any keyboard, touch pad (or external mouse) operations.• Closing the display.Starting Up/Shutting Down](https://usermanual.wiki/Panasonic-of-North-America/9TGCF-502.Users-Manual-2/User-Guide-338206-Page-8.png)
![19OperationFunctionTouch PadUse the touch pad to move the cursor on the display and perform normal computer operations.Do not place any object on the work surface or press down forcefully with sharp-pointedobjects (e.g., nails) or hard objects that can leave marks (e.g., pencils and ball point pens).Try to avoid having any harmful substances, such as oil, come in contact with the touch pad.The cursor may not work properly in such cases.When the touch pad becomes dirty:Wipe to remove dirt by using a dry soft cloth such as gauze or a soft cloth first applied withdetergent diluted with water and then thoroughly wrung.Do not use benzene, thinner, or rubbing alcohol. Doing so may adversely affect the sur-face, e.g., discoloration. In addition, do not use commercially-available household clean-ers and cosmetics, as they may contain components harmful to the surface.By design the touch pad is to be used with a finger tip only. Therefore, do not use anyimplement which causes damage on the work surface.Left ButtonRight ButtonWork Surface NOTEorTwo quick taps, but on the sec-ond tap leaving your fingerdown (applying pressure) andmoving it on the work surface.While holding down the but-ton, moving your finger onthe work surface.orOperationMoving the CursorTapping/ClickingDouble-Tapping/Double-ClickingDraggingScrollorMove the tip of your fingerlightly over the surface.tapping clickingdouble-tapping double-clickingHandling the Touch Pad “Touch Pad”Besides the above operations, operations such as Zoom and Pan are possible by allocatingthese functions to the buttons and/or pad. For more details, refer to [Mouse Properties]*.*Windows 2000 :Select [Start] - [Settings] - [Control Panel] - [Mouse].Windows XP: Select [start] - [Control Panel] - [Printers and Other Hardware] - [Mouse].The operations of Scroll, Pan or Zoom will differ depending on the application. There arecases the touch pad will not support these operations even with an application that sup-ports the functions.NOTE](https://usermanual.wiki/Panasonic-of-North-America/9TGCF-502.Users-Manual-2/User-Guide-338206-Page-9.png)