Panasonic of North America 9TGCF-502 Panasonic ToughBook w/ Intel WLAN User Manual Operating Instructions
Panasonic Corporation of North America Panasonic ToughBook w/ Intel WLAN Operating Instructions
Contents
- 1. Users Manual 1
- 2. Users Manual 2
- 3. Users Manual 3
Users Manual 2
11
Getting Started
2
Read the LIMITED USE LICENSE AGREEMENT ( page 30)
Before removing the seal covering the power switch, read the LIMITED USE LI-
CENSE AGREEMENT.
3
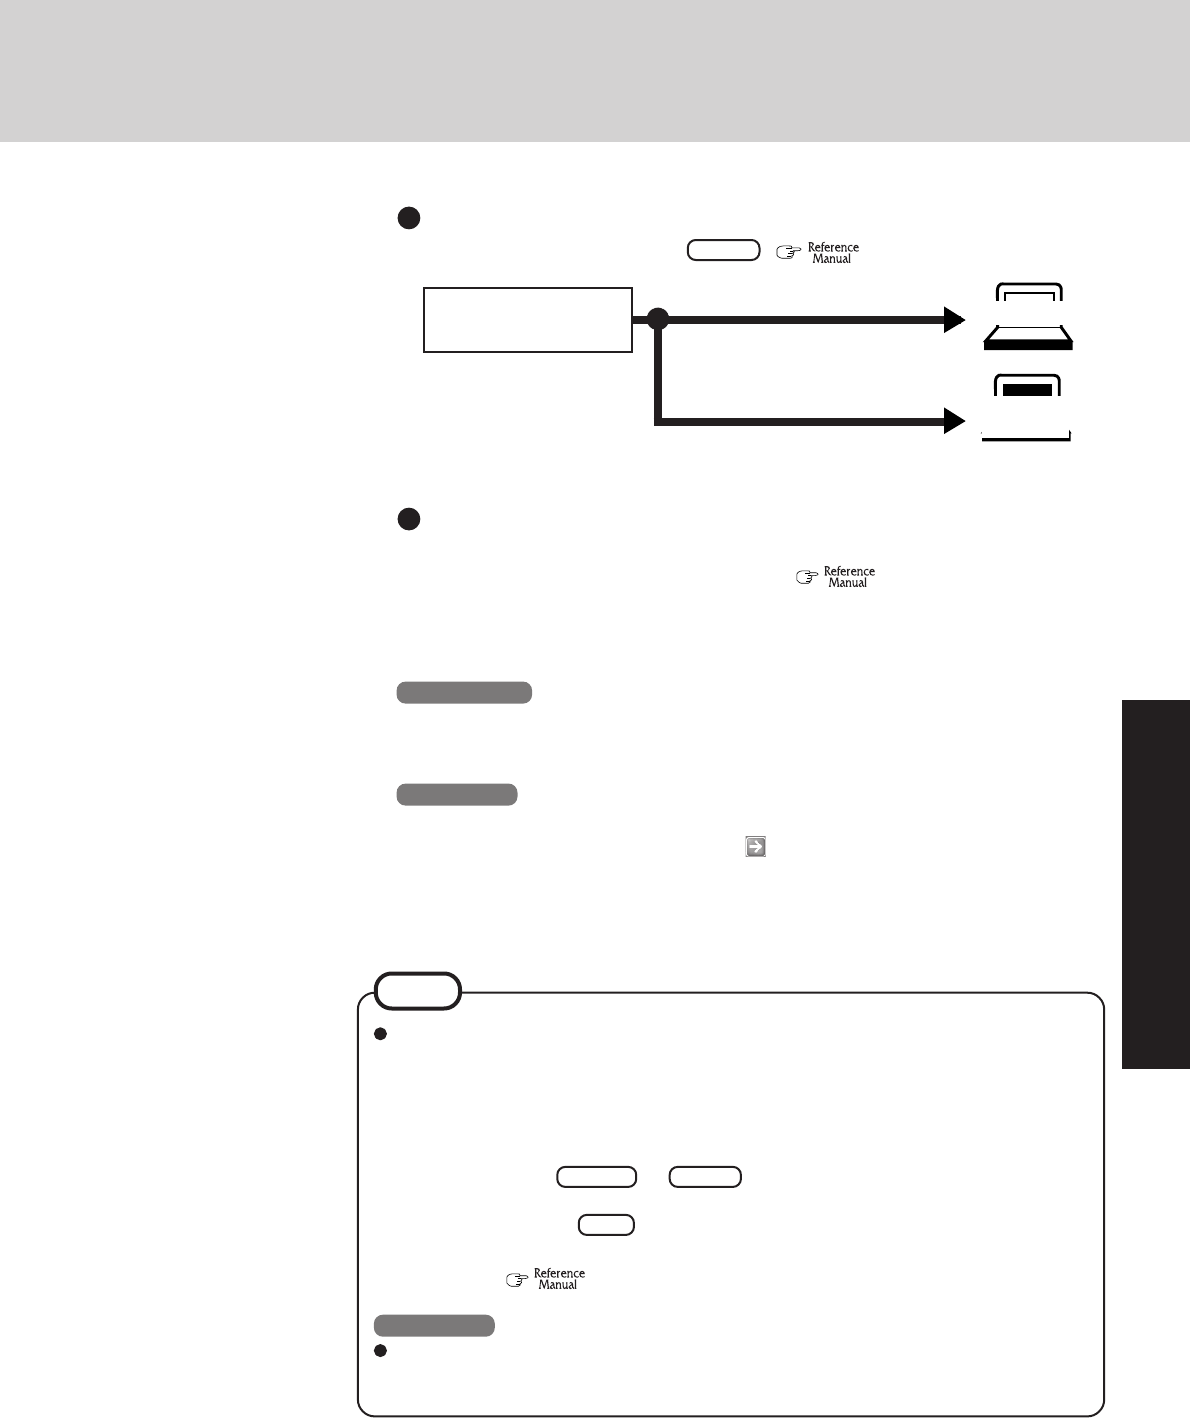
Insert the battery pack
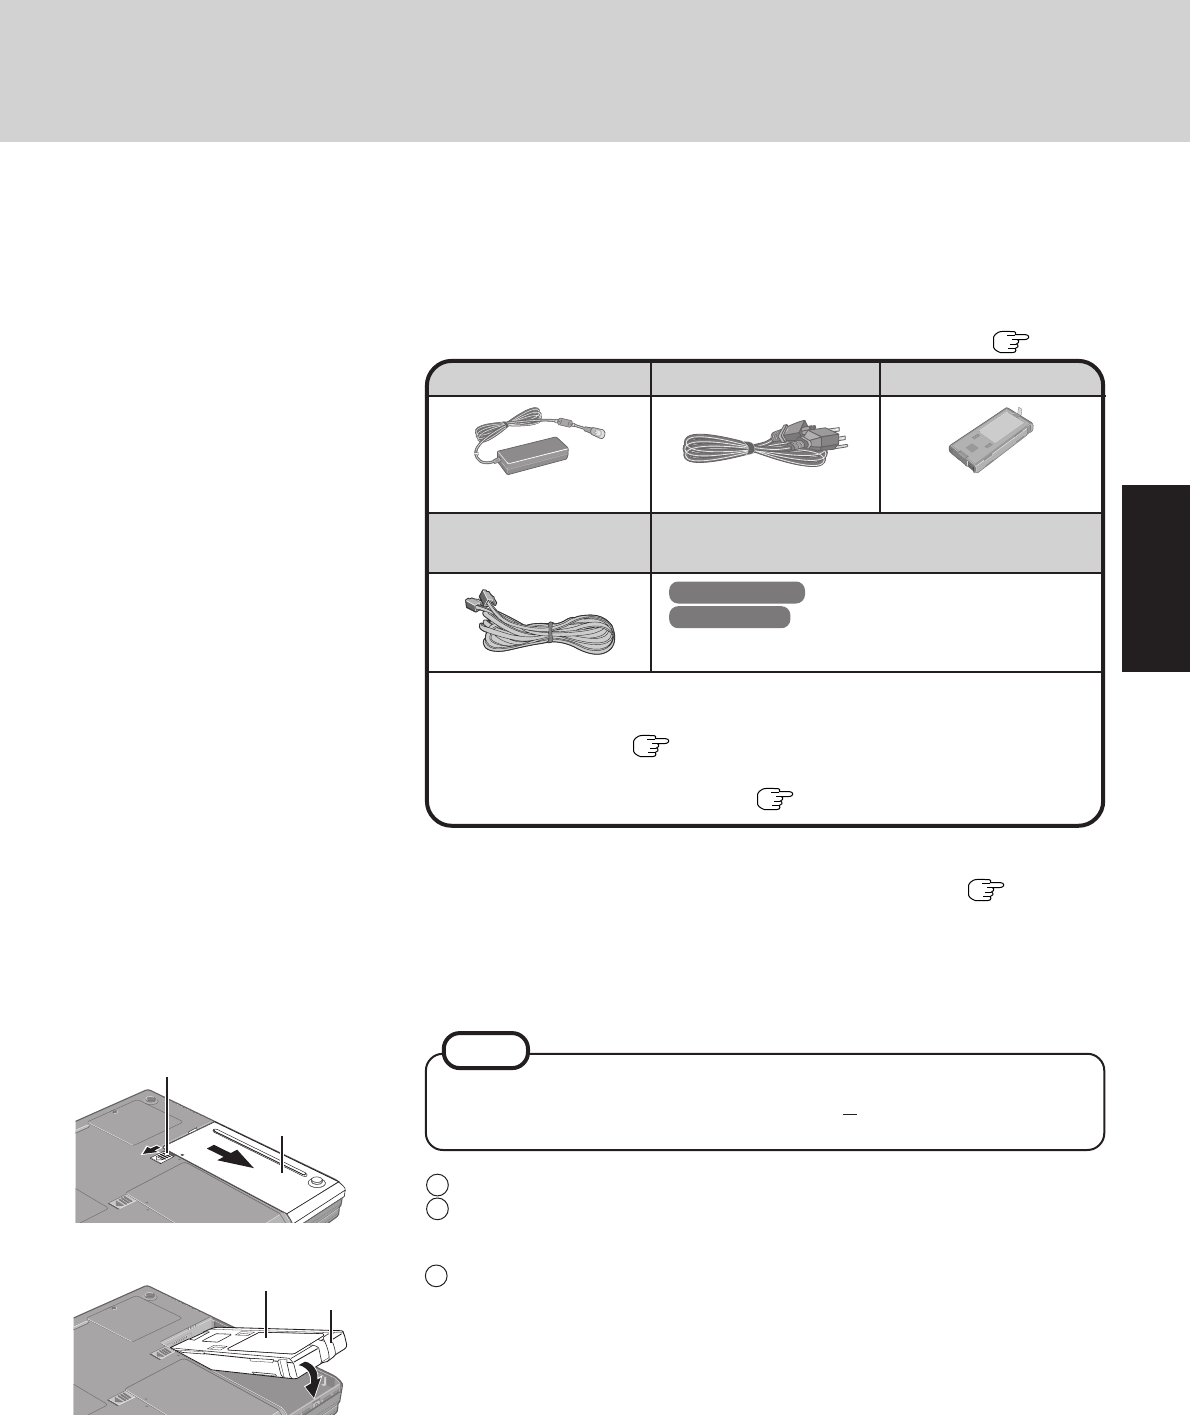
1Turn your computer over.
2Slide the latch, and then without releasing it, slide and remove the cover.
First-time Operation
Read the steps below to help you learn what parts are included, and to gain an understanding of
some basic computer-related operations.
1
Confirm the inclusion of all parts
Make sure the parts shown in the figure have been supplied. If any of these items are
missing or is not working properly, contact Panasonic Technical Support ( page 42).
Battery Pack
Cover
Tab
Model No : CF-AA1653A
AC adaptor .......... 1
Model No :CF-VZSU18A
AC Cord ...............1 Battery Pack........1
Modem Telephone
Cable ................... 1 Product Recovery CD-ROM
Latch
Operating Instructions (This book)
................................................................
1
Windows® Book .................................................................................... 1
WinDVD™ CD-ROM ( page 35). ........................................................... 1
<Model with a DVD-ROM & CD-R/RW Drive / Model with a DVD MULTI Drive>
B’s Recorder/B’s CLiP CD-ROM ( page 33) ................................ 1
3Put the battery pack into the computer and firmly attach the pack to the connector.
NOTE
<Only for CF-50A******/CF-50B******>
Use only the specified battery pack (CF-VZSU18A, yellow tab) with your com-
puter. CF-VZSU18 (blue tab) cannot be used with this computer.
Windows 2000 ....................................... 2
Windows XP ....................................... 3
12
Getting Started
First-time Operation
6
Turn your computer on
Press the power switch and hold it for approximately one second until the power indicator
turns on before releasing it.
Do not press the power switch repeatedly.
Once the computer is powered off, you must wait at least ten seconds before pow-
ering it on again.
4
Connect your computer to a power outlet
The battery pack will be charged automatically.
Charging Time: Approx. 3.5 hours
(Varies depending on the usage conditions.)
Be sure the AC adaptor is connected until completing the first-time use operation.
When using the computer for the first time, do not connect any peripheral device
except the battery pack and AC adaptor to the computer.
Handling the AC adaptor
Do not twist or pull the AC power cord forcefully. Doing so may damage the
connections.
Use only the specified AC adaptor with your computer. Using an AC adaptor other
than the one supplied might damage the battery and/or the computer.
When the DC plug is not connected to the computer, disconnect the AC cord from
your AC wall outlet.
Problems such as sudden voltage drops may arise during periods of thunder and
lightning. Since this could adversely affect your computer, an uninterruptible power
source (UPS) is highly recommended unless running from the battery pack alone.
5
Open the display
1Slide the latch located at the front.
2Lift open the display.
CAUTION
CAUTION
Power
Switch
Power Indicator
If the cover is not attached properly, the battery may fall out while the com-
puter is being carried.
CAUTION
4Match the mark on the cover to the body of the computer and slide the cover back
into place. Be sure the tab does not get caught when closing the cover.
Mark
DC-IN Jack
DC IN 15.6V

13
Getting Started
7
Setup Windows
Moving the cursor ( ) or clicking buttons can be performed with the touch pad ( page 19).
1At [Welcome to the Windows 2000 Setup Wizard], select [Next].
2After reading the agreement, select [I accept this agreement] or [I don’t accept this
agreement], then select [Next].
3Select settings for your region, then select [Next].
4Enter your name and organization and then select [Next].
5Enter your computer name and administrator password and then select [Next].
Windows 2000
NOTE
If [I don’t accept this agreement] is selected, the Windows setup will be aborted.
Do not change the Setup Utility settings before executing Windows setup.
Do not press any key or move the touch pad until [Windows 2000 Professional
Setup] is displayed.
CAUTION
CAUTION
Remember this password! If the password is forgotten, Windows 2000 cannot be
operated.
6Enter the correct date, time and the time zone, then select [Next].
7At [Networking Settings], select [Typical settings], then select [Next].
8At [Workgroup or Computer Domain], select [No, this computer is not on a network,
or is on a network without a domain], then select [Next].
The computer will restart.
9At [Welcome to the Network Identification Wizard], select [Next].
10
At [Users of This Computer], select [Users must enter a user name and password to
use this computer], then select [Next].
11
Select [Finish].
12
Enter your administrator password and select [OK].
NOTE
After setting up Windows, you can use “Icon Enlarger” to change the size of the
icons, etc. as you like. To use this, select on the desktop or [Icon Enlarger] in
[Start] - [Programs] - [Panasonic].
1At [Welcome to the Windows XP Setup Wizard], select [Next].
2After reading the agreement, select [I accept this agreement] or [I don’t accept this
agreement], then select [Next].
Windows XP
Do not change the Setup Utility settings before executing Windows setup.
Do not press any key or move the touch pad until [Windows XP Professional
Setup] is displayed.
CAUTION
NOTE
If [I don’t accept this agreement] is selected, the Windows setup will be aborted.
(To next page)
14
Getting Started
First-time Operation
3Select settings for your region, then select [Next].
4Enter your name and organization and then select [Next].
5Enter your computer name and administrator password and then select [Next].
6Enter the correct date, time and the time zone, then select [Next].
7At [Networking Settings], select [Typical settings], then select [Next].
8At [Workgroup or Computer Domain], select [No, this computer is not on a network,
or is on a network without a domain], then select [Next].
The computer will restart.
9Enter your administrator password and select .
10 Select [start] - [Control Panel] - [User Accounts] - [Create a new account] and follow
the instructions on the display to create a user account, then restart the computer.
CAUTION
Remember this password! If the password is forgotten, Windows XP cannot be
operated.
NOTE
It may take two to three minutes until the next screen is displayed. Wait, and do
not press any keys, or touch the touch pad, etc.
NOTE
After setting up Windows, you can use “Icon Enlarger” to change the size of the
icons, etc. as you like. To use this, select on the desktop or [Icon Enlarger] in
[start] - [All Programs] - [Panasonic].
When creating a new user account:
If you make mail settings, create password reset disks ( page 15), or conduct
other related operations before creating the user account, you will be unable to
use any previous mail history or settings.
When you create the first new account, you can only select [Computer administrator].
Once a “Computer Administrator” account has been created, you can create ad-
ditional limited user accounts.
Note also that only the added user account will be displayed in the Welcome screen.
The account for the administrator created during Windows setup will not be dis-
played.
<Only for CF-50E******/CF-50G******>
If [Windows XP is currently configured to manage the Intel(R) PRO/Wireless
LAN adaptor.] is displayed, select [Yes].
If you use the wireless LAN, be sure to refer to the Reference Manual’s “Wire-
less LAN”.
If “Yes, make this computer a member of the following domain” is selected, the
following message may be displayed: [An invalid domain was specified. Would
you like to proceed for now and try joining a domain later?]. In this case, select
[Yes]. After selecting [Yes], the computer will restart automatically, but some-
times the [Starting Windows] message will remain on the screen, and windows
will not start up. If this happens, hold Alt down while pressing Tab until
[Network ID Wizard] is displayed on top, and follow the instructions on the
screen.
NOTE
CAUTION
Remember this password! If the password is forgotten, Windows XP cannot be
operated. You can create a password reset disk beforehand ( page 15).
15
Getting Started
Depending on the Windows settings, installed applications, and drivers, menus and
other displays may differ, or some functions (such as use of the password reset disk)
may be inoperable. Check with your system administrator for details.
You can select Classic view for the Control Panel or select the Classic Start menu. You
can also change the way a user logs on or off.
The procedure in this manual uses the method or view of the Windows XP default
setting (not Classic view or Classic Start menu etc.).
Resetting the password
Windows XP has a function to reset a forgotten password.
To use this function, you need to create a password reset disk beforehand following the
steps below.
1
Select [start] - [Control Panel] - [User Accounts].
2
Select [Prevent a forgotten password] from [Related Tasks] menu of the account you
used to logon and create a password reset disk following the on-screen instructions.
Store the password reset disk in a safe place.
· Only the logon password for each account can be reset.
The password set in the Setup Utility cannot be reset.
Information for Windows XP
This concludes the first-time use operation guidelines.
<Information for the DVD-ROM & CD-R/RW drive>
Before using the DVD-ROM & CD-R/RW drive for the first time, remove the protective
sheet from the lens area. The protective sheet inside the drive delays the opening of the
drive by about ten seconds. This delay is not a problem.
NOTE
<Only for CF-50A******/CF-50B******>
8
Create Backup Disks for reinstallation
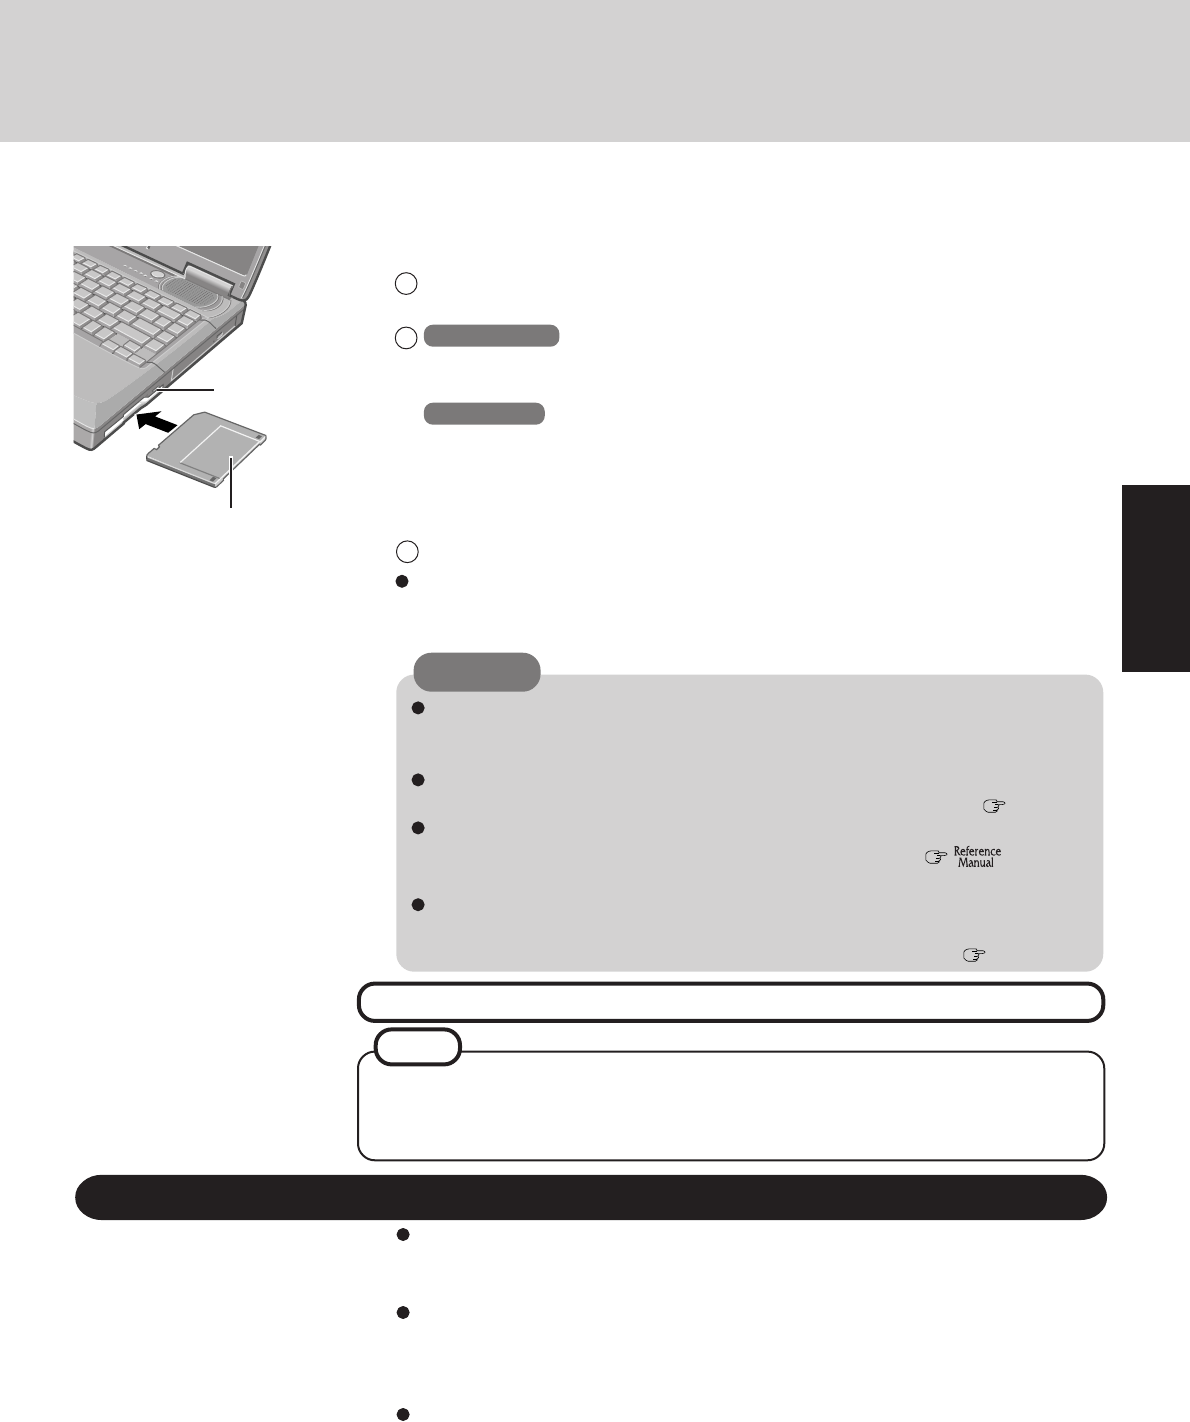
1Prepare 2HD floppy disks and make sure they are not in the write-protected state, and
then set it.
2Windows 2000
Select [Start] - [Programs] - [Panasonic] - [Create Backup Disk] and follow the on-
screen instructions.
Windows XP
Select [start] - [All Programs] - [Panasonic] - [Create Backup Disk] and follow the on-
screen instructions.
When [You do not need to make “BACKUP DISK”] is displayed, there is no need to
create a Backup Disk.
3Place a label identifying the contents on each disk.
Name of created backup disk
FIRSTAID FD (When the display for creating the UPDATE FD is shown, create the
disk by following the on-screen instructions.)
Label on the top surface, and
insert the shutter-side headfirst.
Eject Button
CAUTION
Store the floppy disks in a safe place. They will enable you to return your com-
puter to close to the condition at the time of purchase should any problems occur.
When creating backup disks, do not run any other application program.
When creating backup disks and the message [Insufficient files to copy] is dis-
played, select [OK] and then contact Panasonic Technical Support ( page 42).
While the floppy disk drive indicator is on, do not remove the floppy disk, power
off your computer or use the standby or hibernation function ( “Standby/
Hibernation Functions”).
Be sure to create the backup disk.
If a backup disk is not created, it will be impossible to return the computer to its
original state. In this case, contact Panasonic Technical Support ( page 42).

16
Operation
1
Open the display
1Slide the latch as shown.
2Lift open the display.
Starting Up/Shutting Down
Starting Up
2
Turn your computer on
Press the power switch and hold it for approximately one second until the power indicator
turns on before releasing it.
While booting, avoid the following until the hard disk drive indicator ( ) has
turned off.
• Connecting or disconnecting the AC adaptor.
• Touching the power switch.
• Performing any keyboard or touch pad (or external mouse) operations.
• Closing the display.
Once the computer is powered off, you must wait at least ten seconds before pow-
ering it on again.
When the CPU temperature rises, the computer may not power on to prevent the
CPU from overheating. Should this happen, allow the computer to cool down then
switch the power on again.
If the computer still does not power on, contact Panasonic Technical Support (
page 42).
CAUTION
You may encounter the following situations when the computer is turned on at very
low temperatures. These functions are designed to prevent hard disk drive malfunc-
tions that may occur at low temperatures.
The message “Warming up the system” is displayed, and start-up takes longer than
usual (a few minutes or more).
In this case, wait for the computer to start up.
The power indicator will blink quickly (in green); in this case, the power does not
turn on, or the computer does not resume from standby or hibernation mode.
To restart the computer, leave it in an environment with a temperature of 5°C (41°F)
or more for about an hour, and try turning the power on once more.
Power
Switch
Power Indicator
NOTE
1
2
17
Operation
3
Log on to Windows
Windows 2000
Wait for 10 seconds after confirming that the hard disk drive access has been completed,
input the user name and password, then select [OK]. Until the correct user name and
password are entered, the computer will not operate.
Windows XP
Wait for 10 seconds after confirming that the hard disk access has been completed, select
the user and input the password, then select . Until the correct password is entered, the
computer will not operate.
4
Select your application
You are able to start working on your computer.
The power saving function is factory set, so if there is no input from a key, the touch pad
or an external mouse (when one is connected) for a certain interval of time, the power to
the LCD and hard disk may be turned off. The LCD will resume operation when the
touch pad or an external mouse (when one is connected) is used or a key is pressed.
The power to the LCD may be turned off even when an application software is being
installed. In this case, because it is conceivable that a selection dialog box will be
shown, do not press Space or Enter to attempt to resume from this condition as
doing so may trigger a selection, but instead, press a key unrelated to the direct trigger-
ing of a selection, like Ctrl .
In addition, when the computer is left alone, it automatically enters the standby or hiber-
nation mode ( “Standby/Hibernation Functions”). The computer will resume
by pressing the power switch.
Windows XP
When switching to a different user with the Fast User Switching function, it may not be
possible to set the settings of the display. In this case, log off all users, and try the
operation once more. If the problem persists, restart the computer.
NOTE
When an application or file that was previously displayed ap-
pears on your screen
The standby or hibernation mode has been set ( “Standby/Hibernation Func-
tions”).
Enter your password* and press Enter .( “Security Measures”)
Will Start
Will Not Start
(Power off)
If [Enter Password] is displayed
*Supervisor Password or User Password set in the Setup Utility (not
the Windows password).
Three incorrect attempts
or
No password for about a minute
The correct password
Enter Password [ ]

18
Operation
Shutting Down (power off your computer)
Restarting your computer (without shutting down)
Windows 2000
Select [Restart], then select [OK].
Windows XP
Select [Restart].
To shut down using the keyboard,
Windows 2000
Press , U , and select [Shut Down] with , then press Enter .
Windows XP
Press , U , and select [Turn Off] with , then press Enter .
To quickly resume computer operation after shutting down,
The standby or hibernation function is available ( “Standby/Hibernation
Functions”).
NOTE
This procedure is for shutting down the computer without using the standby or hibernation
function.
(
“Standby/Hibernation Functions”
)
1
Save important data and close each application
2
Windows 2000
Select [Start] - [Shut Down]
Windows XP
Select [start] - [Turn Off Computer]
3
Windows 2000
Select [Shut down], then select [OK]
Windows XP
Select [Turn Off]
Your computer will power off automatically.
CAUTION
Do not do the following during the shutdown/restart procedure.
• Connecting or disconnecting the AC adaptor.
• Touching the power switch.
• Performing any keyboard, touch pad (or external mouse) operations.
• Closing the display.
Starting Up/Shutting Down
19
Operation
Function
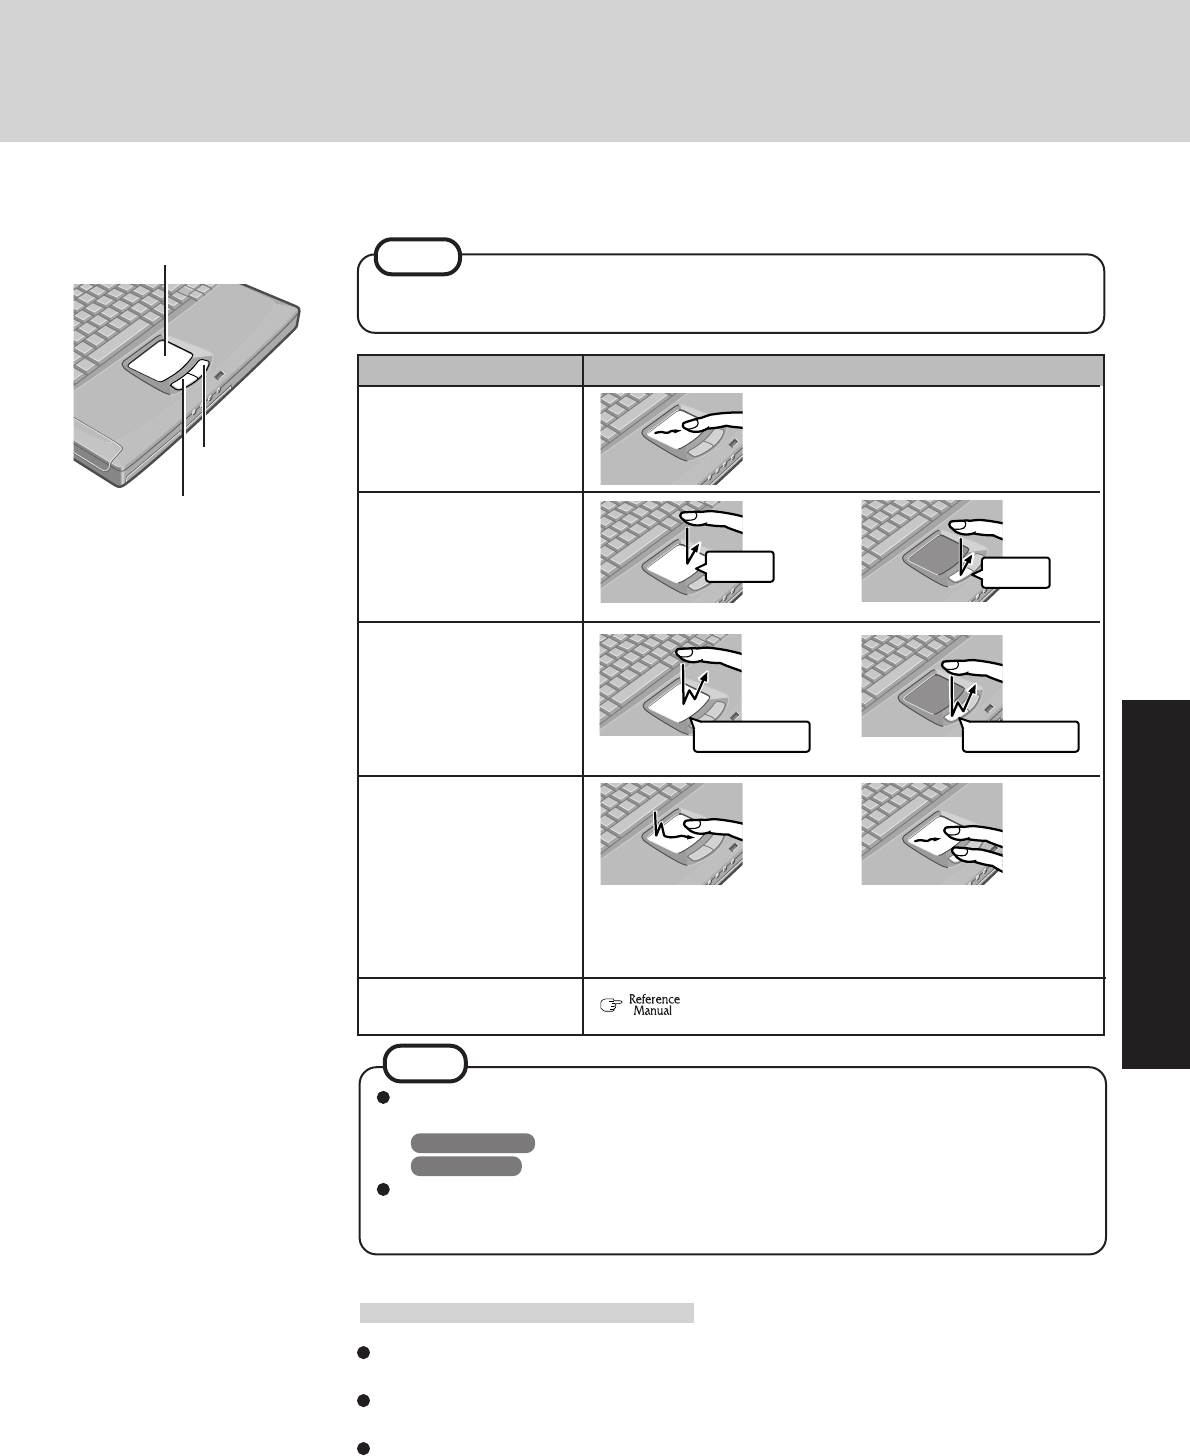
Touch Pad
Use the touch pad to move the cursor on the display and perform normal computer operations.
Do not place any object on the work surface or press down forcefully with sharp-pointed
objects (e.g., nails) or hard objects that can leave marks (e.g., pencils and ball point pens).
Try to avoid having any harmful substances, such as oil, come in contact with the touch pad.
The cursor may not work properly in such cases.
When the touch pad becomes dirty:
Wipe to remove dirt by using a dry soft cloth such as gauze or a soft cloth first applied with
detergent diluted with water and then thoroughly wrung.
Do not use benzene, thinner, or rubbing alcohol. Doing so may adversely affect the sur-
face, e.g., discoloration. In addition, do not use commercially-available household clean-
ers and cosmetics, as they may contain components harmful to the surface.
By design the touch pad is to be used with a finger tip only. Therefore, do not use any
implement which causes damage on the work surface.
Left Button
Right Button
Work Surface NOTE
or
Two quick taps, but on the sec-
ond tap leaving your finger
down (applying pressure) and
moving it on the work surface.
While holding down the but-
ton, moving your finger on
the work surface.
or
Operation
Moving the Cursor
Tapping/Clicking
Double-Tapping/
Double-Clicking
Dragging
Scroll
or
Move the tip of your finger
lightly over the surface.
tapping clicking
double-tapping double-clicking
Handling the Touch Pad
“Touch Pad”
Besides the above operations, operations such as Zoom and Pan are possible by allocating
these functions to the buttons and/or pad. For more details, refer to [Mouse Properties]*.
*Windows 2000 :
Select [Start] - [Settings] - [Control Panel] - [Mouse].
Windows XP
: Select [start] - [Control Panel] - [Printers and Other Hardware] - [Mouse].
The operations of Scroll, Pan or Zoom will differ depending on the application. There are
cases the touch pad will not support these operations even with an application that sup-
ports the functions.
NOTE