Panasonic of North America PT-VW350 LCD PROJECTOR User Manual PT VW350 Manual Part 2
Panasonic Corporation of North America LCD PROJECTOR PT VW350 Manual Part 2
Contents
- 1. PT-VW350_Manual Part 1-1
- 2. PT-VW350_Manual Part 1-2
- 3. PT-VW350_Manual Part 2
- 4. PT-VW350_Manual Part 3
PT-VW350_Manual Part 2
![Basic operations by using the remote controlUsing the AUTO SETUP functionThe automatic setup function can be used to automatically adjust the resolution, clock phase, and image position when analog RGB signals consisting of bitmap images such as computer signals are being input. Supplying images with bright white borders at the edges and high-contrast black and white characters is recommended when the system is in automatic adjustment mode.Avoid supplying images that include halftones or gradation, such as photographs and computer graphics. button1) Press the <AUTO SETUP> button on the remote control.Note fThe [CLOCK PHASE] may shift even if it has completed without any incident. In such cases, adjust the [POSITION] menu → [CLOCK PHASE] (x page 58). fAutomatic adjustment may not work depending on the model of the computer and the input signal. fImages may be disrupted for a few seconds during automatic adjustment, but it is not a malfunction. fIf you press any button on the remote control during the automatic adjustment, the automatic adjustment will be canceled. fIf the automatic setup function is used while moving images are being input, the adjustment may not be performed properly even for an RGB signal that can use automatic setup.Using the KEYSTONE buttonYou can correct the trapezoidal distortion that occurs when the projector is installed tilted or when the screen is tilted. button1) Press the <KEYSTONE> button to select [KEYSTONE] or press the <KEYSTONE> button again to select [CORNER CORRECTION]. fThe [KEYSTONE] or [CORNER CORRECTION] individual adjustment screen is displayed.2) Press asqw to adjust the item.Note fFor more details, refer to the [POSITION] menu → [KEYSTONE] (x page 56).ENGLISH - 41Chapter 3 Basic Operations - Basic operations by using the remote control](https://usermanual.wiki/Panasonic-of-North-America/PT-VW350.PT-VW350-Manual-Part-2/User-Guide-2596826-Page-1.png)
![Switching the input signalYou can switch the input signals to project. buttons1) Press the <COMPUTER 1>, <COMPUTER 2>, <HDMI>, <VIDEO> or <S-VIDEO> button on the remote control. fThis operation can be also performed using the <INPUT SELECT> button on the control panel.<COMPUTER 1> Switch to COMPUTER1 input.<COMPUTER 2> Switch to COMPUTER2 input. <HDMI> Switch to HDMI input.<VIDEO> Switch to VIDEO input. <S-VIDEO> Switch to S-VIDEO input.Using the FUNCTION buttonSome operations in the menu can be assigned to the <FUNCTION> button on the remote control so that it can be used as an easy shortcut button.button1) Press the <FUNCTION> button on the remote control.To assign functions to the <FUNCTION> button1) Press the <MENU> button on the control panel or on the remote control to display the menu items (main menu, sub-menu or details menu) you want to assign. fRefer to “Navigating through the menu” (x page 47) for the operation of the on-screen menu.2) Press and hold the <FUNCTION> button for 3 seconds or more.Note fAfter settings have been completed, the assigned menu item (main menu, sub-menu or details menu) will be displayed in [ASSIGNED FUNCTION] of the operation guide under the menu. fPerform the [PROJECTOR SETUP] menu → [FUNCTION BUTTON] (x page 73) when deallocating functions.Using the FREEZE functionYou can freeze the projected image and stop the sound temporarily, regardless of the playing condition of the external device.button1) Press the <FREEZE> button on the remote control. fThe video is paused and the audio is muted. [FREEZE] is displayed on the lower left of the screen during FREEZE.2) Press the <FREEZE> button again. fThe video playback resumes and the audio is unmuted.Note fWhen no signal input, [KEY NOT APPLICABLE] message will appear. fWhen [MIC] is set to [ON], the audio of MIC can be output even during FREEZE.42 - ENGLISHChapter 3 Basic Operations - Basic operations by using the remote control](https://usermanual.wiki/Panasonic-of-North-America/PT-VW350.PT-VW350-Manual-Part-2/User-Guide-2596826-Page-2.png)
![Using the AV MUTE functionIf the projector is not used for a certain period of time during the meeting intermission, for example, it is possible to turn off the audio and image temporarily.button1) Press the <AV MUTE> button on the remote control. fThe audio and image turn off.2) Press the <AV MUTE> button again. fThe audio and image turn on.Note fWhen [MIC] is set to [ON], the audio of MIC can be output even during AV MUTE.Using the P-TIMER functionYou can operate the presentation timer function.Presentations, etc. can be performed while checking the elapsed time or time remaining in the preset time. button1) Press the <P-TIMER> button on the remote control. fThe count is started. fThe elapsed time or the remaining time is displayed at the bottom right of the projected image.2) Press the <P-TIMER> button again. fThe count is stopped.3) Press the <P-TIMER> button again. fThe count is resumed.Note fPressing the <P-TIMER> button for at least 3 seconds to release the P-TIMER function. fFor details, please refer to the [DISPLAY OPTION] menu → [P-TIMER] (x page 66).Using the DIGITAL ZOOM function(Only for still image-based computer (RGB) and still image-based HDMI signals input)You can enlarge the center area. You can also change the location of the area to be enlarged.buttons1) Press the <D.ZOOM +> button or <D.ZOOM -> button on the remote control. fThe moving screen is displayed. fThe [DIGITAL ZOOM] individual adjustment screen is displayed when executing the menu operation. For details, refer to [DISPLAY OPTION] → [OTHER FUNCTIONS] (x page 67). fYou can press the <RETURN> button to cancel the function. rButton functions during [DIGITAL ZOOM]Operation menu Operation Adjustment Adjustment rangePress the <D.ZOOM +> button or w button. Increases magnication.1.0 ~ 3.0Press the <D.ZOOM -> button or q button. Decreases magnication.ENGLISH - 43Chapter 3 Basic Operations - Basic operations by using the remote control](https://usermanual.wiki/Panasonic-of-North-America/PT-VW350.PT-VW350-Manual-Part-2/User-Guide-2596826-Page-3.png)
![rButton functions of moving screenOperation menu Operation AdjustmentPress the a button. The display position moves down.Press the s button. The display position moves up.Press the q button. The display position moves right.Press the w button. The display position moves left. fWhen you have executed the operation of remote control directly, the individual adjustment screen is not be displayed and the operation menu of the moving screen is displayed. At this time, you can adjust the magnication by using the <D.ZOOM +> button or <D.ZOOM -> button on the remote control.ABCABCABABCABCNote fMagnication can be set from 1.0x to 3.0x in 0.1 increments. fWhen press the <MENU> button during [DIGITAL ZOOM], the adjustment value of DIGITAL ZOOM will be cancelled. fWhen the input signals change during [DIGITAL ZOOM], the adjustment value of DIGITAL ZOOM will be cancelled. fWhen [DIGITAL ZOOM] is active, the FREEZE function is not available. fThe digital zoom function may not work properly for some still image-based signals.Controlling the volume of the speakerYou can control the volume of the projector’s speaker or audio output.buttons1) Press the <VOL -> button or <VOL +> button on the remote control. fThis operation can be also performed using the qw buttons on the control panel.<VOL +> Increases the volume.<VOL -> Decreases the volume.Using the MUTE functionThis function allows you to turn off the audio output temporarily.button1) Press the <MUTE> button on the remote control. fThe audio turns off.2) Press the <MUTE> button again. fThe audio turns on.E.g. When you press the w button, the display position moves to the left.44 - ENGLISHChapter 3 Basic Operations - Basic operations by using the remote control](https://usermanual.wiki/Panasonic-of-North-America/PT-VW350.PT-VW350-Manual-Part-2/User-Guide-2596826-Page-4.png)
![Using the P IN P function(Only for PT-VW350)Two images can be projected simultaneously in form of projection mode (a small sub screen in the main screen [P IN P] / a small sub screen side by side with the main screen [SIDE BY SIDE]).button1) Press the <P IN P> button on the remote control. fPress this button to switch the mode ([P IN P]/[SIDE BY SIDE]).Note fFor details, refer to [P IN P] (x page 67). Switch the input sourceYou can switch the input source of the main screen and sub screen while the P IN P function is operating. rSwitch the input source of the main screenSwitch the input source as the same operation as the single screen. rSwitch the input source of the sub screenWhen two screens are displayed (when no menu is displayed), press the <ENTER> button, the red frame of the sub screen will be displayed. Switch the input source as the same operation as the single screen.Press the <ENTER> button again, the red frame of the sub screen will disappear and then return to switch the input source of the main screen.Setting the ID number of the remote controlWhen you use the system with multiple projectors, you can operate all the projectors simultaneously or each projector individually by using single remote control, if unique ID number is assigned to each projector.After setting the ID number of the projector, set the same ID number to the remote control.The factory default ID number of the projector is set to [ALL]. When using a single projector, press the <ID ALL> button on the remote control. Also, you can control a projector by pressing the <ID ALL> button on the remote control even if you do not know the projector ID.buttons1) Press the <ID SET> button on the remote control.2) Within five seconds, press the one-digit ID number set on the projector using the number (<1> - <6>)buttons. fIf you press the <ID ALL> button, you can control the projectors regardless of the ID number setting of the projector.Attention fSince the ID number of the remote control can be set without the projector, do not press the <ID SET> button on the remote control carelessly. If the <ID SET> button is pressed and no number (<1> - <6>) buttons are pressed within ve seconds, the ID number returns to its original value before the <ID SET> button was pressed. fThe ID number set on the remote control will be stored unless it is set again. However, it will be erased if the remote control is left with dead batteries. Set the same ID number again when the batteries are replaced.Note fSet the ID number of the projector from the [PROJECTOR SETUP] menu → [PROJECTOR ID] (x page 69).INPUT A INPUT AINPUT BINPUT A INPUT BMain screenSub screenMain screenSub screenENGLISH - 45Chapter 3 Basic Operations - Basic operations by using the remote control](https://usermanual.wiki/Panasonic-of-North-America/PT-VW350.PT-VW350-Manual-Part-2/User-Guide-2596826-Page-5.png)
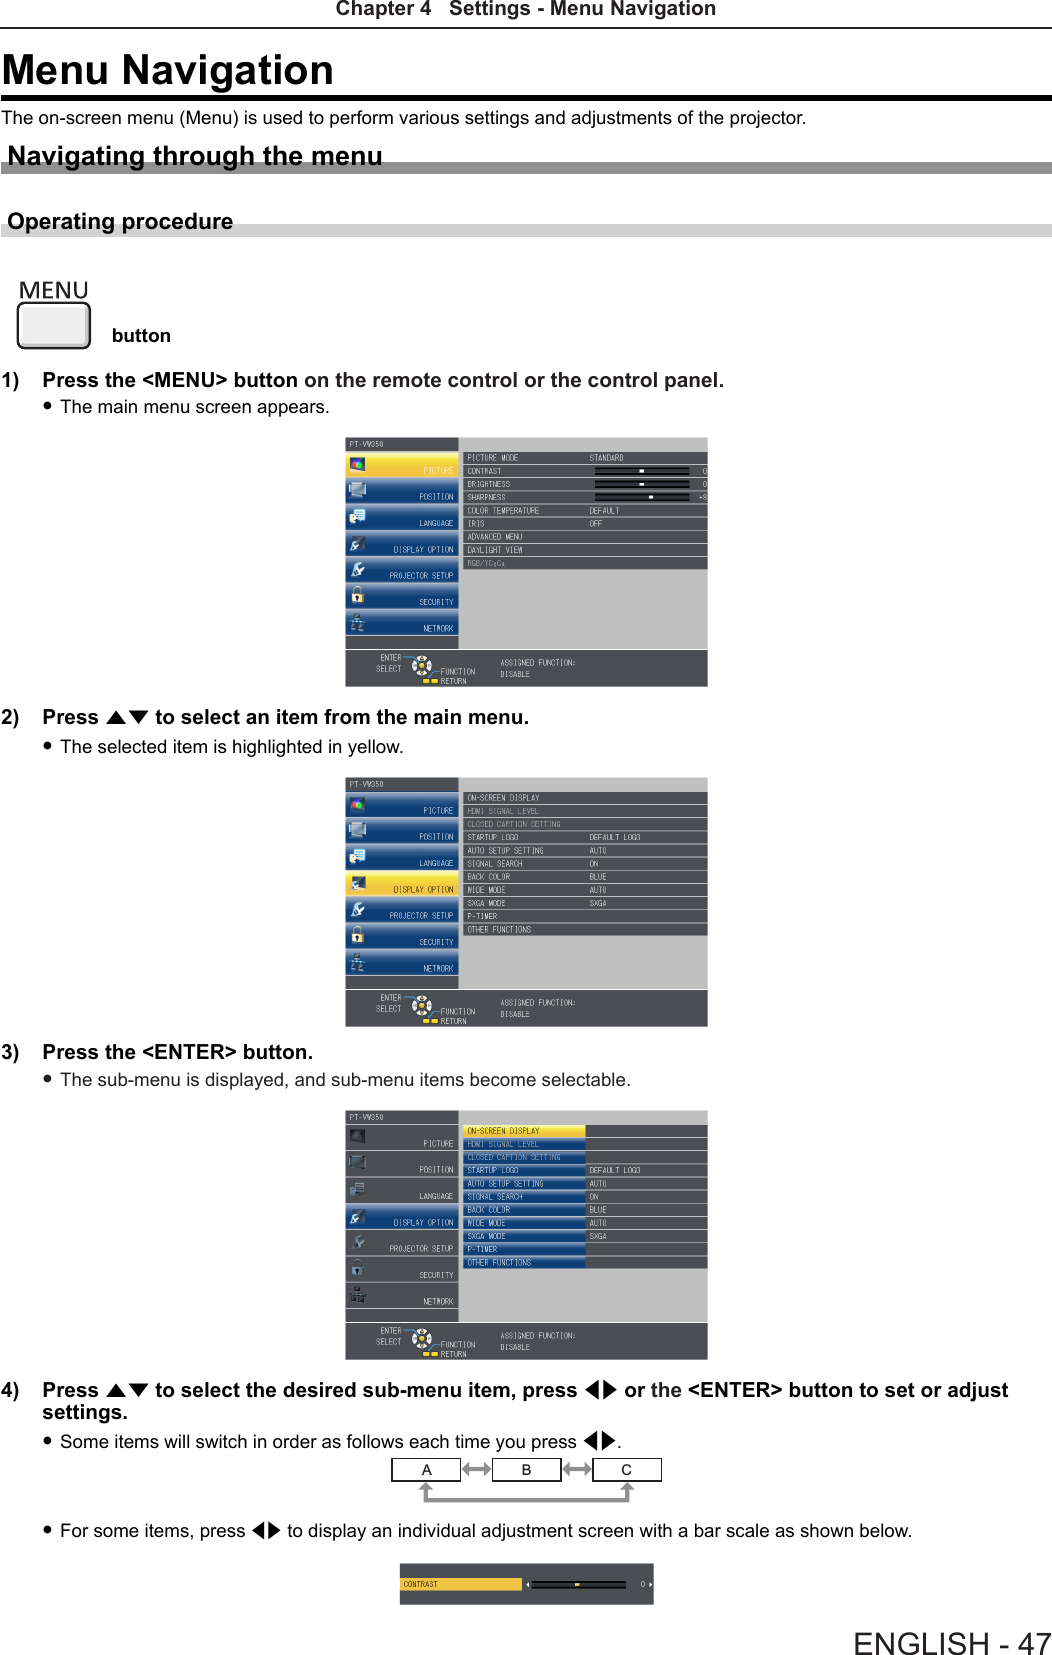
![Note fPressing the <MENU> button or <RETURN> button while the menu screen is displayed returns to the previous menu. fSome items may not be adjusted or used for certain signal formats to be input to the projector. The menu items that cannot be adjusted or used are shown in gray characters, and they cannot be selected. [DIGITAL CINEMA REALITY] and [FRAME LOCK] may not be displayed depending on the input signal. fSome items can be adjusted even if signals are not input. fIndividual adjustment screen is cleared automatically if no operation is performed for approximately ve seconds. fFor menu items, refer to “Main menu” (x page 48) and “Sub-menu” (x page 49).Resetting adjustment values to the factory defaultIf the <DEFAULT> button on the remote control is pressed, the values adjusted in the menu items are restored to the factory default settings. button1) Press the <DEFAULT> button on the remote control.Note fYou cannot reset all the settings to the factory default at a time. fTo reset all the settings adjusted in the sub-menu item to the factory default one at a time, execute the [PROJECTOR SETUP] menu → [INITIALIZE ALL] (x page 75). fSome items cannot be reset by pressing the <DEFAULT> button. Adjust each item manually.Main menuThe main menu consists of the following 7 menu items.When a main menu item is selected, the screen changes to a sub-menu selection screen.Main-menu item Page[PICTURE] 51[POSITION] 56[LANGUAGE] 61[DISPLAY OPTION] 62[PROJECTOR SETUP] 69[SECURITY] 76[NETWORK] 7948 - ENGLISHChapter 4 Settings - Menu Navigation](https://usermanual.wiki/Panasonic-of-North-America/PT-VW350.PT-VW350-Manual-Part-2/User-Guide-2596826-Page-8.png)
![Sub-menuThe sub-menu screen of the selected main menu appears, and you can set and adjust the various items in the sub-menu.[PICTURE] Sub-menu item Factory default Page[PICTURE MODE] [STANDARD] 51[CONTRAST] [0] 51[BRIGHTNESS] [0] 52[COLOR]*1[0] 52[TINT]*1[0] 52[SHARPNESS] [8] 52[COLOR TEMPERATURE] [DEFAULT] 53[IRIS] [OFF]*253[ADVANCED MENU] -53[DAYLIGHT VIEW] [AUTO] 53[DIGITAL CINEMA REALITY] [ON] 54[NOISE REDUCTION]*3[OFF] 54[TV-SYSTEM]*3[AUTO] 54[RGB/YPBPR]/[RGB/YCBCR]*4[AUTO] 55*1 Only for movie-based signals.*2 It may be different depending on the input signal.*3 Only when the <S-VIDEO IN >/<VIDEO IN> terminal is selected.*4 Only when the <COMPUTER 1 IN >/<HDMI IN> terminal is selected.Note fThe factory default settings may vary depending on the picture mode.[POSITION] Sub-menu item Factory default Page[REALTIME KEYSTONE] [ON] 56[KEYSTONE] -56[SHIFT] -58[DOT CLOCK]*1[0] 58[CLOCK PHASE]*1[0] 58[OVER SCAN] -59[ASPECT] -59[FRAME LOCK]*1[OFF] 60*1 Only for still image signals.[LANGUAGE] Details (x page 61)[DISPLAY OPTION] Sub-menu item Factory default Page[ON-SCREEN DISPLAY] -62[HDMI SIGNAL LEVEL] [AUTO] 63[CLOSED CAPTION SETTING] -63[SCREEN SETTING]*1-64[STARTUP LOGO] [DEFAULT LOGO] 64[AUTO SETUP SETTING] [AUTO] 65[SIGNAL SEARCH] [ON] 65[BACK COLOR] [BLUE] 65[WIDE MODE] -65[SXGA MODE] -65[P-TIMER] -66[P IN P]*1-67[OTHER FUNCTIONS] -67*1 Only for PT-VW350.ENGLISH - 49Chapter 4 Settings - Menu Navigation](https://usermanual.wiki/Panasonic-of-North-America/PT-VW350.PT-VW350-Manual-Part-2/User-Guide-2596826-Page-9.png)
![[PROJECTOR SETUP] Sub-menu item Factory default Page[STATUS] -69[COMPUTER2 SELECT] [COMPUTER2 IN] 69[PROJECTOR ID] [ALL] 69[INITIAL START UP] [LAST MEMORY] 70[PROJECTION METHOD] [FRONT/DESK] 70[HIGH ALTITUDE MODE] [OFF] 70[LAMP POWER] [NORMAL] 71[ECO MANAGEMENT] - 71[EMULATE] [DEFAULT] 72[FUNCTION BUTTON] - 73[AUDIO SETTING] - 73[TEST PATTERN] -75[FILTER COUNTER] -75[INITIALIZE ALL] -75[SECURITY] Sub-menu item Factory Default Page[PASSWORD] [OFF] 76[PASSWORD CHANGE] -76[TEXT DISPLAY] [OFF] 77[TEXT CHANGE] - 77[MENU LOCK] [OFF] 77[MENU LOCK PASSWORD] - 77[CONTROL DEVICE SETUP] - 78[NETWORK] Sub-menu item Factory default Page[WIRED LAN] -79[NAME CHANGE] - 80[NETWORK CONTROL] [ON] 80[AMX D.D.] [OFF] 80[Crestron Connected(TM)] [OFF] 80[STATUS] - 81[INITIALIZE] - 81Note fSome items may not be adjusted or used for certain signal formats to be input to the projector. The menu items that cannot be adjusted or used are shown in gray characters, and they cannot be selected. fSub-menu items and factory default settings differ depending on the selected input terminal.50 - ENGLISHChapter 4 Settings - Menu Navigation](https://usermanual.wiki/Panasonic-of-North-America/PT-VW350.PT-VW350-Manual-Part-2/User-Guide-2596826-Page-10.png)
![[PICTURE] menuOn the menu screen, select [PICTURE] from the main menu, and select an item from the sub-menu.Refer to "Navigating through the menu" (x page 47) for the operation of the menu screen.After selecting the item, press asqw to set.[PICTURE MODE]You can switch to the desired picture mode suitable for the image source and the environment in which the projector is used.1) Press as to select [PICTURE MODE]. 2) Press qw or the <ENTER> button. fThe [PICTURE MODE] individual adjustment screen is displayed.3) Press qw to switch the item. fThe items will switch each time you press the button.[STANDARD] The picture becomes suitable for moving images in general.[DYNAMIC] The light output is maximized for use in bright areas.[BLACKBOARD] The picture becomes suitable for projecting on a black board.[WHITE BOARD] The picture becomes suitable for projecting on a white board.[CINEMA]*1The picture becomes suitable for movie sources.[NATURAL]*2The picture becomes suitable for use in low-light areas.*1 Only for the movie-based signals.*2 Only for the still image signals.[CONTRAST]You can adjust the contrast of the colors.1) Press as to select [CONTRAST].2) Press qw or the <ENTER> button. fThe [CONTRAST] individual adjustment screen is displayed.3) Press qw to adjust the level.Operation Adjustment Adjustment rangePress the ► button. Brightens the screen and makes the color of image deeper. -32 ~ +32Press the ◄ button. Darkens the screen and makes the color of image lighter. Attention fAdjust [BRIGHTNESS] rst when you need to adjust [BRIGHTNESS] and [CONTRAST].ENGLISH - 51Chapter 4 Settings - [PICTURE] menu](https://usermanual.wiki/Panasonic-of-North-America/PT-VW350.PT-VW350-Manual-Part-2/User-Guide-2596826-Page-11.png)
![[BRIGHTNESS]You can adjust the dark (black) part of the projected image.1) Press as to select [BRIGHTNESS].2) Press qw or the <ENTER> button. fThe [BRIGHTNESS] individual adjustment screen is displayed.3) Press qw to adjust the level.Operation Adjustment Adjustment rangePress the ► button. Increases the brightness of the dark (black) parts of the screen. -32 ~ +32Press the ◄ button. Reduces the brightness of the dark (black) parts of the screen.[COLOR](Only for movie-based signal input)You can adjust the color saturation of the projected image.1) Press as to select [COLOR].2) Press qw or the <ENTER> button. fThe [COLOR] individual adjustment screen is displayed.3) Press qw to adjust the level.Operation Adjustment Adjustment rangePress the ► button. Deepens colors. -32 ~ +32Press the ◄ button. Weakens colors.[TINT](Only for NTSC/NTSC4.43 signal, when inputting movie-based signal to the <S-VIDEO IN> terminal or the <VIDEO IN> terminal.)You can adjust the skin tone in the projected image.1) Press as to select [TINT].2) Press qw or the <ENTER> button. fThe [TINT] individual adjustment screen is displayed.3) Press qw to adjust the level.Operation Adjustment Adjustment rangePress the ► button. Adjusts skin tone toward greenish color. -32 ~ +32Press the ◄ button. Adjusts skin tone toward reddish purple.[SHARPNESS]You can adjust the sharpness of the projected image.1) Press as to select [SHARPNESS].2) Press qw or the <ENTER> button. fThe [SHARPNESS] individual adjustment screen is displayed.3) Press qw to adjust the level.Operation Adjustment Adjustment rangePress the ► button. Contours become sharper. 0 ~ +15Press the ◄ button. Contours become softer.Note f[SHARPNESS] will be invalid when [DAYLIGHT VIEW] is set to [AUTO] or [ON].52 - ENGLISHChapter 4 Settings - [PICTURE] menu](https://usermanual.wiki/Panasonic-of-North-America/PT-VW350.PT-VW350-Manual-Part-2/User-Guide-2596826-Page-12.png)
![[COLOR TEMPERATURE]You can switch the color temperature if the white areas of the projected image are bluish or reddish.1) Press as to select [COLOR TEMPERATURE].2) Press qw or the <ENTER> button. fThe [COLOR TEMPERATURE] individual adjustment screen is displayed.3) Press qw to switch the item. fThe items will switch each time you press the button.[DEFAULT] Factory default setting.[HIGH] Becomes a bluish image. Select this when the white areas of the projected image are reddish.[LOW] Becomes a reddish image. Select this when the white areas of the projected image are bluish.[IRIS]Aperture correction and signal compensation are performed automatically based on the image to result in an image of optimum contrast.1) Press as to select [IRIS].2) Press qw or the <ENTER> button. fThe [IRIS] individual adjustment screen is displayed.3) Press qw to switch the item. fThe items will switch each time you press the button.[OFF] No correction.[ON] Corrects the aperture.[ADVANCED MENU]You can perform more advanced image adjustment.1) Press as to select [ADVANCED MENU].2) Press the <ENTER> button. fThe [ADVANCED MENU] screen is displayed.3) Press as to select one item among [CONTRAST R] ~ [BRIGHTNESS B].4) Press qw or the <ENTER> button. fThe individual adjustment screen of items are displayed.5) Press qw to adjust the value.Items Operation Adjustment Adjustment range[CONTRAST R] Press the w button. Emphasizes red in highlight areas. -32 ~ +32Press the q button. Deemphasizes red in highlight areas.[CONTRAST G] Press the w button. Emphasizes green in highlight areas. -32 ~ +32Press the q button. Deemphasizes green in highlight areas.[CONTRAST B] Press the w button. Emphasizes blue in highlight areas. -32 ~ +32Press the q button. Deemphasizes blue in highlight areas.[BRIGHTNESS R] Press the w button. Emphasizes red in shadow areas. -32 ~ +32Press the q button. Deemphasizes red in shadow areas.[BRIGHTNESS G] Press the w button. Emphasizes green in shadow areas. -32 ~ +32Press the q button. Deemphasizes green in shadow areas.[BRIGHTNESS B] Press the w button. Emphasizes blue in shadow areas. -32 ~ +32Press the q button. Deemphasizes blue in shadow areas.[DAYLIGHT VIEW]You can correct the image to the optimal vividness even if it is projected under a bright light.1) Press as to select [DAYLIGHT VIEW].2) Press qw or the <ENTER> button. fThe [DAYLIGHT VIEW] individual adjustment screen is displayed.ENGLISH - 53Chapter 4 Settings - [PICTURE] menu](https://usermanual.wiki/Panasonic-of-North-America/PT-VW350.PT-VW350-Manual-Part-2/User-Guide-2596826-Page-13.png)
![3) Press qw to switch the item. fThe items will switch each time you press the button.[AUTO] Enables auto correction of [DAYLIGHT VIEW]. The brightness of the room is detected by the luminance sensor, and the vividness of the image is automatically corrected. [ON] Enables [DAYLIGHT VIEW].[OFF] Disables [DAYLIGHT VIEW].Note f[DAYLIGHT VIEW] cannot be set to [AUTO] when the [PROJECTOR SETUP] menu → [PROJECTION METHOD] is set to [REAR/DESK] or [REAR/CEILING]. fThe [AUTO] mode may not function properly if an object is placed on the top of the projector.[DIGITAL CINEMA REALITY](Only for movie-based signal input)You can improve the vertical resolution of 2-2 and 2-3 pull down video.This function is available only with the following signal inputs.525i (480i), 625i (576i), 1125 (1080)/60i, 1125 (1080)/50i, S-VIDEO signal, VIDEO signal.1) Press as to select [DIGITAL CINEMA REALITY].2) Press qw or the <ENTER> button. fThe [DIGITAL CINEMA REALITY] individual adjustment screen is displayed.3) Press qw to switch the item. fThe items will switch each time you press the button.[OFF] Disables [DIGITAL CINEMA REALITY].[ON] Enables [DIGITAL CINEMA REALITY].[NOISE REDUCTION](Only when the <S-VIDEO IN >/<VIDEO IN> terminal is selected)You can reduce noises when the input image is degraded and noise is occurring in the image signal.1) Press as to select [NOISE REDUCTION].2) Press qw or the <ENTER> button. fThe [NOISE REDUCTION] individual adjustment screen is displayed.3) Press qw to switch the item. fThe items will switch each time you press the button.[OFF] Disables [NOISE REDUCTION].[ON] Enables [NOISE REDUCTION].Attention fWhen this is set for an input signal with less noise, the image may look different from what it originally was. In such a case, set it to [OFF].[TV-SYSTEM](Only when the <S-VIDEO IN >/<VIDEO IN> terminal is selected)The projector will automatically detect the input signal, but you can set the color system manually when an unstable signal is input. Set the color system matching the input signal.1) Press as to select [TV-SYSTEM].2) Press qw or the <ENTER> button. fThe [TV-SYSTEM] individual adjustment screen is displayed.3) Press qw to select the color system. fThe items will switch each time you press the button. fSelect among [AUTO], [NTSC], [NTSC4.43], [PAL], [PAL-M], [PAL-N], [PAL60] and [SECAM]. fSet it to [AUTO] normally. (Setting [AUTO] will automatically select [NTSC], [NTSC4.43], [PAL], [PAL-M], [PAL-N], [SECAM] or [PAL60].)54 - ENGLISHChapter 4 Settings - [PICTURE] menu](https://usermanual.wiki/Panasonic-of-North-America/PT-VW350.PT-VW350-Manual-Part-2/User-Guide-2596826-Page-14.png)
![[RGB/YPBPR]/[RGB/YCBCR]Set it to [AUTO] normally. If images are not displayed correctly when this is set to [AUTO], set either [RGB], [YCBCR] or [YPBPR] in accordance with the input signal.1) Press as to select [RGB/YPBPR] or [RGB/YCBCR].2) Press qw or the <ENTER> button. fThe [RGB/YPBPR] or [RGB/YCBCR] individual adjustment screen is displayed.3) Press qw to switch the item. fThe items will switch each time you press the button.[AUTO] The sync signal automatically selects the signal [RGB]/ [YPBPR]/[YCBCR].[RGB] Select it for RGB signal input.[YPBPR]Select it for YPBPR signal input.[YCBCR]Select it for YCBCR signal input.When the <COMPUTER 1 IN> terminal is selected fFor 525i (480i), 625i (576i), 525p (480p) and 625p (576p) inputSelect [AUTO], [RGB] or [YCBCR]. fFor other movie-based signal inputSelect [AUTO], [RGB] or [YPBPR].When the <HDMI IN > terminal is selected fFor 525p (480p) and 625p (576p) inputSelect [AUTO], [RGB] or [YCBCR]. fFor other movie-based signal inputSelect [AUTO], [RGB] or [YPBPR].Note fRefer to “List of compatible signals” (x page 112) for the signal details. fThe signal selection may not function properly depending on connected devices.ENGLISH - 55Chapter 4 Settings - [PICTURE] menu](https://usermanual.wiki/Panasonic-of-North-America/PT-VW350.PT-VW350-Manual-Part-2/User-Guide-2596826-Page-15.png)
![[POSITION] menuOn the menu screen, select [POSITION] from the main menu, and select an item from the sub-menu.Refer to "Navigating through the menu" (x page 47) for the operation of the menu screen. fAfter selecting the item, press asqw to set.[REALTIME KEYSTONE]The projector can correct the vertical trapezoidal distortion automatically when the projector is installed tilted.1) Press as to select [REALTIME KEYSTONE].2) Press qw or the <ENTER> button. f[REALTIME KEYSTONE] individual adjustment screen is displayed.3) Press qw to switch the item. fThe items will switch each time you press the button.[OFF] Set this function to off.[ON] Executes vertical keystone correction automatically when the projector is installed tilted.Note fThe [REALTIME KEYSTONE] function cannot work when the [FRONT/CEILING] or [REAR/CEILING] feature is selected in [PROJECTION METHOD] in the [PROJECTOR SETUP] menu.[KEYSTONE]You can correct the trapezoidal distortion that occurs when the projector is installed tilted or when the screen is tilted.1) Press as to select [KEYSTONE].2) Press the <ENTER> button. fThe [KEYSTONE] screen is displayed.3) Press as to select one item to adjust.[KEYSTONE] Adjusts when the trapezoid of the projected image is distorted.[CORNER CORRECTION] Adjusts when the four corners of the projected image are distorted.[KEYSTONE]1) Press as to select [KEYSTONE].2) Press the <ENTER> button. fThe [KEYSTONE] screen is displayed.3) Press as to select [KEYSTONE].56 - ENGLISHChapter 4 Settings - [POSITION] menu](https://usermanual.wiki/Panasonic-of-North-America/PT-VW350.PT-VW350-Manual-Part-2/User-Guide-2596826-Page-16.png)
![4) Press the <ENTER> button. fThe [KEYSTONE] individual adjustment screen is displayed.5) Press asqw to adjust the item.Items Operation Adjustment Adjustment range[H]Press the w button. Adjusts the right of the keystone.-60 ~ +60Press the q button. Adjusts the left of the keystone.[V]Press the a button. Adjusts the upper of the keystone.-80 ~ +80Press the s button. Adjusts the bottom of the keystone.[CORNER CORRECTION]1) Press as to select [KEYSTONE].2) Press the <ENTER> button. fThe [KEYSTONE] screen is displayed.3) Press as to select [CORNER CORRECTION].4) Press the <ENTER> button. fThe [CORNER CORRECTION] screen is displayed.5) Press as to select the item to adjust, then press the <ENTER> button. fThe [CORNER CORRECTION] individual adjustment screen is displayed.6) Press asqw to adjust.[CORNER CORRECTION][UPPER LEFT] [UPPER RIGHT] [LOWER LEFT] [LOWER RIGHT]Note fEither [KEYSTONE] or [CORNER CORRECTION] setting value is valid. When [KEYSTONE] or [CORNER CORRECTION] adjustment is nished, you adjust the other one, the adjusted value will be reset. fPress the <KEYSTONE> button on the remote control when the [KEYSTONE] or [CORNER CORRECTION] screen is displaying, it will switch to the other adjustment screen. fWhen the [CORNER CORRECTION] individual adjustment screen is displaying, the individual adjustment screen of the next corner can also be displayed by pressing the <ENTER> button. fCorrecting up to ±40° for the tilt in the vertical direction and ±30° for the tilt in the horizontal are available for adjustments with [KEYSTONE]. However, the image quality will degrade and it will get harder to focus with more correction. Install the projector so that the correction will be as small as possible. fScreen size will also change when [KEYSTONE] is used to perform various adjustments. fAspect ratio of the image size may shift depending on the correction.ENGLISH - 57Chapter 4 Settings - [POSITION] menu](https://usermanual.wiki/Panasonic-of-North-America/PT-VW350.PT-VW350-Manual-Part-2/User-Guide-2596826-Page-17.png)
Move the image position vertically or horizontally if the image position projected on the screen is shifted even when the relative position of the projector and the screen is installed correctly.1) Press as to select [SHIFT].2) Press the <ENTER> button. fThe [SHIFT] screen is displayed.3) Press asqw to adjust the position.Orientation Operation AdjustmentVertical (up and down) adjustment.Press the a button. The image position moves up.Press the s button. The image position moves down.Horizontal (right and left) adjustment.Press the w button. The image position moves to the right.Press the q button. The image position moves to the left.Note fDepending on the input signal, if the adjustment of [SHIFT] exceeds the effective adjustment range of the input signal, the position of the image cannot be changed. Please adjust [SHIFT] within an effective adjustment range.[DOT CLOCK](Only for computer (RGB) signals input)Use this function to adjust and minimize the effect of interference caused by projection of patterns consisting of vertical stripes.The projection of the striped pattern may cause cyclic patterns (noise). Adjust so that the amount of interference is at a minimum. You can adjust the dot clock of image.1) Press as to select [DOT CLOCK].2) Press qw or the <ENTER> button. fThe [DOT CLOCK] individual adjustment screen is displayed.3) Press qw to adjust the value. fThe adjustment values are [-32] to [+32].Attention fSet it before adjusting [CLOCK PHASE].[CLOCK PHASE](Only for computer (RGB) signals input)You can adjust to achieve an optimal image when there is a ickering image or smeared outlines.1) Press as to select [CLOCK PHASE].2) Press qw or the <ENTER> button. fThe [CLOCK PHASE] individual adjustment screen is displayed.58 - ENGLISHChapter 4 Settings - [POSITION] menu](https://usermanual.wiki/Panasonic-of-North-America/PT-VW350.PT-VW350-Manual-Part-2/User-Guide-2596826-Page-18.png)
![3) Press qw to adjust the value. fThe adjustment values are [-16] to [+16]. Adjust so that the amount of interference is at a minimum.Note fCertain signals may not be adjustable. fOptimal value may not be achieved if the output from the input computer is unstable. fTo project a signal with dot clock frequency with 162 MHz or higher, noise may not disappear even if [CLOCK PHASE] is adjusted. f[CLOCK PHASE] cannot be adjusted when a digital signal is input. [OVER SCAN]Use this function when characters or pictures are cropped near the periphery of the projected image.1) Press as to select [OVER SCAN].2) Press qw or the <ENTER> button. fThe [OVER SCAN] individual adjustment screen is displayed.3) Press qw to adjust the level. fThe adjustment values are [0] to [+3].Note fIt is unavailable for still image computer (RGB) signals and still image HDMI signals.[ASPECT]You can switch the aspect ratio of the image.The aspect ratio is switched within the screen range selected in [SCREEN SETTING]. Set [SCREEN SETTING] rst. (x page 64)[SCREEN SETTING] is only for PT-VW350.1) Press as to select [ASPECT].2) Press qw or the <ENTER> button. fThe [ASPECT] individual adjustment screen is displayed.3) Press qw to switch the item. fThe items will switch each time you press the button.[NORMAL] Displays images without changing the aspect ratio of the input signals.[AUTO]*1The aspect ratio is automatically switched to the optimum aspect ratio when an aspect ratio identier is included in the input signal.[WIDE] Displays images with the aspect ratio converted to 16:9 when standard signals*2 are input.Display images without changing the aspect ratio when wide-screen signals*3 are input.[H FIT]Displays images using the entire width of the screen. When signals have the aspect ratio vertically longer than the aspect ratio of the screen selected in [SCREEN FORMAT]*4, the images are displayed with the top and bottom parts cut off.[V FIT]Displays the height of the panel pixels vertically without changing the aspect ratio when wide-screen signals are input. When signals have the aspect ratio horizontally longer than the aspect ratio of the screen, the images are displayed with the right and left parts cut off.[FULL] The image is projected using all the panel (screen) pixels. The input signals are converted to the aspect ratio of the panel (screen).[NATIVE] Displays images without changing the resolution of the input signals.*1 Only for Video (NTSC) and 480i (YCBCR) signals input*2 Standard signals are input signals with an aspect ratio of 4:3 or 5:4.*3 Wide-screen signals are input signals with an aspect ratio of 16:10, 16:9 or 15:9.*4 [SCREEN FORMAT] is only for PT-VW350.ENGLISH - 59Chapter 4 Settings - [POSITION] menu](https://usermanual.wiki/Panasonic-of-North-America/PT-VW350.PT-VW350-Manual-Part-2/User-Guide-2596826-Page-19.png)
![Note fThe image size may be switched abnormally when [AUTO] is selected, please set to [NORMAL] or [WIDE] according to the input signal. fSome size modes are not available for certain types of input signals. fIf an aspect ratio which is different from the aspect ratio for the input signals is selected, the images will appear differently from the originals. Be careful of this when selecting the aspect ratio. fIf using the projector in places such as cafes or hotels to display programs for a commercial purpose or for public presentation, note that adjusting the aspect ratio or using the zoom function to change the screen images may be an infringement of the rights of the original copyright owner for that program under copyright protection laws. Take care when using a function of the projector such as the aspect ratio adjustment and zoom function. fIf conventional (normal) 4:3 images which are not wide-screen images are displayed on a wide screen, the edges of the images may not be visible or they may become distorted. Such images should be viewed as with an aspect ratio of 4:3 in the original format intended by the creator of the images.[FRAME LOCK](Only for still image signals input)This setting is available for specic computer signals. Set when the movie is distorted.1) Press as to select [FRAME LOCK].2) Press qw or the <ENTER> button. fThe [FRAME LOCK] individual adjustment screen is displayed.3) Press qw to switch the [FRAME LOCK]. fThe items will switch each time you press the button.[OFF] Disables the frame lock.[ON] Enables the frame lock.60 - ENGLISHChapter 4 Settings - [POSITION] menu](https://usermanual.wiki/Panasonic-of-North-America/PT-VW350.PT-VW350-Manual-Part-2/User-Guide-2596826-Page-20.png)
![[LANGUAGE] menuOn the menu screen, select [LANGUAGE] from the main menu, and select an item from the sub-menu.Refer to "Navigating through the menu" (x page 47) for the operation of the menu screen. fPress as to select a language, and press <ENTER> button to set.[LANGUAGE]You can select the language of the on-screen display. fVarious menus, settings, adjustment screens, control button names, etc., are displayed in the selected language. fThe language can be changed to English, German, French, Italian, Spanish, Portuguese, Dutch, Swedish, Finnish, Norwegian, Danish, Polish, Hungarian, Romanian, Czech, Russian, Turkish, Arabic, Kazakh, Vietnamese, Chinese, Korean, Japanese and Thai.Note fThe on-screen display language of the projector is set to English by default and when [INITIALIZE ALL] (x page 75) in [PROJECTOR SETUP] is executed.ENGLISH - 61Chapter 4 Settings - [LANGUAGE] menu](https://usermanual.wiki/Panasonic-of-North-America/PT-VW350.PT-VW350-Manual-Part-2/User-Guide-2596826-Page-21.png)
![[DISPLAY OPTION] menu On the menu screen, select [DISPLAY OPTION] from the main menu, and select an item from the sub-menu.Refer to "Navigating through the menu" (x page 47) for the operation of the menu screen. fAfter selecting the item, press asqw to set.[ON-SCREEN DISPLAY]Set the on-screen display and position.[INPUT GUIDE]Set whether to display the input guide when switching the input source.1) Press as to select [ON-SCREEN DISPLAY].2) Press the <ENTER> button. fThe [ON-SCREEN DISPLAY] screen is displayed.3) Press as to select [INPUT GUIDE].4) Press qw to switch the item. fThe items will switch each time you press the button.[DETAILED] Displays the name of input terminal and input signal graphically. [OFF] Disables the input guide.[SIMPLE] Displays the name of input terminal and input signal.[OSD POSITION]Set the position of the menu screen (OSD).1) Press as to select [ON-SCREEN DISPLAY].2) Press the <ENTER> button. fThe [ON-SCREEN DISPLAY] screen is displayed.3) Press as to select [OSD POSITION].4) Press qw to switch the item. fThe items will switch each time you press the button as following: [CENTER] → [UPPER LEFT] → [UPPER RIGHT] → [LOWER LEFT] → [LOWER RIGHT] → [CENTER] → ...[WARNING MESSAGE]Set the display/hide of the warning message.1) Press as to select [ON-SCREEN DISPLAY].2) Press the <ENTER> button. fThe [ON-SCREEN DISPLAY] screen is displayed.62 - ENGLISHChapter 4 Settings - [DISPLAY OPTION] menu](https://usermanual.wiki/Panasonic-of-North-America/PT-VW350.PT-VW350-Manual-Part-2/User-Guide-2596826-Page-22.png)
![3) Press as to select [WARNING MESSAGE].4) Press qw to switch the item. fThe items will switch each time you press the button.[OFF] Hides the warning message.[ON] Displays the warning message.[HDMI SIGNAL LEVEL]Switch the setting when the external equipment is connected to the <HDMI IN> terminal of the projector and the image is not projected correctly.1) Press as to select [HDMI SIGNAL LEVEL].2) Press qw to switch the item. fThe items will switch each time you press the button.[AUTO] Sets the signal level automatically.[64-940] Select when the HDMI terminal of an external device (such as a blu-ray player) is connected to the <HDMI IN> terminal.[0-1023]Select when the DVI terminal output of an external device (such as a computer) is connected to the <HDMI IN> terminal via a conversion cable or similar cable.Select also when the HDMI terminal output of a computer or other device is connected to the <HDMI IN> terminal.Note fThe optimal setting varies depending on the output setting of the connected external device. Refer to the operation instruction of the external device regarding the output of the external device. fThe displayed signal level is assumed when the input is 30 bits.[CLOSED CAPTION SETTING](Only for NTSC, 480i YCBCR input)Set the closed caption.Selecting the closed caption display1) Press as to select [CLOSED CAPTION SETTING].2) Press the <ENTER> button. fThe [CLOSED CAPTION SETTING] screen is displayed.3) Press as to select [CLOSED CAPTION].4) Press qw to switch the item. fThe items will switch each time you press the button.[OFF] Closed captions are not displayed.[ON] Closed captions are displayed. fWhen [ON] is selected, proceed to Step 5).5) When the confirmation is displayed, select [OK], and press the <ENTER> button.Setting the closed caption mode1) Press as to select [CLOSED CAPTION SETTING].2) Press the <ENTER> button. fThe [CLOSED CAPTION SETTING] screen is displayed.3) Press as to select [MODE].4) Press qw to switch the item. fThe items will switch each time you press the button.[CC1] Displays CC1 data.ENGLISH - 63Chapter 4 Settings - [DISPLAY OPTION] menu](https://usermanual.wiki/Panasonic-of-North-America/PT-VW350.PT-VW350-Manual-Part-2/User-Guide-2596826-Page-23.png)
![[CC2] Displays CC2 data.[CC3] Displays CC3 data.[CC4] Displays CC4 data.Note fClosed caption is a function that displays text information of video signals mainly used in North America. Captions may not be displayed depending on the connected devices or contents being played back. f[CLOSED CAPTION SETTING] can only be selected if an NTSC or 480i YCBCR signal is input. fIf [CLOSED CAPTION SETTING] is set to [ON], the brightness of image may be changed according to the external devices or the used content of the closed caption corresponding connection. fIf a closed caption signal of the selected mode is input, the text is not displayed even when the [SECURITY] menu → [TEXT DISPLAY] (x page 77) is set to [ON]. fClosed captions are not displayed when the menu screen is displayed.[SCREEN SETTING] (Only for PT-VW350)Set the screen size.When changing the aspect of a projected image, correct to the optimum image position for the set screen. Set as necessary for the screen in use.1) Press as to select [SCREEN SETTING].2) Press the <ENTER> button. fThe [SCREEN SETTING] screen is displayed.3) Press as to select [SCREEN FORMAT].4) Press qw to switch the [SCREEN FORMAT] item. fThe items will switch each time you press the button.[SCREEN FORMAT] Description Range when [SCREEN POSITION] is selected[16:10] The projected aspect ratio is 16:10. Cannot be adjusted.[16:9] The projected aspect ratio is 16:9. Adjusts the vertical position.5) Press as to select [SCREEN POSITION]. fIf [SCREEN FORMAT] is set to [16:10], adjustment of [SCREEN POSITION] is not available.6) Press qw to adjust the [SCREEN POSITION]. fThe items will switch each time you press the button.[HIGH] The image which aspect ratio is 16:9 will displayed at the top.[CENTER] The image which aspect ratio is 16:9 will displayed in the center.[LOW] The image which aspect ratio is 16:9 will displayed at the bottom.[STARTUP LOGO]Set the logo display when the power is turned on.1) Press as to select [STARTUP LOGO].2) Press qw to switch the item. fThe items will switch each time you press the button.[DEFAULT LOGO] Displays the Panasonic logo.[USER LOGO] Displays the image registered by the user.[OFF] Disables the startup logo display.Note fThe startup logo will disappear in approximately 30 seconds. fTo create/register the [USER LOGO] image, use “Logo Transfer Software” included in the supplied CD-ROM. fIf you do not register the image of the [USER LOGO], the startup logo will not be displayed even if the [STARTUP LOGO] is set to [USER LOGO].64 - ENGLISHChapter 4 Settings - [DISPLAY OPTION] menu](https://usermanual.wiki/Panasonic-of-North-America/PT-VW350.PT-VW350-Manual-Part-2/User-Guide-2596826-Page-24.png)
![[AUTO SETUP SETTING]Set the automatic execution of AUTO SETUP.The screen display position or signal level can be adjusted automatically without pressing the <AUTO SETUP> button on the remote control or on the control panel on each occasion if you input unregistered signals frequently at meetings, etc.1) Press as to select [AUTO SETUP SETTING].2) Press qw to switch the item. fThe items will switch each time you press the button.[AUTO] Enables the auto setup function when switching signals.[BUTTON] Enables the auto setup function only when the <AUTO SETUP> button is pressed.[SIGNAL SEARCH]When the power is turned on, this function automatically detects the terminal which signals are input and sets the function to switch.1) Press as to select [SIGNAL SEARCH].2) Press qw to switch the item. fThe items will switch each time you press the button.[ON] Enables input detection automatically.[OFF] Disables input detection automatically.Note fIf the [SIGNAL SEARCH] is set to [ON] when there is no signal input, press the <AUTO SETUP> button on the remote control or on the control panel, this function automatically detects the terminal to which signals are input and then switches.[BACK COLOR]Set the display of the projected screen when there is no signal input. 1) Press as to select [BACK COLOR].2) Press qw to switch the item. fThe items will switch each time you press the button.[BLUE] Displays the entire projection area in blue.[BLACK] Displays the entire projection area in black.[DEFAULT LOGO] Displays the Panasonic logo.[USER LOGO] Displays the image registered by the user.Note fTo create/register the [USER LOGO] image, use “Logo Transfer Software” included in the supplied CD-ROM. fIf you do not register the image of the [USER LOGO], the projected image will be displayed in black even if the [BACK COLOR] is set to [USER LOGO].[WIDE MODE]Using this function when displays the incorrect signals input.1) Press as to select [WIDE MODE].2) Press qw to switch the item. fThe items will switch each time you press the button.[AUTO] Displays by judging the signal automatically. Set to this mode normally.[ON] When input the wide signal.[OFF] When input the 4:3 signal.[SXGA MODE]This function is used if the whole projected image is not displayed when SXGA signal is input. Set it to [SXGA] normally.1) Press as to select [SXGA MODE].2) Press qw to switch the item. fThe items will switch each time you press the button.[SXGA] Normal setting. [SXGA +] Set this when the edge of the image is cropped. ENGLISH - 65Chapter 4 Settings - [DISPLAY OPTION] menu](https://usermanual.wiki/Panasonic-of-North-America/PT-VW350.PT-VW350-Manual-Part-2/User-Guide-2596826-Page-25.png)
![[P-TIMER]Set and operate the presentation timer function.1) Press as to select [P-TIMER].2) Press the <ENTER> button. fThe [P-TIMER] screen is displayed.[MODE] Switches the elapsed time between [COUNT UP] and [COUNT DOWN].[TIMER] Sets the nish time of timer when [COUNT DOWN] is selected.[START] / [STOP] /[RESTART] Operates the timer.[RESET] Resets the count.[EXIT] [P-TIMER] is nished.Setting [MODE]1) Press as to select [MODE].2) Press qw to switch the item. fThe items will switch each time you press the button.[COUNT UP] Displays the elapsed time since the count was started.[COUNT DOWN] Displays the remaining time of the time set by [TIMER].Setting the countdown timer1) Press as to select [TIMER].2) Press qw to set the timer. fThe time can be set in 1-minute increments from 1 to 180 minutes. fThe factory default value is 10 minutes.Note f[TIMER] is available only when [MODE] is set to [COUNT DOWN].The operation of [P-TIMER]1) Press as to select one item.[START] The count is started.[STOP] The count is stopped.[RESTART] The count is resumed.[RESET] The count is reset. 2) Press the <ENTER> button. fWhen you select [START] or [RESTART], the remaining time or the elapsed time will be displayed in the lower right of the projected image. fWhen you select [STOP], the remaining time or the elapsed time while stopping the counting will be displayed in the lower right of the projected image.Note fYou can also use the P-TIMER function by pressing the <P-TIMER> button on the remote control (x page 43). fIf the elapsed time or remaining time is displaying, the text will not be displayed even when the [SECURITY] menu → [TEXT DISPLAY] (x page 77) is set to [ON]. fThe elapsed time or remaining time will not be displayed when the menu screen is displaying. fThe start time will be “000:00” when [MODE] is set to [COUNT UP]. fWhen [MODE] is set to [COUNT DOWN], the start time becomes the value set at [TIMER]. fThe time gauge turns clockwise when [COUNT UP] is set, and turns counterclockwise when [COUNT DOWN] is set.Ending the presentation timer1) Press as to select [P-TIMER].2) Press the <ENTER> button. fThe [P-TIMER] screen is displayed.66 - ENGLISHChapter 4 Settings - [DISPLAY OPTION] menu](https://usermanual.wiki/Panasonic-of-North-America/PT-VW350.PT-VW350-Manual-Part-2/User-Guide-2596826-Page-26.png)
![3) Press as to select [EXIT].4) Press the <ENTER> button.[P IN P](Only for PT-VW350)Locate a separate, small sub screen in the main screen to project two images simultaneously.1) Press as to select [P IN P].2) Press the <ENTER> button. fThe [P IN P] screen is displayed.[MODE]1) Press as to select [MODE].2) Press qw to switch the item. fThe items will switch each time you press the button.[OFF] P IN P function is disabled.[SIDE BY SIDE] Sub screen is displayed at the side of the main screen.[P IN P] Sub screen is displayed in the main screen.[SUBPICTURE SIZE]If [MODE] is set to [P IN P], you can change the size of the sub screen.1) Press as to select [SUBPICTURE SIZE].2) Press qw to switch the item. fThe items will switch each time you press the button.[SMALL] The size of the sub screen is small (30% of the panel resolution).[MIDDLE] The size of the sub screen is middle (40% of the panel resolution).[LARGE] The size of the sub screen is large (50% of the panel resolution).[SUBPICTURE POSITION]If [MODE] is set to [P IN P], you can change the position of the sub screen.1) Press as to select [SUBPICTURE POSITION].2) Press qw to switch the item. fThe items will switch each time you press the button as following: [LOWER RIGHT] → [LOWER LEFT] → [UPPER LEFT] →[ UPPER RIGHT] → [LOWER RIGHT] → ...Note fThe P IN P function may be unavailable for some signals being input or terminals being selected. Refer to “Two-window display combination list” (x page 111) for details. fThe main window setting values are applied to image adjustment values such as [PICTURE MODE] and [COLOR TEMPERATURE].[OTHER FUNCTIONS]You can perform some of the remote control button operations from the sub-menu.1) Press as to select [OTHER FUNCTIONS].2) Press the <ENTER> button. fThe [OTHER FUNCTIONS] screen is displayed.3) Press as to select one item.[AUTO SETUP] For details, refer to "Using the AUTO SETUP function" (x page 41).[FREEZE]The projected image is paused temporarily and the sound stopped regardless of the playback of the external equipment. To release this function, press the <RETURN> button or the <FREEZE> button on the remote control.ENGLISH - 67Chapter 4 Settings - [DISPLAY OPTION] menu](https://usermanual.wiki/Panasonic-of-North-America/PT-VW350.PT-VW350-Manual-Part-2/User-Guide-2596826-Page-27.png)
![[AV MUTE] Turn off audio and image when the projector is not used for a certain period of time. To release this function, press the <RETURN> button or the <AV MUTE> button on the remote control.[DIGITAL ZOOM] For details, refer to "Using the DIGITAL ZOOM function" (x page 43).4) Press the <ENTER> button.68 - ENGLISHChapter 4 Settings - [DISPLAY OPTION] menu](https://usermanual.wiki/Panasonic-of-North-America/PT-VW350.PT-VW350-Manual-Part-2/User-Guide-2596826-Page-28.png)
![[PROJECTOR SETUP] menuOn the menu screen, select [PROJECTOR SETUP] from the main menu, and select an item from the sub-menu.Refer to "Navigating through the menu" (x page 47) for the operation of the menu screen. fAfter selecting the item, press asqw to set.[STATUS]You can check the using status of the projector.1) Press as to select [STATUS].2) Press the <ENTER> button. fThe [STATUS] screen is displayed.[SIGNAL] [NAME] Displays the name of input signal.[FREQUENCY] Displays the scanning frequency of input signal.[RUNTIME]*1[PROJECTOR] Displays the current usage time of projector.[LAMP (ET-LAV300*2)] Displays the model No. of the replacement lamp unit for this projector.[NORMAL] Displays the lamp runtime when [LAMP POWER] is set to [NORMAL] by actual time.[ECO] Displays the lamp runtime when [LAMP POWER] is set to [ECO] by actual time.[SERIAL NUMBER] [PROJECTOR] Displays the serial number of the projector.*1 The following conversion is required to calculate the rough estimate for lamp replacement.Formula for lamp replacement time (rough estimate)A x 1 + B x 5/7 fA : Runtime which is displayed in [STATUS] screen - [RUNTIME] - [LAMP] - [NORMAL] fB : Runtime which is displayed in [STATUS] screen - [RUNTIME] - [LAMP] - [ECO]*2 The model No. of the optional lamp unit is subject to change without prior notice.Note fIf you attach a lamp unit used in a projector of a model different from the projector (PT-VW350, PT-VX420) to the projector, or when the lamp unit used in the projector to a projector of a different model, the [RUNTIME] displayed in [STATUS] may differ from the actual time.[COMPUTER2 SELECT]Set whether to use the <COMPUTER 2 IN/1 OUT> terminal.1) Press as to select [COMPUTER2 SELECT].2) Press qw to switch the item. fThe items will switch each time you press the button.[COMPUTER2 IN] When input the computer signal.[COMPUTER1 OUT] Outputs the signal which have been input <COMPUTER 1 IN> terminal.Note fThe [COMPUTER2 SELECT] will be unavailable when [COMPUTER2] is selected as input source.[PROJECTOR ID]The projector has an ID number setting function that can be used when multiple projectors are used side by side to enable simultaneous control or individual control via a single remote control.ENGLISH - 69Chapter 4 Settings - [PROJECTOR SETUP] menu](https://usermanual.wiki/Panasonic-of-North-America/PT-VW350.PT-VW350-Manual-Part-2/User-Guide-2596826-Page-29.png)
![1) Press as to select [PROJECTOR ID].2) Press the <ENTER> button. fThe [PROJECTOR ID] screen is displayed.3) Press as to select a projector ID. fSelect one from [ALL], and [1] to [6].[ALL] Select when controlling projectors without specifying an ID number.[1] - [6] Select when specifying an ID number to control individual projector.4) Press the <ENTER> button to set it. f[PROJECTOR ID] is set.Note fTo specify an ID number for individual control, the ID number of a remote control must match the ID number of the projector. fWhen the ID number is set to [ALL], the projector will operate regardless of the ID number specied during remote control or computer control. If multiple projectors are set up side by side with ID set to [ALL], they cannot be controlled separately from the projectors with other ID numbers. fRefer to “Setting the ID number of the remote control” (x page 45) for how to set the ID number on the remote control.[INITIAL START UP]Set the method of start up when the power cord plugged into the AC outlet.1) Press as to select [INITIAL START UP].2) Press qw to switch the item. fThe items will switch each time you press the button.[LAST MEMORY] Starts in the condition that before disconnected the power cord or turn off the breaker. [STANDBY] Starts up in the standby mode.[ON] Starts the projection immediately.[PROJECTION METHOD]Set the projection method in accordance with the installation status of the projector.Change the projection method if the screen display is upside down or inverted.1) Press as to select [PROJECTION METHOD].2) Press qw to switch the projection method. fThe items will switch each time you press the button.[FRONT/DESK] When installing the projector on the desk, etc., in front of the screen.[FRONT/CEILING] When installing the projector in front of the screen with the Ceiling Mount Bracket (optional).[REAR/DESK] When installing the projector on the desk, etc. behind the screen (with a translucent screen).[REAR/CEILING] When installing the projector behind the screen (with a translucent screen) with the Ceiling Mount Bracket (optional).[HIGH ALTITUDE MODE]Change the setting according to the altitude in which you use the projector.1) Press as to select [HIGH ALTITUDE MODE].2) Press qw to switch the item. fThe items will switch each time you press the button.[OFF] When using the projector in the elevation of below 1 400 m.[HIGH1] When using the projector in the elevation of above 1 400 m and below 2 000 m.[HIGH2] When using the projector in the elevation of above 2 000 m and below 2 700 m.Note fIt is set to [OFF] when using the projector in the elevation of below 1 400 m. It is set to [HIGH1] when using the projector in the elevation of above 1 400 m and below 2 000 m. It is set to [HIGH2] when using the projector in the elevation of above 2 000 m and below 2 700 m. Failure to do so may shorten the life of the internal parts and result in malfunctions.70 - ENGLISHChapter 4 Settings - [PROJECTOR SETUP] menu](https://usermanual.wiki/Panasonic-of-North-America/PT-VW350.PT-VW350-Manual-Part-2/User-Guide-2596826-Page-30.png)
![fDo not set the projector in the elevation of 2 700 m or above, otherwise it may shorten the life of the internal parts and result in malfunctions. fWhen it is set to [HIGH1] or [HIGH2], the fan noise becomes louder and fan speed increases.[LAMP POWER]Switch the brightness of the lamp according to the operating environment of the projector or the purpose.1) Press as to select [LAMP POWER]. 2) Press qw to switch the item. fThe items will switch each time you press the button.[NORMAL] Select when high luminance is required.[ECO] Select when high luminance is not required.Note fSet it to [ECO] rather than [NORMAL] when you want to reduce power consumption, extend the life of lamp and reduce operation noise.[ECO MANAGEMENT]This function optimizes lamp power according to the operating status to reduce power consumption.1) Press as to select [ECO MANAGEMENT].2) Press the <ENTER> button. fThe [ECO MANAGEMENT] screen is displayed.3) Press as to select one item.Setting [AUTO POWER SAVE] in step 3)Set whether or not to enable the three functions, [AMBIENT LIGHT DETECTION], [SIGNAL DETECTION] and [AV MUTE DETECTION].Note f[AUTO POWER SAVE] cannot be set when the [LAMP POWER] is set to [ECO].4) Press qw to switch the [AUTO POWER SAVE].[ON] Enables power-saving mode.[OFF] Disables power-saving mode.5) Press as to select one item.[AMBIENT LIGHT DETECTION] Adjusts the lamp power according to the ambient brightness.[SIGNAL DETECTION] Drops the lamp power when no signal is input.[AV MUTE DETECTION] Drops the lamp power in the AV mute mode.6) Press qw to switch the item. fThe items will switch each time you press the button.[ON] Enables above setting.[OFF] Disables above setting.Note fLamp power cannot reduced automatically in the following cases: - When [LAMP POWER] is set to [ECO] - When the lamp lighting is just completed or the setting of [LAMP POWER] is just completed, etc.. fWhen [AUTO POWER SAVE] is set to [OFF], [AMBIENT LIGHT DETECTION], [SIGNAL DETECTION] and [AV MUTE DETECTION] cannot be set. f[AMBIENT LIGHT DETECTION] will not work correctly when placing some objects on the ambient luminance sensor.Setting [POWER MANAGEMENT] in step 3)Set the operation as following if there is no signal input.1) Press as to select [POWER MANAGEMENT].2) Press qw to switch the item. fThe items will switch each time you press the button.ENGLISH - 71Chapter 4 Settings - [PROJECTOR SETUP] menu](https://usermanual.wiki/Panasonic-of-North-America/PT-VW350.PT-VW350-Manual-Part-2/User-Guide-2596826-Page-31.png)
![[SHUT DOWN] The countdown timer is displayed after 30 seconds without input signal. The projection lamp is turned off and cooled down when reached the set time, then the projector enter into standby status. [OFF] Power management function is off.[READY]The countdown timer is displayed after 30 seconds without input signal. The projection lamp turns off and cools down when reaching the set time, meanwhile the projector is in the power management mode. The projection lamp will be turned on if the input signal is reconnected or any button is pressed.Setting [TIMER]The timer can be set to 5-120 minutes. The increment is 5 minutes.1) Press as to select [TIMER].2) Press qw to set the timer (5-120 MIN.). fThe time will switch each time you press the button.Note fThe factory default setting for [TIMER] is [15 MIN.].Setting [STANDBY MODE] in step 3)Set the operation mode during standby. The default setting is [ECO] that keeps power consumption low during standby. When the network function or the serial communication function is used during standby, set to [NORMAL].1) Press as to select [STANDBY MODE].2) Press qw to switch the item. fThe items will switch each time you press the button.[ECO] Select this item to reduce power consumption during standby.[NORMAL] Select this item to use the network function or the serial communication function during standby.[NETWORK] Select this item to reduce power consumption during standby, and to operate the projector via the wired LAN or the serial communication function by using the Wake on LAN function.Note fIf [STANDBY MODE] is set to [ECO], you cannot use network functions when the projector is standing by. Also, you cannot use some RS-232C protocol commands. fWhen set to [ECO], it may take approx. 10 seconds longer before the projector starts projecting after the power is turned on, compared with when [NORMAL] is set. fIf [STANDBY MODE] is set to [NETWORK], it takes less power consumption than it is set to [NORMAL]. fWhen [STANDBY MODE] is set to [NETWORK], it will be no restriction for network function and serial communication function within 60 seconds when the Wake on LAN function is working. fThe setting of [STANDBY MODE] cannot be returned to the factory default even if the [PROJECTOR SETUP] menu → [INITIALIZE ALL] is executed (x page 75).[EMULATE]When controlling the projector on a computer via the <SERIAL IN> terminal, set use of control commands on a previously purchased Panasonic projector. This allows the control software for an existing Panasonic projector to be inherited and used.1) Press as to select [EMULATE].2) Press the <ENTER> button. fThe [EMULATE] screen is displayed.3) Press as to select one item.[DEFAULT]VW350 series, VX420 series, VZ575N series, VW535N series, VX605N series, EZ580 series, EW640 series, EX610 series, EW540 series, EZ770 series, EW730 series, EX800 series, VW345N series, VX415N series, VW340Z, VX410Z, VX42Z, RZ475 series, RZ470 series, RW430 series, RZ370 series, RW330 series[D3500] D3500 series[D4000] D4000 series[D/W5k SERIES]D5700 series, DW5100 series, D5600 series, DW5000 series, D5500 series[D/W/Z6k SERIES]DZ770 series, DW740 series, DX810 series, DZ680 series, DW640 series, DX610 series, DW730 series, DX800 series, DZ6710 series, DZ6700 series, DW6300 series, D6000 series, D5000 series, DZ570 series, DW530 series, DX500 series[L730 SERIES] L730 series, L720 series, L520 series[L780 SERIES] L780 series, L750 series[L735 SERIES] L735 series[L785 SERIES] L785 series[F/W SERIES] FW430 series, FX400 series, FW300 series, F300 series, F200 series, FW100 series, F100 series[LZ370] LZ370 series[LB/W SERIES]LB3 series, LB2 series, LB1 series, ST10 series, LB90 series, LW80NT series, LB80 series, LB78 series, LB75 series72 - ENGLISHChapter 4 Settings - [PROJECTOR SETUP] menu](https://usermanual.wiki/Panasonic-of-North-America/PT-VW350.PT-VW350-Manual-Part-2/User-Guide-2596826-Page-32.png)
![[VX500 SERIES] VW435N series, VW440 series, VW430 series, VX505N series, VX510 series, VX500 series, VW330 series, VX400NT series, VX400 series, VX41 series [EZ570 SERIES] EZ570 series, EW630 series, EW530 series, EX600 series, EX500 series[VW431D] VW431D series4) Press the <ENTER> button.[FUNCTION BUTTON]The function assigned to the <FUNCTION> button of the remote control is displayed. You can also release the assigned setting.Releasing assigned function to the <FUNCTION> button1) Press as to select [FUNCTION BUTTON].2) Press the <ENTER> button. fThe [FUNCTION BUTTON] screen is displayed.3) Press the <ENTER> button.4) When the confirmation message is displayed, select [OK] and press the <ENTER> button.Note fYou can also cancel the assigned settings by displaying the on-screen menu, selecting the menu item to be canceled (main menu, sub-menu or details menu), and then pressing the <FUNCTION> button for at least 3 seconds.[AUDIO SETTING]You can perform more detailed setting for Audio.Adjusting the volume1) Press as to select [AUDIO SETTING].2) Press the <ENTER> button. fThe [AUDIO SETTING] screen is displayed.3) Press as to select [VOLUME].4) Press qw to adjust the level.Operation Adjustment RangePress the w button. Turns up the volume. 0 ~ 63Press the q button. Turns down the volume.Setting the mute1) Press as to select [AUDIO SETTING].2) Press the <ENTER> button. fThe [AUDIO SETTING] screen is displayed.3) Press as to select [MUTE].4) Press qw to switch the item.[OFF] Output the audio.[ON] Turns off the volume temporarily.Setting the audio output during standby1) Press as to select [AUDIO SETTING].2) Press the <ENTER> button. fThe [AUDIO SETTING] screen is displayed.3) Press as to select [IN STANDBY MODE].4) Press qw to switch [IN STANDBY MODE]. fThe items will switch each time you press the button.ENGLISH - 73Chapter 4 Settings - [PROJECTOR SETUP] menu](https://usermanual.wiki/Panasonic-of-North-America/PT-VW350.PT-VW350-Manual-Part-2/User-Guide-2596826-Page-33.png)
![[OFF] Disables audio output in the standby mode.[ON]Enables audio output in the standby mode when [STANDBY MODE] is set to [NORMAL]. At this time, press the <VOL - > button / <VOL +> button on the remote control or qw buttons on the control panel to adjust the volume.Note fWhen [ECO MANAGEMENT] → [STANDBY MODE] is set to [ECO] (x page 72), even if [IN STANDBY MODE] is set to [ON], audio cannot be output during standby. Setting audio input selectionChoose the audio input terminal for each input signal.1) Press as to select [AUDIO SETTING].2) Press the <ENTER> button. fThe [AUDIO SETTING] screen is displayed.3) Press as to select one item of [AUDIO IN SELECT].[COMPUTER1] Set the audio output when [COMPUTER1] input is selected.[COMPUTER2] Set the audio output when [COMPUTER2] input is selected.[VIDEO] Set the audio output when [VIDEO] input is selected.[S-VIDEO] Set the audio output when [S-VIDEO] input is selected.[HDMI] Set the audio output when [HDMI] input is selected.4) Press qw to switch the item. fThe sub items will switch each time you press the button.[COMPUTER1] Select one item among [AUDIO IN 1], [AUDIO IN 2] or [AUDIO IN 3].[COMPUTER2] Select one item among [AUDIO IN 1], [AUDIO IN 2] or [AUDIO IN 3].[VIDEO] Select one item among [AUDIO IN 1], [AUDIO IN 2] or [AUDIO IN 3].[S-VIDEO] Select one item among [AUDIO IN 1], [AUDIO IN 2] or [AUDIO IN 3].[HDMI] Select one item among [HDMI AUDIO IN], [AUDIO IN 1], [AUDIO IN 2] or [AUDIO IN 3].Note fWhen [MIC] is set to [ON], [AUDIO IN 2] cannot be selected. fEven if [AUDIO IN 2] is selected, it will change to [AUDIO IN 1] automatically when [MIC] is set to [ON].Using MIC function1) Press as to select [AUDIO SETTING].2) Press the <ENTER> button. fThe [AUDIO SETTING] screen is displayed.3) Press as to select [MIC].4) Press qw to switch the item. fThe items will switch each time you press the button.[OFF] MIC is disabled.[ON] <AUDIO IN 2> terminal switches to MIC input.5) Press as to select [MIC GAIN].6) Press qw to adjust the level.Operation Adjustment RangePress the w button. Turns up the MIC mixing gain. 0 ~ 63Press the q button. Turns down the MIC mixing gain.Note fWhen [OFF] is selected in MIC function, the MIC GAIN function is not available. fIf the MIC function is set to [ON] when connecting audio signals to the <AUDIO IN 2 (MIC IN)> terminal, loud sound may be output suddenly depending on the setting value of [MIC GAIN]. fWhen [MIC] is set to [ON], no signal is input, AV MUTE function is on, FREEZE function is on or the POWER MANAGEMENT function is working, the audio of MIC will be output.74 - ENGLISHChapter 4 Settings - [PROJECTOR SETUP] menu](https://usermanual.wiki/Panasonic-of-North-America/PT-VW350.PT-VW350-Manual-Part-2/User-Guide-2596826-Page-34.png)
![[TEST PATTERN]Displays the test pattern built-in to the projector.Settings of position, size, and other factors will not be reected in test patterns. Make sure to display the input signal before performing various adjustments.1) Press as to select [TEST PATTERN].2) Press the <ENTER> button. fThe test pattern with the [PATTERN CHANGE] individual adjustment screen is displayed. 3) Press qw to switch the item. fThe items will switch each time you press the button. All white → Color bars → White cross on the black background → Black cross on the white background → Cross hatch → All white →... fWhen you press the <MENU> button or <RETURN> button, it will exit the test pattern and return to the sub-menu of [PROJECT SETUP].Note fThe initial setting is All white. The initial screen is Cross hatch if you have assigned it to the <FUNCTION> button.[FILTER COUNTER]This function is used to reset the lter use time and set the notication display.1) Press as to select [FILTER COUNTER].2) Press the <ENTER> button. fThe [FILTER COUNTER] screen is displayed.[FILTER COUNTER] Displays the using time of the lter.[TIMER] Sets the timer when you want to display an alert message of lter replacement.[FILTER COUNTER RESET] Resets the lter counter.Setting [TIMER] 1) Press as to select [TIMER].2) Press qw to switch the setting of the timer. fThe items will switch each time you press the button. [OFF] → [1000 H] → [2000 H] → [3000 H] → [4000 H] → [5000 H] → [6000 H] → [7000 H][FILTER COUNTER RESET] 1) Press as to select [FILTER COUNTER RESET].2) Press the <ENTER> button. fThe [FILTER COUNTER RESET] screen is displayed.3) Press qw to select [OK] and then press the <ENTER> button.[INITIALIZE ALL]Return various setting values to their factory default settings.1) Press as to select [INITIALIZE ALL].2) Press the <ENTER> button. fThe [INITIALIZE ALL] screen is displayed.3) When the confirmation is displayed, press qw to select [OK] and then press the <ENTER> button. fThe [NOW INITIALIZING...] screen is displayed and then the [POWER OFF.] screen will be displayed.4) Press the <ENTER> button. fThe operation of other buttons is disabled. fThe initial setting (display language) screen will be displayed when turning on the projector next time.Note fThe projector will enter into the standby status to reect the setting values when [INITIALIZE ALL] is executed. fWhen [INITIALIZE ALL] is executed, [STANDBY MODE], [EMULATE], [FILTER COUNTER] and the setting values of [NETWORK] cannot be returned to the factory default values. For details about the initialization of [NETWORK], please refer to [NETWORK] → [INITIALIZE] (x page 81). ENGLISH - 75Chapter 4 Settings - [PROJECTOR SETUP] menu](https://usermanual.wiki/Panasonic-of-North-America/PT-VW350.PT-VW350-Manual-Part-2/User-Guide-2596826-Page-35.png)
![[SECURITY] menuOn the menu screen, select [SECURITY] from the main menu, and select an item from the sub-menu.Refer to "Navigating through the menu" (x page 47) for the operation of the menu screen. f When the projector is used for the rst time Initial password: Press awsqawsq in order, and press the <ENTER> button. fAfter selecting the item, press asqw to set. Attention fWhen you select the [SECURITY] menu and press the <ENTER> button, entering a password is required. Enter the preset password and then continue operations of the [SECURITY] menu. fWhen the password has been changed previously, enter the changed password, and press the <ENTER> button.Note fThe entered password is displayed with "" mark on the screen. fAn error message is displayed on the screen when the entered password is incorrect. Re-enter the correct password.[PASSWORD]The [PASSWORD] screen is displayed when the power is turned on, [INITIALIZE ALL] is executed or [INITIALIZE] in the [NETWORK] menu is executed. When the entered password is incorrect, the operation will be restricted to the power standby <v/b> button on the control panel or on the remote control.1) Press as to select [PASSWORD].2) Press qw to switch the item. fThe items will switch each time you press the button.[OFF] Disables the security password entry.[ON] Enables the security password entry.Note fThe [PASSWORD] setting is set to [OFF] by the factory default. fChange the password periodically that is hard to guess. fThe security password is enabled after setting [PASSWORD] to [ON], turning the power off and disconnecting the power plug from the power outlet.[PASSWORD CHANGE]Change the security password.1) Press as to select [PASSWORD CHANGE].2) Press the <ENTER> button. fThe [PASSWORD CHANGE] screen is displayed.3) Press asqw or number buttons (<1>-<6>) to set the password. fUp to eight button operations can be set.4) Press the <ENTER> button.5) Re-enter the password for the confirmation.6) Press the <ENTER> button.76 - ENGLISHChapter 4 Settings - [SECURITY] menu](https://usermanual.wiki/Panasonic-of-North-America/PT-VW350.PT-VW350-Manual-Part-2/User-Guide-2596826-Page-36.png)
![Note fThe entered password is displayed with "" mark on the screen. fAn error message is displayed on the screen when the entered password is incorrect. Re-enter the correct password. fIf numbers have been used for the security password, the security password will need to be initialized again if the remote control is lost. Consult your dealer for the initialization method.[TEXT DISPLAY]Overlap the security message (text) over the projecting image.1) Press as to select [TEXT DISPLAY].2) Press qw to switch the item. fThe items will switch each time you press the button.[OFF] Disables the text display.[ON] Enables the text display.[TEXT CHANGE]Change the text displayed when the text display is enabled by selecting [ON] in [TEXT DISPLAY].1) Press as to select [TEXT CHANGE].2) Press the <ENTER> button. fThe [TEXT CHANGE] screen is displayed.3) Press asqw to select the text, and press the <ENTER> button to enter the text.4) Press asqw to select [OK], and press the <ENTER> button. fThe text is changed.[MENU LOCK]Display the menu by the <MENU> button and set whether or not to enable menu operations.1) Press as to select [MENU LOCK].2) Press qw to switch the item. fThe items will switch each time you press the button.[OFF] Unlocks menu operations.[ON] Locks menu operations.Note fWhen the entered password is incorrect after setting [MENU LOCK] to [ON], the <MENU> button cannot be operated. f[MENU LOCK] is set to [OFF] at the time of purchase or when [INITIALIZE ALL] is executed. fWhen [MENU LOCK] is set to [ON] and then enter the password to release the lock, the unlock state is held until the projector enters the standby mode.[MENU LOCK PASSWORD]Change the menu lock password.1) Press as to select [MENU LOCK PASSWORD].2) Press the <ENTER> button. fThe [MENU LOCK PASSWORD] screen is displayed.3) Press asqw to select the text, and press the <ENTER> button to enter the text. fUp to 16 characters can be input.4) Press asqw to select [OK], and press the <ENTER> button. fTo cancel, select [CANCEL].Attention fThe initial password is “AAAA” at the time of purchase or when [INITIALIZE ALL] is executed. fChange the password periodically that is hard to guess.ENGLISH - 77Chapter 4 Settings - [SECURITY] menu](https://usermanual.wiki/Panasonic-of-North-America/PT-VW350.PT-VW350-Manual-Part-2/User-Guide-2596826-Page-37.png)
![[CONTROL DEVICE SETUP]Enable/disable the button operations on the control panel and the remote control.1) Press as to select [CONTROL DEVICE SETUP].2) Press the <ENTER> button. fThe [CONTROL DEVICE SETUP] screen is displayed.3) Press as to select one item between [CONTROL PANEL] and [REMOTE CONTROLLER].[CONTROL PANEL] You can set the limitation on the control from the control panel.[REMOTE CONTROLLER] You can set the limitation on the control from the remote control.4) Press qw to switch between [ENABLE] and [DISABLE]. fYou can set the limitation on the control from the control panel or the remote control.[ENABLE] Enable the button operations.[DISABLE] Disable the button operations. fA conrmation screen will be displayed when you change [ENABLE] to [DISABLE], then proceed to Step 5).5) Press qw to select [OK], and then press the <ENTER> button.Note fWhen a button operation is performed on the device set to [DISABLE] , the [PASSWORD] screen is displayed. To continue operations, enter the security password. fThe [PASSWORD] screen will disappear when there is no operation for approx. 10 seconds. fIf the operations of both [CONTROL PANEL] and [REMOTE CONTROLLER] are set to [DISABLE], the projector cannot be turned off (cannot enter standby). fEven when you set button operations on the remote control to be disabled, operations of the <ID ALL> and <ID SET> buttons on the remote control are enabled.78 - ENGLISHChapter 4 Settings - [SECURITY] menu](https://usermanual.wiki/Panasonic-of-North-America/PT-VW350.PT-VW350-Manual-Part-2/User-Guide-2596826-Page-38.png)
![[NETWORK] menuOn the menu screen, select [NETWORK] from the main menu, and select an item from the sub-menu.Refer to "Navigating through the menu" (x page 47) for the operation of the menu screen. fAfter selecting the item, press asqw to set.[WIRED LAN]You can make detailed wired LAN settings.1) Press as to select [WIRED LAN].2) Press the <ENTER> button. fThe [WIRED DETAILED SETUP] screen is displayed.3) Press as to select an item, and change the setting according to the instructions.[DHCP] [ON]: If a DHCP server exists in the network to which the projector is connected, the IP address will automatically be acquired.[OFF]: If a DHCP server does not exist in the network to which the projector is connected, additionally set [IP ADDRESS], [SUBNET MASK] and [DEFAULT GATEWAY].[IP ADDRESS] Enter the IP address if DHCP server is not used.[SUBNET MASK] Enter the subnet mask if DHCP server is not used.[DEFAULT GATEWAY] Enter the gateway address if DHCP server is not used.[DNS1] Enter the DNS server address if DHCP server is not used.[DNS2] Enter the alternate DNS server address if DHCP server is not used.4) Press as to select [OK], and press the <ENTER> button. rDefault wired LAN settings fThe following settings are set before the projector leaves the factory.[DHCP] OFF[IP ADDRESS] 192.168.10.100[SUBNET MASK] 255.255.255.0[DEFAULT GATEWAY] 192.168.10.1[DNS1] / [DNS2] NONENote fWhen using a DHCP server, conrm that the DHCP server is running. fConsult your network administrator regarding the IP ADDRESS, SUBNET MASK, and DEFAULT GATEWAY.ENGLISH - 79Chapter 4 Settings - [NETWORK] menu](https://usermanual.wiki/Panasonic-of-North-America/PT-VW350.PT-VW350-Manual-Part-2/User-Guide-2596826-Page-39.png)
![[NAME CHANGE]You can change the projector name, for example, when using the DHCP server.1) Press as to select [NAME CHANGE].2) Press the <ENTER> button. fThe [NAME CHANGE] screen is displayed.3) Select characters with the asqw buttons and press the <ENTER> button to enter the projector name. fSelect [ALL DELETE] to delete all the entered characters, or press the <DEFAULT> button on the remote control to delete a character on the cursor in the entry eld.4) Select [OK] with the as buttons and press the <ENTER> button. fTo cancel the change of the name, select [CANCEL] and press the <ENTER> button.Note f[Name □□□□] (□□□□ is 4-digit number) is set before the projector leaves the factory.[NETWORK CONTROL]Set when you want to control the projector from a computer connected to the network.1) Press as to select [NETWORK CONTROL].2) Press qw to switch the item. fThe items will switch each time you press the button.[ON] This function is enabled. Web control, PJLink control, the command control of the LAN are enabled.[OFF] This function is disabled.[AMX D.D.]Set to [ON] to control with the controller of AMX Corporation.Setting this function to [ON] enables detection through “AMX Device Discovery”. For details, refer to the website of AMX Corporation.URL http://www.amx.com/1) Press as to select [AMX D.D.].2) Press qw to switch the item. fThe items will switch each time you press the button.[OFF] This function is disabled.[ON] This function is enabled.[Crestron Connected(TM)]Set to [ON] to control with Crestron Connected™ of Crestron Electronics, Inc.1) Press as to select [Crestron Connected(TM)].2) Press qw to switch the item. fThe items will switch each time you press the button.[OFF] This function is disabled.[ON] This function is enabled.80 - ENGLISHChapter 4 Settings - [NETWORK] menu](https://usermanual.wiki/Panasonic-of-North-America/PT-VW350.PT-VW350-Manual-Part-2/User-Guide-2596826-Page-40.png)
![[STATUS]Displays the current network status.1) Press as to select [STATUS].2) Press the <ENTER> button. fThe [STATUS] screen is displayed.[DHCP] Displays the usage state of the DHCP server.[IP ADDRESS] Displays the IP address.[SUBNET MASK] Displays the subnet mask.[DEFAULT GATEWAY] Displays the default gateway.[DNS1] Displays the address of the primary DNS server.[DNS2] Displays the address of the secondary DNS server.[MAC ADDRESS] Displays the MAC address.[INITIALIZE]This function is used to return various setting values of [NETWORK] to the factory default value.1) Press as to select [INITIALIZE].2) Press the <ENTER> button. fThe [INITIALIZE] screen is displayed.3) Press qw to select [OK] and then press the <ENTER> button.Network connectionsThe projector has a network function, and the following operations are available from the computer using the web browser control. fSetting and adjustment of the projector. fDisplay of the projector status. fTransmission of an E-mail message when there is a problem with the projector.The projector supports "Crestron Connected™", and the following application software of Crestron Electronics, Inc. can be used. fRoomView Express fFusion RV fRoomView Server EditionNote f"Crestron Connected™" is a system developed by Crestron Electronics, Inc. which collectively manage and control multiple system devices connected via the network, from a computer. This projector supports "Crestron Connected™". fFor details of "Crestron Connected™", refer to the Crestron Electronics, Inc. website. (Provided only in English.)http://www.crestron.com/ For the download of "RoomView Express", refer to the Crestron Electronics, Inc. website. (Provided only in English.)http://www.crestron.com/getroomviewComputer that can be usedIn order to use the Web control function, a Web browser is required. Conrm that the Web browser can be used beforehand.OS Compatible web browserWindows Internet Explorer 8.0 / 9.0 / 10.0 / 11.0Mac OS Safari 6.0 / 7.0 / 8.0Note fCommunication with an E-mail server is required to use the E-mail function. Conrm that the E-mail can be used beforehand.ENGLISH - 81Chapter 4 Settings - [NETWORK] menu](https://usermanual.wiki/Panasonic-of-North-America/PT-VW350.PT-VW350-Manual-Part-2/User-Guide-2596826-Page-41.png)
![Connecting with Wired LANExample of a normal network connectionAttention fWhen a LAN cable is directly connected to the projector, the network connection must be made indoors.Note fA LAN cable is required to use the network function. fUse shielded LAN cable (STP cable) that is compatible with category 5 or above. fUse a LAN cable with length of 100 m or shorter.Projector settings1) Use the LAN cable to connect the projector with computer.2) Turn on the projector.3) Press the <MENU> button to display the [NETWORK] menu, and then select [WIRED LAN], and press the <ENTER> button.4) Set the detailed setup of [WIRED LAN]. fFor details, refer to “WIRED LAN”. (x page 79)Note fPlease conrm with your network administrator before you connect to an existing network. fThe following settings are set before the projector leaves the factory.[DHCP] OFF[IP ADDRESS] 192.168.10.100[SUBNET MASK] 255.255.255.0[DEFAULT GATEWAY] 192.168.10.1[DNS1] / [DNS2] NONEComputer setting1) Turn on the computer.2) Make the network setting according to your system administrator. fIf the projector settings are the default settings, the computer can be used with the following network settings.[IP ADDRESS] 192.168.10.101[SUBNET MASK] 255.255.255.0[DEFAULT GATEWAY] 192.168.10.1ComputerProjectorLAN cable (straight) LAN cable (straight)Hub82 - ENGLISHChapter 4 Settings - [NETWORK] menu](https://usermanual.wiki/Panasonic-of-North-America/PT-VW350.PT-VW350-Manual-Part-2/User-Guide-2596826-Page-42.png)
![Accessing from the web browser1) Start up the web browser on the computer.2) Enter the IP address set on the projector into the URL entry field of the web browser.3) Enter the user name and the password. fThe factory default setting of the user name is user1 (user rights)/admin1 (administrator rights) and the password is panasonic (lower case).4) Click [OK]. fThe [Projector status] page is displayed.Note fIf you use a web browser to control the projector, set [NETWORK CONTROL] to [ON] in [NETWORK] (x page 80). fDo not perform setting or control simultaneously by starting up multiple web browsers. Do not set or control the projector from multiple computers. fChange the password rst. (x page 93) fAccess will be locked for few minutes when an incorrect password is entered three times consecutively. fSome items on the projector setting page use the Javascript function of the web browser. The projector may not be able to be controlled properly if it is set with a browser that does not have this function enabled. fIf the screen for the web control is not displayed, consult your network administrator. fWhile updating the screen for the web control, the screen may become white for a moment, but it is not a malfunction.ENGLISH - 83Chapter 4 Settings - [NETWORK] menu](https://usermanual.wiki/Panasonic-of-North-America/PT-VW350.PT-VW350-Manual-Part-2/User-Guide-2596826-Page-43.png)
![Available functions per accountWith the administrator rights, all functions can be used. With the user rights, available functions are restricted. Select an account according to the purpose of use.Item Function Administrator rights*1 User rights*1 Page[Status][Projector status] l l 85Error information page l l 86[Network status] l l 86[Projector control] [Basic control] l l 87[Advanced control] l l 87[Detailed set up][Network cong] l―88[Ping test] l―89[E-mail set up] l―89[Authentication set up] l―90[ECO management set up] l―93[Change password]User name for [Administrator] l―94User name for [User] l―94Password for [Administrator] l―94Password for [User] l l 94[Crestron Connected(TM)]Operation l―95[Tools] l―95[Info] l―96[Help] l―96*1 The functions with l marks in the columns of administrator rights/user rights indicate that the operation can be performed by each right.Description of each item 1 Page tabSwitches pages by clicking this item.2 [Status]The status of the projector is displayed by clicking this item.3 [Projector control]The [Projector control] page is displayed by clicking this item.4 [Detailed set up]The [Detailed set up] page is displayed by clicking this item.5 [Change password]The [Change password] page is displayed by clicking this item.6 [Crestron Connected(TM)]The control page of Crestron Connected™ is displayed by clicking this item.84 - ENGLISHChapter 4 Settings - [NETWORK] menu](https://usermanual.wiki/Panasonic-of-North-America/PT-VW350.PT-VW350-Manual-Part-2/User-Guide-2596826-Page-44.png)
![[Projector status] pageClick [Status] → [Projector status].Display the status of the projector for the following items.1 [PROJECTOR TYPE]Displays the type of projector.2 [PROJECTOR NAME]Displays the name set in the projector.3 [MAIN VERSION]Displays the rmware version of the projector.4 [POWER]Displays the status of the power.5 [PICTURE MODE]Displays the status of the picture mode.6 [SERIAL NUMBER]Displays the serial number of the projector.7 [NETWORK VERSION]Displays the version of rmware of the network.8 [AV MUTE]Displays the AV mute status.9 [VOLUME]Displays the volume status.10 [INPUT]Displays the status of the selected input.11 [INTAKE AIR TEMPERATURE]Displays the status of the air intake temperature of the projector.12 [EXHAUST AIR TEMPERATURE]Displays the status of the exhaust air temperature of the projector.13 [OPTIC MODULE TEMPERATURE]Displays the optics module temperature status of the projector.14 [LAMP RUNTIME]Displays the runtime of the lamp (converted value).15 [SELF TEST]Displays the self diagnostics information. 16 [PROJECTOR RUNTIME]Displays the runtime of the projector.ENGLISH - 85Chapter 4 Settings - [NETWORK] menu](https://usermanual.wiki/Panasonic-of-North-America/PT-VW350.PT-VW350-Manual-Part-2/User-Guide-2596826-Page-45.png)
![Error information page When [Error (Detail)] or [Warning (Detail)] is displayed in the self-diagnosis display of the [Projector status] screen, click it to display the error/warning details. fThe projector may go into the standby status to protect the projector depending on the contents of the error.1 Self-diagnosis result displayDisplays the item check results.[OK]: Indicates that operation is normal.[FAILED]: Indicates that there is a problem.[WARNING]: Indicates that there is a warning. r[FAILED] items displayed when a problem occursParameter Description[FAN] Trouble has occurred in the fan or its drive circuit. Consult your dealer. [FAN(INTAKE)] Trouble has occurred in the intake fan. [FAN(EXHAUST)] Trouble has occurred in the exhaust fan. [FAN(LAMP)] Trouble has occurred in the lamp cooling fan.[INTAKE AIR TEMPERATURE] The air intake temperature is too high. The projector may be used in an operating environment where the temperature is high, such as near a heating appliance.[EXHAUST AIR TEMPERATURE] The exhaust air temperature is high. The air exhaust port may be blocked.[OPTICS MODULE TEMPERATURE] The temperature around the optics module inside the projector is high. The projec-tor may be used in an operating environment where the temperature is high, such as near a heating appliance.[LAMP REMAIN TIME] The lamp runtime has exceeded the prescribed cumulative time, and it is now time to replace the lamp.[LAMP STATUS] The lamp has failed to light.Wait a short while for the lamp to cool off, and then turn on the power.[APERTURE (CONTRAST-SHUTTER)] Trouble has occurred in the contrast shutter circuitry. Consult your dealer.[AIR FILTER] There is too much dust accumulated in the air lter unit. Turn off the projector and unplug the power plug from the wall outlet, then replace the air lter unit.[Network status] pageClick [Status] → [Network status].The current network setting status is displayed.86 - ENGLISHChapter 4 Settings - [NETWORK] menu](https://usermanual.wiki/Panasonic-of-North-America/PT-VW350.PT-VW350-Manual-Part-2/User-Guide-2596826-Page-46.png)
![[Basic control] page Click [Projector control] → [Basic control].1 [INPUT]Switches the input signal.2 [VOLUME]Adjusts the volume level.3 [PICTURE MODE]Switches the picture mode.4 [AV MUTE]Switches between AV mute on/off.5 [POWER]Turns on/off the power.6 [CLOSED CAPTION]Switches the closed caption mode.[Advanced control] pageClick [Projector control] → [Advanced control].1 [POSITION]Adjusts the position of image and the keystone correction.2 [PICTURE]Adjusts the items of image.ENGLISH - 87Chapter 4 Settings - [NETWORK] menu](https://usermanual.wiki/Panasonic-of-North-America/PT-VW350.PT-VW350-Manual-Part-2/User-Guide-2596826-Page-47.png)
![[Network cong] pageClick [Detailed set up] → [Network cong].1) Click [Network cong]. fThe [CAUTION!] screen is displayed.2) Select the item which you want to change the setting, then click [Next]. fThe current setting is displayed.3) Click [Change] button. fThe setting change screen is displayed. 1 [DHCP ON]/[DHCP OFF]To enable the DHCP client function, set to [DHCP ON].2 [IP ADDRESS]Enter the IP address when not using a DHCP server.3 [SUBNET MASK]Enter the subnet mask when not using a DHCP server.4 [DEFAULT GATEWAY]Enter the default gateway address when not using a DHCP server.5 [DNS1]/[DNS2]Enter the DNS1/DNS2 server address.Permissible/ available characters for the entry of DNS1/DNS2 server address.(primary):Numbers (0 - 9), period (.)(Example: 192.168.0.253).6 [Back]/[Next]Click the [Back] button to return to the original screen. The current settings are displayed by pressing the [Next] button.Click the [Submit] button to update the settings.Note fWhen you use the “Forward” and “Back” functions of your browser, a warning message “Page has Expired” may appear. In that case, click [Network cong] again since the following operation will not be guaranteed. fChanging LAN settings while connected to the LAN may cause the connection to cut out.88 - ENGLISHChapter 4 Settings - [NETWORK] menu](https://usermanual.wiki/Panasonic-of-North-America/PT-VW350.PT-VW350-Manual-Part-2/User-Guide-2596826-Page-48.png)
![[Ping test] pageCheck whether the network is connected to the mail server, POP server, DNS server, etc.Click [Detailed set up] → [Ping test].1 [Input IP address]Enter the IP address of the server to be tested.2 [Submit]Executes the connection test.3 Example of display when the connection has succeeded4 Example of display when the connection has failed[E-mail set up] page When there is a problem or the runtime of a lamp reaches a set value, an E-mail can be sent to preset E-mail addresses (up to two addresses).Click [Detailed set up] → [E-mail set up].1 [ENABLE]Select [Enable] to use the E-mail function.2 [SMTP SERVER NAME]Enter the IP address or the server name of the E-mail server (SMTP). To enter the server name, the DNS server needs to be set up.3 [MAIL FROM]Enter the E-mail address of the projector. (Up to 63 characters in single byte)4 [MEMO]Enter information such as the location of the projector that noties the sender of the E-mail. (Up to 63 characters in single byte)5 [MINIMUM TIME]Change the minimum interval for the temperature warningE-mail. The default value is 60 minutes. In this case, another E-mail will not be sent for 60 minutes after sending the temperature warning E-mail even if it reaches the warning temperature.6 [INTAKE AIR TEMPERATURE]Change the temperature setting for the temperature warning mail. A temperature warning E-mail is sent when the temperature exceeds this value.ENGLISH - 89Chapter 4 Settings - [NETWORK] menu](https://usermanual.wiki/Panasonic-of-North-America/PT-VW350.PT-VW350-Manual-Part-2/User-Guide-2596826-Page-49.png)