Panasonic of North America PT-VW350 LCD PROJECTOR User Manual PT VW350 Manual Part 1 1
Panasonic Corporation of North America LCD PROJECTOR PT VW350 Manual Part 1 1
Contents
- 1. PT-VW350_Manual Part 1-1
- 2. PT-VW350_Manual Part 1-2
- 3. PT-VW350_Manual Part 2
- 4. PT-VW350_Manual Part 3
PT-VW350_Manual Part 1-1

![Features of the ProjectorHigh Contrast ▶A high contrast of 12 000:1 is achieved by the unique optical system.Auto Setup Function ▶This function executes [SHIFT], [CLOCK PHASE], [DOT CLOCK] at the same time by pressing the <AUTO SETUP> button.Direct Power Off Function ▶With the Direct Power Off function, you can disconnect the power cord from the wall outlet or turn off the breaker even during projection.Wired LAN Function ▶This function allows you to project an image on a computer as well as operate and manage the projector via network.Useful Functions for Presentations ▶ The digital zoom function allows you to focus on the crucial information during a presentation. ▶ The MIC function and 10 W audio output allows you to make a presentation without any external audio equipment.Quick StepsFor details, see the corresponding pages.1. Set up your projector. (x page 26)2. Connect with other devices. (x page 30)3. Connect the power cord. (x page 35)4. Power on. (x page 36)5. Make initial settings. (x page 36) fTake this step when you power on for the rst time after purchasing the projector.6. Select the input signal. (x page 40)7. Adjust the image. (x page 40)10 - ENGLISH](https://usermanual.wiki/Panasonic-of-North-America/PT-VW350.PT-VW350-Manual-Part-1-1/User-Guide-2596823-Page-10.png)
![ContentsContentsRead this first! ............................................2Chapter 1 PreparationPrecautions for use ................................................. 14Cautions when transporting .................................. 14Cautions when installing ....................................... 14Security ................................................................ 15Disposal ................................................................ 16Cautions on use ................................................... 16Accessories .......................................................... 17Contents of the supplied CD-ROM ....................... 18Optional accessories ............................................ 18About your projector ............................................... 19Remote control ..................................................... 19Projector body ...................................................... 20Preparing the remote control ................................. 23Inserting and removing batteries .......................... 23When using the system with multiple projectors .. 23Attaching the Lens Cap .......................................... 24Chapter 2 Getting StartedSetting up ................................................................. 26Installation mode .................................................. 26Parts for ceiling mount (optional) .......................... 26Screen size and throw distance ........................... 27Adjusting adjustable feet ...................................... 29Connecting ............................................................... 30Before connecting ................................................ 30Connecting example : AV equipment ................... 32Connecting example : Computers ........................ 32Connecting example : Audio ................................. 33Chapter 3 Basic OperationsPowering on/off ....................................................... 35Connecting the power cord .................................. 35Power indicator ..................................................... 35Powering On the Projector ................................... 36When the initial setting screen is displayed .......... 36Making adjustments and selections ..................... 38Powering Off the Projector ................................... 39Direct Power Off function ..................................... 39Projecting ................................................................. 40Selecting the input signal ..................................... 40How to adjust the state of the image .................... 40Basic operations by using the remote control ..... 41Using the AUTO SETUP function ......................... 41Using the KEYSTONE button ............................... 41Switching the input signal ..................................... 42Using the FUNCTION button ................................ 42Using the FREEZE function ................................. 42Using the AV MUTE function ................................ 43Using the P-TIMER function ................................. 43Using the DIGITAL ZOOM function ...................... 43Controlling the volume of the speaker .................. 44Using the MUTE function ..................................... 44Using the P IN P function ..................................... 45Setting the ID number of the remote control ........ 45Chapter 4 SettingsMenu Navigation ...................................................... 47Navigating through the menu ............................... 47Resetting adjustment values to the factory default ................................................................ 48Main menu ............................................................ 48Sub-menu ............................................................. 49[PICTURE] menu ...................................................... 51[PICTURE MODE] ................................................ 51[CONTRAST] ........................................................ 51[BRIGHTNESS] .................................................... 52[COLOR] ............................................................... 52[TINT] ................................................................... 52[SHARPNESS] ..................................................... 52[COLOR TEMPERATURE] ................................... 53[IRIS] .................................................................... 53[ADVANCED MENU] ............................................ 53[DAYLIGHT VIEW] ................................................ 53[DIGITAL CINEMA REALITY] ............................... 54[NOISE REDUCTION] .......................................... 54[TV-SYSTEM] ....................................................... 54[RGB/YPBPR]/[RGB/YCBCR] ................................ 55[POSITION] menu .................................................... 56[REALTIME KEYSTONE] ..................................... 56[KEYSTONE] ........................................................ 56[SHIFT] ................................................................. 58[DOT CLOCK]....................................................... 58[CLOCK PHASE] .................................................. 58[OVER SCAN] ...................................................... 59[ASPECT] ............................................................. 59[FRAME LOCK] .................................................... 60[LANGUAGE] menu ................................................. 61[LANGUAGE] ....................................................... 61[DISPLAY OPTION] menu ....................................... 62[ON-SCREEN DISPLAY] ...................................... 62[HDMI SIGNAL LEVEL] ........................................ 63[CLOSED CAPTION SETTING] ........................... 63[SCREEN SETTING] ........................................... 64[STARTUP LOGO] ................................................ 64[AUTO SETUP SETTING] .................................... 65[SIGNAL SEARCH] .............................................. 65[BACK COLOR] .................................................... 65[WIDE MODE] ...................................................... 65[SXGA MODE] ...................................................... 65ENGLISH - 11ContentsBe sure to read “Read this rst!” from page 2.](https://usermanual.wiki/Panasonic-of-North-America/PT-VW350.PT-VW350-Manual-Part-1-1/User-Guide-2596823-Page-11.png)
![[P-TIMER] ............................................................. 66[P IN P] ................................................................. 67[OTHER FUNCTIONS] ......................................... 67[PROJECTOR SETUP] menu .................................. 69[STATUS] .............................................................. 69[COMPUTER2 SELECT] ...................................... 69[PROJECTOR ID] ................................................. 69[INITIAL START UP] ............................................. 70[PROJECTION METHOD] .................................... 70[HIGH ALTITUDE MODE] ..................................... 70[LAMP POWER] ................................................... 71[ECO MANAGEMENT] ......................................... 71[EMULATE] ........................................................... 72[FUNCTION BUTTON] ......................................... 73[AUDIO SETTING] ............................................... 73[TEST PATTERN] ................................................. 75[FILTER COUNTER]............................................. 75[INITIALIZE ALL] .................................................. 75[SECURITY] menu ................................................... 76[PASSWORD] ....................................................... 76[PASSWORD CHANGE] ...................................... 76[TEXT DISPLAY] .................................................. 77[TEXT CHANGE] .................................................. 77[MENU LOCK] ...................................................... 77[MENU LOCK PASSWORD] ................................ 77[CONTROL DEVICE SETUP] ............................... 78[NETWORK] menu ................................................... 79[WIRED LAN] ....................................................... 79[NAME CHANGE] ................................................. 80[NETWORK CONTROL] ...................................... 80[AMX D.D.] ........................................................... 80[Crestron Connected(TM)] .................................... 80[STATUS] .............................................................. 81[INITIALIZE] .......................................................... 81Network connections ............................................ 81Accessing from the web browser ......................... 83Chapter 5 MaintenanceLamp and Warning Indicators ................................ 98When an indicator lights up .................................. 98Maintenance/replacement....................................... 99Before performing maintenance/replacement ...... 99Maintenance ......................................................... 99Replacing the unit ................................................. 99Troubleshooting .................................................... 103Chapter 6 AppendixTechnical Information ........................................... 105PJLink protocol ................................................... 105Control commands via LAN ................................ 106Serial terminal .................................................... 108[MENU LOCK PASSWORD] operations .............110Two window display combination list ................... 111List of compatible signals ....................................112Specications ........................................................ 114Dimensions ............................................................ 116Ceiling mount bracket safeguards....................... 117Index ....................................................................... 11812 - ENGLISHContents](https://usermanual.wiki/Panasonic-of-North-America/PT-VW350.PT-VW350-Manual-Part-1-1/User-Guide-2596823-Page-12.png)
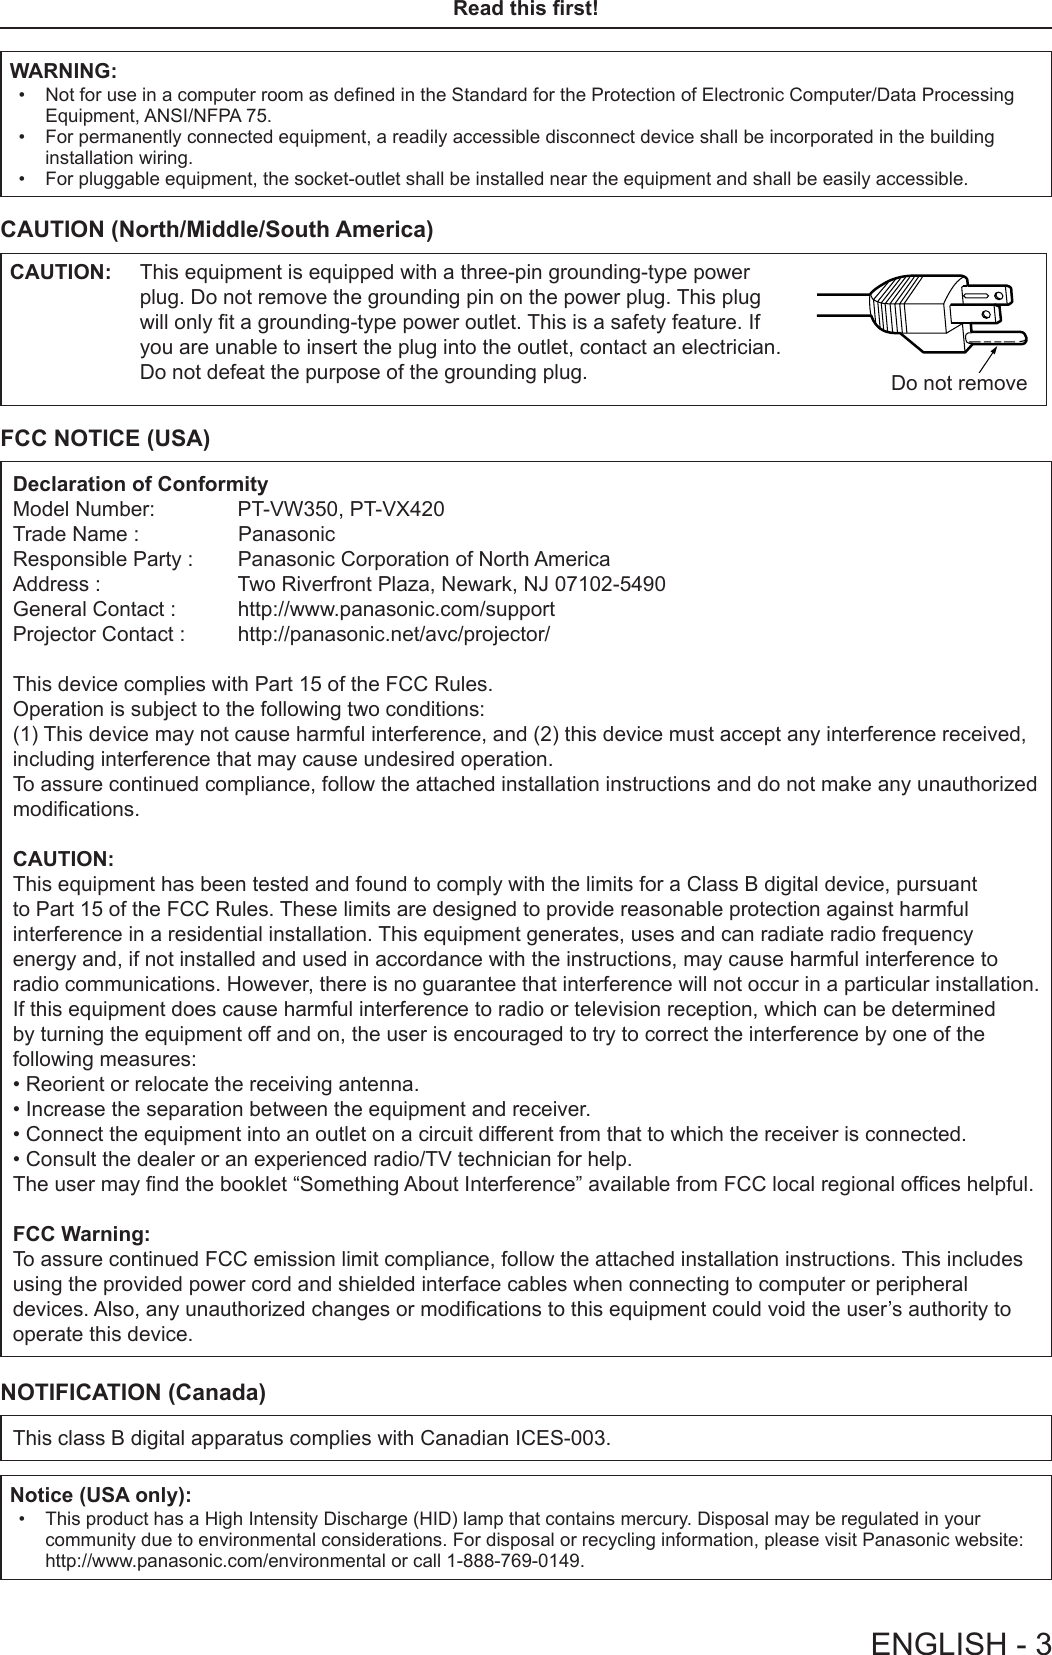
![Precautions for useCautions when transporting fWhen transporting the projector, hold it securely by its bottom and avoid excessive vibration and impacts. Doing so may damage the internal parts and result in malfunctions. fDo not transport the projector with the adjustable feet extended. Doing so may damage the adjustable feet.Cautions when installing rDo not set up the projector outdoors. fThe projector is designed for indoor use only. rDo not use under the following conditions. fPlaces where vibration and impacts occur such as in a car or vehicle: Doing so may damage the internal parts and result in malfunctions. fLocations near the sea or areas affected by corrosive gas: Corrosion may damage internal components or cause the projector to malfunction. fNear the exhaust of an air conditioner: Depending on the conditions of use, the screen may uctuate in rare cases due to the heated air from the air exhaust port or the hot or cooled air. Make sure that the exhaust from the projector or other equipment, or the air from the air conditioner does not blow toward the front of the projector. fPlaces with sharp temperature uctuations such as near lights (studio lamp): Doing so may shorten the life of the lamp, or result in deformation of the outer case due to heat, which may cause malfunctions. The operating environment temperature of the projector should be between 0 °C (32 °F) and 40 °C (104 °F)*1 when using it at elevations lower than 1 400 m (4 593') above sea level, and between 0 °C (32 °F) and 30 °C (86 °F) when using it at high altitudes (between 1 400 m (4 593') and 2 700 m (8 858') above sea level).*1 When the operating environment temperature of the projector is between 35 °C (95°F) and 40 °C (104 °F), the lamp mode will change to [ECO] automatically. fNear high-voltage power lines or near motors: Doing so may interfere with the operation of the projector. rBe sure to ask a specialized technician when installing the product to a ceiling.This requires an optional ceiling mount bracket. Be sure to use the Projector Mount Bracket together with the ceiling mount bracket for high ceilings or low ceilings. Model No.: ① ET-PKL100H (for high ceilings), ET-PKV400B (Projector Mount Bracket) ② ET-PKL100S (for low ceilings), ET-PKV400B (Projector Mount Bracket) rFocus adjustmentThe projection lens is thermally affected by the light from the light source, making the focus unstable in the period just after switching on the power. It is recommended that the images are projected continuously for at least 30 minutes before the focus is adjusted. rWhen using the projector in the elevation of below 1 400 m (4 593'), make sure [HIGH ALTITUDE MODE] is set to [OFF].Failure to do so may shorten the life of the internal parts and result in malfunctions. rWhen using the projector in the elevation of above 1 400 m (4 593') and below 2 000 m (6 562'), make sure [HIGH ALTITUDE MODE] is set to [HIGH1].Failure to do so may shorten the life of the internal parts and result in malfunctions. rWhen using the projector in the elevation of above 2 000 m (6 562') and below 2 700 m (8 858'), make sure [HIGH ALTITUDE MODE] is set to [HIGH2].Failure to do so may shorten the life of the internal parts and result in malfunctions. rDo not install the projector at elevations of 2 700 m (8 858') or higher above sea level.Failure to do so may shorten the life of the internal parts and result in malfunctions. rDo not tilt the projector or place it on its side.Do not tilt the projector body more than approximately ±40 degrees vertically or ±15 degrees horizontally. Over tilting may result in shortening the life of the components. Within 15°Within 15°Within 40°Within 40°14 - ENGLISHChapter 1 Preparation - Precautions for use](https://usermanual.wiki/Panasonic-of-North-America/PT-VW350.PT-VW350-Manual-Part-1-1/User-Guide-2596823-Page-14.png)