Panasonic of North America PT-VW355N LCD PROJECTOR User Manual PT VW355N Part 3
Panasonic Corporation of North America LCD PROJECTOR PT VW355N Part 3
Contents
- 1. PT-VW355N_User Manual Part 1
- 2. PT-VW355N_User Manual Part 2
- 3. PT-VW355N_User Manual Part 3
- 4. PT-VW355N_User Manual Part 4
PT-VW355N_User Manual Part 3

[D/W/Z6k
SERIES]
DZ770 series, DW740 series, DX810 series, DZ680 series, DW640 series, DX610 series,
DW730 series, DX800 series, DZ6710 series, DZ6700 series, DW6300 series, D6000 series,
D5000 series, DZ570 series, DW530 series, DX500 series
[L730 SERIES] L730 series, L720 series, L520 series
[L780 SERIES] L780 series, L750 series
[L735 SERIES] L735 series
[L785 SERIES] L785 series
[F/W SERIES] FW430 series, FX400 series, FW300 series, F300 series, F200 series, FW100 series, F100 series
[LZ370] LZ370 series
[LB/W SERIES] LB3 series, LB2 series, LB1 series, ST10 series, LB90 series, LW80NT series, LB80 series,
LB78 series, LB75 series
[VX500 SERIES] VW435N series, VW440 series, VW430 series, VX505N series, VX510 series, VX500 series,
VW330 series, VX400NT series, VX400 series, VX41 series
[EZ570 SERIES] EZ570 series, EW630 series, EW530 series, EX600 series, EX500 series
[VW431D] VW431D series
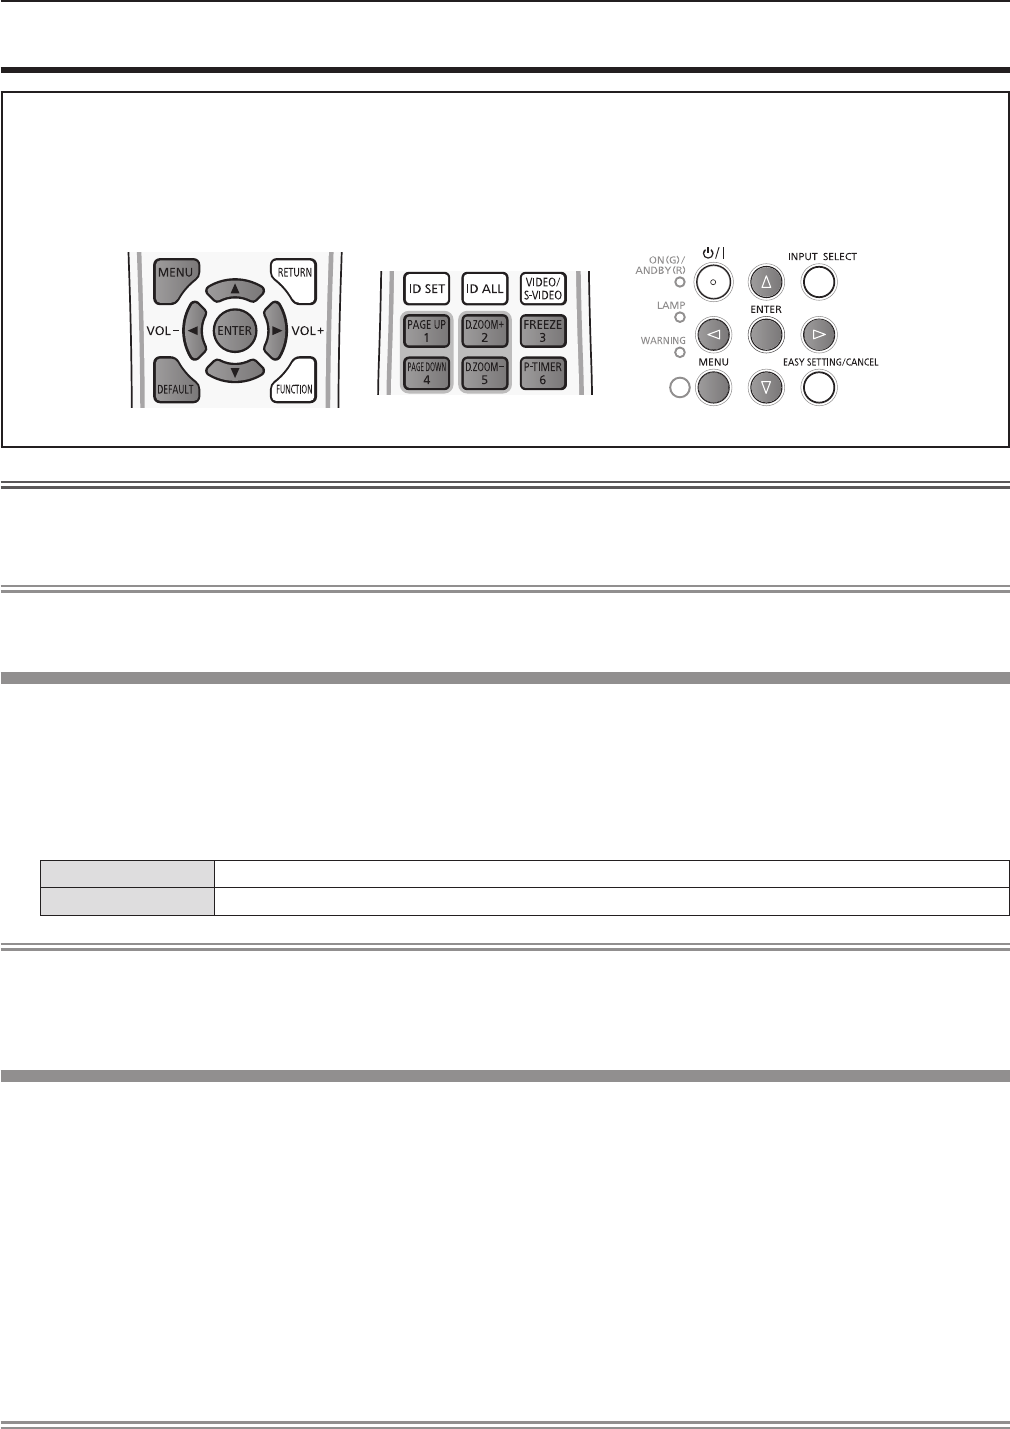
4) Press the <ENTER> button.
[FUNCTION BUTTON]
The function assigned to the <FUNCTION> button of the remote control is displayed. You can also release the assigned
setting.
Releasing assigned function to the <FUNCTION> button
1) Press as to select [FUNCTION BUTTON].
2) Press the <ENTER> button.
fThe [FUNCTION BUTTON] screen is displayed.
3) Press the <ENTER> button.
4) When the confirmation message is displayed, select [OK] and press the <ENTER> button.
Note
fYou can also cancel the assigned settings by displaying the on-screen menu, selecting the menu item to be canceled (main
menu, sub-menu or details menu), and then pressing the <FUNCTION> button for at least 3 seconds.
[AUDIO SETTING]
You can perform more detailed setting for Audio.
Adjusting the volume
1) Press as to select [AUDIO SETTING].
2) Press the <ENTER> button.
fThe [AUDIO SETTING] screen is displayed.
3) Press as to select [VOLUME].
4) Press qw to adjust the level.
Operation Adjustment Range
Press the w button. Turns up the volume. 0 ~ 63
Press the q button. Turns down the volume.
Setting the mute
1) Press as to select [AUDIO SETTING].
2) Press the <ENTER> button.
fThe [AUDIO SETTING] screen is displayed.
3) Press as to select [MUTE].
4) Press qw to switch the item.
ENGLISH - 81
Chapter 4 Settings - [PROJECTOR SETUP] menu

[OFF] Output the audio.
[ON] Turns off the volume temporarily.
Setting the audio output during standby
1) Press as to select [AUDIO SETTING].
2) Press the <ENTER> button.
fThe [AUDIO SETTING] screen is displayed.
3) Press as to select [IN STANDBY MODE].
4) Press qw to switch [IN STANDBY MODE].
fThe items will switch each time you press the button.
[OFF] Disables audio output in the standby mode.
[ON]
Enables audio output in the standby mode when [STANDBY MODE] is set to [NORMAL]. At this
time, press the <VOL - > button / <VOL +> button on the remote control or qw buttons on the
control panel to adjust the volume.
Note
fWhen [ECO MANAGEMENT] → [STANDBY MODE] is set to [ECO] (x page 80), even if [IN STANDBY MODE] is set to
[ON], audio cannot be output during standby.
Setting audio input selection
Choose the audio input terminal for each input signal.
1) Press as to select [AUDIO SETTING].
2) Press the <ENTER> button.
fThe [AUDIO SETTING] screen is displayed.
3) Press as to select one item of [AUDIO IN SELECT].
[COMPUTER1] Set the audio output when [COMPUTER1] input is selected.
[COMPUTER2] Set the audio output when [COMPUTER2] input is selected.
[VIDEO] Set the audio output when [VIDEO] input is selected.
[S-VIDEO] Set the audio output when [S-VIDEO] input is selected.
[HDMI] Set the audio output when [HDMI] input is selected.
[NETWORK/USB] Set the audio output when [NETWORK/USB] input is selected.
4) Press qw to switch the item.
fThe sub items will switch each time you press the button.
[COMPUTER1] Select one item among [AUDIO IN 1], [AUDIO IN 2] or [AUDIO IN 3].
[COMPUTER2] Select one item among [AUDIO IN 1], [AUDIO IN 2] or [AUDIO IN 3].
[VIDEO] Select one item among [AUDIO IN 1], [AUDIO IN 2] or [AUDIO IN 3].
[S-VIDEO] Select one item among [AUDIO IN 1], [AUDIO IN 2] or [AUDIO IN 3].
[HDMI] Select one item among [HDMI AUDIO IN], [AUDIO IN 1], [AUDIO IN 2] or [AUDIO IN 3].
[NETWORK/USB]
Select one item among [NETWORK/USB AUDIO IN], [AUDIO IN 1], [AUDIO IN 2] or [AUDIO IN 3].
Note
fWhen [MIC] is set to [ON], [AUDIO IN 2] cannot be selected.
fEven if [AUDIO IN 2] is selected, it will change to [AUDIO IN 1] automatically when [MIC] is set to [ON].
Using MIC function
1) Press as to select [AUDIO SETTING].
2) Press the <ENTER> button.
fThe [AUDIO SETTING] screen is displayed.
3) Press as to select [MIC].
4) Press qw to switch the item.
fThe items will switch each time you press the button.
[OFF] MIC is disabled.
[ON] <AUDIO IN 2> terminal switches to MIC input.
5) Press as to select [MIC GAIN].
82 - ENGLISH
Chapter 4 Settings - [PROJECTOR SETUP] menu
6) Press qw to adjust the level.
Operation Adjustment Range
Press the w button. Turns up the MIC mixing gain. 0 ~ 63
Press the q button. Turns down the MIC mixing gain.
Note
fWhen [OFF] is selected in MIC function, the MIC GAIN function is not available.
fIf the MIC function is set to [ON] when connecting audio signals to the <AUDIO IN 2 (MIC IN)> terminal, loud sound may be
output suddenly depending on the setting value of [MIC GAIN].
fWhen [MIC] is set to [ON], no signal is input, AV MUTE function is on, FREEZE function is on or the POWER
MANAGEMENT function is working, the audio of MIC will be output.
[EASY SETTING]
You can set the operation when press the <EASY SETTING/CANCEL> button on the control panel.
1) Press as to select [EASY SETTING].
2) Press the <ENTER> button.
fThe [EASY SETTING] screen is displayed.
3) Press as to select [FOCUS ASSIST], [SCREEN FIT] or [COLORBOARD].
[FOCUS ASSIST] The level of focus adjustment is displayed in the color and length of the bar. It is supported the
manual adjustment through rotating the focus ring.
[SCREEN FIT] If it detects a screen frame, the projected image is corrected to t the screen frame automatically.
If it does not detect a screen frame, the KEYSTONE starts to work automatically.
[COLORBOARD] The color values will change automatically to reach the optimal color except for the white screen.
4) Press qw to switch the item.
fThe items will switch each time you press the button.
[FOCUS ASSIST] This function is enabled when it is set to [ON]. This function is disabled when it is set to [OFF].
[SCREEN FIT]
The image will be displayed in full screen when it is set to [FULL]. The projected image will
maintain the aspect ratio which is input when it is set to [ORIGINAL]. This function is disabled
when it is set to [OFF].
[COLORBOARD] This function is enabled when it is set to [ON]. This function is disabled when it is set to [OFF].
Note
fFor details about EASY SETTING, refer to "Adjusting the projected image via EASY SETTING function" (x page 47).
fIf all items are set to [OFF], press the <EASY SETTING/CANCEL> button and then [KEY NOT APPLICABLE] massage will
be displayed on the screen.
[TEST PATTERN]
Displays the test pattern built-in to the projector.
Settings of position, size, and other factors will not be reected in test patterns. Make sure to display the input signal before
performing various adjustments.
1) Press as to select [TEST PATTERN].
2) Press the <ENTER> button.
fThe test pattern with the [PATTERN CHANGE] individual adjustment screen is displayed.
3) Press qw to switch the item.
fThe items will switch each time you press the button.
All white → Color bars → White cross on the black background → Black cross on the white background → Cross hatch
→ All white →...
fWhen you press the <MENU> button or <RETURN> button, it will exit the test pattern and return to the Sub-menu of
[PROJECT SETUP].
Note
fThe initial setting is All white. The initial screen is Cross hatch if you have assigned it to the <FUNCTION> button.
[FILTER COUNTER]
This function is used to reset the lter use time and set the notication display.
ENGLISH - 83
Chapter 4 Settings - [PROJECTOR SETUP] menu
1) Press as to select [FILTER COUNTER].
2) Press the <ENTER> button.
fThe [FILTER COUNTER] screen is displayed.
[FILTER
COUNTER] Displays the using time of the lter.
[TIMER] Sets the timer when you want to display an alert message of lter replacement.
[FILTER COUNTER
RESET] Resets the lter counter.
Setting [TIMER]
1) Press as to select [TIMER].
2) Press qw to switch the setting of the timer.
fThe items will switch each time you press the button.
[OFF] → [1000 H] → [2000 H] → [3000 H] → [4000 H] → [5000 H] → [6000 H] → [7000 H]
[FILTER COUNTER RESET]
1) Press as to select [FILTER COUNTER RESET].
2) Press the <ENTER> button.
fThe [FILTER COUNTER RESET] screen is displayed.
3) Press qw to select [OK] and then press the <ENTER> button.
[INITIALIZE ALL]
Return various setting values to their factory default settings.
1) Press as to select [INITIALIZE ALL].
2) Press the <ENTER> button.
fThe [INITIALIZE ALL] screen is displayed.
3) When the confirmation is displayed, press qw to select [OK] and then press the <ENTER> button.
fThe [NOW INITIALIZING...] screen is displayed and then the [POWER OFF.] screen will be displayed.
4) Press the <ENTER> button.
fThe operation of other buttons is disabled.
fThe initial setting (display language) screen will be displayed when turning on the projector next time.
Note
fThe projector will enter into the standby status to reect the setting values when [INITIALIZE ALL] is executed.
fWhen [INITIALIZE ALL] is executed, [STANDBY MODE], [EMULATE], [FILTER COUNTER] and the setting values of
[NETWORK/USB] cannot be returned to the factory default values. For details about the initialization of [NETWORK/USB],
please refer to [NETWORK/USB] → [INITIALIZE] (x page 96).
84 - ENGLISH
Chapter 4 Settings - [PROJECTOR SETUP] menu
[SECURITY] menu
On the menu screen, select [SECURITY] from the main menu, and select an item from the sub-menu.
Refer to "Navigating through the menu" (x page 56) for the operation of the menu screen.
f When the projector is used for the rst time Initial password:
Press awsqawsq in order, and press the <ENTER> button.
fAfter selecting the item, press asqw to set.
Attention
fWhen you select the [SECURITY] menu and press the <ENTER> button, entering a password is required. Enter the preset
password and then continue operations of the [SECURITY] menu.
fWhen the password has been changed previously, enter the changed password, and press the <ENTER> button.
Note
fThe entered password is displayed with "" mark on the screen.
fAn error message is displayed on the screen when the entered password is incorrect. Re-enter the correct password.
[PASSWORD]
The [PASSWORD] screen is displayed when the power is turned on, [INITIALIZE ALL] is executed or [INITIALIZE] in the
[NETWORK/USB] menu is executed. When the entered password is incorrect, the operation will be restricted to the power
standby <v/b> button on the control panel or <v> button on the remote control.
1) Press as to select [PASSWORD].
2) Press qw to switch the item.
fThe items will switch each time you press the button.
[OFF] Disables the security password entry.
[ON] Enables the security password entry.
Note
fThe [PASSWORD] setting is set to [OFF] by the factory default.
fChange the password periodically that is hard to guess.
fThe security password is enabled after setting [PASSWORD] to [ON], turning the power off and disconnecting the power
plug from the power outlet.
[PASSWORD CHANGE]
Change the security password.
1) Press as to select [PASSWORD CHANGE].
2) Press the <ENTER> button.
fThe [PASSWORD CHANGE] screen is displayed.
3) Press asqw or number buttons (<1>-<6>) to set the password.
fUp to eight button operations can be set.
4) Press the <ENTER> button.
5) Re-enter the password for the confirmation.
6) Press the <ENTER> button.
Note
fThe entered password is displayed with "" mark on the screen.
fAn error message is displayed on the screen when the entered password is incorrect. Re-enter the correct password.
fIf numbers have been used for the security password, the security password will need to be initialized again if the remote
control is lost. Consult your dealer for the initialization method.
ENGLISH - 85
Chapter 4 Settings - [SECURITY] menu
[TEXT DISPLAY]
Overlap the security message (text) over the projecting image.
1) Press as to select [TEXT DISPLAY].
2) Press qw to switch the item.
fThe items will switch each time you press the button.
[OFF] Disables the text display.
[ON] Enables the text display.
[TEXT CHANGE]
Change the text displayed when the text display is enabled by selecting [ON] in [TEXT DISPLAY].
1) Press as to select [TEXT CHANGE].
2) Press the <ENTER> button.
fThe [TEXT CHANGE] screen is displayed.
3) Press asqw to select the text, and press the <ENTER> button to enter the text.
4) Press asqw to select [OK], and press the <ENTER> button.
fThe text is changed.
[MENU LOCK]
Display the menu by the <MENU> button and set whether or not to enable menu operations.
1) Press as to select [MENU LOCK].
2) Press qw to switch the item.
fThe items will switch each time you press the button.
[OFF] Unlocks menu operations.
[ON] Locks menu operations.
Note
fWhen the entered password is incorrect after setting [MENU LOCK] to [ON], the <MENU> button cannot be operated.
f[MENU LOCK] is set to [OFF] at the time of purchase or when [INITIALIZE ALL] is executed.
fWhen [MENU LOCK] is set to [ON] and then enter the password to release the lock, the unlock state is held until the
projector enters the standby mode.
[MENU LOCK PASSWORD]
Change the menu lock password.
1) Press as to select [MENU LOCK PASSWORD].
2) Press the <ENTER> button.
fThe [MENU LOCK PASSWORD] screen is displayed.
3) Press asqw to select the text, and press the <ENTER> button to enter the text.
fUp to 16 characters can be input.
4) Press asqw to select [OK], and press the <ENTER> button.
fTo cancel, select [CANCEL].
Attention
fThe initial password is “AAAA” at the time of purchase or when [INITIALIZE ALL] is executed.
fChange the password periodically that is hard to guess.
86 - ENGLISH
Chapter 4 Settings - [SECURITY] menu
[CONTROL DEVICE SETUP]
Enable/disable the button operations on the control panel and the remote control.
1) Press as to select [CONTROL DEVICE SETUP].
2) Press the <ENTER> button.
fThe [CONTROL DEVICE SETUP] screen is displayed.
3) Press as to select one item between [CONTROL PANEL] and [REMOTE CONTROLLER].
[CONTROL PANEL] You can set the limitation on the control from the control panel.
[REMOTE CONTROLLER] You can set the limitation on the control from the remote control.
4) Press qw to switch between [ENABLE] and [DISABLE].
fYou can set the limitation on the control from the control panel or the remote control.
[ENABLE] Enable the button operations.
[DISABLE] Disable the button operations.
fA conrmation screen will be displayed when you change [ENABLE] to [DISABLE], then proceed to Step 5).
5) Press qw to select [OK], and then press the <ENTER> button.
Note
fWhen a button operation is performed on the device set to [DISABLE] , the [PASSWORD] screen is displayed.
To continue operations, enter the security password.
fThe [PASSWORD] screen will disappear when there is no operation for approx. 10 seconds.
fIf the operations of both [CONTROL PANEL] and [REMOTE CONTROLLER] are set to [DISABLE], the projector cannot be
turned off (cannot enter standby).
fEven when you set button operations on the remote control to be disabled, operations of the <ID ALL> and <ID SET>
buttons on the remote control are enabled.
ENGLISH - 87
Chapter 4 Settings - [SECURITY] menu
[NETWORK/USB] menu
On the menu screen, select [NETWORK/USB] from the main menu, and select an item from the sub-menu.
Refer to "Navigating through the menu" (x page 56) for the operation of the menu screen.
fAfter selecting the item, press asqw to set.
Conrmation of the network information
When connecting the “Wireless Manager ME6.3”, the dedicated application of iPad/iPhone/iPod touch/Android, or the Intel®
WiDi / Intel® Pro WiDi / Miracast compatible device to a projector, the information such as the Network number of Wireless
LAN, Projector name and Network ID are required. You can conrm the information in the [STATUS] in the [NETWORK/USB]
menu. (x page 95).
[WIRED LAN]
You can make detailed wired LAN settings.
1) Press as to select [WIRED LAN].
2) Press the <ENTER> button.
fThe [WIRED DETAILED SETUP] screen is displayed.
3) Press as to select an item, and change the setting according to the instructions.
[DHCP]
[ON]: If a DHCP server exists in the network to which the projector is connected,
the IP address will automatically be acquired.
[OFF]: If a DHCP server does not exist in the network to which the projector is
connected, additionally set [IP ADDRESS], [SUBNET MASK] and
[DEFAULT GATEWAY].
[IP ADDRESS] Enter the IP address if DHCP server is not used.
[SUBNET MASK] Enter the subnet mask if DHCP server is not used.
[DEFAULT GATEWAY] Enter the gateway address if DHCP server is not used.
[DNS1] Enter the DNS server address if DHCP server is not used.
[DNS2] Enter the alternate DNS server address if DHCP server is not used.
4) Press as to select [OK], and press the <ENTER> button.
rDefault wired LAN settings
fThe following settings are set before the projector leaves the factory.
[DHCP] OFF
[IP ADDRESS] 192.168.10.100
[SUBNET MASK] 255.255.255.0
[DEFAULT GATEWAY] 192.168.10.1
[DNS1]/[DNS2] NONE
Note
fWhen using a DHCP server, conrm that the DHCP server is running.
fConsult your network administrator regarding the IP ADDRESS, SUBNET MASK, and DEFAULT GATEWAY.
fA wired LAN and wireless LAN cannot be used in the same segment.
88 - ENGLISH
Chapter 4 Settings - [NETWORK/USB] menu

[WIRELESS LAN]
Set the connections of wireless LAN.
1) Press as to select [WIRELESS LAN].
2) Press qw to select the connection method.
[DISABLE] When do not use the wireless LAN function.
[SIMPLE]
Direct connection mode that can be compatible with all OS (Windows / Mac / iOS /
Android etc.).
Use the wireless LAN function via the application software which supports
"Wireless Manager ME6.3", iPad / iPhone / iPod touch and Android devices.
Switch the input to [Panasonic APPLICATION], the idle screen will appear. You
can conrm the SSID and KEY. The factory default value of the KEY can be
changed. For details, refer to the following “Detailed setup of [SIMPLE]“.
[NORMAL]
[S-DIRECT]
Use this setting when use the wireless LAN function via the software "Wireless
Manager ME6.3" of the supplied CD-ROM which supports Windows and Mac
computer.
[M-DIRECT]
Use this setting when the projector is used as a simple access point.
Even if there is no access point, the connection is enabled. Select this setting
when use the wireless LAN function via the application software which supports
iPad / iPhone / iPod touch and Android devices.
For details, refer to the following "Detailed setup of [M-DIRECT]”.
[USER1] / [USER2] /
[USER3]
To match your network environment, set the detailed setup of network.
For details, refer to the following "Detailed setup of [USER1] / [USER2] /
[USER3]".
Note
fProjectors that can be connected to [SIMPLE], [S-DIRECT] or [M-DIRECT] are up to 10.
fWhen [WIRELESS LAN] is set to [SIMPLE], [S-DIRECT] or [M-DIRECT] and the input signal is other than [Panasonic
APPLICATION], the normal wireless connection is disabled.
fEven if [WIRELESS LAN] is set to [SIMPLE], [S-DIRECT] or [M-DIRECT], when switch to input MIRRORING signal it will be
disabled.
fFor more information on how to use the application software "Wireless Manager ME6.3", refer to the operating instructions of
"Wireless Manager ME6.3".
fIt is possible to project the images which are stored in iPad / iPhone / iPod touch / Android and are sent to the projector by
using the dedicated application. For more information on how to use the application software, refer to the application guide
described in the following URL.
[iOS support site] http://panasonic.net/avc/projector/ios/
[Android support site] http://panasonic.net/avc/projector/android/
[WIRELESS DETAILED SETUP]
You can congure more precise network settings, if you select [SIMPLE], or select [M-DIRECT] or [USER1] ~ [USER3] (user)
in [NORMAL] for [WIRELESS LAN] in the network menu. For network settings, contact your network administrator.
Detailed setup of [SIMPLE]
Direct connection mode and compatible with all OS (Windows / Mac / iOS / Android etc.).
1) Press the <ENTER> button when [SIMPLE] is selected.
fThe [WIRELESS DETAILED SETUP] screen is displayed.
2) Press the <ENTER> button.
fThe [KEY] screen is displayed.
3) Press asqw to change the key according to the instructions.
[KEY] Setting a key for the access point. Input either 8 to 15 alphanumerics.
4) Press as to select [OK], and press the <ENTER> button.
rDefault setting of [SIMPLE]
fThe following setting is set before the projector leaves the factory.
[KEY] proj + The last 4 digits of the network ID
Detailed setup of [M-DIRECT]
Use this setting when the projector is used as a simple access point. Even if there is no access point, you can still connect the
projector to computer via the infrastructure.
ENGLISH - 89
Chapter 4 Settings - [NETWORK/USB] menu

1) Press the <ENTER> button when [NORMAL] is selected.
fThe [NORMAL] screen is displayed.
2) Press qw to select [M-DIRECT], and press the <ENTER> button.
fThe [WIRELESS DETAILED SETUP] screen is displayed.
3) Press as to select an item, and press qw to change the setting according to the instructions.
[IP ADDRESS] Enter the IP address.
[SUBNET MASK] Enter the subnet mask.
[SSID] Select M-DIRECT in Wireless LAN, then the SSID can be set.
[CHANNEL] Select M-DIRECT in Wireless LAN, then the Channel can be set.
1~11
[KEY]
Select M-DIRECT in Wireless LAN, then the KEY can be set.
Setting a key for the access point. Input either 8 to 63 alphanumerics or a 64 digit
string in the hexadecimal format.
4) Press as to select [OK], and press the <ENTER> button.
rDefault setting of [M-DIRECT]
fThe following settings are set before the projector leaves the factory.
[IP ADDRESS] 192.168.12.100
[SUBNET MASK] 255.255.255.0
[SSID] M-DIRECT + The last 4 digits of
the network ID
[CHANNEL] 1
[KEY] The same string as the SSID
Note
fThe authentication method is WPA2-PSK, and the encryption method is AES. Both methods are fixed.
fWhen you need to change initial configuration of [M-DIRECT], please contact your network administrator.
fIf [KEY] is kept as the factory default value, information leak by a third party may occur. Be sure to change it from the factory
default value.
fSince the DHCP server automatically starts up, set the DHCP setting of devices to be wirelessly connected to the projector
to on and connect them.
fThe [Key] may be displayed with the password of SSID depending on the devices.
Detailed setup of [USER1]/[USER2]/[USER3]
1) Press the <ENTER> button when [NORMAL] is selected.
fThe [NORMAL] screen is displayed.
2) Press qw to select [USER1], [USER2] or [USER3], and press the <ENTER> button.
fThe [WIRELESS DETAILED SETUP 1/2] screen is displayed.
3) Press as to select an item, and press qw to change the setting according to the instructions.
[NAME CHANGE] The identied names of the projectors on the application software can be changed.
[DHCP]
ON: If a DHCP server exists in the network to which the projector is connected, the
IP address will automatically be acquired.
OFF: If a DHCP server does not exist in the network to which the projector is
connected, additionally set [IP ADDRESS], [SUBNET MASK ] and [DEFAULT
GATEWAY].
[IP ADDRESS] Enter the IP address if DHCP server is not used.
[SUBNET MASK] Enter the subnet mask if DHCP server is not used.
[DEFAULT GATEWAY] Enter the gateway address if DHCP server is not used.
[DNS1] Enter the DNS server address if DHCP server is not used.
[DNS2] Enter the alternate DNS server address if DHCP server is not used.
Note
fBefore using the DHCP server, make sure the DHCP server is already functioning.
fFor details of IP ADDRESS, SUBNET MASK, DEFAULT GATEWAY and DNS server address, ask the network administrator.
fA wired LAN and wireless LAN cannot be used in the same segment.
4) Press s.
fThe [WIRELESS DETAILED SETUP 2/2] screen is displayed.
90 - ENGLISH
Chapter 4 Settings - [NETWORK/USB] menu

5) Press as to select the item and press asqw to change the setting according to the instructions.
[SSID] Enter the same character string that is registered in the access point.
[AUTHENTICATION] Set the user authentication method used by the network to be connected.
[OPEN] Select when the access point authentication method is Open System.
[SHARED] Select when the access point authentication method is Shared Key.
[WPA-PSK ] Select when the access point authentication method is WPA-PSK.
[WPA2-PSK ] Select when the access point authentication method is WPA2-PSK.
[WPA-EAP/WPA2-EAP ] Select when the access point authentication method is WPA-EAP/WPA2-EAP.
[WPA-EAP] Select when the access point authentication method is WPA-EAP.
[WPA2-EAP] Select when the access point authentication method is WPA2-EAP.
[ENCRYPTION] Select the encryption method to be used for communication between the projector and
the network.
[NONE] Select when transmit without encryption.
It is selectable only when [AUTHENTICATION] is [OPEN] or [SHARED].
[WEP] Select when Encryption is WEP.
[TKIP]
Select when Encryption is TKIP.
Selectable when [AUTHENTICATION] is either [WPA-PSK], [WPA2-PSK], [WPA-EAP],
[WPA2-EAP].
[AES]
Select when Encryption is AES.
Selectable when [AUTHENTICATION] is either [WPA-PSK], [WPA2-PSK], [WPA-EAP],
[WPA2-EAP].
[DEFAULT KEY]
Set 1 – 4 numerals for the default key.
It is can be set when [AUTHENTICATION] is [OPEN] or [SHARED] and [DEFAULT KEY]
is [WEP].
[KEY1] - [KEY4]
Set a [WEP] key to the key number selected with [DEFAULT KEY].
It is can be set when [AUTHENTICATION] is [OPEN] or [SHARED] and [DEFAULT KEY]
is [WEP].
Either the 64-bit or 128-bit WEP key can be set. For the 64-bit key, input 5 alphanumerics
(or a 10-digit string for the hexadecimal format) for the 128-bit key, input 13
alphanumerics (or a 26-digit string for the hexadecimal format).
[KEY]
Set a key.
It is can be set when [AUTHENTICATION] is [WPA-PSK] or [WPA2-EAP].
Input either 8 to 63 alphanumerics or a 64 digit string in the hexadecimal format.
[EAP]
Select the EAP setup in the RADIUS server.
It is can be set when [AUTHENTICATION] is [WPA-EAP/WPA2-EAP], [WPA-PSK] or
[WPA2-EAP].
Types of EAP that can be selected are as follows.
PEAP (MS-CHAPv2), PEAP (GTC), EAP-TTLS (MD5), EAP-TTLS (MS-CHAPv2 ),
EAP-FAST (MS-CHAPv2), EAP-FAST (GTC)
[USE NAME]
Input a user name used for authentication (excluding spaces) (maximum 64 characters).
It is can be set when [AUTHENTICATION] is [WPA-EAP/WPA2-EAP], [WPA-PSK] or
[WPA2-EAP].
[PASSWORD]
Input a password used for authentication (maximum 64 characters).
It is can be set when [AUTHENTICATION] is [WPA-EAP/WPA2-EAP], [WPA-PSK] or
[WPA2-EAP].
Note
fIf you are unable to connect to the wireless LAN through the access point even after performing the steps in "Projector
settings" (x page 98), contact the manufacturer of the access point (Radio repeater).
fWhen using EAP, the projector needs to be set according to the setting of the RADIUS server. Check with the network
administrator for the setting of the RADIUS server.
fWhen using an EAP together with an access point with invalid SSID broadcast, select [WPA-EAP] or [WPA2-EAP] for the
authentication method even if the authentication method of the access point is WPA-EAP / WPA2-EAP.
fIf USER1 ~ 3 use, you can not connect to the access point of stealth SSID conguration, please use it to cancel the stealth
setting. For details, please refer to the Operating Instructions of the access point.
6) Press as to select [OK], and press the <ENTER> button.
ENGLISH - 91
Chapter 4 Settings - [NETWORK/USB] menu

rDefault setting of [USER1], [USER2], [USER3]
fThe following settings are set before the projector leaves the factory.
[SSID] Panasonic Projector
[DHCP] OFF
[IP ADDRESS] 192.168.11.100
[SUBNET MASK] 255.255.255.0
[DEFAULT GATEWAY] 192.168.11.1
[AUTHENTICATION] OPEN
[ENCRYPTION] NONE
[DNS1]/[DNS2] NONE
[CONNECTION LOCK]
You can switch the input signal between Panasonic APPLICATION, MIRRORING and MEMORY VIEWER, or choose one xed
input signal from three of them.
1) Press as to select [CONNECTION LOCK].
2) Press qw to switch the item.
fThe items will switch each time you press the button.
[OFF] The [NETWORK/USB] input signal can be switched between [Panasonic APPLICATION],
[MIRRORING] and [MEMORY VIEWER].
[Panasonic APPLICATION] The [Panasonic APPLICATION] is the xed [NETWORK/USB] input signal.
[MIRRORING] The [MIRRORING] is the xed [NETWORK/USB] input signal.
[MEMORY VIEWER] The [MEMORY VIEWER] is the xed [NETWORK/USB] input signal.
Note
fIf [CONNECTION LOCK] is set to one xed item other than [OFF] and you press other buttons, the [KEY NOT APPLICABLE]
appears.
[NAME CHANGE]
You can change the projector name, for example, when using the DHCP server.
1) Press as to select [NAME CHANGE].
2) Press the <ENTER> button.
fThe [NAME CHANGE] screen is displayed.
3) Select characters with the asqw buttons and press the <ENTER> button to enter the projector
name.
fSelect [ALL DELETE] to delete all the entered characters, or press the <DEFAULT> button on the remote control to
delete a character on the cursor in the entry eld.
4) Select [OK] with the as buttons and press the <ENTER> button.
fTo cancel the change of the name, select [CANCEL] and press the <ENTER> button.
Note
f[Name □□□□] (□□□□ is 4-digit number) is set before the projector leaves the factory.
[PASSWORD]
By controlling connection with password setting, it is possible to prevent an external device from accidentally connecting and
interrupting projection images, etc.
1) Press as to select [PASSWORD].
2) Press qw to switch the item.
fThe items will switch each time you press the button.
[OFF] Disables the entry of network password.
[ON] Enables the entry of network password.
Note
fSet to [ON] to perform password check when connecting with the projector using “Wireless Manager ME6.3”.
(Default: [OFF])
fWhen using the deliver image to all function or the delivered image deletion function of the “Multi Projector Monitoring &
Control Software”, image cannot be delivered to the projector with password setting set to [ON]. To use these image delivery
functions, set it to [OFF].
92 - ENGLISH
Chapter 4 Settings - [NETWORK/USB] menu

[PASSWORD CHANGE]
1) Press as to select [PASSWORD CHANGE].
2) Press the <ENTER> button.
fThe [PASSWORD CHANGE] screen is displayed.
3) Press asqw to set the password.
4) Press as to select [OK], and press the <ENTER> button.
Note
fYou can enter 8 characters at most.
fChange the password periodically that is hard to guess.
[NETWORK CONTROL]
Set when you want to control the projector from a computer connected to the network.
1) Press as to select [NETWORK CONTROL].
2) Press qw to switch the item.
fThe items will switch each time you press the button.
[ON] This function is enabled. Web control, PJLink control, the command control of the LAN are
enabled.
[OFF] This function is disabled.
[AMX D.D.]
Set to [ON] to control with the controller of AMX Corporation.
Setting this function to [ON] enables detection through “AMX Device Discovery”. For details, refer to the website of AMX
Corporation.
URL http://www.amx.com/
1) Press as to select [AMX D.D.].
2) Press qw to switch the item.
fThe items will switch each time you press the button.
[OFF] This function is disabled.
[ON] This function is enabled.
[Crestron Connected(TM)]
Set to [ON] to control with Crestron Connected™ of Crestron Electronics, Inc.
1) Press as to select [Crestron Connected(TM)].
2) Press qw to switch the item.
fThe items will switch each time you press the button.
[OFF] This function is disabled.
[ON] This function is enabled.
[LIVE MODE CUT IN]
Set this [ON] to allow interrupt of the Live mode by other users, or to allow delivery of images by the “Multi Projector Monitoring
& Control Software”, while the Live mode is active (sending image) by the “Wireless Manager ME6.3”.
1) Press as to select [LIVE MODE CUT IN].
2) Press qw to switch the item.
fThe items will switch each time you press the button.
[ON] This function is enabled.
[OFF] This function is disabled.
ENGLISH - 93
Chapter 4 Settings - [NETWORK/USB] menu

Note
fIf you use the “Wireless Manager ME6.3” and the “Multi Projector Monitoring & Control Software” on the same computer at
the same time, the function of delivering image to all may not be available. If you want to use them at the same time, please
use another computer with respective software.
[MULTI-LIVE]
Switch to the Multi-live mode when using the “Wireless Manager ME6.3”. For details, refer to "Wireless Manager ME6.3"
operating instructions. You can also use the application that is used for iOS or Android.
1) Press as to select [MULTI-LIVE].
2) Press the <ENTER> button.
fTo switch the multi mode.
fThe items will switch each time you press the button.
4-screen multi style → 4-screen index style → 16-screen index style → 4-screen multi style →...
[MEMORY VIEWER]
Change the setting of MEMORY VIEWER.
1) Press as to select [MEMORY VIEWER].
2) Press the <ENTER> button.
fThe [MEMORY VIEWER] screen is displayed.
3) Press as to select one item, and press qw to set the selected item.
fThe items will switch each time you press the button.
[VIEW] Sets the display method of MEMORY VIEWER screen.
[THUMBNAIL] Displays in the [THUMBNAIL] display method.
[LIST] Displays in the [LIST] display method.
[SORT] Sets the display order of the les in the memory viewer screen.
[NAME] Displays in ascending order of the le name.
[TYPE] Displays in each type of le.
[TIME] Displays in reverse chronological order of date and time of the update le.
[AUTOPLAY] Enables / disables the auto play function.
[OFF] Disables the auto play function.
[ON] Enables the auto play function.
[INTERVAL] Sets the display time of still images of automatic playing.
[5 S] ~ [120 S] Sets the display time of still images.
It can be set to [5 S], [10 S], [15 S], [30 S], [60 S] or [120 S].
[EFFECT] Sets the special effects to be used for playback screen upon conversion of the still image.
[OFF] It does not apply the special effects.
[RANDOM] Applies to the random special effects.
[WIPE LEFT] Displays gradually to wipe from the left side.
[WIPE RIGHT] Displays gradually to wipe from the right side.
[WIPE DOWN] Displays gradually to wipe from the top.
[SPLIT] Displays gradually to wipe towards the left and right sides from the center.
[ZOOM OUT] Displays gradually from the center to the whole.
[FADE] Displays the whole gradually.
[BLIND] Displays gradually to open a vertical blind.
[CHECKER WIPE] Displays gradually to the right from the left side in a grid pattern.
[SLIDE IN] Displays the next screen to appear from right to left.
[SLIDE OUT] Disappears the previous screen from right to left, then displays the next screen.
[GUIDE] It is set to [ON] when the guide is displayed.
[ON] Select to display operations guide and time bar (only for video playback) in full screen
during playback.
[OFF] Select if you do not want to display the time bar and operations guide.
Note
fFor details about [MEMORY VIEWER] refer to "Memory viewer function" (x page 116).
fWhen the [AUTOPLAY] is set to [OFF], the [INTERVAL] cannot be set.
94 - ENGLISH
Chapter 4 Settings - [NETWORK/USB] menu

fIf you change the settings in the [INTERVAL] or [EFFECT] during playback of a MEMORY VIEWER, it does not affect the
projected image during playback. Please re-play it back to the MEMORY VIEW screen in the [THUMBNAIL] display method
or [LIST] display method. For information on how to use MEMORY VIEW function, refer to “Memory Viewer Function”.
(x page 116)
fWhen the [GUIDE] is set to [ON], the operation guide and timer bar will automatically disappear after about 3 seconds.
fPress asqw or the <ENTER> button in a still image during playback, the operation guide will appear; press aqw or the
<ENTER> button in a video during playback, the operation guide and timer bar will appear.
[MIRRORING]
You can make detailed settings of the MIRRORING function.
1) Press as to select [MIRRORING].
2) Press the <ENTER> button.
fThe [MIRRORING] screen is displayed.
[AUTONOMOUS GROUP
OWNER]
Sets the projector to be or not to be the autonomous group owner via Intel® WiDi / Intel®
Pro WiDi / Miracast connection. Once the projector is set to be the autonomous group
owner, [MANAGED MEETING] or [CHANNEL] can be selected.
[ON] Sets the projector to be the autonomous group owner.
[OFF] Sets the projector not to be the autonomous group owner.
[MANAGED MEETINGS] Enables / disables the managed meeting of Intel® WiDi or Intel® Pro WiDi.
[ON] Enables the managed meeting.
[OFF] Disables the managed meeting.
[CHANNEL] Selects the communication channels used by Intel® WiDi / Intel® Pro WiDi / Miracast.
[CONNECTION TYPE] Selects the connection type for the MIRRORING function.
[PIN] A PIN (8-digit number) will be displayed in the idle screen of the MIRRORING function,
and then makes connection by entering the PIN on the device.
[AUTO] If the PIN connection is supported on the device, do the PIN connection. If it is not
supported, do the connection without a PIN.
[LOWER BANDWIDTH
MODE] Enables / disables the lower bandwidth mode of Intel® WiDi or Intel® Pro WiDi.
[OFF] Disables the lower bandwidth mode.
[ON] Enables the lower bandwidth mode. The bit rate will decrease, and the image quality will
reduce.
Note
fEven if the [AUTONOMOUS GROUP OWNER] is set to [OFF], it may set to the autonomous group owner depending on the
connected device.
fIf you cannot connect to the projector, or the projector is not existed in the available connection device list, you can try to
switch the [AUTONOMOUS GROUP OWNER] to [OFF] or [ON].
fFor more information about Intel® WiDi or Intel® Pro WiDi conference mode, please refer to the HELP of Intel® WiDi or Intel®
Pro WiDi application, or visit the Intel Corporation website.
[STATUS]
Displays the current network status.
1) Press as to select [STATUS].
2) Press the <ENTER> button.
fThe [STATUS] screen (WIRED LAN 1/3) is displayed.
3) Press as to switch between the screen (WIRED LAN 1/3 → WIRELESS LAN 2/3 →
WIRELESS LAN 3/3).
fThe page will switch each time you press the button.
[WIRED LAN] Displays the network information of the wired LAN that set on the projector.
[DHCP] Displays the usage state of the DHCP server.
[IP ADDRESS] Displays the IP address.
[SUBNET MASK] Displays the subnet mask.
[DEFAULT GATEWAY] Displays the default gateway.
[DNS1] Displays the address of the primary DNS server.
[DNS2] Displays the address of the secondary DNS server.
ENGLISH - 95
Chapter 4 Settings - [NETWORK/USB] menu

[MAC ADDRESS] Displays the MAC address of wired LAN.
[WIRELESS LAN] Displays the network information of the wireless LAN that set on the projector.
[ANTENNA LEVEL] Displays the radio wave state of the wireless LAN.
[NETWORK] Displays the connection method of the wireless LAN.
[SSID] Displays the character string of SSID.
[AUTHENTICATION] Displays the user authentication method.
[EAP] Displays the type of EAP.
[ENCRYPTION] Displays the encryption method.
[DEFAULT KEY] Displays the number of the default key.
[DHCP] Displays the usage state of the DHCP server.
[IP ADDRESS] Displays the IP address.
[SUBNET MASK] Displays the subnet mask.
[DEFAULT GATEWAY] Displays the default gateway.
[DNS1] Displays the address of the primary DNS server.
[DNS2] Displays the address of the secondary DNS server.
[MAC ADDRESS] Displays the MAC address of wireless LAN.
Note
fWhen [WIRELESS LAN] is set to [DISABLE], the [STATUS] screen of the wireless LAN will not be displayed.
[INITIALIZE]
This function is used to return various setting values of [NETWORK/USB] to the factory default value.
1) Press as to select [INITIALIZE].
2) Press the <ENTER> button.
fThe [INITIALIZE] screen is displayed.
3) Press qw to select [OK] and then press the <ENTER> button.
Network connections
The projector has a network function, and the following operations are available from the computer using the web browser
control.
fSetting and adjustment of the projector.
fDisplay of the projector status.
fTransmission of an E-mail message when there is a problem with the projector.
The projector supports "Crestron Connected™", and the following application software of Crestron Electronics, Inc. can be
used.
fRoomView Express
fFusion RV
fRoomView Server Edition
Note
f"Crestron Connected™" is a system developed by Crestron Electronics, Inc. which collectively manage and control multiple
system devices connected via the network, from a computer. This projector supports "Crestron Connected™".
fFor details of "Crestron Connected™", refer to the Crestron Electronics, Inc. website. (Provided only in English.).
http://www.crestron.com/
For the download of "RoomView Express", refer to the Crestron Electronics, Inc. website. (Provided only in English.).
http://www.crestron.com/getroomview
Computer that can be used
In order to use the Web control function, a Web browser is required. Conrm that the Web browser can be used beforehand.
OS Compatible web browser
Windows Internet Explorer 8.0 / 9.0 / 10.0 / 11.0
Mac OS Safari 6.0 / 7.0 / 8.0
Note
fCommunication with an E-mail server is required to use the E-mail function. Conrm that the E-mail can be used
beforehand.
96 - ENGLISH
Chapter 4 Settings - [NETWORK/USB] menu
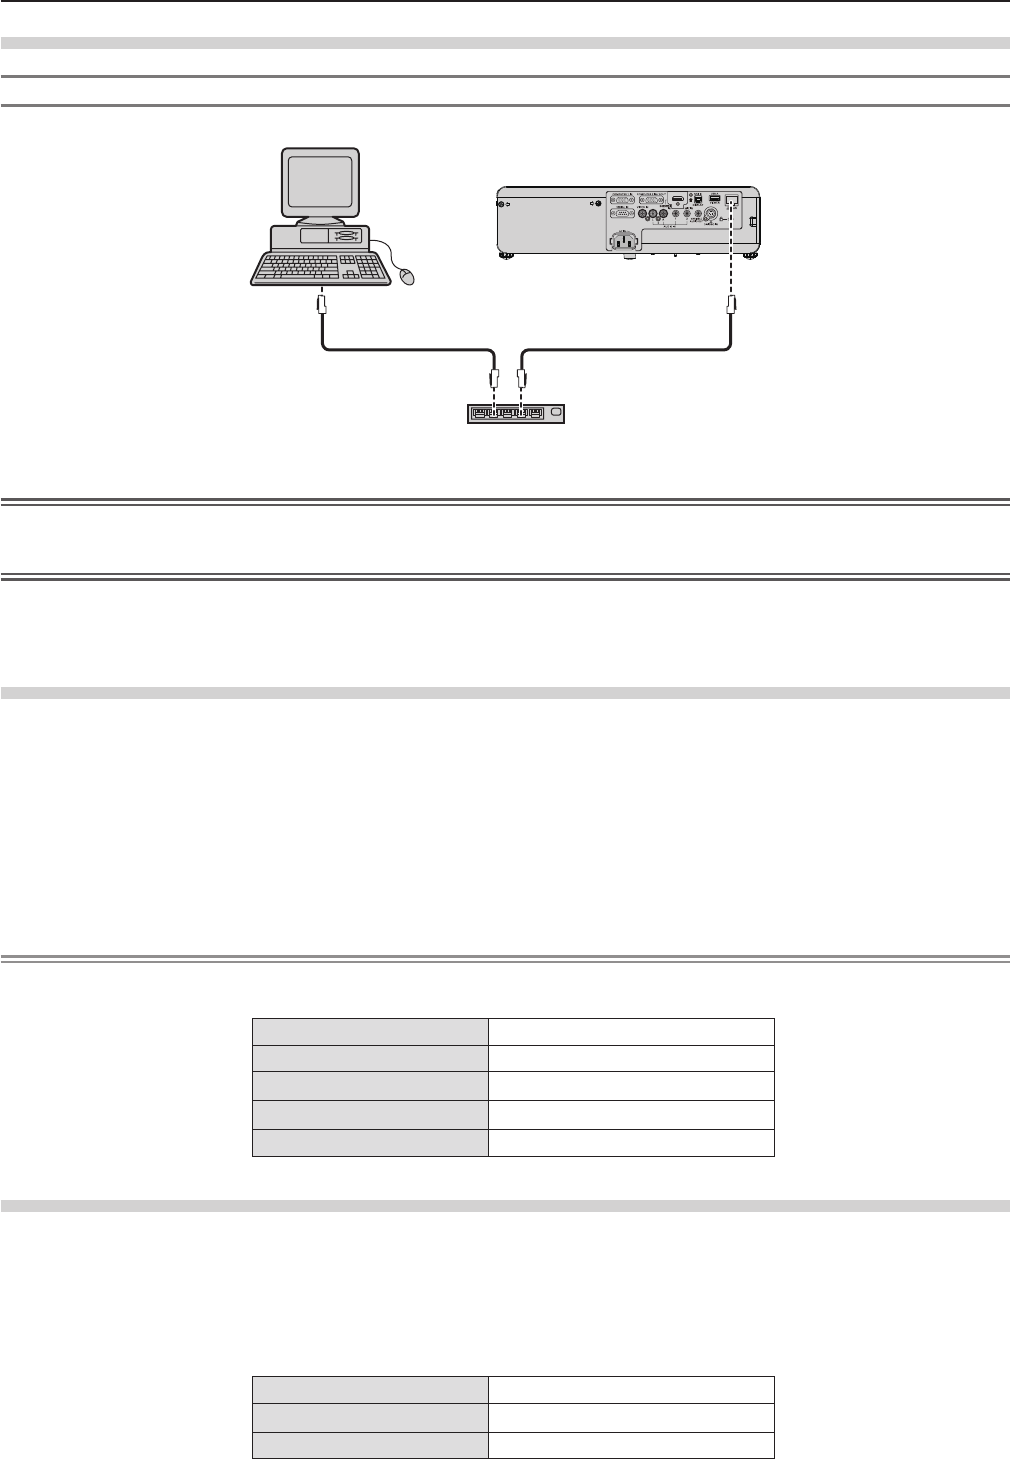
Connecting with Wired LAN
Example of a normal network connection
Computer
Projector
LAN cable (straight) LAN cable (straight)
Hub
Attention
fWhen a LAN cable is directly connected to the projector, the network connection must be made indoors.
Note
fA LAN cable is required to use the wired LAN function.
fUse shielded LAN cable (STP cable) that is compatible with category 5 or above.
fUse a LAN cable with length of 100 m or shorter.
Projector settings
1) Use the LAN cable (Straight) to connect the projector with computer.
2) Turn on the projector.
3) Press the <MENU> button to display the [NETWORK/USB] menu, and then select [WIRED LAN], and
press the <ENTER> button.
4) Set the detailed setup of [WIRED LAN].
fFor details,please refer to “WIRED LAN” (x page 88).
Note
fPlease conrm with your network administrator before you connect to an existing network.
fThe following settings are set before the projector leaves the factory.
[DHCP] OFF
[IP ADDRESS] 192.168.10.100
[SUBNET MASK] 255.255.255.0
[DEFAULT GATEWAY] 192.168.10.1
[DNS1]/[DNS2] NONE
Computer settings
Connection can be made with wired LAN. However, conrm to your system administrator on network settings before chang-
ing any settings.
1) Turn on the computer.
2) Make the network setting according to your system administrator.
fIf the projector settings are the default settings, the computer can be used with the following network settings.
[IP ADDRESS] 192.168.10.101
[SUBNET MASK] 255.255.255.0
[DEFAULT GATEWAY] 192.168.10.1
ENGLISH - 97
Chapter 4 Settings - [NETWORK/USB] menuChapter 4 Settings - [NETWORK/USB] menu
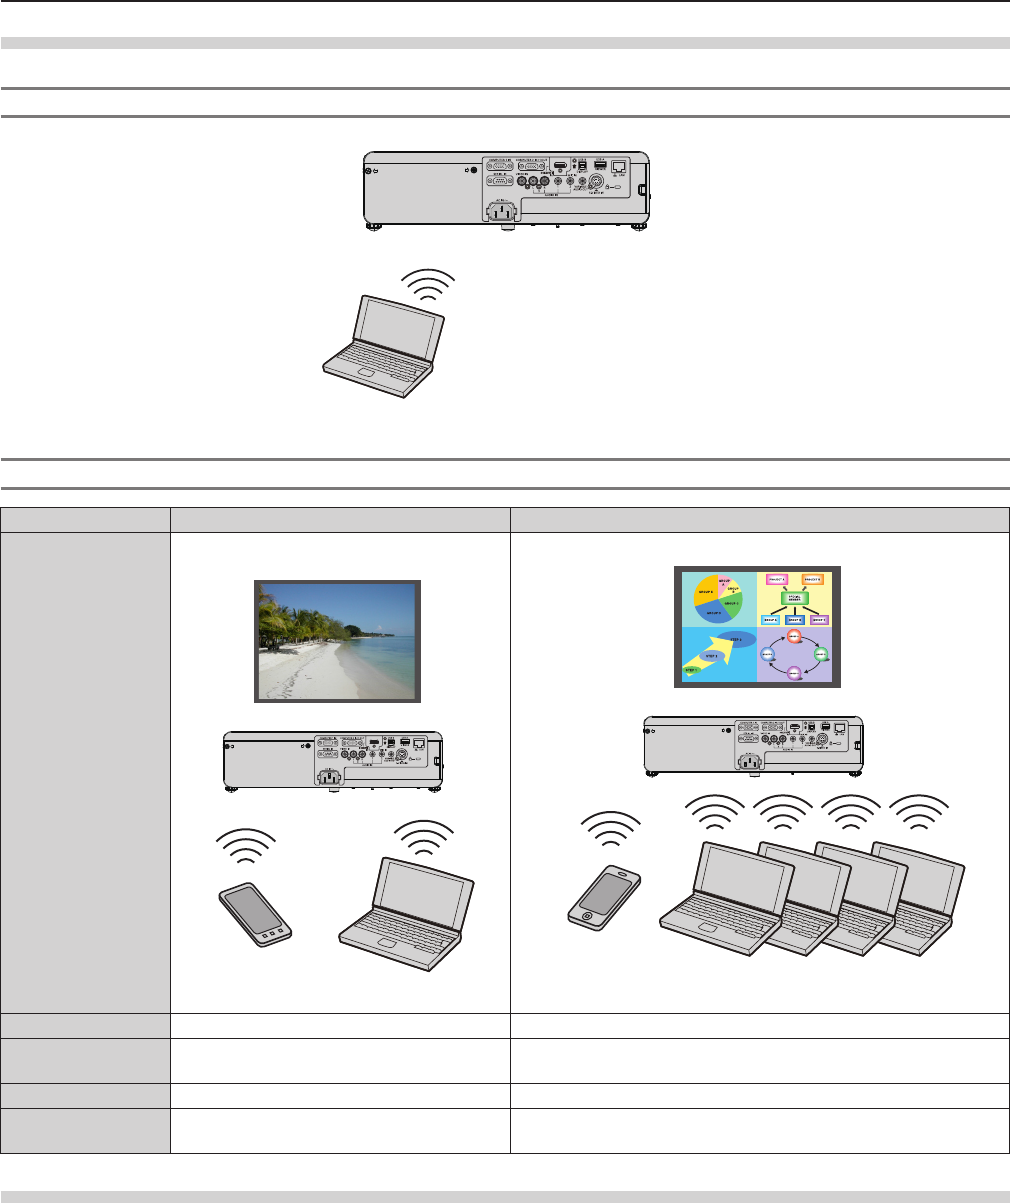
Connecting with Wireless LAN
Example of connection
IEEE802.11a/b/g/n
Example of connection for image transfer
MIRRORING Image transfer application software
Connection image
Intel® WiDi / Intel® Pro WiDi / Miracast
compatible device
(Example) Copyright protection content display
Projector
(Example) Multi-screen display
iPad/iPhone/iPod touch, Android mobile terminal and computer
which are installed with the image transfer application software
Projector
Input MIRRORING Panasonic APPLICATION
Communication
method IEEE802.11a/n IEEE802.11b/g/n
Connection method WPS + Wi-Fi Direct Panasonic proprietary + User connections
Image transmission
method Intel® WiDi / Intel® Pro WiDi / Miracast Panasonic proprietary
Projector settings
1) Turn on the projector.
2) Press the <MENU> button to display the [NETWORK/USB] menu, and then press the <ENTER> button.
3) Press as to select [WIRELESS LAN].
4) Press qw to select [SIMPLE] or [NORMAL].
5) Press the <ENTER> button.
fThe [WIRELESS LAN] screen is displayed.
6) According to the network number selected in step 4), set the [WIRELESS DETAILED SETUP].
fFor details, see “WIRELESS DETAILED SETUP” (x page 89).
98 - ENGLISH
Chapter 4 Settings - [NETWORK/USB] menu
Chapter 4 Settings - [NETWORK/USB] menu
Note
fWireless LAN and wired LAN cannot be used in the same segment.
fWhen multiple devices are connected, a unique IP ADDRESS must be allocated to each device.
fSSID has to be entered in alphanumeric letters.
fYou cannot set “any” or “ANY” for SSID.
fThe projector settings are not required when MIRRORING is connected. For details about MIRRORING, please refer to
"About MIRRORING" (x page 123).
fThe following settings are set before the projector leaves the factory.
[SIMPLE]
[KEY] proj + The last 4 digits of the network ID
[NORMAL] → [M-DIRECT]
[IP ADDRESS] 192.168.12.100
[SUBNET MASK] 255.255.255.0
[SSID] M-DIRECT + The last 4 digits of the network ID
[CHANNEL] 1
[KEY] The same string as the SSID
[NORMAL] → [USER1] ~ [USER3]
[SSID] Panasonic Projector
[DHCP] OFF
[IP ADDRESS] 192.168.11.100
[SUBNET MASK] 255.255.255.0
[DEFAULT GATEWAY] 192.168.11.1
[AUTHENTICATION] OPEN
[ENCRYPTION] NONE
[DNS1] / [DNS2] NONE
Computer settings
1) Turn on the computer.
2) Make the network setting according to your system administrator.
fIf you select [M-DIRECT] in [WIRELESS LAN], the IP address will automatically be acquired.
fIf you select [USER1] ~ [USER3] in [WIRELESS LAN], then make the network settings for the computer and the
projector according to your system administrator.
3) Connect the computer to the network that has been set for the projectors.
fIf you use a Windows computer, click on the task tray (bottom right of the Windows screen), then select the same
name as the SSID that has been set in the projector when you select [M-DIRECT] in [WIRELESS LAN], or select the
same name as the SSID that is used in current access point when you select [USER1] ~ [USER3] in [WIRELESS LAN].
If you use a Mac computer, click on the menu bar (top right of the Mac screen), then select the same name as the
SSID that has been set in the projector.
fWhen you select default settings of [M-DIRECT] for [WIRELESS LAN] in the network menu, the SSID is [M-DIRECT +
The last 4 digits of the network ID].
Note
fIf you use any wireless LAN connection utility that meets the OS standard, follow the operation instruction of the utility to
connect it.
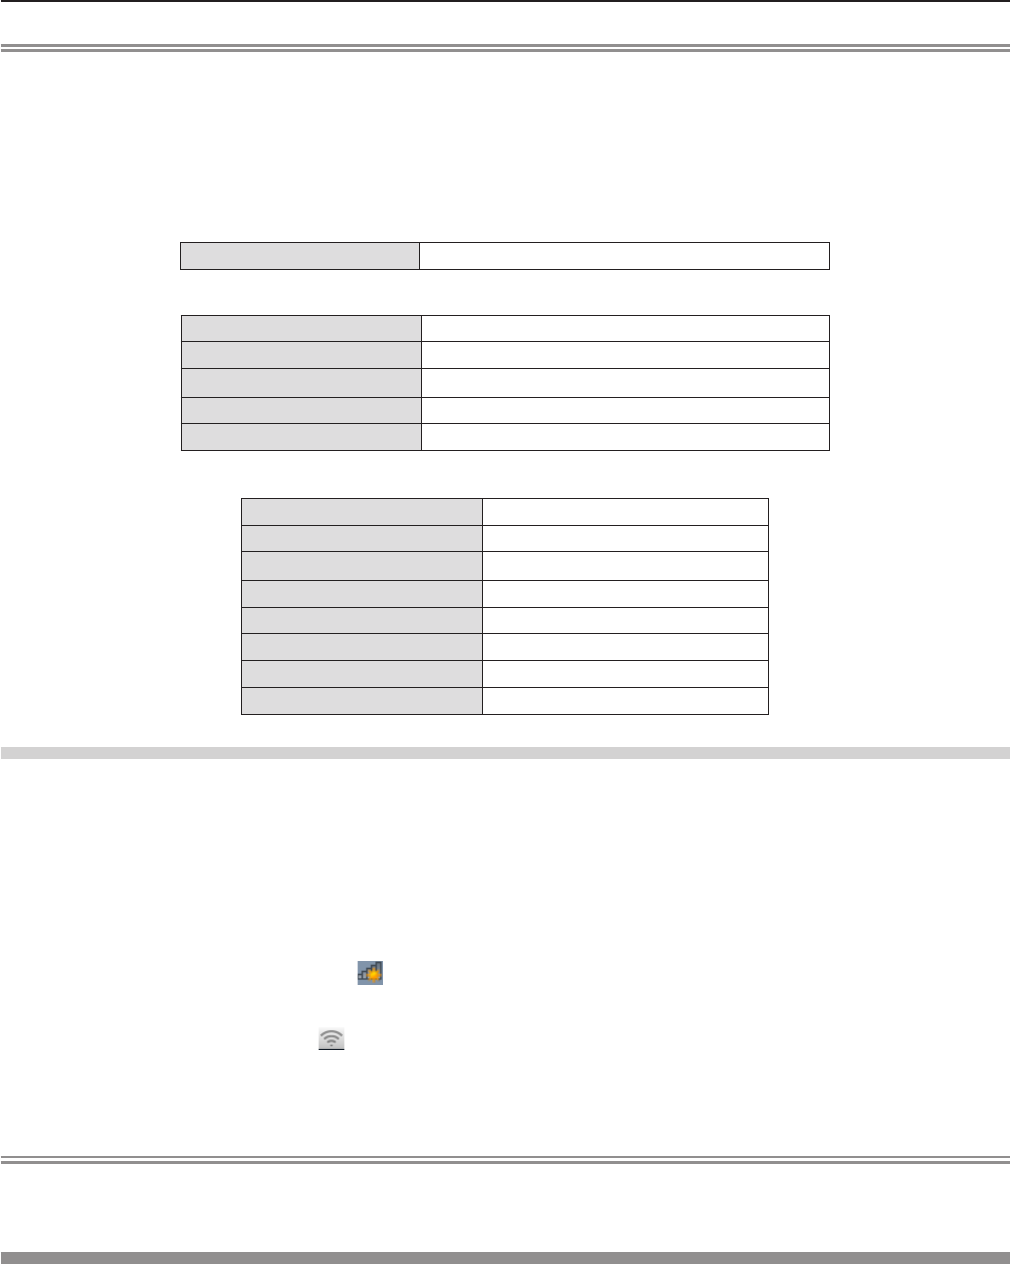
Accessing from the web browser
1) Start up the web browser on the computer.
2) Enter the IP address set on the projector into the URL entry field of the web browser.
3) Enter the user name and the password.
fThe factory default setting of the user name is user1 (user rights)/admin1 (administrator rights) and the password is
panasonic (lower case).
ENGLISH - 99
Chapter 4 Settings - [NETWORK/USB] menu
4) Click [OK].
f[Projector status] page is displayed.
Note
fIf you use a web browser to control the projector, set [NETWORK CONTROL] to [ON] in [NETWORK/USB] (x page 93).
fDo not perform setting or control simultaneously by starting up multiple web browsers. Do not set or control the projector
from multiple computers.
fChange the password rst. (x page 110)
fAccess will be locked for few minutes when an incorrect password is entered three times consecutively.
fSome items on the projector setting page use the Javascript function of the web browser. The projector may not be able to
be controlled properly if it is set with a browser that does not have this function enabled.
fIf the screen for the web control is not displayed, consult your network administrator.
fWhile updating the screen for the web control, the screen may become white for a moment, but it is not a malfunction.
Available functions per account
With the administrator rights, all functions can be used. With the user rights, available functions are restricted. Select an
account according to the purpose of use.
Item Function Administrator rights*1 User rights*1 Page
[Status]
[Projector status] l l 101
Error information page l l 102
[Network status] l l 103
[Projector control] [Basic control] l l 103
[Advanced control] l l 104
[Detailed set up]
[Network cong] l―104
[Ping test] l―106
[E-mail set up] l―106
[Authentication set up] l―107
[ECO management set up] l―110
100 - ENGLISH
Chapter 4 Settings - [NETWORK/USB] menu
Chapter 4 Settings - [NETWORK/USB] menu
[Change password]
User name for [Administrator] l―111
User name for [User] l―111
Password for [Administrator] l―111
Password for [User] l l 111
[Crestron
Connected(TM)]
Operation l―112
[Tools] l―113
[Info] l―113
[Help] l―114
*1 The functions with l marks in the columns of administrator rights/user rights indicate that the operation can be performed
by each right.
Description of each item
1
2
3
4
5
6
1 Page tab
Switches pages by clicking this item.
2 [Status]
The status of the projector is displayed by clicking this
item.
3 [Projector control]
The [Projector control] page is displayed by clicking this
item.
4 [Detailed set up]
The [Detailed set up] page is displayed by clicking this
item.
5 [Change password]
The [Change password] page is displayed by clicking this
item.
6 [Crestron Connected(TM)]
The control page of Crestron Connected™ is displayed by
clicking this item.
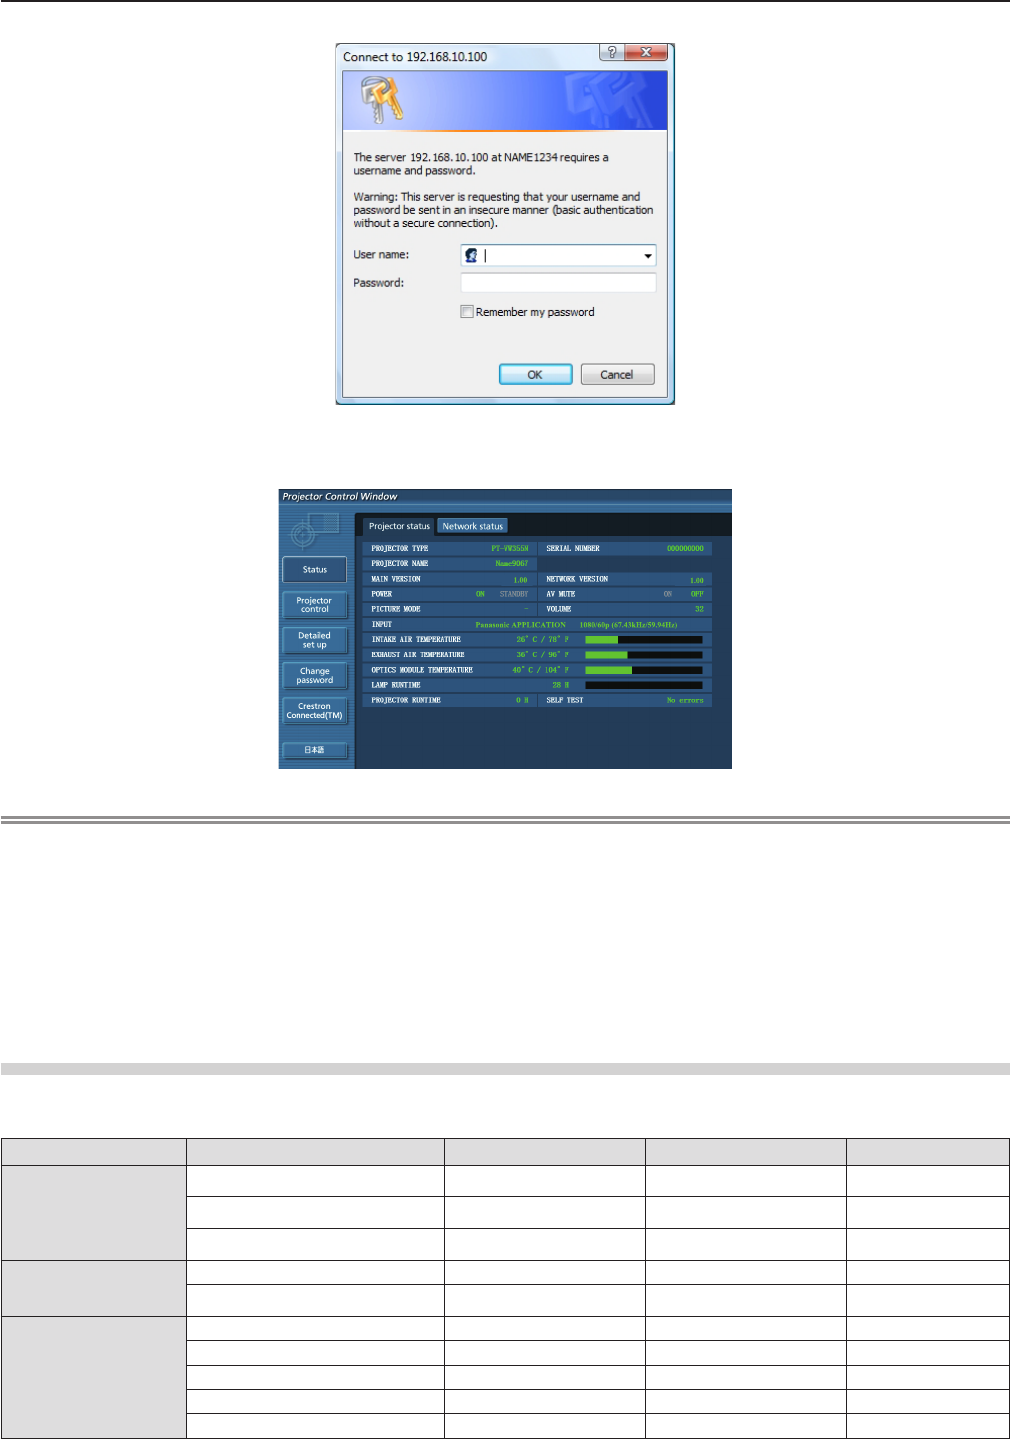
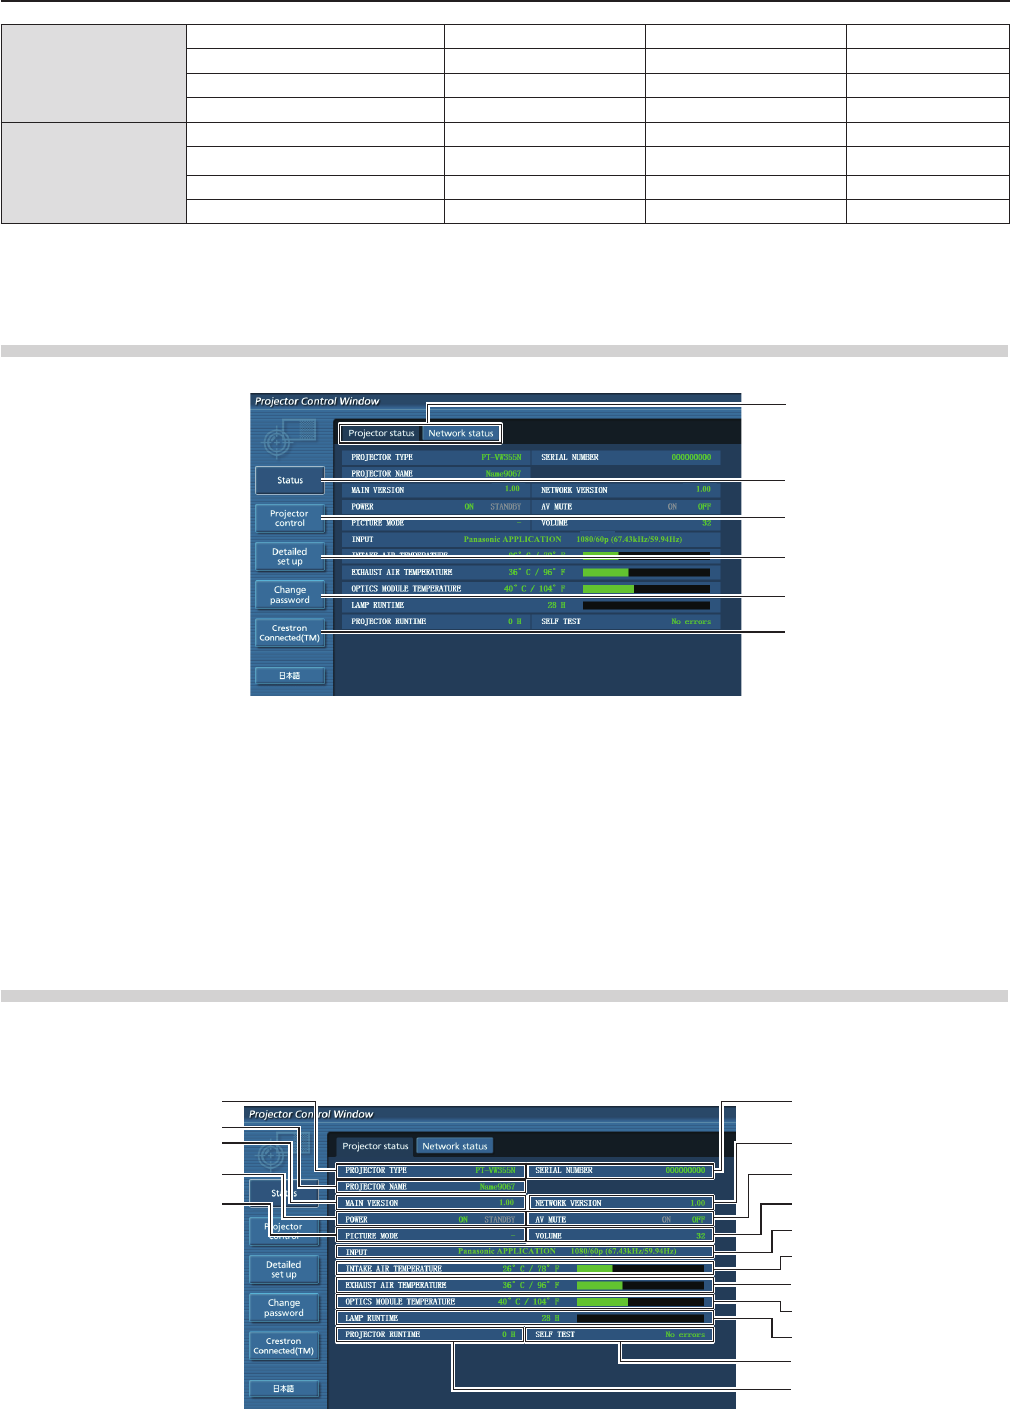
[Projector status] page
Click [Status] → [Projector status].
Display the status of the projector for the following items.
14
15
16
6
7
8
9
1
2
4
5
10
11
12
13
3
ENGLISH - 101
Chapter 4 Settings - [NETWORK/USB] menu
1 [PROJECTOR TYPE]
Displays the type of projector.
2 [PROJECTOR NAME]
Displays the name set in the projector.
3 [MAIN VERSION]
Displays the rmware version of the projector.
4 [POWER]
Displays the status of the power.
5 [PICTURE MODE]
Displays the status of the picture mode.
6 [SERIAL NUMBER]
Displays the serial number of the projector.
7 [NETWORK VERSION]
Displays the version of rmware of the network.
8 [AV MUTE]
Displays the AV mute status.
9 [VOLUME]
Displays the volume status.
10 [INPUT]
Displays the status of the selected input.
11 [INTAKE AIR TEMPERATURE]
Displays the status of the air intake temperature of the
projector.
12 [EXHAUST AIR TEMPERATURE]
Displays the status of the exhaust air temperature of the
projector.
13 [OPTIC MODULE TEMPERATURE]
Displays the optics module temperature status of the
projector.
14 [LAMP RUNTIME]
Displays the runtime of the lamp (converted value).
15 [SELF TEST]
Displays the self diagnostics information.
16 [PROJECTOR RUNTIME]
Displays the runtime of the projector.
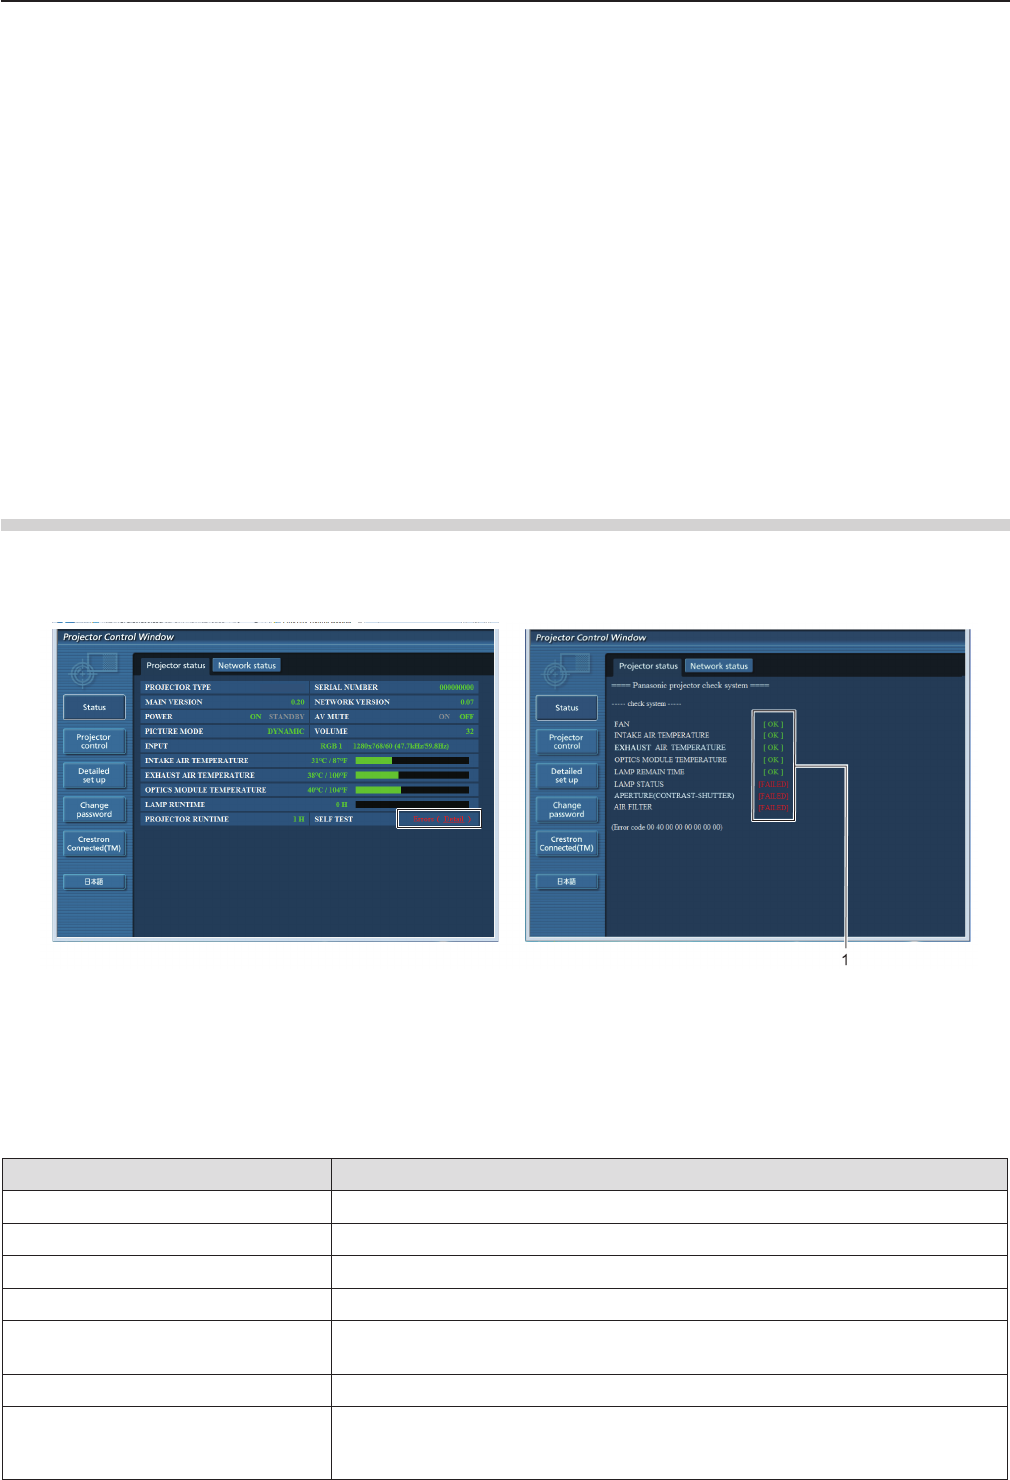
Error information page
When [Error (Detail)] or [Warning (Detail)] is displayed in the self-diagnosis display of the [Projector status] screen, click it to
display the error/warning details.
fThe projector may go into the standby status to protect the projector depending on the contents of the error.
PT-VW355N
1 Self-diagnosis result display
Displays the item check results.
[OK]: Indicates that operation is normal.
[FAILED]: Indicates that there is a problem.
[WARNING]: Indicates that there is a warning.
r[FAILED] items displayed when a problem occurs
Parameter Description
[FAN] Trouble has occurred in the fan or its drive circuit. Consult your dealer.
[FAN(INTAKE)] Trouble has occurred in the intake fan.
[FAN(EXHAUST)] Trouble has occurred in the exhaust fan.
[FAN(LAMP)] Trouble has occurred in the lamp cooling fan.
[INTAKE AIR TEMPERATURE] The air intake temperature is too high. The projector may be used in an operating
environment where the temperature is high, such as near a heating appliance.
[EXHAUST AIR TEMPERATURE] The exhaust air temperature is high. The air exhaust port may be blocked.
[OPTICS MODULE TEMPERATURE]
The temperature around the optics module inside the projector is high. The projec-
tor may be used in an operating environment where the temperature is high, such
as near a heating appliance.
102 - ENGLISH
Chapter 4 Settings - [NETWORK/USB] menu
Chapter 4 Settings - [NETWORK/USB] menu
[LAMP REMAIN TIME] The lamp runtime has exceeded the prescribed cumulative time, and it is now time
to replace the lamp.
[LAMP STATUS] The lamp has failed to light.
Wait a short while for the lamp to cool off, and then turn on the power.
[APERTURE (CONTRAST-SHUT-
TER)] Trouble has occurred in the contrast shutter circuitry. Consult your dealer.
[AIR FILTER] There is too much dust accumulated in the air lter unit. Turn off the projector and
unplug the power plug from the wall outlet, then replace the air lter unit.
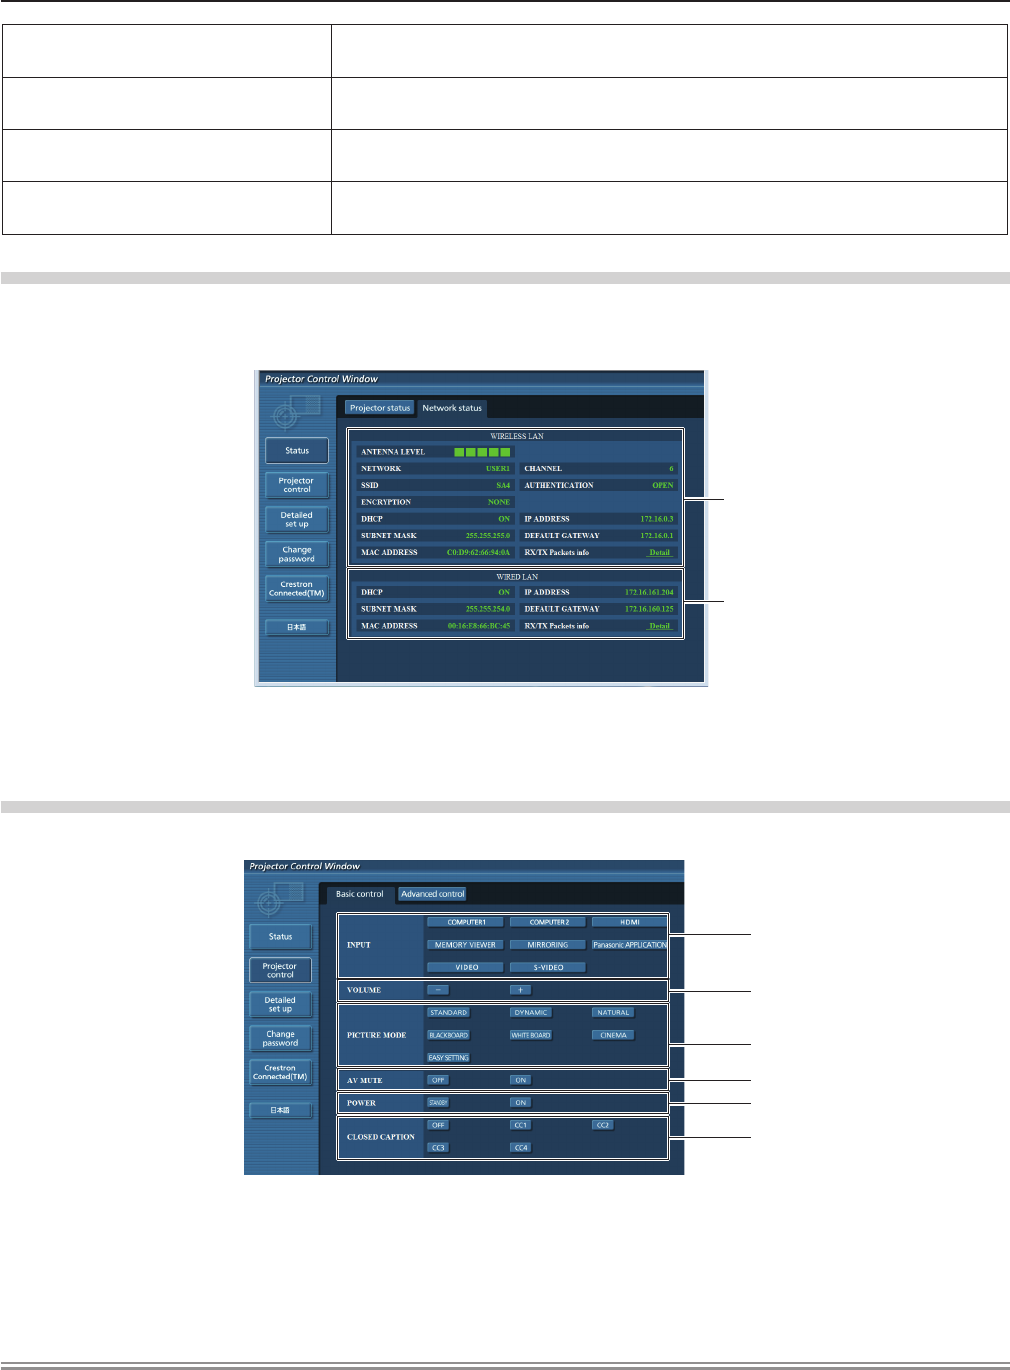
[Network status] page
Click [Status] → [Network status].
The current network setting status is displayed.
2
1
1 [WIRELESS LAN]
Displays the conguration details of wireless LAN.
2 [WIRED LAN]
Displays the conguration details of wired LAN.
[Basic control] page
Click [Projector control] → [Basic control].
1
2
5
6
3
4
1 [INPUT]
Switches the input signal.
2 [VOLUME]
Adjusts the volume level.
3 [PICTURE MODE]
Switches the picture mode.
4 [AV MUTE]
Switches between AV mute on/off.
5 [POWER]
Turns on/off the power.
6 [CLOSED CAPTION]
Switches the closed caption mode.
Note
fAfter selecting [NETWORK/USB] in [INPUT], it will select the previous input source. If you need to select the other, please
press the <MEMORY VIEWER> / <MIRRORING> / <Panasonic APP> button on the remote control.
fWhen [NETWORK/USB] → [WIRELESS LAN] is set to [SIMPLE], [S-DIRECT] or [M-DIRECT], and the web control function
is enabled in the wireless LAN connection, if you switch the input to [MEMORY VIEWER] or [MIRRORING], the wireless
connection will be cut off and the web control function cannot be used any more.
ENGLISH - 103
Chapter 4 Settings - [NETWORK/USB] menuChapter 4 Settings - [NETWORK/USB] menu
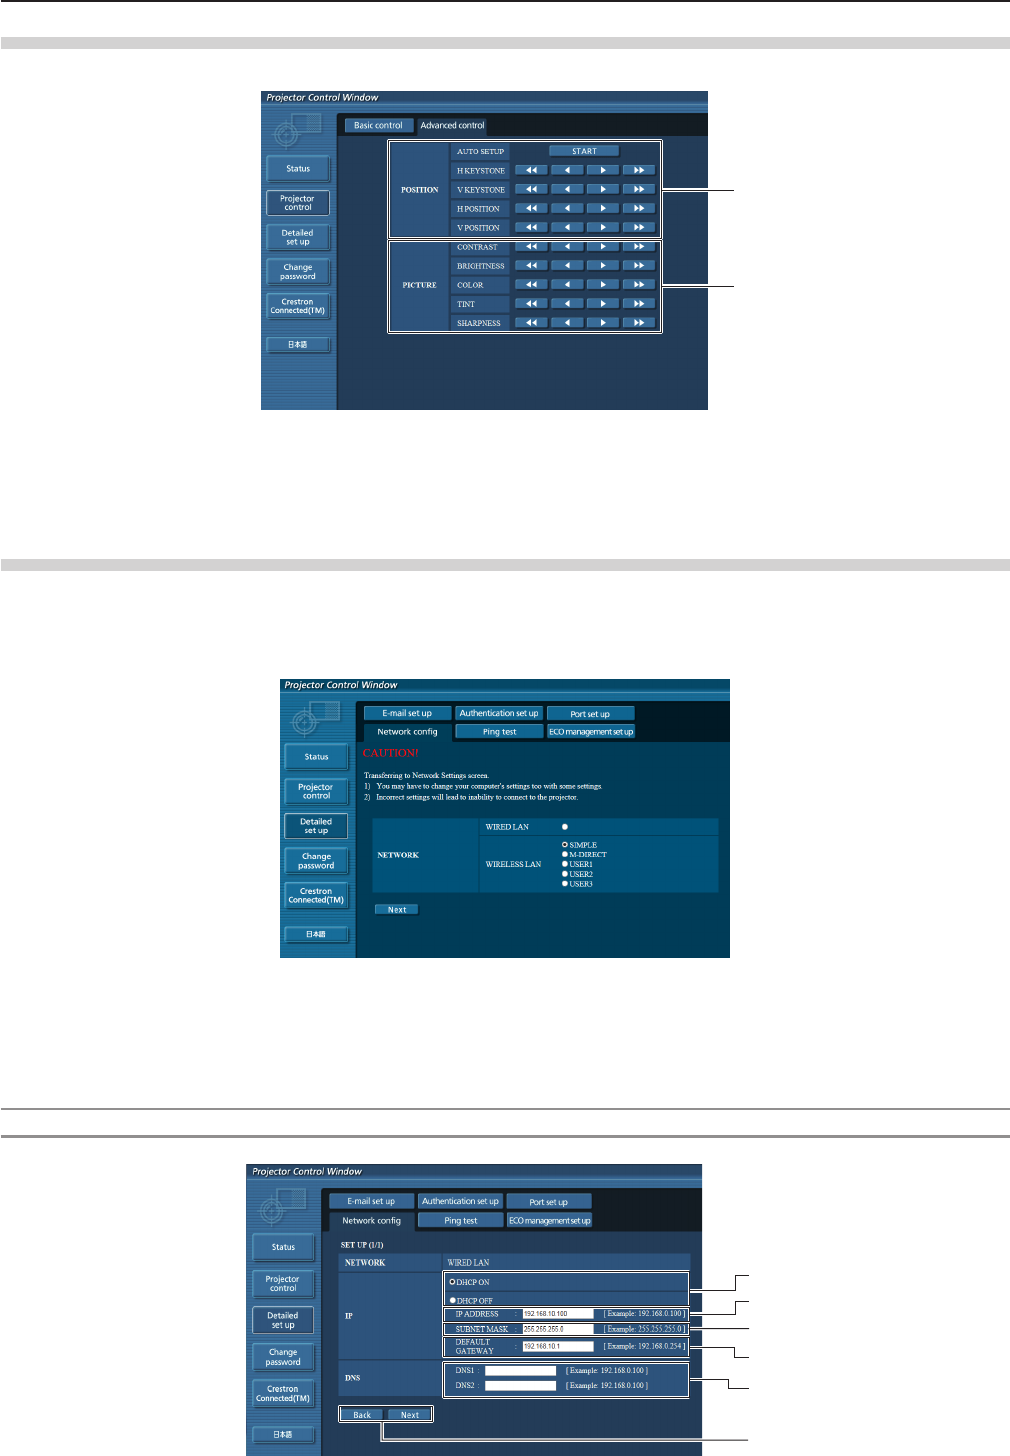
[Advanced control] page
Click [Projector control] → [Advanced control].
1
2
1 [POSITION]
Adjusts the position of image and the keystone
correction.
2 [PICTURE]
Adjusts the items of image.
[Network cong] page
Click [Detailed set up] → [Network cong].
1) Click [Network cong].
fThe [CAUTION!] screen is displayed.
2) Select the item which you want to change the setting, then click [Next].
fThe current setting is displayed.
3) Click [Change] button.
fThe setting change screen is displayed.
Wired LAN
1
2
3
4
5
6
104 - ENGLISH
Chapter 4 Settings - [NETWORK/USB] menu
Chapter 4 Settings - [NETWORK/USB] menu
1 [DHCP ON]/[DHCP OFF]
To enable the DHCP client function, set to [DHCP ON].
2 [IP ADDRESS]
Enter the IP address when not using a DHCP server.
3 [SUBNET MASK]
Enter the subnet mask when not using a DHCP server.
4 [DEFAULT GATEWAY]
Enter the default gateway address when not using a
DHCP server.
5 [DNS1]/[DNS2]
Enter the DNS1/DNS2 server address.
Permissible/ available characters for the entry of DNS1/
DNS2 server address.
(primary):
Numbers (0 - 9), period (.)
(Example: 192.168.0.253).
6 [Back]/[Next]
Click the [Back] button to return to the original screen.
The current settings are displayed by pressing the [Next]
button.
Click the [Submit] button to update the settings.
Note
fWhen you use the “Forward” and “Back” functions of your browser, a warning message “Page has Expired” may appear. In
that case, click [Network cong] again since the following operation will not be guaranteed.
fChanging LAN settings while connected to the LAN may cause the connection to cut out.
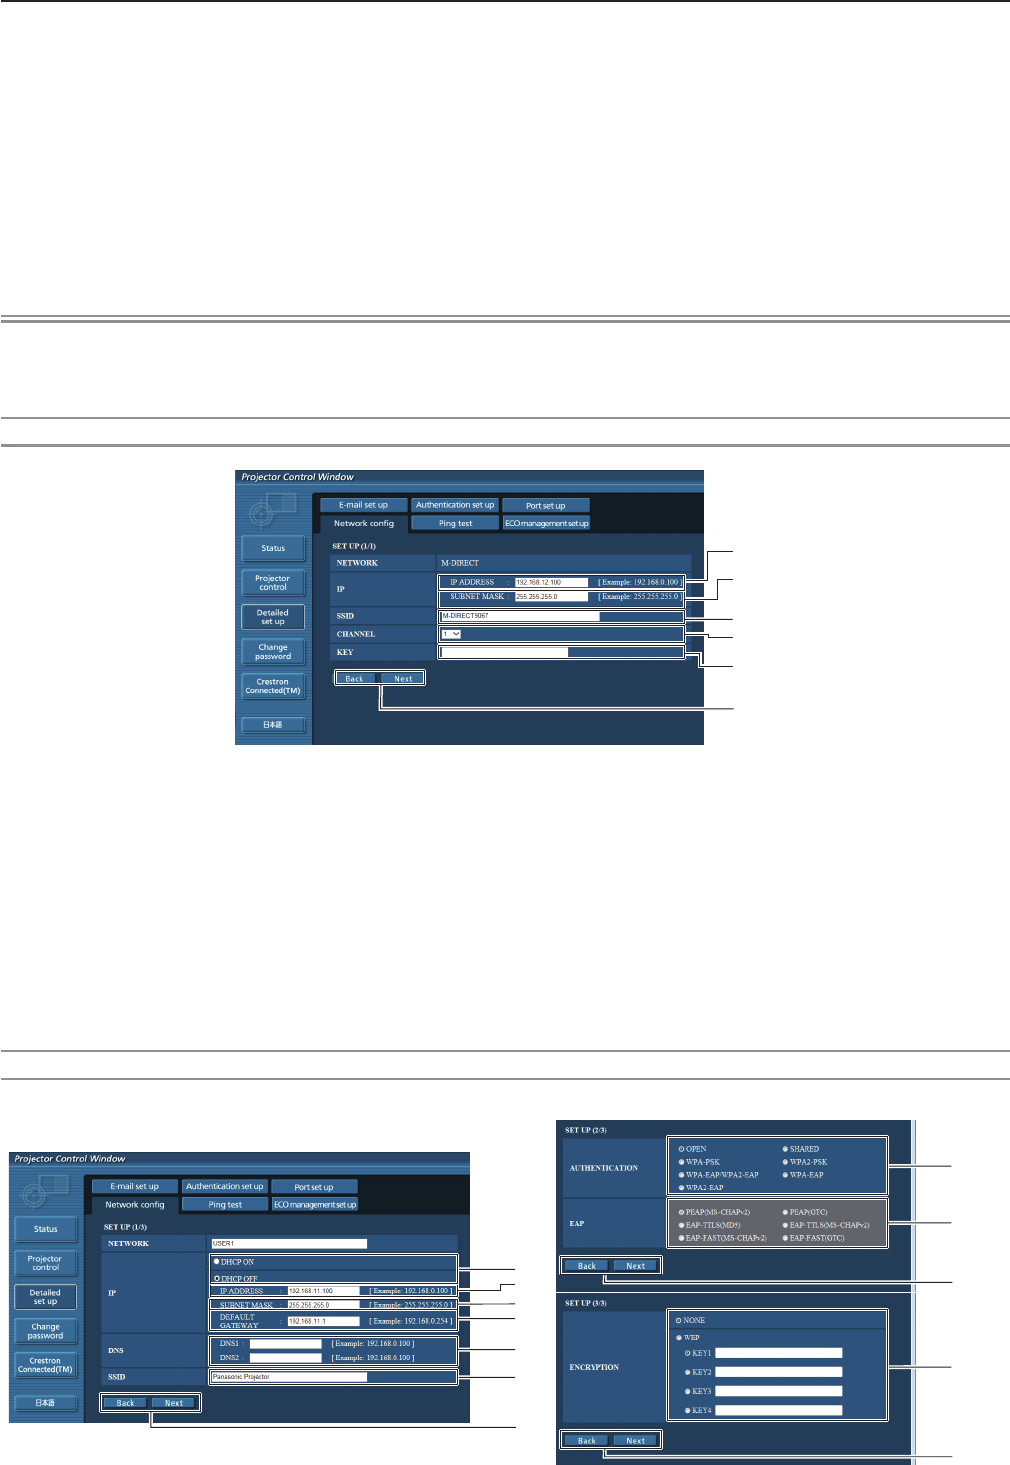
Wireless LAN (M-DIRECT)
1
2
3
4
5
6
1 [IP ADDRESS]
Enter the IP address.
2 [SUBNET MASK]
Enter the subnet mask.
3 [SSID]
Set the SSID to be used in M-DIRECT.
4 [CHANNEL]
Set the channel to be used in M-DIRECT.
5 [KEY]
Set the key to be used in M-DIRECT.
Input either 8 to 63 alphanumerics or a 64 digit string in the
hexadecimal format.
6 [Back]/[Next]
Click the [Back] button to return to the original screen.
The current settings are displayed by pressing the [Next]
button.
Click the [Submit] button to update the settings.
Wireless LAN (USER 1~USER 3)
1
2
3
4
5
6
7
8
9
10
7
7
ENGLISH - 105
Chapter 4 Settings - [NETWORK/USB] menuChapter 4 Settings - [NETWORK/USB] menu
1 [DHCP ON]/[DHCP OFF]
To enable the DHCP client function, set to [DHCP ON].
2 [IP ADDRESS]
Enter the IP address when not using a DHCP server.
3 [SUBNET MASK]
Enter the subnet mask when not using a DHCP server.
4 [DEFAULT GATEWAY]
Enter the default gateway address when not using a
DHCP server.
5 [DNS1]/[DNS2]
Enter the preferred DNS/alternate DNS server when not
using a DHCP server.
6 [SSID]
Enter the same character string that are registered in
the access point.
7 [Back]/[Next]
Click the [Back] button to return to the original screen.
The current settings are displayed by pressing the [Next]
button.
Click the [Submit] button to update the settings.
8 [AUTHENTICATION]
Set the user authentication method used by the network to
be connected.
9 [EAP]
Select the EAP setup in the RADIUS server.
10 [ENCRYPTION]
Select the encryption method to be used for
communication between the projector and the network.
Note
fThe screen items will change according to the authentication method of wireless LAN which is connected.
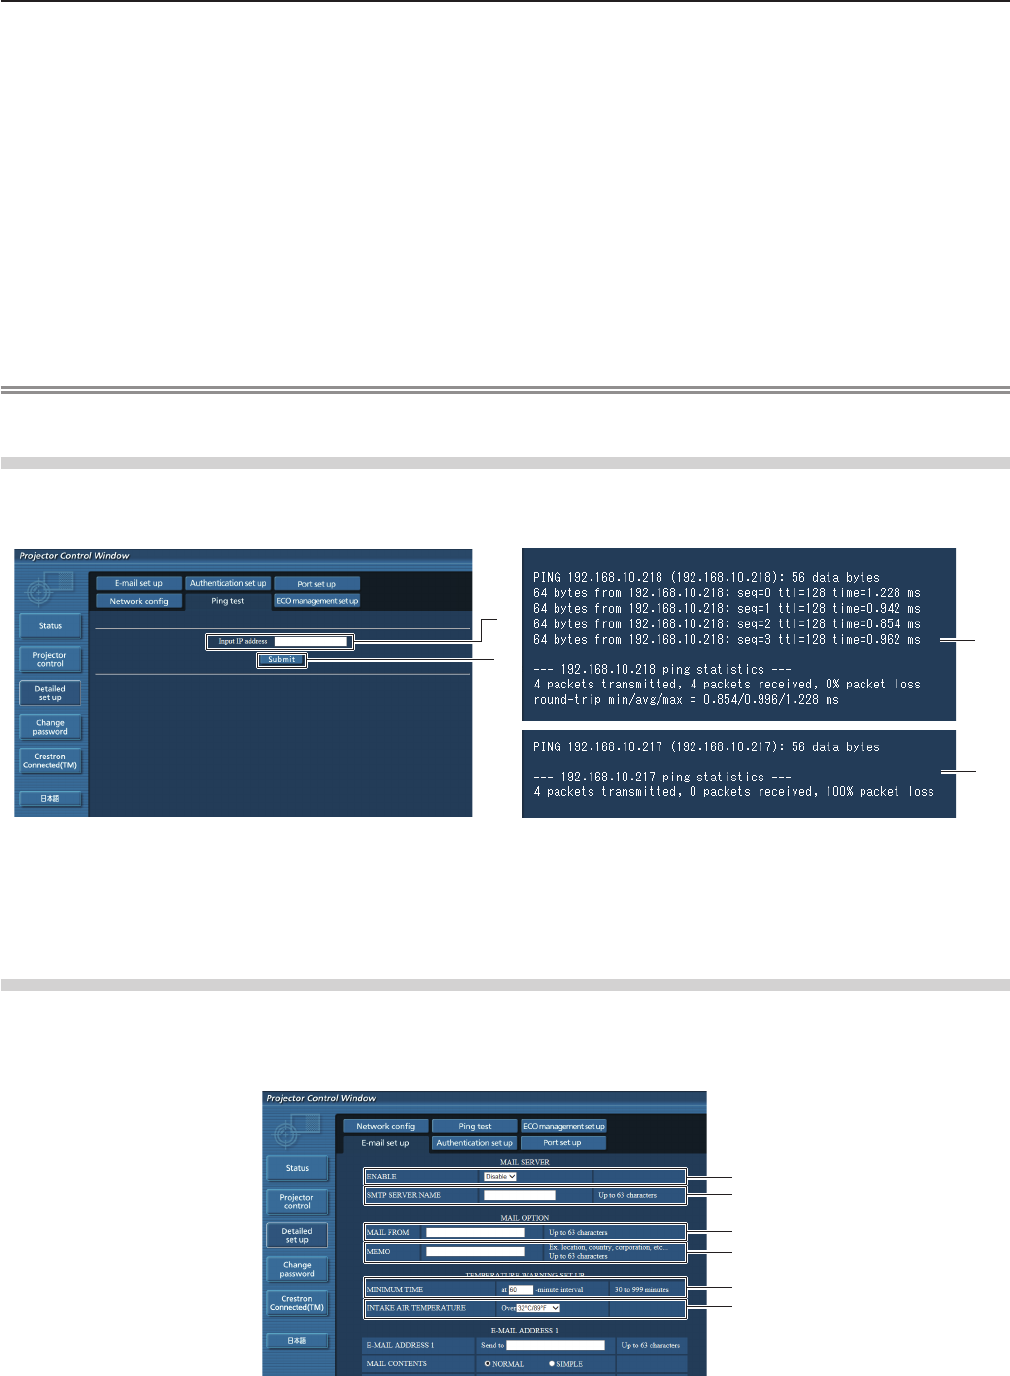
[Ping test] page
Check whether the network is connected to the mail server, POP server, DNS server, etc.
Click [Detailed set up] → [Ping test].
1
2
3
4
1 [Input IP address]
Enter the IP address of the server to be tested.
2 [Submit]
Executes the connection test.
3 Example of display when the connection has
succeeded
4 Example of display when the connection has failed
[E-mail set up] page
When there is a problem or the runtime of a lamp reaches a set value, an E-mail can be sent to preset E-mail addresses (up to
two addresses).
Click [Detailed set up] → [E-mail set up].
1
2
3
4
5
6
106 - ENGLISH
Chapter 4 Settings - [NETWORK/USB] menu
Chapter 4 Settings - [NETWORK/USB] menu
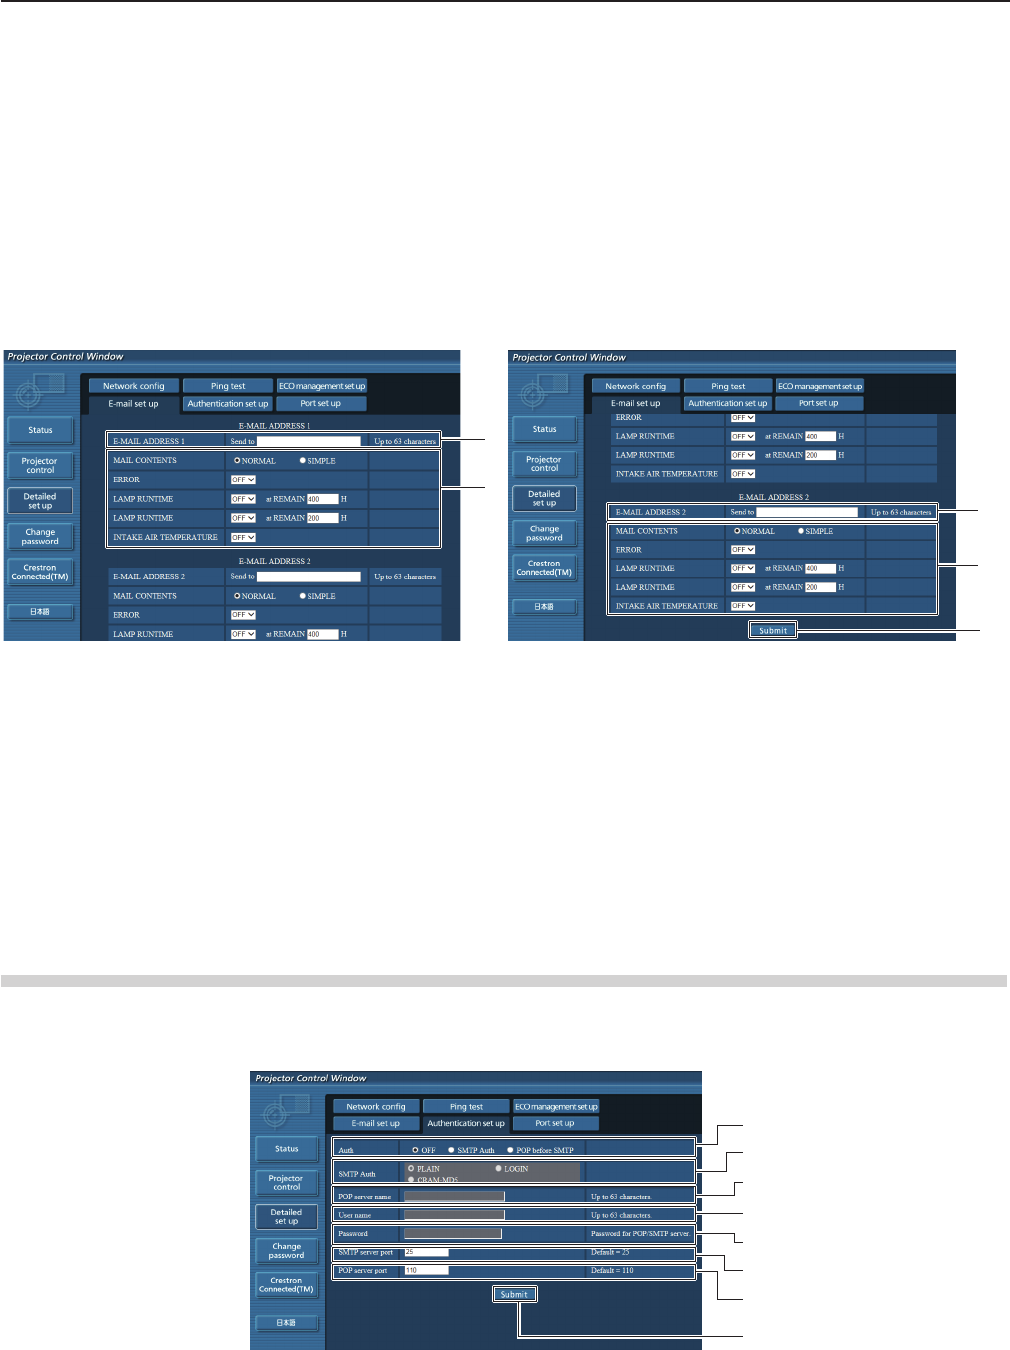
1 [ENABLE]
Select [Enable] to use the E-mail function.
2 [SMTP SERVER NAME]
Enter the IP address or the server name of the E-mail
server (SMTP). To enter the server name, the DNS
server needs to be set up.
3 [MAIL FROM]
Enter the E-mail address of the projector. (Up to 63
characters in single byte)
4 [MEMO]
Enter information such as the location of the projector
that noties the sender of the E-mail. (Up to 63
characters in single byte)
5 [MINIMUM TIME]
Change the minimum interval for the temperature warning
E-mail. The default value is 60 minutes. In this case,
another E-mail will not be sent for 60 minutes after
sending the temperature warning E-mail even if it reaches
the warning temperature.
6 [INTAKE AIR TEMPERATURE]
Change the temperature setting for the temperature
warning mail. A temperature warning E-mail is sent when
the temperature exceeds this value.
8
7
9
8
7
7 [E-MAIL ADDRESS 1]/[E-MAIL ADDRESS 2]
Enter the E-mail address to be sent. Leave [E-MAIL
ADDRESS 2] blank when two E-mail addresses are not
to be used.
8 Settings of the conditions to send E-mail
Select the conditions to send E-mail.
[MAIL CONTENTS]:
Select either [NORMAL] or [SIMPLE].
[ERROR]:
Send an E-mail when an error occurred in the self-
diagnosis.
[LAMP RUNTIME]:
An E-mail message is sent when the remaining lamp on
time for the lamp has reached the value set at the right
eld.
[INTAKE AIR TEMPERATURE]:
Send an E-mail when the air intake temperature has
reached the value set at the above eld.
9 [Submit]
Update the settings.
[Authentication set up] page
Set the authentication items when POP authentication or SMTP authentication is necessary to send an E-mail.
Click [Detailed set up] → [Authentication set up].
1
2
3
4
5
6
7
8
ENGLISH - 107
Chapter 4 Settings - [NETWORK/USB] menuChapter 4 Settings - [NETWORK/USB] menu

1 [Auth]
Select the authentication method specied by your
Internet service provider.
2 [SMTP Auth]
Set when the SMTP authentication is selected.
3 [POP server name]
Enter the POP server name.
Allowed characters:
Alphanumerics (A - Z, a - z, 0 - 9)
Minus sign (-) and period (.)
4 [User name]
Enter the user name for the POP server or the SMTP
server.
5 [Password]
Enter the password for the POP server or the SMTP
server.
6 [SMTP server port]
Enter the port number of the SMTP server.
(Normally 25)
7 [POP server port]
Enter the port number of the POP server.
(Normally 110)
8 [Submit]
Update the settings.
Contents of mail sent
Example of E-mail sent when E-mail is set
Mail with the contents shown below is sent when the e-mail settings have been established.
=== Panasonic projector report(CONFIGURE) ===
Projector Type : PT-VW355N
Serial No : 000000000
----- E-mail setup data -----
TEMPERATURE WARNING SETUP
MINIMUM TIME at [ 60] minutes interval
INTAKE AIR TEMPERATURE Over [ 32degC / 89degF ]
ERROR [ OFF ]
LAMP RUNTIME
[ OFF ] at REMAIN [ 400] H
LAMP RUNTIME
[ OFF ] at REMAIN [ 200] H
INTAKE AIR TEMPERATURE
[ OFF ]
----- check system -----
FAN [ OK ]
INTAKE AIR TEMPERATURE
[ OK ]
EXHAUST AIR TEMPERATURE
[ OK ]
OPTICS MODULE TEMPERATURE
[ OK ]
LAMP REMAIN TIME
[ OK ]
LAMP STATUS [ OK ]
APERTURE (CONTRAST-SHUTTER)
[ OK ]
AIR FILTER
[ OK ]
(Error code 00 00 00 00 00 00 00 00)
Intake air temperature : 31 degC / 87 degF
Exhaust air temperature : 37 degC / 98 degF
Optics module temperature : 39 degC / 102 degF
PROJECTOR RUNTIME 800 H
LAMP NORMAL
500 H
LAMP ECO 700 H
LAMP REMAIN
4000 H
-------- Current status ---------
MAIN VERSION 1.00
NETWORK VERSION 1.00
SUB VERSION 1.00
LAMP STATUS LAMP=ON
INPUT RGB
SIGNAL NAME XGA6
SIGNAL FREQUENCY 0.00kHz / 0.00Hz
----- Wired Network conguration -----
DHCP Client OFF
IP ad d re ss 192.168.10.100
M AC ad d re ss 04:20:9A:00:00:00
----- Wireless Network conguration -----
DHCP Client OFF
IP ad d r es s 192.168.0.100
M AC ad d re ss 04:20:9A:00:00:00
----- Memo -----
108 - ENGLISH
Chapter 4 Settings - [NETWORK/USB] menu
Chapter 4 Settings - [NETWORK/USB] menu
Example of E-mail sent for an error
Mail with the contents shown below is sent when an error has occurred.
=== Panasonic projector report(ERROR) ===
Projector Type : PT-VW355N
Serial No : 000000000
----- check system -----
FAN [ OK ]
INTAKE AIR TEMPERATURE
[ OK ]
EXHAUST AIR TEMPERATURE
[ OK ]
OPTICS MODULE TEMPERATURE
[ OK ]
LAMP REMAIN TIME
[ OK ]
LAMP STATUS [ OK ]
APERTURE (CONTRAST-SHUTTER)
[ OK ]
AIR FILTER
[ FAILED ]
(Error code 00 00 00 20 00 00 00 00)
Intake air temperature : 31 degC / 87 degF
Exhaust air temperature : 37 degC / 98 degF
Optics module temperature : 39 degC / 102 degF
PROJECTOR RUNTIME 800 H
LAMP NORMAL
500 H
LAMP ECO 700 H
LAMP REMAIN
4000 H
-------- Current status ---------
MAIN VERSION 1.00
NETWORK VERSION 1.00
SUB VERSION 1.00
LAMP STATUS LAMP=OFF
INPUT RGB
----- Wired Network conguration -----
DHCP Client OFF
IP ad d re ss 192.168.10.100
M AC ad d re ss 04:20:9A:00:00:00
----- Wireless Network conguration -----
DHCP Client OFF
IP ad d r es s 192.168.0.100
M AC ad d re ss 04:20:9A:00:00:00
----- Memo -----
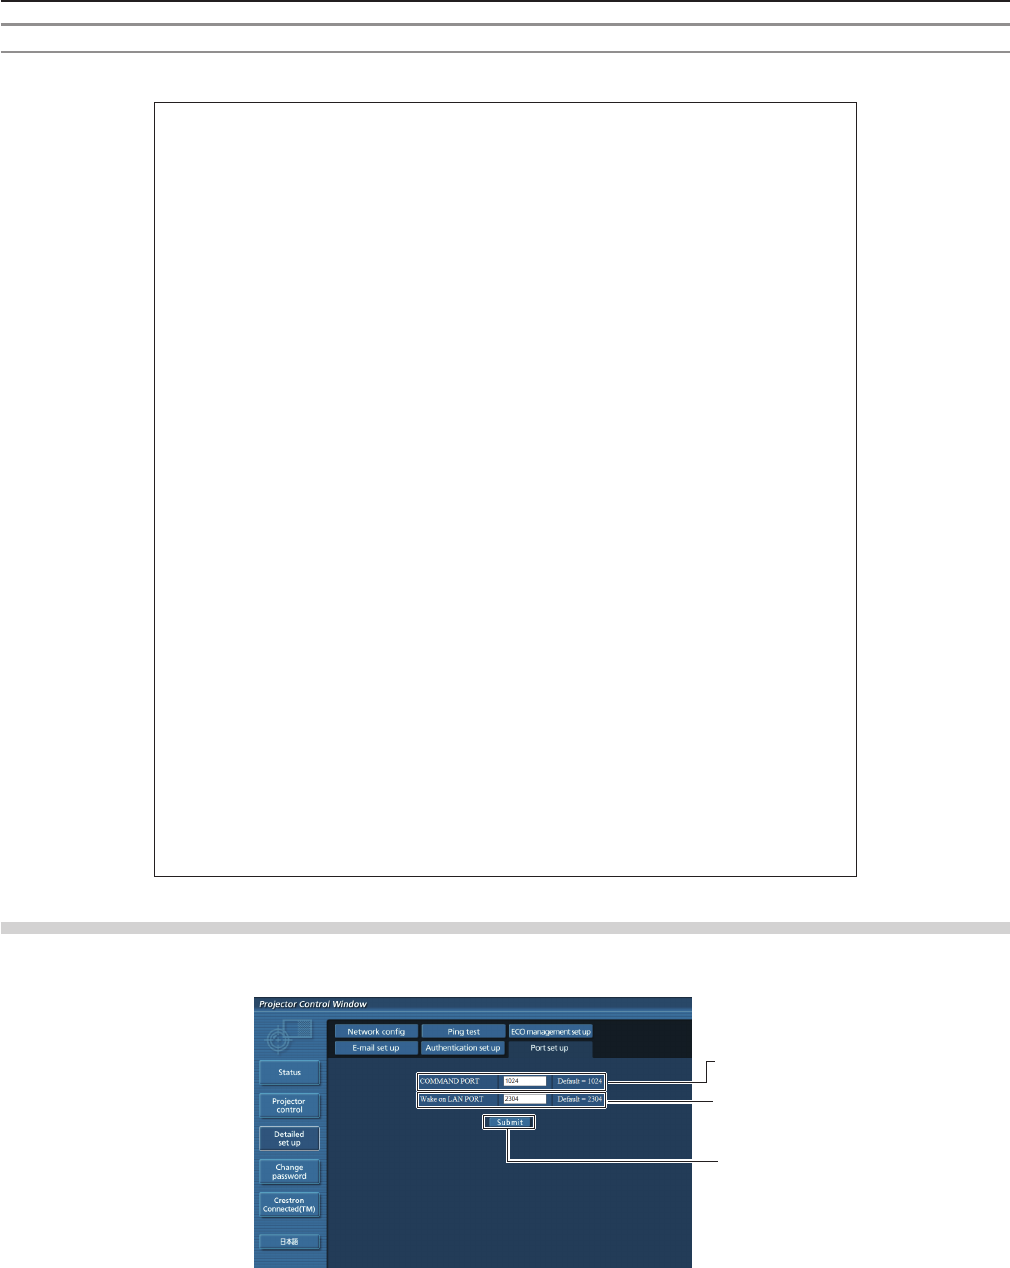
[Port set up] page
Set the port number used for command control.
Click [Detailed set up] → [Port set up].
3
1
2
1 [COMMAND PORT]
Set the port number used for command control.
2 [Wake on LAN PORT]
When [STANDBY MODE] is set to [NETWORK], set the
port number used for the Wake on LAN function.
3 [Submit]
Update the settings.
ENGLISH - 109
Chapter 4 Settings - [NETWORK/USB] menuChapter 4 Settings - [NETWORK/USB] menu
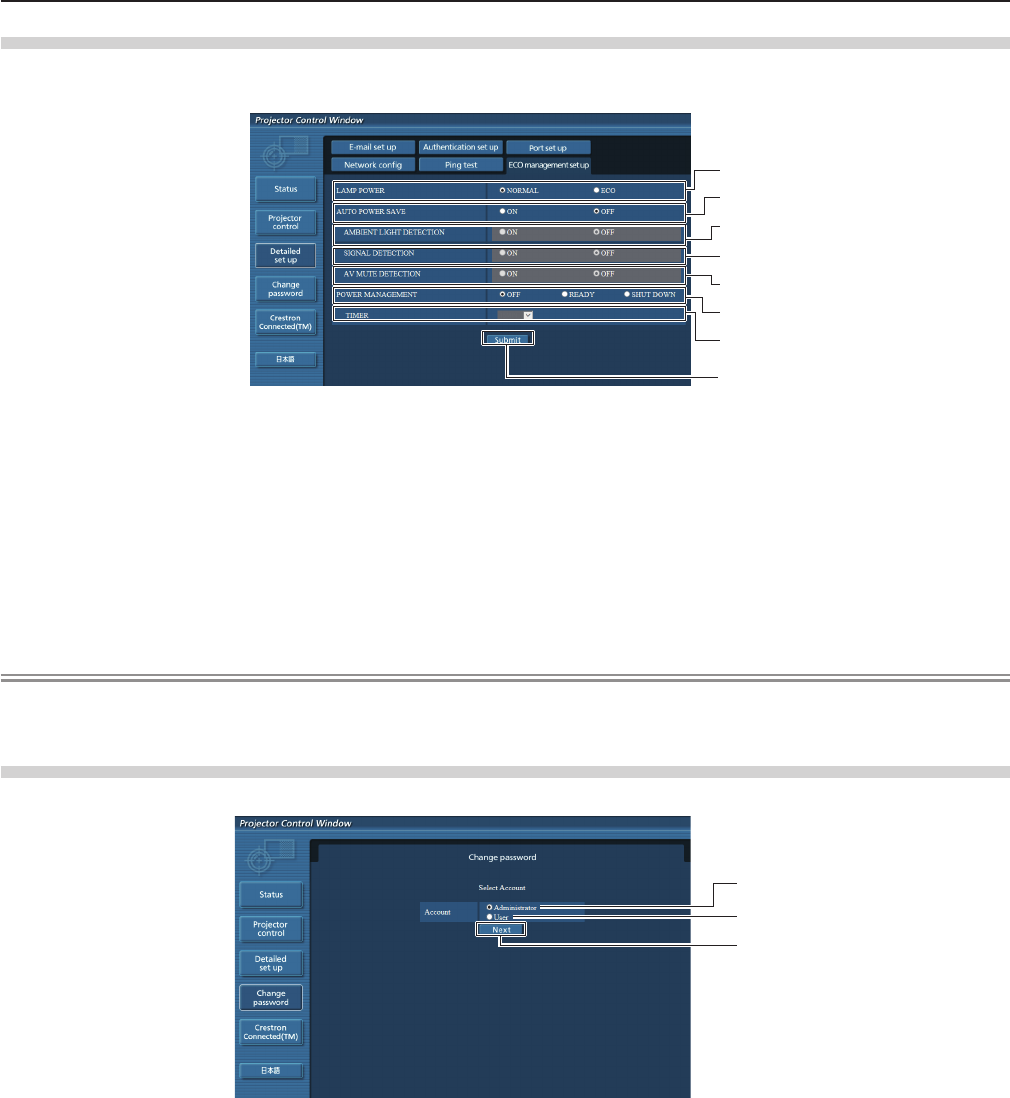
[ECO management set up] page
You can make settings for the ECO management function of the projector.
Click [Detailed set up] → [ECO management set up].
1
2
3
4
5
6
7
8
1 [LAMP POWER]
Selects the [LAMP POWER] setting.
2 [AUTO POWER SAVE]
Select [ON] to set [AMBIENT LIGHT DETECTION],
[SIGNAL DETECTION], and [AV MUTE DETECTION].
3 [AMBIENT LIGHT DETECTION]
Enable ([ON])/disable ([OFF]) the ambient light
detection function.
4 [SIGNAL DETECTION]
Enable ([ON])/disable ([OFF]) the signal detection
function.
5 [AV MUTE DETECTION]
Enable ([ON])/disable ([OFF]) the AV mute detection
function.
6 [POWER MANAGEMENT]
Select the power consumption mode.
7 [TIMER]
Select the time that the lamp is turned off when the
POWER MANAGEMENT function is using.
8 [Submit]
Update the setting.
Note
fFor detailed description of each setting item, refer to the [PROJECTOR SETUP] menu of the projector → [ECO
MANAGEMENT] (x page 79).
[Change password] page
Click [Change password].
1
2
3
1 [Administrator]
Used to change the setting of [Administrator].
2 [User]
Used to change the setting of [User].
3 [Next]
Used to change the setting of the password.
110 - ENGLISH
Chapter 4 Settings - [NETWORK/USB] menu
Chapter 4 Settings - [NETWORK/USB] menu
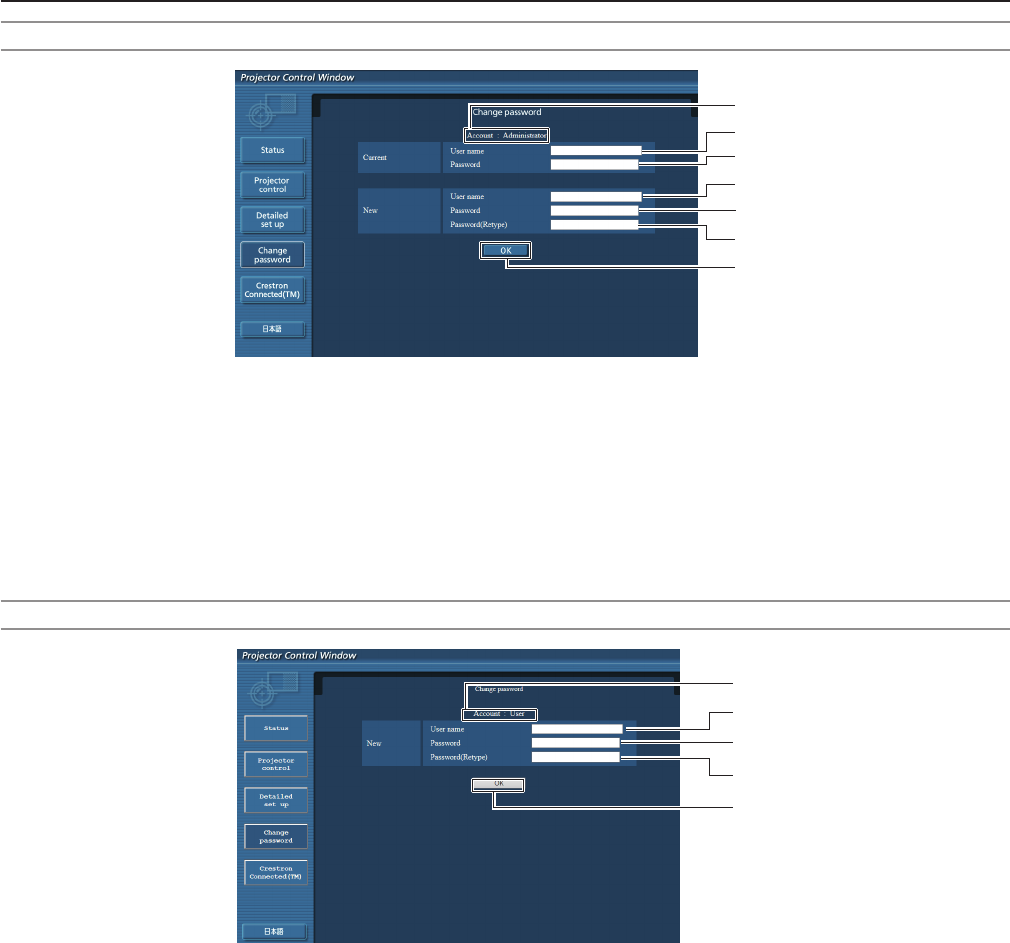
[Administrator] account
1
2
3
4
5
6
7
1 [Account : Administrator]
Displays the account to change.
2 [Current] [User name]
Enter the user name before the change.
3 [Current] [Password]
Enter the current password.
4 [New] [User name]
Enter the desired new user name.
(Up to 16 characters in single byte)
5 [New] [Password]
Enter the desired new password.
(Up to 16 characters in single byte)
6 [New] [Password (Retype)]
Enter the desired new password again.
7 [OK]
Determines the change of password.
[User] account
1
2
3
5
4
1 [Account : User]
Displays the account to change.
2 [New] [User name]
Enter the desired new user name.
(Up to 16 characters in single byte)
3 [New] [Password]
Enter the desired new password. (Up to 16 characters
in single byte)
4 [New] [Password (Retype)]
Enter the desired new password again.
5 [OK]
Determines the change of password.
ENGLISH - 111
Chapter 4 Settings - [NETWORK/USB] menuChapter 4 Settings - [NETWORK/USB] menu
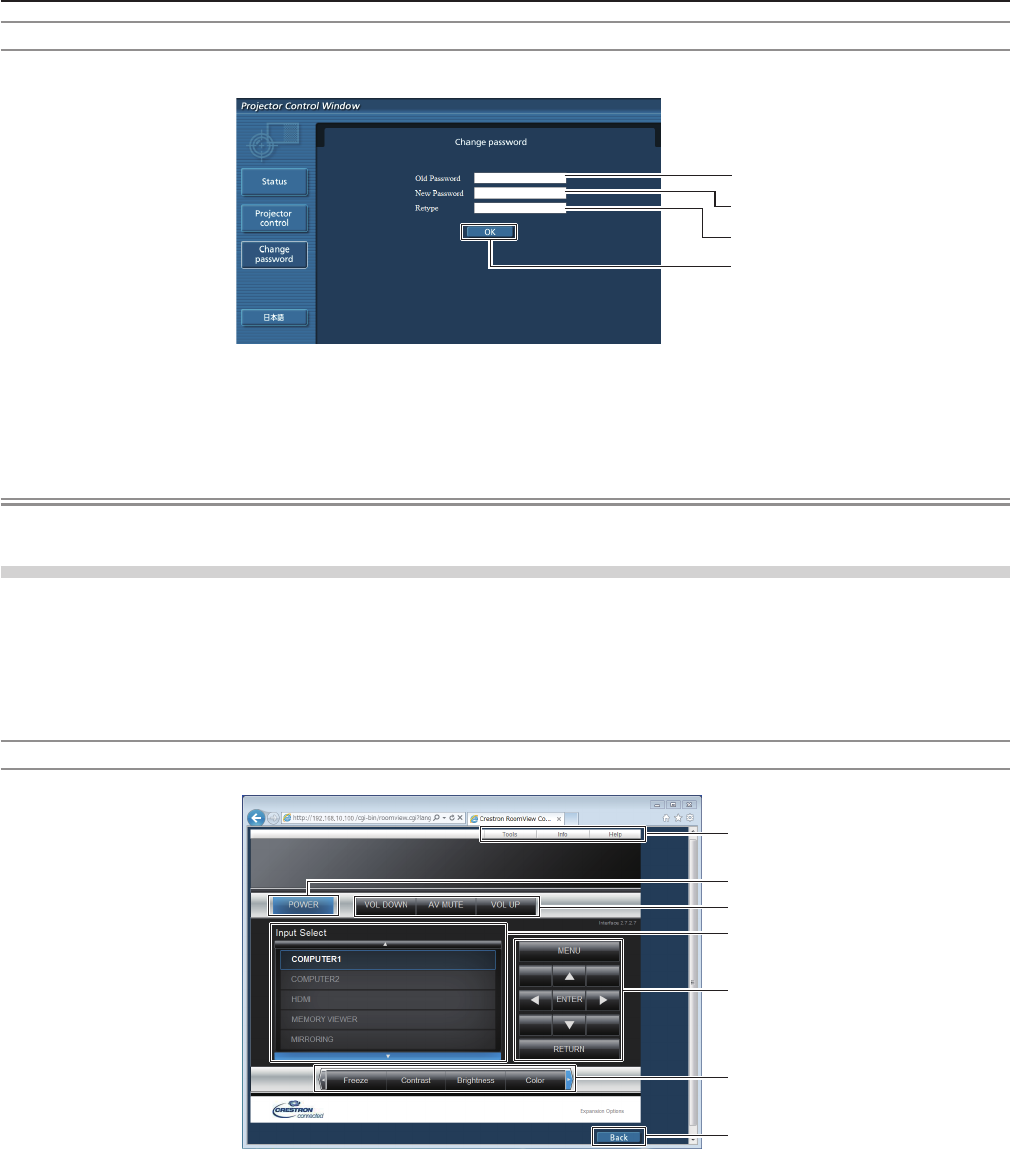
[Change password] (For user rights)
Only the change of password is enabled under the user rights.
1
2
4
3
1 [Old Password]
Enter the current password.
2 [New Password]
Enter the desired new password. (Up to 16 characters
in single byte)
3 [Retype]
Enter the desired new password again.
4 [OK]
Determines the change of password.
Note
fTo change the account of the administrator, you must enter the [User name] and [Password] in [Current].
[Crestron Connected(TM)] page
The projector can be monitored/controlled with Crestron Connected™.
To start the Crestron Connected™ control page from the web control screen, you need to access with the administrator rights.
(For user rights, the [Crestron Connected(TM)] button is not displayed on the web control screen.)
The control page of Crestron Connected™ is displayed by clicking [Crestron Connected(TM)].
It is not displayed if Adobe® Flash® Player is not installed on the computer used, or the browser used does not support Flash.
In that case, click [Back] on the control page to go back to the previous page.
Control page
1
2
3
4
5
6
7
1 [Tools], [Info], [Help]
Tabs for selecting the setting, information or help page
of the projector.
2 [POWER]
Turns on/off the power.
3 [VOL DOWN], [AV MUTE], [VOL UP]
Adjusts the volume.
Switches the AV mute function on/off.
4 [Input Select]
Controls input selection.
Not available when the power of the projector is turned off.
5 Menu screen control buttons
Navigates the menu screen.
6 Freeze/image quality adjustment
Controls items related to freeze/image quality.
7 [Back]
Performs return to the previous page.
112 - ENGLISH
Chapter 4 Settings - [NETWORK/USB] menu
Chapter 4 Settings - [NETWORK/USB] menu
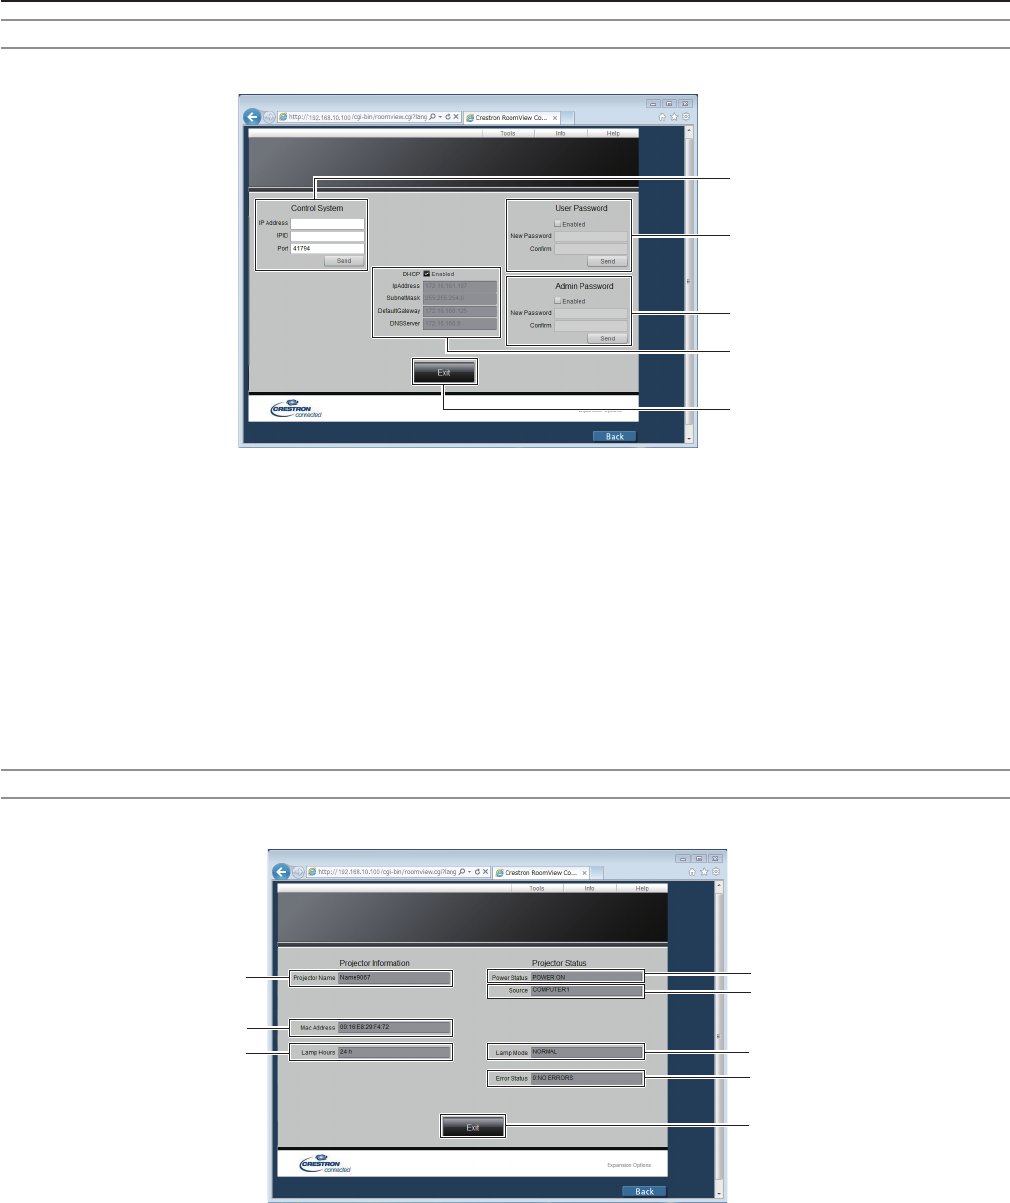
[Tools] page
Click [Tools] on the control page.
1
2
3
4
5
1 [Control System]
Set the information required for communicating with the
controller to be connected with the projector.
2 [User Password]
Set the user rights password for the Crestron
Connected™ control page.
3 [Admin Password]
Set the administrator rights password for the Crestron
Connected™ control page.
4 Network status
Displays the settings of wired LAN.
[DHCP]
Displays the current setting.
[IpAddress]
Displays the current setting.
[SubnetMask]
Displays the current setting.
[DefaultGateway]
Displays the current setting.
[DNSServer]
Displays the current setting.
5 [Exit]
Returns to the control page.
[Info] page
Click [Info] on the control page.
4
5
6
7
1
2
3
8
1 [Projector Name]
Displays the projector name.
2 [Mac Address]
Displays the MAC address.
3 [Lamp Hours]
Displays the runtime of the lamp (converted value).
4 [Power Status]
Displays the status of the power.
5 [Source]
Displays the selected input.
6 [Lamp Mode]
Displays the setting status of [LAMP POWER]
(x page 79).
7 [Error Status]
Displays the error status.
8 [Exit]
Returns to the control page.
ENGLISH - 113
Chapter 4 Settings - [NETWORK/USB] menuChapter 4 Settings - [NETWORK/USB] menu
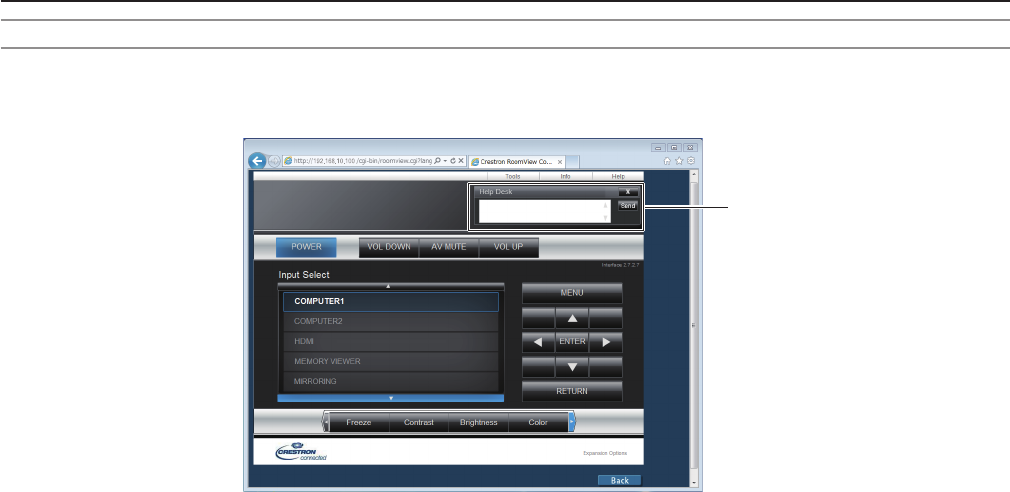
[Help] page
Click [Help] on the control page.
The [Help Desk] window is displayed.
1
1 [Help Desk]
Send/receive messages to/from an administrator who uses
Crestron Connected™.
114 - ENGLISH
Chapter 4 Settings - [NETWORK/USB] menu
Chapter 4 Settings - [NETWORK/USB] menu

Chapter 5 Operation of Function
This chapter describes the operation methods of some functions.
ENGLISH - 115