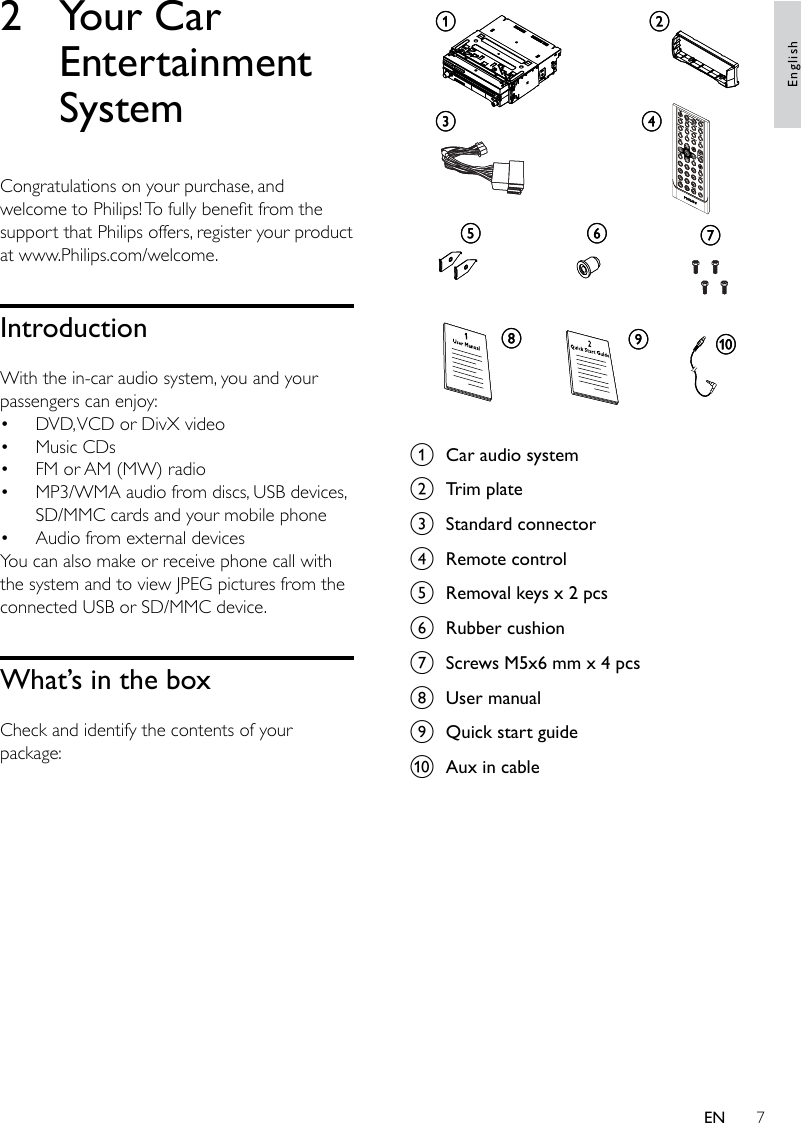
Philips Consumer Lifestyle CED750 7" TFT DVD PLAYER / AV SYSTEM In-Car Entertainment User Manual 1

Philips Consumer Lifestyle 7" TFT DVD PLAYER / AV SYSTEM In-Car Entertainment 1

Contents

User Manual 1

© 2008 Koninklijke Philips Electronics N.V.All rights reserved.Document order number:  000000000000
Register your product and get support atwww.philips.com/welcomeCED750/55EN  User manual  3
3Random play    267  Browse pictures    27Rotate pictures    27Zoom    27Select slide show duration    278  Make/receive phone call    28Make a call    28Receive call    28Call transfer    289  Adjust sound    29Adjust volume    29Mute    29Select preset equalizer    29Adjut fader/balance    2910  Adjust settings    30Adjust general system settings    30Adjust sound settings    30Adjust video settings    31Adjust bluetooth settings    31Adjust language settings    32Adjust volume settings    32Adjust DVD rating    3311  Others    34Listen to other devices    34Reset    34Remove the unit    34Replace fuse    3412  Product information    3613  Troubleshooting    3814  Glossary    39Contents1  Important    4Safety    4Notice    42  Your Car Entertainment System    7Introduction    7What’s in the box    7Overview of the main unit    8Overview of the remote control    103  Get started    12Install the car audio    12Install remote control battery    18Turn on    18Adjust screen    18Load discs    18Insert USB device    19Insert SD/MMC card    19Pairing bluetooth devices    19Set clock    194  Listen to radio    21Tune to a radio station automatically    21Tune to a radio station manually    21Select tuner sensitivity    21Store radio stations in memory    21Tune to a preset station    225  Play video    23Play/Pause    23Skip/Search    23Select audio language    23Select subtitle language    23Repeat    23Selecting a different camera angle    246 Playaudioles  25Play/Pause    25Skip/Search    25Intro play    25Repeat    25EnglishEN
4NoticeFCC Declaration of conformity  Model number: PHILIPS CED750/55  Trade Name: Philips  Responsible Party:   Philips Consumer Electronics  P. O. Box 671539  Marietta, GA 30006-0026 1-800-PHILIPS (744-5477)Notice of complianceThe set complies with the FCC-Rules, Part 15 and with 21 CFR 1040.10. Operation is subject to the following two conditions:1.This device may not cause harmful interference, and2.This device must accept any interference received, including interference that may cause undesired operation.FCC Notice (For U.S. and Canada)Note:This equipment has been tested and found to comply with the limits for a Class B digital device,pursuant to part 15 of the FCC Rules. These limits are designed to provide reasonable protection against harmful interference in a residential installation. This equipment generates, uses, and can radiate radio frequency energy and, if not installed and used in accordance with the instruction manual, may cause harmful interference to radio communications. However, there is no guarantee that interference will not occur in a particular installation. If this equipment does cause harmful interference to radio or television reception, which can be determined by turning the equipment off and on, the user is encouraged to try to correct the interference by one or more of the following measures:– Relocate the receiving antenna.– Increase the separation between the equipment and receiver– Connect the equipment into an outlet on a circuit different from that to which the receiver is connected.1  ImportantSafetyRead and understand all instructions before you use your system. If damage is caused by failure to follow instructions, the warranty does not apply.Use of controls or adjustments or performance of procedures other than herein may result in hazardous radiation exposure or other unsafe operation.This unit is designed for negative ground (earth) 12 V DC operation only.To reduce the risk of trafc accident, do no watch video during driving.To ensure safe driving, adjust the volume to a safe and comfortable level.Improper fuses can cause damage or re. When you need to change the fuse, consult a professional.Use only the supplied mounting hardware for a safe and secure installation.To avoid short circuit, do not expose the system, remote control or remote control batteries to rain or water.Never insert objects into the ventilation slots or other openings on the system.Clean the system and frame with a soft, damp cloth. Never use substances such as alcohol, chemicals or household cleaners on the system.Never place any objects other than discs into the system.Never use solvents such as benzene, thinner, cleaners available commercially, or anti-static sprays intended for discs.Visible and invisible laser radiation when open. Avoid exposure to beam.Risk of damage to the system screen! Never touch, push, rub or strike the screen with any object.••••••••••••••EN
5Recycling Your product is designed and manufactured with high quality materials and components, which can be recycled and reused.When you see the crossed-out wheel bin symbol attached to a product, it means the product is covered by the European Directive 2002/96/EC: Never dispose of your product with other household waste. Please inform yourself about the local rules on the separate collection of electrical and electronic products. The correct disposal of your old product helps prevent potentially negative consequences on the environment and human health.Your product contains batteries covered by the European Directive 2006/66/EC, which cannot be disposed of with normal household waste.Please inform yourself about the local rules on separate collection of batteries. The correct disposal of batteries helps prevent potentially negative consequences on the environment and human health. This product complies with the radio interference requirements of the European Community.– Consult the dealer or an experienced radio/TV technician for help.IMPORTANT!modications not authorized by the manufacturer may void users authority to operate this device.  The making of unauthorized copies of copy-protected material, including computer programs, les, broadcasts and sound recordings, may be an infringement of copyrights and constitute a criminal offence. This equipment should not be used for such purposes. Ofcal DivX® Certied product. Plays all versions of DivX® video (including DivX® 6) with standard playback of DivX® media les. “DivX, DivX” Certied, and associated logos are trademarks of DivX, Inc. and are used under license.This system includes these labels: Class II equipment symbol  This symbol indicates that the unit has a double insulation system.EnglishEN
6This product complies with the requirements of the following directives and guidelines: 2004/108/EC+2006/95/ECEnvironmental informationAll unnecessary packaging has been omitted. We have tried to make the packaging easy to separate into three materials: cardboard (box), polystyrene foam (buffer) and polyethylene (bags, protective foam sheet.) Your system consists of materials which can be recycled and reused if disassembled by a specialized company. Please observe the local regulations regarding the disposal of packaging materials, exhausted batteries and old equipment.Any changes or modications made to this device that are not expressly approved by Philips Consumer Lifestyle may void the user’s authority to operate the equipment.2008 © Koninklijke Philips Electronics N.V. All rights reserved.Specications are subject to change without notice. Trademarks are the property of Koninklijke Philips Electronics N.V. or their respective owners. Philips reserves the right to change products at any time without being obliged to adjust earlier supplies accordingly.EN
7 a  Car audio systemb  Trim platec  Standard connectord  Remote controle  Removal keys x 2 pcsf  Rubber cushiong  Screws M5x6 mm x 4 pcsh  User manuali  Quick start guidej  Aux in cableacgjhidefbacgjhidefb2  Your Car Entertainment SystemCongratulations on your purchase, and welcome to Philips! To fully benet from the support that Philips offers, register your product at www.Philips.com/welcome.IntroductionWith the in-car audio system, you and your passengers can enjoy:DVD, VCD or DivX videoMusic CDsFM or AM (MW) radioMP3/WMA audio from discs, USB devices, SD/MMC cards and your mobile phoneAudio from external devicesYou can also make or receive phone call with the system and to view JPEG pictures from the connected USB or SD/MMC device.What’s in the boxCheck and identify the contents of your package:•••••EnglishEN
8Overview of the main unitEN
9Eject disc.f  4 WAY NAVIGATION Move to left/rightTune for radio station.Skip/search for track.Move up/downSelect tuner band.Fast forward/backward.  Press downConrm selection.Start play or pause.g •••• a  OPENOpen or close the TFT screen.b  INTRO.SCHTurn scan play on or off.Search for radio station.c  EQSelect equalizer (EQ) setting.d  DISPDisplay play mode and its related information. e •••••nlkjihfegmabcdopnlkjihfegmabcdopEnglishEN
10Overview of the remote control a   TLT Adjust tilt of the TFT screen.b  OPEN/CLOSEOpen or close the TFT screen.c  SUBTITLESelect DVD or DivX subtitle language.d  ANGLESelect a difference angle/version of the current DVD scene.••••stvwy{}uxz|bajdcfehgiklmnopqrstvwy{}uxz|bajdcfehgiklmnopqrUSB socketh  SD/MMC card slot i  Disc slotj  AUX INExternal equipment audio-in socketk  RESETRestore default settings.l Terminate call.m Answer phone.Dial number.n  SOURCESelect audio source.o Turn the unit on or off.Turn mute on or off.Adjust volume.p Set screen brightness and contrast.q   TLT Adjust tilt of the screen.••••••••••••EN
11Select tuner band.Fast forward/backward. SELConrm selection.Start play or pause.v  MENUAccess system menuw  GOTOSelect track/chapter.x Stop play.y  DISC MENUReturn to DVD main menu.z Adjust brightness/contrast.{  SOURCESelect connected device.|  TITLEAccess or exit DVD title menu.}  PWRTurn the unit on or off.•••••••••e  DISC AUDIOSelect audio channel source.f Change to wide screen display.g  REPT A->BSet A-B repeat play.h  REPTSelect repeat play mode.i Return to previous menu.j  VOLUME +/-Adjust volume.k  EQSelect equalizer (EQ) setting.l Mute or unmute audio.m  DISPDisplay play information. n  CLEARDelete an entered number.o  Numeric keypadp Answer phone.Dial number.q Terminate call.r  SHUFF #Turn random play on or off.# symbol for phone call.s  INTRO *Turn intro play on or off.* symbal for phone call.t  AUDIOAccess audio setting menu.u  Navigation buttons/Tune for radio station.Skip/search for track./••••••••••••••••••••EnglishEN
12When you connect other devices to this system, ensure that the rating of the car circuit is higher than the total fuse value of all the connected devices.Notes on speaker connectionNever connect speaker wires to the metal body or chassis of the car.Never connect speaker wires with stripes to one another.Overview of partsThese are the supplied parts needed to connect and install this unit.  a  Trim plateb  Standard connectorc  Rubber cushiond  Screw x 4 pcs e  Removal keys x 2 pcsConnect wires: ISO connectorsCautionEnsure that all loose leads are insulated with electrical tape.•1  Pull out the ISO connectors from the car dashboard and connect them to the bigger end of the supplied standard connector.•••ac dbac db3  Get startedCautionUse the controls only as stated in this user manual.•Always follow the instructions in this chapter in sequence.If you contact Philips, you will be asked for the model and serial number of your system. The model number and serial number are on the bottom of your system. Write the numbers here: Model No. __________________________Serial No. ___________________________Install the car audioThese instructions are for a typical installation. However, if your car has different requirements, make the corresponding adjustment. If you have any questions regarding installation kits, consult your Philips car audio dealer.CautionThis unit is designed for negative ground (earth) 12 V DC operation only.Always install this unit in the car dashboard. Other locations can be dangerous as the rear of the unit heats up during use.To avoid short-circuit: before you connect, ensure that the ignition is off.Ensure that you connect the yellow and red power supply leads after all other leads are connected.Ensure that all loose leads are insulated with electrical tape.Ensure that the leads do not get caught under screws orin parts that will move (e.g. seat rail).Ensure that all ground (earth) leads are run to a common ground (earth) point.Use only the supplied mounting hardware for a safe and secure installation.Improper fuses can cause damage or re. When you need to change the fuse, consult a professional.•••••••••Note on the power supply lead (yellow)EN
13Connect wires: without ISO connectorsCautionEnsure that all loose leads are insulated with electrical tape.•1  Cut off the bigger end of the supplied standard connector.  2  Check the car’s wiring carefully, then connect them to the standard connector. 132456789132456789 2  Connect the other end of supplied standard connector to the unit.  3  Do the other connections, if applicable. FRONT LINE OUT LFRONT LINE OUT RREAR LINE OUT LREAR LINE OUT RPARKINGSUB OUTANTENNACAMERAVIDEO OUT 1 VIDEO OUT 2 CAMERA INFRONT LINE OUT LFRONT LINE OUT RREAR LINE OUT LREAR LINE OUT RPARKINGSUB OUTANTENNACAMERAVIDEO OUT 1 VIDEO OUT 2 CAMERA INEnglishEN
145 Red wire The +12V power terminal which is live in the accessory (ACC) position of the ignition switchIf there is no accessory position, connect to the +12V car battery terminal that is always live. Be sure to connect the black ground (earth) lead to a metal surface of the car rst.6 Green and green/black wiresLeft speaker (Rear)7 White and white/black wiresLeft speaker (Front)8 Gray and gray/black wires Right speaker (Front)9 Purple and purple/black wiresRight speaker (Rear)3  Connect the supplied standard connector to the unit.  4  Do the other connections, if applicable.Connector Connect to1 Black wire A metal surface of the carFirst connect the black ground (earth) lead, then connect the yellow and red power supply leads.2 Blue wire The electric antenna control lead or power supply lead of the antenna boosterIf there is no electric antenna or antenna booster, or it is manually operated telescopic antenna, it is not necessary to connect this lead.3 Yellow wire The +12V car battery which is live at all times.4 Orange/white wireIllumination switchEN
15  Connect parking brake cable     FRONT LINE OUT LFRONT LINE OUT RREAR LINE OUT LREAR LINE OUT RPARKINGSUB OUTANTENNACAMERAVIDEO OUT 1 VIDEO OUT 2 CAMERA INFRONT LINE OUT LFRONT LINE OUT RREAR LINE OUT LREAR LINE OUT RPARKINGSUB OUTANTENNACAMERAVIDEO OUT 1 VIDEO OUT 2 CAMERA INEnglishEN
16  3  Remove the two transport screws on the top of the unit.183 mm53.5mm5mm183 mm53.5mm5mmConnect reverse driving cable  Mount in the dashboardNoteFor proper operation of the DVD player, the chassis must be mounted within 20 degree horizontal. Ensure that the unit is mounted within this limitation.Check wire connection before you mount the unit into a car. If preset radio stations are lost when the ignition key is turned OFF and then back ON, reconnect the red leads crosswise to the yellow ones.••1  If the car does not have an on-board drive or navigation computer, disconnect the negative terminal of the car attery. If you disconnect the car battery in a car that has an on-board drive or navigation computer, the computer may lost its memory. If the car battery is not disconnected, to avoid short-circuit, ensure that bare wires do not touch each other.2  Ensure that car dashboard opening is within these measurements:••EN
17  7  Slide the unit into the dashboard until a click sound is heard.  8  Attach the trim plate.  9  Reconnect the negative terminal of the car battery.  4   Remove the mounting sleeve with the removal keys.  5  Install the sleeve into the dashboard and bend the tabs outward to x the sleeve. If the unit is not xed by sleeve but by the supplied screws, skip this step.  6  Place the rubber cushion over the end of the bolt.•EnglishEN
18NOte: To change the OSD language, see “Adjust Settings” chapter. To turn off the system, press the   knob for 3 seconds. The screen is closed automatically.Adjust screenNoteDo not watch video or adjust settings while driving, as it may lead to distraction and cause an accident. •1  Press OPEN/CLOSE to close the screen. To open the scree, press OPEN/CLOSE again.2  To adjust the tilt of the screen, press   TLT .Load discs1  Insert the disc into the disc slot with label side facing up.Play resumes from the point where it was last stopped.   To remove the disc, press the   button.When the disc is ejected, the unit switches to TUNER mode automatically.•»»»»Printing in ChinaPrinting in ChinaPrinting in ChinaPrinting in ChinaInstall remote control batteryCautionRisk of explosion! Keep batteries away from heat, sunshine or re. Never discard batteries in re.Risk of decreased battery life! Never mix different brands or types of batteries.Risk of product damage! When the remote control is not used for long periods, remove the batteries.Perchlorate Material - special handling may apply. See www.dtsc.ca.gov/hazardouswaste/perchlorate.••••Forrst-timeuse:1  Remove the protective tab to activate the remote control battery.To replace the remote control battery: 1  Open the battery compartment.2  Insert 1 CR2025 batteries with correct polarity (+/-) as indicated.Close the battery compartment.  Turn on1  Press the   knob to turn on the system.The screen comes out automatically.The available OSD langagues is displayed on the screen.2  Select a language by touch on it.The OSD language is changed to the selected language immediately.»»»EN
19 TipThe system supports SDHC card. (see ‘SDHC’ on page 39)•Remove the SD/MMC card1  Press SOURCE to switch the system to other mode.2  Press the card until you hear a click sound. The card is now disengaged.3  Remove the SD or MMC card.Pairing bluetooth devicesYou can pair your bluetooth device with the system as follows:1  Turn on bluetooth function on the device.2  Setup bluetooth fuction on your device.3  Select “CED750” in the pairing list.4  Enter default password “0000”.[Connect] is displayed on the panel if pairing succeeds.Set clock1  Press MENU, if necessary.The main menu is displayed.  2  Touch [Setting].The setup menu is displayed.»»»»Insert USB device1  Open the USB/SD/MMC card cover.  2  Insert the USB device into the USB socket.The unit starts playing from the USB device automatically.  Remove the USB device1  Press SOURCE to switch the system to other mode.2  Remove the USB device.Insert SD/MMC card1  Open the USB/SD/MMC card cover.2  Insert the SD or MMC card into the card slot.The unit starts playing from the SD/MMC card automatically.»»EnglishEN
20  3  Touch [General] , if necessary.4  To select clock mode, repeatedly touch the mode in the [Clock mode] line.[12hr] : 12 hour mode[24hr] : 24 hour mode5  To set time, touch hour or minute rst, then touch   or  .6  Touch   to exit. ••EN

Navigation menu