Pioneer K026 Multi- Media AVN Navigation Server System with BT User Manual 2
Pioneer Corporation Multi- Media AVN Navigation Server System with BT 2
Pioneer >
Contents
- 1. User Manual 1
- 2. User Manual 2
- 3. User Manual 3
- 4. User Manual 4
- 5. User Manual 5
User Manual 2
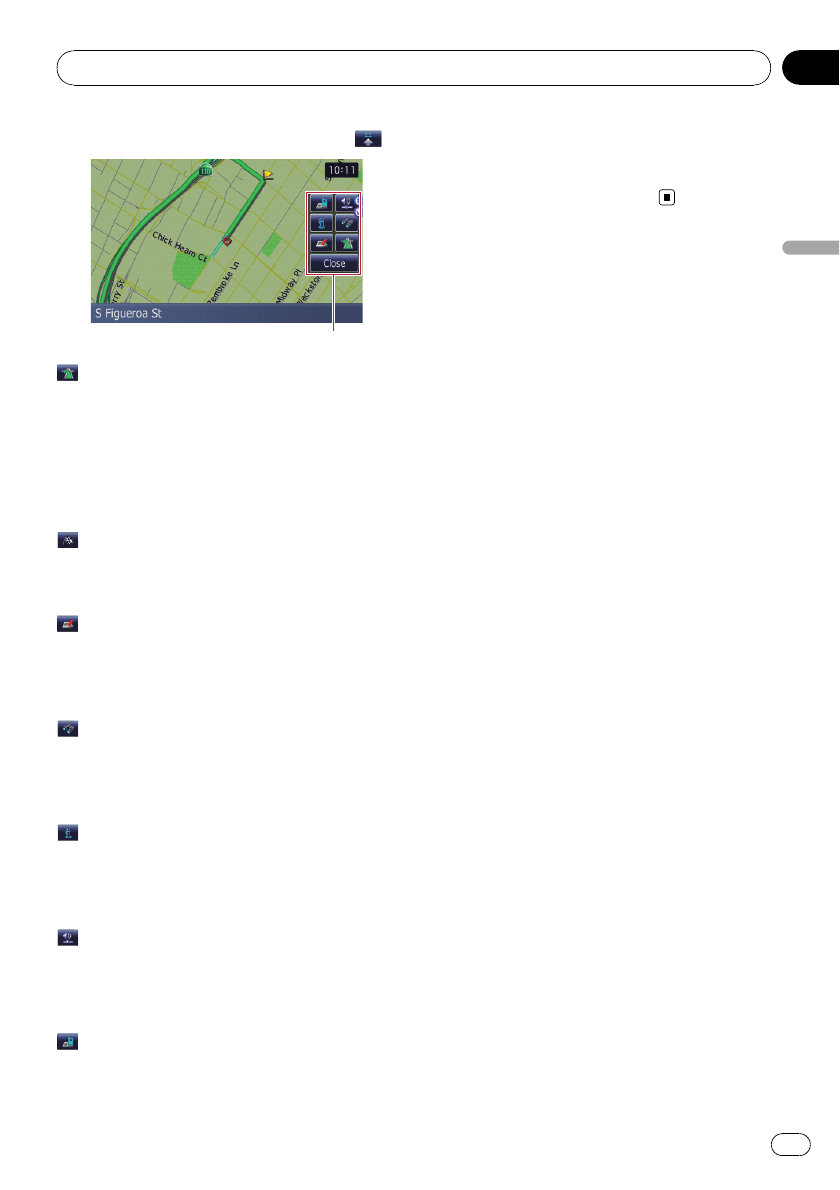
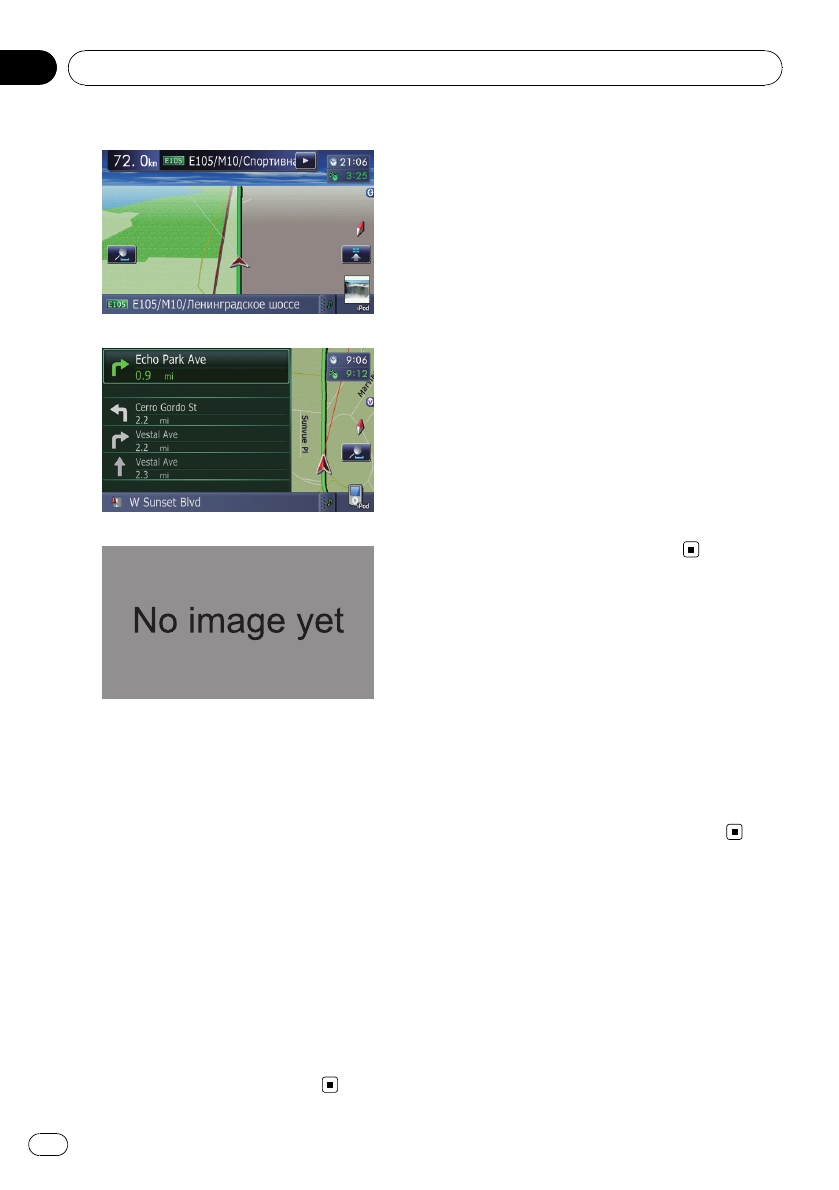
%When the map is displayed, touch .
Quick Access menu
:Route Overview*
Displayed when the map is not scrolled. This
item can be selected only during route gui-
dance.
You can modify the conditions for route calcu-
lation and recalculate the current route.
=For details, refer to Checking and modifying
the current route on page 52.
:Destination*
Displayed when the map is scrolled. Set the
route to the place specified with the scroll cur-
sor.
:Registration
Register information on the location indicated
by the scroll cursor to the Address Book.
=For details, refer to Registering a location by
scroll mode on page 62.
:Vicinity Search
Find POIs (Points Of Interest) in the vicinity of
the scroll cursor.
=For details, refer to Searching for a nearby
POI on page 58.
:Overlay POI
Displays icons for surrounding facilities (POI)
on the map.
=For details, refer to Displaying POI on the
map on page 44.
:Volume
Displays [Phone Volume].
=For more details about “Phone Volume”,
refer to Setting the Volume for Guidance and
Phone on page 96.
:Contacts
Displays the “Contacts List”screen.
=For details, refer to Calling a number in the
“Contacts List”on page 81.
[Close]
Hides the Quick Access menu.
How to use the map
En 41
Chapter
04
How to use the map
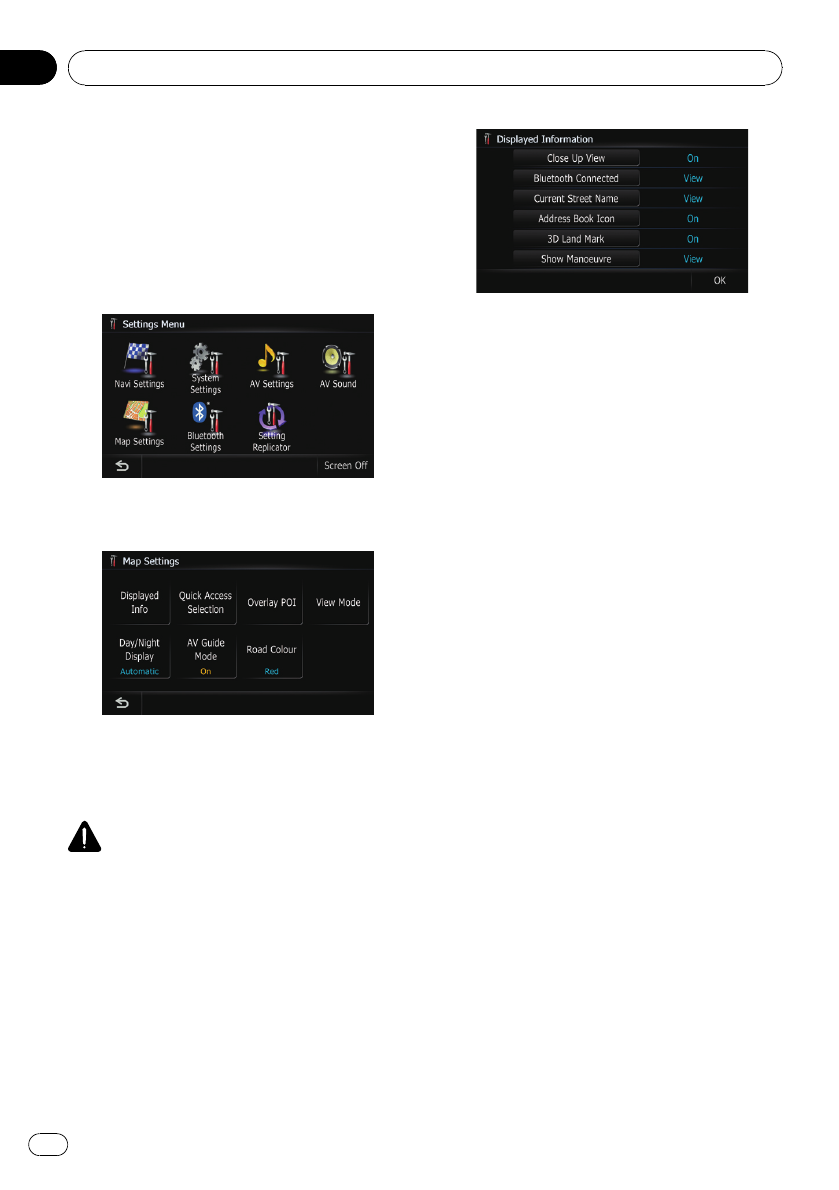
The general settings related with a map screen
can be customized.
To customize the map screen, display the
“Map Settings”screen.
1 Display the “Top Menu”screen.
2 Touch [Settings].
The “Settings Menu”screen appears.
3 Touch [Map Settings].
The “Map Settings”screen appears.
Setting the Item on the
Map Screen
CAUTION
The speed limit display may not match the actual
speed limit of the current road. This is not a defi-
nite value. Be sure to drive according to the ac-
tual speed limit.
1 Display the “Map Settings”screen.
2 Touch [Displayed Info].
The “Displayed Info”screen appears.
Setting “Close Up View”
This setting enables switching to an enlarged
map around the point where your vehicle is
approaching an intersection, entrance/exit of
freeway or a junction.
%Touch [Close Up View].
Each time you touch the key changes that set-
ting.
![On] (default):
Switches to an enlarged map.
Displays the close up view with the 2D map.
![Off]:
Does not switch to an enlarged map.
City Map
You can select whether to display the city map
when in certain metropolitan city areas.
%Touch [City Map].
Each time you touch the key changes that set-
ting.
![On] (default):
Automatically switches to the city map
when in a city map area.
![Off]:
Does not show the city map.
pEven if you switch [City Map]to[On],
city map cannot display in areas where
there is no city map data.
Setting the switching of the
city map display
Sets whether to switch to the city map display
when the vehicle is within a city map area.
Customizing the map screen settings
En
42
Chapter
05

%Touch [City Map Barrier].
Each time you touch the key changes that set-
ting.
![On] (default):
Displays a city map when the vehicle enters
the area of the city map.
![Off]:
Displays a city map when the area dis-
played on the map falls entirely within the
city map area.
Show Traffic Incident
Selects whether to display or hide the traffic
notification icons on the map when incidents
occur on your route.
%Touch [Show Traffic Incident].
Each time you touch the key changes that set-
ting.
![View] (default):
Displays the icons on the map.
![Hide]:
Hides the icons on the map.
=New translation required.
Bluetooth Connected
Selects whether to display or hide the icon for
current status of the phone connection via
Bluetooth wireless technology.
%Touch [Bluetooth Connected].
Each time you touch the key changes that set-
ting.
![View] (default):
Displays the Bluetooth Connected icon on
the map.
![Hide]:
Hides the Bluetooth Connected icon on
the map.
=For more details about “Bluetooth Con-
nected icon”, refer to Bluetooth Con-
nected icon on page 38.
Setting the current street name
display
Selects whether to display or hide the street
name (or city name) that your vehicle is travel-
ing along.
%Touch [Current Street Name].
Each time you touch the key changes that set-
ting.
![View] (default):
Displays the street name (or city name) on
the map.
![Hide]:
Hides the street name (or city name) on the
map.
Setting the Address Search icon
display
You can select whether to display the Address
Book Icon on the map.
%Touch [Address Book Icon].
Each time you touch the key changes that set-
ting.
![On] (default):
Displays the Address Book Icon on the
map.
![Off]:
Hides the Address Book Icon on the map.
3D Landmark
You can select whether to display the 3D Land-
mark on the map.
p3D Landmark only appears when the view
mode is [3D View] and the map scale is
set to 0.25 mile (200 m) or lower.
%Touch [3D Landmark].
Each time you touch the key changes that set-
ting.
![On] (default):
Displays the 3D Landmark on the map.
![Off]:
Hides the 3D Landmark on the map.
Customizing the map screen settings
En 43
Chapter
05
Customizing the map screen settings
Displaying maneuvers
Selects whether to display or hide the next
turn ahead of the vehicle on the map.
%Touch [Show Manuever].
Each time you touch the key changes that set-
ting.
![View] (default):
Displays the next turn ahead of the vehicle
on the map.
![Hide]:
Hides the next turn ahead of the vehicle on
the map.
MSN Direct
New translation required.
%Touch [MSN Direct].
Each time you touch the key changes that set-
ting.
![View] (default):
Displays the icons on the map.
![Hide]:
Hides the icons on the map.
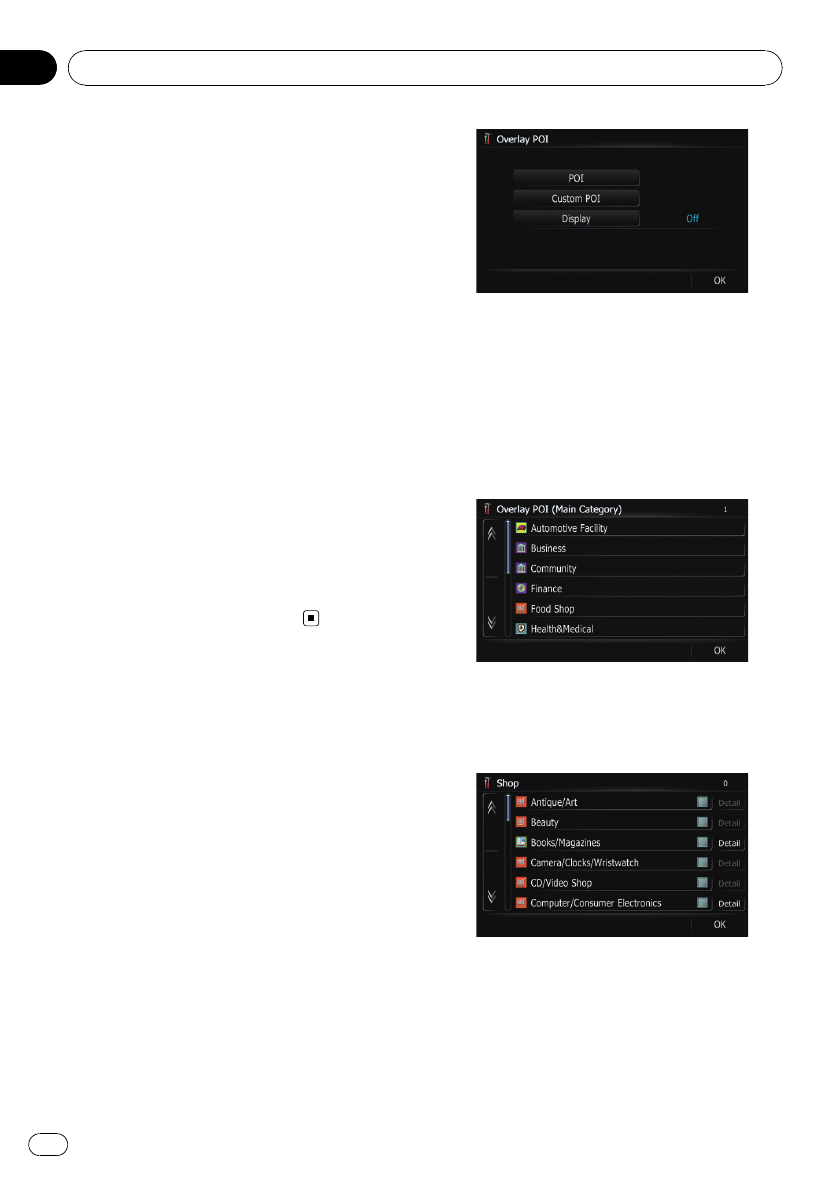
Displaying POI on the map
Displays icons for the surrounding facilities
(POI) on the map.
Displaying preinstalled POIs on
the map
pYou can select up to 10 items from the de-
tailed category.
1 Display the “Map Settings”screen.
2 Touch [Overlay POI].
The “Overlay POI”screen appears.
3 Touch [Display] to turn it [On].
pIf you do not want to display the POI icon
on the map, touch [Display] to turn it [Off].
(Even if [Display] is turned [Off], the POI
selection setting is retained.)
4 Touch [POI].
The “Overlay POI (Main Category)”screen
appears.
5 Touch the category you want to dis-
play.
A list of subcategories under the selected
main category appears.
#Touch [OK].
Returns previous screen.
6 Touch the subcategory.
A red check mark appears next to the selected
category. To cancel the selection, touch the
entry again.
Customizing the map screen settings
En
44
Chapter
05
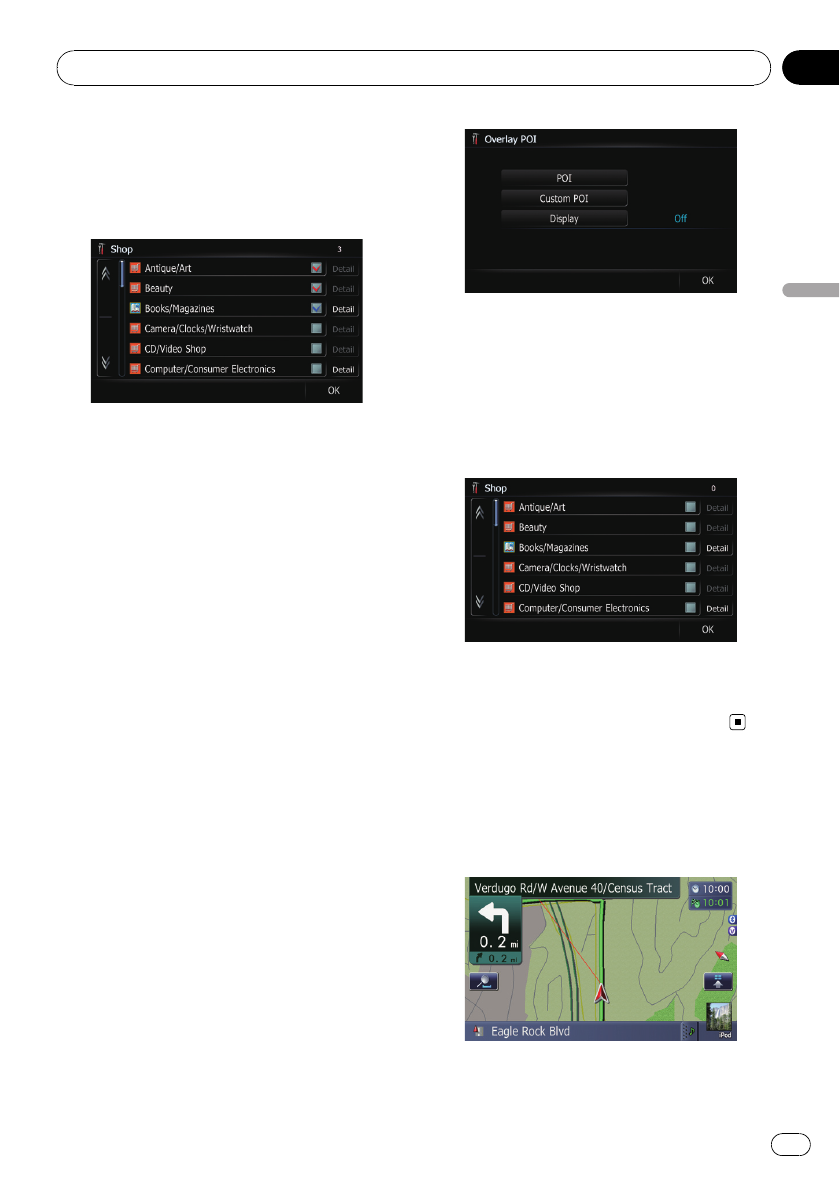
#If you want to search with more detailed cate-
gories, touch [Detail].
Touch the item and touch [OK]. When only a few
types of the detailed categories are selected, blue
check marks will appear.
pWhen subcategory is selected, [Detail]is
not available.
7 Touch [OK].
Returns previous screen.
8 To finish the selection, touch [OK].
Displaying the customized POIs
Creating a customized POI is possible by
using the utility program “NavGate FEEDS”
which is available separately, on your PC.
(“NavGate FEEDS”will be available on our
website.) Storing the customized POI properly
and inserting the SD memory card enables
the system to display the icons on the map
screen.
pYou can select up to 10 items from the de-
tailed category.
1 Insert an SD memory card into the SD
card slot.
=For more details of the operation, refer to In-
serting and ejecting an SD memory card on
page 29.
2 Display the “Map Settings”screen.
3 Touch [Overlay POI].
The “Overlay POI”screen appears.
4 Touch [Display] to turn it [On].
pIf you do not want to display the POI icon
on the map, touch [Display] to turn it [Off].
(Even if [Display] is turned [Off], the POI
selection setting is retained.)
5 Touch [Custom POI].
The list of POI categories appears.
6 Touch the category you want to dis-
play.
7 To finish the selection, touch [OK].
Switching the view mode
Various types of screen displays can be se-
lected for navigation guidance.
2D map screen
Customizing the map screen settings
En 45
Chapter
05
Customizing the map screen settings
3D map screen
Street View
Rear View
1 Display the “Map Settings”screen.
2 Touch [View Mode].
The “View Mode”screen appears.
3 Touch the type that you want to set.
You can select the following types:
![2D View] (default):
Displays the 2D map screen.
![3D View]:
Displays the 3D map screen.
![Street View]:
Displays the “Street View”screen.
pThis type is available when the route is
set.
![Rear View]:
Displays the rear view images.
pThis type is available when [Back Cam-
era Settings] is set to [On].
Setting the map color change
between day and night
To improve the visibility of the map during the
evening, you can set the timing for changing
the combination of the map color.
1 Display the “Map Settings”screen.
2 Touch [Day/Night Display].
Each time you touch the key changes that set-
ting.
![Automatic] (default):
You can change the colors of a map be-
tween daytime and nighttime according to
whether the vehicle lights are On or Off.
![Day]:
The map is always displayed with daytime
colors.
pTo use this function with [Automatic], the
Orange/white lead of the navigation system
must be connected correctly.
Changing the road color
You can set the road color to bluish or reddish.
1 Display the “Map Settings”screen.
2 Touch [Road Color].
Each time you touch the key changes that set-
ting.
![Red] (default):
Changes to red based road colors.
![Blue]:
Changes to blue based road colors.
Customizing the map screen settings
En
46
Chapter
05
Changing the setting of
navigation interruption screen
Set whether to automatically switch to the na-
vigation screen from the audio screen when
your vehicle approaches a guidance point
such as an intersection while displaying a
screen other than navigation.
1 Display the “Map Settings”screen.
2 Touch [AV Guide Mode].
Each time you touch the key changes that set-
ting.
![On] (default):
Switches from the audio operation screen
to the navigation screen.
![Off]:
Does not switch the screen.
Selecting “Quick Access”
Select items to display on the map screen. In
the list displayed on screen, the items with red
checks are displayed on the map screen.
Touch the item you want to display and then
touch [OK] when a red check appears. You
can select up to five items.
1 Display the “Map Settings”screen.
2 Touch [Quick Access Selection].
The “Quick Access Selection”screen appears.
3 Touch the item that you want to set in
“Quick Access”.
You can select the following items:
pSettings marked with an asterisk (*) show
that these are default or factory settings.
!:Registration*
Register the information on the location in-
dicated by the scroll cursor to the Address
book.
!:Vicinity Search*
Find POIs (Points Of Interest) in the vicinity
of the scroll cursor.
!:Overlay POI*
Displays icon for surrounding facilities
(POI) on the map.
!:Volume*
Displays [Phone Volume].
!:Contacts*
Displays [Phone Book].
!:Whole Route Overview
Displays the entire route (currently set).
!:Stock Info
Displays stock prices.
!:Traffic On Route
Displays a list of traffic information on the
route.
!:Traffic Events
Displays a list of traffic events information.
!:Day/Night Display
Switches Day/Night Display setting.
!:Address Book Icon Display
Switches Address Book Icon setting.
4 To finish the setting, touch [OK].
Customizing the map screen settings
En 47
Chapter
05
Customizing the map screen settings
CAUTION
For safety reasons, these route-setting functions
are not available while your vehicle is in motion.
To enable these functions, you must stop in a
safe place and put on the parking brake before
setting your route.
pSome information regarding traffic regula-
tions depends on the time when the route
calculation is performed. Thus, the infor-
mation may not correspond with a certain
traffic regulation when your vehicle actually
passes through the location in question.
Also, the information on the traffic regula-
tions provided will be for a passenger vehi-
cle, and not for a truck or other delivery
vehicles. Always follow the actual traffic
regulations when driving.
The basic flow of creating
your route
1 Park your vehicle in a safe place, and
apply the parking brake.
2 Display the “Top Menu”screen.
3 Select the method of searching for your
destination.
=For details, refer to Searching for and select-
ing a location on page 55.
4 Enter the information about your desti-
nation to calculate route.
5 Confirm the location on the map.
=For details, refer to Checking the location on
the map on this page.
6 The navigation system calculates the
route to your destination, and then shows
the route on the map.
7 Check and decide the route.
=For details, refer to Checking the calculated
route on this page.
8 Your navigation system sets the route
to your destination, and the map of your
surroundings appears.
9 After releasing the parking brake, drive
in accordance with navigation guidance.
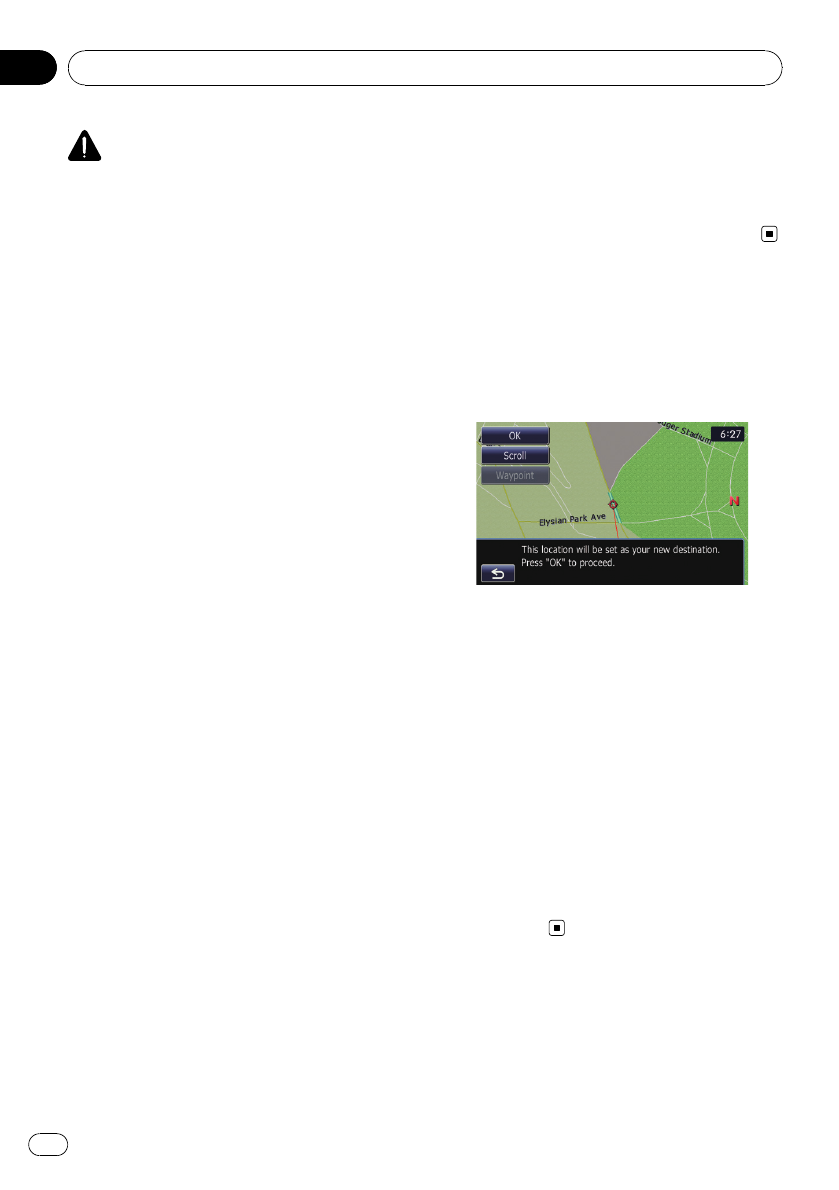
Checking the location on
the map
After searching for the destination, the “Loca-
tion confirmation screen”appears.
Location confirmation screen
%Touch [OK].
The destination is set, and then route calcula-
tion starts.
pIf you press MODE button during route cal-
culation, the calculation is canceled and
the map display appears.
#Touch [Scroll].
The map display changes to the scroll mode. You
can fine-tune the location in the scroll mode, and
then you can set the location as your destination
or do various operations.
#Touch [Waypoint].
The location is added to the “Waypoints List”
screen.
pIf a destination is not set, [Waypoint] is not
available.
Checking the calculated route
After the destination is set, route calculation
starts.
Setting a route to your destination
En
48
Chapter
06
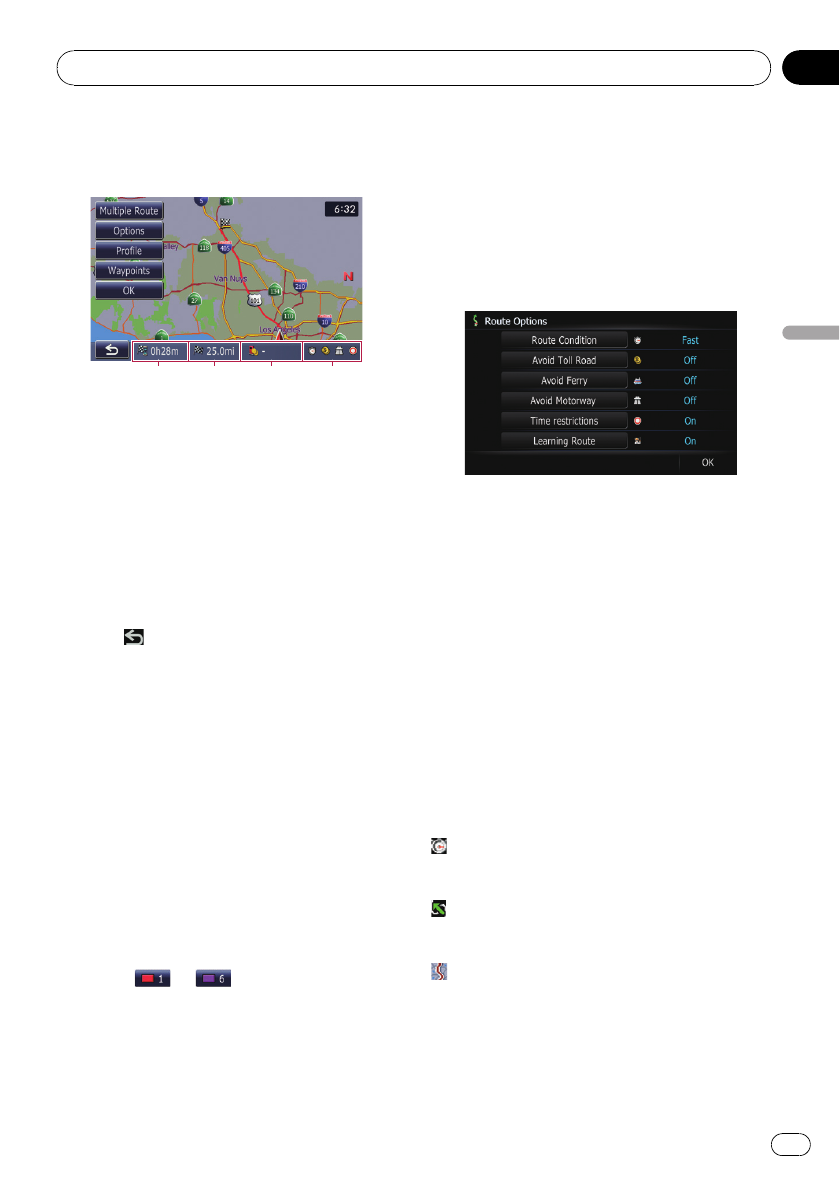
When the route calculation is completed,
“Route confirmation screen”appears.
Route confirmation screen
123 4
1Distance to the destination
2Travel time to your destination
3Estimate the fuel cost to your destination
=For details, refer to Inputting the fuel
consumption information for calculating
the fuel cost on page 91.
4Route calculation condition
%Touch [OK].
Sets the displayed route as your route, and
starts the route guidance.
#Touch .
The message confirming whether to cancel the
calculated route appears.
Touch [Yes] to cancel the calculated route, and
then the map screen appears.
Display multiple routes
You can select a desired route from multiple
route options. Calculated routes are shown in
different colors.
pIf you set waypoints, you cannot use the
multiple route option.
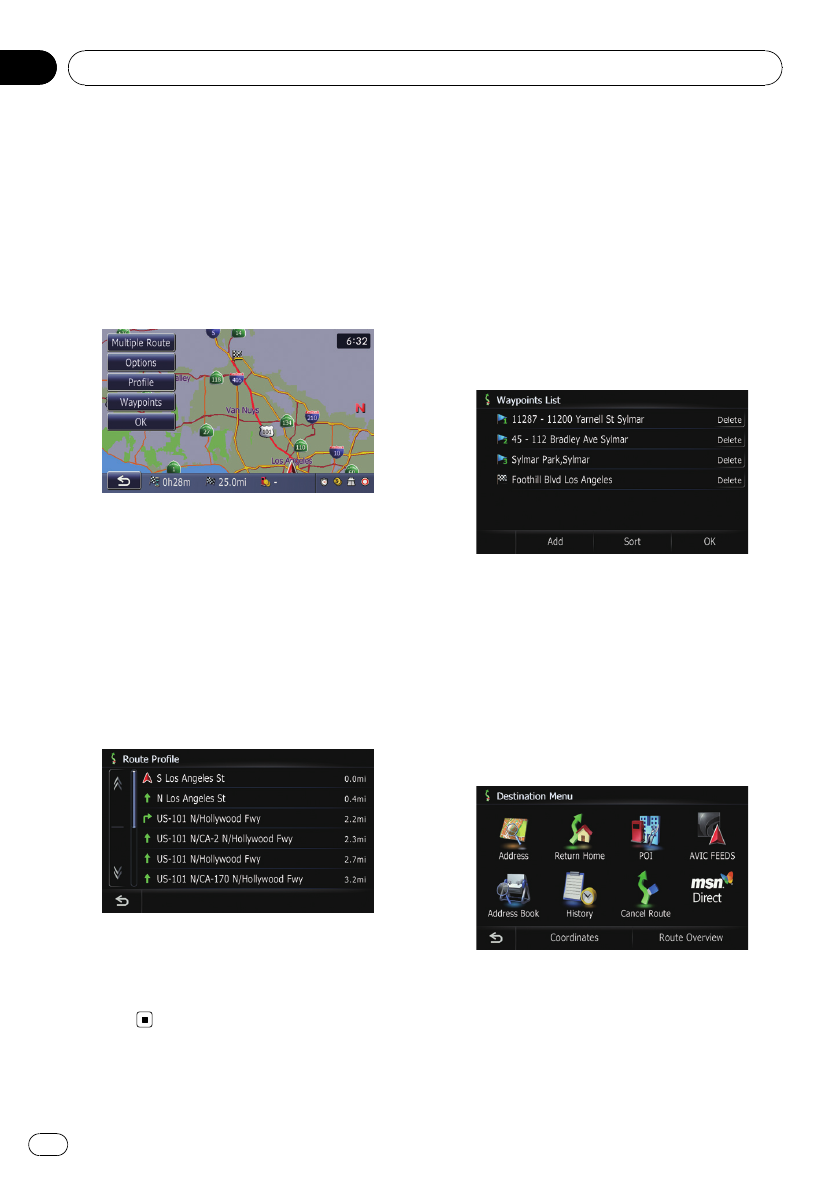
1 Touch [Multiple Route].
The “Multiple Route Option”screen appears.
2 Touch to .
Another route is displayed.
3 Touch [OK].
“Route confirmation screen”appears.
Modifying the route
calculation conditions
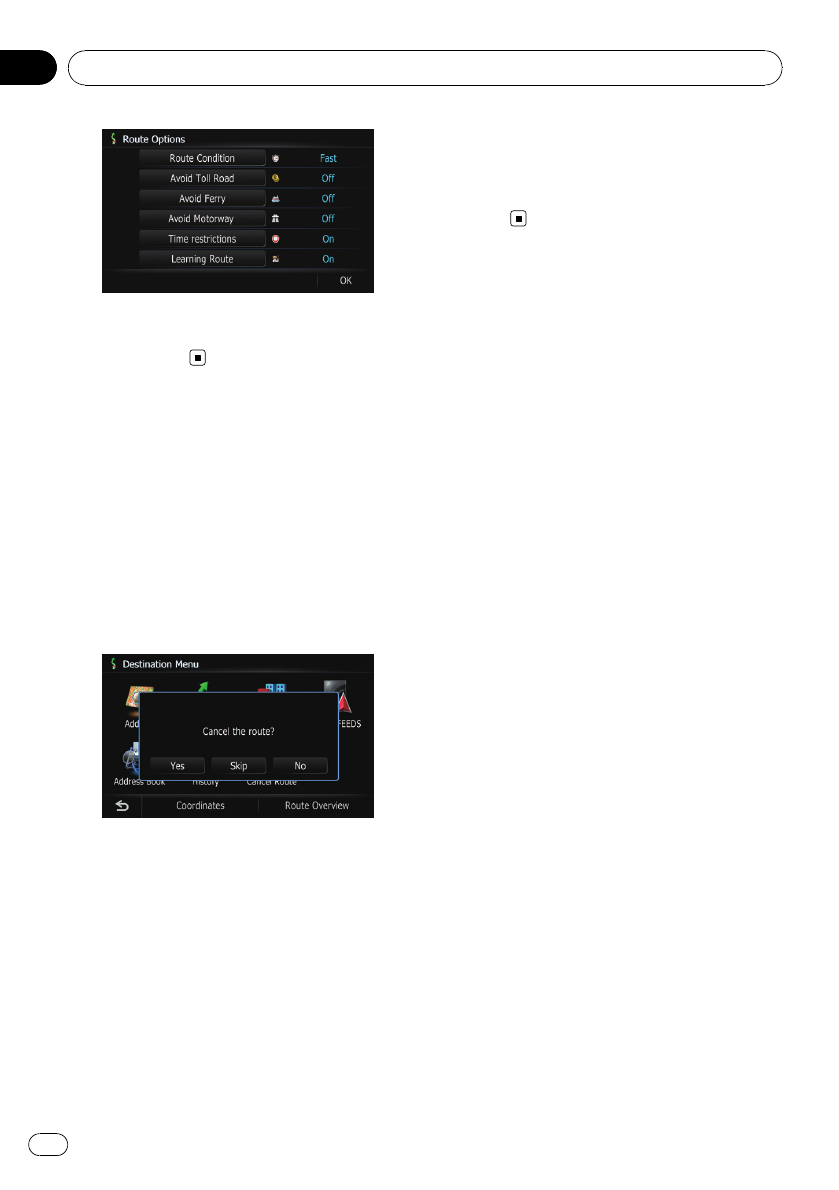
You can modify the conditions for route calcu-
lation and recalculate the current route.
1 Touch [Options] on the “Route confir-
mation screen”.
The “Route Options”screen appears.
2 Touch the desired items to change the
route calculation conditions and then
touch [OK].
The route is recalculated, and “Route confir-
mation screen”appears.
Items that users can operate
Settings marked with an asterisk (*) show that
these are default or factory settings.
Route Condition
This setting controls how the route should be
calculated by taking into account the time or
the distance or the main road.
Determines which condition takes priority for
route calculation.
[Fast]*:
Calculates a route with the shortest travel time
to your destination as a priority.
[Short]:
Calculates a route with the shortest distance
to your destination as a priority.
[Main Road]:
Calculate a route that passes major arterial
road as a priority.
Setting a route to your destination
En 49
Chapter
06
Setting a route to your destination
Avoid Toll Road
This setting controls whether toll roads (in-
cluding toll areas) should be taken into ac-
count.
[Off]*:
Calculate a route that may include toll roads
(including toll areas).
[On]:
Calculate a route that avoids toll roads (includ-
ing toll areas).
pThe system may calculate a route that in-
cludes toll road even if [On] is selected.
Avoid Ferry
This setting controls whether ferry crossings
should be taken into account.
[Off]*:
Calculate a route that may include ferries.
[On]:
Calculate a route that avoids ferries.
pThe system may calculate a route that in-
cludes ferry way even if [On] is selected.
Avoid Motorway
This setting controls whether freeways may be
included in the route calculation.
[Off]*:
Calculate a route that may include freeways.
[On]:
Calculate a route that avoids freeways.
pThe system may calculate a route that in-
cludes freeway even if [On] is selected.
Time restrictions
This setting controls whether streets or
bridges have traffic restrictions during a cer-
tain time should be taken into account.
pIf you want to set your route to avoid
opened bridges, select [On].
[On]*:
Calculate a route while avoiding streets or
bridges with traffic restrictions during a cer-
tain time.
[Off]:
Calculate a route while ignoring traffic restric-
tions.
pThe system may calculate a route that in-
cludes streets or bridges that are subject to
traffic restrictions during a certain time
even if [On] is selected.
CAUTION
If the time difference is not set correctly, the navi-
gation system cannot consider traffic regulations
correctly. Set the time difference correctly (=
Refer to Setting the time difference on page 95).
Learning Route
The system learns the travel history of your ve-
hicle for each road.
This setting controls whether or not the travel
history should be taken into account.
[On]*:
Calculate the route with the travel history
taken into account.
[Off]:
Calculate the route without the travel history
taken into account.
[Clear]:
Clear the current travel history.
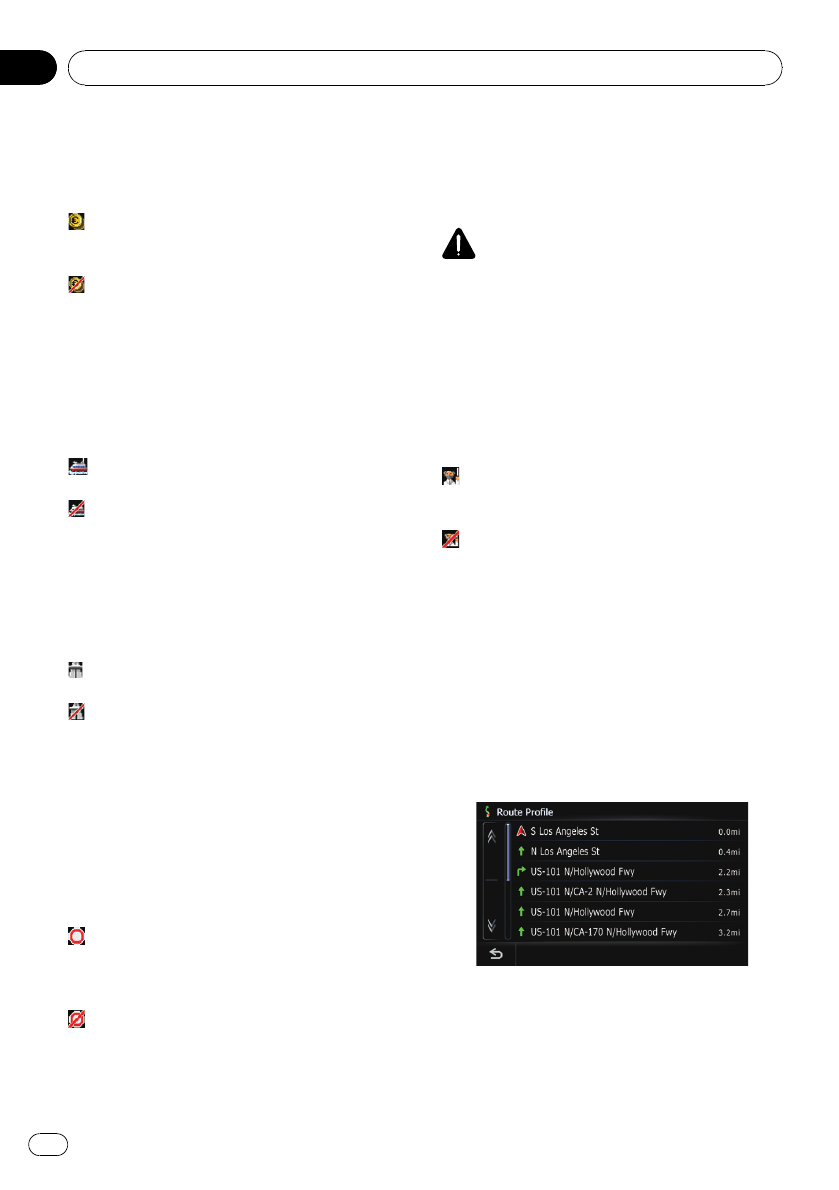
Checking the current itinerary
You can check the route details.
%Touch [Profile] on the “Route confirma-
tion screen”.
The “Route Profile”screen appears.
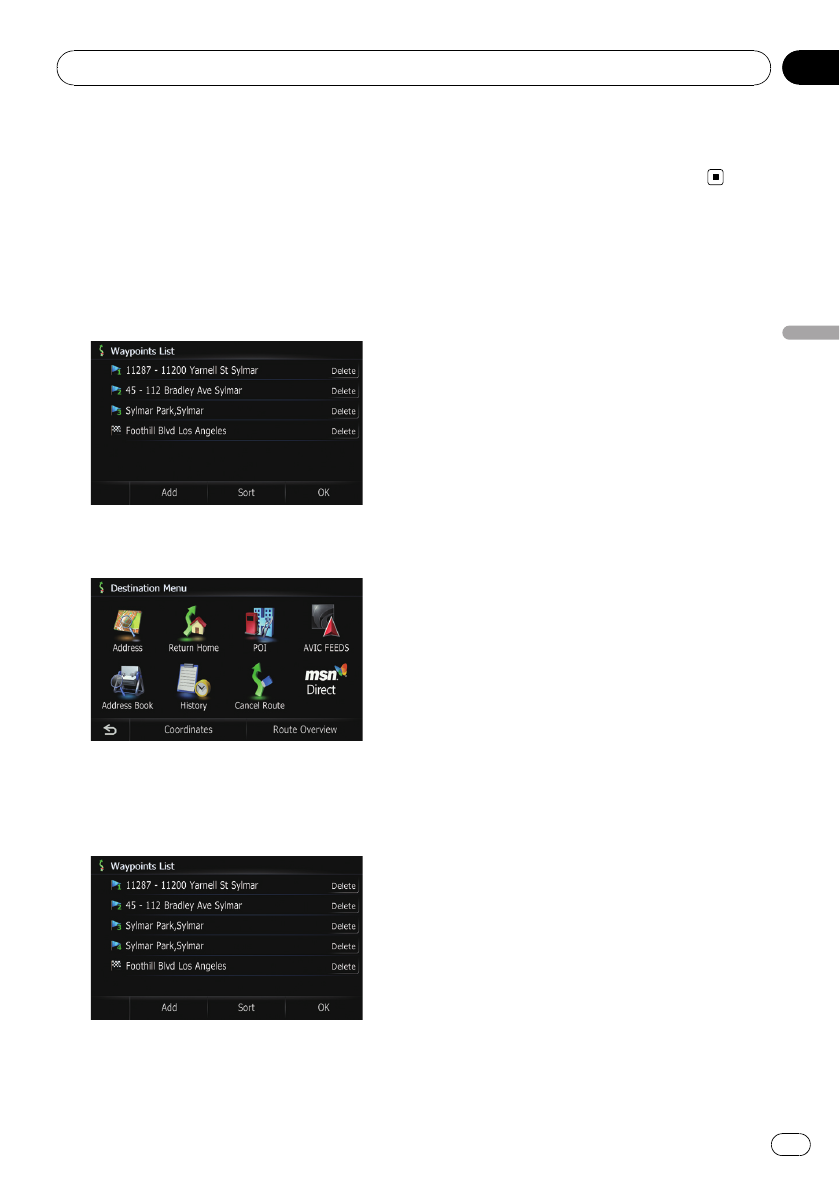
Adding a waypoint
Up to 5 waypoints can be set, and waypoints
and final destination can be sorted automati-
cally or manually.
Setting a route to your destination
En
50
Chapter
06
pWhen you set waypoints in the route to
your destination, the route up to the next
waypoint will appear in light green. The rest
of the route will appear in light blue.
=For details concerning operations, refer to
Adding a waypoint on the next page.
1 Touch [Waypoints] on the “Route con-
firmation screen”.
The “Waypoints List”screen appears.
2 Touch [Add].
The “Select Search Method”screen appears.
3 Search for a location.
After searching for a point, display it on a
map, then touch [OK] to add to the “Way-
points List”screen.
pFor details, refer to Searching for and select-
ing a location on page 55.
4 Touch [OK] on the “Waypoints List”
screen.
“Route confirmation screen”appears.
Setting a route to your destination
En 51
Chapter
06
Setting a route to your destination
You can check the route details. You can also
recalculate the route in different conditions.
1 Display the “Top Menu”screen.
2 Touch [Destination].
The “Destination Menu”screen appears.
3 Touch [Route Overview].
The “Route Overview”screen appears.
p[Route Overview] is active only when the
route is set.
Checking the current itinerary
You can check the route details.
1 Display the “Route Overview”screen.
2 Touch [Profile].
The “Route Profile”screen appears.
pWhen a long distance route is calculated,
your navigation system may not be able to
list all roads. (In this case, the remaining
roads will be shown in the list as you drive
on.)
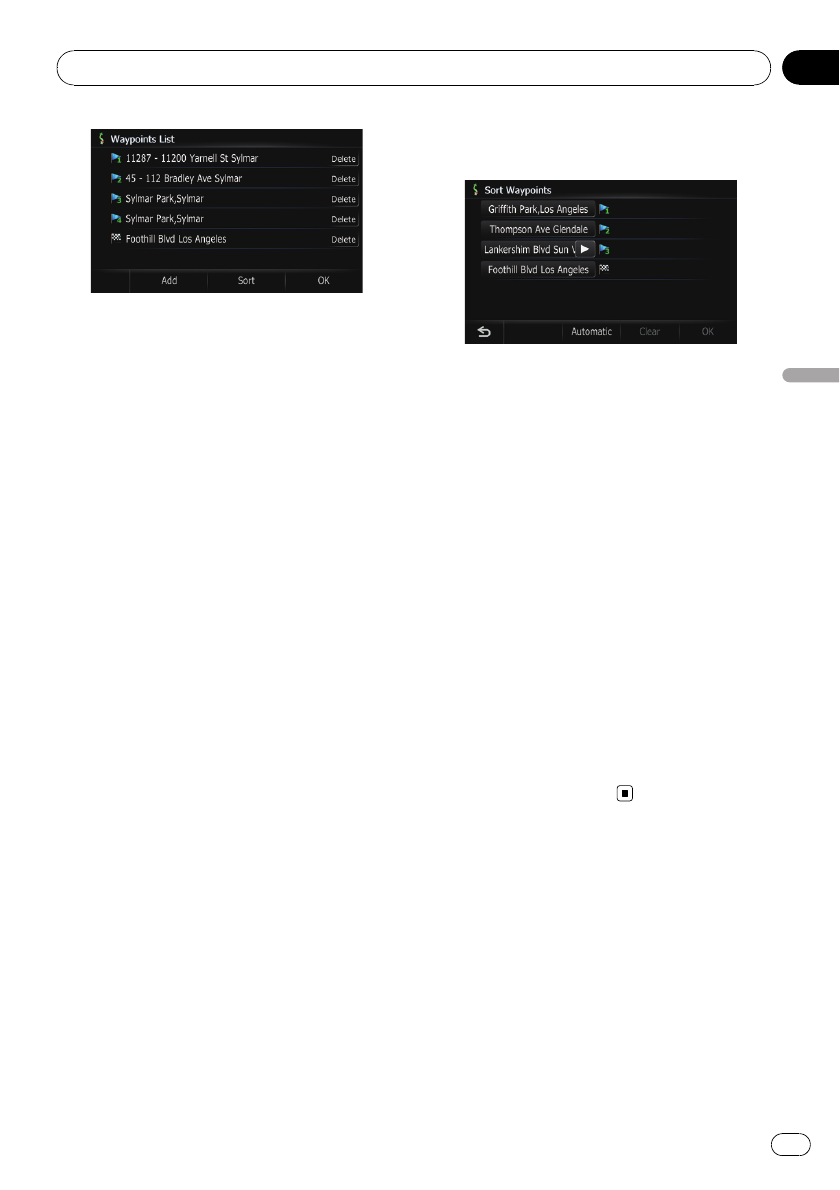
Editing waypoints
You can edit waypoints (locations you want to
visit on the way to your destination) and recal-
culate the route so that is passes through
these locations.
To edit the waypoints, display the “Waypoints
List”screen.
1 Display the “Route Overview”screen.
2 Touch [Waypoint].
The “Waypoints List”screen appears.
Adding a waypoint
Up to 5 waypoints can be set, and waypoints
and final destination can be sorted automati-
cally or manually.
1 Display the “Waypoints List”screen.
2 Touch [Add].
The “Select Search Method”screen appears.
3 Search for a location.
After searching for a point, display it on a
map, then touch [OK] to add to the “Way-
points List”screen.
Checking and modifying the current route
En
52
Chapter
07
pFor details, refer to Searching for and select-
ing a location on page 55.
4 Touch [OK] on the “Waypoints List”
screen.
“Route confirmation screen”appears.
5 Touch [OK].
The route is recalculated and the map of the
current position appears.
Deleting a waypoint
You can delete waypoints from the route and
then recalculate the route. (You can delete
waypoints successively.)
1 Display the “Waypoints List”screen.
2 Touch [Delete] next to the waypoint
that you want to delete.
The touched waypoint will be deleted from the
list.
3 Touch [OK] on the “Waypoints List”
screen.
“Route confirmation screen”appears.
4 Touch [OK].
The route is recalculated and the map of the
current position appears.
Sorting waypoints
You can sort waypoints and recalculate the
route.
pYou cannot sort waypoints that you have al-
ready passed.
1 Display the “Waypoints List”screen.
2 Touch [Sort].
The “Sort Waypoints”screen appears.
3 Touch the waypoint or destination.
Put them in the desired order.
#Touch [Automatic].
You can sort the destination and waypoints auto-
matically. The system will show the nearest way-
point (distance in a straight line) from the current
location as waypoint 1, and sort the other points
(including your destination) in order of distance
from the waypoint 1.
#Touch [Clear].
The sorting waypoints is canceled.
4 Touch [OK].
The “Waypoints List”screen appears.
5 Touch [OK] on the “Waypoints List”
screen.
“Route confirmation screen”appears.
6 Touch [OK].
The route is recalculated and the map of the
current position appears.
Modifying the route
calculation conditions
The settings related to route calculation can
be customized.
1 Display the “Route confirmation
screen”.
2 Touch [Options].
The “Route Options”screen appears.
Checking and modifying the current route
En 53
Chapter
07
Checking and modifying the current route
pFor details concerning operations, refer to
Modifying the route calculation conditions
on page 49.
Canceling the route guidance
If you no longer need to travel to your destina-
tion, follow the steps below to cancel the route
guidance.
1 The “Destination Menu”screen ap-
pears.
2 Touch [Cancel Route].
A message confirming the cancellation of the
current route appears.
3 Touch [Yes].
The current route is deleted, and a map of
your surroundings reappears.
#Touch [Skip].
The next waypoint along the route can be
skipped.
A new route to your destination through all re-
maining waypoints, except for the skipped way-
point, is calculated.
When the route calculation is completed, “Route
confirmation screen”appears.
p[Skip] is available only when a waypoint is
set.
#Touch [No].
Returns to the previous display without deleting
the route.
Checking and modifying the current route
En
54
Chapter
07
CAUTION
For safety reasons, these route-setting functions
are not available while your vehicle is in motion.
To enable these functions, you must stop in a
safe place and put on the parking brake before
setting your route.
pSome information regarding traffic regula-
tions depends on the time when the route
calculation is performed. Thus, the infor-
mation may not correspond with a certain
traffic regulation when your vehicle actually
passes through the location in question.
Also, the information on the traffic regula-
tions provided will be for a passenger vehi-
cle, and not for a truck or other delivery
vehicles. Always follow the actual traffic
regulations when driving.
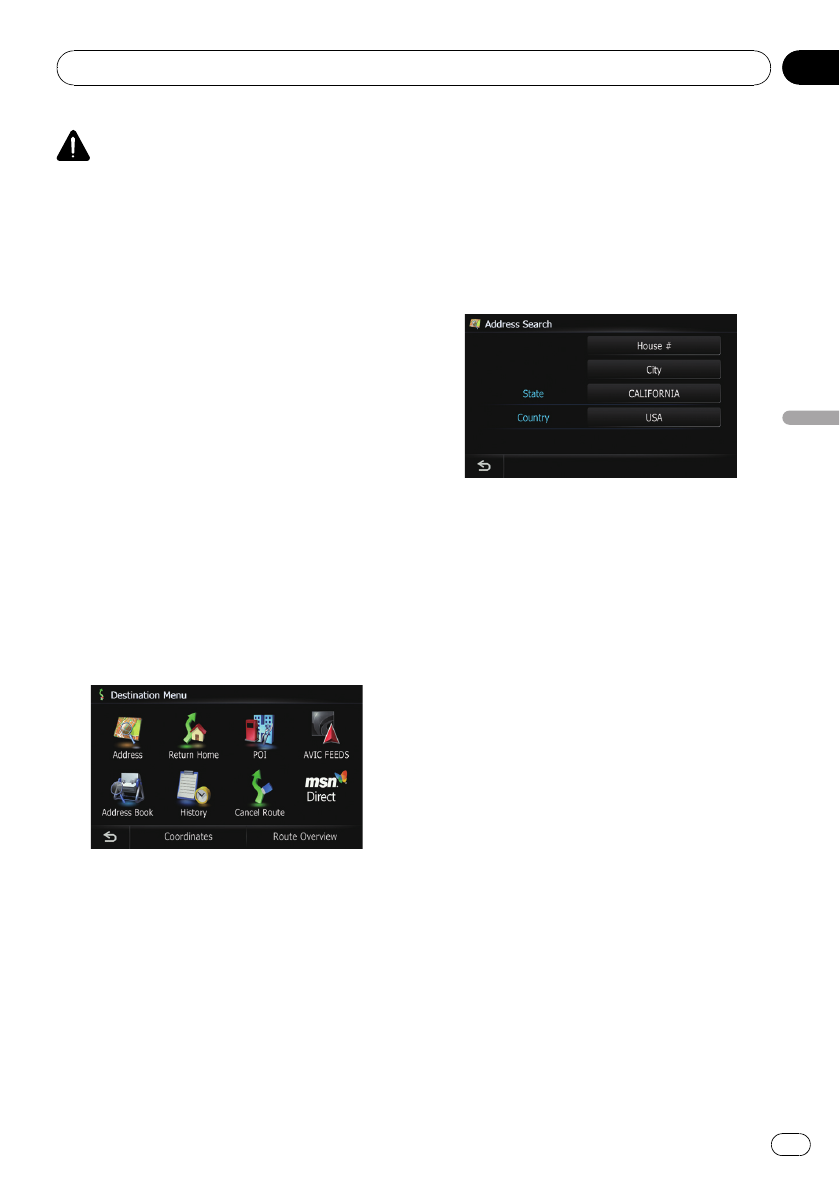
To search for a location, display the “Destina-
tion Menu”screen.
1 Press the HOME button to display the
“Top Menu”.
2 Touch [Destination].
The “Destination Menu”screen appears.
Searching for a location by
address
The most frequently used function is [Address
Search], in which the address is specified and
the destination is searched.
You can select the method of searching for a
location by address.
!Searching for a city name first
!Finding the location by specifying the
house number
To search for a location, display the “Address
Search”screen.
1 Display the “Destination Menu”screen.
2 Touch [Address Search].
The “Address Search”screen appears.
3 Touch the key next to “Country”to se-
lect the country.
If the destination is in another country, this
changes the country setting.
pOnce the country has been selected, you
only have to change countries when your
destination is outside of the country you se-
lected.
4 Touch the key next to “State”and
touch the desired state, province, or terri-
tory on the list.
If the location that you want to search for is in
another state, province, or territory, this
changes the area setting.
pOnce the state, province, or territory has
been selected, you only have to change
states, provinces, or territories when your
destination is outside of the state, province,
or territory you selected.
Searching for a city name first
pDepending on the search results, some
steps may be skipped.
1 Display the “Address Search”screen.
2 Touch [City].
The “Enter City Name”screen appears.
Searching for and selecting a location
En 55
Chapter
08
Searching for and selecting a location
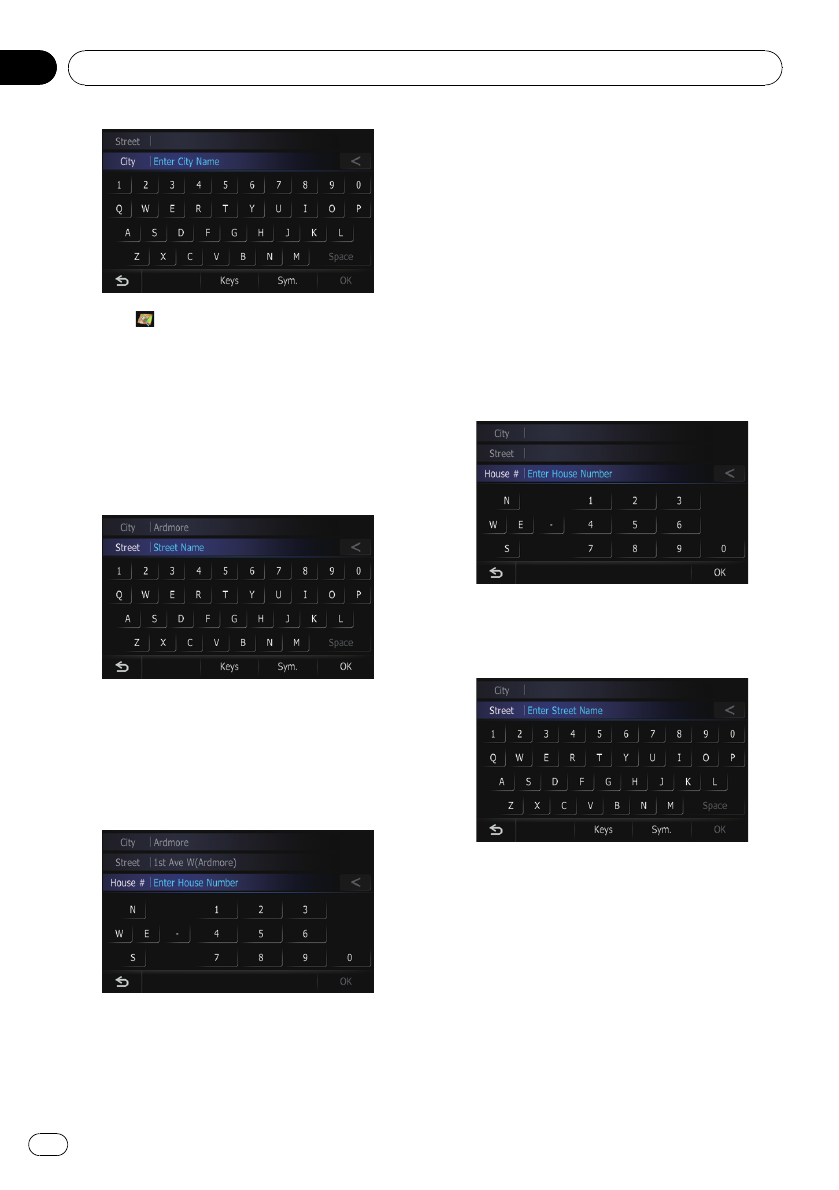
#Touch .
The representative location of the city appears on
the map screen.
3 Enter the city name and then touch
[OK].
The “Select City”screen appears.
4 Touch the desired city name.
The “Enter Street Name”screen appears.
5 Enter the street name and then touch
[OK].
The “Select Street”screen appears.
6 Touch the desired street.
The “Enter House Number”screen appears.
7 Enter the house number and then
touch [OK].
The “House Number Selection”screen ap-
pears.
8 Touch the desired house number range.
The searched location appears on the map
screen.
Finding the location by
specifying the house number
pDepending on the search results, some
steps may be skipped.
1 Display the “Address Search”screen.
2 Touch [House #].
The “Enter House Number”screen appears.
3 Enter the house number and then
touch [OK].
The “Enter Street Name”screen appears.
4 Enter the street name and then touch
[OK].
The “Select Street”screen appears.
5 Touch the desired street.
The “Enter City Name”screen appears.
Searching for and selecting a location
En
56
Chapter
08
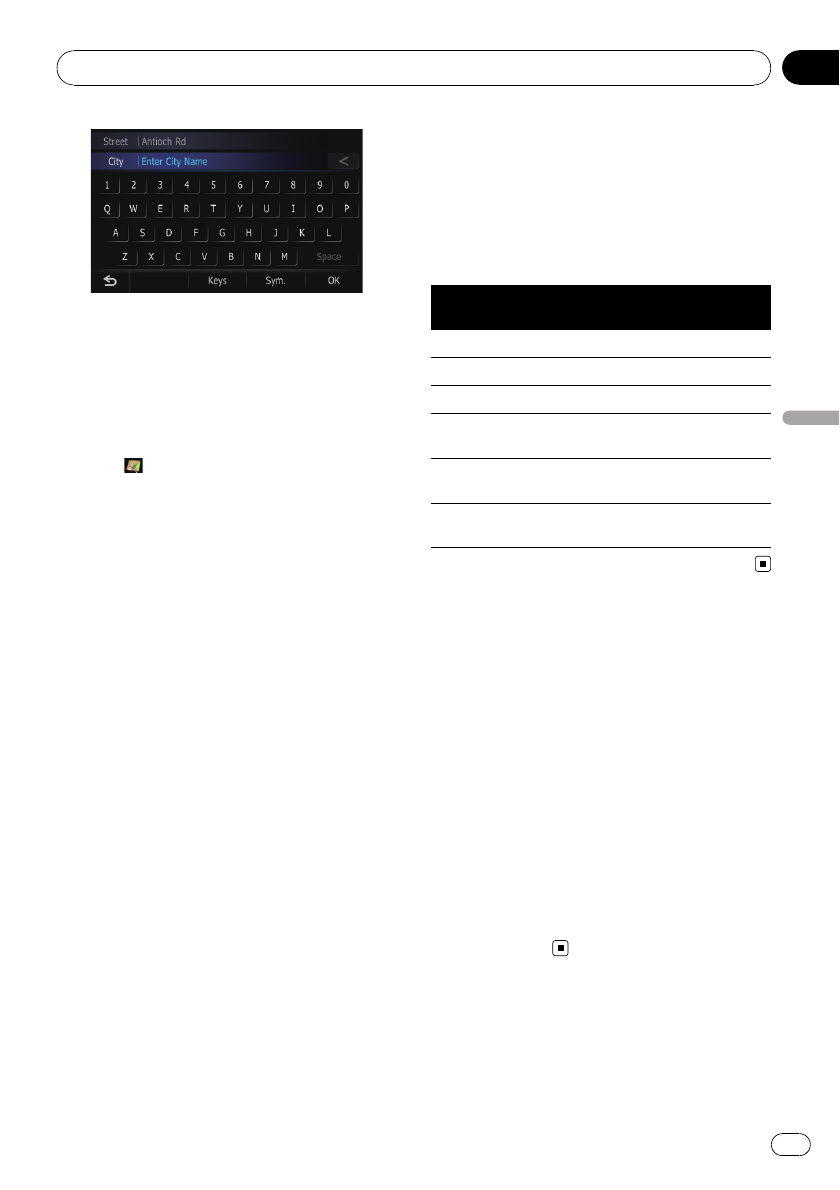
6 Enter the city name and then touch
[OK].
The “Select City”screen appears.
7 Touch the desired city name.
The “House Number Selection”screen ap-
pears.
#Touch .
The representative location of the city appears on
the map screen.
8 Touch the desired house number range.
The searched location appears on the map
screen.
Searching for a name by
entering multiple keywords
You can search for a name (such as a city
name or a street name) by entering multiple
keywords.
pUp to three keywords can be entered.
pEnter a space between keywords as you
want to enter several ones.
The result of search depends on the number
of the entered keywords.
Entering a keyword
All names containing the word beginning with
entered keyword are displayed as a search re-
sult.
Entering two keywords
The names including the following two words
below are displayed as a result:
!The word that matches with the first key-
word you entered.
!The word beginning with the second key-
word.
Entering three keywords
The names including the following two words
below are displayed as a result:
!The words that match with both first and
second keywords you entered.
!The word beginning with the third keyword.
e.g. Searching “East West Street”.
Entered key-
words Search results
EAST W “East West Street”is searchable.
WEST S “East West Street”is searchable.
EAST WEST S “East West Street”is searchable.
WEST STREET
E
“East West Street”is searchable.
WES
“East West Street”is not search-
able.
E WEST
STREET
“East West Street”is not search-
able.
Setting up a route to your
home
If your home location is stored, the route
home can be calculated by touching a single
key.
1 Display the “Destination Menu”screen.
2 Touch [Return Home].
“Location confirmation screen”appears.
If the home location has not been stored yet,
the confirmation message appears.
#Touch [Register].
The “Set Home”screen appears.
=For details, refer to Registering your home
on page 94.
Searching for and selecting a location
En 57
Chapter
08
Searching for and selecting a location
Searching for Points of
Interest (POI)
Information about various facilities (Points Of
Interest - POI), such as gas stations, parking
lots or restaurants, is available. You can
search for a POI by selecting the category (or
entering the POI Name).
To search for POIs, display the “POI Search”
screen.
1 Display the “Destination Menu”screen.
2 Touch [POI].
The “POI Search”screen appears.
Searching for POIs by
specifying a category first
You can search for POIs with one touch by
touching the preset category.
1 Display the “POI Search”screen.
2 Touch the desired category.
The “POI List”screen appears.
3 Touch the POI you want.
The searched location appears on the map
screen.
Searching for a POI directly
from the name of the facilities
1 Display the “POI Search”screen.
2 Touch [Spell Name].
The “POI Name”screen appears.
State code key
3 Touch the state code key and touch the
desired state, province, or territory on the
list.
If the location that you want to search for is in
another state, province, or territory, this
changes the area setting.
#Touch [Country] to display the country list.
If the destination is in another country, this
changes the country setting.
4 Enter the POI name and then touch
[OK].
The “POI List”screen appears.
5 Touch the POI you want.
The searched location appears on the map
screen.
#Touch [Sort].
Each time you touch [Sort] changes the sort
order.
pCurrent order is displayed on the upper
right of the screen.
!:
Sorts the items in the list in order by dis-
tance from the vehicle position.
!:
Sorts the items in the list alphabetically.
Searching for a nearby POI
You can search for POIs in your surroundings.
1 Display the “POI Search”screen.
2 Touch [Near Me].
POI’s are divided into several categories.
Searching for and selecting a location
En
58
Chapter
08
3 Touch the category you want.
The “POI List”screen appears.
pIf there are more detailed categories within
the selected category, repeat this step as
many times as necessary.
4 Touch the POI you want.
The searched location appears on the map
screen.
Searching for POIs around the
destination
pThis function is available when the route is
set.
1 Display the “POI Search”screen.
2 Touch [Near Destination].
POI’s are divided into several categories.
3 Touch the category you want.
The “POI List”screen appears.
pIf there are more detailed categories within
the selected category, repeat this step as
many times as necessary.
4 Touch the POI you want.
The searched location appears on the map
screen.
Searching for POIs around the city
You can search for POIs around a specified
city.
1 Display the “POI Search”screen.
2 Touch [Around City].
The “Enter City Name”screen appears.
State code key
3 Touch the state code key and touch the
desired state, province, or territory on the
list.
If the location that you want to search for is in
another state, province, or territory, this
changes the area setting.
#Touch [Country] to display the country list.
If the destination is in another country, this
changes the country setting.
4 Enter the city name and then touch
[OK].
The “Select City”screen appears.
5 Touch the desired city name.
The “POI List”screen appears.
#Touch .
The representative location of the city appears on
the map screen.
6 Touch the category you want.
POI’s are divided into several categories.
7 Touch the POI you want.
The searched location appears on the map
screen.
Selecting destination from
“Address Book”
Storing locations you visit frequently saves
time and effort.
Selecting an item from the list provides an
easy way to specify the position.
pThis function is not available when there is
no registered location in “Address Book”.
Searching for and selecting a location
En 59
Chapter
08
Searching for and selecting a location
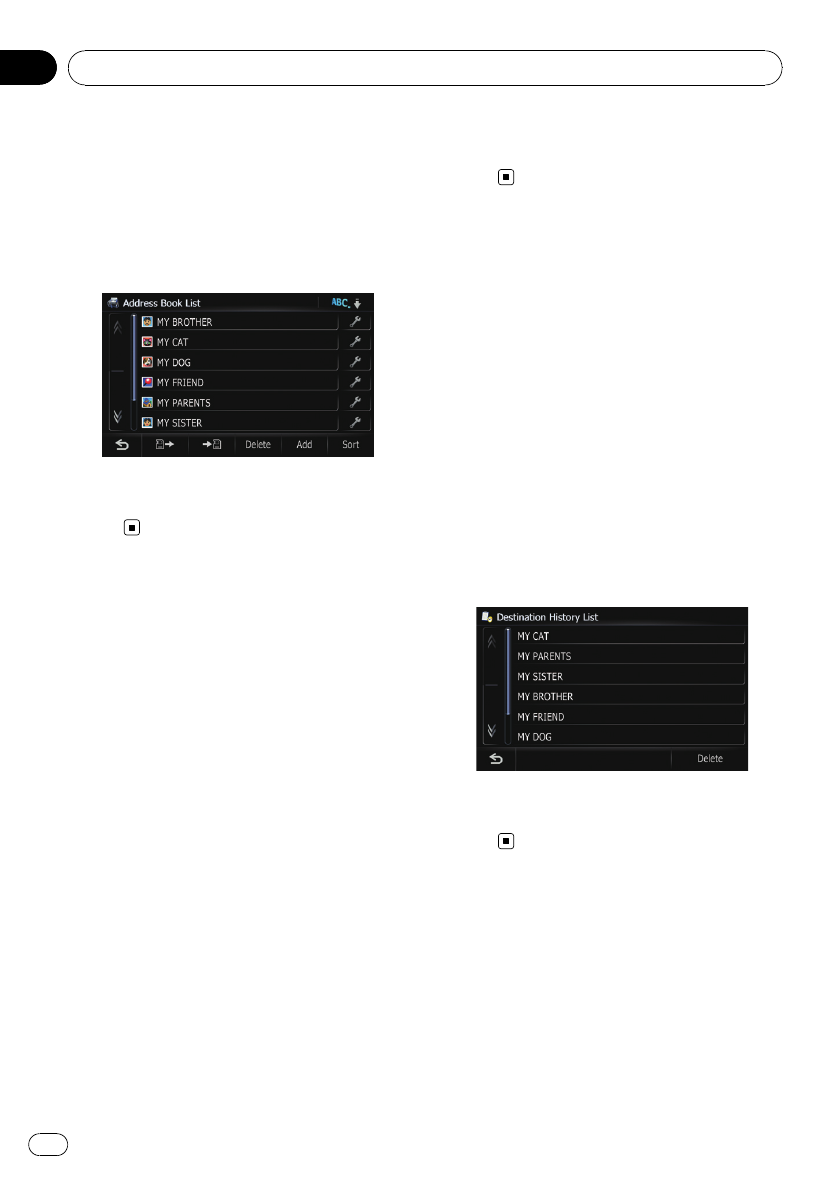
=For details, refer to Registering a location
into “Address Book”on page 62.
1 The “Destination Menu”screen ap-
pears.
2 Touch [Address Book].
The “Address Book List”screen appears.
3 Touch the entry you want.
The searched location appears on the map
screen.
Searching for POIs by using
the data on the SD memory
card
Creating a customized POI is possible by
using the utility program “NavGate FEEDS”
which is available separately, on your PC.
(“NavGate FEEDS”will be available on our
website.) Storing the customized POI properly
and inserting the SD memory card enables
the system to use the data for searches.
1 Insert an SD memory card into the SD
card slot.
=For more details of the operation, refer to In-
serting and ejecting an SD memory card on
page 29.
2 Display the “Destination Menu”screen.
3 Touch [AVIC FEEDS].
POI’s are divided into several categories.
4 Touch the category you want.
The “Select POI”screen appears.
5 Touch the POI you want.
The searched location appears on the map
screen.
Selecting a location you
searched for recently
The places that you have searched for in the
past are automatically stored in “History”.
pIf no location is stored in Destination His-
tory, you cannot select [History]. (If you
perform a route calculation, you can select
[History].)
p“History”can store up to 32 locations. If
the entries reach the maximum, the new
entry overwrites the oldest one.
1 Display the “Destination Menu”screen.
2 Touch [History].
The “Destination History List”screen ap-
pears.
3 Touch the entry you want.
The searched location appears on the map
screen.
Searching for a location by
coordinates
Entering a latitude and longitude pinpoints
the location.
1 Display the “Destination Menu”screen.
2 Touch [Coordinates].
The “Coordinate Input”screen appears.
Searching for and selecting a location
En
60
Chapter
08
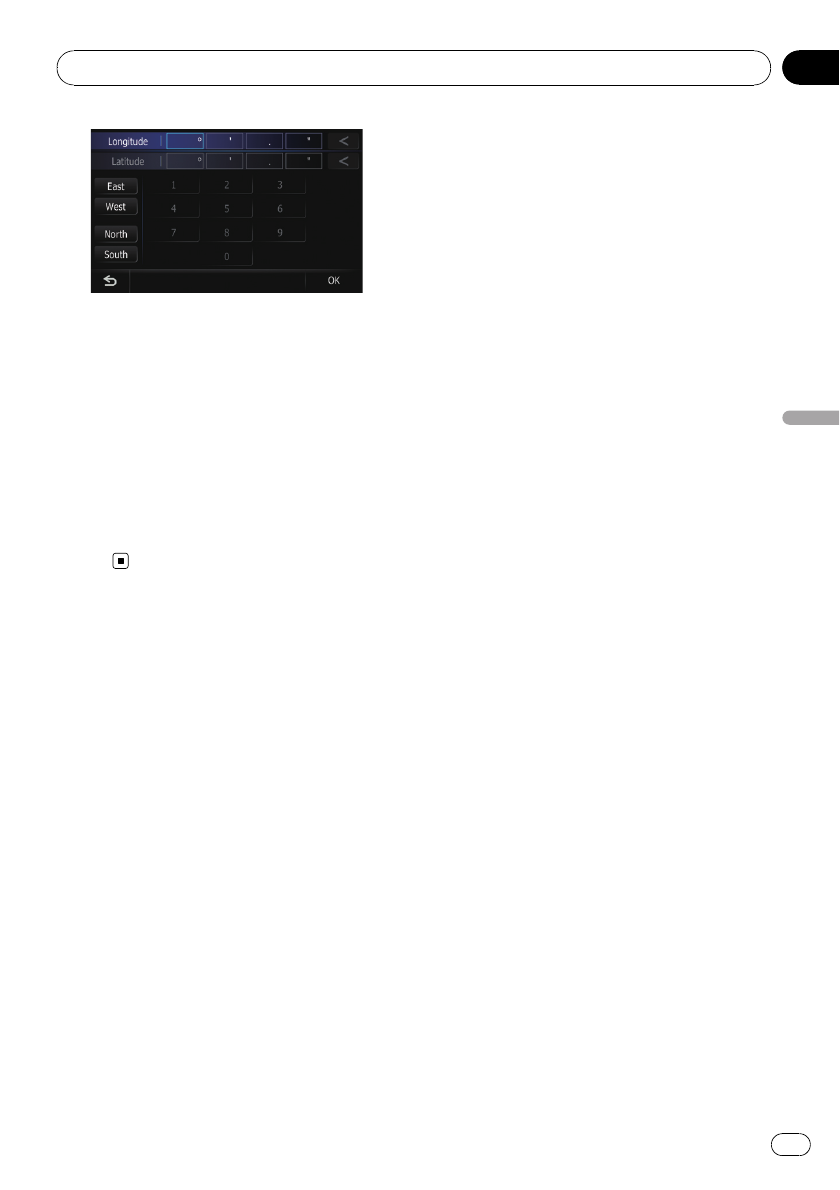
3 Touch [East] or [West], and then enter
the longitude.
To enter W 50°1’2.5”for example, touch
[West], [0], [5], [0], [0], [1], [0], [2], and [5].
4 Touch [North] or [South], and then
enter the latitude.
To enter N 5°1’2.5”for example, touch [North],
[0], [5], [0], [1], [0], [2], and [5].
5 Touch [OK].
The searched location appears on the map
screen.
Searching for and selecting a location
En 61
Chapter
08
Searching for and selecting a location
Registering a location into
“Address Book”
Registering a location by
“Address Book”
Address Book can store up to 400 registered
locations. These can include your home loca-
tion, favorite places, and destinations you
have already registered.
1 Display the “Destination Menu”screen.
2 Touch [Address Book].
The “Address Book List”screen appears.
3 Touch [Add].
The “Select Search Method”screen appears.
4 Search for a location.
pFor details, refer to Searching for and select-
ing a location on page 55.
5 When the map of the location you
want to register is displayed, touch [OK].
The location is registered, and then the “Ad-
dress Book Edit”screen appears.
pFor details, refer to Editing the entry in “Ad-
dress Book”on this page.
6 Touch [OK].
The registration is completed.
Registering a location by scroll
mode
1 Touch and drag the screen to scroll the
map to the position that you want to regis-
ter.
2 Touch to display the Quick Access
menu.
3 Touch .
The location is registered, and then the “Ad-
dress Book Edit”screen appears.
pFor details, refer to Editing the entry in “Ad-
dress Book”on this page.
4 Touch [OK].
The registration is completed.
Editing registered locations
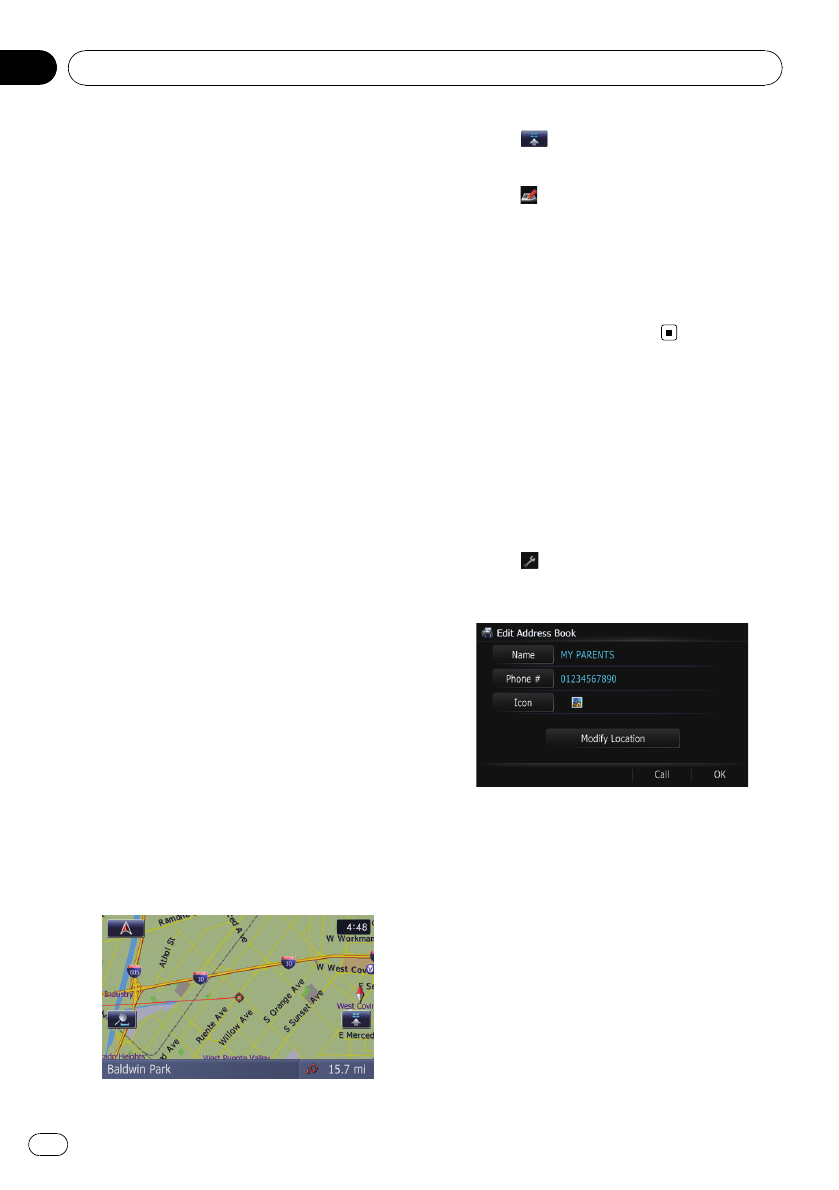
Editing the entry in “Address Book”
1 Display the “Destination Menu”screen.
2 Touch [Address Book].
The “Address Book List”screen appears.
3 Touch next to the location that you
want to edit.
The “Address Book Edit”screen appears.
4 Touch [Name].
You can enter the desired name.
pUp to 17 characters can be input for the
name.
#Touch [Phone #].
You can edit the registered phone number. To dial
the number, touch [Call].
#Touch [Icon].
The symbol displayed on the map and “Address
Book”.
#Touch [Modify Location].
You can change the registered location by scrol-
ling the map.
Registering and editing locations
En
62
Chapter
09
Editing your home
When you have already registered your home,
you can edit the information of your home.
1 Display the “Destination Menu”screen.
2 Touch [Address Book].
The “Address Book List”screen appears.
pHome location is displayed on the top of
the list.
3 Touch next to the home location.
The “Address Book Edit”screen appears.
#Touch [Phone #].
You can edit the registered phone number. To dial
the number, touch [Call].
#Touch [Modify Location].
You can change the registered location by scrol-
ling the map.
4 Touch [OK].
The registration is completed.
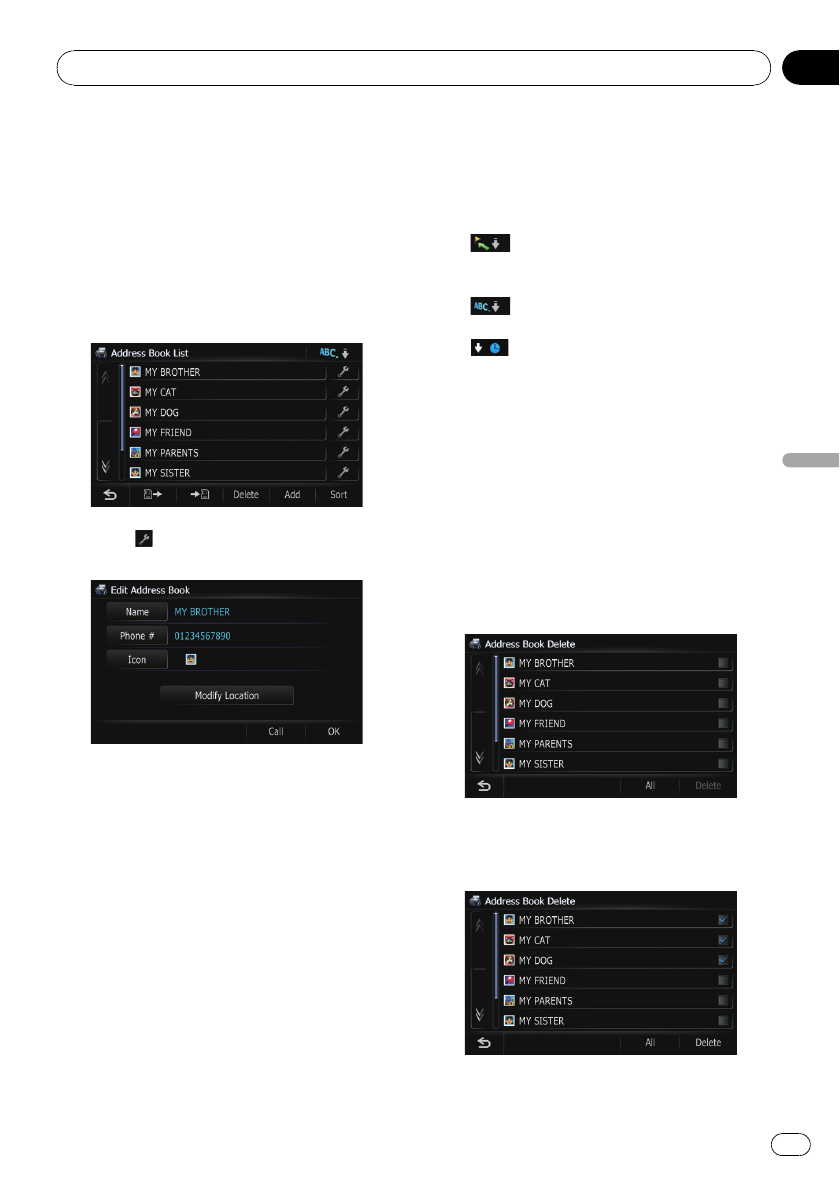
Sorting the entry in “Address Book”
1 Display the “Destination Menu”screen.
2 Touch [Address Book].
The “Address Book List”screen appears.
3 Touch [Sort].
Each time you touch [Sort] changes the sort
order.
pCurrent order is displayed on the upper
right of the screen.
!:
Sorts the items in the list in order by dis-
tance from the vehicle position.
!:
Sorts the items in the list alphabetically.
!:
Sorts the items in the list in order of the re-
cently used items.
Deleting the entry in “Address
Book”
1 Display the “Destination Menu”screen.
2 Touch [Address Book].
The “Address Book List”screen appears.
3 Touch [Delete].
The “Delete from Favourite”screen appears.
4 Select the location you want to delete.
A check mark appears by the selected loca-
tion.
#Touch [All].
Registering and editing locations
En 63
Chapter
09
Registering and editing locations
Selects all entries.
#Touch [None].
Displayed when all locations are selected. Can-
cels all selected locations.
5 Touch [Delete].
A message will appear asking you to confirm
the deletion.
6 Touch [Yes].
The data you selected is deleted.
#Touch [No].
Cancels the deletion.
Exporting and importing
the entry in “Address Book”
Exporting the entry in “Address
Book”
Exporting the “Address Book”data to an SD
memory card for editing is possible by using
the utility program “NavGate FEEDS”which is
available separately, on your PC.
1 Insert an SD memory card into the SD
card slot.
=For more details of the operation, refer to In-
serting and ejecting an SD memory card on
page 29.
2 Display the “Destination Menu”screen.
3 Touch [Address Book].
The “Address Book List”screen appears.
4 Touch .
Exporting the data starts.
After exporting the data is finished, the follow-
ing message appears.
5 Touch [OK].
The “Address Book List”screen appears.
Importing “Address Book”
edited on “NavGate FEEDS”
You can import the locations that you have edi-
ted on the utility program “NavGate FEEDS”
which is available separately to “Address
Book”.
pWhen a location that is already registered
in “Address Book”is imported, the loca-
tion is overwritten.
1 Insert an SD memory card into the SD
card slot.
=For more details of the operation, refer to In-
serting and ejecting an SD memory card on
page 29.
2 Display the “Destination Menu”screen.
3 Touch [Address Book].
The “Address Book List”screen appears.
4 Touch .
The following message appears.
Registering and editing locations
En
64
Chapter
09
5 Touch [Yes].
Importing of the data starts.
After importing the data is finished, the “Ad-
dress Book List”screen appears.
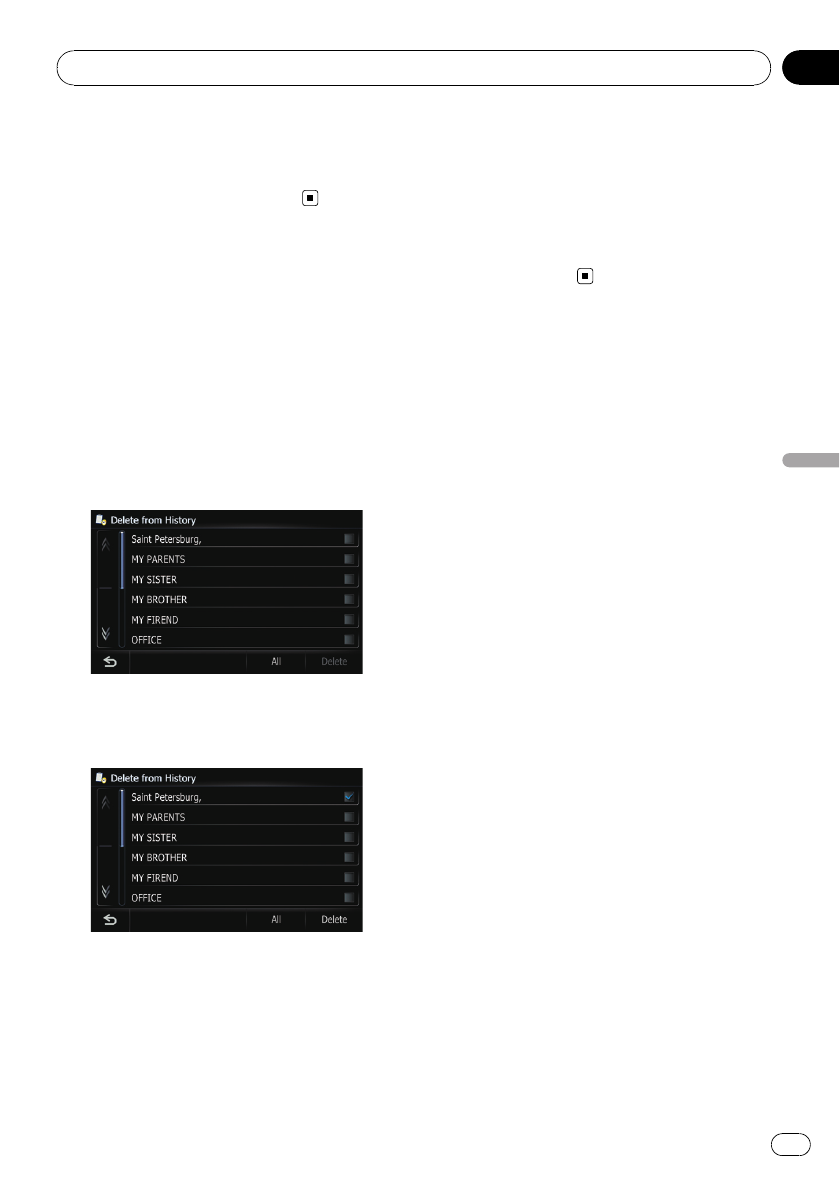
Deleting an entry in “History”
Items in History can be deleted. All entries in
History can be deleted at once.
1 Display the “Destination Menu”screen.
2 Touch [History].
The “Destination History List”screen ap-
pears.
3 Touch [Delete].
The “Delete from History”screen appears.
4 Select the location you want to delete.
A check mark appears by the selected loca-
tion.
#Touch [All].
Selects all entries.
#Touch [None].
Displayed when all locations are selected. Can-
cels all selected locations.
5 Touch [Delete].
A message will appear asking you to confirm
the deletion.
6 Touch [Yes].
The data you selected is deleted.
#Touch [No].
Cancels the deletion.
Registering and editing locations
En 65
Chapter
09
Registering and editing locations

If you have an active subscription to
MSN Direct service, you can check and
browse various information on your navigation
system, such as gas prices, movie times,
weather conditions and traffic information.
The information will be updated periodically.
Notice about MSN Direct™
Pioneer is not responsible for the accuracy of
the MSN Direct content. The MSN Direct con-
tent may not be current or available at times,
and is subject to change without notice. To re-
ceive MSN Direct content, you must subscribe
to the MSN Direct service, and you must be
within the MSN Direct coverage area. Cover-
age may also be affected by the availability and
relative strength of FM transmissions, as well
as reception limitations of Microsoft’s Direct-
Band network.
Please visit
http://www.msndirect.com/pioneer
or current coverage area maps, subscription
details, and other important information about
MSN Direct.
Activating the service
You have to activate MSN Direct first.
pA web-connected computer is required for
the online subscription.
pIf you have difficulty for the online subscrip-
tion, please call toll-free 1-866-658-7032.
General flow chart:
1Check your product key.
You have to know your product key for the
subscription.
(Refer to Checking your product key on this
page.)
j
2Make an online subscription to MSN Direct
service using your PC.
(Refer to Subscribing to the MSN Direct ser-
vice on the next page.)
j
3Activate the MSN Direct service on this pro-
duct.
(Refer to Activating the MSN Direct function
on the next page.)
j
4Activation is complete.
Checking your product key
The product key that you can find here is used
in the online subscription.
1 Touch [Destination] on the “Top Menu”,
and then touch [MSN Direct].
The “MSN Direct”screen appears.
2 Touch [Status].
3 Write your product key down in the fol-
lowing box;
Browsing information on MSN Direct
En
66
Chapter
10
Subscribing to the MSN Direct
service
Within two days of completing the subscription,
execute Activating the MSN Direct function.
1 Access the following URL and read the
description.
http://www.msndirect.com/pioneer
2 Be sure to check the coverage area and
other availabilities of MSN Direct on the
web page.
3 Go to the page for activation and enter
your product key.
4 Follow the directions on the web page
to complete the subscription.
Activating the MSN Direct function
After the online subscription, complete the ac-
tivation so that the navigation system can re-
ceive the information.
This operation must be performed under the
following conditions
—You are currently in the coverage area of
MSN Direct.
1 Boot-up your navigation system.
2 Touch [Destination] on the “Top Menu”,
and then touch [MSN Direct].
The “MSN Direct”screen appears.
3 Touch [Status].
4 Wait until the activation status changes
to “Active”.
It may take approximately 20 or 30 minutes to
complete the activation.
After activation is complete, the information
will be available on each menu.
Browsing gas prices
Recent gas prices of nearby gas stations are
displayed in a list.
Although the MSN Direct service regularly up-
dates gas price information, the information
provided may not necessarily correspond to ac-
tual gas prices. Please refer to Notice about
MSN Direct™on the previous page.
It may take up to 24 hours for all the data to be-
come available under the following conditions:
!When you use MSN Direct for the first time.
!When you have not performed this function
previously around the current area.
!After the navigation system has been
turned off for a few days.
1 Touch [Destination] on the “Top Menu”,
and then touch [MSN Direct].
The “MSN Direct”screen appears.
2 Touch [Gas Prices].
The “Gas Prices”screen appears.
3 Touch the desired tab to change the
sort order.
Available options;
![Distance] (default):
Sorts the items in the list in order by dis-
tance from the vehicle position.
![Name]:
Sorts the items in the list alphabetically.
![Price]:
Browsing information on MSN Direct
En 67
Chapter
10
Browsing information on MSN Direct
Sorts the items in the list by price.
#Touch [Refresh].
New translation required.
p[Refresh] appears when new gas prices in-
formation is received.
4 Touch on the item that you want to
view in detail.
1The names of gas stations and their loca-
tions
2Gas prices
The information in ( ) shows how current
the information is.
3Distance from the current position
#Touch .
“Location confirmation screen”appears.
=For details, refer to Checking the location on
the map on page 48.
5 Touch [OK].
“Location confirmation screen”appears.
=For details, refer to Checking the location on
the map on page 48.
Browsing movie times
Nearby theaters can be displayed on a list.
Switching the screen allows you to see the
movie title now showing.
Although the MSN Direct service regularly up-
dates movie information, the information pro-
vided may not necessarily correspond to actual
movie information. Please refer to Notice
about MSN Direct™on page 66.
It may take up to 6 hours for all the data to be-
come available under the following conditions:
!When you use MSN Direct for the first time.
!When you have not performed this function
previously around the current area.
!After the navigation system has been
turned off for a few days.
Searching for a theater by
selecting a movie title
1 Touch [Destination] on the “Top Menu”,
and then touch [MSN Direct].
2 Touch [Movie Times].
The “All Movie Theaters”screen appears.
3 Touch [All Movie Titles].
The movie titles now showing are displayed.
#Touch [Refresh].
New translation required.
p[Refresh] appears when the new informa-
tion is received.
4 Touch the desired movie title.
The theaters that are currently showing the se-
lected movie are displayed.
#Touch [Refresh].
New translation required.
p[Refresh] appears when the new informa-
tion is received.
Browsing information on MSN Direct
En
68
Chapter
10
5 Touch the desired tab to change the
sort order.
Available options;
![Distance] (default):
Sorts the items in the list in order by dis-
tance from the vehicle position.
![Name]:
Sorts the items in the list alphabetically.
6 Touch on the item that you want to
view in detail.
1The names of theaters and their locations
2Distance from the current position
#Touch .
“Location confirmation screen”appears.
=For details, refer to Checking the location on
the map on page 48.
7 Touch [OK].
“Location confirmation screen”appears.
=For details, refer to Checking the location on
the map on page 48.
#Touch [Dial].
Enables you to call the position if a telephone
number is available. (Pairing with cellular phone
featuring Bluetooth wireless technology is re-
quired.)
Searching for a movie title by
selecting a theater
1 Touch [Destination] on the “Top Menu”,
and then touch [MSN Direct].
2 Touch [Movie Times].
The “All Movie Theaters”screen appears.
3 Touch the desired tab to change the
sort order.
Available options;
![Distance] (default):
Sorts the items in the list in order by dis-
tance from the vehicle position.
![Name]:
Sorts the items in the list alphabetically.
4 Touch the desired theater.
The movie titles currently shown on the se-
lected theater are displayed.
#Touch .
“Location confirmation screen”appears.
=For details, refer to Checking the location on
the map on page 48.
#Touch [Refresh].
New translation required.
p[Refresh] appears when the new informa-
tion is received.
5 Touch on the item that you want to
view in detail.
6 Touch [OK].
“Location confirmation screen”appears.
=For details, refer to Checking the location on
the map on page 48.
#Touch [Dial].
Enables you to call the position if a telephone
number is available. (Pairing with cellular phone
featuring Bluetooth wireless technology is re-
quired.)
Browsing weather
information
Local weather information can be displayed
on a list. Switching the screen allows you to
see worldwide weather conditions.
Although the MSN Direct service regularly up-
dates weather information, the information
provided may not necessarily correspond to ac-
tual weather conditions. Please refer to Notice
about MSN Direct™on page 66.
Browsing information on MSN Direct
En 69
Chapter
10
Browsing information on MSN Direct
Checking the local weather
information
1 Touch [Destination] on the “Top Menu”,
and then touch [MSN Direct].
2 Touch [Weather].
The local weather information is displayed.
New translation required.
3 Touch the desired area.
Detailed information is displayed.
Touching [Forecast] displays the weather fore-
casts for these three days.
Checking worldwide weather
conditions
1 Touch [Destination] on the “Top Menu”,
and then touch [MSN Direct].
2 Touch [Weather].
The local weather information is displayed.
3 Touch [Worldwide].
Worldwide weather conditions are displayed.
The area name, distance and direction from
current position are displayed on the list. The
list is sorted alphabetically by the area name.
4 Touch the desired area.
Detailed information is displayed.
Using traffic information
You can view current traffic conditions and in-
formation. When the navigation system re-
ceives updated traffic information, it will
overlay the traffic information on your map
and also display detailed text information
when available.
In the default setting, the navigation system
takes into account traffic information and tries
to avoid traffic congestions and suggest better
routes. Also, when you are traveling along a
route and the system finds another better
route for avoiding the traffic congestion, the
current route will be recalculated automati-
cally.
The term “traffic congestion”in this section in-
dicates the following types of traffic condi-
tions:
—Stop-and-go traffic
—Stopped traffic
—Closed/blocked roads
Viewing the traffic event
Traffic Information is displayed on a screen in
the form of a list. This allows you to check how
many traffic incidents have occurred, their lo-
cation and their distance from your current po-
sition.
Although the MSN Direct service regularly up-
dates traffic information, the information pro-
vided may not necessarily correspond to actual
traffic conditions. Please refer to Notice about
MSN Direct™on page 66.
1 Touch [Destination] on the “Top Menu”,
and then touch [MSN Direct].
2 Touch [Traffic List].
The “Traffic Event List”screen appears.
The list with received traffic information is
shown.
Browsing information on MSN Direct
En
70
Chapter
10
3 Select an incident you want to view in
detail.
The details of the selected incident are dis-
played.
pTouching an incident you want to see allows
you to view the detailed information of the
incident. If the information cannot be dis-
played on one screen, touch or to view
the remaining information.
#Touch [Sort].
You can sort the traffic information.
Each time you touch the key changes that set-
ting.
!:
You can sort the traffic information by dis-
tance from your current position.
For the list displayed when you touch [Traf-
fic List], the list will be sorted according to
the linear distance from the vehicle position
to the traffic information.
For the list displayed when you touch [Traf-
fic On Route], the list will be sorted accord-
ing to the distance from the vehicle position
to the traffic information.
!:
You can sort the traffic information in alpha-
betical order.
!:
You can sort the traffic information accord-
ing to the incident.
The list will be sorted in the order of closed/
blocked roads, traffic congestion, acci-
dents, road works and others.
Current order is displayed on the upper right of
the screen.
#Touch [Refresh].
When new traffic information is received, current
information is changed or old information has
been removed, the list is updated to reflect the
new situation.
#Touch .
Touching allows you to check the location on a
map. (Traffic information without positional infor-
mation cannot be checked on a map.)
4 Touch .
Return to the previous screen.
Checking traffic information on
the route
All traffic information on the current route is
displayed on screen in a list.
%Touch [Traffic On Route].
The “Traffic On Route List”screen appears.
The method for checking the content dis-
played on the screen is the same for “Viewing
the traffic event”.
How to read traffic information
on the map
The traffic event information displayed on the
map is as follows.
pA line is displayed only when the map scale
is 5 km (2.5 miles) or lower.
pIcon appears only when the scale on the
map is 20 km (10 miles) or lower. If the
scale is changed, the icons are resized ac-
cording to the selected scale.
Traffic event icon
!with yellow line:
Stop-and-go traffic
!with red line:
Stopped traffic
!with black line:
Closed/blocked roads
!etc.:
Accidents, constructions, etc.
Browsing information on MSN Direct
En 71
Chapter
10
Browsing information on MSN Direct
Viewing the traffic flow
Traffic Information is displayed on a screen in
the form of a list. This allows you to check how
many traffic incidents have occurred, their lo-
cation and their distance from your current po-
sition.
Although the MSN Direct service regularly up-
dates traffic information, the information pro-
vided may not necessarily correspond to actual
traffic conditions. Please refer to Notice about
MSN Direct™on page 66.
1 Touch [Destination] on the “Top Menu”,
and then touch [MSN Direct].
2 Touch [Traffic Flow].
A list with traffic event information that has
been received is shown.
Places (street names) where incidents have
occurred are displayed on the list.
3 Select an incident you want to view in
detail.
The details of the selected incident are dis-
played.
pTouching an incident you want to see allows
you to view the detailed information of the
incident. If the information cannot be dis-
played on one screen, touch or to view
the remaining information.
#Touch [Sort].
You can sort the traffic information.
Each time you touch the key changes that set-
ting.
!:
You can sort the traffic information by dis-
tance from your current position.
For the list displayed when you touch [Traf-
fic List], the list will be sorted according to
the linear distance from the vehicle position
to the traffic information.
For the list displayed when you touch [Traf-
fic On Route], the list will be sorted accord-
ing to the distance from the vehicle position
to the traffic information.
!:
You can sort the traffic information in alpha-
betical order.
!:
You can sort the traffic information accord-
ing to the incident.
The list will be sorted in the order of closed/
blocked roads, traffic congestion, acci-
dents, road works and others.
Current order is displayed on the upper right of
the screen.
#Touch [Refresh].
When new traffic information is received, current
information is changed or old information has
been removed, the list is updated to reflect the
new situation.
#Touch .
The traffic event information displayed on the
map is as follows.
Traffic flow icon and line
!Red: average speed in this area is slower
than 15mph (24 km/h)
!Yellow: average speed in this area is be-
tween 15 mph to 45mph (24 km/h to 72 km/
h)
!Green: average speed in this area is faster
than 45 mph (72 km/h) (An icon without a
line will be displayed)
Browsing information on MSN Direct
En
72
Chapter
10
Selecting traffic information to
display
There are different types of traffic information
that can be received via the MSN Direct ser-
vice, and you can select which types will be in-
corporated and displayed on your navigation
system.
1 Touch [Destination] on the “Top Menu”,
and then touch [MSN Direct].
2 Touch [Traffic Settings].
The “Traffic Settings”screen appears.
3 Touch [Displayed traffic information].
The “Traffic Type Settings”screen appears.
4 Touch the traffic information item to
display.
A check mark appears by the selected traffic
information.
pTouching [All (None)] selects or deselects
all traffic information.
#Touch [All].
Selects all traffic information.
#Touch [None].
Displayed when all traffic information are se-
lected. Cancels all selected traffic information.
5 Touch [OK].
The selected traffic information icon is added
to the screen.
6 Touch [OK].
Browsing local events
The nearby events to be held in the next few
days are displayed on a list, and you can see
the detail event information.
Although the MSN Direct service regularly up-
dates local event information, the information
provided may not necessarily correspond to ac-
tual local event conditions. Please refer to No-
tice about MSN Direct™on page 66.
1 Touch [Destination] on the “Top Menu”,
and then touch [MSN Direct].
2 Touch [Local Events].
The “Local Event Date”screen appears.
3 New translation required.
The “Local Event Groups List”screen ap-
pears.
4 Touch the category of events that you
want to check.
The “Local Event Sub Groups List”screen ap-
pears.
5 Touch the subcategory of events that
you want to check.
The “Local Events”screen appears.
6 Touch the desired tab to change the
sort order.
Available options;
![Distance] (default):
Sorts the items in the list in order by dis-
tance from the vehicle position.
![Name]:
Sorts the items in the list alphabetically.
Browsing information on MSN Direct
En 73
Chapter
10
Browsing information on MSN Direct

7 Touch the desired event to display de-
tailed information of the event.
#Touch .
“Location confirmation screen”appears.
=For details, refer to Checking the location on
the map on page 48.
#Touch [Refresh].
New translation required.
p[Refresh] appears when the new informa-
tion is received.
8 Touch [OK].
“Location confirmation screen”appears.
=For details, refer to Checking the location on
the map on page 48.
#Touch [Dial].
Enables you to call the position if a telephone
number is available. (Pairing with cellular phone
featuring Bluetooth wireless technology is re-
quired.)
Browsing news headlines
Recent news headlines are displayed in a list.
Although the MSN Direct service regularly up-
dates news headlines, the information pro-
vided may not necessarily correspond to
current news headlines. Please refer to Notice
about MSN Direct™on page 66.
1 Touch [Destination] on the “Top Menu”,
and then touch [MSN Direct].
2 Touch [News].
3 Touch the desired news headline.
Further details about the news are displayed.
#Touch [Refresh].
New translation required.
p[Refresh] appears when the new informa-
tion is received.
4 Touch or to scroll the list.
Browsing information on MSN Direct
En
74
Chapter
10
Browsing stock quotes
Recent stock quotes are displayed in a list.
Although the stock quote displayed onscreen
is updated about 40 minutes (approx.), these
prices are not realtime values.
It may take up to 20 minutes for all the data to
become available under the following condi-
tions:
!When you use MSN Direct for the first time.
!When you have not performed this function
previously around the current area.
!After the navigation system has been
turned off for a few days.
=Please refer to Notice about MSN Direct™
on page 66.
Selecting stock symbols
Up to 30 stock symbols can be selected.
1 Touch [Destination] on the “Top Menu”,
and then touch [MSN Direct].
2 Touch [Add].
The “Stock Info”screen appears.
pThe blank list appears when no symbols are
selected.
3 Touch [Add].
The “Stock Info”screen appears.
4 Enter the stock symbol that you want
to select, and then touch [OK].
New translation required.
pArrow in the left of each item indicates the
stock price movement. If there is no stock
price movements than previous close, “—”
is displayed.
Viewing the detailed stock quotes
1 Touch [Destination] on the “Top Menu”,
and then touch [MSN Direct].
2 Touch [Add].
3 Touch the desired stock quote.
Detailed stock quote information is displayed.
#Touch [Delete].
The message confirming whether to delete the
entry appears.
And then touch [OK] to delete the stock symbol
from the “Stock Info”screen.
Browsing information on MSN Direct
En 75
Chapter
10
Browsing information on MSN Direct
If your devices feature Bluetoothâtechnology,
this navigation system can be connected to
your devices wirelessly. This section describes
how to set up a Bluetooth connection.
For more information about the connectivity
with the devices featuring Bluetooth wireless
technology, refer to the information on our
website.
Preparing communication
devices
This navigation system has a built-in function
to use devices featuring Bluetooth wireless
technology.
=For details, refer to Notes for hands-free
phoning on page 88.
New translation required.
!HFP (Hands Free Profile)
!A2DP (Advanced Audio Distribution Pro-
file)
pWhen the navigation system is turned off,
the Bluetooth connection is also discon-
nected. When the system restarts, the sys-
tem automatically attempts to reconnect
the previously-connected cellular phone.
Even when the connection is severed for
some reason, the system automatically re-
connects the specified cellular phone (ex-
cept when the connection is severed due to
cellular phone operation).
Registering your Bluetooth
devices
You need to register your devices featuring
Bluetooth wireless technology when you con-
nect it for the first time. A total of 5 devices
can be registered. Three registration methods
are available:
!Searching for nearby Bluetooth devices
!Searching for a specified Bluetooth device
!Pairing from your Bluetooth devices
pIf you try to register more than 5 devices,
the system will ask you to select one of the
registered devices to delete.
=For details, refer to Deleting a registered
device on page 78.
To register your Bluetooth devices, display the
“Bluetooth Settings”screen.
1 Press the HOME button to display the
“Top Menu”.
2 Touch [Settings].
The “Settings Menu”screen appears.
3 Touch [Bluetooth Settings].
The “Bluetooth Settings”screen appears.
Searching for nearby Bluetooth
devices
The system searches for available Bluetooth
devices near the navigation system, displays
them in a list, and registers them for connec-
tion.
1 Activate the Bluetooth wireless tech-
nology on your devices.
For some Bluetooth devices, no specific action
is necessary to activate Bluetooth wireless
technology. For details, refer to the instruction
manual of your devices.
2 Display the “Bluetooth Settings”
screen.
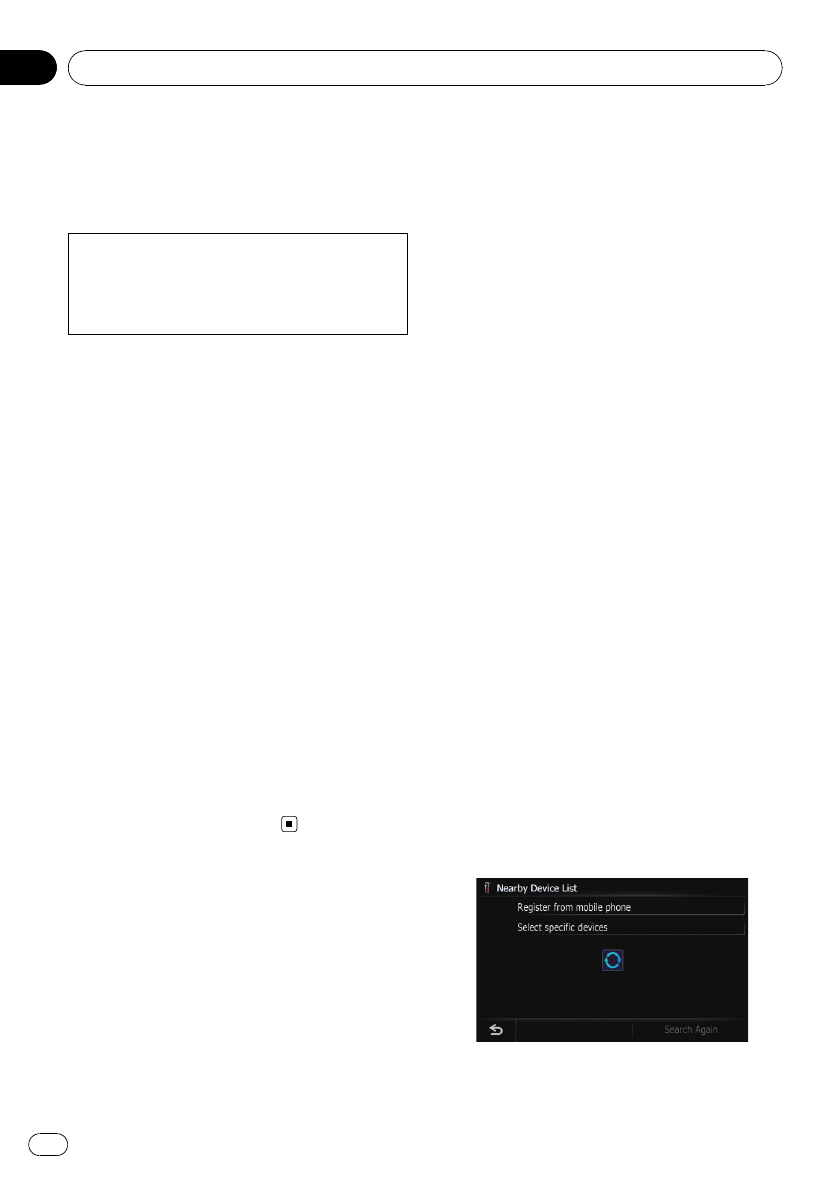
3 Touch [Registration].
The “Nearby Device List”screen appears.
Registering and connecting the Bluetooth device
En
76
Chapter
11
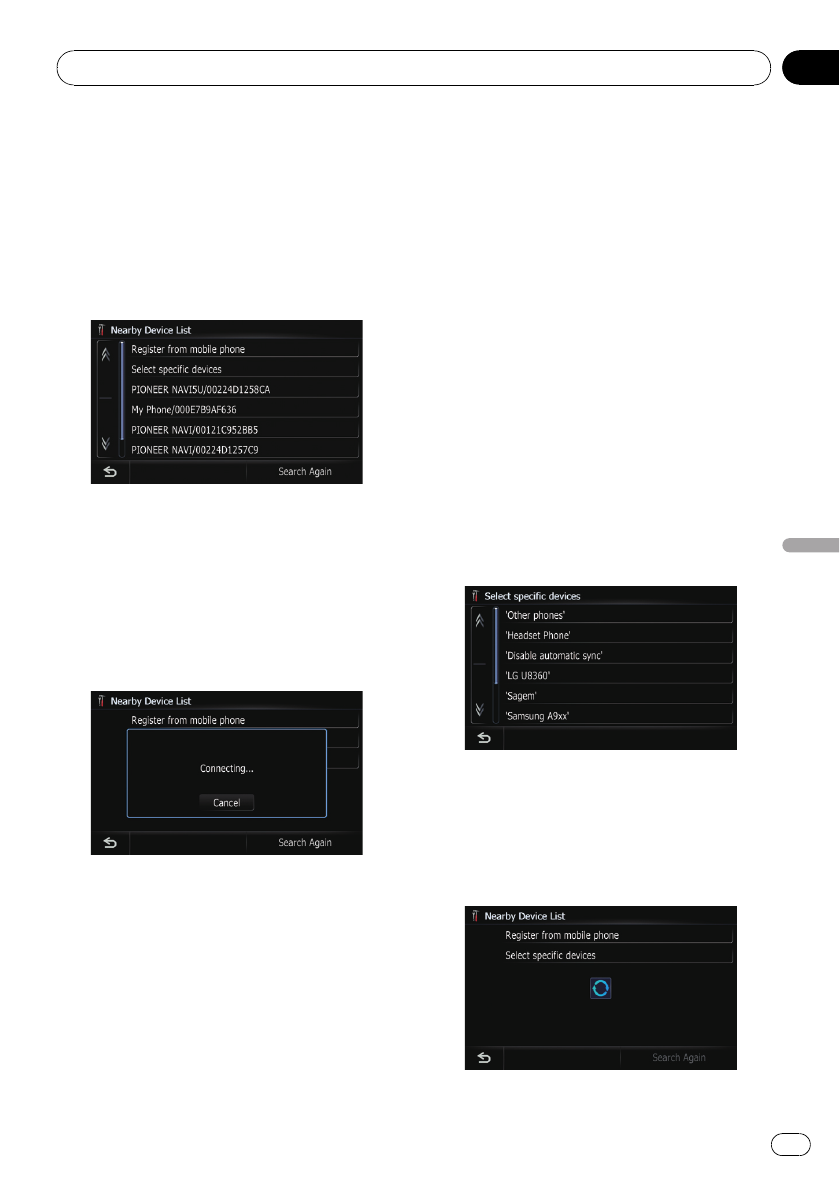
The system searches for devices featuring
Bluetooth technology that are waiting for the
connection and displays them in the list if the
device has found.
pUp to 30 devices will be listed in the order
that the devices are found.
4 Wait until your Bluetooth device ap-
pears in the list.
pIf you cannot find the Bluetooth device that
you want to connect, check that the device
is waiting for the Bluetooth wireless tech-
nology connection.
5 Touch the Bluetooth device name you
want to register.
A message prompting you to enter a PIN code
appears.
6 Enter the PIN code “1111”using the
Bluetooth device.
New translation required.
New translation required.
pNew translation required.
pNew translation required.
pNew translation required.
Searching for a specified
Bluetooth device
If you cannot connect your Bluetooth device
using [Search devices] and [Register from
mobile phone], try this method if your Blue-
tooth device is found in the list.
1 Activate the Bluetooth wireless tech-
nology on your devices.
For some Bluetooth devices, no specific action
is necessary to activate Bluetooth wireless
technology. For details, refer to the instruction
manual of your devices.
2 Display the “Bluetooth Settings”
screen.
3 Touch [Registration].
The “Nearby Device List”screen appears.
4 Touch [Select specific devices].
The “Select specific devices”screen appears.
5 Touch the model name of the Bluetooth
device to be connected.
The system searches for devices featuring
Bluetooth technology that are waiting for the
connection and displays them in the list if the
device has found.
Registering and connecting the Bluetooth device
En 77
Chapter
11
Registering and connecting the Bluetooth device
pIf you cannot find the desired model name
on the list, touch [Other phones] to search
the devices available nearby.
6 Touch the Bluetooth device name you
want to register.
A message prompting you to enter a PIN code
appears.
7 Enter the PIN code “1111”using the
Bluetooth device.
New translation required.
New translation required.
pNew translation required.
pNew translation required.
pNew translation required.
Pairing from your Bluetooth
devices
You can register the Bluetooth device by set-
ting the navigation system to standby mode
and requesting connection from the Bluetooth
device.
1 Activate the Bluetooth wireless tech-
nology on your devices.
For some Bluetooth devices, no specific action
is necessary to activate Bluetooth wireless
technology. For details, refer to the instruction
manual of your devices.
2 Display the “Bluetooth Settings”
screen.
3 Touch [Registration].
The “Nearby Device List”screen appears.
4 Touch [Register from mobile phone].
The navigation system waits for a Bluetooth
wireless technology connection.
5 Register the navigation system on your
Bluetooth device.
If your device asks you to enter a password,
enter the PIN code (password) of the naviga-
tion system.
New translation required.
pIf registration fails repeat the procedure
from the beginning.
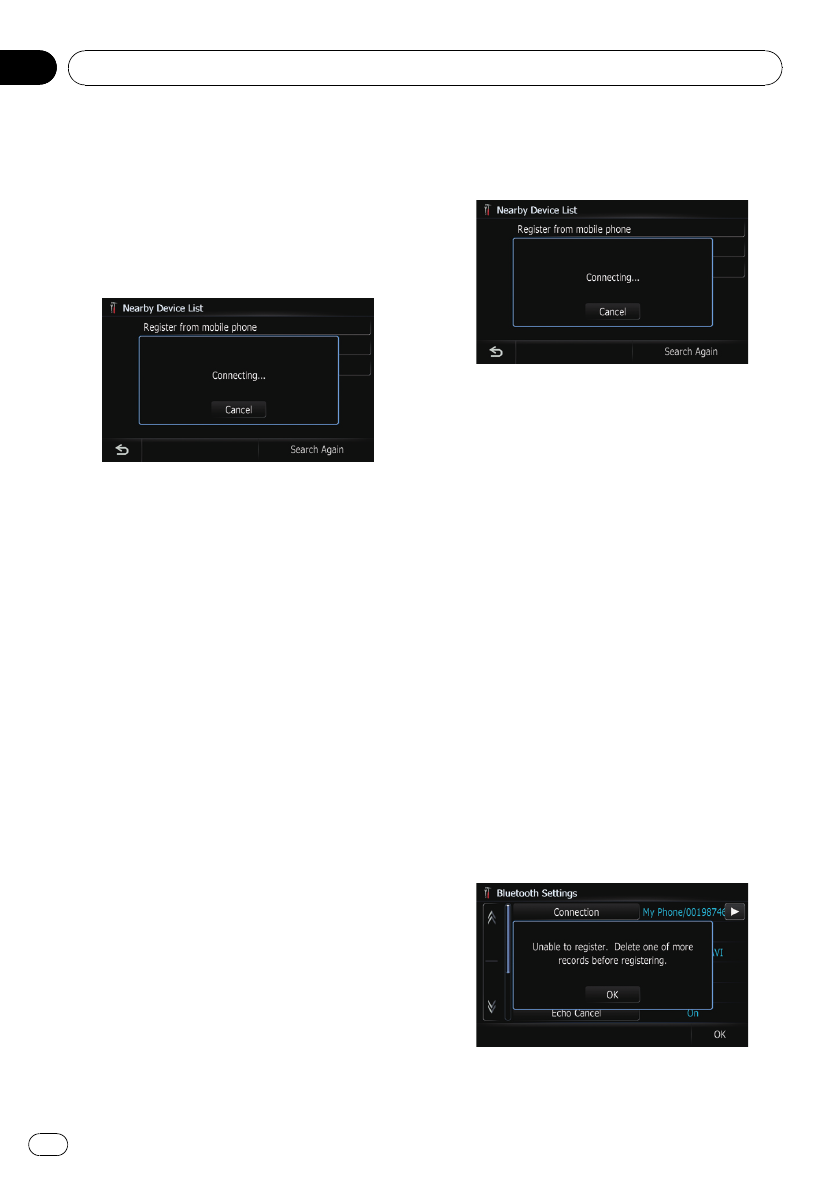
Deleting a registered device
When you have already registered 5 bluetooth
devices and try to add another one, you have
to delete a registered device.
pIf a registered phone is deleted, all the
phone book entries and call history lists
that correspond to the phone will be also
cleared.
1 Display the “Bluetooth Settings”
screen.
2 Touch [Registration].
The following message appears.
Registering and connecting the Bluetooth device
En
78
Chapter
11
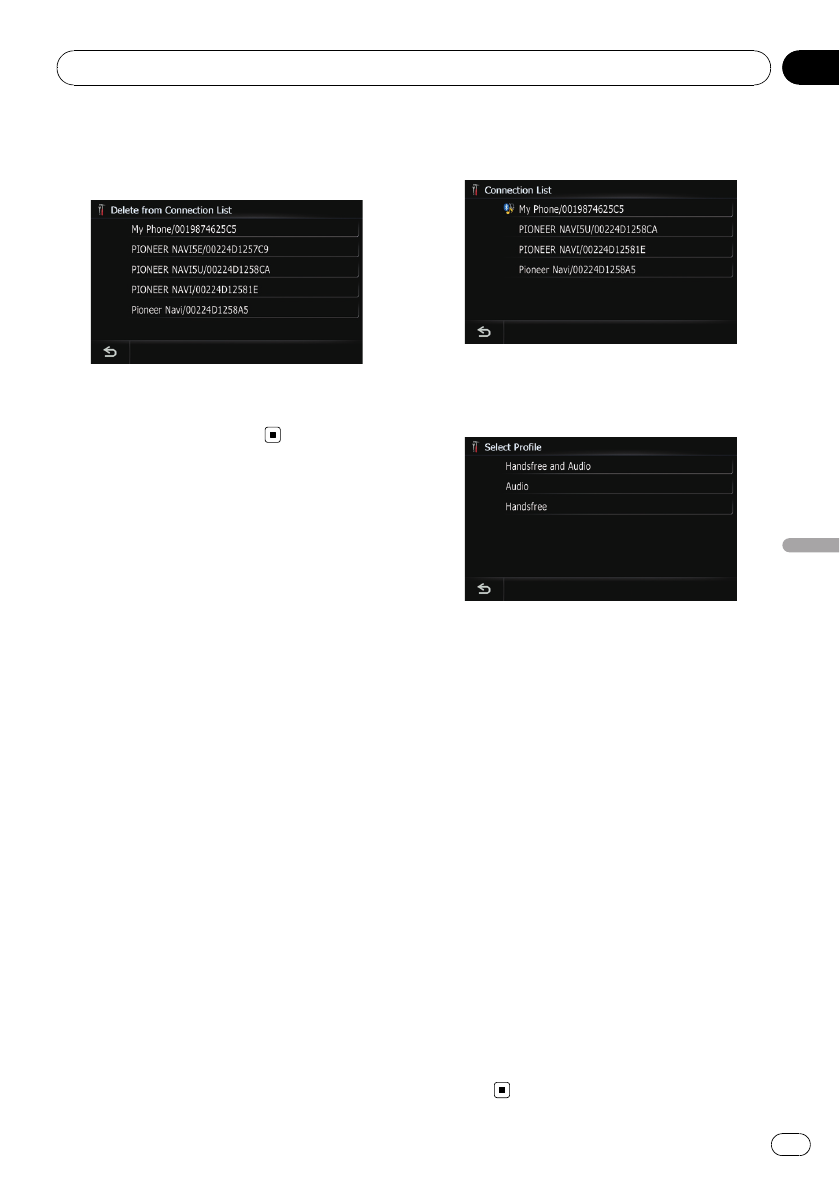
3 Touch [OK].
The “Delete From Connection List”screen
appears.
4 Touch the Bluetooth device name that
you want to delete.
The registration is canceled.
Connecting a registered
Bluetooth device
The navigation system automatically connects
the Bluetooth device selected as the target of
connection. However, connect the Bluetooth
device manually in the following cases:
!Two or more Bluetooth devices are regis-
tered, and you want to manually select the
device to be used.
!You want to reconnect a disconnected
Bluetooth device.
!Connection cannot be established automa-
tically for some reason.
If you start connection manually, carry out the
following procedure. You can also connect the
Bluetooth device by having the navigation sys-
tem detect it automatically.
1 Activate the Bluetooth wireless tech-
nology on your devices.
For some Bluetooth devices, no specific action
is necessary to activate Bluetooth wireless
technology. For details, refer to the instruction
manual of your devices.
2 Display the “Bluetooth Settings”
screen.
3 Touch [Connection].
The “Connection List”screen appears.
4 Touch the name of the device that you
want to connect.
The “Select Profile”screen appears.
5 Touch the profile that you want to con-
nect.
You can select the following profiles:
![Handsfree and Audio]:
Connects the device as the hands-free
phone and the Bluetooth audio player.
![Audio]:
Connects the device as Bluetooth audio
player.
![Handsfree]:
Connects the device as the hands-free
phone.
Connection starts.
When a connection is successfully estab-
lished, a connection complete message ap-
pears, the screen returns to the map screen by
touching [OK].
pTo cancel the connection to your device,
touch [Cancel].
pNew translation required.
pIf connection fails, check whether your de-
vice is waiting for a connection and then re-
try.
Registering and connecting the Bluetooth device
En 79
Chapter
11
Registering and connecting the Bluetooth device
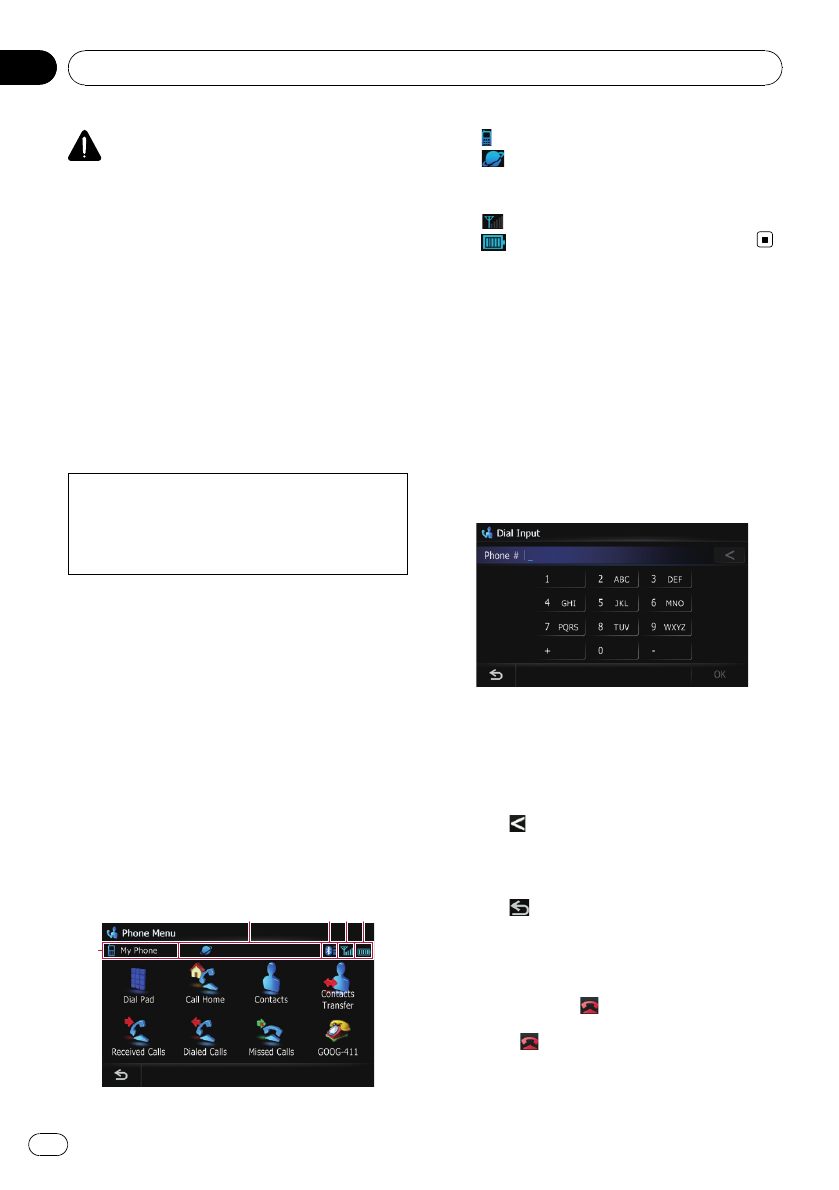
CAUTION
For your safety, avoid talking on the phone as
much as possible while driving.
If your cellular phone features Bluetooth®
technology, this navigation system can be con-
nected to your cellular phone wirelessly. Using
this hands-free function, you can operate the
navigation system to make or receive phone
calls. You can also transfer the phone book
data stored in your cellular phone to the navi-
gation system. This section describes how to
set up a Bluetooth connection and how to op-
erate a cellular phone featuring Bluetooth
technology on the navigation system.
For more information about the connectivity
with the cellular phone featuring Bluetooth
wireless technology, refer to the information
on our website.
Displaying the Phone Menu
Use the “Phone Menu”if you connect the cel-
lular phone to the navigation system for utiliza-
tion.
=For more details of the operation, refer to
Registering and connecting the Bluetooth
device on page 76.
1 Press the HOME button to display the
“Top Menu”.
2 Touch [Phone].
The “Phone Menu”screen appears.
1
2345
1: Name of connected cellular phone
2: Network name of the cellular phone
company
3New translation required.
4: Reception status of the cellular phone
5: Battery status of the cellular phone
Making a phone call
You can make a phone call in many different
ways.
Direct dialing
1 Display the “Phone Menu”screen.
2 Touch [Dial Pad].
The direct dial screen appears.
3 Touch the number keys to enter the
phone number.
The phone number that was input is dis-
played.
And then [OK] is activated.
#Touch .
The input number is deleted a digit at a time from
the end of the number. Continuing to press this
deletes all of the digits.
#Touch .
Return to the previous screen.
4 Touch [OK] to make a call.
pTo cancel the call after the system starts
dialing, touch .
5 Touch to end the call.
Using hands-free phoning
En
80
Chapter
12