Pioneer K026 Multi- Media AVN Navigation Server System with BT User Manual 4
Pioneer Corporation Multi- Media AVN Navigation Server System with BT 4
Pioneer >
Contents
- 1. User Manual 1
- 2. User Manual 2
- 3. User Manual 3
- 4. User Manual 4
- 5. User Manual 5
User Manual 4
Switch the playback mode
You have two methods for playing DVD-VR
discs; Original (original) and Playlist (play-
list).
pTitles created with DVD recorders are
called original. Those based on original, re-
arranged titles are called playlist. Playlists
are created on DVD-R/-RW discs.
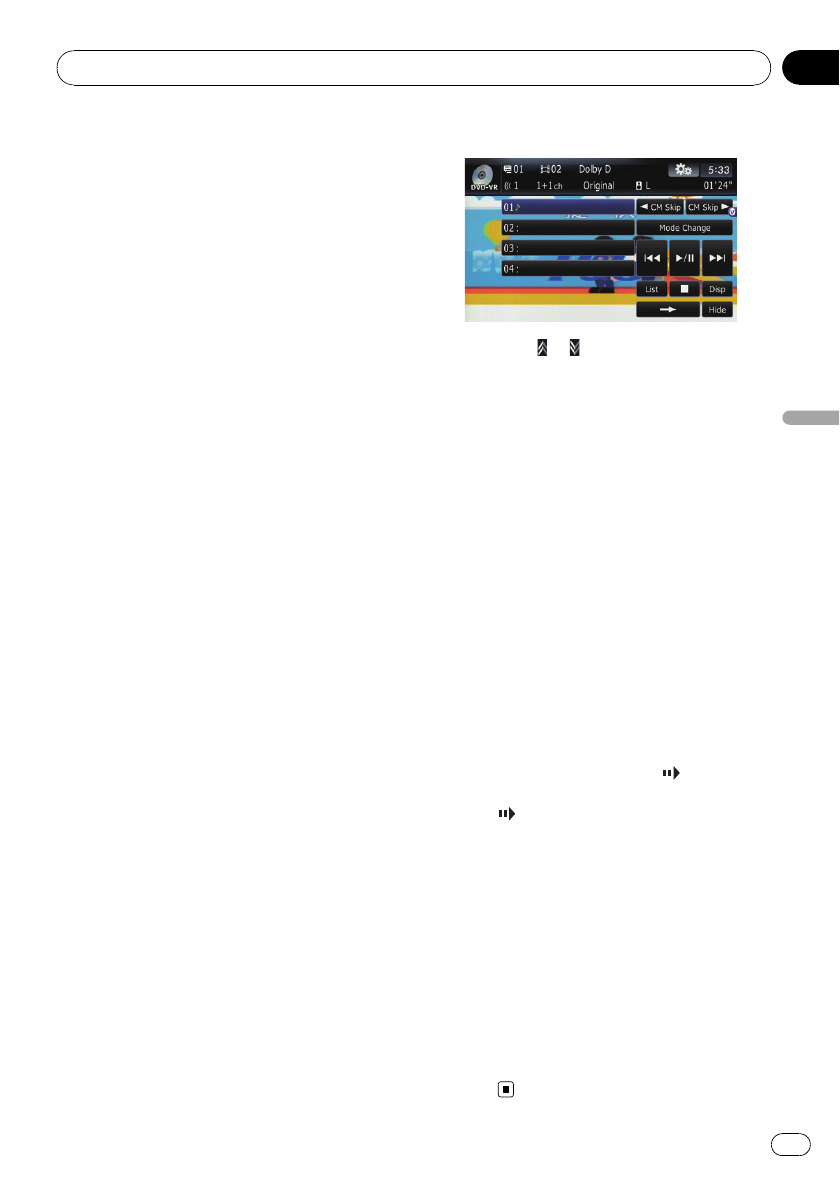
%Touch [Mode Change] to switch the
play mode.
If the play mode is changed, playback starts
from the beginning of the selected play mode.
Using the short-time skip function
This function enables you to skip over your
specified interval on the video playback. This
is useful to skip commercials on your recorded
DVD-VR disc.
%To skip progressively backward or for-
ward, touch [cCM Back] or [CM Skip d].
Each touch of [cCM Back]or[CM Skip d]
changes steps in the following order:
cCM Back
5 sec. —15 sec. —30 sec. —1 min. —2 min.
—3 min. —0 sec.
CM Skip d
30 sec. —1 min. —1.5 min. —2 min. —3 min.
—5 min. —10 min. —0 sec.
Playing by selecting from the
title list
You can select and play the title you want from
the list.
1 Touch [List] on the playback screen.
2 Touch the title to play from the list.
pTouching or switches the selection to
the next or previous page in the list.
3 To return to the previous screen, touch
[List].
Frame-by-frame playback
This lets you move ahead one frame at a time
during playback.
%Touch [r] during playback.
Each time you touch [r], you move ahead
one frame.
To return to normal playback, touch [f].
pWith some discs, images may be unclear
during frame-by-frame playback.
Slow motion playback
This lets you slow down playback speed.
1 Touch and hold [r] until is dis-
played during playback.
The icon is displayed, and forward slow
motion playback begins.
pTo return to normal playback, touch [f].
2 Touch [q]or[r] to adjust playback
speed during slow motion playback.
Each time you touch [q]or[r] it changes
the speed in four steps in the following order:
1/16 f1/8 f1/4 f1/2
pThere is no sound during slow motion play-
back.
pWith some discs, images may be unclear
during slow motion playback.
pReversed slow motion playback is not possi-
ble.
Playing a DVD-VR disc
En 121
Chapter
20
Playing a DVD-VR disc
Using the “Function”menu
1 Touch [DISC] on the “AV Source”menu
to display the “DVD-VR”screen.
=For details concerning operations, refer to
Screen switching overview on page 34.
2 Touch the screen to display the touch
panel keys.
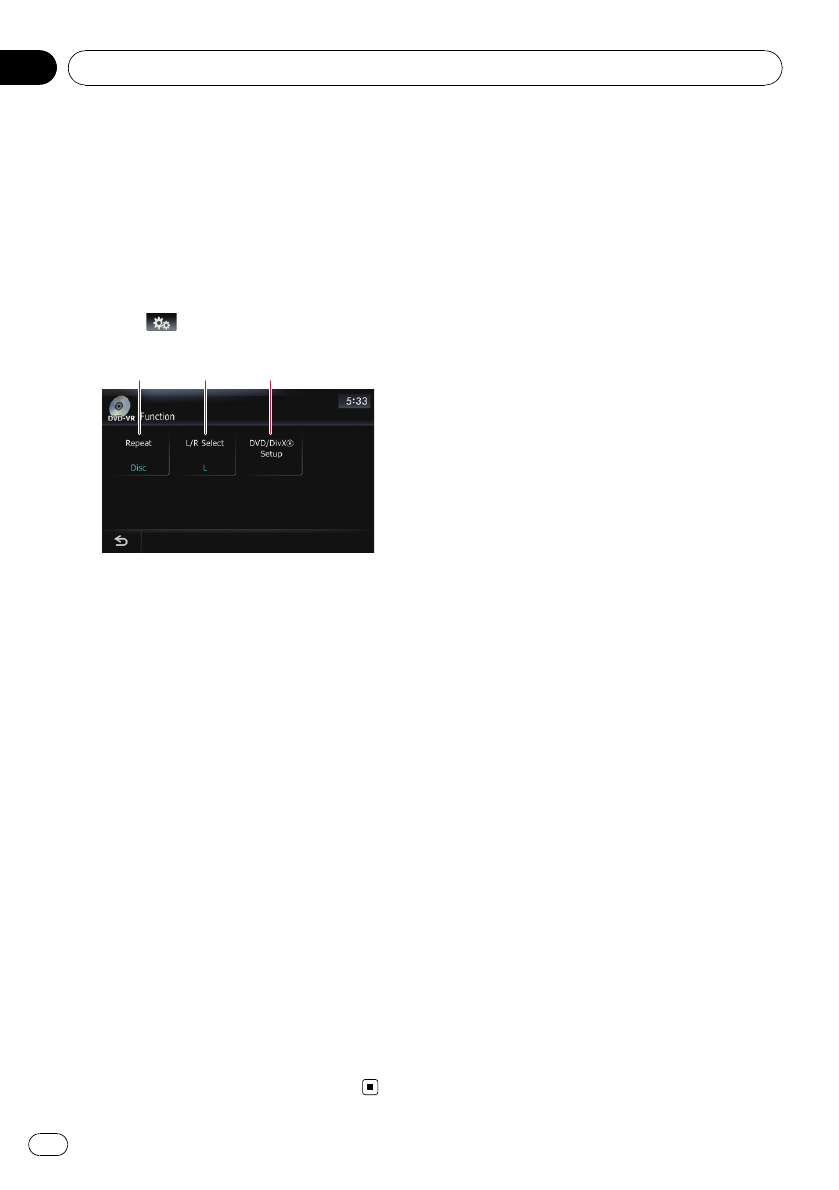
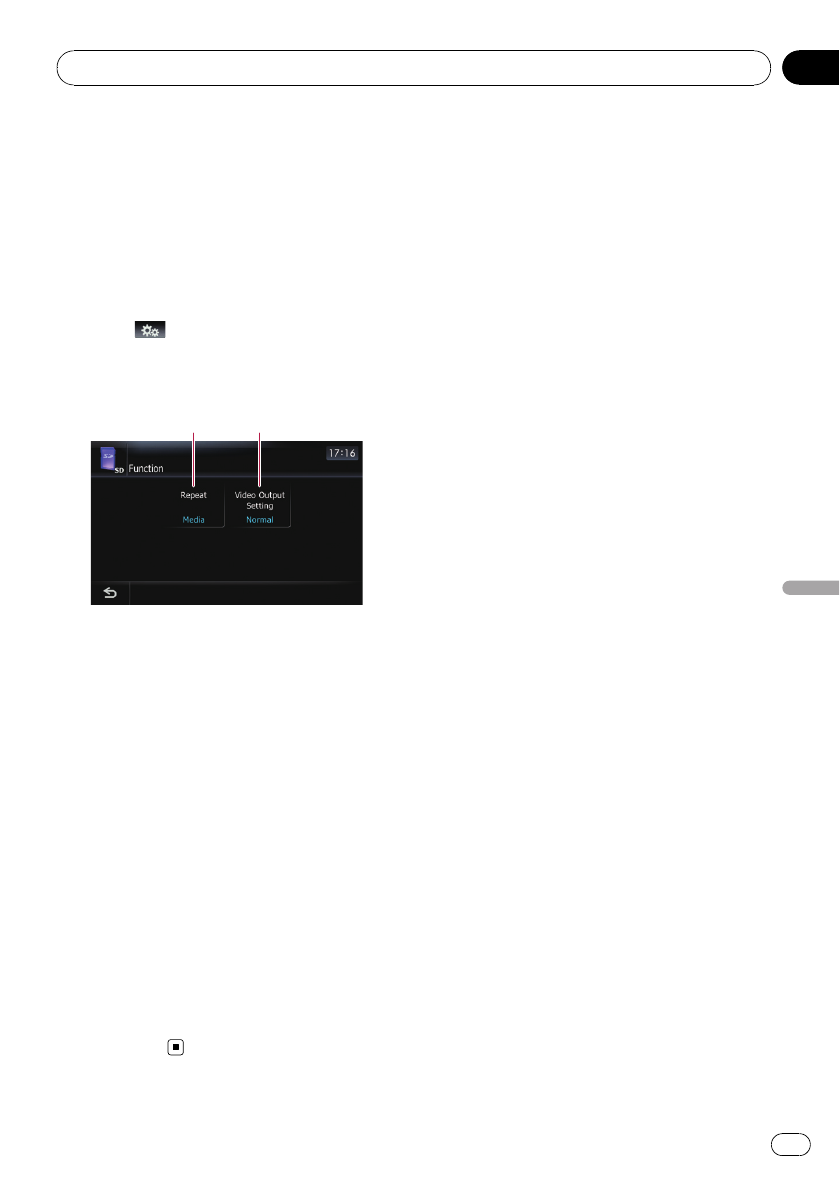
3 Touch .
Function menu
1 2 3
1Repeating play
Each touch of [Repeat] changes the setting
as follows:
!Title —Repeats just the current title
!Chapter —Repeats just the current
chapter
!Disc —Plays throughout the current
disc
pIf you perform chapter (title) search, fast
forward/rewind or slow motion playback,
the repeat play range changes to [Disc].
2Selecting audio output
When playing DVDs that both channels are
recorded in monaural, you can switch the
audio output. Touch [L/R Select] repeatedly
until the desired audio output appears in
the display.
!L+R —Left and right
!L—Left
!R—Right
!Mix —Mixing left and right
pThis function is not available when disc
playback has been stopped.
3DVD setup adjustments
=For details, refer to Displaying DVD/
DivX® Setup menu on page 126.
Playing a DVD-VR disc
En
122
Chapter
20
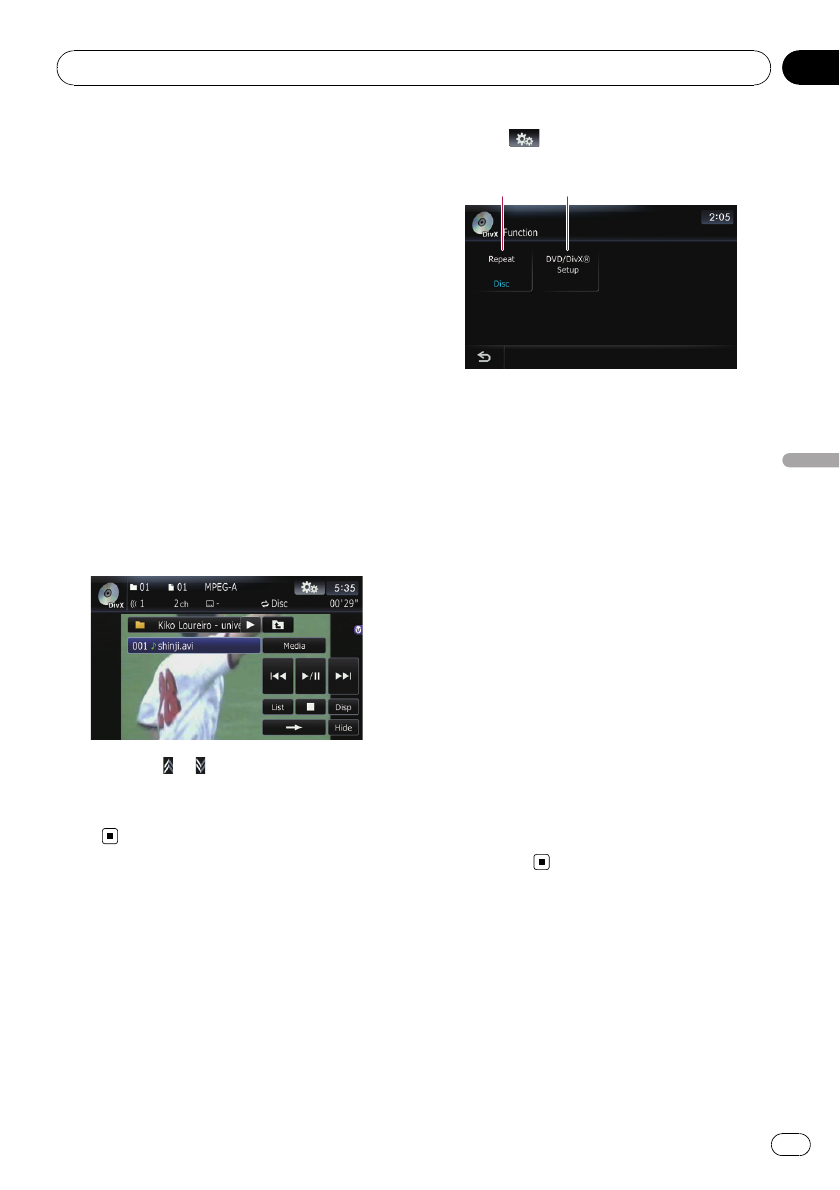
You can play a DivX disc using the built-in
drive of the navigation system. This section de-
scribes that operations.
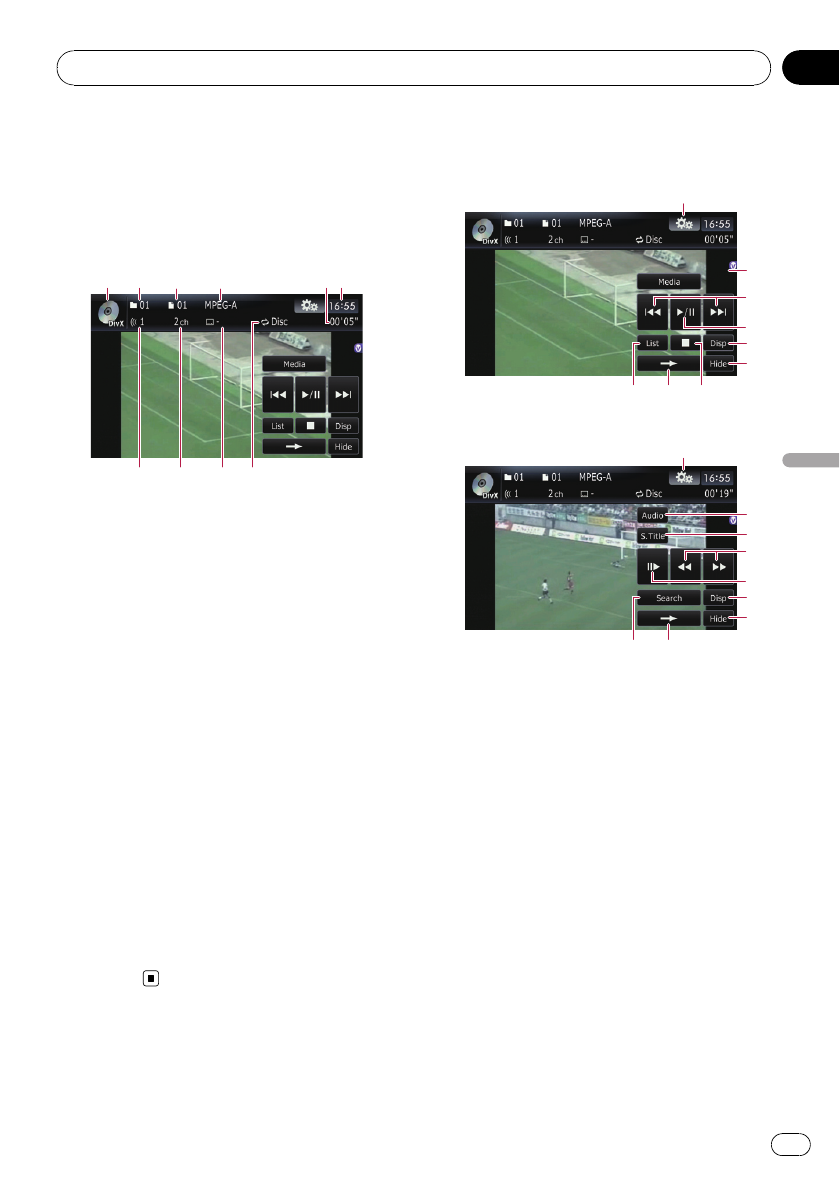
Reading the screen
1 2 43 65
879a
1Source icon
Shows which source has been selected.
2Folder number indicator
Shows the folder number currently playing.
3File number indicator
Shows the file number currently playing.
4Digital sound format indicator
Shows the digital sound format (surround
sound format) currently selected.
5Play time indicator
Shows the elapsed playing time of the current
file.
6Current time
7Audio track indicator
Shows the audio track number currently se-
lected.
8Audio channel indicator
Shows the current audio channel type, such
as “Mch”(Multi-channel).
9Subtitle number indicator
Shows the subtitle number currently selected.
aRepeat range indicator
Shows which repeat range has been
selected.
Using the touch panel keys
Playback screen (page1)
3
6
4
1
5
2
789
Playback screen (page2)
c
5
d
1
4
b
a
e7
pWith some discs, the icon 9may be dis-
played, meaning that the operation is not
valid.
1Display the “Function”menu
=For details, refer to Using the
“Function”menu on page 125.
2Switch the media file type played
When playing a disc containing a mixture of
various media file types, you can switch be-
tween media files types to play.
Touch [Media] repeatedly to switch between
the following media file types:
CD (audio data (CD-DA)) —ROM (com-
pressed audio file) —DivX (DivX video files)
pThis touch panel key appears only when
playing a disc containing a mixture of
various media file types.
3Skip forward or backward
Playing a DivX video
En 123
Chapter
21
Playing a DivX video
Touching [p] skips to the start of the next
file. Touching [o] once skips to the start of
the current file. Touching again will skip to the
previous file.
pYou can also perform these operations
by using TRK (c/d) button.
4Playback and Pause
Touching [f] switches between “playback”
and “pause”.
5Switch the information
Touching [Disp] changes the content of the in-
formation panel as follows:
Disc information display —Current folder dis-
play —File name display
6Hide the touch panel keys
Touching [Hide] hides the touch panel keys.
Touch anywhere on the LCD screen to display
the touch panel keys again.
7Display the title list
Displays the title list recorded on the disc.
8Switch next page of touch panel keys
9Stop playback
aChange audio tracks (Multi-audio)
Each touch of [Audio] switches between
audio tracks.
bChange the subtitle (Multi-subtitle)
Each touch of [S.Title] switches between the
subtitle languages.
cFast reverse or forward
Touch [m]or[n] to perform fast reverse or
forward.
If you touch and hold [m]or[n] for five
seconds, fast reverse/fast forward continues
even if you release either of these keys. To re-
sume playback at a desired point, touch
[f], [m]or[n] opposite to key pushed
for five seconds.
dFrame-by-frame playback (or slow-motion
playback)
=For details, refer to Frame-by-frame play-
back on this page.
=For details, refer to Slow motion playback
on this page.
eSearching for a desired scene and starting
playback from a specified time
=For details, refer to Searching for a speci-
fic scene and starting playback from a
specified time on this page.
Frame-by-frame playback
This lets you move ahead one frame at a time
during playback.
%Touch [r] during playback.
Each time you touch [r], you move ahead
one frame.
To return to normal playback, touch [f].
pWith some discs, images may be unclear
during frame-by-frame playback.
Slow motion playback
This lets you slow down playback speed.
%Touch and hold [r] until is dis-
played during playback.
The icon is displayed, and forward slow
motion playback begins.
pTo return to normal playback, touch [n]
or [m], etc.
pThere is no sound during slow motion play-
back.
pWith some discs, images may be unclear
during slow motion playback.
pReversed slow motion playback is not possi-
ble.
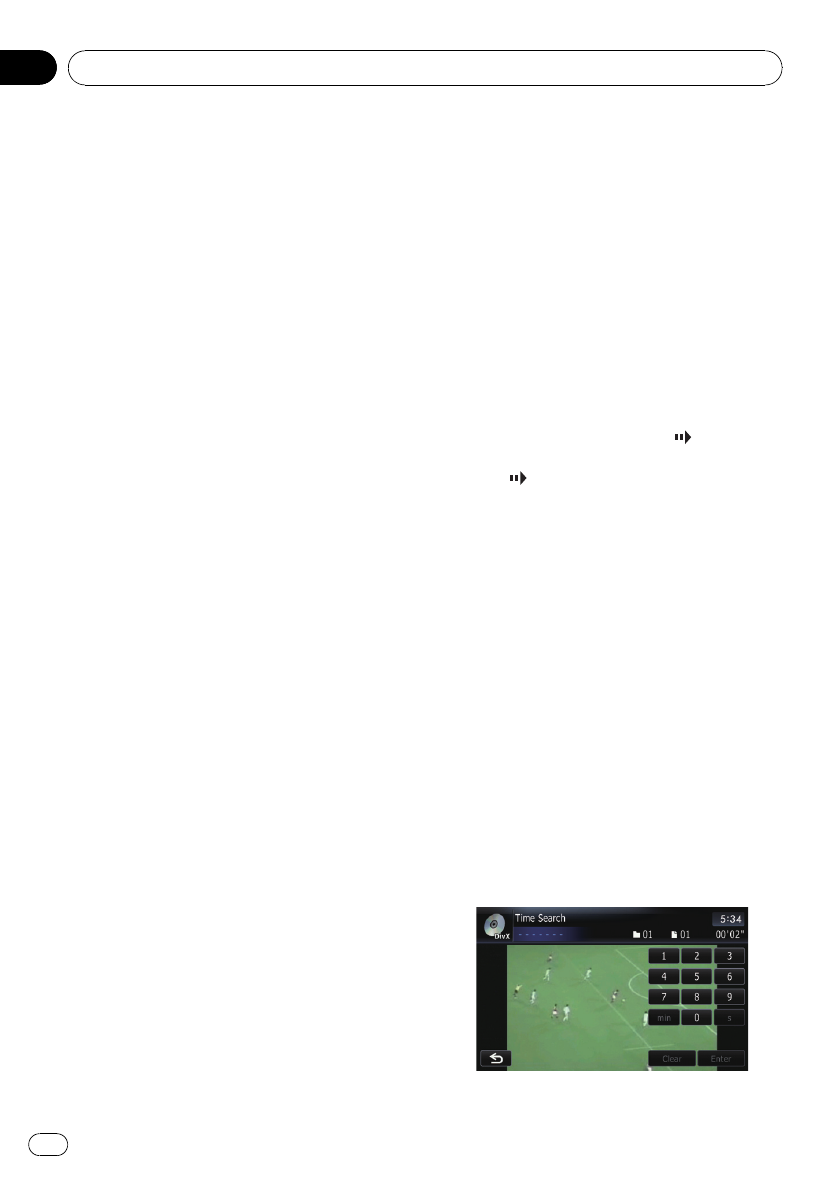
Searching for a specific scene
and starting playback from a
specified time
You can search for a desired scene by specify-
ing the time.
pTime search are not possible when disc
playback has been stopped.
1 Touch [Search].
Playing a DivX video
En
124
Chapter
21
2 Touch the keys to input the target num-
ber or time and then touch [Enter].
For time (time search)
!To select 5 minutes 03 seconds, touch [5],
[min], [0], [3] and [Enter] in order.
!To select 71 minutes 00 seconds, touch [7],
[1], [min], [0], [0] and [Enter] in order.
!To select 100 minutes 05 seconds, touch
[1], [0], [0], [5], [s] and [Enter] in order.
pTo cancel an input number, touch [Clear].
To cancel the input numbers, touch and
hold [Clear].
Playing by selecting from the
title list
You can select and play the title you want from
the list.
1 Touch [List] on the playback screen.
2 Touch the title to play from the list.
pTouching or switches the selection to
the next or previous page in the list.
3 To return to the previous screen, touch
[List].
Using the “Function”menu
1 Touch [DISC] on the “AV Source”menu
to display the “DivX”screen.
=For details concerning operations, refer to
Screen switching overview on page 34.
2 Touch the screen to display the touch
panel keys.
3 Touch .
Function menu
1 2
1Repeating play
Each touch of [Repeat] changes the setting
as follows:
!File —Repeat just the current file
!Folder —Repeat just the current folder
!Disc —Plays throughout the current
disc
pIf you select another folder during repeat
play, the repeat play range changes to
[Disc].
pIf you perform fast forward/rewind dur-
ing [File], the repeat play range changes
to [Folder].
pWhen [Folder] is selected, it is not pos-
sible to play back a subfolder of that
folder.
pWhen playing discs with compressed
audio files and audio data (CD-DA), re-
peat play is performed within DivX vi-
deos even if [Disc] is selected.
2DVD setup adjustments
=For details, refer to Displaying DVD/
DivX® Setup menu on the next
page.
Playing a DivX video
En 125
Chapter
21
Playing a DivX video
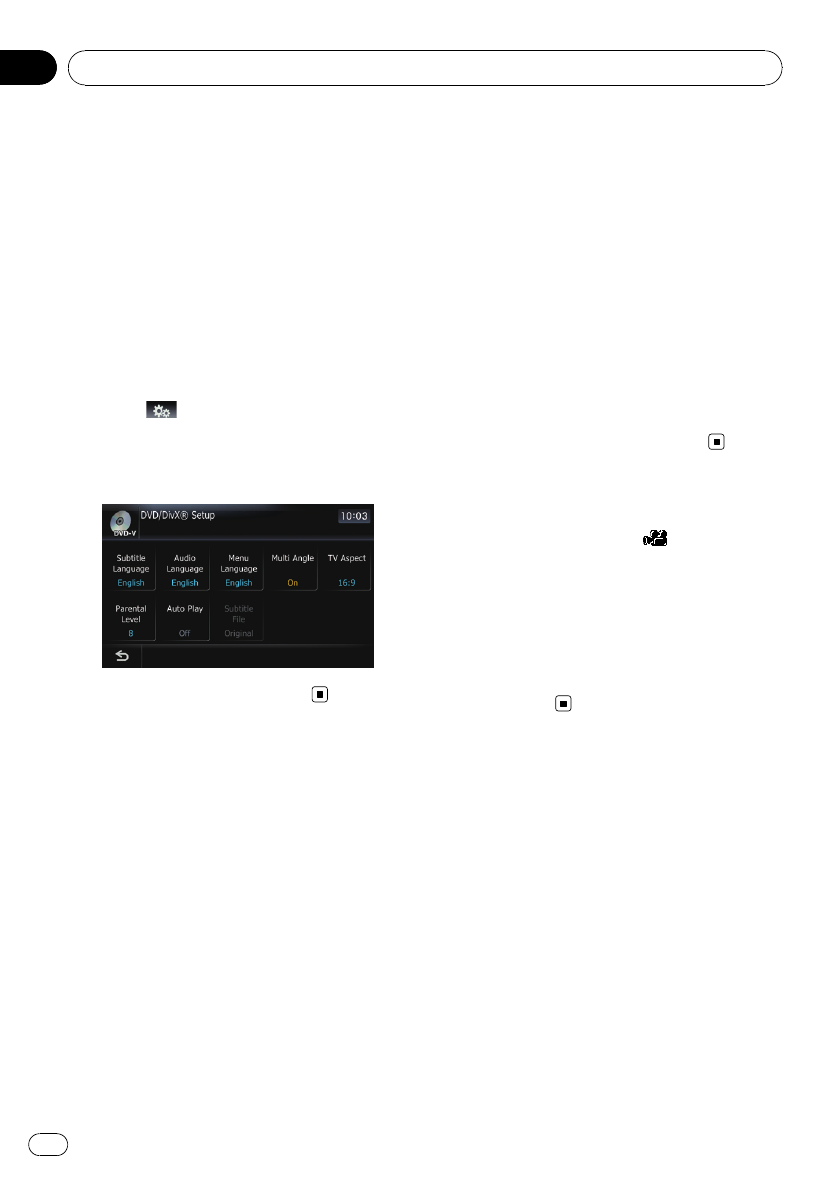
Configure the DVD-Video/DVD-VR/DivX player.
Displaying DVD/DivX® Setup
menu
1 Play the disc that contains DVD-Video,
DVD-VR or DivX.
2 Touch [DISC] on the “AV Source”menu
to display the normal playback screen.
=For details concerning operations, refer to
Screen switching overview on page 34.
3 Touch .
The “Function”menu appears.
4 Touch [DVD/DivX® Setup].
The “DVD/DivX® Setup”screen appears.
5 Touch the desired function.
Setting the top-priority
languages
You can assign the top-priority language to the
top-priority subtitle, audio and menu in initial
playback. If the selected language is recorded
on the disc, subtitles, audio and menu are dis-
played or output in that language.
1 Display the “DVD/DivX® Setup”screen.
=For details, refer to Displaying DVD/DivX®
Setup menu on this page.
2 Touch [Subtitle Language], [Audio Lan-
guage] or [Menu Language].
Each language menu is displayed and the cur-
rently set language is selected.
3 Touch the desired language.
When you select [Others], a language code
input display is shown. Input the four digit
code of the desired language then touch
[Enter].
=Refer to Language code chart for DVDs on
page 129.
pIf the selected language is not recorded on
the disc, the default language specified on
the disc is output and displayed.
pYou can also switch the subtitle and audio
language by touching [S.Title]or[Audio]
during playback.
pEven if you use [S.Title]or[Audio]to
switch the subtitle or audio language, this
does not affect the settings here.
Setting the angle icon display
You can set the angle icon to display in
scenes where the angle can be switched.
1 Display the “DVD/DivX® Setup”screen.
=For details, refer to Displaying DVD/DivX®
Setup menu on this page.
2 Touch [Multi Angle].
Touching [Multi Angle] switches between
[On] and [Off].
Setting the aspect ratio
There are two kinds of displays. A wide screen
display has a width-to-height ratio (TV aspect)
of 16:9, while a regular display has a TV aspect
of 4:3. If you use a regular rear display with a
TV aspect of 4:3, you can set the aspect ratio
suitable for your rear display. (We recommend
use of this function only when you want to fit it
to the rear display.)
pWhen using a regular display, select either
“Letter Box”or “Panscan”. Selecting
“16:9”may result in an unnatural picture.
1 Display the “DVD/DivX® Setup”screen.
=For details, refer to Displaying DVD/DivX®
Setup menu on this page.
DVD-Video, DVD-VR, DivX setup
En
126
Chapter
22
2 Touch [TV Aspect].
Each touch of [TV Aspect] changes the setting
as follows:
!16:9 —Wide screen picture (16:9) is dis-
played as it is (initial setting)
!Letter Box —The picture is in the shape of
a letter box with black bands at the top and
bottom of the screen
!Panscan —The picture is cut short at the
right and left of the screen
pWhen playing discs that do not have a pan-
scan system, the disc is played back with
[Letter Box] even if you select [Panscan]
setting. Confirm whether the disc package
bears the mark.
pSome discs do not enable changing of the
TV aspect. For details, refer to the disc’s in-
structions.
Setting the parental lock
Some DVD-Video discs let you use parental
lock to set restrictions so that children cannot
watch violent or adult-oriented scenes. You
can set the parental lock level in steps as de-
sired.
pWhen you set a parental lock level and then
play a disc featuring parental lock, code
number input indications may be dis-
played. In this case, playback will begin
when the correct code number is input.
Setting the code number and level
When you first use this function, register your
code number. If you do not register a code
number, parental lock will not operate.
1 Display the “DVD/DivX® Setup”screen.
=For details, refer to Displaying DVD/DivX®
Setup menu on the previous page.
2 Touch [Parental Level].
3 Touch [0] to [9] to input a four digit
code number.
4 While the input number is displayed,
touch [Enter].
The code number is registered, and you can
now set the level.
5 Touch any of [1] to [8] to select the de-
sired level.
The parental lock level is set.
!Level 8 —Playback of the entire disc is
possible (initial setting)
!Level 7 to Level 2 —Playback of discs for
children and non-adult oriented discs is
possible
!Level 1 —Only playback of discs for chil-
dren is possible
pIf you want to change the parental level al-
ready set, enter the registered code number
and then select the parental level.
pWe recommend that you keep a record of
your code number in case you forget it.
pThe parental lock level is recorded on the
disc. You can confirm it by looking at the
disc package, the included literature or the
disc itself. You cannot use parental lock
with discs that do not feature a recorded
parental lock level.
pWith some discs, parental lock operates to
skip certain scenes only, after which normal
playback resumes. For details, refer to the
disc’s instructions.
pIf you forget the registered code number,
touch [Clear] 10 times on the number input
screen. The registered code number is can-
celed, letting you register a new one.
Setting “Auto Play”
When a DVD disc with DVD menu is inserted,
this unit will cancel the DVD menu automati-
cally and start playback from the first chapter
of the first title.
pThis function is available for DVD-Video.
pSome DVDs may not operate properly. If
this function is not fully operable, turn this
function off and start playback.
DVD-Video, DVD-VR, DivX setup
En 127
Chapter
22
DVD-Video, DVD-VR, DivX setup

1 Display the “DVD/DivX® Setup”screen.
=For details, refer to Displaying DVD/DivX®
Setup menu on page 126.
2 Touch [Auto Play].
Touching [Auto Play] switches this setting be-
tween [On] and [Off].
pNew translation required.
Setting the subtitle file for
DivX
You can select whether to display DivX exter-
nal subtitles or not.
pIf no DivX external subtitle files exist, the
original DivX subtitles are displayed even
when [Custom] is selected.
1 Display the “DVD/DivX® Setup”screen.
=For details, refer to Displaying DVD/DivX®
Setup menu on page 126.
2 Touch [Subtitle File].
Touching [Subtitle File] switches this setting
between [Original] and [Custom].
pUp to 42 characters can be displayed on
one line. If more than 42 characters are set,
the line breaks and the characters are dis-
played on the next line.
pUp to 126 characters can be displayed on
one screen. If more than 126 characters are
set, the excess characters will not be dis-
played.
pThe DivX subtitles will be displayed even
when the subtitle file setting is on if no cor-
responding subtitle files exist.
pUp to three lines can be displayed at
once.
DVD-Video, DVD-VR, DivX setup
En
128
Chapter
22

Language code chart for DVDs
Language (code), input code Language (code), input code Language (code), input code
Japanese (ja), 1001 Guarani (gn), 0714 Pashto, Pushto (ps), 1619
English (en), 0514 Gujarati (gu), 0721 Quechua (qu), 1721
French (fr), 0618 Hausa (ha), 0801 Rhaeto-Romance (rm), 1813
Spanish (es), 0519 Hindi (hi), 0809 Kirundi (rn), 1814
German (de), 0405 Croatian (hr), 0818 Rumanian (ro), 1815
Italian (it), 0920 Hungarian (hu), 0821 Kinyarwanda (rw), 1823
Chinese (zh), 2608 Armenian (hy), 0825 Sanskrit (sa), 1901
Dutch (nl), 1412 Interlingua (ia), 0901 Sindhi (sd), 1904
Portuguese (pt), 1620 Interlingue (ie), 0905 Sango (sg), 1907
Swedish (sv), 1922 Inupiak (ik), 0911 Serbo-Croatian (sh), 1908
Russian (ru), 1821 Indonesian (in), 0914 Shinghalese (si), 1909
Korean (ko), 1115 Icelandic (is), 0919 Slovak (sk), 1911
Greek (el), 0512 Hebrew (iw), 0923 Slovenian (sl), 1912
Afar (aa), 0101 Yiddish (ji), 1009 Samoan (sm), 1913
Abkhazian (ab), 0102 Javanese (jw), 1023 Shona (sn), 1914
Afrikaans (af), 0106 Georgian (ka), 1101 Somali (so), 1915
Amharic (am), 0113 Kazakh (kk), 1111 Albanian (sq), 1917
Arabic (ar), 0118 Greenlandic (kl), 1112 Serbian (sr), 1918
Assamese (as), 0119 Cambodian (km), 1113 Siswati (ss), 1919
Aymara (ay), 0125 Kannada (kn), 1114 Sesotho (st), 1920
Azerbaijani (az), 0126 Kashmiri (ks), 1119 Sundanese (su), 1921
Bashkir (ba), 0201 Kurdish (ku), 1121 Swahili (sw), 1923
Belorussian (be), 0205 Kirghiz (ky), 1125 Tamil (ta), 2001
Bulgarian (bg), 0207 Latin (la), 1201 Telugu (te), 2005
Bihari (bh), 0208 Lingala (ln), 1214 Tajik (tg), 2007
Bislama (bi), 0209 Laotian (lo), 1215 Thai (th), 2008
Bengali, Bangla (bn), 0214 Lithuanian (lt), 1220 Tigrinya (ti), 2009
Tibetan (bo), 0215 Latvian, Lettish (lv), 1222 Turkmen (tk), 2011
Breton (br), 0218 Malagasy (mg), 1307 Tagalog (tl), 2012
Catalan (ca), 0301 Maori (mi), 1309 Setswana (tn), 2014
Corsican (co), 0315 Macedonian (mk), 1311 Tongan (to), 2015
Czech (cs), 0319 Malayalam (ml), 1312 Turkish (tr), 2018
Welsh (cy), 0325 Mongolian (mn), 1314 Tsonga (ts), 2019
Danish (da), 0401 Moldavian (mo), 1315 Tatar (tt), 2020
Bhutani (dz), 0426 Marathi (mr), 1318 Twi (tw), 2023
Esperanto (eo), 0515 Malay (ms), 1319 Ukrainian (uk), 2111
Estonian (et), 0520 Maltese (mt), 1320 Urdu (ur), 2118
Basque (eu), 0521 Burmese (my), 1325 Uzbek (uz), 2126
Persian (fa), 0601 Nauru (na), 1401 Vietnamese (vi), 2209
Finnish (fi), 0609 Nepali (ne), 1405 Volapük (vo), 2215
Fiji (fj), 0610 Norwegian (no), 1415 Wolof (wo), 2315
Faroese (fo), 0615 Occitan (oc), 1503 Xhosa (xh), 2408
Frisian (fy), 0625 Oromo (om), 1513 Yoruba (yo), 2515
Irish (ga), 0701 Oriya (or), 1518 Zulu (zu), 2621
Scottish Gaelic (gd), 0704 Panjabi (pa), 1601
Galician (gl), 0712 Polish (pl), 1612
DVD-Video, DVD-VR, DivX setup
En 129
Chapter
22
DVD-Video, DVD-VR, DivX setup
You can play the compressed audio files
stored in the external storage device (USB,
SD).
pIn the following description, the SD mem-
ory card and USB memory device are col-
lectively referred to as the “external storage
device (USB, SD)”. If it indicates the USB
memory device only, it is referred to as the
“USB storage device”.
Starting procedure
1 Insert the SD memory card into the SD
card slot or plug the USB storage device
into the USB connector.
=For details, refer to Plugging in a USB sto-
rage device on page 30.
=For details, refer to Inserting and ejecting an
SD memory card on page 29.
2 Touch [USB] or [SD] on the “AV Source”
menu to display the “USB”or “SD”screen.
pPlayback is performed in order of folder
number. Folders are skipped if they con-
tains no playable files. (If there are no play-
able files in folder 001 (root folder),
playback starts from folder 002.)
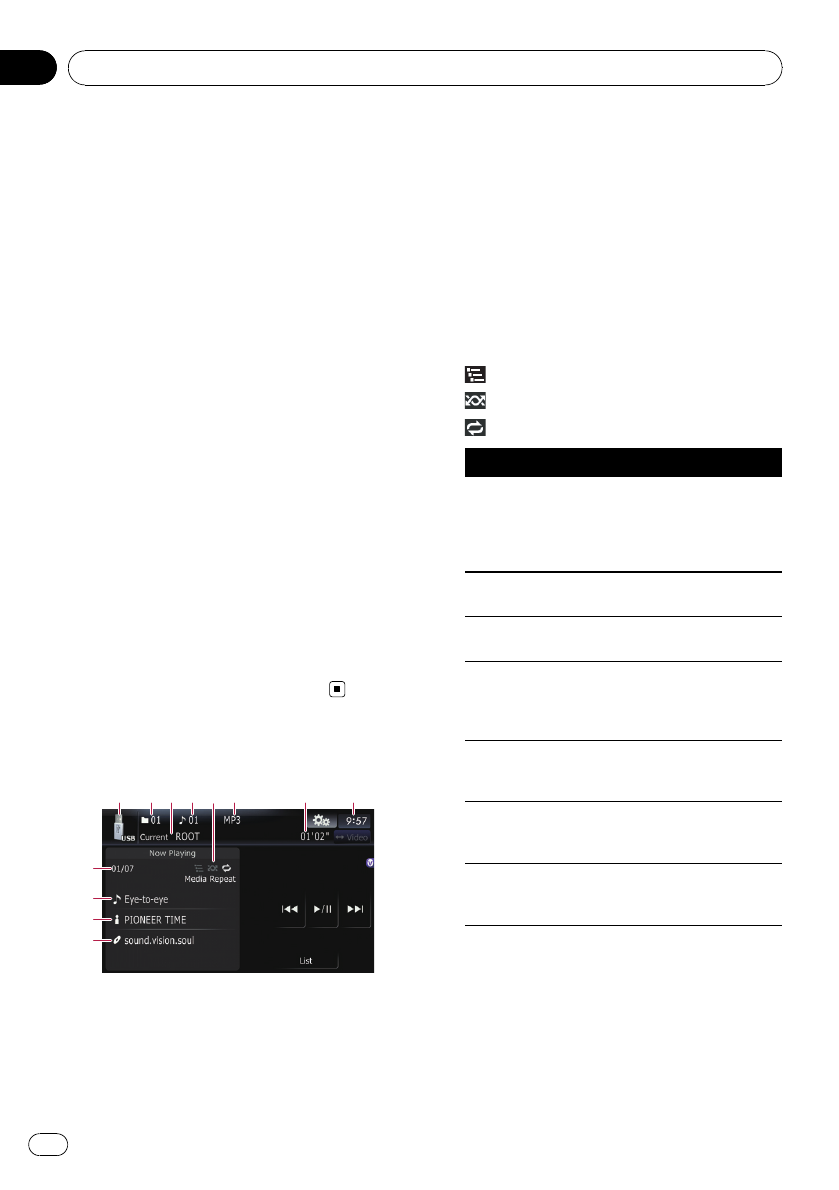
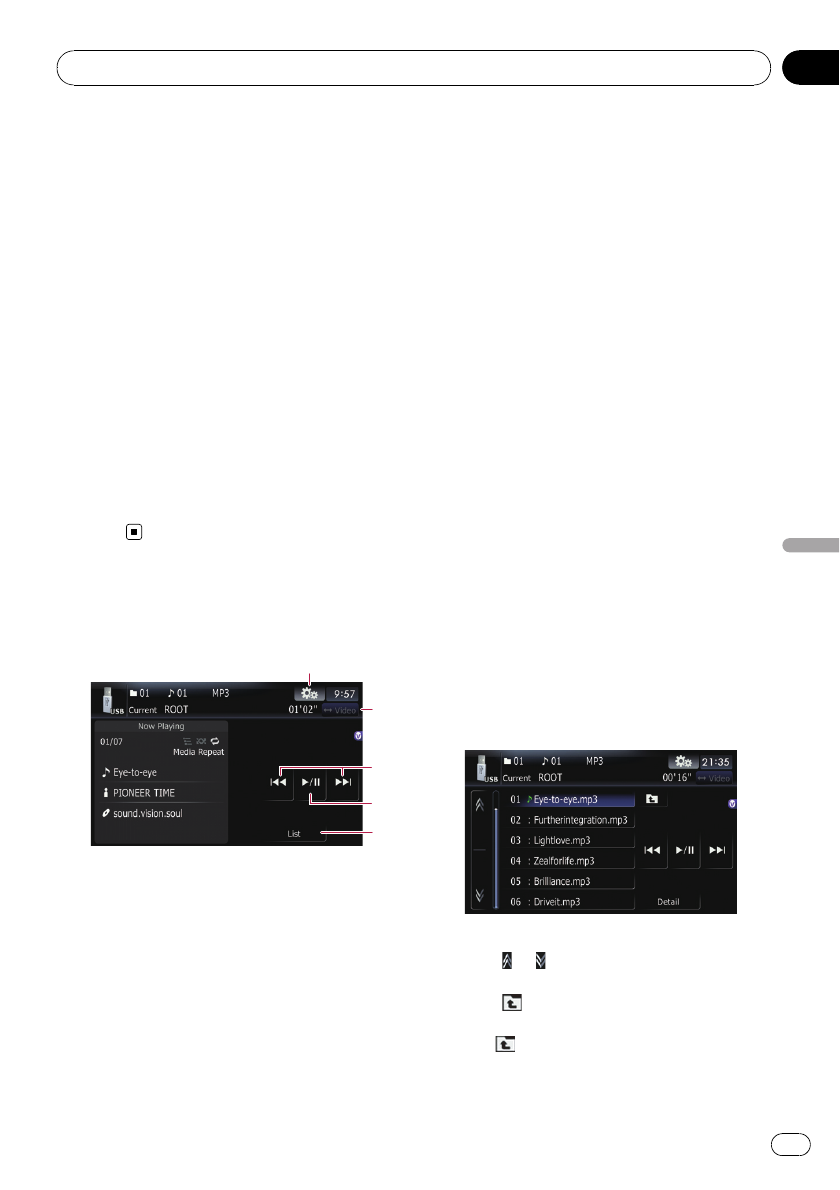
Reading the screen
1 2 3 4 65 87
9
c
a
b
pThis unit may not achieve optimum perfor-
mance with some external storage devices.
pYou can playback the files on a USB sto-
rage device compliant with Mass Storage
Class. For details about the USB Class,
refer to the manual supplied with USB sto-
rage device.
1Source icon
Shows which source has been selected.
2Folder number indicator
3Current folder name indicator
Shows the folder name currently playing.
4File number indicator
5Playback condition indicator
The marks shown below appears and indi-
cates the current playback condition.
: Scan play
: Random play
: Repeat play
Indicator Meaning
Media Repeat
All audio files in the current
external storage device
(USB, SD) are played repeat-
edly. This is the default con-
dition.
Folder Repeat The current folder is played
repeatedly.
Track Repeat The current file is played re-
peatedly.
Media Random
All audio files in the current
external storage device
(USB, SD) are played in ran-
dom order.
Folder Random
All audio files in the current
folder are played in random
order.
Media Scan
The beginning of each audio
file is played for about 10
seconds.
Folder Scan
The beginning of each track
in the current folder is
played for about 10 seconds.
=For more information, refer to Using the
“Function”menu on page 132.
6File type indicator
Shows the type of audio file currently playing.
7Play time indicator
Shows the elapsed playing time within the
current track.
8Current time
Playing music files (from USB or SD)
En
130
Chapter
23
9Current file number and total number of
files
Shows the file number currently played and
the total number of playable audio files.
aTrack title indicator*
Shows the title of the track currently playing
(when available).
!New translation required.
bArtist name indicator*
Shows the artist name currently playing
(when available).
cAlbum title indicator*
Shows the title of the album for the current
track (when available).
pThe information marked with an asterisk (*)
is displayed only when the information has
been encoded on the compressed audio
files. If specific information has not been
encoded on the files, “—” is displayed in-
stead.
Using the touch panel keys
(Music)
2
5
3
1
4
1Display the “Function”menu
=For details, refer to Using the
“Function”menu on the next page.
2Switch the operation screen
Touching this key switches between the
screen to operate music files and the screen
to operate video files. This touch panel key is
available only when there are both audio and
video files in the external storage device (USB,
SD).
3Skip forward or backward
Touching [p] skips to the start of the next
file. Touching [o] once skips to the start of
the current file. Touching again will skip to the
previous file.
Fast reverse or forward
Touch and hold [o]or[p] to fast rewind
or fast forward.
pThere is no sound on fast reverse or for-
ward.
pYou can also perform these operations
by using the TRK (c/d) button.
4Playback and Pause
Touching [f] switches between playback
and pause.
Selecting a track from the list
The list lets you see the list of track titles or
folder names on an external storage device
(USB, SD). Touch a folder on the list to view its
contents. Touch a track on the list to play that
track.
1 Touch [List].
Contents of the folder in which the currently
playing file is located are displayed.
#Touch and hold [List].
New translation required.
2 Touch the folder that you want to view.
The track currently playing is highlighted.
Touching or switches the selection to the
next or previous page in the list.
Touching displays the content of the upper
folder (parent folder). If the uppermost folder
is listed, cannot be used.
Playing music files (from USB or SD)
En 131
Chapter
23
Playing music files (from USB or SD)
3 Touch the track you want to play.
pTo cancel the list screen, touch [Detail].
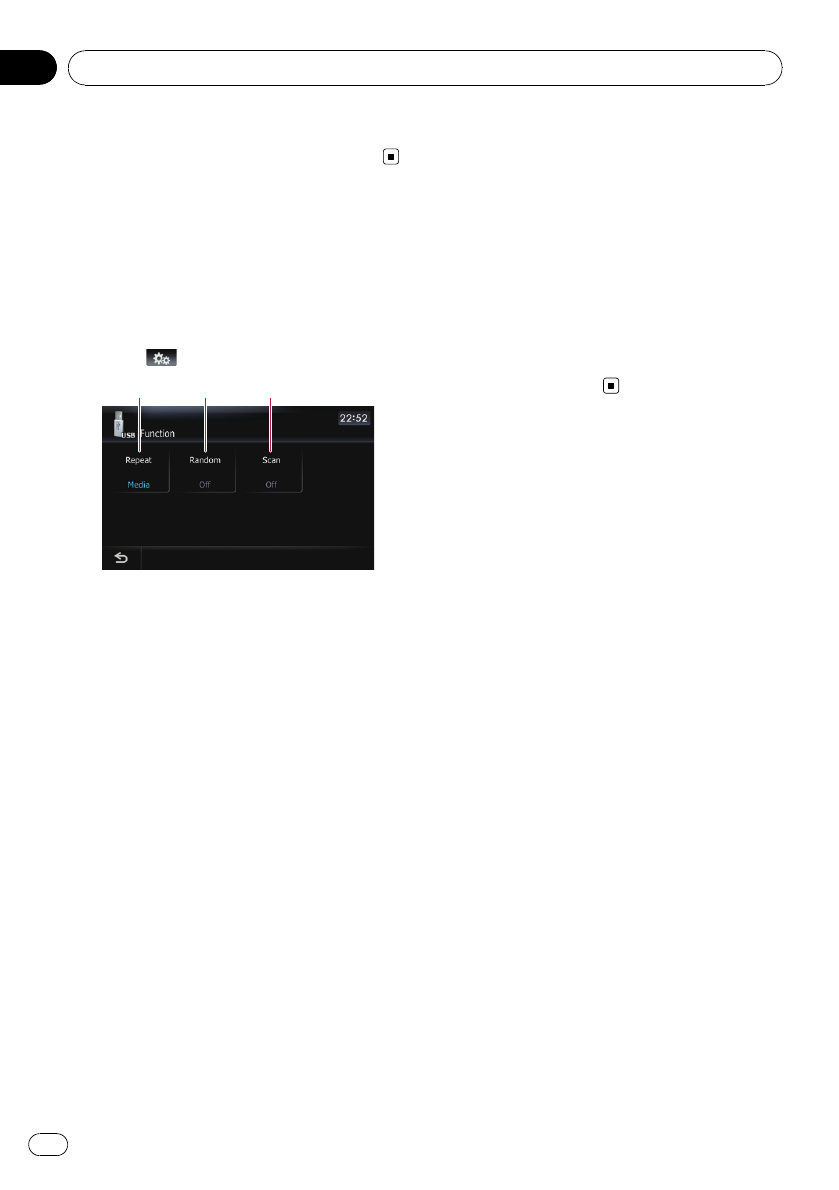
Using the “Function”menu
1 Touch [USB] or [SD] on the “AV Source”
menu to display the “USB”or “SD”screen.
=For details concerning operations, refer to
Screen switching overview on page 34.
2 Touch .
1 2 3
1Repeating play
Each touch of [Repeat] changes the setting
as follows:
!Media —Repeat all compressed audio
files in the selected external storage de-
vice (USB, SD)
!Track —Repeat just the current track
!Folder —Repeat the current folder
pIf you skip the file forward or backward
when the repeat play range in “Track”,
the repeat play range changes to
“Folder”.
2Play tracks in a random order
Random play lets you playback tracks in
random order within the current repeat
range.
Touching [Random] switches between “On”
and “Off”.
pIf you turn [Random]to“On”while the
repeat play range is set to “Track”, the
repeat play range changes to “Folder”
automatically.
3Scan folders and tracks
Scan play lets you hear the first 10 seconds
of each track. Scan play is performed in the
current repeat play range.
Touching [Scan] switches between “On”
and “Off”. When you find the track you
want, touch [Scan] to turn scan play off.
pAfter all tracks or folders scanning are
finished, normal playback will begin
again.
pIf you turn [Scan]to“On”while the re-
peat play range is set to “Track”, the re-
peat play range changes to “Folder”
automatically.
Playing music files (from USB or SD)
En
132
Chapter
23
You can play the video files stored in the exter-
nal storage device (USB, SD).
pIn the following description, the SD mem-
ory card and USB memory device are col-
lectively referred to as the “external storage
device (USB, SD)”. If it indicates the USB
memory device only, it is referred to as the
“USB storage device”.
Starting procedure
1 Insert the SD memory card into the SD
card slot or plug the USB storage device
into the USB connector.
=For details, refer to Plugging in a USB sto-
rage device on page 30.
=For details, refer to Inserting and ejecting an
SD memory card on page 29.
2 Touch [USB] or [SD] on the “AV Source”
menu to display each operation screen.
pPlayback is performed in order of folder
number. Folders are skipped if they con-
tains no playable files. (If there are no play-
able files in folder 001 (root folder),
playback starts from folder 002.)
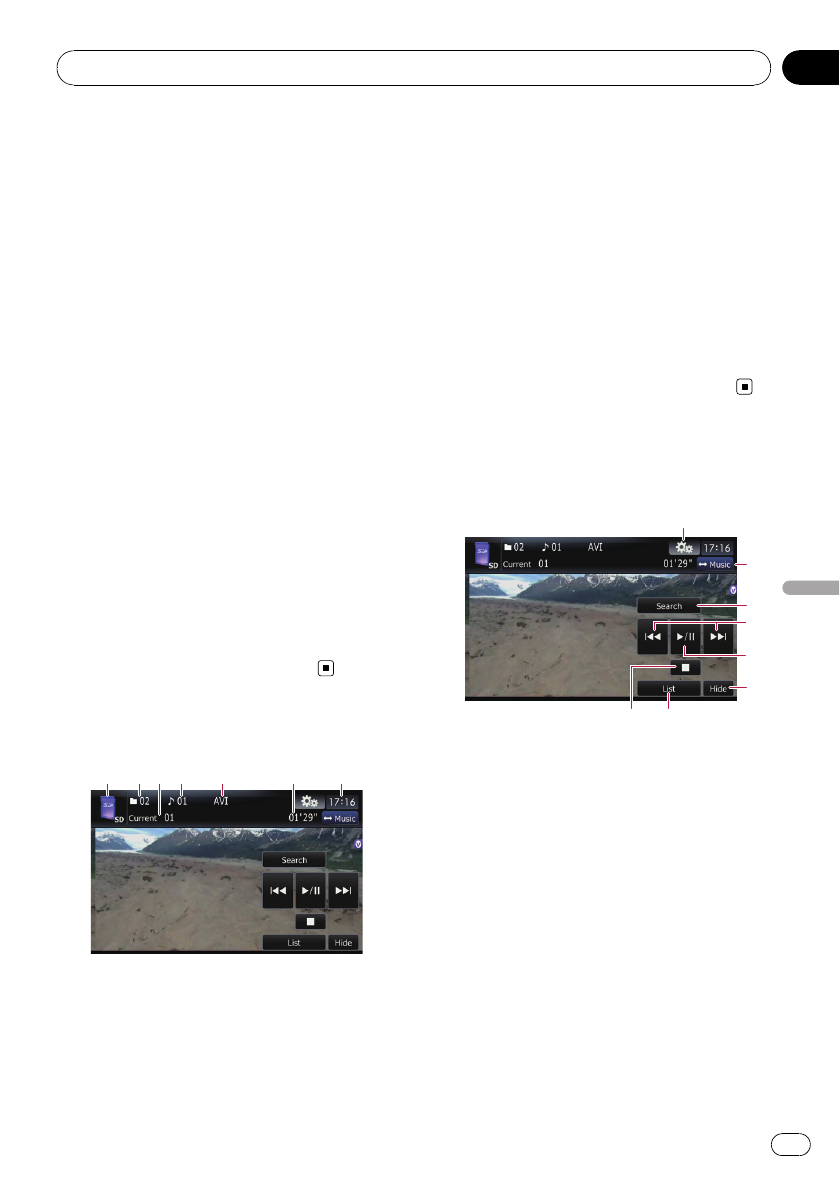
Reading the screen
1 2 3 4 5 76
pThis unit may not achieve optimum perfor-
mance with some external storage devices.
pYou can playback the files on a USB sto-
rage device compliant with Mass Storage
Class. For details about the USB Class,
refer to the manual supplied with USB sto-
rage device.
1Source icon
Shows which source has been selected.
2Folder number indicator
3File number indicator
4File type indicator
Shows the type of audio file currently playing.
5Play time indicator
Shows the elapsed playing time within the
current track.
6Current folder name indicator
Shows the folder name currently playing.
Using the touch panel keys
(Video)
2
3
6
78
4
1
5
1Display the “Function”menu
=For details, refer to Using the
“Function”menu on page 135.
2Switch the operation screen
Touching this key switches between the
screen to operate music files and the screen
to operate video files. This touch panel key is
available only when there are both audio and
video files in the external storage device (USB,
SD).
3Searching for a desired scene and starting
playback from a specified time
=For details, refer to Searching for a speci-
fic scene and starting playback from a
specified time on the next page.
4Skip forward or backward
Playing video files (from USB or SD)
En 133
Chapter
24
Playing video files (from USB or SD)
Touching [p] skips to the start of the next
file. Touching [o] once skips to the start of
the current file. Touching again will skip to the
previous file.
Fast reverse or forward
Touch and hold [o]or[p] to fast rewind
or fast forward.
pThere is no sound on fast reverse or for-
ward.
pYou can also perform these operations
by using the TRK (c/d) button.
5Playback and Pause
Touching [f] switches between playback
and pause.
6Hide the touch panel keys
Touching [Hide] hides the touch panel keys.
Touch anywhere on the LCD screen to display
the touch panel keys again.
7Stop playback
8Display the title list
Displays the title list recorded on the external
storage device (USB, SD).
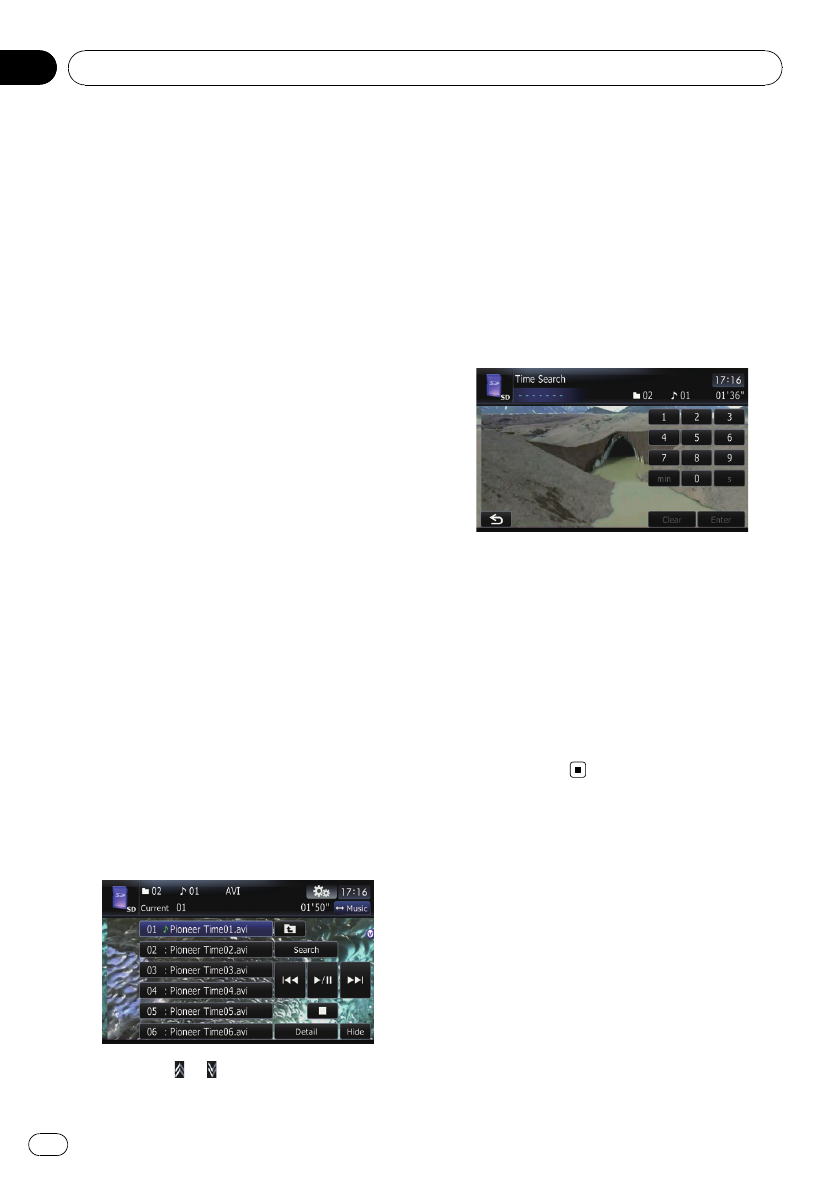
Playing by selecting from the
title list
You can select and play the title you want from
the list.
1 Touch [List] on the playback screen.
Contents of the folder in which the currently
playing file is located are displayed.
#Touch and hold [List].
New translation required.
2 Touch the title to play from the list.
pTouching or switches the selection to
the next or previous page in the list.
3 To return to the previous screen, touch
[Detail].
Searching for a specific scene
and starting playback from a
specified time
You can search for a desired scene by specify-
ing the time.
1 Touch [Search].
2 Touch the keys to input the target num-
ber or time and then touch [Enter].
!To select 5 minutes 03 seconds, touch [5],
[min], [0], [3] and [Enter] in order.
!To select 71 minutes 00 seconds, touch [7],
[1], [min], [0], [0] and [Enter] in order.
!To select 100 minutes 05 seconds, touch
[1], [0], [0], [5], [s] and [Enter] in order.
pTo cancel an input number, touch [Clear].
To cancel the input numbers, touch and
hold [Clear].
Playing video files (from USB or SD)
En
134
Chapter
24
Using the “Function”menu
1 Touch [USB] or [SD] on the “AV Source”
menu to display the “USB”or “SD”screen.
=For details concerning operations, refer to
Screen switching overview on page 34.
2 Touch the screen to display the touch
panel keys.
3 Touch .
pIf the touch panel keys are not shown,
touch anywhere on the screen to display
them.
1 2
1Repeating play
Each touch of [Repeat] changes the setting
as follows:
!Media —Repeat all video files in the se-
lected external storage device (USB, SD)
!File —Repeat just the current file
!Folder —Repeat the current folder
pIf you skip the file forward or backward
when the repeat play range in “Track”,
the repeat play range changes to
“Folder”.
2Changing the screen size of video
If a video file is played, you can select the
display mode between normal and full
screen.
Each touch of [Video Output Setting]
changes the setting as follows:
!Normal —Video files appear in normal
size.
!Full —Video files appear in a full-
screen
Playing video files (from USB or SD)
En 135
Chapter
24
Playing video files (from USB or SD)
Using the USB interface cable for iPod en-
ables you to connect your iPod to the naviga-
tion system.
pA USB interface cable for iPod (CD-IU50V)
(sold separately) is required for connection.
Starting procedure
%Connect your iPod.
The source changes and then playback will
start.
=For details, refer to Connecting your iPod on
page 31.
pIf the iPod is already connected, touch
[iPod] on the “AV Source”menu.
=For details concerning operations, refer to
Screen switching overview on page 34.
pNo video output if iPod is selected as AV
source, check the setting in “AV1 Input”on
the “AV System Settings”menu.
=For details, refer to Setting video input 1
(AV1)on page 159.
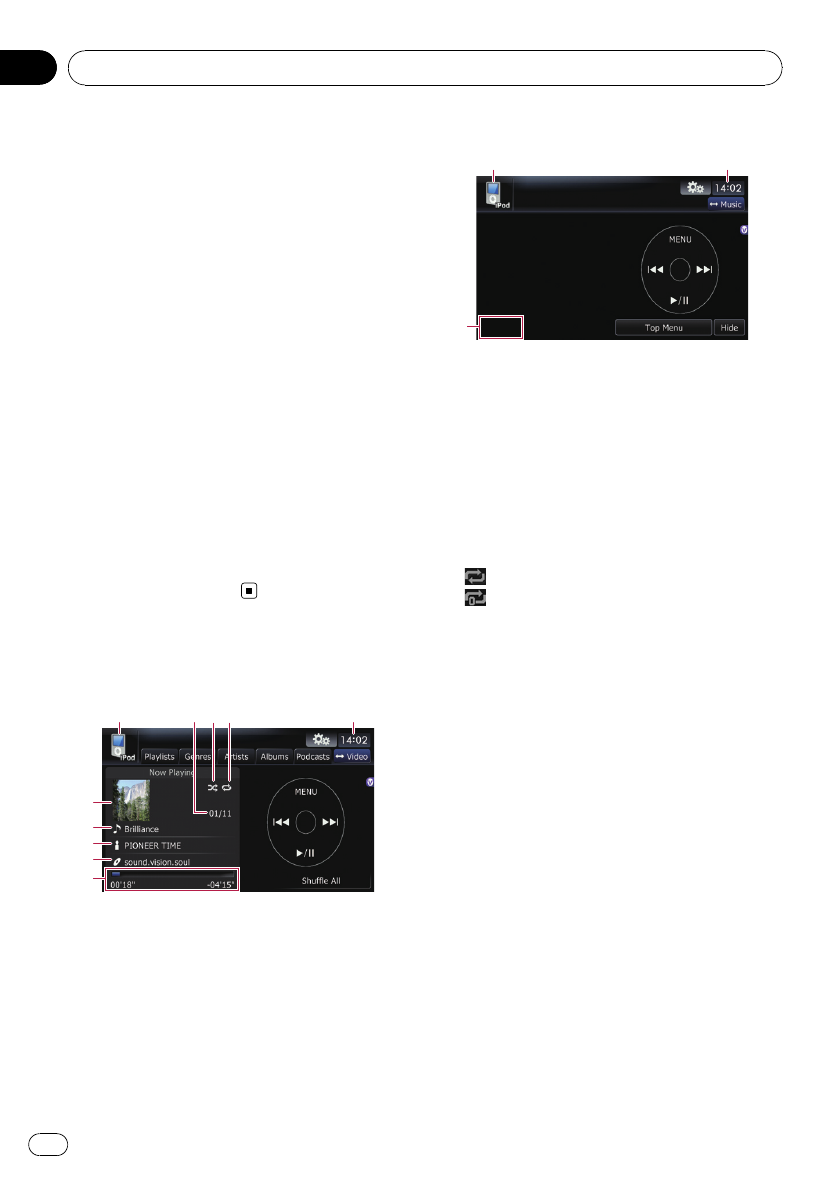
Reading the screen
Music
1243
6
5
8
9
a
7
Video
1
d
6
1Source icon
Shows which source has been selected.
2Song number indicator
Shows the number of the song currently play-
ing and total number of songs in the selected
list.
3Shuffle play indicator
Appears when shuffle play is activated.
4Repeat play indicator
Appears when repeat play is activated.
: All-tracks repeat
: One-track repeat
5Current time
6Album artwork
Album art of the current song is displayed if it
is available.
7Song title (episode) indicator
Shows the title of the current song. When a
podcast is played, the episode is displayed.
8Artist name (podcast title) indicator
Shows the artist name currently playing.
When a podcast is played, the podcast title is
displayed.
9Album title (release date) indicator
Shows the title of the album for the song.
When a podcast is played, the release date is
displayed.
aPlay time indicator
Shows the elapsed playing time within the
current song.
bChapter number indicator
Shows the current chapter number and total
number of chapters when the video with chap-
ters played.
Using an iPod (iPod)
En
136
Chapter
25
pIf characters recorded on the iPod are not
compatible with this navigation system,
they may turn into garbled characters.
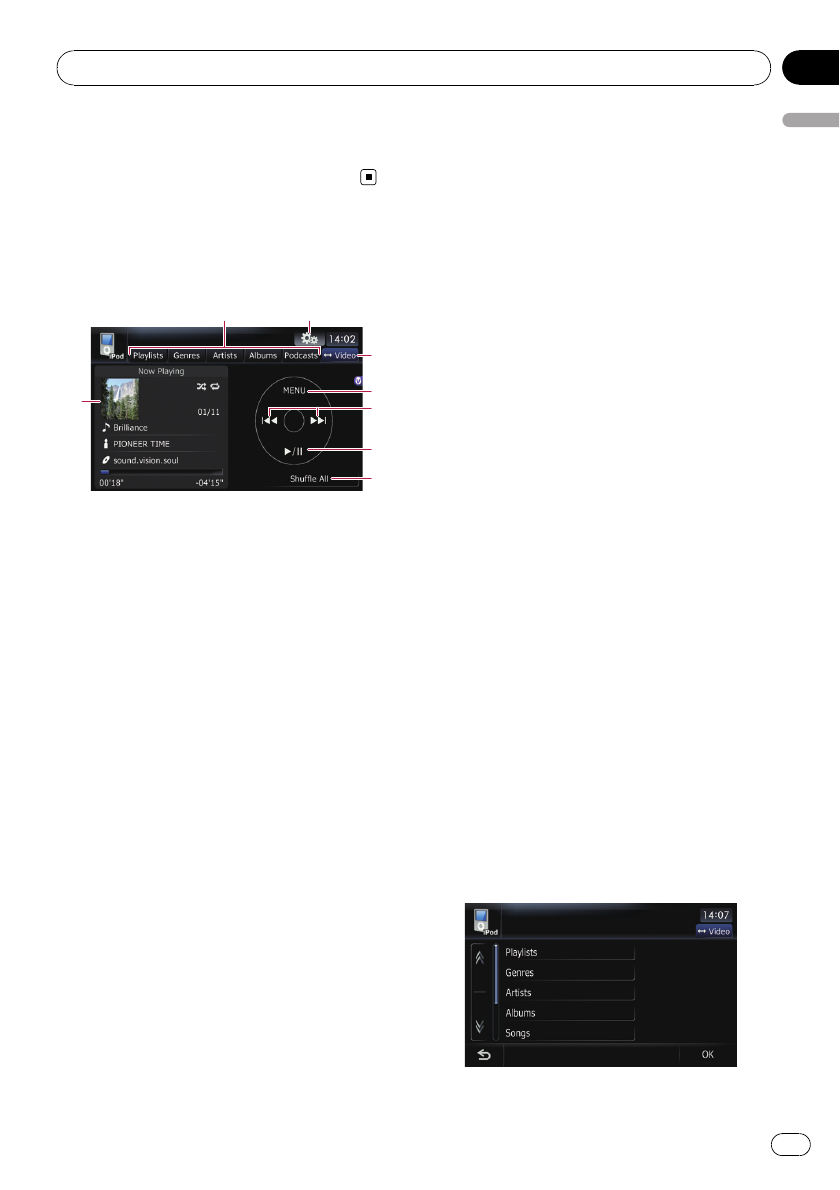
Using the touch panel keys
(Music)
3
7
8
6
5
4
1
2
1Album artwork
Touch the key to enlarge the album artwork. If
you touch again, the artwork returns to its nor-
mal size.
2Category tabs
Shows the list to narrow down the songs. If
you want to use the list of “Audiobooks”,
“Composers”or “Songs”, touch [Menu]to
display the lists.
3Display the “Function”menu
=For details, refer to Using the
“Function”menu on page 140.
4Switch the operation screen
Touching this key switches between the
screen to operate music files and the screen
to operate video files. After you touch the key,
the top category menu appears to let you se-
lect the item for playback.
pThis touch panel key is available only
when there are both audio and video file
in your iPod.
5Display the top category menu
Touching the key displays the top category be-
fore you use the category tabs. If you select
the song using the category tabs to play,
touching the key displays the previous list.
6Skip back or forward to another song
Touching [p] skips to the start of the next
song. Touching [o] once skips to the start
of the current song. Touching again will skip
to the previous song. When the track with
chapters played, chapter can be skipped back
and forward.
Fast reverse or forward
Touch and hold [o]or[p] to fast rewind
or fast forward.
pYou can also perform these operations
by using the TRK (c/d) button.
7Playback and Pause
Touching [f] switches between playback
and pause.
8Shuffle All
All songs (except for the track in “Audio-
books”and “Podcasts”) in your iPod can be
played randomly.
pTo cancel the random play, switch
[Shuffle] on the “Function”menu to the
“Off”.
Browsing for a song
Touch an item on list to search for a song and
play it on your iPod.
Narrowing down listed songs
1 Touch your desired category tab to dis-
play the song or track list.
!Playlists (playlists)
!Genres (genres)
!Artists (artists)
!Albums (albums)
!Podcasts (podcasts)
The search screen is displayed.
Using an iPod (iPod)
En 137
Chapter
25
Using an iPod (iPod)
2 Touching or switches the selection
to the next or previous page in the list.
3 Touch the item that you want to refine.
Refine the item until the track title is displayed
on the list.
pTouching [All] on the list includes all op-
tions in the current list. For example, if you
touch [All] after touching [Artists], you can
proceed to the next screen with all artists in
the list selected.
pAfter you select Artists,Albums,or
Genres, go on to touch one of the list to
start playing the first songs in the selected
list and display the next options.
4 On the song (or episode) list, touch the
track you want to play.
pAfter you select the track using this func-
tion, touching [Menu] displays the list pre-
viously selected.
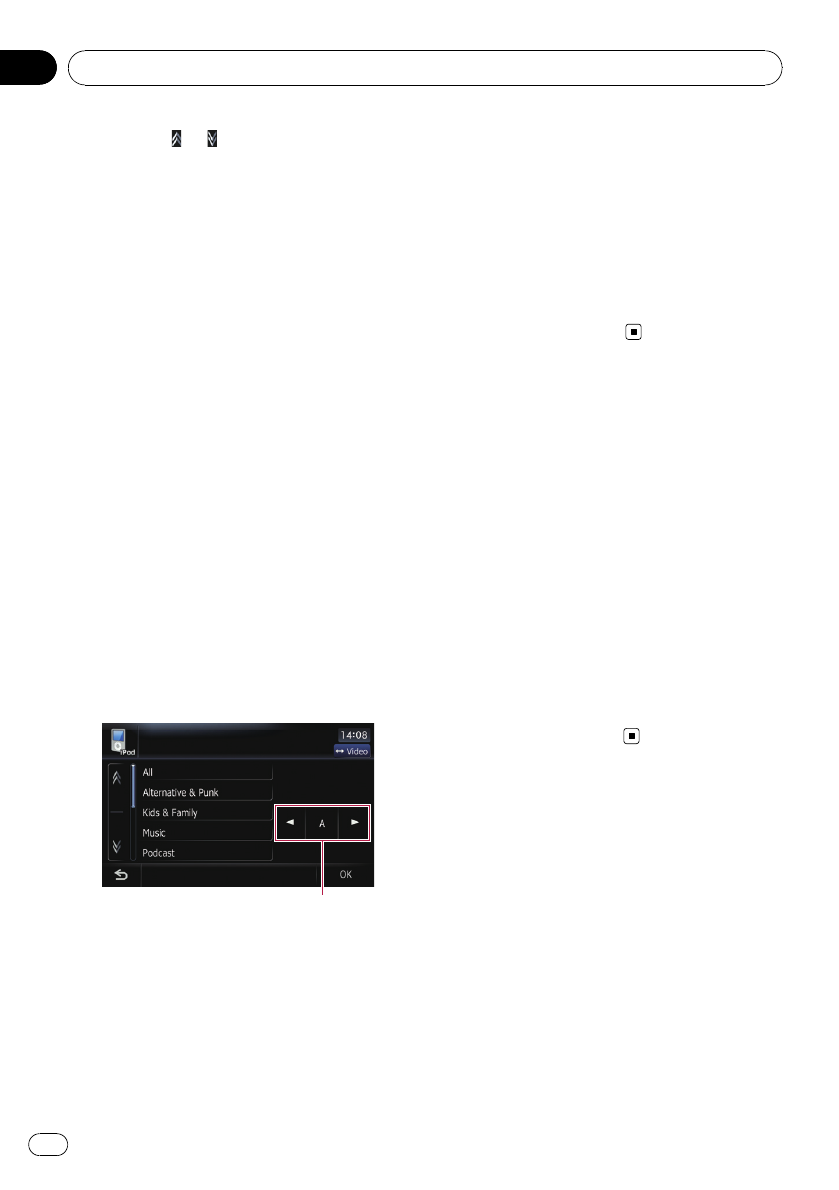
Searching for applicable items
alphabetically
Using the search control displays the page
which includes the first applicable option.
pThis function is available for the alphabeti-
cal list only.
Search control
1 Touch your desired category tab to dis-
play the list.
2 Touch the item that you want to refine.
3 Touch [c]or[d] to select the character.
pAn article listed below and space at the be-
ginning of the artist name will be ignored
and the next character will be taken into ac-
count for searching.
—“A”or “a”
—“AN”,“An”,or“an”
—“THE”,“The”,or“the”
4 Touch the character key to display the
page which includes applicable options.
5 On the song (or episode) list, touch the
track you want to play.
Operating this navigation
system's iPod function
from your iPod
This navigation system’s iPod function can be
operated from your iPod. Sound can be heard
from the car’s speakers, and operation can be
conducted from your iPod.
This function can be operated with the follow-
ing iPod models:
Even if [Change Control Mode] is set to
[iPod], following functions are available from
this navigation system.
!Playback and Pause
!Fast reverse or forward
!Skip forward or backward
!Adjusting the volume
Starting the video playback
This navigation system can play video if an
iPod with video capabilities is connected.
1 Touch [Video].
Using an iPod (iPod)
En
138
Chapter
25
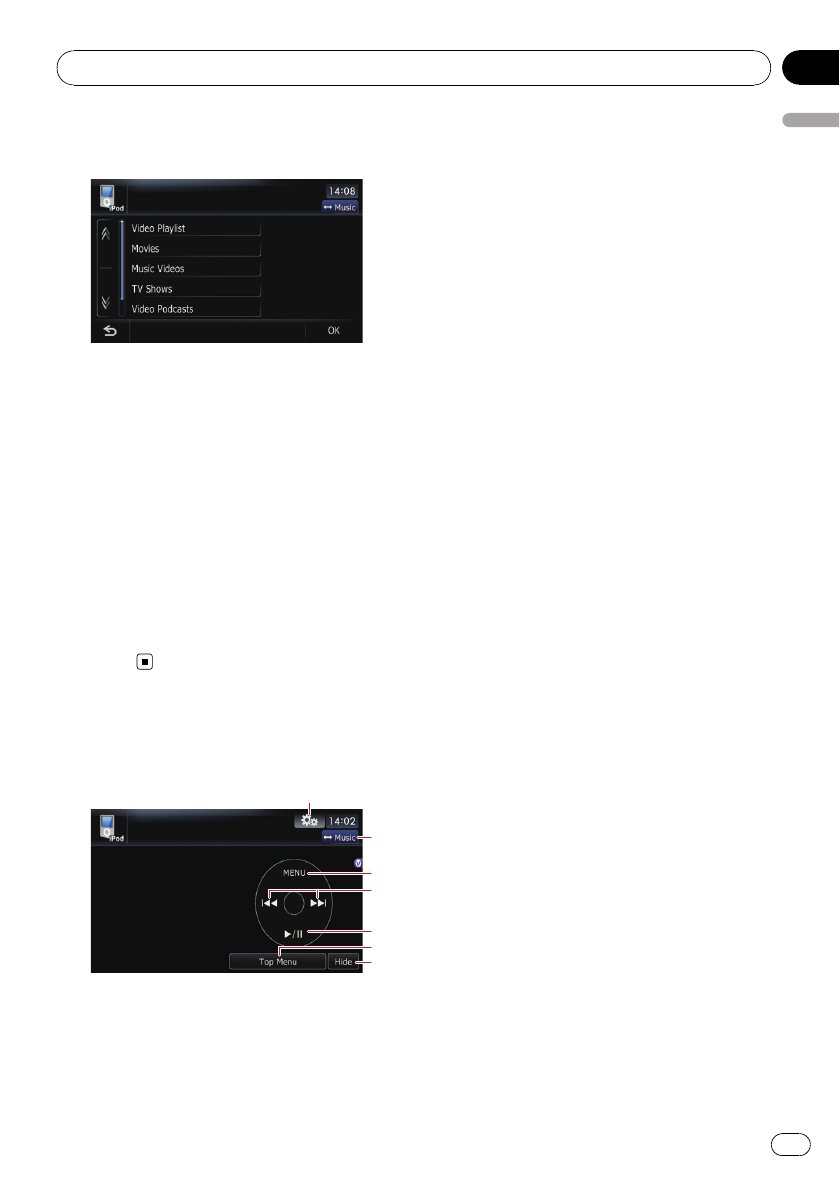
2 Touch one of the categories in that con-
tains the video you want to play.
Video playback will start.
3 Touch your desired item on the list to
narrow down them until the video list ap-
pears.
=For details concerning operations, refer to
Browsing for a video on this page.
4 On the video list, touch the video you
want to play.
5 Touch the screen to display the touch
panel keys.
=For more details of the operation, refer to
Using the touch panel keys (Video)on this
page.
Using the touch panel keys
(Video)
1
5
7
4
3
3
6
1Display the “Function”menu
=For details, refer to Using the
“Function”menu on the next page.
2Switch the operation screen
Touching this key switches between the
screen to operate music files and the screen
to operate video files. After you touch the key,
the top category menu appears to let you se-
lect the item for playback.
pThis touch panel key is available only
when there are both audio and video file
in your iPod.
3Display the previous selected list
If you select the video from the list to play
after touching Top Menu, touching the key
displays the previous list.
4Skip back or forward to another song
Touching [p] skips to the start of the next
video. Touching [o] once skips to the start
of the current video. Touching again will skip
to the previous video. When the video with
chapters played, chapter can be skipped back
and forward.
Fast reverse or forward
Touch and hold [o]or[p] to fast rewind
or fast forward.
If you touch and hold [o]or[p] for five
seconds, fast reverse/fast forward continues
even if you release either of these keys. To re-
sume playback at a desired point, touch
[f], [o]or[p].
pYou can also perform these operations
by using the TRK (c/d) button.
5Playback and Pause
Touching [f] switches between playback
and pause.
6Display the top category menu for video
Touching the key displays the top category for
video playback.
7Hide the touch panel keys
Touching [Hide] hides the touch panel keys.
Touch anywhere on the LCD screen to display
the touch panel keys again.
Browsing for a video
Touching the item on list allows you to search
for a video and play it in your iPod.
Using an iPod (iPod)
En 139
Chapter
25
Using an iPod (iPod)