Realtek Semiconductor RTL8188CE 802.11b/g/n RTL8188CE miniCard User Manual
Realtek Semiconductor Corp. 802.11b/g/n RTL8188CE miniCard Users Manual
Contents
- 1. User Manual
- 2. Warning Statements inside Users Manual
- 3. Users Manual
- 4. Manual host
- 5. manual module
- 6. user manual I
- 7. user manual II
- 8. User Manual module
Warning Statements inside Users Manual
Lenovo(Japan), Ltd., Date: July 15, 2010
Document Number: UY610-03-0063-53
User’s Manual
The attachment is the user’s manual for the specific Lenovo host PC device in this application that
consists of the following three sections.
1. The regulatory notice concerning the FCC Part 2 /15B /15C and IC RSS-102/210, ICES-003 for the
applying WLAN transmitter device (FCC ID: TX2-RTL8188CE,
IC: 6317A-RTL8188CE).
2. Reference only:
The regulatory notice concerning the FCC Part 2 /15B /22H /24E and IC RSS-102/132 /133,
ICES-003 for a WWAN transmitter device incorporated in the host PC device.
3. Screen copies of electronic user’s guidance referred to in the above regulatory notices, which are
displayed on the LCD screen of the host PC device.
fi1. Regulatory notice for WLAN / Bluetooth transmitter devices

7KLQN3DG 5HJXODWRU\ 1RWLFH
$ERXW WKLV PDQXDO
7KLV PDQXDO FRQWDLQV UHJXODWRU\ LQIRUPDWLRQ IRU WKH IROORZLQJ 7KLQN3DGŪ SURGXFWV
š 7KLQN3DG ;H DQG 7KLQN3DG 0LQL
5HDG ıUVW Š UHJXODWRU\ LQIRUPDWLRQ
5HDG WKLV GRFXPHQW EHIRUH XVLQJ \RXU FRPSXWHU 7KLV FRPSXWHU FRPSOLHV ZLWK
WKH UDGLR IUHTXHQF\ DQG VDIHW\ VWDQGDUGV RI DQ\ FRXQWU\ RU UHJLRQ LQ ZKLFK LW KDV
EHHQ DSSURYHG IRU ZLUHOHVV XVH ,QVWDOO DQG XVH \RXU FRPSXWHU DFFRUGLQJ WR WKH
IROORZLQJ LQVWUXFWLRQV
,I \RXU FRPSXWHU FRQWDLQV D ZLUHOHVV :$1 DGDSWHU EH VXUH WR DOVR UHDG 7KLQN3DG
5HJXODWRU\ 1RWLFH IRU WKH :LUHOHVV :$1 $GDSWHU LQFOXGHG ZLWK \RXU FRPSXWHU
7KH ODWHVW 5HJXODWRU\ 1RWLFH KDV EHHQ XSORDGHG RQ WKH :HE VLWH 7R UHIHU WR LW JR
WR KWWSZZZOHQRYRFRPWKLQNVXSSRUW FOLFN 7URXEOHVKRRWLQJ DQG WKHQ FOLFN
8VHUV JXLGHV DQG PDQXDOV
9HXLOOH] OLUH OH SUÜVHQW GRFXPHQW DYDQW GXWLOLVHU YRWUH RUGLQDWHXU &HW RUGLQDWHXU
HVW FRQIRUPH DX[ QRUPHV GH IUÜTXHQFH UDGLR HW GH VÜFXULWÜ GH WRXV OHV SD\V RX
UÜJLRQV GDQV OHVTXHOV VRQ XWLOLVDWLRQ VDQV ıO D ÜWÜ KRPRORJXÜH ,QVWDOOH] HW XWLOLVH]
ORUGLQDWHXU HQ UHVSHFWDQW OHV LQVWUXFWLRQV TXL VXLYHQW
6L YRWUH RUGLQDWHXU FRQWLHQW XQH FDUWH GH UÜVHDX ÜWHQGX :$1 VDQV ıO YHLOOH] Ç OLUH
ÜJDOHPHQW OD FRQVLJQH UÜJOHPHQWDLUH 7KLQN3DG 5HJXODWRU\ 1RWLFH IRU WKH :LUHOHVV
:$1 $GDSWHU IRXUQLH DYHF YRWUH RUGLQDWHXU
/D YHUVLRQ OD SOXV UÜFHQWH GH OD 1RWLFH UHODWLYH Ç OD UÜJOHPHQWDWLRQ D ÜWÜ FKDUJÜH VXU
OH VLWH :HE 3RXU OD FRQVXOWHU DFFÜGH] Ç KWWSZZZOHQRYRFRPWKLQNVXSSRUW
FOLTXH] VXU 7URXEOHVKRRWLQJ SXLV VXU 8VHUV JXLGHV DQG PDQXDOV
86$ Š )HGHUDO &RPPXQLFDWLRQV &RPPLVVLRQ )&&
, $SSURYHG ZLUHOHVV GHYLFHV
7KLV VHFWLRQ SUHVHQWV WKH )&& ,' DQG PRGHO QXPEHU RI HDFK ZLUHOHVV GHYLFH
L 8VHU LQVWDOODEOH ZLUHOHVV /$1:L0$; DGDSWHU
š )&& ,' 7;57/6(/ 0RGHO 57/6(
š )&& ,' 7;57/&( 0RGHO 57/&(
š )&& ,' 4'6%5&0 0RGHO %&0+06

š )&& ,' 3'$1;+8 0RGHO $1;+0:
š )&& ,' 3'%1+8 0RGHO %1+0:
1RWH 3&, ([SUHVV 0LQL &DUGV IRU D ZLUHOHVV /$1 PDUNHWHG LQ WKH 86$ DQG
&DQDGD GR QRW VXSSRUW RU IXQFWLRQ LQ WKH H[WHQGHG FKDQQHOV FK FK
š 7KH 3&, ([SUHVV 0LQL &DUG 0RGHO $1;+0: LQFRUSRUDWHV WZR IXQFWLRQV
/$1 DQG :L0$; 7KHVH IXQFWLRQV RSHUDWH H[FOXVLYHO\ DQG GR QRW WUDQVPLW
UDGLR IUHTXHQFLHV VLPXOWDQHRXVO\
LL 3UHLQVWDOOHG LQWHJUDWHG %OXHWRRWK GHYLFH
š )&& ,' 4'6%5&0 0RGHO %&00'B/(12
,, 8VHU LQVWDOODEOH ZLUHOHVV /$1:L0$; DGDSWHU
L 8VH RI WKH ZLUHOHVV /$1:L0$; DGDSWHU
,I QR LQWHJUDWHG 3&, ([SUHVV 0LQL &DUG KDV EHHQ SUHLQVWDOOHG LQ \RXU FRPSXWHU
\RX FDQ LQVWDOO RQH SURYLGHG E\ /HQRYRŪ DV DQ RSWLRQ 3OXJ WKH ZLUHOHVV RSWLRQ
DGDSWHU LQWR WKH 3&, ([SUHVV 0LQL &DUG VORW )RU WKH LQVWDOODWLRQ SURFHGXUH VHH
,QVWDOOLQJ DQG UHSODFLQJ WKH 3&, ([SUHVV 0LQL &DUG IRU ZLUHOHVV /$1:L0$;
FRQQHFWLRQ LQ $FFHVV +HOS
$WWHQWLRQ 7KH FRPSXWHU FRQWDLQV DQ DXWKHQWLFDWLRQ PHFKDQLVP ,I \RX LQVWDOO
DQ XQDXWKRUL]HG 3&, ([SUHVV 0LQL &DUG WKDW LV QRW DSSURYHG IRU XVH LQ \RXU
FRPSXWHU WKH FRPSXWHU ZLOO QRW VWDUW EXW RQO\ GLVSOD\V DQ HUURU PHVVDJH DQG
HPLWV DXGLEOH EHHSV
LL )&& ,' ORFDWLRQ
7KHUH LV QR )&& ,' IRU WKH 3&, ([SUHVV 0LQL &DUG VKRZQ RQ WKH HQFORVXUH RI
\RXU FRPSXWHU ,QVWHDG \RX ZLOO ıQG DQ LQGLFDWRU SRLQWLQJ WR WKH ORFDWLRQ RI WKH
)&& ,' RQ WKH ERWWRP RI \RXU FRPSXWHU 7KH )&& ,' LV DIı[HG RQ WKH DSSURYHG
DGDSWHU LQVWDOOHG LQ WKH 3&, ([SUHVV 0LQL &DUG VORW DQG WKH )&& ,' LV YLVLEOH SULRU
WR LQVWDOODWLRQ )RU WKH ORFDWLRQ RI WKH )&& ,' LQGLFDWRU DQG WKH VORW VHH /RFDWLRQ
RI WKH )&& ,' DQG ,& &HUWLıFDWLRQ QXPEHU ODEHO LQ $FFHVV +HOS
LLL )&& 5) ([SRVXUH FRPSOLDQFH
7KH UDGLDWHG HQHUJ\ IURP WKH DQWHQQDV FRQQHFWHG WR WKH 3&, ([SUHVV 0LQL &DUG
FRQIRUPV WR WKH )&& OLPLW RI WKH 6$5 6SHFLıF $EVRUSWLRQ 5DWH UHTXLUHPHQW
UHJDUGLQJ &)5 3DUW VHFWLRQ ZKHQ WKH FRPSXWHU ZDV WHVWHG LQ WKH
FRQYHQWLRQDO RULHQWDWLRQ
7KH WUDQVPLVVLRQ DQWHQQDV IRU WKH 3&, ([SUHVV 0LQL &DUG DUH ORFDWHG LQ WKH /&'
FRYHU 6HH /RFDWLRQ RI WKH 8OWUD&RQQHFWū ZLUHOHVV DQWHQQDV LQ $FFHVV +HOS

LY 5DGLR )UHTXHQF\ LQWHUIHUHQFH UHTXLUHPHQWV
7KH ZLUHOHVV /$1 WUDQVPLWWHU GHYLFH KDV EHHQ WHVWHG DQG IRXQG WR FRPSO\ ZLWK
WKH OLPLWV IRU D &ODVV % GLJLWDO GHYLFH SXUVXDQW WR )&& 3DUW 6XESDUW % 5HIHU WR
(OHFWURQLF HPLVVLRQ QRWLFHV RQ SDJH
:KHQ \RX XVH D ZLUHOHVV /$1:L0$; DGDSWHU LQ WKH DQ WUDQVPLVVLRQ
PRGH
š (DFK GHYLFH LV UHVWULFWHG WR LQGRRU XVH GXH WR LWV RSHUDWLRQ LQ WKH WR
0+] IUHTXHQF\ UDQJH )&& UHTXLUHV WKHVH SURGXFWV WR EH XVHG LQGRRUV IRU
WKH IUHTXHQF\ UDQJH WR 0+] WR UHGXFH WKH SRWHQWLDO IRU KDUPIXO
LQWHUIHUHQFH WR FRFKDQQHO 0RELOH 6DWHOOLWH V\VWHPV
š +LJK SRZHU UDGDUV DUH DOORFDWHG DV SULPDU\ XVHUV RI WKH WR 0+] DQG
WR 0+] EDQGV 7KHVH UDGDU VWDWLRQV FDQ FDXVH LQWHUIHUHQFH ZLWK
DQGRU GDPDJH WKLV GHYLFH
,,, 3UHLQVWDOOHG LQWHJUDWHG %OXHWRRWK GHYLFH
L 8VH RI WKH %OXHWRRWK GHYLFH
7KH %OXHWRRWK GHYLFH LV SUHLQVWDOOHG E\ /HQRYR DQG DQ\ RWKHU GHYLFH LV QRW
DSSURYHG IRU XVH LQ \RXU FRPSXWHU ,I WKH GHYLFH UHTXLUHV UHSODFHPHQW YLD
WKH SURSHU VWHSV VKRZQ LQ *HWWLQJ KHOS DQG VHUYLFH RI WKH 6HUYLFH DQG
7URXEOHVKRRWLQJ *XLGH VKLSSHG ZLWK \RXU FRPSXWHU /HQRYR ZLOO VHQG \RX D
&XVWRPHU 5HSODFHDEOH 8QLW &58
LL )&& ,' ORFDWLRQ
,I \RXU FRPSXWHU XVHV D %OXHWRRWK GHYLFH WKH )&& ,' IRU WKH %OXHWRRWK GHYLFH LV
DIı[HG RQ WKH ODEHO DW WKH ERWWRP RI \RXU FRPSXWHU
LLL )&& 5) VDIHW\ UHTXLUHPHQW
7KH UDGLDWHG RXWSXW SRZHU RI WKH %OXHWRRWK GHYLFH LV IDU EHORZ WKH )&& UDGLR
IUHTXHQF\ H[SRVXUH OLPLWV 7KHUHIRUH D FP RI VHSDUDWLRQ EHWZHHQ WKH
%OXHWRRWK DQWHQQD DQG KXPDQ ERG\ LV QRW UHTXLUHG
7KH %OXHWRRWK GHYLFH LV ORFDWHG XQGHU WKH SDOP UHVW 6HH $ERXW \RXU FRPSXWHU
LQ $FFHVV +HOS
LY 5DGLR )UHTXHQF\ LQWHUIHUHQFH UHTXLUHPHQWV
7KH %OXHWRRWK GHYLFH KDV EHHQ WHVWHG DQG IRXQG WR FRPSO\ ZLWK WKH OLPLWV IRU
ERWK D &ODVV % GLJLWDO GHYLFH UHJDUGLQJ )&& 3DUW 6XESDUW % DQG DQ LQWHQWLRQDO
UDGLDWRU UHJDUGLQJ )&& 3DUW 6XESDUW & WKHQ LW XQGHUZHQW WKH FHUWLıFDWLRQ
SURFHVVHV IRU ERWK UXOHV 7KXV WKH )&& ,' RI WKH %OXHWRRWK GHYLFH LQFOXGHV ERWK
FHUWLıFDWLRQV RI 3DUW 6XESDUW % DQG &

,9 6LPXOWDQHRXV XVH RI 5) WUDQVPLWWHUV
<RXU FRPSXWHU LV DSSURYHG IRU VLPXOWDQHRXV XVH RI WKH DSSURYHG ZLUHOHVV
/$1:L0$; DGDSWHU WKH DSSURYHG ZLUHOHVV :$1 DGDSWHU DQG WKH DSSURYHG
%OXHWRRWK GHYLFH )RU D OLVW RI WKRVH WUDQVPLWWHUV UHIHU WR , $SSURYHG ZLUHOHVV
GHYLFHV RQ SDJH DQG 7KLQN3DG 5HJXODWRU\ 1RWLFH IRU WKH :LUHOHVV :$1
$GDSWHU
0DNH VXUH RI WKH IROORZLQJ FRQGLWLRQV ZKHQ \RX XVH DQ\ RWKHU H[WHUQDO 5) RSWLRQ
GHYLFH
:KHQ \RX XVH DQ\ RWKHU 5) RSWLRQ GHYLFH \RX DUH UHTXHVWHG WR FRQıUP WKDW
WKH GHYLFH FRQIRUPV WR WKH 5) 6DIHW\ UHTXLUHPHQW DQG LV DSSURYHG WR XVH
IRU \RXU FRPSXWHU
<RX PXVW IROORZ WKH 5) 6DIHW\ LQVWUXFWLRQV RI WKH 5) RSWLRQ GHYLFH WKDW DUH
LQFOXGHG LQ WKH XVHU PDQXDO RI WKH 5) RSWLRQ GHYLFH
,I WKH 5) RSWLRQ GHYLFH LV SURKLELWHG WR XVH LQ FRQMXQFWLRQ ZLWK DQRWKHU
WUDQVPLWWHUV \RX PXVW WXUQ RII DOO RWKHU ZLUHOHVV IHDWXUHV LQ \RXU FRPSXWHU
&DQDGD Š ,QGXVWU\ &DQDGD ,&
,& &HUWLıFDWLRQ QXPEHU
, $SSURYHG ZLUHOHVV GHYLFHV
7KLV VHFWLRQ SUHVHQWV WKH ,& &HUWLıFDWLRQ DQG PRGHO QXPEHU RI HDFK ZLUHOHVV
GHYLFH
L 8VHU LQVWDOODEOH ZLUHOHVV /$1 DGDSWHU
š ,& $57/6( 0RGHO 57/6(
š ,& $57/&( 0RGHO 57/&(
š ,& $%5&0 0RGHO %&0+06
š ,& 0%1+8 0RGHO %1+0:
1RWH 3&, ([SUHVV 0LQL &DUGV IRU D ZLUHOHVV /$1 PDUNHWHG LQ WKH 86$ DQG
&DQDGD GR QRW VXSSRUW RU IXQFWLRQ LQ WKH H[WHQGHG FKDQQHOV FK FK
LL 3UHLQVWDOOHG LQWHJUDWHG %OXHWRRWK GHYLFH
š ,& $%5&0 0RGHO %&00'B/(12
,, 8VHU LQVWDOODEOH ZLUHOHVV /$1 DGDSWHU
7KHUH LV QR FHUWLıFDWLRQ QXPEHU RI ,QGXVWU\ &DQDGD IRU WKH 3&, ([SUHVV 0LQL
&DUG VKRZQ RQ WKH HQFORVXUH RI \RXU FRPSXWHU ,QVWHDG \RX ZLOO ıQG DQ LQGLFDWRU
SRLQWLQJ WR WKH ORFDWLRQ RI WKH ,& &HUWLıFDWLRQ QXPEHU RQ WKH ERWWRP RI \RXU
FRPSXWHU 7KH ,& FHUWLıFDWLRQ QXPEHU LV DIı[HG RQ WKH DSSURYHG DGDSWHU LQVWDOOHG
LQ WKH 3&, ([SUHVV 0LQL &DUG VORW DQG WKH ,& &HUWLıFDWLRQ QXPEHU LV YLVLEOH SULRU WR

LQVWDOODWLRQ )RU WKH ORFDWLRQ RI WKH ,& &HUWLıFDWLRQ QXPEHU LQGLFDWRU DQG WKH VORW
VHH /RFDWLRQ RI WKH )&& ,' DQG ,& &HUWLıFDWLRQ QXPEHU ODEHO LQ $FFHVV +HOS
$WWHQWLRQ 7KH FRPSXWHU FRQWDLQV DQ DXWKHQWLFDWLRQ PHFKDQLVP <RX FDQ LQVWDOO
RU UHPRYH HDFK ZLUHOHVV DGDSWHU E\ \RXUVHOI ,I \RX LQVWDOO DQ XQDXWKRUL]HG
ZLUHOHVV DGDSWHU WKDW LV QRW DSSURYHG IRU XVH LQ WKH FRPSXWHU WKH FRPSXWHU ZLOO
QRW VWDUW EXW RQO\ GLVSOD\V DQ HUURU PHVVDJH DQG HPLWV DXGLEOH EHHSV
,,, 3UHLQVWDOOHG LQWHJUDWHG %OXHWRRWK GHYLFH
,I \RXU FRPSXWHU XVHV D %OXHWRRWK GHYLFH WKH ,& &HUWLıFDWLRQ QXPEHU IRU WKH
%OXHWRRWK GHYLFH LV DIı[HG RQ WKH ODEHO DW WKH ERWWRP RI \RXU FRPSXWHU 7KH
%OXHWRRWK GHYLFH LV SUHLQVWDOOHG E\ /HQRYR DQG DQ\ RWKHU GHYLFH LV QRW DSSURYHG
IRU XVH LQ \RXU FRPSXWHU ,I WKH GHYLFH UHTXLUHV UHSODFHPHQW YLD WKH SURSHU VWHSV
VKRZQ LQ *HWWLQJ KHOS DQG VHUYLFH RI WKH 6HUYLFH DQG 7URXEOHVKRRWLQJ *XLGH
VKLSSHG ZLWK \RXU FRPSXWHU /HQRYR ZLOO VHQG \RX D &XVWRPHU 5HSODFHDEOH 8QLW
&58
,9 :L0$; IHDWXUHV
7KH XVH RI WKH :L0$; IHDWXUHV DQG WKH :LUHOHVV 86% IHDWXUHV LV QRW SHUPLWWHG LQ
&DQDGD 'R QRW XVH WKH IHDWXUHV WKHVH IHDWXUHV 7R GR VR ZRXOG EH D YLRODWLRQRI
,QGXVWU\ &DQDGD UHJXODWLRQV
9 /RZ SRZHU OLFHQVHH[HPSW UDGLRFRPPXQLFDWLRQ GHYLFHV 566
2SHUDWLRQ LV VXEMHFW WR WKH IROORZLQJ WZR FRQGLWLRQV
7KLV GHYLFH PD\ QRW FDXVH LQWHUIHUHQFH DQG
WKLV GHYLFH PXVW DFFHSW DQ\ LQWHUIHUHQFH LQFOXGLQJ LQWHUIHUHQFH WKDW PD\
FDXVH XQGHVLUHG RSHUDWLRQ RI WKH GHYLFH
7KH WUDQVPLWWHU GHYLFHV KDYH EHHQ GHVLJQHG WR RSHUDWH ZLWK WKH DQWHQQDV
LQWHJUDWHG LQ WKH FRPSXWHU DQG KDYLQJ D PD[LPXP JDLQ RI ZLWKLQ G%L
7KH PD[LPXP DQWHQQD JDLQ SHUPLWWHG IRU GHYLFHV LQ WKH 0+]
0+] DQG 0+] EDQGV FRPSOLHV ZLWK WKH HLUS OLPLW LQ
VHFWLRQ $ RI 566
:KHQ \RX XVH D ZLUHOHVV /$1 DGDSWHU LQ WKH DQ WUDQVPLVVLRQ PRGH
š 7KH GHYLFHV IRU WKH EDQG ş 0+] DUH RQO\ IRU LQGRRU XVDJH WR UHGXFH
SRWHQWLDO IRU KDUPIXO LQWHUIHUHQFH WR FRFKDQQHO 0RELOH 6DWHOOLWH V\VWHPV
š +LJK SRZHU UDGDUV DUH DOORFDWHG DV SULPDU\ XVHUV PHDQLQJ WKH\ KDYH SULRULW\
RI ş 0+] DQG ş 0+] DQG WKHVH UDGDUV FRXOG FDXVH
LQWHUIHUHQFH DQGRU GDPDJH WR /(/$1 /LFHQFH([HPSW /RFDO $UHD 1HWZRUN
GHYLFHV

9, ([SRVXUH RI KXPDQV WR 5) ıHOGV 566
7KH FRPSXWHUV HPSOR\ ORZ JDLQ LQWHJUDO DQWHQQDV WKDW GR QRW HPLW 5) ıHOG LQ
H[FHVV RI +HDOWK &DQDGD OLPLWV IRU WKH JHQHUDO SRSXODWLRQ FRQVXOW 6DIHW\ &RGH
REWDLQDEOH IURP +HDOWK &DQDGDV :HE VLWH DW KWWSZZZKFVFJFFD
7KH UDGLDWHG HQHUJ\ IURP WKH DQWHQQDV FRQQHFWHG WR WKH ZLUHOHVV DGDSWHUV
FRQIRUPV WR WKH ,& OLPLW RI WKH 5) H[SRVXUH UHTXLUHPHQW UHJDUGLQJ ,& 566
,VVXH FODXVH
1XPÜUR GKRPRORJDWLRQ ,&
, 3ÜULSKÜULTXHV VDQV ıO KRPRORJXÜV
&HWWH VHFWLRQ SUÜVHQWH OH QXPÜUR GKRPRORJDWLRQ ,& HW OH QXPÜUR GH PRGÛOH GH
FKDTXH SÜULSKÜULTXH VDQV ıO
L 0RGXOH VDQV ıO LQVWDOODEOH SDU OXWLOLVDWHXU
š ,& $57/6( 0RGHO 57/6(
š ,& $57/&( 0RGHO 57/&(
š ,& $%5&0 0RGHO %&0+06
š ,& 0%1+8 0RGHO %1+0:
5HPDUTXH /HV FDUWHV GH UÜVHDX ORFDO VDQV ıO ([SUHVV PLQL3&, FRPPHUFLDOLVÜHV
DX[ (WDWV8QLV HW DX &DQDGD QH SUHQQHQW SDV HQ FKDUJH OHV FDQDX[ ÜWHQGXV
FK FK HW QH IRQFWLRQQHQW GRQF SDV VXU GH WHOV FDQDX[
LL xPHWWHXU %OXHWRRWK LQWÜJUÜ SUÜLQVWDOOÜ
š ,& $%5&0 0RGHO %&00'B/(12
,, 0RGXOH VDQV ıO LQVWDOODEOH SDU OXWLOLVDWHXU
/H ERîWLHU GH YRWUH RUGLQDWHXU QH FRPSRUWH SDV GH QXPÜUR GKRPRORJDWLRQ ,&
,QGXVWU\ &DQDGD SRXU OD FDUWH PLQL3&, ([SUHVV PDLV VRXV YRWUH RUGLQDWHXU YRXV
WURXYHUH] XQ LQGLFDWHXU SRLQWDQW YHUV OHPSODFHPHQW GX QXPÜUR GKRPRORJDWLRQ
,& 3RXU FRQQDîWUH OHPSODFHPHQW GX QXPÜUR GKRPRORJDWLRQ ,& FRQVXOWH] OD
VHFWLRQ FRUUHVSRQGDQWH GDQV $FFHVV +HOS /H QXPÜUR GKRPRORJDWLRQ ,& ıJXUH
VXU OD FDUWH KRPRORJXÜH LQVWDOOÜH GDQV OH ORJHPHQW SRXU FDUWH PLQL3&, ([SUHVV
HW HVW YLVLEOH DYDQW OLQVWDOODWLRQ 3RXU VDYRLU RĚ VH WURXYH FHW HPSODFHPHQW
FRQVXOWH] OD VHFWLRQ FRUUHVSRQGDQWH GDQV $FFHVV +HOS
$WWHQWLRQ /RUGLQDWHXU FRQWLHQW XQ PÜFDQLVPH GDXWKHQWLıFDWLRQ 9RXV SRXYH]
LQVWDOOHU RX GÜVLQVWDOOHU WRXW GLVSRVLWLI VDQV ıO 6L YRXV LQVWDOOH] XQH FDUWH VDQV ıO
TXL QHVW SDV KRPRORJXÜH GDQV YRWUH RUGLQDWHXU ORUGLQDWHXU QH GÜPDUUHUD SDV
PDLV DIıFKHUD XQ PHVVDJH GHUUHXU HW JÜQÜUHUD GHV ELSV VRQRUHV

,,, xPHWWHXU %OXHWRRWK LQWÜJUÜ SUÜLQVWDOOÜ
6L YRWUH RUGLQDWHXU XWLOLVH XQ ÜPHWWHXU %OXHWRRWK OH QXPÜUR GKRPRORJDWLRQ ,& GH
FHW ÜPHWWHXU %OXHWRRWK ıJXUH VXU XQH ÜWLTXHWWH FROOÜH VRXV ORUGLQDWHXU /ÜPHWWHXU
%OXHWRRWK HVW SUÜLQVWDOOÜ SDU /HQRYR HW QH SHXW SDV ÝWUH UHWLUÜ SDU OXWLOLVDWHXU 6LO
GRLW ÝWUH UHPSODFÜ SHQGDQW OD SÜULRGH GH JDUDQWLH ORSÜUDWLRQ GRLW ÝWUH HIIHFWXÜH
SDU XQ SUHVWDWDLUH GH VHUYLFHV DJUÜÜ SDU /HQRYR
,9 )RQFWLRQV :L0$;
/XWLOLVDWLRQ GH IRQFWLRQV :L0$; HW GH IRQFWLRQV 86% VDQV ıO QHVW SDV DXWRULVÜH
DX &DQDGD 9HXLOOH] QH SDV XWLOLVHU FHWWH IRQFWLRQ FHV IRQFWLRQV FDU FH VHUDLW XQH
LQIUDFWLRQ DX[ ORLV G,QGXVWULH &DQDGD
9 5HPDUTXH UHODWLYH DX[ DSSDUHLOV GH FRPPXQLFDWLRQ UDGLR GH IDLEOH
SXLVVDQFH VDQV OLFHQFH &15
/H IRQFWLRQQHPHQW GH FH W\SH GDSSDUHLO HVW VRXPLV DX[ GHX[ FRQGLWLRQV
VXLYDQWHV
&HW DSSDUHLO QH GRLW SDV SHUWXUEHU OHV FRPPXQLFDWLRQV UDGLR HW
&HW DSSDUHLO GRLW VXSSRUWHU WRXWH SHUWXUEDWLRQ \ FRPSULV OHV SHUWXUEDWLRQV
TXL SRXUUDLHQW SURYRTXHU VRQ G\VIRQFWLRQQHPHQW
/HV SÜULSKÜULTXHV GÜPLVVLRQ VRQW FRQ×XV SRXU IRQFWLRQQHU DYHF GHV DQWHQQHV
LQWÜJUÜHV Ç ORUGLQDWHXU HW D\DQW XQ JDLQ PD[LPDO GH PRLQV GH G%L
/H JDLQ GDQWHQQH PD[LPDO SRXU OHV SÜULSKÜULTXHV GDQV OHV EDQGHV GH IUÜTXHQFH
0+] 0+] HW 0+] HVW FRQIRUPH Ç OD OLPLWH
SLUH ÜQRQFÜH GDQV OD VHFWLRQ $ GH OD &15
/RUVTXH YRXV XWLOLVH] OD FDUWH SRXU UÜVHDX ORFDO VDQV ıO HQ PRGH GH WUDQVPLVVLRQ
DQ
š 7RXW DSSDUHLO GHVWLQÜ Ç OD EDQGH 0+] GHYUD ÝWUH H[FOXVLYHPHQW XWLOLVÜ
HQ LQWÜULHXU DıQ GH UÜGXLUH OHV ULVTXHV GH SHUWXUEDWLRQV ÜOHFWURPDJQÜWLTXHV
JÝQDQWHV VXU OHV V\VWÛPHV GH VDWHOOLWH PRELOH GDQV XQ PÝPH FDQDO
š /HV UDGDUV Ç IRUWH SXLVVDQFH VRQW GÜVLJQÜV FRPPH OHV XWLOLVDWHXUV SULQFLSDX[
FHVWÇGLUH TXLOV VRQW SULRULWDLUHV GHV EDQGHV 0+] HW
0+] ,OV SHXYHQW SURYRTXHU GHV SHUWXUEDWLRQV ÜOHFWURPDJQÜWLTXHV VXU OHV
DSSDUHLOV GH W\SH /(/$1 UÜVHDX GH FRPPXQLFDWLRQ ORFDO VDQV OLFHQFH RX
OHV HQGRPPDJHU
9,,, ([SRVLWLRQ GHV ÝWUHV KXPDLQV DX[ FKDPSV UDGLRÜOHFWULTXHV 5)
&15
/RUGLQDWHXU XWLOLVH GHV DQWHQQHV LQWÜJUDOHV Ç IDLEOH JDLQ TXL QÜPHWWHQW SDV XQ
FKDPS ÜOHFWURPDJQÜWLTXH VXSÜULHXU DX[ QRUPHV LPSRVÜHV SDU OH 0LQLVWÜUH GHOD
VDQWÜ FDQDGLHQ SRXU OD SRSXODWLRQ &RQVXOWH] OH 6DIHW\ &RGH VXU OH VLWH :HEGX
0LQLVWÜUH GH OD VDQWÜ FDQDGLHQ Ç ODGUHVVH KWWSZZZKFVFJFFD

/ÜQHUJLH ÜPLVH SDU OHV DQWHQQHV UHOLÜHV DX[ DGDSWDWHXUV VDQV ıO UHVSHFWH OD OLPLWH
GH[SRVLWLRQ DX[ UDGLRIUÜTXHQFHV WHOOH TXH GÜıQLH SDU ,QGXVWULH &DQDGD GDQV
OD FODXVH GX GRFXPHQW &15
(OHFWURQLF HPLVVLRQ QRWLFHV
)HGHUDO &RPPXQLFDWLRQV &RPPLVVLRQ )&& 'HFODUDWLRQ RI
&RQIRUPLW\
š 0RGHO 57/6(
š 0RGHO 57/&(
š 0RGHO %&0+06
š 0RGHO 3'%1+8
1RWH 7KH ZLUHOHVV /$1:L0$; DGDSWHU 0RGHO $1;+0: DQG WKH %OXHWRRWK
GHYLFH 0RGHO %&00'B/(12 XQGHUZHQW FHUWLıFDWLRQ SURFHVV IRU WKH )&&
3DUW 6XESDUW % FRPSOLDQFH XQGHU HDFK UHVSHFWLYH )&& ,' QXPEHU
7KLV HTXLSPHQW KDV EHHQ WHVWHG DQG IRXQG WR FRPSO\ ZLWK WKH OLPLWV IRU D &ODVV%
GLJLWDO GHYLFH SXUVXDQW WR 3DUW RI WKH )&& 5XOHV 7KHVH OLPLWV DUH GHVLJQHG
WR SURYLGH UHDVRQDEOH SURWHFWLRQ DJDLQVW KDUPIXO LQWHUIHUHQFH LQ D UHVLGHQWLDO
LQVWDOODWLRQ 7KLV HTXLSPHQW JHQHUDWHV XVHV DQG FDQ UDGLDWH UDGLR IUHTXHQF\
HQHUJ\ DQG LI QRW LQVWDOOHG DQG XVHG LQ DFFRUGDQFH ZLWK WKH LQVWUXFWLRQV PD\
FDXVH KDUPIXO LQWHUIHUHQFH WR UDGLR FRPPXQLFDWLRQV +RZHYHU WKHUH LV QR
JXDUDQWHH WKDW LQWHUIHUHQFH ZLOO QRW RFFXU LQ D SDUWLFXODU LQVWDOODWLRQ ,I WKLV
HTXLSPHQW GRHV FDXVH KDUPIXO LQWHUIHUHQFH WR UDGLR RU WHOHYLVLRQ UHFHSWLRQ ZKLFK
FDQ EH GHWHUPLQHG E\ WXUQLQJ WKH HTXLSPHQW RII DQG RQ WKH XVHU LV HQFRXUDJHGWR
WU\ WR FRUUHFW WKH LQWHUIHUHQFH E\ RQH RU PRUH RI WKH IROORZLQJ PHDVXUHV
š 5HRULHQW RU UHORFDWH WKH UHFHLYLQJ DQWHQQD
š ,QFUHDVH WKH VHSDUDWLRQ EHWZHHQ WKH HTXLSPHQW DQG UHFHLYHU
š &RQQHFW WKH HTXLSPHQW LQWR DQ RXWOHW RQ D FLUFXLW GLIIHUHQW IURP WKDW WR ZKLFK
WKH UHFHLYHU LV FRQQHFWHG
š &RQVXOW DQ DXWKRUL]HG GHDOHU RU VHUYLFH UHSUHVHQWDWLYH IRU KHOS
/HQRYR LV QRW UHVSRQVLEOH IRU DQ\ UDGLR RU WHOHYLVLRQ LQWHUIHUHQFH FDXVHG E\
XQDXWKRUL]HG FKDQJHV RU PRGLıFDWLRQV WR WKLV HTXLSPHQW 8QDXWKRUL]HG FKDQJHV
RU PRGLıFDWLRQV FRXOG YRLG WKH XVHUV DXWKRULW\ WR RSHUDWH WKH HTXLSPHQW
7KLV GHYLFH FRPSOLHV ZLWK 3DUW RI WKH )&& 5XOHV 2SHUDWLRQ LV VXEMHFW WR WKH
IROORZLQJ WZR FRQGLWLRQV WKLV GHYLFH PD\ QRW FDXVH KDUPIXO LQWHUIHUHQFH DQG
WKLV GHYLFH PXVW DFFHSW DQ\ LQWHUIHUHQFH UHFHLYHG LQFOXGLQJ LQWHUIHUHQFH WKDW
PD\ FDXVH XQGHVLUHG RSHUDWLRQ
5HVSRQVLEOH 3DUW\

/HQRYR 8QLWHG 6WDWHV ,QFRUSRUDWHG
7KLQN 3ODFH%XLOGLQJ 2QH
0RUULVYLOOH 1&
7HOHSKRQH
,QGXVWU\ &DQDGD &ODVV % (PLVVLRQ &RPSOLDQFH 6WDWHPHQW
7KLV &ODVV % GLJLWDO DSSDUDWXV FRPSOLHV ZLWK &DQDGLDQ ,&(6
$YLV GH FRQIRUPLWÜ Ç OD UÜJOHPHQWDWLRQ G,QGXVWULH &DQDGD
&HW DSSDUHLO QXPÜULTXH GH OD FODVVH % HVW FRQIRUPH Ç OD QRUPH 10% GX
&DQDGD
7UDGHPDUNV
7KH IROORZLQJ WHUPV DUH WUDGHPDUNV RI /HQRYR LQ WKH 8QLWHG 6WDWHV RWKHU
FRXQWULHV RU ERWK
/HQRYR
7KLQN3DG
8OWUD&RQQHFW
2WKHU FRPSDQ\ SURGXFW DQG VHUYLFH QDPHV PD\ EH WUDGHPDUNV RU VHUYLFH PDUNV
RI RWKHUV

ũ &RS\ULJKW /HQRYR 2009, 2010
/(1292 SURGXFWV GDWD FRPSXWHU VRIWZDUH DQG VHUYLFHV KDYH EHHQ GHYHORSHG
H[FOXVLYHO\ DW SULYDWH H[SHQVH DQG DUH VROG WR JRYHUQPHQWDO HQWLWLHV DV
FRPPHUFLDO LWHPV DV GHıQHG E\ &)5 ZLWK OLPLWHG DQG UHVWULFWHG ULJKWV
WR XVH UHSURGXFWLRQ DQG GLVFORVXUH
/,0,7(' $1' 5(675,&7(' 5,*+76 127,&( ,I SURGXFWV GDWD FRPSXWHU VRIWZDUH
RU VHUYLFHV DUH GHOLYHUHG SXUVXDQW D *HQHUDO 6HUYLFHV $GPLQLVWUDWLRQ ŗ*6$Ř FRQWUDFW
XVH UHSURGXFWLRQ RU GLVFORVXUH LV VXEMHFW WR UHVWULFWLRQV VHW IRUWK LQ &RQWUDFW 1R
*6)
3 31 <
/
§2. Reference only
Regulatory notice of a WWAN transmitter device incorporated in the host PC device

ThinkPad Regulatory Notice for the Wireless WAN Adapter
Read first — regulatory information
Read this document before using your computer. Be sure to also read
ThinkPad®Regulatory Notice. This computer complies with the radio frequency
and safety standards of any country or region in which it has been approved
for wireless use. Install and use your computer according to the following
instructions.
The latest Regulatory Notice has been uploaded on the Web site. To refer to it,
go to http://www.lenovo.com/think/support, click Troubleshooting, and
then click User’s guides and manuals.
Veuillez lire le présent document avant d’utiliser votre ordinateur. Veillez à
lire également la consigne réglementaire ThinkPad Regulatory Notice. Cet
ordinateur est conforme aux normes de fréquence radio et de sécurité de tous
les pays ou régions dans lesquels son utilisation sans fil a été homologuée.
Installez et utilisez l’ordinateur en respectant les instructions qui suivent.
La version la plus récente de la Notice relative à la réglementation a été
chargée sur le site Web. Pour la consulter, accédez à http://www.lenovo.com/
think/support, cliquez sur Troubleshooting, puis sur User’s guides and
manuals.
© Copyright Lenovo 2010 1

USA — Federal Communications Commission (FCC)
If your computer integrates the wireless WAN adapter (Model: Gobi2000), you
may connect it to the radiocommunication Public Network in the USA.
I. FCC ID of the wireless adapter
PCI Express Mini Card:
vFCC ID: J9CGOBI2000-L (Model: Gobi2000)
There is no FCC ID for the adapter shown on the enclosure of your computer.
Instead you will find an indicator pointing to the location of the FCC ID on
the bottom of your computer. The FCC ID is affixed on the approved adapter
installed in the PCI Express Mini Card slot, and the FCC ID is visible prior to
installation. For the location of the FCC ID indicator and the slot, see
“Location of the FCC ID and IC Certification number label” in Access Help.
II. Installation of the approved wireless adapter
If no integrated PCI Express Mini Card has been preinstalled in your
computer, you can install one, provided by Lenovo®as an option. Plug the
wireless option adapter into the PCI Express Mini Card slot. For the
installation procedure, see “Installing and replacing the PCI Express Mini
Card for wireless WAN connection” in Access Help.
Attention: The computers contain an authentication mechanism. If you
install an unauthorized PCI Express Mini Card that is not approved for use in
your computer, the computer will not start, but only displays an error
message and emits audible beeps.
III. RF safety compliance
The radiated energy from the antenna connected to the wireless WAN adapter
conforms to the FCC limit of the SAR (Specific Absorption Rate) requirement
regarding 47 CFR Part 2 section 1093, when the computer was tested in the
conventional orientation.
The transmission antenna is located in the LCD cover. See “Location of the
UltraConnect™wireless antennas” in Access Help.
IV. Emergency Calls
The wireless WAN adapter embedded in the computer does not support voice
calls, hence their use for essential communication is not possible, including
emergency calls regarding the E911 rule.
V. Simultaneous use of RF transmitters
The wireless WAN adapter is approved for simultaneous use with certain
wireless transmitters. For a list of those transmitters, refer to the latest
ThinkPad Regulatory Notice, which has been uploaded on the Web site at:
http://www.lenovo.com/think/support
2
Make sure of the following conditions when you use any other external RF
option device:
1. When you use any other RF option device, you are requested to confirm
that the device conforms to the RF Safety requirement and is approved to
use for your computer.
2. You must follow the RF Safety instructions of the RF option device that
are included in the user manual of the RF option device.
3. If the RF option device is prohibited to use in conjunction with another
transmitters, you must turn off all other wireless features in your
computer.
ThinkPad Regulatory Notice for the Wireless WAN Adapter 3

Electronic emission notices
Federal Communications Commission (FCC) Declaration of Conformity
vModel: Gobi2000
This equipment has been tested and found to comply with the limits for a
Class B digital device, pursuant to Part 15 of the FCC Rules. These limits are
designed to provide reasonable protection against harmful interference in a
residential installation. This equipment generates, uses, and can radiate radio
frequency energy and, if not installed and used in accordance with the
instructions, may cause harmful interference to radio communications.
However, there is no guarantee that interference will not occur in a particular
installation. If this equipment does cause harmful interference to radio or
television reception, which can be determined by turning the equipment off
and on, the user is encouraged to try to correct the interference by one or
more of the following measures:
vReorient or relocate the receiving antenna.
vIncrease the separation between the equipment and receiver.
vConnect the equipment into an outlet on a circuit different from that to
which the receiver is connected.
vConsult an authorized dealer or service representative for help.
Lenovo is not responsible for any radio or television interference caused by
unauthorized changes or modifications to this equipment. Unauthorized
changes or modifications could void the user’s authority to operate the
equipment.
This device complies with Part 15 of the FCC Rules. Operation is subject to
the following two conditions: (1) this device may not cause harmful
interference, and (2) this device must accept any interference received,
including interference that may cause undesired operation.
Responsible Party:
Lenovo (United States) Incorporated
1009 Think Place-Building One
Morrisville, NC 27560
Telephone: 1-919-294-5900
Tested To Comply
With FCC Standards
FOR HOME OR OFFICE USE
4

Canada — Industry Canada (IC)
IC Certification number
User installable wireless WAN adapter:
vIC: 2723A-GOBI2000 (Model: Gobi2000)
There is no certification number of Industry Canada for the PCI Express Mini
Card shown on the enclosure of your computer. Instead you will find an
indicator pointing to the location of the certification number on the bottom of
your computer. The IC certification number is affixed on the approved
adapter installed in the PCI Express Mini Card slot, and the IC Certification
number is visible prior to installation. For the location of the certification
number indicator and the slot, see ″Location of the FCC ID and IC
certification number label″in Access Help.
Attention: The computer contains an authentication mechanism. You can
install or remove each wireless adapter by yourself. If you install an
unauthorized wireless adapter that is not approved for use in the computer,
the computer will not start, but only displays an error message and emits
audible beeps.
Exposure of humans to RF fields (RSS-102)
The computers employ low gain integral antennas that do not emit RF field in
excess of Health Canada limits for the general population; consult Safety Code
6, obtainable from Health Canada’s Web site at http://www.hc-sc.gc.ca/
The radiated energy from the antenna connected to the wireless WAN adapter
conforms to the IC limit of the SAR (Specific Absorption Rate) requirement
regarding IC RSS-102, Issue 2 clause 4.1.
Industry Canada Class B Emission Compliance Statement
This Class B digital apparatus complies with Canadian ICES-003.
Operation is subject to the following two conditions: (1) this device may not
cause interference, and (2) this device must accept any interference, including
interference that may cause undesired operation of the device.
ThinkPad Regulatory Notice for the Wireless WAN Adapter 5
Numéro d’homologation IC
Module sans fil installable par l’utilisateur:
vIC: 2723A-GOBI2000 (Model: Gobi2000)
Le boîtier de votre ordinateur ne comporte pas de numéro d’homologation IC
(Industry Canada) pour la carte mini-PCI Express ; mais sous votre
ordinateur, vous trouverez un indicateur pointant vers l’emplacement du
numéro d’homologation IC. Pour connaître l’emplacement du numéro
d’homologation, consultez la section ″Emplacement de l’étiquette
d’identification FCC et du label du numéro de certification″dans Access Help.
Le numéro d’homologation IC figure sur la carte homologuée installée dans le
logement pour carte mini-PCI Express et est visible avant l’installation. Pour
savoir où se trouve cet emplacement, consultez la section correspondante dans
Access Help.
Attention: L’ordinateur renferme un mécanisme d’authentification. Vous
pouvez installer ou retirer chaque carte sans fil vous-même. Si vous installez
une carte sans fil qui n’est pas homologuée dans votre ordinateur, l’ordinateur
ne démarrera pas mais affichera un message d’erreur et générera des bips
sonores.
Exposition des êtres humains aux champs radioélectriques (RF)
(CNR-102)
L’ordinateur utilise des antennes intégrales à faible gain qui n’émettent pas un
champ électromagnétique supérieur aux normes imposées par le Ministére de
la santé canadien pour la population. Consultez le Safety Code 6 sur le site
Web du Ministére de la santé canadien à l’adresse http://www.hc-sc.gc.ca/
L’énergie émise par l’antenne reliée au adaptateur sans fil respecte la limite
concernant le débit d’absorption spécifique (DAS) telle que définie par
Industrie Canada dans la clause 4.1 du document CNR-102.
Avis de conformité à la réglementation d’lndustrie Canada
Cet appareil numérique de la classe B est conforme à la norme NMB-003 du
Canada.
Le fonctionnement de ce type d’appareil est soumis aux deux conditions
suivantes: (1) Cet appareil ne doit pas perturber les communications radio, et
(2) cet appareil doit supporter toute perturbation, y compris les perturbations
qui pourraient provoquer son dysfonctionnement.
6

Trademarks
The following terms are trademarks of Lenovo in the United States, other
countries, or both:
Lenovo®
ThinkPad®
UltraConnect
Other company, product, and service names may be trademarks or service
marks of others.
ThinkPad Regulatory Notice for the Wireless WAN Adapter 7

Part Number: 75Y4318
Printed in China
8

Section 3. The screen copies of electronic user’s guidance
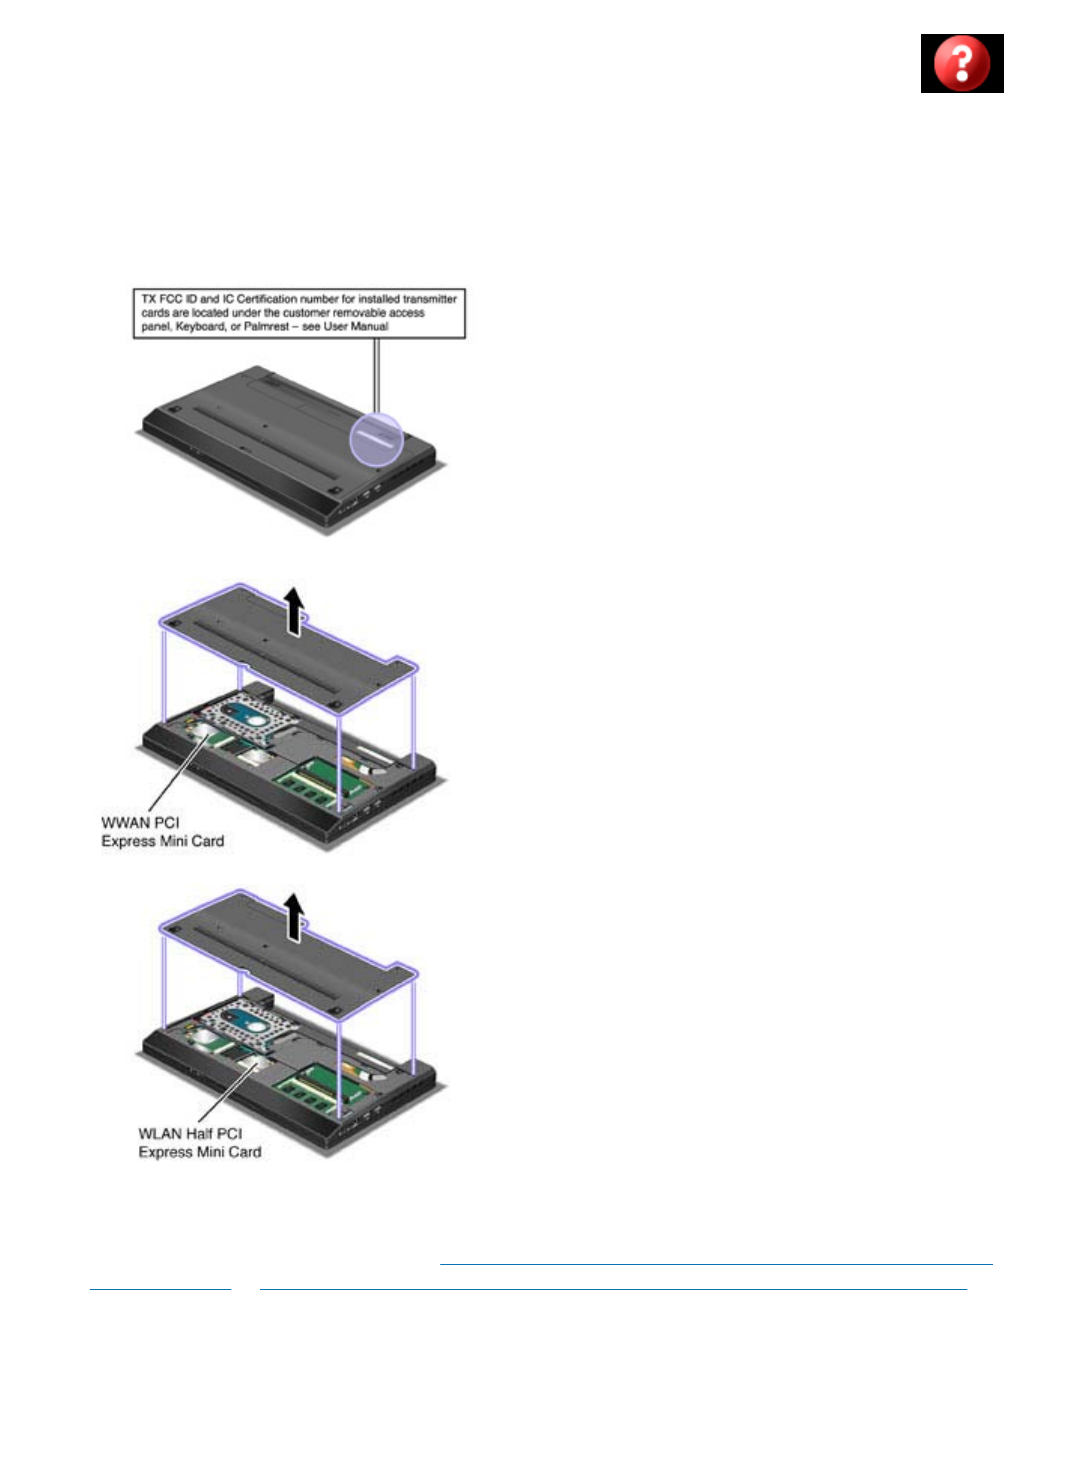
Location: FCC ID and IC Certification number label
There is no FCC ID or IC Certification number for the PCI Express Mini Card shown on the enclosure
of your computer. The FCC ID and IC Certification number label is affixed on the card installed in the
Mini PCI Express Card slot of your computer.
If no integrated wireless PCI Express Mini Card has been preinstalled in your computer, you can install
one. To do this, follow the procedure in Installing and replacing the PCI Express Mini Card for wireless
LAN connection or Installing and replacing the PCI Express Mini Card for wireless WAN connection.
1/1 ページLocation: FCC ID and IC Certification number label
2009/10/13file://C:\TamaTemp\fccidlbl.htm\fccidlbl.htm
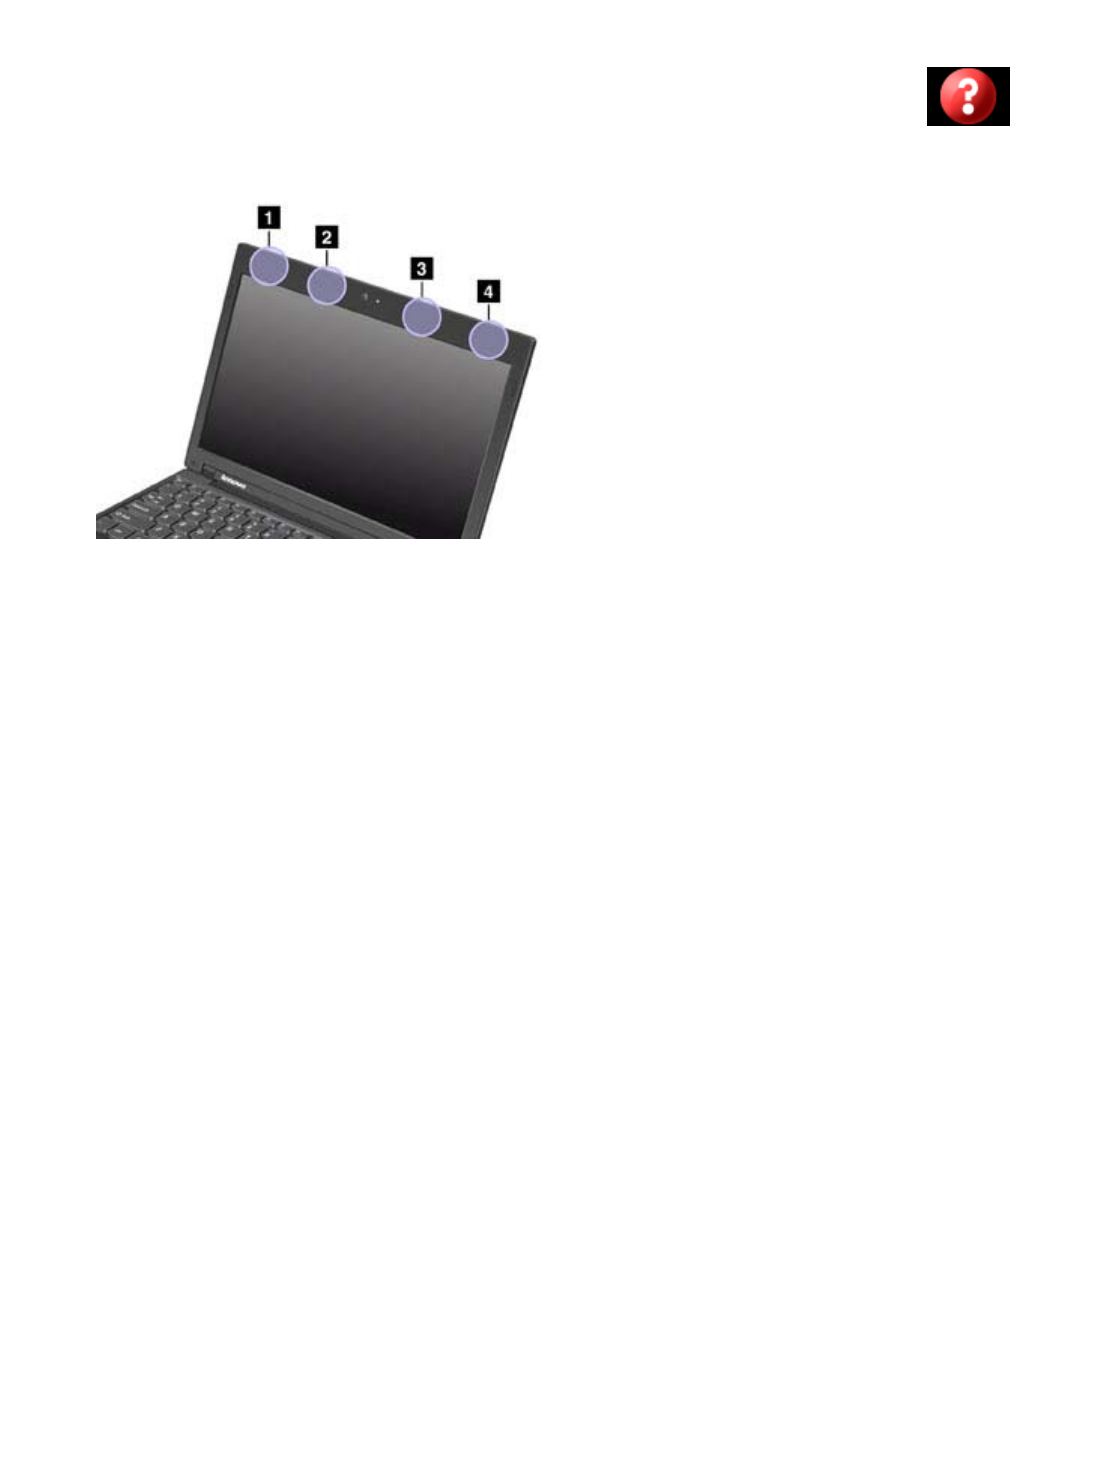
Location of the UltraConnect wireless antennas
1. Wireless LAN antenna (Auxiliary)
The auxiliary antenna connected to the wireless LAN is located at the top left corner of the computer
display.
2. Wireless WAN antenna (Auxiliary)
If your computer comes with a wireless WAN feature, its transmitter antenna is located at the top left
side of the computer display, near the center.
3. Wireless WAN antenna (Main)
The main antenna connected to the wireless WAN feature is located at the top right side of the
computer display, near the center.
4. Wireless LAN antenna (Main)
The main antenna connected to the wireless LAN feature is located at the top right corner of the
computer display.
1/1 ページLocation of the UltraConnect wireless antennas
2009/10/13file://C:\TamaTemp\antennas.htm\antennas.htm
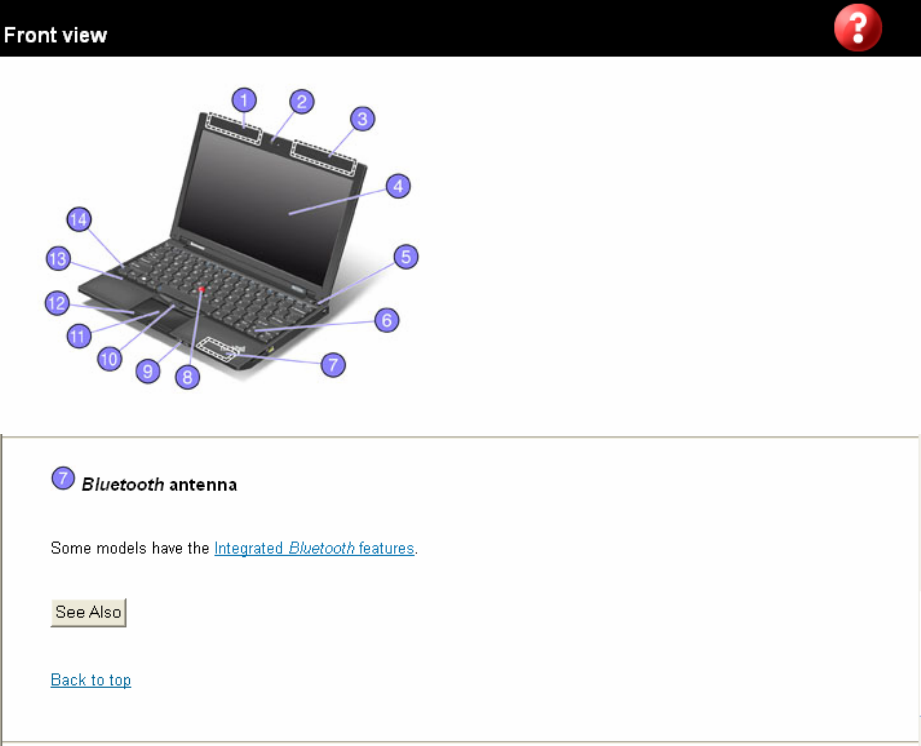
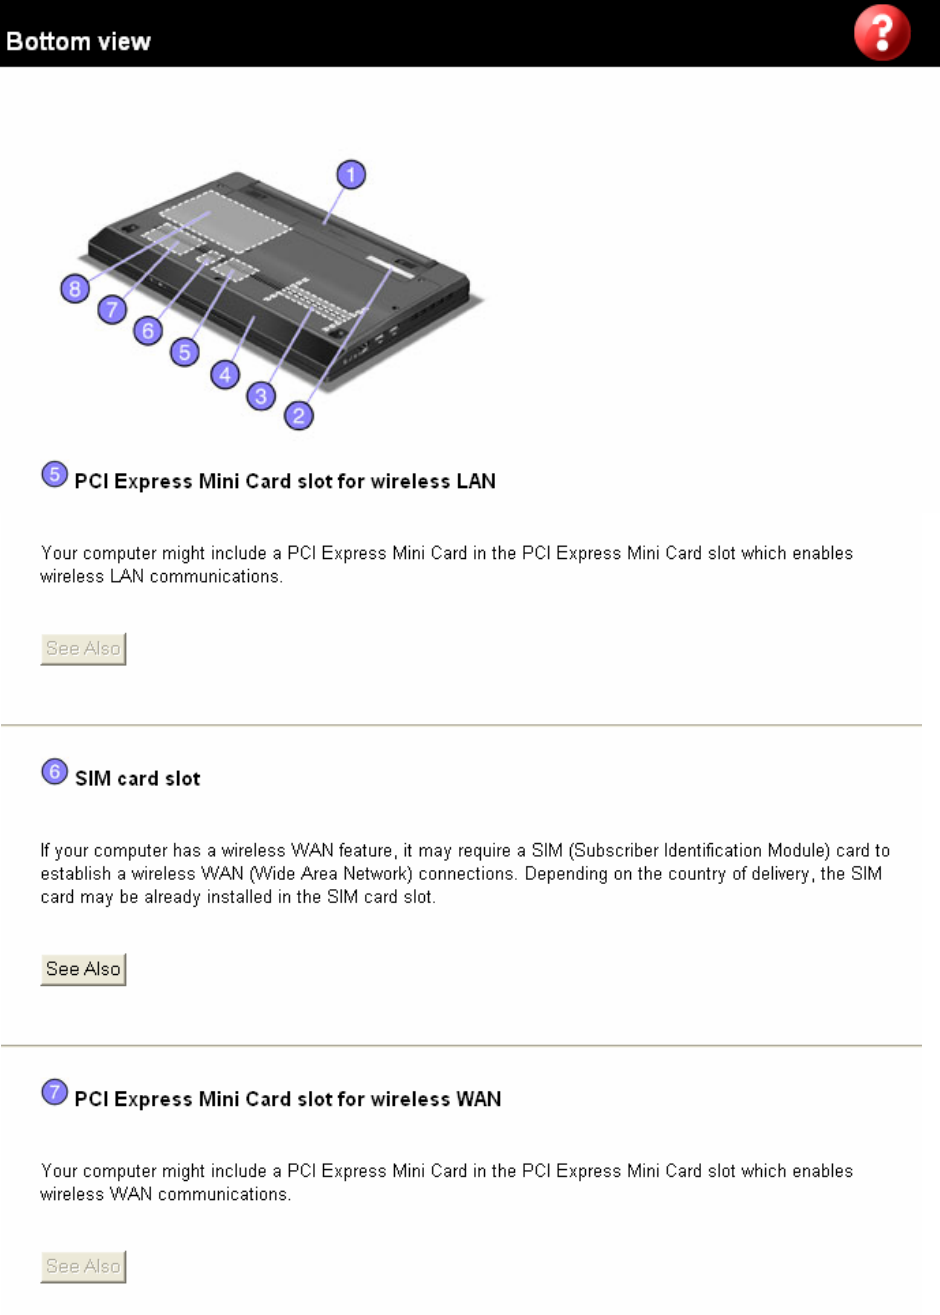
Installing and replacing a PCI Express Mini Card for wireless LAN
connection
Before you start, print these instructions.
Your computer has a PCI Express Mini Card slot for connection to a wireless LAN. To replace the PCI
Express Mini Card with a new one, read the following prerequisites, and then the instructions.
Prerequisites for the procedure
Danger: During electrical storms, do not connect the cable to or disconnect it from the telephone
outlet on the wall.
Danger: Electric current from power, telephone, and communication cables is hazardous. To
avoid shock hazard, disconnect the cables before opening the cover of this slot.
Attention: Before you start installing a PCI Express Mini Card, touch a metal table or a grounded
metal object. This action reduces any static electricity from your body. The static electricity could
damage the card.
Replacing the card
To replace the card, do as follows:
Note: Your computer may look slightly different from what these illustrations show.
1. Turn off the computer; then disconnect the ac adapter and all cables from the computer.
Wait for a few minutes, till the inside of the computer cools, before you start the following
procedure.
2. Close the computer display, and turn the computer over.
3. Remove the battery.
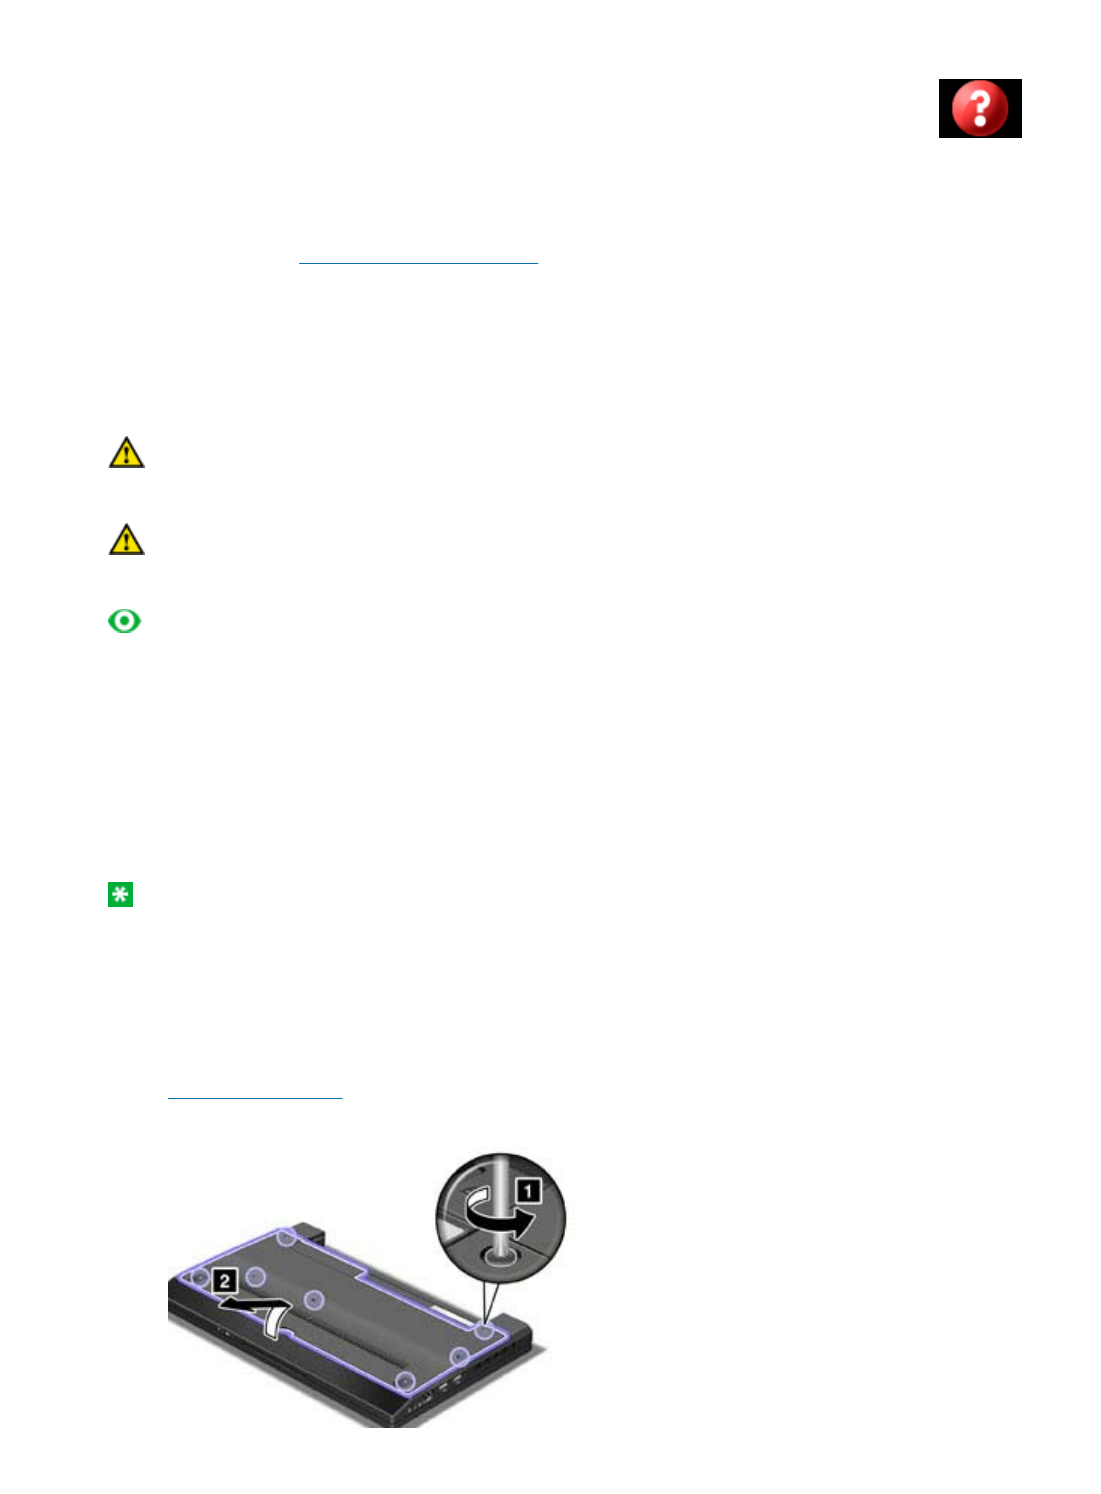
4. Loosen the screws on the slot cover (1), then remove the cover (2).
1/3 ページInstalling and replacing a PCI Express Mini Card for wireless LAN connection
2009/10/13file://C:\TamaTemp\replpci.htm\replpci.htm
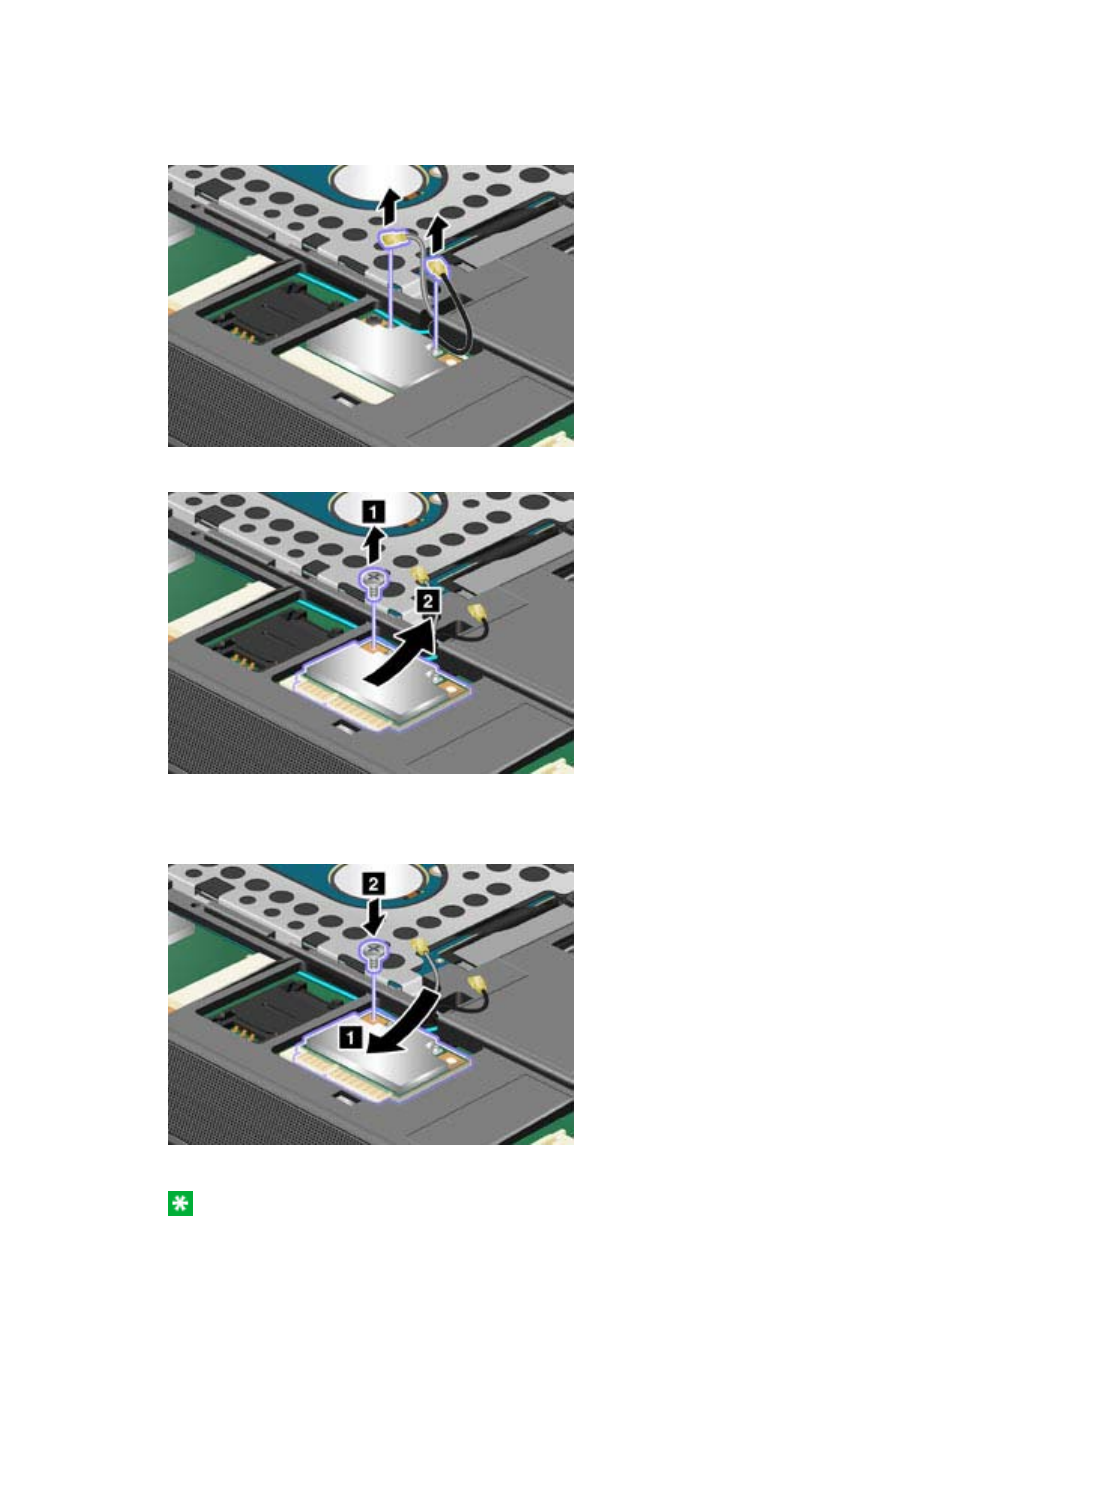
5. If a tool for removing connectors is included in the package with the new card, use it to
disconnect the cables from the card. If no such tool is included, disconnect the cables by
picking up the connectors with your fingers and gently unplugging them.
6. Remove the screw (1). The card pops up (2). Remove the card.
7. Align the contact edge of the new card with the corresponding socket contact of the
computer. Pivot the card until you can snap it into place (1), and secure the card with the
screw (2).
8. Connect the cables to the new PCI Express Mini Card.
Note: Be sure to attach the gray cable to the connector marked MAIN on the card and
the black cable to the connector marked AUX.
2/3 ページInstalling and replacing a PCI Express Mini Card for wireless LAN connection
2009/10/13file://C:\TamaTemp\replpci.htm\replpci.htm
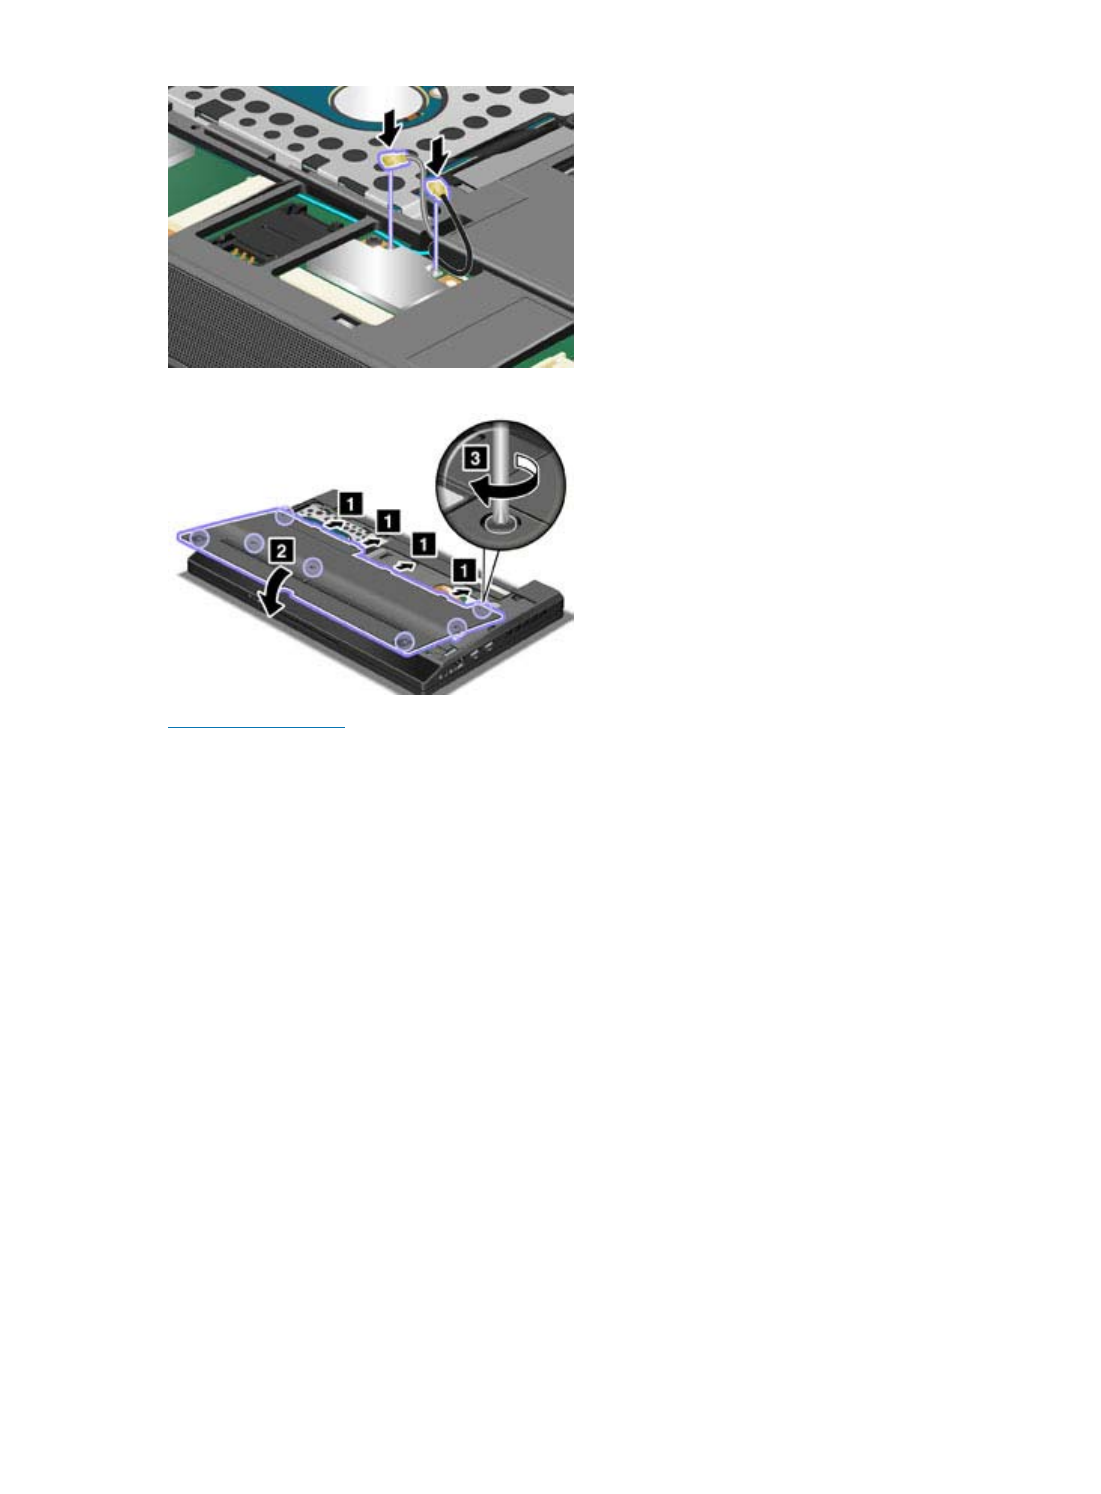
9. Put the slot cover back in place (1), close the cover (2), and then tighten the screws (3).
10. Reinstall the battery.
11. Turn the computer over again. Connect the ac adapter and cables to the computer; then
turn it on.
3/3 ページInstalling and replacing a PCI Express Mini Card for wireless LAN connection
2009/10/13file://C:\TamaTemp\replpci.htm\replpci.htm
Installing and replacing the PCI Express Mini Card for wireless WAN
connection
Before you start, print these instructions.
Some ThinkPad® models have a PCI Express Mini Card slot for wireless WAN connection. To
replace the PCI Express Mini Card with a new one, follow the procedure below.
Danger: During electrical storms, do not connect the cable to or disconnect it from the
telephone outlet on the wall.
Danger: Electric current from power, telephone, and communication cables is hazardous. To
avoid shock hazard, disconnect the cables before opening the cover of this slot.
Attention: Before you start installing a PCI Express Mini Card, touch a metal table or a
grounded metal object. This action reduces any static electricity from your body. The static
electricity could damage the card.
Replacing the PCI Express Mini Card
To replace the PCI Express Mini Card, do as follows:
1. Turn off the computer; then disconnect the AC adapter and all cables from the
computer. Wait for a few minutes, till the inside of the computer cools, before you start
the following procedures.
2. Close the computer display, and turn the computer over.
3. Remove the battery.
4. Remove the keyboard.
5. Remove the palm rest.
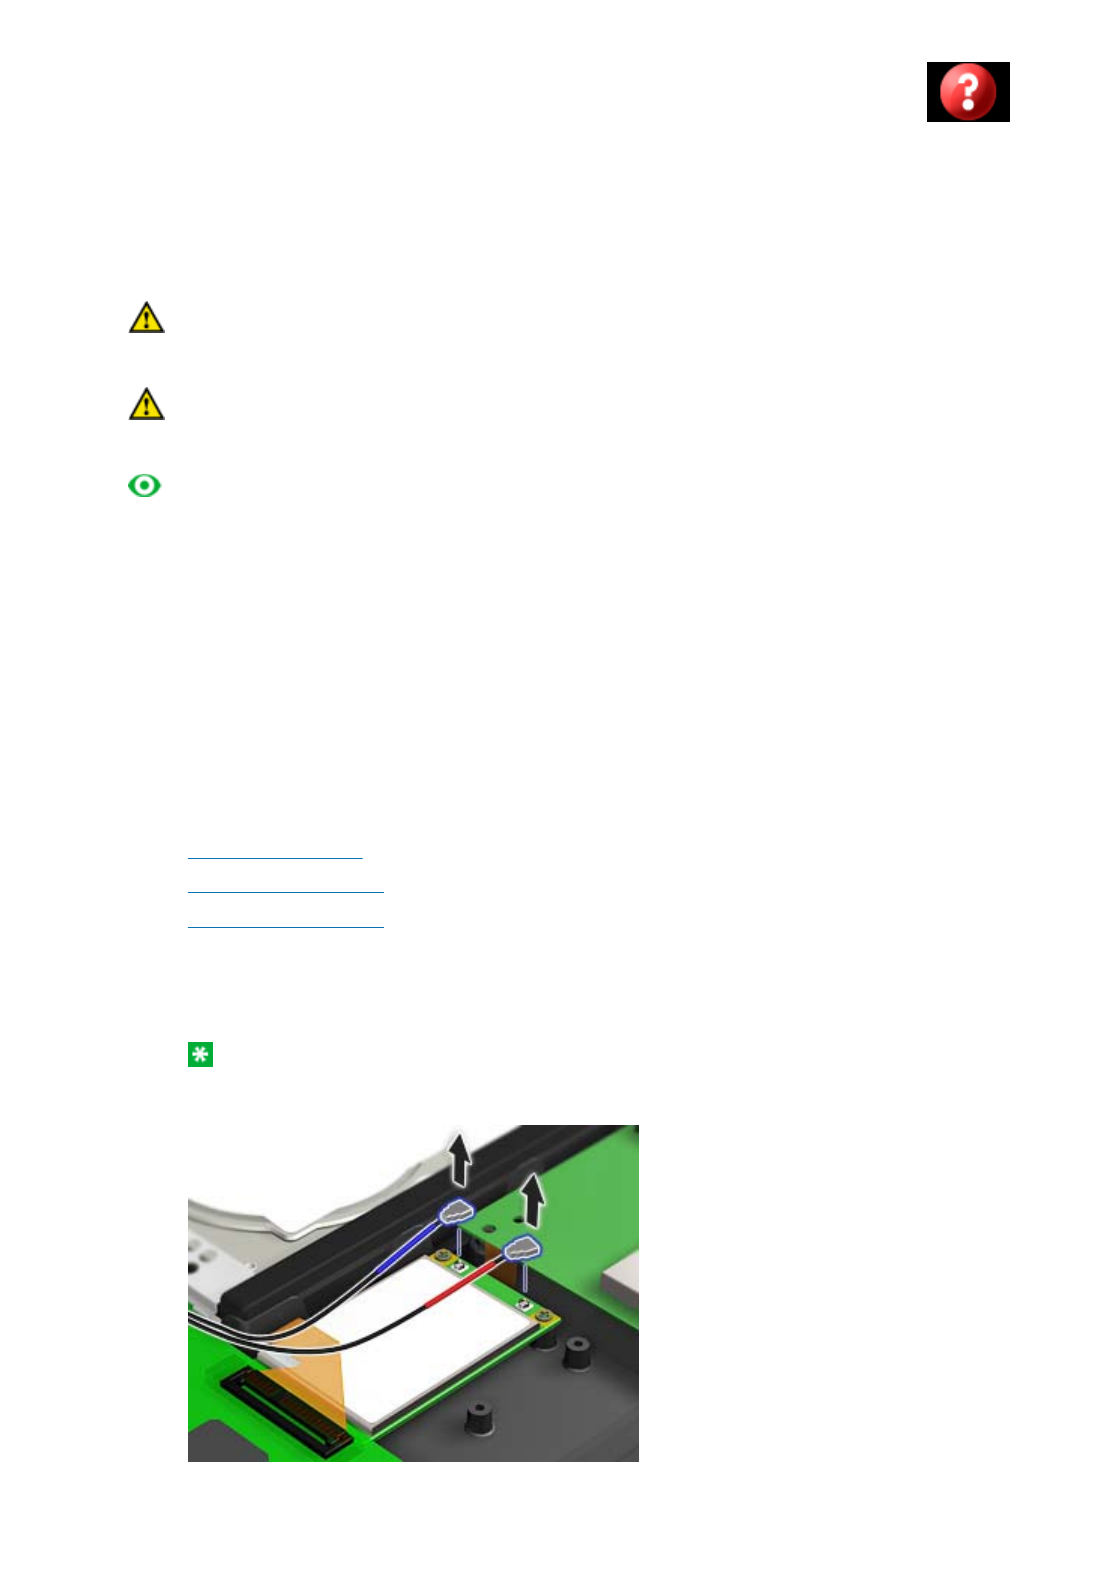
6. If a tool for removing connectors is included in the package with the new card, use it to
disconnect the cables from the card. If no such tool is included, disconnect the cables
from the card by picking up the connectors with your fingers and gently unplugging
them.
Note: Depending on the system configuration of your computer, the card may have
only one connector.
7. Remove the screws that secure the card.
1/2 ページInstalling and replacing the PCI Express Mini Card for wireless WAN connection
2010/03/12mk:@MSITStore:C:\DOCUME~1\murota\LOCALS~1\Temp\Rar$DI02.890\upgrade...
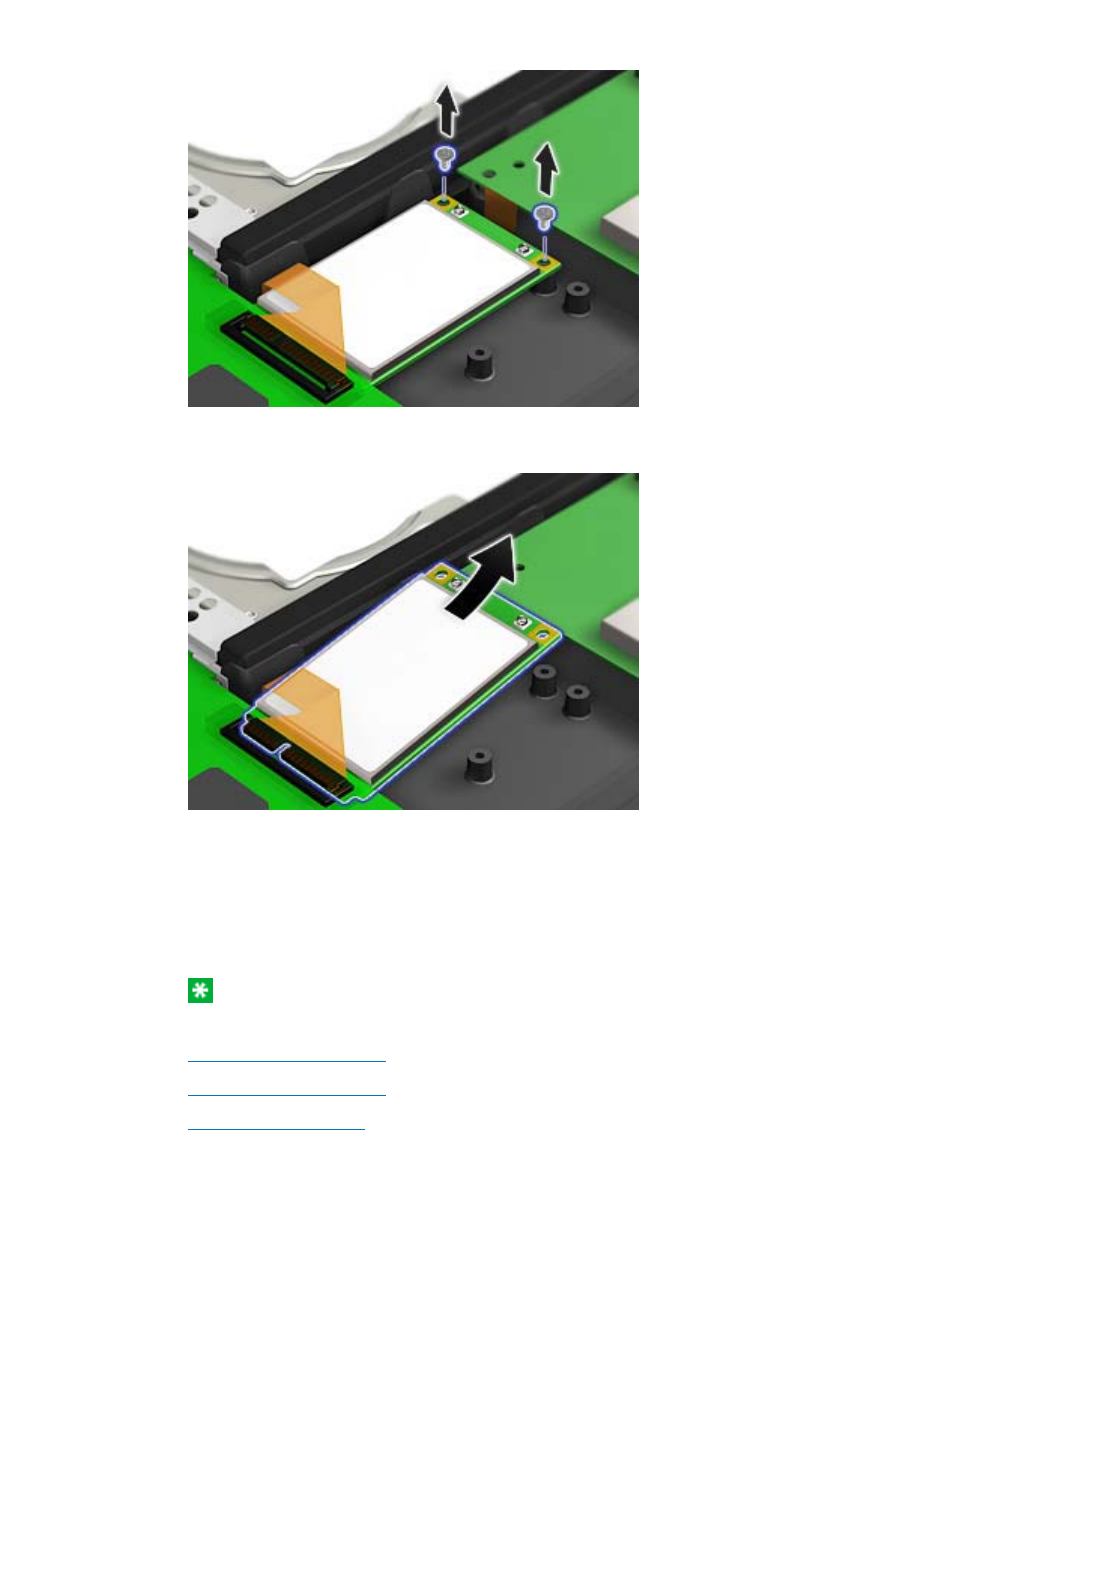
8. Remove the card.
9. Align the contact edge of the new Wireless WAN Card with the corresponding socket
contact of the computer.
10. Pivot the card until you can snap it into place by pressing the upper side of the
connectors; then secure the card with the two screws. Connect the cables to the new
card.
Note: Depending on the system configuration of your computer, the card may have
only one connector.
11. Reinstall the palm rest.
12. Reinstall the keyboard.
13. Reinstall the battery.
14. Turn the computer over again. Connect the AC adapter and cables to the computer;
then turn it on.
2/2 ページInstalling and replacing the PCI Express Mini Card for wireless WAN connection
2010/03/12mk:@MSITStore:C:\DOCUME~1\murota\LOCALS~1\Temp\Rar$DI02.890\upgrade...

Wireless connections
Wireless connection is the transfer of data without the use of cables by means of radio waves only.
Depending on the frequency used for data transmission, the area covered, or the type of the device used for data transfer, the following
categories of wireless networks may be available to you:
Wireless LAN
A wireless local area network covers a relatively small geographic area, such as an office building or a house. Devices based on the 802.11
standards can connect to this network.
Wireless WAN
A wireless wide area network covers a broader geographic area. Cellular networks are used for data transmission, and access is provided by a
wireless service carrier.
Bluetooth
One of a number of technologies used to create a wireless personal area network. Bluetooth can connect devices a short distance from one
another, and is commonly used for connecting peripheral devices to a computer, transferring data between hand-held devices and PC, or
remotely controlling and communicating with devices such as mobile phones.
Using wireless LAN connections
Using wireless WAN connections
Using Bluetooth feature
Checking wireless connection status
Enabling or disabling the wireless feature
1/1 ページWireless connections
2009/10/02mk:@MSITStore:C:\Temp\MKCHM_1stDraft\MKCHM_1stDraft\wireless.chm::/wireless.htm

Using wireless LAN connections
Your computer comes with a built-in wireless networking card and a configuration utility to help you make wireless connections and monitor the
status of your connection, so that you can stay connected to your network while you are in the office, in a meeting room, or at home, with no
need for a wired connection.
Attention:
zIf you carry your ThinkPad® Notebook with the wireless LAN feature into an airplane, check the services with the airline before
boarding the airplane.
zIf there are restrictions on the use of computers on an airplane with the wireless feature, you need to disable it before boarding. To
disable it, refer to the instructions in Enabling or disabling the wireless feature.
Note: You can purchase a wireless networking card as an option. For more information, refer to Finding ThinkPad options.
Tips for using the wireless LAN feature
zPlace your computer so that there are as few obstacles as possible between the wireless LAN access point and the computer.
zFor the best connection of the wireless LAN feature, open your computer display to an angle of slightly more than 90 degrees.
zIf you use the wireless feature (the 802.11 standard) of your computer simultaneously with a Bluetooth option, data transmission
speed can be delayed and the performance of the wireless feature can be degraded.
Wireless networking setup
1/1 ページUsing wireless LAN connections
2009/10/02mk:@MSITStore:C:\Temp\MKCHM_1stDraft\MKCHM_1stDraft\wireless.chm::/wireconn.htm

Wireless networking setup
To use the built-in wireless networking card (the 802.11 standard) to communicate, start Access Connections™.
For Windows® 7: To start the Access Connections wizard, see Getting started with Windows 7, and follow the instructions on the screen.
For Windows XP: To start the Access Connections wizard, click Start --> All Programs --> ThinkVantage --> Access Connections, and
follow the instructions on the screen.
Note: Before you start setting up wireless networking connections by using Access Connections, obtain a Network Name (SSID) and your
encryption information from your network administrator.
Access Connections, a connectivity assistant program, can easily enable one network adapter and disable the other adapters on demand. After
setting up your wireless networking connection, you can use the program to quickly switch the network settings.
1/1 ページWireless networking setup
2009/10/02mk:@MSITStore:C:\Temp\MKCHM_1stDraft\MKCHM_1stDraft\wireless.chm::/wireset.htm

Using wireless WAN connections
Wireless Wide Area Network (wireless WAN) enables you to establish wireless connections over remote public or private networks. These
connections can be maintained over a large geographical area, such as a city or an entire country, by use of multiple antenna sites or satellite
systems maintained by wireless service providers.
Some ThinkPad® Notebooks come with a built-in wireless WAN card integrating some wireless WAN technologies, such as 1xEV-DO, HSPA,
3G or GPRS. You can connect to the Internet or your company network with the built-in wireless WAN card and the configuration utility to make
a wireless WAN connection and monitor its status.
Note: Wireless WAN service is provided by authorized service providers in some countries.
To use the wireless WAN feature, start Access Connections™.
For Windows® 7: To start the Access Connections wizard, see Getting started with Windows 7, and follow the instructions on the screen.
For Windows XP: To start the Access Connections wizard, click Start --> All Programs --> ThinkVantage --> Access Connections, and
follow the instructions on the screen.
1/1 ページUsing wireless WAN connections
2009/10/02mk:@MSITStore:C:\Temp\MKCHM_1stDraft\MKCHM_1stDraft\wireless.chm::/usewan.htm

Using Bluethooth feature
For Windows® 7
For Windows XP
For Windows 7:
If your computer is equipped with the Integrated Bluetooth features, you can enable or disable the features by pressing Fn+F5. If you press
Fn+F5, a list of wireless features is displayed. You can enable or disable the Bluetooth features with a single click.
To configure a Bluetooth device or manage connection settings, you can use Bluetooth Devices in Control Panel.
1. Click Start --> Control Panel.
2. Click Hardware and Sound.
3. Click Devices and Printers.
To send data to a Bluetooth-enabled device, do as follows:
1. Right-click data that you want to send.
2. Select Send To --> Bluetooth Devices.
For details, refer to the Windows online help.
Note: If you use the wireless feature (the 802.11 standard) of your computer simultaneously with a Bluetooth option, data transmission
speed can be delayed and the performance of the wireless feature can be degraded.
For Windows XP:
If your computer is equipped with the Integrated Bluetooth features, you can enable or disable the features by pressing Fn+F5.
1/6 ページUsing Bluetooth feature
2009/10/02mk:@MSITStore:C:\Temp\MKCHM_1stDraft\MKCHM_1stDraft\wireless.chm::/bluetoo.htm

If you press Fn+F5, a list of wireless features is displayed. You can enable or disable the Bluetooth features with a single click.
In Windows XP, you can use either ThinkPad® Bluetooth with Enhanced Data Rate Software, or the Microsoft® Bluetooth software.
By default, ThinkPad Bluetooth with Enhanced Data Rate Software is installed on your computer.
Using Bluetooth for the first time on your computer
Using the Microsoft Bluetooth software
Using ThinkPad Bluetooth with Enhanced Data Rate Software
Installing the Microsoft Bluetooth software in Windows XP
Installing ThinkPad Bluetooth with Enhanced Data Rate Software in Windows XP
Using Bluetooth for the first time on your computer
If this is the first time Bluetooth has been used on your computer, use either of the following procedures:
1. Double-click the My Bluetooth Places icon on the desktop, or the Bluetooth icon in the task bar. The Start Using Bluetooth
window opens, and some virtual device drivers are installed automatically.
2. Wait until the installation of the drivers is complete.
OR
1. Right-click the My Bluetooth Places icon on the desktop, or the Bluetooth icon in the task bar.
2. Select Start Using Bluetooth. The Start Using Bluetooth window opens, and some virtual device drivers are installed automatically.
3. Wait until the installation of the drivers is complete.
Some other virtual device drivers will be installed on demand when you use certain Bluetooth profiles for the first time.
Using the Microsoft Bluetooth software
If you are using Windows XP and want to use the Microsoft standard Bluetooth features, install the software by following the instructions in
Installing the Microsoft Bluetooth software in Windows XP.
2/6 ページUsing Bluetooth feature
2009/10/02mk:@MSITStore:C:\Temp\MKCHM_1stDraft\MKCHM_1stDraft\wireless.chm::/bluetoo.htm

For information about how to use the Bluetooth function, do as follows:
1. Press Fn+F5 to turn on Bluetooth.
2. Click Start --> Control Panel.
3. Click Printers and Other Hardware.
4. Click Bluetooth Devices.
5. Click the Options tab.
6. Click Learn more about Bluetooth Settings.
Using ThinkPad Bluetooth with Enhanced Data Rate Software
If ThinkPad Bluetooth with Enhanced Data Rate Software is installed on your computer, two icons are displayed on the screen:
My Bluetooth Places on the desktop
Bluetooth Configuration in the system tray of the taskbar
My Bluetooth Places
To use the Bluetooth features, do the following:
1. Double-click the My Bluetooth Places icon on the desktop.
2. Go to Bluetooth Tasks and double-click View devices in range. A list of the devices on which Bluetooth has been enabled appears.
3. Click the device to which you want access. A list of the services available on that device appears, as follows:
{Bluetooth keyboard and mouse (Human interface devices)
{Printer (HCRP)
{Audio gateway
{Headset
{PIM synchronization
{Fax
{File transfer
{PIM item transfer
{Dial-up networking
{Network access
3/6 ページUsing Bluetooth feature
2009/10/02mk:@MSITStore:C:\Temp\MKCHM_1stDraft\MKCHM_1stDraft\wireless.chm::/bluetoo.htm

{Bluetooth Imaging
{Hands Free
{AV profile
4. Click the service you want.
For more information, press the F1 key to open the online help for Bluetooth.
Bluetooth Configuration
To use the configuration features of Bluetooth, right-click the icon. A pop-up menu appears. Select Bluetooth Setup Wizard or Advanced
Configuration.
The Bluetooth Setup Wizard has the following capabilities:
zFinding all Bluetooth-enabled devices that can provide services
zFinding a specific Bluetooth-enabled device that you want to use, and configuring the services on that device
zConfiguring the Bluetooth-enabled services on your computer that are provided for remote devices
zConfiguring the name and device type of your computer
The Advanced Configuration has the following functions:
zConfiguring the name and device type of your computer
zConfiguring your computer settings so that remote Bluetooth-enabled devices can find your computer
zConfiguring your computer settings so that your computer can find remote Bluetooth-enabled devices
zConfiguring, on your computer, the Bluetooth-enabled services provided for remote devices
zConfiguring the services on remote Bluetooth-enabled devices
zDisplaying information about Bluetooth hardware
For details, refer to the help for Bluetooth.
To see the help, double-click My Bluetooth Places, and click Help and then Bluetooth help.
Another way to start the help is to right-click Bluetooth Configuration in the system tray of the taskbar, and click Advanced Configuration
and then Help.
4/6 ページUsing Bluetooth feature
2009/10/02mk:@MSITStore:C:\Temp\MKCHM_1stDraft\MKCHM_1stDraft\wireless.chm::/bluetoo.htm

Installing the Microsoft Bluetooth software in Windows XP
If you want to use the Microsoft Bluetooth software, do as follows:
First uninstall the ThinkPad Bluetooth with Enhanced Data Rate Software.
1. Turn Bluetooth power off.
2. Click Start --> Control Panel.
3. Click Add/Remove Programs.
4. Select ThinkPad Bluetooth with Enhanced Data Rate Software; then click Change/Remove to uninstall the software.
5. Follow the instructions on the screen.
Next install the Microsoft Bluetooth software, as follows:
1. Turn Bluetooth power on. Microsoft Bluetooth software is loaded automatically.
2. If the Found New Hardware Wizard window pops up, do the following:
1. Select No, not this time, and then click Next.
2. Select Install from a list or specific location (Advanced); then click Next.
3. Select Search for the best driver in those locations.
4. Select Include this location in the search:, and type "C:\SWTOOLS\Drivers\MSBTooth," or specify the location in
which you placed the extracted INF file. Then click Next.
3. Click Finish.
Installing ThinkPad Bluetooth with Enhanced Data Rate Software in Windows XP
If you are using the Microsoft Bluetooth software and want to use ThinkPad Bluetooth with Enhanced Data Rate Software instead, replace the
Microsoft Bluetooth software with ThinkPad Bluetooth with Enhanced Data Rate Software as follows:
1. Press Fn+F5 to turn the Bluetooth power on.
2. Click Start --> Run.
3. Type "C:\SWTOOLS\Drivers\TPBTooth\Setup.exe" (or specify the full path to the setup.exe file you have downloaded from
5/6 ページUsing Bluetooth feature
2009/10/02mk:@MSITStore:C:\Temp\MKCHM_1stDraft\MKCHM_1stDraft\wireless.chm::/bluetoo.htm

http://www.lenovo.com/think/support) then click OK.
4. Click Next.
5. Select I accept the terms in the license agreement; then click Next.
6. Click Next to select the default destination folder.
If you need to change the destination folder, click Change, select or enter the name of the destination folder in the Change current
destination folder window, and click OK.
7. Click Install to begin installation.
8. Click OK to accept the driver signature.
9. Click Finish.
10. Restart the computer if necessary.
If you did not turn the Bluetooth power on before installing ThinkPad Bluetooth with Enhanced Data Rate Software -- that is, if you skipped step
1 -- replace the Bluetooth driver, as follows:
1. Click Start --> Control Panel.
2. Click Performance and Maintenance; then click System.
3. Click the Hardware tab; then click Device Manager.
4. Double-click Bluetooth Radios to extract the Bluetooth Radios device tree.
5. Double-click the ThinkPad Bluetooth with Enhanced Data Rate icon to open the Properties window.
6. Click the Driver tab; then click Update Driver.
7. Click No, not this time, and then click Next.
8. Select Install from a list or specific location (Advanced), and then click Next.
9. Select Don't search. I will choose the driver to install; then click Next.
10. Select the driver that has no "Digital Signed" icon; then click Next.
11. Click Finish.
Note: If you use the wireless feature (the 802.11 standard) of your computer simultaneously with a Bluetooth option, data transmission
speed can be delayed and the performance of the wireless feature can be degraded.
6/6 ページUsing Bluetooth feature
2009/10/02mk:@MSITStore:C:\Temp\MKCHM_1stDraft\MKCHM_1stDraft\wireless.chm::/bluetoo.htm

Checking wireless connection status
Access Connections™ Gauge (Windows® 7)
Access Connection icon and wireless status icon
Access Connections Gauge (Windows 7)
If your computer is running Windows 7, the Access Connections Gauge in the task bar displays the signal strength and status of your wireless
connection.
Note: To display Access Connections Gauge in the task bar, see the Help in Access Connections.
You can find more detailed information about the signal strength and status of your wireless connection by opening Access Connections or by
right-clicking the Access Connections Gauge in the task bar and selecting View Status of Wireless Connection.
Access Connections Gauge states: wireless LAN
z Power to the wireless radio is off or no signal.
z Power to the wireless radio is on. The signal strength of the wireless connection is poor. To improve signal strength, move
your system closer to the wireless access point.
z Power to the wireless radio is on. The signal strength of the wireless connection is marginal.
z Power to the wireless radio is on. The signal strength of the wireless connection is excellent.
Note: For more information about Access Connections Gauge, see the Help in Access Connections.
Access Connections Gauge states: wireless WAN
z No signal
z Signal level 1
1/3 ページChecking wireless connection status
2009/10/02mk:@MSITStore:C:\Temp\MKCHM_1stDraft\MKCHM_1stDraft\wireless.chm::/WIRESTAT.HTM

z Signal level 3
Access Connections icon and wireless status icon
The Access Connections icon displays general connection status.
The wireless status icon displays the signal strength and status of your wireless connection.
You can find more detailed information about the signal strength and status of your wireless connection either by opening Access Connections
or by double-clicking the Access Connections wireless status icon in the task bar.
Note: If your computer is running Windows 7, to display the Access Connections icon and wireless status icon, click Show hidden icons in
the task bar. To add it to the task bar permanently, click Customize and proceed to customize the settings. For more information about the
icon, see the Help in Access Connections.
Access Connections icon states
z No location profile is active or none exists.
z Current location profile is disconnected.
z Current location profile is connected.
Wireless status icon states: wireless LAN
z Power to the wireless radio is off.
z Power to the wireless radio is on. No association.
z Power to the wireless radio is on. No signal.
z Power to the wireless radio is on. The signal strength of the wireless connection is excellent.
z Power to the wireless radio is on. The signal strength of the wireless connection is marginal.
z Power to the wireless radio is on. The signal strength of the wireless connection is poor. To improve signal strength, move your
system closer to the wireless access point.
2/3 ページChecking wireless connection status
2009/10/02mk:@MSITStore:C:\Temp\MKCHM_1stDraft\MKCHM_1stDraft\wireless.chm::/WIRESTAT.HTM

Note: If you have trouble in making a connection, try moving your computer closer to your wireless access point.
Wireless status icon states: wireless WAN
z Power to the WAN radio is off.
z No association
z No signal
z Signal level 1
z Signal level 2
z Signal level 3
3/3 ページChecking wireless connection status
2009/10/02mk:@MSITStore:C:\Temp\MKCHM_1stDraft\MKCHM_1stDraft\wireless.chm::/WIRESTAT.HTM

Enabling or disabling the wireless feature
To enable or disable the wireless feature, press Fn+F5. A list of wireless features is displayed. You can turn the feature on and off with a single
click.
You can also enable or disable the feature by the following procedures.
To enable the wireless feature, do as follows:
1. Click the Access Connections™ wireless icon in the system tray.
2. Click Power On Wireless Radio.
To disable the wireless feature, do as follows:
1. Click the Access Connections wireless icon in the system tray.
2. Click Power Off Wireless Radio.
Note: You can use the wireless radio switch to disable the wireless radio of all the wireless devices on your computer.
Note: If your computer is a Windows® 7 model, click Show hidden icons in the task bar. The Access Connections wireless icon is
displayed. To add it to the task bar permanently, click Customize and proceed to customize the settings.
1/1 ページEnabling or disabling the wireless feature
2009/10/02mk:@MSITStore:C:\Temp\MKCHM_1stDraft\MKCHM_1stDraft\wireless.chm::/Wlenab.htm

Wireless related information
Wireless interoperability
Wireless LAN PCI Express Mini Card is designed to be interoperable with any wireless LAN product that is based on Direct Sequence Spread
Spectrum (DSSS), Complementary Code Keying (CCK), and/or Orthogonal Frequency Division Multiplexing (OFDM) radio technology, and is
compliant to:
zThe 802.11b/g or 802.11n draft 2.0 standard on Wireless LANs, as defined and approved by the Institute of Electrical and
Electronics Engineers.
zThe Wireless Fidelity (WiFi) certification as defined by the Wi-Fi Alliance.
Bluetooth device is designed to be interoperable with any Bluetooth product that is compliant to Bluetooth Specification 2.1 + EDR as defined
by the Bluetooth SIG. Following profiles are supported by Bluetooth device:
zGeneric Access
zService Discovery
zSerial Port
zDial-up Networking
zFAX
zLAN Access using PPP
zPersonal Area Network
zGeneric Object Exchange
zGeneric Object Push
zFile Transfer
zSynchronization
zAudio Gateway
zHeadset
zPrinter
zHuman Interface Devices (Keyboard/Mouse)
zBasic Image
zHandsfree
zAV
zPhone Book Access Profile (PBAP) (Windows® 7)
zVDP-Sync Profile (Windows 7)
1/2 ページWireless related information
2009/10/02mk:@MSITStore:C:\Temp\MKCHM_1stDraft\MKCHM_1stDraft\masteraibl.chm::/wiinfo.htm

Usage environment and your health
Wireless LAN PCI Express Mini Card, Wireless WAN PCI Express Mini Card, and Bluetooth device emit radio frequency electromagnetic
energy like other radio devices. However, the level of energy emitted is far much less than the electromagnetic energy emitted by wireless
devices like for example mobile phones.
Due to the fact that Wireless LAN PCI Express Mini Card, Wireless WAN PCI Express Mini Card, and Bluetooth device operate within the
guidelines found in radio frequency safety standards and recommendations, Lenovo believes the integrated wireless cards are safe for use by
consumers. These standards and recommendations reflect the consensus of the scientific community and result from deliberations of panels
and committees of scientists who continually review and interpret the extensive research literature.
In some situation or environment, the use of Wireless LAN PCI Express Mini Card, Wireless WAN PCI Express Mini Card or Bluetooth device
may be restricted by the proprietor of the building or responsible representatives of the organization. These situations and areas may for
example include:
zUsing the integrated wireless cards on board of airplanes, in hospitals or near petrol stations, blasting areas (with electro-explosive
devices), medical implants or body-worn electronic medical devices, e.g. pace makers.
zIn any other environment where the risk of interference to other devices or services is perceived or identified as harmful.
If you are uncertain of the policy that applies on the use of wireless devices in a specific organization (e.g., airport or hospital), you are
encouraged to ask for authorization to use Wireless LAN PCI Express Mini Card, Wireless WAN PCI Express Mini Card or Bluetooth device
prior to turning on the computer.
2/2 ページWireless related information
2009/10/02mk:@MSITStore:C:\Temp\MKCHM_1stDraft\MKCHM_1stDraft\masteraibl.chm::/wiinfo.htm

Verifying the connection of replaceable or upgradable devices
You can replace or upgrade the following devices for your ThinkPad® Notebook. If you experience a problem, click each of the following in
turn, and verify that each device is correctly and securely installed on and connected to the computer.
zBattery
zPCI Express Mini Card for wireless LAN connection
zPCI Express Mini Card for wireless WAN connection
zHard disk drive
zMemory
zSIM card
zAC adapter and power cord (refer also to the Setup Instructions.)
zTrackPoint® cap
1/1 ページ
2009/10/13file://C:\DOCUME~1\Murota\LOCALS~1\Temp\2T9ZZ2MC.htm