Realtek Semiconductor RTL8192EHMC 802.11 b/g/n RTL8192E half miniCard User Manual unprotected UserMan 3 TX2 RTL8192EHMC Revised3
Realtek Semiconductor Corp. 802.11 b/g/n RTL8192E half miniCard unprotected UserMan 3 TX2 RTL8192EHMC Revised3
Contents
- 1. Manual
- 2. Users Manual
- 3. User manual 1 of 3
- 4. User manual 2 of 3
- 5. User manual 3 of 3
User manual 3 of 3
464
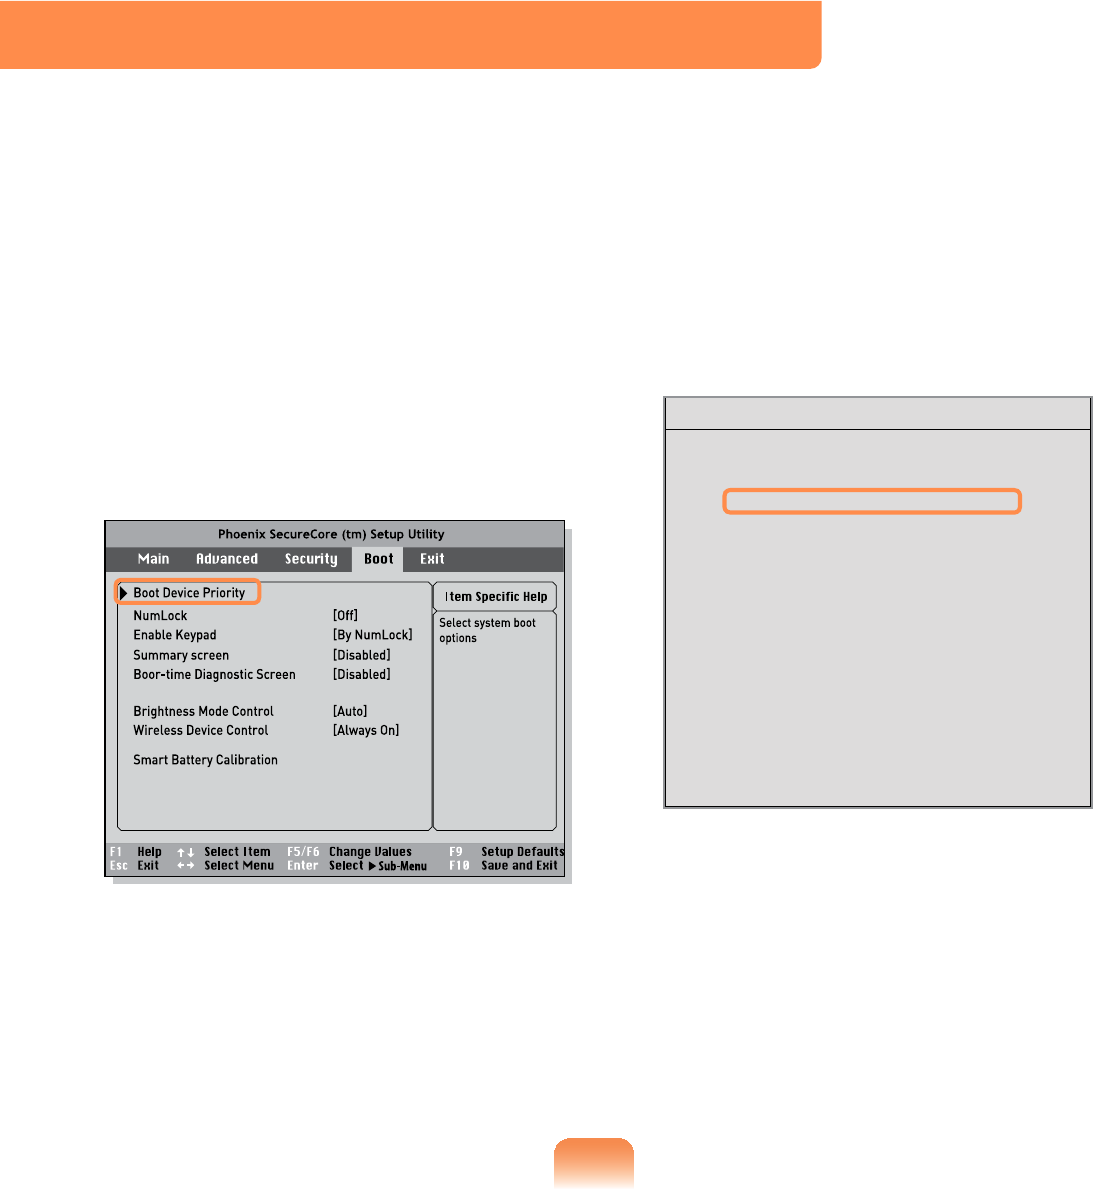
1 Select the Boot menu in the BIOS
Setup.
2 Press <Enter> on the Boot Device
Priority item.
PXE OPROM [Only with F12]
3 Press the down key (↓) to move to the
IDE HDD item and press the F6 key
to move up to the top item.
[Boot priority order]
1. USB CD : N/A
2. IDE HDD : XXXXXXXX
3. PCI BEV : N/A
4. USB FDD : N/A
5. USB KEY : N/A
6. USB HDD : XXXXXXXX
7.
8.
[Excluded from boot order]
- USB ZIP : N/A
- USB LS120 : N/A
- PCI SCSI : N/A
- Other USB : N/A
- PCI : N/A
Boot Device Priority
4 Press the F10 key to save the settings
and exit Setup.
The highest boot priority device is
now set to the Hard Drive.
Changing the Boot Priority
This computer is configured to boot from an external-type ODD first.
This chapter describes how to change the boot priority so that the computer boots from
the hard disk drive first.
465
Upgrading Memory
A memory is installed in the memory slot at the bottom of this computer. The
procedures to replace the memory are described below.
Replace new memory only after shutting the computer down completely. Do not
replace memory when the computer is in Sleep mode.
Disconnect main power plug and remove the battery before continuing.
Only use the same type of memory as specified in the Product Specification.
Replacing the Memory
1 Remove the screw on the memory
compartment cover at the bottom of
the computer using a screw driver.
Fixing Screw
2 Pull the memory module latches
outward. The memory module will pop
up.
Remove the memory module out at
an angle of 30 degrees.
133
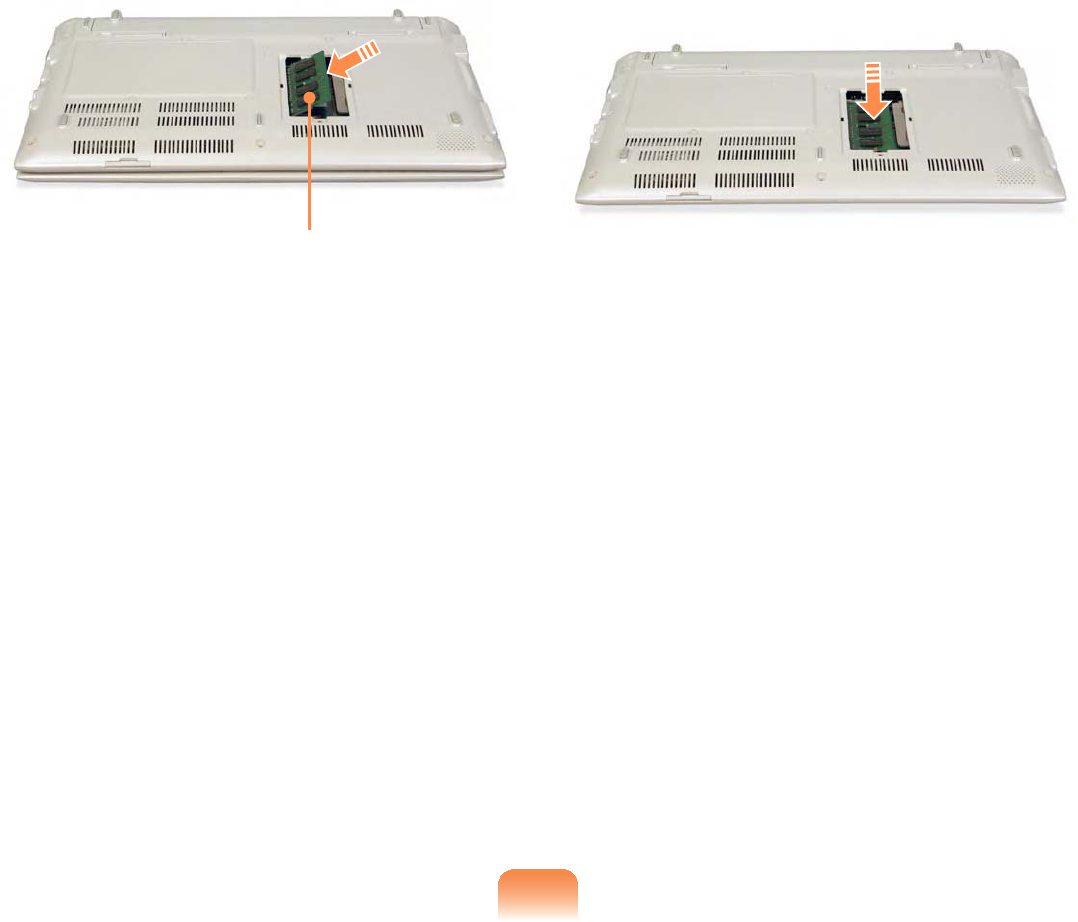
3 Insert a new memory module into
the memory slot at an angle of
approximately 30 degrees aligning it
to the angle of the memory slot.
Memory Slot
4 Push the memory module down
so that it is completely fixed. If the
memory does not fit easily, push the
memory module down while pulling
the memory module latches outward.
5 Close the memory compartment
cover and fasten the screw.

467
Battery
Please refer to the following instructions when running the computer on battery power
without connecting the AC power.
A Lithium-Ion smart battery is supplied with this computer.
Carefully read and follow the precautions printed on the battery before using the
battery.
Precautions
Use only chargers specified in the User Manual.
Never heat the battery pack, put it near or in a fire or use at a temperature higher than
60°C, as this may cause fire.
Never cause a short circuit between the battery pack terminals or disassemble the
battery pack.
Carefully read and follow the precautions printed on the battery and the safety
instructions in the User Manual before using the battery.
Please refer to the system operation environment ( 178) of this manual and operate
and store the battery at room temperature.
Installing/Removing the Battery
1 Shutdown the system, close the LCD panel and place the computer upside down on
a flat surface.

135
2 Slide the right battery latch to the
OPEN position and remove the
battery while holding the left battery
latch to the OPEN position.
l
n
W
3 To install the battery again, slide the
battery into the system.
Slide and fix the right battery latch to
the CLOSE (inside) position so that
the battery is fixed.
n
l
If the right battery latch is not in the
CLOSE (inside) position, there is
a danger of data loss because the
battery may become separated.
Slide and fix the latch to the CLOSE
position so that the red circle mark is
hidden.
Check if the battery latch has been
moved inwards.

136
Charging the Battery
1 Attach the battery and connect the
AC adapter to the DC-in jack of the
computer.
The battery will then start charging.
2 When charging is complete, the
Charge LED turns green.
Status Charge LED
Charging Red
Charging complete Green
AC adapter not
connected Off

137
Measuring the Remaining Battery Charge
You can view the battery charge status by completing the following procedures.
To use the shortcut key to view
Press the Fn + keys on the keyboard.
The remaining battery charge (%) will
displayed for a moment.
You can only view the charge status in
this way when Easy Display Manager is
installed on your computer.
Battery Warning
You will hear an alarm when the
remaining battery charge reaches
below 10%.
In this case, connect the AC
adapter or turn off the computer
and install a fully charged battery.
If the battery residual amount is
3~5%, the computer automatically
shuts down after saving the data.
The battery residual amount may
vary depending on the computer
model.
Battery Usage Time Information
A battery is an expendable supply,
so when using it over a long time, the
capacity/battery life is shortened. If the
battery life is reduced to under half of its
initial time, we recommend purchasing a
new battery.
For long periods of not using the battery,
keep the battery after discharging it. This
extends the battery life time.
138
Extending the Battery Usage Time
Decreasing the LCD Brightness
Press the Fn + keys on the keyboard
to decrease the LCD brightness to extend
the battery usage time.
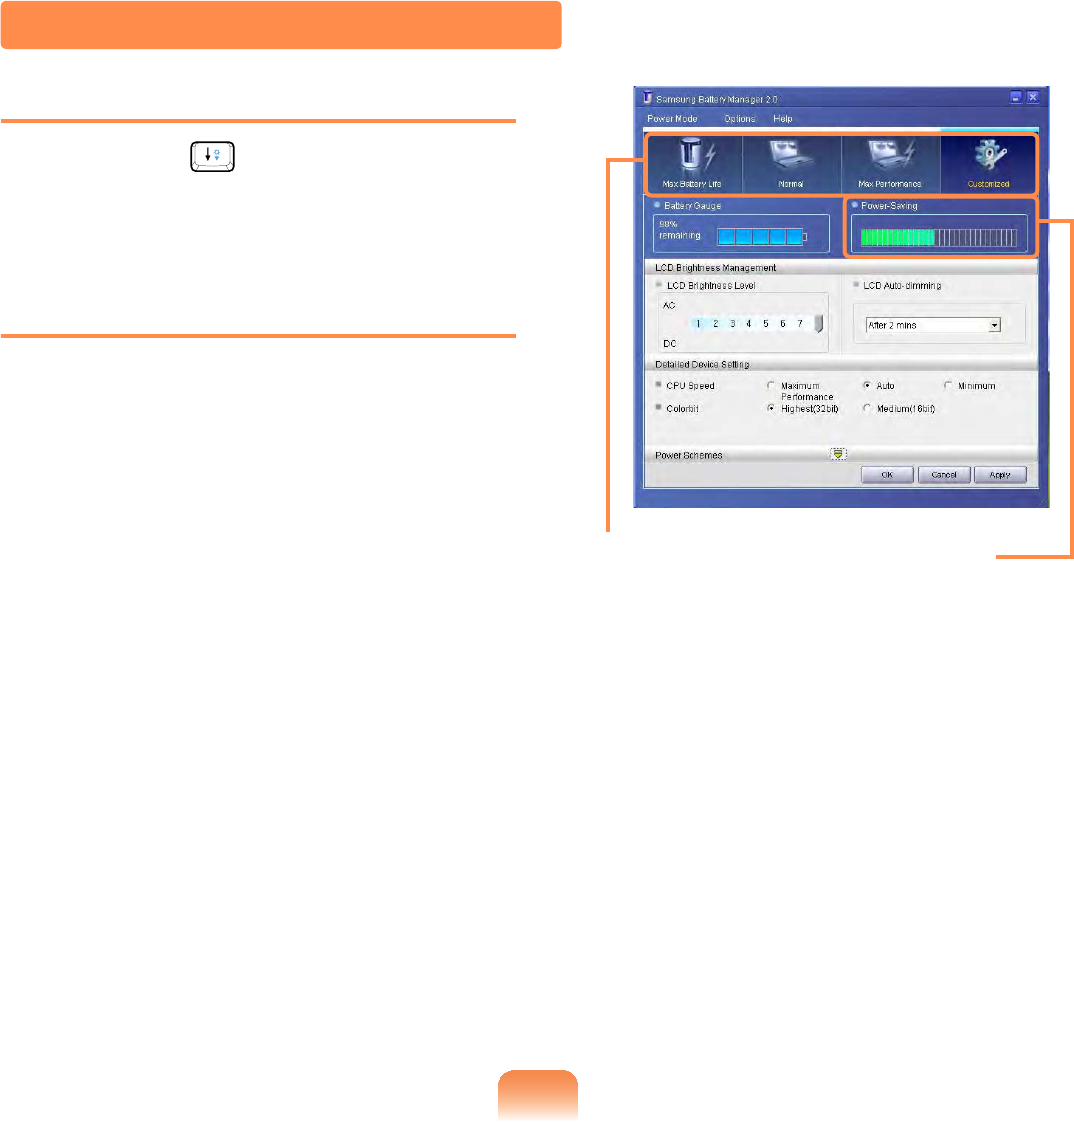
Using Samsung Battery Manager
Battery Manager is a management
program that allows you to use the battery
efficiently. You can select the optimized
power mode depending on the system
environment.
Click Start > All Programs > Samsung
> Samsung Battery Manager >
Samsung Battery Manager.
Select Power
Mode
Power-saving
Effect
Maximum Battery Mode
This mode is appropriate for the
environment that requires maximum
battery lifetime. The system performance
may be degraded in this mode.
General Mode
This mode is appropriate for the regular
environment and it optimizes the
performance of the system and battery.

139
Maximum Performance Mode
This mode is appropriate for the
environment that requires maximum
system performance. The battery life may
get shorter in this mode.
User Settings Mode
This mode allows you to configure the
detailed settings. You can set LCD
brightness, power status, and color
quality.
What is the Power-saving Effect?
This product displays the battery life
in each power mode. The higher the
power saving effect increases, the
longer the graph bar is displayed.
When Using Games or Multimedia
The system may not operate properly
in maximum battery mode. It is
recommended to connect the AC
adapter to the system or to use the
system in general mode.
Usage Mode of Samsung Battery
Manager
The maximum battery mode
optimizes the system operation
speed to increase the battery run
time, so the program execution
time may get longer.
If you change the power settings,
the properties in Power Options
window will also be changed.
Complete, install Samsung Battery
Manager using the System
Software Media in order to use
the general mode.
Disabling Unused Devices
If you turn off unused devices, battery
lifetime will improve.
1 Click Device Manager from Start
> Control Panel > Performance
and Maintenance > Systems >
Hardware tab.
2 Right-click the devices that you are
not using and select Disable.
140
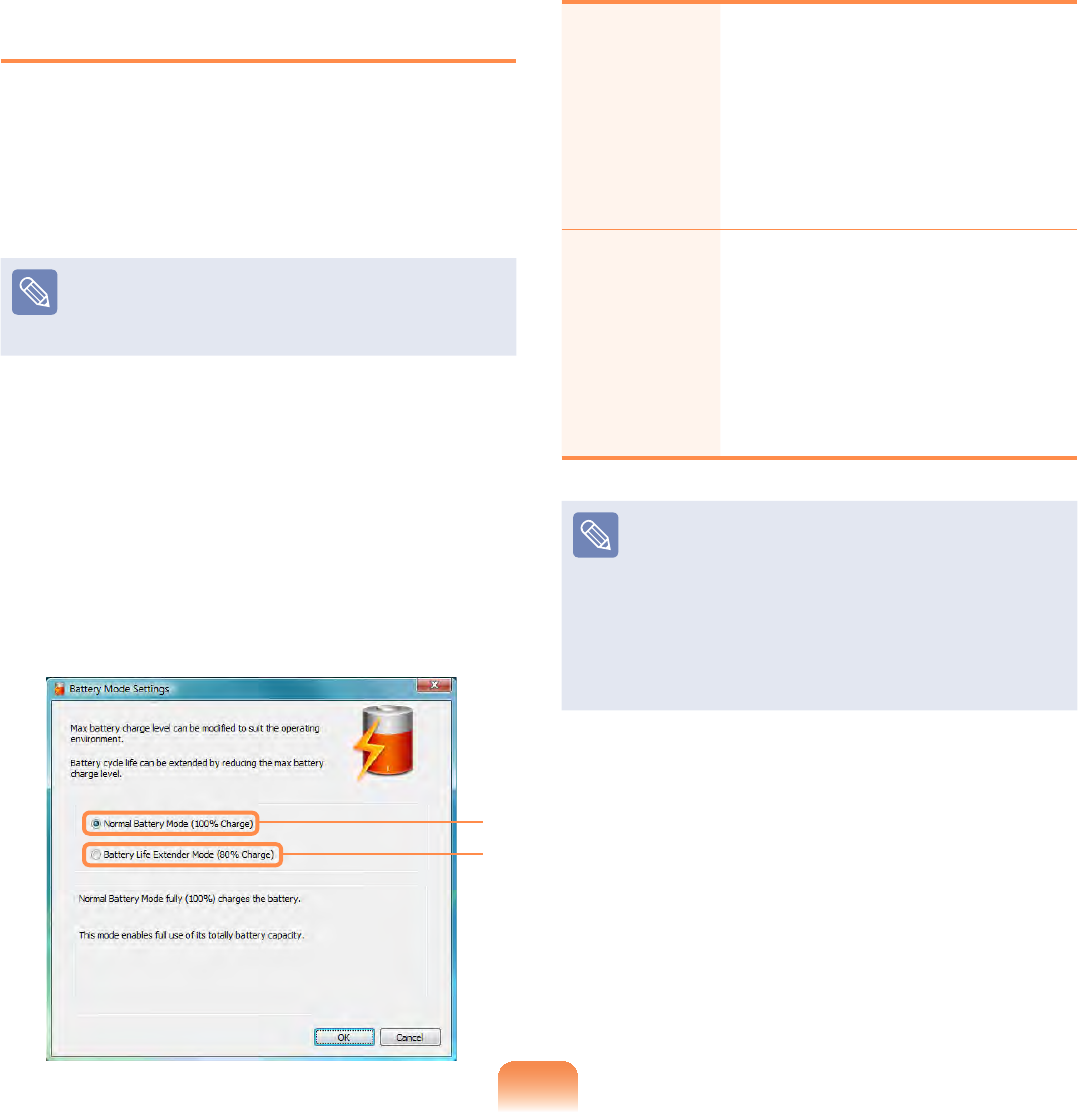
Extending the Battery Life
(Optional)
The Battery Life Extender is a battery
power management program that enables
extending the battery life. Users can
change the settings depending on their
requirements.
The Battery Life Extender is optional
and may not be supplied depending
on the model.
1 Click Start > All Programs >
Samsung > Battery Life Extender >
Battery Life Extender.
2 When the following screen appears,
select a mode and click the OK
button. You can use the battery in the
selected mode.
Battery Normal Mode
Battery Life Extension Mode
Battery Life Extension Mode
Battery
Normal
Mode
This mode maintains 100%
of the battery charge when
using the computer on AC
power.
In this case, although the
battery use time increases,
the battery life is reduced.
Battery
Life
Extension
Mode
This mode maintains 80%
of the battery charge when
using the computer on AC
power.
In this case, although the
battery use time decreases,
the battery life is extended.
Press the F2 key when the Samsung
logo appears in the booting
sequence to enter the BIOS Setup,
select Advanced > Battery Life
Cycle Extension, and set it to
Enable. Then you can use the
battery life cycle extension mode.
141
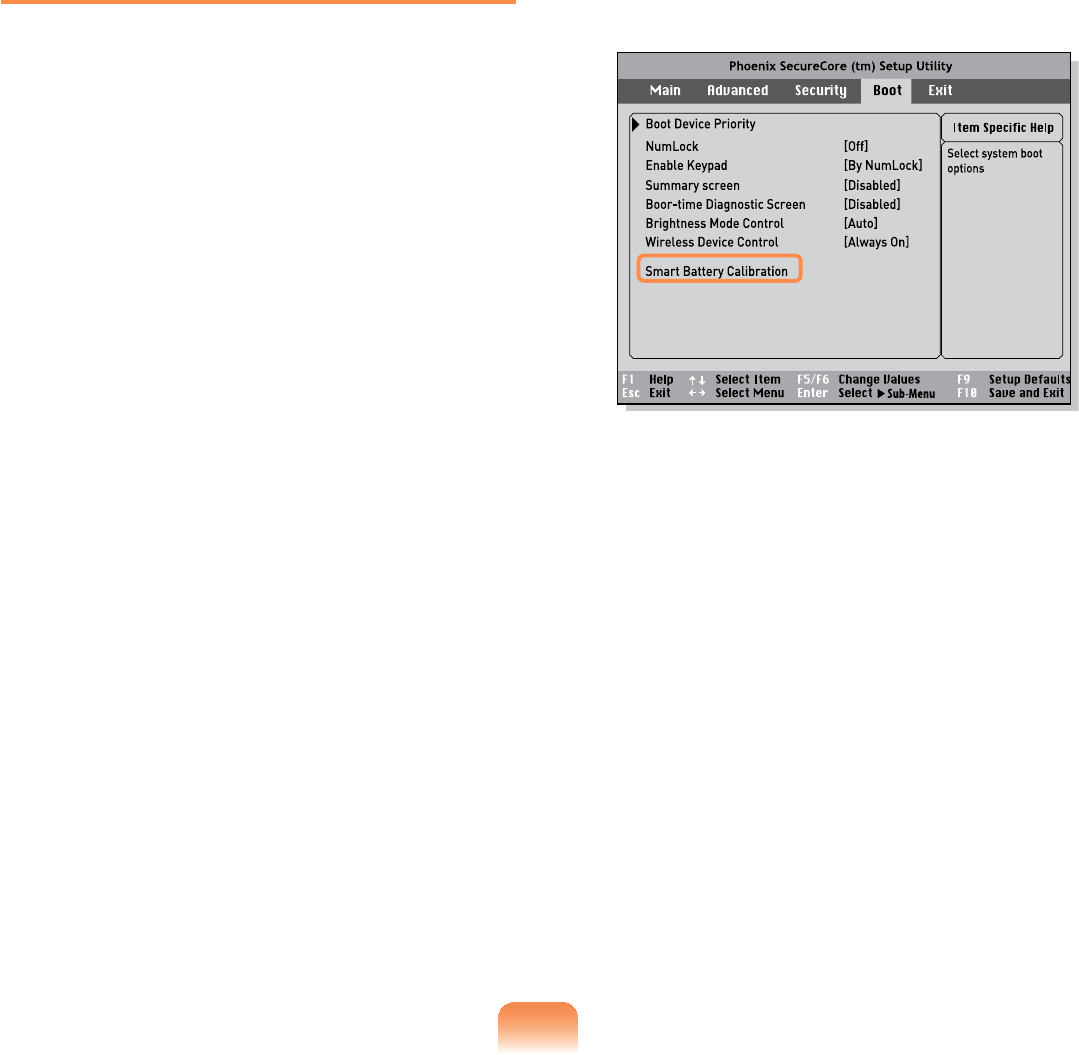
Using the Battery Calibration
Function
When charging/discharging the battery
repeatedly for a short time only, the
battery usage time may be reduced by
the difference between the actual battery
charge and the remaining charge display.
In this case, the actual battery charge
and the remaining charge display will
be the same by discharging the battery
completely using the Battery Calibration
function, and then recharging it again.
1 Disconnect the AC power adapter
after turning off the computer.
2 Restart your computer and press the
F2 button when the Samsung logo
appears, to start the BIOS Setup.
3 Move to the Boot > Smart Battery
Calibration item using the direction
keys and press <Enter>.
4 Highlight Yes in the Battery
Calibration Confirmation window
and press <Enter>.
The Battery Calibration function is
activated and the battery is forcefully
discharged. To stop the operation,
press the <Esc> button.
This operation requires 3~5 hours
depending on the battery capacity
and the remaining battery charge.
475
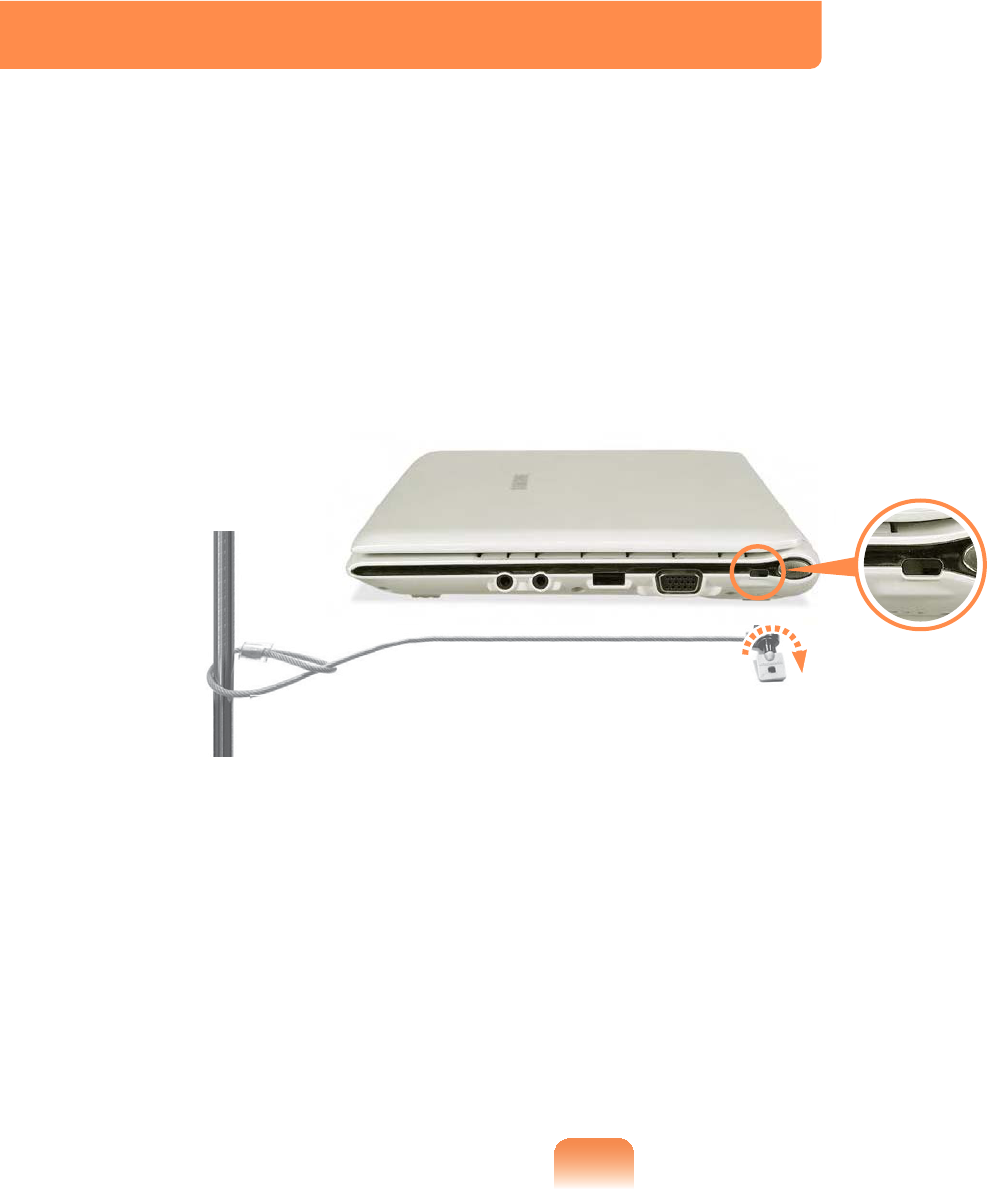
Using the Security Lock Port
You can connect a Kensington lock to the Security Lock port to prevent your computer
from being stolen when you have to use the computer in a public place.
To use this feature, you have to purchase the Kensington lock additionally. To use the
Kensington lock, refer to the product manual.
Tie the Kensington lock cable to a fixed object and install the other end of the cable to
the Security Lock port.

Chapter 7.
Appendix
Reinstalling Windows XP (Optional) 144
Using Samsung Recovery Solution
(Optional) 149
Questions and Answers 158
Windows Related 158
Display Related 159
Sound Related 161
Wired LAN Related 164
Wireless LAN Related 165
Games and Programs Related 171
Bluetooth 173
Security Center 174
Product Specifications 178
Glossary 188
Index 192

144
Reinstalling Windows XP (Optional)
You can reinstall Windows using the System Recovery CD when Windows does not
work properly.
A System Recovery CD may not be supplied depending on your computer model.
To reinstall Windows when Windows does not boot, refer to page 147.
To reinstall Windows using System Recovery Media, an external-type ODD must be
connected before turning the computer on. The following descriptions assume that
an external ODD is connected.
Reinstalling Windows may delete data (files and programs) saved on the hard disk
drive. Make sure to backup all important data. Samsung Electronics shall not be held
liable for any loss of data.
Reinstalling Windows
Explain Standard installation option as a standard.
1 Insert the system recovery CD into
the CD-ROM drive.
2 In the initial screen, click Standard
Installation.
Standard installation
You can change the settings for
partitioning, the installation folder,
etc. during the Windows installation.
However, reinstalling Windows may
delete the data on the hard disk drive
such as files, programs, etc. In order
to minimize damage from data loss,
please remember to always back up
data.
Quick Installation
This re-installs Windows with the user
data and the system configuration
intact. The user data in the already
existing Windows folders may be
preserved as the existing Windows
folders are overwritten.

145
3 The description for the standard
installation appears. Click Yes. The
installation starts, and the system will
be restarted after a while.
When Quick Installation is selected,
Setup proceeds with Step 3 before
automatically installing Windows.
Quick Installation overwrites the
existing Windows version, so that
drivers or applications do not need to
be reinstalled.
4 After the system has restarted, the
message ’Press any key to boot from
CD’ appears. Do not press any key
at this time. After a while the partition
configuration screen appears. To not
change the partition, press Enter.
What is partition configuration?
Partition configuration is a function
that divides the hard disk drive into
one or several partitions. Note that
changing the partition deletes all of
the data on the hard disk drive.
5 Select the folder to install the
Windows operating system. To delete
the previous version of Windows and
install in the current folder, press L on
the keyboard.
If you press ESC to select another
folder for the installation, new
Windows folders are created causing
a risk of dual booting.
6 After the installation process copies
the necessary folders for the
Windows installation, restart the
system, and the message “Press any
key to boot from CD” is displayed. You
do not need to enter anything. In a
moment, the Windows XP installation
screen will appear to proceed with the
installation.
7 When the Regional and Language
Options window appears, click Next.
8 When a window that requires your
name and organization pops up, enter
your name and the organization and
click Next.
9 When the Date and Time Settings
window appears, click Next. Setup
will continue.

146
10 When the system restarts to display
Press any key to boot from CD, do
not press any key.
When you see the Windows desktop,
this means that the installation process is
completed.
Remove the system recovery CD
and install the device drivers and
applications from the system software
Media.

147
1 Insert the system recovery CD into
the CD-ROM drive and start the
computer.
2 If the following message appears on
the screen, press any key from the
keyboard.
Press any key to boot from CD.....
3 Do not press any key at this
time. After a while the partition
configuration screen appears. To not
change the partition, press Enter.
4 Select the desired file system (format).
To maintain the current file system,
press Enter.
5 Select the folder to install the
Windows operating system. To delete
the previous version of Windows and
install in the current folder, press L on
the keyboar.
6 After the installation process copies
the necessary folders for the
Windows installation, restart the
system, and the message “Press any
key to boot from CD” is displayed. You
do not need to enter anything. In a
moment, the Windows XP installation
screen will appear to proceed with the
installation.
7 Follow the instructions of the Windows
XP installation wizard to continue with
the installation.
Reinstalling when Windows does not start
When Windows does not start, boot up with the System Recovery CD and from there
you can reinstall Windows.

148
8 When the installation is complete,
the computer will restart. When the
system has restarted, the Press
any key to boot from CD message
appears.
Ignore the message.
The system boots and the Windows
and Windows Registration screen
appears. Register Windows, following
the instructions to finish the Windows
installation. Remove the System
Recovery CD and install the device
drivers and application programs using
Standard Installation from the System
Software Media.

149
Using Samsung Recovery Solution (Optional)
Samsung Recovery Solution provides a Restore Function that enables you to
easily restore your computer to a previous, normal state when a problem occurs with
your computer, as well as a Backup Function that enables you to easily save your
computer’s current status and your data.
Samsung Recovery Solution may not be provided or the version may differ
depending on your computer model and the usage procedures may differ depending
on the version. The screen images in this document may differ from actual product.
For models with an SSD (Solid State Disk), Samsung Recovery Solution is not
provided.
To use the backup and restore function to DVD, an external ODD must be
connected. The following descriptions assume that an external ODD is connected.
Samsung Recovery Solution Functions
Restore Function
Using this function, you can easily restore your computer to a previous, normal state
without using the System Recovery CD or the Windows Installation CD, when your
computer is no longer working properly or fails to boot up due to a problem. If you
have backed up data, you can restore the backup data.

150
Basic Restore Complete Restore Data Restore
This function quickly
restores major
Windows files (C:\
Windows) without
touching the user
configuration and
data on the C drive.
This function deletes the entire C
drive and then restores the contents
of the C drive completely.
This function
restores the user
data if the user
previously backed up
data.
Initial Status Restore
This function restores the computer
to the initial status saved when the
computer was run for the first time
after it was purchased.
Complete Backup Restore
This function restores the computer
to the point where the user
performed a Complete Backup.
Restore Functions
Backup Function
You can backup the entire C drive or all your data to another hard disk drive or
DVD. You can restore the backed up drive or data using the Restore function.
Backup Functions
This function backs up
the initial status of the
computer.
Initial Status Backup
This function backs up
specific folders or files.
Data Backup
This function backs up
the entire drive C.
Complete Backup

151
Using Samsung Recovery Solution
Not only can you use Samsung Recovery Solution when Windows is running, but
also when you are unable to boot up into Windows. Let’s learn how to use Samsung
Recovery Solution.
Initial Status Backup
If you turn your computer on for the first
time, the Initial Status Backup function
is performed after registering Windows.
This function saves an image of the Initial
Status of the C drive to a secure location
so that users can restore the computer
to the Initial Status using the Complete
Restore function. An Initial Status Backup
is only performed once immediately after
the computer is purchased.
1 If you turn the power on for the first
time, the Register Windows screen
appears. If you register Windows
according to the instructions on the
screen, the computer will be restarted.
2 When the computer has been
restarted, the User Registration
Complete message appears. Click
OK. The computer will restart.
3 The Initial Status Backup screen
appears.
To resize the C and D drives, click
Advanced and partition the disk
accordingly. Adjust the partition size
using the slide bar and then click
Next.
The partition disk function is only
available when the computer is
turned on for the first time and will
not be available afterwards. Once
you have completed the partitions,
you cannot resize the partitions.
Therefore partition the disk carefully.
4 The Initial Status Backup is performed
to backup the initial status of the
C drive to a secure location. This
backup image is used for the
Complete Restore function that
restores your computer to the initial
status when the computer is not
working properly.
5 When the Initial Status Backup is
complete, restart Windows.

152
Quick Restore
Quick Restore enables you to easily
restore your computer to a previous,
normal state when a problem occurs with
your computer. Quick Restore provides
Basic Restore and Complete Restore
(Computer Initial Status Restore) options.
1 – When Windows is running:
Click Start > All Programs >
Samsung > Samsung Recovery
Solution > Samsung Recovery
Solution.
– When Windows does not start:
Turn the computer on and press
the F4 key when the boot screen
(SAMSUNG logo) appears. After a
moment, the computer boots up in
Restoration mode and the Samsung
Recovery Solution screen appears.
The touch screen function is not
supported in this mode even if your
model supports a touch screen. In
this mode, please use the touchpad
or mouse instead of the touch
screen.
2 If the Samsung Recovery Solution
program is launched for the first time
after purchasing the computer, the
license agreement screen appears
before the restoration is started. Read
the agreement and click Agree to
continue.
3 If the initial menu screen appears,
click Restore.
If you click Select by Symptom,
the Select by Symptom menu
appears. If you select a symptom, a
recommended restoration option will
blink. Click the restoration option to
continue.
4 Select either Basic Restore or
Complete Restore from the Restore
menu.
A Basic Restore restores the major
Windows files only while maintaining
the user configuration and data on the
C drive in a short time.
A Complete Restore deletes the
entire C drive and then restores the
contents of the C drive.

153
Run Complete Restore if the
computer does not work even after
Basic Restore has been completed.
4-1 If you have selected Basic Restore:
In the Basic Restore screen, click
the Next button. The system will be
restarted.
4-2 If you have selected Complete
Restore:
In the restoration point selection
screen, select the restoration point
described as ‘Computer Initial
Status’ and click the Next button.
The system will be restarted.
Since a Complete Restore deletes
all user data as well as additionally
installed programs, please backup
your important data first using the
Data Backup function, before running
Complete Restore.
5 The computer boots up into
restoration mode and the restoration
progress message appears. If you
click OK, the restoration begins. The
restoration may take some time,
please wait for a moment.
6 When the ‘Restart the System’
message appears after the restoration
is complete, click OK to restart the
system.
Make sure that the power cord is
connected while the restoration is in
progress. The first time the computer
boots up after a Complete Restore has
been performed, the speed of the boot
process may be slowed down due to
the system optimization process. At this
time, do not shut the computer down by
force.
User Complete Backup/Restore
A Complete Backup saves the complete
image of the C drive onto another drive or
DVD. A Complete Restore restores the
image file saved by the Complete Backup
onto the C drive. This guide describes the
Complete Backup and Complete Restore
procedures on the basis of backing up
and restoring by using DVD.
154
Complete Backup
If you run Complete Backup
using a DVD, you can restore the
computer even when a problem
occurs with the hard disk or when
the restoration area is removed.
To perform a complete backup
onto DVD, an external ODD that
supports DVD burning must be
connected.
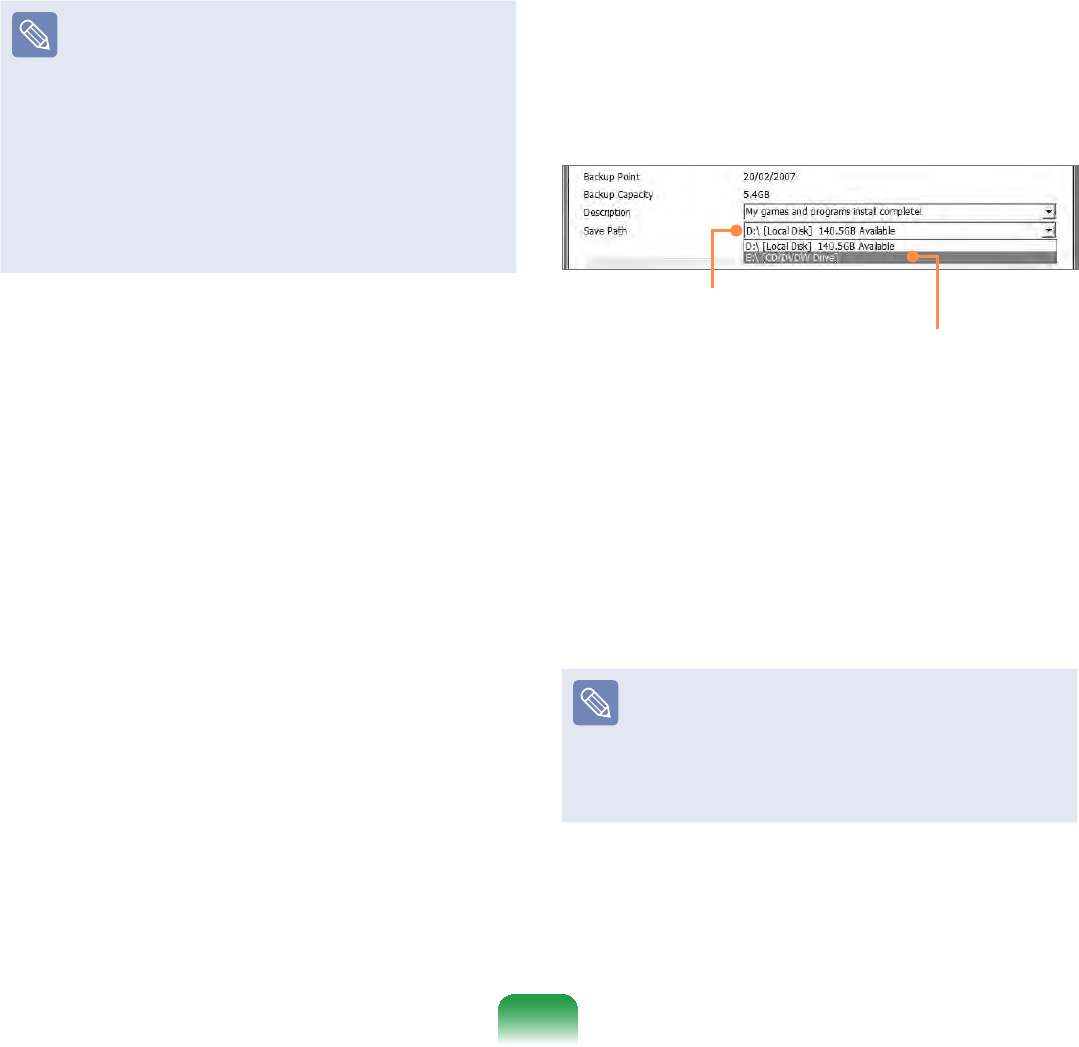
1 Click Start > All Programs >
Samsung > Samsung Recovery
Solution > Samsung Recovery
Solution.
2 When the initial menu screen
appears, click Backup.
3 Click Complete Backup in the
backup menu.
4 Enter a description for the backup
regarding the current computer status
in the Description field so that you can
easily recognize it later, and specify
the Save Path. If your computer has a
DVD-Writer, you can specify the DVD
drive as the Save Path.
Select Drive D.
Select the DVD drive.
5 If you click the Next button, the
system restarts in restoration mode
and the Complete Backup begins.
If you have selected the DVD drive
as the Save Path, the “Enter a blank
DVD” message appears. Insert a
blank DVD and click the OK button.
Samsung Recovery Solution
supports DVD+R, DVD-R, DVD+RW,
and DVD-RW, but does not support
CD-R, CD-RW, DVD-RAM, DVD-DL
(Dual Layer), HD-DVD, and Blu-Ray.

155
6 The Complete Backup begins.
If multiple DVDs are required,
the expected number of DVDs is
displayed in the progress screen.
Whenever burning a DVD is
completed, the “Insert the next DVD”
message will appear. Continue the
backup according to the instructions.
7
When the ‘Restart the System’ message
appears after the backup is complete,
click OK to restart the system.
Complete Restore
1 – When backing up onto DVD
Turn the computer on and insert the
backup DVD into the DVD drive.
If there are multiple backup DVDs,
insert the first DVD.
– When backing up to another
drive
Proceed to Step 2.
2 Click Start > All Programs >
Samsung > Samsung Recovery
Solution > Samsung Recovery
Solution.
When you cannot start Windows,
turn the computer on and press the
F4 key in the boot screen to enter
restoration mode.
3 When the initial menu screen
appears, click Restore and then click
Complete Restore.
4 Select a Complete Backup
restoration point in the restoration
point selection screen and click the
Next button. The system is restarted.
5 The restoration progress message
appears after the computer boots up
in restoration mode. If you click OK,
the restoration begins.
If multiple DVDs have been used
for a Complete Backup, whenever
burning a DVD is completed, the
“Insert the next DVD” message will
appear.
6 When the ‘Restart the System’
message appears after the restoration
is complete, click OK to restart the
system. The Complete Restore has
been completed.

156
User Data Backup/Restore
Data Backup enables you to save
specific files or folders onto another drive
or DVD. Data Restore enables you to
restore data using the data saved by
a Data Backup when data is lost. This
guide describes the Backup and Restore
procedures on the basis of backing up
and restoring by using DVD.
Data Backup
1 Click Start > All Programs >
Samsung > Samsung Recovery
Solution > Samsung Recovery
Solution.
When you cannot start Windows,
turn the computer on and press the
F4 key in the boot screen to enter
restoration mode.
2 When the initial menu screen
appears, click Backup and then click
Data Backup.
3 In the data selection screen, select
either Basic Selection or Select
from all, select a folder or file to be
backed up, and then click the Next
button.
4 Enter a description for the backup in
the Description field so that you can
easily recognize it later and specify
the Save Path. If your computer has a
DVD-Writer, you can specify the DVD
drive as the Save Path.
If you have specified a hard disk
drive or a removable disk as the
Save Path, the SamsungRecovery\
SamsungData folder is created on
the corresponding drive (e.g. D:\)
and the data is saved to the folder.
Take care to not delete the folder by
mistake or on purpose.
5 If you click the Next button, the Data
Backup begins. If you have selected
the DVD drive as the Save Path,
the “Enter a blank DVD” message
appears. Insert a blank DVD and click
the OK button.
6 The “Backup is completed” message
appears.

157
Data Restore
1 – When backing up onto DVD
Turn the computer on and insert the
backup DVD into the DVD drive.
– When backing up to another
drive
Proceed to Step 2.
2 Click Start > All Programs >
Samsung > Samsung Recovery
Solution > Samsung Recovery
Solution.
When you cannot start Windows,
turn the computer on and press the
F4 key in the boot screen to enter
restoration mode.
3 When the initial menu screen
appears, click Restore and then click
Data Restore.
4 Select a backup item to be restored
in the backup list and click the Next
button.
5 Select a folder for the restoration and
click the Next button. Data Restore
begins.
6 When Data Restore is completed,
check if the data has been restored to
the specified folder.

158
Questions and Answers
This section provides information on possible problems, solutions and other references
for system use.
T The system does not shutdown
properly.
A When the system does not shutdown
normally, press and hold the Power
button until the system manually
shuts off. If the Power-Saving Mode
is configured into the Power button,
press and hold for more than 4
seconds to shut the system off. When
the system is turned on after such
manual shutdown, Scandisk will run to
check errors in the system.
T The system freezes during
program operation.
A1 There is an error with the program
currently being used. Press the
<Ctrl>, <Alt>, and <Delete> keys
simultaneously and click End Task in
the Windows Task Manager window.
A2 There is an error with the Windows
OS. Reboot the system by using the
Power button.
Windows Related

159
T The LCD screen is too dark or too
bright.
A Turn on the LCD backlight or adjust
the screen brightness. Press Fn +
to turn on the LCD backlight or
press Fn + , Fn + to adjust the
screen brightness.
T The screen saver disturbs screen
viewing during Media Player or
video file operation.
A Click Tools > Options > Player and
then clear the Allow screen saver
during playback in the Media
Center check box.
T When I connect an external
display and change the settings
to display the screen image on
both the LCD and the external
display by pressing the Fn +
key combination, the screen is not
displayed properly.
A Press Fn + key combination
again. If the screen is still not
displayed or only part of the screen
is displayed by doing this, that means
the LCD resolution is too low or too
wide and the external display support
the resolution. Right-click over the
Desktop, select Properties, select
the Settings tab and change the
resolution to 800 x 600.
T The Taskbar on the bottom of the
screen does not appear when a
projector is used as the display
device.
A This may happen, if the projector
does not support LCD resolution. In
this case change the resolution to
800 x 600 (recommended) on your
computer.
Display Related

160
T Switching the MS-DOS command
prompt to full screen mode or
Windows mode by pressing the
<Alt>+<Enter> keys does not
operate properly.
A Pressing the <Alt>+<Enter> keys
using an USB keyboard, may cause
the key input to be recognized as
multiple key inputs depending on the
keyboard input recognition time. In
this case, the MS-DOS command
prompt is repeatedly switched to
full screen and then to Windows
several times. Please press the
<Alt>+<Enter> keys more quickly, or
press the <Alt>+<Enter> keys using
the system keyboard.
T The shortcut icons are not
displayed on the screen even if I
press the shortcut key.
A The shortcut icons only appear when
the Easy Display Manager program is
installed.
T The color is strange when the
picture is displayed on the
connected monitor (or projector).
A Check the monitor signal cable
connection and reconnect the cable.

161
T How to install and uninstall the
sound driver.
A To install or uninstall the sound driver
from this system, please follow the
procedures below.
Sound Driver Components
The sound driver consists of the
following 2 components and the
2 components are automatically
installed during the installation.
– Realtek High Definition Audio
Driver: Realtek High Definition Audio
– WOW XT and TSXT Filter Driver :
SRS
Uninstalling the Sound Driver
To remove the sound driver due to a
problem or for an update, follow the
procedures below.
If you do not follow the sequence
below, the sound driver may not be
removed or the reinstalled driver, or
may not work properly.
n Select Start > Control Panel > Add
or Remove Programs.
l Remove WOW XT and TSXT Filter
Driver first.
W Remove Realtek High Definition
Audio Driver and restart the
computer.
Reinstalling the Sound Driver
If there is an already installed sound
driver, uninstall the driver according to
the procedures above.
The sound driver is included on the
System Software Media.
n Insert the System Software CD-
ROM into the CD-ROM drive.
l Select Sound Driver on either
Standard Installation or Custom
Installation, then the 2 components
of the sound driver are automatically
installed.
Sound Related

162
T How can I configure the Recording
Mixer while I am video or audio
chatting?
A1 Playback Mixer Settings
n Double-click the Volume icon in
the Taskbar and select Options >
Properties from the menu.
l Select Realtek HD Audio Input in
the Mixer device field, confirm that the
Microphone is selected in the Show
the following volume controls field,
and click the OK button.
W Select the Microphone item in the
Record Control window and close
the window.
A2 Realtek HD Sound Effect Manager
Settings
n Click Start > Control Panel >
Sounds, Speech, and Audio
Devices > Realtek HD Sound Effect
Manager.
l Click Microphone tab.
W Select Noise Suppression and
Acoustic Echo Cancellation and
Click OK.
Using Acoustic Echo Cancellation
option keeps the Microphone Volume
muted in the Playback Mixer.
T How can I configure the Recording
Mixer while broadcasting music in
WinAMP?
A1 Playback Mixer Settings
n Double-click the Volume icon in
the Taskbar and select Options >
Properties from the menu.
l Select Realtek HD Audio Input in the
Mixer device field, select Stereo Mix
in the Show the following volume
controls field, and click the OK
button.
W Select the Stereo Mix item in the
Record Control window and close
the window.
A2 Realtek HD Sound Effect Manager
Settings
n Click Start > Control Panel >
Sounds, Speech, and Audio
Devices > Realtek HD Sound Effect
Manager.
l Click Microphone tab.
W Unselect Noise Suppression and
Acoustic Echo Cancellation and
Click OK.

163
T I cannot hear my voice through the
built-in microphone.
A This is because the setting is
configured so that sound from the
built-in microphone to the speaker is
muted to reduce the howling sound
effect. You can use the microphone
recording function normally, even in
this state.
When using an external microphone,
if you disable the microphone channel
mute function of the play mixer, you
can hear the sound input into the
external microphone through the
speaker.
T I have a trouble with recording
after selecting ‘Acoustic Echo
Cancellation’ and unselecting Mute
in the Microphone volume of the
Playback Mixer.
A This is because the sound from the
external microphone is muted by
the Acoustic Echo Cancellation
Algorithm considering the sound as a
Acoustic Echo while the recording and
playing back is processed at the same
time. In this case, select Mute in the
Microphone Volume of the Playback
Mixer after selecting Acoustic Echo
Cancellation item.

164
T
<Wake On LAN> function
A <Wake On LAN> is a function that
activates the system from Sleep mode
when a signal (such as a ping or
magic packet command) arrives over
the network (wired LAN).
S3 WOL (Wake On LAN)
n Select Start > Control Panel >
Performance and Maintenance
> System > Hardware > Device
Manager > Network Adapters.
l Double-click the Marvell Yukon
88E8040 PCI-E Fast Ethernet
Controller item.
The above driver name may be
different.
W From Power management tab, select
“Allow this device to bring the
computer out of standby”, then click
OK. Restart the system.
- If the system wake up from Sleep
mode even though there is no
received signal, use the system
after disabling the <Wake On LAN>
function.
- The LAN LED may not be turned off if
System is shutdown without disabling
the WOL <Wake on LAN> option.
- Connecting a wired LAN while using
a wireless LAN may not activate the
<Wake On LAN> function. Set the
Wireless LAN to Disable to use the
<Wake On LAN> function.
- When the computer exits standby/
hibernate mode a message informing
10Mbps wired LAN connection may
appear. It is because restoring the
network takes about 3 seconds. When
the network is restored, it operates in
100Mbps.
Wired LAN Related

165
T
I cannot find an AP.
Check the Wireless LAN LED.
A Check if the Wireless LAN LED is on.
If off, press the Wireless LAN On/Off
button <Fn>+<F9> to turn it on.
Reinstall the driver.
A Reinstall the driver using the software
media.
Check the Wireless Zero
Configuration (WZC) service.
A If the “Windows cannot make this
wireless connection” message
appears while searching for wireless
networks, it indicates that a program
other than Windows is set to manage
the wireless LAN settings.
To use the wireless LAN settings
using Windows:
A n Click Start > Control Panel
> Network and Internet
Connections > Network
Connections > Wireless LAN
Connection, right-click and check
if the “Windows manages wireless
network settings (W)” option is
selected in the Wireless Network
tab of the Properties window. If not,
select the option.
l Click Start > Control Panel >
Performance and Maintenance >
Administrative Tools > Computer
Management and click Services
and Applications > Services.
In the right pane, double-click
Wireless Zero Configuration
and check if the Startup Type is
Automatic and the Status is Started.
Wireless LAN Related

166
T I cannot connect to an AP.
(The wireless connection is
disconnected frequently.)
Check the Network Key.
A Right-click the Wireless Network
Connections icon from the Taskbar
and click View available wireless
networks. If wireless networks are
found, it indicates that the device is
operating properly but the network
settings may have a problem. Please
check the Network Key (Encryption
Key) and the AP settings.
Check if there is a device nearby
using the same frequency band.
A1 If there is a device nearby using the
same frequency band such as another
wireless LAN device, wireless video
transceiver, microwave oven, plasma
bulb, etc., channel interference
may occur. If you experience
interference from another device, it
is recommended changing the AP
channel.
A2 When operating in EEE802.11g mode,
if there is a IEEE802.11b device
operating nearby, you may experience
low data rates or even disconnection
as it operates in Hybrid mode.
Check the authentication type.
A A connection may be disconnected
after a period of time if the “Use
IEEE 802.1x network authentication”
option is selected when IEEE 802.1x
authentication is not being used.
View the properties of the
corresponding AP in the Wireless
Network Properties. In the
Authentication tab, unselect the “Use
IEEE 802.1x authentication in this
network” option.
For detailed information on the
authentication server, ask your
network administrator.
Check the AP settings.
A1 Check if the surroundings are
appropriate for a wireless LAN.
A wireless LAN connection may
be limited by the surrounding
environment and distance. Obstacles
such as walls and door mats affect
the quality of the wireless LAN signal.
You have to install an AP in a high,
open position far away from any other
radio signal sources.

167
If the AP is excessively far away, or
is installed at the end of a building
and you are attempting to use the
wireless LAN from the other end, you
may not be able to use the wireless
communication normally because
the signal is blocked by obstacles
between you and the AP (such as a
wall).
A2 Check if the AP operates properly. If
the AP is not operating properly, turn
it off and on again and try again.
A3 Check if the AP firmware is the latest
version. (For more information on the
AP firmware, ask the AP manufacturer
or your product provider.)
A4 Check if the AP is properly connected
to the network. Connect the LAN
cable from the AP to a computer and
check if the network is connected
properly.
A5 Check the Network Key (Encryption
Key) settings again. If the automatic
password converting function
(passphrase function) is enabled and
the wireless connection is normal
but you cannot send data over the
connection, please enter the Network
Key (Encryption Key) manually.
A6 Check the AP settings as follows.
If there are multiple APs running at
the same time, check the channel
setting of each AP. If the interval
between the channels of the APs
is narrow, you may experience
electromagnetic interference. Set the
channel numbers of the APs so that
the internals between the channels
are maximized. (for example, Ch1,
Ch5, Ch9, Ch13) computer.
It is recommended unselecting the
Hide option of the AP. SSID (Service
Set ID) is a name used to distinguish
a wireless LAN from other wireless
LANs.
It is recommended using Long
Preamble. Preamble is a signal for
data transmission synchronization.
Although some APs support
Short Preamble, there might be a
compatibility problem.
Because “Fixed” channel selection
is more stable then ‘Auto’ channel
selection, “Fixed” channel selection
is recommended. It is recommended
not using the “Block Any” and “Any
Connection Block” functions. Although
these functions block connections
at the client side when the network
name is Any or Blank, it may cause a
compatibility problem.

168
For more information on the AP
settings, see the owner’s manual
supplied with the AP.
T Although a connection has been
established, I cannot connect to
the Internet.
Check the TCP/IP settings.
A If you cannot connect to the Internet
but you are connected to an AP,
check if the TCP/IP settings are
configured properly.
When you are not connected to an
AP, an X mark appears over the
‘Wireless Network Connections’ icon#
in the Taskbar. If you double-click
the icon, the Search for Wireless
Connections window appears.
Reconnect to a wireless network
referring to the descriptions of
Connecting to a Wireless LAN in
the Using the Network section.
When you are connected to an AP, an
X mark appears over the “Wireless
Network Connections” icon in the
Taskbar. Double-click the icon and
check if the IP address is properly
allocated on the Support tab. If the
IP address is not properly allocated,
the IP address will be displayed as
follows; (for example, 169.254.xxx.
xxx).
If your network does not support
DHCP, you have to manually
configure an IP address by asking
your network administrator.
In addition, even if your network
supports DHCP, the Internet
connection may not be available if the
DHCP server fails to allocate an IP
address to your computer.
T I have configured both wired and
wireless connections with the
same IP address, but the network
connections do not work properly.
A You cannot use the same IP address
for wired and wireless connections.
To use only one IP address for both
wired and wireless connections, you
must disable one of them according
to your requirements in Network
Connections in the Control Panel.

169
T After installing the Wireless LAN
Setting program, the “AEGIS
Protocol (IEEE 802.1x)” protocol
appears in the [Local Area Connect
Properties] window.
A The protocol is a security
authentication protocol that is
automatically installed when the
Wireless LAN Settings program is
installed and does not affect the
program operation.
T (For Intel PROSet) Although I have
turned the wireless LAN off using
the Turn Off Wireless LAN button
in PROSet, the Wireless LAN LED
is still on.
A This is normal. The Turn Off Wireless
LAN button in PROSet just turns
off the wireless LAN software. The
wireless LAN hardware is not affected
by this operation.
T (For Intel PROSet) After installing
PROSet, I cannot manage my
wireless network in Windows.
A When clicking Use Microsoft Client
in the Tools menu of the PROSet,
you can manage wireless network in
Windows.
Thereafter, if you wish to manage your
wireless network, click Activate Intel
PROSet/Wireless in the Tools menu
of the PROSet.
T Internet Connection or File Sharing
doesn’t work, when I use Internet
Connection Sharing or Ad Hoc.
A You have to register the IP address
allocated for Internet Connection
Sharing or Ad Hoc as a ‘Trusted IP’ in
McAfee SecurityCenter.
Click McAfee SecurityCenter >
Advanced menu > Configure >
Internet and Network > Advanced
> Trusted and Banned IPs, and
register the IP address or IP address
range as a Trusted IP address. The IP
address range for DHCP is 10.0.0.1 ~
10.255.255.254 if not specified.

170
T Computer-to-computer(ADHOC)
wireless Network connection is
established but not detected on
the other wireless network.
A To enable peer-to-peer network
search under Windows XP SP3
environment, you have to select
additional options in the wireless
profiles as follows:
n Right-click on the Wireless Network
Connection icon on the taskbar,
and select View Available Wireless
Networks.
l Click Change the order of preferred
networks on the left window.
W At the Preferred networks, select the
peer-to-peer network profile and click
Properties.
j Check Connect even if this network
is not broadcasting item.
V On the Connection tab, check
Connect when this network is in
range and click OK.

171
T 3D game is not executed, or some
functions are not working.
A Change the graphic setting of the
game to “2D” or “Software Renderer,”
then execute the program again.
T I launched a game right after
installing it, and the game is not
executed.
A This problem may occur when the
game is not compatible with Windows
XP. Launch the game again, and it will
be executed properly.
T Fn + Key combination does not
work.
A While displaying video of VCD or
MPEG, or the display setting is Dual
View, you cannot toggle display
devices. Also the installation of
NetWare Client 32 program disables
the function of Fn + .
T While playing a game, pressing the
Fn + keys does not work or the
screen is not properly displayed.
A Some games and 3D application
programs may change the display
device control. Therefore, pressing
the Fn + keys may terminate the
running program or may display an
abnormal screen.
Press the Fn + keys before
launching a program and do not press
them while running the program.
T Running speed of a game is too
slow or fast.
A Change the setting of Power
Schemes to “Always On.”
(Click Start > Control Panel >
Performance and Maintenance >
Power Options > Power Schemes
tab, then configure the Power
schemes field to “Always On.”)
Games and Programs Related

172
T Some part of a game image is not
displayed or is displayed in black.
A This may happen when running a
game designed for DirecX 8.1 or
which has 1024 x 768 as the default
resolution, such as NHL 2003, MVP
Baseball 2003, Special Forces,
Hangame, Pmang etc.
T The picture is not displayed
properly for some games.
A Some games may not display the
picture properly when the screen
resolution is set to 1024 × 600 and the
color quality is set to 32 bit.
For these games, set the screen
resolution to 1024 x 600 or 800 x 600,
and the color quality to 16bit.
T Game play is not displayed
smoothly on the screen.
A For 3D games, the texture data
for the 3D screen display is saved
to the system memory. If there is
insufficient system memory, the data
is saved to the hard disk drive and
loaded to memory when required.
This operation may temporarily stop
displaying the picture on the screen.
In this case, lower the game
resolution or the screen settings.
In addition, some 3D games, such as
Dungeon and Fighter, RollerCoaster
Tycoon 3, Special Forces, Universe
at War, Transformer the Game etc,
take up lots of hardware resources so
upgrading system memory to 2G is
recommneded.

173
T How to view the Bluetooth help
information.
A Double-click the My Bluetooth
Environment shortcut icon on the
Desktop to launch the program, and
then press the F1 key to view the help
information.
T I cannot find or connect the
headset.
A1 If the headset is connected to another
device and is currently being used,
you will not be able to locate it. In this
case, even if you locate the headset,
you will not be able to connect it.
Disconnect the headset from the
device and then try again.
A2 For some headset models, if the
headset is connected to the power
adapter, the headset cannot be
connected through the Bluetooth
wireless connection.
Disconnect the headset from the
power adapter and try again.
A3 A Bluetooth headset generally
provides On/Off and Pairing modes.
To connect the headset to another
Bluetooth device such as a computer
or cellphone, it must be in Pairing
mode. Switch the headset to Pairing
mode and try again.
In general, a Bluetooth headset
in Pairing mode is automatically
switched to On/ Off mode after a pre-
determined period of time.
T I have connected the headset, but I
cannot hear sound normally.
A1 If the Bluetooth headset and the PC
are successfully connected, check if
the audio playing device in the Control
Panel is set to Bluetooth audio or
Bluetooth high-quality audio.
For a mono headset or a hands-free
connection, voice communication is
only provided when both the playing
device and the recording device
are set to Bluetooth audio. For a
stereo headset, stereo music is only
transmitted from the PC when the
playing device is set to Bluetooth
high-quality audio.
Bluetooth

174
A2 When a Bluetooth microphone is
activated or is being used, Bluetooth
high-quality audio is stopped. To use
the Bluetooth microphone function,
set the playing device to Bluetooth
audio.
A3 Check if the headset is properly
connected and is operating normally.
A4 Check the volume settings of the
headset and the computer.
A5 If a multimedia application such as
Windows Media Player is running
when connecting the headset, the
headset may not be connected or
recognized properly. Connect the
headset first and then launch a
multimedia application.
T To change the popup window
display settings when connected
to the Internet. In the Windows
XP SP3 environment, you can
decide whether to display a popup
window when connected to the
Internet, for user convenience and
security.
A1 To display most of the popup windows
when connected to the Internet:
n Click Internet Options in Start >
Control Panel > Security Center >
Manage security settings for.
l In the Privacy tab of Internet
Properties, clear Block pop-ups.
A2 To display popup windows only from
the current site when connected to the
Internet:
Place the cursor on the notification
area at the bottom of the Internet
address bar and right-click to display
a menu, from which you can select
Temporarily Allow Pop-ups or Always
Allow Pop-ups from This Site.
Security Center

175
A3 To display popup windows from a
particular site:
n Click Internet Options in Start >
Control Panel > Security Center >
Manage security settings for.
l In the Privacy tab of Internet
Properties, click Settings from Block
pop-ups.
W Enter a URL to want to allow pop-ups
into Address of Web site to allow and
click Add.
j You will find that the entered address
is added to the allowed sites list. The
next time you connect to the Web site,
you will see pop-ups appearing.
When you need to re-block a
permitted site, select the Web site
address that you want to block from
the Allowed Sites and click Remove.
T When you connect to a Web site,
you see the message, “To help
protect your security, Internet
Explorer stopped this site from
installing an ActiveX control on
your computer” or “This site might
require the following ActiveX
control” below the address bar.
A Windows XP SP3 blocks unsigned
ActiveX controls from being installed
when connected to certain Web sites
for security reasons. On some Web
sites that have no ActiveX controls
installed, applications are not started
or do not display properly.
In this case, to install ActiveX controls,
right-click the notification area to
display a menu from which you can
select Install ActiveX control.

176
T When you see a Windows Security
Alert icon appear on the right
part of the Taskbar. With the
Security Center feature added,
Windows XP SP3 checks the
Firewall, the automatic updates
configuration and installation
of virus-checking programs
to display a Windows Security
Alert icon on the right part of the
Taskbar when it judges that the
computer is vulnerable to attacks
from the Internet. In this case,
check the following to install the
necessary components.
A1 Set up the Windows Firewall.
When you set up the Windows
Firewall, you will be protected from
unauthorized access through the
Internet or the network.
n Click Windows Firewall in Start >
Control Panel > Security Center >
Manage security settings for.
l From the General tab of Windows
Firewall, select ON (recommended).
W If you want to allow a certain program
or service to gain access to your
computer using the Firewall, select
and check the program or service
that you want to allow access from,
in the Exceptions tab of the Windows
Firewall. If you want to add a program
to Programs and Services, click Add
Program and select it.
A2 Set up Windows Automatic Updates.
This automatically downloads and
installs critical updates via the Internet
to keep your computer up to date.
n Click Automatic Updates in Start >
Control Panel > Security Center >
Manage security settings for.
l From general tab of Automatic
Updates window, select Automatic
(recommended).
A3 Keep your computer current with
the latest virus updates. (ex: Norton
Antivirus) Even when you have
installed Norton AntiVirus on your
computer, Windows cannot recognize
the program until you configure the
settings, displaying a Security Alert
icon.

177
When you first use or install Norton
AntiVirus for the first time, follow the
Registration Wizard steps to configure
the registration settings.
To protect your computer from virus
attacks with the latest updates, click
Options to display the Norton
AntiVirus Options window. From
the left menu of the window, check
Run Automatic Protection to select
Automatic Protection and check Run
LiveUpdate to select LiveUpdate.
A4 Two virus scanning programs on one
computer may cause system conflicts.
Remove one of the programs from the
system.
A5 If Windows does not recognize the
existence of an anti-virus program
even when it has been installed, your
computer could be vulnerable to
attacks from the Internet. You should
install an anti-virus program that your
computer is able to identify.
Check the following programs which
Windows can detect and select one
from the list.
A list of anti-virus programs that
Windows can detect:
- Symantec Norton Anti-Virus
- NetworkAssociates (McAfee)
- TrendMicro
- ComputerAssociates
- Panda
- Kaspersky
- Ahnlabs (AhnLab)
Visit the Microsoft Web site
(www.microsoft.com) regularly to
check the latest list.

178
Product Specifications
The system specifications may differ depending on the derived models. For detailed system
specifications, refer to the product catalog.
CPU Intel ATOM™ Processor
Main Memory Memory type: DDR2 SODIMM
Main Chipset Intel 945GSE + ICH7M
Hard Disk Drive (Optional) 9.5mmH SATA HDD or 9.5mmH SATA SSD
Graphics Intel 945GSE (Internal)
Operating Environment Temperature : -5~40°C for storage, 10~32°C when operating
Humidity : 5~90% for storage, 20~80% when operating
Operating Voltage 100 - 240VAC
Frequency 50/60Hz
Output Power 40W
Output Voltage 19VDC 2.1A(40W)
The weight and dimension listed are approximate values and may vary a bit from
the actual product.
Optional components may not be provided or different components may be provided
depending on the computer model.
The system specifications are subject to change without notice.

179
Wireless LAN Specifications (802.11a/b/g, 802.11n Card)
Intel 802.11ABG WLAN
The Name of the Registered Equipment : Special Low Power Wireless Device for
Wireless Data Communication Systems.
Item Detailed Specifications
Physical
Specifications
Dimensions 30.0 × 50.95mm (Width X Height)
Operating
Temperature And
Humidity
Same as System Operations
Temperature: Bet. 0°C and 70°C,
Humidity: Less than 85%
Power
Specifications Power 3.3V
Network
Specifications
Compatibility IEEE 802.11a, IEEE 802.11b, IEEE 802.11g
Operating System Microsoft Windows XP/Vista
Media Access
Protocol (MAC)
CSMA/CA (Collision Avoidance) with
Acknowledgement (ACK)
Security Wired Equivalent Privacy support (WEP)
64bit/128bit WPA*
* This device supports the Wireless LAN Security Specifications WPA (Wi-Fi Protected
Access) for Wi-Fi.
To connect to a WPA wireless network, you have to configure the settings according to
the network connection environment. For detailed setting information, ask your network
administrator.

180
Radio Specifications
RF Band 2.4GHz, 5GHz
Supported Channels Channels allowed per country.
Device Transceiver
Modulation Scheme
11a mode : OFDM
11b mode : DSSS
11g mode : OFDM
Data Rate (Mbps)*
11a mode** : MAX 54Mbps
11b mode : MAX 11Mbps
11g mode*** : MAX 54Mbps
Antenna Type Built-in Antenna
* The data rate may differ from the real data transmission rate.
** 11a mode is only supported when the device is connected to an IEEE 802.11a device.
(e.g. Access Point supporting IEEE 802.11a)
*** 11g mode is only supported when the device is connected to an IEEE 802.11g device.
(e.g. Access Point supporting IEEE 802.11g)

181
Intel 802.11AGN WLAN
The Name of the Registered Equipment : Special Low Power Wireless Device for
Wireless Data Communication Systems.
Item Detailed Specifications
Physical
Specifications
Dimensions 30.0 × 50.95mm (Width X Height)
Operating
Temperature And
Humidity
Same as System Operations
Temperature: Bet. 0°C and 70°C,
Humidity: Less than 85%
Power
Specifications Power 3.3V
Network
Specifications
Compatibility IEEE 802.11a, IEEE 802.11b, IEEE 802.11g,
IEEE 802.11n
Operating System Microsoft Windows XP/Vista
Media Access
Protocol (MAC)
CSMA/CA (Collision Avoidance) with
Acknowledgement (ACK)
Security Wired Equivalent Privacy support (WEP)
64bit/128bit WPA*
* This device supports the Wireless LAN Security Specifications WPA (Wi-Fi Protected
Access) for Wi-Fi.
To connect to a WPA wireless network, you have to configure the settings according to
the network connection environment. For detailed setting information, ask your network
administrator.

182
Radio Specifications
RF Band 2.4GHz, 5GHz
Supported Channels Channels allowed per country.
Device Transceiver
Modulation Scheme
11a mode : OFDM
11b mode : DSSS
11g mode : OFDM
11n mode : MIMO
Data Rate (Mbps)*
11a mode** : MAX 54Mbps
11b mode : MAX 11Mbps
11g mode*** : MAX 54Mbps
11n mode**** : MAX 450Mbps, MAX 300Mbps
Antenna Type Built-in Antenna
* The data rate may differ from the real data transmission rate.
** 11a mode is only supported when the device is connected to an IEEE 802.11a device.
(e.g. Access Point supporting IEEE 802.11a)
*** 11g mode is only supported when the device is connected to an IEEE 802.11g device.
(e.g. Access Point supporting IEEE 802.11g)
**** 11n mode is only supported when it is connected to an IEEE802.11n device (e.g.
Access Point supporting IEEE802.11n).

183
Wireless LAN Specifications (802.11BG Card)
Intel 802.11BG WLAN
The Name of the Registered Equipment : Special Low Power Wireless Device for
Wireless Data Communication Systems.
Item Detailed Specifications
Physical
Specifications
Dimensions 30.0 × 50.95mm (Width X Height)
Operating
Temperature And
Humidity
Same as System Operations
Temperature: Bet. 0°C and 70°C,
Humidity: Less than 85%
Power
Specifications Power 3.3V
Network
Specifications
Compatibility IEEE 802.11b, IEEE 802.11g
Operating System Microsoft Windows XP/Vista
Media Access
Protocol (MAC)
CSMA/CA (Collision Avoidance) with
Acknowledgement (ACK)
Security Wired Equivalent Privacy support (WEP)
64bit/128bit WPA*
* This device supports the Wireless LAN Security Specifications WPA (Wi-Fi Protected
Access) for Wi-Fi.
To connect to a WPA wireless network, you have to configure the settings according to
the network connection environment. For detailed setting information, ask your network
administrator.

184
Radio Specifications
RF Band 2.4GHz
Supported Channels Channels allowed per country.
Device Transceiver
Modulation Scheme 11b mode : DSSS
11g mode : OFDM
Data Rate (Mbps)*11b mode : MAX 11Mbps
11g mode** : MAX 54Mbps
Antenna Type Built-in Antenna
* The data rate may differ from the real data transmission rate.
** 11g mode is only supported when the device is connected to an IEEE 802.11g device.
(e.g. Access Point supporting IEEE 802.11g)

185
Atheros 802.11BG WLAN
The Name of the Registered Equipment : Special Low Power Wireless Device for
Wireless Data Communication Systems.
Item Detailed Specifications
Physical
Specifications
Dimensions 30.0 × 50.95mm (Width X Height)
Operating
Temperature And
Humidity
Temperature: Between 0°C and 70°C,
Maximum Humidity: 85%
Power
Specifications Power 3.3V
Network
Specifications
Compatibility IEEE 802.11b, IEEE 802.11g
Operating System Microsoft Windows XP/Vista
Media Access
Protocol (MAC)
CSMA/CA (Collision Avoidance) with
Acknowledgement (ACK)
Security Wired Equivalent Privacy support (WEP)
64bit/128bit WPA*
* This device supports the Wireless LAN Security Specifications WPA (Wi-Fi Protected
Access) for Wi-Fi.
To connect to a WPA wireless network, you have to configure the settings according to
the network connection environment. For detailed setting information, ask your network
administrator.

186
Radio Specifications
RF Band 2.4GHz
Supported Channels Channels allowed per country.
Device Transceiver
Modulation Scheme 11b mode : DSSS
11g mode : OFDM
Data Rate (Mbps)*11b mode : MAX 11Mbps
11g mode** : MAX 54Mbps
Antenna Type Built-in Antenna
* The data rate may differ from the real data transmission rate.
** 11g mode is supported only when you are connected to an IEEE 802.11g device (e.g. An
Access Point supporting IEEE 802.11g).

187
Registered Trademarks
Samsung is a registered trademark of
Samsung Co., Ltd.
SENS is a registered trademark of
Samsung Electronics Co., Ltd.
Intel, ATOM/ Pentium/Celeron are
registered trademarks of the Intel
Corporation.
Microsoft, MS-DOS, and Windows are
registered trademarks of the Microsoft
Corporation.
is a trademark of SRS Labs, Inc.
TruSurround XT technology is
incorporated under license from SRS
Labs, Inc.
SRS TruSurround XT™ processes
multichannel audio content to create
a truly immersive surround sound
experience with rich bass and clear dialog
from the laptop speakers or headphones.
is a trademark of SRS Labs, Inc.
WOW XT technology is incorporated
under license from SRS Labs, Inc.
SRS WOW XT™ significantly improves
the playback quality of audio, delivering
a dynamic 3D entertainment experience
with deep bass from even the smallest
and most closely spaced speakers.
All other product or company names
mentioned herein are registered
trademarks of their respective companies.
ENERGY STAR® Partner
As an ENERGY STAR® Partner,
SAMSUNG has determined that
this product meets the ENERGY
STAR® guidelines for energy
efficiency.

188
Glossary
The Glossary lists the terminologies used in this User Guide.
For terminologies other than these, look in Windows Help.
Backup
A way to save the current data to restore
it later if necessary. A backup is a way
to restore computer data when the data
or computer is damaged.
Client
This refers to a computer that uses a
shared network resource provided by a
server.
DDR SDRAM (Double Data Rate
Synchronous Dynamic Random Access
Memory)
DRAM is a memory type whose cells
consist of a capacitor and transistor
manufactured at a low price. SDRAM
is a memory type whose performance
has been improved by synchronizing
the clock with the external CPU clock.
DDR SDRAM is a memory type whose
performance has been improved by
doubling the operating speed of the
SDRAM and is widely used nowadays.
This computer uses DDR SDRAM.
Device Manager
An administrative tool used to manage
computer devices. You can add or
remove hardware or update a device
driver using the Device Manager.
Direct X
An application interface developed to
enable Windows application programs
to access hardware devices at a very
high speed. Since the operating speed
of graphics, memory and sound cards
must be very fast to provide high
quality video and sound for games,
Direct X enables faster control and
interaction between applications and
hardware devices. By using Direct X,
the multimedia performance of Windows
has been hugely improved.
Driver
Software that interacts between the
hardware and the operating system. An
operating system knows the hardware
information and controls the hardware.
In general, a driver is supplied with the
corresponding hardware device.

189
DVD (Digital Versatile Disk)
DVD was developed to replace CD
(compact disk). Although the shape and
size of the disc are the same as that of
a CD, the capacity of a DVD is at least
4.7GB while the capacity of a CD is
600MB. DVD video is digital unlike VHS
(analog) video and supports MPEG2
compression and digital audio. To play a
DVD, a DVD drive is required.
Firewall
A security system used to protect an
internal network or intranet from external
networks
through an authentication procedure.
Hibernation Mode
A power mode that saves all data in
memory to the hard disk and turns the
CPU and hard disk off. When canceling
Hibernation Mode, all application
programs that were running are restored
to their last state.
Icon
This refers to a small image that
represents a file that users can use.
LAN (Local Area Network)
A communications network connecting
computers, printers and other devices
within a local area such as within a
building. A LAN enables all connected
devices to interact with other devices
on the network. The current LAN uses
the Ethernet media access control
method developed in the early 1980s.
To connect to an Ethernet, a network
card called a LAN card, Ethernet card
or network interface card is required.
To exchange data between computers,
a protocol is required besides the
hardware equipment. Windows XP uses
TCP/IP as the default protocol.
LCD (Liquid Crystal Display)
There are Passive Matrix and Active
Matrix LCD types. This computer uses
the Active Matrix type LCD called a TFT
LCD. Since an LCD is implemented by
transistors instead of a cathode-ray tube
unlike a CRT, its size can be slim. And
because it does not blink, it reduces eye
strain.

190
Network
A group of computers and devices, such
as printers and scanners, connected
by a communications link. A network
can be either small or large and can be
connected permanently through cables
or temporarily through telephone lines
or wireless links. The biggest network is
the Internet, a worldwide network.
Notification Area
This refers to the right area of the
Taskbar including program icons such
as the volume control, the power options
and the time.
Power Schemes
This refers to a pre-determined power
management option group. For example,
you can set the time the computer waits
before entering Standby Mode, or before
the monitor or hard drive turns off. The
settings are saved as a power scheme.
Quick Launch
This refers to a toolbar that can be
configured so that you can launch a
program such as Internet Explorer or
display the Windows Desktop with one
click. You can add any icon to the quick
launch area of the Taskbar and launch
frequently used program by clicking that
icon.
Server
In general, a server refers to a computer
that provides shared resources for
network users.
Share
This refers to setting a resource of a
computer such as a folder or printer so
that other users can also use it.
Shared Folder
A folder that can be used by other users
on the network.

191
SSD (Solid State Disk)
This refers to a device that saves
information to semiconductors unlike a
normal hard disk drive (HDD). There are
two types of SSD. One saves data to
the DRAM and the other saves data to
the Flash Memory. Since there are no
mechanical parts, an SSD provides a
much better performance than an HDD.
Especially, a Flash Memory-Type SSD
provides high reliability and durability.
Network Administrator
A user who plans, configures and
manages network operations.
Sometimes, a network administrator is
called a system administrator.
Sleep Mode
A power mode that enables computers
to save power consumption when they
are not being used. When a computer
is in Sleep Mode, the data on the
computer memory is not saved to the
hard disk. If the power is turned off, the
data in memory will be lost.
System File
System Files refer to files that are read
and used by the Windows operating
system. In general, system files must not
be deleted or moved.
USB (Universal Serial Bus)
This refers to a serial interface standard
developed to replace the conventional
interface standards such as Serial and
PS/2. While USB 1.1 supports 12Mbps
(12 million bits per second), USB 2.0
supports a data rate that is 40 times
(480Mpbs) faster than that of USB 1.1.
The data rate of USB 2.0 is equivalent to
that of IEEE1394. Therefore USB 2.0 is
used for A/V devices supported by IEEE
1394 and a 2nd HDD and CDRW that
require a high data rate.
Windows Media Player
A multimedia program included with
Windows. Using this program, you can
play a media file, create an audio CD,
listen to a radio broadcast, search and
manage media files, and copy files to a
portable device, etc.

192
Index
WR21xx_N
B
Battery 134
Battery Calibration 141
BIOS Setup 124
Booting Priority 131
C
CD Drive / Recording 66
Charge 136
Click 63
Connect / Output Monitor 71
Control Panel 85
D
Desktop / Change 81
Dual View 73
E
Easy Network Manager 100
H
Help 80
L
LCD Brightness 122
M
Memory 132
Multi Card Slot 68
N
Network 100
P
Password 128
Product Specifications 178
Program 105
R
Recorder 77
Remaining Battery Charge 137
Resolution / Color 89
S
Safety Precautions 8
Samsung Battery Manager 138
Samsung Update Plus 111
Security Lock Port 142
Shortcut Keys 59
Status Indicators 51
T
Touchpad 62
U
User Accounts / Switch User 87
V
Volume Control 75
W
Windows XP 79
Wired Network 91
Wireless Network 94