Robert Bosch Car Multimedia 52R0 Car radio & infotainment system User Manual Part 2
Robert Bosch Car Multimedia GmbH Car radio & infotainment system Users Manual Part 2
Contents
Users Manual_Part 2
en | 17
Note:
If you enter a wrong digit, you can
delete it by tapping .
fTap .
Note:
fIf you have not entered the correct
security PIN for the device, the
“Wrong security PIN” notification
appears briefly and the number of
remaining input attempts is dis-
played.
fIf you enter an incorrect security PIN
5 times, the device will be blocked
and an appropriate notification
displayed. Please contact your
dealer to get the device unblocked.
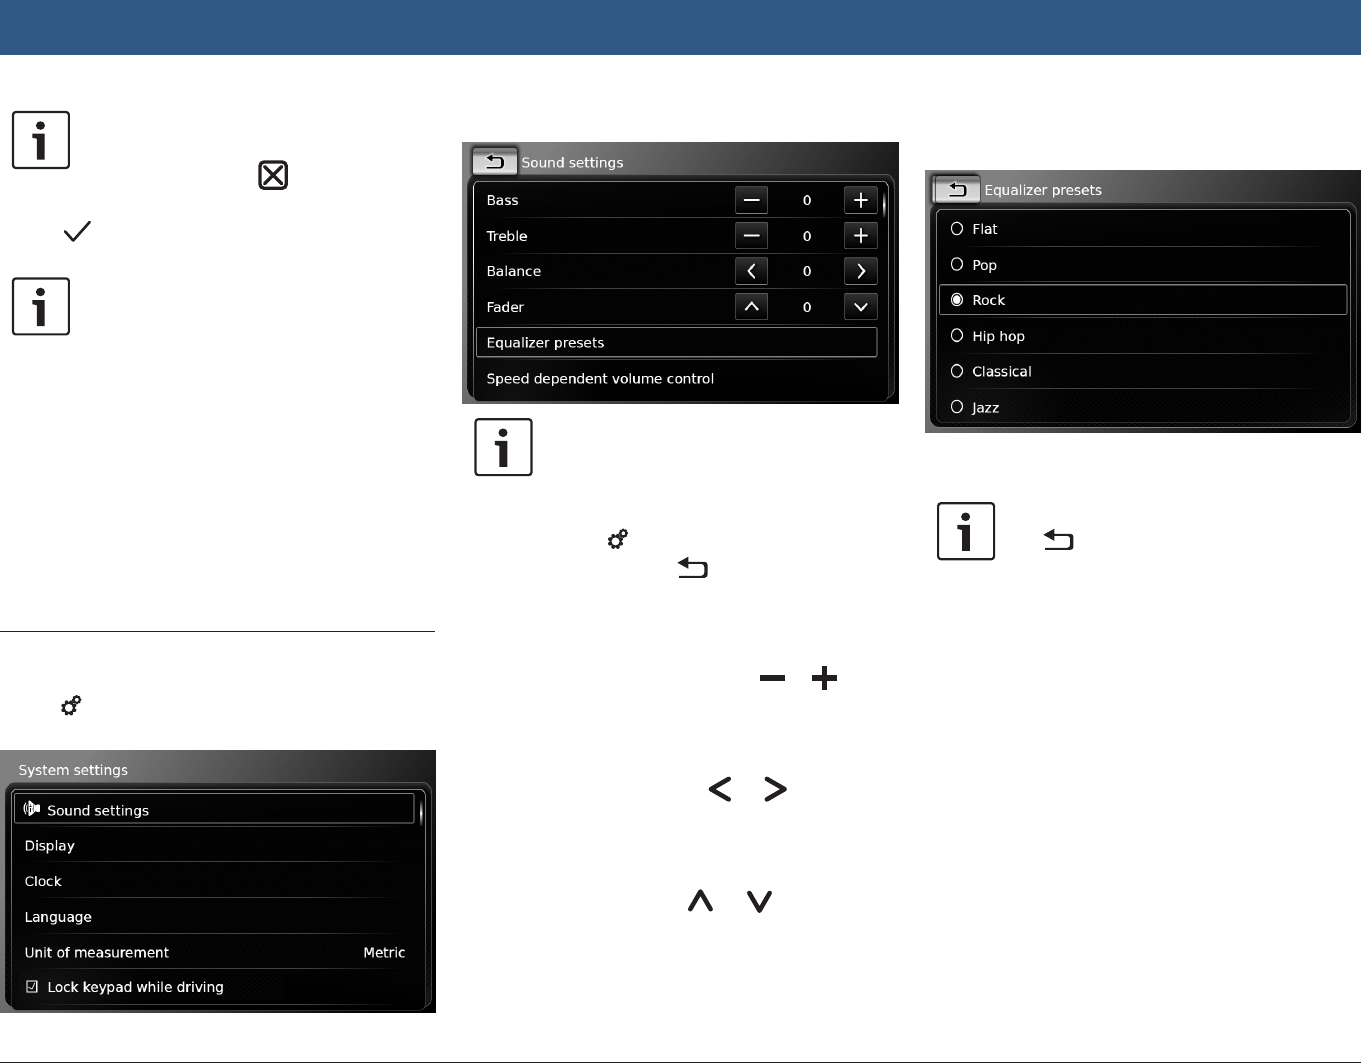
4.8 Sound settings
To adjust the sound settings,
ftap 6.
The system settings are displayed.
fTap Sound settings.
Note:
fTo scroll through the available sound
settings, touch the list area and
swipe up or down.
fTap 6 to close the sound set-
tings or tap to return to the
system settings.
4.8.1 Adjusting the bass and treble
fIn the Bass or Treble item, tap or to
decrease or increase the value.
4.8.2 Adjusting the balance
fIn the Balance item, tap or to shift the
sound towards the left or right.
4.8.3 Adjusting the fader
fIn the Fader item, tap or to shift the
sound towards the front or rear.
4.8.4 Selecting an equalizer preset
fTap Equalizer presets.
fTap the desired preset.
Note:
Tap to return to the sound settings.
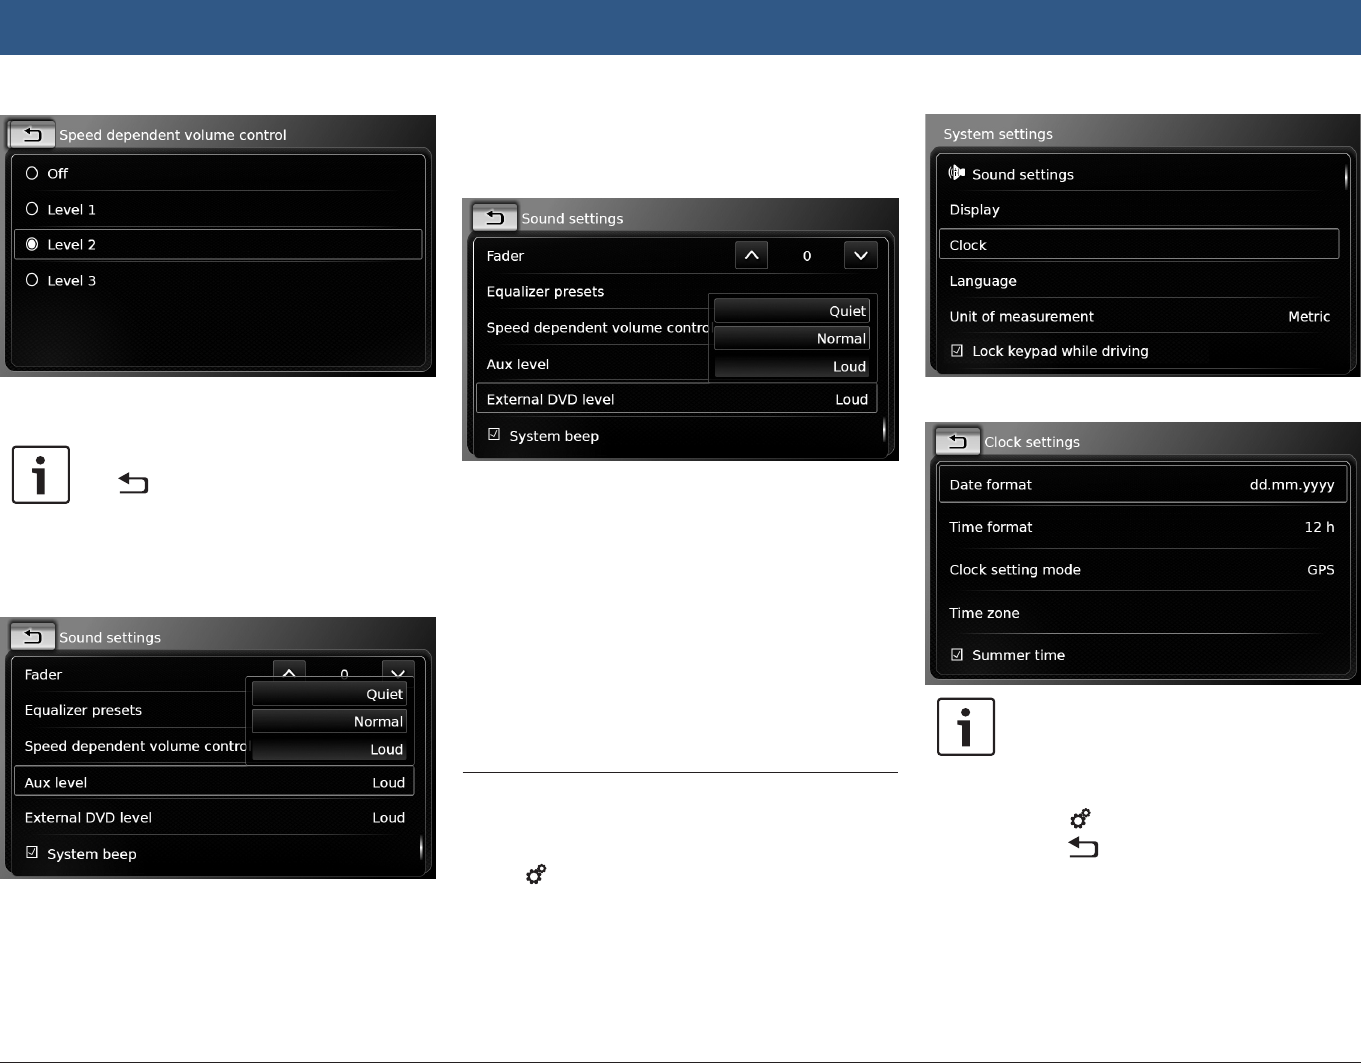
4.8.5 Adjusting the speed depend-
ent volume
This function automatically adjusts the volume
of the car sound system to the speed driven and
the associated driving noises. For example, at
an increased speed, the volume is automatically
increased to compensate for the increased
driving noise (e.g. due to the airstream).
The automatic increase in volume can be
adjusted in 4 increments (OFF, 1-3).
fTap Speed dependent volume control.
Operation
18 | en
fTap the desired option: Off or Level 1 - 3.
Note:
Tap to return to the sound settings.
4.8.6 Volume adjustment for the
AUX source
fTap Aux level.
fTap the desired option: Quiet, Normal or
Loud.
4.8.7 Volume adjustment for an
external DVD source
fTap External DVD level.
fTap the desired option: Quiet, Normal or
Loud.
4.8.8 System beep – on/off
The system confirms certain actions with a
beep. You can enable or disable this confirma-
tion beep.
fTap System beep.
The system beep is enabled when the check
mark is displayed in the checkbox.
4.9 Setting the time and date
To adjust the time and date settings,
ffirst switch to the Home menu, if necessary.
fTap 6.
The system settings are displayed.
fTap Clock.
Note:
fTo scroll through the available set-
tings, touch the list area and swipe
up or down.
fTap 6 to close the settings or
tap to return to the system
settings.
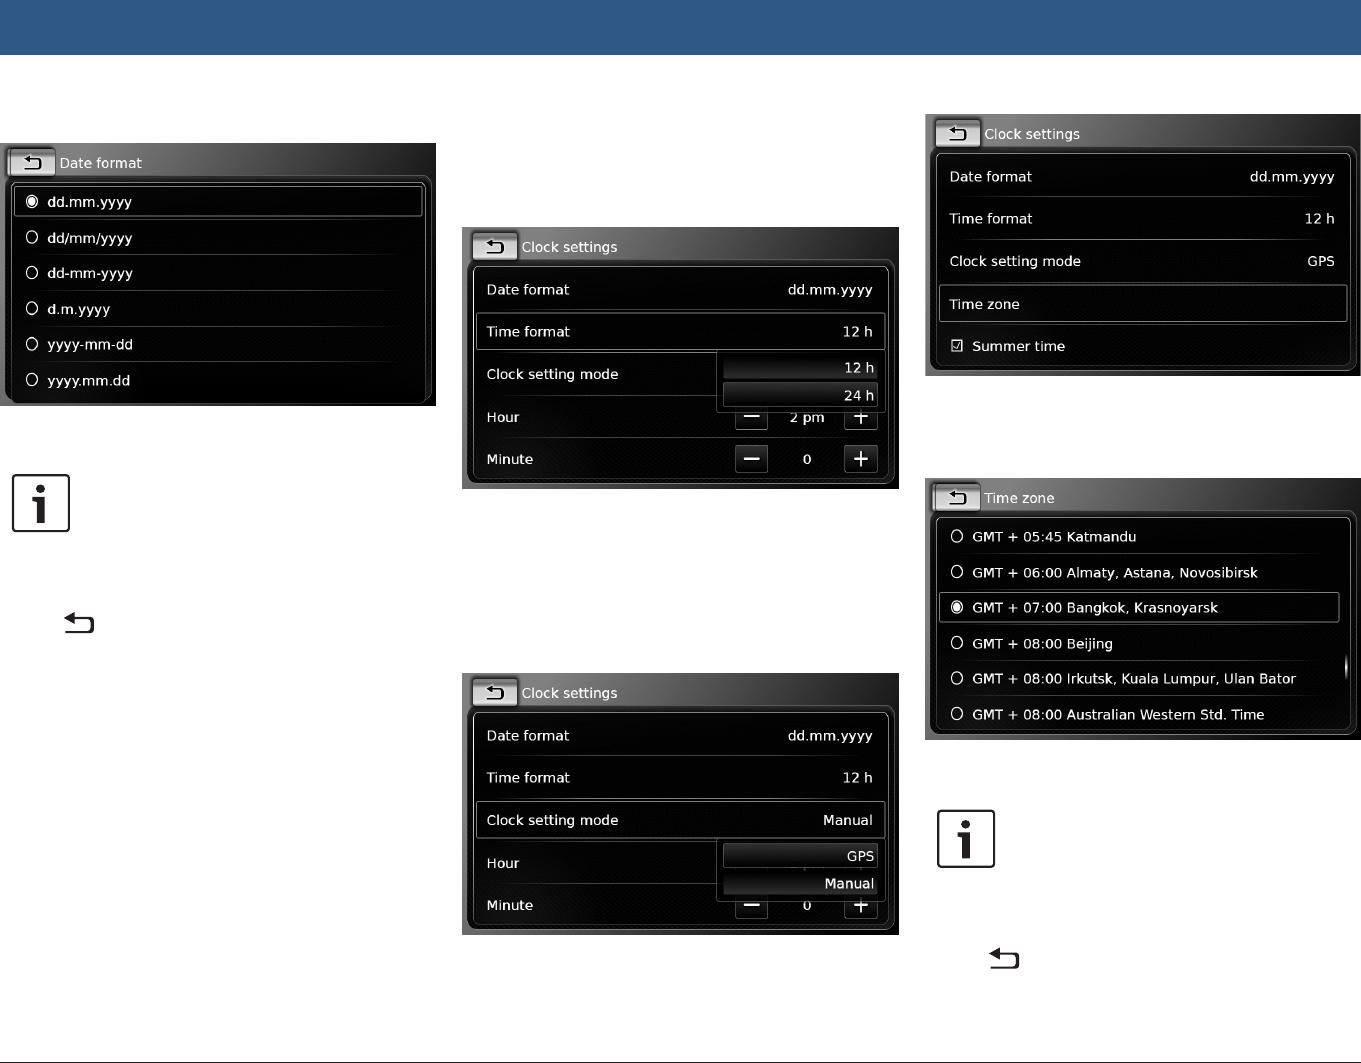
4.9.1 Selecting the date format
The selected date format refers to the display of
the date, e.g. in the Calls list of the phone mode.
Operation
en | 19
fTap Date format.
fTap the desired date format.
Note:
To scroll through the available date
formats, touch the list area and swipe
up or down.
fTap to return to the time and date set-
tings.
4.9.2 Selecting the time format
The selected time format refers to the display of
the time, e.g. in the Home menu.
fTap Time format.
fTap the desired option: 12 h or 24 h.
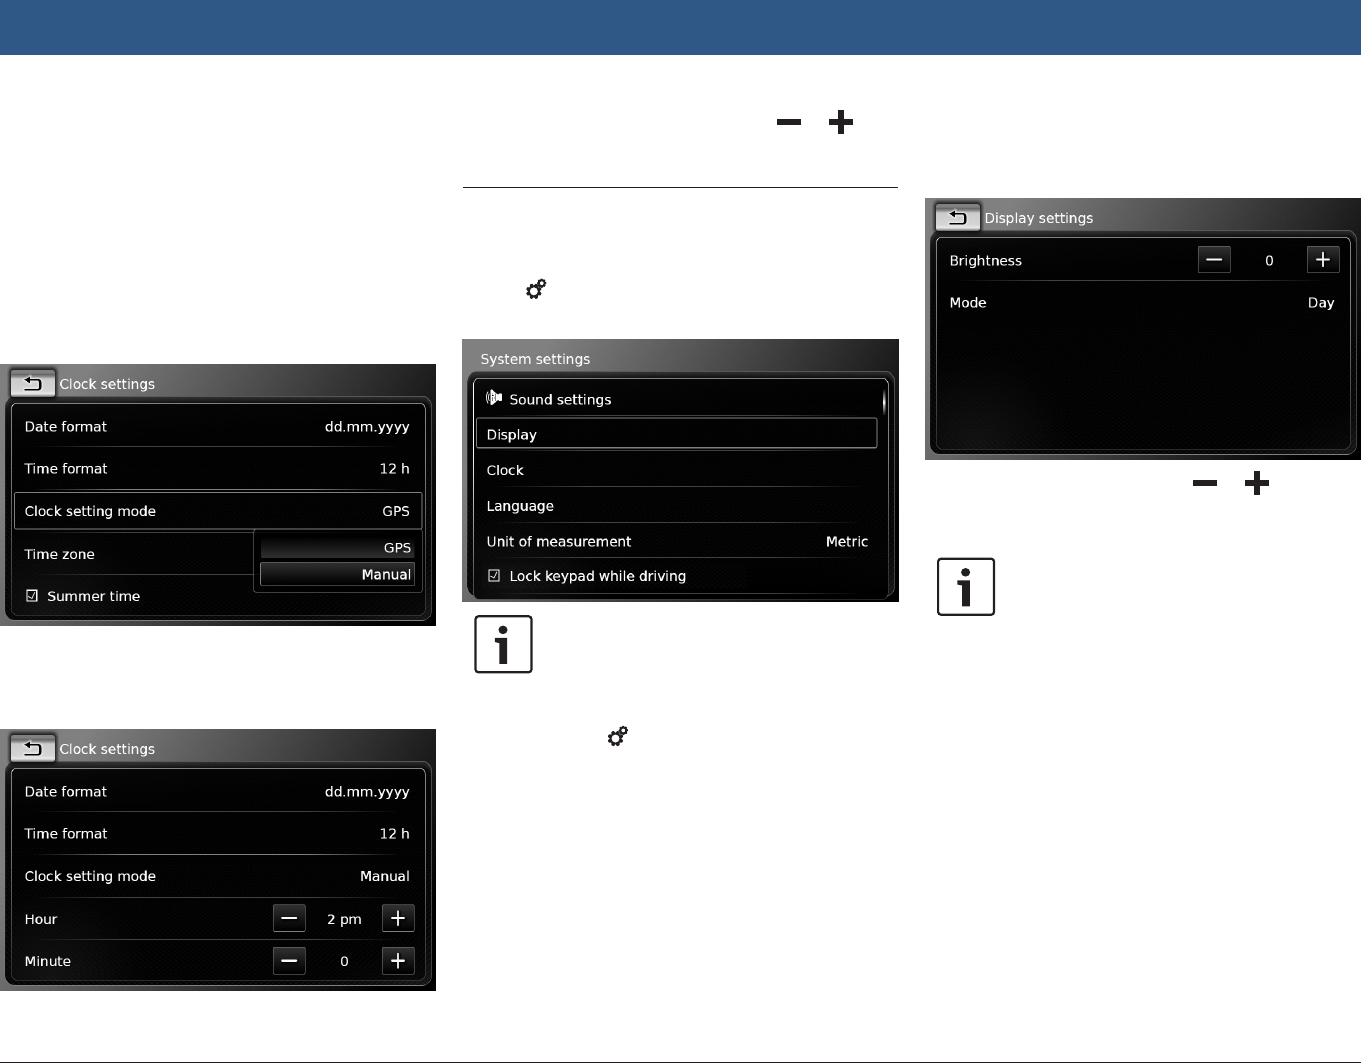
4.9.3 Setting the time via GPS
First select “GPS” as the time setting, if neces-
sary:
fTap Clock setting mode.
fTap GPS.
The options for setting the time via GPS are
displayed:
Select your time zone:
fTap Time zone.
fTap the desired time zone.
Note:
To scroll through the available time
zones, if necessary, touch the list area
and swipe up or down.
fTap to return to the time and date set-
tings.
Operation
20 | en
Activate or deactivate summer time:
fTap Summer time.
Summer time is activated when the check mark
is displayed in the checkbox.
4.9.4 Setting the time manually
First select “Manual” as the time setting, if nec-
essary:
fTap Clock setting mode.
fTap Manual.
The options for setting the time manually are
displayed.
fIn the Hour or Minute item, tap or to
adjust the hours or minutes.
4.10 Further system settings
To adjust the system settings,
ffirst switch to the Home menu, if necessary.
fTap 6.
The system settings are displayed.
Note:
fTo scroll through the available sys-
tem settings, touch the list area and
swipe up or down.
fTap 6 to close the system set-
tings.
4.10.1 Adjusting the display bright-
ness
The display is equipped with a day and night
mode. The display switches between day and
night mode automatically when the vehicle
headlights are switched on or off.
You can manually adjust the display brightness
of the current mode:
fIn the system settings, tap Display.
fIn the Brightness item, tap or to
decrease or increase the value.
Note:
The vehicle’s brightness level control
function is available on the vehicle’s
instrument cluster. If you use this func-
tion to change the vehicle’s brightness
level to maximum, the map display in
navigation mode will stay set to day
mode. Please refer to the car owner’s
manual for details about the vehicle’s
brightness level control and how to
use it.
4.10.2 Setting the language
Set the language used by the device.
fIn the system settings, tap Language.
Operation
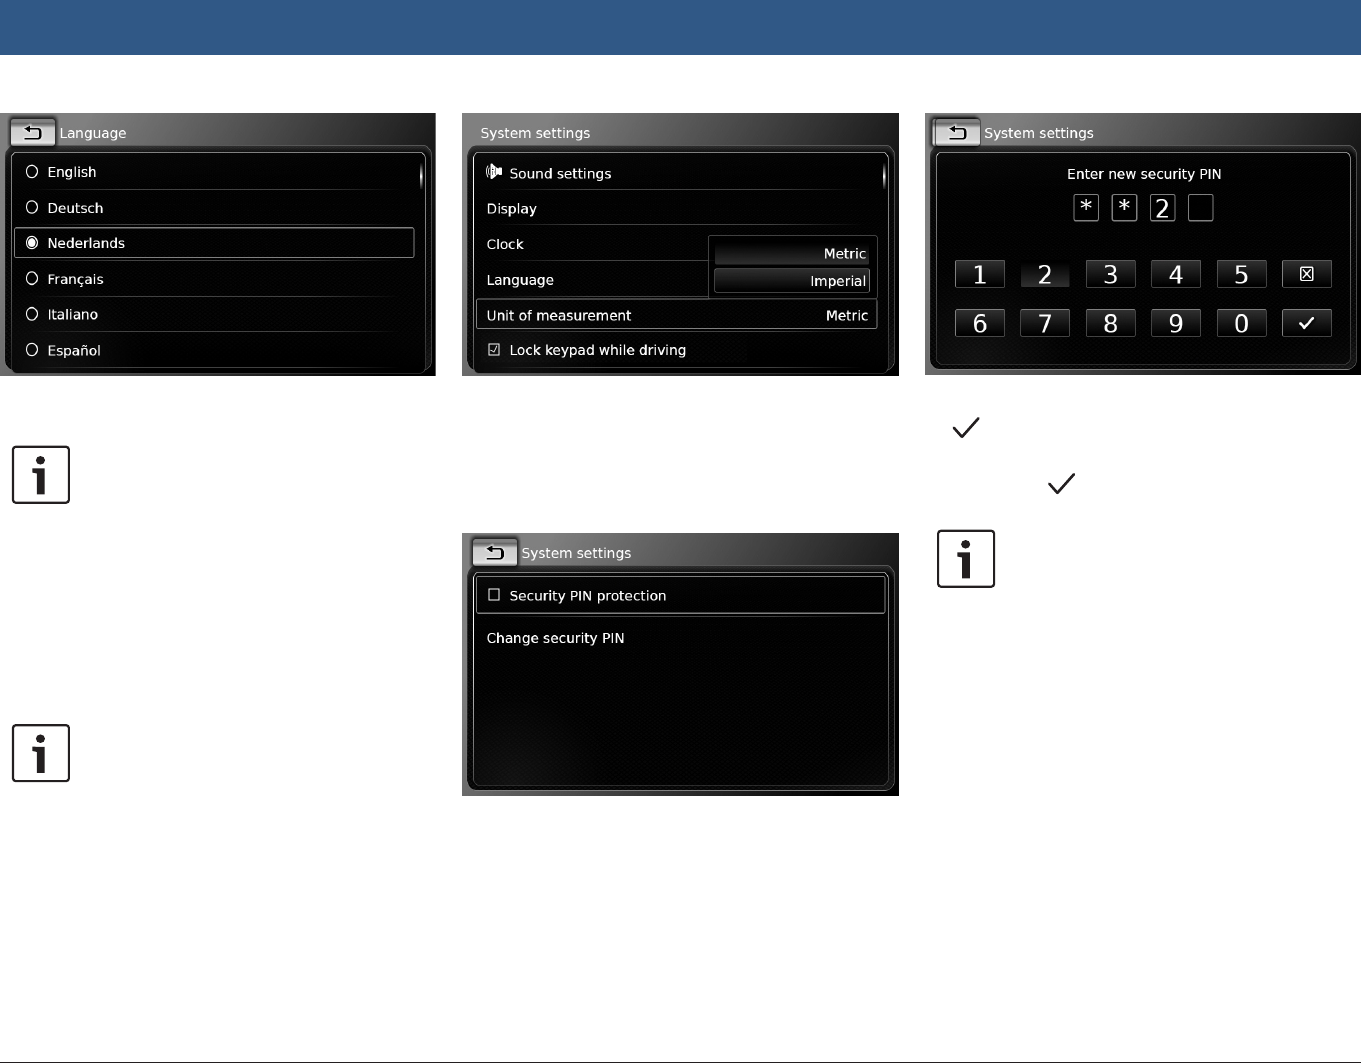
en | 21
fTap the desired language.
Note:
To scroll through the available lan-
guages, touch the list area and swipe
up or down.
4.10.3 Selecting the system of meas-
urement
The device can use metric or imperial units of
measurement.
Note:
The selected system of measurement is
used by the navigation system.
fIn the system settings, tap Unit of measure-
ment.
fTap the desired option: Metric or Imperial.
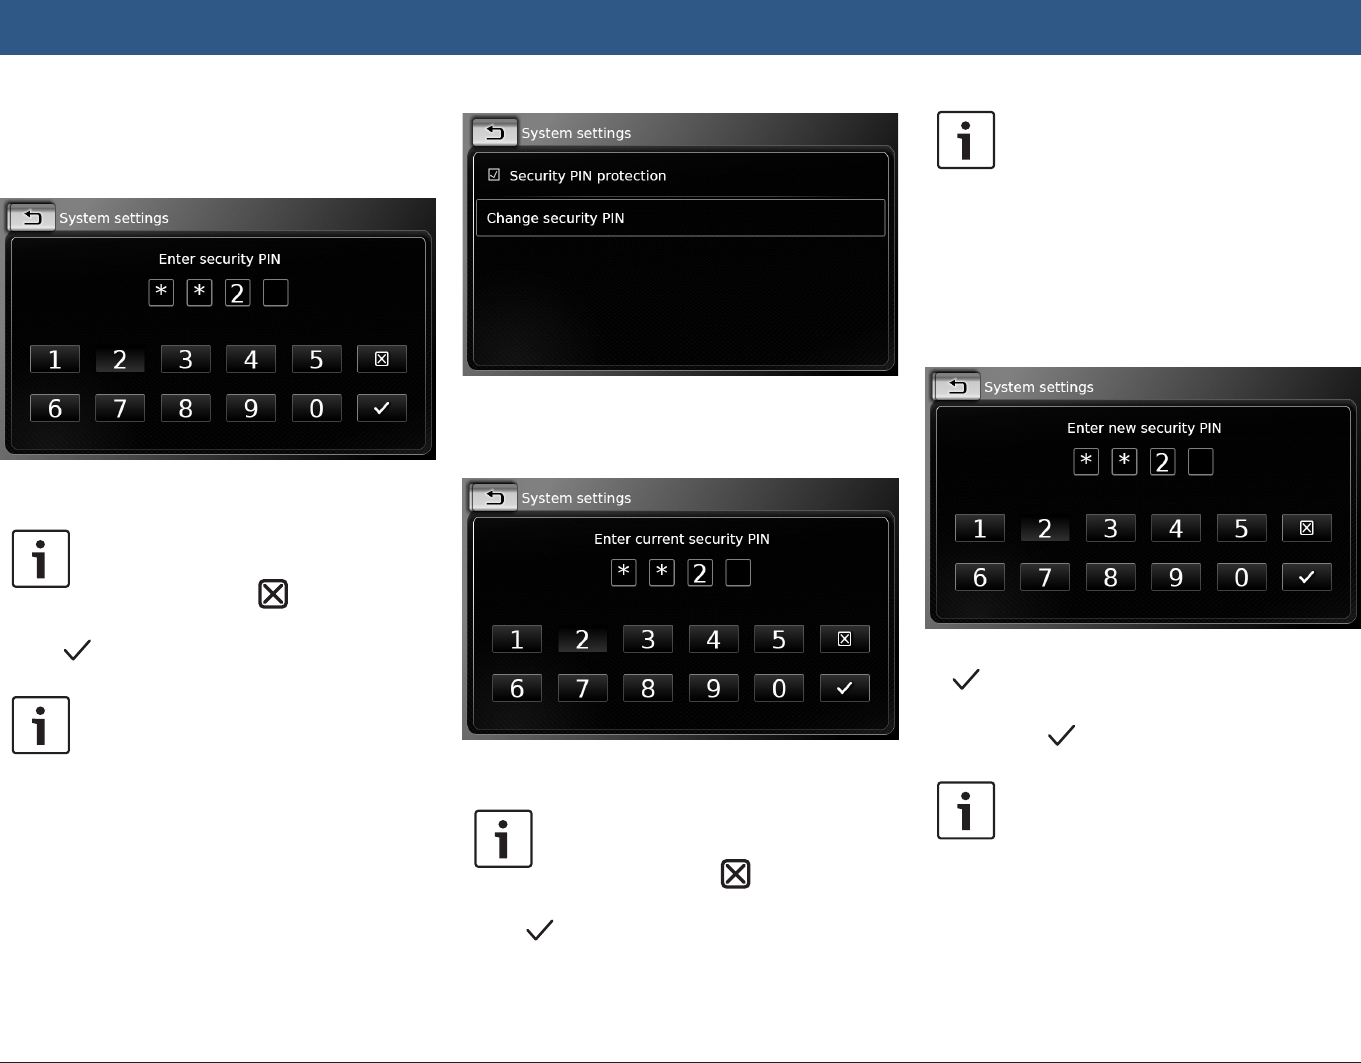
4.10.4 Security PIN protection – on/
off
fIn the system settings, tap Security PIN.
fTap Security PIN protection.
Security PIN protection is enabled when the
check mark is displayed in the checkbox.
If you enable security PIN protection, you will be
prompted to enter a new security PIN for the
device.
fEnter a four-digit device security PIN and tap
.
fEnter the new security PIN again to confirm
it, and tap .
Note:
If the security PIN you entered as con-
firmation differs, a notification is dis-
played, and you can enter the new
security PIN again, starting from the
very beginning.
Operation
22 | en
If you disable security PIN protection, you will be
prompted to enter the device’s current security
PIN:
fEnter the device’s four-digit security PIN.
Note:
If you enter a wrong digit, you can
delete it by tapping .
fTap .
Note:
If you have not entered the correct
security PIN for the device, the “Wrong
security PIN” notification appears
briefly, and you can enter the security
PIN again.
4.10.5 Changing the device’s secu-
rity PIN
fIn the system settings, tap Security PIN.
fTap Change security PIN.
You will be prompted to enter the device’s cur-
rent security PIN.
fEnter the device’s four-digit security PIN.
Note:
If you enter a wrong digit, you can
delete it by tapping .
fTap .
Note:
If you have not entered the correct
security PIN for the device, the “Wrong
security PIN” notification appears
briefly, and you can enter the security
PIN again.
You will be prompted to enter the new security
PIN for the device.
fEnter a four-digit device security PIN and tap
.
fEnter the new security PIN again to confirm
it, and tap .
Note:
If the security PIN you entered as con-
firmation differs, a notification is dis-
played, and you can enter the new
security PIN again, starting from the
very beginning.
Operation
en | 23
4.10.6 Displaying information about
open-source software
The device uses open-source software. To view
information about it,
fin the system settings, tap Open-source
software.
Notes:
fTo scroll through the available infor-
mation, touch the list area and
swipe up or down.
fTap to return to the system
settings.
4.10.7 Reset to the factory settings
Note:
Resetting to the factory settings will
erase all the settings you defined previ-
ously.
fIn the system settings, tap Reset to factory
settings.
fTap to confirm that you want to reset the
device to the factory settings.
Wait for a short time for the factory settings to
be restored.
4.11 Connecting/inserting exter-
nal devices and data storage
devices
Note:
Only use appropriate connecting
cables and external devices in regard to
safety, electromagnetic compatibility
and grade of shielding.
4.11.1 General information
The device supports the following media file
formats:
fMP3
fWMA
fAAC
fWAV
f3GPP
fAudiobooks
fMPG
fAVI for H.264/MPEG4 ASP (Xvid)
The following restrictions apply for the data
stored on SD cards and external devices con-
nected to the USB port:
fFile system: FAT16/32
fMax. 11 folders in depth hierarchy are sup-
ported.
fMaximum file / song number: 10000
fMaximum URL / file path length: 1024
fID3 tags: Version 1 and 2, max. length 256
fWMA files with Digital Rights Management
(DRM) from online music shops cannot be
played.
fWMA files can only be played back, if they
were created with Windows Media Player
version 9 or 10.
fApplicable playlist extensions:
– .m3u
– .pls
– .wpl
MP3
fCodecs
– MPEG-1: Layer-1, Layer-2, Layer-3
– MPEG-2: Layer-1, Layer-2, Layer-3
– MPEG-2.5: Layer-3
fBitrates
– 8 kBit/s to 448 kBit/s with VBR and CBR
fSample rates
– up to 48kHz
AAC
fCodecs
– AAC-LC
fBitrates
– 8kBit/s to 256kBit/s with VBR and CBR
fSample Rates
– 8-48kHz
WMA
fCodecs
– WMA 9 Lossless
– WMA 10 Std, 44.1kHz, 64-161 kBit/s
– WMA 10 Pro, 48 - 192kBit/s
Operation
24 | en
4.11.2 SD card
Inserting and removing an SD card
Important notes:
fNever insert anything other than an
SD card into the SD card slot. Doing
so could damage the device.
fNever use excessive force when
removing an SD card or else the
card slot or the card itself may be
damaged.
fWhen inserting an SD card into the
device, make sure the card is
aligned and positioned correctly
(the correct side must be facing
upwards, and you must insert the
correct end of the card). If you use
force to insert an incorrectly aligned
and positioned SD card into the
slot, you may damage the card and
the slot.
fIf the “No Card” notification appears
in the display despite your having
inserted an SD card into the SD card
slot, this means that the device
does not recognize the card for
some reason. Try removing the card
and inserting it again. Please bear in
mind, however, that some SD cards
may not be compatible with this
device.
fEnsure the label on the SD card is
fully attached. Otherwise the SD
card may become stuck in the slot
or particles from the label may be
left inside the device leading to the
possible failure of SD-card function-
ality.
fDo not use an SD card that has been
cracked, deformed or repaired
using adhesive tape. Use of a dam-
aged SD card may damage the
device.
Note:
If your device is equipped with a navi-
gation system:
If you want to insert a media SD card,
you may have to remove the SD card
containing the navigation system’s map
data first.
As long as the SD card containing the
navigation system’s map data is
removed, you will not be able to use the
navigation function.
To insert an SD card,
fslide the SD card with its printed side facing
upwards and its contacts pointing towards
the device into the SD card slot 3.
A notification appears briefly in the display
when the device detects the SD card.
To remove an SD card,
fpress the SD card gently with your fingertip
into the SD card slot 3.
The SD card is released and ejected, and a
corresponding notification appears briefly in the
display.
fPull the SD card out of the SD card slot 3.
Note:
Remove the SD card as soon as it is
ejected. If an ejected SD card remains
in the card slot, it may lead to the
touchscreen not functioning properly.
4.11.3 USB storage device/Apple
Note:
Information about which Apple devices
the device supports is available at
www.suzuki-slda.com.
General information
fThe external devices connected to the USB
port must comply with the USB Mass Storage
Class specification (USB MSC).
fDevices connected via USB are supported
according to USB specification V 2.0.
Devices with USB specification 1.0 and 3.0
are compatible.
fDevices without FAT16 / FAT32 file system
are not supported.
Operation
en | 25
fHard Disk Drives (HDD) are not generally
supported.
fUSB hubs are not supported.
Connecting and removing a USB storage device
or Apple device
To connect a USB storage device or Apple
device,
fconnect it to the USB port.
A notification appears briefly in the display
when the device detects the USB storage device
or Apple device.
To remove a USB storage device or Apple
device,
fpull it out of the USB port.
An appropriate notification appears briefly in
the display.
4.11.4 AUX audio source
Note:
Only applicable if your vehicle is fitted
with an AUX input.
Connecting an AUX source
fUse a suitable cable to connect the AUX
source to the AUX input.
Note:
If you want to play a connected AUX
source, you must first enable the AUX
input (see below).
Enabling the AUX input
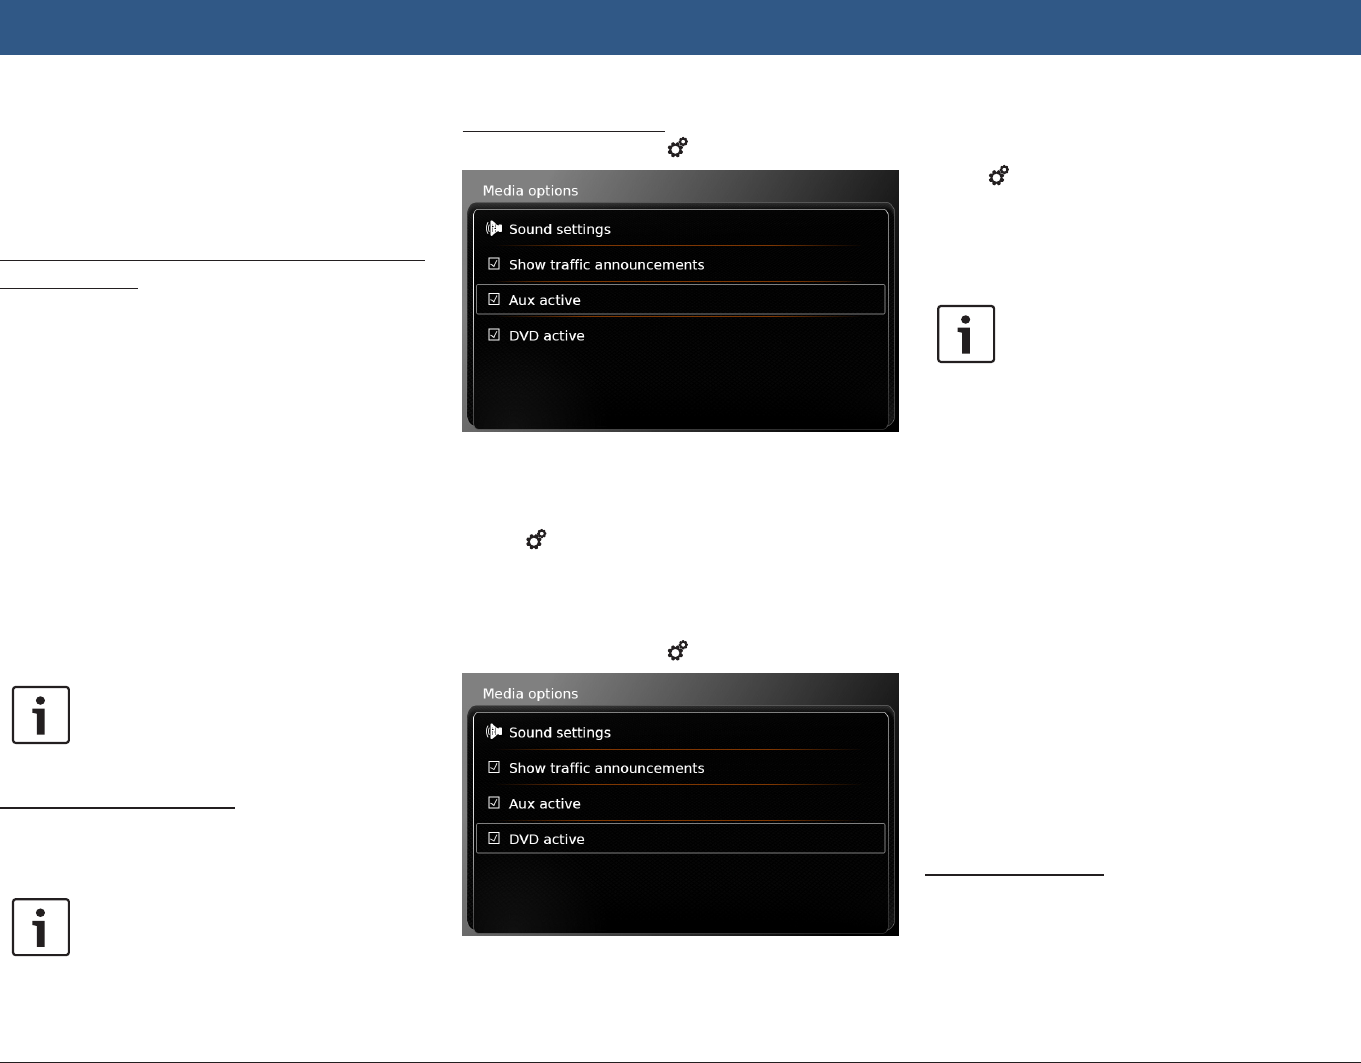
fIn media mode, tap 6.
fTap Aux active.
The AUX input is enabled when the check mark
is displayed in the checkbox.
fTap 6 to close the menu.
4.11.5 Enabling the external DVD
input
fIn media mode, tap 6.
fTap DVD active.
The external DVD input is enabled when the
check mark is displayed in the checkbox.
fTap 6 to close the menu.
4.11.6 Connecting a device via Blue-
tooth®
Notes:
fInformation about which external
devices the device supports is
available at www.suzuki-slda.com.
fThe procedures described in this
chapter apply to Bluetooth® mobile
phones as well as to Bluetooth®
audio streaming devices such as a
Bluetooth® MP3 player.
fIf a smartphone is already con-
nected to the device via smartphone
integration, it is not possible to
establish a Bluetooth® connection
to another mobile phone.
fAn existing Bluetooth® connection
will be disconnected automatically
as soon as another smartphone is
connected via smartphone integra-
tion.
General information
The device supports Bluetooth® 3.0 + HS and
the following Bluetooth® profiles and standards:
fA2DP 1.2
fAVRCP 1.3
fHFP 1.6
Operation