Robert Bosch Car Multimedia 52R0 Car radio & infotainment system User Manual Part 3
Robert Bosch Car Multimedia GmbH Car radio & infotainment system Users Manual Part 3
Contents
Users Manual_Part 3
26 | en
fMAP 1.0
fPBAP 1.1
fSPP 1.1
fVcards 2.1, 3.0
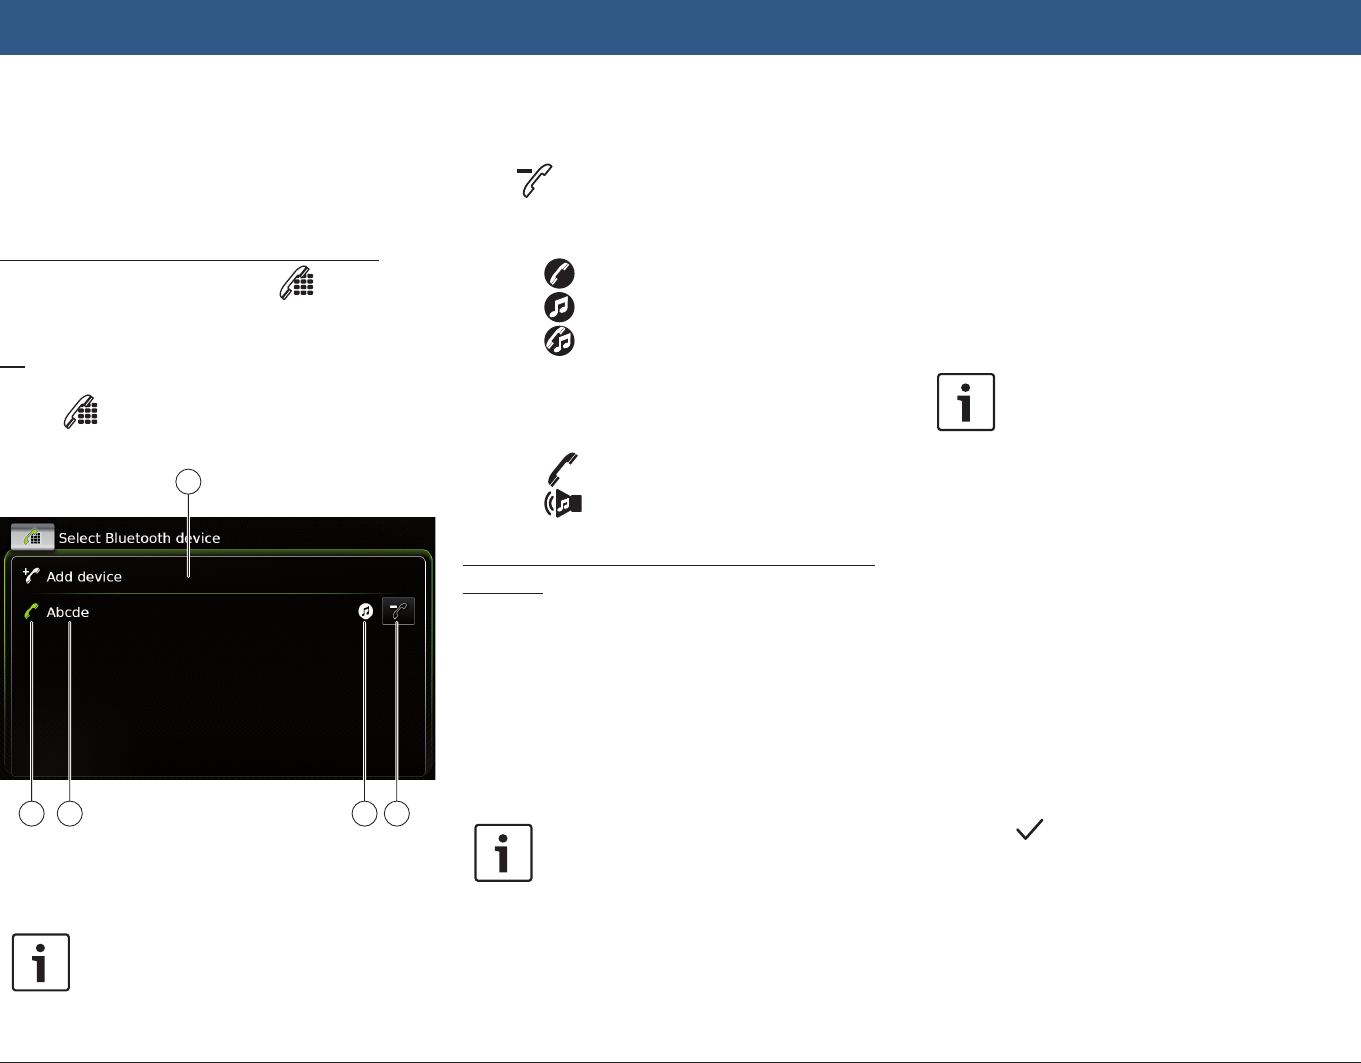
Opening the Select Bluetooth device menu
fTap the direct-select button in the Home
menu.
or:
fTap the Call area in the Home menu.
fTap .
The Select Bluetooth device menu is displayed:
8
9101112
You will find the following information and con-
trols in the Select Bluetooth device menu:
Note:
The currently connected device is
always the first item in the device list.
8 Add device button: Start pairing a new
mobile phone
9 button: Delete a paired mobile phone
: Supported Bluetooth® functions of the
connection:
f: Telephone
f: Audio streaming
f: Telephone and audio streaming
; Bluetooth® name of the device
< Indication of Bluetooth® device type and
currently connected device:
f: Telephone
f: Audio streaming device
Pairing and connecting a mobile phone for the
first time
fIn the Select Bluetooth device menu, tap Add
device 8.
The device is now available for setting up a
connection (pairing). The Bluetooth® PIN of the
device is displayed. Next, please follow the
instructions provided by the device and your
mobile phone.
Notes:
fThe Bluetooth® name of the device
is “Suzuki”.
fIf 10 mobile phones are already
paired with the device, it will not be
possible to pair and connect a fur-
ther mobile phone. In this case, first
delete one of the paired mobile
phones (see the section entitled
“Deleting a paired mobile phone”
(page 27)).
There are 3 methods of establishing a Blue-
tooth® connection. Please proceed according to
the method employed:
Note:
Please refer to your mobile phone’s
instruction manual for information on
how to set up a Bluetooth® connection
on your mobile phone.
fMethod 1:
Perform the connection setup process on
your mobile phone. On your mobile phone,
enter the displayed PIN.
fMethod 2:
The connection setup does not require you to
enter a PIN on the mobile phone. A notifica-
tion appears in the display informing you that
the mobile phone wants to connect.
fTap .
The rest of the connection setup process is
performed automatically. An appropriate
notification appears in the display.
fMethod 3:
Operation
en | 27
The mobile phone receives the device’s PIN
and displays it.
fCheck that the mobile phone is displaying
the correct PIN and then tap .
fConfirm on your mobile phone that you
want to set up a connection.
If connection setup was successful, the mobile
phone will connect to the device.
Notes:
fIf the connection attempt fails, a
notification is displayed. Make
another attempt at setting up a
connection from the mobile phone.
fAs soon as a new mobile phone is
connected to the device, the list of
calls appears in the display, and the
phone book and call lists are down-
loaded from the mobile phone onto
the device. The time required to
download the phone book and call
lists may vary depending on the
connected mobile phone.
Connecting an already paired mobile phone
The device stores the information for the 10 pre-
viously paired mobile phones. These mobile
phones are displayed in the Select Bluetooth
device menu.
To connect a mobile phone shown in this list,
ftap the relevant item in the Select Bluetooth
device menu.
If connection setup was successful, the mobile
phone will connect to the device.
Deleting a paired mobile phone
To delete a paired mobile phone,
ftap 9 in the corresponding item of the
Select Bluetooth device menu.
The selected mobile phone is unpaired and
deleted from the list.
Notes:
fIf the mobile phone is unpaired
during an active call, the call is
interrupted. The call can then be
continued on the mobile phone if
the mobile phone supports this.
fWhen the mobile phone is unpaired,
its phone book and call lists are also
deleted from the device.
fTo connect the mobile phone to the
device again, proceed as described
in the section entitled “Pairing and
connecting a mobile phone for the
first time” (page 26).
4.11.7 Connecting a smartphone via
smartphone integration
Notes:
fInformation about which smart-
phones the device supports is avail-
able at www.suzuki-slda.com.
fA smartphone can be connected to
the device using the smartphone
integration function. The connec-
tion can be made via the USB port.
fA simultaneous Bluetooth® connec-
tion with another smartphone is not
allowed when a smartphone is
connected using the smartphone
integration function.
fYou should disconnect any existing
Bluetooth® connection before con-
necting a smartphone using the
smartphone integration function.
If, however, you want to continue
using an existing Bluetooth® con-
nection, you should cancel the
smartphone integration setup pro-
cess.
fIf a smartphone is connected via
MirrorLink™ or Android Auto and a
Bluetooth® connection from the
same smartphone already exists,
the Bluetooth® connection will be
maintained.
fSmartphones that are integrated via
MirrorLink™ or Android Auto require
a Bluetooth® connection in addition
to smartphone integration via USB
in order to provide full support for
the telephone functions.
Users can use the non-phone fea-
tures of MirrorLink™ or Android
Operation
28 | en
Auto without a Bluetooth® connec-
tion.
If there is no Bluetooth® connection
established before you integrate a
MirrorLink™ or Android Auto smart-
phone, you will have to establish the
Bluetooth® connection manually
(see the section entitled “Connect-
ing a device via Bluetooth®” (page
25)).
fSmartphone integration via Apple
CarPlay does not allow any parallel
Bluetooth® connection. If an Apple
CarPlay smartphone is already
connected via Bluetooth®, this
Bluetooth® connection will be can-
celled.
To connect a smartphone,
fconnect it to the USB port.
The smartphone is detected automatically and
connected via smartphone integration.
To disconnect the smartphone from the device,
funplug the smartphone from the USB port.
An appropriate notification appears briefly in
the display.
5 FM/AM radio mode
Notes:
fAM reception: Generally, strong AM
signals provide stable sound quality
with low signal noise. At night,
however, atmospheric conditions
may sometimes lead to interference
from other stations.
fFM reception: The FM waveband
offers the highest sound quality;
however, the signal may be suscep-
tible to noise due to:
– The limited reach of some trans-
mitters.
– Distortion caused by signals
reflected off local buildings and
other obstructions.
– “Shadow zones” wherein the
signal reception is obstructed or
restricted.
5.1 Listening to the radio
fTap the direct-select button in the Home
menu.
Note:
You will also find the button in the
display of the currently playing media.
fTap the Radio tab, if necessary.
fTap the memory bank of the desired wave-
band.
The tuner display for the selected memory bank
is displayed and you can hear the radio broad-
cast.
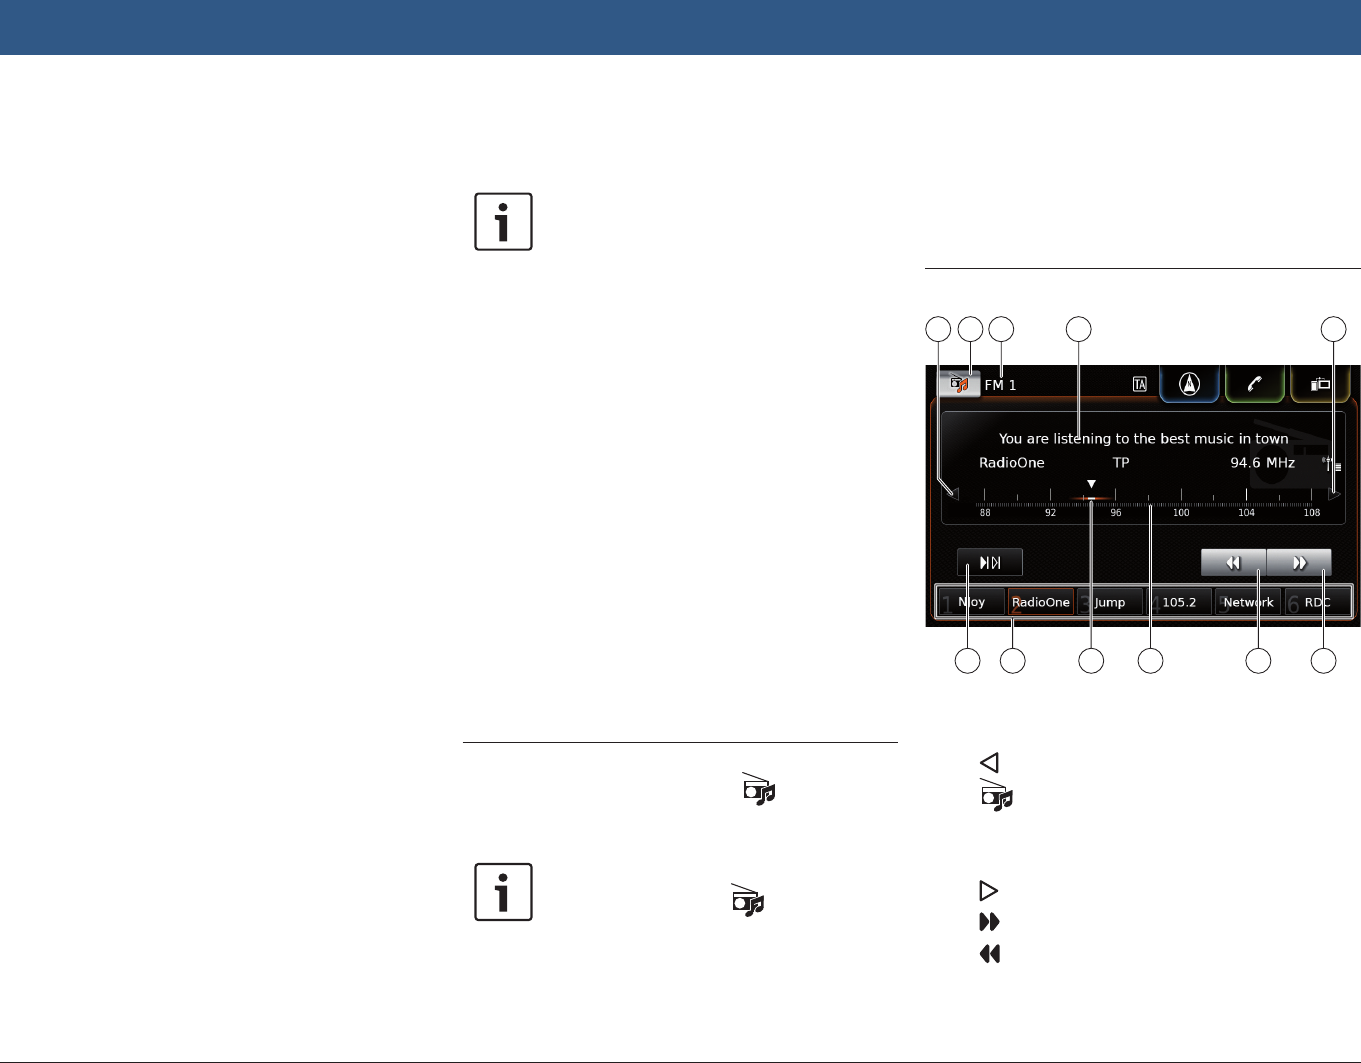
5.2 The tuner display
15 161413 17
23 22 19 182021
You will find the following information and con-
trols in the tuner display:
= button: Change frequency
> button: Open the source menu
? Current memory bank
@ Station information area
A button: Change frequency
B button: Start seek tuning
C button: Start seek tuning
D Tuning scale
Operation | FM/AM radio mode
en | 29
E Frequency pointer
F Memory preset buttons
G button: Start scan function
In memory bank FM-AST and AM-AST:
button: Start autostore function)
Note:
The information displayed in the sta-
tion information area @ depends on
whether RDS is supported in your
reception area or by the current sta-
tion.
5.3 Calling up the tuner display
While you are listening to the radio:
fTap the Listen area in the Home menu.
5.4 RDS
Note:
If RDS is not supported in your recep-
tion area or by the current station, you
will not be able to experience these
functions.
This device is equipped with an RDS radio
receiver. Many FM stations transmit a signal that
not only carries the radio programme but also
information like the station name. The station
name appears in the display as soon as the tuner
receives it.
The convenient RDS functions “Alternative
Frequency” and “Regional Mode” enhance the
performance of your tuner:
fAlternative frequency (AF): The device auto-
matically performs a background search for
the best reception frequency for the tuned
station.
fRegional mode: Some radio stations divide
their schedule at certain times into regional
programmes offering different content. You
can enable or disable regional mode. With
regional mode enabled, the device is pre-
vented from switching to alternative frequen-
cies for the tuned station that have different
programme content.
5.4.1 AF mode – on/off
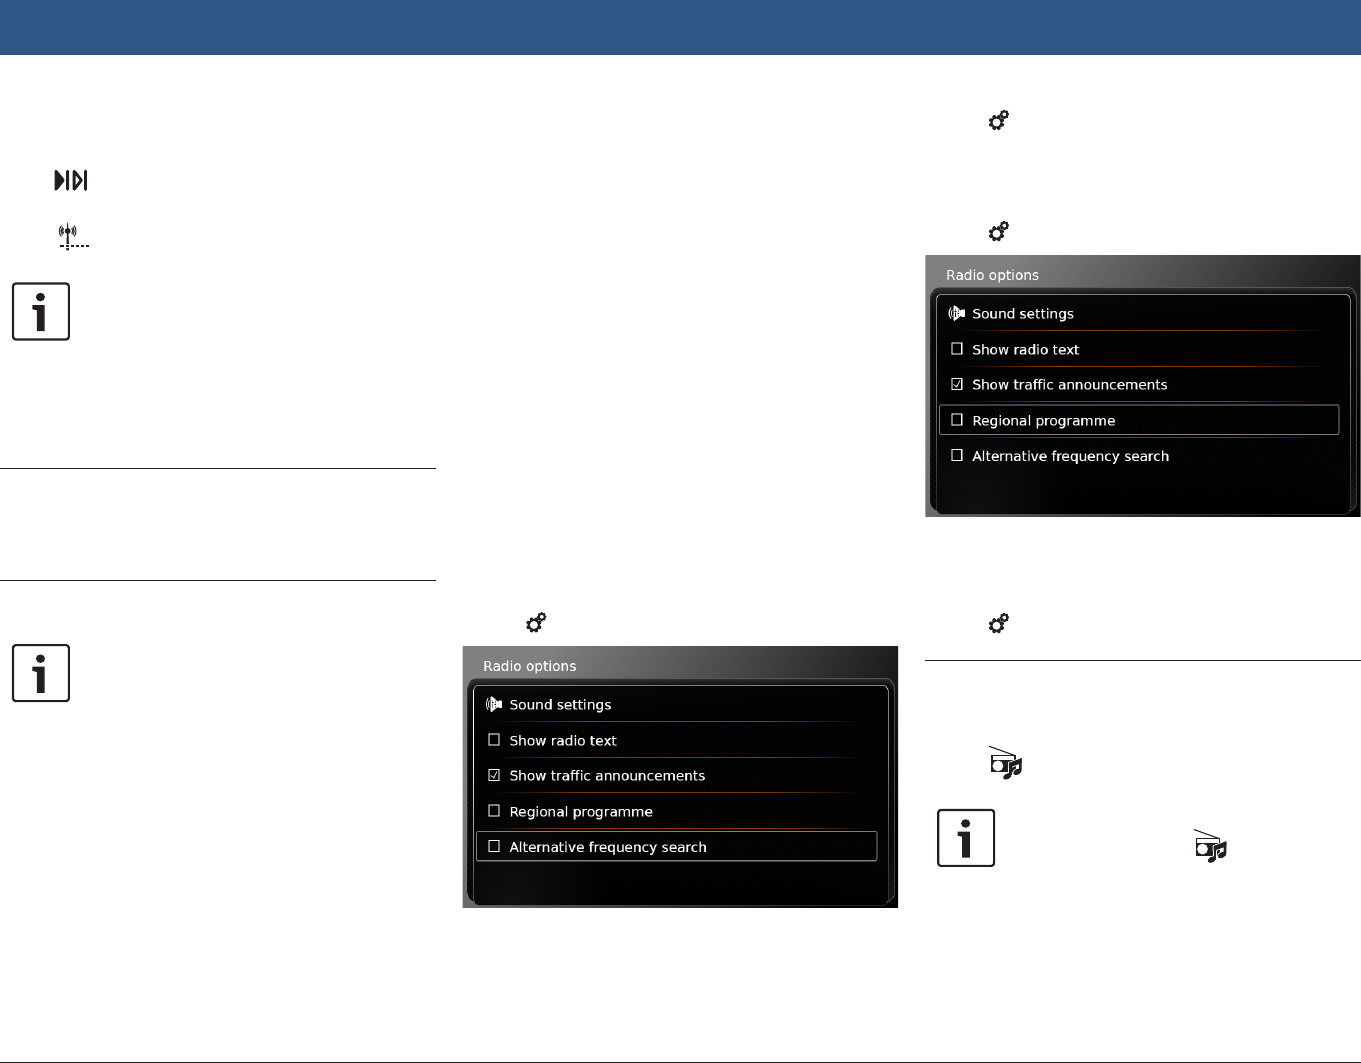
fCall up the tuner display.
fTap 6.
fTap Alternative frequency search.
AF mode is enabled when the check mark is
displayed in the checkbox.
fTap 6 to close the menu.
5.4.2 Regional mode – on/off
fCall up the tuner display.
fTap 6.
fTap Regional programme.
Regional mode is enabled when the check mark
is displayed in the checkbox.
fTap 6 to close the menu.
5.5 Selecting the waveband/mem-
ory bank
While you are listening to the radio:
fTap > in the tuner display.
Note:
You will also find the button in the
Home menu.
fTap a memory bank of the desired waveband.
The tuner display for the selected memory bank
is displayed.
FM/AM radio mode
30 | en
5.6 Tuning stations
5.6.1 Tuning stations manually
fTap = or A once or several times to
adjust the frequency incrementally.
Or:
fTap any position on the tuning scale D to set
the corresponding frequency.
Or:
fTouch the frequency pointer E and swipe
left or right along the scale to adjust the
frequency continuously.
5.6.2 Starting seek tuning
fTap B or C to tune to the next or
previous station in the reception area.
Note:
By long-tapping B or C you
adjust the frequency continuously.
After you release the button, the radio
tunes to the next station automatically.
5.6.3 Station list
Note:
This function is only available in the FM
waveband.
All currently receivable radio stations are dis-
played in the FM station list.
fTap the station information area @.
The FM station list is displayed.
fTap the desired radio station.
To return to the tuner display,
ftap .
5.6.4 Scanning receivable stations
Note:
This function is only available in the AM
waveband.
fTap G.
The receivable stations are played one after
another for around 10 seconds each.
To continue listening to the station that is cur-
rently being scanned,
ftap G again.
5.7 Storing stations
5.7.1 Storing stations manually
fFirst select the desired memory bank, if
necessary, and tune to the desired station.
fLong-tap one of the memory preset buttons
F.
The currently tuned station is then stored to the
memory preset button.
5.7.2 Storing stations automatically
fSelect the autostore memory bank FM-AST or
AM-AST.
fTap G.
The six stations offering the strongest reception
in the current waveband are stored automati-
cally. The stations are sorted according to their
reception strength; the station with the strong-
est reception is stored on memory preset 1.
Afterwards, the station stored on memory pre-
set 1 will be played.
5.8 Listening to a stored station
fFirst select the desired memory bank, if
necessary.
fShort-tap one of the memory preset buttons
F.
The stored station is played.
5.9 Radio-text display – on/off
Note:
If the stations in your reception area do
not support RDS, you will not be able
to use this function.
fCall up the tuner display.
fTap 6.
FM/AM radio mode
en | 31
fTap Show radio text.
Displaying of radio text is enabled when the
check mark is displayed in the checkbox.
fTap 6 to close the options display.
5.10 Traffic announcement
Note:
If the stations in your reception area do
not support RDS, you will not be able
to use these functions.
5.10.1 Traffic announcement priority
– on/off
fIn radio mode, tap 6.
fTap Show traffic announcements.
Traffic announcement priority is enabled when
the check mark is displayed in the checkbox.
fTap 6 to close the options display.
When traffic announcement priority is enabled,
the TA symbol is displayed in the Home menu
and in the tuner display or in the display for the
currently playing media.
The device will play a traffic announcement as
soon as it receives one. The received station is
shown in the display for the duration of the
announcement.
5.10.2 Cancelling a playing traffic
announcement
You can cancel a playing traffic announcement
and return to the audio source you were listen-
ing to before:
fTap while the traffic announcement is
playing.
Note:
Traffic announcement priority remains
enabled.
FM/AM radio mode
32 | en
6 DAB radio mode
Notes:
fThis function is only available if the
device supports DAB reception.
fDAB radio supports traffic
announcement priority (please refer
to the section entitled “Traffic
announcement” (page 31)).
6.1 Listening to DAB
fTap the direct-select button in the Home
menu.
Note:
You will also find the button in the
display of the currently playing media.
fTap the Radio tab, if necessary.
fTap a DAB memory bank.
The DAB display for the selected memory bank
is displayed and you hear the DAB broadcast.
6.2 The DAB display
29
2524 26
272830
You will find the following information and con-
trols in the DAB display:
H button: Open the source menu
I Current memory bank
J Service information area
K button: Skip to the next service
L button: Skip to the previous service
M Memory preset buttons
N button (only in memory bank DAB-
AST): Start autostore function
6.3 Calling up the DAB display
While you are listening to DAB:
fTap the Listen area in the Home menu.
6.4 DAB features
With DAB radio, a service represents a pro-
gramme of a radio station.
Several services are transmitted on the same
frequency. These services are combined into an
ensemble. The ensemble name of the current
service is displayed in the service information
area J.
A service may provide one or more secondary
audio channels containing alternative audio
content.
Besides the audio programme, DAB services
can also broadcast extra information, such as
song titles, music genres and even programme
guides. This information can be shown in the
service information area J (please refer to the
section entitled “Displaying DAB extra informa-
tion” (page 34)).
6.5 DAB service list
fTap the service information area J.
All currently receivable services are displayed in
the DAB service list.
fTap the desired service.
The desired service is played.
To return to the DAB display,
ftap .
DAB radio mode
en | 33
Notes:
fIf available, the DAB service list also
contains the secondary audio chan-
nel of services.
fThe DAB service list shows all ser-
vices that are receivable when the
list is opened. The receivable ser-
vices may change while the DAB
service list is displayed. To update
the DAB service list, tap the title
“DAB service list”.
6.6 Selecting services
fTap K or L to skip to the next or
previous service.
6.7 Storing services
6.7.1 Storing services manually
fFirst select the desired memory bank, if
necessary, and select the desired service.
fLong-tap one of the memory preset buttons
M.
The currently selected service is then stored to
the memory preset button.
6.7.2 Storing services automati-
cally
fSelect the autostore memory bank DAB-AST.
fTap N.
The available services (up to 6) are stored auto-
matically. Afterwards, the service stored on
memory preset 1 will be played.
Note:
The preselection of programme types
does not affect the autostore function.
6.8 Listening to a stored service
fFirst select the desired memory bank, if
necessary.
fShort-tap one of the memory preset buttons
M.
The stored service is played.
6.9 Listening to a service’s second-
ary audio channel
If a service provides an alternative audio chan-
nel, 2nd audio appears in the display. The sec-
ondary audio channel is listed in the DAB service
list (please refer to the section entitled “DAB
service list” (page 32)).
Note:
It is not possible to store a service’s
secondary audio channel. Select, if
necessary, the regular audio channel to
store the service.
6.10 Preselecting programme types
You can apply the DAB category filter in order to
limit the available services in the DAB service
list to the ones that support certain programme
types. If the DAB category filter is enabled, only
the services of selected programme types will
be available.
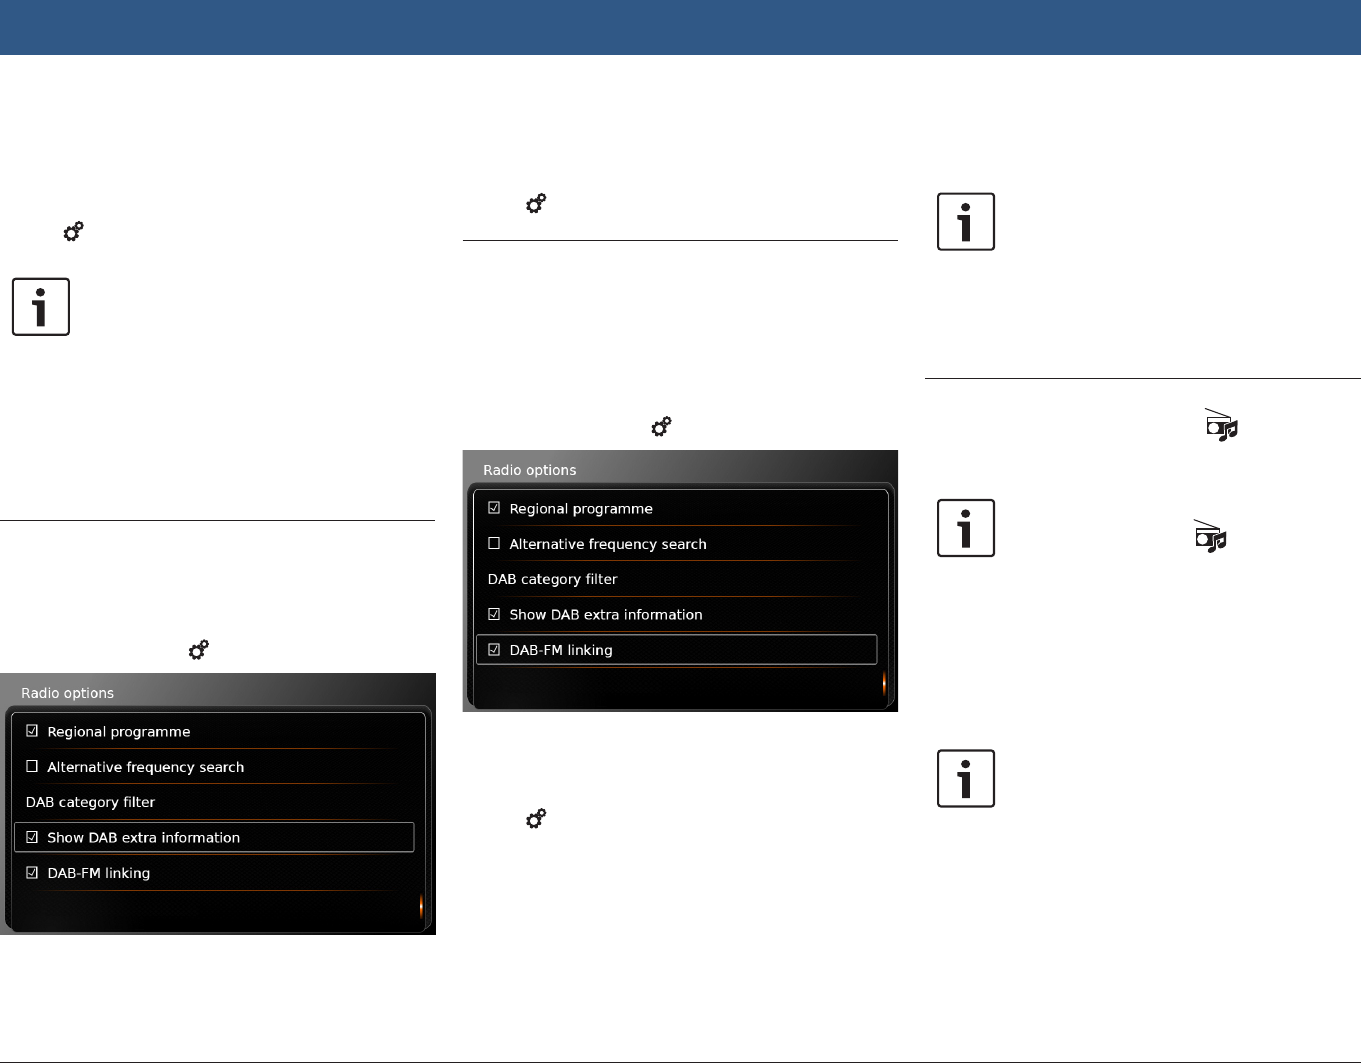
fIn DAB mode, tap 6.
fTap DAB category filter.
The available programme types are displayed.
To select programme types,
ftap the desired programme type.
A programme type is selected when the check
mark is displayed in the checkbox.
DAB radio mode
34 | en
To enable or disable the DAB PTY filter,
ftap DAB category filter.
The DAB category filter is enabled when the
check mark is displayed in the checkbox.
fTap 6 to close the options display.
Notes:
fIf the DAB category filter is enabled,
the PTY symbol is displayed in the
DAB display.
fA service that is selected via the
DAB category filter remains selected
even if the DAB PTY filter is later
disabled.
6.11 Displaying DAB extra informa-
tion
You can preset whether DAB extra information is
shown or hidden.
fIn DAB mode, tap 6.
fTap Show DAB extra information.
Displaying of DAB extra information is enabled
when the check mark is displayed in the check-
box.
fTap 6 to close the options display.
6.12 DAB-FM switching
A service may be receivable via DAB and on FM
simultaneously. If DAB-FM switching is enabled
and the current DAB service becomes unavail-
able, the device automatically switches to FM
reception until DAB reception is available again.
fIn DAB mode, tap 6.
fTap DAB-FM linking.
DAB-FM switching is activated when the check
mark is displayed in the checkbox.
fTap 6 to close the options display.
7 Playing media
Note:
To connect or insert an external device,
please refer to the section entitled
“Connecting/inserting external devices
and data storage devices” (page
23).
7.1 Selecting a media source
fTap the direct-select button in the Home
menu.
Note:
You will also find the button in the
display of the currently playing media.
fTap the Media tab, if necessary.
fTap the desired media source.
The audio or video display for the selected
media source is displayed and playback begins.
Note:
A notification appears briefly in the
display
fif the selected audio source is not
connected or inserted.
fif it is not possible to play all the
tracks on the selected audio source
due to the maximum number of
manageable tracks being exceeded.
DAB radio mode | Playing media