Roche Diabetes Care 876 Hand Held Blood Glucose Meter User Manual manual pt 1
Roche Diagnostics Operations, Inc. Hand Held Blood Glucose Meter manual pt 1
Contents
- 1. manual pt 1
- 2. manual pt 2
- 3. manual pt 3
- 4. manual pt 4
manual pt 1
User’s Manual for Single Patient Use Only
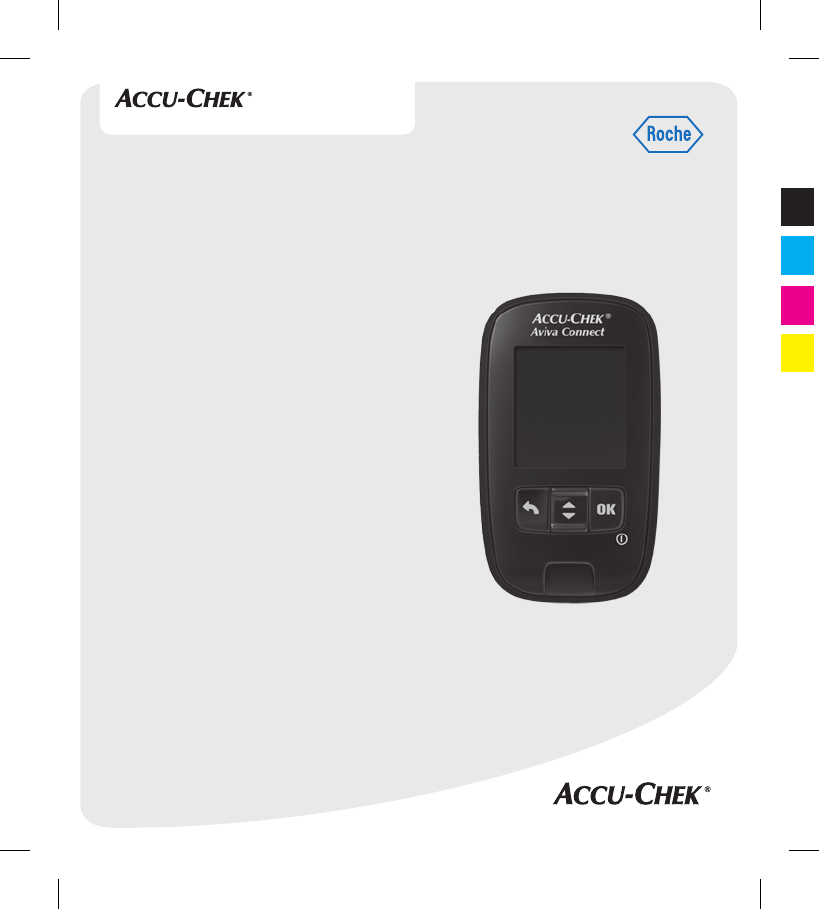
Blood Glucose Meter
This file may not print or view at 100%.
Die lines and color breaks do not print.
“Holding Area” text, box and rules do not print.
Roche USA –52195
V4/1 – – Black
Roche USA –52195
V4/2 – – Cyan
Roche USA –52195
V4/3 – – Magenta
Roche USA –52195
V4/4 – – Yellow
Blood Glucose Monitoring System
Aviva Connect
52195_Book_Bridge_US_CVR.indb 1 4/28/14 2:25 PM

52195_Book_Bridge_US_CVR.indb 2 4/28/14 2:25 PM

1
Contents
Important Safety Information ...................................................................................................3
Chapter 1: Your New System ................................................................................................... 9
Chapter 2: Control Tests ........................................................................................................ 19
Chapter 3: The ACCU‑CHEK FastClix Lancing Device .............................................................25
Chapter 4: Blood Glucose Tests .............................................................................................29
Chapter 5: Meter Settings .....................................................................................................39
Chapter 6: Review Your Data ................................................................................................. 51
Chapter 7: Wireless Communication and Meter Pairing .........................................................57
Chapter 8: Data Transfer and PC Reports ..............................................................................71
Chapter 9: Meter and Lancing Device Cleaning and Disinfecting ...........................................87
Chapter 10: Meter Maintenance and Troubleshooting ............................................................ 95
Chapter 12: License and Warranty ......................................................................................109
Index ..................................................................................................................................115
This file may not print or view at 100%.
Die lines and color breaks do not print.
“Holding Area” text, box and rules do
not print.
Roche USA –52195
V2/1 – Black
Roche USA – 52195
V2/2 – PMS 287 CVC 30%
52195_AvivaConnect_FDA.indb 1 5/1/14 7:23 AM

2
52195_AvivaConnect_FDA.indb 2 5/1/14 7:23 AM

3
Important Safety Information
Important Safety Information
The ACCU‑CHEK Aviva Connect System
The ACCU‑CHEK Aviva Connect blood glucose monitoring system is intended to be used for the quantitative
measurement of glucose (sugar) in fresh capillary whole blood samples drawn from the fingertip. The
ACCU‑CHEK Aviva Connect blood glucose monitoring system is intended to be used by a single person and
should not be shared.
The ACCU‑CHEK Aviva Connect blood glucose monitoring system is intended for self‑testing outside the body
(in vitro diagnostic use) by people with diabetes at home as an aid to monitor the eectiveness of diabetes
control. The ACCU‑CHEK Aviva Connect blood glucose monitoring system should not be used for the
diagnosis of or screening of diabetes or for neonatal use.
The ACCU‑CHEK Aviva Plus test strips are for use with the ACCU‑CHEK Aviva Connect blood glucose meter to
quantitatively measure glucose (sugar) in fresh capillary whole blood samples drawn from the fingertip.
This system is intended to be used by a single person and should not be shared.
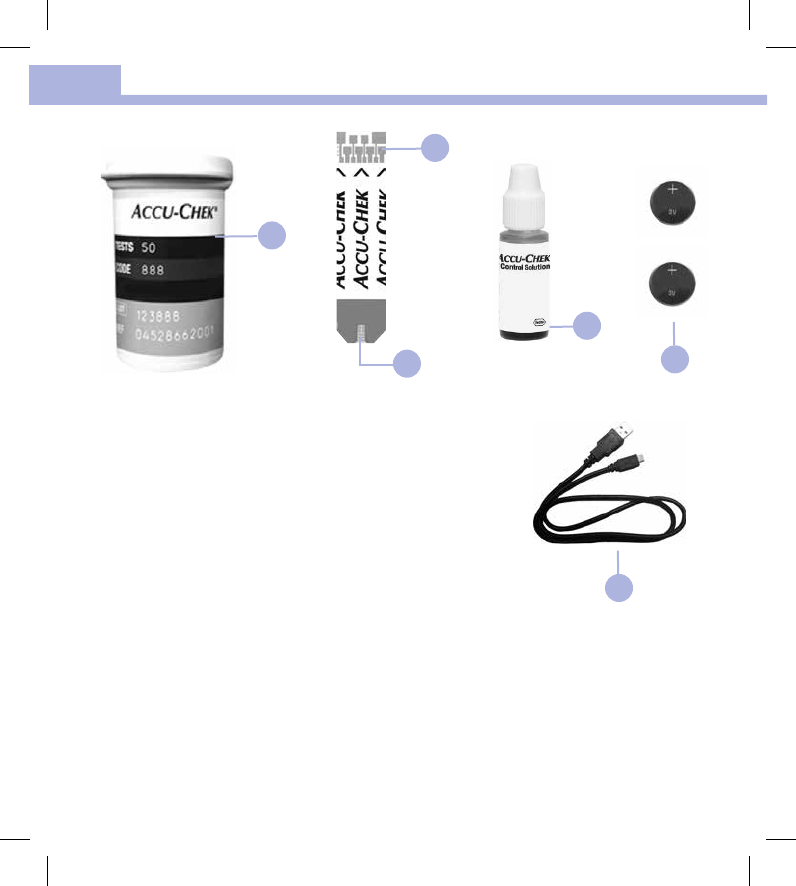
The ACCU‑CHEK Aviva Connect blood glucose monitoring system includes:
ACCU‑CHEK Aviva Connect meter with batteries, ACCU‑CHEK Aviva Plus test strips,* ACCU‑CHEK Aviva
control solutions,* ACCU‑CHEK FastClix lancing device*, ACCU‑CHEK FastClix lancet drums.*
*Some items may not be included in the kit. They are a separate purchase.
WARNING
Choking hazard. Small parts. Keep away from children under the age of 3years.
NOTE
• The term “blood glucose” is used when referring to “blood sugar.”
• Sample data displays are shown throughout the manual. Your data will dier.
52195_AvivaConnect_FDA.indb 3 5/1/14 7:23 AM
4
Important Safety Information
Need Help?
For questions, contact the ACCU‑CHEK Customer Care Service Center toll‑free at 1‑800‑858‑8072. Hours of
operation are Monday through Friday between 8:00 a.m. and 8:00 p.m. eastern standard time (EST). We oer
assistance in many languages. You can also visit accu‑chek.com for diabetes management tools and product
demonstrations.
Please complete the warranty card and mail it, so you receive the best customer service possible and
product update news.
About Testing Yourself or Others
WARNING
• DO NOT CHANGE YOUR THERAPY BASED ON A TEST RESULT THAT DOES NOT MATCH HOW YOU FEEL OR IF
YOU BELIEVE THAT YOUR TEST RESULT COULD BE INCORRECT.
• It is always a good idea to have a back‑up testing method available. Failure to test could cause a delay in
therapy decisions and lead to a serious medical condition. Examples of back‑up testing methods include
a back‑up meter or testing by a laboratory. Ask your healthcare professional or pharmacist about other
possible back‑up methods.
• If your blood glucose result does not match how you feel and you have followed the instructions in this
User’s Manual, follow your healthcare professional’s instructions, or contact your healthcare professional.
52195_AvivaConnect_FDA.indb 4 5/1/14 7:23 AM

5
Important Safety Information
WARNING
• During normal testing, any blood glucose meter or lancing device may come in contact with blood. All parts
of the kit are considered biohazardous and can potentially transmit infectious diseases from bloodborne
pathogens, even after you have performed cleaning and disinfecting.
1,2
• The meter and lancing device should never be used by more than one person. Do not share the meter
and lancing device with anyone, including family members, due to the risk of infection from bloodborne
pathogens.
1,2
Do not use on multiple patients!
• Cleaning and disinfecting the meter and lancing device destroys most, but not necessarily all, bloodborne
pathogens.
3
• If the meter is being operated by a second person who is providing testing assistance to the user, the meter
and lancing device should be cleaned and disinfected prior to use by the second person.
• Disinfect the meter and lancing device before allowing anyone else to handle them. Do not allow anyone
else to test with the meter or lancing device.
• It is important to keep the meter and lancing device clean and disinfected. For instructions on how to clean
and disinfect the meter and lancing device, see the chapter Meter and Lancing Device Cleaning and
Disinfecting.
• Wash hands thoroughly before and after handling the meter, lancing device, or test strips.
52195_AvivaConnect_FDA.indb 5 5/1/14 7:23 AM
6
Important Safety Information
NOTE
• Perform a control test when you open a new test strip box or if you think that a test result is incorrect.
Performing a control test lets you know that the meter and test strips are working properly.
• Refer to the test strip and control solution package inserts for additional health‑related information.
• Blood glucose and bG are interchangeable and mean the same thing.
Special Information for Caregivers
• Do not use the meter system to measure blood glucose in people who are experiencing cardiovascular
collapse (severe shock) or decreased peripheral blood flow.
• Consult your healthcare professional to determine if it is appropriate for your child to be taught how to use
the meter system or any other medical products.
• Some people with diabetes do not experience symptoms of low blood glucose (hypoglycemia). Others, such
as children or people who are unconscious or have certain disabilities, may not be able to communicate
their symptoms to caregivers. For these reasons, do not change any therapy without first talking to a
healthcare professional.
• Not for use on critically ill patients, patients in shock, dehydrated patients, or hyperosmolar patients.
52195_AvivaConnect_FDA.indb 6 5/1/14 7:23 AM

7
Important Safety Information
Before You Start Testing
WARNING
• Carefully read and follow the instructions in the User’s Manual and package inserts for the test strips and
control solutions. It is very important to follow the instructions in order to avoid an incorrect test result that
leads to improper therapy.
• Inspect the test strip container before using the test strips for the first time. If you see any damage to the
container cap or if anything prevents the cap from closing properly, do not use the test strips. Contact the
ACCU‑CHEK Customer Care Service Center. Damaged test strips can cause inaccurate results, which could
lead to improper therapy.
• The meter, test strips, and control solution are only for use outside the body (in vitro). Do not eat the test
strips. Do not swallow or inject the control solution or use the control solution for any purpose other than
testing the ACCU‑CHEK Aviva Connect system.
NOTE
• The meter prompts you to choose a language the first time you turn it on.
• Check the time and date on the meter before you begin testing. Adjust the time and date if necessary.
52195_AvivaConnect_FDA.indb 7 5/1/14 7:23 AM

8
Important Safety Information
52195_AvivaConnect_FDA.indb 8 5/1/14 7:23 AM
Your New System
9
1
5
6
7
2
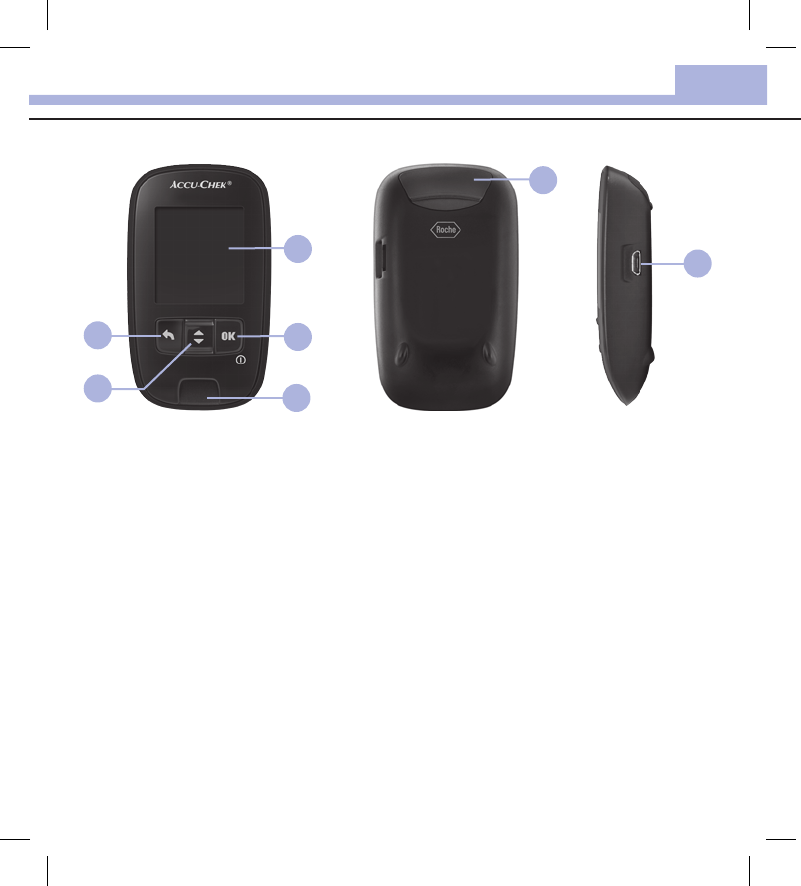
The ACCU‑CHEK Aviva Connect Meter
Front View Back View Side View
1
3
4
Chapter 1: Your New System
1. Back Button
Returns to a previous display or field.
2. Up Arrow and Down Arrow Button
Press to move between menu options or to
increase or decrease numbers.
3. Display
Shows results, messages, and test results
stored in memory.
4. Power/Set/OK Button
Turns meter on or o and sets options.
5. Test Strip Slot
Insert test strip here.
6. Battery Drawer
Pull out to replace batteries.
7. Micro USB Port
Transfers data from the meter to a computer
(PC).
52195_AvivaConnect_FDA.indb 9 5/1/14 7:23 AM
Your New System
10
1
8
9
10 12
8. Test Strip Container*
9. Insert this end into meter.
10. Yellow Window
Touch blood drop or control solution here.
11. Control Solution Bottle*
12. Batteries
13. USB Cable*
Connects the meter to a PC.
*Some items may not be included in the kit.
They are a separate purchase.
(for example)
13
11
Test Strip
52195_AvivaConnect_FDA.indb 10 5/1/14 7:23 AM
Your New System
11
1
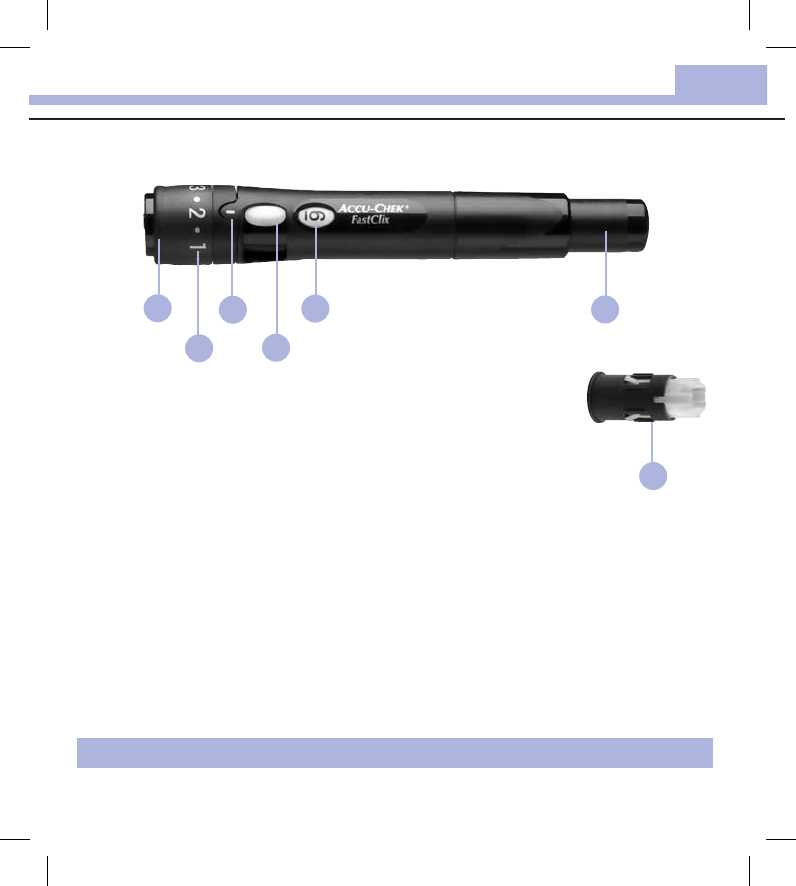
1. Cap
For fingertip testing.
2. Comfort Dial with Depth
Selection
Select penetration depth.
3. Penetration Depth Indicator
Points to depth setting.
4. Lever
Advance to a new lancet.
5. Lancet Counter Window
Shows number of available
lancets.
6. Release button
Press to prime and prick.
7. Lancet Drum
Contains 6 lancets.
The ACCU‑CHEK FastClix Lancing Device
NOTE
Some items may be sold separately.
1
2
7
56
4
3
52195_AvivaConnect_FDA.indb 11 5/1/14 7:23 AM
Your New System
12
1
Button Functions
Here are the functions of the back, arrow, and Power/Set/OK buttons on the meter. These functions are used
throughout this manual. See the chapter Meter Settings for specific instructions on setting up the meter.
Button Function
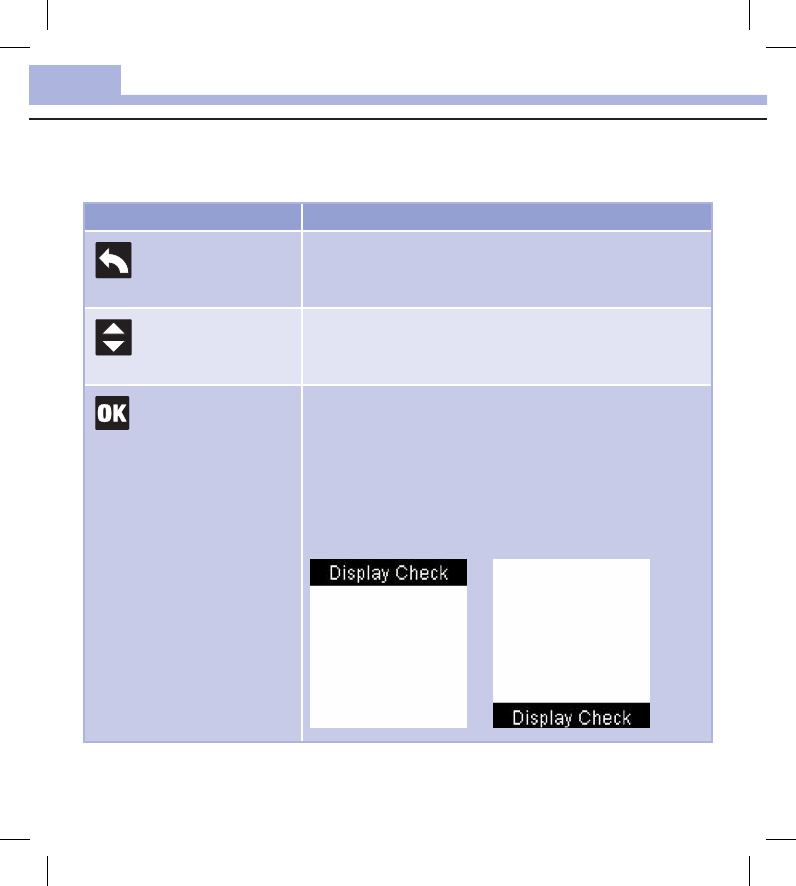
Back Button
Return to the previous display.
Return to the previous field.
Up Arrow and Down Arrow Button
Navigate up and down in a menu.
Increase or decrease a number.
Power/Set/OK Button
Press briefly to turn the meter on.
Press and hold to turn the meter o.
Press to select an option.
Press to move to the next field or display.
Press to save an option.
With the meter o, press and hold to check the meter display.
52195_AvivaConnect_FDA.indb 12 5/1/14 7:23 AM
Your New System
13
1
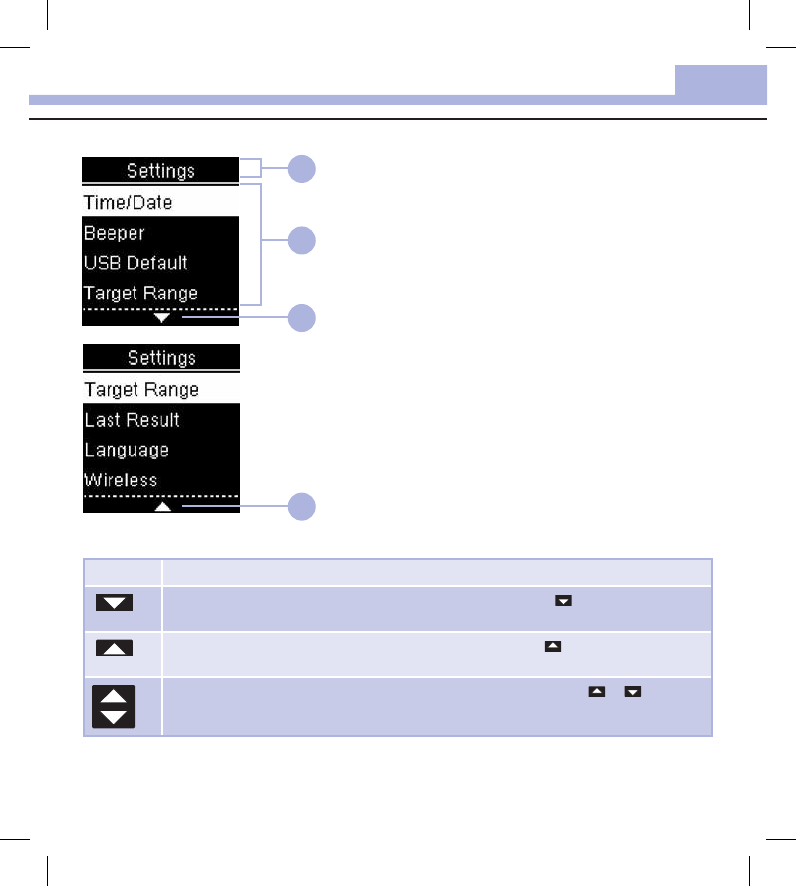
Meter Menus
1 Title of display or menu
2 Menu options
3 Scroll down
4 Scroll up
Display Description
There are more menu options listed beneath the last option. Press on the meter to view
the options.
There are more menu options listed above the first option. Press on the meter to view
the options.
There are more menu options listed above and below the options. Press or on the
meter to view the options.
1
2
3
4
52195_AvivaConnect_FDA.indb 13 5/1/14 7:23 AM
Your New System
14
1
Display Description
Highlighted option (Test)
Press to enter the Test menu.
Highlighted field (Hour)
Press or to increase or decrease the hour. Press
to set the hour and move to the minutes field.
52195_AvivaConnect_FDA.indb 14 5/1/14 7:23 AM
Your New System
15
1
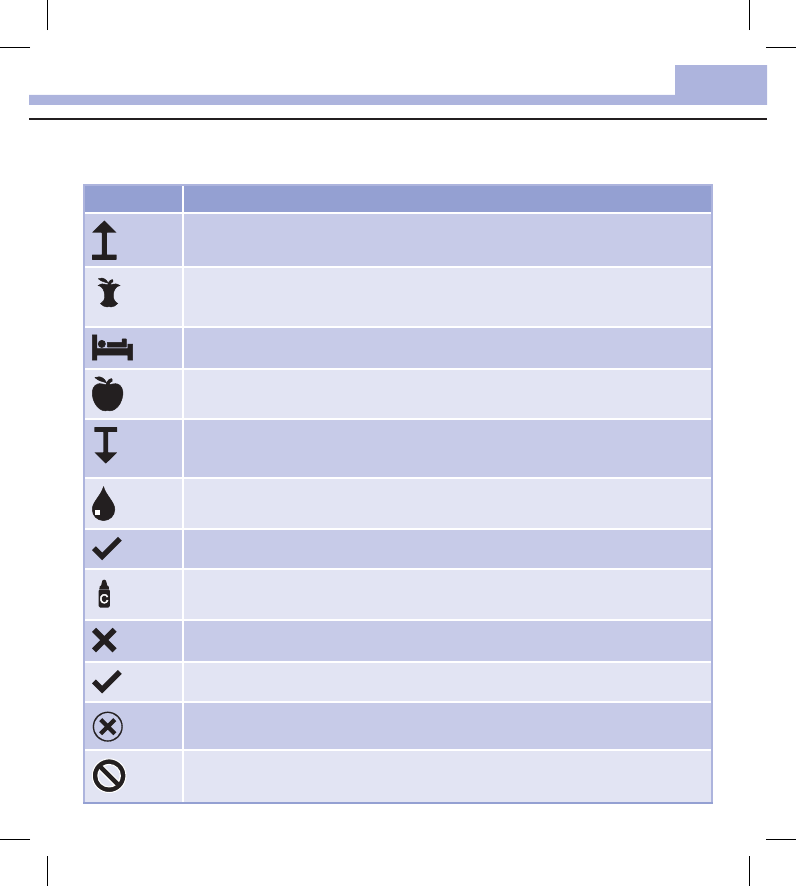
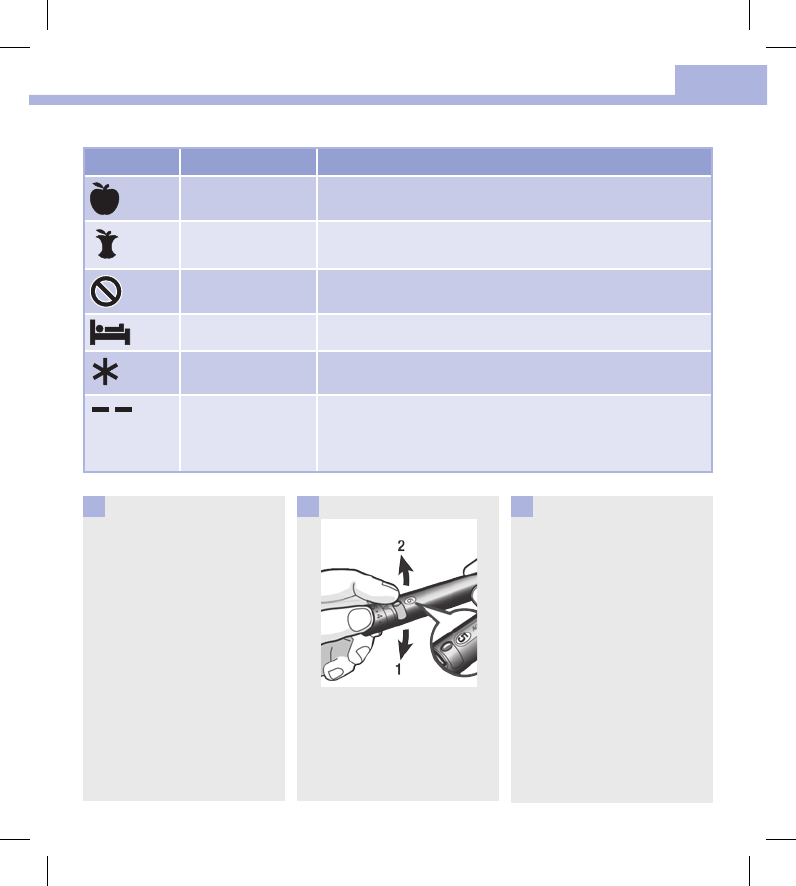
Icons
Here is a list of the icons on the display.
Icon Description
Above target range
After meal
Bedtime
Before meal
Below target range
Blood glucose test
Checkmark
Control bottle
Control test not OK
Control test OK
Error
Fasting
52195_AvivaConnect_FDA.indb 15 5/1/14 7:23 AM
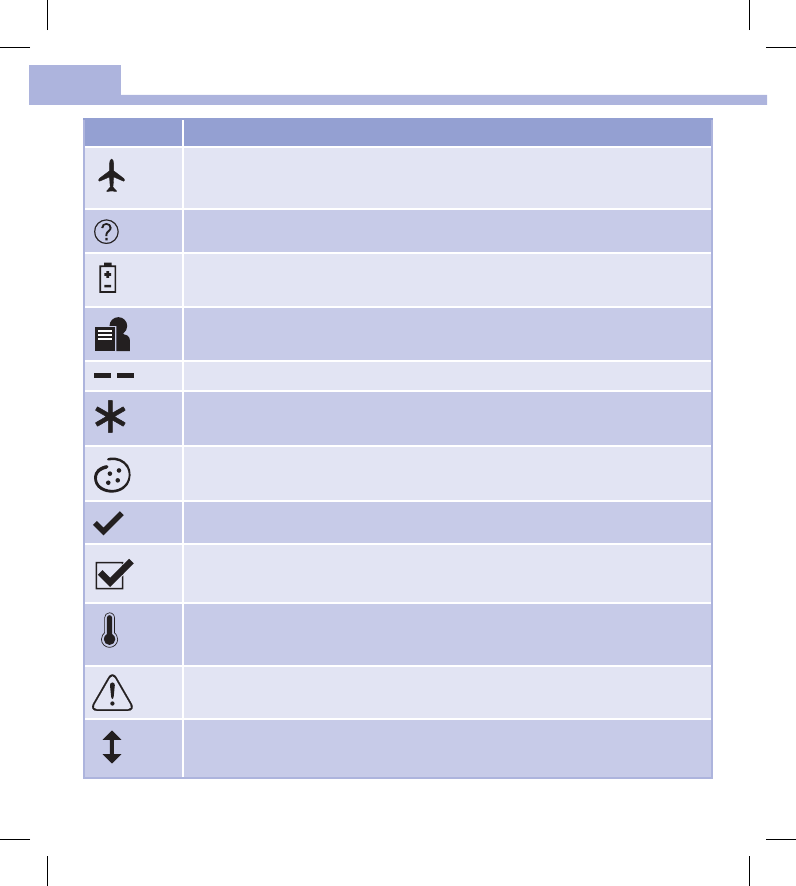
Your New System
16
1
Icon Description
Flight mode
Help
Low battery
My data
No comment
Other
Overall
Selected setting
Settings
Temperature warning
Warning
Within target range
52195_AvivaConnect_FDA.indb 16 5/1/14 7:23 AM
Your New System
17
1
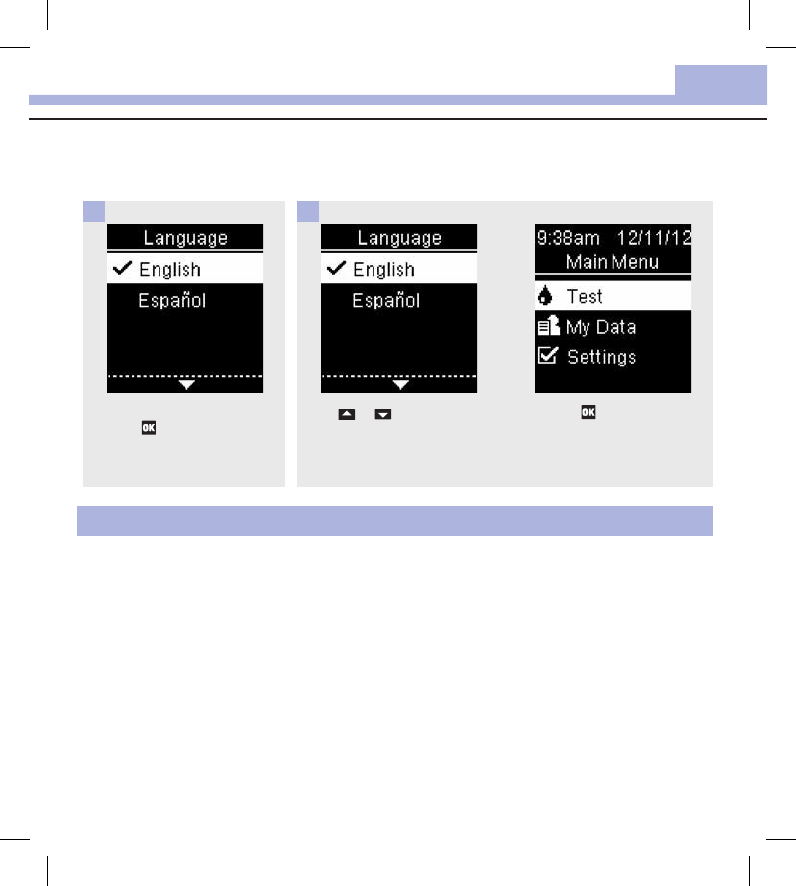
Set the Language
The meter prompts you to choose a language the first time you turn it on.
Turn the meter on by briefly
pressing . Language appears.
1
Press or to highlight the language. Press to set the
language and return to Main Menu.
2
NOTE
If you select the wrong language and cannot correct it, contact the ACCU‑CHEK Customer Care Service
Center at 1‑800‑858‑8072.
52195_AvivaConnect_FDA.indb 17 5/1/14 7:23 AM

Your New System
18
1
52195_AvivaConnect_FDA.indb 18 5/1/14 7:23 AM
Control Tests
19
2
When to Perform a Control Test
Performing a control test lets you know the meter and test strips are working properly. You should perform a
control test when:
• you open a new test strip box.
• you left the test strip container open.
• you think the test strips are damaged.
• you want to check the meter and test strips.
• the test strips were stored in extreme temperatures, humidity, or both.
• you dropped the meter.
• your test result does not match how you feel.
• you want to check if you are performing the test correctly.
About the Control Solutions
• Use only ACCU‑CHEK Aviva control solutions.
• Close the control solution bottle tightly after use.
• Write the date you open the control solution bottle on the bottle label. The control solution must be
discarded 3months from the date the control solution bottle was opened (discard date) or on the Use By
date on the bottle label, whichever comes first.
• Do not use control solution that is past the Use By or discard date.
• Refer to the control solution package insert for control solution storage conditions.
• The meter automatically recognizes the dierence between the control solution and blood.
• The control results are not displayed in memory.
• The control solution can stain fabric. Remove stains by washing with soap and water.
• Control solution is available for purchase. To order the control solution, talk to your pharmacist or visit
accu‑chek.com to order online.
Chapter 2: Control Tests
52195_AvivaConnect_FDA.indb 19 5/1/14 7:23 AM
Control Tests
20
2
Performing a Control Test
You need the meter, a test strip, and control solution Level 1 or Level 2.
Check the Use By date on the
test strip container. Do not use
test strips past the Use By date.
1
Insert the test strip into the
meter in the direction of the
arrows. Place the meter on a flat
surface.
The meter turns on. Preparing
to test appears.
Apply drop appears.
2
52195_AvivaConnect_FDA.indb 20 5/1/14 7:23 AM
Control Tests
21
2
Select the control solution to
test. You will enter the level later
in the test.
3
Remove the bottle cap. Wipe the
tip of the bottle with a tissue.
Squeeze the bottle until a tiny
drop forms at the tip.
4
Touch the drop to the front
edge of the yellow window of
the test strip. Do not put control
solution on top of the test strip.
Analyzing appears when there
is enough control solution in the
test strip.
5
52195_AvivaConnect_FDA.indb 21 5/1/14 7:23 AM
Control Tests
22
2
Control Result and the control
bottle icon appear.
Press or to select the
control level you tested. If you
do not select a level, the control
level is saved as – –.
If any other action is taken at
this time, the control result is
saved with no control level.
6
Press .
and Within range appear if
the control result is within range.
and Out of range appear if
the control result is out of range.
7
52195_AvivaConnect_FDA.indb 22 5/1/14 7:23 AM

Control Tests
23
2
Wipe the tip of the bottle with a
tissue. Cap the bottle tightly.
8
Remove and discard the used
test strip.
9
NOTE
• Most people just test the Level1 control. If you wish, you can also test a Level2 control. A set of Level1
and Level2 control solutions is available for purchase.
• The ranges for Level1 and Level2 control solutions are printed on the test strip container label.
• The meter turns o 90seconds after a successful test or 15seconds after the test strip is removed,
provided no other action is taken.
52195_AvivaConnect_FDA.indb 23 5/1/14 7:23 AM
Control Tests
24
2
Understanding Out‑of‑Range Control Results
WARNING
The control range applies only to a control result. It only indicates that the test strips and meter are working
properly. Do not use a control result to interpret blood glucose results.
If the control result is out of range, do not use the meter until you solve the problem. Check this list to help
solve the problem.
Troubleshooting Checks Action
Were the test strips or control solutions expired? Discard the test strips or control solution if either
is past the Use By date. If the control solution
was opened more than 3months ago, discard it.
Repeat the control test with an unexpired test
strip and an unexpired control solution.
Did you wipe the tip of the control solution bottle
before use?
Wipe the tip of the bottle with a tissue. Repeat
the control test with a new test strip and a fresh
drop of control solution.
Were the caps on the test strip container and the
control solution bottle always closed tightly?
Replace the test strips or control solution if you
think either was uncapped for some time. Repeat
the control test.
Was the test strip used immediately after it was
removed from the test strip container?
Repeat the control test with a new test strip and
a fresh drop of control solution.
Were the test strips and control solutions stored in a
cool, dry place?
Repeat the control test with a properly stored test
strip or control solution.
Did you follow the directions? Read the chapter Control Tests and repeat the
control test.
Did you choose the correct control solution level,
either 1 or 2, when you performed the test?
If you chose the wrong control solution level, you
can still compare the control result to the range
printed on the test strip container.
Are you still unsure of the problem? Contact the ACCU‑CHEK Customer Care Service
Center at 1‑800‑858‑8072.
52195_AvivaConnect_FDA.indb 24 5/1/14 7:23 AM
The ACCU‑CHEK FastClix Lancing Device
25
3
Using the ACCU‑CHEK FastClix Lancing Device
• Remember that the opening where the lancet comes out is not in the center
of the cap.
• Remove the cap by pulling it straight o. Do not twist the cap.
• A new lancet drum is dark gray with a white end.
• A used lancet drum has a visible red stripe on the white end.
• You cannot reuse a used lancet drum.
• Do not remove the lancet drum until you have used all 6 lancets.
• The penetration depth indicator on the comfort dial shows the current depth
setting. The higher the number, the deeper the penetration. The best depth
setting is the lowest number that lets you get enough blood for a test. Try
dierent depth settings to find the one that is right for you.
• For soft skin, we suggest a depth setting of 2. For thick skin, try a higher
depth setting.
Chapter 3: The ACCU‑CHEK FastClix Lancing Device
52195_AvivaConnect_FDA.indb 25 5/1/14 7:23 AM
The ACCU-CHEK FastClix Lancing Device
26
3
Inserting a Lancet Drum
You must first load the lancet drum into the lancing device to get it ready for use.
Remove the cap.
Insert a new lancet drum, white
end first, until it clicks firmly into
place.
1
Slide the cap on until it stops by
aligning the notch on the cap
with the notch on the lancing
device.
2
You are now ready to use the
first lancet.
The lancet counter shows a
number 6, meaning you have six
new lancets remaining.
3
NOTE
Once the lancet drum is inserted into the lancing device, do not remove the lancet drum until completely
used. The lancet drum cannot be reused once it has been removed from the lancing device.
WARNING
You must not insert the lancet drum into the lancing device and simultaneously press the release button or
hold the lancing device with the release button resting on a surface such as a table top. This could release a
lancet and inadvertently cause injury.
52195_AvivaConnect_FDA.indb 26 5/1/14 7:23 AM
The ACCU‑CHEK FastClix Lancing Device
27
3
Using the ACCU‑CHEK FastClix Lancing Device
Adjust the lancet depth by
turning the comfort dial.
1
Obtain a blood drop. See the
chapter Blood Glucose Tests.
Advance to the next lancet by
sliding the lever forward and
back all the way.
The number in the lancet
counter decreases by 1.
The lancet counter window
shows the number of remaining
lancets.
2
3
NOTE
• ALWAYS use a new, sterile lancet each time you test to avoid infection.
• For safety reasons, once you advance to a new lancet, you cannot go back to a used lancet.
• NEVER reuse a lancet.
• NEVER share your lancing device with anyone.
52195_AvivaConnect_FDA.indb 27 5/1/14 7:23 AM
The ACCU-CHEK FastClix Lancing Device
28
3
Changing the Lancet Drum
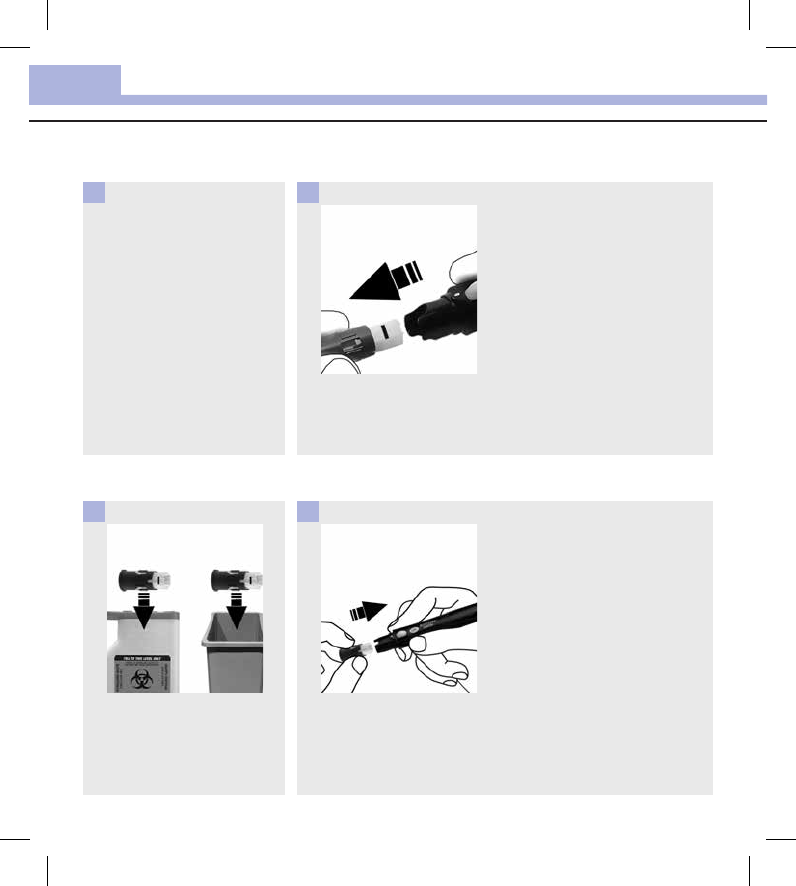
When you have used the sixth and last lancet, change the lancet drum.
Remove the cap.
1
Hold the lancet drum between
your thumb and index finger and
pull it straight out.
A red stripe is visible on the
white part, indicating that the
lancet drum has been used.
Insert a new lancet drum, white
end first, until it clicks firmly into
place.
Slide the cap back on until it
stops by aligning the notch on
the cap with the notch on the
lancing device.
Throw the old lancet drum away.
Always discard according to
local regulations.
2
43
52195_AvivaConnect_FDA.indb 28 5/1/14 7:23 AM
Blood Glucose Tests
29
4
WARNING
mg/dL or mmol/L is printed here
Chapter 4: Blood Glucose Tests
• The meter and lancing device should never be used by more than one person. Do not share the meter
and lancing device with anyone, including family members, due to the risk of infection from bloodborne
pathogens.
1,2
Do not use on multiple patients!
• Blood glucose results can be displayed in either mg/dL or mmol/L. The back label of the meter shows the
unit of measurement. If the meter shows the wrong unit, contact the ACCU‑CHEK Customer Care Service
Center at 1‑800‑858‑8072. If you do not know which unit of measurement is correct for you, contact your
healthcare professional. Using the wrong unit of measurement may cause misinterpretation of your actual
blood glucose level and may lead to improper therapy.
52195_AvivaConnect_FDA.indb 29 5/1/14 7:23 AM

Blood Glucose Tests
30
4
Using the ACCU‑CHEK Aviva Connect System
• Use only ACCU‑CHEK Aviva Plus test strips.
• Use the test strip immediately after removing it from the test strip container.
• Do not apply blood or control solution to the test strip before inserting it into the meter. If you applied blood
or control solution before inserting the test strip into the meter, retest with a new test strip. If a result
appears before applying blood or control solution, do not act on that result.
• Close the test strip container tightly immediately after removing a test strip. Moisture can damage the test
strips and produce incorrect results.
• Store the unused test strips in their original container with the cap tightly closed.
• Discard the test strips if they are past the Use By date printed on the test strip container. If the Use By date
is missing or cannot be read, do not use the test strips. Contact the ACCU‑CHEK Customer Care Service
Center at 1‑800‑858‑8072.
• Refer to the test strip package insert for test strip storage and system operating conditions.
• Do not remove test strips from the test strip container and put them into another container, such as a
plastic bag, pocket, purse, wallet, etc.
• Do not reuse test strips. Once control solution or blood has been applied to a test strip, discard it. If a retest
is necessary, use a new test strip.
• Perform a control test every time you open a new test strip box.
52195_AvivaConnect_FDA.indb 30 5/1/14 7:23 AM
Blood Glucose Tests
31
4
WARNING
To prevent inaccurate results:
• DO NOT expose test strips to heat, moisture, or humidity. Temperatures outside the required range, as well
as moisture and humidity, can damage the test strips and lead to inaccurate results.
• DO NOT bend, cut, or alter the test strips.
• DO NOT get dirt, food, or other material on the test strip.
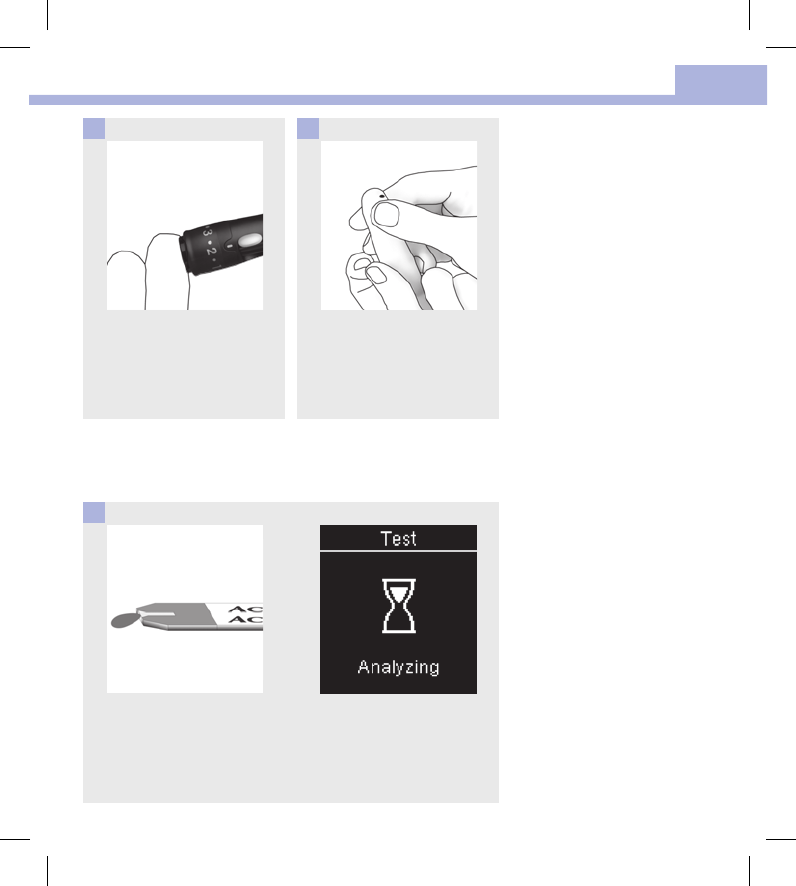
Performing a Blood Glucose Test with Blood from Your Fingertip
Refer to the Important Safety Information section at the beginning of this manual.
NOTE
• A blood glucose test cannot be performed while the meter is connected to a PC with a USB cable.
• Before you perform your first blood glucose test, set up the meter correctly and perform a control test.
• You need the meter, a test strip, and a lancing device with a lancet drum loaded to perform a blood test.
• There are 2ways to start a blood glucose test.
• Insert a test strip into the meter.
• Turn the meter on by briefly pressing . Select Test > .
52195_AvivaConnect_FDA.indb 31 5/1/14 7:23 AM
Blood Glucose Tests
32
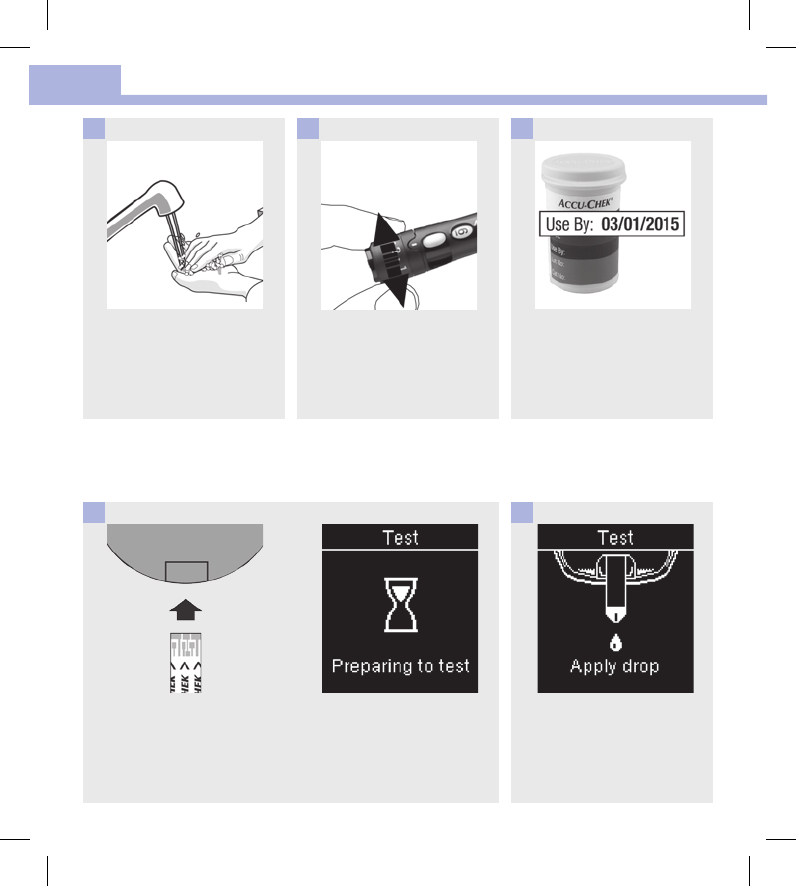
4
Wash your hands with warm
soapy water and dry thoroughly.
Dirty or wet hands could affect
test results.
1
Adjust the comfort dial.
2
Check the Use By date on the
test strip container.
Do not use test strips past the
Use By date.
3
Insert the test strip into the
meter in the direction of the
arrows.
The meter turns on. Preparing
to test appears.
4
When Apply drop appears,
obtain a blood drop.
5
52195_AvivaConnect_FDA.indb 32 5/1/14 7:23 AM
Blood Glucose Tests
33
4
Place the lancing device firmly
against the side of your fingertip.
Press the release button all the
way down to prick your finger.
6
Gently squeeze your finger to
assist the blood flow. This helps
you get a blood drop.
7
Touch the end of the test strip to
the blood drop. Do not put blood
on top of the test strip.
Analyzing appears when there
is enough blood in the test strip.
8
52195_AvivaConnect_FDA.indb 33 5/1/14 7:23 AM

Blood Glucose Tests
34
4
The test result appears at the
top of the display 1. If Last
Result is on, the previous result
appears at the bottom of the
display 2.
See the chapter Meter Settings
for details on Last Result.
To add a comment to the test
result, press .
9
Add Comment appears. Press
or to highlight the
comment. Press .
The final result appears.
With the comment highlighted,
either press to set the
comment or press to return to
Add Comment to change the
comment. If the result field is
highlighted, press to set the
option and return to Main Menu.
10
2
1
52195_AvivaConnect_FDA.indb 34 5/1/14 7:23 AM
Blood Glucose Tests
35
4
Here is a list of icons that can be added to a blood glucose result.
Icon Description
Before meal
After meal
Fasting
Bedtime
Other
No entry 1. You do not want to add a comment.
2. You want to remove a comment for the current blood glucose
result.
Remove and discard the used
test strip.
11
Advance to the next lancet.
12
Wash hands thoroughly with
soap and water.
13
52195_AvivaConnect_FDA.indb 35 5/1/14 7:23 AM

Blood Glucose Tests
36
4
If you see either of these results:
Blood glucose may be lower than the measurement range of the
system. See Unusual Blood Glucose Results in this chapter.
Blood glucose may be higher than the measurement range of the
system. See Unusual Blood Glucose Results in this chapter.
52195_AvivaConnect_FDA.indb 36 5/1/14 7:23 AM
Blood Glucose Tests
37
4
Unusual Blood Glucose Results
If your blood glucose result does not match how you feel, follow these steps:
1. Perform a control test. See the chapter Control Tests.
2. Repeat the blood glucose test.
If your blood glucose result still does not match how you feel, follow your healthcare professional’s
instructions or call your healthcare professional immediately.
NOTE
Always follow your healthcare professional’s instructions. For example, if your healthcare professional has
advised you to immediately treat a low blood glucose result (such as by eating something), then do that first.
WARNING
• Do not change your treatment because of one blood glucose result.
• NEVER ignore symptoms of low or high blood glucose.
52195_AvivaConnect_FDA.indb 37 5/1/14 7:23 AM
Blood Glucose Tests
38
4
Symptoms of Low or High Blood Glucose
WARNING
The meter is designed to provide a numerical value for blood glucose in the range of 20–600mg/dL. If you
receive a numerical value below 20mg/dL or above 600mg/dL and it does not match how you feel, contact
the ACCU‑CHEK Customer Care Service Center toll‑free at 1‑800‑858‑8072.
Being aware of the symptoms of low or high blood glucose can help you understand your test results and
decide what to do if they seem unusual.
Low blood glucose (hypoglycemia): Symptoms of hypoglycemia may include, but are not limited to, anxiety,
shakiness, sweating, headache, increased hunger, dizziness, pale skin color, sudden change in mood or
irritability, fatigue, diculty concentrating, clumsiness, palpitations, and/or confusion.
High blood glucose (hyperglycemia): Symptoms of hyperglycemia may include, but are not limited to,
increased thirst, frequent urination, blurred vision, drowsiness, and/or unexplained weight loss.
If you are experiencing any of these symptoms, or other unusual symptoms, test your blood glucose from the
fingertip. If your blood glucose result is displayed as LO or HI, follow your healthcare professional’s
instructions or contact your healthcare professional immediately. If your blood glucose result does not match
how you feel, follow the steps in Unusual Blood Glucose Results.
Comparing Your Meter Result to a Laboratory Result
A common question is how the blood glucose results on the meter compare to the laboratory results. Your
blood glucose can change quickly, especially after eating, taking medication, or physical activity. If you test
yourself in the morning, then go to your healthcare professional’s oce for a blood glucose test, your test
results will probably not match, even if you are fasting. This is typically not a problem with the meter, it just
means that time has elapsed and your blood glucose level has changed.
Although you always apply fresh capillary whole blood to the test strip, the system has been calibrated to
deliver plasma‑like values for easier comparison to laboratory results.
If you want to compare your meter result to the laboratory result, you must be fasting. Take the meter to
your healthcare professional’s oce and test yourself by fingerstick within 5minutes of having blood drawn
from your arm by a healthcare professional. Keep in mind that the laboratory uses dierent technology than
the meter and that blood glucose meters for self‑testing generally read somewhat lower than the laboratory
result.
52195_AvivaConnect_FDA.indb 38 5/1/14 7:23 AM
Meter Settings
39
5
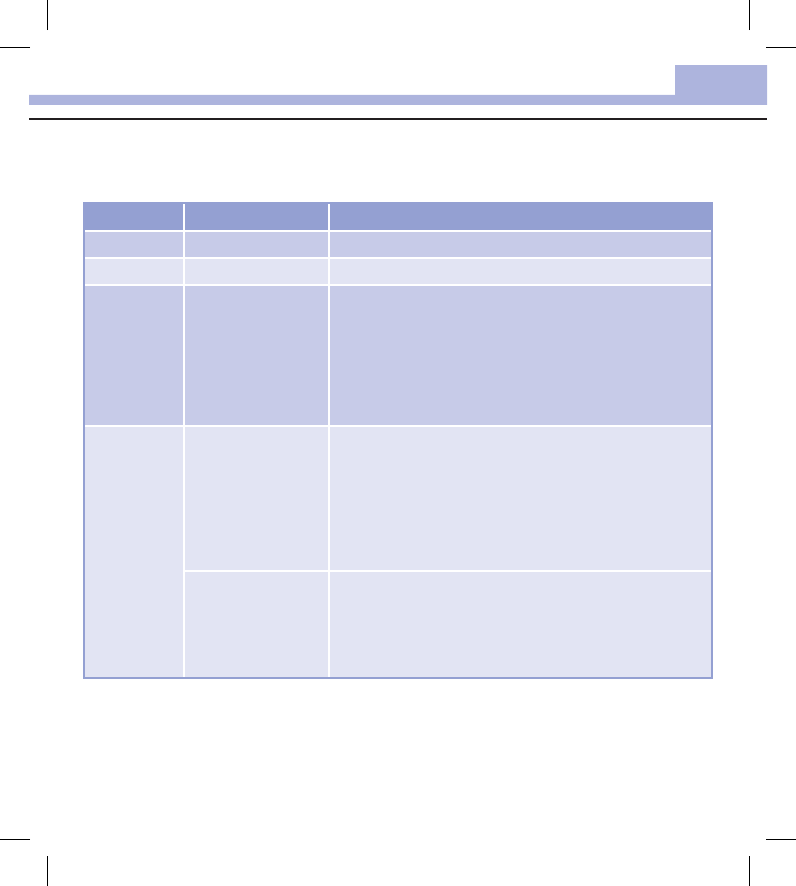
Overview
You can adjust the following settings in the meter for your personal preferences. Refer to the sections later
in this chapter for details and how to set the options.
Setting Options Function
Time/Date Time / Date Set the time and date.
Beeper On / O Select On or O.
USB Default Data Transfer /
PC Reports
Select the desired activity for the data in the meter when the
USB cable is plugged into the meter and a PC.
Data Transfer – copies the data in the meter to a compatible
software program.
PC Reports – the meter generates data reports that open in an
Internet browser and can be printed.
Target Range On / O Set Markers
Select On or O.
On – blood glucose results are marked as above, within, or
below based on the target range set in the meter.
O – no target range markers appear with a blood glucose
result.
70–160mg/dL
(pre‑set target range)
Set Range
Select the blood glucose target range appropriate for you.
Consult your healthcare professional for the appropriate target
range for you.
Chapter 5: Meter Settings
52195_AvivaConnect_FDA.indb 39 5/1/14 7:23 AM
Meter Settings
40
5
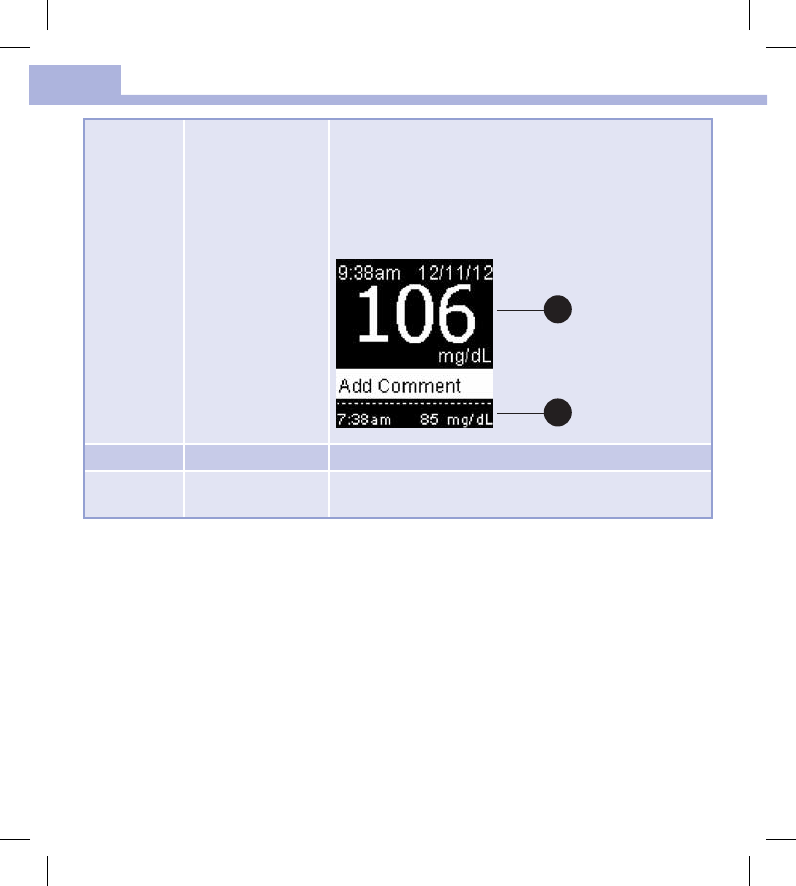
Last Result On / O Select whether the previous blood glucose result (within the
past 24hours) 2 appears with the current blood glucose
result 1
On – the previous blood glucose result appears with the
current blood glucose result.
O – only the current blood glucose result appears.
Language Select the language for the meter.
Wireless Select wireless communication settings. See the chapter
Wireless Communication and Meter Pairing.
2
1
52195_AvivaConnect_FDA.indb 40 5/1/14 7:23 AM
Meter Settings
41
5
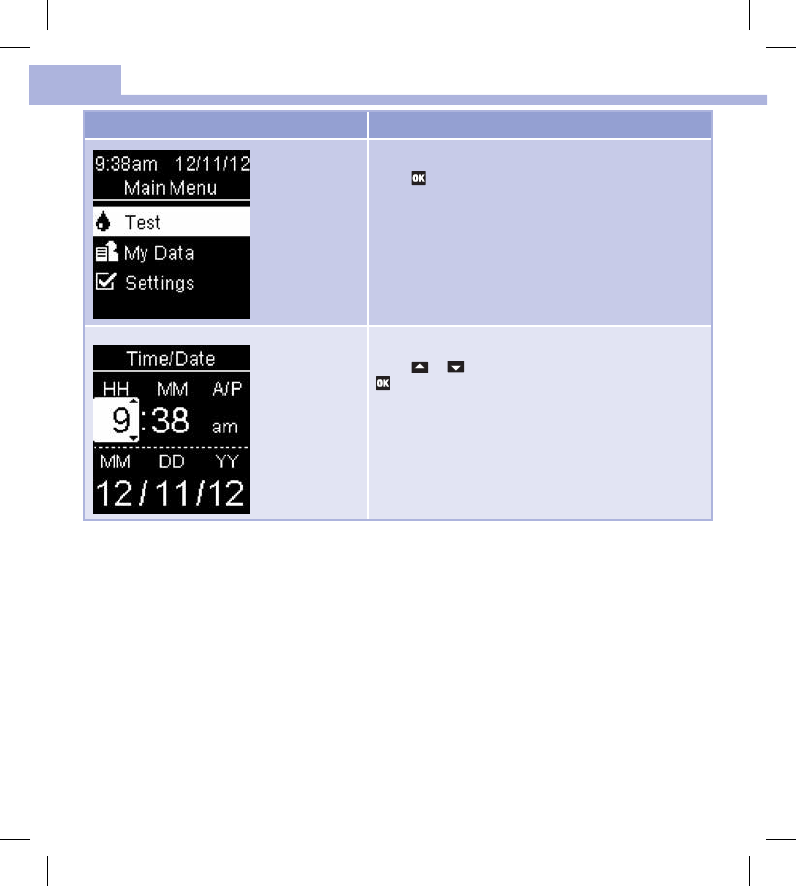
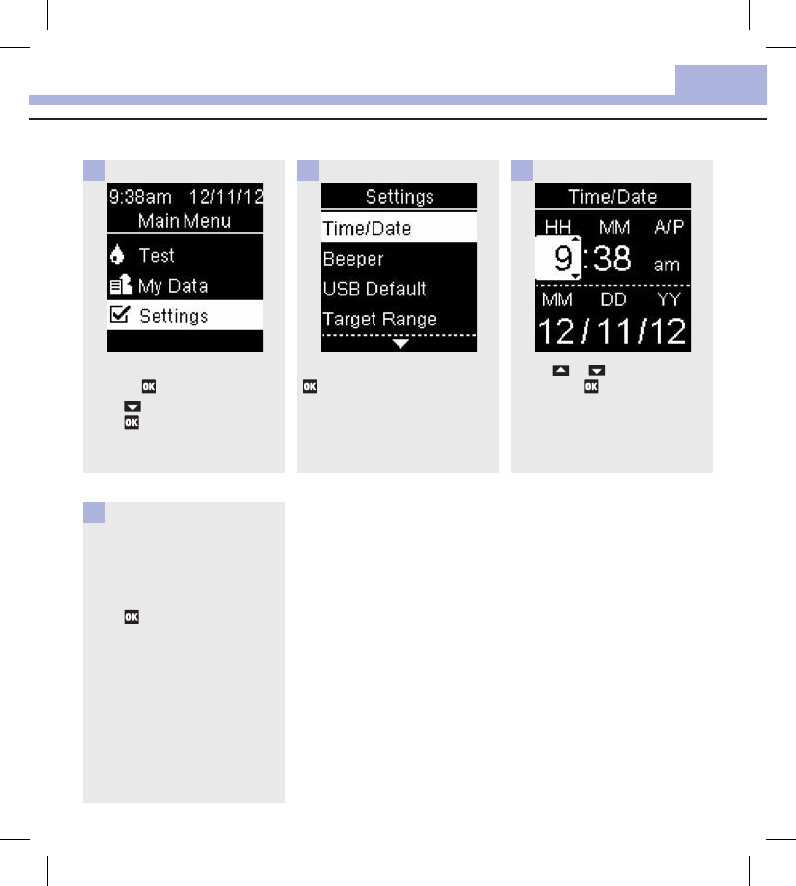
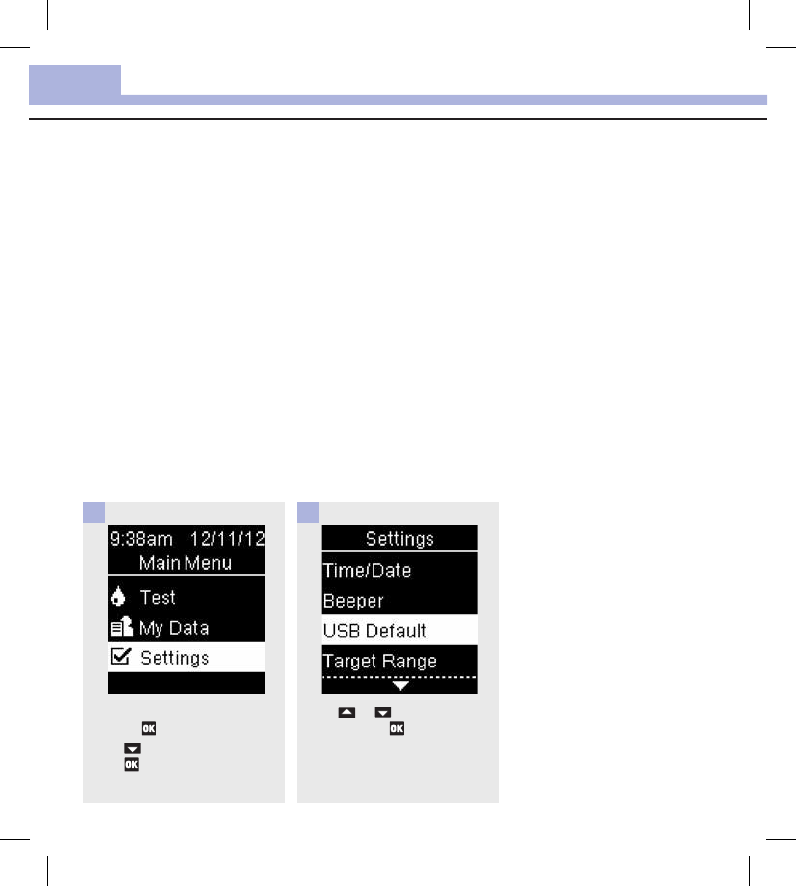
Turn the meter on by briefly
pressing . From Main Menu,
press to highlight Settings.
Press .
1
Time/Date is highlighted. Press
.
2
Press or to adjust each
field. Press to set and move
to the next field.
3
Press to save and return to
Settings.
4
Time/Date (Main Menu > Settings > Time/Date)
52195_AvivaConnect_FDA.indb 41 5/1/14 7:23 AM
Meter Settings
42
5
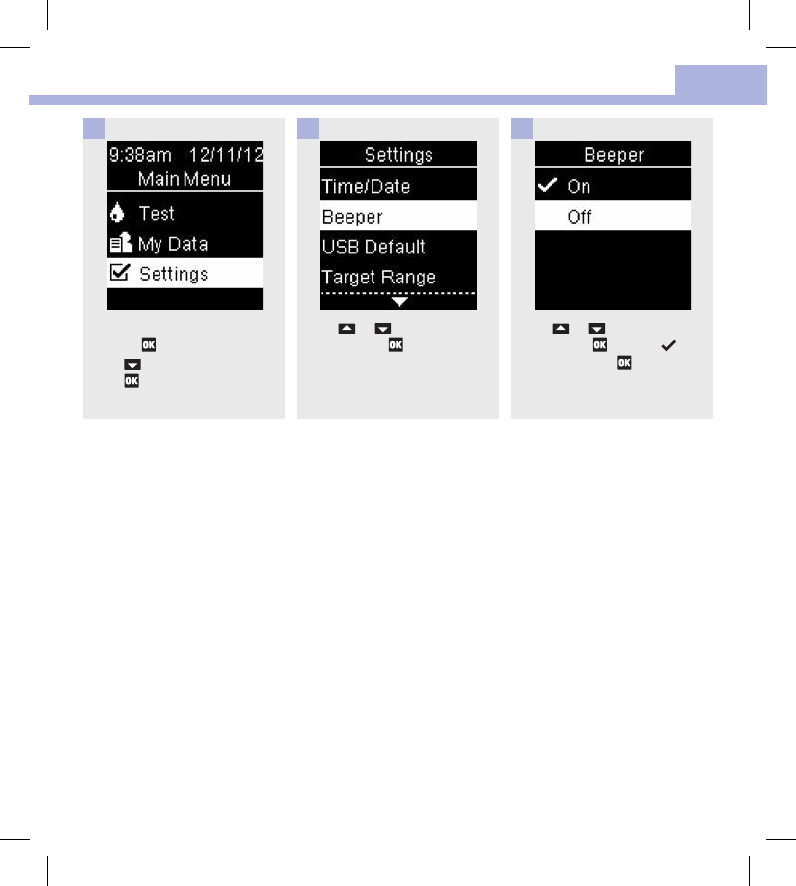
Beeper (Main Menu > Settings > Beeper)
The beeper prompts you:
• when a test strip is inserted.
• to apply blood or control solution to the test strip.
• when enough blood or control solution is drawn into the test strip.
• when the blood glucose or control test is complete.
• when the meter is turned on.
• when a button is pressed.
• when the batteries are inserted.
• when there are no stored blood glucose results or errors or there is an invalid record.
• if an error occurred (even if the beeper is o, it still beeps for an error).
52195_AvivaConnect_FDA.indb 42 5/1/14 7:23 AM
Meter Settings
43
5
Turn the meter on by briefly
pressing . From Main Menu,
press to highlight Settings.
Press .
1
Press or to highlight
Beeper. Press .
2
Press or to highlight On
or Off. Press to move to
the option. Press to set the
option and return to Settings.
3
52195_AvivaConnect_FDA.indb 43 5/1/14 7:23 AM
Meter Settings
44
5
USB Default (Main Menu > Settings > USB Default)
The USB Default option determines how the data in the meter is handled whenever you plug the USB cable
into the meter and a PC. Your default option remains the same until you change it.
There are 2options to display and analyze results on a PC.
Data Transfer – the data is read by special software for diabetes management on the computer.
PC Reports – the meter generates data reports that open in an Internet browser and can be printed.
See the chapter Data Transfer and PC Reports for detailed information on data management.
Turn the meter on by briefly
pressing . From Main Menu,
press to highlight Settings.
Press .
1
Press or to highlight USB
Default. Press .
2
52195_AvivaConnect_FDA.indb 44 5/1/14 7:23 AM