Roche Diabetes Care 876 Hand Held Blood Glucose Meter User Manual manual pt 2
Roche Diagnostics Operations, Inc. Hand Held Blood Glucose Meter manual pt 2
Contents
- 1. manual pt 1
- 2. manual pt 2
- 3. manual pt 3
- 4. manual pt 4
manual pt 2
Meter Settings
45
5
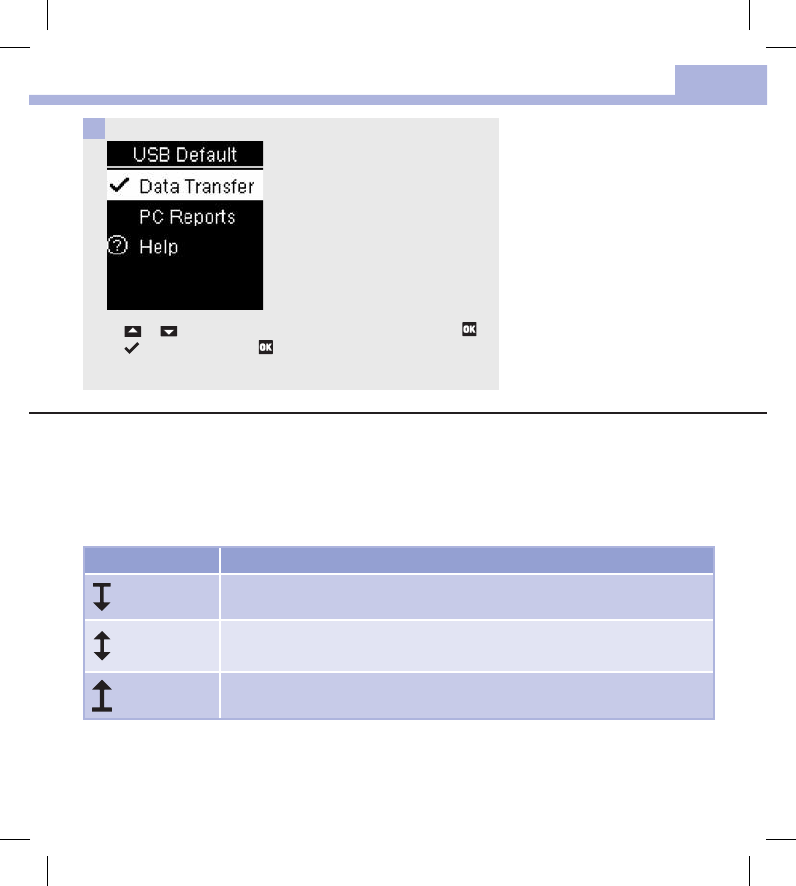
Press or to highlight Data Transfer or PC Reports. Press to
move to the option. Press to set the option and return to
Settings.
3
Target Range (Main Menu > Settings > Target Range > Set Markers / Set Range)
Set Markers
• If Set Markers is o, the markers do not appear with the blood glucose results.
• Any marker remains with the blood glucose result in the Logbook, even if you later turn Set Markers o.
• If Set Markers is on, the following markers appear with blood glucose results.
Marker Meaning
The blood glucose result is below the target range.
The blood glucose result is within the target range.
The blood glucose result is above the target range.
52195_AvivaConnect_FDA.indb 45 5/1/14 7:23 AM
Meter Settings
46
5
Set Range
• Consult your healthcare professional for the appropriate target range for you.
• The target range can be set from a lower limit of 50–100mg/dL to an upper limit of 101–200mg/dL.
WARNING
This function is no substitute for hypoglycemia training by your healthcare professional.
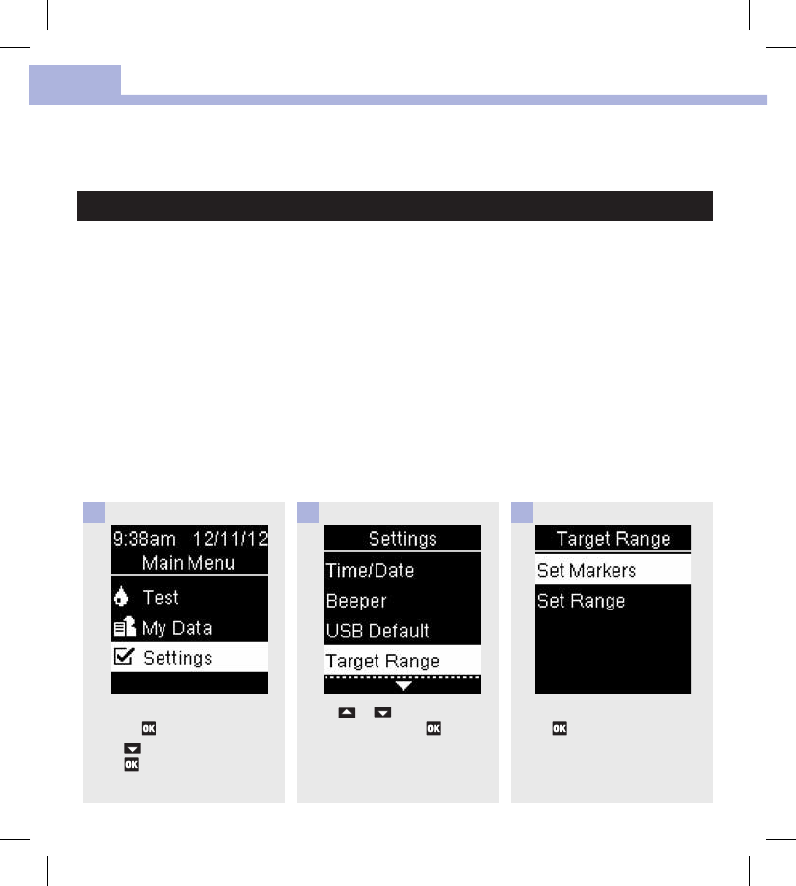
Turn the meter on by briefly
pressing . From Main Menu,
press to highlight Settings.
Press .
1
Press or to highlight
Target Range. Press .
2
Set Markers is highlighted.
Press .
3
52195_AvivaConnect_FDA.indb 46 5/1/14 7:23 AM
Meter Settings
47
5
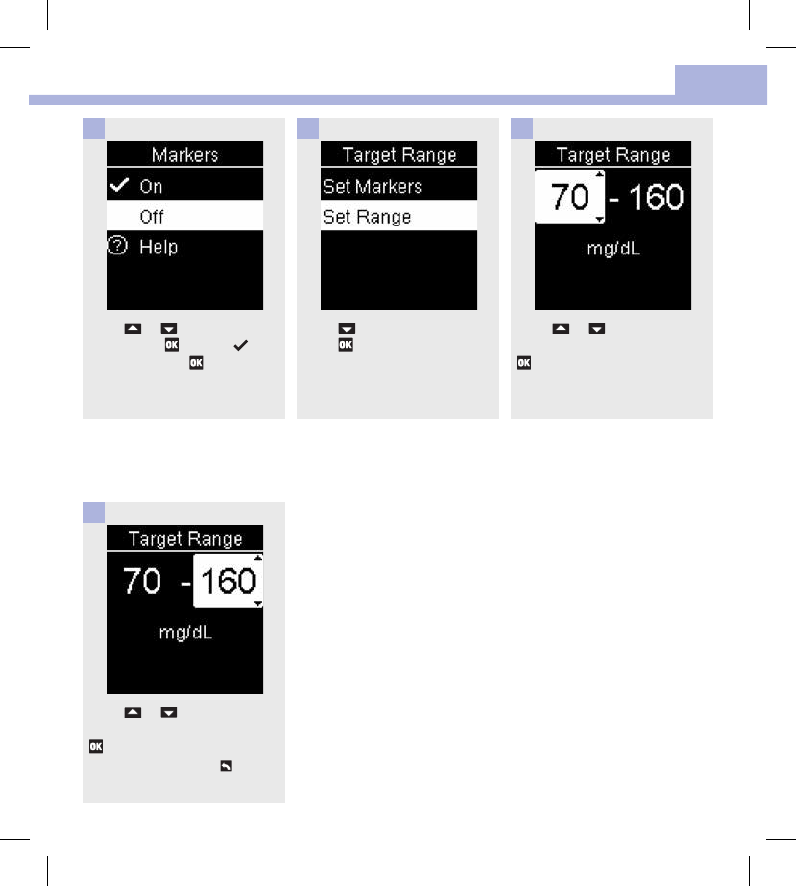
Press or to adjust the
upper limit of the range. Press
to set the option. Target
Range appears. Press to
return to Settings.
Press or to highlight On
or Off. Press to move to
the option. Press to set the
option and return to Target
Range.
4
Press to highlight Set Range.
Press .
5
Press or to adjust the
lower limit of the range. Press
.
6
7
52195_AvivaConnect_FDA.indb 47 5/1/14 7:23 AM

Meter Settings
48
5
Last Result (Main Menu > Settings > Last Result)
Select whether the previous blood glucose result appears with the current blood glucose result. Test results
older than 24hours do not appear.
On – the previous blood glucose result appears with the current blood glucose result.
O – only the current blood glucose result appears.
Turn the meter on by briefly
pressing . From Main Menu,
press to highlight Settings.
Press .
1
Press or to highlight Last
Result. Press .
2
Press or to highlight On
or Off. Press to move to
the option. Press to set the
option and return to Settings.
3
52195_AvivaConnect_FDA.indb 48 5/1/14 7:23 AM
Meter Settings
49
5
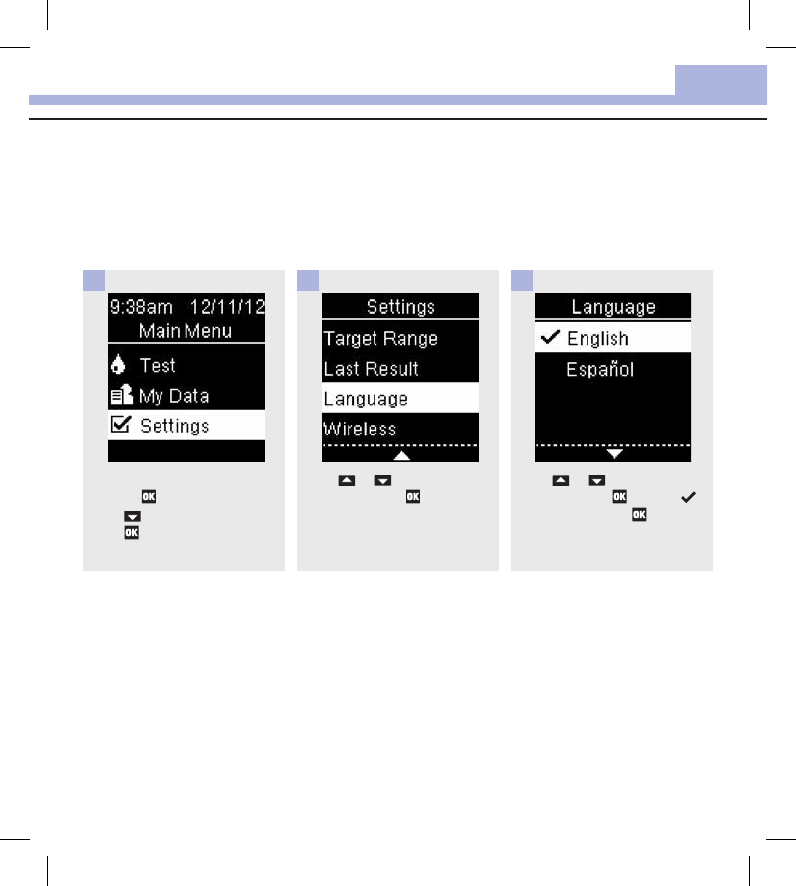
Language (Main Menu > Settings > Language)
Choose the language that appears on the meter.
Turn the meter on by briefly
pressing . From Main Menu,
press to highlight Settings.
Press .
1
Press or to highlight
Language. Press .
2
Press or to highlight the
language. Press to move
to the option. Press to set the
language and return to Settings.
3
52195_AvivaConnect_FDA.indb 49 5/1/14 7:23 AM

Meter Settings
50
5
52195_AvivaConnect_FDA.indb 50 5/1/14 7:23 AM

Review Your Data
51
6
Overview
• Blood glucose results are stored from the newest to the oldest.
• The meter automatically stores up to 750blood glucose results in memory with the time and date of the
test and any test result markers.
• Once more than 750blood glucose results are in memory, adding a new blood glucose result deletes the
oldest blood glucose result.
• Only test results that have been assigned a fasting, before meal, after meal, or bedtime marker are included
in the average for that marker.
• All test results are included in the overall 7‑, 14‑, 30‑, and 90‑day averages regardless of what comment is
assigned.
• Control results are stored in memory but cannot be reviewed on the meter. To view stored control results,
transfer them to a compatible software application.
• Control results are not included in the averages or blood glucose reports.
• Once more than 30control results are in memory, adding a new control result deletes the oldest control
result.
WARNING
Do not change your therapy based on an individual test result in memory. Talk to your healthcare
professional before changing therapy based on test results in memory.
Chapter 6: Review Your Data
52195_AvivaConnect_FDA.indb 51 5/1/14 7:23 AM
Review Your Data
52
6
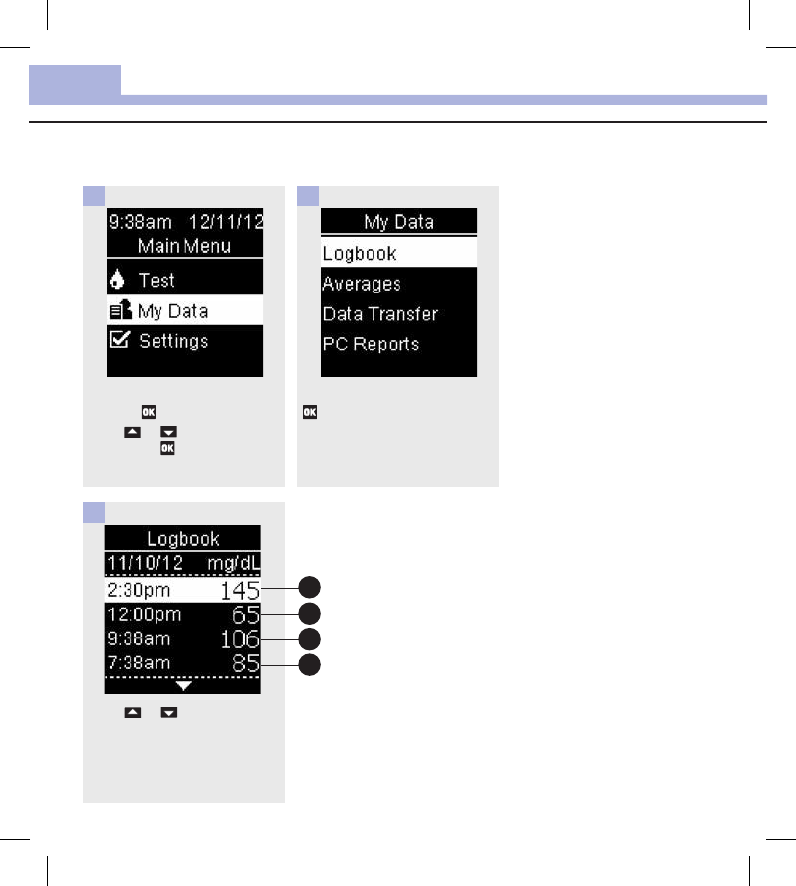
Logbook (Main Menu > My Data > Logbook)
Turn the meter on by briefly
pressing . From Main Menu,
press or to highlight My
Data. Press .
1
Logbook is highlighted. Press
.
2
Press or to scroll through
Logbook.
3
2
1
3
4
52195_AvivaConnect_FDA.indb 52 5/1/14 7:23 AM

Review Your Data
53
6
4
To view details about a result, press or to highlight the result. Press . These details only
appear if Target Range and Markers are on or comments are added to the test result.
3
1
4
2
most recent result 2nd most recent result
3rd most recent result 4th most recent result
52195_AvivaConnect_FDA.indb 53 5/1/14 7:23 AM
Review Your Data
54
6
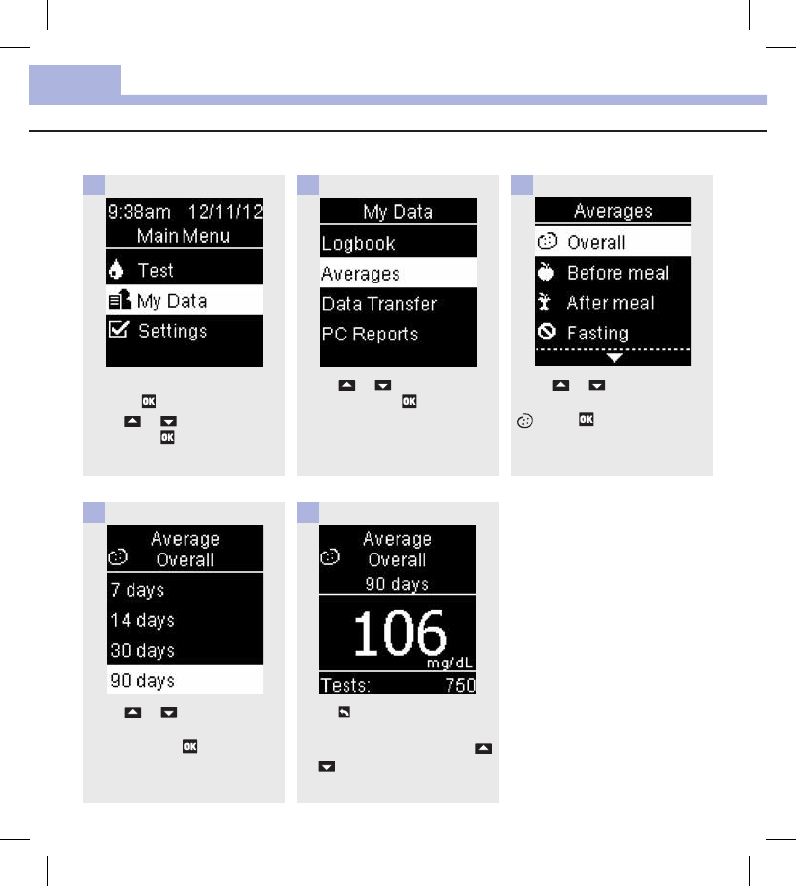
Turn the meter on by briefly
pressing . From Main Menu,
press or to highlight My
Data. Press .
1
Press or to highlight
Averages. Press .
2
Press or to highlight a
category (the example is Overall
). Press .
3
Press or to highlight a
time period (the example is
90 days). Press .
4
Averages (Main Menu > My Data > Averages)
Press to return to the previous
menu if you want to review a
different time period or press
or to move through different
averages.
5
52195_AvivaConnect_FDA.indb 54 5/1/14 7:23 AM
Review Your Data
55
6
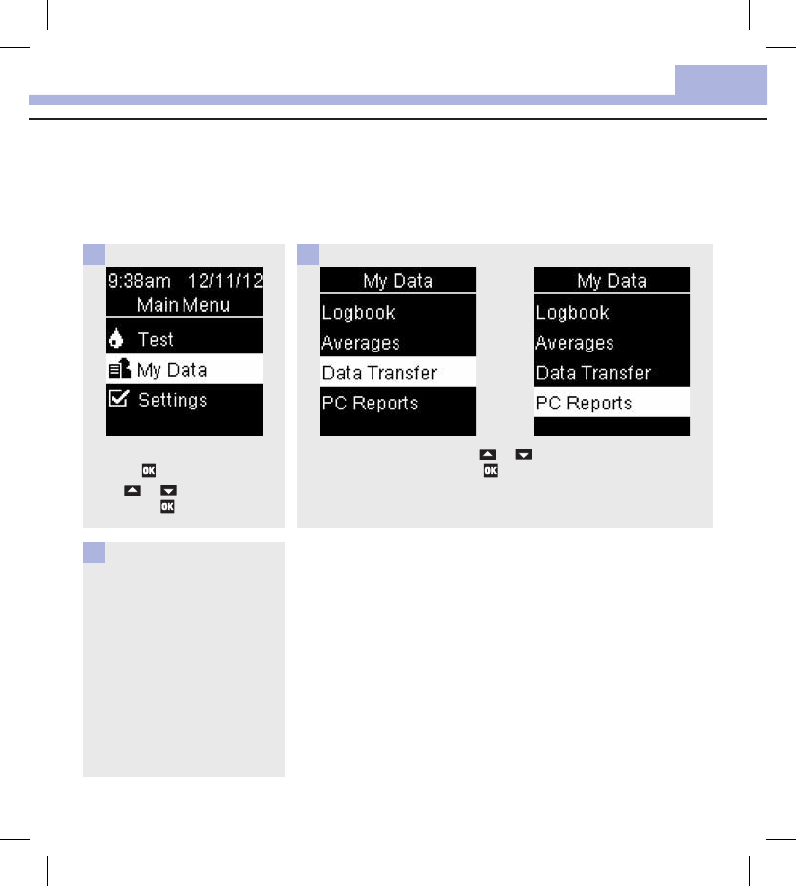
Transfer Data (Main Menu > My Data > Data Transfer/PC Reports)
This menu allows you to choose either Data Transfer or PC Reports, regardless of what the USB Default
setting is or if you do not set the USB Default. For example, if the USB Default is PC Reports, but your
healthcare professional wants to transfer your data, navigate to this menu and select Data Transfer. If the
USB Default is not set, you can use this menu to select where to view your data each time.
Turn the meter on by briefly
pressing . From Main Menu,
press or to highlight My
Data. Press .
1
Connect the USB cable to the
meter.
Logbook is highlighted. Press or to highlight either Data
Transfer or PC Reports. Press .
3
2
52195_AvivaConnect_FDA.indb 55 5/1/14 7:23 AM

Review Your Data
56
6
52195_AvivaConnect_FDA.indb 56 5/1/14 7:23 AM

Wireless Communication and Meter Pairing
57
7
Overview
You can wirelessly and automatically synchronize your diabetes information with a mobile device and your
personal ACCU‑CHEK Connect online account. The process of creating a connection between the meter and
the other device is called pairing. You need an application that can accept the meter’s data.
Setting Options Function
Flight Mode On / O Select whether wireless communication is available.
On – wireless communication is not available.
O – wireless communication is available.
Default Device List of devices paired
with the meter
If more than 1device is paired, select the device with
which the Auto‑Send and Sync Time features will
communicate.
Auto‑Send On / O Select whether data is automatically sent to the default
paired device after each test.
On – data is automatically sent to the default paired
device.
O – data is not automatically sent to the default paired
device.
Sync Time On / O Select whether to synchronize the time and date to the
default paired device.
On – the time and date on the meter synchronize to the
time and date on the default paired device.
O – the time and date on the meter do not synchronize
to the time and date on the default paired device.
Pairing Pair Device / Delete
Pairing
Select whether to pair a device or to delete a paired
device.
Chapter 7: Wireless Communication and Meter Pairing
52195_AvivaConnect_FDA.indb 57 5/1/14 7:23 AM
Wireless Communication and Meter Pairing
58
7
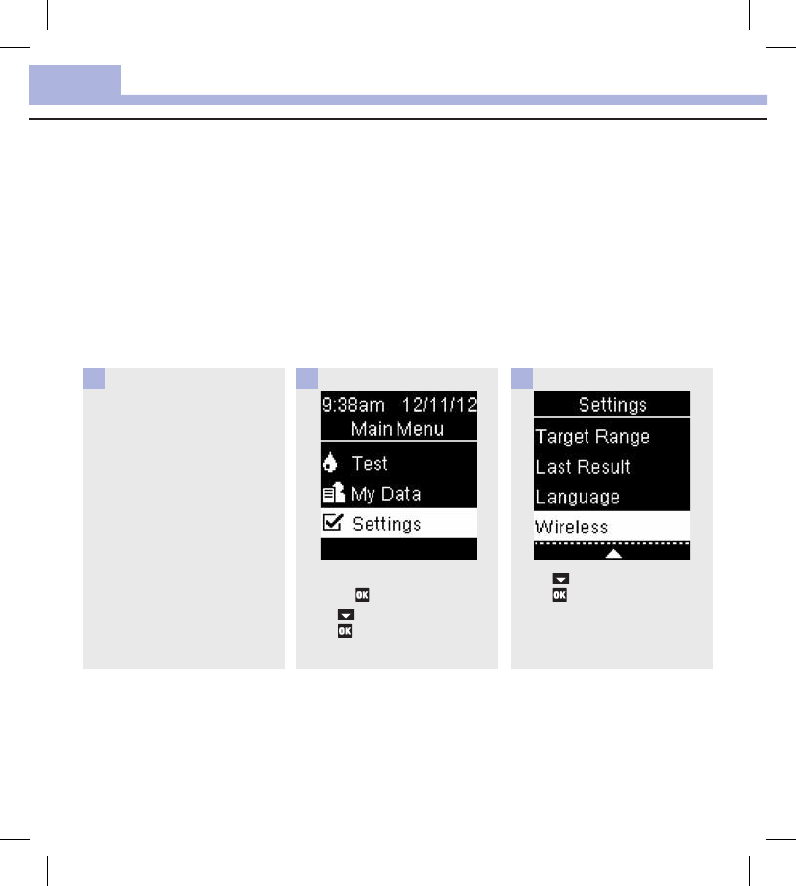
Wireless (Main Menu > Settings > Wireless)
The steps below are for first time pairing.
Up to 5devices can be paired with the meter at any time.
Each device must be paired with the meter one at a time.
The meter and the device to be paired should be within 1meter (3feet) of each other.
Prepare the device for pairing.
Refer to the device’s instructions
for information about pairing.
1
Turn the meter on by briefly
pressing . From Main Menu,
press to highlight Settings.
Press .
2
Press to highlight Wireless.
Press .
3
52195_AvivaConnect_FDA.indb 58 5/1/14 7:23 AM