Roche Diabetes Care 876 Hand Held Blood Glucose Meter User Manual manual pt 3
Roche Diagnostics Operations, Inc. Hand Held Blood Glucose Meter manual pt 3
Contents
- 1. manual pt 1
- 2. manual pt 2
- 3. manual pt 3
- 4. manual pt 4
manual pt 3
Wireless Communication and Meter Pairing
59
7
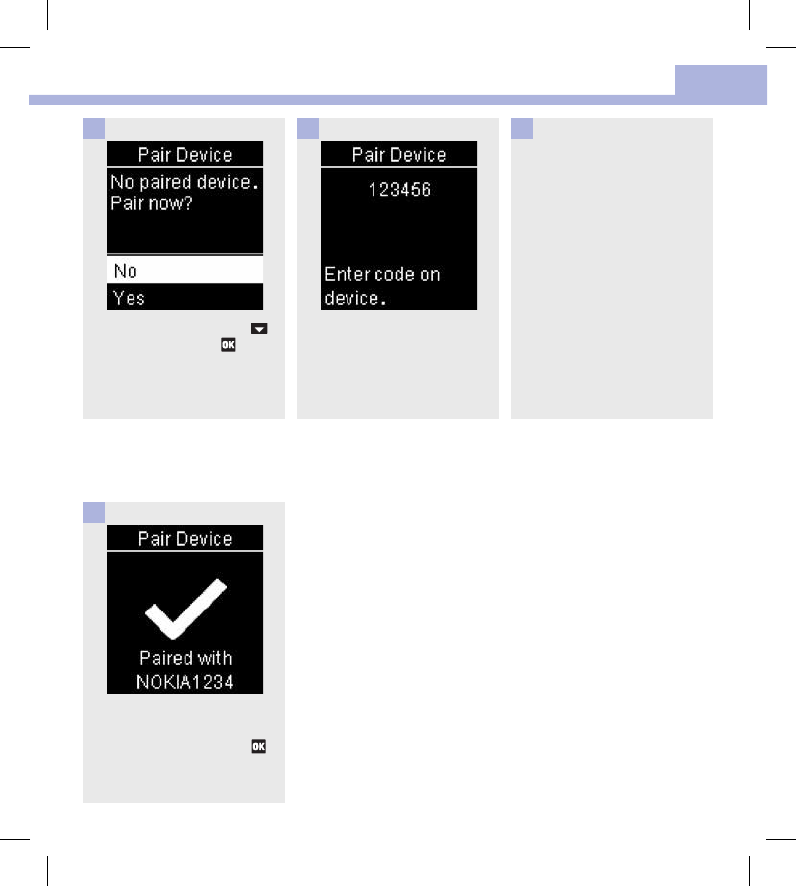
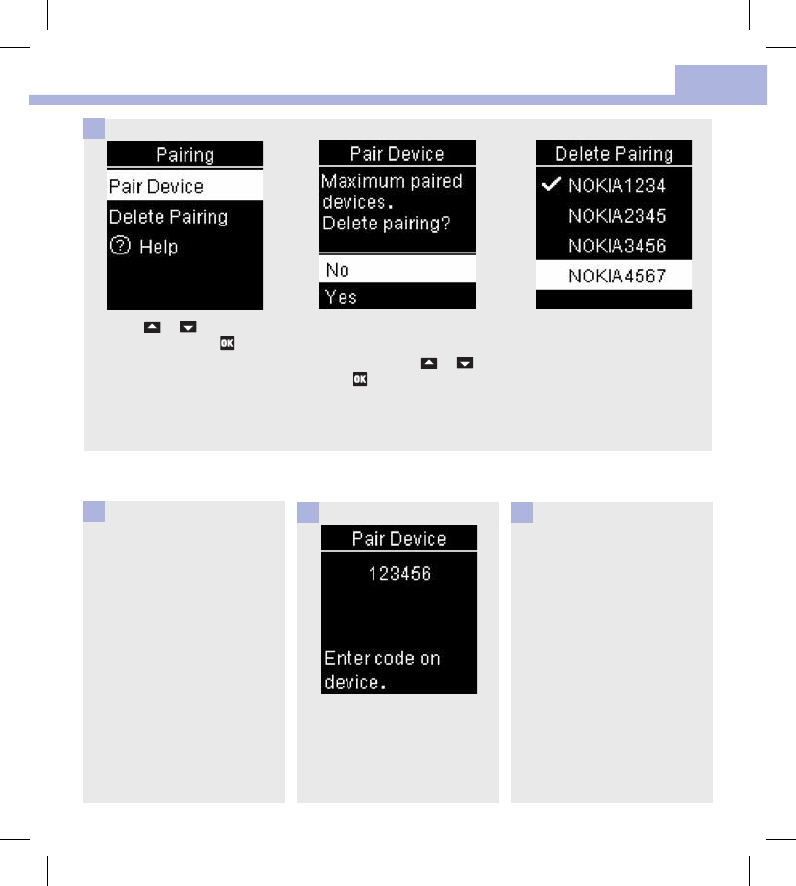
Pair Device appears. Press
to highlight Yes. Press .
4
The meter displays its code.
5
The other device displays a list
of found devices, including the
meter. Select Accu‑Chek from
the list. When prompted, enter
the meter code from Step5 into
the device to be paired.
6
When pairing is complete, a
checkmark and the name of the
paired device appear. Press
to return to Wireless.
7
52195_AvivaConnect_FDA.indb 59 5/1/14 7:23 AM
Wireless Communication and Meter Pairing
60
7
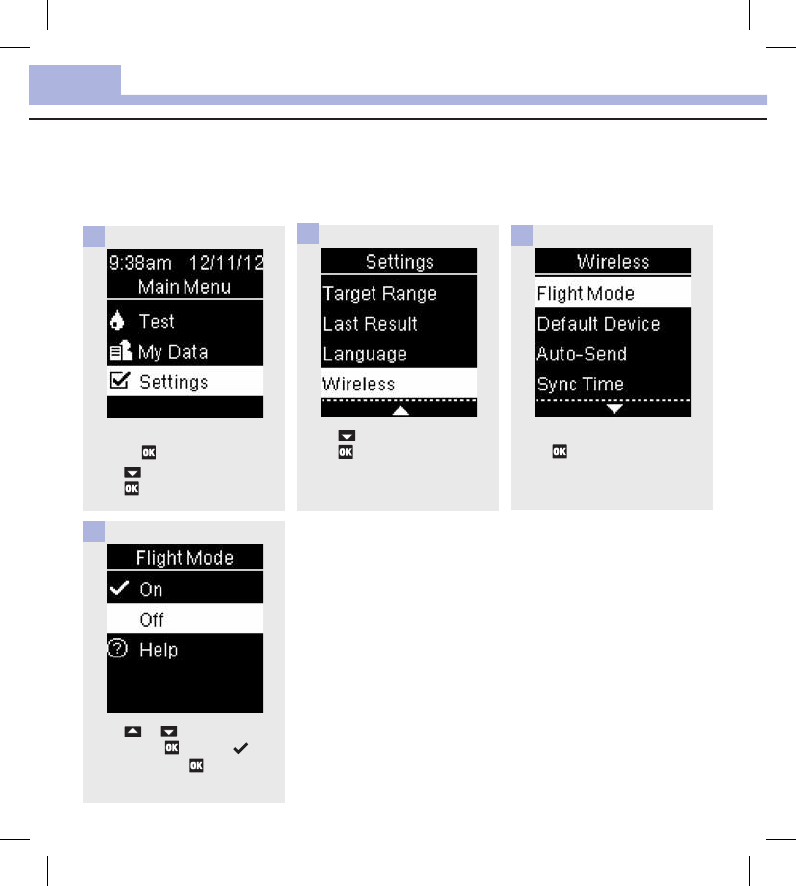
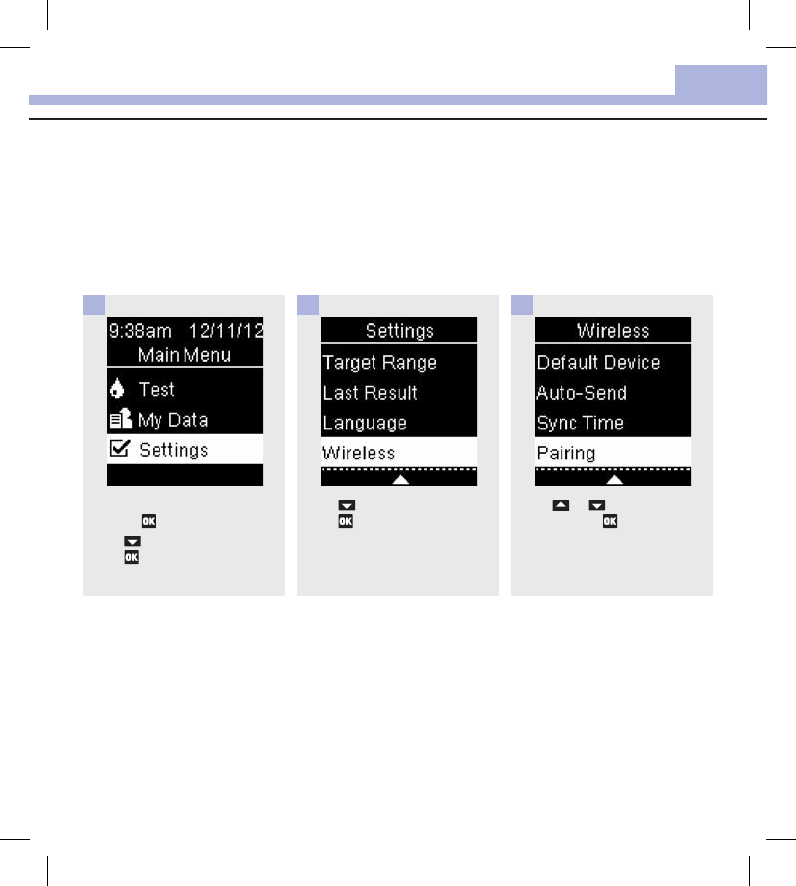
Flight Mode (Main Menu > Settings > Wireless > Flight Mode)
Select whether wireless communication is available or not. When Flight Mode is on, the airplane icon
appears in the title bar and wireless communication is not available.
Turn the meter on by briefly
pressing . From Main Menu,
press to highlight Settings.
Press .
1
Press to highlight Wireless.
Press .
2
Flight Mode is highlighted.
Press .
3
Press or to highlight On
or Off. Press to move to
the option. Press to set the
option and return to Wireless.
4
52195_AvivaConnect_FDA.indb 60 5/1/14 7:23 AM
Wireless Communication and Meter Pairing
61
7
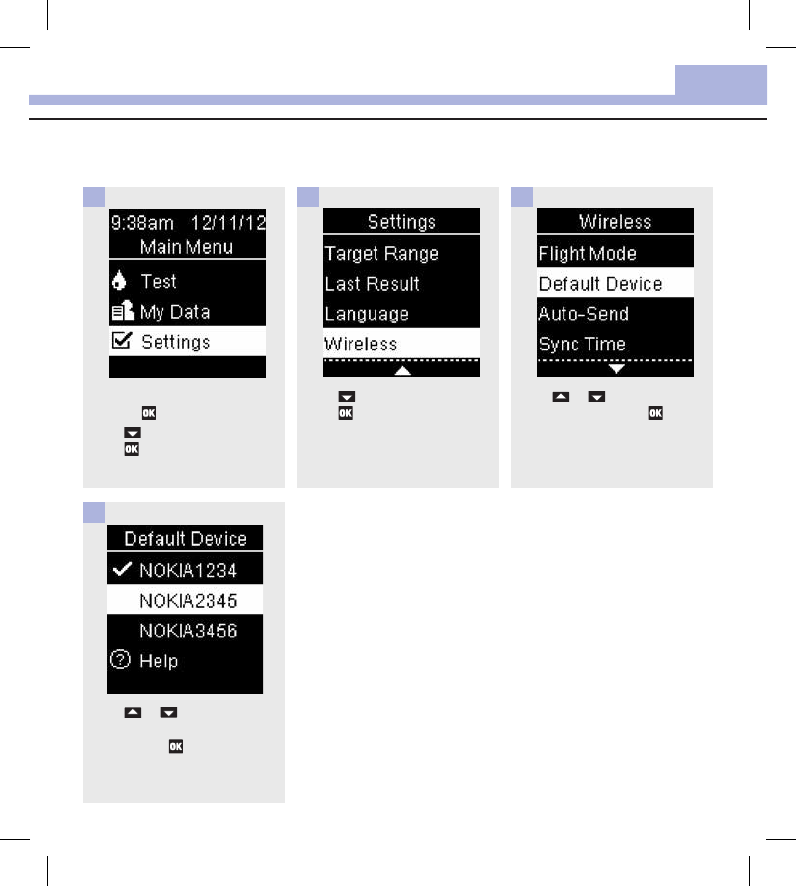
Default Device (Main Menu > Settings > Wireless > Default Device)
If more than 1device is paired, select the default paired device for the Auto‑Send and Sync Time features.
Turn the meter on by briefly
pressing . From Main Menu,
press to highlight Settings.
Press .
1
Press to highlight Wireless.
Press .
2
Press or to highlight
Default Device. Press . A list
of paired devices appears.
3
Press or to highlight the
device you want as the default
device. Press to set the
option and return to Wireless.
4
52195_AvivaConnect_FDA.indb 61 5/1/14 7:23 AM
Wireless Communication and Meter Pairing
62
7
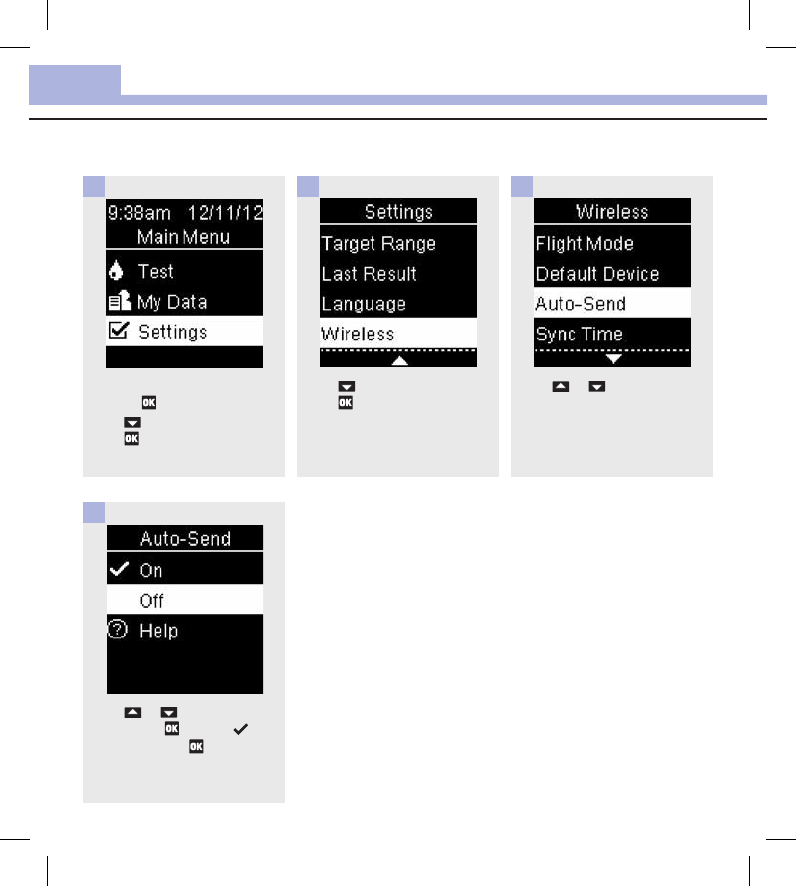
Auto‑Send (Main Menu > Settings > Wireless > Auto‑Send)
Select whether data is automatically sent to the default paired device after each test.
Turn the meter on by briefly
pressing . From Main Menu,
press to highlight Settings.
Press .
1
Press to highlight Wireless.
Press .
2
Press or to highlight
Auto‑Send.
3
Press or to highlight On
or Off. Press to move to
the option. Press to set the
option and return to Wireless.
4
52195_AvivaConnect_FDA.indb 62 5/1/14 7:23 AM
Wireless Communication and Meter Pairing
63
7
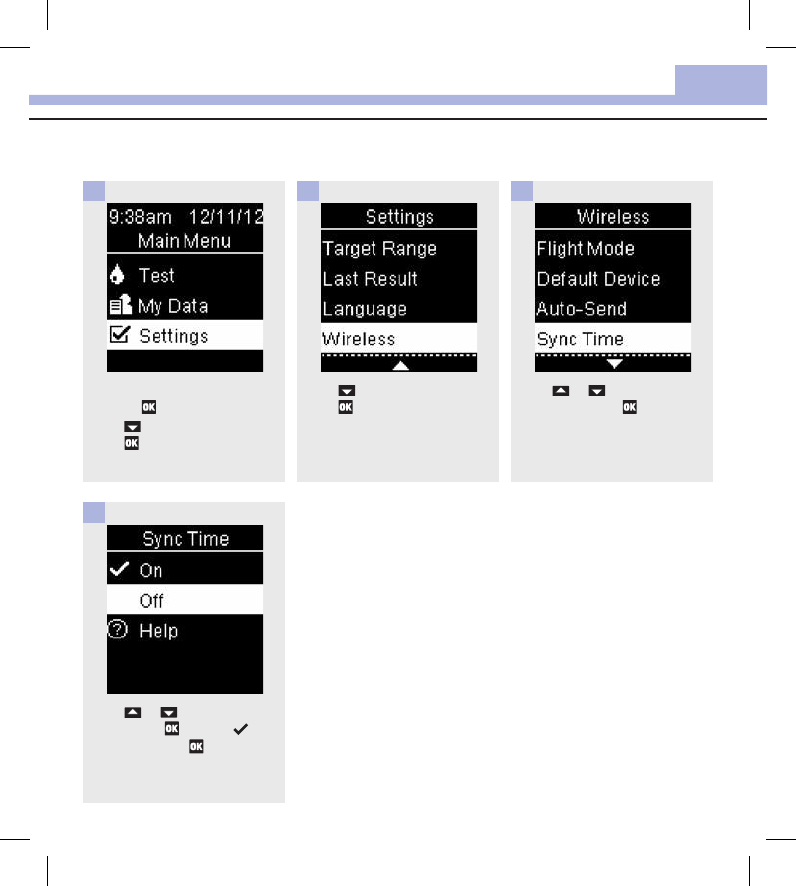
Sync Time (Main Menu > Settings > Wireless > Sync Time)
Select whether to synchronize the time and date to the default paired device.
Turn the meter on by briefly
pressing . From Main Menu,
press to highlight Settings.
Press .
1
Press to highlight Wireless.
Press .
2
Press or to highlight
Sync Time. Press .
3
Press or to highlight On
or Off. Press to move to
the option. Press to set the
option and return to Wireless.
4
52195_AvivaConnect_FDA.indb 63 5/1/14 7:23 AM
Wireless Communication and Meter Pairing
64
7
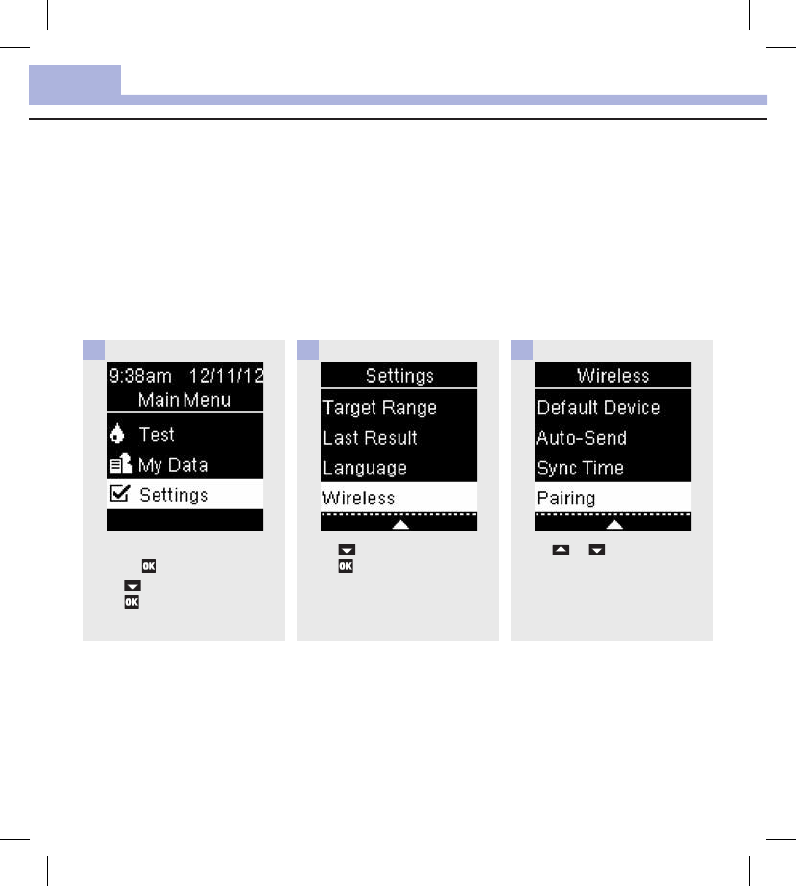
Pairing Additional Devices (Main Menu > Settings > Wireless > Pairing > Pair
Device)
This procedure is to add another paired device (assumes there is already 1paired device).
You can pair 5devices.
If you have 5paired devices, you must delete a pairing before you can add another device.
The device you choose remains as the default until you change it.
Turn the meter on by briefly
pressing . From Main Menu,
press to highlight Settings.
Press .
1
Press to highlight Wireless.
Press .
2
Press or to highlight
Pairing.
3
52195_AvivaConnect_FDA.indb 64 5/1/14 7:23 AM
Wireless Communication and Meter Pairing
65
7
4
Prepare the other device for
pairing. Refer to the other
device’s instructions for
information about pairing.
5
The meter displays its code.
6
The other device displays a list
of found devices, including the
meter. Select Accu‑Chek from
the list. When prompted, enter
the meter code from Step6 into
the device to be paired.
7
Press or to highlight
Pair Device. Press .
If there are less than
5paired devices, Pair
Device appears. Go to
Step5.
If there are already 5paired devices, Pair Device appears. You
must delete a paired device before you can proceed to Step5.
Select Yes. Press or to highlight the device to delete.
Press . Proceed to Step5.
52195_AvivaConnect_FDA.indb 65 5/1/14 7:23 AM
Wireless Communication and Meter Pairing
66
7
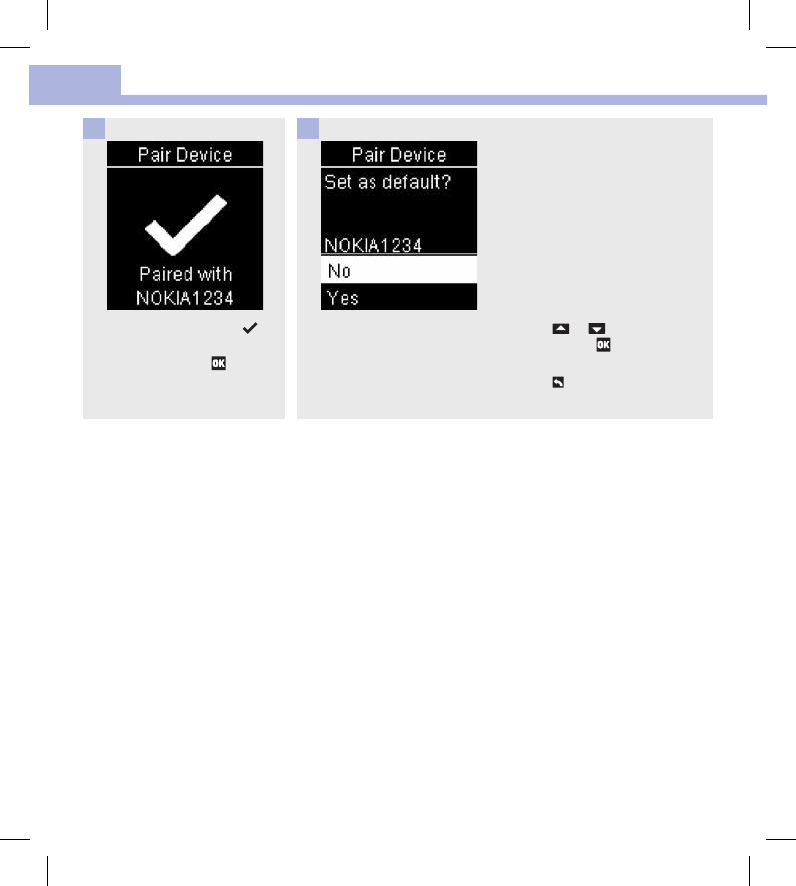
If there is more than 1paired
device, you will be asked if you
want the new device to be the
default device.
Press or to highlight No
or Yes. Press to set the
option and return to Pairing.
Press to return to Wireless.
9
When pairing is complete,
and the name of the paired
device appear. Press .
8
52195_AvivaConnect_FDA.indb 66 5/1/14 7:23 AM
Wireless Communication and Meter Pairing
67
7
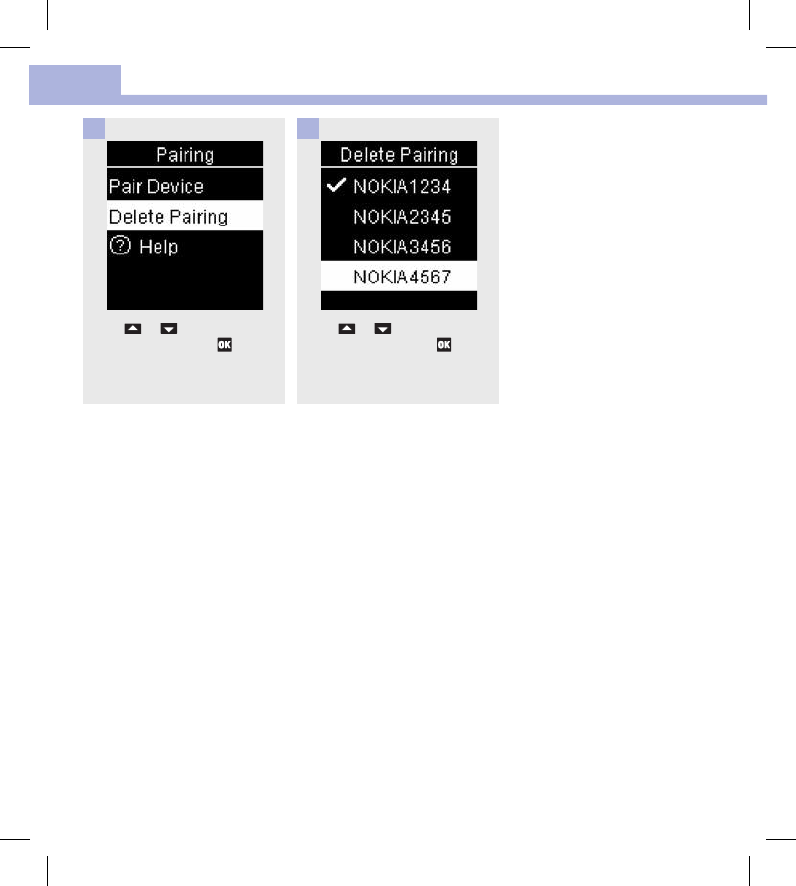
Delete Pairing (Main Menu > Settings > Wireless > Pairing > Delete Pairing)
This procedure is to delete a paired device (assumes there is at least 1paired device).
You can pair 5devices. If you have 5paired devices, you must delete a pairing before you pair to another
device.
The device you choose remains as the default until you change it.
Turn the meter on by briefly
pressing . From Main Menu,
press to highlight Settings.
Press .
1
Press to highlight Wireless.
Press .
2
Press or to highlight
Pairing. Press .
3
52195_AvivaConnect_FDA.indb 67 5/1/14 7:23 AM
Wireless Communication and Meter Pairing
68
7
Press or to highlight
Delete Pairing. Press .
4
Press or to highlight the
device to delete. Press to set
the option.
5
52195_AvivaConnect_FDA.indb 68 5/1/14 7:23 AM
Wireless Communication and Meter Pairing
69
7
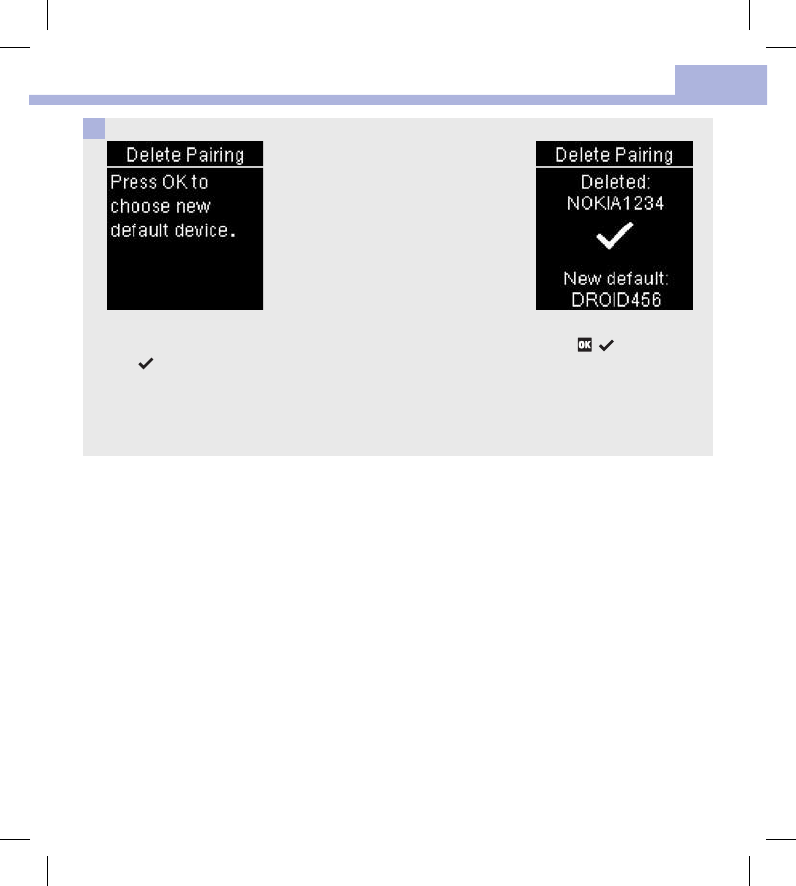
If the selected device is not the
default device, the pairing is
deleted. and the name of the
deleted device appear.
If the selected device is the
default device, you are asked to
select a new default device. If
there is only 1device remaining,
it becomes the default device.
The list of paired devices
appears.
Highlight the new default device
and press . and the name
of the deleted device appear,
along with the new default
device.
6
52195_AvivaConnect_FDA.indb 69 5/1/14 7:23 AM

Wireless Communication and Meter Pairing
70
7
52195_AvivaConnect_FDA.indb 70 5/1/14 7:23 AM