Samsung Electronics Co BTW410 TX CARD FOR WIRELESS AMPLIFIER User Manual 3
Samsung Electronics Co Ltd TX CARD FOR WIRELESS AMPLIFIER Users Manual 3
Contents
- 1. Users Manual 1
- 2. Users Manual 2
- 3. Users Manual 3
- 4. Users Manual 4
- 5. User Manual 5
Users Manual 3

30
connections
HDMI FUNCTION
Resolution Selection
This function allows the user to select the screen resolution for
HDMI output.
In Stop mode, press and hold the SD/HD (Standard
Definition/High Definition) button on the remote control.
Resolutions available for the HDMI output are 480p, 720p, •
1080i/1080p.
SD(Standard Definition) resolution is 480p and HD •
(High Definition) resolution is 720p, 1080i/1080p.
M
If the TV does not support the configured `
resolution, you will not be able to see the picture
properly.
When an HDMI cable is connected, composite and `
component video signals are not output.
See your TV owner's manual for more information on `
how to select the TV's Video Input source.
Using Anynet+(HDMI-CEC)
Anynet+ is a function that enables you to control other Samsung Devices with your Samsung TV's remote
control. Anynet + can be used by connecting this Home Theater to a SAMSUNG TV using an HDMI Cable.
This is only available with SAMSUNG TVs that support Anynet+.
Connect the main unit of the Home Theater to a Samsung 1.
TV with an HDMI cable. (See page 25)
Set the Anynet+ function on your TV. 2.
(See the TV instruction manual for more information.)
You can operate the Home Theater by using the TV •
remote control. (Available TV buttons : , , , ,
,
and
,
buttons, ~button)
If you select the TV
Set the Anynet+(HDMI-CEC) to On by pressing the Anynet+
button on your TV remote control.
•
Receiver : On :
You can listen to audio through the Home Theater.
•
Receiver : Off : You can listen to audio through the TV.
If you select the THEATER
Select THEATER to connect and set the option of each item below.
•
View TV :
If anynet+(HDMI CEC) is set to on and you select View TV, the
home theater will automatically switch to digital in mode.
• Theater
Menu :
you can access and control the Home theater menu.
• Theater Operation : The Home Theater disc playback
information will be displayed. You can
control the Disc operation of the
Home Theater such as title, chapter
and subtitle change.
•
Receiver : On :
You can listen to audio through the Home Theater.
•
Receiver : Off : You can listen to audio through the TV.
M
In case that you choose 'View TV', if you want to listen to TV sound through Digital In, you `
have to connect the optical cable between the TV and the Home Theater.
Why use HDMI (High Definition
Multimedia Interface)?
This device transmits a DVD video
signal digitally without the process
of converting to analog. You will get
sharper digital pictures when using
an HDMI connection.
MoveEnterExit
Setup
Connected to Player
Off
On
View TV
THEATER
THEATER Menu
MOVE
ENTER
EXIT
MOVE
ENTER
EXIT
MoveEnterExit
Setup
Connected to Player
Off
On
View TV
THEATER
THEATER Menu
MOVE
ENTER
EXIT
With Anynet+
You can operate this unit, power
on your TV, or watch a movie by
pressing the Play button on your
Samsung TV's remote control.
CD RIPPING
S.VOL
AUDIO
UPSCALE
CD RIPPING
S.VOL
AUDIO
UPSCALE
31
ENG ● CONNECTIONS
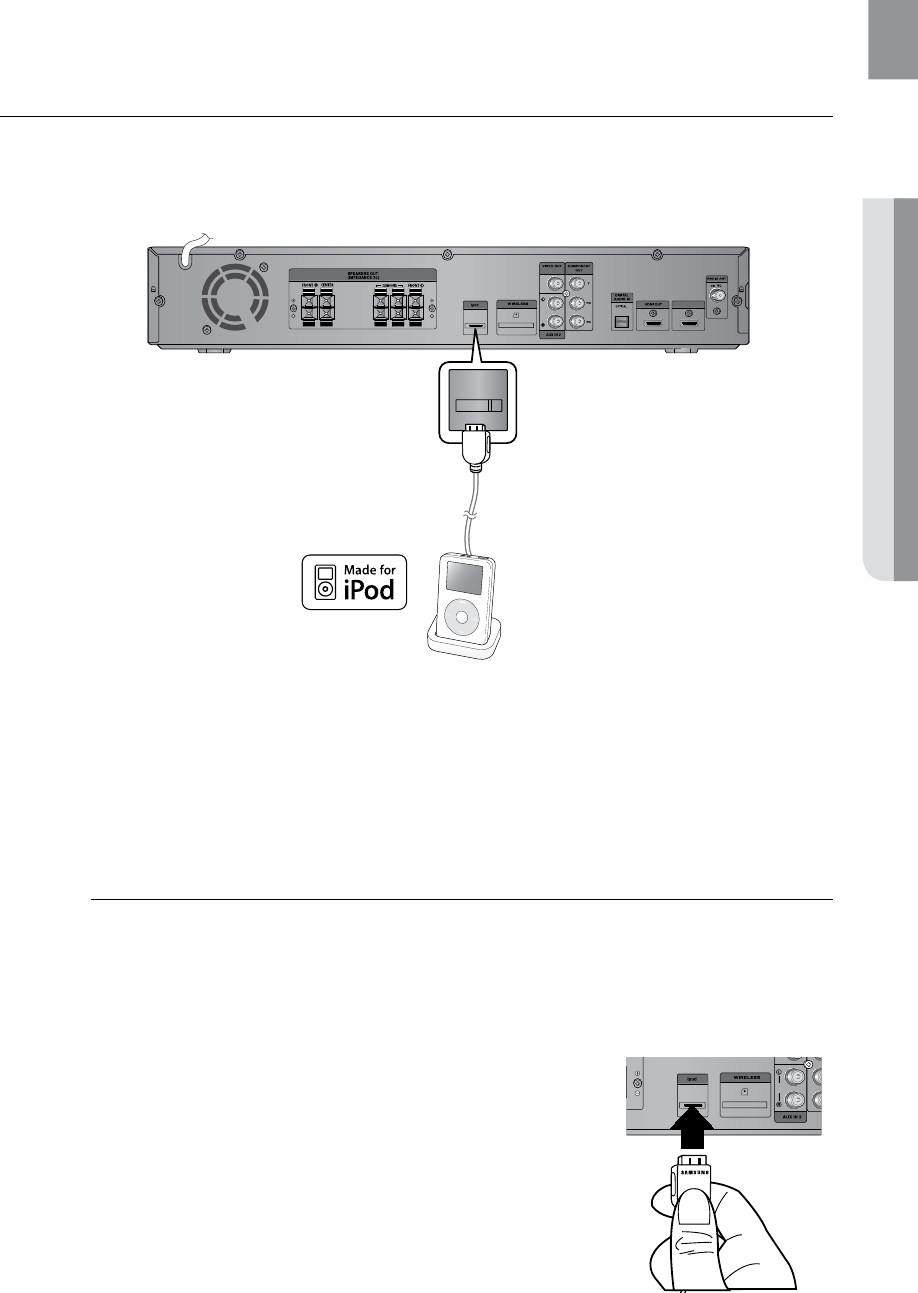
CONNECTING AN
iPod
You can listen to the audio from an iPod through the main unit. For iPod operation with this Home Theater, see
pages 31 and 50.
HDMI IN
ipod
Connect the iPod dock connector to the iPod jack on the DVD home theater.1.
Press the 2. PORT button on the remote control to select iPod input.
You can also use the • FUNCTION button on the main unit.
The mode switches as follows :
DVD/CD ➞ D-IN ➞ AUX 1 ➞ AUX 2 ➞HDMI IN ➞ USB ➞ B/T ➞A IPOD ➞ V IPOD ➞
TUNER.
M
As the cable ports are close together, be sure to remove the wireless adaptor before `
disconnecting the ipod docking cable.
Depending on the type of iPod, you may need to insert one of the dock slots into the dock `
before you station your iPod (see next page).
Adjust the volume to a moderate level before you connect your iPod and DVD home `
theater.
When the unit is powered on and you connect an iPod, the unit will charge your iPod's
`
battery.
Make sure to connect the dock connector so that the label `
“SAMSUNG” faces upward.
HDMI IN
AUDIO
(supplied)
(supplied)
32
connections
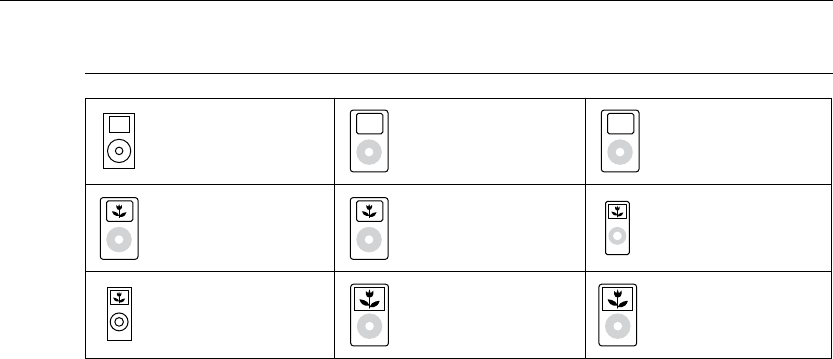
iPod models compatible with the dock
mini (4GB, 6GB) 20GB 40GB
20GB, 30GB
(color display)
40GB, 60GB
(color display)
nano
(1GB, 2GB, 4GB)
nano (aluminum)
(2GB, 4GB, 8GB) 30GB (video) 60GB, 80GB (video)
iPod is a trademark of Apple Computer, Inc., registered in the U.S. and other countries.
33
ENG ● CONNECTIONS
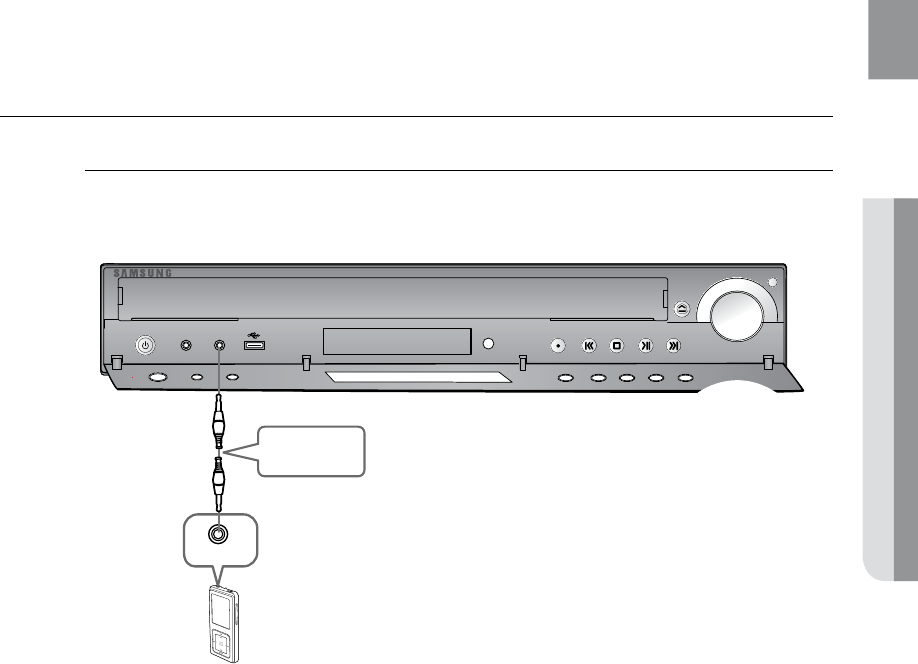
CONNECTING AUDIO FROM EXTERNAL COMPONENTS
AUX1 : Connecting an External Component/MP3 player
Components such as an MP3 Player
VOLUME
VOLUME
DISC CHANGE
PHONES FUNCTION
AUX IN 1/
ASC IN
Audio Cable
(not supplied)
Audio OUT
Connect AUX IN 1 (Audio) on the Home Theater to the Audio Out of the external component/MP3 1.
player.
Press the 2. AUX button on the remote control to select AUX1 input.
You can also use the • FUNCTION button on the main unit.
The mode switches as follows :
DVD/CD ➞ D-IN ➞ AUX 1 ➞ AUX 2 ➞HDMI IN ➞ USB ➞B/T ➞ A IPOD ➞ V IPOD ➞
TUNER.
34
connections
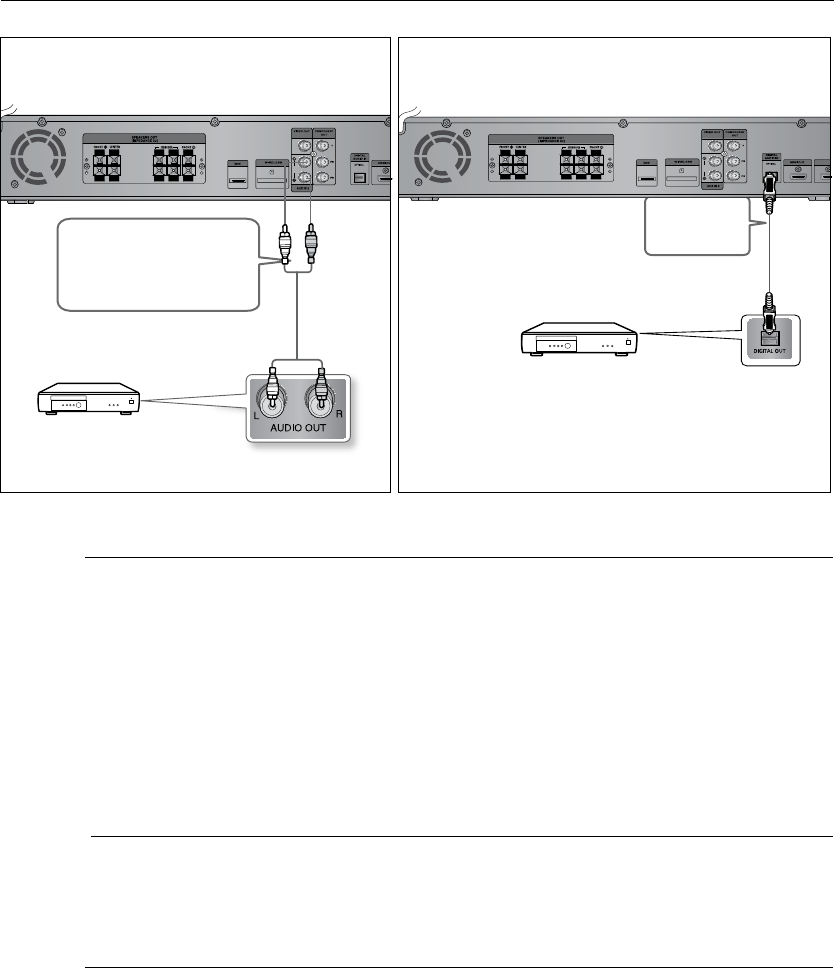
Audio Cable (not supplied)
If the external analog component
has only one Audio Out, connect
either left or right.
Optical Cable
(not supplied)
AUX2 : Rear Panel OPTICAL : Rear Panel
HDMI IN
AUDIO
HDMI IN
AUDIO
AUX2 : Connecting an External Analog Component
Analog signal components such as a VCR.
Connect AUX IN 2 (Audio) on the Home Theater to the Audio Out of the external analog component.1.
Be sure to match connector colors. •
Press the 2. AUX button on the remote control to select AUX 2 input.
You can also use the• FUNCTION button on the main unit.
The mode switches as follows :
DVD/CD ➞ D-IN ➞ AUX 1 ➞ AUX 2 ➞HDMI IN ➞ USB ➞ B/T➞ A IPOD ➞ V IPOD ➞
TUNER.
M
You can connect the Video Output jack of your VCR to the TV, and connect the Audio `
Output jacks of the VCR to this product.
OPTICAL : Connecting an External Digital Component
Digital signal components such as a Cable Box/Satellite receiver (Set-Top Box).
Connect the Digital Input (OPTICAL) on the Home Theater to the Digital Output of the external digital 1.
component.
Press the 2. AUX button on the remote control to select DIGITAL IN.
You can also use the • FUNCTION button on the main unit.
The mode switches as follows :
DVD/CD ➞ D-IN ➞ AUX 1 ➞ AUX 2 ➞HDMI IN ➞ USB ➞ B/T➞ A IPOD ➞ V IPOD ➞
TUNER.
External Analog Component
External Digital Component
35
ENG ● CONNECTIONS
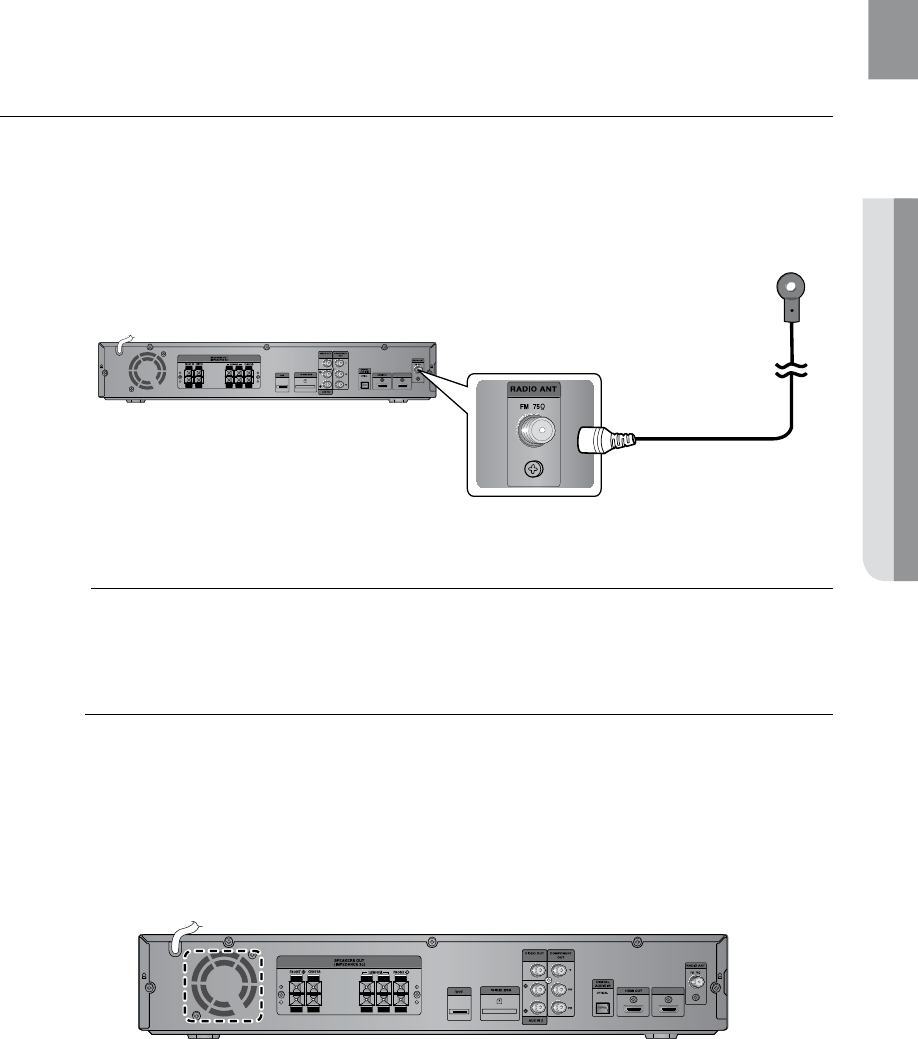
CONNECTING THE FM ANTENNA
Connect the FM antenna supplied to the FM 751. Ω Coaxial Jack.
Slowly move the antenna wire around until you find a location where reception is good, then fasten it 2.
to a wall or other rigid surface.
M
This unit does not receive AM broadcasts. `
Cooling Fan
The cooling fan supplies cool air to the unit to prevent overheating.
Please observe the following cautions for your safety.
Make sure the unit is well-ventilated. If the unit has poor ventilation, the temperature inside the unit may rise •
and may damage it.
Do not obstruct the cooling fan or ventilation holes. (If the cooling fan or ventilation holes are covered with a •
newspaper or cloth, heat may build up inside the unit and fire may result.)
HDMI IN
HDMI IN
FM Antenna
(supplied)
36
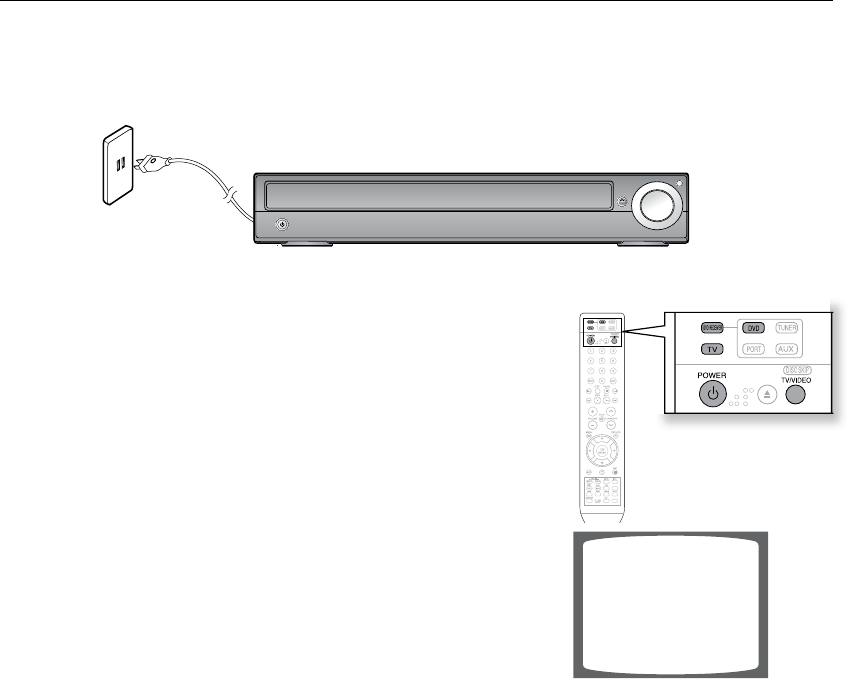
The DVD Home Theater's remote can be used to control Samsung TVs.
Plug the main unit's power cord into the AC power supply.1.
Press the 2. DVD RECEIVER button to operate the DVD Home
Theater.
Press the 3. FUNCTION button on the main unit or DVD button
on the remote to enable DVD/CD playback.
Press the 4. TV button to set the remote to TV mode.
Press the 5. POWER button to turn on your Samsung TV
with this remote.
Press the 6. TV/VIDEO button to select VIDEO mode
on your TV.
before using your home theater
VIDEO
CD RIPPING
S.VOL
AUDIO
UPSCALE
37
ENG ● PLAYBACK
DISC PLAYBACK
dB
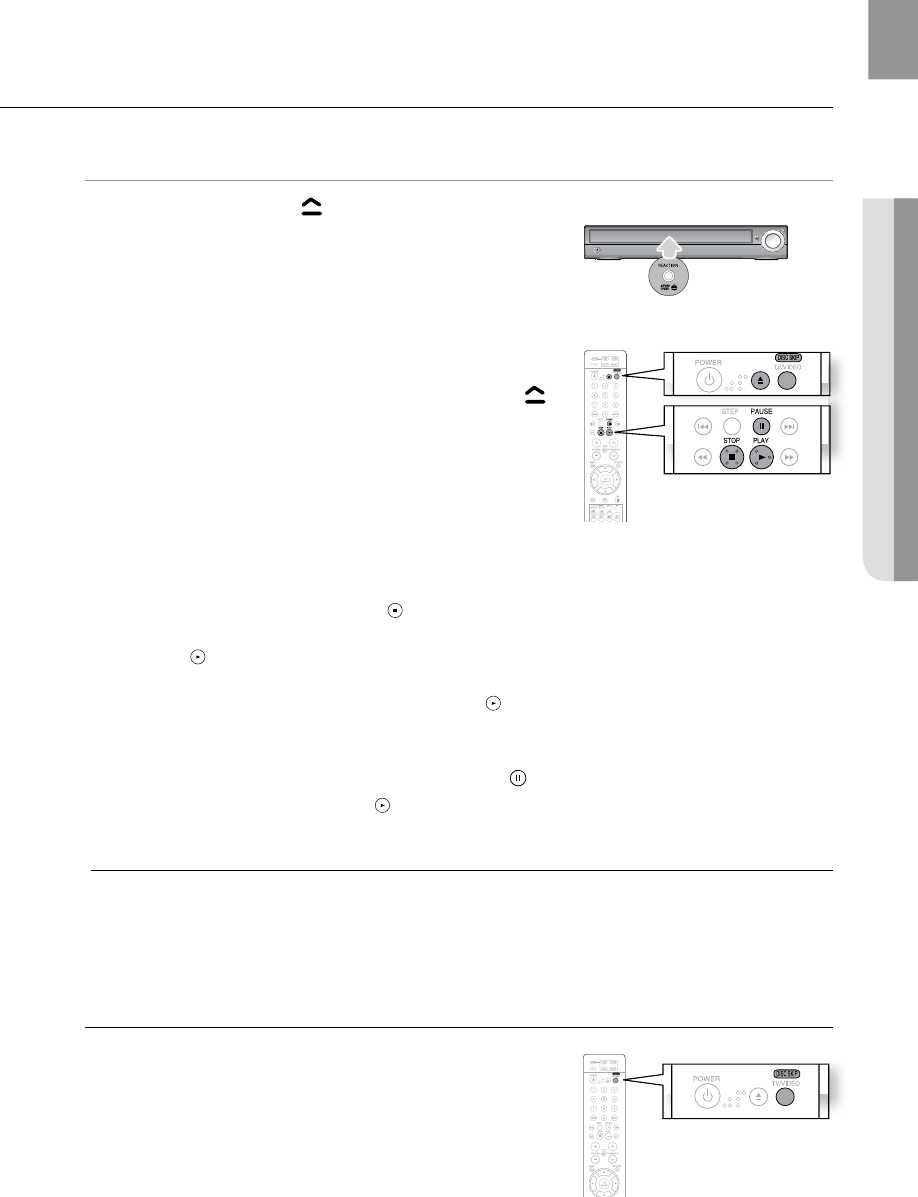
Press the 1. OPEN/CLOSE ( ) button to open the disc tray.
Load a disc.2.
Place a disc gently into the tray with the disc’s label •
facing up.
Press the 3. DISC SKIP button.
Rotate the carousel tray so you can load the third, •
fourth, and fifth discs.
Close the compartment by pressing the 4. OPEN/CLOSE ( )
button again.
Playback starts automatically.•
To stop playback, press the STOP () button during playback.
If pressed once, • PRESS PLAY is displayed and the stop position will be stored in memory.
If the PLAY ( ) button or ENTER button is pressed, playback resumes from the stop position.
(This function works only with DVDs.)
If pressed twice, • STOP is displayed, and if the PLAY ( ) button is pressed, playback starts from the
beginning.
To temporarily pause playback, press the PAUSE ( ) button during playback.
To resume playback, press the • PLAY ( ) or ENTER button.
M
Depending on the content of the disc, the initial screen may appear different. `
Pirated discs will not run in this player because it violates the CSS (Content Scrambling System : `
a copy protection system) recommendations.
Selecting a Disc in the Disc changer
To select a specific disc, press the corresponding the DIRECT PLAY
(1, 2, 3, 4, 5) buttons on the front panel or the DISC SKIP button
on the remote control, until the required disc indicator flashes.
If the disc selected is not loaded, the next disc is played •
automatically.
CD RIPPING
S.VOL
AUDIO
UPSCALE
playback
38
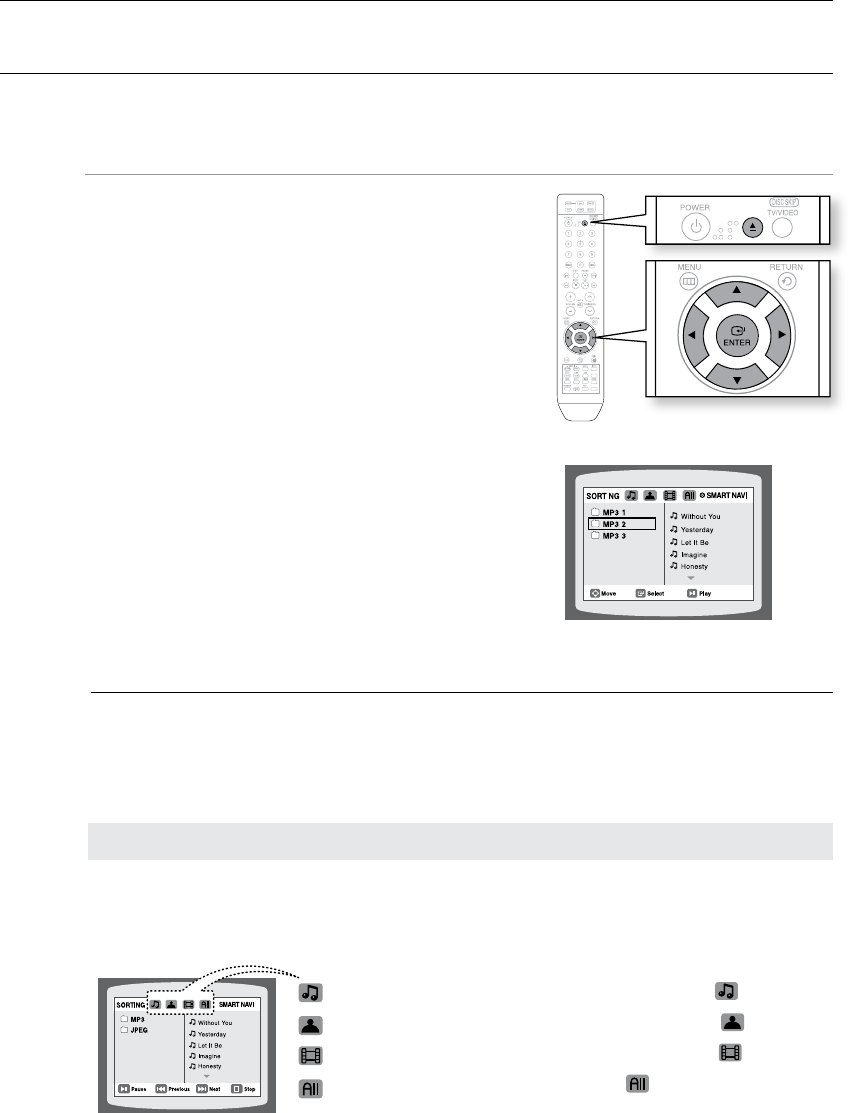
MP3/WMA-CD PLAYBACK
Data CDs (CD-R, CD-RW) encoded in MP3/WMA format can be played.
A
Place the MP3/WMA disc on the disc tray.1.
The MP3/WMA menu screen will appear and •
playback will start.
The appearance of the menu depends on the •
MP3/WMA disc.
WMA-DRM files cannot be played.•
In Stop mode, use the Cursor 2. ,,, button
to select the album, and then press the ENTER button.
Use the Cursor •
,
button to select the track.
To change the album, use the Cursor 3. ,,,
button to select another album in Stop mode, and then
press the ENTER button.
Press the 4. STOP (T) button to stop playback.
M
Depending on the recording mode, some MP3/WMA-CDs may not play. `
Table of contents of a MP3-CD varies depending on the MP3/WMA track format recorded `
on the disc.
Press the Cursor • ,,, button when it is in Stop mode and select a desired icon from the
top part of the menu.
Music File Icon : To play music files only, select the Icon.
Image File Icon : To view image files only, select the Icon.
Movie File Icon : To view movie files only, select the Icon.
All File Icon : To view all files select the Icon.
To play a file icon in the screen,
CD RIPPING
S.VOL
AUDIO
UPSCALE
39
ENG ● PLAYBACK
JPEG FILE PLAYBACK
Images captured with a digital camera or camcorder, or JPEG files on a PC can be stored on a CD and then played back
with this Home Theater.
Slide Mode G
Place the JPEG disc on the disc tray.
Playback starts automatically. Each image is displayed •
for 5 seconds and then the next image is displayed.
Press the [,] button to skip to the next slide.
Each time the button is pressed, the slide moves backward or forward.•
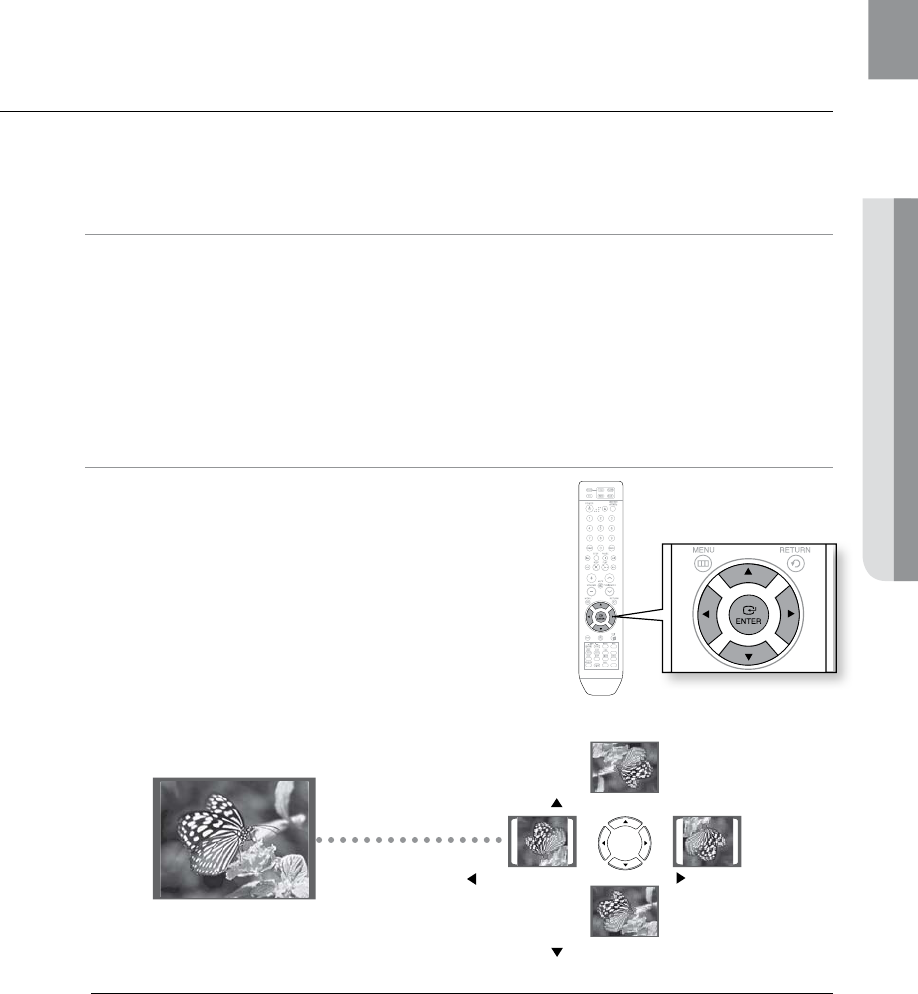
Rotate/Flip Function G
Press the Cursor ,,, button during playback.
M
The maximum resolutions supported by this product are 5120 x 3480 (or 19.0 MPixel) for `
standard JPEG files and 2048 x 1536 (or 3.0 MPixel) for progressive image files.
If a JPEG file is played when the HDMI output
`
resolution is 720p/1080i/1080p, the mode is automatically converted to 480p mode.
button: Rotate 90°
Clockwise
button: Rotate 90°
Counterclockwise
button: Flip Vertically
button: Flip Horizontally
Original Image
ENTER SELECT
CD RIPPING
S.VOL
AUDIO
UPSCALE