Samsung Electronics Co S760 Notebook Computer User Manual Version 0 Maverick Change from Matrix
Samsung Electronics Co Ltd Notebook Computer Version 0 Maverick Change from Matrix
Contents
- 1. user manual 1 of 3
- 2. user manual 2 of 3
- 3. user manual 3 of 3
user manual 2 of 3
Multi Media Functions/Equipment 41
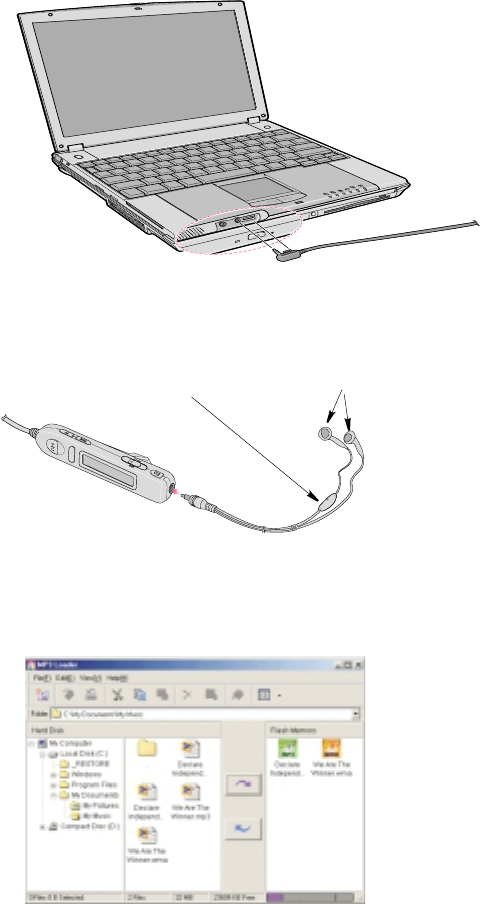
2. Connect MP3 remote controller to its jack on front of a system.
Figure 32. Connecting MP3 Player
3. Connect ear-phone to the MP3 remote controller.
Figure 33. Headphone Hookup
4. Click Start > MP3 Loader > MP3 Loader.
Figure 34. MP3 Loader
Ear-phones
Microphone

42 Multi Media Functions/Equipment
5. Open the folder you saved the MP3 files on the hard disk. The files will be shown
in the middle part of the window in a similar manner to Windows Explorer.
6. Select files you want to save to the flash memory of MP3 Player and click on the
upload button or you may use the standard windows drag and drop method. Repeat
this step until you have uploaded all of your selections or you have run out of
memory.
7. Close the MP3 loader.
The MP3 player will not operate with the MP3 loader open. "PC"will be
displayed in the led window of the player.
8. Slide the Power Slide bar to Music mode .Amusicalnoteicon will appear
on the LCD of MP3 remote controller.
9. Press the Play/Stop button to play MP3 files. The MP3 file number and the playing
time will be displayed on the LCD of the remote controller.
10.Adjust volume with the volume bar(+ VOL -).
Refer to the on-line help of the program.
Voice Recorder
You can use the microphone attached to the ear-phone to record your voice or other
sounds into the MP3 Player.
Recording
1. Slide the Power Slide bar to Voice mode . A microphone icon ( ) will appear on
the LCD of MP3 remote controller.
2. Press the REC/Erase button to record your voice. The track number and recording
time will be shown on the LCD of the MP3 remote controller.
3. Press the REC/Erase button again to finish recording.
4. To listen to what you recorded, press the Play/Stop button.
Delete Recording
1. Select a file (recorded file) from your MP3 remote controller that you wish to
delete.

Multi Media Functions/Equipment 43
2. Press the REC/Erase button for greater than 1 second. Next ‘ERASE’ message is
displayed and blinks on the LCD, it means that the MP3 Player is ready to erase
what you have chosen.
3. When ‘ERASE’ message is blinking, press REC/Erase button for greater than 1
second to erase the file.
If you are using MP3 Leader program, it is easier to erase the file by
deleting a file from flash memory.

44 Using the Battery
Using the Battery
Your computer uses a smart rechargeable Lithium-ion (Li-ion) battery pack for power
when the AC adapter is not attached to an electrical outlet. The smart battery gives a
accurate measurement of the current battery capacity which helps extend operating
time by enabling effective power management in operating systems that take
advantage of the accurate information supplied by the battery.
Charging the Battery
Your computer’s battery starts charging automatically when you connect the power to
the computer and to an electrical outlet. If the computer is off, the battery charges faster
than if the computer’s power is on.
Approximate charging times for the Li-Ion battery are:
•2-3 hours with the computer off (Small battery) and 4-5 hours (Large battery).
•5-6 hours with the computer on (Small battery) and 10-11 hours (Large battery).
While the battery is charging normally, the battery charge light on the computer is
amber (See ”System Status Lights” on page 25 for the location of the battery charge
light). When the battery is fully charged, the light changes to green.
When you use a new battery pack for the first time or use a battery after a long period
of storage, the initial battery life is shorter than normal. Normal battery life resumes
after a few discharge-recharge cycles.
Follow these rules for charging your battery:
•A battery normally discharges power when not used for long periods of time. Be
sure to recharge the battery every two months when it is not in use.
•Make it a practice to discharge your battery fully before recharging the battery. This
can help extend the life of the battery.
•Do not attempt to charge the battery in temperatures of under 50oF(10
oC) or over 90o
F(32
oC.)
All batteries eventually wear out and lose the ability to hold a charge.
You may need to replace your battery pack after a year of average usage.

Using the Battery 45
Safely Using the Battery
Follow these guidelines to safely use the battery:
•Turn off your computer and unplug it if you accidentally:
– Expose the equipment to liquid.
– Drop, jar, or damage the computer.
•Use only approved battery chargers.
•Do not disassemble the battery, heat it above 212° F (100° C), or burn it. The
battery used in this computer may cause a fire or chemical burn if mistreated.
•Your computer's rechargeable battery may be considered hazardous waste. If you
replace your battery with a new one:
– Keep the old battery out of the reach of children.
– Dispose of the old battery promptly.
– Make sure that you follow all local requirements when you dispose of
the old battery.
Removing the Battery
Your computer comes with the battery pack inserted in the computer. To remove the
battery from the computer:
1. Turn the computer’s power off and close the LCD panel.
2. Undock the computer if docked. See ”Undocking your Computer” on page 7.
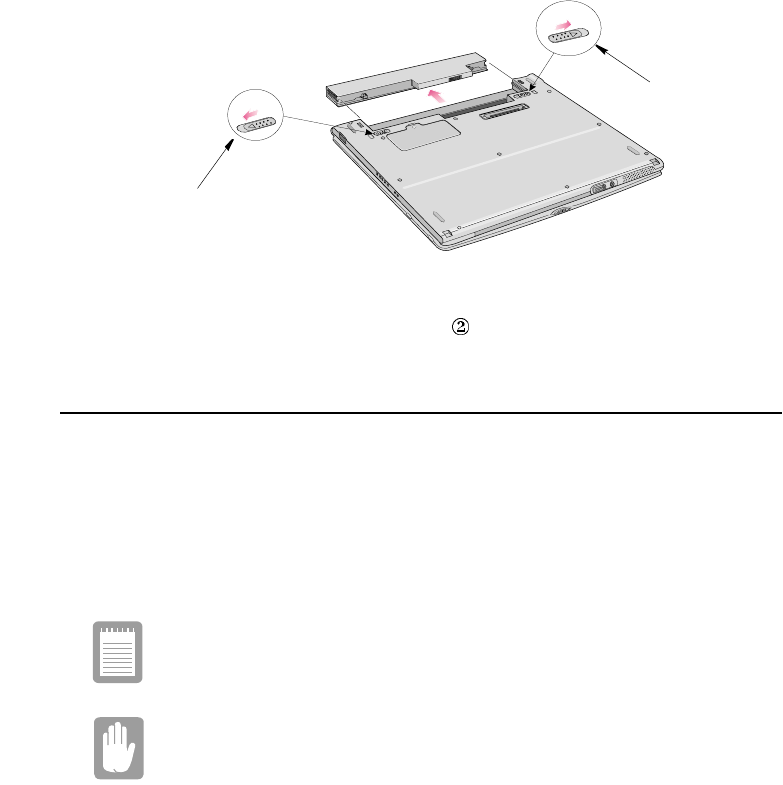
3. Turn the computer over so that the bottom of the unit faces up.
4. Slide the battery locking taps outward .
46 Using the Battery
.
Figure 35. Removing the Battery Pack
5. Slide the battery out of the compartment .
Installing the Battery
To install the battery pack:
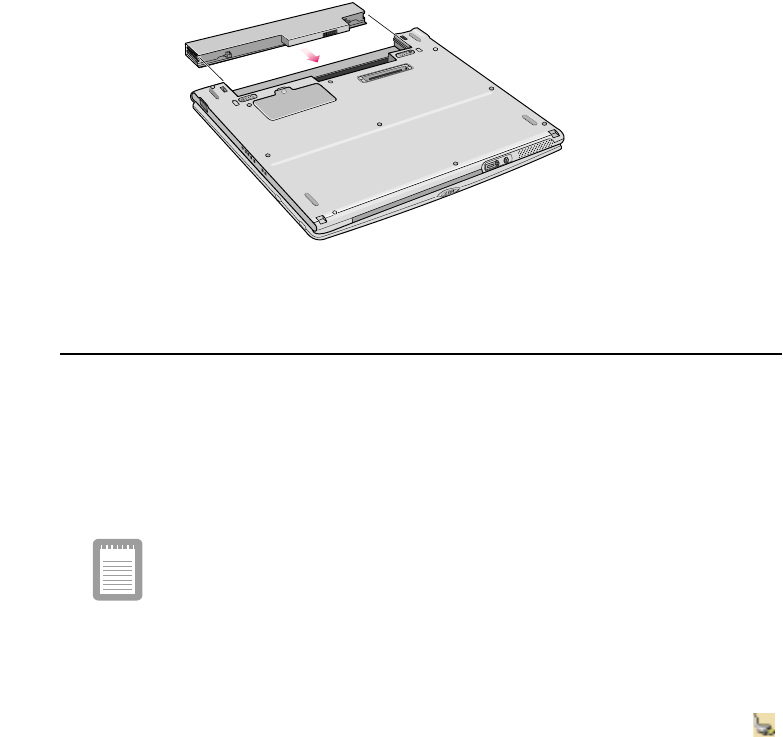
1. With the computer’s power off, close the LCD panel and turn the computer over so
the bottom of the unit faces up.
2. Slide the battery into the battery pack into the compartment (Figure 37). Make sure
the battery is fully inserted into the compartment.
Insure you have chosen the correct battery for your intended use of the
computer.
Insert the battery into the battery compartment, ensuring the correct
orientation so that the battery fits in its slot properly.
3. Slide the battery pack latches toward the center of the computer.
Lock
Unlock
1
2
2
Battery Latch
Battery Latch
Using the Battery 47
Figure 36. Installing the Battery
Monitoring the Battery Charge
Battery life is affected by factors such as the power-management settings in System
Setup, the applications you use, and the brightness settings of the LCD. Under normal
usage, the battery charge lasts approximately 3 hours for small battery (undocked),
1 1/2 on small battery (docked) and approximately 5 hours for the large battery
(undocked).
Battery life estimates are subject to variation. The actual life of your
battery may be less than the estimates given in the manual.
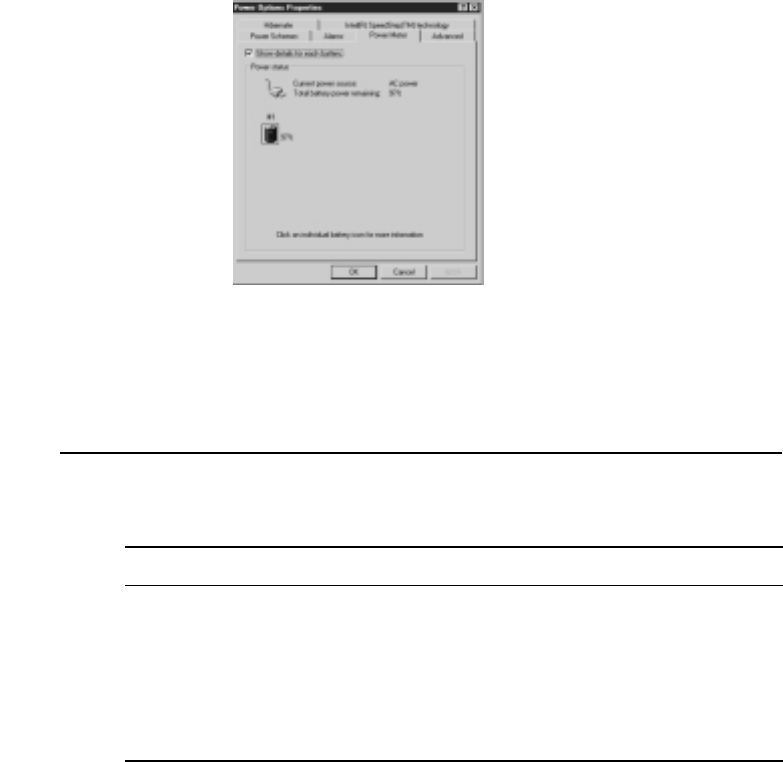
Power Meter
The Power Meter displays the charge of the batteries and the current source of
computer power, AC or batteries. You may monitor the battery charge or usage by
using the "Power Meter". To access the power meter click on the power meter icon
on the task bar or click Start > Control Panel > Power Options > Power Meter tab.
48 Using the Battery
Figure 37. Power Meter
You may also check battery charge by moving the mouse cursor to the power meter
icon, a small dialog box will display the % of charge.
Battery Warnings
Your computer gives you the following low-battery warnings (Table 3).
Table 3. Battery Warnings
The above features are valid with Windows 95 or any other APM compliant operating
systems. In the case of a Windows 98/ Me or any other ACPI compliant operating
system which is running on APM interface, you should adjust the battery alarm
features by using the operating systems power management program (Control Panel >
Power management in Windows 98/ Me).
Warnings Condition Action to Take
The power LED blinks. Battery low: The battery
charge is about 10 percent.
Approximately
5–10 minutes of battery
charge is left.
Save your work. Use the
power cord to power the
computer or turn off the
computer and install a fully
charged battery.
The computer automatically
goes into rest mode.
Battery very low: The battery
charge is about 3 percent.
Use the power cord to power
the computer and charge the
battery.
Using the Battery 49
In the ACPI mode you should select the Suspend mode of the low battery situations
(Save to RAM/Save-to-File) in BIOS setup, See “Power Menu” on page 81. Also see
“Using Power Management Options @” on page 89
If you cannot run your computer from the battery and the battery will not charge when
you attach the power cord, the problem may be that:
•The battery temperature is below 50° F (10° C) or over 90° F (32° C). If you think
the battery temperature is too hot or too cold, turn off the computer, remove the
battery, and let the battery reach room temperature. Then try charging the battery
again.
•The battery is defective. Replace the battery with a new battery.

50 Using the Modem
Using the Modem
Your Notebook computer will have a Modem/LAN installed in your computer.
Precautions Before Use
If you connect the modem to the digital key-phone line, the modem will
be damaged.
DOS support
Windows 98: The 3Com Modem with a PCI/Mini PCI interface or AMR/MDC
interface does not support DOS mode. You can use DOS box in
Windows 98 instead of pure DOS mode.
Windows Me: Windows Me does not support pure DOS mode and the modem does
not support a DOS box in Windows. So you can not use a
communication application using in DOS.
If you use the modem on a PBX system (Key-phone system)
If you use a simple terminal program
you should type "ATX3&W" or "ATX3" command as an initialization command.
If you use a Windows Communication Program
Follow the instructions below.
1. Click the Start button and then point to Settings.
2. Click Control Panel.
3. Double-click Modems icon and the click Properties button at the General tab.
4. Check off "Wait for dial tone before dialing" check box at theConnection tab.
5. Click OK button to close the dialog box.
6. Click OK button to close "Modem Properties" dialog box.

Using the Modem 51
Description of 56K
There are different standards regarding 56K technology.
•K56Flex.
Technology developed by Rockwell Semiconductor Systems and Lucent
Technologies
•X2.
Technology developed by USR (US Robotics, now 3Com)
K56Flex and X2 are not interoperable.
•V.90 Standard.
In February 1998, The ITU-T (ITU Telecommunication Standardization Sector)
agreed on the technical specifications for 56K modems (V.90) and has approved in
mid-September, 1998.
But, the modem driver can be updated to resolve fine points of operation between
different vendor's modems and unusual telephone line conditions.
MODEM Notes:
1. Due to FCC limitations, speeds of 53kbps are the maximum permissible
transmit power levels during download transmissions. Actual data speeds
will vary depending on line conditions.
2. In order to use the 56K feature, be sure to check if the standards supported
by the on-line service provider and the modem are identical.
3. If you use a PBX phone system, you can not connect using the 56K mode
due to line loss.
Specifications
•Data communications.
V.90, K56Flex, V.34+, V.34, V.32bis, V.32, V22bis, V.22, V.23, V.21 BELL212A
•Data throughput speed
56,000 bps ~ 28,000 bps (V.90, downstream only, step: about 1333 bps)
56,000 bps ~ 32,000 bps (K56Flex, downstream only, step: 2000 bps)
33,600 bps ~ 2,400 bps (step: 2400 bps)

52 Using the Modem
1,200 bps
300 bps
•Fax mode support.
V.17, V.29, V.27ter, V.21ch2
•Fax throughput speed.
14400, 12000, 9600, 7200, 4800, 2400, 300
•Data compression feature.
V.42bis, MNP CLASS 5
•Data correction feature.
V.42 LAPM, MNP CLASS 2~4
•Fax capacity.
CLASS 1
•PCI 2.1, PPMI 1.0 support
Windows Me Modem Driver Installation
Install the Modem Driver
Before you install the modem drivers, check if the PCI Card under Other devices of
Device Manager tab of Control Panel on Windows exists. If it exists, remove it first.
After that, install the modem driver according to the instruction below.
1. When the Windows ME automatically detects PCI Card, Choose "Specify the
location of the driver (Advanced)" and then click Next button.
2. Insert the CD or floppy diskette that has a modem driver in it.
3. Check "Specify a location" of Search for the best driver for your
device.(Recommended)." and enter the directory location, then click Next button.
4. Click Next button when a dialog appears saying that windows is now ready to
install the best driver for 3Com 56K V.90 Mini PCI Modem WDM Driver.
5. Click Finish button when a dialog appears saying that windows has finished
installing 3Com 56K V.90 Mini PCI Modem WDM Driver.
6. Choose "Specify the location of the driver (Advanced) when the Windows ME
automatically detects Modem Device and then click Next button.
7. Check "Specify a location" of Search for the best driver for your device
(Recommended)." and enter the directory location, then click Next button.

Using the Modem 53
8. Click Next button when a dialog appears saying that windows is now ready to
install the best driver for 3Com 56K V.90 Mini PCI Modem.
9. Click Finish button when a dialog appears saying that windows has finished
installing 3Com 56K V.90 Mini PCI Modem.
10.Restart the system.
Selecting a Country
You have to check if the country is selected correctly before you use the modem.
If the country is not selected correctly, the modem may not work
properly. So, you must check if the country you're calling from is
selected appropriately and then use the modem. If your modem only
supports "Domestic", you must select the country where you bought
your notebook computer. And, if you use the modem in other countries,
your modem may not work properly. If your modem supports
"Worldwide", please check with your local distributor which countries
can be supported by the 3Com modem.
1. Click the Start button, point to Settings and click control panel.
2. Double-click "3Com 56K V.90 Mini PCI Modem WDM Driver" icon.
3. Select the country at the Country list box.
4. Click OK button.
Confirming Installation of the Modem Driver
After the modem driver is installed, check if the modem driver is installed properly.
1. Click the Start button, point to Settings and then click Control Panel.
2. Double-Click Modems icon.
3. Select 3Com 56K V.90 Mini PCI Modem in the Diagnostics tab and then click the
More Info... button.
4. The modem is properly installed if the contents of Command and Response appear
in the More Info... window.
Deleting the Modem Driver
1. Click the Start button, point to Settings and then click Control Panel.

54 Using the Modem
2. Double-Click Add/Remove Programs icon.
3. Choose 3Com 56K V.90 Mini PCI Modem in the Install/Uninstall tab and then
click Add/Remove... button.
4. Click Yes button in the Confirming File Deletion dialog.
Modem Driver Installation in Windows 98 (Modem Module
Driver)
You can install the modem driver as shown in the following.
Install the Modem Driver
Before you install the modem drivers, check if the PCI Card under Other devices of
Device Manager tab of Control Panel on Windows exists. If it exists, remove it first.
After that, install the modem driver according to the instructions below.
1. If the Windows 98 automatically detects the modem and shows the dialog saying
This wizard searches for new drivers for PCI Card,clickNext button.
2. Choose Search for the best driver for your device (Recommended) and then click
Next button.
3. Check Specify a location check box in the dialog for specifying the search location.
Insert the CD or floppy diskette that has the modem driver on it. Locate the
directory that contains the modem driver, then click Next button. (’D’ refers to the
CD-ROM driver.)
"D:\Win98\Driver\Modemonly\Setup.exe"
In this manual, "D"refers to the CD-ROM drive. The directory path is
subject to change depending on models.
4. If Windows 98 found 3Com 56K V.90 Mini PCI Modem driver, click Next button.
5. Click Finish button when a dialog appears saying that installation is completed.
6. In order to complete the driver installation, you must restart the system.
Selecting a Country
You have to check if the country is selected correctly before you use the modem.

Using the Modem 55
MODEM Notes:
If the country is not selected correctly, the modem may not work properly. So,
you must check if the country you're calling from is selected appropriately and
then use the modem. If your modem only supports "Domestic", you must
select the country where you bought your notebook computer. And, if you use
the modem in other countries, your modem may not work properly. If your
modem supports "Worldwide", please check with your local distributor which
countries can be supported by the 3Com modem.
1. Click the Start button, point to Settings,andtheclickControl Panel.
2. Double-click the 3Com 56K V.90 Mini PCI Modem icon.
3. Select the country at the Country list box.
Check if My location is set properly at telephony of Control panel before
using modem.
Confirming Modem Driver Installation
After the modem driver is installed, you can check if the modem driver is installed
properly.
1. Click the Start button, point to Settings, and then click Control Panel.
2. Double-click Modem icon.
3. Go to Diagnostics tab when the Modem Properties dialog appears.
4. Select the port that the modem is installed in and then click the More Info button.
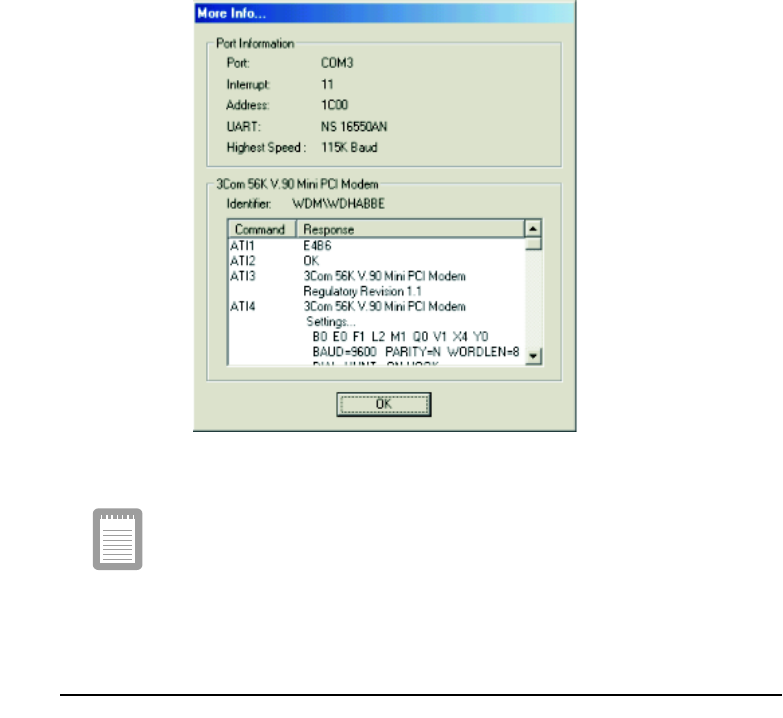
5. The modem is properly installed if you can see the following dialog.
56 Using the Modem
Figure 38. More Info Dialog Box
If the modem driver is not properly installed, install the driver again.
Installing the Modem Driver in Windows Millennium
(Modem/LAN Module Driver)
Install the Modem Driver
You don't need to install the modem driver because WinME already has this Modem
driver. But, this driver shows the modem name as Lucent Win Modem at the device
manager. You can see 3Com 56K V.90 Mini PCI Modem at the device manager if you
wish to install the driver from System Recovery CD.
Install the modem driver according to the instruction below.
1. Insert the CD or floppy diskette that has a modem driver in it.

Using the Modem 57
2. Click the Start button, and then click Run. Locate the directory that contains
modem driver and run setup.exe.
(ex, D:\WinME\Drivers\Modem\Setup.exe)
3. Click OK button in the confirming dialog.
4. Setup copies the driver files onto the system.
5. Restart the system by clicking OK button.
Selecting a Country
You have to check if the country is selected correctly before you use the modem.
If the country is not selected correctly at the
I am in this country/region
of the
Dialing Properties
dialog, the modem may not work properly. So,
you must check if the country you're calling from is selected
appropriately and then use the modem. If your modem only supports
"Domestic", you must select the country where you bought your
notebook computer. And, if you use the modem in other countries, your
modem may not work properly. If your modem supports "Worldwide",
please check with your local distributor which countries can be
supported by the 3Com modem.
1. Click the Start button, point to Settings, and then click Control Panel.
2. Double-click the Telephony icon.
3. Go to the My Locations tab of Dialing Properties dialog. Select the country at the
I am in this country/region list box.
Confirming Installation of the Modem Driver
After the modem driver is installed, check if the modem driver is installed properly.
1. Click the Start button, point to Settings and then click Control Panel.
2. Double-Click Modems icon.
3. Select 3Com 56K V.90 Mini PCI Modem in the Diagnostics tab and then click the
More Info... button.
4. The modem is properly installed if the contents of Command and Response appear
in the More Info... window.

58 Using the Modem
Windows 98 Modem Driver Installation (Modem/LAN
Module Driver)
You can install the modem driver as shown in the following.
The figures illustrated in this manual may not be identical to those on
your system. The figures in this manual were developed using the 3Com
56KV.90MiniPCIModem Installation as a reference.
Install the Modem Driver
Before you install the modem drivers, check if the Serial Controller under Other
devices of Device Manager tab of Control Panel on Windows exists. If it exists,remove
it first.
After that, install the modem driver according to the instructions below.
You can also install the modem driver by specifying the location of the
directory that the modem driver is in when Windows 98 automatically
detects the modem and shows the
Add New Hardware Wizard dialog
.
But, it is easier to press the
Cancel
button at this time and follow the
instructions below.
1. Insert the CD or floppy diskette that has the modem driver on it.
2. Click the Start button, and then click Run. Locate the directory that contains
modem driver and run setup.exe. (In this manual, "D" refers to the CD-ROM drive.)
"D:\Win98\Drivers\Modem\Setup.exe"
3. Click Next button when the Welcome dialog appears.
4. Setup copies the driver files onto the system.
5. The Setup Complete dialog appears when the file copying process is finished. In
order to complete the driver installation, you must restart the system. CheckYes, I
want to restart my computer now and click Finish button.
Selecting a Country
You have to check if the country is selected correctly before you use the modem.
Selecting a Country Note:
If the country is not selected correctly at the
I am in this country/region
of the
Dialing Properties
dialog, the modem may not work properly. Therefore, you
must check if the country you're calling from is selected appropriately and then

Using the Modem 59
use the modem. If your modem only supports "Domestic", you must select the
country where you bought your notebook computer. And, if you use the
modem in other countries, your modem may not work properly. If your modem
supports "Worldwide", please check with your local distributor which countries
can be supported by the 3Com modem.
1. Click the Start button, point to Settings,andtheclickControl Panel.
2. Double-click the Telephony icon.
3. Go to the My Locations tab of Dialing Properties dialog. Select the country at the
I am in this country/region list box.
Confirming Installation of the Modem Driver
After the modem driver is installed, you can check if the modem driver is installed
properly.
1. Click the Start button, point to Settings, and then click Control Panel.
2. Double-click Modem icon.
3. Go to Diagnostics tab when the Modem Properties dialog appears.
4. Select the port that the modem is installed in and then click the More Info button.
The port where your modem is installed may be different from that of the
above picture.
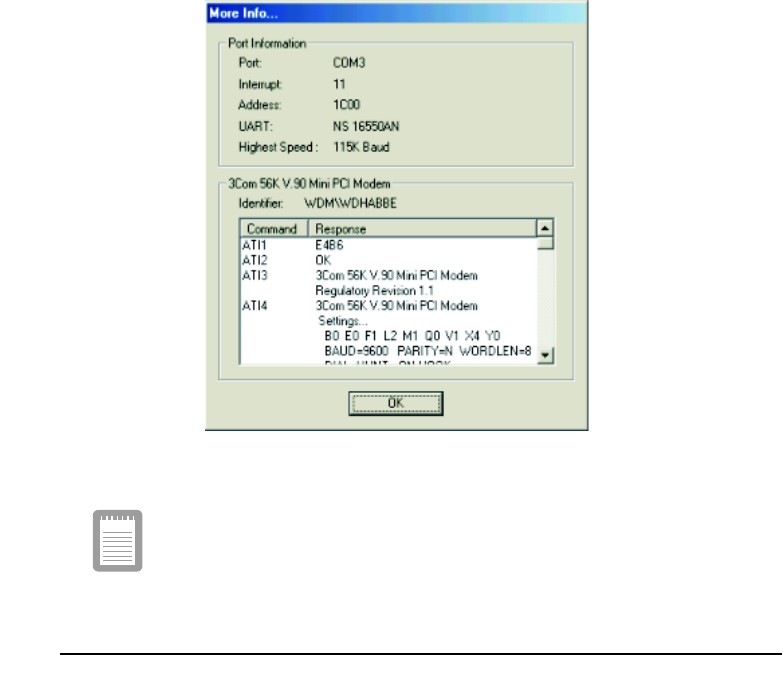
5. The modem is properly installed if you can see the following dialog.
60 Using the Modem
Figure 39. More Info Dialog Box
If the modem is not properly installed, install the driver again.
Modem Commands
The 3Com Modem includes the basic commands used by the Smart Modem of the
Hayes Corporation. Some additional commands have been added to it to improve its
capacity.
What are AT commands?
AT commands are the control commands of Fax modems developed by the Hayes
Corporation. AT commands are the industry standard and necessary for any fax
modem. It is used with the S-register to set the modem status.
Using the Modem 61
Generally, AT commands are used by directly entering the command into any
communications program, like Hyper terminal.
You can do the jobs below more easily by using AT commands.
•Calling up or hanging up the phone in order to communicate by Computer modem
•Choosing a modem in order to make the most efficient communication status.
But, as the communication programs are becoming more efficient and more intelligent
nowadays, users do not have to know all the AT commands. Only a few basic
commands are enough for computer communications.
Before Using AT Commands
AT commands can be used by entering them into terminal-based communication
programs directly. (Hyper terminal, CrossTalk, Procomm, etc.)
CompuServe, America On-line applications are not terminal-based communication
programs, but they are the communication programs based on a Graphic environment.
This kind of program can initiate the modem setting by entering AT commands in a
menu having a modem initialization command.
What you have to know before using AT commands is that there are two kinds of
modes when you use it.
Command mode:
If you turn on your computer and start communication by a communication program,
you can see a prompt on the terminal screen. Under such conditions, you can use AT
commands like calling, etc.
DATA Mode
In command mode, you can call by using AT commands and communicate with others
by connecting to other modems. You can call this status Data mode or On-line mode.
In data mode, You can't use any AT commands except the +++ command, which has
+++ at the head.
If you stop communication and disconnect the phone, the Fax modem will run in
command mode again.
Using Command Mode during Communications
Sometimes, you have to use AT command while you're communicating with others via
modem. In this case, you can use +++ command for AT command without hanging up
your telephone. Pressing '+' three times makes fax modem change to command mode.
Of course, the telephone is not disconnected. (Don't enter Enter key after input +++)

62 Using the Modem
Connection may be lost depending on the server.
If you want return to Data mode from command mode, you only have to input ATO
and press the Enter key to start the communications again.
The mode can not be transferred from the command mode to data mode
depending on the server.
Using AT commands
AT commands can be used in the following way. There's no difference between capital
letters and small letters, and all commands should include 'AT' as a prefix except ones,
which include 'A/' instead.
Also, Carriage Return saved in the S3 register should be entered in order to sign the
end of the command.
AT commandPress Enter key
Example: ATDT 123-4567Press Enter and the modem dials to 123-4567
Display the result value
After entering AT commands, the result value is displayed on the screen.
The result value can be displayed during communication. Generally, the result will be
OK. According to the ATV command, the result can be displayed as Words or numeral
letters. (ATV0: Display as numeral letters, ATV1: Display as English words)
Basic AT Commands
A/ Repeats the previous command in the buffer
ATA Responds manually to incoming RING signals
+++ Switches from on-line mode to command mode
ATO Switches from command mode to on-line mode
ATEn Echo control
E0 Disables echoing of the commands to the screen
E1 Enables echoing of the commands to the screen
Using the Modem 63
ATDT phone numberTouch tone dial
ATDP phone numberPulse dial
ATHn Hook control
H0 On-Hook (same as hang-up)
H1 Off-Hook (same as hold-on)
ATLn Modem speaker loudness control
L0~1 Low volume
L2 Medium volume
L3 High volume
ATMn Modem speaker control
M0 Disables modem speaker
M1 Enables only when in connection procedure
M2 Enables always
M3 Enables until carrier has been detected after connection
ATS0=n Sets S0 register value (n range: 0~255). Sets the number of incoming
ring signals before answering. Modem responds after ringing as many
times as specified in n value. If the value of n is '0', ATA command
should be entered for auto answer
ATS0? Displays S0 register value on the terminal
ATX3 Dials after waiting for specified time
ATX4 Dials after dial tone is detected
ATZ Initializes modem
AT&F Loads the factory default configuration (profile)
AT&V Shows current configuration
AT&W Saves user profile
AT&Zn=x Stores the dial string in modem memory (n=0~3, x=phone number)
e.g.) AT&Z0=1235678
Automatically calls the stored phone number by using the following
command.